Embed Size (px)
Citation preview
Table of Contents
Health & Safety Information 1
Fired ProductsWare Preparation 4General Glaze Terms 4Application Methods 7
Non-Toxic Glazes for BisqueStroke & Coat® WonderGlaze® for Bisque 11Speckled Stroke & Coat® 11Dimensional Stroke & Coat® 12Classic Crackles™ 12Crystalite™ Non-Toxic Crystal Glazes 13Elements™ & Elements Chunkies Non-Toxic Glazes 14Pottery Coat 15Pottery Cascades 16Series 2000™ Non-Toxic Glazes 16Stoneware-Like Glazes 16Roll-a-Coat™ Tintable Glazes 18
Non-Toxic Products for GreenwareOpaque Underglazes 19One Stroke™ Translucent Underglazes 22Astro Gems™ Textural Glazes 24
Glazes for BisqueClear Glazes 25Jungle Gem™ Crystal Glazes 26Art Glazes 27Clear Art Glazes 31Bisque Glazes and Utopia Glazes 32Specialty Glazes 32Exotic Glazes 33Overglazes 34
Accessory Products 37
Non-Fired Products 44
High Fire Guide 57

Preface
Welcome to the world of color according to Mayco. We have manufactured highquality ceramic products for over 50 years, starting in California and then relocating toOhio in the early 1970’s. Our products are now enjoyed by different ceramic enthusi-asts all over the world: hobbyists, potters, educators, contemporary studios and finishedware producers.
We work very hard to provide you with consistent, top performing glazes andacrylic stains in a broad range of colors in both non-toxic and health caution formulas,depending on your needs. Our engineers have established very strict quality control pro-cedures to insure that the product you receive performs to the very highest standards.All products are tested by an independent toxicologist and are properly labeled for con-formance to ASTM and FDA guidelines.
This product guide is designed to provide you basic information and applicationinstructions and is meant to be used as a desktop reference manual. Of course, our tech-nical service and education departments are available to work with you to achieve betterunderstanding, maximizing the performance of our products. For any questions, pleasecontact us at 614-876-1171 or e-mail your questions to [email protected].
Mayco is committed, through our marketing and education programs, to promoteceramics. We are dedicated to manufacturing superior products at a reasonable cost forall to enjoy.
Health & SafetyCeramics is one of the most rewarding and enjoyable of all hobbies, and one of the
safest, if some simple common-sense precautions are taken. As with any activity,responsibility must be taken for safe practices.
General rules of good housekeeping and common sense should be applied whendoing ceramics. Following simple rules will insure your safety and help you producegreat results when creating a ceramic project.
Our “Health and Safety Bulletin” is available for that purpose. It is available onour web site at www.maycocolors.com. In addition to this bulletin, we urge you to readother health and safety information, and to talk to your dealer, distributor or certifiedceramics teachers about the safe use of ceramic products. MSDS (Material Safety DataSheets) are available on our website or can be obtained by contacting Mayco CustomerService Department.
All Mayco products are properly labeled for material safety. Read labels withcare. In ceramics, as in all areas of human activity, proper usage of products insuressafety. It is the responsibility of the user to read and understand the product label and tofollow the guidelines for safety. Anyone not able to understand and follow the labelinstructions and safety guidelines should have an adult, competent of doing so, supervis-ing the application and usage of all Mayco products. This includes the preparation,application and firing of these products. The person firing a kiln should have completeknowledge of and understand the specific instructions for operation of the kiln as pro-vided by the manufacturer. The user should know any local ordinances applicable to theinstallation of the kiln.
To insure your health and safety, follow these simple basic rules:• Keep work surfaces and shelves clean by wiping down with a wet sponge.• Clean up spills when they occur. Do not allow to dry. Keep dust under control
at all times.• Work on a newspaper or paper towel for easy clean up and disposal.• Do not smoke, eat or drink when working with hazardous ceramic materials. Do
not put your brush or brush handle in your mouth.• Wash your hands before you begin. The natural body oils and salts on your hands
may affect the finished piece. Any open cuts should be properly covered.• Wash your hands thoroughly when you are through working.• Use a smock when working with ceramic materials. Wash often and separately
from other garments.• Keep children away from kilns and out of glaze dipping rooms. Only a qualified
adult should operate a kiln.• Children should not use lead-containing glazes or other hazardous ceramic
materials.• Do not intermix dinnerware safe glazes containing lead.• If pregnant or contemplating pregnancy, tell your physician about your work with
ceramics.• When using solvent-containing ceramic materials, work out doors, in a locally
exhausting hood or with an exhaust fan. Do not use or store near kilns, other heatsources or an open flame. Dispose of used rags in an airtight metal container.
• Do not spray apply any product.
1

2
• Do not fire kilns in an enclosed area. Use a kiln ventilation system. Carbonmonoxide fumes can build up and present a danger. Consult with your kiln supplier or manufacturer for more information.
• If you should ingest ceramic products, seek medical help immediately.
A neat work area should include the following:• A table covered with several layers of newsprint and a comfortable chair. • An old towel under the newsprint - this will cushion the ware.• Only the products and pieces that you are working with at one time to avoid
contaminating other pieces.• Proper ventilation.
The labels on a product are very important and give you a wealth of information.Read the label for information on proper product use and hazards, if any.
Ceramic hobby glazes are manufactured using a variety of raw materials. Most ofthe ingredients are mined and extracted from the ground. Some of these materialscan be classified as toxic and if misused can be harmful. The key to safe use of allart materials starts with professional education and training. Contact your Maycodistributor for information on seminars in your area.
Non-Toxic GlazesNon-Toxic glazes are formulated without the addition of lead. They are tested
for safety by an independent toxicologist. They meet FDA standards and those forthe Arts and Craft Material Institute for which the non-toxic seal is assigned. Youcan use these glazes and products with confidence and ease. These products contain no materials in sufficient quantities to be toxic or injurious to humans or tocause acute or chronic health problems. This does not mean that any less careshould be given while handling these products.
Dinnerware Safe (Food-Safe) Glazes Many glazes are formulated to be safely used on surfaces that come into contact
Toxicity StatusApplicationInstructions
FiringInstructions
OverglazeCompatibility
Product Lot #
Product Family
Product Number
Color Name
with food or drink. • If surfaces will come into contact with food or drink, use only glazes that are
labeled food or dinnerware safe. Follow label instructions closely.• Do not mix lead-containing dinnerware safe glazes, as the balance of ingredients
in each glaze will be disrupted. Each mixture would have to be re-tested by an approved laboratory to determine if the mixture is also food safe.
• It is the responsibility of anyone making pieces for resale to have them tested by an approved laboratory for lead release.
• Proper firing of dinnerware safe glazes is critical. Use shelf cones on the kiln shelves to insure that the pieces are fired hot enough, even if the kiln is electronically controlled or has an automatic kiln sitter. Always fire in accordance with manufacturer’s instructions. If crazed or under fired, these glazes may not be food safe. Too heavy an application of glaze, fast firing or not firing to the proper shelf cone listed on the label may result in a glaze that does not meet the FDAstandards.
Lead and/or Cadmium Containing Glazes Lead and cadmium are used in many ceramic glazes. Cadmium is used to
produce brilliant reds and yellows. Lead gives a brilliance to the glaze andallows the glazes to mature well at lower firing temperatures (shelf cone 06).
Glazes containing lead and/or cadmium should be handled with respect. Thedust from such glazes should not be inhaled. Anyone who is pregnant or contem-plating pregnancy should only use these glazes with professional supervision. Usegood personal hygiene when working with these types of glazes and keep them outof the reach of children.
Sprays, Solvents and Overglazes These products are easy to use safely and will present no problems as long as
these important rules are observed: • Containers should be kept tightly closed when not in use.• Keep out of reach of children.• Aerosol sprays, solvents and solvent-based overglazes should be used outdoors,
with a locally exhausting hood or spray booth or a window exhaust to assure adequate ventilation.
• Do not use near an open flame or heat source.• Clean up after use and dispose of products properly in a metal container designed
for disposal of flammable materials. Contaminated materials can be washed orplaced under water until final disposal.
SlipThe mixture of any fine powder like slip requires the use of a safety mask
approved by OSHA. The work area should be well ventilated with a system thatdraws all dust. This area should be away from other working areas so as not tospread the fine dust particles. Good housecleaning habits are necessary whenmixing and pouring slip. Wipe up spills immediately. Do not sweep the area.Chronic lung damage may result from prolonged inhalation and exposure to theclay dust.
3
4
FIRED PRODUCTS & ACCESSORIES
Ware PreparationGreenware is prepared using a cleaning tool, grit sanding pad, a duster brush
and a slightly dampened sponge – preferably a sea wool or synthetic sponge. Use aclean-up tool in a diagonal motion to remove the seam line. A grit sanding pad is thenused over the seam line to remove any marks or imperfections not removed with theclean-up tool. Use a circular motion to prevent misshapen ware. Re-carve any lostdetail on the piece, making sure lids fit and holes are drilled for lamps.
A duster brush is used to clean away the dust particles from the ware. Removeany remaining dust by lightly cleaning with a slightly damp sponge. Do not saturate thepiece with water or scrub the ware with the damp sponge. This could affect the finalfinish.
If the ware was cleaned previously but has been sitting around for a while, thepiece should be given a light cleaning with a damp sponge before applying the finish toremove any dust that may have accumulated.
Your choice of finish should be made at this time. Some colors, such astranslucent underglazes, opaque underglazes and some specialty glazes, are applied atthe greenware stage. If glazes are to be applied, the piece will most likely need to befired to bisque first. Check the jar label or consult a qualified ceramic instructor if youhave questions.
Once the piece has been fired to bisque, the glaze can be applied. Glaze makesthe ware vitreous, sealing it, so water does not migrate through the piece. A glaze can betransparent, semi-transparent, semi-opaque or opaque. Your choice of glaze will dependon the final look desired. Once the choice of glaze(s) has been made, the first step is togo over the bisque with a damp sponge to remove any lingering dust that may have beenfired onto the ware.
Always apply glaze according to label directions. Use a brush or sponge,whichever is suitable for the particular glaze and technique. Shake or stir the color inthe jar prior to application. Sometimes it may be necessary to thin the glaze due to thespecific product or because of the method of application. Always check the label forspecific instructions or method of application for a given color.
General Glaze Terms Glazes are the protective coatings that make ceramics safe and useful. Without the
fired surfaces, the ware would not be able to hold water or be safe for food. The manytypes and textures of glazes that Mayco offers are almost endless - from bright shinyreds to soft pastels, metallic gold to satiny rich black. Mayco is committed to bringingthe latest technology and safest products to market for the discerning consumer. All ofMayco colors are tested independently by a toxicologist to insure that they meet orexceed the government’s strictest standards.
There are some terms that the consumer needs to know when choosing a glazefor any finished piece. These terms let the user know the characteristics of the glaze –whether it is shiny or dull, transparent or opaque, safe to use on utility items or fordecorative items only. Reading the label is the best way to insure that you have selected

the correct product for your technique and piece. The jar label should be read each time that you use a product. At times raw
materials may change or become obsolete. In order to continue producing a specificcolor, changes to the formula may be required. The label will have the most up to dateinformation concerning your safety and that of the piece you produce. Mayco is com-mitted to bringing you “America’s finest colors” and providing you with a fun and safehobby.
Surface: The first category for glazes deals with the surface shine. The followingterms will help you understand the labels more clearly and will allow you to make thebest choice of products for great looking results. Some glazes fall in between all ofthese groups. Some glazes even have tiny specks or granules of a contrasting orcomplimenting color floating in them.
Gloss - Shiny and smooth, bright high gloss and a highly reflective surface.Satin - Not real shiny, but not dull either. Think of an eggshell or a satiny sheen.Matte - The opposite of gloss. This surface is duller than Satin reflecting little shine. Dead Matte - Even duller than a Matte. This surface reflects no light.Opacity - Refers to the transparency of the glaze. Some glazes are so transparentthat it’s like placing a clear piece of glass on top of the ware. These clear glazescan act like a magnifying glass on top of the ceramic surface or on top of under-glazes. Some glaze colors are nearly opaque and others totally so.
The codes and definitions for the opacity of glazes are:
C: Clear - the glaze is completely clear adding only a shiny wet look and bringing out the true underlying colors on the piece.T: Transparent - the color underneath is slightly tinted by the overlying glaze changing the appearance only a little.ST: Semi-transparent - the underglazes beneath these are identifiable, but are changed by the tone of the glaze over them.SO: Semi-opaque - light underglaze colors will not show through and dark colors will be muted.O: Opaque - most colors will not show through.
Safety:One of the most important considerations when choosing a glaze deals with their
use of utilitarian or serving pieces. In our industry, several words are used to describethe level of potential hazard that a glaze poses to a customer. Some words are used todescribe the product in the liquid state and others are used to describe the finished glazesurface after firing. To determine the toxicity of a glaze in its liquid state, formulas aresubmitted to an independently licensed toxicologist who examines each glaze formulaand determines whether the product can be labeled as non-toxic or whether it requires ahealth caution label.
To determine dinnerware safe, a second set of tests are required. Samples of the
5
6
glaze in its fired form (we use coffee cups) are tested by an independent laboratoryfacility for leachability of lead and cadmium. If the surface passes the standards set bythe Food and Drug Administration (FDA), then it may be used on food contact areasand can be labeled as dinnerware safe. Dinnerware safe only refers to the leachabilityof lead and cadmium; other surface characteristics are not considered. Please be awarethat if a finished surface is bumpy, grooved, pitted, cracked or rough, there is potentialfor bacteria to hide out in the surface texture. So, even if a glaze is technically dinner-ware safe, it may not be practical for use on food or beverage containers due to the diffi-culty of cleaning. A comparison would be a cutting board and the care required whenpreparing foods. Glazes fall into the following categories.
Non-Toxic: Refers to the product in the jar. Contains no harmful ingredients insufficient quantities that could be harmful to humans (including children).
Health Caution: Refers to the product in the jar. There are some ingredientspresent in large enough quantities that the product may be harmful to humans.There will be detailed information on the product label as to the type of riskthat is posed as well as proper handling instructions. Even more detailedinformation is available on the relevant Material Safety Data Sheet (MSDS).
Dinnerware Safe/ Food Safe: Refers to the finished, fired surface of theglaze. Once fired according to the instructions on the product label, the firedsurface may be used in contact with food or beverage without leaching poten-tially harmful elements from the glaze into the food or beverage.
Not for Dinnerware Use/Not for Food Use: Refers to the finished, fired sur-face of the glaze. Even when the glaze is fired according to label directions,the fired glaze may potentially transfer harmful elements into food or beverageupon contact.
Here are some examples to illustrate the differences:Stroke & Coat glazes are Non-Toxic and Dinnerware-safe. There are no toxic ele-
ments present in the liquid state, and therefore, no toxic elements to be leached intofood or beverage.
Classics Crackles and Crystalites are Non-Toxic, just like the Stroke & Coats.And although they are also Dinnerware-safe, the surface should be examined todetermine if it is easy cleanable after food contact.
C-109 Wonder Clear Dipping Glaze has a Health Caution and is Dinnerware-safe.There is lead present in the liquid glaze and care must be taken to avoid exposurethrough inhalation or ingestion. However, when fired according to label directions, thefired surface of C-109 conforms to the standards established by the FDA and isdinnerware safe.
Other products (like our Exotics glaze line) have a Health Caution and are Not forDinnerware use. There are potentially harmful elements present in the liquid glazes andinstructions must be followed for proper use to avoid exposure. Even when the glazesare fired according to label instructions, they should not be used on food or beveragecontact areas, as enough of the harmful elements may be transferred to the food orbeverage to be considered harmful to humans.
Application MethodsThe following list gives an overview on the general application of glazes. There
are times when only two coats may be required, some times four coats, applied tobisque or applied to greenware. Always read the jar label for the proper applicationinstructions. There are times when a specific technique may require you to deviate fromthe instructions on the jar. At those times, follow the technique carefully and applythose instructions only at that specified time.
• Are generally applied to properly fired shelf cone 04 bisque. Always read the label for possible exceptions.
• Wipe the piece down with a damp sponge before glazing.• Use either an Oval Mop or Flat Glaze brush to apply glazes and check individual
glaze categories for any exceptions.• Shake jar and/or stir well before using. The consistency should be like melted
ice cream.• Apply 3 flowing coats unless noted differently on the jar. Clear glazes require
only 2 coats. Bright Reds usually require 4 coats. Check individual glaze categories for exceptions.
• Fire to shelf cone 06 unless noted differently on the jar label. Clean brushes with warm water and Brush Cleaner.
BrushingFired color is best applied with a natural hair brush. Use an Oval Mop, Flat
Glaze or Pointed Round brush. There are synthetic hair brushes that can also be used toapply many of these same products. A wide selection of brushes is available and allhave been designed for specific needs and products. Some brushes can be used in avariety of products. Always clean brushes well between uses.
For general application, we recommend that you use an Oval Mop to applyopaque underglazes and glazes. Oval Mops come in several sizes. A second choicewould be a Flat Glaze brush. A Flat Glaze brush is helpful when brushing glaze out ofthe embossed areas on a piece. A Flat Glaze brush is preferred when applying non-toxicglazes to highly detailed or embossed pieces. The size of the brush should be as largeas possible for the area being covered. For smaller areas, a Pointed Round brush can beused.
Color should not be used directly out of the jar to avoid possible contaminationof the remaining color. Color should be placed onto a tile or in a shallow dish. Do notuse wax-coated paper cups to hold color; the wax could prevent the color from adheringproperly.
Moisten the brush with water and remove the excess. Dip the brush into thecolor up to the ferrule (metal part of the brush.) Tap the brush on the jar rim or tile toremove drips. The brush should not be dragged along the jar rim to remove color fromthe bristles. A full load of color should remain in the hairs of the brush.
Apply color in a flowing motion. Do not “scrub” color onto the ware. The brushshould never drag because of a lack of color. Most likely a three-coat application will beneeded. Not all coats are equal. If bisque is visible underneath the first dried coat ofcolor, then apply an extra coat for proper coverage. The thickness of the three coatscombined should be about the same as the thickness of a postcard. Some colors require
7

8
more or less than three coats of product. Always check the jar label for specificdirections for the application of each color.
Apply each coat in a different direction. Crosshatch each successive coatapplying at a 90º angle to the previous one. This will give more even coverage. Alloweach coat to dry a few minutes until the shiny look is gone.
Rolling a GlazePouring or rolling a glaze to the inside surface of a container that is difficult to
reach is a simple solution to glazing with a brush. Care should be taken when using thismethod of glazing because some problems can occur. The inside of the piece must befree of any debris and clay dust. Any clay particles left inside the piece may causecrawling. Excessive glaze in or on the bottom of the piece may cause it to split, pit orcrawl. These problems can be overcome by making sure the excess glaze is removed byinverting the piece as the glaze dries.
Choose a gloss glaze if possible; application is easier and it will be easier to cleanthe fired surface. If not using Roll-A-Coat you must thin the rolling glaze with Mediaor water to the consistency of coffee cream. (Roll-A-Coat, a specialty glaze designed forthis purpose is already thinned to the proper consistency.)
Pour the Roll-A-Coat or thinned glaze into the piece and quickly rotate the piececovering the entire inside surface. Drain out the excess glaze and continue to rotate thepiece momentarily to avoid glaze build up in any one area. Invert the piece to dry toavoid buildups and runs. This will keep the piece from splitting during the firing andavoid pitting of the glaze.
When the glaze is firm, turn the piece upright and check for any missed spots.Glaze these areas with a brush. Remove any glaze that has spilled on the outside sur-face with a damp sponge. Allow the piece to dry before glazing the outside.
Glaze ButtingButting of glazes is the term used to describe a method of applying glazes side by
side so that the colors meet but do not blend. To butt glazes, avoid overlapping the twoglazes. Use a pencil to draw a line on the bisque to determine the precise placement ofthe glazes. The mark will burn away in firing. When butting glazes, the brush is usedlike a push broom at a 45º angle to shove a small ridge of glaze up to, but not over, thepencil line as the first coat is applied. This small roll of glaze should give sufficientcoverage to the perimeter of the area so that special care with successive coats is notnecessary; they can be applied in the usual manner.
Butting should be all that is needed to control the flow of the glazes unless theglaze application is unusually heavy. On a vertical piece you can cut through the glazewhile it is still wet and use a grease pencil (red marking pencil) to follow the originalpencil mark. The grease in the pencil will provide enough of a barrier to keep theglazes in place.
Be aware that some colors are sensitive to other colors. Some white or clearglazes placed next to glazes high in copper compounds may discolor. Metallic blacksand greens may cause a fuming, shadowing or flashing onto the lighter color. This iscaused by a chemical reaction between the two glazes during firing.
Glaze CombinationsGlaze combinations or the use of one glaze over another offer the hobbyist an
expanded dimension to their decorating possibilities. There are “soft” glazes that movemore during the firing process and these glazes have more tolerance against pitting,cracking or blistering. Using combinations of two types of glaze that react chemicallyto each other can give many exciting and unexpected results.
When two or more glazes that move or “boil” in the firing are used, one overanother, a blending of the two colors results. The glaze next to the bisque will alwaysdominate the piece because it has a stronger footing or hold on the bisque. Except forthe Series 2000 or other non-toxic glazes, the glossier the glaze is, the more it moves inthe firing. Heavier applications of these glossier glazes will produce more dramaticintermingling of the colors.
Not all glazes used in combination need to be so free moving. Variations to themix, for example, using a Series 2000 Matte glaze with a moving glaze, can give fasci-nating results. A non-moving glaze will retard the movement of a more active glaze.An application of three coats of a moving glaze applied first on the bisque, then twocoats of a non-moving glaze on top of that will result in the breakup of the top glazeinto little islands of the matte color. The use of a Tuffy™ or Chore Boy™ sponge toapply leftover amounts of glaze creates interesting effects. Apply a moving glaze andthen apply another glaze on top of that, then Tuffy™ sponge the third glaze on top ofthe previous two for a unique finish.
SpongingDifferent types of sponges can be used in decorating a piece. Each offers a
distinct look. More than likely, a silk decorating sponge will be used for sponging mostcolors. It gives the best application for most glazes when an even coverage is needed.A Sea Wool type sponge produces a bumpy, mottled look or may be used to veil thecolor onto the ware. Once the type of sponge is selected and the color has been chosen,follow these application instructions:
• Dampen the sponge and remove excess water onto a paper towel. • Pour some of the color onto a tile.• To load color, pounce the sponge into the color. Apply to the piece using the
same pouncing (up and down) motion. Do not apply so much pressure to the sponge that the color runs out of the sponge and down the piece.
• Allow the wet look to disappear before adding additional coats.• For solid coverage, more than three coats may be needed when using a sponge. As a general rule, four to five coats is required to achieve the same coverage as when you apply color using a brush.
SpatteringWhen spattering, a stiff bristled brush is loaded with color and then the handle of
another brush is dragged over the bristles of the brush (toward the user), causing thecolor to spatter onto the ware in a speckled effect. Most any product can be applied thisway. The specks of color can travel long distances, so cover or remove any other piecesfrom the decorating area.
9

10
BandingColored bands are created on round objects using a decorator’s wheel. A decora-
tor’s wheel is a type of turntable that allows the ware to rotate evenly and freely whiledecorating. Most types of products can be used for this application. Some colors mayrequire thinning to achieve proper color distribution or to create a specific effect. Thismethod of applying color usually requires a round piece.
• Center the piece on the wheel. • If possible, place something heavy inside the ware to weight the piece on the
wheel, like a bag of beans or rice.• Load the brush with color.• While the wheel is spinning, the brush is brought to the surface of the ware.
The piece continues to rotate while the brush is on the ware.• Once color has been applied, the brush is lifted off the ware while the piece
continues to rotate.• Many bands of color can be applied and blended back onto one another for a
variety of effects.
AntiquingAntiquing with glazes can be a lot of fun as well. Glazes hide flaws in the bisque
rather than accentuating them as One Stroke™ Translucent Underglazes do. The trans-parency of the glaze adds dimension to the piece. Great effects can be achieved byantiquing with a matte glaze under a gloss glaze, as well as the reverse - antiquing witha gloss under a matte glaze. Both glazes should be non-moving when used in thismethod. Generally a highly embossed piece is used to allow the glaze to fill in crevices.
To antique a piece with glazes: • Apply one flowing coat to the entire surface and let it dry. More than one coat
may be needed, but generally only one is required for proper color application. • Using a damp sponge, wipe off the highlights on the piece. • Apply two coats of the top glaze over the entire piece while concentrating the top
glaze to the higher points of the embellishments.
MajolicaMajolica is a technique where a non-moving glaze is applied to the entire sur-
face, and then design work is done on top of the unfired glaze using other glazes. Thistechnique makes the design look less rigid and the colors are usually lighter in nature onthe finished piece. There are a number of points to remember when choosing colors fora majolica technique. Lighter colors over darker colors lose their distinctness. The inten-sity of the colors being applied either over or under one another should be taken intoconsideration. The thickness of the combined colors on the surface should be a factor inthe decision. The movement of the glazes in the firing should be noted as well. Theshape of the piece can also influence the final outcome; a flat piece versus a verticalone could dramatically affect the outcome.
AirbrushingMayco does not recommend spraying or airbrushing ceramic glazes. Specific
safety procedures must be followed along with the use of proper safety equipmentdesigned specifically for the spraying of color. Do not spray apply ceramic productswithout proper OSHA approved respiration equipment.

NON-TOXIC GLAZES FOR BISQUE
Stroke and Coat® Wonderglaze® Glaze for Bisque
Stroke & Coat is the premier product to use in the “One Fire” or “1-2-3 Step”method of decorating on bisque. Apply to bisque, let dry, clear glaze and fire, produc-ing a finish that is almost fool proof for everyone from the amateur to the masterceramist.
If one coat is applied, you get transparent coverage, two coats give asemi-opaque coverage, and three coats give a solid coverage. The variety of colors isnot limited to the palette given, as all are intermixable to obtain intermediate shades.When applied heavily the color will retain some dimensional qualities that give thedecorator a useful tool in a variety of techniques. They can also be applied over anynon-moving glaze, underglaze, or Astro Gem™ surface. When thinned Stroke and Coat®
is applied on top of a Series 2000 Matte surface in a brushstroke design or watercolortechnique, Stroke & Coat takes on the underlying matte characteristic of the glaze. Twoto three coats on top of a Series 2000 Matte glaze will give a shinier surface.
Application:• Non-toxic.• Apply to properly fired shelf cone 04 bisque.• Apply one coat for a translucent look.• Apply three coats for solid opaque coverage.• All are intermixable to create a wider color palette.• True color out of the jar makes design work easier.• Use a soft glaze brush for ease of application.• Apply smooth even coats for solid coverage. Dimensional or embossed
effects can be achieved when applied heavily.• Glaze with any clear glaze, dipping or brush-on type. • Fire to shelf cone 06.• Dinnerware safe when used with a dinnerware approved clear glaze.• All luster compatible.• Can be fired up to shelf cone 6. Check High Fire Guide.• SC-69 Princess Pink and SC-70 Pink-a-Dot are more translucent than the rest of
the Stroke & Coat. These colors may take 4 coats to achieve opaque coverage.• Speckled Stroke & Coat performs in the same manner and has the same character-
istics as the opaque Stroke & Coat line.
Stroke & Coat colors range from vibrant brights to pastel shades, and SpeckledStroke & Coats® provide a variety of speckled colors for today’s decorating needs.They can be used in a variety of decorating techniques like antiquing, banding,brushstroke work, dimensional accents, glaze butting, Majolica, marbleizing,spattering, sponging, stenciling and watercolor applications. A top coat of a clearglaze or a S-2000 transparent glaze should be applied to the dried color when notapplied over an unfired glaze, as in a Majolica technique. This topcoat of glaze canbe a clear dipping or a brush on type of clear glaze. Stroke and Coats‚ are resistant
11
12
to streaking or bleeding of the colors when the top coat of glaze is applied to thedry color, whether it is dipped, sponged or brushed onto the surface. There is nobleeding or running of the colors in the firing process.
Important: SC-13 Grapel and SC-33 Fruit of the Vine should have eitherC-101 Blu White Clear, C-105 Crystal Clear, C-109 Wonder Clear Dipping orSC-209 Clearly-the-Best Clear glaze applied over them to produce the brightest andclearest color. Some non-toxic clear glazes can turn the color milky.
Dimensional Stroke and Coat® Wonderglaze® for BisqueDimensional Stroke and Coat is a raised type of glaze that can be used with regular
Stroke and Coat. These glazes are color-coordinated to the Stroke and Coats to givethe artist a wider range of decorating possibilities. While regular Stroke and Coats cangive some dimension or embossing, they do not compare to Dimensional Stroke andCoat. Dimensionals are formulated to stay raised when used on top of the glaze andresist the crawling that may occur when the regular Stroke and Coat is used in the samemanner. These colors allow outlining in an embossed effect. The colors can be used togive contrast to a pattern not only by the use of color but by the added dimension of thisglaze.
When applying the topcoat of glaze use a moistened sponge on the first coat andbrush the second coat. The product may bleed if sponged too hard or while the color iseven the least bit damp. There is no problem when the top glaze is dipped.
Classic Crackles™ Non Toxic Glazes
Characteristics:Classic Crackles is a series of non-toxic crackle glazes in a subtle color palette
appropriate for today’s home décor. Stylish and sophisticated, Classic Crackles are idealon items such as vases, candleholders and more.
Application:• Apply three even solid coats to properly fired shelf cone 04 bisque using any soft
fan or oval mop glaze brush. Fire to shelf cone 06. To accentuate the crackle pattern, antique the fired piece with a non-fired acrylic stain or mineral spirit stain.
• Simply apply a coat of the desired color to the fired piece and wipe off with a soft cloth. The color will fill in the cracks and make the crackle pattern stand out.
Firing:Fire Classic Crackles to shelf cone 06. Allow the pieces ample room in the
kiln for air circulation during firing. These glazes can also be high fired up to shelfcone 6 with various color shifts; refer to the High Fire Guide.
Notes:• Sometimes the crackle pattern will be developed when the kiln is cool enough to
open. Other pieces may need to sit out of the kiln for a period of time before the crackle pattern develops.
• Remove pieces from the kiln with a coffee filter or clean rag placed over your

hand. The oils in your hand can fill the cracks and prevent the antiquing colors from filling in the cracks.
• Pieces don’t always need to be antiqued with black. You have an endless selection of colors that can be used to antique. If you prefer to use a fired product, use One Strokes on the fired crackled piece and then refire to shelf cone 06.
• If you prefer non-fired products, you can use an acrylic, mineral spirit stain or even shoe polish or India ink to stain the cracks.
• Classic Crackles are non-toxic but are not recommended for food surfaces. Bacteria could possibly become trapped in the exposed bisque between the cracks, making it inappropriate for surfaces that hold food.
• Crackle glazes place stress on the ware during firing. To prevent containers such as vases from splitting or cracking apart, make sure to use a non-toxic glaze to coat the remainder of the inside of the vase (such as Series 2000) to further reduce stress on the piece.
• You can use Stroke & Coat or One Strokes to create beautiful designs under Classic Crackles. Create the design with Stroke & Coat on properly fired shelf cone 04 bisque. Use only 1-2 coats of Stroke & Coat or the crackle will not develop properly. Allow to dry and then apply three solid even coats of Classic Crackle. Allow to dry and fire to shelf cone 06.
• When using One Strokes, apply your design on greenware and fire to shelf cone 04. Then apply three solid even coats of Classic Crackle. Allow to dry and fire to shelf cone 06.
• Gold and Mother of Pearl can be used as a finishing touch on your Classic Crackle piece. Decals also work well over Classic Crackle glazes.
Crystalite™ Non-Toxic Crystal GlazesCrystalites™ are a group of crystal glazes that are a new generation in the formula-
tion of non-toxic glazes. Crystalites are a non-toxic glaze combination in a jar. Theseunique magical potions of colors and rock-like crystals produce dramatic effects thatflow and melt during the firing process. Their usage is almost endless in decoratingpossibilities and is limited only with your imagination.
Mayco’s original crystal glazes are a standard in the ceramic hobby market. Theintroduction of the new Crystalites will set the new standard even higher for the indus-try. Truly, you will not believe that these are a non-toxic, non-moving glaze like those ofthe past.
Previous lead bearing crystal glazes flowed, allowing the crystals in the glaze topattern or bloom, producing multi-colored beauty from one jar. Typically, a non-toxicformula creates a stiff glaze that does not allow the crystals to blossom or develop intocolorful flowing arrays during the firing. This inhibits the vary nature of what you wantto achieve in this type of glaze. Mayco’s lab has formulated this new line of glazes toreact like the old lead bearing glazes, but without all of the lead or safety concerns.This new formulation is unlike any other non-toxic crystals on the market today.
Mayco’s new line of Crystalite crystal glazes are non-toxic and certified by ASTM.This means that there is no lead added in their formulation. Crystalites can be usedsafely by children in schools, institutions or anyone with health concerns.
Crystalites are applied using an Oval Glaze or Soft Fan Brush to shelf cone 04bisque. The fan brush may help more in the even disbursement of the crystals, thus
13
14
creating a more pleasing pattern to the glaze. Generally two coats of the glaze areapplied from the jar after being shaken thoroughly; shake the jar before applying eachcoat. With the application of the third coat of glaze, the crystals are stirred and shakento suspend them into the glaze. Due to the nature of the non-toxic formula of the glaze,these crystals settle quicker and may need to be stirred more often while glazing. Thebrush should be swished down to the bottom of the jar to gather the crystals during theapplication of the third coat of glaze to insure a good coat of crystals are applied.Remember, that the beauty of these glazes are the disbursement of the crystals to pro-duce an even pattern to the finished piece. Large clusters of crystals can be dispersed ormanipulated more easily with a soft fan brush during the third coat. A little attentionduring the application of the third coat of glaze will produce stunning effects. The flowof the glaze can be great even with these non-toxic glazes. For this reason, the glazecrystals should be tapered off towards the bottom of the piece. The excess of glazecrystals on the bottom of the piece can run, creating unsightly feet or lumps.
Interesting patterns may be obtained by placing several rings of crystals in a neck-lace-like placement around the piece. The glaze may need to be strained in order to sep-arate the crystals for this procedure. The crystals are then applied using a brush or smallspoon in a linear necklace-like ring around the piece. This can be several rings insequential order or in a zigzag pattern to produce the most pleasing effect.
The firing temperature of the Crystalites is shelf cone 06, but can be fired up toshelf cone 6. There is no need to fire the glazes any hotter to make the crystals flow,bloom more or to pattern better.
• Apply to shelf cone 04 bisque using an Oval Mop or Soft Fan Brush.• Apply two coats, shaking the jar before applying each coat. On the third coat, stir
and shake the crystals into the glaze. Stir the crystals often during application. Dipthe brush down to the bottom of the jar while glazing to pick up the crystals. Applythe third coat while evenly dispersing the crystals over the surface of the ware.
• Avoid placing heavy amounts of large crystals near the bottom of the piece, as somecrystals tend to flow more than others.
• Fired to shelf cone 06.• All are non-toxic.• Can be used in glaze combinations amongst other non-toxic glazes or Crystalites.
Elements™ Non-Toxic GlazesCharacteristics:
Elements™ are non-toxic glazes in natural earth tones. Surfaces vary from glossto matte, with subtle variations in each color for a truly unique look. No two pieces willever be alike. Elements are great for achieving a natural organic look or a sophisticatedelegant look.
Application:• Apply to properly fired shelf cone 04 bisque. Use a soft fan or glaze brush,
depending on the area and surface to be covered. • Generally three coats of glaze is recommended, however, applying four coats will
produce a totally different look. For a different effect, brush on three coats and apply a final fourth coat using a silk or sea wool sponge.
• An uneven glaze application and the piece’s shape and surface (plain or embossed) will also affect the look of the glaze.
• Elements Chunkies (EL-201 through EL-206) are a Elements base with the addi-tion of crystals. Apply Element Chunkies in the same manner as Element glazes.
Firing:Fire to shelf cone 06. Allow the pieces ample room in the kiln for air
circulation during firing. A heavily loaded kiln will affect the color and the floatwithin the colors. Elements may also be fired at higher temperatures, up to a shelfcone 6. These glazes develop their own personalities when high fired. Notes:• Color application, firing time and temperature, shape of the piece and placement
of pieces in the kiln can all affect the final results. This is part of the beauty and versatility of Elements. Each piece will be uniquely different.
• Intermixing Elements with other glazes is unpredictable; make test samples first to see if the fired result is the desired effect. Combining them with other productsmay alter the chemical composition and change their non-toxic status.
• Elements and Element Chunkies are not overglaze compatible. When Elementsare fired to lower overglaze firing temperatures (shelf cone 018-020), the originalglaze color changes. However some of the matte finish Elements have interestingfinishes after an overglaze firing. Experiment and make test samples before usingoverglazes with Elements.
Pottery CoatCharacteristics:
Pottery Coat creates the look of stoneware or colored clay bodies on bisque tosimulate the look of high fire pottery/stoneware. Although Pottery Coats can be usedalone, the best looks are achieved when used as a base coat in combination with PotteryCascades and a flowing non-toxic glaze, such as Elements.
Application:• Non-Toxic• Apply to properly fired shelf cone 04 bisque.• Lightly dampen the bisque with a moistened sponge before painting allows
better adhesion to the bisque.• Shake jar well before application. Product should be the consistency of
melted ice cream.• Apply with a soft glaze brush, using the largest brush to cover the area.• Apply 3 even coats. Apply the coats at right angles to each other to minimize
brush marks. Apply Pottery Cascades and Elements on top of the PotteryCoat, following instructions above.
• To use Pottery Coats on a functional item such as dinnerware, you must applyclear glaze to seal the surface. This will darken the color and will showuneven application and brush strokes. When used alone, Pottery Coats areporous and therefore, not recommended for use with dinnerware or otherfunctional items.
• Fire to shelf cone 06. 15
16
• Clean brushes with Brush Cleaner and warm water. • Pottery Coats are not overglaze compatible.
Pottery CascadesCharacteristics:
Pottery Cascades are non-toxic, free flowing glazes used to produce specialeffects or flow patterns when used in combinations with other non-toxic glazes. PotteryCascades are not intended to be used alone. PC-602 White Cascade intermingles withthe other glazes being used, introducing pure white to the colors you are using, blendingwith the color. White Cascade has a minimum movement and will stay in the patternthat you apply it in. Clear Cascade (PC-601) produces a flowing effect, and allows thecolor of the base glaze to show through. It can also alter your original color, creating anew color. It will form runs or you can direct the runs when you apply the product.Cascades should be used in combination with other non-toxic glazes; using a leadedproduct with Cascades will create stress on the piece during firing and crack the piece.For best results, use with Elements, Classic Crackles, Crystalite Non-Toxic Glazes,Stroke & Coat and Pottery Coat bases.
Application: • Apply White Cascade with a brush in 1-3 coats. Can be dabbed on at ran-
dom, evenly or unevenly to create different flow patterns using a sea woolsponge, Chore Boy™ or Tuffy™ sponge.
• Clear Cascade should be brushed on as you would apply a glaze. Apply 1-2brushed coats over or under a non-toxic glaze. Do not go below the halfwaypoint of the piece.
• Fire to shelf cone 06.
Notes:• Can be applied between color, underneath and over colors for different
effects.• Shape of the piece affects the performance of the glaze• Firing temperature, ramp rate and a soaking period may enhance the flow pat-
terns.• Avoid excess color toward the bottom of the piece to prevent drips from
forming on the bottom of pieces.• Pottery Cascades are overglaze compatible.• Clean brushes with Brush Cleaner and warm water.
Series 2000™ Non-Toxic Glazes and Stoneware-Like Glazes:Gloss, Matte and Specstone
Characteristics:The development of Series 2000 Glazes introduced a new era in glaze formula-
tion and technology while addressing the consumer’s safety needs for non-toxic glazes.
While leaded glazes have a wide firing temperature range, non-toxic glazes have a narrower window in which the glaze will perform to its optimum potential. Series 2000glazes mature at shelf cone 06 and for best results should be applied to bisque fired twocones hotter (shelf cone 04). Series 2000 are ideal for schools, nursing homes and insti-tutional use, meeting the F.D.A. standard for lead and cadmium release. Their non-flowing characteristics can be used to advantage by the decorator.
Series 2000 glazes have a wide color palette and a range of finishes – fromtransparent to opaque, and from speckled to matte.
Application:For solid even coverage, time and care should be given to their application.
The first coat is the most important. Use an Oval Mop to apply the Series 2000 to alarge plain area. This allows a full brush load of color to be delivered to the surface.
A Flat Glaze brush is suited for applying color to pieces with lots of detail. Usingthis brush on highly detailed pieces will help avoid any build up of color in the crevices.For the best coverage, apply each successive coat in an alternate direction. Always readthe label instructions, as all glazes are not applied in the same way.
Notes:• These glazes offer the artist the opportunity to do Majolica techniques (using a
glaze on top of another unfired glaze). If doing a majolica technique it is best to add an additional coat of color. Handling the piece when designing can cause color to be removed.
• The Specialty Glazes (UR-90 or 151) can be used over the Series 2000 and retaintheir individuality, opening endless decorating options to the artist.
• New shades can be created within certain parameters. A lighter, more transparent color is created when mixed with S-2101 Natural Clear. This glaze mix remains safe and non-toxic.
• When mixing the Series 2000 Gloss Glazes, try a small test first. Some pigmentsare not stable when mixed together and may give unsatisfactory results. All matteglazes are intermixable.
• Do not mix Series 2000 glazes with glazes outside of this family. Doing so may alter the chemical composition and cause them to no longer be non-toxic or dinnerware safe.
• Do not apply Series 2000 to greenware as this will give very poor results.
Firing:It is very important that bisque be fired two cones hotter than the glaze firing.
A shelf cone should always be used to verify that the desired cone was reachedthrough each firing.
Fast firing during the bisque and glaze firing does not allow the glaze toproperly develop. This will produce trapped gases and carbons in the glaze. Thepreferred rate of increase during the bisque firing is 250º per hour and 375º per hourduring the glaze firing.
Make sure the glaze has dried thoroughly prior to firing. Always give thepieces the proper space in the kiln chamber and provide proper ventilation during thefiring cycle.
17

18
Roll-a-Coat™ Tintable Glaze
Characteristics:Roll-a-Coat is a tintable rolling glaze used to coat the inside of bisque pieces.
It is pre-mixed to the correct consistency for rolling. Roll-a-Coat can be tinted usingStroke & Coat to complement any decoration. It is available in a food-safe leadedformula and a non-toxic formula and is perfect for the inside of functional pieces suchas pitchers, vases and teapots.
Tinting Instructions:1. Using the chart above, determine which Roll-a-Coat version you need to finish
your ware. 2. Select a Stroke & Coat color to match or compliment the outside color of your
piece. 3. The amount of Stroke & Coat added as well as the color value of the Stroke &
Coat will determine the final tint of the glaze. Darker Stroke & Coat colors will require less color to tint the rolling glaze.
4. The color mixture should be prepared just prior to rolling the interior of the piece. A natural thickening may occur if the colored glaze is allowed to sit for extended periods of time.
5. Generally, 1 tablespoon of Stroke & Coat added to 2 oz. of Roll-a-Coat will produce a light to medium tint. Adding 2 tablespoons of Stroke & Coat to 2 oz. of glaze will produce a medium to dark or more opaque colored tint.
6. Shake and stir Roll-a-Coat until the Stroke & Coat color is completely mixed into the glaze.
7. If you desire a clear glaze finish on the inside of your piece, you may choose to use Roll-a-Coat alone with no tinting color.
Rolling Instructions:1. Start with clean properly fired shelf cone 04 bisque.2. Make sure any dust is removed prior to rolling. Anything left in the interior of
If on the outside you use: You should use on the inside:Crystalites Non-Toxic Glazes SC-210 Roll-a-Coat
C-109 Dipping Glaze C-110 Roll-a-CoatSC-209 Dipping Glaze SC-210 Roll-a-Coat
AG, BG, CA, CG, or Exotic Series C-110 Roll-a-CoatSeries 2000 glazes SC-210 Roll-a-Coat
Stroke and Coat (without clear glaze) SC-210 Roll-a-CoatPottery Coats (Bases & Cascades) SC-210 Roll-a-Coat
Roll-a-Coat Compatibility Chart
When using Roll-a-Coat, it is very important to use compatible glazes on theinside and outside of the piece.

the piece may affect the final surface of the Roll-a-Coat and cause crawling or pulling of the glaze.
3. Wipe the inside of the piece with a slightly damp sponge to make sure all dust and debris is removed.
4. Working quickly, pour the freshly prepared Roll-a-Coat into the piece. Using a continuous rolling motion, coat the entire interior. Roll right up to the inside rim or top edge of the piece. Try to avoid drips over the top edge.
5. Carefully pour out excess glaze and place the piece upside down to dry, preferably on a drying rack or other open device to allow air to circulate.
6. After all the glaze has dripped out of the piece and some of the glossy sheen has faded, use a clean damp sponge to clean away unwanted drips or excess Roll-a- Coat. (Hint: If glaze dries on the piece, you can use a soft clean eraser to remove unwanted glaze.)
7. Check rolled area for missed spots. Use a soft fan brush to add Roll-a-Coat to any missed areas by tapping once with color. Decorate the outside of the piece as desired. If the piece will not be dipped, be sure to cover all open bisque areas to seal the piece.
8. If you use Stroke & Coat or a color designed to be dip glazed, dip the rolled piece only to the lip or rim. If the piece is dipped entirely into the clear glaze with a heavy application, crazing may occur.
9. Allow entire piece to dry thoroughly.10.Fire to shelf cone 06.
Notes:• Why can’t you just thin your dipping or brushing glaze to achieve the same
effect? Brushing, dipping and rolling glazes are each designed for specific purposes. Brushing glazes have leveling agents to minimize the appearance of brush strokes. Dipping glazes are designed for good sheeting action to minimize drips and runs. Roll-a-Coat is designed to produce a nice smooth coat without depositing excessive solids in the rolling process.
• We do not recommend reusing the left-over glaze. The remaining glaze can become contaminated with chunks of bisque from previous use. Also, each time you roll a piece, water is removed from the glaze, causing it to thicken.When glazing with C-110, purples will be vibrant and beautiful. However, when using a non-toxic formula (SC210), you may experience some fogging and hazing. The raw materials used in purples can react with non-toxic formulas.
NON-TOXIC PRODUCTS FOR GREENWARE
Underglazes: One-Stroke Translucent Underglazes™ and Opaque Underglazes
Originally underglazes, refer to ceramic colors used under-the-glaze, like a foundation.Now the term generally refers to a product put on greenware that is cov-ered with a clear glaze. Underglazes can be translucent or opaque. Opaque
19

20
underglazes are generally used for large solid area coverage. They are opaque andwill block out other underglaze colors over which they are applied. Underglazesare occasionally used in a specific technique with no covering glaze. The translu-cent types are referred to as One Strokes and are usually covered with a glaze aswell.
The use and application of both opaque and translucent underglazes are varied.They can be intermixed in each separate category or intermixed between the two.Many times the two categories can be interchanged in techniques but require anunderstanding of their basic properties. An oversimplification is: OpaqueUnderglazes are mostly clay with pigment; One Strokes are mostly pigment withlittle clay. The amount of clay determines the opacity of the product and requiresthe product to be applied to the greenware so that the products shrink at the samerate as the clay in the firing.
Underglazes can be used directly from the jar, but should be put out onto a tileto avoid possible contamination of the remaining product in the jar. Make sure theconsistency is like melted ice cream. Dip a dampened, blotted brush into the color.Fully load the brush without dragging the brush on the side of the tile. Apply thecolor in a flowing motion; if it starts to drag, reload the brush. The clay will absorbthe moisture from the color, so care has to be used when applying. As you flow thecolor on, avoid ridges and runs. Brush these flaws out as you apply the color. Onan embossed piece do not allow excess color to build up. Brush the excess out ofthe crevices as you apply the underglaze. Apply the first coat. When the dark wetlook has disappeared, apply the second coat at a right angle to the first. The third isthen applied at a right angle to the second coat. This will assure better coverage.
There are other methods for applying opaque and translucent underglazes.Sponging and spattering are two other common means of application.
General Application of Opaque Underglazes• Non-toxic• Apply to greenware.• Lightly dampening the ware with a moistened sponge before painting allows
better adhesion to the ware.• Shake the jar well before application. Product should be the consistency of
melted ice cream.• Apply with a soft brush. Use the largest brush to cover the area. Can also be
sponged or spattered.• Apply three smooth even coats. Four coats are required for UG-84, UG-85, and
UG-86. The coats are applied at right angles to one another.• Do not thin for general application.• All colors are intermixable.• Can be tinted with One Stroke™ Translucent Underglazes.• Fire to shelf cone 04. Can be high-fired. Check the High Fire Guide for stability at
higher temperatures.• Clean brushes with Brush Cleaner and warm water.• Thin with AC-304 Media or water.• Generally a glaze finish is applied after firing to bring out the true color and
vividness of the product. Opaque Underglazes are not true color out of the jar, making them more difficult to design with.

Polished Underglaze TechniqueWhile opaque underglazes can be applied to ware in many ways from brushing
to sponging, there is an interesting technique that is very old. One of the most strikinglooks can be achieved by polishing the surface of the color to produce a soft sheen, andthen leaving it unglazed. The finished surface resembles earthenware. This techniquecannot be obtained by any other method and is unique to opaque underglazes.
The beautiful surface is achieved by buffing the opaque underglaze while it isstill damp. While the surface is somewhat sealed, it will not be waterproof. The surfacecan be sealed using AC-301 Repellent Sealer for easier cleaning.
This technique is only used on decorative items and is not suitable for surfacesthat come into contact with food or drink. This technique creates a great background forspot glazing using a gloss or satin matte glaze. Design work done in translucent under-glazes can be completed and then spot glazed on the design giving a contrast of textureand surface.
A smooth surfaced piece works best for polishing underglaze rather than anembossed piece. Care must be taken to avoid removing the color from sharp angles andrims. It is easy to scratch the ware accidentally with your fingernails, etc. Be carefulwhen applying the color as any ridges or buildup of color will affect the end result.Use a silk sponge to apply the color to eliminate some of these problems and to give adifferent look. Some colors polish better than others do. Those that dry with a frostylook give less successful results. For example, Mayco’s UG-33 Redwood works beau-tifully; UG-27 Pomona Green is very difficult to polish.
The following method is the most fool proof for beginners and can also be usedfor colors that do not polish easily.
• Apply three coats of underglaze with a brush, in the usual manner, to assure all over coverage. Apply the colors very evenly and smoothly. Do not allow prolonged drying time between the coats.
• Thin the same color, half-and-half, with AC-304 Media and mix well. Prepare aball of soft facial tissue or soft T-shirt material.
• Apply the thinned mixture to a small area about the size of the palm of your hand.When the shiny wet look disappears and the color will not stick to the pad, polishthat area briskly. The pressure should be light and the movement fast. It is the friction from the polishing that develops the sheen.
• Continue to apply the diluted color mixture to a small area at a time, each oneslightly overlapping the previous one, until all of the piece has been polished.Now buff the entire surface again, without wetting, until a high sheen has developed. If the color looks blotchy, this will disappear as the piece dries.
• If you wish to add a design using other opaque underglazes or translucent underglazes, be careful not to mar the surface. Use a soft cloth to hold the pieceto protect it from body oils and moisture. Wait until the piece has thoroughly dried before tracing the design so the pressure of the transferring does not mar thesurface.
If a design is being added with White Foam or any other type of glaze, properly firing the piece to shelf cone 04 before adding the design will avoid problems.For UR-90 Bright Red and UG-151 Fire Engine Red, see the description under
Specialty Glazes on page 33.
21
22
Translucent Underglazes: Translucent One-Stroke™ UnderglazesOne Strokes are translucent underglazes that have a light, airy look and concen-
trated color. These translucent underglazes appear almost the same color in the bottleas on the finished piece. This allows mixing, shading and blending with them to bedone with minimal complications. They can be compared to the artist’s watercolors.The “see-through” characteristics of translucent underglazes allow shading of one colorover another to achieve depth and dimension. Translucent Underglazes are not intendedfor large area coverage. Requiring only one coat, they are excellent for design work,two-tone shaded techniques and accents.
As the name states, One Strokes infers one stroke of the brush. When multiplecolors are applied, the thinning of the color and thinner layers of the product allow theproduct to be used to its full advantage. The thinning of the One Strokes and theamount of the application is adjusted to the number of times a color is used on a givenarea. The final depth of color should be no more than a generous stroke of the brushwith unthinned One Strokes.
It is important to thin One Strokes to the proper consistency for the type ofwork being done. Concentrated translucent colors are designed for relatively thin appli-cations that naturally result from one brush stroke. Very heavy applications of color canlead to problems with dry areas, cracking or bare spots where the One Strokes may popoff, taking the glaze with it. Bleeding of darker colors of blue and black may occur, butis generally the result of not firing the color before glazing or too heavy an applicationof the top glaze.
When applied too thinly, the color will seem to disappear under the topcoat ofclear glaze after firing. The One Stroke has to be thick enough so that the top glazedoes not “cannibalize” it. Thinning with water minimizes the danger of too heavy anapplication, but over-diluting can cause the loss of color. Mayco AC-304 Media can beused with water or alone to thin color for brush strokes and sponging. Media helps sus-pend the color without diluting it. As a rule, darker colors can with stand more thinningthan lighter shades.
For airbrushing bright red oranges and purples, it is more effective to thin colorsusing media.
(*Mayco does not recommend spraying or airbrushing ceramic glazes andunderglazes. In any case, do not spray apply ceramic products without properOSHA approved respiration equipment.)
Use a palette knife to thin the color to the consistency of light cream for most appli-cations. The consistency of very light cream is recommended for banding wheel workand decorating over unfired glazes. A wash of color, spattering or full brush shadingover one color with another color would use a product thinned to the consistency ofmilk. With practice you will learn the feel of the product in its various uses.
General rules for One Stroke application are:• Non-toxic• One Strokes are generally applied to greenware. They are sometimes applied to
bisque, for special techniques such as color washes, Majolica or on top of anunfired glaze.
• Dampen the greenware slightly before applying.
• Shake bottle well and thin with AC-304 Media or water. The consistency of theproduct depends upon the technique being completed.
• Use a quality decorating brush for applying.• Can be intermixed to achieve more colors.• Use to tint opaque underglazes, glazes and slip.• Bisque fire to shelf cone 04. Product can be high-fired up to shelf cone 6, check
high fire chart for stability at higher temperature.• Clean up using AC-525 Brush Cleaner and warm water.• Generally a glaze finish is applied after firing to bring out the true color and
vividness of the product.
Brushing One StrokesBecause of the translucent quality of One Strokes, the direction of the brush
stroke is apparent. This makes them ideal for artistic detail work and designs. Although One Strokes are not designed for solid coverage, generally they can be
used satisfactorily on large areas if applied properly. Thin the color to the thickness oflight cream, apply with a flat brush sized for the area. More than one coat of colorthinned properly will produce a more opaque look.
Sponging One StrokesA sponge can be used in a variety of ways with One Strokes, achieving a totally
different look each way. Choosing, loading and using the sponge is the same asdescribed for opaque underglazes, but the similarity stops there.
Unlike the opaque underglazes that block out color beneath, One Strokes allowevery overlap of the sponge to show. Sponging of the piece should not be so concen-trated with color so as not to allow the bisque to show. This light or airy look is accom-plished by choosing a sponge with a specific pattern to it and rotating the sponge withlighter mixtures of color allowing the bisque to show through. Several colors can beblended into the sponge at a single time to give a wider variety of decoratingpossibilities.
Usually One Stokes are thinned to the consistency of light cream for sponging.The color can be thinned to the consistency of milk, allowing for a two-toned value ofthe same color. Generally darker colors can be thinned more than lighter shades.Darker shades will block out lighter colors underneath, while lighter shades applied overdarker ones gives a shadowing to the area. Blending of the colors from dark to light ispreferred. Blend the colors into the sponge and test on a piece of paper to see how thecolors intermix.
Color Washes and Antiquing (Wash-Away)This technique is done on bisque – whether it is soft bisque shelf cone
(018-022) or hard bisque (shelf cone 04.) Each has their advantages, but hard bisqueis the preferred type to use in most techniques. Whichever bisque is used, use littlewater while cleaning the greenware to reduce unwanted erosion of the surface. Whenusing the harder bisque, dampen the surface with water so the color is more even intone. When using softer bisque for antiquing, re-fire the ware to shelf cone 04 beforeglazing.
The wash mixture should be the consistency of non-fat milk or water. It is
23
24
then applied to the embossed area where it flows into the recesses and crevices. Use alarge brush so that the color is even. The color will have a natural tendency to be darkerin the recesses while automatically highlighting the embossed areas. Mixing the OneStroke with Media will not allow the color to thin out enough.
When antiquing, color is applied and then removed from the high points with adamp sponge, leaving color in the recessed areas. Color should be thinned to theconsistency of light cream using AC-304 Media and applied using the largest brushpossible for the area. If the color is too thin, it will run and penetrate and stain thebisque. When the color is too thin, it has a tendency to weaken the color and can causethe color to shiver off after firing. If the color is too thick, it will not get into all of theembossed areas and can actually repel the top coat of glaze during the firing. Applyingone coat of AC-304 Media to the surface before the antiquing is applied will aid in mak-ing the color more even in tone.
Allow the color to dry before removing it from the raised areas with a dampsponge. Follow the contour of the design on the piece. Wiping the wrong direction willcause you to remove too much color. Rinse the sponge often to keep the highlightedareas crisp and clean. Too much pressure on the sponge will remove excessive amountsof color. Persistence, not pressure, is what does the job effectively.
Antiquing over a fired underglaze can be very attractive. This can be done to apiece that has had several colors applied to the surface. This ties the piece together foran even look. The underglazes should be properly fired to shelf cone 04 before doingthis technique. Antiquing done alone with a clear glaze is very effective, but can alsobe done with a speckled or clear art glaze. Darker colors used under semi-transparentcolor offers the artist a wider range of decorating possibilities. Remember the top glazewill mute the underlying color. Darker shades are most often used for this purpose.
Astro Gem® Textural Glazes
Characteristics:Astro Gems are non-moving textural glazes that contain two sizes of tiny crystals.
When fired these crystals provide jewel-like spots that compliment and enhance thestone type or dead matte surface of the glaze. These unique glazes can be applied togreenware or bisque. For the best results the glazes are applied to greenware. Applyingthese glazes to bisque require more drying time between coats.
Application:• Non-toxic.• Apply to greenware or bisque. Greenware preferred.• Apply using Oval Mop or Soft Fan.• Apply three even coats, crossing each coat at 90 degrees.• Can be intermixed for other shades.• Do not apply inside of food containers.• Fire to shelf cone 04.
Stir and shake well to disperse the crystals before applying. Apply three fullcoats, changing direction with each coat for better distribution of the crystals.Avoid heavy application in recessed areas of detailed pieces. Any puddles shouldbe brushed out before the glaze dries.
The firing range of these glazes is shelf cone 06, but they can be fired even higherto shelf cone 6. Refer to High Fire Guide. They become darker the higher they arefired. Should these glazes require touch up, re-fire to at least the original cone orhigher to achieve uniform color.
Notes:• AS-518 Amethyst requires a special method of application because some of the
crystals may appear as light spots. It is suggested one full coat of UG-10 Crimson opaque underglaze be applied to the greenware, then three coats of AS-518 Amethyst Astro Gem.
• Most any color can be made by intermixing the Astro Gems or by adding One Strokes translucent underglaze to AS-510 White Opal Astro Gem.
• When applied to greenware or bisque, remember to stilt the piece. If you wipe off large crystals after application of each coat, the piece need not be stilted.
• Seal with AC-301 Repellent Sealer for a water-resistant surface. See the accessory chapter for application and usage of Repellent Sealer.
• Decorating ideas are almost endless with Astro Gems. Over these unfired glazesyou can decorate with One Strokes, Underglazes, White Foam, Clear Glaze,Stroke and Coat, and other Astro Gems. Products used over fired Astro Gemsare Specialty Red Glazes and Non-Fired Softees Acrylic Stains. AC-302 WaxResist and AC-303 Mask are natural to use when doing many techniques.
• OV-3 Mother-of-Pearl can be applied over fired Astro Gems. Though it fires out of the porous background, the tiny crystals will have a high iridescent reflective sheen. There may be some background color change on certain Astro Gems.
• To use fired gold over Astro Gems, apply and fire clear glaze on the area where gold is desired.
• Astro Gems are non-toxic, but their porous surface makes them unsuitable for items intended for food and drink. However, they can be used on the outside of storage containers. Because porous surfaces are difficult to clean when soiled, the surface should be treated with AC-301 Repellent Sealer when the project is completed.
• Most of the colors are stable when fired to shelf cone 6. The surface becomesvitrified and the background develops a slight sheen. They can be applied toeither porcelain or stoneware.
GLAZES FOR BISQUE
Clear Glazes
Characteristics:Mayco offers a wide selection of clear glazes. These glazes are shiny glazes that
enhance the translucent and opaque underglazes as well as the Stroke and Coat line.Both brush-on and dipping glazes are available for everyone from the hobbyist to thecommercial potter.
Generally the clear brushing glazes require only two coats unless a fired metallic
25

26
is to be applied over them. If a fired metallic is applied over the clear glaze, a third coatof glaze is recommended.
There are five different types of clear dipping and each has specialconsiderations and performance standards. These subtle differences are based on theneeds of the consumer. Always refer to the instructions on the jar label before use.
Application:• The general instructions for brush-on type clear glaze is as follows:• Apply to properly fired shelf cone 04 or higher bisque.• Apply 2 coats unless noted differently on the jar. Use three coats when fired
metallics will be used over the clear glaze.• Use an Oval Mop or Soft Fan brush for applying glazes.• All produce clean shiny surfaces, excluding the clear matte. Each has it’s own
personality as to brushability. • All are food safe when properly applied and fired to shelf cone 06. Some are
Non-toxic. Check labels in this series for toxicity.• May be high fired up to shelf cone 6.
Jungle Gem™ Crystal GlazesCharacteristics:Crystal glazes are an exciting array of colored glazes that “explode” with jewels of
color during the firing process. They consist of a base glaze with pebbles, granules, andspecks of contrasting glazes. During the firing, the crystals spread out to produce aburst of color. The base glaze may be gloss or matte; the crystals may be the same typeof glaze or a contrasting type. In any case, the mixture is designed to melt and smoothout in the firing. Crystal Glazes are a lead-bearing glaze and should not be confusedwith the non-toxic crystal glazes called Crystalites.
Application:Most crystal glazes require three coats. Crystal glazes that have a red glaze base
should have four coats. Regardless of the base glaze, if enough of the glaze is notapplied, the crystals will not melt into the surface. It is easier to get a good coverage ofthe base glaze if all but the last coat is applied without the crystals or with fewercrystals. Usually the crystals are in the bottom of the jar, so it is easy to put the baseglaze into a container.
Apply the first two coats in the usual manner with a soft fan brush. Mix thecrystals into the remainder of the glaze and apply the last coat with crystals; a fan brushis helpful when applying the last coat for even disbursement of the crystals.
While glazing, continually stir down to the bottom of the jar to pick up thecrystals that may have settled. Larger crystals should not be placed where they canspread out toward the bottom of a piece. Large crystals in the bottom of a bowl cannotspread out as easily as they would on the outside of the bowl. Avoid too many crystalsnear the bottom of the piece. The application of too many crystals on a piece can causeit to split. A piece is unattractive with too few or too many crystals.
• Apply to properly fired shelf cone 04 bisque• Use a soft fan brush to apply the first two (or three) base coats and to apply the
final coat to disperse the crystals evenly.
• Fire to shelf cone 06. If more flow is desired, fire to cone 05.• Avoid a larger concentration of crystal towards the bottom of the ware.• Do not use on the inside of food containers.
Notes:• A plain vertical shape, glazed with the base glaze, looks great if crystals are
placed in a heavy “necklace” around the top of the piece, resulting in a cascade of multi-colored crystals flowing down into a field of plain color.
• Crystal glazes can be used in glaze combinations with great results. If two glazes from the 700 Series are used in combination, a total of four coats give the best results.
• Many of the crystal glazes can be high fired up to shelf cone 6 with interestingeffects. This information can be found in the High Fire Guide. Individual testsshould be made to insure the best results.
CG-730 Clear EnamelwareCharacteristics:Clear Enamelware is a clear based glaze with a white crystal that does not flow in
the firing. It is designed to be used over a fired underglaze to resemble spattered tinenamelware.
Application:The underglaze is applied to the greenware in the usual manner and fired. Two to
three coats of Clear Enamelware is applied over the fired underglaze and the pieces re-fired to shelf cone 06.
Suggestions for traditional enamelware are; UG-1 Kings Blue, UG-31 Chocolate,UG-21 Leaf Green, UG-73 Cobalt Black or UG-58 Harvest Gold.
Art Glazes
AG-200 SeriesCharacteristics:All the glazes in the gloss series are pretty well described by the individual color
name and the term “gloss.” The user needs only to check out the dinnerware (foodsafe) quality and opacity of these glazes before using them.
Application:Apply three full flowing coats unless noted differently on the jar.
Notes:• Apply smoothly to plain surfaces to avoid a spotty look.• Pale colors applied too sparsely will look more like clear glazes.• Transparent and Semi-transparent glazes accent embossed designs.• All glazes work well in glaze combinations and can be applied in one,
two or three coats for this technique depending on the strength ofcolor desired.
27
28
AG-400 SeriesCharacteristics:The term “art glaze” is usually used as a catchall to describe any glaze that
produces a lustrous finish, dual coloring, multi or single colored specs, gold or metallicflecks, or a grained or metallic look. Art Glazes have exciting two or three tonecolor with both matte and gloss finishes, sometimes in the same glaze! Art glazes canbe used side by side with good control, though a slight diffusion of color can occurwhen too much glaze is used on a vertical surface.
Application:Apply three flowing coats of glaze. An uneven application will produce more
two toned color variations.
Notes:• Shape of the piece, thickness of application, and the firing rate and temperature
will affect the glaze.• Apply smoothly to plain surfaces to avoid a spotty look.• Re-firing will give more color formation to the two-toned colors.• Art glazes are great for creating new effects when used in combinations.• Apply one, two, or three coats of glaze under, over, or between other glazes for
interesting variations.• 410 Black Lustre produces a mirror-like brilliant surface. It may run off the high
areas or heavily embossed areas. A soaking cycle at the end of the glaze firingwill enhance the metallic sheen of this glaze.
AG-460 Empress WhiteCharacteristics:AG-460 Empress White is rightfully an Art Glaze but is different due to the fact that
it flows more freely during the firing. The movement in firing produces a silverythread of color, changing from gloss to matte, and pools in recessed areas of embossed ware.
Application:While three coats produces a beautiful color an extra dabbing of color here and
there will produce more of the metallic-looking color to change. The third coat shouldbe tapered back, slightly, from the bottom of vertical pieces to reduce the chance ofdrips. Care should be given when using Empress White next to other glazes to preventthem from mingling.
Notes:Empress White is especially versatile. If used alone, it produces an off-white
color, almost ecru, with just the right amount of color variation for shading on clothingor dogs and other animals. If used over underglaze colors, such as dark browns andRedwood, the flow of the glaze adds iridescence to the finish. If used in combinationwith Matte Transparent over One Stroke colors, it produces tiny brown threads that addto the detail of the design. Empress White works well in combinations using one, two,or three coats over, under, or between other glazes.
AG-601 White Drape & CG-712 Super Spill Characteristics:These two glazes are not intended to be used alone. They are free flowing glazes
used to produce special effects or flow patterns when used in combinations with otherglazes. White Drape forms a cascading water effect when used alone over a glazeapplied heavily at the top of the piece. It will form runs or you can direct the runs whenyou apply the product. Depending on the glaze underneath, the White Drape can blendwith the color creating a tint to the special effect glaze.
Super Spill is similar to White Drape but has an added crystal. These white crystals form bursts of white spots mottling the special effect glaze and the otherglazes used in combinations. Better results are obtained when used either as the first orsecond coat in the glaze combination. When applied as the top coat, the effect is lessdramatic.
Application:Usually these glazes are applied with a brush in 1-3 coats. AG-601 can be
applied using either a sea wool sponge, Chore Boy or Tuffy™ sponge. Either can bedabbed on at random, even or unevenly to create different flow patterns.
Notes:• Can be applied between colors, underneath and over colors for break-up effects.• Shape of the piece affects the performance of the glazes.• Firing temperature, ramp rate and a soaking period may enhance the flow patterns.• Avoid excess color toward the bottom of the piece to prevent drips from forming
on the bottom of pieces.• Both can be used in combination with Jungle Gem Crystal Glazes to add more
flow and color variations.• Do not use on the inside of dinnerware pieces.
AG-605 Gold Filigree, AG-630 Opaque White, AG-585 TesseraeGold Filigree
Characteristics:Gold Filigree is a metallic looking glaze that resembles a beautiful gold, mirror-like
finish with delicate lacy threads weaving through it. The lacy pattern is morepronounced with heavier applications.
Application:Apply three to four full, flowing coats to properly fired shelf cone 04 bisque.
Notes:• Cannot be fired to a lower temperature cone and retain its mirror-like finish. The
higher firing produces the glaze surface and any less of a cone will affect theglaze. A luster firing removes the lustrous mirror finish to the glaze.
29
30
Opaque White Characteristics:White Opaque is a white gloss glaze that resembles expensive white opaque glass.
It covers imperfections in bisque and works well with decals and fired metallic lusters.
Application:Apply three even flowing coats.
Tesserae Characteristics:Tesserae is a unique textural glaze that forms a raised rectangular chip-like texture.
This white opaque glaze can be used to save fired pieces with mistakes or flaws in thefinal glaze finish.
Application:• Apply to properly fired shelf cone 04 bisque. After application of Tesserae,
allow to dry and fire to shelf cone 06.• Apply over any moving glaze, fired or not, or any underglaze surface. Sometimes
an extra coat of the underlying glaze is needed. This is because the color can have a tendency to absorb the underlying glaze.
Notes:• Handle the ware carefully as the dried Tesserae has a tendency to flake off.
Pieces of color that fall off may be reapplied to the ware using AC-302 WaxResist. A protective coating of AC-302 Wax Resist can be applied over the colorto help alleviate the flaking of the product.
• The application, drying time before firing, the method and temperature of the firing will impact the final finish of this product.
• One Strokes can be used to apply designs or tint this product as well.
AG-610 White Foam and AC-308 Fired Snow
Characteristics:White Foam develops fine bubbles during the firing, resulting in a foam-like, snowy
texture. Foam can be used for designs and dimensional scenes, hills, snow banks.Foam maintains its position when used over non-moving matte glazes in the Series 2000Glaze line. Foam can be used alone or for all over coverage as a background.
Application:The general rules for applying both glazes are as follows. More specialized
applications are described below the following bullet points:• Apply to properly fired shelf cone 04 bisque. It can also be applied to greenware.• Apply with a brush or sponge.• Fire to shelf cone 06 to 04.• Can be glazed.

Notes:• Three even coats can be applied with a brush or for a better and more even texture
of the glaze, apply with a silk sponge. • Once the glaze is fired it can be used for a textured background for China paints,
overglaze metallics or overglaze lusters and stains. • Can be tinted with One Strokes to form different colors. Use darker colors for
tinting to avoid diluting the glaze.• When using with another glaze that meet, apply the first coat of White Foam
overlapping the applied other glaze. Foam has a tendency to pull into itself, which would leave a bare spot if this is not done.
• Lusters and fired metallic can be used over the fired glaze.• Non-fired acrylic stains, opaque or translucent may be used over foam after firing
for a different look
AC-308 Winter Snow
AC-308 Winter Snow is applied to greenware or bisque with a palette knife,brush or sponge depending on the thickness and the texture desired. This glaze isformulated to be thicker than normal so a heavier application will be easy to obtain.In most cases, one heavy frosting type application is sufficient for small areas. Ifapplying to large areas or on bisque, it is recommended to apply one coat of clearglaze to the surface before applying the Winter Snow. Two coats of glaze may beapplied to larger areas or where a fluffier texture is desired.
Notes:• Winter Snow will produce a more fluffy, snow-like appearance. It is perfect for
Christmas decorating projects. This bubbly glaze will foam to a fuller texture the heavier it is applied. This product was specifically designed to use for snow-likeaccents on Christmas trees and winter decorations.
• AG-454 Holly Green can be used and will not boil up into the Winter Snow, discoloring the snow areas.
Clear Art Glazes
Characteristics:The glazes in this series are not totally clear, but are ideal for use over Opaque
Underglazes and One Strokes. They may be applied to the bisque to produce a softcolor, only tinting it or it can be applied heavily to give a bit more color depending onthe glaze used. These glazes offer no significant color contribution.
Application:• Apply two coats when used over underglazes. Three coats on plain bisque in an
overall color.• Fire to shelf cone 06. Some may be high fired. Check High Fire Guide for color
stability.
31
32
Notes:• Two coats of glaze are sufficient over underglazes; too much glaze will eat up the
underlying color. When these glazes are used alone, three coats give more depthof color.
• Heavy applications of clear glazes have a tendency to craze.• All of the clear art glazes are dinnerware safe when applied and fired properly to
shelf cone 06. • Some have a speck of color in them to add more interest to the glaze. These
specks can be of different colors.
Bisque Glazes and Utopia Glazes
Characteristics: Bright red and orange colors are very popular with ceramists, but these colors
should be handled properly. Certain metal particles, raw clay or clay dust, salt, and oth-er foreign matter can discolor bisque glazes. If reds and oranges are diluted or if theyare not applied heavily enough, they will look white, gray or clear. They must receiveplenty of oxygen during the firing process to prevent discoloration.
Application:When using Bisque Glazes, extra care should be taken. The bisque, the glaze
brush, and the hands should be clean. The bisque should be properly fired to a shelfcone 04 in order to burn out any foreign matter in the clay that could later discolor theglaze during the glaze firing. Bisque glazes should be used on pieces that are free fromsharp edges or embossing. Red glazes have a tendency to pull away from sharp corners;therefore, red glazes may have a white trim if the corners of the piece are not rounded.
• Apply to properly fired shelf cone 04 bisque.• Apply four full flowing coats, allowing each coat to dry between applications. • Utopia glazes only require two to three coats of glaze.• Apply an extra coat to high areas for better coverage. On highly embossed or
sharp edges the color may run off and produce a gray highlight.• Make sure hands are clean from body oils and salts.• Make sure the brush is clean.• Wipe down the bisque with a clean damp sponge to make sure all dirt is off the
ware.• After application of glaze, allow to dry and fire to shelf cone 06.• Allow extra room around each piece in the kiln for firing of pieces with red
glazes. They need breathing room for the glaze to develop. They need space,oxygen and ventilation in order to achieve the desired color.
Notes:• Bisque Red or Utopia glazes are compatible with each other and can be fired with
any of Mayco other glazes without any discoloration. Some other glaze companies’ products in the kiln could affect the red glaze.
• Red glazes should not be used on the inside of food or drink containers. Due to
the delayed crazing aspect of the glaze, they should not be applied to the inside ofa container that would hold any liquid.
• Vibrant Red is semi-opaque and allows designs in black to show through. Thelook of Flambé ware is a technique done with the design done in black onestroke, fired and the red glaze applied over it. The design is obscured, but doesrecreate the look of the Flambé ware.
Specialty GlazesUR-90 Bright Red and UG-151 Fire Engine RedThese underglazes are really not underglazes but very stiff glazes that require a top
coating of clear glaze to achieve a bright shiny quality. These two colors must beapplied to properly fired shelf cone 04 bisque.
• Apply 3 to 4 even coats. Allow each coat to dry well between applications. • These colors can not be intermixed with any other type of underglaze product.• These products are Semi-Opaque, allowing only dark colors to show through.• Apply one to two thin coats of a clear glaze on top of the unfired product. The use
of BS-100 Brite Strokes Clear glaze will make both UR-90 and UG-151 food safe.• Glaze fire to shelf cone 06.• These colors do not withstand high fire temperatures.• Perfect for small spots of color in a design, such as fruit.• Clean up with water.
Brite Strokes Clear GlazeCharacteristics:This glaze was specifically developed to be used over Specialty Underglazes,
UR-90 Bright Red & UG-151 Fire Engine Red to promote the color stability of theunderlying color. It is applied over Specialty Glazes in order to make them food safe.
Application:Apply to properly fired shelf cone 04 bisque using a soft glaze brush sized for thearea. Apply two coats for proper glaze application.
Notes:• This glaze may discolor regular underglaze colors. A test should be made for
color stability. • When decorating with the Specialty Glazes, the Brite Stroke Clear glaze is
only applied to the area that is painted with the Specialty Glazes.
Exotic GlazesCharacteristics:
Each Exotic glaze is so strikingly different that “Exotic” is the only word thatadequately describes them. Their pattern development will depend upon many variablesand as a result no two pieces will look exactly alike. The shape of the object,application, firing temperature, kiln load, and the firing time all will affect the flowpatterns of these glazes. With the application of three even coats and the usual cone 06firing, these glazes do not flow out of control, but move within themselves enough to
33

34
result in a pleasing effect. A heavier, uneven application, a heavily loaded kiln, a thick walled kiln that holds the
heat longer, any soaking period, or a prolonged firing will develop a more intricatepattern with Exotic glazes. Re-firing will also bring out more of a pattern change withthe underlying color. Some shift from gloss to matte to develop a frosted look; someproduce a flow of two, three or more colors; others contain specks. The fired colorchips are usually too small to show the lovely true characteristics of Exotic glazes.
Application:• Apply to properly fired shelf cone 04 bisque.• Using an Oval Mop, apply 3-4 flowing coats for general application.• Fire to shelf cone 06. Can be high fired up to shelf cone 6.
Notes:• The shape of the piece, glaze application, firing temperature and kiln load all
affects the final surface.• Exotics are great for fur and animals. • Can be used when doing glaze combinations to aid in the flowing pattern.• Embossed pieces can contribute to the flow of the glaze during firing. • E-850 Milk Glass is a beautiful glaze applied alone to give that subtle blue cast
like fine glass objects. Milk glass can be applied over underglazes to “milk” the underlying colors to give an attractive result.
• E-944 Taffy is a crackle glaze and the instructions for Classic Crackles should befollowed for the application and firing of this glaze. However, this glaze containslead and should be used with other leaded products. Refer to page 12.
Overglazes: Fired Lusters and Metallics
Characteristics:In the language of ceramics, the term “overglaze” refers to the group of colors
(lusters and metallics) that are applied to a previously glazed and fired surface. Theseoverglaze materials are then fired to a temperature considerably lower than the originalglaze firing.
General Application and Firing Information:Proper overglaze decorating begins with the greenware. Greenware that will
eventually be overglazed should be cleaned carefully and bisque fired to shelf cone04. This encourages the dissipation of gases that might otherwise cause imperfec-tions in the overglaze and also makes crazing less likely. The areas to be over-glazed are then glazed and fired to maturity. The firing should be to the highesttemperature recommended for the glaze of your choice. The label will tell youwhether a glaze is overglaze compatible. If the jar label states that the glaze is notoverglaze compatible, in some cases this only means the glaze will change duringthe overglaze firing. The metallic luster will be cloudy and may look beautiful incombination with the glaze used. While the finish may not be what was anticipat-ed, that does not mean that it is not complimenting the piece or glaze. If a certainglaze is in question, we recommend you test fire the color first. Keep in mind that

a matte glaze will provide matte finish to the luster or metallic, and a gloss glazewill furnish the glossy finish more commonly associated with overglazes.
After glaze firing, the overglaze decoration is applied. Firing temperature for allBright Gold is shelf cone 018 or 723º to 752º F. In firing an overglaze, the glaze issoftened to the point where the overglaze settles onto the softened surface andbecomes a part of that surface. Overfiring will cause the colors to sink deeply intothe glaze resulting in distortion, fade-out, burn-out and possibly a break up of thesurface color. Underfiring will prevent the glaze from becoming soft enough toreceive the color causing poor adhesion. With proper firing, overglaze decorationbecomes a permanent part of the glaze, and provides a durable, lasting finish thatcannot be obtained with any other decorating medium.
Fired GoldThe best known of the overglaze decorations is Bright Gold, which is a solu-
tion of true gold in solvents and oils. The popularity of this decoration is based onthe rich, elegant finish it provides. Since there is great similarity in colors betweenthe unfired solutions, especially the metallics, care should be taken to make sureyou properly identify the product being used. Use a permanent marker to label alljars and lids for identification.
The piece to be decorated and the work area must be thoroughly clean and dry toavoid contamination of the piece while applying an overglaze. The piece should becleaned with a lint-free cloth. If alcohol is used as a cleaner, be sure to allow suffi-cient drying time. Some alcohols contain water and oils. Always check labelswhen purchasing. If water does not dry completely, an imperfection will result inthe overglaze.
When a piece that is to receive overglazes comes out of your kiln, use a coffeefilter to grasp and remove the ware from the firing chamber. The piece should bestored in a plastic bag away from dust and lint. Brushes should never be cleanedwith alcohol since the inner bristles will tend to hold water. Coughing, sneezingand the presence of cigarette smoke can also put moisture on the object causingimperfections.
Overglazes may be applied with a brush, sponge, stamp or almost any othermethod to obtain the desired finish. Brushing is the most popular application tech-nique and should be undertaken with a high quality soft natural hair brush.Application is best done with the largest brush sized to the object being decorated.
The general instructions for applying a metallic luster are:• Apply to a clean and dry piece, free from lint and dust. Remove pieces from the
kiln using a coffee filter for handling and store in a plastic bag until ready for overglaze decoration.
• Use a high quality brush reserved for that specific metallic. A camel hair brush works best for all-over decorating of any fired luster. Synthetic Taklon brushes are soft and versatile, making ideal detail and liner brushes. Taklon brushes are too stiff for all over application of metallics. Camel hair brushes are good for all over coverage of Mother-of-Pearl.
• Fully saturate the brush but not completely up to the ferrule. Remove excess color. For proper coverage the color of the product on the piece generally should be half as dark as it appears in the jar. Fired gold will appear a toasted honey
35

36
color on the piece while the color in the jar is like dark molasses. This is true for all the metallics. Mother-of-Pearl, however, is usually applied thinner.
• Fire to shelf cone 018 for metallics. • Clean brushes in OV-6 Essence using a double bath system. The paragraph
below contains more information about this system.
The brush should be well saturated with the excess product worked out of thebristles. Proper brush technique is important in overglaze decorating. Each strokeshould be firmly and evenly placed next to the last one in an effort to make theapplication as even as possible. Where an even edge is required, or the decoration isto be applied to a raised or embossed surface, the overglaze may be allowed to airthicken slightly. This slight thickening can help where added brush control isdesired, such as when decorating very small areas. The product is allowed to airthicken on a tile or glass. If the product becomes too thick, add (OV-6) Essenceone drop at a time to avoid over-thinning. Essence (OV-6) is used as a thinner forthe metallics.
Brushes used for metallic overglazes should be kept thoroughly clean and pro-tected from contamination between uses. It is highly recommended that one brushbe set aside for each metallic preparation and marked. We suggest that one set beused for fired gold and one for Mother-of-Pearl. A brush used for Mother-of-Pearlshould never be used to apply any other product. The slightest bit of gold in abrush will discolor the Mother-of-Pearl.
The most desirable preparation for cleaning brushes is OV-6 Essence that hassolvent properties to thoroughly remove metallics as well as conditioning propertiesfor the brush. Alcohol is not recommended for the reasons stated previously. This is the recommended procedure for cleaning metallic brushes:• Divide a small amount of Brush Cleaner into two portions and place in glass
containers. • Mark each container with appropriate name and number them Cleaner #1 and #2. • Before cleaning, press the brush in a paper towel between your fingers to remove
excess remaining luster or metallic. Do not squeeze the bristles and pull on the handle of the brush at the same time.
• Bath #1. Gently dip the brush in cleaner. Do not swish the brush. Gently press the hairs between the fingers and paper towel again but do not use a pulling action. Continue repeating this process of dipping and pressing the brush 5 or 6 times. The color in the paper towel will either be almost gone, very light, or color free in the paper towel by the last dipping. This bath will become discolored more quickly than bath #2 and should be changed when needed. Go to bath # 2, tocontinue the cleaning process.
• Bath # 2. Now swish the brush into the cleaner and press the brush into a paper towel as before. This is repeated until all color is gone from the brush. Over time this bath will start to take on color and need to be replaced. It should be almost clear for a long period of time.
• Store the brushes in a closed container away from dust and lint. It is a goodpractice never to dip a brush into overglaze all the way up to the metal ferrule. This only wastes color, makes the brush more difficult to clean, and causes it to break down and lose hair sooner.
Sponge application is done with slightly thickened metallic. The thicker prod-
uct will hold the sponge pattern better. Use a new small piece of a natural sponge forthe application and discard it after use.
Stamped application can be done with fired metallics using a rubber stamp thathas only been used with metallics. Use product that has been slightly thickened andspread out evenly onto a tile or glass surface when stamping. For proper coverage,you will need to replenish the product often.
Mother-of-Pearl creates a beautiful iridescent effect and is one of the mostpopular overglaze finishes. A successful outcome can be assured by proper lightapplication of the product. Unlike colored lusters and metallics, Mother-of-Pear shouldbe applied unevenly. This is best accomplished by swirling or stippling with the brushduring application. This luster is most commonly applied directly over a glaze, eitherclear or colored. The decorator should keep in mind that beautiful and unique effectscan also be achieved by applying Mother-of-Pearl over the top of a fired coat of anotherluster or metallic. Mother-of-Pearl is generally fired to shelf cone 020- 019 for opti-mum results, but can be fired with gold and other colored lusters at shelf cone 018. TheMother-of-Pearl may sometimes appear frosted at higher temperatures.
Firing Metallics:There are some general rules for firing metallics that should be followed.
Following these steps will provide the best environment for the piece and the colors todevelop.
• Pieces should be completely dry and free from dust and moisture.• Fire to shelf cone 018-019. Mother-of-Pearl does better at shelf cone 020.• Ventilation is the single most important factor. Allow extra room around and
above each piece, about 2-3 inches. • Stilt each piece for better air circulation.• The kiln is operated on “low” for 45 minutes with the peepholes removed and
the kiln lid fully open. The lid is then lowered to about 6 inches and the kiln is turned up to “medium” for 45 minutes or until all smoke and odors have disappeared. The kiln is then turn on “high” and the lid lowered to about 1 inch. When the kiln is turned off, the lid and peepholes are closed. This will give the optimum results when firing metallics and lusters.
Accessory Products: Fired and Non-Fired
Mayco produces many products that are used with other products to achievedifferent decorating effects. Listed below are accessory products and their uses. Thiscategory of products is dealing with the fired portion of the line. Some of these prod-ucts are used in both the fired and non-fired lines interchangeably
AC-301 Repellent SealerCharacteristics:This product is a silicon based water sealer that is applied to Astro Gems and
polished or unglazed underglaze surfaces to protect them from being soiled. Also workvery well for non-fired surfaces.
Application:
37

38
This product is applied to the ware using a soft brush. Apply 1 coat and let dryfor 24 hours and then apply a second coat. This product makes porous surfaces waterand soil resistant. It can also be used with polished underglaze piece to make cleaningeasier. It is not a replacement for glaze on this surface.
Stain pieces that are exposed to outdoor element can be coated with Repellentfor added protection. It can be applied to the inside of lawn ornaments to resist waterpenetration and allow more weather protection. Clean up is with AC-525 Brush Cleanerand warm water. Do not fire.
AC-302 Wax Resist
Characteristics:This wax emulsion is one of two resist products used in many fired color tech-
niques. The wax emulsion repels color from the coated area and fires off. If colorsadhere to the wax it must be removed prior to firing as it can stick to the ware. This isespecially true with any glaze “beads” that may form on the wax. Any color left on thewax that is used on top of an unfired glaze will adhere to the underlying glaze duringthe firing.
Wax resist can be used on greenware or bisque, under, between or on top of anyunfired color, to protect coated areas from color. It can be applied with a brush, spongeor spattered. Each method allows the artist to expand the options in the decoratingprocess. Dramatic Batik effects can be achieved by layering the Wax Resist betweencoats of color or simply by using Wax Resist as an aid to keep color off an area whilepainting. A sea wool sponge offers the most varied and dramatic effect to veil the waxand color. Mayco recommends the brush or sponge be preconditioned with AC-525Brush Cleaner to allow easier clean up. Condition the brush by saturating the hairs.Then remove any excess Brush Cleaner before using the Wax Resist. If Wax Resistshould dry in the brush it may be removed using AC-520 Solvent.
Apply one generous coat of Wax Resist. Even a thin coat will repel color. Oncean area is coated with Wax Resist a second coat will not adhere to the previous one; itwill bead up on the first coat. Once a coat of Wax Resist is applied it can only beremoved by firing.
When glaze or color is applied over Wax Resist with an underlying unfiredglaze, the “beads” of color need to be removed prior to firing. These can be removedby pouncing a clean, damp sponge over the waxed areas. If several coats of color arebeing applied, it is easier to remove excess color after each coat rather than letting themdry and trying to remove them all after the final coat. A different effect will result whenthe beads are allowed to remain during the firing. This option can be used to advantagewith some techniques.
During the firing process there is additional smoke that will be given off as the waxis burned off. Allow extra ventilation of the kiln during the early part of the firing toremove these fumes and gases. Remember that because the wax repels the color it canfall off the ware and could land on an adjacent piece. Allow extra room when loadingthe kiln in case this happens and to allow the carbons to burn off. This product has atendency to chip when trying to sgraffito through it.
Wax Resist will only repel color during application. A glaze applied too heavily

may run during the firing and Wax Resist will not keep it from moving onto an area.
AC-303 Liquid Mask
Characteristics:Liquid Mask is a rubbery emulsion that dries as a protective film when applied to
greenware or bisque. It can also be used on top of fired or unfired glaze, over acrylicareas that have been sealed, and on fired metallics to prevent the area from beingover-sprayed with a sealer. It is not recommended for use over One Strokes ongreenware before they are fired. There is a tendency for the color to be lifted off withthe Mask in this instance. The difference between this product and Wax Resist is how itis removed after use. Liquid Mask is peeled away when the project is finished andbefore the firing process. It does not burn away in the firing like Wax Resist. LiquidsMask can be used like Wax Resist for similar techniques. However, Mask is generallyapplied to areas that need to be blocked out in order for another color to be applied afterthe first.
Application:The brush must be “conditioned” before using Liquid Mask. This is done by
working a small amount of AC-525 Brush Cleaner throughout the bristles. The brushcleaner is not washed from the brush. This prevents the Liquid Mask from imbeddingitself into the hairs of the brush, ruining the brush from any future use.
Be sure to peel Liquid Mask from the ware the same day it is applied. If lefttoo long it is difficult to remove. If for some reason the mask cannot be removed fromthe piece within a day of the application, apply another coat of the mask and thenremove.
Notes:When color is applied and allowed to dry before the mask can be removed, the
color has a tendency to chip when the mask is lifted from the ware. This can besolved in one of two ways. You can dampen the edge with water or reapply anothercoat of the underlying color. Be careful to watch where the mask may still be leftunderneath a color or where the Mask lifts the edge of the top color, but doesn’tcompletely come off of the piece. This may keep the color from adhering to theware. Do not fire.
AC-304 Media
Characteristics:Media is a general conditioning and thinning agent used for all water-based
products. Mixed or blended with any water-based product, the product’s formulationkeeps the color from drying out too quickly. It is the preferred media to mix with OneStrokes, rather than water. It will recondition a color that has dried out making itworkable again. This can be important if the water in your area has chemicals orminerals that may contaminate a product. If your water has a high iron content, forexample, it could discolor your red glazes.
39
40
Notes:When mixing colors for brushing ease, Media thins the product while not
diluting the strength of the color. Use Media when you want to condition OneStrokes or Stroke and Coats‚ for doing fine detail work. This makes the colorsbrushable and causes them to flow from the brush, concentrating the color andreducing the necessity of applying several coats to achieve the proper color deposit.Coloramics Media can be used instead of water in the brush for shading work witha Flat Shader The Media is the vehicle that allows the color to blend out of thebrush. It can be used in the same manner with One Strokes or Softees AcrylicStains when doing “Tole” work. It can be added to Softees Acrylic Stains forantiquing. Media maybe added to all Mayco product except the oil based products
AC-305 Mender Adhesive
Characteristics:Mender Adhesive is used in conjunction with AC-306 Clay Mender for mending
greenware. This product will not weaken the greenware as water would if used inmending the ware. Mender Adhesive provides a better bond between the brokenparts of the greenware.
AC-306 Clay MenderCharacteristics:
Clay Mender is used with Mender Adhesive to stick wet or dry pieces ofgreenware together. It is more than just liquid clay. It has chemicals in it thatmakes it a stronger bond than the existing clay that it mends. It can be used onbisque to join two pieces together, but is primarily for greenware use.
Application:• If the attachment is a handle or arm like piece, then scoring or marking the area
with a Wire Scratch Tool will allow better adhesion of the appendage. • Apply 2-3 coats of AC-305 to both sides of the break or items to be attached. • Apply one light coat of AC-306 to both pieces. • Apply a generous coat of AC-306 and immediately and firmly press the pieces
together, holding them into place for 10-20 seconds until they become affixed. • Let the area dry.• After drying, the areas can then be sanded and smoothed to prepare for decoration.• A top dressing of an underglaze may be needed. Clay Mender sometimes will
show a slightly different color than the clay being used. There are times when the glaze will not readily adhere to the mended area and the top dressing of an underglaze will overcome this problem.
Notes: • If there is an area that did not fill in completely with Clay Mender, an additional
application may be necessary. If the area is large and cannot be filled in solely with the product, then the addition of some clay dust to the product can thicken it to compensate for the gap in the ware.

• Larger areas or missing areas can be filled in using the Clay Mender thickened with clay dust. Fill in the area slowly and let it dry. Repeat until the area is filled and level with the surrounding areas. A piece of paper towel can be used to support the back of the missing area while you work. The piece of toweling is cut slightly larger than the missing piece, wet with the Clay Mender and applied to the inside area. Allow to dry and then fill in the area.
• Hairline cracks can be difficult to repair. It helps to widen the crack and then fill this area with the Clay Mender, thus bonding the gap.
AC-308 Fired Snow Refer to page 30 for general directions of application under the Foam glaze
category.
AC-520 Solvent CleanerCharacteristics:Solvent Cleaner is a mineral spirit based product used to remove excess oil based
translucent stains. Dampen a soft cloth with the Solvent Cleaner and wipe away theunwanted color. This product will take off the color quickly and should be used sparingly. It can also be used to remove dried Wax Resist from a brush. You can alsouse the Solvent Cleaner to clean brushes used to apply Repellent. Do not fire.
AC-523 Non-Fired SnowCharacteristics:Non-Fired Snow is a water based acrylic material that creates snow effects. Its
tough durable properties allow it to be applied to a fired glaze surface to create snow onpieces. It can be applied to bisque directly for an all over background texture. This canbe done with a stiff Fan Brush to aid in the even application of the product.
You can tint Non-Fired Snow using any Softees Acrylic Stain or Softees Pearls.However, if a darker color is desired, apply the Snow first, allowed to dry and thenapply a top coating of the desired Softees Acrylic Stain, Softees Pearls or DazzlingMetallic.
Clean up is done with warm water and AC-525 Brush Cleaner. This product isquick drying and the brush should be cleaned frequently during use to prevent a buildup that is not easily removed. Do not fire.
AC-522 Weathered Krackle Characteristics:
This unique product is used to create a distressed wood look using acrylic stains. Anytype of water base Softees Acrylic Stain, Softees Pearls or Dazzling Metallic can beused as the base coat, but the top coat can only be of an opaque acrylic.
Application:• Apply a base coat of Softees Acrylic Stain, Softees Pearls or Dazzling Metallic.
Allow to dry thoroughly.• Apply a coat of Weathered Krackle using a fan brush for a smooth even coat. It
does not need to be applied heavily. Allow to dry.
41

42
• Apply a topcoat of Softees Acrylic Stain to produce the crackle pattern. Flow thecolor onto the ware using a fully loaded brush sized for the area and piece. Anysoft brush or soft fan brush can be used for this application. Do not overlap orreapply the color before the effect takes place.
• Seal the surface with either a spray or brush on sealer. Apply the spray sealer in two light to medium coats.
• The base coat must be dry before application of Weathered Krackle as a wet base coat of color may affect the drying time and final look of the Weathered Krackle.
• Apply Weathered Krackle in a thin even coat using a Fan Brush. Do not apply too heavily as it can produce runs as it dries. Any drips should be removed with a clean moistened brush or a moist finger. Avoid excessive runs and puddles of this product. Wash the brush in AC-525 Brush Cleaner and warm water.
• Do not fire.
Notes:• The amount of Weathered Krackle applied does not determine the size of the
crackle pattern. The crackle pattern is determined by the direction or method ofthe application of the topcoat of Softees Acrylic Stain, the dryness or dampnessof the Weathered Krackle and the viscosity (thickness) of the top acrylic. A dry-ing time of about 30 minutes (depending upon the weather and humidity) is allthat is needed to produce the desired effect. The piece should be dry to the touchand able to be handled before applying the Weathered Krackle.
• Many different looks can be achieved by varying any one of these components tothe process. Going in one direction with the topcoat will produce striations in thetop color. A top coating of Softees Acrylic Stain over wet Weathered Kracklewill give a wider crackling pattern as the top coat is drying over a moving base ofcrackle product. A fine web of transparent crackle can be achieved using athinned topcoat of opaque acrylic.
• The application of the top coat of Softees Acrylic Stain should be done quicklyand smoothly. Do not overwork the area being covered. Overworking or re-stroking an area with the brush full of color will lift the color just applied. Thetopcoat will start to crackle almost immediately after application. This topcoat ofcolor is applied with any soft brush sized large enough for the piece. A FanBrush is preferred for this application. Use only Softees Acrylic Stains for thetopcoat as Softee Pearls and Dazzling Metallics will not produce the crackle pat-tern. They may, however, be used under the Weathered Krackle as a base coat.
• Weathered Krackle requires a sealer, either brush on or spray to adequately sealthe final surface. Mayco AC-516 Porcelain Mist Spray is the recommended seal-er. Remember that several light coats of spray are always best. One heavy coatof spray can create runs or discoloration. Weathered Krackle should not be usedfor outdoor items and especially items that would be exposed to rain.
• If any decoration is applied over the unsealed surface of the Weathered Krackle, the decoration will continue to crackle where it meets the product. This is fine if this is the look that is being sought. Antiquing over Weathered Krackle is best done by first sealing the surface. A final sealer is applied over the antiquing to complete the piece.
• An authentic weathered wood look can be achieved by rouging the sealed crackle

surfaces with translucent stains. This will give a look of peeling and fading paint as if it were exposed to the elements.
AC-525 Brush CleanerCharacteristics:This is a high quality brush cleaner designed for use with all water-based products.
It can be used with oil base translucents to clean them as well. Do not use it to cleanthe fired metallics. The Brush Cleaner is mild to the hands and very effective in riddingbrushes of paint particles left in the bristles. If a dried acrylic brush is left to soak in thecleaner, it will dissolve the dried material after a few days. It also conditions the hairsas it cleans.
Application:To clean a brush with water or oil based products in them the following steps are taken:1. Pour a tiny bit of AC-525 Brush Cleaner into the palm of your cupped hand.2. Massage the brush back and forth in your palm. Work the cleaner up into the
ferrule of the brush. Do not bend the hairs of the brush as this can cut the bristles at the ferrule.
3. Rinse the brush with lukewarm water and repeat if necessary until the brush rinses clear and clean.
Notes:Use AC-525 Brush Cleaner to condition a brush when AC-302 Wax Resist or
AC-303 Liquid Mask are to be used. Work brush cleaner into the bristles of thebrush and blot out the excess. Immediately after the masking agent is used, cleanthe brush as noted above.
AC-527 Mending and Sculpting PasteCharacteristics:
Mending and Sculpting Paste is a water based, non-toxic texturing medium. Itcan be used with virtually any water based acrylic color. You can mix it into SofteesAcrylic Stains to create your own textured colors. Use as much or as little as you wantto create the desired thickness. The medium will not affect the value or intensity of theacrylic color being used. Generally a 1 to 1 ratio is used when mixing with the acryliccolor. Less acrylic will give you a rougher texture. The mixture can be applied with abrush, sponge or palette knife to create many interesting surfaces. Clean up is donewith AC-525 Brush Cleaner and warm water.
43

44
NON-FIRED PRODUCTS
Softees® Acrylic StainsBasic Information:Non-fired finishes are applied to bisque and do not need to be fired in a kiln.
These fast drying colors are suitable for use on bisque, plaster ware, wood, fabric and avariety of other porous surfaces. They are intermixable and clean up with water. Manyspecialty products are available for use with the non-fired finishes and these will bediscussed in more detail under each product section.
There are two basic categories for non-fired stains. The primary or base coats arewater-based acrylic colors. All Softees Acrylic Stains are intermixable to create a virtu-ally unlimited color palette. Specialty sub-categories to the water-based acrylics includeproducts like Dazzling Metallics, Softees Pearls and texturing products. Some areapplied as a base or foundation coat, others are added on top of an acrylic or as a finaldesign element to the piece.
The other category of stains is the oil-based (mineral spirit or solvent) type ofcolors. These Translucent Oil Base Stains are concentrated colors that are generally usedto antique a piece, adding dimension to the surface, and are applied over the water-based base coat colors. Specialized products like Non-fired Snow and WeatheredKrackle are used to enhance the decorating process.
Acrylic decorated pieces are generally sealed with a final coating of a sealer eitherbrush-on or aerosol spray. These sealers offer the consumer a choice of finishes and aredesigned to protect the surface. The finishes range from matte to high gloss to thedelicate Porcelain-like finish. Each has an appropriate use depending on the projectbeing completed.
Softees® Acrylic StainsCharacteristics:Mayco’s Softees can be used on ceramic bisque, wood, fabric, plaster, paper, and
metal. They can also be applied to specially prepared glazed ware that has first beentreated with Porcelain Mist Spray Sealer.
Application Instructions:• Shake plastic squeeze bottles well to thoroughly mix the contents.• Sand ware using a medium grit pad to insure a smooth surface to receive the
color.• Before application, wipe down the ware using a damp sponge. Do not over wet
the piece with water.• Apply to properly fired shelf cone 04 bisque.• Use a synthetic brush for basic application, either Base Coat brush or a soft hair
brush is ideal.• Apply two thin coats for best results.• Allow to dry thoroughly.• Clean brushes in warm water and AC-525 Brush Cleaner.• Acrylics are self-sealing, however, a sealer is recommended for easier cleaning.• All non-toxic.• Do not fire
Notes:• For best results apply Softees with a synthetic brush. A non-fired base coat brush
or soft hair brush are ideal for this application as either will give a smooth finish that is free of brush marks. Softees can be applied with a sponge or brush. It is better to apply two thin coats rather than one heavy coat to avoid ridges, brush marks and rough textures. A thin coat does not mean that you thin the color to apply it to the ware, it simply means to use less color in the brush. This allows you to brush out the color and obtain a perfectly smooth and solid color before it dries. If a color should become excessively thick with use, thin with AC-304 Media. This will thin the product without diluting the color. If the product is thinned too much, it will not cover the surface of the ware without repeated applications.
• The application of Softees Acrylic Stains is generally the foundation of a stained piece, therefore, it is important to apply the color as evenly and as smoothly as possible. If color is applied improperly, the finish will be marred by excessive brush marks, ridges and textures. Antiquing, blending or rouging with translucent stains will only magnify these imperfections. Air bubbles that develop during the application of the acrylic need to be corrected at this time. These small imperfections can reappear later and cause the base coat to lift or peel. Some corrections can be made by lightly sanding the base coat using fine sandpaper.Wipe off residue with a clean damp sponge and apply a second smooth coat of thecolor. For a professional look when staining pieces, be sure to complete the backsand bottoms.
• Softees Acrylic Stains do not require a sealer, as they are self-sealing. Whetheryou seal or not depends on the technique and the materials used on the piece.Sealing does make the ware more soil resistant, therefore, easier to clean.Sealers, either brush-on or spray types are available. When antiquing, a sealerwill make the Translucent Stain easier to wipe back and remove.
• Place the colors to be used on a tile that has been covered with a piece ofaluminum foil. Softees Acrylic stains should not be washed down the drain and afoil palette allows the unused product to be disposed off easily. Be careful toclean the snap lid before replacing, as dried product can accumulate around thelid. Acrylic stains should not be allowed to dry in a brush, as this will ruin thebristles. Rinse the brush often during use and when finished, wash the brush withAC-525 Brush Cleaner and warm water to insure a clean brush.
Dry Brushing with Softees Acrylic Stains
Dry brushing is a technique where just enough color is left in the brush to tint thepiece in gradual layers. This method of application is done with a stiff brush.
Work the brush into the color, and then wipe the excess color onto a lint-free cloth,paper towel, coffee filter or brown paper bag until the bristles feel almost dry. Work thebrush back and forth several times. When little color remains in the brush, it is ready touse for dry brushing.
The brush is worked in a soft back and forth motion until an evenly blended coat ofcolor is achieved. In dry brushing, the color is slowly deposited, building up in layers.
45

46
Some people describe this motion as “tickling,” “dusting” or “dancing” the color ontothe surface. A heavier pressure of the brush will distribute more color onto the ware. Agradual building up of color is the desired effect.
As you paint, the brush may or may not be cleaned in between colors to give abetter mixture of colors. If the brush is cleaned between colors, all moisture should beremoved by squeezing the brush in a paper towel before again loading the brush withcolor. It is better to let the brush dry completely, as the added moisture from the brushwill affect the drybrushing technique. Allowing a couple of minutes of drying time topass before the next color is applied works best. Working too fast between colorapplications can cause the previous color to be lifted off the piece.
The general technique for dry brushing can vary depending upon the base coatcolor that is applied to the piece. Some techniques call for a dark color, such as black ordark brown, to be applied first to the entire surface of the ware. Then dry brushing ofvarious colors in sequence is done to achieve the final effect. Other techniques call foryou to apply a dark hue and then slowly apply lighter shades of that hue. Either tech-nique is acceptable as long as the desired effect is ultimately achieved.
Dazzling Metallics™
Characteristics:Dazzling Metallics are non-fired water based colors that can be used for solid cov-
erage or detailing. They are applied directly to bisque or over any of the Softees AcrylicStains.
Application:For smooth coverage, two lighter coats are better than one heavy coat. Either a
synthetic or natural hair brush can be used for application. Dazzling Metallics can beintermixed with any water-based product for interesting effects. The appearance of dif-ferent metals can be simulated using one of the metallics antiqued with a translucentstain. Porcelain Mist Spray Sealer is not recommended as a final sealer for themetallics, as it will dull the surface. Do not fire.
Notes:Do not use a brush that has been used to apply a Dazzling Metallic to apply aglaze. Any metallic particles left in the bristles can cause a discoloration in theglaze surface.
Softees®Pearls
Characteristics:Softees Pearls are high luster acrylics in a wide range of shimmering hues that are
water thinnable and intermixable. Pearls can be used on ceramic bisque, fabric andmany other craft surfaces.

Application:Softees Pearls are best applied with a soft hair brush or natural sponge. Pearls
may be applied over a base coat of acrylic, but the color performs better if applieddirectly to bisque.
Softees Pearls are self-sealing because of their glossy translucent base material.These colors take longer to dry and cure, and may remain tacky for several days.Thinning of the pearls for detail work or for a light coating is best done with AC-304Media which allows the color to be thinned without becoming watery.
A silk sponge can be used to apply these colors to make them appear even.They can be intermixed with any non-fired water based product to give an added dimen-sion to the color. The color should be removed from the brush immediately after usewith AC-525 Brush Cleaner and warm water. Color left to dry in a brush will ruin itcompletely. Do not fire.
Sparkling Sandstones
Characteristics:Sparkling Sandstones are a non-toxic, water based, textured, acrylic stain. Sparkling
Sandstones can be used on ceramic bisque, wood, plaster, Styrofoam, resin, concrete,picture frames, boxes, flower pots, vases, wicker and terra cotta. The addition of thesetextured colors can give any plain surface a stone-like texture. Sparkling Sandstoneswill loose their “sparkling” character when covered with an opaque color. The whitercolors of the Sparkling Sandstones work the best for intermixing to create other shadesof colors in this line. White Mica is preferred for this application.
Application:For best results use a stiff Fan Brush for over-all coverage. Two light coats are
better than one heavy coat, as the color can streak when over brushed. A second coatwill disperse the granules to the areas where they may appear thinner. When using thefan brush to apply the color, apply in a crosshatch application (short crisscrossstrokes), reloading the brush often to distribute the color evenly.
Notes:• Sealing of the Sparkling Sandstones is optional. Either matte or gloss spray sealer
can be used. However, spray sealing is highly recommended for items that are to be used outdoors.
• When using the Sparkling Sandstones on an item that is to be used in extremely wet conditions or on outdoor items, the inside surface should also be sealed usingAC-301 Repellent Sealer.
• Use AC-525 Brush Cleaner and warm water to clean brushes. • Do not fire.
Non-Fired Snow
Characteristics:AC-523 Snow is a water-soluble product used to create snow effects and raised
47
48
designs. Snow can be applied on top of Softees Acrylic Stains or on top of fired glazesurfaces.
Application:Snow should be stirred well before use and throughout its usage to keep the
product mixed and fluid. A flowing coat is applied using a brush. Use a stiff Brush forover-all coverage.
Once Snow is dry, it is permanent, therefore, rinse brushes and tools during useand again immediately after use with AC-525 Brush Cleaner and warm water. SofteesAcrylic Stains or Softees Pearls can be added to Snow to produce a wide variety ofcolors.
Notes:• Snow is ideal for adding snow effects on top of fired glazed Christmas trees. Apply the product using a palette knife. Pile on the snow, allowing it to cascade over the top of the branches. Icicles can be pulled down from rooftops or trusses to add dimension to a piece.
• The color is self-sealing and becomes a permanent surface when dry. When applied heavily on top of a fired glaze the product can flow and care should be taken in its application.
• Do not fire.
Translucent Oil Base Stains
Characteristics:Translucent Oil Based Stains are a rich creamy concentrated translucent formula of
colors generally used for antiquing pieces to create depth and dimension. These colorsoffer the hobbyist an expanded range of decorating possibilities. Their formulationallows easy application and gives the decorator greater control when highlighting andantiquing. Used singularly or in combination, they add multiple effects for the comple-tion of acrylic stain pieces.
Application:• Apply over a dry Softees Acrylic Stain for the best results.• May be applied directly to the bisque, but will grab more on open bisque.• Apply with a stiff brush.• Apply to a small sections at a time, highlighting and overlapping to complete the
piece.• Wipe off highlights with a soft cloth (T-shirt material).• All are intermixable. A gold sparkle may be added to any color using TL-115
Gold Blending Media in small quantities. TL-115 may be used alone. The Gold Blending Media should be stirred into the color and not ground into it by means of a palette knife.
• Use AC-552 Solvent Cleaner to remove more color.

• May be applied to glazed surfaces. Gloss or Matte surfaces need to be treated with two coats of AC-516 Porcelain Mist Spray.
• Wash brushes using AC-525 Brush Cleaner and warm water when using the Translucent Oil Base Stains and Rich Translucents™. Use AC-520 Solvent Cleaner to clean brushes when using Twinkles.
• Do not fire.
Application Notes:Apply a base coat of Softees Acrylic Stain and allow to dry. While they do not
necessarily need to be applied over an acrylic stain, the sealing of the bisque doesfacilitate the ease with which the translucent is removed from the ware. Working insections, apply the color with a stiff brush allowing it to get into all the recessed anddetailed areas of the piece.
When a piece is antiqued with Translucent Oil Base Stains, the color is appliedto the piece in small areas, about three to five inches squares and then wiped away;leaving bright highlights on raised areas and deeper tones in the crevices. Any color ofTranslucent can be used, depending on the desired effect, but for most techniques blackor brown is used.
Using a light touch and a soft material (T-shirt) folded into a pad of severallayers, wipe down your piece. Working slowly and carefully, apply sufficient pressureto remove antiquing to the desired shade. There is no rush to wipe back quickly whenusing oilbased translucents. A little more Translucent can be applied, or a little solventcan be used on the wiping cloth to even out or blend the color together.
When using Solvent Cleaner to highlight the areas, it is much better to place afew drops of solvent on a glazed tile, wrap a portion of the cloth over the index fingerand pat the cloth into the solvent on the tile. This places the correct amount of solventon the cloth. The wiping cloth should be turned frequently to expose a clean area tokeep from muddying the colors.
When antiquing figurines, attention and care must be focused on the face of thepiece. Either do not apply antiquing on the face or wipe down very carefully. Removeany large collection of color in the crevices around the features of the face. The colorshould appear to be a delicate shadow on the flesh areas.
A properly antiqued piece will show no streaks, smears or smudges. Thedecorator has the choice of whether the color is light or dark and this decision ispersonal in choice. For example, an angel would be antiqued very lightly, while an ani-mal figurine may be left darker.
Notes:• All of the colors can be intermixed to achieve a virtually unlimited color palette.
The Twinkles contain a gold fleck for added sparkle. The TL-115 Gold BlendingMedia can be used to add gold sparkle to any of the other colors in the line. GoldBlending Media is highly concentrated and should be added sparingly to the color.It may also be used alone to give a gold wash effect to a piece.
• Once cured, Translucent Oil Base Stains do not require a topcoat sealer. A sprayor brush on sealer may be applied over the translucent stain for durability. Whencompleting techniques requiring multiple layers of Translucents, a coat or a light misting of a spray sealer may be required after two layers of color has been applied. This will set the previous colors for further decorating.
49

50
• There are a variety of techniques that use Translucents for tinting and rouging. These methods of decorating are similar in look but applied differently depending on the surface.
• Tinting is a thin application of color applied with a soft brush using a light touch. • Rouging is the thin application of color applied with a cloth in a patting or
pouncing motion. • Some people rouge with a brush using a dry brush technique. The decorator may
choose the method that is easiest for them.• The top of some glaze surfaces may be decorated without any advance preparation
to the piece. Any AS Series of Astro Gems or AG-610 Foam can be decorated in this manner. Other glazes must first be prepared by spraying with two or more coats of Porcelain Mist spray to dull the surface sufficiently to allow decoration. Let each coat dry for a few extra minutes to determine if more than the two-coat minimum may be needed to dull the surface of the glaze.
• Clean brushes with AC-525 Brush Cleaner and warm water. Solvent can also be used to clean the brush.
Rich™ Translucent Stains
CharacteristicsThe main characteristic of Rich Translucent Stains is the fact they are
non-toxic. Rich Translucents are oil-based, water clean up translucent stains with avibrant creamy concentrated translucent formula of colors generally used for antiquingpieces to create depth and dimension.
Application:• Apply over a dry Softees Acrylic Stain for the best results.• May be applied directly to the bisque, but will grab more on open bisque • Apply with a stiff brush if antiquing, if applying as top color best to use a soft
haired brush.• Apply to a small section at a time, highlighting and overlapping to complete the
piece.• Wipe off highlights with a soft cloth (T-shirt material).• All are intermixable.• Use water to remove color and to clean up brushes and supplies.• May be applied to glazed surfaces. Gloss and Matte surfaces need to be treated
with two coats of AC-516 Porcelain Mist Spray.• Do not fire.
Application Notes:Apply a base coat of Softees Acrylic Stain and allow to dry. While they do not nec-
essarily need to be applied over an acrylic stain, the sealing of the bisque does facilitatethe ease with which the Rich Translucent is removed from the ware. Working in sec-tions, apply the color with a brush allowing it to get into all the recessed and detailedareas of the piece.
When a piece is antiqued with non fired oilbased Rich Translucents, the color isapplied to the piece in small areas, about three to five inches square and then wiped
away; leaving bright highlights on raised areas and deeper tones in the crevices. Anycolor of Rich Translucent can be used, depending on the desired effect, but for mosttechniques black or brown is used.
Using a light touch and a soft material folded into the pad of several layers, wipedown your piece. Working slowly and carefully, apply sufficient pressure to remove therich translucents to the desired shade. There is no rush to wipe back quickly when usingoilbased Rich Translucents. A little more Rich Translucent can be applied, or a littlewater can be used on the wiping cloth to even out or blend the color together.
A properly antiqued piece will show no streaks, smears or smudges. The decoratorhas the choice of whether the color is light or dark and this decision is personal inchoice. When using Rich Translucent color you also have the choice of adding morecolor after allowing the first application to dry. These colors can be built up to a veryrich creamy color. Allow to dry in between applications or spray lightly with AC-502Matte Sealer.
Notes:• All the colors can be intermixed to achieve a virtually unlimited color palette.• Once cured or dried, oilbased rich translucents do not require a topcoat of sealer.
A spray or brush on sealer may be applied over the Rich Translucent stain fordurability. When completing techniques requiring multiple layers of RichTranslucent color, a coat or light misting of a spray may be required after two lay-ers of color has been applied. This will set the previous colors for further decorat-ing.
• Clean brushes with warm water and AC-525 Brush Cleaner.
Touch ‘n Glo Wax Metallics
Characteristics:Wax Metallics are a soft, creamy wax metallic paste used for rouging or
highlighting ceramic stain pieces. The wide range of colors allows a varied choice ofdecorating possibilities. Wax Metallics are excellent for “Tole” pieces or for addinghighlights or a glimmer of metallic shine to a piece.
Application:• Apply Wax Metallics to the highlights using the middle finger. They can also be
thinned with AC-520 Solvent Cleaner to a brushable consistency. • Once the color has been applied buffing the color will enhance the shine. Clean
up is with AC-520 Solvent Cleaner. • Do not fire.
51
52
Sealers
Brush-On Sealers: AC-501 Gloss and AC-502 Matte
Characteristics:Brush-on sealers are used over dry acrylic stains to provide a protective coating.
Both sealers are water-based and dry clear. They are durable and are water-resistantwhen dry.
Application:Do not shake. Stir gently to prevent air bubbles. For best results, apply the sealer
with a soft brush. Apply two thin coats. Allow the first coat to dry before applying thesecond coat. This will insure that there are no brush marks. Clean the brushimmediately after use with AC-525 Brush Cleaner and warm water. Do not fire.
Aerosol Spray Sealers: AC-510 Gloss Spray, AC-512 True GlossSpray, AC-514 Matte Spray and AC-516 Porcelain Mist Spray
Characteristics:Aerosol spray sealers provide finishes that range from the dullest matte to the
highest gloss finish. Spray sealers provide quick drying, smooth, durable, hard coatingsfor all acrylic Stains. The matte and gloss spray sealers give the colors brightness,enhancing the colors and providing varying degrees of glossiness. Porcelain Mist sprayproduces the look, touch and feel of elegant porcelain pieces.
Application:The piece should be dry before applying an aerosol spray sealer. Shake the can
well. This should be done for a minimum of two minutes to mix the ingredients well.There is an agitating ball inside to mix the active ingredients.
Hold can approximately 10-12 inches from the surface of the ware. Start andstop the spray away from the piece. Keep the spray can moving as you are spraying.Periodically stop to shake the can to provide the proper mixture of product. This is mostimportant with the Porcelain spray. Make sure each coat is dry before applying thenext.
The spray nozzle should be completely depressed when spraying. Not fullydepressing the nozzle can cause the spray to falter. Keep your finger out of the spray aslarger droplets can form and be transferred to the surface.
To insure that the can functions properly for the next usage, invert the can anddepress the nozzle to clear the opening. This should take only a second or two.Depress the nozzle only until no spray escapes. You will hear air escaping, but will notsee any spray being emitted.
Notes:• Spray applied to wet acrylic can cause the color to bleed if applied too heavily. • For the final coating of sealer, allow the piece to dry a day or two as moisture can
be trapped into the spray sealer. • The final sealing “coat” is two to three light coats of the desired spray. • A “set” coat can be applied with a sealer while work is in progress. Apply one
very light coat; just enough to set the color for further decoration. Either Porcelain Mist or Matte Spray is preferred.
• When spraying, the distance from the ware should be 10 to 12 inches. Refer to the label for any noted difference in this distance. Spraying from a greater distance can cause the tiny droplets of sealer to dry before they come into contact with the piece. Holding the can too close can cause runs, drips and discoloration in the final coating.
• For best results, spray at room temperature (70°-75°) and do not spray in high humidity areas. The humidity in the air can be trapped in the layers of the sprayed surfaces producing a cloudy look and should be taken into consideration when using.
• Use sprays only in a well-ventilated area. A spray booth should be designed with enough air draft to pull the overspray away from the user and large enough to keep it off other objects.
• While there is no immediate danger from using spray sealers, as a precautionary measure a respirator should be used. This will also insure no escaping sealer fumes are breathed. If a spray booth is not used, a window should be opened to remove any fumes.
• Do not spray in drafty areas. Spraying outside is acceptable, taking into consider-ation the humidity and any wind while in use. Excessive wind can cause the spray to blow back into your face instead of onto your piece. The air temperature should be noted as temperatures of more than 85∞ or less than 70∞ will give poor results.
Porcelain Mist spray gives the look and feel of fine porcelain. This product willdeaden the glossiest of surfaces. It can be used over a fired glaze surface to imitate theappearance of porcelain bisque. This will allow you to decorate with stains on top ofthe fired glaze surface.
The application of Porcelain Mist spray should be done in several light coats withsufficient drying time in between. Insufficient drying time or insufficient shaking of thecan may cause the colors underneath to appear cloudy or milky. This can also resultfrom excessive moisture in the air or from the piece.
Porcelain Mist spray should never be applied over Glitters or Metallics as they willdull the reflective surface of the color.
When Porcelain Mist spray is applied over fired gold it gives the appearance ofRoman Gold and over Mother-of-Pearl it gives a subtle opalescence. If a piece has firedGold Luster and you wish it to remain shiny after the stain decoration, apply AC-304Liquid Mask to the desired areas to protect it from the spray. Apply two coats of Maskto give proper protection and ease of removal of the mask afterwards. Read the labelfor directions on using the masking agent as it pertains to the brush.
53

54
Porcelain Mist spray is used on animals to give them that natural look afterdrybrushing.
Matte Spray is somewhat glossy but not exceedingly so. This is the most pre-ferred Spray for all around use. Two light coats will give a pleasing shine to thefinished piece. Three light coats make it a bit shinier. Too much can give a slightlyyellow cast. Matte Spray is a good choice to use to set colors while working.
Gloss Spray is a shiny glossy surface. It gives the ware a nice polished shine. Itworks well with most techniques to provide a tough durable glossy surface. This spraywill brighten and enliven your colors.
True Gloss Spray provides the ultimate in shine. This spray is even shinier that theGloss Spray in appearance. For those pieces that need to resemble a fired glaze surfacethis is the perfect choice. The acrylic colors will appear bright and wet.
AC-520 Solvent Cleaner
Characteristics:This is an odorless solvent used for removing excess translucent from your brush or
for lightening an antiqued piece.
Application:Use T-shirt material to apply the solvent to the desired highlighted areas. Wrap
the T-shirt material around the index finger and dab with solvent to assure the properamount is used during this process.
Notes:Use to remove dried MP-2 Wax Resist and Repellent from brushes.
Magic Metallic™
Characteristics:Magic Metallics are not a faux finish but a real metal coating. These coatings
contain real ground metal particles that adhere to the surface and cause the finishedpiece to look as though it’s actually made of metal. Magic Metallics may be applied toalmost any paintable surface. They work like magic to create patina and real rust finish-es. The Metallic Finishes are beautiful used alone but may be further enhanced by theaddition of one of the Patinas or the Quick Rust Finish.
The metallic finishes can be mixed to create an endless variety of metallic colors;Magic Metallics can also be mixed with acrylic paint. The base color or combination ofcolors used, the application of rust and patinas, the length of time the product is allowedto process before it is neutralized or dried, the amount of product used, even the temper-ature and humidity will all affect the finished results.
A unique and original finish can be obtained every time. Follow our instructionsor have fun experimenting on your own with unique combinations of metallic finishesand patinas.
Application:• Apply a basecoat of the metallic finish. Allow to dry. Apply a second coat and
while slightly tacky apply the Patina solution.• Apply your choice of Patina antiquing solution to basecoated piece with a brush,
sponge or spritzer bottle. As the solution dries, the Patina will develop.• Once the desired effect is achieved, apply neutralizer to stop the process. You
may also dry the piece with a hair dryer. Seal with Matte Sealer.• Once the base metal is applied, a reactionary agent is sprayed, sponged or brushed
over the metal. These reactive patinas or rusts speed up the natural oxidation process of the metal. While it may take rust several years to develop in nature, this oxidation will occur in minutes right before your eyes. Other factors such as humidity, temperature and the dampness of the product may speed up the process even more.
There are several hues of Patinas and tints that may be used alone or incombination with one another to create different shades on a piece. Once thedesired reaction is achieved a neutralizing agent is applied to the surface or the areais dried with a hair dryer to stop the oxidation process.
Use the Magic Metallic Sealer to seal the final surface. The insides of piecesmust be sealed as well or the oxidation process will continue due to the poroussurface and absorption of moisture through the bisque.
Notes:• Always refer to the label for specific instructions on the product being used. • Metallics should be shaken and stirred to make sure the metals are in suspension
for application. Due to the heaviness of these metals, they do not stay suspended in the jar and will sink to the bottom.
• The surface should be completely clean, dry and free from dust. The inside ofhollow objects should be sealed prior to the application of the metals. This pre-vents the continued oxidation process from continuing even after the outer colorhas been neutralized. Ceramic bisque is porous and will allow even water vaporin the air to eventually affect the metal’s color.
• Apply metal colors with a soft brush. They can also be applied with a sponge or rag. A separate brush should be kept for the applications of the metals, as the fine particles if left embedded in the hairs of the brush will discolor glazes.
• Two coats of the Metallics are needed for adequate coverage. The first coat should be dry before the second coat is applied. While the second coat of metal is still damp or tacky the Patinas are applied. (The Dark Bronze, however, can be completely dry and still react to the Patinas.) Steel requires heavy coats for good rusting to take place, so an extra “padding” of color is suggested.
• Steel does not react with the Aqua Blue Patina. Steel will react with the QuickRust or Verde Green or Green Patina. Applying one coat of Steel over anothermetallic and applying the Patina can create an interesting effect. This creates atwo-tone effect of colors.
• The Purple Patina is a tinting color used to add variety. It will not oxidize by itself. Combinations of patinas as well as a tinting patina may be used on the piece at the same time. The patinas may be intermixed. A favorite is the Verde Green with Aqua Blue Patinas.
55

56
• The Patinas may be applied with a brush, sponge or by spraying using the spritzer nozzle. The spritzer nozzle fits easily onto the Patina bottles. A little goes a long way! More can always be added later. Remember you are letting the color oxidize or bloom. The Patinas and Rust oxidizing mediums are almost clear in appearance. Several colors of Patinas can be applied to the same piece at the same time. Brush strokes of the Patinas in a design can be completed if so desired, oxidizing the pattern only.
• Once the Patina or Quick Rust has oxidized on the metal, a neutralizing agent is applied to stop the process. Sometimes it’s better to stop the process before it goes to the extreme oxidation or rusting of the metals. Part of the beauty is being able to still see the metal color underneath the Patina.
• Several areas may be completed independently of each other to create separate areas on the same piece. Different areas can be added over other sealed areas of metals to create multiple layers of oxidation and colors.
• The metal base coats may be forced dried. The Patinas and Quick Rust should be allowed to dry naturally and let the “Magic” of the product take place.
• If too much Patina has developed, it can be removed slightly using a clean soft cloth or a dampened green grit pad to remove some of the Patina. After the Patina has been applied, you may choose to take a dry cloth and remove some of the Patina on the highlights on the piece. This will in effect, produce an antiquing of the Patinas. Drybrushing of a metal over the sealed Magic Metallic™ finish can give life to a piece.
• These products speed up the natural oxidation of metals. Overspraying and depositing the Patinas or Quick Rust on metal shelving or tables will cause them to oxidize. Use care when spraying. Any health cautions are noted on the jar label.
• Once the piece is completed or has been allowed to oxidize to your preference, the color is neutralized using the MM-400 Patina/ Rust Neutralizing Agent, then a sealer is applied. The Neutralizing agent can be applied to stop the oxidation process. A coating of a specialized sealer needs to be applied over the neutralized colors. This sealer is specifically designed for this product. Do not attempt to use other brush on sealers over the Magic Metallics.
• All products are water-soluble and water clean up. Use AC-525 Brush Cleaner and water to clean all brushes.
• The inside of hollow pieces must be sealed or they will continue to oxidize even after the other steps have been completed. The sealer may be rolled to the interior of the piece if brushing would be difficult.
• There is one sealer for Magic Metallics™ Matte Interior, and is intended for indoor use.
• Use a soft hair brush for the application of the sealer. Apply 3-4 thin coats ofSealer.
• Use AC-525 Brush Cleaner and warm water to clean brushes.

57
Item# Name Code DetailsSC-1 Pink-A-Boo CH Color becomes beige to off whiteSC-2 Melon-Choly NCSC-3 Wine About It NCSC-4 Salsa NCSC-5 Tiger Tail CH Color fades & is very unstableSC-6 Sunkissed NCSC-7 Leapin’ Lizard NCSC-8 Just Froggy NCSC-9 Jaded NCSC-10 Teal Next Time NCSC-11 Blue Yonder NCSC-12 Moody Blue NCSC-13 Grapel NCSC-14 Java Bean NCSC-15 Tuxedo NCSC-16 Cotton Tail NCSC-17 Cheeky Pinky NCSC-18 Rosey Posey NCSC-19 Plum Crazy NCSC-20 Birthday Suit NCSC-21 Sunburn NC
Stroke and Coat® WonderGlaze® for BisqueApplied 3 coats of all glazes.
High Fire Guide
High Fire Cone 6 DataThe following is an outline of what you can expect to encounter when firing any of Mayco’sglazes to shelf cone 6. All colors were painted as directed on the jar label onto a high-fire green-ware body. Any changes that took place in the color or surface quality are described as accuratelyas possible. However, since these are only our descriptions it is recommended that you use thesedescriptions as a starting point and always test fire the glaze on your own high-fire body. Crazingis possible depending on the body you use. Food safe, lead-bearing glazes may NOT still befood safe at a high fire. Glazes rated non-toxic and food safe will remain so providing they donot craze. Although some Mayco glazes will fire up to shelf cone 10, we have not tested thistemperature or included results at temperatures higher than shelf cone 6.
Due to their composition, the following do not withstand cone 5 firing.UR-90 Bright Red BG-642 Vibrant RedBG-259 Cranberry Red BG-261 California OrangeBG-600 Dragon Red BG-643 TangerineBG-640 Poppy Orange BG-644 Poppy RedG-3001 Real Red G-3002 Real OrangeG-3003 Chrome Yellow
CodesNC = No noticeable change in color or characteristicsCH = There is noticeable change in color or characteristicsXC = Crystal has changed color
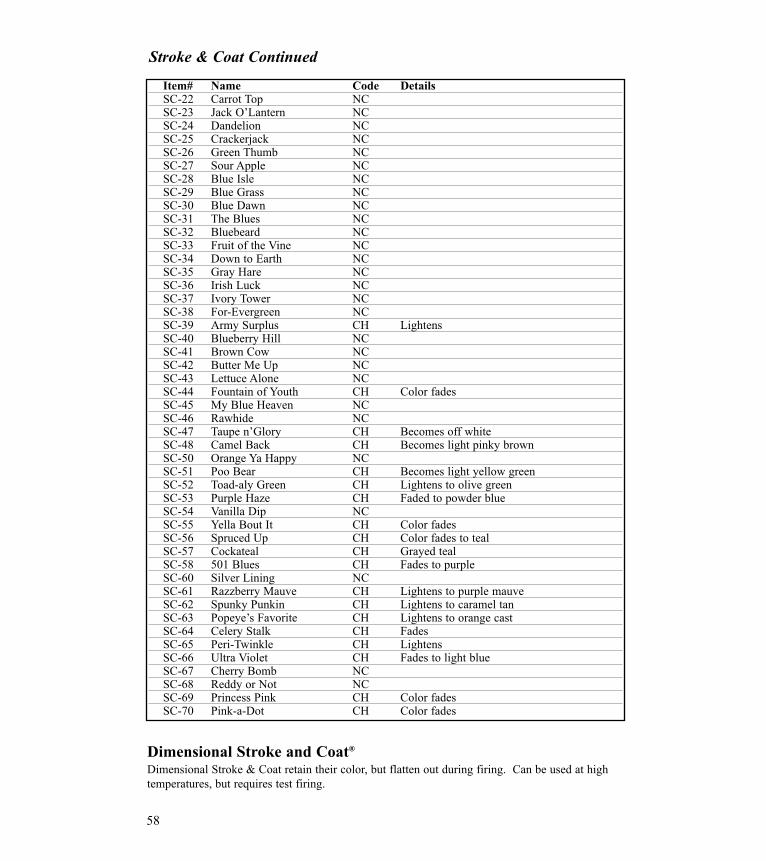
58
Item# Name Code DetailsSC-22 Carrot Top NCSC-23 Jack O’Lantern NCSC-24 Dandelion NCSC-25 Crackerjack NCSC-26 Green Thumb NCSC-27 Sour Apple NCSC-28 Blue Isle NCSC-29 Blue Grass NCSC-30 Blue Dawn NCSC-31 The Blues NCSC-32 Bluebeard NCSC-33 Fruit of the Vine NCSC-34 Down to Earth NCSC-35 Gray Hare NCSC-36 Irish Luck NCSC-37 Ivory Tower NCSC-38 For-Evergreen NCSC-39 Army Surplus CH LightensSC-40 Blueberry Hill NCSC-41 Brown Cow NCSC-42 Butter Me Up NCSC-43 Lettuce Alone NCSC-44 Fountain of Youth CH Color fadesSC-45 My Blue Heaven NCSC-46 Rawhide NCSC-47 Taupe n’Glory CH Becomes off whiteSC-48 Camel Back CH Becomes light pinky brownSC-50 Orange Ya Happy NCSC-51 Poo Bear CH Becomes light yellow greenSC-52 Toad-aly Green CH Lightens to olive greenSC-53 Purple Haze CH Faded to powder blueSC-54 Vanilla Dip NCSC-55 Yella Bout It CH Color fadesSC-56 Spruced Up CH Color fades to tealSC-57 Cockateal CH Grayed tealSC-58 501 Blues CH Fades to purpleSC-60 Silver Lining NCSC-61 Razzberry Mauve CH Lightens to purple mauveSC-62 Spunky Punkin CH Lightens to caramel tanSC-63 Popeye’s Favorite CH Lightens to orange castSC-64 Celery Stalk CH FadesSC-65 Peri-Twinkle CH LightensSC-66 Ultra Violet CH Fades to light blueSC-67 Cherry Bomb NCSC-68 Reddy or Not NCSC-69 Princess Pink CH Color fadesSC-70 Pink-a-Dot CH Color fades
Stroke & Coat Continued
Dimensional Stroke and Coat®
Dimensional Stroke & Coat retain their color, but flatten out during firing. Can be used at hightemperatures, but requires test firing.
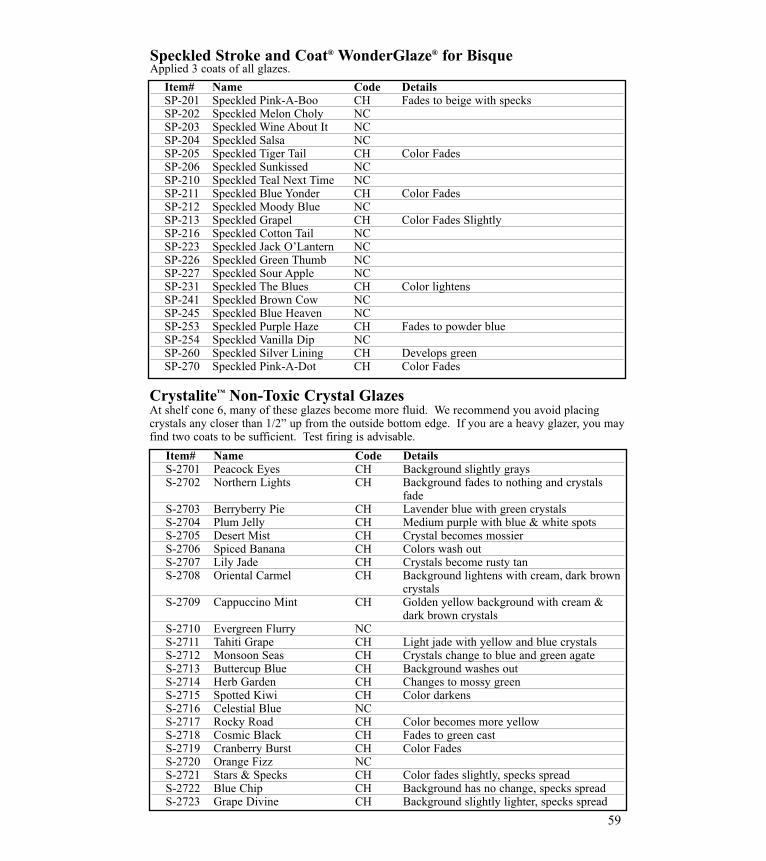
59
Item# Name Code DetailsSP-201 Speckled Pink-A-Boo CH Fades to beige with specksSP-202 Speckled Melon Choly NCSP-203 Speckled Wine About It NCSP-204 Speckled Salsa NCSP-205 Speckled Tiger Tail CH Color FadesSP-206 Speckled Sunkissed NCSP-210 Speckled Teal Next Time NCSP-211 Speckled Blue Yonder CH Color FadesSP-212 Speckled Moody Blue NCSP-213 Speckled Grapel CH Color Fades SlightlySP-216 Speckled Cotton Tail NCSP-223 Speckled Jack O’Lantern NCSP-226 Speckled Green Thumb NCSP-227 Speckled Sour Apple NCSP-231 Speckled The Blues CH Color lightensSP-241 Speckled Brown Cow NCSP-245 Speckled Blue Heaven NCSP-253 Speckled Purple Haze CH Fades to powder blueSP-254 Speckled Vanilla Dip NCSP-260 Speckled Silver Lining CH Develops greenSP-270 Speckled Pink-A-Dot CH Color Fades
Item# Name Code DetailsS-2701 Peacock Eyes CH Background slightly graysS-2702 Northern Lights CH Background fades to nothing and crystals
fadeS-2703 Berryberry Pie CH Lavender blue with green crystalsS-2704 Plum Jelly CH Medium purple with blue & white spotsS-2705 Desert Mist CH Crystal becomes mossierS-2706 Spiced Banana CH Colors wash outS-2707 Lily Jade CH Crystals become rusty tanS-2708 Oriental Carmel CH Background lightens with cream, dark brown
crystalsS-2709 Cappuccino Mint CH Golden yellow background with cream &
dark brown crystalsS-2710 Evergreen Flurry NCS-2711 Tahiti Grape CH Light jade with yellow and blue crystalsS-2712 Monsoon Seas CH Crystals change to blue and green agateS-2713 Buttercup Blue CH Background washes outS-2714 Herb Garden CH Changes to mossy greenS-2715 Spotted Kiwi CH Color darkensS-2716 Celestial Blue NCS-2717 Rocky Road CH Color becomes more yellowS-2718 Cosmic Black CH Fades to green castS-2719 Cranberry Burst CH Color FadesS-2720 Orange Fizz NCS-2721 Stars & Specks CH Color fades slightly, specks spreadS-2722 Blue Chip CH Background has no change, specks spreadS-2723 Grape Divine CH Background slightly lighter, specks spread
Speckled Stroke and Coat® WonderGlaze® for BisqueApplied 3 coats of all glazes.
Crystalite™ Non-Toxic Crystal GlazesAt shelf cone 6, many of these glazes become more fluid. We recommend you avoid placingcrystals any closer than 1/2” up from the outside bottom edge. If you are a heavy glazer, you mayfind two coats to be sufficient. Test firing is advisable.
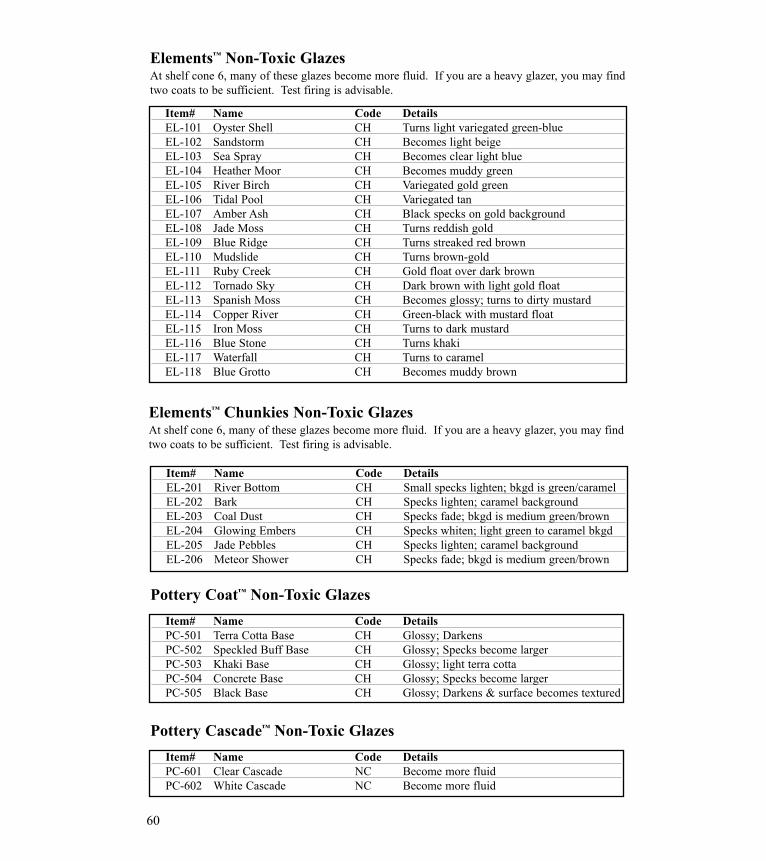
60
Item# Name Code DetailsEL-101 Oyster Shell CH Turns light variegated green-blueEL-102 Sandstorm CH Becomes light beigeEL-103 Sea Spray CH Becomes clear light blueEL-104 Heather Moor CH Becomes muddy greenEL-105 River Birch CH Variegated gold greenEL-106 Tidal Pool CH Variegated tanEL-107 Amber Ash CH Black specks on gold backgroundEL-108 Jade Moss CH Turns reddish goldEL-109 Blue Ridge CH Turns streaked red brownEL-110 Mudslide CH Turns brown-goldEL-111 Ruby Creek CH Gold float over dark brownEL-112 Tornado Sky CH Dark brown with light gold floatEL-113 Spanish Moss CH Becomes glossy; turns to dirty mustardEL-114 Copper River CH Green-black with mustard floatEL-115 Iron Moss CH Turns to dark mustardEL-116 Blue Stone CH Turns khakiEL-117 Waterfall CH Turns to caramelEL-118 Blue Grotto CH Becomes muddy brown
Item# Name Code DetailsEL-201 River Bottom CH Small specks lighten; bkgd is green/caramelEL-202 Bark CH Specks lighten; caramel backgroundEL-203 Coal Dust CH Specks fade; bkgd is medium green/brownEL-204 Glowing Embers CH Specks whiten; light green to caramel bkgdEL-205 Jade Pebbles CH Specks lighten; caramel backgroundEL-206 Meteor Shower CH Specks fade; bkgd is medium green/brown
Elements™ Non-Toxic GlazesAt shelf cone 6, many of these glazes become more fluid. If you are a heavy glazer, you may findtwo coats to be sufficient. Test firing is advisable.
Elements™ Chunkies Non-Toxic GlazesAt shelf cone 6, many of these glazes become more fluid. If you are a heavy glazer, you may findtwo coats to be sufficient. Test firing is advisable.
Item# Name Code DetailsPC-501 Terra Cotta Base CH Glossy; DarkensPC-502 Speckled Buff Base CH Glossy; Specks become largerPC-503 Khaki Base CH Glossy; light terra cottaPC-504 Concrete Base CH Glossy; Specks become largerPC-505 Black Base CH Glossy; Darkens & surface becomes textured
Pottery Coat™ Non-Toxic Glazes
Item# Name Code DetailsPC-601 Clear Cascade NC Become more fluidPC-602 White Cascade NC Become more fluid
Pottery Cascade™ Non-Toxic Glazes
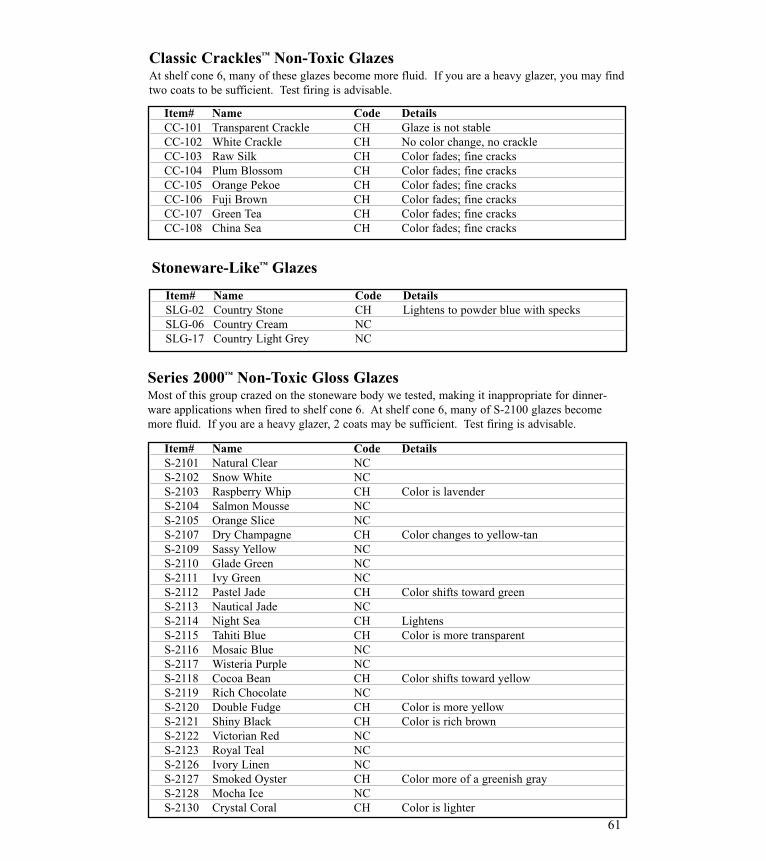
61
Item# Name Code DetailsS-2101 Natural Clear NCS-2102 Snow White NCS-2103 Raspberry Whip CH Color is lavenderS-2104 Salmon Mousse NCS-2105 Orange Slice NCS-2107 Dry Champagne CH Color changes to yellow-tanS-2109 Sassy Yellow NCS-2110 Glade Green NCS-2111 Ivy Green NCS-2112 Pastel Jade CH Color shifts toward greenS-2113 Nautical Jade NCS-2114 Night Sea CH LightensS-2115 Tahiti Blue CH Color is more transparentS-2116 Mosaic Blue NCS-2117 Wisteria Purple NCS-2118 Cocoa Bean CH Color shifts toward yellowS-2119 Rich Chocolate NCS-2120 Double Fudge CH Color is more yellowS-2121 Shiny Black CH Color is rich brownS-2122 Victorian Red NCS-2123 Royal Teal NCS-2126 Ivory Linen NCS-2127 Smoked Oyster CH Color more of a greenish grayS-2128 Mocha Ice NCS-2130 Crystal Coral CH Color is lighter
Series 2000™ Non-Toxic Gloss GlazesMost of this group crazed on the stoneware body we tested, making it inappropriate for dinner-ware applications when fired to shelf cone 6. At shelf cone 6, many of S-2100 glazes becomemore fluid. If you are a heavy glazer, 2 coats may be sufficient. Test firing is advisable.
Item# Name Code DetailsCC-101 Transparent Crackle CH Glaze is not stableCC-102 White Crackle CH No color change, no crackleCC-103 Raw Silk CH Color fades; fine cracksCC-104 Plum Blossom CH Color fades; fine cracksCC-105 Orange Pekoe CH Color fades; fine cracksCC-106 Fuji Brown CH Color fades; fine cracksCC-107 Green Tea CH Color fades; fine cracksCC-108 China Sea CH Color fades; fine cracks
Classic Crackles™ Non-Toxic GlazesAt shelf cone 6, many of these glazes become more fluid. If you are a heavy glazer, you may findtwo coats to be sufficient. Test firing is advisable.
Item# Name Code DetailsSLG-02 Country Stone CH Lightens to powder blue with specksSLG-06 Country Cream NCSLG-17 Country Light Grey NC
Stoneware-Like™ Glazes
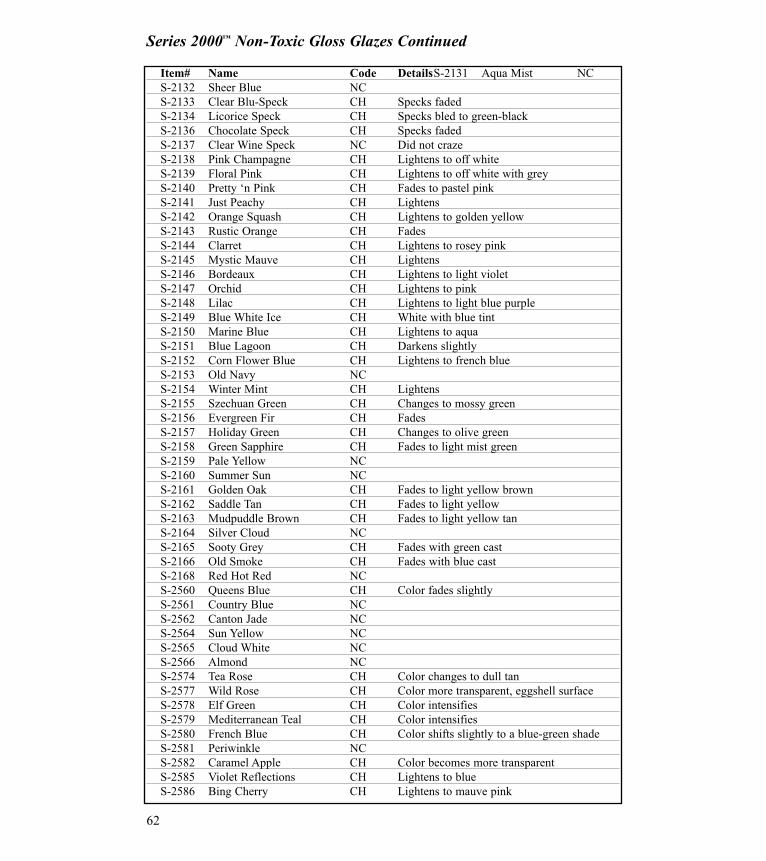
62
Item# Name Code DetailsS-2131 Aqua Mist NCS-2132 Sheer Blue NCS-2133 Clear Blu-Speck CH Specks fadedS-2134 Licorice Speck CH Specks bled to green-blackS-2136 Chocolate Speck CH Specks fadedS-2137 Clear Wine Speck NC Did not crazeS-2138 Pink Champagne CH Lightens to off whiteS-2139 Floral Pink CH Lightens to off white with greyS-2140 Pretty ‘n Pink CH Fades to pastel pinkS-2141 Just Peachy CH LightensS-2142 Orange Squash CH Lightens to golden yellowS-2143 Rustic Orange CH FadesS-2144 Clarret CH Lightens to rosey pinkS-2145 Mystic Mauve CH LightensS-2146 Bordeaux CH Lightens to light violetS-2147 Orchid CH Lightens to pinkS-2148 Lilac CH Lightens to light blue purpleS-2149 Blue White Ice CH White with blue tintS-2150 Marine Blue CH Lightens to aquaS-2151 Blue Lagoon CH Darkens slightlyS-2152 Corn Flower Blue CH Lightens to french blueS-2153 Old Navy NCS-2154 Winter Mint CH LightensS-2155 Szechuan Green CH Changes to mossy greenS-2156 Evergreen Fir CH FadesS-2157 Holiday Green CH Changes to olive greenS-2158 Green Sapphire CH Fades to light mist greenS-2159 Pale Yellow NCS-2160 Summer Sun NCS-2161 Golden Oak CH Fades to light yellow brownS-2162 Saddle Tan CH Fades to light yellowS-2163 Mudpuddle Brown CH Fades to light yellow tanS-2164 Silver Cloud NCS-2165 Sooty Grey CH Fades with green castS-2166 Old Smoke CH Fades with blue castS-2168 Red Hot Red NCS-2560 Queens Blue CH Color fades slightlyS-2561 Country Blue NCS-2562 Canton Jade NCS-2564 Sun Yellow NCS-2565 Cloud White NCS-2566 Almond NCS-2574 Tea Rose CH Color changes to dull tanS-2577 Wild Rose CH Color more transparent, eggshell surfaceS-2578 Elf Green CH Color intensifiesS-2579 Mediterranean Teal CH Color intensifiesS-2580 French Blue CH Color shifts slightly to a blue-green shadeS-2581 Periwinkle NCS-2582 Caramel Apple CH Color becomes more transparentS-2585 Violet Reflections CH Lightens to blueS-2586 Bing Cherry CH Lightens to mauve pink
Series 2000™ Non-Toxic Gloss Glazes Continued

63
Item# Name Code DetailsS-2401 Cotton Seed CH Glaze is glossy, color fades, no speckS-2402 Peppercorn CH Glaze is glossy, color fades, no speckS-2408 Cream Spice CH Color and speck fadeS-2421 Berry Parfait CH Changes to lavender S-2422 Evergreen Ash CH Color becomes brighter, more intenseS-2423 Teal Splash CH Color becomes brighter, more intenseS-2424 Blue Enamelware CH Color shifts to blue-green S-2425 Pepperwinkle CH Color darkens, specks more predominantS-2427 Fiesta NCS-2167 Holliberri NCS-2169 Eggnog NC
Series 2000™ Non-Toxic Specstone Glazes
Item# Name Code DetailsS-2200 Marshmallow White CH Color is grayerS-2201 Ivory Cream CH Color is grayerS-2208 Deep Sea Blue CH Color is darkerS-2209 Black Velvet CH Color is a good gloss blackS-2218 Milk Chocolate CH Color turns light brownS-2220 Autumn Orange CH Becomes glossyS-2221 Pumpkin Tart CH Becomes glossyS-2223 Soft Yellow CH Becomes pale yellow to creamS-2224 Coral CH Becomes more translucentS-2225 Red NCS-2226 Rose Berry CH Color fades awayS-2227 Parchment Pink CH Very light tanS-2228 Orchid CH Light PinkS-2229 Violet CH Becomes blue-purpleS-2230 Deep Purple CH Powder blueS-2231 English Blue CH Color lightensS-2232 Indigo Blue NCS-2233 Light Olive CH Color lightens slightlyS-2234 Clover Green NCS-2235 Dark Sage CH Lighten to mint greenS-2236 Tan CH Very light tanS-2237 Taupe CH Changes to medium tanS-2238 Dark Gray CH Changes to light brownS-2239 Slate CH Lightens to greenish grey
Series 2000™ Non-Toxic Matte GlazesAll glazes in this group become glossy and translucent at shelf cone 6.
Series 2000™ Non-Toxic Gloss Glazes Continued
Item# Name Code DetailsS-2587 Big Sky Blue CH Slightly graysS-2588 True Blue CH Slightly graysS-2589 Bear Brown CH LightensS-2590 Intense Yellow CH Fades to light lemon yellowS-2591 New Leaf CH LightensS-2592 Deep Teal NCS-2593 Jungle Green NC

64
One Stroke™ Translucent UnderglazesAll One Stroke colors were top coated with C-101 Crystal Clear Glaze.
Item# Name Code DetailsOS-1 Mirror Black CH Color has a green castOS-2 Snow White NCOS-3 Lip Red CH Fades to a muted pinkOS-4 Chinese Blue NCOS-6 Foliage Green NCOS-8 Briarwood NCOS-9 Auburn NCOS-17 Pearl Gray NCOS-18 Princess Blue NCOS-21 Petal Pink NCOS-26 Buttercup NCOS-29 Delft Blue NCOS-32 Shamrock Green CH Color becomes slightly darkerOS-34 Sienna Brown NCOS-36 Umber NCOS-38 Yuma Turquoise NCOS-41 Real Holly NCOS-43 Catalina Blue CH Color becomes darkerOS-44 Dark Red CH Becomes more intenseOS-45 Ultra Orange CH Becomes more intenseOS-46 Bright Red CH Becomes more intenseOS-47 Purple NCOS-48 Leaf Green NCOS-52 Passion Plum CH Color changes to a light blueOS-53 Melon Blush NCOS-54 Southern Peach CH Color changes to a tan with hint of pinkOS-58 Loganberry CH Color unstable; performs better under S-2101
Natural Clear OS-59 Sunflower NCOS-60 Pansy Petal CH Color changes to blue grayOS-61 Azure Blue NCOS-62 Lime Green NCOS-63 Basil Green NCOS-65 Red Earth NCOS-66 Taupe CH LightensOS-104 Sun Yellow NCOS-105 Golden Ochre CH LightensOS-132 Chestnut Brown NCOS-136 Lavender CH Lightens to pinkish toneOS-137 Thistle Purple CH Light blueOS-138 Rose CH Lightens to tanOS-140 Jade Green NCOS-142 Hunter Green NCOS-143 Fleshtone CH LightensOS-144 Golden Buckskin NCOS-147 Powder Blue NCOS-153 Denim Blue CH Lightens

65
Item# Name Code DetailsUG-1 Kings Blue CH Color becomes darkerUG-2 Sea Blue CH Color becomes weakerUG-3 Baby Blue NCUG-7 Purple CH Color becomes a dull blue-grayUG-8 Violet CH Color fades to a light blue-grayUG-10 Crimson CH Color fadesUG-11 Ruby Red CH Color fadesUG-12 Deep Rose CH Color fadesUG-15 Coral Pink NCUG-17 Sandalwood NCUG-18 Ice Blue NCUG-19 Electra Blue NCUG-21 Leaf Green CH Becomes a dull olive greenUG-22 Spring Green CH Fades & turns green-brownUG-24 Jade Green CH Color fadesUG-25 Lime NCUG-26 Myrtle Green CH Becomes deeper blue-greenUG-27 Pomona Green NCUG-30 Sand CH Changes to dark tanUG-31 Chocolate NCUG-32 Cocoa CH Color fadesUG-33 Redwood CH Changes to dark yellow-brownUG-34 Chestnut Brown NCUG-35 Carnation Pink CH Color disappearsUG-37 Suntan CH Color darkens slightlyUG-38 Pink Flesh CH Color disappearsUG-39 Light Flesh CH Becomes dull yellowUG-41 Orange NCUG-42 Light Yellow NCUG-43 Lemon Yellow CH Becomes slightly orangeUG-45 Golden Yellow CH Color fadesUG-46 Bright Yellow NCUG-50 Jet Black CH Color becomes dark brownUG-51 China White NCUG-52 Pepper Grey CH Color fadesUG-53 Silver Grey CH Color becomes blue-gray with blue specksUG-56 Rustic Red CH Color fades to a light tanUG-57 Spice Brown NCUG-58 Harvest Gold NCUG-67 Ivory NCUG-68 Apple Green NCUG-69 Green Olive CH Sandy beigeUG-70 Medium Green CH Color shifts toward yellowUG-71 Wisteria NCUG-72 Wedgewood Blue NCUG-73 Cobalt Black NCUG-75 Peach CH Becomes a faint yellow
Opaque UnderglazesAll Underglazes were painted on greenware, then covered with two coats of C-101 Crystal ClearGlaze.

66
Item# Name Code DetailsUG-78 Desert Coral CH Soft tanUG-80 Slate Blue CH Color becomes a deeper blueUG-81 Cottage Brown CH Color fades to a dark tanUG-82 Tucson Turquoise NCUG-83 Blue Jade NCUG-84 Deep Red CH Color becomes more vibrantUG-85 Orange Sorbet CH Color becomes more vibrantUG-86 Coral Red CH Color becomes more vibrantUG-87 Regal Purple CH Color fades slightlyUG-89 Lemon Drop CH Color fades slightlyUG-90 Green Mist CH Color fades slightlyUG-91 True Teal NCUG-92 Lilac CH Color becomes very light pinkUG-93 Wild Violet CH Color becomes pale blueUG-94 Pansy Purple CH Color becomes a gray blueUG-95 Royal Navy NCUG-97 Bright Blue NCUG-98 Desert Toast CH LightensUG-100 Terra Cotta CH Chocolate BrownUG-103 Rose CH Lightens to tanUG-104 Red Garnet CH Loose all colorUG-105 Orchid CH Powder blueUG-108 Alice Blue CH Powder blueUG-109 Powder Blue CH Very light blueUG-110 Capri Blue CH Become teal blueUG-111 Marine Blue NCUG-116 Aqua NCUG-119 Green Grape NCUG-125 Natural Flesh CH LightensUG-127 Nutmeg CH Carmel brownUG-128 Teakwood CH Redish brownUG-130 Hair Brown CH Carmel brownUG-131 White NCUG-136 Pacific Blue NCUG-141 Candy Pink CH Light tanUG-142 Grass Green NCUG-144 Blue Sky NCUG-145 Evergreen CH Olive greenUG-146 Pink Pink CH Becomes tanUG-150 Royal Purple CH Becomes grey blueUG-178 Folk Art Blue NCUG-180 Satin Blue NCUG-181 Cape Cod Grey NCUG-189 Lavender CH Powder blueUG-191 Real Brown CH Carmel brownUG-192 Pearl Grey CH LightensUG-194 Purple Iris CH Becomes light greyUG-195 Ivory Toast NCUG-196 Tropical Blue NCUG-198 Dark Grey NCUG-201 Beach Sand NCUG-202 Walnut Speck CH Becomes carmel brown
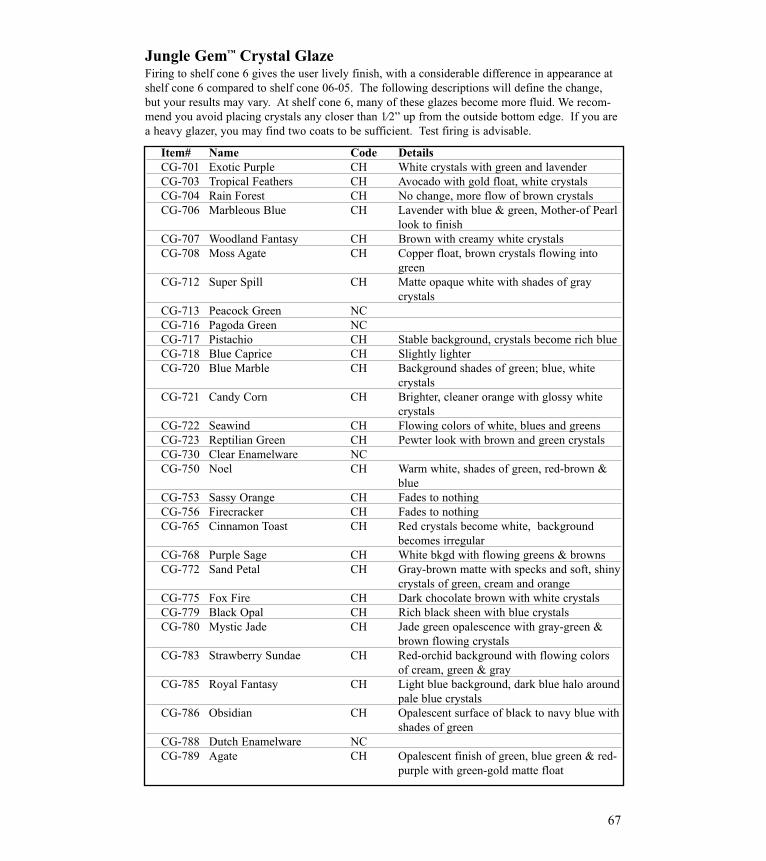
67
Jungle Gem™ Crystal GlazeFiring to shelf cone 6 gives the user lively finish, with a considerable difference in appearance atshelf cone 6 compared to shelf cone 06-05. The following descriptions will define the change,but your results may vary. At shelf cone 6, many of these glazes become more fluid. We recom-mend you avoid placing crystals any closer than 1⁄2” up from the outside bottom edge. If you area heavy glazer, you may find two coats to be sufficient. Test firing is advisable.
Item# Name Code DetailsCG-701 Exotic Purple CH White crystals with green and lavenderCG-703 Tropical Feathers CH Avocado with gold float, white crystalsCG-704 Rain Forest CH No change, more flow of brown crystalsCG-706 Marbleous Blue CH Lavender with blue & green, Mother-of Pearl
look to finishCG-707 Woodland Fantasy CH Brown with creamy white crystalsCG-708 Moss Agate CH Copper float, brown crystals flowing into
greenCG-712 Super Spill CH Matte opaque white with shades of gray
crystalsCG-713 Peacock Green NCCG-716 Pagoda Green NCCG-717 Pistachio CH Stable background, crystals become rich blueCG-718 Blue Caprice CH Slightly lighter CG-720 Blue Marble CH Background shades of green; blue, white
crystalsCG-721 Candy Corn CH Brighter, cleaner orange with glossy white
crystalsCG-722 Seawind CH Flowing colors of white, blues and greensCG-723 Reptilian Green CH Pewter look with brown and green crystalsCG-730 Clear Enamelware NCCG-750 Noel CH Warm white, shades of green, red-brown &
blueCG-753 Sassy Orange CH Fades to nothingCG-756 Firecracker CH Fades to nothingCG-765 Cinnamon Toast CH Red crystals become white, background
becomes irregular CG-768 Purple Sage CH White bkgd with flowing greens & brownsCG-772 Sand Petal CH Gray-brown matte with specks and soft, shiny
crystals of green, cream and orangeCG-775 Fox Fire CH Dark chocolate brown with white crystalsCG-779 Black Opal CH Rich black sheen with blue crystalsCG-780 Mystic Jade CH Jade green opalescence with gray-green &
brown flowing crystalsCG-783 Strawberry Sundae CH Red-orchid background with flowing colors
of cream, green & grayCG-785 Royal Fantasy CH Light blue background, dark blue halo around
pale blue crystalsCG-786 Obsidian CH Opalescent surface of black to navy blue with
shades of greenCG-788 Dutch Enamelware NCCG-789 Agate CH Opalescent finish of green, blue green & red-
purple with green-gold matte float

68
Item# Name Code DetailsCG-790 Autumn Feathers CH Fluid gold background with flowing brown
shades & gold floatCG-793 Beach Pebbles CH Taupe background with greenish brown to
deep taupe, more fluidCG-795 Yadro Print CH Grayish background with flowing colors of
soft greens & taupe to brownsCG-798 Black Iris NCCG-932 Green Agate CH Olive green crystal becomes goldenCG-954 Wildfire CH Loses all colorCG-958 Lagoon Blue CH Wash of navy with dark blue speckCG-961 Evergreen CH Olive green, no crystals
Astro™ Gem Textural GlazesAll Astro Gems glazes will not have the same texture at shelf cone 6; the surface will be smootherand the crystals will spread out more. The following is data concerning the fired color at shelfcone 6 as compared to normal shelf cone 04 firing.
Item# Name Code DetailsAS-510 White Opal NCAS-512 Black Diamond NCAS-513 Golden Sand XC The crystal will dominate color, spreading out
over most of the glazed areaAS-515 Coral Sand XC The crystal will look yellow & the back-
ground color will darkenAS-516 Sand Stone NCAS-518 Amethyst XC The color will fade to faint pink and the
crystals leave pitsAS-519 Green Saffire NCAS-520 Aqua Frost NCAS-521 Star Blue NCAS-523 Gray Granite XC Color will become a rich looking brownAS-524 Terra Cotta XC Color becomes red-brownAS-527 Smoky Topaz NCAS-528 Peach Cameo XC The crystal will be light tan and the back-
ground medium tanAS-531 Lapis Blue XC Color becomes a rich navy blueAS-532 Turquoise NCAS-534 Blue Sapphire XC Color becomes a darker shade of blueAS-535 Emerald Green NCAS-539 Gray Quartz XC Color takes on a green castAS-541 Sea-Blue Topaz NCAS-545 Purple Quartz NCAS-547 Ice Blue XC Color remains, crystals become white and
splotchyAS-548 Seafoam Quartz NCAS-551 Peach Frost NC
Jungle Gem™ Crystal Glazes Continued

69
Art GlazesAt shelf cone 6, many of these glazes become more fluid. If you are a heavy glazer, you mayfind two coats to be sufficient. Test firing is advisable.
Item# Name Code DetailsAG-201 Royal Blue NCAG-202 Persian Blue NCAG-203 Flame Blue NCAG-207 Royal Purple CH Color is a medium gray-blueAG-210 Burgundy CH Color resembles AG-216AG-213 Blossom Pink CH Glaze becomes clearAG-214 Tropical Rose CH Color fades to a light lavenderAG-216 Orchid Bouquet NCAG-224 Aztec Jade CH Color takes on a bluer castAG-226 Olive Green CH Color takes on a yellow castAG-240 Root Beer CH Yellowish brownAG-241 Mango Orange CH Glaze is matte and fadedAG-242 Canary Yellow NCAG-243 Golden Rod CH Fades to very faint yellowAG-244 Brown Sugar CH Light yellow brownAG-251 Black Beauty NCAG-252 Danish Blue Ice CH Light greyAG-253 Twilight Grey NCAG-254 Celadon NCAG-256 Peach NCAG-257 Baby Blue NCAG-258 Cobalt Glass NCAG-259 Mesa Mauve CH Color fades slightlyAG-261 Santa Fe Turquoise NCAG-263 Purple Iris CH Color becomes a grayed purpleAG-264 Silky Plum CH Fades to light pink-purpleAG-266 Spruce Green NCAG-291 Rasberry Ice CH No ColorAG-400 Lustre Green CH Color is comparable to AG-420AG-404 Golden Amber CH Darkens to medium brownAG-405 Pewter CH Glaze is unstable AG-407 Old Pine CH Glaze is matte, color burns away in spotsAG-408 Sirocco Red CH Fades to a lavender pinkAG-410 Black Lustre CH Glaze takes on a blue hueAG-414 Tawny Birch CH Glaze darkensAG-420 Autumn Green CH Color looks like Terra CottaAG-453 Old English CH Color is yellow brownAG-454 Holly Green NCAG-460 Empress White CH Celadon with blue floatAG-461 Honeycomb CH LightensAG-601 White Drape NCAG-605 Gold Filigree CH Must be on thick to look goodAG-610 White Foam CH Flattens out somewhatAG-630 Opaque White NC
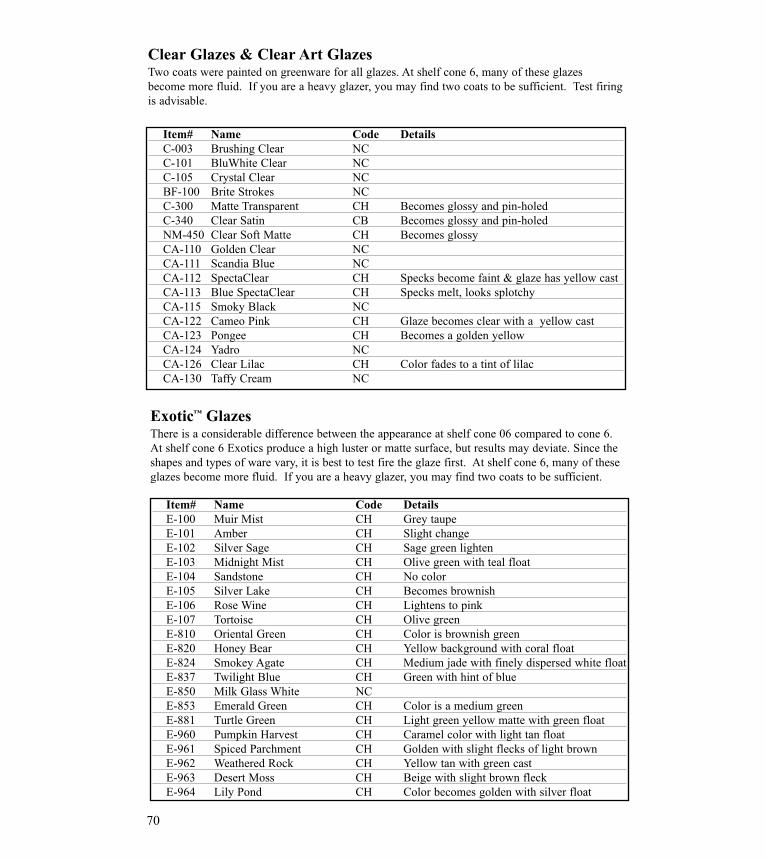
70
Clear Glazes & Clear Art GlazesTwo coats were painted on greenware for all glazes. At shelf cone 6, many of these glazesbecome more fluid. If you are a heavy glazer, you may find two coats to be sufficient. Test firingis advisable.
Item# Name Code DetailsC-003 Brushing Clear NCC-101 BluWhite Clear NCC-105 Crystal Clear NCBF-100 Brite Strokes NCC-300 Matte Transparent CH Becomes glossy and pin-holedC-340 Clear Satin CB Becomes glossy and pin-holedNM-450 Clear Soft Matte CH Becomes glossyCA-110 Golden Clear NCCA-111 Scandia Blue NCCA-112 SpectaClear CH Specks become faint & glaze has yellow castCA-113 Blue SpectaClear CH Specks melt, looks splotchyCA-115 Smoky Black NCCA-122 Cameo Pink CH Glaze becomes clear with a yellow castCA-123 Pongee CH Becomes a golden yellowCA-124 Yadro NCCA-126 Clear Lilac CH Color fades to a tint of lilacCA-130 Taffy Cream NC
Exotic™ GlazesThere is a considerable difference between the appearance at shelf cone 06 compared to cone 6.At shelf cone 6 Exotics produce a high luster or matte surface, but results may deviate. Since theshapes and types of ware vary, it is best to test fire the glaze first. At shelf cone 6, many of theseglazes become more fluid. If you are a heavy glazer, you may find two coats to be sufficient.
Item# Name Code DetailsE-100 Muir Mist CH Grey taupeE-101 Amber CH Slight changeE-102 Silver Sage CH Sage green lightenE-103 Midnight Mist CH Olive green with teal floatE-104 Sandstone CH No colorE-105 Silver Lake CH Becomes brownishE-106 Rose Wine CH Lightens to pinkE-107 Tortoise CH Olive greenE-810 Oriental Green CH Color is brownish greenE-820 Honey Bear CH Yellow background with coral floatE-824 Smokey Agate CH Medium jade with finely dispersed white floatE-837 Twilight Blue CH Green with hint of blueE-850 Milk Glass White NCE-853 Emerald Green CH Color is a medium greenE-881 Turtle Green CH Light green yellow matte with green floatE-960 Pumpkin Harvest CH Caramel color with light tan floatE-961 Spiced Parchment CH Golden with slight flecks of light brownE-962 Weathered Rock CH Yellow tan with green castE-963 Desert Moss CH Beige with slight brown fleckE-964 Lily Pond CH Color becomes golden with silver float

71
Item# Name Code DetailsE-965 Evening Sage CH Washes out to moss greenE-966 Frosted Emerald CH Sage green with brown, more matteE-967 Mottled Aqua CH Becomes ivoryE-968 Mountain Mist CH Medium green with tan floatE-969 Brownstone CH Mottled medium brownE-970 Heavy Metal CH Blackened oliveE-971 Brimstone CH Mottled cinnamon brownE-944 Taffy CH Color is light yellow; glaze did not crackle
Jungle Gem™ Crystal Glazes Continued

72