Embed Size (px)
Citation preview
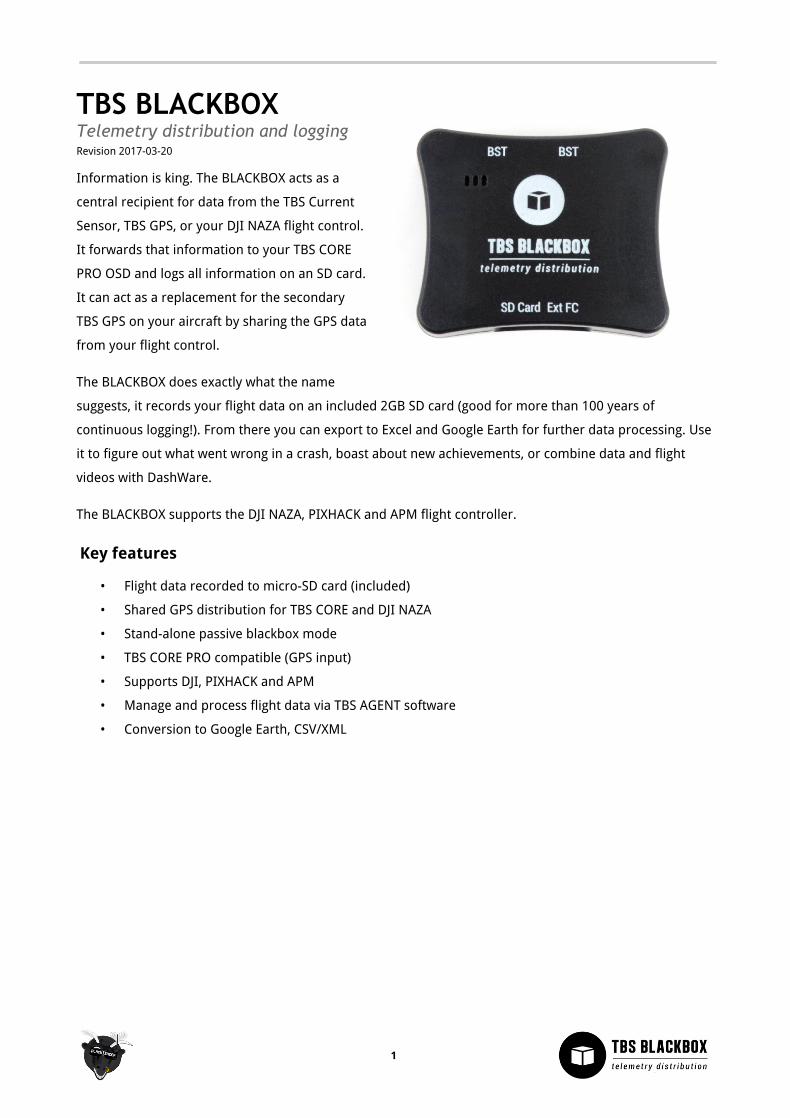
TBS BLACKBOX Telemetry distribution and logging Revision 2017-03-20
Information is king. The BLACKBOX acts as a
central recipient for data from the TBS Current
Sensor, TBS GPS, or your DJI NAZA flight control.
It forwards that information to your TBS CORE
PRO OSD and logs all information on an SD card.
It can act as a replacement for the secondary
TBS GPS on your aircraft by sharing the GPS data
from your flight control.
The BLACKBOX does exactly what the name
suggests, it records your flight data on an included 2GB SD card (good for more than 100 years of
continuous logging!). From there you can export to Excel and Google Earth for further data processing. Use
it to figure out what went wrong in a crash, boast about new achievements, or combine data and flight
videos with DashWare.
The BLACKBOX supports the DJI NAZA, PIXHACK and APM flight controller.
Key features
• Flight data recorded to micro-SD card (included)
• Shared GPS distribution for TBS CORE and DJI NAZA
• Stand-alone passive blackbox mode
• TBS CORE PRO compatible (GPS input)
• Supports DJI, PIXHACK and APM
• Manage and process flight data via TBS AGENT software
• Conversion to Google Earth, CSV/XML
1
Table of content Setup 4
SD card 4
Using CORE PRO with DJI GPS puck 4
Using CORE PRO with PIXHACK or APM GPS puck 5
To use with PIXHACK 5
To use with APM 6
Configuring PIXHACK or APM for use with TBS BLACKBOX 6
Configuring for PX4 Software Stack 7
Using BLACKBOX stand-alone 8
Connecting to TBS equipment via BST 9
Using TBS CORE PRO with TBS GPS/COMPASS 9
Managing flight data 11
Installing software 11
Upgrading firmware 11
Importing flight data 11
From SD card 11
Manually loading flight logs 12
Changing flight log details 12
Deleting flight log entry 12
Exporting data 12
Compiling Google Earth flight path 12
Exporting to CSV/XML 13
Move flight log directory 13
Telemetry data points 14
Good practices 15
2
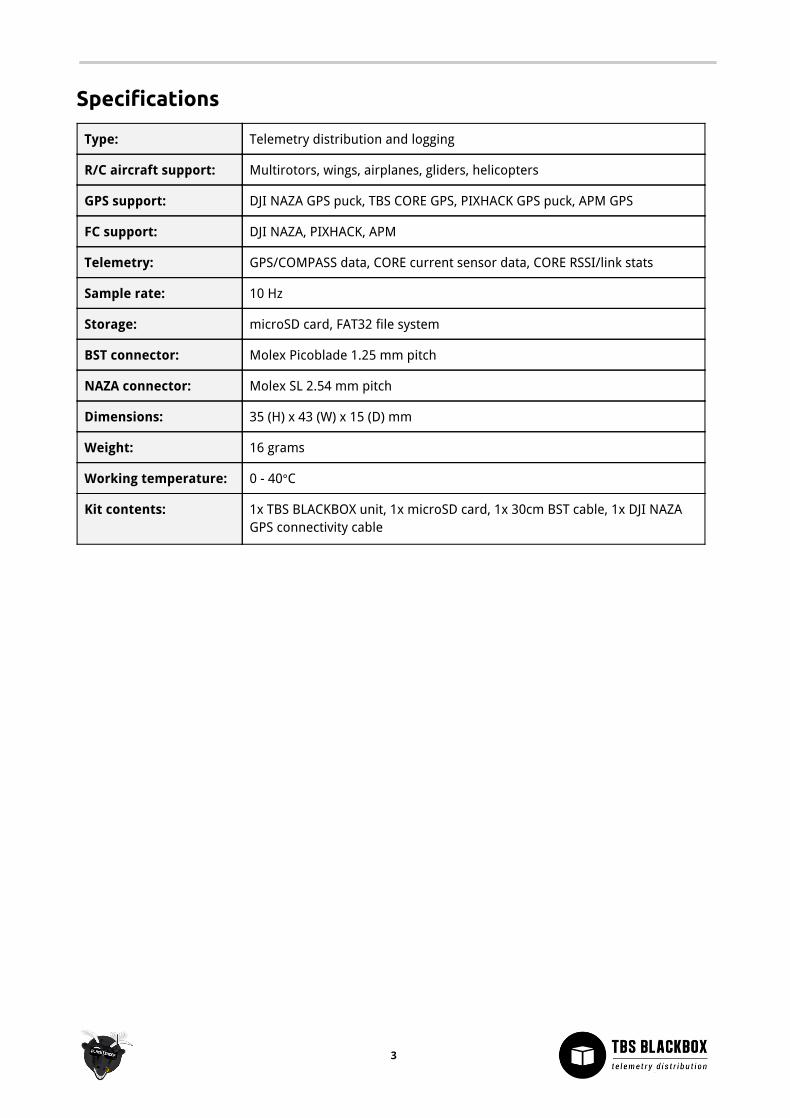
Specifications
Type: Telemetry distribution and logging
R/C aircraft support: Multirotors, wings, airplanes, gliders, helicopters
GPS support: DJI NAZA GPS puck, TBS CORE GPS, PIXHACK GPS puck, APM GPS
FC support: DJI NAZA, PIXHACK, APM
Telemetry: GPS/COMPASS data, CORE current sensor data, CORE RSSI/link stats
Sample rate: 10 Hz
Storage: microSD card, FAT32 file system
BST connector: Molex Picoblade 1.25 mm pitch
NAZA connector: Molex SL 2.54 mm pitch
Dimensions: 35 (H) x 43 (W) x 15 (D) mm
Weight: 16 grams
Working temperature: 0 - 40°C
Kit contents: 1x TBS BLACKBOX unit, 1x microSD card, 1x 30cm BST cable, 1x DJI NAZA GPS connectivity cable
3

Setup Getting set up and ready to record telemetry data is a quick and easy task. Setting up the unit is plug&play.
SD card
Use the provided SD card or use any microSD card,
formatted with FAT32 file system. A 2 GB card can hold
approx. 50k flight logs. The logs will be time stamped
using GPS time data.
The card can be ejected/inserted by pressing the
spring-loaded push-push holder on front of the unit.
The SD card leads should face up while inserting it.
After powerup, a red light on top of the BLACKBOX indicates a missing or faulty SD card. Green light,
everything is OK.
Using CORE PRO with DJI GPS puck
For multirotors, it is possible to use the BLACKBOX to act as an intermediary in place of a secondary TBS
GPS/COMPASS on your aircraft, by sharing the GPS data from your flight control, e.g. DJI NAZA GPS puck or
PIXHACK GPS.
Put the provided DJI NAZA GPS connectivity cable between the DJI NAZA GPS puck and DJI NAZA flight
control or DJI NAZA PMU. Plug the small connector into the “EXT FC” port on the BLACKBOX unit.
4

Using CORE PRO with PIXHACK or APM GPS puck
The TBS BLACKBOX can also be used alongside a CORE PRO as well as PIXHACK or APM autopilot so that it
may use the GPS data from the PIXHACK or APM GPS.
To use with PIXHACK
Connect the RADIO port on the PIXHACK to the Ext FC port on the TBS BLACKBOX using a custom cable.
The GPS puck connects to the normal GPS port on the PIXHACK.
5

To use with APM
Connect the TELEM port on the APM to the TBS BLACKBOX using a custom cable.
Configuring PIXHACK or APM for use with TBS BLACKBOX
Once the BLACKBOX is connected to the PIXHACK radio port or APM telemetry port, you must connect the
PIXHACK or APM to a computer with the APM Mission Planner software installed. Download the latest
version from http://3drobotics.com/download_software/
Select the “CONFIG/TUNING”-tab, under “Full Parameter Tree”, navigate to “SR1” and click the “+” to
expand the list. Enter the following values into the “SR1_*” parameters.
6

Configuring for PX4 Software Stack
Now, create a folder titled “etc” in the SD card of the FC, create a file called “extras.txt” into the folder,
paste the following data into the file and save it.
mavlink start -d /dev/ttyS2 -b 57600 -m custom
mavlink stream -d /dev/ttyS2 -s HEARTBEAT -r 1
mavlink stream -d /dev/ttyS2 -s ATTITUDE -r 10
mavlink stream -d /dev/ttyS2 -s GLOBAL_POSITION_INT -r 10
mavlink stream -d /dev/ttyS2 -s SYS_STATUS -r 5
mavlink stream -d /dev/ttyS2 -s GPS_RAW_INT -r 1
mavlink stream -d /dev/ttyS2 -s SYSTEM_TIME -r 1
mavlink stream -d /dev/ttyS2 -s LOCAL_POSITION_NED -r 0
mavlink stream -d /dev/ttyS2 -s GPS_GLOBAL_ORIGIN -r 0
mavlink stream -d /dev/ttyS2 -s VFR_HUD -r 0
mavlink stream -d /dev/ttyS2 -s ATTITUDE_TARGET -r 0
mavlink stream -d /dev/ttyS2 -s POSITION_TARGET_GLOBAL_INT -r 0
mavlink stream -d /dev/ttyS2 -s HIGHRES_IMU -r 0
7
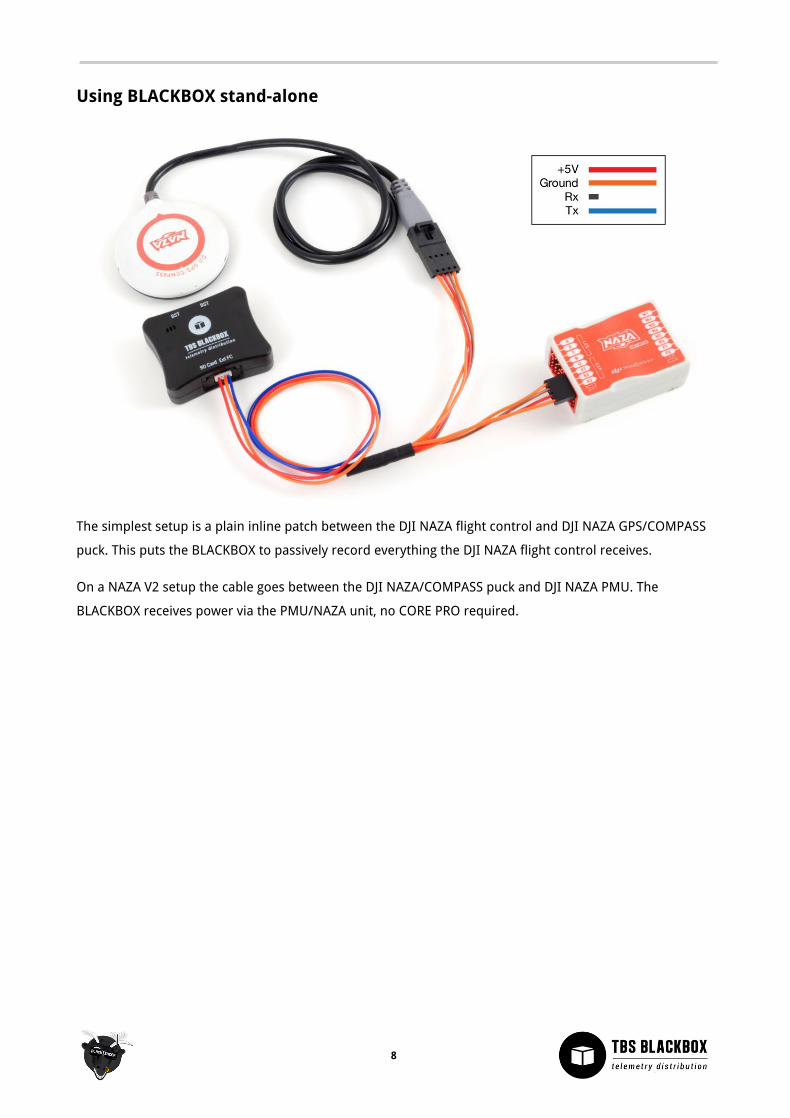
Using BLACKBOX stand-alone
The simplest setup is a plain inline patch between the DJI NAZA flight control and DJI NAZA GPS/COMPASS
puck. This puts the BLACKBOX to passively record everything the DJI NAZA flight control receives.
On a NAZA V2 setup the cable goes between the DJI NAZA/COMPASS puck and DJI NAZA PMU. The
BLACKBOX receives power via the PMU/NAZA unit, no CORE PRO required.
8

Connecting to TBS equipment via BST There is an issue when you want to run BST devices like the GPS or BLACKBOX direct without a CORE PRO.
Most of the BST devices needs 5V which the CORE PRO provides. The CROSSFIRE RX does not power the
BST line when 5V is applied to the servo connectors.
The following explains the required power needs:
● TBS BLACKBOX - Can be powered by the BST 5V or by the Flight Controller over the ext. FC port
● TBS GPS - Can only be powered by the BST 5V
● TBS CURRENT SENSOR - Provides VBatt but needs BST 5V to run itself
● TBS CROSSFIRE RX - Can be powered over one of the eight servo connectors or by BST 5V
● TBS CORE PRO / FPVISION - This is only device is providing 5V on the BST line
Power type: BST 5V VBATT ESC BEC 5V FC 5V
TBS CROSSFIRE ✔ PWR IN ✔ PWR IN
TBS BLACKBOX ✔ PWR IN ✔ PWR IN
TBS GPS ✔ PWR IN
TBS CORE PRO / FPVISION ✔ PWR OUT ✔ PWR IN
TBS CURRENT SENSOR ✔ PWR IN ✔ PWR OUT
TBS BULLETPROOF ESC (SET) ✔ PWR OUT
9
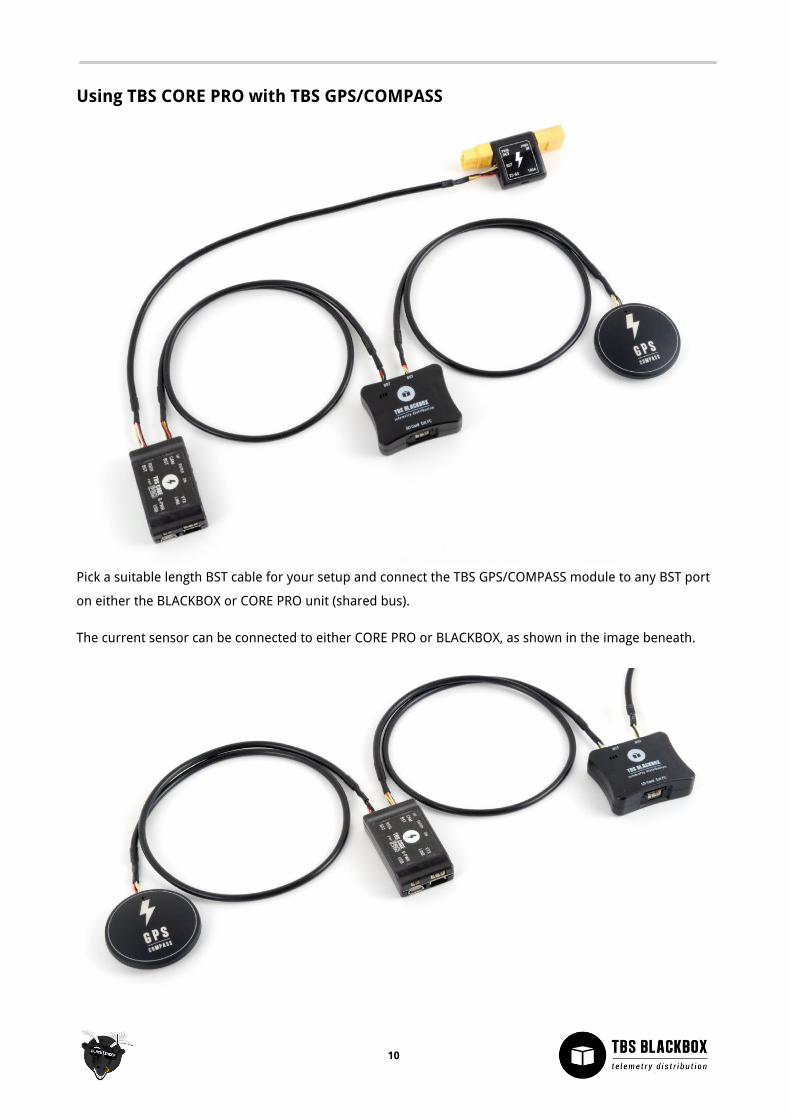
Using TBS CORE PRO with TBS GPS/COMPASS
Pick a suitable length BST cable for your setup and connect the TBS GPS/COMPASS module to any BST port
on either the BLACKBOX or CORE PRO unit (shared bus).
The current sensor can be connected to either CORE PRO or BLACKBOX, as shown in the image beneath.
10
Managing flight data
Installing software
Download the latest version of the TBS AGENT software from http://www.team-blacksheep.com/
corepro/agent (direct link, Windows 7/8, 64-bit). No driver install necessary, all plug&play.
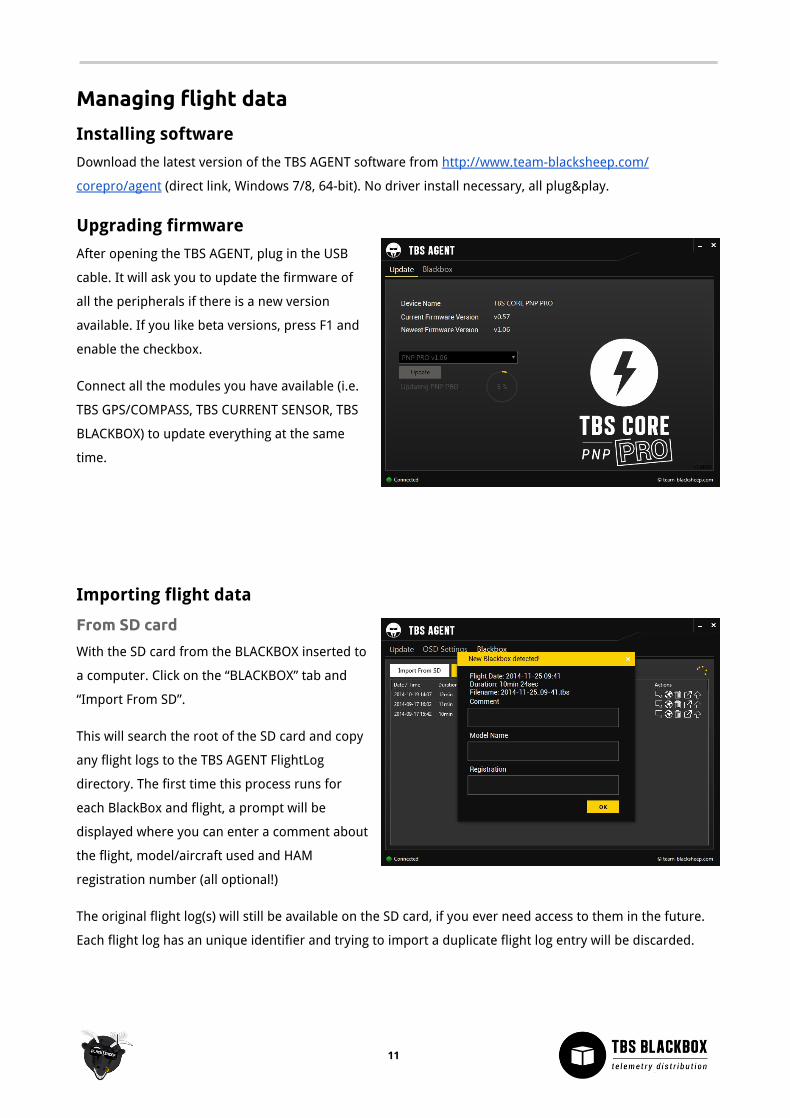
Upgrading firmware
After opening the TBS AGENT, plug in the USB
cable. It will ask you to update the firmware of
all the peripherals if there is a new version
available. If you like beta versions, press F1 and
enable the checkbox.
Connect all the modules you have available (i.e.
TBS GPS/COMPASS, TBS CURRENT SENSOR, TBS
BLACKBOX) to update everything at the same
time.
Importing flight data
From SD card
With the SD card from the BLACKBOX inserted to
a computer. Click on the “BLACKBOX” tab and
“Import From SD”.
This will search the root of the SD card and copy
any flight logs to the TBS AGENT FlightLog
directory. The first time this process runs for
each BlackBox and flight, a prompt will be
displayed where you can enter a comment about
the flight, model/aircraft used and HAM
registration number (all optional!)
The original flight log(s) will still be available on the SD card, if you ever need access to them in the future.
Each flight log has an unique identifier and trying to import a duplicate flight log entry will be discarded.
11
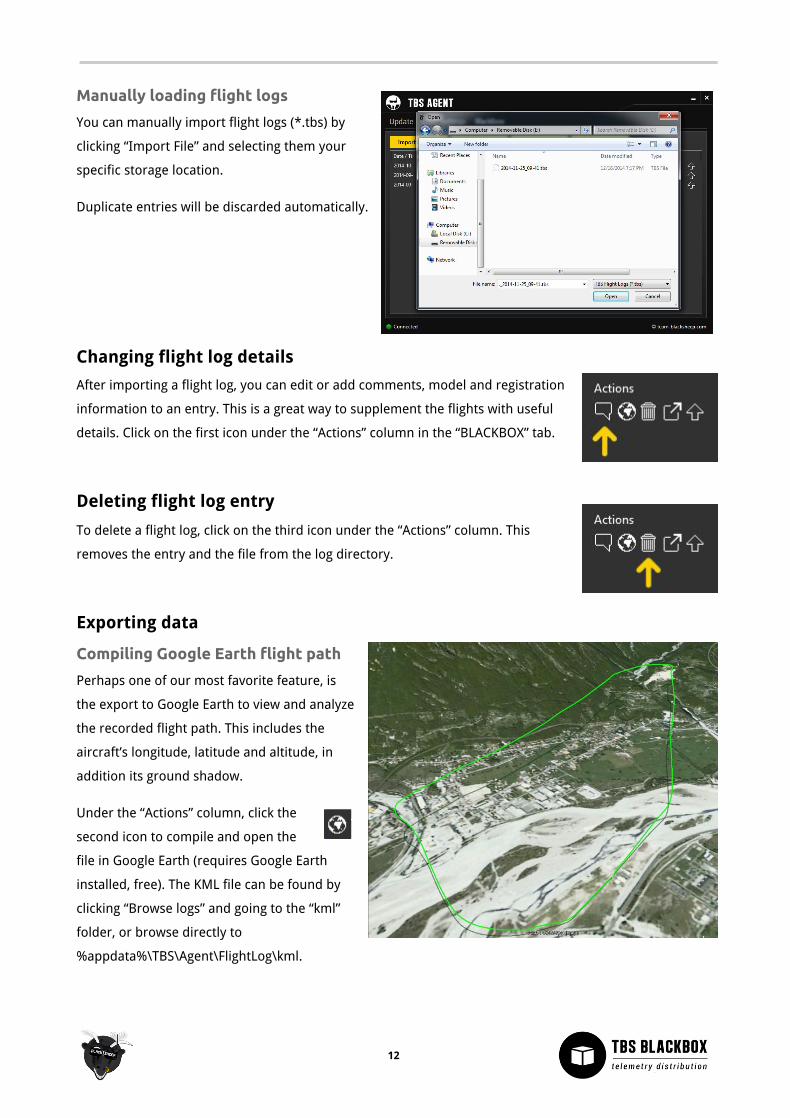
Manually loading flight logs
You can manually import flight logs (*.tbs) by
clicking “Import File” and selecting them your
specific storage location.
Duplicate entries will be discarded automatically.
Changing flight log details
After importing a flight log, you can edit or add comments, model and registration
information to an entry. This is a great way to supplement the flights with useful
details. Click on the first icon under the “Actions” column in the “BLACKBOX” tab.
Deleting flight log entry
To delete a flight log, click on the third icon under the “Actions” column. This
removes the entry and the file from the log directory.
Exporting data
Compiling Google Earth flight path
Perhaps one of our most favorite feature, is
the export to Google Earth to view and analyze
the recorded flight path. This includes the
aircraft’s longitude, latitude and altitude, in
addition its ground shadow.
Under the “Actions” column, click the
second icon to compile and open the
file in Google Earth (requires Google Earth
installed, free). The KML file can be found by
clicking “Browse logs” and going to the “kml”
folder, or browse directly to
%appdata%\TBS\Agent\FlightLog\kml.
12

Exporting to CSV/XML
We believe in portability of your data and made it possible to export to CSV and XML, both open formats.
Use these files for further processing, e.g. in DashWare. These data sets include all available data recorded
in the original flight log.
Under the “Actions” column, click the fourth icon to compile the files. The files can
be found by clicking “Browse logs” and opening the “export” folder, or browse
directly to %appdata%\TBS\Agent\FlightLog\export.
Move flight log directory
To move the current TBS AGENT log folder to an
external drive, Dropbox or archive, click the
“Move Log Folder” tab and select the new
location. All the flight data will be moved to the
new location.
The default location is %APPDATA%\TBS\Agent\.
Periodically make a backup copy of all the flight
logs to avoid losing your flight logs in case of a
drive failure or OS reinstall.
13
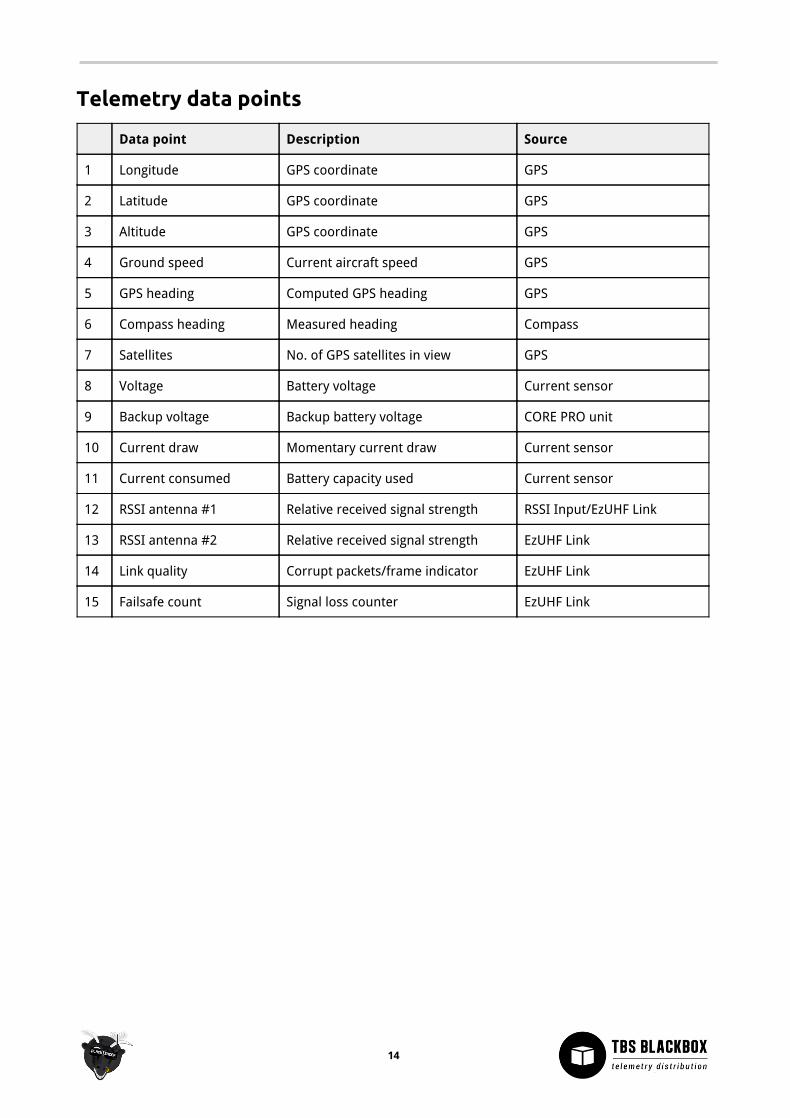
Telemetry data points
Data point Description Source
1 Longitude GPS coordinate GPS
2 Latitude GPS coordinate GPS
3 Altitude GPS coordinate GPS
4 Ground speed Current aircraft speed GPS
5 GPS heading Computed GPS heading GPS
6 Compass heading Measured heading Compass
7 Satellites No. of GPS satellites in view GPS
8 Voltage Battery voltage Current sensor
9 Backup voltage Backup battery voltage CORE PRO unit
10 Current draw Momentary current draw Current sensor
11 Current consumed Battery capacity used Current sensor
12 RSSI antenna #1 Relative received signal strength RSSI Input/EzUHF Link
13 RSSI antenna #2 Relative received signal strength EzUHF Link
14 Link quality Corrupt packets/frame indicator EzUHF Link
15 Failsafe count Signal loss counter EzUHF Link
14
Good practices We have compiled a list of all of practices which have been tried and tested in countless environments and
situations by the TBS crew and other experienced FPV pilots.
Follow these simple rules, even if rumors on the internet suggest otherwise, and you will have success in
FPV.
● Start with the bare essentials and add equipment one step at a time, after each new equipment
was added to proper range- and stress tests.
● Do not fly with a video system that is capable of outperforming your R/C system in terms of range.
● Do not fly with a R/C frequency higher than the video frequency (e.g. 2.4GHz R/C, 900MHz video).
● Monitor the vitals of your plane (R/C link and battery). Flying with a digital R/C link without RSSI is
dangerous.
● Do not use 2.4GHz R/C unless you fly well within its range limits, in noise-free environments and
always within LOS. Since this is most likely never the case, it is recommended to not use 2.4GHz
R/C systems for longer range FPV.
● Do not fly at the limits of video, if you see noise in your picture, turn around and buy a higher-gain
receiver antenna before going out further.
● Shielded wires or twisted cables only, anything else picks up RF noise and can cause problems.
● When using powerful R/C transmitters, make sure your groundstation equipment is properly
shielded.
● Adding Return-To-Home (RTH) to an unreliable system does not increase the chances of getting
your plane back. Work on making your system reliable without RTH first, then add RTH as an
additional safety measure if you must.
● Avoid powering the VTx directly from battery, step-up or step-down the voltage and provide a
constant level of power to your VTx. Make sure your VTx runs until your battery dies.
● Do not power your camera directly unless it works along the complete voltage range of your
battery. Step-up or step-down the voltage and provide a constant level of power to your camera.
Make sure your camera runs until your battery dies.
● A single battery system is safer than using two dedicated batteries for R/C and FPV. Two batteries
in parallel even further mitigate sources of failure.
● For maximum video range and “law compatibility”, use 2.4GHz video with high-gain antennas.
● When flying with R/C buddies that fly on 2.4GHz, or when flying in cities, it is perfectly possible to
use 2.4GHz video provided you stick to the channels that do not lie in their band (CH5 to CH8 for
Lawmate systems, available from TBS).
● Do not use diversity video receivers as a replacement for pointing your antennas, diversity should
be used to mitigate polarization issues.
15

● Improving the antenna gain on the receiver end is better than increasing the output power (except
in RF-noisy areas). More tx power causes more issues with RF on your plane. 500mW is plenty of
power!
● Try to achieve as much separation of the VTx and R/C receiver as possible to lower the RF noise
floor and EMI interference.
● Do not buy the cheapest equipment unless it is proven to work reliably (e.g. parts falling off,
multitudes of bug fix firmware updates, community hacks and mods are a good indicator of poor
quality and something you do NOT want to buy for a safe system). Do due diligence and some
research before sending your aircraft skyward.
Manual written and designed by ivc.no in cooperation with TBS.
16