Embed Size (px)
Citation preview

04

Sistemas In-Wall In-Wall Systems
05
Sistemas In-Wall In-Wall Systems 06
Sistemas Systems
Pro WB Pro WB
Pro WC Pro WC
Basic WC Basic WC
Basic TK Basic TK
Pro BD Pro BD
Pro UR Pro UR
PL PL
20
25
30
22
26
24
28
Espacios Spaces
Privados Privates
Públicos Publics
Semipúblicos Semi-publics
081216

In-Wall Systems offer creative, practical and safe installation solutions that adapt perfectly to the sanitary fittings and complements that make up the bathroom space: basin, toilet, bidet, cisterns and operating plates. According to the chosen system, they are installed without the need for brickwork (in a wall or between prefabricated partition walls) or with a minimum of works (in or behind a wall or in a half-wall).
Los Sistemas In-Wall ofrecen soluciones de instalación creativas, prácticas y seguras que se adaptan perfectamente a las piezas de sanitario y sus complementos que conforman el espacio de baño: lavabo, inodoro, bidé, tanques de descarga y placas de accionamiento. Dependiendo del sistema elegido, se instalan sin obra (delante de una pared o entre tabiques prefabricados) o con un mínimo de obra (delante o detrás de una pared o en un murete).
06

Inodoro: Meridian. W.C.: Meridian.
PL1. 30
Pro WC, Basic WC.
22,24
Sistemas In-Wall In-Wall Systems
07

Espacios privados.Private spaces.
PL2. 32
Pro BD. 26
Pro WB. 20
Pro WC, Basic WC.
22,24
Colección de baño: Element. Bathroom collection: Element.
08
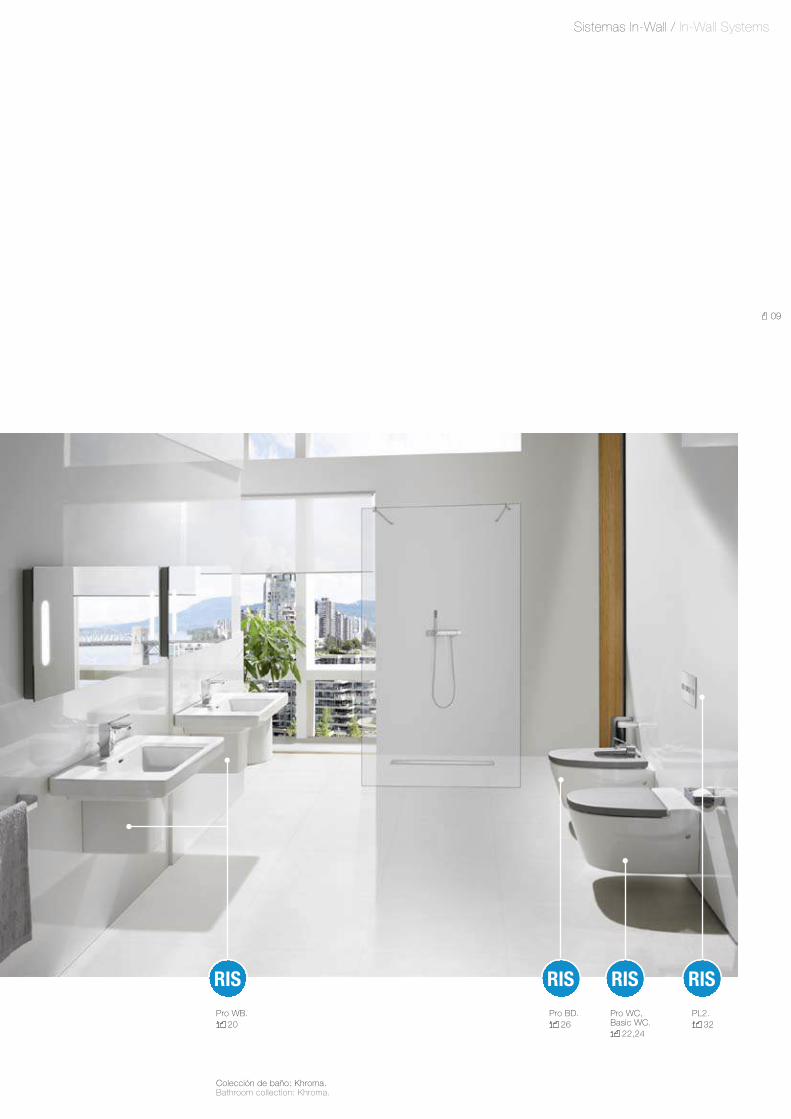
Sistemas In-Wall / In-Wall Systems
PL2. 32
Pro BD. 26
Pro WB. 20
Pro WC, Basic WC.
22,24
Colección de baño: Khroma. Bathroom collection: Khroma.
09
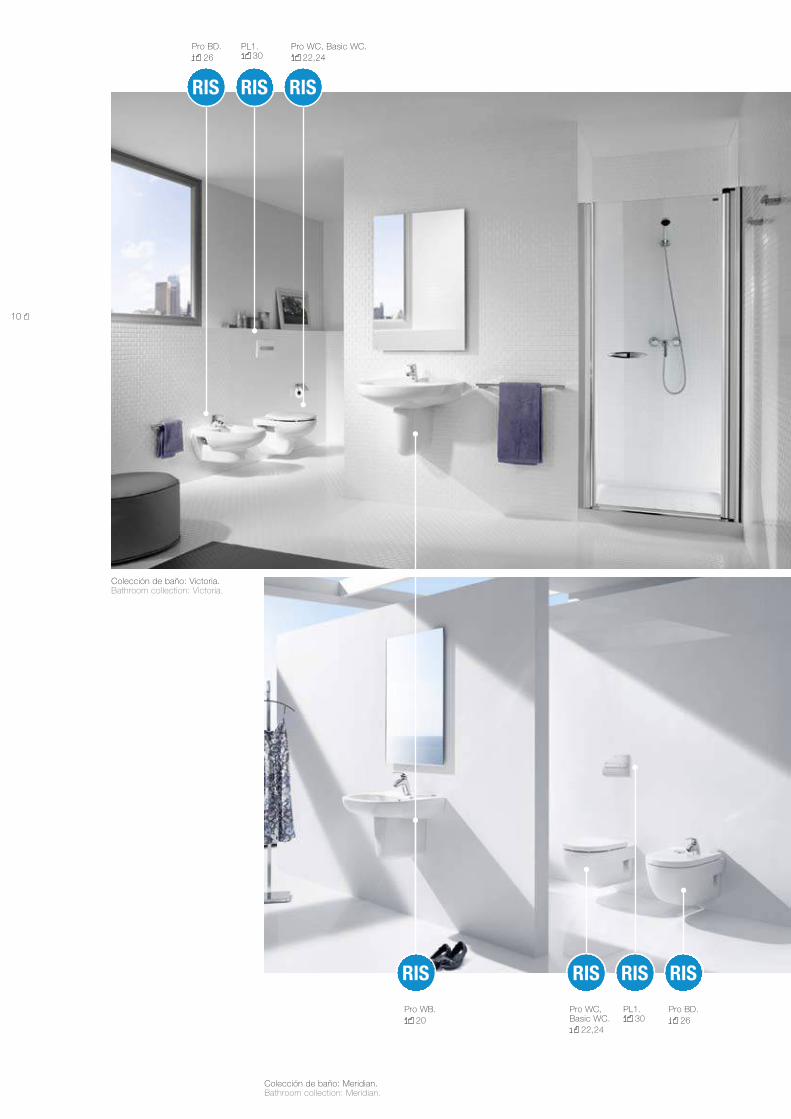
10
Pro WB. 20
Pro WC, Basic WC.
22,24
Pro BD. 26
PL1. 30
PL1. 30
Pro BD. 26
Pro WC, Basic WC. 22,24
Colección de baño: Meridian. Bathroom collection: Meridian.
Colección de baño: Victoria. Bathroom collection: Victoria.

11
Sistemas In-Wall / Espacios privados. In-Wall Systems / Private spaces
Basic TK. 25
PL1. 30
Pro WB. 20
Colección de baño: Meridian. Bathroom collection: Meridian.

12
Espacios públicos.Public spaces.
Pro WB, 20
aERoPUERToS. AIRpoRTS
hoTELES. hoTelS
CENTRoS DE CoNVENCIoNES. ConvenTIon CenTReS
ÓPERaS. opeRAS
ESTaCIoNES. STATIonS
SaLaS DE oCIo. ReCReATIon RoomS
CENTRoS CoMERCIaLES. ShoppIng
DISCoTECaS. ClubS
Lavabos: Forum. Urinarios: Site. Inodoro: Meridian: Inodoro suspendido: access. Placas de accionamiento: PL3 Washbasins: Forum. Urinals: Site W.C.: Meridian: Wall-hung W.C.: access. operating plates: PL3

13
Sistemas In-Wall / In-Wall Systems
Pro UR, 28
Basic TK. 25
PL3, 34
Pro WC, Basic WC.
22,24

Pro UR, 28
Pro UR, 28
Pro WB, 20
Urinarios: Urinett. Urinals: Urinett.
Lavabos: hall. Urinarios: hall Waterless. Washbasins: hall. Urinals: hall Waterless.
14

15
Pro WB, 20
Pro UR, 28
Pro WB, 20
Pro UR, 28
Lavabos: Forum. Urinarios: Site. Washbasins: Forum. Urinals: Site.
Lavabo y urinario: Spun. Washbasin & Urinal: Spun.
Sistemas In-Wall / Espacios públicos. In-Wall Systems / Public spaces

16
Espacios semipúblicos.Semi-public spaces.
gIMNaSIoS / gYmS
SPaS / SpAS
CENTRoS DE aTENCIÓN SaNITaRIa / hoSpITAlS
hoTELES / hoTelS
PaRaDoRES / luXe hoTelS
CENTRoS EDUCaTIVoS / SChoolS
TIENDaS / ShoppIng
ESPaCIoS CULTURaLES / muSeumS
Pro WB. 20
Pro WC, Basic WC.
22,24
PL2. 32
Pro BD. 26
Colección de baño: hall. Bathroom collection: hall.

17
Sistemas In-Wall / In-Wall Systems
Basic TK. 25
Pro WC, Basic WC.
22,24
PL1. 30
PL1. 30
Pro WB. 20
Colección de baño: access. Bathroom collection: access.
Colección de baño: Meridian. Bathroom collection: Meridian.

Pro UR, 28
Pro WB. 20
Pro WC, Basic WC.
22,24
PL2. 32
Colección de baño: hall. Bathroom collection: hall.
18

Sistemas In-Wall / Espacios semipúblicos. In-Wall Systems / Semi-public spaces
Pro WB. 20
Pro WC, Basic WC.
22,24
Pro WC, Basic WC. 22,24
PL2. 32
Colección de baño: access. Bathroom collection: access.
19

Sistemas In-Wall. In-Wall Systems
890093000 Sistema de instalación para lavabo mural.Con accesorios de instalación.
890093000 Installation system for wall-hung basin.With installation accessories.
Pro WB System
Lavabos murales / Wall-hung basins
Con In-Wall Systems tienes toda la flexibilidad de instalación. Delante pared lisa, con repisa o en un murete. La instalación es la más rápida. Son sistemas autoportantes, es decir, que no requieren macizado con obra para conseguir la resistencia necesaria durante el uso del sanitario. Totalmente válidos para instalarse tanto por delante de tabique como con paredes ligeras (tipo Pladur).
Vea la instalación completa en: See the complete installation procedure at:
Instalación delante de pared o murete:
1. Colocar Pro WB en el suelo. Colocar el Sistema Pro WB sobre el tabique y sujetarlo al suelo con 2 tornillos.
2. Fijar Pro WB a la pared. Colocar el Sistema Pro WB nivelado al tabique y sujetarlo con 2 tornillos. Los pies son regulables. Conectar la toma de agua y el desagüe.
3. Tapar Pro WB. Cubrir la instalación, no hace falta que sea con obra, puede hacerse con paneles prefabricados o madera y aplicarle el acabado deseado.
4. Colocar el lavabo. Instalar el lavabo conectando la grifería y el desagüe.
Instalación en tabiques prefabricados:
1. Colocar en la guía y fijar Pro WB en el suelo. Colocar el Sistema Pro WB sobre las guías del tabique y sujetarlo al suelo con 2 tornillos.
2. Fijar Pro WB a la pared. Colocar las guías verticales del tabique ajustadas al Sistema Pro WB y sujetarlo con 8 tornillos. Los pies son regulables. Conectar la toma de agua y el desagüe.
3. Tapar Pro WB con tabiques prefabricados. Cubrir la instalación con los paneles prefabricados y aplicarle el acabado deseado.
4. Colocar el lavabo. Instalar el lavabo conectando la grifería y el desagüe.
Installation on wall or half-wall:
1. Place Pro WB on the floor. Place the Pro WB System on the partition wall and fix it to the floor with 2 bolts.
2. Fix Pro WB to the wall. Place the levelled Pro WB System on the partition wall and fix it with 2 bolts. The feet are adjustable. Connect the water inlet and the waste.
3. Cover Pro WB. Cover the installation: this does not need to be done with brickwork, it can be done with prefabricated panels or wood, applying the desired finish.
4. Place the basin in position. Install the basin, connecting the faucet and the waste.
Installation in prefabricated partition walls:
1. Place Pro WB in the guide and fix it to the floor. Place the Pro WB System on the guides of the partition wall and fix it to the floor with 2 bolts.
2. Fix Pro WB to the wall. Place the vertical guides of the partition wall adjusted to the Pro WB System and fix it with 8 bolts. The feet are adjustable. Connect the water inlet and the waste.
3. Cover Pro WB with prefabricated wall panels. Cover the installation with the prefabricated panels and apply the desired finish.
4. Place the basin in position. Install the basin, connecting the faucet and the waste.
www.RIS.roca.com
500
1090 1120
30
300
90
500
1090 1120
30
300
90
20

In-Wall Systems offer you complete flexibility of installation: in a flat wall, with a shelf or in a half-wall. The installation method is the fastest. These are free-standing systems, that is to say, they do not require consolidation works to achieve the necessary strength during the use of the sanitary fitting. They can be installed in partition walls or light plasterboard-type walls.
1 Lavabo: Meridian. grifería: M2. Basin: Meridian. Faucet: M2.
2 Lavabo: Spun. grifería: Sprint. accesorios: Select. Basin: Spun. Faucet: Sprint. accessories: Select.
3 Lavabo: access. grifería: Esmai. accesorios: Superinox. Basin: access. Faucet: Esmai. accessories: Superinox.
4 Lavabo: Diverta. Desagüe: In-Drain News. grifería: Thesis. Basin: Diverta. Waste: In-Drain News. Faucet: Thesis.
1 2
4
3
21

Vea la instalación completa en: See the complete installation procedure at:
www.RIS.roca.com
Inodoros suspendidos / Wall-hung W.C.
Con Pro WC tienes toda la flexibilidad de instalación. Delante pared lisa, con repisa o en un murete.
Pro WC System offers you complete flexibility of installation: in a flat wall, with a shelf or in a half-wall.
Instalación delante de pared o murete:
1. Colocar Pro WC en el suelo. Colocar el Sistema Pro WC sobre el tabique y sujetarlo al suelo con 2 tornillos.
2. Fijar Pro WC a la pared. Colocar el Sistema Pro WC nivelado al tabique y sujetarlo con 2 tornillos. Los pies son regulables. Conectar la toma de agua y el desagüe.
3. Tapar Pro WC. Cubrir la instalación, no hace falta que sea con obra, puede hacerse con paneles prefabricados o madera y aplicarle el acabado deseado.
4. Colocar inodoro. Instalar el inodoro conectando el tubo de descarga del tanque y el desagüe. Colocar la placa de accionamiento. El fácil desmontaje de la placa permite acceder al interior del tanque.
Instalación en tabiques prefabricados:
1. Colocar en la guía y fijar Pro WC en el suelo. Colocar el Sistema Pro WC sobre las guías del tabique y sujetarlo al suelo con 2 tornillos.
2. Fijar Pro WC a la pared. Colocar las guías verticales del tabique ajustadas al Sistema Pro WC y sujetarlo con 8 tornillos. Los pies son regulables. Conectar la toma de agua y el desagüe.
3. Tapar Pro WC con tabiques prefabricados. Cubrir la instalación con los paneles prefabricados y aplicarle el acabado deseado.
4. Colocar inodoro. Instalar el inodoro conectando el tubo de descarga del tanque y el desagüe. Colocar la placa de accionamiento. El fácil desmontaje de la placa permite acceder al interior del tanque.
Installation in wall or half-wall:
1. Place Pro WC on the floor. Place the Pro WC System on the wall and fix it to the floor with 2 bolts.
2. Fix Pro WC to the wall. Place the levelled Pro WC System on the wall and fix it with 2 bolts. The feet are adjustable. Connect the water inlet and the waste.
3. Cover Pro WC. Cover the installation: this does not need to be done with brickwork, it can be done with prefabricated panels or wood, applying the desired finish.
4. Place WC in position. Install WC, connecting the flush of the cistern and the waste. Place the operating plate in position. The easy removal of the plate makes it possible to access the interior of the cistern.
Installation in prefabricated partition walls:
1. Place Pro WC in the guide and fix it to the floor. Place the Pro WC System in the guides on the partition wall and fix it to the floor with 2 bolts.
2. Fix Pro WC to the wall. Place the vertical guides of the partition wall adjusted to the Pro WC System and fix it with 8 bolts. The feet are adjustable. Connect the water inlet and the waste.
3. Cover Pro WC with prefabricated wall panels. Cover the installation with the prefabricated panels and apply the desired finish.
4. Place WC in position. Install WC, connecting the flush pipe of the cistern and the waste. Place the operating plate in position. The easy removal of the plate makes it possible to access the interior of the cistern.
22
500
1090
230
175
1120
245
30
180210
410290
30
890090000 Sistema de instalación para inodoro suspendido.Con cisterna de doble descarga 3/6 litros y accesorios de instalación.
Profundidad mínima de 135, codo de evacuación 90 ø.
890090000 Installation system for wall-hung WC.With double-flush cistern 3/6 litres and installation accessories.
Minimum depth 135, connection elbow 90 ø.
Pro WC System22

23
Sistemas In-Wall / In-Wall Systems
1 Inodoro: hall. accesorios: Select. Placa de accionamiento: PL1 Dual Combi. W.C.: hall. accessories: Select. operating plate: PL1 Dual Combi.
2 Inodoro: access. accesorios: Superinox. Placa de accionamiento: PL1 Single White. W.C.: access. accessories: Superinox. operating plate: PL1 Single White.
1 2

Vea la instalación completa en: See the complete installation procedure at:
www.RIS.roca.com
24 890090100 Tanque de doble descarga 3/6 litros.Con juego de fijación.
890090100 Double-flush cistern 3/6 litres.With fixing set.
Basic WC System
450120
30
655
40
778
85 13535
230180
Con Basic WC tienes toda la flexibilidad de instalación. Delante pared lisa, con repisa o en un murete. La instalación requiere indispensablemente del macizado con obra (desde la base del soporte hasta el suelo) para conseguir la correcta resistencia.
Basic WC System offers you complete flexibility of installation: in a flat wall, with a shelf or in a half-wall. Installation necessarily requires consolidation works (from the base of the support to the floor) to achieve the correct strength.
Tanques empotrados para inodoro / Embedded WC cisterns
Instalación delante de pared o murete:
1. Colocar Basic WC con tornillos. Colocar el Sistema Basic WC en la pared y fijarlo con 6 tornillos.
2. Fijar Basic WC con obra. Macizar con obra la zona de la base del Basic WC al suelo. Conectar la toma de agua y el desagüe.
3. Colocar tapa protectora. Colocar la tapa protectora. Cubrir la instalación, no hace falta que sea con obra, puede hacerse con paneles prefabricados o madera y aplicarle el acabado deseado.
4. Colocar inodoro y placa. Instalar el inodoro conectando el tubo de descarga del tanque y el desagüe y colocar la placa de accionamiento. El fácil desmontaje de la placa permite acceder al interior del tanque.
Installation in wall or half-wall:
1. Fix Basic WC with bolts. Place the Basic WC System on the wall and fix it with 6 bolts.
2. Fix Basic WC with brickwork. Consolidate with brickwork the zone from the base of the Basic WC to the floor. Connect the water inlet and the waste.
3. Place the protective cover in position. Place the protective cover. Cover the installation: this does not need to be done with brickwork, it can be done with prefabricated panels or wood, applying the desired finish.
4. Place WC and plate in position. Install the toilet, connecting the flush pipe of the cistern and the waste, and place the operating plate in position. The easy removal of the plate makes it possible to access the interior of the cistern.
Inodoro y Bidé: hall. grifería: Esmai. Placa de accionamiento: PL2 Dual Combi.W.C. & bidet: hall. Faucets: Esmai. operating plate: PL2 Dual Combi.

25
www.RIS.roca.com
726
520
488
4515-75
655
65124
G1/2
110 30
Tanto en tabiques como en paredes gruesas se puede colocar Basic TK en la pared. Ideal para baños con poco espacio. También es posible su instalación detrás de una pared con el soporte bastidor.
Basic TK System can be installed in thick or partition walls. It is ideal for smaller bathrooms. It can also be installed behind a wall with the support frame.
Vea la instalación completa en: See the complete installation procedure at:
890090200 Tanque empotrable de doble descarga 3/6 litros.Con tubo y manguito.
890090200 Embeddable double-flush cistern 3/6 litres.With pipe and hose.
Basic TK System
Sistemas In-Wall / In-Wall Systems
Inodoro: Meridian. Placa de accionamiento: PL1 Dual White.W.C.: Meridian. operating plate: PL1 Dual White.
Instalación delante de pared o murete:
1. Empotrar Basic TK. Colocar Basic TK y fijarlo con 2 tornillos. Conectar la toma de agua y el desagüe.
2. Colocar inodoro y placa. Instalar el inodoro conectando el tubo de descarga del tanque y el desagüe y colocar la placa de accionamiento. El fácil desmontaje de la placa permite acceder al interior del tanque.
Installation in wall or half-wall:
1. Embed Basic TK. Place the Basic TK System and fix it with 2 bolts. Connect the water inlet and the waste.
2. Place WC and plate in position. Install the toilet, connecting the flush pipe of the cistern and the waste, and place the operating plate in position. The easy removal of the plate makes it possible to access the interior of the cistern.

Vea la instalación completa en: See the complete installation procedure at:
www.RIS.roca.com
890091000 Sistema de instalación para bidé suspendido.Con accesorios de instalación.
890091000 Installation system for wall-hung bidet.With installation accessories.
Pro BD System
180150
500
1090
340 410
1120
290
30
230
180150
500
1090
340 410
1120
290
30
230
Bidés suspendidos / Wall-hung bidets
Instalación delante de pared o murete:
1. Colocar Pro BD en el suelo. Colocar el Sistema Pro BD sobre el tabique y sujetarlo al suelo con 2 tornillos.
2. Fijar Pro BD a la pared. Colocar el Sistema Pro BD nivelado al tabique y sujetarlo con 2 tornillos. Los pies son regulables. Conectar la toma de agua y el desagüe.
3. Tapar Pro BD. Cubrir la instalación, no hace falta que sea con obra, puede hacerse con paneles prefabricados o madera y aplicarle el acabado deseado.
4. Colocar el bidé. Instalar el bidé conectandola grifería y el desagüe.
Instalación en tabiques prefabricados:
1. Colocar Pro BD en el suelo. Colocar el Sistema Pro BD y sujetarlo al suelo con 2 tornillos.
2. Fijar Pro BD. Colocar las guías verticales del tabique ajustadas al Sistema Pro BD y sujetarlo con 8 tornillos. Los pies son regulables. Conectar la toma de agua y el desagüe.
3. Tapar Pro BD con tabiques prefabricados. Cubrir la instalación con los paneles prefabricados y aplicarle el acabado deseado.
4. Colocar el bidé. Instalar el bidé conectandola grifería y el desagüe.
Installation in wall or half-wall:
1. Place Pro BD on the floor. Place the Pro BD System on the partition wall and fix it to the floor with 2 bolts.
2. Fix Pro BD to the wall. Place the levelled Pro BD System on the partition wall and fix it with 2 bolts. The feet are adjustable. Connect the water inlet and the waste.
3. Cover Pro BD. Cover the installation: this does not need to be done with brickwork, it can be done with prefabricated panels or wood, applying the desired finish.
4. Place the bidet in position. Install the bidet, connecting the faucet and the waste.
Installation in prefabricated partition walls:
1. Place Pro BD in the guide and fix it to the floor. Place the Pro BD System in the guides on the partition wall and fix it to the floor with 2 bolts.
2. Fix Pro BD to the guides. Place the vertical guides of the partition wall adjusted to the Pro BD System and fix it with 8 bolts. The feet are adjustable. Connect the water inlet and the waste.
3. Cover Pro BD with prefabricated wall panels. Cover the installation with the prefabricated panels and apply the desired finish.
4. Place the bidet in position. Install the bidet, connecting the faucet and the waste.
26
Con Pro WC tienes toda la flexibilidad de instalación. Delante pared lisa, con repisa o en un murete.
Pro BD System offers you complete flexibility of installation: in a flat wall, with a shelf or in a half-wall.

27
Sistemas In-Wall / In-Wall Systems
Inodoro y Bidé: Meridian. grifería: M2. Placa de accionamiento: PL1 Dual Matt.W.C. & Bidet: Meridian. Faucet: M2. operating plate: PL1 Dual Matt.

Vea la instalación completa en: See the complete installation procedure at:
www.RIS.roca.com
28 890094000 Sistema de instalación para urinario.Con accesorios de instalación.
890094000 Installation system for urinal.With installation accessories.
Pro UR System
6060
500
300
1260 1320
6060
500
300
1260 1320
Con Pro UR tienes toda la flexibilidad de instalación. Delante pared lisa, con repisa o en un murete.
Pro UR System offers you complete flexibility of installation: in a flat wall, with a shelf or in a half-wall.
Urinarios / Urinals
Instalación delante de pared o murete:
1. Colocar Pro UR. Colocar en la pared y hacer los taladros en el suelo y la pared.
2. Fijar Pro UR a la pared. Sujetar el Sistema Pro UR al suelo y a la pared con 4 tornillos. Los pies son regulables. Conectar la toma de agua y el desagüe.
3. Tapar Pro UR. Cubrir la instalación, no hace falta que sea con obra, puede hacerse con paneles prefabricados o madera y aplicarle el acabado deseado.
4. Colocar el urinario. Instalar el urinario conectando el fluxor / grifería electrónica y el desagüe.
Instalación en tabiques prefabricados:
1. Colocar Pro UR. Colocar en la pared y hacer los taladros en el suelo y la pared.
2. Fijar Pro UR a la pared. Sujetar el Sistema Pro UR al suelo y a la pared con 4 tornillos. Los pies son regulables. Conectar la toma de agua y el desagüe.
3. Tapar Pro UR con tabiques prefabricados. Cubrir la instalación con los paneles prefabricados y aplicarle el acabado deseado.
4. Colocar el urinario. Instalar el urinario conectando el fluxor / grifería electrónica y el desagüe.
Installation in wall or half-wall:
1. Place Pro UR in the guide. Place to the wall and drill the bore holes in the floor and in the wall.
2. Fix Pro UR to the wall. Fix the Pro UR System to the floor and to the wall with 4 bolts. The feet are adjustable. Connect the water inlet and the waste.
3. Cover Pro UR. Cover the installation: this does not need to be done with brickwork, it can be done with prefabricated panels or wood, applying the desired finish.
4. Place the urinal in position. Install the urinal, connecting the flush valve / electronic faucet and the waste.
Installation in prefabricated partition walls:
1. Place Pro UR in the guide. Place to the wall and drill the bore holes in the floor and in the wall.
2. Fix Pro UR to the wall. Fix the Pro UR System to the floor and to the wall with 4 bolts. The feet are adjustable. Connect the water inlet and the waste.
3. Cover Pro UR with prefabricated wall panels. Cover the installation with the prefabricated panels and apply the desired finish.
4. Place the urinal in position. Install the urinal connecting the flush valve / electronic faucet and the waste.
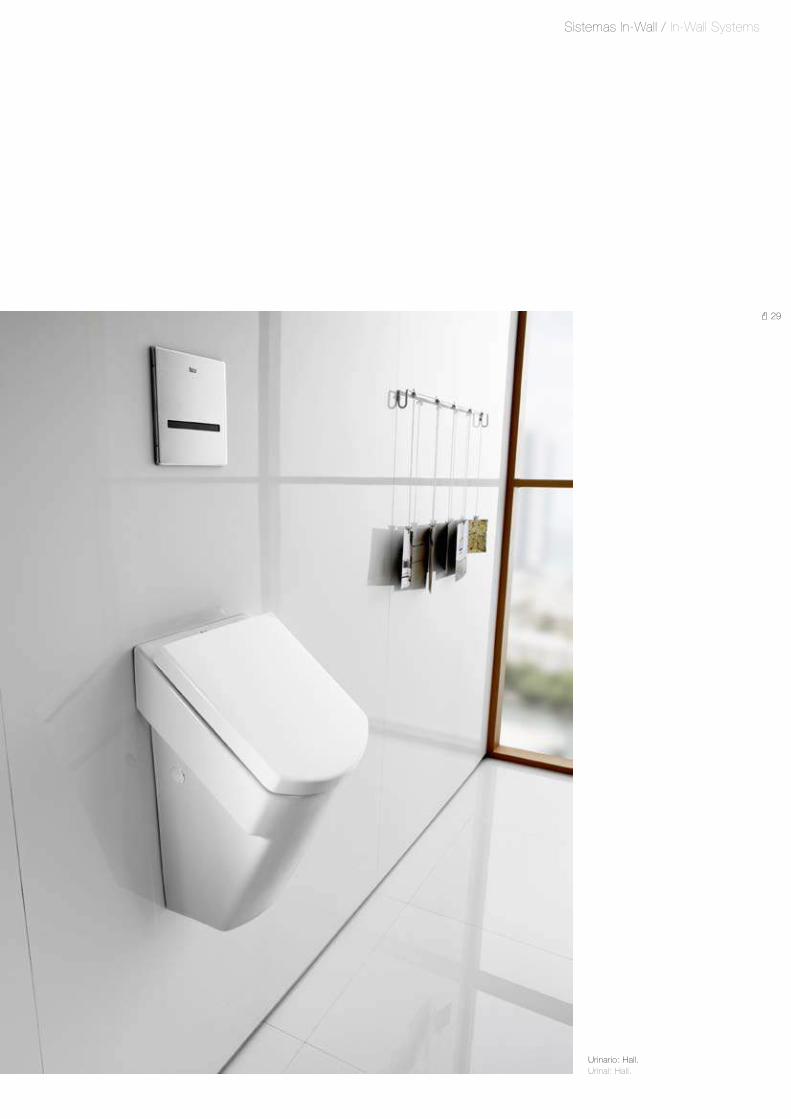
29
Sistemas In-Wall / In-Wall Systems
Urinario: hall.Urinal: hall.

30
Con PL1, PL2 y PL3 dispones de una amplia gama de posibilidades para personalizar tu espacio de baño. PL1 y PL2 te ofrecen diferentes acabados para que elijas el que mejor se adapte a tu estilo. PL3 con su acabado en acero inoxidable es ideal para instalaciones en espacios públicos o semipúblicos. Las versiones Dual tienen doble pulsador para descargas de 3 ó 6 litros.
Placas de accionamiento / Operating plates
890095100 Single White.
PL1 Single White.
PL1
250
160
10
250
160
10
250
160
14
10
250
160
14
10
11259
169
250
16014
10
250
160
14
10
PL1 Dual
250
160
10
250
160
10
250
160
14
10
250
160
14
10
11259
169
250
16014
10
250
160
14
10
890095000 Dual White.
890095001 Dual Chrome.
890095002 Dual Matt.
890095005 Dual Combi.
y PL2 te ofrecen diferentes acabados para que elijas el que mejor se adapte a tu estilo. PL3 con su acabado en acero inoxidable es ideal para instalaciones en espacios públicos o semipúblicos. Las versiones Dual tienen doble pulsador
PL1 Single White.

31
With PL1, PL2 and PL3 you have a wide range of possibilities for personalising your bathroom space. PL1 and PL2 offer different finishes for you to choose the one best suited to your style. PL3, with its stainless steel finish, is ideal for installing in public or semi-public spaces. The Dual versions have a double operating plate for flush volumes of 3 or 6 litres.
Sistemas In-Wall / In-Wall Systems
PL1 Dual White. PL1 Dual Chrome.
PL1 Dual Matt. PL1 Dual Combi. PL1 Dual Combi.
PL1 and PL2 offer different finishes for you to choose the one best suited to your style. PL3, with its stainless steel finish, is ideal for installing in public or semi-public spaces. The Dual versions have a double operating plate for flush volumes of 3 or 6 litres.
PL1 Dual Matt. PL1 Dual Combi.
PL1 Dual White.
31
PL1 and PL2 offer different finishes for you to choose the one best suited to your style. PL3, with its stainless steel finish, is ideal for installing in public or semi-public spaces. The Dual versions have a double operating
PL1 Dual Chrome.
PL1 and PL2 offer different finishes for you to choose the one best suited to your style. PL3, with its stainless steel finish, is ideal for installing in public or semi-public spaces. The Dual versions have a double operating
PL1 Dual Chrome.

32
PL2 Single White. PL2 Single White.
890096100 Single White.
PL2
250
160
10
250
160
10
250
160
14
10
250
160
14
10
11259
169
250
16014
10
250
160
14
10
PL2 Dual
250
160
10
250
160
10
250
160
14
10
250
160
14
10
11259
169
250
16014
10
250
160
14
10
890096000 Dual White.
890096001 Dual Chrome.
890096002 Dual Matt.
890096003 Dual Combi.
Placas de accionamiento / Operating plates

33
Sistemas In-Wall / In-Wall Systems
PL2 Dual White. PL2 Dual Chrome.
PL2 Dual Matt. PL2 Dual Combi. PL2 Dual Combi. PL2 Dual Matt. PL2 Dual Combi.
PL2 Dual White.
33
PL2 Dual Chrome. PL2 Dual Chrome.
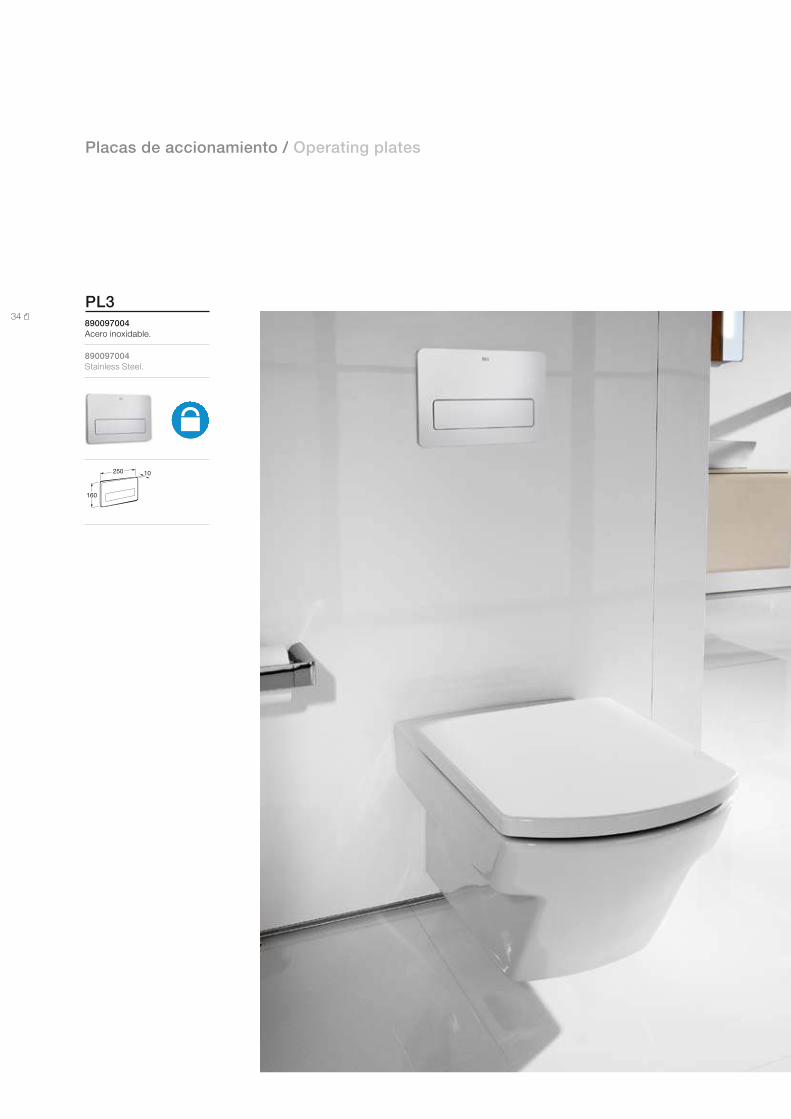
34
250
160
10
250
160
10
250
160
14
10
250
160
14
10
11259
169
250
16014
10
250
160
14
10
890097004 Acero inoxidable.
890097004 Stainless Steel.
PL3
Placas de accionamiento / Operating plates

35
Vea la instalación completa en: See the complete installation procedure at:
www.RIS.roca.com
Sistemas In-Wall / In-Wall Systems
Fácil acceso al interior del tanque:
El acceso al mecanismo de descarga del interior del tanque se realiza a través de la placa de accionamiento que gracias a un sistema de autosujeción permite su desmontaje y montaje de una forma sencilla y sin necesidad de herramientas.
1. Empujar la placa hacia arriba.
2. Dejar caer hacia delante la parte superior de la placa.
3. Desbloquear los tres puntos de anclaje.
4. Extraer la placa soporte.
5. Extraer la placa protectora.
6. El mecanismo de descarga queda completamente a la vista.
Easy access to interior of cistern:
The flushing mechanism inside the cistern is accessed by way of the operating plate, which thanks to a self-fixing system allows for simple removal and fitting without the need for tools.
1. Push the plate upwards.
2. Let the top of the plate fall forwards.
3. Unlock the three anchorage points.
4. Remove the support plate.
5. Remove the protective plate.
6. The flushing mechanism is now in full view.