Embed Size (px)
Citation preview
S y s t e m C h a r g i n g
History 1977–1991
Hea
ting
and
Coo
ling
|
Cap
illar
y Tu
be S
yste
ms
The
rmos
tati
c E
xpan
sion
Val
ve S
yste
ms
|
Cha
rgin
g by
Wei
ght

Preface
The purpose of this publication is to provide service technicians with the general knowledge necessary to properly charge a Heat Pump system or an Air Conditioning system. This manual outlines, in detail, recommended charging procedures to be followed on all capillary tube and expansion valve systems.
Before any of the procedures outlined in this manual can be initiated the service technician must have all the necessary tools as listed under equipment on page 4.
In addition to tools proper airflow must be verified prior to any attempt to charge a system. The system should be checked to confirm that all air filters are clean, that the blower assembly and coil are free of dirt and that the duct system is adequate. If proper airflow is not available all associated problems must be corrected prior to attempting any charging procedure.
Cooling performance can be checked when outdoor temperature is above 75°. Heating performance can be checked when the outdoor temperature is below 60°.
Note: This publication is general in nature and is intended for INSTRUCTIONAL PURPOSES ONLY. It is not to be used for equipment selection, application, installation, or specific service procedures.
Section 608, paragraph C of the Clean Air Act of 1990 states:Effective July 1, 1992, it shall be unlawful for any person, in the course of maintaining, servicing, repairing, or disposing of an air conditioning system, to knowingly vent or release any CFC or HCFC refrigerant. Minimal releases (air purges of refrigerant hoses) associated with good faith attempts to recapture or recycle are exempt from the ban on venting.
The Clean Air Act has provisions for significant fines and/or imprisonment for non-compliance. These fines could range from $5,000 to $25,000 per day.

Table Of Contents
Refrigerant System Charging ........................................................................................................................................ 2
Service Tools — Equipment ............................................................................................................................................ 2
Metering Devices ............................................................................................................................................................. 3
Cooling Systems ............................................................................................................................................................. 4
Heat Pump Systems ........................................................................................................................................................ 5
Equipment Pressure Taps (General) .............................................................................................................................. 6
Charging Capillary Tube/FCCV – Cooling Mode Only .................................................................................................. 7
Example Slide Rule Calculation ..................................................................................................................................... 8
Performance – Cooling Mode ......................................................................................................................................... 9
Charging and Performance – Cooling Mode ................................................................................................................. 10
Charging Units With Sub Cooling Value On Name Plate ............................................................................................. 11
Charging By Subcooling – Cooling Mode ..................................................................................................................... 12
Performance – Heating Mode ........................................................................................................................................ 13
Charging – Heating Mode ............................................................................................................................................... 14
Charging By Weight ........................................................................................................................................................ 16
Calibrating Pressure Gauges .......................................................................................................................................... 17
Refrigerant 410A
Background .................................................................................................................................................................. 18
Characteristics .............................................................................................................................................................. 18
Refrigerant Safety ............................................................................................................................................................ 19
Application Notes ............................................................................................................................................................ 20
System Charging Using R410A ...................................................................................................................................... 21
R-410A Temperature and Pressure Chart ....................................................................................................................... 22
Subcooling Table.............................................................................................................................................................. 23
R-410A Split Cooling Units Only .................................................................................................................................... 24
R-410A Split Heat Pump Units Only ............................................................................................................................... 26
R-410A Charging and Performance – Cooling Mode ................................................................................................... 27
R-410A Charging – Heating Mode – R-410A .................................................................................................................. 28
IMPORTANT
These procedures should be followed at initial start-up and at anytime the power has been removed for 12 hours or more.
To prevent compressor damage which may result from the presence of LIQUID refrigerant in the crankcase:
1. Make certain the room thermostat is in “off” position. (The compressor is not to operate.)
2. Apply power by closing the system disconnect switch. This energizes the compressor heater which evaporates the liquid refrigerant in the crankcase. Allow 30 minutes for each pound of refrigerant in the system as noted on the unit nameplate.
3. After proper elapsed time the thermostat may be set to operate the compressor.
4. Except as required for safety while servicing – DO NOT OPEN SYSTEM DISCONNECT SWITCH.
1
Refrigerant System Charging
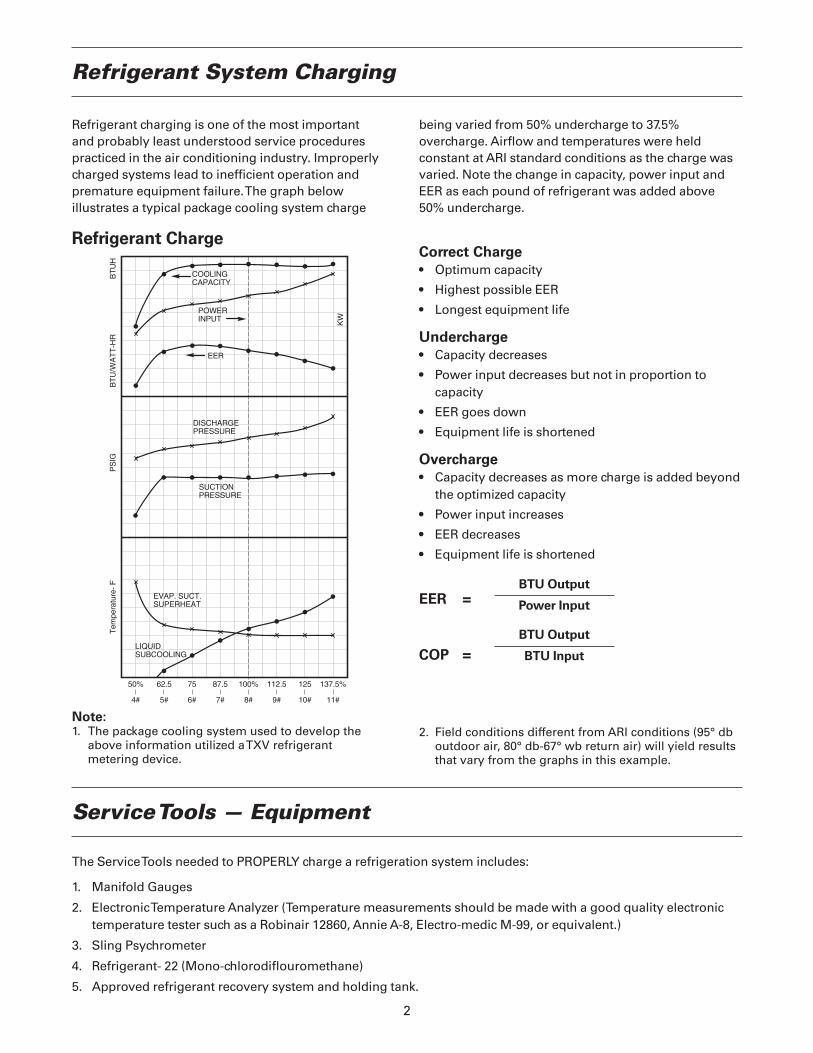
Refrigerant charging is one of the most important and probably least understood service procedures practiced in the air conditioning industry. Improperly charged systems lead to inefficient operation and premature equipment failure. The graph below illustrates a typical package cooling system charge
being varied from 50% undercharge to 37.5% overcharge. Airflow and temperatures were held constant at ARI standard conditions as the charge was varied. Note the change in capacity, power input and EER as each pound of refrigerant was added above 50% undercharge.
Refrigerant ChargeCorrect Charge• Optimum capacity
• Highest possible EER
• Longest equipment life
Undercharge• Capacity decreases
• Power input decreases but not in proportion to capacity
• EER goes down
• Equipment life is shortened
Overcharge• Capacity decreases as more charge is added beyond
the optimized capacity
• Power input increases
• EER decreases
• Equipment life is shortened
EER =
COP =
BTU Output
Power Input
BTU Output
BTU Input
Service Tools — Equipment
The Service Tools needed to PROPERLY charge a refrigeration system includes:
1. Manifold Gauges
2. Electronic Temperature Analyzer (Temperature measurements should be made with a good quality electronic temperature tester such as a Robinair 12860, Annie A-8, Electro-medic M-99, or equivalent.)
3. Sling Psychrometer
4. Refrigerant- 22 (Mono-chlorodiflouromethane)
5. Approved refrigerant recovery system and holding tank.
Note:1. The package cooling system used to develop the
above information utilized a TXV refrigerant metering device.
2
2. Field conditions different from ARI conditions (95° db outdoor air, 80° db-67° wb return air) will yield results that vary from the graphs in this example.
LIQUIDSUBCOOLING
50%
4#
62.5
5#
75
6#
87.5
7#
100%
8#
112.5
9#
125
10#
137.5%
11#
EVAP. SUCT.SUPERHEAT
SUCTIONPRESSURE
EER
POWERINPUT
COOLINGCAPACITY
KW
BT
UH
BT
U/W
AT
T-H
RP
SIG
Tem
pera
ture
- F
DISCHARGEPRESSURE

Metering Devices
We use various types of refrigerant metering devices in air conditioning and heat pump systems. The cooling units we will discuss are equipped with Flow Control Check Valves (FCCV), see diagram below left, Capillary Tubes, Bleed-Type Thermostatic Expansion Valves (TXV-B) and Non-Bleed Thermostatic Expansion Valves (TXV-NB), see diagram below right. Current heat pump units which we will cover are equipped with Bleed and Non-Bleed TXV in outdoor sections with everything but Capillary Tubes on indoor coils. The CCBA and CUBA coils have a fixed flow control device for cooling-only applications.
The FCCV Flow Control is used on TXA-C and TXC-C universal convertible coils. This metering device is applied to these coils for cooling and heat pump ap-plications with 10 and 11 SEER products respectively. Package products may either use a FCCV or Capillary Tube metering devices. (FCCV coils are not an approved combination with a 5 ton 12 SEER or any 14 SEER outdoor units. These units can easily be over-charged with this type of metering device because the large volume of refrigerant in the system may not show an increase in head pressure. Only TVX coils should be used.)
Care should be taken that the proper size FCCV is matched to the outdoor unit to insure that the correct volume of refrigerant is flowing through the system (approx. 3 lbs/ton/minute). The orifice size of the FCCV is marked on the side of the metering device. TXA-C and TXC-C coils are shipped with the orifice size that matches the most commonly used outdoor unit with that particular coil combination. That size is indicated on the tag on the coil connection end. Correct orifice size is dependent on the outdoor unit model. The prop-er orifice for the indoor unit is in a small bag attached to the outdoor unit. (Orifices shipped with indoor coils may or may not be correct for the outdoor
unit, so the installer must verify size at the time of in-stallation.) Refer to Service Facts which also shows the proper size and type of metering device for the application.
TXC-E high efficiency coils are equipped with Bleed- Type TXVs for refrigerant control. The diaphragm on the TXV opens or closes the valve orifice to maintain a preset superheat and control refrigerant flow as load conditions on the evaporator change. When the com-pressor shuts off, refrigerant is able to bleed between the high pressure side upstream of the TXV and the low pressure downstream of the TXV; the system will equalize within 3-5 minutes. Also, these coils have a larger internal volume in order to support additional charge and provide for higher efficiencies. These coils are designed to be matched with 12 SEER outdoor units for higher SEER requirements. These coils can also be mated to 10 and 11 SEER units.
The TXC-S variable speed coils are equipped with Non-Bleed TXVs (TXV-NB). These coils do not equalize or bleed through the valve orifice which helps to pre-vent refrigerant from migrating back to the compressor after system shutdown. These coils should only be applied to outdoor products that are equipped with quick start components because of the pressure dif-ferential during system start up. Scroll compressor unit does not require a quick start component. Variable speed coils are mated with 12 and 14 SEER products for high efficiency.
Because today’s high efficiency systems require additional refrigerant volume to produce the needed capacity and efficiency, it is important that systems be installed with the proper size indoor coils equipped with the necessary metering device. Failure to do so could cause a decrease in reliability, capacity and efficiency.
Accutron™ Flow Control Check Valve (FCCV) Typical Thermostatic Expansion Valve
3

Cooling Systems
The diagram below illustrates the proper Manifold Gauge and Temperature Analyzer connections for charging a split cooling system.
Cooling Package System1. Attach center hose from manifold to drum of
refrigerant. Purge center hose with a minimum amount of refrigerant. Use the guidelines for deminimus release of refrigerant.
2. Purge with a minimum amount of refrigerant and attach suction (compound) gauge hose to the suction line (larger refrigerant line) pressure tap. This pressure tap may be located on the inside of the cabinet. For example: on the Voyager and Impack lines.
3. Purge with a minimum amount of refrigerant and attach high pressure gauge hose to the liquid line (smaller refrigerant line) pressure tap. This pressure tap is located inside the cabinet.
4. Attach temperature probe securely to the suction line approximately 6" away from compressor, if charging a cooling system with capillary tubes or checking TXV superheat. Insulate the probe with suction line insulation to prevent the element from being influenced by the surrounding air. Allow adequate time for system temperatures to stabilize before recording the temperature.
5. Attach temperature probe securely to the liquid line near the service valve, to check subcooling when charging a cooling system with a TXV. Insulate the probe with insulation to prevent the element from being influenced by the surrounding air. Allow adequate time for system temperatures to stabilize before recording the temperature.
Split System1. Attach center hose from manifold to drum of
refrigerant. Purge center hose with a minimum amount of refrigerant. Use the guidelines for deminimus release of refrigerant.
2. Purge with a minimum amount of refrigerant and attach suction (compound) gauge hose to the suction line (larger refrigerant line) pressure tap. This pressure tap is located on the suction line service valve.
3. Purge with a minimum amount of refrigerant and attach the high pressure gauge hose to the liquid line (smaller refrigerant line) pressure tap. This pressure tap is located on the liquid line service valve.
4. Attach temperature probe securely to the suction line near the service valve (if charging a cooling system with capillary tubes or checking TXV superheat). Insulate the probe with suction line insulation to prevent the element from being influenced by the surrounding air. Allow adequate time for system temperatures to stabilize before recording the temperature.
5. Attach temperature probe securely to the liquid line, to check subcooling when charging a cooling system with a TXV. Insulate the probe with insulation to prevent the element from being influenced by the surrounding air. Allow adequate time for system temperatures to stabilize before recording the temperature.
4
On either style of system, if refrigerant must be removed to achieve charge balance, an approved refrigerant recovery system and an approved storage tank must be used.

Heat Pump Systems
The diagram below illustrates the proper Manifold Gauge and Temperature Analyzer connections for charging a split heat pump system in the cooling or heating mode.
5
On either style of system, if refrigerant must be removed to achieve charge balance, an approved refrigerant recovery system and an approved storage tank must be used.
Heat Pump Package System1. Attach center hose from manifold to drum of
refrigerant.. Purge center hose with a minimum amount of refrigerant. Use the guidelines for deminimus release of refrigerant.
2. Purge with a minimum amount of refrigerant and attach suction (compound) gauge hose to low side charging port. This charging port (pressure tap) is inside the cabinet of the heat pump and is piped directly to the suction line at the Compressor.
3. Purge with a minimum amount of refrigerant and attach the high pressure gauge hose to the high side charging port. The high side charging port (pressure tap) is inside the cabinet of the heat pump and is piped directly to the discharge line at the compressor. Use this tap to obtain head pressure when charging heat pumps in the heating or cooling mode.
4. Attach the temperature probe securely to the suc-tion line approximately 6" away from compressor, if charging a system with indoor capillary tubes by the superheat method or a heat pump with capillary tubes by the hot gas method. Insulate the probe with suction line insulation to prevent the element from being influenced by the surrounding air. Allow adequate time for recording the temperature.
5. Attach the temperature probe securely to the Liquid line outside the unit cabinet. Insulate the probe with insulation to prevent the element from being influenced by the surrounding air. Allow adequate time before recording the temperature.
Heat Pump Split System1. Attach center hose from manifold to drum
of refrigerant. Purge with a minimum amount of refrigerant. Use the guidelines for deminimus release of refrigerant.
2. Purge with a minimum amount of refrigerant and attach suction (compound) gauge hose to low side charging port. This charging port (pressure tap)★ on older models protrudes from the corner service valve panel of the heat pump and is piped directly to the suction line at the compressor. On current models this pressure tap is inside the cabinet.
3. Purge with a minimum amount of refrigerant and attach the high pressure gauge hose to the high side charging port. The high and low sides charging ports (pressure taps)★ on older models protrude from the corner service valve panel of the heat pump and are piped directly to the discharge and suction lines at the compressor. Use this tap to obtain head pressure when charging heat pumps in the heating or cooling mode. DO NOT use the pressure tap on the liquid line (small) service valve for charging or performance measurements. On current models, this pressure tap is inside the cabinet.
4. Attach the temperature probe securely to the suction line near the service valve if charging a system with indoor capillary tubes by the super heat method or a heat pump with capillary tubes by the hot gas method. Insulate the probe with suction line insulation to prevent the element from being influenced by the surrounding air. Allow adequate time for recording the temperature.
5. Attach temperature probe securely to the liquid line near the service valve when charging a heat pump system (in the cooling mode) with an indoor TXV. Insulate the probe with insulation to prevent the element from being influenced by the surrounding air. Allow adequate time before recording the temperature.

Equipment Pressure Taps (General)
Pressure taps may be located on the equipment cabinet, on the refrigerant lines, or on refrigerant line service valves. Some equipment may have pressure taps at more than one location. See the charging charts located on the equipment for selecting proper pressure taps. Inaccurate pressure readings will occur if the wrong taps are used. Pressure taps located on or inside the equipment cabinet must be used on heat pumps. Inaccurate readings and damage to pressure gauges will result if the wrong taps are used.
Three phase 7.5 ton and larger split system models have pressure taps located on service valves which are closed when the valves are fully open in their operating position (backseated). After connecting gauges to pressure taps, the service valves are turned one turn in a clockwise direction to open the pressure taps. Do not exceed one turn.
When pressure measurements have been completed, return the valves to their fully backseated position. Replace and tighten valve caps securely to prevent leaks. Cover caps on pressure taps should always be replaced and tightened after making pressure measurements to prevent leaks. Do not overtighten caps on Schrader type pressure taps. The tap may be damaged preventing future use.
Manifold Gauge RemovalCaution must be used when removing hoses from a refrigerant system. When attaching and removing manifold gauges access valve actuators manufactured by Robinair, Watsco, J.B. Industries, Imperial Eastman and Delco may be used to prevent loss of refrigerant charge. Liquid refrigerant when released can cause severe burns and permanent eye damage. Always wear safety glasses, face mask and protective clothing when handling refrigerants.
6

Charging Capillary Tube/FCCV – Cooling Mode Only – R-22
Current Superheat Method1. Measure indoor dry bulb
temperature. (Return air at air handler).
2. Measure outdoor dry bulb tempera-ture. (Measure at outdoor unit).
3. Measure suction pressure at suction pressure tap.
4. Measure suction temperature before the suction service valve on a split system or 6" away from the compres-sor on a package system.
5. You may determine the actual system superheat in degrees by referring to a temperature pressure chart or the low side manifold gauge and the measured suction line temperature.
6. *Find the intersection when the outdoor temperature and indoor temperature meet and read degrees superheat. If unit superheat is more than 5° above chart value, add R-22 until within 5°. If unit superheat is more than 5° below chart value, remove R-22 until within 5°, using an approved recovery system.
7. If superheat is below the 5° limit line, DO NOT ADD R-22.
7
*If Relative Humidity is above 70% or below 20% use indoor Wet Bulb Temperature.
Charts based on 400 CFM/ton indoor airflow and 50% relative humidity, use only on systems that cool with an FCCV or capillary tube.
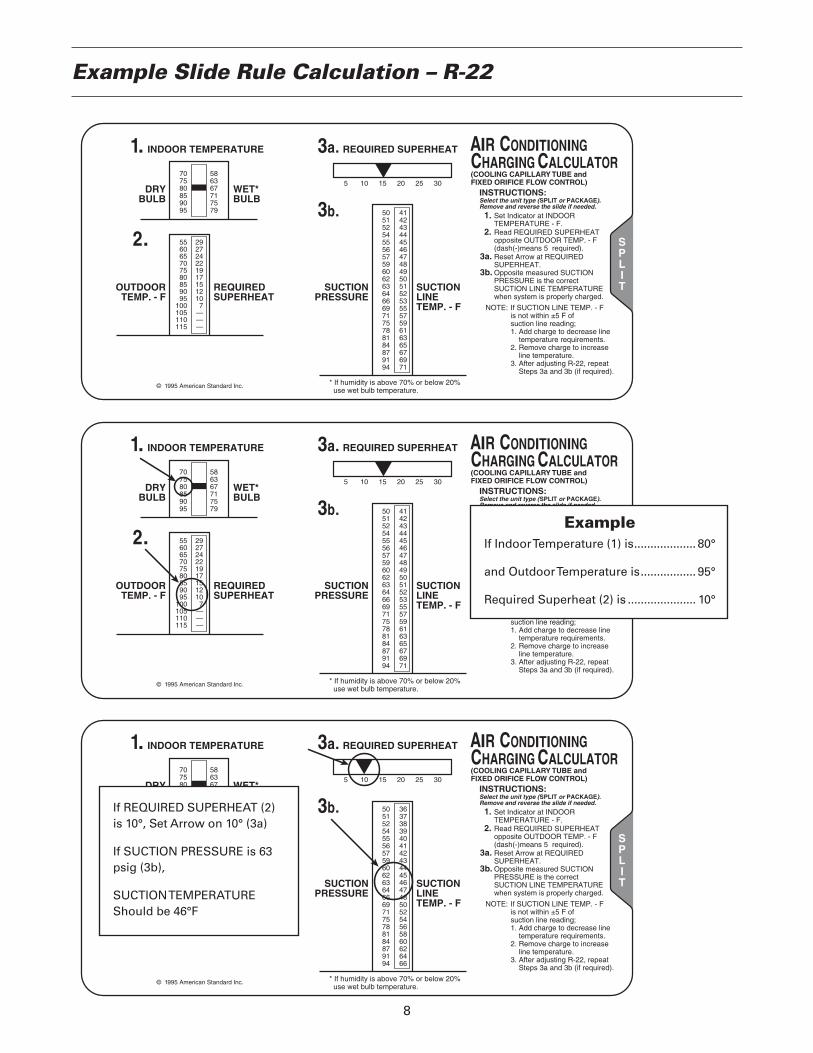
Example Slide Rule Calculation – R-22
ExampleIf Indoor Temperature (1) is ................... 80°
and Outdoor Temperature is ................. 95°
Required Superheat (2) is ..................... 10°
If REQUIRED SUPERHEAT (2) is 10°, Set Arrow on 10° (3a)
If SUCTION PRESSURE is 63 psig (3b),
SUCTION TEMPERATURE Should be 46°F
8

Performance – Cooling Mode – R-22
Current MethodSplit System with a TWV036A Air HandlerCooling System with FCCV or Capillary TubesIndoor Air Flow 1200 CFM
PERFORMANCE CURVES ARE NOT UNIVERSALIndoor Unit Alternates See Correction Table
CORRECTION TABLE Corr. Press.Indoor Unit CFM S H
COOLING WITH CAPILLARYBXA036A200A 1200 –3 –6BXA736M2HPA 1200 –3 –6BXA736D200A 1200 0 0BXF036A200A 1200 –2 –4BXA042A200A 1350 0 0BXF048A200A 1350 3 6BWH736A100A 1200 0 0BWV036A100E 1200 0 0BWV736A100E 1200 0 0BWV042A100C 1350 3 6
COOLING WITH FCCVTWV036A140A* 1200 0 0
Cooling performance can be checked when the outdoor temperature is above 75°F.
To check cooling performance, allow pressures to stabilize and measure indoor wet bulb temperature, outdoor temperature and pressures (both head and suction).
Locate outdoor dry bulb and indoor wet bulb temp-erature. Find the intersection of the outdoor dry bulb temperature and indoor wet bulb temperature. Read head (or liquid) and suction pressure value in the left hand column of the chart.
Actual Head Pressure should be ±10 PSIG of chart.
Suction Pressure should be ±3 PSIG of chart.
Example: Outdoor Dry Bulb Temperature = 90°F Indoor Wet Bulb Temperature = 67°F
Answer: Suction Pressure @ 1200 CFM = 75 PSIG Head Pressure @ 1200 CFM = 225 PSIG
*Note: Interconnecting Lines: Gas - 7/8" O.D.: Liquid - 5/16" O.D.
† These graphs are for checking unit performance only. They are not to be used for system charging. To charge systems with indoor capillary tube, see superheat graphs or capillary tube slide rule calculation on pages 7 and 8.
9

Charging and Performance – Cooling Mode – R-22
Current MethodSplit System with a TXC730P3HPA CoilCooling System with Thermal Expansion Valve.Indoor Airflow 1060 CFM
PERFORMANCE CURVES ARE NOT UNIVERSALIndoor Unit Alternates See Correction Table
CORRECTION TABLE Corr. Press.Indoor Unit CFM S H
TWH036A140A 1200 0 0TWH736A140A 1200 0 0TWH042A140A 1350 3 6TWH742A140A 1350 2 4TWH048A140A 1350 5 10
COOLING WITH TXVBXA730P3HPA 1125 –5 –10BXA736P3HPA 1200 –2 –4BXF736P3HPA 1200 0 0BXA742P3HPA 1350 0 0BXF748P3HPA 1350 2 4TXC730P3HPA 1060 0 0TXC730P6HPB* 1060 0 0TXC736P3HPA 1200 3 6
Cooling performance can be checked when the outdoor temperature is above 75°.
To check cooling performance, allow pressures to stabilize and measure indoor wet bulb temperature, outdoor dry bulb temperature and pressures (both head and suction).
Locate outdoor dry bulb and indoor wet bulb temp-erature. Find the intersection of the outdoor dry bulb temperature and indoor wet bulb temperature. Read head (or liquid) and suction pressure value in the left hand column of the chart.
Actual Head Pressure should be ±10 PSIG of chart.
Suction Pressure should be ±3 PSIG of chart.
Example:Outdoor Dry Bulb Temperature = 85°FIndoor Wet Bulb Temperature = 67°F
Answer:Suction Pressure @1060 CFM = 74 PSIGHead Pressure @ 1060 CFM = 210 PSIG
*Note: Interconnecting Lines: Gas - 7/8" O.D.: Liquid - 5/16" O.D.
10
40 60 80 100 120
INDOOR ENTERING WET BULB ˚F
LIQ
UID
PR
ES
SU
RE
(P
SIG
)
100
150
200
250
300
350
400
50
55
60
65
70
75
80
85
90
95
100
40 60 80 100 120
INDOOR ENTERING WET BULB ˚F
SU
CT
ION
PR
ES
SU
RE
(P
SIG
)
1
3
2
4
1
34
2
OUTDOOR TEMPERATURE (˚F)
71˚F
59˚F
71˚F
67˚F
63˚F
59˚F
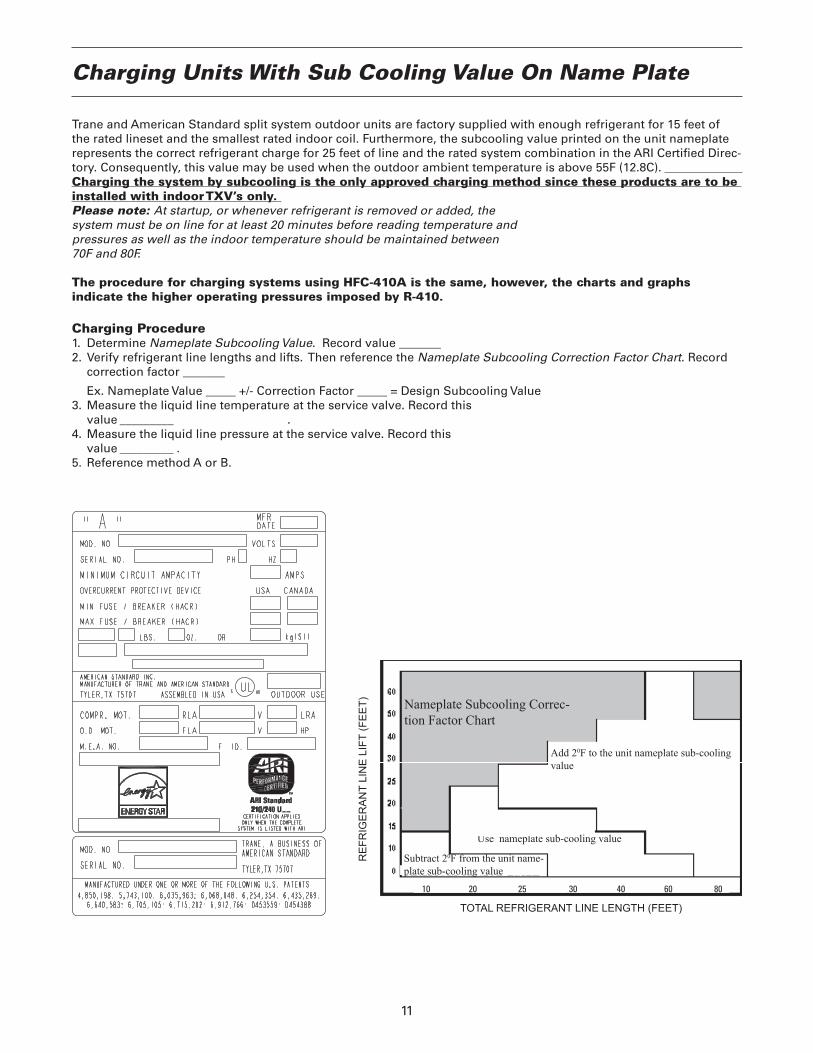
Trane and American Standard split system outdoor units are factory supplied with enough refrigerant for 15 feet of the rated lineset and the smallest rated indoor coil. Furthermore, the subcooling value printed on the unit nameplate represents the correct refrigerant charge for 25 feet of line and the rated system combination in the ARI Certified Direc-tory. Consequently, this value may be used when the outdoor ambient temperature is above 55F (12.8C). Charging the system by subcooling is the only approved charging method since these products are to be installed with indoor TXV’s only. Please note: At startup, or whenever refrigerant is removed or added, the system must be on line for at least 20 minutes before reading temperature and pressures as well as the indoor temperature should be maintained between 70F and 80F.
The procedure for charging systems using HFC-410A is the same, however, the charts and graphs indicate the higher operating pressures imposed by R-410.
Charging Procedure1. Determine Nameplate Subcooling Value. Record value _______2. Verify refrigerant line lengths and lifts. Then reference the Nameplate Subcooling Correction Factor Chart. Record
correction factor _______
Ex. Nameplate Value _____ +/- Correction Factor _____ = Design Subcooling Value 3. Measure the liquid line temperature at the service valve. Record this value _________ .4. Measure the liquid line pressure at the service valve. Record this value _________ .5. Reference method A or B.
Charging Units With Sub Cooling Value On Name Plate
11
TOTAL REFRIGERANT LINE LENGTH (FEET)
RE
FRIG
ER
AN
T LI
NE
LIF
T (F
EE
T) Nameplate Subcooling Correc-tion Factor Chart
Add 20F to the unit nameplate sub-cooling value
Use nameplate sub-cooling value
Subtract 20F from the unit name-plate sub-cooling value
10 20 25 30 40 60 80

Charging Units With Sub Cooling Value On Name Plate
Method B - TXV Sub-cooling Charging ChartUse the TXV Sub-cooling Charging Chart and select the appropriate design subcooling column. Locate the temperature corresponding to the measured liquid line temperature in step 3. Then follow the row over to the appropriate design subcooling column as determined in step 2. If the pressure is lower than the chart’s value, add refrigerant and wait 20 minutes for the system to stabilize. If the pressure is higher than the chart’s value, refrigerant will need to be recovered and wait 20 minutes to the system to stabilize. (Repeat this procedure as necessary to achieve cor-rect system charge.)
Method A - TXV Charging Curve GraphUse the TXV Charging Curve Graph and select the appropriate design subcooling curve. Plot the temperature vs. pressure. If the lines intersect below the appropriate curve on the TXV chart, meter in refrigerant to the suc-tion line and wait 20 minutes for the system to stabilize. If the lines intersect above the appropriate curve on the TXV chart, refrigerant will need to be recovered and wait 20 minutes for the system to stabilize. (Repeat this procedure as necessary to achieve correct system charge.)
12

Charging Units With Sub Cooling Value On Name Plate
13
Example: 2TTB3036A1000AA / 2TEC3036A installed with 60 feet of 7/8” gas line and 3/8” liquid line. Vertical change is 20 feet. System airflow has been designed to be 400 CFM per ton
1. Outdoor unit’s subcool value is 10F
2. The Nameplate Sub-cooling Correction Factor Chart indicates the curve or column that is 2F higher than the nameplate charge be used.
a) 10 + 2 = 12F, use the 12F charging curve or column.
Add 20F to the unit nameplate sub-cooling value
RE
FRIG
ER
AN
T LI
NE
LIF
T (F
EE
T)
TOTAL REFRIGERANT LINE LENGTH (FEET)
Nameplate Subcooling Correction Factor Chart
Use nameplate sub-cooling value
Subtract 20F from the unit name-plate sub-cooling value

Charging Units With Sub Cooling Value On Name Plate
3. After 20 minutes run time, the liquid line temperature reads 90F and the liquid line pressure reads 175 PSIG.
4. More refrigerant is required. After adding charge, wait 20 minutes for the system to stabilize.
5. After system charge is set, then verify system performance based on the pressure curves furnished in the Service Facts.
14
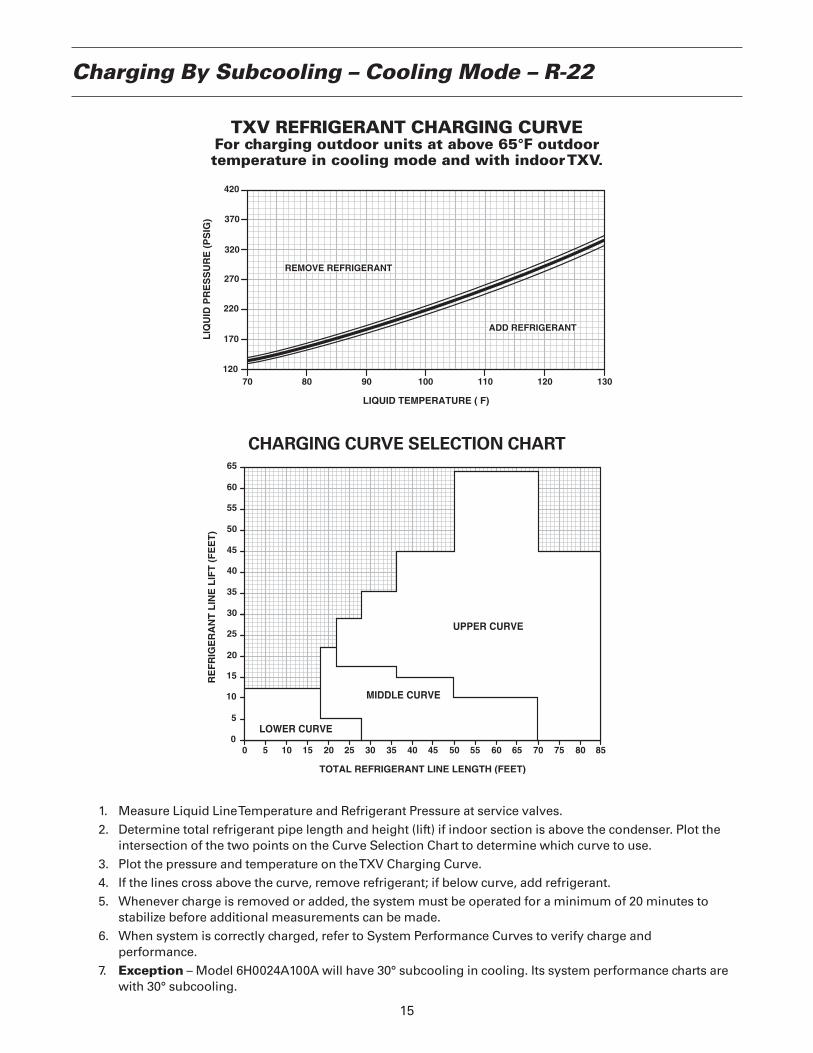
Charging By Subcooling – Cooling Mode – R-22
1. Measure Liquid Line Temperature and Refrigerant Pressure at service valves.2. Determine total refrigerant pipe length and height (lift) if indoor section is above the condenser. Plot the
intersection of the two points on the Curve Selection Chart to determine which curve to use.3. Plot the pressure and temperature on the TXV Charging Curve.4. If the lines cross above the curve, remove refrigerant; if below curve, add refrigerant.5. Whenever charge is removed or added, the system must be operated for a minimum of 20 minutes to
stabilize before additional measurements can be made.6. When system is correctly charged, refer to System Performance Curves to verify charge and
performance.7. Exception – Model 6H0024A100A will have 30° subcooling in cooling. Its system performance charts are
with 30° subcooling.
15
70 80 90 100 110 120 130
LIQ
UID
PR
ES
SU
RE
(P
SIG
)
LIQUID TEMPERATURE ( F)
120
170
220
270
420
320
370
REMOVE REFRIGERANT
ADD REFRIGERANT
0 105 15 25 35 45 5520 30 40 50 60 65 70 75 80 85
RE
FR
IGE
RA
NT
LIN
E L
IFT
(F
EE
T)
TOTAL REFRIGERANT LINE LENGTH (FEET)
0
5
10
15
20
25
30
35
40
45
50
55
60
65
LOWER CURVE
MIDDLE CURVE
UPPER CURVE
TXV REFRIGERANT CHARGING CURVEFor charging outdoor units at above 65°F outdoor temperature in cooling mode and with indoor TXV.
CHARGING CURVE SELECTION CHART

Performance – Heating Mode – R-22
This is a Typical Chart and is Not Universal for All Heat Pumps.
Heat Pump with Capillary Tubes or FCCV
16
3. To check either HEAD or SUCTION PRESSURE enter the chart on the bottom scale marked OUTDOOR TEMPERATURE.
4. Draw a vertical line up to the INDOOR TEMPERA-TURE and read SUCTION PRESSURE or HEAD PRESSURE horizontally to the left in the appropriate airflow column.
5. The HEAD PRESSURE reading on the gauge should be equal to, or within 5 PSIG BELOW the chart reading.
6. The SUCTION PRESSURE reading on the gauge should be within ±3 PSIG of the chart reading.
These charts are located in the outdoor section along with the charging charts. If the unit has a capillary tube outdoors these charts should NOT be used for charging but only to ensure you are in the ball park on the charge and that the system is working properly. Once this has been established you should use the charging chart on the outdoor unit. A typical chart is shown on the next page to fine tune the charge for maximum efficiency.
To use the chart:
1. Read indoor and outdoor temperatures at the air handler and outdoor unit respectively.
2. Measure head and suction pressures at the outside pressure tap.

Charging – Heating Mode – R-22
Heat Pump with Capillary Tubes or FCCV
This is a Typical Chart and is Not Universal for All Heat Pumps.
17
1. Unit must be in the Heating Mode with stabilized running conditions and coil must be free of ice.
2. Measure suction pressure and discharge pressure and check against pressure curve performance in the outdoor unit. If pressures are within tolerance proceed with the following steps. If pressures are not within tolerance see preceding page.
3. Measure outdoor dry bulb temperature at the outdoor unit.
4. Measure indoor dry bulb temperature at the air handler.
5. Measure Hot Gas temperature near outdoor unit.
6. Using the Charging Chart on the outdoor unit find the intersection where the outdoor temperature and the indoor temperature meet. Read hot gas temper-ature for this intersection. If measured hot gas temperature is more than 2° above chart value, add R-22 until within 2 degrees. If measured hot gas temperature is more than 2° below chart value, remove R-22 until within 2°, using an approved recovery system.
continued

Charging – Heating Mode – R-22 – continued
PERFORMANCE CURVES ARE NOT UNIVERSALIndoor Unit Alternates See Correction Table
Current MethodSplit Heat Pump with a TWV030A Air HandlerHeat Pump with TXV Outdoor UnitIndoor Airflow 1000 CFM
CORRECTION TABLE Corr. Press.Indoor Unit CFM S H
TXA036A4HPA 1125 -1 -15TXA736A4HPA 1125 -1 -15TXC042A4HPA 1125 -1 -20TXA042A4HPA 1125 -1 -20TXA742A4HPA 1125 -1 -20TWV025A140A 900 1 15TWV725A140A 900 1 15TWV730A140A 1000 0 0TWV036A140A 1125 -1 -15TWV736A140A 1125 -1 -15TWV042A140A 1125 -1 -20TWV742A140A 1125 -1 -20TWH024A140A 900 1 15TWH742A140A 900 1 15TWH030A140A 1000 0 0TWH730A140A 1000 0 0TWH036A140A 1125 -1 -15TWH736A140A 1125 -1 -15TWH042A140A 1125 -1 -20TWH742A140A 1125 -1 -20
Heating performance can be checked when the outdoor temperature is below 60°F.
To check heating performance, allow pressures to stabilize and measure indoor dry bulb temperature, outdoor temperature and pressures (both head and suction).
Locate outdoor and indoor dry bulb temperature, find the intersection of the outdoor temperature and indoor temperature and read head or suction pressure value in the left hand column of the chart.
Actual Head Pressure should be: Equal to or less than 5 PSIG of chart.
Suction Pressure should be ±3 PSIG of chart.
18

Charging By Weight
When a refrigerant system is opened, as in compres-sor replacement, the service technician may want to recharge the system by weight.
Package SystemsThe charge stamped on the unit‘s nameplate is the total charge. With an accurate scale the weight method of charging is a rapid and accurate method of charging.
Split SystemsCharging by weight using unit’s nameplate inform-ation only is not an approved method. Prior to 8/98, the refrigerant charge stamped on the outdoor unit nameplate was the total system charge when installed with 25 feet of refrigerant lines and with the indoor coil or air handler that the outdoor unit was rated with. The Department of Energy, test procedures require the manufacturer to test and rate their outdoor unit with their highest sales volume indoor coil or air handler. This rated combination is listed in the Air Conditioning and Refrigeration Institute Directory, ARI. In the ARI Directory this tested combination is noted by a ‡ sign. Unless you have this tested combination installed, which is listed in the ARI Directory only, the charge stamped on the outdoor unit nameplate is of little use. Further, this nameplate stamping is not the charge always shipped in the outdoor unit.
The units are shipped with the minimum operating charge. The minimum charge is the charge required for 25 feet of line for units produced prior to 8/98. For units produced after this date, the shipped charge is the total system charge when installed with 15 feet of refrigerant lines and the smallest indoor coil, by internal volume, that the unit is listed within the ARI Directory. The smallest indoor coil may not be the ‡ tested combination. This minimum operating charge is shipped in the unit so at start up time no refrigerant recovery will be necessary.
Indoor coils are shipped with a 10 PSIG nitrogen holding charge.
EvacuationWhen the refrigerant lines installation is completed and leak checked they and the indoor coil must be dehydrated. Proper dehydration is achieved when these components are evacuated to a minimum of 500 microns.
19

Calibrating Pressure Gauges
To check pressure gauges, connect the low pressure gauge to a cylinder of CFC-12 and the high pressure gauge to a cylinder of HCFC-22. Make sure the cylinders have been left standing in a stable environment, away from radiant heat sources, for several hours. This guarantees that the temperature inside the cylinder is the same as the temperature outside the cylinder. Measure the temperature of the air around the cylinders. Now compare the pressure indicated on the gauges to the Temperature-Pressure Chart. Use the adjustment screw on the gauges to calibrate them to this pressure.
EXAMPLE: The air temperature is 75°F. The low pressure gauge (connected to the cylinder of CFC-12) should be adjusted to indicate 77 PSIG. The high pressure gauge (connected to HCFC-22) should indicate 132.25 PSIG – or as close as we can read it.
We don’t need a pressure/temperature chart to make this check. Most manifold gauges used for refrigeration and air conditioning have this chart “built into” the scales, right on the gauge. Figure 1 is a copy of the scales on a typical set of refrigeration gauges. Notice the inside scales labeled HCFC-22, CFC-12 and CFC-502. The values on these scales are the saturation temperatures for the pressures indicated.
If the low pressure gauge is connected to a cylinder of CFC-12, and the air temperature is 75°F, adjust the needle to indicate a temperature of 75°F on the CFC-12 (middle) scale. The pressure reading is about 77 PSIG.
Finally, after calibrating the high pressure gauge to HCFC-22, calibrate it also to CFC-12. This gives us two reference points for more accuracy.
Due to the rough handling these test instruments go through day after day, it is important to develop a habit of routine maintenance and calibration. These instruments are our “eyes and ears.” How can we quickly and accurately service equipment if we can’t trust the measurements we make?
Figure 1
20

21
BackgroundThe traditional refrigerants, which have been used in central air conditioning systems for the past fifty years, have been declared to be a threat to the environment. This is due to the presence of Chlorine in their chemical make-up. As a consequence, the air conditioning industry has been required to search for a suitable replacement for the most popular of the current refrigerants, Refrigerant 22.
Since there are concerns of efficiency and service use, as well as the environmental issues, the job has not been easy. To locate a replacement and qualify it for use in the products we manufacture has taken years of work. The refrigerant chosen at this time is Refrigerant 410A. Continuing study will be conducted into other alternates.
Refrigerant CharacteristicsThe refrigerants developed in the nineteen twenties, using chlorine, such as Refrigerant 22, were uniform in their chemical make-up. Such refrigerants are called compounds. Each molecule of the refrigerant is like every other molecule. There is no way in the field to separate the elements of a compound once it has been made. Only the most sophisticated laboratory equipment can break the building blocks of the refrigerant apart. They contained Hydrogen, Chlorine, Fluorine, and Carbon. These refrigerants were called HCFC’s.
The alternative refrigerants are different in the materials used to make them. They are also different in the manner in which they are made. Refrigerants like Refrigerant 410A are mixtures of chemicals. This means its components are not as tightly bonded together and may separate when released from pressure. It is said
Refrigerant 410A
to be near AZEOTROPIC in its construction. This word means that it is a mixture, not a compound. It is manufactured by combining Refrigerant 32 and Refrigerant 125. Both of these refrigerants are made of Hydrogen, Fluorine, and Carbon and are referred to as HFC’s.
The most important reason for using an alternate refrigerant is that it does not contain any Chlorine.
Under Federal law, no release of refrigerant is allowed beyond the minimum required to do service to the products. This “DE MINIMUS” or “least possible” loss must be closely observed during service to avoid being subject to possible fines and worse. Even the alternative refrigerants cannot be released to atmosphere. The EPA (Environmental Protection Agency) requires they must be collected and handled as the existing refrigerants are handled. The issue here is not Ozone Depletion but the contribution to Global Warming and the waste of a valuable resource.
The alternative refrigerant R-410A is not a “drop-in” replacement for R-22. Since they use different oils, different drier construction materials and different expansion devices, they require the greatest caution in replacement situations. At this time, R410A is intended for use in new equipment.
The service tools that are used for the alternative refrigerant are not the same as the tools used for the current refrigerants and this will be explained in this manual. Please read and heed the warnings included in the material in this manual and the manufactures’ literature included with the products containing this alternative refrigerant.
The alternative refrigerant, R-410A, like R-22 is a safe product. The same precautions must be observed

when using either one. However, the technician must be aware of several differences in the handling of R-410A.
When the cylinders containing Refrigerant 410A are sitting upright, the valve will release liquid refrigerant. As you can see in Figure 1, there is a dip tube in the tank reaching to near the bottom of the cylinder. To charge with vapor, turn the cylinder upside down as shown in Figure 2. For cylinders made after 2¦99, turn the cylinder upside down as shown in Figure 1A for liquid and upright for vapor as shown in Figure 2A.
Refrigerant cylinders containing Refrigerant 410A are ROSE colored for identification.
Refrigerant cylinders should never be stored at 125°F or higher temperatures.
Never charge any refrigerant cylinder to greater than 80% of its capacity. This was true for Refrigerant 22 and is also true for Refrigerant 410A.
Refrigerant 410A boils at -62.9°F. when released to atmosphere. This is twenty degrees colder than Refrigerant 22. The danger of frostbite is much greater on exposed skin. Wear gloves and protect your eyes with safety glasses at all times.
Refrigerant Safety
Figure 1 Figure 2 Figure 1A
Invert cylinder if it has NO Dip Tube for charging. NO Dip Tube on cylinders manufactured after Feb. 1999.
Figure 2A
NO Dip Tube on cylinders manufactured after Feb. 1999.
22
This refrigerant, like Refrigerant 22, is low in toxicity but it can still be harmful to humans as it displaces oxygen. Since it is heavier than air, it will form puddles in low places. Use adequate ventilation near equipment that is leaking.
Refrigerant 410A is classified as non-flammable. Like Refrigerant 22, when mixed with air under pressure it can ignite. Make sure the system is without pressure before using a torch for a repair.
Recovery cylinders used with Refrigerant 410A are not the same cylinders used for Refrigerant 22. Refrigerant 410A recovery cylinders are constructed and tested to higher pressures, 400 PSIG (Pounds to the Square Inch Gauge).
Since the vapor pressure of Refrigerant 410A is from 50% to 70% higher than Refrigerant 22 at the same temperature, service hoses, manifolds and gauges are all constructed to withstand higher pressures. See Figure 3 for the gauge faces.
The oils used with the alternative refrigerant are also different. The oil used with the HCFC refrigerants such as 22 was mineral oil based. The oil used with Refrigerant 410A is a synthetic oil called POLYOLESTER, abbreviated POE. This oil requires special handling. Since it is hygroscopic in nature,

Refrigerant Safety
Application NotesReplacement of a unit using Refrigerant 22 with a unit using Refrigerant 410A requires that both the indoor and outdoor units be replaced. If the existing line sets are the correct size and the oil from the replaced unit did not contain any acid, the existing line set may be used. The technician should make every effort to eliminate any low spots in the lines forming traps. Blow through the lines with dry nitrogen to
23
reduce the amount of oil remaining in the lines. Then the lines may be used.
Line set lengths and lift restrictions will be similar to those found in R22 systems. This table is shown for training only, and must be used only for that purpose. For line sizing, use Pub. No. 32-3009 latest edition.
5 Ton 4 Ton 3.5 Ton 3 Ton 2.5 Ton 2 Ton 1.5 Ton 1 Ton
7/8 7/8 3/4 3/4 5/8 5/8 5/8 1/2 R22 1 1/8 1 1/8 7/8 7/8 3/4 3/4 3/4 5/8 1 3/8 1 1/8 7/8 7/8
3/4 3/4 5/8 5/8* 5/8* 1/2* 1/2* R410A 7/8* 7/8* 3/4* 3/4* 3/4 3/4 5/8 5/8 1 1/8 1 1/8 7/8 7/8 7/8 7/8 3/4
Liquid Line 3/8 3/8 3/8 3/8 5/16 5/16 1/4 1/4
*Rated tube size
Figure 3
(it picks up moisture from the air), it must be kept sealed until used. Liquid line driers must be changed whenever the system is opened for service. A good vacuum cannot adequately remove the moisture from the synthetic oil as it did from a mineral oil based lubricant.
The only system additive that may be used is AcidAway. This additive has ONLY been approved for Refrigerant 22, when used in accordance with the manufacturers’ instructions. All other additives are discouraged and are not recommended.
The last caution will seem unusual to the technician. Synthetic oil will attack many materials used in roofing. When service is required on equipment mounted on a roof, the surrounding roof must be protected from oil spray or spills. A plastic covering or tarp must be spread around the work area. This caution must be taken seriously! Wiping up spilled oil will not stop it from causing long term damage to roofing materials.
24
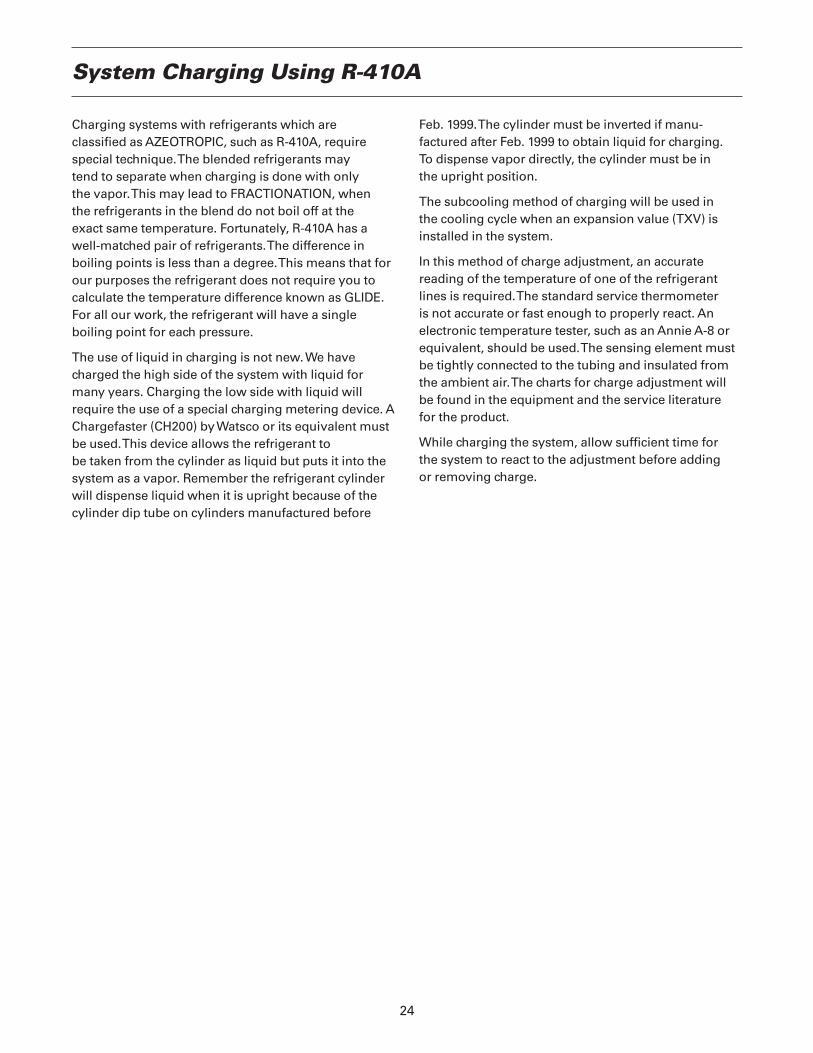
Charging systems with refrigerants which are classified as AZEOTROPIC, such as R-410A, require special technique. The blended refrigerants may tend to separate when charging is done with only the vapor. This may lead to FRACTIONATION, when the refrigerants in the blend do not boil off at the exact same temperature. Fortunately, R-410A has a well-matched pair of refrigerants. The difference in boiling points is less than a degree. This means that for our purposes the refrigerant does not require you to calculate the temperature difference known as GLIDE. For all our work, the refrigerant will have a single boiling point for each pressure.
The use of liquid in charging is not new. We have charged the high side of the system with liquid for many years. Charging the low side with liquid will require the use of a special charging metering device. A Chargefaster (CH200) by Watsco or its equivalent must be used. This device allows the refrigerant to be taken from the cylinder as liquid but puts it into the system as a vapor. Remember the refrigerant cylinder will dispense liquid when it is upright because of the cylinder dip tube on cylinders manufactured before
Feb. 1999. The cylinder must be inverted if manu-factured after Feb. 1999 to obtain liquid for charging. To dispense vapor directly, the cylinder must be in the upright position.
The subcooling method of charging will be used in the cooling cycle when an expansion value (TXV) is installed in the system.
In this method of charge adjustment, an accurate reading of the temperature of one of the refrigerant lines is required. The standard service thermometer is not accurate or fast enough to properly react. An electronic temperature tester, such as an Annie A-8 or equivalent, should be used. The sensing element must be tightly connected to the tubing and insulated from the ambient air. The charts for charge adjustment will be found in the equipment and the service literature for the product.
While charging the system, allow sufficient time for the system to react to the adjustment before adding or removing charge.
System Charging Using R-410A

25
R-410A Temperature and Pressure Chart
-60 1.2 -55 3.4 -50 5.8 -45 8.6 -40 11.6 -35 14.9 -30 18.5 -25 22.5 -20 26.9 -15 31.7 -10 36.8 -5 42.5 0 48.6 1 49.9 2 51.2 3 52.5 4 53.8 5 55.2 6 56.6 7 58.0 8 59.4 9 60.9 10 62.3 11 63.8 12 65.4 13 66.9 14 68.5 15 70.0
16 71.717 73.318 75.019 76.620 78.321 80.122 81.823 83.624 85.425 87.326 89.127 91.028 92.929 94.930 96.831 98.832 100.833 102.934 105.035 107.136 109.237 111.438 113.639 115.840 118.0 41 120.342 122.643 125.0
44 127.345 129.746 132.2 47 134.6 48 137.1 49 139.6 50 142.2 55 155.5 60 169.6 65 184.6 70 200.6 75 217.4 80 235.3 85 254.1 90 274.1 95 295.1 100 317.2 105 340.5 110 365.0 115 390.7 120 417.7 125 445.9 130 475.6 135 506.5 140 539.0 145 572.8 150 608.1 155 645.0
Pub No. 34-3400-01
TEMP R410 TEMP R410 TEMP R410
Figure 4

26
Figure 5
Subcooling Charging Table
REQUIRED LIQUID LINE TEMPERATURE LIQUID PRESSURE REQUIRED SUBCOOLING TEMPERATURE (°F) AT SERVICE VALVE (PSIG) 8 10 12 14 16 18
189 58 56 54 52 50 48 195 60 58 56 54 52 50 202 62 60 58 56 54 52 208 64 62 60 58 56 54
215 66 64 62 60 58 56 222 68 66 64 62 60 58 229 70 68 66 64 62 60 236 72 70 68 66 64 62
243 74 72 70 68 66 64 251 76 74 72 70 68 66 259 78 76 74 72 70 68 266 80 78 76 74 72 70
274 82 80 78 76 74 72 283 84 82 80 78 76 74 291 86 84 82 80 78 76 299 88 86 84 82 80 78
308 90 88 86 84 82 80 317 92 90 88 86 84 82 326 94 92 90 88 86 84 335 96 94 92 90 88 86
345 98 96 94 92 90 88 354 100 98 96 94 92 90 364 102 100 98 96 94 92 374 104 102 100 98 96 94
384 106 104 102 100 98 96 395 108 106 104 102 100 98 406 110 108 106 104 102 100 416 112 110 108 106 104 102
427 114 112 110 108 106 104 439 116 114 112 110 108 106 450 118 116 114 112 110 108 462 120 118 116 114 112 110
474 122 120 118 116 114 112 486 124 122 120 118 116 114 499 126 124 122 120 118 116 511 128 126 124 122 120 118

27
In the cooling cycle the Subcooling chart shown in Figure 5 will help you to make the decisions when charging units equipped with thermostatic expansion valves (TXV). Since the valve controls the superheat, subcooling must be used to determine the correct charge level.
It is recommended that charging be done in the liquid phase. When adding liquid refrigerant into the low side of the system, a charge-metering device is recommended (WATSCO CH200, or equivalent). Allow ample time when adding refrigerant for the system to balance out, to avoid having to recover refrigerant.
Existing Halide leak detectors do not work with R-410A. Existing acid test kits do not work with R-410A. (New kits are being developed.) Existing driers do not work with R-410A. Note that although R-410A does not deplete the ozone layer, all refrigerants must be recovered.
R-410A systems use POE oil, which is not compatible with the oils used in R-22 systems. If existing refrig-erant lines are to be used with an R-410A system (assuming that the line sizes are acceptable), they must be thoroughly blown out with dry nitrogen to remove the old oil. Blow vertical sections from top to bottom.
POE oils absorb moisture very quickly. Keep container tightly closed, whenever possible, and expose the system to the atmosphere as little as possible. POE oils can also damage a roof, if spilled.
410A Refrigerant
Vacuum pumps can not remove all of the moisture from POE oils. Change the liquid line drier anytime the system is opened to the atmosphere.
Suction line driers are to be left in the system for no more than 72 hours. Use only liquid and suction line driers approved for R-410A.
Since all current R-410A systems are expansion valve systems, the refrigerant charge is to be checked by the subcooling method, See Charts 6 and 7 in the cooling cycle. In heating use the heating discharge pressure curves.
Maximum liquid line pressure drop with R-410A systems is 50 PSI (10° subcooling). Recommended suction line pressure drop (2°F) is 4.8 PSI (Round up to 5.0).
At this time, only matched systems are permit-ted with R-410A. Both indoor and outdoor units must be changed in a unit replacement.
R-410A boils at -62.9° at atmospheric pressure, so beware of frostbite!
Line set lengths and lift restrictions will be similar to those found in R22 systems, as long as the rise is limited to 60 feet and the length is 200 feet or less. Tables on the following pages show the line sizes.
28
ERPD 4292A
DISTR T-1
A150999P05 REV.0
R410A Split Cooling Units Only
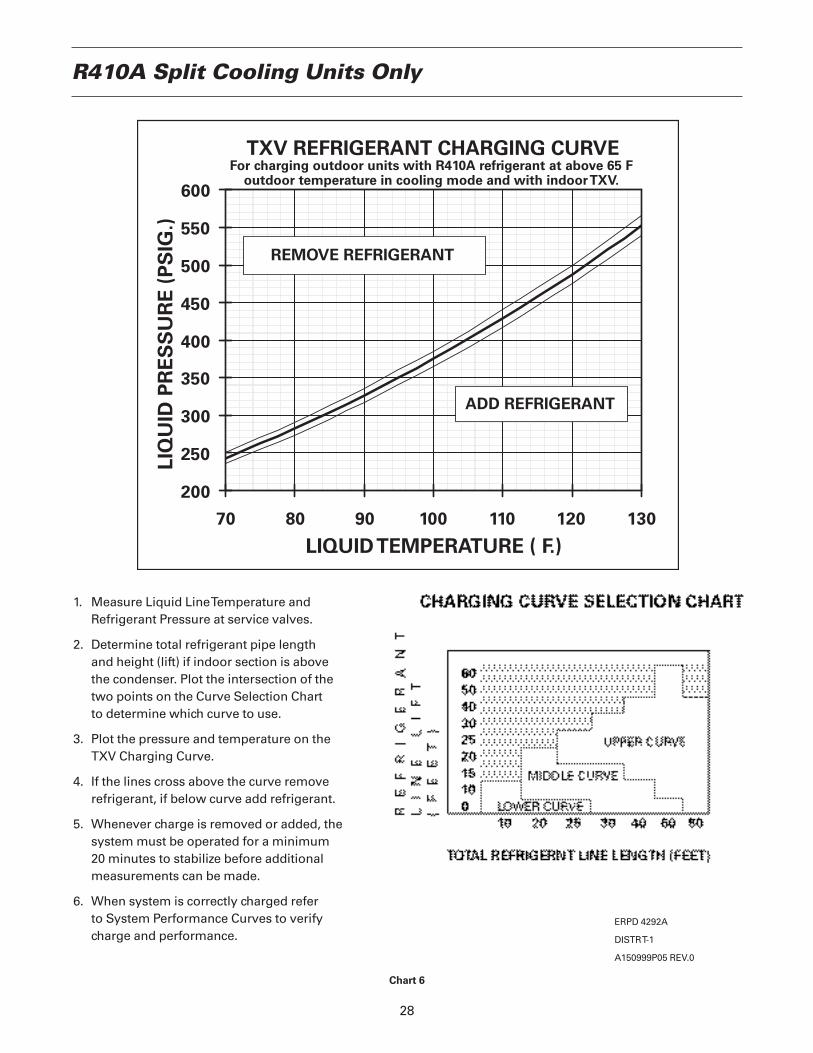
1. Measure Liquid Line Temperature and Refrigerant Pressure at service valves.
2. Determine total refrigerant pipe length and height (lift) if indoor section is above the condenser. Plot the intersection of the two points on the Curve Selection Chart to determine which curve to use.
3. Plot the pressure and temperature on the TXV Charging Curve.
4. If the lines cross above the curve remove refrigerant, if below curve add refrigerant.
5. Whenever charge is removed or added, the system must be operated for a minimum 20 minutes to stabilize before additional measurements can be made.
6. When system is correctly charged refer to System Performance Curves to verify charge and performance.
TXV REFRIGERANT CHARGING CURVE
200
250
300
350
400
450
500
550
600
70 80 90 100 110 120 130
LIQUID TEMPERATURE ( F.)
LIQ
UID
PR
ES
SU
RE
(P
SIG
.)For charging outdoor units with R410A refrigerant at above 65 F
outdoor temperature in cooling mode and with indoor TXV.
REMOVE REFRIGERANT
ADD REFRIGERANT
Chart 6

29
R410A Split Heat Pump Units Only
1. Measure Liquid Line Temperature and Refrigerant Pressure at service valves.
2. Determine total refrigerant pipe length and height (lift) if indoor section is above the condenser. Plot the intersection of the two points on the Curve Selection Chart to determine which curve to use.
3. Plot the pressure and temperature on the TXV Charging Curve.
4. If the lines cross above the curve remove refrigerant, if below curve add refrigerant.
5. Whenever charge is removed or added, the system must be operated for a minimum 20 minutes to stabilize before additional measurements can be made.
6. When system is correctly charged refer to System Performance Curves to verify charge and performance.
ERPD 4309B
DISTR T-1
A150999P06 REV.0
TXV REFRIGERANT CHARGING CURVE
200
250
300
350
400
450
500
550
600
70 80 90 100 110 120 130
LIQUID TEMPERATURE ( F.)
LIQ
UID
PR
ES
SU
RE
(P
SIG
.)For charging outdoor units with R410A refrigerant at above 65 F
outdoor temperature in cooling mode and with indoor TXV.
REMOVE REFRIGERANT
ADD REFRIGERANT
Chart 7

30
R-410A Charging and Performance – Cooling Mode
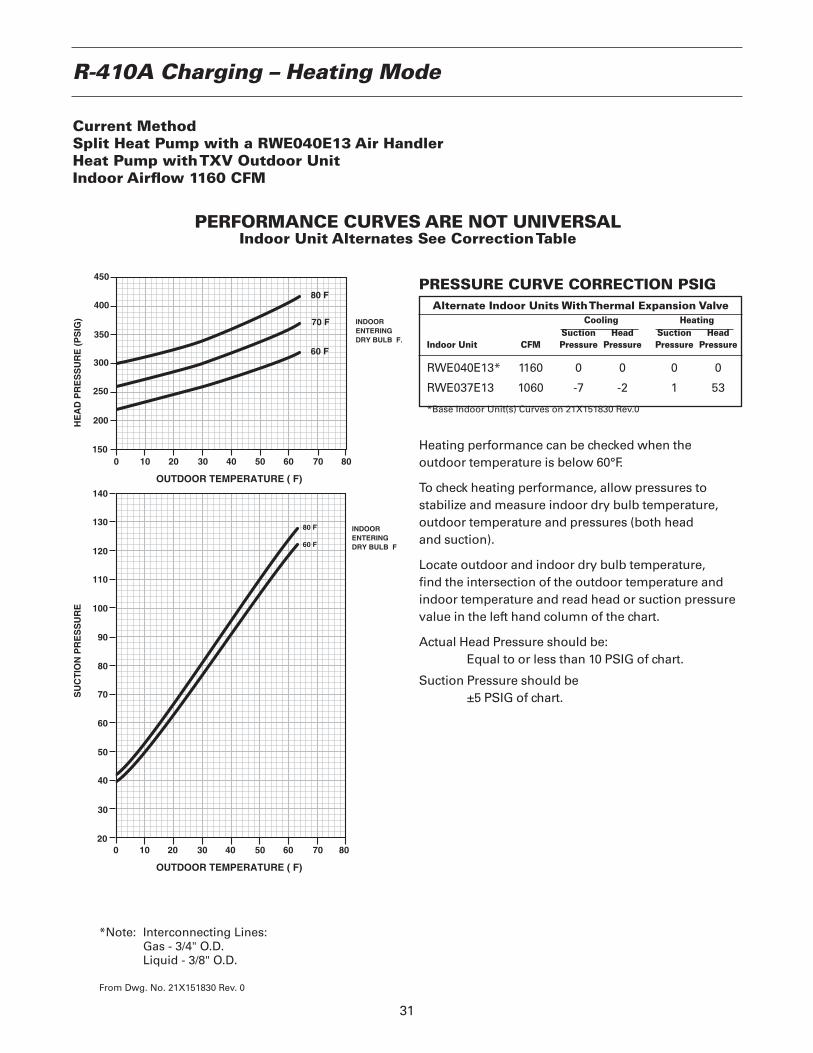
Current MethodSplit System with a RWE040E13 CoilCooling System with Thermal Expansion Valve.Indoor Airflow 1160 CFM
PERFORMANCE CURVES ARE NOT UNIVERSALIndoor Unit Alternates See Correction Table
PRESSURE CURVE CORRECTION PSIGAlternate Indoor Units With Thermal Expansion Valve
Cooling Heating Suction Head Suction HeadIndoor Unit CFM Pressure Pressure Pressure Pressure
RWE040E13* 1160 0 0 0 0
RWE037E13 1060 -7 -2 1 53
*Base Indoor Unit(s) Curves on 21X151830 Rev.0
*Note: Interconnecting Lines: Gas - 3/4" O.D. Liquid - 3/8" O.D.
From Dwg. No. 21X151830 Rev. 0
Cooling performance can be checked when the outdoor temperature is above 65°.
To check cooling performance, allow pressures to stabilize and measure indoor wet bulb temperature, outdoor dry bulb temperature and pressures (both head and suction).
Locate outdoor dry bulb and indoor wet bulb temp-erature. Find the intersection of the outdoor dry bulb temperature and indoor wet bulb temperature. Read head (or liquid) and suction pressure value in the left hand column of the chart.
Actual Head Pressure should be ±20 PSIG of chart.
Suction Pressure should be ±5 PSIG of chart.
Example:Outdoor Dry Bulb Temperature = 85°FIndoor Wet Bulb Temperature = 67°F
Answer:Suction Pressure @1160 CFM = 137 PSIGHead Pressure @ 1160 CFM = 340 PSIG
40 60 80 100 120
INDOOR ENTERING WET BULB ˚F
LIQ
UID
PR
ES
SU
RE
(P
SIG
)
200
250
300
350
400
450
500
1
3
2
4
71˚F
59˚F
550
600
50 70 90 110
100
105
110
115
120
125
130
135
140
145
150
40 50 70 90 11060 80 100 120
INDOOR ENTERING WET BULB ̊ F
SU
CT
ION
PR
ES
SU
RE
(P
SIG
)
1
34
2
OUTDOOR TEMPERATURE (˚F)
71˚F
67˚F
63˚F
59˚F
155
160
165
170
OUTDOOR TEMPERATURE (˚F)
31
R-410A Charging – Heating Mode
PERFORMANCE CURVES ARE NOT UNIVERSALIndoor Unit Alternates See Correction Table
Current MethodSplit Heat Pump with a RWE040E13 Air HandlerHeat Pump with TXV Outdoor UnitIndoor Airflow 1160 CFM
Heating performance can be checked when the outdoor temperature is below 60°F.
To check heating performance, allow pressures to stabilize and measure indoor dry bulb temperature, outdoor temperature and pressures (both head and suction).
Locate outdoor and indoor dry bulb temperature, find the intersection of the outdoor temperature and indoor temperature and read head or suction pressure value in the left hand column of the chart.
Actual Head Pressure should be: Equal to or less than 10 PSIG of chart.
Suction Pressure should be ±5 PSIG of chart.
PRESSURE CURVE CORRECTION PSIGAlternate Indoor Units With Thermal Expansion Valve
Cooling Heating Suction Head Suction HeadIndoor Unit CFM Pressure Pressure Pressure Pressure
RWE040E13* 1160 0 0 0 0
RWE037E13 1060 -7 -2 1 53
*Base Indoor Unit(s) Curves on 21X151830 Rev.0
*Note: Interconnecting Lines: Gas - 3/4" O.D. Liquid - 3/8" O.D.
From Dwg. No. 21X151830 Rev. 0
0 2010 30 50 7040 60 80
INDOOR ENTERING DRY BULB F.
HE
AD
PR
ES
SU
RE
(P
SIG
)
150
200
250
300
350
400
450
20
30
40
50
60
70
80
90
100
110
120
0 20 40 60 80
INDOOR ENTERING DRY BULB F
SU
CT
ION
PR
ES
SU
RE
OUTDOOR TEMPERATURE ( F)
80 F
70 F
60 F
80 F
60 F
50 703010
OUTDOOR TEMPERATURE ( F)
130
140

32
Notes

Literature Order Number File No. Pub. No. 34-4100-09 3/06Supersedes Pub. No. 34-4100-08 12/05Stocking location PI
Since Trane has a policy of continuous product improvement, it reserves the right to change design and
P.O. Box 9010Tyler TX 75711-9010http://www.trane.com
specifications without notice.© 2006 American Standard All rights reserved
A Business of American Standard Companies.

![fgw.henan.gov.cnfgw.henan.gov.cn/filecenter/res_base/rjcms/... · GB/T GB,'T 2978] 50052 GB 50965-2014 AC charging spot charging spot EV charging station EV power—supply system](https://img.pdfslide.us/doc/110x75/6012a0d474313f339b176015/fgwhenangovcnfgwhenangovcnfilecenterresbaserjcms-gbt-gbt-2978.jpg)


![New York State Elevtric Vehicle Charging Station Quarterly ......charging stations (also refer red to as electric vehicle supply equipment [EVSE]) across New York State. These installations](https://img.pdfslide.us/doc/110x75/5f3256b2bd715f3509100110/new-york-state-elevtric-vehicle-charging-station-quarterly-charging-stations.jpg)