Embed Size (px)
Citation preview
System Administrator Last Updated: March 31, 2015
Table of Contents
Introduction ........................................................................................................ 3
Roles ............................................................................................................................................ 4
Login ................................................................................................................... 5
Main Screen ........................................................................................................ 6
Menu .................................................................................................................. 7
Reviewer Administration ................................................................................... 8
Search for an Equivalency Request ................................................................... 11
Search for an Equivalency Request Details Page....................................................................... 12
System Administration ..................................................................................... 14
Manage Justifications ................................................................................................................ 14 Sort ...................................................................................................................................................................... 14 Add ...................................................................................................................................................................... 14 Delete .................................................................................................................................................................. 15 Inactive ................................................................................................................................................................ 16 Deleting a greyed out Justification ...................................................................................................................... 16
Modify Equivalency Decision ..................................................................................................... 16
View List of Faculty Administrators ................................................................... 19
Request to Add or Remove a Faculty Administrator .......................................... 20
McGill IT Customer Services Table of Contents Last Updated: March 31, 2015 Page 2 of 22

Introduction The Course Equivalency System is a web-based application. It is used to simplify the process of students finding and requesting course equivalencies when researching or applying for the Course Equivalency System. This project will contribute to the University’s larger goal of increasing participation in these programs, as per the Strategic Enrolment Management Plan.
The general process starts with the student wanting to know if a course from an External institution is equivalent to a McGill course. Students can access the Course Equivalency public database. If the course(s) that the student is looking for is not in the database, the students can submit a course equivalency request(s). A request number is created and is emailed to the student, along with a contact name (reviewer). The reviewer(s) can also submit a course equivalency request on behalf of a student.
While the request is immediately available to the reviewer to start working on, the email notification is only sent to the Reviewers the next business day. If the Reviewer(s) have already processed the request on the same, then they will not get the email notification. Reviewers will take a look at the student’s request and approve or disapprove it.
Depending on the Faculty, there will either be 1st Reviewer(s), or 1st and 2nd Reviewers. If there are no reviewer(s) set up, the Faculty Administrator will need to assign reviewer(s) for that request. However, if there are no 1st Reviewers assigned for a particular subject that has a pending request, an email notification will be sent to the Faculty Administrator. If there is no Faculty Administrator, a System Administrator will assign the appropriate Faculty Administrator.
The System Administrator role allows you to perform one or more of the following:
1. Add/remove 1st and 2nd Reviewer(s) per McGill Subject 2. Enable/disable 1st or 2nd Reviewer(s) 3. Manage Justifications 4. Modify course equivalency records 5. Search for course equivalency requests by request number or requestor’s email address and
view request details 6. View the list of Faculty Administrators 7. Request the addition/removal of a Faculty Administrator 8. Manage Info Text and email messages
McGill IT Customer Services Introduction Last Updated: March 31, 2015 Page 3 of 22

Roles System Administrator: They are able to manage Faculty Administrators, manage reviewers, and perform system administration tasks as well as search and view requests.
Faculty Administrator: They are able to manage reviewers, as well as search and review request(s) for their faculty and departments.
Reviewers: They are assigned by their Faculty Administrator to either be the 1st or 2nd Reviewer. There could be one or two levels of reviewers in a department. Here are some examples:
• There can be many 1st Reviewers and no 2nd Reviewer. This means the first person to assess the request will make the final decision.
• A person cannot be assigned 1st and 2nd Reviewer roles for the same subject. However, they can be assigned both roles for different subjects.
• If there are 1st and 2nd Reviewers, the 1st Reviewer will take a look at the request and make a preliminary decision. This request will go to the 2nd Reviewer who will make the final decision.
McGill IT Customer Services Introduction Last Updated: March 31, 2015 Page 4 of 22
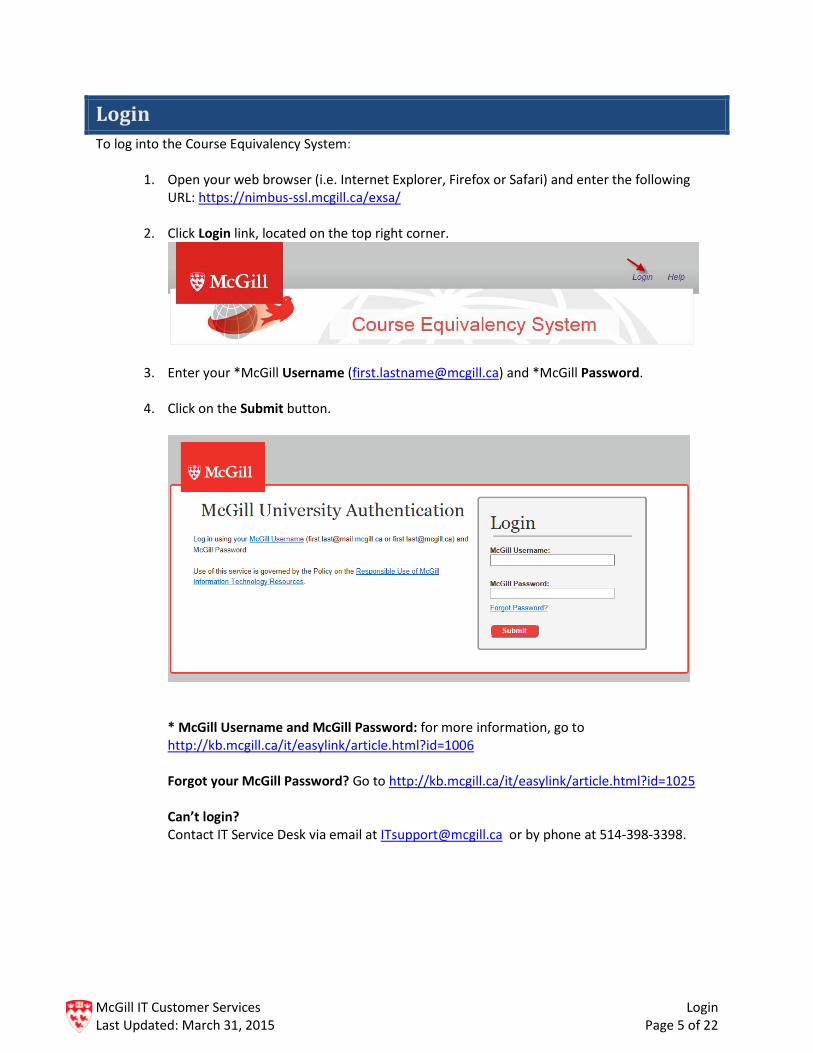
Login To log into the Course Equivalency System:
1. Open your web browser (i.e. Internet Explorer, Firefox or Safari) and enter the following URL: https://nimbus-ssl.mcgill.ca/exsa/
2. Click Login link, located on the top right corner.
3. Enter your *McGill Username ([email protected]) and *McGill Password.
4. Click on the Submit button.
* McGill Username and McGill Password: for more information, go to http://kb.mcgill.ca/it/easylink/article.html?id=1006 Forgot your McGill Password? Go to http://kb.mcgill.ca/it/easylink/article.html?id=1025 Can’t login? Contact IT Service Desk via email at [email protected] or by phone at 514-398-3398.
McGill IT Customer Services Login Last Updated: March 31, 2015 Page 5 of 22
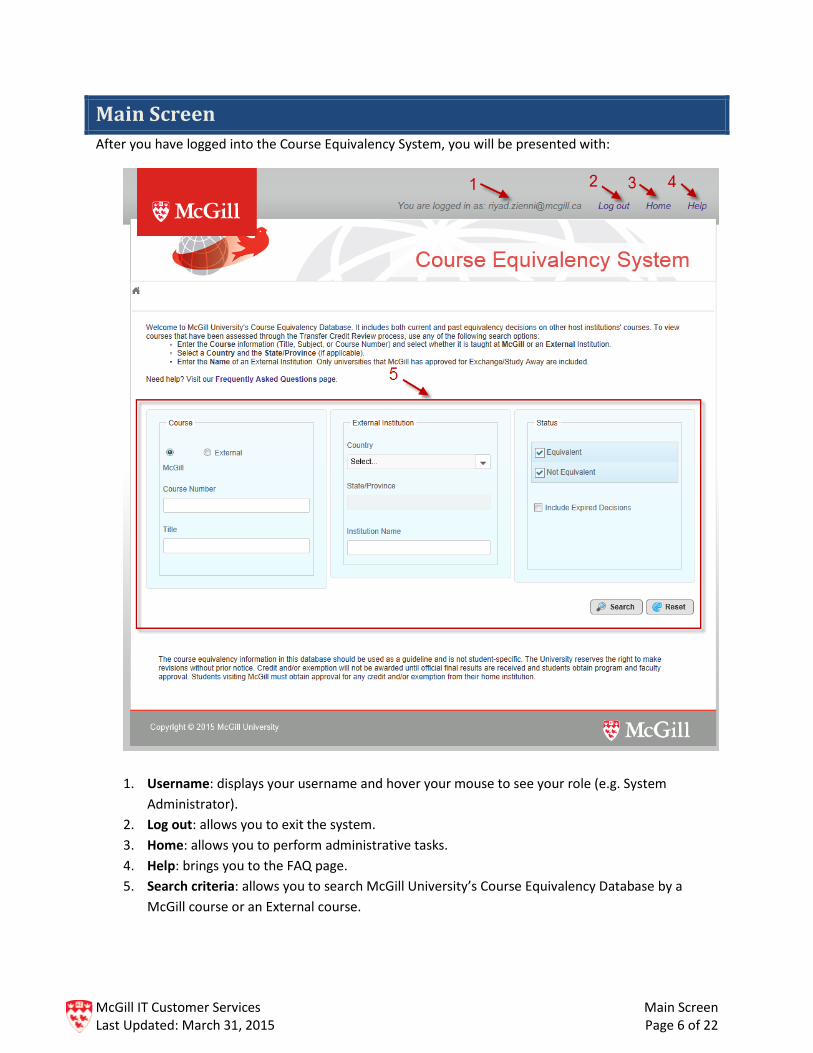
Main Screen After you have logged into the Course Equivalency System, you will be presented with:
1. Username: displays your username and hover your mouse to see your role (e.g. System
Administrator). 2. Log out: allows you to exit the system. 3. Home: allows you to perform administrative tasks. 4. Help: brings you to the FAQ page. 5. Search criteria: allows you to search McGill University’s Course Equivalency Database by a
McGill course or an External course.
McGill IT Customer Services Main Screen Last Updated: March 31, 2015 Page 6 of 22

Menu To do administrative tasks, you will need to go the menu.
1. Log into the Course Equivalency System. 2. Click on the Home link.
3. From Home, you will have 4 sections: a. Course Equivalency: It allows you to search for any McGill or External course(s). b. Reviewer Administration: This sections allows you to look up, add or delete reviewers
for a specific Faculty. c. Search for an Equivalency Request: It allows you to view the status of a request made
by the students. d. System Administration: It allows you manage the justification of reasons for a request
and modify any equivalence decision.
McGill IT Customer Services Menu Last Updated: March 31, 2015 Page 7 of 22

Reviewer Administration When a student requests a course equivalency, the system automatically sends an email to the reviewer(s) of the Faculty. If there are no reviewers, it sends a notification to the Faculty administrator. If there is no Faculty administrator, this notification is sent to the System Administrator.
As a System Administrator, you will have access to see all faculties. You will see the names of the 1st and 2nd Reviewers for a particular subject. If need be, you will be able to add or delete these reviewers on behalf of a department or faculty.
1. Click Manage Reviewers from the Reviewers section of the Menu. 2. Click on a Faculty.
3. Find the subject by filtering the column (Subject, Description, # of 1st Reviewers, # of 2nd Reviewers) or using the scrollbar at the bottom.
The column “# of Subjects with no assigned Reviewers ” should always be “0”. If it displays more than 0, this means that the Faculty Administrator has not assigned reviewer(s) for that subject(s). N
ote
McGill IT Customer Services Reviewer Administration Last Updated: March 31, 2015 Page 8 of 22
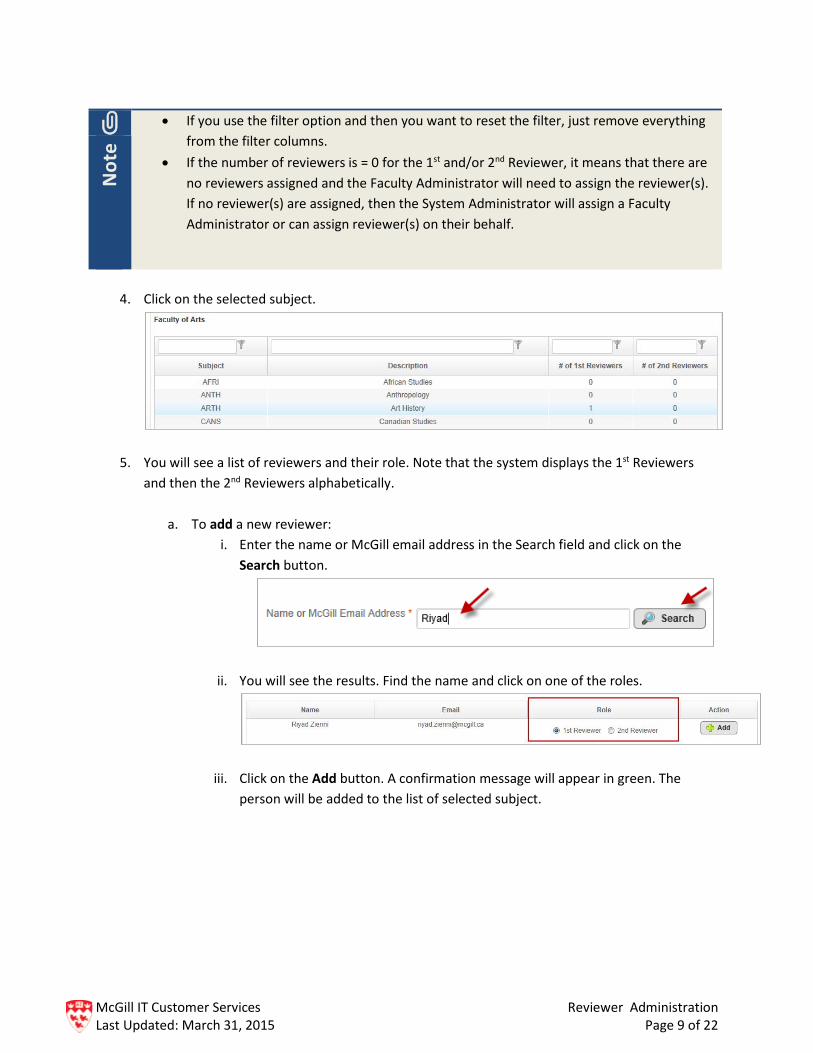
4. Click on the selected subject.
5. You will see a list of reviewers and their role. Note that the system displays the 1st Reviewers and then the 2nd Reviewers alphabetically.
a. To add a new reviewer: i. Enter the name or McGill email address in the Search field and click on the
Search button.
ii. You will see the results. Find the name and click on one of the roles.
iii. Click on the Add button. A confirmation message will appear in green. The person will be added to the list of selected subject.
• If you use the filter option and then you want to reset the filter, just remove everything from the filter columns.
• If the number of reviewers is = 0 for the 1st and/or 2nd Reviewer, it means that there are no reviewers assigned and the Faculty Administrator will need to assign the reviewer(s). If no reviewer(s) are assigned, then the System Administrator will assign a Faculty Administrator or can assign reviewer(s) on their behalf.
Not
e
McGill IT Customer Services Reviewer Administration Last Updated: March 31, 2015 Page 9 of 22

b. To modify the reviewer’s role from the list: i. Find the name and click on the desired role.
ii. It will automatically get saved. A confirmation message will appear in green.
c. To delete a reviewer from the list:
i. Find the name and click on the Delete button.
ii. You will see a Confirm reviewer deletion dialogue box. Click on the OK button to continue. A confirmation message will appear in green.
If you don’t want to delete or suspend access for a short term without removing the reviewer(s), you can uncheck their role and their name will remain on the list.
An individual can only assume a 1st Reviewer or 2nd Reviewer role for the same McGill Subject.
Not
e
McGill IT Customer Services Reviewer Administration Last Updated: March 31, 2015 Page 10 of 22

Search for an Equivalency Request This section allows you to search for a course equivalency request. To search for a request or an email:
1. Enter the request number or email field in the Search for an Equivalency Request section.
2. Click on the Search button. You will see the details of the request. For more information, go to the Search for an Equivalency Request Details Page on page 12.
McGill IT Customer Services Search for an Equivalency Request Last Updated: March 31, 2015 Page 11 of 22

Search for an Equivalency Request Details Page
1. Request Number or Email: It displays the request number or email. If you want to do a new
search, just enter a new request number or email and click on the Search icon. 2. Action Required: If the status of the request is Pending or Confirm, this field displays as Assess
and it shows who will be reviewing the request on the right. If the status of request is Final, it will not show the Action Required area.
3. Request Information: It shows you the request number, the McGill email address of the requestor, the current status and when the request was created. There are several statuses; see section 5 (History) below for definitions.
4. Requested Equivalency: it displays the course equivalency between the External and McGill courses: name of institution, course number and title. Click View to see the syllabus, if provided.
McGill IT Customer Services Search for an Equivalency Request Last Updated: March 31, 2015 Page 12 of 22

5. History: It shows you the history of the request status(es): a. Pending: no one has made a decision yet. b. Final: The first ‘Final’ status means a decision has been made by the 1st or 2nd Reviewer.
If you see more than one ‘Final’ status, it means that a decision was modified by the System Administrator.
c. Preliminary decision: a decision has been made by the 1st Reviewer and is waiting for the 2nd Reviewer to confirm the decision.
d. Incomplete: The request did not have enough information or accurate information (e.g. wrong syllabus) to enable a reviewer to make a decision. The requestor will receive an email about it and he or she will have to create a new request with the proper information.
McGill IT Customer Services Search for an Equivalency Request Last Updated: March 31, 2015 Page 13 of 22

System Administration As a System Administrator, you will be able to Manage Justifications and Modify Equivalency Decisions from the System Administration section.
Manage Justifications This allows you to manage the database of justification reasons. Justification reasons should be generic in nature so that they apply to all faculties and departments. You can sort, add, delete, deactivate, or activate the justification reasons. All Faculty administrators and reviewers will be able to see and select from the same list of justification reasons (with “active” status) for course equivalency request(s).
Sort
You can sort the justification reasons. The default sort is by Justification column.
1. Click Manage Justifications from the System Administration section. 2. Click on the field that you want to sort by (e.g. Active). The up or down arrow will indicate if it is
sorted in ascending or descending order.
Add
You will add a new justification when a new one is needed to process a course equivalency request. For example, a department has requested a new justification reason and it is approved by Enrolment Services and now has to be added to the list of reasons.
1. Click Manage Justifications from the System Administration section. 2. Type in the reason in the Justification for Course Equivalency Decisions field. 3. Click on the Add button. A confirmation message will appear in green.
McGill IT Customer Services System Administration Last Updated: March 31, 2015 Page 14 of 22
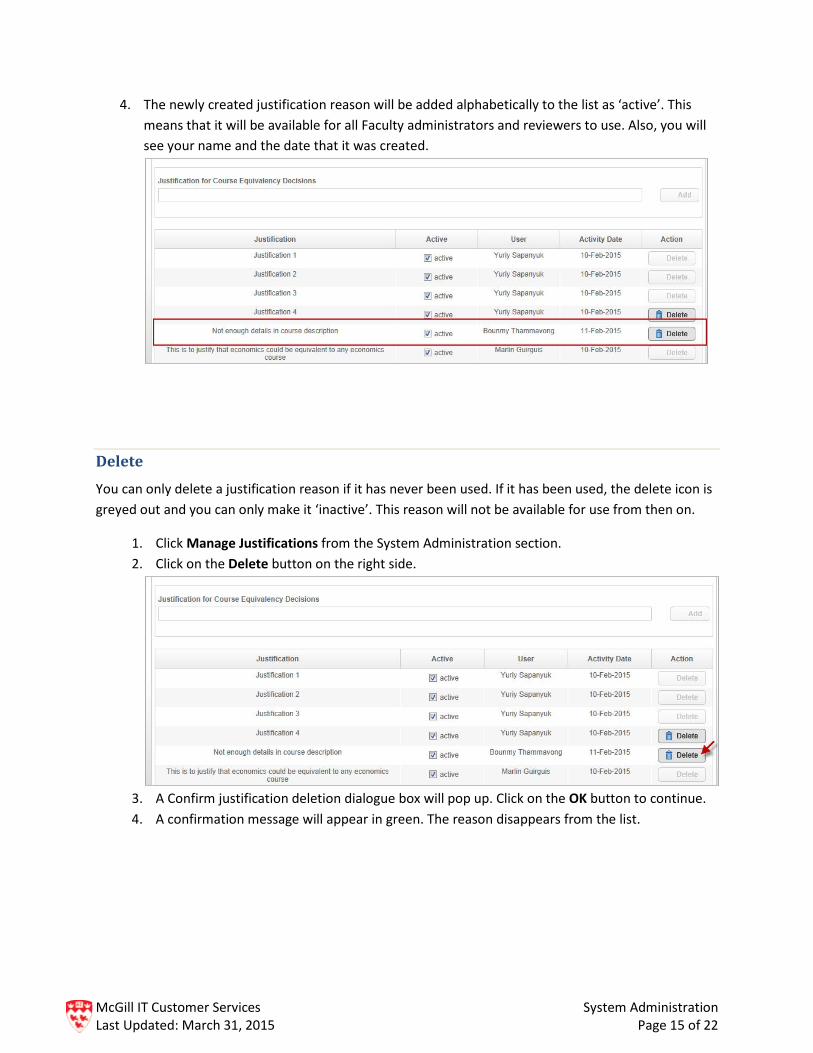
4. The newly created justification reason will be added alphabetically to the list as ‘active’. This means that it will be available for all Faculty administrators and reviewers to use. Also, you will see your name and the date that it was created.
Delete
You can only delete a justification reason if it has never been used. If it has been used, the delete icon is greyed out and you can only make it ‘inactive’. This reason will not be available for use from then on.
1. Click Manage Justifications from the System Administration section. 2. Click on the Delete button on the right side.
3. A Confirm justification deletion dialogue box will pop up. Click on the OK button to continue. 4. A confirmation message will appear in green. The reason disappears from the list.
McGill IT Customer Services System Administration Last Updated: March 31, 2015 Page 15 of 22

Inactive
If you want the reason to not appear on the Justification list for use, do the following.
1. Click Manage Justifications from the System Administration section. 2. Find the reason from the Justification list. 3. Click to uncheck the active checkbox.
4. A confirmation message will appear in green. The reason will now show as “inactive”.
Deleting a greyed out Justification
It is not impossible to delete a greyed out justification. Doing so requires doing extra steps:
1. Inactivate (see section above) the justification so that no Reviewers can use it. 2. Run a report to see a list of all equivalency decisions currently using that justification. 3. Go to the equivalency decision request that has the justification that you want to delete. 4. Deselect the justification that you want to delete and choose another justification for the
equivalency decision. 5. Repeat steps 3 and 4 to remove all of the justification that you want to delete. 6. When you are done, go to the justification and delete it.
Modify Equivalency Decision This allows you to modify (e.g. typos, reason of justification, comments) equivalency decisions for McGill and External course(s). Note that for McGill course(s), you can only change the course number.
1. Click Modify Equivalence Decision from the System Administration section. 2. Search for a course and decide whether it is a McGill or External Course Number (e.g. Math).
3. Click on the Search button.
McGill IT Customer Services System Administration Last Updated: March 31, 2015 Page 16 of 22
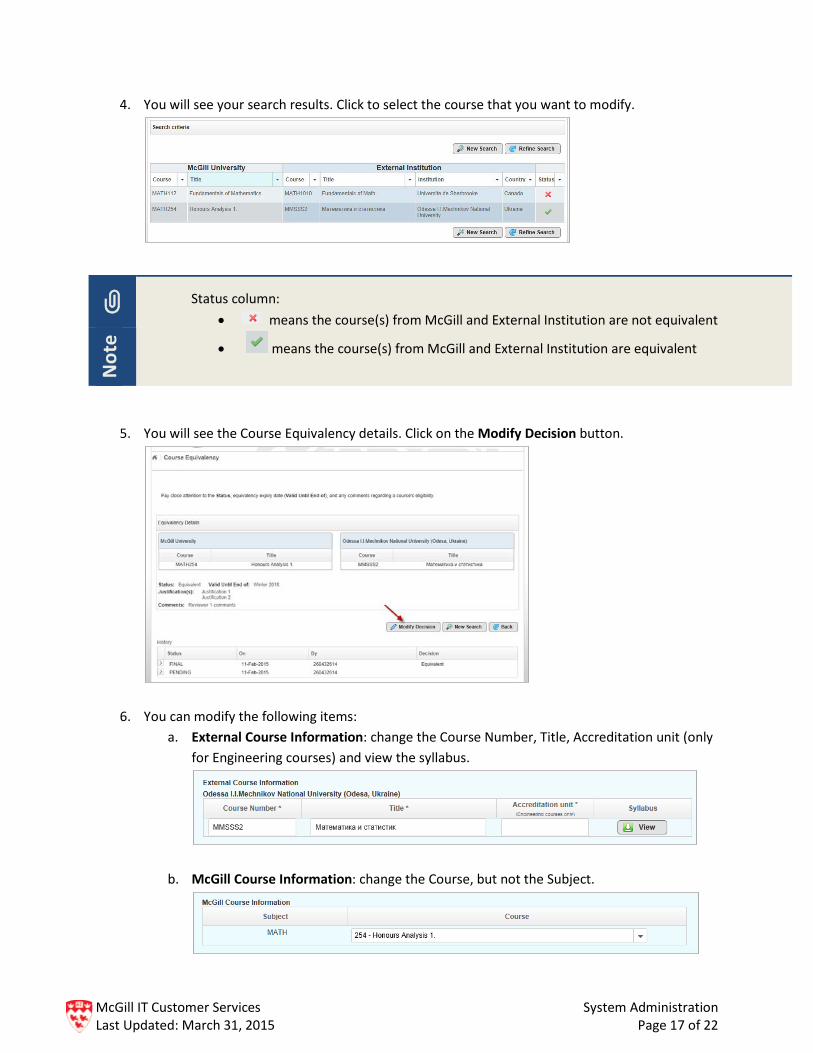
4. You will see your search results. Click to select the course that you want to modify.
5. You will see the Course Equivalency details. Click on the Modify Decision button.
6. You can modify the following items: a. External Course Information: change the Course Number, Title, Accreditation unit (only
for Engineering courses) and view the syllabus.
b. McGill Course Information: change the Course, but not the Subject.
Status column: • means the course(s) from McGill and External Institution are not equivalent
• means the course(s) from McGill and External Institution are equivalent
Not
e
McGill IT Customer Services System Administration Last Updated: March 31, 2015 Page 17 of 22

c. Decision: select Equivalent or Not Equivalent.
d. Valid Until End of: select one previous term from the current term, or any future term.
For example, if we are currently in Term Winter 2015, you can only select Fall 2014, Winter 2015 or any future term.
e. Justification: displays the current justification(s). To update, click on the search icon and check/uncheck the correct justification(s) for this course equivalency.
f. Public Comments: update the comments up to a maximum of 2000 characters. Keep in mind that the comments are visible to the public.
7. Click on the Submit button.
McGill IT Customer Services System Administration Last Updated: March 31, 2015 Page 18 of 22
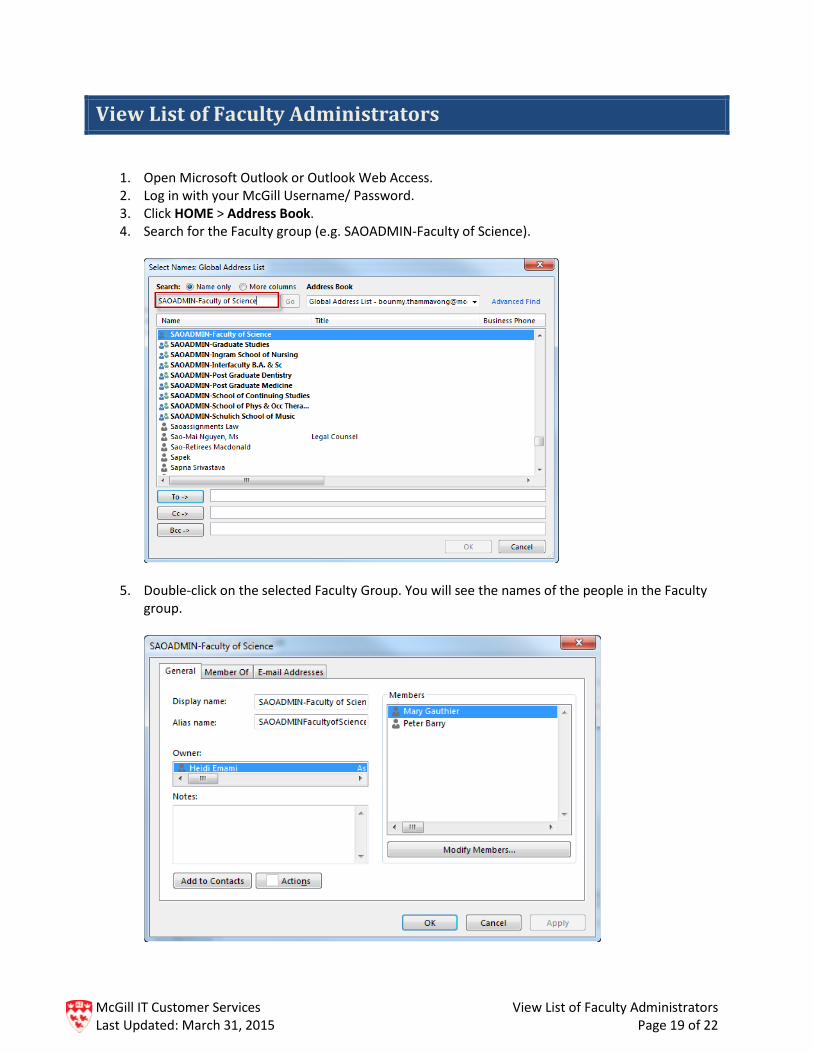
View List of Faculty Administrators
1. Open Microsoft Outlook or Outlook Web Access. 2. Log in with your McGill Username/ Password. 3. Click HOME > Address Book. 4. Search for the Faculty group (e.g. SAOADMIN-Faculty of Science).
5. Double-click on the selected Faculty Group. You will see the names of the people in the Faculty group.
McGill IT Customer Services View List of Faculty Administrators Last Updated: March 31, 2015 Page 19 of 22
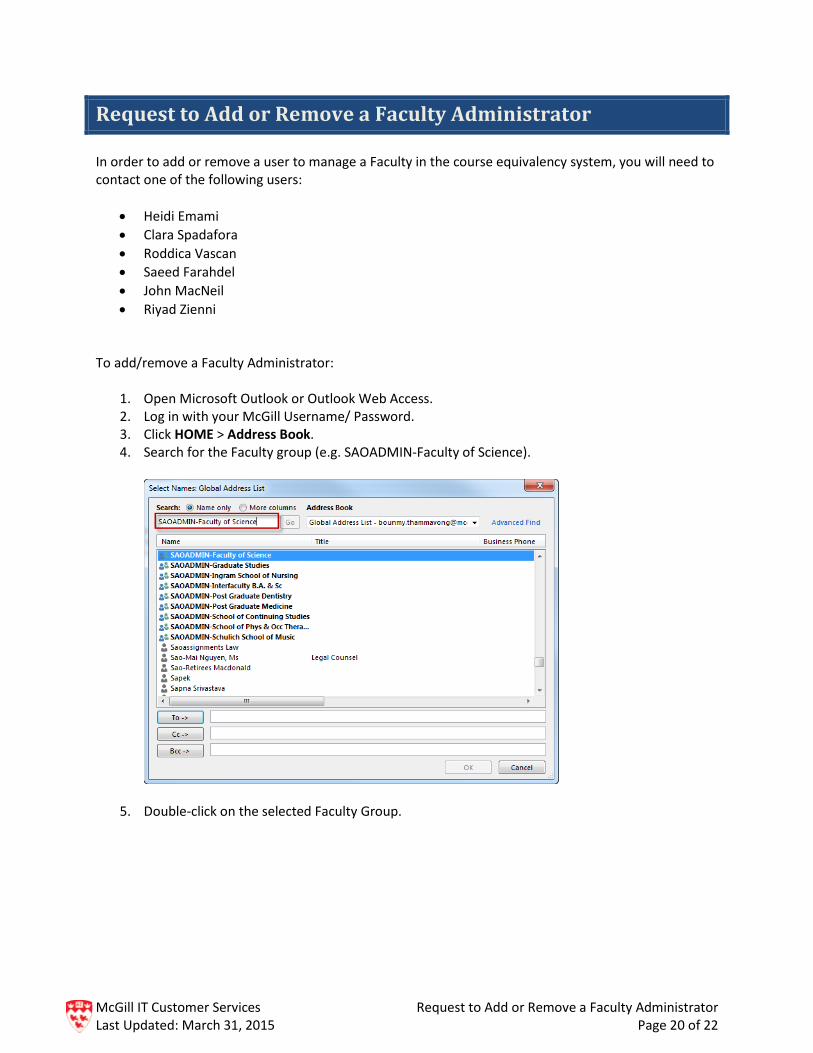
Request to Add or Remove a Faculty Administrator In order to add or remove a user to manage a Faculty in the course equivalency system, you will need to contact one of the following users:
• Heidi Emami • Clara Spadafora • Roddica Vascan • Saeed Farahdel • John MacNeil • Riyad Zienni
To add/remove a Faculty Administrator:
1. Open Microsoft Outlook or Outlook Web Access. 2. Log in with your McGill Username/ Password. 3. Click HOME > Address Book. 4. Search for the Faculty group (e.g. SAOADMIN-Faculty of Science).
5. Double-click on the selected Faculty Group.
McGill IT Customer Services Request to Add or Remove a Faculty Administrator Last Updated: March 31, 2015 Page 20 of 22
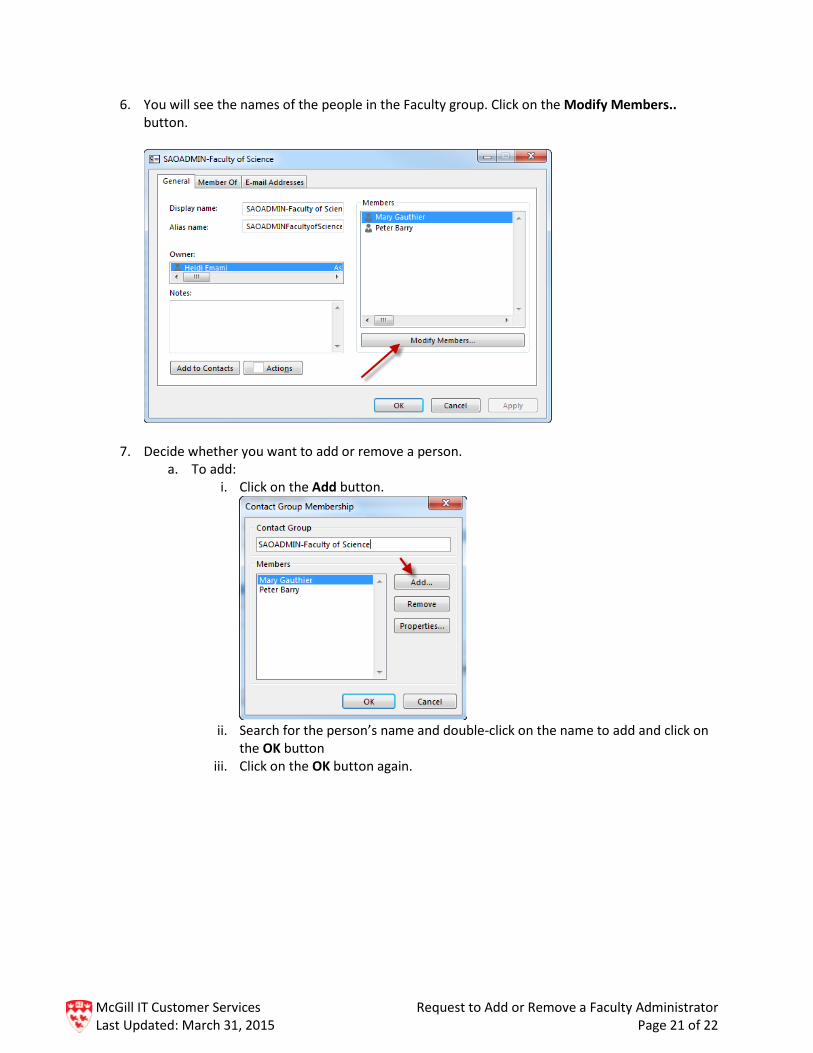
6. You will see the names of the people in the Faculty group. Click on the Modify Members.. button.
7. Decide whether you want to add or remove a person. a. To add:
i. Click on the Add button.
ii. Search for the person’s name and double-click on the name to add and click on
the OK button iii. Click on the OK button again.
McGill IT Customer Services Request to Add or Remove a Faculty Administrator Last Updated: March 31, 2015 Page 21 of 22
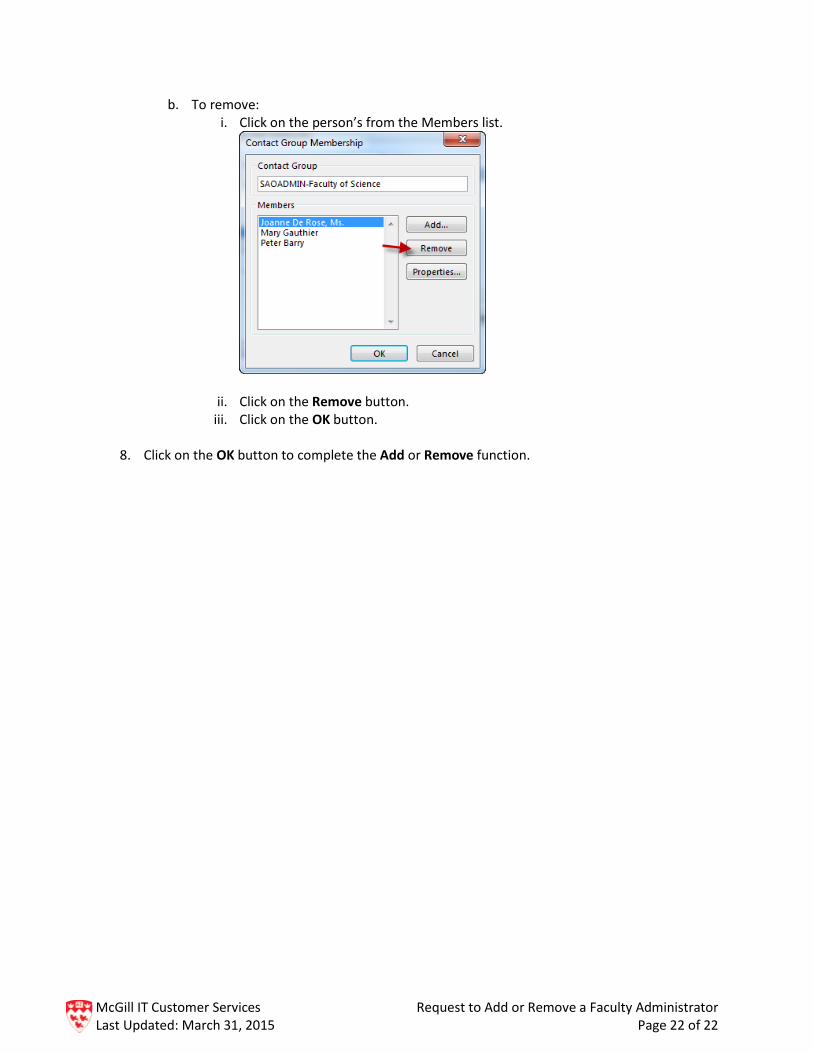
b. To remove: i. Click on the person’s from the Members list.
ii. Click on the Remove button. iii. Click on the OK button.
8. Click on the OK button to complete the Add or Remove function.
McGill IT Customer Services Request to Add or Remove a Faculty Administrator Last Updated: March 31, 2015 Page 22 of 22