Embed Size (px)
Citation preview
TUHSD Tech Guide: Synergy
1 | P a g e Information Provided by N. Lucca (LCHS), N. McFarland, and T. Suggs Updated: 2/27/2015 9:11 AM
Tolleson Union High School District
Synergy Teacher’s Manual
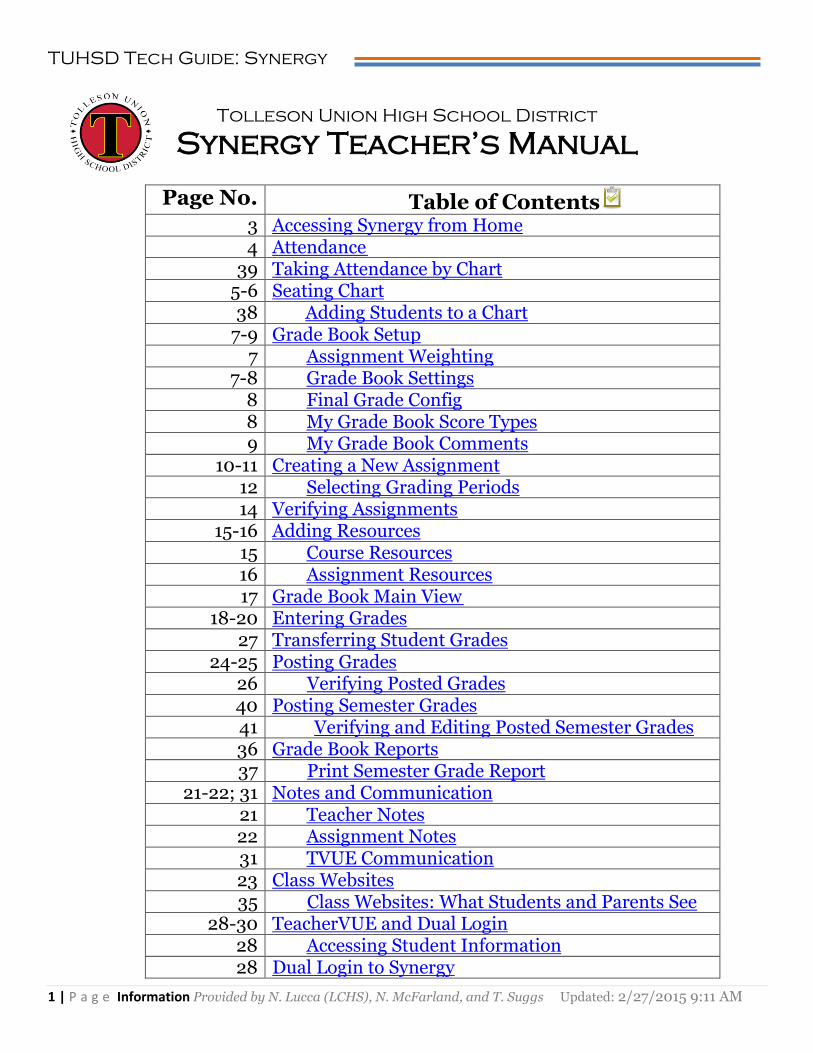
Page No. Table of Contents
3 Accessing Synergy from Home 4 Attendance
39 Taking Attendance by Chart
5-6 Seating Chart 38 Adding Students to a Chart
7-9 Grade Book Setup 7 Assignment Weighting
7-8 Grade Book Settings 8 Final Grade Config 8 My Grade Book Score Types 9 My Grade Book Comments
10-11 Creating a New Assignment 12 Selecting Grading Periods 14 Verifying Assignments
15-16 Adding Resources 15 Course Resources 16 Assignment Resources 17 Grade Book Main View
18-20 Entering Grades 27 Transferring Student Grades
24-25 Posting Grades
26 Verifying Posted Grades
40 Posting Semester Grades 41 Verifying and Editing Posted Semester Grades 36 Grade Book Reports
37 Print Semester Grade Report
21-22; 31 Notes and Communication 21 Teacher Notes 22 Assignment Notes 31 TVUE Communication 23 Class Websites 35 Class Websites: What Students and Parents See
28-30 TeacherVUE and Dual Login 28 Accessing Student Information 28 Dual Login to Synergy

TUHSD Tech Guide: Synergy
2 | P a g e Information Provided by N. Lucca (LCHS), N. McFarland, and T. Suggs Updated: 2/27/2015 9:11 AM
29 Change Focus Year to New Year
34 Change Focus to Previous Year 30 View Transcripts 32 Synergy Email Reports 33 TVUE Test Group Analysis 42 Creating a Class List in Synergy
TUHSD Tech Guide: Synergy
3 | P a g e Information Provided by N. Lucca (LCHS), N. McFarland, and T. Suggs Updated: 2/27/2015 9:11 AM
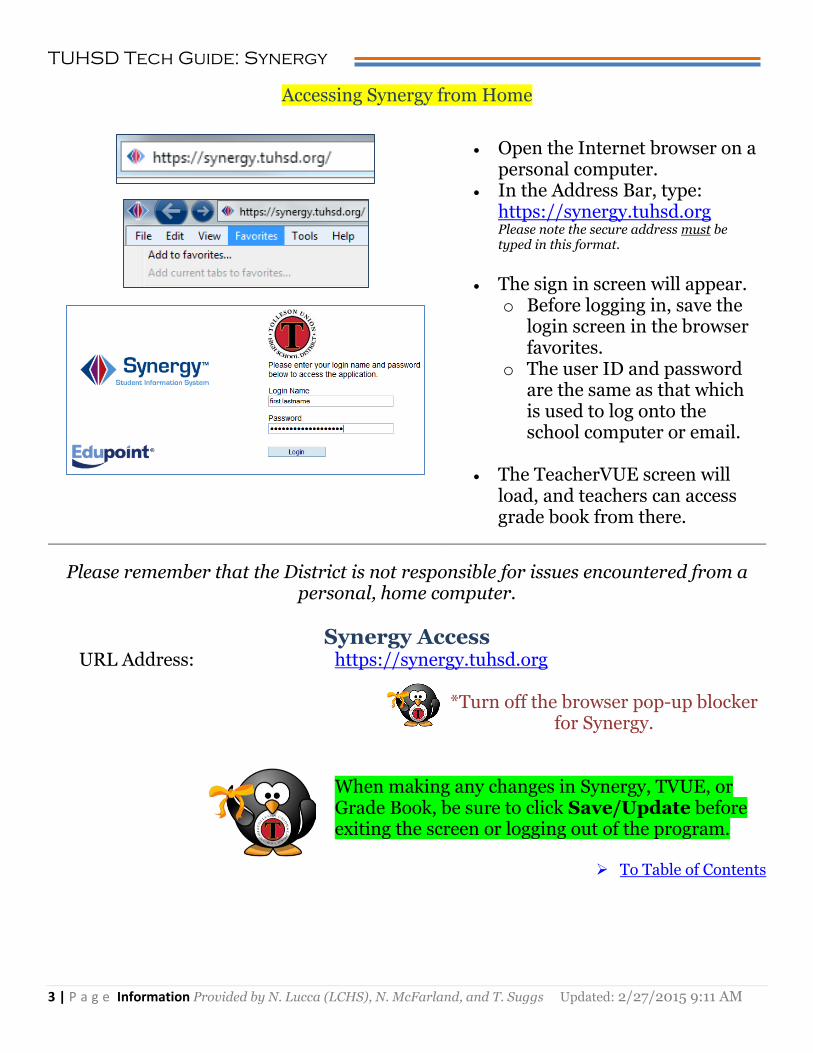
Accessing Synergy from Home
Open the Internet browser on a personal computer.
In the Address Bar, type: https://synergy.tuhsd.org Please note the secure address must be typed in this format.
The sign in screen will appear.
o Before logging in, save the login screen in the browser favorites.
o The user ID and password are the same as that which is used to log onto the school computer or email.
The TeacherVUE screen will
load, and teachers can access grade book from there.
Please remember that the District is not responsible for issues encountered from a personal, home computer.
Synergy Access
URL Address: https://synergy.tuhsd.org *Turn off the browser pop-up blocker
for Synergy.
When making any changes in Synergy, TVUE, or Grade Book, be sure to click Save/Update before exiting the screen or logging out of the program.
To Table of Contents
TUHSD Tech Guide: Synergy
4 | P a g e Information Provided by N. Lucca (LCHS), N. McFarland, and T. Suggs Updated: 2/27/2015 9:11 AM
Synergy Features
Att
en
da
nc
e
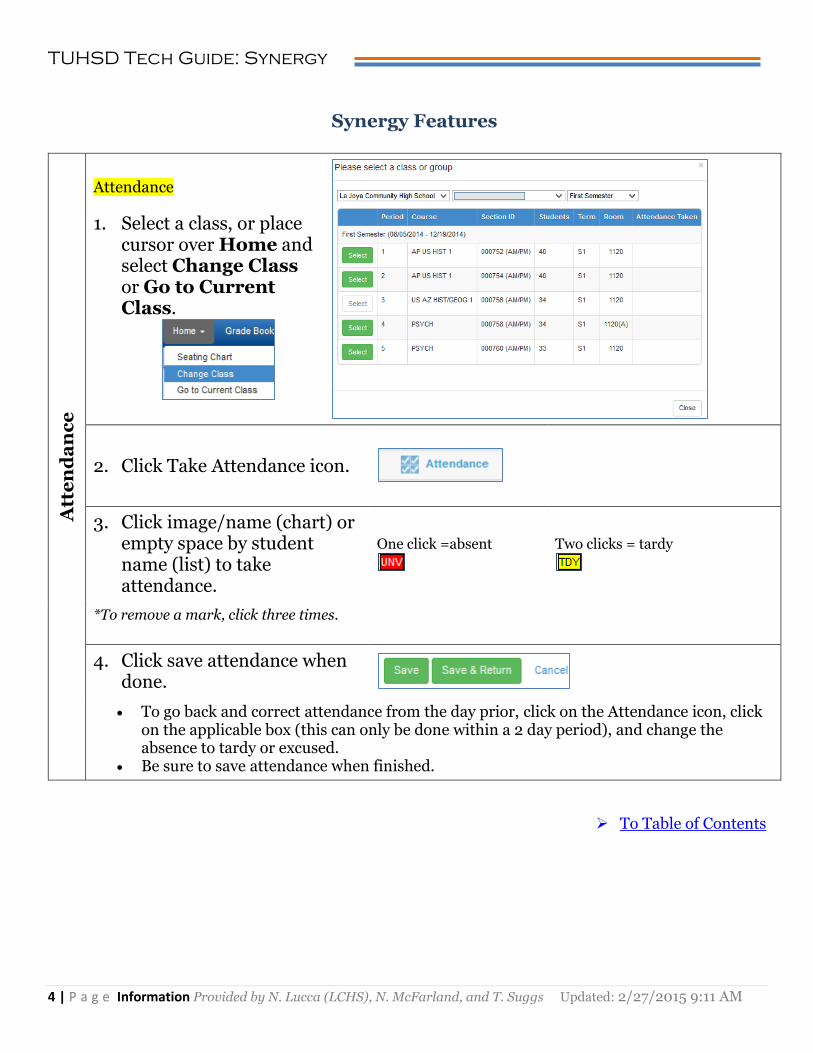
Attendance
1. Select a class, or place cursor over Home and select Change Class or Go to Current Class.
2. Click Take Attendance icon.
3. Click image/name (chart) or empty space by student name (list) to take attendance.
One click =absent
Two clicks = tardy
*To remove a mark, click three times.
4. Click save attendance when done.
To go back and correct attendance from the day prior, click on the Attendance icon, click on the applicable box (this can only be done within a 2 day period), and change the absence to tardy or excused.
Be sure to save attendance when finished.
To Table of Contents
TUHSD Tech Guide: Synergy
5 | P a g e Information Provided by N. Lucca (LCHS), N. McFarland, and T. Suggs Updated: 2/27/2015 9:11 AM
Se
ati
ng
Ch
ar
t
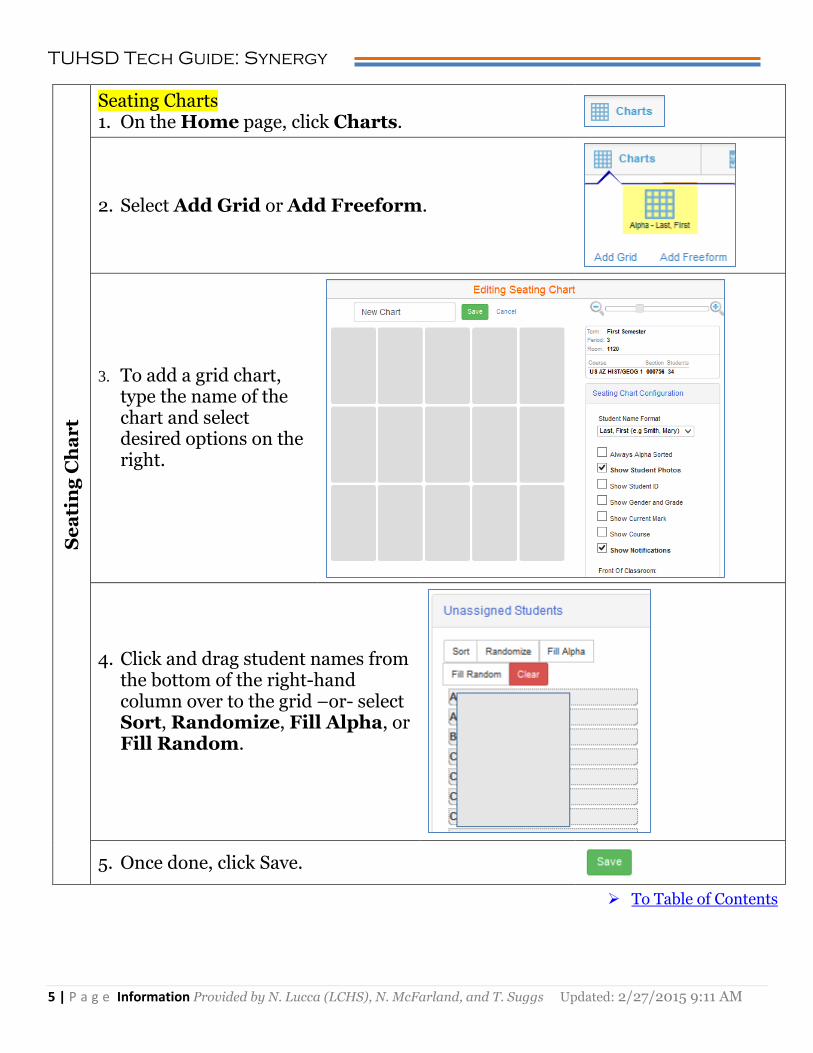
Seating Charts 1. On the Home page, click Charts.
2. Select Add Grid or Add Freeform.
3. To add a grid chart, type the name of the chart and select desired options on the right.
4. Click and drag student names from the bottom of the right-hand column over to the grid –or- select Sort, Randomize, Fill Alpha, or Fill Random.
5. Once done, click Save.
To Table of Contents

TUHSD Tech Guide: Synergy
6 | P a g e Information Provided by N. Lucca (LCHS), N. McFarland, and T. Suggs Updated: 2/27/2015 9:11 AM
To Table of Contents
To print a seating chart, click Reports.
Click Section Seating Chart and print.
Alternative: Highlight the selected area or students, go to the browser’s File tab, click Print Preview, and then select “As Selected on Screen” from the drop down menu on the top of the page.
Freefrom Seating Chart
Teachers may custom-create seating charts in
TVUE to reflect the seating layout of the
classroom.
1. Drag and drop student names onto the
blank space and organize as needed. 2. Or select any of the following options
and rearrange as needed.
3. For a clean look, try using the Snap
Grid Size feature. Move the slider to the
right or left to create a grid, then drag
each photo/student name along the grid
and let it “snap” in place.
4. To change the position of the Front of
the classroom, click on the Preferences
tab.
5. When finished, click Save.
TUHSD Tech Guide: Synergy
7 | P a g e Information Provided by N. Lucca (LCHS), N. McFarland, and T. Suggs Updated: 2/27/2015 9:11 AM
Gr
ad
e B
oo
k
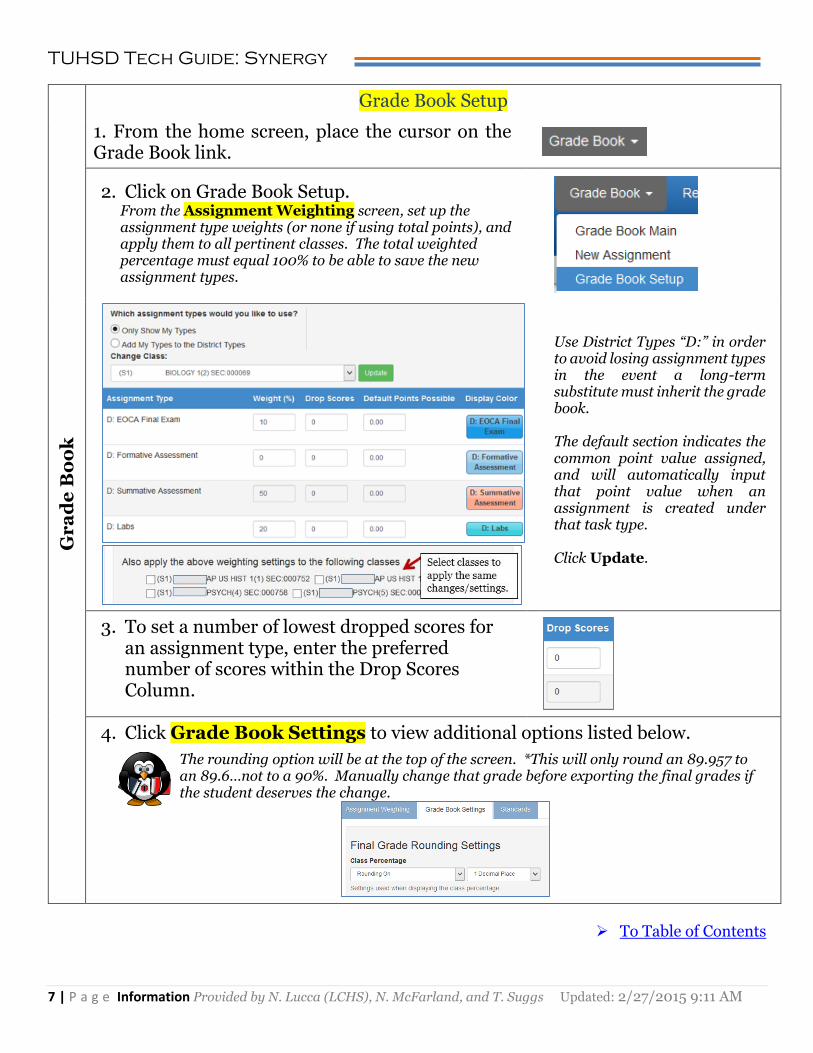
Grade Book Setup
1. From the home screen, place the cursor on the Grade Book link.
2. Click on Grade Book Setup. From the Assignment Weighting screen, set up the assignment type weights (or none if using total points), and apply them to all pertinent classes. The total weighted percentage must equal 100% to be able to save the new assignment types.
Use District Types “D:” in order to avoid losing assignment types in the event a long-term substitute must inherit the grade book. The default section indicates the common point value assigned, and will automatically input that point value when an assignment is created under that task type. Click Update.
3. To set a number of lowest dropped scores for an assignment type, enter the preferred number of scores within the Drop Scores Column.
4. Click Grade Book Settings to view additional options listed below.
The rounding option will be at the top of the screen. *This will only round an 89.957 to an 89.6…not to a 90%. Manually change that grade before exporting the final grades if the student deserves the change.
To Table of Contents
TUHSD Tech Guide: Synergy
8 | P a g e Information Provided by N. Lucca (LCHS), N. McFarland, and T. Suggs Updated: 2/27/2015 9:11 AM
Gr
ad
e B
oo
k (
co
nti
nu
ed
)
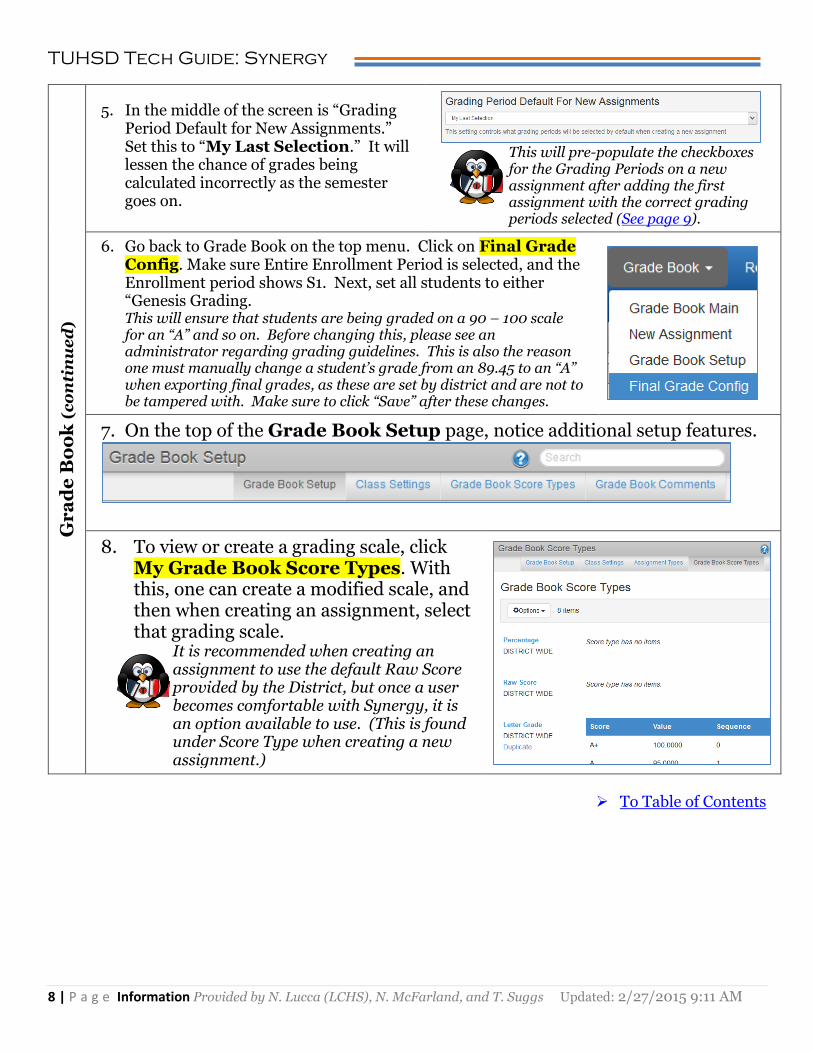
5. In the middle of the screen is “Grading Period Default for New Assignments.” Set this to “My Last Selection.” It will lessen the chance of grades being calculated incorrectly as the semester goes on.
This will pre-populate the checkboxes for the Grading Periods on a new assignment after adding the first assignment with the correct grading periods selected (See page 9).
6. Go back to Grade Book on the top menu. Click on Final Grade Config. Make sure Entire Enrollment Period is selected, and the Enrollment period shows S1. Next, set all students to either “Genesis Grading. This will ensure that students are being graded on a 90 – 100 scale for an “A” and so on. Before changing this, please see an administrator regarding grading guidelines. This is also the reason one must manually change a student’s grade from an 89.45 to an “A” when exporting final grades, as these are set by district and are not to be tampered with. Make sure to click “Save” after these changes.
7. On the top of the Grade Book Setup page, notice additional setup features.
8. To view or create a grading scale, click My Grade Book Score Types. With this, one can create a modified scale, and then when creating an assignment, select that grading scale.
It is recommended when creating an assignment to use the default Raw Score provided by the District, but once a user becomes comfortable with Synergy, it is an option available to use. (This is found under Score Type when creating a new assignment.)
To Table of Contents
TUHSD Tech Guide: Synergy
9 | P a g e Information Provided by N. Lucca (LCHS), N. McFarland, and T. Suggs Updated: 2/27/2015 9:11 AM
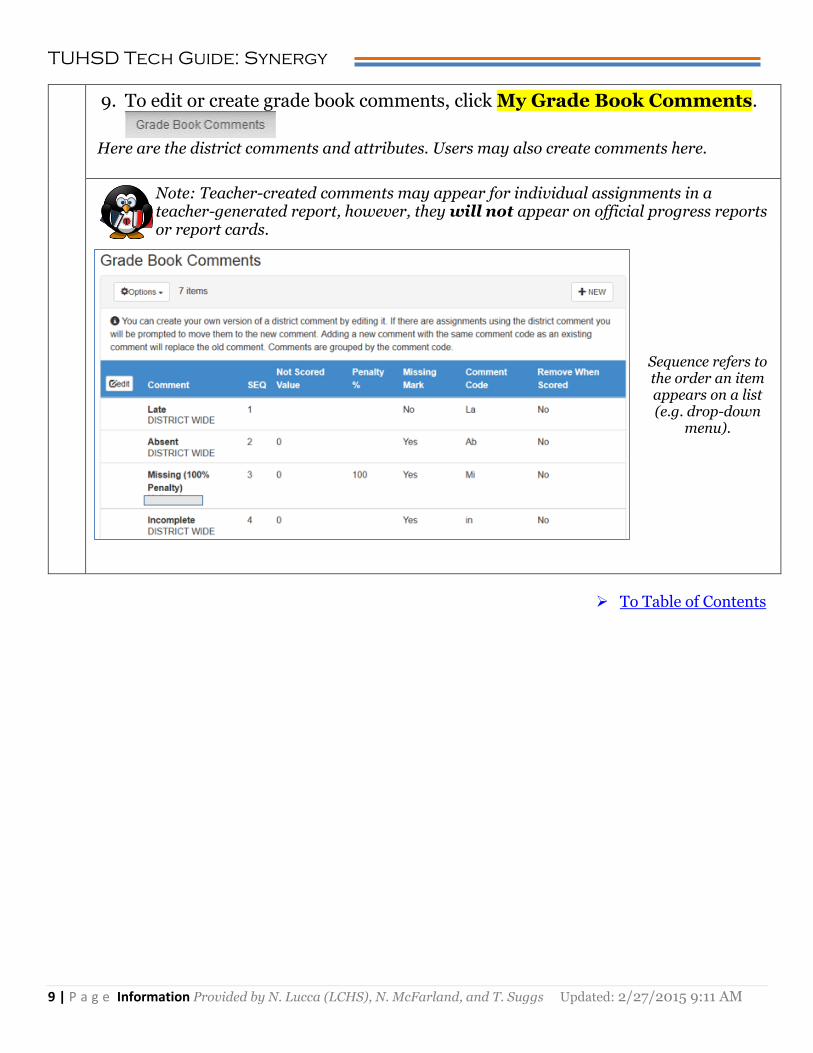
9. To edit or create grade book comments, click My Grade Book Comments.
Here are the district comments and attributes. Users may also create comments here.
Note: Teacher-created comments may appear for individual assignments in a teacher-generated report, however, they will not appear on official progress reports or report cards.
Sequence refers to the order an item appears on a list (e.g. drop-down
menu).
To Table of Contents
TUHSD Tech Guide: Synergy
10 | P a g e Information Provided by N. Lucca (LCHS), N. McFarland, and T. Suggs Updated: 2/27/2015 9:11 AM
Cr
ea
tin
g a
n A
ss
ign
me
nt
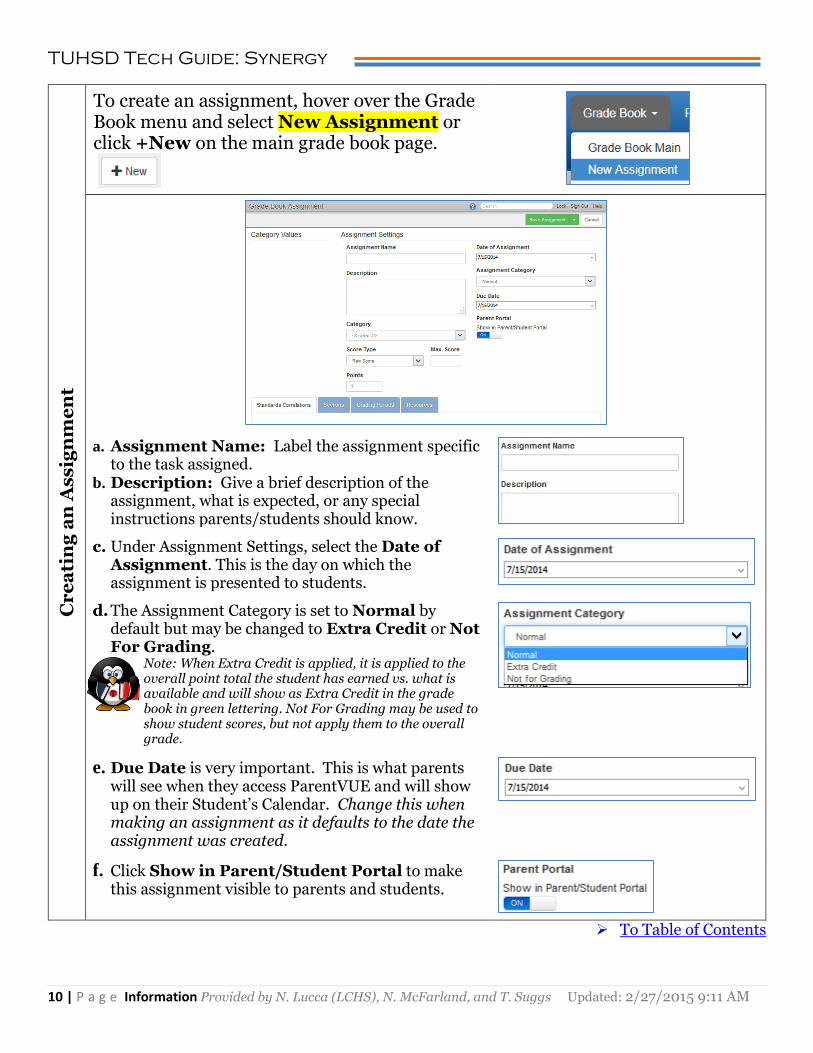
To create an assignment, hover over the Grade Book menu and select New Assignment or click +New on the main grade book page.
a. Assignment Name: Label the assignment specific to the task assigned.
b. Description: Give a brief description of the assignment, what is expected, or any special instructions parents/students should know.
c. Under Assignment Settings, select the Date of Assignment. This is the day on which the assignment is presented to students.
d. The Assignment Category is set to Normal by default but may be changed to Extra Credit or Not For Grading.
Note: When Extra Credit is applied, it is applied to the overall point total the student has earned vs. what is available and will show as Extra Credit in the grade book in green lettering. Not For Grading may be used to show student scores, but not apply them to the overall grade.
e. Due Date is very important. This is what parents will see when they access ParentVUE and will show up on their Student’s Calendar. Change this when making an assignment as it defaults to the date the assignment was created.
f. Click Show in Parent/Student Portal to make this assignment visible to parents and students.
To Table of Contents
TUHSD Tech Guide: Synergy
11 | P a g e Information Provided by N. Lucca (LCHS), N. McFarland, and T. Suggs Updated: 2/27/2015 9:11 AM
Cr
ea
tin
g a
n A
ss
ign
me
nt
(co
nti
nu
ed
)
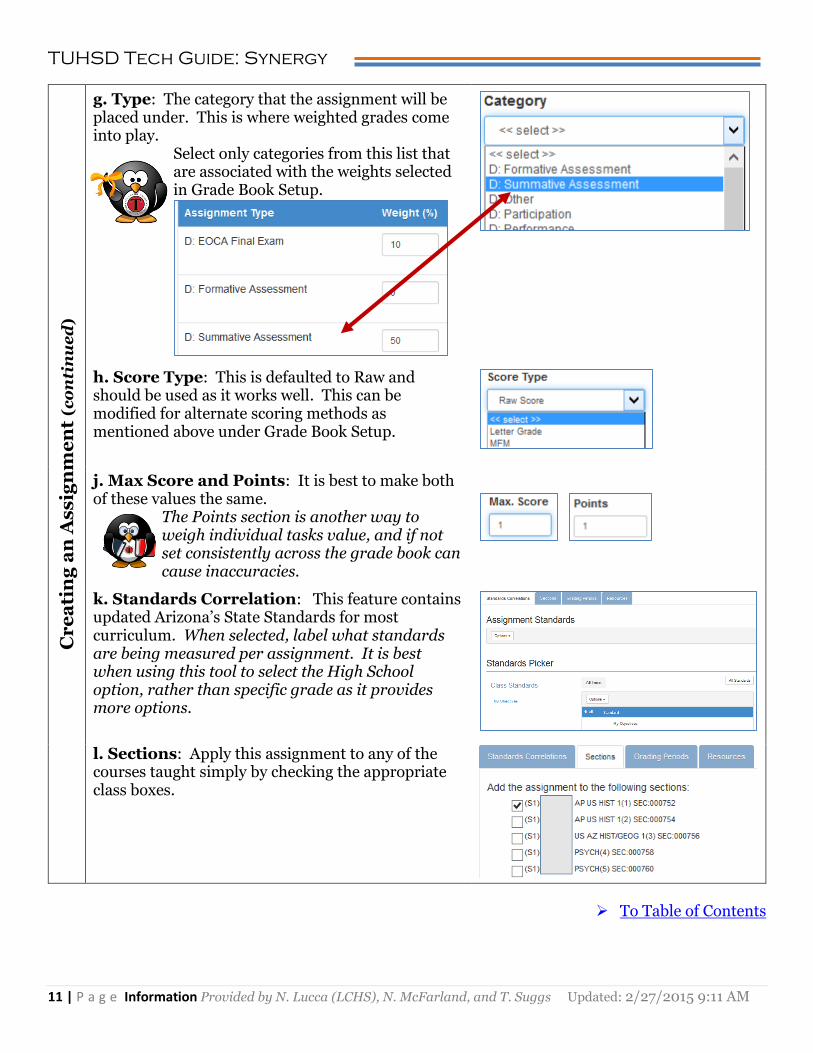
g. Type: The category that the assignment will be placed under. This is where weighted grades come into play.
Select only categories from this list that are associated with the weights selected in Grade Book Setup.
h. Score Type: This is defaulted to Raw and should be used as it works well. This can be modified for alternate scoring methods as mentioned above under Grade Book Setup.
j. Max Score and Points: It is best to make both of these values the same.
The Points section is another way to weigh individual tasks value, and if not set consistently across the grade book can cause inaccuracies.
k. Standards Correlation: This feature contains updated Arizona’s State Standards for most curriculum. When selected, label what standards are being measured per assignment. It is best when using this tool to select the High School option, rather than specific grade as it provides more options.
l. Sections: Apply this assignment to any of the courses taught simply by checking the appropriate class boxes.
To Table of Contents

TUHSD Tech Guide: Synergy
12 | P a g e Information Provided by N. Lucca (LCHS), N. McFarland, and T. Suggs Updated: 2/27/2015 9:11 AM
m. Selecting Grading Periods:
THIS IS THE MOST IMPORTANT PART OF CREATING AN
ASSIGNMENT AND HAVING AN ACCURATE GRADEBOOK!
At the beginning of the year, the following boxes should be selected: (Q1Prog, Q1Grd, Q2Prog, Q2Grd, S1Grd). Do Not select S1Exam. As the semester continues, and after posting the first progress report, uncheck the Q1Prog box for each new assignment created thereafter until Q1GRD is reached. Following each grade period posting, uncheck the previous grading period box for each new assignment during that period until the Final Exam.
Note the examples provided to the right. When it is time for the Final Exam (or EOCA), create the exam as an assignment, label it under the EOCA or Final Exam Task type, and check the S1 Exam button, and S1Grd button only. This allows the exam to show up on its own on a grade report, and only affects the overall grade and not the previous grading periods.
Be sure to repeat this process for the second
semester.
EXAMPLES: Q1Prog
Q1GRD
Q2Prog
Q2Grd
S1Exam
To Table of Contents
TUHSD Tech Guide: Synergy
13 | P a g e Information Provided by N. Lucca (LCHS), N. McFarland, and T. Suggs Updated: 2/27/2015 9:11 AM
Cr
ea
tin
g a
n A
ss
ign
me
nt
(co
nti
nu
ed
)
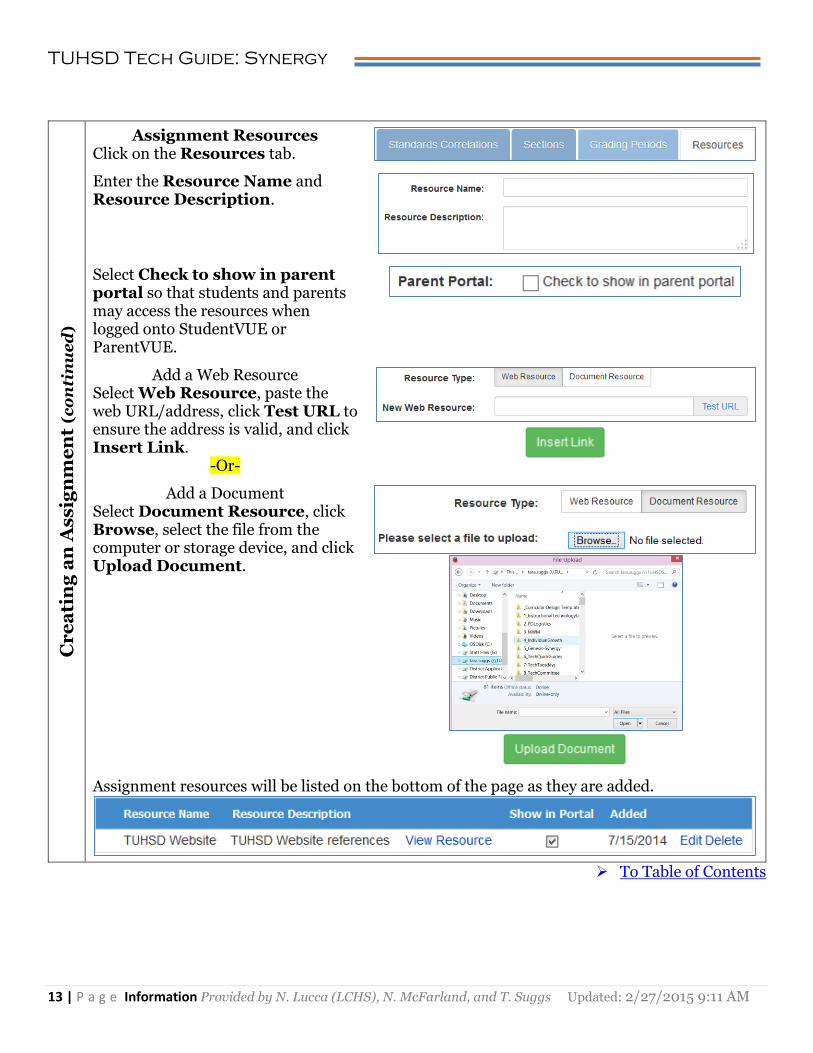
Assignment Resources Click on the Resources tab.
Enter the Resource Name and Resource Description.
Select Check to show in parent portal so that students and parents may access the resources when logged onto StudentVUE or ParentVUE.
Add a Web Resource Select Web Resource, paste the web URL/address, click Test URL to ensure the address is valid, and click Insert Link.
-Or-
Add a Document Select Document Resource, click Browse, select the file from the computer or storage device, and click Upload Document.
Assignment resources will be listed on the bottom of the page as they are added.
To Table of Contents
TUHSD Tech Guide: Synergy
14 | P a g e Information Provided by N. Lucca (LCHS), N. McFarland, and T. Suggs Updated: 2/27/2015 9:11 AM
Ve
rif
yin
g A
ss
ign
me
nts
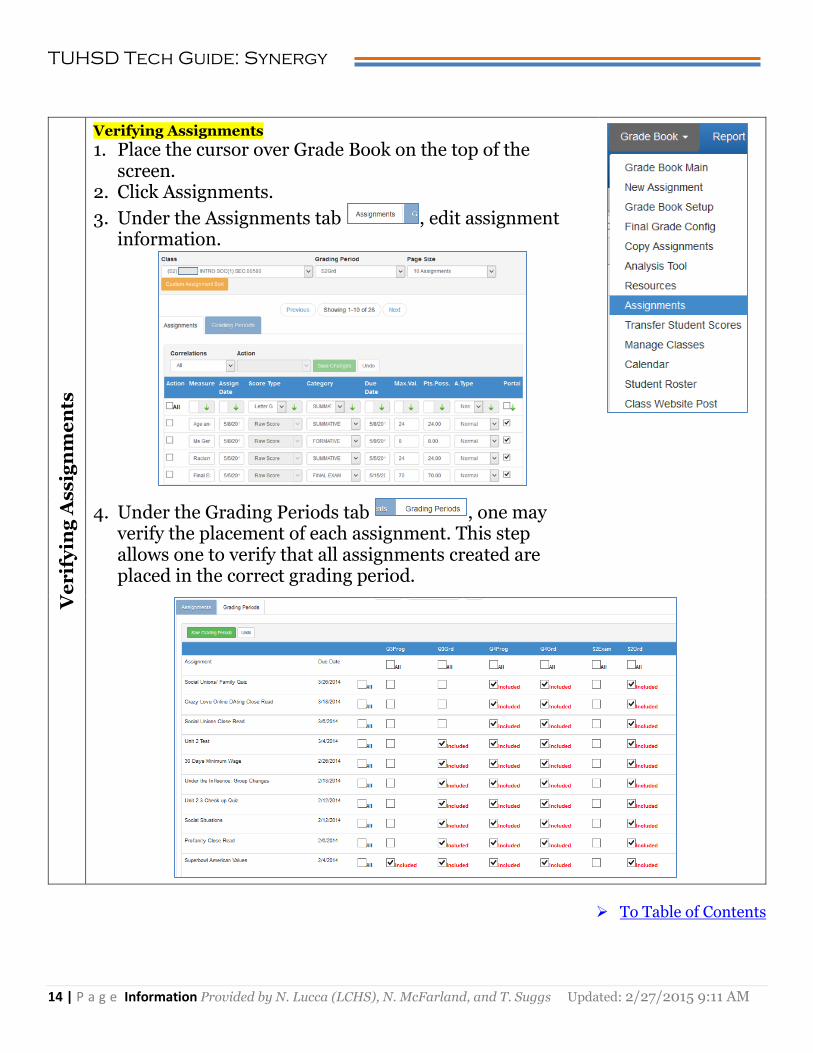
Verifying Assignments
1. Place the cursor over Grade Book on the top of the screen.
2. Click Assignments.
3. Under the Assignments tab , edit assignment information.
4. Under the Grading Periods tab , one may verify the placement of each assignment. This step allows one to verify that all assignments created are placed in the correct grading period.
To Table of Contents
TUHSD Tech Guide: Synergy
15 | P a g e Information Provided by N. Lucca (LCHS), N. McFarland, and T. Suggs Updated: 2/27/2015 9:11 AM
Ad
din
g R
es
ou
rc
es
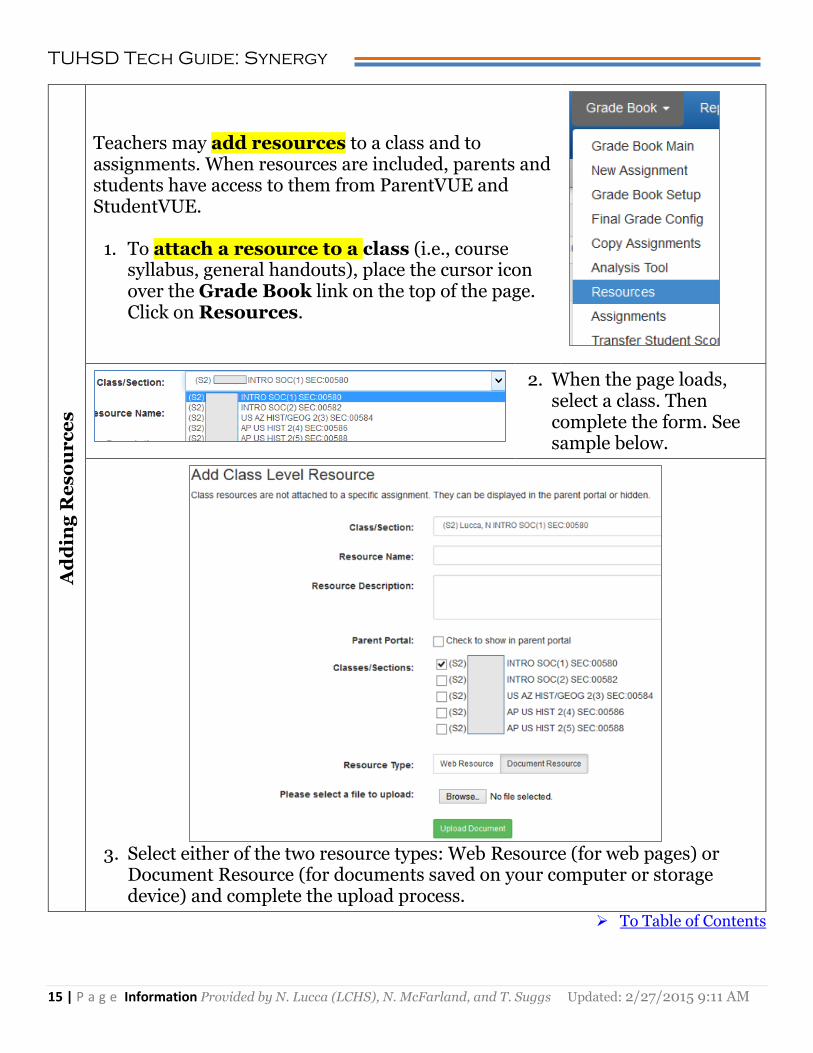
Teachers may add resources to a class and to assignments. When resources are included, parents and students have access to them from ParentVUE and StudentVUE.
1. To attach a resource to a class (i.e., course syllabus, general handouts), place the cursor icon over the Grade Book link on the top of the page. Click on Resources.
2. When the page loads, select a class. Then complete the form. See sample below.
3. Select either of the two resource types: Web Resource (for web pages) or
Document Resource (for documents saved on your computer or storage device) and complete the upload process.
To Table of Contents
TUHSD Tech Guide: Synergy
16 | P a g e Information Provided by N. Lucca (LCHS), N. McFarland, and T. Suggs Updated: 2/27/2015 9:11 AM
Ad
din
g R
es
ou
rc
es
(c
on
tin
ue
d)
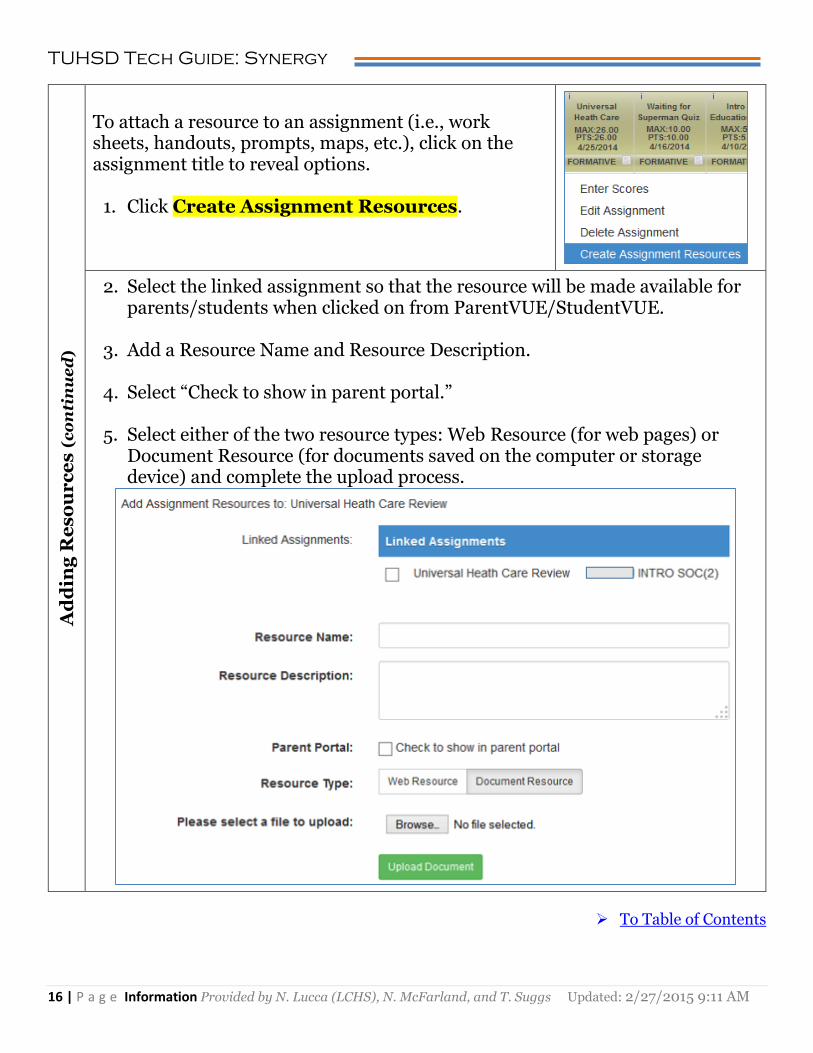
To attach a resource to an assignment (i.e., work sheets, handouts, prompts, maps, etc.), click on the assignment title to reveal options.
1. Click Create Assignment Resources.
2. Select the linked assignment so that the resource will be made available for parents/students when clicked on from ParentVUE/StudentVUE.
3. Add a Resource Name and Resource Description.
4. Select “Check to show in parent portal.”
5. Select either of the two resource types: Web Resource (for web pages) or Document Resource (for documents saved on the computer or storage device) and complete the upload process.
To Table of Contents
TUHSD Tech Guide: Synergy
17 | P a g e Information Provided by N. Lucca (LCHS), N. McFarland, and T. Suggs Updated: 2/27/2015 9:11 AM
Gr
ad
e B
oo
k M
ain
Vie
w
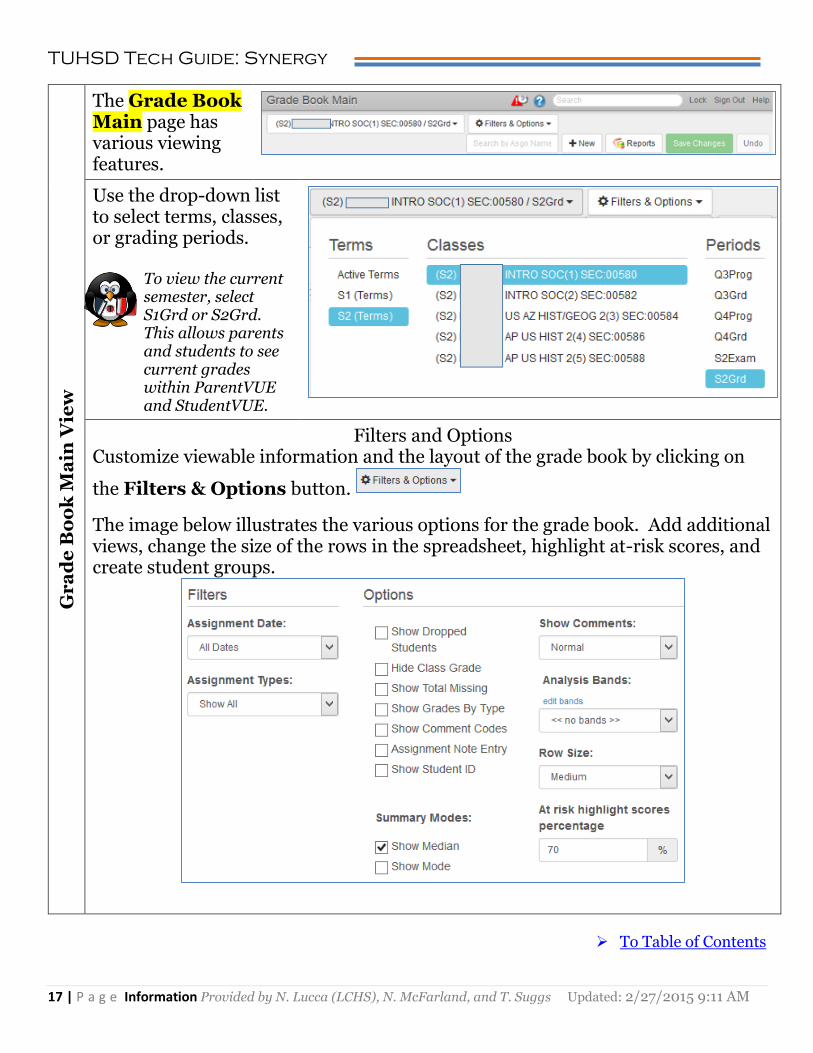
The Grade Book Main page has various viewing features.
Use the drop-down list to select terms, classes, or grading periods.
To view the current semester, select S1Grd or S2Grd. This allows parents and students to see current grades within ParentVUE and StudentVUE.
Filters and Options Customize viewable information and the layout of the grade book by clicking on
the Filters & Options button.
The image below illustrates the various options for the grade book. Add additional views, change the size of the rows in the spreadsheet, highlight at-risk scores, and create student groups.
To Table of Contents
TUHSD Tech Guide: Synergy
18 | P a g e Information Provided by N. Lucca (LCHS), N. McFarland, and T. Suggs Updated: 2/27/2015 9:11 AM
En
ter
ing
Gr
ad
es
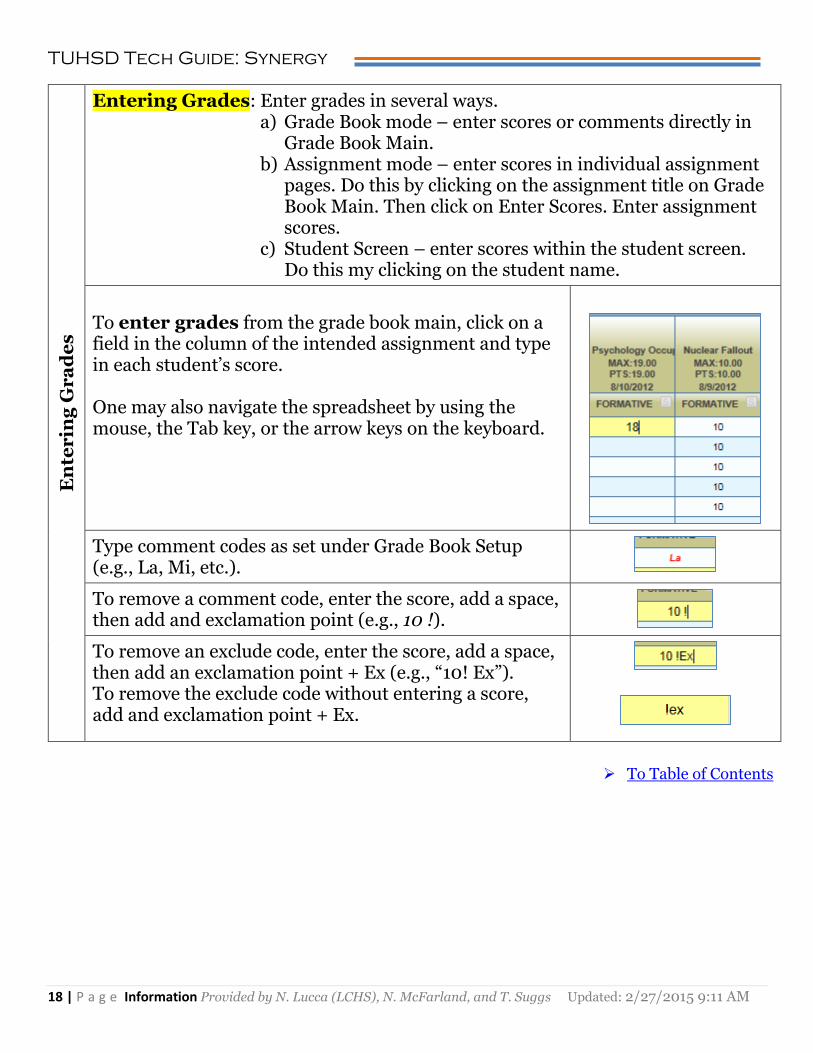
Entering Grades: Enter grades in several ways. a) Grade Book mode – enter scores or comments directly in
Grade Book Main. b) Assignment mode – enter scores in individual assignment
pages. Do this by clicking on the assignment title on Grade Book Main. Then click on Enter Scores. Enter assignment scores.
c) Student Screen – enter scores within the student screen. Do this my clicking on the student name.
To enter grades from the grade book main, click on a field in the column of the intended assignment and type in each student’s score. One may also navigate the spreadsheet by using the mouse, the Tab key, or the arrow keys on the keyboard.
Type comment codes as set under Grade Book Setup (e.g., La, Mi, etc.).
To remove a comment code, enter the score, add a space, then add and exclamation point (e.g., 10 !).
To remove an exclude code, enter the score, add a space, then add an exclamation point + Ex (e.g., “10! Ex”). To remove the exclude code without entering a score, add and exclamation point + Ex.
To Table of Contents
TUHSD Tech Guide: Synergy
19 | P a g e Information Provided by N. Lucca (LCHS), N. McFarland, and T. Suggs Updated: 2/27/2015 9:11 AM
En
ter
ing
Gr
ad
es
(c
on
tin
ue
d)
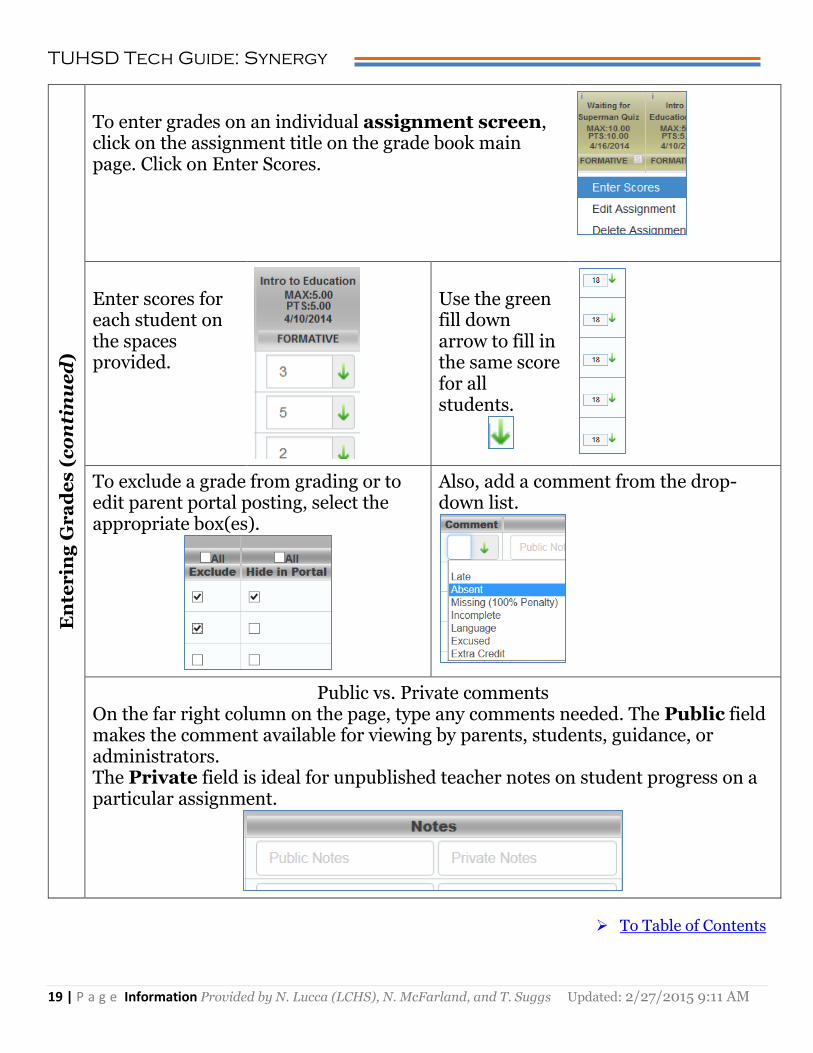
To enter grades on an individual assignment screen, click on the assignment title on the grade book main page. Click on Enter Scores.
Enter scores for each student on the spaces provided.
Use the green fill down arrow to fill in the same score for all students.
To exclude a grade from grading or to edit parent portal posting, select the appropriate box(es).
Also, add a comment from the drop-down list.
Public vs. Private comments On the far right column on the page, type any comments needed. The Public field makes the comment available for viewing by parents, students, guidance, or administrators. The Private field is ideal for unpublished teacher notes on student progress on a particular assignment.
To Table of Contents
TUHSD Tech Guide: Synergy
20 | P a g e Information Provided by N. Lucca (LCHS), N. McFarland, and T. Suggs Updated: 2/27/2015 9:11 AM
En
ter
ing
Gr
ad
es
(c
on
tin
ue
d)
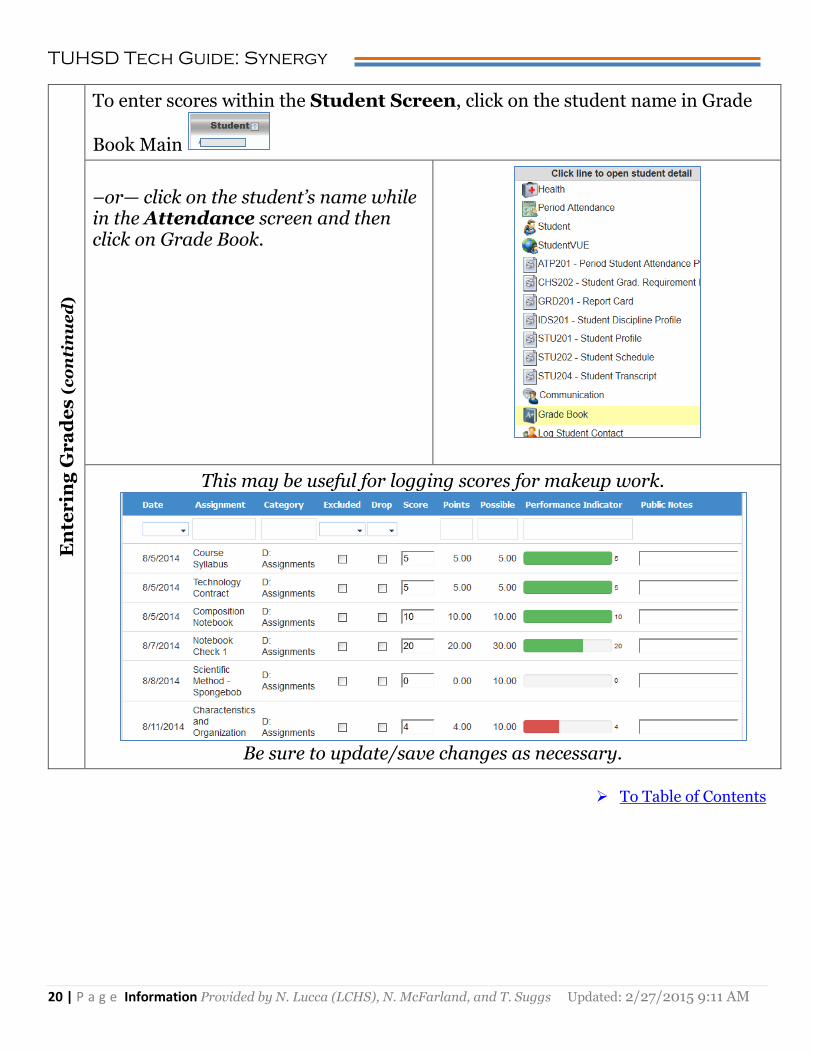
To enter scores within the Student Screen, click on the student name in Grade
Book Main
–or— click on the student’s name while in the Attendance screen and then click on Grade Book.
This may be useful for logging scores for makeup work.
Be sure to update/save changes as necessary.
To Table of Contents
TUHSD Tech Guide: Synergy
21 | P a g e Information Provided by N. Lucca (LCHS), N. McFarland, and T. Suggs Updated: 2/27/2015 9:11 AM
No
tes
an
d C
om
mu
nic
ati
on
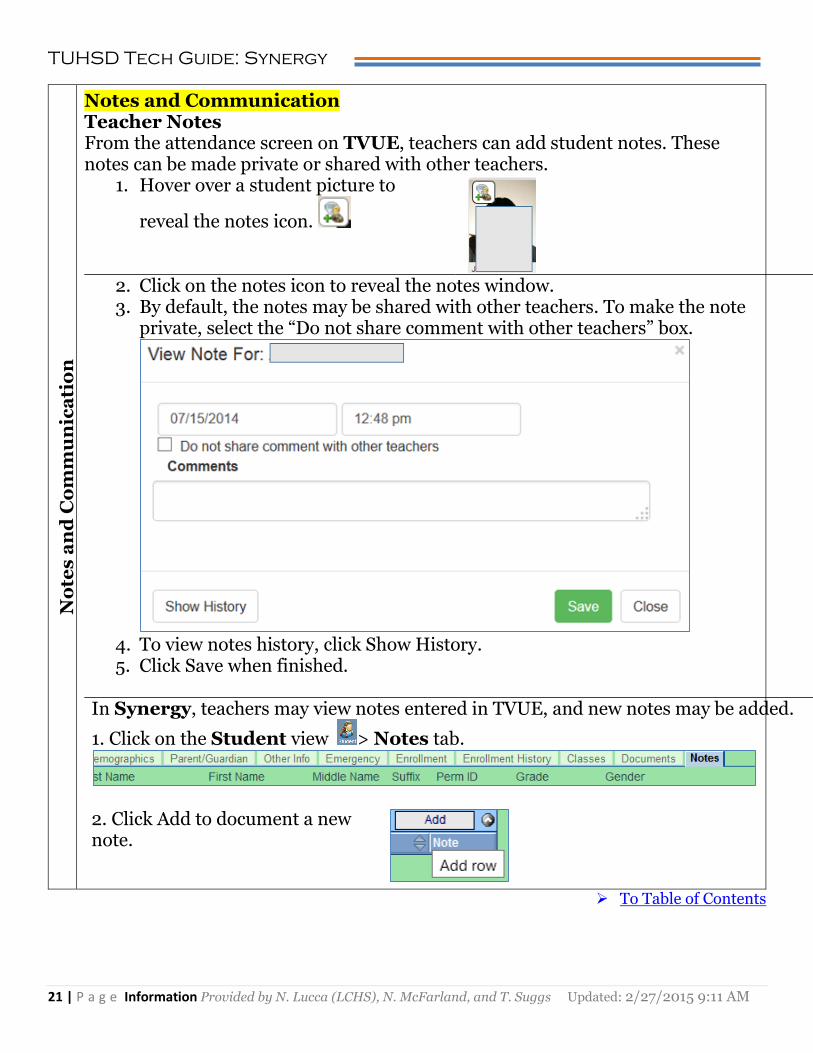
Notes and Communication Teacher Notes From the attendance screen on TVUE, teachers can add student notes. These notes can be made private or shared with other teachers.
1. Hover over a student picture to
reveal the notes icon.
2. Click on the notes icon to reveal the notes window. 3. By default, the notes may be shared with other teachers. To make the note
private, select the “Do not share comment with other teachers” box.
4. To view notes history, click Show History. 5. Click Save when finished.
In Synergy, teachers may view notes entered in TVUE, and new notes may be added.
1. Click on the Student view > Notes tab.
2. Click Add to document a new note.
To Table of Contents
TUHSD Tech Guide: Synergy
22 | P a g e Information Provided by N. Lucca (LCHS), N. McFarland, and T. Suggs Updated: 2/27/2015 9:11 AM
As
sig
nm
en
t N
ote
s
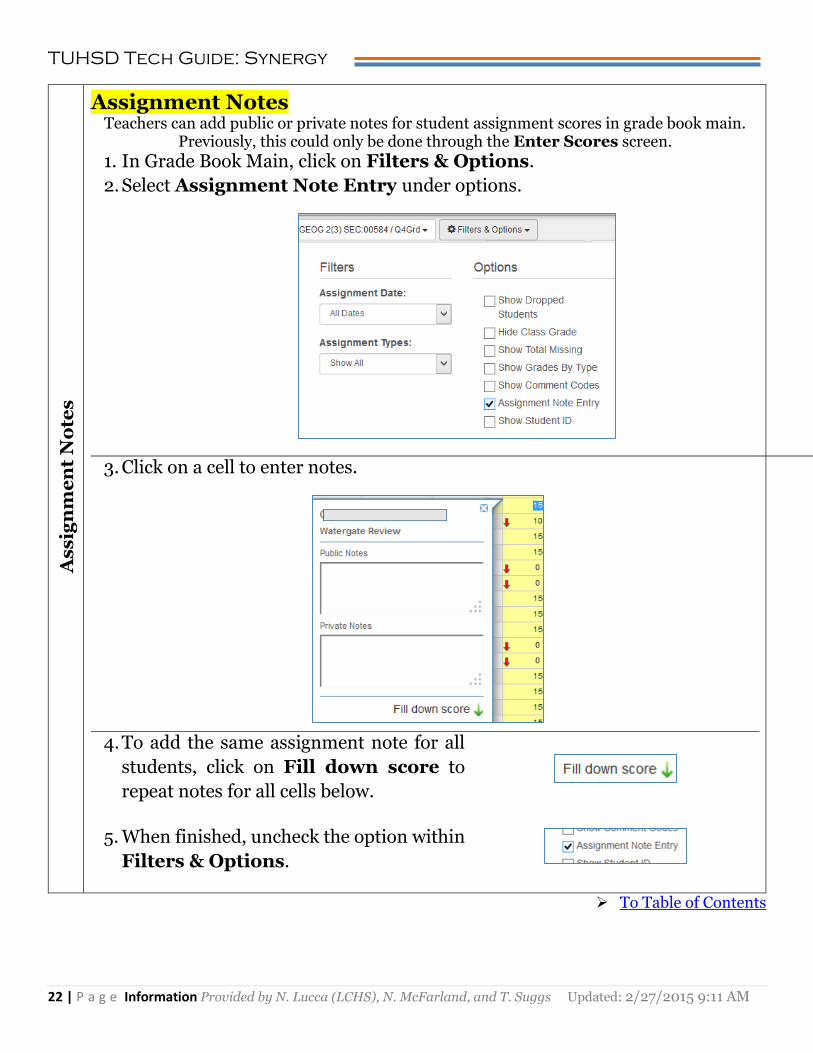
Assignment Notes Teachers can add public or private notes for student assignment scores in grade book main.
Previously, this could only be done through the Enter Scores screen.
1. In Grade Book Main, click on Filters & Options.
2. Select Assignment Note Entry under options.
3. Click on a cell to enter notes.
4. To add the same assignment note for all
students, click on Fill down score to
repeat notes for all cells below.
5. When finished, uncheck the option within
Filters & Options.
To Table of Contents
TUHSD Tech Guide: Synergy
23 | P a g e Information Provided by N. Lucca (LCHS), N. McFarland, and T. Suggs Updated: 2/27/2015 9:11 AM
Cla
ss W
eb
sit
es
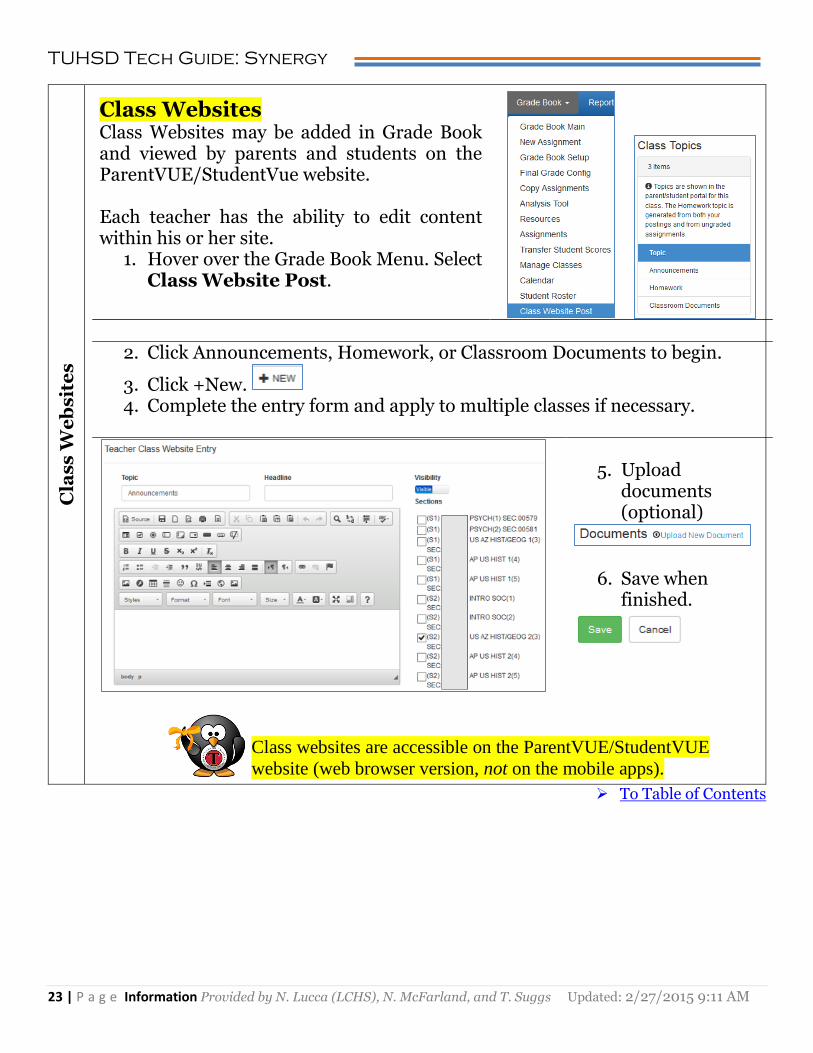
Class Websites Class Websites may be added in Grade Book and viewed by parents and students on the ParentVUE/StudentVue website. Each teacher has the ability to edit content within his or her site.
1. Hover over the Grade Book Menu. Select Class Website Post.
2. Click Announcements, Homework, or Classroom Documents to begin.
3. Click +New. 4. Complete the entry form and apply to multiple classes if necessary.
5. Upload
documents (optional)
6. Save when finished.
Class websites are accessible on the ParentVUE/StudentVUE
website (web browser version, not on the mobile apps).
To Table of Contents
TUHSD Tech Guide: Synergy
24 | P a g e Information Provided by N. Lucca (LCHS), N. McFarland, and T. Suggs Updated: 2/27/2015 9:11 AM
Po
sti
ng
Gr
ad
es
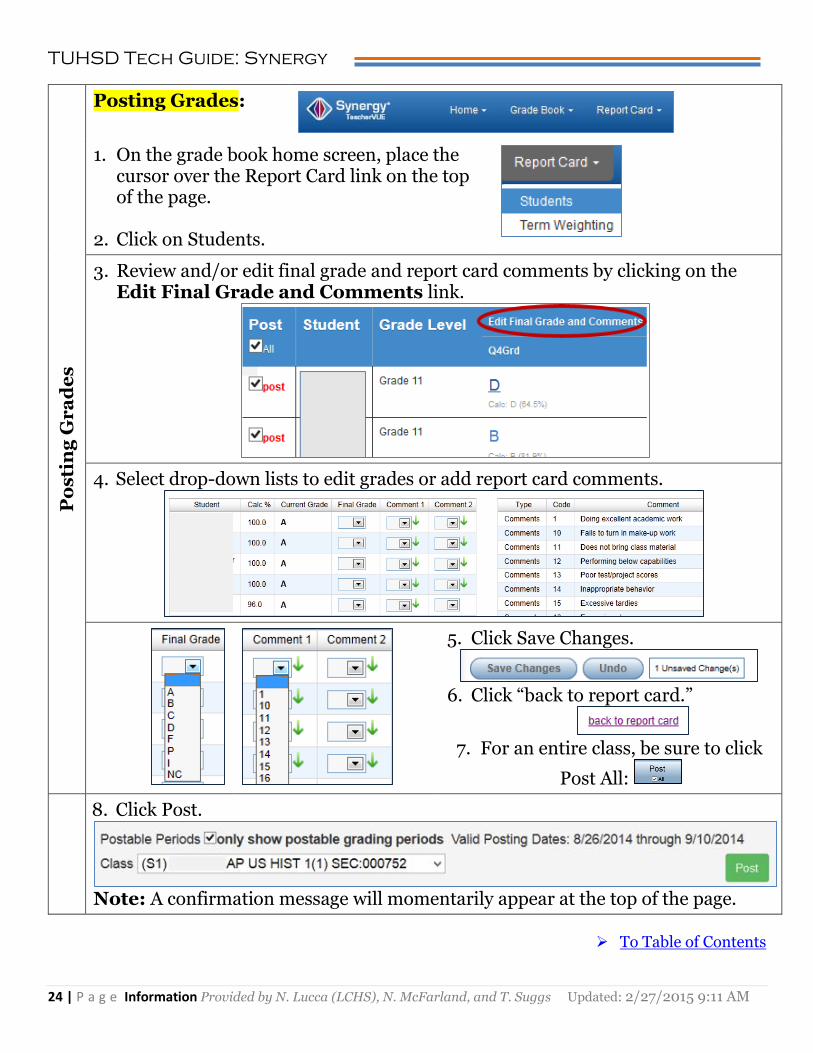
Posting Grades:
1. On the grade book home screen, place the cursor over the Report Card link on the top of the page.
2. Click on Students.
3. Review and/or edit final grade and report card comments by clicking on the Edit Final Grade and Comments link.
4. Select drop-down lists to edit grades or add report card comments.
5. Click Save Changes.
6. Click “back to report card.”
7. For an entire class, be sure to click
Post All:
8. Click Post.
Note: A confirmation message will momentarily appear at the top of the page.
To Table of Contents
TUHSD Tech Guide: Synergy
25 | P a g e Information Provided by N. Lucca (LCHS), N. McFarland, and T. Suggs Updated: 2/27/2015 9:11 AM
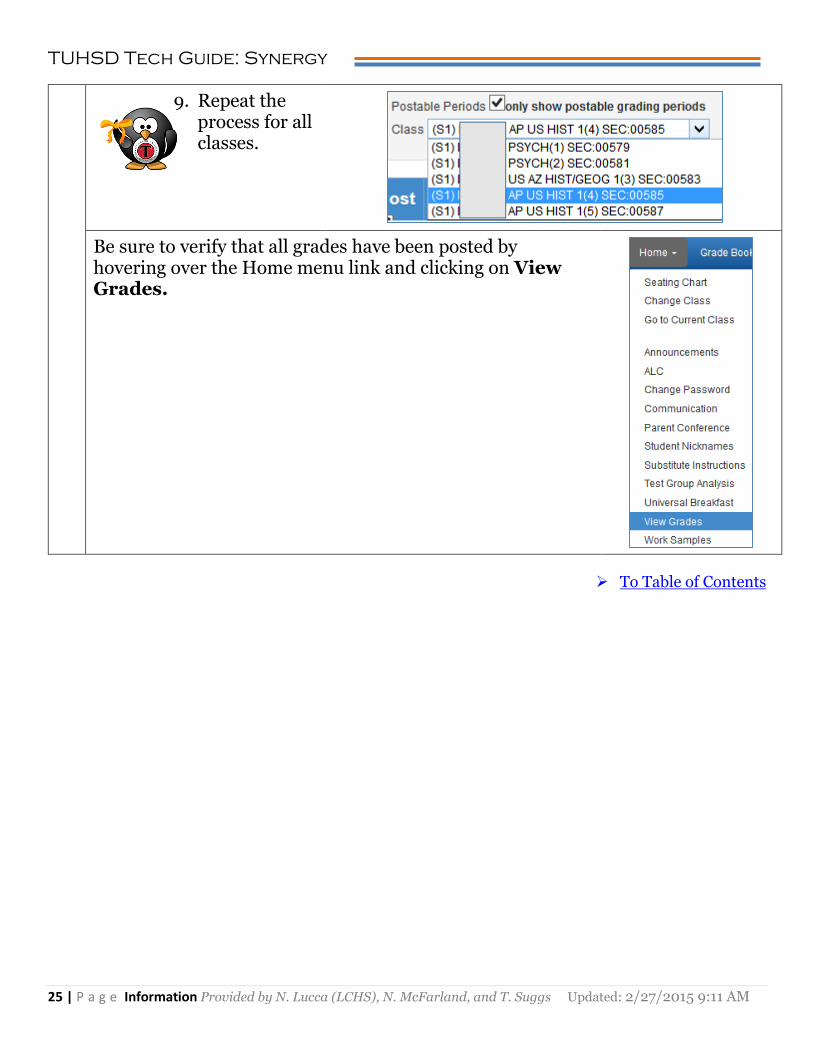
9. Repeat the process for all classes.
Be sure to verify that all grades have been posted by hovering over the Home menu link and clicking on View Grades.
To Table of Contents
TUHSD Tech Guide: Synergy
26 | P a g e Information Provided by N. Lucca (LCHS), N. McFarland, and T. Suggs Updated: 2/27/2015 9:11 AM
Ve
rif
yin
g P
os
ted
Gr
ad
es
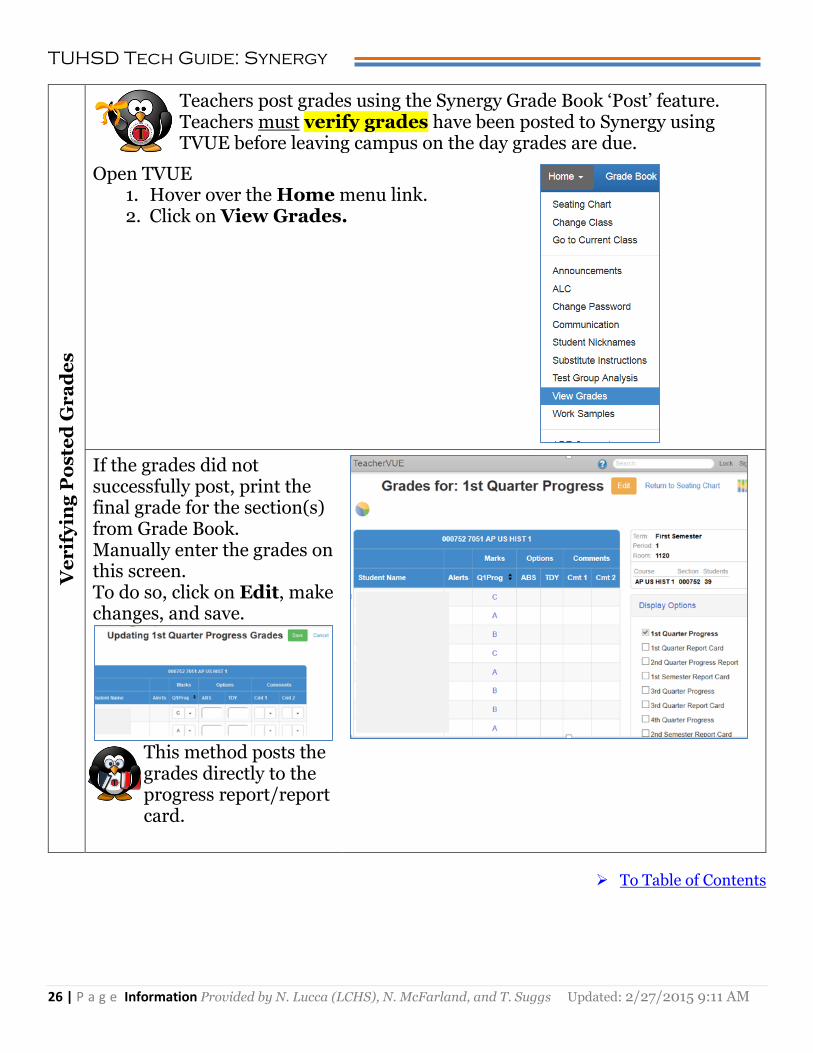
Teachers post grades using the Synergy Grade Book ‘Post’ feature. Teachers must verify grades have been posted to Synergy using TVUE before leaving campus on the day grades are due.
Open TVUE 1. Hover over the Home menu link. 2. Click on View Grades.
If the grades did not successfully post, print the final grade for the section(s) from Grade Book. Manually enter the grades on this screen. To do so, click on Edit, make changes, and save.
This method posts the grades directly to the progress report/report card.
To Table of Contents
TUHSD Tech Guide: Synergy
27 | P a g e Information Provided by N. Lucca (LCHS), N. McFarland, and T. Suggs Updated: 2/27/2015 9:11 AM
Tr
an
sfe
rr
ing
Stu
de
nt
Gr
ad
es
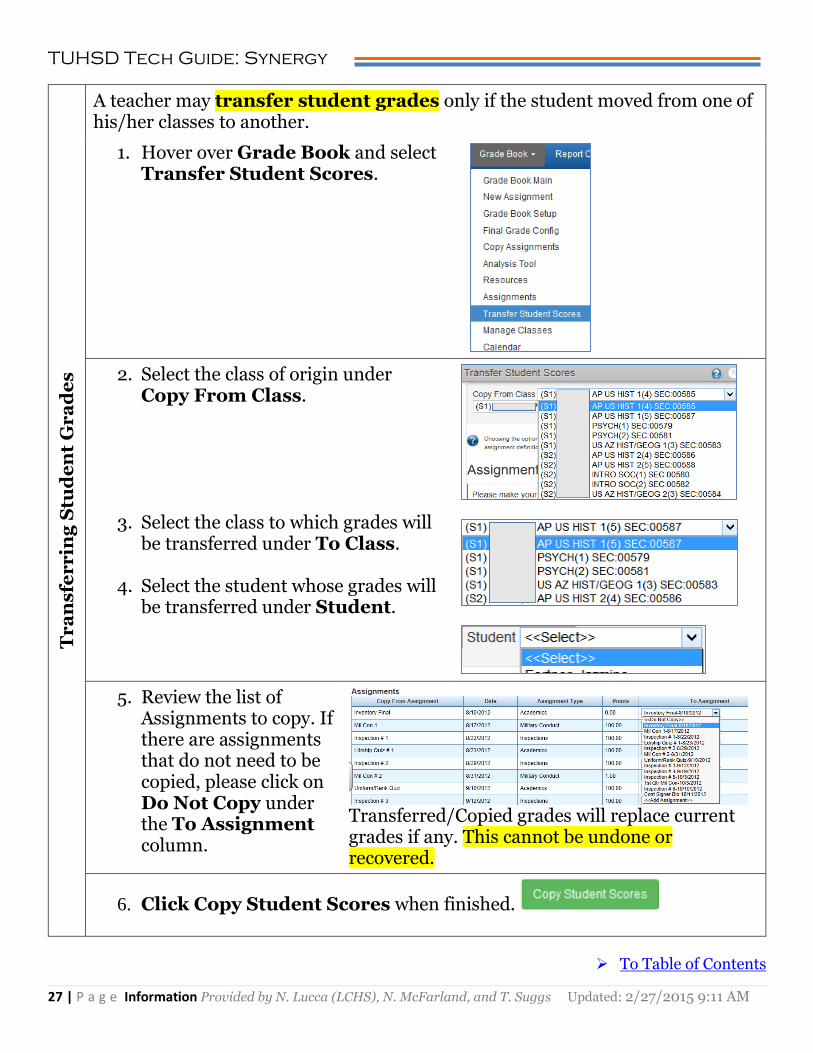
A teacher may transfer student grades only if the student moved from one of his/her classes to another.
1. Hover over Grade Book and select Transfer Student Scores.
2. Select the class of origin under Copy From Class.
3. Select the class to which grades will be transferred under To Class.
4. Select the student whose grades will be transferred under Student.
5. Review the list of Assignments to copy. If there are assignments that do not need to be copied, please click on Do Not Copy under the To Assignment column.
Transferred/Copied grades will replace current grades if any. This cannot be undone or recovered.
6. Click Copy Student Scores when finished.
To Table of Contents
TUHSD Tech Guide: Synergy
28 | P a g e Information Provided by N. Lucca (LCHS), N. McFarland, and T. Suggs Updated: 2/27/2015 9:11 AM
Te
ac
he
rV
UE
an
d D
ua
l L
og
in
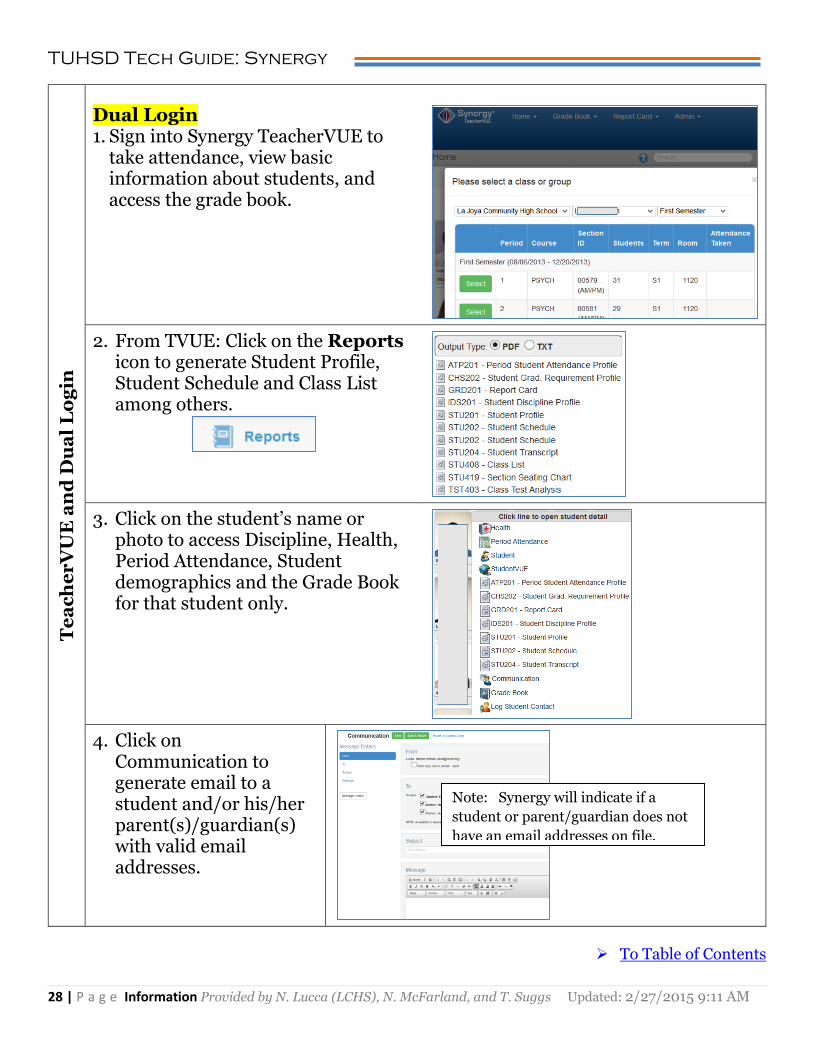
Dual Login 1. Sign into Synergy TeacherVUE to
take attendance, view basic information about students, and access the grade book.
2. From TVUE: Click on the Reports icon to generate Student Profile, Student Schedule and Class List among others.
3. Click on the student’s name or photo to access Discipline, Health, Period Attendance, Student demographics and the Grade Book for that student only.
4. Click on Communication to generate email to a student and/or his/her parent(s)/guardian(s) with valid email addresses.
To Table of Contents
Note: Synergy will indicate if a
student or parent/guardian does not
have an email addresses on file.
TUHSD Tech Guide: Synergy
29 | P a g e Information Provided by N. Lucca (LCHS), N. McFarland, and T. Suggs Updated: 2/27/2015 9:11 AM
Te
ac
he
rV
UE
an
d D
ua
l L
og
in (
co
nti
nu
ed
)
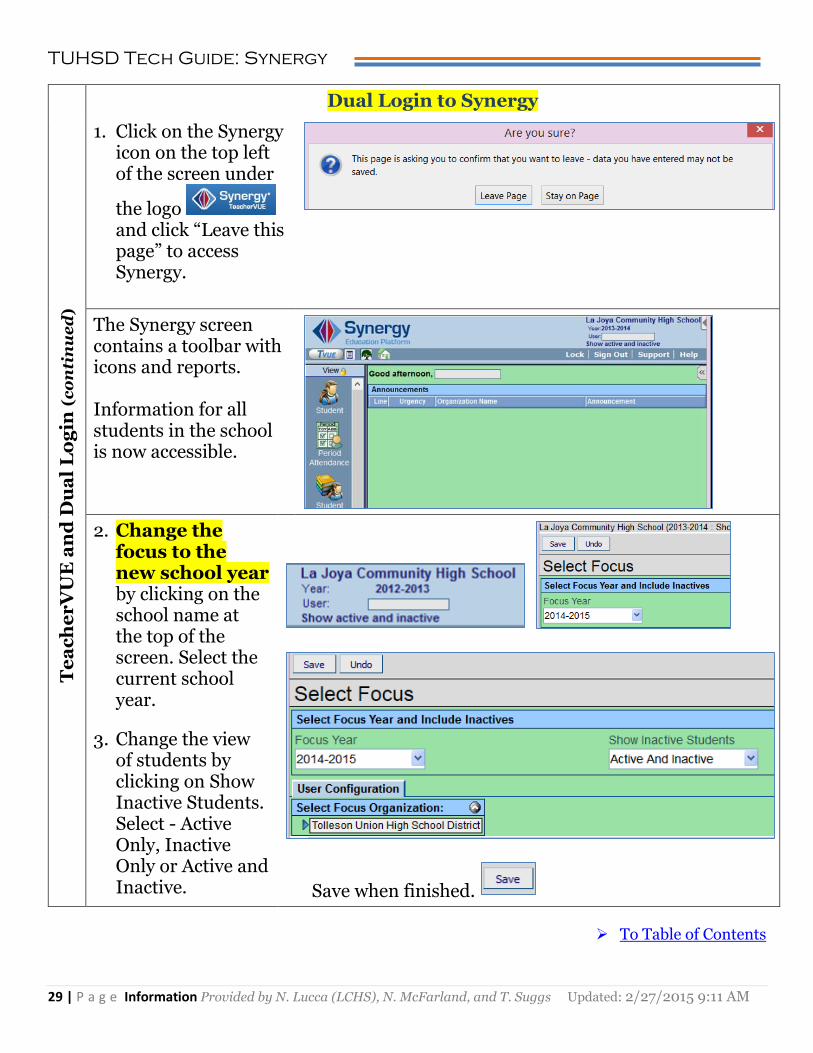
Dual Login to Synergy
1. Click on the Synergy icon on the top left of the screen under
the logo and click “Leave this page” to access Synergy.
The Synergy screen contains a toolbar with icons and reports. Information for all students in the school is now accessible.
2. Change the focus to the new school year by clicking on the school name at the top of the screen. Select the current school year.
3. Change the view of students by clicking on Show Inactive Students. Select - Active Only, Inactive Only or Active and Inactive.
Save when finished.
To Table of Contents
TUHSD Tech Guide: Synergy
30 | P a g e Information Provided by N. Lucca (LCHS), N. McFarland, and T. Suggs Updated: 2/27/2015 9:11 AM
Te
ac
he
rV
UE
an
d D
ua
l L
og
in (
co
nti
nu
ed
)
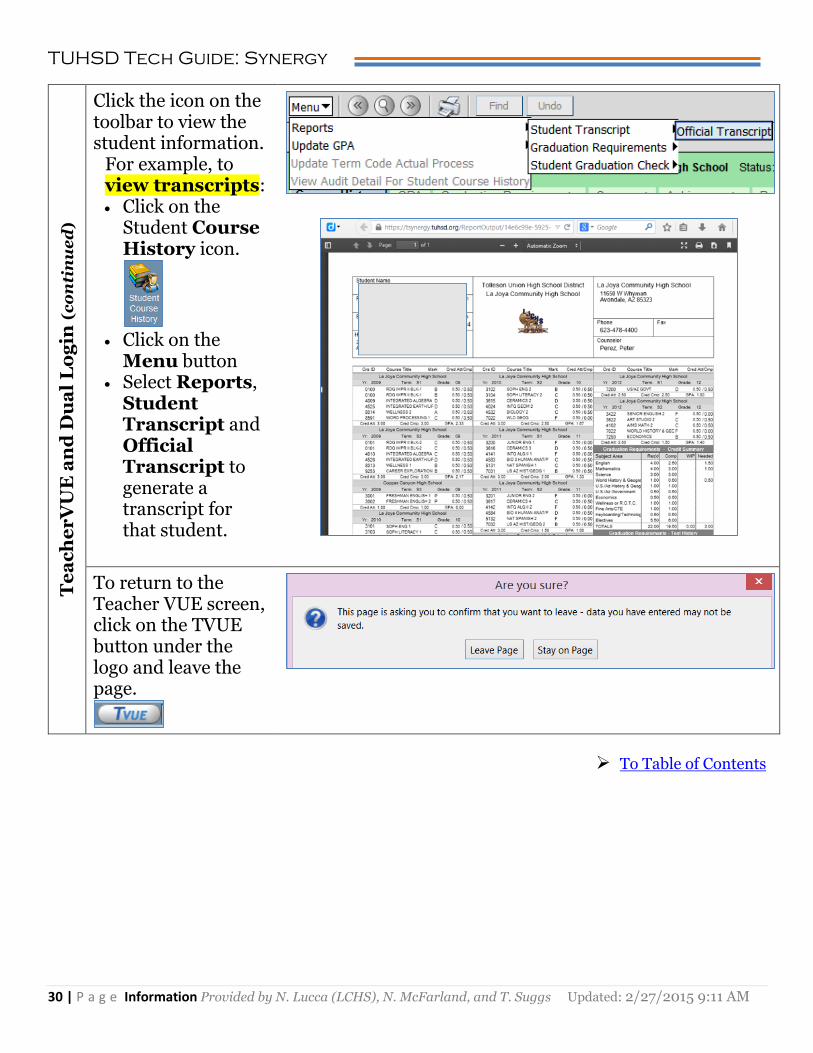
Click the icon on the toolbar to view the student information.
For example, to view transcripts: Click on the
Student Course History icon.
Click on the
Menu button Select Reports,
Student Transcript and Official Transcript to generate a transcript for that student.
To return to the Teacher VUE screen, click on the TVUE button under the logo and leave the page.
To Table of Contents
TUHSD Tech Guide: Synergy
31 | P a g e Information Provided by N. Lucca (LCHS), N. McFarland, and T. Suggs Updated: 2/27/2015 9:11 AM
Te
ac
he
rV
UE
Co
mm
un
ica
tio
n
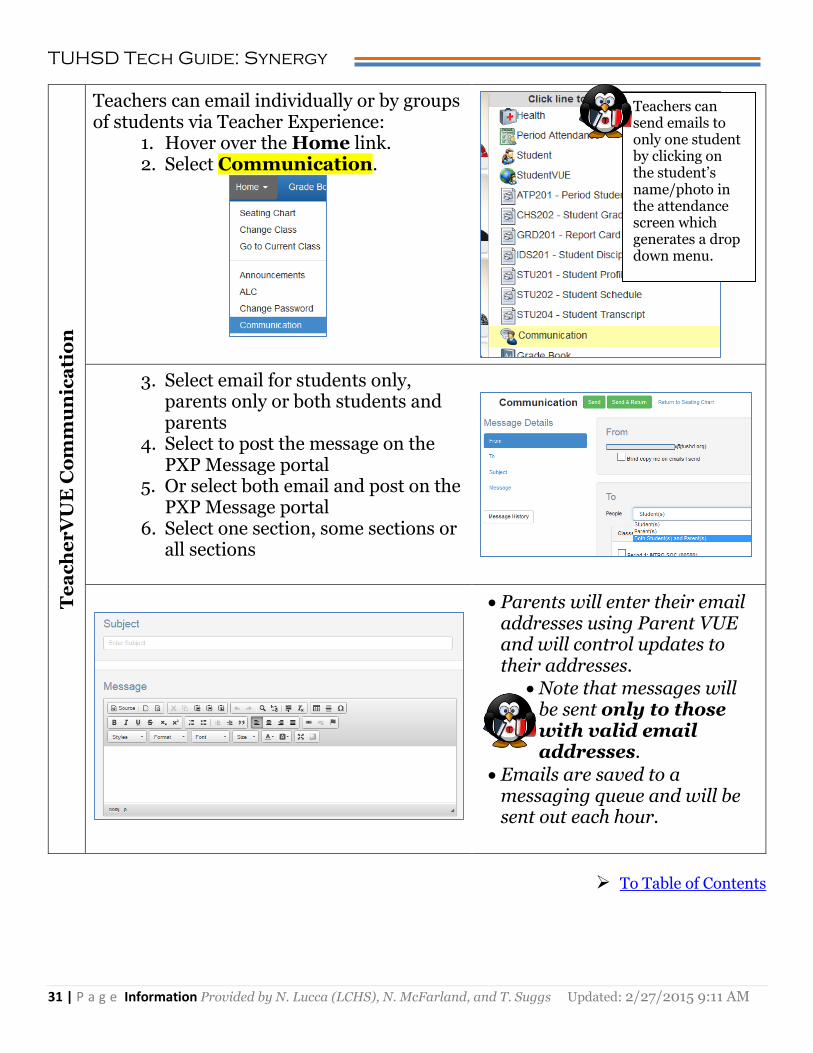
Teachers can email individually or by groups of students via Teacher Experience:
1. Hover over the Home link. 2. Select Communication.
3. Select email for students only, parents only or both students and parents
4. Select to post the message on the PXP Message portal
5. Or select both email and post on the PXP Message portal
6. Select one section, some sections or all sections
Parents will enter their email addresses using Parent VUE and will control updates to their addresses.
Note that messages will be sent only to those with valid email addresses.
Emails are saved to a messaging queue and will be sent out each hour.
To Table of Contents
Teachers can send emails to only one student by clicking on the student’s name/photo in the attendance screen which generates a drop down menu.
TUHSD Tech Guide: Synergy
32 | P a g e Information Provided by N. Lucca (LCHS), N. McFarland, and T. Suggs Updated: 2/27/2015 9:11 AM
Sy
ne
rg
y E
ma
il R
ep
or
ts
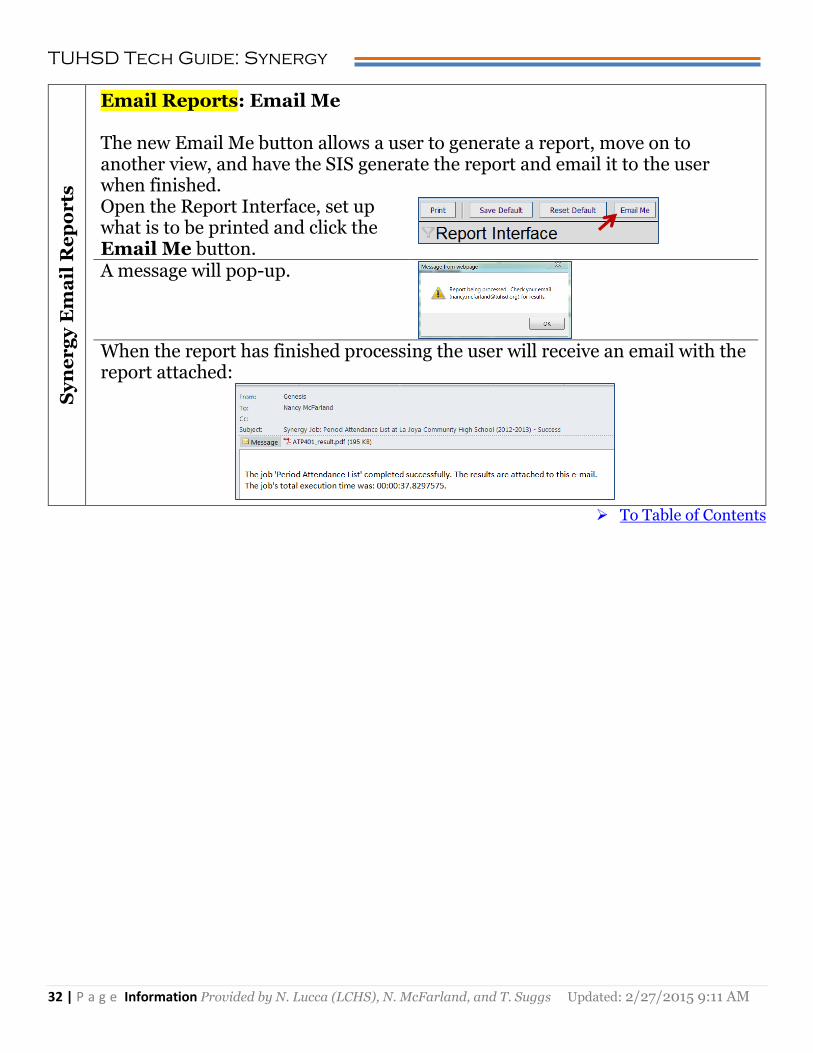
Email Reports: Email Me The new Email Me button allows a user to generate a report, move on to another view, and have the SIS generate the report and email it to the user when finished. Open the Report Interface, set up what is to be printed and click the Email Me button.
A message will pop-up.
When the report has finished processing the user will receive an email with the report attached:
To Table of Contents
TUHSD Tech Guide: Synergy
33 | P a g e Information Provided by N. Lucca (LCHS), N. McFarland, and T. Suggs Updated: 2/27/2015 9:11 AM
Te
ac
he
rV
UE
Te
st
Gr
ou
p A
na
lys
is
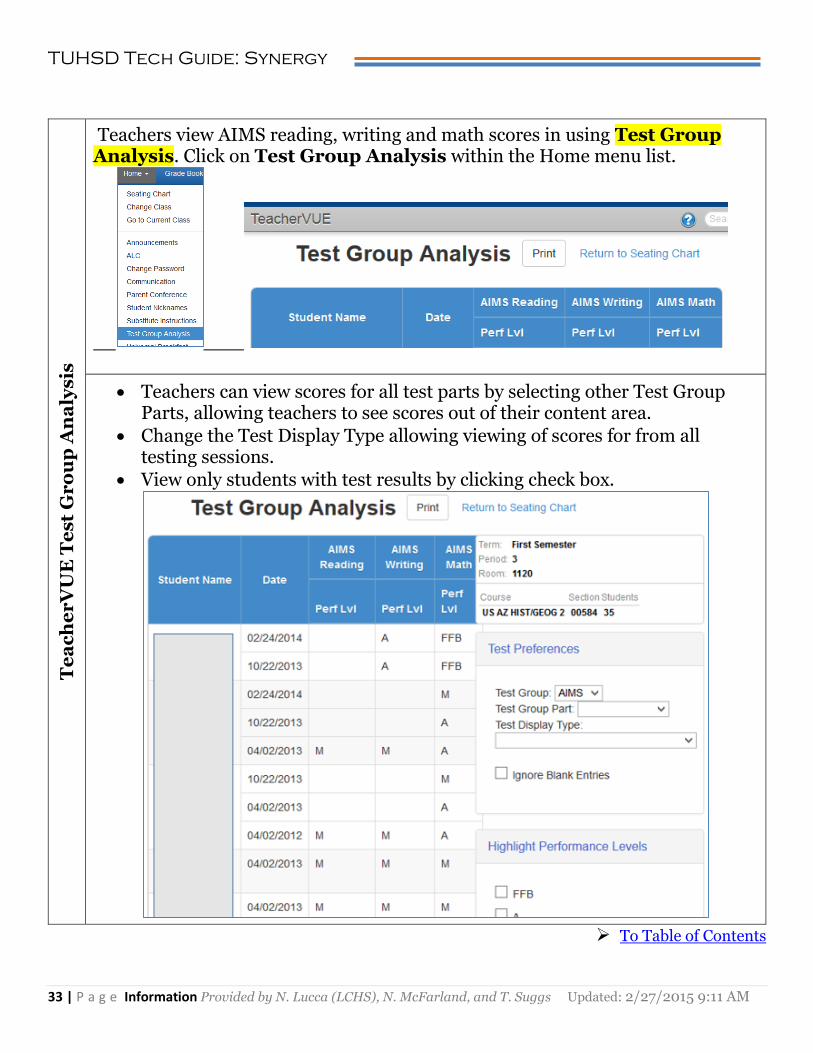
Teachers view AIMS reading, writing and math scores in using Test Group Analysis. Click on Test Group Analysis within the Home menu list.
Teachers can view scores for all test parts by selecting other Test Group Parts, allowing teachers to see scores out of their content area.
Change the Test Display Type allowing viewing of scores for from all testing sessions.
View only students with test results by clicking check box.
To Table of Contents
TUHSD Tech Guide: Synergy
34 | P a g e Information Provided by N. Lucca (LCHS), N. McFarland, and T. Suggs Updated: 2/27/2015 9:11 AM
Gr
ad
e B
oo
k:
Ch
an
ge
Fo
cu
s t
o P
re
vio
us
Ye
ar
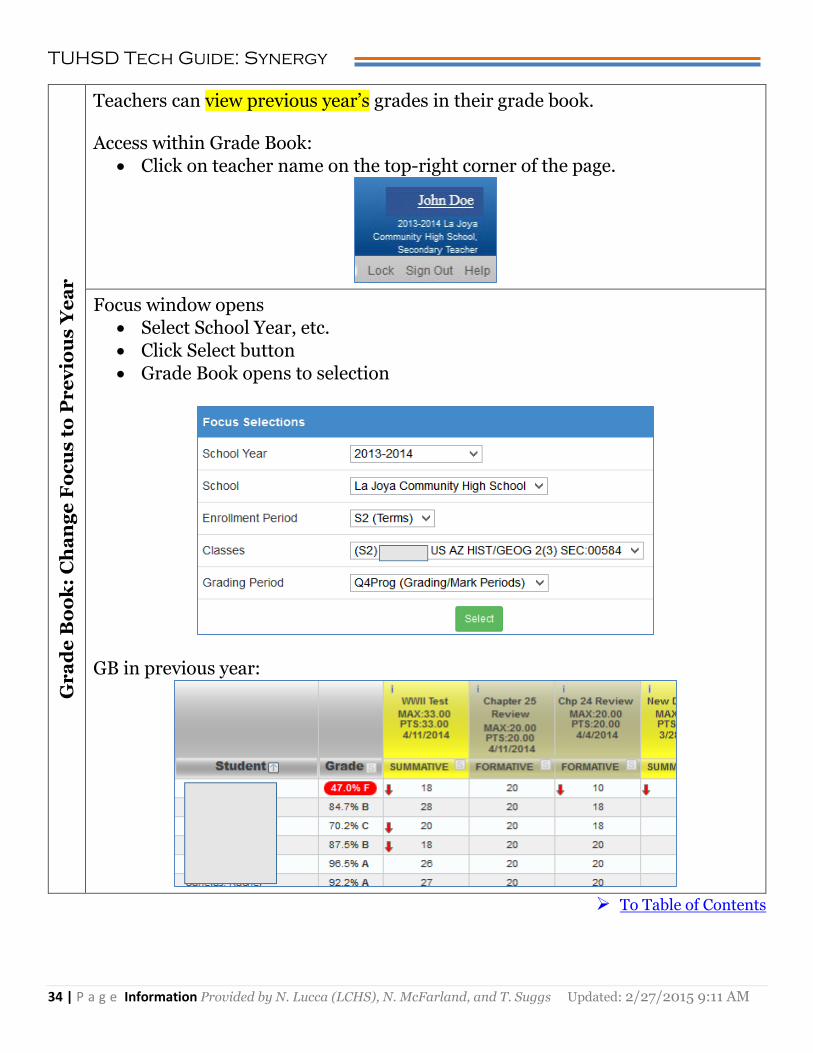
Teachers can view previous year’s grades in their grade book. Access within Grade Book:
Click on teacher name on the top-right corner of the page.
Focus window opens Select School Year, etc.
Click Select button
Grade Book opens to selection
GB in previous year:
To Table of Contents
TUHSD Tech Guide: Synergy
35 | P a g e Information Provided by N. Lucca (LCHS), N. McFarland, and T. Suggs Updated: 2/27/2015 9:11 AM
Cla
ss W
eb
sit
es
Wh
at
Stu
de
nts
an
d P
ar
en
ts S
ee
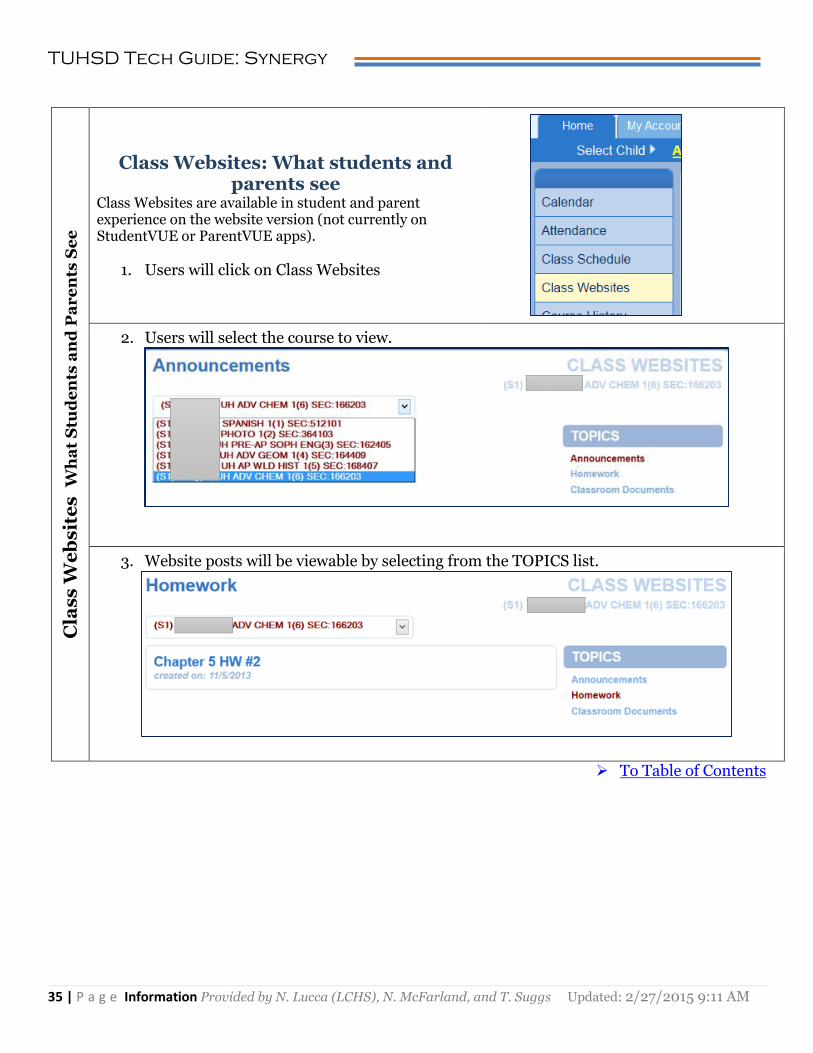
Class Websites: What students and parents see
Class Websites are available in student and parent experience on the website version (not currently on StudentVUE or ParentVUE apps).
1. Users will click on Class Websites
2. Users will select the course to view.
3. Website posts will be viewable by selecting from the TOPICS list.
To Table of Contents

TUHSD Tech Guide: Synergy
36 | P a g e Information Provided by N. Lucca (LCHS), N. McFarland, and T. Suggs Updated: 2/27/2015 9:11 AM
Gr
ad
e B
oo
k R
ep
or
ts
Teachers can generate reports in Grade Book.
1. Click on Reports in Grade Book Main.
2. Select the type of report to generate.
Commonly Used Reports Detailed Progress Report: A detailed list of assignments, scores, and final grade per student Summary Progress Report: An abbreviated list of assignment type scores and final grade per student Print Grade Book: Full grade book printout as shown in Grade Book Main Class Summary Report: An abbreviated list including the overall grade, assignment type scores, and number of missing assignments
3. Click Run Report.
To Table of Contents
TUHSD Tech Guide: Synergy
37 | P a g e Information Provided by N. Lucca (LCHS), N. McFarland, and T. Suggs Updated: 2/27/2015 9:11 AM
Pr
int
Se
me
ste
r G
ra
de
Re
po
rt
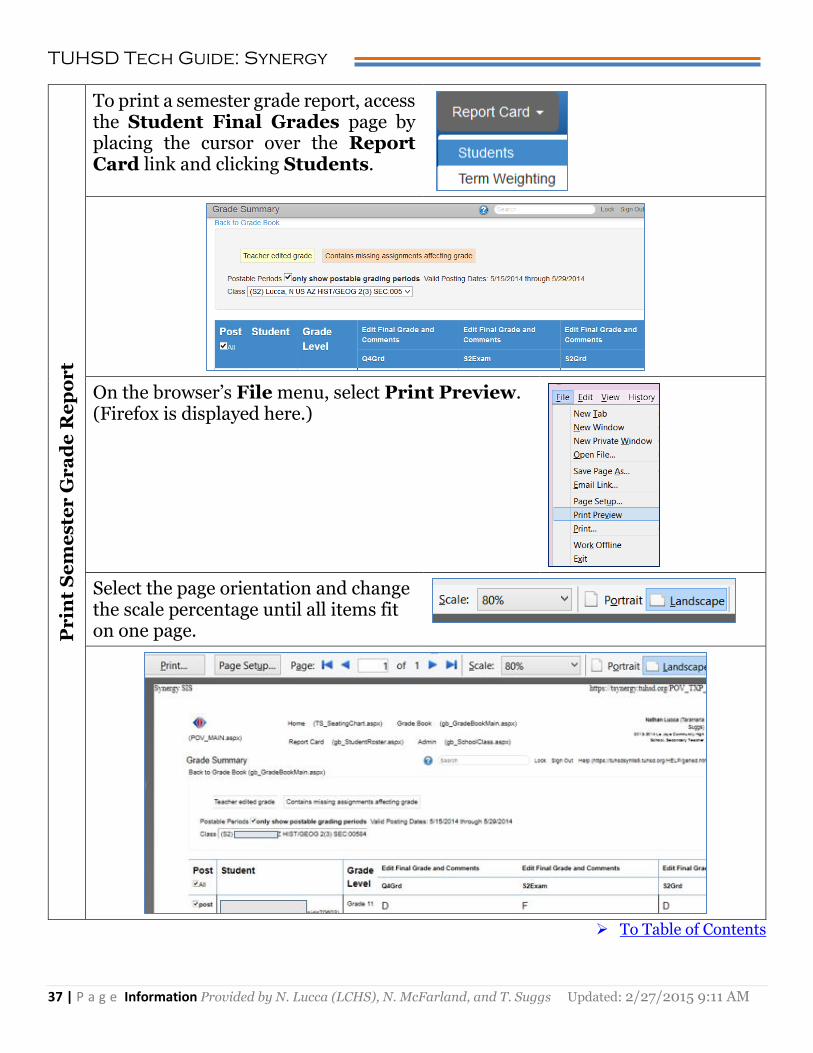
To print a semester grade report, access the Student Final Grades page by placing the cursor over the Report Card link and clicking Students.
On the browser’s File menu, select Print Preview. (Firefox is displayed here.)
Select the page orientation and change the scale percentage until all items fit on one page.
To Table of Contents
TUHSD Tech Guide: Synergy
38 | P a g e Information Provided by N. Lucca (LCHS), N. McFarland, and T. Suggs Updated: 2/27/2015 9:11 AM
Ad
din
g S
tud
en
ts t
o a
Ch
ar
t
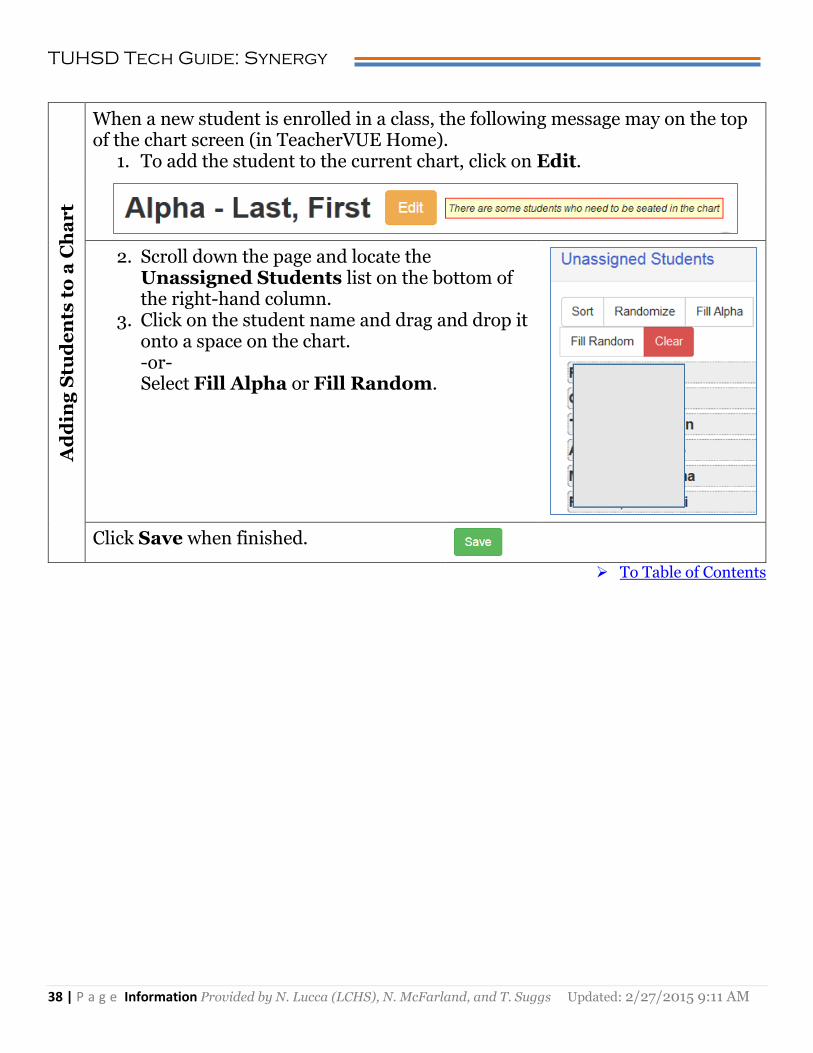
When a new student is enrolled in a class, the following message may on the top of the chart screen (in TeacherVUE Home).
1. To add the student to the current chart, click on Edit.
2. Scroll down the page and locate the Unassigned Students list on the bottom of the right-hand column.
3. Click on the student name and drag and drop it onto a space on the chart. -or- Select Fill Alpha or Fill Random.
Click Save when finished.
To Table of Contents
TUHSD Tech Guide: Synergy
39 | P a g e Information Provided by N. Lucca (LCHS), N. McFarland, and T. Suggs Updated: 2/27/2015 9:11 AM
Ta
kin
g A
tte
nd
an
ce
by
Ch
ar
t
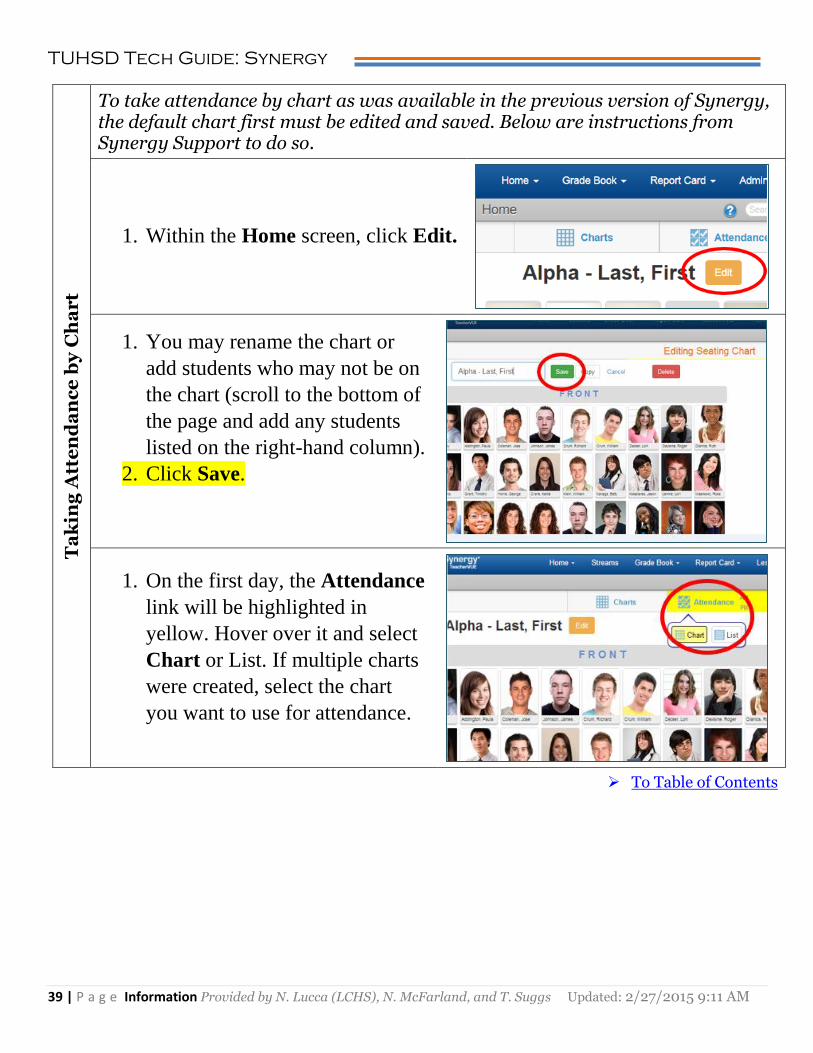
To take attendance by chart as was available in the previous version of Synergy, the default chart first must be edited and saved. Below are instructions from Synergy Support to do so.
1. Within the Home screen, click Edit.
1. You may rename the chart or
add students who may not be on
the chart (scroll to the bottom of
the page and add any students
listed on the right-hand column).
2. Click Save.
1. On the first day, the Attendance
link will be highlighted in
yellow. Hover over it and select
Chart or List. If multiple charts
were created, select the chart
you want to use for attendance.
To Table of Contents
TUHSD Tech Guide: Synergy
40 | P a g e Information Provided by N. Lucca (LCHS), N. McFarland, and T. Suggs Updated: 2/27/2015 9:11 AM
Po
sti
ng
Se
me
ste
r G
ra
de
s
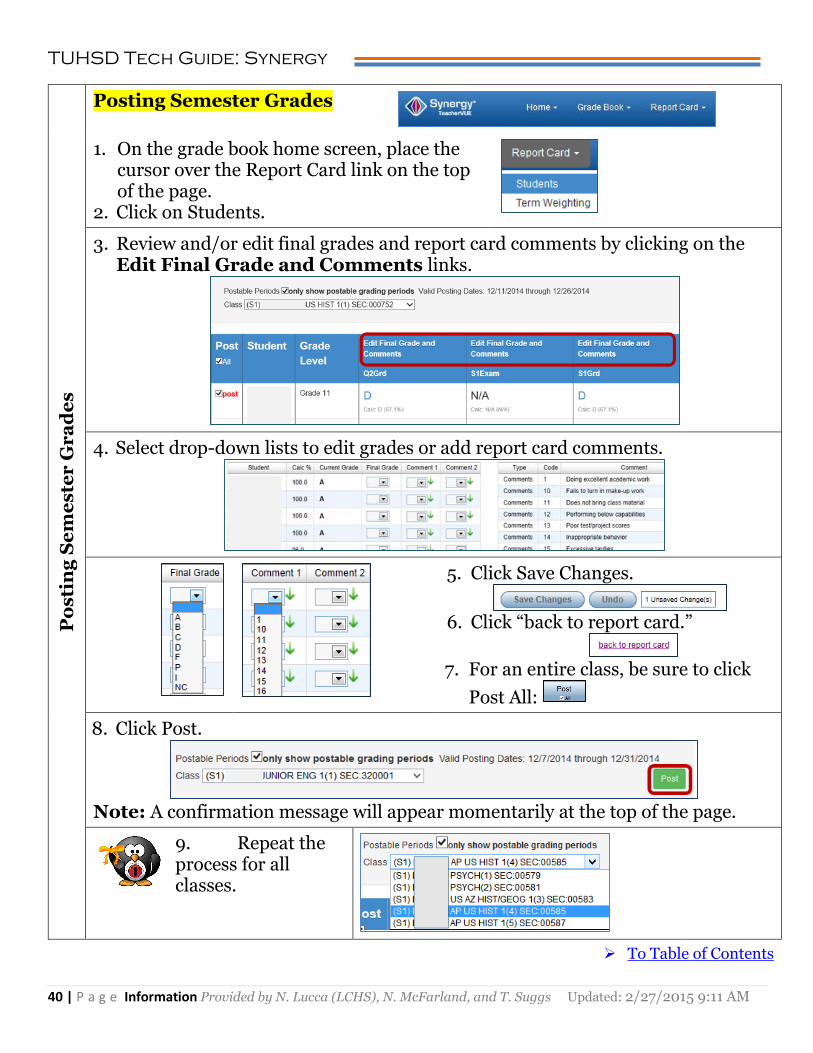
Posting Semester Grades
1. On the grade book home screen, place the cursor over the Report Card link on the top of the page.
2. Click on Students.
3. Review and/or edit final grades and report card comments by clicking on the Edit Final Grade and Comments links.
4. Select drop-down lists to edit grades or add report card comments.
5. Click Save Changes.
6. Click “back to report card.”
7. For an entire class, be sure to click
Post All:
8. Click Post.
Note: A confirmation message will appear momentarily at the top of the page.
9. Repeat the process for all classes.
To Table of Contents
TUHSD Tech Guide: Synergy
41 | P a g e Information Provided by N. Lucca (LCHS), N. McFarland, and T. Suggs Updated: 2/27/2015 9:11 AM
Ve
rif
yin
g a
nd
Ed
itin
g P
oste
d G
ra
de
s
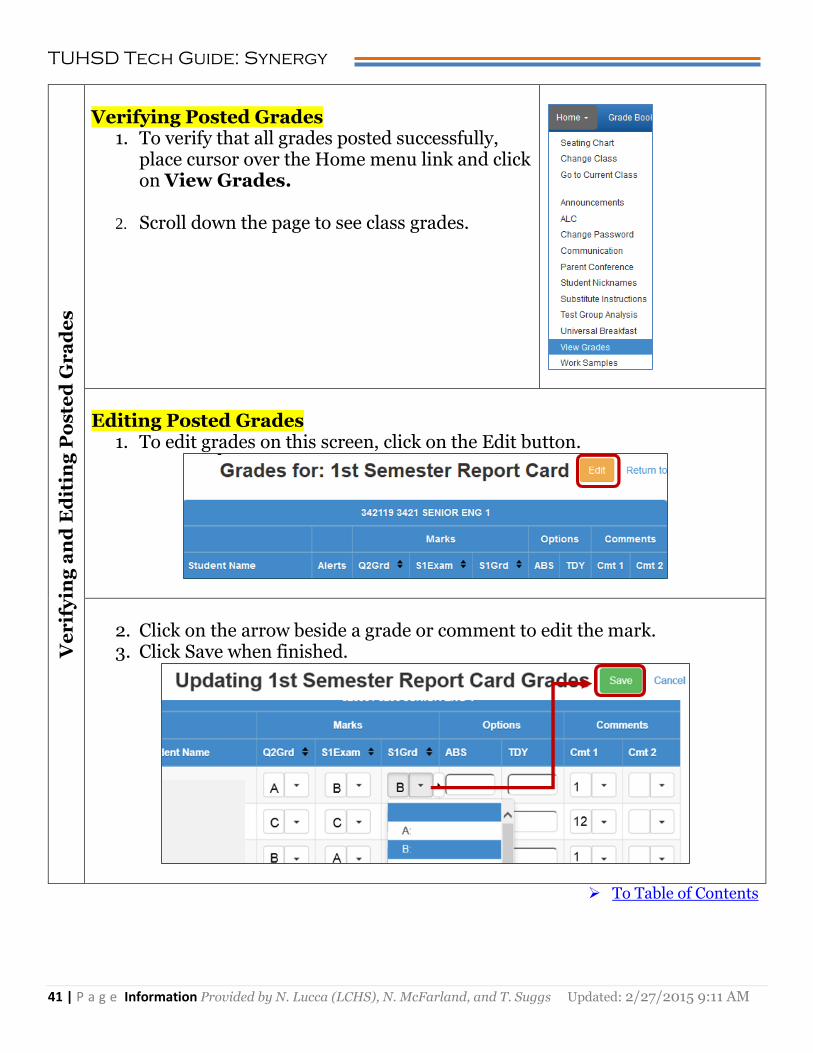
Verifying Posted Grades
1. To verify that all grades posted successfully, place cursor over the Home menu link and click on View Grades.
2. Scroll down the page to see class grades.
Editing Posted Grades
1. To edit grades on this screen, click on the Edit button.
2. Click on the arrow beside a grade or comment to edit the mark. 3. Click Save when finished.
To Table of Contents
TUHSD Tech Guide: Synergy
42 | P a g e Information Provided by N. Lucca (LCHS), N. McFarland, and T. Suggs Updated: 2/27/2015 9:11 AM
Cr
ea
tin
g a
Cla
ss
Lis
t in
Sy
ne
rg
y
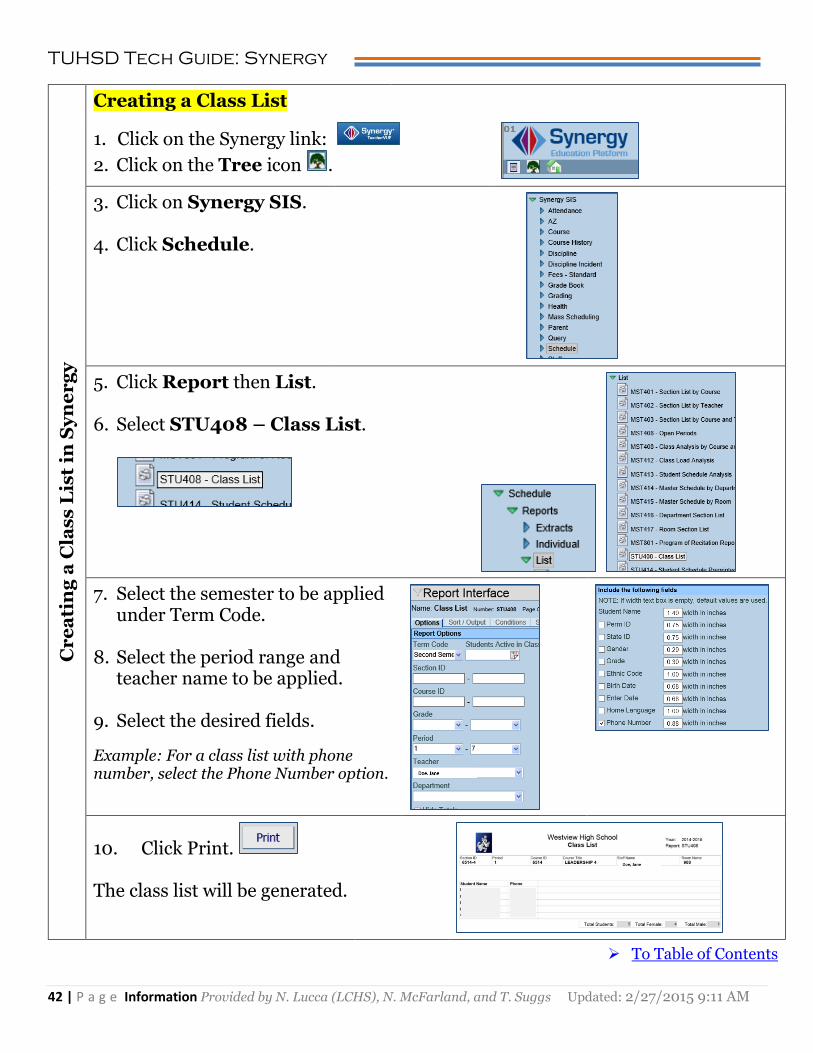
Creating a Class List
1. Click on the Synergy link:
2. Click on the Tree icon .
3. Click on Synergy SIS.
4. Click Schedule.
5. Click Report then List.
6. Select STU408 – Class List.
7. Select the semester to be applied under Term Code.
8. Select the period range and teacher name to be applied.
9. Select the desired fields.
Example: For a class list with phone number, select the Phone Number option.
10. Click Print. The class list will be generated.
To Table of Contents
TUHSD Tech Guide: Synergy
43 | P a g e Information Provided by N. Lucca (LCHS), N. McFarland, and T. Suggs Updated: 2/27/2015 9:11 AM
Index Page No.
Accessing Student Information 28
Accessing Synergy from Home 3
Accessing Synergy from Home 3
Adding Resources 15-16
Adding Students to a Chart 38 Assignment Notes 22
Assignment Resources 16
Assignment Weighting 7 Attendance 4 Change Focus to Previous Year 34
Change Focus Year to New Year 29
Class Websites 23
Class Websites: What Students and Parents See 35
Course Resources 15
Creating a Class List in Synergy 42 Creating a New Assignment 10-11
Dual Login to Synergy 28
Entering Grades 18-20
Final Grade Config 8
Grade Book Main View 17
Grade Book Reports 36
Grade Book Settings 7-8
Grade Book Setup 7-9
My Grade Book Comments 9
My Grade Book Score Types 8
Notes and Communication 21-22; 31
Posting Grades 24-25
Posting Semester Grades 40 Print Semester Grade Report 37
Seating Chart 5-6
Selecting Grading Periods 12
Synergy Email Reports 32
Taking Attendance by Chart 39
Teacher Notes 21
TeacherVUE and Dual Login 28-30
Transferring Student Grades 27
TVUE Communication 31
TVUE Test Group Analysis 33
TUHSD Tech Guide: Synergy
44 | P a g e Information Provided by N. Lucca (LCHS), N. McFarland, and T. Suggs Updated: 2/27/2015 9:11 AM
Verifying and Editing Posted Semester Grades 41 Verifying Assignments 14
Verifying Posted Grades 26
View Transcripts 30