Embed Size (px)
Citation preview
Symantec™ Protection for
SharePoint® Servers
Implementation Guide
2
Symantec™ Protection for SharePoint® ServersImplementation Guide
The software described in this book is furnished under a license agreement and may be
used only in accordance with the terms of the agreement.
Documentation version 5.1a
Legal Notice
Copyright © 2008 Symantec Corporation.
All rights reserved.
Symantec, the Symantec Logo are trademarks or registered trademarks of Symantec
Corporation or its affiliates in the U.S and other countries. Other names may be
trademarks of their respective owners.
This Symantec product may contain third party software for which Symantec is required
to provide attribution to the third party (“Third Party Programs”). Some of the Third Party
Programs are available under open source or free software licenses. The License
Agreement accompanying the Software does not alter any rights or obligations you may
have under those open source or free software licenses. Please see the Third Party Legal
Notice Appendix to this Documentation or TPIP ReadMe File accompanying this Symantec
product for more information on the Third Party Programs.
The product described in this document is distributed under licenses restricting its use,
copying, distribution, and decompilation/reverse engineering. No part of this document
may be reproduced in any form by any means without prior written authorization of
Symantec Corporation and its licensors, if any.
THE DOCUMENTATION IS PROVIDED “AS IS” AND ALL EXPRESS OR IMPLIED
CONDITIONS, REPRESENTATIONS, AND WARRANTIES, INCLUDING ANY IMPLIED
WARRANTY OF MERCHANTABILITY, FITNESS FOR A PARTICULAR PURPOSE OR NON-
INFRINGEMENT, ARE DISCLAIMED, EXCEPT TO THE EXTENT THAT SUCH
DISCLAIMERS ARE HELD TO BE LEGALLY INVALID. SYMANTEC CORPORATION SHALL
NOT BE LIABLE FOR INCIDENTAL OR CONSEQUENTIAL DAMAGES IN CONNECTION
WITH THE FURNISHING, PERFORMANCE, OR USE OF THIS DOCUMENTATION. THE
INFORMATION CONTAINED IN THIS DOCUMENTATION IS SUBJECT TO CHANGE
WITHOUT NOTICE.
The Licensed Software and Documentation are deemed to be commercial computer
software as defined in FAR 12.212 and subject to restricted rights as defined in FAR
Section 52.227-19 “Commercial Computer Software - Restricted Rights” and DFARS
227.7202, “Rights in Commerical Computer Software or Commerical Computer Software
Documentation”, as applicable, and any successor regulations. Any use, modification,
reporoduction release, performance, display or disclosure of the Licensed Software and
Documentation by the U.S Government shall be solely in accordance with the terms of this
Agreement.

3
Symantec Corporation
20330 Stevens Creek Blvd.
Cupertino, CA 95014
http://www.symantec.com
4
Technical support
Symantec Technical Support maintains support centers globally. Technical
Support’s primary role is to respond to specific queries about product features
and functionality. The Technical Support group also creates content for our
online Knowledge Base. The Technical Support group works collaboratively with
the other functional areas within Symantec to answer your questions in a timely
fashion. For example, the Technical Support group works with Product
Engineering and Symantec Secuirty Response to provide alerting services and
virus definition updates.
Symantec’s maintenance offerings include the following:
■ A range of support options that give you the flexibility to select the right
amount of service for any site organization
■ Telephone and Web-based support that provides rapid response and up-to-
the-minute information
■ Upgrade assurance that delivers automatic software upgrade protection
■ Global support that is available 24 hours a day, 7 days a week
■ Advanced features, including Account Management Services
For information about Symantec’s Maintenance Programs, you can visit our
Web site at the following URL:
www.symantec.com/techsupp/
Contacting Technical Support
Customers with a current maintenance agreement may access Technical
Support information at the following URL:
www.symantec.com/techsupp/
Before contacting Technical Support, make sure that you have satisfied the
system requirements that are listed in your product documentation. Also, you
should be at the computer on which the problem occurred, in case it is necessary
to replicate the problem.
When you contact Technical Support, please have the following information available:
■ Product release level
■ Hardware information
■ Available memory, disk space, and NIC information
■ Operating system
■ Version and patch level
■ Network topology
■ Router, gateway, and IP address information
■ Problem description:
5
■ Error messages and log files
■ Troubleshooting that was performed before contacting Symantec
■ Recent software configuration changes and network changes
Licensing and registration
If your Symantec product requires registration or a license key, access our
technical support Web page at the following URL:
www.symantec.com/techsupp/
Customer Service
Customer service information is available at the following URL:
www.symantec.com/techsupp/
Customer Service is available to assist with the following types of issues:
■ Questions regarding product licensing or serialization
■ Product registration updates such as address or name changes
■ General product information (features, language availability, local dealers)
■ Latest information about product updates and upgrades
■ Information about upgrade assurance and maintenance contracts
■ Information about the Symantec Buying Programs
■ Advice about Symantec’s technical support options
■ Nontechnical presales questions
■ Issues that are related to CD-ROMs or manuals
Maintenance agreement resources
If you want to contact Symantec regarding an existing maintenance agreement,
please contact the maintenance agreement administration team for your region
as follows:
■ Asia-Pacific and Japan: [email protected]
■ Europe, Middle-East, and Africa: [email protected]
■ North America and Latin America: [email protected]
Additional enterprise services
Symantec offers a comprehensive set of services that allow you to maximize
your investment in Symantec products and to develop your knowledge,
6
expertise, and global insight, which enable you to manage your business risks
proactively.
Enterprise services that are available include the following:
To access more information about Enterprise services, please visit our Web site
at the following URL:
www.symantec.com
Select your country or language from the site index.
Symantec Early Warning
Solutions
These solutions provide early warning of cyber attacks,
comprehensive threat analysis, and countermeasures to
prevent attacks before they occur.
Managed Security
Services
These services remove the burden of managing and monitoring
security devices and events, ensuring rapid response to real
threats.
Consulting services Symantec Consulting Services provide on-site technical
expertise from Symantec and its trusted partners. Symantec
Consulting Services offer a variety of prepackaged and
customizable options that include assessment, design,
implementation, monitoring and management capabilities.
Each is focused on establishing and maintaining the integrity
and availability of your IT resources.
Educational Services Educational Services provide a full array of technical training,
security education, security certification, and awareness
communication programs.
Symantec Corporation Software License Agreement
SYMANTEC CORPORATION AND/OR ITS
SUBSIDIARIES ("SYMANTEC") IS WILLING TO
LICENSE THE LICENSED SOFTWARE TO YOU AS THE
INDIVIDUAL, THE COMPANY, OR THE LEGAL ENTITY
THAT WILL BE UTILIZING THE LICENSED
SOFTWARE (REFERENCED BELOW AS "YOU" OR
"YOUR") ONLY ON THE CONDITION THAT YOU
ACCEPT ALL OF THE TERMS OF THIS LICENSE
AGREEMENT. READ THE TERMS AND CONDITIONS
OF THIS LICENSE AGREEMENT CAREFULLY BEFORE
USING THE LICENSED SOFTWARE. THIS IS A LEGAL
AND ENFORCEABLE CONTRACT BETWEEN YOU AND
SYMANTEC. BY OPENING THE LICENSED SOFTWARE
PACKAGE, BREAKING THE LICENSED SOFTWARE
SEAL, CLICKING THE "I AGREE" OR "YES" BUTTON
OR OTHERWISE INDICATING ASSENT
ELECTRONICALLY, OR LOADING THE LICENSED
SOFTWARE OR OTHERWISE USING THE LICENSED
SOFTWARE, YOU AGREE TO THE TERMS AND
CONDITIONS OF THIS LICENSE AGREEMENT. IF YOU
DO NOT AGREE TO THESE TERMS AND CONDITIONS,
CLICK THE "I DO NOT AGREE" OR "NO" BUTTON OR
OTHERWISE INDICATE REFUSAL AND MAKE NO
FURTHER USE OF THE LICENSED SOFTWARE.
UNLESS OTHERWISE DEFINED HEREIN,
CAPITALIZED TERMS WILL HAVE THE MEANING
GIVEN IN THE “DEFINITIONS” SECTION OF THIS
LICENSE AGREEMENT AND SUCH CAPITALIZED
TERMS MAY BE USED IN THE SINGULAR OR IN THE
PLURAL, AS THE CONTEXT REQUIRES.
1. Definitions:
“Content Updates” means content used by eertain
Symantec products which is updated from time to
time, including but not limited to: updated anti-
spyware products; updated antispam rules for
antispam products; updated virus definitions for
antivirus and crimeware products; updated URL lists
for content filtering and antiphishing products;
updated firewall rules for firewall products; updated
intrusion detection data for intrusion detection
products; updated lists of authenticated web pages for
website authentication products; updated policy
compliance rules for policy compliance products; and
updated vulnerability signatures for vulnerability
assessment products.
“Documentation” means the user documentation
Symantec provides with the Licensed Software.
“License Instrument” means one or more of the
following applicable documents which further defines
Your license rights to the Licensed Software: a
Symantec license certificate or a similar license
document issued by Symantec, or a written agreement
between You and Symantec, that accompanies,
precedes or follows this License Agreement.
“Licensed Software” means the Symantec software
product, in object code form, accompanying this
License Agreement, including any Documentation
included in, or provided for use with, such software or
that accompanies this License Agreement.
“Support Certificate” means the certificate sent by
Symantec confirming Your purchase of the applicable
Symantec maintenance/support for the Licensed
Software.
“Upgrade” means any version of the Licensed Software
that has been released to the public and which replaces
the prior version of the Licensed Software on
Symantec’s price list pursuant to Symantec’s then-
current upgrade policies.
“Use Level” means the license use meter or model
(which may include operating system, hardware
system, application or machine tier limitations, if
applicable) by which Symantec measures, prices and
licenses the right to use the Licensed Software, in
effect at the time an order is placed for such Licensed
Software, as indicated in this License Agreement and
the applicable License Instrument.
2. License Grant
Subject to Your compliance with the terms and
conditions of this License Agreement, Symantec grants
to You the following rights:
(i) a non-exclusive, non-transferable (except as stated
otherwise in Section 16.1) license to use the Licensed
Software solely in support of Your internal business
operations in the quantities and at the Use Levels
described in this License Agreement and the applicable
License Instrument; and
(ii) the right to make a single uninstalled copy of the
Licensed Software for archival purposes which You
may use and install for disaster-recovery purposes (i.e.
where the primary installation of the Licensed
Software becomes unavailable for use).
2.1 Term
The term of the Licensed Software license granted
under this License Agreement shall be perpetual
(subject to Section 14) unless stated otherwise in
Section 17 or unless You have obtained the Licensed
Software on a non-perpetual basis, such as, under a
subscription or term-based license for the period of
time indicated on the applicable License Instrument. If
You have obtained the Licensed Software on a non-
perpetual basis, Your rights to use such Licensed
Software shall end on the applicable end date as
indicated on the applicable License Instrument and
You shall cease use of the Licensed Software as of such
applicable end date.
3.License Restrictions
You may not, without Symantec’s prior written
consent, conduct, cause or permit the:
(i) use, copying, modification, rental, lease, sublease,
sublicense, or transfer of the Licensed Software except
as expressly provided in this License Agreement;
(ii) creation of any derivative works based on the
Licensed Software;
(iii) reverse engineering, disassembly, or decompiling
of the Licensed Software (except that You may
decompile the Licensed Software for the purposes of
interoperability only to the extent permitted by and
subject to strict compliance under applicable law);
(iv) use of the Licensed Software in connection with
service bureau, facility management, timeshare,
service provider or like activity whereby You operate
or use the Licensed Software for the benefit of a third
party;
(v) use of the Licensed Software by any party other
than You;
(vi) use of a later version of the Licensed Software
other than the version that accompanies this License
Agreement unless You have separately acquired the
right to use such later version through a License
Instrument or Support Certificate; nor
(vii) use of the Licensed Software above the quantity
and Use Level that have been licensed to You under
this License Agreement or the applicable License
Instrument.
4.Ownership/Title
The Licensed Software is the proprietary property of
Symantec or its licensors and is protected by copyright
law. Symantec and its licensors retain any and all
rights, title and interest in and to the Licensed
Software, including in all copies, improvements,
enhancements, modifications and derivative works of
the Licensed Software. Your rights to use the Licensed
Software shall be limited to those expressly granted in
this License Agreement. All rights not expressly
granted to You are retained by Symantec and/or its
licensors.
5.Content Updates
If You purchase a Symantec maintenance/support
offering consisting of or including Content Updates, as
indicated on Your Support Certificate, You are granted
the right to use, as part of the Licensed Software, such
Content Updates as and when they are made generally
available to Symantec’s end user customers who have
purchased such maintenance/support offering and for
such period of time as indicated on the face of the
applicable Support Certificate. This License Agreement
does not otherwise permit You to obtain and use
Content Updates.
6.Upgrades/Cross-grades
Symantec reserves the right to require that any
upgrades (if any) of the Licensed Software may only be
obtained in a quantity equal to the number indicated
on the applicable License Instrument. An upgrade to an
existing license shall not be deemed to increase the
number of licenses which You are authorized to use.
Additionally, if You upgrade a Licensed Software
license, or purchase a Licensed Software license listed
on the applicable License Instrument to cross-grade an
existing license (i.e. to increase its functionality, and/
or transfer it to a new operating system, hardware tier
or licensing meter), then Symantec issues the
applicable Licensed Instrument based on the
understanding that You agree to cease using the
original license. Any such license upgrade or cross-
grade is provided under Symantec's policies in effect at
the time of order. This License Agreement does not
separately license You for additional licenses beyond
those which You have purchased, and which have been
authorized by Symantec as indicated on the applicable
License Instrument.
7.Limited Warranty
7.1. Media Warranty
If Symantec provides the Licensed Software to You on
tangible media, Symantec warrants that the magnetic
media upon which the Licensed Software is recorded
will not be defective under normal use, for a period of
ninety (90) days from delivery. Symantec will replace
any defective media returned to Symantec within the
warranty period at no charge to You. The above
warranty is inapplicable in the event the Licensed
Software media becomes defective due to unauthorized
use of the Licensed Software. THE FOREGOING IS
YOUR SOLE AND EXCLUSIVE REMEDY FOR
SYMANTEC’S BREACH OF THIS WARRANTY.
7.2. Performance Warranty
Symantec warrants that the Licensed Software, as
delivered by Symantec and when used in accordance
with the Documentation, will substantially conform to
the Documentation for a period of ninety (90) days
from delivery. If the Licensed Software does not
comply with this warranty and such non-compliance is
reported by You to Symantec within the ninety (90) day
warranty period, Symantec will do one of the
following, selected at Symantec’s reasonable
discretion: either
(i) repair the Licensed Software,
(ii) replace the Licensed Software with software of
substantially the same functionality, or
(iii) terminate this License Agreement and refund the
relevant license fees paid for such non-compliant
Licensed Software. The above warranty specifically
excludes defects resulting from accident, abuse,
unauthorized repair, modifications or enhancements,
or misapplication. THE FOREGOING IS YOUR SOLE
AND EXCLUSIVE REMEDY FOR SYMANTEC’S
BREACH OF THIS WARRANTY.
8.Warranty Disclaimers
TO THE MAXIMUM EXTENT PERMITTED BY
APPLICABLE LAW, THE WARRANTIES SET FORTH IN
SECTIONS 7.1 AND 7.2 ARE YOUR EXCLUSIVE
WARRANTIES AND ARE IN LIEU OF ALL OTHER
WARRANTIES, WHETHER EXPRESS OR IMPLIED,
INCLUDING, BUT NOT LIMITED TO, THE IMPLIED
WARRANTIES OF MERCHANTABILITY,
SATISFACTORY QUALITY, FITNESS FOR A
PARTICULAR PURPOSE, AND NONINFRINGEMENT
OF INTELLECTUAL PROPERTY RIGHTS. SYMANTEC
MAKES NO WARRANTIES OR REPRESENTATIONS
THAT THE LICENSED SOFTWARE, CONTENT
UPDATES OR UPGRADES WILL MEET YOUR
REQUIREMENTS OR THAT OPERATION OR USE OF
THE LICENSED SOFTWARE, CONTENT UPDATES,
AND UPGRADES WILL BE UNINTERRUPTED OR
ERROR-FREE. YOU MAY HAVE OTHER WARRANTY
RIGHTS, WHICH MAY VARY FROM STATE TO STATE
AND COUNTRY TO COUNTRY.
9.Limitation of Liability
TO THE MAXIMUM EXTENT PERMITTED BY
APPLICABLE LAW AND REGARDLESS OF WHETHER
ANY REMEDY SET FORTH HEREIN FAILS OF ITS
ESSENTIAL PURPOSE, IN NO EVENT WILL
SYMANTEC OR ITS LICENSORS, RESELLERS,
SUPPLIERS OR AGENTS BE LIABLE TO YOU FOR (i)
ANY COSTS OF PROCUREMENT OF SUBSTITUTE OR
REPLACEMENT GOODS AND SERVICES, LOSS OF
PROFITS, LOSS OF USE, LOSS OF OR CORRUPTION
TO DATA, BUSINESS INTERRUPTION, LOSS OF
PRODUCTION, LOSS OF REVENUES, LOSS OF
CONTRACTS, LOSS OF GOODWILL, OR ANTICIPATED
SAVINGS OR WASTED MANAGEMENT AND STAFF
TIME; OR (ii) ANY SPECIAL, CONSEQUENTIAL,
INCIDENTAL OR INDIRECT DAMAGES WHETHER
ARISING DIRECTLY OR INDIRECTLY OUT OF THIS
LICENSE AGREEMENT, EVEN IF SYMANTEC OR ITS
LICENSORS, RESELLERS, SUPPLIERS OR AGENTS
HAS BEEN ADVISED SUCH DAMAGES MIGHT OCCUR.
IN NO CASE SHALL SYMANTEC’S LIABILITY EXCEED
THE FEES YOU PAID FOR THE LICENSED SOFTWARE
GIVING RISE TO THE CLAIM. NOTHING IN THIS
AGREEMENT SHALL OPERATE SO AS TO EXCLUDE
OR LIMIT SYMANTEC’S LIABILITY TO YOU FOR
DEATH OR PERSONAL INJURY ARISING OUT OF
NEGLIGENCE OR FOR ANY OTHER LIABILITY WHICH
CANNOT BE EXCLUDED OR LIMITED BY LAW. THE
DISCLAIMERS AND LIMITATIONS SET FORTH
ABOVE WILL APPLY REGARDLESS OF WHETHER OR
NOT YOU ACCEPT THE LICENSED SOFTWARE,
CONTENT UPDATES OR UPGRADES.
10.Maintenance/Support
Symantec has no obligation under this License
Agreement to provide maintenance/support for the
Licensed Software. Any maintenance/support
purchased for the Licensed Software is subject to
Symantec’s then-current maintenance/support
policies.
11.Software Evaluation
If the Licensed Software is provided to You for
evaluation purposes and You have an evaluation
agreement with Symantec for the Licensed Software,
Your rights to evaluate the Licensed Software will be
pursuant to the terms of such evaluation agreement. If
You do not have an evaluation agreement with
Symantec for the Licensed Software and if You are
provided the Licensed Software for evaluation
purposes, the following terms and conditions shall
apply. Symantec grants to You a nonexclusive,
temporary, royalty-free, non-assignable license to use
the Licensed Software solely for internal non-
production evaluation. Such evaluation license shall
terminate (i) on the end date of the pre-determined
evaluation period, if an evaluation period is pre-
determined in the Licensed Software or (ii) sixty (60)
days from the date of Your initial installation of the
Licensed Software, if no such evaluation period is pre-
determined in the Licensed Software (“Evaluation
Period”). The Licensed Software may not be
transferred and is provided “AS IS” without warranty
of any kind. You are solely responsible to take
appropriate measures to back up Your system and take
other measures to prevent any loss of files or data. The
Licensed Software may contain an automatic disabling
mechanism that prevents its use after a certain period
of time. Upon expiration of the Licensed Software
Evaluation Period, You will cease use of the Licensed
Software and destroy all copies of the Licensed
Software. All other terms and conditions of this
License Agreement shall otherwise apply to Your
evaluation of the Licensed Software as permitted
herein.
12.U.S. Government Restricted Rights
The Licensed Software is deemed to be commercial
computer software as defined in FAR 12.212 and
subject to restricted rights as defined in FAR Section
52.227-19 "Commercial Computer Licensed Software -
Restricted Rights" and DFARS 227.7202, “Rights in
Commercial Computer Licensed Software or
Commercial Computer Licensed Software
Documentation”, as applicable, and any successor
regulations. Any use, modification, reproduction
release, performance, display or disclosure of the
Licensed Software by the U.S. Government shall be
solely in accordance with the terms of this License
Agreement.
13.Export Regulation
You acknowledge that the Licensed Software and
related technical data and services (collectively
"Controlled Technology") are subject to the import and
export laws of the United States, specifically the U.S.
Export Administration Regulations (EAR), and the laws
of any country where Controlled Technology is
imported or re-exported. You agree to comply with all
relevant laws and will not to export any Controlled
Technology in contravention to U.S. law nor to any
prohibited country, entity, or person for which an
export license or other governmental approval is
required. All Symantec products, including the
Controlled Technology are prohibited for export or re-
export to Cuba, North Korea, Iran, Syria and Sudan and
to any country subject to relevant trade sanctions. You
hereby agree that You will not export or sell any
Controlled Technology for use in connection with
chemical, biological, or nuclear weapons, or missiles,
drones or space launch vehicles capable of delivering
such weapons.
14.Termination
This License Agreement shall terminate upon Your
breach of any term contained herein. Upon
termination, You shall immediately stop using and
destroy all copies of the Licensed Software.
15.Survival
The following provisions of this License Agreement
survive termination of this License Agreement:
Definitions, License Restrictions and any other
restrictions on use of intellectual property,
Ownership/Title, Warranty Disclaimers, Limitation of
Liability, U.S. Government Restricted Rights, Export
Regulation, Survival, and General.
16. General
16.1. Assignment
You may not assign the rights granted hereunder or
this License Agreement, in whole or in part and
whether by operation of contract, law or otherwise,
without Symantec’s prior express written consent.
16.2. Compliance with Applicable Law
You are solely responsible for Your compliance with,
and You agree to comply with, all applicable laws,
rules, and regulations in connection with Your use of
the Licensed Software.
16.3. Audit
An auditor, selected by Symantec and reasonably
acceptable to You, may, upon reasonable notice and
during normal business hours, but not more often than
once each year, inspect Your records and deployment
in order to confirm that Your use of the Licensed
Software complies with this License Agreement and
the applicable License Instrument. Symantec shall
bear the costs of any such audit, except where the audit
demonstrates that the Manufacturer’s Suggested
Reseller Price (MSRP) value of Your non-compliant
usage exceeds five percent (5%) of the MSRP value of
Your compliant deployments. In such case, in addition
to purchasing appropriate licenses for any over-
deployed Licensed Software, You shall reimburse
Symantec for the auditor’s reasonable actual fees for
such audit.
16.4. Governing Law; Severability; Waiver
If You are located in North America or Latin America,
this License Agreement will be governed by the laws of
the State of California, United States of America. If you
are located in China, this License Agreement will be
governed by the laws of the Peoples Republic of China.
Otherwise, this License Agreement will be governed by
the laws of England. Such governing laws are exclusive
of any provisions of the United Nations Convention on
Contracts for Sale of Goods, including any
amendments thereto, and without regard to principles
of conflicts of law. If any provision of this License
Agreement is found partly or wholly illegal or
unenforceable, such provision shall be enforced to the
maximum extent permissible, and remaining
provisions of this License Agreement shall remain in
full force and effect. A waiver of any breach or default
under this License Agreement shall not constitute a
waiver of any other subsequent breach or default.
16.5. Third Party Programs
This Licensed Software may contain third party
software programs (“Third Party Programs”) that are
available under open source or free software licenses.
This License Agreement does not alter any rights or
obligations You may have under those open source or
free software licenses. Notwithstanding anything to
the contrary contained in such licenses, the disclaimer
of warranties and the limitation of liability provisions
in this License Agreement shall apply to such Third
Party Programs.
16.6. Customer Service
Should You have any questions concerning this
License Agreement, or if You desire to contact
Symantec for any reason, please write to: (i) Symantec
Enterprise Customer Care, 555 International Way,
Springfield, Oregon 97477, U.S.A., (ii) Symantec
Enterprise Customer Care Center, PO BOX 5689, Dublin
15, Ireland, or (iii) Symantec Enterprise Customer Care,
1 Julius Ave, North Ryde, NSW 2113, Australia.
16.7. Entire Agreement
This License Agreement and any related License
Instrument are the complete and exclusive agreement
between You and Symantec relating to the Licensed
Software and supersede any previous or
contemporaneous oral or written communications,
proposals, and representations with respect to its
subject matter. This License Agreement prevails over
any conflicting or additional terms of any purchase
order, ordering document, acknowledgement or
confirmation or other document issued by You, even if
signed and returned. This License Agreement may only
be modified by a License Instrument that accompanies
or follows this License Agreement.
17. Additional Terms and Conditions
Your use of the Licensed Software is subject to the
terms and conditions below in addition to those stated
above.
17.1 Per-User License
You may use the Licensed Software for the number of
licensed User(s) and at the Use Levels as have been
licensed to You by Symantec herein and as indicated in
the applicable License Instrument (“Per-User
License”). Your License Instrument shall constitute
proof of Your right to make and use such copies. For
purposes of this License Agreement, “User(s)” means
an individual person and/or device authorized by You
to use and/or benefit from the use of the Licensed
Software, or is the person and/or device that actually
uses any portion of the Licensed Software.
17.2 Per-Server License
You may use the Licensed Software for the number of
licensed Server(s) and at the Use Levels as have been
licensed to You by Symantec herein and as indicated in
the applicable License Instrument (“Per-Server
License”). Your License Instrument shall constitute
proof of Your right to make and use such copies. For
purposes of this License Agreement, “Server(s)” means
a standalone system or an individual computer acting
as a service or resource provider to client computers by
sharing the resources within the network
infrastructure. A Server(s) can run server software for
other computers or devices.
17.3 If You use the Licensed Software exclusively for
Your internal business operations, a Per-User License
is required for each User that has access to a Microsoft
SharePoint computing environment protected by the
Licensed Software. If You permit external access to a
Server on which a Microsoft SharePoint computing
environment protected by the Licensed Software
resides, a Per-Server License is required for each such
Server. If You require use of the Licensed Software
both on a Per-User basis and on an a Per-Server basis,
You must purchase both types of licenses described
above in Sections 17.1 and 17.2.
17.4 If the Licensed Software you have licensed is on a
per-Server basis as described in Section 17.2, the
following additional use(s) and restriction(s) apply:
i) You may use the Licensed Software only with files
that are received from third parties through a
Microsoft SharePoint front-end server;
ii) You may use the Licensed Software only with files
received from less than 10,000 unique third parties per
month; and
iii) You may not charge or assess a fee for use of the
Licensed Software for Your internal business.
17.5 For the avoidance of doubt, You may only use the
Licensed Software in a Symantec-supported computing
environment, as described in further detail in the then-
current Licensed Software Documentation.

12
Contents
Technical support
Chapter 1 Introducing Symantec™ Protection for SharePoint® Servers
About Symantec Protection for SharePoint Servers ...................................... 18
What’s new ........................................................................................................... 18
Components of Symantec Protection for SharePoint Servers ...................... 20
How Symantec Protection for SharePoint Servers works ............................. 20
About real-time scanning ........................................................................... 21
About scheduled scanning and manual scanning .................................. 23
What happens when a file is scanned ....................................................... 25
About scanning policies in the Symantec Scan Engine ......................... 26
About logging and email notifications ..................................................... 27
About on-demand reports and scheduled reports .................................. 28
About deployment options ......................................................................... 29
About handling large scanning volumes .................................................. 31
How Symantec Scan Engine protects against viruses ................................... 32
Where to get more information ......................................................................... 32
Chapter 2 Installing Symantec Protection for SharePoint Servers
Before you install ................................................................................................. 35
About protecting the servers that are running the Symantec Protection
for SharePoint Servers components ................................................. 36
About preventing conflicts with other products .................................... 36
About stopping IIS during installation ..................................................... 37
System requirements .......................................................................................... 37
System requirements for Symantec Protection for SharePoint
Servers integrated installation .......................................................... 38
System requirements for Symantec Protection for SharePoint console
only ......................................................................................................... 39
System requirements for Symantec Scan Engine .................................. 40
14 Contents
About installing Symantec Protection for SharePoint Servers .................... 43
About the installation options ................................................................... 45
About installing Symantec Protection for SharePoint Servers
(integrated installation) ...................................................................... 46
Installing only Symantec Scan Engine using the
installation wizard ............................................................................... 50
Installing Symantec Scan Engine on a 64-bit computer ....................... 52
About installing only the Symantec Protection for SharePoint
console ................................................................................................... 53
About repairing or modifying Symantec Protection for SharePoint
Servers or its components .................................................................. 56
Post-installation tasks ........................................................................................ 58
Uninstalling Symantec Protection for SharePoint Servers .......................... 59
Uninstalling the Symantec Protection for SharePoint console ........... 59
Uninstalling Symantec Scan Engine ........................................................ 61
Chapter 3 Using the Symantec Protection for SharePoint console
About the Symantec Protection for SharePoint console ............................... 63
Accessing the console ................................................................................. 64
Changing the service logon account information .................................. 67
About the console home page ............................................................................ 68
Navigation links ........................................................................................... 68
Feature links ................................................................................................. 69
Status pane ................................................................................................... 70
Chapter 4 Configuring Symantec Protection for SharePoint Servers
About configuring Symantec Protection for SharePoint Servers ................ 71
Configuring a password for the console ................................................... 72
Configuring real-time scanning ........................................................................ 73
About manual scans and scheduled scans ....................................................... 75
About configuring global manual and scheduled scanning
options ................................................................................................... 76
Scheduling scans ......................................................................................... 83
Performing manual scans .......................................................................... 85
Registering Symantec Scan Engine with Symantec Protection for
SharePoint Servers ...................................................................................... 85
Specifying the scanning mode for load balancing .................................. 89
Checking for the latest virus definitions ................................................. 90
15Contents
Chapter 5 Configuring Symantec Scan Engine
Accessing the Symantec Scan Engine console ................................................ 95
About communication protocol settings ......................................................... 96
Configuring ICAP-specific settings ........................................................... 96
Ways to control which file types are scanned ................................................. 98
About licensing Symantec Scan Engine ........................................................... 99
About license activation ............................................................................. 99
If you do not have a serial number ..........................................................100
Obtaining a license file ..............................................................................100
Installing the license file ..........................................................................101
About keeping your product and protection up-to-date .............................102
About product updates ..............................................................................102
About definition updates ..........................................................................103
About LiveUpdate ..............................................................................................103
Configuring LiveUpdate to occur automatically ...................................103
Performing LiveUpdate on demand ........................................................104
About enabling security risk detection ..........................................................104
Chapter 6 Monitoring Symantec Protection for SharePoint Servers activity
Ways to monitor Symantec Protection for SharePoint Servers
activity .........................................................................................................108
About the status pane .......................................................................................109
About SMTP logging ..........................................................................................110
Configuring SMTP logging .......................................................................114
Customizing SMTP messages ..................................................................117
About monitoring scanning activity ...............................................................126
Configuring the log file folder location ..................................................127
Setting the logging level for each event source ....................................127
Setting the maximum storage time for log files ...................................128
Generating an on-demand report ............................................................129
Scheduling a report ...................................................................................130
16 Contents
Chapter 7 Troubleshooting Symantec Protection for SharePoint Servers
About troubleshooting common issues ..........................................................135
Symantec Protection for SharePoint Servers link is missing from
the SharePoint Central Administration site ..................................136
Unable to access the Symantec Scan Engine console ..........................137
Symantec Scan Engine registration fails ...............................................138
Slow server response or high server load ..............................................138
No reports are generated ..........................................................................139
Failure sending mail error message ........................................................139
The connection to the Symantec SharePoint Security Service
cannot be established. Code 8000 ....................................................140
Virus Found: There is no Symantec Scan Engine available. The file was
not saved. Code: 8002 ........................................................................141
Unable to remember the console password ...........................................143
Error 1722 when installing Symantec Scan Engine .............................143
Appendix A Error codes
About error codes and messages .....................................................................145
Index
Chapter
1Introducing Symantec™
Protection for SharePoint®
Servers
■ About Symantec Protection for SharePoint Servers
■ What’s new
■ Components of Symantec Protection for SharePoint Servers
■ How Symantec Protection for SharePoint Servers works
■ How Symantec Scan Engine protects against viruses
■ Where to get more information
18 Introducing Symantec™ Protection for SharePoint® Servers
About Symantec Protection for SharePoint Servers
About Symantec Protection for SharePoint ServersSymantec™ Protection for SharePoint® Servers, replaces the former version
Symantec AntiVirus™ 4.3 for Microsoft® SharePoint®, and provides virus
scanning and repair services for the following SharePoint products:
■ Windows® SharePoint® Services 2.0 (WSS 2.0)
■ Windows SharePoint Services 3.0 (WSS 3.0)
■ SharePoint Portal Server 2003 (SPS 2003)
■ Microsoft Office SharePoint® Server 2007 (MOSS 2007) (32-bit and 64-bit)
In addition to virus scanning and repair services, Symantec Protection for
SharePoint Servers provides logging, monitoring, and reporting of infected
documents on the SharePoint server.
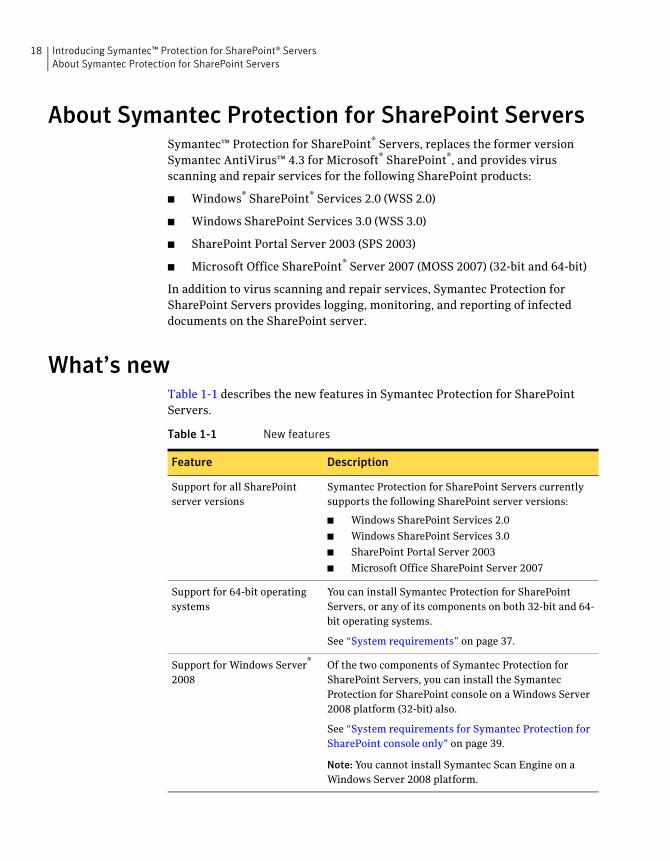
What’s newTable 1-1 describes the new features in Symantec Protection for SharePoint
Servers.
Table 1-1 New features
Feature Description
Support for all SharePoint
server versions
Symantec Protection for SharePoint Servers currently
supports the following SharePoint server versions:
■ Windows SharePoint Services 2.0
■ Windows SharePoint Services 3.0
■ SharePoint Portal Server 2003
■ Microsoft Office SharePoint Server 2007
Support for 64-bit operating
systems
You can install Symantec Protection for SharePoint
Servers, or any of its components on both 32-bit and 64-
bit operating systems.
See “System requirements” on page 37.
Support for Windows Server®
2008
Of the two components of Symantec Protection for
SharePoint Servers, you can install the Symantec
Protection for SharePoint console on a Windows Server
2008 platform (32-bit) also.
See “System requirements for Symantec Protection for
SharePoint console only” on page 39.
Note: You cannot install Symantec Scan Engine on a
Windows Server 2008 platform.
19Introducing Symantec™ Protection for SharePoint® Servers
What’s new
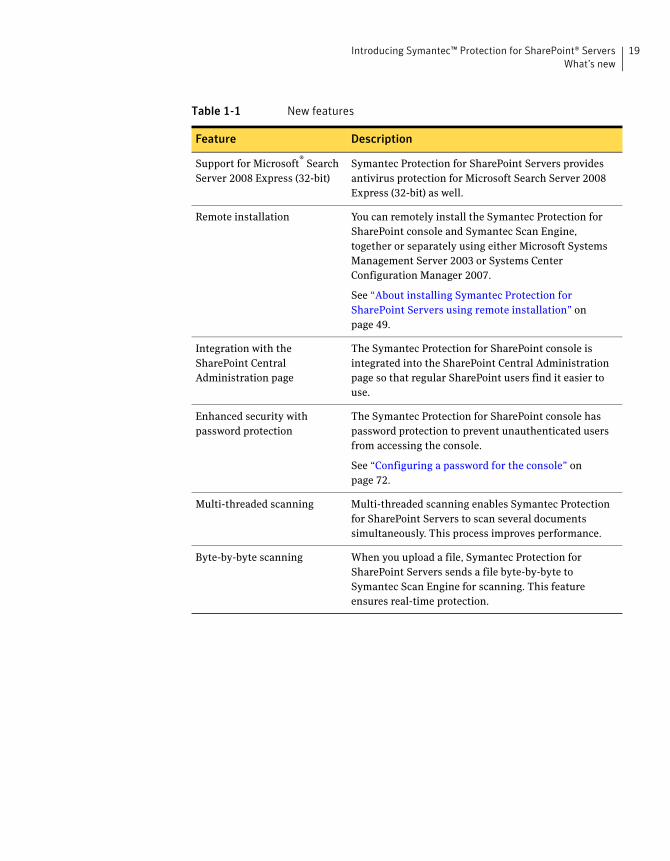
Support for Microsoft® Search
Server 2008 Express (32-bit)
Symantec Protection for SharePoint Servers provides
antivirus protection for Microsoft Search Server 2008
Express (32-bit) as well.
Remote installation You can remotely install the Symantec Protection for
SharePoint console and Symantec Scan Engine,
together or separately using either Microsoft Systems
Management Server 2003 or Systems Center
Configuration Manager 2007.
See “About installing Symantec Protection for
SharePoint Servers using remote installation” on
page 49.
Integration with the
SharePoint Central
Administration page
The Symantec Protection for SharePoint console is
integrated into the SharePoint Central Administration
page so that regular SharePoint users find it easier to
use.
Enhanced security with
password protection
The Symantec Protection for SharePoint console has
password protection to prevent unauthenticated users
from accessing the console.
See “Configuring a password for the console” on
page 72.
Multi-threaded scanning Multi-threaded scanning enables Symantec Protection
for SharePoint Servers to scan several documents
simultaneously. This process improves performance.
Byte-by-byte scanning When you upload a file, Symantec Protection for
SharePoint Servers sends a file byte-by-byte to
Symantec Scan Engine for scanning. This feature
ensures real-time protection.
Table 1-1 New features
Feature Description
20 Introducing Symantec™ Protection for SharePoint® Servers
Components of Symantec Protection for SharePoint Servers
Components of Symantec Protection for SharePoint Servers
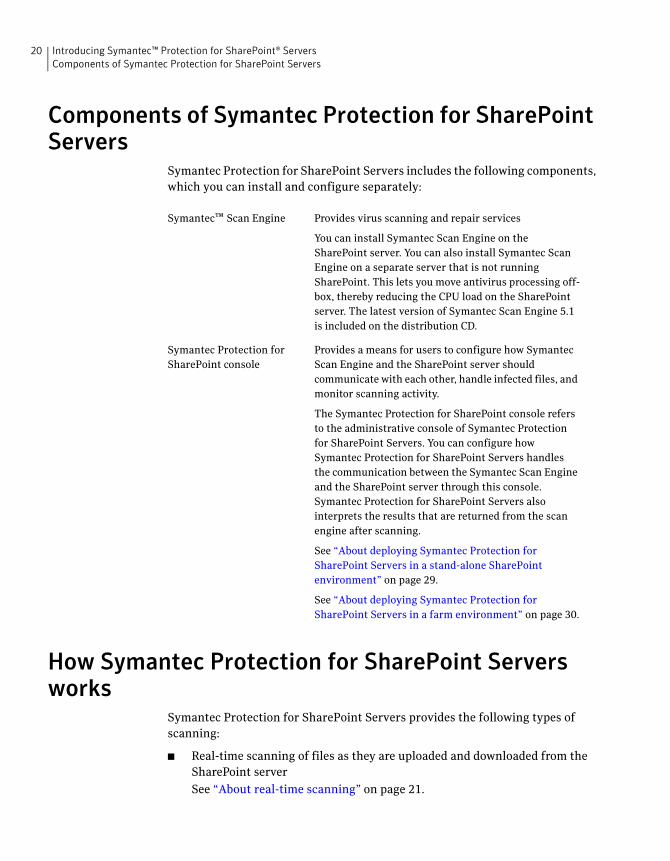
Symantec Protection for SharePoint Servers includes the following components,
which you can install and configure separately:
How Symantec Protection for SharePoint Servers works
Symantec Protection for SharePoint Servers provides the following types of
scanning:
■ Real-time scanning of files as they are uploaded and downloaded from the
SharePoint server
See “About real-time scanning” on page 21.
Symantec™ Scan Engine Provides virus scanning and repair services
You can install Symantec Scan Engine on the
SharePoint server. You can also install Symantec Scan
Engine on a separate server that is not running
SharePoint. This lets you move antivirus processing off-
box, thereby reducing the CPU load on the SharePoint
server. The latest version of Symantec Scan Engine 5.1
is included on the distribution CD.
Symantec Protection for
SharePoint console
Provides a means for users to configure how Symantec
Scan Engine and the SharePoint server should
communicate with each other, handle infected files, and
monitor scanning activity.
The Symantec Protection for SharePoint console refers
to the administrative console of Symantec Protection
for SharePoint Servers. You can configure how
Symantec Protection for SharePoint Servers handles
the communication between the Symantec Scan Engine
and the SharePoint server through this console.
Symantec Protection for SharePoint Servers also
interprets the results that are returned from the scan
engine after scanning.
See “About deploying Symantec Protection for
SharePoint Servers in a stand-alone SharePoint
environment” on page 29.
See “About deploying Symantec Protection for
SharePoint Servers in a farm environment” on page 30.
21Introducing Symantec™ Protection for SharePoint® Servers
How Symantec Protection for SharePoint Servers works
■ Scheduled scans and manual scans of files that are stored on the SharePoint
server
See “About scheduled scanning and manual scanning” on page 23.
In addition to scanning, Symantec Protection for SharePoint Servers does the
following:
■ Monitors scanning activity by its logging and email notification feature
See “About logging and email notifications” on page 27.
■ Generates on-demand reports and schedules distribution of reports by mail
See “About on-demand reports and scheduled reports” on page 28.
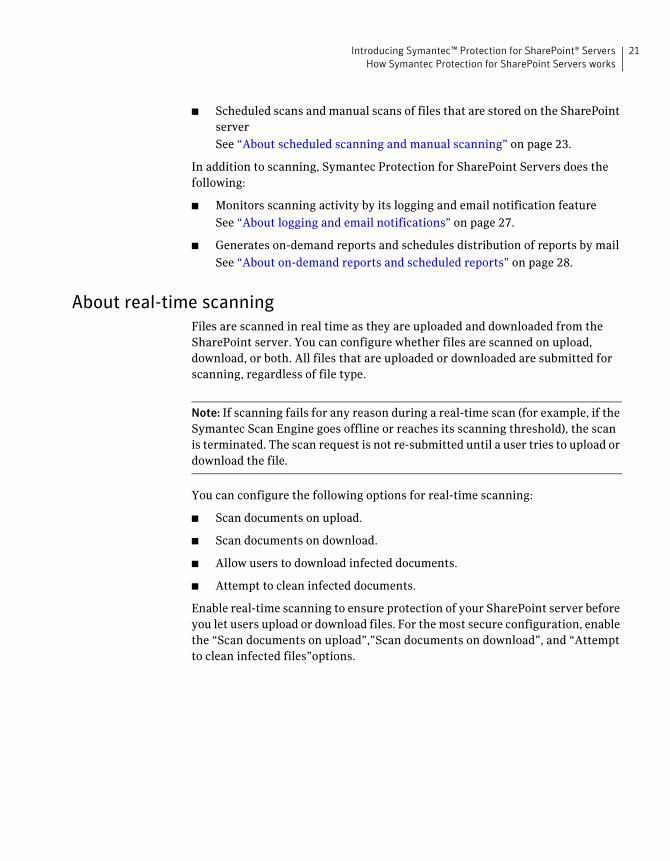
About real-time scanning
Files are scanned in real time as they are uploaded and downloaded from the
SharePoint server. You can configure whether files are scanned on upload,
download, or both. All files that are uploaded or downloaded are submitted for
scanning, regardless of file type.
Note: If scanning fails for any reason during a real-time scan (for example, if the
Symantec Scan Engine goes offline or reaches its scanning threshold), the scan
is terminated. The scan request is not re-submitted until a user tries to upload or
download the file.
You can configure the following options for real-time scanning:
■ Scan documents on upload.
■ Scan documents on download.
■ Allow users to download infected documents.
■ Attempt to clean infected documents.
Enable real-time scanning to ensure protection of your SharePoint server before
you let users upload or download files. For the most secure configuration, enable
the “Scan documents on upload”,”Scan documents on download”, and “Attempt
to clean infected files”options.
22 Introducing Symantec™ Protection for SharePoint® Servers
How Symantec Protection for SharePoint Servers works
If you enable the option “Allow users to download infected documents”, only
administrators can download infected files. Users only get a virus found
message.
Warning: Enabling the option “Allow users to download infected documents” can
put your organization at risk. Unrepairable files might contain viruses that can
infect your computer. SharePoint security ensures that only administrators can
download the unrepairable files if you enable this option. However, use this
option only when you want to resolve a virus issue.
See “Configuring real-time scanning” on page 73.
How caching works on the SharePoint server
The SharePoint server caches the scanning results for each stored file. The
cached information includes the date and revision number of the virus
definitions that were used to perform the scan. The cached information also
includes the status of the file (whether the file is clean or infected).
In real-time scanning, all files that are uploaded or downloaded are submitted
for scanning. On download, the SharePoint server evaluates the status of the file
and the virus definition that were used to determine whether the file must be
scanned. If another user requests access to that same file and the virus
definitions have not changed, a redundant scan is avoided. Individual cache
entries are updated whenever a stored file is changed.
What happens when a file is uploaded
When a user tries to upload a file to the SharePoint server, the file is submitted
first to Symantec Scan Engine for scanning. If the file contains a virus that
cannot be repaired, the file is not stored on the SharePoint server. The user
receives a notification that the file is infected and cannot be uploaded. If you
configure the SharePoint server to repair infected files and the infected file can
be repaired, the repaired file is uploaded to the SharePoint server.
What happens when a file is downloaded
When a user tries to download a stored file, Microsoft SharePoint verifies the
following information about the file:
■ If the file was scanned on upload
■ The status of the file (for example, if the file is clean)
■ Whether the virus definition that were used during the latest scan are the
most current
23Introducing Symantec™ Protection for SharePoint® Servers
How Symantec Protection for SharePoint Servers works
If the file is infected, or if the virus definitions are not the most current, the file
is submitted to Symantec Scan Engine for scanning. Based on the scan results,
the file is handled according to the settings that you specify.
See “Configuring real-time scanning” on page 73.
If the file is clean and was scanned with the latest definitions, the file is not
rescanned. It is automatically downloaded to the user.
The SharePoint server passes clean files to the user. If you configure the
SharePoint server to attempt to clean infected files and the infected file can be
repaired, the repaired file is passed to the user. The infected file that is stored on
the SharePoint server is replaced with the clean file.
If the file contains a virus that cannot be repaired, the file is not downloaded to
the user. The user receives a notification that the file is infected and cannot be
downloaded. (You can configure Symantec Protection for SharePoint Servers to
permit users to download infected files. However, the most secure configuration
is to disable this option. Files that contain viruses pose a risk to your
organization. Users are denied access to infected files by default.)
Note: Infected files that cannot be repaired are not automatically deleted from
the SharePoint server. To remove infected files from the SharePoint server,
activate a scheduled scan or perform a manual scan and select the option to
delete unrepairable infected files from the SharePoint server.
About scheduled scanning and manual scanning
You can schedule periodic scans of the documents that are stored on the
SharePoint server. Schedule periodic scans of the document library to ensure
that all files have been scanned for viruses. These scans ensure that files that
have not been previously scanned are scanned in a timely manner. Regular
scans also ensure that scanning is kept up to date as virus definitions change.
Scheduled scans occur at the time and frequency that you specify. Scheduled
scanning occurs in the background and does not affect real-time scanning of
uploaded and downloaded files.
You can force an immediate (manual) scan of the documents that are stored on
the server. The options that you configure for scheduled scans also apply to
manual scans.
See “About manual scans and scheduled scans” on page 75.
During scheduled scans and manual scans, all files are submitted for scanning,
regardless of whether they were scanned previously or not. Only files in the
Exclude folders list and the File extension exclude list are omitted from
24 Introducing Symantec™ Protection for SharePoint® Servers
How Symantec Protection for SharePoint Servers works
scanning. If a scan request fails because the scan engine is unavailable, the scan
request is sent to the next available registered scan engine.
You can configure the following options for manual scans and scheduled scans:
■ Excluding files with specific extensions from being scanned
See “Excluding files with specific extensions from being scanned” on
page 76.
■ Excluding folders from being scanned
See “Excluding folders from being scanned” on page 77.
■ Specifying the number of threads for scanning
See “Specifying the number of threads for scanning” on page 77.
■ Scanning all file versions in the document library
See “Scanning all file versions in the document library” on page 78.
■ Scanning only those files that were added or modified from the last scan
See “Scanning those files that have been added or modified since the last
completed scan” on page 78.
■ Specifying the location for quarantined documents
See “Specifying the location for quarantined documents” on page 79.
■ Specifying file handling rules
See “Specifying file handling rules” on page 80.
■ Reviewing scan statistics
See “Reviewing scan statistics” on page 82.
Preserving bandwidth and time during manual and scheduled scans
You can designate which directories on the SharePoint server are scanned
during scheduled scans and manual scans. You can scan all directories on the
SharePoint server, or you can exclude certain directories from scanning.
You can also control which file types are scanned during manual scans and
scheduled scans by specifying which file types are passed to Symantec Scan
Engine. Viruses are found only in file types that contain executable code. You
can save bandwidth and time by excluding those files types that are not likely to
contain viruses and can be excluded from scanning. Symantec Protection for
SharePoint Servers makes an initial determination, based on file extension,
about whether to pass a file to Symantec Scan Engine for scanning.
You can limit scanning to only those files that have been added or modified
since the last manual or scheduled scan. Symantec Protection for SharePoint
Servers can compare the time a file was modified or added with the time of the
25Introducing Symantec™ Protection for SharePoint® Servers
How Symantec Protection for SharePoint Servers works
last scan. This feature lets you conserve scanning resources by omitting files
from scanning that have not been modified or added since the last scan. When
this feature is disabled, all files are scanned during manual scans and scheduled
scans.
Quarantining infected files
Symantec Protection for SharePoint Servers can quarantine infected files that
are found during a scheduled scan or manual scan. A copy of each infected item
is forwarded to a quarantine directory. This feature lets you preserve a copy of
all files, even infected ones, in the event that a file must be retrieved. The
infected items can be accessed or deleted from the quarantine by the
administrator. The default quarantine location is C:\Program
Files\Symantec\SharePoint\Quarantine.
What happens when a file is scanned
After the Symantec Protection for SharePoint console and Symantec Scan
Engine are installed and properly configured, files are passed to Symantec Scan
Engine for analysis.
If Symantec Scan Engine does not find a virus in a file, Symantec Scan Engine
indicates that the file is clean.
If a virus is detected, Symantec Scan Engine does one of the following actions:
Records a log entry
that an infection
was found
Separate logging and alerting features are available through the
Symantec Protection for SharePoint console and Symantec Scan
Engine. You can activate logging and alerting options in
Symantec Scan Engine to supplement those logging and alerting
options that are available through the Symantec Protection for
SharePoint console. The Symantec Protection for SharePoint
console sends an email notification and records a log entry when
an infection is found.
Attempts to repair
the infected file
If the file can be repaired, Symantec Scan Engine repairs it and
passes a clean file back to Symantec Protection for SharePoint
Servers. Configure the SharePoint antivirus settings to accept
these repaired files so that infected files are replaced with
repaired files on the SharePoint server.
See “Configuring real-time scanning” on page 73.
26 Introducing Symantec™ Protection for SharePoint® Servers
How Symantec Protection for SharePoint Servers works
About scanning policies in the Symantec Scan Engine
When Symantec Scan Engine scans a file for viruses, it applies the scanning
policies that you configure in the Symantec Scan Engine console. For example,
you can limit the resources that Symantec Scan Engine uses by only scanning
certain types of files.
When an established threshold is met or exceeded during a scan, or a policy is
violated, Symantec Scan Engine communicates this information to Symantec
Protection for SharePoint Servers. Symantec Protection for SharePoint Servers
treats the file as though an unrepairable infection was found. The policies that
you configure for handling infected files (that is, blocking or deleting files) are
applied.
Deletes
unrepairable
infected files from
container files
When a container file or archive file is submitted for scanning,
Symantec Scan Engine decomposes the container file and scans
each embedded file individually. If the container file contains
unrepairable files, Symantec Scan Engine deletes the
unrepairable files from the container or archive file. The
remaining clean contents are forwarded to the SharePoint server.
This container file is handled by Symantec Protection for
SharePoint Servers as a repaired file. (Configure the SharePoint
antivirus settings to accept repaired files so that infected files can
be replaced with repaired files.)
Note: When a top-level file (a file that is not embedded in a
container file) is infected and cannot be repaired, Symantec Scan
Engine indicates this to Symantec Protection for SharePoint
Servers and the SharePoint server. The SharePoint server denies
access to the infected file by default. The file is deleted from the
SharePoint server if you have configured it to do so.
See “Registering Symantec Scan Engine with Symantec
Protection for SharePoint Servers” on page 85.
27Introducing Symantec™ Protection for SharePoint® Servers
How Symantec Protection for SharePoint Servers works
The following scanning policies are available through the Symantec Scan
Engine console:
For more information, see the Symantec Scan Engine Implementation Guide.
About logging and email notifications
Symantec Protection for SharePoint Servers logs events for the Scan Process,
Symantec Scan Engine and System report sources by default. You can specify
the logging level for each of these report sources in Log File settings.
See “About monitoring scanning activity” on page 126.
The default location of the log files is <installdir>:\Program
Files\Symantec\SharePoint\Logfiles.
Symantec Protection for SharePoint Servers provides Simple Mail Transfer
Protocol (SMTP) logging capabilities. When SMTP logging is configured, an
email notification is sent to a specified recipient for chosen events.
You can restrict the
amount of resources
that are used to
process large
container files.
Symantec Scan Engine uses a decomposer to extract the embedded
files from a container file, scan all of the files, and reassemble the
container file once scanning is complete. For overly large container
files, this process can require a significant amount of resources.
You can use these settings to control the resources that Symantec
Scan Engine uses to process large container files and to prevent
these overly large container files from being stored on the
SharePoint server. You can specify the maximum amount of time
spent in decomposing a container file, the maximum file size for
individual files in a container file, maximum number of nested
levels to be decomposed, and the maximum number of bytes that
are read when determining whether a file is MIME-encoded.
You can establish a
mail policy to filter
mail and mail
attachments based
on a number of
attributes.
These mail policy settings are applied to all MIME-encoded
messages. If MIME-encoded messages are posted for user access on
the SharePoint server, you can use the mail policy settings in
Symantec Scan Engine to filter email based on attachment file size
or file name, message origin, total message size, or message subject
line.
Note: Mail policy settings do not affect nonMIME-encoded file
types that are passed to Symantec Scan Engine for scanning. When
a mail filter policy is violated, Symantec Scan Engine only applies
the action to MIME-encoded messages.

28 Introducing Symantec™ Protection for SharePoint® Servers
How Symantec Protection for SharePoint Servers works
To configure SMTP logging, you must do the following:
■ Enable the email notification system.
■ Identify an SMTP server and port number for forwarding the log messages.
■ Provide the default origin and destination information for the SMTP
messages.
■ Select the event categories for which SMTP messages should be generated.
You can choose separate sender and recipient email addresses for each
event category.
See “Configuring SMTP logging” on page 114.
You can also select the email notification level so that Symantec Protection for
SharePoint Servers sends an email notification only for the events whose level
you specify. You can provide separate recipient information for each type of
message. Default message text is included, but you can customize individual
messages.
See “Customizing SMTP messages” on page 117.
About on-demand reports and scheduled reports
You can manually generate and analyze reports for a specified date range. You
must select a report source (Scan Engines, Scan Processes, or System) and define
the log data you to display. You can generate a detailed report of all logs or pie-
chart reports. Symantec Protection for SharePoint Servers displays a numerical
statistical report beneath the pie-chart.
See “Generating an on-demand report” on page 129.
You can configure Symantec Protection for SharePoint Servers to generate
reports and distribute them by mail to specified recipients at a scheduled time.
Select an hourly, daily, weekly, monthly, one time, or any of the default
schedules for scheduled reports.
Note: You must first configure email notifications before you try to schedule a
report by email.
To schedule reports, you must do the following tasks:
■ Select a schedule.
Choose from the default schedules or create a new schedule.
■ Select a report data range.
Symantec Protection for SharePoint Servers retrieves data from within this
specified date range.
29Introducing Symantec™ Protection for SharePoint® Servers
How Symantec Protection for SharePoint Servers works
■ Choose a report source (Scan Engines, Scan Processes, or System) and report
definition.
These options determine the content of your scheduled report.
■ Select a report format.
■ Activate report generation by mail.
Specify the sender and recipient’s email address.
See “Scheduling a report” on page 130.
About deployment options
Symantec Protection for SharePoint Servers includes the following components
that can be installed separately or together:
■ Symantec Protection for SharePoint console
■ Symantec Scan Engine
See “Components of Symantec Protection for SharePoint Servers” on page 20.
See “About the installation options” on page 45.
You must deploy Symantec Protection for SharePoint Servers and its
components in different ways based on the following SharePoint environments:
■ Stand-alone SharePoint environment
■ Farm environment
About deploying Symantec Protection for SharePoint Servers in a stand-alone SharePoint environment
In a stand-alone SharePoint environment, you can choose to do a full install of
both components of Symantec Protection for SharePoint Servers on the same
computer. You can also choose to move antivirus processing off-box by
installing Symantec Scan Engine on a separate server. However, ensure that you
install the Symantec Protection for SharePoint console on the SharePoint
server.
30 Introducing Symantec™ Protection for SharePoint® Servers
How Symantec Protection for SharePoint Servers works
About deploying Symantec Protection for SharePoint Servers in a farm environment
In a SharePoint farm environment, based on the SharePoint version used,
deploy Symantec Protection for SharePoint Servers on the following servers:
About supported platforms
The Symantec Protection for SharePoint console can be installed on the
following platforms:
■ Windows Server 2003 (32-bit or 64-bit)
■ Windows Server 2008 (32-bit)
See “System requirements for Symantec Protection for SharePoint console
only” on page 39.
See “About installing only the Symantec Protection for SharePoint console” on
page 53.
Symantec Scan Engine runs on the following platforms:
■ Sun™ Solaris™
■ Red Hat Linux™
■ Microsoft® Windows® 2000 Server
■ Microsoft Windows Server 2003 (32-bit and 64-bit)
WSS 2.0/ SPS 2003 Install the Symantec Protection for SharePoint console on each
front-end web server in the farm.
Symantec Scan Engine, the other component, can be installed on
the same server as the Symantec Protection for SharePoint console
or on a separate server.
WSS 3.0/ MOSS 2007 Install the Symantec Protection for SharePoint console on each
front-end web server in the farm.
Note: It is important that each front-end web server must have the
Central Administration service installed and started.
You can install the Symantec Protection for SharePoint console on
the other Application servers in the farm to run on-demand or
scheduled scans on these servers, if desired. However, you can run
these scans from the front-end servers as well.
Symantec Scan Engine, the other component, can be installed on
the same server as the Symantec Protection for SharePoint console
or on a separate server.
31Introducing Symantec™ Protection for SharePoint® Servers
How Symantec Protection for SharePoint Servers works
You can deploy Symantec Scan Engine in any environment that is running any
combination of these platforms.
See “System requirements for Symantec Scan Engine” on page 40.
See “Installing only Symantec Scan Engine using the installation wizard” on
page 50.
You can install both components together only on a 32-bit Windows Server 2003
platform. On a 64-bit computer, you must install the components separately.
See “System requirements for Symantec Protection for SharePoint Servers
integrated installation” on page 38.
See “About installing Symantec Protection for SharePoint Servers (integrated
installation)” on page 46.
About handling large scanning volumes
In a simple Symantec Protection for SharePoint Servers configuration, a single
Symantec Scan Engine handles the scanning and repair services for the
SharePoint server. However, larger traffic volumes can require multiple scan
engines to handle virus scanning. If you are processing large traffic volumes or
have multiple clients making virus scanning requests, you can install and
configure multiple scan engines to handle the scanning load.
If you install multiple scan engines to handle increased loads, you must register
each Symantec Scan Engine with Symantec Protection for SharePoint Servers.
Each Symantec Scan Engine must be installed on a separate computer on your
network.
See “Registering Symantec Scan Engine with Symantec Protection for
SharePoint Servers” on page 85.
When you use multiple scan engines, you can specify how you want the
scanning load to be distributed by selecting a scanning mode.
The scanning modes are as follows:
If you enable both modes, the priority mode takes precedence.
Cyclic mode Scanning is distributed evenly across all registered Symantec Scan
Engines using a continuous repeating sequence.
Priority mode Scanning is distributed to Symantec Scan Engines based on
priority. When you register a Symantec Scan Engine, you specify
the priority.
See “To register a new Symantec Scan Engine” on page 87.
See “To edit a Symantec Scan Engine registration” on page 89.
32 Introducing Symantec™ Protection for SharePoint® Servers
How Symantec Scan Engine protects against viruses
If you do not activate automatic load distribution, cyclic mode becomes active.
Files are submitted to the first registered Symantec Scan Engine unless it is
unavailable. If the first scan engine is not available, the second scan engine is
contacted, and so on.
See “Specifying the scanning mode for load balancing” on page 89.
How Symantec Scan Engine protects against virusesSymantec Protection for SharePoint Servers sends files to Symantec Scan
Engine for virus scanning and repair. Symantec Scan Engine detects viruses,
worms, and Trojan horses in all major file types (for example, Windows files,
DOS files, and Microsoft Word and Excel files). Symantec Scan Engine includes a
decomposer that handles most compressed and archive file formats and nested
levels of files.
Symantec Scan Engine provides protection against container files that can
cause denial of service attacks (for example, container files that are overly large,
that contain large numbers of embedded compressed files, partial container
files, or that have been designed to use resources maliciously and degrade
performance). Symantec Scan Engine detects security risks such as adware,
dialers, hacktools, joke programs, remote access programs, spyware, and
trackware.
The Symantec Scan Engine also detects mobile code such as Java™, ActiveX®,
and stand-alone script-based threats. Symantec Scan Engine uses Symantec
antivirus technologies, for heuristic detection of new or unknown viruses.
Where to get more informationIn addition to this guide, Symantec Protection for SharePoint Servers includes
Help topics that you can access through the Help table of contents and index.
You can also search for keywords in the Help.
Context-sensitive help is available on each page.
You can visit the Symantec Web site for more information about your product.
The following online resources for Symantec Protection for SharePoint Servers
are available:
Provides access to the technical support
Knowledge Base, news groups, contact
information, downloads, and mailing list
subscriptions
http://www.symantec.com/business/
support/index.jsp
33Introducing Symantec™ Protection for SharePoint® Servers
Where to get more information
Provides product news and updates http://www.symantec.com/business/
index.jsp
Provides access to the Virus Encyclopedia,
which contains information about all known
threats; information about hoaxes; and
access to white papers about threats
http://www.symantec.com/
security_response/index.jsp
34 Introducing Symantec™ Protection for SharePoint® Servers
Where to get more information
Chapter
2Installing Symantec
Protection for SharePoint
Servers
■ Before you install
■ System requirements
■ About installing Symantec Protection for SharePoint Servers
■ Post-installation tasks
■ Uninstalling Symantec Protection for SharePoint Servers
Before you installDo the following tasks before you install Symantec Protection for SharePoint
Servers or its components:
■ Provide antivirus protection for the servers on which the Symantec
Protection for SharePoint Servers components run.
See “About protecting the servers that are running the Symantec
Protection for SharePoint Servers components” on page 36.
■ Exclude certain directories from scanning by any other antivirus product
that is running on the computers on which you install the components.
See “About preventing conflicts with other products” on page 36.
■ Plan to install the Symantec Protection for SharePoint console at a time
when Microsoft Internet Information Server (IIS) can be stopped
temporarily.
See “About stopping IIS during installation” on page 37.
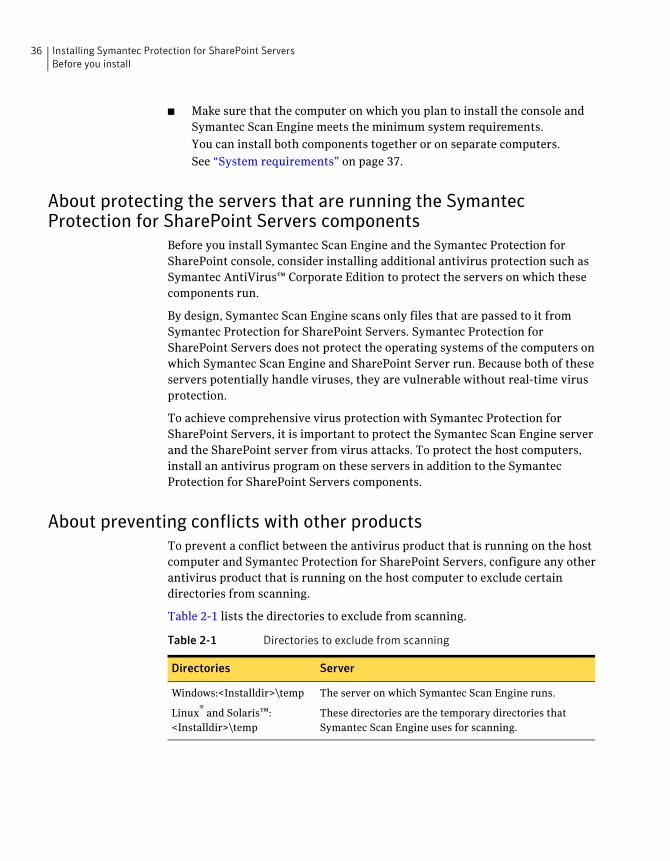
36 Installing Symantec Protection for SharePoint Servers
Before you install
■ Make sure that the computer on which you plan to install the console and
Symantec Scan Engine meets the minimum system requirements.
You can install both components together or on separate computers.
See “System requirements” on page 37.
About protecting the servers that are running the Symantec Protection for SharePoint Servers components
Before you install Symantec Scan Engine and the Symantec Protection for
SharePoint console, consider installing additional antivirus protection such as
Symantec AntiVirus™ Corporate Edition to protect the servers on which these
components run.
By design, Symantec Scan Engine scans only files that are passed to it from
Symantec Protection for SharePoint Servers. Symantec Protection for
SharePoint Servers does not protect the operating systems of the computers on
which Symantec Scan Engine and SharePoint Server run. Because both of these
servers potentially handle viruses, they are vulnerable without real-time virus
protection.
To achieve comprehensive virus protection with Symantec Protection for
SharePoint Servers, it is important to protect the Symantec Scan Engine server
and the SharePoint server from virus attacks. To protect the host computers,
install an antivirus program on these servers in addition to the Symantec
Protection for SharePoint Servers components.
About preventing conflicts with other products
To prevent a conflict between the antivirus product that is running on the host
computer and Symantec Protection for SharePoint Servers, configure any other
antivirus product that is running on the host computer to exclude certain
directories from scanning.
Table 2-1 lists the directories to exclude from scanning.
Table 2-1 Directories to exclude from scanning
Directories Server
Windows:<Installdir>\temp
Linux® and Solaris™:
<Installdir>\temp
The server on which Symantec Scan Engine runs.
These directories are the temporary directories that
Symantec Scan Engine uses for scanning.
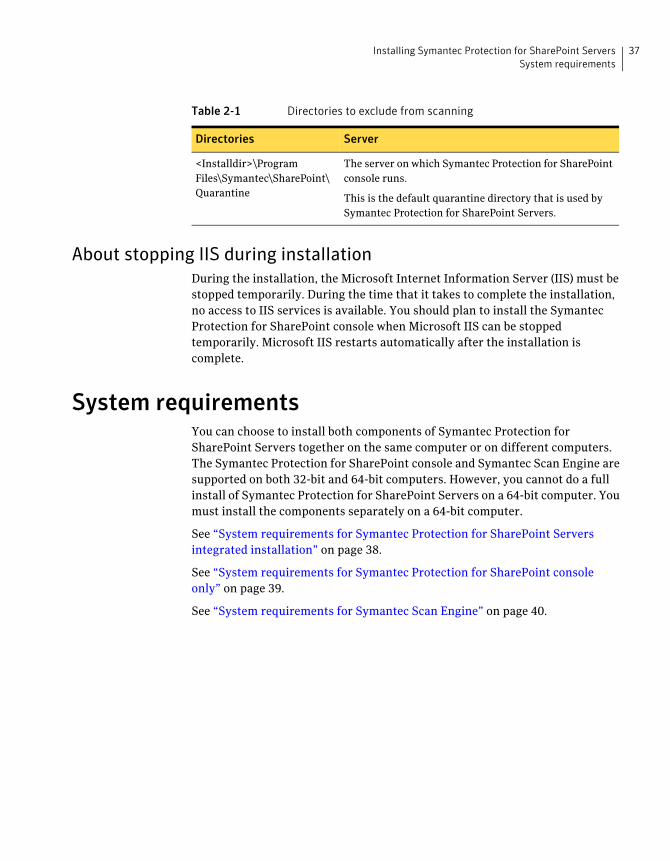
37Installing Symantec Protection for SharePoint Servers
System requirements
About stopping IIS during installation
During the installation, the Microsoft Internet Information Server (IIS) must be
stopped temporarily. During the time that it takes to complete the installation,
no access to IIS services is available. You should plan to install the Symantec
Protection for SharePoint console when Microsoft IIS can be stopped
temporarily. Microsoft IIS restarts automatically after the installation is
complete.
System requirementsYou can choose to install both components of Symantec Protection for
SharePoint Servers together on the same computer or on different computers.
The Symantec Protection for SharePoint console and Symantec Scan Engine are
supported on both 32-bit and 64-bit computers. However, you cannot do a full
install of Symantec Protection for SharePoint Servers on a 64-bit computer. You
must install the components separately on a 64-bit computer.
See “System requirements for Symantec Protection for SharePoint Servers
integrated installation” on page 38.
See “System requirements for Symantec Protection for SharePoint console
only” on page 39.
See “System requirements for Symantec Scan Engine” on page 40.
<Installdir>\Program
Files\Symantec\SharePoint\
Quarantine
The server on which Symantec Protection for SharePoint
console runs.
This is the default quarantine directory that is used by
Symantec Protection for SharePoint Servers.
Table 2-1 Directories to exclude from scanning
Directories Server
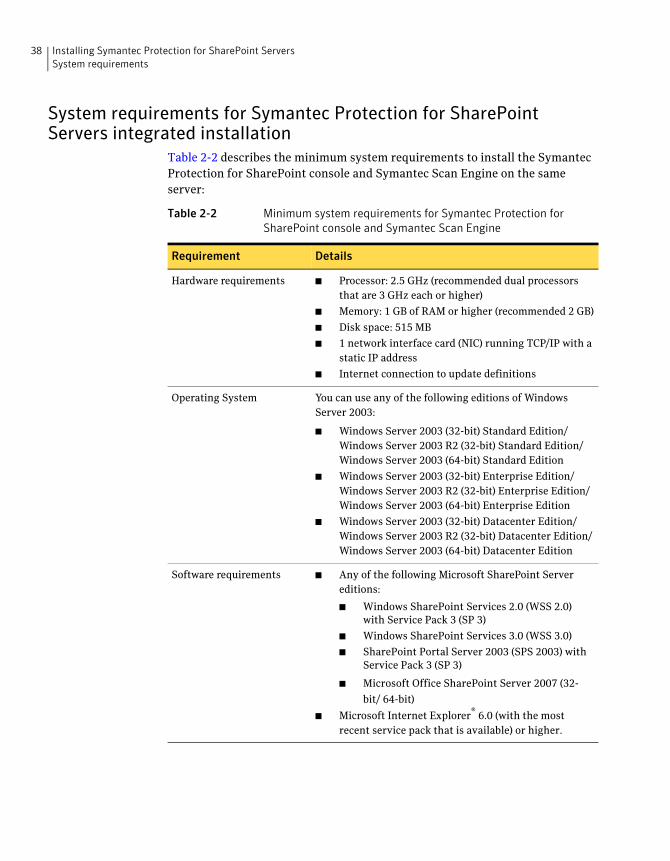
38 Installing Symantec Protection for SharePoint Servers
System requirements
System requirements for Symantec Protection for SharePoint Servers integrated installation
Table 2-2 describes the minimum system requirements to install the Symantec
Protection for SharePoint console and Symantec Scan Engine on the same
server:
Table 2-2 Minimum system requirements for Symantec Protection for
SharePoint console and Symantec Scan Engine
Requirement Details
Hardware requirements ■ Processor: 2.5 GHz (recommended dual processors
that are 3 GHz each or higher)
■ Memory: 1 GB of RAM or higher (recommended 2 GB)
■ Disk space: 515 MB
■ 1 network interface card (NIC) running TCP/IP with a
static IP address
■ Internet connection to update definitions
Operating System You can use any of the following editions of Windows
Server 2003:
■ Windows Server 2003 (32-bit) Standard Edition/
Windows Server 2003 R2 (32-bit) Standard Edition/
Windows Server 2003 (64-bit) Standard Edition
■ Windows Server 2003 (32-bit) Enterprise Edition/
Windows Server 2003 R2 (32-bit) Enterprise Edition/
Windows Server 2003 (64-bit) Enterprise Edition
■ Windows Server 2003 (32-bit) Datacenter Edition/
Windows Server 2003 R2 (32-bit) Datacenter Edition/
Windows Server 2003 (64-bit) Datacenter Edition
Software requirements ■ Any of the following Microsoft SharePoint Server
editions:
■ Windows SharePoint Services 2.0 (WSS 2.0)
with Service Pack 3 (SP 3)
■ Windows SharePoint Services 3.0 (WSS 3.0)
■ SharePoint Portal Server 2003 (SPS 2003) with
Service Pack 3 (SP 3)
■ Microsoft Office SharePoint Server 2007 (32-
bit/ 64-bit)
■ Microsoft Internet Explorer® 6.0 (with the most
recent service pack that is available) or higher.
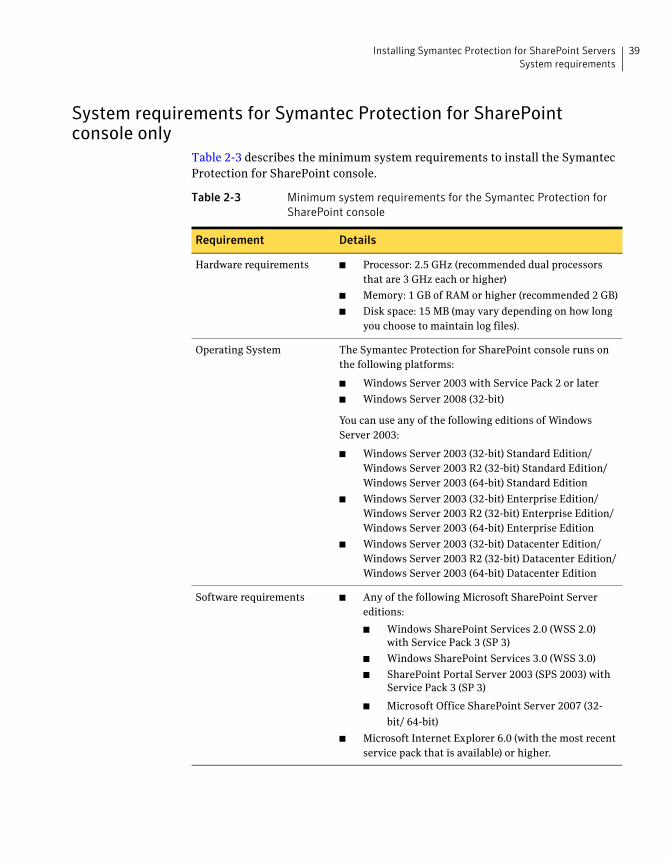
39Installing Symantec Protection for SharePoint Servers
System requirements
System requirements for Symantec Protection for SharePoint console only
Table 2-3 describes the minimum system requirements to install the Symantec
Protection for SharePoint console.
Table 2-3 Minimum system requirements for the Symantec Protection for
SharePoint console
Requirement Details
Hardware requirements ■ Processor: 2.5 GHz (recommended dual processors
that are 3 GHz each or higher)
■ Memory: 1 GB of RAM or higher (recommended 2 GB)
■ Disk space: 15 MB (may vary depending on how long
you choose to maintain log files).
Operating System The Symantec Protection for SharePoint console runs on
the following platforms:
■ Windows Server 2003 with Service Pack 2 or later
■ Windows Server 2008 (32-bit)
You can use any of the following editions of Windows
Server 2003:
■ Windows Server 2003 (32-bit) Standard Edition/
Windows Server 2003 R2 (32-bit) Standard Edition/
Windows Server 2003 (64-bit) Standard Edition
■ Windows Server 2003 (32-bit) Enterprise Edition/
Windows Server 2003 R2 (32-bit) Enterprise Edition/
Windows Server 2003 (64-bit) Enterprise Edition
■ Windows Server 2003 (32-bit) Datacenter Edition/
Windows Server 2003 R2 (32-bit) Datacenter Edition/
Windows Server 2003 (64-bit) Datacenter Edition
Software requirements ■ Any of the following Microsoft SharePoint Server
editions:
■ Windows SharePoint Services 2.0 (WSS 2.0)
with Service Pack 3 (SP 3)
■ Windows SharePoint Services 3.0 (WSS 3.0)
■ SharePoint Portal Server 2003 (SPS 2003) with
Service Pack 3 (SP 3)
■ Microsoft Office SharePoint Server 2007 (32-
bit/ 64-bit)
■ Microsoft Internet Explorer 6.0 (with the most recent
service pack that is available) or higher.
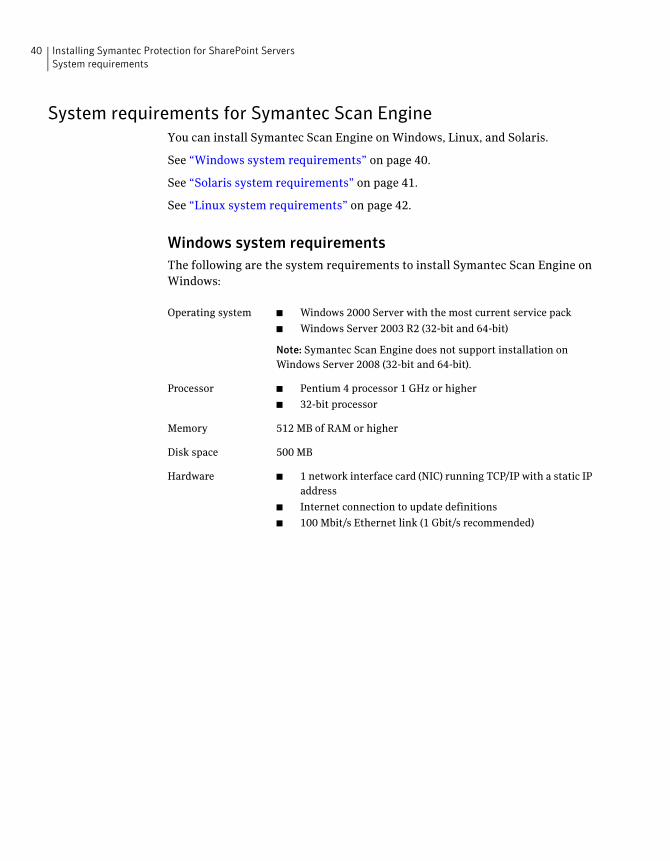
40 Installing Symantec Protection for SharePoint Servers
System requirements
System requirements for Symantec Scan Engine
You can install Symantec Scan Engine on Windows, Linux, and Solaris.
See “Windows system requirements” on page 40.
See “Solaris system requirements” on page 41.
See “Linux system requirements” on page 42.
Windows system requirements
The following are the system requirements to install Symantec Scan Engine on
Windows:
Operating system ■ Windows 2000 Server with the most current service pack
■ Windows Server 2003 R2 (32-bit and 64-bit)
Note: Symantec Scan Engine does not support installation on
Windows Server 2008 (32-bit and 64-bit).
Processor ■ Pentium 4 processor 1 GHz or higher
■ 32-bit processor
Memory 512 MB of RAM or higher
Disk space 500 MB
Hardware ■ 1 network interface card (NIC) running TCP/IP with a static IP
address
■ Internet connection to update definitions
■ 100 Mbit/s Ethernet link (1 Gbit/s recommended)
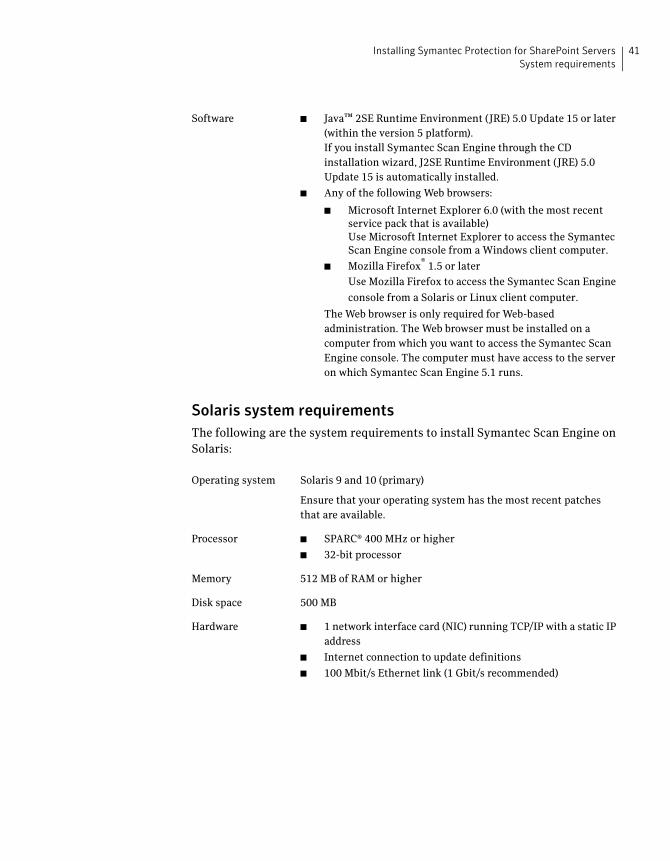
41Installing Symantec Protection for SharePoint Servers
System requirements
Solaris system requirements
The following are the system requirements to install Symantec Scan Engine on
Solaris:
Software ■ Java™ 2SE Runtime Environment (JRE) 5.0 Update 15 or later
(within the version 5 platform).
If you install Symantec Scan Engine through the CD
installation wizard, J2SE Runtime Environment (JRE) 5.0
Update 15 is automatically installed.
■ Any of the following Web browsers:
■ Microsoft Internet Explorer 6.0 (with the most recent
service pack that is available)
Use Microsoft Internet Explorer to access the Symantec
Scan Engine console from a Windows client computer.
■ Mozilla Firefox® 1.5 or later
Use Mozilla Firefox to access the Symantec Scan Engine
console from a Solaris or Linux client computer.
The Web browser is only required for Web-based
administration. The Web browser must be installed on a
computer from which you want to access the Symantec Scan
Engine console. The computer must have access to the server
on which Symantec Scan Engine 5.1 runs.
Operating system Solaris 9 and 10 (primary)
Ensure that your operating system has the most recent patches
that are available.
Processor ■ SPARC® 400 MHz or higher
■ 32-bit processor
Memory 512 MB of RAM or higher
Disk space 500 MB
Hardware ■ 1 network interface card (NIC) running TCP/IP with a static IP
address
■ Internet connection to update definitions
■ 100 Mbit/s Ethernet link (1 Gbit/s recommended)
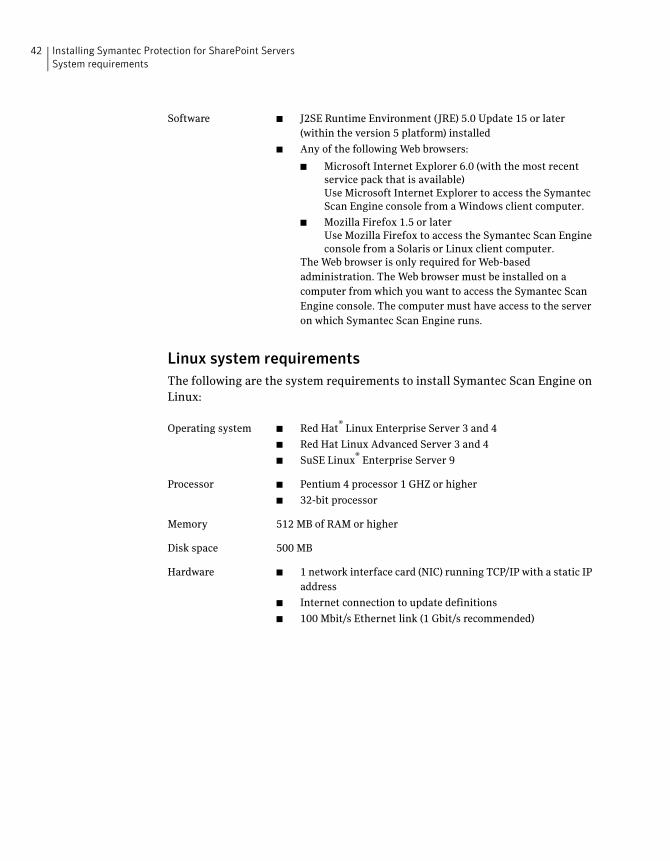
42 Installing Symantec Protection for SharePoint Servers
System requirements
Linux system requirements
The following are the system requirements to install Symantec Scan Engine on
Linux:
Software ■ J2SE Runtime Environment (JRE) 5.0 Update 15 or later
(within the version 5 platform) installed
■ Any of the following Web browsers:
■ Microsoft Internet Explorer 6.0 (with the most recent
service pack that is available)
Use Microsoft Internet Explorer to access the Symantec
Scan Engine console from a Windows client computer.
■ Mozilla Firefox 1.5 or later
Use Mozilla Firefox to access the Symantec Scan Engine
console from a Solaris or Linux client computer.
The Web browser is only required for Web-based
administration. The Web browser must be installed on a
computer from which you want to access the Symantec Scan
Engine console. The computer must have access to the server
on which Symantec Scan Engine runs.
Operating system ■ Red Hat® Linux Enterprise Server 3 and 4
■ Red Hat Linux Advanced Server 3 and 4
■ SuSE Linux® Enterprise Server 9
Processor ■ Pentium 4 processor 1 GHZ or higher
■ 32-bit processor
Memory 512 MB of RAM or higher
Disk space 500 MB
Hardware ■ 1 network interface card (NIC) running TCP/IP with a static IP
address
■ Internet connection to update definitions
■ 100 Mbit/s Ethernet link (1 Gbit/s recommended)
43Installing Symantec Protection for SharePoint Servers
About installing Symantec Protection for SharePoint Servers
About installing Symantec Protection for SharePoint Servers
Symantec Protection for SharePoint Servers comprises of the following
components:
You can install these components separately or together.
Based on the SharePoint farm environment and SharePoint version used, you
must install the Symantec Protection for SharePoint console on all front-end
servers in the farm or with the Central Administration service started.
See “About deployment options” on page 29.
During installation, Symantec Protection for SharePoint Servers installs both
components together or separately based on the installation option that you
choose. You cannot do a full install of Symantec Protection for SharePoint
Software ■ J2SE Runtime Environment (JRE) 5.0 Update 15 or later
(within the version 5 platform) installed
■ Any of the following Web browsers:
■ Microsoft Internet Explorer 6.0 (with the most recent
service pack that is available)
Use Microsoft Internet Explorer to access the Symantec
Scan Engine console from a Windows client computer.
■ Mozilla Firefox 1.5 or later
Use Mozilla Firefox to access the Symantec Scan Engine
console from a Solaris or Linux client computer.
The Web browser is only required for Web-based
administration. The Web browser must be installed on a
computer from which you want to access the Symantec Scan
Engine console. The computer must have access to the server
on which Symantec Scan Engine runs.
Symantec Scan Engine Provides the virus scanning and repair
services.
Symantec Protection for SharePoint
console
Provides a means for users to configure how
Symantec Scan Engine and the SharePoint
server communicate with each other. The
console also allows users to configure how
Symantec Protection for SharePoint Servers
handles infected files and monitors scanning
activity.
44 Installing Symantec Protection for SharePoint Servers
About installing Symantec Protection for SharePoint Servers
Servers on a 64-bit computer. However, you can install both components
separately on the same 64-bit computer.
See “About the installation options” on page 45.
The Symantec Protection for SharePoint Servers installation program checks
for previous versions of the product and does one of the following:
During installation of Symantec Scan Engine, you can enter the file path of a
valid license for automatic license activation. Symantec Protection for
SharePoint Servers automatically registers the Symantec Scan Engine if you
enter the license file path during a full installation. When you register Symantec
Scan Engine during the installation process, you eliminate the need to register it
through the Symantec Protection for SharePoint console.
If you install Symantec Scan Engine separately, you can still enter the license
file path during installation. Automatic activation occurs if the license is valid.
However, you must register Symantec Scan Engine manually with Symantec
Protection for SharePoint Servers.
See “Registering Symantec Scan Engine with Symantec Protection for
SharePoint Servers” on page 85.
Symantec Scan Engine installs a virtual administrative account during
installation. Do not forget the password for this account because it is the only
account that you can use to manage Symantec Scan Engine. You can change the
password in the console, but to do so you must have the old password.
See “Accessing the Symantec Scan Engine console” on page 95.
If you do not have the license file at the time of installation, you can activate the
license later through the Symantec Scan Engine console.
No previous version is
detected
A full installation is performed.
A previous version of
either component is
detected
Symantec Protection for SharePoint Servers does not support
an upgrade. You must uninstall the previous version and run
the Symantec Protection for SharePoint Servers installation
program again.
If the installation program detects an older version of
Symantec AntiVirus for Microsoft SharePoint, a message first
prompts the user to upgrade. When you click yes, you get a
message stating that installation cannot continue unless you
uninstall the previous version.
If the installer detects Symantec Scan Engine 4.3x, you are
not allowed to proceed with the installation unless you
uninstall the previous version.
45Installing Symantec Protection for SharePoint Servers
About installing Symantec Protection for SharePoint Servers
See “About licensing Symantec Scan Engine” on page 99.
The installation program installs the Symantec Protection for SharePoint
console using the service logon details that you enter during the installation
procedure. You can change the service logon details after installation. You can
also password protect the console so that unauthenticated users cannot access
or modify the settings.
See “Accessing the console” on page 64.
You can use the silent installation or remote installation feature for multiple
installations on your network.
See “Installing the Symantec Protection for SharePoint console using the silent
installation feature” on page 55.
See “About installing Symantec Protection for SharePoint Servers using remote
installation” on page 49.
About the installation options
On a Windows platform, the CD installer displays the following options:
Install Symantec Protection 5.1
for SharePoint Servers (Full
Install)
Installs both Symantec Scan Engine and the Symantec
Protection for SharePoint console.
See “About installing Symantec Protection for
SharePoint Servers (integrated installation)” on page 46.
Symantec Scan Engine is supported on 64-bit computers,
however, the option of full install is grayed out.
See “Installing Symantec Scan Engine on a 64-bit
computer” on page 52.
Install only the Symantec Scan
Engine 5.1
Installs Symantec Scan Engine only.
This installation is useful if you want to move antivirus
scanning off-box, thereby reducing the CPU load on the
SharePoint Server.
See “Installing only Symantec Scan Engine using the
installation wizard” on page 50.
Symantec Scan Engine is supported on 64-bit computers,
however, this option is grayed out on a 64-bit computer.
See “Installing Symantec Scan Engine on a 64-bit
computer” on page 52.
46 Installing Symantec Protection for SharePoint Servers
About installing Symantec Protection for SharePoint Servers
On a Linux/Solaris platform, you can install Symantec Scan Engine only. This is
because only Symantec Scan Engine is supported on Linux or Solaris.
About installing Symantec Protection for SharePoint Servers (integrated installation)
When you perform an integrated installation, you install both the Symantec
Protection for SharePoint console and Symantec Scan Engine on the same
server. Before you begin the installation procedure, ensure that your server
meets the minimum system requirements. You should also ensure that the
SharePoint server and all applicable updates are installed, configured, and
working correctly before you begin installation.
For more information, see the Microsoft documentation.
See “System requirements for Symantec Protection for SharePoint Servers
integrated installation” on page 38.
You can do a consolidated install of Symantec Protection for SharePoint Servers
or install either component separately from the distribution CD using the
installation wizard. However, you cannot do an integrated install using the
silent install feature. You can install the Symantec Protection for SharePoint
console and Symantec Scan Engine separately using the silent install feature.
See “Installing Symantec Protection for SharePoint Servers using the
installation wizard” on page 47.
See “Installing the Symantec Protection for SharePoint console using the silent
installation feature” on page 55.
Though both components are supported on a 64-bit computer, you must install
the components separately as the option for a full install from the CD installer is
grayed out.
See “About installing only the Symantec Protection for SharePoint console” on
page 53.
See “Installing Symantec Scan Engine on a 64-bit computer” on page 52.
For more information about how to install Symantec Scan Engine using the
silent install feature, see the Symantec Scan Engine Implementation Guide.
Install only the Symantec
Protection for SharePoint
console
Installs the administrative console for Symantec
Protection for SharePoint Servers
See “About installing only the Symantec Protection for
SharePoint console” on page 53.
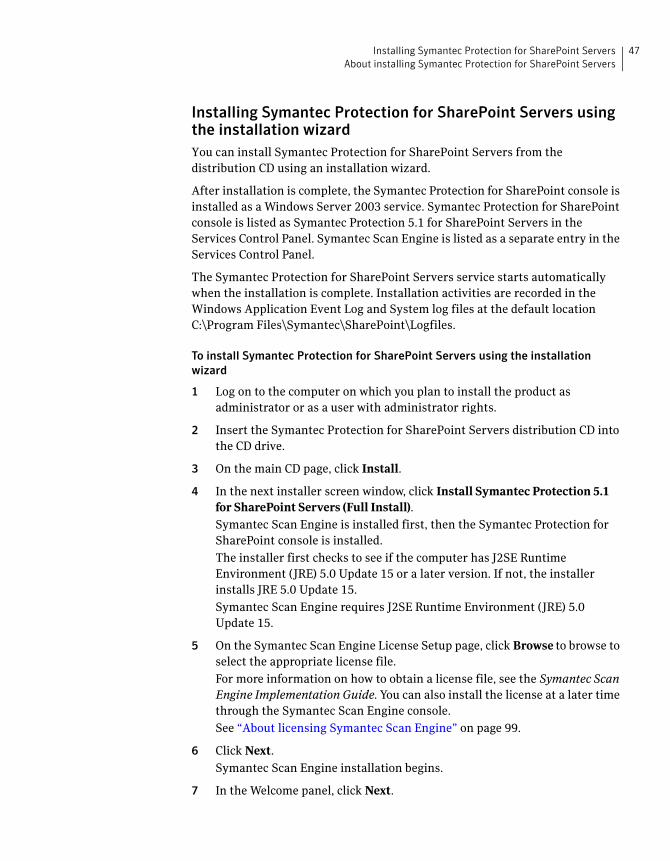
47Installing Symantec Protection for SharePoint Servers
About installing Symantec Protection for SharePoint Servers
Installing Symantec Protection for SharePoint Servers using the installation wizard
You can install Symantec Protection for SharePoint Servers from the
distribution CD using an installation wizard.
After installation is complete, the Symantec Protection for SharePoint console is
installed as a Windows Server 2003 service. Symantec Protection for SharePoint
console is listed as Symantec Protection 5.1 for SharePoint Servers in the
Services Control Panel. Symantec Scan Engine is listed as a separate entry in the
Services Control Panel.
The Symantec Protection for SharePoint Servers service starts automatically
when the installation is complete. Installation activities are recorded in the
Windows Application Event Log and System log files at the default location
C:\Program Files\Symantec\SharePoint\Logfiles.
To install Symantec Protection for SharePoint Servers using the installation
wizard
1 Log on to the computer on which you plan to install the product as
administrator or as a user with administrator rights.
2 Insert the Symantec Protection for SharePoint Servers distribution CD into
the CD drive.
3 On the main CD page, click Install.
4 In the next installer screen window, click Install Symantec Protection 5.1
for SharePoint Servers (Full Install).
Symantec Scan Engine is installed first, then the Symantec Protection for
SharePoint console is installed.
The installer first checks to see if the computer has J2SE Runtime
Environment (JRE) 5.0 Update 15 or a later version. If not, the installer
installs JRE 5.0 Update 15.
Symantec Scan Engine requires J2SE Runtime Environment (JRE) 5.0
Update 15.
5 On the Symantec Scan Engine License Setup page, click Browse to browse to
select the appropriate license file.
For more information on how to obtain a license file, see the Symantec Scan Engine Implementation Guide. You can also install the license at a later time
through the Symantec Scan Engine console.
See “About licensing Symantec Scan Engine” on page 99.
6 Click Next.
Symantec Scan Engine installation begins.
7 In the Welcome panel, click Next.
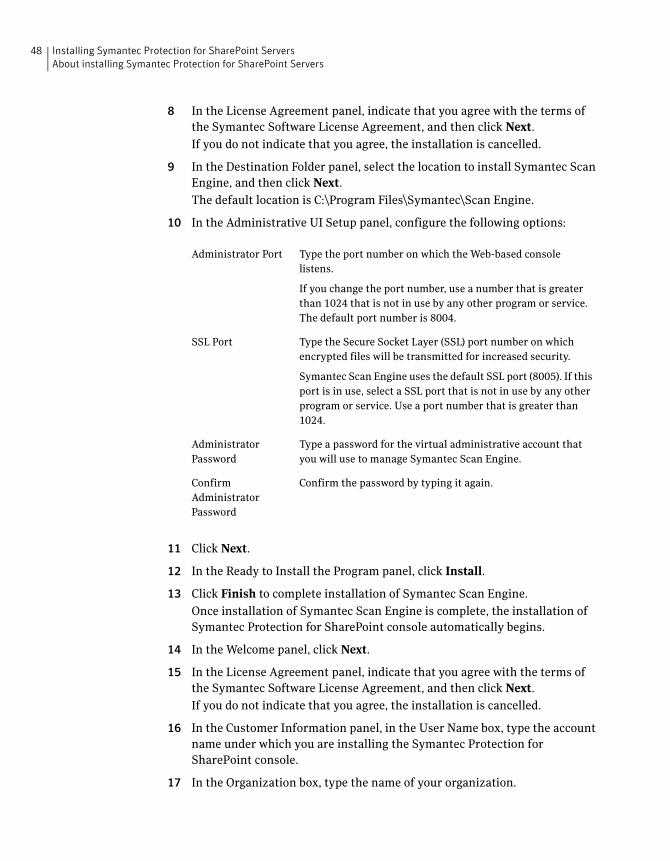
48 Installing Symantec Protection for SharePoint Servers
About installing Symantec Protection for SharePoint Servers
8 In the License Agreement panel, indicate that you agree with the terms of
the Symantec Software License Agreement, and then click Next.
If you do not indicate that you agree, the installation is cancelled.
9 In the Destination Folder panel, select the location to install Symantec Scan
Engine, and then click Next.
The default location is C:\Program Files\Symantec\Scan Engine.
10 In the Administrative UI Setup panel, configure the following options:
11 Click Next.
12 In the Ready to Install the Program panel, click Install.
13 Click Finish to complete installation of Symantec Scan Engine.
Once installation of Symantec Scan Engine is complete, the installation of
Symantec Protection for SharePoint console automatically begins.
14 In the Welcome panel, click Next.
15 In the License Agreement panel, indicate that you agree with the terms of
the Symantec Software License Agreement, and then click Next.
If you do not indicate that you agree, the installation is cancelled.
16 In the Customer Information panel, in the User Name box, type the account
name under which you are installing the Symantec Protection for
SharePoint console.
17 In the Organization box, type the name of your organization.
Administrator Port Type the port number on which the Web-based console
listens.
If you change the port number, use a number that is greater
than 1024 that is not in use by any other program or service.
The default port number is 8004.
SSL Port Type the Secure Socket Layer (SSL) port number on which
encrypted files will be transmitted for increased security.
Symantec Scan Engine uses the default SSL port (8005). If this
port is in use, select a SSL port that is not in use by any other
program or service. Use a port number that is greater than
1024.
Administrator
Password
Type a password for the virtual administrative account that
you will use to manage Symantec Scan Engine.
Confirm
Administrator
Password
Confirm the password by typing it again.
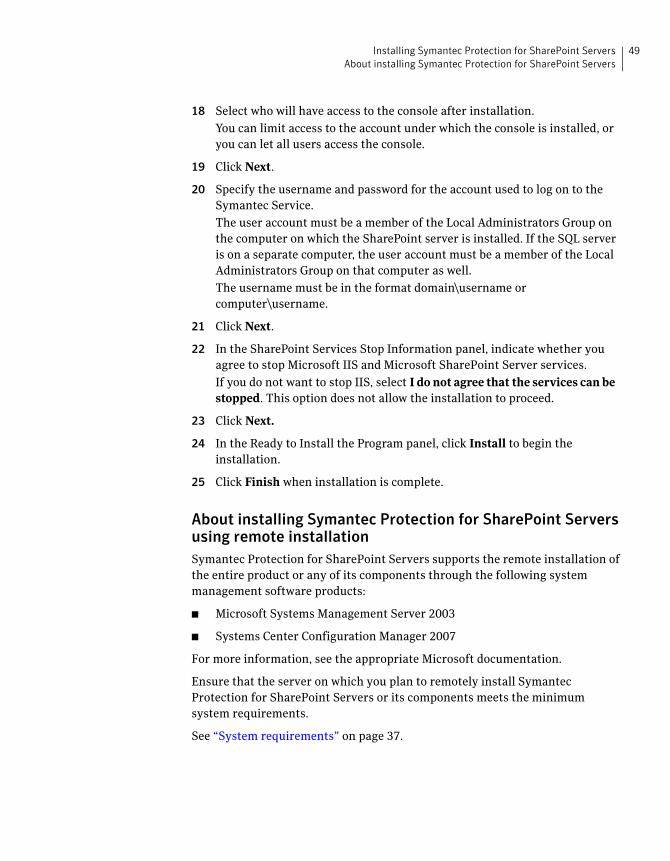
49Installing Symantec Protection for SharePoint Servers
About installing Symantec Protection for SharePoint Servers
18 Select who will have access to the console after installation.
You can limit access to the account under which the console is installed, or
you can let all users access the console.
19 Click Next.
20 Specify the username and password for the account used to log on to the
Symantec Service.
The user account must be a member of the Local Administrators Group on
the computer on which the SharePoint server is installed. If the SQL server
is on a separate computer, the user account must be a member of the Local
Administrators Group on that computer as well.
The username must be in the format domain\username or
computer\username.
21 Click Next.
22 In the SharePoint Services Stop Information panel, indicate whether you
agree to stop Microsoft IIS and Microsoft SharePoint Server services.
If you do not want to stop IIS, select I do not agree that the services can be
stopped. This option does not allow the installation to proceed.
23 Click Next.
24 In the Ready to Install the Program panel, click Install to begin the
installation.
25 Click Finish when installation is complete.
About installing Symantec Protection for SharePoint Servers using remote installation
Symantec Protection for SharePoint Servers supports the remote installation of
the entire product or any of its components through the following system
management software products:
■ Microsoft Systems Management Server 2003
■ Systems Center Configuration Manager 2007
For more information, see the appropriate Microsoft documentation.
Ensure that the server on which you plan to remotely install Symantec
Protection for SharePoint Servers or its components meets the minimum
system requirements.
See “System requirements” on page 37.
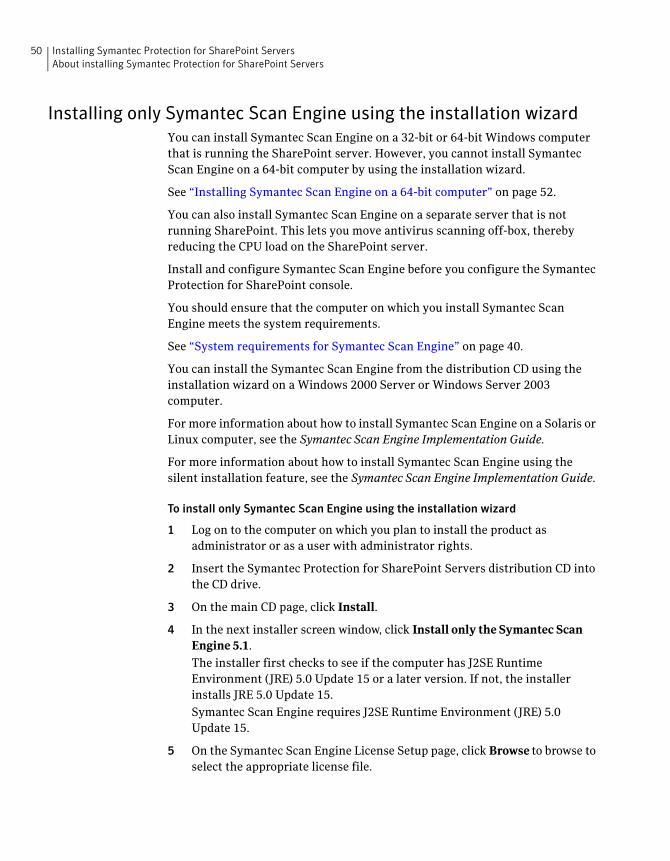
50 Installing Symantec Protection for SharePoint Servers
About installing Symantec Protection for SharePoint Servers
Installing only Symantec Scan Engine using the installation wizard
You can install Symantec Scan Engine on a 32-bit or 64-bit Windows computer
that is running the SharePoint server. However, you cannot install Symantec
Scan Engine on a 64-bit computer by using the installation wizard.
See “Installing Symantec Scan Engine on a 64-bit computer” on page 52.
You can also install Symantec Scan Engine on a separate server that is not
running SharePoint. This lets you move antivirus scanning off-box, thereby
reducing the CPU load on the SharePoint server.
Install and configure Symantec Scan Engine before you configure the Symantec
Protection for SharePoint console.
You should ensure that the computer on which you install Symantec Scan
Engine meets the system requirements.
See “System requirements for Symantec Scan Engine” on page 40.
You can install the Symantec Scan Engine from the distribution CD using the
installation wizard on a Windows 2000 Server or Windows Server 2003
computer.
For more information about how to install Symantec Scan Engine on a Solaris or
Linux computer, see the Symantec Scan Engine Implementation Guide.
For more information about how to install Symantec Scan Engine using the
silent installation feature, see the Symantec Scan Engine Implementation Guide.
To install only Symantec Scan Engine using the installation wizard
1 Log on to the computer on which you plan to install the product as
administrator or as a user with administrator rights.
2 Insert the Symantec Protection for SharePoint Servers distribution CD into
the CD drive.
3 On the main CD page, click Install.
4 In the next installer screen window, click Install only the Symantec Scan
Engine 5.1.
The installer first checks to see if the computer has J2SE Runtime
Environment (JRE) 5.0 Update 15 or a later version. If not, the installer
installs JRE 5.0 Update 15.
Symantec Scan Engine requires J2SE Runtime Environment (JRE) 5.0
Update 15.
5 On the Symantec Scan Engine License Setup page, click Browse to browse to
select the appropriate license file.
51Installing Symantec Protection for SharePoint Servers
About installing Symantec Protection for SharePoint Servers
For more information on how to obtain a license file, see the Symantec Scan Engine Implementation Guide. You can also install the license at a later time
through the Symantec Scan Engine console.
See “About licensing Symantec Scan Engine” on page 99.
6 Click Next.
Symantec Scan Engine installation begins.
7 In the Welcome panel, click Next.
8 In the License Agreement panel, indicate that you agree with the terms of
the Symantec Software License Agreement, and then click Next.
If you do not indicate that you agree, the installation is cancelled.
9 In the Destination Folder panel, select the location to install Symantec Scan
Engine, and then click Next.
The default location is C:\Program Files\Symantec\Scan Engine.
10 In the Administrative UI Setup panel, configure the following options:
11 Click Next.
12 In the Ready to Install the Program panel, click Install.
13 Click Finish to complete installation of Symantec Scan Engine.
Symantec Scan Engine is listed as a separate entry in the Services Control
Panel.
Administrator Port Type the port number on which the Web-based console
listens.
If you change the port number, use a number that is greater
than 1024 that is not in use by any other program or service.
The default port number is 8004.
SSL Port Type the Secure Socket Layer (SSL) port number on which
encrypted files will be transmitted for increased security.
Symantec Scan Engine uses the default SSL port (8005). If this
port is in use, select a SSL port that is not in use by any other
program or service. Use a port number that is greater than
1024.
Administrator
Password
Type a password for the virtual administrative account that
you will use to manage Symantec Scan Engine.
Confirm
Administrator
Password
Confirm the password by typing it again.
52 Installing Symantec Protection for SharePoint Servers
About installing Symantec Protection for SharePoint Servers
Installing Symantec Scan Engine on a 64-bit computer
You can install both components of Symantec Protection for SharePoint Servers
separately on a Windows 2003 64-bit computer.
To install the Symantec Protection for SharePoint console on a 64-bit computer,
you can use the installation wizard or use the silent installation feature.
See “About installing only the Symantec Protection for SharePoint console” on
page 53.
To install Symantec Scan Engine on a 64-bit computer, you must do the
following steps:
■ Install Java manually.
If you have JRE 5.0 Update 15 or a higher version installed on your
computer already, you can skip this step.
See “To install Java manually” on page 52.
■ Install Symantec Scan Engine manually.
See “To install Symantec Scan Engine manually” on page 52.
■ Activate the license.
See “Installing the license file” on page 101.
■ Register Symantec Scan Engine with the Symantec Protection for
SharePoint console.
See “Registering Symantec Scan Engine with Symantec Protection for
SharePoint Servers” on page 85.
To install Java manually
1 Go to the folder named “Java” within the Scan_Engine\Tools folder in the CD
contents.
The location would be <CD drive>:\Scan_Engine\Tools\Java\Win32.
2 Double-click jre-1_5_0_15-windows-i586-p.exe to manually install JRE 5.0
Update 15.
JRE 5.0 Update 15 is a pre-requisite to install Symantec Scan Engine.
3 Follow the on-screen instructions to install JRE 5.0 Update 15.
To install Symantec Scan Engine manually
1 After you install Java, go to the Scan_Engine\Win32 folder.
2 Double-click the ScanEngine.exe installer.
3 Follow the on-screen instructions to install Symantec Scan Engine.
See “To install only Symantec Scan Engine using the installation wizard” on
page 50.
53Installing Symantec Protection for SharePoint Servers
About installing Symantec Protection for SharePoint Servers
About installing only the Symantec Protection for SharePoint console
Ensure that you install the Symantec Protection for SharePoint console on a
server that meets the system requirements. The Symantec Protection for
SharePoint console supports both 32-bit and 64-bit SharePoint environments.
See “System requirements for Symantec Protection for SharePoint console
only” on page 39.
Based on the SharePoint farm environment and SharePoint version used, you
must install the Symantec Protection for SharePoint console on all front-end
servers in the farm or with the Central Administration service started.
See “About deployment options” on page 29.
You should ensure that the SharePoint server and all applicable updates are
installed, configured, and working correctly before you install the Symantec
Protection for SharePoint console.
For more information, see the Microsoft documentation.
You can install the Symantec Protection for SharePoint console from the
distribution CD using the installation wizard or you can use the silent install
feature.
See “Installing the Symantec Protection for SharePoint console using the
installation wizard” on page 53.
See “Installing the Symantec Protection for SharePoint console using the silent
installation feature” on page 55.
You can use the remote installation feature for multiple installations of
Symantec Protection for SharePoint console or Symantec Scan Engine on your
network.
See “About installing Symantec Protection for SharePoint Servers using remote
installation” on page 49.
Installing the Symantec Protection for SharePoint console using the installation wizard
You can install Symantec Protection for SharePoint console from the
distribution CD.
When the installation is complete, the Symantec Protection for SharePoint
console is installed as a Windows Server 2003 service (or Windows Server 2008
service) and is listed as Symantec Protection 5.1 for SharePoint Servers in the
Services Control Panel. The Symantec Protection for SharePoint Servers service
starts automatically when the installation is complete. Installation activities are
recorded in the Windows Application Event Log and System log files at the
default location C:\Program Files\Symantec\SharePoint\Logfiles.
54 Installing Symantec Protection for SharePoint Servers
About installing Symantec Protection for SharePoint Servers
To install the Symantec Protection for SharePoint console using the
installation wizard
1 Log on to the computer on which you plan to install the console as
administrator or as a user with administrator rights.
2 Insert the Symantec Protection for SharePoint Servers distribution CD into
the CD drive.
3 On the main CD page, click Install.
4 In the next installer screen window, click Install only the Symantec
Protection for SharePoint console.
5 In the Welcome panel, click Next.
6 In the License Agreement panel, indicate that you agree with the terms of
the Symantec Software License Agreement, and then click Next.
If you do not indicate that you agree, the installation is cancelled.
7 In the Customer Information panel, in the User Name box, type the account
name under which you are installing the Symantec Protection for
SharePoint console.
8 In the Organization box, type the name of your organization.
9 Select who will have access to the console after installation.
You can limit access to only the account under which the console is
installed, or you can let all users access the console.
10 Click Next.
11 Specify the username and password for the account used to log on to the
Symantec Service.
The user account must be a member of the Local Administrators Group on
the computer on which the SharePoint server is installed. If the SQL server
is on a separate computer, the user account must be a member of the Local
Administrators Group on that computer as well.
The username must be in the format domain\username or
computer\username.
12 Click Next.
13 In the SharePoint Services Stop Information panel, indicate whether you
agree to stop Microsoft IIS and Microsoft SharePoint Server services.
If you do not want to stop IIS, select I do not agree that the services can be
stopped. This option does not allow the installation to proceed.
14 Click Next.
15 In the Ready to Install the Program panel, click Install to begin the
installation.
55Installing Symantec Protection for SharePoint Servers
About installing Symantec Protection for SharePoint Servers
16 Click Finish when the installation is complete.
Installing the Symantec Protection for SharePoint console using the silent installation feature
The silent installation feature lets you automate the installation of Symantec
Protection for SharePoint console. You can use the silent installation feature
when you are installing multiple applications of Symantec Protection for
SharePoint console and Symantec Scan Engine with identical input values.
For more information about how to install Symantec Scan Engine using the
silent install feature, see the Symantec Scan Engine Implementation Guide.
Performing silent installations using default configuration values
The Symantec Protection for SharePoint Servers CD includes pre-configured
silent installation. You can use these scripts to install the application with the
default configuration values. You can also generate a log of the installation
events.
You must change directories to the location of the Symantec Protection for
SharePoint console installation program file, setup.exe, on the distribution CD,
which is in following folder:
■ SharePoint/setup.exe (for a 32-bit system)
■ SharePoint X64/setup.exe (for a 64-bit system)
To install the Symantec Protection for SharePoint console
◆ At the command line, type the following:
setup.exe /s /v”/qn”
This installs the console with the default Local System Account as the
service logon user.
To install the Symantec Protection for SharePoint console with service logon
user input values
◆ At the command line, type the following:
setup.exe /s /v”/qn IS_NET_API_LOGON_USERNAME=Domain\user IS_NET_API_LOGON_PASSWORD=password
Specify the service logon user as Server\user or Domain\user with the
IS_NET_API_LOGON_USERNAME parameter.
Specify the service logon password after the parameter
IS_NET_API_LOGON_PASSWORD. The default Local System Account is
taken as the service logon user if the specified password is not correct.
56 Installing Symantec Protection for SharePoint Servers
About installing Symantec Protection for SharePoint Servers
To install Symantec Protection for SharePoint console and log installation
events
◆ At the command line, type the following:
setup.exe /s /v"/qn /L* C:\<filename>.log"
Specify the installation log file name in <filename>.log. The location of the
installation log is C:\<filename>.log. You can modify the location of the log
by changing the file location in the command line entry.
About repairing or modifying Symantec Protection for SharePoint Servers or its components
If you have the Symantec Protection for SharePoint console and Symantec Scan
Engine or either component installed on the computer, you can use the product
distribution CD to modify, repair, or remove both or either program.
When you click a CD installation option, the Symantec Protection for
SharePoint Servers installation program checks for current installations. If you
have the previous version of either Symantec Protection for SharePoint Servers
(Symantec AntiVirus 4.3 for Microsoft SharePoint) or Symantec AntiVirus Scan
Engine, you must manually uninstall the older version before installing
Symantec Protection for SharePoint Servers.
See “About installing Symantec Protection for SharePoint Servers” on page 43.
If the current version of Symantec Protection for SharePoint Servers is installed
on the computer, the installation program displays a modify, repair or remove
screen based on the component present on the computer.
The installation program does one of the following when you select the modify,
repair or remove option:
Modify Reinstalls the component.
Repair Repairs any installation errors.
Remove Uninstalls the component of Symantec
Protection for SharePoint Servers.
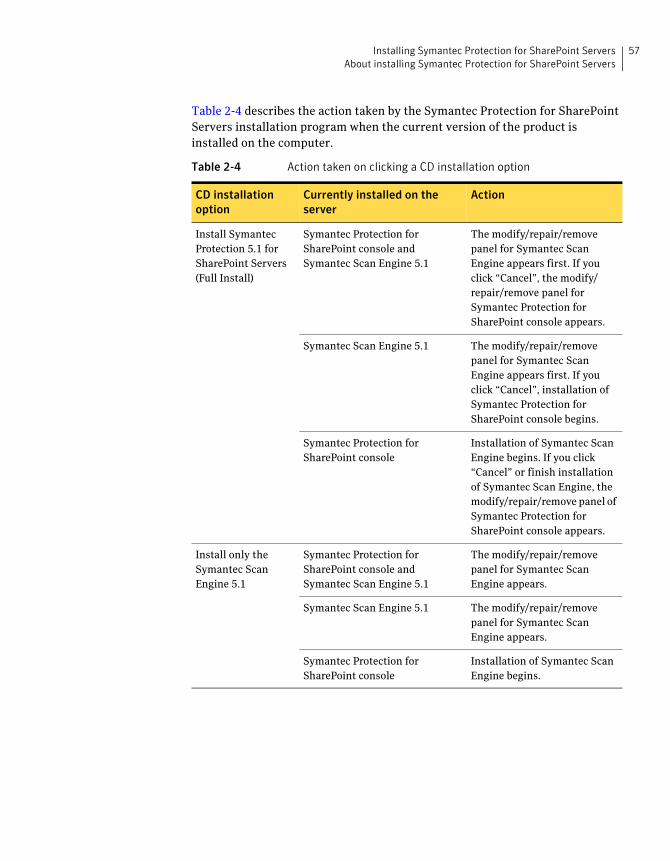
57Installing Symantec Protection for SharePoint Servers
About installing Symantec Protection for SharePoint Servers
Table 2-4 describes the action taken by the Symantec Protection for SharePoint
Servers installation program when the current version of the product is
installed on the computer.
Table 2-4 Action taken on clicking a CD installation option
CD installation
option
Currently installed on the
server
Action
Install Symantec
Protection 5.1 for
SharePoint Servers
(Full Install)
Symantec Protection for
SharePoint console and
Symantec Scan Engine 5.1
The modify/repair/remove
panel for Symantec Scan
Engine appears first. If you
click “Cancel”, the modify/
repair/remove panel for
Symantec Protection for
SharePoint console appears.
Symantec Scan Engine 5.1 The modify/repair/remove
panel for Symantec Scan
Engine appears first. If you
click “Cancel”, installation of
Symantec Protection for
SharePoint console begins.
Symantec Protection for
SharePoint console
Installation of Symantec Scan
Engine begins. If you click
“Cancel” or finish installation
of Symantec Scan Engine, the
modify/repair/remove panel of
Symantec Protection for
SharePoint console appears.
Install only the
Symantec Scan
Engine 5.1
Symantec Protection for
SharePoint console and
Symantec Scan Engine 5.1
The modify/repair/remove
panel for Symantec Scan
Engine appears.
Symantec Scan Engine 5.1 The modify/repair/remove
panel for Symantec Scan
Engine appears.
Symantec Protection for
SharePoint console
Installation of Symantec Scan
Engine begins.

58 Installing Symantec Protection for SharePoint Servers
Post-installation tasks
Post-installation tasksThe post-installation tasks are as follows:
■ Access the Symantec Protection for SharePoint console
See “Accessing the console” on page 64.
■ Enable real-time scanning
See “Configuring real-time scanning” on page 73.
■ Install the license for Symantec Scan Engine
This step is required if you did not install the license during installation.
See “Installing the license file” on page 101.
■ Register the Symantec Scan Engine with the Symantec Protection for
SharePoint console
See “Scheduling scans” on page 83.
Install only the
Symantec Protection
for SharePoint
console
Symantec Protection for
SharePoint console and
Symantec Scan Engine 5.1
The modify/repair/remove
panel for Symantec Protection
for SharePoint console
appears.
Symantec Scan Engine 5.1 Installation of Symantec
Protection for SharePoint
console begins.
Symantec Protection for
SharePoint console
The modify/repair/remove
panel for Symantec Protection
for SharePoint console
appears.
Table 2-4 Action taken on clicking a CD installation option
CD installation
option
Currently installed on the
server
Action
59Installing Symantec Protection for SharePoint Servers
Uninstalling Symantec Protection for SharePoint Servers
■ Configure Symantec Scan Engine
See “Configuring Symantec Scan Engine” on page 95.
■ Enable security risk detection
See “About enabling security risk detection” on page 104.
■ Configure Symantec Protection for SharePoint Servers
See “About configuring Symantec Protection for SharePoint Servers” on
page 71.
Uninstalling Symantec Protection for SharePoint Servers
You can uninstall both components of Symantec Protection for SharePoint
Servers from the Windows Control Panel or using the product CD. You can also
silently uninstall the Symantec Protection for SharePoint console from the
command line.
See “Uninstalling the Symantec Protection for SharePoint console” on page 59.
See “Uninstalling Symantec Scan Engine” on page 61.
Uninstalling the Symantec Protection for SharePoint console
When you uninstall Symantec Protection for SharePoint console, the quarantine
folder remains.You can uninstall the console from the Windows Control Panel,
the product CD, or do a silent uninstall from the command line.
To uninstall the Symantec Protection for SharePoint console from the
Windows Control Panel
1 Log on to the computer as administrator or as a user with administrator
rights.
2 In the Add/Remove Programs Control Panel, click Symantec Protection 5.1
for SharePoint Servers.
3 Click Change/Remove.
4 Follow the on-screen instructions to complete the uninstallation.
To uninstall the Symantec Protection for SharePoint console by using the
product CD
1 Insert the Symantec Protection for SharePoint Servers distribution CD into
the CD drive.
2 On the main CD page, click Install.
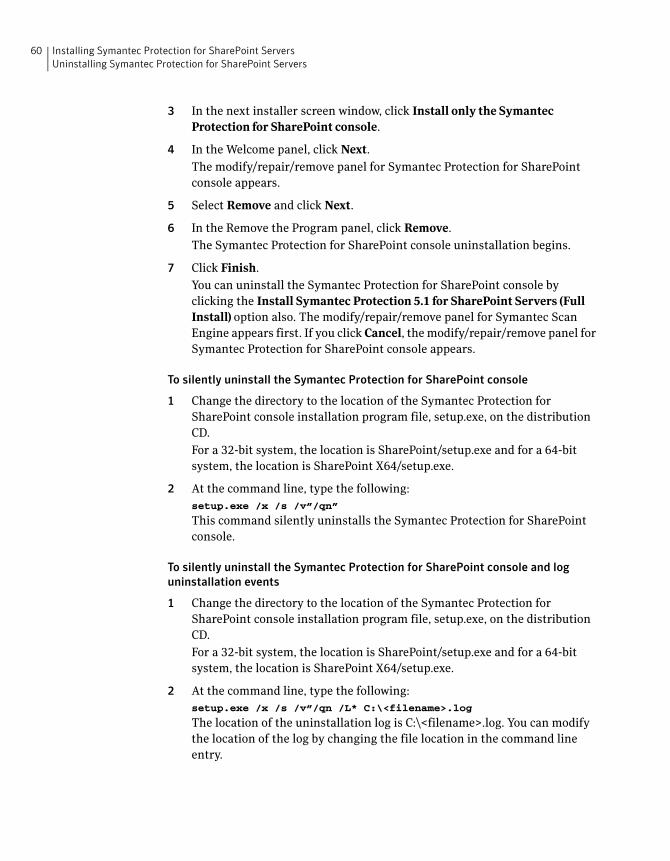
60 Installing Symantec Protection for SharePoint Servers
Uninstalling Symantec Protection for SharePoint Servers
3 In the next installer screen window, click Install only the Symantec
Protection for SharePoint console.
4 In the Welcome panel, click Next.
The modify/repair/remove panel for Symantec Protection for SharePoint
console appears.
5 Select Remove and click Next.
6 In the Remove the Program panel, click Remove.
The Symantec Protection for SharePoint console uninstallation begins.
7 Click Finish.
You can uninstall the Symantec Protection for SharePoint console by
clicking the Install Symantec Protection 5.1 for SharePoint Servers (Full
Install) option also. The modify/repair/remove panel for Symantec Scan
Engine appears first. If you click Cancel, the modify/repair/remove panel for
Symantec Protection for SharePoint console appears.
To silently uninstall the Symantec Protection for SharePoint console
1 Change the directory to the location of the Symantec Protection for
SharePoint console installation program file, setup.exe, on the distribution
CD.
For a 32-bit system, the location is SharePoint/setup.exe and for a 64-bit
system, the location is SharePoint X64/setup.exe.
2 At the command line, type the following:
setup.exe /x /s /v”/qn”
This command silently uninstalls the Symantec Protection for SharePoint
console.
To silently uninstall the Symantec Protection for SharePoint console and log
uninstallation events
1 Change the directory to the location of the Symantec Protection for
SharePoint console installation program file, setup.exe, on the distribution
CD.
For a 32-bit system, the location is SharePoint/setup.exe and for a 64-bit
system, the location is SharePoint X64/setup.exe.
2 At the command line, type the following:
setup.exe /x /s /v”/qn /L* C:\<filename>.log
The location of the uninstallation log is C:\<filename>.log. You can modify
the location of the log by changing the file location in the command line
entry.
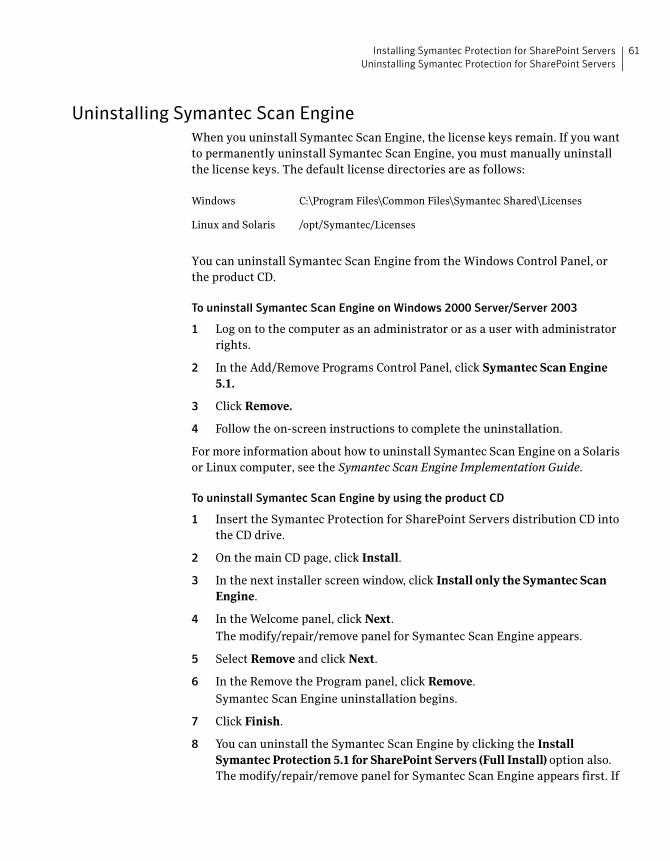
61Installing Symantec Protection for SharePoint Servers
Uninstalling Symantec Protection for SharePoint Servers
Uninstalling Symantec Scan Engine
When you uninstall Symantec Scan Engine, the license keys remain. If you want
to permanently uninstall Symantec Scan Engine, you must manually uninstall
the license keys. The default license directories are as follows:
You can uninstall Symantec Scan Engine from the Windows Control Panel, or
the product CD.
To uninstall Symantec Scan Engine on Windows 2000 Server/Server 2003
1 Log on to the computer as an administrator or as a user with administrator
rights.
2 In the Add/Remove Programs Control Panel, click Symantec Scan Engine
5.1.
3 Click Remove.
4 Follow the on-screen instructions to complete the uninstallation.
For more information about how to uninstall Symantec Scan Engine on a Solaris
or Linux computer, see the Symantec Scan Engine Implementation Guide.
To uninstall Symantec Scan Engine by using the product CD
1 Insert the Symantec Protection for SharePoint Servers distribution CD into
the CD drive.
2 On the main CD page, click Install.
3 In the next installer screen window, click Install only the Symantec Scan
Engine.
4 In the Welcome panel, click Next.
The modify/repair/remove panel for Symantec Scan Engine appears.
5 Select Remove and click Next.
6 In the Remove the Program panel, click Remove.
Symantec Scan Engine uninstallation begins.
7 Click Finish.
8 You can uninstall the Symantec Scan Engine by clicking the Install
Symantec Protection 5.1 for SharePoint Servers (Full Install) option also.
The modify/repair/remove panel for Symantec Scan Engine appears first. If
Windows C:\Program Files\Common Files\Symantec Shared\Licenses
Linux and Solaris /opt/Symantec/Licenses
62 Installing Symantec Protection for SharePoint Servers
Uninstalling Symantec Protection for SharePoint Servers
you click Cancel, the modify/repair/remove panel for Symantec Protection
for SharePoint console appears.
See “About repairing or modifying Symantec Protection for SharePoint
Servers or its components” on page 56.
Chapter
3Using the Symantec
Protection for SharePoint
console
■ About the Symantec Protection for SharePoint console
■ About the console home page
About the Symantec Protection for SharePoint console
The Symantec Protection for SharePoint console refers to the administrative
interface for Symantec Protection for SharePoint Servers. You can access the
Symantec Protection for SharePoint console through the SharePoint
administrative interface.
The integration of the Symantec Protection for SharePoint console into the
SharePoint administrative interface makes it easy for regular SharePoint users
to navigate. You can access the Symantec Protection for SharePoint console
from any computer on your network that can access the server on which the
Symantec Protection for SharePoint console is installed. However, you must
have the permissions to access the SharePoint Central Administration page.
Once you open the SharePoint Central Administration page, access to the
Symantec Protection for SharePoint console is limited to only domain
administrators or members of the Local Administrators group.
64 Using the Symantec Protection for SharePoint console
About the Symantec Protection for SharePoint console
You can ensure that only authenticated users can access and modify Symantec
Protection for SharePoint Servers settings. Set a password so that only users
who are aware of this password can gain access to the Symantec Protection for
SharePoint console.
See “Configuring a password for the console” on page 72.
Accessing the console
You can access the Symantec Protection for SharePoint console through the
following ways:
■ SharePoint Central Administration page
See “To access the console through the SharePoint Central Administration
page” on page 64.
■ Internet Information Services (IIS) Manager
See “To access the console through Internet Information Services (IIS)
Manager” on page 65.
■ Internet Explorer
See “To access the console through Internet Information Services (IIS)
Manager” on page 65.
Access the console from the system on which the Symantec Protection for
SharePoint console is installed. You can also access the console from other
computers on the network, but you must be a member of the domain
administrator group or the Local Administrators group. You can change the
service logon username and password for the Symantec Protection for
SharePoint Servers after you log on.
To access the console through the SharePoint Central Administration page
1 Click the Start button, and then point to Programs. Point to Administrative
Tools, and then do the following tasks:
2 Type the username and password of an account that has domain
administrator or local administrator rights.
3 On the Central Administration page, click Operations to go to the operations
page.
By default, Operations can be seen in the left menu under Central
Administration.
For MOSS 2007 Click SharePoint 3.0 Central Administration
For SPS 2003 Click SharePoint Central Administration
65Using the Symantec Protection for SharePoint console
About the Symantec Protection for SharePoint console
4 Click the Symantec Protection 5.1 for SharePoint Servers link to access the
Symantec Protection for SharePoint console.
See “Symantec Protection for SharePoint Servers link is missing from the
SharePoint Central Administration site” on page 136.
To access the console through Internet Information Services (IIS) Manager
1 Click the Start button, and then point to Programs. Point to Administrative
Tools, and then click Internet Information Services (IIS)Manager.
2 In the left pane, expand your server name.
3 In the list, expand Web Sites.
4 Under Web Sites, right-click SharePoint Central Administration v3.
5 In the menu, click Properties.
You can see the TCP port number in the TCP port box under the Web Site
tab.
6 Click Cancel.
7 Right-click SharePoint Central Administration v3. In the menu, click
Browse.
8 Type the username and password of the user account with local
administrator or domain administrator rights.
The SharePoint Central Administration page appears in the right pane of
the IIS Manager.
9 On the Central Administration page, click Operations to go to the operations
page.
By default, Operations can be seen in the left menu under Central
Administration.
10 Click the Symantec Protection 5.1 for SharePoint Servers link to access the
Symantec Protection for SharePoint console.
See “Symantec Protection for SharePoint Servers link is missing from the
SharePoint Central Administration site” on page 136.
To access the console through Internet Explorer
Do the following to access the Symantec Protection for SharePoint console
through the Internet Explorer:
■ Determine the port number of the Central Administration page on the
server that is running the Symantec Protection for SharePoint console.
■ Launch the Central Administration page through the Internet Explorer.
66 Using the Symantec Protection for SharePoint console
About the Symantec Protection for SharePoint console
■ Access the console through the Central Administration page
See “To access the console through the SharePoint Central Administration
page” on page 64.
To determine the port number of the Central Administration page
1 Click the Start button, and then point to Programs. Point to Administrative
Tools, and then click Internet Information Services (IIS) Manager.
2 In the left pane, expand your server name.
3 In the list, expand Web Sites.
4 Under Web Sites, right-click SharePoint Central Administration v3.
5 In the menu, click Properties.
You can see the TCP port number in the TCP port box under the Web Site
tab.
To launch the Central Administration page through Internet Explorer
1 Launch a Web browser on any computer on your network that can access the
server that is running the Symantec Protection for SharePoint console.
2 Go to the following URL:
http://<servername>:<port>/
where <servername> is the host name or IP address of the server that is
running the Symantec Protection for SharePoint console and <port> is the
TCP port number that is assigned during installation to the Central
Administration page.
The Central Administration page appears.
See “To access the console through the SharePoint Central Administration
page” on page 64.
67Using the Symantec Protection for SharePoint console
About the Symantec Protection for SharePoint console
Changing the service logon account information
The components of Symantec Protection for SharePoint Servers have the
following separate entries in the Services Control Panel:
You can change the service logon account for Symantec Protection for
SharePoint Servers through the Services Control Panel any time after
installation.
To change the service logon account information
1 In the Windows Control Panel, double-click Administrative Tools.
2 In the Administrative Tools window, double-click Services.
3 In the list of services, right-click Symantec Protection 5.1 for SharePoint
Servers and click Properties.
4 Under the Log On tab, select This account. Type the user name and
password.
The username must be in the format domain\username or
computer\username.
The user account must be a member of the Local Administrators Group on
the computer on which the SharePoint server is installed. If the SQL server
is on a separate computer, the user account must be a member of the Local
Administrators Group on that computer as well
Symantec Protection
for SharePoint
console
Symantec Protection for SharePoint console is listed as Symantec
Protection 5.1 for SharePoint Servers in the Services Control Panel.
During the installation, you must type a service logon username
and password. The user account must be a member of the Local
Administrators Group on the computer on which the SharePoint
server is installed. If the SQL server is on a separate computer, the
user account must also be a member of the Local Administrators
Group on that computer.
The username should be in the following format:
domain\username or computer\username.
See “To change the service logon account information” on page 67.
Symantec Scan
Engine
Symantec Scan Engine is installed with the local system account
as the logon service account by default. To access the Symantec
Scan Engine console, you need the virtual administrative account
password.
See “Accessing the Symantec Scan Engine console” on page 95.
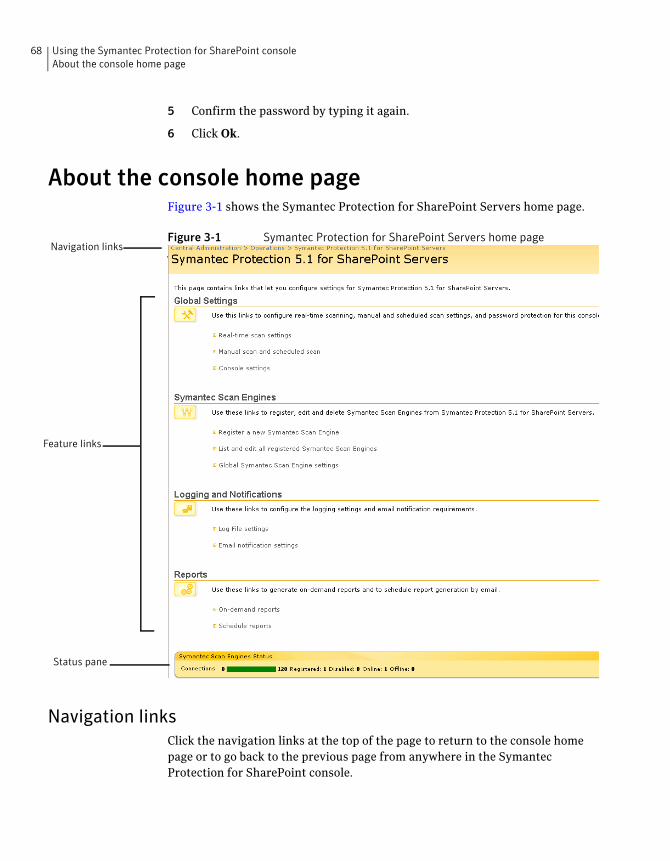
68 Using the Symantec Protection for SharePoint console
About the console home page
5 Confirm the password by typing it again.
6 Click Ok.
About the console home pageFigure 3-1 shows the Symantec Protection for SharePoint Servers home page.
Figure 3-1 Symantec Protection for SharePoint Servers home page
[MM
Navigation links
Click the navigation links at the top of the page to return to the console home
page or to go back to the previous page from anywhere in the Symantec
Protection for SharePoint console.
Feature links
Navigation links
Status pane
69Using the Symantec Protection for SharePoint console
About the console home page
Feature links
Use the feature links to navigate to the main features for Symantec Protection
for SharePoint Servers. When you click a link, the page that contains that
feature’s options appears.
Table 3-1 provides information about the feature links.
Table 3-1 Feature links functions
Link Description
Global Settings Global Settings has the following links:
■ Real-time scan settings: Lets you configure the real-time
scan settings for upload and download of documents from
the SharePoint server.
See “Configuring real-time scanning” on page 73.
■ Manual scan and scheduled scan: Lets you run an
immediate (manual) scan, schedule scans of documents that
are stored on the SharePoint server, and configure settings
for manual scans and scheduled scans of the SharePoint
server content.
See “About manual scans and scheduled scans” on page 75.
■ Console settings: Lets you configure password protection for
the console.
See “Configuring a password for the console” on page 72.
Symantec Scan
Engines
Symantec Scan Engines has the following links:
■ Register a new Symantec Scan Engine: Lets you register a
Symantec Scan Engine.
See “Registering Symantec Scan Engine with Symantec
Protection for SharePoint Servers” on page 85.
■ List and edit all registered Symantec Scan Engines: Lets you
add, delete, and edit registered Symantec Scan Engines.
See “About adding, removing, editing, and viewing
registered Symantec Scan Engines” on page 87.
■ Global Symantec Scan Engine settings: Lets you configure
the auto-check interval for the status of registered
Symantec Scan Engines, and other settings relevant to all
registered Symantec Scan Engines.
See “Specifying the scanning mode for load balancing” on
page 89.
See “Checking for the latest virus definitions” on page 90.
70 Using the Symantec Protection for SharePoint console
About the console home page
Status pane
The status pane on the console home page provides an overview of the current
status of the Symantec Scan Engines. You also can view a graphic overview of
the maximum and currently used scanning threads for all active online
Symantec Scan Engines.
See “About the status pane” on page 109.
Logging and
Notifications
Logging and Notifications has the following links:
■ Log file settings: Lets you set the event logging level and log
file location.
See “About SMTP logging” on page 110.
■ Email notification settings: Lets you specify and customize
email notifications.
See “Configuring SMTP logging” on page 114.
Reports Reports has the following links:
■ On-demand reports: Lets you examine system, scan process,
and Symantec Scan Engine data in either a report or pie-
chart format.
See “Generating an on-demand report” on page 129.
■ Schedule reports: Lets you schedule an hourly, daily, weekly,
or monthly report that is generated and distributed by email
to the users that you specify.
See “Scheduling a report” on page 130.
Table 3-1 Feature links functions (Continued)
Link Description
Chapter
4Configuring Symantec
Protection for SharePoint
Servers
■ About configuring Symantec Protection for SharePoint Servers
■ Configuring real-time scanning
■ About manual scans and scheduled scans
■ Registering Symantec Scan Engine with Symantec Protection for
SharePoint Servers
About configuring Symantec Protection for SharePoint Servers
Symantec Protection for SharePoint Servers lets the SharePoint server
communicate with Symantec Scan Engine to request virus scanning. Symantec
Protection for SharePoint Servers interprets the results that are returned from
Symantec Scan Engine after scanning. You configure Symantec Protection for
SharePoint Servers through the Symantec Protection for SharePoint
console.You can access the console from the SharePoint server administrative
interface.
See “Accessing the console” on page 64.
72 Configuring Symantec Protection for SharePoint Servers
About configuring Symantec Protection for SharePoint Servers
You can configure the following options through the Symantec Protection for
SharePoint console:
■ Configuring a password for the console
See “Configuring a password for the console” on page 72.
■ Configuring real-time scanning
See “Configuring real-time scanning” on page 73.
■ About configuring global manual and scheduled scanning options
See “About manual scans and scheduled scans” on page 75.
■ Scheduling scans
See “Scheduling scans” on page 83.
■ Performing a manual scan
See “Performing manual scans” on page 85.
■ Specifying file handling rules
See “Specifying file handling rules” on page 80.
■ Excluding files with specific extensions from being scanned
See “Excluding files with specific extensions from being scanned” on
page 76.
■ Excluding folders from being scanned
See “Excluding folders from being scanned” on page 77.
■ Specifying the location for quarantined documents
See “Specifying the location for quarantined documents” on page 79.
■ Registering Symantec Scan Engine with Symantec Protection for SharePoint
Servers
See “Registering Symantec Scan Engine with Symantec Protection for
SharePoint Servers” on page 85.
■ Specifying the scanning mode for load balancing
See “Specifying the scanning mode for load balancing” on page 89.
■ Checking for the latest virus definitions
See “Checking for the latest virus definitions” on page 90.
Configuring a password for the console
You can ensure that only authenticated users can access and modify Symantec
Protection for SharePoint Servers settings by securing the console with a
password.When you initially install Symantec Protection for SharePoint
Servers, no password is set. You set the password through the console after
installation.

73Configuring Symantec Protection for SharePoint Servers
Configuring real-time scanning
You can also configure a time-out setting. The time-out setting locks the console
if there is no activity for the amount of time that you specify. Users can only
unlock the console with the password.
For added security, the console contains a lockout feature. The lockout feature
lets users lock the console when they step away from the computer. The console
can only be unlocked with the password.
The lockout link appears at the top-right of the console.
Note: You must set and save the console password for the Lockout link to appear
on the console.
To configure a password for the console
1 On the home page of the Symantec Protection for SharePoint console, under
Global Settings, click Console settings.
2 Check Password protect the Symantec Protection for SharePoint console.
3 In the password field, type the password.
Note: Blank passwords are not supported.
4 Check Show password to see the password.
The password text is hidden by default.
5 In the Timeout box, type the number of minutes of inactivity at which the
console locks.
6 Click Save.
Configuring real-time scanningReal-time scanning means that you can specify whether you want files scanned
as they are being uploaded to and downloaded from the SharePoint server. All
uploaded files and downloaded files are submitted for scanning, unless the file
type is listed as a default blocked type under Security configuration in the
SharePoint Central Administration page.
When a user attempts to upload a file that contains an unrepairable virus, the
user receives a notification that the file is infected. The file is not stored on the
SharePoint server.
When a user attempts to download a file from the SharePoint server that is
infected and unrepairable, the file is not passed to the user. The user receives a
notification that access to the file is denied.
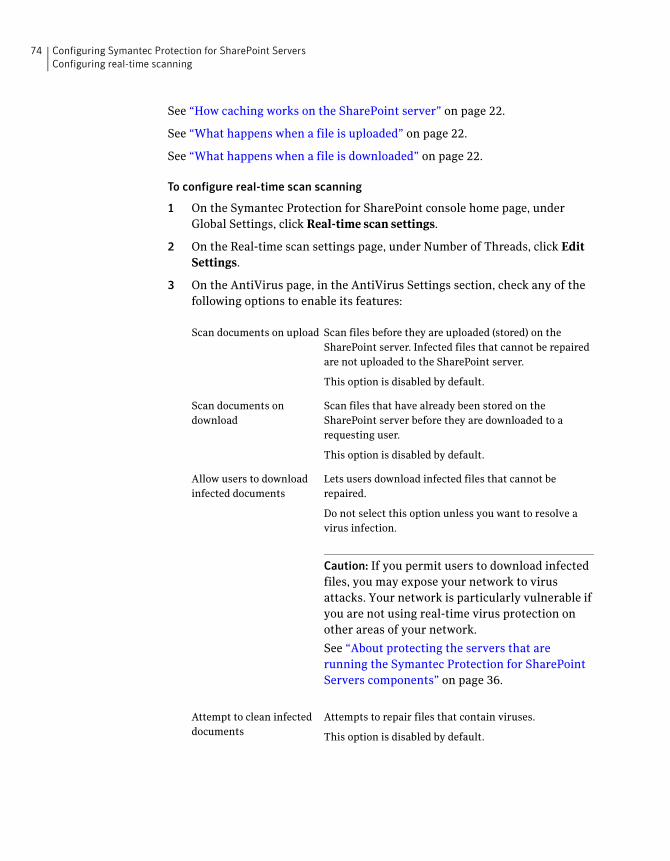
74 Configuring Symantec Protection for SharePoint Servers
Configuring real-time scanning
See “How caching works on the SharePoint server” on page 22.
See “What happens when a file is uploaded” on page 22.
See “What happens when a file is downloaded” on page 22.
To configure real-time scan scanning
1 On the Symantec Protection for SharePoint console home page, under
Global Settings, click Real-time scan settings.
2 On the Real-time scan settings page, under Number of Threads, click Edit
Settings.
3 On the AntiVirus page, in the AntiVirus Settings section, check any of the
following options to enable its features:
Scan documents on upload Scan files before they are uploaded (stored) on the
SharePoint server. Infected files that cannot be repaired
are not uploaded to the SharePoint server.
This option is disabled by default.
Scan documents on
download
Scan files that have already been stored on the
SharePoint server before they are downloaded to a
requesting user.
This option is disabled by default.
Allow users to download
infected documents
Lets users download infected files that cannot be
repaired.
Do not select this option unless you want to resolve a
virus infection.
Caution: If you permit users to download infected
files, you may expose your network to virus
attacks. Your network is particularly vulnerable if
you are not using real-time virus protection on
other areas of your network.
See “About protecting the servers that are
running the Symantec Protection for SharePoint
Servers components” on page 36.
Attempt to clean infected
documents
Attempts to repair files that contain viruses.
This option is disabled by default.
75Configuring Symantec Protection for SharePoint Servers
About manual scans and scheduled scans
4 In the Time out duration box, type the amount of time that the virus scanner
runs before the scanning process times out.
The default setting is 300 seconds (5 minutes). You can adjust this duration
based on the performance.
5 In the number of threads box, type the number of threads that real-time
scanning processes will use.
The default setting is 5. You can adjust this value based on the performance.
6 Click Ok.
7 On the Symantec Protection for SharePoint console home page, under
Global Settings, click Real-time scan settings.
8 Check Bypass scanning when all Symantec Scan Engines are offline or
disabled to permit users to continue to access files even if no registered
Symantec Scan Engine is available to scan the file.
This option is disabled by default.
9 Select one of the following:
About manual scans and scheduled scansSchedule periodic scans of the document library to ensure that all files have
been scanned for viruses. Scheduled scans occur at the time and frequency that
you specify. Scheduled scanning occurs in the background and does not affect
real-time scanning of uploaded and downloaded files.
You can also force an immediate (manual) scan of the documents in the
document library. The options that you configure for scheduled scans also apply
to manual scans. You should perform a manual scan whenever you make
configuration changes to Symantec Scan Engine such as changes to mail filter
policy settings, container processing limits, or other processing limits.
You can improve scanning performance by excluding certain directories or
folders from being scanned. You can also specify which file types to omit from
scanning. During a manual or scheduled scan, all files are submitted for
scanning except the files and folders contained in exclusion lists.
You can also limit scanning to only those files that have been added or modified
since the last manual scan or scheduled scan. Symantec Protection for
SharePoint Servers can compare the time a file was modified or added with the
time of the last scan. This feature lets you conserve scanning resources by
Save Saves your settings.
Restore Reverts your settings to the last
saved settings.
76 Configuring Symantec Protection for SharePoint Servers
About manual scans and scheduled scans
omitting files from scanning that have not been modified or added since the last
scan. When this feature is disabled, all files are scanned during manual scans
and scheduled scans.
About configuring global manual and scheduled scanning options
You can configure the following options for both scheduled scans and manual
scans:
■ Excluding files with specific extensions from being scanned
See “Excluding files with specific extensions from being scanned” on
page 76.
■ Excluding folders from being scanned
See “To exclude document libraries from manual and scheduled scans” on
page 77.
■ Specifying the number of threads for scanning
See “To specify the number of threads for scanning” on page 77.
■ Scanning all file versions in the document library
See “To scan all file versions in the document library” on page 78.
■ Scanning only those files that were added or modified from the last scan
See “To scan only those files that have been added or modified since the last
completed scan” on page 78.
■ Specifying the location for quarantined documents
See “Specifying the location for quarantined documents” on page 79.
■ Specifying file handling rules
See “Registering Symantec Scan Engine with Symantec Protection for
SharePoint Servers” on page 85.
■ Reviewing scan statistics
See “Reviewing scan statistics” on page 82.
Excluding files with specific extensions from being scanned
Viruses are found only in file types that contain executable code. You can save
bandwidth and time by excluding those files types that are not likely to contain
viruses from scanning.
The default file extension exclude list is prepopulated with extensions for those
file types that are not likely to contain viruses and can be excluded from
scanning. You can customize this list.

77Configuring Symantec Protection for SharePoint Servers
About manual scans and scheduled scans
To exclude files with specific extensions from being scanned
1 On the Symantec Protection for SharePoint console home page, under
Global Settings, click Manual scan and scheduled scan.
2 Under Exclusion List, on the right pane, in the File extension exclude list,
add extensions that you do not want to scan or delete extensions that you do
want to scan.
Use a period with each extension in the list. Separate each extension with a
semicolon (for example, .com;.doc;.bat).
3 Click Save.
Excluding folders from being scanned
You can exclude directories or folders from manual scans or scheduled scans.
To exclude document libraries from manual and scheduled scans
1 On the Symantec Protection for SharePoint console home page, under
Global Settings, click Manual scan and scheduled scan.
2 In the Exclusion List section, the “Number of excluded paths” gives the
number of selected paths that are excluded from a manual or scheduled
scan.
3 Click Add exclude path.
In the Exclude folder page, the Exclude Path section under Exclude folders
gives the current excluded paths.
There are no exclude folders or paths defined by default.
4 In the Microsoft SharePoint Server Folder section, select the folder,
directory, or path that you want to exclude from a scan.
5 Scroll down to the bottom of the page and click Add.
You can view the added folder or path in the Exclude Path section.
6 To include a folder or path back into a scan, click the Remove icon against
the path.
Specifying the number of threads for scanning
Symantec Protection for SharePoint Servers sends several documents in parallel
for scanning based on the number of threads that you specify. This process
improves the performance significantly.
To specify the number of threads for scanning
1 On the Symantec Protection for SharePoint console home page, under
Global Settings, click Manual scan and scheduled scan.
78 Configuring Symantec Protection for SharePoint Servers
About manual scans and scheduled scans
2 Under the Optional Settings feature, in the Number of threads box, specify
the number of threads that you want Symantec Protection for SharePoint
Servers to use during scanning.
The default number of threads is 4. You can specify any value between 1 and
25. The number of threads that you specify here is only for manual scans
and scheduled scans.
See “Configuring real-time scanning” on page 73.
3 Click Save.
Scanning all file versions in the document library
Microsoft Windows SharePoint Services lets users keep multiple versions of a
document. This option also lets users revert back to a previous version.
To scan all file versions in the document library
1 On the Symantec Protection for SharePoint console home page, under
Global Settings, click Manual scan and scheduled scan.
2 Under the Optional Settings feature, in the right pane, check Scan all file
versions in the document library.
If you enable the option Scan all file versions in the document library,
Symantec Scan Engine scans all versions of a document.
3 Click Save.
Scanning those files that have been added or modified since the last completed scan
You can limit scanning to only those files that have been added or modified
since the last completed manual scan or scheduled scan. Symantec Protection
for SharePoint Servers compares the time a file was modified or added with the
time of the last completed scan. This feature lets you conserve scanning
resources by omitting files from scanning that have not been modified or added
since the last scan. When this feature is disabled, all files are scanned during
manual scans and scheduled scans.
To scan only those files that have been added or modified since the last
completed scan
1 On the Symantec Protection for SharePoint console home page, under
Global Settings, click Manual scan and scheduled scan.
79Configuring Symantec Protection for SharePoint Servers
About manual scans and scheduled scans
2 Under the Optional Settings feature, in the right pane, check Scan only
modified or new files since last completed scan:.
If no manual or scheduled scan has been completed, then this option is
inactive. If a previous scan has been completed, the end time appears.
3 Click Save.
Specifying the location for quarantined documents
You can quarantine any of the file types that are detected during a manual scan
or scheduled scan. When you specify the option to “Copy to Quarantine and
Delete”, Symantec Protection for SharePoint Servers puts a copy of the file in
the quarantine folder. Then it deletes the file. You can access and remove files
directly from the quarantine folder.
See “Specifying file handling rules” on page 80.
You can specify the location of the quarantine folder. The default location is as
follows: C:\Program Files\Symantec\SharePoint\Quarantine.
Whatever location you choose for the quarantine folder, ensure that you omit
this folder from being scanned by any antivirus scanning program.
To specify the location for quarantined documents
1 On the Symantec Protection for SharePoint console home page, under
Global Settings, click Manual scan and scheduled scan.
2 Under Optional Settings, in the Quarantine folder box, type the path to the
quarantine folder.
Symantec Protection for SharePoint Servers stores infected files that are
found during a scheduled or a manual scan in this folder.
The default location is C:\Program Files\Symantec\SharePoint\Quarantine\.
3 Click Save.

80 Configuring Symantec Protection for SharePoint Servers
About manual scans and scheduled scans
Specifying file handling rules
You can specify how you want Symantec Protection for SharePoint Servers to
process the following types of files that are detected during a manual scan or
scheduled scan:
Infected files Infected files are files that are infected with one or more viruses.
You can configure Symantec Protection for SharePoint Servers to
attempt to repair the file, delete it, or copy it to quarantine and
then delete the infected file under Basic Virus Rule.
See “Specifying the location for quarantined documents” on
page 79.
Unrepairable virus
files
If you configure Symantec Protection for SharePoint Servers to
attempt to repair infected files, you can also specify how you want
to process an unrepairable, infected file. You can configure
Symantec Protection for SharePoint Servers to delete an
unrepairable, infected file or copy it to the quarantine and then
delete the unrepairable, infected file.
See “Specifying the location for quarantined documents” on
page 79.
Unscannable files Unscannable files include partial container files, malformed
container files, and encrypted container files. You can configure
Symantec Protection for SharePoint Servers to delete an
unscannable file or copy it to the quarantine and then delete the
unscannable file.
See “Specifying the location for quarantined documents” on
page 79.
Encrypted files Infected file are often encrypted to deflect scanning attempts.
Encrypted files cannot be decrypted and scanned without the
appropriate decryption tool. You can configure Symantec
Protection for SharePoint Servers to log the detection of encrypted
files (but take no action with the file), delete the encrypted file,
copy it to the quarantine and then delete the encrypted file.
See “Specifying the location for quarantined documents” on
page 79.
81Configuring Symantec Protection for SharePoint Servers
About manual scans and scheduled scans
Note: Symantec Scan Engine contains a decomposer that extracts the contents
of a container file and scans the contents for risks. If the container file includes
an unrepairable virus, an encrypted file, an unscannable file, or a file that
contains a security risk, that specific file is handled according to its file
detection rules. The decomposer then re-assembles the container file and sends
it back to Symantec Protection for SharePoint Servers. Symantec Protection for
SharePoint Servers considers the file repaired and handles it according to how
you have configured the Basic Virus Rule.
You can minimize the likelihood that infected files will be stored on the
SharePoint server by choosing to scan files before they are uploaded. If the files
are found to be infected, they are not uploaded. If the SharePoint server was in
operation before you added antivirus scanning, you may have infected files
already stored on the SharePoint server. Scheduled scans of the SharePoint
server should identify any infected files that have been stored on the server.
See “Scheduling scans” on page 83.
To specify file handling rules
1 On the Symantec Protection for SharePoint console home page, under
Global Settings, click Manual scan and scheduled scan.
2 In the Infected File Detection Rules section, select the actions that you want
Symantec Protection for SharePoint Servers to take for files that are
detected during a scan.
3 Click Save.
Files containing
security risks
Symantec Protection 5.1 for SharePoint Servers detects files with
security risks like spyware, adware, hack tools, dialers, joke
programs etc. You can configure Symantec Protection for
SharePoint Servers to delete the file that contains the security risk,
copy it to the quarantine and then delete the file, or log the
detection of a security risk, but take no action with the file.
You must also enable security risk detection on Symantec Scan
Engine.
See “About enabling security risk detection” on page 104.
See “Specifying the location for quarantined documents” on
page 79.
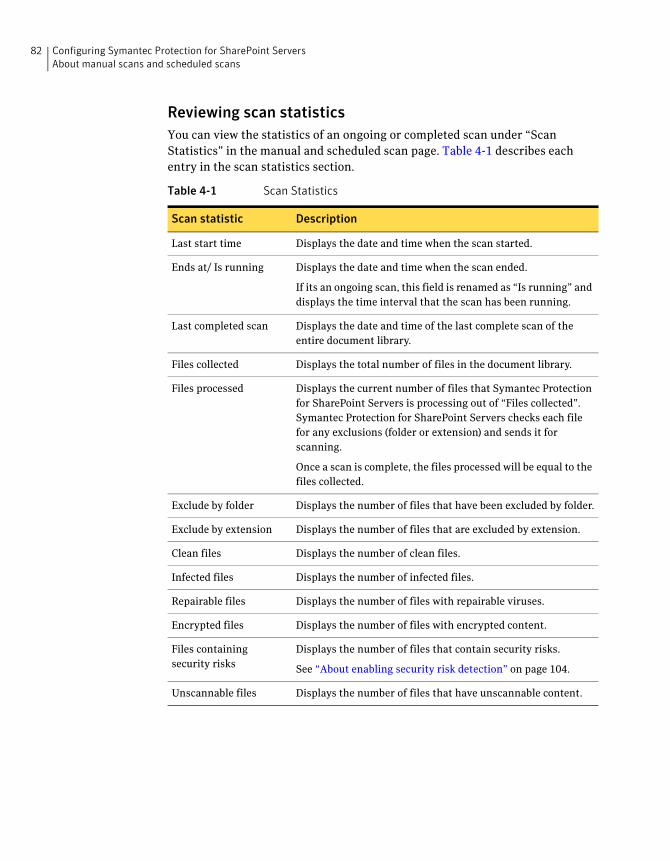
82 Configuring Symantec Protection for SharePoint Servers
About manual scans and scheduled scans
Reviewing scan statistics
You can view the statistics of an ongoing or completed scan under “Scan
Statistics” in the manual and scheduled scan page. Table 4-1 describes each
entry in the scan statistics section.
Table 4-1 Scan Statistics
Scan statistic Description
Last start time Displays the date and time when the scan started.
Ends at/ Is running Displays the date and time when the scan ended.
If its an ongoing scan, this field is renamed as “Is running” and
displays the time interval that the scan has been running.
Last completed scan Displays the date and time of the last complete scan of the
entire document library.
Files collected Displays the total number of files in the document library.
Files processed Displays the current number of files that Symantec Protection
for SharePoint Servers is processing out of “Files collected”.
Symantec Protection for SharePoint Servers checks each file
for any exclusions (folder or extension) and sends it for
scanning.
Once a scan is complete, the files processed will be equal to the
files collected.
Exclude by folder Displays the number of files that have been excluded by folder.
Exclude by extension Displays the number of files that are excluded by extension.
Clean files Displays the number of clean files.
Infected files Displays the number of infected files.
Repairable files Displays the number of files with repairable viruses.
Encrypted files Displays the number of files with encrypted content.
Files containing
security risks
Displays the number of files that contain security risks.
See “About enabling security risk detection” on page 104.
Unscannable files Displays the number of files that have unscannable content.
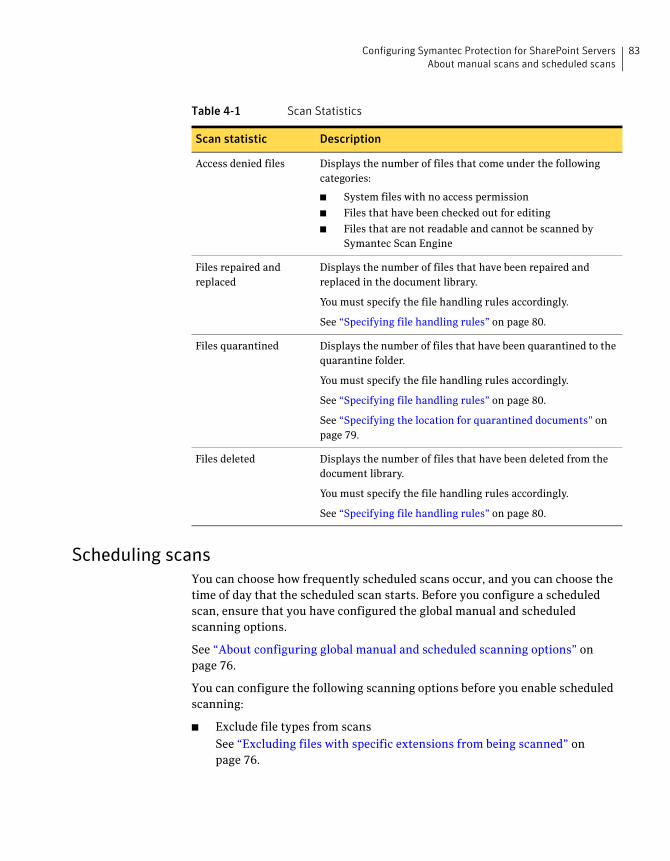
83Configuring Symantec Protection for SharePoint Servers
About manual scans and scheduled scans
Scheduling scans
You can choose how frequently scheduled scans occur, and you can choose the
time of day that the scheduled scan starts. Before you configure a scheduled
scan, ensure that you have configured the global manual and scheduled
scanning options.
See “About configuring global manual and scheduled scanning options” on
page 76.
You can configure the following scanning options before you enable scheduled
scanning:
■ Exclude file types from scans
See “Excluding files with specific extensions from being scanned” on
page 76.
Access denied files Displays the number of files that come under the following
categories:
■ System files with no access permission
■ Files that have been checked out for editing
■ Files that are not readable and cannot be scanned by
Symantec Scan Engine
Files repaired and
replaced
Displays the number of files that have been repaired and
replaced in the document library.
You must specify the file handling rules accordingly.
See “Specifying file handling rules” on page 80.
Files quarantined Displays the number of files that have been quarantined to the
quarantine folder.
You must specify the file handling rules accordingly.
See “Specifying file handling rules” on page 80.
See “Specifying the location for quarantined documents” on
page 79.
Files deleted Displays the number of files that have been deleted from the
document library.
You must specify the file handling rules accordingly.
See “Specifying file handling rules” on page 80.
Table 4-1 Scan Statistics
Scan statistic Description
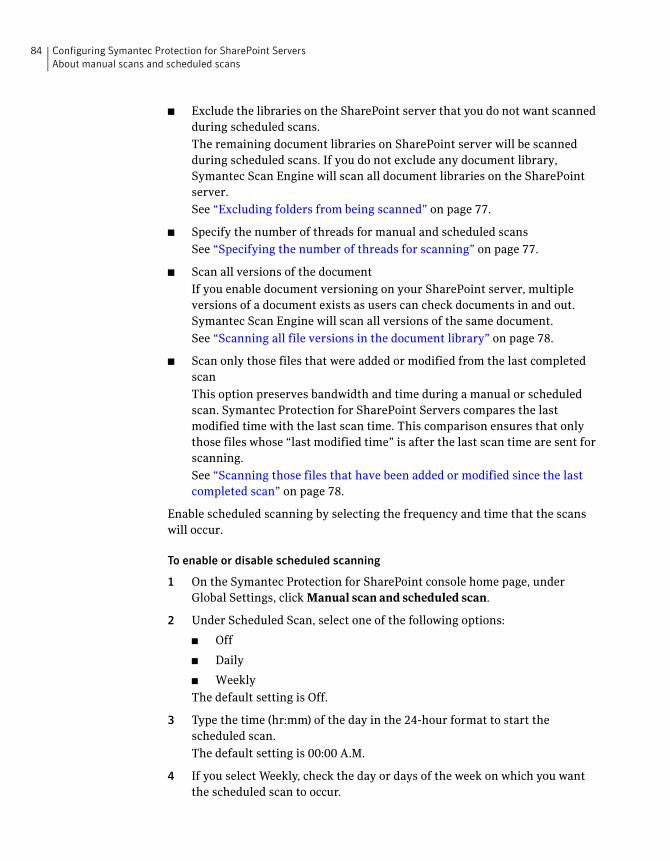
84 Configuring Symantec Protection for SharePoint Servers
About manual scans and scheduled scans
■ Exclude the libraries on the SharePoint server that you do not want scanned
during scheduled scans.
The remaining document libraries on SharePoint server will be scanned
during scheduled scans. If you do not exclude any document library,
Symantec Scan Engine will scan all document libraries on the SharePoint
server.
See “Excluding folders from being scanned” on page 77.
■ Specify the number of threads for manual and scheduled scans
See “Specifying the number of threads for scanning” on page 77.
■ Scan all versions of the document
If you enable document versioning on your SharePoint server, multiple
versions of a document exists as users can check documents in and out.
Symantec Scan Engine will scan all versions of the same document.
See “Scanning all file versions in the document library” on page 78.
■ Scan only those files that were added or modified from the last completed
scan
This option preserves bandwidth and time during a manual or scheduled
scan. Symantec Protection for SharePoint Servers compares the last
modified time with the last scan time. This comparison ensures that only
those files whose “last modified time” is after the last scan time are sent for
scanning.
See “Scanning those files that have been added or modified since the last
completed scan” on page 78.
Enable scheduled scanning by selecting the frequency and time that the scans
will occur.
To enable or disable scheduled scanning
1 On the Symantec Protection for SharePoint console home page, under
Global Settings, click Manual scan and scheduled scan.
2 Under Scheduled Scan, select one of the following options:
■ Off
■ Daily
■ Weekly
The default setting is Off.
3 Type the time (hr:mm) of the day in the 24-hour format to start the
scheduled scan.
The default setting is 00:00 A.M.
4 If you select Weekly, check the day or days of the week on which you want
the scheduled scan to occur.
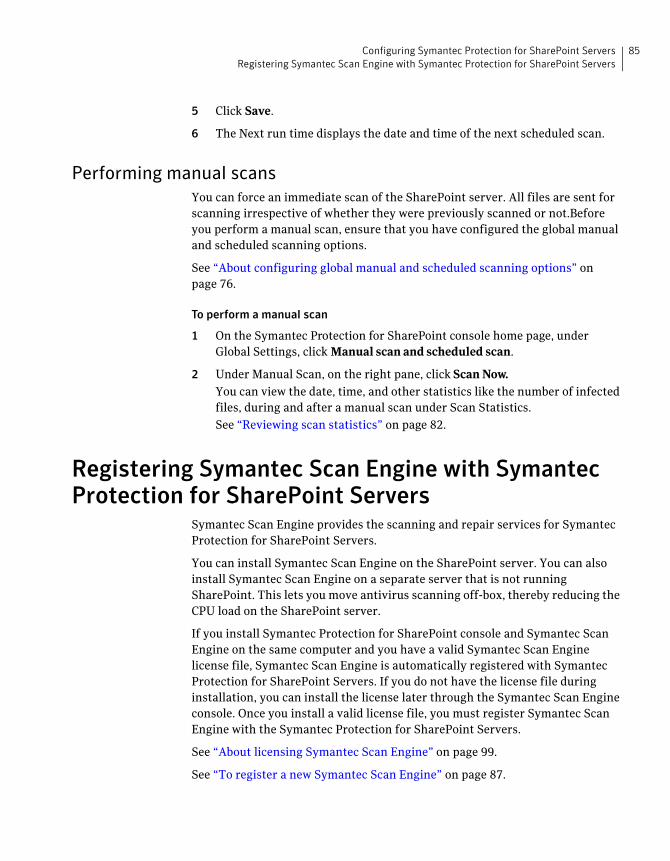
85Configuring Symantec Protection for SharePoint Servers
Registering Symantec Scan Engine with Symantec Protection for SharePoint Servers
5 Click Save.
6 The Next run time displays the date and time of the next scheduled scan.
Performing manual scans
You can force an immediate scan of the SharePoint server. All files are sent for
scanning irrespective of whether they were previously scanned or not.Before
you perform a manual scan, ensure that you have configured the global manual
and scheduled scanning options.
See “About configuring global manual and scheduled scanning options” on
page 76.
To perform a manual scan
1 On the Symantec Protection for SharePoint console home page, under
Global Settings, click Manual scan and scheduled scan.
2 Under Manual Scan, on the right pane, click Scan Now.
You can view the date, time, and other statistics like the number of infected
files, during and after a manual scan under Scan Statistics.
See “Reviewing scan statistics” on page 82.
Registering Symantec Scan Engine with Symantec Protection for SharePoint Servers
Symantec Scan Engine provides the scanning and repair services for Symantec
Protection for SharePoint Servers.
You can install Symantec Scan Engine on the SharePoint server. You can also
install Symantec Scan Engine on a separate server that is not running
SharePoint. This lets you move antivirus scanning off-box, thereby reducing the
CPU load on the SharePoint server.
If you install Symantec Protection for SharePoint console and Symantec Scan
Engine on the same computer and you have a valid Symantec Scan Engine
license file, Symantec Scan Engine is automatically registered with Symantec
Protection for SharePoint Servers. If you do not have the license file during
installation, you can install the license later through the Symantec Scan Engine
console. Once you install a valid license file, you must register Symantec Scan
Engine with the Symantec Protection for SharePoint Servers.
See “About licensing Symantec Scan Engine” on page 99.
See “To register a new Symantec Scan Engine” on page 87.

86 Configuring Symantec Protection for SharePoint Servers
Registering Symantec Scan Engine with Symantec Protection for SharePoint Servers
You configure Symantec Scan Engine separately from the Symantec Protection
for SharePoint console through its own Web-based administrative interface.
See “Configuring Symantec Scan Engine” on page 95.
Install and configure Symantec Scan Engine before you register it with
Symantec Protection for SharePoint Servers.
Table 4-2 describes the information that you must provide for each Symantec
Scan Engine so that Symantec Protection for SharePoint Servers can pass files
for scanning.
Table 4-2 Symantec Scan Engine registration fields
Option Description
Host or IP address Specify a host name or IP address for each Symantec Scan Engine
that will provide scanning services for the SharePoint server. You
can install Symantec Scan Engine on the SharePoint server. You
can also install Symantec Scan Engine on a separate server that is
not running SharePoint. This lets you move antivirus scanning
off-box, thereby reducing the CPU load on the SharePoint server.
For more information, see the Symantec Scan Engine Implementation Guide.
TCP/IP port Specify a TCP/IP port number through which files are passed to
Symantec Scan Engine for scanning. The port number must be
exclusive to Symantec Scan Engine. This is the port number that
you specified during the Symantec Scan Engine installation. The
default port is 1344.
Description You can add a description (up to 50 characters) for each Symantec
Scan Engine.
Enable this
Symantec Scan
Engine
During the registration process, you can choose to enable
Symantec Scan Engine. A disabled Symantec Scan Engine is
dropped from rotation and is not available for scanning. You can
still view the disabled Symantec Scan Engine in the list of
registered scan engines.
You can enable or disable a registered scan engine after the
registration process.
See “To edit a Symantec Scan Engine registration” on page 89.
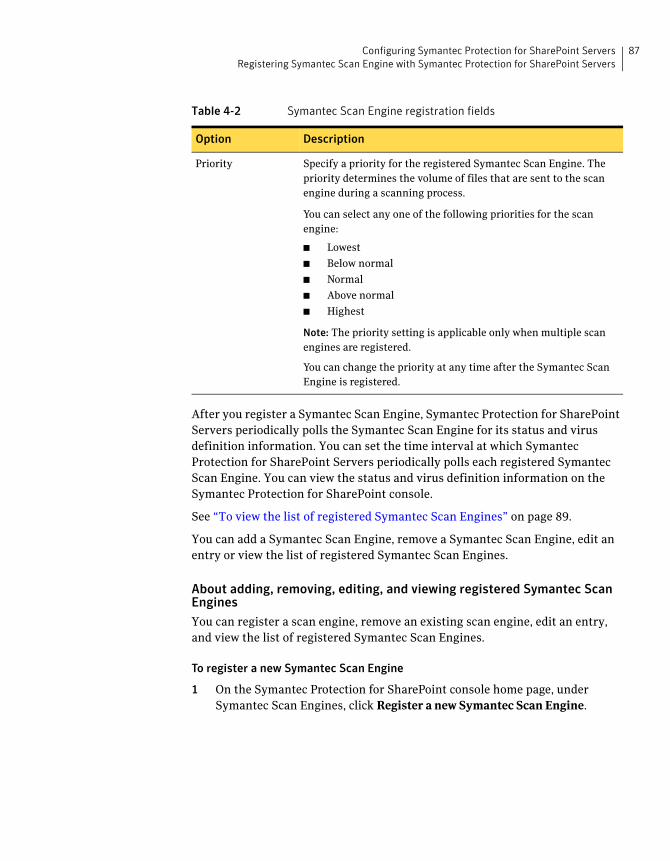
87Configuring Symantec Protection for SharePoint Servers
Registering Symantec Scan Engine with Symantec Protection for SharePoint Servers
After you register a Symantec Scan Engine, Symantec Protection for SharePoint
Servers periodically polls the Symantec Scan Engine for its status and virus
definition information. You can set the time interval at which Symantec
Protection for SharePoint Servers periodically polls each registered Symantec
Scan Engine. You can view the status and virus definition information on the
Symantec Protection for SharePoint console.
See “To view the list of registered Symantec Scan Engines” on page 89.
You can add a Symantec Scan Engine, remove a Symantec Scan Engine, edit an
entry or view the list of registered Symantec Scan Engines.
About adding, removing, editing, and viewing registered Symantec Scan Engines
You can register a scan engine, remove an existing scan engine, edit an entry,
and view the list of registered Symantec Scan Engines.
To register a new Symantec Scan Engine
1 On the Symantec Protection for SharePoint console home page, under
Symantec Scan Engines, click Register a new Symantec Scan Engine.
Priority Specify a priority for the registered Symantec Scan Engine. The
priority determines the volume of files that are sent to the scan
engine during a scanning process.
You can select any one of the following priorities for the scan
engine:
■ Lowest
■ Below normal
■ Normal
■ Above normal
■ Highest
Note: The priority setting is applicable only when multiple scan
engines are registered.
You can change the priority at any time after the Symantec Scan
Engine is registered.
Table 4-2 Symantec Scan Engine registration fields
Option Description
88 Configuring Symantec Protection for SharePoint Servers
Registering Symantec Scan Engine with Symantec Protection for SharePoint Servers
2 In the Step 1 : Start Registration page, specify the following details about
Symantec Scan Engine that you want to register:
3 Click Next.
4 In the Step 2: Complete Registration page, verify the Symantec Scan Engine
details.
Click Back to make any modifications.
5 After you verify the details, check Enable this Symantec Scan Engine to
activate this Symantec Scan Engine.
6 Click the drop-down menu to select the scanning priority that you want to
assign to this Symantec Scan Engine.
See “Specifying the scanning mode for load balancing” on page 89.
7 Click Register.
The registered Symantec Scan Engine appears in the Registered Symantec
Scan Engines list.
To remove a registered Symantec Scan Engine
1 On the Symantec Protection for SharePoint console home page, under
Symantec Scan Engines, click List and Edit all registered Symantec Scan
Engines.
Host or IP address Type the host name or IP address of the computer on which
Symantec Scan Engine is running.
If the computer on which Symantec Scan Engine is running is
configured to have multiple IP addresses, specify the address
on which Symantec Scan Engine listens.
TCP/IP Port Type the port number on which Symantec Scan Engine
listens.
The port number that you specify here must match the port
number that you specified during Symantec Scan Engine
installation. The default port number for Symantec Scan
Engine is 1344 when ICAP is used as the communication
protocol.
Description Type a description that can be used to identify Symantec Scan
Engine.
You can type a maximum of 50 number of characters.
89Configuring Symantec Protection for SharePoint Servers
Registering Symantec Scan Engine with Symantec Protection for SharePoint Servers
2 In the Details column beside the Symantec Scan Engine that you want to
remove, click Show.
Details, response data, and statistics of the selected Symantec Scan Engine
appear.
3 Click Delete.
To edit a Symantec Scan Engine registration
1 On the Symantec Protection for SharePoint console home page, under
Symantec Scan Engines, click List and Edit all registered Symantec Scan
Engines.
2 In the Details column beside the Symantec Scan Engine that you want to
modify, click Show.
Details, response data, and statistics of the selected Symantec Scan Engine
appear.
3 Modify any of the Symantec Scan Engine details.
4 Click Save.
To view the list of registered Symantec Scan Engines
1 On the Symantec Protection for SharePoint console home page, under
Symantec Scan Engines, click List and Edit all registered Symantec Scan
Engines.
You can view a list of all registered Symantec Scan Engines with the priority,
host name, virus definition date, description, and status.
2 In the Details column beside the Symantec Scan Engine whose details that
you want to view, click Show.
Details, response data, and statistics of the selected Symantec Scan Engine
appears.
Specifying the scanning mode for load balancing
Symantec Scan Engine performance depends on scan volume, the number of
client SharePoint servers making requests to Symantec Scan Engine, and
memory and disk space requirements. If you are processing large traffic
volumes or have multiple clients making virus scanning requests, you can
install and configure multiple Symantec Scan Engines to handle the virus
scanning load.
90 Configuring Symantec Protection for SharePoint Servers
Registering Symantec Scan Engine with Symantec Protection for SharePoint Servers
You can specify how you want the scanning load to be distributed by selecting a
scanning mode. The scanning modes are as follows:
If you enable both modes, the priority mode takes precedence.
You can allocate a priority level to a registered Symantec Scan Engine based on
its performance. Symantec Protection for SharePoint Servers sends files for
scanning based on the allocated priority levels if you have enabled the priority
mode.
To specify the scanning mode for load balancing
1 On the Symantec Protection for SharePoint console home page, under
Symantec Scan Engines, click Global Symantec Scan Engine settings.
2 Under Select Modes, on the right pane, select the mode that you want to use
for scanning load balancing.
See “To register a new Symantec Scan Engine” on page 87.
See “To edit a Symantec Scan Engine registration” on page 89.
Note: You can enable this option only if multiple scan engines are
registered. If there is only one registered Symantec Scan Engine, these
modes are inactive.
3 Click Save.
Checking for the latest virus definitions
Virus definition files contain the necessary information for Symantec Scan
Engine to detect and eliminate viruses. Updated virus definitions files are
supplied by Symantec regularly and whenever a new virus threat is discovered.
Virus definition files are dated and have a version number so that when virus
definitions change, Symantec software can determine the most current set of
definitions.
When new virus definition files are available, Symantec LiveUpdate technology
automatically downloads the files and installs them in the proper location on
Cyclic mode Scanning is distributed evenly across all registered Symantec Scan
Engines using a continuous repeating sequence.
Priority mode Scanning is distributed to Symantec Scan Engines based on
priority. When you register a Symantec Scan Engine, you specify
the priority.
See “Registering Symantec Scan Engine with Symantec Protection
for SharePoint Servers” on page 85.
91Configuring Symantec Protection for SharePoint Servers
Registering Symantec Scan Engine with Symantec Protection for SharePoint Servers
the computer that is running Symantec Scan Engine. If an error occurs during
this process or there is a problem with the new virus definition files, Symantec
Scan Engine attempts to roll back to the previous virus definitions and continue
scanning. Occasionally, if you are running more than one Symantec Scan
Engine, the versions of the virus definition files that are in use may temporarily
differ until LiveUpdate has had a chance to update definitions for all of the scan
engines.
For more information, see the Symantec Scan Engine Implementation Guide.
When you enable the auto-check feature, Symantec Protection for SharePoint
Servers regularly polls the registered scan engines to verify that they are online.
Symantec Protection for SharePoint Servers also determines whether the
registered Symantec Scan Engines have the latest definitions. You can specify
how often you want Symantec Protection for SharePoint Servers to perform an
auto-check.
Symantec Protection for SharePoint Servers also has a feature that you can use
to perform an on-demand check of definitions.
The latest virus definition version and date number among the Symantec Scan
Engines is registered with Symantec Protection for SharePoint Servers. View
the virus definition version and date number that is registered with Symantec
Protection for SharePoint Servers under Latest Virus Definitions.
You can configure Symantec Protection for SharePoint Servers to remove a
Symantec Scan Engine if its virus definition files is older than the registered
virus definition files. You must specify a threshold time within which the virus
definition files must be made the latest. For a Symantec Scan Engine with an old
virus definition version and date, Symantec Protection for SharePoint Servers
first generates a warning message on the console page. Symantec Protection for
SharePoint Servers logs this warning message and sends out an email
notification. If the virus definition files are not updated within the threshold
time, the Symantec Scan Engine is taken offline.
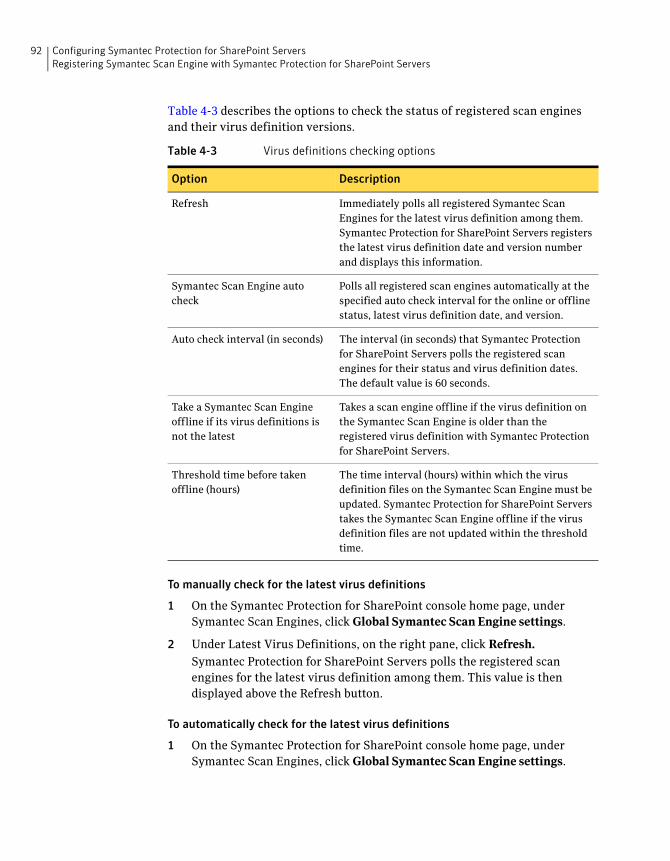
92 Configuring Symantec Protection for SharePoint Servers
Registering Symantec Scan Engine with Symantec Protection for SharePoint Servers
Table 4-3 describes the options to check the status of registered scan engines
and their virus definition versions.
To manually check for the latest virus definitions
1 On the Symantec Protection for SharePoint console home page, under
Symantec Scan Engines, click Global Symantec Scan Engine settings.
2 Under Latest Virus Definitions, on the right pane, click Refresh.
Symantec Protection for SharePoint Servers polls the registered scan
engines for the latest virus definition among them. This value is then
displayed above the Refresh button.
To automatically check for the latest virus definitions
1 On the Symantec Protection for SharePoint console home page, under
Symantec Scan Engines, click Global Symantec Scan Engine settings.
Table 4-3 Virus definitions checking options
Option Description
Refresh Immediately polls all registered Symantec Scan
Engines for the latest virus definition among them.
Symantec Protection for SharePoint Servers registers
the latest virus definition date and version number
and displays this information.
Symantec Scan Engine auto
check
Polls all registered scan engines automatically at the
specified auto check interval for the online or offline
status, latest virus definition date, and version.
Auto check interval (in seconds) The interval (in seconds) that Symantec Protection
for SharePoint Servers polls the registered scan
engines for their status and virus definition dates.
The default value is 60 seconds.
Take a Symantec Scan Engine
offline if its virus definitions is
not the latest
Takes a scan engine offline if the virus definition on
the Symantec Scan Engine is older than the
registered virus definition with Symantec Protection
for SharePoint Servers.
Threshold time before taken
offline (hours)
The time interval (hours) within which the virus
definition files on the Symantec Scan Engine must be
updated. Symantec Protection for SharePoint Servers
takes the Symantec Scan Engine offline if the virus
definition files are not updated within the threshold
time.

93Configuring Symantec Protection for SharePoint Servers
Registering Symantec Scan Engine with Symantec Protection for SharePoint Servers
2 Under Auto-Check Options, on the right pane, check Symantec Scan Engine
auto check.
3 In the Auto-check interval (in seconds) box, type the interval (in seconds) in
which you want the auto-check process to occur. Symantec Protection for
SharePoint Servers polls the registered scan engines at the interval that you
specify for their statuses, and their virus definition versions.
The default setting is 60 seconds. You can enter a value between 20 and 360.
4 Check Take a Symantec Scan Engine offline if its virus definition is not the
latest to take a Symantec Scan Engine that does not have the latest
definitions out of rotation.
Symantec Protection for SharePoint Servers compares its virus definition
version with the version on each registered Symantec Scan Engine. If any
Symantec Scan Engine has a virus definition older than the registered virus
definition, that scan engine is taken offline.
5 Click Save.
94 Configuring Symantec Protection for SharePoint Servers
Registering Symantec Scan Engine with Symantec Protection for SharePoint Servers

Chapter
5Configuring Symantec
Scan Engine
This chapter includes the following topics:
■ Accessing the Symantec Scan Engine console
■ About communication protocol settings
■ Ways to control which file types are scanned
■ About licensing Symantec Scan Engine
■ About keeping your product and protection up-to-date
Accessing the Symantec Scan Engine consoleThe Symantec Scan Engine console is a Web-based interface that lets you
manage Symantec Scan Engine. The interface is provided through a built-in
HTTPS server. You access the interface by using a virtual administrative
account that you set up at installation. You can access the Symantec Scan
Engine console by using a Web browser on any computer on your network that
can access the server that is running Symantec Scan Engine.
If you did not install the license file at the time of installation, the License page
automatically appears the first time that you access the Symantec Scan Engine
console. This License page is the only page that is active. If at least one valid
scanning license is installed, the Home page automatically appears.
Each time that you start a new browser session and open the console, the Home
page appears. As long as the browser session continues to run, each time that
you open the Symantec Scan Engine console, you return to the page that you
were on when you logged out or when the session times-out.
For more information, see the Symantec Scan Engine Implementation Guide.
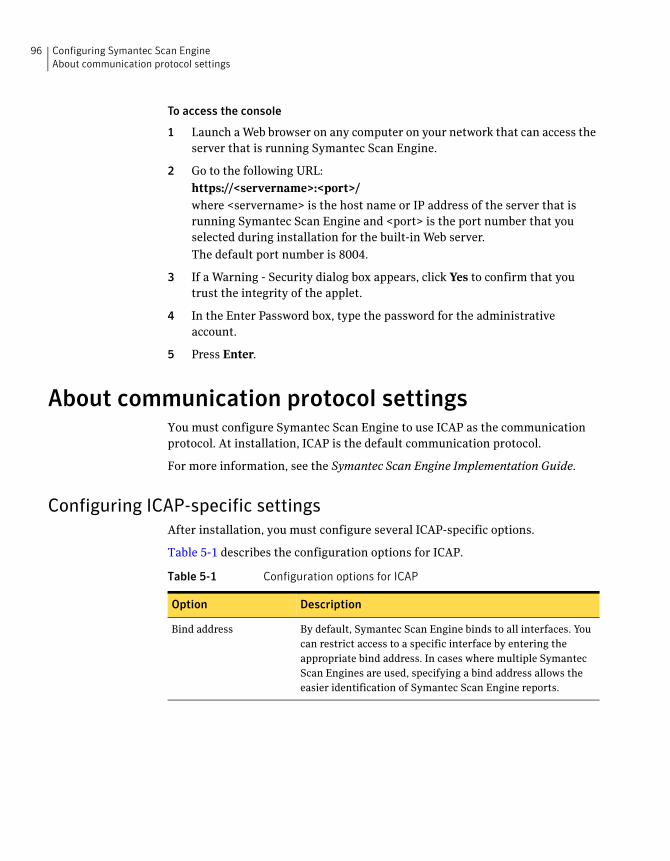
96 Configuring Symantec Scan Engine
About communication protocol settings
To access the console
1 Launch a Web browser on any computer on your network that can access the
server that is running Symantec Scan Engine.
2 Go to the following URL:
https://<servername>:<port>/
where <servername> is the host name or IP address of the server that is
running Symantec Scan Engine and <port> is the port number that you
selected during installation for the built-in Web server.
The default port number is 8004.
3 If a Warning - Security dialog box appears, click Yes to confirm that you
trust the integrity of the applet.
4 In the Enter Password box, type the password for the administrative
account.
5 Press Enter.
About communication protocol settingsYou must configure Symantec Scan Engine to use ICAP as the communication
protocol. At installation, ICAP is the default communication protocol.
For more information, see the Symantec Scan Engine Implementation Guide.
Configuring ICAP-specific settings
After installation, you must configure several ICAP-specific options.
Table 5-1 describes the configuration options for ICAP.
Table 5-1 Configuration options for ICAP
Option Description
Bind address By default, Symantec Scan Engine binds to all interfaces. You
can restrict access to a specific interface by entering the
appropriate bind address. In cases where multiple Symantec
Scan Engines are used, specifying a bind address allows the
easier identification of Symantec Scan Engine reports.
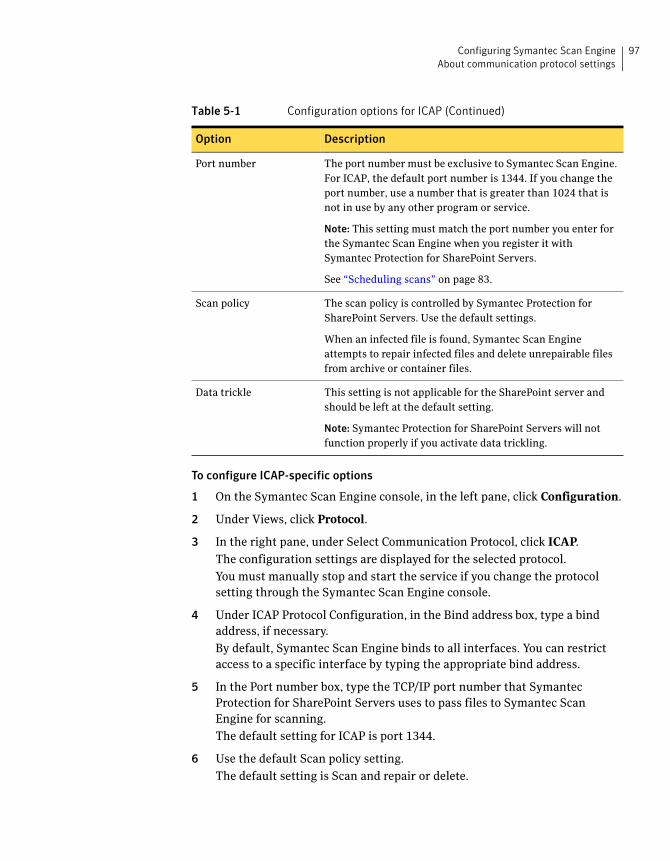
97Configuring Symantec Scan Engine
About communication protocol settings
To configure ICAP-specific options
1 On the Symantec Scan Engine console, in the left pane, click Configuration.
2 Under Views, click Protocol.
3 In the right pane, under Select Communication Protocol, click ICAP.
The configuration settings are displayed for the selected protocol.
You must manually stop and start the service if you change the protocol
setting through the Symantec Scan Engine console.
4 Under ICAP Protocol Configuration, in the Bind address box, type a bind
address, if necessary.
By default, Symantec Scan Engine binds to all interfaces. You can restrict
access to a specific interface by typing the appropriate bind address.
5 In the Port number box, type the TCP/IP port number that Symantec
Protection for SharePoint Servers uses to pass files to Symantec Scan
Engine for scanning.
The default setting for ICAP is port 1344.
6 Use the default Scan policy setting.
The default setting is Scan and repair or delete.
Port number The port number must be exclusive to Symantec Scan Engine.
For ICAP, the default port number is 1344. If you change the
port number, use a number that is greater than 1024 that is
not in use by any other program or service.
Note: This setting must match the port number you enter for
the Symantec Scan Engine when you register it with
Symantec Protection for SharePoint Servers.
See “Scheduling scans” on page 83.
Scan policy The scan policy is controlled by Symantec Protection for
SharePoint Servers. Use the default settings.
When an infected file is found, Symantec Scan Engine
attempts to repair infected files and delete unrepairable files
from archive or container files.
Data trickle This setting is not applicable for the SharePoint server and
should be left at the default setting.
Note: Symantec Protection for SharePoint Servers will not
function properly if you activate data trickling.
Table 5-1 Configuration options for ICAP (Continued)
Option Description
98 Configuring Symantec Scan Engine
Ways to control which file types are scanned
7 On the toolbar, select one of the following:
Ways to control which file types are scannedSymantec Protection for SharePoint Servers lets you save bandwidth and time
by specifying the file types that are passed to Symantec Scan Engine for
scanning during manual scans and scheduled scans. You can configure the
Symantec Protection for SharePoint console to exclude certain file types from
scanning using an exclusion list. Symantec Protection for SharePoint Servers
makes this initial determination of whether to send the file for scanning based
on the file extension of the top-level file.
Note: The exclusion list on the Symantec Protection for SharePoint console
applies only to files that are scanned during manual scans and scheduled scans.
All files that are downloaded or uploaded to the SharePoint server are submitted
for scanning regardless of file type. (You must configure Symantec Protection
for SharePoint Servers to submit files for scanning on download and upload.)
See “Excluding files with specific extensions from being scanned” on page 76.
All top-level files that are sent to Symantec Scan Engine are scanned regardless
of file extension. Symantec Scan Engine is configured by default to scan all files.
There is a file extension exclude list and a file type exclude list on the Symantec
Scan Engine as well. However, priority is given to the extension exclude list that
you configure through the Symantec Protection for SharePoint console. All files
that are sent to Symantec Scan Engine are scanned regardless of file extension.
It is recommended that you let Symantec Scan Engine scan all files regardless of
file extension.
To scan all files regardless of extension
1 In the console on the primary navigation bar, click Policies.
2 In the sidebar under Views, click Scanning.
3 In the content area under Files to Scan, click Scan all files.
Save Saves your changes.
You can continue to make changes in the
administrative interface until you are ready to
apply them.
Apply Applies your changes.
Your changes are not implemented until you
apply them.
99Configuring Symantec Scan Engine
About licensing Symantec Scan Engine
4 On the toolbar, select one of the following:
About licensing Symantec Scan EngineYou activate key features for Symantec Scan Engine, including scanning for
threats and security risks, by installing the appropriate license. You must install
the licenses through the Symantec Scan Engine console if you did not install it
during installation.
Note: If you have multiple Symantec Scan Engines, you must install the license
for each scan engine through its console.
For complete scanning functionality and definition updates, you need the
following licenses:
The first time that you open the console after installation, only the License view
is active. You must install the AV Scanning license to access the Configuration,
Reports, Monitors, and System pages in the console.
About license activation
The scanning features and definitions updates for Symantec Scan Engine are
activated by licenses. A separate license must be installed for each feature. If
you purchase additional product features from Symantec as they become
available for Symantec Scan Engine, these features will require a new license.
Save Saves your changes.
This option lets you continue making changes in the
console until you are ready to apply them.
Apply Applies your changes.
Your changes are not implemented until you apply them.
Product licenses Product licenses activate scanning functionality.
The AV Scanning license activates the threat and security risk
scanning features.
Content licenses Content licenses let you receive product updates.
The AV Content license lets you receive updated threat and security
risk definitions. Updated definitions ensure that your server is
protected from risks.
100 Configuring Symantec Scan Engine
About licensing Symantec Scan Engine
Symantec issues a serial number for each type of license that you purchase. This
serial number is required to register your product and your maintenance
agreement. The serial number is provided on a license certificate, which is
mailed separately and arrives in the same time frame as your software. For
security reasons, the license certificate is not included in the Symantec Scan
Engine software distribution package.
See “If you do not have a serial number” on page 100.
License activation involves the following process:
If you do not have a serial number
Your license certificate, which contains the serial numbers for the licenses that
you have purchased, should arrive within three to five business days of when
you receive your software. If you do not receive the license certificate, contact
Symantec Customer Service at 800-721-3934 or your reseller to check the status
of your order. If you have lost your license certificate, contact Symantec License
Administration.
See “Where to get more information” on page 32.
Obtaining a license file
To request a license file, you must have the serial number that is required for
activation. (Each license has a separate serial number.) The serial number is
used to request a license file and to register for support.
The serial number is printed on the license certificate that is mailed to you. The
format of a serial number is a letter followed by 10 digits, for example,
F2430482013.
If you purchased multiple types of licenses but register them separately,
Symantec sends you a separate license file for each license. You must install
Obtain a license file
from Symantec.
To request a license file, you must have the license serial number
for each license that you want to activate. After you complete the
registration process, Symantec sends you the appropriate license
file by email.
See “Obtaining a license file” on page 100.
Install the license
file.
You must install the content and product licenses on each server on
which you run Symantec Scan Engine. This enables the scanning
processes and lets you update your product and its associated
content using LiveUpdate.
See “Installing the license file” on page 101.
101Configuring Symantec Scan Engine
About licensing Symantec Scan Engine
each license file separately. If you register multiple licenses at the same time,
Symantec sends you a single license file that contains all of your licences.
The license file that Symantec sends to you is contained within a .zip file. The
.slf file that is contained within the .zip file is the actual license file. Ensure that
your inbound email environment permits .zip email message attachments.
Warning: License files are digitally signed. If you attempt to edit a license file,
you will corrupt the file and render it invalid.
To obtain a license file
1 In a Web browser, type the following address:
https://licensing.symantec.com
Your Web browser must use 128-bit encryption to view the site.
2 If a Security Alert dialog box appears, click OK.
3 Follow the procedures on the Symantec Licensing Portal to register your
license and request your license file.
Symantec sends you an email message that contains the license file in an
attachment. If the email message does not arrive within two hours, an error
might have occurred. Try again to obtain the license file through the
Symantec Web site. If the problem continues, contact Symantec Technical
Support.
See “Where to get more information” on page 32.
Installing the license file
A license file contains the information that is required to activate one or more
features in a product. A license file is also required to update the product and its
associated content. A license file might contain one or more types of licenses.
The number of licenses it contains depends on whether you registered the
license serial numbers separately or at the same time.
See “Obtaining a license file” on page 100.
You can install the license file through the console. If you disabled the console,
you can install the license file by copying it to a specific directory location.
To install the license file through the console
1 When you receive the email message from Symantec that contains the
license file, save the file that is attached to the email message to the
computer from which you will access the Symantec Scan Engine console.
102 Configuring Symantec Scan Engine
About keeping your product and protection up-to-date
2 Access the Symantec Scan Engine console.
See “Accessing the Symantec Scan Engine console” on page 95.
3 In the console on the primary navigation bar, click System.
If no license has been installed, when you open the console, the System tab
is selected by default.
4 In the sidebar under Views, click License.
5 Under Tasks, click Install License.
6 In the Install License window, click Browse.
7 In the Load File window, browse to the folder location where you saved the
license file, select it, and then click Open.
8 In the Install License window, click Install.
A status message indicates that the license was successfully installed.
To install the license file without using the console
◆ When you receive the email message from Symantec that contains the
license file, do one of the following:
■ In Windows, save the license file in the following location:
C:\Program Files\Common Files\Symantec Shared\Licenses
■ In Solaris or Linux, save the license file in the following location:
/opt/Symantec/Licenses
About keeping your product and protection up-to-date
You can update the Symantec Scan Engine product software and content. The
product updates ensure that you have the most current updates to the Symantec
Scan Engine product. The content updates ensure that your network is up-to-
date with the most current antivirus and DDR/URL definitions. You can update
Symantec Scan Engine with the latest definitions without any interruption in
scanning.
About product updates
You can use LiveUpdate to determine if any product updates are available. If a
product update is available, you can use LiveUpdate to download the product
update installer file. This file lets you install the product update at your
convenience.
103Configuring Symantec Scan Engine
About LiveUpdate
About definition updates
Definition files contain the necessary information to detect and eliminate risks,
such as viruses and adware. Symantec supplies updated definition files at least
every week and whenever a new risk is discovered.
You can update risk definitions using LiveUpdate or Intelligent Updater.
About LiveUpdateWhen you install or upgrade Symantec Scan Engine, LiveUpdate is enabled by
default to run every two hours. You can modify this schedule, or you can run
LiveUpdate manually.
See “Configuring LiveUpdate to occur automatically” on page 103.
See “Performing LiveUpdate on demand” on page 104.
When Symantec Scan Engine performs a content LiveUpdate, the definitions
that are downloaded are automatically selected as the active definitions.
However, you can revert to the previous version of the antivirus definitions. The
definition set that you choose remains active until the next LiveUpdate runs.
The definition set that is downloaded by LiveUpdate then becomes the active
definition set.
For more information, see the Symantec Scan Engine Implementation Guide.
Symantec Scan Engine uses Symantec Java LiveUpdate technology. To run
LiveUpdate, you must have the Java™ 2SE Runtime Environment (JRE) 5.0
Update 6 or later (within the version 5 platform) installed.
Configuring LiveUpdate to occur automatically
You can schedule LiveUpdate to occur automatically at a specified time interval
to ensure that Symantec Scan Engine always has the most current definitions.
When you install a valid AV Content license, Symantec Scan Engine
automatically attempts to perform a LiveUpdate. To continue receiving
automatic updates, you must schedule LiveUpdate.
When LiveUpdate is scheduled, LiveUpdate runs at the specified time interval
that is relative to the LiveUpdate base time. The default LiveUpdate base time is
the time that Symantec Scan Engine was installed. If you change the scheduled
LiveUpdate interval, the interval adjusts based on the LiveUpdate base time.
To configure LiveUpdate to occur automatically
1 In the console on the primary navigation bar, click System.
2 In the sidebar under Views, click LiveUpdate Content.
104 Configuring Symantec Scan Engine
About enabling security risk detection
3 In the content area under LiveUpdate Content, check Enable scheduled
LiveUpdate.
The default setting is enabled.
4 In the LiveUpdate interval drop-down list, select the interval.
You can choose from 2, 4, 8, 10, 12, or 24-hour intervals. The default setting
is 2 hours.
5 On the toolbar, select one of the following:
Performing LiveUpdate on demand
You can run LiveUpdate on demand to force an immediate update of definitions.
If you have scheduled LiveUpdate, the next scheduled LiveUpdate attempt
occurs at its scheduled time.
To perform LiveUpdate on demand
1 In the console on the primary navigation bar, click System.
2 In the sidebar under Views, click LiveUpdate Content.
3 Under Tasks, click LiveUpdate Content.
About enabling security risk detectionSymantec Scan Engine can detect security risks. Security risks are programs
that do any of the following:
■ Provide unauthorized access to computer systems
■ Compromise data integrity, privacy, confidentiality, or security
■ Present some type of disruption or nuisance
These programs can put your employees and your organization at risk for
identity theft or fraud if they: log keystrokes; capture email and instant
messaging traffic; and harvest personal information, such as passwords and
login identifications.
Security risks can be introduced into your system unknowingly when users: visit
a Web site; download shareware or freeware software programs; click links or
Save Saves your changes.
This option lets you continue making changes in the
console until you are ready to apply them.
Apply Applies your changes.
Your changes are not implemented until you apply them.
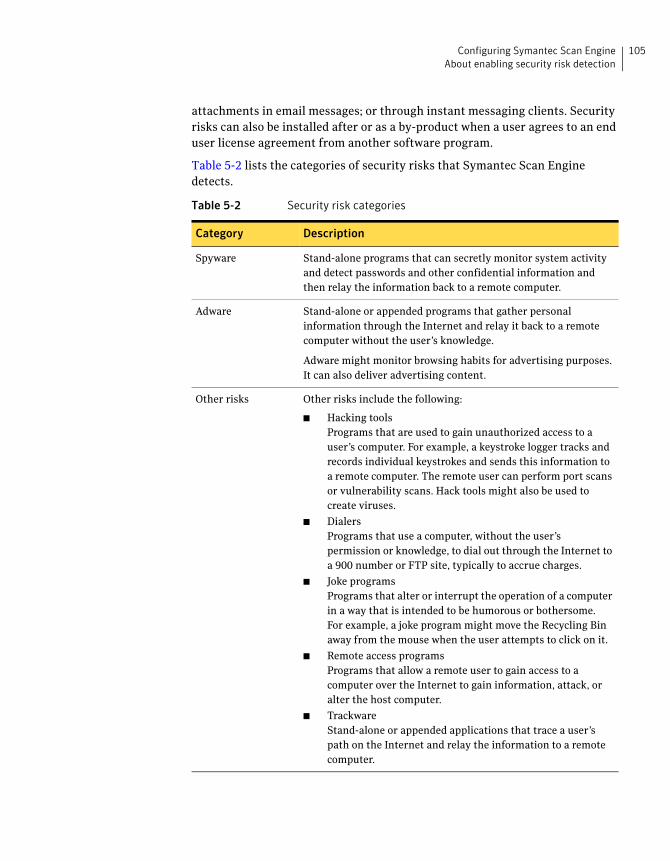
105Configuring Symantec Scan Engine
About enabling security risk detection
attachments in email messages; or through instant messaging clients. Security
risks can also be installed after or as a by-product when a user agrees to an end
user license agreement from another software program.
Table 5-2 lists the categories of security risks that Symantec Scan Engine
detects.
Table 5-2 Security risk categories
Category Description
Spyware Stand-alone programs that can secretly monitor system activity
and detect passwords and other confidential information and
then relay the information back to a remote computer.
Adware Stand-alone or appended programs that gather personal
information through the Internet and relay it back to a remote
computer without the user’s knowledge.
Adware might monitor browsing habits for advertising purposes.
It can also deliver advertising content.
Other risks Other risks include the following:
■ Hacking tools
Programs that are used to gain unauthorized access to a
user’s computer. For example, a keystroke logger tracks and
records individual keystrokes and sends this information to
a remote computer. The remote user can perform port scans
or vulnerability scans. Hack tools might also be used to
create viruses.
■ Dialers
Programs that use a computer, without the user’s
permission or knowledge, to dial out through the Internet to
a 900 number or FTP site, typically to accrue charges.
■ Joke programs
Programs that alter or interrupt the operation of a computer
in a way that is intended to be humorous or bothersome.
For example, a joke program might move the Recycling Bin
away from the mouse when the user attempts to click on it.
■ Remote access programs
Programs that allow a remote user to gain access to a
computer over the Internet to gain information, attack, or
alter the host computer.
■ Trackware
Stand-alone or appended applications that trace a user’s
path on the Internet and relay the information to a remote
computer.
106 Configuring Symantec Scan Engine
About enabling security risk detection
If a security risk is detected, Symantec Scan Engine applies the Infected files
detection rule that you configured on the Symantec Protection for SharePoint
console; however, security risks cannot be repaired.
See “Specifying file handling rules” on page 80.
To enable security risk detection
1 In the console on the primary navigation bar, click Policies.
2 In the sidebar under Views, click Scanning.
3 In the content area under Security Risk Scanning, check the security risks
that you want Symantec Scan Engine to detect.
4 On the toolbar, select one of the following:
5 On a Windows server, go to the configuration.xml file in the default location
of C:\Program Files\Symantec\Scan Engine\.
In Solaris and Linux, the default location for the XML file is /opt/
SYMCScan/bin/.
6 Set the “EnableNonViralThreatCategoryResp” parameter in the
configuration.xml file to true.
7 Stop and start the Symantec Scan Engine for changes to be implemented.
For more information, see the Symantec Scan Engine Implementation Guide.
Save Saves your changes.
This option lets you continue making changes in the
console until you are ready to apply them.
Apply Applies your changes.
Your changes are not implemented until you apply them.
Chapter
6Monitoring Symantec
Protection for SharePoint
Servers activity
This chapter includes the following topics:
■ Ways to monitor Symantec Protection for SharePoint Servers activity
■ About the status pane
■ About SMTP logging
■ About monitoring scanning activity
108 Monitoring Symantec Protection for SharePoint Servers activity
Ways to monitor Symantec Protection for SharePoint Servers activity
Ways to monitor Symantec Protection for SharePoint Servers activity
You can obtain information about Symantec Protection for SharePoint Servers
activity in the following ways:
A number of options are available for managing the logs and statistics. You can
Examine the Symantec
Protection for SharePoint
console home page
You can obtain the current status of registered Symantec
Scan Engines, the current number of available scanning
threads, and the status of the threads.
See “About the status pane” on page 109.
Activate SMTP logging You can activate Simple Mail Transfer Protocol (SMTP)
logging capabilities so that notification email messages are
sent to specified recipients for chosen events.
See “About SMTP logging” on page 110.
Examine the Symantec Scan
Engine response data
You can view the scan statistics for each registered
Symantec Scan Engine.
See “To view the list of registered Symantec Scan Engines”
on page 89.
View the logs You can view log entries for selected types of events.
See “About monitoring scanning activity” on page 126.
Generate reports and
schedule reports by mail
You can manually generate log reports for scan engines,
scan processes, or the system for any date range. You can
also schedule the generation of these reports by email to
specified recipients.
See “Generating an on-demand report” on page 129.
See “Scheduling a report” on page 130.
Examine the scan statistics You can see the scan statistics after every manual scan or
scheduled scan.
See “Reviewing scan statistics” on page 82.
Examine the Symantec Scan
Engine logs and reports
Symantec Scan Engine has its own monitoring tools as
well. You can activate logging and alerting options in the
Symantec Scan Engine to supplement those that are
available through the Symantec Protection for SharePoint
console.
See the Symantec Scan Engine Implementation Guide for
more information.

109Monitoring Symantec Protection for SharePoint Servers activity
About the status pane
specify the log level for each logging source, specify how long log entries are
maintained on the system, and specify the logging destination path.
See “About monitoring scanning activity” on page 126.
Note: The monitoring and logging options that you configure in the Symantec
Protection for SharePoint console are separate from the options that are
available through the Symantec Scan Engine console. Activate logging and
monitoring options for Symantec Protection for SharePoint Servers and
Symantec Scan Engine based on your organization needs.
For more information, see the Symantec Scan Engine Implementation Guide.
About the status paneThe status pane at the bottom of the home page lets you monitor up-to-date
metrics on the registered Symantec Scan Engines. You can also examine the
number of scanning threads in use at any time.
The status pane updates itself automatically every 10 seconds when you visit
the Symantec Protection for SharePoint console home page.
Figure 6-1 Status pane
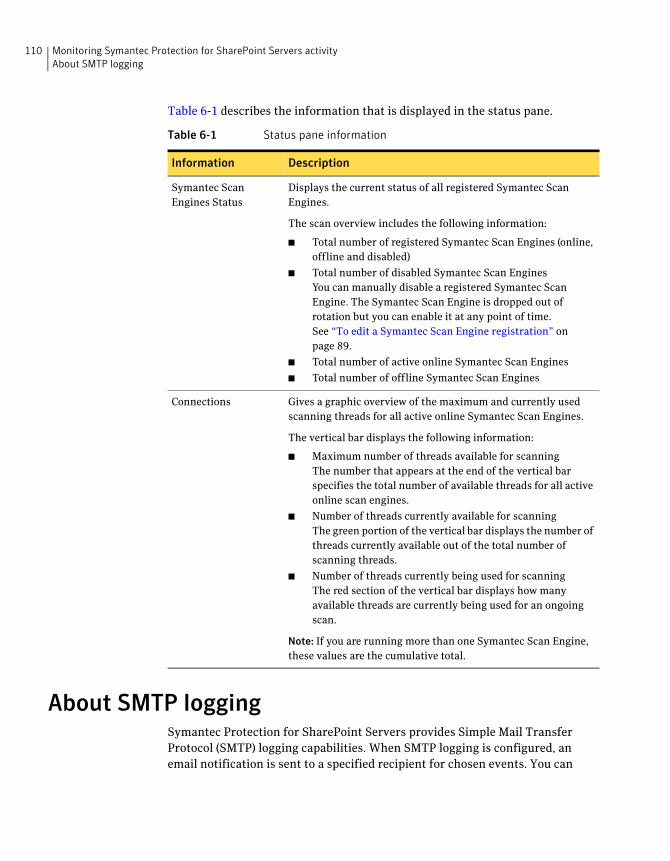
110 Monitoring Symantec Protection for SharePoint Servers activity
About SMTP logging
Table 6-1 describes the information that is displayed in the status pane.
About SMTP loggingSymantec Protection for SharePoint Servers provides Simple Mail Transfer
Protocol (SMTP) logging capabilities. When SMTP logging is configured, an
email notification is sent to a specified recipient for chosen events. You can
Table 6-1 Status pane information
Information Description
Symantec Scan
Engines Status
Displays the current status of all registered Symantec Scan
Engines.
The scan overview includes the following information:
■ Total number of registered Symantec Scan Engines (online,
offline and disabled)
■ Total number of disabled Symantec Scan Engines
You can manually disable a registered Symantec Scan
Engine. The Symantec Scan Engine is dropped out of
rotation but you can enable it at any point of time.
See “To edit a Symantec Scan Engine registration” on
page 89.
■ Total number of active online Symantec Scan Engines
■ Total number of offline Symantec Scan Engines
Connections Gives a graphic overview of the maximum and currently used
scanning threads for all active online Symantec Scan Engines.
The vertical bar displays the following information:
■ Maximum number of threads available for scanning
The number that appears at the end of the vertical bar
specifies the total number of available threads for all active
online scan engines.
■ Number of threads currently available for scanning
The green portion of the vertical bar displays the number of
threads currently available out of the total number of
scanning threads.
■ Number of threads currently being used for scanning
The red section of the vertical bar displays how many
available threads are currently being used for an ongoing
scan.
Note: If you are running more than one Symantec Scan Engine,
these values are the cumulative total.
111Monitoring Symantec Protection for SharePoint Servers activity
About SMTP logging
select the logging level for events related to system, scan process, and Symantec
Scan Engine.
See “About monitoring scanning activity” on page 126.
You can also select the email notification level so that Symantec Protection for
SharePoint Servers sends an email notification only for the events whose level
you specify. You can provide separate destination information for each type of
message. Default message text is included, but you can customize individual
messages.
See “Customizing SMTP messages” on page 117.
Note: The SMTP logging that you configure for the Symantec Protection for
SharePoint Servers is separate from the SMTP logging that is available through
the Symantec Scan Engine console. You can activate either or both of these
features to meet the needs of your organization.
For more information, see the Symantec Scan Engine Implementation Guide.
Symantec Protection for SharePoint Servers logs events from the following
event sources:
■ Scan Process
■ Symantec Scan Engines
■ System
You can set the logging level to None, Error, Warning, Information, or Verbose
for each event source.
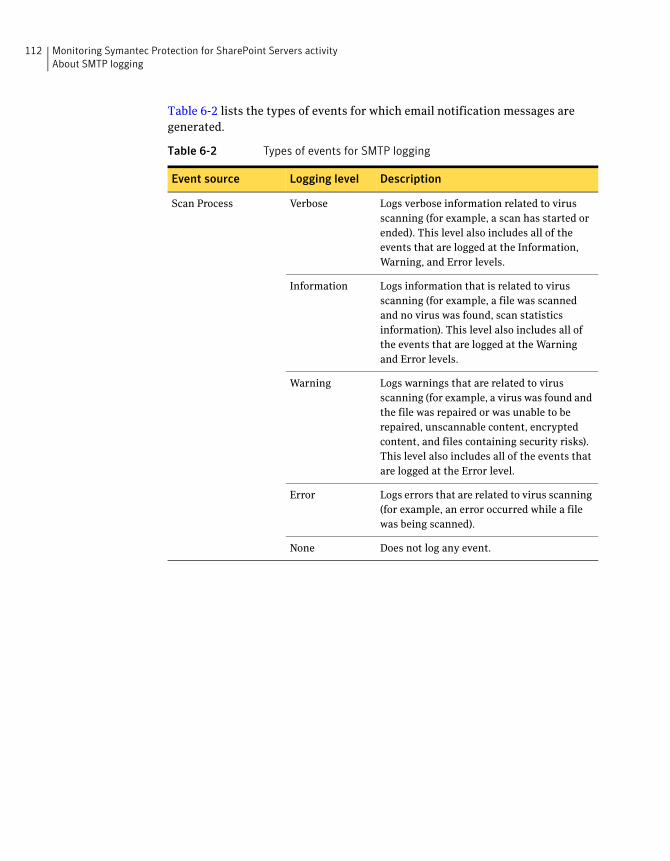
112 Monitoring Symantec Protection for SharePoint Servers activity
About SMTP logging
Table 6-2 lists the types of events for which email notification messages are
generated.
Table 6-2 Types of events for SMTP logging
Event source Logging level Description
Scan Process Verbose Logs verbose information related to virus
scanning (for example, a scan has started or
ended). This level also includes all of the
events that are logged at the Information,
Warning, and Error levels.
Information Logs information that is related to virus
scanning (for example, a file was scanned
and no virus was found, scan statistics
information). This level also includes all of
the events that are logged at the Warning
and Error levels.
Warning Logs warnings that are related to virus
scanning (for example, a virus was found and
the file was repaired or was unable to be
repaired, unscannable content, encrypted
content, and files containing security risks).
This level also includes all of the events that
are logged at the Error level.
Error Logs errors that are related to virus scanning
(for example, an error occurred while a file
was being scanned).
None Does not log any event.
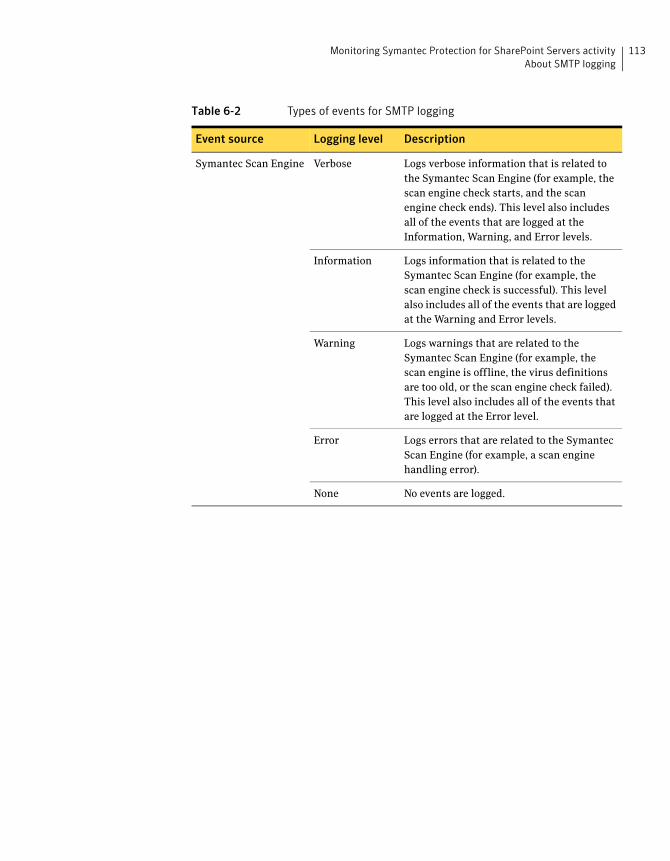
113Monitoring Symantec Protection for SharePoint Servers activity
About SMTP logging
Symantec Scan Engine Verbose Logs verbose information that is related to
the Symantec Scan Engine (for example, the
scan engine check starts, and the scan
engine check ends). This level also includes
all of the events that are logged at the
Information, Warning, and Error levels.
Information Logs information that is related to the
Symantec Scan Engine (for example, the
scan engine check is successful). This level
also includes all of the events that are logged
at the Warning and Error levels.
Warning Logs warnings that are related to the
Symantec Scan Engine (for example, the
scan engine is offline, the virus definitions
are too old, or the scan engine check failed).
This level also includes all of the events that
are logged at the Error level.
Error Logs errors that are related to the Symantec
Scan Engine (for example, a scan engine
handling error).
None No events are logged.
Table 6-2 Types of events for SMTP logging
Event source Logging level Description
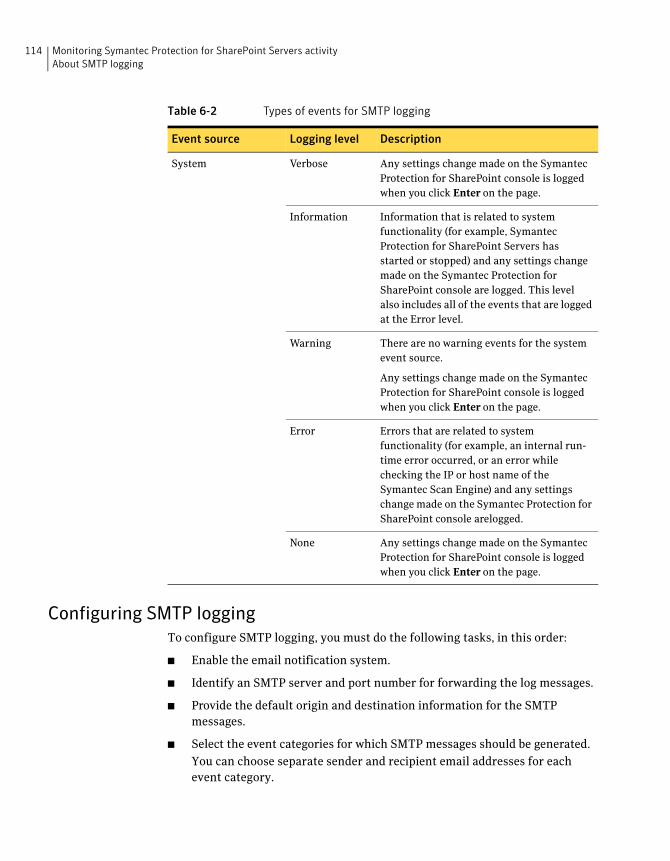
114 Monitoring Symantec Protection for SharePoint Servers activity
About SMTP logging
Configuring SMTP logging
To configure SMTP logging, you must do the following tasks, in this order:
■ Enable the email notification system.
■ Identify an SMTP server and port number for forwarding the log messages.
■ Provide the default origin and destination information for the SMTP
messages.
■ Select the event categories for which SMTP messages should be generated.
You can choose separate sender and recipient email addresses for each
event category.
System Verbose Any settings change made on the Symantec
Protection for SharePoint console is logged
when you click Enter on the page.
Information Information that is related to system
functionality (for example, Symantec
Protection for SharePoint Servers has
started or stopped) and any settings change
made on the Symantec Protection for
SharePoint console are logged. This level
also includes all of the events that are logged
at the Error level.
Warning There are no warning events for the system
event source.
Any settings change made on the Symantec
Protection for SharePoint console is logged
when you click Enter on the page.
Error Errors that are related to system
functionality (for example, an internal run-
time error occurred, or an error while
checking the IP or host name of the
Symantec Scan Engine) and any settings
change made on the Symantec Protection for
SharePoint console arelogged.
None Any settings change made on the Symantec
Protection for SharePoint console is logged
when you click Enter on the page.
Table 6-2 Types of events for SMTP logging
Event source Logging level Description
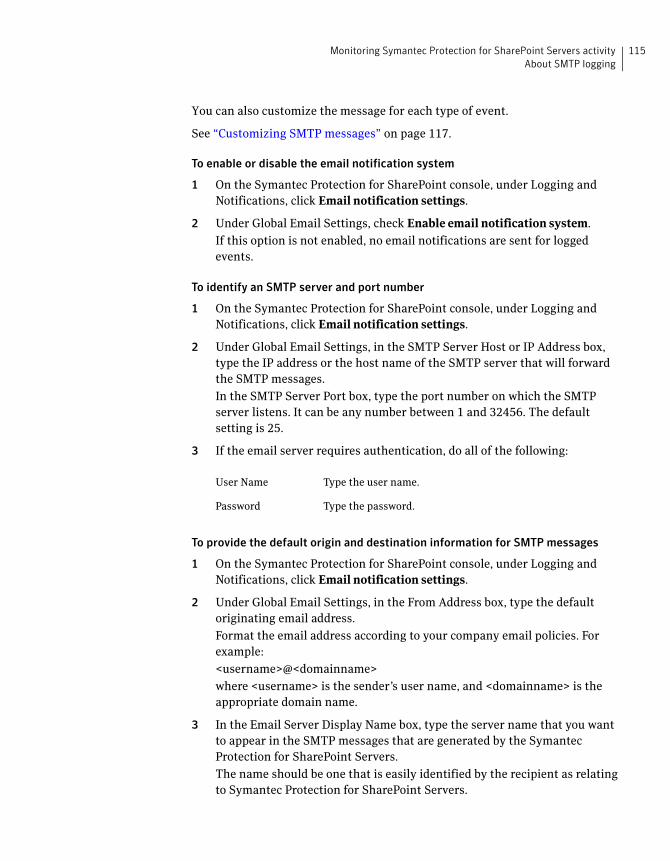
115Monitoring Symantec Protection for SharePoint Servers activity
About SMTP logging
You can also customize the message for each type of event.
See “Customizing SMTP messages” on page 117.
To enable or disable the email notification system
1 On the Symantec Protection for SharePoint console, under Logging and
Notifications, click Email notification settings.
2 Under Global Email Settings, check Enable email notification system.
If this option is not enabled, no email notifications are sent for logged
events.
To identify an SMTP server and port number
1 On the Symantec Protection for SharePoint console, under Logging and
Notifications, click Email notification settings.
2 Under Global Email Settings, in the SMTP Server Host or IP Address box,
type the IP address or the host name of the SMTP server that will forward
the SMTP messages.
In the SMTP Server Port box, type the port number on which the SMTP
server listens. It can be any number between 1 and 32456. The default
setting is 25.
3 If the email server requires authentication, do all of the following:
To provide the default origin and destination information for SMTP messages
1 On the Symantec Protection for SharePoint console, under Logging and
Notifications, click Email notification settings.
2 Under Global Email Settings, in the From Address box, type the default
originating email address.
Format the email address according to your company email policies. For
example:
<username>@<domainname>
where <username> is the sender’s user name, and <domainname> is the
appropriate domain name.
3 In the Email Server Display Name box, type the server name that you want
to appear in the SMTP messages that are generated by the Symantec
Protection for SharePoint Servers.
The name should be one that is easily identified by the recipient as relating
to Symantec Protection for SharePoint Servers.
User Name Type the user name.
Password Type the password.
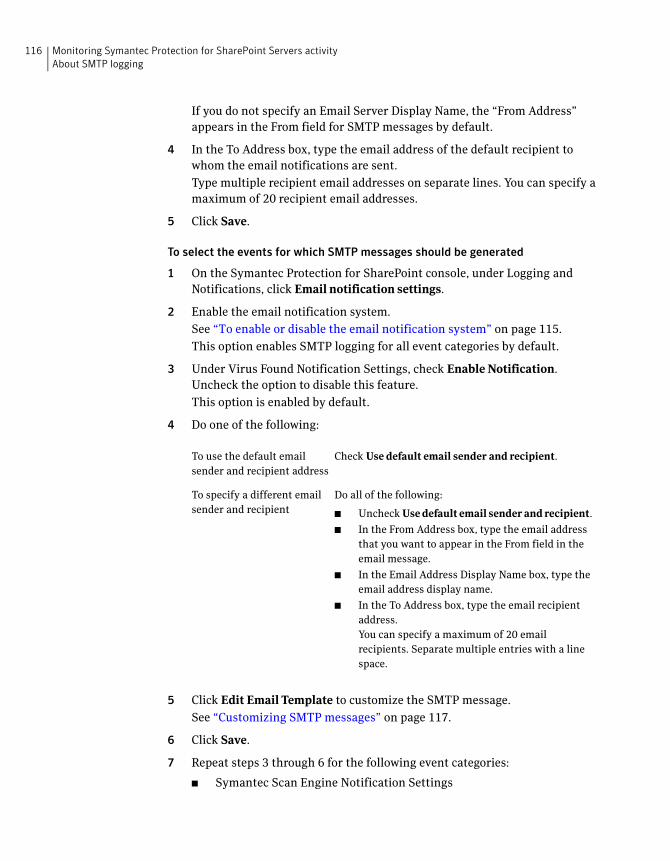
116 Monitoring Symantec Protection for SharePoint Servers activity
About SMTP logging
If you do not specify an Email Server Display Name, the “From Address”
appears in the From field for SMTP messages by default.
4 In the To Address box, type the email address of the default recipient to
whom the email notifications are sent.
Type multiple recipient email addresses on separate lines. You can specify a
maximum of 20 recipient email addresses.
5 Click Save.
To select the events for which SMTP messages should be generated
1 On the Symantec Protection for SharePoint console, under Logging and
Notifications, click Email notification settings.
2 Enable the email notification system.
See “To enable or disable the email notification system” on page 115.
This option enables SMTP logging for all event categories by default.
3 Under Virus Found Notification Settings, check Enable Notification.
Uncheck the option to disable this feature.
This option is enabled by default.
4 Do one of the following:
5 Click Edit Email Template to customize the SMTP message.
See “Customizing SMTP messages” on page 117.
6 Click Save.
7 Repeat steps 3 through 6 for the following event categories:
■ Symantec Scan Engine Notification Settings
To use the default email
sender and recipient address
Check Use default email sender and recipient.
To specify a different email
sender and recipient
Do all of the following:
■ Uncheck Use default email sender and recipient.
■ In the From Address box, type the email address
that you want to appear in the From field in the
email message.
■ In the Email Address Display Name box, type the
email address display name.
■ In the To Address box, type the email recipient
address.
You can specify a maximum of 20 email
recipients. Separate multiple entries with a line
space.
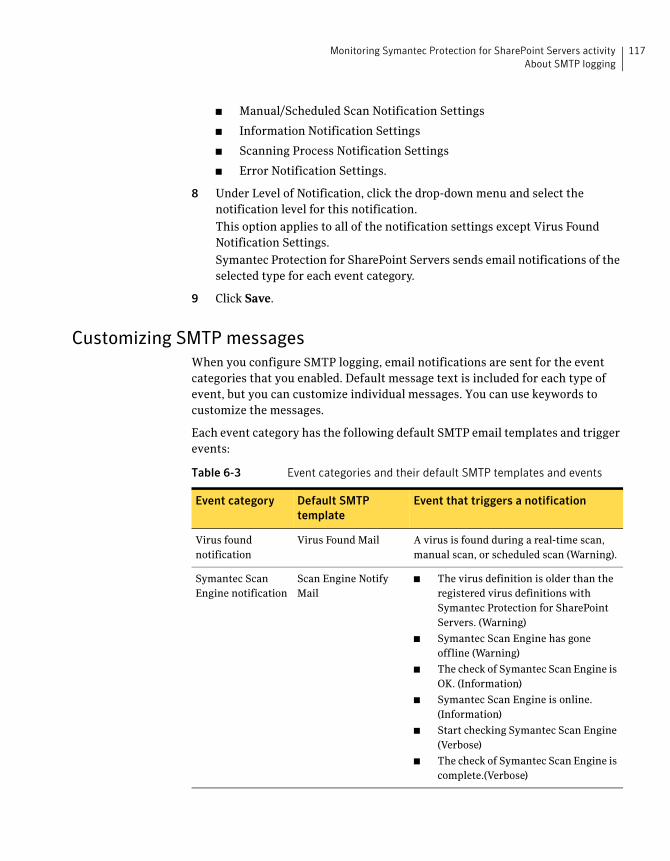
117Monitoring Symantec Protection for SharePoint Servers activity
About SMTP logging
■ Manual/Scheduled Scan Notification Settings
■ Information Notification Settings
■ Scanning Process Notification Settings
■ Error Notification Settings.
8 Under Level of Notification, click the drop-down menu and select the
notification level for this notification.
This option applies to all of the notification settings except Virus Found
Notification Settings.
Symantec Protection for SharePoint Servers sends email notifications of the
selected type for each event category.
9 Click Save.
Customizing SMTP messages
When you configure SMTP logging, email notifications are sent for the event
categories that you enabled. Default message text is included for each type of
event, but you can customize individual messages. You can use keywords to
customize the messages.
Each event category has the following default SMTP email templates and trigger
events:
Table 6-3 Event categories and their default SMTP templates and events
Event category Default SMTP
template
Event that triggers a notification
Virus found
notification
Virus Found Mail A virus is found during a real-time scan,
manual scan, or scheduled scan (Warning).
Symantec Scan
Engine notification
Scan Engine Notify
■ The virus definition is older than the
registered virus definitions with
Symantec Protection for SharePoint
Servers. (Warning)
■ Symantec Scan Engine has gone
offline (Warning)
■ The check of Symantec Scan Engine is
OK. (Information)
■ Symantec Scan Engine is online.
(Information)
■ Start checking Symantec Scan Engine
(Verbose)
■ The check of Symantec Scan Engine is
complete.(Verbose)
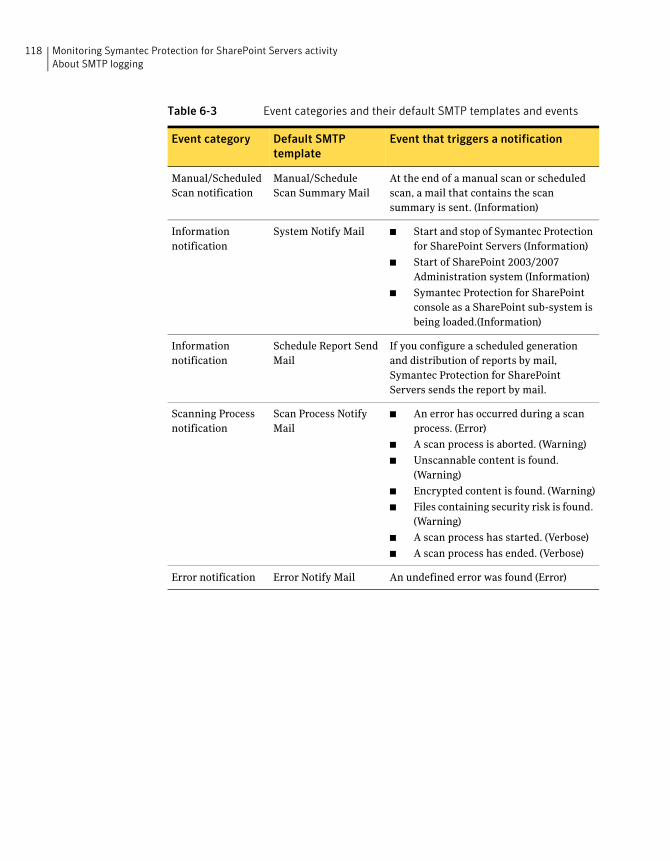
118 Monitoring Symantec Protection for SharePoint Servers activity
About SMTP logging
Manual/Scheduled
Scan notification
Manual/Schedule
Scan Summary Mail
At the end of a manual scan or scheduled
scan, a mail that contains the scan
summary is sent. (Information)
Information
notification
System Notify Mail ■ Start and stop of Symantec Protection
for SharePoint Servers (Information)
■ Start of SharePoint 2003/2007
Administration system (Information)
■ Symantec Protection for SharePoint
console as a SharePoint sub-system is
being loaded.(Information)
Information
notification
Schedule Report Send
If you configure a scheduled generation
and distribution of reports by mail,
Symantec Protection for SharePoint
Servers sends the report by mail.
Scanning Process
notification
Scan Process Notify
■ An error has occurred during a scan
process. (Error)
■ A scan process is aborted. (Warning)
■ Unscannable content is found.
(Warning)
■ Encrypted content is found. (Warning)
■ Files containing security risk is found.
(Warning)
■ A scan process has started. (Verbose)
■ A scan process has ended. (Verbose)
Error notification Error Notify Mail An undefined error was found (Error)
Table 6-3 Event categories and their default SMTP templates and events
Event category Default SMTP
template
Event that triggers a notification
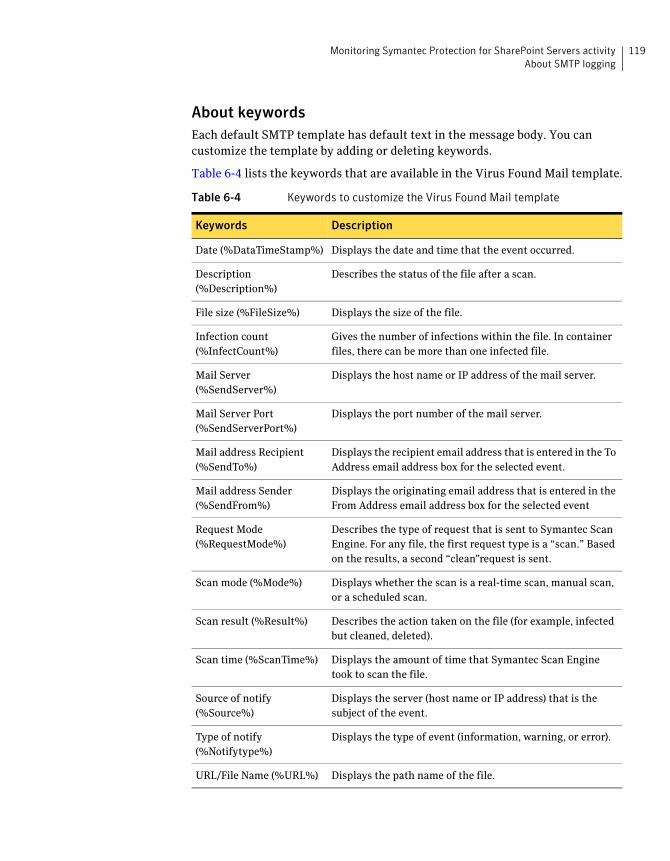
119Monitoring Symantec Protection for SharePoint Servers activity
About SMTP logging
About keywords
Each default SMTP template has default text in the message body. You can
customize the template by adding or deleting keywords.
Table 6-4 lists the keywords that are available in the Virus Found Mail template.
Table 6-4 Keywords to customize the Virus Found Mail template
Keywords Description
Date (%DataTimeStamp%) Displays the date and time that the event occurred.
Description
(%Description%)
Describes the status of the file after a scan.
File size (%FileSize%) Displays the size of the file.
Infection count
(%InfectCount%)
Gives the number of infections within the file. In container
files, there can be more than one infected file.
Mail Server
(%SendServer%)
Displays the host name or IP address of the mail server.
Mail Server Port
(%SendServerPort%)
Displays the port number of the mail server.
Mail address Recipient
(%SendTo%)
Displays the recipient email address that is entered in the To
Address email address box for the selected event.
Mail address Sender
(%SendFrom%)
Displays the originating email address that is entered in the
From Address email address box for the selected event
Request Mode
(%RequestMode%)
Describes the type of request that is sent to Symantec Scan
Engine. For any file, the first request type is a “scan.” Based
on the results, a second “clean”request is sent.
Scan mode (%Mode%) Displays whether the scan is a real-time scan, manual scan,
or a scheduled scan.
Scan result (%Result%) Describes the action taken on the file (for example, infected
but cleaned, deleted).
Scan time (%ScanTime%) Displays the amount of time that Symantec Scan Engine
took to scan the file.
Source of notify
(%Source%)
Displays the server (host name or IP address) that is the
subject of the event.
Type of notify
(%Notifytype%)
Displays the type of event (information, warning, or error).
URL/File Name (%URL%) Displays the path name of the file.
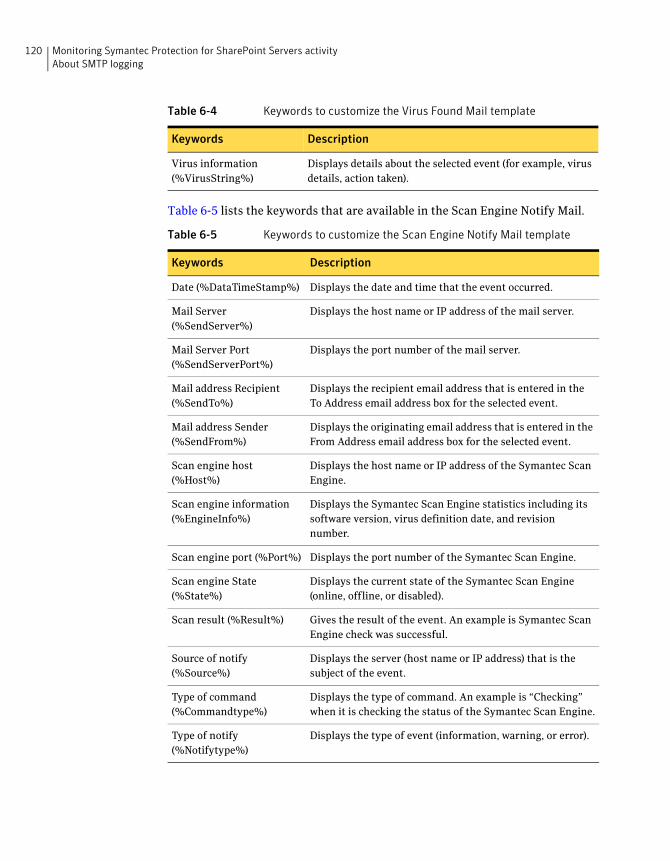
120 Monitoring Symantec Protection for SharePoint Servers activity
About SMTP logging
Table 6-5 lists the keywords that are available in the Scan Engine Notify Mail.
Virus information
(%VirusString%)
Displays details about the selected event (for example, virus
details, action taken).
Table 6-5 Keywords to customize the Scan Engine Notify Mail template
Keywords Description
Date (%DataTimeStamp%) Displays the date and time that the event occurred.
Mail Server
(%SendServer%)
Displays the host name or IP address of the mail server.
Mail Server Port
(%SendServerPort%)
Displays the port number of the mail server.
Mail address Recipient
(%SendTo%)
Displays the recipient email address that is entered in the
To Address email address box for the selected event.
Mail address Sender
(%SendFrom%)
Displays the originating email address that is entered in the
From Address email address box for the selected event.
Scan engine host
(%Host%)
Displays the host name or IP address of the Symantec Scan
Engine.
Scan engine information
(%EngineInfo%)
Displays the Symantec Scan Engine statistics including its
software version, virus definition date, and revision
number.
Scan engine port (%Port%) Displays the port number of the Symantec Scan Engine.
Scan engine State
(%State%)
Displays the current state of the Symantec Scan Engine
(online, offline, or disabled).
Scan result (%Result%) Gives the result of the event. An example is Symantec Scan
Engine check was successful.
Source of notify
(%Source%)
Displays the server (host name or IP address) that is the
subject of the event.
Type of command
(%Commandtype%)
Displays the type of command. An example is “Checking”
when it is checking the status of the Symantec Scan Engine.
Type of notify
(%Notifytype%)
Displays the type of event (information, warning, or error).
Table 6-4 Keywords to customize the Virus Found Mail template
Keywords Description
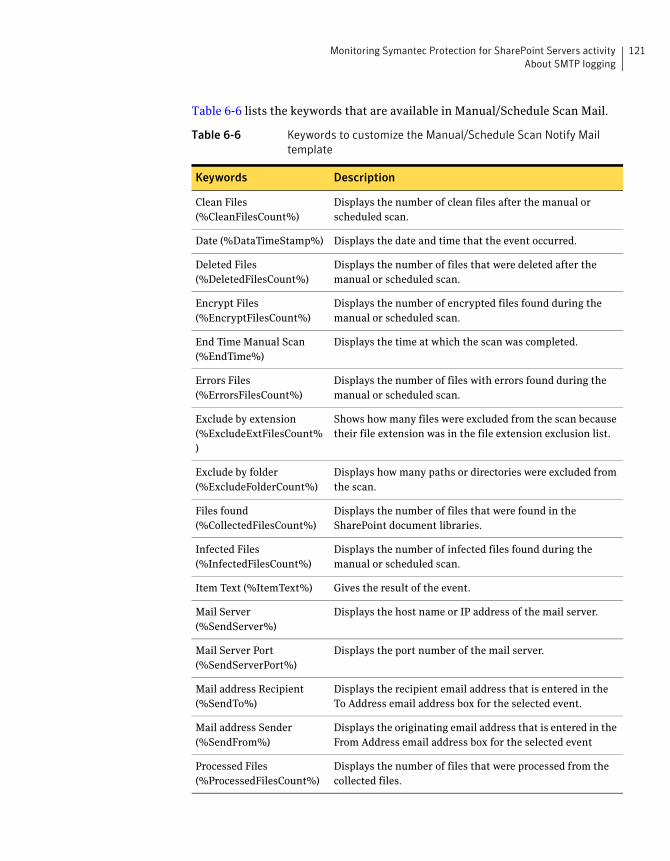
121Monitoring Symantec Protection for SharePoint Servers activity
About SMTP logging
Table 6-6 lists the keywords that are available in Manual/Schedule Scan Mail.
Table 6-6 Keywords to customize the Manual/Schedule Scan Notify Mail
template
Keywords Description
Clean Files
(%CleanFilesCount%)
Displays the number of clean files after the manual or
scheduled scan.
Date (%DataTimeStamp%) Displays the date and time that the event occurred.
Deleted Files
(%DeletedFilesCount%)
Displays the number of files that were deleted after the
manual or scheduled scan.
Encrypt Files
(%EncryptFilesCount%)
Displays the number of encrypted files found during the
manual or scheduled scan.
End Time Manual Scan
(%EndTime%)
Displays the time at which the scan was completed.
Errors Files
(%ErrorsFilesCount%)
Displays the number of files with errors found during the
manual or scheduled scan.
Exclude by extension
(%ExcludeExtFilesCount%
)
Shows how many files were excluded from the scan because
their file extension was in the file extension exclusion list.
Exclude by folder
(%ExcludeFolderCount%)
Displays how many paths or directories were excluded from
the scan.
Files found
(%CollectedFilesCount%)
Displays the number of files that were found in the
SharePoint document libraries.
Infected Files
(%InfectedFilesCount%)
Displays the number of infected files found during the
manual or scheduled scan.
Item Text (%ItemText%) Gives the result of the event.
Mail Server
(%SendServer%)
Displays the host name or IP address of the mail server.
Mail Server Port
(%SendServerPort%)
Displays the port number of the mail server.
Mail address Recipient
(%SendTo%)
Displays the recipient email address that is entered in the
To Address email address box for the selected event.
Mail address Sender
(%SendFrom%)
Displays the originating email address that is entered in the
From Address email address box for the selected event
Processed Files
(%ProcessedFilesCount%)
Displays the number of files that were processed from the
collected files.
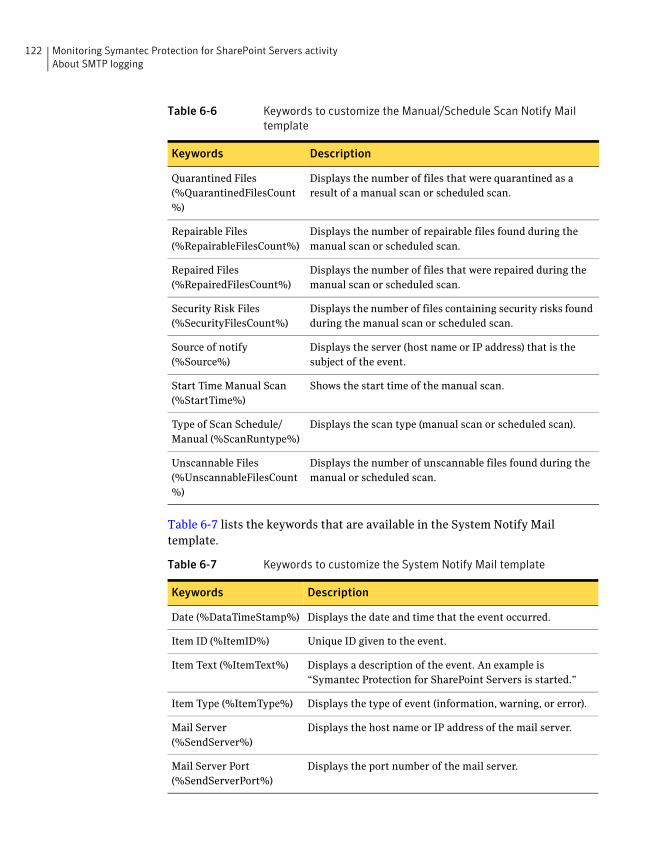
122 Monitoring Symantec Protection for SharePoint Servers activity
About SMTP logging
Table 6-7 lists the keywords that are available in the System Notify Mail
template.
Quarantined Files
(%QuarantinedFilesCount
%)
Displays the number of files that were quarantined as a
result of a manual scan or scheduled scan.
Repairable Files
(%RepairableFilesCount%)
Displays the number of repairable files found during the
manual scan or scheduled scan.
Repaired Files
(%RepairedFilesCount%)
Displays the number of files that were repaired during the
manual scan or scheduled scan.
Security Risk Files
(%SecurityFilesCount%)
Displays the number of files containing security risks found
during the manual scan or scheduled scan.
Source of notify
(%Source%)
Displays the server (host name or IP address) that is the
subject of the event.
Start Time Manual Scan
(%StartTime%)
Shows the start time of the manual scan.
Type of Scan Schedule/
Manual (%ScanRuntype%)
Displays the scan type (manual scan or scheduled scan).
Unscannable Files
(%UnscannableFilesCount
%)
Displays the number of unscannable files found during the
manual or scheduled scan.
Table 6-7 Keywords to customize the System Notify Mail template
Keywords Description
Date (%DataTimeStamp%) Displays the date and time that the event occurred.
Item ID (%ItemID%) Unique ID given to the event.
Item Text (%ItemText%) Displays a description of the event. An example is
“Symantec Protection for SharePoint Servers is started.”
Item Type (%ItemType%) Displays the type of event (information, warning, or error).
Mail Server
(%SendServer%)
Displays the host name or IP address of the mail server.
Mail Server Port
(%SendServerPort%)
Displays the port number of the mail server.
Table 6-6 Keywords to customize the Manual/Schedule Scan Notify Mail
template
Keywords Description
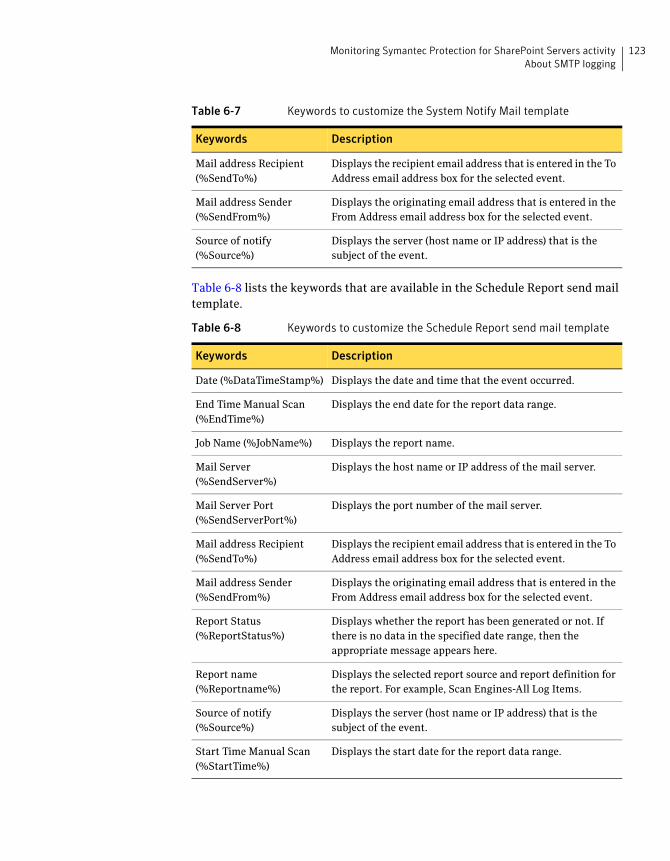
123Monitoring Symantec Protection for SharePoint Servers activity
About SMTP logging
Table 6-8 lists the keywords that are available in the Schedule Report send mail
template.
Mail address Recipient
(%SendTo%)
Displays the recipient email address that is entered in the To
Address email address box for the selected event.
Mail address Sender
(%SendFrom%)
Displays the originating email address that is entered in the
From Address email address box for the selected event.
Source of notify
(%Source%)
Displays the server (host name or IP address) that is the
subject of the event.
Table 6-8 Keywords to customize the Schedule Report send mail template
Keywords Description
Date (%DataTimeStamp%) Displays the date and time that the event occurred.
End Time Manual Scan
(%EndTime%)
Displays the end date for the report data range.
Job Name (%JobName%) Displays the report name.
Mail Server
(%SendServer%)
Displays the host name or IP address of the mail server.
Mail Server Port
(%SendServerPort%)
Displays the port number of the mail server.
Mail address Recipient
(%SendTo%)
Displays the recipient email address that is entered in the To
Address email address box for the selected event.
Mail address Sender
(%SendFrom%)
Displays the originating email address that is entered in the
From Address email address box for the selected event.
Report Status
(%ReportStatus%)
Displays whether the report has been generated or not. If
there is no data in the specified date range, then the
appropriate message appears here.
Report name
(%Reportname%)
Displays the selected report source and report definition for
the report. For example, Scan Engines-All Log Items.
Source of notify
(%Source%)
Displays the server (host name or IP address) that is the
subject of the event.
Start Time Manual Scan
(%StartTime%)
Displays the start date for the report data range.
Table 6-7 Keywords to customize the System Notify Mail template
Keywords Description
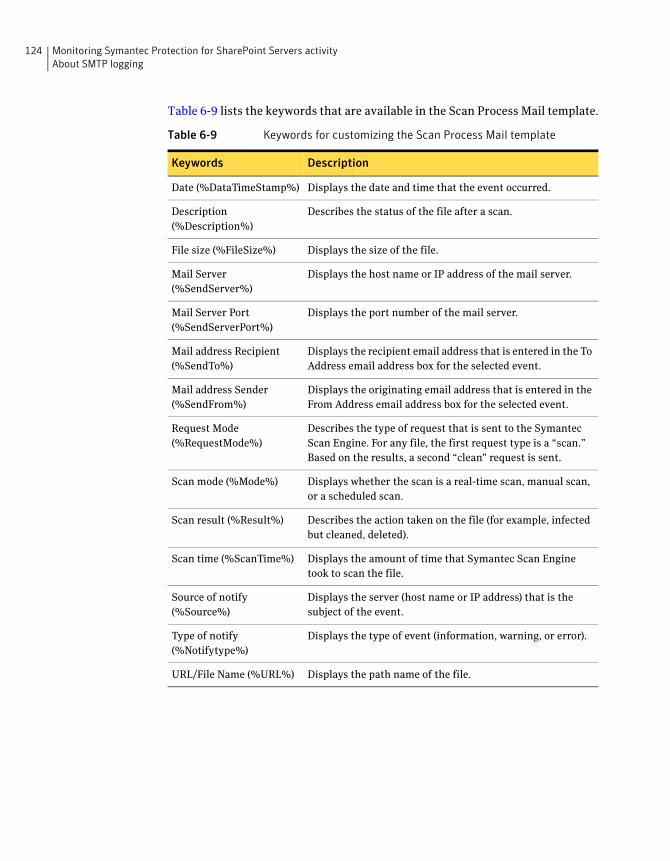
124 Monitoring Symantec Protection for SharePoint Servers activity
About SMTP logging
Table 6-9 lists the keywords that are available in the Scan Process Mail template.
Table 6-9 Keywords for customizing the Scan Process Mail template
Keywords Description
Date (%DataTimeStamp%) Displays the date and time that the event occurred.
Description
(%Description%)
Describes the status of the file after a scan.
File size (%FileSize%) Displays the size of the file.
Mail Server
(%SendServer%)
Displays the host name or IP address of the mail server.
Mail Server Port
(%SendServerPort%)
Displays the port number of the mail server.
Mail address Recipient
(%SendTo%)
Displays the recipient email address that is entered in the To
Address email address box for the selected event.
Mail address Sender
(%SendFrom%)
Displays the originating email address that is entered in the
From Address email address box for the selected event.
Request Mode
(%RequestMode%)
Describes the type of request that is sent to the Symantec
Scan Engine. For any file, the first request type is a “scan.”
Based on the results, a second “clean” request is sent.
Scan mode (%Mode%) Displays whether the scan is a real-time scan, manual scan,
or a scheduled scan.
Scan result (%Result%) Describes the action taken on the file (for example, infected
but cleaned, deleted).
Scan time (%ScanTime%) Displays the amount of time that Symantec Scan Engine
took to scan the file.
Source of notify
(%Source%)
Displays the server (host name or IP address) that is the
subject of the event.
Type of notify
(%Notifytype%)
Displays the type of event (information, warning, or error).
URL/File Name (%URL%) Displays the path name of the file.
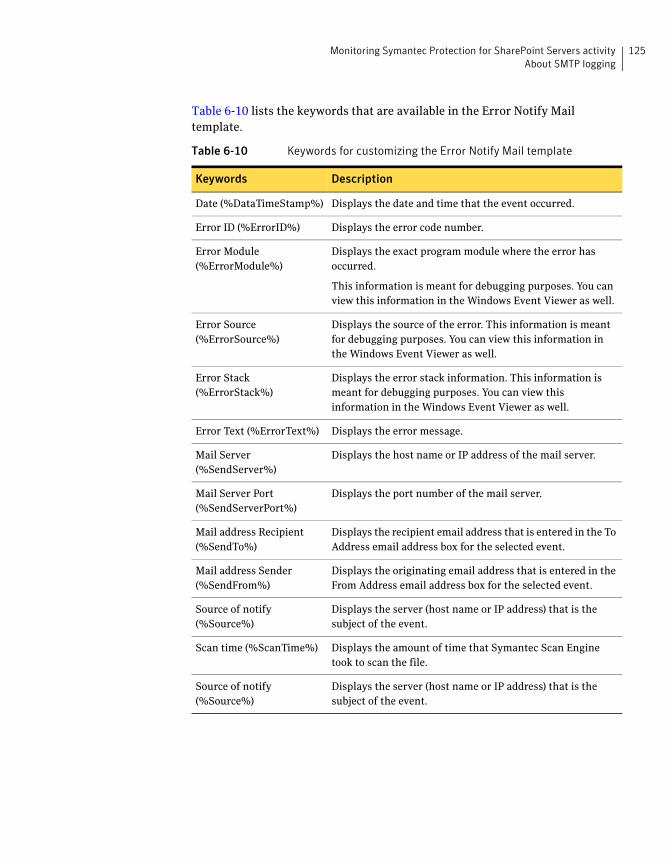
125Monitoring Symantec Protection for SharePoint Servers activity
About SMTP logging
Table 6-10 lists the keywords that are available in the Error Notify Mail
template.
Table 6-10 Keywords for customizing the Error Notify Mail template
Keywords Description
Date (%DataTimeStamp%) Displays the date and time that the event occurred.
Error ID (%ErrorID%) Displays the error code number.
Error Module
(%ErrorModule%)
Displays the exact program module where the error has
occurred.
This information is meant for debugging purposes. You can
view this information in the Windows Event Viewer as well.
Error Source
(%ErrorSource%)
Displays the source of the error. This information is meant
for debugging purposes. You can view this information in
the Windows Event Viewer as well.
Error Stack
(%ErrorStack%)
Displays the error stack information. This information is
meant for debugging purposes. You can view this
information in the Windows Event Viewer as well.
Error Text (%ErrorText%) Displays the error message.
Mail Server
(%SendServer%)
Displays the host name or IP address of the mail server.
Mail Server Port
(%SendServerPort%)
Displays the port number of the mail server.
Mail address Recipient
(%SendTo%)
Displays the recipient email address that is entered in the To
Address email address box for the selected event.
Mail address Sender
(%SendFrom%)
Displays the originating email address that is entered in the
From Address email address box for the selected event.
Source of notify
(%Source%)
Displays the server (host name or IP address) that is the
subject of the event.
Scan time (%ScanTime%) Displays the amount of time that Symantec Scan Engine
took to scan the file.
Source of notify
(%Source%)
Displays the server (host name or IP address) that is the
subject of the event.
126 Monitoring Symantec Protection for SharePoint Servers activity
About monitoring scanning activity
To customize SMTP messages
1 On the Symantec Protection for SharePoint console, under Logging and
Notifications, click Email notification settings.
2 Under any event category, click Edit Email Template.
The Modify Email Template page appears.
3 In the Modify Email Template page, modify the subject text.
4 To add a variable, in the Value Keyword list, click the drop-down menu,
select the keyword that you want to insert, and then click Add.
The variable is appended to the end of the subject. Cut and paste the
variable to the desired location in the subject.
5 In the message body text, modify the existing text.
6 To add a variable from the Value Keyword list to the message body, click the
drop-down menu, select the keyword that you want to insert, and then click
Add.
The variable is appended to the bottom of the message. Cut and paste the
variable to the desired location in the message body. You can add text to
identify the variable in the message.
7 Click Save.
Clicking Cancel discards changes and displays the email notifications page.
8 Repeat steps 2 through 7 for each type of event category for which you want
to customize the message.
About monitoring scanning activityThe Symantec Protection for SharePoint Servers log files contain all log entries
for all types of events. You can configure the location of the log file folder. The
monitoring tools that are available through the Symantec Protection for
SharePoint console let you organize and view only the log entries that you want
to see.
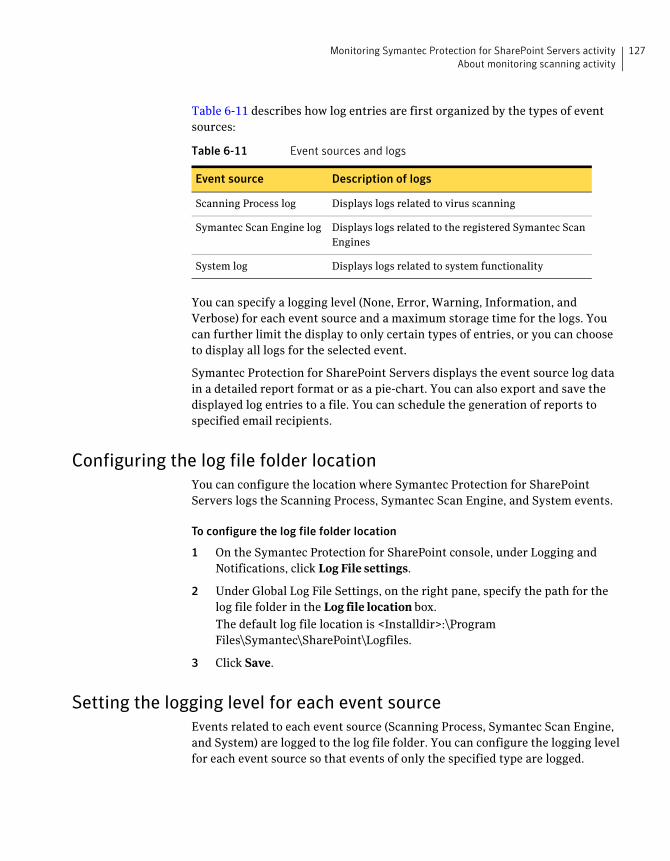
127Monitoring Symantec Protection for SharePoint Servers activity
About monitoring scanning activity
Table 6-11 describes how log entries are first organized by the types of event
sources:
You can specify a logging level (None, Error, Warning, Information, and
Verbose) for each event source and a maximum storage time for the logs. You
can further limit the display to only certain types of entries, or you can choose
to display all logs for the selected event.
Symantec Protection for SharePoint Servers displays the event source log data
in a detailed report format or as a pie-chart. You can also export and save the
displayed log entries to a file. You can schedule the generation of reports to
specified email recipients.
Configuring the log file folder location
You can configure the location where Symantec Protection for SharePoint
Servers logs the Scanning Process, Symantec Scan Engine, and System events.
To configure the log file folder location
1 On the Symantec Protection for SharePoint console, under Logging and
Notifications, click Log File settings.
2 Under Global Log File Settings, on the right pane, specify the path for the
log file folder in the Log file location box.
The default log file location is <Installdir>:\Program
Files\Symantec\SharePoint\Logfiles.
3 Click Save.
Setting the logging level for each event source
Events related to each event source (Scanning Process, Symantec Scan Engine,
and System) are logged to the log file folder. You can configure the logging level
for each event source so that events of only the specified type are logged.
Table 6-11 Event sources and logs
Event source Description of logs
Scanning Process log Displays logs related to virus scanning
Symantec Scan Engine log Displays logs related to the registered Symantec Scan
Engines
System log Displays logs related to system functionality
128 Monitoring Symantec Protection for SharePoint Servers activity
About monitoring scanning activity
Table 6-2 gives you a detailed description of the various events logged based on
the selected logging level.
To set the logging level for each event source
1 On the Symantec Protection for SharePoint console, under Logging and
Notifications, click Log File settings.
2 Under Scanning Process Log File Settings, on the right pane, under Log file
level, in the drop-down list, select the event logging level.
By default, the logging level is Information for Scanning Process Log File
Settings.
3 Click Save.
4 Repeat steps 2 through 3 for Symantec Scan Engine Log File Settings and
System Log File Settings.
By default, the logging level is Warning for Symantec Scan Engine Log File
Settings and Information for System Log File Settings.
Setting the maximum storage time for log files
You can specify how long the log files are stored on the server. The default
storage time is one month for each event source (Scanning Process, Symantec
Scan Engine, and System). After the threshold is met, log files are over-written
with new logs. If no new logs are created after the threshold is met, the old log
files remain.
To set the maximum storage time for the log files
1 On the Symantec Protection for SharePoint console, under Logging and
Notifications, click Log File settings.
2 Under Scanning Process Log File Settings, on the right pane, under
Maximum storage time, in the drop-down list, select the time frame
threshold to store log files.
The default setting is one month.
3 Click Save.
4 Repeat steps 2 through 3 for Symantec Scan Engine Log File Settings and
System Log File Settings.
129Monitoring Symantec Protection for SharePoint Servers activity
About monitoring scanning activity
Generating an on-demand report
You can manually generate and analyze reports for a specified date range. You
must select a report source (Scan Engines, Scan Processes, and System) and
define the log data you want displayed. Symantec Protection for SharePoint
Servers generates only detailed reports of all logs for Scan Engines and System.
With the Scan Processes report source, you can generate a report of any of the
following:
■ Pie-chart report of real-time statistics (Scan Statistic (Real-time))
■ Pie-chart report of manual scan and scheduled scan statistics (Scan Statistic
(Manual + Schedule))
■ Pie-chart report of real-time scan, manual scan, and scheduled scan
statistics (Scan Statistic (All))
■ Detailed report of all logs (All log)
The color legend explains what each color in the pie-chart represents. Symantec
Protection for SharePoint Servers displays a numerical statistical report
beneath the pie-chart.
To generate an on-demand report
1 On the Symantec Protection for SharePoint console, under Report, click On-
demand reports.
2 In the right pane, under Report Date Range, select the From and To date
range for the report that you want to generate.
3 In the Report Source drop-down list, select a report source.
4 Select a Report Definition based on the data that you want to view.
For Scan Engines, and System, Symantec Protection for SharePoint Servers
generates detailed reports of All Logs data only.
For Scan Processes, select Scan Statistic (Real-time), Scan Statistic (Manual
+ Schedule), Scan Statistic (All), or All Log.
5 Click Show Report.
You can save the report in a .pdf, .xls, .rtf, or .txt format.
6 In the report display, in the Format drop-down list, select a format.
7 Click the icon with a floppy disk graphic to save the report.
8 Click the printer icon to print the report.
130 Monitoring Symantec Protection for SharePoint Servers activity
About monitoring scanning activity
Scheduling a report
You can schedule regular generation of reports and have them automatically
emailed to you. This feature makes remote monitoring of your SharePoint
document library possible. You must first configure email notifications before
you try to schedule a report by email.
See “Configuring SMTP logging” on page 114.
To schedule reports, you must do the following tasks, in this order:
■ Select a schedule.
Choose from the default schedules or create a new schedule.
■ Select a report data range.
Symantec Protection for SharePoint Servers pulls up data from within this
specified date range.
■ Choose a report source (Scan Engines, Scan Processes, or System) and report
definition.
These options determine the content of your scheduled report.
■ Select a report format.
■ Activate report generation by mail.
Specify the sender and recipient’s email address.
■ Edit the default schedule report email template.
To select a schedule
1 On the Symantec Protection for SharePoint console, under Report, click
Schedule reports.
2 On the right pane, click Create schedule report.
3 In the Name box, type the name that you want to identify this schedule
report.
4 In the Schedule drop-down list, you can select one of the following default
schedules:
■ Daily (Every night at midnight)
■ Monthly (Last day of the month at midnight)
■ Weekly (Every Friday at midnight)
5 Click Edit to make changes to the default schedules.
Note: If you edit any schedule, it will affect all reports that use the schedule.
If you click Delete, the entire schedule will be deleted.
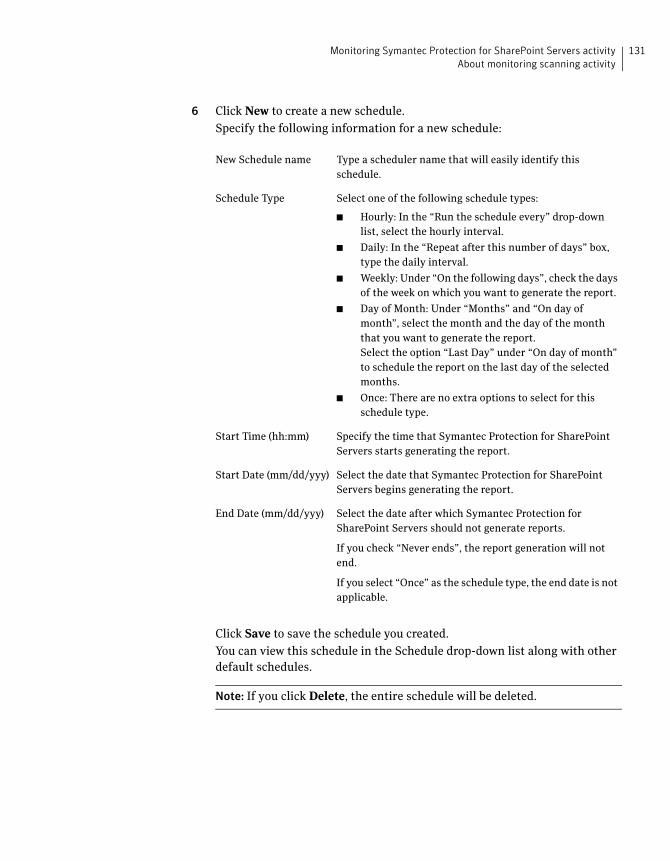
131Monitoring Symantec Protection for SharePoint Servers activity
About monitoring scanning activity
6 Click New to create a new schedule.
Specify the following information for a new schedule:
Click Save to save the schedule you created.
You can view this schedule in the Schedule drop-down list along with other
default schedules.
Note: If you click Delete, the entire schedule will be deleted.
New Schedule name Type a scheduler name that will easily identify this
schedule.
Schedule Type Select one of the following schedule types:
■ Hourly: In the “Run the schedule every” drop-down
list, select the hourly interval.
■ Daily: In the “Repeat after this number of days” box,
type the daily interval.
■ Weekly: Under “On the following days”, check the days
of the week on which you want to generate the report.
■ Day of Month: Under “Months” and “On day of
month”, select the month and the day of the month
that you want to generate the report.
Select the option “Last Day” under “On day of month”
to schedule the report on the last day of the selected
months.
■ Once: There are no extra options to select for this
schedule type.
Start Time (hh:mm) Specify the time that Symantec Protection for SharePoint
Servers starts generating the report.
Start Date (mm/dd/yyy) Select the date that Symantec Protection for SharePoint
Servers begins generating the report.
End Date (mm/dd/yyy) Select the date after which Symantec Protection for
SharePoint Servers should not generate reports.
If you check “Never ends”, the report generation will not
end.
If you select “Once” as the schedule type, the end date is not
applicable.
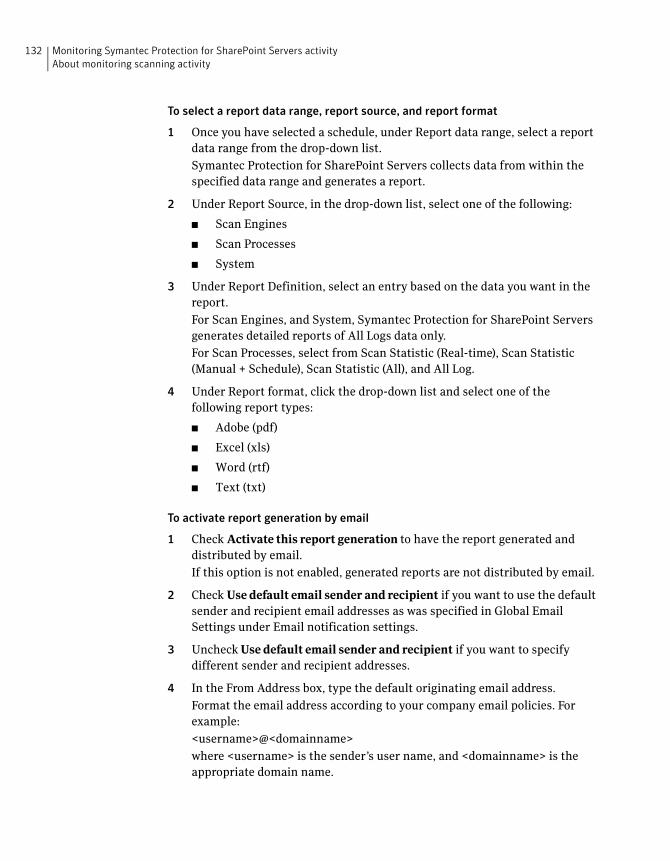
132 Monitoring Symantec Protection for SharePoint Servers activity
About monitoring scanning activity
To select a report data range, report source, and report format
1 Once you have selected a schedule, under Report data range, select a report
data range from the drop-down list.
Symantec Protection for SharePoint Servers collects data from within the
specified data range and generates a report.
2 Under Report Source, in the drop-down list, select one of the following:
■ Scan Engines
■ Scan Processes
■ System
3 Under Report Definition, select an entry based on the data you want in the
report.
For Scan Engines, and System, Symantec Protection for SharePoint Servers
generates detailed reports of All Logs data only.
For Scan Processes, select from Scan Statistic (Real-time), Scan Statistic
(Manual + Schedule), Scan Statistic (All), and All Log.
4 Under Report format, click the drop-down list and select one of the
following report types:
■ Adobe (pdf)
■ Excel (xls)
■ Word (rtf)
■ Text (txt)
To activate report generation by email
1 Check Activate this report generation to have the report generated and
distributed by email.
If this option is not enabled, generated reports are not distributed by email.
2 Check Use default email sender and recipient if you want to use the default
sender and recipient email addresses as was specified in Global Email
Settings under Email notification settings.
3 Uncheck Use default email sender and recipient if you want to specify
different sender and recipient addresses.
4 In the From Address box, type the default originating email address.
Format the email address according to your company email policies. For
example:
<username>@<domainname>
where <username> is the sender’s user name, and <domainname> is the
appropriate domain name.
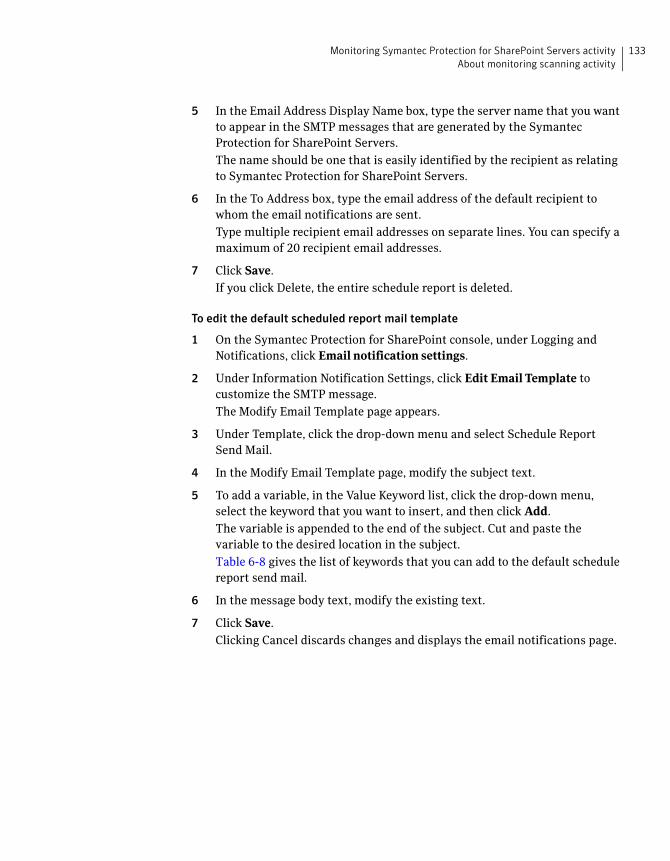
133Monitoring Symantec Protection for SharePoint Servers activity
About monitoring scanning activity
5 In the Email Address Display Name box, type the server name that you want
to appear in the SMTP messages that are generated by the Symantec
Protection for SharePoint Servers.
The name should be one that is easily identified by the recipient as relating
to Symantec Protection for SharePoint Servers.
6 In the To Address box, type the email address of the default recipient to
whom the email notifications are sent.
Type multiple recipient email addresses on separate lines. You can specify a
maximum of 20 recipient email addresses.
7 Click Save.
If you click Delete, the entire schedule report is deleted.
To edit the default scheduled report mail template
1 On the Symantec Protection for SharePoint console, under Logging and
Notifications, click Email notification settings.
2 Under Information Notification Settings, click Edit Email Template to
customize the SMTP message.
The Modify Email Template page appears.
3 Under Template, click the drop-down menu and select Schedule Report
Send Mail.
4 In the Modify Email Template page, modify the subject text.
5 To add a variable, in the Value Keyword list, click the drop-down menu,
select the keyword that you want to insert, and then click Add.
The variable is appended to the end of the subject. Cut and paste the
variable to the desired location in the subject.
Table 6-8 gives the list of keywords that you can add to the default schedule
report send mail.
6 In the message body text, modify the existing text.
7 Click Save.
Clicking Cancel discards changes and displays the email notifications page.

134 Monitoring Symantec Protection for SharePoint Servers activity
About monitoring scanning activity
Chapter
7Troubleshooting Symantec
Protection for SharePoint
Servers
This chapter includes the following topics:
■ About troubleshooting common issues
About troubleshooting common issuesYou can troubleshoot the following list of common issues seen in Symantec
Protection for SharePoint Servers:
■ Symantec Protection for SharePoint Servers link is missing from the
SharePoint Central Administration site
■ Unable to access the Symantec Scan Engine console
■ Symantec Scan Engine registration fails
■ Slow server response or high server load
■ No reports are generated
■ Failure sending mail error message
■ The connection to the Symantec SharePoint Security Service cannot be
established. Code 8000
■ Virus Found: There is no Symantec Scan Engine available. The file was not
saved. Code: 8002
■ Unable to remember the console password
■ Error 1722 when installing Symantec Scan Engine
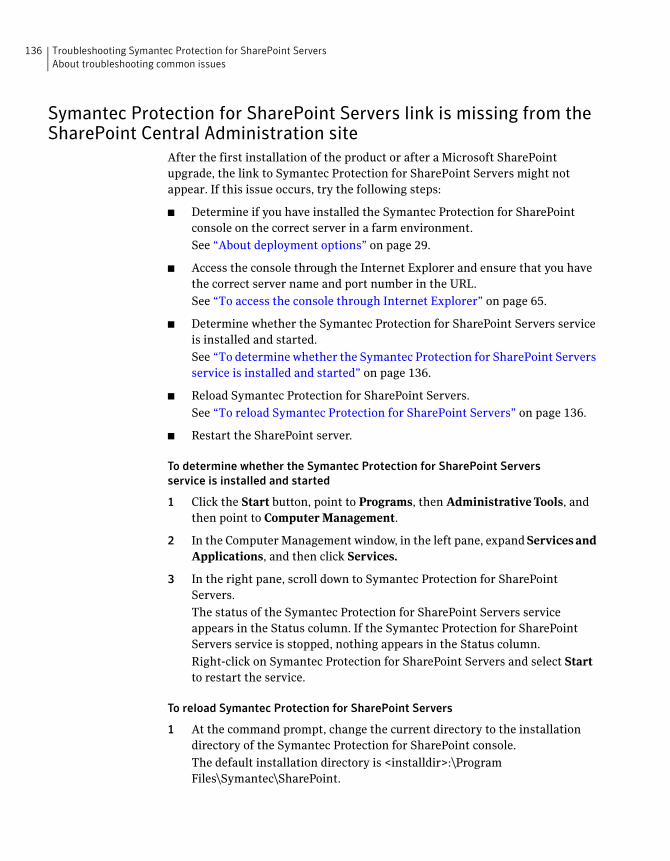
136 Troubleshooting Symantec Protection for SharePoint Servers
About troubleshooting common issues
Symantec Protection for SharePoint Servers link is missing from the SharePoint Central Administration site
After the first installation of the product or after a Microsoft SharePoint
upgrade, the link to Symantec Protection for SharePoint Servers might not
appear. If this issue occurs, try the following steps:
■ Determine if you have installed the Symantec Protection for SharePoint
console on the correct server in a farm environment.
See “About deployment options” on page 29.
■ Access the console through the Internet Explorer and ensure that you have
the correct server name and port number in the URL.
See “To access the console through Internet Explorer” on page 65.
■ Determine whether the Symantec Protection for SharePoint Servers service
is installed and started.
See “To determine whether the Symantec Protection for SharePoint Servers
service is installed and started” on page 136.
■ Reload Symantec Protection for SharePoint Servers.
See “To reload Symantec Protection for SharePoint Servers” on page 136.
■ Restart the SharePoint server.
To determine whether the Symantec Protection for SharePoint Servers
service is installed and started
1 Click the Start button, point to Programs, then Administrative Tools, and
then point to Computer Management.
2 In the Computer Management window, in the left pane, expand Services and
Applications, and then click Services.
3 In the right pane, scroll down to Symantec Protection for SharePoint
Servers.
The status of the Symantec Protection for SharePoint Servers service
appears in the Status column. If the Symantec Protection for SharePoint
Servers service is stopped, nothing appears in the Status column.
Right-click on Symantec Protection for SharePoint Servers and select Start
to restart the service.
To reload Symantec Protection for SharePoint Servers
1 At the command prompt, change the current directory to the installation
directory of the Symantec Protection for SharePoint console.
The default installation directory is <installdir>:\Program
Files\Symantec\SharePoint.
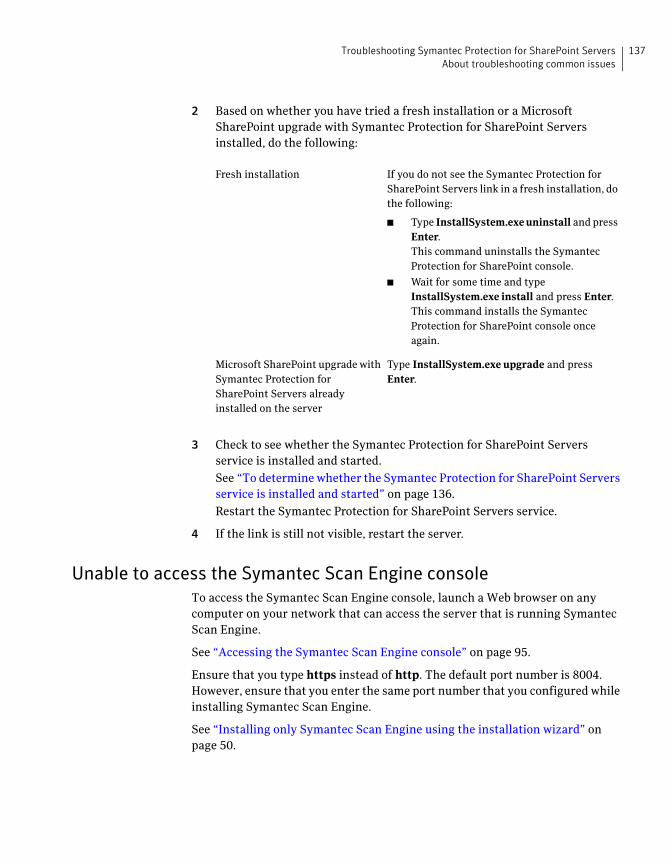
137Troubleshooting Symantec Protection for SharePoint Servers
About troubleshooting common issues
2 Based on whether you have tried a fresh installation or a Microsoft
SharePoint upgrade with Symantec Protection for SharePoint Servers
installed, do the following:
3 Check to see whether the Symantec Protection for SharePoint Servers
service is installed and started.
See “To determine whether the Symantec Protection for SharePoint Servers
service is installed and started” on page 136.
Restart the Symantec Protection for SharePoint Servers service.
4 If the link is still not visible, restart the server.
Unable to access the Symantec Scan Engine console
To access the Symantec Scan Engine console, launch a Web browser on any
computer on your network that can access the server that is running Symantec
Scan Engine.
See “Accessing the Symantec Scan Engine console” on page 95.
Ensure that you type https instead of http. The default port number is 8004.
However, ensure that you enter the same port number that you configured while
installing Symantec Scan Engine.
See “Installing only Symantec Scan Engine using the installation wizard” on
page 50.
Fresh installation If you do not see the Symantec Protection for
SharePoint Servers link in a fresh installation, do
the following:
■ Type InstallSystem.exe uninstall and press
Enter.
This command uninstalls the Symantec
Protection for SharePoint console.
■ Wait for some time and type
InstallSystem.exe install and press Enter.
This command installs the Symantec
Protection for SharePoint console once
again.
Microsoft SharePoint upgrade with
Symantec Protection for
SharePoint Servers already
installed on the server
Type InstallSystem.exe upgrade and press
Enter.
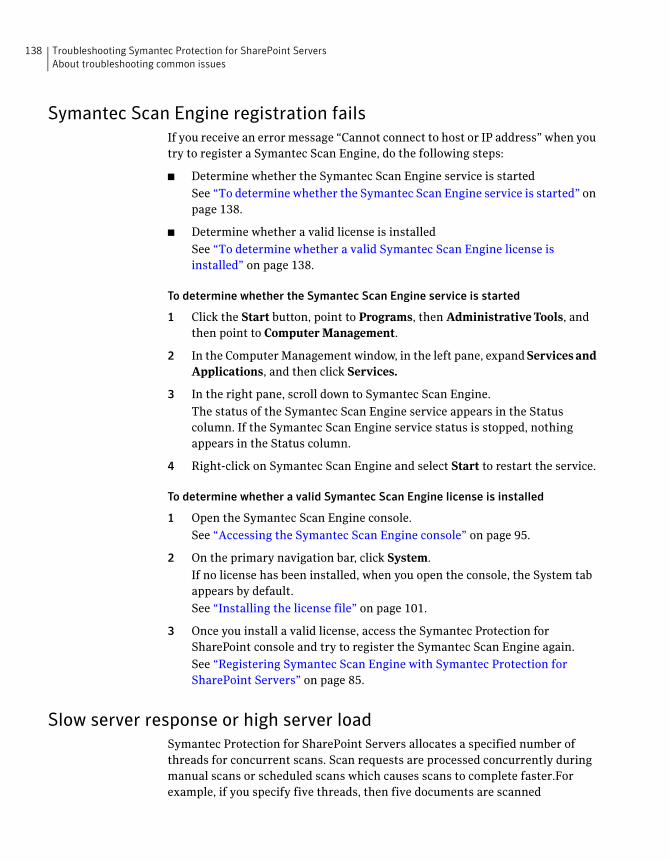
138 Troubleshooting Symantec Protection for SharePoint Servers
About troubleshooting common issues
Symantec Scan Engine registration fails
If you receive an error message “Cannot connect to host or IP address” when you
try to register a Symantec Scan Engine, do the following steps:
■ Determine whether the Symantec Scan Engine service is started
See “To determine whether the Symantec Scan Engine service is started” on
page 138.
■ Determine whether a valid license is installed
See “To determine whether a valid Symantec Scan Engine license is
installed” on page 138.
To determine whether the Symantec Scan Engine service is started
1 Click the Start button, point to Programs, then Administrative Tools, and
then point to Computer Management.
2 In the Computer Management window, in the left pane, expand Services and
Applications, and then click Services.
3 In the right pane, scroll down to Symantec Scan Engine.
The status of the Symantec Scan Engine service appears in the Status
column. If the Symantec Scan Engine service status is stopped, nothing
appears in the Status column.
4 Right-click on Symantec Scan Engine and select Start to restart the service.
To determine whether a valid Symantec Scan Engine license is installed
1 Open the Symantec Scan Engine console.
See “Accessing the Symantec Scan Engine console” on page 95.
2 On the primary navigation bar, click System.
If no license has been installed, when you open the console, the System tab
appears by default.
See “Installing the license file” on page 101.
3 Once you install a valid license, access the Symantec Protection for
SharePoint console and try to register the Symantec Scan Engine again.
See “Registering Symantec Scan Engine with Symantec Protection for
SharePoint Servers” on page 85.
Slow server response or high server load
Symantec Protection for SharePoint Servers allocates a specified number of
threads for concurrent scans. Scan requests are processed concurrently during
manual scans or scheduled scans which causes scans to complete faster.For
example, if you specify five threads, then five documents are scanned
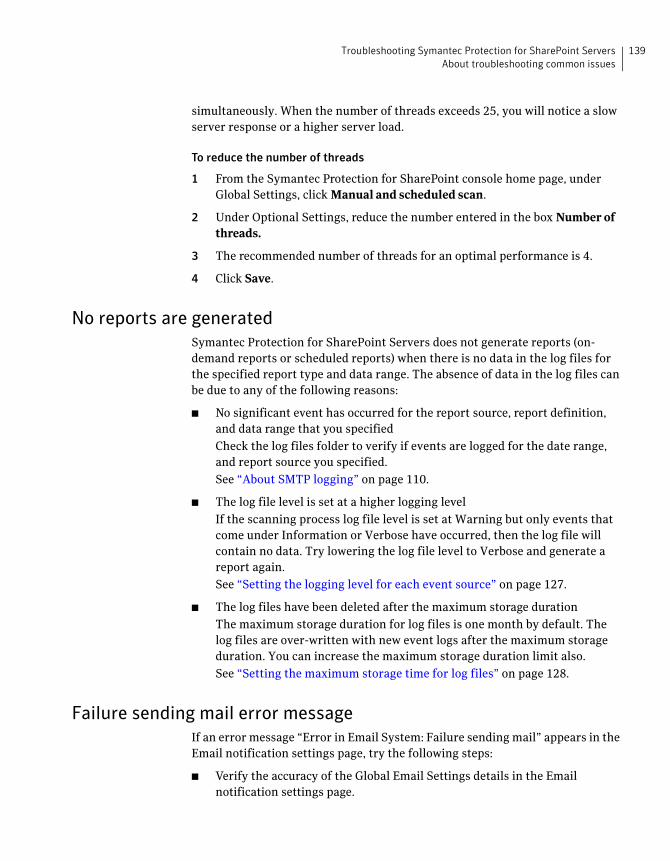
139Troubleshooting Symantec Protection for SharePoint Servers
About troubleshooting common issues
simultaneously. When the number of threads exceeds 25, you will notice a slow
server response or a higher server load.
To reduce the number of threads
1 From the Symantec Protection for SharePoint console home page, under
Global Settings, click Manual and scheduled scan.
2 Under Optional Settings, reduce the number entered in the box Number of
threads.
3 The recommended number of threads for an optimal performance is 4.
4 Click Save.
No reports are generated
Symantec Protection for SharePoint Servers does not generate reports (on-
demand reports or scheduled reports) when there is no data in the log files for
the specified report type and data range. The absence of data in the log files can
be due to any of the following reasons:
■ No significant event has occurred for the report source, report definition,
and data range that you specified
Check the log files folder to verify if events are logged for the date range,
and report source you specified.
See “About SMTP logging” on page 110.
■ The log file level is set at a higher logging level
If the scanning process log file level is set at Warning but only events that
come under Information or Verbose have occurred, then the log file will
contain no data. Try lowering the log file level to Verbose and generate a
report again.
See “Setting the logging level for each event source” on page 127.
■ The log files have been deleted after the maximum storage duration
The maximum storage duration for log files is one month by default. The
log files are over-written with new event logs after the maximum storage
duration. You can increase the maximum storage duration limit also.
See “Setting the maximum storage time for log files” on page 128.
Failure sending mail error message
If an error message “Error in Email System: Failure sending mail” appears in the
Email notification settings page, try the following steps:
■ Verify the accuracy of the Global Email Settings details in the Email
notification settings page.
140 Troubleshooting Symantec Protection for SharePoint Servers
About troubleshooting common issues
See “Configuring SMTP logging” on page 114.
■ Read the System logs to determine the cause of the error.
The default location is <installdir>:\Program
Files\Symantec\SharePoint\Logfiles\system.
■ Read the entries in Symantec AntiVirus in the Event Viewer.
The connection to the Symantec SharePoint Security Service cannot be established. Code 8000
If you see the error message “The connection to the Symantec SharePoint
Security Service cannot be established. Please check the status of the Symantec
SharePoint Security Service or contact your administrator for more
information”, try the following steps:
■ Determine if the Symantec Protection for SharePoint Servers service is
started
■ Determine if the service logon user account has the necessary permissions.
■ Reset the Internet Information Services (IIS) Manager.
To determine whether the Symantec Protection for SharePoint Servers
service is started
1 Click the Start button, point to Programs, then Administrative Tools, and
then point to Computer Management.
2 In the Computer Management window, in the left pane, expand Services and
Applications, and then click Services.
3 In the right pane, scroll down to Symantec Protection for SharePoint
Servers.
The status of the Symantec Protection for SharePoint Servers service
appears in the Status column. If the Symantec Protection for SharePoint
Servers service status is stopped, nothing appears in the Status column.
Right-click on Symantec Protection for SharePoint Servers and select Start
to restart the service.
To determine whether the service logon user account has the necessary
permissions
1 Click the Start button, point to Programs, then Administrative Tools, and
then point to Computer Management.
2 In the Computer Management window, in the left pane, expand Services and
Applications, and then click Services.
141Troubleshooting Symantec Protection for SharePoint Servers
About troubleshooting common issues
3 In the right pane, scroll down to Symantec Protection for SharePoint
Servers.
4 Right-click on Symantec Protection for SharePoint Servers and select
Properties.
5 Click the Log on tab.
The current log on user account is selected under “Log on as”. If Local
System account is selected, the user account will not have the necessary
permissions to access the SQL database and Symantec Scan Engine installed
on other servers.
6 Select “This account” and specify the username and password for the
account used to log on to the Symantec Service.
The user account must be a member of the Local Administrators Group on
the computer on which the SharePoint server is installed. If the SQL server
is on a separate computer, the user account must be a member of the Local
Administrators Group on that computer as well.
The username must be in the format domain\username or
computer\username.
7 Type the password again in the “Confirm password” box.
8 Click Ok.
To reset the Internet Information Services (IIS) Manager
◆ From the command prompt, run IISRESET.
Access the Symantec Protection for SharePoint console again.
Virus Found: There is no Symantec Scan Engine available. The file was not saved. Code: 8002
The error message “<filename> contains the following virus: There is no
Symantec Scan Engine available. The file was not saved. Please contact your
administrator for more information. Code: 8002”, appears when there is no
online registered Symantec Scan Engine to scan files.
Troubleshoot the error message: There is no Symantec Scan Engine available. The file was not saved. Code 8002
You must determine if atleast one Symantec Scan Engine is installed, registered,
and online in order to troubleshoot this error. To troubleshoot the error
message, do the following:
■ Check if a Symantec Scan Engine is installed and running.
142 Troubleshooting Symantec Protection for SharePoint Servers
About troubleshooting common issues
■ If Symantec Scan Engine is installed, check if it is registered with Symantec
Protection for SharePoint Servers.
See “To view the list of registered Symantec Scan Engines” on page 89.
See “To register a new Symantec Scan Engine” on page 87.
■ Check if Symantec Scan Engine has gone offline if it is already registered.
See “To view the list of registered Symantec Scan Engines” on page 89.
Symantec Scan Engine goes offline if its virus definition is older than the
registered virus definition with Symantec Protection for SharePoint
Servers. Symantec Scan Engine also goes offline if Symantec Protection for
SharePoint Servers fails to connect to Symantec Scan Engine in the
specified time interval.
See “Checking for the latest virus definitions” on page 90.
■ Check if the registered Symantec Scan Engine has been disabled.
You can manually enable or disable a Symantec Scan Engine during
registration or when you edit the Symantec Scan Engine details. A
Symantec Scan Engine must be enabled and online to be in rotation for
scanning files.
See “To edit a Symantec Scan Engine registration” on page 89.
To check if Symantec Scan Engine is installed and running
1 Click the Start button, point to Settings, and then point to Control Panel.
2 In the Control Panel window, double-click Add or Remove Programs.
3 In the Add or Remove Programs window, scroll down to Symantec Scan
Engine.
If you can view Symantec Scan Engine in the Add or Remove Programs
window, Symantec Scan Engine is installed completely on the server.
4 Now click the Start button, point to Programs, then Administrative Tools,
and then point to Computer Management.
5 In the Computer Management window, in the left pane, expand Services and
Applications, and then click Services.
6 In the right pane, scroll down to Symantec Scan Engine.
The status of the Symantec Scan Engine service appears in the Status
column. If the Symantec Scan Engine service status is stopped, nothing
appears in the Status column.
7 Right-click on Symantec Scan Engine and select Start to restart the service.
To check if Symantec Scan Engine is registered
1 Click the Start button, point to Settings, and then point to Control Panel.
143Troubleshooting Symantec Protection for SharePoint Servers
About troubleshooting common issues
2 In the Control Panel window, double-click Add or Remove Programs.
3 In the Add or Remove Programs window, scroll down to Symantec Scan
Engine.
If you can view Symantec Scan Engine in the Add or Remove Programs
window, Symantec Scan Engine is installed completely on the server.
Unable to remember the console password
If you forget the console password, you can reset the password by doing the
following steps:
■ Stop the Symantec Protection for SharePoint Servers service in Windows
services.
■ Delete all files with a .dat file extension in C:\Program Files\Common
Files\Symantec Shared\SharePointEngine.
■ Go to Windows services and start Symantec Protection for SharePoint
Servers.
■ Reset the Internet Information Services (IIS) Manager.
From the command prompt, run IISRESET.
You will not be prompted for a password now.
Error 1722 when installing Symantec Scan Engine
This error is observed when J2SE Runtime Environment (JRE) 5.0 Update 15 is
not completely installed on the server or when the Java file is corrupted.
To troubleshoot this error message, try the following steps:
■ Uninstall the existing Java package from the server.
■ Restart the server.
■ Run the Symantec Protection for SharePoint Servers installation program
again.
■ Select the option “Install only the Symantec Scan Engine 5.1” from the CD
installation menu.
This option automatically installs J2SE Runtime Environment (JRE) 5.0
Update 15.
144 Troubleshooting Symantec Protection for SharePoint Servers
About troubleshooting common issues
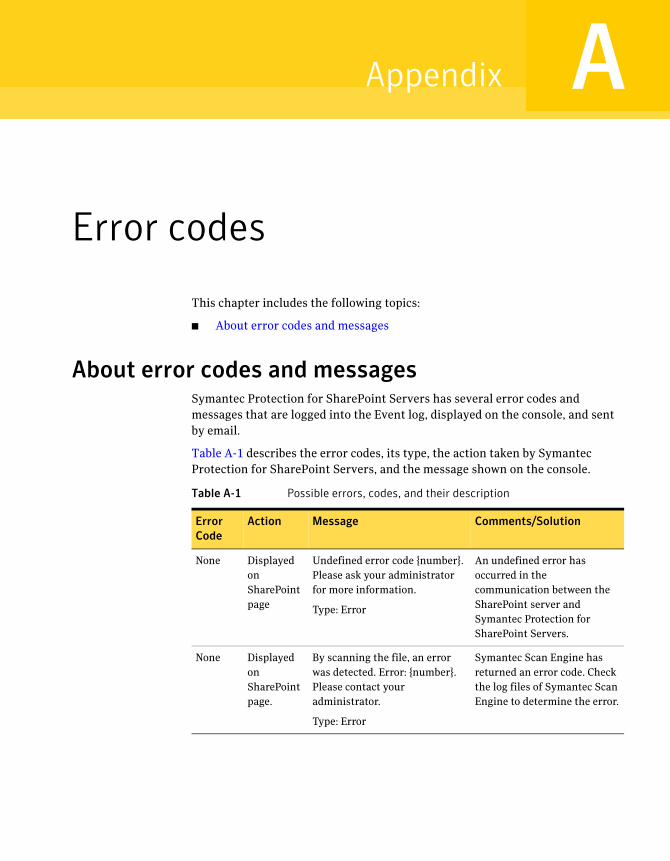
Appendix
AError codes
This chapter includes the following topics:
■ About error codes and messages
About error codes and messagesSymantec Protection for SharePoint Servers has several error codes and
messages that are logged into the Event log, displayed on the console, and sent
by email.
Table A-1 describes the error codes, its type, the action taken by Symantec
Protection for SharePoint Servers, and the message shown on the console.
Table A-1 Possible errors, codes, and their description
Error
Code
Action Message Comments/Solution
None Displayed
on
SharePoint
page
Undefined error code {number}.
Please ask your administrator
for more information.
Type: Error
An undefined error has
occurred in the
communication between the
SharePoint server and
Symantec Protection for
SharePoint Servers.
None Displayed
on
SharePoint
page.
By scanning the file, an error
was detected. Error: {number}.
Please contact your
administrator.
Type: Error
Symantec Scan Engine has
returned an error code. Check
the log files of Symantec Scan
Engine to determine the error.
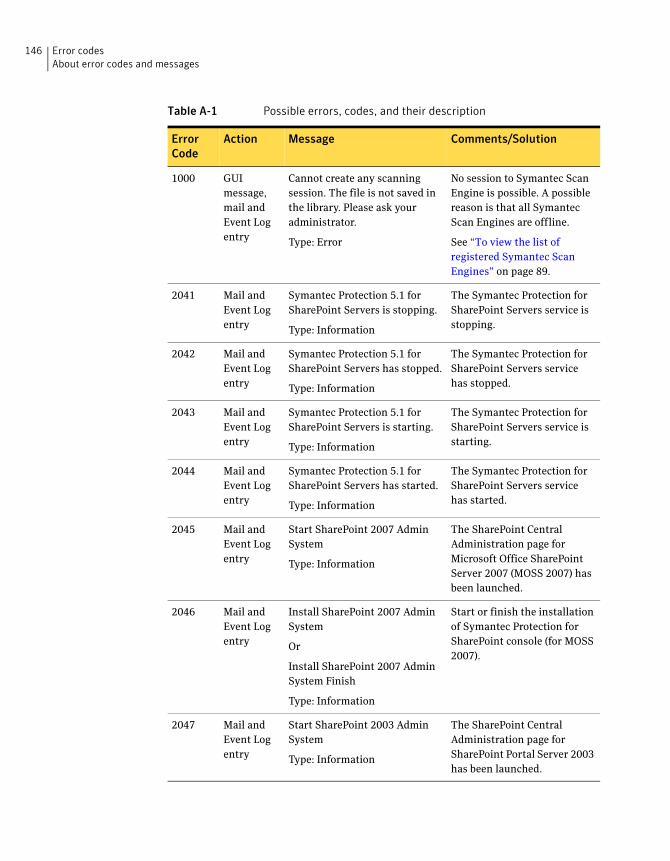
146 Error codes
About error codes and messages
1000 GUI
message,
mail and
Event Log
entry
Cannot create any scanning
session. The file is not saved in
the library. Please ask your
administrator.
Type: Error
No session to Symantec Scan
Engine is possible. A possible
reason is that all Symantec
Scan Engines are offline.
See “To view the list of
registered Symantec Scan
Engines” on page 89.
2041 Mail and
Event Log
entry
Symantec Protection 5.1 for
SharePoint Servers is stopping.
Type: Information
The Symantec Protection for
SharePoint Servers service is
stopping.
2042 Mail and
Event Log
entry
Symantec Protection 5.1 for
SharePoint Servers has stopped.
Type: Information
The Symantec Protection for
SharePoint Servers service
has stopped.
2043 Mail and
Event Log
entry
Symantec Protection 5.1 for
SharePoint Servers is starting.
Type: Information
The Symantec Protection for
SharePoint Servers service is
starting.
2044 Mail and
Event Log
entry
Symantec Protection 5.1 for
SharePoint Servers has started.
Type: Information
The Symantec Protection for
SharePoint Servers service
has started.
2045 Mail and
Event Log
entry
Start SharePoint 2007 Admin
System
Type: Information
The SharePoint Central
Administration page for
Microsoft Office SharePoint
Server 2007 (MOSS 2007) has
been launched.
2046 Mail and
Event Log
entry
Install SharePoint 2007 Admin
System
Or
Install SharePoint 2007 Admin
System Finish
Type: Information
Start or finish the installation
of Symantec Protection for
SharePoint console (for MOSS
2007).
2047 Mail and
Event Log
entry
Start SharePoint 2003 Admin
System
Type: Information
The SharePoint Central
Administration page for
SharePoint Portal Server 2003
has been launched.
Table A-1 Possible errors, codes, and their description
Error
Code
Action Message Comments/Solution
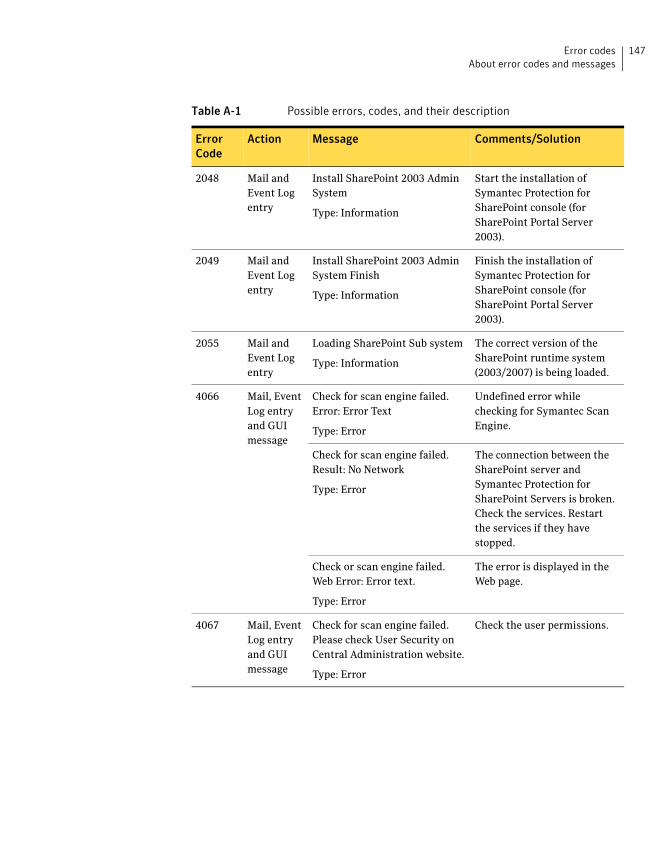
147Error codes
About error codes and messages
2048 Mail and
Event Log
entry
Install SharePoint 2003 Admin
System
Type: Information
Start the installation of
Symantec Protection for
SharePoint console (for
SharePoint Portal Server
2003).
2049 Mail and
Event Log
entry
Install SharePoint 2003 Admin
System Finish
Type: Information
Finish the installation of
Symantec Protection for
SharePoint console (for
SharePoint Portal Server
2003).
2055 Mail and
Event Log
entry
Loading SharePoint Sub system
Type: Information
The correct version of the
SharePoint runtime system
(2003/2007) is being loaded.
4066 Mail, Event
Log entry
and GUI
message
Check for scan engine failed.
Error: Error Text
Type: Error
Undefined error while
checking for Symantec Scan
Engine.
Check for scan engine failed.
Result: No Network
Type: Error
The connection between the
SharePoint server and
Symantec Protection for
SharePoint Servers is broken.
Check the services. Restart
the services if they have
stopped.
Check or scan engine failed.
Web Error: Error text.
Type: Error
The error is displayed in the
Web page.
4067 Mail, Event
Log entry
and GUI
message
Check for scan engine failed.
Please check User Security on
Central Administration website.
Type: Error
Check the user permissions.
Table A-1 Possible errors, codes, and their description
Error
Code
Action Message Comments/Solution
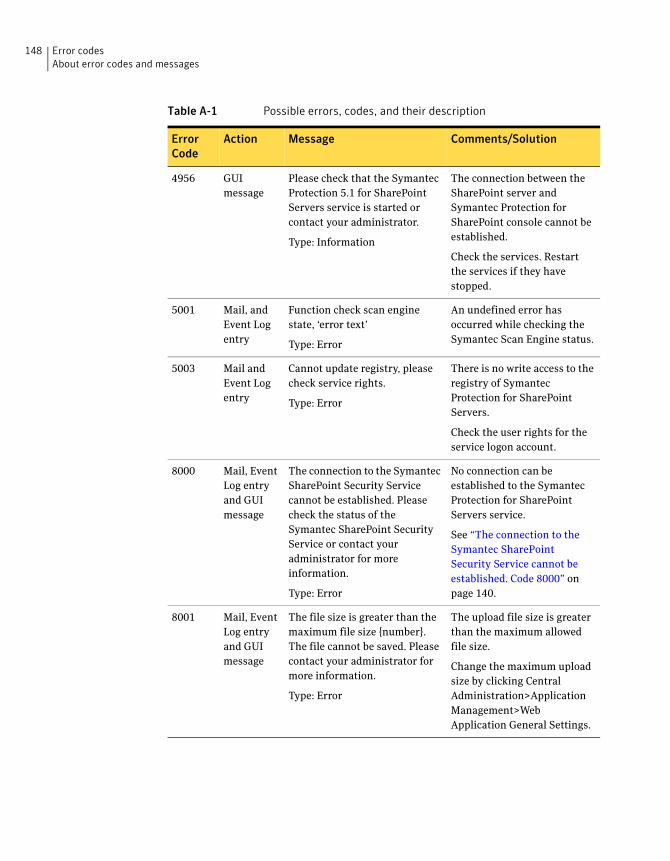
148 Error codes
About error codes and messages
4956 GUI
message
Please check that the Symantec
Protection 5.1 for SharePoint
Servers service is started or
contact your administrator.
Type: Information
The connection between the
SharePoint server and
Symantec Protection for
SharePoint console cannot be
established.
Check the services. Restart
the services if they have
stopped.
5001 Mail, and
Event Log
entry
Function check scan engine
state, ‘error text’
Type: Error
An undefined error has
occurred while checking the
Symantec Scan Engine status.
5003 Mail and
Event Log
entry
Cannot update registry, please
check service rights.
Type: Error
There is no write access to the
registry of Symantec
Protection for SharePoint
Servers.
Check the user rights for the
service logon account.
8000 Mail, Event
Log entry
and GUI
message
The connection to the Symantec
SharePoint Security Service
cannot be established. Please
check the status of the
Symantec SharePoint Security
Service or contact your
administrator for more
information.
Type: Error
No connection can be
established to the Symantec
Protection for SharePoint
Servers service.
See “The connection to the
Symantec SharePoint
Security Service cannot be
established. Code 8000” on
page 140.
8001 Mail, Event
Log entry
and GUI
message
The file size is greater than the
maximum file size {number}.
The file cannot be saved. Please
contact your administrator for
more information.
Type: Error
The upload file size is greater
than the maximum allowed
file size.
Change the maximum upload
size by clicking Central
Administration>Application
Management>Web
Application General Settings.
Table A-1 Possible errors, codes, and their description
Error
Code
Action Message Comments/Solution

149Error codes
About error codes and messages
8002 Mail, Event
Log entry
and GUI
message
There is no Symantec Scan
Engine available. The file was
not saved. Please contact your
administrator for more
information.
Type: Error
You have not registered any
Symantec Scan Engines.
See “Virus Found: There is no
Symantec Scan Engine
available. The file was not
saved. Code: 8002” on
page 141.
8003 Mail, Event
Log entry
and GUI
message
All virus scanners are at
maximum load. Please try again
later. The file has not been
saved. Please contact your
administrator for more
information.
Type: Error
All registered Symantec Scan
Engines are at their maximum
load. Symantec Scan Engine
has 128 threads for scanning
by default.
Modify the maximum number
of available threads through
the Symantec Scan Engine
console. For more
information, see the Symantec Scan Engine Implementation Guide.
9002 Mail, Event
Log entry
and GUI
message
Error by processing rendering
report job. Error: Error text.
Type: Error
An undefined error has
occurred while generating
reports.
9999 Mail and
Event Log
entry
General Error. Error: Error text
Type: Error
An undefined error has
occurred.
Table A-1 Possible errors, codes, and their description
Error
Code
Action Message Comments/Solution

150 Error codes
About error codes and messages
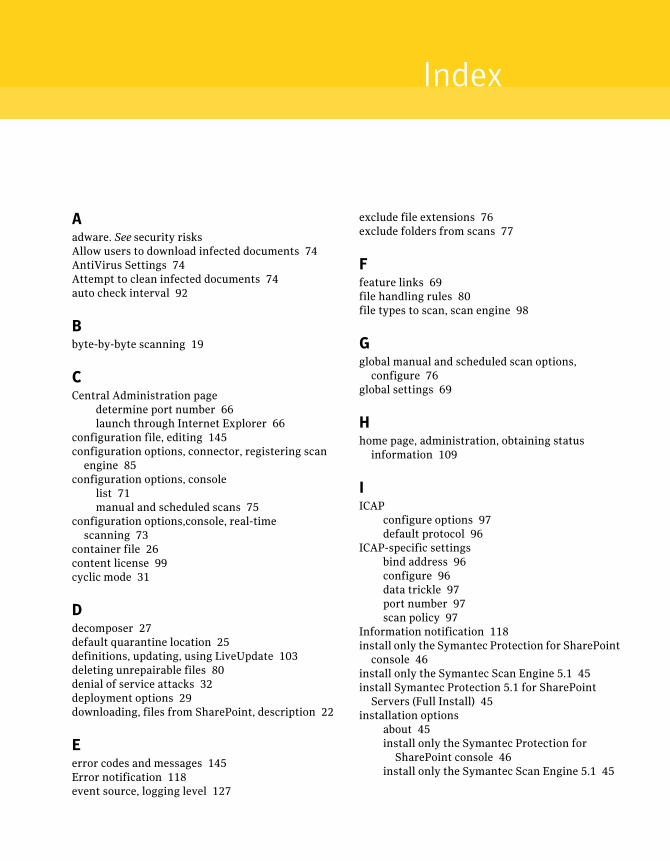
Index
Aadware. See security risks
Allow users to download infected documents 74
AntiVirus Settings 74
Attempt to clean infected documents 74
auto check interval 92
Bbyte-by-byte scanning 19
CCentral Administration page
determine port number 66
launch through Internet Explorer 66
configuration file, editing 145
configuration options, connector, registering scan
engine 85
configuration options, console
list 71
manual and scheduled scans 75
configuration options,console, real-time
scanning 73
container file 26
content license 99
cyclic mode 31
Ddecomposer 27
default quarantine location 25
definitions, updating, using LiveUpdate 103
deleting unrepairable files 80
denial of service attacks 32
deployment options 29
downloading, files from SharePoint, description 22
Eerror codes and messages 145
Error notification 118
event source, logging level 127
exclude file extensions 76
exclude folders from scans 77
Ffeature links 69
file handling rules 80
file types to scan, scan engine 98
Gglobal manual and scheduled scan options,
configure 76
global settings 69
Hhome page, administration, obtaining status
information 109
IICAP
configure options 97
default protocol 96
ICAP-specific settings
bind address 96
configure 96
data trickle 97
port number 97
scan policy 97
Information notification 118
install only the Symantec Protection for SharePoint
console 46
install only the Symantec Scan Engine 5.1 45
install Symantec Protection 5.1 for SharePoint
Servers (Full Install) 45
installation options
about 45
install only the Symantec Protection for
SharePoint console 46
install only the Symantec Scan Engine 5.1 45
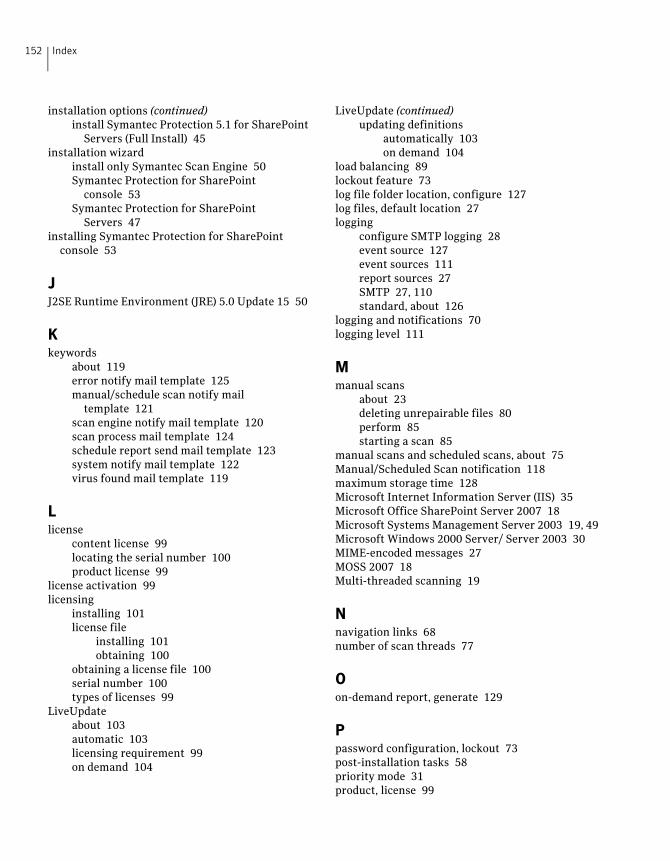
152 Index
installation options (continued)install Symantec Protection 5.1 for SharePoint
Servers (Full Install) 45
installation wizard
install only Symantec Scan Engine 50
Symantec Protection for SharePoint
console 53
Symantec Protection for SharePoint
Servers 47
installing Symantec Protection for SharePoint
console 53
JJ2SE Runtime Environment (JRE) 5.0 Update 15 50
Kkeywords
about 119
error notify mail template 125
manual/schedule scan notify mail
template 121
scan engine notify mail template 120
scan process mail template 124
schedule report send mail template 123
system notify mail template 122
virus found mail template 119
Llicense
content license 99
locating the serial number 100
product license 99
license activation 99
licensing
installing 101
license file
installing 101
obtaining 100
obtaining a license file 100
serial number 100
types of licenses 99
LiveUpdate
about 103
automatic 103
licensing requirement 99
on demand 104
LiveUpdate (continued)updating definitions
automatically 103
on demand 104
load balancing 89
lockout feature 73
log file folder location, configure 127
log files, default location 27
logging
configure SMTP logging 28
event source 127
event sources 111
report sources 27
SMTP 27, 110
standard, about 126
logging and notifications 70
logging level 111
Mmanual scans
about 23
deleting unrepairable files 80
perform 85
starting a scan 85
manual scans and scheduled scans, about 75
Manual/Scheduled Scan notification 118
maximum storage time 128
Microsoft Internet Information Server (IIS) 35
Microsoft Office SharePoint Server 2007 18
Microsoft Systems Management Server 2003 19, 49
Microsoft Windows 2000 Server/ Server 2003 30
MIME-encoded messages 27
MOSS 2007 18
Multi-threaded scanning 19
Nnavigation links 68
number of scan threads 77
Oon-demand report, generate 129
Ppassword configuration, lockout 73
post-installation tasks 58
priority mode 31
product, license 99
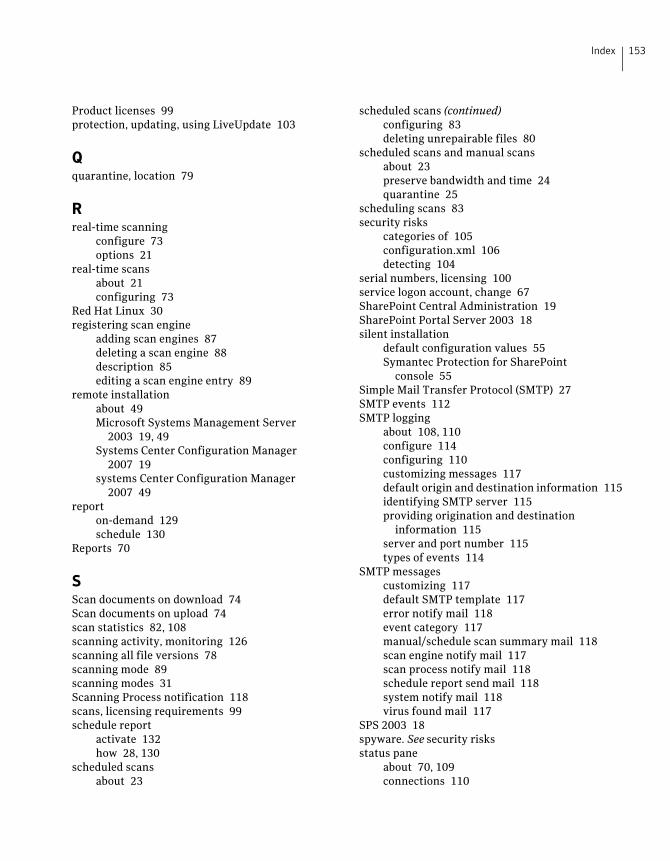
153Index
Product licenses 99
protection, updating, using LiveUpdate 103
Qquarantine, location 79
Rreal-time scanning
configure 73
options 21
real-time scans
about 21
configuring 73
Red Hat Linux 30
registering scan engine
adding scan engines 87
deleting a scan engine 88
description 85
editing a scan engine entry 89
remote installation
about 49
Microsoft Systems Management Server
2003 19, 49
Systems Center Configuration Manager
2007 19
systems Center Configuration Manager
2007 49
report
on-demand 129
schedule 130
Reports 70
SScan documents on download 74
Scan documents on upload 74
scan statistics 82, 108
scanning activity, monitoring 126
scanning all file versions 78
scanning mode 89
scanning modes 31
Scanning Process notification 118
scans, licensing requirements 99
schedule report
activate 132
how 28, 130
scheduled scans
about 23
scheduled scans (continued)configuring 83
deleting unrepairable files 80
scheduled scans and manual scans
about 23
preserve bandwidth and time 24
quarantine 25
scheduling scans 83
security risks
categories of 105
configuration.xml 106
detecting 104
serial numbers, licensing 100
service logon account, change 67
SharePoint Central Administration 19
SharePoint Portal Server 2003 18
silent installation
default configuration values 55
Symantec Protection for SharePoint
console 55
Simple Mail Transfer Protocol (SMTP) 27
SMTP events 112
SMTP logging
about 108, 110
configure 114
configuring 110
customizing messages 117
default origin and destination information 115
identifying SMTP server 115
providing origination and destination
information 115
server and port number 115
types of events 114
SMTP messages
customizing 117
default SMTP template 117
error notify mail 118
event category 117
manual/schedule scan summary mail 118
scan engine notify mail 117
scan process notify mail 118
schedule report send mail 118
system notify mail 118
virus found mail 117
SPS 2003 18
spyware. See security risks
status pane
about 70, 109
connections 110
154 Index
status pane (continued)Symantec Scan Engines Status 110
Sun Solaris 30
Symantec AntiVirus 4.3 for Microsoft
SharePoint 18, 56
Symantec AntiVirus Corporate Edition 36
Symantec Protection for SharePoint console
about 20, 63
configure password 72
hardware requirements 39
how to access 64
installing 53
operating system requirements 39
options to configure 72
password configuration 72
password protection 19
platforms 30
silent installation 55
silent uninstall 60
silently uninstall and log uninstallation
events 60
software requirements 39
system requirements 39
uninstalling 59
Symantec Protection for SharePoint console home
page
about 68
feature links 69
global settings 69
logging and notifications 70
navigation links 68
reports 70
status pane 70
Symantec Scan Engines 69
Symantec Protection for SharePoint Server, link
missing 136
Symantec Protection for SharePoint Servers
about 18
before you install 35
caching 22
components 20
configuring 71
deployment options 29, 31
download a file 22
error codes 145
handle large scanning volumes 31
how it works 20
installation options 45
installation wizard 47
Symantec Protection for SharePoint
Servers (continued)installing 43
keep product up-to-date 102
log files 126
logging and email notifications 27
Microsoft® Search Server 2008 Express
support 19
monitoring 21, 108
more information 32
on-demand reports 28
post-installation tasks 58
real-time scanning of files 20
remote installation 19, 49
repair or modify 56
reporting 21
scanning modes 31
scheduled reports 28
scheduled scans and manual scans 21
SharePoint versions supported 18
software components 20
status pane 109
system requirements 37
troubleshoot common issues 135
uninstalling 59
upgrade 44
upload a file 22
What’s new 18
when a file is scanned 25
working 20
Symantec Protection for SharePoint Servers
integrated installation
about installing 46
hardware requirements 38
operating system 38
software requirements 38
system requirements 38
Symantec Scan Engine
access console 95
add,remove,edit,view 87
adding a scan engine 87
communication protocol settings 96
configuring ICAP 96
container files 32
cyclic mode 90
deleting a scan engine 88
description 86
editing an entry 89
enable 86
155Index
Symantec Scan Engine (continued)file types 98
host or IP address 86
ICAP 96
installation wizard 50
installing 50
installing Java manually 52
installing on a 64-bit computer 52
license activation 99
licensing 99
Linux system requirements 42
load balancing 89
platforms 30
priority 87
priority mode 90
register 85
registering with connector 85
scan policies 26
Solaris system requirements 41
specifying which file types to scan 98
system requirements 40
TCP/IP port 86
uninstall 61
uninstall on Windows 2000 Server/Server
2003 61
uninstall using product CD 61
virus protection 32
Windows system requirements 40
Symantec Scan Engine auto check 92
Symantec Scan Engine console 95
Symantec Scan Engine notification 117
Symantec Scan Engines, link on the console 69
System log files 47
system requirements 37
Systems Center Configuration Manager 2007 19, 49
TTake a Symantec Scan Engine offline 92
Threshold time 92
Trojan horses 32
Uuninstalling Symantec Protection for SharePoint
Servers 59
uploading files to SharePoint, description 22
Vvirus definition
automatically check 92
check 90
manually check 92
virus definitions files 90
Virus found notification 117
virus protection 32
virus scanning
how scanning works 25
manual 23
real-time 21
scheduled 23
WWindows Application Event Log 47
Windows Server® 2008 18
Windows SharePoint Services 2.0 18
Windows SharePoint Services 3.0 18
worm 32
WSS 2.0 18
WSS 3.0 18

156 Index