Embed Size (px)
Citation preview

Product Manual
Care for our Environment; ‘It's the right thing to do.’Symantec has removed the cover from this manual to reduce the Environmental Footprint of ourproducts. This manual is made from recycled materials.

Norton™ Internet Security ProductManual
The software described in this book is furnished under a licenseagreement and may be used only in accordance with the terms ofthe agreement.
Documentation version 20.1
Copyright © 2012 Symantec Corporation. All rights reserved.
Symantec, the Symantec Logo, LiveUpdate, Norton 360, and Nortonare trademarks or registered trademarks of Symantec Corporationor its affiliates in the U.S. and other countries. Portions of thisproduct Copyright 1996-2011 Glyph & Cog, LLC. Other names maybe trademarks of their respective owners.
The product described in this document is distributed under licensesrestricting its use, copying, distribution, and decompilation/reverseengineering. No part of this document may be reproduced in anyform by any means without prior written authorization of SymantecCorporation and its licensors, if any.
THE DOCUMENTATION IS PROVIDED “AS IS” AND ALL EXPRESSOR IMPLIED CONDITIONS, REPRESENTATIONS ANDWARRANTIES, INCLUDING ANY IMPLIED WARRANTY OFMERCHANTABILITY, FITNESS FOR A PARTICULAR PURPOSE ORNON-INFRINGEMENT, ARE DISCLAIMED, EXCEPT TO THE EXTENTTHAT SUCH DISCLAIMERS ARE HELD TO BE LEGALLY INVALID.SYMANTEC CORPORATION SHALL NOT BE LIABLE FORINCIDENTAL OR CONSEQUENTIAL DAMAGES IN CONNECTIONWITH THE FURNISHING, PERFORMANCE, OR USE OF THISDOCUMENTATION. THE INFORMATION CONTAINED IN THISDOCUMENTATION IS SUBJECT TO CHANGE WITHOUT NOTICE.
The Licensed Software and Documentation are deemed to becommercial computer software as defined in FAR 12.212 and subjectto restricted rights as defined in FAR Section 52.227-19 "CommercialComputer Software - Restricted Rights" and DFARS 227.7202, etseq. “Commercial Computer Software and Commercial ComputerSoftware Documentation”, as applicable, and any successorregulations. Any use, modification, reproduction release,performance, display or disclosure of the Licensed Software andDocumentation by the U.S. Government shall be solely in accordancewith the terms of this Agreement.
Symantec Corporation350 Ellis Street,Mountain View, CA 94043
http://www.symantec.com
Printed in the United States of America.
10 9 8 7 6 5 4 3 2 1

Norton License AgreementNorton™ Internet Security
IMPORTANTPLEASE READ THE TERMSAND CONDITIONS OF THIS LICENSEAGREEMENT (“LICENSE AGREEMENT”)CAREFULLY BEFORE USING THESOFTWARE (AS DEFINED BELOW).SYMANTEC CORPORATION, IF YOU ARELOCATED IN THE AMERICAS; ORSYMANTEC ASIA PACIFIC PTE LTD, IF YOUARE LOCATED IN THE ASIA PACIFIC RIMOR JAPAN; OR SYMANTEC LIMITED, IF YOUARE LOCATED IN EUROPE, THE MIDDLEEAST OR AFRICA (“SYMANTEC”) ISWILLING TO LICENSE THE SOFTWARE TOYOU AS THE INDIVIDUAL, THE COMPANY,OR THE LEGAL ENTITY THAT WILL BEUTILIZING THE SOFTWARE (REFERENCEDBELOW AS “YOU” OR “YOUR”) ONLY ONTHE CONDITION THAT YOU ACCEPT ALLOF THE TERMS OF THIS LICENSEAGREEMENT. THIS IS A LEGAL ANDENFORCEABLE CONTRACT BETWEEN YOUAND SYMANTEC. BY OPENING THISPACKAGE, BREAKING THE SEAL, CLICKINGTHE “I AGREE” OR “YES” BUTTON OROTHERWISE INDICATING ASSENTELECTRONICALLY, OR LOADING THESOFTWARE, YOU AGREE TO THE TERMSAND CONDITIONS OF THIS LICENSEAGREEMENT. IF YOU DO NOT AGREE TOTHESE TERMS AND CONDITIONS, CLICKTHE “CANCEL” OR “NO” OR “CLOSEWINDOW” BUTTON OR OTHERWISEINDICATE REFUSAL, MAKE NO FURTHERUSE OF THE SOFTWARE, AND CONTACTYOUR VENDOR OR SYMANTEC CUSTOMERSERVICE, USING THE CONTACT DETAILSIN SECTION 12 OF THIS LICENSEAGREEMENT, FOR INFORMATION ON HOWTO OBTAIN A REFUND OF THE AMOUNTYOU PAID FOR THE CURRENT SERVICEPERIOD (DEFINED BELOW) (LESS SHIPPING,HANDLING, AND ANY APPLICABLE TAXESEXCEPT IN CERTAIN STATES ANDCOUNTRIES WHERE SHIPPING, HANDLING,AND TAXES ARE REFUNDABLE) AT ANYTIME DURING THE SIXTY (60) DAY PERIODFOLLOWING THE DATE OF PURCHASE OFAN ANNUAL SUBSCRIPTION OR WITHINTHIRTY (30) DAYS FOLLOWING THE DATEOF PURCHASE OF A MONTHLYSUBSCRIPTION.
1. License:The software (including all its accompanyingfeatures and services), and softwaredocumentation, (including any productpackaging) (the “Documentation”), thataccompanies this License Agreement(collectively the “Software”) is the propertyof Symantec or its licensors, and is protectedby copyright law. Although Symanteccontinues to own the Software, after Youracceptance of this License Agreement Youwill have certain rights to use the Softwareduring the Service Period. The “ServicePeriod” shall begin on either (a) the date ofYour initial installation of a copy of theSoftware on a computer, mobile or mobilecomputing device (a “Device”), or (b) if Youreceived this Software as part of a multipleproduct offering, the date of Your initialinstallation of a copy of the Software or anysoftware product or mobile applicationincluded in such offering on a Device. TheService Period shall last for the period of timeset out in the Documentation or theapplicable transaction documentation fromthe authorized distributor or reseller fromwhich You obtained the Software. TheSoftware may automatically deactivate andbecome non-operational at the end of theService Period, and You will not be entitledto receive any feature or content updates tothe Software unless the Service Period isrenewed. Subscriptions for renewals of theService Period will be available in accordancewith Symantec’s support policy posted at
http://www.symantec.com/norton/support/technical_support_policy.jsp
This License Agreement governs anyreleases, revisions, updates or enhancementsto the Software that Symantec may makeavailable to You. Except as may be modifiedby the Documentation, and subject toSymantec’s right to terminate for Yourbreach pursuant to Section 10, Your rightsand obligations under this LicenseAgreement with respect to the use of thisSoftware are as follows.

During the Service Period, Youmay:A. use one copy of the Software on a singleDevice. If a greater number of copies and/ornumber of Devices is specified within theDocumentation or the applicable transactiondocumentation from the authorizeddistributor or reseller from which Youobtained the Software, You may use theSoftware in accordance with suchspecifications;
B. make one copy of the Software for back-upor archival purposes, or copy the Softwareonto the hard disk of Your Device and retainthe original for back-up or archival purposes;
C. use the Software on a network, providedthat You have a licensed copy of the Softwarefor each Device that can access the Softwareover that network;
D. permanently transfer all of Your rights inthe Software granted under this LicenseAgreement to another person or entity,provided that You retain no copies of theSoftware and the transferee agrees to theterms of this License Agreement. Partialtransfer of Your rights under this LicenseAgreement shall not be permitted. Forexample, if the applicable documentationgrants You the right to use multiple copiesof the Software, only a transfer of the rightsto use all such copies of the Software wouldbe valid; and
E. use the Software in accordance with anyadditional permitted uses which may be setforth below.
You may not, nor may You permitany other person to:A. sublicense, rent or lease any portion of theSoftware;
B. reverse engineer, decompile, disassemble,modify, translate, make any attempt todiscover the source code of the Software orcreate derivative works from the Software;
C. use the Software as part of a facilitymanagement, timesharing, service provideror service bureau arrangement; or
D. use the Software in any manner that is notpermitted pursuant to this LicenseAgreement.
2. Software and Content Updates:A. You shall have the right to receive newfeatures to and versions of the Software asSymantec, in its sole discretion, makes suchfeatures and versions available during YourService Period. Symantec continually strivesto improve the usability and performance ofits products and services. In order tooptimize the Software, and to provide Youwith the most current version of theSoftware, You agree the Software maydownload and install new updates andversions of the Software as they are madeavailable by Symantec in its sole discretion.You agree to receive and permit Symantecto deliver such new updates and versions toYour Device. Additionally, Symantec maymodify the terms and conditions that applyto Your use of the Software to reflect suchupdates and You agree to such updatedterms.
B. Certain software uses content that isupdated from time to time, including but notlimited to the following software: antivirusand crimeware software use updated virusdefinitions; antispyware software usesupdated spyware definitions; antispamsoftware uses updated antispam rules;content filtering and antiphishing softwareuse updated URL lists; some firewall softwareuse updated firewall rules; vulnerabilityassessment products use updatedvulnerability data and web siteauthentication software uses updated listsof authenticated web pages; these updatesare collectively referred to as “ContentUpdates” (or alternatively referred to as“Protection Updates” or “Security Updates”at times). You shall have the right to receiveContent Updates for the Software duringYour Service Period.
3. Product Installation; RequiredActivation:A. During the installation process, theSoftware may uninstall or disable othersecurity products, or features of suchproducts, if such products or features areincompatible with the Software or forpurposes of improving the overallfunctionality of the Software.
B. There may be technological measures inthis Software that are designed to preventunlicensed or illegal use of the Software. Youagree that Symantec may use these measures

to protect Symantec against software piracy.This Software may contain enforcementtechnology that limits the ability to installand uninstall the Software on a Device to notmore than a finite number of times for afinite number of Devices. This LicenseAgreement and the Software containingenforcement technology may requireactivation as further set out in theDocumentation. If so, the Software will onlyoperate for a finite period of time prior toSoftware activation by You. Duringactivation, You may be required to provideYour unique activation code accompanyingthe Software and Device configuration in theform of an alphanumeric code over theInternet to verify the authenticity of theSoftware. If You do not complete theactivation within the finite period of time setforth in the Documentation, or as promptedby the Software, the Software will cease tofunction until activation is complete; atwhich time the Software functionality willbe restored. In the event that You are notable to activate the Software over theInternet, or through any other methodspecified during the activation process, Youmay contact Symantec Customer Supportusing the information provided by Symantecduring activation, or as set out below.
5. Technical Support:In connection with Your use of the SoftwareYou may choose to access certain technicalsupport features that may be offered fromwithin the Software, which may include livechat with a technical support agent and/orassistance from a technical support agentvia remote computer access (any suchtechnical support offered from within theSoftware shall be referred to in this LicenseAgreement as the “Technical Support”). Anysuch Technical Support shall be provided inSymantec’s sole discretion without anyguarantee or warranty of any kind other thanany guarantees applicable under consumerlaws in Your jurisdiction which cannot beexcluded or limited in any way. It is solelyYour responsibility to complete a backup ofall Your existing data, software and programsbefore receiving any Technical Support. Inthe course of providing the TechnicalSupport, Symantec may determine that thetechnical issue is beyond the scope of theTechnical Support. Symantec reserves theright to refuse, suspend or terminate any ofthe Technical Support in its sole discretion.
6. Money Back Guarantee:If You are the original licensee of this copyof the Software and are not completelysatisfied with it for any reason, please makeno further use of the Software and contactSymantec Customer Service, using thecontact details set out in Section 12 of thisLicense Agreement, for a refund of theamount You paid for the current ServicePeriod (less shipping, handling, and anyapplicable taxes except in certain states andcountries where shipping, handling and taxesare refundable) at any time during the sixty(60) day period following the date of purchaseof an annual subscription or within thirty(30) days following the date of purchase of amonthly subscription.
7. Limited Warranty:Symantec warrants that any mediamanufactured by Symantec on which theSoftware is distributed will be free fromdefects for a period of sixty (60) days fromthe date of delivery of the Software to You.Your sole remedy in the event of a breach ofthis warranty will be that Symantec will, atits option, replace any defective mediareturned to Symantec within the warrantyperiod or refund the money You paid for theSoftware. Symantec does not warrant thatthe Software will meet Your requirements orthat operation of the Software will beuninterrupted or that the Software will beerror-free. For the avoidance of doubt,references to “Software” in the foregoingsentence shall include, but not be limited to,the Online Backup Feature and TechnicalSupport.
TO THE MAXIMUM EXTENT PERMITTEDBY APPLICABLE LAW, THE ABOVEWARRANTY IS EXCLUSIVE AND IN LIEUOFALLOTHERWARRANTIES,WHETHEREXPRESS OR IMPLIED, INCLUDING THEIMPLIED WARRANTIES OFMERCHANTABILITY, FITNESS FOR APARTICULAR PURPOSE, ANDNON-INFRINGEMENTOFINTELLECTUALPROPERTY RIGHTS. THIS WARRANTYGIVESYOUSPECIFICLEGALRIGHTS.YOUMAYHAVEOTHERRIGHTS,WHICHVARYFROM STATE TO STATE AND COUNTRYTO COUNTRY.

8. Disclaimer of Damages:SOME STATES AND COUNTRIES DO NOTALLOWTHELIMITATIONOREXCLUSIONOF LIABILITY FOR INCIDENTAL ORCONSEQUENTIAL DAMAGES, SO THEBELOWLIMITATIONOREXCLUSIONMAYNOT APPLY TO YOU.
TO THE MAXIMUM EXTENT PERMITTEDBYAPPLICABLELAWANDREGARDLESSOF WHETHER ANY REMEDY SET FORTHHEREIN FAILS OF ITS ESSENTIALPURPOSE,INNOEVENTWILLSYMANTECORITSLICENSORSBELIABLETOYOUFORANY SPECIAL, CONSEQUENTIAL,INDIRECT, OR SIMILAR DAMAGES,INCLUDINGANYLOSTPROFITSORLOSTDATA ARISING OUT OF THE USE ORINABILITY TO USE THE SOFTWARE(INCLUDING BUT NOT LIMITED TO USEOF THE ONLINE BACKUP FEATURE ANDTECHNICAL SUPPORT) EVEN IFSYMANTEC HAS BEEN ADVISED OF THEPOSSIBILITY OF SUCH DAMAGES.
IN NO CASE SHALL SYMANTEC’S OR ITSLICENSORS’ LIABILITY EXCEED THEPURCHASEPRICEWHICHYOUPAIDFORTHE APPLICABLE SERVICE PERIOD. Thedisclaimersand limitationsset forthabovewillapplyregardlessofwhetherYouacceptthe Software.
9. U.S. Government RestrictedRights:For U.S. Government procurements, theSoftware is deemed to be commercialcomputer software as defined in FAR 12.212and subject to restricted rights as defined inFAR Section 52.227-19 "CommercialComputer Software - Restricted Rights" andDFARS 227.7202, “Rights in CommercialComputer Software or Commercial ComputerSoftware Documentation”, as applicable, andany successor regulations. Any use,modification, reproduction release,performance, display or disclosure of theSoftware by the U.S. Government shall besolely in accordance with the terms of thisLicense Agreement.
10. Export Regulation:You acknowledge that the Software andrelated technical data and services(collectively "Controlled Technology") maybe subject to the import and export laws of
the United States, specifically the U.S. ExportAdministration Regulations (EAR), and thelaws of any country where ControlledTechnology is imported or re-exported. Youagree to comply with all relevant laws andwill not export any Controlled Technologyin contravention to U.S. law nor to anyprohibited country, entity, or person forwhich an export license or othergovernmental approval is required. AllSymantec product is prohibited for exportor re-export to Cuba, North Korea, Iran, Syriaand Sudan and to any country subject torelevant trade sanctions. USE ORFACILITATIONOFSYMANTECPRODUCTIN CONNECTION WITH ANY ACTIVITYINCLUDING, BUT NOT LIMITED TO, THEDESIGN,DEVELOPMENT,FABRICATION,TRAINING, OR TESTING OF CHEMICAL,BIOLOGICAL,ORNUCLEARMATERIALS,OR MISSILES, DRONES, OR SPACELAUNCH VEHICLES CAPABLE OFDELIVERING WEAPONS OF MASSDESTRUCTION IS PROHIBITED, INACCORDANCE WITH U.S. LAW.
11. Arbitration:If You are a U.S. customer, You and Symantecagree that any dispute, claim or controversyarising out of or relating in any way to theSoftware or this License Agreement, shall bedetermined by binding arbitration or smallclaims court, instead of in courts of generaljurisdiction. Arbitration is more informalthan a lawsuit in court. Arbitration uses aneutral arbitrator instead of a judge or jury,allows for more limited discovery than incourt, and is subject to very limited reviewby courts. Arbitrators can award the samedamages and relief that a court can award.You agree that, by agreeing to this LicenseAgreement, the U.S. Federal Arbitration Actgoverns the interpretation and enforcementof this arbitration provision, and that Youand Symantec are each waiving the right toa trial by jury or to participate in a classaction. This arbitration provision shallsurvive termination of this LicenseAgreement and/or the termination of YourSymantec product license.
If You elect to seek arbitration, You must firstsend to Symantec, by certified mail, a writtenNotice of Your claim ("Notice of Claim"). TheNotice of Claim to Symantec should beaddressed to: General Counsel, Symantec,Inc., 350 Ellis Street, Mountain View, CA94043 and should be prominently captioned

“NOTICE OF CLAIM”. The Notice of Claimshould include both the mailing address andemail address You would like Symantec touse to contact You. If Symantec elects to seekarbitration, it will send, by certified mail, awritten Notice of Claim to Your billingaddress on file. A Notice of Claim, whethersent by You or by Symantec, must (a) describethe nature and basis of the claim or dispute;and (b) set forth the specific amount ofdamages or other relief sought ("Demand").
If You and Symantec do not reach anagreement to resolve the claim within thirty(30) days after the Notice of Claim is received,You or Symantec may commence anarbitration proceeding or file a claim in smallclaims court. You may download or copy aform of notice and a form to initiatearbitration at www.adr.org. If You arerequired to pay a filing fee, Symantec willpromptly reimburse You for Your paymentof the filing fee after arbitration iscommenced. The arbitration will be governedby the Commercial Arbitration Rules and theSupplementary Procedures for ConsumerRelated Disputes (collectively, "AAA Rules")of the American Arbitration Association("AAA"), as modified by this LicenseAgreement, and will be administered by theAAA. The AAA Rules and Forms are availableonline at www.adr.org or by calling the AAAat 1-800-778-7879. The arbitrator is boundby the terms of this License Agreement. Allissues are for the arbitrator to decide,including issues relating to the scope andenforceability of this arbitration provision.Unless Symantec and You agree otherwise,any arbitration hearings will take place inthe county (or parish) of either the mailingaddress You provided in Your Notice or, if noaddress was provided in Your Notice, Yourbilling address on file. If Your claim is forU.S. $10,000 or less, Symantec agrees thatYou may choose whether the arbitration willbe conducted solely on the basis ofdocuments submitted to the arbitrator,through a telephonic hearing, or by anin-person hearing as established by the AAARules. If Your claim exceeds U.S. $10,000,the right to a hearing will be determined bythe AAA Rules. Regardless of the manner inwhich the arbitration is conducted, thearbitrator shall issue a reasoned writtendecision sufficient to explain the essentialfindings and conclusions on which the awardis based. If the arbitrator issues You an awardthat is greater than the value of Symantec’slast written settlement offer made before an
arbitrator was selected (or if Symantec didnot make a settlement offer before anarbitrator was selected), then Symantec willpay You, in addition to the award, either U.S.$500 or 10% of the amount awarded,whichever is greater. Except as expressly setforth herein, the payment of all filing,administration and arbitrator fees will begoverned by the AAA Rules.
YOU AND SYMANTEC AGREE THAT EACHMAY BRING CLAIMS AGAINST THE OTHERONLY IN YOUR OR ITS INDIVIDUALCAPACITY, AND NOT AS A PLAINTIFF ORCLASS MEMBER IN ANY PURPORTED CLASSOR REPRESENTATIVE PROCEEDING.Further, unless both You and Symantec agreeotherwise, the arbitrator may not consolidatemore than one person's claims with Yourclaims, and may not otherwise preside overany form of a representative or classproceeding. If this specific provision is foundto be unenforceable, then the entirety of thisarbitration provision shall be null and void.The arbitrator may award declaratory orinjunctive relief only in favor of theindividual party seeking relief and only tothe extent necessary to provide reliefwarranted by that party's individual claim.
12. General:This License Agreement will be governed bythe laws of the State of California, UnitedStates of America. This License Agreementis the entire agreement between You andSymantec relating to the Software and: (i)supersedes all prior or contemporaneous oralor written communications, proposals, andrepresentations with respect to its subjectmatter; and (ii) prevails over any conflictingor additional terms of any quote, order,acknowledgment, or similar communicationsbetween the parties. Notwithstanding theforegoing, nothing in this License Agreementwill diminish any rights You may have underexisting consumer protection legislation orother applicable laws in Your jurisdictionthat may not be waived by contract.Symantec may terminate this LicenseAgreement if You breach any term containedin this License Agreement (other than atrivial or inconsequential breach) and, if suchtermination occurs, You must cease use ofand destroy all copies of the Software andDocumentation. The disclaimers ofwarranties and damages and limitations onliability shall survive and continue to applyafter termination. This License Agreement

may only be modified by the Documentationor by a written document that has beensigned by both You and Symantec. ShouldYou have any questions concerning thisLicense Agreement, or if You desire tocontact Symantec for any reason, pleasewrite to Symantec Customer Service, 555International Way, Springfield, OR 97477,U.S.A. or visit the Support page atwww.symantec.com.
ADDITIONAL TERMS AND CONDITIONS.Your use of the Software is subject to theterms and conditions below in addition tothose stated above.

Chapter 1 Getting started . . . . . . . . . . . . . . . . . . . . . . . . . . . . . . . . . . . . . . 13Activation protects you . . . . . . . . . . . . . . . . . . . . . . . . . . . . . 13About Norton Internet Security main
window .. . . . . . . . . . . . . . . . . . . . . . . . . . . . . . . . . . . . . . . . . . 18About your Norton Account . . . . . . . . . . . . . . . . . . . . . . . . 32About Norton Management . . . . . . . . . . . . . . . . . . . . . . . . 38About Norton Community Watch . . . . . . . . . . . . . . . . . 45About Norton Bootable Recovery
Tool . . . . . . . . . . . . . . . . . . . . . . . . . . . . . . . . . . . . . . . . . . . . . . . 47About Norton Power Eraser . . . . . . . . . . . . . . . . . . . . . . . . 59Starting Norton Internet Security from the
command prompt . . . . . . . . . . . . . . . . . . . . . . . . . . . . . . 61About the Norton Internet Security
icon . . . . . . . . . . . . . . . . . . . . . . . . . . . . . . . . . . . . . . . . . . . . . . . . 61About LiveUpdate . . . . . . . . . . . . . . . . . . . . . . . . . . . . . . . . . . . . 64About Network Proxy Settings . . . . . . . . . . . . . . . . . . . . 76
Chapter 2 Monitoring your system'sperformance . . . . . . . . . . . . . . . . . . . . . . . . . . . . . . . . . . . 81
About System Insight . . . . . . . . . . . . . . . . . . . . . . . . . . . . . . . . 81
Chapter 3 Protecting your files and data . . . . . . . . . . . . . . . . 125About maintaining protection . . . . . . . . . . . . . . . . . . . 125About the Norton Internet Security
scans . . . . . . . . . . . . . . . . . . . . . . . . . . . . . . . . . . . . . . . . . . . . . 128
Contents

Chapter 4 Responding to security issues . . . . . . . . . . . . . . . . 199What to do if a security risk is found . . . . . . . . . . . 199
Chapter 5 Protecting Internet activities . . . . . . . . . . . . . . . . . 211About the Smart Firewall . . . . . . . . . . . . . . . . . . . . . . . . . 211About Download Insight . . . . . . . . . . . . . . . . . . . . . . . . . . . 262About Intrusion Prevention . . . . . . . . . . . . . . . . . . . . . . 272About Vulnerability Protection . . . . . . . . . . . . . . . . . . 280About the types of security risks . . . . . . . . . . . . . . . . 282About Norton AntiSpam .. . . . . . . . . . . . . . . . . . . . . . . . . . 284About configuring POP3 and SMTP
ports . . . . . . . . . . . . . . . . . . . . . . . . . . . . . . . . . . . . . . . . . . . . . 298About the Network Security Map .. . . . . . . . . . . . . . . 301About Network Cost Awareness . . . . . . . . . . . . . . . . . 326
Chapter 6 Securing your sensitive data . . . . . . . . . . . . . . . . . . 331About securing your sensitive data . . . . . . . . . . . . . 331
Chapter 7 Monitoring protection features . . . . . . . . . . . . . . 405About Security History . . . . . . . . . . . . . . . . . . . . . . . . . . . . 405
Chapter 8 Customizing protection features . . . . . . . . . . . . 443Feature summary . . . . . . . . . . . . . . . . . . . . . . . . . . . . . . . . . . . 443About turning off automatic features . . . . . . . . . . 452About customizing settings and
options . . . . . . . . . . . . . . . . . . . . . . . . . . . . . . . . . . . . . . . . . . 458
Chapter 9 Finding additional solutions . . . . . . . . . . . . . . . . . . 515Finding the version number of your
product . . . . . . . . . . . . . . . . . . . . . . . . . . . . . . . . . . . . . . . . . . 515Finding the End-User License
Agreement . . . . . . . . . . . . . . . . . . . . . . . . . . . . . . . . . . . . . 516About upgrading your product . . . . . . . . . . . . . . . . . . . 516About Norton Autofix . . . . . . . . . . . . . . . . . . . . . . . . . . . . . . 519Staying informed about protection
issues . . . . . . . . . . . . . . . . . . . . . . . . . . . . . . . . . . . . . . . . . . . . 521About Support . . . . . . . . . . . . . . . . . . . . . . . . . . . . . . . . . . . . . . . 523About uninstalling . . . . . . . . . . . . . . . . . . . . . . . . . . . . . . . . . . 529
Contents10

Index . . . . . . . . . . . . . . . . . . . . . . . . . . . . . . . . . . . . . . . . . . . . . . . . . . . . . . . . . . . . . . . . . . . . . . . . . . 535
11Contents

Contents12

This chapter includes the following topics:
1 Activation protects you
1 About Norton Internet Security main window
1 About your Norton Account
1 About Norton Management
1 About Norton Community Watch
1 About Norton Bootable Recovery Tool
1 About Norton Power Eraser
1 Starting Norton Internet Security from thecommand prompt
1 About the Norton Internet Security icon
1 About LiveUpdate
1 About Network Proxy Settings
Activation protects youProduct activation protects users from pirated orcounterfeit software. It protects you by limiting theuse of a product to those users who have acquired theproduct legitimately. Product activation requires aproduct key for each installation of a product. You must
1Getting started

activate the product within a limited time period afteryou install it.
If you are connected to the Internet, product activationtakes place automatically when you start the productfor the first time after installation. After activation,the Norton Account window appears. You can createyour Norton Account and register your product.
If you are not connected to the Internet, you can clickTry Later in the Activation not complete window tostart your product. The Activation window reappearsevery time you start your product until you activateyour product. If you choose not to activate at that time,you receive an alert that reminds you to activate theproduct. You can also activate your product from theNorton Internet Security main window.
w If you do not activate the product within the timeperiod that the alert specifies, the product stopsworking. You can activate it after the time period haselapsed, but you are not protected until you activatethe product.
Activating your productIf you did not activate your product during installation,you receive an activation-needed alert regularly untilyou activate the product.
Product activation reduces software piracy and ensuresthat you use authentic Symantec software. Activationprovides you with a specified period of subscription toyour Norton product. You can also renew yoursubscription to continue using Norton InternetSecurity.
w You must activate your product within the time periodthat the alert specifies, or your product stops working.
You can activate your product directly from theactivation-needed alert or from the main window.Activation should take only a few minutes.
Getting startedActivation protects you
14

During activation, the Norton Account windowappears. You can create your Norton Account andregister your product. You can also view details, suchas your product key, your registration date, and recentupdates to the product. If you skip the NortonAccountwindow, the product is activated, but the product keyis not saved in the Norton Account. You can print theproduct key to reinstall your product in the future.
To activate your product from the alert
1 In the alert, do one of the following:
1 If you purchased a subscription version of aretail product or the product came installed onyour computer, select Activate Now(Recommended).
1 If you want to renew the subscription of yourproduct, select Renew Now.
You can also activate or renew the subscription ofyour product from any non-admin user account.
2 Click OK.
3 Follow the on-screen instructions to activate orrenew your product.
4 In the window that appears, click Done.
To activate your product from the main window
1 In the Norton Internet Security main window, doone of the following:
1 If you purchased a subscription version of aretail product, click Activate Now.
1 If the product came installed on your computer,click Activate Online Now.
1 If you want to renew the subscription of yourproduct, click Renew.
You can also activate or renew the subscription ofyour product from any non-admin user account.
2 Follow the on-screen instructions to activate orsubscribe your product.
3 In the window that appears, click Done.
15Getting startedActivation protects you

Where to find your product keyThe product key is a unique key that helps you to installand activate the Symantec product on your computer.The product key is a 25-character alphanumeric stringthat is shown in five groups of five characters each,separated by hyphens. The location of the product keyvaries depending on how you acquired the product.
The locations of the product key are as follows:
The product key is either ona sticker on the CD sleeve oron an insert in the productpackage.
If you purchased a retail copyof the product on CD
The product key is on theDVD package.
If you purchased the producton DVD
The product key is stored onyour computer as part of thedownload process and isincluded in the confirmationemail from the SymantecStore.
If you downloaded theproduct from the SymantecStore
The product key is providedas part of the activationprocess. Be sure to save yourproduct key by creating orsigning in to your NortonAccount, or by printing thekey. You may need theproduct key if you ever wantto reinstall your product.
If your computer came withthe product already installed
Getting startedActivation protects you
16
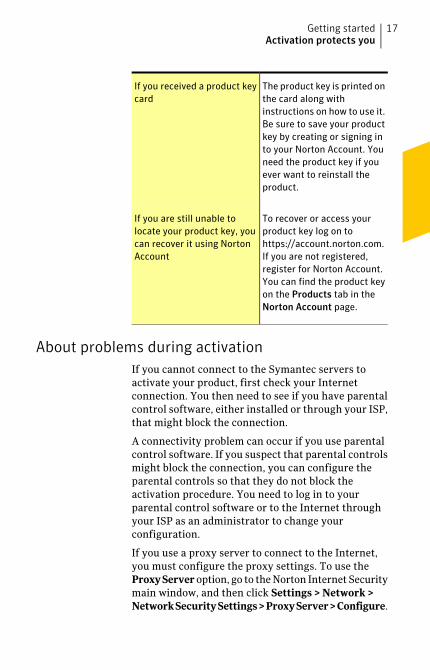
The product key is printed onthe card along withinstructions on how to use it.Be sure to save your productkey by creating or signing into your Norton Account. Youneed the product key if youever want to reinstall theproduct.
If you received a product keycard
To recover or access yourproduct key log on tohttps://account.norton.com.If you are not registered,register for Norton Account.You can find the product keyon the Products tab in theNorton Account page.
If you are still unable tolocate your product key, youcan recover it using NortonAccount
About problems during activationIf you cannot connect to the Symantec servers toactivate your product, first check your Internetconnection. You then need to see if you have parentalcontrol software, either installed or through your ISP,that might block the connection.
A connectivity problem can occur if you use parentalcontrol software. If you suspect that parental controlsmight block the connection, you can configure theparental controls so that they do not block theactivation procedure. You need to log in to yourparental control software or to the Internet throughyour ISP as an administrator to change yourconfiguration.
If you use a proxy server to connect to the Internet,you must configure the proxy settings. To use theProxyServer option, go to the Norton Internet Securitymain window, and then click Settings > Network >NetworkSecuritySettings>ProxyServer>Configure.
17Getting startedActivation protects you

About Norton Internet Security mainwindow
The Norton Internet Security main window acts as asecurity management interface. You can access themain features and monitor the performance of yourcomputer from the main window.
You can find the following items in the main window:
Lets you access the Settingswindow.
You can view and configurevarious options to customize theNorton Internet Securitysettings.
Settings
Lets you access thePerformancewindow.
The Performance windowdisplays a chroniclerepresentation of all the installs,downloads, optimizations,detections, alerts, and instancesof Quick Scan. The window alsodisplays a detailed graphicalrepresentation of CPU andmemory usage by your Nortonproduct.
Performance
Lets you provide feedback on theproduct on a Symantec Webpage.
w This feature may not beavailable in some versions ofNorton Internet Security.
Feedback
Getting startedAbout Norton Internet Security main window
18

Lets you create or access yourNorton Account.
Norton Account lets you manageall of your Norton products inone place.
w This feature may not beavailable in some versions ofNorton Internet Security.
Account
Lets you access the NortonAutofix window that providesyou various support options.
You can also access the onlineHelp from the Supportdrop-down menu. Help provideslinks to information that assistsyou with the specific tasks thatyou want to complete. The onlineHelp guides you to configure allof the product features.
You can also access theproduct’s version number.
Support
You can use the following options to perform theimportant tasks in Norton Internet Security:
Lets you view the overallprotection status of yourcomputer.
When your system status isSecure, your computer is fullyprotected. When your systemstatus is at Attention state,ensure that you fix all the issues.When your system status is atAtRisk state, you must takeimmediate actions to fix theissues.
System Status
19Getting startedAbout Norton Internet Security main window

Lets you access different typesof scans to protect yourcomputer and your sensitivedata.
By using the Scan Now option,you can run the following typesof scans:
1 Computer Scan
Lets you run differentcomputer scans includingQuick Scan, Full SystemScan, and Custom Scan.
1 Reputation Scan
Lets you run differentreputation scans includingQuick Scan, Full SystemScan, and Custom Scan.
1 Scan Facebook Wall
Lets you scan News Feeds onyour Facebook Wallperiodically to protect youfrom malicious links.
Scan Now
Lets you run LiveUpdate todownload the latest virusdefinitions and programupdates.
Norton Internet Security usesthe latest virus definitions fromSymantec servers to detect andremove latest security threats.
LiveUpdate
Getting startedAbout Norton Internet Security main window
20

Lets you access the NortonInternet Security advancedwindow.
By using the Norton InternetSecurity advanced window, youcan do the following:
1 Run different scans.
1 View Security History.
1 View the quarantined itemsin the Security Historywindow.
1 View Norton Insight -Application Ratings.
1 View the list of programsthat are vulnerable on yourcomputer and find howNorton protects you from theprogram vulnerabilities.
1 View and configure NetworkSecurity Map.
1 Manage logins and cards.
1 Configure parental controls.
In addition, you can choose toturn on or turn off the protectionfeatures from this window.
Advanced
When your system status is AtRisk or Attention, thissection automatically provides you the FixNow optionto fix all the issues at once.
21Getting startedAbout Norton Internet Security main window

The options on the right side of the Norton InternetSecurity main window help you do the following:
Online Family
Getting startedAbout Norton Internet Security main window
22

Lets you monitor your child’sactivities on the Internet.
w Norton Online Familymay not be available in someversions of Norton InternetSecurity.
When you click the OnlineFamily icon, the NortonInternet Security mainwindow displays NortonOnline Family Log in option.Norton Online Familyprovides you advancedcontrols to monitor yourchild's online activities.
Symantec recommends thatyou use your Norton Accountlogin credentials to sign in toNorton Online Family. If youregister your product withyour Norton Account, yourNorton Account emailaddress is auto-filled in theemail address text box.
You can use the Click Herelink to set up your accountwith Norton Online Family.
After you set up youraccount, you can sign in toyour account on the NortonInternet Security mainwindow and view your child’sInternet activities. You canview details such as yourchild’s latest search terms,and the latest alerts. Afteryou sign in, you can use theGet Details option to viewmore details on the NortonOnline Family Web site.
23Getting startedAbout Norton Internet Security main window

Lets you access NortonManagement.
Norton Management lets youmanageyourNortonproductson all of your devices fromone location. Click theManage icon at the right sideof the main window to signup for or log into NortonManagement. The NortonManagement agent should beinstalled on each device thatyou want to add to NortonManagement. You can useyour existing Norton Accountlogin information to accessNorton Management.
w Norton Managementmay not be available in someversions of Norton InternetSecurity.
Manage
Getting startedAbout Norton Internet Security main window
24

Lets you download theNorton Mobile Security forAndroid.
You can use Norton MobileSecurity on all your devicesthat use Android operatingsystem. When you click theMobile icon, the main windowdisplays a Quick Response(QR) code for installingNorton Mobile Security. Youcan use the Android scan appon your Android device toscan the QR code and installNorton Mobile Security.
You can also click the link togo to the Web site where youcan download Norton MobileSecurity.
w Norton Mobile Securitymay not be available in someversions of Norton InternetSecurity.
Mobile
25Getting startedAbout Norton Internet Security main window

Lets you set up the NortonOnline Backup account oraccess your online backupstatus.
w Norton Online Backupmay not be available in someversions of Norton InternetSecurity.
When you click the Backupicon, the main windowdisplays Norton OnlineBackup Log in option. NortonOnline Backup provides asecure online backup solutionthat safeguards yourimportant data againstsystem crash, accidentaldeleting, virus infection, andother disasters. You canaccess or restore the backedup data from any computerthat is connected to theInternet.
Backup
Getting startedAbout Norton Internet Security main window
26

Lets you check the safety ofa Web site.
You can also perform a safesearch.
w This option may not beavailable with some versionsof Norton Internet Security.
When you click the SafeWebicon, the Norton InternetSecurity main windowdisplays Norton Safe Weboptions.
You can use the Check Siteoption to analyze the securitylevels of any Web site thatyou want to visit. When youtype a Web site address in thetext box and clickCheck Site,it shows the Symantec’sratings for the Web site.
You can use the Safe Searchoption to search forinformation on the Internet.The Norton Safe Search usesAsk.com to generate thesearch results. Norton SafeSearch provides a site safetystatus and a Norton rating foreach of the search resultsgenerated.
You can use the View recentNorton Safe Web activityoption to view the recentNorton Safe Web statistics onmalicious sites and URLs. Youcan also view the list of newmalicious URLs.
Safe Web
27Getting startedAbout Norton Internet Security main window

Lets you access NortonStudio.
Norton Studio is an app thatis available on your Windows8 Apps Store. Norton Studiolets you manage your Nortonproducts and Norton productkeys from one location. Youcan view the security statusof each of your devices andresolve the security issues byusing the Norton Studio fromany location around theworld. You can go to Windows8 App Store and downloadand install Norton Studio.
Studio
Your activation status or subscription status appearsat the bottom of the main window. You can use theActivate Now option to activate or subscribe yourNorton product.
You can also monitor the overall system CPU usageand the Norton-specific CPU usage in this window.
About the Norton Internet Security advanced windowThe Norton Internet Security advanced window actsas a security management interface. The options inthis window help you address all the important securityand performance issues of your computer. The optionsare classified in different panes. Each pane containsthe important features that you can easily access orconfigure from this window.
Getting startedAbout Norton Internet Security main window
28

The panes are:
Provides you the essentialcomputer protection options.
It also contains links to scanyour computer, view thehistory of protection events,and manage quarantineditems. You can also view theNorton Insight - ApplicationRatingswindow and improvethe performance of NortonInternet Security scans.
In addition, you can runLiveUpdate. It also displaysthe updates availability as towhen the last virusdefinitions were updated.
Computer Protection
Provides you the essentialnetwork protection options.
It also contains links to thelist of vulnerable programsand Network Security Map.
Network Protection
Provides you the essentialWeb protection options.
It also contains links tomanaging logins and creditcards. In addition, you canmonitor and manage thecomputer usage and Internetactivities of your child.
w The parental controlfeature is not available insome of the versions ofNorton Internet Security.
Web Protection
29Getting startedAbout Norton Internet Security main window

You can view the different protection features on theright side of the window. You can move your mousepointer over each feature to view a brief summaryabout the feature. You can also choose to ignore ormonitor the protection status of a feature. You canchoose to turn on or turn off the protection featuresfrom this window.
Responding to System Status indicatorsNorton Internet Security displays the overall protectionstatus of your computer under the Secure section ofthe main window. When the system status needsattention or is at risk, you can take appropriate actionto improve the System Status. Your computerprotection is based on the programs that are installedon your computer. To improve your protection status,ensure that your installed programs are up to date.
The System Status indicator displays the followingstatuses:
Indicates that your computer andactivities are protected fromthreats, risks, and damage.
Secure
Indicates that your computer andactivities require attention.
Take appropriate action to improveyour protection status.
Attention
Indicates that your computer andactivities are at risk.
Take immediate action to improveyour protection status.
At Risk
You can respond to the System Status indicatorsdirectly from the main window.
Getting startedAbout Norton Internet Security main window
30

To respond to System Status indicators from the mainwindow
1 In the bottom section of the Norton InternetSecurity main window, click Fix Now.
2 Follow the on-screen instructions.
Monitoring the protection status of a featureThe Norton Internet Security main window acts as asecurity management interface. You can access themain features and monitor the performance of yourcomputer from the main window.
At times, you may want to turn off any option for aparticular purpose. But by doing so, the status of yoursystem changes to Attention or AtRisk. In such cases,you can ignore the protection status of a particularfeature to maintain a healthy overall system status.For example, you want to turn off BrowserProtectionfor a limited period, and you still want the systemstatus to be Secure. In this case, you can ignore theprotection status of BrowserProtection and then, turnoff the option. When you ignore the protection statusof a feature, it does not affect the overall SystemStatus.
You can also monitor the protection status of thefeature that has been ignored at any time.
You can ignore or monitor the protection status of onlyselected features that are available in the Advancedwindow.
The features are:
1 Antivirus
1 Antispyware
1 SONAR Protection
1 Smart Firewall
1 Intrusion Prevention
1 Email Protection
1 Browser Protection
31Getting startedAbout Norton Internet Security main window

1 Safe Surfing
To monitor the protection status of a feature
1 In the Norton Internet Security main window, clickAdvanced.
2 In the window that appears, move your mousepointer over the feature name.
3 In the pop-up that appears, do one of the following:
1 To ignore the protection status of the featurethat affects your computer’s overall healthevaluation, click Ignore.
1 To monitor the protection status of the featurethat has been ignored, click Monitor.
About your Norton AccountWhen you create a Norton Account, you can manageall of your Norton products in one place. You can storeyour product keys in your Norton Account and alsobuy additional product keys. You can also register yourproduct with the Norton Account. It takes only a fewmoments to create your Norton Account. You must beconnected to the Internet to create a Norton Account.
After you create a Norton Account, you can access andmanage your account information and productinformation from anywhere. It helps to reinstall yourproducts and download the latest version of theproducts. If you install your product on more than onePC, you can use the same Norton Account. To accessyour Norton Account, go to the following URL:
https://account.norton.com
You can create a Norton Account in the following ways:
1 During activation
You can create your Norton Account and registeryour product from the Norton Account windowthat appears when you activate the product. Youmust provide your account information in theNorton Account window that appears.
Getting startedAbout your Norton Account
32

1 Any time after activation
If you skip the Norton Account window duringactivation, you can create a Norton Account anytime after activation. You can create your NortonAccount and register your product from theAccount link that appears at the top of the NortonInternet Security main window.
After you log in to your Norton Account, you canmanage your product information with the followingoptions:
Saves the information for all ofthe Norton products that youown.
The Products tab provides youthe information about theNorton products that you ownand the expiration date. You canclick the arrow icon against aproduct for more informationsuch as product key and theregistration date. You can alsobuy a new product key to protectadditional computers. You canuse the Update option to checkand download the latest productversion using Norton UpdateCenter.
Products
Contains order information ofthe Norton products you boughtfrom Norton online store.
Order History
33Getting startedAbout your Norton Account

Saves your account informationand your billing details.
The Profile options are:1 Account Information
You can update your NortonAccount information andyour shipping address on theAccount Information tab.After you update, clickUpdate to save the changes.
1 Billing Information
You can save your credit cardinformation and your billingaddress on the BillingInformation tab. It makes iteasier for saving onlineorders. After you update,click Update to save thechanges.
1 Change Password
You can change your currentNorton Account password onthe Change Password tab.
Profile
You can use the icons at the bottom of your NortonAccount Web page to access and use the following:
Norton Online Familymonitors and manages yourchild's Internet activities andcomputer usage.
Norton Online Family
Getting startedAbout your Norton Account
34

Norton Online Backupprovides a secure andeasy-to-use online backupsolution that safeguards yourimportant data againstsystem crash, accidentaldeleting, virus infection, andother disasters.
Norton Online Backup
Norton Safe Web checks thesafety of a Web site and letsyou perform a safe Websearch.
Norton Safe Web
The Symantec Web siteprovides more informationabout the various products ofSymantec, the latest updateson Internet security, andvarious support options.
Norton.com
Norton Update Center checksand lets you download thelatest version of your Nortonproduct.
Norton Update Center
If you forget your Norton Account password, you canget a temporary password by clicking the Forgot yourpassword link in the Norton Account sign-in Webpage. You need to provide your email address. You needto use the same email address that you provided whenyou created your Norton Account. Symantec sends atemporary password to your email address. You canuse the temporary password for a limited time period.You must reset your password after you log in to yourNorton Account.
35Getting startedAbout your Norton Account

Creating a Norton AccountYour Norton Account stores the product key and thebilling information of your product. You can alsoregister your product with the Norton Account.
In addition, Norton Account helps you to do thefollowing:
1 Access the product key and other productinformation when you need it.
1 Reinstall your Norton product.
1 Buy additional product keys for your home or office.
1 Check and download the latest version of theproduct by using Norton Update Center.
1 Save online orders and update billing information.
1 Log in to other product add-ons such as NortonOnline Family and Norton Online Backup.
Your computer must be connected to the Internet tocreate a Norton Account. If you use a proxy server toconnect to the Internet, you must configure the proxysettings. To configure the proxy settings of yournetwork, go to the Norton Internet Security mainwindow, and then click Settings>Network>NetworkSecurity Settings > Proxy Server > Configure.
You can also create a Norton Account when youactivate your product. When you create your NortonAccount from the product, your product gets registeredin your account. If you have an existing NortonAccount, you can provide the same email address inthe NortonAccount window in your product. This way,you can register your current product and add it to thelist of Norton products in your existing NortonAccount. If you upgrade your registered product to thelatest available version, your product remainsregistered to the same Norton Account. In this case,you can continue using the same Norton Account logincredentials.
w Symantec products that are older than the 2006product year do not appear in your Norton Account.
Getting startedAbout your Norton Account
36

To create a Norton Account from the Norton AccountWeb page
1 In the Norton Internet Security main window, clickAccount.
2 In the Norton Account Web page that appears, clickSign up now.
3 In the Norton Account Sign Up Web page, providethe details about your account information, andthen click Sign Up.
To create a Norton Account and register your productafter activation
1 In the Norton Internet Security main window, clickAccount.
2 In the CompleteYourActivation window, type youremail address, and then click Next.
3 In the CreateyourNortonAccount window, provideyour account details, and then click Next.Your product information gets saved in your NortonAccount only after you log in to your NortonAccount.
4 In the window that appears, click Done.
To log in to your Norton Account and access yourproduct information, visit https://account.norton.com.
Accessing your Norton AccountThe product key for each Norton product isconveniently stored in your Norton Account. After youhave created your Norton Account successfully, youcan access your account from anywhere in the world.You can log in to your Norton Account any time byvisiting the following URL:
https://account.norton.com
You can easily find and update your account, product,and billing information from your Norton Account.You can also change your Norton Account password,if required. Your computer must be connected to theInternet to access your Norton Account.
37Getting startedAbout your Norton Account

w Symantec products that are older than the 2006product year do not appear in your Norton Account.
To access Norton Account
1 In the Norton Internet Security main window, clickAccount.
2 In the Web page that appears, type your emailaddress and password, and click Sign In.
About Norton ManagementNorton Management lets you manage all of your Nortonproducts and Norton product keys from one location.You can add your devices such as personal computersand laptops to Norton Management and remotelyinstall and manage your Norton products on the device.You can view the security status of each of your devicesand resolve the security issues by using the NortonManagement Web site from any location around theworld.
The Norton Management agent must be installed oneach device that you want to manage in NortonManagement. Norton Management uses the NortonManagement agent to install and uninstall Nortonproducts on your devices and to resolve the securityissues on your device remotely. After you install theNorton Management agent on a device, it can bemanaged remotely using the Web site.
You can do the following using Norton Management:
1 Add a device to Norton Management.
1 Install a Norton product on a device.
1 View Norton products that are installed on a device.
1 View the security status of a device.
1 Fix security issues on a device.
1 Purchase a new Norton product key.
1 Renew your Norton product subscription.
1 Remove a device from Norton Management.
Getting startedAbout Norton Management
38

1 Activate your product using another product key.
1 Upgrade your Norton products to the latestavailable version.
w The features listed above vary for different Nortonproducts and devices.
Accessing Norton Management on WindowsYou can access Norton Management in one of thefollowing ways:
1 Using a Web browser on any computer.
1 From the main window of Norton security products.
To access Norton Management from the main windowof a Norton security product, you need to install theNorton Management agent on that device. Your devicemust be connected to the Internet to access NortonManagement.
To access Norton Management using a browser
1 Open your browser, and go to:https://.manage.norton.com
2 Click Sign In.
3 In the EmailAddress box, type your Norton Accountemail address.
4 In the Password box, type your Norton Accountpassword.
5 If you want Norton Management to remember youremail address every time when you log on, checkRemember me on this computer.
6 Click Sign In.
To access Norton Management from Norton securityproducts
1 At the bottom of the Norton security product mainwindow, click the Manage icon.
2 Click Log in.
3 Type your email address that you use for NortonAccount.
39Getting startedAbout Norton Management

4 Type your password that you use for NortonAccount.
5 Click Go.
6 Click Manage Devices.
To access Norton Management from the Windowsnotification area
1 Go to the Windows device on which NortonManagement is installed.
2 In the notification area on the taskbar, click theNorton Management icon.
3 In the pop-up that appears, click Open NortonManagement.
Installing the Norton Management agent on WindowsNorton Management uses the Norton Managementagent to monitor and manage the security status of adevice. You must install Norton Management agent onevery device that you want to manage using NortonManagement.
You can download and install the Norton Managementagent in one of the following ways:
1 Log on to the Norton Management Web site anddownload the agent.
1 If your computer has Norton AntiVirus or NortonInternet Security, go to the main window of theproduct, click the Manage icon and then install theagent program.
w You must have an administrator privilege on yourdevice to install the Norton Management agent.
To install the Norton Management agent from theNorton Management Web site
1 Go to the device that you want to manage withNorton Management.
2 Open your browser, and go to:https://manage.norton.com
Getting startedAbout Norton Management
40

3 Click Sign In and log on to your account using yourNorton Account email address and password.
4 On the My Devices page, click Add Device.
5 In the confirmation window, click Yes to confirmthat you are already on the device you want tomanage.
6 In the window that appears, click Save File anddownload the installer file.
7 Double-click the file that you downloaded.
8 Click Run.
9 In the Welcome to Norton Management window,click UserLicenseAgreement, read the user licenseagreement, and then click Agree & Install.
10 If you are prompted to provide your email address,in the Email Address box, type the email addressthat you use to log on to your Norton Account, andthen click Next.
11 If you are prompted to provide your password, inthe Password box, type the password that you useto log on to your Norton Account, and then clickNext.
12 In the Set up this computer window, in the Namethis computer box, type a display name for thedevice.The name that you specify must be unique and mustnot exceed 40 characters.
13 Click Finish.
14 In the Congratulations window, click ManageDevices.
To install the NortonManagement agent from a Nortonsecurity product
1 At the bottom of the Norton security product mainwindow, click the Manage icon.
2 Click Get Started.
3 In the Welcome to Norton Management window,click the User License Agreement link, read theuser license agreement, and then click Agree &Install.
41Getting startedAbout Norton Management

4 If you are prompted to provide your email address,in the Email Address box, type the email addressthat you use to log on to your Norton Account, andthen click Next.
5 If you are prompted to provide your password, inthe Password box, type the password that you useto log on to your Norton Account, and then clickNext.
6 In the Set up this computer window, in the Namethis computer box, type a display name for thedevice, and then click Finish.
7 In the Congratulations window, click ManageDevices.
About managing devicesNorton Management lets you manage your device, viewthe security status of each of the devices, and resolvesecurity issues by using the Norton Management Website from any location around the world.
Using Norton Management, you can do the following:
1 Add a device to Norton Management.
1 Install a Norton product on a device.
1 View Norton products that are installed on a device.
1 View the security status of a device.
1 Fix security issues on any device.
1 Purchase a new Norton product key.
1 Renew your Norton product subscription.
1 Remove a device from Norton Management.
1 Uninstall a Norton product from a device.
1 Activate your product using another product key.
1 Upgrade your Norton products to the latestavailable version.
w The features listed above vary for different Nortonproducts and devices.
Getting startedAbout Norton Management
42

About the supported devicesTo install and use Norton Internet Security, your devicemust meet the following minimum systemrequirements:
Hardware requirement
Windows
1 300-MHz or faster processor
1 512 MB of RAM (256 MB minimum)
1 100 MB of available hard disk space
Operating systems
Service PackVersionPlatform
Service Pack 132-bit and 64-bitversions
1 MicrosoftWindows 7Home Basic
1 MicrosoftWindows 7HomePremium
1 MicrosoftWindows 7Professional
1 MicrosoftWindows 7Ultimate
1 MicrosoftWindows 7Starter
43Getting startedAbout Norton Management

Service Pack 1 and2
32-bit and 64-bitversions
1 MicrosoftWindows VistaHome Basic
1 MicrosoftWindows VistaHomePremium
1 MicrosoftWindows VistaUltimate
1 MicrosoftWindows VistaBusiness
Service Pack 2 and3
32-bit versions1 MicrosoftWindows XPHome
1 MicrosoftWindows XPPro
1 MicrosoftWindows XPMedia CenterEdition (2005and later)
Mac
1 OS X 10.7 (Lion)
1 2GB of RAM
1 1.5 GB of available hard disk space
Android
1 Android OS 2.1 (Eclair) or later
1 2 MB of available hard disk space
Supported devices
1 Windows computers (desktop and laptop)
1 Mac
1 Android smartphones
Getting startedAbout Norton Management
44

Supported Norton products
To use all the features of Norton Internet Security, youmust use the following versions of Norton securityproduct:
If you use an older version of Norton product, ensurethat you upgrade your product to the latest version touse all the features of Norton Internet Security.
w Currently, there are no upgrades available for NortonAnti-Theft and Norton Online Family.
Supported browsers
1 Internet Explorer 7.0 or later.
1 Mozilla Firefox 3.5 or later.
1 Google Chrome 6.0 or later.
1 Apple Safari 4.0 or later.
1 Opera 10.0 or later.
Norton Internet Security may not work properly withthe 64-bit version of Web browsers.
You must enable JavaScript and cookies on yourbrowser to access Norton Internet Security.
About Norton Community WatchNorton Community Watch helps in identifying newsecurity risks by submitting selected security andapplication data to Symantec for analysis. Symantecassesses the data to determine the new threats andtheir sources. The collective efforts from Nortonsecurity product users help in quick identification ofsolutions for these threats and risks. NortonCommunity Watch improves user security and productfunctionality. In addition, it helps Symantec to analyzethe execution, schedule, and efficiency ofNorton-specific tasks and settings on your computer.
Norton Community Watch collects and submits thefollowing types of data:
45Getting startedAbout Norton Community Watch

1 Identified malicious software such as portableexecutable files and running processes
1 Any Web site URL that your product identifies asfraudulent
1 All the Web site URLs that you visited before thedetection of a risk
1 The applications and processes that run on yourcomputer regularly and during any security riskdetection
1 Response instances that your computer sends toany potential security risk
1 General system information and performanceattributes from the computer
1 General information about your computer such asidle time, standby, and screensaver settings
After the potential security risks are assessed from thesubmitted data, Symantec sends the information backto Norton Internet Security. The Norton features suchas Norton Insight and Insight Network use thisinformation to identify files and processes at risk.
You should participate in Norton Community Watchsubmissions to provide valuable contribution to theentire community that uses Norton security products.Symantec maintains an adequate level of protectionfor the collected information. To allow or deny thedetailed data submissions, you must configure theDetailed Error Data Collection option under NortonCommunityWatch. To access the DetailedErrorDataCollection option, go the Norton Internet Security mainwindow, and then click Settings > General > OtherSettings>DetailedErrorDataCollection. The detaileddata may vary depending on the Norton-specific errorsand components. You can configure the option tomanage the data submissions.
w Norton Community Watch collects and submits detaileddata about the Norton-specific errors and componentsonly. It does not collect or store any personalinformation of any user.
Getting startedAbout Norton Community Watch
46

If you chose not to join Norton Community Watch whenyou installed your Norton product, you can turn it onlater. To access the NortonCommunityWatch option,go to the Norton Internet Security main window, andthen click Settings>General>OtherSettings>NortonCommunity Watch. You can also review the data,which Norton Community Watch collects and submitsto Symantec, in the Security History window.
About Norton Bootable Recovery ToolNorton Bootable Recovery Tool scans and removesviruses, spyware, and other security risks from yourcomputer. Your computer might be infected with avirus if you experience any of the following symptoms:
1 You cannot install Norton Internet Security.
1 You cannot start your computer.
1 Your computer is extremely slow.
Norton Bootable Recovery Tool is integrated withWindows Preinstallation Environment (WinPE).Therefore, you can run Norton Bootable Recovery Toolonly from a CD, DVD, or USB key. You must use NortonBootable Recovery Tool Wizard to create the NortonBootable Recovery Tool CD, DVD, or USB key.
w You cannot run Norton Bootable Recovery Tool inWinPE for more than 72 hours. If you run NortonBootable Recovery Tool for more than 72 hours, yourcomputer restarts without any notification.
You can use the Norton Bootable Recovery Tool CD,DVD, or USB key to recover a computer that is infectedwith viruses and other security threats. This securityprogram is not a replacement for continuous, real-timeprotection from viruses and latest security risks. Toprotect your computer from future infections, be sureto install or continue using Norton Internet Securitythat you already purchased.
47Getting startedAbout Norton Bootable Recovery Tool

Norton Bootable Recovery Tool detects and resolvesthe following security threats:
Programs that infect anotherprogram, boot sector,partition sector, or documentby inserting themselves orattaching themselves to thatmedium. Most viruses justreplicate; many also dodamage.
Viruses
Programs containingmalicious codes that aredisguised as or hiding insomething benign, such as agame or utility.
Trojan horses
Tools that are used by ahacker to gain unauthorizedaccess to your computer. Onetype of hacking tool, akeystroke logger, tracks andrecords your individualkeystrokes and can send thisinformation back to thehacker.
Hacking tools
Programs that can scansystems or monitor activityand relay the information toother computers or locationsin cyberspace.
Spyware
Programs that facilitate thedelivery of advertisingcontent through their ownwindow, or by using anotherprogram's interface.
Adware
Getting startedAbout Norton Bootable Recovery Tool
48

Programs that track systemactivity, gather systeminformation, or track userhabits, and relay thisinformation to third-partyorganizations. Theinformation that is gatheredby such programs is neitherpersonally identifiable norconfidential. Trackwareprograms are installed withthe user's consent, and mayalso be packaged as part ofother software that isinstalled by the user.
Trackware
Downloading the Norton Bootable Recovery ToolWizard
If your attempt to install a Norton product fails, youcan download the Norton Bootable Recovery ToolWizard. This easy-to-use wizard helps you createNorton Bootable Recovery Tool on a CD, DVD, or USBkey. You can use Norton Bootable Recovery Tool toscan your computer and remove any security threatsthat prevent successful installation.
It is recommended that you download and installNorton Bootable Recovery Tool Wizard on a computerthat does not have any security threats and createNorton Bootable Recovery Tool. If you create NortonBootable Recovery Tool on an infected computer, thereis a chance that the recovery CD, DVD, or USB keymight get infected.
w To use Norton Bootable Recovery Tool, you must usethe product key of the Norton product that youpurchased. If you use a trial version of Norton InternetSecurity, you need to create a Norton Account toreceive a product key to use Norton Bootable RecoveryTool.
49Getting startedAbout Norton Bootable Recovery Tool
You can download Norton Bootable Recovery ToolWizard in one of the following ways:
1 From the Start menu.
1 From the Norton Support Web site.
To download theNortonBootable Recovery ToolWizardfrom the Start menu
1 On the Windows taskbar, do one of the following:
1 In Windows XP, click Start>Programs>NortonInternet Security > Norton Recovery Tools.
1 In Windows Vista or Windows 7, click Start >All Programs > Norton Internet Security >Norton Recovery Tools.
1 In Windows 8, on the Start screen, click NortonRecovery Tools
2 Follow the on-screen instructions.
To download theNortonBootable Recovery ToolWizardfrom the Internet
1 Open your Web browser, and go to the followingURL:http://www.norton.com/recoverytool
2 Follow the on-screen instructions.
To download theNortonBootable Recovery ToolWizardfrom Norton Internet Security
1 In the Norton Internet Security main window, clickScan Now.
2 In the ComputerScan pane, do one of the following:
1 Click Quick Scan.
1 Click Full System Scan.
3 At the bottom of the scan window, next to If youthink there are still risks, click click here.
4 In the Norton Rescue Tools Web page, clickDownload Norton Bootable Recovery Tool.
5 Follow the on-screen instructions.
Getting startedAbout Norton Bootable Recovery Tool
50

About locating your Norton Product Key or activationPIN
To use Norton Bootable Recovery Tool, you must startthe computer from any of the following recovery mediaand then provide your Norton Product Key or theactivation PIN when prompted:
1 Norton Bootable Recovery Tool CD or DVD
1 Norton Bootable Recovery Tool USB key
w If you already installed and activated any one of thefollowing Norton product on your computer, you donot have to enter the Product Key for Norton BootableRecovery Tool:
1 Norton Internet Security 2010 or later
1 Norton AntiVirus 2010 or later
1 Norton 360 version 3.0 or later
1 Norton Business Suite 4.0 or later
1 Norton Security Suite 4.0 or later
w Norton Bootable Recovery Tool does not have aseparate Product Key or activation PIN. To use NortonBootable Recovery Tool, you must provide the ProductKey or activation PIN of the Norton product that youpurchased.
w If you purchased your Norton product from an Internetservice provider (ISP), you would have received anactivation PIN. When you use Norton BootableRecovery Tool, you must use this activation PIN.
Norton Bootable Recovery Tool does not automaticallylocate the Product Key or the activation PIN on acomputer that has multiple operating systems. If youuse a computer that has multiple operating systems,you need to write down the Product Key or theactivation PIN before you start Norton BootableRecovery Tool and provide the key when prompted.
You can locate your Norton Product Key or activationPIN in any of the following ways:
51Getting startedAbout Norton Bootable Recovery Tool

1 If you received your Norton product preinstalledby the computer manufacturer, the Product Key isavailable on your Norton Account. When you areprompted, you need to register for a NortonAccount. After you complete registration, you canlog on to your Norton Account and find yourProduct Key. You can also click on the Account linkon the main window of your product and registerand access Norton Account.
1 If you bought your product from Best Buy store, theNorton Product Key is available in the product CDbox. If you are not able to locate your Product Key,contact Best Buy.
1 If you bought a Norton product CD online or froma local store, the Norton Product Key is printed onthe back of the CD envelope. You can also log on toyour Norton Account and find your Product Key.
1 If you downloaded a Norton product from theNorton Online Store, the Product Key is in yourconfirmation email message. You can also see it inyour order details. In addition, you can log on toyour Norton Account and find your Product Key.
1 If you purchased your Norton product from an ISP,the activation PIN is in your confirmation emailmessage from your ISP. If you are not able to locateyour activation PIN, contact your ISP.
In case you use Norton Security Suite or NortonBusiness Suite, you can find your activation PIN in thefollowing way:
1 Go to the following URL:http://www.comcast.net/security
2 Under Get Norton Now, click Windows.
3 Click Get It Now.
4 Log on to your Comcast account, and then find youractivation PIN under the product name.You can use this activation PIN when you use NortonBootable Recovery Tool.
Getting startedAbout Norton Bootable Recovery Tool
52

Creating Norton Bootable Recovery Tool on a CD orDVD
Norton Bootable Recovery Tool is integrated withWindows Preinstallation Environment (WinPE).Therefore, you can run Norton Bootable Recovery Toolonly from a CD, DVD, or USB key. To use it, you firstneed to burn it to a CD or DVD.
w If you choose to create Norton Bootable Recovery Toolon a re-writable CD or DVD, all the data that are storedin the CD or DVD are permanently deleted. Ensure thatyou back up all the data before creating NortonBootable Recovery Tool on a re-writable CD or DVD.
To create Norton Bootable Recovery Tool CD or DVD
1 Open your CD drive and insert an empty CD or DVD.
2 In the Norton Bootable Recovery Tool mainwindow, click Create on CD/DVD media.
3 In the Create on CD/DVD media window, do of thefollowing:
1 Select the CD drive from the Specify drivedrop-down list.
1 If you want to add drivers, click Add next to Adddrivers.
1 If you want to change the default language, clickChange next to Specify language. You canchange the language in the Select Languagewindow. By default, Norton Bootable RecoveryTool is created in English.
4 Click Next.
5 If you create Norton Bootable Recovery Tool on are-writable CD or DVD, click Yes to confirm.
6 Review the results and do one of the following:
1 Click Done to close Norton Bootable RecoveryTool.
1 Click Back to Main to create or update NortonBootable Recovery Tool in another media.
53Getting startedAbout Norton Bootable Recovery Tool

Creating Norton Bootable Recovery Tool ISO fileYou can create a Norton Bootable Recovery Tool ISOfile on your computer. You can burn this ISO file to aCD or DVD and use it as a recovery CD or DVD on anycomputer. You can also use this ISO file to point to anyvirtual machine as a virtual CD-ROM.
To create Norton Bootable Recovery Tool ISO file
1 In the NortonBootableRecoveryToolWizard mainwindow, click Create ISO file.
2 In the Create ISO file window, do the following:
1 If you want to save the ISO file to a specificlocation, click Change next to Select location.
You can browse and select the folder location.
1 If you want to add drivers, click Add next to Adddrivers.
1 If you want to change the default language, clickChange next to Specify language.
You can change the language in the SelectLanguage window. By default, Norton BootableRecovery Tool is created in English.
3 Click Next.
4 Review the results and do one of the following:
1 Click Done to close Norton Bootable RecoveryTool.
1 Click Back to Main to create or update NortonBootable Recovery Tool in another media.
Creating Norton Bootable Recovery Tool on a USB keyYou can create Norton Bootable Recovery Tool on aUSB key and use it to run Norton Bootable RecoveryTool on your computer.
When you create Norton Bootable Recovery Tool on aUSB key, all the data that are stored in this USB keyare permanently deleted, and the USB key is formatted.Ensure that you back up all the data before creatingNorton Bootable Recovery Tool on a USB key.
Getting startedAbout Norton Bootable Recovery Tool
54

To create Norton Bootable Recovery Tool on a USB key
1 Insert the USB key into the USB port of yourcomputer.
2 In the NortonBootableRecoveryToolWizard mainwindow, click Create on USB key.
3 In the CreateonUSBkey window, do the following:
1 Select the USB drive from the Specify drivedrop-down list.
1 If you want to add drivers, click Add next to Adddrivers.
1 If you want to change the default language, clickChange next to Specify language.
You can change the language in the SelectLanguage window. By default, Norton BootableRecovery Tool is created in English.
4 Click Next.
5 In the confirmation message, click Yes to let NortonBootable Recovery Tool format your USB key beforecreating Norton Bootable Recovery Tool.
6 Review the results and do one of the following:
1 Click Done to close Norton Bootable RecoveryTool.
1 Click Back to Main to create or update NortonBootable Recovery Tool in another media.
Accessing Norton Bootable Recovery Tool WizardNorton Bootable Recovery Tool is integrated withWindows Preinstallation Environment (WinPE).Therefore, you can run Norton Bootable Recovery Toolonly from a CD, DVD, or USB key.
Norton Bootable Recovery Tool Wizard helps you createNorton Bootable Recovery Tool. You can create NortonBootable Recovery Tool on a CD, DVD, or USB key. Youcan use this media to run Norton Bootable RecoveryTool on your computer.
55Getting startedAbout Norton Bootable Recovery Tool

If you have a valid Norton product key or activationPIN, you can go to your Norton Account and access theNorton Bootable Recovery Tool download link.
To access your Norton Account, go to the followingaddress:
https://account.norton.com
To access Norton Bootable Recovery Tool Wizard
1 Do one of the following:
1 Double-click the Norton Bootable Recovery ToolWizard icon on your computer desktop.
1 In Windows XP, Windows Vista, and Windows7, on the Windows taskbar, click Start > AllPrograms > Norton Bootable Recovery ToolWizard > Norton Bootable Recovery ToolWizard.
1 In Windows 8, on the Start screen, click NortonRecovery Tools.
2 Follow the on-screen instructions to downloadNorton Bootable Recovery Tool Wizard.
Using the Norton Bootable Recovery ToolIf the installation of your Norton product fails, you canuse the Norton Bootable Recovery Tool to scan andremove any security threats that prevent successfulinstallation. If your computer is infected and you arenot able to start your Windows operating system, youcan use Norton Bootable Recovery Tool to removethreats and recover your computer.
Norton Bootable Recovery Tool is available on theproduct CD that you purchased. You can use theproduct CD as a recovery media.
If you have purchased this product as a download, goto the following URL to download the Norton BootableRecovery Tool Wizard:
http://www.norton.com/recoverytool_n360
Getting startedAbout Norton Bootable Recovery Tool
56

Norton Bootable Recovery Tool automaticallydownloads the latest virus definitions from Symantecservers and uses these virus definitions to secure yourcomputer from all types of viruses and latest securitythreats. If Dynamic Host Configuration Protocol (DHCP)is enabled, virus definitions are automatically updatedwhen your computer is connected to the Internet.Therefore, you must use an Ethernet connection toupdate the virus definitions in Norton BootableRecovery Tool. You cannot update the Norton BootableRecovery Tool virus definitions by using a wirelessnetwork connection.
If the virus definitions are out of date, Norton BootableRecovery Tool may not detect and remove all the latestsecurity threats from your computer.
w To use Norton Bootable Recovery Tool, you must usethe product key of the Norton product that youpurchased. If you use a trial version of Norton InternetSecurity, you need to create a Norton Account toreceive a product key to use Norton Bootable RecoveryTool.
To use the Norton Bootable Recovery Tool
1 Insert the Norton Bootable Recovery Tool recoverymedia.
2 Turn on or Restart your computer and enter to theBIOS mode.You can enter the BIOS mode by pressing the keythat is displayed immediately after your system isturned on.
3 Select the recovery media on which you have createdthe Norton Bootable Recovery Tool and then pressEnter.If you are using UEFI-enabled machine, select therecovery media under the Legacy Boot optioninstead of the UEFI Boot option.The recovery media can be the Norton BootableRecovery Tool CD, DVD, or USB key.
57Getting startedAbout Norton Bootable Recovery Tool

4 Read the Norton License Agreement, type yourProduct Key, and then click I Agree.If you use a non-QWERTY keyboard, use the VirtualKeyboard option to enter your Product Key.
5 In the Norton Bootable Recovery Tool window, clickNorton Advanced Recovery Scan.
6 In the Scan section, click Start Scan.When the scan is complete, the scan results windowlists the following:
1 The total number of files scanned
1 The total number of threats detected
1 The total number of resolved threats
1 The total number of unresolved threats
1 The details of each detected threat
7 In the scan results window, do one of the following:
1 To fix all of the threats that are found on yourcomputer, select Set all action to Fix.
1 To perform appropriate actions for each of thethreats, select Fix or Ignore.
8 Click Continue.
9 If a confirmation dialog box appears, click OK.
10 In the Scan Summary window, review the scansummary and do one of the following:
1 Click Done.
1 To run another scan, click Scan Again.
Updating virus definitions on a USB keySymantec virus definitions are used in Norton BootableRecovery Tool to scan your computer for the latestsecurity risks. When you create Norton BootableRecovery Tool on a USB key, the latest virus definitionsare automatically downloaded and included in the USBkey. You can update the virus definitions in NortonBootable Recovery Tool on a USB key that you createdearlier.
Getting startedAbout Norton Bootable Recovery Tool
58

To update Norton Bootable Recovery Tool virusdefinitions on a USB key
1 Insert your Norton Bootable Recovery Tool USB keyinto the USB port of your computer.
2 In the NortonBootableRecoveryToolWizard mainwindow, click Update USB key definitions.
3 In the Update USB key definitions window, fromthe Specify drive drop-down list, select the USBdrive.
4 Click Next.
5 Review the results and click Done.
About Norton Power EraserNorton Power Eraser is a powerful removal tool thatcan help you clean up the security risks that aredifficult to remove from your computer. If a programhijacked your computer and you have difficulty inremoving it, Norton Power Eraser helps you removethe security threat from your computer.
Norton Power Eraser includes detection and removalcapabilities for the security risks that impersonatelegitimate applications. The tool uses more aggressivetechniques than your Norton security product; hencethere is a risk that it may flag legitimate programs forremoval. You should carefully review the scan resultspage before removing any files.
Downloading and accessing Norton Power EraserYou can download Norton Power Eraser using yourWeb browser. After you download, you can scan yourcomputer with Norton Power Eraser to remove securitythreats.
To download and access Norton Power Erase
1 Open your Web browser and go the following URL:http://security.symantec.com/nbrt/npe.aspx
59Getting startedAbout Norton Power Eraser

2 In the page that appears, click Download NortonPower Eraser.
3 Save the NPE.exe file to your Desktop.
4 Double-click the NPE.exe file on your Desktop.
5 Read the license agreement, and then click Accept.
Scanning your computer with Norton Power EraserYou can scan your computer with Norton Power Eraserto remove threats even if you have a Symantec securityproduct. If you cannot start your computer in Normalmode, you can run Norton Power Eraser in Safe mode.
To scan your computer with Norton Power Eraser
1 Double-click the NPE icon on your desktop.
2 Read the End User License Agreement and clickAccept.
3 In the NortonPowerEraser window, click Scan forRisks.
4 In the window that appears, click Restart.Norton Power Eraser restarts your computer andstarts the system scan after you log back in to yourcomputer. By default, Norton Power Eraser performsa Rootkit scan and requires a system restart.
w If Norton Power Eraser finds some issues or risks, youmay need to follow the on-screen instructions toresolve the issues
w Scanning your computer may take several minutes.The scan progress screen displays the items beingscanned. After the scan is complete, you candouble-click a file name in the list and get moreinformation about the item.
Getting startedAbout Norton Power Eraser
60
Starting Norton Internet Security from thecommand prompt
If you work from the command line (for example,writing a script or code), you can start Norton InternetSecurity while you are still in DOS.
To start Norton Internet Security from the commandprompt
1 At the command-line prompt, type the directorywhere Norton Internet Security is located, and theexecutable.
1 In 32-bit version of Windows, Norton InternetSecurity and the executable are located at thefollowing path:
\Program Files\Norton InternetSecurity\Engine\version\Uistub.exe
Where version represents the version numberof installed Norton Internet Security.
1 In 64-bit version of Windows, Norton InternetSecurity and the executable are located at thefollowing path:
\Program Files (x86)\Norton InternetSecurity\Engine\version\Uistub.exe
Where version represents the version numberof installed Norton Internet Security.
2 Press Enter.
About the Norton Internet Security iconAfter you install Norton Internet Security, it displaysan icon in the notification area at the far right of theWindows taskbar. This icon indicates the current statusof your computer.
Norton Internet Security displays alerts andnotifications to inform you how viruses and othersecurity threats are detected and resolved. These alerts
61Getting startedStarting Norton Internet Security from the command prompt

and notifications appear over the notification area ofyour computer. In most cases, you can click the linkavailable in the alert to view the details and fix theproblems.
The Norton Internet Security icon represents thecurrent state of your computer. The icon changes itscolor when it actively fixes any issues or wants toinform you about any warning or urgent issues.
You can see the following representations of NortonInternet Security icon in the notification area:
Represents that your computeris completely secure
Icon with a green badge
Represents that there are someissues against your computerprotection that require yourattention
Icon with an orange badge
Represents that there are someurgent issues against yourcomputer protection that requireimmediate resolution
Icon with a red badge
Represents that your product isdisabled
Icon with a gray badge
Represents that Norton InternetSecurity is fixing issues
Icon with a yellow badge
Represents that the Silent Modefeature is turned on
This icon also displays thecurrent protection status badge.
Icon with acrescent-pattern
You can right-click the Norton Internet Security iconto open the shortcut menu to quickly access a fewimportant tasks of Norton Internet Security.
Getting startedAbout the Norton Internet Security icon
62
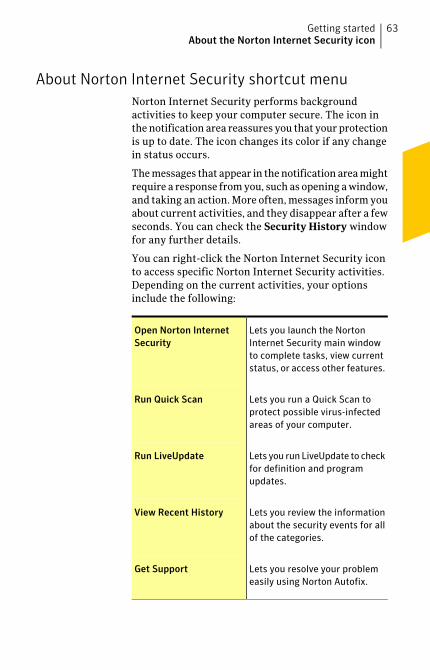
About Norton Internet Security shortcut menuNorton Internet Security performs backgroundactivities to keep your computer secure. The icon inthe notification area reassures you that your protectionis up to date. The icon changes its color if any changein status occurs.
The messages that appear in the notification area mightrequire a response from you, such as opening a window,and taking an action. More often, messages inform youabout current activities, and they disappear after a fewseconds. You can check the Security History windowfor any further details.
You can right-click the Norton Internet Security iconto access specific Norton Internet Security activities.Depending on the current activities, your optionsinclude the following:
Lets you launch the NortonInternet Security main windowto complete tasks, view currentstatus, or access other features.
Open Norton InternetSecurity
Lets you run a Quick Scan toprotect possible virus-infectedareas of your computer.
Run Quick Scan
Lets you run LiveUpdate to checkfor definition and programupdates.
Run LiveUpdate
Lets you review the informationabout the security events for allof the categories.
View Recent History
Lets you resolve your problemeasily using Norton Autofix.
Get Support
63Getting startedAbout the Norton Internet Security icon
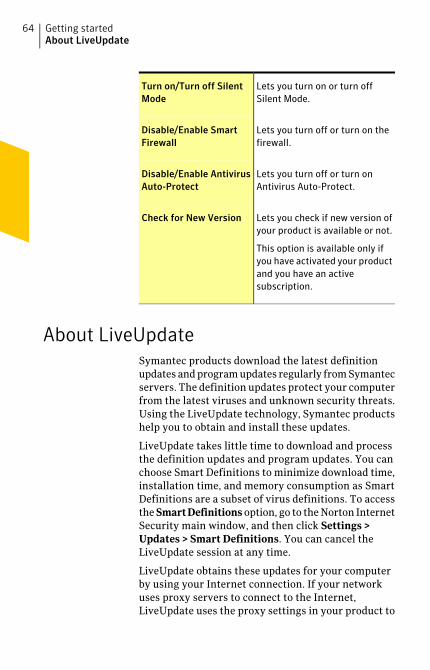
Lets you turn on or turn offSilent Mode.
Turn on/Turn off SilentMode
Lets you turn off or turn on thefirewall.
Disable/Enable SmartFirewall
Lets you turn off or turn onAntivirus Auto-Protect.
Disable/Enable AntivirusAuto-Protect
Lets you check if new version ofyour product is available or not.
This option is available only ifyou have activated your productand you have an activesubscription.
Check for New Version
About LiveUpdateSymantec products download the latest definitionupdates and program updates regularly from Symantecservers. The definition updates protect your computerfrom the latest viruses and unknown security threats.Using the LiveUpdate technology, Symantec productshelp you to obtain and install these updates.
LiveUpdate takes little time to download and processthe definition updates and program updates. You canchoose Smart Definitions to minimize download time,installation time, and memory consumption as SmartDefinitions are a subset of virus definitions. To accessthe SmartDefinitions option, go to the Norton InternetSecurity main window, and then click Settings >Updates > Smart Definitions. You can cancel theLiveUpdate session at any time.
LiveUpdate obtains these updates for your computerby using your Internet connection. If your networkuses proxy servers to connect to the Internet,LiveUpdate uses the proxy settings in your product to
Getting startedAbout LiveUpdate
64
download the latest updates. To configure the proxysettings of your network, go to the Norton InternetSecurity main window, and then click Settings >Network>NetworkSecuritySettings>ProxyServer> Configure.
w LiveUpdate does not download the latest definitionupdates and program updates, if the Network CostAwareness option in the Settings window is set to NoTraffic. Network Cost Awareness lets you define theamount of network bandwidth that Norton InternetSecurity can use. Therefore, you must ensure that theNetwork Cost Awareness option is turned on and setto No Limit or Critical Updates Only for LiveUpdateto run successfully.
About Program and Definition UpdatesLiveUpdate obtains program updates and definitionupdates for your computer by using your Internetconnection.
Program updates are minor improvements to yourinstalled product. These differ from product upgrades,which are newer versions of the entire product.Program updates are usually created to extend theoperating system or hardware compatibility, adjust aperformance issue, or fix program errors. Programupdates are released on an as-needed basis.
w Some program updates may require that you restartyour computer after you install them.
LiveUpdate automates the process of downloading andinstalling program updates. It locates and obtains filesfrom an Internet site, installs them, and then deletesthe older files and downloaded definitions from thetemporary folder after processing the updates.
Definition updates are the files that keep yourSymantec products up to date with the latest antithreattechnology. The definition updates that you receivedepend on which product you use.
65Getting startedAbout LiveUpdate

The type of definition updates that each of theSymantec products receive are as follows:
Users of these productsreceive the latest virusdefinitions fromSymantec that protectsyour computer from alltypes of security threats.
Norton AntiVirus, NortonAntiVirus Online
In addition to the virusand security risk updates,users of these productsreceive definition updatesfor security protection.For the products thatcontain protectionagainst phishing, usersreceive definition updatesagainst phishing.
The security definitionupdates provide the latestpredefined firewall rules,the updated lists ofapplications that accessthe Internet, IntrusionPrevention signatures,and Symantec spamdefinition files. Theselists are used to identifyunauthorized accessattempts to yourcomputer.
Norton Internet Security, NortonInternet Security Online
Getting startedAbout LiveUpdate
66

Users of these productsreceive the latest virusdefinitions fromSymantec that protectsyour computer from alltypes of security threats.
In addition, users of theseproducts receiveSymantec spamdefinitionfiles and definitionupdates against phishing.
Norton 360, Norton 360 Online
Users of these productsreceive the latest virusdefinitions fromSymantec that protectsyour computer from alltypes of security threats.
In addition, users of theseproducts receiveSymantec spamdefinitionfiles and definitionupdates against phishing.
Norton Security Suite, NortonBusiness Suite
About Smart DefinitionsNorton Internet Security downloads and installs virusdefinitions regularly to protect your computer fromthe latest security threats. For faster downloads andinstallation purpose, Norton Internet Security classifiesthese virus definitions into two sets.
The virus definitions are classified into the followingtwo sets:
Contains all the virus definitionsfor each threat that is known toSymantec.
Complete Set
67Getting startedAbout LiveUpdate

Contains the most importantvirus definitions that arerequired for latest securitythreats as viewed by Symantec.
The Core Set is a subset of theComplete Set, and it isapproximately 30 percentsmaller than the Complete Set.The Core Set minimizesdownload time, installation time,and system start time. It alsooccupies lesser amount of diskspace as compared to theComplete Set virus definitions.Therefore, the Core Set resultsin faster performance of yourcomputer.
Core Set
The Core Set virus definitions are called as SmartDefinitions. Norton Internet Security provides theSmart Definitions option to choose between Core Setvirus definitions and Complete Set virus definitionsfor LiveUpdate sessions. To access the SmartDefinitions option, go to the Norton Internet Securitymain window, and then click Settings > Updates >Smart Definitions.
During Automatic LiveUpdate or each time that yourun LiveUpdate manually, Norton Internet Securitychecks if the SmartDefinitions option is turned on oroff. It then downloads and installs the desired set ofvirus definitions based on the option settings. Bydefault, the Smart Definitions option is turned on,which means that the Core Set virus definitions aredownloaded and installed.
Turning off or turning on Smart Definitions
Smart Definitions are a subset of virus definitions thatcontains most important definitions for the latestsecurity threats.
Getting startedAbout LiveUpdate
68

As the Smart Definitions are of considerably smallersize, it results in lesser download time, lesserinstallation time, lesser boot time, and lesser memoryconsumption. It also occupies lesser amount of diskspace as compared to the full set of virus definitions.Therefore, Smart Definitions result in fasterperformance of your computer.
Norton Internet Security checks the SmartDefinitionsoption settings during each LiveUpdate session. If theoption is turned on, the Smart Definitions aredownloaded and installed. If the option is turned off,all of the virus definitions are downloaded andinstalled.
To turn off or turn on Smart Definitions
1 In the Norton Internet Security main window, clickSettings.
2 In the Settings window, in the left pane, clickUpdates.
3 In the Smart Definitions row, do one of thefollowing:
1 To turn off Smart Definitions, move the On/Offswitch to the right to the Off position.
1 To turn on Smart Definitions, move the On/Offswitch to the left to the On position.
4 In the Settings window, click Apply.
5 Click OK.
About running LiveUpdateYou should run LiveUpdate as soon as you installNorton Internet Security. Some Symantec productsrun LiveUpdate automatically to keep your protectionup to date. If you do not use the AutomaticLiveUpdateoption, you should manually run LiveUpdate once aweek.
In addition to the definition updates that AutomaticLiveUpdate downloads, the product uses streamingtechnology to download the latest virus definitions.
69Getting startedAbout LiveUpdate

These downloads are called Pulse Updates. The PulseUpdates are lighter and faster than AutomaticLiveUpdate. It keeps your computer secure from theongoing threats on the World Wide Web.
When Pulse Updates are enabled, LiveUpdate checksfor definition updates every few minutes anddownloads the streamed virus definitions. The PulseUpdates protect your computer from the latest securitythreats without compromising your systemperformance. Even if you turn off Pulse Updates,LiveUpdate picks all the missed streams and it updatesyour computer during the full definition updates.
Each LiveUpdate session checks if the SmartDefinitions option is turned on or off, and downloadsand installs the updates based on the option settings.To access the Smart Definitions option, go to theNorton Internet Security main window, and then clickSettings > Updates > Smart Definitions. By default,the Smart Definitions option is turned on. As SmartDefinitions are only a subset of all the virus definitions,you can minimize download time, installation time,and memory consumption. However, if you want all ofthe virus definitions to be downloaded and installed,you can turn off the Smart Definitions option.
Checking for updates manuallyLiveUpdate checks for updates to the product that isinstalled on your computer.
These updates protect your computer from newlydiscovered threats. LiveUpdate uses the Internetconnection to connect to the Symantec server, checksfor updates, and then downloads and installs themautomatically.
You should have the Automatic LiveUpdate optionturned on to ensure that you have the latest definitionupdates and program updates. Definition updatescontain the information that allows the product torecognize and alert you to the presence of a specificvirus or security threat. Symantec issues program
Getting startedAbout LiveUpdate
70

updates periodically, which are enhancements to theproduct. Program updates are usually created to fixprogram errors, improve the performance of theprogram, or, to extend the operating system orhardware compatibility. After you install programupdates, you might not necessarily see a difference inthe way that the product works.
If you are not connected to the Internet, connect to theInternet first, and then run LiveUpdate. Or, if you usea proxy server to connect to the Internet, configure theproxy settings, and then run LiveUpdate. To configurethe proxy settings of your network, go to the NortonInternet Security main window, and then click Settings>Network>NetworkSecuritySettings>ProxyServer> Configure.
When the LiveUpdate session is complete, you can usethe View Summary link to view the summary of theupdates that are installed on your computer.
To check for updates manually
1 In the Norton Internet Security main window, clickLiveUpdate.LiveUpdate connects to the Symantec server, checksfor available updates, and then downloads andinstalls them automatically.
2 In the Norton LiveUpdate window, when theinstallation is complete, click OK.Some program updates may require you to restartyour computer after you install them.
About keeping your protection up to dateDefinition updates are available to you as long as youmaintain an active product status. The ways in which
71Getting startedAbout LiveUpdate

you can acquire the product and maintain your statusare as follows:
The product includes a limited-timesubscription to definition updates. Whenthe subscription is due to expire, you areprompted to renew. Follow the on-screeninstructions to complete yoursubscription renewal.
After your product expires, you cannotobtain updates of any kind and all thesecurity features are turned off. If youdo not renew your product, you are nolonger protected against security threats.Though LiveUpdate continues to checkfor updates after expiration, you mustrenew your product to enable all thesecurity features.
If you purchaseda subscriptionversion of a retailproduct
If you do not activate your service orrenew your subscription, you cannotobtain updates of any kind and thesoftware no longer functions.
If you purchaseda product as aservice, or it cameinstalled on yourcomputer
Your product status is always active aslong as your security service is activewith your service provider.
If your security service is not active, youcannot obtain updates of any kind andthe software no longer functions.
If you receive thisservice throughyour serviceprovider
Turning off or turning on Automatic LiveUpdateYou can have LiveUpdate check for definition updatesand product updates automatically on a set schedule,by turning on the Automatic LiveUpdate option. Youcan also run LiveUpdate manually when the AutomaticLiveUpdate option is turned on. However, you must
Getting startedAbout LiveUpdate
72
run LiveUpdate manually to obtain updates if you haveturned off the Automatic LiveUpdate option.
w If you are connected to the Internet, AutomaticLiveUpdate downloads product updates and definitionupdates every hour. If you have an Integrated ServicesDigital Network (ISDN) router that is set toautomatically connect to your Internet service provider(ISP), it may incur charges each time. If you do not wantthis setup, you can turn off the automatic connectionon your ISDN router, or turn off the AutomaticLiveUpdate option.
To turn off Automatic LiveUpdate
1 In the Norton Internet Security main window, clickSettings.
2 In the Settings window, in the left pane, clickUpdates.
3 In the AutomaticLiveUpdate row, move the On/Offswitch to the right to the Off position.
4 In the Settings window, click Apply.
5 In the Security Request dialog box, in the Selectthe duration drop-down list, select how long youwant to turn off Automatic LiveUpdate, and thenclick OK.
6 In the Settings window, click OK.
To turn on Automatic LiveUpdate
1 In the Norton Internet Security main window, clickSettings.
2 In the Settings window, in the left pane, clickUpdates.
3 In the AutomaticLiveUpdate row, move the On/Offswitch to the left to the On position.
4 In the Settings window, click Apply.
5 Click OK.
73Getting startedAbout LiveUpdate

Turning on or turning off Apply updates only on rebootLiveUpdate obtains latest definition updates and theprogram updates that keep your computer secure fromthe latest security threats. Definition updates containthe information that allows Norton Internet Securityto recognize and alert you to the presence of a specificvirus or a security threat. Certain program updatesrequire system restart for the update to complete. TheApply updates only on reboot option lets you choosehow the program updates needs to be applied.
w The Apply updates only on reboot option is availableonly on Windows 7 and Windows 8.
When you turn on the Apply updates only on rebootoption, the RestartNow and the RestartLater optionsappear in the Norton LiveUpdate window. When youclick RestartNow, your computer is restarted and theprogram updates are applied. When you click RestartLater, the program updates are applied when yourestart your computer.
When you turn off the Apply updates only on rebootoption, the Apply Now option appears in the NortonLiveUpdate window. When you click Apply Now, theprogram updates that do not require system restartare applied instantly. However, the program updatesthat require system restart are automatically appliedthe next time you restart your computer.
To turn on or turn off Apply updates only on reboot
1 In the Norton Internet Security main window, clickSettings.
2 In the Settings window, in the left pane, clickUpdates.
3 In the Apply updates only on reboot row, do oneof the following:
1 To turn off Applyupdatesonlyonreboot, movethe On/Off switch to the right to the Off position.
1 To turn on Applyupdatesonlyonreboot, movethe On/Off switch to the left to the On position.
Getting startedAbout LiveUpdate
74

4 In the Settings window, click Apply.
5 Click OK.
About Pulse UpdatesIn addition to the definition updates that AutomaticLiveUpdate downloads, Norton Internet Security usesstreaming technology to download the latest virusdefinitions. These downloads are called Pulse Updates.The Pulse Updates are lighter and faster thanAutomatic LiveUpdate. They keep your computersecure from the ongoing threats that exist on theInternet. Pulse Updates protect you against therapidly-changing environment of security threatswithout compromising your computer's performance.Pulse Updates should always be turned on to get thelatest updates.
Pulse Updates checks for definition updates every 5minutes. If definition updates are available, LiveUpdatedownloads the streamed virus definitions. PulseUpdates provide the updates in between the fullupdates, which Automatic LiveUpdate downloadsautomatically every hour. Norton Internet Securitymerges the new stream that is downloaded with thelast updates that are installed. The Pulse Updatesdownloads provide additional and fast protection forthe latest threats in between the full updates withoutdisrupting your online experience.
Even if you do not turn on Pulse Updates, LiveUpdatecollects all the missed streams and, it updates yourcomputer during full definition updates.
Turning off or turning on Pulse Updates
Pulse Updates provide frequent, lightweight updatesevery 5 minutes in between the full updates. Alwaysensure that the Pulse Updates option is turned on. Itprotects you from the latest threats withoutcompromising your system performance or disruptingyour online experience.
75Getting startedAbout LiveUpdate
You must be connected to the Internet to obtain latestdefinition updates by using Pulse Updates. You canturn on or turn off Pulse Updates only if AutomaticLiveUpdate is turned on.
To turn off or turn on Pulse Updates
1 In the Norton Internet Security main window, clickSettings.
2 In the Settings window, in the left pane, clickUpdates.
3 Under AutomaticLiveUpdate, in the PulseUpdatesrow, do one of the following:
1 To turn off Pulse Updates, move the On/Offswitch to the right to the Off position.
1 To turn on Pulse Updates, move the On/Offswitch to the left to the On position.
4 In the Settings window, click Apply.
5 Click OK.
About Network Proxy SettingsA proxy server regulates access to the Internet, andprevents external computers from accessing yournetwork. If you are on a network that uses a proxyserver to connect to the Internet, you can provide proxyserver details to Norton Internet Security. You can usethe Network Proxy Settings window to specify theautomatic configuration URL, the proxy settings, andthe authentication details. Norton Internet Securityuses the proxy settings and authentication details toconnect to the Internet automatically, wheneverrequired. For example, LiveUpdate uses the specifiedproxy server settings to retrieve updates. You mustensure that you specify the proxy server details forLiveUpdate to run successfully.
In some cases, your network uses an automaticconfiguration URL or script for managing Internetaccess. In this case, you must provide the URL of therequired Proxy Automatic Configuration (PAC) file. A
Getting startedAbout Network Proxy Settings
76

PAC file contains the code that lets your browser knowabout the proxy settings for different Web sites overthe Internet. It also contains the words which you wantto filter and block while you access the Internet. Youcan also choose the option that lets your browser toautomatically detect the proxy settings. If you wantyour manual settings in the network, ensure that youdisable the Automatic Configuration options.
Network Proxy Settings window lets you specify thefollowing settings:
Lets you specify the automaticconfiguration URL or script tomanage Internet access.
You have the following options:1 Automatically detect
settings
Lets your browser detect thenetwork settingsautomatically.
If you do not want to overrideyour manual settings fornetwork connections, youmust disable this option.
1 Useautomatic configurationscript
Lets your browser use theautomatic configuration URLor script to manage Internetaccess.
Use the URL box to providethe HTTP URL or the HTTPSURL.
Automatic Configuration
77Getting startedAbout Network Proxy Settings

Lets you provide the details ofyour Proxy Settings.
UnderProxySettings, checkUsea proxy server for your HTTPconnections, and do thefollowing:
1 In the Address box, type theURL or IP address of yourproxy server.
1 In the Port box, type the portnumber of your proxy server.
You can specify a value from1 to 65535.
Proxy Settings
Lets you connect to the Internetthrough a server that requiresauthentication.
Use the Username box andPassword box to type theauthentication details.
Authentication
Configuring Network Proxy SettingsWhen you use a proxy server to connect to the Internet,you must specify the proxy server details. The NetworkProxy Settings window lets you enter automaticconfiguration settings, proxy settings, and proxy serverauthentication settings. The Network Proxy settingslet you connect to the Internet while you perform taskssuch as activating the product or accessing the supportoptions.
To configure Network Proxy Settings
1 In the Norton Internet Security main window, clickSettings.
2 In the Settings window, click the Network tab.
3 In the left pane, click Network Security Settings.
4 In the Proxy Server row, click Configure.
Getting startedAbout Network Proxy Settings
78

5 In the Network Proxy Settings window, do thefollowing:
1 If you want your browser to automatically detectnetwork connection settings, under AutomaticConfiguration, check Automatically detectsettings.
1 If the proxy server requires an automaticconfiguration URL, under AutomaticConfiguration, check Use automaticconfiguration script. Type the URL of the PACfile in the URL box.
1 If your network uses a proxy server, under ProxySettings, check Use a proxy server for yourHTTPconnections. In the Address box, type theURL or IP address of your proxy server, and inthe Port box, type the port number of your proxyserver. You can specify a value from 1 to 65535.
1 If your proxy server requires a user name andpassword, under Authentication, check I needauthenticationtoconnect throughmyfirewallor proxy server. Type the user name in theUsername box and password in the Passwordbox.
6 In the NetworkProxySettings window, click Apply.
79Getting startedAbout Network Proxy Settings

Getting startedAbout Network Proxy Settings
80

This chapter includes the following topics:
1 About System Insight
About System InsightNorton Internet Security continuously monitors yourcomputer to keep it free of any problems and run atpeak efficiency. Norton Internet Security constantlyscans the vital areas of your computer includingmemory, registry keys, and running processes. Itmonitors the important activities such as general fileoperation, network traffic, and Internet browsing. Inaddition, Norton Internet Security ensures that theactivities that it performs on your computer do notdegrade the overall performance of your computer.
System Insight provides you a centralized locationwhere you can view and monitor the activities that youperform on your system. System Insight displays suchinformation in the Performance window.
You can use the Performance window for the following:
1 To view monthly history of the important systemactivities that you performed or that occurred overa period of the last three months.
The Events graph that appears at the top of thewindow provides a pictorial representation ofimportant system activities. The activities includeapplication installations, application downloads,
2Monitoring yoursystem'sperformance

disk optimizations, threat detections, performancealerts, or Quick Scans. The graph displays theactivities as icon or stripe, and the description foreach icon or stripe is provided at the bottom of thegraph. The pop-up that appears when you move themouse pointer over an icon provides you the detailsabout the activity. The View Details link in thepop-up lets you view additional details about theactivity in the Security History window. You canuse the tabs at the top of the graph to obtain detailsfor the current month and details for the last twomonths.
1 To rearrange the organization of files on yourcomputer.
Optimizing your system helps you maximize theusable free space on a disk by grouping files basedon how they are accessed. The Optimize option atthe top of the Events graph lets you defragmentyour system.
1 To view and analyze the effect of Norton InternetSecurity on the performance of your computer.
The Performance graph that appears at the bottomof the window provides a graphical representationof your CPU usage and memory usage. The CPU tabdisplays a graph that represents the overall systemCPU usage and Norton-specific CPU usage. Whenyou click at any point on the CPU graph andmemory graph, Norton Internet Security displaysa list of the processes that consume maximumresources at that point. It also displays thepercentage of usage for each process. You can clicka process that is available in the list to get moreinformation about the process in the File Insightwindow. The Memory tab displays a graph thatrepresents overall memory usage andNorton-specific memory usage. You can select anyof the Zoom options to obtain magnified view orhistorical data of the graphs.
1 To view the details of Norton-specific jobs that arecurrently running in the background.
Monitoring your system's performanceAbout System Insight
82

The NortonTasks window provides the details suchas the timestamp, the duration, and the status ofthe background jobs. The details also include thetype of power the job needs to run and if a job randuring idle time. You can select different powersources for the background jobs. You can also startor stop a background job at any time.
1 To view the details of the Files of Interest.
The Norton Insight -ApplicationRatings windowprovides details on the trust level, prevalence,resource usage, and stability ratings for the Filesof Interest.
You can use the Performance Monitoring option tomonitor the performance of your computer. To accessthe PerformanceMonitoring option, go to the NortonInternet Security main window, click Settings >General > Performance Monitoring > PerformanceMonitoring .
Accessing the Performance windowSystem Insight provides you a centralized locationwhere you can view and monitor your system activities.System Insight displays such information in thePerformance window. You can access the Performancewindow to view details about the important systemactivities, CPU usage and memory usage, andNorton-specific background jobs. You can also viewNorton Insight details and defragment your bootvolume.
To access the Performance window
4 In the Norton Internet Security main window, clickPerformance.
About monitoring system activitiesSystem Insight provides information about theimportant system activities that you performed or thatoccurred over a period of the last three months. SystemInsight displays the information in the Performance
83Monitoring your system's performanceAbout System Insight

window. The Events graph at the top of thePerformance window displays each activity as icon orstripe. The description for each icon or stripe appearsat the bottom of the graph. You can use the tabs at thetop of the graph to obtain details for the current monthand for the last two months. The activities include:
Provides the details about theinstallation activities that youperformed on your system overa period of the last threemonths.
The details include theapplication that you installed,the date on which you installedthe application, and the totalnumber of installations on thatdate.
Installs
Provides the details about theapplication-download activitiesthat you performed on yoursystem over a period of the lastthree months.
The details include the date onwhich you downloaded a file andthe total number of downloadson that date. You can click thefile name link to view additionaldetails about the downloadedfile such as the Download Insightreport, file name, reputationlevel, and recommended action.
Downloads
Indicates the optimizationactivities that you performed onyour system over a period of thelast three months.
Optimized
Monitoring your system's performanceAbout System Insight
84

Provides the details about thethreat detection activities thatNorton Internet Securityperformed on your system overa period of the last threemonths.
The details include the date onwhich Norton Internet Securitydetected a threat and the totalnumber of threats that NortonInternet Security detected onthat date. The View Details linkprovides additional details aboutthe risk such as the risk impactand the origin of the risk. Thedetails also include the actionthat a threat has performed onyour system and the action thatSymantec recommends you toresolve the threat.
Detections
Provides the details about theperformance alerts that NortonInternet Security displayed overa period of the last threemonths.
The details include themonitored date and the numberof performance alerts generated.The View Details link providesadditional details aboutperformance-related activities,program name, programlocation, and system resourcesutilization.
Alerts
85Monitoring your system's performanceAbout System Insight

Provides the details about QuickScans that Norton InternetSecurity performed on yoursystem over a period of the lastthree months.
The details include the date onwhich a Quick Scan wasperformed and the number ofQuick Scans that wereperformed on that date. TheView Details link providesadditional details such as thescan time, total items scanned,total risk detected, total risksresolved, and recommendedaction.
Quick Scans
Viewing details of your system activities
System Insight lets you view details of the systemactivities that you performed or that occurred over thelast three months in the Performance window. Theactivities include application installations, applicationdownloads, disk optimizations, threat detections,performance alerts, or Quick Scans. You can use thetabs at the top of the Events graph to obtain details forthe current month and for the last two months. TheEvents graph at the top of the Performance windowdisplays each activity as icon or stripe. The descriptionfor each icon or stripe appears at the bottom of thegraph. The pop-up that appears when you move themouse pointer over an icon provides you the detailsabout the activity. The details include the date on whichan activity was performed and the number of suchactivities that you performed on that date. The ViewDetails link provides additional details of the activityin the Security History window.
Monitoring your system's performanceAbout System Insight
86
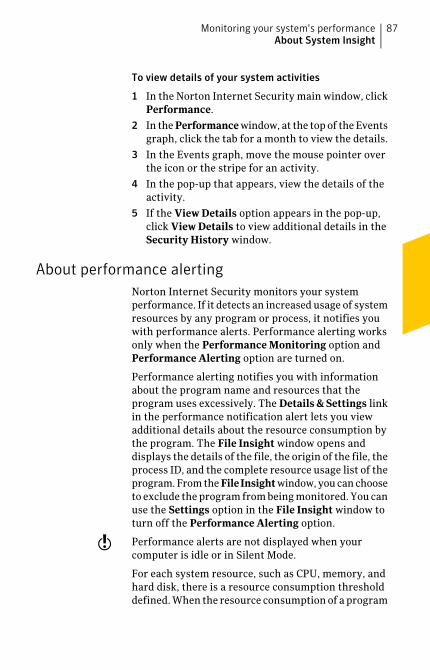
To view details of your system activities
1 In the Norton Internet Security main window, clickPerformance.
2 In the Performance window, at the top of the Eventsgraph, click the tab for a month to view the details.
3 In the Events graph, move the mouse pointer overthe icon or the stripe for an activity.
4 In the pop-up that appears, view the details of theactivity.
5 If the View Details option appears in the pop-up,click View Details to view additional details in theSecurity History window.
About performance alertingNorton Internet Security monitors your systemperformance. If it detects an increased usage of systemresources by any program or process, it notifies youwith performance alerts. Performance alerting worksonly when the Performance Monitoring option andPerformance Alerting option are turned on.
Performance alerting notifies you with informationabout the program name and resources that theprogram uses excessively. The Details & Settings linkin the performance notification alert lets you viewadditional details about the resource consumption bythe program. The File Insight window opens anddisplays the details of the file, the origin of the file, theprocess ID, and the complete resource usage list of theprogram. From the FileInsight window, you can chooseto exclude the program from being monitored. You canuse the Settings option in the File Insight window toturn off the Performance Alerting option.
w Performance alerts are not displayed when yourcomputer is idle or in Silent Mode.
For each system resource, such as CPU, memory, andhard disk, there is a resource consumption thresholddefined. When the resource consumption of a program
87Monitoring your system's performanceAbout System Insight
exceeds the defined threshold limit, Norton InternetSecurity alerts you with a performance alert.
You can use the Resource Threshold Profile forAlerting option to configure the threshold limit. Toaccess the Resource Threshold Profile for Alertingoption, go to the Norton Internet Security mainwindow, and then click Settings > General >Performance Monitoring > Resource ThresholdProfile for Alerting.
You can use the UseLowResourceProfileOnBatteryPower option to let Norton Internet Securityautomatically change the resource threshold profileto low when your computer runs on battery power.
You can use AlertforHighusage of option to configureNorton Internet Security to alert for high usage of CPU,memory, disk, and handles.
In addition, you can add programs to the ProgramExclusions list using the Program Exclusions option.When you add a program to the Program Exclusionslist, Norton Internet Security does not alert you whenthe program exceeds the defined resource consumptionthreshold limit.
You can view all the performance-related logs underthe Performance Alert category in the SecurityHistory window.
Configuring performance alerts
You can use the Performance Alerting option toreceive performance alerts when there is an increasedusage of system resources by any program or process.
Monitoring your system's performanceAbout System Insight
88

You can use the following options to configureperformance alerts:
Turns off performance alerts.
Select this option if you donot want Norton InternetSecurity to notify you withperformance alerts.
Off
Turns on performance alerts.
Select this option if you wantNorton Internet Security tonotify you with performancealerts when a program orprocess exceeds thethreshold limit of the systemresource usage.
By default, the PerformanceAlerting option is turned on.
On
Monitors and records thesystem resource usage.
Select this option if you wantNorton Internet Security toonly monitor the systemresource usage of everyprogram or process runningon your computer.
When a program or processexceeds the threshold limitof the system resource usage,Norton Internet Securityrecords these details in theSecurityHistorywindow. Youcan view the details that arerelated to performance alertsunder Performance Alertcategory in the SecurityHistory window.
Log Only
89Monitoring your system's performanceAbout System Insight

To configure performance alerts
1 In the Norton Internet Security main window, clickSettings.
2 In the Settings window, click the General tab.
3 In the left pane, click Performance Monitoring.
4 Under Performance Monitoring, in thePerformanceAlerting row, do one of the following:
1 To turn off performance alerts, move thePerformanceAlerting switch to the Off position.
1 To turn on performance alerts, move thePerformanceAlerting switch to the On position.
1 To suppress the performance alerts, move thePerformance Alerting switch to the Log Onlyposition.
5 Under Alert for High Usage of, do one of thefollowing:
1 If you want Norton Internet Security to monitorthe CPU usage, move the CPU switch to the leftto the On position.
1 If you want Norton Internet Security to monitorthe memory usage, move the Memory switch tothe left to the On position.
1 If you want Norton Internet Security to monitorthe disk usage, move the Disk switch to the leftto the On position.
1 If you want Norton Internet Security to monitorthe handle count, move the Handles switch tothe left to the On position. By default, this optionis turned off.
6 Click Apply, and then click OK.
Configuring the resource threshold profile
The threshold limit for the system resourcesdetermines at which point Norton Internet Securityshould notify you with performance alerts. When aspecific program exceeds the threshold limit of using
Monitoring your system's performanceAbout System Insight
90
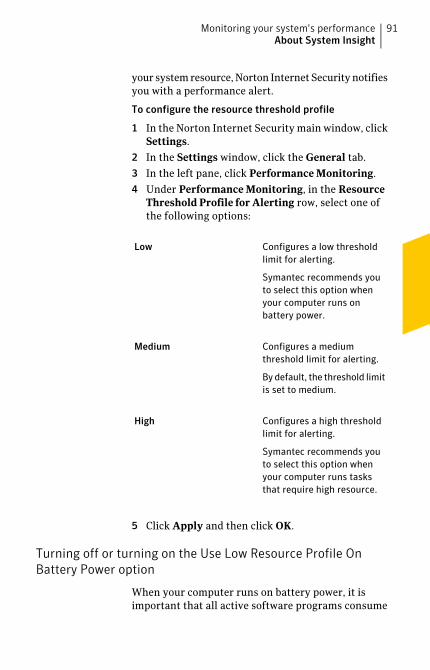
your system resource, Norton Internet Security notifiesyou with a performance alert.
To configure the resource threshold profile
1 In the Norton Internet Security main window, clickSettings.
2 In the Settings window, click the General tab.
3 In the left pane, click Performance Monitoring.
4 Under Performance Monitoring, in the ResourceThreshold Profile for Alerting row, select one ofthe following options:
Configures a low thresholdlimit for alerting.
Symantec recommends youto select this option whenyour computer runs onbattery power.
Low
Configures a mediumthreshold limit for alerting.
By default, the threshold limitis set to medium.
Medium
Configures a high thresholdlimit for alerting.
Symantec recommends youto select this option whenyour computer runs tasksthat require high resource.
High
5 Click Apply and then click OK.
Turning off or turning on the Use Low Resource Profile OnBattery Power option
When your computer runs on battery power, it isimportant that all active software programs consume
91Monitoring your system's performanceAbout System Insight

minimum resource usage. By reducing resource usage,your computer gains longer battery life and becomesmore energy efficient.
You can configure a low threshold profile and ensurethat all programs consume minimum resource usage.When the resource usage of a program or a processexceeds the low threshold limit, Norton InternetSecurity notifies you with a performance alert. You canchoose to close the program or the process manuallyand free the resource.
If the Use Low Resource Profile On Battery Poweroption is turned on, Norton Internet Securityautomatically changes the threshold profile to lowwhen your computer runs on battery power. By default,this option is turned on.
w Symantec recommends that you keep the Use LowResourceProfileOnBatteryPower option turned on.
To turn off the Use Low Resource Profile On BatteryPower option
1 In the Norton Internet Security main window, clickSettings.
2 In the Settings window, click the General tab.
3 In the left pane, click Performance Monitoring.
4 Under Performance Monitoring, in the Use LowResource Profile On Battery Power row, move theOn/Off switch to the right to the Off position.
5 Click Apply, and then click OK.
To turn on the Use Low Resource Profile On BatteryPower option
1 In the Norton Internet Security main window, clickSettings.
2 In the Settings window, click the General tab.
3 In the left pane, click Performance Monitoring.
4 Under Performance Monitoring, in the Use LowResource Profile On Battery Power row, move theOn/Off switch to the left to the On position.
5 Click Apply, and then click OK.
Monitoring your system's performanceAbout System Insight
92

Excluding programs from performance alerts
Norton Internet Security lets you exclude programsfrom performance alerts. You can add the programsthat consume high CPU, memory, or disk usage to theProgram Exclusions list. When you add a program tothe ProgramExclusions list, Norton Internet Securitydoes not alert you when the program exceeds theresource consumption threshold limit.
To exclude a program from performance alerts
1 In the Norton Internet Security main window, clickSettings.
2 In the Settings window, click the General tab.
3 In the left pane, click Performance Monitoring.
4 Under Performance Monitoring, in the ProgramExclusions row, click Configure.
5 In the Program Exclusions window, click Add.
6 In the Select a program dialog box, browse to theexecutable file for the program that you want toadd.
7 Click Open.
8 In the Program Exclusions window, click Apply.
9 Click OK.
10 In the Settings window, click Apply.
11 Click OK.
Removing programs from Program Exclusions
The ProgramExclusions window lists all the programsthat are excluded from performance alerts. If you want,you can remove any of the programs that you alreadyadded to the Program Exclusions window. When youremove a program, the program appears in theperformance alert the next time it crosses the definedthreshold limit for resource consumption.
To remove a program from Program Exclusions
1 In the Norton Internet Security main window, clickSettings.
93Monitoring your system's performanceAbout System Insight

2 In the Settings window, click the General tab.
3 In the left pane, click Performance Monitoring.
4 Under Performance Monitoring, in the ProgramExclusions row, click Configure.
5 In the Program Exclusions window, select theprogram that you want to delete, and then clickRemove.To remove all the programs available in theProgram Exclusions window, click Remove All.
6 In the Program Exclusions window, click Apply7 Click OK.
8 In the Settings window, click OK.
About CPU graph and memory graphNorton Internet Security monitors the overall systemCPU usage and memory usage and the Norton-specificCPU usage and memory usage. Norton Internet Securitydisplays the details in the CPU graph and the memorygraph. The CPU graph and memory graph are real-timegraphs of CPU utilization and memory utilization.
The graphs display a performance time for the last 90minutes or for the duration since you started yourcomputer. The graphs update the information at aninterval of every 15 seconds. The graphs progress fromright to left, and the most recent data appear on thefar right of the graph. The blue pattern in the graphsdepicts the overall system usage, and the yellow patterndepicts the Norton-specific usage. The gray blocks thatare labeled as Idle indicate the idle period of yourcomputer. The gray blocks include the period whenyour computer is in shutdown, sleep, or log out state.
The graphs show a default performance time of 90minutes. However, you can use the Zoom options todefine a region of the graph that you are interested toview. You can select a Zoom option to obtain magnifiedview or historical data of the graphs. For example, ifyou select the 10min option, Norton Internet Securitydisplays the magnified view of CPU graph or memory
Monitoring your system's performanceAbout System Insight
94

graph for the last 10 minutes. If you select the 1Doption, Norton Internet Security displays a historicaldata of the last one day.
When you click at any point on the CPU graph ormemory graph, Norton Internet Security displays a listof the processes that consume maximum resources atthat point. It also displays the percentage of usage foreach process. You can click a process that is availablein the list to get more information in the File Insightwindow.
The File Insight window provides information aboutthe process such as:
1 The file name, version number, digital signature,the date on which the process was installed.
1 The date on which the process was last used andwhether it is a startup file.
1 The stability details.
1 The confidence level.
1 The resource usage details.
1 The actions that the process performs on yoursystem.
In addition, the File Insight window displays the CPUgraph and the resource usage details for the runningprocesses. The graph shows the breakdown of overallsystem CPU usage and the CPU usage by the process.
Viewing the CPU graph and memory graph
Norton Internet Security monitors the overall systemCPU usage and memory usage and the Norton-specificCPU usage and memory usage. The CPU tab and theMemory tab at the top of the Performance graphdisplay the CPU graph and the memory graphrespectively.
The Zoom options provide you the magnified view ofthe CPU graph and memory graph. For example, if youselect the 10min option, Norton Internet Securitydisplays the magnified view of CPU graph or memory
95Monitoring your system's performanceAbout System Insight
graph for the last 10 minutes. If you select the 1Woption, Norton Internet Security displays the CPUgraph and memory graph for the last one week.
w By default, the graphs display performance time forthe last 90 minutes.
To view CPU graph and memory graph
1 In the Norton Internet Security main window, clickPerformance.
2 In the Performance window, do one of the following:
1 To view the CPU graph, click the CPU tab.
1 To view the memory graph, click the Memorytab.
1 To magnify or shrink the graph, click 10min,30min, 1D, 1W, or 1M next to the Zoom option.
Obtaining historical data of your CPU and memory usage
The Zoom options also provide you the historical dataof the CPU graph and memory graph. For example, ifyou select the 1D option, Norton Internet Securitydisplays the data of CPU graph or memory graph forthe last one day.
To view historical data of your CPU or memory usage
1 In the Norton Internet Security main window, clickPerformance.
2 In the Performance window, do one of the following:
1 To view the CPU graph, click the CPU tab.
1 To view the memory graph, click the Memorytab.
3 Do one of the following:
1 To obtain historical data for the last one day,click 1D.
1 To obtain historical data for the last one week,click 1W.
1 To obtain historical data for the last one month,click 1M.
Monitoring your system's performanceAbout System Insight
96

Identifying resource-consuming processes
You can click at any point on the CPU graph or memorygraph to obtain a list of top three processes thatconsume maximum resources of your computer at thatpoint. You can click a process that is available in thelist to get more information about the process in theFile Insight window.
To identify resource-consuming processes
1 In the Norton Internet Security main window, clickPerformance.
2 In the Performance window, do one of the following:
1 To view the CPU graph, click the CPU tab.
1 To view the memory graph, click the Memorytab.
3 Click at any point on the graph to obtain a list ofresource-consuming processes.
4 Click the name of a process to obtain additionalinformation about the process in the File Insightwindow.
About Startup ManagerSome programs are configured to launch during startupof your computer. The number of startup itemsincreases as you install new applications, and the timethat is required to start your computer increases as aresult. Startup Manager helps to manage the startupitems on your computer. For any startup program thatthe Startup Manager lists, you can view the detailedinformation such as CommunityUsage and ResourceUsage. You can also click the application name andview the File Insight details. These details would helpyou determine whether or not to enable an applicationduring startup.
You can use Startup Manager to manage programs withthe following extensions:
1 Windows executable files (.exe)
97Monitoring your system's performanceAbout System Insight
1 Windows System files (.sys)
1 Dynamic link library files (.dll)
1 ActiveX control files (.ocx)
Norton Internet Security displays the community usagedetails under the following conditions:
1 When the Norton Community Watch option isturned on.
See “Turning off or turning on Norton CommunityWatch” on page 454.
1 When the Network Cost Awareness option isconfigured to No Limit or Economy.
See “Defining the Internet usage of Norton InternetSecurity” on page 328.
Startup Manager lets you view the list of programs thatare included to the startup items. You can configureStartup Manager to run or not run these programswhen your computer starts. You can also choose todelay the start of the programs and run them manuallyfrom the Startup Manager. This way, you can enhancethe performance of your computer. You can disable aprogram and measure the performance of yourcomputer the next time you start your computer.
Norton Internet Security delays the start of the delayedprograms by five minutes. The first delayed programin the Startup Manager window, starts five minutesafter you start your computer. Every subsequentdelayed program starts with a further delay of 10seconds.
When you uninstall or if your Norton Internet Securityexpires, the programs that you had added to the StartupManager are reset to their default startup setting.
Sometimes, you may see some startup programsmissing from the startup list. Norton Internet Securityremoves a startup program from the list for thefollowing reasons:
1 When you disable a program that has a startupsetting.
Monitoring your system's performanceAbout System Insight
98

1 When you update a program that can possibly resetall startup settings to default.
1 When you use another program to manage yourstartup programs.
1 When you edit the registry keys manually.
w To add a startup item, you can open your Startup folderthat is available in your Windows Start menu and addprograms as required. For more information on addingprograms in Windows Startup, go to MicrosoftTechnical Support Web site or Windows online Help.
Disabling or enabling startup items
Whenever you start your computer, there are someprograms that automatically start and run in parallel.These programs are called startup items. The startupitems increase the start time of your computer.
Startup Manager helps you manage the startup itemsof your computer efficiently. If you do not want aprogram to automatically start when you turn on yourcomputer, you can disable the program using StartupManager. You can also delay a startup item that youwant to start at a later time.
To disable startup items
1 In the Norton Internet Security main window, clickPerformance.
2 In the Performance window, click StartupManager.
3 In the Startup Manager window, in the On/Offcolumn, uncheck the program that you do not wantto automatically start when you turn on yourcomputer.
4 Click Apply.
5 Click Close.
To enable startup items
1 In the Norton Internet Security main window, clickPerformance.
2 In the Performance window, click StartupManager.
99Monitoring your system's performanceAbout System Insight

3 In the Startup Manager window, in the On/Offcolumn, select the program that you want toautomatically start when you turn on yourcomputer.
4 Click Apply.
5 Click Close.
Managing startup items
Norton Internet Security Startup Manager monitorsand lists the programs that automatically start whenyou turn on your computer. To reduce the start timeof your computer and improve the performance, youcan delay the start of some of the programs when youturn on your computer.
Norton Internet Security delays the start of the delayedprograms by five minutes. The first delayed programin the Startup Manager window starts five minutesafter you start your computer. Every subsequentdelayed program starts with a further delay of 10seconds.
To delay startup items
1 In the Norton Internet Security main window, clickPerformance.
2 In the Performance window, click StartupManager.
3 In the StartupManager window, in the DelayStartcolumn, select the program that you want to delay.
4 Click Apply.
5 Click Close.
To run delayed startup items manually
1 In the Norton Internet Security main window, clickPerformance.
2 In the Performance window, click StartupManager.
3 In the StartupManager window, click RunDelayedItems Now.
4 Wait for the program to start, and then in theStartup Manager window, click Close.
Monitoring your system's performanceAbout System Insight
100

About optimizationThe data storage space on a disk is divided into discreteunits. These units are called clusters. When files arewritten to the disk, they are broken up intocluster-sized pieces. When all of the file pieces arelocated in adjacent or contiguous clusters, the file canbe accessed quickly.
Your computer’s hard disk stores all of your files,applications, and the Windows operating system. Thebits of information that make up your files graduallyspread over the disk. This process is known asfragmentation. The more that you use your computer,the more fragmented the hard disk gets.
When a fragmented file is accessed, the diskperformance is slower. The performance is slowerbecause the drive head locates, loads, saves, and keepstrack of all of the fragments of the file. If free space isalso fragmented, the drive head might have to trackadequate free space to store temporary files or newlyadded files.
Optimization rearranges file fragments into adjacentor contiguous clusters. When the drive head accessesall of the file data in one location, the file is read intothe memory faster. Optimization also maximizes theusable free space on a disk by grouping most frequentlyused files and infrequently used files. Optimizationconsolidates free space to avoid fragmenting newlyadded files. It adds extra space after major datastructures so that they can grow without immediatelybecoming fragmented again.
You can optimize your boot volume manually by usingthe Optimize option in the Performance window.
You can also configure Norton Internet Security todefragment your boot volume or the local disk thatcontains boot volume when your computer is idle.Norton Internet Security automatically schedules theoptimization when it detects the installation of an
101Monitoring your system's performanceAbout System Insight

application on your computer. The optimizationprocess starts next time when your computer is idle.
You can use the IdleTimeOptimizer option to optimizethe boot volume during the idle time. To access theIdleTimeOptimizer option, go to the Norton InternetSecurity main window, and then click Settings >General > Norton Tasks > Idle Time Optimizer.
Optimizing your boot volume
The Optimize option lets you optimize your bootvolume to improve the boot time of your computer.Optimization of your boot volume maximizes the usablefree space by rearranging file fragments into adjacentand contiguous clusters. When the drive head of yourhard disk accesses all of the file data in one location,the file is read into the memory faster.
When you use the Optimize option in Windows XP,Norton Internet Security optimizes only the bootvolume (for example, C:\Windows). Therefore, itrequires less time to complete optimization. However,when you use the Optimize option in Windows Vista,Windows 7, or Windows 8, Norton Internet Securityoptimizes the drive that contains the boot volume.Therefore, it requires more time to completeoptimization.
You can access the Optimize option at the top of thesecurity status graph in the Performance window. Youcan also optimize your boot volume using the InsightOptimizer option in the Norton Tasks window. TheInsightOptimizer row in the background jobs list thatis available in the Norton Tasks window displays thedetails of the boot volume optimization process. Youcan view details such as timestamp, duration, andstatus of the background job.
To optimize your boot volume from the Performancewindow
1 In the Norton Internet Security main window, clickPerformance.
Monitoring your system's performanceAbout System Insight
102

2 In the Performance window, at the top of thesecurity status graph, click Optimize.
To optimize your boot volume from the Norton Taskswindow
1 In the Norton Internet Security main window, clickPerformance.
2 In the Performance window, click Norton Tasks.
3 In the Norton Tasks window, under the NortonTasks column, click the play icon that appearsbefore Insight Optimizer.
About the Idle Time Optimizer
Idle Time Optimizer lets you configure Norton InternetSecurity to defragment your boot volume or the localdisk that contains boot volume when your computeris idle. Norton Internet Security automaticallyschedules the optimization when it detects theinstallation of an application on your computer andyour computer is idle. If you start using your computeragain, Norton Internet Security stops the optimizationtask, and starts optimizing the next time that yourcomputer is idle. This way, the background job ofoptimization does not affect the performance of yourcomputer.
Optimization rearranges file fragments into adjacentor contiguous clusters in the hard disk. It improves thecomputer performance by reading the files into thememory faster. Optimization also maximizes the usablefree space on a disk by grouping most frequently usedfiles and infrequently used files. In addition, itconsolidates free space to avoid fragmenting newlyadded files.
You can use the IdleTimeOptimizer option to optimizethe boot volume during the idle time. To access theIdleTimeOptimizer option, go to the Norton InternetSecurity main window, and then click Settings >General > Norton Tasks > Idle Time Optimizer.
103Monitoring your system's performanceAbout System Insight

Turning off or turning on Idle Time Optimizer
Norton Internet Security automatically schedules theoptimization when it detects the installation of a newapplication on your computer. Norton Internet Securityruns this optimization only when your computer isidle.
You can use the IdleTimeOptimizer option to optimizethe boot volume during idle time. By default, this optionis turned on.
To turn off Idle Time Optimizer
1 In the Norton Internet Security main window, clickSettings.
2 In the Settings window, click the General tab.
3 In the left pane, click Norton Tasks.
4 In the Idle Time Optimizer row, move the On/Offswitch to the right to the Off position.
5 Click Apply, and then click OK.
To turn on Idle Time Optimizer
1 In the Norton Internet Security main window, clickSettings.
2 In the Settings window, click the General tab.
3 In the left pane, click Norton Tasks.
4 In the Idle Time Optimizer row, move the On/Offswitch to the left to the On position.
5 Click Apply, and then click OK.
About the Norton TasksThe NortonTasks window provides an interface whereyou can view and monitor all Norton-specificbackground tasks. Norton Internet Security runs mostof the background tasks when your computer is idle.The Norton Tasks window provides the details of thebackground tasks that Norton Internet Securityperforms.
The details include:
Monitoring your system's performanceAbout System Insight
104

1 The name of the Norton task
You can use the icon that appears before the nameof a background job to start or stop a backgroundtask. You can start or stop a background task at anytime.
1 The timestamp of the Norton task
You can view details such as the date on which thebackground job last ran and the time. These detailshelp you decide whether to start a background taskor wait for Norton Internet Security to run the jobduring idle time.
1 The duration of the Norton task
You can view the length of time that a Norton taskran the last time. The details also help youdetermine the length of time a background tasktakes to complete if you start it.
1 The background task has run during idle time ornot
This detail helps you determine if a task has alreadyrun during idle time or you should run it.
1 The status of the Norton task
You can view details about the completion of thetask.
1 The power source that the Norton Task uses.
You can specify the type of power source that eachof the Norton Tasks uses. Use the Configure linkthat is available next to the power source icon toconfigure the power source for the Norton Tasks.
105Monitoring your system's performanceAbout System Insight

The Norton Tasks window lets you monitor thefollowing Norton-specific tasks:
Automatic LiveUpdateautomatically checks fordefinition updates andprogram updates when yourcomputer is connected to theInternet.
By default, AutomaticLiveUpdate checks forupdates every hour.
Automatic LiveUpdate
Scans your entire computerfor viruses, spyware, anddifferent securityvulnerabilities.
Full System Scan
Optimizes the boot volume ofyour computer.
Insight Optimizer
Norton Community Watchprotects your computeragainst potential risks. Itcollects the informationabout new security threatsfrom your computer andsubmits the information toSymantec for analysis.Symantec assesses the datato identify the new threatsand resolves it.
Norton Community Watch
Monitoring your system's performanceAbout System Insight
106
Allows the smart scanning offiles on your computer. Itimproves the performance ofNorton Internet Securityscans by letting you scanfewer files withoutcompromising the security ofyour computer.
Norton Insight lets you checkthe details of the Files ofInterest that are available onyour computer. You can viewdetails such as signature ofthe file and the date on whichthe file was installed. You canalso view details such as thetrust level, community usage,resource usage, and thesource of the file.
Norton Insight
Pulse Updates check fordefinition updates every fiveminutes and downloads thestreamed virus definitions.Pulse Updates provide theupdates during the fullupdates, which LiveUpdatedownloads automaticallyevery few hours. Alwaysensure that the PulseUpdates option is turned on.It protects you from the latestthreats withoutcompromising your systemperformance or disruptingyour online experience.
Pulse Updates
107Monitoring your system's performanceAbout System Insight
Scans the important locationsof your computer that theviruses and other securitythreats often target.
Quick Scan takes less time toscan than a Full System Scanbecause this scan does notscan your entire computer.
Quick Scan
The following grayed out categories of jobs run in thebackground to improve your system performance andprotection. You can only view the last run details forthe following activities.
Performs backgroundmaintenance tasks related toIdentity Safe. Tasks includesending Identity Safe profilestatistics and downloadingthe favorite icons.
Identity Safe Maintenance
Performs backgroundmaintenance tasks related toAntiSpam. Tasks includeupdating contacts andAntiSpam filters.
AntiSpam Maintenance
Performs backgroundmaintenance tasks related tolicensing.
Licensing Maintenance
Performs backgroundmaintenance tasks related toNorton Insight. Tasks includemaintaining details about thestability and trust level offiles in your computer.
Insight Maintenance
Monitoring your system's performanceAbout System Insight
108

Performs backgroundmaintenance tasks related toNorton Internet Security.Tasks include clearing installlogs and rescanningconsolidated firewall rule.
Product Maintenance
You can also manually turn on Silent Mode for aspecified duration.
Monitoring background jobs of Norton Internet Security
The Norton Tasks window provides the details of thebackground tasks that Norton Internet Securityperforms and lets you view and monitor thebackground tasks. Norton Internet Security runs mostof the background tasks when your computer is idle.Performing all background tasks when your computeris idle helps your computer to run at peak efficiencywhen you use your computer. However, you canmanually start or stop a task at any time. You can alsospecify the IdleTimeOut duration. After the IdleTimeOut duration is reached, Norton Internet Securityidentifies the computer as idle and run the backgroundtasks. You can use the IdleCountdown bar to confirmthe idle state of your computer. You can also view theCPU graph and memory graph to obtain theperformance data of your computer.
To monitor background jobs
1 In the Norton Internet Security main window, clickPerformance.
2 In the Performance window, click Norton Tasks.
3 In the Norton Tasks window, view the details ofbackground jobs.
109Monitoring your system's performanceAbout System Insight

4 Do one of the following:
1 To run a background job, click the play icon thatappears before the name of the background job.
1 To stop a running background job, click the stopicon that appears before the name of thebackground job.
5 Click Close.
About Power Source
You can choose the power source for Norton InternetSecurity to perform the Norton Tasks when thecomputer is idle. Norton Tasks are background tasksthat Norton Internet Security performs when yourcomputer is idle. Norton Tasks include Quick Scan,Automatic LiveUpdate, Norton Community Watch,Norton Insight, Full System Scan, Insight Optimizer,and Pulse Updates. Norton Internet Security consumesmore power when it runs Norton Tasks.
By default, Norton Internet Security performs thesetasks only when your computer is connected to theexternal power. For example, if you are in an airport,and your computer is running on battery power, NortonInternet Security does not perform the Norton Tasks.In this way, you can extend the battery power of yourcomputer. However, you can choose the power sourcefor Norton Internet Security to perform the NortonTasks.
You can select one of the following options:
Allows the Norton Tasks torun only when your computeruses external power.
If you choose this option,Norton Internet Securityperforms the Norton Taskswhen the computer is idleand connected to externalpower.
External
Monitoring your system's performanceAbout System Insight
110

Allows the Norton Tasks torun irrespective if thecomputer uses externalpower or battery power.
If you choose this option,Norton Internet Securityperforms the Norton Taskswhen the computer is idle. Itdoes not consider the type ofpower source the computeruses.
External and Battery
You can configure the power source for each of theNorton Tasks.
Configuring the Power Source
You can choose the power source for Norton InternetSecurity to perform the Norton Tasks when thecomputer is idle. Norton Tasks are background tasksthat Norton Internet Security performs when yourcomputer is idle.
By default, Norton Internet Security performs thesetasks only when your computer is connected to theexternal power. You can configure the power sourcefor each of the Norton Tasks.
To configure the power source
1 In the Norton Internet Security main window, clickPerformance.
2 In the Performance window, in the left pane, clickNorton Tasks.
3 In the Norton Tasks window, under the PowerSource column, click the Configure link for theNorton Task that you want to configure the powersource.
111Monitoring your system's performanceAbout System Insight

4 In the Power Source window, select one of thefollowing:
1 ExternalAllows the Norton Task to run only when yourcomputer uses external power.
1 External and BatteryAllows the Norton Task to run irrespective if thecomputer uses external power or battery power.
If you choose this option, Norton InternetSecurity performs the Norton Task when thecomputer is idle. It does not consider the type ofpower source the computer uses.
5 Click OK.
6 In the Norton Tasks window, click Close.
About Norton InsightNorton Insight allows the smart scanning of files onyour computer. It improves the performance of NortonInternet Security scans by letting you scan fewer fileswithout compromising the security of your computer.
A Norton Internet Security scan can identify threatson your computer in the following ways:
At regular intervals, NortonInternet Security obtainsdefinition updates fromSymantec. These updatescontain signatures of knownthreats. Each time when NortonInternet Security obtains thedefinition updates, it performsa scan of all of the files that areavailable on your computer. Itcompares the signature of thefiles against the known threatsignatures to identify threats onyour computer.
The Blacklist technique
Monitoring your system's performanceAbout System Insight
112

Norton Internet Security obtainsspecific information about theFiles of Interest and submits theinformation to Symantec duringidle time. The informationincludes things such as filename, file size, and hash key.Symantec analyzes theinformation of each File ofInterest and its unique hashvalue and provides a confidencelevel to the file. The Symantecserver stores the hash value andconfidence level details of theFiles of Interest. The serverprovides the details immediatelyafter you open the NortonInsight - Application Ratingswindow. Even the slightestmodification of the file causes achange in the hash value and theconfidence level of the file.Typically, most Files of Interestbelong to the operating systemor known applications, and theynever change. These files do notrequire repeated scanning ormonitoring. For example,Excel.exe is a file that neverchanges but you always scan itduring a normal security scan.
The Whitelist technique
113Monitoring your system's performanceAbout System Insight

Symantec assigns the following confidence levels toFiles of Interest:
Symantec analyzes the file astrusted based on the statisticalevaluation that is done on thefiles that are available within theNorton Community.
If the file has three green bars,Symantec rates the file asNorton Trusted.
The files that have three greenbars display a Norton Trustedpop-up text when you move themouse pointer over the greenbars.
Trusted
Symantec analyzes the file asgood based on the statisticalevaluation that is done on thefiles that are available within theNorton Community.
Symantec rates the trusted filesas follows:
1 If the file has two green bars,Symantec rates the file asGood.
1 If the file has one green bar,Symantec rates the file asFavorable.
Good
Symantec does not have enoughinformation about the file toassign a trust level to the file.
Unproven
Symantec has only a fewindications that the file is nottrusted.
Poor
Monitoring your system's performanceAbout System Insight
114
Norton Internet Security also provides differentprofiles to configure your scan performance. Whenyou use the FullScan profile, Norton Internet Securityfollows the Blacklist technique to scan your computer.It scans all of the files on your computer against thesignatures that it obtained during definition updates.When you use the Standard Trust or High Trustprofile, Norton Internet Security follows the Whitelisttechnique to scan the files based on their confidencelevel. This way, Norton Internet Security significantlyreduces the time that is required to scan your computercompletely for security threats.
The Whitelist technique that Norton Insight uses alsohelps in heuristic detection of suspicious applications.Normally, the execution behavior of well-knownapplications appears identical to the execution behaviorof unknown applications. Such behavior results in falseidentification of good applications as suspicious, andtherefore, necessitates security applications tomaintain a low heuristic detection threshold. However,keeping a low detection threshold does not provide acomplete heuristic protection against maliciousapplications. Norton Internet Security uses theWhitelist technique that helps maintain a highheuristic detection threshold. It excludes well-knownapplications from heuristic detection to prevent falsedetection of well-known applications and to ensure ahigh detection rate of malicious applications.
Viewing the files using Norton Insight
Norton Insight provides information about the Files ofInterest that are available on your computer. NortonInternet Security lets you view specific categories offiles based on the option that you select in the NortonInsight - Application Ratings window.
115Monitoring your system's performanceAbout System Insight

The drop-down list that is available in the NortonInsight - Application Ratings window provides youthe following options:
Lists the processes that runon your computer at thatpoint in time when youselected this option.
All Running Processes
Lists the Files of Interest.All Files
Lists the programs that startwhen you start yourcomputer.
Startup Items
Lists all the files andprograms that are currentlyloaded on to the programmemory space.
All Loaded Modules
Lists the programs thatconsumemaximumresourcesof your computer.
Norton Internet Securitydisplays a list of top 10resources that highly affectthe performance of yourcomputer.
Highest Performance Impact
Lists the files that have themaximum community usage.
Highest Community Usage
Monitoring your system's performanceAbout System Insight
116

Lists the Files of Interest thatyou manually trusted in theFile Insight window.
This category does not listthe files that do not belongto the File of Interest even ifyou manually trust the files.However, Norton InternetSecurity excludes all of themanually trusted files fromNorton Internet Security scanwhen you configure ScanPerformanceProfiles toHighTrust.
You can also remove the usertrust from all of the Files ofInterest that you manuallytrusted. You can use theClear All User Trust optionnext to the drop-down list toremove the user trust.
User Trusted Files
Lists the files that are notNorton Trusted.
You can manually trust all thefiles that are not trusted byclicking the Trust All Filesoption next to the drop-downlist.
Untrusted Files
You can view file details such as file name, trust level,community usage, resource usage, and the stabilityrating. There may be instances when the trust level ofa file has changed or a process running might havestopped running. You can refresh the Norton Insight- Application Ratings window to update the file listand file details. The coverage meter provides agraphical representation of the percentage of theNorton Trusted Files and the total Files of Interest. Thehigher the percentage, the lesser time the scan takes.
117Monitoring your system's performanceAbout System Insight

To view the files using Norton Insight
1 In the Norton Internet Security main window, clickAdvanced.
2 In the ComputerProtection pane, click ApplicationRatings.
3 In the Norton Insight - Application Ratingswindow, select an option from the Show drop-downlist to view a category of files.You may need to scroll the window to view all thefiles that are listed in the details area.
4 Click Close.
To refresh the list of files
4 In the Norton Insight - Application Ratingswindow, at the top of the file icon, click the refreshicon.
Checking the trust level of a file
Norton Insight lets you check the details of the Filesof Interest that are available on your computer. Youcan view details such as signature of the file and thedate on which the file was installed. You can also viewdetails such as the trust level, stability details,community usage, resource usage, and the source ofthe file. You can use the Locate option to find thelocation of the file on your computer. When youright-click a file that is available on your computer, theshortcut menu displays Norton Internet Securityoption and then Norton File Insight option. You canuse the options to check the details of a File of Interest.
w Norton Internet Security displays the Norton FileInsight option only when you right-click a File ofInterest. In Windows Safe mode, you cannot access thisoption for any file. Norton Internet Security alsocategorizes any file for which you open the FileInsightwindow to view details as a File of Interest.
The Symantec server stores the hash value and trustlevel details of the File of Interest. The server providesthe file details immediately after you open the Norton
Monitoring your system's performanceAbout System Insight
118

Insight - Application Ratings window. However, youcan use theCheckTrustNow option in the FileInsightwindow to update the trust value of a file. You can alsomanually trust any well-known files. You can changethe trust level of any file to User Trusted other thanthe files that are Norton Trusted.
You can determine the resource usage of a file that isavailable on your computer. The File Insight windowdisplays the CPU graph and the system resource usagedetails for the running processes. The graph shows thebreakdown of overall system CPU usage and the CPUusage or memory usage by the process.
To check the trust level of a file
1 In the Norton Internet Security main window, clickAdvanced.
2 In the window that appears, in the ComputerProtection pane, click Application Ratings.
3 In the Norton Insight - Application Ratingswindow, click a file for which you want to check thedetails.
4 In the File Insight window, view the details of thefile.
5 In the File Insight window, click Close.
To check the trust level of a specific file
1 In the Norton Internet Security main window, clickAdvanced.
2 In the window that appears, in the ComputerProtection pane, click Application Ratings.
3 In the Norton Insight - Application Ratingswindow, click Check a Specific File.
4 Browse to the location of the file for which you wantto check the details.
5 Select the file, and then click Open.
6 In the File Insight window, view the details of thefile.
7 In the File Insight window, click Close.
119Monitoring your system's performanceAbout System Insight

To find the location of the file
4 In the File Insight window, click Locate.
To refresh the trust level of the file
4 In the File Insight window, click CheckTrustNow.
To manually trust the file
4 In the File Insight window, in the Details tab, clickTrust Now.You can manually trust the files that are poor,unproven, or not Norton trusted.
To determine the resource usage of a running process
1 In the File Insight window, in the left pane, clickActivity.
2 In the Show drop-down list, do one of the following:
1 Select Performance to view the performancegraph of the process.
1 Select Performance Alert to view theperformance alert-related details of the process.
1 Select Network to view the network activitiesof the process.
1 Select Run Key change to include registrychanges.
Configuring the Scan Performance Profiles
The Scan Performance Profiles settings let youconfigure how Norton Internet Security should scanyour computer based on the digital signature andconfidence level of the files. To make Norton InternetSecurity scans lighter, faster, and more effective, youcan exclude from scans the files that have known digitalsignatures or high confidence levels.
You can configure the Scan Performance Profilessettings to do the following:
1 Configure to Full Scan to perform a complete scanof your computer.
Monitoring your system's performanceAbout System Insight
120

The complete scan includes a scan of all files onyour computer irrespective of the confidence levelor digital signature of the files.
1 Configure to StandardTrust to perform a scan thatexcludes the files that are Norton Trusted.
Norton Internet Security scans the files that havea confidence level other than Norton Trusted.
1 Configure to High Trust to perform a scan thatexcludes the files that have known digital signaturesor high confidence levels.
Norton Internet Security does not scan the filesthat have confidence level as Norton Trusted orUser Trusted. It also excludes the Good files withhigh confidence level from the scan. It scans thefiles with confidence levels as Poor Trust, UnprovenTrust, Bad Trust, and the files without a class 3digital signature.
You must configure the Scan Performance Profilessettings before you run a scan or before a scan isscheduled to run. Norton Internet Security scans yourcomputer according to the configuration you specifiedin the Scan Performance Profiles settings.
To configure Scan Performance Profiles from theSettings window
1 In the Norton Internet Security main window, clickSettings.
2 In the Settings window, in the left pane, clickComputer Scan.
3 In the ScanPerformanceProfiles row, click on oneof the settings. Your options are:
1 Full Scan
1 Standard Trust
1 High Trust
4 Click Apply, and then click OK.
121Monitoring your system's performanceAbout System Insight

To configure ScanPerformanceProfiles from theNortonInsight - Application Ratings window
1 In the Norton Internet Security main window, clickAdvanced.
2 In the window that appears, in the ComputerProtection pane, click Application Ratings.
3 In the Norton Insight - Application Ratingswindow, move the ScanPerformanceProfiles sliderto one of the settings. Your options are:
1 Full Scan
1 Standard Trust
1 High Trust
4 Click Close.
About Monthly ReportMonthly Report lets you view a summary of whatNorton Internet Security has done for you. NortonInternet Security displays the monthly report every30 days after you install your product. After 30 daysof installation, Norton Internet Security displays theMonthly Report automatically. If you do not wantNorton Internet Security to display the Monthly Reportautomatically, you can select the Do not displaymonthly reports automatically option in the NortonMonthly Report window.
To turn on the Monthly Report option, go to theNorton Internet Security main window, and then clickSettings>General>OtherSettings>MonthlyReport> On. The Norton Monthly Report window displaysthe Tip of the month to recommend some of theproduct's features and services.
When your product expires after the trial period,Monthly Report displays the activation status of yourproduct. However, when your product expires after thesubscription period, Monthly Report displays thesubscription status of your product.
Monitoring your system's performanceAbout System Insight
122

Norton Internet Security provides reports based on thefollowing categories:
Lets you view the details of thevarious attacks your computeris protected from.
For example, you can view thetotal number of viruses andspyware from which you areprotected.
Computer
Lets you view the various typesof Internet attacks from whichyou are protected.
For example, you can view thetotal number of intrusionattempts that are blocked.
Network
Lets you view the details ofAntiphishing activities.
For example, you can view thetotal number of knownauthenticated sites that youvisited.
Web
Monthly Report lets you view the latest news onInternet security and also provides information on howto stay safe while you are online. You can click ReadMore in the Norton Monthly Report window to viewmore information on how to stay safe online.
Viewing the Monthly Report
The Monthly Report provides you with the statisticsthat are up to date. At a glance, you can see whatNorton Internet Security has done for you sinceinstallation.
123Monitoring your system's performanceAbout System Insight
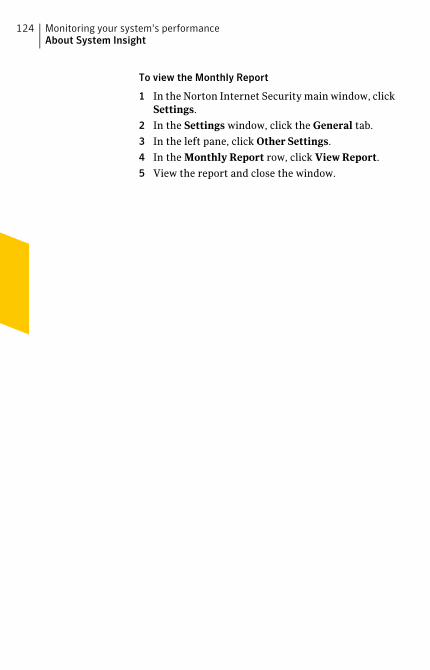
To view the Monthly Report
1 In the Norton Internet Security main window, clickSettings.
2 In the Settings window, click the General tab.
3 In the left pane, click Other Settings.
4 In the Monthly Report row, click View Report.
5 View the report and close the window.
Monitoring your system's performanceAbout System Insight
124
This chapter includes the following topics:
1 About maintaining protection
1 About the Norton Internet Security scans
About maintaining protectionAfter you have installed your product and runLiveUpdate, you have complete protection from virusesand other security risks. However, new security risksare a constant threat. Security risks can spread whenyou start your computer from an infected disk or whenyou run an infected program. You can do several thingsto avoid security risks.
Practicing regular file maintenance and keeping yoursecurity protection up to date helps in protecting yourcomputer.
To avoid security risks:
1 Stay informed about the latest viruses and othersecurity risks by logging in to the SymantecSecurity Response Web site at the following URL:
http://securityresponse.symantec.com
The Web site includes extensive, frequently updatedinformation on viruses and automatic virusprotection.
1 Keep AutomaticLiveUpdate turned on at all timesto continually receive definition updates.
3Protecting yourfiles and data

1 Run LiveUpdate regularly to receive new programupdates.
1 Keep Auto-Protect turned on at all times to preventviruses from infecting your computer.
1 Watch for email messages from unknown senders.Do not open attachments from these senders.
1 Keep Email Protection turned on to avoid sendingor receiving infected email attachments.
1 Keep all recommended maximum protectionsettings turned on.
1 Keep the default options turned on at all times.
You should be always prepared in case a virus infectsyour computer.
Ensuring that protection settings are turned onNorton Internet Security is configured to provide yourcomputer with complete protection against viruses.
In addition, Norton Internet Security protects yourcomputer against spyware, adware, and other securityrisks.
The default settings provide complete protection foryour computer. However, you should ensure that yourprotection features are turned on for maximumprotection.
To ensure that protection settings are turned on
1 In the Norton Internet Security main window, clickSettings.
Protecting your files and dataAbout maintaining protection
126

2 In the Settings window, in the Computer tab, movethe On/Off switch to the left to the On position forthe following settings:
Computer Scan providesthe following options:
Computer Scan
1 Compressed FilesScan
1 Microsoft OfficeAutomatic Scan
1 Rootkits and StealthItems Scan
1 Network Drives Scan
Real Time Protectionprovides the followingoptions:
Real Time Protection
1 Antispyware
1 Auto-Protect
1 Caching
1 Removable MediaScan
1 SONAR Protection
Updates provides thefollowing options:
Updates
1 AutomaticLiveUpdate
1 Pulse Updates
1 Smart Definitions
1 Apply update onreboot
3 In the Settings window, click the Network tab.
4 In the Intrusion Prevention section, in theIntrusionPrevention row, move the On/Off switchto the left to the On position.
127Protecting your files and dataAbout maintaining protection

5 In the SmartFirewall section, in the SmartFirewallrow, move the On/Off switch to the left to the Onposition.
6 In the MessageProtection section, move the On/Offswitch to the left to the On position, click Configure,and check all options for the following features:
Email Antivirus Scan providesthe following options:
Email Antivirus Scan
1 Scan incoming emailmessages
1 Scan outgoing emailmessages
1 Scan outgoingmessages forsuspected worms
1 Protect against timeouts
1 Display progress indicator
You should configure any newinstant messenger programsthat you installed after youinstalled Norton InternetSecurity.
Instant Messenger Scan
1 Select the instant messengerclients that you want toprotect.
7 In the Settings window, click the General tab.
8 In the left pane, click Other Settings.
9 In the Insight Protection row, move the On/Offswitch to the left to the On position.
10 Click Apply, and then click OK.
About the Norton Internet Security scansNorton Internet Security scans secure your computerfrom all types of viruses and unknown threats usingthe latest virus definitions. It also scans all the Internet
Protecting your files and dataAbout the Norton Internet Security scans
128

activities that are performed on your computer toprotect your computer from the Internet-based threatsthat exploit software vulnerabilities.
Norton Internet Security automatically performsdifferent types of scans to secure your computer fromlatest threats. It also lets you run different types ofscans manually to secure your computer.
By using Norton Internet Security, you can run thefollowing types of scans:
Computer Scan uses the latestvirus definitions that areavailable locally in the computer.
If you suspect that yourcomputer is infected, you canrun three types of computerscans manually to prevent virusinfections on your computer. Thethree types of scans that areavailable under Computer Scanare Quick Scan, Full SystemScan, and Custom Scan.
Computer Scan
129Protecting your files and dataAbout the Norton Internet Security scans

Insight Network Scan uses thevirus definitions that areavailable locally and hosted inthe Cloud. InsightNetwork Scandetects the files that aresuspicious or vulnerable on yourcomputer using thereputation-based threatdetection. Norton InternetSecurity performs an InsightNetwork Scan only when theInsight Protection option isturned on. By default, the InsightProtection option is turned on.
To turn on the InsightProtection option, go to theNorton Internet Security mainwindow, and then click Settings> General > Other Settings >Insight Protection > On.
Insight Network Scan
Protecting your files and dataAbout the Norton Internet Security scans
130

Reputation Scan displays thereputation information of thefiles on your computer. Itdisplays the reputationinformation such as trust level,prevalence, stability rating, andresource usage. ReputationScan displays the detailedreputation information of thegood files and the number of badfiles that have been detected orremoved.
Reputation Scan also internallyperforms Computer Scan andInsight Network Scan to detectthe threats. The different typesof scans that are available underReputation Scan areQuick Scan,Full System Scan, and CustomScan.
w Norton Internet SecurityReputation Scan is applicableonly for the executable files andthe installer files.
Reputation Scan
131Protecting your files and dataAbout the Norton Internet Security scans

Scan Facebook Wall lets youscan the links and URLs that areavailable on your Facebookprofile.
When you click the ScanFacebook Wall option, NortonInternet Security takes you tothe Facebook login Web page.After you log in to your Facebookprofile, Norton Safe Web asksyou to grant permission toaccess your Facebook wall. Todo so, use the grant uspermission to access yourstream option available on theFacebook Web page, and thenfollow the on-screeninstructions. After you grantpermission, Norton safe Webscans all the available links onyour Facebook wall each timeyou use Scan Facebook Walloption. It then displays thesecurity status of the scannedURLs.
Scan Facebook Wall
Norton Internet Security keeps your computer securefrom latest threats by automatically running FullSystem Scan when your computer is in the idle state.
Norton Internet Security provides options to configureNorton Internet Security scans. The computer settingsand some of the options in the network settings let youconfigure how you want Norton Internet Security toscan your computer for viruses and other securitythreats. You can click the Settings link available in theNorton Internet Security main window and view theoptions that are available under the Computer tab andNetwork tab.
Protecting your files and dataAbout the Norton Internet Security scans
132

Accessing Norton Internet Security scansYou can use Norton Internet Security scans to secureyour computer from all types of viruses and unknownthreats.
You can access Full System Scan and custom scansfrom the Norton Internet Security main window. Youcan access Quick Scan from the Norton InternetSecurity main window or the Norton Internet Securityicon on the taskbar.
You can also scan any particular folder using thecontext scan feature. The context menu scan isavailable when you right-click the folder that you wantto scan.
If the InsightProtection option is turned on, when youright-click a file, the shortcut menu displays NortonInternet Security and then InsightNetworkScan. Youcan use this command to scan a file using both the localdefinitions and the definitions that are hosted in theCloud.
You can also run the Reputation Scan to view thereputation information of the files.
To access the scan from the Norton Internet Securitymain window
1 In the Norton Internet Security main window, clickAdvanced.
2 In Computer Protection pane, click Scan Now.
3 In the window that appears, do one of the following:
1 In the Computer Scan pane, click the scan thatyou want to run.
1 Click Reputation Scan, and then click the scanthat you want to run.
1 Click ScanFacebookWall to scan the links thatare available on your Facebook wall.
133Protecting your files and dataAbout the Norton Internet Security scans

To access the scan from the notification area
4 In the notification area on the taskbar, right-clickthe Norton Internet Security icon, and then clickRun Quick Scan.By default, Insight Protection option is turned on.In this case, Norton Internet Security performs anInsight Network Quick Scan simultaneously with atraditional Quick Scan.
To scan a particular folder
4 Right-click the folder, and click Norton InternetSecurity > Scan Now.
To scan a particular file
4 Right-click the file, and click Norton InternetSecurity > Insight Network Scan.The Insight Network Scan option is available onlyif the Insight Protection option is turned on. Toaccess the Insight Protection option, go to theNorton Internet Security main window, and thenclick Settings>General >OtherSettings> InsightProtection.
About Computer ScanNorton Internet Security automatically downloadslatest virus definition regularly and secures yourcomputer from all types of viruses and unknownthreats. When Norton Internet Security performs aComputer Scan, it uses the latest virus definitions thatSymantec provides.
The threat detections that are based on the localdefinition are specified with a specific name. Forexample, if a Trojan horse is detected, the scan resultsof the Computer Scan displays the threat as Trojan.Foo.You can click the Scan Now option available in theNorton Internet Security main window to access thedifferent types of computer scans.
Protecting your files and dataAbout the Norton Internet Security scans
134

If you suspect that your computer is infected, you canrun three types of computer scans manually to preventvirus infections on your computer.
You can run the following types of computer scans:
Scans the important locations ofyour computer that the virusesand other security threats oftentarget.
Quick Scan takes less time toscan than a Full System Scanbecause this scan does not scanyour entire computer.
Quick Scan
Scans your computer for alltypes of viruses and securitythreats.
Full System Scan performs adeep scan of your computer toremove viruses and othersecurity threats. It checks allboot records, files, and runningprocesses to which the user hasaccess. Consequently, when yourun a Full System Scan withadministrator privileges, it scansmore files than when you run itwithout administrator privileges.
Norton Internet Securityautomatically runs a Full SystemScan when your computer is inidle state.
w Full System Scan scans allthe local drives, mapped networkdrives, and removable drivesexcept floppy drives. You canalso minimize and run a FullSystem Scan in the background.
Full System Scan
135Protecting your files and dataAbout the Norton Internet Security scans

Scans a specific file, folder,drive, or removable drive thatyou choose.
Custom Scan
Computer Scan provides details about the scanneditems. You can view the details such as total numberof files scanned, security risks detected, security risksresolved, and the total items that require attention. Italso provides you the different ways to resolve anyitems that were not automatically resolved during thescan. You can also view the severity of the risk, thename of the risk, and the status of the risk about theresolved items.
Running a Full System Scan
Full System Scan performs a deep scan of the systemto remove viruses and other security threats. It checksall boot records, files, and running processes to whichthe user has access. Consequently, when you run a FullSystem Scan with administrator privileges, it scansmore files than when you run it without administratorprivileges.
w You can also minimize and run a Full System Scan inthe background.
To run a Full System Scan
1 In the Norton Internet Security main window, clickScan Now.
Protecting your files and dataAbout the Norton Internet Security scans
136
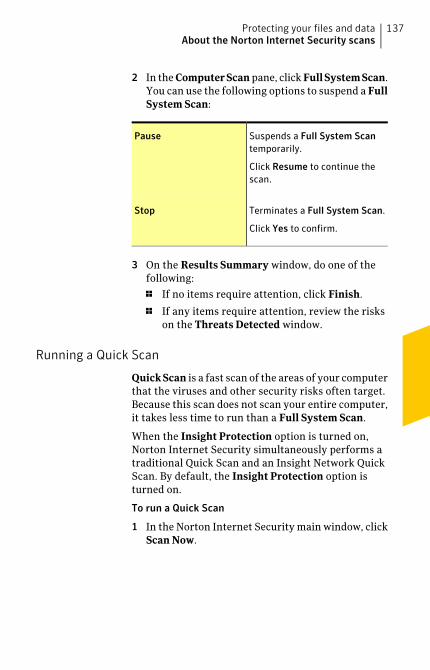
2 In the ComputerScan pane, click FullSystemScan.You can use the following options to suspend a FullSystem Scan:
Suspends a Full System Scantemporarily.
Click Resume to continue thescan.
Pause
Terminates a Full System Scan.
Click Yes to confirm.
Stop
3 On the Results Summary window, do one of thefollowing:
1 If no items require attention, click Finish.
1 If any items require attention, review the riskson the Threats Detected window.
Running a Quick Scan
QuickScan is a fast scan of the areas of your computerthat the viruses and other security risks often target.Because this scan does not scan your entire computer,it takes less time to run than a Full System Scan.
When the Insight Protection option is turned on,Norton Internet Security simultaneously performs atraditional Quick Scan and an Insight Network QuickScan. By default, the Insight Protection option isturned on.
To run a Quick Scan
1 In the Norton Internet Security main window, clickScan Now.
137Protecting your files and dataAbout the Norton Internet Security scans

2 In the Computer Scan pane, click Quick Scan.You can use the following options to suspend aQuick Scan:
Suspends a Quick Scantemporarily.
Click Resume to continue thescan.
Pause
Terminates a Quick Scan.
Click Yes to confirm.
Stop
3 On the Results Summary window, do one of thefollowing:
1 If no items require attention, click Finish.
1 If any items require attention, review the riskson the Threats Detected window.
Scanning selected drives, folders, or files
Occasionally, you might want to scan a particular file,removable drives, any of your computer's drives, orany folders or files on your computer. For example,when you work with removable media and suspect avirus, you can scan that particular disk. Also, if youhave received a compressed file in an email messageand you suspect a virus, you can scan that individualelement.
To scan individual elements
1 In the Norton Internet Security main window, clickScan Now.
2 In the Computer Scan pane, click Custom Scan.
Protecting your files and dataAbout the Norton Internet Security scans
138

3 In the Scans window, do one of the following:
1 To scan specific drives, click Run next to DriveScan, select the drives that you want to scan,and then click Scan.
1 To scan specific folders, click Run next to FolderScan, select the folders that you want to scan,and then click Scan.
1 To scan specific files, click Run next to FileScan,select the files that you want to scan, and thenclick Add.
You can also press Ctrl, and select multiple filesto scan.
You can use the following options to suspend ascan:
Suspends a custom scantemporarily.
Click Resume to continue thescan.
Pause
Terminates the scan.
Click Yes to confirm.
Stop
4 In the Results Summary window, do one of thefollowing:
1 If no items require attention, click Finish.
1 If any items require attention, review them onthe Threats Detected window.
About the Results Summary window
Norton Internet Security displays the ResultSummarywindow when you run a manual scan. At the end of ascan, the Results Summary window provides thesummary of the scan results.
If your most recent scan was a Quick Scan, this windowshows the results of a fast scan of the areas of your
139Protecting your files and dataAbout the Norton Internet Security scans

computer. Viruses, spyware, and other risks oftentarget these areas.
If your most recent scan was a Full System Scan, thiswindow shows the results of a comprehensive scan ofyour entire computer.
The Result Summary window displays the followinginformation:
1 Total items scanned
1 Total security risks detected
1 Total security risks resolved
1 Total items that require your attention
About the Threats Detected window
Norton Internet Security displays the ThreatsDetectedwindow when it detects threats. At the end of a scan,the Threats Detected window provides you differentways to resolve any items that were not automaticallyresolved during the scan.
The ThreatsDetected window provides the informationsuch as the severity of the risk, the name of the risk,and the status of the risk. It also provides the actionthat you can take to resolve the item. The ThreatsDetected window provides you the different optionssuch as Fix, Manual Fix, Exclude, Get Help, andRescan to resolve the item.
It also provides the Ignore option only once during thefirst-time detection of low-risk items.
Ignore option is available once until you do not changethe default settings for the Low Risks option underComputer Scan.
The options in the ThreatsDetected window vary basedon the types of files that Norton Internet Securityidentified as infected during the scan.
Protecting your files and dataAbout the Norton Internet Security scans
140

About custom scans
You can create a custom scan if you regularly scan aparticular segment of your computer. This custom scanlets you scan the segment frequently without havingto specify it every time. You can also schedule thecustom scan to run automatically on specific dates andtimes or at periodic intervals. You can schedule a scanaccording to your preferences. If the scheduled scanbegins when you use your computer, you can run thescan in the background instead of stopping your work.
You can delete the scan when it is no longer necessary.For example, if you work on a project for which youneed to swap files frequently with others. In this case,you might want to create a folder into which you copyand scan those files before using them. When theproject is done, you can delete the custom scan for thatfolder.
Creating a custom scan
Instead of running the default scans that are listed inthe Scans pane, you can create your own scans thatmeet your specific requirements. For example, you cancreate a scan that checks a folder in which you storeall the downloaded files.
You can create a custom scan in the Scans window.
When you create custom scans, you can also schedulethem to run automatically on specific dates and timesor at periodic intervals.
To create a custom scan
1 In the Norton Internet Security main window, clickScan Now.
2 In the Computer Scan pane, click Custom Scan.
3 In the Scans window, click Create Scan.
4 In the New Scan window, in the Scan Name box,type a name for the scan.You cannot specify a scan name that is already inuse.
141Protecting your files and dataAbout the Norton Internet Security scans

5 On the Scan Items tab, add the items that you wantto scan. See “Selecting the scan items” on page 142.
6 On the Scan Schedule tab, set the frequency andtime at which you want to perform the scan. See“Scheduling a scan” on page 146.
7 On the ScanOptions tab, configure the scan optionsas required. See “Configuring the scan options”on page 143.
8 Click Save.
Selecting the scan items
When you configure a custom scan, you must selectthe items that you want to include in the scan. You caninclude individual files, folders, or drives. You caninclude multiple drives, folders, and files to add to thescan. You can also exclude items from the scan.
w When you select a drive, all the items in the driveincluding the files and folders are automatically addedto the scan. When you select a folder, all of the files infolder are added to the scan.
To select the scan items
1 In the Norton Internet Security main window, clickScan Now.
2 In the Computer Scan pane, click Custom Scan.
3 In the Scans window, do one of the following:
1 To add items for a new scan, click Create Scan.
You must provide a name for the scan in theScan Name box.
1 To add items for an existing scan, in the EditScan column, click the edit icon for the scan thatyou want to modify.
Protecting your files and dataAbout the Norton Internet Security scans
142

4 In the window that appears, on the Scan Items tab,do the following:
1 To add drives, click Add Drives, in the ScanDrives dialog box, select the drives to bescanned, and click Add.
1 To add folders, click Add Folders, in the ScanFolders dialog box, select the folders to bescanned, and click Add.
1 To add files, click AddFiles, in the Files toScandialog box, select the files to be scanned, andthen click Add.
If you need to remove an item from the list, selectthe item, and then click Remove.
5 Click Next.
6 In the Scan Schedule tab, select the scan scheduleas required, and then click Next.
7 In the Scan Options tab, click Save.
Configuring the scan options
Norton Internet Security lets you configure scanoptions for each scan that you create. By default, thescan options reflect the current Computer Scansettings in the Settings window. The changes that youmake are applicable to the current scan only. Anychange that is made to the Computer Scan settings inthe Settings window does not affect the scan optionssettings for the current scan.
In addition to the custom scans that you create, youcan configure the scan options for the default scans.You can configure scan options for Full System Scan,Quick Scan, Drive Scan, Folder Scan, and File Scan.
To configure the scan options
1 In the Norton Internet Security main window, clickScan Now.
2 In the Computer Scan pane, click Custom Scan.
143Protecting your files and dataAbout the Norton Internet Security scans

3 In the Scans window, in the EditScan column, clickthe edit icon next to the scan that you want toschedule.
4 In the Edit Scan window, on the Scan Options tab,configure the scan options as required.
5 Click Save.
Editing a custom scan
You can edit a custom scan that you created. You caninclude additional files or folders to the scan or removethe files and folders that you do not want to scan. Youcan also change the name of the scan.
You can edit a custom scan in the Scans window.
To edit a custom scan
1 In the Norton Internet Security main window, clickScan Now.
2 In the Computer Scan pane, click Custom Scan.
3 In the Scans window, in the EditScan column, clickthe edit icon next to the custom scan that you wantto modify.
4 In the Edit Scan window, on the Scan Items tab,select the items that you want to scan. See“Selecting the scan items” on page 142.
5 On the Scan Schedule tab, set the frequency andtime at which you want to perform the scan. See“Scheduling a scan” on page 146.
6 On the ScanOptions tab, configure the scan optionsas required. See “Configuring the scan options”on page 143.
7 Click Save.
Running a custom scan
When you run a custom scan, you do not have toredefine what you want to scan.
You can run a custom scan from the Scans window.
Protecting your files and dataAbout the Norton Internet Security scans
144

To run a custom scan
1 In the Norton Internet Security main window, clickScan Now.
2 In the Computer Scan pane, click Custom Scan.
3 In the Scans window, click Run next to the customscan that you want to run.You can use the following options to suspend acustom scan:
Suspends a custom scantemporarily.
Click Resume to continue thescan.
Pause
Terminates a custom scan.
Click Yes to confirm.
Stop
4 In the Results Summary window, do one of thefollowing:
1 If no items require attention, click Finish.
1 If any items require attention, review the riskson the Threats Detected window.
Deleting a custom scan
You can delete custom scans if they are no longerneeded.
You can delete a custom scan in the Scans window.
To delete a custom scan
1 In the Norton Internet Security main window, clickScan Now.
2 In the Computer Scan pane, click Custom Scan.
3 In the Scans window, in the Delete column, clickthe delete icon next to the custom scan that youwant to delete.
145Protecting your files and dataAbout the Norton Internet Security scans

4 Click Yes to confirm that you want to delete thescan.
About scheduling scans
Norton Internet Security automatically detects the idlestate of your computer and runs a Full System Scan.However, you can schedule a Full System Scanaccording to your preferences. You can also set up aschedule for a Quick Scan and custom virus scans thatyou create.
You can schedule scans to run automatically on specificdates and times or at periodic intervals. If the scheduledscan begins when you use your computer, you can runthe scan in the background instead of stopping yourwork. Norton Internet Security lets you schedule theFull System Scan, Quick Scan, and custom virus scans.However, you cannot schedule the Drive Scan, FolderScan, and File Scan.
You can also set up Norton Internet Security to turnoff your computer or move it to sleep mode or hibernatemode automatically when the scheduled scan iscomplete.
Scheduling a scan
You have complete flexibility in scheduling customscans. When you select how frequently you want a scanto run (daily, weekly, or monthly), you are presentedwith additional options. For example, you can requesta monthly scan, and then schedule it to occur onmultiple days instead.
In addition to the custom scans that you create, NortonInternet Security lets you schedule the Full SystemScan and Quick Scan.
You can also schedule the scan to run in specific timeintervals (hours or days). You can schedule a customscan in the Scans window.
Protecting your files and dataAbout the Norton Internet Security scans
146

w Norton Internet Security lets you select multiple datesif you schedule a monthly scan.
To schedule a custom scan
1 In the Norton Internet Security main window, clickScan Now.
2 In the Computer Scan pane, click Custom Scan.
3 In the Scans window, in the EditScan column, clickthe edit icon next to the custom scan that you wantto schedule.
4 In the EditScan window, on the ScanSchedule tab,do one of the following:
1 If you do not want to run the scan at anyparticular time, but want to keep the scanoptions and scan items saved, select Do notschedule this scan.
1 To run the scan at specific time intervals, selectRun at a specific time interval.
1 To run the scan at specific time every day, selectDaily.
1 To run the scan on a specific day on a week,select Weekly.
1 To run the scan on a specific day on a month,select Monthly.
These frequency options include the additionaloptions that you can use to refine the schedule. Setthe additional options as required.
5 Under Run the scan, do the following:
1 To run the scan only at idle time, check Only atidle time.
1 To run the scan only when your computer isconnected with external power source, checkOnly on AC power.
1 To prevent your computer from going to a Sleepor Standby mode, check Prevent standby.
147Protecting your files and dataAbout the Norton Internet Security scans

6 Under After scan completion:, select the state atwhich your computer should be after the scan iscomplete. Your options are:
1 Stay On
1 Turn Off
1 SleepThis option works only if you have configuredthe power options in your computer using theWindows Control Panel.
1 HibernateThis option works only if you have configuredthe power options in your computer using theWindows Control Panel.
7 Click Next.
8 In the Scan Options tab, click Save.
Scheduling a Full System Scan
Norton Internet Security automatically detects the idlestate of your computer and runs a Full System Scan.Full System Scan protects your computer againstinfection without compromising the performance ofyour computer. You can schedule a Full System Scanon specific dates and times or at periodic intervals.
You can schedule a Full System Scan in the Scanswindow.
To schedule a Full System Scan
1 In the Norton Internet Security main window, clickScan Now.
2 In the Computer Scan pane, click Custom Scan.
3 In the Scans window, in the EditScan column, clickthe edit icon next to Full System Scan.
4 In the Edit Scan window, under Whendoyouwantthe scan to run?, set the frequency and time atwhich you want the scan to run.Most of the frequency options include the additionaloptions that you can use to refine the schedule. Setthe additional options as required.
Protecting your files and dataAbout the Norton Internet Security scans
148

5 Click Next.
6 In the Scan Options tab, click Save.
Scheduling a Quick Scan
Quick Scan scans the important locations of yourcomputer that the viruses and other security threatsoften target. When you perform a Quick Scan, NortonInternet Security scans only the running processes andthe loaded programs. Quick Scan takes less time to scanthan a Full System Scan because this scan does notscan your entire computer.
Norton Internet Security lets you schedule a QuickScan. You can schedule a Quick Scan in the Scanswindow.
To schedule a Quick Scan
1 In the Norton Internet Security main window, clickScan Now.
2 In the Computer Scan pane, click Custom Scan.
3 In the Scans window, in the EditScan column, clickthe edit icon next to Quick Scan.
4 In the Edit Scan window, under Whendoyouwantthe scan to run?, set the frequency and time atwhich you want the scan to run.Most of the frequency options include the additionaloptions that you can use to refine the schedule. Setthe additional options as required.
5 Click Next.
6 In the Scan Options tab, click Save.
Editing a scheduled scan
You can change the schedule of any scheduled customscan, QuickScan, or Full SystemScan from the Scanswindow.
149Protecting your files and dataAbout the Norton Internet Security scans

To edit a scheduled scan from Norton Internet SecurityScans dialog box
1 In the Norton Internet Security main window, clickScan Now.
2 In the Computer Scan pane, click Custom Scan.
3 In the Scans window, in the EditScan column, clickthe edit icon next to the scan that you want to edit.
4 In the EditScan window, on the ScanSchedule tab,change the schedule as required.Most of the frequency options include the additionaloptions that you can use to refine the schedule. Setthe additional options as required.
5 Click Next.
6 In the Scan Options tab, click Save.
Running a scan at the command prompt
You can scan with Norton Internet Security from thecommand prompt without opening the Norton InternetSecurity main window. You type the path and name ofthe file that you want to scan or customize the scan byadding a specific command. The following commandsare available:
NAVW32 launches helpand terminates.
/?
Scans all drives/A
Scans the local drives/L
Enables (+) or disables(-) subfolders scanning
/S[+|-]
Protecting your files and dataAbout the Norton Internet Security scans
150
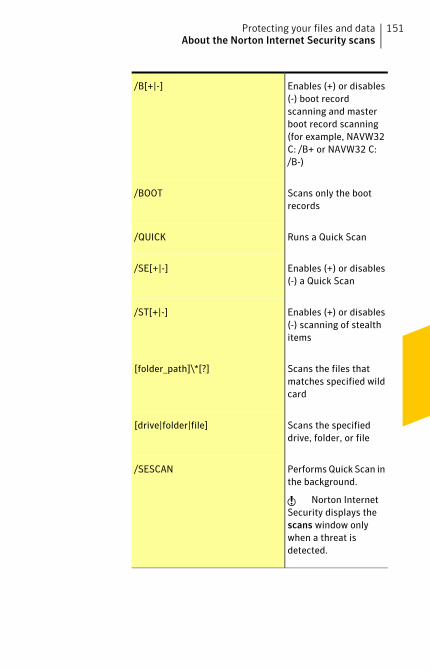
Enables (+) or disables(-) boot recordscanning and masterboot record scanning(for example, NAVW32C: /B+ or NAVW32 C:/B-)
/B[+|-]
Scans only the bootrecords
/BOOT
Runs a Quick Scan/QUICK
Enables (+) or disables(-) a Quick Scan
/SE[+|-]
Enables (+) or disables(-) scanning of stealthitems
/ST[+|-]
Scans the files thatmatches specified wildcard
[folder_path]\*[?]
Scans the specifieddrive, folder, or file
[drive|folder|file]
Performs Quick Scan inthe background.
w Norton InternetSecurity displays thescans window onlywhen a threat isdetected.
/SESCAN
151Protecting your files and dataAbout the Norton Internet Security scans
To run a scan from the command prompt
1 At the command prompt, type the path in whichNorton Internet Security is located and theexecutable's file name.The following examples show the syntax of a scancommand:
1 "\Program Files\Norton InternetSecurity\Engine\version\NAVW32"/command_name
Where version represents the version numberof Norton Internet Security and command_namerepresents the command.
1 "\Program Files\Norton InternetSecurity\Engine\version\NAVW32"[path]file_name
Where version represents the version numberof Norton Internet Security and [path] file_namerepresents the location, name, and extension ofthe file.
2 Press Enter.
About Insight Network scanThe Insight Network scan uses the Cloud technologywherein a remote server on the Web contains the latestvirus definitions. Norton Internet Security scans yourcomputer for the latest security threats. When NortonInternet Security performs the Insight Network scan,it uses the virus definitions that are available locallyand in the Cloud. Norton Internet Security providesadditional protection by using the most recentdefinitions in the Cloud, apart from the definitions thatare available locally on your computer.
Norton Internet Security performs an Insight Networkscan only when the InsightProtection option is turnedon. To turn on the InsightProtection option, go to theNorton Internet Security main window, and then clickSettings > General > Other Settings > Insight
Protecting your files and dataAbout the Norton Internet Security scans
152

Protection > On. By default, the Insight Protectionoption is turned on.
When the Insight Protection option is turned on,Norton Internet Security performs a traditional scanand an Insight Network scan simultaneously. Thetraditional scan uses the definitions from the localsystem, and the Insight Network scan uses thedefinitions that are hosted in the Cloud.
Threat detection based on the Cloud definitions isidentical to the threat detection that is based on thelocal definitions. However, the Cloud definitions arespecified with additional data about the threats that itdetects which indicates that it has been obtained fromthe Internet. Definitions in the Cloud provide a genericname for the risk detected, but the local definitionsprovide the specific name for the risk detected. Forexample, if a Trojan horse is detected, the scan resultsof the Insight Network might display Cloud.Trojan.However, the scan results of the local definition mightdisplay Trojan.Foo.
If the traditional scan completes while the InsightNetwork scan is still running, you can view the InsightNetwork Scan progress status.
If the Insight Protection option is turned on, you canmanually run the following types of Insight Networkscans:
1 Insight Network Quick Scan
Norton Internet Security simultaneously performsa traditional Quick Scan and an Insight NetworkQuick Scan to scan the areas of your computer thatthe viruses often target. Norton Internet Securityalso performs an Insight Network Quick Scansimultaneously with an Idle Quick Scan.
1 Insight Network Single File Scan
Norton Internet Security simultaneously performsa traditional Single File Scan and an InsightNetwork Single File Scan to scan a file on yourcomputer. It also scans the files that are receivedthrough instant messenger programs. You can
153Protecting your files and dataAbout the Norton Internet Security scans

perform this scan by running an Insight Networkscan on single file using the Custom Scan optionon the Scans window.
1 Insight Network context-menu scan
When you right-click a file, the shortcut menudisplays Norton Internet Security and then InsightNetwork Scan. You can use this command to scana file using both local definitions and definitionsthat are hosted in the Cloud.
w This Insight Network Scan command is availableonly for single file.
Turning off or turning on Insight Protection
InsightProtection option lets Norton Internet Securityperform an Insight Network scan on your computer
When the Insight Protection option is turned on,Norton Internet Security performs a traditional scanand an Insight Network scan simultaneously. Thetraditional scan uses the definitions from the localsystem, and the Insight Network scan uses thedefinitions that are hosted in the Cloud. NortonInternet Security performs only a traditional scan ifthe Insight Protection option is turned off.
Norton Internet Security performs an Insight Networkscan only when the InsightProtection option is turnedon. By default, the InsightProtection option is turnedon.
To turn off or turn on the Insight Protection
1 In the Norton Internet Security main window, clickSettings.
2 In the Settings window, click the General tab.
3 In the left pane, click Other Settings.
Protecting your files and dataAbout the Norton Internet Security scans
154

4 In the Insight Protection row, do one of thefollowing:
1 To turn off Insight Protection, move the On/Offswitch to the right to the Off position.
1 To turn on Insight Protection, move the On/Offswitch to the left to the On position.
5 In the Settings window, click Apply.
About Reputation ScanReputation Scan provides information on thetrust-worthiness of all programs and processes runningon your computer. It helps you detect the files that aresuspicious or vulnerable on your computer using thereputation-based threat detection. Reputation-basedthreat detection maintains information of every filesubmitted by millions of other Norton users. Theinformation include trust level, community usage,stability, etc. During reputation scan, reputation-basedthreat detection uses this information to detectsuspicious or vulnerable files on your computer. NortonInternet Security lets you run different types ofReputation Scan and detect suspicious programs onyour computer.
Reputation Scan filters the files on the basis of certainfiltering criteria and performs an Insight NetworkScan on the filtered files. Reputation Scan filters thefiles as reputation files. It filters running processesand the loaded DLLs, startup files (services, drivers,and auto run apps), portable executable files mentionedin the Windows prefetch cache, and executable filesthat are listed in the Run registry keys and RunOnceregistry keys.
When you perform a Reputation Quick Scan or FullSystem Scan, Norton Internet Security considers theFiles of Interest that are available on your computer.
After it has filtered the reputation files, Norton InternetSecurity performs an Insight Network Scan. WhenNorton Internet Security performs an InsightNetwork
155Protecting your files and dataAbout the Norton Internet Security scans

Scan, it also performs a Computer Scan. NortonInternet Security uses the Computer Scan to performthe signature-based threat detection. It compares thesignature of the filtered reputation files against theknown threat signatures to identify threats on yourcomputer. If a security threat is detected, NortonInternet Security automatically removes the threatfrom your computer.
Norton Internet Security uses the Insight NetworkScan to detect suspicious or vulnerable files on yourcomputer using the reputation-based threat detection.The Insight Network Scan uses the Cloud technologywherein a remote Symantec server on the Web storesthe latest reputation information. It checks the Cloudfor the reputation information on the filtered files.
Norton Internet Security obtains specific informationsuch as file name and hash key about the filteredreputation files and sends this information to theCloud. The Cloud analyzes the file information andprovides a trust level for each file. The Symantec serversends back the reputation information to yourcomputer. If any of the filtered files is suspicious orvulnerable, Norton Internet Security assigns Bad orPoor trust level. Apart from reputation information,Norton Internet Security also checks for the latest virusdefinitions on the Cloud.
w Your computer must be connected to the Internet toaccess the latest reputation information and virusdefinitions from the Cloud. If your computer is notconnected to the Internet, Norton Internet Securityuses the reputation information that is available locally.
When you perform a Reputation Scan, Norton InternetSecurity considers only the following categories of files:
This category includesWindows executable files(.exe) and script files (.scr).
Executable files
Protecting your files and dataAbout the Norton Internet Security scans
156

This category includesWindows System files (.sys),dynamic link library files(.dll), and device driver files(.drv).
System files
This category includesActiveX control files (.ocx).
Developer files
This category includesWindows Installer Packagefiles (.msi) and resource-onlyDLL files (.loc).
Miscellaneous files
Norton Internet Security lets you scan specific areasof your computer based on the type of Reputation Scanthat you select. You can manually run the followingtypes of Reputation Scan:
Scans the important locationsof your computer that theviruses and other securitythreats often target.
When you perform a QuickScan, Norton InternetSecurity considers the Filesof Interest that related toloaded programs and therunning processes.
Quick Scan
157Protecting your files and dataAbout the Norton Internet Security scans

Scans all the Files of Interestthat are available on yourcomputer.
When you perform a FullSystem Scan, Norton InternetSecurity searches for Files ofInterest on all the locationson your computer. Thelocations include all drives,running processes, loadedprograms, and startup files.
Full System Scan
Scans a specific file, folder,drive, or removable drive.
When you perform a customscan, Norton InternetSecurity considers only thefiltered reputation files.
Custom Scan
Symantec rates a file based on the statistical evaluationthat is done on the file using the Norton CommunityWatch data and Symantec’s analysis. Symantec assignsthe following confidence levels to reputation files:
Symantec has a highindication that the file istrusted.
Trusted
Symantec has a highindication that the file istrusted.
Good
Symantec does not haveenough information aboutthe file to assign a trust levelto the file.
The file is neither safe norunsafe.
Unknown
Protecting your files and dataAbout the Norton Internet Security scans
158

Symantec has a fewindications that the file is nottrusted.
This file is suspicious and canharm your computer.
Poor
Symantec has a highindication that the file is nottrusted.
This file is suspicious and canharm your computer.
Bad
When the Reputation Scan is complete, you can viewthe summary of the scan results in the NortonReputationScan window. You can view the reputationinformation such as the file name, trust level, age ofthe file, stability rating, and community usage for eachfile. The trust level determines whether a file is safeor unsafe. If a file has Poor or Bad trust level, NortonInternet Security lets you quarantine the file.
Running a Reputation Full System Scan
When you perform a FullSystemScan, Norton InternetSecurity scans all the Files of Interest that are availableon your computer. This fileset includes the files thatrelate to the running processes, startup files, andloaded programs.
To run a Reputation Full System Scan
1 In the Norton Internet Security main window, clickScan Now.
2 In the window that appears, click ReputationScan.
3 In the Reputation Scan pane, click Full SystemScan.In the Norton Reputation Scan window, you cananalyze the trust level, community usage, resourceusage, and stability of the scanned items.
159Protecting your files and dataAbout the Norton Internet Security scans

4 If there is a file with Poor or Bad trust level, underthe TrustLevel column, click the red cross (x) icon.
5 In the Quarantine File window, click Quarantinethis file.
6 In the Manual Quarantine window, click Add.
7 Click Close.
8 In the NortonReputationScan window, click Close.
Running a Reputation Quick Scan
When you perform a Quick Scan, Norton InternetSecurity scans only the running processes and theloaded programs. Reputation Quick Scan does not scanyour entire computer and it takes lesser time to runthan a Reputation Full System Scan.
To run a Reputation Quick Scan
1 In the Norton Internet Security main window, clickScan Now.
2 In the window that appears, click ReputationScan.
3 In the Reputation Scan pane, click Quick Scan.In the Norton Reputation Scan window, you cananalyze the trust level, community usage, resourceusage, and stability of the scanned items.
4 If there is a file with Poor or Bad trust level, underthe TrustLevel column, click the red cross (x) icon.
5 In the Quarantine File window, click Quarantinethis file.
6 In the Manual Quarantine window, click Add.
7 Click Close.
8 In the NortonReputationScan window, click Close.
Running a Reputation custom scan
Norton Internet Security lets you scan specific areason your computer by using the Reputation custom scan.You can scan any of your computer's drives, removabledrives, folders or files. For example, if you want to
Protecting your files and dataAbout the Norton Internet Security scans
160

check the trust level of a specific file, you can scan theparticular file.
To run a Reputation custom scan
1 In the Norton Internet Security main window, clickScan Now.
2 In the window that appears, click ReputationScan.
3 In the Reputation Scan pane, click Custom Scan.
4 In the Reputation Custom Scan window, do one ofthe following:
1 Click Drive Scan, select the drive that you wantto scan, and then click Scan.
1 Click FolderScan, select the folder that you wantto scan, and then click OK.
1 Click File Scan, select the file that you want toscan, and then click Open.
In the Norton Reputation Scan window, you cananalyze the trust level, community usage, resourceusage, and stability of the scanned items.
5 If there is a file with Poor or Bad trust level, underthe TrustLevel column, click the red cross (x) icon.
6 In the Quarantine File window, click Quarantinethis file.
7 In the Manual Quarantine window, click Add.
8 Click Close.
9 In the NortonReputationScan window, click Close.
About the Reputation Scan results
Norton Internet Security lets you run differentReputation Scans to detect any suspicious programsor vulnerable programs on your computer. NortonInternet Security lets you manually run the followingtypes of Reputation Scan:
1 Reputation Quick Scan
1 Reputation Full System Scan
1 Reputation Custom Scan
161Protecting your files and dataAbout the Norton Internet Security scans
When you run a Reputation Quick Scan, NortonInternet Security considers the Files of Interest whichinclude running processes and loaded programs. Whenyou run a Reputation Full System Scan, Norton InternetSecurity considers all the Files of Interest that areavailable on your computer. When you run aReputation custom scan, Norton Internet Security letsyou select the drive, folder, or file that you want toscan.
Reputation Scan filters the files on the basis of certainfiltering criteria and performs an Insight NetworkScan on the filtered files. Reputation Scan filters .exefiles, .scr files, .sys files, .dll files, .drv files, .ocx files,and .msi files and analyzes these files.
Norton Internet Security displays the reputationinformation of the scanned files in the NortonReputation Scan window.
Norton Internet Security consolidates the reputationinformation of your most recent scan and presents thereputation information using different graphicalformats.
The top of the Norton Reputation Scan windowdisplays the following statistics:
1 The Trust Level graph displays the average trustlevel of files on your computer. It also displays theaverage trust level of the files that Symantecanalyzes within the Norton Community.
1 The CommunityUsage graph displays the averagecommunity usage of files on your computer. It alsodisplays the average community usage of the filesthat Symantec analyzes within the NortonCommunity.
1 The Stability graph displays the average reliablefiles on your computer. It also displays the averagereliable files that Symantec analyzes within theNorton Community.
w Stability ratings vary depending upon youroperating system.
Protecting your files and dataAbout the Norton Internet Security scans
162

1 The Norton Network graph displays the detailsabout the known good files and bad files.
You can view the number of trusted files that areon your computer. You can also view the totalnumber of files that Symantec analyzes within theNorton Community.
w Your computer must be connected to the Internet toview these details. Norton Internet Security connectsto the Symantec servers to collect the reputationinformation.
The bottom of the Norton Reputation Scan windowdisplays the reputation information of each scanneditem. For each scanned item, you can view the followingdetails:
Indicates the file name andfile type.
You can click a file name toview additional details aboutthe file in the File Insightwindow.
File Name
163Protecting your files and dataAbout the Norton Internet Security scans

Trust Level
Protecting your files and dataAbout the Norton Internet Security scans
164

Indicates the trust level thatis assigned to a file.
Symantec analyzes specificinformation about a file suchas the digital signature andthe hash value to determinethe trust level of a file.Symantec rates a file basedon the statistical evaluationthat is done on the file usingtheNortonCommunityWatchdata and Symantec’sanalysis.
Symantec assigns thefollowing trust levels toreputation files:
1 Trusted: Symantec has ahigh indication that thefile is trusted.
1 Good: Symantec has ahigh indication that thefile is trusted.
1 Unknown: Symantec doesnot have enoughinformation about the fileto assign a trust level tothe file.
1 Poor: Symantec has a fewindications that the file isnot trusted.
1 Bad: Symantec has a highindication that the file isnot trusted.
If you have a file that hasPoor or Bad trust level,Norton Internet Securitydisplays a red cross (x) iconnext to the trust level. Youcan click on the red cross (x)icon and quarantine the
165Protecting your files and dataAbout the Norton Internet Security scans

suspicious file.
Indicates the communityusage level of the file.
The search results aregrouped in to the followingcategories:
1 Very Few Users: Showsthe files that have verylow community usage.
1 Few Users: Shows thefiles that have averagecommunity usage.
1 Many Users: Shows thefiles that have very highcommunity usage.
You can also use thecommunity usage of a file todetermine the legitimacy ofthe file. Symantec uses astringent statistical methodto evaluate thetrustworthiness of a file andto classify the file as a Goodfile.
Community Usage
Protecting your files and dataAbout the Norton Internet Security scans
166

Indicates the system resourceusage level of the file.
The usage levels are asfollows:
1 Low: Indicates that thefile consumes minimumsystem resources.
1 Moderate: Indicates thatthe file consumesmoderate systemresources.
1 High: Indicates that thefile consumes maximumsystem resources.
1 Unknown: Indicates thatthe file has performed noaction in your computer.
Resource Usage
167Protecting your files and dataAbout the Norton Internet Security scans

Indicates the stability ratingof the file.
The stability rating dependson how frequently theprogram crashes. Thedifferent stability ratings areas follows:
1 Reliable: Indicates thatthe program is reliable.
1 Stable: Indicates that theprogram is comparativelystable. However, itcrashes sometimes.
1 Slightly Unstable:Indicates that theprogram is slightlyunstable.
1 Unstable: Indicates thatthe program is unstable.
1 Very Unstable: Indicatesthat the programfrequently crashes.
1 Unknown: Indicates thatthe crash history of theprogram is not known.
w Stability ratings varydepending upon youroperating system.
Stability
About Scan Facebook WallNorton Safe Web protects your computer frommalicious URLs when you use Facebook. It scans eachURL that is available on your Facebook Wall anddisplays the Norton rating icons for the scanned URLs.
You can also check if a URL is safe or unsafe. NortonSafe Web scans your Facebook News feed and providesyou the safety status for each of the URL. This way,you are not only protected from unsafe sites but you
Protecting your files and dataAbout the Norton Internet Security scans
168

can also let other Facebook users know the securitystatus of any Web site.
However, Norton Safe Web requires your permissionto scan the URLs that are available on your FacebookWall. When you install the Norton Safe Web FacebookApp, Norton Safe Web App asks for your permissionto access your Facebook Wall. You can choose to allowor deny permission to let Norton Safe Web access yourFacebook Wall.
The auto-scan feature in Norton Safe Web applicationpage helps you protect your Facebook Wall offline.Norton Safe Web scans the News Feed on yourFacebook Wall every day and protects you frommalicious links. When Norton Safe Web detects amalicious link, it notifies you with a post on yourFacebook Wall. To activate Norton Auto-Scan, go toyour NortonSafeWebScanResults page on Facebookand click EnableAuto-Scan. The Norton Safe Web appwill ask for additional permission to post in your wallwhen malicious links are identified while enabling thisfeature.
To remove the malicious link from your Facebook Wall,go to your profile and remove the malicious link. Youcan also click See Norton Safe Web Report to viewNorton ratings and other details about this maliciouslink. When no malicious activity is detected on yourFacebook Wall, Norton Safe Web posts a messagenotifying that your Facebook Wall is safe. Norton SafeWeb posts this message on your Facebook Wall oncein every 30 days.
If you later decide to remove Norton Safe Web fromyour Facebook profile, you can use the ApplicationSettings option of Facebook.
169Protecting your files and dataAbout the Norton Internet Security scans

The following are the safety states that Norton SafeWeb provides after it scans the links on your FacebookWall:
Indicates that the site is safe tovisit and Norton Trusted.
The sites with this rating do notharm your computer and so youcan visit this site.
Safe
Indicates that the site hassecurity risks.
The sites with this rating mayinstall malicious software onyour computer. Symantecrecommends that you do notvisit this site.
Warning
Indicates that Norton Safe Webhas not yet tested this site andit does not have sufficientinformation about this site.
Untested
Indicates that the site may havesecurity threats. Symantecrecommends you to be cautiouswhile you visit such Web sites.
Caution
Enabling your Facebook Wall Scan
The Norton Safe Web feature scans your Facebook Walland analyzes the security levels of all the availablelinks on your Facebook Wall. It then displays thesecurity status of the scanned URLs. However, NortonSafe Web requires your permission to scan yourFacebook Wall.
Protecting your files and dataAbout the Norton Internet Security scans
170

To enable your Facebook Wall
1 In the Norton Internet Security main window, clickScan Now.
2 In the window that appears, click Scan FacebookWall.
3 In the Scan Facebook Wall pane, click Scan MyFacebook Wall.
4 In the Facebook login Web page, log in to yourFacebook profile.
5 In the Request for permission page, click Allow.
6 In the Web page that appears, click Pleasegrantuspermission to access your News Feed and Wall.
7 Follow the on-screen instructions to let Norton SafeWeb access your Facebook Wall.
About Idle Time ScansNorton Internet Security keeps your computer securefrom ongoing threats by automatically running scanson your computer by using the Idle Time Scans feature.Idle Time Scans detect the time when you do not useyour computer and intelligently run scans dependingon the scan history of your computer.
The IdleTimeScans option is automatically turned onwhen you install Norton Internet Security. Even thoughIdle Time Scans automatically run the scans, you canstill customize the settings of IdleTimeScans. NortonInternet Security decides when to run Idle Time Scans,depending on your settings and a few other predefinedparameters.
171Protecting your files and dataAbout the Norton Internet Security scans

The following list provides details on the settings thatyou can make and the predefined parameters:
You can set the duration afterwhich Norton Internet Securityshould identify your computeras idle. You can select a value (inminutes) between 1 minute and30 minutes. When you do notuse your computer for theduration that you specify, NortonInternet Security checks for theotherpredefinedparameters andruns Idle Time Scans.
Idle Time Out duration
Some of the predefinedparameters that Norton InternetSecurity checks are CPU idletime, disk usage, and type ofelectric current you use tooperate your computer.
For example, you set the IdleTime Out duration as 10 minutesand watch an online video for 11minutes without anyintervention. In this case, IdleTime Scans do not run becauseof the CPU-intensive task.
Predefined parameter
w You must run your computer on alternating current(AC) power for Norton Internet Security to run IdleTime Scans.
You can view the results of the scans in any of thefollowing locations:
1 The Scan Results category in the SecurityHistorywindow
1 The Norton Tasks category in the Norton Taskswindow
Protecting your files and dataAbout the Norton Internet Security scans
172

Norton Internet Security discontinues any Idle TimeScans that it started during idle time if you begin touse your computer again. However, it resumes the scanwhen your computer is idle again.
w You must turn off Idle Time Scans to schedule a FullSystem Scan. However, you should always keep IdleTime Scans turned on to allow Norton Internet Securityto scan your computer when it becomes idle.
Turning off or turning on Idle Time Scans
The IdleTimeScans option is automatically turned onwhen you install Norton Internet Security. When theIdle Time Scans option is turned on, Norton InternetSecurity detects the time when you do not use yourcomputer. Norton Internet Security then intelligentlyruns a scan, depending on the scan history of yourcomputer. However, there may be times when you wantto turn off Idle Time Scans.
To turn off Idle Time Scans
1 In the Norton Internet Security main window, clickSettings.
2 In the Settings window, in the left pane, clickComputer Scan.
3 In the Idle Time Scans row, in the drop-down list,select Off.
4 Click Apply.
To turn on Idle Time Scans
1 In the Norton Internet Security main window, clickSettings.
2 In the Settings window, in the left pane, clickComputer Scan.
173Protecting your files and dataAbout the Norton Internet Security scans

3 In the Idle Time Scans row, in the drop-down list,select the option that you want to set. Your optionsare:
1 Weekly
1 Monthly
1 Quarterly
4 Click Apply.
Specifying Idle Time Out duration
You can set the duration after which Norton InternetSecurity should identify your computer as idle. Youcan select a value (in minutes) between 1 minute and30 minutes. When you do not use your computer forthe duration that you specify, Norton Internet Securitychecks for other predefined parameters and runs a FullSystem Scan.
To specify Idle Time Out duration from the Settingswindow
1 In the Norton Internet Security main window, clickSettings.
2 In the Settings window, click the General tab.
3 In the Idle Time Out row, in the drop-down list,select the duration that you want to specify.You might need to scroll the window to view theoption.
4 In the Settings window, click Apply.
About SONAR ProtectionSymantec Online Network for Advanced Response(SONAR) provides real-time protection against threatsand proactively detects unknown security risks on yourcomputer. SONAR identifies emerging threats basedon the behavior of applications. SONAR identifiesthreats quicker than the traditional signature-basedthreat detection techniques. SONAR detects andprotects you against malicious code even before virusdefinitions are available through LiveUpdate.
Protecting your files and dataAbout the Norton Internet Security scans
174

w Symantec recommends that your computer remainsconnected to Internet to get the real-time protectionagainst threats and proactively detects unknownsecurity risks on your computer.
SONAR monitors your computer for malicious activitiesthrough heuristic detections.
SONAR automatically blocks and removeshigh-certainty threats. Norton Internet Securitynotifies you when high-certainty threats are detectedand removed. SONAR provides you the greatest controlwhen low-certainty threats are detected. You can alsosuppress the SONAR notifications by disabling theShow SONAR Block Notifications option.
The ViewDetails link in the notification alert lets youview the summary of the resolved high-certaintythreats. You can also view the details under ResolvedSecurity Risks category in the Security Historywindow.
Turning off or turning on SONAR Protection
SONAR protects you against malicious code even beforevirus definitions are available through LiveUpdate. Bydefault, SONAR Protection is turned on to proactivelydetect unknown security risks on your computer.
When you turn off SONAR Protection, you areprompted with a protection alert. This protection alertlets you specify the amount of time for which you wantSONAR Protection to be turned off.
w When Auto-Protect is turned off, SONAR Protection isalso disabled. In this case, your computer is notprotected against emerging threats.
To turn off or turn on SONAR Protection
1 In the Norton Internet Security main window, clickSettings.
2 In the Settings window, in the left pane, click RealTime Protection.
175Protecting your files and dataAbout the Norton Internet Security scans

3 In the SONAR Protection row, do one of thefollowing:
1 To turn off SONAR Protection, move the On/Offswitch to the right to the Off position.
1 To turn on SONAR Protection, move the On/Offswitch to the left to the On position.
4 In the Settings window, click Apply.
About Real Time Exclusions
Symantec Online Network for Advanced Response(SONAR) provides real-time protection against threatsand proactively detects unknown security risks on yourcomputer. SONAR identifies emerging threats basedon the behavior of applications. SONAR identifiesthreats quickly compared to the traditionalsignature-based threat detection techniques. SONARdetects and protects you from malicious programs evenbefore virus definitions are available throughLiveUpdate.
SONAR monitors your computer for malicious activitiesusing heuristic detections. It automatically blocks andremoves high-certainty threats. Norton InternetSecurity notifies you when high-certainty threats aredetected and removed.
However, you can configure Norton Internet Securityto exclude certain programs from the Norton InternetSecurity Auto-Protect scans and SONAR scans. Youshould exclude programs only if you are confident thatthey are not infected. You can exclude the programsfrom the Auto-Protect scans and SONAR scans byadding them to the Real Time Exclusions window.When you add a program to the RealTimeExclusionswindow, Norton Internet Security ignores the file whenit performs Auto-Protect scan and SONAR scan. Thisoption also excludes subfolders within a folder.
Protecting your files and dataAbout the Norton Internet Security scans
176

w Exclude a program from Norton Internet Security scansonly if you are confident that the program is safe. Forexample, if another program relies on a security riskprogram to function, you might decide to keep theprogram on your computer.
To add programs to the RealTimeExclusions window,go to the Norton Internet Security main window, andthen click Settings > Computer > AntiVirus andSONAR Exclusions > Items to Exclude fromAuto-Protect, SONAR and Download IntelligenceDetection > Configure.
Excluding security threats from scanning
You can use Scan Exclusions window and Real TimeExclusions window to exclude viruses and otherhigh-risk security threats from scanning.
To exclude high-risk security threats from scanning
1 In the Norton Internet Security main window, clickSettings.
2 In the Settings window, in the left pane, clickAntiVirus and SONAR Exclusions.
3 Do one of the following:
1 In the Items to Exclude from Scans row, clickConfigure.
1 In the Items to Exclude from Auto-Protect,SONAR and Download Intelligence Detectionrow, click Configure.
4 In the window that appears, click Add.
5 In the Add Item dialog box, click the browse icon.
6 In the dialog box that appears, select the item thatyou want to exclude from the scan.
7 Click OK.
8 In the Add Item dialog box, click OK.
9 In the window that appears, click Apply, and thenclick OK.
177Protecting your files and dataAbout the Norton Internet Security scans

About Signature Exclusions
Norton Internet Security lets you select specific knownsecurity risks and exclude them from Norton InternetSecurity scans. Exclude a risk from Norton InternetSecurity scans only if you have a specific need. Forexample, if another program relies on a security riskprogram to function, you might decide to keep theprogram on your computer. You might also decide notto be notified about the program in future scans.
w When you exclude a known security risk from NortonInternet Security scans, the protection level of yourcomputer reduces. You should exclude items only ifyou are confident that they are not infected.
To exclude a security risk from scans, you need to addthe specific security risk to the Signature Exclusionswindow. The Signature Exclusions window containsthe list of all security risks that can be excluded fromNorton Internet Security scans. For each security risk,you can view the risk details and the effect of the riskon your computer.
To add security risks to the Signature Exclusionswindow, go to the Norton Internet Security mainwindow, and then click Settings > Computer >AntiVirus and SONAR Exclusions > Signatures toExclude from All Detections > Configure.
Adding items to the Signature Exclusions
To exclude a security risk from scans, you must addthe specific security risk to the Signature Exclusionswindow. You can select a known risk by name and addit to the list.
w When you exclude a known security risk from NortonInternet Security scans, the protection level of yourcomputer reduces. You should exclude items only ifyou are confident that they are not infected.
Protecting your files and dataAbout the Norton Internet Security scans
178
To add a signature to the Signature Exclusions
1 In the Norton Internet Security main window, clickSettings.
2 In the Settings window, in the left pane, clickAntiVirus and SONAR Exclusions.
3 In the Signatures to Exclude from All Detectionsrow, click Configure.
4 In the Signature Exclusions window, click Add.
5 In the Security Risks window, click on a securityrisk that you want to exclude and then click Add.
6 In the Signature Exclusions window, click Apply,and then click OK.
7 In the Settings window, click OK.
About clearing file IDs that are excluded during scans
When you run a Reputation Scan, Norton InternetSecurity provides information on the trust-worthinessof all programs and processes running on yourcomputer. Reputation Scan helps you detect the filesthat are suspicious or vulnerable on your computerusing the reputation-based threat detection. NortonInternet Security provides reputation information suchas trust level, user prevalence, and stability for eachprogram and process that is scanned. Norton InternetSecurity stores the reputation information of allscanned files.
All trusted and favorable files are provided withTrusted and Good trust levels. If any of the scannedfiles is suspicious or vulnerable, Norton InternetSecurity assigns Bad or Poor trust level.
During each successive scan that you run, NortonInternet Security excludes the Trusted and Good filesfrom being scanned. However, if you want NortonInternet Security to scan all the files in your computer,you must clear the reputation information of theexcluded files.
179Protecting your files and dataAbout the Norton Internet Security scans
w When you exclude a reputation-based threat, NortonInternet Security does not add the signature of theexcluded threat to the Signature Exclusions window.This is because the reputation-based threats areexcluded by hash value. You can use the Clearing IDsof files that are excludedduring scans option to clearthe excluded reputation-based threats.
To clear the reputation information of files that areexcluded from scans. In the Norton Internet Securitymain window, click Settings > Computer > AntiVirusand SONAR Exclusions > Clear file IDs excludedduring scans > Clear All.
Clearing IDs of files that are excluded duringscans
Norton Internet Security tags all trusted and favorablefiles with Trusted and Good trust levels. When a fileis tagged as Trusted or Good, Norton Internet Securitydoes not scan this file again. This can improve the scanperformance of Norton Internet Security on yourcomputer.
However, if you want Norton Internet Security to scanall the files in your computer, you must clear thereputation information of the excluded files.
w When you clear IDs of files that are excluded duringscans, it might take a longer time to complete scan.
Norton Internet Security excludes the Trusted andGood files from being scanned. However, if you wantNorton Internet Security to scan all the files in yourcomputer, you must clear the reputation informationof the excluded files.
To clear IDs of files that are excluded during scans
1 In the Norton Internet Security main window, clickSettings.
2 In the Settings window, in the left pane, clickAntiVirus and SONAR Exclusions.
Protecting your files and dataAbout the Norton Internet Security scans
180

3 In the Clear file IDs excluded during scans row,click Clear All.
4 In the Warning window, click Yes.
5 In the Settings window, click Apply, and then clickOK.
About scanning Office documentsNorton Internet Security protects all Office documentsthat you receive through email messages, throughInternet download, and through inserted floppy disksor other removable media. By automatically scanningall Office files, Norton Internet Security maintains ahigher level of security. Norton Internet Security scansthe Office document when you open them.
You can use the Microsoft Office Automatic Scanoption in the Settings window to scan documents ofthe following Microsoft Office applications:
Microsoft Wordwinword.exe
Microsoft Excelexcel.exe
Microsoft PowerPointpowerpnt.exe
Microsoft Visiovisio.exe
Microsoft Accessmsaccess.exe
Microsoft Projectwinproj.exe
Norton Internet Security scans the Office documentsand protect against threats, including virus macrosand infected embedded objects.
By default, the MicrosoftOfficeAutomaticScan optionin the Settings window is turned off. Turn on thisoption to scan Microsoft Office files automatically.
181Protecting your files and dataAbout the Norton Internet Security scans

Turning on or turning off Microsoft Office Automatic Scan
Norton Internet Security maintains a higher level ofsecurity by automatically scanning all Office files. Youcan turn on the Microsoft Office Automatic Scanoption to protect your computer against the virusmacros and embedded objects.
To Turn on or turn off Microsoft Office Automatic Scan
1 In the Norton Internet Security main window, clickSettings.
2 In the Settings window, in the left pane, clickComputer Scan.
3 In the MicrosoftOfficeAutomaticScan row, do oneof the following:
1 To turn on Microsoft Office Automatic Scan,move the On/Off switch to the left to the Onposition.
1 To turn off Microsoft Office Automatic Scan,move the On/Off switch to the right to the Offposition.
4 In the Settings window, click Apply, and then clickOK.
About Silent ModeNorton Internet Security provides many solutions andfeatures to handle viruses and other security threats.Norton Internet Security displays alerts andnotifications to inform you how viruses and othersecurity threats are detected and resolved. When youperform important tasks on your computer, you likelyprefer not to receive any alert messages. NortonInternet Security suppresses alerts and notificationsand temporarily suspends most of the backgroundactivities based on the Silent Mode Settings that areturned on.
Protecting your files and dataAbout the Norton Internet Security scans
182

Norton Internet Security provides the following optionsunder Silent Mode Settings:
Norton Internet Security allowsyou to manually turn on for aspecified duration using SilentMode option.
Silent Mode
Norton Internet Security turnson this option automaticallywhen it detects a full-screenapplication and turns off whenyou stop using the full-screenapplication.
Full Screen Detection
Norton Internet Security turnson this option automaticallywhen it detects a disk burningtask or a Media Center TVrecording task. Norton InternetSecurity also turns on QuietMode automatically when yourun a program that you includedin theQuietModePrograms list.Norton Internet Security turnsoff Quiet Mode when the diskburning session or TV programrecording session is complete.Norton Internet Security alsoturns off Quiet Mode when itstops detecting runninginstances of the programs thatyou included in the Quiet ModePrograms list.
Quiet Mode
The Norton Internet Security icon displays the turn-onstatus of Silent Mode in the notification area, at thefar right of the taskbar. The icon changes to acrescent-patterned icon when Silent Mode is turnedon. Norton Internet Security also notifies you afterSilent Mode is turned off.
183Protecting your files and dataAbout the Norton Internet Security scans

You can view the summary of the Silent Mode sessionsunder the Recent History, Full History, and SilentMode categories in the drop-down list of the Showoption in the Security History window.
The summary includes the following information:
1 The turn-on or turn-off status of Silent Mode
1 Usage of Silent Mode Settings, such as Silent Modeor Quiet Mode
1 The type of program that turns on Silent Mode,such as disk burning or TV recording
1 The name of a user-specified program that turnson Silent Mode
1 The time and date when Silent Mode is turned onor turned off
1 The severity displays the risk level of the selecteditem
About the Silent Mode that you turn on manually
Norton Internet Security lets you manually turn onSilent Mode for a specified duration. When Silent Modeis turned on, Norton Internet Security suppresses alertsand suspends background activities for the durationthat you specify. You can verify the turn-on status ofSilent Mode in the notification area, at the far right ofthe taskbar. The Norton Internet Security icon in thenotification area changes to a crescent-patterned iconto display the turn-on status of Silent Mode. Turningon Silent Mode manually before you perform your taskshelps you prevent alerts, notifications, or backgroundactivities interrupting you for the specified duration.
You can turn on Silent Mode for a period of one hour,two hours, four hours, six hours, or one day. After thespecified duration, Norton Internet Security turns offSilent Mode. You can also manually turn off SilentMode at any time. Norton Internet Security notifiesyou after Silent Mode is turned off. The activities thatare suspended when Silent Mode is turned on run afterSilent Mode is turned off.
Protecting your files and dataAbout the Norton Internet Security scans
184

Turning on or turning off Silent Mode manually
You can manually turn on Silent Mode for a specifiedduration before you perform any important task onyour computer. You can turn on Silent Mode for aperiod of one hour, two hours, four hours, six hours,or one day. The Norton Internet Security icon displaysthe turn-on status of Silent Mode in the notificationarea, at the far right of the taskbar. Norton InternetSecurity notifies you after Silent Mode is turned off.After Silent Mode is turned off, Norton InternetSecurity also displays alerts if it detected any securityactivities that occurred during the Silent Mode session.
You can turn on or turn off Silent Mode from the SilentMode Settings section of the Settings window. Youcan also turn on or turn off Silent Mode by using theNorton Internet Security icon in the notification area.
To turn on Silent Mode from the Settings window
1 In the Norton Internet Security main window, clickSettings.
2 In the Settings window, click the General tab.
3 In the left pane, click Silent Mode Settings.
4 In the Silent Mode row, move the On/Off switch tothe left to the On position.
5 In the Settings window, click Apply.
6 In the TurnonSilentMode dialog box, in the Selectthe duration drop-down list, select how long youwant to turn on Silent Mode, and then click OK.
7 In the Settings window, click OK.
To turn off Silent Mode from the Settings window
1 In the Norton Internet Security main window, clickSettings.
2 In the Settings window, click the General tab.
3 In the left pane, click Silent Mode Settings.
4 In the Silent Mode row, move the On/Off switch tothe right to the Off position.
5 In the Settings window, click Apply.
185Protecting your files and dataAbout the Norton Internet Security scans

6 Click OK.
To turn on Silent Mode from the notification area
1 In the notification area on the Windows taskbar,right-click the Norton Internet Security icon, andthen click Turn on Silent Mode.
2 In the TurnonSilentMode dialog box, in the Selectthe duration drop-down list, select how long youwant to turn on Silent Mode, and then click OK.
To turn off Silent Mode from the notification area
4 In the notification area on the Windows taskbar,right-click the Norton Internet Security icon, andthen click Turn off Silent Mode.
About the Silent Mode that turns on automatically
When you watch a movie, play games, or make apresentation, you run the application in the full-screenmode. Norton Internet Security detects the applicationthat you run in the full-screen mode and automaticallyenables Silent Mode. When Silent Mode is enabled,Norton Internet Security suppresses most of the alertsand suspends background activities. Only thoseactivities run that are involved in protecting yourcomputer from viruses and other security threats.Minimum background activities also ensure highperformance of your computer. The activities that aresuspended run after you finish using the applicationin the full-screen mode.
Silent Mode also helps you maintain an uninterruptedMedia Center Extender session. A Media CenterExtender session is an extended session of Media Centerto an entertainment device, such as a television. Thealerts and notifications that appear during a MediaCenter Extender session disconnect the session betweenthe host computer and the entertainment device.Norton Internet Security identifies a Media CenterExtender session as an active full-screen applicationand turns on Silent Mode. When Silent Mode is enabled,Norton Internet Security suppresses alerts and
Protecting your files and dataAbout the Norton Internet Security scans
186

notifications and suspends background activities toprovide uninterrupted sessions for Silent Mode optionssuch as Full Screen Detection or Media Centerapplications.
Turning off or turning on Full Screen Detection
You can use the Full Screen Detection option in theSettings window to turn on or turn off Silent Modeautomatically when Norton Internet Security detectsa full-screen application. By default, the Full ScreenDetection option remains turned on after you installNorton Internet Security.
To turn off Full Screen Detection
1 In the Norton Internet Security main window, clickSettings.
2 In the Settings window, click the General tab.
3 In the left pane, click Silent Mode Settings.
4 In the Full ScreenDetection row, move the On/Offswitch to the right to the Off position.
5 In the Settings window, click Apply.
6 Click OK.
To turn on Full Screen Detection
1 In the Norton Internet Security main window, clickSettings.
2 In the Settings window, click the General tab.
3 In the left pane, click Silent Mode Settings.
4 In the Full ScreenDetection row, move the On/Offswitch to the left to the On position.
5 In the Settings window, click Apply.
6 Click OK.
About Quiet Mode
Norton Internet Security automatically enables QuietMode when you perform tasks that require higherutilization of your system resources. When Quiet Modeis turned on, Norton Internet Security suspends the
187Protecting your files and dataAbout the Norton Internet Security scans

background activities and lets the task use themaximum resources for better performance.
You can choose to set Norton Internet Security toautomatically enable Quiet Mode when you do thefollowing tasks:
1 IMAPI 2.0 Disk Burn
1 Media Center TV Recording
1 User-Specified Programs
Protecting your files and dataAbout the Norton Internet Security scans
188

The following table explains about the various options:
When you use a Media Centerapplication to burn a CD or aDVD, Norton Internet Securityautomatically enables QuietMode, if the IMAPI 2.0 Disk Burnoption is turned on. By default,the IMAPI 2.0 Disk Burn optionis turned on. When Quiet Modeis enabled, Norton InternetSecurity suspends backgroundactivities to improve theperformance of yourdisk-burning session. However,Norton Internet Securitycontinues to display alerts andnotifications during the session.
Norton Internet Securitysupports the following MediaCenter disk-burner applicationsto turn on Quiet Mode:1 IMAPI 2.0
1 J. River MEDIA CENTER(version 13.0.125 and later)
Norton Internet Security turnson Quiet Mode as soon as youstart burning a CD or a DVDusing a Media Centerapplication. Norton InternetSecurity turns off Quiet Modeafter the disk-burning session iscomplete. You cannot turn offQuiet Mode during thedisk-burning session by turningoff the IMAPI 2.0 Disk Burnoption in the Settings window.
IMAPI 2.0 Disk Burn
189Protecting your files and dataAbout the Norton Internet Security scans

When you use a Media Centerapplication to record a TVprogram, Norton InternetSecurity automatically enablesQuiet Mode, if theMedia CenterTV Recording option is turnedon. By default, theMedia CenterTV Recording option is turnedon. When Quiet Mode is enabled,Norton Internet Securitysuspends background activitiesto improve the performance ofyour TV program recordingsession. However, NortonInternet Security continues todisplay alerts and notificationsduring the session.
Norton Internet Securitysupports the following MediaCenter applications to turn onQuiet Mode:1 Windows Media Center
For Windows Media Centerto enable Quiet Mode duringTV program session, youmight need to restart yourcomputer after you installNorton Internet Security.
1 J. River MEDIA CENTER(version 13.0.125 and later)
Norton Internet Security turnson Quiet Mode as soon as youstart recording a TV program.After Quiet Mode is turned on, itturns off after the recordingsession is complete. You cannotturn off Quiet Mode during theTV program recording session byturning off theMedia Center TVRecording option in theSettingswindow.
Media Center TVRecording
Protecting your files and dataAbout the Norton Internet Security scans
190

Norton Internet Securityautomatically turns on QuietMode when it detects a TVprogram recording session or adisk-burning session. Inaddition, you can manually addthe programs for which you wantNorton Internet Security to turnon Quiet Mode to the QuietMode Programs list. WhenNorton Internet Security detectsa running instance of a programthat you added in the list, itautomatically turns on QuietMode. When Quiet Mode isturned on, Norton InternetSecurity suspends thebackground activities but doesnot suppress alerts andnotifications.
You can also add or remove arunning program to the QuietMode Programs list.
User-Specified Programs
Turning off or turning on the Quiet Mode options
You can turn off or turn on the Quiet Mode options,such as IMAPI 2.0 Disk Burn and Media Center TVRecording in the Settings window. By default, the QuietMode options are turned on. If you perform a task foran option that you turned on, Norton Internet Securitydetects the task and automatically turns on SilentMode. For example, you turn on the IMAPI 2.0 DiskBurn option and start burning a disk using a MediaCenter application. In this case, Norton InternetSecurity detects the disk-burning session and turns onQuiet Mode.
Norton Internet Security turns on Quiet Mode as soonas you start recording a TV program or burning a CDor a DVD. Once Quiet Mode is turned on, it turns off
191Protecting your files and dataAbout the Norton Internet Security scans
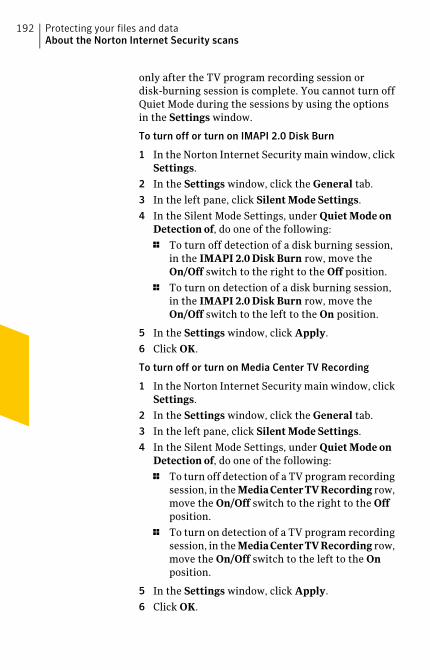
only after the TV program recording session ordisk-burning session is complete. You cannot turn offQuiet Mode during the sessions by using the optionsin the Settings window.
To turn off or turn on IMAPI 2.0 Disk Burn
1 In the Norton Internet Security main window, clickSettings.
2 In the Settings window, click the General tab.
3 In the left pane, click Silent Mode Settings.
4 In the Silent Mode Settings, under Quiet Mode onDetection of, do one of the following:
1 To turn off detection of a disk burning session,in the IMAPI 2.0 Disk Burn row, move theOn/Off switch to the right to the Off position.
1 To turn on detection of a disk burning session,in the IMAPI 2.0 Disk Burn row, move theOn/Off switch to the left to the On position.
5 In the Settings window, click Apply.
6 Click OK.
To turn off or turn on Media Center TV Recording
1 In the Norton Internet Security main window, clickSettings.
2 In the Settings window, click the General tab.
3 In the left pane, click Silent Mode Settings.
4 In the Silent Mode Settings, under Quiet Mode onDetection of, do one of the following:
1 To turn off detection of a TV program recordingsession, in the MediaCenterTVRecording row,move the On/Off switch to the right to the Offposition.
1 To turn on detection of a TV program recordingsession, in the MediaCenterTVRecording row,move the On/Off switch to the left to the Onposition.
5 In the Settings window, click Apply.
6 Click OK.
Protecting your files and dataAbout the Norton Internet Security scans
192

About User-Specified Programs
Norton Internet Security automatically turns on QuietMode when it detects a TV program recording sessionor a disk-burning session. In addition, you can manuallyadd the programs for which you want Norton InternetSecurity to turn on Quiet Mode to the Quiet ModePrograms list. When Norton Internet Security detectsa running instance of a program that you added in thelist, it automatically turns on Quiet Mode. When QuietMode is turned on, Norton Internet Security suspendsthe background activities but does not suppress alertsand notifications.
You can also add a running program to the Quiet ModePrograms list. However, when you add a runningprogram, Norton Internet Security does not detect thecurrent running instance of the program to turn onQuiet Mode. Norton Internet Security turns on QuietMode the next time when you execute the program.
You can also remove a running program from the QuietMode Programs list. However, if Quiet Mode is turnedon, it turns off only after the running instances of allthe programs in the list are complete. You cannot turnoff Quiet Mode by removing a program from the listwhen it runs.
You can view the details of the programs that you addto the Quiet Mode Programs list or remove from thelist in the Security History window.
Adding programs to User-Specified Programs
You can manually add the programs for which you wantNorton Internet Security to turn on Quiet Mode to theQuiet Mode Programs list. When you execute theprogram that you added to the list, Norton InternetSecurity detects the program and turns on Quiet Mode.
You can also add a running program to the QuietModePrograms list. However, when you add a runningprogram, Norton Internet Security does not detect thecurrent running instance of the program to turn on
193Protecting your files and dataAbout the Norton Internet Security scans

Quiet Mode. Norton Internet Security turns on QuietMode the next time when you execute the program.
You can only add the programs that have .exe fileextension to the Quiet Mode Programs list.
To add a program
1 In the Norton Internet Security main window, clickSettings.
2 In the Settings window, click the General tab.
3 In the left pane, click Silent Mode Settings.
4 In the Silent Mode Settings, under Quiet Mode onDetectionof, in the User-SpecifiedPrograms row,click Configure.
5 In the Quiet Mode Programs window, click Add.
6 In the Add Program dialog box, navigate to thelocation of the file that you want to add to the QuietMode Programs list.
7 Select the file, and then click Open.
8 Click Apply.
9 In the Quiet Mode Programs window, click OK.
Removing programs from User-Specified Programs
You can remove a program from the Quiet ModePrograms list. After you remove a program, NortonInternet Security does not turn on Quiet Mode the nexttime when it detects a running instance of the program.
You can also remove a running program from the QuietModePrograms list. However, if Quiet Mode is turnedon, it turns off only after the running instances of allthe programs in the list are complete. You cannot turnoff Quiet Mode by removing a program from the listwhen it runs.
To remove a program
1 In the Norton Internet Security main window, clickSettings.
2 In the Settings window, click the General tab.
3 In the left pane, click Silent Mode Settings.
Protecting your files and dataAbout the Norton Internet Security scans
194

4 Under Quiet Mode on Detection of, in theUser-Specified Programs row, click Configure.
5 In the Quiet Mode Programs window, select theprogram that you want to delete, and then clickRemove.
6 In the confirmation dialog box, click Yes.
7 In the Quiet Mode Programs window, click Applyand then click OK.
About boot time protectionThe boot time protection feature provides enhancedsecurity level from the time you start your computer.It ensures better security by running all the necessarycomponents that are required for computer protectionas soon as you start your computer.
To protect your computer during boot time, you mustconfigure the EnableBootTimeProtection option. Toaccess the Enable Boot Time Protection option, go tothe Norton Internet Security main window, and thenclick Settings > Computer > Real Time Protection.
You can use the following options to configure EnableBoot Time Protection:
1 AggressiveProvides maximum protection during yourcomputer start time.
This option ensures complete protection during theboot time as Auto-Protect starts functioning as soonas you start your computer.
1 NormalProvides enhanced protection during your computerstart time without compromising your computer'sboot performance.
When you select this option, the drivers andplug-ins start functioning during the computer starttime before their specified time delay. This optionensures better boot performance along with goodsecurity levels.
195Protecting your files and dataAbout the Norton Internet Security scans

1 OffTurns off boot time protection.
If you turn off the Enable Boot Time Protectionoption, the protection level of your computerreduces.
Configuring boot time protection
The boot time protection feature provides enhancedsecurity level from the time you start your computer.As soon as you start your computer, Norton InternetSecurity starts Auto-Protect and all required driversand plug-ins start functioning. This feature ensureshigher level of security from the moment you turn onyour computer.
To configure boot time protection
1 In the Norton Internet Security main window, clickSettings.
2 In the Settings window, in the left pane, click RealTime Protection.
3 In the Enable Boot Time Protection row, click onone of the settings. Your options are:
1 Aggressive
1 Normal
1 Off
4 Click Apply, and then click OK.
About Early Launch Anti-Malware ProtectionThe early launch anti-malware protection featureprovides enhanced security level when you start yourcomputer. It ensures better security by running all thenecessary components of Norton Internet Security thatare required to block any malware from functioningwhen you start your computer.
To enable early launch anti-malware protection, go tothe Norton Internet Security main window, and then
Protecting your files and dataAbout the Norton Internet Security scans
196
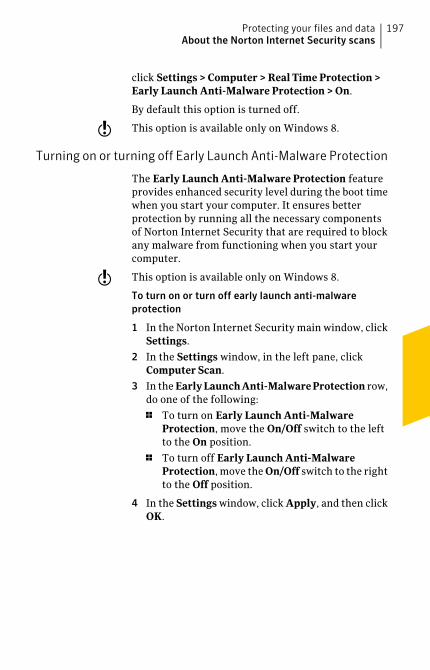
click Settings > Computer > Real Time Protection >Early Launch Anti-Malware Protection > On.
By default this option is turned off.
w This option is available only on Windows 8.
Turning on or turning off Early Launch Anti-Malware Protection
The Early Launch Anti-Malware Protection featureprovides enhanced security level during the boot timewhen you start your computer. It ensures betterprotection by running all the necessary componentsof Norton Internet Security that are required to blockany malware from functioning when you start yourcomputer.
w This option is available only on Windows 8.
To turn on or turn off early launch anti-malwareprotection
1 In the Norton Internet Security main window, clickSettings.
2 In the Settings window, in the left pane, clickComputer Scan.
3 In the EarlyLaunchAnti-MalwareProtection row,do one of the following:
1 To turn on Early Launch Anti-MalwareProtection, move the On/Off switch to the leftto the On position.
1 To turn off Early Launch Anti-MalwareProtection, move the On/Off switch to the rightto the Off position.
4 In the Settings window, click Apply, and then clickOK.
197Protecting your files and dataAbout the Norton Internet Security scans

Protecting your files and dataAbout the Norton Internet Security scans
198

This chapter includes the following topics:
1 What to do if a security risk is found
What to do if a security risk is foundYour product provides many solutions and features forhandling viruses and other security threats that itdetects.
When Norton Internet Security detects a security riskon your computer, you must take appropriate actionon the risk. Norton Internet Security notifies you whenit detects a security risk. You can view details aboutthe risk in the window that appears and select an actionthat you want Norton Internet Security to perform onthe risk.
By default, Norton Internet Security removes thesecurity risk from your computer and quarantines it.However, you can restore the file from the Quarantineto its original location and exclude it from future scans.
w Exclude a program from Norton Internet Security scansonly if you are confident that the program is safe. Forexample, if another program relies on a security riskprogram to function, you might decide to keep theprogram on your computer.
In some cases, Norton Internet Security requires yourattention to manually resolve the detected security
4Responding tosecurity issues

risk. You can access the Symantec Security ResponseWeb site and refer the manual removal instructions.
In some cases, Norton Internet Security might notidentify an item as a security threat, but you mightsuspect that the item is infected. In such cases, you cansubmit the item to Symantec for further analysis.
In addition, your product provides solutions forsecurity risks, such as spyware and adware.
About detecting viruses, spyware, and other risksViruses and other security threats can be detectedduring a manual or scheduled scan. Auto-Protectdetects these threats when you perform an action withan infected file. Threats can also appear during aninstant messenger session, when you send an emailmessage, or during a manual or scheduled scan.
Security risks, such as spyware and adware, can alsobe detected when these activities are performed.
The files that can potentially infect your system whenyour computer first starts up are scanned first.
These files include the following:
1 Files that are associated with the processes that arecurrently running in memory
1 Files with startup folder entries
1 Files with system start INI file entries
1 Files with system start batch file entries
1 Files that the system start registry keys refers
If an infected file is detected during this portion of themanual scan, it is repaired or removed. Anyunnecessary references are also removed from yourcomputer. Before attempting to repair, quarantine, ordelete any infected file that has a process running inmemory, your product attempts to terminate theprocess. You are alerted and prompted to close allunnecessary programs before the process is terminated.
Responding to security issuesWhat to do if a security risk is found
200

You can view information about detected viruses andother security threats in Security History.
Security History also includes information aboutspyware, adware, and other security risks.
Reviewing Auto-Protect notificationsAuto-Protect scans files for viruses, worms, and Trojanhorses when you perform an action with them, suchas moving them, copying them, or opening them.
It also scans for spyware, adware, and other securityrisks.
If Auto-Protect detects suspicious activity, it logs anotification in Security History that tells you that arisk was found and resolved.
If Auto-Protect detect one or more viruses it eitherrepairs or deletes the viruses and notifies you. Thenotification provides information on which file wasrepaired or deleted and which virus, Trojan horse, orworm infected the file. No further action is necessary.
To review Auto-Protect notifications
1 In the Norton Internet Security main window, clickAdvanced.
2 In the Computer Protection pane, click History.
201Responding to security issuesWhat to do if a security risk is found

3 In the Show drop-down list, select the category forwhich you want to review Auto-Protect alerts.Your options are:
Review Auto-Protectnotifications that youreceived in the last sevendays.
Recent History
Review all of theAuto-Protect notificationsthat you have received.
Full History
Review all of the resolvedsecurity threats.
The Resolved SecurityRisks category includesthe infected files thatNorton Internet Securityrepairs, removes, orquarantines.
Resolved Security Risks
Review the list ofunresolved security risks.
The Unresolved SecurityRisks category includesthe infected files forwhich Norton InternetSecurity was not able totake any action. Thiscategory mostly includesthe low-level risks thatrequire your attention fora suitable action.
Unresolved Security Risks
Responding to security issuesWhat to do if a security risk is found
202

4 In the right pane, click the Options link.The option name appears as Restore & Options forfew items.If one or more security risks such as spyware arefound, you can take action on these items, ifrequired.
203Responding to security issuesWhat to do if a security risk is found

5 In the Threat Detected window, select theappropriate action on the risk.The following are some of the options that areavailable in the Threat Detected window:
Returns the selectedQuarantine item to its
Restore & Exclude this file
original location andexcludes the item frombeing detected in thefuture scans.
This option is availablefor the detected viral andnon-viral threats.
Excludes the security riskfrom future scan.
Exclude this program
Norton Internet Securityadds the security risk tothe appropriateexclusions list.
Lets you resolve the riskusing a manual fix tool.
Manual Fix (recommended)
If you resolve a threatmanually, you mustremove the threatinformation from theSecurity Historywindow.
Removes the security riskfrom your computer andquarantines it.
Remove this file (may causebrowser to close)(recommended)
This option is availablefor the security risks thatrequire your attention.
Responding to security issuesWhat to do if a security risk is found
204

Removes the selectedsecurity risk from thecomputer andquarantines it.
This option is availablefor the security risks thatrequire your attention formanual removal.
This option is alsoavailable for the securityrisks that are manuallyquarantined.
Remove this file (may causebrowser to close)
Removes the selectedsecurity risk item fromthe Security History log.
Remove from history
Takes you to theSymantec SecurityResponse Web site.
This option is availablefor the security risks thatrequire your attention formanual removal. You canrefer the SymantecSecurity Response Website for manual removalinstructions or otherinformation about therisk.
Get help (recommended)
205Responding to security issuesWhat to do if a security risk is found

Sends the security risk toSymantec.
In some cases, NortonInternet Security mightnot identify an item as asecurity threat, but youmight suspect that theitem is infected. In suchcases, you can use thisoption to submit the itemto Symantec for furtheranalysis.
Submit to Symantec
Responding to Worm Blocking alertsIf a program tries to email itself or a copy of itself, itcould be a worm trying to spread through email. Aworm can send itself or send a copy of itself in an emailmessage without any interaction with you.
Worm Blocking continually scans outgoing emailattachments for worms. If it detects a worm, youreceive an alert notifying you that a malicious wormwas found.
Worm Blocking alert appears only when you enablethe Ask me what to do option under How to respondwhen an outbound threat is found in the EmailAntivirus Scan window. If the Ask me what to dooption is disabled Norton Internet Securityautomatically quarantines the detected worm andnotifies you.
The alert presents you with options and asks you whatto do. If you do not send an email message at that time,then it is probably a worm and you should quarantinethe file.
Responding to security issuesWhat to do if a security risk is found
206

To respond to Worm Blocking alerts
4 In the alert window, select the action that you wantto take. Your options are:
Permanently stops theworm by putting it inSecurity History. While inSecurity History, theworm is unable to spread.This Quarantine is thesafest action.
Quarantine
Sends the email messagefor which you havereceived the wormblocking alert. If youallow the email message,it could infect therecipient's computer.Select this option if youare sure that the email isnot infected with a worm.
Allow
Ignores this risk.Ignore
If a malicious worm is found, it should be quarantined.
To quarantine a worm-infected file
1 In the alert, in the drop-down list, click Quarantine.
207Responding to security issuesWhat to do if a security risk is found

2 After the worm has been quarantined, perform thefollowing tasks:
1 Run LiveUpdate to ensure that you have thelatest definition updates.
See “About Program and Definition Updates”on page 65.
1 Scan your computer.
See “Running a Full System Scan” on page 136.
If nothing is detected, submit the infected file toSymantec Security Response. Also, indicate that thefile was detected and that you have scanned it withthe latest definition updates. Symantec SecurityResponse replies to you within 48 hours.
About responding to risks detected during a scanAt the end of a scan, the Results Summary windowprovides the summary of the scan results. You can usethe ThreatsDetected window to resolve any items thatwere not automatically resolved during the scan.
You can use the Show drop-down list that is availablein the Security History window to resolve any itemsthat were not automatically resolved during the scan.The Recommended Action section in the SecurityHistory window displays the action that you shouldtake to resolve the security threat.
About actions when Norton Internet Security cannotrepair a file
One of the common reasons that Norton InternetSecurity cannot automatically repair or delete aninfected file is that you do not have the currentdefinition updates. Run LiveUpdate, and then scanagain.
Before running LiveUpdate to receive protectionupdates, ensure that Quick Scan is turned on (it isturned on by default). After LiveUpdate retrieves thelatest definition updates, Quick Scan automatically
Responding to security issuesWhat to do if a security risk is found
208

checks for the infections that have processes runningin memory. It also checks for the infections that thestart-up files and folders refer.
If that does not work, read the information on theThreatsDetected window to identify the types of filesthat cannot be repaired. You can take one of thefollowing actions, depending on the file type:
You can view the file type ofthe detected risk. Thisinformation helps you todecide the action that can betaken depending on the filetype.
For example, you can view theinfected files with thefollowing file nameextensions (any file can beinfected):1 .exe
1 .doc
1 .dot
1 .xls
Use the Threats Detectedwindow to solve the problem.
Infected files
Replace using your operatingsystem disks.
Hard disk master boot record,boot record, or system files(such as IO.SYS orMSDOS.SYS) and floppy diskboot record and system files
Resolving a suspected security riskNorton Internet Security needs to close a suspectedsecurity risk program to resolve it.
209Responding to security issuesWhat to do if a security risk is found

To resolve the suspected security risk
4 Save all open files, and then click Go.If you do not respond to this dialog box, it closesautomatically without resolving and closing thesuspected security risk.
Responding to security issuesWhat to do if a security risk is found
210

This chapter includes the following topics:
1 About the Smart Firewall
1 About Download Insight
1 About Intrusion Prevention
1 About Vulnerability Protection
1 About the types of security risks
1 About Norton AntiSpam
1 About configuring POP3 and SMTP ports
1 About the Network Security Map
1 About Network Cost Awareness
About the Smart FirewallThe Smart Firewall monitors the communicationsbetween your computer and other computers on the
5Protecting Internetactivities

Internet. It also protects your computer from suchcommon security problems as the following:
Warns you of connectionattempts from othercomputers and ofattempts by programs onyour computer to connectto other computers
Improper connection attempts
Cloaks the inactive portson your computer therebyproviding protectionagainst attacks throughhacking techniques suchas port scanning
Port scans
Monitors the networktraffic to or from yourcomputer for suspiciousbehavior and stops anyattack before theythreaten your system
Intrusions
A firewall blocks hackers and other unauthorizedtraffic, while it allows authorized traffic to pass.Turning off Smart Firewall reduces your systemprotection. Always ensure that the Smart Firewall isturned on.
Turning off or turning on Smart FirewallSmart Firewall monitors communications betweenyour computer and the other computers on theInternet. It also protects your computer from commonsecurity problems.
If you must turn off the Smart Firewall, you shouldturn it off temporarily to ensure that it is turned onagain automatically. To ensure that your computer
Protecting Internet activitiesAbout the Smart Firewall
212
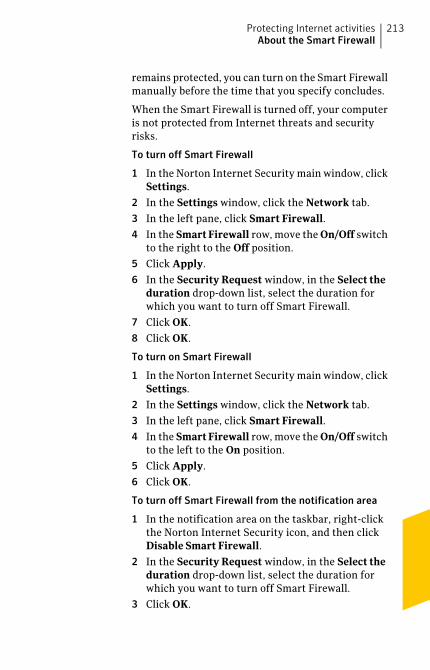
remains protected, you can turn on the Smart Firewallmanually before the time that you specify concludes.
When the Smart Firewall is turned off, your computeris not protected from Internet threats and securityrisks.
To turn off Smart Firewall
1 In the Norton Internet Security main window, clickSettings.
2 In the Settings window, click the Network tab.
3 In the left pane, click Smart Firewall.4 In the SmartFirewall row, move the On/Off switch
to the right to the Off position.
5 Click Apply.
6 In the Security Request window, in the Select theduration drop-down list, select the duration forwhich you want to turn off Smart Firewall.
7 Click OK.
8 Click OK.
To turn on Smart Firewall
1 In the Norton Internet Security main window, clickSettings.
2 In the Settings window, click the Network tab.
3 In the left pane, click Smart Firewall.4 In the SmartFirewall row, move the On/Off switch
to the left to the On position.
5 Click Apply.
6 Click OK.
To turn off Smart Firewall from the notification area
1 In the notification area on the taskbar, right-clickthe Norton Internet Security icon, and then clickDisable Smart Firewall.
2 In the Security Request window, in the Select theduration drop-down list, select the duration forwhich you want to turn off Smart Firewall.
3 Click OK.
213Protecting Internet activitiesAbout the Smart Firewall

To turn on Smart Firewall from the notification area
4 In the notification area on the taskbar, right-clickthe Norton Internet Security icon, and then clickEnable Smart Firewall.
About firewall rulesA firewall is a security system that uses rules to blockor allow connections and data transmission betweenyour computer and the Internet. Firewall rules controlhow the Smart Firewall protects your computer frommalicious programs and unauthorized access. Thefirewall automatically checks all traffic that comes inand out of your computer against these rules.
The Smart Firewall uses two kinds of firewall rules:
Control network access forprograms on your computer.
Program rules
Control all the incoming and theoutgoing network traffic.
General rules
About the order in which firewall rules are processed
The Smart Firewall processes General rules before itprocesses Program rules. For example, consider a casewhen there is a Program rule that allows InternetExplorer to access Internet using port 80 with TCPprotocol and a General rule that blocks TCPcommunication through port 80 for all applications.The Internet Explorer application cannot access theInternet as Norton Internet Security gives precedenceto General rules over the Program rules.
Within the list of General rules, rules are processed inorder of appearance, from top to bottom. ProgramControl entries are not processed in order. The ruleswithin each Program Control entry, however, areprocessed in order of appearance, from top to bottom.
Protecting Internet activitiesAbout the Smart Firewall
214

For example, you have a Program rule for the SymantecpcAnywhere application that blocks the use of theapplication with any other computer. You add anotherrule for the same application that allows its use witha specific computer. You then move the new rule beforethe original rule in the program rule list. NortonInternet Security processes the new rule first and letsyou use Symantec pcAnywhere with that specificcomputer. It then processes the original rule andprevents its use with any other computer.
About General rules
Norton Internet Security includes a number ofpredefined general firewall rules. These rules providenetwork functionality and protection from knownInternet risks. Examples of default firewall rulesinclude the following:
Permit all types ofoutbound and safe typesof inbound ICMP (InternetControl MessageProtocol) messaging.
ICMP messages providestatus and controlinformation.
Default Allow Specific InboundICMP
Default Allow Specific OutboundICMP
215Protecting Internet activitiesAbout the Smart Firewall

Permit the use of theNetBIOS name serviceand the NetBIOSdatagram service that theMicrosoft Network usesin file and printer sharing.
NetBIOS is an acronymfor Network BasicInput/Output System.NetBIOS provides nameservice, session service,and datagram service.Name service providesresolution of names,Session service managessessions forconnection-orientedservices, and Datagramservice distributesdatagrams forconnection-orientedservices.
Default Allow Inbound NetBIOSName (Shared Networks)
Default Allow Inbound NetBIOS(Shared Networks)
Permit the use of theBootp service.
Bootp is short forBootstrap Protocol, whichenables a computer todiscover its own IPaddress.
Default Allow Inbound Bootp
Default Allow Outbound Bootp
The GeneralRules window displays a list of predefinedgeneral rules. These rules appear in the order of theirpriority levels. Rules that appear higher in the listoverride the rules that appear lower in the list.
Protecting Internet activitiesAbout the Smart Firewall
216

You can add a new General rule in this window. Youcan also do the following activities:
You can change the settings ofa General rule that does notfunction the way you want.
However, you cannot modifysome of the default rules thatare read-only.
See “Modifying General rulesand Program rules” on page 233.
Modify a General rule
You can disable a General rule.
However, you cannot turn offsome of the default rules thatare read-only.
See “Turning off a General ruletemporarily” on page 236.
Turn off a General rule
You can change the priority of aGeneral rule by changing theorder in which it appears in thelist.
w Only advanced users ornovice users at the direction oftechnical support, shouldperform this action.
See “Changing the order offirewall rules” on page 235.
Change the priority of aGeneral rule
About Program rules
Program rules control network access for the programsthat are on your computer. You can use the ProgramControl feature to create and modify rules forprograms.
217Protecting Internet activitiesAbout the Smart Firewall

The Program Control window displays a list ofprograms. In this window, you can do the following:
1 Add a program.
1 Rename a program.
1 Modify the rules for a program.
1 Add a rule for a program.
1 Modify the access settings of a program rule.
1 Modify the priority of rules for a program bychanging the sequence of rules in the list.
1 Remove a program rule.
1 Remove a program.
1 View the trust level of a program.
You can create Program rules in the following ways:
Lets the firewallautomatically configureaccess for programs thefirst time that users runthem. This method is theeasiest way to createfirewall rules.
Automatically customize Internetaccess settings
Manages the list ofprograms that can accessthe Internet.
Use Program Control
Protecting Internet activitiesAbout the Smart Firewall
218

Lets the firewall notifyyou when a programattempts to access theInternet. You can thenallow or block Internetaccess for the program.
In some instances, suchas when you watch amovie, you might prefernot to be alerted with anymessages. In such cases,you can turn onAutomatic ProgramControl. Norton InternetSecurity does not promptyou with any firewallalerts in this state.
The firewall notifies youonly if you have changedthe Advanced Settingsoptions of Smart Firewallfrom their default,recommended settings.
Respond to alerts
Turning off Automatic Program Control
Automatic Program Control automatically configuresInternet access settings for Web-enabled programs thefirst time that they run. When a program tries to accessthe Internet for the first time, Automatic ProgramControl creates rules for it.
Automatic Program Control configures Internet accessonly for the versions of programs that Symantecrecognizes as safe. An alert occurs when an infectedprogram tries to access your computer.
If you want to determine the Internet access settingsfor your programs, you can turn off Automatic ProgramControl. When a program tries to access the Internet
219Protecting Internet activitiesAbout the Smart Firewall

for the first time, an alert prompts you to configureaccess settings.
When you turn off Automatic Program Control, awarning appears. Symantec recommends thatAutomatic Program Control remain set to Aggressive.By turning it off, you might make the incorrectdecisions that can allow malicious programs to run orblock critical Internet programs and functions.
After you turn off Automatic Program Control, you canturn on the Advanced Events Monitoring feature.
w When you turn on any Advanced Events Monitoringfeature, you are prompted with numerous firewallalerts that prompt you to allow or deny network accessfor any unrecognized program the first time that itruns or that is not currently handled by the firewallrules or the Advanced Events Monitoring feature.
When you set Automatic Program Control toAggressive or Automatic, the Advanced EventsMonitoring features are disabled. The AdvancedEvents Monitoring settings that you configured areno longer applicable.
To turn off Automatic Program Control
1 In the Norton Internet Security main window, clickSettings.
2 In the Settings window, click the Network tab.
3 In the left pane, click Smart Firewall.4 Under Smart Firewall, in the Advanced Settings
row, click Configure.
5 In the AdvancedSettings window, in the AutomaticProgram Control row, move theAggressive/Automatic/Off switch to the right tothe Off position.
6 In the window that appears, click Yes.
7 In the AdvancedSettings window, click Apply, andthen click OK.
Protecting Internet activitiesAbout the Smart Firewall
220
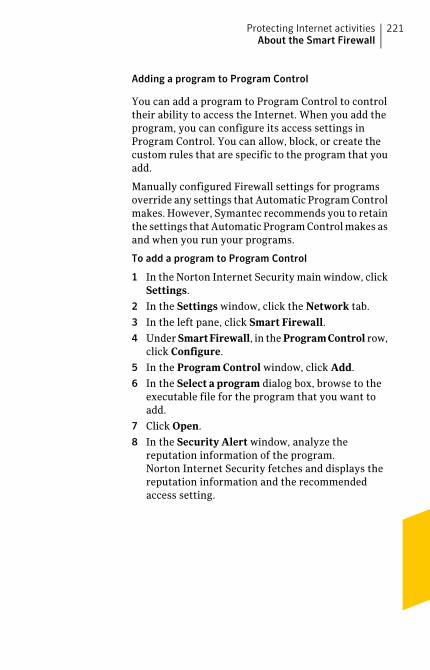
Adding a program to Program Control
You can add a program to Program Control to controltheir ability to access the Internet. When you add theprogram, you can configure its access settings inProgram Control. You can allow, block, or create thecustom rules that are specific to the program that youadd.
Manually configured Firewall settings for programsoverride any settings that Automatic Program Controlmakes. However, Symantec recommends you to retainthe settings that Automatic Program Control makes asand when you run your programs.
To add a program to Program Control
1 In the Norton Internet Security main window, clickSettings.
2 In the Settings window, click the Network tab.
3 In the left pane, click Smart Firewall.4 Under SmartFirewall, in the ProgramControl row,
click Configure.
5 In the Program Control window, click Add.
6 In the Select a program dialog box, browse to theexecutable file for the program that you want toadd.
7 Click Open.
8 In the Security Alert window, analyze thereputation information of the program.Norton Internet Security fetches and displays thereputation information and the recommendedaccess setting.
221Protecting Internet activitiesAbout the Smart Firewall

9 In the Options drop-down list, select the access levelthat you want this program to have.Your options are:
Allow all access attemptsby this program.
Allow Always
Deny all access attemptsby this program.
Block Always
Create the rules thatcontrol how this programaccesses the Internet.
You can set the followingcriteria for a rule:
Manually configure
1 Action
1 Connections
1 Computers
1 Communications
1 Advanced
1 Description
If you select this option,you must follow theinstructions in the wizardthat appears andconfigure the rule.
10 Click OK.
Removing a program from Program Control
You can remove programs from Program Control ifnecessary. In this case, Norton Internet Securityremoves all the rules that are associated with theapplication that you remove.
The firewall settings for the programs are not migratedfrom previous versions of Norton Internet Security. Ifyou removed any programs in the previous version and
Protecting Internet activitiesAbout the Smart Firewall
222

do not want them in the current version, you mustremove them again.
To remove a program from Program Control
1 In the Norton Internet Security main window, clickSettings.
2 In the Settings window, click the Network tab.
3 In the left pane, click Smart Firewall.4 Under SmartFirewall, in the ProgramControl row,
click Configure.
5 In the Program Control window, in the Programcolumn, select the program that you want to remove.
6 Click Remove.
7 In the Confirmation dialog box, click Yes.The confirmation dialog box appears only when theAutomatic Program Control option is turned off.
8 Click OK.
Customizing Program Control
After you use Norton Internet Security for a while, youmight need to change the access settings for certainprograms.
To customize Program Control
1 In the Norton Internet Security main window, clickSettings.
2 In the Settings window, click the Network tab.
3 In the left pane, click Smart Firewall.4 Under SmartFirewall, in the ProgramControl row,
click Configure.
5 In the Program Control window, in the Programcolumn, select the program that you want to change.
223Protecting Internet activitiesAbout the Smart Firewall

6 In the drop-down list next to the program that youwant to change, select the access level that you wantthis program to have. Your options are:
Allow all access attemptsby this program.
Allow
Deny all access attemptsby this program.
Block
Create the rules thatcontrol how this programaccesses the Internet.
Custom
7 Click OK.
Adding General rules and Program rules
Program Control automatically creates most of thefirewall rules that you need. You can add custom rulesif necessary.
w Only experienced users should create their own firewallrules.
You can add the following types of firewall rules:
1 General rules
1 Program rules
To add a General rule
1 In the Norton Internet Security main window, clickSettings.
2 In the Settings window, click the Network tab.
3 In the left pane, click Smart Firewall.4 Under Smart Firewall, in the Advanced Settings
row, click Configure.
5 In the Advanced Settings window, in the GeneralRules row, click Configure.
6 In the General Rules window, click Add.
Protecting Internet activitiesAbout the Smart Firewall
224

7 Follow the instructions in the Add Rule wizard.
8 In the General Rules window, click OK.
9 In the Advanced Settings window, click OK.
To add a Program rule
1 In the Norton Internet Security main window, clickSettings.
2 In the Settings window, click the Network tab.
3 In the left pane, click Smart Firewall.4 Under SmartFirewall, in the ProgramControl row,
click Configure.
5 In the Program Control window, in the Programcolumn, select the program to which you want toadd a rule.
6 Click Modify.You can also use the Access drop-down list next tothe program to modify the access level for theprogram. Accordingly, Smart Firewall modifies orcreates the relevant rule for the program.
7 In the Rules window, click Add.
8 Follow the instructions in the Add Rule wizard.
9 In the Rules window, click OK.
10 In the Program Control window, click OK.
Using the Add Rule Wizard
The AddRule Wizard leads you through the steps thatare necessary to create firewall rules.
To use the Add Rule Wizard
1 Open the Add Rule Wizard by creating a Generalrule or a Program rule.
225Protecting Internet activitiesAbout the Smart Firewall

2 In the first panel of the AddRuleWizard, select theaction that you want for this rule. Your options are:
Allow communication ofthis type.
Allow
For example, consider aGeneral rule with thefollowing criteria: allinbound connectionsfrom Internet address192.168.1.1 through port8080. When you selectAllow, Smart Firewallallows all connectionssatisfying the criteria ofthis General rule.
Prevent communicationof this type.
Block
For example, consider aGeneral rule with thefollowing criteria: allinbound connectionsfrom Internet address192.168.1.1 through port8080. When you selectBlock, Smart Firewallblocks all connectionssatisfying the criteria ofthis General rule.
Protecting Internet activitiesAbout the Smart Firewall
226

Update the Firewall –Activities category in theevent log each time thatcommunication of thistype takes place. Thisoption lets you monitorhow often this firewallrule is used. NortonInternet Security notifiesyou every time that thetraffic matching themonitor rule criteriapasses through yourcomputer. You can usethe links in thesenotifications to view thelogs. You can view theevent log under Firewall– Activities category inthe Security Historywindow.
Norton Internet Securitycreates separate actionrules to allow or block theprograms that have onlyaMonitor rule associatedwith them. The Monitorrule must be of higherorder than the action rulefor successful log entry ofthe network event that isrelated to the program.
Monitor
3 Click Next.
227Protecting Internet activitiesAbout the Smart Firewall

4 Select the type of connection for the rule. Youroptions are:
The rule applies tooutbound connectionsfrom your computer toanother computer.
Connections to other computers
The rule applies toinbound connectionsfrom another computer toyour computer.
Connections from othercomputers
The rule applies toinbound and to outboundconnections.
Connections to and from othercomputers
Protecting Internet activitiesAbout the Smart Firewall
228

5 Click Next, and then select the computers that applyto the rule. Your options are:
The rule applies to allcomputers.
Any computer
This rule applies only tocomputers in the localsubnet.
Any computer in the localsubnet
Anorganization’snetworkis divided into subnets tofacilitate efficientInternet communications.A subnet represents all ofthe computers in thesame LAN.
229Protecting Internet activitiesAbout the Smart Firewall
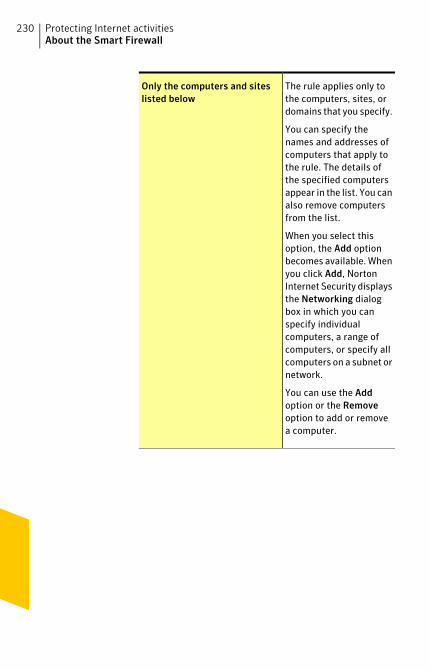
The rule applies only tothe computers, sites, ordomains that you specify.
You can specify thenames and addresses ofcomputers that apply tothe rule. The details ofthe specified computersappear in the list. You canalso remove computersfrom the list.
When you select thisoption, the Add optionbecomes available. Whenyou click Add, NortonInternet Security displaysthe Networking dialogbox in which you canspecify individualcomputers, a range ofcomputers, or specify allcomputers on a subnet ornetwork.
You can use the Addoption or the Removeoption to add or removea computer.
Only the computers and siteslisted below
Protecting Internet activitiesAbout the Smart Firewall
230

6 Click Next, and then select the protocols for therule. Your options are:
The rule applies to TCP(Transmission Control
TCP
Protocol)communications.
The rule applies to UDP(User Datagram Protocol)communications.
UDP
The rule applies to TCPand to UDPcommunications.
TCP and UDP
The rule applies to ICMP(InternetControlMessage
ICMP
Protocol)communications.
This option is availableonly when you add ormodify a General rule.
The rule applies toICMPv6 (Internet Control
ICMPv6
Message Protocol forInternet Protocol version6) communications.
This option is availableonly when you add ormodify a General rule.
231Protecting Internet activitiesAbout the Smart Firewall

The rule applies to allsupported protocols.
When you select thisoption, you cannotspecify the types ofcommunications or portsthat apply to the rule.
All
7 Select the ports for the rule. Your options are:
The rule applies tocommunications that useany port.
All types of communication (allports, local and remote)
The rule applies to theports that you specify.You can specify the portsby selecting from thelisted ports or by addingspecific ports or portranges.
Only communications thatmatch all types and ports listedbelow
w If you select ICMPor ICMPv6 protocol, youcan specify thecommands. To do so,select a command fromthe list of knowncommandsor add specificcommands or commandranges.
When you select thisoption, the Add optionbecomes available. Youcan use theAdd option orthe Remove option tospecify or remove a portor a command.
Protecting Internet activitiesAbout the Smart Firewall
232

8 Click Next.
9 Check Create a Security History log entry if youwant Norton Internet Security to create an entry inthe firewall event log.Norton Internet Security creates an entry when anetwork communication event matches this rule.You can view the event log in the Security Historywindow under Firewall–Activities. If you selectedthe Monitor option in the Action window, then theCreate a Security History log entry option isautomatically checked. You cannot uncheck the boxto turn off this option as it is the default setting.
10 Check Apply this rule if you want to apply this ruleto IPv6 NAT Traversal traffic.
11 Click Next, and then, in the text box, type a namefor this rule.
12 Click Next, and then review the new rule settings.
13 Click Finish.
14 When you have finished adding rules, click OK.
Modifying General rules and Program rules
You can change an existing firewall rule if it does notfunction the way that you want. You can use the Modifyoption to change the settings of an existing firewallrule. When you change a rule, the firewall uses the newcriteria of the modified rule to control network traffic.
You cannot modify some of the default rules that areread-only. However, you can view the settings of theserules by using the View option.
To modify a General rule
1 In the Norton Internet Security main window, clickSettings.
2 In the Settings window, click the Network tab.
3 In the left pane, click Smart Firewall.4 Under Smart Firewall, in the Advanced Settings
row, click Configure.
233Protecting Internet activitiesAbout the Smart Firewall

5 In the Advanced Settings window, in the GeneralRules row, click Configure.
6 In the General Rules window, select the rule thatyou want to change.
7 Click Modify.
8 In the Modify Rule window, make the necessarychanges to modify any aspect of the rule.
9 When you have finished changing the rule, clickOK.
10 In the General Rules window, click OK.
11 In the Advanced Settings window, click OK.
To modify a Program rule
1 In the Norton Internet Security main window, clickSettings.
2 In the Settings window, click the Network tab.
3 In the left pane, click Smart Firewall.4 Under SmartFirewall, in the ProgramControl row,
click Configure.
5 In the Program Control window, in the Programcolumn, select the program that you want to change.
6 Click Modify.You can also use the Access drop-down list next tothe program to modify the access level for theprogram. Accordingly, Smart Firewall modifies orcreates the relevant rule for the program.
7 In the Rules window, select the rule that you wantto change.
8 Click Modify.
9 In the Modify Rule window, make the necessarychanges to modify to change any aspect of the rule.
10 When you have finished changing the rule, clickOK.
11 In the Rules window, click OK.
12 In the Program Control window, click OK.
Protecting Internet activitiesAbout the Smart Firewall
234

Changing the order of firewall rules
Each list of firewall rules is processed from the topdown. You can adjust how the firewall rules areprocessed by changing their order.
w Do not change the order of the default General rulesunless you are an advanced user. Changing the orderof default General rules can affect firewall functionalityand reduce the security of your computer.
To change the order of General rules
1 In the Norton Internet Security main window, clickSettings.
2 In the Settings window, click the Network tab.
3 In the left pane, click Smart Firewall.4 Under Smart Firewall, in the Advanced Settings
row, click Configure.
5 In the Advanced Settings window, in the GeneralRules row, click Configure.
6 In the General Rules window, select the rule thatyou want to move.
7 Do one of the following:
1 To move this rule before the rule above it, clickMove Up.
1 To move this rule after the rule below it, clickMove Down.
8 When you are done moving the rules, click OK.
9 In the Advanced Settings window, click OK.
To change the order of Program rules
1 In the Norton Internet Security main window, clickSettings.
2 In the Settings window, click the Network tab.
3 In the left pane, click Smart Firewall.4 Under SmartFirewall, in the ProgramControl row,
click Configure.
235Protecting Internet activitiesAbout the Smart Firewall

5 In the Program Control window, in the Programcolumn, select the program that contains the rulethat you want to move.
6 Click Modify.
7 In the Rules window, select the rule that you wantto move.
8 Do one of the following:
1 To move this rule before the rule above it, clickMove Up.
1 To move this rule after the rule below it, clickMove Down.
9 When you are done moving the rules, click OK.
10 In the Program Control window, click OK.
Turning off a General rule temporarily
You can temporarily turn off a general rule if you wantto allow specific access to a computer or a program.You must remember to turn on the rule again whenyou are done working with the program or computerthat required the change.
w You cannot turn off some of the default firewall rulesthat appear in the list. You can only view the settingsof these rules by using the View option.
To turn off a General rule temporarily
1 In the Norton Internet Security main window, clickSettings.
2 In the Settings window, click the Network tab.
3 In the left pane, click Smart Firewall.4 Under Smart Firewall, in the Advanced Settings
row, click Configure.
5 In the Advanced Settings window, in the GeneralRules row, click Configure.
6 In the GeneralRules window, uncheck the box nextto the rule you want to turn off.
7 Click OK.
8 In the Advanced Settings window, click OK.
Protecting Internet activitiesAbout the Smart Firewall
236

Removing a firewall rule
You can remove some of the firewall rules if necessary.However, you cannot remove some of the defaultGeneral rules that appear in the list. You can view thesettings of these rules by using the View option.
w Do not remove a firewall rule unless you are anadvanced user. Removing a firewall rule can affectfirewall functionality and reduce the security of yourcomputer.
To remove a General rule
1 In the Norton Internet Security main window, clickSettings.
2 In the Settings window, click the Network tab.
3 In the left pane, click Smart Firewall.4 Under Smart Firewall, in the Advanced Settings
row, click Configure.
5 In the Advanced Settings window, in the GeneralRules row, click Configure.
6 In the General Rules window, select the rule thatyou want to remove.
7 Click Remove.
8 In the Confirmation dialog box, click Yes.
9 When you are done removing rules, click OK.
10 In the Advanced Settings window, click OK.
To remove a Program rule
1 In the Norton Internet Security main window, clickSettings.
2 In the Settings window, click the Network tab.
3 In the left pane, click Smart Firewall.4 Under SmartFirewall, in the ProgramControl row,
click Configure.
5 In the Program Control window, in the Programcolumn, select the program that contains the rulethat you want to remove.
237Protecting Internet activitiesAbout the Smart Firewall

6 Click Modify.To remove all the program rules that are associatedwith the program, click Remove.
7 In the Rules window, select the rule that you wantto remove.
8 Click Remove.
9 In the Confirmation dialog box, click Yes.
10 When you are done removing rules, click OK.
11 In the Program Control window, click OK.
12 Click OK.
About Smart Firewall settingsThe SmartFirewall options let you customize how thefirewall monitors and responds to inboundcommunications and outbound communications.
w You can change the Smart Firewall settings only if youhave the administrator permissions.
You can set the following Smart Firewall options:
Control settings of the advancedprotection features of Smart Firewall.
Advanced Settings
Control settings for the programsthat access the Internet.
Program Control
View the networks that yourcomputer is connected to, and addthe networks and computers to theTrusted list or the Restricted list.
Trust Control
Protecting Internet activitiesAbout the Smart Firewall
238

Lets you configure how NortonInternet Security must control thenetwork communications to and fromyour computer.
For instance, you may have to beaway from your system for a verylong time. During this period, youwant to secure your system by notallowing it to communicate with theother computers on the network. Insuch cases, you can use theBlock AllNetwork Traffic option to block allthe communications to and from yourcomputer.
Block All NetworkTraffic
About Smart Firewall Program Control settings
Smart Firewall Program Control settings let you controloptions for the programs that access the Internet.
In the list of programs, you can modify Internet accessfor each program. You can also add a program to the
239Protecting Internet activitiesAbout the Smart Firewall

list or remove a program from the list. Your optionsare:
Displays the trust level of a program.
Symantec collects the informationfrom the Norton Community.
Symantec assigns the following trustlevels:
1 Norton Trusted: Indicates the filethat is Norton Trusted.
1 Good: Symantec has highindications that the file is trusted.
1 Unproven: Symantec does nothave enough information aboutthe file to assign a trust level tothe file.
The file is neither safe nor unsafe.1 Poor: Symantec has only a few
indications that the file is nottrusted.
1 Bad: Symantec has very highindications that the file is nottrusted.
This file is suspicious and canharm your computer.
You can set the access level for eachprogram based on the trust level.
Trust
Displays the name of the program, orthe name of the program’s executablefile.
You can also view the location of theprogram on your computer.
Program
Protecting Internet activitiesAbout the Smart Firewall
240

Displays the level of access that theprogram has.
You can change the access level byselecting a different entry from thedrop-down list.
Your options are Allow, Block, andCustom.
Access
Lets you add a program to ProgramControl manually.
Add
Opens the Rules window, in whichyou can customize rules for aselected program.
Modify
Lets you remove a selected programfrom Program Control.
Remove
Lets you change the description forthe selected program.
In this case, the file name does notchange.
Rename
About Smart Firewall Trust Control settings
You can use the Smart Firewall Trust Control settingsto view the devices on the network to which yourcomputer is connected.
This feature also lets you do the following:
1 Select the networks or computers you can trust atcertain levels of access.
1 Select the networks or computers you want tocompletely restrict from directly accessing yourcomputer.
When you select TrustControl, the NetworkSecurityMap window appears. Some of the activities that youcan do in this window are the following:
241Protecting Internet activitiesAbout the Smart Firewall

1 View the details of the devices that are present inthe network.
1 Monitor the connection status of the devices thatare present in the network.
1 View the security status of your networkconnection.
1 View the security status of each computer that youremotely monitor.
1 View the Trust Control status of all the devices thatare on your Network Security Map.
About Smart Firewall Advanced Settings
Smart Firewall Advanced Settings let you activateadvanced protection features of Smart Firewall. Youroptions are:
Determines how theSmart Firewall controlsincoming network trafficand outgoing networktraffic.
General Rules
Determines how theSmart Firewall handlesuncommon protocolssuch as Internet GroupManagement Protocol(IGMP) and IPv6Hop-by-Hop Option(HOPOPT).
Uncommon Protocols
Protecting Internet activitiesAbout the Smart Firewall
242
Firewall Reset
243Protecting Internet activitiesAbout the Smart Firewall
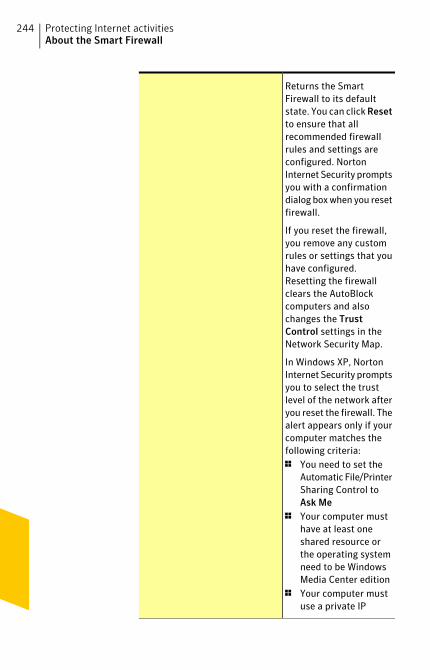
Returns the SmartFirewall to its defaultstate. You can clickResetto ensure that allrecommended firewallrules and settings areconfigured. NortonInternet Security promptsyou with a confirmationdialog box when you resetfirewall.
If you reset the firewall,you remove any customrules or settings that youhave configured.Resetting the firewallclears the AutoBlockcomputers and alsochanges the TrustControl settings in theNetwork Security Map.
In Windows XP, NortonInternet Security promptsyou to select the trustlevel of the network afteryou reset the firewall. Thealert appears only if yourcomputer matches thefollowing criteria:1 You need to set the
Automatic File/PrinterSharing Control toAsk Me
1 Your computer musthave at least oneshared resource orthe operating systemneed to be WindowsMedia Center edition
1 Your computer mustuse a private IP
Protecting Internet activitiesAbout the Smart Firewall
244

address range1 Your computer must
be connected to asecure wireless orwired connection
Ensures that blocked andinactive ports do notrespond to connectionattempts.
Prevents the active portsfrom responding toconnection attempts withincorrect source ordestination information.
Stealth Blocked Ports
Automatically allows theInternet traffic thatmatches the connectionsthat an application opens.
Check this option to dothe following:
1 Analyze the networktraffic that entersyour computer.
1 Block the suspiciousapplications that tryto connect to yourcomputer.
Stateful Protocol Filter
245Protecting Internet activitiesAbout the Smart Firewall

Automatic File/Printer SharingControl
Protecting Internet activitiesAbout the Smart Firewall
246
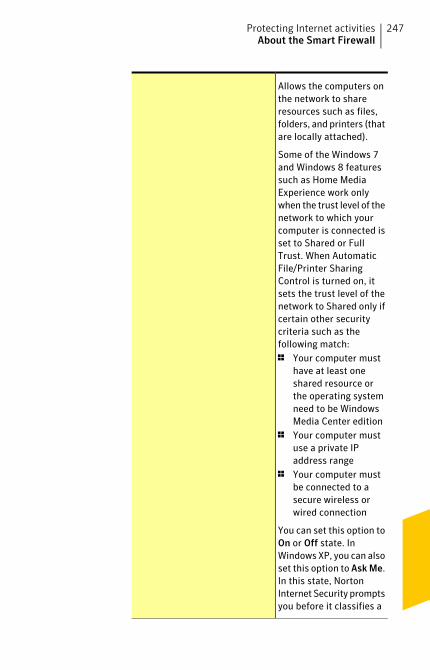
Allows the computers onthe network to shareresources such as files,folders, and printers (thatare locally attached).
Some of the Windows 7and Windows 8 featuressuch as Home MediaExperience work onlywhen the trust level of thenetwork to which yourcomputer is connected isset to Shared or FullTrust. When AutomaticFile/Printer SharingControl is turned on, itsets the trust level of thenetwork to Shared only ifcertain other securitycriteria such as thefollowing match:1 Your computer must
have at least oneshared resource orthe operating systemneed to be WindowsMedia Center edition
1 Your computer mustuse a private IPaddress range
1 Your computer mustbe connected to asecure wireless orwired connection
You can set this option toOn or Off state. InWindows XP, you can alsoset this option to AskMe.In this state, NortonInternet Security promptsyou before it classifies a
247Protecting Internet activitiesAbout the Smart Firewall

new network to whichyour computer isconnected as Shared orProtected. The promptappears only when thesecurity criteria forsharing matches.
Protecting Internet activitiesAbout the Smart Firewall
248

Automatic Program Control
249Protecting Internet activitiesAbout the Smart Firewall

Automatically configuresInternet access settingsfor the Web-enabledprograms that are run forthe first time.
You can configure theAutomatic ProgramControl option to thefollowing settings:
1 Aggressive - AllowsNorton InternetSecurity to alert youwhen it detects aprogram withUnproven or Poortrust level receivinginbound traffic. Youcan decide whether toallow or block thetraffic after viewingthe reputation detailsof the program in thefirewall alert. Whenyou select this option,Norton InternetSecurity does notalert you for anyoutbound trafficirrespective of thereputation of theprogram (NortonTrusted, Good,Unproven, Poor, orBad). Norton InternetSecurity automaticallytakes decisions on theoutbound traffic.
1 Automatic - AllowsNorton InternetSecurity toautomatically take
Protecting Internet activitiesAbout the Smart Firewall
250

decisions when aprogram receivesinbound or outboundtraffic. When youselect this option,Norton InternetSecurity does notprompt you with anyfirewall alerts.
1 Off - Turns offAutomatic ProgramControl. If you haveselected this option,you must manuallyspecify the Internetaccess settings for allinbound traffic andoutbound traffic inthe firewall alerts.
The Automatic LearnIPv6 NAT TraversalTraffic option is availableonly when AutomaticProgram Control is set toAggressive orAutomatic.Norton Internet Securityprovides this option tocontrol the networktraffic that uses Teredoto communicatewith yourcomputer. Some of theWindows 7 and Windows8 features such asRemoteMediaExperienceand Remote Assistancework only whenAutomatic Learn IPv6NATTraversal Traffic is on.
251Protecting Internet activitiesAbout the Smart Firewall
When you turn offAutomatic ProgramControl, you can turn onAdvanced EventsMonitoring. You can usethe Advanced EventsMonitoring options, toconfigure the Internetaccess settings forInternet-enabledprograms the first timethat they run.
When you turn on theAdvanced EventsMonitoring feature, youare prompted withnumerous firewall alerts.If you do not want toreceive firewall alerts,you can set AutomaticProgram Control toAutomatic. If you want tomanually specify Internetaccess settings forprograms with Unprovenor Poor trust levelreceiving inbound traffic,you can set AutomaticProgram Control toAggressive.
The Advanced EventsMonitoring settingsconsist of the followingcategories that provideyour computer withadvanced protection:
Protecting Internet activitiesAbout the Smart Firewall
252

1 Program Component
This option protectsyou against themalicious programsthat launchInternet-enabledprograms.
1 Program Launch
This option protectsyou against themalicious programsthat attach to safeprograms withoutbeing detected.
1 Command LineExecution
This option protectsyou against the Trojanhorses or maliciousprograms that launchtrusted applicationsin hidden modethrough-commandline parameters.
1 Code Injection
This option protectsyou against the Trojanhorses or maliciousprograms that injectcode into anapplication’s processwithout firewallalerts.
1 Window Messages
This option protectsyou against the Trojanhorses and othermalicious programsthat manipulate anapplication’s behaviorto connect to the
253Protecting Internet activitiesAbout the Smart Firewall

Internet withoutfirewall alerts.
1 Direct NetworkAccess
This option protectsyou against the Trojanhorses and othermalicious programsthat bypass networktraffic.
These programspenetrate theWindows TCP/IP layerto send and receivedata withouttriggering firewallalerts.
1 Active DesktopChange
This option protectsyou against themalicious programsthat use thedocumentedinterfaces that thetrusted applicationsprovide to transmitdata outside thenetwork withouttriggering firewallalerts.
1 Key Logger Monitor
This option protectsyou against themalicious keyloggerprograms that accesspersonal informationof a user on aparticular computerby monitoring theirkeystroke activities.
Protecting Internet activitiesAbout the Smart Firewall
254

1 COM Control
This option protectsyou against themalicious programsthat manipulate anapplication's behaviorby instantiatingcontrolled COMobjects.
About Norton Firewall DiagnosisThere may be times when firewall may block thenetwork traffic that you want to allow based on itsconfiguration settings. In such cases, you may haveissues in accessing the Internet, the Network, oranother computer to perform tasks such as sharingresources.
When you experience network connection problems,Norton Firewall acts quickly in identifying the causeof failure and provides its diagnosis. Norton InternetSecurity displays the Firewall Diagnostics Wizardwhen you encounter network connection problems.
w Norton Firewall Diagnosis is available only in Windows7 and Windows 8.
The Wizard contains the problem diagnosis report thatis unique for different cases of network blocks. Forinstance, a network block can occur in any of thefollowing cases:
1 The one click option to stop all network traffic isactive
1 The uncommon protocol that is handling the trafficis blocked
1 The currently active firewall rule is conditioned toblock the traffic that you want to allow
1 The traffic has violated the process policy of thefirewall
255Protecting Internet activitiesAbout the Smart Firewall

1 The traffic has violated the traffic policy of thefirewall
1 The traffic comes from the restricted zone ofnetworks or computers
1 The traffic matches an Intrusion Prevention attacksignature
You can use the FirewallDiagnosticsWizard as a guideto troubleshoot the network connection problem byyourself.
For each case of network block, the Wizard containsthe firewall’s analysis of the cause and the possiblesolutions to fix the block.
Norton Internet Security recommends that you use theFirewall Diagnostics Wizard to remove any type ofblock. The solutions in the Wizard let you analyze theissue and take a suitable action to resolve the problem.
Using the Wizard to troubleshoot the problem has thefollowing advantages:
1 It automatically tries to fix the problem by itself
1 It lets you modify the settings that are related tothe block
1 It lets you view the log details related to the networkblock event
1 It provides you the option to turn off firewall as thelast means to resolve the issue
About Reputation FirewallThe Reputation Firewall feature lets Norton InternetSecurity to take firewall decisions based on informationon the trust-worthiness of programs and runningprocesses that access the network. It provides thereputation information in the firewall alerts. Firewallalerts notify you of connection attempts from othercomputers and by programs on your computer toconnect to the Internet or other computers. You canuse the reputation information in the firewall alerts to
Protecting Internet activitiesAbout the Smart Firewall
256

make definite decisions on whether to allow or blockcommunication attempts of networking applications.
In addition, you can identify any suspicious programsor vulnerable programs that attempt to access yourcommunication network.
When Automatic Program Control is set to Aggressiveor Automatic, Norton Internet Security automaticallyconfigures Internet access settings for all Web-enabledprograms the first time they run. When a programattempts to access Internet for the first time, AutomaticProgram Control creates rules for it.
w Automatic Program Control configures network accessonly for the versions of programs that Symantecrecognizes as safe. Norton Internet Security blocks anyinfected program or process that attempts to connectto the Internet.
However, if you have turned off Automatic ProgramControl, Norton Internet Security displays firewallalerts each time a program or process attempts toaccess the network. You must manually specify theaccess settings in the firewall alerts for all inboundtraffic and outbound traffic. You can use the reputationdetails that appear in the left pane in the firewall alertto make your decision.
To learn more about the reputation details in thefirewall alerts, See “About the reputation informationin firewall alerts” on page 257.
About the reputation information in firewall alerts
Firewall alerts notify you of connection attempts fromother computers and of attempts by programs on yourcomputer to connect to other computers. Thereputation details in the firewall alerts help you makemore definite decisions on whether to allow or blockcommunication attempts of networking applications.
You can use the reputation details to determine thetrust-worthiness of programs and running processeson your computer that access the network. The
257Protecting Internet activitiesAbout the Smart Firewall
reputation-based security technology providesreputation ratings for files on the Internet based onthe information that is collected from Nortoncustomers.
Norton Internet Security obtains specific informationsuch as file name and hash key about the file and sendsthis information to the Symantec server. Symantecanalyzes the file information and provides a trust levelfor the file. The Symantec server sends back thereputation information to your computer. Based on thereputation information of the program, you can allowor block the inbound traffic or outbound traffic. If anyof the file is suspicious or vulnerable, Norton InternetSecurity assigns Poor or Bad trust level.
w Your computer must be connected to the Internet toaccess the latest reputation information that Symanteccollects. If your computer is not connected to theInternet, Norton Internet Security uses the reputationinformation that is available locally.
Protecting Internet activitiesAbout the Smart Firewall
258

In the left pane of the firewall alerts, you can find thefollowing reputation information:
Shows the stability rating ofthe file on your computer.
The stability rating dependson how frequently theprogram crashes. Thedifferent stability ratings areas follows:
1 Reliable
Indicates that theprogram is reliable.
1 Stable
Indicates that theprogram is comparativelystable. However, itcrashes sometimes.
1 Slightly Unstable
Indicates that theprogram is slightlyunstable.
1 Unstable
Indicates that theprogram is unstable.
1 Very Unstable
Indicates that theprogram frequentlycrashes.
1 Unknown
Indicates that the crashhistory of the program isnot known.
w Stability ratings varydepending upon youroperating system.
Stability
259Protecting Internet activitiesAbout the Smart Firewall

Shows the user prevalence ofthe file. This data is based onthe information that millionsof Norton Community Watchcustomers shared andSymantec's researchanalysis.
The different categories are:
1 Very Few Users
Indicates that the file hasvery low user prevalence.
1 Few Users
Indicates that the file hasaverage user prevalence.
1 Many Users
Indicates that the file hashigh user prevalence.
Prevalence
Indicates the age of the filebased on the data thatmillions of NortonCommunity Watch customersshared and Symantec'sresearch analysis.
Age
Protecting Internet activitiesAbout the Smart Firewall
260

Shows the trust level of thefile.
Symantec assigns thefollowing trust levels:
1 Norton Trusted -Indicates the file that isNorton Trusted.
1 Good - Symantec has highindications that the file istrusted.
1 Unproven - Symantecdoes not have enoughinformation about the fileto assign a trust level tothe file.
The file is neither safe norunsafe.
1 Poor - Symantec has onlya few indications that thefile is not trusted.
1 Bad - Symantec has veryhigh indications that thefile is not trusted.
This file is suspicious andcan harm your computer.
If the Security Alert windowdisplays Poor or Badreputation, Symantecrecommends that you selectthe Terminate or BlockAlways option from theOptions drop-down list. Thisaction terminates or blocksall access attempts by theprogram or process. Thisprogram or process issuspicious and can harm yourcomputer.
Trust Level
261Protecting Internet activitiesAbout the Smart Firewall

About Download InsightDownload Insight provides information about thereputation of any executable file that you downloadfrom the supported portals. The reputation detailsindicate whether the downloaded file is safe to install.You can use these details to decide the action that youwant to take on the file.
Some of the supported portals are:
1 Internet Explorer (Browser)
1 Opera (Browser)
1 Firefox (Browser)
1 Chrome (Browser)
1 AOL (Browser)
1 Safari (Browser)
1 Yahoo (Browser)
1 MSN Explorer (Browser, E-mail & Chat)
1 QQ (Chat)
1 ICQ (Chat)
1 Skype (Chat)
1 MSN Messenger (Chat)
1 Yahoo Messenger (Chat)
1 Limewire (P2P)
1 BitTorrent (P2P)
1 Thunder (P2P)
1 Vuze (P2P)
1 Bitcomet (P2P)
1 uTorrent (P2P)
1 Outlook (E-mail)
1 Thunderbird (E-mail)
1 Windows Mail (E-mail)
1 Outlook Express (E-mail)
1 FileZilla (File Manager)
Protecting Internet activitiesAbout Download Insight
262
1 UseNext (Download Manager)
1 FDM (Download Manager)
1 Adobe Acrobat Reader (PDF viewer)
Based on the type of portal you use to download yourfile, Norton Internet Security does one of the following:
1 Analyzes the file based on its reputation detailswhen the download is complete.
1 Analyzes the file based on its reputation detailswhen the file is accessed.
Download Insight uses the file analysis results toprovide you the reputation details of the file. The basicreputation levels of the files are good, bad, unproven,and poor. Based on the reputation levels, the files canbe broadly classified as follows:
Includes the files that are eitherNorton trusted or User trusted.
Safe files have good reputationlevels. These files do not harmyour computer. By default,Auto-Protect allows theexecution of the safe files.
Safe
Includes the files that NortonInternet Security identifies as asecurity risk or a threat.
Unsafe files are characterized bybad or poor reputation levelsand Norton Internet Securityremoves them from yourcomputer.
Unsafe
263Protecting Internet activitiesAbout Download Insight

Includes the files that areneither safe nor unsafe.
Unknown files have unprovenreputation. These files mightharm your computer. In the caseof an unknown file, DownloadInsight notifies you that it isunsure of the reputation level ofthe file. You can use the ViewDetails link in the notificationsto view more details of the file.
For unknown files, NortonInternet Security lets you decidethe action that you want toperform on the file. For example,you can run a file, stop the filefrom running, or remove the filefrom your computer.
Unknown
By default, Download Insight lets you install safe files.For files of unknown reputation levels, DownloadInsight prompts you to select an action that you wantto perform on the file. In case of an unsafe file,Download Insight informs you that Norton InternetSecurity has detected the file as a threat and hasremoved the file.
Based on the reputation details that the DownloadInsight notifications provide for the files that needattention, you can take an action on the file. TheDownloadInsight window provides the various optionsthat let you select an action. The options that appearin the window vary depending on the reputation levelof the downloaded file. The following are some of theoptions that are available in this window:
Lets you install the executableprogram.
Run this program
Protecting Internet activitiesAbout Download Insight
264

Lets you cancel the installationof the executable program.
Cancel run
Lets you remove the file fromyour computer.
Remove this file frommysystem
Security History logs details of all events thatDownload Insight processes and notifies. It alsocontains information about the safety level of the fileand the action that you take on the file, if any. You canview these details in the Download Insight categoryin Security History.
When you turn off Auto-Protect, Norton InternetSecurity automatically turns off Download Insight. Inthis case, your computer is not adequately protectedfrom Internet threats and security risks. Therefore,ensure that you always keep Auto-Protect turned onto protect your computer from security risks.
When Silent Mode is turned on, Norton InternetSecurity suppresses the Download Insight notifications.
Turning off or turning on Download IntelligenceDownload Insight protects your computer against anyunsafe file that you may run or execute after youdownload it using a supported Web browser. By default,the DownloadIntelligence option is turned on. In thiscase, Download Insight notifies you about thereputation levels of any executable file that youdownload. The reputation details that Download Insightprovides indicate whether the downloaded file is safeto install.
There may be times when you want to turn offDownload Insight. For example, if you want todownload an unsafe file. In this case, you must turn offDownload Insight so that Norton Internet Security letsyou download the file and does not remove it from yourcomputer.
265Protecting Internet activitiesAbout Download Insight

You can use the DownloadIntelligence option to turnoff or turn on Download Insight.
To turn off Download Intelligence
1 In the Norton Internet Security main window, clickSettings.
2 In the Settings window, click the Web tab.
3 In the left pane, click Download Intelligence.
4 In the DownloadIntelligence row, move the On/Offswitch to the right to the Off position.
5 In the Settings window, click Apply.
6 In the Security Request dialog box, in the Selectthe duration drop-down list, select how long youwant to turn off Download Insight, and then clickOK.
7 In the Settings window, click Apply, and then clickOK.
To turn on Download Intelligence
1 In the Norton Internet Security main window, clickSettings.
2 In the Settings window, click the Web tab.
3 In the left pane, click Download Intelligence.
4 In the DownloadIntelligence row, move the On/Offswitch to the left to the On position.
5 In the Settings window, click Apply, and then clickOK.
Configuring the Download Insight Notifications optionYou can use the DownloadInsightNotifications optionto choose when you want Download Insight to displaynotifications.
By default, the DownloadInsightNotifications optionis set to On. Based on the type of portal you use todownload your file, Norton Internet Security does oneof the following:
1 Notifies you each time when you download anexecutable file.
Protecting Internet activitiesAbout Download Insight
266

1 Notifies you only when you download a file that isinfected with a local virus identification. If the filethat you download is infected with a cloud virusidentification, Norton Internet Security removesthe file from your computer and notifies you withthe threat details.
When the Download Insight Notifications option isset to RisksOnly, Download Insight notifies only whenyou download an infected or a suspicious executablefile.
Setting the Download Insight Notifications to RisksOnly does not turn off analysis of all the otherexecutable files that you download. Whether or notyou receive notifications of all files, Security Historykeeps a record of all the Download Insight activities.You can review the summary of the Download Insightalerts and notifications in Security History.
To configure the Download Insight Notifications option
1 In the Norton Internet Security main window, clickSettings.
2 In the Settings window, click the Web tab.
3 In the left pane, click Download Intelligence.
4 Under Download Intelligence, in the DownloadInsight Notifications row, do one of the following:
1 To receive Download Insight notifications onlyfor the infected or the suspicious executable filesthat you download, move the DownloadInsightNotifications switch to the right to the RisksOnly position.
1 To receive Download Insight notifications forall files that you download, move the DownloadInsight Notifications switch to the left to theOn position.
5 In the Settings window, click Apply, and then clickOK.
267Protecting Internet activitiesAbout Download Insight

Configuring the Show Report on Launch of Filesoption
The Show Report on Launch of Files option lets youspecify when and for what type of file you want to beprompted to select a suitable action. For example, youcan specify the type of downloaded files for whichDownload Insight asks you to decide what to do withthe file and how frequently these prompts for a suitableaction must appear.
You can use the following options to configure ShowReport on Launch of Files:
When you set the Show Reporton Launch of Files option toAlways, Download Insightprompts you for a suitable actionin case of safe and unknownfiles. In this case, the DownloadInsight window appearswhenever you try to launch anydownloaded file that has a safeor an unknown reputation score.In this window, you can viewdetails about the file and theoptions that let you select asuitable action for the file.
In the case of unsafe files,Norton Internet Securityidentifies them as threats andremoves them.
Always
Protecting Internet activitiesAbout Download Insight
268

When you set the Show Reporton Launch of Files option toUnproven Files Only, DownloadInsight prompts you to select asuitable action for unknown filesonly. In this case, the DownloadInsight window appearswhenever you try to launch anydownloaded file that has anunknown reputation score. Inthis window, you can viewdetails about the file and theoptions that let you select asuitable action for the file.
By default, the Show Report onLaunch of Files option is set toUnproven Files Only. In thiscase, Norton Internet Securityallows the execution of the safefiles without prompting you fora suitable action. In the case ofunsafe files, Norton InternetSecurity identifies them asthreat and removes them.
Unproven Files Only
269Protecting Internet activitiesAbout Download Insight

When you set the Show Reporton Launch of Files option toNever, Download Insight doesnot prompt you to select asuitable action for any type offile that you download. In thiscase, the Download Insightwindow does not appearwhenever you try to launch anydownloaded file.
However, if the Alert on PoorStability option is turned on,Download Insight prompts youto select a suitable action whenyou try to download an unstablefile.
In case of unsafe files, NortonInternet Security identifies themas threat and removes them.
The alert messages that yousuppress and the activity detailscan be reviewed at any time inSecurity History.
Never
To configure the ShowReport on Launch of Files option
1 In the Norton Internet Security main window, clickSettings.
2 In the Settings window, click the Web tab.
3 In the left pane, click Download Intelligence.
Protecting Internet activitiesAbout Download Insight
270

4 Under Download Intelligence, in the ShowReporton Launch of Files row, do one of the following:
1 If you want Download Insight to prompt you fora suitable action in case of safe and unknownfiles, move the Show Report on Launch of Filesswitch to the Always position.
1 If you want Download Insight to prompts you toselect a suitable action for unknown files only,move the ShowReportonLaunchofFiles switchto the Unproven Files Only position.
1 If you do not want Download Insight to promptyou to select a suitable action for any type of file,move the ShowReportonLaunchofFiles switchto the Never position.
5 In the Settings window, click Apply, and then clickOK.
Turning on or turning off Alert on Poor StabilityWhen you turn on the Alert on Poor Stability option,Download Insight prompts you to select a suitableaction when you try to download an unstable file.
When you set the Show Report on Launch of Filesoption to Never, Download Insight does one of thefollowing:
1 Does not prompt you to select a suitable action forany type of file that you download if the Alert onPoor Stability option is turned off. The DownloadInsight window does not appear whenever you tryto open any downloaded file.
1 Prompts you to select a suitable action when youtry to download an unstable file if the AlertonPoorStability option is turned on. Norton InternetSecurity identifies unsafe files as security threatand removes them.
By default, the AlertonPoorStability option is turnedoff.
271Protecting Internet activitiesAbout Download Insight

To turn on or turn off Alert on Poor Stability
1 In the Norton Internet Security main window, clickSettings.
2 In the Settings window, click the Web tab.
3 In the left pane, click Download Intelligence.
4 Under DownloadIntelligence, in the AlertonPoorStability row, do one of the following:
1 To turn on Alert on Poor Stability, move theOn/Off switch to the left to the On position.
1 To turn off Alert on Poor Stability, move theOn/Off switch to the right to the Off position.
5 Click Apply, and then click OK.
About Intrusion PreventionIntrusion Prevention scans all the network traffic thatenters and exits your computer and compares thisinformation against a set of attack signatures. Attacksignatures contain the information that identifies anattacker's attempt to exploit a known operating systemor program vulnerability. Intrusion Prevention protectsyour computer against most common Internet attacks.
For more information about the attacks that IntrusionPrevention blocks, go to the following URL:
http://www.symantec.com/business/security_response/attacksignatures
If the information matches an attack signature,Intrusion Prevention automatically discards the packetand breaks the connection with the computer that sentthe data. This action protects your computer from beingaffected in any way.
Intrusion Prevention scanning of every request fromall the devices that access your computer increases thescan time which slows down the network speed of yourcomputer. You can reduce the scan time and improvethe network speed of your computer by excluding thetrusted devices from Intrusion Prevention scanning.
Protecting Internet activitiesAbout Intrusion Prevention
272

If you are sure that a device on your network is safe,you use the EditDeviceTrustLevel window to changethe trust level of the device to FullTrust. You can thenselect the ExcludefromIPSscanning option to excludethese trusted devices from Intrusion Prevention scan.
Intrusion Prevention relies on an extensive list ofattack signatures to detect and block suspiciousnetwork activity. Norton Internet Security runsLiveUpdate automatically to keep your list of attacksignatures up to date. If you do not use AutomaticLiveUpdate, you should manually run LiveUpdate oncea week.
Turning off or turning on Intrusion Preventionnotifications
You can choose whether you want to receivenotifications when Intrusion Prevention blockssuspected attacks. Whether or not you receivenotifications, Intrusion Prevention activities arerecorded in Security History. The Security Historyentries include information about the attackingcomputer and information about the attack.
You can choose whether you want to receivenotifications when Intrusion Prevention blockssuspected attacks based on a particular signature.
To turn off or turn on Intrusion Prevention notifications
1 In the Norton Internet Security main window, clickSettings.
2 In the Settings window, click the Network tab.
3 In the left pane, click Intrusion Prevention.
4 Under Intrusion Prevention, in the Notificationsrow, do one of the following:
1 To turn off notifications, move the On/Off switchto the right to the Off position.
1 To turn on notifications, move the On/Off switchto the left to the On position.
5 In the Settings window, click Apply.
273Protecting Internet activitiesAbout Intrusion Prevention
6 Click OK.
To turn off or turn on an individual Intrusion Preventionnotification
1 In the Norton Internet Security main window, clickSettings.
2 In the Settings window, click the Network tab.
3 In the left pane, click Intrusion Prevention.
4 Under Intrusion Prevention, in the IntrusionSignatures row, click Configure.
5 In the IntrusionSignatures window, click an attacksignature, and then click Properties.
6 In the Signature Properties window, uncheck orcheck Notify me when this signature is detected.
7 Click OK.
8 In the Intrusion Signatures window, click OK.
Excluding or including attack signatures in monitoringIn some cases, benign network activity may appearsimilar to an attack signature. You may receiverepeated notifications about possible attacks. If youknow that the attacks that trigger these notificationsare safe, you can create exclusion for the attacksignature that matches the benign activity.
Each exclusion that you create leaves your computervulnerable to attacks.
If you have excluded the attack signatures that youwant to monitor again, you can include them in the listof active signatures.
To exclude attack signatures from being monitored
1 In the Norton Internet Security main window, clickSettings.
2 In the Settings window, click the Network tab.
3 In the left pane, click Intrusion Prevention.
4 Under Intrusion Prevention, in the IntrusionSignatures row, click Configure.
Protecting Internet activitiesAbout Intrusion Prevention
274
5 In the Intrusion Signatures window, uncheck theattack signatures that you want to exclude.
6 Click OK.
To include the attack signatures that were previouslyexcluded
1 In the Norton Internet Security main window, clickSettings.
2 In the Settings window, click the Network tab.
3 In the left pane, click Intrusion Prevention.4 Under Intrusion Prevention, in the Intrusion
Signatures row, click Configure.
5 In the Intrusion Signatures window, check theattack signatures that you want to include.
6 Click OK.
Turning off or turning on AutoBlockWhen an attack is detected from a computer, the attackis automatically blocked to ensure that your computeris safe. If a different attack signature is detected fromthe same computer, Norton Internet Security activatesAutoBlock. The AutoBlock feature blocks all trafficbetween your computer and the attacking computerfor a specific time period. During this period, AutoBlockalso blocks the traffic that does not match an attacksignature.
w You can specify the period for which you want NortonInternet Security to block the connections fromattacking computers. By default Norton InternetSecurity blocks all traffic between your computer andthe attacking computer for a period of 30 minutes.
AutoBlock stops traffic between your computer and aspecific computer. If you want to stop all traffic to andfrom your computer, you can use the Block AllNetwork Traffic option.
If AutoBlock blocks a computer or computers that youneed to access, you can turn off AutoBlock.
275Protecting Internet activitiesAbout Intrusion Prevention

To turn off or turn on AutoBlock
1 In the Norton Internet Security main window, clickSettings.
2 In the Settings window, click the Network tab.
3 In the left pane, click Intrusion Prevention.
4 Under Intrusion Prevention, in the IntrusionAutoBlock row, click Configure.
5 In the Intrusion AutoBlock window, underAutoBlock, do one of the following:
1 To turn off Intrusion AutoBlock, click Off.
1 To turn on Intrusion AutoBlock, click On(Recommended), and then in the AutoBlockattacking computers for drop-down list, selecthow long you want to turn on AutoBlock.
6 Click OK.
Unblocking AutoBlocked computersIn some cases, benign network activity can appear tobe similar to an attack and AutoBlock blocks thenetwork activity automatically to ensure that yourcomputer is safe. The list of computers that AutoBlockhas currently blocked may include the computer thatyou should be able to communicate with.
If a computer that you need to access appears on thelist of blocked computers, you can unblock it. You maywant to reset your AutoBlock list if you have changedyour protection settings. To reset the AutoBlock list,you can unblock all of the computers that are on thelist at one time.
To unblock AutoBlocked computers
1 In the Norton Internet Security main window, clickSettings.
2 In the Settings window, click the Network tab.
3 In the left pane, click Intrusion Prevention.
4 Under Intrusion Prevention, in the IntrusionAutoBlock row, click Configure.
Protecting Internet activitiesAbout Intrusion Prevention
276

5 In the Intrusion AutoBlock window, underComputers currently blocked by AutoBlock, doone of the following:
1 To unblock one computer, select its IP address,and then click Unblock.
6 Click OK.
Permanently blocking a computer that has beenblocked by AutoBlock
You can permanently block a computer that AutoBlockhas blocked. The permanently blocked computer isremoved from the AutoBlock list and added as aRestricted computer in the Network Security Map.
To permanently block a computer that has been blockedby AutoBlock
1 In the Norton Internet Security main window, clickSettings.
2 In the Settings window, click the Network tab.
3 In the left pane, click Intrusion Prevention.
4 Under Intrusion Prevention, in the IntrusionAutoBlock row, click Configure.
5 In the Intrusion AutoBlock window, underComputers currently blockedbyAutoBlock, clickthe computer that you want to block permanently.
6 Under the Action column, select Restrict.
7 Click OK.
About Intrusion Prevention exclusion listThe Intrusion Prevention System in Norton InternetSecurity scans all the network traffic that enters andexits your computer. When a device on your networkrequests access to your computer, Intrusion Preventionscans this request to ensure that it is not a virus attack.If the information matches an attack signature,Intrusion Prevention blocks the traffic from thesuspicious device and protects your computer.
277Protecting Internet activitiesAbout Intrusion Prevention

Scanning every request from all the devices that accessyour computer increases the scan time which slowsdown the network speed of your computer.
If you are sure that a device on your network is safe,you can change the trust level of the device to FullTrust. You can configure the trust level of a deviceusing the Network Security Map. You can exclude thesetrusted devices from Intrusion Prevention scan.Excluding Full Trust devices from the IntrusionPrevention scan saves the scan time and improves thenetwork speed of your computer. When you exclude adevice that is set to Full Trust, Norton Internet Securitydoes not scan any information that is received fromthis device. The Full Trust devices that are excludedfrom Intrusion Prevention scan are added to IntrusionPrevention exclusion list.
When a device on your network attempts to infect yourcomputer, AutoBlock stops all access requests fromthis device. If you add this device to the IntrusionPrevention exclusion list, Norton Internet Securityremoves the device from the exclusion list.
w Ensure that the IP address of the devices that are addedto Intrusion Prevention exclusion list never changes.
If you find that any of the devices that you excludedfrom the Intrusion Prevention scan is infected, you canpurge the saved exclusion list. When you purge theexclusion list, Norton Internet Security removes all theIPS excluded devices from the exclusion list.
Removing all devices from Intrusion Preventionexclusion list
If you are sure that a device on your network is safe,you can change the trust level of the device to FullTrust. You can then select the Exclude from IPSscanning option to exclude these trusted devices fromIntrusion Prevention scan. Excluding Full Trust devicesfrom Intrusion Prevention scan saves the scan timeand improves the network speed of your computer.
Protecting Internet activitiesAbout Intrusion Prevention
278

When you exclude a Full Trust device from IntrusionPrevention scan, Norton Internet Security does notscan any information that is received from this device.The Full Trust devices that are excluded from IntrusionPrevention scan are added to Intrusion Preventionexclusion list.
If you find that any of the devices that you excludedfrom Intrusion Prevention scan is infected, you canpurge the saved exclusion list and remove all thedevices.
You can purge the saved exclusion list under thefollowing circumstances:
1 Any of the devices that you excluded from IntrusionPrevention scan is infected.
1 Any of the devices that you excluded from IntrusionPrevention scan attempts to infect your computer.
1 Your home network is infected.
When a device on your network attempts to infect yourcomputer, AutoBlock stops all the access requests fromthis device. If you add this device to the IntrusionPrevention exclusion list, Norton Internet Securityremoves the device from the exclusion list.
When you remove all the devices from the savedexclusion list, Intrusion Prevention scans every requestfrom all the devices that access your computer.
To remove all the devices from the Intrusion Preventionexclusion list
1 In the Norton Internet Security main window, clickSettings.
2 In the Settings window, click the Network tab.
3 In the left pane, click Intrusion Prevention.
4 Under IntrusionPrevention, in the ExclusionListrow, click Purge.
5 In the confirmation dialog box, click Yes.
6 In the Settings window, click OK
279Protecting Internet activitiesAbout Intrusion Prevention
About Vulnerability ProtectionVulnerability Protection is a component of IntrusionPrevention System. Vulnerability Protection providesinformation about the susceptibility of the programsthat may be on your computer against maliciousattacks. It also provides information about the knownattacks that they are protected from.
Vulnerabilities are flaws in your programs or youroperating system that can create weaknesses in overallsecurity of your system. Improper computerconfigurations or security configurations also createvulnerabilities. External attackers exploit thesevulnerabilities and perform malicious actions on yourcomputer. Examples of such malicious attacks areactive desktop monitoring, keylogging, and hacking.Such attacks can slow down the performance of yourcomputer, cause program failure, or expose yourpersonal data and confidential information to thehackers.
Norton Internet Security provides signature-basedsolutions to protect your computer from the mostcommon Internet attacks. Attack signatures containthe information that identifies an attacker’s attemptto exploit a known vulnerability in your operatingsystem or the programs that are installed on yourcomputer. The Intrusion Prevention feature of NortonInternet Security uses an extensive list of attacksignatures to detect and block suspicious networkactivity.
Vulnerability Protection lets you view the correlationbetween the vulnerabilities that your computer isprotected against and the programs that may containthese vulnerabilities. For example, if Internet Explorerdoes not handle certain HTTP responses, it can resultin a vulnerability that can be exploited. In this case,Vulnerability Protection lists Internet Explorer as avulnerable program. It also provides details about thesignatures that Intrusion Prevention uses to detect anyattempt to exploit this vulnerability.
Protecting Internet activitiesAbout Vulnerability Protection
280

Viewing the list of vulnerable programsThe Vulnerability Protection window lets you viewthe extensive list of programs with the knownvulnerabilities that Norton Internet Security protectsyou against.
For each program, you can view details such as thename of the program, its vendor, and the number ofvulnerabilities that the program contains. You can alsoview more details about the vulnerabilities by clickingon the program name.
To view the list of vulnerable programs
1 In the Norton Internet Security main window, clickAdvanced.
2 In the NetworkProtection pane, click VulnerabilityProtection.
3 In the Vulnerability Protection window, view thelist of vulnerable applications.
4 After you finish viewing the list, click Close.
Viewing details about a vulnerable applicationThe VulnerabilityProtection window displays the listof the programs on your computer that are susceptibleto malicious attacks. In addition, you can view detailsof the vulnerabilities that a program contains. TheProgram Vulnerability Details window displays thenames of the attack signatures that IntrusionPrevention uses to detect any attempts to exploit thevulnerabilities in the program.
You can click an attack signature to get additionalinformation about the signature in the SymantecSecurity Response Web site.
The Intrusion Signatures window of IntrusionPrevention lets you view a list of attack signatures.Intrusion Prevention relies on this list of attacksignatures to detect and block suspicious activity. Youcan uncheck a signature from the list, if you do notwant Norton Internet Security to monitor the signature.
281Protecting Internet activitiesAbout Vulnerability Protection

The Program Vulnerability Details list does notinclude any signature that you disable in the IntrusionSignatures window. By default, all the signatures inthe IntrusionSignatures window are turned on. Unlessyou have a good reason to disable a signature, youshould leave the signatures turned on. If you disable asignature, your computer may be vulnerable to attack.
To view details about a vulnerable application
1 In the Norton Internet Security main window, clickAdvanced.
2 In the NetworkProtection pane, click VulnerabilityProtection.
3 In the Vulnerability Protection window, in theProgram column, click the program name for whichyou want to view the details.
4 In the ProgramVulnerabilityDetails window, viewthe signature details of the program.
5 If you want to view additional information aboutthe signature, then click the signature name.
6 After you finish viewing the vulnerability details,in the ProgramVulnerabilityDetails window, clickClose.
7 In the VulnerabilityProtection window, click Close.
About the types of security risksSecurity risks, such as spyware and adware, cancompromise your personal information and privacy.Spyware and adware programs are closely related. Insome cases, their functionalities might overlap; butwhile they both collect information about you, the typesof information that they collect can differ.
Spyware programs might put you at risk for identitytheft or fraud. These programs might log yourkeystrokes, capture your email and instant messagingtraffic. These programs also steal sensitive personalinformation such as passwords, login IDs, or credit
Protecting Internet activitiesAbout the types of security risks
282

card numbers. These programs can then send yourcompromised data to other people.
Adware displays advertisements on your computer andcollects information about your Web browsing habits.It then gives this data to companies that can send youadvertisements based on these preferences.
Tracking cookies are the small files that programs canplace on your computer to track your computingactivities. Tracking cookies can then report thatinformation back to a third party.
Some programs rely on other programs that areclassified as security risks to function. For example, ashareware or freeware program that you downloadmight use adware to keep its price low. In this case,you might want to allow the security risk program toremain on your computer. Also, you might need torestore the security risk program if Spyware Protectionhas removed it.
Norton Internet Security allows joke programs andother low-risk items to be installed on your computerby default. You can change your settings in the Settingswindow so that Norton Internet Security detects thesesecurity risks.
Checking Antispyware settingsWhile the default settings provide maximum protectionfrom spyware, adware and other security risks, thesesettings are customizable.
To check Antispyware settings
1 In the Norton Internet Security main window, clickSettings.
2 Under Real Time Protection, in the Antispywarerow, click Configure.
3 In the Antispyware window, check the category ofsecurity risks that you want Antispyware to detect.
4 Click OK.
283Protecting Internet activitiesAbout the types of security risks
About Norton AntiSpamNorton AntiSpam lets you categorize the emailmessages that you receive in your email programs intospam email and legitimate email. It filters legitimateemail into the Inbox folder and spam email into theJunk folder or the Norton AntiSpam folder.
Norton AntiSpam uses Symantec enterprise-class,spam-filtering technology to classify the spam emailmessages from legitimate email messages. NortonAntiSpam uses a real-time filter delivery mechanismand filters email messages using various local filtersat different levels. The local filters classify the emailmessages as spam or legitimate. If the local filtersclassify the email message as legitimate, NortonAntiSpam collects information such as signature andURL hashes of the email message. Norton AntiSpamthen sends this information to the Symantec Webserver for additional analysis.
When the email message is classified as spam, NortonAntiSpam changes the subject of the email messageand sends it to your email client. The email clientidentifies the change in the subject of the emailmessage and moves it to the Junk folder or the NortonAntiSpam folder.
The Norton AntiSpam local filters use Whitelisttechnique, Blacklist technique, and patented filteringtechnology to classify email messages as spam orlegitimate. For these filters to work efficiently, NortonAntiSpam requires antispam definition updates atregular intervals through LiveUpdate. These updatescontain signature information of spam and legitimateemail messages. The updates also contain any new rulethat Symantec creates to filter spam email messages.
Norton AntiSpam uses predefined email rules and theuser-defined Allowed List and Blocked List, to expeditethe scanning of email. It accepts email messages fromthe list of allowed email senders and blocks emailmessages from the list of blocked email senders.
Protecting Internet activitiesAbout Norton AntiSpam
284

Norton AntiSpam also automatically imports the listsof addresses from supported email programs duringthe initial integration. It helps you keep your list ofallowed and blocked email senders in sync with yourcurrent address books. When Norton AntiSpam importsthe addresses from your Outlook address book orWindows address book, it also imports the addressesthat are available in the Safe Sender and the BlockedSender lists.
w Turning off Norton AntiSpam increases your exposureto receive unsolicited email messages. Always ensurethat Norton AntiSpam is turned on. It secures youremail client from unwanted online content.
You can review all the antispam statistics under theAntiSpam category in the Security History window.
About Norton AntiSpam settingsWith the increase in usage of email, many users receivea number of unwanted and unsolicited commercialemail messages that are known as spam. Not only doesspam make it difficult to identify valid email messages,but some spam contains offensive messages andimages.
Norton AntiSpam incorporates several powerfulfeatures to reduce your exposure to unwanted onlinecontent.
Norton AntiSpam settings help you configure thefollowing:
1 The email client with which Norton AntiSpamshould integrate
1 The list of allowed email senders
1 The list of blocked email senders
1 The email addresses and domains that NortonAntiSpam should not import into the list of allowedand blocked email senders
1 The option to send feedback to Symantec aboutmisclassified email
285Protecting Internet activitiesAbout Norton AntiSpam
1 The option to filter email messages through WebQuery to maintain high spam detection efficiency
Configuring Client Integration
The Client Integration window lists the supported emailprograms, or clients, that are installed on yourcomputer and their associated address books. Whenyou select an email program, Norton Internet Securityadds a Norton AntiSpam drop-down list or a fewoptions to the toolbar of the supported email program.You can use the Norton AntiSpam drop-down list orthe options to classify the email messages as spam orlegitimate. You can also use these options to empty thespam folder and to open the Settings window toconfigure the Norton AntiSpam settings. If your emailprogram does not have a Junk folder, it also adds aNorton AntiSpam folder in the folders area. You canuse the Norton AntiSpam folder to sort and store spammessages. However, if your email client has a NortonAntiSpam folder from the previous version of NortonInternet Security, Norton AntiSpam uses the NortonAntiSpam folder and not the Junk folder.
w The following email clients do not support clientintegration:
1 Outlook 2010 64-bit
1 Thunderbird
1 Windows Mail
When you classify an email message as spam orlegitimate, Norton AntiSpam lets you send themisclassified email message as feedback to Symantec.You can use the Feedback option to send themisclassified email message to Symantec for analysis.
You can also import the list of addresses that arepresent in the supported email program into the NortonAntiSpam Allowed List and Blocked List. NortonAntiSpam automatically adds the new email addressesfrom the address book of your supported email programonce in a day when your computer is idle. However, if
Protecting Internet activitiesAbout Norton AntiSpam
286
you want to manually import addresses, use the Importoption in the Allowed List window.
When you open your email client, the welcome screenappears. If you do not want the welcome screen toappear in the future, check the Don't show this againoption before you click Close. Norton Internet Securitynotifies the successful integration of Norton AntiSpamwith your email client.
Norton AntiSpam also automatically imports the listsof addresses from the supported email programs duringthe initial client integration. It helps you keep your listof allowed and blocked email senders in sync with yourcurrent address books. When Norton AntiSpam importsthe addresses from your Outlook address book orWindows address book, it also imports the addressesthat are available in the Safe Sender and the BlockedSender lists.
Norton Internet Security supports Norton AntiSpamintegration with the following email programs:
1 Microsoft Outlook 2002/2003/2007/2010
1 Outlook Express 6.0 or later
w Norton Internet Security supports only the 32-bitversion of Microsoft Outlook 2010.
w After successful integration, Outlook Express restartsautomatically.
To configure Client Integration
1 In the Norton Internet Security main window, clickSettings.
2 In the Settings window, click the Network tab.
3 In the left pane, click Message Protection.
4 Under AntiSpam, in the Client Integration row,click Configure.
5 In the Client Integration window, check theprograms with which you want Norton AntiSpamto integrate.
287Protecting Internet activitiesAbout Norton AntiSpam
6 Select one or more address books to be importedautomatically into your Allowed List.
7 Click OK to save the changes and close the ClientIntegration window.
Setting Address Book Exclusions
When you add an email address to the Address BookExclusions list, Norton AntiSpam does not import theaddress into the Allowed List and Blocked List. If youdelete an email address from the Allowed List orBlocked List, Norton AntiSpam automatically adds theaddress to the Address Book Exclusions list. However,when you delete an email address that you manuallyadded to the Allowed List or Blocked List, NortonAntiSpam does not add the address to the Address BookExclusions list.
You cannot add a domain name to the Address BookExclusions list. When you delete a domain name fromthe Allowed List or Blocked List, Norton AntiSpam doesnot add the domain name to the Address BookExclusions list.
w You can specify Address Book Exclusions before youimport the address book. Add all email addresses tothe Address Book Exclusions list that you do not wantto import from the address book of your email program.
To add entries to the Address Book Exclusions list
1 In the Norton Internet Security main window, clickSettings.
2 In the Settings window, click the Network tab.
3 In the left pane, click Message Protection.
4 Under AntiSpam, in the Address Book Exclusionsrow, click Configure.
5 In the AddressBookExclusions window, click Add.
6 In the AddEmailAddress dialog box, type the emailaddress.Optionally, type the name that corresponds to theemail address for easy identification.
Protecting Internet activitiesAbout Norton AntiSpam
288

7 Click OK to close the AddEmailAddress dialog box.
8 Click OK to save and close the Address BookExclusions window.
To edit or delete entries in the Address Book Exclusionslist
1 In the Norton Internet Security main window, clickSettings.
2 In the Settings window, click the Network tab.
3 In the left pane, click Message Protection.
4 Under AntiSpam, in the Address Book Exclusionsrow, click Configure.
5 In the AddressBookExclusions window, select theitem with which you want to work.
6 Do one of the following:
1 To edit an entry, click Edit to open the EditEmailAddress window, edit the details, and thenclick OK.
1 To delete an entry, click Remove.
7 Click OK to save and close the Address BookExclusions window.
Identifying authorized senders
If you are sure that an email address or domain is safeand do not want Norton AntiSpam to block them, youcan add them to the Allowed List
When your computer is idle, Norton AntiSpamautomatically imports the address book entries andSafe Sender List entries once in a day.
If you have added a new supported email program, youcan import its address book manually to your AllowedList immediately or at any time. You can also addnames and domains to the Allowed List individually.
w Before you import the address book, you can specifyyour Address Book Exclusions. Norton AntiSpam doesnot import the email addresses that you add to theAddress Book Exclusions list.
289Protecting Internet activitiesAbout Norton AntiSpam

To import an address book
1 In the Norton Internet Security main window, clickSettings.
2 In the Settings window, click the Network tab.
3 In the left pane, click Message Protection.
4 Under AntiSpam, in the Allowed List row, clickConfigure.
5 In the Allowed List window, click Import.
6 In the Allowed List window, click Apply.
7 Click OK.
To add entries to your Allowed List
1 In the Norton Internet Security main window, clickSettings.
2 In the Settings window, click the Network tab.
3 In the left pane, click Message Protection.4 Under AntiSpam, in the Allowed List row, click
Configure.
5 In the Allowed List window, click Add.
6 In the Add Email Address dialog box, in theAddress Type drop-down list, select the addresstype.You can select one the following options.
1 Email
1 Domain
7 Do one of the following:
1 To add an email address, type the email addressthat you want to allow, and optionally, the nameof the sender.
1 To add a domain name, type the address of thedomain (for example, symantec.com), andoptionally, the name of the domain.
8 Click OK.
9 In the Allowed List window, click Apply.
10 Click OK
Protecting Internet activitiesAbout Norton AntiSpam
290

To edit or delete entries in the Allowed List
1 In the Norton Internet Security main window, clickSettings.
2 In the Settings window, click the Network tab.
3 In the left pane, click Message Protection.
4 Under AntiSpam, in the Allowed List row, clickConfigure.
5 In the Allowed List window, select the item thatyou want to edit or delete.
6 Do one of the following:
1 To edit an entry, click Edit to open the EditEmail Address dialog box, edit the details, andclick OK.
1 To delete an entry, click Remove.
When you delete an entry that was imported,Norton AntiSpam automatically adds it to theAddress Book Exclusions list.
7 In the Allowed List window, click Apply.
8 Click OK.
Identifying senders of spam
If you do not want to receive any email messages froma specific address or domain, you can add it to theBlocked List. Norton AntiSpam marks all emailmessages from this address or domain as spam.
w Norton AntiSpam also automatically imports the listsof addresses that are available in the Blocked Senderlists of your email program into the Blocked List duringthe initial client integration or address book import.
Norton AntiSpam lets you type invalid email addressesto the Blocked List.
w Always add suspicious email addresses and domainsto the Blocked List, so that you do not receiveunsolicited email messages from such addresses ordomains.
291Protecting Internet activitiesAbout Norton AntiSpam

To import addresses to the Blocked List
1 In the Norton Internet Security main window, clickSettings.
2 In the Settings window, click the Network tab.
3 In the left pane, click Message Protection.
4 Under AntiSpam, in the Allowed List row, clickConfigure.
5 In the Allowed List window, click Import.
6 In the Allowed List window, click Apply.
7 Click OK.
To add entries to the Blocked List
1 In the Norton Internet Security main window, clickSettings.
2 In the Settings window, click the Network tab.
3 In the left pane, click Message Protection.
4 Under AntiSpam, in the Blocked List row, clickConfigure.
5 In the Blocked List window, click Add.
6 In the Add Email Address dialog box, in theAddress Type drop-down list, select the addresstype.You can select one of the following:
1 Email
1 Domain
7 Do one of the following:
1 To add an email address, type the email addressthat you want to block, and the name of thesender.
1 To add a domain, enter the address of the domain(for example, symantec.com), and the name ofthe domain.
8 Click OK.
9 In the Blocked List window, click Apply.
10 Click OK.
Protecting Internet activitiesAbout Norton AntiSpam
292

To edit or delete entries in the Blocked List
1 In the Norton Internet Security main window, clickSettings.
2 In the Settings window, click the Network tab.
3 In the left pane, click Message Protection.
4 Under AntiSpam, in the Blocked List row, clickConfigure.
5 In the Blocked List window, select the item withwhich you want to work.
6 Do one of the following:
1 To edit an entry, click Edit to open the EditEmail Address dialog box, edit the details, andthen click OK.
1 To delete an entry, click Remove.
When you delete an entry that was imported,Norton AntiSpam automatically adds it to theAddress Book Exclusions list.
7 In the Blocked List window, click Apply.
8 Click OK.
About your email program toolbar
Norton AntiSpam adds a drop-down list or a fewoptions to the toolbar of supported email programs.
293Protecting Internet activitiesAbout Norton AntiSpam

You can use the following options:
Marks the selected email as spam and movesthe email message into the Junk folder or theNorton AntiSpam folder.
When you reclassify an email message as spam,Norton Internet Security provides you the optionto send the misclassified email message asfeedback to Symantec. This option appears onlyif the Feedback option in the MessageProtection section of theSettingswindow is setas Ask Me. The Message Protection section isavailable in the Network tab.
When you reclassify an email message as spam,Norton Internet Security displays a messagewhether or not to add the sender's email addressto the Blocked List. This message appearsdepending on the option that you select in thedrop-down list present at the bottom of theBlocked List window.
This isSpam
Marks the selected email as allowed (not spam)and moves the email message into the Inbox.
When you reclassify an email message aslegitimate, Norton Internet Security providesyou the option to send the misclassified emailmessage as feedback to Symantec. This optionappears only if the Feedback option in theMessage Protection section of the Settingswindow is set as Ask Me. The MessageProtection section is available in the Networktab.
When you reclassify an email message aslegitimate, Norton Internet Security displays amessage whether or not to add the sender'semail address to the Allowed List. This messageappears depending on the option that you selectin the drop-down list present at the bottom ofthe Allowed List window.
This isnot Spam
Protecting Internet activitiesAbout Norton AntiSpam
294

Removes all email that has been placed in theJunk folder or the Norton AntiSpam folder.
EmptySpamFolder
Displays theMessage Protection section of theSettings window.
The Message Protection section is available inthe Network tab.
OpenNortonAntiSpam
Setting the Feedback option
Email messages in the email client might sometimesget wrongly classified as spam or legitimate. TheFeedback option lets you send the misclassified emailmessage as feedback to Symantec for analysis.
w The Feedback option is available only when MicrosoftOutlook or Outlook Express is installed on yourcomputer.
To set the Feedback option
1 In the Norton Internet Security main window, clickSettings.
2 In the Settings window, click the Network tab.
3 In the left pane, click Message Protection.
295Protecting Internet activitiesAbout Norton AntiSpam

4 Under AntiSpam, in the Feedback row, select anyone from the following three options:
Automatically sends themisclassified email message toSymantec when you classify anemail message as spam orlegitimate
On
Prompts you before NortonAntiSpam sends themisclassified email message toSymantec when you classify anemail message as spam orlegitimate
Ask Me
Does not send the misclassifiedemail message to Symantec
Off
5 In the Settings window, click Apply.
6 Click OK.
About Web Query
With the increase in usage of email, many users receivea number of unwanted and unsolicited commercialemail messages that are known as spam. Not only doesspam make it difficult to identify valid email messages,but some spam contains offensive messages andimages. The Web Query is a feature of Norton AntiSpamthat Norton Internet Security uses to classify the emailmessages more effectively.
An effective spam filtration is possible when each emailmessage that you receive is scanned through differentfilters. With only one or two levels of email filters, ahigh percentage of legitimate emails are misclassifiedas spam or spam is misclassified as legitimate. To avoidsuch misclassification, Norton AntiSpam employsdifferent filters. Each email filter uses a unique
Protecting Internet activitiesAbout Norton AntiSpam
296

approach to filter spam email messages from legitimateemail messages.
The email messages that you receive in your emailprogram undergo scanning through different localfilters of Norton AntiSpam. The local filters useWhitelist technique, Blacklist technique, and patentedfiltering technology to classify email messages aslegitimate or spam. If the local filters classify an emailmessage as spam, Norton AntiSpam changes the subjectof the email message. Norton AntiSpam then sends theemail message to your email client. If the local filtersfail to classify the email message as spam, NortonAntiSpam collects information such as signature andURL hashes of the email message. Norton AntiSpamthen sends this information to the Web Query filterfor additional analysis.
The Web Query filter analyzes the signature and URLhashes of the email message and then sends theanalysis report to Norton AntiSpam. If the emailmessage is identified as spam, Norton AntiSpam altersthe subject of the email message and sends it to youremail program. Based on predefined email rules, theemail program then moves the email message to theJunk folder or the Norton AntiSpam folder.
w Symantec recommends that you keep the Web Queryoption turned on. Turning off the Web Query optionincreases your exposure to the spam email messagesthat contain phishing or spam URLs.
Turning off or turning on Web Query
Norton AntiSpam uses local filters to identify spamemail messages. The email messages that the localfilters do not identify as spam are then scannedadditionally through the Web Query filter. Web Queryfilter analyzes the signature and URL hashes of theemail messages to classify them as legitimate email orspam email.
If the email message is identified as spam, then NortonAntiSpam alters the subject of the email message.
297Protecting Internet activitiesAbout Norton AntiSpam

Norton AntiSpam then sends the email message to youremail program. Based on predefined email rules, theemail program then moves the email message to theJunk folder or the Norton AntiSpam folder.
w Symantec recommends you to keep the Web Queryoption turned on. Turning off the Web Query optionincreases your exposure to the spam email messagesthat contain phishing or spam URLs.
To turn off the Web Query filter
1 In the Norton Internet Security main window, clickSettings.
2 In the Settings window, click the Network tab.
3 In the left pane, click Message Protection.
4 Under AntiSpam, in the WebQuery row, move theOn/Off switch to the right to the Off position.
5 In the Settings window, click Apply.
6 Click OK.
To turn on the Web Query filter
1 In the Norton Internet Security main window, clickSettings.
2 In the Settings window, click the Network tab.
3 In the left pane, click Message Protection.
4 Under AntiSpam, in the WebQuery row, move theOn/Off switch to the left to the On position.
5 In the Settings window, click OK.
6 Click OK.
About configuring POP3 and SMTP portsNorton Internet Security automatically configures youremail program to protect it from viruses and othersecurity threats. Norton Internet Security supports allemail accounts that use non-SSL POP3 and SMTPcommunication protocols. Norton Internet Securityalso scans all incoming and outgoing email messages.
Protecting Internet activitiesAbout configuring POP3 and SMTP ports
298

Norton Internet Security lets you manually configureyour POP3 and SMTP email ports for email protection.Typically, your Internet service provider (ISP) providesyou the port numbers for your email program. If theSMTP and POP3 port numbers for your email programare different from the default port numbers, you mustconfigure Norton Internet Security.
To ensure email protection, Symantec recommendsthat you check the POP3 and SMTP port numbers foryour email program. If they are not the default ports,add them to the ProtectedPorts window. To configurethe Protected Ports Settings option, go to the NortonInternet Security main window, and then click Settings> Network > Message Protection > Protected PortSettings > Configure.
If you do not want Norton Internet Security to protecta port, you can remove the port from the ProtectedPorts window.
w You cannot remove the default SMTP port 25 and POP3port 110. Norton Internet Security automaticallyprotects these default ports.
Adding POP3 and SMTP ports to Protected PortsNorton Internet Security supports all email programsthat use POP3 and SMTP communication protocolswith default ports. However, if your email program isnot configured with the default ports, you can manuallyconfigure your POP3 and SMTP email ports.
To ensure email protection, the POP3 and SMTP portnumbers must be protected. If the POP3 and SMTP portnumbers are not the default ports, Symantecrecommends that you add the port numbers to theProtected Ports window.
To add POP3 and SMTP ports to Protected Ports
1 In the Norton Internet Security main window, clickSettings.
2 In the Settings window, click the Network tab.
299Protecting Internet activitiesAbout configuring POP3 and SMTP ports

3 In the left pane, click Message Protection.
4 In the Protected Ports Settings row, clickConfigure.
5 In the Protected Ports window, click Add.
6 In the AddPorttoprotect window, in the PortTypedrop-down list, do one of the following:
1 To add the incoming email port, click POP3.
1 To add the outgoing email port, click SMTP.
7 In the Port box, type the port number.The port number must be between 1 and 65535.
8 Click OK.
9 In the Protected Ports window, click Apply, andthen click OK.
10 In the Settings window, click OK.
Removing an email port from Protected PortsIf you do not want Norton Internet Security to protecta port, you can remove the port from the ProtectedPorts window.
w Norton Internet Security automatically protects thedefault SMTP port 25 and the default POP3 port 110.You cannot remove these default ports.
To remove an email port from Protected Ports
1 In the Norton Internet Security main window, clickSettings.
2 In the Settings window, click the Network tab.
3 In the left pane, click Message Protection.
4 In the Protected Ports Settings row, clickConfigure.
5 In the Protected Ports window, click the port thatyou want to remove, and then click Remove.
6 Click Apply and then click OK.
7 In the Settings window, click OK.
Protecting Internet activitiesAbout configuring POP3 and SMTP ports
300

About the Network Security MapA home network typically consists of the computersand other devices that share your Internet connection.The Network Security Map helps you view and manageyour network.
After you configure Network Security Map, NortonInternet Security automatically detects the devicesthat are connected to your network and lists them inthe Network Security Map. You can view devices andcustomize the Network Security Map to remotelymonitor the computers on which a Norton product isinstalled.
w Ensure that the computers that you want to remotelymonitor have a version of a Norton product thatsupports Remote Monitoring.
You can monitor the following items in the NetworkSecurity Map:
1 Security status of the computers that are connectedto the network
1 Status of the protection features of the computersthat are connected to the network
1 Subscription status and Norton product version ofthe computers that are connected to your network
1 Status of your wireless network connection
1 Connection status of the devices that are on thenetwork
1 The known, unknown, or intruder devices that areon your network
You can grant or deny permission to the networkeddevices to access your computer.
You can also modify details about a computer or devicethat is connected to your network.
Turning off or turning on Network Security OverviewThe Network Security Overview window provides abrief summary about the following features:
301Protecting Internet activitiesAbout the Network Security Map

1 Wireless Security
1 Remote Monitoring
1 Network Map
1 Trust Controls
You can click each of the features and read thesummary to learn more about using Network SecurityMap to manage your home network. By default, theNetworkSecurityOverview window appears each timeyou open Network Security Map.
If you do not want to view the Network SecurityOverview window, you can turn it off. Turning off theNetwork Security Overview window does not affectthe performance or security of your computer.
w You can also turn off the NetworkSecurityOverviewwindow if you check Do not show this again optionthat is available at the bottom of the NetworkSecurityOverview window.
To turn off Network Security Overview
1 In the Norton Internet Security main window, clickSettings.
2 In the Settings window, click the Network tab.
3 In the left pane, click Network Security Settings.
4 In the WelcomeScreen row, move the On/Off switchto the right to the Off position.
5 Click Apply.
6 Click OK.
To turn on Network Security Overview
1 In the Norton Internet Security main window, clickSettings.
2 In the Settings window, click the Network tab.
3 In the left pane, click Network Security Settings.
4 In the WelcomeScreen row, move the On/Off switchto the left to the On position.
5 Click Apply.
6 Click OK.
Protecting Internet activitiesAbout the Network Security Map
302

Viewing devices on the Network Security MapThe NetworkSecurityMap window provides a pictorialrepresentation of the devices on the network to whichyour computer is connected. You can view the detailsof each device, such as device name, security status,and IP address.
The Network Security Map window also provides thesecurity status of the following computers:
1 The computer on which you view the remotemonitoring status (MY PC)
1 The computers that are remotely monitored
The trust level of the device appears at the bottom ofthe icon in the network map.
Norton Internet Security displays devices in thefollowing order:
1 MY PC
1 Devices with online connection status
1 Devices with offline connection status
When you connect a new device to your network,Norton Internet Security automatically refreshes theNetworkSecurityMap window and displays the device.
w Norton Internet Security requires you to configure theSymantec Security Driver to open the Network SecurityMap. You cannot install the Symantec Security Driverwhen you run LiveUpdate. You can either allow theNorton LiveUpdate to complete or close the NortonLiveUpdate session before you install the SymantecSecurity Driver.
To view devices on the Network Security Map
1 In the Norton Internet Security main window, clickAdvanced.
2 Under NetworkProtection, click NetworkSecurityMap.
303Protecting Internet activitiesAbout the Network Security Map

3 If the Product Configuration panel appears, clickContinue.The Product Configuration panel appears whenyou click Network Security Map for the first time.The ProductConfiguration panel helps you installSymantec Security Driver that is required to viewthe NetworkSecurityMap window. The process ofinstallation of the Symantec Security Driverdisrupts your network connection temporarily.
4 If the NetworkSecurityOverview window appears,click OK.The Network Security Overview window lets youview the summary of features of the NetworkSecurity Map. The Network Security Overviewwindow appears in the following instances:
1 When you open the Network Security Mapwindow for the first time
1 When you turn on Welcome Screen underNetwork Security Map in the Settings window
If you do not want to view the Network SecurityOverview window in the future, check Donotshowthis again before you click OK.
5 In the Network Details drop-down list, select thenetwork that lists the device for which you want tosee the details.
Protecting Internet activitiesAbout the Network Security Map
304

To view the details of a device on the Network SecurityMap
305Protecting Internet activitiesAbout the Network Security Map

4 In the NetworkSecurityMap window, click a deviceicon.You can use the scroll arrows to view the devicesthat are listed in the network map.The device details section that is located below thenetwork map displays the following details:
Shows the name of the deviceDevice Name
For a computer, the NetworkSecurity Map displays theNetBIOS name by default.However, the Network SecurityMap displays the name of thedevice as NEW if it meets thefollowing conditions:
1 The device does not have aNetBIOS name
1 The device has a firewall thatis enabled
You can change the device namein the Edit Device Detailswindow.
Shows the name of the networkadapter manufacturer of thedevice
Adapter Manufacturer
The adapter manufacturer'sname is based on the physicaladdress (also known as MediaControl Access address or MACaddress) of the device.
Protecting Internet activitiesAbout the Network Security Map
306
Shows the category to which thedevice belongs
The device category iconprovides details on theconnection status and securitystatus. Norton Internet Securitylabels all unknown devices asNEW and sets the category asGENERIC DEVICE.
This category may includecomputer-related devices, suchas printers, media devices, andgame consoles.
You can change the devicecategory in the Edit DeviceDetails window.
Category
Shows how well your computeris protected from threats, risks,and damage
w The security statusappears only for MY PC and thecomputers that are remotelymonitored.
Security Status
Shows the connection status ofRemote Monitoring
The statuses are:
1 ON
1 OFF
You can turn off RemoteMonitoring for an individualcomputer or for all thecomputers that you remotelymonitor.
Remote Monitoring
307Protecting Internet activitiesAbout the Network Security Map

Shows the access level that isgranted to a remote device toconnect to your computer
The initial trust level is set basedon the configuration of yourcomputer. You can set trust levelfor all devices other thanMYPC.
Trust Level
Shows the status of theconnection
The statuses are:
1 ONLINE
1 OFFLINE
Connection
Shows the physical address (alsoknown as the Media AccessControl address or MAC address)of the computer or device
Physical Address
Shows the IP address of thecomputer or device
If you change the IP address ofa device, the updated IP addressappears in theNetwork SecurityMap window when you refreshthe list.
IP Address
Protecting Internet activitiesAbout the Network Security Map
308
Shows if the device is excludedfrom Intrusion Prevention scan.
You can exclude a Full Trustdevice from Intrusion Preventionscan. When you exclude atrusted device from IntrusionPrevention scan, Norton InternetSecurity trusts this device anddoes not scan any informationthat is received from this device.This improves the network speedof your computer and helps thetrusted device to access yourdevice quickly.
Excluded from IPSscanning
Setting up Remote MonitoringYou can set up Remote Monitoring by allowingcomputers on your network to communicate with yourcomputer.
w Ensure that the computers that you want to remotelymonitor have a version of a Norton product thatsupports Remote Monitoring.
Norton Internet Security requires a Passkey to set upRemote Monitoring. You must type the same Passkeyfor all the computers that you want to remotelymonitor.
After you set up Remote Monitoring, you can connectany computer to your network and enter the samePasskey. Norton Internet Security automaticallyidentifies the computer and connects it to the NetworkSecurity Map.
To set up Remote Monitoring
1 In the Norton Internet Security main window, clickAdvanced.
2 Under NetworkProtection, click NetworkSecurityMap.
309Protecting Internet activitiesAbout the Network Security Map

3 On the left side of the Network Security Mapwindow, under Remote Monitoring, click Setup.
4 In the Remote Monitoring Setup window, type aPasskey.The Passkey should be between 6 and 20 charactersin length. The Passkey is case sensitive.
5 Under Choose the default mode for ComputerDiscovery, select one of the following options:
Lets your computer alwaysdiscover other computers thatare connected to the network
Computer Discoveryalways on
Lets your computer discoverother computers that areconnected to the network whenthe Network Security Mapwindow is open
Computer Discovery ononly when NetworkSecurity Map screen isdisplayed
6 Click OK.
7 Set up Remote Monitoring for all other computersthat you want to monitor remotely.
Turning off Remote MonitoringWhen you turn off Remote Monitoring, you stop remotemonitoring of the computers that are connected toyour network.
You can turn off Remote Monitoring for the following:
1 All of the computers that you remotely monitor
1 An individual computer that you remotely monitor
w You can turn off Remote Monitoring only after youcomplete the Remote Monitoring Setup process.
To turn off Remote Monitoring for all computers
1 In the Norton Internet Security main window, ClickAdvanced.
Protecting Internet activitiesAbout the Network Security Map
310

2 Under NetworkProtection, click NetworkSecurityMap.
3 On the left side of the Network Security Mapwindow, under Remote Monitoring, click Disable.
4 In the confirmation dialog box, click Yes.
To turn off Remote Monitoring for an individualcomputer
1 In the Norton Internet Security main window, clickAdvanced.
2 Under NetworkProtection, click NetworkSecurityMap.
3 In the Network Security Map window, in thenetwork map, click the computer for which you wantto disable Remote Monitoring.
4 In the device details area, next to RemoteMonitoring, click Disable.
5 In the confirmation dialog box, click Yes.
Adding a device to the Network Security MapYou can manually add a computer or device to theNetwork Security Map.
You can add the following details when you add adevice:
1 The name or description
1 The IP address or physical address
The Network Security Map finds any computers thatare connected to your network. However, you can addthe computers and the devices that are currently notconnected.
Norton Internet Security adds to the Trust Controlnetwork all the devices that you manually add toNetwork Security Map. You can select the Trust Controlnetwork in the NetworkDetails drop-down list to viewthe devices that you added. You can also edit the nameof the device.
w You cannot edit the Trust Control network details.
311Protecting Internet activitiesAbout the Network Security Map

The default trust level of the devices that you add tothe Network Security Map is Protected. However, youcan change the trust level of the devices.
w If you trust a device that is not on your network, youcan expose your computer to potential security risks.
To add a device to the Network Security Map
1 In the Norton Internet Security main window, clickAdvanced.
2 Under NetworkProtection, click NetworkSecurityMap.
3 On the left side of the Network Security Mapwindow, under Total in Network, click the plussymbol.
4 In the AddaDevice window, in the Name box, typethe name of the device that you want to add to theNetwork Security Map.The maximum character length of the device nameis 15 characters.
5 In the IP or Physical Address box, type the IPaddress or physical address of the device that youwant to add to the Network Security Map.You can use the following formats in the IP orPhysical Address box:
172.16.0.0IPv4 address
fe80::12ac:fe44:192a:14ccIPv6 address
11-22-c3-5a-fe-a4Physical address
ftp.myfiles.comResolvable host
The address that you provide is not verified untilthe device is physically found on the network.
6 Click Add Device.
Protecting Internet activitiesAbout the Network Security Map
312

Finding a computer's IP addressYou can find a computer's IP address in various ways.On Windows 2000/XP, Windows Vista, Windows 7, andWindows 8 computers, you can use the ipconfigcommand to find the IP address of a computer.
The ipconfig command reports the IP address of itslocal computer only. You must run this program on thecomputer that you want to identify.
To find the IP address by using ipconfig on Windows2000/XP
1 On the computer you want to identify, on theWindows taskbar, click Start > Run.
2 In the Run dialog box, type cmd.
3 Click OK.
4 At the command prompt, type ipconfig, and thenpress Enter.
5 Write down the IP address.
To find the IP address by using ipconfig on WindowsVista
1 On the computer you want to identify, on theWindows taskbar, click Start.
2 In the Start Search text box, type cmd, and thenpress Enter on your keyboard.
3 At the command prompt, type ipconfig, and thenpress Enter.
4 Write down the IP address.
To find the IP address by using ipconfig on Windows 7
1 On the computer you want to identify, on theWindows taskbar, click Start.
2 In the Searchprogramsandfiles text box, typecmd,and then press Enter on your keyboard.
3 At the command prompt, type ipconfig, and thenpress Enter.
4 Write down the IP address.
313Protecting Internet activitiesAbout the Network Security Map

To find the IP address by using ipconfig on Windows 8
1 On the Apps screen, under Windows System, clickCommand Prompt.
2 At the command prompt, type ipconfig, and thenpress Enter.
3 Write down the IP address.
Editing device detailsYou can change the name and category of a device thatis available on the Network Security Map. You canselect the categories such as Generic Device, Laptop,Media Device, or Game Console.
You cannot change the category of the device that youadded manually. By default, Norton Internet Securitydisplays the category of the manually added device asUSER DEFINED.
The NetworkSecurityMap window displays differenticons, depending on the category that you select. Iconshelp you identify the devices that are listed in thenetwork map.
To edit the details of the device that is on your network
1 In the Norton Internet Security main window, clickAdvanced.
2 Under NetworkProtection, click NetworkSecurityMap.
3 In the Network Security Map window, in thenetwork map, click a device icon.
4 In the device details section, next to Device Name,click Edit.
5 In the EditDeviceDetails window, in the Name box,type a new name.The maximum character length of the device nameis 15 characters.
Protecting Internet activitiesAbout the Network Security Map
314

6 In the Category drop-down list, click one of thefollowing device categories:
1 GENERIC DEVICE
1 DESKTOP PC
1 LAPTOP
1 SERVER PC
1 NETWORK PRINTER
1 ROUTER/SWITCH
1 CABLE/DSL MODEM
1 MEDIA DEVICE
1 GAME CONSOLE
1 PDA/MOBILE PHONE
1 NETWORK STORAGE DEVICE
1 WEB CAMERA
1 TABLET
1 MUSIC PLAYER
1 TV
7 Click OK.
To edit the name of the device that you addedmanually
1 In the Norton Internet Security main window, clickAdvanced.
2 Under NetworkProtection, click NetworkSecurityMap.
3 In the Network Security Map window, in theNetworkDetails drop-down list, click TrustControl.
4 In the network map, select a device that you added.
5 In the device details area, next to DeviceName, clickEdit.
6 In the Edit Device Details dialog box, in the Namebox, type a new name.
7 Click OK.
315Protecting Internet activitiesAbout the Network Security Map

Editing network detailsYou can view the details and change the name of yournetwork in the Edit Network Details window.
w You cannot edit the Trust Control network details.
To edit network details
1 In the Norton Internet Security main window, clickAdvanced.
2 Under NetworkProtection, click NetworkSecurityMap.
3 In the NetworkSecurityMap window, on the rightside of Network Details, click Edit.
4 In the Edit Network Details dialog box, in theNetwork Name box, type a new name.
5 Click OK.
Changing the trust level of your network and devicesThe trust level determines the default level of accessthat devices on your network have to your computer.Any device on your network that is not explicitlyTrusted or Restricted uses the trust level of yournetwork. The initial network trust level is set based onthe configuration of your computer.
w Ensure that you change the trust level of a device toFull Trust, if it is a known device, and is connected toyour network.
The following conditions are necessary for the trustlevel of a device to be Shared:
1 The computer should not have a public IP address.
Your computer does not have a public IP address ifit is not directly connected to the Internet.
1 The computer should be connected to a LANthrough a secure connection.
1 The network category should be private in WindowsVista.
Protecting Internet activitiesAbout the Network Security Map
316

In addition, the trust level of a device is Shared in anyof the following cases:
1 When the computer on the network has one or morefolders or printers that are shared
1 When the computer is Media Center compatible (forexample, if you have Windows XP Media CenterEdition, Windows Vista Home Premium, WindowsVista Ultimate, Windows 7 Home Premium,Windows 7 Professional, or Windows 7 Ultimate)
w If you use a wireless network that is not secure, thedefault trust level of all the devices that are on thenetwork is Protected.
The trust level of a device also depends on the trustlevel of its network. When you change the trust levelof a network, Norton Internet Security assigns the sametrust level to all the devices that are connected to thatnetwork. However, Norton Internet Security does notchange the trust level of the devices that youindividually trust or restrict.
You can modify these settings if you want to changethe trust level for the following:
1 Your network
1 Devices that are connected to the Network SecurityMap
To change the trust level of your network
1 In the Norton Internet Security main window, clickAdvanced.
2 Under NetworkProtection, click NetworkSecurityMap.
3 In the NetworkSecurityMap window, on the rightside of Network Details, click Edit.
4 In the Edit Network Details window, next to TrustLevel, click Edit.You can view the details of the network in the EditNetwork Details window before you change thetrust level.
317Protecting Internet activitiesAbout the Network Security Map

5 To select a trust level for a network, in the EditNetwork Trust Level window, click one of thefollowing:
Adds the network to the Trustedlist
FULL TRUST
All the network traffic that yourcomputer receives from aTrusted network is filtered andallowed through firewall.However, known attacks andinfections are still monitored.You should select this settingonly when you are sure that thenetwork is completely safe.
Adds the network to the Sharedlist
SHARED
All the network traffic that yourcomputer receives from a Sharednetwork is filtered. Only sharedresources on your computer,such as files, folders, andprinters are allowed. You shouldselect this setting if you want thefirewall to protect you from alltraffic except those that pertainto file and printer sharing.
Adds the network to theProtected list
PROTECTED
A network is in the ProtectedTrust Level when it has not beenclassified as Trusted, Shared, orRestricted. You remain protectedfrom known attacks and allunexpected traffic.
Protecting Internet activitiesAbout the Network Security Map
318

Adds the network to theRestricted list
The devices that are onRestricted network cannotcommunicate with yourcomputer. However, you can stilluse the network to browse Websites, send email messages, ortransmit other communications.
RESTRICTED
6 Click OK.
To change the trust level of a device
1 In the Norton Internet Security main window, clickAdvanced.
2 Under NetworkProtection, click NetworkSecurityMap.
3 In the Network Security Map window, do one ofthe following:
1 To edit the trust level of a device that is on yournetwork, in the network map, click the device.
1 To edit the trust level of a device that youmanually added, in the Network Detailsdrop-down list, click Trust Control, and thenclick the device.
4 In the device details section, next to Trust Level,click Edit.
319Protecting Internet activitiesAbout the Network Security Map

5 To select a trust level for a device, in the EditDeviceTrust Level window, click one of the following:
Adds a device to the Full Trustlist
Full Trust devices are monitoredonly for known attacks andinfections. You should select thissetting only when you are surethat the device is completelysafe.
FULL TRUST
Adds a device to the Restrictedlist
Restricted devices do not haveaccess to your computer.
RESTRICTED
Adds a device to a default trustlevel
The devices that are removedfrom the Full Trust level orRestricted trust level take thedefault trust level of thenetwork. The trust level of thenetwork can be Full Trust,Restricted, Protected, or Shared.
USE NETWORK TRUST(trust level)
6 Click OK.Norton Internet Security displays the trust levelstatus of each restricted device on the icon of thedevice.
Excluding a device from Intrusion Prevention scanThe Intrusion Prevention System in Norton InternetSecurity scans all the network traffic that enters andexits your computer. When a device on your networkrequests access your computer, Intrusion Preventionscans this request to ensure that it is not a virus attack.
Protecting Internet activitiesAbout the Network Security Map
320
Scanning every request from all the devices that accessyour computer increases the scan time which slowsdown the network speed of your computer.
If you know that a specific device on your network issafe, you can apply Full Trust level to this device. Inaddition, you can exclude this specific device fromIntrusion Prevention scan. When you exclude a devicefrom Intrusion Prevention scan, Norton InternetSecurity trusts this device and does not scan anyinformation that is received from this device. Thisimproves the network speed of your computer andhelps the trusted device to access your device quickly.
w You can exclude only full trusted devices that are onthe local subnet.
To exclude a device from Intrusion Prevention scan,you must ensure that the IP address of the device neverchanges. Norton Internet Security uses IP addressesto identify devices on your home network. If the IPaddress of the device changes, Norton Internet Securitycannot identify the trusted device that should beexcluded from Intrusion Prevention scan.
w You can exclude a trusted device from IntrusionPrevention scan only if you are sure that the devicedoes not have any security threats.
When you apply Full Trust to a device and exclude itfrom Intrusion Prevention scan, the IP address andMAC address of the device are added to the TrustControl.
To exclude a device from Intrusion Prevention scan
1 In the Norton Internet Security main window, clickAdvanced.
2 Under NetworkProtection, click NetworkSecurityMap.
3 If the NetworkSecurityOverview window appears,click OK.
321Protecting Internet activitiesAbout the Network Security Map

4 In the Network Security Map window, do one ofthe following:
1 To edit the trust level of a device that is on yournetwork, in the network map, click the device.
1 To edit the trust level of a device that youmanually added, in the Network Detailsdrop-down list, click Trust Control, and thenclick the device.
5 In the device details section, in the TrustLevel row,click Edit.
6 In the Edit Device Trust Level window, click FULLTRUST.
7 At the bottom of the Edit Device Trust Levelwindow, check Exclude from IPS scanning.
8 In the Exclude fromIPSScanning dialog box, clickYes to confirm.
9 Click OK.
Removing devices from the Network Security MapThe Network Security Map window lists the devicesthat are connected to your network. You can remove adevice or a computer from the Network Security Map.You can purge all devices from the network map andcreate a new list of devices. For example, you can purgeall the devices that were present in your previousnetwork before you connect to a new network. Ensurethat you disable Remote Monitoring before you purgethe network map. Norton Internet Security cannotpurge the network map when the Remote Monitoringis turned on. Also, ensure that you close the NetworkSecurity Map window before you purge the networkmap. You cannot purge the network map when theNetwork Security Map window is open.
w Norton Internet Security purges the devices that youadd manually in the Trust Control network dependingupon their trust level. It does not purge the devicesthat have a trust level as Full Trust or Restricted.
Protecting Internet activitiesAbout the Network Security Map
322
When you remove an individual device, the onlinedevices appear again the next time you open theNetwork Security Map. However, Norton InternetSecurity permanently removes the offline devices.
To remove an individual device
1 In the Norton Internet Security main window, clickAdvanced.
2 Under NetworkProtection, click NetworkSecurityMap.
3 In the Network Security Map window, do one ofthe following:
1 To remove a device that is on your network, inthe network map, click the device.
1 To remove a device that you manually added, inthe NetworkDetails drop-down list, select TrustControl, and then click the device.
4 On the left side of the Network Security Mapwindow, under Total in Network, click the minussymbol.
5 In the confirmation dialog box, click Yes.
To purge the Network Security Map
1 In the Norton Internet Security main window, clickSettings.
2 In the Settings window, click the Network tab.
3 In the left pane, click Network Security Settings.
4 In the Network Security Map row, click Purge.
5 In the confirmation dialog box, click Yes.
Viewing the status of your wireless networkYou can view the status of your wireless network inthe Network Security Map window. The NetworkSecurity Map displays the status of your wirelessnetwork as secure or not secure. A secure networkrequires a strong wireless encryption. If your wirelessnetwork is not secure, you can turn on encryption onyour wireless router.
323Protecting Internet activitiesAbout the Network Security Map

For more information on how to secure your wirelessnetwork, on the left side of the NetworkSecurityMapwindow, click the Why is it not secure link. Follow theinstructions.
w You should only trust a wireless connection that issecure. Trusting a wireless connection that is notsecure puts all of the devices on your network at risk.
To view the status of your wireless network
1 In the Norton Internet Security main window, clickAdvanced.
2 Under NetworkProtection, click NetworkSecurityMap.
3 On the left side of the Network Security Mapwindow, view the status of your wireless network.Your wireless network statuses are:
Indicates that your wirelessnetwork is secure.
WirelessNetwork Secure
Indicates that your wirelessnetwork is not secure.
Wireless Network NotSecure
Viewing the device detailsThe Network Security Map lets you view the details ofyour computer. You can view the following details:
1 The configuration status of your protectionfeatures, such as Auto-Protect, IntrusionPrevention, and Email Scanning
1 The configuration status of your definition updates,such as Automatic LiveUpdate and Pulse Updates
1 The version number of your Norton product
1 The subscription status of your Norton product
1 The configuration status of your transactionsecurity, such as Identity Safe and Antiphishing
Protecting Internet activitiesAbout the Network Security Map
324

To view the device details
1 In the Norton Internet Security main window, clickAdvanced.
2 Under NetworkProtection, click NetworkSecurityMap.
3 In the Network Security Map window, in thenetwork map, click the device for which you wantto see the details.You can view the details of only the computers thatyou remotely monitor.
4 In the device details section, next to Category, clickDetails.
5 In the Device Details window, view the details ofthe device.
6 Click Close.
Modifying the communication port for NetworkSecurity Map
The Network Security Map settings let you configurethe communication port number that Norton productsuse to communicate with each other over a network.By default, Norton products use 31077 as thecommunication port number.
If you change the communication port number of yourNorton product, you must change it on every computerthat is connected to your home network. In addition,when you find more computers that use the RemoteMonitoring Setup process, ensure that the same portnumber is used on every computer.
w Though you can modify the communication portnumber, it is recommended that you do not change thisport number. If you change the communication portnumber, you must use a port number in the range of1-65535.
325Protecting Internet activitiesAbout the Network Security Map

Tomodify the communication port forNetwork SecurityMap
1 In the Norton Internet Security main window, clickSettings.
2 In the Settings window, click the Network tab.
3 In the Communication Port box, type a newcommunication port number.You must use the same port number for each of thedevice that is connected to your Network SecurityMap.
4 Click Apply.
5 Click OK.
About Network Cost AwarenessThe Network Cost Awareness feature lets you set uppolicies to restrict the Internet usage of Norton InternetSecurity. You can define the amount of networkbandwidth that Norton Internet Security can use.
You can choose a communication policy that suits yourInternet connection. If you have unlimited Internetplan, you can set up No Limit policy so that NortonInternet Security connects to Symantec servers toensure complete protection. However, if you think thatNorton Internet Security uses too much of yourInternet connection, you can restrict the Internet usageof Norton Internet Security. Network Cost Awarenesshelps you manage the Internet usage of Norton InternetSecurity.
To connect to the Internet, Norton Internet Securityaccesses the gateway through a network connection.The connecting device can be a 3G phone, an Internetdata card, or a wireless network card. Network CostAwareness lets you set up a policy for each networkconnection that Norton Internet Security uses toconnect to the Internet.
Protecting Internet activitiesAbout Network Cost Awareness
326

You can set up one of the following policies for each ofthe network connection that Norton Internet Securityuses to connect to the Internet:
1 AutoAllows Norton Internet Security to receive allproduct and virus definition updates based on theWindows 8 cost awareness policy. By default, theAuto policy has unlimited Internet connection onLAN and Wi-Fi.
w The Auto option is available only in Windows 8.
1 No LimitAllows Norton Internet Security use the networkbandwidth that is required to receive all productand virus definition updates. Symantecrecommends that you apply this policy. If you donot use Windows 8, the default policy is set to NoLimit.
1 EconomyAllows Norton Internet Security access the Internetonly to receive critical product updates, virusdefinitions, and web queries needed to protect yourdevice.
1 No TrafficBlocks Norton Internet Security from connectingto the Internet. If you choose this policy, NortonInternet Security cannot receive critical virusdefinitions and program updates, which can leadto potential dangers and virus attacks.
Turning off or turning on Network Cost AwarenessYou can set up policies to restrict the Internet usageof Norton Internet Security. If you do not want torestrict the Internet usage of Norton Internet Security,you can turn off Network Cost Awareness.
If you feel that Norton Internet Security uses too muchnetwork bandwidth, you can turn on Network CostAwareness. Then, you can set up policies to restrict
327Protecting Internet activitiesAbout Network Cost Awareness

the Internet usage of Norton Internet Security. NortonInternet Security connects to the Internet based on thepolicy that you set up in the NetworkCostAwarenessSettings window. By default, NetworkCostAwarenessis turned on.
To turn off Network Cost Awareness
1 In the Norton Internet Security main window, clickSettings.
2 In the Settings window, click the Network tab.
3 In the left pane, click Network Security Settings.
4 In the Network Cost Awareness row, move theOn/Off switch to the right to the Off position.
5 Click Apply.
6 Click OK.
To turn on Network Cost Awareness
1 In the Norton Internet Security main window, clickSettings.
2 In the Settings window, click the Network tab.
3 In the left pane, click Network Security Settings.
4 In the Network Cost Awareness row, move theOn/Off switch to the left to the On position.
5 Click Apply.
6 Click OK.
Defining the Internet usage of Norton InternetSecurity
If you think that Norton Internet Security uses toomuch of your network bandwidth, you can restrict theInternet usage of Norton Internet Security. You canset up policy for each network connection that NortonInternet Security uses to connect to the Internet.
The Network Cost Awareness Settings window listsall the network connections that your computer usesto connect to the Internet. You can view the status ofthe network connections that are currently in use. Thenetwork policy that you set up defines the amount of
Protecting Internet activitiesAbout Network Cost Awareness
328
network bandwidth that Norton Internet Security canuse.
To define the Internet usage of Norton Internet Security
1 In the Norton Internet Security main window, clickSettings.
2 In the Settings window, click the Network tab.
3 In the left pane, click Network Security Settings.
4 In the Network Cost Awareness row, move theOn/Off switch to the left to the On position.
5 Click Configure.The NetworkCostAwarenessSettings window listsall the network connections that Norton InternetSecurity uses to connect to the Internet.
6 Under the Policy column, click the drop-down listnext to the network connection for which you wantto set up a policy.
329Protecting Internet activitiesAbout Network Cost Awareness

7 Select one of the following:
1 AutoAllows Norton Internet Security to receive allproduct and virus definition updates based onthe Windows 8 cost awareness policy. By default,the Auto policy has unlimited Internetconnection on LAN and Wi-Fi.
w The Auto option is available only in Windows 8.
1 No LimitAllows Norton Internet Security use the networkbandwidth that is required to receive all productand virus definition updates. If you do not useWindows 8, the default policy is set to NoLimit.
1 EconomyAllows Norton Internet Security access theInternet only to receive critical product updatesand virus definitions.
If you have a limited Internet connection, youcan select the Economy option to ensureprotection from critical security threats.
1 No TrafficBlocks Norton Internet Security from connectingto the Internet. If you choose this policy, NortonInternet Security cannot receive critical virusdefinitions and program updates, which can leadto potential dangers and virus attacks.
8 Click Apply, and then click OK.
9 In the Settings window, click OK.
Protecting Internet activitiesAbout Network Cost Awareness
330

This chapter includes the following topics:
1 About securing your sensitive data
About securing your sensitive dataThe Internet provides the fastest and the easiest wayto exchange information. In spite of the manyadvantages that the Internet provides, you arevulnerable to information theft and identity theft.Information can be stolen and misused in several ways.
Following are a few of the most common methods ofinformation theft:
1 Online financial transactions
1 Unsafe online storage of sensitive information
1 Misuse of your identity while you communicateonline
The Identity Safe feature in Norton Internet Securityoffers several powerful ways to tackle identity theft.Identity Safe is the best tool that you can use tosafeguard your identity while you are online.
About Safe SurfingSafe Surfing comprises of the Antiphishing and theNorton Safe Web features. Antiphishing analyzes thesecurity level of the Web sites that you visit anddisplays the results in the Norton Site Safety pop-up
6Securing yoursensitive data

window. The Norton Safe Web feature provides you asafe search environment in the Web by displaying thesite rating icons next to every search result.
When you install Norton Internet Security, it adds theNorton Toolbar to the Internet Explorer, Firefox, orChrome browsers. Norton Internet Security protectsyour Web browsers when you turn on the Antiphishingand Norton Safe Web options in the Safe Surfingsection of the Norton Internet Security Settingswindow. The Safe Surfing section is available in theWeb tab.
w The Antiphishing and Norton Safe Web features aresupported in the Internet Explorer, Firefox, or ChromeWeb browsers.
When you turn off Antiphishing and Norton Safe Web,Identity Safe may autofill fraudulent Web sites withyour confidential information. Symantec recommendsthat you do not browse the Web when Antiphishingand Norton Safe Web features are turned off.
About Antiphishing
Antiphishing protects you from visiting unsafe Websites. When Antiphishing is turned on, the Antiphishingcomponent analyzes the security level of the Web sitesthat you visit. It then displays the results in the NortonSite Safety pop-up window. Antiphishing also blocksnavigation to the Web sites that are confirmed to befraudulent.
Antiphishing provides you the following informationabout the Web sites you visit:
1 If the Web site is safe to enter confidentialinformation
1 If the Web site is fraudulent
1 If the Web site is suspicious
1 If the Web site is known to give annoying results
The Norton Site Safety pop-up window in InternetExplorer, Firefox, or Chrome Web browsers lets you
Securing your sensitive dataAbout securing your sensitive data
332

view more details about the safety status of the Websites you visit.
In addition, the Norton Site Safety pop-up windowincludes information about Symantec AuthenticatedWeb sites. Web site hackers often mimic company Websites to create fraudulent Web sites. Norton InternetSecurity identifies the fraudulent Web sites.
Symantec analyzes the pages of these sites and verifiesif they belong to the company that it represents. Youcan be confident that the information that you providegoes to the company with which you want to dobusiness.
You can report the evaluation of a Web site you suspectto be fraudulent to Symantec for further evaluation.Use the Report Site option from Norton Toolbar toreport a Web site. You can also report the evaluationof a Web site that you suspect to be fraudulent butAntiphishing reports as safe.
Even when you turn off the Antiphishing option,Norton Internet Security protects you from Internetthreats through its Norton Safe Web features. WhenAntiphishing is turned off, you cannot use the ReportSite option in the Norton menu to submit theevaluation of the Web site to Symantec.
The Norton Site Safety pop-up window displays thefollowing messages:
1 Site is Safe
1 Site is Unsafe
1 Site Untested
1 Norton Secured
1 Caution
1 Fraudulent Site
1 Suspicious Site
1 Page Not Analyzed
333Securing your sensitive dataAbout securing your sensitive data
Reporting an incorrect evaluation of a Web site
On rare occasions, Antiphishing may report incorrectevaluation of a Web site. For example, you might visita site that you shop with regularly and Antiphishingreports that the site is fraudulent. On the contrary, youmight visit a Web site that you suspect is a phishingsite, but Antiphishing reports that no fraud wasdetected. In either case, you can report the Web site toSymantec for further evaluation.
w The Web site you want to report to Symantec forfurther evaluation must be kept open in your Webbrowser.
To report an incorrect evaluation of a suspicious Website
1 Open your browser and go to the Web site that youthink is suspicious.
2 On the Norton Toolbar, in the Norton menu, clickReport site.
3 In the dialog box that appears, verify that the Website address and click Submit.
4 In the confirmation dialog box, click Close.
To report an incorrect evaluation of a safe Web site
1 Open your browser and go to the Web site that youthink is safe.
2 On the Norton Toolbar, in the Norton menu, clickReport site.
3 In the dialog box that appears, verify that the Website address and click Submit.
4 In the confirmation dialog box, click Close.
Turning off or turning on Antiphishing
Antiphishing protects you from visiting unsafe Websites. The Antiphishing feature in Norton InternetSecurity analyzes the security level of all the Web sitesthat you visit and displays the results in the NortonSite Safety pop-up window. Antiphishing also blocks
Securing your sensitive dataAbout securing your sensitive data
334

navigation to the Web sites that are confirmed to befraudulent.
The Norton Site Safety pop-up window helps youunderstand if the Web site that you visit is safe orunsafe.
You can turn off or turn on Antiphishing in the SafeSurfing section of the Settings window. The SafeSurfing section is available in the Web tab.
To turn off or turn on Antiphishing
1 In the Norton Internet Security main window, clickSettings.
2 In the Settings window, click the Web tab.
3 In the left pane, click Safe Surfing.
4 In the Antiphishing row, do one of the following:
1 To turn off Antiphishing, in the Antiphishingrow, move the On/Off switch to the right to theOff position.
1 To turn on Antiphishing, in the Antiphishingrow, move the On/Off switch to the left to theOn position.
5 In the Settings window, click Apply.
6 Click OK.
About Norton Safe Web
Norton Safe Web helps you surf, search, and shop moresafely on the Internet. By using Norton Safe Web, youcan check if a Web site is malicious or not even beforeyou visit it. Norton Safe Web analyzes the Web sitesyou visit and detects if there are any viruses, spyware,malware, or other security threats that exist on theWeb sites. Based on the analysis, Norton Safe Webprovides safety ratings for all the Web sites.
In addition, Norton Safe Web lets you view thecommunity rating and user reviews of the Web sitesyou visit.
335Securing your sensitive dataAbout securing your sensitive data

w Norton Safe Web supports Internet Explorer, Firefox,or Chrome Web browsers.
You can view the site safety status of any Web siteusing the FullReport option on the NortonSiteSafetypop-up window. You can also use the CommunityBuzzoption on the Norton menu to view the safety statusof the Web sites.
w The Community Buzz option is available only inEnglish-language versions of Windows.
For each Web site that you want to know the site safetystatus, Norton Safe Web lets you do the following:
1 View the Norton rating.
1 View the community rating.
1 Add your reviews.
1 View the user reviews.
1 View a list of keywords that are tagged to the Website.
1 View the threat information and the generalinformation about the Web site.
If you use a proxy server to connect to the Internet,you must configure the Network Proxy Settings ofNorton Internet Security.
When you search the Internet using Google, Yahoo, orBing search engines, Norton Safe Web displays siterating icons next to the search results. As you movethe mouse pointer over the Norton icon, a pop-upappears with site safety and shopping safetyinformation. The pop-up displays brief informationabout the safety of the site. Norton Safe Web alsoprovides a detailed report about the safety of the WebSites you visit.
You can click the icon next to the search results or theFull Report option in the Norton Site Safety pop-upwindow to view the detailed report. The report isdisplayed on the Norton Safe Web site.
Securing your sensitive dataAbout securing your sensitive data
336

Norton Safe Web provides the following Web site safetystates when you browse through the Internet:
You can see Norton Secured iconnext to the search results.
Symantec has analyzed this pageand determined that the Website is VeriSign trusted and issafe to visit.
Norton Secured
You can see a green OK icon nextto the search results.
When you visit a Web site withthis status, you can see a similarstatus icon on the NortonToolbar. Norton Safe Web hasanalyzed this Web site anddetermined that it is safe to visit.
Site is Safe
You can see a gray questionmark icon next to the searchresults.
When you visit this Web site, theNorton Toolbar shows a greenOK icon. Norton Safe Web hasnot analyzed this Web site andit does not have sufficientinformation about this Web site.As Symantec has not tested theWeb site, it is recommended thatyou do not visit this Webs site.
Site Untested
337Securing your sensitive dataAbout securing your sensitive data

You can see a red cross (x) iconnext to the search results.
When you visit a Web site withthis status, you can see a similarstatus icon on the NortonToolbar. Norton Safe Web hasanalyzed this Web site anddetermined that the Web site isunsafe to visit. This Web sitemay attempt to install malicioussoftware on your computer.
Site is Unsafe
You can see a yellow exclamationmark icon next to the searchresults.
When you visit a Web site withthis status, you can see a similarstatus icon on the NortonToolbar. Norton Safe Web hasanalyzed this Web site anddetermined that this Web sitehas some threats that areclassified asAnnoyance Factors.These annoyance factors are notdangerous, but it can installunwanted applications on yourcomputer without yourpermission.
Caution
In addition to the site safety information, Norton SafeWeb provides the following shopping safetyinformation:
Norton Safe Web has analyzedthis Web site and determinedthat you can have a safeshopping experience.
Safe
Securing your sensitive dataAbout securing your sensitive data
338

Norton Safe Web does not havesufficient information about thisWeb site to provide a shoppingsafety rating.
Untested
Norton Safe Web has analyzedthis Web site and determinedthat the site has shopping risks.
Symantec recommends that youdo not visit this page. The Website may sell counterfeit itemswithout proper indication.
Risky
Norton Safe Web has analyzedthis Web site and has only someinformation about the Web siteto provide shopping safetyinformation.
The information is not sufficientto declare that the Web site issafe to shop.
Limited
When you visit any Web site that has an unsafe status,Norton Safe Web blocks that Web page. If you still wantto view the Web site, use the Continue to site anywayoption that appears on the blocked page. You can usethe Block Malicious Pages option to block maliciouspages. To access the BlockMaliciousPages option, goto the Norton Internet Security main window, and thenclick Settings>Web>SafeSurfing>BlockMaliciousPages. If you turn off the BlockMaliciousPages option,Norton Safe Web does not block the unsafe Web sites.However, Norton Toolbar displays the status of theseWeb sites as unsafe even when the option is turned off.
You can block malicious pages using the BlockMalicious Pages option under Safe Surfing option inthe Web tab. The Web tab is available under theSettings window.
339Securing your sensitive dataAbout securing your sensitive data

In addition, Norton Safe Web protects your computerwhile you use Facebook. It scans each URL that isavailable on your Facebook Wall and displays theNorton rating icons for the scanned URLs. You can alsolet other Facebook users know about the security statusof any Web site.
To scan your Facebook Wall using Norton Safe Web,use the ScanFacebookWall option. The option appearswhen you click the Scan Now option in the NortonInternet Security main window.
Searching the Web using Norton Safe Search
Norton Safe Search enhances your Web searchexperience. When you search the Internet using NortonSafe Search, it uses Ask.com to generate the searchresults. Norton Safe Search provides the site safetystatus and Norton rating for each of the search resultsgenerated.
By default, the NortonSafeSearch box is enabled. Afteryou install Norton Internet Security and open InternetExplorer, Firefox, or Chrome Web browsers for the firsttime, an alert message is displayed. The alert messageprompts you to enable Norton Safe Search. You canchoose to enable or disable Norton Safe Search.
Norton Safe Search provides you the intelligentsearch-as-you-type feature that displays searchsuggestions when you type a few letters of the searchphrase.
Securing your sensitive dataAbout securing your sensitive data
340

In addition, Norton Safe Search provides the followingfeatures:
When you search the Internetusing Norton Safe Search, itanalyzes the security levels ofthe Web sites and displays thesearch results.
You can use the Filter OutUnsafe Sites option in theNorton Safe Search Web site tofilter the unsafe Web sites fromthe search results. When youclick the Filter Out Unsafe Sitesoption the Unsafe Site Filteroption is turned on. By defaultthis option is turned off.
Unsafe Site Filter
Norton Safe Search enables youto erase all the data that arerelated to your search activitiesfrom the Ask.com server. ThePrivacy Safeguard feature ofNorton Safe Search removes thesearch data, such as your IPaddress, user identifier, andsession identifier from theAsk.com server.
You can turn on or turn offPrivacy Safeguard using theTurnOn Privacy Safeguard and TurnOff Privacy Safeguard optionsrespectively.
Erase Search History
w Norton Safe Search feature is available only for someregions including the United States, the UnitedKingdom, Canada, Australia, and Germany. The PrivacySafeguard feature is available only for the UnitedStates, the United Kingdom, and Canada.
341Securing your sensitive dataAbout securing your sensitive data

You can use Norton Safe Search even when you turnoff the Identity Safe features.
w Norton Safe Search is supported only in the InternetExplorer, Firefox, or Chrome Web browsers.
To search the Web using Norton Safe Search
1 Start your Web browser.
2 On the Norton Toolbar, in the Norton Safe Searchbox, type the search string that you want to search.
3 Do one of the following:
1 Click Search.
1 In the pop-up window that appears, select asearch suggestion that matches your searchstring.
Turning off or turning on Norton Safe Web
Norton Safe Web protects your computer while youbrowse the Internet using Internet Explorer, Firefox,or Chrome Web browsers. It analyzes the security levelsof the Web sites that you visit and indicates if the Websites are free from threats. It provides you a safeenvironment on the Web by displaying the site ratingicons next to each search result. The site rating iconslets you know if a Web site is malicious or not evenbefore you visit it.
You can turn off or turn on Norton Safe Web in theSafe Surfing section under the Web tab. The Web tabis available under the Settings window.
To turn off or turn on Norton Safe Web
1 In the Norton Internet Security main window, clickSettings.
2 In the Settings window, click the Web tab.
3 In the left pane, click Safe Surfing.
Securing your sensitive dataAbout securing your sensitive data
342
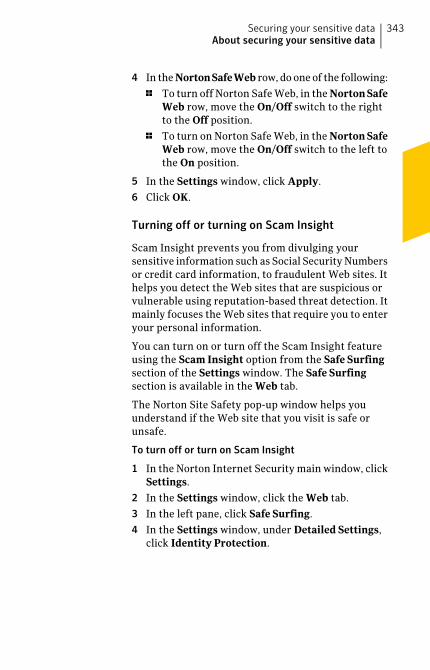
4 In the NortonSafeWeb row, do one of the following:
1 To turn off Norton Safe Web, in the NortonSafeWeb row, move the On/Off switch to the rightto the Off position.
1 To turn on Norton Safe Web, in the NortonSafeWeb row, move the On/Off switch to the left tothe On position.
5 In the Settings window, click Apply.
6 Click OK.
Turning off or turning on Scam Insight
Scam Insight prevents you from divulging yoursensitive information such as Social Security Numbersor credit card information, to fraudulent Web sites. Ithelps you detect the Web sites that are suspicious orvulnerable using reputation-based threat detection. Itmainly focuses the Web sites that require you to enteryour personal information.
You can turn on or turn off the Scam Insight featureusing the Scam Insight option from the Safe Surfingsection of the Settings window. The Safe Surfingsection is available in the Web tab.
The Norton Site Safety pop-up window helps youunderstand if the Web site that you visit is safe orunsafe.
To turn off or turn on Scam Insight
1 In the Norton Internet Security main window, clickSettings.
2 In the Settings window, click the Web tab.
3 In the left pane, click Safe Surfing.
4 In the Settings window, under Detailed Settings,click Identity Protection.
343Securing your sensitive dataAbout securing your sensitive data

5 In the Scam Insight row, do one of the following:
1 To turn off Scam Insight, in the Scam Insightrow, move the On/Off switch to the right to theOff position.
1 To turn on Scam Insight, in the Scam Insightrow, move the On/Off switch to the left to theOn position.
6 In the Settings window, click Apply.
7 Click OK.
8 Click Close.
About Identity SafeIdentity Safe helps you manage your identities andprovides additional security while you perform onlinetransactions.
The following features in Identity Safe provide securestorage of your sensitive information:
Stores login information, suchas your login credentials for youronline bank account, email userID, and password.
Edit Logins
Stores your personalinformation, such as addresses,date of birth, and credit cardinformation.
Edit Cards
Stores the details, such aspassport numbers and socialsecurity numbers.
Edit Notes
In addition to being a depository of sensitiveinformation, Identity Safe provides the followingfeatures:
1 Protects you from identity theft when you performonline transactions
Securing your sensitive dataAbout securing your sensitive data
344

Antiphishing also helps to protect you frommalicious Web sites when you perform onlinetransactions.
1 Manages your card information when you havemultiple credit cards to maintain
1 Safeguards the data that you save on your computer
By saving your data with a local vault, you canprevent your sensitive Identity Safe data on yourcomputer from being misused. A local vault isspecific to each of the Windows user accountspresent on your computer.
1 Provides you the ease of carrying and using yourIdentity Safe data when you are on the move
By saving your data using an online vault, you canaccess your sensitive Identity Safe data from anycomputer that has Norton Internet Securityinstalled.
Norton Internet Security adds the Norton Toolbar tothe Internet Explorer, Firefox, or Chrome Webbrowsers. The Norton Toolbar has the followingcomponents:
1 Norton menu
1 Norton Safe Search
1 Share
1 Safe Web indicator
1 Vault Open/Vault Closed menu
1 Login Assistant
When you have cards or logins in Identity Safe, theVaultOpen menu displays the list of cards and logins.
w Norton Internet Security supports latest versions ofGoogle Chrome and Firefox.
If you turn off Identity Safe, you cannot access yourlogins and Identity Safe features from the NortonToolbar.
Norton Internet Security lets you access all the IdentitySafe features from your browser’s toolbar even after
345Securing your sensitive dataAbout securing your sensitive data

the product expires. This way, you can still view ormanage your login details even after Norton InternetSecurity expires. However, it is not safe to browse theInternet after Norton Internet Security expires as youare vulnerable to online thefts and phishing attacks.
About setting up Norton Identity Safe Account
Identity Safe helps you manage your sensitiveinformation and provide additional security while youperform online transactions. The features in IdentitySafe provide a secure storage for your personalinformation such as your address, login information,passwords, and credit card details.
Identity Safe provides a secure storage for thefollowing:
1 Login information such as user IDs and passwordsof your email accounts
1 Personal information such as your address, date ofbirth, passport number, and social security number.
1 Credit card details including card number and cardexpiry date.
w You can view all the options that are available inIdentity Safe only after you set up Identity Safe.
Identity Safe lets you create an online vault and saveyour Identity Safe data. You can create one online vaultfor each Norton Account. You cannot create a new localvault but use your existing local vault when youupgrade to new version of the Norton Internet Security.
In addition to the local vault on your Windows useraccount, you can save your Identity Safe data in onlinevault. The Identity Safe data is stored online vault usingyour Norton Account.
You can access the Identity Safe data that you storedonline from any computer that meets the followingcriteria:
1 The latest version of Norton Internet Security mustbe installed.
Securing your sensitive dataAbout securing your sensitive data
346

1 The computer must be connected to the Internet.
The Identity Safe data is stored online using yourNorton Account. You can create only one online vaultfor a Norton Account.
w If you have Identity Safe data that is stored on anyexternal drives from the older versions of NortonInternet Security, you can convert that portable profileto local vault or online vault. When you connect yourexternal drive to your computer, the Identity Safe menuin the Norton Toolbar provides option to merge ordelete the Identity Safe data from your portable profile.You can merge the data from the portable profile tolocal vault or online vault.
Turning off or turning on Identity Safe
Identity Safe helps you manage your identity andprovides additional security while you perform onlinetransactions. You can use the various features inIdentity Safe to manage your personal data such asaddresses, date of birth and credit card information.The logins, cards, and notes help you store and useyour personal information in a secure way.
w After you turn on Identity Safe, you must log in toIdentity Safe to access the various features.
To turn off or turn on Identity Safe fromSettingswindow
1 In the Norton Internet Security main window, clickSettings.
2 In the Settings window, click the Web tab.
3 In the left pane, click Identity Safe.
4 In the Identity Safe row, do one of the following:
1 To turn off Identity Safe, in the Identity Saferow, move the On/Off switch to the right to theOff position.
1 To turn on Identity Safe, in the Identity Saferow, move the On/Off switch to the left to theOn position.
5 In the Settings window, click Apply.
347Securing your sensitive dataAbout securing your sensitive data

6 Click OK.
About Identity Safe vaults
You can create one local vault for each Windows useraccount on your computer. The data that you save andthe Identity Safe settings that you make are specific tothat local vault. You cannot access the data that yousave in one Windows user account from anotherWindows user account. This way Identity Safe protectsyour sensitive data from misuse by multiple users ofyour computer.
Symantec recommends that you create separatepassword-protected Windows user accounts if you wantto share your computer with multiple users.
In addition to the local vault that you create on aWindows user account, you can save your Identity Safedata in online vault. When you move your Identity Safedata from local vault to online vault, the data in yourlocal vault is permanently removed. The Identity Safedata is stored online using your Norton Account.
You can access the Identity Safe data that you storedonline from any computer that meets the followingcriteria:
1 The latest version of Norton Internet Security mustbe installed.
1 The computer must be connected to the Internet.
You can create only one online vault for a NortonAccount.
w If you have Identity Safe data that is stored on anyexternal drives from the older versions of NortonInternet Security, you can convert that portable profileto local vault or online vault. When you connect yourexternal drive to your computer, the VaultOpen menuin the Norton Toolbar provides option to merge theIdentity Safe data from your portable profile. You canmerge the data from the portable profile to your localvault or online vault.
Securing your sensitive dataAbout securing your sensitive data
348

In addition to the features such as saving logins, cards,and notes, you can do the following using your IdentitySafe vault:
1 Import your Identity Safe data from the file youalready backed up. You can also import the datathat you stored in portable profile from an olderversion of the product to the current version.
1 Export your Identity Safe data to .DAT file.
1 Reset your Identity Safe.
About creating Identity Safe vaults
Identity Safe helps you manage your sensitiveinformation and provide additional security while youperform online transactions. The various features inIdentity Safe provide a secure storage for your personalinformation such as your address, login information,passwords, and credit card details.
Identity Safe lets you create an online vault and saveyour Identity Safe data. You can create one online vaultfor each Norton Account. You cannot create a new localvault but use your existing local vault when youupgrade to new version of the Norton Internet Security.
In addition to the local vault on your Windows useraccount, you can save your Identity Safe data in onlinevault. The Identity Safe data is stored online vault usingyour Norton Account.
You can access the Identity Safe data that you storedonline from any computer that meets the followingcriteria:
1 The latest version of Norton Internet Security mustbe installed.
1 The computer must be connected to the Internet.
w You can create only one online vault for a NortonAccount. You must log in to your Norton Account tomove Identity Safe data from the local vault to theonline vault.
349Securing your sensitive dataAbout securing your sensitive data

You can create Identity Safe vaults from the IdentitySafe section of the Settings window. The IdentitySafesection is available in the Web tab.
Creating online vault
Identity Safe lets you create an online vault and saveyour Identity Safe data. You can create one online vaultfor each Norton Account. You cannot create a new localvault but use your existing local vault when youupgrade to new version of the Norton Internet Security.
In addition to the local vault on your Windows useraccount, you can save your Identity Safe data in onlinevault. The Identity Safe data is stored online vault usingyour Norton Account.
You can access the Identity Safe data that you storedonline from any computer that meets the followingcriteria:
1 The latest version of Norton Internet Security mustbe installed.
1 The computer must be connected to the Internet.
w You can create only one online vault for a NortonAccount.
To create online vault
1 In the Norton Internet Security main window, clickSettings.
2 In the Settings window, click the Web tab.
3 In the left pane, click Identity Safe.
4 Under IdentitySafe, in the IdentitySafeSetup row,click Configure.
5 Click Next, and enter your Norton Accountcredentials.If you do not have a Norton Account, Identity Safeautomatically redirects you to Create NortonAccount window to create a new Norton Account.
6 In the Create your Vault Password window, in theCreate Vault Password box, type your password.
Securing your sensitive dataAbout securing your sensitive data
350

7 In the Re-type Vault Password box, type thepassword again to confirm.
8 In the Password Hint box, type a hint for thepassword.
9 Check Store information online through yourNorton Account.This option appears only if you log in to your NortonAccount.
10 Click Create.
11 In the IdentitySafeSetupSuccessful window, clickGet Started.
Signing in to Norton Account
Identity Safe lets you create a local vault and an onlinevault to save your Identity Safe data. You must log into your Norton Account to create an online vault. TheIdentity Safe data is stored online using your NortonAccount.
You can access the Identity Safe data that you storedonline from any computer that meets the followingcriteria:
1 The latest version of Norton Internet Security mustbe installed.
1 The computer must be connected to the Internet.
w You can create only one online vault per NortonAccount. If you already have a Norton Account, youcan log in with your credentials or create a newaccount.
To sign in to Norton Account
1 In the Norton Internet Security main window, clickSettings.
2 In the Settings window, click the Web tab.
3 In the left pane, click Identity Safe.
4 Under IdentitySafe, in the IdentitySafeSetup row,click Configure.
351Securing your sensitive dataAbout securing your sensitive data

5 At the bottom of the Set Up Identity Safe window,click Log In to Norton Account.
6 In the SignIntoNortonAccount window, type yourE-mail Address and Password.
7 Click Sign In.
Syncing local vault to online vault
You can sync the Identity Safe data from your localvault to the online vault. When you move the data fromyour local vault to online vault, all the data in yourlocal vault is removed permanently.
The Sync Data Online option in Identity Safe helpsyou to save your data online.
The following are the benefits of moving your IdentitySafe data online:
1 Lets you access your Identity Safe data from anycomputer.
w Your computer must have the latest version NortonInternet Security installed and must be connectedto the Internet.
1 Lets you access your Identity Safe data from onlinevault without depending on any external drive.
1 Provides a convenient means to automaticallysynchronize Identity Safe data across differentcomputers using your Norton Account.
w You must log in to your Norton Account to move theIdentity Safe data from your local vault to online vault.
To sync local vault to online vault
1 In the Norton Internet Security main window, clickSettings.
2 In the Settings window, click the Web tab.
3 In the left pane, click Identity Safe.
4 Under Identity Safe, in the Sync Data Online row,click Configure.
Securing your sensitive dataAbout securing your sensitive data
352

5 In the Sync Identity Safe Data Online window, inthe Enter thePassword box, type the password foryour local vault.
6 Click Log In to Norton Account.
7 In the SignIntoNortonAccount window, type yourNorton Account user name and password, and clickLog In.
8 Click Validate.
9 In the Sync Identity Safe Data Online window,create a password for your online vault.
10 Click Sync Data.
11 In the SyncIdentitySafeDataOnline window, clickGet Started.
Merging local vault to online vault
Identity Safe lets you store and manage your sensitiveinformation including your address, login information,passwords, and credit card details. You can sync youridentity safe data in the local vault into the online vault.
When you save your data in online vault, you can accessyour Identity Safe data from any computer that hasNorton Internet Security installed.
You can merge the Identity Safe data from your localprofile into your online vault.
w When you merge the data from local vault to onlinevault, the data from the local vault is permanentlymoved to the online vault. You can access the data fromthe online vault.
To merge local vault to online vault
1 In the Norton Internet Security main window, clickSettings.
2 In the Settings window, click the Web tab.
3 In the left pane, click Identity Safe.
4 Under Identity Safe, in the Sync Data Online row,click Configure.
353Securing your sensitive dataAbout securing your sensitive data

5 In the Sync Identity Safe Data Online window, inthe Enter thePassword box, type the password foryour local vault.
6 Click LogIntoNortonAccount option at the bottomof the Sync Identity Safe Data Online window.
7 In the SignIntoNortonAccount window, type yourNorton Account user name and password, and clickSign In.
8 Click Validate.If you already have an online vault, Norton InternetSecurity automatically takes you to MergeIdentitySafe Online window to merge your local vault withyour online vault.
9 In the Warning dialog box, click Yes.This window appears only if your Norton Accountalready has an online vault associated with it.
10 In the Merge Identity Safe Data Online window,type your online vault password associated withyour Norton Account in the Enter the Passwordbox.
11 In the Merge Identity Safe Data Online window,click Merge.
Deleting local vault and online vault
Identity Safe lets you create a local vault and an onlinevault to save your Identity Safe data. If you no longerrequire your Identity Safe data that is stored in yourlocal vault and online vault, you can delete the vaults.When you delete the local vault and online vault, allthe Identity Safe data is permanently removed.
To delete the local vault and online vault
1 In the Norton Internet Security main window, clickSettings.
2 In the Settings window, click the Web tab.
3 In the left pane, click Identity Safe.
4 Under Identity Safe, in the Delete Data row, clickConfigure.
Securing your sensitive dataAbout securing your sensitive data
354

5 In the Warning window, click Yes.
6 In the Settings window, click Apply.
7 Click OK.
Merging portable profile to local vault or online vault
If you have Identity Safe data that is stored on anyexternal drives from the older versions of NortonInternet Security, you can merge that portable profileto local vault or online vault. When you connect yourexternal drive to your computer, the Identity Safemenu in the NortonToolbar provides option to mergethe Identity Safe data from your portable profile. Youcan merge the data from the portable profile to localvault or online vault.
w You can merge the Identity Safe data from the portableprofile to the vault that you are currently logged in.
To merge the Identity Safe data from portable profileto local vault or online vault
1 On the Norton Toolbar, in the Identity Safe menu,click Merge Portable Data (Drive:\).This option appears only if you connect an externaldrive with portable profile.
2 In the dialog box that appears, click Yes.
3 In the Import Identity Safe Data window, underImport my data from, click Portable Profile(Drive:\).
4 In the Password box, type the password.
5 Do one of the following:
1 If you want to delete the data from the portableprofile after import, check Delete original dataonce merged.
1 If you do not want to delete the data from theportable profile after import, uncheck Deleteoriginal data once merged.
355Securing your sensitive dataAbout securing your sensitive data

Importing logins
Identity Safe lets you import the logins that you havesaved in Internet Explorer. After you set up IdentitySafe vaults, the IdentitySafeSetupSuccessful windowappears.
You can use this window to import your logins. Theimported logins appear in the VaultOpen menu on theNorton Toolbar and in the Edit Logins window. Youcan use the imported logins the same way that you usethe logins that you create.
w This option is unavailable for Windows 8 OperatingSystem.
To import logins
1 In the Norton Internet Security main window, clickSettings.
2 In the Settings window, click the Web tab.
3 In the left pane, click Identity Safe.
4 Under IdentitySafe, in the IdentitySafeSetup row,click Configure.
5 Set up Identity Safe.
6 In the Identity Safe Setup Successful window, doone of the following:
1 Check ImportmyloginsfromInternetExplorerto import all the logins that you saved in yourWeb browser.
1 Uncheck Import my logins from InternetExplorer, if you do not want to import all thelogins that you saved in your Web browser.
7 In the IdentitySafeSetupSuccessful window, clickDone.
Resetting Identity Safe
There may be instances when you need to reset yourIdentity Safe.
You may need to reset your Identity Safe in thefollowing occasions:
Securing your sensitive dataAbout securing your sensitive data
356

1 You experience a computer failure.
1 You forget your Identity Safe password.
w If you forget your Identity Safe password, you cannotrestore it. You can only reset your Identity Safe andstore all your data again.
Norton Internet Security lets you enter an incorrectpassword three times. If your attempts areunsuccessful, Norton Internet Security provides youan option to reset your Identity Safe. If you reset theIdentity Safe, you lose all the Identity Safe data thatyou stored, such as your login information, cards, andnotes.
To reset your Identity Safe
1 In the Norton Internet Security main window, clickSettings.
2 In the Settings window, click the Web tab.
3 In the left pane, click Identity Safe.
4 Under Identity Safe, in the Log in to Identity Saferow, click Configure.
5 In the Enter the Password box, type your IdentitySafe password.If you forget your password, Identity Safe lets youenter wrong password three times. If your attemptsare unsuccessful, the Trouble Logging In? windowappears.
6 In the Trouble Logging In? window, click ResetIdentity Safe.If you forget the Identity Safe password of youronline vault, you need to provide your NortonAccount credentials to reset your Identity Safe.
7 In the confirmation dialog box, click Yes.
Accessing Identity Safe
You can access the Identity Safe settings from thefollowing sections of Norton Internet Security:
1 From the Web tab in the Norton Internet SecuritySettings window
357Securing your sensitive dataAbout securing your sensitive data

1 From the Norton Toolbar
With Norton Internet Security, you can access andconfigure all the Identity Safe features even after theproduct expires. The following are the features thatyou can view or access after the product expires:
You can view the Edit Loginswindow using the Identity Safemenu on the Norton Toolbar.
Edit Logins
You can use this feature to takea backup of your Identity Safedata.
The data that you back up arestored as .DAT file.
Export Data
w You must be logged in to Identity Safe to access theIdentity Safe features. The Identity Safe features aresupported only in the Internet Explorer, Firefox, orChrome Web browsers.
To access Identity Safe settings from the main window
1 In the Norton Internet Security main window, clickSettings.
2 In the Settings window, click the Web tab.
3 In the left pane, click Identity Safe.
4 Under Identity Safe, for the Identity Safe featurethat you want to open, click Configure.
To access Identity Safe settings from theNorton Toolbar
1 Start your Web browser.
2 On the Norton Toolbar, in the Norton menu, clickSettings.
3 For the Identity Safe feature that you want to open,click Configure.
Securing your sensitive dataAbout securing your sensitive data
358

Logging in to and logging out of Identity Safe
You can log in to or log out of Identity Safe from thefollowing areas of Norton Internet Security:
1 The Web tab in the Norton Internet SecuritySettings window
1 The Norton Toolbar
To secure your Identity Safe data from others, log outof Identity Safe whenever you are away from yourcomputer.
Identity Safe automatically logs you out of the currentvault, when you are logged in to your local vault oronline vault and click Identity Safe Setup to create anew vault.
To log in to Identity Safe
1 In the Norton Internet Security main window, clickSettings.
2 In the Settings window, click the Web tab.
3 In the left pane, click Identity Safe.
4 In the Open Vault window, in the Enter thePassword box, type the password of the vault youwant to log in.
5 Click Log In.
To log out of Identity Safe
1 In the Norton Internet Security main window, clickSettings.
2 In the Settings window, click the Web tab.
3 In the left pane, click Identity Safe.
4 Under IdentitySafe, in the Logoutof IdentitySaferow, click Log out now.
To log in to Identity Safe from the Norton Toolbar
1 Start your Web browser.
2 On the Norton Toolbar, click Vault Closed.
3 In the Open Vault window, in the Enter thePassword box, type the password of the vault youwant to log in.
359Securing your sensitive dataAbout securing your sensitive data

4 Click Open Vault.
To log out of Identity Safe from the Norton Toolbar
1 Start your Web browser.
2 On the NortonToolbar, click VaultOpen, and thenclick Close Vault.
Configuring Identity Safe settings
You can use the various features in Identity Safe tomanage your personal sensitive information. Thelogins, cards, and notes help you store and use yourinformation in a secure way.
To configure Identity Safe settings
1 In the Norton Internet Security main window, clickSettings.
2 In the Settings window, click the Web tab.
3 In the left pane, click Identity Safe.
Securing your sensitive dataAbout securing your sensitive data
360

4 Under Identity Safe, identify the feature that youwant to use, and click Configure. Your options are:
Lets you set up Identity Safevault.
Identity Safe Setup
You can create a local vault oran online vault and store yourIdentity Safe data.
w You must log in to yourNorton Account to create anonline vault.
361Securing your sensitive dataAbout securing your sensitive data

Lets you configure the way youwant Identity Safe to collect,store, and display the logininformation for the Web pagesyou visit.
You can configure Identity Safeto display your cards that youcreated for the Web sites thathave forms. You can alsoconfigure the autofill settings forthe Web sites that containsecurity threats.
In addition, you can do thefollowing activities:1 Configure the region for your
card information.1 Specify how you want Norton
Identity Safe to use theautofill feature.
1 Set the options that makeIdentity Safe to display amessage to notify you thatyou have inserted an externaldrive.
1 Set the options that makeIdentity Safe to warn youabout the unsafe removal ofexternal drives.
1 Turn off the browser’spassword manager
Browsing Options
Lets you change the passwordsettings and the security level ofyour Identity Safe password.
w You should change yourIdentity Safe passwordfrequently to keep your IdentitySafe data from being misused.
Password & Security
Securing your sensitive dataAbout securing your sensitive data
362

Lets you manage your personalinformation such as name, dateof birth, email address, andcredit card information in oneplace.
You can use the information thatyou store to automatically fillforms. This feature lets youprovide sensitive informationwithout typing it when you areonline. In this way, Identity Safeprotects you from keyloggersthat steal and misuse youridentity.
Edit Cards
Lets you manage your variouslogin information.
Logins include information suchas your email login credentialsand Internet bankingcredentials.
When you save all of your logininformation in the Identity Safe,you can do the following:1 Easily track all your logins
1 Quickly launch your loginWeb sites
1 View or update yourpassword for the Web site
1 Use folders to organize yourlogins
1 Change your login settings
Edit Logins
363Securing your sensitive dataAbout securing your sensitive data
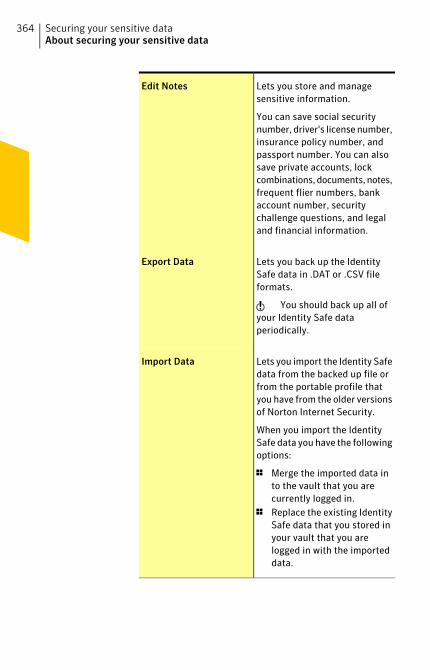
Lets you store and managesensitive information.
You can save social securitynumber, driver's license number,insurance policy number, andpassport number. You can alsosave private accounts, lockcombinations, documents, notes,frequent flier numbers, bankaccount number, securitychallenge questions, and legaland financial information.
Edit Notes
Lets you back up the IdentitySafe data in .DAT or .CSV fileformats.
w You should back up all ofyour Identity Safe dataperiodically.
Export Data
Lets you import the Identity Safedata from the backed up file orfrom the portable profile thatyou have from the older versionsof Norton Internet Security.
When you import the IdentitySafe data you have the followingoptions:
1 Merge the imported data into the vault that you arecurrently logged in.
1 Replace the existing IdentitySafe data that you stored inyour vault that you arelogged in with the importeddata.
Import Data
Securing your sensitive dataAbout securing your sensitive data
364

Lets you move your Identity Safedata that you stored in your localvault to online vault.
w When you sync yourIdentity Safe data from localvault to online vault, the data inthe local vault is permanentlyremoved.
Sync Data Online
Lets you permanently removethe Identity Safe vault.
Delete Data
About Edit logins
The Edit Logins feature in Identity Safe lets you viewall the logins that you want Identity Safe to manage.Login information includes information such as youremail login credentials and Internet bankingcredentials.
Identity Safe provides you the option to save yourlogins when you enter your login information in a Website's login page. You can instantly save your logininformation in Identity Safe.
w To manage your logins, you must be logged in toIdentity Safe.
Identity Safe offers the following features:
1 Safely stores Web site login information
1 Lets you save multiple IDs or accounts andpasswords for a Web site
1 Lets you organize your logins under various folders
1 Intelligently searches for a particular login
1 Lets you save the Web site name with a name otherthan the default name
1 Displays the login ID and lets you show or hide thepassword
1 Displays the strength of the password for your login
365Securing your sensitive dataAbout securing your sensitive data

1 Lets you quickly launch the Web site login page
1 Fills in your login automatically when you revisitWeb pages
1 Lets you manually add logins
1 Lets you change the URL of your saved logins
1 Lets you view the last time you made changes tothe settings of your saved logins
1 Lets you access the login features that you savedfor a Web site even after Norton Internet Securityexpires.
The Identity Safe features are supported in the InternetExplorer, Firefox, or Chrome Web browsers.
w Norton Internet Security supports latest versions ofGoogle Chrome and Firefox.
You can use the Vault Open menu that is available onthe Norton Toolbar to view and autofill the details ofthe saved logins.
You can also use LoginAssistant option on the NortonToolbar to view, copy, or edit the logins or cards inyour online vault.
Login Assistant window has the following options:
Lets you view the logincredentials of the web pagecurrently loaded in yourbrowser.
Website Login
Lets you view the Cards thatyou have saved in your onlinevault.
Cards
Lets you view all the logincredentials that you havesaved in your online vault.
All Logins
If you have saved multiple logins for a same Web site,you can choose a login from the drop-down list that
Securing your sensitive dataAbout securing your sensitive data
366

appears on the top left corner of the Login Assistantwindow.
Identity Safe automatically detects login fields whichare not auto filled or filled incorrect by Identity safein the Web pages and displays the Need Assistancemenu bar in your browser. The NeedAssistancemenubar will let you use the saved login credentials. If youwant manually enter the details from your IdentitySafe data, you can click Copy option to copy and pastethe information.
w You need to validate your vault password for managingthe login credentials in the Login Assistant window,if you have selected Require Identity Safe passwordbefore filling option in the Edit Logins window.
Saving logins
If you do not want your logins to be savedautomatically, you can use the following option in theBrowsing Option window:
1 Yes, Save Automatically
1 No, Never Save any logins
1 Ask before saving
By default Yes, Save Automatically option is set.
After Identity Safe saves a login, it automatically fillsthe login details next time you visit the Web site.
You must be logged in to Identity Safe to save and useautofill passwords. If the password or user name fieldis blank, Identity Safe does not prompt you to save thelogin.
Identity Safe lets you access all the login features thatyou saved for a Web site even after the product expires.
To save a login
1 Go to the Web site for which you want to save yourlogin.
367Securing your sensitive dataAbout securing your sensitive data

2 Type your login details, and then click the optionor link that logs you in.Norton Internet Security automatically saves yourlogin details when you enter them for the first time.
To save additional logins for a Web site
1 Go to the Web page for which you want to saveanother login.Your login credentials automatically appear on theWeb page.
2 Clear the login credentials that appear on the Webpage.
3 Type the new login, and then click the option or linkthat logs you in.
4 On the Norton Toolbar, in the Login Saved to YourVault row, click Options.
5 In the Save Login for Site dialog box, type a namefor your login in the Name box, select the folder inwhich you want to save your login from the Folderdrop-down list.
6 Click Save.
Editing logins
Edit Logins lets you view all of the logins that you wantIdentity Safe to manage.
Edit Logins provides the following features:
1 Lets you safely store Web site login information.
1 Lets you save multiple IDs or accounts andpasswords for a Web site.
1 Lets you organize your logins under various folders.
1 Intelligently searches for a particular login.
1 Lets you save the Web site name with a name otherthan the default name.
1 Displays the login ID and lets you show or hide thepassword.
1 Displays the strength of the password for each ofthe logins.
Securing your sensitive dataAbout securing your sensitive data
368
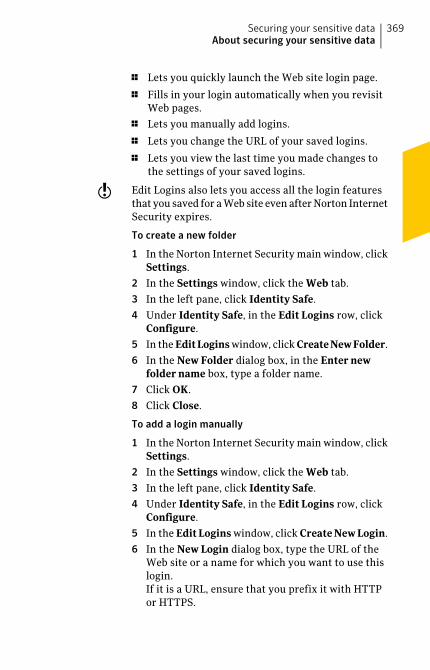
1 Lets you quickly launch the Web site login page.
1 Fills in your login automatically when you revisitWeb pages.
1 Lets you manually add logins.
1 Lets you change the URL of your saved logins.
1 Lets you view the last time you made changes tothe settings of your saved logins.
w Edit Logins also lets you access all the login featuresthat you saved for a Web site even after Norton InternetSecurity expires.
To create a new folder
1 In the Norton Internet Security main window, clickSettings.
2 In the Settings window, click the Web tab.
3 In the left pane, click Identity Safe.
4 Under Identity Safe, in the Edit Logins row, clickConfigure.
5 In the EditLogins window, click CreateNewFolder.
6 In the New Folder dialog box, in the Enter newfolder name box, type a folder name.
7 Click OK.
8 Click Close.
To add a login manually
1 In the Norton Internet Security main window, clickSettings.
2 In the Settings window, click the Web tab.
3 In the left pane, click Identity Safe.
4 Under Identity Safe, in the Edit Logins row, clickConfigure.
5 In the EditLogins window, click CreateNewLogin.
6 In the New Login dialog box, type the URL of theWeb site or a name for which you want to use thislogin.If it is a URL, ensure that you prefix it with HTTPor HTTPS.
369Securing your sensitive dataAbout securing your sensitive data
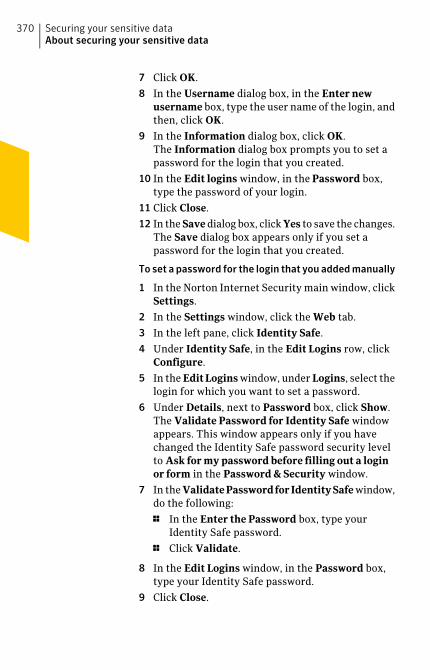
7 Click OK.
8 In the Username dialog box, in the Enter newusername box, type the user name of the login, andthen, click OK.
9 In the Information dialog box, click OK.The Information dialog box prompts you to set apassword for the login that you created.
10 In the Edit logins window, in the Password box,type the password of your login.
11 Click Close.
12 In the Save dialog box, click Yes to save the changes.The Save dialog box appears only if you set apassword for the login that you created.
To set a password for the login that you addedmanually
1 In the Norton Internet Security main window, clickSettings.
2 In the Settings window, click the Web tab.
3 In the left pane, click Identity Safe.
4 Under Identity Safe, in the Edit Logins row, clickConfigure.
5 In the EditLogins window, under Logins, select thelogin for which you want to set a password.
6 Under Details, next to Password box, click Show.The Validate Password for Identity Safe windowappears. This window appears only if you havechanged the Identity Safe password security levelto Ask for my password before filling out a loginor form in the Password & Security window.
7 In the ValidatePasswordforIdentitySafe window,do the following:
1 In the Enter the Password box, type yourIdentity Safe password.
1 Click Validate.
8 In the Edit Logins window, in the Password box,type your Identity Safe password.
9 Click Close.
Securing your sensitive dataAbout securing your sensitive data
370

10 In the confirmation dialog box, click Yes to save thechanges.
To delete a login or a folder
1 In the Norton Internet Security main window, clickSettings.
2 In the Settings window, click the Web tab.
3 In the left pane, click Identity Safe.
4 Under Identity Safe, in the Edit Logins row, clickConfigure.
5 In the EditLogins window, under Logins, select theWeb site name or the folder that you want to delete.You can only delete the folders that you manuallycreate; You cannot delete the folders createdthrough auto categorization.
6 Click Delete.
7 In the Warning dialog box, click Yes.
8 Click Close.
You can also use LoginAssistant option on the NortonToolbar to view, copy, or edit the logins or cards inyour online vault.
Identity Safe automatically detects login fields whichare not auto filled or filled incorrect by Identity safein the Web pages and displays the Need Assistancemenu bar in your browser. The NeedAssistancemenubar will let you use the saved login credentials. If youwant manually enter the details from your IdentitySafe data, you can click Copy option to copy and pastethe information.
w You need to validate your vault password for managingthe login credentials in the Login Assistant window,if you have selected Require Identity Safe passwordbefore filling option in the Edit Logins window.
Managing your URL details
Edit Logins lets you view the URL of the logins thatyou saved. You can view the URL of the Web site loginsthat you save in Edit Logins.
371Securing your sensitive dataAbout securing your sensitive data
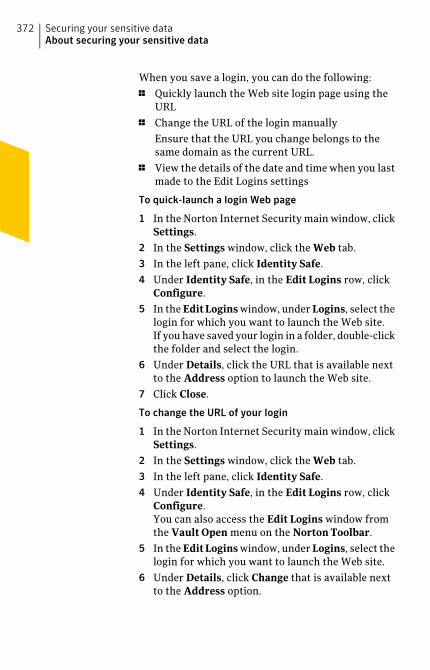
When you save a login, you can do the following:
1 Quickly launch the Web site login page using theURL
1 Change the URL of the login manually
Ensure that the URL you change belongs to thesame domain as the current URL.
1 View the details of the date and time when you lastmade to the Edit Logins settings
To quick-launch a login Web page
1 In the Norton Internet Security main window, clickSettings.
2 In the Settings window, click the Web tab.
3 In the left pane, click Identity Safe.
4 Under Identity Safe, in the Edit Logins row, clickConfigure.
5 In the EditLogins window, under Logins, select thelogin for which you want to launch the Web site.If you have saved your login in a folder, double-clickthe folder and select the login.
6 Under Details, click the URL that is available nextto the Address option to launch the Web site.
7 Click Close.
To change the URL of your login
1 In the Norton Internet Security main window, clickSettings.
2 In the Settings window, click the Web tab.
3 In the left pane, click Identity Safe.
4 Under Identity Safe, in the Edit Logins row, clickConfigure.You can also access the Edit Logins window fromthe Vault Open menu on the Norton Toolbar.
5 In the EditLogins window, under Logins, select thelogin for which you want to launch the Web site.
6 Under Details, click Change that is available nextto the Address option.
Securing your sensitive dataAbout securing your sensitive data
372

7 In the Update URL window, in the Enter the newURL here box, type the new URL.Ensure that the URL you modify is valid and isprefixed with HTTP or HTTPS.
8 Click OK.
9 In the Edit Logins window, click Close.
Changing the user name and password
Identity Safe lets you change the user name andpassword for the logins that you have saved in the EditLogins window. The updated information isautomatically filled the next time you visit that Webpage.
To change the user name
1 In the Norton Internet Security main window, clickSettings.
2 In the Settings window, click the Web tab.
3 In the left pane, click Identity Safe.
4 Under Identity Safe, in the Edit Logins row, clickConfigure.
5 In the EditLogins window, under Logins, select theWeb site name for which you want to change theuser name.
6 Under Details, next to Username box, clickChange.
7 In the Username dialog box, in the Enter newusername box, type the new user name.
8 Click OK.
9 In the Edit Logins window, click Close.
To change the password
1 In the Norton Internet Security main window, clickSettings.
2 In the Settings window, click the Web tab.
3 In the left pane, click Identity Safe.
4 Under Identity Safe, in the Edit Logins row, clickConfigure.
373Securing your sensitive dataAbout securing your sensitive data
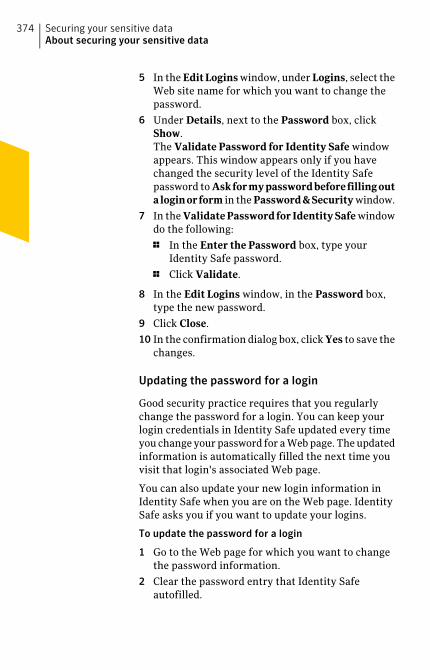
5 In the EditLogins window, under Logins, select theWeb site name for which you want to change thepassword.
6 Under Details, next to the Password box, clickShow.The Validate Password for Identity Safe windowappears. This window appears only if you havechanged the security level of the Identity Safepassword to Askformypasswordbeforefillingoutaloginorform in the Password&Security window.
7 In the ValidatePasswordforIdentitySafe windowdo the following:
1 In the Enter the Password box, type yourIdentity Safe password.
1 Click Validate.
8 In the Edit Logins window, in the Password box,type the new password.
9 Click Close.
10 In the confirmation dialog box, click Yes to save thechanges.
Updating the password for a login
Good security practice requires that you regularlychange the password for a login. You can keep yourlogin credentials in Identity Safe updated every timeyou change your password for a Web page. The updatedinformation is automatically filled the next time youvisit that login's associated Web page.
You can also update your new login information inIdentity Safe when you are on the Web page. IdentitySafe asks you if you want to update your logins.
To update the password for a login
1 Go to the Web page for which you want to changethe password information.
2 Clear the password entry that Identity Safeautofilled.
Securing your sensitive dataAbout securing your sensitive data
374

3 Type the new password, and then click the buttonor link that logs you in.
4 In the Savenewpasswordforlogin? menu bar, clickSave.
About Edit Cards
The EditCards option in Identity Safe lets you manageyour personal information such as name, date of birth,email address, and credit card information in one place.
You can use the information that you store in the cardsto do the following:
1 Automatically fill forms
1 Provide sensitive information without having totype it while you are online
In this way, Identity Safe protects you from keyloggersthat steal and misuse your identity.
w Some Web sites have forms with fields for credit cardsor other personal information. The Vault Open menuon the NortonToolbar lists the cards that you createdfor autofill. You can choose a card from the list to fillthe forms automatically.
You can add, view, edit, and duplicate the details of anycard that you create. You can also delete a card if it isno longer needed.
In addition, Edit Cards provides you the followingfeatures:
1 Lets you password-protect the card to protectyourself from misuse of your sensitive informationand personal information
1 Recognizes the Web pages that have forms andimmediately displays a pop-up window with the listof cards
1 Provides you a quick view of any of your cards thatis not password-protected
Identity Safe provides additional security for yourpassword-protected cards by not displaying thesummary of the card
375Securing your sensitive dataAbout securing your sensitive data

Identity Safe automatically detects login fields whichare not auto filled or filled incorrect by Identity safein the Web pages and displays the Need Assistancemenu bar below the Norton Toolbar in your browser.The Need Assistance menu bar lets you choose therequired card from the list of cards that you have saved.You can also click LoginAssistant option to select thecard to fill the Web site with the details that are savedin the card.
You can also copy and edit the required fields from theselected card in the Login Assistant window. Bydefault, the important data such as Passwords, CreditCard number, and birth date are hidden; you need toselect Show option to view and copy the data.
w Symantec recommends you to clear your data copiedfrom the cards by selecting Clear Clipboard option.
Adding cards
The cards in the Edit Identity Cards window help youto automatically fill forms on Web sites with a singleclick. You can create cards to store information, suchas personal details, contact details, and credit carddetails. You can provide a card name to help youidentify a specific card.
If you have more than one credit card, you can createmultiple cards with different sets of information. Whenyou visit a transactional Web site, you can provide thecredit card details that are present in any of the cardsthat you created.
You can also create anonymous cards for use onunfamiliar Web sites where you may be uncomfortableproviding your personal information. You canautomatically fill online forms when you visit a Website.
To add a card
1 In the Norton Internet Security main window, clickSettings.
2 In the Settings window, click the Web tab.
Securing your sensitive dataAbout securing your sensitive data
376
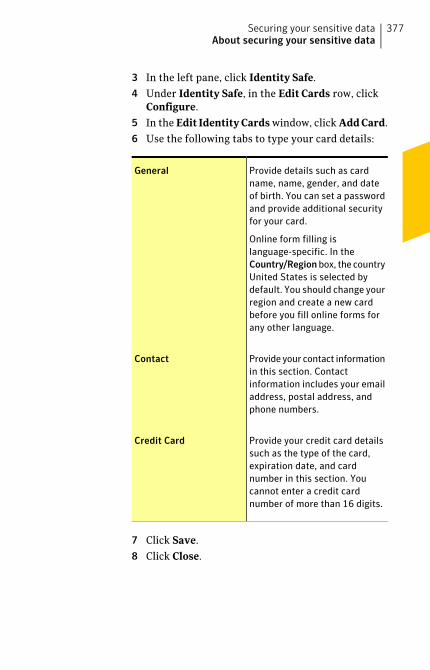
3 In the left pane, click Identity Safe.
4 Under Identity Safe, in the Edit Cards row, clickConfigure.
5 In the Edit IdentityCards window, click AddCard.
6 Use the following tabs to type your card details:
Provide details such as cardname, name, gender, and dateof birth. You can set a passwordand provide additional securityfor your card.
Online form filling islanguage-specific. In theCountry/Regionbox, the countryUnited States is selected bydefault. You should change yourregion and create a new cardbefore you fill online forms forany other language.
General
Provide your contact informationin this section. Contactinformation includes your emailaddress, postal address, andphone numbers.
Contact
Provide your credit card detailssuch as the type of the card,expiration date, and cardnumber in this section. Youcannot enter a credit cardnumber of more than 16 digits.
Credit Card
7 Click Save.
8 Click Close.
377Securing your sensitive dataAbout securing your sensitive data

Editing, deleting, or duplicating cards
All the cards that you have saved in Identity Safe arelisted in the Edit Identity Cards window. You canselect, view, duplicate, and edit the details of any cardthat you created. You can delete a card if it is no longerneeded. You can also duplicate a saved card and changeonly the fields that you want to change.
You can view a summary of the card that you created.You can select any of the cards that are present in thelist of cards at the left pane of the Edit Identity Cardswindow. When you select a card, you can view asummary of the card.
w When you lock your card with a password, IdentitySafe provides additional security to your card. Youcannot view the summary of the locked card. Youcannot edit, delete, or duplicate a card unless youprovide the password.
If you have multiple cards, use the scroll arrows tobrowse the list.
When you create, duplicate, or edit a card, the card'sregion is set to the user's default region. If you browseto a Web site other than the default region and use thecard to fill the form on that Web site, the fields maynot fill correctly. For example, your card has a defaultUnited States region but you are on a France Web page.In this case, you must use the card with France as theregion to fill the Web page form.
To edit a card
1 In the Norton Internet Security main window, clickSettings.
2 In the Settings window, click the Web tab.
3 In the left pane, click Identity Safe.
4 Under Identity Safe, in the Edit Cards row, clickConfigure.
5 In the Edit Identity Cards window, select the cardthat you want to edit.
6 Click Edit Card.
Securing your sensitive dataAbout securing your sensitive data
378

7 Modify the required details that you want to change.
8 Click Save.
9 Click Close.
To delete a card
1 In the Norton Internet Security main window, clickSettings.
2 In the Settings window, click the Web tab.
3 In the left pane, click Identity Safe.
4 Under Identity Safe, in the Edit Cards row, clickConfigure.
5 In the Edit Identity Cards window, select the cardthat you want to delete.
6 Click Delete Card.
7 In the Warning dialog box, click Yes.
8 Click Close.
To duplicate a card
1 In the Norton Internet Security main window, clickSettings.
2 In the Settings window, click the Web tab.
3 In the left pane, click Identity Safe.
4 Under Identity Safe, in the Edit Cards row, clickConfigure.
5 In the Edit Identity Cards window, select the cardthat you want to duplicate.
6 Click Duplicate Card.
7 Modify the details that you want to change.
8 Click Save.
9 Click Close.
Identity Safe automatically detects login fields whichare not auto filled or filled incorrect by Identity safein the Web pages and displays the Need Assistancemenu bar below the Norton Toolbar in your browser.The Need Assistance menu bar lets you choose therequired card from the list of cards that you have saved.You can also click LoginAssistant option to select the
379Securing your sensitive dataAbout securing your sensitive data

card to fill the Web site with the details that are savedin the card.
You can also copy and edit the required fields from theselected card in the Login Assistant window. Bydefault, the important data such as Passwords, CreditCard number, and birth date are hidden; you need toselect Show option to view and copy the data.
w Symantec recommends you to clear your data copiedfrom the cards by selecting Clear Clipboard option.
About Edit Notes
Identity Safe stores and manages your sensitiveinformation. It becomes difficult to manage all of theidentity numbers that you use when you browse theWeb. The Edit Notes option in Identity Safe stores allyour sensitive IDs in a very secure way and lets youuse them easily when you are online. You can use EditNotes to save information such as social securitynumber, driver's license number, insurance policynumber, and legal and financial information.
Editing Notes
You can use the Edit Notes option in Identity Safe tostore your personal information, which you can retrieveand use when needed. You can use this information tofill out Web site registration forms. You can also view,edit, and delete the notes that you have saved.
To create Notes
1 In the Norton Internet Security main window, clickSettings.
2 In the Settings window, click the Web tab.
3 In the left pane, click Identity Safe.
4 Under Identity Safe, in the Edit Notes row, clickConfigure.
Securing your sensitive dataAbout securing your sensitive data
380

5 In the EditNotes window, under Details, in the Titlebox, type a title for the note you want to save.If a note already exists, click CreateNewNotes, andthen under Details, in the Title box, type a title forthe note you want to save.
6 Type any additional information in the Informationbox.
7 Click Save.
8 In the Edit Notes window, click OK.
To edit Notes
1 In the Norton Internet Security main window, clickSettings.
2 In the Settings window, click the Web tab.
3 In the left pane, click Identity Safe.
4 Under Identity Safe, in the Edit Notes row, clickConfigure.
5 In the Edit Notes window, under Title, select thetitle of the note that you want to edit.
6 Click EditNotes, and modify the information underDetails.You can change the category, modify the title, andedit the additional information that you haveprovided.
7 Click Save.
8 In the Edit Notes window, click OK.
To delete Notes
1 In the Norton Internet Security main window, clickSettings.
2 In the Settings window, click the Web tab.
3 In the left pane, click Identity Safe.
4 Under Identity Safe, in the Edit Notes row, clickConfigure.
5 In the Edit Notes window, under Title, select thetitle of the note that you want to delete.
6 Click Delete Notes.
7 In the Warning dialog box, click Yes.
381Securing your sensitive dataAbout securing your sensitive data

8 In the Edit Notes window, click OK.
About exporting and importing Identity Safe data
You can export your Identity Safe data for securitypurposes, data recovery, or when you transfer yourIdentity Safe data to a new computer. The backup filesare saved as .DAT files.
You can protect the files that you backed up with apassword. Symantec recommends that you use apassword to keep your Identity Safe data more secure.The backup password does not need to be the same asyour Identity Safe password. You must provide thepassword when you restore the Identity Safe data thatyou backed up.
You can import your Identity Safe data from the filethat you previously backed up. You can also import theIdentity Safe data from the portable profile.
When you import the Identity Safe data you have thefollowing options:
1 Merge the imported data in to the vault that youare currently logged in.
1 Replace the existing Identity Safe data that youstored in your vault that you are logged in with theimported data.
w You can also delete the data once the import iscomplete.
Exporting your Identity Safe data
You can export your Identity Safe data for securitypurposes, data recovery, or when you transfer yourIdentity Safe data to a new computer.
You can retrieve Identity Safe data when your productexpires.
To export your Identity Safe data
1 In the Norton Internet Security main window, clickSettings.
Securing your sensitive dataAbout securing your sensitive data
382

2 In the Settings window, click the Web tab.
3 In the left pane, click Identity Safe.
4 Under Identity Safe, in the Export Data row, clickConfigure.
5 In the ExportIdentitySafeData window, select theFile Format.You can select one of the following:
1 Identity Safe Backup Format
1 Plain text
6 In the Exportmydata to box, type or browse to thelocation to which you want your data saved.
7 Type the name that you want to assign to the file.
8 If you want to back up your data with a passwordfor more security, type and confirm the password.
9 Click OK.In the ValidatePasswordforIdentitySafewindow,enter your vault password to export your IdentitySafe data
10 In the confirmation dialog box, click OK.
Importing your Identity Safe data
You can import your Identity Safe data from the filethat you previously backed up. You can also import theIdentity Safe data from the portable profile that yousaved in the older version of Norton Internet Security.
You can merge the imported data in to the vault thatyou are currently logged in or replace the existingIdentity Safe data that you stored in your vault thatyou are logged in with the imported data.
w The Merge with existing data and Replace existingdata options appear only when you import IdentitySafe data from a backup file.
When you import Identity Safe data from local orportable profile, you can only merge the data. TheDeleteOriginaldataoncemerged option appears whenyou import the data from local or portable profile. Bydefault, this option is enabled.
383Securing your sensitive dataAbout securing your sensitive data
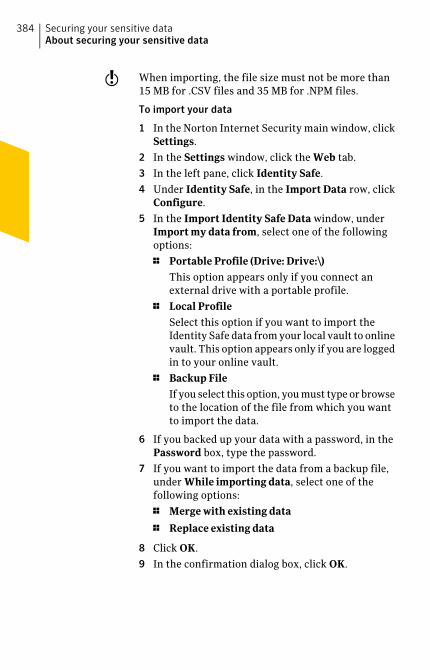
w When importing, the file size must not be more than15 MB for .CSV files and 35 MB for .NPM files.
To import your data
1 In the Norton Internet Security main window, clickSettings.
2 In the Settings window, click the Web tab.
3 In the left pane, click Identity Safe.
4 Under Identity Safe, in the Import Data row, clickConfigure.
5 In the Import Identity Safe Data window, underImport my data from, select one of the followingoptions:
1 Portable Profile (Drive: Drive:\)This option appears only if you connect anexternal drive with a portable profile.
1 Local ProfileSelect this option if you want to import theIdentity Safe data from your local vault to onlinevault. This option appears only if you are loggedin to your online vault.
1 Backup FileIf you select this option, you must type or browseto the location of the file from which you wantto import the data.
6 If you backed up your data with a password, in thePassword box, type the password.
7 If you want to import the data from a backup file,under While importing data, select one of thefollowing options:
1 Merge with existing data
1 Replace existing data
8 Click OK.
9 In the confirmation dialog box, click OK.
Securing your sensitive dataAbout securing your sensitive data
384

About Browsing Options
BrowsingOptions lets you configure the way you wantIdentity Safe to collect, store, and display the logininformation for the Web pages you visit. You canconfigure Identity Safe to display your cards that youcreated for the Web sites that have forms. You can alsoconfigure the autofill settings for the Web sites thatcontain security threats.
w Symantec recommends you to keep the default settingsfor logins.
You can configure the following options in theBrowsing Options window:
Configures Identity Safe todisplay your logins each timeyou visit a Web site that hasmultiple logins.
Displaymy Logins each timeI visit a page with multipleLogins
Automatically fills your logindetails when you visit a Website.
Autofill my logins when Ivisit websites
Automatically categorizes thesaved logins in theirrespective folders such asBanking, Shopping, News,and so on.
Autocategorize Logins
Displays your Identity Cardseach time you visit a Webpage with forms to fill yourpersonal details.
Display my Identity Cardseach time I visit a page withfillable form
385Securing your sensitive dataAbout securing your sensitive data
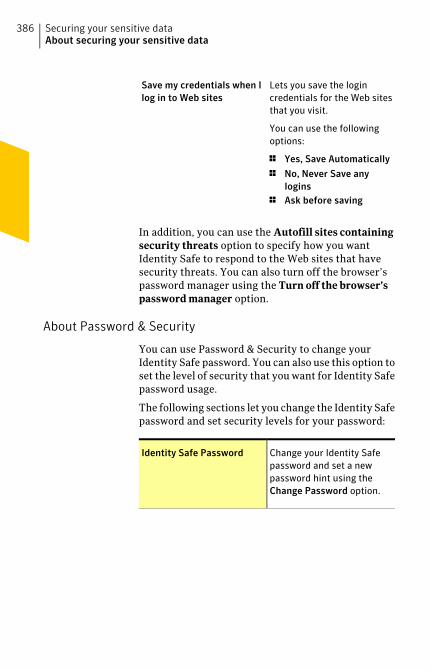
Lets you save the logincredentials for the Web sitesthat you visit.
You can use the followingoptions:
1 Yes, Save Automatically
1 No, Never Save anylogins
1 Ask before saving
Save my credentials when Ilog in to Web sites
In addition, you can use the Autofill sites containingsecurity threats option to specify how you wantIdentity Safe to respond to the Web sites that havesecurity threats. You can also turn off the browser’spassword manager using the Turn off the browser’spassword manager option.
About Password & Security
You can use Password & Security to change yourIdentity Safe password. You can also use this option toset the level of security that you want for Identity Safepassword usage.
The following sections let you change the Identity Safepassword and set security levels for your password:
Change your Identity Safepassword and set a newpassword hint using theChange Password option.
Identity Safe Password
Securing your sensitive dataAbout securing your sensitive data
386

Password Security
387Securing your sensitive dataAbout securing your sensitive data

Specify the Identity Safepassword security level.
Identity Safe provides fourlevels of security to protectyour Identity Safe password.Choose one of the followingoptions:1 Ask for my password at
the beginning of eachlogin session
Prompts for your IdentitySafe password the firsttime you access IdentitySafe.
If you are logged in toWindows, you do not needto provide the passwordagain.
You should use thisoption to make your logincredentials more secure.
1 Ask for my passwordbefore filling out a loginor form
Prompts for your IdentitySafe password with everyonline form before itautofills any login.
You can specify thatindividual logins requireyour Identity Safepassword before autofilloccurs.
1 Automatically log out ofIdentity Safe if it isinactive for
Automatically logs youout of Identity Safe whendo not use your IdentitySafe for a specified time
Securing your sensitive dataAbout securing your sensitive data
388

period. You can specifythe idle time-out periodas 15, 30, or 45 minutes.
Use this option if otherpeople have access toyour computer.
1 Ask for my passwordafter sleep orhibernation
Prompts you for yourIdentity Safe passwordwhen your systemrestores from suspendedstate.
This option preventsmisuse of your IdentitySafe data by validatingyour Identity Safepassword each time yoursystem restores fromsuspended state.w Norton InternetSecurity prompts you toenter your Identity Safepassword only if you hadlogged into your IdentitySafe vault when thesystem moved to thesuspended state.
w You must validate yourIdentity Safe password eachtime you change the securitylevel of the vault to a settingthat is less secure than thecurrent security level.
389Securing your sensitive dataAbout securing your sensitive data

Changing the Identity Safe password
You should change your Identity Safe Passwordregularly to prevent unauthorized access to yourpersonal information in Identity Safe.
If you want to change the Identity Safe password ofyour online vault, the password you provide must havethe following characteristics:
1 At least eight characters
1 At least one capital letter
1 At least two numerals (0 through 9)
1 At least one symbol (for example, * > & $ %)
1 The password must not match with your NortonAccount user name or password.
w You can set your password hint here if you did notprovide it when you configured Identity Safe.
To change the Identity Safe password
1 In the Norton Internet Security main window, clickSettings.
2 In the Settings window, click the Web tab.
3 In the left pane, click Identity Safe.
4 Under Identity Safe, in the Password & Securityrow, click Configure.
5 In the Password & Security window, click ChangePassword.
6 In the ChangeIdentitySafePassword window, typethe current password and the new password, andconfirm the new password.
7 Click OK.
8 In the confirmation dialog box, click OK.
About Norton ToolbarWhen you install Norton Internet Security, it addsNorton Toolbar to Internet Explorer, Firefox, andChrome Web browsers.
Securing your sensitive dataAbout securing your sensitive data
390

You have the following options in the NortonToolbar:
Lets you access the Web Settingsand other settings.
The following options areavailable in the Norton menu:1 Report Site
1 Settings
1 Go to Norton Safe Webwebsite
1 Enable Norton Safe Web
1 Enable Norton SafeSearch/DisableNortonSafeSearch
1 My Norton Account
1 Help
w The Minimize Toolbaroption appears only in theInternet Explorer browser. Also,the Community Buzz option isavailable only inEnglish-language versions ofWindows.
Norton menu
391Securing your sensitive dataAbout securing your sensitive data

Lets you access the Identity Safedata stored in your online vault.You can add, edit or delete yourLogins, Cards, and Notes underthis section.
You can use the Norton SafeSearch option to enhance yourWeb search experience. TheNorton Safe Search usesAsk.com to generate the searchresults. Norton Safe Searchgenerates the search resultsbased upon the site safety statusand Norton rating for each of thesearch results.
You can also set this page asyour default home page.
Navigate to the IdentitySafe Home Page icon
Lets you share the Web site withyour friends through the popularnetworking sites such asFacebook, Twitter, LinkedIn,Yahoo Mail, Hot Mail or GoogleMail.
Share
Lets you know if the Web siteyou visit is safe or unsafe.
The Antiphishing and NortonSafe Web options under theSafeSurfing section on the Web tabof the Settingswindow, analyzethe security level of the Websites you visit. It then displaysthe results in the Norton SiteSafety pop-up window.
Safe Web indicator
Securing your sensitive dataAbout securing your sensitive data
392

Lets you view the logins andcards that you have saved inIdentity Safe.
Some Web sites have forms tofill or require login information.You can use the VaultOpen/Vault Closed menu to fillthe details in those Web sites.The Vault Open/Vault Closedmenu displays the list of alllogins and cards that you saved.You can select a login from thelist and a use it to log in to theWeb site. You can also select acard from the list and use to fillforms.
You can access all the IdentitySafe options from the VaultOpen/Vault Closed menu.
w You should be logged in toany of the Identity Safe vault toaccess the Vault Open/VaultClosed menu.
Vault Open/Vault Closedmenu
Lets you view and copy thelogins or cards that you saved inyour Identity Safe vault. You canselect the desired login or cardfrom the drop-down menu to fillin the Web site.
w You must enable Show FillForm Assistant option, underthe Vault Open menu on theNorton Toolbar.
Fill Assistant
In Google Chrome Web browser, the Norton Toolbarcan be accessed as a Chrome Extension. In theExtensions page of the Chrome browser, you can enable
393Securing your sensitive dataAbout securing your sensitive data
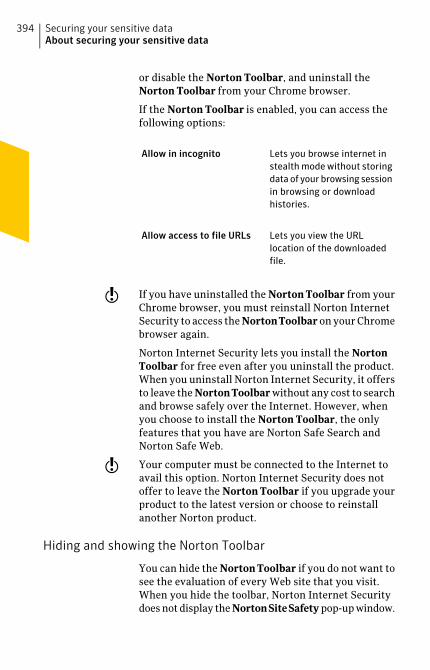
or disable the Norton Toolbar, and uninstall theNorton Toolbar from your Chrome browser.
If the Norton Toolbar is enabled, you can access thefollowing options:
Lets you browse internet instealth mode without storingdata of your browsing sessionin browsing or downloadhistories.
Allow in incognito
Lets you view the URLlocation of the downloadedfile.
Allow access to file URLs
w If you have uninstalled the NortonToolbar from yourChrome browser, you must reinstall Norton InternetSecurity to access the NortonToolbar on your Chromebrowser again.
Norton Internet Security lets you install the NortonToolbar for free even after you uninstall the product.When you uninstall Norton Internet Security, it offersto leave the NortonToolbar without any cost to searchand browse safely over the Internet. However, whenyou choose to install the Norton Toolbar, the onlyfeatures that you have are Norton Safe Search andNorton Safe Web.
w Your computer must be connected to the Internet toavail this option. Norton Internet Security does notoffer to leave the Norton Toolbar if you upgrade yourproduct to the latest version or choose to reinstallanother Norton product.
Hiding and showing the Norton Toolbar
You can hide the NortonToolbar if you do not want tosee the evaluation of every Web site that you visit.When you hide the toolbar, Norton Internet Securitydoes not display the NortonSiteSafety pop-up window.
Securing your sensitive dataAbout securing your sensitive data
394

However, Norton Internet Security notifies you aboutsuspicious and fraudulent Web sites or if an error needsyour attention.
To hide or show the Norton Toolbar in the InternetExplorer and Firefox Web browsers
1 At the top of your browser window, click View.
2 On the Toolbars submenu, do one of the following:
1 Uncheck Norton Toolbar to hide the toolbar.
1 Check Norton Toolbar to show the toolbar.
To hide or show the Norton Toolbar in the ChromeWebbrowser
1 At the top-right corner of your Web browser, clickthe Wrench icon.
2 In the main menu that appears, click Tools >Extensions.
3 In the Web page that appears, under Extensions, doone of the following:
1 Click Disable to hide the toolbar.
w You can also hide the Norton Toolbar byright-clicking the NortonToolbar icon near theWrench icon. However, you cannot enable theNortonToolbar using the NortonToolbar icon.
1 Click Enable to show the toolbar.
To hide the Norton Toolbar button in the Chrome Webbrowser
4 At the top-right corner of your Web browser,right-click the NortonToolbar icon, and then clickHide button option.
To show the Norton Toolbar button in the Chrome Webbrowser
1 At the top-right corner of your Web browser, clickthe Wrench icon.
2 In the main menu that appears, click Tools >Extensions.
3 Under Extensions page, click Show button option.
395Securing your sensitive dataAbout securing your sensitive data

Accessing Identity Safe settings from the Norton Toolbar
When you install Norton Internet Security, it adds theNorton Toolbar to the Internet Explorer, Firefox, andChrome Web browsers. The Vault Open menu on theNorton Toolbar provides quick links to access theoptions under Identity Safe.
To access the Identity Safe settings from the Nortonmenu
1 Start your Web browser.
Securing your sensitive dataAbout securing your sensitive data
396

2 On the NortonToolbar, in the Norton menu, selectone of the following:
Lets you report to Symantecabout the current Antiphishingevaluation.
Report Site
Lets you minimize the NortonToolbar.
Minimize Toolbar
When you check this option, theIdentity Safe phrase and theSafe Web phrase disappear andonly the Identity Safe and SafeWeb indicators remain.
In addition, the size of theNorton Safe Search box isreduced.
w The Minimize Toolbaroption appears only in theInternet Explorer browser.
Lets you open theWeb tab in theNorton Internet SecuritySettings window.
Settings
Lets you open the Norton SafeWeb sitehttp://www.safeweb.norton.com.
Go to Norton Safe Webwebsite
397Securing your sensitive dataAbout securing your sensitive data

Lets you turn on the Norton SafeWeb feature which provides asafe online browsing experience.
The following are the uniquefeatures of Norton Safe Web:
1 Displays the site safetyrating icons next to thesearch results
1 Displays the site safetyrating icons when you are ona Web site
Enable Norton Safe Web
Lets you view the Norton SafeSearch box.
You can type a search string inthe Norton Safe Search box andperform a search. The search boxdisplays relevant searchsuggestions in a pop-up window.
By default, the Norton SafeSearch box is enabled. If youwant to disable Norton SafeSearch, you can use the DisableNorton Safe Search option.
Enable Norton SafeSearch/ Disable NortonSafe Search
Lets you open the Web sitehttps://account.norton.com.
Norton Account lets you registeryour product with Symantec andmanage all of your Nortonproducts in one place.
My Norton Account
Lets you view the Norton menuhelp page.
Help
Securing your sensitive dataAbout securing your sensitive data
398
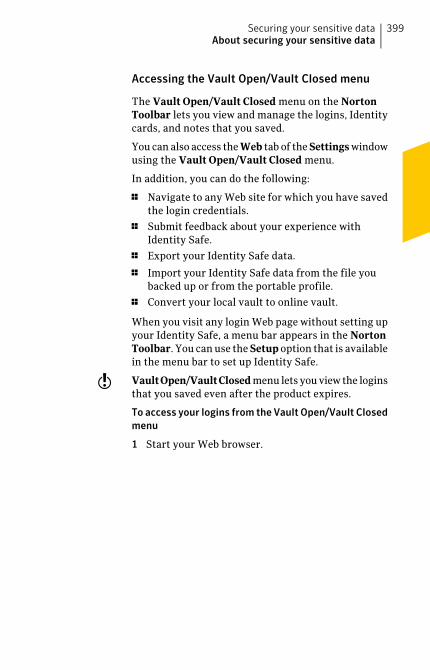
Accessing the Vault Open/Vault Closed menu
The Vault Open/Vault Closed menu on the NortonToolbar lets you view and manage the logins, Identitycards, and notes that you saved.
You can also access the Web tab of the Settings windowusing the Vault Open/Vault Closed menu.
In addition, you can do the following:
1 Navigate to any Web site for which you have savedthe login credentials.
1 Submit feedback about your experience withIdentity Safe.
1 Export your Identity Safe data.
1 Import your Identity Safe data from the file youbacked up or from the portable profile.
1 Convert your local vault to online vault.
When you visit any login Web page without setting upyour Identity Safe, a menu bar appears in the NortonToolbar. You can use the Setup option that is availablein the menu bar to set up Identity Safe.
w VaultOpen/VaultClosed menu lets you view the loginsthat you saved even after the product expires.
To access your logins from the Vault Open/Vault Closedmenu
1 Start your Web browser.
399Securing your sensitive dataAbout securing your sensitive data

2 On the Norton Toolbar, in the Vault Open/VaultClosed menu, select one of the following:
Lets you merge the IdentitySafe data from your portable
Merge Portable Data(Drive:\)
profile that you have createdfrom the previous versions ofNorton Internet Security.
w This option appears intheVault Open/Vault Closedmenu only if you haveconnected an external drivewith portable profile.
You can select this option ifyou want to autofill the login
Stop ignoring this page
information in the currentWeb page.
w This option appears intheVault Open/Vault Closedmenu only if you selectIgnore this page option.
Lets you view the list oflogins that you used recentlyin that computer.
Recently Used Logins
w You can view only thelatest five logins that youused.
Lets you view the list of allthe logins you have stored inIdentity Safe.
All Logins
Securing your sensitive dataAbout securing your sensitive data
400

Settings
401Securing your sensitive dataAbout securing your sensitive data

Lets you view the variousoptions that are available inIdentity Safe.
The options are:1 Edit Logins
Lets you open the EditLogins window.
1 Edit Identity Cards
Lets you open the EditIdentity Cards window.
1 Edit Notes
Lets you open the EditNotes window.
1 Export
Lets you open the ExportIdentity Safe Datawindow.
1 Import
Lets you open the ImportIdentity Safe Datawindow.
1 Sync to Online
Lets you open the SyncIdentity Safe DataOnlinewindow.
You can move yourIdentity Safe data thatyou stored in your localvault to online vault. Youmust log in to your NortonAccount to move yourdata online.w This option appearsin the Vault Open menuonly when you are loggedin to your local vault.
1 Ignore this page
You can select this optionif you do not want to
Securing your sensitive dataAbout securing your sensitive data
402

autofill the logininformation in the currentWeb page.
Lets you open the NortonFeedback Web site.
You can submit feedback onyour experience with IdentitySafe. You can also submit theproblems that youencountered with IdentitySafe. You can select from thelist of problems or you candescribe your problem.
Report Issue
Lets you log out of or log into Identity Safe.
You should log out of IdentitySafe to secure your IdentitySafe data when you are awayfrom your computer.
Close Vault
403Securing your sensitive dataAbout securing your sensitive data

Securing your sensitive dataAbout securing your sensitive data
404

This chapter includes the following topics:
1 About Security History
About Security HistorySecurity History window lets you do the following:
1 View the summary of alerts and event messages.
1 View the results of scans that are run on yourcomputer.
1 View the items that you submitted to SymantecSecurity Response Web site.
1 Manage Quarantine items.
1 Monitor the security tasks that your productsperform in the background.
Security History lets you monitor the security tasksthat your product performs in the background. Inaddition, the alerts that you receive can be reviewedat any time in Security History. If you cannot reviewan alert when you receive it, you can review it later inSecurity History.
The alerts, scan results, and other security items thatare related to various product features appear undertheir respective categories in the Security Historywindow. For example, the security items that arerelated to the Quarantine feature appear under theQuarantine category. In addition, the SecurityHistory
7Monitoringprotectionfeatures

window displays details of each item in the Detailspane.
Based on their functionalities, Security History broadlyorganizes all categories into the following groups:
1 All Activity
1 Protection and Performance
1 Submissions and Errors
1 Informational
By default, the following information categories areavailable in the Security History window:
1 Recent History
1 Full History
1 Scan Results
1 Resolved Security Risks
1 Unresolved Security Risks
1 Quarantine
1 SONAR Activity
1 Firewall – Network and Connections
1 Firewall – Activities
1 Intrusion Prevention
1 Download Insight
1 AntiSpam
1 Identity
1 Norton Product Tamper Protection
1 Performance Alert
1 Network Cost Awareness
1 Sites reported to Symantec
1 Norton Error Reporting
1 Email Errors
1 Norton Community Watch
1 Silent Mode
1 LiveUpdate
Monitoring protection featuresAbout Security History
406

You can view the security items based on the categoryof events that you select and the search string that youprovide. Norton Internet Security restricts the numberof search results that appear on each page in theSecurityHistory window. Therefore, Security Historydivides the items that are returned for any searchcriteria and displays them on separate pages. You canuse the pagination scroll at the bottom of the windowto navigate to different pages sequentially. In case youwant to view a specific page, you can use the Gotopageoption to open the page. The maximum number ofitems that appear per page is 100.
Based on the security status of an item in aninformation category, you can take an appropriateaction to resolve a risk or a threat. The actions thatyou can perform include the following:
1 Restore and exclude a quarantined item.
1 Remove an item from Security History.
1 Submit an item to Symantec for further analysis.
1 Trust or restrict devices on a selected network.
1 Remove the trusted or restricted status of deviceson the selected network.
1 Allow a selected program to access the Internet.
1 Configure Norton Internet Security to notify youwhen it blocks a selected attack signature.
Norton Internet Security also lets you save the securityevents history. You can view the security eventinformation whenever you want. If you want to analyzethe security events for a particular day, you can savethe Security History logs for that day. You can laterimport the file into Security History and analyze thedata.
Opening Security HistorySecurity History provides a record of all the activitiesthat Norton Internet Security performed on yourcomputer.
407Monitoring protection featuresAbout Security History

You can access Security History from the followingareas:
1 Norton Internet Security advanced window
1 Various alert windows and notifications
1 Notification area of the Windows taskbar
1 ThreatsDetected section in different Scan windows
To open Security History
1 In the Norton Internet Security main window, clickAdvanced.
2 In the Computer Protection pane, click History.
Viewing items in Security HistorySecurity History provides a record of all the activitiesthat Norton Internet Security performed on yourcomputer.
You can view details about all the activities including:
1 Security History alerts and event messages
1 Results of different scans
1 Information that you submitted to SymantecSecurity Response Web site
1 Quarantined items
1 Norton Internet Security firewall activities
1 Security tasks that Norton Internet Securityperformed in the background
Based on their functionalities, all Security Historycategories appear under the following groups in theShow drop-down list:
1 All Activity
1 Protection and Performance
1 Submissions and Errors
1 Informational
The items that are related to the various productfeatures appear under their respective categories inthe SecurityHistory window. For example, the security
Monitoring protection featuresAbout Security History
408

items that are related to the Quarantine feature appearunder Quarantine category in the Security Historywindow. In addition, the Security History windowdisplays details of each item in the Details pane.
To view items in Security History
1 In the Norton Internet Security main window, clickAdvanced.
2 In the Computer Protection pane, click History.
409Monitoring protection featuresAbout Security History

3 In SecurityHistory window, in the Show drop-downlist, select the category of items that you want toview. Your options are:
The Recent History view inthe Security History window
Recent History
displays the alerts that youreceived during the last sevendays. It lists the history ofcertain recent securityevents.
The Full History view in theSecurity History window
Full History
displays the completeSecurity History.
You can scan your computerto check if any virus, spyware,
Scan Results
malware, or security risk hasinfected your computer.
The Scan Results view in theSecurity History windowdisplays the details about thescans that are run on yourcomputer.
Monitoring protection featuresAbout Security History
410

The security risks include thesuspicious programs that cancompromise the security ofyour computer.
The Resolved Security Risksview in the Security Historywindow displays a list ofsecurity risks that NortonInternet Security hasdetected and then repaired,quarantined, or removed. Thequarantined items are listedin the Quarantine view. Youcan also view the quarantineditems in theQuarantine view.
Resolved Security Risks
The security risks include thesuspicious programs that cancompromise the security ofyour computer.
The Unresolved SecurityRisks view in the SecurityHistorywindow displays a listof security risks that NortonInternet Security was not ableto repair, remove, orquarantine.
Certain threats requiresystem restart. Logs for suchthreats can be cleared onlyafter you restart your system.
Unresolved Security Risks
411Monitoring protection featuresAbout Security History

The Security HistoryQuarantine provides a safelocation on your computerwhere you can isolate itemswhile you decide an action totake on them.
The Quarantine view in theSecurity History windowdisplays all of the securityrisks that are isolated in theSecurity History Quarantine.
Quarantine
Symantec Online Network forAdvanced Response (SONAR)identifies new threats basedon the suspicious behavior ofapplications. SONAR detectsand protects your computeragainst malicious code evenbefore virus definitions areavailable throughLiveUpdate.
The SONAR Activity view inthe Security History windowdisplays details about thesecurity risks that SONARdetects. This category alsolists any activity thatmodifies the configuration orthe settings of yourcomputer.
The More Details option forthis category provides detailsabout the resources that thisactivity affects.
SONAR Activity
Monitoring protection featuresAbout Security History
412

The firewall monitors thecommunications betweenyour computer and othercomputers on the Internet.
The Firewall - Network andConnections category in theSecurity History windowdisplays information aboutthe networks that yourcomputer connects to. It alsodisplays the actions that youhave taken to trust or torestrict networks andcomputers.
This category also displays ahistory of all of the TCP/IPnetwork connections thatwere made with yourcomputer. Networkconnections are logged whenthe connection is closed.
The Security History -AdvancedDetailswindow forthis category lets you modifytrust or restrict settings forcomputers and networks.
Firewall - Network andConnections
413Monitoring protection featuresAbout Security History

The firewall monitors thecommunications betweenyour computer and othercomputers on the Internet.The firewall maintains rulesto control Internet access toand from your computer.
The Firewall - Activities viewin the Security Historywindow displays the rulesthat firewall creates. Therules that you create alsoappear in this view.
The Security History -AdvancedDetailswindow forthis category shows thecreated Program rules. It alsolets you allow a blockedprogram rule.
Firewall - Activities
Intrusion Prevention scans allthe network traffic thatenters and exits yourcomputer for known threats.
The Intrusion Preventionview in the Security Historywindow displays detailsabout recent IntrusionPrevention activities.
The Security History -AdvancedDetailswindow forthis category lets you controlwhether or not to be notifiedwhen Intrusion Preventiondetects an IntrusionPrevention signature.
Intrusion Prevention
Monitoring protection featuresAbout Security History
414

Download Insight processesany executable file that youdownload for analysis of itsreputation level. It theninforms you about theprocessing results based onthe Download Insightsettings.
The Download Insight viewin the Security Historywindow displays details of allevents that Download Insightprocesses and notifies. Thisview also containsinformation about the actionsthat you take based on thereputation data of the events.
Download Insight
Norton AntiSpam protectsyour computer from exposureto unsolicited email.
The AntiSpam view in theSecurity History windowdisplays details about theemail messages thatAntiSpam has processed.
AntiSpam
415Monitoring protection featuresAbout Security History

The various features ofIdentity Safe help youmanage your identities andprovide additional securitywhile you perform onlinetransactions.
The Identity view in theSecurity History windowdisplays the Antiphishingdefinitions that NortonInternet Security downloadswhen you run LiveUpdate toobtain the latest virusdefinitions.
Identity
Norton Product TamperProtection lets you protectyour Norton product from anyattack or modification byunknown, suspicious, ormalicious applications.
The Norton Product TamperProtection view in theSecurity History windowdisplays details aboutunauthorized attempts tomodify Symantec processes.The tasks that your Symantecproduct blocks also appear inthe list.
Norton Product TamperProtection
Monitoring protection featuresAbout Security History
416

The performance alertfeature lets you view,monitor, and analyze theimpact of the systemactivities on your computer.
The Performance Alert viewin the Security Historywindow provides detailsabout the impact of theprocesses that run on yourcomputer. The details includethe process name, theresources used, the extent ofresource utilization, and theoverall impact of the processon your computer. Inaddition, logs related toperformance alerts and theprograms that you haveexcluded from performancealerts also appear in the list.
Performance Alert
Network Cost Awareness letsyou set up policies andrestrict the Internet usage ofNorton Internet Security. Youcan define the amount ofnetwork bandwidth thatNorton Internet Security canuse.
The Network Cost Awarenessview in the Security Historywindow provides detailsabout the actions that youperformed to restrict theInternet usage of NortonInternet Security.
Network Cost Awareness
417Monitoring protection featuresAbout Security History

In some cases, you mighthave submitted evaluation ofcertain Web pages toSymantec.
The Sites Reported toSymantec view in theSecurity History windowdisplays all the Web sites thatyou reported to Symantec toverify authenticity.
Sites reported to Symantec
Norton Internet Security maygenerate errors in somecases. For example, an errorcan occur when you runLiveUpdate or scan a folder.Engine errors, timeout errors,and program errors are someof the types of errors.
The Norton Error Reportingview in the Security Historywindow displays any errorthat Norton Internet Securityhas generated.
Norton Error Reporting
Monitoring protection featuresAbout Security History
418

Email errors include anyfailure that occurs whenNorton Internet Security triesto send, download, or scan anemail message that you sendor receive.
The Email Errors view in theSecurity History displaysdetails about any Email Erroralerts that you receive whenan Email error occurs. Detailsinclude the Error ID and theErrormessage. This view alsodisplays information aboutsubject, sender address, andthe recipient address that arerelated to the email messagein the alert.
Email Errors
The Norton CommunityWatch feature lets yousubmit any suspicioussecurity or suspiciousapplication data to Symantecfor analysis. Symantecassesses the data todetermine the new threats.
The Norton CommunityWatch view in the SecurityHistorywindow displays a listof files that you havesubmitted to Symantec foranalysis. Files, at variousstages of submission, alsoappear in the list.
Norton Community Watch
419Monitoring protection featuresAbout Security History
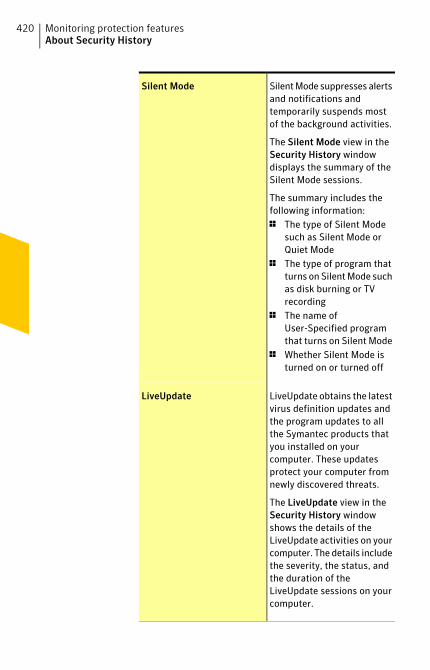
SilentMode suppresses alertsand notifications andtemporarily suspends mostof the background activities.
The Silent Mode view in theSecurity History windowdisplays the summary of theSilent Mode sessions.
The summary includes thefollowing information:1 The type of Silent Mode
such as Silent Mode orQuiet Mode
1 The type of program thatturns on Silent Mode suchas disk burning or TVrecording
1 The name ofUser-Specified programthat turns on Silent Mode
1 Whether Silent Mode isturned on or turned off
Silent Mode
LiveUpdate obtains the latestvirus definition updates andthe program updates to allthe Symantec products thatyou installed on yourcomputer. These updatesprotect your computer fromnewly discovered threats.
The LiveUpdate view in theSecurity History windowshows the details of theLiveUpdate activities on yourcomputer. The details includethe severity, the status, andthe duration of theLiveUpdate sessions on yourcomputer.
LiveUpdate
Monitoring protection featuresAbout Security History
420

4 Click a row to view details for that item.If you want to view additional information about anitem, click the More Details option in the Detailspane or double-click the particular row. You canview the advanced details about the item in theSecurity History-Advanced Details window andtake actions as needed. For some categories, theMoreDetails option opens the File Insight windowthat displays the details about the selected SecurityHistory event. You must use the Options link in theSecurity History window to select an action thatNorton Internet Security must perform on any itemin these categories. The Options link is alsoavailable in the File Insight window for certainitems.
About the Security History - Advanced Details windowThe SecurityHistory -AdvancedDetails window letsyou view more information about the items that youselect in the Show drop-down list in the SecurityHistory window. You can also perform any action thatis available for the selected item from this window.
421Monitoring protection featuresAbout Security History
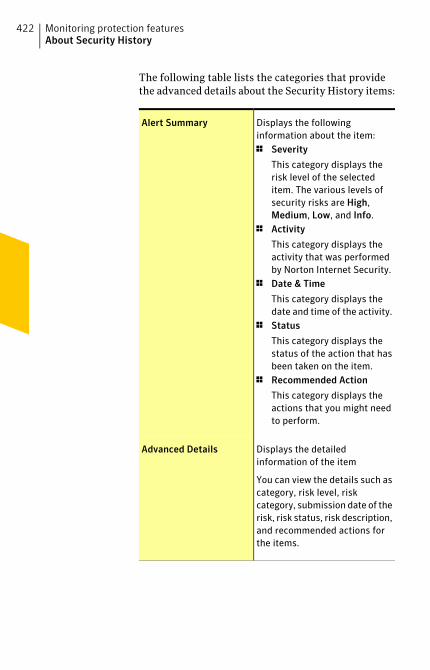
The following table lists the categories that providethe advanced details about the Security History items:
Displays the followinginformation about the item:1 Severity
This category displays therisk level of the selecteditem. The various levels ofsecurity risks are High,Medium, Low, and Info.
1 Activity
This category displays theactivity that was performedby Norton Internet Security.
1 Date & Time
This category displays thedate and time of the activity.
1 Status
This category displays thestatus of the action that hasbeen taken on the item.
1 Recommended Action
This category displays theactions that you might needto perform.
Alert Summary
Displays the detailedinformation of the item
You can view the details such ascategory, risk level, riskcategory, submission date of therisk, risk status, risk description,and recommended actions forthe items.
Advanced Details
Monitoring protection featuresAbout Security History
422

Actions
423Monitoring protection featuresAbout Security History
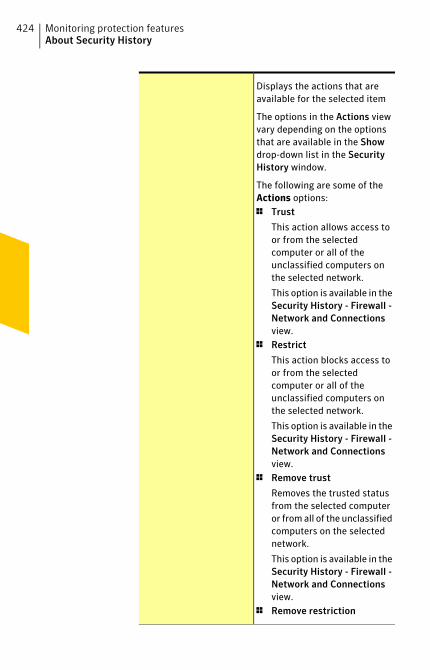
Displays the actions that areavailable for the selected item
The options in the Actions viewvary depending on the optionsthat are available in the Showdrop-down list in the SecurityHistory window.
The following are some of theActions options:1 Trust
This action allows access toor from the selectedcomputer or all of theunclassified computers onthe selected network.
This option is available in theSecurity History - Firewall -Network and Connectionsview.
1 Restrict
This action blocks access toor from the selectedcomputer or all of theunclassified computers onthe selected network.
This option is available in theSecurity History - Firewall -Network and Connectionsview.
1 Remove trust
Removes the trusted statusfrom the selected computeror from all of the unclassifiedcomputers on the selectednetwork.
This option is available in theSecurity History - Firewall -Network and Connectionsview.
1 Remove restriction
Monitoring protection featuresAbout Security History
424

This action removes therestricted status from theselected computer or fromall of the unclassifiedcomputers on the selectednetwork.
This option is available in theSecurity History - Firewall -Network and Connectionsview.
1 View Rule
This action shows thefirewall rule that is used tocontrol the Internet accessattempts by the selectedprogram in the ProgramControl window of NortonInternet Security.
This option is available in theSecurity History -Firewall-Activities view.
1 Norton File Insight
This action shows the detailsof the file that accessed thenetwork in the File Insightwindow.
This option is available in theSecurity History -Firewall-Activities view.
1 Allow
This action allows theselected program to accessthe Internet.
This option is available in theSecurity History - IntrusionPrevention view.
425Monitoring protection featuresAbout Security History

1 Stop Notifying Me
This action prevents NortonInternet Security fromnotifying you when it blocksthe selected attack signaturein the future.
This option is available in theSecurity History - IntrusionPrevention view.
1 Notify Me
This action allows NortonInternet Security to notifyyou when it blocks theselected attack signature inthe future.
This option is available in theSecurity History - IntrusionPrevention view.
Displays the links that providethe information that is relatedto the selected item
For some Security History items,this view lets you access therelevant settings pane of theNorton Internet Securitywindow.
Risk Management
About the File Insight windowThe File Insight window provides details about anyFile of Interest that is available on your computer. Thisoption of file analysis is available for the files that youdownload, scan, or use to perform an activity.
You can access the File Insight window in differentways. For example, you can use the variousnotifications, alerts, scan and performance-relatedwindows, and the shortcut menu of the various filesthat are present on your computer to open the window.
Monitoring protection featuresAbout Security History
426

Security History provides a centralized location whereyou can access the File Insight windows of the variousevents that are related to Security Risks, DownloadInsight, and Performance.
The File Insight window lets you view more details ofevents that belong to some of the following categoriesin the Security History window:
Lets you view the detailedinformation about the resolvedsecurity risks in an organizedway.
The Resolved Security Riskscategory includes the infectedfiles that Norton InternetSecurity repairs, removes, orquarantines. This categorymostly includes themedium-level or the high-levelrisks that are either quarantinedor blocked.
The File Insightwindow providesdetails about the risk level, theorigin, and the activity report ofthe resolved security risks onyour system.
Resolved Security Risks
427Monitoring protection featuresAbout Security History

Lets you view the detailedinformation about theunresolved security risks in anorganized way.
The Unresolved Security Riskscategory includes the infectedfiles for which Norton InternetSecurity was not able to take anyaction. This category mostlyincludes the low-level risks thatrequire your attention for asuitable action.
The File Insightwindow providesdetails about the risk level, theorigin, and the activity report ofthe unresolved security risks onyour system.
Unresolved SecurityRisks
Lets you view the detailedinformation about quarantinedsecurity risks in an organizedway.
The Quarantine categoryincludes the infected files thatare isolated from the rest of yourcomputer while they await yourattention for a suitable action.
The File Insightwindow providesdetails about the risk level, theorigin, and the activity report ofquarantined security risks onyour system.
Quarantine
Monitoring protection featuresAbout Security History
428

Lets you view the reputationdetails of a file that youdownload.
You can use these details todetermine the safety level of thefile and then decide the actionthat you want to perform.
Download Insight
Lets you view the performancedetails of any File of Interest thatis available on your computer.
The information includes thegeneral details, the origin andlineage information, theresource usage, and the actionsthat the file has performed onyour system.
Performance Alert
The FileInsight window provides various details aboutthe Security History item. These details are classifiedin different tabs in the File Insight window.
429Monitoring protection featuresAbout Security History

You can select a tab to view more details about it. TheFile Insight window provides details about a file in thefollowing tabs:
Displays the information such asthe confidence level, communityusage of a file, how long ago thefile was released and how stablethe file is.
w Stability ratings of a filemay vary depending upon youroperating system.
You can view details such as thesignature and the date on whichthe file was created. You candetermine if a file is a startupfile and the date on which thefile was last used.
Details
Provides the lineage details of afile.
You can view the file name andthe URL of the source fromwhere the file was downloaded.The lineage details of a file areavailable only if you downloadedor created the file after youinstalled Norton InternetSecurity.
w If the historical details ofa file are not available, NortonInternet Security disables thisOrigin section.
Origin
Monitoring protection featuresAbout Security History
430

Provides the details about thesuspicious actions performed bythe file on your computer. It alsoprovides information about theresource usage of a process andthe effect of the process on theoverall CPU utilization of yourcomputer.
Activity
Based on the severity of the security risks and the risktype, Norton Internet Security might display one ormore of the following options in the File Insightwindow:
Lets you locate the file onyour computer.
This option is available at thetop of the window.
Locate
Lets you copy the data fromthe File Insightwindow to theclipboard.
After you copy the content tothe Clipboard, you can opena document, paste the data,and save the document.
Copy to Clipboard
431Monitoring protection featuresAbout Security History

Let you return the securityrisk that is quarantined to theoriginal location on yourcomputer.
Returns the selectedQuarantine item to itsoriginal location withoutrepairing it and excludes theitem from being detected inthe future scans. If you do notwant to exclude the item fromfuture scans uncheck thecheck box available in theQuarantine Restorewindow.
Restore
Lets you access the ThreatDetected window and viewmore details and performactions.
Options
About the Threat Detected windowThe ThreatDetected window appears whenever NortonInternet Security detects a security risk on yourcomputer. You can use this window to view detailsabout the risk and select an action for the risk.Sometimes, you may want to access the ThreatDetected window for the same risk again. In that case,the window can be opened at any time from SecurityHistory. Security History is the centralized locationwhere you can access the ThreatDetected windows ofrisks that belong to some of the following categories:
This category includes thesecurity risks or the infectedfiles that Norton InternetSecurity has detected and thenrepaired, quarantined, orremoved.
Resolved Security Risks
Monitoring protection featuresAbout Security History
432

This category includes thesecurity risks or the infectedfiles that Norton InternetSecurity was not able to repair,remove, or quarantine.
Unresolved SecurityRisks
This category includes thesecurity risk items that areisolated from the rest of yourcomputer while they await yourattention for a suitable action.
Quarantine
The action options in the ThreatDetected window fora risk vary depending on the risk type and its severitylevel. The following are some of the options that areavailable in this window:
Returns the security risk that isquarantined to the originallocation on your computer
Restore
Returns the selected Quarantineitem to its original locationwithout repairing it and excludesthe item from being detected inthe future scans
Removes the security risk fromyour computer and quarantinesit
Remove this file
Excludes the security risk fromfuture scan
Exclude this program
Removes the selected securityrisk item from the SecurityHistory log
Remove from history
433Monitoring protection featuresAbout Security History

Takes you to the SymantecSecurity Response Web site
Get help
Sends the security risk toSymantec
Submit to Symantec
Searching in Security HistoryYou can search the items that are listed in SecurityHistory. You can use the Quick Search option to finditems using a keyword or the name of a security risk.If you want to view all of the Security History itemsthat pertain to a particular security risk, you can filterthe items using QuickSearch. For example, if you wantto view all of the alerts that Auto-Protect has generated,you can type Auto-Protect and filter the list.
You can clear the search results and return to thecurrent Security History list by clicking the black cross(x) icon in the Quick Search box.
The Quick Search option works on the current viewonly. If you want your search to include all of the itemsin Security History, you must select the Full Historyview.
To search in Security History
1 In the Security History window, in the QuickSearch text box, type the name of the item that youwant to search.
2 Click Go.
Exporting or Importing Security History informationNorton Internet Security lets you export the SecurityHistory events to a file. You can export and save theSecurity History events and view them at your leisure.
For example, you can analyze the security events on aparticular day. You can use the Quick Search optionto obtain a list of all of the items that are related to a
Monitoring protection featuresAbout Security History
434

particular security risk. You can then use the Exportoption to save the list in the Security History log. Youcan later import the log file and analyze the data.
Security History stores the information in a separatefile. When the file size reaches its maximum size limit,information that is related to new events overwritesthe information that is related to older events. You canexport the log periodically, if you want to keep theentire Security History information.
You can save your log file in one of the following fileformats:
1 Security History Log Files (.mcf)
The .mcf file format is the Security History Log Filesformat and is proprietary to Symantec.
When you use this file type option, you can viewthe file only in the Security History window.
1 Text Files (.txt)
The data is saved in a comma-separated text format.
When you use this file type option, you can openand view the file externally without using SecurityHistory.
You can import only the log files that have .mcf fileextension. When you import a log file, the exported listof Security History information in the log file appears.This list replaces the current security events list. Youcan select an option in the Show drop-down list to viewthe option-specific details that are saved in the log file.To revert to the current Security History list you mustclick the Close file: file_name.mcf link.
To export Security History information
1 In the Norton Internet Security main window, clickAdvanced.
2 In the Computer Protection pane, click History.
3 In the Security History window, in the Showdrop-down list, select an option.
4 Click Export.
435Monitoring protection featuresAbout Security History

5 In the Save As dialog box that appears, navigate toa location and specify the name for the file.The category name in the Show drop-down listappears as the default file name. You can provide afile name of your choice.
6 In the Save as type box, select the format in whichyou want to save your log file.
7 Click Save.
To import Security History information
1 In the Norton Internet Security main window, clickAdvanced.
2 In the Computer Protection pane, click History.
3 In the Security History window, click Import.
4 In the Open dialog box that appears, browse to thefolder that has the file you want to import.
5 Select the .mcf file and click Open.You can only open log files of .mcf format in theSecurity History window. You can open and viewlog files of .txt file externally without using SecurityHistory.In the import mode, you cannot make modificationsto the information. For example, you cannot clearthe logs. You can revert to the current SecurityHistory list by closing the file.
Managing items in the QuarantineThe Security History Quarantine provides a safelocation on your computer where you can isolate itemswhile you decide on an action to take on them.Quarantined items are isolated from the rest of yourcomputer so that they cannot spread or reinfect yourcomputer. In some cases, you may have an item thatyou think is infected, but is not identified as a risk bythe Norton Internet Security scans. You can manuallyplace such items in the Quarantine.
You cannot open quarantined items accidentally andspread the virus, but you can evaluate the quarantineditems for possible submission to Symantec.
Monitoring protection featuresAbout Security History
436

The Security History Quarantine includes the followinggroups of items:
Includes the items suchas spyware and adwarethat are generally low riskand that another programrequires to functionproperly.
You can restore theseitems if necessary.
Security risks
Includes viruses andother high-risk items.
Security threats
Once an item has been quarantined, you have severaloptions. All of the actions that you take on quarantineditems must be performed in the Security HistoryQuarantine.
To open the Quarantine
1 In the Norton Internet Security main window, clickAdvanced.
2 In the ComputerProtection pane, click Quarantine.
To perform an action on a quarantined item
1 In the SecurityHistory window, in the Quarantineview, select the item on which you want to performthe action.
2 In the Details pane, click Restore & Options.You can use the More Details link to view moredetails about the item before you select an actionfor it. The link opens the File Insight window thatcontains more information about the risk.
437Monitoring protection featuresAbout Security History

3 In the Threat Detected window, select the actionthat you want to perform. Some of the options are:
Returns the security risk thatis quarantined to the originallocation on your computer
This option is available onlyfor the detected viral threats.
Restore
Returns the selectedQuarantine item to itsoriginal location withoutrepairing it and excludes theitem from being detected inthe future scans
This option is available forthe detected viral andnon-viral threats.
Restore & exclude this file
Removes the selected itemfrom the Security History log
Remove from history
Sends the selected item toSymantec for evaluation ofthe security risk
In some cases, NortonInternet Security might notidentify an item as a securitythreat, but you might suspectthat the item is infected. Insuch cases, you can use thisoption to submit the item toSymantec for furtheranalysis.
Submit to Symantec
You can also navigate to this window by using theOptions link in the File Insight window for somerisks.
4 Follow the on-screen instructions.
Monitoring protection featuresAbout Security History
438

Adding an item to the Quarantine
Security History Quarantine provides a safe locationon your computer in which you can isolate items whileyou decide on an action to take on each item.
The Quarantine view in the SecurityHistory windowdisplays a list of quarantined items. You can view thename and the risk status of each quarantined item.
You can manually add an item to the Security HistoryQuarantine. You can use the AddtoQuarantine optionin the Quarantine view in the SecurityHistory windowto quarantine the items that you suspect are infected.This action has no effect on the items that are alreadyquarantined.
w You cannot add a known Good File to Quarantine.
To add an item to the Quarantine
1 In the SecurityHistory window, in the Quarantineview, click Add to Quarantine.
2 In the Manual Quarantine dialog box, in theDescription text box, type a short name for the itemthat you want to add.This text appears in the Quarantine, so you shoulduse a recognizable description.
3 Click Browse.
4 In the Select File toQuarantine dialog box, browseto the item that you want to add, select it, and thenclick Open.
5 Click Add.
6 Click Close.
Restoring an item from the Quarantine
Some programs rely on other programs that areclassified as security risks to function. The programmay not function if a particular security file is removed.All of the removed security risks are automaticallybacked up in the Security History Quarantine. Thisway, Norton Internet Security lets you restore any risk
439Monitoring protection featuresAbout Security History

to regain the functionality of a program that requiresthe risk program to run.
For example, a shareware or freeware program thatyou download may use adware to keep its price low. Inthis case, you can allow the security risk program toremain on your computer or restore it if SpywareProtection has removed it.
Some quarantined items are successfully disinfectedafter Norton Internet Security rescans them. You canalso restore such items.
w If you restore an item to a directory other than itsoriginal location, it may not function properly.Therefore, it is recommended that you reinstall theprogram.
To restore an item from the Quarantine
1 In the SecurityHistory window, in the Quarantineview, select the item that you want to restore.
2 In the Details pane, click Restore & Options.
3 In the Threat Detected window, click Restore &exclude this file.This option returns the selected Quarantine itemto its original location without repairing it andexcludes the item from being detected in the futurescans.
4 In the Quarantine Restore window, click Yes.In case of non-viral threats, you can use the optionthat is available in this window to exclude thesecurity risk. Norton Internet Security does notdetect the security risks that you exclude in thefuture scans.
5 In the Browse forFolder dialog, select the folder ordrive where you want to restore the file and thenclick OK.
6 Click Close.
Monitoring protection featuresAbout Security History
440

Manually submitting an item to Symantec
When a virus or other risk is detected, it isautomatically submitted to Symantec SecurityResponse Web site for analysis. If you have turned offthe option to submit risks automatically, you canmanually submit them from the Security HistoryQuarantine. You must have an Internet connection tosubmit an item.
When you submit files to Symantec automatically ormanually, you contribute to the effectiveness of yourSymantec product. For example, you can submit anitem that has not been detected during scanning thatyou believe may be a security risk. Symantec SecurityResponse analyzes the file. If it is identified as asecurity risk, it is added to a future definition update.
Personally identifiable information is never includedin submissions.
In some cases it is necessary for Symantec SecurityResponse to block submissions of a particular type orvolume. These items appear as Not Submitted inSecurity History.
To manually submit an item to Symantec
1 In the SecurityHistory window, in the Quarantineview, select the item that you want to submit toSymantec.
2 In the Details pane, click Restore & Options.
3 In the Threat Detected window, click Submit toSymantec.
4 In the dialog box that appears, click OK.
441Monitoring protection featuresAbout Security History

Monitoring protection featuresAbout Security History
442

This chapter includes the following topics:
1 Feature summary
1 About turning off automatic features
1 About customizing settings and options
Feature summaryUse the information in this section to familiarizeyourself with the product.
This section includes the following information:
1 A list of all of the features in the product
1 A brief description of each feature
The feature summary can help you determine whichfeature to use to solve a problem. Read the featuredescriptions to locate the correct component to use.
For more information, select one of the sub-entries forthis Help topic.
About virus and security risk protection featuresVirus and security risk protection features providecomprehensive virus prevention and security riskdetection for your computer. Known viruses areautomatically detected and repaired. Instant messengerattachments, email message attachments, Internet
8Customizingprotectionfeatures
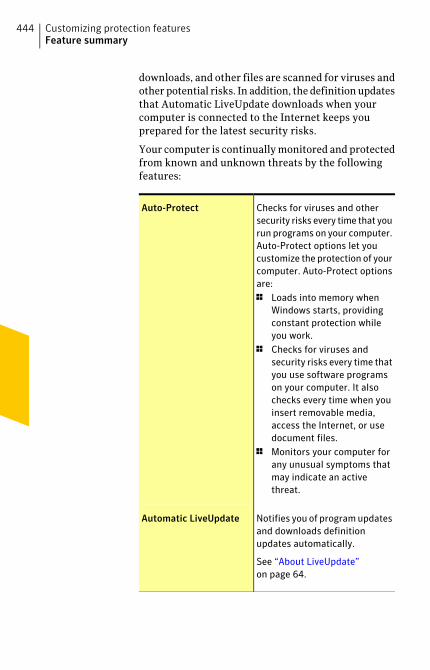
downloads, and other files are scanned for viruses andother potential risks. In addition, the definition updatesthat Automatic LiveUpdate downloads when yourcomputer is connected to the Internet keeps youprepared for the latest security risks.
Your computer is continually monitored and protectedfrom known and unknown threats by the followingfeatures:
Checks for viruses and othersecurity risks every time that yourun programs on your computer.Auto-Protect options let youcustomize the protection of yourcomputer. Auto-Protect optionsare:1 Loads into memory when
Windows starts, providingconstant protection whileyou work.
1 Checks for viruses andsecurity risks every time thatyou use software programson your computer. It alsochecks every time when youinsert removable media,access the Internet, or usedocument files.
1 Monitors your computer forany unusual symptoms thatmay indicate an activethreat.
Auto-Protect
Notifies you of program updatesand downloads definitionupdates automatically.
See “About LiveUpdate”on page 64.
Automatic LiveUpdate
Customizing protection featuresFeature summary
444

Detects viruses, spyware, andother security risks incompressed files during manualscans.
See “What to do if a security riskis found” on page 199.
Compressed File Scan
Protects your computer againstthe threats that you may receivethrough email attachments.
You can use the Email AntivirusScan option and the AntiSpamoption to configure your emailprogram for protection againstviruses and other securitythreats.
Email Protection
Lets Norton Internet Securityperform an Insight Network scanon your computer
The Insight Network scan usesthe virus definitions that areavailable locally and hosted inthe Cloud. Norton InternetSecurity provides additionalprotection by using the mostrecent definitions from theCloud, apart from the definitionsthat are available locally on yourcomputer.
See “About Insight Networkscan” on page 152.
Insight Protection
445Customizing protection featuresFeature summary

Scans for and detects viruses ininstant messenger attachments.
Scans the instant messengerattachments for the supportedinstant messenger programsthat were on your computerwhen you installed your product.New instant messengerprograms must be configured inInstant Messenger Scanwindow.
Instant Messenger Scan
Detects the new and theunknown viruses by analyzingan executable file's structure,and behavior. Also, by analyzingother attributes such asprogramming the logic,computer instructions, and anydata that is contained in the file.
Heuristic Protection
Protects Norton InternetSecurity Settings fromunauthorized changes.
Settings PasswordProtection
Checks for the infections thathave processes running inmemory and the infections thatthe startup folders and filesrefer.
Automatically runs onceLiveUpdate updates yourcomputer with program updatesand definition updates.
See “Running a Quick Scan”on page 137.
Quick Scan
Customizing protection featuresFeature summary
446

About spyware and other security risk protectionfeatures
Spyware and other security risk protection featuresprovide protection against the latest security risks,such as spyware and adware. These features scan forexisting risks and blocks new risks before they can beinstalled on your computer.
Spyware and other security risk protection featuresinclude the following:
Auto-Protect blocks theprograms that have beenidentified as spyware oradware before they can beinstalled on your computer.
Auto-Protect SpywareBlocking
By default, manual andscheduled scans search forspyware, adware, and othersecurity risks. Auto-Protectscans for these items as well.
Security risk scan
If a scan removes a securityrisk program that anotherprogram relies on forfunctionality, you can restorethe security risk programfrom Security History.
Security risk restore
447Customizing protection featuresFeature summary
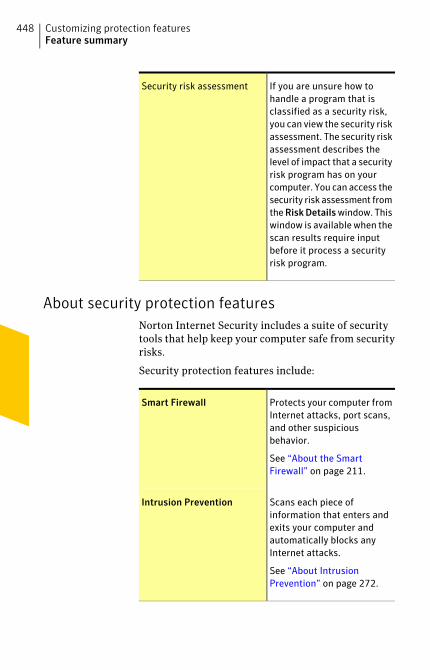
If you are unsure how tohandle a program that isclassified as a security risk,you can view the security riskassessment. The security riskassessment describes thelevel of impact that a securityrisk program has on yourcomputer. You can access thesecurity risk assessment fromtheRiskDetailswindow. Thiswindow is available when thescan results require inputbefore it process a securityrisk program.
Security risk assessment
About security protection featuresNorton Internet Security includes a suite of securitytools that help keep your computer safe from securityrisks.
Security protection features include:
Protects your computer fromInternet attacks, port scans,and other suspiciousbehavior.
See “About the SmartFirewall” on page 211.
Smart Firewall
Scans each piece ofinformation that enters andexits your computer andautomatically blocks anyInternet attacks.
See “About IntrusionPrevention” on page 272.
Intrusion Prevention
Customizing protection featuresFeature summary
448

Detects when your computerconnects to a new network.You can then allow or blockconnections from allcomputers that areconnected to that network.
See “About Smart FirewallTrust Control settings”on page 241.
Trust Control
About spam filtering featuresWith the increase in usage of email, many users receivea number of unwanted and unsolicited commercialemail messages that are known as spam. Not only doesspam make it difficult to identify valid email messages,but some spam contains offensive messages andimages.
Norton Internet Security provides several powerfulfeatures to reduce your exposure to unwanted onlinecontent.
Adds several options to the toolbar insupported email programs.
See “About your email programtoolbar” on page 293.
Integration withemail programs
449Customizing protection featuresFeature summary

1 Uses a user-defined address listto expedite the scanning of email.
1 Accepts all email messages fromsenders in the Allowed List.
1 Treats all email messages fromsenders in the Blocked List asspam.
1 Allows and blocks email messagesfrom entire domains as well asindividual email addresses.
See “About Norton AntiSpam settings”on page 285.
Allowed and BlockedLists
Automatically imports lists ofaddresses from supported emailprograms to keep your list of allowedemail senders and blocked emailsenders in sync.
See “Identifying authorized senders”on page 289.
Automatic import ofaddresses
Lets you query the Symantec Webservers to filter the spam emailmessages which the local filters failto classify as spam.
See “About Web Query” on page 296.
Web Query
Updates the copies of Symantec spamdefinition files automatically.
See “Checking for updates manually”on page 70.
Automatedupdateofspam definitions
About Parental ControlThe Parental Controls option lets you create yourNorton Online Family account. Norton Online Familyis a parental control application that provides a smartway to keep your children safe when they are online.
Customizing protection featuresFeature summary
450

Norton Online Family helps parents to get a betterunderstanding of what children do online, so that theycan better protect and guide them.
You can use the Online Family icon at the bottom ofthe main window to create your Norton Online Familyaccount. The icon may not be available with someversions of Norton Internet Security. In such case, youmay not be able to access Norton Online Family options.You need to install Norton Safety Minder on eachcomputer that your children use. If your children usethe same computer, you need to create user accountsfor each child and install Norton Safety Minder on thecomputer.
You can also use the ParentalControls link in the WebProtection pane in the Norton Internet Securityadvanced window to create your Norton Online Familyaccount. Symantec recommends that you use yourNorton Account credentials to register with NortonOnline Family.
After you set up your account, you can configure yoursettings in Norton Online Family Web site to monitoryour children’s Internet activities. You can sign in toyour Norton Online Family account at any time to viewtheir online activities. You can also use the OnlineFamily icon at the bottom of the main window to signin to your account and view your child's Internetactivities.
By using Norton Online Family, you can manage theInternet activities of your children in the followingways:
1 Monitor and manage the Web sites that yourchildren visit.
1 Manage and monitor the computer usage of yourchildren.
1 Monitor and manage the social networkingactivities of your children.
1 Monitor and manage the instant messagingactivities of your children.
451Customizing protection featuresFeature summary

1 Monitor and manage the Internet search that yourchildren perform.
1 Define House Rules for your children based on theirage and maturity.
w Norton Online Family may not be available with someversions of Norton Internet Security. In such case, youmay not be able to access the Norton Online Familyoptions.
About turning off automatic featuresYour Symantec product is set by default to providecomplete protection for your computer. Many of thesesettings include the automatic features that providecontinuous protection. Under certain circumstances,you might need to turn off an automatic feature tocomplete a task.
w When you have completed the task for which youturned off the automatic feature, make sure that youturn the feature on again.
See “Turning offAuto-Protecttemporarily andturning it on again”on page 452.See “Turning off orturning on spamfiltering”onpage453.
Turning off Auto-Protect temporarily and turning iton again
If you have not changed the default option settings,Auto-Protect loads when you start your computer.Auto-Protect also guards against viruses, Trojan horses,worms, and other malicious threats. It checks programsfor viruses when programs run and monitors yourcomputer. It also checks the removable media for anyactivity that might indicate the presence of a virus.When Auto-Protect detects a virus or virus-like activity,it alerts you.
Customizing protection featuresAbout turning off automatic features
452
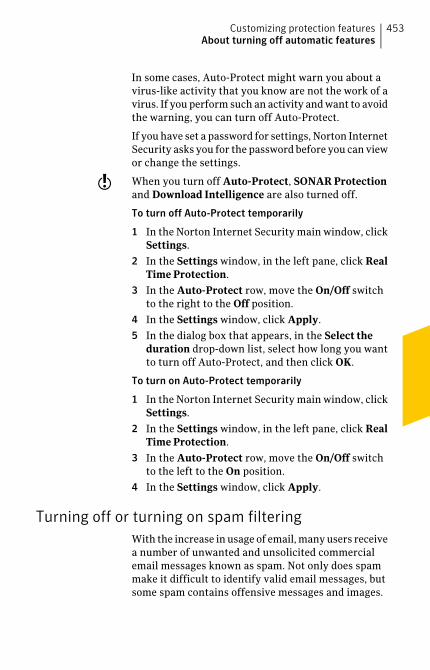
In some cases, Auto-Protect might warn you about avirus-like activity that you know are not the work of avirus. If you perform such an activity and want to avoidthe warning, you can turn off Auto-Protect.
If you have set a password for settings, Norton InternetSecurity asks you for the password before you can viewor change the settings.
w When you turn off Auto-Protect, SONAR Protectionand Download Intelligence are also turned off.
To turn off Auto-Protect temporarily
1 In the Norton Internet Security main window, clickSettings.
2 In the Settings window, in the left pane, click RealTime Protection.
3 In the Auto-Protect row, move the On/Off switchto the right to the Off position.
4 In the Settings window, click Apply.
5 In the dialog box that appears, in the Select theduration drop-down list, select how long you wantto turn off Auto-Protect, and then click OK.
To turn on Auto-Protect temporarily
1 In the Norton Internet Security main window, clickSettings.
2 In the Settings window, in the left pane, click RealTime Protection.
3 In the Auto-Protect row, move the On/Off switchto the left to the On position.
4 In the Settings window, click Apply.
Turning off or turning on spam filteringWith the increase in usage of email, many users receivea number of unwanted and unsolicited commercialemail messages known as spam. Not only does spammake it difficult to identify valid email messages, butsome spam contains offensive messages and images.
453Customizing protection featuresAbout turning off automatic features

To control these spam mails you can use the spamfiltering. By default, spam protection remains active.If for any reason you want to disable it, you can turnit off from within the program itself.
w Turning off Norton AntiSpam increases your exposureto receive unsolicited email messages.
To turn off spam filtering
1 In the Norton Internet Security main window, clickSettings.
2 In the Settings window, click the Network tab.
3 In the left pane, click Message Protection.
4 In the AntiSpam row, move the On/Off switch tothe right to the Off position.
5 In the Settings window, click Apply.
6 In the Security Request window, in the Select theduration drop-down list, select the duration forwhich you want to turn off spam filtering.
7 Click OK.
8 In the Settings window, click OK.
To turn on spam filtering
1 In the Norton Internet Security main window, clickSettings.
2 In the Settings window, click the Network tab.
3 In the left pane, click Message Protection.
4 In the AntiSpam row, move the On/Off switch tothe left to the On position.
5 In the Settings window, click Apply.
Turning off or turning on Norton Community WatchYou can use the Norton Community Watch option tosend information about a suspicious file to Symantecfor analysis. Symantec assesses the data to determinethe new threats and their sources. The Norton featuressuch as Norton Insight and Insight Network use theSymantec assessed information to detect the securitythreats.
Customizing protection featuresAbout turning off automatic features
454

w Norton Community Watch collects and submits detaileddata about the Norton-specific errors and componentsonly. It does not collect or store any personalinformation of any user.
You can use Security History to review the informationthat has been sent to Symantec.
To turn off or turn on Norton Community Watch
1 In the Norton Internet Security main window, clickSettings.
2 In the Settings window, click the General tab.
3 In the left pane, click Other Settings.
4 In the Norton Community Watch row, do one ofthe following:
1 To turn off Norton Community Watch, move theOn/Off switch to the right to the Off position.
1 To turn on Norton Community Watch, move theOn/Off switch to the left to the On position.
5 In the Settings window, click Apply.
6 Click OK.
Turning off or turning on security protection featuresThere may be times when you want to turn off asecurity protection feature. For example, you mightwant to see if the Smart Firewall prevents a Web pagefrom appearing as expected.
Turning off security protection features reduces yourcomputer's security. When you turn off a feature, youcan specify the amount of time it should remain off.After that time limit, the feature turns onautomatically.
To ensure that your computer remains protected, youcan turn on security protection features manuallybefore the specified time frame concludes.
To turn off a security protection feature
1 In the Norton Internet Security main window, clickSettings.
455Customizing protection featuresAbout turning off automatic features
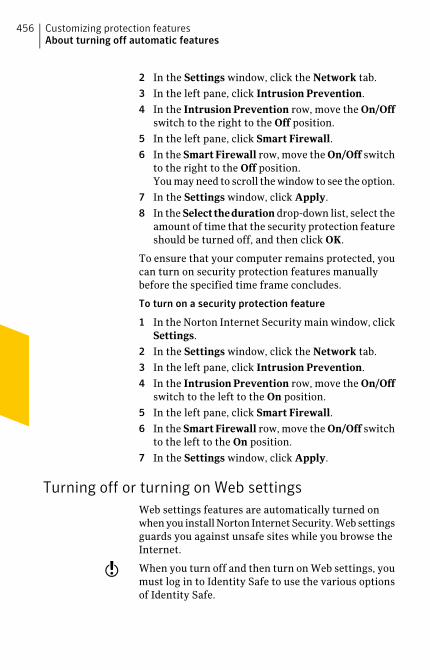
2 In the Settings window, click the Network tab.
3 In the left pane, click Intrusion Prevention.
4 In the Intrusion Prevention row, move the On/Offswitch to the right to the Off position.
5 In the left pane, click Smart Firewall.6 In the SmartFirewall row, move the On/Off switch
to the right to the Off position.You may need to scroll the window to see the option.
7 In the Settings window, click Apply.
8 In the Selecttheduration drop-down list, select theamount of time that the security protection featureshould be turned off, and then click OK.
To ensure that your computer remains protected, youcan turn on security protection features manuallybefore the specified time frame concludes.
To turn on a security protection feature
1 In the Norton Internet Security main window, clickSettings.
2 In the Settings window, click the Network tab.
3 In the left pane, click Intrusion Prevention.
4 In the Intrusion Prevention row, move the On/Offswitch to the left to the On position.
5 In the left pane, click Smart Firewall.6 In the SmartFirewall row, move the On/Off switch
to the left to the On position.
7 In the Settings window, click Apply.
Turning off or turning on Web settingsWeb settings features are automatically turned onwhen you install Norton Internet Security. Web settingsguards you against unsafe sites while you browse theInternet.
w When you turn off and then turn on Web settings, youmust log in to Identity Safe to use the various optionsof Identity Safe.
Customizing protection featuresAbout turning off automatic features
456
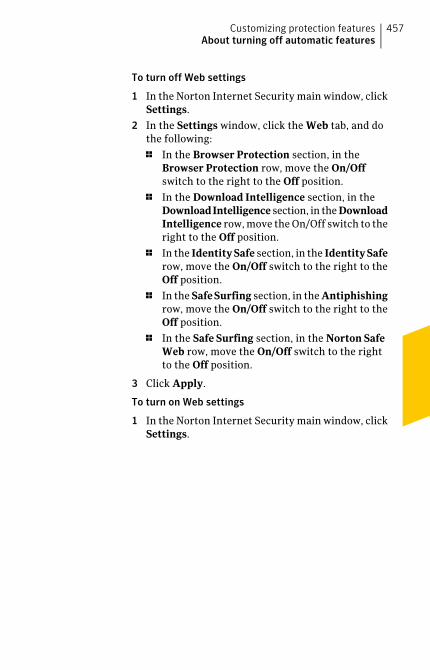
To turn off Web settings
1 In the Norton Internet Security main window, clickSettings.
2 In the Settings window, click the Web tab, and dothe following:
1 In the Browser Protection section, in theBrowser Protection row, move the On/Offswitch to the right to the Off position.
1 In the Download Intelligence section, in theDownloadIntelligence section, in the DownloadIntelligence row, move the On/Off switch to theright to the Off position.
1 In the IdentitySafe section, in the IdentitySaferow, move the On/Off switch to the right to theOff position.
1 In the SafeSurfing section, in the Antiphishingrow, move the On/Off switch to the right to theOff position.
1 In the Safe Surfing section, in the Norton SafeWeb row, move the On/Off switch to the rightto the Off position.
3 Click Apply.
To turn on Web settings
1 In the Norton Internet Security main window, clickSettings.
457Customizing protection featuresAbout turning off automatic features

2 In the Settings window, click the Web tab, and dothe following:
1 In the Browser Protection section, in theBrowser Protection row, move the On/Offswitch to the left to the On position.
1 In the Download Intelligence section, in theDownload Intelligence row, move the On/Offswitch to the left to the On position.
1 In the IdentitySafe section, in the IdentitySaferow, move the On/Off switch to the left to theOn position.
1 In the SafeSurfing section, in the Antiphishingrow, move the On/Off switch to the left to theOn position.
1 In the Safe Surfing section, in the Norton SafeWeb row, move the On/Off switch to the left tothe On position.
3 Click Apply.
About customizing settings and optionsThe default settings provide complete protection foryour computer. However, you may want to adjust thesettings to optimize system performance or disable theoptions that do not apply. You can change the product'ssettings to fit your work environment.
From non-admin accounts of your computer, you needadministrator authentication to change productsettings. If you are an administrator, keep in mind thatthe changes that you make apply to everyone who usesthe computer.
However, you can configure your Identity Safe settingsfrom any non-admin user account also. Each useraccount can individually configure and access theirIdentity Safe options only.
For more information, select one of the sub-entries forthis Help topic.
Customizing protection featuresAbout customizing settings and options
458

Configuring Norton Internet Security settingsThe default Norton Internet Security settings providea safe, automatic, and efficient way to protect yourcomputer. If you want to change or customize yourprotection, you can access most features from the mainwindow.
If you want to control additional settings, such as TrustControl or Program Control, you can use the NortonInternet Security Settings window.
To configure Norton Internet Security settings forindividual features
1 In the Norton Internet Security main window, clickSettings.
2 In the Settings window, click any of the settings tabto open it.
3 Move the switch to the desired position.
4 Click Configure for the feature that you want tochange.
5 In the window that appears, make the necessarychanges, and then click OK.
6 To apply the default settings in a specific section,click Use Section Defaults on the tab.
7 In the Settings window, do one of the following:
1 To save your changes and close the Settingswindow, click OK.
1 To save your changes without closing theSettings window, click Apply.
1 To apply the default settings, click Default All,and then click OK or Apply.
8 If Security Request dialog box appears, select theduration for how long you want to turn off a feature,and then click OK.
To configure Norton Internet Security Settings
1 In the Norton Internet Security main window, clickSettings.
459Customizing protection featuresAbout customizing settings and options

2 In the Settings window, configure your settings inthe following tabs:
Lets you configure howyou want Norton Internet
Computer
Security to scan yourcomputer for viruses andother security threats.
You can also configureNorton Internet Securityto obtain regular updatesfor complete protectionof your computer. Youcan include additionalprotection to yourcomputer by using themost recent definitionsfrom Cloud during scans.
Your options are:1 AntiVirus and SONAR
Exclusions1 Computer Scan
1 Real Time Protection
1 Updates
Customizing protection featuresAbout customizing settings and options
460
Lets you configure howyou want Norton InternetSecurity to monitor yournetwork activities.
You can protect yourcomputer against thethreats that you mightreceive through emailattachments, instantmessaging programattachments. You canalso configure thecommunication port thatNorton products use tocommunicate with eachother.
In addition, you canprotect your computeragainst intrusionattempts andunauthorized traffic. Youcan also configure NortonAntiSpam options to filterout unsolicited emailmessages.
Your options are:1 Intrusion Prevention
1 Message Protection
1 Network SecuritySettings
1 Smart Firewall
Network
461Customizing protection featuresAbout customizing settings and options

Lets you safeguard yoursensitive information andonline transactions.
You can manage yourlogin information, such asemail login credentialsand your financialinformation, such ascredit card details. Youcan also manage otherpersonal information,such as social securitynumber or driver's licensenumber. You can alsosafely browse theInternet.
In addition, you canprotect your Web browseragainst attacks bymalicious Web sites. Youcan also configure NortonInternet Security toindicate whether theexecutable file that youdownload is safe to installor not.
Your options are:1 Browser Protection
1 DownloadIntelligence
1 Identity Safe
1 Safe Surfing
Web
Customizing protection featuresAbout customizing settings and options
462

Lets you configure theappearance and securityof your product.
In addition, you canconfigure how NortonInternet Security submitsrisk details to Symantec.You can specify yourproxy settings to obtaindefinition updates. Youcan also configure SilentMode, PerformanceMonitoring, Idle Time Outduration, Monthly Report,and other miscellaneousoptions.
Your options are:1 Norton Tasks
1 Other Settings
1 PerformanceMonitoring
1 Product Security
1 Silent Mode Settings
General
If you set a password to access the Settings window,you must enter the password to view or configuresettings even if you are an administrator. Therefore,ensure that you set an easy password. However, if youforget your settings password, you can reset thepassword in the window that appears when you chooseto uninstall Norton Internet Security. You need notuninstall the product to reset your password. You canuse the reset settings password option in the uninstallpreference window to reset your password.
About Computer settings
The various options in the Computer tab let youconfigure how you want Norton Internet Security to
463Customizing protection featuresAbout customizing settings and options

scan your computer for viruses and other securitythreats.
Your options are:
AntiVirus and SONARExclusions options let youspecify the items that NortonInternet Security excludes fromits scans. Scans and signaturesare some items that you canexclude from scanning.
AntiVirus and SONARExclusions options also let youchoose which categories of risksyou want Norton InternetSecurity to detect.
w AntiVirus and SONARExclusions reduce your level ofprotection and should be usedonly if you have a specific need.
AntiVirus and SONARExclusions
Customizing protection featuresAbout customizing settings and options
464

Norton Internet Security lets yourun different types of scans todetect and prevent any virusinfection on your computer.
You can use the variousComputer Scan options to selectthe scan type, file types to scan,and the scan schedule. You canalso specify scanning ofcompressed files and MicrosoftOffice documents. You canperform a Full System Scan. Youcan also individually scan drives,folders, or files.
TheComputer Scan options alsolet you specify scans to detectrootkits, other stealth items,network drives, tracking cookies,and unknown security threats.
The Scan Performance Profilesoption lets you configure aNorton Internet Security scanbased on the digital signatureand trust level of the files onyour computer.
w You must configure theScan Performance Profilessettings before you run a scanor before a scan is scheduled torun. Norton Internet Securityscans your computer accordingto the configuration that youspecified in the ScanPerformance Profiles settings.
Computer Scan
465Customizing protection featuresAbout customizing settings and options

Real Time Protection
Customizing protection featuresAbout customizing settings and options
466

Real Time Protection optionprotects your computer bycontinuously checking forviruses and other security risks.
You can use the Real TimeProtection options to control thescanning and monitoring of yourcomputer.
Your options are:
1 Antispyware
Antispyware protects yourcomputer against thesecurity risks that cancompromise your personalinformation and privacy.Antispyware options let youchoose which categories ofrisk you want Norton InternetSecurity to detect formanual, email, and instantmessenger scanning.
1 Auto-Protect
Auto-Protect loads intomemory when Windowsstarts, providing constantprotection while you work.Auto-Protect checks forsecurity risks every time thatyou use software programson your computer, insertremovable media, access theInternet, or use documentfiles. It also monitors yourcomputer for any unusualsymptoms that may indicatean active threat.
You can use theAuto-Protect options tocustomize the protection ofyour computer.
467Customizing protection featuresAbout customizing settings and options

SONAR Protection1
Symantec Online Network forAdvancedResponse (SONAR)provides you with real-timeprotection against threats byproactively detectingunknown security risks onyour computer.
SONAR identifies emergingthreats based on thebehavior of applications.SONAR Protection is quickerthan the traditionalsignature-based threatdetection techniques. SONARdetects and protects youagainst malicious code evenbefore virus definitions areavailable throughLiveUpdate. You can turn onthis option to proactivelydetect unknown securityrisks on your computer.
SONAR provides you thegreatest control when lowcertainty threats aredetected.
1 EnableBoot TimeProtection
EnableBoot TimeProtectionstarts Auto-Protect when youstart your computer. Itprovides enhanced securitylevel from the time your startyour computer.
Customizing protection featuresAbout customizing settings and options
468

1 Early Launch Anti-MalwareProtection
This feature provides betterprotection by running all thenecessary components ofNorton Internet Security thatblock malware intrusionwhen you start yourcomputer.w This feature isavailable only in Windows 8.
469Customizing protection featuresAbout customizing settings and options

Updates
Customizing protection featuresAbout customizing settings and options
470

Norton Internet Securityprotects your computer fromvulnerabilities through the latestprogram and definition updates.Definition updates contain theinformation that lets NortonInternet Security recognize andalert you to the presence of aspecific virus or security threat.
You can use the options in theUpdates section to obtain thelatest virus definitions and keepyour computer secure from thelatest security threats.
Your options are:
1 Automatic LiveUpdate
Automatic LiveUpdateautomatically checks fordefinition updates andprogram updates to yourvirus protection when youare connected to theInternet.
1 Pulse Updates
In addition to the definitionupdates that AutomaticLiveUpdate downloads,Norton Internet Security usesstreaming technology todownload the latest virusdefinitions. These downloadsare called Pulse Updates. ThePulse Updates are lighter andfaster, and keep yourcomputer secure from theongoing threats on the WorldWide Web.
1 AutomaticDownloadofNewVersion
Automatically downloads the
471Customizing protection featuresAbout customizing settings and options
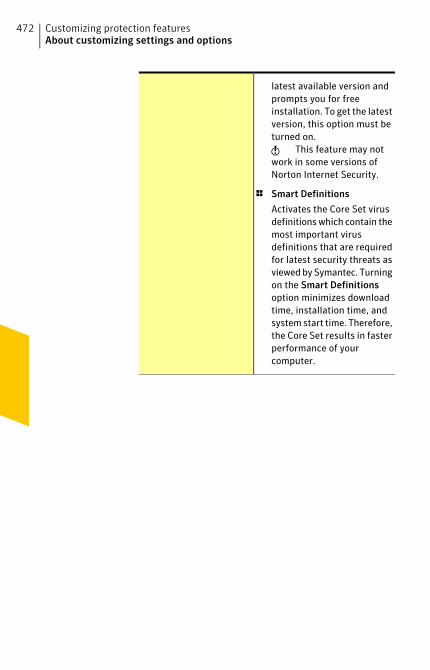
latest available version andprompts you for freeinstallation. To get the latestversion, this option must beturned on.w This feature may notwork in some versions ofNorton Internet Security.
1 Smart Definitions
Activates the Core Set virusdefinitions which contain themost important virusdefinitions that are requiredfor latest security threats asviewed by Symantec. Turningon the Smart Definitionsoption minimizes downloadtime, installation time, andsystem start time. Therefore,the Core Set results in fasterperformance of yourcomputer.
Customizing protection featuresAbout customizing settings and options
472

1 Apply updates only onreboot
Lets you choose how theprogram updates obtainedby Automatic LiveUpdateneed to be applied to yourcomputer. Certain programupdates may require you torestart your computer for theupdates to complete.
When you turn on thisoption, program updates thatrequire system restart areautomatically applied thenext time you restart yoursystem. However, programupdates that do not requiresystem restart are appliedinstantly. By default, thisoption is turned off.w This option is availableonly in Windows 7 andWindows 8.
About Network settings
The options in the Network tab let you configureNorton Internet Security to monitor your Internetactivities.
You can configure Norton Internet Security to protectyour computer against any threat that you may receivethrough email attachments or instant messengerattachments. You can also use the options in theNetwork tab to protect your computer againstintrusion attempts and unauthorized traffic.
473Customizing protection featuresAbout customizing settings and options

Your options are:
Intrusion Prevention
Customizing protection featuresAbout customizing settings and options
474

Intrusion Prevention scans allthe network traffic to and fromyour computer and comparesthis information against a set ofattack signatures. Attacksignatures contain theinformation that identifies anattacker's attempt to exploit aknown vulnerability in theoperating system or in aprogram. If the informationmatches an attack signature,Intrusion Prevention blocks thetraffic from the suspiciouscomputer.
The following are some activitiesthat you can do using theIntrusion Prevention options:
1 View the list of IntrusionPrevention signatures.
1 Exclude individual signaturesfrom being monitored.
1 Specify whether or not youmust be notified whenIntrusion Preventionsignatures are detected.
1 Activate AutoBlock for aspecified duration to blockall incoming traffic from acomputer that continues toattack your system.
1 View, restrict, or unblock thelist of computers thatAutoBlock blocks.
1 View or unblock the list ofcomputers that AutoBlockblocks.
1 Determine whether or notyou are notified whenIntrusion Preventionactivities are detected.
475Customizing protection featuresAbout customizing settings and options

Message Protection
Customizing protection featuresAbout customizing settings and options
476

Message Protection protectsyour computer against thethreats that you may receivethrough email attachments. Youcan use theEmail Antivirus Scanoption, the AntiSpam option,and the Protected PortsSettings option to configureyour email program forprotection against viruses andother security threats.
Email Antivirus Scan protectsyou from the threats that aresent or received in emailattachments.
You can use the Email AntivirusScan options to define howNorton Internet Security shouldbehave when it scans emailmessages. Based on the optionsyou choose, Norton InternetSecurity automatically scans theemail messages that you send orreceive.
Norton AntiSpam lets youcategorize the email messagesthat you receive into spam emailand legitimate email.
You can use the followingAntiSpam options to do thefollowing:1 Specify the addresses in your
address book that NortonInternet Security must notadd to the Allowed List.
1 Specify the addresses ordomains from which youwant to receive or blockemail.
1 Select the email programs in
477Customizing protection featuresAbout customizing settings and options

your computer with whichyou want to integrate NortonAntiSpam.
1 Send feedback about anymisclassified email messageto Symantec for analysis.
1 Classify the spam emailmessages effectively.
Instant Messenger Scan optionlets you customize the scanningof the files the instantmessenger programs receive.You can select the supportedinstant messenger programsfrom which you may receive files.Norton Internet Security scansthe files that you receive fromthe selected instant messengerprograms.
You can use theProtected PortsSettings option to protect thePOP3 and SMTP ports that areassociated with your emailprogram. Norton InternetSecurity automatically protectsthe default SMTP port 25 andthe default POP3 port 110. Ifyour email program is notconfigured with the defaultports, you can manuallyconfigure Norton InternetSecurity to protect your POP3and SMTP ports.
Customizing protection featuresAbout customizing settings and options
478

Network SecuritySettings
479Customizing protection featuresAbout customizing settings and options
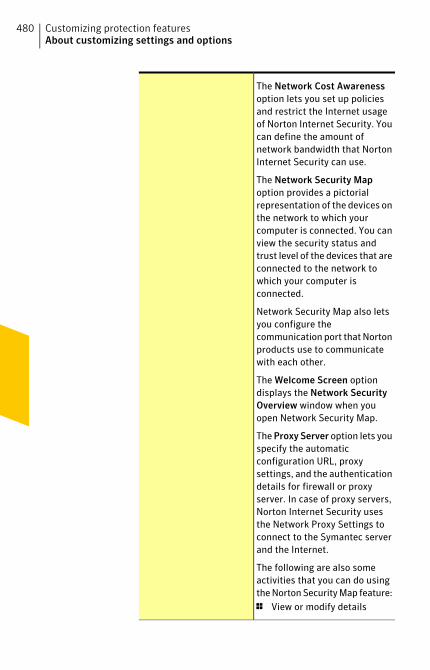
The Network Cost Awarenessoption lets you set up policiesand restrict the Internet usageof Norton Internet Security. Youcan define the amount ofnetwork bandwidth that NortonInternet Security can use.
The Network Security Mapoption provides a pictorialrepresentation of the devices onthe network to which yourcomputer is connected. You canview the security status andtrust level of the devices that areconnected to the network towhich your computer isconnected.
Network Security Map also letsyou configure thecommunication port that Nortonproducts use to communicatewith each other.
The Welcome Screen optiondisplays the Network SecurityOverview window when youopen Network Security Map.
TheProxy Server option lets youspecify the automaticconfiguration URL, proxysettings, and the authenticationdetails for firewall or proxyserver. In case of proxy servers,Norton Internet Security usesthe Network Proxy Settings toconnect to the Symantec serverand the Internet.
The following are also someactivities that you can do usingthe Norton Security Map feature:1 View or modify details
Customizing protection featuresAbout customizing settings and options
480

related to the computers ordevices that are on yournetwork.
1 Grant or deny permissions tothe networked devices toaccess your computer.
1 Add or Remove any device inthe Network Security Map.
1 Change the trust controllevel for a particular Networkaddress or an IP address.
481Customizing protection featuresAbout customizing settings and options

Smart Firewall monitorscommunications between yourcomputer and the othercomputers on the Internet. Italso protects your computerfromcommonsecurity problems.
You can use the Smart Firewalloptions to customize how thefirewall monitors and respondsto inbound communications andoutbound communications. Youroptions are:
1 Advanced Settings
Lets you activate advancedprotection features of SmartFirewall
1 Program Control
Lets you control settings forthe programs that access theInternet
1 Trust Control
Lets you view the networksto which your computer isconnected
1 Block All Network Traffic
Lets you configure howNorton Internet Securityshould control the networkcommunications to and fromyour computer
Smart Firewall
About Web settings
Norton Internet Security provides complete protectionfor your sensitive information while you use theinformation on the World Wide Web.
The options in the Web tab let you configure NortonInternet Security to monitor your Internet activities.
Customizing protection featuresAbout customizing settings and options
482
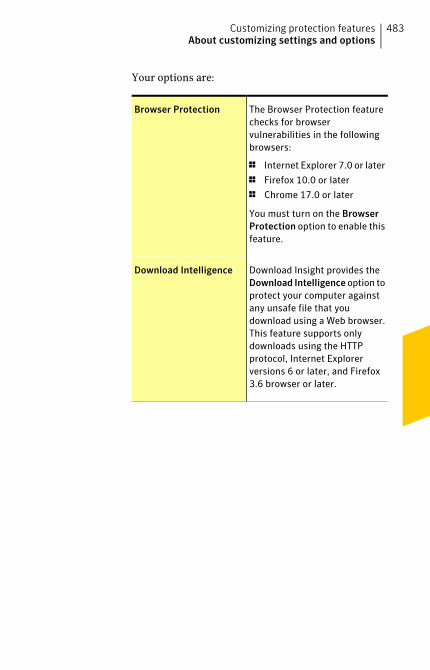
Your options are:
The Browser Protection featurechecks for browservulnerabilities in the followingbrowsers:
1 Internet Explorer 7.0 or later
1 Firefox 10.0 or later
1 Chrome 17.0 or later
You must turn on the BrowserProtection option to enable thisfeature.
Browser Protection
Download Insight provides theDownload Intelligence option toprotect your computer againstany unsafe file that youdownload using a Web browser.This feature supports onlydownloads using the HTTPprotocol, Internet Explorerversions 6 or later, and Firefox3.6 browser or later.
Download Intelligence
483Customizing protection featuresAbout customizing settings and options

The Identity Safe feature inNorton Internet Security lets yousave and protect your logins.
Identity Safe provides you thefollowing features:1 Export Identity Safe data
1 Move Identity Safe Online
1 Delete Identity Safe
1 Identity Safe Options
1 Identity Safe Password &Security
1 Edit Identity Cards
1 Edit Logins
1 Edit Notes
1 Import Identity Safe data
Identity Safe
Norton Internet Securityprotects your Internet Explorer,Firefox, and Chrome Webbrowsers with the Safe Surfingoptions.
When the options under SafeSurfing are turned on,Antiphishing and Norton SafeWeb analyze the security level ofthe Web sites that you visit. Itthen displays the securityinformation in the Norton SiteSafety pop-up window.
Safe Surfing
About General settings
You can use General settings to schedule your producttasks and configure different Norton Internet Securitysettings. You can access the General settings optionsunder the General tab in the Settings window. You canalso configure the security settings of your productfrom General settings.
Customizing protection featuresAbout customizing settings and options
484
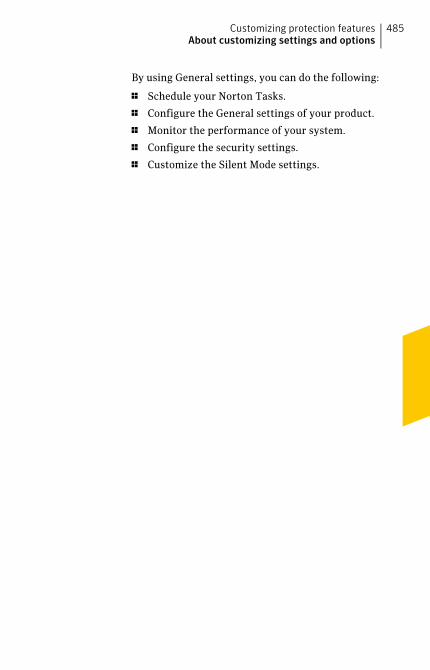
By using General settings, you can do the following:
1 Schedule your Norton Tasks.
1 Configure the General settings of your product.
1 Monitor the performance of your system.
1 Configure the security settings.
1 Customize the Silent Mode settings.
485Customizing protection featuresAbout customizing settings and options
Your options are:
Norton Tasks
Customizing protection featuresAbout customizing settings and options
486

Lets you configure yourNorton Tasks settings.
Your options are:
1 Automatic ResumeDelayFrom Sleep orHibernation
This option delays theautomatic backgroundtasks for a specificduration even if yourcomputer is idle for thatperiod. You can specifyAutomatic Resume Delayduration for a period ofone minute to 20minutes. By default, theAutomatic ResumeDelayFrom Sleep orHibernation option is setto 10 minutes.
1 Automatic Tasks Delay
Lets you delay thestart-up ofNorton-specific programson your computer thatrun automatically whenyou turn on yourcomputer.
Automatic Tasks Delaydoes not delay NortonInternet Securityprotection. You canspecify Automatic TasksDelay duration for aperiod of one minute to20 minutes. The defaultduration is 20 minutes.
1 Idle Time Optimizer
Lets you configure NortonInternet Security to
487Customizing protection featuresAbout customizing settings and options

defragment your bootvolume or the local diskthat contains the bootvolume when yourcomputer is idle.
When the option is turnedon, Norton InternetSecurity automaticallyschedules theoptimization after youinstall an application onyour computer.Optimization improvesthe performance of yourcomputer bydefragmenting thefragmented parts of thedisk.
1 Idle Time Out
Lets you specify the IdleTime Out duration afterNorton Internet Securityidentifies your computeras idle. You can specifythe Idle Time Out for aperiod of one minute to30 minutes. The defaultduration is 10 minutes.
1 Norton TaskNotification
Lets you configure NortonInternet Security to showor hide the notificationsthat appear whenautomatic Norton Tasksare started.
Customizing protection featuresAbout customizing settings and options
488
Other Settings
489Customizing protection featuresAbout customizing settings and options

Lets you configure themiscellaneous settings.
Your options are:
1 Power Saving Mode
Lets you save your batterypower by suspending theNorton Tasks when yourcomputer is on batterypower.
By default, this option isturned on.
1 Monthly Report
Lets you view the MonthlyReport for the last 30days.
You can configure theMonthly Report optionsto remind you to viewMonthly Report.
1 SpecialOfferNotification
Lets you configure NortonInternet Security to notifyyou about special offerson the latest Nortonproducts, add-ons, andother useful informationfrom Symantec.
1 Insight Protection
Lets Norton InternetSecurity to perform anInsight Network scan onyour computer.
The Insight Network scanuses the virus definitionsthat are available locallyand hosted in the cloud.Norton Internet Securityprovides additionalprotection by using the
Customizing protection featuresAbout customizing settings and options
490

most recent definitions.1 Norton Community
Watch
Lets you submit selectedsecurity and applicationdata to Symantec foranalysis. Symantecanalyses the data todetermine any possiblesecurity risks andprovides you the usefulstatistical informationabout the applications.
The Detailed Error DataCollection option lets youallow or deny some of thedetailed datasubmissions. Thesedetailed data may varydepending on theNorton-specific errorsand components. You canuse the Always, Never,and Ask Me options toconfigure thesubmissions.
491Customizing protection featuresAbout customizing settings and options

1 Remote Management
Lets you remotely viewyour device’s securitystatus and fix somesecurity issues by usingNorton Management,Norton One, and NortonStudio. Norton Sudio is anapp that works onWindows 8.
When you turn onRemoteManagement, NortonInternet Securitypublishes details such asyour subscription status,security status of yourdevice, and other detailsto the NortonManagement, NortonOne, and Norton Studioapp. These details helpyou view and fix securityissues of your device. Youcan access these detailsby using Norton Studioapp in Windows 8, orusing NortonManagement and NortonOne from anywhere tomanage Norton InternetSecurity on your device.w By default, thisfeature is disabled unlessyou register your NortonInternet Security withyour Norton Account.
Customizing protection featuresAbout customizing settings and options
492

1 Parental Controls havenot been installed
Lets you install NortonOnline Family.
Norton Online Family is aparental controlapplication that helps youprotect your child fromInternet dangers andonline predators. It letsyou grant permission foryour child to access Websites based on the ageand maturity of yourchild. You can use theClick here to install linkto install Norton SafetyMinder and to configureNorton Online Family.Norton Safety Minder isan application that needsto be installed on eachcomputer that your childuses.w After you installNorton Online Family, theParental Controls havenot been installed optionchanges toNortonOnlineFamily is installed. TheClick here to install linkalso changes toClick hereto configure. You can usethe Click here toconfigure link to log on toNorton Online Family andmodify the Norton OnlineFamily settings.
493Customizing protection featuresAbout customizing settings and options

Performance Monitoring
Customizing protection featuresAbout customizing settings and options
494

Lets you monitor theperformance of yourcomputer.
1 PerformanceMonitoring
When you turn on thePerformanceMonitoringoption, Norton InternetSecurity monitors theCPU usage and memoryusage of your computer.You can also monitor theimportant systemactivities that youperformed for the lastthree months in thePerformance window.
In addition, NortonInternet Security notifiesyou with performancealerts when there is highusage of your systemresources by a programor process.
Your options are:2 PerformanceAlerting
Lets you configureNorton InternetSecurity to detect andnotify you about theincreased usage ofyour computerresources by anyprogram or process.
Norton InternetSecurity notifies youwith the details of theprogram name andresources that theprogramuses. Youcanset PerformanceAlerting to the On,
495Customizing protection featuresAbout customizing settings and options
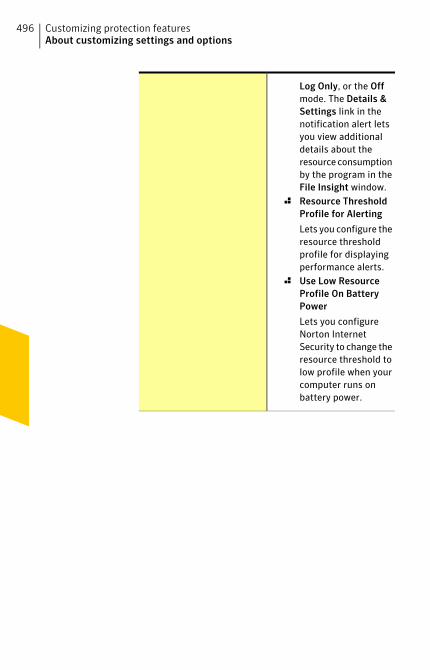
Log Only, or the Offmode. The Details &Settings link in thenotification alert letsyou view additionaldetails about theresource consumptionby the program in theFile Insight window.
2 Resource ThresholdProfile for Alerting
Lets you configure theresource thresholdprofile for displayingperformance alerts.
2 Use Low ResourceProfile On BatteryPower
Lets you configureNorton InternetSecurity to change theresource threshold tolow profile when yourcomputer runs onbattery power.
Customizing protection featuresAbout customizing settings and options
496

2 Alert for High-Usageof:2 CPU
When this optionis turned on,Norton InternetSecurity detectsand notifies youwith the details ofincreased usage ofthe CPU resourceby any program orprocess.
2 Memory
When this optionis turned on,Norton InternetSecurity detectsand notifies youabout theincreased usage ofmemory by anyprogram orprocess.
2 Disk
When this optionis turned on,Norton InternetSecurity detectsand notifies youabout theincreased usage ofyour disk by anyprogram orprocess.
2 Handles
When this optionis turned on,Norton InternetSecurity detectsand notifies you
497Customizing protection featuresAbout customizing settings and options

about theincreased usage ofhandles by anyprogram orprocess.
2 Program Exclusions
Lets you selectspecific programs toexclude fromappearing inperformance alerts.
Customizing protection featuresAbout customizing settings and options
498

Product Security
499Customizing protection featuresAbout customizing settings and options

Lets you protect NortonInternet Security fromunauthorized changes.
Your options are:
1 Non-Admins Access toSettings
Lets you access andconfigure all the optionsin the Settings windowfrom a non-admin useraccount as well.
By default, this option isturned off. You need tolog in to your computer asan administrator to turnon this option. You cannotaccess the Settingswindow if the Settingswindow is opened in someother user account onyour computer.
1 Norton Product TamperProtection
Lets you protect yourNorton product from anattack or modification byunknown or suspiciousapplications.
1 Settings PasswordProtection
Lets you set up apassword to protectNorton Internet Securitysettings.
It protects the productsettings fromunauthorized access. Ifyou set a password, youmust enter the passwordeach time that you want
Customizing protection featuresAbout customizing settings and options
500
to view or configure yourproduct settings.
However, if you forgetyour settings password,you can reset thepassword in the windowthat appears when youchoose to uninstallNorton Internet Security.You do not need touninstall the product toreset your password. Youcan use the reset settingspassword option in theuninstall preferencewindow to reset yourpassword.
501Customizing protection featuresAbout customizing settings and options
Silent Mode Settings
Customizing protection featuresAbout customizing settings and options
502

Lets you turn on or turn offSilent Mode.
Your options are:
1 Silent Mode
When you turn on theSilentModeoption, SilentMode is enabled for aspecifiedduration.NortonInternet Securitysuppresses all alerts andsuspends the backgroundactivities for the durationthat you specify.
1 Full Screen Detection
When you turn on the FullScreen Detection option,Norton Internet Securityautomatically detects theapplications that are runin full-screen mode andenables Silent Mode.Norton Internet Securitysuppresses most of thealerts and suspends thebackgroundactivities. Theonly activities that run arethose that protect yourcomputer from virusesand other securitythreats.
1 QuietMode onDetectionof:2 IMAPI 2.0 Disk Burn
When you use theMedia Centerapplication to burn aCD or DVD, NortonInternet Securitydetects the activity,and automatically
503Customizing protection featuresAbout customizing settings and options

turns on Quiet Mode.When Quiet Mode isturned on, NortonInternet Securitysuppresses thebackground activitiesbut continues todisplay alerts andnotifications.
2 Media Center TVRecording
When you use theMedia Centerapplication to recorda TV program, NortonInternet Securitydetects the activity,and automaticallyturns on Quiet Mode.When Quiet Mode isturned on, NortonInternet Securitysuppresses thebackground activitiesbut continues todisplay alerts andnotifications.
Customizing protection featuresAbout customizing settings and options
504

2 User-SpecifiedPrograms
When you run anapplication that islisted in theUser-SpecifiedPrograms list, NortonInternet Securitydetects the activity,and automaticallyturns on Quiet Mode.When Quiet Mode isturned on, NortonInternet Securitysuppresses thebackground activitiesbut continues todisplay alerts andnotifications.
You can configure thelist of programs forwhich you want toturn on Quiet Mode.
About Norton Product Tamper Protection
Norton Product Tamper Protection prevents outsideprograms from making changes to the Norton product.This security feature also prevents Windows SystemRestore from changing Norton files, which results inthe Restoration Incomplete message.
Norton Product Tamper Protection protects NortonInternet Security from an attack or modification byany virus or other unknown threat. You can protectyour product from accidental modification or deletionby keeping the Norton Product Tamper Protectionoption turned on.
If you want to temporarily turn off Norton ProductTamper Protection, you can turn it off for a specifiedduration.
505Customizing protection featuresAbout customizing settings and options
w You cannot run System Restore on your computer whenNortonProductTamperProtection is turned on. Youmust temporarily turn off Norton Product TamperProtection to run a successful System Restore.
Turning off or turning on Norton Product Tamper
Protection
Norton Product Tamper Protection protects the NortonInternet Security files from an attack or modificationby any virus or other unknown threat. You can protectyour product from accidental modification or deletionby keeping the Norton Product Tamper Protectionoption turned on.
If you want to temporarily turn off Norton ProductTamper Protection, you can turn it off for a specifiedduration.
w You cannot run System Restore on your computer whenNortonProductTamperProtection is turned on. Youmust temporarily turn off Norton Product TamperProtection to run a successful System Restore.
To turn off Norton Product Tamper Protection
1 In the Norton Internet Security main window, clickSettings.
2 In the Settings window, click the General tab.
3 In the left pane, click Product Security.
4 In the Norton Product Tamper Protection row,move the On/Off switch to the right to the Offposition.
5 Click Apply.
6 In the Security Request dialog box, in the Selectthe duration drop-down list, select how long youwant to turn off Norton Product Tamper Protection.
7 Click OK.
8 In the Settings window, click OK.
Customizing protection featuresAbout customizing settings and options
506
To turn on Norton Product Tamper Protection
1 In the Norton Internet Security main window, clickSettings.
2 In the Settings window, click the General tab.
3 In the left pane, click Product Security.
4 In the Norton Product Tamper Protection row,move the On/Off switch to the left to the Onposition.
5 Click Apply, and then click OK.
About securingNorton Internet Security Settingsusing a password
You can configure Norton Internet Security to preventunauthorized access to your product settings. If youshare your computer with others and do not want themto modify your Norton Internet Security Settings, youcan secure Norton Internet Security Settings using apassword. The Settings Password Protection optionlets you secure your Norton Internet Security Settingsby setting up a password.
By default, Settings Password Protection option isturned off. You must turn on the Settings PasswordProtectionoption to set up a password for your productsettings. To use the Settings Password Protectionoption, go to the Norton Internet Security mainwindow, and then click Settings >General >ProductSecurity. The password must be between 8 and 256characters in length.
After you set up a password for Norton InternetSecurity Settings, you must enter the password eachtime to access or configure your product settings. Ifyou forget your settings password, you can reset thepassword in the window that appears when you chooseto uninstall Norton Internet Security. You do not needto uninstall the product to reset your password. Youcan use the reset settings password option in theSelectyourUninstallPreference window to reset yourpassword.
507Customizing protection featuresAbout customizing settings and options

w The reset settings password option appears in theSelect your Uninstall Preference window only whenthe SettingsPasswordProtection option is turned on.
You can turn off the Settings Password Protectionoption if you no longer require password protectionfor your Norton Internet Security Settings.
Securing your Norton Internet Security Settings using
a password
You can secure your Norton Internet Security Settingsfrom unauthorized access by setting up a password foryour product settings. The Settings PasswordProtection option lets you secure your Norton InternetSecurity Settings using a password.
After you set up a password for Norton InternetSecurity settings you must enter the password eachtime to view or configure your product settings.
By default, the Settings Password Protection optionis turned off. You must turn on the SettingsPasswordProtection option to set up a password for your productsettings.
w The password must be between 8 and 256 charactersin length.
To secure your Norton Internet Security Settings usinga password
1 In the Norton Internet Security main window, clickSettings.
2 In the Settings window, click the General tab.
3 In the left pane, click Product Security.
4 In the SettingsPasswordProtection row, move theOn/Off switch to the left to the On position.
5 Do one of the following:
1 In the Settings Password Protection row, clickConfigure.
1 In the Settings window, click Apply.
Customizing protection featuresAbout customizing settings and options
508

6 In the dialog box that appears, in the Password box,type a password.
7 In the Confirm Password box, type the passwordagain.
8 Click OK.
9 In the Settings window, click OK.
Turning off Norton Internet Security Settings password
You can protect your Norton Internet Security Settingswith a password using the Settings PasswordProtection option. If the SettingsPasswordProtectionoption is turned on, you need to enter the Settingspassword each time to view or configure your NortonInternet Security settings. You cannot access theproduct settings without providing your Settingspassword.
w In case you forget your Settings password, you canreset it using the resetsettingspassword option in theSelect Uninstall Preference window.
You can turn off the Settings Password Protectionoption if you do not require password protection forNorton Internet Security settings.
To turn off Norton Internet Security Settings password
1 In the Norton Internet Security main window, clickSettings.
2 In the dialog box that appears, in the Password box,type your Settings password, and then click OK.
3 In the Settings window, click the General settingstab.
4 In the left pane, click Product Security.
5 Click Apply, and then click OK.
Resetting your Norton Internet Security Settings
password
If you forget your Norton Internet Security Settingspassword, you can reset the password. You can reset
509Customizing protection featuresAbout customizing settings and options

your Norton Internet Security Settings password usingthe reset settings password option in the SelectUninstall Preference window.
To access the SelectUninstallPreference window, youmust choose to uninstall Norton Internet Security.However, you need not uninstall the product to resetyour Settings password.
w The reset settings password option appears in theSelect Uninstall Preference window only if theSettings Password Protection option is turned on. Touse the SettingsPasswordProtection option, go to theNorton Internet Security main window, and then clickSettings >General >Product Security.
To reset your Norton Internet Security Settingspassword
1 On the Windows taskbar, do one of the following:
1 In Windows XP, Windows Vista, or Windows 7,click Start > Control Panel.
1 In Windows 8, on the Apps screen, underWindows System, click Control Panel.
2 In WindowsControlPanel, do one of the following:
1 In Windows XP, double-click Add or RemovePrograms.
1 In Windows Vista, click ProgramsandFeatures.
1 In Windows 7 or Windows 8, click Programs >Programs and Features.
The Programs option in Windows 7 or Windows8 is available when you select the Categoryoption in the View by drop-down list.
3 In the list of currently installed programs, do oneof the following:
1 In Windows XP, click NortonInternetSecurity,and then click Change/Remove.
1 In Windows Vista, Windows 7, or Windows 8,click Norton Internet Security, and then clickUninstall/Change.
Customizing protection featuresAbout customizing settings and options
510

4 At the bottom of the Select Your UninstallPreference window, click reset settingspassword.
5 In the dialog box that appears, in the ResetPassword Key box, type the randomly generatedkey that is displayed against Reset Password Key.
6 In the New Password box, type the new password.
7 In the Confirm New Password box, type the newpassword again.
8 Click OK.
About Remote Management
The Remote Management feature lets you remotelymanage Norton Internet Security using Norton Studioapp, Norton Management, and Norton One. It allowsNorton Internet Security to send the product-relateddetails to Norton Management, Norton One, and NortonStudio app. The details that Remote Managementpublishes help you view and fix some security issuesof the device.
w By default, this feature is disabled unless you registeryour Norton Internet Security with your NortonAccount.
Norton Studio is a Metro App and works only onWindows 8. But, you can view the security status andfix security issues of your devices running earlierversions of Windows from Norton Studio app. In thiscase, you must turn on the RemoteManagement optionin your Norton product that is installed on your devices.For example, you have a Norton Studio app and Norton360 installed on your laptop running Windows 8. Youalso have Norton Internet Security and NortonAntiVirus installed on your desktops running WindowsXP and Vista, respectively. In this case, you can viewthe security status of all three devices in the NortonStudio app. If any of the device is at risk, you can alsofix them from the Norton Studio app.
To use the Remote Management feature, you need toregister your Norton Internet Security with your
511Customizing protection featuresAbout customizing settings and options
Norton Account. Your device needs to be connected tothe Internet to use Remote Management feature. Whenthe Remote Management option is turned on, NortonInternet Security publishes details such as your NortonInternet Security subscription status, current securitystate of your device, and other details to the NortonManagement, Norton One, and Norton Studio app. Youcan access your Norton Studio app in Windows 8, orNorton Management and Norton One from anywhereto view your Norton Internet Security details andresolve any security issue. When this option is turnedoff, Norton Internet Security does not publish any ofits details in the Norton Management, Norton One, andNorton Studio app.
By default, the Remote Management option is turnedoff. You can turn on this option if you want to remotelymanage Norton Internet Security on your device.
In the Norton Management, Norton One, and NortonStudio app, you can do the following:
1 View the security statistics of Norton InternetSecurity for the last 30 days (only in Norton Studioapp)
w The activities that are displayed in Norton Studioapp may vary depending on the latest version ofNorton product that is installed on your devices.
2 Blocked malicious software
2 Blocked intrusions
2 Blocked spam messages
2 Blocked phishing Web sites
2 Blocked Safe Web sites
2 Quarantined items
2 Blocked Firewall threats
2 Total number of known threats
2 Total number of known attacks
2 Total number of known antiphishing sites
2 Timestamp of last full scan
Customizing protection featuresAbout customizing settings and options
512

2 Timestamp of last Quick Scan
2 Timestamp when stats were published
1 View health states of different components of yourdevice
2 Overall product health
2 Computer category health
2 Network category health
2 Web category health
1 Fix the following items:
2 Firewall
2 Auto-Protect
2 Scan incoming emails
2 Scan outgoing emails
2 Antispyware
2 Intrusion Prevention
2 SONAR
2 Antiphishing
2 Browser Protection
1 Perform the following tasks:
2 Resolve issues
2 Re-key Norton Internet Security
2 Re-sync license
2 Run LiveUpdate
Turning on or turning off Remote Management
Remote management lets you remotely manage NortonInternet Security using Norton Management, NortonOne, and Norton Studio app. Norton Studio is a MetroApp and works only on Windows 8. When you turn onRemoteManagement option, you can view your NortonInternet Security details and fix some security issuesof your device.
513Customizing protection featuresAbout customizing settings and options

By default, this feature is disabled unless you registeryour Norton Internet Security with your NortonAccount.
When the Remote Management option is turned on,Norton Internet Security sends details related to yourNorton product to Norton Management, Norton One,and Norton Studio app. When this option is turned off,Norton Internet Security does not publish any of itsdetails in the Norton Management, Norton One, andNorton Studio app.
By default, the Remote Management option is turnedoff.
In some cases, you are prompted to enter your NortonAccount password when turning on RemoteManagement option.
To turn on Remote Management
1 In the Norton Internet Security main window, clickSettings.
2 In the Settings window, click the General tab.
3 In the left pane, click Other Settings.
4 In the Remote Management row, move the On/Offswitch to the left to the On position.
5 Click Apply, and then click OK.
To turn off Remote Management
1 In the Norton Internet Security main window, clickSettings.
2 In the Settings window, click the General tab.
3 In the left pane, click Other Settings.
4 In the Remote Management row, move the On/Offswitch to the right to the Off position.
5 Click Apply, and then click OK.
Customizing protection featuresAbout customizing settings and options
514

This chapter includes the following topics:
1 Finding the version number of your product
1 Finding the End-User License Agreement
1 About upgrading your product
1 About Norton Autofix
1 Staying informed about protection issues
1 About Support
1 About uninstalling
Finding the version number of your productIf you want to upgrade your Norton product or wantto reach the customer support for assistance, you mustknow your product version number. You can find theversion number of your product on your computer.
To find the version number of your product
1 In the Norton Internet Security main window, clickSupport.
2 In the Support drop-down menu, move your mousepointer over About.You can note the version number of your productin the pop-up that appears.
9Finding additionalsolutions

Finding the End-User License AgreementEnd-User License Agreement (EULA) is a legaldocument that you agree to while installing theproduct. EULA contains information such as therestriction on sharing or usage of the software, theuser rights on the software, and the supportinformation.
You can read the EULA to learn more about thefollowing information:
1 The usage policies of Norton Internet Security.
1 The terms and conditions for using Norton InternetSecurity.
To find the End-User License Agreement
1 In the Norton Internet Security main window, clickSupport.
2 In the Support drop-down menu, click UserLicenseAgreement.
3 Read the Norton License Agreement and click Close.
About upgrading your productNorton Internet Security helps you upgrade yourproduct if you have an active subscription. You canupgrade your current product to the latest versionwithout any cost as long as you have an activesubscription with the current product. If a new versionof your product is available, Norton Internet Securitylets you download the new version.
The Automatic Download of New Version optionautomatically downloads the latest available versionof Norton Internet Security and prompts you for freeinstallation. To get the latest version of Norton InternetSecurity, you need to turn on the AutomaticDownloadof New Version option. To turn on the AutomaticDownload of New Version option, go the NortonInternet Security main window, and then click Settings
Finding additional solutionsFinding the End-User License Agreement
516

> Updates > Automatic Download of New Version >On.
If you choose to install the latest version of the product,Norton Internet Security downloads and seamlesslyinstalls the latest version. Ensure that you have savedall your important data such as pictures and financialrecords before you install the new version of theproduct.
If you download and install the latest version of yourproduct, your subscription status remains the same asyour previous version of product. For example, youhave 200 days of subscription left with your currentversion of product and you upgrade your product tothe latest version. In this case, the subscription statusof your upgraded product remains 200 days only.
If a new version is not available, the Web page informsyou that no new version is available and your productis up to date. Symantec recommends that you have thelatest version of the product, as it contains new andenhanced features for better protection against securitythreats.
Product upgrade is different from the program updatesand the definition updates that are minorimprovements to your installed product. The maindifferences are as follows:
1 Product upgrade lets you download and install anew version of the entire product.
1 Definition updates are the files that keep yourSymantec products up to date with the latestantithreat technology.
1 Program updates are enhancements to NortonInternet Security that Symantec issues periodically.
If a new version of the product is not available, ensurethat you have all the latest program updates anddefinition updates. LiveUpdate automates the processof obtaining and installing program and definitionupdates. You can use LiveUpdate to obtain the latestupdates.
517Finding additional solutionsAbout upgrading your product

The upgrade process might not work if your Webbrowser is incompatible to communicate with theSymantec servers.
w Your product must be activated and you need anInternet connection to check and install new productversion.
Checking for a new version of the productYou can upgrade your product to the latest version ifyou have an active subscription. If you have a newversion available, you can download and install thenew version of your product. You can also let NortonInternet Security notify you when a new version ofyour product is available. You can do so by turning onthe Automatic Download of New Version option. Toturn on the Automatic Download of New Versionoption, go the Norton Internet Security main window,and then click Settings > Updates > AutomaticDownload of New Version > On. The latest version ofyour product may contain new and enhanced featuresfor better protection against security threats.
When you check for a new version, details about yourproduct such as product name and version are sent toSymantec servers. The servers then check whether anew version of the specified product is available or not.
If a new version is available, you can download andinstall it from the Web page. If a new version is notavailable, the Web page informs you about it. In suchcase, you can run LiveUpdate to obtain latest programand definition updates and keep the existing versionof your product up to date.
The upgrade process might not work if your Webbrowser is incompatible to communicate with theSymantec servers. You can use Internet Explorerversion 6.0 or later, Chrome version 10.0 or later, andFirefox version 3.6 or later.
Finding additional solutionsAbout upgrading your product
518

w Your product must be activated and you need anInternet connection to check if a new version isavailable and install new version of the product.
To check for a new version of the product
1 In the Norton Internet Security main window, clickSupport.
2 In the Support drop-down menu, click NewVersionCheck.This option is available only if your product isactivated. The Web page that appears displayswhether a new version of the product is availableor not.
3 Follow the on-screen instructions to download thenew product.
About Norton AutofixNorton Autofix provides additional product supportwith one-click access from the Norton Internet Securitymain window. Norton Autofix performs a Quick Scanof your computer and repairs problems without yourintervention. If the problem persists, you can use theOpen Support Web Site option to go to the NortonSupport Web site for help using our online forum, chat,email, or telephone.
In addition, the Norton Support Web site providesaccess to the knowledge base articles. By using thesearticles, you can easily find solutions to your technicalproblems.
The support technicians can help you solve morecomplex problems by using remote-assistancetechnology. The remote-assistance technology allowsSymantec support technicians to access your computeras remote users so that they can perform maintenanceor service.
w Support offerings can vary based on the language orproduct.
519Finding additional solutionsAbout Norton Autofix

When you click the GetSupport option in the Supportdrop-down menu, Norton Internet Security checks yourInternet connection. To access Norton Autofix, ensurethat your computer is connected to the Internet. If youuse a proxy server to connect to the Internet, you mustconfigure the proxy settings of Norton InternetSecurity. See “Configuring Network Proxy Settings”on page 78.
If you do not know your proxy settings, contact yourInternet service provider or network administrator forassistance.
Solving a problem using Norton AutofixNorton Autofix performs a Quick Scan of yourcomputer and repairs problems without yourintervention. If a problem persists, you can use theNorton Support Web site for additional online supportand contact options.
Your computer must be connected to the Internet toaccess Norton Autofix. If you use a proxy server toconnect to the Internet, you must configure the proxysettings of Norton Internet Security.
w If you do not want to proceed with the support session,you can use the Cancel option to bypass the scan.
To solve a problem if your computer is connected to theInternet
1 In the Norton Internet Security main window, clickSupport.
2 In the Support drop-down menu, click GetSupport.
3 In the Norton Autofix window, do one of thefollowing:
1 If the problem is not fixed automatically, clickOpen Support Web Site, and follow theon-screen instructions to find additional support.
1 If the problem is fixed, click Close.
Finding additional solutionsAbout Norton Autofix
520

To solve a problem if your computer is unable to connectto the Internet
1 In the Norton Internet Security main window, clickSupport.
2 In the Support drop-down menu, click GetSupport.
3 Follow the on-screen instructions in the CheckingYourConnection window to attempt to correct yourconnection issue.
4 In the Checking Your Connection window, clickRetry.
5 If you use a proxy server to connect to the Internet,you may be prompted to authenticate. If you areprompted, then in the Proxy Settings Detectedwindow, do the following:
1 In the Username box, type the user name thatyou provided when you configured your NetworkProxy settings.
1 In the Password box, type the password that youprovided when you configured your NetworkProxy settings.
1 Click OK.
6 If the problem still persists, in the Norton Autofixwindow, click the click here link.Under SupportContactNumbers, select the region,and then your country to view the contact details.You can use the contact details to contact thetechnical support team.
Staying informed about protection issuesIf you need help using Norton Internet Security, youcan find helpful information on the Symantec Web site.It contains many useful and informative features thatare especially designed to complement Norton InternetSecurity, including the following:
1 Detailed background information about currentthreats and outbreaks.
521Finding additional solutionsStaying informed about protection issues
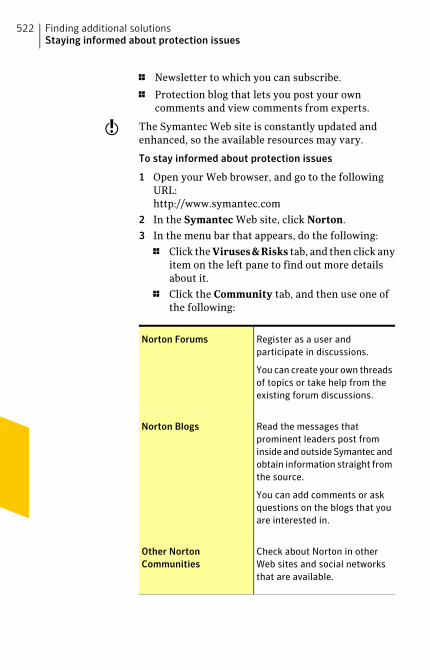
1 Newsletter to which you can subscribe.
1 Protection blog that lets you post your owncomments and view comments from experts.
w The Symantec Web site is constantly updated andenhanced, so the available resources may vary.
To stay informed about protection issues
1 Open your Web browser, and go to the followingURL:http://www.symantec.com
2 In the Symantec Web site, click Norton.
3 In the menu bar that appears, do the following:
1 Click the Viruses&Risks tab, and then click anyitem on the left pane to find out more detailsabout it.
1 Click the Community tab, and then use one ofthe following:
Register as a user andparticipate in discussions.
You can create your own threadsof topics or take help from theexisting forum discussions.
Norton Forums
Read the messages thatprominent leaders post frominside and outside Symantec andobtain information straight fromthe source.
You can add comments or askquestions on the blogs that youare interested in.
Norton Blogs
Check about Norton in otherWeb sites and social networksthat are available.
Other NortonCommunities
Finding additional solutionsStaying informed about protection issues
522

About SupportIf you have purchased Norton Internet Security, youcan access Support from the product.
w Support offerings may vary based on the language orproduct.
About Norton Support Web siteThe Norton Support Web site provides a full range ofself-help options.
By using Norton Support Web site, you can do thefollowing:
1 Find help with your product download, productsubscription, product activation, productinstallation, and other issues.
1 Find and download the latest product manual.
1 Manage your products and services using NortonAccount.
1 Search Norton Forum to find the additional producthelp about installing, configuring, andtroubleshooting errors. You can also post yourquestions in the forum and get answers fromexperts. To post your questions, you need to firstregister for Norton Forum.
1 Find information about the latest virus threats andremoval tools.
w Availability of support varies by region, language, orproduct. For additional support, go to the followingURL:
http://www.norton.com/support
In addition to the self-help options, you can use theContact Us option at the bottom of the Web page to
523Finding additional solutionsAbout Support

contact the technical support team in the followingways:
Chat in real time with asupport representative.
For more complex technicalissues, chat offers the optionto allow a supportrepresentative to connectremotely to your computerand resolve your problem.
Live Chat
Submit your question on ourWeb site and receive aresponse by email.
Email support has a slowerresponse time than chat orphone.
Speak to a supportrepresentative in real time.
Phone
Search for additional producthelp about installing,configuring, andtroubleshooting errors.
Norton Forums
Using the Norton Support Web site
Norton Support Web site contains answers to the mostcommon customer questions. You can find the latestproduct manual, knowledge base articles, and virusremoval tools.
Norton Support Web site contains problem-solvingarticles that are presented in an easy step-by-stepformat. The articles are categorized and listed on theleft side of the Web page. Using the categories, you canbrowse through the available support topics. You can
Finding additional solutionsAbout Support
524

also use the SearchSupport box to find solution usinga keyword.
Norton Support Web site also contains useful links tothe product manual, the Norton Account, the NortonForum, and the spyware help under AdditionalResources.
To use the Norton Support Web site
1 In the Norton Internet Security main window, clickSupport.
2 In the Support drop-down menu, click GetSupport.
3 Follow the on-screen instructions.
4 In the NortonAutofix window, click OpenSupportWeb Site.The Norton Support Web page appears.
5 Follow the on-screen instructions.
About phone supportNorton Autofix offers a range of technical support andcustomer service options. When you click the GetSupport option in the Support drop-down menu,Norton Autofix performs a Quick Scan and repairsproblems without your intervention.
If the problem persists, and you have an active Internetconnection, you can use the Open Support Web Siteoption in the NortonAutofix window. This option takesyou to the Norton Support Web site for additionalonline support and contact details.
You get the click here option in the Norton Autofixwindow, only when you have a problem connecting tothe Internet. You can use the click here link to get thephone number to contact a support representative.
w Support offerings may vary based on the language orproduct.
If you cannot access phone support by using NortonAutofix, then you can access the phone support optionsat the following URL:
525Finding additional solutionsAbout Support

http://www.norton.com/support
Getting support by phone
When you click the GetSupport option in the Supportdrop-down menu, Norton Autofix performs a QuickScan and should repair your computer problems.However, if the problem persists, you can use the OpenSupport Web Site option to go to the Norton SupportWeb site for help by telephone, email, chat, or forum.
If you have a problem connecting to the Internet, youget the clickhere option in the NortonAutofix window.You can use the clickhere link to get the phone numberto contact a support representative.
w Availability of support varies by region. Regulartelephone and Internet connection fees apply in certaincountries.
To get support by phone if your computer is unable toconnect to the Internet
1 In the Norton Internet Security main window, clickSupport.
2 In the Support drop-down menu, click GetSupport.
3 Follow the on-screen instructions.
4 In the Norton Autofix window, click the click herelink.
5 In the Norton Autofix window, under SupportContact Numbers, select the region, and then thelocation.You can use the phone number to contact a supportrepresentative.
To get support by phone if your computer is connectedto the Internet
1 In the Norton Internet Security main window, clickSupport.
2 In the Support drop-down menu, click GetSupport.
3 After Norton Autofix scans, click the OpenSupportWeb Site link.The Norton Support Web page appears.
Finding additional solutionsAbout Support
526
4 Click the Contact Us option at the bottom of theWeb page and follow the on-screen instructions.
Support policySymantec recommends that you have the latest versionof the product, as it contains new and enhancedfeatures for better protection against security threats.Current help and support for your Norton product canbe found at the following URL:
www.norton.com/support
Symantec reserves the right to change its supportpolicies at any time without notice. You can view thelatest version of the support policy at the followingURL:
www.symantec.com/supportpolicy
About keeping your subscription currentSubscription period lengths vary by Symantec product.To maintain uninterrupted protection, you must keepyour subscription up to date. If you do not renew yoursubscription, you cannot obtain updates of any kindand the software no longer functions.
When you run LiveUpdate near the end of yoursubscription period, you are prompted to subscribe fora nominal charge. Follow the on-screen instructionsto renew your subscription.
When you renew your subscription, the definitionupdates and new product features are availablethroughout the subscription period. Please note thatfeatures may be added, modified, or removed duringthis period.
Worldwide service and supportWorldwide service and support solutions vary bycountry. To contact one of our Support offices, pleasego to the following Web site and select your language.
527Finding additional solutionsAbout Support

www.norton.com/support
If you are a Norton One Premium Member, go to thefollowing Norton One support Web site for informationon this topic:
https://one.norton.com/support
ClubNortonClubNorton is your one-stop resource center forInternet security. As a Norton customer, Symantecwants to make your experience with your computersafe, enjoyable, and productive. Whether you use yourcomputer to manage your personal finances, shoponline, or share your latest digital photos with friendsand family, ClubNorton makes your experience a goodone. Our goal is to consistently provide the proper toolsand information to keep you up to date.
For more information, go to the following URL andselect your country or region in the Select YourCountry/Region drop-down menu:
www.clubnorton.com
The ClubNorton Web page includes a regularly updatedarticle library, a glossary, the Norton Forums, and theNorton Update Center. You can also find the followinguseful links in the Web page:
1 Symantec Security Check
1 Subscription Troubleshooter
1 Home & Home Office Security
1 Product Manuals
1 Product Updates
1 Product Reviews
1 Order Status
1 Returns
1 Rebates
Finding additional solutionsAbout Support
528

About uninstallingTo remove your Symantec product from your computer,use the Add/RemovePrograms option in the WindowsControl Panel.
You must restart your computer after uninstalling theproduct, so ensure that you do not have any otherprograms running while you follow this procedure.
Uninstalling Norton Internet SecurityYou can remove Norton Internet Security in thefollowing ways:
1 From Windows Control Panel.
1 From the Start menu.
w You cannot access online Help while uninstalling.Therefore, you should print out the Uninstalling NortonInternet Security Help topic before continuing touninstall.
You may need to uninstall Norton Internet Securityfor some purpose. You can reinstall the product usingthe installation file that you downloaded fromSymantec Web site or from the CD. To reinstall NortonInternet Security, follow the installation proceduresthat are available in the user guide.
During uninstallation, Norton Internet Security offersto leave the Norton Toolbar for free to search andbrowse safely over the Internet even after the productis uninstalled. You can choose to keep the NortonToolbar that comprises Norton Safe Search and NortonSafe Web features without any cost. Norton Safe Searchprovides site safety status and Norton rating for eachof the search results generated. Norton Safe Webanalyses the security levels of the Web sites you visitand indicates if the Web sites are free from threats.
529Finding additional solutionsAbout uninstalling

w Your computer must be connected to the Internet toavail this option. Norton Internet Security does notoffer to leave the Norton Toolbar if you upgrade yourproduct to the latest version or choose to reinstallanother Norton product. In addition, the NortonToolbar installation is available only if the operatingsystem of your computer is English.
To uninstall Norton Internet Security from WindowsControl Panel
1 Do one of the following:
1 On the Windows taskbar, click Start > ControlPanel.
1 In Windows 8, go to Apps, and under WindowsSystem, click Control Panel.
2 In Windows ControlPanel, do one of the following:
1 In Windows XP, double-click Add or RemovePrograms.
1 In Windows Vista, click ProgramsandFeatures.
1 In Windows 7 or Windows 8, click Programs >Programs and Features.
The Programs option in Windows 7 andWindows 8 is available when you select theCategory option in the View by drop-down list.
3 In the list of currently installed programs, do oneof the following:
1 In Windows XP, click NortonInternetSecurity,and then click Change/Remove.
1 In Windows Vista, Windows 7, or Windows 8,click Norton Internet Security, and then clickUninstall/Change.
Finding additional solutionsAbout uninstalling
530

4 In the page that appears, under Select YourUninstall Preference, click one of the following:
Lets you retain your settings,passwords, and preferences forNorton features before youuninstall Norton InternetSecurity.
Select this option if you want toreinstall Norton Internet Securityor another Norton product.
I plan to reinstall aNorton product. Pleaseleavemy settings behind.
Lets you completely removeNorton Internet Security withoutsaving your settings, passwords,and preferences.
Please remove all userdata.
5 If Norton Internet Security offers to install theNorton Toolbar after uninstall, do one of thefollowing:
1 To keep the Norton Toolbar after uninstall, clickAgree & Install.
1 To uninstall Norton Internet Security withoutkeeping the Norton Toolbar, click Skip.
6 To uninstall Norton Internet Security, click Next.
7 Do one of the following:
1 Click RestartNow (recommended) to restart thecomputer.
1 Click RestartLater to restart the computer later.
Norton Internet Security is not fully uninstalleduntil you restart your computer.
531Finding additional solutionsAbout uninstalling
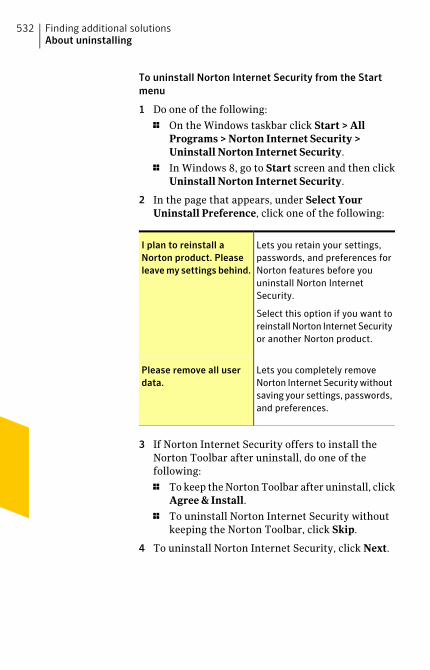
To uninstall Norton Internet Security from the Startmenu
1 Do one of the following:
1 On the Windows taskbar click Start > AllPrograms > Norton Internet Security >Uninstall Norton Internet Security.
1 In Windows 8, go to Start screen and then clickUninstall Norton Internet Security.
2 In the page that appears, under Select YourUninstall Preference, click one of the following:
Lets you retain your settings,passwords, and preferences forNorton features before youuninstall Norton InternetSecurity.
Select this option if you want toreinstall Norton Internet Securityor another Norton product.
I plan to reinstall aNorton product. Pleaseleavemy settings behind.
Lets you completely removeNorton Internet Security withoutsaving your settings, passwords,and preferences.
Please remove all userdata.
3 If Norton Internet Security offers to install theNorton Toolbar after uninstall, do one of thefollowing:
1 To keep the Norton Toolbar after uninstall, clickAgree & Install.
1 To uninstall Norton Internet Security withoutkeeping the Norton Toolbar, click Skip.
4 To uninstall Norton Internet Security, click Next.
Finding additional solutionsAbout uninstalling
532

5 Do one of the following:
1 Click RestartNow (recommended) to restart thecomputer.
1 Click RestartLater to restart the computer later.
Norton Internet Security is not fully uninstalleduntil you restart your computer.
See “About uninstalling” on page 529.
533Finding additional solutionsAbout uninstalling

Finding additional solutionsAbout uninstalling
534

Aabout customer support 523accessing
Facebook Scan 133accessing Norton Internet Security
scansComputer Scan 133Reputation Scan 133
Actions windowdeleting security risks 421performing actions 421restoring security risks 421submission, items to
Symantec 421activation
about 13alerts 14Norton Account 32problems 17procedure 14troubleshooting 17
Add Rule Wizardopening 224using 225
Address Book Exclusionssetting 288
addressesadding allowed 289adding blocked 291importing allowed 289
Advanced Modeallow an event 174
adwareabout 282found by Auto-Protect 201in freeware programs 282protection features 447
AggressiveSONAR Protection 174
alertsresponding to 217Worm Blocking 206
Allowed List 289Antiphishing
about 332hiding the toolbar 394showing the toolbar 394turning off 334turning on 334
AntiSpamabout 284Address Book Exclusions 288Allowed List 289Blocked List 291Client Integration 286configure 285Feedback 295settings 285Web Query 296
Index

Antispywaremanaging using the main
window 283Application Ratings
check trust level 118Scan Performance Profiles 120
attack signatures 272attacks
network 212attention
infected files 208infected items 140resolve any items 140
Attention Requiredabout 140resolving the risk 140
Auto-Protectfunctions 443notifications 201turning on and off 452
automatic featuresdisabling 452
Automatic LiveUpdateturning off or turning on 72
Automatic Program Controlabout 217turning on and off 219
Bbackground jobs
about 104monitoring 109
backupIdentity Safe data 382
Backup and Restoreabout 382
Bandwidthdefining usage 328managing 326
Blocked List 291
blockingspam 284
Boot Time Protection 195configure 196
Browsingoptions 385
Browsing Optionsabout 385
CCards
about 375adding 376deleting 378duplicating 378update image 376updating 378
changingscan schedules 149
Client Integrationconfiguring 286
cloud technologyCloud 152
ClubNortonsecurity tips 528
communication portmodifying 325
computerprotection status 31
Computer Settingsabout 463
computersblocking with AutoBlock 275IP address 313
configureIdentity Safe 360
CPU graphabout 94obtaining historical data 96resource-consuming
processes 97
Index536
CPU usageviewing 95
Creating custom scansadding files 141adding folders 141
Crimeware Protectionturning off or turning on 456
custom scanconfigure scan options 143select items 142
custom scansabout 141creating 141deleting 145editing 144particular area 141running a custom scan 144scan frequently 141schedule the custom scan 141scheduling 146, 149
customer supportabout 523using 524
customizingAllowed List 289Blocked list 291
Ddefinition status 71definition updates 65
obtaining 75deleting
custom scans 145deleting custom scans
deleting 145detecting
security risks 200device
adding 311editing details 314
device (continued)excluding from Intrusion
Prevention scan 320purging from exclusion list 278remotely monitoring 303removing from the Network
Security Map 322viewing 303
deviceschanging trust level 316
domainsadding allowed 289adding blocked 291
Download Insightabout 262configuring alerts 268turning off notifications 266turning on notifications 266
Download Intelligenceturning off 265turning on 265
Eemail
menu 293program 293spam 284
emergencypreparations 125
ensuringprotection settings 126
EULAchecking 516
Events graphmonitoring activities 83
Ffeatures 443
email filtering 449security protection 448
537Index
features (continued)security risk protection 447
FeedbackNorton AntiSpam 295
file extensionsof infected files 208
filterimporting allowed 289Web Query 296
filteringemail 285identifying email senders 289,
291SSL 284web-based 296
firewall rulesabout 214adding 224changing the order of 235creating 217, 225default 215modifying 233processing order 214, 235removing 237turning on and off 236
Full Screen Detectionabout 182
Full System Scanrunning Full System Scan 136scheduling 148
GGeneral Rules
adding 224changing 233removing 237turning on and off 236
Hhigh-risk security threats
excluding from scanning 177
IIdentity Safe
about 344accessing 357, 396backing up 382changing password 390configuring 360information 331logging in and out 359logins 365Norton toolbar 359password 386restoring data 383security 386turning off or turning on 456
Identity Safe Password & Securityoptions
about 386Identity Safe profiles
about 348creating 349
identity theftInternet 331
Idle Time Optimizerabout 103turning off 104turning on 104
Idle Time Outsetting 174
Idle Time Scansabout 171Full System Scan 171Quick Scan 171turning off 173turning on 173
Index538
importlogins 356
Insight Networkabout 152cloud computing 152Insight Network scan 152Quick Scan 152scan 152shortcut menu scan 152Single File Scan 152
Insight Protectionturning off 154turning on 154
installationproblems 49, 56
Instant Messengervirus protection 443
integration with email clients 286integration with email
programs 293Intrusion AutoBlock
blocking computerspermanently 277
turning on and off 275unblocking computers 276
Intrusion Preventionabout 272, 448exclusion list 277turning individual notifications
on and off 273turning notifications on and
off 273turning on and off 455
Intrusion Prevention scanexcluding a device 320exclusion list 277purging devices 278remove devices 278
IP addresses 313finding 313
itemssubmitting from
Quarantine 441
Kkeystroke logging 282, 447
LLiveUpdate
about 64Smart Definitions 67–68using 70when to run 69
Loginadding manually 368changing password 373changing URL 371changing user name 373configuring 360creating new folder 368deleting 368editing 368importing 356managing 368saving 367updating 374
low resource profile on batteryturning off 91turning on 91
Mmain window
options 18maintaining protection
about 125avoiding security risks 125
Manage Loginsabout 365
Manage Notesabout 380
539Index

Manual Repairreviewing remaining risks
in 208Manual Repair window
reviewing remaining risksin 136, 138
Media Center ExtenderSilent Mode 186
Memory graphabout 94obtaining historical data 96
Miscellaneous Settingsabout 484
Monthly Reportabout 122viewing 123
NNetwork
changing trust level 316discovering devices 309editing details 316forming 309joining 309managing 301
Network Cost Awarenessabout 326defining bandwidth 328turning off 327turning on 327
Network Proxy Settingsabout 76configuring 78
Network Security Mapabout 301adding devices 311modifying communication
port 325purging 322removing devices 322turning off 310
Network Security Map (continued)turning off Network Security
Overview 301turning on Network Security
Overview 301viewing device details 324viewing devices 303wireless network
viewing status 323Network Security Overview
turning off 301turning on 301
Network Settingsabout 473
new versionchecking 518
newsletter 528non-admin account 458Norton Account
about 32accessing 37creating 36
Norton AntiSpam 284about 284Address Book Exclusions 288configure 285Feedback 295settings 285SSL 284Web Query 296
Norton Autofixsupport assistants 519
Norton Bootable Recovery Toolabout 47using 56
Norton Bootable Recovery ToolWizard
downloading 49Norton Community Watch
about 45joining 45
Index540

Norton Community Watch(continued)
turning off or turning on 454Norton Firewall Diagnosis
about 255Norton Insight
about 112Files of Interest 115refreshing trust level 115trusted files 112viewing processes 115
Norton Internet Securityabout securing 507activating 14Allowed and Blocked lists 449background jobs 104EULA 516icon 61main window 18new version 518password 508–509protecting 509registering 36securing 508settings 459, 473shortcut menu 63starting from the DOS command
prompt 61uninstalling 529upgrading 516version number 515
Norton Internet Security scanabout 128accessing Norton Internet
Security scans 133command line scanning 150Computer Scan 128custom scans 141Full System Scan 136Idle Time Scan 128Insight Network 152
Norton Internet Security scan(continued)
Insight Network scan 128Quick Scan 137Reputation Scan 128
Norton Internet Security settingsresetting password 509
Norton LiveUpdateabout 64obtaining updates 70
Norton Product Tamper Protectionabout 505turning off 506turning on 506
Norton Safe Searchsearching Web 340
Norton Safe Webabout 335enabling 170Scan Facebook Wall 168turning off 342turning on 342
Norton Tasksabout 104
Norton toolbarabout 390accessing 396settings 357
Notesdeleting 380saving 380updating 380
notification areaicon 61shortcut menu 63
notificationsAuto-Protect 201Intrusion Prevention 273
541Index

OOffice documents
embedded objects 181scanning office documents 181turn on or turn off 182virus macros 181
One Click Supportusing 520
Online transactionsidentity theft 344
Optimizationabout 101boot volume 102
OptionsClient Integration 286customizing 458password protection 443Smart Firewall 238Smart Firewall Advanced
Settings 242Smart Firewall Program
Control 239Smart Firewall Trust
Control 241
PParental Control
settings 450password
changing 390editing 368for Settings 459saving 367updating 374
PC TuneupStartup Manager 97
Performanceaccessing 83alerts 87monitoring 95
performance alertsabout 87configure 88configure threshold 90excluding programs 93removing programs from
exclusion list 93turning off 88turning off low resource
profile 91turning on 88turning on low resource
profile 91Personal data
backing up 382Personal Firewall
about 448turning on and off 455
Phishing Protectionturning off or turning on 456
port scans 212preparing for emergencies
maintaining protection 125problem solving 521problems
problems found during 208resolve any items 208solving 520
Product Key 16accessing 37
product passwordprotecting 508
product status 71program
patches 65Program Control
adding programs 221Automatic 217customizing 223options 239removing programs 222
Index542

Program Control (continued)turning on and off 219
Program rulesadding 224changing 233removing 237
program updates 65programs
adding to Program Control 221configuring Internet access 224creating firewall rules 224removing from Program
Control 222protection
preparing for emergencies 125system scans 136
protection settingsconfiguring 126ensuring 126turning on 126
proxy serverconfiguring 78settings 76
Pulse Updatesabout 75using 75
QQuarantine
adding an item 439items, submitting for
analysis 441managing items 436opening 436restoring items 439
Quarantined Items viewadding items 408
Quick Scan 443scheduling 149
Quiet Modeabout 182, 187
Quiet Mode (continued)disk burning 187options 191turning off 191turning on 191TV recording 187User-Specified Programs 193
RReal Time Exclusions
about 176Remote Management
about 511turning off 513
Remote managementturning on 513
Remote Monitoringsetting up 309
repairactions 208infected files 208removable media 208system files 208
repairingviruses 443
Reputation Scanabout 155results 161running Custom Scan 160running Full System Scan 159running Quick Scan 160
restoreIdentity Safe data 382
restoring itemsQuarantine 439
resultresolved risks 139
Results Summaryabout 139resolved risks 139total items scanned 139
543Index

risksintrusions 212port scans 212
ruleschanging 225, 233creating 224–225
Running custom scansscanning required files 144scanning required folders 144
running Full System ScanReputation Scan 159scanning entire computer 136
running Quick Scanfast scan 137Insight Network Quick Scan 137Quick Scan 137Reputation Scan 160
SSafe Surfing
about 331Safe Web
turning off 342turning on 342
scan at the command promptcommand line scanning 150
Scan Completeappearing after a scan 208
Scan Complete windowappearing after a scan 136, 138
Scan Facebook Wallabout 168enabling 170
scannedtotal items scanned 139
scanningautomatically 146entire computer 136individual elements 138problems found during 208
Scanscommand line 150Computer Scan 134create a custom scan 141Custom Scan 134deleting custom scans 145file 138floppy disk 138folder 138Full System Scan 134hard drive 138Insight Network 152Norton Bootable Recovery
Tool 56Quick Scan 134removable drive 138running custom scans 144using custom 141
schedulingcustom scans 146scans 146
scheduling custom scanmultiple schedules 146
scheduling custom scansscheduling Full System
Scan 146searching
Security History 434Security History
about 405Actions window 421adding items to the
Quarantine 408firewall alerts 408full alert history 408importing or exporting 434manual scan results 408network alerts 408opening 407Quarantine 436Quick Search 434
Index544

Security History (continued)recent alert history 408searching 434security risks 408submission, items to
Symantec 408suspicious email 408traffic alerts 408viewing items 408viewing quarantined items 408
security protectionabout 448
security risksabout 282, 447adding to Quarantine 439assessment 447attacks 212found by Auto-Protect 199, 201managing protection using the
main window 282other programs 282port scans 212protection features 447restoring 447restoring from Quarantine 439scan 447
security status indicatorviewing 31
self-healing 519Settings
accessing 459configuring 459customizing 458Miscellaneous 484
settings passwordresetting 509turning off 509
Settings Password Protectionabout 507configuring 508resetting 509
Settings Password Protection(continued)
turning off 509Signature Exclusions
about 178Signature Ezclusions
excluding items 178signatures
including and excluding 274Silent Mode
about 182Full Screen Detection 186Media Center Extender 186turning off 185, 187turning on 185, 187, 484turning on manually 184
Smart Definitionsabout 67turning on or turning off 68
Smart Firewallabout 211customizing 214options 242
SONAR Protectionabout 174emerging threats 174heuristic technology 174SONAR Advanced Mode 174turning off 175turning on 175
spywareabout 282found by Auto-Protect 201managing protection using the
main window 282protection features 447
SSL (Secure Sockets Layer)Norton AntiSpam 284
startingspam blocking 453virus protection 443
545Index

startup files 200startup items
delaying and running 100disabling or enabling 99
Startup Managerabout 97delaying and running delayed
items 100disabling or enabling startup
items 99stopping spam blocking 453submission, items to Symantec 441subscription
maintaining 527product updates 71
summaryproduct features 443
Supervisor user accountcreating firewall rules 217
SupportAutoFix Scan 520Self Help 523solving problems 520worldwide service 527
Support policy 527Symantec Security Response 441
viewing submitted files 408Symantec Support Web site
about 523using 524
Symantec Web siteblogs and forums 521
System Insightabout 81Events graph 81monitoring activities 83Performance graph 81
system status graphactivity details 86
System Status indicatorsresponding 30
Ttechnical support
about 523using 524
threatsavoiding 125newly discovered 71protection from 211
Trust Controlabout 448Intrusion Prevention and 272options 241
trust levelchanging 316device 316network 316
UUninstall
about 529procedure 529
unknown viruses 443updates
automatically 72checking 70obtaining 75Pulse Updates 75summary 65
upgradingnew version 516
User-Specified Programsabout 193adding programs 193Quiet Mode 193removing programs 194
VVault
accessing 399
Index546

version numberchecking 515
virus protectionabout 443system scans 136updates 443
virusesautomatic protection 443descriptions 443unknown 443
Vulnerability Protectionabout 280–281viewing programs 281
WWeb pages
launching 371protection 332reporting 334
Web Queryabout 296turning off 297turning on 297
Web Settingsabout 482
wireless networkviewing status 323
Worm Blockingthreats found by 206
wormsfound by Worm Blocking 206in email messages 206
547Index

foo
Norton from Symantec products protect consumers from traditional threats with antivirus, antispam, and Spyware Protection.They also protect against bots, drive-by downloads, and identity theft, and are light on system resources. In addition, Symantecprovides services such as online backup and PC Tuneup, and is a trusted source for family online safety. For more information,please click one of the following links:
Antivirus | Antispam | Spyware Protection | Online Backup
Copyright © 2012 Symantec Corporation. All rights reserved. Symantec, Norton, and the Norton Logo are trademarks or registeredtrademarks of Symantec Corporation and its affiliates in the U.S. and other countries. Other names may be trademarks of theirrespective owners.