Embed Size (px)
Citation preview
Symantec NetBackup™Installation Guide
Windows
Release 7.5
21220075
The software described in this book is furnished under a license agreement and may be usedonly in accordance with the terms of the agreement.
Documentation version: 7.5
PN: 21220075
Legal NoticeCopyright © 2012 Symantec Corporation. All rights reserved.
Symantec and the Symantec Logo, NetBackup, Veritas, and LiveUpdate are trademarks orregistered trademarks of Symantec Corporation or its affiliates in the U.S. and othercountries. Other names may be trademarks of their respective owners.
This Symantec product may contain third party software for which Symantec is requiredto provide attribution to the third party (“Third Party Programs”). Some of the Third PartyPrograms are available under open source or free software licenses. The License Agreementaccompanying the Software does not alter any rights or obligations you may have underthose open source or free software licenses. Please see the Third Party Legal Notice Appendixto this Documentation or TPIP ReadMe File accompanying this Symantec product for moreinformation on the Third Party Programs.
The product described in this document is distributed under licenses restricting its use,copying, distribution, and decompilation/reverse engineering. No part of this documentmay be reproduced in any form by any means without prior written authorization ofSymantec Corporation and its licensors, if any.
THE DOCUMENTATION IS PROVIDED "AS IS" AND ALL EXPRESS OR IMPLIED CONDITIONS,REPRESENTATIONS AND WARRANTIES, INCLUDING ANY IMPLIED WARRANTY OFMERCHANTABILITY, FITNESS FOR A PARTICULAR PURPOSE OR NON-INFRINGEMENT,ARE DISCLAIMED, EXCEPT TO THE EXTENT THAT SUCH DISCLAIMERS ARE HELD TOBE LEGALLY INVALID. SYMANTEC CORPORATION SHALL NOT BE LIABLE FOR INCIDENTALOR CONSEQUENTIAL DAMAGES IN CONNECTION WITH THE FURNISHING,PERFORMANCE, OR USE OF THIS DOCUMENTATION. THE INFORMATION CONTAINEDIN THIS DOCUMENTATION IS SUBJECT TO CHANGE WITHOUT NOTICE.
The Licensed Software and Documentation are deemed to be commercial computer softwareas defined in FAR 12.212 and subject to restricted rights as defined in FAR Section 52.227-19"Commercial Computer Software - Restricted Rights" and DFARS 227.7202, "Rights inCommercial Computer Software or Commercial Computer Software Documentation", asapplicable, and any successor regulations. Any use, modification, reproduction release,performance, display or disclosure of the Licensed Software and Documentation by the U.S.Government shall be solely in accordance with the terms of this Agreement.

Symantec Corporation350 Ellis StreetMountain View, CA 94043
http://www.symantec.com
Printed in the United States of America.
10 9 8 7 6 5 4 3 2 1
Technical SupportSymantec Technical Support maintains support centers globally. TechnicalSupport’s primary role is to respond to specific queries about product featuresand functionality. The Technical Support group also creates content for our onlineKnowledge Base. The Technical Support group works collaboratively with theother functional areas within Symantec to answer your questions in a timelyfashion. For example, the Technical Support group works with Product Engineeringand Symantec Security Response to provide alerting services and virus definitionupdates.
Symantec’s support offerings include the following:
■ A range of support options that give you the flexibility to select the rightamount of service for any size organization
■ Telephone and/or Web-based support that provides rapid response andup-to-the-minute information
■ Upgrade assurance that delivers software upgrades
■ Global support purchased on a regional business hours or 24 hours a day, 7days a week basis
■ Premium service offerings that include Account Management Services
For information about Symantec’s support offerings, you can visit our Web siteat the following URL:
www.symantec.com/business/support/
All support services will be delivered in accordance with your support agreementand the then-current enterprise technical support policy.
Contacting Technical SupportCustomers with a current support agreement may access Technical Supportinformation at the following URL:
www.symantec.com/business/support/
Before contacting Technical Support, make sure you have satisfied the systemrequirements that are listed in your product documentation. Also, you should beat the computer on which the problem occurred, in case it is necessary to replicatethe problem.
When you contact Technical Support, please have the following informationavailable:
■ Product release level
■ Hardware information
■ Available memory, disk space, and NIC information
■ Operating system
■ Version and patch level
■ Network topology
■ Router, gateway, and IP address information
■ Problem description:
■ Error messages and log files
■ Troubleshooting that was performed before contacting Symantec
■ Recent software configuration changes and network changes
Licensing and registrationIf your Symantec product requires registration or a license key, access our technicalsupport Web page at the following URL:
www.symantec.com/business/support/
Customer serviceCustomer service information is available at the following URL:
www.symantec.com/business/support/
Customer Service is available to assist with non-technical questions, such as thefollowing types of issues:
■ Questions regarding product licensing or serialization
■ Product registration updates, such as address or name changes
■ General product information (features, language availability, local dealers)
■ Latest information about product updates and upgrades
■ Information about upgrade assurance and support contracts
■ Information about the Symantec Buying Programs
■ Advice about Symantec's technical support options
■ Nontechnical presales questions
■ Issues that are related to CD-ROMs, DVDs, or manuals

Support agreement resourcesIf you want to contact Symantec regarding an existing support agreement, pleasecontact the support agreement administration team for your region as follows:
[email protected] and Japan
[email protected], Middle-East, and Africa
[email protected] America and Latin America
Technical Support . . . . . . . . . . . . . . . . . . . . . . . . . . . . . . . . . . . . . . . . . . . . . . . . . . . . . . . . . . . . . . . . . . . . . . . . . . . . . . . . . . . . . . . . . . . . . . . 4
Chapter 1 Preparing for installation . . . . . . . . . . . . . . . . . . . . . . . . . . . . . . . . . . . . . . . . . . . . . . . . . . 11
About changes in NetBackup 7.5 ... . . . . . . . . . . . . . . . . . . . . . . . . . . . . . . . . . . . . . . . . . . . . . . . . . . 11About image metadata migration after upgrades to NetBackup
7.5 ... . . . . . . . . . . . . . . . . . . . . . . . . . . . . . . . . . . . . . . . . . . . . . . . . . . . . . . . . . . . . . . . . . . . . . . . . . . . . . . 15Planning for image metadata migration after an upgrade to
NetBackup 7.5 ... . . . . . . . . . . . . . . . . . . . . . . . . . . . . . . . . . . . . . . . . . . . . . . . . . . . . . . . . . . . . . . 19About changes in NetBackup 7.1 ... . . . . . . . . . . . . . . . . . . . . . . . . . . . . . . . . . . . . . . . . . . . . . . . . . . 21About changes in NetBackup 7.0 ... . . . . . . . . . . . . . . . . . . . . . . . . . . . . . . . . . . . . . . . . . . . . . . . . . . 23About NetBackup mixed version support ... . . . . . . . . . . . . . . . . . . . . . . . . . . . . . . . . . . . . . . . 26About Symantec Operations Readiness Tools ... . . . . . . . . . . . . . . . . . . . . . . . . . . . . . . . . . 27About NetBackup 7.5 availability ... . . . . . . . . . . . . . . . . . . . . . . . . . . . . . . . . . . . . . . . . . . . . . . . . . 28
About the NetBackup media kit ... . . . . . . . . . . . . . . . . . . . . . . . . . . . . . . . . . . . . . . . . . . . . . . 28About the NetBackup Electronic Software Distribution (ESD)
images ... . . . . . . . . . . . . . . . . . . . . . . . . . . . . . . . . . . . . . . . . . . . . . . . . . . . . . . . . . . . . . . . . . . . . . . . . 30Requirements for Windows NetBackup server installation .... . . . . . . . . . . . . . . . 30Requirements for upgrading Windows servers to NetBackup 7.5 ... . . . . . . . . 33About the NetBackup preinstallation Environment Checker ... . . . . . . . . . . . . . . 35
Running the preinstallation Environment Checker ... . . . . . . . . . . . . . . . . . . . . 36About storage device configuration .... . . . . . . . . . . . . . . . . . . . . . . . . . . . . . . . . . . . . . . . . . . . . . 41
Locating supported robot types ... . . . . . . . . . . . . . . . . . . . . . . . . . . . . . . . . . . . . . . . . . . . . . . 42About replacing NetBackup server types not supported in NetBackup
7.x ... . . . . . . . . . . . . . . . . . . . . . . . . . . . . . . . . . . . . . . . . . . . . . . . . . . . . . . . . . . . . . . . . . . . . . . . . . . . . . . . . . . . . 43How to replace unsupported NetBackup master servers ... . . . . . . . . . . . . . 45How to replace unsupported NetBackup media servers ... . . . . . . . . . . . . . . . 46
Chapter 2 NetBackup licenses . . . . . . . . . . . . . . . . . . . . . . . . . . . . . . . . . . . . . . . . . . . . . . . . . . . . . . . . . . . . . 49
About NetBackup license key requirements ... . . . . . . . . . . . . . . . . . . . . . . . . . . . . . . . . . . . . 49About NetBackup license compatibility ... . . . . . . . . . . . . . . . . . . . . . . . . . . . . . . . . . . . 50About license key entry .... . . . . . . . . . . . . . . . . . . . . . . . . . . . . . . . . . . . . . . . . . . . . . . . . . . . . . . . 50Frequently asked questions about license keys ... . . . . . . . . . . . . . . . . . . . . . . . . . 52
Contents
Chapter 3 Installing or upgrading server software . . . . . . . . . . . . . . . . . . . . . . . . . 57
How to install NetBackup .... . . . . . . . . . . . . . . . . . . . . . . . . . . . . . . . . . . . . . . . . . . . . . . . . . . . . . . . . . . 57About the upgrade order for NetBackup 7.5 ... . . . . . . . . . . . . . . . . . . . . . . . . . . . . . . . . . . . . 58Installing or upgrading servers locally ... . . . . . . . . . . . . . . . . . . . . . . . . . . . . . . . . . . . . . . . . . . 59Installing or upgrading servers remotely ... . . . . . . . . . . . . . . . . . . . . . . . . . . . . . . . . . . . . . . . 71Requirements for Windows cluster installations and upgrades ... . . . . . . . . . . 84
Installing or upgrading servers in clustered environments ... . . . . . . . . . 85About automatic file changes from an upgrade .... . . . . . . . . . . . . . . . . . . . . . . . . . . . . 103Installing or upgrading NetBackup servers silently ... . . . . . . . . . . . . . . . . . . . . . . . . 104
Restarting a system after a silent installation or upgrade .... . . . . . . . . . 108Upgrading NetBackup Servers to NetBackup Enterprise Servers ... . . . . . . 108
Chapter 4 Installing alternative administrative interfaces . . . . . . . . . . 111
About the NetBackup Remote Administration Console forWindows .... . . . . . . . . . . . . . . . . . . . . . . . . . . . . . . . . . . . . . . . . . . . . . . . . . . . . . . . . . . . . . . . . . . . . . . . . . 111Installing the NetBackup Remote Administration Console ... . . . . . . . . . 112Configuring server lists for the NetBackup Remote
Administration Console ... . . . . . . . . . . . . . . . . . . . . . . . . . . . . . . . . . . . . . . . . . . . . . . . . 114Adding remote servers to administer from an existing NetBackup
Remote Administration Console ... . . . . . . . . . . . . . . . . . . . . . . . . . . . . . . . . . . . . . 115About the NetBackup-Java Administration Console ... . . . . . . . . . . . . . . . . . . . . . . . . 115
Installing the NetBackup Java Administration Console for version7.5 on Windows .... . . . . . . . . . . . . . . . . . . . . . . . . . . . . . . . . . . . . . . . . . . . . . . . . . . . . . . . . . . 116
.... . . . . . . . . . . . . . . . . . . . . . . . . . . . . . . . . . . . . . . . . . . . . . . . . . . . . . . . . . . . . . . . . . . . . . . . . . . . . . . . . . . . . . 117
Chapter 5 Removing NetBackup server software . . . . . . . . . . . . . . . . . . . . . . . . . . 121
About NetBackup server software removal on Windows systems .... . . . . . 121Removing NetBackup server software on Windows systems .... . . . . . . . . . . . 122Removing NetBackup server software in a clustered
environment .... . . . . . . . . . . . . . . . . . . . . . . . . . . . . . . . . . . . . . . . . . . . . . . . . . . . . . . . . . . . . . . . . . . . 125Removing NetBackup LiveUpdate from Windows systems .... . . . . . . . . . . . . . 125
Chapter 6 Installing NetBackup client software . . . . . . . . . . . . . . . . . . . . . . . . . . . . 127
About NetBackup client installation .... . . . . . . . . . . . . . . . . . . . . . . . . . . . . . . . . . . . . . . . . . . . 127About NetBackup client installation on Windows .... . . . . . . . . . . . . . . . . . . . . . . . . . 128
About Windows client system requirements ... . . . . . . . . . . . . . . . . . . . . . . . . . . . 128About Windows client installation methods .... . . . . . . . . . . . . . . . . . . . . . . . . . . 129Installing NetBackup Windows clients locally ... . . . . . . . . . . . . . . . . . . . . . . . . . 130Installing NetBackup Windows clients remotely ... . . . . . . . . . . . . . . . . . . . . . . 133Installing NetBackup Windows clients silently ... . . . . . . . . . . . . . . . . . . . . . . . . 139How to configure NetBackup clients ... . . . . . . . . . . . . . . . . . . . . . . . . . . . . . . . . . . . . . . 140
Contents8
About NetBackup client installation on UNIX .... . . . . . . . . . . . . . . . . . . . . . . . . . . . . . . 141About UNIX client installation methods .... . . . . . . . . . . . . . . . . . . . . . . . . . . . . . . . . 143Installing UNIX clients locally ... . . . . . . . . . . . . . . . . . . . . . . . . . . . . . . . . . . . . . . . . . . . . . 144About remote installation methods for UNIX clients ... . . . . . . . . . . . . . . . . 145Adding a UNIX client after initial server installation .... . . . . . . . . . . . . . . . 153
Chapter 7 Removing NetBackup client software . . . . . . . . . . . . . . . . . . . . . . . . . . . 155
About NetBackup software removal on UNIX clients ... . . . . . . . . . . . . . . . . . . . . . . 155Removing NetBackup from UNIX clients ... . . . . . . . . . . . . . . . . . . . . . . . . . . . . . . . . 155
Removing NetBackup Windows client software .... . . . . . . . . . . . . . . . . . . . . . . . . . . . . 161
Chapter 8 Configuring NetBackup . . . . . . . . . . . . . . . . . . . . . . . . . . . . . . . . . . . . . . . . . . . . . . . . . . . . 163
About NetBackup server configuration .... . . . . . . . . . . . . . . . . . . . . . . . . . . . . . . . . . . . . . . . 163Starting the NetBackup Administration Console ... . . . . . . . . . . . . . . . . . . . . . 164About the Device Configuration Wizard .... . . . . . . . . . . . . . . . . . . . . . . . . . . . . . . . . 166About the Volume Configuration Wizard .... . . . . . . . . . . . . . . . . . . . . . . . . . . . . . . 168About the Catalog Backup Wizard .... . . . . . . . . . . . . . . . . . . . . . . . . . . . . . . . . . . . . . . . . 169About the Backup Policy Configuration Wizard .... . . . . . . . . . . . . . . . . . . . . . . 170
Index . . . . . . . . . . . . . . . . . . . . . . . . . . . . . . . . . . . . . . . . . . . . . . . . . . . . . . . . . . . . . . . . . . . . . . . . . . . . . . . . . . . . . . . . . . . . . . . . . . . . . . . . . . . . . . . . . . . 173
9Contents

Contents10
Preparing for installation
This chapter includes the following topics:
■ About changes in NetBackup 7.5
■ About changes in NetBackup 7.1
■ About changes in NetBackup 7.0
■ About NetBackup mixed version support
■ About Symantec Operations Readiness Tools
■ About NetBackup 7.5 availability
■ Requirements for Windows NetBackup server installation
■ Requirements for upgrading Windows servers to NetBackup 7.5
■ About the NetBackup preinstallation Environment Checker
■ About storage device configuration
■ About replacing NetBackup server types not supported in NetBackup 7.x
About changes in NetBackup 7.5The following describes some important changes to NetBackup version 7.5. Forcomplete details, see the NetBackup Release Notes for version 7.5.
1Chapter

Note: If you currently use NetBackup 6.x and plan to upgrade to version 7.5, beaware that NetBackup versions 7.0 and 7.1 contained many changes andenhancements. Before you upgrade from any 6.x version to 7.5, refer also to theNetBackup Release Notes for versions 7.0 and 7.1 for complete details. You canalso refer to the following topics for a summary of changes in NetBackup versions7.0 and 7.1: See “About changes in NetBackup 7.0” on page 23.See “ About changesin NetBackup 7.1” on page 21.
Table 1-1 Changes in NetBackup 7.5
DescriptionChange
Starting with NetBackup 7.5, all backup image metadata isstored in the relational database (NBDB). Previous versionsstored this data in both the NBDB and flat ASCII files (imageheader files).
The following describes the advantages of this change:
■ Eliminates the consistency issues for any data thatpreviously existed in multiple databases.
■ Improves the product search performance, especially inlarge catalogs.
■ Improves the performance of restores, policy scheduling,and image cleanups.
After an upgrade from a previous version of NetBackup,post-upgrade migration of pre-existing image metadatafrom the file system to the NetBackup database occurs.
Caution: This enhancement affects upgrades. To helpensure a successful upgrade to NetBackup 7.5, please visitthe NetBackup 7.5 Upgrade Portal for complete upgradedetails: http://www.symantec.com/docs/TECH74584
For full details about the image migration process and helpto plan for this migration, refer to the following:
See “About image metadata migration after upgrades toNetBackup 7.5” on page 15.
See “Planning for image metadata migration after anupgrade to NetBackup 7.5” on page 19.
Enhanced NetBackup imagemetadata management
Preparing for installationAbout changes in NetBackup 7.5
12
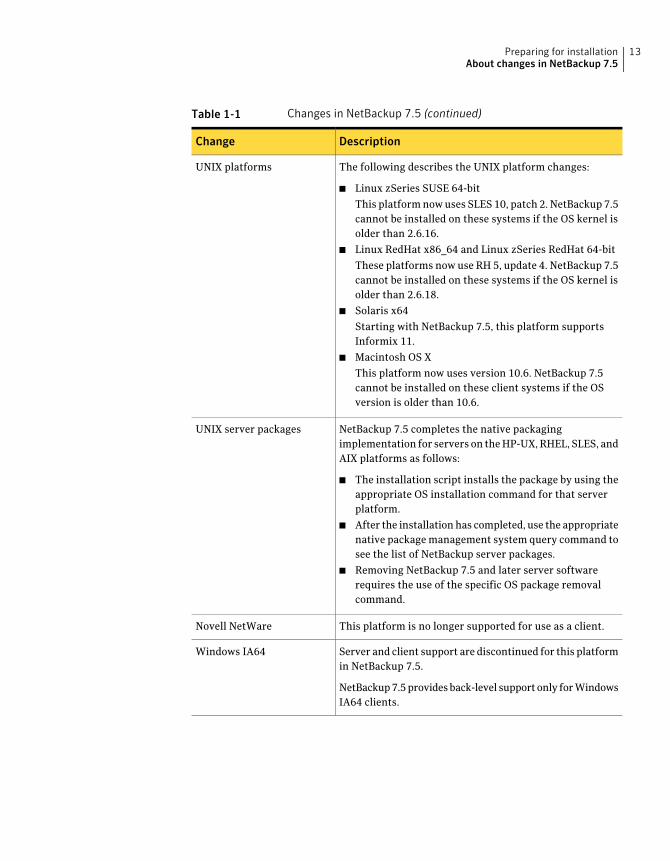
Table 1-1 Changes in NetBackup 7.5 (continued)
DescriptionChange
The following describes the UNIX platform changes:
■ Linux zSeries SUSE 64-bit
This platform now uses SLES 10, patch 2. NetBackup 7.5cannot be installed on these systems if the OS kernel isolder than 2.6.16.
■ Linux RedHat x86_64 and Linux zSeries RedHat 64-bit
These platforms now use RH 5, update 4. NetBackup 7.5cannot be installed on these systems if the OS kernel isolder than 2.6.18.
■ Solaris x64
Starting with NetBackup 7.5, this platform supportsInformix 11.
■ Macintosh OS X
This platform now uses version 10.6. NetBackup 7.5cannot be installed on these client systems if the OSversion is older than 10.6.
UNIX platforms
NetBackup 7.5 completes the native packagingimplementation for servers on the HP-UX, RHEL, SLES, andAIX platforms as follows:
■ The installation script installs the package by using theappropriate OS installation command for that serverplatform.
■ After the installation has completed, use the appropriatenative package management system query command tosee the list of NetBackup server packages.
■ Removing NetBackup 7.5 and later server softwarerequires the use of the specific OS package removalcommand.
UNIX server packages
This platform is no longer supported for use as a client.Novell NetWare
Server and client support are discontinued for this platformin NetBackup 7.5.
NetBackup 7.5 provides back-level support only for WindowsIA64 clients.
Windows IA64
13Preparing for installationAbout changes in NetBackup 7.5
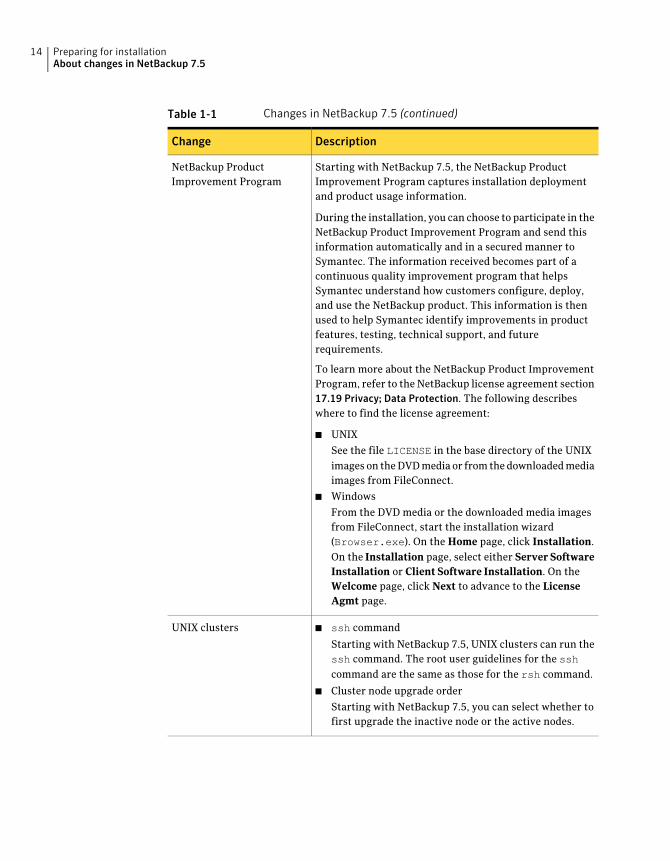
Table 1-1 Changes in NetBackup 7.5 (continued)
DescriptionChange
Starting with NetBackup 7.5, the NetBackup ProductImprovement Program captures installation deploymentand product usage information.
During the installation, you can choose to participate in theNetBackup Product Improvement Program and send thisinformation automatically and in a secured manner toSymantec. The information received becomes part of acontinuous quality improvement program that helpsSymantec understand how customers configure, deploy,and use the NetBackup product. This information is thenused to help Symantec identify improvements in productfeatures, testing, technical support, and futurerequirements.
To learn more about the NetBackup Product ImprovementProgram, refer to the NetBackup license agreement section17.19 Privacy; Data Protection. The following describeswhere to find the license agreement:
■ UNIX
See the file LICENSE in the base directory of the UNIXimages on the DVD media or from the downloaded mediaimages from FileConnect.
■ Windows
From the DVD media or the downloaded media imagesfrom FileConnect, start the installation wizard(Browser.exe). On the Home page, click Installation.On the Installation page, select either Server SoftwareInstallation or Client Software Installation. On theWelcome page, click Next to advance to the LicenseAgmt page.
NetBackup ProductImprovement Program
■ ssh command
Starting with NetBackup 7.5, UNIX clusters can run thessh command. The root user guidelines for the sshcommand are the same as those for the rsh command.
■ Cluster node upgrade order
Starting with NetBackup 7.5, you can select whether tofirst upgrade the inactive node or the active nodes.
UNIX clusters
Preparing for installationAbout changes in NetBackup 7.5
14
About image metadata migration after upgrades to NetBackup 7.5The following information describes important details about the image metadatamigration processes that occur after you upgrade to NetBackup 7.5.
After an upgrade from a previous NetBackup version, post-upgrade migration ofall pre-existing image metadata from the file system to the NetBackup databaseoccurs.
Please note the following in regard to this migration:
■ The LIST_FS_IMAGE_HEADERS entry is created automatically when thepost-upgrade image metadata migration has completed.
Warning:Do not manually create theLIST_FS_IMAGE_HEADERS entry. Prematurecreation of this entry causes non-migrated images to be unrecognized duringNetBackup processing. This problem can result in possible data loss. For acomplete explanation about this entry, see the NetBackup Administrator'sGuide, Volume I.
■ Image metadata consistency checking that is comparable to the bpdbm
-consistency 2 -move command is performed as part of the image metadatamigration.For more information about consistency checking details and the bpdbm
command, see the NetBackup Commands Reference Guide.
■ Until migration is complete, NetBackup behavior is affected.See “Planning for image metadata migration after an upgrade to NetBackup7.5” on page 19.
A number of methods are available to accomplish the migration. Before youupgrade, review the following information to determine the most appropriatemethod to help reduce the effect on normal NetBackup operations:
Review the methods for image metadata migration.In Table 1-2:
Review the NetBackup 7.5 Upgrade Guide.
This guide describes the estimated migration times basedon the migration method and the number of images to bemigrated.
Click on the following link to go to the portal:
http://www.symantec.com/docs/TECH74584
On the NetBackup 7.5Upgrade Portal:
See “Planning for image metadata migration after anupgrade to NetBackup 7.5” on page 19.
In theNetBackup InstallationGuide for 7.5:
15Preparing for installationAbout changes in NetBackup 7.5

Table 1-2 Image metadata migration methods for upgrades to NetBackup 7.5
DescriptionMethod
This method is useful in a backup environment that has thefollowing:
Acceptable CPU performance and a catalog image countwhere NetBackup operations are acceptable during eachstep of the serial image migration.
Use this method for environments with or without capacitymanaged disk policies, such as SLP or DSSU.
The following describes how this method works:
■ An image is migrated after a NetBackup process updatesthe image.
■ At the first instance of the nbstserv process, imagesto be deleted, DSSU images, and images associated withstorage lifecycle policy (SLP) jobs are migrated. AutoImage Replication images are also included.
Note: For more information about nbstserv, see theNetBackup Administrator's Guide, Volume I.
■ As part of catalog cleanup, any images that areassociated with Advance Disk policies, BasicDisk policies,and tape policies are migrated.
Typical migration method(default)
Preparing for installationAbout changes in NetBackup 7.5
16

Table 1-2 Image metadata migration methods for upgrades to NetBackup 7.5(continued)
DescriptionMethod
This method is useful in a backup environment that has thefollowing:
Acceptable CPU performance and a catalog image countwhere NetBackup operations are acceptable during eachstep of the serial image migration.
Use this method if you require AdvancedDisk reportingimmediately after the nbstserv portion of the migration.
The following describes how this method works:
■ Before the upgrade, create the following touch-file:
./netbackup/bin/MERGE_ALL_IMAGE_HEADERS
■ An image is migrated after a NetBackup process updatesthe image.
■ At the first instance of the nbstserv process, imagesto be deleted, DSSU images, and storage lifecycle policy(SLP) jobs are migrated. Auto Image Replication imagesand any images that are associated with Advance Diskpolicies are also included.
■ As part of catalog cleanup, any images that areassociated with BasicDisk policies and tape policies aremigrated.
AdvancedDisk prioritymethod
17Preparing for installationAbout changes in NetBackup 7.5
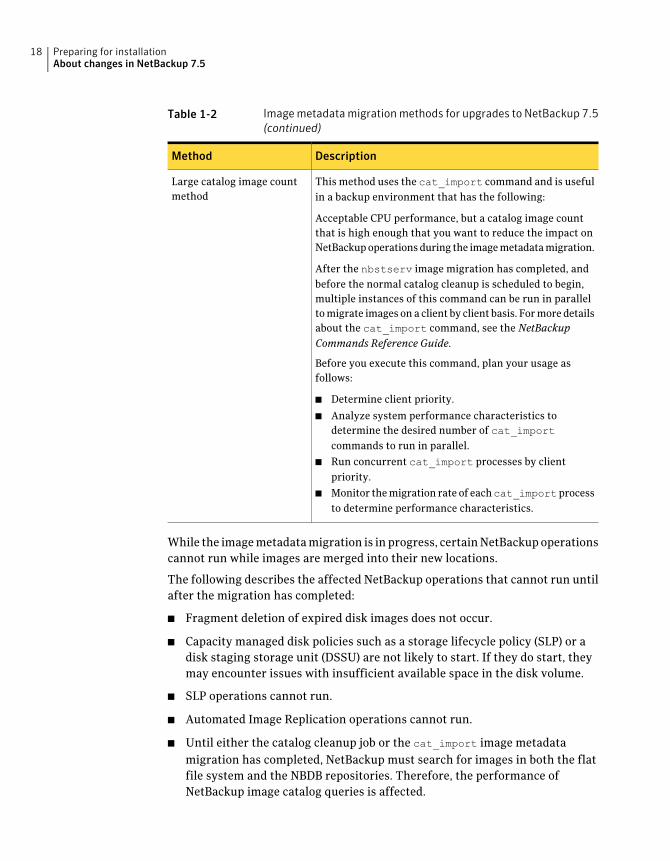
Table 1-2 Image metadata migration methods for upgrades to NetBackup 7.5(continued)
DescriptionMethod
This method uses the cat_import command and is usefulin a backup environment that has the following:
Acceptable CPU performance, but a catalog image countthat is high enough that you want to reduce the impact onNetBackup operations during the image metadata migration.
After the nbstserv image migration has completed, andbefore the normal catalog cleanup is scheduled to begin,multiple instances of this command can be run in parallelto migrate images on a client by client basis. For more detailsabout the cat_import command, see the NetBackupCommands Reference Guide.
Before you execute this command, plan your usage asfollows:
■ Determine client priority.
■ Analyze system performance characteristics todetermine the desired number of cat_importcommands to run in parallel.
■ Run concurrent cat_import processes by clientpriority.
■ Monitor the migration rate of eachcat_importprocessto determine performance characteristics.
Large catalog image countmethod
While the image metadata migration is in progress, certain NetBackup operationscannot run while images are merged into their new locations.
The following describes the affected NetBackup operations that cannot run untilafter the migration has completed:
■ Fragment deletion of expired disk images does not occur.
■ Capacity managed disk policies such as a storage lifecycle policy (SLP) or adisk staging storage unit (DSSU) are not likely to start. If they do start, theymay encounter issues with insufficient available space in the disk volume.
■ SLP operations cannot run.
■ Automated Image Replication operations cannot run.
■ Until either the catalog cleanup job or the cat_import image metadatamigration has completed, NetBackup must search for images in both the flatfile system and the NBDB repositories. Therefore, the performance ofNetBackup image catalog queries is affected.
Preparing for installationAbout changes in NetBackup 7.5
18
To help you prepare and plan for a successful upgrade, refer to the following topic:
See “Planning for image metadata migration after an upgrade to NetBackup 7.5”on page 19.
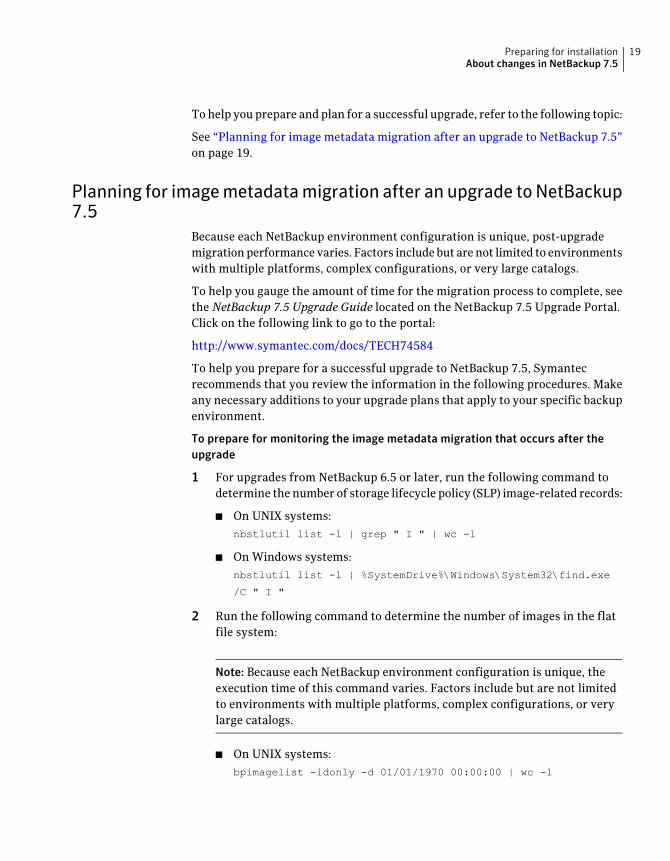
Planning for image metadata migration after an upgrade to NetBackup7.5
Because each NetBackup environment configuration is unique, post-upgrademigration performance varies. Factors include but are not limited to environmentswith multiple platforms, complex configurations, or very large catalogs.
To help you gauge the amount of time for the migration process to complete, seethe NetBackup 7.5 Upgrade Guide located on the NetBackup 7.5 Upgrade Portal.Click on the following link to go to the portal:
http://www.symantec.com/docs/TECH74584
To help you prepare for a successful upgrade to NetBackup 7.5, Symantecrecommends that you review the information in the following procedures. Makeany necessary additions to your upgrade plans that apply to your specific backupenvironment.
To prepare for monitoring the image metadata migration that occurs after theupgrade
1 For upgrades from NetBackup 6.5 or later, run the following command todetermine the number of storage lifecycle policy (SLP) image-related records:
■ On UNIX systems:nbstlutil list -l | grep " I " | wc -l
■ On Windows systems:nbstlutil list -l | %SystemDrive%\Windows\System32\find.exe
/C " I "
2 Run the following command to determine the number of images in the flatfile system:
Note: Because each NetBackup environment configuration is unique, theexecution time of this command varies. Factors include but are not limitedto environments with multiple platforms, complex configurations, or verylarge catalogs.
■ On UNIX systems:bpimagelist -idonly -d 01/01/1970 00:00:00 | wc -l
19Preparing for installationAbout changes in NetBackup 7.5

■ On Windows systems:bpimagelist -idonly -d 01/01/1970 00:00:00 |
%SystemDrive%\Windows\System32\find.exe /C " ID: "
3 Determine the method that you plan to use to accomplish the image metadatamigration, as follows:
■ Review and familiarize yourself with the different methods available toaccomplish the image metadata migration.See “About image metadata migration after upgrades to NetBackup 7.5”on page 15.
■ Review the image metadata migration performance data that is relatedto the different migration methods.See the NetBackup 7.5 Upgrade Guide on the NetBackup 7.5 UpgradePortal.http://www.symantec.com/docs/TECH74584
■ With the information from the previous bulleted items, determine theappropriate method that you plan to use. Document the method steps inyour upgrade plan.
4 For NetBackup configurations that use capacity managed disk storage unitssuch as an SLP or a disk staging storage unit (DSSU):
Plan to expire additional images from capacity managed disk volumes. Forcomplete details, see theNetBackup 7.5UpgradeGuide on the NetBackup 7.5Upgrade Portal:
http://www.symantec.com/docs/TECH74584
5 For backup environments that use disk-based storage units, do the following:
As close to starting the upgrade as possible, run the following command todelete expired disk image fragments:
nbdelete -allvolumes
After you have completed the previous steps, you are ready to upgrade toNetBackup 7.5. The upgrade procedure is included in theNetBackup7.5 InstallationGuide.
After you have completed the upgrade procedure, you are ready to perform thepost-upgrade tasks as necessary for the migration method that you selected.
To perform the necessary post-upgrade tasks
1 Monitor the progress of the specific processes in the image metadata migrationmethod you have selected, as follows:
■ For nbstserv, run the following command:
Preparing for installationAbout changes in NetBackup 7.5
20
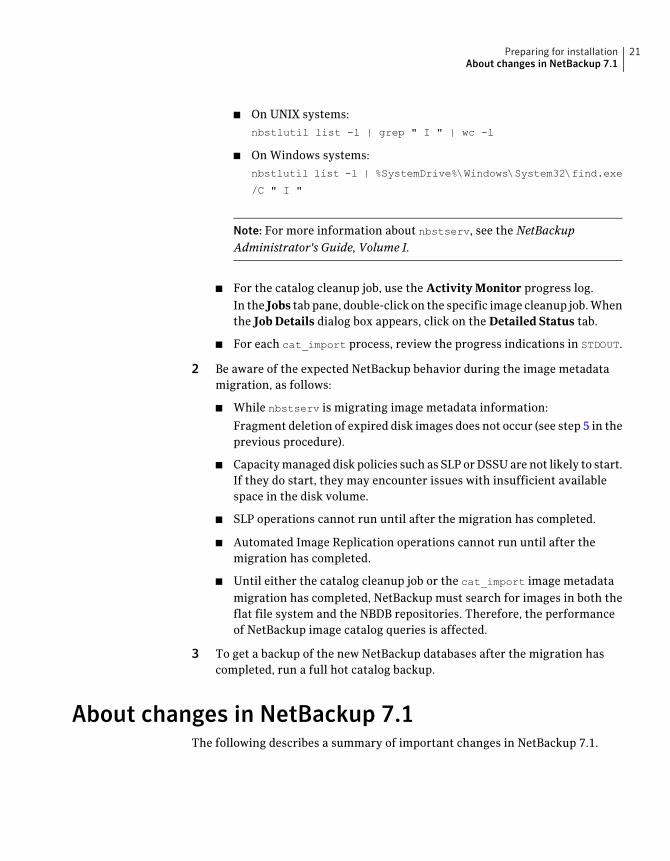
■ On UNIX systems:nbstlutil list -l | grep " I " | wc -l
■ On Windows systems:nbstlutil list -l | %SystemDrive%\Windows\System32\find.exe
/C " I "
Note: For more information about nbstserv, see the NetBackupAdministrator's Guide, Volume I.
■ For the catalog cleanup job, use the Activity Monitor progress log.In the Jobs tab pane, double-click on the specific image cleanup job. Whenthe Job Details dialog box appears, click on the Detailed Status tab.
■ For each cat_import process, review the progress indications in STDOUT.
2 Be aware of the expected NetBackup behavior during the image metadatamigration, as follows:
■ While nbstserv is migrating image metadata information:
Fragment deletion of expired disk images does not occur (see step 5 in theprevious procedure).
■ Capacity managed disk policies such as SLP or DSSU are not likely to start.If they do start, they may encounter issues with insufficient availablespace in the disk volume.
■ SLP operations cannot run until after the migration has completed.
■ Automated Image Replication operations cannot run until after themigration has completed.
■ Until either the catalog cleanup job or the cat_import image metadatamigration has completed, NetBackup must search for images in both theflat file system and the NBDB repositories. Therefore, the performanceof NetBackup image catalog queries is affected.
3 To get a backup of the new NetBackup databases after the migration hascompleted, run a full hot catalog backup.
About changes in NetBackup 7.1The following describes a summary of important changes in NetBackup 7.1.
21Preparing for installationAbout changes in NetBackup 7.1
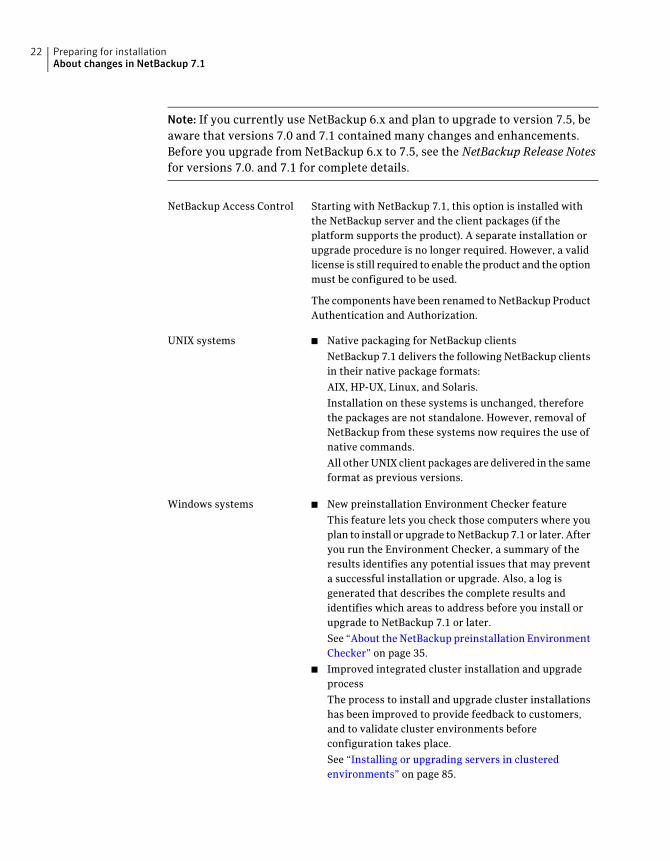
Note: If you currently use NetBackup 6.x and plan to upgrade to version 7.5, beaware that versions 7.0 and 7.1 contained many changes and enhancements.Before you upgrade from NetBackup 6.x to 7.5, see the NetBackup Release Notesfor versions 7.0. and 7.1 for complete details.
Starting with NetBackup 7.1, this option is installed withthe NetBackup server and the client packages (if theplatform supports the product). A separate installation orupgrade procedure is no longer required. However, a validlicense is still required to enable the product and the optionmust be configured to be used.
The components have been renamed to NetBackup ProductAuthentication and Authorization.
NetBackup Access Control
■ Native packaging for NetBackup clients
NetBackup 7.1 delivers the following NetBackup clientsin their native package formats:
AIX, HP-UX, Linux, and Solaris.
Installation on these systems is unchanged, thereforethe packages are not standalone. However, removal ofNetBackup from these systems now requires the use ofnative commands.
All other UNIX client packages are delivered in the sameformat as previous versions.
UNIX systems
■ New preinstallation Environment Checker feature
This feature lets you check those computers where youplan to install or upgrade to NetBackup 7.1 or later. Afteryou run the Environment Checker, a summary of theresults identifies any potential issues that may preventa successful installation or upgrade. Also, a log isgenerated that describes the complete results andidentifies which areas to address before you install orupgrade to NetBackup 7.1 or later.
See “About the NetBackup preinstallation EnvironmentChecker” on page 35.
■ Improved integrated cluster installation and upgradeprocess
The process to install and upgrade cluster installationshas been improved to provide feedback to customers,and to validate cluster environments beforeconfiguration takes place.
See “Installing or upgrading servers in clusteredenvironments” on page 85.
Windows systems
Preparing for installationAbout changes in NetBackup 7.1
22
About changes in NetBackup 7.0The following describes a summary of important changes in NetBackup 7.0.
Note: If you currently use NetBackup 6.x and plan to upgrade to version 7.5, beaware that versions 7.0 and 7.1 contained many changes and enhancements.Before you upgrade from NetBackup 6.x to 7.5, see the NetBackup Release Notesfor versions 7.0. and 7.1 for complete details.
This product has reached its end of life and is no longersupported.
Veritas Storage Migrator(VSM)
Starting with NetBackup 7.0, NOM has been replaced withOpsCenter.
If your current 6.x NetBackup environment includes NOM6.x, you can upgrade NOM to OpsCenter with an upgrade toNetBackup 7.0 or later.
NetBackup OperationsManager (NOM)
23Preparing for installationAbout changes in NetBackup 7.0
Starting with NetBackup 7.0, the following platform supportchanges apply:
■ Except for FreeBSD clients and Mac clients, all UNIX32-bit system support has been discontinued.
To upgrade these systems to NetBackup 7.0 or later, youmust first migrate your current NetBackup 6.x catalogsand databases to a system with a supported 64-bitplatform.
However, 32-bit media servers and the clients that useNetBackup 6.x are compatible with NetBackup 7.x 64-bitmaster servers.
Also, NetBackup requires OpenStorage vendor plug-insto be 64-bit. When you upgrade a media server that isused for OpenStorage to NetBackup 7.x, you also mustupdate the vendor plug-in to a 64-bit version.
For details about how to replace the servers thatcurrently use these unsupported platforms, refer to thefollowing section:
See “About replacing NetBackup server types notsupported in NetBackup 7.x” on page 43.
■ IRIX and Tru64 are no longer supported.
Servers and clients with these operating systems thatuse NetBackup 6.x are compatible with NetBackup 7.xservers.
■ All 64-bit platforms are supported except for FreeBSDclients and Mac clients.
■ Windows IA64 is supported only as a client.
■ Linux SUSE and Linux RedHat Itanium are no longersupported for use as master or media servers. Theseplatforms are only supported as a client.
■ HP-UX PA-RISC is no longer supported as a masterserver. This platform is supported only as a true mediaserver (media server without the EMM server) or a trueclient.
■ Novell NetWare is no longer supported for use as a mediaserver. This platform is only supported as a client.
Platform and operatingsystem support changes
Preparing for installationAbout changes in NetBackup 7.0
24
Starting with NetBackup 7.0, most of the add-on productsand database agents are now installed with the NetBackupserver or the client package. Separate installation for theseproducts is no longer needed.
The following products are now included in the NetBackupserver package (if the platform supports the product):
■ BMR master server
■ NDMP
■ Vault
The following products are now included in the NetBackupclient package (if the platform supports the product):
■ BMR Boot server
■ DB2
■ Encryption
■ Informix
■ LiveUpdate agent
■ Lotus Notes
■ Oracle
■ SAP
■ Snapshot Client
■ Sybase
The binaries for the listed products are laid down with theserver or the client package. A valid license is still requiredto enable the product. If product configuration was requiredpreviously (such as db2_config), configuration is stillrequired.
Note: For Solaris server upgrades, the older versions of anylisted products here must be removed before an upgrade toNetBackup 7.0 or later. For example, VRTSnbdb2,SYMCnbdb2, VRTSnbenc, SYMCnbenc, and others. Theinstallation script displays a list of the packages it finds thatmust be removed.
The French, Japanese, and the Chinese language packagesremain as separate add-ons. The process to install andupgrade these products remains the same.
UNIX package consolidation
New NetBackup 7.0 or later media server installationscannot be clustered. However, existing 6.x clustered mediaservers can be upgraded to version 7.0 or later and remainclustered.
Clustered media serversupport changes
25Preparing for installationAbout changes in NetBackup 7.0
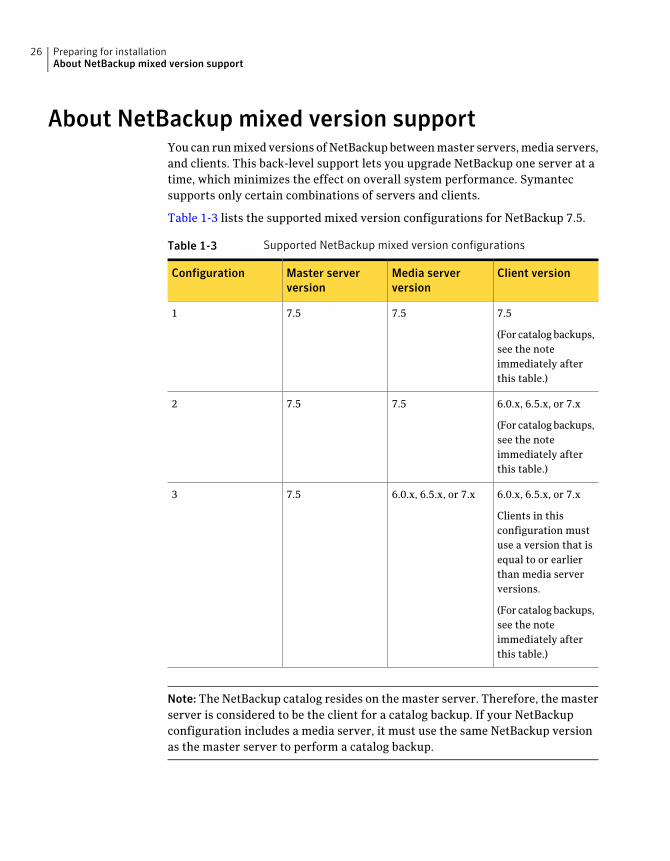
About NetBackup mixed version supportYou can run mixed versions of NetBackup between master servers, media servers,and clients. This back-level support lets you upgrade NetBackup one server at atime, which minimizes the effect on overall system performance. Symantecsupports only certain combinations of servers and clients.
Table 1-3 lists the supported mixed version configurations for NetBackup 7.5.
Table 1-3 Supported NetBackup mixed version configurations
Client versionMedia serverversion
Master serverversion
Configuration
7.5
(For catalog backups,see the noteimmediately afterthis table.)
7.57.51
6.0.x, 6.5.x, or 7.x
(For catalog backups,see the noteimmediately afterthis table.)
7.57.52
6.0.x, 6.5.x, or 7.x
Clients in thisconfiguration mustuse a version that isequal to or earlierthan media serverversions.
(For catalog backups,see the noteimmediately afterthis table.)
6.0.x, 6.5.x, or 7.x7.53
Note: The NetBackup catalog resides on the master server. Therefore, the masterserver is considered to be the client for a catalog backup. If your NetBackupconfiguration includes a media server, it must use the same NetBackup versionas the master server to perform a catalog backup.
Preparing for installationAbout NetBackup mixed version support
26
NetBackup versions 7.0 and later do not support Windows 2000 systems. However,you can still use NetBackup version 6.x on Windows 2000 clients with yourNetBackup 7.x servers.
The following describes what type of action to take if you have any clients thatrun Windows 2000:
No action is required. These clients are compatiblewith NetBackup version 7.x master and mediaservers.
To ensure future compatibility, it is recommendedthat you replace these clients with those that usea more current operating system.
Existing NetBackup customers withWindows 2000 clients at NetBackupversion 6.x:
You must install NetBackup version 6.x clientsoftware on your Windows 2000 systems.
To obtain NetBackup version 6.x, contact yourSymantec NetBackup representative or calltechnical support.
New NetBackup customers withWindows 2000 systems:
For complete information on mixed version support, see the NetBackup ReleaseNotes for version 7.5. Refer to the section "NetBackup backward compatibility".
About Symantec Operations Readiness ToolsSymantec Operations Readiness Tools (SORT) is a set of Web-based tools thatsupports Symantec enterprise products. For NetBackup, SORT provides the abilityto collect, analyze, and report on host configurations across UNIX/Linux orWindows environments. This data helps to assess whether your systems are readyfor an initial NetBackup installation or for an upgrade from your current version.
To access SORT, go to the following Web page:
http://sort.symantec.com/netbackup
Once you get to the SORT page, more information is available as follows:
■ Installation and Upgrade ChecklistUse this tool to create a checklist to see if your system is ready for a NetBackupinstallation or an upgrade.
■ Hot fix and EEB Release AuditorUse this tool to find out whether a release that you plan to install contains thehot fixes that you need.
■ Custom Reports
27Preparing for installationAbout Symantec Operations Readiness Tools
Use this tool to get recommendations for your system and Symantec enterpriseproducts, tips for risk assessment, and product license tracking.
About NetBackup 7.5 availabilityNetBackup 7.5 is available in the following formats:
■ DVD media kitAll necessary software and documentation files are provided on several DVDs.See “About the NetBackup media kit” on page 28.
■ Electronic Software Distribution (ESD) imagesThe DVD image files are posted and available for download on the FileConnectWebsite.See “About the NetBackup Electronic Software Distribution (ESD) images”on page 30.
About the NetBackup media kitThe media kit includes a DVD for each supported UNIX platform or operatingsystem and one DVD for Windows. The label on each DVD provides a briefdescription of its contents.
NetBackup documentation is also included. All documentation for the NetBackupsoftware products in this release is included.
Printed materials include a Getting Started Guide. Documentation on the DVDsis in Portable Document Format (PDF). You can use Acrobat Reader to open, view,and print the files.
If Autorun is enabled on your Windows system, you see a Web page that lists thedocuments that you can select to view. On UNIX or Linux systems, or if Autorunis disabled on the Windows system, navigate to the DVD drive to view the DVDcontents. From that drive, you can select the documents to view or copy them toa local drive.
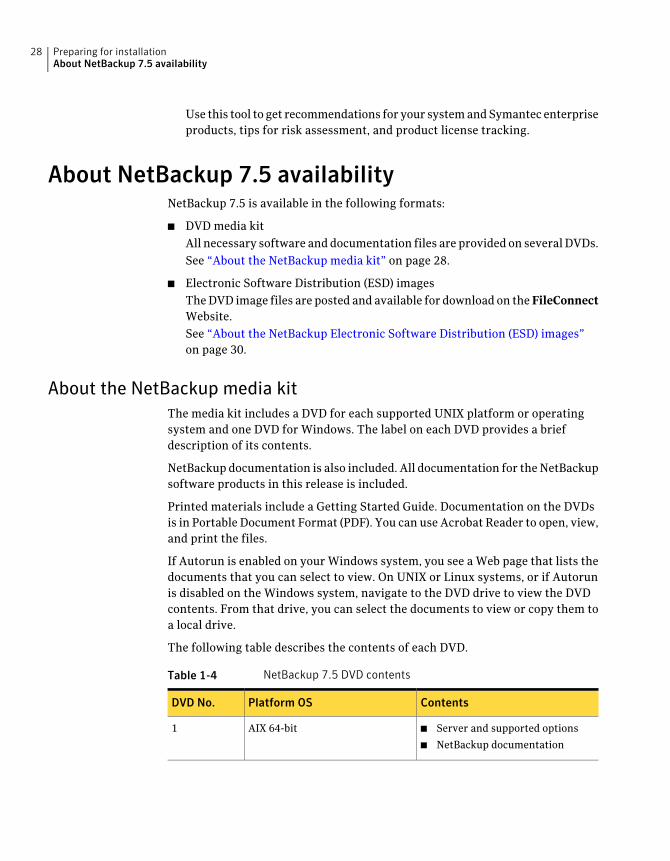
The following table describes the contents of each DVD.
Table 1-4 NetBackup 7.5 DVD contents
ContentsPlatform OSDVD No.
■ Server and supported options
■ NetBackup documentation
AIX 64-bit1
Preparing for installationAbout NetBackup 7.5 availability
28
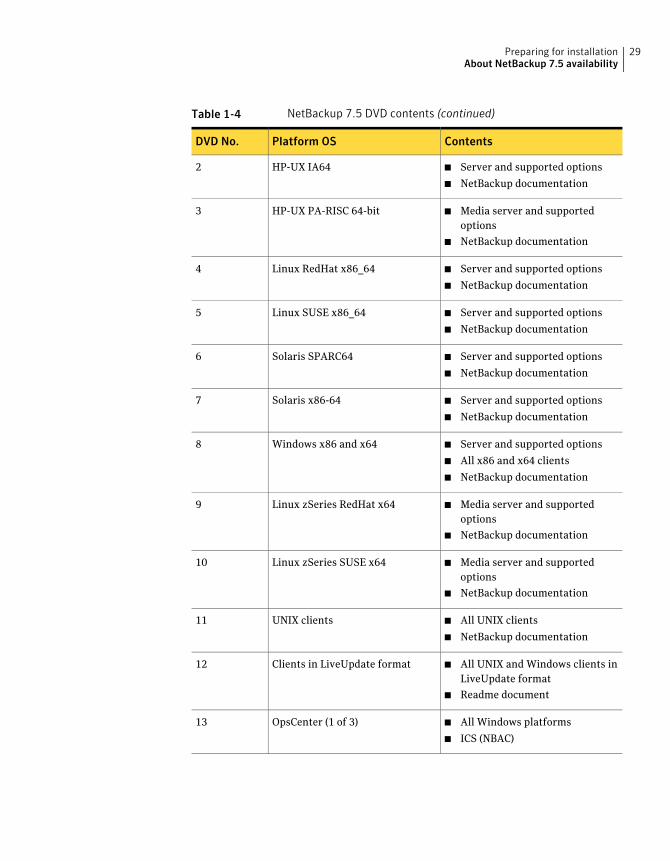
Table 1-4 NetBackup 7.5 DVD contents (continued)
ContentsPlatform OSDVD No.
■ Server and supported options
■ NetBackup documentation
HP-UX IA642
■ Media server and supportedoptions
■ NetBackup documentation
HP-UX PA-RISC 64-bit3
■ Server and supported options
■ NetBackup documentation
Linux RedHat x86_644
■ Server and supported options
■ NetBackup documentation
Linux SUSE x86_645
■ Server and supported options
■ NetBackup documentation
Solaris SPARC646
■ Server and supported options
■ NetBackup documentation
Solaris x86-647
■ Server and supported options
■ All x86 and x64 clients
■ NetBackup documentation
Windows x86 and x648
■ Media server and supportedoptions
■ NetBackup documentation
Linux zSeries RedHat x649
■ Media server and supportedoptions
■ NetBackup documentation
Linux zSeries SUSE x6410
■ All UNIX clients
■ NetBackup documentation
UNIX clients11
■ All UNIX and Windows clients inLiveUpdate format
■ Readme document
Clients in LiveUpdate format12
■ All Windows platforms
■ ICS (NBAC)
OpsCenter (1 of 3)13
29Preparing for installationAbout NetBackup 7.5 availability
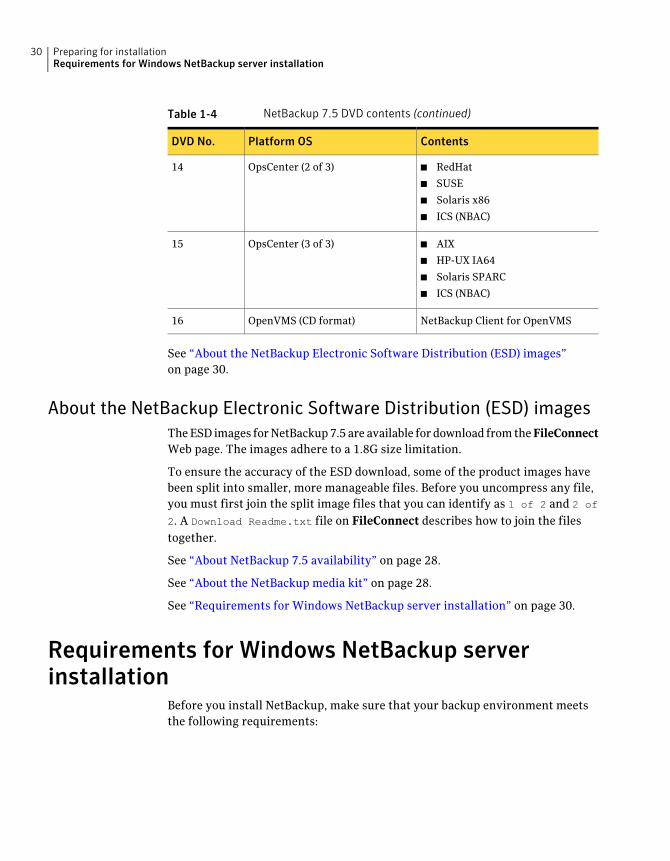
Table 1-4 NetBackup 7.5 DVD contents (continued)
ContentsPlatform OSDVD No.
■ RedHat
■ SUSE
■ Solaris x86
■ ICS (NBAC)
OpsCenter (2 of 3)14
■ AIX
■ HP-UX IA64
■ Solaris SPARC
■ ICS (NBAC)
OpsCenter (3 of 3)15
NetBackup Client for OpenVMSOpenVMS (CD format)16
See “About the NetBackup Electronic Software Distribution (ESD) images”on page 30.
About the NetBackup Electronic Software Distribution (ESD) imagesThe ESD images for NetBackup 7.5 are available for download from the FileConnectWeb page. The images adhere to a 1.8G size limitation.
To ensure the accuracy of the ESD download, some of the product images havebeen split into smaller, more manageable files. Before you uncompress any file,you must first join the split image files that you can identify as 1 of 2 and 2 of
2. A Download Readme.txt file on FileConnect describes how to join the filestogether.
See “About NetBackup 7.5 availability” on page 28.
See “About the NetBackup media kit” on page 28.
See “Requirements for Windows NetBackup server installation” on page 30.
Requirements for Windows NetBackup serverinstallation
Before you install NetBackup, make sure that your backup environment meetsthe following requirements:
Preparing for installationRequirements for Windows NetBackup server installation
30
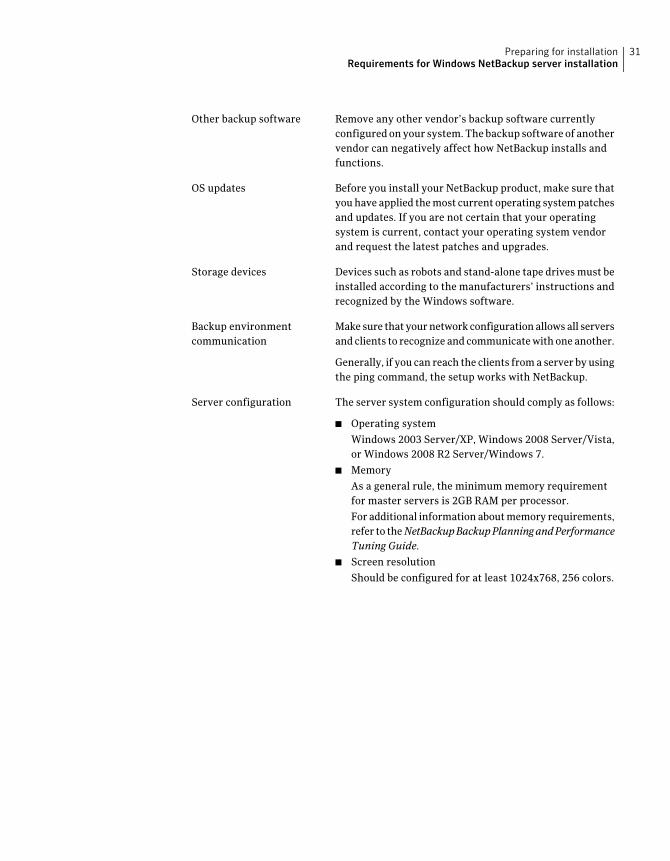
Remove any other vendor’s backup software currentlyconfigured on your system. The backup software of anothervendor can negatively affect how NetBackup installs andfunctions.
Other backup software
Before you install your NetBackup product, make sure thatyou have applied the most current operating system patchesand updates. If you are not certain that your operatingsystem is current, contact your operating system vendorand request the latest patches and upgrades.
OS updates
Devices such as robots and stand-alone tape drives must beinstalled according to the manufacturers’ instructions andrecognized by the Windows software.
Storage devices
Make sure that your network configuration allows all serversand clients to recognize and communicate with one another.
Generally, if you can reach the clients from a server by usingthe ping command, the setup works with NetBackup.
Backup environmentcommunication
The server system configuration should comply as follows:
■ Operating system
Windows 2003 Server/XP, Windows 2008 Server/Vista,or Windows 2008 R2 Server/Windows 7.
■ Memory
As a general rule, the minimum memory requirementfor master servers is 2GB RAM per processor.
For additional information about memory requirements,refer to theNetBackupBackupPlanningandPerformanceTuning Guide.
■ Screen resolution
Should be configured for at least 1024x768, 256 colors.
Server configuration
31Preparing for installationRequirements for Windows NetBackup server installation

■ An NTFS partition.
■ At least 1 GB of storage space to accommodate the serversoftware (512 MB) and NetBackup catalogs (at least 512MB).
NetBackup catalogs contain information about yourbackups, which become larger as you use the product.The catalog disk space requirements depend primarilyon the aspects of your backup configuration. Forexample, the number of files that are backed up, thefrequency of your backups, and how long you retain yourbackup data.
■ For upgrades, you must have an additional 500 MB ofdisk space on the drive where Windows is installed. Afterthe upgrade is complete, this additional space is notneeded.
Disk space requirements
Make sure that you have all of the following items:
■ NetBackup installation DVDs or ESD images
■ Appropriate license keys
■ Administrator account and password for all servers
Note: To install NetBackup on Windows 2008/Vista andWindows 2008 R2/Windows 7 UAC-enabled environments,you must log on as the official administrator. Users that areassigned to the Administrators Group and are not the officialadministrator cannot install NetBackup in UAC-enabledenvironments. To allow users in the Administrators Groupto install NetBackup, disable UAC.
General requirements
When you are prompted for server names, always enter theappropriate host names. Do not enter IP addresses.
Server names
Make sure to install NetBackup servers with a release levelthat is at least equal to the latest client version that youplan to use. Earlier versions of server software canencounter problems with later versions of client software.
Mixed versions
Symantec does not support installation of NetBackup in aCIFS-mounted directory. File locking in CIFS-mounted filesystems can be unreliable.
CIFS-mounted file systems
NetBackup can be installed on these systems only by usingthe silent installation method.
See “Installing or upgrading NetBackup servers silently”on page 104.
Installations on Windows2008 Server Core
Preparing for installationRequirements for Windows NetBackup server installation
32
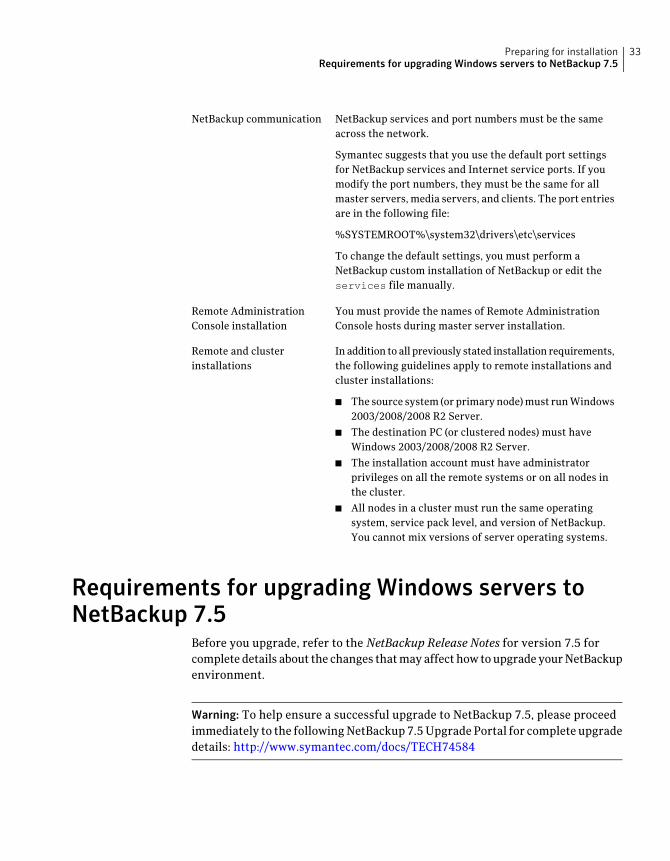
NetBackup services and port numbers must be the sameacross the network.
Symantec suggests that you use the default port settingsfor NetBackup services and Internet service ports. If youmodify the port numbers, they must be the same for allmaster servers, media servers, and clients. The port entriesare in the following file:
%SYSTEMROOT%\system32\drivers\etc\services
To change the default settings, you must perform aNetBackup custom installation of NetBackup or edit theservices file manually.
NetBackup communication
You must provide the names of Remote AdministrationConsole hosts during master server installation.
Remote AdministrationConsole installation
In addition to all previously stated installation requirements,the following guidelines apply to remote installations andcluster installations:
■ The source system (or primary node) must run Windows2003/2008/2008 R2 Server.
■ The destination PC (or clustered nodes) must haveWindows 2003/2008/2008 R2 Server.
■ The installation account must have administratorprivileges on all the remote systems or on all nodes inthe cluster.
■ All nodes in a cluster must run the same operatingsystem, service pack level, and version of NetBackup.You cannot mix versions of server operating systems.
Remote and clusterinstallations
Requirements for upgrading Windows servers toNetBackup 7.5
Before you upgrade, refer to the NetBackup Release Notes for version 7.5 forcomplete details about the changes that may affect how to upgrade your NetBackupenvironment.
Warning: To help ensure a successful upgrade to NetBackup 7.5, please proceedimmediately to the following NetBackup 7.5 Upgrade Portal for complete upgradedetails: http://www.symantec.com/docs/TECH74584
33Preparing for installationRequirements for upgrading Windows servers to NetBackup 7.5
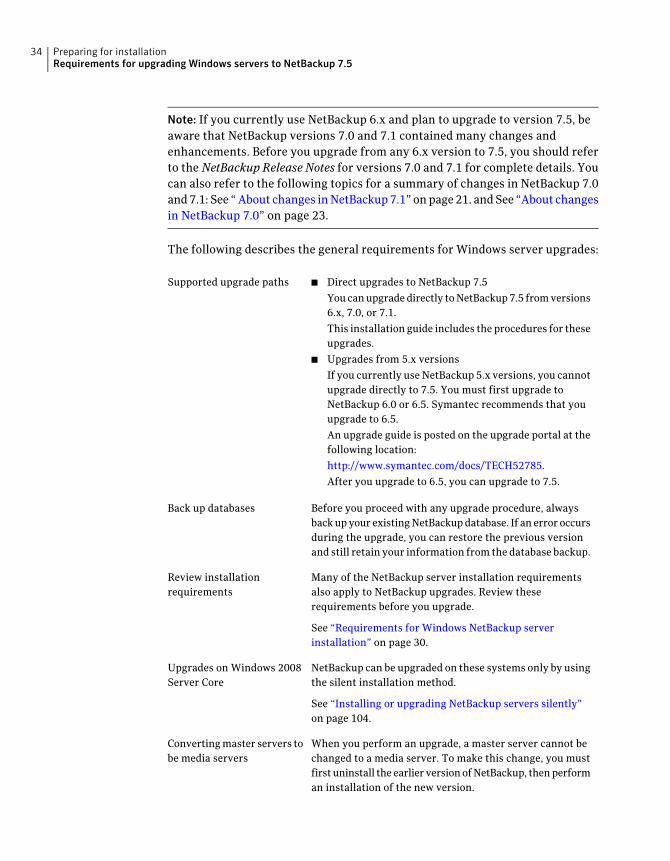
Note: If you currently use NetBackup 6.x and plan to upgrade to version 7.5, beaware that NetBackup versions 7.0 and 7.1 contained many changes andenhancements. Before you upgrade from any 6.x version to 7.5, you should referto theNetBackup Release Notes for versions 7.0 and 7.1 for complete details. Youcan also refer to the following topics for a summary of changes in NetBackup 7.0and 7.1: See “ About changes in NetBackup 7.1” on page 21. and See “About changesin NetBackup 7.0” on page 23.
The following describes the general requirements for Windows server upgrades:
■ Direct upgrades to NetBackup 7.5
You can upgrade directly to NetBackup 7.5 from versions6.x, 7.0, or 7.1.
This installation guide includes the procedures for theseupgrades.
■ Upgrades from 5.x versions
If you currently use NetBackup 5.x versions, you cannotupgrade directly to 7.5. You must first upgrade toNetBackup 6.0 or 6.5. Symantec recommends that youupgrade to 6.5.
An upgrade guide is posted on the upgrade portal at thefollowing location:
http://www.symantec.com/docs/TECH52785.
After you upgrade to 6.5, you can upgrade to 7.5.
Supported upgrade paths
Before you proceed with any upgrade procedure, alwaysback up your existing NetBackup database. If an error occursduring the upgrade, you can restore the previous versionand still retain your information from the database backup.
Back up databases
Many of the NetBackup server installation requirementsalso apply to NetBackup upgrades. Review theserequirements before you upgrade.
See “Requirements for Windows NetBackup serverinstallation” on page 30.
Review installationrequirements
NetBackup can be upgraded on these systems only by usingthe silent installation method.
See “Installing or upgrading NetBackup servers silently”on page 104.
Upgrades on Windows 2008Server Core
When you perform an upgrade, a master server cannot bechanged to a media server. To make this change, you mustfirst uninstall the earlier version of NetBackup, then performan installation of the new version.
Converting master servers tobe media servers
Preparing for installationRequirements for upgrading Windows servers to NetBackup 7.5
34
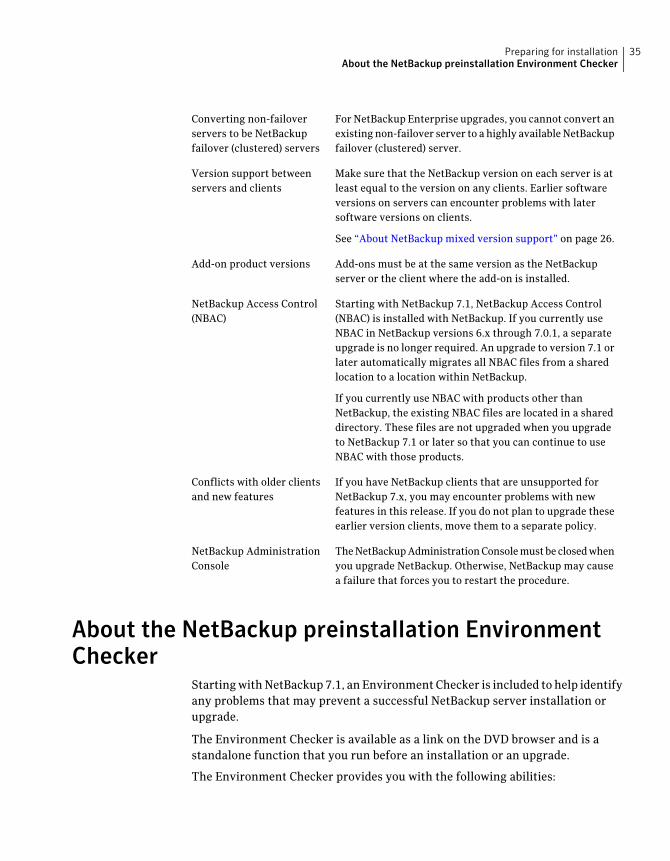
For NetBackup Enterprise upgrades, you cannot convert anexisting non-failover server to a highly available NetBackupfailover (clustered) server.
Converting non-failoverservers to be NetBackupfailover (clustered) servers
Make sure that the NetBackup version on each server is atleast equal to the version on any clients. Earlier softwareversions on servers can encounter problems with latersoftware versions on clients.
See “About NetBackup mixed version support” on page 26.
Version support betweenservers and clients
Add-ons must be at the same version as the NetBackupserver or the client where the add-on is installed.
Add-on product versions
Starting with NetBackup 7.1, NetBackup Access Control(NBAC) is installed with NetBackup. If you currently useNBAC in NetBackup versions 6.x through 7.0.1, a separateupgrade is no longer required. An upgrade to version 7.1 orlater automatically migrates all NBAC files from a sharedlocation to a location within NetBackup.
If you currently use NBAC with products other thanNetBackup, the existing NBAC files are located in a shareddirectory. These files are not upgraded when you upgradeto NetBackup 7.1 or later so that you can continue to useNBAC with those products.
NetBackup Access Control(NBAC)
If you have NetBackup clients that are unsupported forNetBackup 7.x, you may encounter problems with newfeatures in this release. If you do not plan to upgrade theseearlier version clients, move them to a separate policy.
Conflicts with older clientsand new features
The NetBackup Administration Console must be closed whenyou upgrade NetBackup. Otherwise, NetBackup may causea failure that forces you to restart the procedure.
NetBackup AdministrationConsole
About the NetBackup preinstallation EnvironmentChecker
Starting with NetBackup 7.1, an Environment Checker is included to help identifyany problems that may prevent a successful NetBackup server installation orupgrade.
The Environment Checker is available as a link on the DVD browser and is astandalone function that you run before an installation or an upgrade.
The Environment Checker provides you with the following abilities:
35Preparing for installationAbout the NetBackup preinstallation Environment Checker
■ Assess a system to determine if it is ready for a new NetBackup installationor upgrade.
■ Perform the assessment on local and remote Windows systems.
■ Create a list of remote computers to check, either manually or by browsingthe network.
■ Run the Environment Checker on all supported Windows platforms that supportNetBackup as a master server or a media server (x86 and x64).
■ Generate HTML reports for immediate viewing.
See “ Running the preinstallation Environment Checker” on page 36.
Running the preinstallation Environment CheckerUse the following procedure to run the Environment Checker and assess whethercomputers are ready for NetBackup installation.
To run the Environment Checker
1 Start the NetBackup Installation Wizard with one of the following methods:
■ DVD mediaInsert the NetBackup for Windows DVD in the drive. If Autorun is disabled,navigate to the DVD drive and run Browser.exe.
■ ESD images (downloaded files)
Preparing for installationAbout the NetBackup preinstallation Environment Checker
36
Navigate to the directory where the images reside and run Browser.exe.
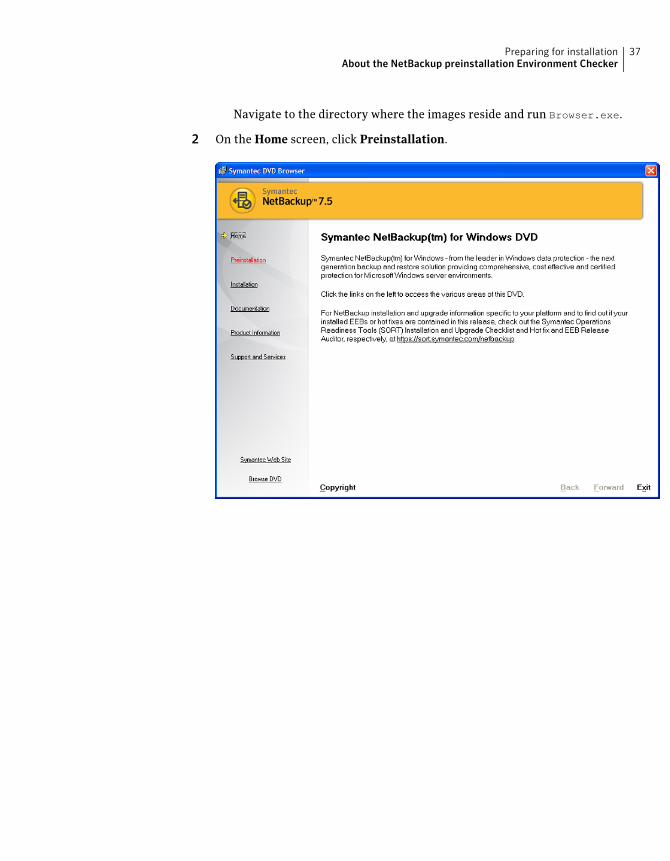
2 On the Home screen, click Preinstallation.
37Preparing for installationAbout the NetBackup preinstallation Environment Checker
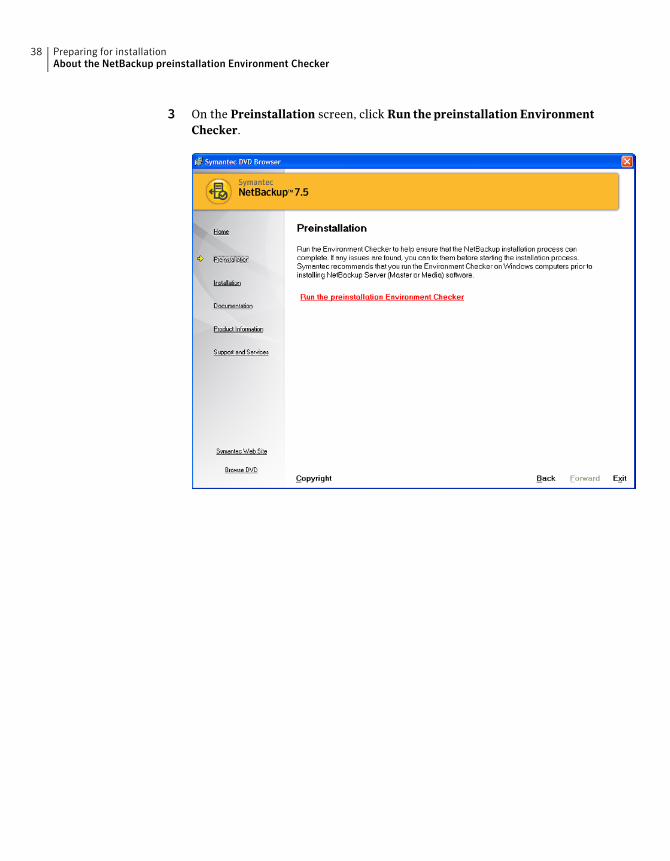
3 On the Preinstallation screen, click Run the preinstallation EnvironmentChecker.
Preparing for installationAbout the NetBackup preinstallation Environment Checker
38
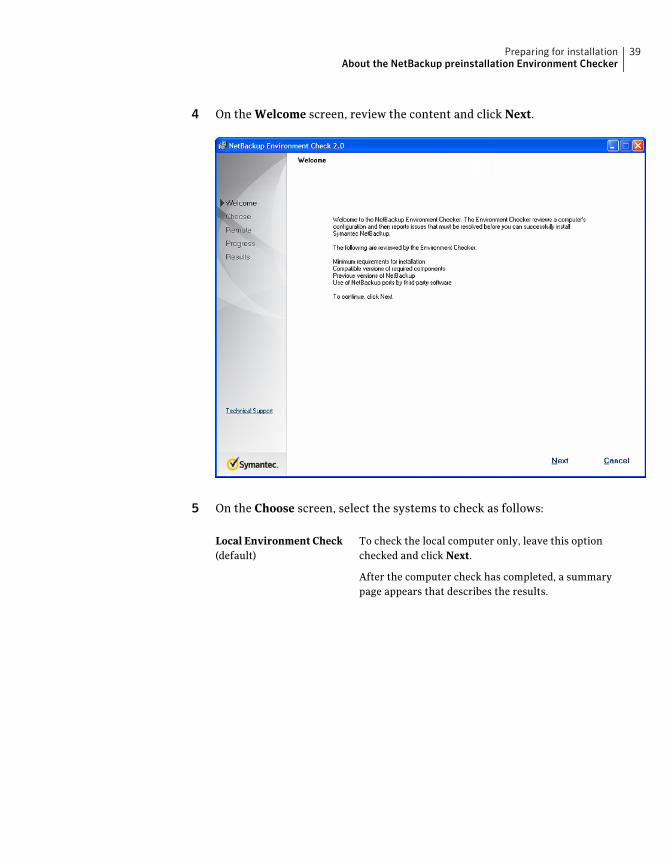
4 On the Welcome screen, review the content and click Next.
5 On the Choose screen, select the systems to check as follows:
To check the local computer only, leave this optionchecked and click Next.
After the computer check has completed, a summarypage appears that describes the results.
Local Environment Check(default)
39Preparing for installationAbout the NetBackup preinstallation Environment Checker
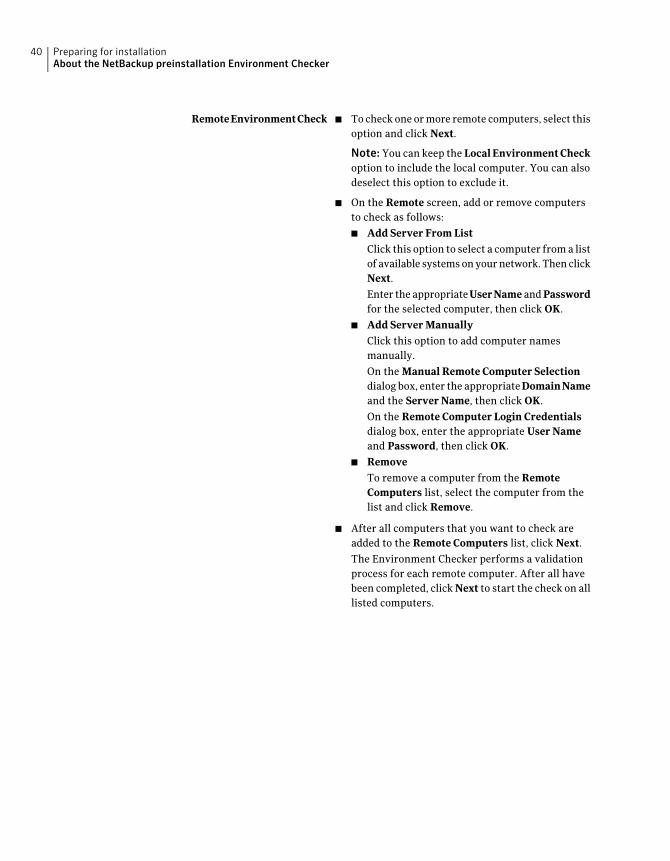
■ To check one or more remote computers, select thisoption and click Next.
Note: You can keep the LocalEnvironmentCheckoption to include the local computer. You can alsodeselect this option to exclude it.
■ On the Remote screen, add or remove computersto check as follows:
■ Add Server From ListClick this option to select a computer from a listof available systems on your network. Then clickNext.
Enter the appropriateUserName and Passwordfor the selected computer, then click OK.
■ Add Server ManuallyClick this option to add computer namesmanually.
On the Manual Remote Computer Selectiondialog box, enter the appropriateDomainNameand the Server Name, then click OK.
On the Remote Computer Login Credentialsdialog box, enter the appropriate User Nameand Password, then click OK.
■ RemoveTo remove a computer from the RemoteComputers list, select the computer from thelist and click Remove.
■ After all computers that you want to check areadded to the Remote Computers list, click Next.
The Environment Checker performs a validationprocess for each remote computer. After all havebeen completed, click Next to start the check on alllisted computers.
RemoteEnvironmentCheck
Preparing for installationAbout the NetBackup preinstallation Environment Checker
40
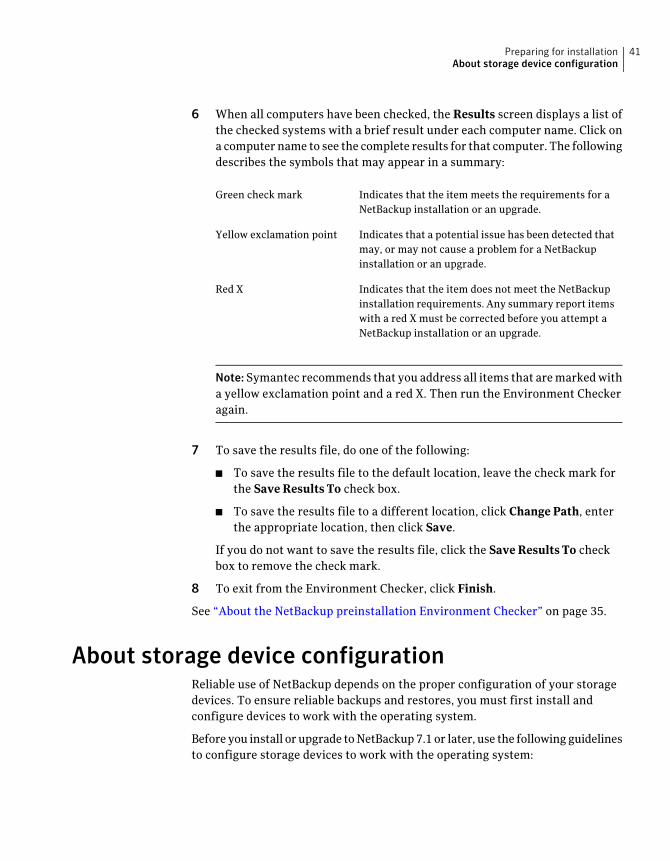
6 When all computers have been checked, the Results screen displays a list ofthe checked systems with a brief result under each computer name. Click ona computer name to see the complete results for that computer. The followingdescribes the symbols that may appear in a summary:
Indicates that the item meets the requirements for aNetBackup installation or an upgrade.
Green check mark
Indicates that a potential issue has been detected thatmay, or may not cause a problem for a NetBackupinstallation or an upgrade.
Yellow exclamation point
Indicates that the item does not meet the NetBackupinstallation requirements. Any summary report itemswith a red X must be corrected before you attempt aNetBackup installation or an upgrade.
Red X
Note: Symantec recommends that you address all items that are marked witha yellow exclamation point and a red X. Then run the Environment Checkeragain.
7 To save the results file, do one of the following:
■ To save the results file to the default location, leave the check mark forthe Save Results To check box.
■ To save the results file to a different location, click Change Path, enterthe appropriate location, then click Save.
If you do not want to save the results file, click the Save Results To checkbox to remove the check mark.
8 To exit from the Environment Checker, click Finish.
See “About the NetBackup preinstallation Environment Checker” on page 35.
About storage device configurationReliable use of NetBackup depends on the proper configuration of your storagedevices. To ensure reliable backups and restores, you must first install andconfigure devices to work with the operating system.
Before you install or upgrade to NetBackup 7.1 or later, use the following guidelinesto configure storage devices to work with the operating system:
41Preparing for installationAbout storage device configuration
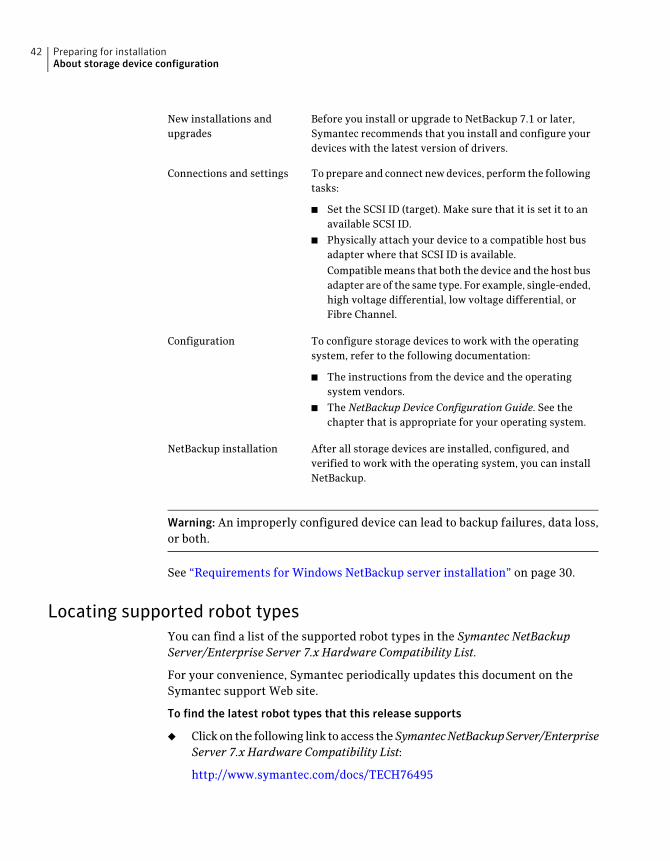
Before you install or upgrade to NetBackup 7.1 or later,Symantec recommends that you install and configure yourdevices with the latest version of drivers.
New installations andupgrades
To prepare and connect new devices, perform the followingtasks:
■ Set the SCSI ID (target). Make sure that it is set it to anavailable SCSI ID.
■ Physically attach your device to a compatible host busadapter where that SCSI ID is available.
Compatible means that both the device and the host busadapter are of the same type. For example, single-ended,high voltage differential, low voltage differential, orFibre Channel.
Connections and settings
To configure storage devices to work with the operatingsystem, refer to the following documentation:
■ The instructions from the device and the operatingsystem vendors.
■ The NetBackup Device Configuration Guide. See thechapter that is appropriate for your operating system.
Configuration
After all storage devices are installed, configured, andverified to work with the operating system, you can installNetBackup.
NetBackup installation
Warning: An improperly configured device can lead to backup failures, data loss,or both.
See “Requirements for Windows NetBackup server installation” on page 30.
Locating supported robot typesYou can find a list of the supported robot types in the Symantec NetBackupServer/Enterprise Server 7.x Hardware Compatibility List.
For your convenience, Symantec periodically updates this document on theSymantec support Web site.
To find the latest robot types that this release supports
◆ Click on the following link to access theSymantecNetBackupServer/EnterpriseServer 7.x Hardware Compatibility List:
http://www.symantec.com/docs/TECH76495
Preparing for installationAbout storage device configuration
42

About replacing NetBackup server types notsupported in NetBackup 7.x
Certain hardware support and operating system support has been discontinuedin NetBackup 7.x. These systems must be replaced with supported systems beforean upgrade to NetBackup 7.x.
For complete details about hardware and operating system support in NetBackup7.x versions, refer to the following documents:
■ NetBackup Release Notes for 7.5http://www.symantec.com/docs/DOC5041Refer to the sections "About platform and operating system support changes"and "About NetBackup Compatibility Lists".
■ NetBackup Enterprise Server and Server 7.x OS Software Compatibility Listhttp://www.symantec.com/docs/TECH76648
■ NetBackup server 7.x hardware compatibility listhttp://www.symantec.com/docs/TECH76495
The following describes the general guidelines to replace unsupported serversbefore an upgrade to NetBackup 7.x:
43Preparing for installationAbout replacing NetBackup server types not supported in NetBackup 7.x
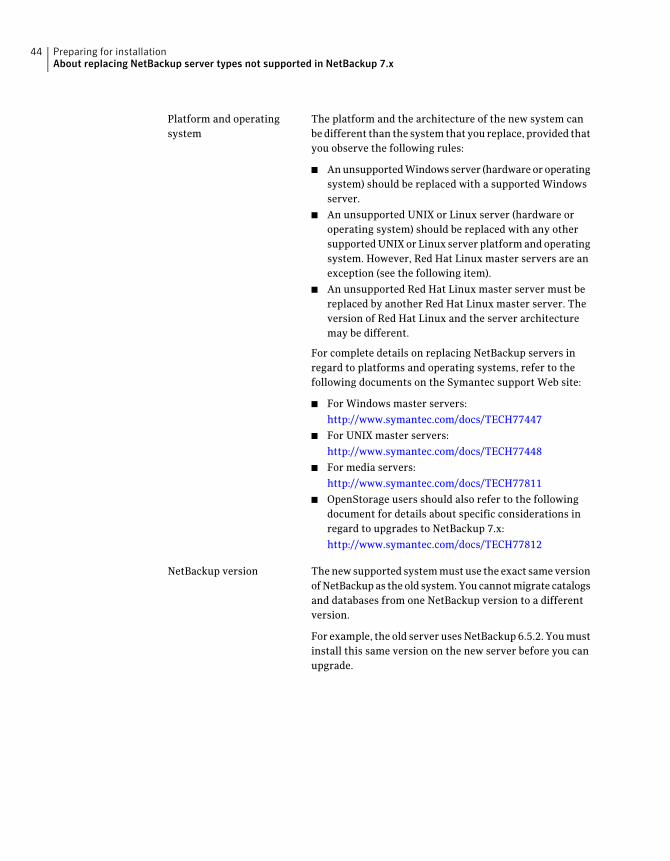
The platform and the architecture of the new system canbe different than the system that you replace, provided thatyou observe the following rules:
■ An unsupported Windows server (hardware or operatingsystem) should be replaced with a supported Windowsserver.
■ An unsupported UNIX or Linux server (hardware oroperating system) should be replaced with any othersupported UNIX or Linux server platform and operatingsystem. However, Red Hat Linux master servers are anexception (see the following item).
■ An unsupported Red Hat Linux master server must bereplaced by another Red Hat Linux master server. Theversion of Red Hat Linux and the server architecturemay be different.
For complete details on replacing NetBackup servers inregard to platforms and operating systems, refer to thefollowing documents on the Symantec support Web site:
■ For Windows master servers:
http://www.symantec.com/docs/TECH77447
■ For UNIX master servers:
http://www.symantec.com/docs/TECH77448
■ For media servers:
http://www.symantec.com/docs/TECH77811
■ OpenStorage users should also refer to the followingdocument for details about specific considerations inregard to upgrades to NetBackup 7.x:
http://www.symantec.com/docs/TECH77812
Platform and operatingsystem
The new supported system must use the exact same versionof NetBackup as the old system. You cannot migrate catalogsand databases from one NetBackup version to a differentversion.
For example, the old server uses NetBackup 6.5.2. You mustinstall this same version on the new server before you canupgrade.
NetBackup version
Preparing for installationAbout replacing NetBackup server types not supported in NetBackup 7.x
44
On the old system, you must create a hot catalog backup.This backup is then used to restore the catalog to the newsupported system and complete the migration.
The method that you use to create the catalog backup canmake a difference in how you restore it on the new system.For example:
■ Whether you back up the catalog to tape or disk
■ Whether you back up the catalog to a master server ora media server
For complete details on how to create a hot catalog backup,see the NetBackup Troubleshooting Guide.
Hot catalog backup
How to replace unsupported NetBackup master serversThe following steps describe only the primary tasks to replace an unsupportedmaster server.
For complete detailed instructions, refer to the following documents on theSymantec support Web site:
http://www.symantec.com/docs/TECH77447
http://www.symantec.com/docs/TECH77448
OpenStorage users should also refer to the following document for details aboutspecific considerations in regard to upgrades to NetBackup 7.x:
http://www.symantec.com/docs/TECH77812
To replace an unsupported master server
1 Configure a new supported master server with the same name as the oldunsupported master server.
See “About replacing NetBackup server types not supported in NetBackup7.x” on page 43.
2 Install the same version of NetBackup on the new master server that is usedon the old master server.
You must install NetBackup to the exact same path and location as the oldserver.
3 On the old master server, create a hot catalog backup.
For complete details on how to create a hot catalog backup, see theNetBackupTroubleshooting Guide.
4 Shut down the old master server and remove it from your backupenvironment.
45Preparing for installationAbout replacing NetBackup server types not supported in NetBackup 7.x
5 Install the new master server in your backup environment.
6 Restore the catalog backup.
7 Run some test backups and restores to verify successful operation.
After you verify successful operation, you can upgrade to NetBackup 7.x.
How to replace unsupported NetBackup media serversThe following steps describe only the primary tasks to replace an unsupportedmedia server.
For complete detailed instructions, refer to the following document on theSymantec support Web site:
http://www.symantec.com/docs/TECH77811
OpenStorage users should also refer to the following document for details aboutspecific considerations in regard to upgrades to NetBackup 7.x:
http://www.symantec.com/docs/TECH77812
To replace an unsupported media server
1 Deactivate the old media server through the NetBackup AdministrationConsole, or by running the following command:
nbemmcmd -updatehost -machinename <Media Server> -machinestateop
set_admin_pause -machinetype media -masterserver <Master Server>
2 Shut down the old media server.
3 Configure a new supported media server with the same name and IP addressas the old media server.
Note: To use a new IP address, make sure that you update the DNS.
4 Connect all backup storage devices to the new media server.
5 Install the same version of NetBackup on the new media server that is usedon the old media server. You must install NetBackup to the exact same pathand location as the old server.
Also, make sure that you specify the same list of additional servers that wereidentified on the old server.
6 Install the new media server in your backup environment.
Preparing for installationAbout replacing NetBackup server types not supported in NetBackup 7.x
46
7 Activate the new media server through the NetBackup Administration Console,or by running the following command:
nbemmcmd -updatehost -machinename <Media Server> -machinestateop
clr_admin_pause -machinetype media -masterserver <Master Server>
8 Run the device discovery on the new media server so that all connected backupstorage devices are recognized.
9 Run some test backups and restores to verify successful operation.
After you verify successful operation, you can upgrade to NetBackup 7.x.
47Preparing for installationAbout replacing NetBackup server types not supported in NetBackup 7.x

Preparing for installationAbout replacing NetBackup server types not supported in NetBackup 7.x
48
NetBackup licenses
This chapter includes the following topics:
■ About NetBackup license key requirements
About NetBackup license key requirementsTo install NetBackup master server or media server software, you must enter aNetBackup product license key.
To obtain license keys, you must order a license SKU when you order yourNetBackup products.
After you place your order, Symantec sends you an email with a license certificatethat includes the following information:
This list includes all of the licenses for the products thatyou ordered.
Keep this list in a secure location. You may be asked for aproduct license key if you ever need to contact technicalsupport for assistance.
List of NetBackup licensespurchased
Instead of a DVD media kit, you can use this serial numberto download the Electronic Software Distribution (ESD)images for NetBackup product installation.
Go to the following Web site and enter this serial numberto download the ESD images to your system:
https://fileconnect.symantec.com/LangSelection.jsp
Serial number for access todownload NetBackupproducts
When you install NetBackup, Symantec recommends that you enter all otherproduct license keys on the master server when you are prompted. Although youcan add these license keys later, it is easier to enter them when you install themaster server software.
2Chapter
For detailed information on how to administer NetBackup license keys, refer tothe NetBackup Administration Guide, Volume I.
About NetBackup license compatibilityTo use your current NetBackup license keys to upgrade servers, add-on products,and database agents to NetBackup 7.5, the following are required:
■ NetBackup versions 6.x or 7.0.x must already be installed.
■ You must have a valid maintenance contract for all licensed NetBackupproducts.
Note: You cannot upgrade to NetBackup 7.5 if your current installed version isNetBackup 5.x. You must first upgrade to NetBackup 6.0 or 6.5, and then you canupgrade to NetBackup 7.5. Any 6.x version can be upgraded directly to 7.5.
Upgrade licenses and software may be obtained from the Symantec LicensingPortal at the following Web site:
https://licensing.symantec.com/acctmgmt/index.jsp
For detailed information and procedures on how to administer license keys, referto the NetBackup Administrator’s Guide, Volume I.
See “About license key entry” on page 50.
About license key entryLicense keys for all NetBackup SKUs must be entered on the master server. Licensekeys for some SKUs must also be entered on the media server, depending on thecapabilities that you require for the media server.
Table 2-1 describes the license keys that must be entered on each server.
NetBackup licensesAbout NetBackup license key requirements
50
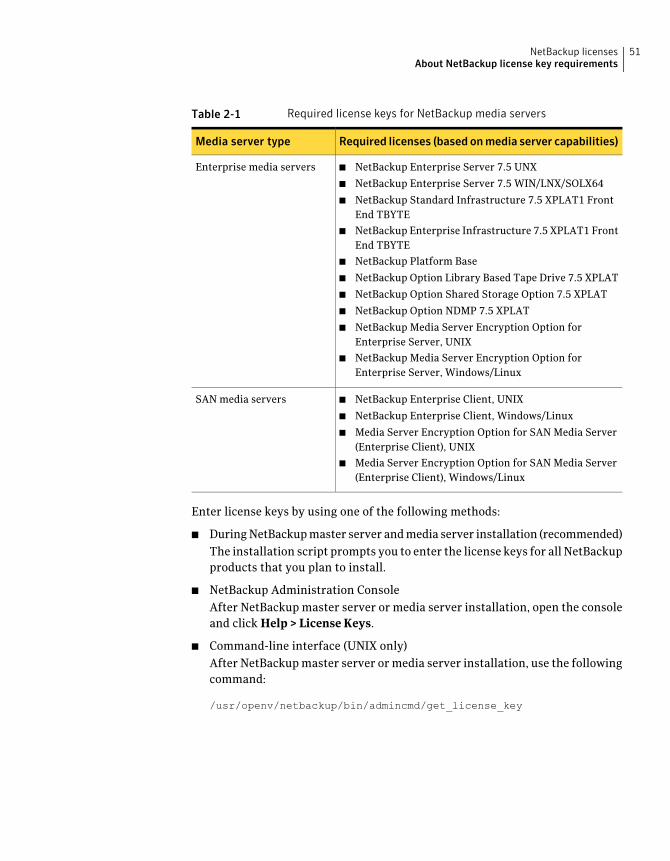
Table 2-1 Required license keys for NetBackup media servers
Required licenses (based onmedia server capabilities)Media server type
■ NetBackup Enterprise Server 7.5 UNX
■ NetBackup Enterprise Server 7.5 WIN/LNX/SOLX64
■ NetBackup Standard Infrastructure 7.5 XPLAT1 FrontEnd TBYTE
■ NetBackup Enterprise Infrastructure 7.5 XPLAT1 FrontEnd TBYTE
■ NetBackup Platform Base
■ NetBackup Option Library Based Tape Drive 7.5 XPLAT
■ NetBackup Option Shared Storage Option 7.5 XPLAT
■ NetBackup Option NDMP 7.5 XPLAT
■ NetBackup Media Server Encryption Option forEnterprise Server, UNIX
■ NetBackup Media Server Encryption Option forEnterprise Server, Windows/Linux
Enterprise media servers
■ NetBackup Enterprise Client, UNIX
■ NetBackup Enterprise Client, Windows/Linux
■ Media Server Encryption Option for SAN Media Server(Enterprise Client), UNIX
■ Media Server Encryption Option for SAN Media Server(Enterprise Client), Windows/Linux
SAN media servers
Enter license keys by using one of the following methods:
■ During NetBackup master server and media server installation (recommended)The installation script prompts you to enter the license keys for all NetBackupproducts that you plan to install.
■ NetBackup Administration ConsoleAfter NetBackup master server or media server installation, open the consoleand click Help > License Keys.
■ Command-line interface (UNIX only)After NetBackup master server or media server installation, use the followingcommand:
/usr/openv/netbackup/bin/admincmd/get_license_key
51NetBackup licensesAbout NetBackup license key requirements
Note: You can log on to a NetBackup server from almost any server in a systemto view, enter, and administer license keys. When you administer license keysremotely, make sure that you view the licenses of the system you intend to change.You do not want to add or change a license key on the wrong server.
Frequently asked questions about license keysSymantec customers have asked the following questions about how to managelicense keys.
NetBackup uses a common license system that otherSymantec products also use. Please remember, however,that the common license system provides flexibility in thelicense features that each product implements. For example,NetBackup does not have a node-locked license system, butsome other products do.
Is the license system forNetBackup the same as thelicense system in otherSymantec products?
No. The media kit by itself does not allow any access toNetBackup. You always need a license key (either permanentor evaluation). License keys should always be delivered withthe media kit, so you should never find yourself with a mediakit and no key.
Can I use NetBackup if all Ihave is a media kit?
The key is a multi-digit alphanumeric string (for example:8EPP-ABCD-9XYZ-XYZ9-8881-VCF4-OIUF-AJDC). The keycontains information on the following:
■ Whether the key is for NetBackup Server or NetBackupEnterprise Server
■ Whether the key is for a server, a client, an agent, or anoption (and which one)
■ Whether the key is a permanent key or an evaluationkey
■ Information about how and where the key was generated
What does the license keylook like? What informationdoes it contain?
Yes, serialization information is embedded in the key.Is the license key serialized?
NetBackup licensesAbout NetBackup license key requirements
52
Yes. Information about license keys is stored on the masterserver.
To access the information, open the NetBackupAdministration Console and select Help > License Keys.
On UNIX servers, you can also run the following command:
/usr/openv/netbackup/bin/admincmd/get_license_key
For more information on how to view reports, refer to theNetBackup Administrator’s Guide, Volume I.
Can I see reports on whatlicense keys I have?
When you install NetBackup, you are prompted to enter thelicense keys for all options and agents.
If you purchase an agent or other add-on product at a laterdate, you can enter its license key manually. Open theNetBackup Administration Console and select Help >License Keys.
On UNIX servers, you can also run the following command:
/usr/openv/netbackup/bin/admincmd/get_license_key
Some options require that you have your original NetBackupDVDs, because additional binaries must be installed. Youshould always keep your NetBackup DVDs in a safe place.
How do I enable options andagents?
Yes. Always store copies of your license keys in a secureplace.
Should I save license keysafter they have been entered?
Symantec has a record of all license keys that are issued tocustomers. Customers who lose their license key(s) can callOrder Management to get copies of their license keys.
■ For Americas, Japan, PacRim, Australia:
650.318.4265 FAX: 650.335.8428
■ For Europe, Middle East and Africa:
00.353.61.365232 FAX: 00.353.61.365223
If you have purchased NetBackup from a Symantec partner,you need to contact that partner for information on yourkey.
What should I do if I havelost my license key(s)?
53NetBackup licensesAbout NetBackup license key requirements
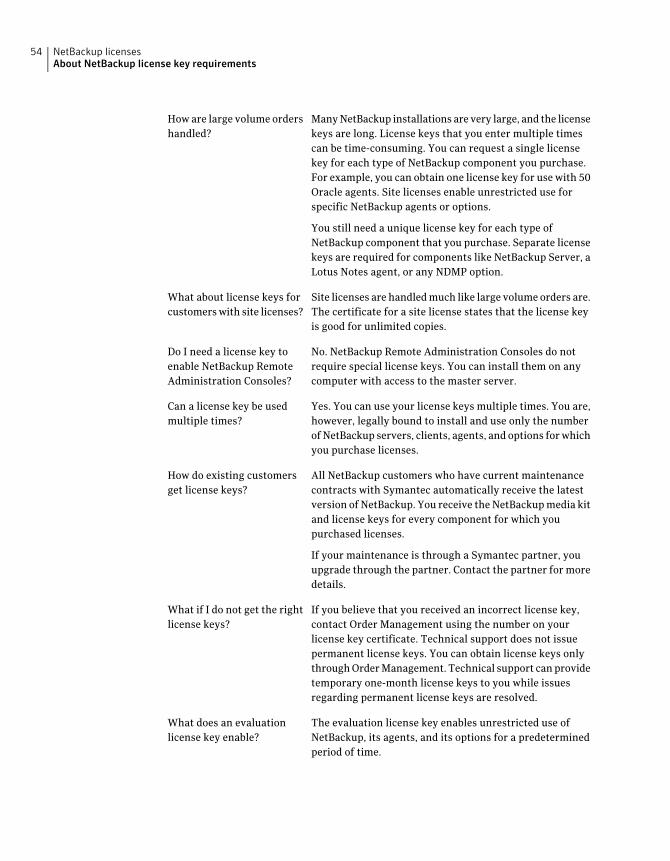
Many NetBackup installations are very large, and the licensekeys are long. License keys that you enter multiple timescan be time-consuming. You can request a single licensekey for each type of NetBackup component you purchase.For example, you can obtain one license key for use with 50Oracle agents. Site licenses enable unrestricted use forspecific NetBackup agents or options.
You still need a unique license key for each type ofNetBackup component that you purchase. Separate licensekeys are required for components like NetBackup Server, aLotus Notes agent, or any NDMP option.
How are large volume ordershandled?
Site licenses are handled much like large volume orders are.The certificate for a site license states that the license keyis good for unlimited copies.
What about license keys forcustomers with site licenses?
No. NetBackup Remote Administration Consoles do notrequire special license keys. You can install them on anycomputer with access to the master server.
Do I need a license key toenable NetBackup RemoteAdministration Consoles?
Yes. You can use your license keys multiple times. You are,however, legally bound to install and use only the numberof NetBackup servers, clients, agents, and options for whichyou purchase licenses.
Can a license key be usedmultiple times?
All NetBackup customers who have current maintenancecontracts with Symantec automatically receive the latestversion of NetBackup. You receive the NetBackup media kitand license keys for every component for which youpurchased licenses.
If your maintenance is through a Symantec partner, youupgrade through the partner. Contact the partner for moredetails.
How do existing customersget license keys?
If you believe that you received an incorrect license key,contact Order Management using the number on yourlicense key certificate. Technical support does not issuepermanent license keys. You can obtain license keys onlythrough Order Management. Technical support can providetemporary one-month license keys to you while issuesregarding permanent license keys are resolved.
What if I do not get the rightlicense keys?
The evaluation license key enables unrestricted use ofNetBackup, its agents, and its options for a predeterminedperiod of time.
What does an evaluationlicense key enable?
NetBackup licensesAbout NetBackup license key requirements
54
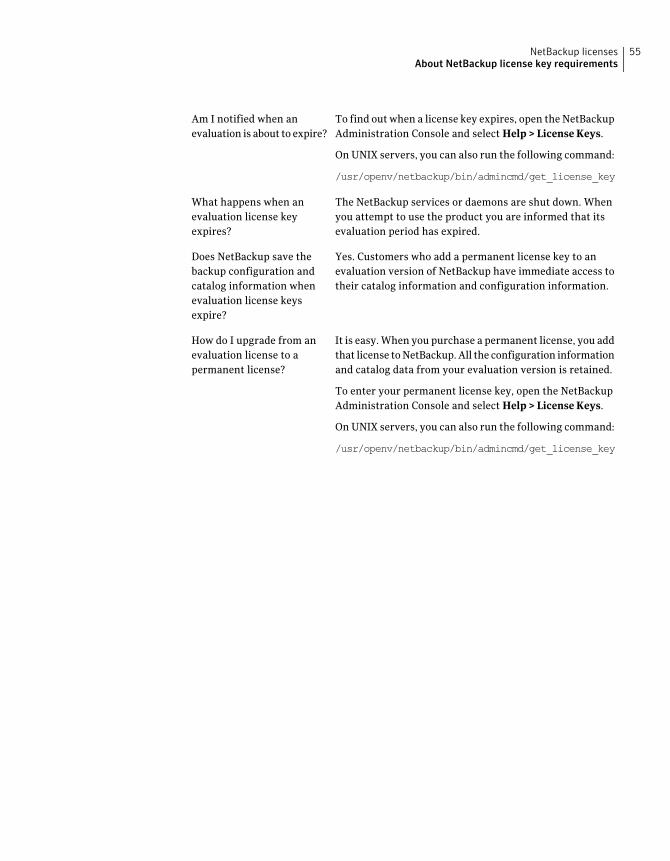
To find out when a license key expires, open the NetBackupAdministration Console and select Help > License Keys.
On UNIX servers, you can also run the following command:
/usr/openv/netbackup/bin/admincmd/get_license_key
Am I notified when anevaluation is about to expire?
The NetBackup services or daemons are shut down. Whenyou attempt to use the product you are informed that itsevaluation period has expired.
What happens when anevaluation license keyexpires?
Yes. Customers who add a permanent license key to anevaluation version of NetBackup have immediate access totheir catalog information and configuration information.
Does NetBackup save thebackup configuration andcatalog information whenevaluation license keysexpire?
It is easy. When you purchase a permanent license, you addthat license to NetBackup. All the configuration informationand catalog data from your evaluation version is retained.
To enter your permanent license key, open the NetBackupAdministration Console and select Help > License Keys.
On UNIX servers, you can also run the following command:
/usr/openv/netbackup/bin/admincmd/get_license_key
How do I upgrade from anevaluation license to apermanent license?
55NetBackup licensesAbout NetBackup license key requirements

NetBackup licensesAbout NetBackup license key requirements
56
Installing or upgradingserver software
This chapter includes the following topics:
■ How to install NetBackup
■ About the upgrade order for NetBackup 7.5
■ Installing or upgrading servers locally
■ Installing or upgrading servers remotely
■ Requirements for Windows cluster installations and upgrades
■ About automatic file changes from an upgrade
■ Installing or upgrading NetBackup servers silently
■ Upgrading NetBackup Servers to NetBackup Enterprise Servers
How to install NetBackupFor new NetBackup installations, install the software in the following order:
Install master server software.Step 1
Install media server software (NetBackup Enterprise only).Step 2
Install the NetBackup Remote Administration Console (optional).Step 3
Install client software.Step 4
Install any NetBackup add-on products (such as language packages).Step 5
3Chapter
Before you proceed with any installation procedure, be sure to review theinstallation requirements.
See “Requirements for Windows NetBackup server installation” on page 30.
About the upgrade order for NetBackup 7.5If you use NetBackup OpsCenter, you must first upgrade those product componentsbefore you upgrade to NetBackup 7.5. Upgrading OpsCenter first helps to ensurethat it can interact with the new features in NetBackup 7.5. For completeinstructions about how to upgrade NetBackup OpsCenter, see the NetBackupOpsCenter Administrator's Guide.
The following describes the order in which to upgrade all of these products. If youdo not use NetBackup OpsCenter, upgrade NetBackup as described in the last step.
Upgrade OpsCenter Agent.Step 1
Upgrade OpsCenter Server.Step 2
Upgrade OpsCenter View Builder.Step 3
Upgrade your NetBackup environment in the following order:
■ Back up the current NetBackup databases.
■ Upgrade master servers.
■ Upgrade media servers.
■ Upgrade NetBackup Remote Administration Consoles.
■ Upgrade clients.
■ Upgrade any installed NetBackup add-on products (such aslanguage packs).
Note: If your current NetBackup environment uses a remote EMM(an EMM installed on a media server), you must upgrade this serverfirst. Once you upgrade the remote EMM, you must upgrade all masterservers that communicate with it. NetBackup does not support theuse of a later version EMM server with an earlier version master server.
Step 4
The installation process automatically searches to determine if an earlierNetBackup version exists on your system. The presence of an existing versiondictates that you are about to perform an upgrade.
Before you proceed with any upgrade, be sure to review the upgrade requirements.
See “Requirements for upgrading Windows servers to NetBackup 7.5” on page 33.
See “About NetBackup mixed version support” on page 26.
Installing or upgrading server softwareAbout the upgrade order for NetBackup 7.5
58
See “Requirements for Windows NetBackup server installation” on page 30.
Installing or upgrading servers locallyBefore you begin any upgrade to NetBackup 7.5, refer to the following topics tohelp you prepare and plan for the upgrade:
See “About image metadata migration after upgrades to NetBackup 7.5” on page 15.
See “Planning for image metadata migration after an upgrade to NetBackup 7.5”on page 19.
Caution: To help ensure a successful upgrade to NetBackup 7.5, please visit thefollowing NetBackup 7.5 Upgrade Portal for complete upgrade details:http://www.symantec.com/docs/TECH74584
Use the following procedure to install or upgrade to NetBackup 7.5 on a localcomputer.
To install NetBackup server software locally on Windows
1 Log on to the system where you want to install NetBackup. Be sure to log onwith administrator privileges.
2 For upgrades only, run a hot catalog backup. If an error occurs during theupgrade, you can roll back to the previous version and still retain yourinformation from the catalog backup.
This step is especially important for upgrades from 6.x versions because coldcatalog backup support was discontinued starting with NetBackup 7.0.
Catalog backups are typically scheduled to occur automatically from a catalogbackup policy. You can also initiate a hot catalog backup manually as follows:
Note: If a catalog backup policy does not exist, you must first create andconfigure one to run a hot catalog backup. For complete details, see theNetBackup Administartor's Guide, Volume I.
■ In the NetBackup Administration Console, expand NetBackupManagement > Policies.
■ Select the catalog backup policy you want to run.
■ Select Actions > Manual Backup.
3 This step applies only to upgrades. For new installations, skip to the nextstep.
59Installing or upgrading server softwareInstalling or upgrading servers locally
■ Deactivate all NetBackup policies as follows:
■ On the master server, open the NetBackupAdministration Console.
■ From the tree on the left, select Policies.
■ In the right pane, select all of the NetBackuppolicies that appear.
■ Right-click on the highlighted policies andselect Deactivate.
For NetBackupAdministration Console users
Enter the following commands for the appropriatepolicies:
■ For NetBackup policies, enter the followingcommand:
install_path\NetBackup\bin\admincmd\bpplinfo policy_name -modify -inactive
For command-line users
■ Deactivate disk staging storage units as follows:
■ On the master server, open the NetBackupAdministration Console.
■ From the tree on the left, expand NetBackupManagement > Storage Units.
■ In the right pane, double-click on a disk stagingstorage unit.
■ When the Change Storage Unit dialog boxappears, select Staging Schedule.
■ When the Disk Staging Schedule dialog boxappears, click the Exclude Dates tab.
■ Select the date in the calendar that matches thedate of the system upgrade, then click OK. Thestorage unit is then disabled on that date.
■ Click OK to close the Disk Staging Scheduledialog box, then click OK to close the ChangeStorage Unit dialog box.
■ Repeat these tasks for each disk staging storageunit.
For NetBackupAdministration Console users
■ Enter the following command:
install_path\netbackup\bin\admincmd\bpschedulerep schedulename -exclmm/dd/yyyy
For command-line users
Installing or upgrading server softwareInstalling or upgrading servers locally
60
■ Deactivate all media servers as follows:
■ On the master server, open the NetBackupAdministration Console.
■ From the tree on the left, select Media andDevice Management > Devices > MediaServers.
■ In the right pane, select all media servers thatappear.
■ Right-click on the highlighted servers and selectDeactivate.
For NetBackupAdministration Console users
■ Enter the following command:
install_path\Volmgr\bin\vmoprcmd-deactivate_host -h device_host
For command-line users
■ If the NetBackup Administration Console is open, you must close it now.
4 Start the NetBackup Installation Wizard with one of the following methods:
■ DVD mediaInsert the NetBackup for Windows DVD in the drive. If Autorun is disabled,navigate to the DVD drive and run Browser.exe.
■ ESD images (downloaded files)Navigate to the directory where the images reside and run Browser.exe.
61Installing or upgrading server softwareInstalling or upgrading servers locally
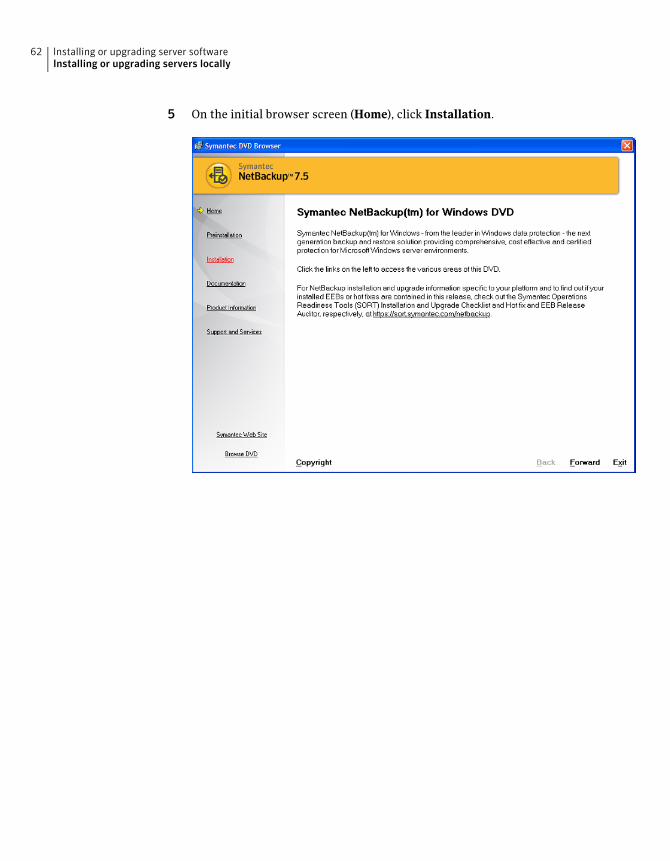
5 On the initial browser screen (Home), click Installation.
Installing or upgrading server softwareInstalling or upgrading servers locally
62
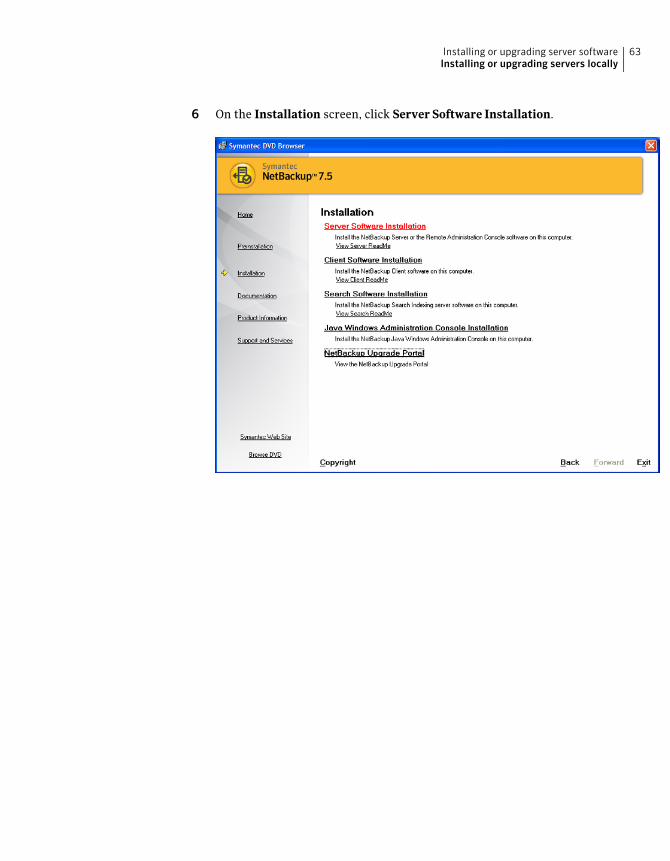
6 On the Installation screen, click Server Software Installation.
63Installing or upgrading server softwareInstalling or upgrading servers locally

7 On the Welcome screen, review the content and click Next.
Note: For upgrades to NetBackup 7.5, make sure that you read the Attention!notice on the Welcome screen. Before you perform an upgrade, please proceedto the NetBackup 7.5 Upgrade Portal.
8 On the License Agreement screen, do the following:
■ I agree to and accept the terms of the license agreement.You must select this item to install the software.
■ Participate in the NetBackup Product Improvement Program.By default, this option is enabled. To disable this option, click the checkbox to remove the check mark.
■ Click Next.
Installing or upgrading server softwareInstalling or upgrading servers locally
64
9 On the SymantecNetBackupInstallationType screen, provide the followinginformation:
For a local installation, select Install to thiscomputeronly.
Where to install
Select this option to install NetBackup default featuresand settings.
Typical
Select this option to choose the NetBackup features toinstall and the settings that you want.
Custom
Click Next.
10 On the NetBackupLicenseKeyandServerType screen, provide the followinginformation:
Enter the base product license key that you receivedwith your product.
For new installations, the license key that you providedetermines which components you can select. Forexample, you can click the icon next to NetBackupMasterServer only if you enter a master server licensekey.
For upgrades, the license for the existing installationtype determines which components you can select.
License Key
Click this icon to install master server software.NetBackup Master Server
Click this icon to install media server software.NetBackup Media Server
11 This step applies only to Custom installations. For Typical installations, skipto the next step.
This step describes how to select and configure the NetBackup Features,NetBackup Port Numbers, and the NetBackup Services.
■ NetBackup FeaturesOn this screen, you can select the features to install and where theNetBackup files are installed.
Click the icon next to any feature and a drop-downmenu appears.
Select Install or Do not install.
Feature List
65Installing or upgrading server softwareInstalling or upgrading servers locally
By default, NetBackup files are installed to thefollowing location:
C:\Program Files\VERITAS
To change the folder destination where NetBackup isinstalled:
■ Click Change.
■ Browse to the preferred location and designate anew or an existing folder.
■ Click Next.
Note: For upgrades, you cannot change the destination.
Destination Folder
Click Next.
■ NetBackup Port NumbersOn this screen, you can change port numbers, if it is necessary in yourconfiguration.You may need to change a port number if you encounter conflicts whenNetBackup and another industry product try to share the same port.Another example is if a port conflict occurs with a firewall, which maycause security issues.To change a port number, select the port number that you want to replaceand type the new number.Click Next.
■ NetBackup ServicesOn this screen, provide the following startup account and startup typeinformation for NetBackup services:
By default, this box is checked so that NetBackupuses the built-in system account. When this box ischecked, the fields below it are disabled.
To specify a different system account:
■ Click this box to remove the check mark.
■ Enter the account information in the followingfields:
UsernamePasswordDomain
Use the built-in systemaccount
Installing or upgrading server softwareInstalling or upgrading servers locally
66
This option determines whether NetBackupservices start automatically if you need to restartthe NetBackup host. The default is Automatic.
To start NetBackup services manually after arestart, select Manual.
Startup
By default, job-related services are set to startautomatically after the installation or the upgradehas completed.
To prevent job-related services from startingautomatically, click on the box to clear the checkmark.
Startjob-relatedNetBackupservices followinginstallation
Check this box to prevent a reboot while youperform a remote installation. When you checkthis box, processes that use the NetBackupexecutables and DLLs are stopped.
Warning: For Oracle users, if you select this option,you must take down your database before youcontinue the installation.
Terminate NetBackupprocesses
This option determines how the installationproceeds if a restart is required as part of theinstallation or upgrade.
If you select this option and the installation processdetermines that a restart is required, theinstallation (or upgrade) stops. The system is thenrolled back to its original state.
If you do not select this option, the installation (orupgrade) proceeds even if the installation processdetermines that a restart is required.
Abort install if a reboot isrequired
Click Next.
12 On the NetBackupSystemNames screen, provide the following information:
For master server installations, enter the name of thelocal computer.
For media server installations, you must change thename to the master server name to which the mediaserver is configured.
Master Server Name
67Installing or upgrading server softwareInstalling or upgrading servers locally
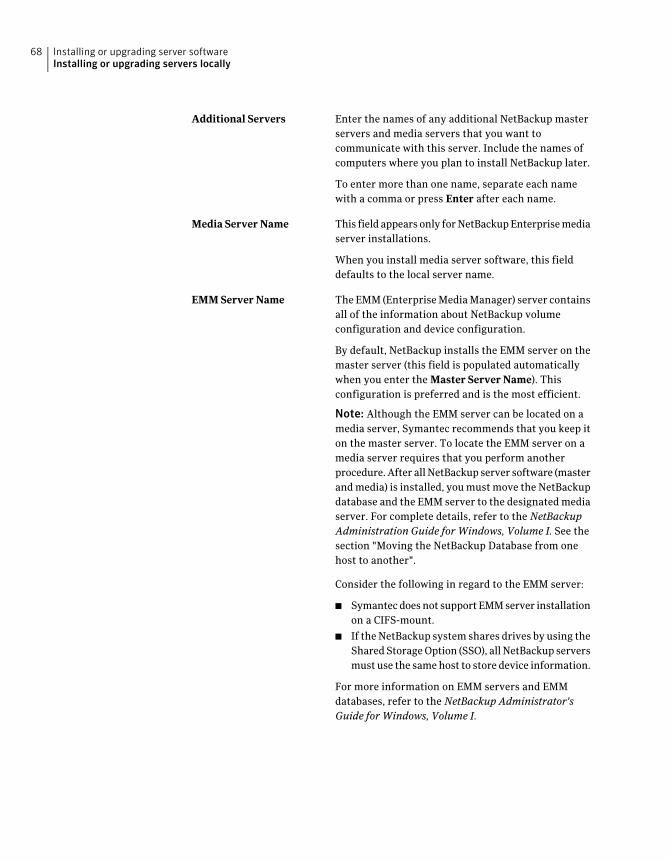
Enter the names of any additional NetBackup masterservers and media servers that you want tocommunicate with this server. Include the names ofcomputers where you plan to install NetBackup later.
To enter more than one name, separate each namewith a comma or press Enter after each name.
Additional Servers
This field appears only for NetBackup Enterprise mediaserver installations.
When you install media server software, this fielddefaults to the local server name.
Media Server Name
The EMM (Enterprise Media Manager) server containsall of the information about NetBackup volumeconfiguration and device configuration.
By default, NetBackup installs the EMM server on themaster server (this field is populated automaticallywhen you enter the Master Server Name). Thisconfiguration is preferred and is the most efficient.
Note: Although the EMM server can be located on amedia server, Symantec recommends that you keep iton the master server. To locate the EMM server on amedia server requires that you perform anotherprocedure. After all NetBackup server software (masterand media) is installed, you must move the NetBackupdatabase and the EMM server to the designated mediaserver. For complete details, refer to the NetBackupAdministration Guide for Windows, Volume I. See thesection "Moving the NetBackup Database from onehost to another".
Consider the following in regard to the EMM server:
■ Symantec does not support EMM server installationon a CIFS-mount.
■ If the NetBackup system shares drives by using theShared Storage Option (SSO), all NetBackup serversmust use the same host to store device information.
For more information on EMM servers and EMMdatabases, refer to the NetBackup Administrator'sGuide for Windows, Volume I.
EMM Server Name
Installing or upgrading server softwareInstalling or upgrading servers locally
68
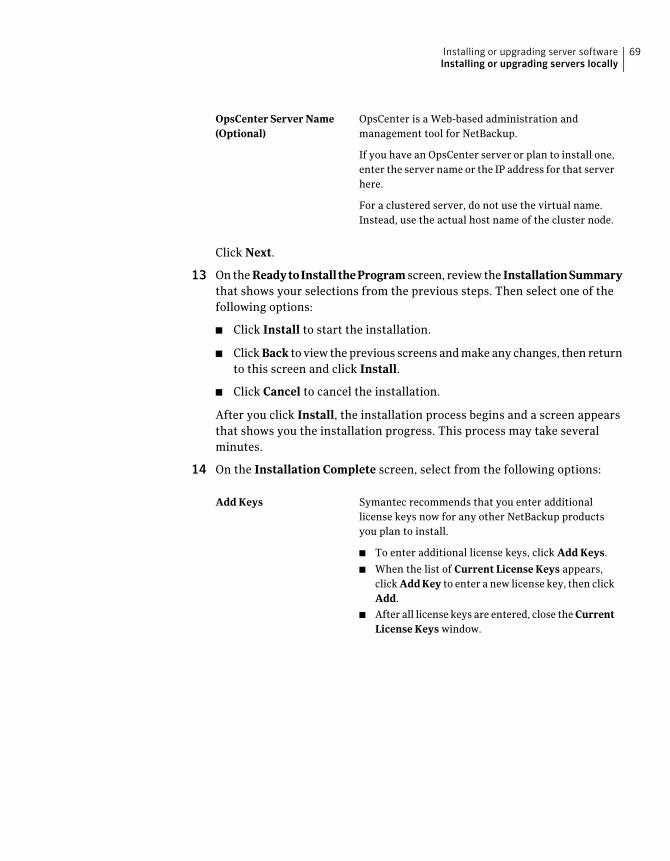
OpsCenter is a Web-based administration andmanagement tool for NetBackup.
If you have an OpsCenter server or plan to install one,enter the server name or the IP address for that serverhere.
For a clustered server, do not use the virtual name.Instead, use the actual host name of the cluster node.
OpsCenter Server Name(Optional)
Click Next.
13 On the ReadytoInstalltheProgram screen, review the InstallationSummarythat shows your selections from the previous steps. Then select one of thefollowing options:
■ Click Install to start the installation.
■ Click Back to view the previous screens and make any changes, then returnto this screen and click Install.
■ Click Cancel to cancel the installation.
After you click Install, the installation process begins and a screen appearsthat shows you the installation progress. This process may take severalminutes.
14 On the Installation Complete screen, select from the following options:
Symantec recommends that you enter additionallicense keys now for any other NetBackup productsyou plan to install.
■ To enter additional license keys, click Add Keys.
■ When the list of Current License Keys appears,click AddKey to enter a new license key, then clickAdd.
■ After all license keys are entered, close the CurrentLicense Keys window.
Add Keys
69Installing or upgrading server softwareInstalling or upgrading servers locally
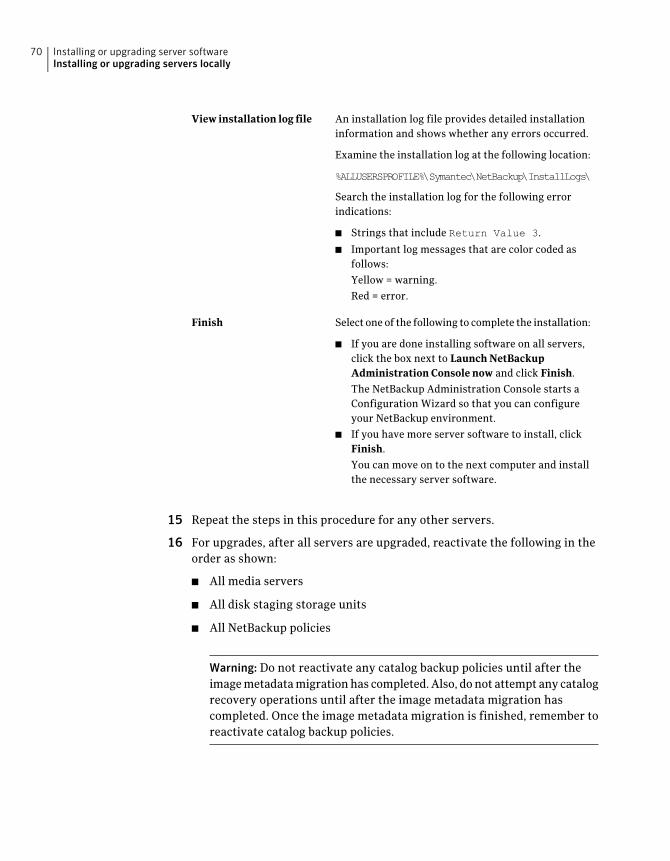
An installation log file provides detailed installationinformation and shows whether any errors occurred.
Examine the installation log at the following location:
%ALLUSERSPROFILE%\Symantec\NetBackup\InstallLogs\
Search the installation log for the following errorindications:
■ Strings that include Return Value 3.
■ Important log messages that are color coded asfollows:
Yellow = warning.
Red = error.
View installation log file
Select one of the following to complete the installation:
■ If you are done installing software on all servers,click the box next to Launch NetBackupAdministration Console now and click Finish.
The NetBackup Administration Console starts aConfiguration Wizard so that you can configureyour NetBackup environment.
■ If you have more server software to install, clickFinish.
You can move on to the next computer and installthe necessary server software.
Finish
15 Repeat the steps in this procedure for any other servers.
16 For upgrades, after all servers are upgraded, reactivate the following in theorder as shown:
■ All media servers
■ All disk staging storage units
■ All NetBackup policies
Warning: Do not reactivate any catalog backup policies until after theimage metadata migration has completed. Also, do not attempt any catalogrecovery operations until after the image metadata migration hascompleted. Once the image metadata migration is finished, remember toreactivate catalog backup policies.
Installing or upgrading server softwareInstalling or upgrading servers locally
70
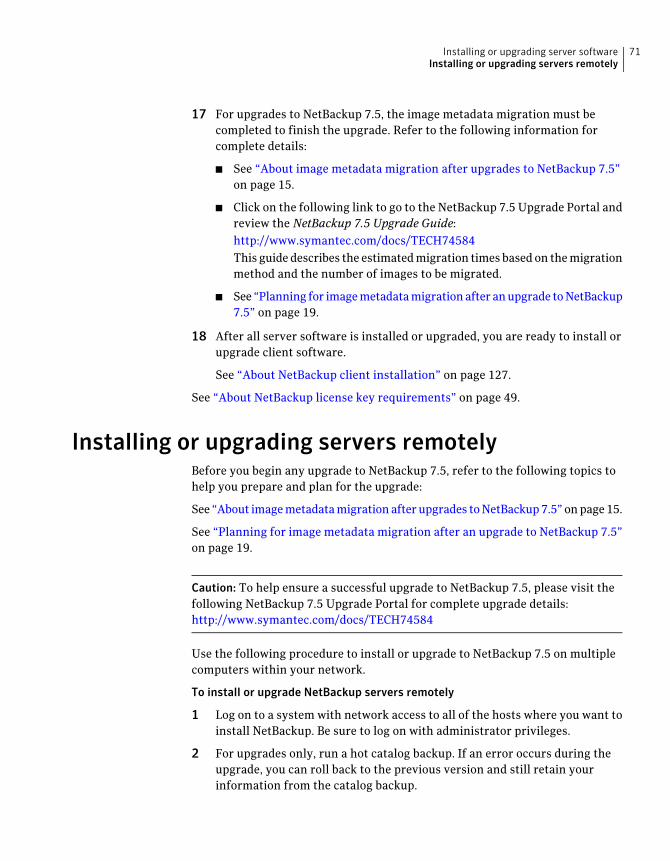
17 For upgrades to NetBackup 7.5, the image metadata migration must becompleted to finish the upgrade. Refer to the following information forcomplete details:
■ See “About image metadata migration after upgrades to NetBackup 7.5”on page 15.
■ Click on the following link to go to the NetBackup 7.5 Upgrade Portal andreview the NetBackup 7.5 Upgrade Guide:http://www.symantec.com/docs/TECH74584This guide describes the estimated migration times based on the migrationmethod and the number of images to be migrated.
■ See “Planning for image metadata migration after an upgrade to NetBackup7.5” on page 19.
18 After all server software is installed or upgraded, you are ready to install orupgrade client software.
See “About NetBackup client installation” on page 127.
See “About NetBackup license key requirements” on page 49.
Installing or upgrading servers remotelyBefore you begin any upgrade to NetBackup 7.5, refer to the following topics tohelp you prepare and plan for the upgrade:
See “About image metadata migration after upgrades to NetBackup 7.5” on page 15.
See “Planning for image metadata migration after an upgrade to NetBackup 7.5”on page 19.
Caution: To help ensure a successful upgrade to NetBackup 7.5, please visit thefollowing NetBackup 7.5 Upgrade Portal for complete upgrade details:http://www.symantec.com/docs/TECH74584
Use the following procedure to install or upgrade to NetBackup 7.5 on multiplecomputers within your network.
To install or upgrade NetBackup servers remotely
1 Log on to a system with network access to all of the hosts where you want toinstall NetBackup. Be sure to log on with administrator privileges.
2 For upgrades only, run a hot catalog backup. If an error occurs during theupgrade, you can roll back to the previous version and still retain yourinformation from the catalog backup.
71Installing or upgrading server softwareInstalling or upgrading servers remotely
This step is especially important for upgrades from 6.x versions because coldcatalog backup support was discontinued starting with NetBackup 7.0.
Catalog backups are typically scheduled to occur automatically from a catalogbackup policy. You can also initiate a hot catalog backup manually as follows:
Note: If a catalog backup policy does not exist, you must first create andconfigure one to run a hot catalog backup. For complete details, see theNetBackup Administartor's Guide, Volume I.
■ In the NetBackup Administration Console, expand NetBackupManagement > Policies.
■ Select the catalog backup policy you want to run.
■ Select Actions > Manual Backup.
3 This step applies only to upgrades. For new or initial installations, skip to thenext step.
■ Deactivate all NetBackup policies as follows:
■ On the master server, open the NetBackupAdministration Console.
■ From the tree on the left, select Policies.
■ In the right pane, select all of the NetBackuppolicies that appear.
■ Right-click on the highlighted policies andselect Deactivate.
For NetBackupAdministration Console users
Enter the following commands for the appropriatepolicies:
■ For NetBackup policies, enter the followingcommand:
install_path\NetBackup\bin\admincmd\bpplinfo policy_name -modify -inactive
For command-line users
■ Deactivate disk staging storage units as follows:
Installing or upgrading server softwareInstalling or upgrading servers remotely
72
For NetBackupAdministration Consoleusers
■ On the master server, open the NetBackupAdministration Console.
■ From the tree on the left, expand NetBackupManagement > Storage Units.
■ In the right pane, double-click on a disk stagingstorage unit.
■ When the ChangeStorageUnit dialog box appears,select Staging Schedule.
■ When the Disk Staging Schedule dialog boxappears, click the Exclude Dates tab.
■ Select the date in the calendar that matches thedate of the system upgrade, then click OK. Thestorage unit is then disabled on that date.
■ Click OK to close the DiskStagingSchedule dialogbox, then click OK to close the ChangeStorageUnitdialog box.
■ Repeat these tasks for each disk staging storageunit.
■ Enter the following command:
install_path\netbackup\bin\admincmd\bpschedulerep schedulename -exclmm/dd/yyyy
For command-line users
■ Deactivate all media servers as follows:
■ On the master server, open the NetBackupAdministration Console.
■ From the tree on the left, select Media and DeviceManagement > Devices > Media Servers.
■ In the right pane, select all media servers thatappear.
■ Right-click on the highlighted servers and selectDeactivate.
For NetBackupAdministration Consoleusers
■ Enter the following command:
install_path\Volmgr\bin\vmoprcmd-deactivate_host -h device_host
For command-line users
4 Start the NetBackup Installation Wizard with one of the following methods:
■ DVD media
73Installing or upgrading server softwareInstalling or upgrading servers remotely

Insert the NetBackup for Windows DVD in the drive. If Autorun is disabled,navigate to the DVD drive and run Browser.exe.
■ ESD images (downloaded files)Navigate to the directory where the images reside and run Browser.exe.
5 On the initial browser screen (Home), click Installation.
Installing or upgrading server softwareInstalling or upgrading servers remotely
74

6 On the Installation screen, click Server Software Installation.
75Installing or upgrading server softwareInstalling or upgrading servers remotely
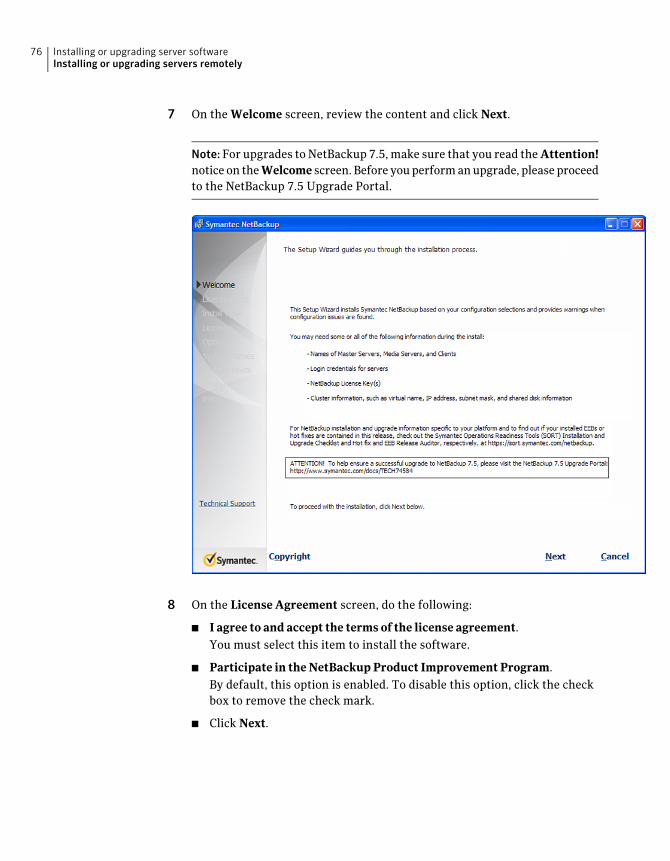
7 On the Welcome screen, review the content and click Next.
Note: For upgrades to NetBackup 7.5, make sure that you read the Attention!notice on the Welcome screen. Before you perform an upgrade, please proceedto the NetBackup 7.5 Upgrade Portal.
8 On the License Agreement screen, do the following:
■ I agree to and accept the terms of the license agreement.You must select this item to install the software.
■ Participate in the NetBackup Product Improvement Program.By default, this option is enabled. To disable this option, click the checkbox to remove the check mark.
■ Click Next.
Installing or upgrading server softwareInstalling or upgrading servers remotely
76
9 On the SymantecNetBackupInstallationType screen, provide the followinginformation:
For a remote installation, click Install to multiplecomputers on your network.
Where to install
Select this option to install NetBackup default featuresand settings.
Typical
Select this option to choose the NetBackup features toinstall and the settings that you want.
Custom
Click Next.
10 On the NetBackupLicenseKeyandServerType screen, provide the followinginformation:
77Installing or upgrading server softwareInstalling or upgrading servers remotely
Enter the base product license key that you receivedwith your product.
For new installations, the license key that you providedetermines which components you can select. Forexample, you can click the icon next to NetBackupMasterServer only if you enter a master server licensekey.
For upgrades, the license that was used for the existinginstallation type determines which components youcan select.
Note: The license key that you enter here gets pushedto the other nodes. Your license key may enable add-onproducts. If you push NetBackup to nodes that havean add-on product already installed, your key worksfor the add-on product(s).
During this installation process, the following occursto verify that you have proper credentials to performremote installations:
■ When you select a clustered system for installation,NetBackup determines if you have properadministrator credentials on all nodes in thecluster. If you do not have the proper credentials,the system is not added to the list.
■ If you have the proper credentials, NetBackupperforms a second check to determine if a licensekey is needed. If a key is needed and one was notentered, the system cannot be added to the list. Youmust enter a valid license key to install on thatnode. If you enter an invalid license key, this screenremains visible until a valid key is entered.
License Key
Click this icon to install master server software.NetBackup Master Server
Click this icon to install media server software.NetBackup Media server
11 This step applies only to Custom installations. For Typical installations, skipto the next step.
This step describes how to select and configure the NetBackupPortNumbersand the NetBackup Services.
■ NetBackup Port NumbersOn this screen, you can change port numbers, if it is necessary in yourconfiguration.
Installing or upgrading server softwareInstalling or upgrading servers remotely
78
You may need to change a port number if you encounter conflicts whenNetBackup and another industry product try to share the same port.Another example is if a port conflict occurs with a firewall, which maycause security issues.To change a port number, select the port number that you want to replaceand type the new number.Click Next.
■ NetBackup ServicesOn this screen, provide the following startup account and startup typeinformation for NetBackup services:
By default, this box is checked so that NetBackupuses the built-in system account. When this box ischecked, the fields below it are disabled.
To specify a different system account:
■ Click this box to remove the check mark.
■ Enter the account information in the followingfields:
User namePasswordDomain
Use the built-in systemaccount
This option determines whether NetBackupservices start automatically if you need to restartthe NetBackup host. The default is Automatic.
To start NetBackup services manually after arestart, select Manual.
Startup
By default, job-related services are set to startautomatically after the installation or the upgradehas completed.
To prevent job-related services from startingautomatically, click on the box to clear the checkmark.
Startjob-relatedNetBackupservices followinginstallation
Check this box to prevent a reboot while youperform a remote installation. When you checkthis box, processes that use the NetBackupexecutables and DLLs are stopped.
Warning: For Oracle users, if you select this option,you must take down your database before youcontinue the installation.
Terminate NetBackupprocesses
79Installing or upgrading server softwareInstalling or upgrading servers remotely
This option determines how the installationproceeds if a restart is required as part of theinstallation or upgrade.
If you select this option and the installation processdetermines that a restart is required, theinstallation (or upgrade) stops. The system is thenrolled back to its original state.
If you do not select this option, the installation (orupgrade) proceeds even if the installation processdetermines that a restart is required.
Abort install if a reboot isrequired
Click Next.
12 On the NetBackup System Names screen, enter the following:
Enter the names of any additional NetBackup serversthat you want to communicate with all of the serversthat you want to install. Include the names ofcomputers where you plan to install NetBackup later.
To enter more than one name, separate each namewith a comma or press Enter after each name.
Additional Servers
The EMM (Enterprise Media Manager) server name ispopulated automatically. You may need to change itbased on the type of server that you want to install.
Specify the EMM server as described in the followingserver installation types:
■ For master server installations:
To assign all master servers to use the same EMMserver, select EachsystemusestheEMMspecifiedabove.
To allow each master server to use its own EMMserver, leave the option Each system uses its ownEMM server selected (default).
■ For media server installations:
Specify the EMM server to be used by these mediaservers.
EMM Server Name
Installing or upgrading server softwareInstalling or upgrading servers remotely
80
OpsCenter is a Web-based administration andmanagement tool for NetBackup.
If you have an OpsCenter server or plan to install one,enter the server name or the IP address for that serverhere.
For a clustered server, do not use the virtual name.Instead, use the actual host name of the cluster node.
OpsCenter Server Name(Optional)
Click Next.
13 On the Symantec NetBackup Remote Hosts and Features screen, specifythe hosts where you want NetBackup and any selected features installed.
■ Windows Destination SystemsRight-click Windows Destination Computers and select from thedrop-down menu, or use the following methods:
Click here to search the network for the hostswhere you want to install NetBackup.
■ On the AvailableSystems dialog box, select thecomputer to add and click Next.
■ On the Remote Computer Login Credentialsdialog box, enter the User Name and thePassword of the account to be used to performthe installation on the remote computers.
■ If you plan to install to multiple remotecomputers, click the box next to RememberUserNameandPassword. Selecting this optionprevents the need to enter this information foreach remote computer.
■ Click OK.
■ On the Remote Destination Folder dialog box,verify or change the DestinationFolder whereNetBackup is installed.
The default location is C:\ProgramFiles\Veritas.
If you plan to install to multiple remotecomputers and you want to use the samelocation, click the box next to Use this folderfor subsequent systems. Selecting this optionprevents the need to enter the location for eachremote computer.
Browse
81Installing or upgrading server softwareInstalling or upgrading servers remotely
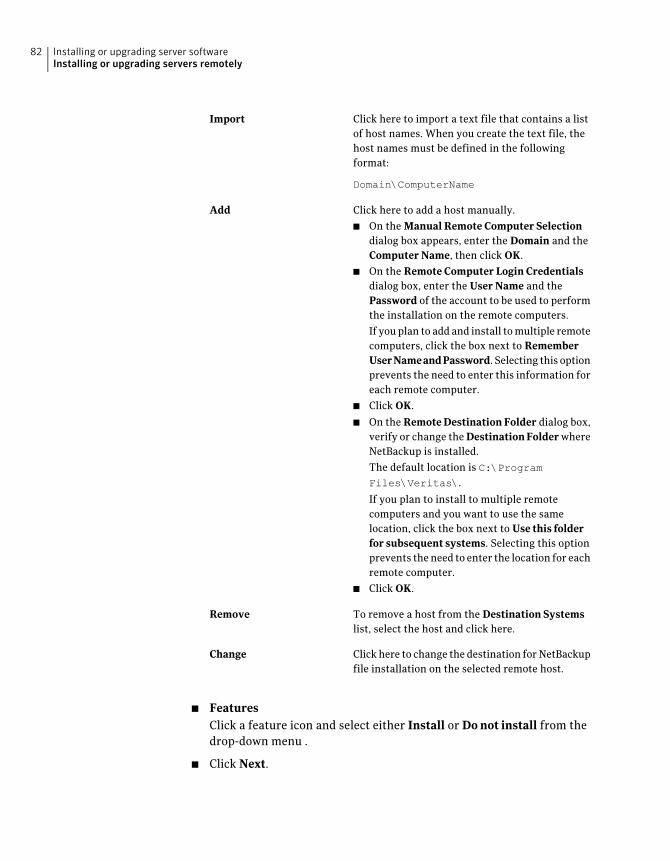
Click here to import a text file that contains a listof host names. When you create the text file, thehost names must be defined in the followingformat:
Domain\ComputerName
Import
Click here to add a host manually.
■ On the Manual Remote Computer Selectiondialog box appears, enter the Domain and theComputer Name, then click OK.
■ On the Remote Computer Login Credentialsdialog box, enter the User Name and thePassword of the account to be used to performthe installation on the remote computers.
If you plan to add and install to multiple remotecomputers, click the box next to RememberUserNameandPassword. Selecting this optionprevents the need to enter this information foreach remote computer.
■ Click OK.
■ On the Remote Destination Folder dialog box,verify or change the DestinationFolder whereNetBackup is installed.
The default location is C:\ProgramFiles\Veritas\.
If you plan to install to multiple remotecomputers and you want to use the samelocation, click the box next to Use this folderfor subsequent systems. Selecting this optionprevents the need to enter the location for eachremote computer.
■ Click OK.
Add
To remove a host from the Destination Systemslist, select the host and click here.
Remove
Click here to change the destination for NetBackupfile installation on the selected remote host.
Change
■ FeaturesClick a feature icon and select either Install or Do not install from thedrop-down menu .
■ Click Next.
Installing or upgrading server softwareInstalling or upgrading servers remotely
82
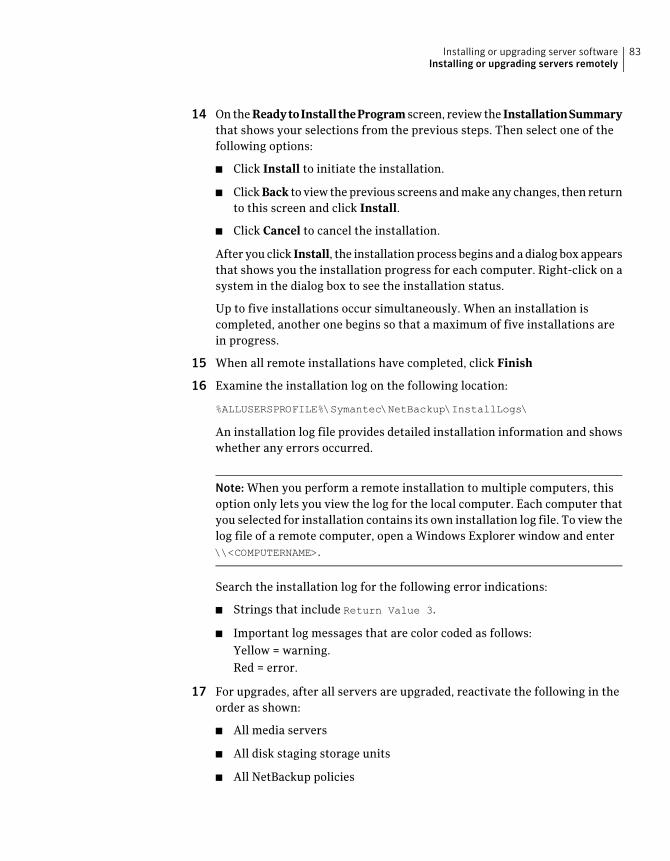
14 On the ReadytoInstalltheProgram screen, review the InstallationSummarythat shows your selections from the previous steps. Then select one of thefollowing options:
■ Click Install to initiate the installation.
■ Click Back to view the previous screens and make any changes, then returnto this screen and click Install.
■ Click Cancel to cancel the installation.
After you click Install, the installation process begins and a dialog box appearsthat shows you the installation progress for each computer. Right-click on asystem in the dialog box to see the installation status.
Up to five installations occur simultaneously. When an installation iscompleted, another one begins so that a maximum of five installations arein progress.
15 When all remote installations have completed, click Finish
16 Examine the installation log on the following location:
%ALLUSERSPROFILE%\Symantec\NetBackup\InstallLogs\
An installation log file provides detailed installation information and showswhether any errors occurred.
Note: When you perform a remote installation to multiple computers, thisoption only lets you view the log for the local computer. Each computer thatyou selected for installation contains its own installation log file. To view thelog file of a remote computer, open a Windows Explorer window and enter\\<COMPUTERNAME>.
Search the installation log for the following error indications:
■ Strings that include Return Value 3.
■ Important log messages that are color coded as follows:Yellow = warning.Red = error.
17 For upgrades, after all servers are upgraded, reactivate the following in theorder as shown:
■ All media servers
■ All disk staging storage units
■ All NetBackup policies
83Installing or upgrading server softwareInstalling or upgrading servers remotely
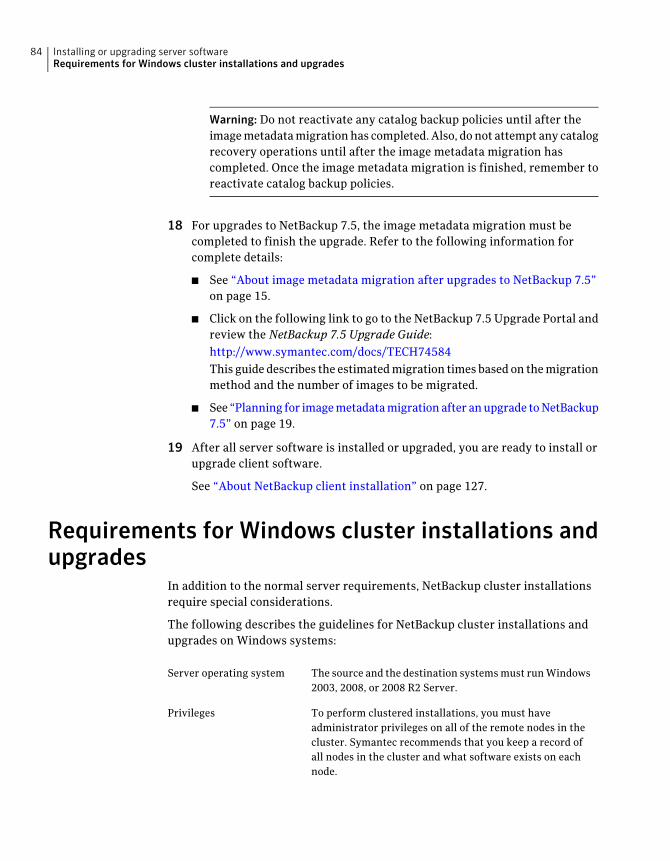
Warning: Do not reactivate any catalog backup policies until after theimage metadata migration has completed. Also, do not attempt any catalogrecovery operations until after the image metadata migration hascompleted. Once the image metadata migration is finished, remember toreactivate catalog backup policies.
18 For upgrades to NetBackup 7.5, the image metadata migration must becompleted to finish the upgrade. Refer to the following information forcomplete details:
■ See “About image metadata migration after upgrades to NetBackup 7.5”on page 15.
■ Click on the following link to go to the NetBackup 7.5 Upgrade Portal andreview the NetBackup 7.5 Upgrade Guide:http://www.symantec.com/docs/TECH74584This guide describes the estimated migration times based on the migrationmethod and the number of images to be migrated.
■ See “Planning for image metadata migration after an upgrade to NetBackup7.5” on page 19.
19 After all server software is installed or upgraded, you are ready to install orupgrade client software.
See “About NetBackup client installation” on page 127.
Requirements for Windows cluster installations andupgrades
In addition to the normal server requirements, NetBackup cluster installationsrequire special considerations.
The following describes the guidelines for NetBackup cluster installations andupgrades on Windows systems:
The source and the destination systems must run Windows2003, 2008, or 2008 R2 Server.
Server operating system
To perform clustered installations, you must haveadministrator privileges on all of the remote nodes in thecluster. Symantec recommends that you keep a record ofall nodes in the cluster and what software exists on eachnode.
Privileges
Installing or upgrading server softwareRequirements for Windows cluster installations and upgrades
84
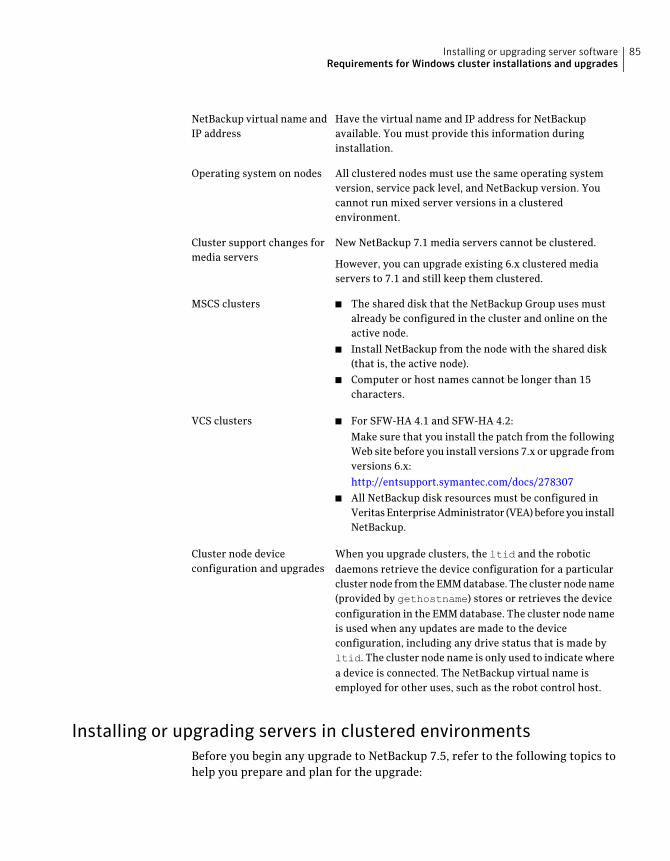
Have the virtual name and IP address for NetBackupavailable. You must provide this information duringinstallation.
NetBackup virtual name andIP address
All clustered nodes must use the same operating systemversion, service pack level, and NetBackup version. Youcannot run mixed server versions in a clusteredenvironment.
Operating system on nodes
New NetBackup 7.1 media servers cannot be clustered.
However, you can upgrade existing 6.x clustered mediaservers to 7.1 and still keep them clustered.
Cluster support changes formedia servers
■ The shared disk that the NetBackup Group uses mustalready be configured in the cluster and online on theactive node.
■ Install NetBackup from the node with the shared disk(that is, the active node).
■ Computer or host names cannot be longer than 15characters.
MSCS clusters
■ For SFW-HA 4.1 and SFW-HA 4.2:
Make sure that you install the patch from the followingWeb site before you install versions 7.x or upgrade fromversions 6.x:
http://entsupport.symantec.com/docs/278307
■ All NetBackup disk resources must be configured inVeritas Enterprise Administrator (VEA) before you installNetBackup.
VCS clusters
When you upgrade clusters, the ltid and the roboticdaemons retrieve the device configuration for a particularcluster node from the EMM database. The cluster node name(provided by gethostname) stores or retrieves the deviceconfiguration in the EMM database. The cluster node nameis used when any updates are made to the deviceconfiguration, including any drive status that is made byltid. The cluster node name is only used to indicate wherea device is connected. The NetBackup virtual name isemployed for other uses, such as the robot control host.
Cluster node deviceconfiguration and upgrades
Installing or upgrading servers in clustered environmentsBefore you begin any upgrade to NetBackup 7.5, refer to the following topics tohelp you prepare and plan for the upgrade:
85Installing or upgrading server softwareRequirements for Windows cluster installations and upgrades

See “About image metadata migration after upgrades to NetBackup 7.5” on page 15.
See “Planning for image metadata migration after an upgrade to NetBackup 7.5”on page 19.
Caution: To help ensure a successful upgrade to NetBackup 7.5, please visit thefollowing NetBackup 7.5 Upgrade Portal for complete upgrade details:http://www.symantec.com/docs/TECH74584
Use the following procedure to install or upgrade clustered environments toNetBackup 7.5.
To install or upgrade NetBackup servers in clustered environments
1 Log on to the active node (the node with the shared disk). Be sure to log onwith administrator privileges.
2 For upgrades only, run a hot catalog backup. If an error occurs during theupgrade, you can roll back to the previous version and still retain yourinformation from the catalog backup.
This step is especially important for upgrades from 6.x versions because coldcatalog backup support was discontinued starting with NetBackup 7.0.
Catalog backups are typically scheduled to occur automatically from a catalogbackup policy. You can also initiate a hot catalog backup manually as follows:
Note: If a catalog backup policy does not exist, you must first create andconfigure one to run a hot catalog backup. For complete details, see theNetBackup Administartor's Guide, Volume I.
■ In the NetBackup Administration Console, expand NetBackupManagement > Policies.
■ Select the catalog backup policy you want to run.
■ Select Actions > Manual Backup.
3 For upgrades only:
■ Deactivate all NetBackup policies as follows:
Installing or upgrading server softwareRequirements for Windows cluster installations and upgrades
86
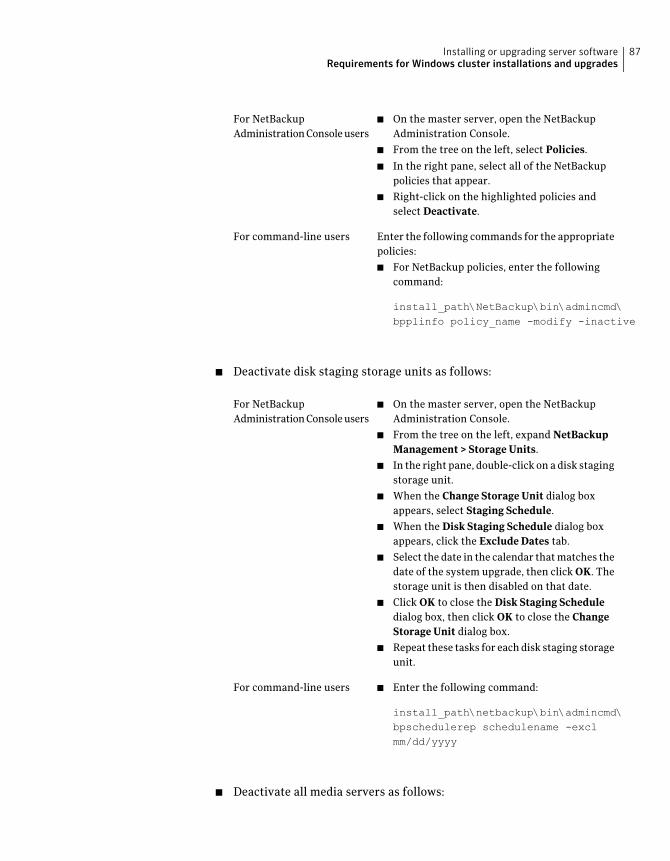
For NetBackupAdministration Console users
■ On the master server, open the NetBackupAdministration Console.
■ From the tree on the left, select Policies.
■ In the right pane, select all of the NetBackuppolicies that appear.
■ Right-click on the highlighted policies andselect Deactivate.
Enter the following commands for the appropriatepolicies:
■ For NetBackup policies, enter the followingcommand:
install_path\NetBackup\bin\admincmd\bpplinfo policy_name -modify -inactive
For command-line users
■ Deactivate disk staging storage units as follows:
■ On the master server, open the NetBackupAdministration Console.
■ From the tree on the left, expand NetBackupManagement > Storage Units.
■ In the right pane, double-click on a disk stagingstorage unit.
■ When the Change Storage Unit dialog boxappears, select Staging Schedule.
■ When the Disk Staging Schedule dialog boxappears, click the Exclude Dates tab.
■ Select the date in the calendar that matches thedate of the system upgrade, then click OK. Thestorage unit is then disabled on that date.
■ Click OK to close the Disk Staging Scheduledialog box, then click OK to close the ChangeStorage Unit dialog box.
■ Repeat these tasks for each disk staging storageunit.
For NetBackupAdministration Console users
■ Enter the following command:
install_path\netbackup\bin\admincmd\bpschedulerep schedulename -exclmm/dd/yyyy
For command-line users
■ Deactivate all media servers as follows:
87Installing or upgrading server softwareRequirements for Windows cluster installations and upgrades
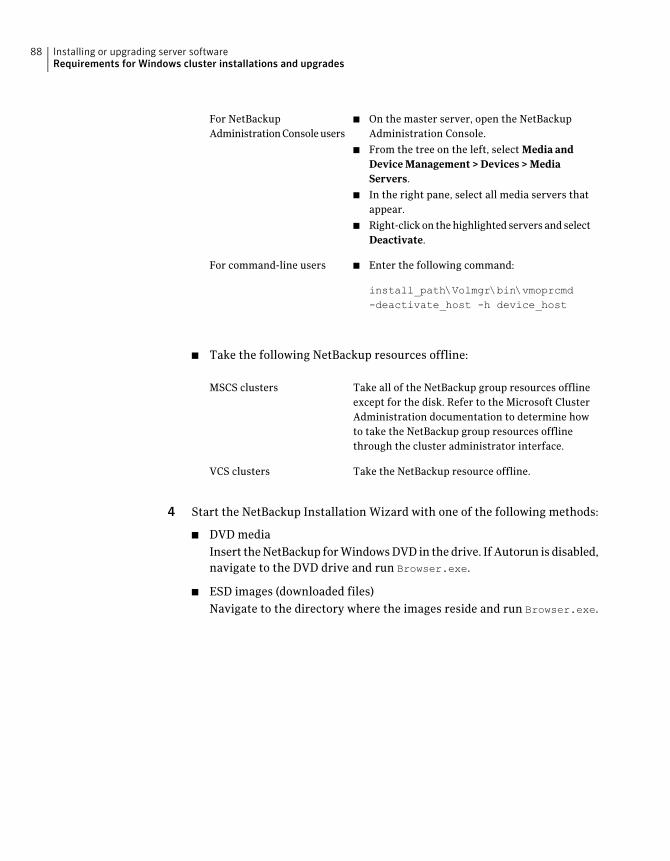
For NetBackupAdministration Console users
■ On the master server, open the NetBackupAdministration Console.
■ From the tree on the left, select Media andDevice Management > Devices > MediaServers.
■ In the right pane, select all media servers thatappear.
■ Right-click on the highlighted servers and selectDeactivate.
■ Enter the following command:
install_path\Volmgr\bin\vmoprcmd-deactivate_host -h device_host
For command-line users
■ Take the following NetBackup resources offline:
Take all of the NetBackup group resources offlineexcept for the disk. Refer to the Microsoft ClusterAdministration documentation to determine howto take the NetBackup group resources offlinethrough the cluster administrator interface.
MSCS clusters
Take the NetBackup resource offline.VCS clusters
4 Start the NetBackup Installation Wizard with one of the following methods:
■ DVD mediaInsert the NetBackup for Windows DVD in the drive. If Autorun is disabled,navigate to the DVD drive and run Browser.exe.
■ ESD images (downloaded files)Navigate to the directory where the images reside and run Browser.exe.
Installing or upgrading server softwareRequirements for Windows cluster installations and upgrades
88
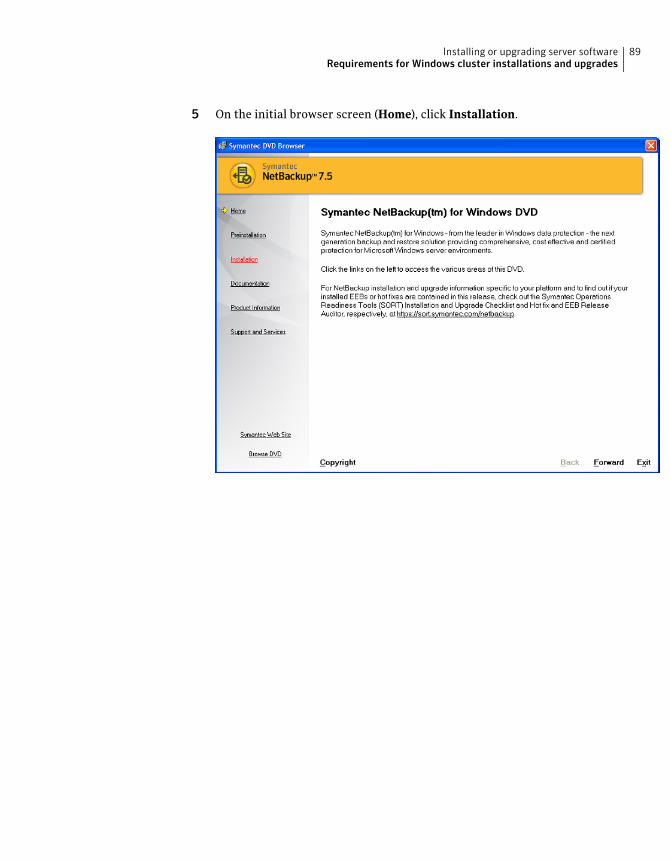
5 On the initial browser screen (Home), click Installation.
89Installing or upgrading server softwareRequirements for Windows cluster installations and upgrades
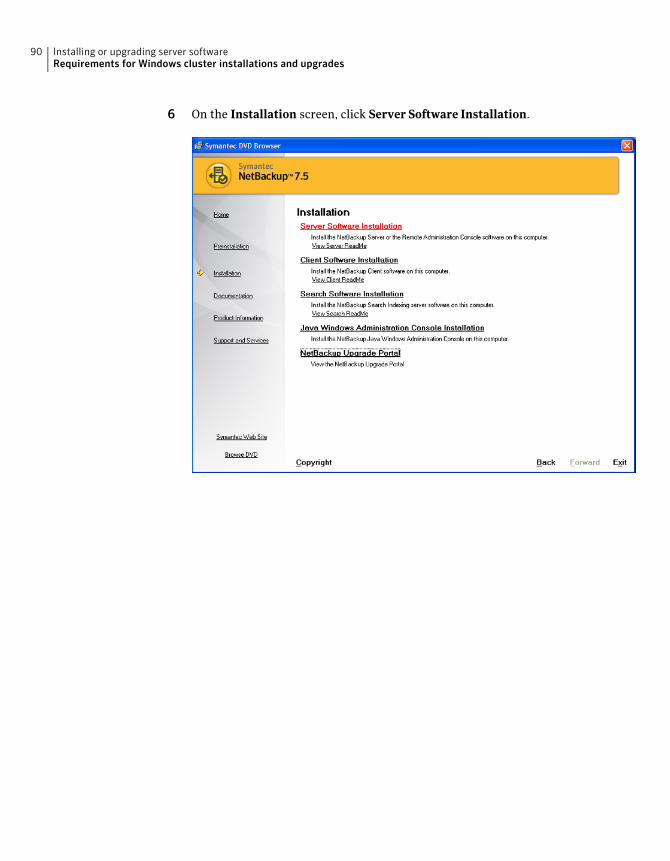
6 On the Installation screen, click Server Software Installation.
Installing or upgrading server softwareRequirements for Windows cluster installations and upgrades
90
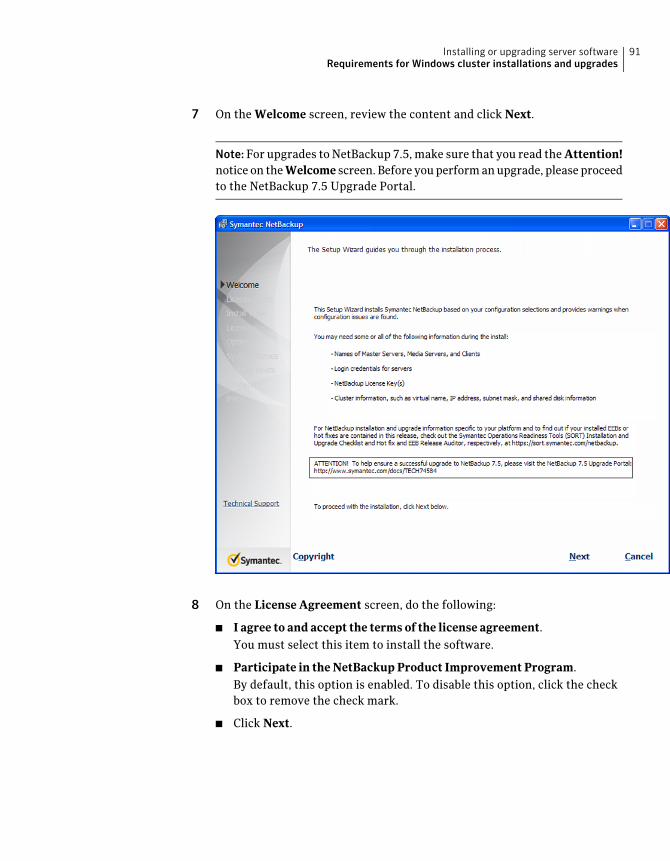
7 On the Welcome screen, review the content and click Next.
Note: For upgrades to NetBackup 7.5, make sure that you read the Attention!notice on the Welcome screen. Before you perform an upgrade, please proceedto the NetBackup 7.5 Upgrade Portal.
8 On the License Agreement screen, do the following:
■ I agree to and accept the terms of the license agreement.You must select this item to install the software.
■ Participate in the NetBackup Product Improvement Program.By default, this option is enabled. To disable this option, click the checkbox to remove the check mark.
■ Click Next.
91Installing or upgrading server softwareRequirements for Windows cluster installations and upgrades
9 On the SymantecNetBackupInstallationType screen, provide the followinginformation:
For a cluster installation, select InstallaclusteredMasterServer.
This option is available only if the installation processdetermines that your system is configured for a WindowsMSCS or VCS clustered environment.
Where to install
Select this option to install NetBackup default features andsettings.
Typical
Select this option to choose the NetBackup features toinstall and the settings that you want.
Custom
Click Next.
10 On the NetBackupLicenseKeyandServerType screen, provide the followinginformation:
Installing or upgrading server softwareRequirements for Windows cluster installations and upgrades
92
Enter the base product license key that you receivedwith your product.
For new installations, the license key that you providedetermines which components you can select. Forexample, you can click the icon next to NetBackupMasterServer only if you enter a master server licensekey.
For upgrades, the license for the existing installationtype determines which components you can select.
Note: The license key that you enter here gets pushedto the other nodes. Your license key may enable add-onproducts. If you push NetBackup to nodes that havean add-on product already installed, your key worksfor the add-on product(s).
During this installation process, the following occursto verify that you have proper credentials to performremote installations:
■ When you select a clustered system for installation,NetBackup determines if you have properadministrator credentials on all nodes in thecluster. If you do not have the proper credentials,the system is not added to the list.
■ If you have the proper credentials, NetBackupperforms a second check to determine if a licensekey is needed. If a key is needed and one was notentered, the system cannot be added to the list. Youmust enter a valid license key to install on thatnode. If you enter an invalid license key, this screenremains visible until a valid key is entered.
License Key
Click this icon to install master server software.Master Server
11 This step applies only to Custom installations or upgrades. For Typicalinstallations or upgrades, skip to the next step.
This step describes how to select and configure the NetBackupPortNumbersand the NetBackup Services.
■ NetBackup Port NumbersOn this screen, you can change port numbers, if it is necessary in yourconfiguration.You may need to change a port number if you encounter conflicts whenNetBackup and another industry product try to share the same port.
93Installing or upgrading server softwareRequirements for Windows cluster installations and upgrades
Another example is if a port conflict occurs with a firewall, which maycause security issues.To change a port number, select the port number that you want to replaceand type the new number.Click Next.
■ NetBackup ServicesOn this screen, provide the following startup account and startup typeinformation for NetBackup services:
By default, this box is checked so that NetBackupuses the built-in system account. When this box ischecked, the fields below it are disabled.
To specify a different system account:
■ Click this box to remove the check mark.
■ Enter the account information in the followingfields:
UsernamePasswordDomain
Use the built-in systemaccount
This option determines whether NetBackupservices start automatically if you need to restartthe NetBackup host. The default is Automatic.
To start NetBackup services manually after arestart, select Manual.
Startup
By default, job-related services are set to startautomatically after the installation or the upgradehas completed.
To prevent job-related services from startingautomatically, click on the box to clear the checkmark.
Startjob-relatedNetBackupservices followinginstallation
Check this box to prevent a reboot while youperform a remote installation. When you checkthis box, processes that use the NetBackupexecutables and DLLs are stopped.
Warning: For Oracle users, if you select this option,you must take down your database before youcontinue the installation.
Terminate NetBackupprocesses
Installing or upgrading server softwareRequirements for Windows cluster installations and upgrades
94
This option determines how the installationproceeds if a restart is required as part of theinstallation or upgrade.
If you select this option and the installation processdetermines that a restart is required, theinstallation (or upgrade) stops. The system is thenrolled back to its original state.
If you do not select this option, the installation (orupgrade) proceeds even if the installation processdetermines that a restart is required.
Abort install if a reboot isrequired
Click Next.
12 On the NetBackupSystemNames screen, provide the following information:
For cluster installations, enter the cluster virtual servername.
Master Server Name
Enter the names of any additional NetBackup masterservers and media servers that you want tocommunicate with the master server that you identifiedpreviously. Include the actual host names of the clusternodes where you plan to install NetBackup.
To enter more than one name, separate each namewith a comma or press Enter after each name.
Additional Servers
This field appears only for media server upgrades andis populated automatically with the virtual host nameof the cluster.
Media Server Name
95Installing or upgrading server softwareRequirements for Windows cluster installations and upgrades
The EMM (Enterprise Media Manager) server containsall of the information about NetBackup volumeconfiguration and device configuration.
By default, NetBackup installs the EMM server on themaster server (this field is populated automaticallywhen you enter the Master Server Name). Thisconfiguration is preferred and is the most efficient.
Note: Although the EMM server can be located on amedia server, Symantec recommends that you keep iton the master server. To locate the EMM server on amedia server requires that you perform anotherprocedure. After all NetBackup server software (masterand media) is installed, you must move the NetBackupdatabase and the EMM server to the designated mediaserver. For complete details, refer to the NetBackupAdministration Guide for Windows, Volume I. See thesection "Moving the NetBackup Database from onehost to another".
Consider the following in regard to the EMM server:
■ Symantec does not support EMM server installationon a CIFS-mount.
■ If the NetBackup system shares drives by using theShared Storage Option (SSO), all NetBackup serversmust use the same host to store device information.
For more information on EMM servers and EMMdatabases, refer to theNetBackupAdministrationGuidefor Windows, Volume I.
EMM Server Name
OpsCenter is a Web-based administration andmanagement tool for NetBackup.
If you have an OpsCenter server or plan to install one,enter the server name or the IP address for that serverhere.
For a clustered server, do not use the virtual name.Instead, use the actual host name of the cluster node.
OpsCenter Server Name(Optional)
Click Next.
13 On the NetBackup Remote Hosts and Features screen, specify the remotesystem information for installation on those computers.
■ On the initial screen, right-click Browse.
Installing or upgrading server softwareRequirements for Windows cluster installations and upgrades
96
■ On the Available Systems dialog box, select the computer that you wantto add. Control-click to select multiple computers.Click Next.
■ On the Remote Computer Login Credentials dialog box, enter the username, password, and domain that NetBackup is to use on the remotesystem(s).If you intend to add more remote computers, click the check box next toRemember user name and password.When you provide credentials, you select cluster nodes and add them tothe WindowsDestinationSystems list. These are the nodes on which youremotely install NetBackup. Make sure that you select your local hostwhen you select systems to install.Each time you choose a system, NetBackup performs system and licensechecks. For example, it verifies the system for a server installation thatmatches the type that you selected, as follows:
Considers the remote to be verified.■ NetBackup notinstalled
Compares the installation type on that system to theinstallation type that you request.
■ NetBackup alreadyinstalled
Notifies you of the problem and disallows the choice.One example of an invalid combination is to try toinstall a Remote Administration Console on a remotesystem that is already a master server.
■ Invalid combination
Notifies you of the problem and disallows the choice.■ Remote system not asupported platformor level
The installation procedure also verifies that you have proper administratorcredentials on the remote system. If you do not have administratorcredentials, the Enter Network Password screen appears, and promptsyou to enter the administrator’s user name and password.Click OK and continue selecting destination systems.
This process repeats for each node that you select. You can elect to retain theuser name and password. In that case, you are prompted only when the username or password is not valid.
Note the following regarding the push-install process in a clusteredenvironment:
97Installing or upgrading server softwareRequirements for Windows cluster installations and upgrades

■ You can install NetBackup on any number of nodes. However, theclustering service sets the limit for the number of nodes in a cluster, notNetBackup.
■ NetBackup add-on products, such as language packages, cannot be installedwith the push method. Add-on products must be installed on eachindividual node in the cluster group. For instructions on how to installthese products, refer to the NetBackup documentation that supports eachproduct.
■ NetBackup pushes to the other nodes only the license key you enter at thebeginning of the installation. Your license key may enable add-on products.If you push NetBackup to nodes that have an add-on product alreadyinstalled, your key works for that product.
Click Next.
14 On the Cluster Settings screen, you provide the virtual and the physicalnetwork information.
For new installations and upgrades, the following configuration settings thatyou enter apply to all nodes:
For new cluster server installations, select this option.Create a new ClusterGroup
To upgrade current or existing cluster servers, select thisoption.
Upgrade existingCluster Group
To add a host to an existing cluster group, select thisoption.
When you select this option, all other fields are filledautomatically except for PublicNetwork. You must selectthe appropriate network manually.
Add node(s) to existingCluster Group
Installing or upgrading server softwareRequirements for Windows cluster installations and upgrades
98
The default cluster setting is IPv4.
Enter the following addresses:
■ Virtual IPv4 AddressThe IP address to which the virtual server name shouldresolve.
For new cluster installations, you must enter theaddress manually.
For upgrades or if you add a new node to a currentcluster, the address field is populated automatically.
■ IPv4 Subnet MaskIdentifies a subnetwork so that IP addresses can beshared on a local area network. This number correlatesdirectly to the virtual IP address of the cluster.
IPv4 Clusters
To enable IPv6 clusters, select this option.
Enter the following IP address:
■ Virtual IPv6 AddressThe IPv6 address must be entered in CIDR format.
IPv6 Clusters
The name that is used to identify a NetBackup service groupor resource group. The resources in any resource groupare related and interdependent.
NBClusterGroupName
The name by which NetBackup is known in the cluster.
When you install the client software, this host name mustbe added to the AdditionalServers field on the NetBackupSystem Names screen.
The server uses this name when it communicates with theclient nodes.
Virtual Host Name
A directory on one of the shared disks in the cluster whereNetBackup stores configuration information. If the letterfor the disk (or drive) does not appear in the pull-down list,enter only the letter.
Path to Shared Data
For NetBackup clustered environments, select a publicnetwork that is assigned to the node of the cluster.
Warning: You must not select a private network that isassigned to this cluster.
Public Network
99Installing or upgrading server softwareRequirements for Windows cluster installations and upgrades
After you set all of the parameters, click this icon toconfigure the cluster for use with NetBackup. The Nexticon is not available until after successful clusterconfiguration.
The text box provides the following information about theconfiguration:
■ Identifies any existing clusters or NetBackup clustergroups.
■ Indicates a successful configuration.
■ Identifies any problems or errors that occurred duringthe configuration (configuration failure).
Note: After a successful cluster configuration for newinstallations or upgrades, if you click Cancel, a pop-upmessage appears. The message asks if you are sure thatyou want to proceed with the cancellation. To cancel theinstallation and remove the new cluster group, click Yes.To continue with the installation and retain the new clustergroup, click No and then click Next.
If the cluster configuration fails, see the NetBackupClustered Master Server Administrator's Guide forinformation about how to resolve the problem.
Cluster Configuration
When the successful cluster configuration message appears, click Next.
15 On the ReadytoInstalltheProgram screen, review the InstallationSummarythat shows your selections from the previous steps. Then select one of thefollowing options:
■ Click Install to initiate the installation.
■ Click Back to view the previous screens and make any changes, then returnto this screen and click Install.
■ Click Cancel to cancel the installation.
After you click Install, the installation process begins and a dialog box appearsthat shows you the installation progress for each computer. Right-click on asystem in the dialog box to see the installation status.
Up to five installations occur simultaneously. When an installation iscompleted, another one begins so that a maximum of five installations arein progress.
16 Examine the installation log on the following location:
%ALLUSERSPROFILE%\Symantec\NetBackup\InstallLogs\
Installing or upgrading server softwareRequirements for Windows cluster installations and upgrades
100
An installation log file provides detailed installation information and showswhether any errors occurred.
Note: When you perform a cluster installation to multiple computers, thisoption only lets you view the log for the local computer. Each computer thatyou selected for installation contains its own installation log file. To view thelog file of a remote computer, open a Windows Explorer window and enter\\<COMPUTERNAME>.
Search the installation log for the following error indications:
■ Strings that include Return Value 3.
■ Important log messages that are color coded as follows:Yellow = warning.Red = error.
17 For upgrades, after all servers are upgraded, reactivate the following in theorder as shown:
■ All media servers
■ All disk staging storage units
■ All NetBackup policies
Warning: Do not reactivate any catalog backup policies until after theimage metadata migration has completed. Also, do not attempt any catalogrecovery operations until after the image metadata migration hascompleted. Once the image metadata migration is finished, remember toreactivate catalog backup policies.
18 For upgrades to NetBackup 7.5, the image metadata migration must becompleted to finish the upgrade. Refer to the following information forcomplete details:
■ See “About image metadata migration after upgrades to NetBackup 7.5”on page 15.
■ Click on the following link to go to the NetBackup 7.5 Upgrade Portal andreview the NetBackup 7.5 Upgrade Guide:http://www.symantec.com/docs/TECH74584This guide describes the estimated migration times based on the migrationmethod and the number of images to be migrated.
101Installing or upgrading server softwareRequirements for Windows cluster installations and upgrades
■ See “Planning for image metadata migration after an upgrade to NetBackup7.5” on page 19.
19 After all server software is installed or upgraded, you are ready to install orupgrade client software.
See “About NetBackup client installation” on page 127.
See “Post-installation tasks for NetBackup cluster environments” on page 102.
See “Requirements for Windows NetBackup server installation” on page 30.
Post-installation tasks for NetBackup cluster environmentsAfter NetBackup server software is installed in a cluster, note the possible actionsyou may need to take:
You may need to restart each of the cluster nodes after theinstallation is complete.
Restart
Under normal circumstances, cluster configuration is oneof the final steps when you install NetBackup in a cluster.If this step is not done or does not complete successfully,you can use thebpclusterutil command from the activenode to perform this step.
For information on how to run bpclusterutil, see theNetBackup Commands Reference Guide.
MSCS and VCS clusters
Any NetBackup resources that you took offline come backonline automatically.
MSCS clusters
See “Verifying Windows cluster installations or upgrades” on page 102.
Verifying Windows cluster installations or upgradesThe Cluster Administration console lets you verify the installation or upgradeand view your current system structure.
To verify a successful MSCS cluster installation or upgrade through the ClusterAdministration console
1 During a cluster installation, you can open the Cluster Administration consoleto see your current structure.
2 After you have completed the installation and the configuration process, theconsole shows the new cluster group configuration.
Installing or upgrading server softwareRequirements for Windows cluster installations and upgrades
102
To verify a successful VCS cluster installation or upgrade through the ClusterManager console
1 During a cluster installation, you can open the Cluster Administration consoleto see your current structure.
2 After you have completed the installation and the configuration process, theconsole shows the new cluster group configuration.
See “About NetBackup server configuration” on page 163.
About automatic file changes from an upgradeWhen you upgrade from an earlier NetBackup version, certain customizable scriptsare overwritten. Before NetBackup overwrites these scripts, it saves copies ofthem so that any modifications are preserved.
The following examples describe how this process works:
Your current NetBackup version is 6.5 and you modifiedfiles in the goodies directory. For example:
C:\Program
Files\Veritas\NetBackup\bin\goodies
After an upgrade to NetBackup 7.x, the following directoryis created automatically and contains the modified filesfrom the earlier version:
C:\Program
Files\Veritas\NetBackup\goodies.6.5
You can use the scripts in this directory to replace the newdefault versions that were installed with the upgrade.
Example 1: goodies directory
Your current NetBackup version is 6.5 and you modifiedfiles in the bin directory. For example:
C:\Program Files\Veritas\NetBackup\bin
After an upgrade to NetBackup 7.x, the following directoryis created automatically and contains the modified filesfrom the earlier version:
C:\Program Files\Veritas\NetBackup\bin.6.5
You can use the scripts in this directory to replace the newdefault versions that were installed with the upgrade.
Example 2: bin directory
Table 3-1 describes the files and scripts that are overwritten when you upgradefrom an earlier Windows version of NetBackup:
103Installing or upgrading server softwareAbout automatic file changes from an upgrade
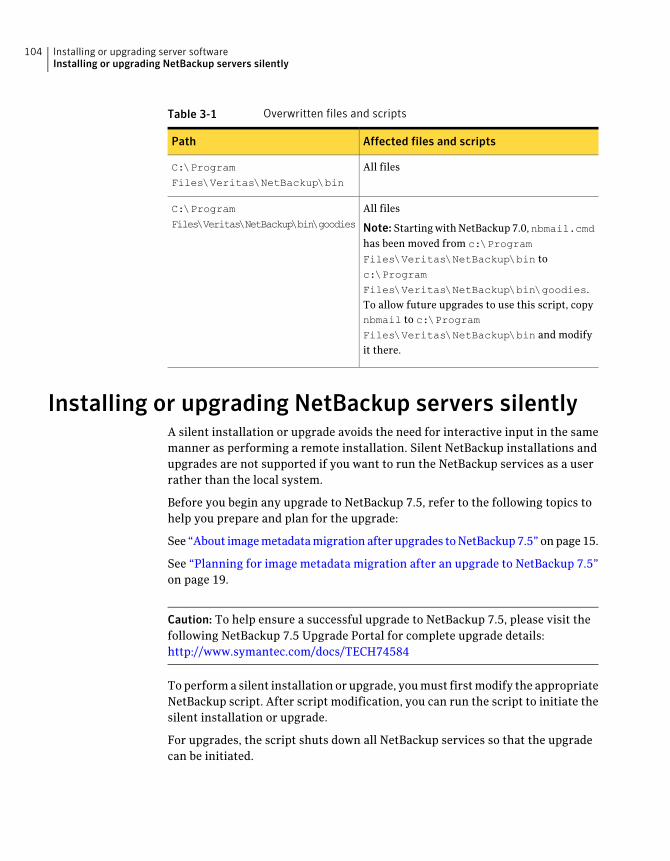
Table 3-1 Overwritten files and scripts
Affected files and scriptsPath
All filesC:\Program
Files\Veritas\NetBackup\bin
All files
Note: Starting with NetBackup 7.0,nbmail.cmdhas been moved from c:\Program
Files\Veritas\NetBackup\bin toc:\Program
Files\Veritas\NetBackup\bin\goodies.To allow future upgrades to use this script, copynbmail to c:\ProgramFiles\Veritas\NetBackup\bin and modifyit there.
C:\Program
Files\Veritas\NetBackup\bin\goodies
Installing or upgrading NetBackup servers silentlyA silent installation or upgrade avoids the need for interactive input in the samemanner as performing a remote installation. Silent NetBackup installations andupgrades are not supported if you want to run the NetBackup services as a userrather than the local system.
Before you begin any upgrade to NetBackup 7.5, refer to the following topics tohelp you prepare and plan for the upgrade:
See “About image metadata migration after upgrades to NetBackup 7.5” on page 15.
See “Planning for image metadata migration after an upgrade to NetBackup 7.5”on page 19.
Caution: To help ensure a successful upgrade to NetBackup 7.5, please visit thefollowing NetBackup 7.5 Upgrade Portal for complete upgrade details:http://www.symantec.com/docs/TECH74584
To perform a silent installation or upgrade, you must first modify the appropriateNetBackup script. After script modification, you can run the script to initiate thesilent installation or upgrade.
For upgrades, the script shuts down all NetBackup services so that the upgradecan be initiated.
Installing or upgrading server softwareInstalling or upgrading NetBackup servers silently
104

If the script detects that other system processes still maintain a handle on anyNetBackup files, the upgrade fails. To identify which NetBackup processes arestill running, check the NetBackup Install log file at the following location:
%ALLUSERSPROFILE%\Symantec\NetBackup\InstallLogs
After you have manually stopped each of the identified processes, you can runthe upgrade script again.
Note: For Windows 2008 Server Core systems, you can only install or upgradeNetBackup with this procedure.
To install or upgrade NetBackup server software silently
1 Log on as administrator to the system where you want to install or upgradeNetBackup.
2 For upgrades only, run a hot catalog backup. If an error occurs during theupgrade, you can roll back to the previous version and still retain yourinformation from the catalog backup.
This step is especially important for upgrades from 6.x versions because coldcatalog backup support was discontinued starting with NetBackup 7.0.
Catalog backups are typically scheduled to occur automatically from a catalogbackup policy. You can also initiate a hot catalog backup manually as follows:
Note: If a catalog backup policy does not exist, you must first create andconfigure one to run a hot catalog backup. For complete details, see theNetBackup Administartor's Guide, Volume I.
■ In the NetBackup Administration Console, expand NetBackupManagement > Policies.
■ Select the catalog backup policy you want to run.
■ Select Actions > Manual Backup.
3 Insert the NetBackup installation DVD or navigate to the location where theESD images (downloaded files) reside.
4 Open Windows Explorer and copy the contents of the X86 or the X64 directoryto a temporary directory on your hard drive. Choose the directory that isassociated with the platform type that you want to install.
5 Since the source files are read-only, you must change the permissions for thecopied files to allow the installation or the update.
105Installing or upgrading server softwareInstalling or upgrading NetBackup servers silently
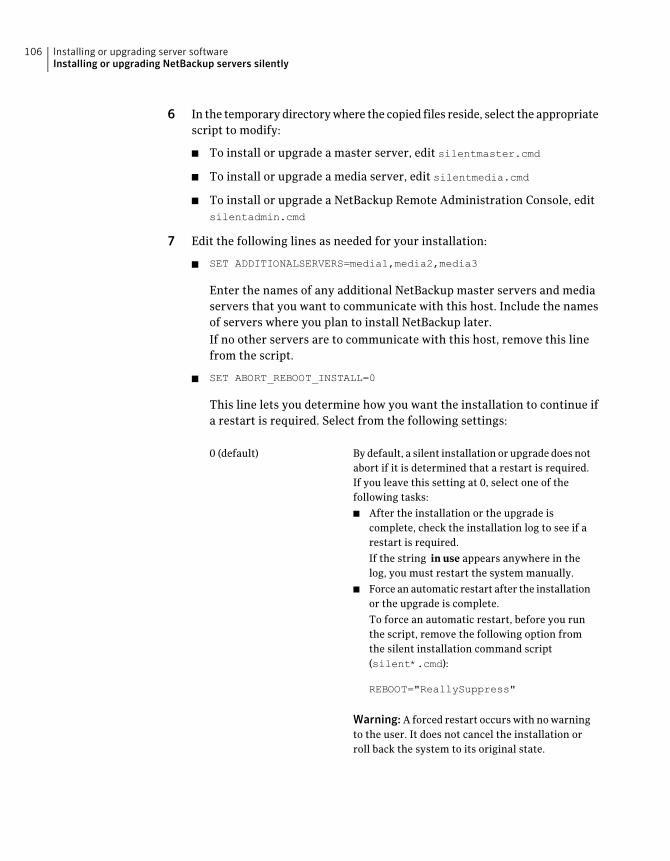
6 In the temporary directory where the copied files reside, select the appropriatescript to modify:
■ To install or upgrade a master server, edit silentmaster.cmd
■ To install or upgrade a media server, edit silentmedia.cmd
■ To install or upgrade a NetBackup Remote Administration Console, editsilentadmin.cmd
7 Edit the following lines as needed for your installation:
■ SET ADDITIONALSERVERS=media1,media2,media3
Enter the names of any additional NetBackup master servers and mediaservers that you want to communicate with this host. Include the namesof servers where you plan to install NetBackup later.If no other servers are to communicate with this host, remove this linefrom the script.
■ SET ABORT_REBOOT_INSTALL=0
This line lets you determine how you want the installation to continue ifa restart is required. Select from the following settings:
By default, a silent installation or upgrade does notabort if it is determined that a restart is required.If you leave this setting at 0, select one of thefollowing tasks:
■ After the installation or the upgrade iscomplete, check the installation log to see if arestart is required.
If the string in use appears anywhere in thelog, you must restart the system manually.
■ Force an automatic restart after the installationor the upgrade is complete.
To force an automatic restart, before you runthe script, remove the following option fromthe silent installation command script(silent*.cmd):
REBOOT="ReallySuppress"
Warning: A forced restart occurs with no warningto the user. It does not cancel the installation orroll back the system to its original state.
0 (default)
Installing or upgrading server softwareInstalling or upgrading NetBackup servers silently
106
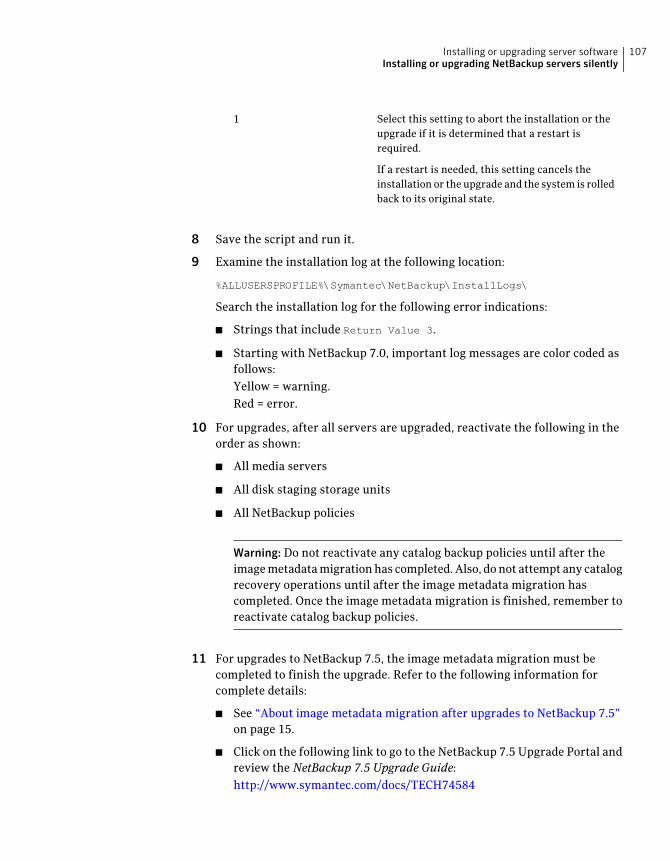
Select this setting to abort the installation or theupgrade if it is determined that a restart isrequired.
If a restart is needed, this setting cancels theinstallation or the upgrade and the system is rolledback to its original state.
1
8 Save the script and run it.
9 Examine the installation log at the following location:
%ALLUSERSPROFILE%\Symantec\NetBackup\InstallLogs\
Search the installation log for the following error indications:
■ Strings that include Return Value 3.
■ Starting with NetBackup 7.0, important log messages are color coded asfollows:Yellow = warning.Red = error.
10 For upgrades, after all servers are upgraded, reactivate the following in theorder as shown:
■ All media servers
■ All disk staging storage units
■ All NetBackup policies
Warning: Do not reactivate any catalog backup policies until after theimage metadata migration has completed. Also, do not attempt any catalogrecovery operations until after the image metadata migration hascompleted. Once the image metadata migration is finished, remember toreactivate catalog backup policies.
11 For upgrades to NetBackup 7.5, the image metadata migration must becompleted to finish the upgrade. Refer to the following information forcomplete details:
■ See “About image metadata migration after upgrades to NetBackup 7.5”on page 15.
■ Click on the following link to go to the NetBackup 7.5 Upgrade Portal andreview the NetBackup 7.5 Upgrade Guide:http://www.symantec.com/docs/TECH74584
107Installing or upgrading server softwareInstalling or upgrading NetBackup servers silently
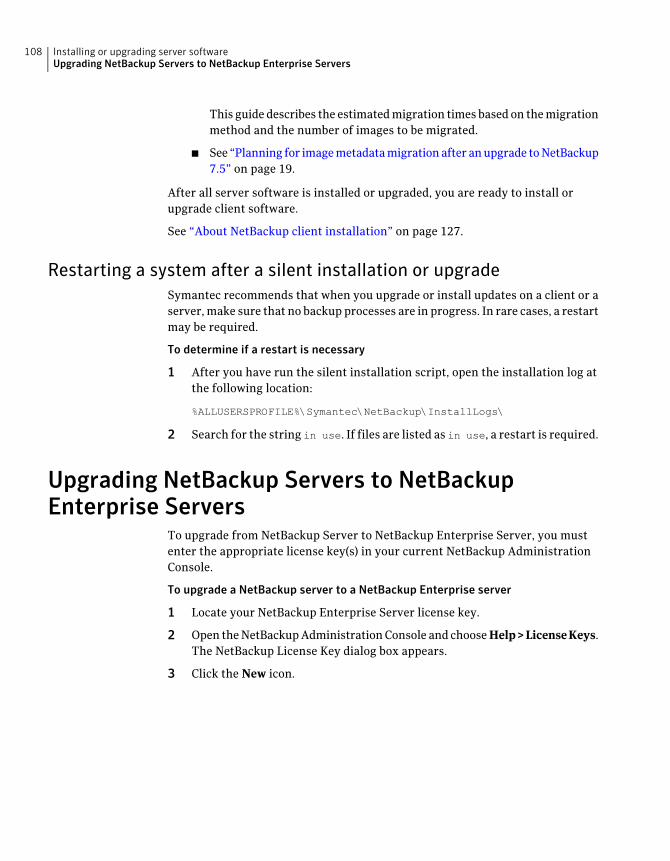
This guide describes the estimated migration times based on the migrationmethod and the number of images to be migrated.
■ See “Planning for image metadata migration after an upgrade to NetBackup7.5” on page 19.
After all server software is installed or upgraded, you are ready to install orupgrade client software.
See “About NetBackup client installation” on page 127.
Restarting a system after a silent installation or upgradeSymantec recommends that when you upgrade or install updates on a client or aserver, make sure that no backup processes are in progress. In rare cases, a restartmay be required.
To determine if a restart is necessary
1 After you have run the silent installation script, open the installation log atthe following location:
%ALLUSERSPROFILE%\Symantec\NetBackup\InstallLogs\
2 Search for the string in use. If files are listed as in use, a restart is required.
Upgrading NetBackup Servers to NetBackupEnterprise Servers
To upgrade from NetBackup Server to NetBackup Enterprise Server, you mustenter the appropriate license key(s) in your current NetBackup AdministrationConsole.
To upgrade a NetBackup server to a NetBackup Enterprise server
1 Locate your NetBackup Enterprise Server license key.
2 Open the NetBackup Administration Console and choose Help>LicenseKeys.The NetBackup License Key dialog box appears.
3 Click the New icon.
Installing or upgrading server softwareUpgrading NetBackup Servers to NetBackup Enterprise Servers
108
4 Enter your license key in the New license key field and click Add.
The new license key appears in the field in the lower part of the dialog box.
For upgrades on Windows from a NetBackup server evaluation license keyto a permanent NetBackup Enterprise Server-based product license key,restart the NetBackup services. When services are restarted, the new licenseinformation is displayed when you select Help > About NetBackupAdministration Console.
If you add, delete, or change any license keys, you must restart the NetBackupAdministration Console.
5 Reboot the system if you are prompted.
109Installing or upgrading server softwareUpgrading NetBackup Servers to NetBackup Enterprise Servers

Installing or upgrading server softwareUpgrading NetBackup Servers to NetBackup Enterprise Servers
110
Installing alternativeadministrative interfaces
This chapter includes the following topics:
■ About the NetBackup Remote Administration Console for Windows
■ About the NetBackup-Java Administration Console
About theNetBackupRemoteAdministrationConsolefor Windows
If your NetBackup server has no graphics display capabilities, you must installan alternative administrative interface. It may also be desirable for various otherconfigurations, such as mixed environments that use the Windows and the UNIXplatforms.
Note: You can skip this section if you do not want or need to administer aNetBackup server remotely from a Windows NetBackup client.
The NetBackup Remote Administration Console is an interface-only version ofNetBackup for Windows that you can use to administer NetBackup servers fromanother computer. The computer that runs the NetBackup Remote AdministrationConsole does not require NetBackup software.
The following is a brief description of the NetBackup Remote AdministrationConsole operation:
■ The console lets you perform all NetBackup operations exactly like theNetBackup Administration Console on a local Windows NetBackup server. You
4Chapter
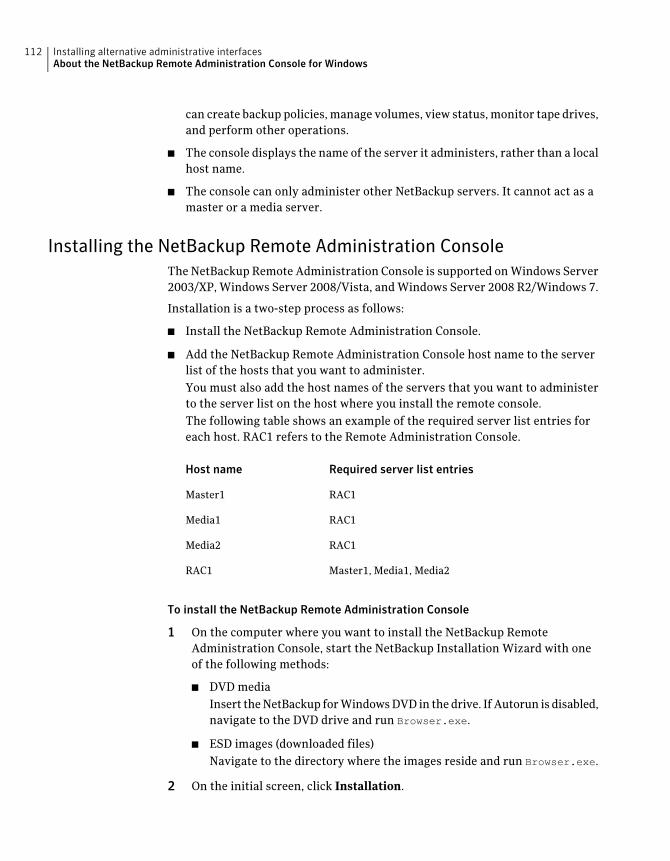
can create backup policies, manage volumes, view status, monitor tape drives,and perform other operations.
■ The console displays the name of the server it administers, rather than a localhost name.
■ The console can only administer other NetBackup servers. It cannot act as amaster or a media server.
Installing the NetBackup Remote Administration ConsoleThe NetBackup Remote Administration Console is supported on Windows Server2003/XP, Windows Server 2008/Vista, and Windows Server 2008 R2/Windows 7.
Installation is a two-step process as follows:
■ Install the NetBackup Remote Administration Console.
■ Add the NetBackup Remote Administration Console host name to the serverlist of the hosts that you want to administer.You must also add the host names of the servers that you want to administerto the server list on the host where you install the remote console.The following table shows an example of the required server list entries foreach host. RAC1 refers to the Remote Administration Console.
Required server list entriesHost name
RAC1Master1
RAC1Media1
RAC1Media2
Master1, Media1, Media2RAC1
To install the NetBackup Remote Administration Console
1 On the computer where you want to install the NetBackup RemoteAdministration Console, start the NetBackup Installation Wizard with oneof the following methods:
■ DVD mediaInsert the NetBackup for Windows DVD in the drive. If Autorun is disabled,navigate to the DVD drive and run Browser.exe.
■ ESD images (downloaded files)Navigate to the directory where the images reside and run Browser.exe.
2 On the initial screen, click Installation.
Installing alternative administrative interfacesAbout the NetBackup Remote Administration Console for Windows
112
3 On the Installation screen, click Server Software Installation.
4 On the Welcome screen, review the content and click Next.
5 On the LicenseAgreement screen, accept the terms of the license agreementand click Next.
6 On the Installation Type screen, select Install to this computer only, clickTypical, and then click Next.
7 On the NetBackup License Key and Server Type screen, select NetBackupRemoteAdministrationConsole. You do not need a license key to install theRemote Administration Console.
8 On the NetBackupSystemNames screen, provide the following information:
Enter the name of the local computer where you wantto install the remote console. (The name should appearby default.)
Client Name
Enter the name of the NetBackup master server. (IfNetBackup master server software is installed on thiscomputer, the name should appear by default.)
Master Server
Enter the names of any additional NetBackup serversthat you want to allow access to this server. To entermore than one name, separate each name with acomma or press Enter after you enter each name.
Additional Servers
9 On the Ready to Install the Program screen, review the summary of yourselections. Then, click Install.
10 After the installation completes, do the following:
■ Click View Log to review the installation details.
■ Click Finish.If you clicked the box next to LaunchNetBackupAdministrationConsolenow, the Remote Administration Console appears. If you did not click thebox, start the console by selecting Start > Programs > SymantecNetBackup > NetBackup Administration Console.This action starts the console on the local host, not on any remote host.
11 Add the required host names to the server lists of all hosts.
See “Configuring server lists for the NetBackup Remote AdministrationConsole” on page 114.
113Installing alternative administrative interfacesAbout the NetBackup Remote Administration Console for Windows
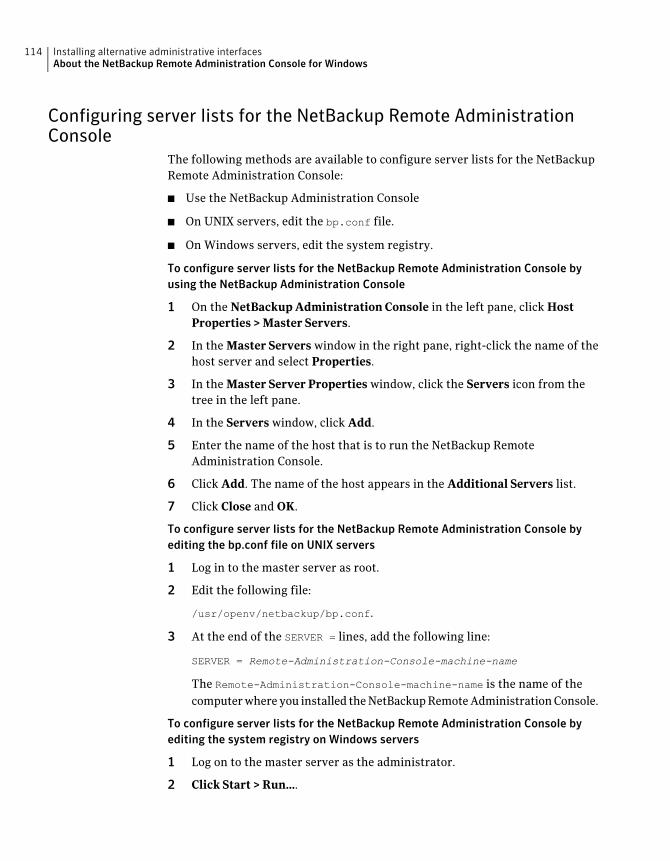
Configuring server lists for the NetBackup Remote AdministrationConsole
The following methods are available to configure server lists for the NetBackupRemote Administration Console:
■ Use the NetBackup Administration Console
■ On UNIX servers, edit the bp.conf file.
■ On Windows servers, edit the system registry.
To configure server lists for the NetBackup Remote Administration Console byusing the NetBackup Administration Console
1 On the NetBackup Administration Console in the left pane, click HostProperties > Master Servers.
2 In the Master Servers window in the right pane, right-click the name of thehost server and select Properties.
3 In the Master Server Properties window, click the Servers icon from thetree in the left pane.
4 In the Servers window, click Add.
5 Enter the name of the host that is to run the NetBackup RemoteAdministration Console.
6 Click Add. The name of the host appears in the Additional Servers list.
7 Click Close and OK.
To configure server lists for the NetBackup Remote Administration Console byediting the bp.conf file on UNIX servers
1 Log in to the master server as root.
2 Edit the following file:
/usr/openv/netbackup/bp.conf.
3 At the end of the SERVER = lines, add the following line:
SERVER = Remote-Administration-Console-machine-name
The Remote-Administration-Console-machine-name is the name of thecomputer where you installed the NetBackup Remote Administration Console.
To configure server lists for the NetBackup Remote Administration Console byediting the system registry on Windows servers
1 Log on to the master server as the administrator.
2 Click Start > Run....
Installing alternative administrative interfacesAbout the NetBackup Remote Administration Console for Windows
114
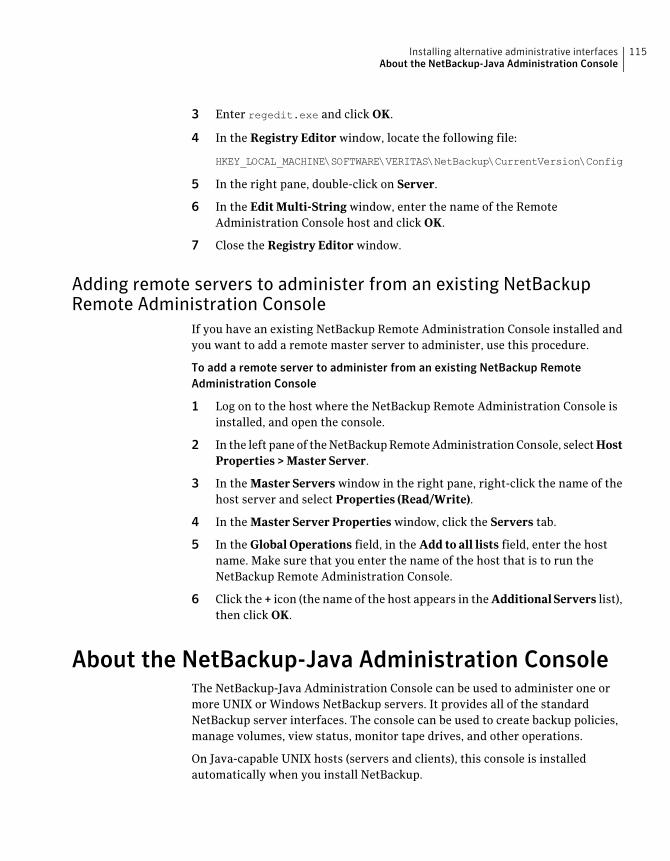
3 Enter regedit.exe and click OK.
4 In the Registry Editor window, locate the following file:
HKEY_LOCAL_MACHINE\SOFTWARE\VERITAS\NetBackup\CurrentVersion\Config
5 In the right pane, double-click on Server.
6 In the Edit Multi-String window, enter the name of the RemoteAdministration Console host and click OK.
7 Close the Registry Editor window.
Adding remote servers to administer from an existing NetBackupRemote Administration Console
If you have an existing NetBackup Remote Administration Console installed andyou want to add a remote master server to administer, use this procedure.
To add a remote server to administer from an existing NetBackup RemoteAdministration Console
1 Log on to the host where the NetBackup Remote Administration Console isinstalled, and open the console.
2 In the left pane of the NetBackup Remote Administration Console, select HostProperties > Master Server.
3 In the Master Servers window in the right pane, right-click the name of thehost server and select Properties (Read/Write).
4 In the Master Server Properties window, click the Servers tab.
5 In the Global Operations field, in the Add to all lists field, enter the hostname. Make sure that you enter the name of the host that is to run theNetBackup Remote Administration Console.
6 Click the + icon (the name of the host appears in the AdditionalServers list),then click OK.
About the NetBackup-Java Administration ConsoleThe NetBackup-Java Administration Console can be used to administer one ormore UNIX or Windows NetBackup servers. It provides all of the standardNetBackup server interfaces. The console can be used to create backup policies,manage volumes, view status, monitor tape drives, and other operations.
On Java-capable UNIX hosts (servers and clients), this console is installedautomatically when you install NetBackup.
115Installing alternative administrative interfacesAbout the NetBackup-Java Administration Console
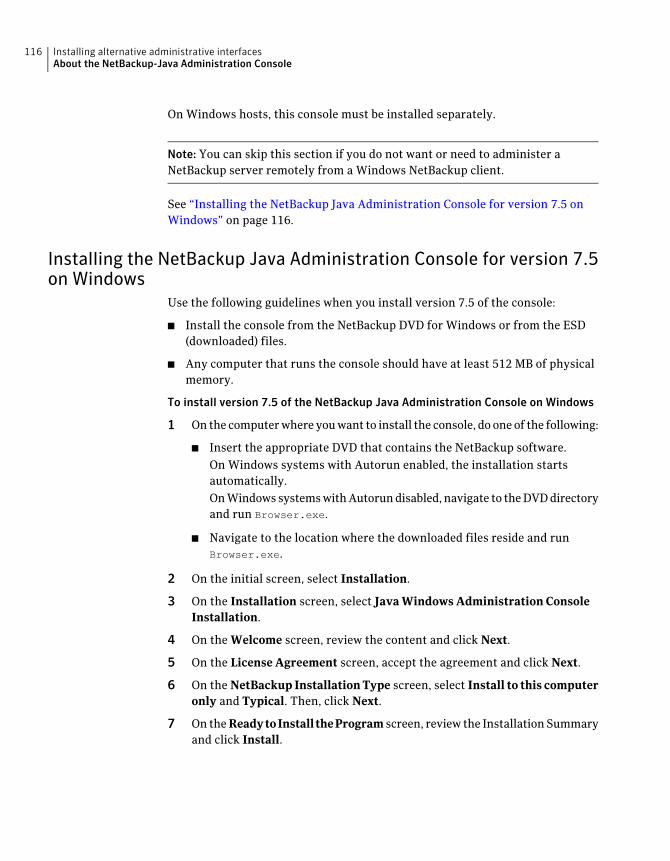
On Windows hosts, this console must be installed separately.
Note: You can skip this section if you do not want or need to administer aNetBackup server remotely from a Windows NetBackup client.
See “Installing the NetBackup Java Administration Console for version 7.5 onWindows” on page 116.
Installing the NetBackup Java Administration Console for version 7.5on Windows
Use the following guidelines when you install version 7.5 of the console:
■ Install the console from the NetBackup DVD for Windows or from the ESD(downloaded) files.
■ Any computer that runs the console should have at least 512 MB of physicalmemory.
To install version 7.5 of the NetBackup Java Administration Console on Windows
1 On the computer where you want to install the console, do one of the following:
■ Insert the appropriate DVD that contains the NetBackup software.On Windows systems with Autorun enabled, the installation startsautomatically.On Windows systems with Autorun disabled, navigate to the DVD directoryand run Browser.exe.
■ Navigate to the location where the downloaded files reside and runBrowser.exe.
2 On the initial screen, select Installation.
3 On the Installation screen, select Java Windows Administration ConsoleInstallation.
4 On the Welcome screen, review the content and click Next.
5 On the License Agreement screen, accept the agreement and click Next.
6 On the NetBackup Installation Type screen, select Install to this computeronly and Typical. Then, click Next.
7 On the ReadytoInstalltheProgram screen, review the Installation Summaryand click Install.
Installing alternative administrative interfacesAbout the NetBackup-Java Administration Console
116
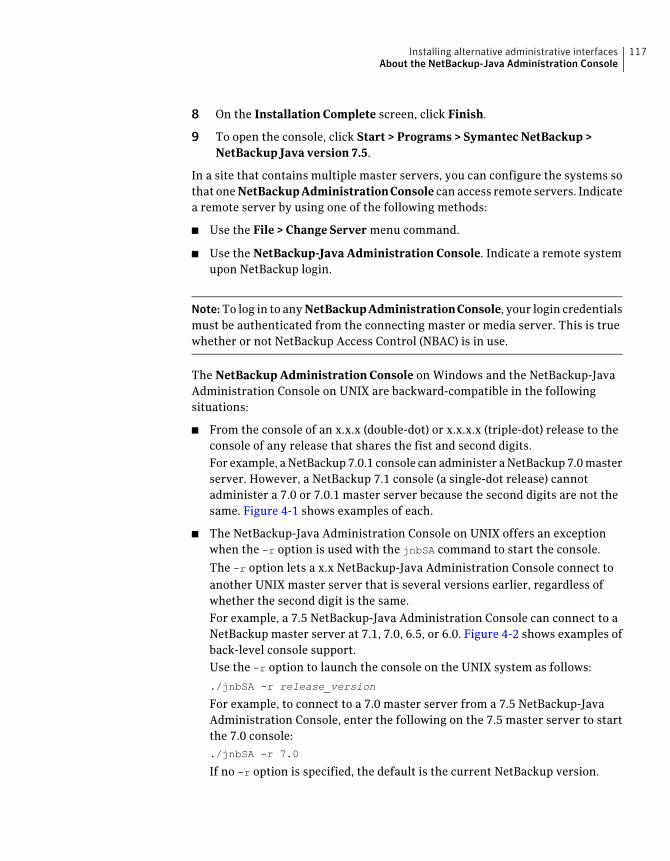
8 On the Installation Complete screen, click Finish.
9 To open the console, click Start > Programs > Symantec NetBackup >NetBackup Java version 7.5.
In a site that contains multiple master servers, you can configure the systems sothat one NetBackupAdministrationConsole can access remote servers. Indicatea remote server by using one of the following methods:
■ Use the File > Change Server menu command.
■ Use the NetBackup-Java Administration Console. Indicate a remote systemupon NetBackup login.
Note:To log in to any NetBackupAdministrationConsole, your login credentialsmust be authenticated from the connecting master or media server. This is truewhether or not NetBackup Access Control (NBAC) is in use.
The NetBackup Administration Console on Windows and the NetBackup-JavaAdministration Console on UNIX are backward-compatible in the followingsituations:
■ From the console of an x.x.x (double-dot) or x.x.x.x (triple-dot) release to theconsole of any release that shares the fist and second digits.For example, a NetBackup 7.0.1 console can administer a NetBackup 7.0 masterserver. However, a NetBackup 7.1 console (a single-dot release) cannotadminister a 7.0 or 7.0.1 master server because the second digits are not thesame. Figure 4-1 shows examples of each.
■ The NetBackup-Java Administration Console on UNIX offers an exceptionwhen the -r option is used with the jnbSA command to start the console.
The -r option lets a x.x NetBackup-Java Administration Console connect toanother UNIX master server that is several versions earlier, regardless ofwhether the second digit is the same.For example, a 7.5 NetBackup-Java Administration Console can connect to aNetBackup master server at 7.1, 7.0, 6.5, or 6.0. Figure 4-2 shows examples ofback-level console support.Use the -r option to launch the console on the UNIX system as follows:
./jnbSA -r release_version
For example, to connect to a 7.0 master server from a 7.5 NetBackup-JavaAdministration Console, enter the following on the 7.5 master server to startthe 7.0 console:./jnbSA -r 7.0
If no -r option is specified, the default is the current NetBackup version.
117Installing alternative administrative interfacesAbout the NetBackup-Java Administration Console
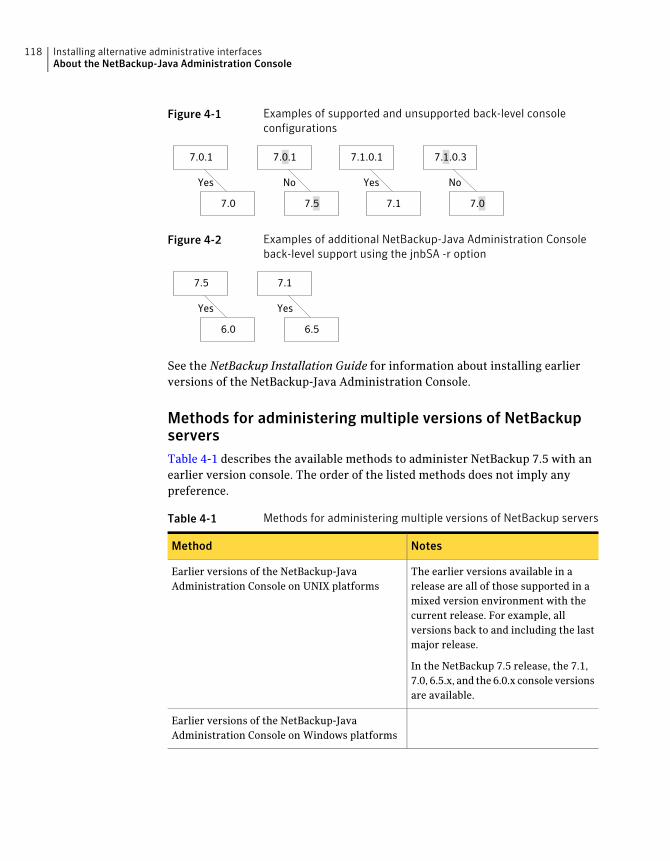
Figure 4-1 Examples of supported and unsupported back-level consoleconfigurations
Yes No Yes
7.1.0.3
No
7.0
7.0.1 7.0.1
7.0 7.5
7.1.0.1
7.1
Figure 4-2 Examples of additional NetBackup-Java Administration Consoleback-level support using the jnbSA -r option
7.5
Yes
6.0
7.1
6.5
Yes
See the NetBackup Installation Guide for information about installing earlierversions of the NetBackup-Java Administration Console.
Methods for administering multiple versions of NetBackupserversTable 4-1 describes the available methods to administer NetBackup 7.5 with anearlier version console. The order of the listed methods does not imply anypreference.
Table 4-1 Methods for administering multiple versions of NetBackup servers
NotesMethod
The earlier versions available in arelease are all of those supported in amixed version environment with thecurrent release. For example, allversions back to and including the lastmajor release.
In the NetBackup 7.5 release, the 7.1,7.0, 6.5.x, and the 6.0.x console versionsare available.
Earlier versions of the NetBackup-JavaAdministration Console on UNIX platforms
Earlier versions of the NetBackup-JavaAdministration Console on Windows platforms
Installing alternative administrative interfacesAbout the NetBackup-Java Administration Console
118

Table 4-1 Methods for administering multiple versions of NetBackup servers(continued)
NotesMethod
From a Windows computer, you canaccess the Java WindowsAdministration Console on a UNIXNetBackup server by using connectivitysoftware applications.
Remote display-back from UNIX servers
Use the appropriate NetBackup-JavaAdministration Console on theNetBackup server with the earlierversion of the console.
At the console on the NetBackup server
Installing multiple versions of the NetBackup-JavaAdministration Console on WindowsTo install multiple versions of the NetBackup interface in a mixed versionenvironment, note the following restrictions and guidelines:
Only the most recent version of the NetBackup-JavaAdministration Console can be updated (or patched).
Updates
The NetBackup-Java Capabilities Authorizationconfiguration file (auth.conf), must always be located ininstall_path\java. For example, C:\ProgramFiles\Veritas\java. The file must exist there regardlessof how many versions of the console are installed, or inwhich directories they are installed.
The file is only used for administering NetBackup on thisWindows host, and default settings exist if the file is notpresent. For more information about these defaults, see thesection "Authorizing NetBackup-Java users" in theNetBackup Administrator’s Guide for Windows, Volume I.
auth.conf file
You must install each Java console version to a differentfolder.
Console version location
To install earlier versions of the NetBackup-Java Administration Console
1 Insert the appropriate version NetBackup Windows installation media withthe NetBackup-Java Administration Console that you want to install.
2 Select one of the following consoles, based on the NetBackup version:
119Installing alternative administrative interfacesAbout the NetBackup-Java Administration Console
■ For NetBackup 6.0 versions, select NetBackup Installation and clickInstall Java Administration Console. Select whether you want to installthe 32-bit or the 64-bit console.
■ For NetBackup 6.5 versions, select NetBackup Installation and clickInstall JavaWindowsAdministrationConsole. Select whether you wantto install the 32-bit or the 64-bit console.
■ For NetBackup 7.0 and 7.1 versions, select Installation and click JavaWindows Administration Console Installation.
3 If a different version of the Java console has already been installed, specifya new folder location to prevent overwriting the earlier installation.
For example, specify C:\Program Files\Veritas\nbjava65 for version 6.5Java consoles.
4 To complete the installation, click Finish.
Removing earlier versions of the NetBackup-JavaAdministration Console on WindowsIn some cases, you can remove earlier versions of the NetBackup-JavaAdministration Console by using the Add/Remove Programs feature. You canuse this method if the version that you want to remove appears in the list ofprograms.
If the version that you want to remove does not appear in the list of programs,you must manually remove it. Use the following procedure.
Tomanually remove earlier versions of theNetBackup-Java Administration Console
1 Remove the folder where the earlier version NetBackup-Java AdministrationConsole is installed.
2 Remove the appropriate menu item from the Start>Programs>NetBackupmenu.
3 Remove any relevant desktop shortcuts.
Installing alternative administrative interfacesAbout the NetBackup-Java Administration Console
120
Removing NetBackup serversoftware
This chapter includes the following topics:
■ About NetBackup server software removal on Windows systems
■ Removing NetBackup server software on Windows systems
■ Removing NetBackup server software in a clustered environment
■ Removing NetBackup LiveUpdate from Windows systems
About NetBackup server software removal onWindows systems
When you remove NetBackup server software, the process deletes theVERITAS/NetBackupdirectories from the server. In a typical installation, NetBackupadd-on products and catalogs are located in this same directory path and are alsodeleted.
You can remove NetBackup server software in the following ways:
■ Remove server software, configuration, and catalog information.
■ Remove server software and save NetBackup configuration and cataloginformation.If you intend to reinstall NetBackup, use this procedure to save theconfiguration, catalog, and log file information before you remove NetBackup.See “Removing NetBackup server software on Windows systems” on page 122.
5Chapter
Removing NetBackup server software on Windowssystems
Use the following procedure to remove NetBackup server software and NetBackupconfiguration and catalog information.
To remove NetBackup server software and NetBackup configuration and cataloginformation
1 If the NetBackup Administration Console is open, close it.
If a console session is open when you try to remove NetBackup, a failure mayoccur that forces you to restart this procedure.
2 Select Start > Settings > Control Panel.
3 On the Control Panel window, do one of the following:
■ For Windows XP/2003 and earlier, click Add/Remove Programs.
■ For Windows Vista/2008 and later, click Programs and Features.
4 On the Currently Installed Programs list, click Symantec NetBackup.
5 Click Remove.
For Windows 2008/Vista and later systems, after you click Yes to continue,another dialog box appears to inform you that PBX is still running.
Symantec recommends that you click Do not close applications. (A rebootwill be required.) to continue with NetBackup removal. PBX is stopped andrestarted automatically as needed for removal.
6 Remove the NetBackup deduplication user directory as follows:
In the Documents and Settings directory, delete the purediskdbuserdirectory.
Use the following procedure to remove NetBackup server software and saveNetBackup configuration and catalog information.
To remove NetBackup server software and save NetBackup configuration andcatalog information
1 If the NetBackup Administration Console is open, close it.
If a console session is open when you try to remove NetBackup, a failure mayoccur that forces you to restart this procedure.
2 Select Start > Settings > Control Panel.
3 On the Control Panel window, do one of the following:
■ For Windows XP/2003 and earlier, click Add/Remove Programs.
Removing NetBackup server softwareRemoving NetBackup server software on Windows systems
122
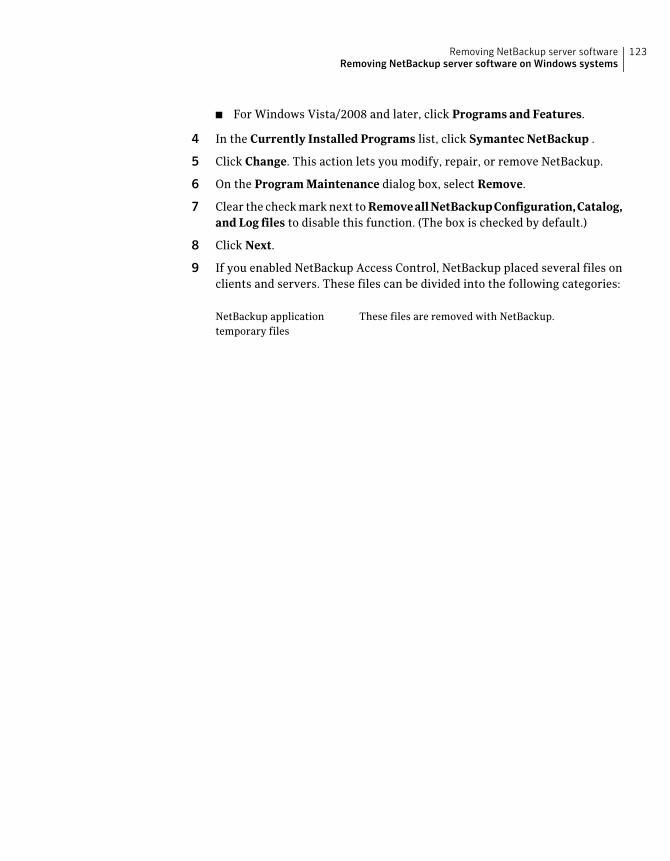
■ For Windows Vista/2008 and later, click Programs and Features.
4 In the Currently Installed Programs list, click Symantec NetBackup .
5 Click Change. This action lets you modify, repair, or remove NetBackup.
6 On the Program Maintenance dialog box, select Remove.
7 Clear the check mark next to RemoveallNetBackupConfiguration,Catalog,and Log files to disable this function. (The box is checked by default.)
8 Click Next.
9 If you enabled NetBackup Access Control, NetBackup placed several files onclients and servers. These files can be divided into the following categories:
These files are removed with NetBackup.NetBackup applicationtemporary files
123Removing NetBackup server softwareRemoving NetBackup server software on Windows systems
User cache files exist in their home directories, asfollows:
user\Local Settings\Application
Data\VERITAS\NetBackup
Files are generated in the \NetBackup directory by aSingle Sign-On operation of the NetBackupAdministration Console on the host where the consoleruns. The NetBackup Administration Console cleansthese files when an exit function is performed, so thedirectory does not always contain temporary files.However, if a system crash were to occur, any files inthe directory may be left behind. With the consoleshutdown, you can delete these files safely with nodata loss.
NetBackup also creates cached certificates for clientand server NetBackup applications. These files residewithin the\NetBackupdirectory. These files typicallyhave a name that is consistent with a DNS entry for anetwork interface, such as machine.company.com.Example directory entries are as follows:
user\Local Settings\Application
Data\VERITAS\NetBackup\pc.comp.com
user\Local Settings\Application
Data\VERITAS\NetBackup\dhcp
These files are created with the command bpnbat
-LoginMachine. If you plan to reinstall NetBackup onthe same computer at a later date, do one of thefollowing:
■ Preserve the certificates in the \NetBackupdirectory.
■ If you do not preserve the certificates, you mustprovide the computer identity password asoriginally set on the Root+AB broker. As analternative, you can reset the password on theRoot+AB broker when you reinstall. See theNetBackup Security and Encryption Guide.
Individual user (cache) files
Removing NetBackup server softwareRemoving NetBackup server software on Windows systems
124
10 Remove the NetBackup deduplication user directory as follows:
Note:This step is necessary only if you upgraded to version 7.5 from a previousor earlier version of NetBackup.
In the Documents and Settings directory, delete the purediskdbuserdirectory.
Removing NetBackup server software in a clusteredenvironment
The following steps refer you to other documentation when you remove NetBackupsoftware from clustered machines.
To remove NetBackup from a clustered environment
1 Follow the instructions in your cluster documentation for removing a group.
2 Remove NetBackup from each node in the cluster.
See “To remove NetBackup server software and NetBackup configurationand catalog information” on page 122.
No method exists to remove NetBackup from multiple nodes at the same time.
Removing NetBackup LiveUpdate from Windowssystems
NetBackup LiveUpdate and Symantec LiveUpdate share the same LiveUpdateagent. When you remove LiveUpdate, you can no longer distribute NetBackupupdates automatically or other Symantec product updates.
Before you remove LiveUpdate, make sure that no other installed Symantecproducts use LiveUpdate.
Use the following procedure to remove LiveUpdate files on Windows systems.
To remove NetBackup LiveUpdate on Windows systems
1 Select Start > Control Panel.
2 On the Control Panel window, do one of the following:
■ For Windows XP/2003 and earlier, click Add/Remove Programs.
125Removing NetBackup server softwareRemoving NetBackup server software in a clustered environment

■ For Windows Vista/2008 and later, click Programs and Features.
3 Click on LiveUpdate and select Remove.
Removing NetBackup server softwareRemoving NetBackup LiveUpdate from Windows systems
126
Installing NetBackup clientsoftware
This chapter includes the following topics:
■ About NetBackup client installation
■ About NetBackup client installation on Windows
■ About NetBackup client installation on UNIX
About NetBackup client installationBy definition, NetBackup servers are also clients. When you install NetBackupserver software, client software is also installed.
When you install client software, you perform a true client installation since noserver software is installed.
Client software can be installed locally at each individual computer or remotely.The operating system determines which clients can be installed remotely.
A Windows host can only push client software to Windowsclients.
NetBackup does not need to be installed on the host that isused to perform the remote client installation.
Windows
A NetBackup UNIX server can only push client software toUNIX clients.
NetBackup software and client type software must beinstalled on the server that is used to perform the remoteclient installation.
UNIX
6Chapter
About NetBackup client installation on WindowsThe NetBackup client installation wizard for Microsoft Windows lets you selectthe appropriate setup and installation options from a series of wizard screens.After you select options, a window appears that lets you verify your selectionsbefore the installation begins.
While the installation is in progress, a dialog box provides details of the installationand the setup progress. When the installation is completed, a final window showsthe results.
Note the following when you install NetBackup client software on Windowssystems:
You cannot install NetBackup client software on thecomputers that currently have NetBackup server software.In these cases, you must first remove the NetBackup serversoftware.
See “Removing NetBackup server software on Windowssystems” on page 122.
Client installationrestrictions
■ By default on Windows 2003, 2008, and 2008 R2 Serversystems, only administrators have write permission tothe Program Files directory.
■ NetBackup writes log files and progress files to thefollowing location:
Program Files\VERITAS\NetBackup\Logs
To perform backups and restores with the Backup,Archive, and Restore interface, users must have writepermission to the Logs directory. Users without writepermission to this directory receive an error message,and the backup or restore is canceled. The administratoraccount has write permission by default, but you mustensure that other users also have write permission.
User permissions
About Windows client system requirementsThe following describes the hardware and the software requirements for successfulinstallation of NetBackup client software.
Installing NetBackup client softwareAbout NetBackup client installation on Windows
128
To install NetBackup client software locally, the systemmust meet the following configuration requirements:
■ Microsoft Windows 2003/XP, Windows 2008/Vista, orWindows 2008 R2/Windows 7
■ Any TCP/IP transport that is Windows Socketscompliant. (Use of the TCP/IP transport that comes withthe server or the operating system is recommended.)
■ A network adapter that your TCP/IP transport supports
Local installation
To install NetBackup client software remotely, the systemmust meet the following configuration requirements:
■ All the requirements for local installations must be met.
■ The source system must run Windows 2003, 2008, or2008 R2 Server.
■ Administrator privileges are required for the user thatperforms remote installations.
Remote installation
The NetBackup client version that you install must be thesame or earlier than the installed version of NetBackupserver software. Later client versions cannot be used withearlier server versions.
See “About NetBackup mixed version support” on page 26.
NetBackup versioncompatibility
About Windows client installation methodsYou can install NetBackup clients on Windows systems with the following methods:
The installation wizard installs the client software only onthe computer where you run the installation.
See “Installing NetBackup Windows clients locally”on page 130.
Local installation
The installation wizard scans the network for availableclients where you can install the client software.
The source computer must run Windows 2003, 2008, or2008 R2 Server.
Also, a remote installation requires system administratorprivileges.
Note: You cannot install clients remotely from NetBackupWindows servers to UNIX computers.
See “Installing NetBackup Windows clients remotely”on page 133.
Remote installation
129Installing NetBackup client softwareAbout NetBackup client installation on Windows
A silent installation is a process that does not requireinteractive input. However, you must edit thesilentclient.cmd file before you run it.
See “Installing NetBackup Windows clients silently”on page 139.
Silent installation
See “About NetBackup client installation” on page 127.
See “About the NetBackup preinstallation Environment Checker” on page 35.
Installing NetBackup Windows clients locallyFollow these instructions to install the NetBackup client software on your localWindows system. You can stop the installation process at any time by clickingCancel or by clicking Back to return to the previous window.
Note:After client installation, you may need to restart the system for the changesto take effect.
To install NetBackup client software locally on Windows systems
1 Log on as administrator on the host where you want to install the clientsoftware.
2 Start the NetBackup Installation Wizard with one of the following methods:
■ DVD mediaInsert the NetBackup for Windows DVD in the drive. If Autorun is disabled,navigate to the DVD drive and run Browser.exe.
■ ESD images (downloaded files)Navigate to the directory where the images reside and run Browser.exe.
3 On the initial screen, select Installation.
4 On the Installation screen, select Client Software Installation.
5 On the Welcome screen, review the content and click Next.
6 On the License Agreement screen, accept the terms of the agreement andclick Next.
Installing NetBackup client softwareAbout NetBackup client installation on Windows
130
7 On the Symantec NetBackup Client Installation Type screen, provide thefollowing information:
For a local installation, select Install to thiscomputeronly.
Where to install
Select this option to install NetBackup default featuresand settings.
Typical
Select this option to choose the NetBackup features toinstall and the settings that you want.
Custom
Click Next.
8 This step applies only to Custom installations. For Typical installations, skipto step 10.
On the Symantec NetBackup Client Features screen, you can select thefeatures to install and where the NetBackup files are installed.
Click the icon next to any feature and a drop-downmenu appears.
Select Install or Do not install.
Feature List
By default, NetBackup files are installed to thefollowing location:
C:\Program Files\VERITAS
To change the folder destination where NetBackup isinstalled:
■ Click Change.
■ Browse to the preferred location and designate anew or an existing folder.
■ Click Next.
Note: For upgrades, you cannot change the destination.
Destination Folder
9 This step applies only to Custom installations. For Typical installations, skipto the next step.
On the NetBackup Options screen, select from the following options:
131Installing NetBackup client softwareAbout NetBackup client installation on Windows
Enable or disable the following options:
■ Start NetBackup Client Service AutomaticallyBy default, this option is enabled so that NetBackupservices are available immediately after systemstartup.
■ StartNetBackupClientJobTrackerAutomaticallyBy default, this option is disabled. To start thisoption manually after installation, click Start>AllPrograms > Symantec NetBackup > NetBackupClient Job Tracker.
At System Startup
On this screen, you can change port numbers, if it isnecessary in your configuration.
You may need to change a port number if youencounter conflicts when NetBackup and anotherindustry product try to share the same port. Anotherexample is if a port conflict occurs with a firewall,which may cause security issues.
To change a port number, select the port number thatyou want to replace and type the new number.
Ports
Click Next.
10 On the NetBackup Services screen, provide the following startup accountand startup type information for NetBackup client services:
By default, this box is checked so that NetBackup usesthe built-in system account. When this box is checked,the fields below it are disabled.
To specify a different system account:
■ Click this box to remove the check mark.
■ Enter the account information in the followingfields:
UsernamePasswordDomain
Use the built-in systemaccount
Installing NetBackup client softwareAbout NetBackup client installation on Windows
132
This option determines how the installation proceedsif a restart is required as part of the installation orupgrade.
If you select this option and the installation processdetermines that a restart is required, the installation(or upgrade) stops. The system is then rolled back toits original state.
If you do not select this option, the installation (orupgrade) proceeds even if the installation processdetermines that a restart is required.
Abort install if a reboot isrequired
11 On the NetBackupSystemNames screen, the following fields are populatedautomatically. Normally, changes are not required. Except for the ClientName, you can make changes as needed for your configuration.
Do not change this name.Client Name
If necessary, change this name to the appropriatemaster server where the client backup images are tobe stored.
Master Server Name
Enter all of the master server and media server namesthat you want this client to access.
Additional Servers
12 On the ReadytoInstalltheProgram screen, review the InstallationSummarythat shows your selections from the previous steps. Then select one of thefollowing options:
■ Click Install to start the installation.
■ Click Back to view the previous screens and make any changes, then returnto this screen and click Install.
■ Click Cancel to cancel the installation.
After you click Install, the installation process begins and a screen appearsthat shows you the installation progress. This process may take severalminutes.
13 On the Installation Complete screen, click Finish.
Installing NetBackup Windows clients remotelyUse this procedure to install NetBackup client software to multiple computers onyour network, including the local computer. You can stop the installation processat any time by clicking Cancel.
133Installing NetBackup client softwareAbout NetBackup client installation on Windows
When you install Windows clients remotely, note the following:
Review the requirements for Windows client installation.
See “About Windows client system requirements”on page 128.
Requirements
You must have administrator privileges on the remoteclients for the NetBackup installation to completesuccessfully.
Privileges
During installation, the client name is written to the registryin lowercase. For backups to work, the policies on theNetBackup server must specify the client names inlowercase.
Client name entries
You may need to restart the local or the remote systems forthe changes to take effect. A message appears to alert youif a restart is needed.
Reboot after installation
To install NetBackup client software remotely on Windows systems
1 Log on as administrator on the host or the system server.
2 Start the NetBackup Installation Wizard with one of the following methods:
■ DVD mediaInsert the NetBackup for Windows DVD in the drive. If Autorun is disabled,navigate to the DVD drive and run Browser.exe.
■ ESD images (downloaded files)Navigate to the directory where the images reside and run Browser.exe.
On the initial screen (Home), select Installation.
3 On the Installation screen, select Client Software Installation.
4 On the Welcome screen, review the content and click Next.
5 On the License Agreement screen, accept the terms of the agreement andclick Next.
Installing NetBackup client softwareAbout NetBackup client installation on Windows
134
6 On the Symantec NetBackup Client Installation Type screen, provide thefollowing information:
For remote installation, select Install to multiplecomputers on your network.
The procedure does not install the client on the localhost unless you add it to the list of systems that youwant to install.
Where to install
Select this option to install NetBackup default featuresand settings.
Typical
Select this option to choose the NetBackup features toinstall and the settings that you want.
Custom
7 This step applies only to Custom installations. For Typical installations, skipto the next step.
On the NetBackup Options screen, select from the following options:
Enable or disable the following options:
■ Start NetBackup Client Service AutomaticallyBy default, this option is enabled so that NetBackupservices are available immediately after systemstartup.
■ StartNetBackupClientJobTrackerAutomaticallyBy default, this option is disabled. To start thisoption manually after installation, click Start>AllPrograms > Symantec NetBackup > NetBackupClient Job Tracker.
At System Startup
On this screen, you can change port numbers, if it isnecessary in your configuration.
You may need to change a port number if youencounter conflicts when NetBackup and anotherindustry product try to share the same port. Anotherexample is if a port conflict occurs with a firewall,which may cause security issues.
To change a port number, select the port number thatyou want to replace and type the new number.
Ports
8 On the NetBackup Services screen, provide the following startup accountand startup type information for NetBackup client services:
135Installing NetBackup client softwareAbout NetBackup client installation on Windows
By default, this box is checked so that NetBackup uses the built-insystem account. When this box is checked, the fields below it aredisabled.
To specify a different system account:
■ Click this box to remove the check mark.
■ Enter the account information in the following fields:
UsernamePasswordDomain
Use the built-insystem account
Check this box to prevent a reboot while you perform a remoteinstallation. When you check this box, processes that use theNetBackup executables and DLLs are stopped.
Warning: For Oracle users, if you select this option, you musttake down your database before you continue the installation.
TerminateNetBackupprocesses
This option determines how the installation proceeds if a restartis required as part of the installation or upgrade on the remotesystem.
If you select this option and the installation process determinesthat a restart is required, the installation (or upgrade) stops. Thesystem is then rolled back to its original state.
If you do not select this option, the installation (or upgrade)proceeds even if the installation process determines that a restartis required.
Abort install if areboot isrequired
9 On the NetBackupSystemNames screen, the following fields are populatedautomatically. Change these fields to meet your specific needs.
If necessary, change this name to the appropriatemaster server where the client backup images are tobe stored.
Master Server Name
Enter all of the master server and media server namesthat you want the clients to access.
Additional Servers
10 On the Symantec NetBackup Remote Hosts and Features screen, specifythe hosts where you want NetBackup and any selected features installed.
■ Destination SystemsRight-click the Windows Destination Computers icon and select fromthe drop-down menu , or use the following icons:
Installing NetBackup client softwareAbout NetBackup client installation on Windows
136
Click here to search the network for the hostswhere you want to install NetBackup.
■ On the AvailableSystems dialog box, select thecomputer to add and click Next.
■ On the Remote Computer Login Credentialsdialog box, enter the User Name and thePassword of the account to be used to performthe installation on the remote computers.
■ If you plan to install to multiple remotecomputers, click the box next to RememberUserNameandPassword. Selecting this optionprevents the need to enter this information foreach remote computer.
■ Click OK.
■ On the Remote Destination Folder dialog box,verify or change the DestinationFolder whereNetBackup is installed.
The default location is C:\ProgramFiles\Veritas.
If you plan to install to multiple remotecomputers and you want to use the samelocation, click the box next to Use this folderfor subsequent systems. Selecting this optionprevents the need to enter the location for eachremote computer.
Browse
Click here to import a text file that contains a listof host names. When you create the text file, thehost names must be defined in the followingformat:
Domain\ComputerName
Import
137Installing NetBackup client softwareAbout NetBackup client installation on Windows
Click here to add a host manually.
■ On the Manual Remote Computer Selectiondialog box appears, enter the Domain and theComputer Name, then click OK.
■ On the Remote Computer Login Credentialsdialog box, enter the User Name and thePassword of the account to be used to performthe installation on the remote computers.
If you plan to add and install to multiple remotecomputers, click the box next to RememberUserNameandPassword. Selecting this optionprevents the need to enter this information foreach remote computer.
■ Click OK.
■ On the Remote Destination Folder dialog box,verify or change the DestinationFolder whereNetBackup is installed.
The default location is C:\ProgramFiles\Veritas.
If you plan to install to multiple remotecomputers and you want to use the samelocation, click the box next to Use this folderfor subsequent systems. Selecting this optionprevents the need to enter the location for eachremote computer.
■ Click OK.
Add
To remove a host from the Destination Systemslist, select the host and click here.
Remove
Click here to change the destination for NetBackupfile installation on the selected remote host.
Change
■ FeaturesClick a feature icon and select either Install or Do not install from thedrop-down menu .
■ Click Next.
11 On the ReadytoInstalltheProgram screen, review the InstallationSummarythat shows your selections from the previous steps. Then select one of thefollowing options:
■ Click Install to initiate the installation.
■ Click Back to view the previous screens and make any changes, then returnto this screen and click Install.
Installing NetBackup client softwareAbout NetBackup client installation on Windows
138
■ Click Cancel to cancel the installation.
After you click Install, the installation process begins and a screen appearsthat shows you the installation progress for each computer. This process maytake several minutes.
Up to five remote installations occur simultaneously. When a remoteinstallation is completed, another one begins so that a maximum of fiveinstallations are in progress.
If you click Cancel after you click Install, the installation does not stopimmediately. Installation continues on all remote hosts where the installationhas already started. Any specified hosts after that point do not get clientsoftware installed.
NetBackup considers any remote installations that were completed when youclicked Cancel to be successful.
12 Examine the installation log on the following location:
%ALLUSERSPROFILE%\Symantec\NetBackup\InstallLogs\
An installation log file provides detailed installation information and showswhether any errors occurred.
Note: When you perform a remote installation to multiple computers, thisoption only lets you view the log for the local computer. Each computer thatyou selected for installation contains its own installation log file. To view thelog file of a remote computer, open a Windows Explorer window and enter\\<COMPUTERNAME>.
Search the installation log for the following error indications:
■ Strings that include Return Value 3.
■ Starting with NetBackup 7.0, important log messages are color coded asfollows:Yellow = warning.Red = error.
Installing NetBackup Windows clients silentlyA silent installation process does not require interactive input. It does, however,require that you edit the silentclient.cmd file before you run it.
Silent installations of NetBackup clients are not supported if you want to run theNetBackup services as a user instead of a local administrator.
139Installing NetBackup client softwareAbout NetBackup client installation on Windows
To install NetBackup with a custom services account, refer to the following topics:
See “Installing NetBackup Windows clients locally” on page 130.
See “Installing NetBackup Windows clients remotely” on page 133.
Use the following procedure to perform a silent installation of a local NetBackupclient.
To perform a silent installation of NetBackup client software on Windows
1 Insert the NetBackup installation DVD in the drive or navigate to the locationwhere the ESD images (downloaded files) reside.
2 In a Microsoft Windows Explorer window, navigate to the DVD drive.
3 Copy the contents of the one of the following directories to a temporary folderon your hard drive. For example, C:\temp.
■ PC_Clnt\x86
■ PC_Clnt\x64
4 Since the original source files are read-only, change the permissions for thecopied files on the hard drive to allow the update.
5 In the temporary directory, use a text editor to edit the silentclient.cmd
file so the script installs the client software as needed.
6 Run the silentclient.cmd script.
7 To verify that the installation was successful, check the installation log filein the following directory:
%ALLUSERSPROFILE%\Symantec\NetBackup\InstallLogs
How to configure NetBackup clientsYou can configure NetBackup clients by performing one of the following actions:
■ Start the Backup, Archive, and Restore interface.
■ Click File > Specify NetBackup Machines.
To add servers or mediaservers:
■ Start the Backup, Archive, and Restore interface.
■ Click File > NetBackup Client Properties.
To display and change theclient properties:
Installing NetBackup client softwareAbout NetBackup client installation on Windows
140
■ Open the NetBackup Administration Console.
■ Expand Host Properties and click Clients.
■ In the right pane, right-click on the client and chooseProperties.
In the dialog box that appears, on the Servers tab, allNetBackup servers that require access to your Windowsclient must be listed.
To display and change theserver properties:
For complete information on client configuration, see the NetBackupAdministrator's Guide, Volume I.
About NetBackup client installation on UNIXYou can install UNIX clients either locally at the client computer or remotely fromyour UNIX NetBackup server. To install client software remotely from a UNIXNetBackup server, the client type software must first be installed on the UNIXserver.
Note:Macintosh OS X clients are UNIX-based clients. Follow the same UNIX clientinstallation procedures in this section.
Note the following when you install NetBackup client software on UNIX systems:
141Installing NetBackup client softwareAbout NetBackup client installation on UNIX
Starting with NetBackup 7.0, many of the add-on productsand database agents are now installed with the NetBackupclient package. Separate installation for these products isno longer needed.
The following products are now included in the NetBackup7.5 client package (if the platform supports the product):
■ BMR Boot server
■ DB2
■ Encryption
■ Informix
■ LiveUpdate agent
■ Lotus Notes
■ Oracle
■ SAP
■ Snapshot Client
■ Sybase
The binaries for the listed products are laid down with theclient package. A valid license is still required to enable theproduct. If product configuration was required previously(such as db2_config), configuration is still required.
The French, Japanese, and Chinese language packagesremain as separate add-ons. The process to install andupgrade these products remains the same.
UNIX package consolidation
The gzip and the gunzip commands must be installed oneach system. The directories where the commands areinstalled must be part of the root user’s PATH environmentvariable setting.
gzipandgunzipcommands
To initiate a backup or a restore from a UNIX client, thefollowing graphical interfaces are available:
■ Clients that are compatible with NetBackup-Java mayuse the NetBackup-Java interface (jbpSA).
Refer to the NetBackup Release Notes for a list ofNetBackup-Java capable hosts.
■ Clients that are not compatible with NetBackup-Java canuse the bp interface. They also support a login from anyNetBackup 7.5 UNIX server’s NetBackup client consolewith the jbpSA command.
Clients that are not compatible with NetBackup-Java areMacintosh OS X, IBM pSeries Linux, and FreeBSD.
NetBackup-Javacompatibility
Installing NetBackup client softwareAbout NetBackup client installation on UNIX
142
About UNIX client installation methodsYou can install NetBackup clients on UNIX systems with the following methods:
■ This method installs the client software on the computerwhere you run the installation script.
■ To install clients to a location other than the default,you must create and link a directory before you installthe client software. First create the directory where youwant the software to reside, then create /usr/openvas a link to that directory.
■ On IBM zSeries Linux clients, you must transfer theNetBackup DVD or ESD image contents to a location thatis readable by the virtual Linux environment. You cantransfer the image with FTP or NFS mountingcommands.
See “Installing UNIX clients locally” on page 144.
Local installations
143Installing NetBackup client softwareAbout NetBackup client installation on UNIX
■ You can "push" the client software from your UNIXNetBackup server to your UNIX client computers. TheUNIX client must be a true client and not a media serveror a master server. The preferred installation method isto push the client software.
■ Before you can push to a UNIX client, you must firstinstall the NetBackup client type software on the server.Then, you must create a policy that includes the clientname.
Refer to the NetBackup Installation Guide for UNIX andLinux. See the section "Installing client type softwareon a master server".
■ You cannot install Windows client software remotelyfrom a NetBackup UNIX server. Firewalls can alsoprevent remote client installation.
■ Clients such as the IBM zSeries Linux may not have alocally mounted DVD device or access to the NetBackupDVD or ESD images. In these cases, you must push theclient software from a UNIX master server or a mediaserver.
■ The following remote installation methods are available:
See “Installing client software with the ftp method”on page 149.
See “Installing client software with the rsh method”on page 146.
See “Installing client software with the ssh method”on page 151.
See “Installing client software with the sftp method”on page 151.
Remote (push) installations
See “About NetBackup client installation” on page 127.
Installing UNIX clients locallyThe following procedure installs the NetBackup client software on a local computer.
To install client software locally on a UNIX client
1 Use one of the following methods to start the installation script:
Installing NetBackup client softwareAbout NetBackup client installation on UNIX
144
■ Insert the NetBackup UNIX Clients DVD into thedrive.
See “About the NetBackup media kit” on page 28.
■ If necessary, mount the DVD.
■ Enter the following command:
cd_directory/install
The cd_directory is the path to the directory whereyou can access the DVD.
DVD
■ Navigate to the location where the installationimages reside.
■ Enter the following command:
./install
ESD images (downloadedfiles)
2 When the following message appears, press Enter to continue:
Installing NetBackup Client Software.
Do you wish to continue? (y/n) [y]
The client binaries represent the operating system versions where the binarieswere compiled. The binaries typically function perfectly on later versions ofthe operating system. For example, HP PA-RISC 11.11 binaries also are usedon the HP PA-RISC 11.23 level of the operating system. The installationprocedure attempts to load the appropriate binaries for your system. If thescript does not recognize the local operating system, it presents choices.
3 Follow the prompts to complete the installation.
4 After the installation is complete, select Exit from this Script.
About remote installation methods for UNIX clientsYou can push the client software from a UNIX master server to a client host byusing the following methods:
■ rsh
See “Installing client software with the rsh method” on page 146.
■ ftp
See “Installing client software with the ftp method” on page 149.
■ ssh
See “Installing client software with the ssh method” on page 151.
145Installing NetBackup client softwareAbout NetBackup client installation on UNIX
■ sftp
See “Installing client software with the sftp method” on page 151.
Note: For installation in clustered environments, enter the virtual name for theNetBackup server and not the actual local host name. You can only push clientsoftware from the active node.
Installing client software with the rsh methodBefore you perform this procedure, read the following guidelines:
To use this method, the UNIX client must have an entry forthe server in its /.rhosts file. The /.rhosts entriesenable software installation, but they are not necessary forcorrect operation of NetBackup software.
Client /.rhosts file
If you want to install client software to a location other thanthe default, you must first create and link to the desireddirectory. Create the directory where you want the clientsoftware to reside, and then create /usr/openv as a linkto that directory.
Client software location
Make sure that the clients are assigned to a backup policy.Backup policies
By default, this operating system version does not enablethe Remote Shell daemon (rshd). Run the followingcommand to enable the daemon:
launchctl load -w
/System/Library/LaunchDaemons/shell.plist
For Macintosh OS X
To install client software from a UNIX master server to UNIX clients with the rshmethod
1 Start the NetBackup Administration Console.
2 On the Login dialog box, provide the name of the NetBackup server thatcontains the policy configuration with the clients.
You can install the client software only from the NetBackup server that youspecify in the Login dialog box when you start the interface. The clients mustbe defined in a policy on this NetBackup server.
3 In the main NetBackup Administration Console window, do the following:
■ In the left pane where the master server properties appear, click the iconnext to NetBackupManagement. The tree expands to show the availableoptions.
Installing NetBackup client softwareAbout NetBackup client installation on UNIX
146
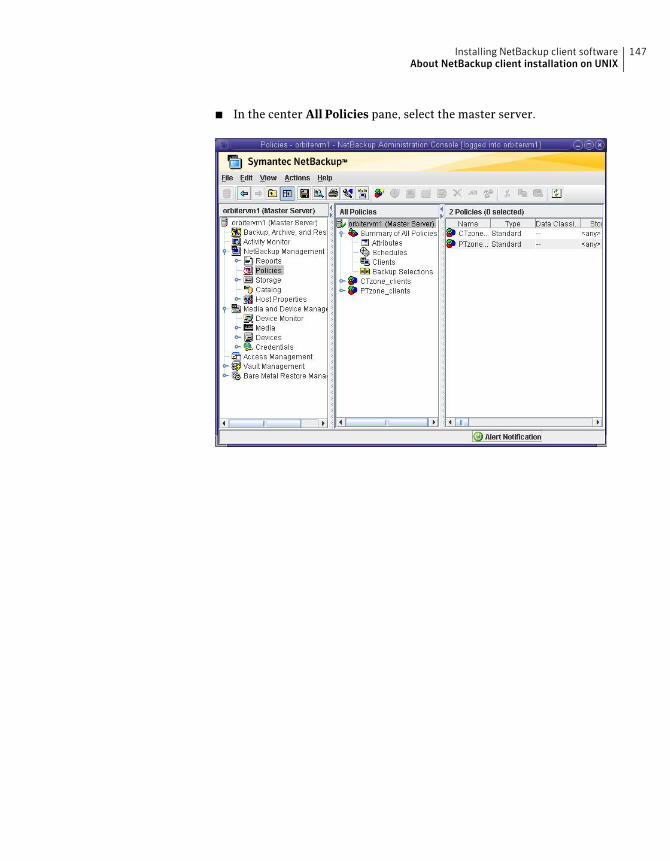
■ In the center All Policies pane, select the master server.
147Installing NetBackup client softwareAbout NetBackup client installation on UNIX
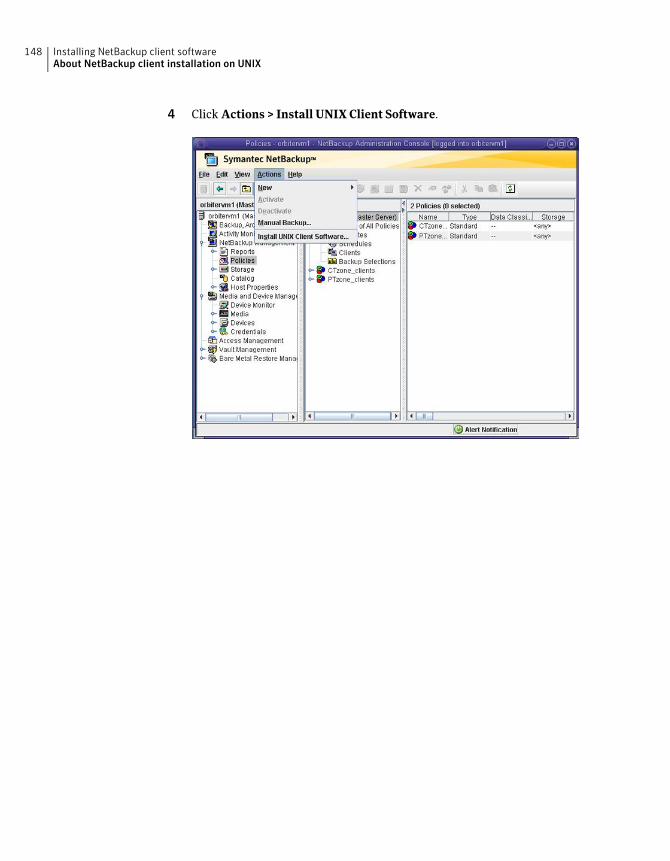
4 Click Actions > Install UNIX Client Software.
Installing NetBackup client softwareAbout NetBackup client installation on UNIX
148
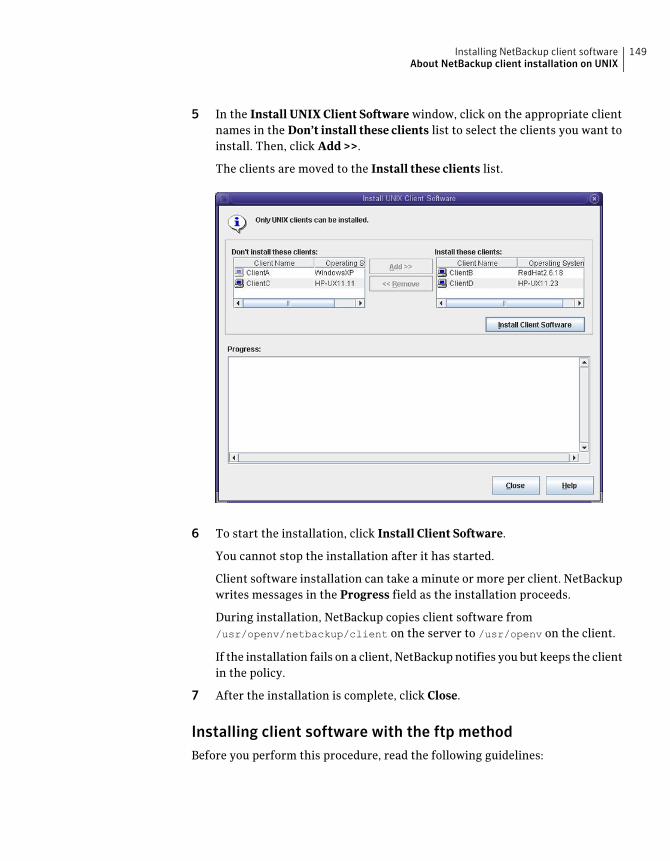
5 In the Install UNIX Client Software window, click on the appropriate clientnames in the Don’t install these clients list to select the clients you want toinstall. Then, click Add >>.
The clients are moved to the Install these clients list.
6 To start the installation, click Install Client Software.
You cannot stop the installation after it has started.
Client software installation can take a minute or more per client. NetBackupwrites messages in the Progress field as the installation proceeds.
During installation, NetBackup copies client software from/usr/openv/netbackup/client on the server to /usr/openv on the client.
If the installation fails on a client, NetBackup notifies you but keeps the clientin the policy.
7 After the installation is complete, click Close.
Installing client software with the ftp methodBefore you perform this procedure, read the following guidelines:
149Installing NetBackup client softwareAbout NetBackup client installation on UNIX
You must have a login ID and password that you can use toaccess the clients through FTP.
Access to clients
If you want to install client software to a location other thanthe default, you must first create and link the desireddirectory. Create the directory where you want the softwareto reside, and then create /usr/openv as a link to thatdirectory.
Client software location
Make sure that the clients are assigned to a backup policy.Backup policies
By default, this operating system version does not enablethe FTP daemon (ftpd), which is required. To enable thedaemon, run the following command:
launchctl load -w
/System/Library/LaunchDaemons/ftp.plist
Macintosh OS X
To install client software from a UNIX master server to UNIX clients with the ftpmethod
1 To move the client software from the server to the /tmp directory on theclient, run the install_client_files script on the NetBackup server.
Use one of the following commands:
■ To move software to one client at a time, enter the following command:/usr/openv/netbackup/bin/install_client_files ftp client user
The client is the host name of the client.
The user is the login ID that FTP requires on the client.
■ To move software to all clients at once:/usr/openv/netbackup/bin/install_client_files ftp ALL user
The ALL option specifies that you want to install all clients that areconfigured in any backup policy on the server.The user is the login ID required by FTP on the client.
If you have not set up a .netrc file, the install_client_files scriptprompts you for a password for each client.
2 After the script runs, the root user on each client computer must run thefollowing script:
sh /tmp/bp.<pid>/client_config
The pid is the process ID. The client_config script installs the binaries.
Installing NetBackup client softwareAbout NetBackup client installation on UNIX
150
Installing client software with the ssh methodThis client installation method is based on the usage of the SunSSH and theOpenSSH products, which must be at specific version and patch levels. For moreinformation about these patches, please refer to the Symantec NetBackup 7.5Release Notes, Chapter 3: Product dependencies, Table 3-1.
Before you perform this procedure, read the following guidelines:
To use the ssh method, the UNIX client must have sshdenabled and configured to allow root user logins.
SSH daemon (sshd)
If you want to install client software to a location other thanthe default, you must first create and link the desireddirectory. Create the directory where you want the clientsoftware to reside, and then create /usr/openv as a linkto that directory.
Client software location
Make sure that the clients are assigned to a backup policy.Backup policies
By default, this operating system version does not enablesshd. You must first enable this daemon to perform thefollowing procedure successfully.
■ In the System Preferences pane, select Sharing.
■ Select Remote Login to enable sshd.
Macintosh OS X
To install client software from a UNIX master server to UNIX clients with the sshmethod
◆ On the NetBackup server, run the install_client_files script.
Use one of the following commands:
■ To move software to only one client at a time:/usr/openv/netbackup/bin/install_client_files ssh client
The client is the host name of the client.
■ To move software to all clients at once:/usr/openv/netbackup/bin/install_client_files ssh ALL
The ALL option specifies that you want to install all clients that areconfigured in any backup policy on the server.
Installing client software with the sftp methodThis client installation method is based on the usage of the SunSSH and theOpenSSH products, which must be at specific version and patch levels. For more
151Installing NetBackup client softwareAbout NetBackup client installation on UNIX
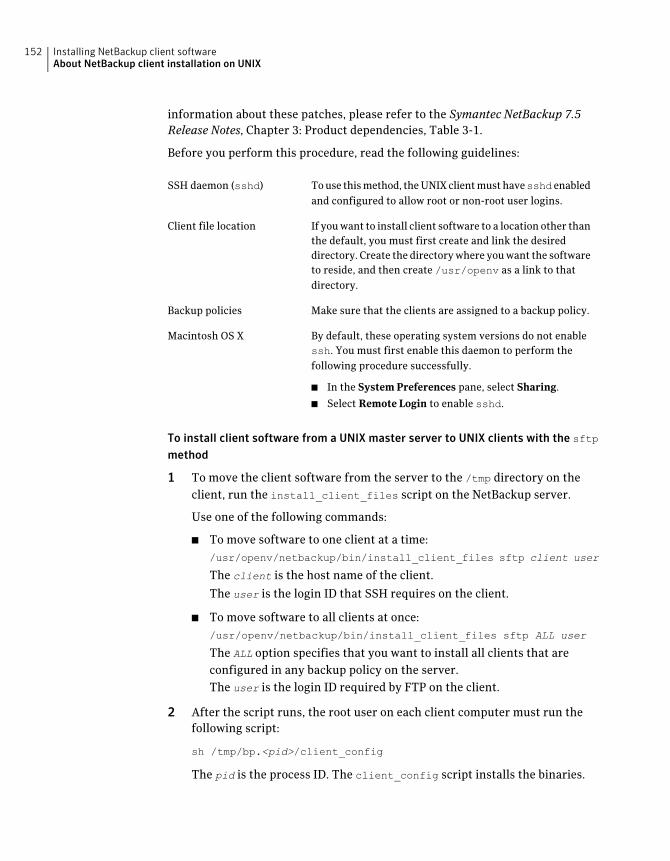
information about these patches, please refer to the Symantec NetBackup 7.5Release Notes, Chapter 3: Product dependencies, Table 3-1.
Before you perform this procedure, read the following guidelines:
To use this method, the UNIX client must havesshd enabledand configured to allow root or non-root user logins.
SSH daemon (sshd)
If you want to install client software to a location other thanthe default, you must first create and link the desireddirectory. Create the directory where you want the softwareto reside, and then create /usr/openv as a link to thatdirectory.
Client file location
Make sure that the clients are assigned to a backup policy.Backup policies
By default, these operating system versions do not enablessh. You must first enable this daemon to perform thefollowing procedure successfully.
■ In the System Preferences pane, select Sharing.
■ Select Remote Login to enable sshd.
Macintosh OS X
To install client software from a UNIX master server to UNIX clients with the sftpmethod
1 To move the client software from the server to the /tmp directory on theclient, run the install_client_files script on the NetBackup server.
Use one of the following commands:
■ To move software to one client at a time:/usr/openv/netbackup/bin/install_client_files sftp client user
The client is the host name of the client.
The user is the login ID that SSH requires on the client.
■ To move software to all clients at once:/usr/openv/netbackup/bin/install_client_files sftp ALL user
The ALL option specifies that you want to install all clients that areconfigured in any backup policy on the server.The user is the login ID required by FTP on the client.
2 After the script runs, the root user on each client computer must run thefollowing script:
sh /tmp/bp.<pid>/client_config
The pid is the process ID. The client_config script installs the binaries.
Installing NetBackup client softwareAbout NetBackup client installation on UNIX
152

Adding a UNIX client after initial server installationYou may want to add UNIX clients after the server installation if you forgot toselect one during the installation. You may also add a new UNIX client type toyour backup environment.
To install client software later, you must first install the NetBackup client softwareonto the NetBackup server.
To add UNIX client types to servers after initial installation
1 Use one of the following methods to start the installation script:
■ Insert the NetBackup UNIX Clients DVD into thedrive.
See “About the NetBackup media kit” on page 28.
■ If necessary, mount the DVD.
■ Enter the following command:
cd_directory/install
The cd_directory is the path to the directory whereyou can access the DVD.
DVD
■ Navigate to the location where the installationimages reside.
■ Enter the following command:
./install
ESD images (downloadedfiles)
2 When the following message appears, press Enter to continue:
Installing NetBackup Client Software.
Do you wish to continue? (y/n) [y]
The client binaries represent the operating system versions where the binarieswere compiled. The binaries typically function perfectly on later versions ofthe operating system. For example, HP PA-RISC 11.11 binaries also are usedon the HP PA-RISC 11.23 level of the operating system. The installationprocedure attempts to load the appropriate binaries for your system. If thescript does not recognize the local operating system, it presents choices.
153Installing NetBackup client softwareAbout NetBackup client installation on UNIX
3 Select the client type that you want to load and follow the prompts to installthat client type. Repeat as necessary until all of the client types you want areloaded.
Make sure that you load the software for all of the UNIX client types that youintend to install remotely from the server.
4 After the installation is complete, unmount the DVD.
5 Install the NetBackup client software on the clients you specified.
See “About remote installation methods for UNIX clients” on page 145.
Installing NetBackup client softwareAbout NetBackup client installation on UNIX
154
Removing NetBackup clientsoftware
This chapter includes the following topics:
■ About NetBackup software removal on UNIX clients
■ Removing NetBackup Windows client software
About NetBackup software removal on UNIX clientsUse the following guidelines when you remove NetBackup from UNIX clients:
When you remove NetBackup client software, PBX is not removed. You mustremove PBX manually. The client software removal procedure in this documentincludes a step that describes how to perform this task.
Warning:Do not remove PBX if your client uses other Symantec software productsthat require PBX to run.
Removing NetBackup from UNIX clientsUse the following procedure to remove all NetBackup client software componentsfrom a UNIX client.
To remove NetBackup software from a UNIX client
1 Log in to the client system as the root user.
2 Stop the NetBackup daemons by entering the following command:
/usr/openv/netbackup/bin/bp.kill_all
7Chapter
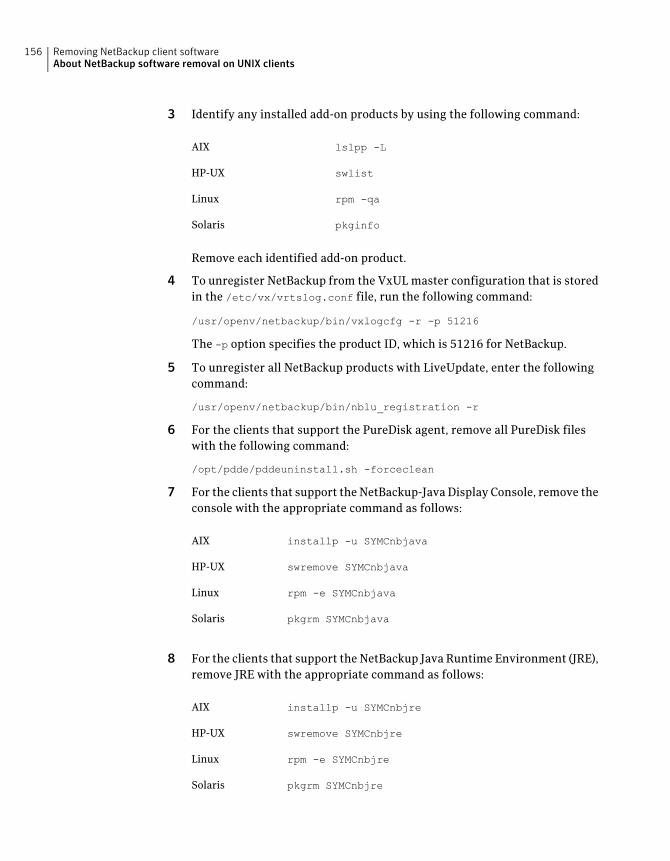
3 Identify any installed add-on products by using the following command:
lslpp -LAIX
swlistHP-UX
rpm -qaLinux
pkginfoSolaris
Remove each identified add-on product.
4 To unregister NetBackup from the VxUL master configuration that is storedin the /etc/vx/vrtslog.conf file, run the following command:
/usr/openv/netbackup/bin/vxlogcfg -r -p 51216
The -p option specifies the product ID, which is 51216 for NetBackup.
5 To unregister all NetBackup products with LiveUpdate, enter the followingcommand:
/usr/openv/netbackup/bin/nblu_registration -r
6 For the clients that support the PureDisk agent, remove all PureDisk fileswith the following command:
/opt/pdde/pddeuninstall.sh -forceclean
7 For the clients that support the NetBackup-Java Display Console, remove theconsole with the appropriate command as follows:
installp -u SYMCnbjavaAIX
swremove SYMCnbjavaHP-UX
rpm -e SYMCnbjavaLinux
pkgrm SYMCnbjavaSolaris
8 For the clients that support the NetBackup Java Runtime Environment (JRE),remove JRE with the appropriate command as follows:
installp -u SYMCnbjreAIX
swremove SYMCnbjreHP-UX
rpm -e SYMCnbjreLinux
pkgrm SYMCnbjreSolaris
Removing NetBackup client softwareAbout NetBackup software removal on UNIX clients
156
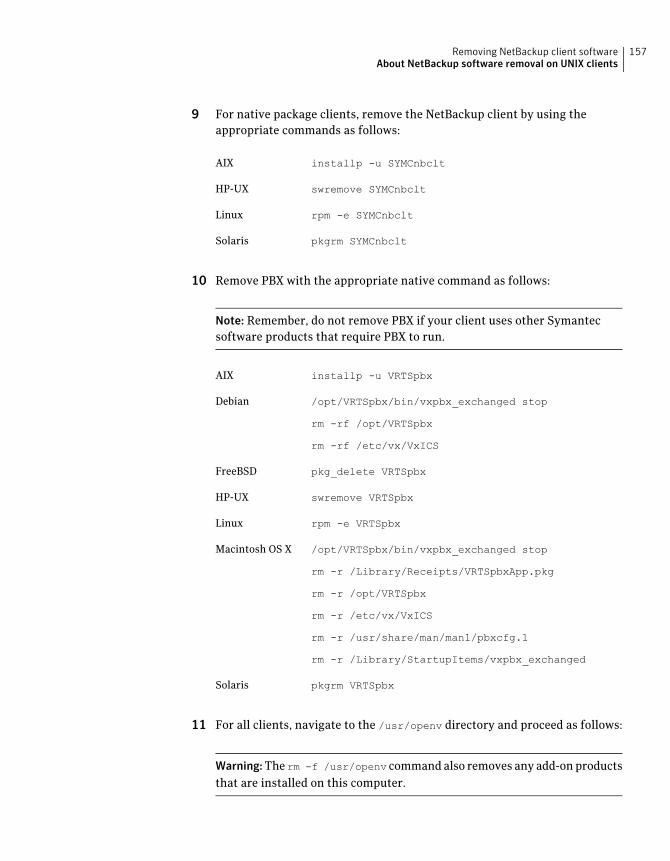
9 For native package clients, remove the NetBackup client by using theappropriate commands as follows:
installp -u SYMCnbcltAIX
swremove SYMCnbcltHP-UX
rpm -e SYMCnbcltLinux
pkgrm SYMCnbcltSolaris
10 Remove PBX with the appropriate native command as follows:
Note: Remember, do not remove PBX if your client uses other Symantecsoftware products that require PBX to run.
installp -u VRTSpbxAIX
/opt/VRTSpbx/bin/vxpbx_exchanged stop
rm -rf /opt/VRTSpbx
rm -rf /etc/vx/VxICS
Debian
pkg_delete VRTSpbxFreeBSD
swremove VRTSpbxHP-UX
rpm -e VRTSpbxLinux
/opt/VRTSpbx/bin/vxpbx_exchanged stop
rm -r /Library/Receipts/VRTSpbxApp.pkg
rm -r /opt/VRTSpbx
rm -r /etc/vx/VxICS
rm -r /usr/share/man/man1/pbxcfg.1
rm -r /Library/StartupItems/vxpbx_exchanged
Macintosh OS X
pkgrm VRTSpbxSolaris
11 For all clients, navigate to the /usr/openv directory and proceed as follows:
Warning:The rm -f /usr/openv command also removes any add-on productsthat are installed on this computer.
157Removing NetBackup client softwareAbout NetBackup software removal on UNIX clients
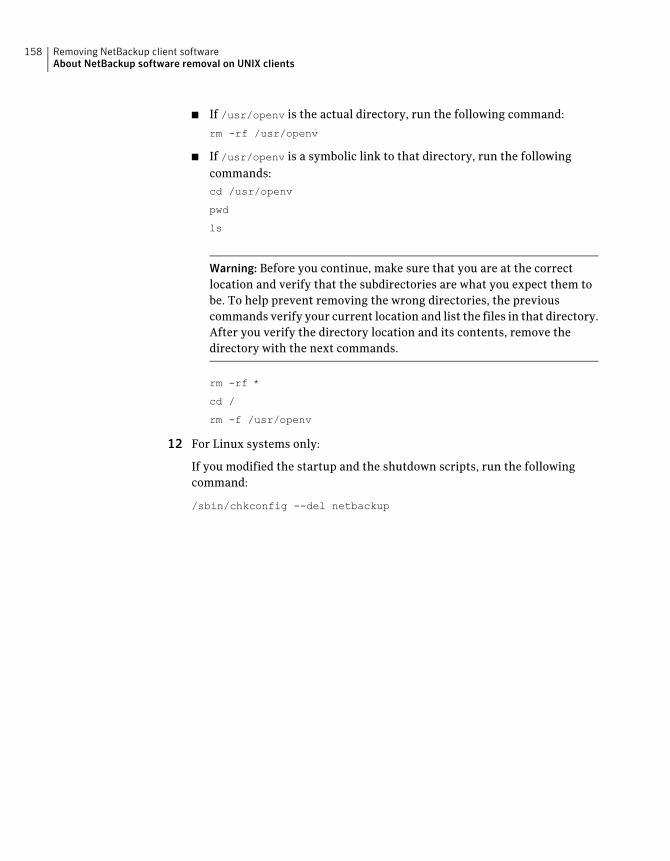
■ If /usr/openv is the actual directory, run the following command:
rm -rf /usr/openv
■ If /usr/openv is a symbolic link to that directory, run the followingcommands:cd /usr/openv
pwd
ls
Warning: Before you continue, make sure that you are at the correctlocation and verify that the subdirectories are what you expect them tobe. To help prevent removing the wrong directories, the previouscommands verify your current location and list the files in that directory.After you verify the directory location and its contents, remove thedirectory with the next commands.
rm -rf *
cd /
rm -f /usr/openv
12 For Linux systems only:
If you modified the startup and the shutdown scripts, run the followingcommand:
/sbin/chkconfig --del netbackup
Removing NetBackup client softwareAbout NetBackup software removal on UNIX clients
158
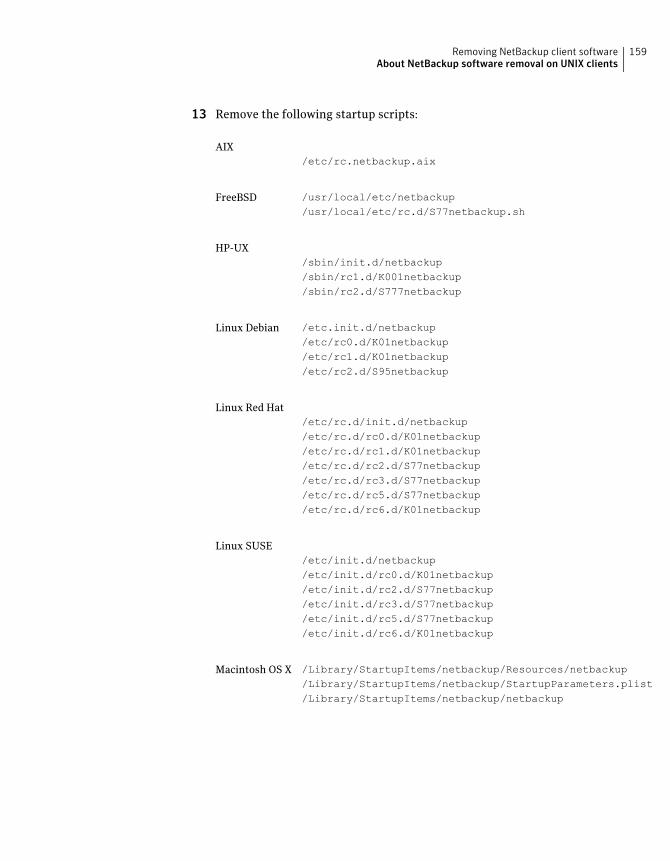
13 Remove the following startup scripts:
/etc/rc.netbackup.aixAIX
/usr/local/etc/netbackup/usr/local/etc/rc.d/S77netbackup.sh
FreeBSD
/sbin/init.d/netbackupHP-UX
/sbin/rc1.d/K001netbackup/sbin/rc2.d/S777netbackup
/etc.init.d/netbackup/etc/rc0.d/K01netbackup
Linux Debian
/etc/rc1.d/K01netbackup/etc/rc2.d/S95netbackup
/etc/rc.d/init.d/netbackupLinux Red Hat
/etc/rc.d/rc0.d/K01netbackup/etc/rc.d/rc1.d/K01netbackup/etc/rc.d/rc2.d/S77netbackup/etc/rc.d/rc3.d/S77netbackup/etc/rc.d/rc5.d/S77netbackup/etc/rc.d/rc6.d/K01netbackup
/etc/init.d/netbackupLinux SUSE
/etc/init.d/rc0.d/K01netbackup/etc/init.d/rc2.d/S77netbackup/etc/init.d/rc3.d/S77netbackup/etc/init.d/rc5.d/S77netbackup/etc/init.d/rc6.d/K01netbackup
/Library/StartupItems/netbackup/Resources/netbackup/Library/StartupItems/netbackup/StartupParameters.plist/Library/StartupItems/netbackup/netbackup
Macintosh OS X
159Removing NetBackup client softwareAbout NetBackup software removal on UNIX clients

/etc/init.d/netbackup/etc/rc0.d/K01netbackup/etc/rc1.d/K01netbackup/etc/rc2.d/S77netbackup
Other clients
14 For AIX systems only:
■ In the /etc/inittab file, remove the following NetBackup entry:
/etc/rc.netbackup.aix
■ In the /etc/rc.shutdown file, remove the following line:
/etc/rc.netbackup.aix stop
15 Remove Symantec LiveUpdate components as follows:
■ First, examine the following file to see if NetBackup is the only productthat uses LiveUpdate:/etc/Product.Catalog.JavaLiveUpdate
■ If no entries in the file contain the string NetBackup, run the followingcommands:/opt/Symantec/LiveUpdate/uninstall.sh -a
rm -f /etc/Symantec.conf
Note: Before you remove the following product catalog file, make surethat it is empty. The empty file size is equal to 0 bytes. If the productcatalog file is not empty, do not remove it because other Symantec productsstill require it.
rm -f /etc/Product.Catalog.JavaLiveUpdate
16 To remove the NetBackup-Java application state data for the root account,run the appropriate command as follows:
Warning: Do not insert a space between the slash character (/) and the periodor dot character (.) of "/.veritas". A space between these characters removesall of your files from the root level and beyond.
■ To remove the NetBackup-Java application state data for the root accountfor all releases, run the following command:/bin/rm -rf /.veritas
Removing NetBackup client softwareAbout NetBackup software removal on UNIX clients
160
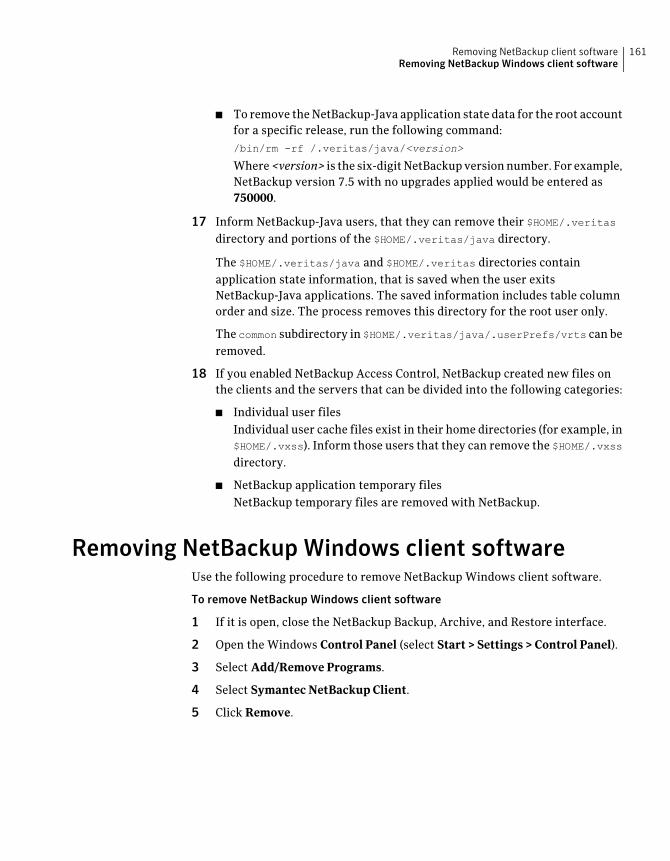
■ To remove the NetBackup-Java application state data for the root accountfor a specific release, run the following command:/bin/rm -rf /.veritas/java/<version>
Where<version> is the six-digit NetBackup version number. For example,NetBackup version 7.5 with no upgrades applied would be entered as750000.
17 Inform NetBackup-Java users, that they can remove their $HOME/.veritasdirectory and portions of the $HOME/.veritas/java directory.
The $HOME/.veritas/java and $HOME/.veritas directories containapplication state information, that is saved when the user exitsNetBackup-Java applications. The saved information includes table columnorder and size. The process removes this directory for the root user only.
The common subdirectory in $HOME/.veritas/java/.userPrefs/vrts can beremoved.
18 If you enabled NetBackup Access Control, NetBackup created new files onthe clients and the servers that can be divided into the following categories:
■ Individual user filesIndividual user cache files exist in their home directories (for example, in$HOME/.vxss). Inform those users that they can remove the $HOME/.vxssdirectory.
■ NetBackup application temporary filesNetBackup temporary files are removed with NetBackup.
Removing NetBackup Windows client softwareUse the following procedure to remove NetBackup Windows client software.
To remove NetBackup Windows client software
1 If it is open, close the NetBackup Backup, Archive, and Restore interface.
2 Open the Windows Control Panel (select Start > Settings > Control Panel).
3 Select Add/Remove Programs.
4 Select Symantec NetBackup Client.
5 Click Remove.
161Removing NetBackup client softwareRemoving NetBackup Windows client software

Removing NetBackup client softwareRemoving NetBackup Windows client software
162
Configuring NetBackup
This chapter includes the following topics:
■ About NetBackup server configuration
About NetBackup server configurationAfter all server software is installed, you are ready to configure NetBackup towork with the robotic and the storage devices in your environment. Remember,these devices must already be configured and recognized by the operating systembefore you can configure NetBackup.
See “About storage device configuration” on page 41.
Use the following guidelines when you configure NetBackup:
The procedures for configuring master and media serversare very similar. However, Symantec recommends that youconfigure all server information such as storage devicesand volumes from the master server. Following this orderhelps ensure that the master servers properly administerthe media servers.
Warning: Communication problems between the masterserver and the media server do not prevent you fromrunning the configuration wizards. Therefore, do not runthe wizards on the media server until the problems arecorrected. If you run any of the wizards when acommunication problem exists, the master server cannotrecognize the information that you enter. You must firstcorrect the problem. After you correct the problem, run theconfiguration wizards from the master server.
NetBackup Enterpriseservers
8Chapter
■ Configure devices on every node in the cluster.
■ Start by configuring all storage devices from the activenode so that they work with NetBackup.
■ For a NetBackup failover server, attach all of the devicesto each node in the cluster on which NetBackup isinstalled. Refer to the clustering vendor’s documentationfor information on how to migrate to another node.
■ Unless otherwise noted, configure NetBackup to use thevirtual host names of master servers and media serversin the cluster.
For complete information on to how to configure anadd-on product to fail over, see theNetBackupClusteredMaster Server Administrator's Guide.
Clustered environments
For initial NetBackup server configuration, Symantec recommends that you launchthe NetBackup Administration Console and click the GettingStarted icon. A seriesof wizards guide you through the following configuration procedures:
■ Configure Storage DevicesSee “About the Device Configuration Wizard” on page 166.
■ Configure VolumesSee “About the Volume Configuration Wizard” on page 168.
■ Configure the Catalog BackupSee “About the Catalog Backup Wizard” on page 169.
■ Create a Backup PolicySee “About the Backup Policy Configuration Wizard” on page 170.
If NetBackup is already configured and you want to change a specific area, clickthe appropriate wizard on the NetBackup Administration Console.
For complete information on all of the NetBackup wizards and how to configureNetBackup, see the NetBackup Administrator's Guide.
See “About storage device configuration” on page 41.
Starting the NetBackup Administration ConsoleUse the following procedures to open the NetBackup Administration Console toconfigure NetBackup. The GettingStarted wizard guides you through the primaryconfiguration steps to make NetBackup function.
Configuring NetBackupAbout NetBackup server configuration
164
Note: Other wizards are available from the initial NetBackup AdministrationConsole window that are not part of the GettingStarted wizard. For example, youcan configure disk pools or create a snapshot backup policy. See the NetBackupAdministrator’s Guide, Volume I for complete information about all NetBackupwizards.
On Windows systems, if you clicked the checkbox LaunchAdministrationConsolethat appears at the end of NetBackup installation, you can skip this procedure.
To start the NetBackup Administration Console on Windows
1 Log on to the NetBackup server as the Administrator.
2 Click Start>Programs>SymantecNetBackup>NetBackupAdministrationConsole.
3 To begin configuration, on the Administration Console, click GettingStarted.
The Getting Started screen appears and prompts you to begin deviceconfiguration.
Note: If you still need to configure devices to work with the operating system,close the wizard. You must first configure those devices as specified by thedevice and the operating system vendors.
To start the NetBackup Administration Console on UNIX
1 Log in to the NetBackup server as root.
For clustered environments, log in to the active node as root.
If you need to run the user interface on a computer other than the NetBackupserver, log on to that computer. For UNIX systems, log in as root.
2 Enter the following command:
/usr/openv/netbackup/bin/jnbSA &
3 Enter the password for root.
For clustered environments, when you log in to the NetBackup AdministrationConsole, specify the virtual host name in the Host field.
4 Click Login.
165Configuring NetBackupAbout NetBackup server configuration
5 To begin configuration, on the Administration Console, click GettingStarted.
6 On the initial Getting Started screen, review the content and click Next.
The following screen prompts you to Configure Storage Devices.
Note: If you still need to configure devices to work with the operating system,close the wizard. You must first configure those devices as specified by thedevice and the operating system vendors.
About the Device Configuration WizardBefore you can run backups, you must define your storage devices for NetBackup.This wizard guides you through this process. However, you must be certain thatyou have configured your storage devices correctly for your operating system.NetBackup cannot function reliably unless devices are installed and configuredcorrectly.
See “About storage device configuration” on page 41.
For clustered environments, begin configuring all storage devices from the activenode. For a NetBackup failover server, Symantec recommends that you attach allof the devices to every node on which NetBackup is installed.
For complete instructions, refer to the NetBackup Clustered Master ServerAdministrator's Guide.
This wizard takes you through the following processes:
■ Scans the hosts for backup devices
■ Verifies the devices that were automatically detected
■ Verifies and corrects the drive configuration
■ Updates the device configuration
The wizard presents the following information when you configure devices:
Configuring NetBackupAbout NetBackup server configuration
166
■ When the wizard displays the DeviceHosts screen, youmust specify the hosts on which to auto-discover andconfigure devices (NetBackup Enterprise servers only).
■ When the wizard displays the Backup Devices screen,confirm that the list of devices is complete and accurate.If a known backup device does not appear in this list,take the following action:
■ Verify that the backup device is physically attachedto the host.
■ Verify that all installation procedures specified bythe device and by the operating system vendor havebeen performed successfully.
■ Verify that all drives correspond to the proper device.If you need to move a drive, select the drive and dragit to the correct location.
■ For clusters, ensure that you perform storage deviceconfiguration on each node. Begin on the active node,then move the NetBackup active node to another nodeand perform the storage device configuration on thatnode. Repeat for each node of the cluster on whichNetBackup runs.
Note:By default, robotic daemons and NetBackup add-onproducts do not cause NetBackup to failover if they fail.You can configure robotic devices and NetBackup add-onproducts to fail over NetBackup if the robot or the add-onproduct fails. Before you configure NetBackup to failover,robots must be configured and recognized by theoperating system. For complete details about fail overconfiguration, refer to the NetBackup Clustered MasterServer Administrator’s Guide.
Device configuration
167Configuring NetBackupAbout NetBackup server configuration
■ You define storage units from the Configure StorageUnits screen. If your system does not have a tape device,you can store data on a disk by defining disk storageunits.
■ When you enter a path for a storage unit, the followingrules apply:
■ Use the correct path separators (forward slash (/) forUNIX and backward slash (\) for Windows).
■ Use a colon (:) to specify a drive separation onWindows platforms.
■ Use the following characters only:
Alphabetic characters (ASCII A-Z, a-z)
Numeric characters (0-9)
Miscellaneous characters: plus (+), minus (-),underscore (_), or period (.)
Defining storage units
See “About the Volume Configuration Wizard” on page 168.
About the Volume Configuration WizardAfter you have configured your storage devices, the Getting Started Wizard startsthe Volume Configuration Wizard. However, if you only have disk storagecapability, NetBackup skips this wizard.
This wizard lets you initiate an inventory of each configured robot. NetBackupautomatically updates the volume database if it finds new robotic media duringthe inventory. In addition, you can define new volumes for use in stand-alonedrives.
For complete information about volumes or volume configuration for stand-alonedrives, refer to the NetBackup Administrator's Guide, Volume I.
Note: For clustered environments, configure volumes from the active node.
This wizard lets you do the following tasks:
■ Select a device for volume configuration
■ Perform an inventory of the robot
■ Create new volumes
■ Create new volume groups
The wizard presents the following information when you configure volumes andperform inventory:
Configuring NetBackupAbout NetBackup server configuration
168
■ NetBackup conducts an inventory of the robot or thedevice that you selected. To view the results after theinventory has completed, see the Results: field.
■ After the device inventory has completed, the wizardprompts you to identify which device slots containcleaning media.
If you upgraded NetBackup and have pre-existingbarcode rules, the barcode reader automatically detectsthe designated slots for the cleaning media. If you donot designate cleaning slots, NetBackup considers allmedia (including cleaning media) as typical media andtries to overwrite it.
■ After the inventory has completed, you are prompted toidentify which device slots contain cleaning media.
If you identify one or more slots as cleaning media inthe Identify Cleaning Media screen, you see the RobotInventory(CleaningMedia) screen. This screen displaysthe results after the software updates the EMM database.
If you do not designate cleaning media, NetBackupconsiders all media to be typical media (includingcleaning media) and tries to overwrite it.
Robot or device inventory
■ Specify the number of volumes for the device.
■ The wizard does not let you configure cleaning tapes forstandalone drives.
Standalone drives
When you specify multiple drive types, the following aretrue:
■ Media that is written by one robot drive may not workin any other drive. If this situation occurs, NetBackupconsiders the robot to have more than one type of drive.
■ If the robot has more than one type of drive, the wizardcannot inventory the robot.
Multiple drive types
See “About the Catalog Backup Wizard” on page 169.
About the Catalog Backup WizardThe NetBackup catalog contains information about your configuration and thelocations of backed up files and directories. If a disk fails and your catalog is lost,a catalog backup makes it easy to restore your data and resume your backupschedule.
Therefore, you must configure a catalog backup policy before any data gets backedup.
169Configuring NetBackupAbout NetBackup server configuration
This wizard lets you create a policy for an online, hot catalog backup. Online, hotcatalog backups can back up the catalog while normal client backups are inprogress.
A catalog backup policy lets you specify the following information:
■ The destinations for the catalog backupA backup destination can be any configured storage device. For additionaldisaster recovery protection, you can specify a second location for your catalogbackup.
Note: Although NetBackup supports catalog backup to disk, Symantecrecommends that you back up the catalog to removable media that gets storedoffsite.
■ When the catalog backup occurs
■ The location of the disaster recovery file that is needed to recover from thecatalog backup
Use the following guidelines to configure a catalog backup:
■ Configure a catalog backup policy before any other files or data are backed up.
■ For clustered systems, configure the catalog backup policy from the activenode.
For complete details about catalog backups, see the chapter "Protecting theNetBackup catalog" in the NetBackup Administrator's Guide, Volume I.
For instructions on how to configure a catalog backup in clustered environments,see the NetBackup Clustered Master Server Administrator's Guide.
About the Backup Policy Configuration WizardThis wizard lets you define a backup policy for a group of one or more clients. Forclustered environments, configure the policy from the active node.
The wizard lets you specify the following:
■ Policy names and types
■ Clients
■ Files and directories to back up
■ Backup types
■ Backup rotations
Configuring NetBackupAbout NetBackup server configuration
170
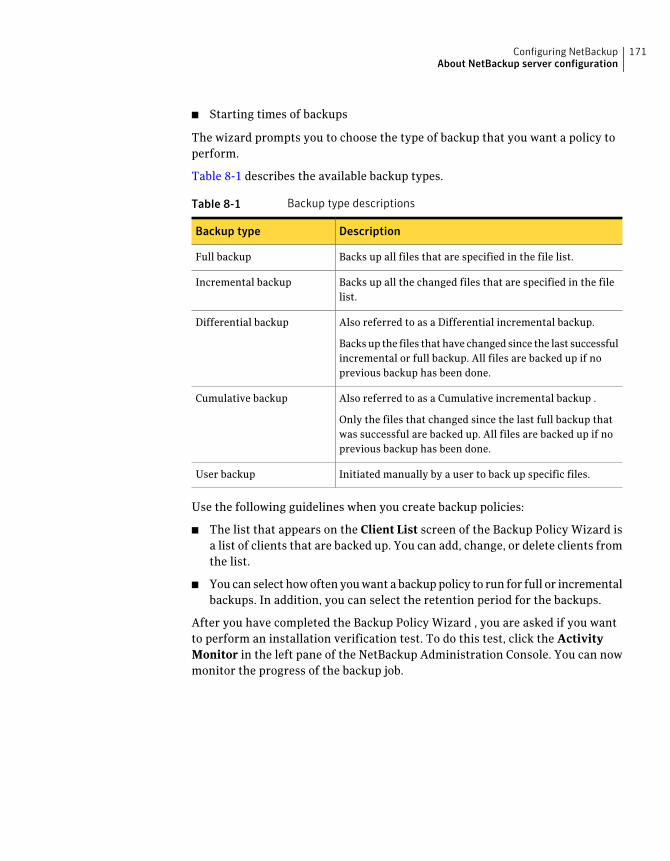
■ Starting times of backups
The wizard prompts you to choose the type of backup that you want a policy toperform.
Table 8-1 describes the available backup types.
Table 8-1 Backup type descriptions
DescriptionBackup type
Backs up all files that are specified in the file list.Full backup
Backs up all the changed files that are specified in the filelist.
Incremental backup
Also referred to as a Differential incremental backup.
Backs up the files that have changed since the last successfulincremental or full backup. All files are backed up if noprevious backup has been done.
Differential backup
Also referred to as a Cumulative incremental backup .
Only the files that changed since the last full backup thatwas successful are backed up. All files are backed up if noprevious backup has been done.
Cumulative backup
Initiated manually by a user to back up specific files.User backup
Use the following guidelines when you create backup policies:
■ The list that appears on the Client List screen of the Backup Policy Wizard isa list of clients that are backed up. You can add, change, or delete clients fromthe list.
■ You can select how often you want a backup policy to run for full or incrementalbackups. In addition, you can select the retention period for the backups.
After you have completed the Backup Policy Wizard , you are asked if you wantto perform an installation verification test. To do this test, click the ActivityMonitor in the left pane of the NetBackup Administration Console. You can nowmonitor the progress of the backup job.
171Configuring NetBackupAbout NetBackup server configuration

Configuring NetBackupAbout NetBackup server configuration
172
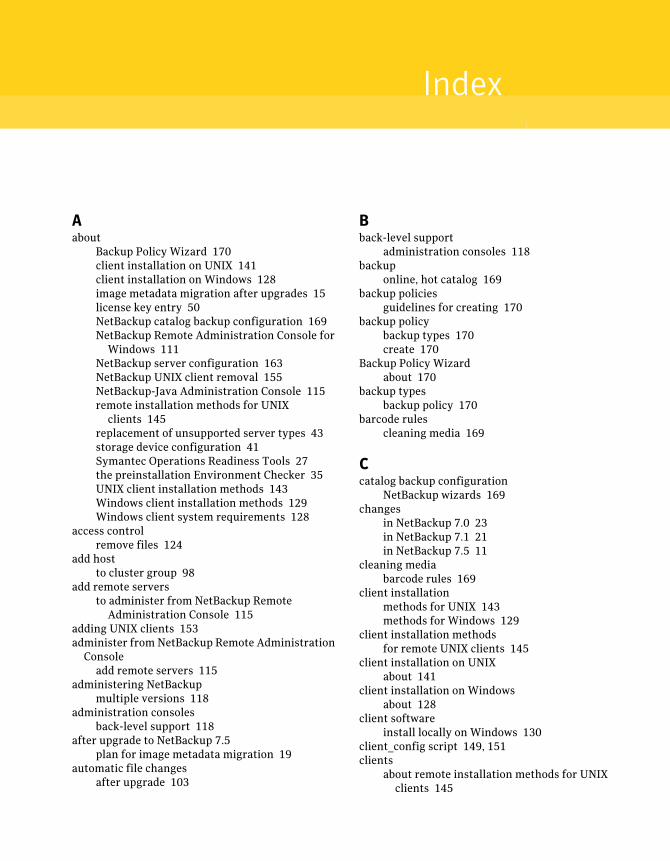
Aabout
Backup Policy Wizard 170client installation on UNIX 141client installation on Windows 128image metadata migration after upgrades 15license key entry 50NetBackup catalog backup configuration 169NetBackup Remote Administration Console for
Windows 111NetBackup server configuration 163NetBackup UNIX client removal 155NetBackup-Java Administration Console 115remote installation methods for UNIX
clients 145replacement of unsupported server types 43storage device configuration 41Symantec Operations Readiness Tools 27the preinstallation Environment Checker 35UNIX client installation methods 143Windows client installation methods 129Windows client system requirements 128
access controlremove files 124
add hostto cluster group 98
add remote serversto administer from NetBackup Remote
Administration Console 115adding UNIX clients 153administer from NetBackup Remote Administration
Consoleadd remote servers 115
administering NetBackupmultiple versions 118
administration consolesback-level support 118
after upgrade to NetBackup 7.5plan for image metadata migration 19
automatic file changesafter upgrade 103
Bback-level support
administration consoles 118backup
online, hot catalog 169backup policies
guidelines for creating 170backup policy
backup types 170create 170
Backup Policy Wizardabout 170
backup typesbackup policy 170
barcode rulescleaning media 169
Ccatalog backup configuration
NetBackup wizards 169changes
in NetBackup 7.0 23in NetBackup 7.1 21in NetBackup 7.5 11
cleaning mediabarcode rules 169
client installationmethods for UNIX 143methods for Windows 129
client installation methodsfor remote UNIX clients 145
client installation on UNIXabout 141
client installation on Windowsabout 128
client softwareinstall locally on Windows 130
client_config script 149, 151clients
about remote installation methods for UNIXclients 145
Index
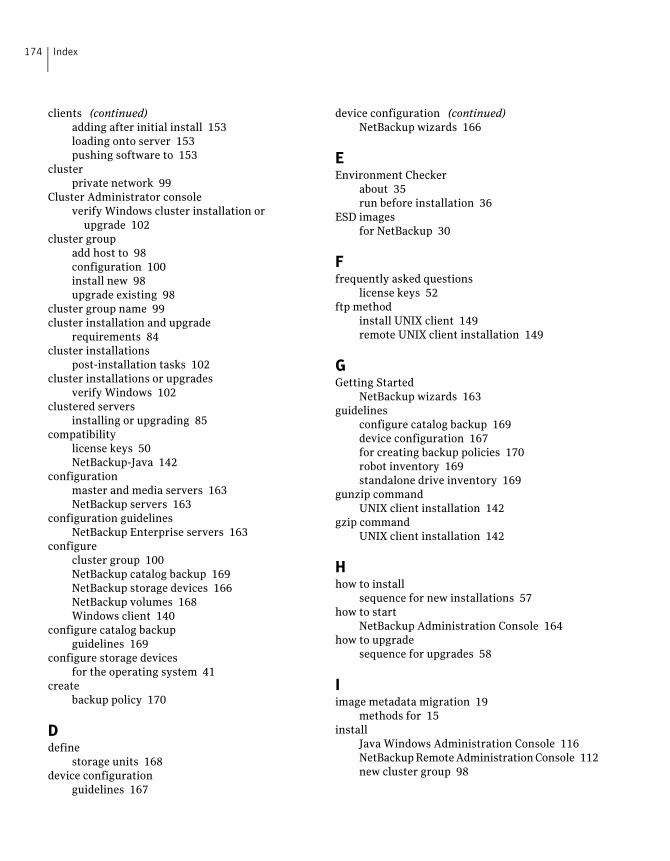
clients (continued)adding after initial install 153loading onto server 153pushing software to 153
clusterprivate network 99
Cluster Administrator consoleverify Windows cluster installation or
upgrade 102cluster group
add host to 98configuration 100install new 98upgrade existing 98
cluster group name 99cluster installation and upgrade
requirements 84cluster installations
post-installation tasks 102cluster installations or upgrades
verify Windows 102clustered servers
installing or upgrading 85compatibility
license keys 50NetBackup-Java 142
configurationmaster and media servers 163NetBackup servers 163
configuration guidelinesNetBackup Enterprise servers 163
configurecluster group 100NetBackup catalog backup 169NetBackup storage devices 166NetBackup volumes 168Windows client 140
configure catalog backupguidelines 169
configure storage devicesfor the operating system 41
createbackup policy 170
Ddefine
storage units 168device configuration
guidelines 167
device configuration (continued)NetBackup wizards 166
EEnvironment Checker
about 35run before installation 36
ESD imagesfor NetBackup 30
Ffrequently asked questions
license keys 52ftp method
install UNIX client 149remote UNIX client installation 149
GGetting Started
NetBackup wizards 163guidelines
configure catalog backup 169device configuration 167for creating backup policies 170robot inventory 169standalone drive inventory 169
gunzip commandUNIX client installation 142
gzip commandUNIX client installation 142
Hhow to install
sequence for new installations 57how to start
NetBackup Administration Console 164how to upgrade
sequence for upgrades 58
Iimage metadata migration 19
methods for 15install
Java Windows Administration Console 116NetBackup Remote Administration Console 112new cluster group 98
Index174
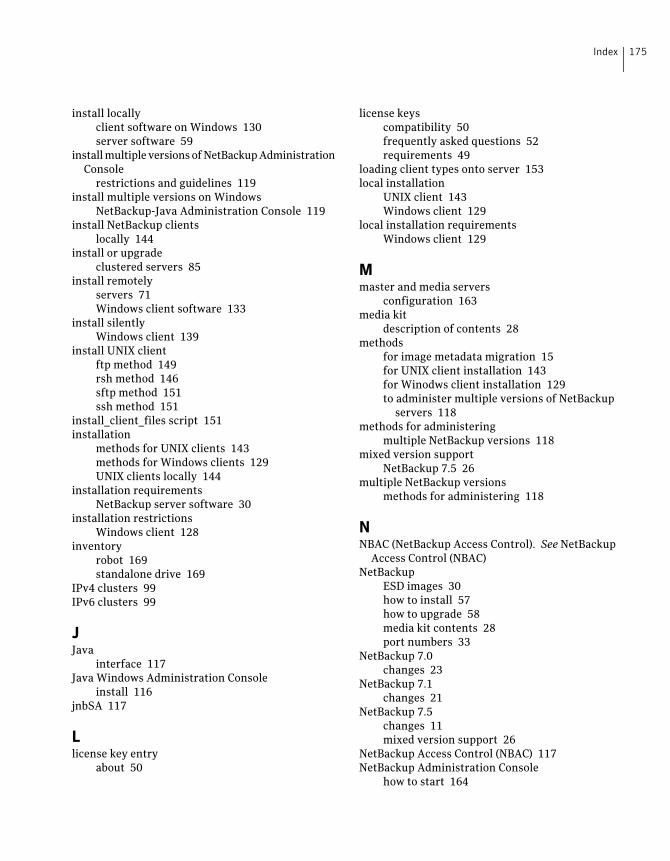
install locallyclient software on Windows 130server software 59
install multiple versions of NetBackup AdministrationConsole
restrictions and guidelines 119install multiple versions on Windows
NetBackup-Java Administration Console 119install NetBackup clients
locally 144install or upgrade
clustered servers 85install remotely
servers 71Windows client software 133
install silentlyWindows client 139
install UNIX clientftp method 149rsh method 146sftp method 151ssh method 151
install_client_files script 151installation
methods for UNIX clients 143methods for Windows clients 129UNIX clients locally 144
installation requirementsNetBackup server software 30
installation restrictionsWindows client 128
inventoryrobot 169standalone drive 169
IPv4 clusters 99IPv6 clusters 99
JJava
interface 117Java Windows Administration Console
install 116jnbSA 117
Llicense key entry
about 50
license keyscompatibility 50frequently asked questions 52requirements 49
loading client types onto server 153local installation
UNIX client 143Windows client 129
local installation requirementsWindows client 129
Mmaster and media servers
configuration 163media kit
description of contents 28methods
for image metadata migration 15for UNIX client installation 143for Winodws client installation 129to administer multiple versions of NetBackup
servers 118methods for administering
multiple NetBackup versions 118mixed version support
NetBackup 7.5 26multiple NetBackup versions
methods for administering 118
NNBAC (NetBackup Access Control). See NetBackup
Access Control (NBAC)NetBackup
ESD images 30how to install 57how to upgrade 58media kit contents 28port numbers 33
NetBackup 7.0changes 23
NetBackup 7.1changes 21
NetBackup 7.5changes 11mixed version support 26
NetBackup Access Control (NBAC) 117NetBackup Administration Console
how to start 164
175Index
NetBackup Administration Console (continued)of different versions 117
NetBackup catalog 32NetBackup catalog backup configuration
about 169NetBackup client software
add a UNIX client type 153install locally 144
NetBackup Enterprise serversconfiguration guidelines 163
NetBackup LiveUpdateremove from Windows systems 125
NetBackup media kitabout 28
NetBackup Remote Administration Consoleconfigure server lists for 114installation 112
NetBackup Remote Administration Console forWindows
about 111NetBackup server configuration
about 163NetBackup server requirements
Windows client 129NetBackup server software
installation requirements 30NetBackup servers
configuration 163remove software 122upgrade to NetBackup Enterprise servers 108
NetBackup storage devicesconfigure 166
NetBackup volumesconfigure 168
NetBackup wizardsbackup policy configuration 170catalog backup configuration 169device configuration 166Getting Started 163volume configuration 168
NetBackup-Javacompatibility 142
NetBackup-Java Administration Consoleabout 115install multiple versions on Windows 119remove multiple versions on Windows 120
new installationssequence for 57
NTFS partition 32
Oonline, hot catalog
backup 169operating system
configure storage devices for 41
PPBX
about removal from UNIX clients 155ping command 31plan for image metadata migration
after upgrade to NetBackup 7.5 19post-installation tasks
cluster installations 102preinstallation
about the Environment Checker 35running the Environment Checker 36
private networkcluster 99
public network 99push installation
UNIX client 144pushing client software 153
Rremote
about installation methods for UNIX clients 145systems
administering different versions 117remote installation
about methods for UNIX clients 145UNIX client 144Windows client 129
remote installation requirementsWindows client 129
remote UNIX client installationftp method 149rsh method 146sftp method 151ssh method 151
removeserver software in clusters 125
remove filesaccess control 124
remove from Windows systemsNetBackup LiveUpdate 125
remove multiple versions on WindowsNetBackup-Java Administration Console 120
Index176
remove NetBackupUNIX clients 155
remove NetBackup softwareabout UNIX clients 155Windows client 161
remove softwareNetBackup servers 122
replaceunsupported master servers 45unsupported media servers 46
requirementscluster installation and upgrade 84license keys 49
restartafter silent installation or upgrade 108
restrictions and guidelinesinstall multiple versions of NetBackup
Administration Console 119robot
inventory 169robot inventory
guidelines 169robot types
locate supported 42rsh method
install UNIX client 146remote UNIX client installation 146
Sscripts
client_config 149, 151install_client_files 151install_client_files using ftp 149install_client_files using sftp 151install_client_files using ssh 151
sequencefor new installations 57for upgrades 58
server configurationWindows 2003/2008 31
server listsconfigure for NetBackup Remote Administration
Console 114server software
install locally 59remove in clusters 125
serversinstall remotely 71silent installation or upgrade 104
sftp methodinstall UNIX client 151remote UNIX client installation 151
Shared Storage Option (SSO)storing device information 68, 96
silent installation or upgraderestart after 108servers 104
silent InstallationsWindows client 130
SORTSymantec Operations Readiness Tools 27
ssh methodinstall UNIX client 151remote UNIX client installation 151
standalone driveinventory 169
standalone drive inventoryguidelines 169
storage device configurationabout 41
storage unitsdefine 168
store device informationShared Storage Option (SSO) 68, 96
subnet mask 99supported robot types
locate for this release 42Symantec Operations Readiness Tools (SORT)
about 27system requirements
Windows clients 128
UUNIX client
about removing PBX 155local installation 143push installation 144remote installation 144
UNIX client installation methodsabout 143
UNIX clientsinstallation methods 143installing locally 144, 153remove NetBackup 155
unsupported master servershow to replace 45
unsupported media servershow to replace 46
177Index
unsupported server typesabout replacement 43
upgradeautomatic file changes after 103existing cluster group 98NetBackup servers to NetBackup Enterprise
servers 108upgrades
sequence for 58upgrades to NetBackup 7.5
about image metadata migration after 15user permissions
user-directed operations 128Windows client 128
user-directed operationsuser permissions 128
Vverify
Windows cluster installations or upgrades 102verify Windows cluster installation or upgrade
Cluster Administrator console 102virtual host name 99virtual IP address 99volume configuration
NetBackup wizards 168
WWindows 2003/2008
server configuration 31Windows client
configure 140install silently 139installation restrictions 128local installation 129local installation requirements 129NetBackup server requirements 129remote installation 129remote installation requirements 129remove NetBackup software 161silent installation 130user permissions 128
Windows client installation methodsabout 129
Windows client softwareinstall remotely 133
Windows client system requirementsabout 128
Windows clientsinstallation methods 129system requirements 128
Index178