Embed Size (px)
Citation preview
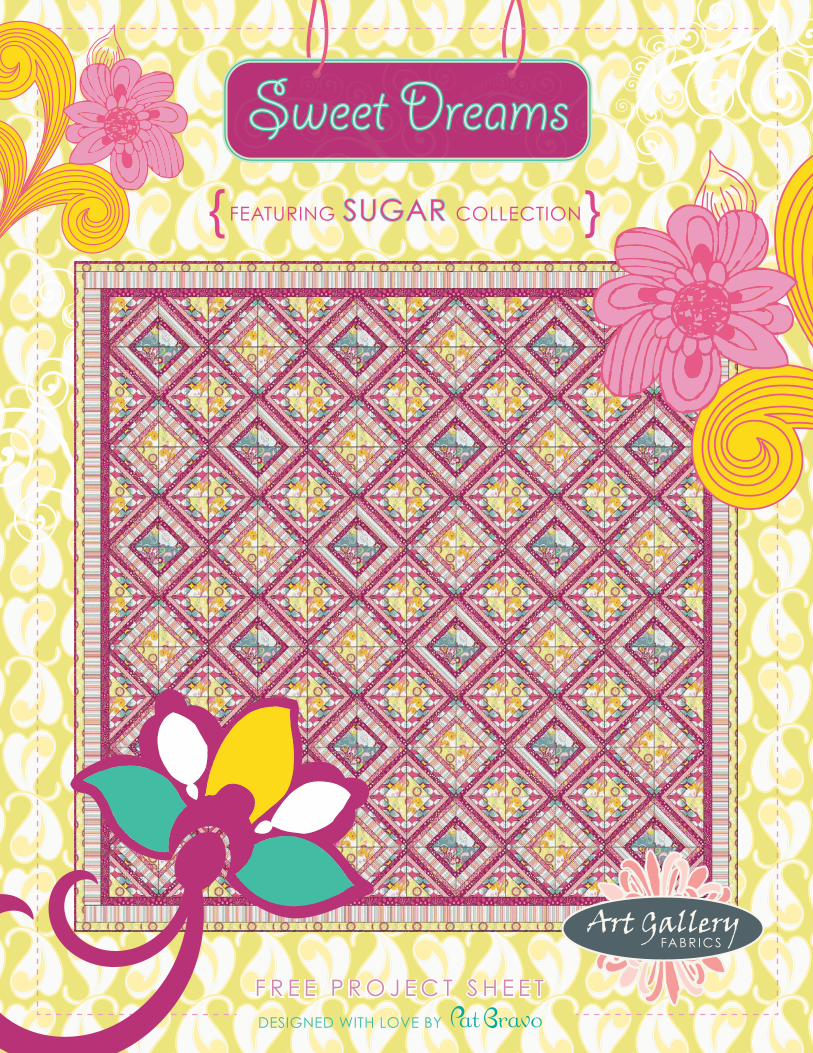
{FEATURING SUGAR COLLECTION}
F R E E P R O J E C T S H E E TF R E E P R O J E C T S H E E TDESIGNED WITH LOVE BY
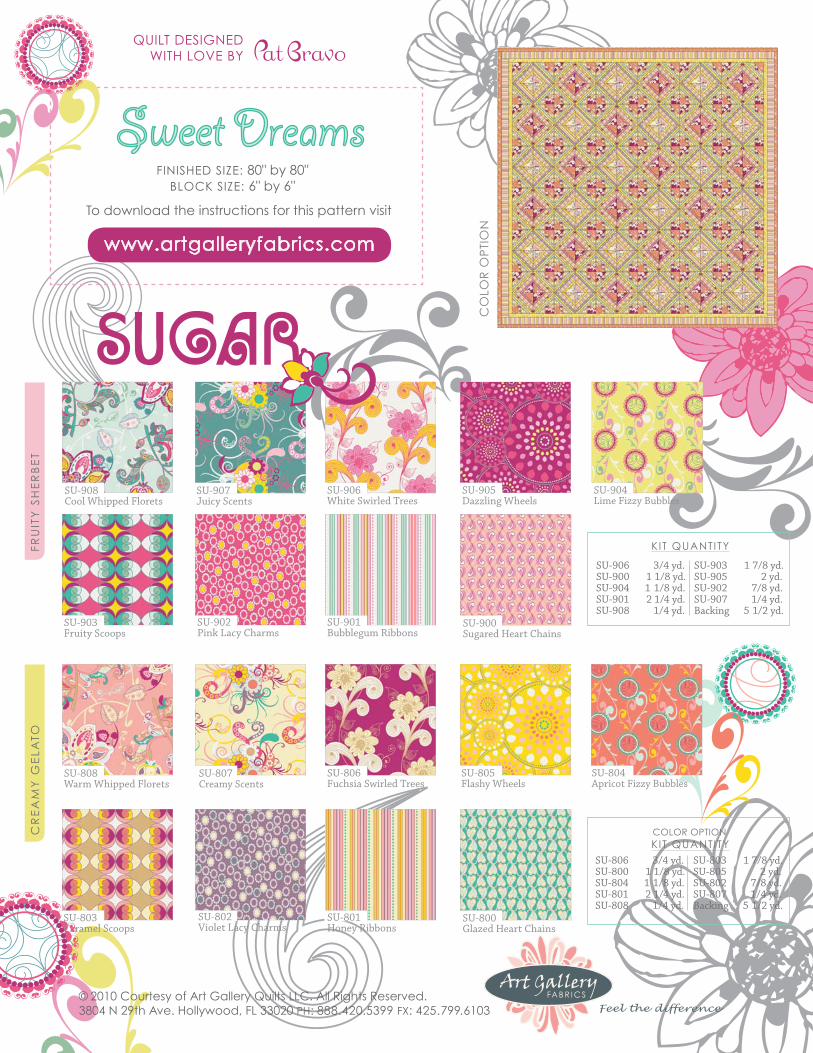
To download the instructions for this pattern visit
CR
EA
MY
GE
LATO
FR
UIT
Y S
HE
RB
ET
FINISHED SIzE: 80" by 80"BLOCk SIzE: 6" by 6"
© 2010 Courtesy of Art Gallery Quilts LLC. All Rights Reserved.3804 N 29th Ave. Hollywood, FL 33020 PH: 888.420.5399 FX: 425.799.6103
CO
LOR
OP
TIO
N
www.artgalleryfabrics.com
SU-906 3/4 yd.SU-900 1 1/8 yd.SU-904 1 1/8 yd. SU-901 2 1/4 yd.SU-908 1/4 yd.
SU-903 1 7/8 yd. SU-905 2 yd. SU-902 7/8 yd.SU-907 1/4 yd.Backing 5 1/2 yd.
kIT QUANTITY
QUILT DESIGNEDWITH LOVE BY
SU-806 3/4 yd.SU-800 1 1/8 yd.SU-804 1 1/8 yd. SU-801 2 1/4 yd.SU-808 1/4 yd.
SU-803 1 7/8 yd. SU-805 2 yd. SU-802 7/8 yd.SU-807 1/4 yd.Backing 5 1/2 yd.
kIT QUANTITYCOLOR OPTION
SU-908Cool Whipped Florets
SU-907Juicy Scents
SU-808Warm Whipped Florets
SU-906White Swirled Trees
SU-806Fuchsia Swirled Trees
SU-904Lime Fizzy Bubbles
SU-903Fruity Scoops
SU-905Dazzling Wheels
SU-804Apricot Fizzy Bubbles
SU-803Caramel Scoops
SU-805Flashy Wheels
SU-807 Creamy Scents
SU-902Pink Lacy Charms
SU-901Bubblegum Ribbons
SU-801Honey Ribbons
SU-802Violet Lacy Charms
SU-900Sugared Heart Chains
SU-800Glazed Heart Chains

FABRIC REQUIREMENTS
COLLECTION
C U T T I N G D I R E C T I O N S
Fabric A SU-906 3/4 yd. Fabric B SU-900 1 1/8 yd. Fabric C SU-904 1 1/8 yd. Fabric D SU-901 2 1/4 yd.Fabric E SU-908 1/4 yd. Fabric F SU-903 1 7/8 yd. Fabric G SU-905 2 yd. Fabric H SU-902 7/8 yd. Fabric I SU-907 1/4 yd.
B L O C K C O N S T R U C T I O NThis quilt was made from blocks composed of four units of strips cut in 45° angle and set forming diamonds. It was made in two color combinations. (¼" seam allowances are included). (sew fabrics right sides together and with
a ¼" seam allowance)
(This block is made from 4 units of strips set in a 45° angle, shown in DIAGRAM 1)
•For units 1 and 4, fold one strip each from fabrics F-B-G-H-D-G and one triangle each from fabrics F-I in half and press with an iron to mark a crease to all of them. DIAGRAM 1
All 36 blocks are constructed the same way
FOR BORDERS CUTFor Inner BorderTwo (2) 72 ½" by 1 ½" strips from fabric G* Two (2) 74 ½" by 1 ½" strips from fabric G*
For Middle BorderTwo (2) 74 ½" by 2 ½" strips from fabric D*Two (2) 78 ½" by 2 ½" strips from fabric D*
For Outer BorderTwo (2) 78 ½" by 1 ½" strips from fabric C*Two (2) 80 ½" by 1 ½" strips from fabric C*
* (in order to get these long strips you need to join two Width Of Fabric strips together)
Backing SU-903 5½ yd. (suggested)
Finished Size: 80" by 80"Block Size: 12" by 12"
FABRICS DESIGNED BY PATRICIA BRAVO QUILT CONSTRUCTED BY PRISCILLA FOR
ART GALLERY FABRICS
QUILT DESIGNED WITH LOVE BY
DIAGRAM 1
DIAGRAM 2
4 units of the block
Binding fabric included SU-905 (FABRIC G)
IMPORTANT HINT FOR FABRIC PLACEMENT:All the letters shown in color pink represent the pieces or patches but ALSO represent the fabric styles explained in “FABRIC REQUIREMENTS” (notice they are also represented in the same color).
FOR BLOCK COMBINATION 1, CUT (18 blocks total)• Eighteen (18) 4 ¼" squares from fabric A,
cut them once diagonally to get 36 triangles.• Eighteen (18) 4 ¼" squares from fabric I,
cut them once diagonally to get 36 triangles.• Eighteen (18) 4 ¼" squares from fabric C,
cut them once diagonally to get 36 triangles.• Eighteen (18) 4 ¼" squares from fabric E,
cut them once diagonally to get 36 triangles.• Seventy-two 8 ½" by 1 ½" strips from fabric F• Seventy-two 9 ½" by 1" strips from fabric B• Seventy-two 10 ¾" by 1" strips from fabric G• Seventy-two 10 ¾" by 1" strips from fabric H• Seventy-two 9 ½" by 1 ½" strips from fabric D• Seventy-two 7 ½" by 1" strips from fabric G
FOR BLOCK COMBINATION 1 (18 blocks total)
FOR BLOCKS COMBINATION 2, CUT (18 blocks total)• Thirty-six (36) 4 ¼" squares from fabric A,
cut them once diagonally to get 72 triangles.• Thirty-six (36) 4 ¼” squares from fabric C,
cut them once diagonally to get 72 triangles.• Seventy-two 8 ½” by 1 ½” strips from fabric F• Seventy-two 9 ½” by 1” strips from fabric B• Seventy-two 10 ¾” by 1” strips from fabric G• Seventy-two 10 ¾” by 1” strips from fabric F• Seventy-two 9 ½” by 1 ½” strips from fabric D• Seventy-two 7 ½” by 1” strips from fabric H
crease
1 2
3 4
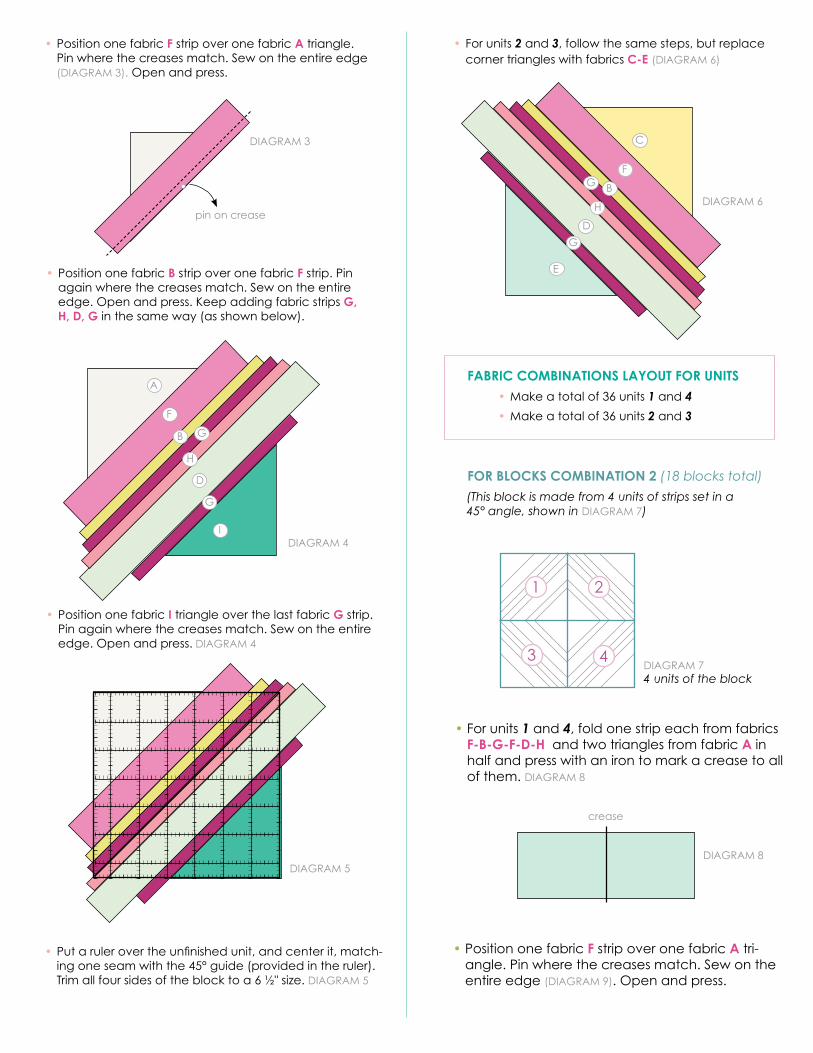
• Position one fabric B strip over one fabric F strip. Pin again where the creases match. Sew on the entire edge. Open and press. keep adding fabric strips G, H, D, G in the same way (as shown below).
• Position one fabric I triangle over the last fabric G strip. Pin again where the creases match. Sew on the entire edge. Open and press. DIAGRAM 4
• Putarulerovertheunfinishedunit,andcenterit,match-ing one seam with the 45° guide (provided in the ruler). Trim all four sides of the block to a 6 ½" size. DIAGRAM 5
• Position one fabric F strip over one fabric A triangle. Pin where the creases match. Sew on the entire edge (DIAGRAM 3). Open and press.
pin on crease
DIAGRAM 3
DIAGRAM 6
DIAGRAM 4
DIAGRAM 5
DIAGRAM 7
• Make a total of 36 units 1 and 4
• Make a total of 36 units 2 and 3
FABRIC COMBINATIONS LAYOUT FOR UNITS
• For units 2 and 3, follow the same steps, but replace corner triangles with fabrics C-E (DIAGRAM 6)
FOR BLOCKS COMBINATION 2 (18 blocks total)
A
F
B G
H
D
G
I
C
F
BG
H
D
G
E
• Position one fabric F strip over one fabric A tri-angle. Pin where the creases match. Sew on the entire edge (DIAGRAM 9). Open and press.
(This block is made from 4 units of strips set in a 45° angle, shown in DIAGRAM 7)
• For units 1 and 4, fold one strip each from fabrics F-B-G-F-D-H and two triangles from fabric A in half and press with an iron to mark a crease to all of them. DIAGRAM 8
DIAGRAM 8
4 units of the block
crease
1 2
3 4

DIAGRAM 9
DIAGRAM 10
• Position one fabric B strip over one fabric F strip. Pin again where the creases match. Sew on the entire edge. Open and press. keep adding fabric strips G, F, D, H in the same way. DIAGRAM 10
• Position one fabric A triangle over the last fabric H strip. Pin again where the creases match. Sew on the entire edge. Open and press. DIAGRAM 10
• Putarulerovertheunfinishedunit,andcenterit,match-ing one seam with the 45° guide (provided in the ruler). Trim all four sides of the block to a 6 ½” size. DIAGRAM 11
DIAGRAM 11
DIAGRAM 12
• Make a total of 36 units 1 and 4
• To make block with combination 1, position one unit 2 on top of a unit 1 and match the intersec-tions with pins. Sew along the edge with a ¼” seam. Repeat the process with unit 4 on top of unit 3. Open both units and press. Position the lower unit on top of the upper unit and locking intersections with pins, sew over the entire edge. Open andpress.YounowfinishedyourBlock Combination 1. Make a total of 18 Blocks.
• To make block with combination 2, position one unit 2 on top of a unit 1 and match the intersec-tions with pins. Sew along the edge with a ¼” seam. Repeat the process with unit 4 on top of unit 3. Open both units and press. Position the lower unit on top of the upper unit and locking intersections with pins, sew over the entire edge. Open andpress.YounowfinishedyourBlock Combination 2. Make a total of 18 Blocks.
• Make a total of 36 units 2 and 3
FABRIC COMBINATIONS LAYOUT FOR UNITS
• For units 2 and 3, follow the same steps, but replace corner triangles with fabric’s C. DIAGRAM 12
U N I T S A S S E M B L Y(sew all fabrics right sides together)
FOR BLOCKS COMBINATION 1 (18 blocks total)
FOR BLOCKS COMBINATION 2 (18 blocks total)
A
F
B G
F
D
H
A
pin on crease
C
F
B
GF
D
H
C
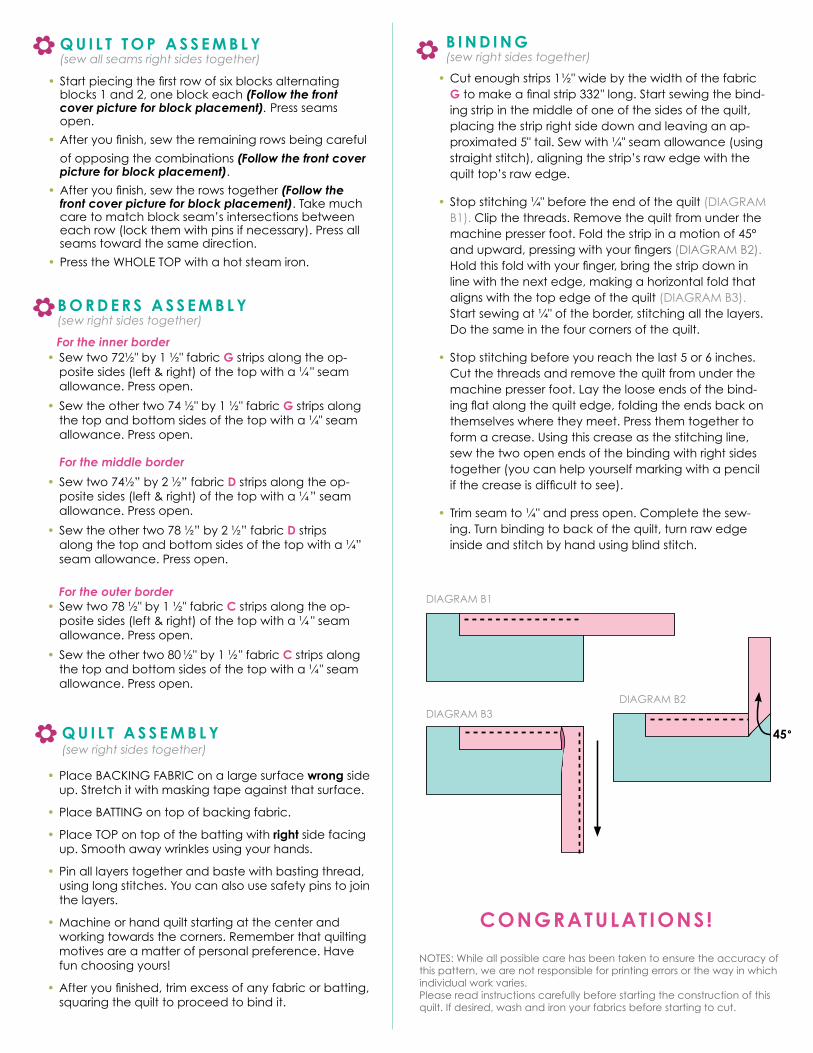
Q U I L T T O P A S S E M B L Y
B O R D E R S A S S E M B L Y
B I N D I N G
Q U I L T A S S E M B L Y
CONGRATULATIONS!
• Sew two 72½" by 1 ½" fabric G strips along the op-posite sides (left & right) of the top with a ¼" seam allowance. Press open.
• Sew the other two 74 ½" by 1 ½" fabric G strips along the top and bottom sides of the top with a ¼" seam allowance. Press open.
• Sew two 74½” by 2 ½” fabric D strips along the op-posite sides (left & right) of the top with a ¼” seam allowance. Press open.
• Sew the other two 78 ½” by 2 ½” fabric D strips along the top and bottom sides of the top with a ¼” seam allowance. Press open.
• Sew two 78 ½" by 1 ½" fabric C strips along the op-posite sides (left & right) of the top with a ¼ " seam allowance. Press open.
• Sew the other two 80 ½" by 1 ½" fabric C strips along the top and bottom sides of the top with a ¼" seam allowance. Press open.
•Startpiecingthefirstrowofsixblocksalternatingblocks 1 and 2, one block each (Follow the front cover picture for block placement). Press seams open.
•Afteryoufinish,sewtheremainingrowsbeingcareful
of opposing the combinations (Follow the front cover picture for block placement).
•Afteryoufinish,sewtherowstogether(Follow the front cover picture for block placement). Take much care to match block seam’s intersections between each row (lock them with pins if necessary). Press all seams toward the same direction.
•Press the WHOLE TOP with a hot steam iron.
• Place BACkING FABRIC on a large surface wrong side up. Stretch it with masking tape against that surface.
• Place BATTING on top of backing fabric.
• Place TOP on top of the batting with right side facing up. Smooth away wrinkles using your hands.
• Pin all layers together and baste with basting thread, using long stitches. You can also use safety pins to join the layers.
• Machine or hand quilt starting at the center and working towards the corners. Remember that quilting motives are a matter of personal preference. Have fun choosing yours!
•Afteryoufinished,trimexcessofanyfabricorbatting, squaring the quilt to proceed to bind it.
• Cut enough strips 1½" wide by the width of the fabric Gtomakeafinalstrip332"long.Startsewingthebind-ing strip in the middle of one of the sides of the quilt, placing the strip right side down and leaving an ap-proximated 5" tail. Sew with ¼" seam allowance (using straight stitch), aligning the strip’s raw edge with the quilt top’s raw edge.
• Stop stitching ¼" before the end of the quilt (DIAGRAM B1). Clip the threads. Remove the quilt from under the machine presser foot. Fold the strip in a motion of 45° andupward,pressingwithyourfingers (DIAGRAM B2). Holdthisfoldwithyourfinger,bringthestripdowninline with the next edge, making a horizontal fold that aligns with the top edge of the quilt (DIAGRAM B3). Start sewing at ¼" of the border, stitching all the layers. Do the same in the four corners of the quilt.
• Stop stitching before you reach the last 5 or 6 inches. Cut the threads and remove the quilt from under the machine presser foot. Lay the loose ends of the bind-ingflatalongthequiltedge,foldingtheendsbackonthemselves where they meet. Press them together to form a crease. Using this crease as the stitching line, sew the two open ends of the binding with right sides together (you can help yourself marking with a pencil ifthecreaseisdifficulttosee).
• Trim seam to ¼" and press open. Complete the sew-ing. Turn binding to back of the quilt, turn raw edge inside and stitch by hand using blind stitch.
(sew all seams right sides together)
(sew right sides together)
(sew right sides together)
(sew right sides together)
For the inner border
For the middle border
For the outer border
45˚
DIAGRAM B1
DIAGRAM B2DIAGRAM B3
NOTES: While all possible care has been taken to ensure the accuracy of this pattern, we are not responsible for printing errors or the way in which individual work varies.Please read instructions carefully before starting the construction of this quilt. If desired, wash and iron your fabrics before starting to cut.


![Sweet Dreams Eurythmics (Ssaa)[1]](https://img.pdfslide.us/doc/110x75/54f4b4f54a7959f82d8b466d/sweet-dreams-eurythmics-ssaa1.jpg)