Embed Size (px)
Citation preview

SW AP315B: Interface
Expense Processing
Web Based Training
Rev 10/17/2016

Welcome
Welcome to Cardinal Training!
This training provides employees with the skills and information necessary to use Cardinal. It is not intended to replace
existing Commonwealth and/or agency policies.
In this course, we will show you the Expenses functional area.
These training materials include diagrams, charts, screenshots, etc., that clarify various Cardinal tasks and processes. The
screenshots are taken from Cardinal and show pages that not all users can access. They are included here so you can see
how your specific responsibilities relate to the overall transaction or process being discussed. See the Cardinal Statewide
Security Handbook for a list of available roles and descriptions.
2

Course Objectives
After completing this course, you will be able to:
• Understand key travel and expense concepts
• Understand the business processes in the Expenses module
• Explain the processes for interfaced cash advances and expense reports
• Create and submit a Cash Advance request online
• View Cash Advance status
• Create and submit an Expense Report online
• View Expense Report status
• Access key reports, queries and online inquiries
Assessment questions will check for your understanding.
3

Introduction
The Accounts Payable functional area of Cardinal is
composed of two modules:
Accounts Payable
The Accounts Payable (AP) module processes
payments to vendors for goods and/or services
received.
Expenses
Payments to employees for non-salary related items
(i.e., travel and other business expense
reimbursements) are made through the Expenses
module.
This course will focus on processing employee
expenses for interfacing agencies.
4

Lesson 1: Processing Employee Expenses Overview
In this lesson, you will learn about the following topics:
• Key Concepts
• Expenses Process
5

Key Concepts
Some key concepts in processing travel and expenses include:
• Accounts Payable (AP) Vouchers: Cardinal does not use AP vouchers to reimburse your agency employees. In
Cardinal, employee reimbursements for your agency employees are processed directly through the Expenses module.
Employees are not set up as vendors in Cardinal when being reimbursed by their agency.
• Employee Profile Update: A profile must exist for an employee prior to an employee being reimbursed, or being
granted access to Cardinal. Employee profiles house important organizational data such as business unit, department,
and default ChartFields. Profiles also contain EDI banking information if applicable. EDI information is added /
updated through a daily interface from the Commonwealth Integrated Payroll Personnel System (CIPPS).
• Proxy / Authorized User: In Cardinal, a proxy (proxies) is assigned to enter employee expense transactions. Most
employees will have proxies other than themselves who will enter and process their expense related transactions.
• Attachment Capability: In Cardinal, you can add attachments (such as scanned receipts) to Travel Authorizations,
Cash Advance requests, or Expense Reports. Note that the scanned documents do not serve as official
documentation for auditing purposes, so the original hard copy of the documents must be maintained.
6

Key Concepts (continued)
• Applying Cash Advances: As a Cardinal Expenses user, you apply any Cash Advances to the employee against the
related Expense Report that is filed after the travel is completed. Cardinal then calculates the amount owed back to
the employee or the amount owed to the Commonwealth.
• Workflow: Workflow routes items to the designated approver’s / approvers’ worklist and describes the path of
approvers required for an item to continue being processed in Cardinal.
• Accounting Distribution: ChartField string that defines how a transaction is charged (i.e., which fund, account,
program, department, etc.).
• Payment Check Cashing: A process that ensures all payments, including vouchers, employee expenses and cash
advances, are checked against available cash before being released for payment each night.
7

Proxies
In Cardinal, you must be a proxy (authorized user) in order to create, update or view expense transactions for that
employee. Only a proxy can create or view Travel Authorizations, Cash Advances and Expense Reports.
Some agency employees may serve as proxies for themselves and create their own expense transactions. In other
instances, one or more employees may serve as proxies for other agency employees. Only proxies can access expense
transactions.
The proxy enters all expense related information in the system including Travel Authorizations, Cash Advances and
Expense Reports. Agencies’ policies and procedures determine how the expense information is provided to the proxy for
their employees. For example, an agency may have a specific form that is used to record the transactions or use the forms
that are available on the Statewide Cardinal Website.
8

Expenses Processing Overview
Travel Authorizations Processing
If a Travel Authorization is required by State and/or Agency policy, interfacing agencies have the option of deciding whether
to use an internal agency process or entering online in Cardinal. Travel Authorizations are used as a means of approving
employees’ plans to travel and/or incur related expenses.
Online Travel Authorizations entered in Cardinal must be entered and approved prior to travel. Cardinal does not allow
authorization of trips that have already occurred. Online Travel Authorizations cannot be used to populate an uploaded
Expense Report. If you are interested in learning more about how the online Travel Authorization process works for
agencies that process Employee Expenses online, please refer to the AP315A Processing Employee Expenses for
Online Agencies course for more details.
Cash Advance Processing
Cash Advances provide funds to an employee prior to travel in order to minimize the impact of business travel on an
employee’s personal finances. Cash advances are created in your agency system and uploaded into Cardinal.
Expense Reporting Processing
Expense Reports are used reimburse your agency’s employees business related travel and/or other business expenses.
Expense Reports are created in your agency system and uploaded into Cardinal.
9

Interface Cash Advance Process
Interfacing agencies create Cash Advances in their agency systems which are then uploaded to Cardinal.
Transactions with valid and complete data are loaded into Cardinal for edit checking then routes for online approval in
Cardinal. Cash advances must be approved in Cardinal. Once they are approved, Cardinal creates the related transaction
entries and generates the cash advance payments to employees.
Cash Advances that contain missing or invalid data are not successfully loaded into Cardinal. They are listed on the Cash
Advance Upload Error Report. See the Cash Advance Interface Processing job aid for additional details on viewing
cash advances and error processing for interfaced transactions.
Below is a high level diagram of the Interfacing Agencies Cash Advance process.
10
Cash Advance
Created in Agency
System
Upload Cash
Advance File to
Cardinal
Edit Check
Cash Advance
Route for
Approval &
Approve
Cash
Advance
Paid to
Employee
Payment
Cash
Checking
Process

Interface Expense Report Process
Interfacing agencies create Expense Reports in their agency systems and follow their agency guidelines for approval.
Their Expense Report approvals occur at their agency, outside of Cardinal. Once approved, the expenses data is
captured in a file and uploaded to Cardinal for processing.
Cardinal does not route interfaced agency Expense Reports through workflow for approval by the agency (agency level
workflow). However, if an Expense Report is updated online in Cardinal, it will be routed for approval and it must be
approved in Cardinal.
Transactions with valid and complete data are loaded into Cardinal for edit and budget checking. Cardinal then creates
the related transaction entries and generates payments to reimburse employees.
Expense transactions that contain missing or invalid data are not successfully loaded in Cardinal. They are listed on the
Expense Upload Error Report. See the Expense Interface Processing job aid for additional details on viewing
expense reports and error processing for interfaced transactions.
Below is a high level diagram of the Interfacing Agencies Expense process.
11
Expense Report
Created in Agency
System
Upload
Expense File
to Cardinal
Edit & Budget
Check Expense
Reports
Post
Liabilities Pay Employee
Payment
Check
Cashing
Process

Lesson 1: Checkpoint
Now is your opportunity to check your understanding of the course material. Read the question, select your answer and click
Submit to see if you chose the correct response.
12

13

15

15

16

Lesson 1: Summary
In this lesson, you learned:
• Key concepts in the Expenses module
• Travel authorizations cannot be uploaded into Cardinal; they can only be entered online. Typically interfacing agencies
handle authorizations for travel offline.
• The Interface Process for Cash Advances and Expense Reports.
• Cash Advances and Expense reports go through the Payment Cash Checking process before payment is made to the
employee.
17

Lesson 2: Cash Advance
In this lesson, you will learn about the following topics:
• Understanding interfaced Cash Advances
• Creating and submitting a Cash Advance request online
• Viewing Cash Advance status
18

Understanding Interfaced Cash Advances
All of your agency’s employee travel and business related expenses are processed in the Expenses module. You can not
use petty cash for payments to your employees. You can only use petty cash when you enter vouchers to pay vendors. In
Cardinal, your agency employees should not be vendors.
Cash Advance requests require approval online in Cardinal. Interfacing agencies may upload a cash advance request or
enter it online. Once a Cash Advance is approved, Cardinal creates related accounting entries, based on the employee’s
profile. Then the amount of the advance is issued by check or deposited in the employee’s bank account. Employee bank
account information is uploaded from CIPPS daily and can only be viewed by the DOA EDI Coordinator.
Note: Employee Profiles created by the Employee Profile Upload will be updated with EDI banking information daily.
19

Understanding Interfaced Cash Advances (continued)
Interfacing Agencies send their agency Cash Advance transactions to Cardinal using the Cash Advance Upload process.
Transactions that do not pass edit checks are not successfully loaded into Cardinal. Cardinal generates an Cash Advance
Upload Error Report nightly that displays details for all rejected transactions. Rejected transactions are reviewed and
corrected by the agency, before being re-sent to Cardinal.
Interfaced Cash Advances successfully uploaded into Cardinal are routed by workflow for agency level approval in Cardinal.
See the Cash Advance Interface Processing job aid for additional details.
20

Creating a Cash Advance Request
Cash advances can be uploaded into Cardinal, or created online. To create a cash advance online in Cardinal, access the
Create Cash Advance Report page, using the following path:
Main Menu > Employee Self Service > Travel and Expense Center > Cash Advance > Create
Use the Create Cash Advance Report page to enter the Cash Advance request information for the employee.
21
Click on image to enlarge

22

Creating a Cash Advance Request
The following fields are required when entering a Cash
Advance request online:
• Description - enter a description for the Cash Advance
request.
• Business Purpose - use the dropdown menu to select
the business purpose for the advance.
• Source - select System Check, which is the only option.
This is not necessarily how the employee will receive
payment. Payment method is determined by the
employee profile setup.
• Description field next to the Source – this field is not
required and is used to capture additional information
about the request if needed.
• Amount - enter the amount of the advance.
• Comment and Reference – use these fields to enter any
additional information about the advance
23
Click on image to enlarge

Saving a Cash Advance Request
After you complete a Cash Advance request you can either
Save for Later or Submit. Cardinal assigns an Advance ID to
the request. You cannot assign your own Advance ID when
creating a Cash Advance online.
To save the request:
• Click the Save for Later button on the Create Cash
Advance Report page. This saves the request and
allows you to make changes. The request must be
submitted to go through the approval process.
• When the Save for Later button is clicked, the Advance
ID populates and the page changes to Modify Cash
Advance Report. At this point, the request is saved and
can be modified if necessary by using the following path:
Main Menu>Employee Self Service>Travel and
Expense Center>Cash Advance>Modify
24

Submitting a Cash Advance Request
To submit the request:
• Click the Submit button on the Create Cash Advance Report page.
• A Submit Confirmation page displays.
• Click the OK button to confirm the submission.
25

Submitting a Cash Advance Request (continued)
• Once you click the OK button on the Submit Confirmation page, the Cash Advance is checked that amounts are
within the Cash Advance Level for the employee and for missing fields. After updates are made, the Cash Advance
will need to be submitted again.
• The report is routed through workflow to the approver’s worklist. If more than one approval is required, Cardinal
automatically routes your report to the designated approvers.
• The approver(s) may approve, deny, or send back the Cash Advance. If the request is not approved, the approver
should indicate the reason(s) in the message comments.
• Once approved, the cash advance will be submitted for payment in the nightly batch.
• The Payment Cash Checking application ensures all payments including vouchers and expenses are checked against
available cash before being released for payment. See these job aids:
• Payment Cash Checking- Overview
• Payment Check Cashing – Reports
• Payment Check Cashing – Fund Level Processing Rules Update
• Payment Check Cashing – Updating Transaction Level Overrides
26

Viewing the Cash Advance Status
Proxies for an employee can view the status on the View Cash Advance Report page. You can access this page using the
following path:
Main Menu > Employee Self Service > Travel and Expense Center > Cash Advance > View
27

Viewing the Cash Advance Status (continued)
The current status displays in the Status field on the View Cash
Advance Report page shown here.
The Totals section displays the running total of the Cash
Advance.
The Pending Actions section displays the approval levels and
names of the approvers that have not yet taken action on the
cash advance.
The Action History list, at the bottom of the page, provides a
history of the submission, approval, and other actions on the
request.
Once you submit an employee’s Cash Advance request, you
can only update it if an approver sends it back to you.
To update or delete a Cash Advance, see the job aid entitled
Updating and Deleting Expense Transactions.
28
Click on image to enlarge
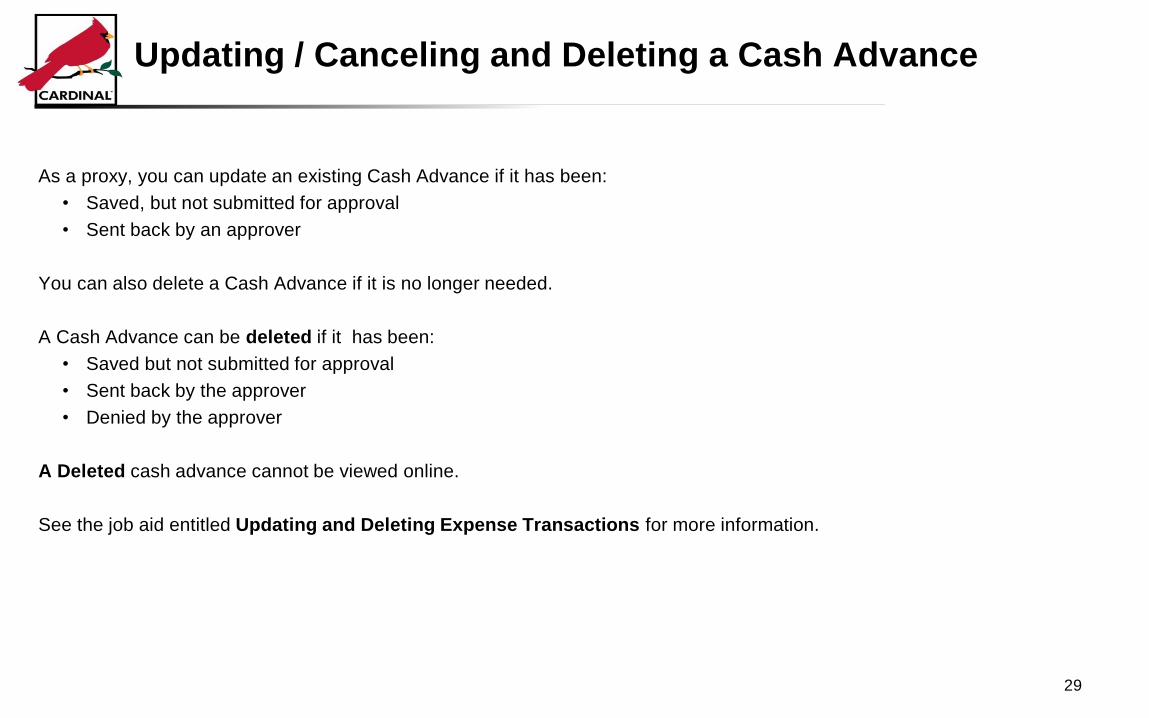
Updating / Canceling and Deleting a Cash Advance
As a proxy, you can update an existing Cash Advance if it has been:
• Saved, but not submitted for approval
• Sent back by an approver
You can also delete a Cash Advance if it is no longer needed.
A Cash Advance can be deleted if it has been:
• Saved but not submitted for approval
• Sent back by the approver
• Denied by the approver
A Deleted cash advance cannot be viewed online.
See the job aid entitled Updating and Deleting Expense Transactions for more information.
29

Lesson 2: Checkpoint
Now is your opportunity to check your understanding of the course material. Read the question, select your answer and click
Submit to see if you chose the correct response.
30

31

32

Lesson 2: Summary
In this lesson, you learned:
• The process for interfaced Cash Advances
• The steps to create and submit a Cash Advance request online
• How to view the status of a Cash Advance
33
Lesson 3: Expense Report
In this lesson, you will learn about the following topics:
• Understanding the process for interfaced Expense Reports
• Creating and submitting an Expense Report online
• Viewing the status of an Expense Report
34

Understanding the Process for Interfaced Expense
Reports
The Expense Report data is uploaded into Cardinal via interface. The interface program checks the Expense Report
transaction for completeness and valid values. If there is an error the Expense Report is rejected and will not be entered
into Cardinal. Once the agency makes corrections within their internal system, it must be resubmitted.
Interfacing Agencies send their agency approved Expense Report transactions to Cardinal using the Expense Report
Upload process.
Cardinal validates required ChartFields and ChartField combinations. Transactions that pass these checks are loaded into
Cardinal.
Transactions that do not pass these checks are rejected. Cardinal generates an Expense Upload Error Report nightly that
displays details for all rejected transactions. Rejected transactions are reviewed and corrected by the agency, before being
re-sent to Cardinal.
Interfaced Expense Reports do not go through agency level workflow for approval. If they are updated online in Cardinal,
the Expense Report will go through one agency level approval.
35

Creating an Expense Report
To enter an expense report online in Cardinal, use the following path:
Main Menu > Employee Self Service > Travel and Expense Center > Expense Report > Create
Enter the employee’s Employee ID in the Empl ID field. This is the 11 digit CIPPS ID number.
Click the Add button.
36

37

Creating an Expense Report (continued)
When entering an Expense Report, start by choosing the appropriate option from the Quick Start drop-down menu:
• A Blank Report – This option displays a blank Expense Report Entry page.
• A Template –This option is not used for Interface agencies
• A Travel Authorization – This option is not used for Interface agencies
• An Existing Report – This option displays the Copy From an Existing Expense Report page, which allows you to
copy all data from an Expense Report, including accounting distributions.
• Entries from My Wallet – This option is not used in Cardinal.
38

General Information Section
If you are copying from another Expense Report, data
here auto-populates.
If you are using a Blank Report, enter a Description
of your trip and select a Business Purpose using the
drop-down menu.
The Attachment link allows you to add attachments to
the Expense Report.
39
Click on image to enlarge
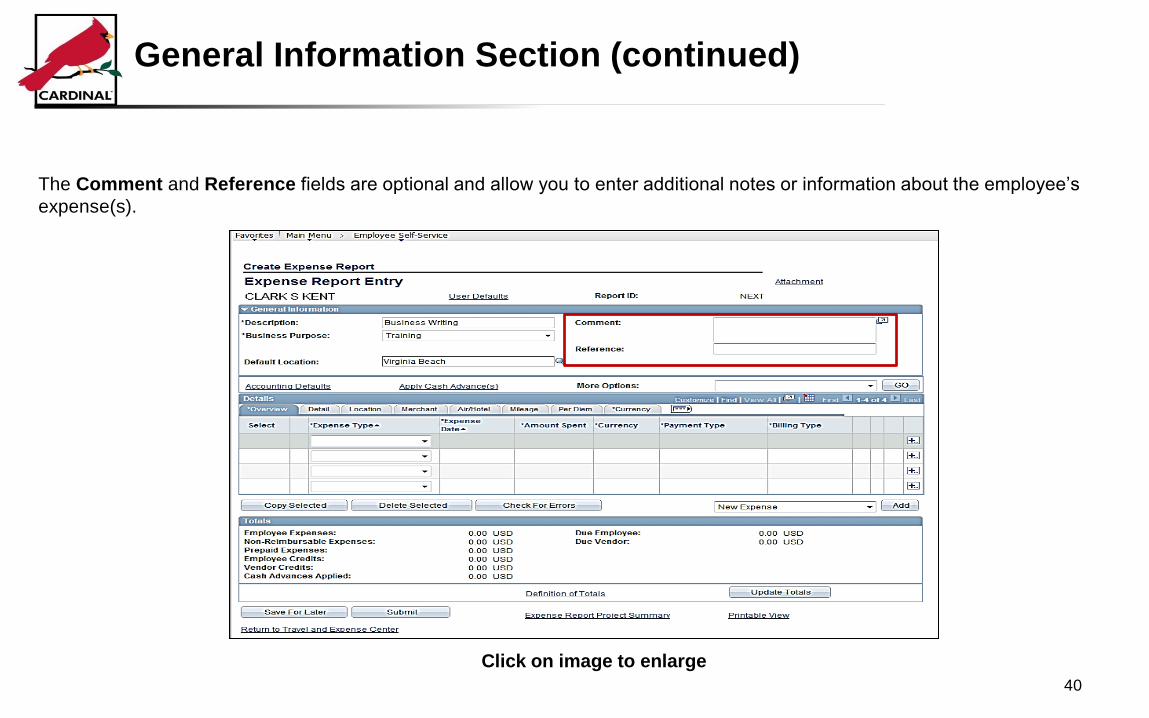
General Information Section (continued)
The Comment and Reference fields are optional and allow you to enter additional notes or information about the employee’s
expense(s).
40
Click on image to enlarge

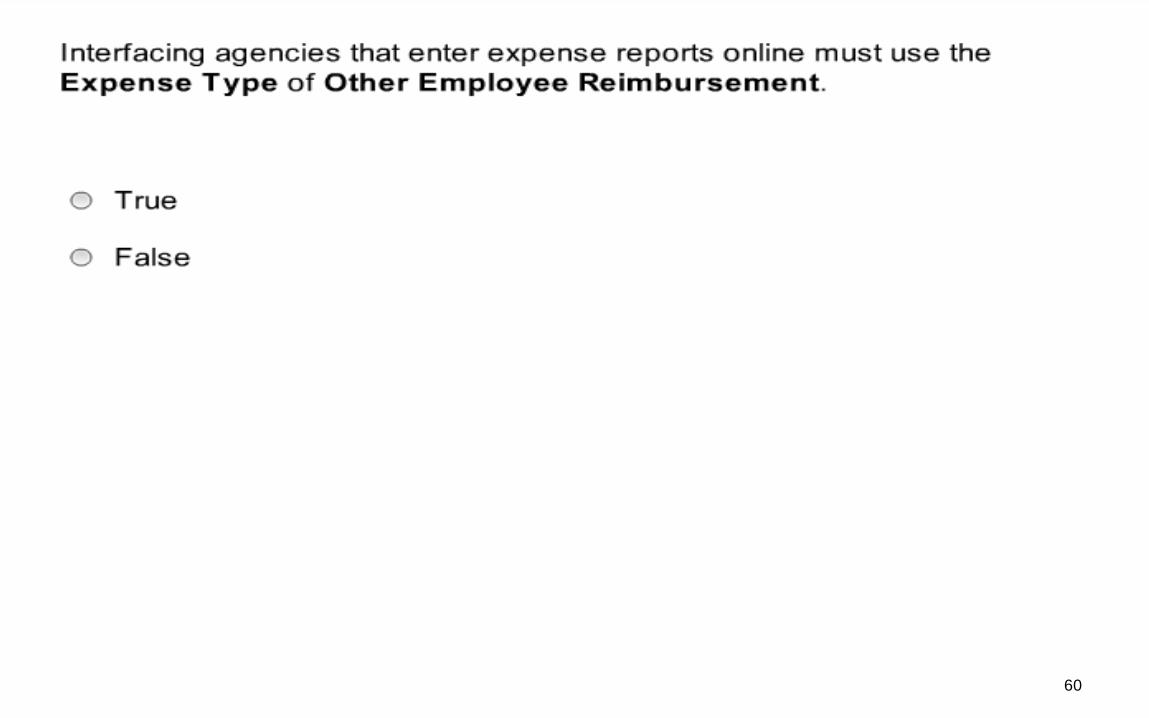
Details Section
Enter the required information in the Details section of the page. The first tab that displays is the Overview tab. Interfacing
agencies use Expense Type of Other Employee Reimbursement for their online expense reports.
Agencies are responsible for ensuring all expenses meet travel and expense guidelines and follow agency policy.
Enter the Expense Date and the Amount Spent. Currency defaults to USD. Select Check as your Payment Type. The
Billing Type field defaults to Billable.
41

Detail Tab (continued)
After completing entries on the Overview tab, additional tabs are required based on the Expense Type. Required tabs are
indicated by an * (asterisk).
Interfacing agencies only need to complete one other tab, which is the Detail tab. Even though Currency contains an * no
inputs are required on that tab. Enter a description for the expense in the Description field.
The Non-Reimb checkbox is only selected if the expense line is not to be reimbursed to the employee and accounting entries
do not need to be created for this expense line.
Click the Overview tab.
42

Accessing the Accounting Detail Page
Go to the Accounting Detail page to enter the detailed charge distribution for each Account. To go to the Accounting Detail
page, click the Accounting Detail icon on the Overview tab.
43

Accounting Detail Page
This page contains the fields entered in the Expense Distribution Record of the Expense Report Upload file for
interfaced transactions.
When entering an expense report online, this is the page that is used to break the total expenses out so they can be
charged to the correct account and accounting distribution. In this example, the total expense amount is $200 with 127.55
for lodging and 74.25 for mileage.
44

Accounting Detail Page (continued)
To update the accounting detail, click in the Amount field and change the total to the specific expense you want to relate to
this line. For this example, lodging and fees of 127.55.
Change the Account and any other values to ensure this amount for lodging is being charged to the correctly. For this
scenario, the Account code is change to 5012850.
45

Accounting Detail Page (continued)
To add another line, click the Add ChartField
Line button and enter the amount for that line in
the Amount field.
Enter the correct distribution for that line. In this
scenario, 72.45 was added for the mileage and
the Account was changed to 5012820.
Repeat this process until all expenses lines are
added.
Click the OK button to return to the Create
Expense Report page.
46
Click on image to enlarge

Checking the Expense Report for Errors
You can check an Expense Report for errors by clicking the Check for Errors button above the Totals section. This checks
the current entries for errors. If errors exist, a red flag displays in the second column of the expense line, and/or the incorrect
fields are highlighted in red.
If errors exist, click the red flag to locate the error(s) and correct them flag(s).
47
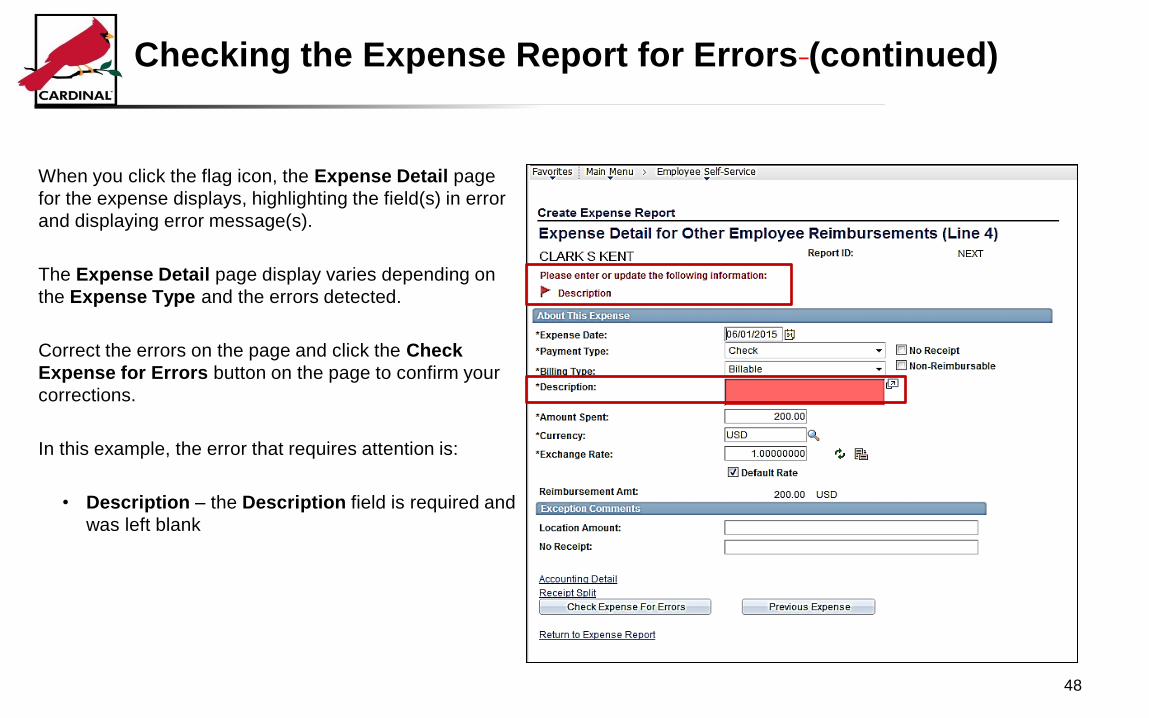
Checking the Expense Report for Errors (continued)
When you click the flag icon, the Expense Detail page
for the expense displays, highlighting the field(s) in error
and displaying error message(s).
The Expense Detail page display varies depending on
the Expense Type and the errors detected.
Correct the errors on the page and click the Check
Expense for Errors button on the page to confirm your
corrections.
In this example, the error that requires attention is:
• Description – the Description field is required and
was left blank
48

Applying a Cash Advance to an Expense Report
If the employee received a Cash Advance for
expense(s), it must be applied to the Expense
Report before you save it.
Apply a Cash Advance by clicking the Apply Cash
Advance(s) link on the Expense Report Entry page.
49

Applying a Cash Advance to an Expense Report
(continued)
The Apply Cash Advance(s) page appears as shown here. The Advance ID must be entered and all other values are auto-
calculated. Make sure the advance is applied to the correct (e.g., related) expense report by reviewing the Description field.
The Description field displays when selecting the Cash Advance.
If the Cash Advance amount is more than the total amount of the Expense Report, only apply the amount of the Expense
Report. The employee will pay the balance back to the Commonwealth. See the job aid entitled SW AP315 Applying and
Reconciling Cash Advances for more information about applying a cash advance entered online to an expense report entered
online.
50

51

Submitting an Expense Report
After completing an Expense Report, applying any Cash Advance(s) and correcting any errors, you can save the Expense
Report for later or submit it for approval:
• To save the report without submitting it, click the Save for Later button.
• To save and submit the Expense Report, click the Submit button on the Expense Report Entry page. After clicking this
button, a confirmation page like the one here appears.
• After an Expense Report has been saved and/or submitted, Cardinal assigns a Report ID to the Expense Report. You
cannot assign your own report id when creating an expense report online.
52
Submitting an Expense Report (continued)
• Once you click the OK button on the Submit Confirmation page, the Expense Report is edit checked. If errors are
detected, additional administrative action may be required.
• After successfully completing budget check, the report is routed through workflow to the approver’s worklist. If more
than one approval is required, Cardinal automatically routes your report to the designated approvers. The approver
can budget check the expense report or view the budget check results when reviewing the report for approval.
• The approver(s) may approve, deny, or send back the Expense Report. If the request is not approved, the approver
should indicate the reason(s) in the message comments.
• Approved Expense Reports will be submitted for payment in the nightly batch.
• The Payment Cash Checking application ensures all payments including vouchers and expenses are checked against
available cash before being released for payment. See the job aids listed below for more information:
• Payment Cash Checking- Overview
• Payment Check Cashing – Reports
• Payment Check Cashing – Fund Level Processing Rules Update
• Payment Check Cashing – Updating Transaction Level Overrides
53
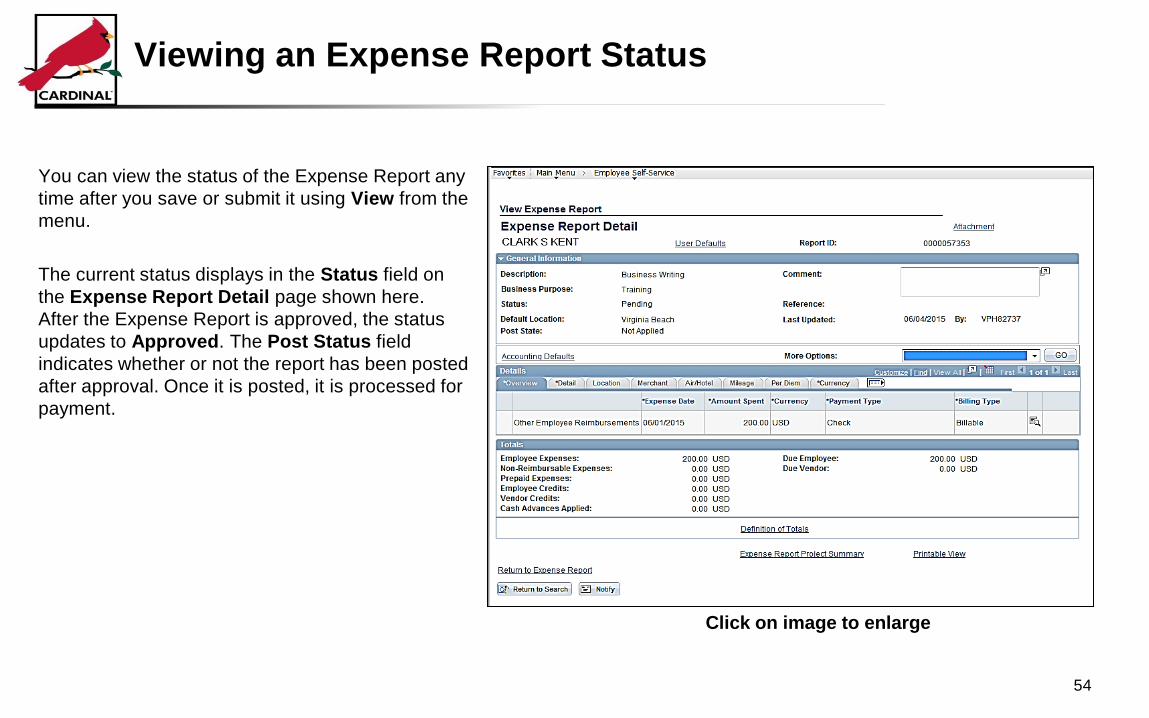
Viewing an Expense Report Status
You can view the status of the Expense Report any
time after you save or submit it using View from the
menu.
The current status displays in the Status field on
the Expense Report Detail page shown here.
After the Expense Report is approved, the status
updates to Approved. The Post Status field
indicates whether or not the report has been posted
after approval. Once it is posted, it is processed for
payment.
54
Click on image to enlarge

Updating / Canceling and Deleting an Expense Report
If necessary, an existing Expense Report can be updated by the proxy if it has been:
• Saved but not submitted for approval
• Sent back by the approver
You can also delete an Expense Report.
A Expense Report can be deleted if it has:
• Been Saved, but not submitted for approval
• Been sent back by the approver
• Not had a cash advance applied to it
• Been denied by the approver
Deleted expense reports cannot be viewed.
See the job aid entitled Updating and Deleting Expense Transactions for more information.
55

Lesson 3: Checkpoint
Now is your opportunity to check your understanding of the material. Read the question, select your answer and click Submit
to see if you chose the correct response.
56

57

58

59
60

Lesson 3: Summary
In this lesson, you learned:
• The process for interfaced Expense Reports
• Creating and submitting an Expense Report online
• Viewing the status of an Expense Report
61

Lesson 4: Reports, Queries and Online Inquiries
In this lesson, you will learn about the following topics:
• Reports
• Queries
• Online Inquiries
62

Reports
Three key Expenses reports include:
• Expense Report
• Cash Advance Upload Error Report
• Expense Report Upload Error Report
63

Expense Report
The Expense Report is available in a printable format.
You can navigate to this report using the following path:
Main Menu > Employee Self Service >Travel and
Expense Center > Print Reports > Expense Report
64

Cash Advance Upload Error Report
This report provides details on all errors, including missing and invalid data, encountered when loading data from agency
systems into Cardinal.
You can access this report using the following path:
Main Menu > Cardinal Interfaces > EX Interfaces > Cash Advance Error Report
65

Expense Report Upload Error Report
This report provides details on all errors, including missing and invalid data, encountered when loading data from agency
systems into Cardinal.
You can access this report using the following path:
Main Menu > Travel and Expenses > Travel & Expenses Center > Print Reports > Expense Report Upload Error
Report
66
Click on image to enlarge

Queries
Some frequently used queries include:
• Expenses in Process
• Potential Duplicate Expense Transactions
• Posted Cash Advance Extract
• Posted Expense Report Extract
• Posted Payments Query
• Payment Cash Check Results
67

Expenses in Process
This query allows you to monitor and take action on travel expenses, authorizations and advances that are NOT Paid,
Approved, Closed or Reconciled.
You can access this query using the following path:
Main Menu > Reporting Tools > Query > Query Viewer > V_AP_EXPENSES_IN_PROCESS
68

Potential Duplicate Expense Transactions
This query identifies potential duplicate expense transactions based on the Expense Line record. Results display based on
the same expense type, same transaction date and same transaction amount within the same expense report or within
another expense report for the same employee.
You can navigate to this query using the following path:
Reporting Tools > Query > Query Viewer > V_AP_EXPENSES_POTENTIAL_DUPS
69

Posted Cash Advance Extract
This query shows a listing of all Cash Advance transactions that have been posted to the General Ledger. The query
requires user inputs for General Ledger Business Unit, Journal Date From and Journal Date To.
You can navigate to this query using the following path:
Reporting Tools > Query > Query Viewer > V_AP_POSTED_ADV
70
Click on image to enlarge

Posted Expense Report Extract
This query shows a listing of all Expense Report transactions that have been posted to the General Ledger. The query
requires user inputs for GL Business Unit, Journal Date From and Journal Date To.
You can navigate to this query using the following path:
Reporting Tools > Query > Query Viewer > V_AP_POSTED_EXPN
71
Click on image to enlarge

Posted Payments Extract Query
This query provides users with posted Payments data for a specific journal date range.
You can access this query using the following path:
Main Menu > Reporting Tools > Query > Query Viewer > V_AP_POSTED_PYMNTS
72
Click on image to enlarge

Payment Check Cashing Results Query
This query will give the ledger cash balance for a given date and also the vouchers/expenses that passed or failed the cash
check.
You can access this query using the following path:
Main Menu > Reporting tools > Query > Query Viewer > V_AP_PYMNT_CASH_CHECK_RESULTS
73
Click on image to enlarge

Online Inquiries
Two frequently used Expenses online inquiries include:
• Employee Payment History
• Employee Expense History
• Payment Cash Check Results
• Payment Cash Check Review Results by Transaction
You must be a proxy to view an employee’s data for these online inquiries.
74

Payment History
The Employee Payment History inquiry displays information about the history of payments for an employee. You can
navigate to this online inquiry using the following path:
Main Menu > Employee Self Service > Travel and Expenses > Review Payments
75

Employee Expense History
The Employee Expense History inquiry displays a history of the Expense Reports you have submitted and their status.
This inquiry also includes links to other pages for more details. You can navigate to this online inquiry using the following
path:
Main Menu > Employee Self Service > Travel and Expenses > Review Expense History
76

Payment Cash Check Results
The Payment Cash Check Results page provides users
with the ability to review the details of results for the daily
Payment Cash Checking process.
You can navigate to this inquiry using the following path:
Main Menu > Accounts Payable > Payments >
Payment Cash Check Results
77
Click on image to enlarge

Payment Cash Check - Review Results by Transaction
The Review Results by Transaction page provide users with the payment cash check results for a particular transaction
for a particular run date.
You can navigate to this inquiry using the following path:
Main Menu > Accounts Payable > Payments > Payment Cash Check > Review Results by Transaction
78

Lesson 4: Summary
In this lesson, you learned how to:
• Use key reports, queries and online inquiries
79

Course Summary
In this course, you learned how to:
• Understand key travel and expense concepts
• Understand the business processes in the Expenses module
• Explain the processes for interfaced cash advances and expense reports
• Create and submit a Cash Advance request online
• View Cash Advance status
• Create and submit an Expense Report online
• View Expense Report status
• Access key reports, queries and online inquiries
80

Course Completion
You have completed the SW AP315B: Interface Expense Processing course. Please use the evaluation link to assess this
course.
Once you have completed and submitted the survey, close the survey window. To close the web based training course, click
the Exit Course button.
Click the Next button if you wish to view the Appendix section of this course.
81
Click here to access the survey

Appendix
• Key Terms
• Integration with Accounts Receivable – Funds Receipts
• Expense Process Flow Diagram
• Screens and Descriptions
• Diagrams and Screenshots
82

Cash Advance – A request made by an employee for an advance on an anticipated expense.
Employee Profile – Employee data that is set up and used to correctly route employee Travel Authorizations and Expense
Reports through workflow for approval, and also to send related payments to the correct mailing address or bank (if
employee is set up for electronic payments). An Employee Profile must exist to process any expense transactions.
Expenses – Any costs incurred by employees related to business and reimbursed to employees. These reimbursements
can be for travel or non-travel related expenses.
Expense Report – A report of expenses incurred by an employee. The report must include details of each expense. The
details from the Travel Authorization (if applicable) can be copied into the Expense Report. If a Cash Advance was
provided, the employee applies the amount of the Cash Advance to the Expense Report.
Expense Type – A field Expense Reports that identifies the category of expense. When an Expense Report is uploaded,
the Expense Type is Interfaced. If an interfacing agency creates an Expense Report online the Expense Type is Other
Employee Reimbursements.
83
Key Terms
Non-Reimbursable Expense – Expense paid by the agency through direct billing or 3rd party that needs to be identified
as part of the total cost of travel.
Payment Cash Checking – A process to ensure all payments, including vouchers, employee expenses and cash
advances are checked against available cash before being released for payment each night.
Proxy – A user authorized to create and view expense transactions for an employee. Each employee must have one or
more proxies.
Travel Authorization – A request made through Cardinal for permission to travel. Travel Authorizations cannot be
uploaded into Cardinal or used to populate Expense Reports that are uploaded into Cardinal. To get more information
about Travel Authorizations, see the course entitled SW AP315A Processing Employee Expenses for Online Agencies.
84
Key Terms (continued)

Integration with Accounts Receivable
If you owe money for an outstanding Cash Advance after submitting your Expense Report, Accounts Receivable processes
repayment once it is received.
85

Create Cash Advance Report Page
86

Description/Business Purpose: Enter a description for the advance and select the appropriate Business Purpose. If you
link to this page from a Travel Authorization, these fields default from your Travel Authorization entries.
Comment/Reference: Enter any additional information about the advance, or specific reference numbers that might be
required. For example, you might want to enter the Authorization ID of the associated Travel Authorization, so you can make
sure to apply the advance correctly on the subsequent Expense Report.
Attachments Link: Click this link to display a page where you can add attachments to the Cash Advance request.
Details Line: The Source defaults to System Check and cannot be changed. Enter an additional Description if needed,
and enter the requested Amount.
Save for Later/Submit: Click Save for Later if you do not want to submit the request at this time, or Submit to save it and
submit it for approval.
87
Create Cash Advance Report Page Descriptions
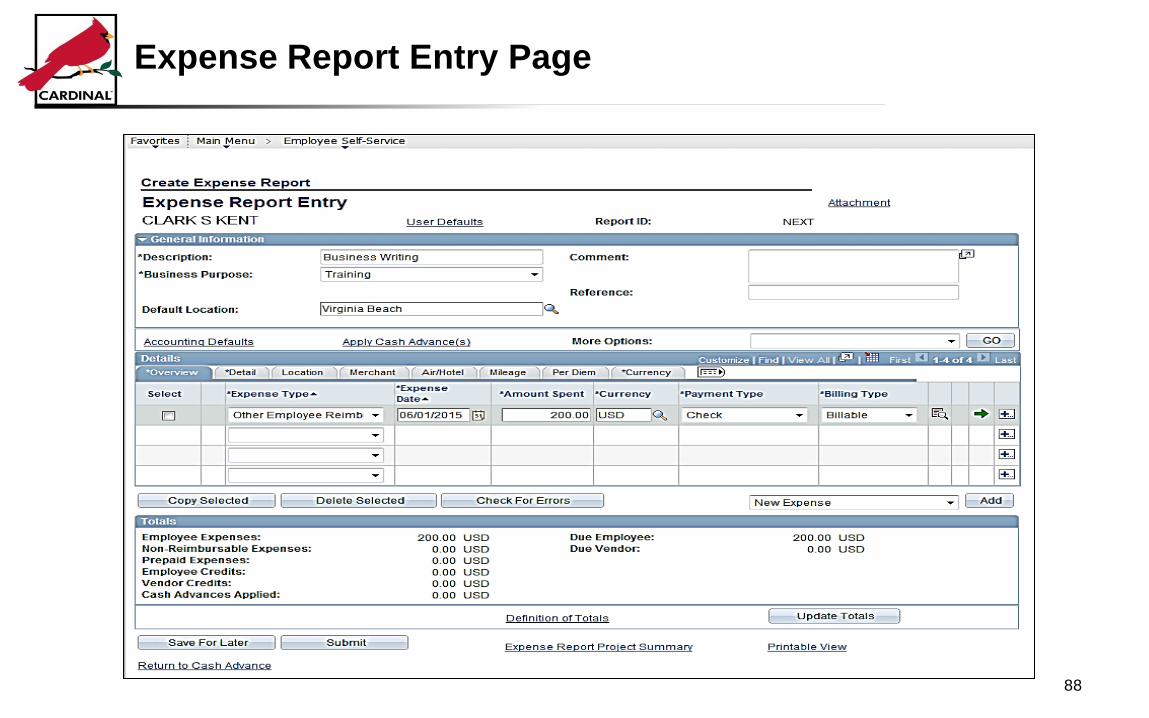
Expense Report Entry Page
88

Attachments link: Click this link to display a page where you can add attachments, such as scanned receipts, to the
Expense Report.
Description / Business Purpose: These are required fields and are copied from the source document if you specified one.
Comment / Reference: These fields are optional and allow you to enter additional notes or information about the expense.
Accounting Defaults link: Allows you to view the accounting defaults that are setup on the employee profile.
More Options drop-down menu: Allows access to see a printable version of the Expense Report. The Expense Report
Project Summary is not applicable.
Apply Cash Advance(s) link: Click this hyperlink to display the page where you apply any outstanding Cash Advances to
the Expense Report.
89
Expense Report Entry Page Descriptions

Tabs above lines: Click these tabs to enter details about the expense on each line, starting with the Overview tab and then
moving left to right. The tabs that contain required fields are indicated by asterisks (*) before their names. The required tabs
vary depending on Expense Type.
Expense Lines: Fields for expense details appear here. As you select different tabs, some fields change to match the
subjects of the tabs.
Accounting Detail icon: These icons appear only on the Overview tab. Click the icon on each line to enter, display, or
change the accounting details on the line.
Green Arrow icon: These arrows allow you to move from tab to tab in place of clicking the tabs.
Employee Expenses: The total of all expenses.
Non-Reimbursable Expenses: Any expense that is prepaid or direct billed to the agency and will not be an out-of-pocket
expense reimbursement to the employee. This field reflects the total amount of expenses that have been indicated as non-
reimbursable on the Expense Report. These lines will not be paid to the employee and accounting entries will not be created
for them.
90
Expense Report Entry Page Descriptions (continued)

Prepaid Expenses: This field is not used in Cardinal
Employee Credits: This field is not used in Cardinal.
Vendor Credits: This field is not used in Cardinal.
Cash Advances Applied: Any Cash Advance received for this travel and applied to this Expense Report.
Due Employee: Equals Employee Expenses less any Cash Advances Applied.
Due Vendor: This field is not used in Cardinal.
91
Expense Report Entry Page Descriptions (continued)

92
Apply Cash Advance(s) Page

Advance ID: Enter or select the ID for the Cash Advance to be applied.
Advance Amount: After you select the advance, the total amount of the advance appears in this field.
Balance: The remaining balance on the Cash Advance after the advance has been applied to an Expense Report.
Total Applied: This field defaults to the amount of the Cash Advance. If you need to apply a portion of the total advance
amount to the Expense Report, enter the appropriate amount in this field. For example, if the total expenses on the Expense
Report are less than the Cash Advance amount, you need to adjust the Total Applied field to match the total expenses.
Delete row icon (-): If you need to remove the advance from the Expense Report, click the Delete row icon.
Add Cash Advance: Click this button to add another Cash Advance to the Expense Report.
Update Totals: Click this button to update the totals below. This indicates of how the amount owed to you, if any. Note that if
you return to the Expense Report and make any changes to the items, this value is no longer be correct, and you may need to
update the Apply Cash Advance(s) page.
93
Apply Cash Advance(s) Page Descriptions

Create Cash Advance Report Page
94
Click on image to return
Create Cash Advance Report Page (continued)
95
Click on image to return

Viewing Cash Advance Status
96
Click on image to return

General Information Section
97
Click on image to enlarge

General Information Section
98
Click on image to enlarge

Accounting Detail Page
99
Click on image to return

Viewing an Expense Report Status
100
Click on image to return
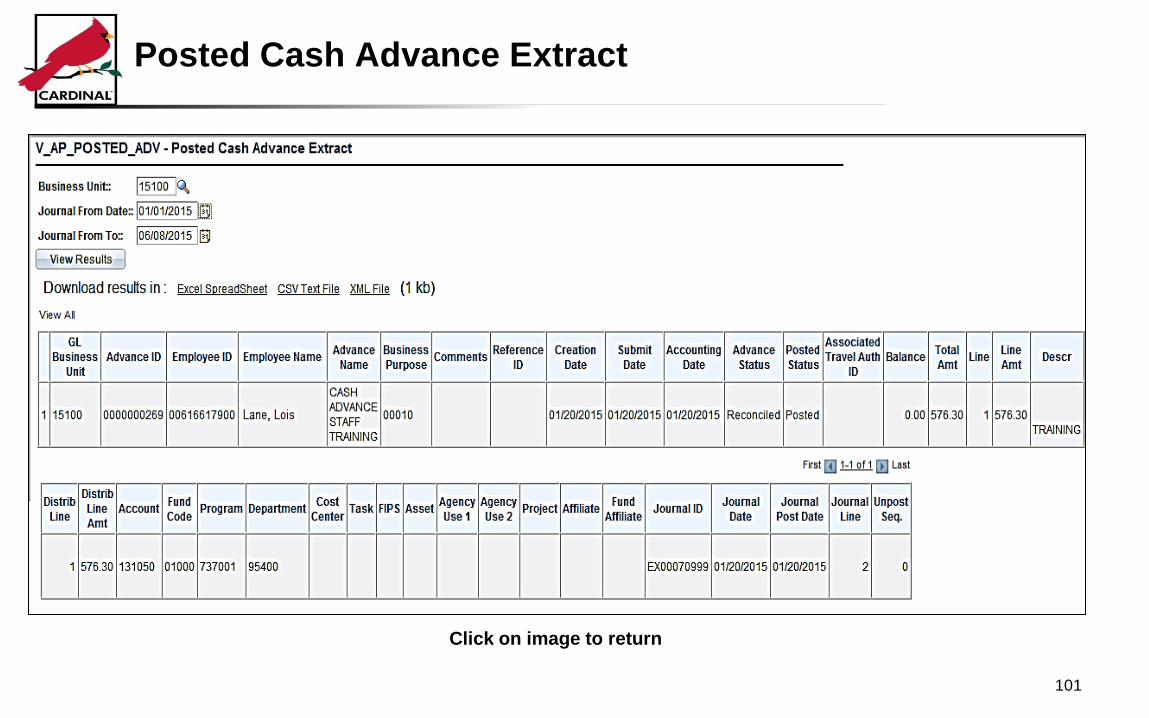
Posted Cash Advance Extract
101
Click on image to return

Posted Expense Report Extract
102
Click on image to return

Posted Payments Query
103
Click on image to return

Payment Cash Check Results
104
Click on image to return

Expense Report Upload Error Report
105
Click on image to return

Payment Cash Check Results
106
Click on image to return

End of Appendix Section
107
This is the end of the appendix section for SW AP315B: Interface Expense Processing course.
Click the Exit Course link at the top right hand corner of this page to exit the course.