Embed Size (px)
Citation preview
Illumina Bio-Rad SureCell WTA 3' LibraryPrepReference Guide
Document # 1000000021452 v01
June 2017
ILLUMINA PROPRIETARY
For Research Use Only. Not for use in diagnostic procedures.

This document and its contents are proprietary to Illumina, Inc. and its affiliates ("Illumina"), and are intended solely forthe contractual use of its customer in connection with the use of the product(s) described herein and for no otherpurpose. This document and its contents shall not be used or distributed for any other purpose and/or otherwisecommunicated, disclosed, or reproduced in any way whatsoever without the prior written consent of Illumina. Illuminadoes not convey any license under its patent, trademark, copyright, or common-law rights nor similar rights of any thirdparties by this document.
The instructions in this document must be strictly and explicitly followed by qualified and properly trained personnel inorder to ensure the proper and safe use of the product(s) described herein. All of the contents of this document must befully read and understood prior to using such product(s).
FAILURE TO COMPLETELY READ AND EXPLICITLY FOLLOW ALL OF THE INSTRUCTIONS CONTAINED HEREIN MAYRESULT IN DAMAGE TO THE PRODUCT(S), INJURY TO PERSONS, INCLUDING TO USERS OR OTHERS, AND DAMAGETO OTHER PROPERTY.
ILLUMINA DOES NOT ASSUME ANY LIABILITY ARISING OUT OF THE IMPROPER USE OF THE PRODUCT(S)DESCRIBED HEREIN (INCLUDING PARTS THEREOF OR SOFTWARE).
© 2017 Illumina, Inc. All rights reserved.
Illumina, SureCell, and the streaming bases design are registered or pending trademarks of Illumina, Inc. and/or itsaffiliate(s) in the U.S. and/or other countries. All other names, logos, and other trademarks are the property of theirrespective owners.
Document # 1000000021452 v01
For Research Use Only. Not for use in diagnostic procedures.ii
Illumina Bio-Rad SureCell WTA 3’ Library Prep Kit for the ddSEQ System
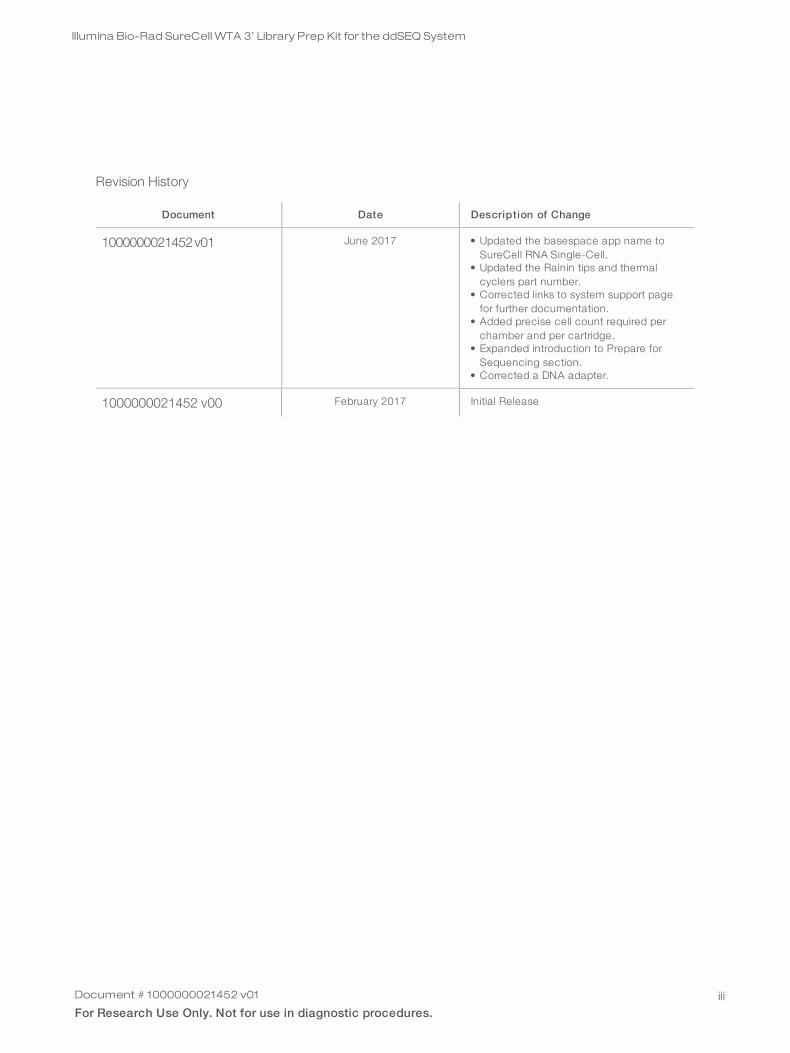
Revision History
Document Date Description of Change
1000000021452v01 June 2017 • Updated the basespace app name toSureCell RNA Single-Cell.
• Updated the Rainin tips and thermalcyclers part number.
• Corrected links to system support pagefor further documentation.
• Added precise cell count required perchamber and per cartridge.
• Expanded introduction to Prepare forSequencing section.
• Corrected a DNA adapter.
1000000021452 v00 February 2017 Initial Release
Document # 1000000021452 v01
For Research Use Only. Not for use in diagnostic procedures.iii
Illumina Bio-Rad SureCell WTA 3’ Library Prep Kit for the ddSEQ System
Table of Contents
Chapter 1 Overview 1Introduction 1Additional Resources 1
Chapter 2 Protocol 3Protocol Introduction 3Critical Workflow Steps 4Tips and Techniques 4Preliminary Cell Prep Optimization Guidelines 5Library Prep Workflow 7Prepare, Count, and Assess Viability of Single-Cell Suspension 8Prepare Cell and Barcode Suspension Mixes 11Isolate Single Cells 13Reverse Transcribe Samples 21Break Emulsion 22Clean Up First Strand Synthesis 23Synthesize Second Strand cDNA 27Clean Up cDNA 28Tagment cDNA 31Amplify Tagmented cDNA 32Clean Up Libraries 33Assess Libraries 36Prepare for Sequencing 37
Appendix A Supporting Information 39Introduction 39How does the SureCell WTA 3' Assay Work? 39Verified Protocol: Mixed Species Control 40Lab Tracking Chart 43Acronyms 44Kit Options 44Consumables and Equipment 47
Technical Assistance 48
Document # 1000000021452 v01
For Research Use Only. Not for use in diagnostic procedures.iv

Chapter 1 OverviewIntroduction 1Additional Resources 1
IntroductionThis protocol describes how to prepare 3’-tagged RNA-Seq libraries from single cells for whole transcriptomegene profiling analysis on Illumina sequencing systems. The protocol requires a Bio-Rad ddSEQ Single-CellIsolator and reagents provided in the Illumina® Bio-Rad® SureCell™ WTA 3' Library Prep Kit for the ddSEQ™
System to isolate single cells and barcode individual transcriptomes.
The SureCell WTA 3’ Library Prep Kit for the ddSEQ System is optimized for 1200 single cells as output foreach ddSEQ Single-Cell Isolator cartridge. Each cartridge has 4 chambers that can be loaded with up to 4unique samples, for an average cell output of 300 single cells per chamber.
The SureCell WTA 3’ Library Prep Kit for the ddSEQ System protocol includes the following features:
u Comprehensive workflow for single-cell analysis of 3' RNA transcripts
u Significant reduction in the time from cell culture to cell lysis using the ddSEQ Single-Cell Isolator for cellisolation
u Individual droplets have cell lysis, cell barcoding, and unique molecule tagging
u 15 minute tagmentation process to fragment cDNA and add adapter sequences
u Benefits of using master mixed reagents, saving reagent containers, pipetting, and hands-on time
Data analysis is conducted using the Illumina SureCell RNA Single-Cell App in the BaseSpace Sequence Hub.The SureCell RNA Single-Cell App performs sample demultiplexing, single-cell identification, genomealignment, 3’ gene counting, and cell clustering. The SureCell RNA Single-Cell App supports multiple species,including, but not limited to, human, mouse, and rat genomes.
Additional ResourcesVisit the SureCell WTA 3’ Library Prep Kit for the ddSEQ System support page on the Illumina website orddSEQ Single-Cell Isolator page on the Bio-Rad website for documentation, software downloads, trainingresources, and information about compatible Illumina and Bio-Rad products.
The following documentation is available for download from the Illumina website.
Resource Description
Custom Protocol Selector A wizard for generating customized end-to-end documentation that is tailored to the libraryprep method, run parameters, and analysis method used for the sequencing run.
SureCell WTA 3' Library PrepChecklist (document #1000000021454)
Provides a checklist of the protocol steps. The checklist is intended for experienced users.
Consumables and EquipmentList (document #1000000021455)
Provides an interactive checklist of user-provided consumables and equipment.
Document # 1000000021452 v01
For Research Use Only. Not for use in diagnostic procedures.1
The following documentation is available for download from the Bio-Rad website.
Resource Description
ddSEQ Single-Cell IsolatorInstruction Manual(Document # 10000069430)
Provides instructions for installing and operating the Bio-Rad ddSEQ Single-Cell Isolator.
Document # 1000000021452 v01
For Research Use Only. Not for use in diagnostic procedures.2
Illumina Bio-Rad SureCell WTA 3’ Library Prep Kit for the ddSEQ System
Chapter 2 ProtocolProtocol Introduction 3Critical Workflow Steps 4Tips and Techniques 4Preliminary Cell Prep Optimization Guidelines 5Library Prep Workflow 7Prepare, Count, and Assess Viabil ity of Single-Cell Suspension 8Prepare Cell and Barcode Suspension Mixes 11Isolate Single Cells 13Reverse Transcribe Samples 21Break Emulsion 22Clean Up First Strand Synthesis 23Synthesize Second Strand cDNA 27Clean Up cDNA 28Tagment cDNA 31Amplify Tagmented cDNA 32Clean Up Libraries 33Assess Libraries 36Prepare for Sequencing 37
Protocol IntroductionThis chapter describes the SureCell WTA 3’ Library Prep Kit for the ddSEQ System protocol, from cellpreparation through qualification and quantification of final libraries for sequencing.
Before you begin, do the following.
u Review SureCell Best Practices on the Illumina website.
u Confirm that Illumina Experiment Manager v1.13 or later is used to set up the sequencing sample sheet ifBaseSpace Prep Tab is not used. Version 1.13 or later has the appropriate UMI settings and indexsequences for sample demultiplexing.
u Confirm that bcl2fastq v2.18 or later is used for FASTQ generation.
u This protocol is verified to process up to 4 cartridges in one experiment. If this is your first experiment,Illumina recommends processing 1-2 cartridges. If you are looking to process more than 4 cartridges,contact Illumina Tech Support for a modified protocol.
u Confirm that the ddSEQ Single-Cell Isolator is installed and operating properly.
u Review pipetting techniques in the ddSEQ Single-Cell Isolator Instruction Manual.
u Confirm kit contents and make sure that you have the required equipment and consumables. Thisprotocol requires two different magnetic stands during library clean-up procedures. See SupportingInformation on page 39.
u Review the color-coded caps that identify the associated suspension mix of the reagents in this protocol.
u Red caps identify reagents used to create Cell Enzyme Mix
u Blue caps identify reagents used to create Barcode Suspension Mix
u Use a Lab Tracking Chart to record sample observations throughout the protocol. See Lab TrackingChart on page 43.
Document # 1000000021452 v01
For Research Use Only. Not for use in diagnostic procedures.3
Critical Workflow StepsSeveral steps within the workflow require additional attention and are key to single-cell library success. Thesesteps are highlighted below.
1 Filter cells through a cell strainer with sufficient pore size to remove cell clumps.
2 Visually confirm that cells are dissociated to single-cell suspension.
3 Keep your single-cell suspension on ice to prevent cells from clumping.
4 A bead purification step purifies single-cell DNA from sample wells containing separate oil and aqueouslayers. Visually confirm that magnetic beads are well-mixed.
5 A custom sequencing primer is provided for Read 1. Dilute the provided primer to the concentrationspecified for the sequencer you are using.
Tips and TechniquesUnless a safe stopping point is specified in the protocol, proceed immediately to the next step.
Designating Separate Areasu Conduct all tissue and cell activities in a designated aseptic area that is restricted to cell culture work.
u Conduct all Pre-PCR activities (cell lysis, tagmentation, and amplification preparation procedures) in adedicated environment physically separated from amplified genetic material (Post-PCR).
u Do not pass material or equipment from the post-PCR area to the pre-PCR area.
u Consult your local regulations for universal precautions regarding amplicon control practices and thehandling of biohazardous material.
Avoiding Cross-Contaminationu When adding or transferring samples, change tips between each sample.
u Use aerosol-resistant pipette tips to reduce the risks of reagent carry-over and sample-to-sample cross-contamination.
Sealing the Plateu Always seal the 96-well plate before the following steps in the protocol:
u Centrifuge stepsu Thermal cycling steps
u Use 8-strip tube caps to seal plates.
Handling Purification (Magnetic) BeadsThis protocol does not include excess Purification Beads (SPB) reagent volume for dispensing from a reservoirand discarding excess volume. Use a single-channel pipette to transfer Purification Beads (SPB) from thereagent tube to individual sample wells.
u Use beads at room temperature.
u Vortex immediately before use. Confirm that the beads are well-dispersed and the color appearshomogeneous.
Document # 1000000021452 v01
For Research Use Only. Not for use in diagnostic procedures.4
Illumina Bio-Rad SureCell WTA 3’ Library Prep Kit for the ddSEQ System

u Pipette accurate bead volume as this is essential to protocol success:
u Beads are viscous; pipette beads slowly from stock tube to obtain full volume.
u Remove any additional drops collected on the outside of tip before dispensing to the sample plate.
u Dispense beads slowly into the sample plate, allowing time to ensure the entire volume has beendispensed from pipette tip.
u When washing beads:u Always prepare fresh 80% ethanol for wash steps. Ethanol can absorb water from the air impacting
your results.u Use the appropriate magnet for the plate.u Dispense liquid so that beads on the side of the wells are wetted.u Keep the plate on the magnet until the instructions specify to remove it.u Do not agitate the plate while on the magnetic stand. Do not disturb the bead pellet.u If beads are aspirated into the pipette tips, dispense them back to the plate on the magnetic stand
and wait a few minutes until the liquid is clear.u Do not let the beads dry out.
Preliminary Cell Prep Optimization GuidelinesBefore planning your first experiment using the SureCell WTA 3' assay, optimize the single-cell suspension foryour cell type by following these guidelines. The protocols provided in these guidelines are applicable to manyadherent or suspension cell lines. However, the dissociation, straining, washing, quantitation, or dispensingbuffer conditions may require additional optimization and specific techniques appropriate for the individualcell type or cell source.
u Optimized cell preparation—When performing the SureCell WTA 3' assay for the first time or workingwith a new cell type, Illumina recommends preparing additional cells that can be used to optimize celldissociation conditions prior to starting a full experiment. Consider these methods when optimizing celldissociation:
u Types of trypsin or alternative enzymes
u Incubation time and temperature for trypsinization
u Intensity of pipetting
u Types (diameter) of serological pipettes or micropipette tips to be used
A verified protocol for human and mouse cell lines can be found at Verified Protocol: Mixed Species Controlon page 40.
CAUTION
u Before starting the protocol, make sure you have the specified cell quantities, consumables, andequipment required to complete the protocol.
u After cells have been prepared, there are no safe stopping points until Synthesize Second StrandcDNA has begun. Proceed immediately to each step in the protocol.
u Cells must be kept cold on ice at all times but should not be frozen. Do not remove the cells fromice until instructed to do so during Isolate Single Cells on page 13.
The following attributes are critical for the success of the SureCell WTA 3' assay.
u Consistent confluency—Cell confluency can impact the gene expression profile of cells. Start with cellsamples at a consistent confluency (between 60 - 90%) to help ensure reproducible expression profilesfrom cells prepared on different days or compared between different conditions. Illumina recommends
Document # 1000000021452 v01
For Research Use Only. Not for use in diagnostic procedures.5
Illumina Bio-Rad SureCell WTA 3’ Library Prep Kit for the ddSEQ System

freshly splitting cell lines 1 day prior to starting the SureCell WTA 3' workflow and seeding several flasks asdifferent confluencies to increase the chances of achieving 60 - 90% confluency on the day of theexperiment.
u Fully dissociated single cells—Single-cell encapsulation by the ddSEQ Single-Cell Isolator instrumentrequires you to fully dissociate cells to form a single-cell suspension prior to droplet generation. Cellaggregates or doublets present in the suspension will significantly increase the probability of doublets ormultiplets during single-cell isolation on the ddSEQ, making data interpretation potentially more difficult.Depending on the method or cell counter device used, multiplets also can affect the accuracy of cellcounting.
u Accurate cell count—Accurate cell count is critical to achieve target cell throughput and to avoid cellmutiplets. Illumina and Bio-Rad have validated and recommend an automated cell counter (Bio-RadTC20) for cell counting of commercially available cell lines. Size-based gating for automated counters ormanual count may be required to avoid counting cell debris. Both viable and non-viable cells should beincluded in total cell count.
u High viabil ity (>95%) and integrity—Dead or damaged cells can release nucleic acids into the cellsuspension buffer. This background signal from these cells remains through subsequent steps, and mayimpact the quality of the resulting analysis.
Document # 1000000021452 v01
For Research Use Only. Not for use in diagnostic procedures.6
Illumina Bio-Rad SureCell WTA 3’ Library Prep Kit for the ddSEQ System

Library Prep Workflow
Figure 1 SureCell WTA 3’ Library Prep Kit for the ddSEQ System Workflow
Document # 1000000021452 v01
For Research Use Only. Not for use in diagnostic procedures.7
Illumina Bio-Rad SureCell WTA 3’ Library Prep Kit for the ddSEQ System

Prepare, Count, and Assess Viability of Single-Cell SuspensionThis section describes preparing a single-cell suspension, counting cells, and assessing cell viability. TheSureCell WTA 3' workflow is optimized for a single-cell suspension input of 2500 cells/µl at greater than 95%viability. Each cartridge can be loaded with up to 4 unique samples. 11,250 cells are required per sample(10,125 - 12,375 cells) and 45,000 cells are required per cartridge (40,500-49,500 cells).
NOTE
If using cells from FACS sorting, go directly to Prepare Cell and Barcode Suspension Mixes on page 11.
After cells have been prepared, there are no safe stopping points until the Second Strand Synthesis hasstarted. Proceed immediately to each step in the protocol.
CAUTION
Delays during cell preparation and handling can lead to sample failure. Make sure you have all requiredconsumables (see Consumables on page 47 and Equipment on page 47) before you begin. Do not stopduring or between steps.
Consumablesu BSA (Bovine Serum Albumin)
u PBS (Phosphate-Buffered Saline)
u Cell filter with appropriate pore size to exclude doublet cells
u Trypan blue
u Hemacytometer or slides for cell counting
u Rainin pipettes
u P200 single channel or P1000 single channel
u [Optional] Trypsin, TrypLE Express, or other enzymatic disaggregation reagent
Guidelinesu Review Preliminary Cell Prep Optimization Guidelines on page 5 before you begin.
Preparation1 Prepare 1X PBS + 0.1% BSA and store on ice.
2 Chill a cell filter on ice for at least 5 minutes.
Document # 1000000021452 v01
For Research Use Only. Not for use in diagnostic procedures.8
Illumina Bio-Rad SureCell WTA 3’ Library Prep Kit for the ddSEQ System

Procedure1 Dissociate cells as directed in Preliminary Cell Prep Optimization Guidelines on page 5 for the cell or tissue
type you are using in this assay.
2 If using adherent cells, neutralize the trypsin by adding 4x the volume of completely warmed medium.
3 Wash cells once in cold 1X PBS + 0.1% BSA at a volume sufficient to remove carryover components fromthe media or dissociation procedure.
4 Centrifuge briefly and resuspend cells in appropriate volume of cold 1X PBS + 0.1% BSA to achieve a finalconcentration of at least 2500 cells/µl.
5 Pipette cell suspension through the chilled cell filter and transfer filtered cells from the cell filter tube to a15 ml conical tube or 1.7 ml tube, depending on cell volume.Keep filtered cells on ice until use.
CAUTION
Significant volume is lost during filtering. Illumina recommends filtering at least 250 µl of cell suspension.
6 Use a microscope or automated cell counter imaging feature to assess cell dissociation, viability, andconcentration.
7 If cells are not dissociated to single-cell suspension, mix thoroughly with a P200 or P1000 pipette, asappropriate, then return to step 6.
Figure 2 Cells that are not fully dissociated with approximately 40% doublets. (Circled field represents an areawith undissociated cells)
Document # 1000000021452 v01
For Research Use Only. Not for use in diagnostic procedures.9
Illumina Bio-Rad SureCell WTA 3’ Library Prep Kit for the ddSEQ System

Figure 3 Cells with approximately 15% doublets. (Circled field represents an area with undissociated cells)
Figure 4 Cells with less than 10% doublets in single cell suspension.
NOTE
If cells do not appear fully disassociated in single cell suspension as shown in Figure 4, mix cellsuspension vigorously with a pipette to further disassociate cells.
Document # 1000000021452 v01
For Research Use Only. Not for use in diagnostic procedures.10
Illumina Bio-Rad SureCell WTA 3’ Library Prep Kit for the ddSEQ System

8 Once single cell suspension is achieved as shown in Figure 4, dilute the stock cell preparation to target2500 cells/µl in 1X PBS + 0.1% BSA solution.Keep diluted cells on ice until use.
CAUTION
Cell concentration outside the range of 2250-2750 cells/µl can adversely affect assay performance.
9 Proceed to Prepare Cell and Barcode Suspension Mixes on page 11 immediately after preparing thesingle-cell suspension.Single-cell suspension can remain on ice for up to 1 hour before loading on the ddSEQ Single-CellIsolator.
Prepare Cell and Barcode Suspension MixesThis step prepares suspension mixes that add first strand synthesis components before loading on theddSEQ Single-Cell Isolator.
Cell Suspension Mix includes all the reagents necessary to perform the first strand synthesis (RT) from themessenger RNA released from the single cell in the droplet after cell lysis.
Barcode Suspension contains the barcoded beads and UMI (unique molecular identifier) elements that allowspecific tagging of messenger RNA.
CAUTION
Delays during cell preparation and handling can lead to sample failure. Do not stop during or between steps.
Consumablesu Cell Suspend Buffer [red cap]
u DTT [red cap]
u RNA Stabilizer [red cap]
u RT Enzyme [red cap]
u Enhancer Enzyme [red cap]
u Barcode Buffer [blue cap]
u 3' Barcode Mix [blue cap]
u Rainin pipettesu P20 single channel and P200 single channel (use in Procedure on page 12)
Preparation1 Prepare the following consumables:
Item Storage Instructions
Cell Suspend Buffer -25°C to -15°C Thaw on ice. Vortex vigorously to mix, and then centrifuge briefly.
DTT -25°C to -15°C Thaw at room temperature. Vortex to mix, then centrifuge briefly.
RNA Stabilizer -25°C to -15°C Thaw on ice. Gently invert the thawed tubes 3–5 times, and thencentrifuge briefly.
RT Enzyme -25°C to -15°C Thaw on ice. Gently invert the thawed tubes 3–5 times, and thencentrifuge briefly.
Document # 1000000021452 v01
For Research Use Only. Not for use in diagnostic procedures.11
Illumina Bio-Rad SureCell WTA 3’ Library Prep Kit for the ddSEQ System

Item Storage Instructions
Enhancer Enzyme -25°C to -15°C Thaw on ice. Flick the thawed tubes 3–5 times, and then centrifugebriefly.
Barcode Buffer -25°C to -15°C Thaw on ice. Vortex vigorously to mix, and then centrifuge briefly.
3' Barcode Mix 2°C to 8°C Gently invert the tube 3–5 times. Keep on ice. Vortex to mix before use.
Encapsulation Oil 2°C to 8°C Let stand for 30 minutes to bring to room temperature. Invert the tube 5times to mix.This will be used in Isolate Single Cells on page 13.
ddSEQ PrimingSolution
2°C to 8°C Let stand for 30 minutes to bring to room temperature. Vortex well to mix,then centrifuge briefly.This will be used in Isolate Single Cells on page 13.
Procedure1 Create the Cell Enzyme Mix by combining the following components (red caps) in a 1.7 ml tube on ice.
Pipette the Cell Enzyme Mix with a P200 single channel pipette 10–15 times while on ice, and thencentrifuge briefly.
NOTE
It is normal to see bubbles after mixing and centrifugation.
Cell Enzyme Mix Component Volume (µl) for 1 Cartridge(4 Samples)
Volume (µl) for 2 Cartridges(8 Samples)
Cell Suspend Buffer 60 120
DTT 8 16
RNA Stabilizer 6 12
RT Enzyme 13.2 26.4
Enhancer Enzyme 12 24
Total 99.2 198.4
Document # 1000000021452 v01
For Research Use Only. Not for use in diagnostic procedures.12
Illumina Bio-Rad SureCell WTA 3’ Library Prep Kit for the ddSEQ System

2 Create the Cell Suspension Mix for each cell type by combining the following components in a new 1.7 mltube on ice. Before adding the filtered cells to the Cell Enzyme Mix, vortex the cells for 1 second, andrepeat 3 times.
a To load 4 unique cell samples per chamber, make a single sample Cell Suspension Mix for each celltype .
b To load the same cell sample across all 4 chambers, make a Cell Suspension Mix using the volumeslisted for 1 cartridge.
c All 4 sample chambers must be loaded with Cell Suspension Mix. If you choose not to load any cellsinto a chamber, prepare and load the Cell Suspension Mix, substituting an equivalent volume 1X PBS+ 0.1% BSA in place of Filtered Cells.
Cell Suspension MixComponent
Volume (µl) perSample
Volume (µl) for 1Cartridge(4 Samples)
Volume (µl) for 2Cartridges(8 Samples)
Cell Enzyme Mix 21.5 86 172
Filtered Cells (2500 cells/μl) 4.5 18 36
NOTE
Proceed immediately to the next step. Do not mix the combined components until Load Cartridge onpage 17.
3 Create the Barcode Suspension Mix by combining the following components (blue caps) in a new 1.7 mltube on ice. Before combining, resuspend the 3' Barcode Mix by vortexing for 1 second, repeat 3 times,and immediately add to the Barcode Buffer.
Barcode Suspension Mix ComponentVolume (µl) for 1 Cartridge(4 Samples)
Volume (µl) for 2 Cartridges(8 Samples)
Barcode Buffer 60 120
3' Barcode Mix 60 120
NOTE
Proceed immediately to the next step. Do not mix the combined components until Load Cartridge onpage 17.
Isolate Single CellsThis step uses the ddSEQ Single-Cell Isolator to coencapsulate cells (samples) and barcodes in droplets thatcreate a highly parallelized library prep for single-cell analysis.
CAUTION
Delays during cell preparation and handlingmay lead to sample failure. Do not stop during or betweensteps.
Consumablesu 96-well cooling block
u ddSEQ cartridge
u ddSEQ cartridge holder
Document # 1000000021452 v01
For Research Use Only. Not for use in diagnostic procedures.13
Illumina Bio-Rad SureCell WTA 3’ Library Prep Kit for the ddSEQ System

u Rainin pipettesu P20 single channel and multichannel, P50 multichannel, P200 single channel and multichannel (use in
Prime Cartridge on page 16, Load Cartridge on page 17, and Transfer Samples on page 20)
u Encapsulation Oil
u ddSEQ Priming Solution
u Bio-Rad ddPCR plate (Bio-Rad catalog # 12001925)
u 8-tube strip (General Lab Supplier)
u 8-tube strip caps (Bio-Rad, catalog # TCS-0803)
u Multichannel Pipette Reservoir
Guidelinesu Make sure the ddSEQ Single-Cell Isolator is installed according to manufacturer instructions and the
power indicator is lit.
u Review pipetting guidelines in the ddSEQ Single-Cell Isolator Instruction Manual.
u Use Rainin pipettes and corresponding tips to load the cartridge. Use of other tips can negatively impactddSEQ cartridge performance.
u Make sure that the ddSEQ cartridge is in the cartridge holder when loading reagents.
u Avoid static generation while handling encapsulated samples.
u Work in a clear, static-free area.
u Do not use latex gloves when making or handling droplets.
About Reagentsu Depress pipette plunger only to the first stop when loading the cartridge to avoid bubbles.
u Aspirate and dispense Encapsulation Oil slowly due to the viscosity of the solution.
Preparation
Prepare Cartridge1 Grip the cartridge by the tab and remove it from the package. Do not touch the wells or gaskets.
Figure 5 ddSEQ Cartridge
Document # 1000000021452 v01
For Research Use Only. Not for use in diagnostic procedures.14
Illumina Bio-Rad SureCell WTA 3’ Library Prep Kit for the ddSEQ System

2 Insert the cartridge into the cartridge holder.
a Lift the cartridge holder lever.b Orient the green gasket on the cartridge with the green stripe on the cartridge holder, insert the tab
under the rails, then slide the cartridge into the holder.c Check that the cartridge is fully inserted and lying flat against the bottom of the holder, then close the
lever. If the lever does not close completely, reinsert the cartridge.
Figure 6 Insert Cartridge Into Cartridge Holder
Figure 7 Incorrectly Assembled Cartridge and Cartridge Holder
A Cartridge not fully insertedB Cartridgeoriented incorrectly
Document # 1000000021452 v01
For Research Use Only. Not for use in diagnostic procedures.15
Illumina Bio-Rad SureCell WTA 3’ Library Prep Kit for the ddSEQ System

Figure 8 Assembled Cartridge and Cartridge Holder
A Encapsulated sample outputwellsB BarcodeSuspensionMix inputwells (Blue)C CellSuspensionMix inputwells (Red)D EncapsulationOil inputwells
Procedure
PrimeCartridgePrime the ddSEQ cartridge to prepare fluidics for single cell isolation.
1 Use a P200 single channel pipette to add 25 µl of ddSEQ Priming Solution to each well of an 8-tube strip.
2 Use a P20 multichannel pipette to add 20 µl of ddSEQ Priming Solution from the 8-tube strip to each wellof the second row of the cartridge as shown in Figure 9.
NOTE
Use a multichannel pipette to avoid missing wells during cartridge priming.
Figure 9 ddSEQ Priming Solution Wells
A ddSEQPrimingSolutionwells
Document # 1000000021452 v01
For Research Use Only. Not for use in diagnostic procedures.16
Illumina Bio-Rad SureCell WTA 3’ Library Prep Kit for the ddSEQ System

3 Allow the ddSEQ Priming Solution to remain in wells for 1 minute, then remove with a P20 multichannelpipette set to 20 µl.Do not allow the ddSEQ Priming Solution to remain in wells longer than 3 minutes.
CAUTION
ddSEQ Priming Solution interferes with single cell isolation. Make sure all ddSEQ Priming Solution isremoved from the wells.
LoadCartridgeProper mixing of the Barcode Suspension Mix and Cell Suspension Mix provides even distribution intoencapsulated droplets.
1 Vortex the Barcode Suspension Mix for 1 second, and repeat 3 times.
2 Using a P20 single channel pipette, load 20 μl of the Barcode Suspension Mix into the bottom of the Bports (Blue). Depress the pipette plunger only to the first stop to avoid bubbles.
Figure 10 Barcode Suspension Mix Wells
3 Vortex the Cell Suspension Mix for 1 second, and repeat 3 times to create a homogeneous single cellsuspension.
4 Using a P20 single channel pipette, load 20 µl of Cell Suspension Mix into the bottom of the red ports,numbered 1–4.Depress the pipette plunger only to the first stop to avoid bubbles.
Document # 1000000021452 v01
For Research Use Only. Not for use in diagnostic procedures.17
Illumina Bio-Rad SureCell WTA 3’ Library Prep Kit for the ddSEQ System
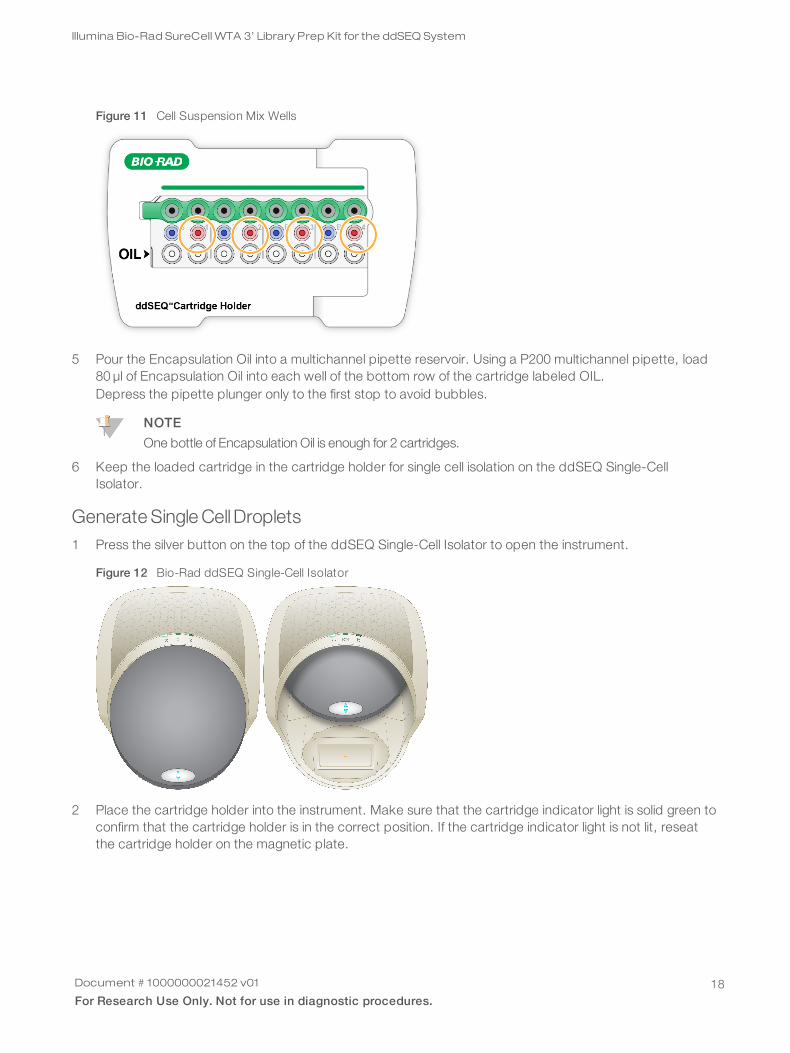
Figure 11 Cell Suspension Mix Wells
5 Pour the Encapsulation Oil into a multichannel pipette reservoir. Using a P200 multichannel pipette, load80 µl of Encapsulation Oil into each well of the bottom row of the cartridge labeled OIL.Depress the pipette plunger only to the first stop to avoid bubbles.
NOTE
One bottle of Encapsulation Oil is enough for 2 cartridges.
6 Keep the loaded cartridge in the cartridge holder for single cell isolation on the ddSEQ Single-CellIsolator.
Generate Single CellDroplets1 Press the silver button on the top of the ddSEQ Single-Cell Isolator to open the instrument.
Figure 12 Bio-Rad ddSEQ Single-Cell Isolator
2 Place the cartridge holder into the instrument. Make sure that the cartridge indicator light is solid green toconfirm that the cartridge holder is in the correct position. If the cartridge indicator light is not lit, reseatthe cartridge holder on the magnetic plate.
Document # 1000000021452 v01
For Research Use Only. Not for use in diagnostic procedures.18
Illumina Bio-Rad SureCell WTA 3’ Library Prep Kit for the ddSEQ System
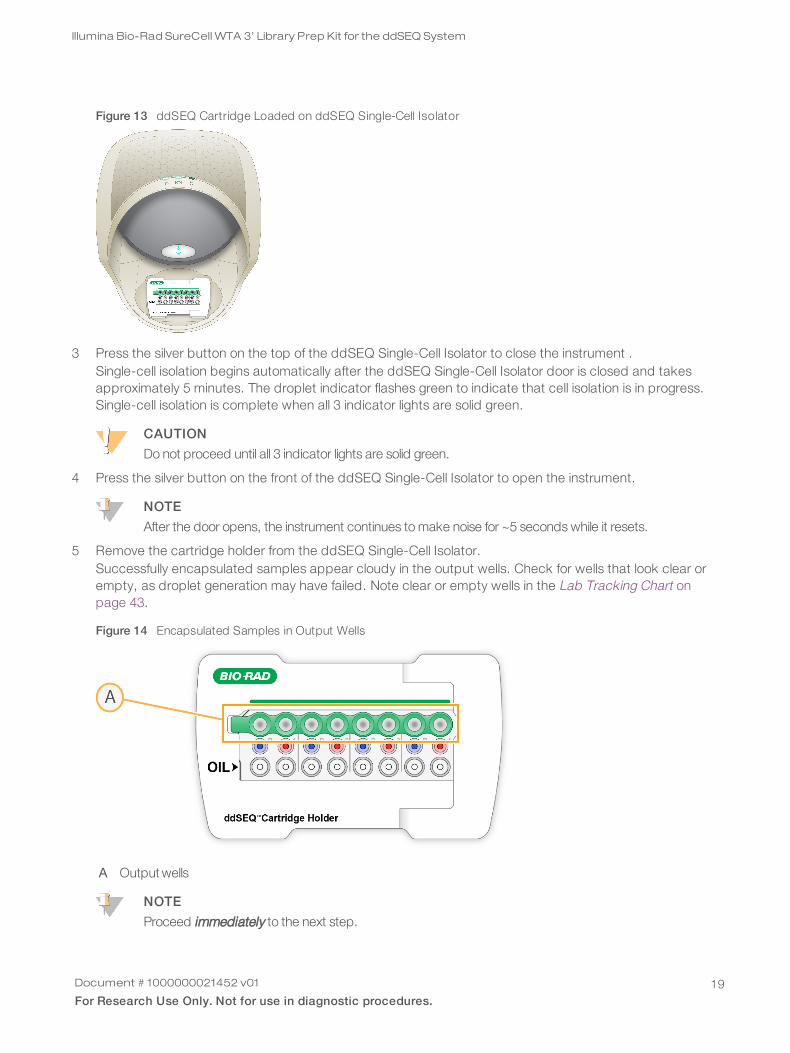
Figure 13 ddSEQ Cartridge Loaded on ddSEQ Single-Cell Isolator
3 Press the silver button on the top of the ddSEQ Single-Cell Isolator to close the instrument .Single-cell isolation begins automatically after the ddSEQ Single-Cell Isolator door is closed and takesapproximately 5 minutes. The droplet indicator flashes green to indicate that cell isolation is in progress.Single-cell isolation is complete when all 3 indicator lights are solid green.
CAUTION
Do not proceed until all 3 indicator lights are solid green.
4 Press the silver button on the front of the ddSEQ Single-Cell Isolator to open the instrument.
NOTE
After the door opens, the instrument continues tomake noise for ~5 seconds while it resets.
5 Remove the cartridge holder from the ddSEQ Single-Cell Isolator.Successfully encapsulated samples appear cloudy in the output wells. Check for wells that look clear orempty, as droplet generation may have failed. Note clear or empty wells in the Lab Tracking Chart onpage 43.
Figure 14 Encapsulated Samples in Output Wells
A Outputwells
NOTE
Proceed immediately to the next step.
Document # 1000000021452 v01
For Research Use Only. Not for use in diagnostic procedures.19
Illumina Bio-Rad SureCell WTA 3’ Library Prep Kit for the ddSEQ System

Transfer SamplesEncapsulated samples are transferred to a 96-well cooling block and kept cold until starting reversetranscription. Keeping the encapsulated samples cold at this step ensures stability of barcoded RNA andencapsulated droplets.
1 Chill a 96-well plate by securely placing it on a chilled 96-well cooling block.
NOTE
Avoid static generation while handling encapsulated samples.
2 Use a P50 multichannel pipette set at 43 μl to gently and slowly aspirate all encapsulated sample from theoutput wells.Fast or harsh pipetting will break the encapsulated samples. Pipette very slowly to avoid yield loss.
CAUTION
Using a single channel pipette to individually transfer encapsulated samples will result in uneven samplevolumes.
Figure 15 Emulsion Layers
A Aqueous layerB Oil layerC Oil+ air bubbles
NOTE
The total emulsion volume transferred to each well is 35–40 μl and ~5 μl of air.
3 Dispense the encapsulated sample as follows.
a Very slowly dispense the encapsulated sample into the corresponding column of the plate, as shownin Figure 16. Dispense should take approximately 5 seconds.
CAUTION
Do not discard tips until all of the encapsulated sample has been transferred to the plate.Discarding tips with sample will result in yield loss.
b Wait 5 seconds for remaining encapsulated sample to collect at the tip of the pipette.c Slowly dispense the remaining encapsulated sample into the same column of the plate.
Document # 1000000021452 v01
For Research Use Only. Not for use in diagnostic procedures.20
Illumina Bio-Rad SureCell WTA 3’ Library Prep Kit for the ddSEQ System

Figure 16 Transferring Encapsulated Samples
u Sample 1 from cartridge to rows A—B of the plateu Sample 2 from cartridge to rows C—D of the plateu Sample 3 from cartridge to rows E—F of the plateu Sample 4 from cartridge to rows G—H of the plate
4 Cover sample wells using an 8-tube strip cap and keep samples on the 96-well cooling block untilReverse Transcribe Samples on page 21.
CAUTION
Plastic plate seals can generate static and impact encapsulated samples. Use 8-tube strip caps to sealwells. Other plate seals may generate static and adversely effect encapsulated samples.
5 If you are processing a second cartridge, proceed to Prepare Cartridge on page 14.Add encapsulated samples from each additional cartridge to a new column of the same 96-well plate.
NOTE
If you intend to processmore than 4 cartridges, contact Illumina Technical Support for a modifiedprotocol.
6 If you have finished processing cartridges, proceed to Reverse Transcribe Samples on page 21.Liquid remaining in the input wells after droplet generation is due to flushing sample from the input wells—this is not left over sample.When removing the cartridge from the cartridge holder, do not invert the cartridge.Dispose of cartridges according to standard laboratory procedures.
Reverse Transcribe SamplesThis step reverse transcribes samples on a thermal cycler.
Guidelinesu Keep the plate on the 96-well cooling block while transporting to the thermal cycler.
u Work in a clear, static-free area, and avoid static generation while handling encapsulated samples.
Document # 1000000021452 v01
For Research Use Only. Not for use in diagnostic procedures.21
Illumina Bio-Rad SureCell WTA 3’ Library Prep Kit for the ddSEQ System

Preparation1 Save the following Reverse Transcription (RT) program on a thermal cycler:
u Choose the preheat lid option and set to 105°Cu Set the reaction volume to 50 µlu 37°C for 30 minutesu 50°C for 60 minutesu 85°C for 5 minutesu Hold at 4°C
Procedure1 Place the 96-well plate on the thermal cycler and run the RT program.
CAUTION
Do not vortex or spin down the plate before placing on the thermal cycler.
2 Remove Purification Beads (SPB) from storage and bring to room temperature for the Clean Up FirstStrand Synthesis on page 23.
Break EmulsionThis step breaks the individual droplets containing barcoded sample cells for further sample processing.
Consumablesu Droplet Disruptor
u Nuclease-free water
u Rainin pipettesu P20 single channel and P200 single channel
Preparation1 Prepare the following consumables:
Item Storage Instructions
Droplet Disruptor 2°C to 8°C Vortex 3–5 times immediately before use to mix, then centrifuge briefly.This reagent can be kept at room temperature during use.
Procedure1 Remove the 96-well plate from the thermal cycler.
CAUTION
Do not vortex or spin down the plate after removing it from the thermal cycler.
2 Visually examine the samples which should all have equal volumes. Each sample has 2 distinct layers, anoil layer on the bottom and an aqueous layer on top. Note if any wells have only one layer in the LabTracking Chart on page 43.
3 Remove the 8-tube strip caps carefully to avoid cross-sample contamination.
4 Add 20 µl of Droplet Disruptor by dispensing slowly against the side of the well above each sample.
Document # 1000000021452 v01
For Research Use Only. Not for use in diagnostic procedures.22
Illumina Bio-Rad SureCell WTA 3’ Library Prep Kit for the ddSEQ System
Do not mix or pipette Droplet Disruptor into the sample.
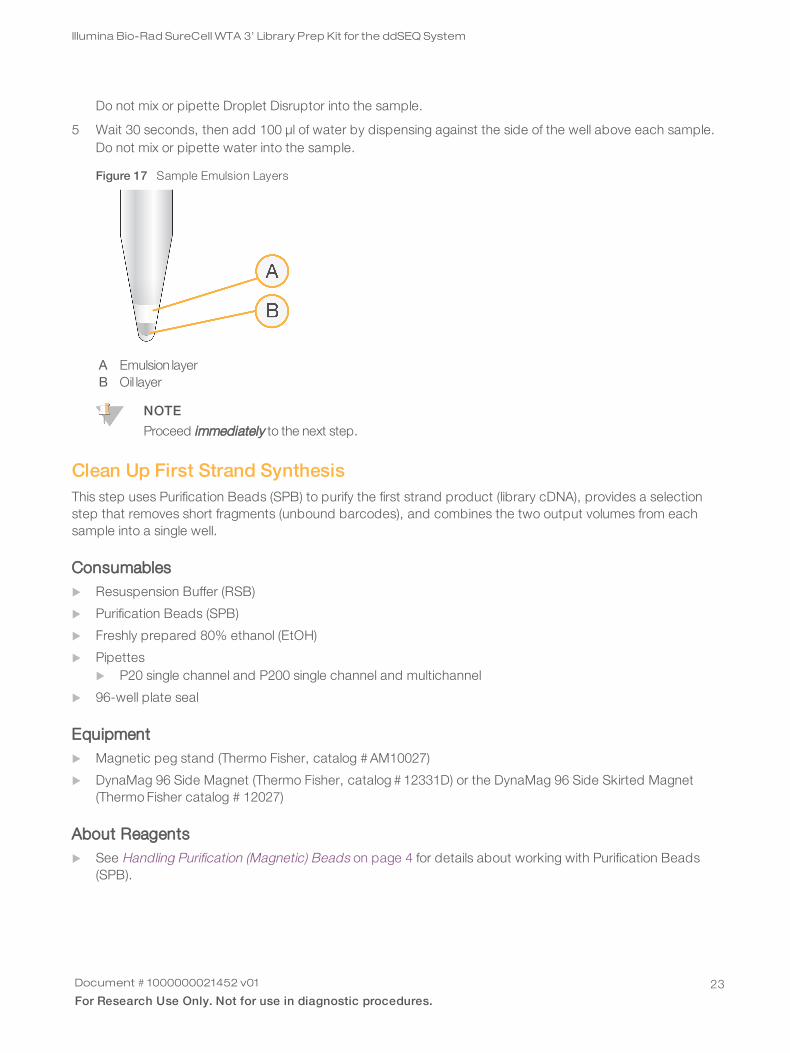
5 Wait 30 seconds, then add 100 µl of water by dispensing against the side of the well above each sample.Do not mix or pipette water into the sample.
Figure 17 Sample Emulsion Layers
A Emulsion layerB Oil layer
NOTE
Proceed immediately to the next step.
Clean Up First Strand SynthesisThis step uses Purification Beads (SPB) to purify the first strand product (library cDNA), provides a selectionstep that removes short fragments (unbound barcodes), and combines the two output volumes from eachsample into a single well.
Consumablesu Resuspension Buffer (RSB)
u Purification Beads (SPB)
u Freshly prepared 80% ethanol (EtOH)
u Pipettesu P20 single channel and P200 single channel and multichannel
u 96-well plate seal
Equipmentu Magnetic peg stand (Thermo Fisher, catalog # AM10027)
u DynaMag 96 Side Magnet (Thermo Fisher, catalog # 12331D) or the DynaMag 96 Side Skirted Magnet(Thermo Fisher catalog # 12027)
About Reagentsu See Handling Purification (Magnetic) Beads on page 4 for details about working with Purification Beads
(SPB).
Document # 1000000021452 v01
For Research Use Only. Not for use in diagnostic procedures.23
Illumina Bio-Rad SureCell WTA 3’ Library Prep Kit for the ddSEQ System

About Samplesu Sample wells contain separate oil and aqueous layers during this step. When mixing, mix only in the
specified layer.
About Magnetsu This procedure uses two types of magnetic stands. Both are needed in this protocol and are not
interchangeable.
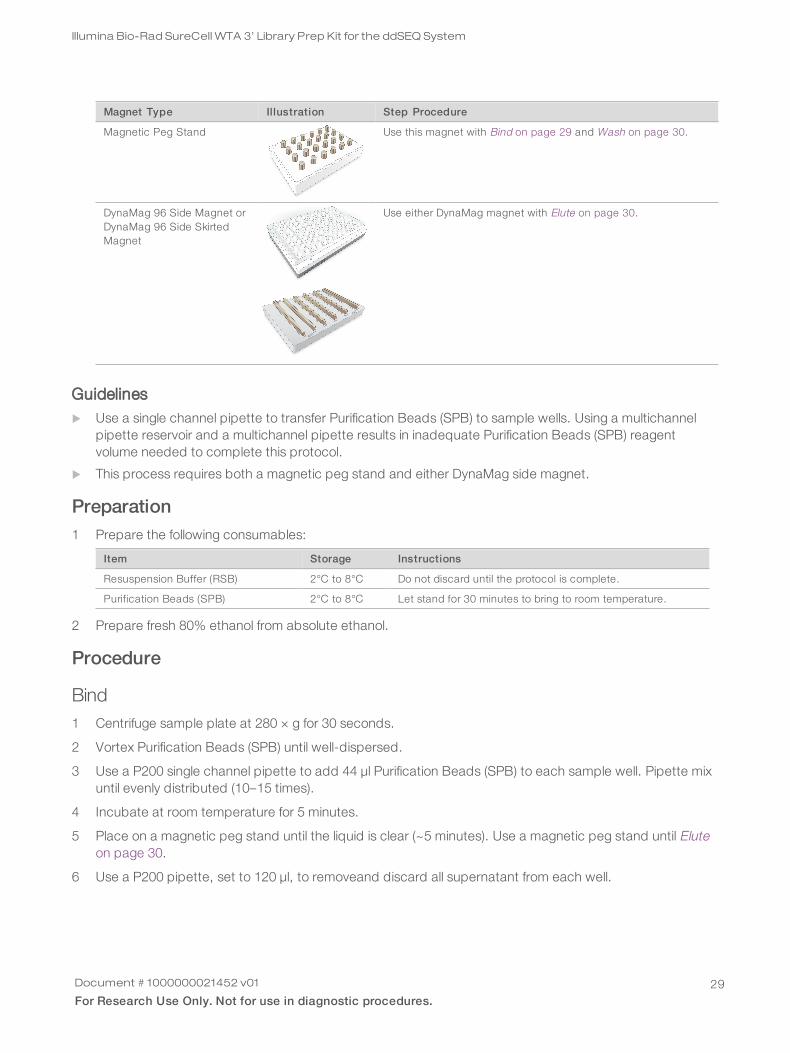
Magnet Type Illustration Step Procedure
Magnetic Peg Stand Use this magnet with Bind on page 24 and Wash on page 26.
DynaMag 96 Side Magnet orDynaMag 96 Side SkirtedMagnet
Use either DynaMag magnet with Elute on page 26.
Guidelinesu Use a single channel pipette to transfer Purification Beads (SPB) to sample wells. Using a multichannel
pipette reservoir and a multichannel pipette results in inadequate Purification Beads (SPB) reagentvolume needed to complete this protocol.
u This process requires both a magnetic peg stand and either DynaMag side magnet.
Preparation1 Prepare the following consumables:
Item Storage Instructions
Resuspension Buffer (RSB) 2°C to 8°C Can be used after removing from 2°C to 8°C. Do not discarduntil the protocol is complete.
Purification Beads (SPB) 2°C to 8°C Let stand for 15 minutes to bring to room temperature.
2 Prepare fresh 80% ethanol from absolute ethanol.
Procedure
Bind1 Vortex Purification Beads (SPB) until well-dispersed.
2 Use a P200 single channel pipette to add90 µl Purification Beads (SPB) to the samples by dispensingslowly above the aqueous layer without mixing. Do not dispense into the oil layer at the bottom of the well.
Document # 1000000021452 v01
For Research Use Only. Not for use in diagnostic procedures.24
Illumina Bio-Rad SureCell WTA 3’ Library Prep Kit for the ddSEQ System

3 Use a P200 single channel pipette, set to 50 µl, to pipette mix Purification Beads (SPB) in the aqueouslayer only until the layer is evenly distributed (10-15 times).After mixing, the samples have 2 distinct layers: an oil layer on the bottom of the well and a homogeneousbrown aqueous layer on the top.
4 Lift the plate to examine the quality of mix for the aqueous layer closely.
CAUTION
The aqueous layer should not appear clear at the top. If parts of the aqueous layer still appear clear or alighter brown, continue tomix until the entire aqueous layer is homogenously brown.
Figure 18 Mixing States From Initial State to Properly Mixed State
A Initial statewitha clearaqueous layerat the topB Notproperlymixed, indicated bya lighterbrownaqueous layerat the topC Properlymixedwithanentirely homogenousbrownaqueous layer
Figure 19 Mixed Aqueous Layer and Oil Layer
A Mixed aqueous layerB Oil layer
5 Incubate at room temperature for 10 minutes.
6 Place on a magnetic peg stand and wait 10 minutes. Use a magnetic peg stand until Elute on page 26.
NOTE
The liquid might not be completely clear of beads due to retention of beads in the aqueous and oillayers.
7 Use a P200 single channel pipette, set to 200 µl, to remove and discard all supernatant from each well.Use a fresh pipette tip to go into the well again to discard approximately 20-30 µl more of supernatant.
Document # 1000000021452 v01
For Research Use Only. Not for use in diagnostic procedures.25
Illumina Bio-Rad SureCell WTA 3’ Library Prep Kit for the ddSEQ System

Wash1 Wash 2 times as follows .
a Add 200 µl freshly prepared 80% EtOH to each well.b Incubate on the magnetic peg stand for 30 seconds.c Remove and discard all supernatant from each well.d Repeat steps a - c to wash again.
2 Seal the plate and centrifuge at 280 × g for 10 seconds to bring down any ethanol or liquid remaining onsides of wells.
3 Place on a magnetic peg stand and wait 30 seconds.
4 Use a P20 single channel pipette to removeresidual 80% EtOH from each well.
5 Air-dry on the magnetic peg stand for 5 minutes.
Elute1 Remove the sample plate from the magnetic peg stand.
2 Use a P200 single channel pipette to add 35μl Resuspension Buffer (RSB) to each sample well. Pipette tomix, making sure all beads are resuspended.
CAUTION
Yield loss can occur if beads are not thoroughly resuspended.
3 Incubate at room temperature for 2 minutes.
4 Seal the plate and centrifuge at 280 × g for 10 seconds.
5 Place on a DynaMag 96 side magnet and wait 2 minutes.
NOTE
You may proceed to the next step even if the solution is not completely clear after 2minutes.
CombineWells fromSample and Transfer1 Using a P200 single channel pipette, combine the 2 wells for each sample into a single well by transferring
34 µl of supernatant from each sample well to a new plate, as follows. Keep the sample plate on theDynaMag 96 side magnet during this step.u Sample 1, rows A—B to row A of the corresponding column in the new plate.u Sample 2, rows C—D to row B of the corresponding column in the new plate.u Sample 3, rows E—F to row C of the corresponding column in the new plate.u Sample 4, rows G—H to row D of the corresponding column in the new plate.After transferring, the total volume of supernatant in each well of the new plate is 68 µl.
CAUTION
Each pair of sample wells in succession represents 1 sample. Proper pooling is critical for library prepindexing and sample processing.
Document # 1000000021452 v01
For Research Use Only. Not for use in diagnostic procedures.26
Illumina Bio-Rad SureCell WTA 3’ Library Prep Kit for the ddSEQ System

Figure 20 Combining Barcoded Samples
NOTE
Proceed immediately to the next step.
Synthesize Second Strand cDNAThis process removes the RNA template and synthesizes a replacement strand to generate double strandedcDNA.
Consumablesu Second Strand Buffer (SSB)
u Second Strand Enzyme (SSE)
u Pipettes
u P20 single channel and P200 multichannel
About Reagentsu Second Strand Enzyme (SSE) is viscous and pipettes slowly. Ensure that the specified volume is
obtained.
Preparation1 Prepare the following consumables:
Item Storage Instructions
Second Strand Buffer(SSB)
-25°C to -15°C Thaw on ice. Vortex to mix, and then centrifuge briefly. Keep on ice untiluse.
Second Strand Enzyme(SSE)
-25°C to -15°C Thaw on ice. Pipette mix and then centrifuge briefly. Keep on ice untiluse.
2 Save the following Second Strand Synthesis (SSS) program on the thermal cycler:u Turn off the heated lid functionu Set the reaction volume to 80 μlu 16°C for 2 hoursu Hold at 4°C
Document # 1000000021452 v01
For Research Use Only. Not for use in diagnostic procedures.27
Illumina Bio-Rad SureCell WTA 3’ Library Prep Kit for the ddSEQ System

Procedure1 Prepare Second Strand Synthesis Master Mix by adding the following to a 1.7 ml tube on ice. Pipette 10
times to mix.
Second Strand SynthesisComponent
Volume (µl) for 1 Cartridge(4 Samples)
Volume (µl) for 2 Cartridges(8 Samples)
Second Strand Buffer (SSB) 36 72
Second Strand Enzyme (SSE) 18 36
2 Using a P20 single channel pipette, add 12 µl of Second Strand Master Mix to each sample well.
3 Using a P200 multichannel pipette set to 40 μl, pipette to thoroughly mix each sample well.
4 Seal the plate and centrifuge at 280 × g for 10 seconds.
5 Place on the preprogrammed thermal cycler and run the Second Strand Synthesis (SSS) program.
SAFE STOPPING POINT
If you are stopping, leave the plate on the thermal cycler at 4°C overnight or store at -25°C to -15°C for up to2 days.
Clean Up cDNAThis process uses Purification Beads (SPB) to purify the library DNA and provides a selection step thatremoves short library fragments.
Consumablesu Resuspension Buffer (RSB)
u Purification Beads (SPB)
u Freshly prepared 80% ethanol (EtOH)
u Pipettesu P20 single channel and P200 single channel and multichannel
u 96-well plate seal
Equipmentu Magnetic peg stand (Thermo Fisher, catalog # AM10027)
u DynaMag 96 Side Magnet (Thermo Fisher, catalog # 12331D) or the DynaMag 96 Side Skirted Magnet(Thermo Fisher catalog # 12027)
About Reagentsu See Handling Purification (Magnetic) Beads on page 4 for details about working with Purification Beads
(SPB).
About Magnetsu This procedure uses two types of magnetic stands. Both are needed in this protocol and are not
interchangeable.
Document # 1000000021452 v01
For Research Use Only. Not for use in diagnostic procedures.28
Illumina Bio-Rad SureCell WTA 3’ Library Prep Kit for the ddSEQ System
Magnet Type Illustration Step Procedure
Magnetic Peg Stand Use this magnet with Bind on page 29 and Wash on page 30.
DynaMag 96 Side Magnet orDynaMag 96 Side SkirtedMagnet
Use either DynaMag magnet with Elute on page 30.
Guidelinesu Use a single channel pipette to transfer Purification Beads (SPB) to sample wells. Using a multichannel
pipette reservoir and a multichannel pipette results in inadequate Purification Beads (SPB) reagentvolume needed to complete this protocol.
u This process requires both a magnetic peg stand and either DynaMag side magnet.
Preparation1 Prepare the following consumables:
Item Storage Instructions
Resuspension Buffer (RSB) 2°C to 8°C Do not discard until the protocol is complete.
Purification Beads (SPB) 2°C to 8°C Let stand for 30 minutes to bring to room temperature.
2 Prepare fresh 80% ethanol from absolute ethanol.
Procedure
Bind1 Centrifuge sample plate at 280 × g for 30 seconds.
2 Vortex Purification Beads (SPB) until well-dispersed.
3 Use a P200 single channel pipette to add 44 µl Purification Beads (SPB) to each sample well. Pipette mixuntil evenly distributed (10–15 times).
4 Incubate at room temperature for 5 minutes.
5 Place on a magnetic peg stand until the liquid is clear (~5 minutes). Use a magnetic peg stand until Eluteon page 30.
6 Use a P200 pipette, set to 120 µl, to removeand discard all supernatant from each well.
Document # 1000000021452 v01
For Research Use Only. Not for use in diagnostic procedures.29
Illumina Bio-Rad SureCell WTA 3’ Library Prep Kit for the ddSEQ System

Wash1 Wash 2 times, as follows.
a Add 200 µl freshly prepared 80% EtOH to each well.b Incubate on the magnetic stand for 30 seconds.c Remove and discard all supernatant from each well.
2 Air-dry on the magnetic peg stand for 5 minutes.
3 Using a P20 pipette, remove residual 80% EtOH from each well.
Elute1 Remove from the magnetic peg stand.
2 Using a P20 single channel pipette, add 11 µl Resuspension Buffer (RSB) to each sample well. Pipette tomix, making sure all beads are resuspended.
CAUTION
Yield loss can occur if beads are not thoroughly resuspended.
3 Incubate at room temperature for 2 minutes.
4 Seal the plate and centrifuge at 280 × g for 10 seconds to bring entire solution to the bottom of the well.
5 Place on a DynaMag 96 side magnet and wait until the liquid is clear (~2 minutes).
6 Transfer 10 µl of supernatant from each sample well to a new sample well of a 96-well plate.
CheckLibrariesPerform the following procedure for quality control analysis on your sample library. cDNA yields at >2ng aresufficient to proceed to Tagment cDNA on page 31. Yields lower than >2ng will result in low final library yieldsdue to overtagmentation.
1 Run 1 µl of undiluted library on an Agilent Technology 2100 Bioanalyzer using a High Sensitivity DNA chip.
2 Drag the blue regions to capture the 200-8000 bp range.Typical libraries have insert sizes ranging from ~400–8000 bp, with a trace profile similar to Figure 21.
CAUTION
Lower cDNA yields will lead to suboptimal library preparation in subsequent steps and is notrecommended.
3 Record the cDNA library fragment size and cDNA yield. See Lab Tracking Chart on page 43.An example of the resulting cDNA prepared using this protocol is shown in Figure 21.
Document # 1000000021452 v01
For Research Use Only. Not for use in diagnostic procedures.30
Illumina Bio-Rad SureCell WTA 3’ Library Prep Kit for the ddSEQ System
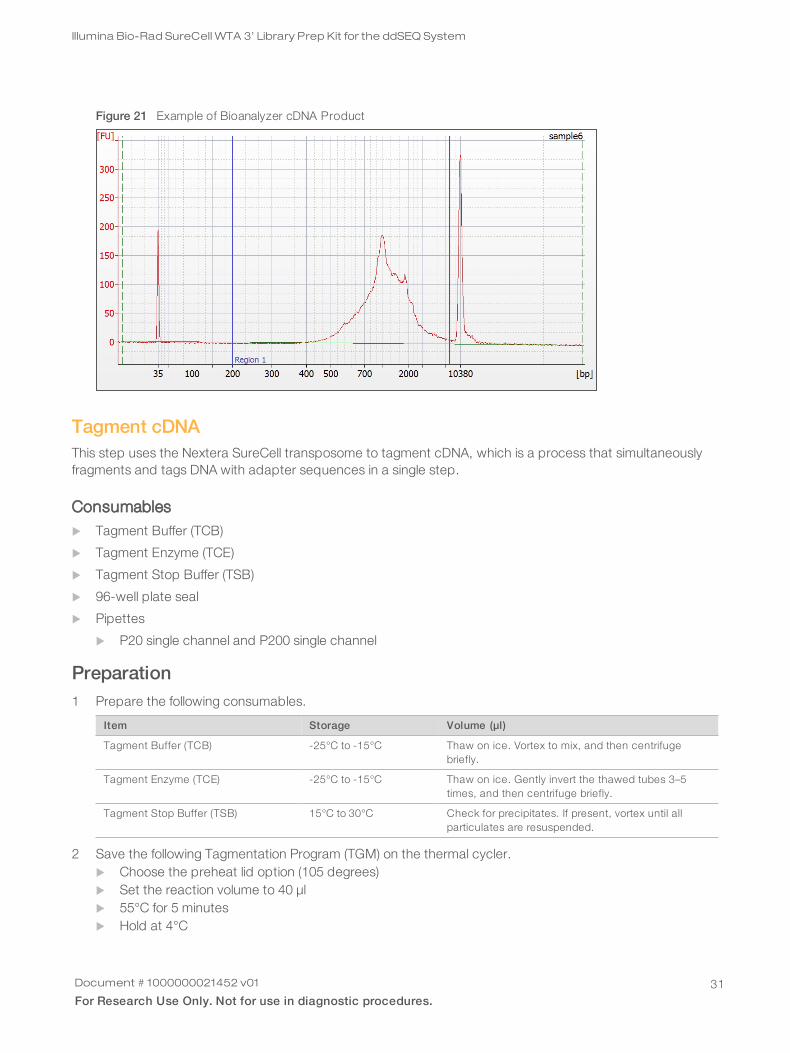
Figure 21 Example of Bioanalyzer cDNA Product
Tagment cDNAThis step uses the Nextera SureCell transposome to tagment cDNA, which is a process that simultaneouslyfragments and tags DNA with adapter sequences in a single step.
Consumablesu Tagment Buffer (TCB)
u Tagment Enzyme (TCE)
u Tagment Stop Buffer (TSB)
u 96-well plate seal
u Pipettes
u P20 single channel and P200 single channel
Preparation1 Prepare the following consumables.
Item Storage Volume (µl)
Tagment Buffer (TCB) -25°C to -15°C Thaw on ice. Vortex to mix, and then centrifugebriefly.
Tagment Enzyme (TCE) -25°C to -15°C Thaw on ice. Gently invert the thawed tubes 3–5times, and then centrifuge briefly.
Tagment Stop Buffer (TSB) 15°C to 30°C Check for precipitates. If present, vortex until allparticulates are resuspended.
2 Save the following Tagmentation Program (TGM) on the thermal cycler.u Choose the preheat lid option (105 degrees)u Set the reaction volume to 40 µlu 55°C for 5 minutesu Hold at 4°C
Document # 1000000021452 v01
For Research Use Only. Not for use in diagnostic procedures.31
Illumina Bio-Rad SureCell WTA 3’ Library Prep Kit for the ddSEQ System
Procedure1 Prepare Tagmentation Mix in a 1.7 ml tube on ice as follows. Pipette 10 times to mix.
Tagmentation MixComponent
Volume (µl) for 1Cartridge(4 Samples)
Volume (µl) for 2Cartridges(8 Samples)
Tagment Buffer (TCB) 88 176
Tagment Enzyme (TCE) 44 88
2 Add 30 µl of Tagmentation Mix to each sample well. Mix with pipette.
3 Seal the plate and centrifuge at 280 × g for 10 seconds.
4 Place on the preprogrammed thermal cycler and run the TGM program.
5 Remove the plate from the thermal cycler as soon as the temperature reaches 4° C. Do not leave thePCR plate on the thermal cycler for longer than 6 minutes.
6 Remove the seal carefully to avoid cross-sample contamination.
7 Use a P20 pipette to add 10 µl of Tagment Stop Buffer to each well. Pipette to mix with a P200 pipette.
8 Seal the plate and centrifuge at 280 × g for 10 seconds.
9 Incubate at room temperature for 5 minutes.
Amplify Tagmented cDNAThis step uses a 15-cycle PCR program to amplify tagmented cDNA and add DNA adapters required forcluster generation. To ensure that your libraries produce high-quality sequencing results, use the specifiednumber of PCR cycles.
Consumablesu Tagmentation PCR Mix (TPM)
u Tagment PCR Adapter (TPP1)
u DNA Adapters (N7XX)
u 96-well plate seal
u Pipettes
u P20 single channel and P200 single channel and multichannel
Preparation1 Prepare the following consumables.
Item Storage Instructions
DNA Adapters -25°C to -15°C Only remove adapters being used. Thaw at roomtemperature for 20 minutes. Vortex to mix, and thencentrifuge briefly.
Tagmentation PCR Mix (TPM) -25°C to -15°C Thaw on ice. Gently invert the thawed tubes 3–5 times,and then centrifuge briefly.
Tagment PCR Adapter (TPP1) -25°C to -15°C Thaw at room temperature for 20 minutes. Vortex to mix,and then centrifuge briefly.
Document # 1000000021452 v01
For Research Use Only. Not for use in diagnostic procedures.32
Illumina Bio-Rad SureCell WTA 3’ Library Prep Kit for the ddSEQ System

2 Save the following Library Amplification (LA) program on the thermal cycler:u Choose the preheat lid option and preheat to 105°Cu Set the reaction volume to 100 µlu 95°C for 30 secondsu 15 cycles of:
u 95°C for 10 secondsu 60°C for 45 secondsu 72°C for 60 seconds
u 72°C for 5 minutesu Hold at 4°C
Procedure1 Arrange the DNA Adapters in a tube rack. Use a different index for each sample well. Record the
DNA Adapter index used for each sample well.This information will be required when setting up the sequencing run.
2 Using a P200 single channel pipette, add 30 µl of Tagmentation PCR Mix (TPM) to each of the tagmentedsamples.
3 Using a P20 single channel pipette, add 10 µl of Tagment PCR Adapter (TPP1) to each of the tagmentedsamples.
4 Using a P20 single channel pipette, add 10 µl of each DNA Adapter to each tagmented sample.DNA Adapters are one time use and do not require new orange caps.
5 Use a P200 multichannel Pipette to mix 10-15 times.
6 Seal the plate and centrifuge at 280 × g at 20°C for 30 seconds.
7 Place on the preprogrammed thermal cycler and run the LA program.
SAFE STOPPING POINT
If you are stopping, leave the plate on the thermal cycler at 4°C overnight or store at -25°C to -15°C for up to2 days.
Clean Up LibrariesThis process uses Purification Beads (SPB) to purify the library DNA and provides a selection step thatremoves short library fragments.
Consumablesu Resuspension Buffer (RSB)
u Purification Beads (SPB)
u Freshly prepared 80% ethanol (EtOH)
u Pipettesu P20 single channel and P200 single channel and multichannel
u 96-well plate seal
Document # 1000000021452 v01
For Research Use Only. Not for use in diagnostic procedures.33
Illumina Bio-Rad SureCell WTA 3’ Library Prep Kit for the ddSEQ System

Equipmentu Magnetic peg stand (Thermo Fisher, catalog # AM10027)
u DynaMag 96 Side Magnet (Thermo Fisher, catalog # 12331D) or the DynaMag 96 Side Skirted Magnet(Thermo Fisher catalog # 12027)
About Reagentsu See Handling Purification (Magnetic) Beads on page 4 for details about working with Purification Beads
(SPB).
About Magnetsu This procedure uses two types of magnetic stands. Both are needed in this protocol and are not
interchangeable.
Magnet Type Illustration Step Procedure
Magnetic Peg Stand Use this magnet with Bind on page 35 and Wash on page 35.
DynaMag 96 Side Magnet orDynaMag 96 Side SkirtedMagnet
Use either DynaMag magnet with Elute on page 35.
Guidelinesu Use a single channel pipette to transfer Purification Beads (SPB) to sample wells. Using a multichannel
pipette reservoir and a multichannel pipette results in inadequate Purification Beads (SPB) reagentvolume needed to complete this protocol.
u This process requires both a magnetic peg stand and either DynaMag side magnet.
Preparation1 Prepare the following consumables.
Item Storage Instructions
Resuspension Buffer (RSB) 2°C to 8°C Do not discard until the protocol is complete.
Purification Beads (SPB) 2°C to 8°C Let stand for 30 minutes to bring to room temperature.
2 Prepare fresh 80% ethanol from absolute ethanol.
Document # 1000000021452 v01
For Research Use Only. Not for use in diagnostic procedures.34
Illumina Bio-Rad SureCell WTA 3’ Library Prep Kit for the ddSEQ System
Procedure
Bind1 Centrifuge sample plate at 280 × g for 30 seconds.
2 Vortex Purification Beads (SPB) until well-dispersed.
3 Using a P200 single channel pipette, add 58 µl of Purification Beads (SPB) to each sample well. Pipette tomix, making sure that all beads are resuspended.
4 Incubate at room temperature for 5 minutes.
5 Place on a 96-well magnetic peg stand until the liquid is clear (~5 minutes). Use a magnetic peg standuntil Elute on page 35.
6 Remove and discard all supernatant from each well.
Wash1 Wash 2 times, as follows.
a Add 200 µl freshly prepared 80% EtOH to each well.b Incubate on the magnetic stand for 30 seconds.c Remove and discard all supernatant from each well.
2 Using a P20 pipette, remove residual 80% EtOH from each well.
3 Air-dry on the magnetic peg stand for 5 minutes.
Elute1 Remove from the magnetic peg stand.
2 Using a P200 pipette, add51 µl of Resuspension Buffer (RSB) to each sample well. Pipette mix untilbeads are thoroughly resuspended.
3 Incubate at room temperature for 2 minutes.
4 Apply the seal and centrifuge at 280 × g for 10 seconds to bring entire solution to the bottom of the well.
5 Place on a DynaMag 96 side magnet until the liquid is clear (~2 minutes). Use a DynaMag 96 side magnetuntil Second Bind on page 35.
6 Transfer 50 µl of supernatant from each sample well to a new sample 96-well plate.
SecondBind1 Vortex Purification Beads (SPB) until well-dispersed.
2 Add 30 µl of Purification Beads (SPB) to each sample well. Use a P200 to pipette until evenly distributed(10-15 times).
3 Incubate at room temperature for 5 minutes.
4 Place on a magnetic peg stand until the liquid is clear (~5 minutes). Use a magnetic peg stand untilSecond Elute on page 36.
5 Remove and discard all supernatant from each well.
Document # 1000000021452 v01
For Research Use Only. Not for use in diagnostic procedures.35
Illumina Bio-Rad SureCell WTA 3’ Library Prep Kit for the ddSEQ System

SecondWash1 Wash 2 times, as follows.
a Add 200 µl freshly prepared 80% EtOH to each well.b Incubate on the magnetic stand for 30 seconds.c Remove and discard all supernatant from each well.
2 Using a P20 pipette, remove residual 80% EtOH from each well.
3 Air-dry on the magnetic peg stand for 5 minutes.
Second Elute1 Remove the 96-well plate from the magnetic peg stand.
2 Add 22 µl Resuspension Buffer (RSB) to each sample well. Using a P200, pipette mix until beads areresuspended.
3 Incubate at room temperature for 2 minutes.
4 Seal the plate and centrifuge at 280 × g for 10 seconds to bring entire solution to the bottom of the well.
5 Place on a DynaMag 96 side magnet until the liquid is clear (~2 minutes).
6 Transfer 20 µl of supernatant from each sample well to a new 96-well plate.
SAFE STOPPING POINT
If you are stopping, seal the plate and store at -25°C to -15°C for up to 7 days.
Assess LibrariesAccuratelyquantifyDNAlibraries toensure optimumclusterdensitieson the flowcell.
1 Run 1 µl undiluted library on an Agilent Technology 2100 Bioanalyzer using a High Sensitivity DNA chip.
2 Determine the concentration of the library using the Agilent Technology 2100 Bioanalyzer.
3 Select the Region Analysis tab.
4 Drag the blue region lines to capture the 200–8000 bp region. Record the final library fragment size andfinal library yield. See Lab Tracking Chart on page 43.The following figure shows an example trace of a successfully sequenced library. Typical libraries show abroad size distribution ~300–1000 bp. A wide variety of libraries can be sequenced with averagefragment sizes as small as 450 bp or as large as 1200 bp.
Document # 1000000021452 v01
For Research Use Only. Not for use in diagnostic procedures.36
Illumina Bio-Rad SureCell WTA 3’ Library Prep Kit for the ddSEQ System

Figure 22 Sample Library Size Distributions
5 Expected library yield is 2-10 nM. Depending on actual library yield, normalize samples to 2 nM.
Prepare for SequencingUse the SureCell Sequencing Primer for your sequencing runs. The Sequencing Primer (SP) is concentrated at50 μM and must be diluted according to the custom sequencing primer documentation for your instrument.See Additional Resources on page 1.
Confirm that Illumina Experiment Manager v1.13 or later is used to set up the sequencing sample sheet if theBaseSpace Prep Tab is not used. Version 1.13 or later has the appropriate UMI settings and indexsequences for sample demultiplexing. If demultiplexing outside of BaseSpace Sequence Hub, confirm thatbcl2fastq v2.18 or later is used for FASTQ Generation.
NOTE
SureCell Sequencing Primer is compatible with this library and PhiX only.
Consumablesu Sequencing Primer (SP) (50 μM)
u [Optional] PhiX Control v3
Custom Primer Guidesu NovaSeq System Custom Primers Guide (document # 1000000022266 v00)
u NextSeq System Custom Primers Guide (document # 15057456)
u HiSeq System Custom Primers Guide (document # 15061846)
u MiSeq System Custom Primers Guide (document # 15041638)
u MiniSeq System Custom Primers Guide (document # 1000000002700 v01)
Document # 1000000021452 v01
For Research Use Only. Not for use in diagnostic procedures.37
Illumina Bio-Rad SureCell WTA 3’ Library Prep Kit for the ddSEQ System
Modify SureCell Loading ConcentrationsUse this table to help you determine your SureCell loading concentration. Loading concentrations presentedin this tabled are based on BioAnalyzer quantification. If you are quantifying with another method, you mayneed to optimize the loading concentration.
Instrument Resource Loading Concentration
NextSeq System Custom Primers Guide (document # 15057456) 2.7 - 3 pM
HiSeq 2500 System Custom Primers Guide (document # 15061846) 18 - 20 pM
HiSeq 3000/4000 System Custom Primers Guide (document # 15061846) 350 - 400 pM
MiSeq System Custom Primers Guide (document # 15041638) 25 - 32 pM
MiniSeq System Custom Primers Guide (document # 1000000002700) Not provided
NovaSeq System Custom Primers Guide (document # 1000000022266) Not provided
Sequence in Your Lab1 Follow the instructions for using custom primers for a sequencing run on your instrument. See Additional
Resources on page 1.
CAUTION
For NextSeq runs connected to BaseSpace Sequence Hub, select the SureCell WTA 3' Library Prep kitduring Prep Tab setup to ensure that the Custom Primer R1 option is automatically selected on thePlanned Runs screen. This option must be selected or the sequencing run fails.
NOTE
[Optional] Add a 1% PhiX control spike-in as a positive control for alignment and error rate calculations.For more information, see the PhiX Control v3 support page on the Illumina website.
Sequence Using an Outside Lab1 Consult with your sequencing lab about dilution of Sequencing Primer (SP) and dilute accordingly.
2 Send Sequencing Primer (SP) with the quantified libraries.The lab adds the Sequencing Primer (SP) to the appropriate sequencing reagents for the Illuminainstrument used for sequencing.
3 [Optional] Add a 1% PhiX control spike-in as a positive control for alignment and error rate calculations.For more information, see the PhiX Control v3 support page on the Illumina website.
Document # 1000000021452 v01
For Research Use Only. Not for use in diagnostic procedures.38
Illumina Bio-Rad SureCell WTA 3’ Library Prep Kit for the ddSEQ System

Appendix A Supporting Information
Supporting InformationIntroduction 39How does the SureCell WTA 3' Assay Work? 39Verif ied Protocol: Mixed Species Control 40Lab Tracking Chart 43Acronyms 44Kit Options 44Consumables and Equipment 47
IntroductionThe protocols described in this guide assume that you have reviewed the contents of this appendix,confirmed your kit contents, and obtained all the required consumables and equipment.
How does the SureCell WTA 3' Assay Work?Single cells are individually partitioned into subnanoliter droplets on a disposable cartridge using the Bio-RadddSEQ™ Single-Cell Isolator. Cell lysis and cell barcoding of mRNA transcripts takes place in each dropletduring reverse transcription. Then droplets are disrupted, and the barcoded cDNA is pooled for secondstrand synthesis in bulk. Double-stranded cDNA is tagmented by Nextera SureCell transposome to addprimer binding sites for subsequent indexing and amplification by PCR. Final libraries are purified and readyfor sequencing on any Illumina sequencing platform.
Document # 1000000021452 v01
For Research Use Only. Not for use in diagnostic procedures.39

Verified Protocol: Mixed Species Control
IntroductionThis is a verified protocol for culturing and preparing HEK-293 (human) and NIH-3T3 (mouse) cell lines foranalysis as a mixed species cell suspension. This protocol can be used as a control in parallel with othersamples. It also enables the assessment of doublet cells by detecting mixed-species crosstalk. Uponcompletion of the protocol, cells are ready to begin the Prepare Cell and Barcode Suspension Mixes on page11.
Cell Lines and Culture Media
Cell Line Species Supplier Catalog Number Culture Conditions
HEK-293 Human ATCC® CRL-1573 EMEM + 10 % FBS + antibiotic
NIH-3T3 Mouse ATCC® CRL-1658 DMEM + 10 % FBS + antibiotic
List of Materialsu Complete Growth Medium based on the ATCC recommendation for the respective cell type and stored
at 4° C. Complete Growth Medium needs to be warmed up to 37° C before the cell handling andpreparation.
u PBS + 0.1% BSA solution; this solution needs to be stored at 4° C at all times. While performing celldissociation, the solution needs to be stored on ice. If working under a hood, take out a large volumefrom the refrigerator right before use.
u PBS is stored at room temperature and can be used as is.u Corning Life Sciences Cell Strainer CP ST 5ML 500/CS (catalog # 352235)u Trypan Blue Solution 0.4%u Bio-Rad TC20u Bio-Rad TC20 counting slides, dual chamber for cell counteru VWR Analog Vortex Mixeru Pipettes and pipette tipsu Microscope, hood, centrifuge, standard cell culture lab equipmentu TypLE Express
Cell Dissociation ProtocolFollow these steps in parallel to perform cell dissociation on both the HEK-293 and NIH-3T3 cell lines.
1 Warm the required media from the refrigerator to 37° C (approximately 30 minutes).
2 Remove the flask from the incubator and check the cells under the microscope.Confluency should be between 60-90%.
3 Carefully remove all the media without touching the surface of the flask.
4 Add PBS to briefly rinse attached cells and discard the PBS.
5 For a regular T-75 flask, add 2.5 ml of Trypsin-EDTA to cover the entire surface of the flask.
Document # 1000000021452 v01
For Research Use Only. Not for use in diagnostic procedures.40
Illumina Bio-Rad SureCell WTA 3’ Library Prep Kit for the ddSEQ System

6 Place flask in the incubator for between 3 - 5 minutes; remove the flask and check to see if cells havedetached or are starting to detach.
CAUTION
Do not tap the flask to detach cells as this may increase the chance of cell aggregation.
7 Add 1 ml of warm medium to the flask. Using a P1000 pipette, break the cell clumps by pipetting up anddown 10-15 times.
8 Add 9 ml of media to the flask to neutralize the TrypLE Express.
Cell Counting ProtocolFollow these steps in parallel to perform cell counting on both the HEK-293 and NIH-3T3 cell lines.
1 Transfer each cell suspension into a Falcon tube. Centrifuge at 250 × g for 3 minutes.
2 Discard supernatant. Suspend the cells in 1 mL cold PBS + 0.1% BSA. With a P1000 pipette, break thecell clumps by pipetting up and down 10-15 times. Then add 9 ml of cold PBS + 0.1% BSA to bring thevolume to 10 ml. Spin at 250 × g for 3 minutes.
NOTE
Keep the cell suspension on ice for the remainder of the protocol.
3 Discard supernatant. Suspend cells in an estimated volume of cold PBS + 0.1% BSA to reach anapproximate cell concentration above 2500 c/µl. (Estimated volume range of 250 - 1500 µl).
4 Dissociate cells by pipetting vigorously (at least 40 times) and then filter cells through the 35 μm cellstrainer to remove cell aggregates.
5 Perform cell viability measurement as follows:
a Vortex the cell tube for a few seconds.b Use a P20 pipette to take 10 µl from the middle of the cell suspension, and then add 10 µl of trypan
blue 0.4%.c Pipette 10 times to mix, then load onto Chamber A of the Bio-Rad TC20 counting slides.d Measure the cell viability (should be ≥ 95%).
NOTE
Make sure the cell suspension is stored on ice during this step.
6 Perform cell concentration measurement as follows:
a Vortex the cell tube for a few seconds.b Use a P20 pipette to take 10 µl from the middle of the cell suspension, and immediately load it onto
Chamber B of the TC20 chip.c Measure the cell counts in Chamber B on the TC20. This step should be performed without adding
trypan blue.d Vortex the cell tube for a few seconds.e Use a P20 pipette to take 10 µl from the middle of the cell suspension and immediately load it onto
Chamber A of the TC20 chip.f Take another 10 µl from the middle of the cell suspension and immediately load it onto Chamber B of
the TC20 chip.
Document # 1000000021452 v01
For Research Use Only. Not for use in diagnostic procedures.41
Illumina Bio-Rad SureCell WTA 3’ Library Prep Kit for the ddSEQ System

g Measure the cell counts in Chamber A and B on the TC20. This step should be performed withoutadding trypan blue.
NOTE
Make sure the cell suspension is stored on ice during this step.
7 Calculate the average cell concentration with the three measurements performed in step 6 to arrive at anaccurate cell count.
8 Check the average cell concentration. Dilute or concentrate the cell suspension if cells are above orbelow the target range of 10% of 2500 cells/µl. Use cold PBS + 0.1% BSA to dilute or resuspend.
9 Pipette an equal volume of HEK-293 cell suspension and NIH-3T3 cell suspension into a single tube (witha minimum of 250 µl total).
10 Pipette vigorously 20 times with a P1000 pipette to mix both cell types together well.
11 Proceed to Prepare Cell and Barcode Suspension Mixes on page 11. Store cell suspension on ice withpreparing reagent.
Document # 1000000021452 v01
For Research Use Only. Not for use in diagnostic procedures.42
Illumina Bio-Rad SureCell WTA 3’ Library Prep Kit for the ddSEQ System

Lab Tracking ChartRecord lab tracking information and sample observations throughout the protocol. The following templatecan be used to record process control results such as cDNA yield and final library yield.
Have this information available when contacting Illumina Technical Support. In addition to the observationform, record the following information if you have unexpected results.
u A detailed description of the problem
u The steps that were performed immediately before the problem occurred
u The expected results
u The observed results
Document # 1000000021452 v01
For Research Use Only. Not for use in diagnostic procedures.43
Illumina Bio-Rad SureCell WTA 3’ Library Prep Kit for the ddSEQ System

Acronyms
Acronym Definition
BSA Bovine Serum Albumin
PBS Phosphate-Buffered Saline
RSB Resuspension Buffer
RTE Reverse Transcription Enzyme
SPB (Sample) Purification Beads
SSB Second Strand Buffer
SSE Second Strand Enzyme
TCB Tagment Buffer
TCE Tagment Enzyme
TPM Tagmentation PCR Mix
TPP1 Tagment PCR Adapter
TSB Tagment Stop Buffer
Kit OptionsMake sure that you have all the reagents identified in this section before proceeding to the library preparationprocedures. Kits are available in the following configurations.
Consumable Catalog #
SureCell WTA 3’ Library Prep Kit for the ddSEQ System (1 Library Prep, 8 Samples) 20014279
SureCell WTA 3’ Library Prep Kit for the ddSEQ System (1 Library Prep, 24 Samples) 20014280
NOTE
Certain components of the kit are stored at a temperature that differs from the shipping temperature. Storekit components at the specified temperature.
CAUTION
The SureCell WTA 3' includes Sequencing Primer (SP). Include the Sequencing Primer (SP) with the librarywhen sending to an outside lab for sequencing.
SureCell WTA 3’ Library Prep Kit for the ddSEQ System - 8 samples
Box1
Quantity Description
2 ddSEQ Cartridges
Box2—Store at 2°C to8°C
Quantity Reagent Acronym
1 Encapsulation Oil N/A
Document # 1000000021452 v01
For Research Use Only. Not for use in diagnostic procedures.44
Illumina Bio-Rad SureCell WTA 3’ Library Prep Kit for the ddSEQ System

Quantity Reagent Acronym
1 3' Barcode Mix (Blue Cap) N/A
1 Droplet Disruptor N/A
1 Resuspension Buffer RSB
2 Purification Beads SPB
1 Tagment Stop Buffer N/A
1 ddSEQ Priming Solution N/A
Box3—Store at -25°C to -15°C
Quantity Reagent Acronym
1 Barcode Buffer (Blue Cap) N/A
1 Cell Suspend Buffer (Red Cap) N/A
1 RNA Stabilizer (Red Cap) N/A
1 DTT (Red Cap) N/A
1 Enzyme Enhancer N/A
1 RT Enzyme (Red Cap) RTE
1 Second Strand Buffer SSB
1 Second Strand Enzyme SSE
1 Tagment Buffer TCB
1 Tagment Enzyme TCE
1 Tagmentation PCR Mix TPM
1 Tagment PCR Adapter TPP1
1 Sequencing Primer SP
Box4—Store at -25°C to -15°C
Quantity Reagent Acronym
8 DNA Adapters N701–N707, N718
SureCell WTA 3’ Library Prep Kit for the ddSEQ System - 24 Samples
Box1 (Quantity 3)
Quantity Description
2 ddSEQ M Cartridges
Box2 (Quantity 3)—Store at 2°C to8°C
Quantity Reagent Acronym
1 Encapsulation Oil N/A
1 3' Barcode Mix N/A
Document # 1000000021452 v01
For Research Use Only. Not for use in diagnostic procedures.45
Illumina Bio-Rad SureCell WTA 3’ Library Prep Kit for the ddSEQ System

Quantity Reagent Acronym
1 Droplet Disruptor N/A
1 Resuspension Buffer RSB
2 Purification Beads SPB
1 Tagment Stop Buffer TSB
1 ddSEQ Priming Solution N/A
Box3 (Quantity 3)—Store at -25°C to -15°C
Quantity Reagent Acronym
1 Barcode Buffer (Blue Cap) N/A
1 Cell Suspend Buffer (Red Cap) N/A
1 RNA Stabilizer (Red Cap) N/A
1 DTT (Red Cap) N/A
1 Enzyme Enhancer N/A
1 RT Enzyme (Red Cap) RTE
1 Second Strand Buffer SSB
1 Second Strand Enzyme SSE
1 Tagment Buffer TCB
1 Tagment Enzyme TCE
1 Tagmentation PCR Mix TPM
1 Tagment PCR Adapter TPP1
Box4—Store at -25°C to -15°C
Quantity Reagent Acronym
24 DNA Adapters N701–N707, N710–N712, N714–N716, N718–N724, N726–N729
Document # 1000000021452 v01
For Research Use Only. Not for use in diagnostic procedures.46
Illumina Bio-Rad SureCell WTA 3’ Library Prep Kit for the ddSEQ System
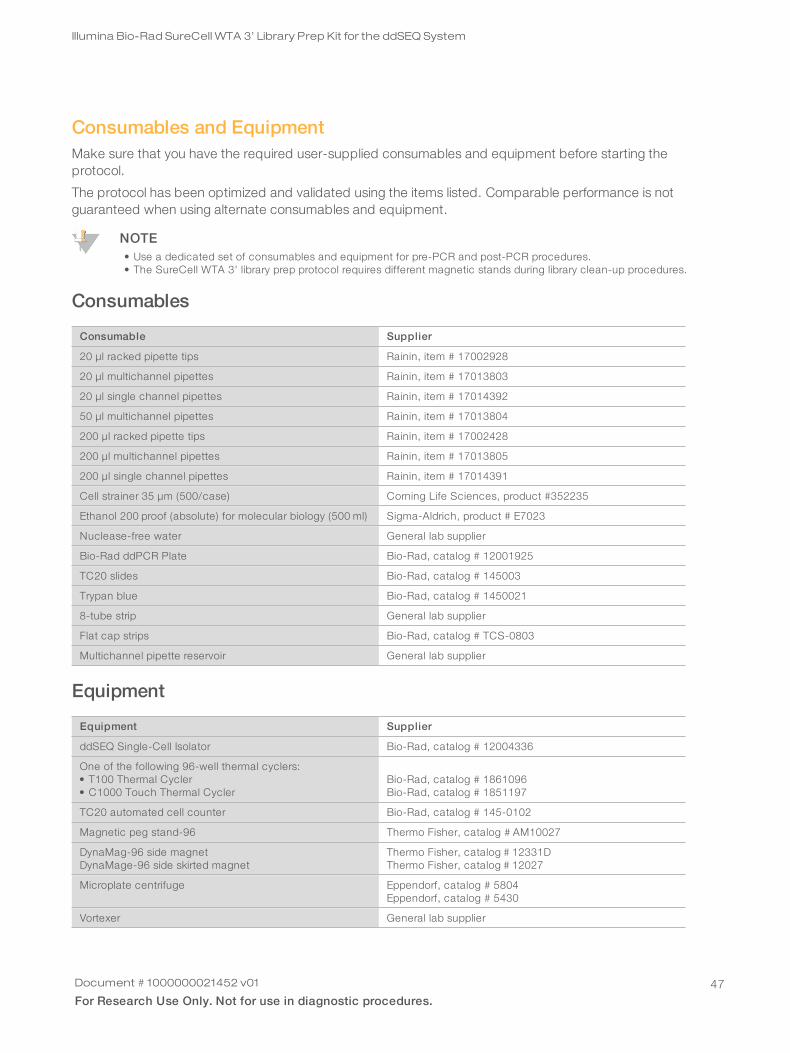
Consumables and EquipmentMake sure that you have the required user-supplied consumables and equipment before starting theprotocol.
The protocol has been optimized and validated using the items listed. Comparable performance is notguaranteed when using alternate consumables and equipment.
NOTE• Use a dedicated set of consumables and equipment for pre-PCR and post-PCR procedures.• The SureCell WTA 3' library prep protocol requires different magnetic stands during library clean-up procedures.
Consumables
Consumable Supplier
20 µl racked pipette tips Rainin, item # 17002928
20 µl multichannel pipettes Rainin, item # 17013803
20 µl single channel pipettes Rainin, item # 17014392
50 µl multichannel pipettes Rainin, item # 17013804
200 µl racked pipette tips Rainin, item # 17002428
200 µl multichannel pipettes Rainin, item # 17013805
200 µl single channel pipettes Rainin, item # 17014391
Cell strainer 35 µm (500/case) Corning Life Sciences, product #352235
Ethanol 200 proof (absolute) for molecular biology (500 ml) Sigma-Aldrich, product # E7023
Nuclease-free water General lab supplier
Bio-Rad ddPCR Plate Bio-Rad, catalog # 12001925
TC20 slides Bio-Rad, catalog # 145003
Trypan blue Bio-Rad, catalog # 1450021
8-tube strip General lab supplier
Flat cap strips Bio-Rad, catalog # TCS-0803
Multichannel pipette reservoir General lab supplier
Equipment
Equipment Supplier
ddSEQ Single-Cell Isolator Bio-Rad, catalog # 12004336
One of the following 96-well thermal cyclers:• T100 Thermal Cycler• C1000 Touch Thermal Cycler
Bio-Rad, catalog # 1861096Bio-Rad, catalog # 1851197
TC20 automated cell counter Bio-Rad, catalog # 145-0102
Magnetic peg stand-96 Thermo Fisher, catalog # AM10027
DynaMag-96 side magnetDynaMage-96 side skirted magnet
Thermo Fisher, catalog # 12331DThermo Fisher, catalog # 12027
Microplate centrifuge Eppendorf, catalog # 5804Eppendorf, catalog # 5430
Vortexer General lab supplier
Document # 1000000021452 v01
For Research Use Only. Not for use in diagnostic procedures.47
Illumina Bio-Rad SureCell WTA 3’ Library Prep Kit for the ddSEQ System

Technical AssistanceFor technical assistance, contact Illumina TechnicalSupport.Website: www.illumina.comEmail: [email protected]
IlluminaCustomer Support TelephoneNumbers
Region Toll Free Regional
North America +1.800.809.4566
Australia +1.800.775.688
Austria +43 800006249 +43 19286540
Belgium +32 80077160 +32 34002973
China 400.635.9898
Denmark +45 80820183 +45 89871156
Finland +358 800918363 +358 974790110
France +33 805102193 +33 170770446
Germany +49 8001014940 +49 8938035677
Hong Kong 800960230
Ireland +353 1800936608 +353 016950506
Italy +39 800985513 +39 236003759
Japan 0800.111.5011
Netherlands +31 8000222493 +31 207132960
New Zealand 0800.451.650
Norway +47 800 16836 +47 21939693
Singapore +1.800.579.2745
Spain +34 911899417 +34 800300143
Sweden +46 850619671 +46 200883979
Switzerland +41 565800000 +41 800200442
Taiwan 00806651752
United Kingdom +44 8000126019 +44 2073057197
Other countries +44.1799.534000
Safety data sheets (SDSs)—Available on the Illumina website at support.illumina.com/sds.html.
Product documentation—Available for download in PDF from the Illumina website. Go tosupport.illumina.com, select a product, then select Documentation & Literature.
Document # 1000000021452 v01
For Research Use Only. Not for use in diagnostic procedures.48

Il lumina
5200 Illumina Way
San Diego, California 92122 U.S.A.
+1.800.809.ILMN (4566)
+1.858.202.4566 (outside North America)
www.illumina.com
Australian Sponsor:
Illumina Australia
1 International Court
Scoresby, Victoria, 3179
Australia
For Research Use Only. Not for use in diagnostic procedures.
© 2017 Illumina, Inc. All rights reserved.
Document # 1000000021452 v01