Embed Size (px)
Citation preview

Supporting Brocade Network Advisor 14.3.1
USER GUIDE
Brocade Network Advisor PortCommissioning Quick Start Guide, 14.3.1
53-1005190-0218 September 2017

© 2017, Brocade Communications Systems, Inc. All Rights Reserved.
Brocade, the B-wing symbol, and MyBrocade are registered trademarks of Brocade Communications Systems, Inc., in the United States and in othercountries. Other brands, product names, or service names mentioned of Brocade Communications Systems, Inc. are listed at www.brocade.com/en/legal/brocade-Legal-intellectual-property/brocade-legal-trademarks.html. Other marks may belong to third parties.
Notice: This document is for informational purposes only and does not set forth any warranty, expressed or implied, concerning any equipment,equipment feature, or service offered or to be offered by Brocade. Brocade reserves the right to make changes to this document at any time, withoutnotice, and assumes no responsibility for its use. This informational document describes features that may not be currently available. Contact a Brocadesales office for information on feature and product availability. Export of technical data contained in this document may require an export license from theUnited States government.
The authors and Brocade Communications Systems, Inc. assume no liability or responsibility to any person or entity with respect to the accuracy of thisdocument or any loss, cost, liability, or damages arising from the information contained herein or the computer programs that accompany it.
The product described by this document may contain open source software covered by the GNU General Public License or other open source licenseagreements. To find out which open source software is included in Brocade products, view the licensing terms applicable to the open source software, andobtain a copy of the programming source code, please visit http://www.brocade.com/support/oscd.
Brocade Network Advisor Port Commissioning Quick Start Guide, 14.3.12 53-1005190-02

ContentsPreface...................................................................................................................................................................................................................................5
Document conventions............................................................................................................................................................................................................................5Notes, cautions, and warnings.....................................................................................................................................................................................................5Text formatting conventions......................................................................................................................................................................................................... 5Command syntax conventions....................................................................................................................................................................................................6
Brocade resources.....................................................................................................................................................................................................................................6Document feedback..................................................................................................................................................................................................................................6Contacting Brocade Technical Support............................................................................................................................................................................................ 7
Brocade customers..........................................................................................................................................................................................................................7Brocade OEM customers............................................................................................................................................................................................................. 7
Port Commissioning ..........................................................................................................................................................................................................9Port commissioning overview.............................................................................................................................................................................................................. 9
z/OS requirements...........................................................................................................................................................................................................................9Configuring port commissioning......................................................................................................................................................................................................10CIMOM servers....................................................................................................................................................................................................................................... 11
Registering a CIMOM server ...................................................................................................................................................................................................11Viewing existing CIMOM servers............................................................................................................................................................................................12Editing CIMOM server credentials..........................................................................................................................................................................................13Importing CIMOM servers and credentials.........................................................................................................................................................................13Exporting CIMOM servers and credentials.........................................................................................................................................................................13Changing CIMOM server credentials ...................................................................................................................................................................................14Testing CIMOM server credentials.........................................................................................................................................................................................14Deleting CIMOM server credentials.......................................................................................................................................................................................15
F_Port commissioning..........................................................................................................................................................................................................................15Decommissioning an F_Port ...................................................................................................................................................................................................15Recommissioning an F_Port ................................................................................................................................................................................................... 17
E_Port commissioning.........................................................................................................................................................................................................................17Decommissioning an E_Port .................................................................................................................................................................................................. 17Recommissioning an E_Port ...................................................................................................................................................................................................18Decommissioning an E_Port trunk........................................................................................................................................................................................18
Port commissioning by switch.......................................................................................................................................................................................................... 18Decommissioning all ports on a switch .............................................................................................................................................................................. 18Recommissioning all ports on a switch ...............................................................................................................................................................................19
Port commissioning by ICL QSFP ports......................................................................................................................................................................................19Decommissioning all ports on an ICL QSFP.................................................................................................................................................................... 20Recommissioning all ports on an ICL QSFP ................................................................................................................................................................... 20
Port commissioning by blade............................................................................................................................................................................................................20Decommissioning all ports on a blade................................................................................................................................................................................. 20Recommissioning all ports on a blade ................................................................................................................................................................................ 21
Port commissioning deployment results...................................................................................................................................................................................... 22Viewing a port commissioning deployment report......................................................................................................................................................... 23Exporting and saving a report to a file.................................................................................................................................................................................. 23E-mailing a report .........................................................................................................................................................................................................................24
Troubleshooting with the cimcli command.................................................................................................................................................................................. 24Obtaining FCPort and PCCUPort data ...............................................................................................................................................................................24IEE169I VARY REJECTED message..................................................................................................................................................................................24
Brocade Network Advisor Port Commissioning Quick Start Guide, 14.3.153-1005190-02 3

Enabling the CIMOM trace file.................................................................................................................................................................................................25Capturing server and client supportSave data...................................................................................................................................................................25
Brocade Network Advisor Port Commissioning Quick Start Guide, 14.3.14 53-1005190-02
Preface• Document conventions...................................................................................................................................................................................... 5• Brocade resources............................................................................................................................................................................................... 6• Document feedback............................................................................................................................................................................................ 6• Contacting Brocade Technical Support.......................................................................................................................................................7
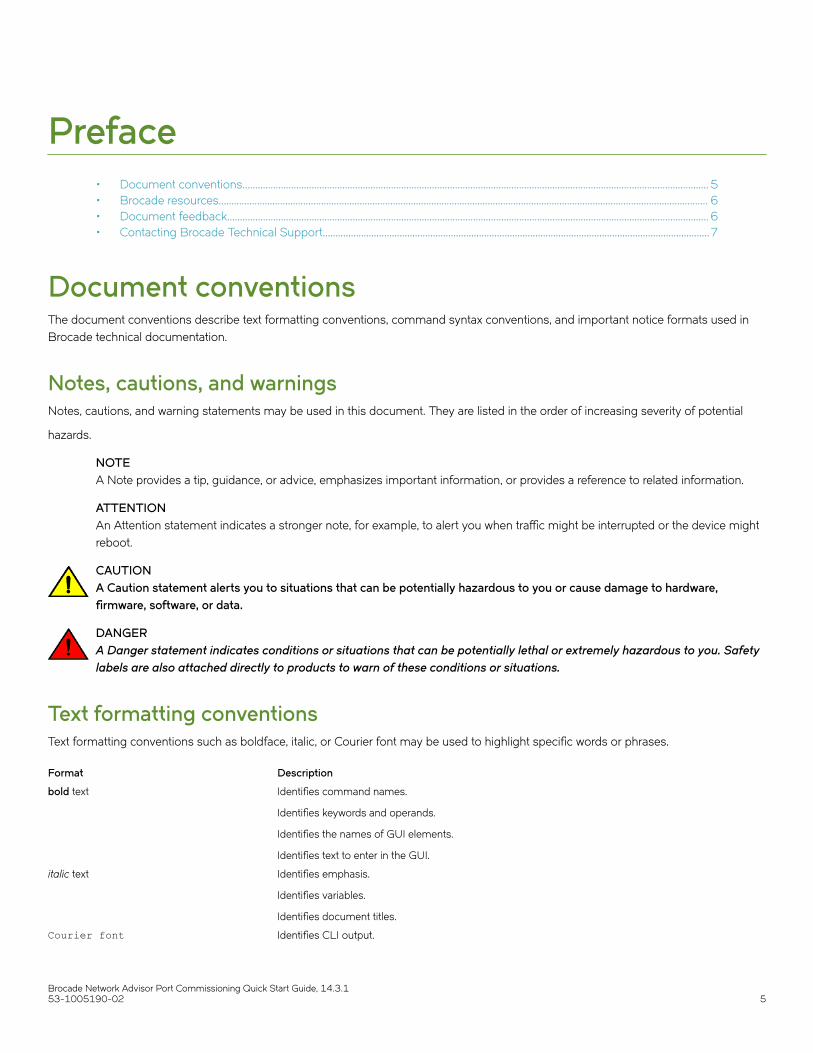
Document conventionsThe document conventions describe text formatting conventions, command syntax conventions, and important notice formats used inBrocade technical documentation.
Notes, cautions, and warningsNotes, cautions, and warning statements may be used in this document. They are listed in the order of increasing severity of potential
hazards.
NOTEA Note provides a tip, guidance, or advice, emphasizes important information, or provides a reference to related information.
ATTENTIONAn Attention statement indicates a stronger note, for example, to alert you when traffic might be interrupted or the device mightreboot.
CAUTIONA Caution statement alerts you to situations that can be potentially hazardous to you or cause damage to hardware,firmware, software, or data.
DANGERA Danger statement indicates conditions or situations that can be potentially lethal or extremely hazardous to you. Safetylabels are also attached directly to products to warn of these conditions or situations.
Text formatting conventionsText formatting conventions such as boldface, italic, or Courier font may be used to highlight specific words or phrases.
Format Description
bold text Identifies command names.
Identifies keywords and operands.
Identifies the names of GUI elements.
Identifies text to enter in the GUI.
italic text Identifies emphasis.
Identifies variables.
Identifies document titles.
Courier font Identifies CLI output.
Brocade Network Advisor Port Commissioning Quick Start Guide, 14.3.153-1005190-02 5
Format Description
Identifies command syntax examples.
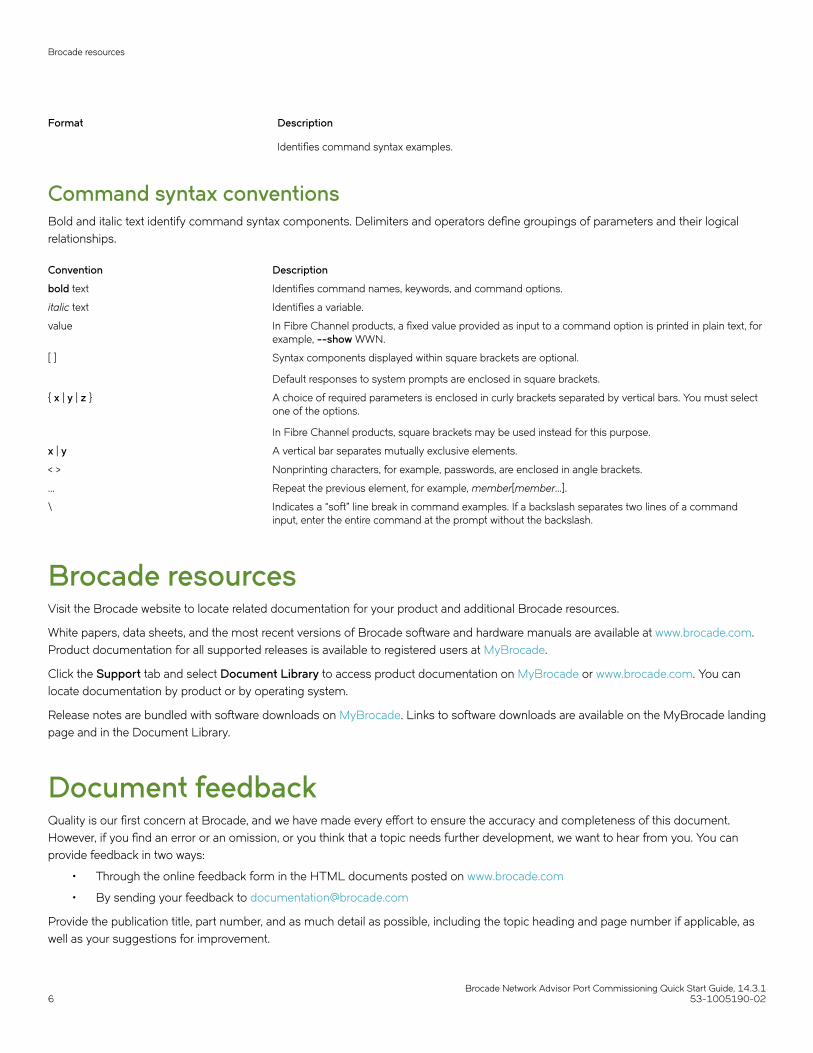
Command syntax conventionsBold and italic text identify command syntax components. Delimiters and operators define groupings of parameters and their logicalrelationships.
Convention Description
bold text Identifies command names, keywords, and command options.
italic text Identifies a variable.
value In Fibre Channel products, a fixed value provided as input to a command option is printed in plain text, forexample, --show WWN.
[ ] Syntax components displayed within square brackets are optional.
Default responses to system prompts are enclosed in square brackets.
{ x | y | z } A choice of required parameters is enclosed in curly brackets separated by vertical bars. You must selectone of the options.
In Fibre Channel products, square brackets may be used instead for this purpose.
x | y A vertical bar separates mutually exclusive elements.
< > Nonprinting characters, for example, passwords, are enclosed in angle brackets.
... Repeat the previous element, for example, member[member...].
\ Indicates a “soft” line break in command examples. If a backslash separates two lines of a commandinput, enter the entire command at the prompt without the backslash.
Brocade resourcesVisit the Brocade website to locate related documentation for your product and additional Brocade resources.
White papers, data sheets, and the most recent versions of Brocade software and hardware manuals are available at www.brocade.com.Product documentation for all supported releases is available to registered users at MyBrocade.
Click the Support tab and select Document Library to access product documentation on MyBrocade or www.brocade.com. You canlocate documentation by product or by operating system.
Release notes are bundled with software downloads on MyBrocade. Links to software downloads are available on the MyBrocade landingpage and in the Document Library.
Document feedbackQuality is our first concern at Brocade, and we have made every effort to ensure the accuracy and completeness of this document.However, if you find an error or an omission, or you think that a topic needs further development, we want to hear from you. You canprovide feedback in two ways:
• Through the online feedback form in the HTML documents posted on www.brocade.com
• By sending your feedback to [email protected]
Provide the publication title, part number, and as much detail as possible, including the topic heading and page number if applicable, aswell as your suggestions for improvement.
Brocade resources
Brocade Network Advisor Port Commissioning Quick Start Guide, 14.3.16 53-1005190-02

Contacting Brocade Technical SupportAs a Brocade customer, you can contact Brocade Technical Support 24x7 online or by telephone. Brocade OEM customers shouldcontact their OEM/solution provider.
Brocade customersFor product support information and the latest information on contacting the Technical Assistance Center, go to www.brocade.com andselect Support.
If you have purchased Brocade product support directly from Brocade, use one of the following methods to contact the BrocadeTechnical Assistance Center 24x7.
Online Telephone
Preferred method of contact for non-urgent issues:
• Case management through the MyBrocade portal.
• Quick Access links to Knowledge Base, Community, DocumentLibrary, Software Downloads and Licensing tools
Required for Sev 1-Critical and Sev 2-High issues:
• Continental US: 1-800-752-8061
• Europe, Middle East, Africa, and Asia Pacific: +800-AT FIBREE(+800 28 34 27 33)
• Toll-free numbers are available in many countries.
• For areas unable to access a toll-free number:+1-408-333-6061
Brocade OEM customersIf you have purchased Brocade product support from a Brocade OEM/solution provider, contact your OEM/solution provider for all ofyour product support needs.
• OEM/solution providers are trained and certified by Brocade to support Brocade® products.
• Brocade provides backline support for issues that cannot be resolved by the OEM/solution provider.
• Brocade Supplemental Support augments your existing OEM support contract, providing direct access to Brocade expertise.For more information, contact Brocade or your OEM.
• For questions regarding service levels and response times, contact your OEM/solution provider.
Contacting Brocade Technical Support
Brocade Network Advisor Port Commissioning Quick Start Guide, 14.3.153-1005190-02 7

Brocade Network Advisor Port Commissioning Quick Start Guide, 14.3.18 53-1005190-02

Port Commissioning• Port commissioning overview.........................................................................................................................................................................9• Configuring port commissioning................................................................................................................................................................ 10• CIMOM servers..................................................................................................................................................................................................11• F_Port commissioning.................................................................................................................................................................................... 15• E_Port commissioning....................................................................................................................................................................................17• Port commissioning by switch.....................................................................................................................................................................18• Port commissioning by ICL QSFP ports................................................................................................................................................ 19• Port commissioning by blade.......................................................................................................................................................................20• Port commissioning deployment results.................................................................................................................................................22• Troubleshooting with the cimcli command.............................................................................................................................................24
Port commissioning overviewNOTEPort commissioning is supported on all FICON and non-FICON devices running Fabric OS 7.1 or later, whereas F_Portcommissioning is only supported on FICON devices.
Port commissioning provides an automated mechanism to remove an E_Port or F_Port from use (decommission) and to put it back inuse (recommission). Port commissioning feature identifies the target port and communicates the intention to decommission orrecommission the port to those systems within the fabric affected by the action. Each affected system can agree or disagree with theaction, and these responses are automatically collected before a port is decommissioned or recommissioned.
Note the following restrictions of port commissioning:
• The local switch and the remote switch on the other end of the E_Port or F_Port must both be running Fabric OS 7.1.0 or later.
• Port commissioning is not supported on links configured for encryption or compression.
• Port commissioning is not supported on ports with dense wavelength division multiplexing (DWDM), coarse wavelengthdivision multiplexing (CWDM), or time-division multiplexing (TDM).
• E_Port commissioning requires that the lossless feature be enabled on both the local switch and the remote switch.
• Fabric tracking must be enabled to maintain the decommissioned port details (such as port type, device port WWN, and so on).Do not accept changes in the Management application client. For more information about fabric tracking, refer to the .
z/OS requirementsYou must meet the following requirements to configure port decommissioning and recommissioning through the Managementapplication:
• The z/OS must be running 1.12 or later to support z/OS CIM and port decommission.
• A working CIMOM server must be on each logical partition (LPAR) that participates in port decommissioning.
For more information, refer to the sections: Quick guide: CIM server setup and verification, CIM server security setup, and Setting up theCIM server for storage management in the Common Information Model User’s Guide, version 1 release 13 (part number:SC33-7998-08).
• You must have System Modification Program/Extended (SMP/E), Resource Access Control Facility (RACF), and UNIX systemsservices skills.
Brocade Network Advisor Port Commissioning Quick Start Guide, 14.3.153-1005190-02 9

• You must have the following IBM Authorized Program Analysis Reports (APARs) for z/OS CIM (CIMOM) and portdecommissioning on z/OS version 1, release 13:
– OA38145: z/OS CIM APAR in support of port decommissioning– OA38303 and HA42524: IOS port decommissioning APARs
NOTEIBM APAR OA38303 requires OA40538 and OA40037.
– OA40538: Switch CUP diagnostics APAR– OA40037: ESCON director code in support of switch CUP diagnostics APAR– OA40876: IOS switch SPOF enhancements APAR
• You must have a Common Event Adapter (CEA) running in full function mode on each LPAR that has a CIMOM server thatparticipates in port decommissioning.
For more information, refer to Customizing for CEA in the z/OS Planning for Installation, version 1 release 13 (part number:GA22-7504-28).
• The CIMOM server must be running as a started task (CFZCIM) on each z/OS LPAR. The CIMOM server must be running forF_Port decommissioning to function properly.
• You must have access to the CLI (cimcli command) for troubleshooting.
For more information, refer to Troubleshooting with the cimcli command on page 24.
Configuring port commissioningThe following steps provide an overview of configuring port commissioning.
1. Make sure you meet the z/OS (mainframe operating system) requirements.
For more information, refer to z/OS requirements on page 9.
2. Register each CIMOM server within the fabric affected by the action.
For instructions, refer to Registering a CIMOM server on page 11.
3. Decommission an F_Port.
For instructions, refer to Decommissioning an F_Port on page 15.
4. Review the decommission deployment report.
For instructions, refer to Viewing a port commissioning deployment report on page 23.
5. Recommission the F_Port.
For instructions, refer to Recommissioning an F_Port on page 17.
6. Review the recommission deployment report.
For instructions, refer to Viewing a port commissioning deployment report on page 23.
You can also configure port commissioning for E_Ports (E_Port commissioning on page 17), all ports on a blade (Portcommissioning by blade on page 20), all ports on a switch (Port commissioning by switch on page 18), or all ICL QSFPports (Port commissioning by ICL QSFP ports on page 19).
Configuring port commissioning
Brocade Network Advisor Port Commissioning Quick Start Guide, 14.3.110 53-1005190-02
CIMOM serversBefore you can decommission or recommission an F_Port, you must register the CIMOM servers within the fabric affected by the action.
Registering a CIMOM serverTo register a CIMOM server, obtain the CIMOM server system and credentials from the CIMOM server administrator and the authorizeduser ID from the RACF administrator.
1. Select Configure > Port Commissioning > Setup.
The Port Commissioning Setup dialog box displays.
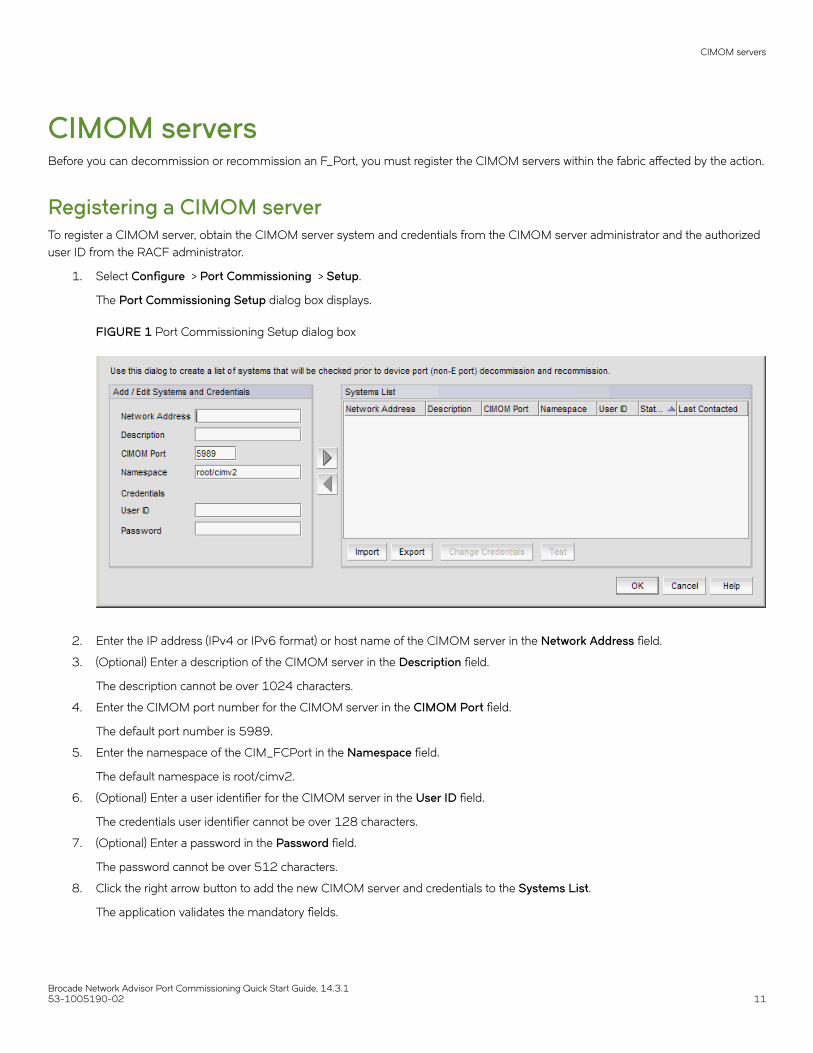
FIGURE 1 Port Commissioning Setup dialog box
2. Enter the IP address (IPv4 or IPv6 format) or host name of the CIMOM server in the Network Address field.
3. (Optional) Enter a description of the CIMOM server in the Description field.
The description cannot be over 1024 characters.
4. Enter the CIMOM port number for the CIMOM server in the CIMOM Port field.
The default port number is 5989.
5. Enter the namespace of the CIM_FCPort in the Namespace field.
The default namespace is root/cimv2.
6. (Optional) Enter a user identifier for the CIMOM server in the User ID field.
The credentials user identifier cannot be over 128 characters.
7. (Optional) Enter a password in the Password field.
The password cannot be over 512 characters.
8. Click the right arrow button to add the new CIMOM server and credentials to the Systems List.
The application validates the mandatory fields.
CIMOM servers
Brocade Network Advisor Port Commissioning Quick Start Guide, 14.3.153-1005190-02 11

9. Select the new CIMOM server in the Systems List and click Test to check connectivity.
When testing is complete, the updated status displays in the Status column of the Systems List for the selected CIMOM server.
10. Click OK to save your work and save the CIMOM server details in the database.
Viewing existing CIMOM serversBefore you can decommission or recommission an F_Port, you must register the CIMOM servers within the fabric affected by the action.For more information, refer to Registering a CIMOM server on page 11.
1. Select Configure > Port Commissioning > Setup.
The Port Commissioning Setup dialog box displays.
The Port Commissioning Setup dialog box has two main areas. The Add/Edit Systems and Credentials pane enables you toregister CIMOM servers (system and credentials) one at a time and contains the following fields and components:
• Network Address: The IP address (IPv4 or Ipv6 format) or host name of the CIMOM server.
• Description (Optional): The description of the CIMOM server. The description cannot be over 1024 characters.
• CIMOM Port: The CIMOM port number for the CIMOM server. The default port number is 5989.
• Namespace: The namespace of the CIM_FCPort. The default namespace is root/cimv2.
• Credentials - User ID (Optional): An user identifier for the CIMOM server. The credentials user identifier cannot be over128 characters.
• Credentials - Password (Optional): A password. The password cannot be over 512 characters.
• Left arrow button: Select a CIMOM server in the Systems List and click to move the defined CIMOM server credentials tothe Add/Edit Systems and Credentials pane for editing or deletion.
• Right arrow button: Click to move the defined CIMOM server credentials form the Add/Edit Systems and Credentials paneto the Systems List.
The Systems List details the defined CIMOM server and contains the following data:
• Network Address: The IP address (IPv4 or Ipv6 format) or host name of the system.
• Description: User-defined description of the system.
• CIMOM Port: The CIMOM port number of the system.
• Namespace: The namespace of the CIM_FCPort.
• User ID: The user identifier for the system.
• Status: The system connectivity status. Updates when you test the reachability of the CIMOM server and when you contactthe CIMOM server to respond to the F_Port recommissioning or decommissioning request. Valid status options include:
– OK: CIMOM server contact successful with current credentials.– Not Contacted Yet: CIMOM servers configured, connectivity not tested yet.– Credentials Updated: Credentials changed, connectivity not tested yet.– Credentials Failed: CIMOM server contact failed with current credentials.– Not Reachable: CIMOM server not reachable.– Wrong Namespace: CIMOM server namespace is incorrect.
• Last Contacted: The last time you contacted the system. Updates when you test the reachability of the CIMOM server andwhen you contact the CIMOM server to respond to the F_Port recommissioning or decommissioning request.
2. Click OK to close Port Commissioning Setup dialog box.
CIMOM servers
Brocade Network Advisor Port Commissioning Quick Start Guide, 14.3.112 53-1005190-02
Editing CIMOM server credentials1. Select Configure > Port Commissioning > Setup.
The Port Commissioning Setup dialog box displays.
2. Select a CIMOM server from the Systems List and click the left arrow button to edit the CIMOM server credentials.
3. (Optional) Edit the description of the CIMOM server in the Description field.
The description cannot be over 1024 characters.
4. Enter the CIMOM port number for the CIMOM server in the CIMOM Port field.
The default port number is 5989.
5. Enter the namespace of the CIM_FCPort in the Namespace field.
The default namespace is root/cimv2.
6. (Optional) Enter a user identifier for the CIMOM server in the Credentials User ID field.
The credentials user identifier cannot be over 128 characters.
7. (Optional) Enter a password in the Password field.
The password cannot be over 512 characters.
8. Click the right arrow button to update the CIMOM server credentials in the Systems List.
9. Click OK to save your work and save the CIMOM server details in the database.
Importing CIMOM servers and credentialsYou can import one or more CIMOM servers (system and credentials) using a CSV-formatted file. You can import a maximum of 2,000CIMOM servers.
1. Select Configure > Port Commissioning > Setup.
The Port Commissioning Setup dialog box displays.
2. Click Import to import CIMOM server information from a file.
The CSV file must use the following format:
Network Address, User ID, CIMOM Port, Namespace, Description, Password
10.24.48.100,user,2015,root/cimv2,IBM Host,password
The Network Address is mandatory. If you do not provide values for the User ID, CIMOM Port, Namespace, Description, orPassword, the Management application provides default values.
3. Browse to the location of the file (.csv file) and click Open.
The imported CIMOM servers display in the Systems List.
4. Click OK to save your work and save the CIMOM server details in the database.
Exporting CIMOM servers and credentials1. Select Configure > Port Commissioning > Setup.
The Port Commissioning Setup dialog box displays.
CIMOM servers
Brocade Network Advisor Port Commissioning Quick Start Guide, 14.3.153-1005190-02 13

2. Click Export to export CIMOM server information to a file.
The Export Files dialog box displays.
3. Browse to the location where you want to export the file (.csv file) and click Save.
The CSV file uses the following format:
Network Address, User ID, CIMOM Port, Namespace, Description,
10.24.48.100,user,2015,root/cimv2,IBM Host,
NOTEExport does not include the password. You can edit the exported file to add the password to thecredentials.
4. Click OK to close the Port Commissioning Setup dialog box.
Changing CIMOM server credentialsYou can edit the CIMOM server credentials for one or more CIMOM servers at the same time.
1. Select Configure > Port Commissioning > Setup.
The Port Commissioning Setup dialog box displays.
2. Select one or more CIMOM servers from the System Lists and click Change Credentials.
The Edit Credentials dialog box displays. If you selected one CIMOM server, the credentials for the selected server display inthe dialog box. If you selected more than one CIMOM server, the credentials fields are empty.
3. (Optional) Enter a user identifier for the CIMOM server in the User ID field.
The user identifier cannot be over 128 characters.
4. (Optional) Enter a password in the Password field.
The password cannot be over 512 characters.
5. Click OK to close the Edit Credentials dialog box.
The Port Commissioning Setup dialog box and the status of the selected CIMOM server rows displays “Credentials Updated”.
To validate the credentials, refer to Testing CIMOM server credentials on page 14.
6. Click OK to close the Port Commissioning Setup dialog box.
Testing CIMOM server credentialsYou should validate the CIMOM server credentials before you decommission or recommission ports. During the decommission orrecommission of an F_Port, the Management application validates the CIMOM server credentials.
1. Select a device and select Configure > Port Commissioning > Setup.
The Port Commissioning Setup dialog box displays.
CIMOM servers
Brocade Network Advisor Port Commissioning Quick Start Guide, 14.3.114 53-1005190-02
2. Select one or more CIMOM servers from the System Lists and click Test.
The connectivity status of the selected CIMOM server rows display “Testing” in the System Lists. When testing is complete, theCIMOM server connectivity status displays. Valid status options include:
• OK: CIMOM server contact successful with current credentials.
• Not Contacted Yet: CIMOM servers configured, connectivity not tested yet.
• Credentials Updated: Credentials changed, connectivity not tested yet.
• Credentials Failed: CIMOM server contact failed with current credentials.
• Not Reachable: CIMOM server not reachable.
• Wrong Namespace: CIMOM server namespace is incorrect.
3. Click OK to close the Port Commissioning Setup dialog box.
When the test is complete, an application event displays in the Master Log detailing success or failure.
Deleting CIMOM server credentials1. Select Configure > Port Commissioning > Setup.
The Port Commissioning Setup dialog box displays.
2. Select one or more CIMOM servers from the System Lists and click the left arrow button.
The details for the last selected CIMOM server row displays in the Add/Edit System and Credentials pane.
3. Confirm that this is the CIMOM server you want to delete and click OK to delete the CIMOM server from the PortCommissioning Setup dialog box.
When the deletion is complete, an application event displays in the Master Log detailing success or failure.
F_Port commissioningAlthough you can use any of the following methods to access the F-Port commissioning commands, individual procedures only includeone method.
• From the main menu, select the F_Port in the Product List or Topology, and then select Configure > Port Commissioning >Decommission/Recommission > Port.
• From the Product List, right-click the F_Port and select Decommission/Recommission > Port.
• From the Topology, right-click the F_Port and select Decommission/Recommission > Port.
• From a Dashboard widget, right-click the F_Port and select Decommission/Recommission > Port.
Decommissioning an F_PortNOTEYou must configure at least one CIMOM server (refer to Registering a CIMOM server on page 11) before you candecommission an F_Port.
F_Port commissioning
Brocade Network Advisor Port Commissioning Quick Start Guide, 14.3.153-1005190-02 15
NOTEFabric tracking must be enabled (refer to "Enabling fabric tracking" in the ) to maintain the decommissioned port details (suchas port type, device port WWN, and so on). Do not accept changes in the Management application client.
1. Select the F_Port in the Product List, and then select Configure > Port Commissioning > Decommission > Port.
The Port Commission Confirmation dialog box displays.
2. Choose one of the following options:
• Apply Default Settings (default): Select to have the Management application contact all registered CIMOM servers withinthe fabric affected by the action and obtain the status from each CIMOM server. If all CIMOM servers are reachable, theManagement application sends a CAL request to decommission the port. If even one CIMOM server is not okay,decommissioning fails.
NOTEIf any CIMOM server is not reachable or the credentials fail, F_Port decommissioning does not occur.
• Force : Select to force decommissioning on the N_Port connected to the F_Port. The Management application contacts allregistered CIMOM servers within the fabric affected by the action, but forces the N_Port decommissioning regardless ofthe CIMOM server response.
NOTEIf the CIMOM server is not reachable or the credentials fail, F_Port decommissioning does not occur. If all CIMOMservers are reachable, the Management application sends a CAL request to decommission the port. If some CIMOMservers are reachable and some CIM servers are not reachable, decommissioning fails and the Managementapplication recommissions the decommissioned CIM instances. If any of the discovered CIMOM servers are notreachable, recommissioning is initiated automatically for decommissioned CIM instances.
A decommission N_Port and switch port message displays.
3. Choose one of the following options:
• Force decommission N port : Select to force decommissioning on the N_Port connected to the F_Port. The Managementapplication contacts all registered CIMOM servers within the fabric affected by the action, but forces the N_Portdecommissioning regardless of the CIMOM server response.
• Keep Switch Port Enabled : Select to keep the F_Port (switch port) enabled and only decommission the N_Port connectedto the F_Port.
4. Click View Deployment Status to view the port commissioning results immediately (refer to Port commissioning deploymentresults on page 22).
You can also view the deployment status in the deployment report at a later time (refer to Viewing a port commissioningdeployment report on page 23).
5. Click OK on the Port Commission Confirmation dialog box.
While decommissioning is in progress, a down arrow icon displays next to the port icon in the Product List. The portdecommissioning status (Port Decommission in Progress or Decommissioned F Port) displays in the Additional Port Info fieldof the Product List. When decommissioning is complete, a deployment status message displays.
When the decommissioning is complete, an application event displays in the Master Log detailing success or failure.
F_Port commissioning
Brocade Network Advisor Port Commissioning Quick Start Guide, 14.3.116 53-1005190-02

Recommissioning an F_PortNOTEYou must configure at least one CIMOM server (refer to Registering a CIMOM server on page 11) before you canrecommission an F_Port.
Select the F_Port in the Product List, and then select Configure > Port Commissioning > Recommission > Port.
NOTEF_Port recommissioning occurs whether or not any CIMOM server is not reachable.
While recommissioning is in progress, an up arrow icon displays next to the port icon in the Product List. The port recommissioningstatus (Port Recommission in Progress or Recommissioned F Port) displays in the Additional Port Info field of the Product List. You canview the port commissioning results in the deployment reports (refer to Viewing a port commissioning deployment report on page 23).
When the recommissioning is complete, an application event displays in the Master Log detailing success or failure.
E_Port commissioningAlthough you can use any of the following methods to access the E_Port commissioning commands, individual procedures only includeone method.
• From the main menu, select the E_Port in the Product List or Topology, and then select Configure > Port Commissioning >Decommission/Recommission > Port.
• From the Product List, right-click the E_Port and select Decommission/Recommission > Port.
• From the Topology, right-click the E_Port and select Decommission/Recommission > Port.
• From a Dashboard widget, right-click the E_Port and select Decommission/Recommission > Port.
Decommissioning an E_PortNOTEYou must enable Lossless DLS on both the source and destination switches before you decommission an E-Port.
NOTEFabric tracking must be enabled (refer to "Enabling fabric tracking" in the ) to maintain the decommissioned port details (suchas port type, device port WWN, and so on). Do not accept changes in the Management application client.
1. Select the E_Port in the Product List, and then select Configure > Port Commissioning > Decommission > Port.
2. If Lossless DLS is enabled, click Yes on the confirmation message.
While decommissioning is in progress, a down arrow icon displays next to the port icon in the Product List. The portdecommissioning status (Port Decommission in Progress or Decommissioned E Port) displays in the Additional Port Info fieldof the Product List. You can view the port commissioning results in the deployment reports (refer to Viewing a portcommissioning deployment report on page 23).
When the decommissioning is complete, an application event displays in the Master Log detailing success or failure.
E_Port commissioning
Brocade Network Advisor Port Commissioning Quick Start Guide, 14.3.153-1005190-02 17
Recommissioning an E_PortNOTEYou do not need to enable Lossless DLS before you recommission an E_Port.
Select the E_Port in the Product List, and then select Configure > Port Commissioning > Recommission > Port.
While recommissioning is in progress, an up arrow icon displays next to the port icon in the Product List. The port recommissioningstatus (Port Recommission in Progress or Recommissioned E_Port) displays in the Additional Port Info field of the Product List. Youcan view the port commissioning results in the deployment reports (refer to Viewing a port commissioning deployment report on page23).
When the recommissioning is complete, an application event displays in the Master Log detailing success or failure.
Decommissioning an E_Port trunk1. Select the E_Port trunk in the Product List, and then select Configure > Port Commissioning > Decommission > Port or
right-click E_Port trunk and select Decommission.
2. If lossless DLS is enabled, click Yes on the confirmation message.
The decommission request is sent to all the trunk members including the master if a decommissioning request is triggered on atrunk level. An error message displays, if the trunk group is the only connection between the switches.
During recommissioning, the port will recommission all the decommissioned members of the trunk group if the port was part ofthe trunk group previously.
Port commissioning by switchAlthough you can use any of the following methods to access the port commissioning commands for a switch, individual proceduresonly include one method.
• From the main menu, select the switch in the Product List or Topology, and then select Configure > Port Commissioning >Decommission/Recommission > All F-Ports on the Switch.
• From the Product List, right-click the switch and select Decommission/Recommission > All F-Ports on the Switch.
• From the Topology, right-click the switch and select Decommission/Recommission > All F-Ports on the Switch.
• From a Dashboard widget, right-click the switch and select Decommission/Recommission > All F-Ports on the Switch.
Decommissioning all ports on a switchNOTEFabric tracking must be enabled (refer to "Enabling fabric tracking" in the ) to maintain the decommissioned port details (suchas port type, device port WWN, and so on). Do not accept changes in the Management application client.
1. Select the switch or logical switch for which you want to decommission all ports in the Product List, and then select Configure >Port Commissioning > Decommission > All F-Ports on the Switch.
NOTEYou can only decommission ports from the logical switch, not the physical chassis.
The Port Commission Confirmation dialog box displays.
Port commissioning by switch
Brocade Network Advisor Port Commissioning Quick Start Guide, 14.3.118 53-1005190-02
2. Choose one of the following options:
• Apply Default Settings (default): Select to have the Management application contact all registered CIMOM servers withinthe fabric affected by the action and obtain the status from each CIMOM server. If all CIMOM servers are reachable, theManagement application sends a CAL request to decommission the port. If even one CIMOM server is not reachable,decommissioning fails.
• Force: Select to force decommissioning on the N_Port connected to the F_Port. The Management application contacts allregistered CIMOM servers within the fabric affected by the action, but forces the N_Port decommissioning regardless ofthe CIMOM server response.
NOTEYou cannot force decommissioning on an F_Port.
NOTEIf any CIMOM server is not reachable or the credentials fail, port decommissioning does not occur.
3. Click OK on the Port Commission Confirmation dialog box.
While decommissioning is in progress, a down arrow icon displays next to the port icon in the Product List. You can view theport commissioning results in the deployment reports (refer to Viewing a port commissioning deployment report on page 23).
When the decommissioning is complete, an application event displays in the Master Log detailing success or failure.
Recommissioning all ports on a switchSelect the switch or logical switch for which you want to recommission all ports in the Product List, and then select Configure > PortCommissioning > Recommission > All F-Ports on the Switch.
NOTEYou can only recommission ports from the logical switch, not the physical chassis.
While recommissioning is in progress, an up arrow icon displays next to the port icon in the Product List. You can view the portcommissioning results in the deployment reports (refer to Viewing a port commissioning deployment report on page 23).
When the recommissioning is complete, an application event displays in the Master Log detailing success or failure.
Port commissioning by ICL QSFP portsNOTEPort commissioning by ICL QSFP ports is supported on the 16 Gbps and 32 Gbps 8-slot Backbone Chassis, 16 Gbps 4-slot, and 32 Gbps 12-slot Backbone Chassis of Brocade G620 and Gen6 Directors.
NOTEPort commissioning by ICL QSFP ports is only available on the 16 Gbps and 32 Gbps Inter-Chassis Link (ICL) Quad SmallForm-Factor Pluggable (QSFP) ports.
NOTEAll ports on the ICL QSFP must be managed by the Management application.
Port commissioning by ICL QSFP ports
Brocade Network Advisor Port Commissioning Quick Start Guide, 14.3.153-1005190-02 19
Although you can use any of the following methods to access the port commissioning commands for an ICL QSFP port, individualprocedures only include one method.
• From the main menu, select the ICL port in the Product List or Topology, and then select Configure > Port Commissioning >Decommission/Recommission > All ICL QSFP Ports.
• From the Product List, right-click the ICL port and select Decommission/Recommission > All ICL QSFP Ports.
• From the Topology, right-click the ICL port and select Decommission/Recommission > All ICL QSFP Ports.
• From a Dashboard widget, right-click the ICL port and select Decommission/Recommission > All ICL QSFP Ports.
Decommissioning all ports on an ICL QSFP1. Select the ICL port for which you want to decommission all ports on the ICL QSFP in the Product List, and then select
Configure > Port Commissioning > Decommission > All ICL QSFP Ports.
The Port Commission Confirmation dialog box displays.
2. Click OK on the Port Commission Confirmation dialog box.
While decommissioning is in progress, a down arrow icon displays next to the port icon in the Product List. You can view theport commissioning results in the deployment reports (refer to Viewing a port commissioning deployment report on page 23).
When the decommissioning is complete, an application event displays in the Master Log detailing success or failure.
Recommissioning all ports on an ICL QSFPSelect the ICL port for which you want to recommission all ports on the ICL QSFP in the Product List, and then select Configure > PortCommissioning > Recommission > All ICL QSFP Ports.
While recommissioning is in progress, an up arrow icon displays next to the port icon in the Product List. You can view the portcommissioning results in the deployment reports (refer to Viewing a port commissioning deployment report on page 23).
When the recommissioning is complete, an application event displays in the Master Log detailing success or failure.
Port commissioning by bladeAlthough you can use any of the following methods to access the port commissioning commands for a blade, individual procedures onlyinclude one method.
• From the main menu, select the blade in the Product List or Topology, and then select Configure > Port Commissioning >Decommission/Recommission > All Ports on the Blade.
• From the Product List, right-click the blade and select Decommission/Recommission > All Ports on the Blade.
• From the Topology, right-click the blade and select Decommission/Recommission > All Ports on the Blade.
• From a Dashboard widget, right-click the blade and select Decommission/Recommission > All Ports on the Blade.
Decommissioning all ports on a bladeNOTE(Virtual Fabrics only) All ports on the blade must be managed by the Management application.
Port commissioning by blade
Brocade Network Advisor Port Commissioning Quick Start Guide, 14.3.120 53-1005190-02

NOTEYou must enable Lossless DLS on both the source and destination switches before you decommission an E_Port.
NOTEFabric tracking must be enabled (refer to "Enabling fabric tracking" in the ) to maintain the decommissioned port details (suchas port type, device port WWN, and so on). Do not accept changes in the Management application client.
NOTEYou can only recommission ports from the logical switch, not the physical chassis.
1. Select a port on the blade for which you want to decommission all ports in the Product List, and then select Configure > PortCommissioning > Decommission > All Ports on the Blade.
The Port Commission Confirmation dialog box displays.
2. Choose one of the following options:
• Apply Default Settings (default): Select to have the Management application contact all registered CIMOM servers withinthe fabric affected by the action and obtain the status from each CIMOM server. If all CIMOM servers are reachable, theManagement application sends a CAL request to decommission the port. If even one CIMOM server is not reachable,decommissioning fails.
• Force: Select to force decommissioning on the N_Port connected to the F_Port. The Management application contacts allregistered CIMOM servers within the fabric affected by the action, but forces the N_Port decommissioning regardless ofthe CIMOM server response.
NOTEYou cannot force decommissioning on an F_Port.
NOTEIf any CIMOM server is not reachable or the credentials fail, port decommissioning does not occur.
3. Click OK on the Port Commission Confirmation dialog box.
While decommissioning is in progress, a down arrow icon displays next to the port icon in the Product List. You can view theport commissioning results in the deployment reports (refer to Viewing a port commissioning deployment report on page 23).
When the decommissioning is complete, an application event displays in the Master Log detailing success or failure.
Recommissioning all ports on a bladeNOTEAll ports on the blade must be managed by the Management application.
NOTEYou can only recommission ports from the logical switch, not the physical chassis.
Select a port on the blade for which you want to recommission all ports in the Product List, and then select Configure > PortCommissioning > Recommission > All Ports on the Blade.
While recommissioning is in progress, an up arrow icon displays next to the port icon in the Product List. You can view the portcommissioning results in the deployment reports (refer to Viewing a port commissioning deployment report on page 23).
When the recommissioning is complete, an application event displays in the Master Log detailing success or failure.
Port commissioning by blade
Brocade Network Advisor Port Commissioning Quick Start Guide, 14.3.153-1005190-02 21
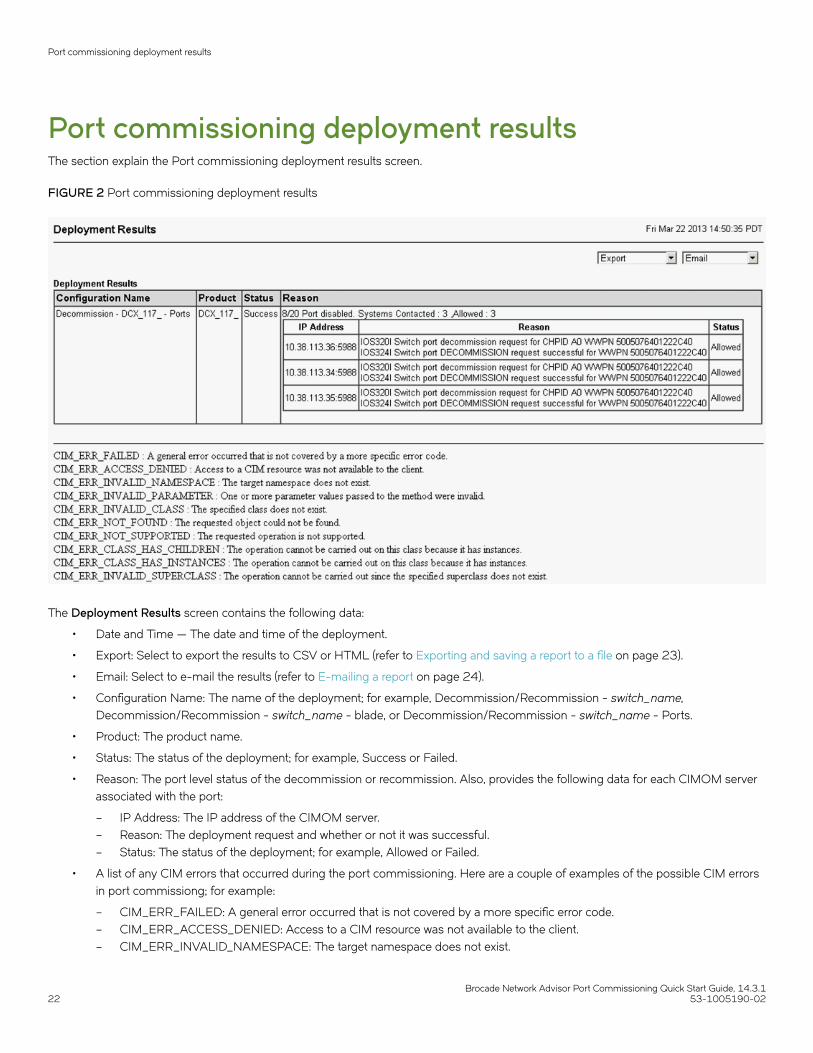
Port commissioning deployment resultsThe section explain the Port commissioning deployment results screen.
FIGURE 2 Port commissioning deployment results
The Deployment Results screen contains the following data:
• Date and Time — The date and time of the deployment.
• Export: Select to export the results to CSV or HTML (refer to Exporting and saving a report to a file on page 23).
• Email: Select to e-mail the results (refer to E-mailing a report on page 24).
• Configuration Name: The name of the deployment; for example, Decommission/Recommission - switch_name,Decommission/Recommission - switch_name - blade, or Decommission/Recommission - switch_name - Ports.
• Product: The product name.
• Status: The status of the deployment; for example, Success or Failed.
• Reason: The port level status of the decommission or recommission. Also, provides the following data for each CIMOM serverassociated with the port:
– IP Address: The IP address of the CIMOM server.– Reason: The deployment request and whether or not it was successful.– Status: The status of the deployment; for example, Allowed or Failed.
• A list of any CIM errors that occurred during the port commissioning. Here are a couple of examples of the possible CIM errorsin port commissiong; for example:
– CIM_ERR_FAILED: A general error occurred that is not covered by a more specific error code.– CIM_ERR_ACCESS_DENIED: Access to a CIM resource was not available to the client.– CIM_ERR_INVALID_NAMESPACE: The target namespace does not exist.
Port commissioning deployment results
Brocade Network Advisor Port Commissioning Quick Start Guide, 14.3.122 53-1005190-02
Viewing a port commissioning deployment reportTo access a port commissioning deployment report, complete the following steps.
1. Select Configure > Task Scheduler.
The Task Scheduler dialog box displays.
2. Click the Log tab.
A list of executed deployment configurations and the status of each displays.
3. Select the port commissioning deployment report you want to view and click Report.
4. Review the contents of the port commissioning deployment report.
The Configuration Deployment Report contains the following data:
• Date and Time: The date and time of the deployment.
• Export: Select to export the results to CSV or HTML (refer to Exporting and saving a report to a file on page 23).
• Email: Select to e-mail the results (refer to E-mailing a report on page 24).
• Configuration Name:The name of the deployment; for example, Decommission/Recommission - switch_name,Decommission/Recommission - switch_name - blade, or Decommission/Recommission - switch_name - Ports.
• Description: A description of the deployment.
• Module: The module name; for example, Port Commission.
• Sub Module: The sub-module name.
• Deployment Time: The time when the deployment occurred. Click to launch the detailed deployment results.
• Status: The status of the deployment.
• Creator: The name of the user that performed the deployment. The Deployment Results contains the following data:
The Deployment Results contains the following data:
• Configuration Name: The name of the deployment; for example, Decommission/Recommission - switch_name,Decommission/Recommission - switch_name - blade, or Decommission/Recommission - switch_name - Ports.
• Product: The product name.
• Status: The status of the deployment. For example, Success or Failed.
• Reason: The port level status of the decommission or recommission. Also, provides the following data for each CIMOMserver associated with the port:
– IP Address: The IP address of the CIMOM server.– Reason: The deployment request and whether or not it was successful.– Status: The status of the deployment; for example, Allowed or Failed.
5. Click the close button (X) to close the deployment report.
Exporting and saving a report to a fileYou can save a report to a comma-separated values (CSV) or HTML file. Each report has an Export list at the top-right corner of thepage.
1. Select one of the following from the Export list:
• Export as HTML
• Export as CSV
2. Browse to the location where you want to save the file and click Save.
Port commissioning deployment results
Brocade Network Advisor Port Commissioning Quick Start Guide, 14.3.153-1005190-02 23
E-mailing a reportYou can e-mail a report in a comma-separated values (CSV) or HTML file. Each report has an Email list at the top-right corner of thepage. To export reports to an e-mail recipient, you must configure e-mail event notification.
1. Select one of the following from the Email list:
• Email as HTML
• Email as CSV
The Report via E-mail dialog box displays.
2. Click the ellipsis button next to the E-mail Recipients field.
The Users dialog box displays.
3. Select the preconfigured e-mail user account from the list and click OK.
4. Enter additional e-mail addresses in the Other Recipients field.
5. Enter text in the Subject field to change the subject of the e-mail.
6. Enter text in the Body field to send a message with the report.
7. Click Send to send the report.
NOTEThe Mozilla Firefox Browser does not support the window close script. Click the browser close button (X) to cancel.
8. Browse to the location where you want to save the file and click Save.
Troubleshooting with the cimcli commandUse the following sections to obtain data to support troubleshooting.
Obtaining FCPort and PCCUPort dataTo obtain CIMOM supporting documentation for troubleshooting, complete the following steps.
1. Log on to the TSO.
NOTEYou need a very large TSO user region size for the cimcli command.
2. From the ISPF Primary Option Menu, select option 6.
3. Enter the TSO OMVS to open the z/OS USS shell.
4. Enter cimcli execquery “select * from IBMzOS_FCPort” to obtain the obtain the FICON channel FCPort control units known toCIMOM on a LPAR.
5. Enter cimcli execquery “select * from IBMzOS_FCCUPort” to obtain the FICON channel DASD/Tape (FCCUPort) controlunit’s known to CIMOM on a LPAR.
IEE169I VARY REJECTED messageIf you receive the “IEE169I VARY REJECTED, PATH(dddd,xx) OFFLINE DUE TO sss” message on the z/OS, use the “force” option tovary the path online as the IBM message text indicates.
Troubleshooting with the cimcli command
Brocade Network Advisor Port Commissioning Quick Start Guide, 14.3.124 53-1005190-02
Enabling the CIMOM trace fileTo enable the CIMOM trace file for troubleshooting, complete the following steps.
1. Open the CIMOM trace file (cimserver.env) in a text editor (such as Notepad).
The CIMOM trace file is located in the /etc/wbem/ directory.
NOTEYou must have superuser (SU) access to change the cimserver.envfile.
2. Enable the trace file by changing the file in the following way:
#OSBASE_TRACE=0#OSBASE_TRACE_FILE=/tmp/wbemosbase.trc
to
OSBASE_TRACE=4OSBASE_TRACE_FILE=/tmp/wbemosbase.trc
Capturing server and client supportSave dataTo capture both server and client supportSave files, complete the following steps.
1. Select Monitor > Technical Support > SupportSave.
The SupportSave dialog box displays.
2. Select the Server SupportSave check box to run supportSave on the server.
3. Enter a file name for the server supportSave file in the File Name field.
The default file name is DCM-SS-Time_Stamp.
4. Select the Include Database check box to include the database in the support save and choose one of the following options:
• Select the Partial (Excludes historical performance data and events) option to exclude historical performance data andevents from the database capture.
• Select the Full option to capture the entire database.
Clear the Include Database check box to exclude the database in the supportSave data.
5. Select the Client SupportSave check box to run supportSave on the client.
6. Enter a file name for the client supportSave file in the File Name field.
The default file name is DCM-Client-SS-Time_Stamp.
7. Click OK on the SupportSave dialog box.
Troubleshooting with the cimcli command
Brocade Network Advisor Port Commissioning Quick Start Guide, 14.3.153-1005190-02 25

8. Click OK on the message.
A progress message displays with a list of the steps to be performed:
• Capturing client supportSave
• Capturing logs and server data
• Capturing partial/full database
• Capturing data from the products
You cannot close the progress message and you cannot perform any other actions until the supportSave is complete.
The application generates separate master logs to show the status of the server and client supportSave collection.
You cannot change the destination directory for server and client supportSave. The following default directories are available:
• Server supportSave location: Install_Home /support
• Client supportSave locations:
– (Local client) User_Home/Management_Application_Name /localhost/support– (Remote client) User_Home/Management_Application_Name /Server IP/support
NOTEServer supportSave initiated from the remote client is only available from a client installed on the server. However, youcan copy the server supportSave from the View Repository dialog box (using the Save button) to the remote clientlocation.
Troubleshooting with the cimcli command
Brocade Network Advisor Port Commissioning Quick Start Guide, 14.3.126 53-1005190-02