Embed Size (px)
Citation preview

1
Supplier’s Quick Guide to Sandia Electronic Invoicing
Sandia National Laboratories is a multimission laboratory managed and operated by National Technology and
Engineering Solutions of Sandia, LLC., a wholly owned subsidiary of Honeywell International, Inc., for the U.S.
Department of Energy’s National Nuclear Security Administration under contract DE-NA-0003525.

2
Table of Contents ACCESS TO ISUPPLIER & OTHER INFORMATION: ........................................................................................................................................................................................................... 3 E-INVOICE INSTRUCTIONS ............................................................................................................................................................................................................................................ 4 ADDING ATTACHMENTS (MANDATORY) ..................................................................................................................................................................................................................... 13 RETRIEVING A SAVED INVOICE (UNSUBMITTED) ........................................................................................................................................................................................................ 14 VIEW STATUS OF SUBMITTED INVOICES ..................................................................................................................................................................................................................... 17 SUPPORT: .................................................................................................................................................................................................................................................................... 19

3
Access to iSupplier & Other Information:
Suppliers need to have an iSupplier portal username and password to submit invoices electronically.
o If the supplier does not have an account established, contact [email protected] to create an iSupplier account or request a password reset. Multiple accounts can be established for each supplier.
Only one email address is allowed to be retained on the supplier’s account to receive payment remittances via email. We recommend establishing an entity account within your company to receive remittance information (such as [email protected]). This technique can reduce the amount of administration for you as you get new employees or others leave.
Sandia's required payment mechanism is Electronic Funds Transfer (EFT). If not already signed up to receive EFT payments, submit an Electronic Funds Transfer Agreement.
To avoid system errors, it is important that you do not use your Internet browser’s back button to navigate between screens
while in the iSupplier Portal.
iSupplier portal Link
Contact [email protected] if you are receiving a specific error. Please include details and a screenshot of error if possible.

4
E-Invoice Instructions To create an invoice click on the ‘Invoices’ link from the Home screen:
5
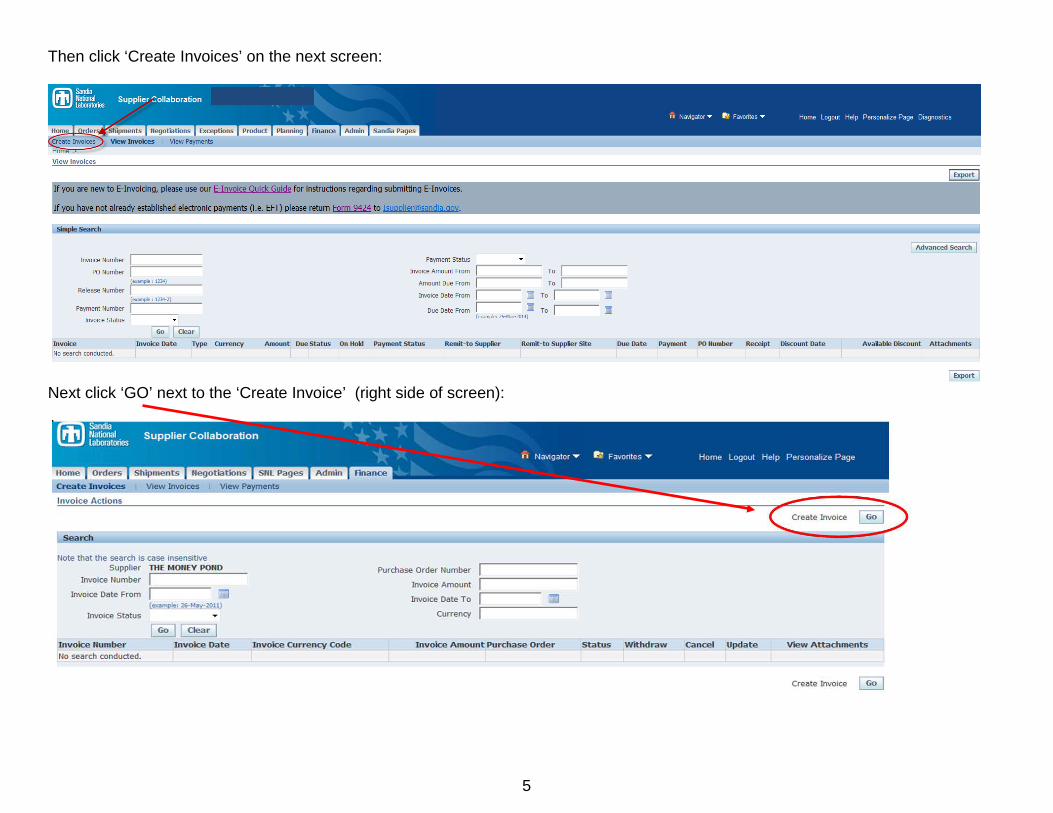
Then click ‘Create Invoices’ on the next screen:
Next click ‘GO’ next to the ‘Create Invoice’ (right side of screen):

6
Step 1 of 4 - Purchase Orders: Enter PO number only in search box and press ‘Go’, DO NOT enter any other fields. Entering multiple fields may result in an error.
PO lines appear in table at the bottom of the screen. The max number of PO lines shown at a time is 10 lines. If your PO has more than 10 PO lines, click to reveal additional PO lines to select.

7
Select line(s) for billing by checking box to the left of the line, click , then click ‘Next’ on the right side of the screen. If you are not sure which line to bill, contact your buyer.

8
Step 2 of 4 – Details: Enter the following fields in order. DO NOT enter any other fields. Table 1 – Invoice Details (reference Invoice Details screenshot below)
Supplier Section 1.Remit To This value will pre-populate with the address associated to your PO. Please review and change if
needed. To change the address listed, enter “%”, click on the magnifying glass for list of values, and click the
option to select the correct remittance address.
2. Remit To Bank Account Click on magnifying icon to display search screen. When the search screen displays click ‘Go’ to
view the bank account associated with the Remit To address.
Click the option to select the bank account. You will receive a check payment if no values are available. Please complete the EFT form to start receiving electronic payments.
Invoice Section

9
3. Invoice Number Enter your invoice number. 4. Invoice Type This value will default to “Invoice”. For credits, please select the credit memo option and enter
negative quantity values on the PO lines. 5. Invoice Description Optional field but recommended. 6. Attachment MANDATORY - Click here (or view page 13) for instructions. Items Section 7. Quantity Enter Quantity for each PO line. If the PO line’s Unit Price does not equal $1 you may need to enter
fractional values when incrementally billing. Invoice Payment Terms Section 8. Available Invoice Terms (Optional)
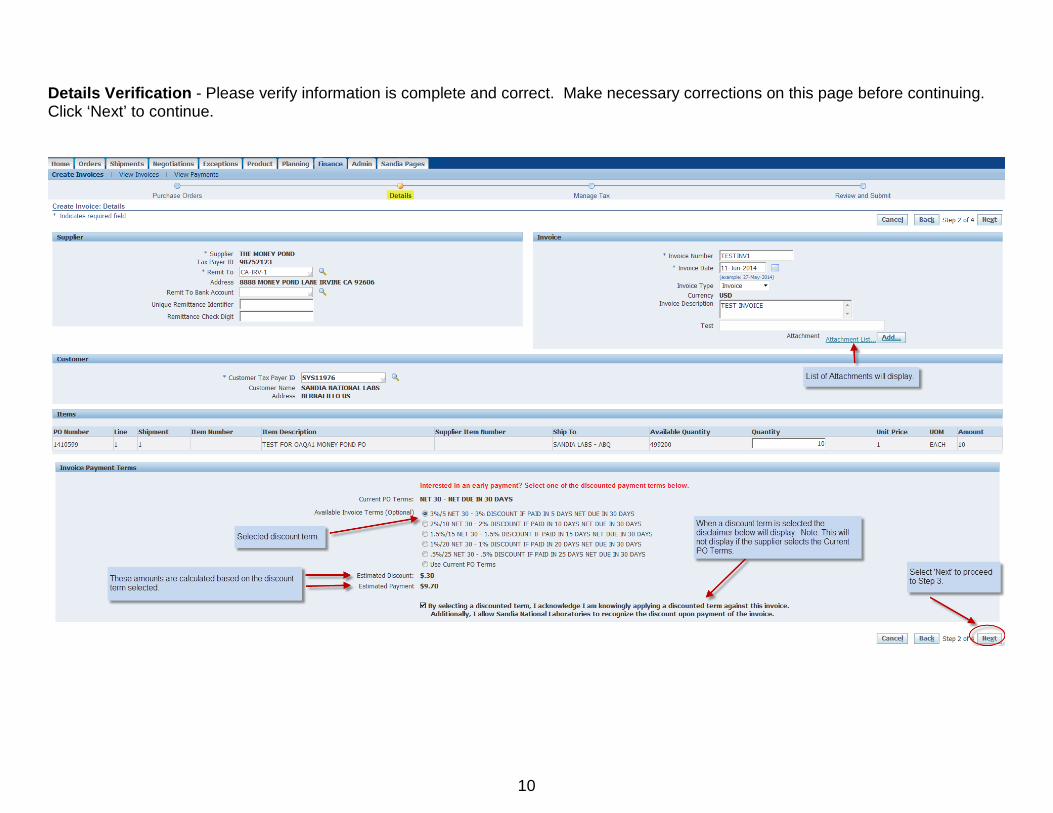
Suppliers have the option to receive early payment by selecting available discounts that display in this region. Only discounts with early payment terms that are more favorable than the PO’s payment terms will be available for selection. The supplier can select the radio button of each of the available terms to view the Estimated Discount and Estimated Payment to aide in determining which discount they prefer. The supplier also has the option to select their current PO Terms.
Invoice Details screenshot:
10
Details Verification - Please verify information is complete and correct. Make necessary corrections on this page before continuing. Click ‘Next’ to continue.

11
Step 3 of 4 – Manage Tax: No input is required on this screen. Click ‘Next’ to continue.

12
Step 4 of 4 – Review and Submit: IMPORTANT: If changes are required at this point, click the ‘Save’ button and you will receive a confirmation notice at the top of the screen that your invoice has been saved for later submission. Click here to obtain instructions on Retrieving a Saved Invoice (or see page 14). Final Verification - This is your final opportunity to verify all information is correct. If information is correct click ‘Submit’.
Once submitted you will receive a confirmation page. If you do not receive this page, your invoice has not been submitted.
13
Click ‘Printable Page’ to print a copy for your records (optional based on your business needs). Click ‘Create Another’ to submit another invoice.
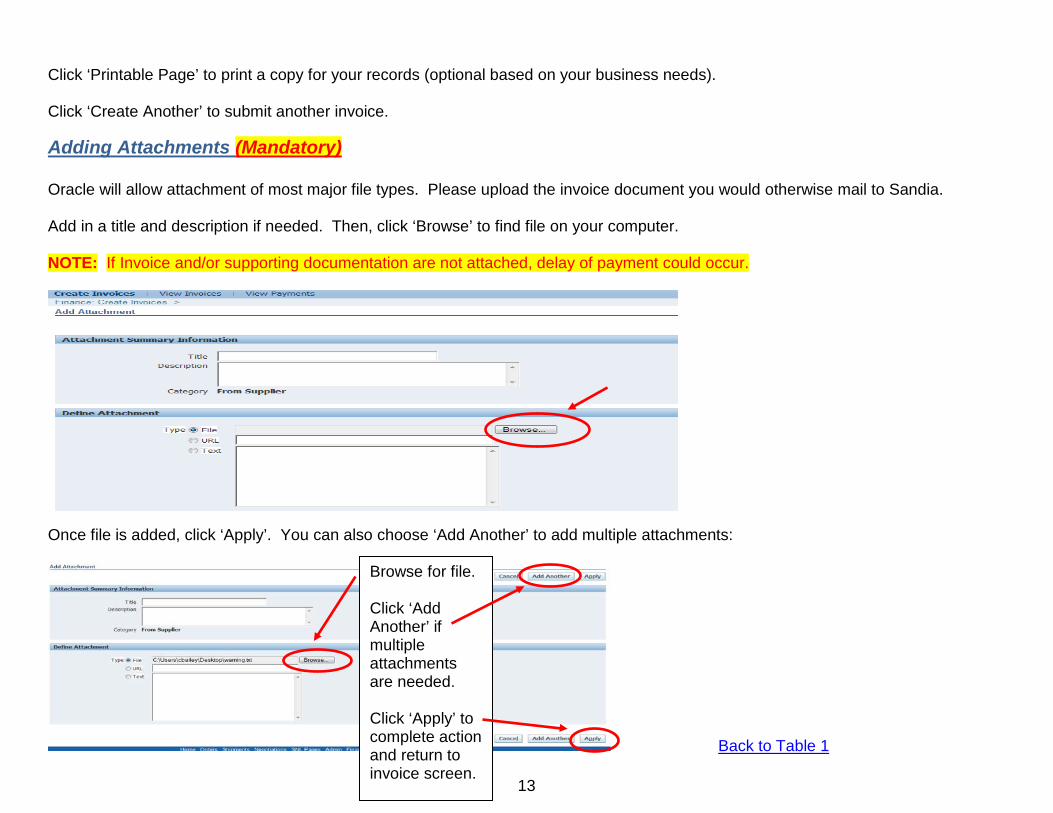
Adding Attachments (Mandatory) Oracle will allow attachment of most major file types. Please upload the invoice document you would otherwise mail to Sandia.
Add in a title and description if needed. Then, click ‘Browse’ to find file on your computer. NOTE: If Invoice and/or supporting documentation are not attached, delay of payment could occur.
Once file is added, click ‘Apply’. You can also choose ‘Add Another’ to add multiple attachments:
Back to Table 1
Browse for file. Click ‘Add Another’ if multiple attachments are needed. Click ‘Apply’ to complete action and return to invoice screen.
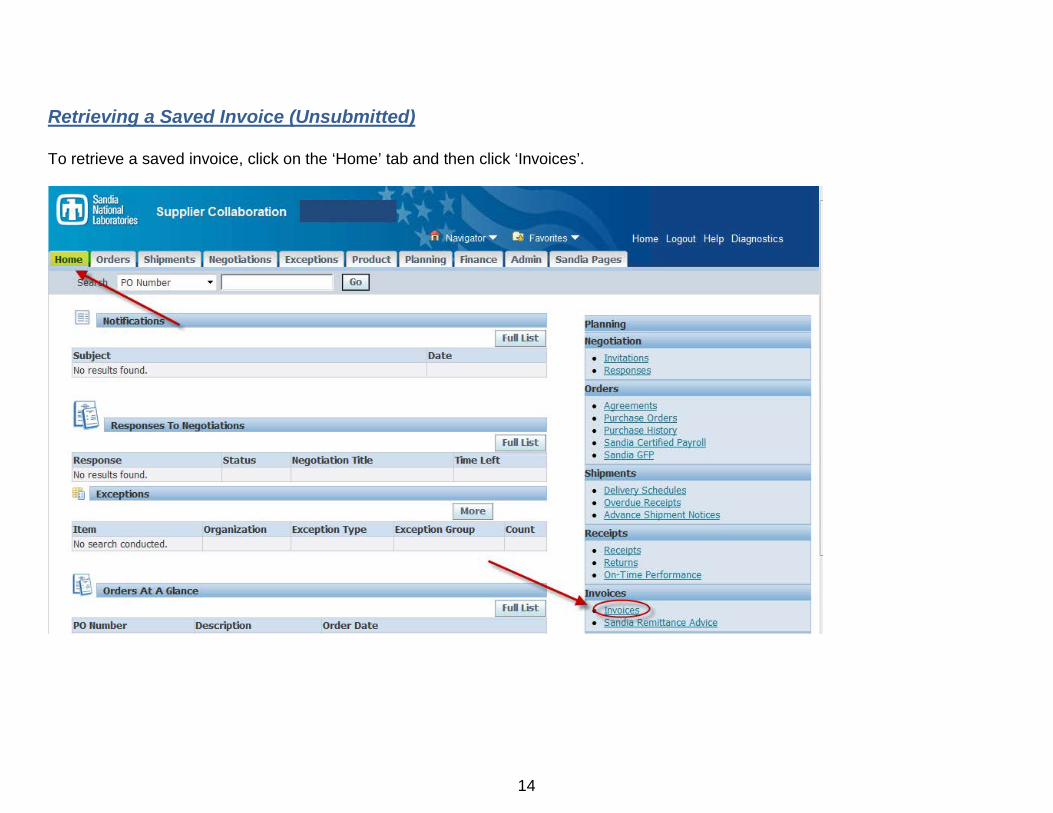
14
Retrieving a Saved Invoice (Unsubmitted) To retrieve a saved invoice, click on the ‘Home’ tab and then click ‘Invoices’.

15
In the View Invoices screen click on ‘Create Invoices’.
On the Search screen you can search for your invoice using any of the search option fields below and select ‘Go’. NOTE: Searching by invoice number is case sensitive and must be in the same format as originally entered when you saved your invoice.
The invoice will display for you to view and you can select ‘Update’.

16
This will bring you to the Details screen that will display the information that you previously entered. From this screen you can make necessary revisions and proceed with submitting your invoice.

17
View Status of Submitted Invoices To view status of submitted invoices, click on the ‘Home’ tab and then click ‘Invoices’.

18
This will bring you to the View Invoices screen.
On the Search screen you can search for your invoice using any of the search option fields below and select ‘Go’. NOTE: Searching by invoice number is case sensitive and must be in the same format as originally entered when you submitted your invoice.
The invoice that you searched for will display. You can click on the Invoice link to receive additional information.

19
Support: Contact [email protected] If you are receiving a specific error, please include details and a screenshot if possible.


![Supplier’s Quality Manual - Homepage | INOAC 14, 2011 [SUPPLIER’S QUALITY MANUAL] Control #: ... CC: Critical Characteristic . CI: ... PTC: Pass Through Characteristic](https://img.pdfslide.us/doc/110x75/5b041c767f8b9a8c688d2415/suppliers-quality-manual-homepage-14-2011-suppliers-quality-manual.jpg)