Embed Size (px)
Citation preview
Supplemental Resource
Gender Sensitive Community Mapping
How to Use this Resource
Phase 1, Task 2, Step 4 of the Model Guidebook for Communities discusses how a community can conduct initial due diligence to support responsible investment. This resource provides more detailed steps on identifying and mapping land users, rights and livelihoods in the community.1 A community map should be seen as a living record that can be updated to reflect changes in people’s land rights and uses. Regardless of the type of map method used, communities should revisit their map
throughout the investment process.
Types of Mapping Methodologies
The choice of mapping method will depend on each community’s context, the resources available to facilitators, and the expected output or use of the map. Some mapping methods require significant preparation time, so facilitating organizations should decide on which mapping method(s) will be used at least one month before community mapping begins.
Sketch mapping involves community members drawing pictures of their lands and natural resources on a large piece of paper to create a general understanding of the community’s spatial layout and promote discussion of land and natural resources management.
Satellite imagery mapping involves using printed, high-resolution photographs that shows community lands and natural resources in detail and can be used to create maps that are more accurate and useful for calculating distance and area. In this strategy, community members draw maps on top of printed satellite imagery.
Best Practice
Regardless of mapping method, the following strategies will be helpful when undertaking community mapping activities:
Ensure broad participation. To prevent conflict, the entire community should be involved with all mapping activities until all boundaries are harmonized and land conflicts resolved. Activities should include participation from:
Married Men
Single Men
Married Women
Single Women
Widowed Women
Male Youth
Female Youth
Male Pastoralists
Female Pastoralists
Vulnerable groups such as widows, religious minorities, elderly, people with disabilities, etc.
Avoid situations where a leader or a group of leaders draws a map without the community present. Leaders may not draw maps that accurately reflect accepted land use and management practices by the broader community.
Put the community in control. Community members, not outside facilitators, should always draw the maps.
Resolve conflicts later. Mapping alone does not decide the boundaries – negotiations and community approval are still needed before boundaries are agreed. Community members should mark disputed areas on the map as “hot spots” and refrain from discussing the conflict further until a proper conflict resolution process at a later date.
Ensure broad participation from all groups. To ensure that all voices are heard, divide women and men into separate groups to draw maps. Importantly, women tend to know the location of certain natural resources that men may not be aware of. As a result, their maps tend to be more thorough than men’s maps. As women share their maps, highlight their contributions to emphasize the importance of women’s active involvement in all community land protection activities.
Involve traditional leaders. Make sure that traditional authorities and leaders who are knowledgeable about sacred sites and particular natural resources are involved. Their participation will strengthen the map’s legitimacy.
Ensure the maps are kept safe by Land Investment Committee. Always
Gender Sensitive Community Mapping
leave the maps - or copies of the maps - with the Land Investment Committee.
Sketch Mapping
Sketch mapping is the simplest and most accessible form of mapping, but it does not show accurate size, distance and spatial location and may also be difficult for people outside the community to understand. Sketch mapping activities take about three hours, and the only materials required are large pieces of paper and colored markers.
Step 1: Prepare by reviewing the general spatial layout of the community.
Review satellite imagery or existing maps to become familiar with the landscape.
Step 2: Hold a community-wide meeting
Work with community leadership to ensure that women, youth, elders, leaders and all relevant stakeholders attend and take part in this meeting.
Describe the steps of the mapping activity. It may be helpful to draw a sample map (of an imaginary community) to demonstrate the end goal of the activity.
Describe the benefits and potential challenges of mapping.
Agree to simply mark conflicted areas on the map, avoid discussing them and commit to a proper conflict resolution process at a later date.
Make a plan for how to keep maps safe and private.
Decide whether the facilitators can take photographs of the map for their records.
Allow community members to ask any questions they have about the activity.
Address all concerns and do not begin mapping until everyone feels comfortable making maps.
Step 3: Agree on what should be on the map.
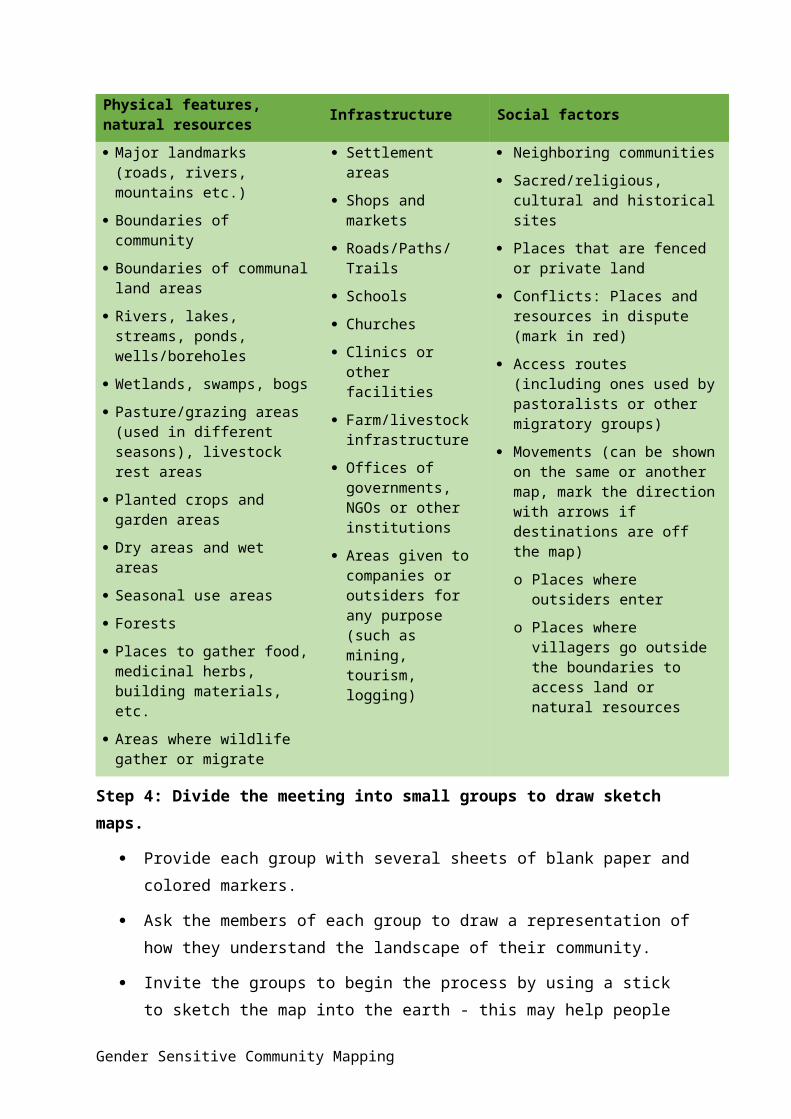
Ask the community to brainstorm a list of things to include on its map. The following table lists examples of what might be included.
Gender Sensitive Community Mapping
Physical features, natural resources Infrastructure Social factors
Major landmarks (roads, rivers, mountains etc.)
Boundaries of community
Boundaries of communal land areas
Rivers, lakes, streams, ponds, wells/boreholes
Wetlands, swamps, bogs
Pasture/grazing areas (used in different seasons), livestock rest areas
Planted crops and garden areas
Dry areas and wet areas
Seasonal use areas
Forests
Places to gather food, medicinal herbs, building materials, etc.
Areas where wildlife gather or migrate
Settlement areas
Shops and markets
Roads/Paths/Trails
Schools
Churches
Clinics or other facilities
Farm/livestock infrastructure
Offices of governments, NGOs or other institutions
Areas given to companies or outsiders for any purpose (such as mining, tourism, logging)
Neighboring communities
Sacred/religious, cultural and historical sites
Places that are fenced or private land
Conflicts: Places and resources in dispute (mark in red)
Access routes (including ones used by pastoralists or other migratory groups)
Movements (can be shown on the same or another map, mark the direction with arrows if destinations are off the map)
o Places where outsiders enter
o Places where villagers go outside the boundaries to access land or natural resources
Step 4: Divide the meeting into small groups to draw sketch maps.
Provide each group with several sheets of blank paper and colored markers.
Ask the members of each group to draw a representation of how they understand the landscape of their community.
Invite the groups to begin the process by using a stick to sketch the map into the earth - this may help people feel more comfortable drawing maps with pens and paper. Alternatively, bring lots of paper, so that groups can draw and re-draw their maps until everyone agrees.
Ask groups to draw a legend – a list of what they will map, with a corresponding symbol or color that they will use when drawing each item to indicate each item on the list.
Once a group feels ready to draw its final group sketch map, ask the group to choose an artist (or a few artists) to do the drawing, guided by the group’s inputs and instructions. Remind groups that everyone should contribute and that the maps should be as clear, detailed and accurate as possible.
Make sure the map is labeled with community name, group and date.
Gender Sensitive Community Mapping
Encourage community members to include notes about landmarks that define boundaries or particular locations (such as roads, rivers, rocky outcrops, trees) and notes about the distance between points or areas (to help with scale and orientation).
Ask each group to choose a spokesperson to present the map to the large group.
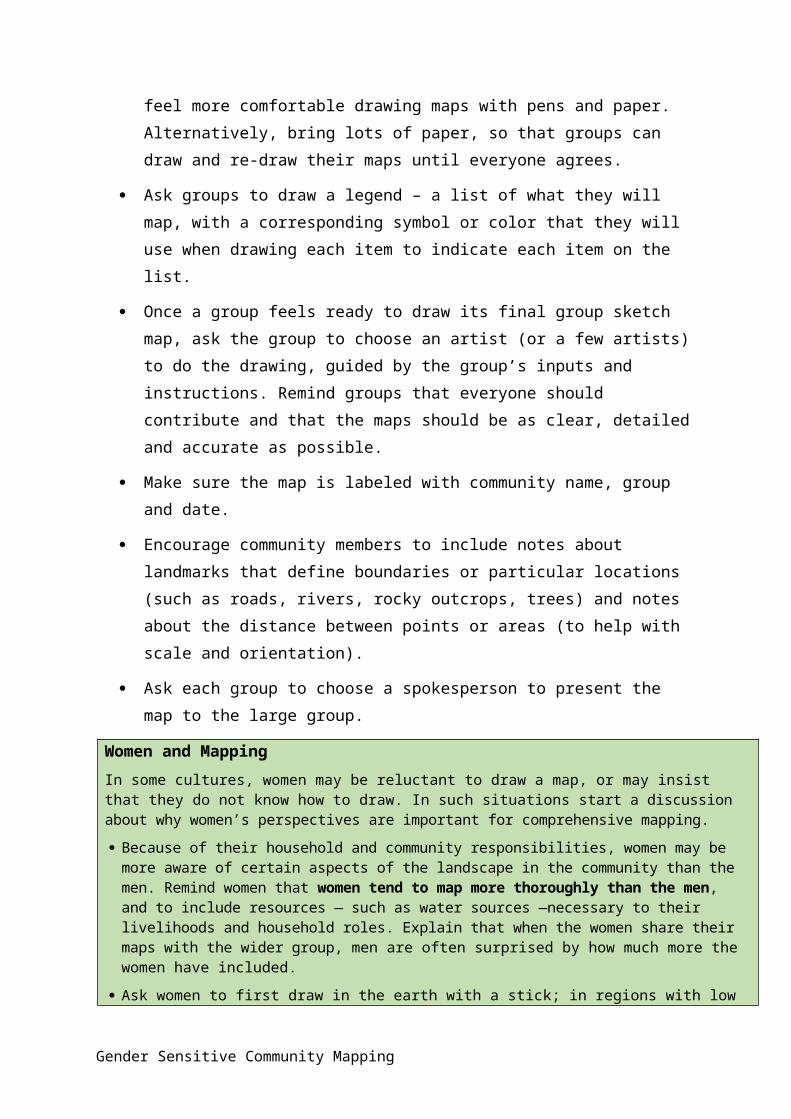
Women and MappingIn some cultures, women may be reluctant to draw a map, or may insist that they do not know how to draw. In such situations start a discussion about why women’s perspectives are important for comprehensive mapping.
Because of their household and community responsibilities, women may be more aware of certain aspects of the landscape in the community than the men. Remind women that women tend to map more thoroughly than the men, and to include resources — such as water sources —necessary to their livelihoods and household roles. Explain that when the women share their maps with the wider group, men are often surprised by how much more the women have included.
Ask women to first draw in the earth with a stick; in regions with low literacy rates, the pen and paper may be the challenge, not the women’s spatial awareness. In such cases, the entire mapping exercise may be completed in the earth, and then the facilitators can work with the women to transcribe it to paper.
It may be that women are shy – ask several times for a woman who can draw. As the mapping exercise starts getting interesting, women may move past their shyness and be ready to take pen in hand.
Step 5: Group presentation of the maps.
When the groups have finished drawing their maps, bring everyone back together and invite each group to present its map.
Encourage spokespeople to explain their group’s discussions (including any disagreements and challenges that arose) and legend.
After each group has made its presentation, the community should discuss all the maps.
Support peaceful discussion when there are disagreements about the location of certain boundaries.
If the disagreement cannot be resolved, support the community to mark both ideas on the map, and give people time to revisit the disagreement in future meetings.
Community members may choose to visit the site and examine the landscape for proof of the current reality on the ground.
Step 6: Combine the maps into one sketch map.
Support the community to draw a single combined map (on a fresh piece of paper) that includes details from each small group.
Gender Sensitive Community Mapping
After the maps have been combined into one final map, the community may want to reflect upon it and continue to add details until all important features and natural resources are accurately represented.
If the time for the meeting runs out before the community agrees that the map is finished, hold additional meetings to finalize the map.
Ask the community to identify any points, lines or areas that should be made more accurate using GPS coordinates later once boundaries are agreed upon.
Step 7: Make a plan for how the map will be safeguarded.
The Land Investment Committee should store the map safely for the community’s use.
Ensures that the maps are safe from unauthorized access.
Step 8: Land Investment Committee should photograph the maps for record-keeping.
Ask for permission to photograph all the maps (small group maps and combined map) for record-keeping purposes.
Ensure that map files are kept in a clear, well-maintained management system that clearly identifies which maps correspond with each community.
Step 9: Later, after completing the boundary harmonization exercise, update the maps and consider making a more permanent version.
Once a community and its neighbors have agreed on boundaries, the harmonized boundaries should be recorded on the map (see Supplemental Resource: Documenting Boundaries and Land Rights).
To ensure that the map will not degrade over time, print and laminate a copy of the final map or support communities to paint it onto a board or fabric to display in a central community meeting place.
Satellite Imagery Mapping
Satellite imagery can help to improve the accuracy of communities’ maps and are easier to convert into the kind of technical maps necessary for formal community land rights formalization and titling. The process of satellite mapping is very similar to sketch mapping, but requires more preparation and recent, high-quality satellite imagery is not always available for all locations. It is not necessary to do sketch mapping first, but the community may want to use sketch mapping as a first step. Supporting communities to work with satellite maps may take several hours longer
Gender Sensitive Community Mapping
than sketch mapping, as community members may be unfamiliar with looking at images of their community from above.
Step 1: Choose mapping software and learn how to use it.
For free, easy mapping software try Google Earth Pro (download it at http://www.google.com/earth/download/gep/agree.html and use the license key: GEPFREE). There are many online tutorials in various languages for learning how to use Google Earth Pro software.
Step 2: Search for imagery.
Collaborate with CSOs or satellite imagery providers in order to search for available imagery files.2
The best scenario is to find a source that allows the download of a georeferenced imagery file (often a .tiff file).
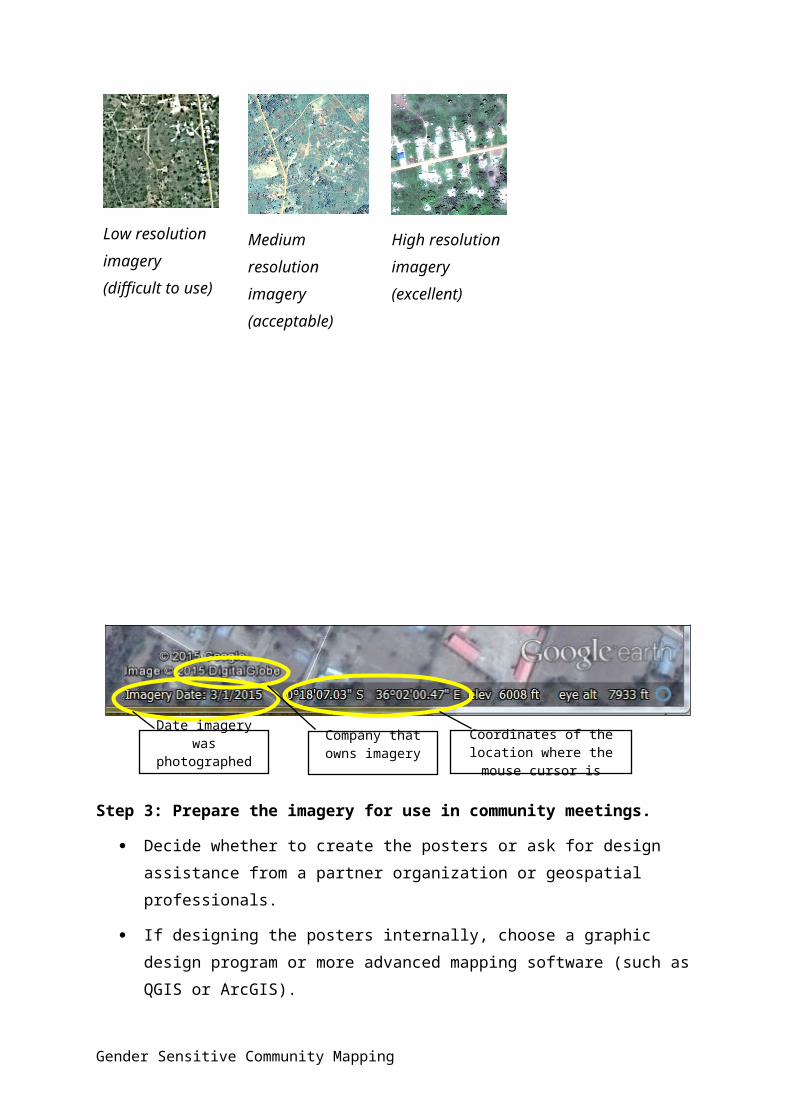
The quality of imagery depends on how recent it is, how clear and detailed it is (resolution), whether it is distorted, or whether there are too many clouds obscuring the landscape. If the imagery is low quality, it will be hard to see individual buildings and details in the landscape, which will make the images unsuitable for mapping.
Low resolution imagery (difficult to use)
Medium resolution imagery (acceptable)
High resolution imagery (excellent)
Gender Sensitive Community Mapping
Step 3: Prepare the imagery for use in community meetings.
Decide whether to create the posters or ask for design assistance from a partner organization or geospatial professionals.
If designing the posters internally, choose a graphic design program or more advanced mapping software (such as QGIS or ArcGIS).
If using downloaded imagery files, use mapping software or design software to format it into large posters.
If using imagery from Google Earth Pro, export .jpegs of imagery at the zoom level needed and reassemble them in design software.3
Format the imagery into a series of large posters or banners that are big enough to allow community members to gather around them and see the imagery comfortably.
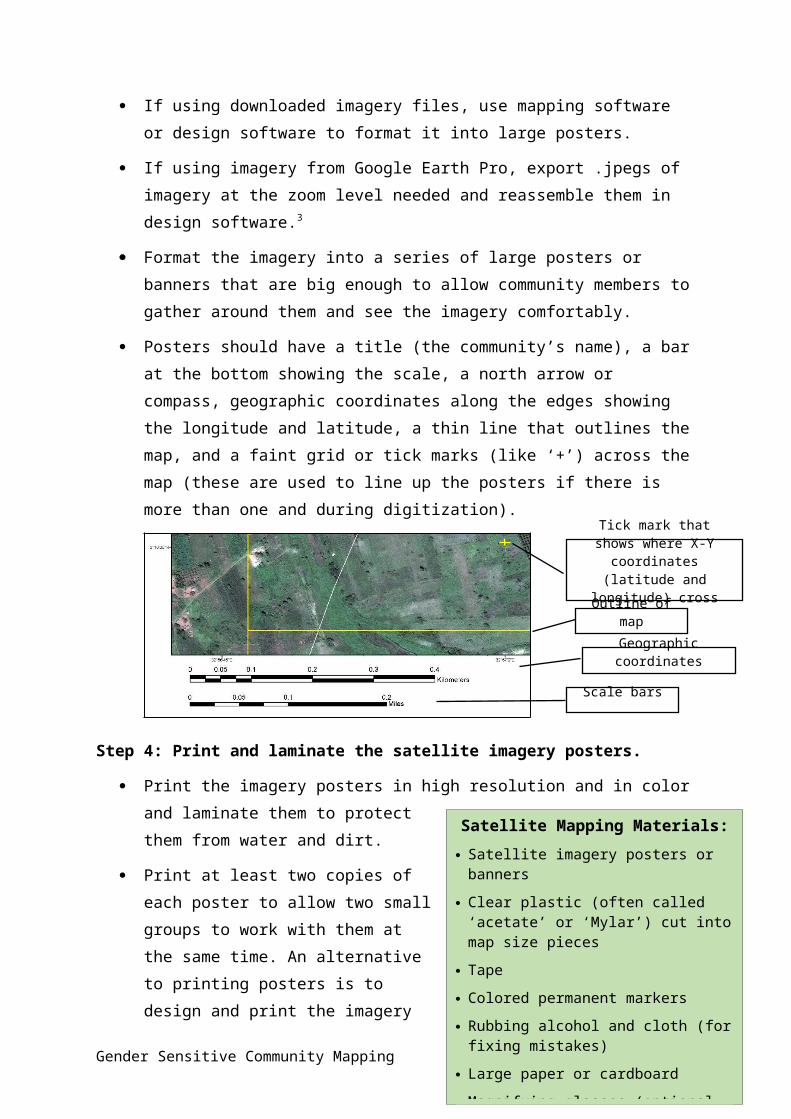
Posters should have a title (the community’s name), a bar at the bottom showing the scale, a north arrow or compass, geographic coordinates along the edges showing the longitude and latitude, a thin line that outlines the map, and a faint grid or tick marks (like ‘+’) across the map (these are used to line up the posters if there is more than one and during digitization).
Step 4: Print and laminate the satellite imagery posters.
Print the imagery posters in high resolution and in color and laminate them to protect them from water and dirt.
Gender Sensitive Community Mapping
Satellite Mapping Materials: Satellite imagery posters or banners
Clear plastic (often called ‘acetate’ or ‘Mylar’) cut into map size pieces
Tape
Colored permanent markers
Rubbing alcohol and cloth (for fixing
Coordinates of the location where the mouse cursor is
Company that owns imagery
Date imagery was photographed
Geographic coordinates
Scale bars
Outline of map
Tick mark that shows where X-Y coordinates (latitude and longitude)
Print at least two copies of each poster to allow two small groups to work with them at the same time. An alternative to printing posters is to design and print the imagery as large plastic or cloth banners if a banner printing business is available.
Step 5: Become familiar with the images.
Spend time looking closely at the posters to be comfortable helping community members identify landmarks and navigate the imagery.
Step 6: Organize a community-wide meeting
Before the meeting, explain the activity and satellite imagery to the local leaders who will be opening the meeting.
Ask them to explain the satellite imagery to participants in a way that will address potential concerns.
Step 7: Divide the meeting into small groups and orient each group to the imagery (see Step 3 of the sketch mapping process, described above).
Give each group a copy of the printed imagery.
Without using the pens and markers yet, ask community members to identify major landmarks, meeting places, basic infrastructure, their homes and fields, neighboring communities, etc.
Ask community members to point to approximate locations of boundaries and any communal lands, forests or water bodies.
Step 8: Agree on what should be on the map.
Ask the group to decide on a list of things to draw on its map (see Step 2 of the sketch mapping process, described above).
On a separate piece of paper, have the group members make a legend – a list of what they will map – with a corresponding symbol or color that they will use when drawing each item to indicate each item on the list.
Step 9: Prepare the group to draw over the map.
Overlay a piece of clear plastic over each printed poster and tape it in place.
Ask a volunteer to mark the corners of the map outline and tick marks (this is in case the plastic needs to be lined up again – it is also important for digitizing the map later). Label the plastic pieces with the community name, group and date.
Ask the group to choose an artist (or a few) to do the drawing.
Step 10: Support each group to draw a map of the community.
Gender Sensitive Community Mapping
Satellite Mapping Materials: Satellite imagery posters or banners
Clear plastic (often called ‘acetate’ or ‘Mylar’) cut into map size pieces
Tape
Colored permanent markers
Rubbing alcohol and cloth (for fixing
The group should work through the list of what to map, first agreeing on what to draw and where, then giving careful instructions to guide the artist(s).
Mark geographic features using single points or icons (such as a dot or ‘x’ for infrastructure like schools and clinics), lines (for things like roads and footpaths), or outlined shapes (for areas like grazing lands).
Prompt the group to make sure that it maps major landmarks, boundaries, common areas, roads and key infrastructure.
If possible, take notes about any discussions that provide details about landmarks that define boundaries, areas used for specific purposes or other details that seem significant to the group.
Step 11: Group presentation of the maps.
When the groups have finished, reconvene the groups and invite them to present their maps and explain any points of disagreement or areas that were challenging to map.
Encourage spokespeople to explain the process their group followed and what was discussed.
If the drawn maps are difficult to see, it is possible to carefully separate the plastic from the imagery poster and hold it up against the white back of the poster – however, the drawn shapes may appear very abstract without the imagery behind them for reference.
Step 12: Combine the maps into one.
Have the group choose an artist to draw a combined community map (either on a new piece of plastic overlaid on the imagery or on one of the small group maps).
The community should discuss the final map to ensure that it is accurate and includes all important natural resources.
Ask the community to identify any points, lines or areas that should be made more accurate using GPS coordinates once boundaries are agreed upon.
Ask the community about potential past and present land disputes and boundary disagreements in order to note them on the community map for future resolution.
Step 13: Once the community has agreed on the combined map, ask for community permission to photograph the maps for record-keeping.
Leave the original map and satellite imagery posters with the community.4
Ensure that map files are kept in a clear, well-maintained management
Gender Sensitive Community Mapping
system that clearly identifies which maps correspond with each community and ensures that the maps are safe from unauthorized access.
Step 14: Make a plan for how the map will be safeguarded.
Leave the digital images and map with the community.
Support the community to create a plan for keeping the map private and safe.
Step 15: Once boundaries are agreed, update the map.
This should be done both on the printed satellite images and on any digital versions of the map (see Supplemental Resource: Documenting Boundaries and Land Rights).
Gender Sensitive Community Mapping
1 This resource is adapted with permission from Namati, Community Land Protection Facilitators Guide 143-46 (2017).2 Contact Namati for support to access other sources of free or donated imagery. Before requesting, purchasing or printing imagery, it is best to take GPS coordinates of the community’s approximate center and (if possible) any agreed boundaries. This confirms locations more precisely and helps ensure that the imagery used is for the correct location.3 In Google Earth Pro, it is only possible to save JPG image files up to 4,800 pixels wide. If printing imagery from Google Earth Pro, add a note to the map that gives attribution to Google Earth and the imagery company (e.g. © Google Earth 2015 and © Digital Globe 2015). Do not charge fees for printed copies of Google Earth imagery. For more on saving images from Google Earth visit https://support.google.com/earth/answer/148146?hl=en. 4 In some cases, the community may prefer that the facilitator hold onto the map for the time being. Or, if the map is incomplete or there are significant conflicts or concerns that came up during the meeting, it may be advisable to ask to keep the map and imagery until another meeting can address concerns and finish the map.


![download.lww.comdownload.lww.com/.../A/PAIN_2016_08_08_HUGUET_PAI… · Web viewSupplemental Digital Content 1. Search strategies for each database. PubMed ((("Headache"[Mesh] OR](https://img.pdfslide.us/doc/110x75/5a951fd87f8b9a9c5b8c6ee2/web-viewsupplemental-digital-content-1-search-strategies-for-each-database-pubmed.jpg)