Embed Size (px)
Citation preview
Copyright by The Goodheart-Willcox Co., Inc. Introduction to Isometric Drawings 1
2014
The most common type of pictorial drawing used in the drafting industry is the gisometric drawing. Seegg Figure 3A-1. This supplement focuses on commands and drawing aids that help you create 2D isometric views that look 3D, as if the object tilts toward you.However, a 3D model provides a better way to display isometric views for most applica-tions. AutoCAD and Its Applications—Advanced describes how to construct 3D models.d
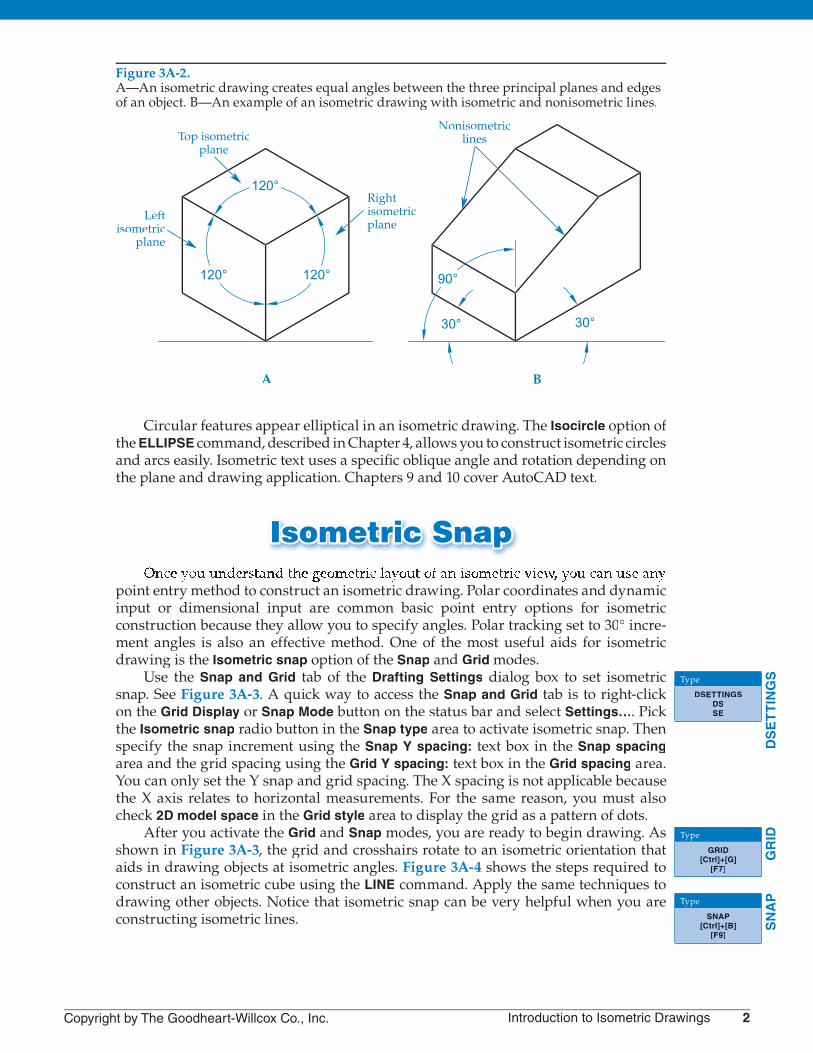
The term isometric means equal (iso) measure (metric). An isometric drawing has no perspective. Therefore, edges that are equal in length are drawn equal in length. The angles between the three principal planes and edges of an object are equal. See Figure 3A-2A. The vertical edges of an object are parallel to each other and formmeasurable isometric lines 90° from horizontal. The horizontal edges of an object areparallel to each other and form measurable isometric lines 30° from horizontal. All other lines are nonisometric lines. See Figure 3A-2B.
pictorial drawing:
A drawing that showsthe height, width, anddepth of an object ina single view.
isometric drawing:
A view in which all three axes appearat equal 120° angles with the plane of projection.
isometric lines:
Lines that areparallel to the axes in an isometricdrawing.
nonisometric lines:
Lines that are not parallel to the axes in an isometricdrawing.
AutoCAD and Its Applications BASICSSupplemental Material—Chapter 3
Introduction to Isometric Drawings
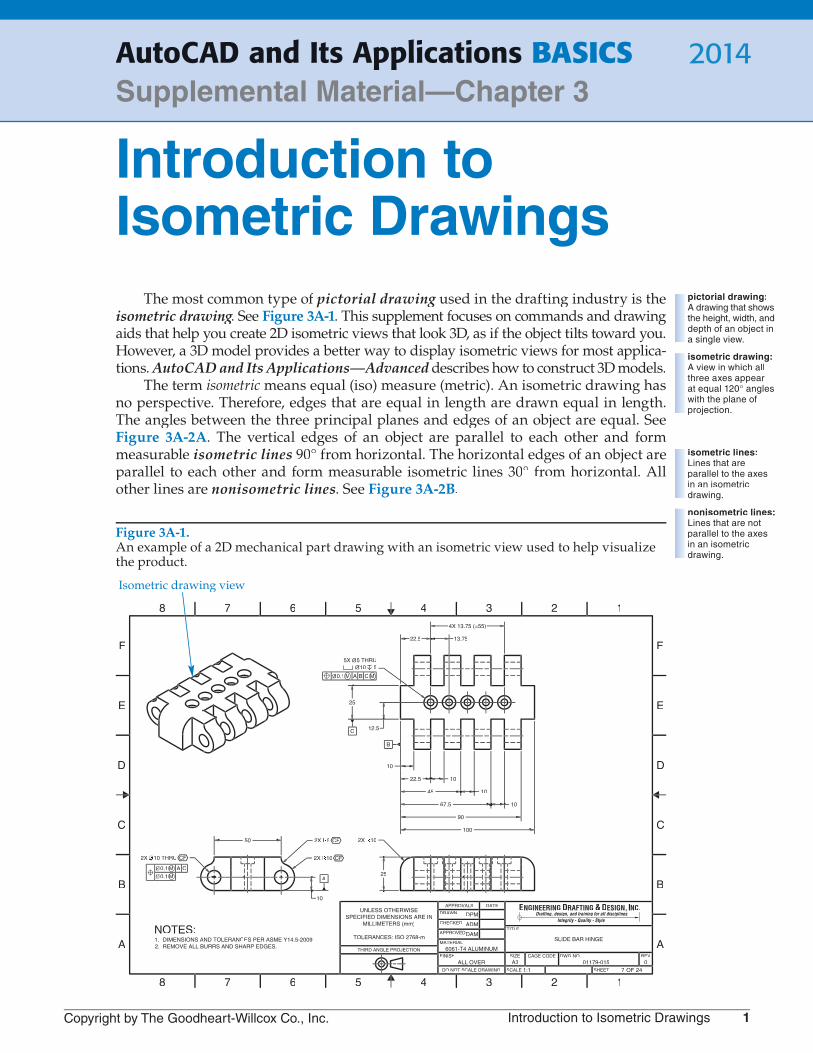
Figure 3A-1.An example of a 2D mechanical part drawing with an isometric view used to help visualizethe product.
A
B
C
D
E
F
A
B
C
D
E
F
12345678
12345678
DO NOT SCALE DRAWING
FINISH
APPROVED
MATERIAL
APPROVALS
DRAWN
CHECKEDTITLE
CAGE CODESIZE
DATE
REVDWG NO.
SCALE SHEET OF
THIRD ANGLE PROJECTION
UNLESS OTHERWISESPECIFIED DIMENSIONS ARE IN
MILLIMETERS (mm)
TOLERANCES: ISO 2768-m
DPM
ADM
DAM
6061-T4 ALUMINUM
ALL OVER
SLIDE BAR HINGE
A31:1
01179-015 0247
NOTES:1. DIMENSIONS AND TOLERANCES PER ASME Y14.5-2009.2. REMOVE ALL BURRS AND SHARP EDGES.
Drafting, design, and training for all disciplines.ENGINEERING DRAFTING &DESIGN, INC.
Integrity - Quality - Style
2X 10
25
10
A
2X 5
2X 10
50
12.5
25
C
10
22.5 10
45 10
67.5 10
90
100
510Ø5 THRUØ5X
)4X 13.75 (=55
22.5
B
2X 10 THRUØ
CFCF
CFCFCFCF
CBA0.1Ø
0.1ØCA0.1Ø
13.75
M M
M
M
Isometric drawing view
Copyright by The Goodheart-Willcox Co., Inc. Introduction to Isometric Drawings 2
Circular features appear elliptical in an isometric drawing. The Isocircle option of the ELLIPSE command, described in Chapter 4, allows you to construct isometric circles and arcs easily. Isometric text uses a specifi c oblique angle and rotation depending on fithe plane and drawing application. Chapters 9 and 10 cover AutoCAD text.
Isometric Snap
point entry method to construct an isometric drawing. Polar coordinates and dynamic input or dimensional input are common basic point entry options for isometric construction because they allow you to specify angles. Polar tracking set to 30° incre-ment angles is also an effective method. One of the most useful aids for isometric drawing is the Isometric snap option of the Snap and Grid modes.
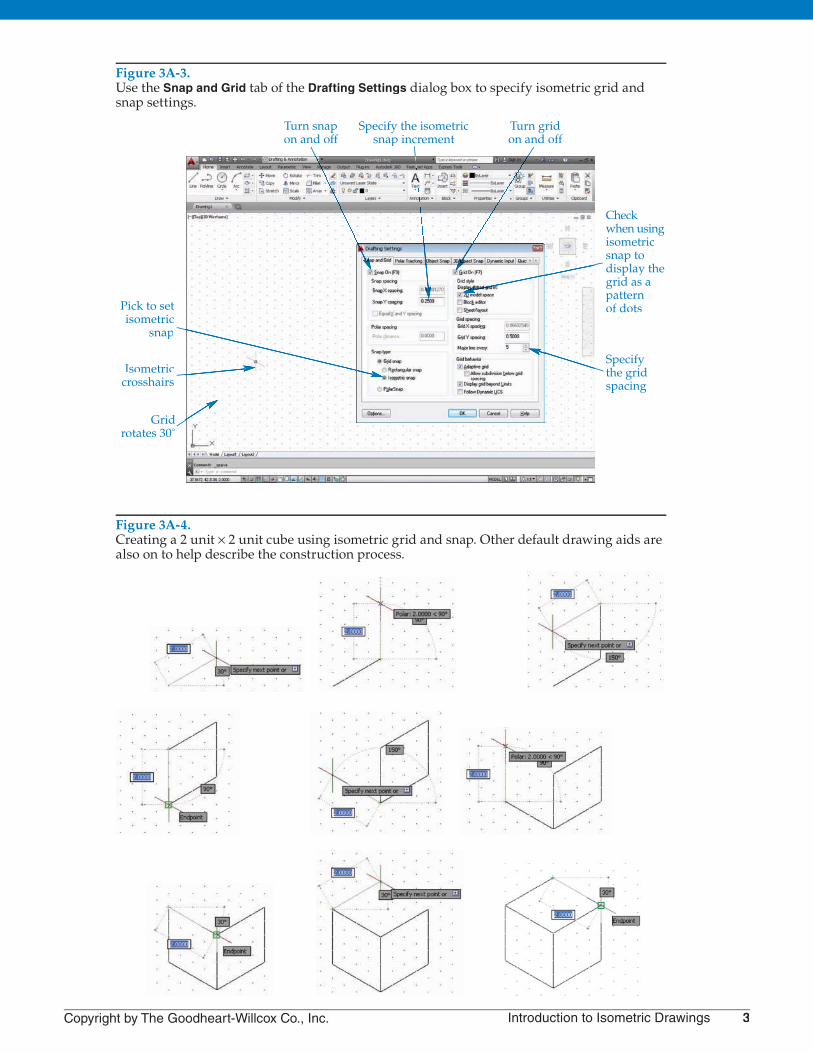
Use the Snap and Grid tab of the Drafting Settings dialog box to set isometric snap. See Figure 3A-3. A quick way to access the Snap and Grid tab is to right-click on the Grid Display or Snap Mode button on the status bar and select Settings…. Pick the Isometric snap radio button in the Snap type area to activate isometric snap. Thenspecify the snap increment using the Snap Y spacing: text box in the Snap spacing
area and the grid spacing using the Grid Y spacing: text box in the Grid spacing area. You can only set the Y snap and grid spacing. The X spacing is not applicable because the X axis relates to horizontal measurements. For the same reason, you must alsocheck 2D model space in the Grid style area to display the grid as a pattern of dots.
After you activate the Grid and Snap modes, you are ready to begin drawing. Asshown in Figure 3A-3, the grid and crosshairs rotate to an isometric orientation that aids in drawing objects at isometric angles. Figure 3A-4 shows the steps required to construct an isometric cube using the LINE command. Apply the same techniques todrawing other objects. Notice that isometric snap can be very helpful when you are constructing isometric lines.
DS
ET
TIN
GSType
DSETTINGS
DS
SE
GR
IDType
GRID
[Ctrl]+[G]
[F7]
SN
APType
SNAP
[Ctrl]+[B]
[F9]
Figure 3A-2.A—An isometric drawing creates equal angles between the three principal planes and edgesof an object. B—An example of an isometric drawing with isometric and nonisometric lines.
90°
120°
120° 120°
30° 30°
Rightisometricplane
Nonisometriclines
Leftisometric
plane
Top isometricplane
A B
Copyright by The Goodheart-Willcox Co., Inc. Introduction to Isometric Drawings 3
Figure 3A-3.Use the Snap and Grid tab of the Drafting Settings dialog box to specify isometric grid and snap settings.
Pick to setisometric
snap
Gridrotates 30˚
Specifythe gridspacing
Checkwhen usingisometricsnap todisplay thegrid as apatternof dots
Turn snapon and off
Turn gridon and off
Specify the isometricsnap increment
Isometriccrosshairs
Figure 3A-4.Creating a 2 unit × 2 unit cube using isometric grid and snap. Other default drawing aids are also on to help describe the construction process.
Copyright by The Goodheart-Willcox Co., Inc. Introduction to Isometric Drawings 4
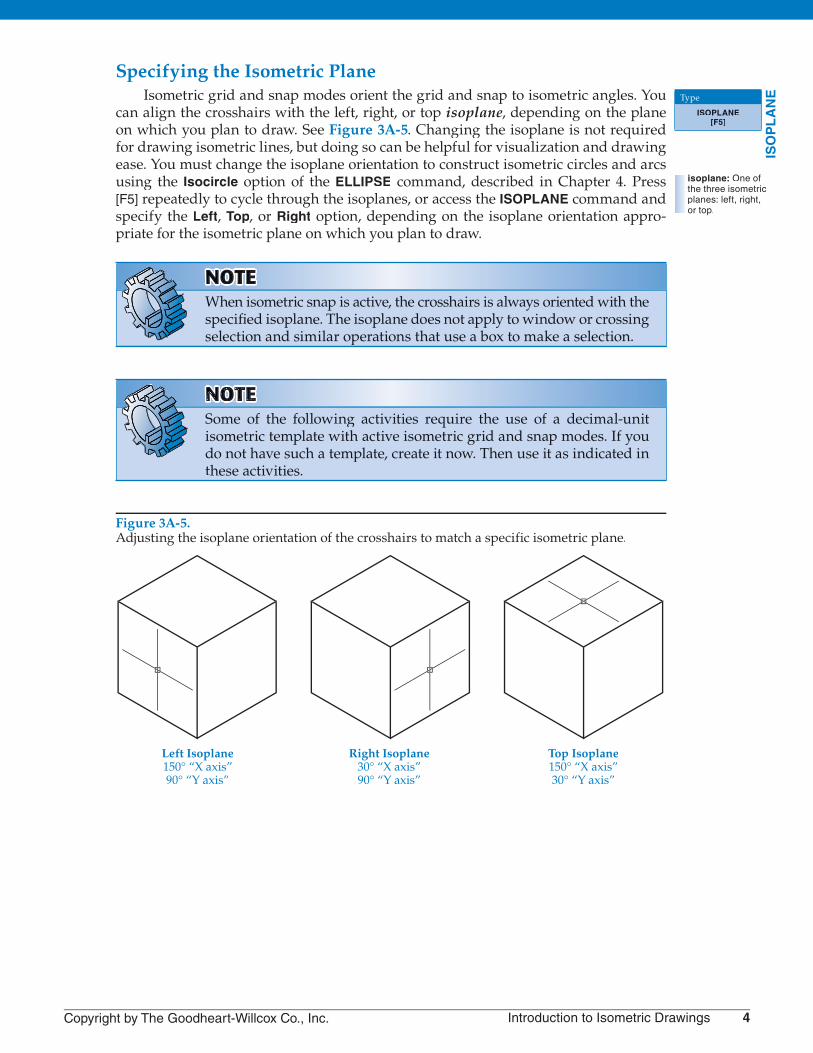
Specifying the Isometric PlaneIsometric grid and snap modes orient the grid and snap to isometric angles. You
can align the crosshairs with the left, right, or top isoplane, depending on the planeon which you plan to draw. See Figure 3A-5. Changing the isoplane is not requiredfor drawing isometric lines, but doing so can be helpful for visualization and drawing ease. You must change the isoplane orientation to construct isometric circles and arcsusing the Isocircle option of the ELLIPSE command, described in Chapter 4. Press[F5] repeatedly to cycle through the isoplanes, or access the ISOPLANE command andspecify the Left, Top, or Right option, depending on the isoplane orientation appro-priate for the isometric plane on which you plan to draw.
NNOTTTNOTOTETEWhen isometric snap is active, the crosshairs is always oriented with thespecified isoplane. The isoplane does not apply to window or crossing fiselection and similar operations that use a box to make a selection.
NOTOTTESome of the following activities require the use of a decimal-unitisometric template with active isometric grid and snap modes. If you do not have such a template, create it now. Then use it as indicated in these activities.
ISO
PL
AN
EType
ISOPLANE
[F5]
isoplane: One of the three isometricplanes: left, right,or top.
Figure 3A-5.Adjusting the isoplane orientation of the crosshairs to match a specific isometric plane.
Left Isoplane150° “X axis”90° “Y axis”
Right Isoplane30° “X axis”90° “Y axis”
Top Isoplane150° “X axis”30° “Y axis”

Copyright by The Goodheart-Willcox Co., Inc. Introduction to Isometric Drawings 5
Activity 3A-11. Start a new drawing from scratch using the imperial format.2. Access the Drafting Settings dialog box. On the Snap and Grid tab, pick the
Isometric snap radio button, enter .25 for the Y snap and grid spacing values,and pick the 2D model space check box.
3. Toggle Grid mode on from the status bar if it is not active. 4. Toggle Snap mode on from the status bar if it is not active. 5. Access the LINE command and use the grid and snaps to draw the isometric
view shown below. Change the isoplane orientation as appropriate for drawing objects on each isometric plane. Do not dimension the drawing.
6. Save the drawing as ACT3A-1.
Copyright by The Goodheart-Willcox Co., Inc. Introduction to Isometric Drawings 6
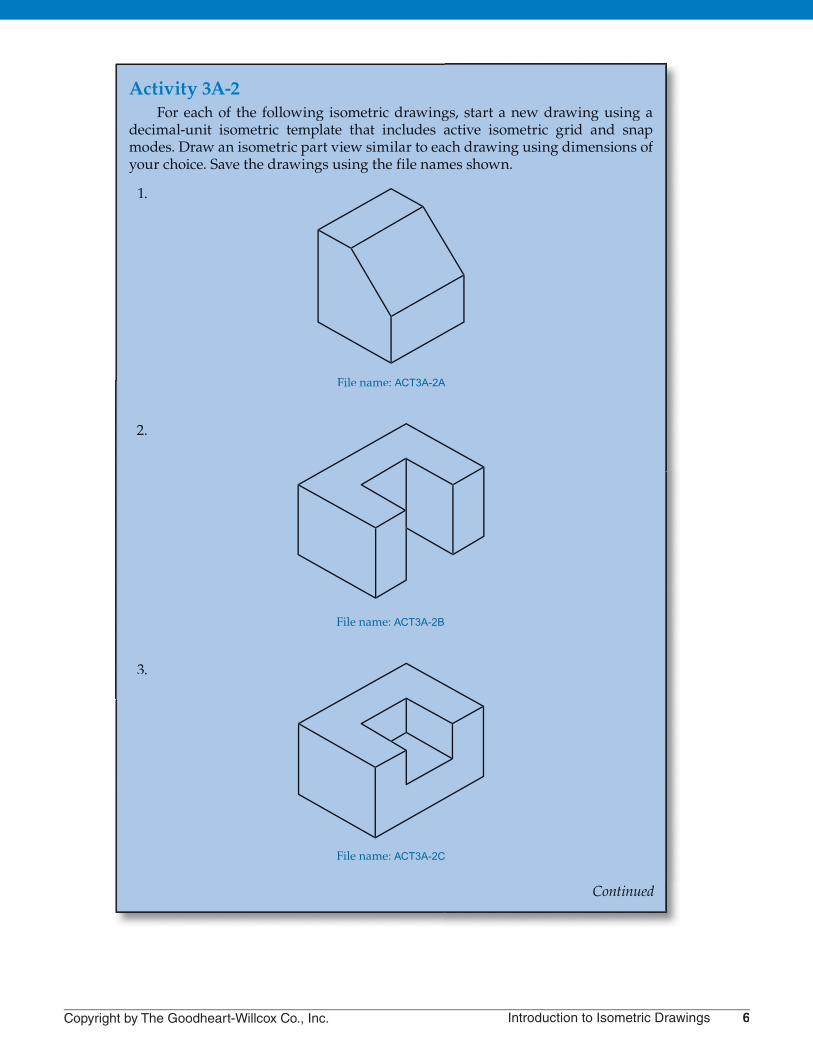
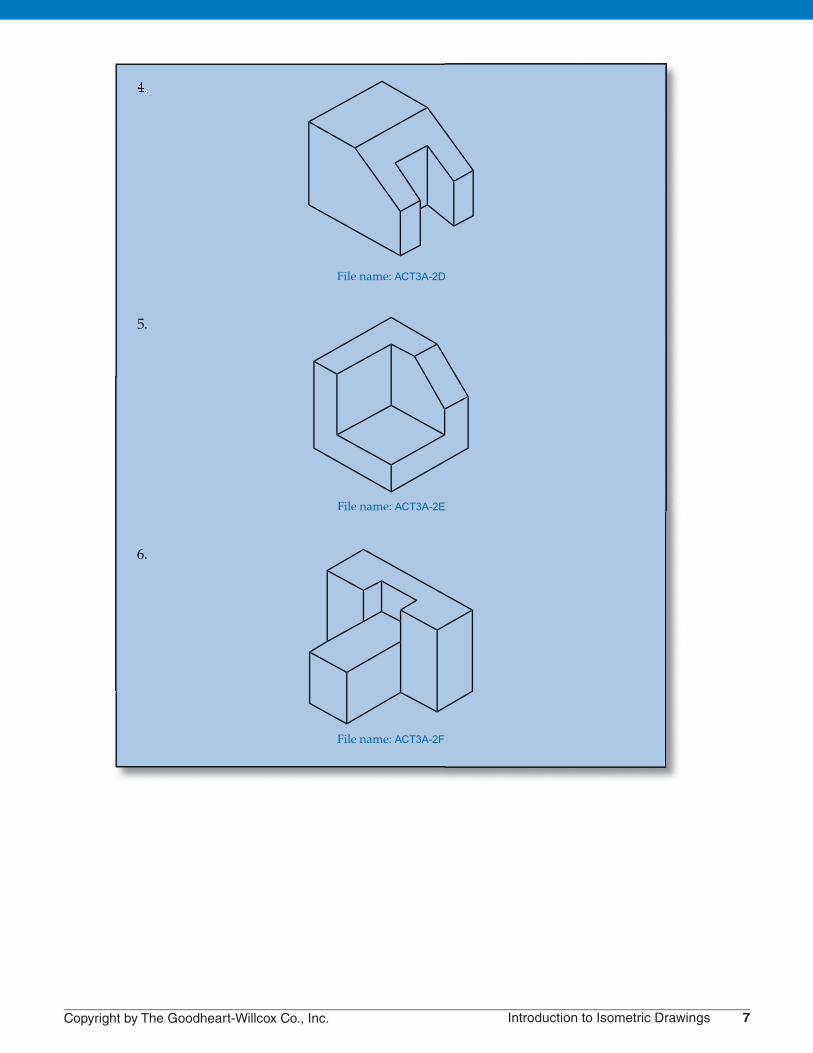
Activity 3A-2For each of the following isometric drawings, start a new drawing using a
decimal-unit isometric template that includes active isometric grid and snapmodes. Draw an isometric part view similar to each drawing using dimensions of your choice. Save the drawings using the file names shown.
1.
File name: ACT3A-2A
2.
File name: ACT3A-2B
3.
File name: ACT3A-2C
Continued
Copyright by The Goodheart-Willcox Co., Inc. Introduction to Isometric Drawings 7
File name: ACT3A-2D
5.
File name: ACT3A-2E
6.
File name: ACT3A-2F