Embed Size (px)
Citation preview
TRAINING OF FACILITATORS
FACILITATOR’S SUPPLEMENTAL
GUIDE

C-Modules Supplemental Facilitator’s Guide: Training of Facilitators
Communication for Change (C-Change) Project August 2012
This publication is made possible by the generous support of the American people through the United States Agency for International Development (USAID) under the terms of Agreement No. GPO-A-00-07-00004-00. The contents are the responsibility of the C-Change project, managed by FHI 360, and do not necessarily reflect the views of USAID or the United States Government.
The guide can be freely adapted and used, provided full credit is given to C-Change. Recommended citation: C-Change. 2012. C-Modules Supplemental Facilitator’s Guide: Training of Facilitators. Washington, DC: C-Change/FHI 360. Contact information: C-Change FHI 360 1825 Connecticut Ave., NW, Ste. 800 Washington, D.C., 20009 USA tel: +1.202.884.8000; fax: +1.202.464.3799 Email: [email protected] Website: www.c-changeproject.org
C-Change is implemented by FHI 360 and its partners: CARE; Internews; Ohio University; IDEO; Center for Media Studies, India; New Concept, India; Soul City, South Africa; Social Surveys, South Africa; and Straight Talk, Uganda.
ACKNOWLEDGMENTS TRAINING OF FACILITATORS GUIDE
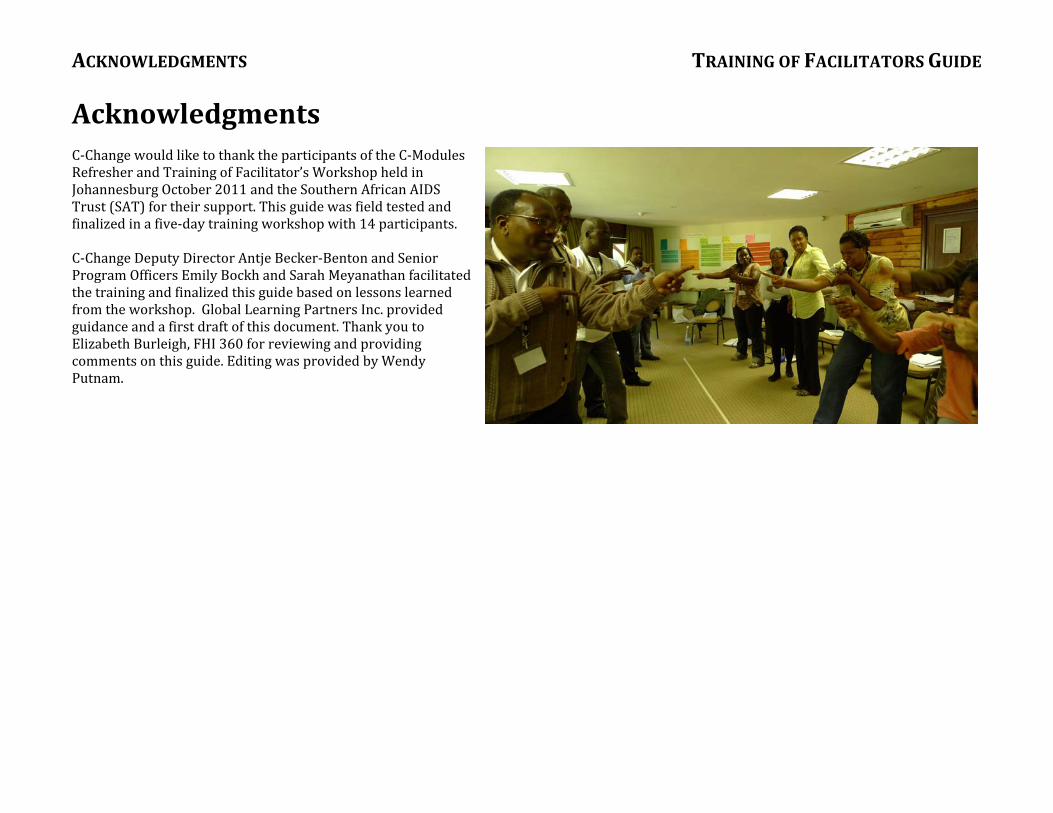
Acknowledgments C‐Change would like to thank the participants of the C‐Modules Refresher and Training of Facilitator’s Workshop held in Johannesburg October 2011 and the Southern African AIDS Trust (SAT) for their support. This guide was field tested and finalized in a five‐day training workshop with 14 participants. C‐Change Deputy Director Antje Becker‐Benton and Senior Program Officers Emily Bockh and Sarah Meyanathan facilitated the training and finalized this guide based on lessons learned from the workshop. Global Learning Partners Inc. provided guidance and a first draft of this document. Thank you to Elizabeth Burleigh, FHI 360 for reviewing and providing comments on this guide. Editing was provided by Wendy Putnam.
TRAINING OF FACILITATORS GUIDE PREPARATION
SUPPLEMENTAL FACILITATOR’S GUIDE C‐MODULES: TRAINING OF FACILITATORS PAGE 2
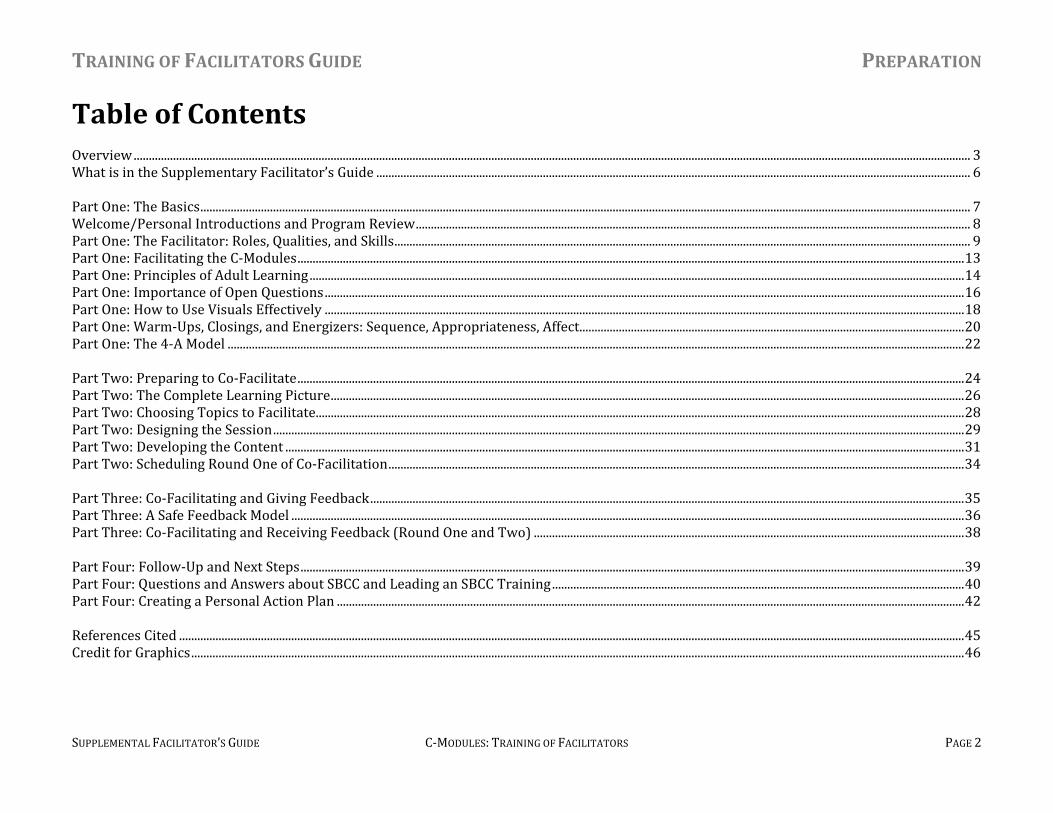
Table of Contents Overview .................................................................................................................................................................................................................................................................................... 3 What is in the Supplementary Facilitator’s Guide .................................................................................................................................................................................................... 6 Part One: The Basics .............................................................................................................................................................................................................................................................. 7 Welcome/Personal Introductions and Program Review ....................................................................................................................................................................................... 8 Part One: The Facilitator: Roles, Qualities, and Skills .............................................................................................................................................................................................. 9 Part One: Facilitating the C‐Modules ............................................................................................................................................................................................................................ 13 Part One: Principles of Adult Learning ........................................................................................................................................................................................................................ 14 Part One: Importance of Open Questions ................................................................................................................................................................................................................... 16 Part One: How to Use Visuals Effectively ................................................................................................................................................................................................................... 18 Part One: Warm‐Ups, Closings, and Energizers: Sequence, Appropriateness, Affect............................................................................................................................... 20 Part One: The 4‐A Model ................................................................................................................................................................................................................................................... 22 Part Two: Preparing to Co‐Facilitate ............................................................................................................................................................................................................................ 24 Part Two: The Complete Learning Picture ................................................................................................................................................................................................................. 26 Part Two: Choosing Topics to Facilitate...................................................................................................................................................................................................................... 28 Part Two: Designing the Session .................................................................................................................................................................................................................................... 29 Part Two: Developing the Content ................................................................................................................................................................................................................................ 31 Part Two: Scheduling Round One of Co‐Facilitation .............................................................................................................................................................................................. 34 Part Three: Co‐Facilitating and Giving Feedback .................................................................................................................................................................................................... 35 Part Three: A Safe Feedback Model .............................................................................................................................................................................................................................. 36 Part Three: Co‐Facilitating and Receiving Feedback (Round One and Two) .............................................................................................................................................. 38 Part Four: Follow‐Up and Next Steps ........................................................................................................................................................................................................................... 39 Part Four: Questions and Answers about SBCC and Leading an SBCC Training ........................................................................................................................................ 40 Part Four: Creating a Personal Action Plan ............................................................................................................................................................................................................... 42 References Cited ................................................................................................................................................................................................................................................................... 45 Credit for Graphics ............................................................................................................................................................................................................................................................... 46
TRAINING OF FACILITATORS GUIDE
SUPPLEMENTAL FACILITATOR’S GUIDE C‐MODULES: TRAINING OF FACILITATORS PAGE 3
Overview This Supplemental Facilitator’s Guide provides facilitators with ideas on how to structure the learning process for a Training of Facilitators for the C‐Modules. This guide contains a day‐by‐day, step‐by‐step approach to a 4 ½–day training. The sessions in this guide aim to provide participants—future C‐Modules facilitators—with the skills and confidence in how to 1) effectively teach the content of the C‐Modules to other practitioners; and 2) how to adapt the C‐Modules to the practitioners’ context and needs of the participants. For Whom is this Package Designed? This package is designed for those planning a Training of Facilitators for the C‐Modules. Ideally, the facilitator leading this training will have substantial experience in social and behavior change communication (SBCC), participatory facilitation, and adult learning principles. Facilitators should tailor each workshop and activity to the profile of the participants, the country setting, as well as to the time available.
Who are the Participants? The participants in a Training of Facilitators workshop should be experienced practitioners from small‐ to medium‐sized organizations who have already been trained in and applied the content of the C‐Modules to their programs. The content of this guide focuses on facilitation skills for the C‐Modules. However, as a facilitator, it is important to ensure that the participants understand the concepts and content of the C‐Modules before teaching them themselves. The ability to provide participants with examples that are tailored to their context and guide their learning is important. If the participants attended training on the C‐Modules more than a year ago, consider offering a refresher course prior to this Training of Facilitators. In addition, facilitators can continually provide technical support to the participants related to SBCC concepts that are not clear throughout this workshop. How to Use this Package This guide is designed for use alongside the C‐Modules Facilitator Guide – Preparation and Modules 0‐5. This is not a standalone document but complements already existing resources for the C‐Modules that provide ideas on session activities, learning approach, and other information. What do the facilitators and participants need:
C‐Modules Practitioner’s Handbook. This handbook contains all the content for the training and should be copied and distributed to the participants.
C‐Modules Facilitator Guide (Preparation and Modules 0‐5). This is the main facilitator’s guide that provides guidance, activities for each session of the C‐Modules Practitioner’s Handbook, and information on the learning approach. Both the facilitator and the participants should have copies of this document.
TRAINING OF FACILITATORS GUIDE
SUPPLEMENTAL FACILITATOR’S GUIDE C‐MODULES: TRAINING OF FACILITATORS PAGE 4
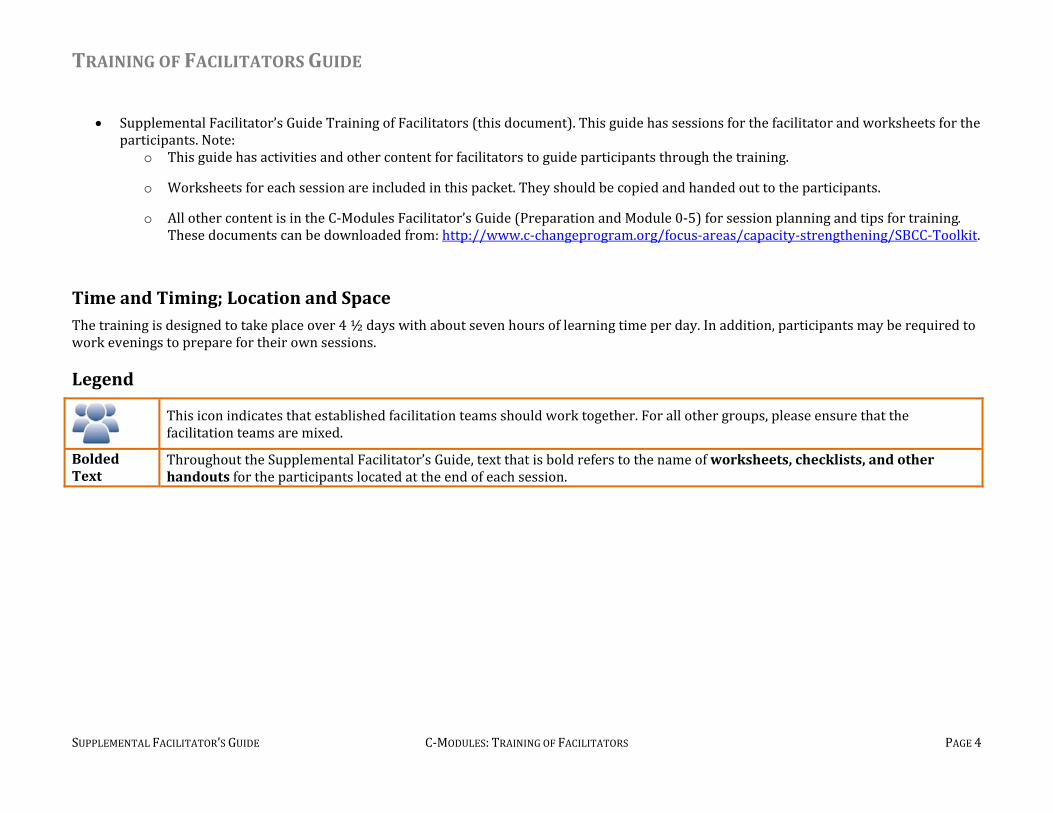
Supplemental Facilitator’s Guide Training of Facilitators (this document). This guide has sessions for the facilitator and worksheets for the
participants. Note: o This guide has activities and other content for facilitators to guide participants through the training.
o Worksheets for each session are included in this packet. They should be copied and handed out to the participants.
o All other content is in the C‐Modules Facilitator’s Guide (Preparation and Module 0‐5) for session planning and tips for training. These documents can be downloaded from: http://www.c‐changeprogram.org/focus‐areas/capacity‐strengthening/SBCC‐Toolkit.
Time and Timing; Location and Space The training is designed to take place over 4 ½ days with about seven hours of learning time per day. In addition, participants may be required to work evenings to prepare for their own sessions. Legend
This icon indicates that established facilitation teams should work together. For all other groups, please ensure that the facilitation teams are mixed.
Bolded Text
Throughout the Supplemental Facilitator’s Guide, text that is bold refers to the name of worksheets, checklists, and other handouts for the participants located at the end of each session.

TRAINING OF FACILITATORS GUIDE
SUPPLEMENTAL FACILITATOR’S GUIDE C‐MODULES: TRAINING OF FACILITATORS PAGE 5
Sample Training of Facilitators Workshop Schedule
DAY ONE DAY TWO DAY THREE DAY FOUR DAY FIVE
Morning
Welcome
Introductions
Program Overview
Part One: The Basics
Part Two: Preparing to Practice Facilitation (Round 1)
Part Three: Facilitating SBCC Sessions (Round 1)
Part Three: Facilitating SBCC Sessions (Round 2)
Part Four: Preparing for the “Real World”—Follow‐Up and Next Steps
Afternoon
Part One: The Basics continued
Part Two: Preparing to Practice Facilitation (Round 1) continued
Part Three: Co‐Facilitating (Round 1) continued
Part Three: Co‐facilitating (Round 2) continued
Closing
In a C‐Modules workshop held with the Southern African AIDS Trust, facilitators provided the participants with time in the afternoons to prepare for their sessions. However, most participant teams met in the evening or early morning to finalize preparations and materials for their sessions. The participants found this useful as this was a reflection of the real world when facilitators work outside of the workshop hours on the sessions.
TRAINING OF FACILITATORS GUIDE
SUPPLEMENTAL FACILITATOR’S GUIDE C‐MODULES: TRAINING OF FACILITATORS PAGE 6
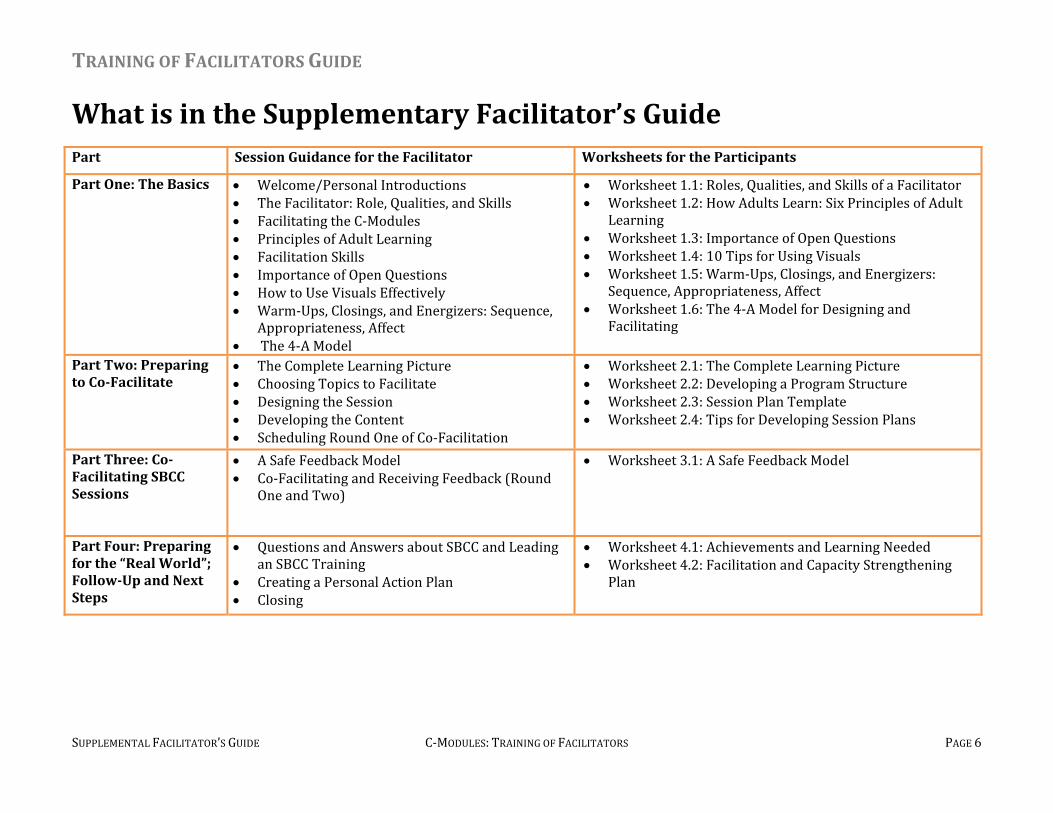
What is in the Supplementary Facilitator’s Guide Part Session Guidance for the Facilitator Worksheets for the Participants
Part One: The Basics
Welcome/Personal Introductions The Facilitator: Role, Qualities, and Skills Facilitating the C‐Modules Principles of Adult Learning Facilitation Skills Importance of Open Questions How to Use Visuals Effectively Warm‐Ups, Closings, and Energizers: Sequence,
Appropriateness, Affect The 4‐A Model
Worksheet 1.1: Roles, Qualities, and Skills of a Facilitator Worksheet 1.2: How Adults Learn: Six Principles of Adult
Learning Worksheet 1.3: Importance of Open Questions Worksheet 1.4: 10 Tips for Using Visuals Worksheet 1.5: Warm‐Ups, Closings, and Energizers:
Sequence, Appropriateness, Affect Worksheet 1.6: The 4‐A Model for Designing and
Facilitating
Part Two: Preparing to CoFacilitate
The Complete Learning Picture Choosing Topics to Facilitate Designing the Session Developing the Content Scheduling Round One of Co‐Facilitation
Worksheet 2.1: The Complete Learning Picture Worksheet 2.2: Developing a Program Structure Worksheet 2.3: Session Plan Template Worksheet 2.4: Tips for Developing Session Plans
Part Three: CoFacilitating SBCC Sessions
A Safe Feedback Model Co‐Facilitating and Receiving Feedback (Round
One and Two)
Worksheet 3.1: A Safe Feedback Model
Part Four: Preparing for the “Real World”; FollowUp and Next Steps
Questions and Answers about SBCC and Leading an SBCC Training
Creating a Personal Action Plan Closing
Worksheet 4.1: Achievements and Learning Needed Worksheet 4.2: Facilitation and Capacity Strengthening
Plan

TRAINING OF FACILITATORS GUIDE PART ONE: THE BASICS
SUPPLEMENTAL FACILITATOR’S GUIDE C‐MODULES: TRAINING OF FACILITATORS PAGE 7
Part One: The Basics Objectives:
Recommended Worksheets and Materials All participants need:
C‐Modules Practitioner’s Handbook (a complete set of modules 0–5) C‐Modules Facilitator’s Guide
By the end of Part One, participants will have: Examined the role of a facilitator and noted what they think is particularly important Discovered how principles of adult learning are used in the C‐Modules Identified the key facilitation skills they want to learn Practiced using open questions Named effective ways to use visuals when facilitating the C‐Modules Described how the 4‐A model helps to ensure learning Practiced using purposeful energizers, warm‐ups, and closings
In this part of the training, the goal is to make participants comfortable with every part of the C‐Modules. To do so, attention is given to the Practitioner’s Handbook and participants are encouraged to “dig into” each module so they feel prepared to teach any part of the modules, no matter the context, down the road.
TRAINING OF FACILITATORS GUIDE PART ONE: THE BASICS
SUPPLEMENTAL FACILITATOR’S GUIDE C‐MODULES: TRAINING OF FACILITATORS PAGE 8
Welcome/Personal Introductions and Program Review The Facilitator’s Guide already gives several suggestions for introduction activities for the C‐Modules to help the participants get to know one another at the beginning of the workshop (look at the C‐Modules Facilitator’s Guide Appendix for some other openers). After the welcome and opening is complete, the openers below will help participants prepare for this particular training. 1. Ask participants to work in groups of three and reflect on their experience with the C‐Modules training (or similar SBCC training). Each group
should ask other members of the group: What do you remember from your previous training? How have you used what you’ve learned? What is one thing you liked about the training approach or structure? Is there anything you would like to change?
2. Have participants come together in plenary and share what they liked about the training approach or structure from the previous C‐Modules
training and what they would have changed. Record responses and remind the participants to think about what was said when they facilitate a session later in the week.
3. Before beginning Part One of the workshop, take time to lay out the objectives and schedule for the week. Review the proposed content for this workshop in plenary. Ask the participants: What topics were you hoping to see during this workshop that you
don’t see in the workshop content and schedule? Which ones are you most interested in?
4. Inform participants that they will be expected to facilitate two sessions
during the workshop. Emphasize that the whole first part of the workshop is devoted to fundamental principles of adult learning and to general facilitation skills.
5. Remind participants this training will also “refresh” and expand their practical knowledge of SBCC. To be credible facilitators, their comfort with key concepts related to SBCC is critical. Ask them not to wait until the end to ask questions about SBCC and about leading an SBCC training. They should use every opportunity to do so.
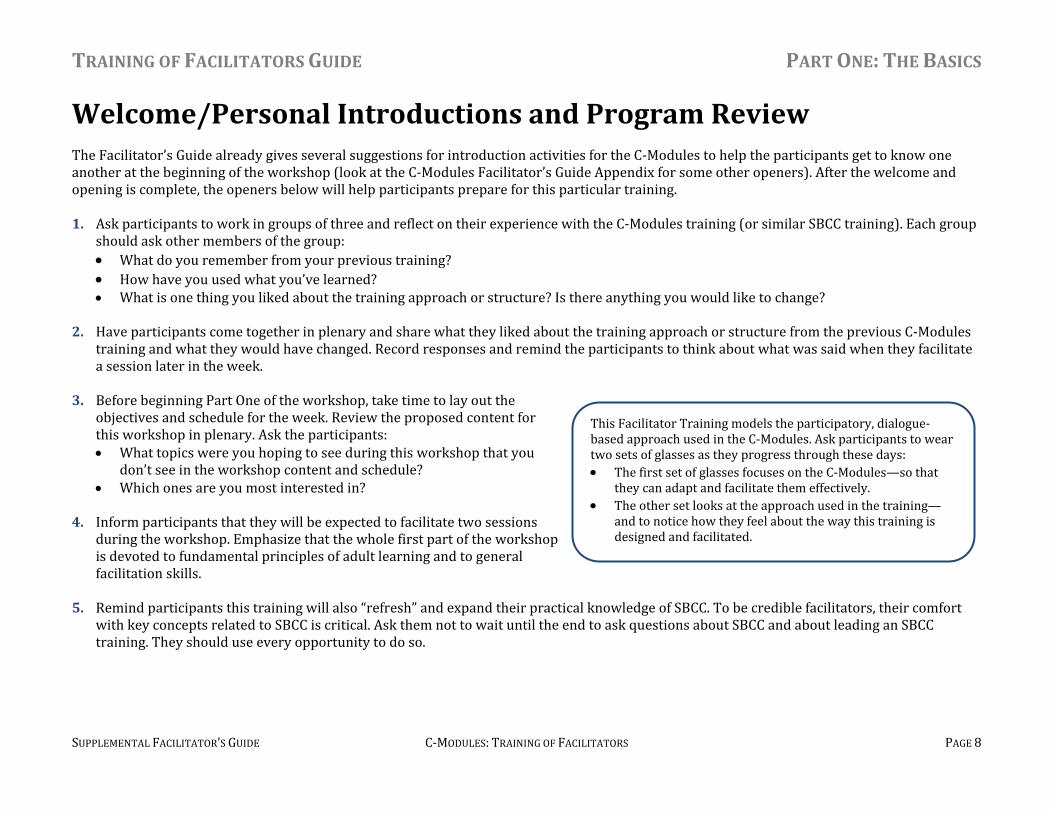
This Facilitator Training models the participatory, dialogue‐based approach used in the C‐Modules. Ask participants to wear two sets of glasses as they progress through these days: The first set of glasses focuses on the C‐Modules—so that
they can adapt and facilitate them effectively. The other set looks at the approach used in the training—
and to notice how they feel about the way this training is designed and facilitated.
TRAINING OF FACILITATORS GUIDE PART ONE: THE BASICS
SUPPLEMENTAL FACILITATOR’S GUIDE C‐MODULES: TRAINING OF FACILITATORS PAGE 9
Part One: The Facilitator: Roles, Qualities, and Skills Distribute Worksheet 1.1: Roles, Qualities, and Skills of a Facilitator Before diving into what facilitation is, it is important to review the role, qualities, and skills that a facilitator should have. 1. In plenary ask participants to read the worksheet and circle the words and
phrases they think are important.
2. After all participants have finished, in plenary discuss: What did you circle? What do you see as especially important in the role of a facilitator given
your context? Is there anything that is missing that should be added?
3. After discussing the worksheet, form three teams to conduct a role‐playing
exercise. Two teams will develop a short role‐play demonstrating an unskilled facilitator. The final team should develop a role‐play demonstrating a skilled facilitator.
4. After each role‐play ask the plenary to review Worksheet 1.1: Roles, Qualities, and Skills of a Facilitator and discuss:
Was this a skilled or unskilled facilitation? What did you observe happening in the role‐play? How was the facilitator following or not following what is in the worksheet?
Each of the sessions that require worksheets will be noted in the beginning of the session. As a facilitator, it is up to you to decide when to distribute the worksheets. Another option is to give the participants all the worksheets in a binder at the beginning and direct them to specific worksheets at the appropriate time.
TRAINING OF FACILITATORS GUIDE PART ONE: THE BASICS
SUPPLEMENTAL FACILITATOR’S GUIDE C‐MODULES: TRAINING OF FACILITATORS PAGE 10
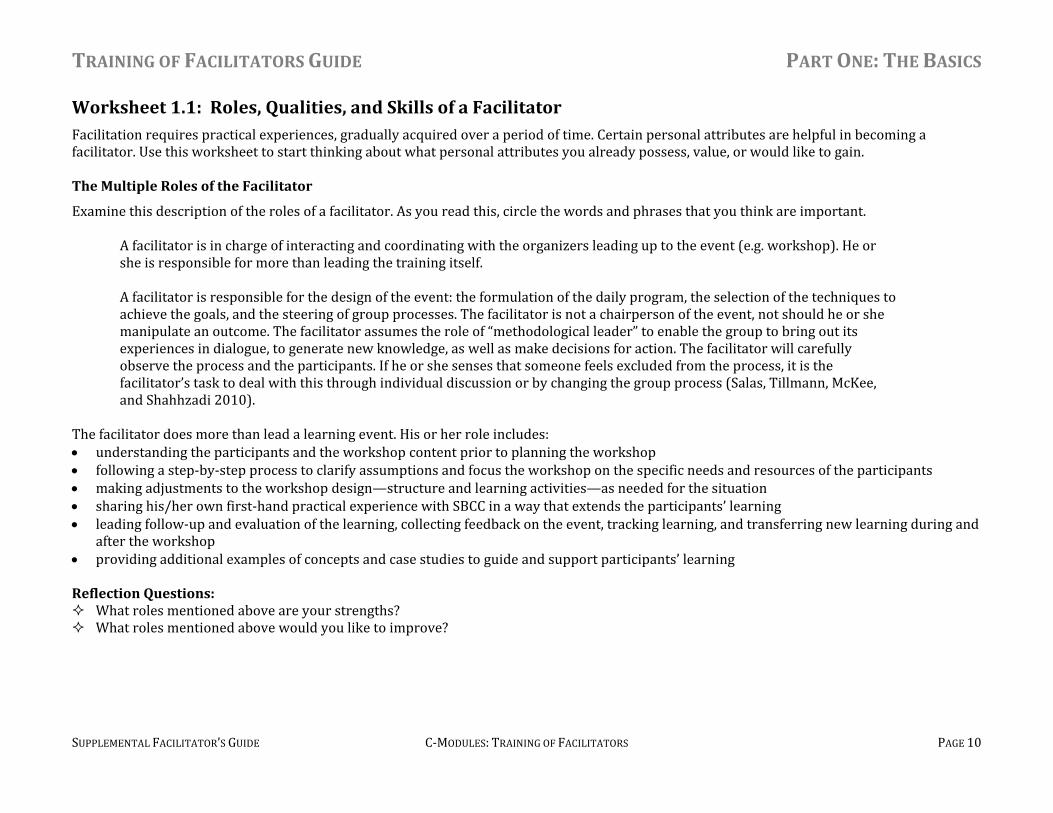
Worksheet 1.1: Roles, Qualities, and Skills of a Facilitator Facilitation requires practical experiences, gradually acquired over a period of time. Certain personal attributes are helpful in becoming a facilitator. Use this worksheet to start thinking about what personal attributes you already possess, value, or would like to gain. The Multiple Roles of the Facilitator
Examine this description of the roles of a facilitator. As you read this, circle the words and phrases that you think are important.
A facilitator is in charge of interacting and coordinating with the organizers leading up to the event (e.g. workshop). He or she is responsible for more than leading the training itself. A facilitator is responsible for the design of the event: the formulation of the daily program, the selection of the techniques to achieve the goals, and the steering of group processes. The facilitator is not a chairperson of the event, not should he or she manipulate an outcome. The facilitator assumes the role of “methodological leader” to enable the group to bring out its experiences in dialogue, to generate new knowledge, as well as make decisions for action. The facilitator will carefully observe the process and the participants. If he or she senses that someone feels excluded from the process, it is the facilitator’s task to deal with this through individual discussion or by changing the group process (Salas, Tillmann, McKee, and Shahhzadi 2010).
The facilitator does more than lead a learning event. His or her role includes: understanding the participants and the workshop content prior to planning the workshop following a step‐by‐step process to clarify assumptions and focus the workshop on the specific needs and resources of the participants making adjustments to the workshop design—structure and learning activities—as needed for the situation sharing his/her own first‐hand practical experience with SBCC in a way that extends the participants’ learning leading follow‐up and evaluation of the learning, collecting feedback on the event, tracking learning, and transferring new learning during and
after the workshop providing additional examples of concepts and case studies to guide and support participants’ learning Reflection Questions: What roles mentioned above are your strengths? What roles mentioned above would you like to improve?
TRAINING OF FACILITATORS GUIDE PART ONE: THE BASICS
SUPPLEMENTAL FACILITATOR’S GUIDE C‐MODULES: TRAINING OF FACILITATORS PAGE 11
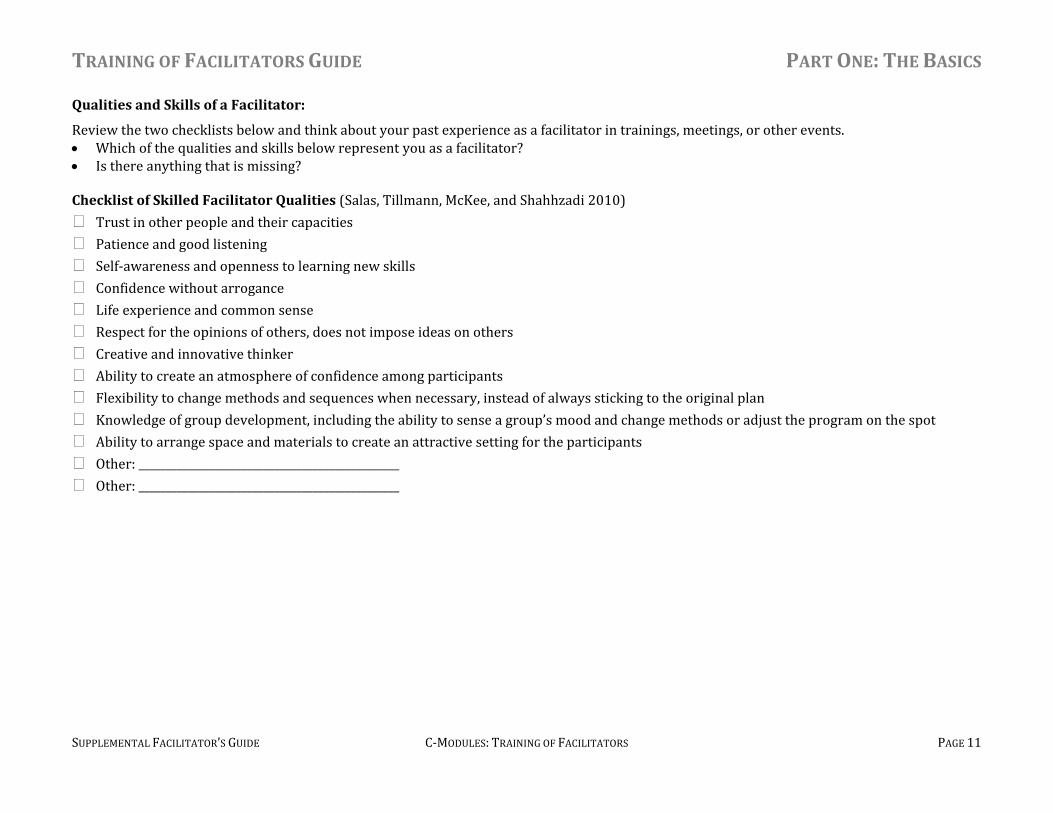
Qualities and Skills of a Facilitator: Review the two checklists below and think about your past experience as a facilitator in trainings, meetings, or other events. Which of the qualities and skills below represent you as a facilitator? Is there anything that is missing? Checklist of Skilled Facilitator Qualities (Salas, Tillmann, McKee, and Shahhzadi 2010)
Trust in other people and their capacities Patience and good listening Self‐awareness and openness to learning new skills Confidence without arrogance Life experience and common sense Respect for the opinions of others, does not impose ideas on others Creative and innovative thinker Ability to create an atmosphere of confidence among participants Flexibility to change methods and sequences when necessary, instead of always sticking to the original plan Knowledge of group development, including the ability to sense a group’s mood and change methods or adjust the program on the spot Ability to arrange space and materials to create an attractive setting for the participants Other: ________________________________________________ Other: ________________________________________________
TRAINING OF FACILITATORS GUIDE PART ONE: THE BASICS
SUPPLEMENTAL FACILITATOR’S GUIDE C‐MODULES: TRAINING OF FACILITATORS PAGE 12
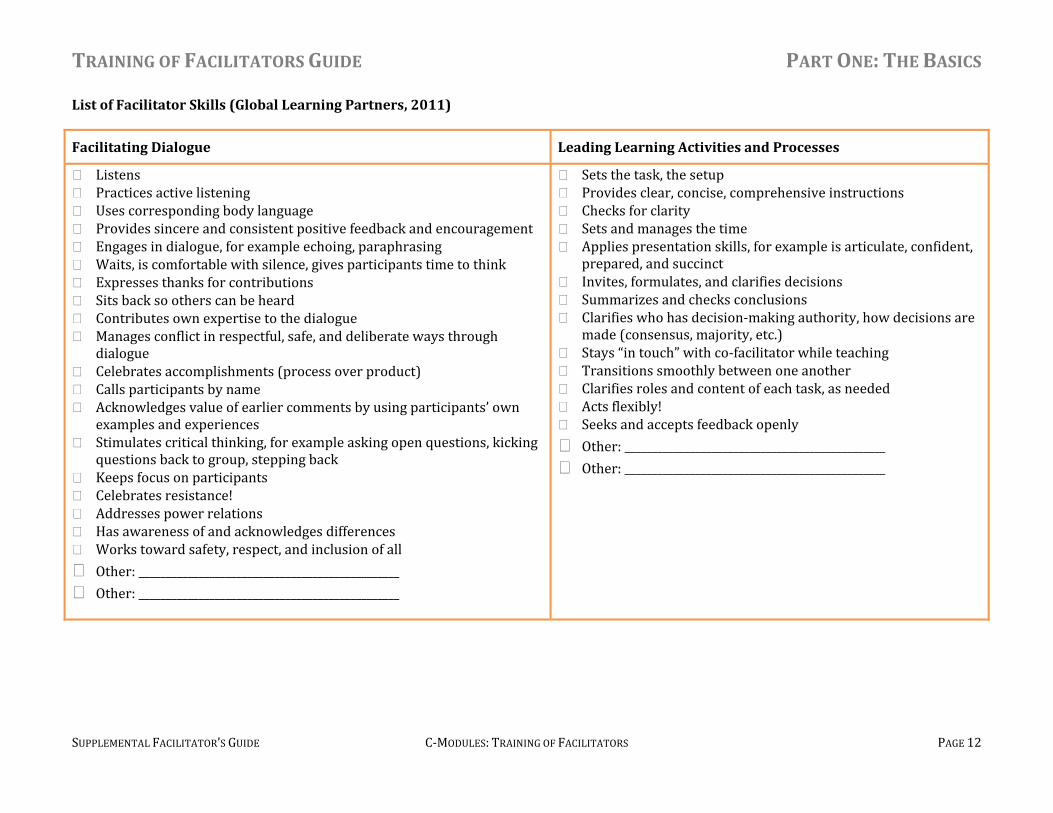
List of Facilitator Skills (Global Learning Partners, 2011)
Facilitating Dialogue Leading Learning Activities and Processes
Listens Practices active listening Uses corresponding body language Provides sincere and consistent positive feedback and encouragement Engages in dialogue, for example echoing, paraphrasing Waits, is comfortable with silence, gives participants time to think Expresses thanks for contributions Sits back so others can be heard Contributes own expertise to the dialogue Manages conflict in respectful, safe, and deliberate ways through dialogue
Celebrates accomplishments (process over product) Calls participants by name Acknowledges value of earlier comments by using participants’ own examples and experiences
Stimulates critical thinking, for example asking open questions, kicking questions back to group, stepping back
Keeps focus on participants Celebrates resistance! Addresses power relations Has awareness of and acknowledges differences Works toward safety, respect, and inclusion of all Other: ________________________________________________ Other: ________________________________________________
Sets the task, the setup Provides clear, concise, comprehensive instructions Checks for clarity Sets and manages the time Applies presentation skills, for example is articulate, confident, prepared, and succinct
Invites, formulates, and clarifies decisions Summarizes and checks conclusions Clarifies who has decision‐making authority, how decisions are made (consensus, majority, etc.)
Stays “in touch” with co‐facilitator while teaching Transitions smoothly between one another Clarifies roles and content of each task, as needed Acts flexibly! Seeks and accepts feedback openly Other: ________________________________________________ Other: ________________________________________________

TRAINING OF FACILITATORS GUIDE PART ONE: THE BASICS
SUPPLEMENTAL FACILITATOR’S GUIDE C‐MODULES: TRAINING OF FACILITATORS PAGE 13
Part One: Facilitating the CModules 1. In plenary, have participants read the overview section of the C‐Modules
Facilitator’s Preparation (pages 2 and 3), as well as a description of who the modules are for, what they aim to accomplish, and how they can best be used. Ask each participant: Which of the modules (0–5) do you feel most confident facilitating?
Why? Which of these modules do you feel will have the most impact on the
people with whom you work? Why? 2. Ask a few participants to share their answers. Then, remind participants that
they will select sessions to facilitate later in the week. Encourage participants to consider selecting a session they think will be most useful to their colleagues. Point out the array of tools used in the different modules on page 5 of the Introduction Module (Practitioner’s Handbook).
3. Have participants form facilitation teams of four people. Explain that these will be the teams they work in throughout the week to develop, facilitate, and evaluate their experiences. Each group should select one tool that they have used effectively in the past—or that they would like to remind themselves about. Each group will prepare a short presentation on that tool.
4. After 10 minutes, all teams stop their preparation work and present their tool to one other team (i.e., a group of four will present to one other group of four, while other groups around the room do the same). After each group is done presenting, have participants share one insight they gained through this activity.
5. Have participants return to their same groups and choose one module they would like to explore in depth right now. The group should study that module with the following questions in mind and write their responses on flipchart paper: What do you see the participants doing for one of the sessions in the module? What do you see as the most important roles, qualities, and skills of a facilitator of the C‐Modules?
6. In plenary, have each group present their answers. Remind participants at the end of this discussion to keep what was said in mind as they
become facilitators during the week.
It is good to form facilitation teams around this time in the course, but you can also form facilitation teams as topics are being assigned.
Now is also a good time to ensure that participants are comfortable using the Practitioner’s Handbook and the Facilitator’s Guide for the C‐Modules. Go through with the participants and remind them: The content is located in the Practitioner’s Handbook. All
the worksheets and information for SBCC practitioners are in the C‐Modules.
Guidance and additional information for facilitators is in the Facilitator’s Guide. This contains activities and additional learning notes for facilitators.

TRAINING OF FACILITATORS GUIDE PART ONE: THE BASICS
SUPPLEMENTAL FACILITATOR’S GUIDE C‐MODULES: TRAINING OF FACILITATORS PAGE 14
Part One: Principles of Adult Learning Distribute Worksheet 1.2: Principles of Adult Learning 1. In plenary explain that adults learn differently than children. Much research has been done on adult learning. In this training, participants will
focus on just six core principles of adult learning.
2. To demonstrate the six principles (respect, immediacy, relevance, safety, engagement, and inclusion), hold a visualized lecture. Write each principle on a small poster while explaining what each means. Ask participants to follow along with Worksheet 1.2: Principles of Adult Learning. As you demonstrate, ask participants to think about which ones they have seen honored in the trainings they have participated in.
3. After the visualized lecture, have the groups of four discuss the following questions: Which are the strongest principles of adult learning? Which principles were demonstrated in the trainings you were part of? Which two principles are most important to you in your own facilitation and training?
4. After the groups are finished with their discussion, have individuals complete Worksheet 1.2. Tell participants this is for their own use and
they will not have to share their answers with the rest of the group. Encourage participants to evaluate and reflect on the six principles of adult learning.
5. After the participants have completed their individual worksheets, ask them to regroup into facilitation teams. Remind participants that no matter how skilled a facilitator is, it can be difficult to honor the fundamental principles of adult learning that they have just reviewed unless there is a corresponding set of materials that does the same. The C‐Modules were built with these core principles in mind.
6. Ask teams to think about the module they chose to delve into in the previous activity. Teams should now review the module again with these principles in mind and discuss how the six principles of adult learning apply.
7. Ask the teams to share their discussion with each other (one team presents to another team). Remind participants as they begin to prepare to
facilitate these modules—or prepare for any training for that matter—to take the time to review the materials with these principles in mind. Have them imagine how their role as facilitator can help bring these principles to life in a training setting.
TRAINING OF FACILITATORS GUIDE PART ONE: THE BASICS
SUPPLEMENTAL FACILITATOR’S GUIDE C‐MODULES: TRAINING OF FACILITATORS PAGE 15
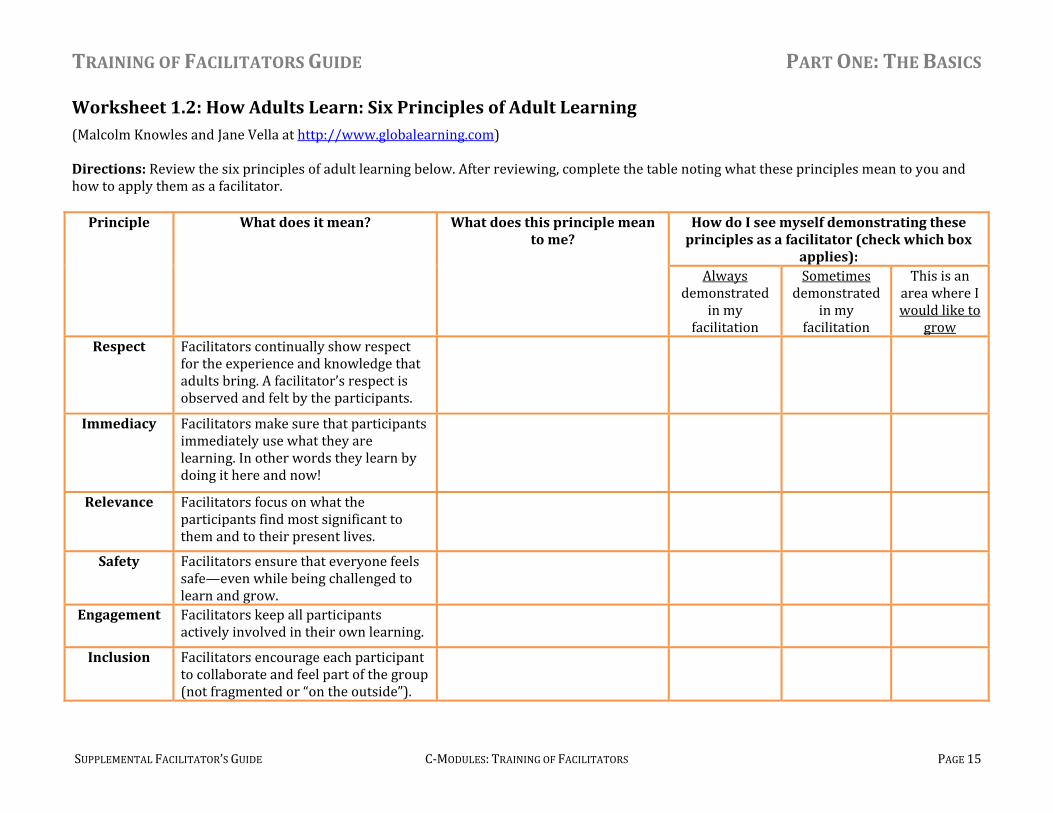
Worksheet 1.2: How Adults Learn: Six Principles of Adult Learning (Malcolm Knowles and Jane Vella at http://www.globalearning.com) Directions: Review the six principles of adult learning below. After reviewing, complete the table noting what these principles mean to you and how to apply them as a facilitator. Principle What does it mean? What does this principle mean
to me? How do I see myself demonstrating these principles as a facilitator (check which box
applies): Always
demonstrated in my
facilitation
Sometimesdemonstrated
in my facilitation
This is an area where I would like to
grow Respect Facilitators continually show respect
for the experience and knowledge that adults bring. A facilitator’s respect is observed and felt by the participants.
Immediacy Facilitators make sure that participants immediately use what they are learning. In other words they learn by doing it here and now!
Relevance Facilitators focus on what the participants find most significant to them and to their present lives.
Safety Facilitators ensure that everyone feels safe—even while being challenged to learn and grow.
Engagement Facilitators keep all participants actively involved in their own learning.
Inclusion Facilitators encourage each participantto collaborate and feel part of the group (not fragmented or “on the outside”).
TRAINING OF FACILITATORS GUIDE PART ONE: THE BASICS
SUPPLEMENTAL FACILITATOR’S GUIDE C‐MODULES: TRAINING OF FACILITATORS PAGE 16
Part One: Importance of Open Questions Distribute Worksheet 1.3: Importance of Open Questions 1. Tell participants that one of the most critical facilitation skills is the skill of
asking questions in a way that leads to learning for all. Open questions invite dialogue and a sharing of perspectives that make the learning real, meaningful, and relevant. Posing open questions that invite critical thinking and extend what the participants know is a facilitation skill that gets better and better over time, with diligent practice.
2. Ask participants to review Worksheet 1.3: Importance of Open Questions.
3. After introducing the types of questions, have the participants practice asking the different types. In pairs, participants should practice asking closed, either/or, and open questions. Participants should ask the same question using different types of questions to elicit answers. Once participants have completed asking questions, switch roles.
4. In plenary, have the participants reflect on what difference they discovered when they posed open questions in lieu of closed or either/or questions.
5. Select one of the modules in the C‐Modules. Ask participants to circle as many open questions as they can find in two minutes. In plenary, close this activity by explaining the connection between the use of open ended questions and the six principles studied earlier.
Depending on the amount of experience the participants have in facilitation, this session may require more or less time. If your group is experienced in facilitation and asking open questions, you may consider focusing on other content and providing the worksheet as a reference. However, if your group is new to facilitation or has indicated in the pre‐assessment that they would like more practice with this session, make sure you allot the time.

TRAINING OF FACILITATORS GUIDE PART ONE: THE BASICS
SUPPLEMENTAL FACILITATOR’S GUIDE C‐MODULES: TRAINING OF FACILITATORS PAGE 17
Worksheet 1.3: Importance of Open Questions One of the most critical facilitation skills is the skill of asking questions in a way that leads to learning for all. Open questions invite dialogue and a sharing of perspectives that make the learning real, meaningful, and relevant. Posing open questions that invite critical thinking and extend what the participants know is a facilitation skill that gets better and better over time, with diligent practice. The skill of asking open questions goes hand‐in‐hand with the skill of listening. They are essential, companion facilitation skills. Consider this classification of questions: Type of Question Type of Answers Provided Examples Closed Questions Evoke a yes or no, or correct, answer Is the socio‐ecological model useful to you?
Do you use theory in your communication efforts? Either/Or Questions Provide a little more detail than yes or no Do you use the socio‐ecological model for analysis or planning?
Do you use social learning theory or the health belief model in your communication efforts?
Open Questions Do not have a set, correct answer and invitedialogue
What about the socio‐ecological model is useful to you? How do you use theory in your communication efforts?
Reflection Questions: Notice that there is not a right or wrong answer to any of the open questions. What else do you notice about sample open questions? What other examples would you offer?

TRAINING OF FACILITATORS GUIDE PART ONE: THE BASICS
SUPPLEMENTAL FACILITATOR’S GUIDE C‐MODULES: TRAINING OF FACILITATORS PAGE 18
Part One: How to Use Visuals Effectively Distribute Worksheet 1.4: 10 Tips for Using Visuals 1. Point participants to Module 0: Introduction of the Practitioner’s
Handbook. Ask participants to study the use of visuals in this module. Ask: What do you notice?
2. In plenary, review Worksheet 1.4: 10 Tips for Using Visuals. Ask participants: Which of these tips really makes sense to you, why?
3. Ask participants to create their own small poster (in a size they can carry around with them) that will help remind them to use visuals when they facilitate the C‐Modules. For example, if the participant is someone who tends to talk without using visuals, suggest that he or she create a poster with a small picture of themselves, sitting and talking next to a visual.
4. After participants have developed their visual, ask them to share it with one other participant. Tell participants they can keep this visual with them to remind them of their goal as they facilitate their sessions later in the week.
5. In facilitation teams, have teams review Module 0: Introduction and discuss the following questions: In what ways do you see this module making good use of visuals? What is one thing that you could do as a facilitator of this module to ensure the visuals are well used?
Depending on the amount of experience the participants have in facilitation, this session may require more or less time. If your group is experienced in facilitation and in using visuals, you may consider focusing on other content and providing the worksheet as a reference.
TRAINING OF FACILITATORS GUIDE PART ONE: THE BASICS
SUPPLEMENTAL FACILITATOR’S GUIDE C‐MODULES: TRAINING OF FACILITATORS PAGE 19
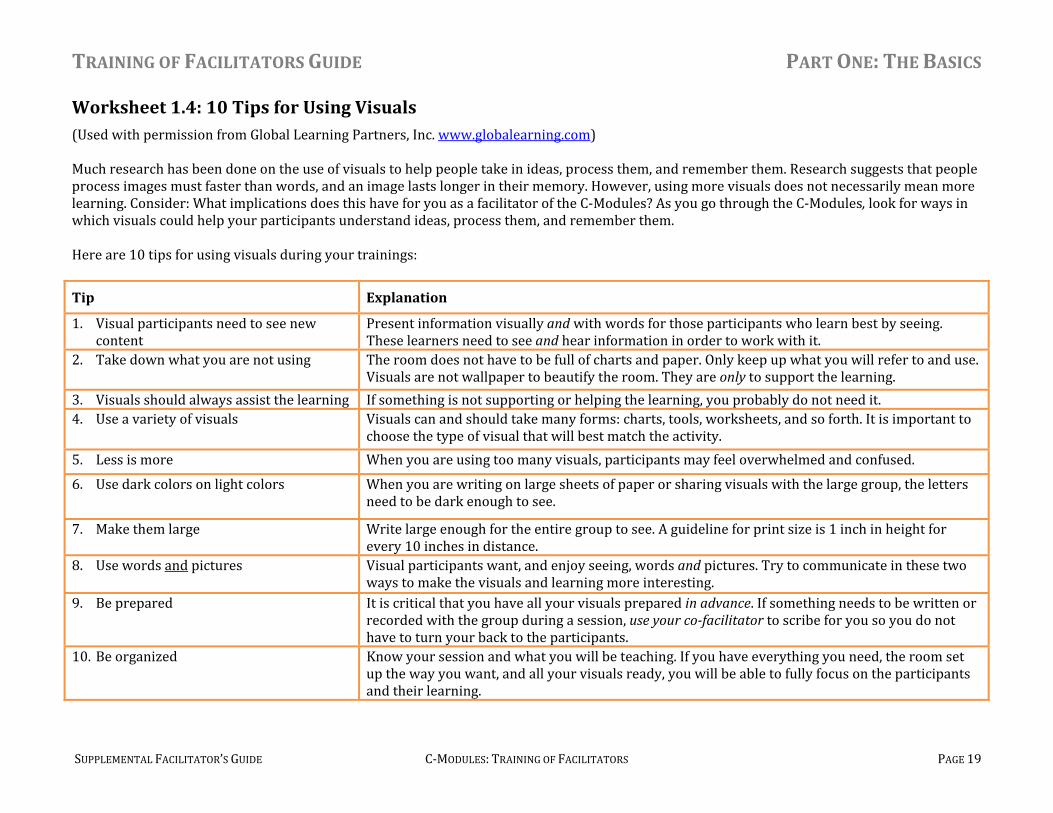
Worksheet 1.4: 10 Tips for Using Visuals (Used with permission from Global Learning Partners, Inc. www.globalearning.com) Much research has been done on the use of visuals to help people take in ideas, process them, and remember them. Research suggests that people process images must faster than words, and an image lasts longer in their memory. However, using more visuals does not necessarily mean more learning. Consider: What implications does this have for you as a facilitator of the C‐Modules? As you go through the C‐Modules, look for ways in which visuals could help your participants understand ideas, process them, and remember them. Here are 10 tips for using visuals during your trainings:
Tip Explanation
1. Visual participants need to see new content
Present information visually andwith words for those participants who learn best by seeing. These learners need to see and hear information in order to work with it.
2. Take down what you are not using The room does not have to be full of charts and paper. Only keep up what you will refer to and use. Visuals are not wallpaper to beautify the room. They are only to support the learning.
3. Visuals should always assist the learning If something is not supporting or helping the learning, you probably do not need it.4. Use a variety of visuals Visuals can and should take many forms: charts, tools, worksheets, and so forth. It is important to
choose the type of visual that will best match the activity. 5. Less is more When you are using too many visuals, participants may feel overwhelmed and confused.
6. Use dark colors on light colors When you are writing on large sheets of paper or sharing visuals with the large group, the letters need to be dark enough to see.
7. Make them large Write large enough for the entire group to see. A guideline for print size is 1 inch in height for every 10 inches in distance.
8. Use words and pictures Visual participants want, and enjoy seeing, words and pictures. Try to communicate in these two ways to make the visuals and learning more interesting.
9. Be prepared It is critical that you have all your visuals prepared in advance. If something needs to be written or recorded with the group during a session, use your cofacilitator to scribe for you so you do not have to turn your back to the participants.
10. Be organized Know your session and what you will be teaching. If you have everything you need, the room set up the way you want, and all your visuals ready, you will be able to fully focus on the participants and their learning.
TRAINING OF FACILITATORS GUIDE PART ONE: THE BASICS
SUPPLEMENTAL FACILITATOR’S GUIDE C‐MODULES: TRAINING OF FACILITATORS PAGE 20
Part One: WarmUps, Closings, and Energizers: Sequence, Appropriateness, Affect Distribute Worksheet 1.5: WarmUps, Closing, and Energizers: Sequence, Appropriateness, and Effect 1. Present the content of Worksheet 1.5: WarmUps, Closing, and
Energizers: Sequence, Appropriateness, and Affect.
2. Ask a few participants to share their experience using warm‐ups, closings, and energizers in past trainings or workshops. After each example, have the group discuss: Did the exercise add to your learning? How? Did it follow the tips listed in the worksheet? If so, which ones?
3. Remind participants that the Appendix of the C‐Modules Facilitator’s Guide
has some suggestions for openers and closers.
4. After presenting the content for this section, divide participants into four groups and give each group three tips for using warm‐ups, closings, and energizers. Instruct participants to: Discuss your three tips, what they mean, and why they are important.
5. After groups finish, have each group share their discussion in plenary.
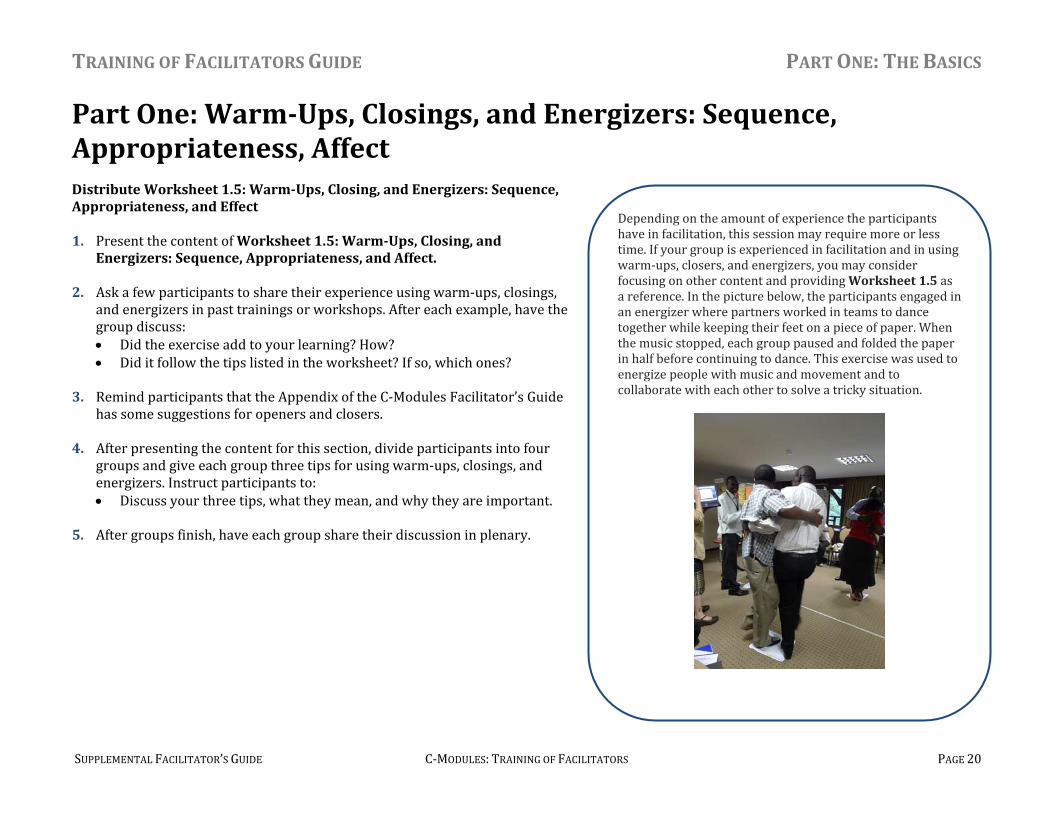
Depending on the amount of experience the participants have in facilitation, this session may require more or less time. If your group is experienced in facilitation and in using warm‐ups, closers, and energizers, you may consider focusing on other content and providing Worksheet 1.5 as a reference. In the picture below, the participants engaged in an energizer where partners worked in teams to dance together while keeping their feet on a piece of paper. When the music stopped, each group paused and folded the paper in half before continuing to dance. This exercise was used to energize people with music and movement and to collaborate with each other to solve a tricky situation.
TRAINING OF FACILITATORS GUIDE PART ONE: THE BASICS
SUPPLEMENTAL FACILITATOR’S GUIDE C‐MODULES: TRAINING OF FACILITATORS PAGE 21
Worksheet 1.5: WarmUps, Closings, and Energizers: Sequence, Appropriateness, and Affect Warm‐Ups are thoughtfully created tasks completed early in the workshop or session. They are designed to:
directly relate to the content that will be learned gently bring people’s attention to the work at hand invite the participant’s perspective linked to content
Closings often bring a day or workshop to an end. They are designed to:
celebrate what has been learned look backward and bridge forward bring to the surface important insights that can be shared
Energizers are short activities used throughout the workshop. They are designed to: encourage fatigued participants offer opportunities to make new connections with the content celebrate active, kinesthetic learning relate to the content of the workshop
Tips for Using Warmups, Closings, and Energizers:
Sequence: Often, but NOT always, warm‐ups follow a sequence: first individual work, then pair work, followed by sharing in the large group. This sequence respects that every group has people who are extraverted and introverted. It gives each person time to think and a chance to participate. It ensures everyone’s voice can be heard.
Appropriateness: When considering what warm‐up, closing, or energizer to use, look to integrate the topic, the purpose of the course or workshop, and where these meet the specific group of people attending. So the “best” activities are those that take the “Who,” “Why,” and the “What” into consideration. And of course location and time should be factored in.
Affect: We know from research on learning and the brain that the deepest learning happens when the affective domain is engaged with the material. Safety for all is therefore paramount. The warm‐ups, closings, and energizers often work best when they are designed to draw on emotions and feelings.
TRAINING OF FACILITATORS GUIDE PART ONE: THE BASICS
SUPPLEMENTAL FACILITATOR’S GUIDE C‐MODULES: TRAINING OF FACILITATORS PAGE 22
Part One: The 4A Model Distribute Worksheet 1.6: The 4A Model for Designing and Facilitating 1. Introduce the 4‐A Model to the plenary in a visualized presentation and ask
participants to follow along using Worksheet 1.6: The 4A Model for Designing and Facilitating.
2. Have participants review the C‐Modules again. In groups of four, have participants select a module that they have not yet looked at during the training. Each group should find examples of where they see any of the following: opportunities to anchor the new learning to their own experiences the addition of some new information or perspective to consider opportunities to apply the new information or perspectives opportunities to say or do something to help them take this learning
away into their life/work
3. Ask each group to present what it has found.
4. Wrap up this session by telling participants that the 4‐A model is a very flexible one. Not all learning activities will include all four. As a facilitator, your job is to ensure that participants get a chance to anchor the learning to their experiences when needed, that they get new information or perspectives in small doses, and that they always get a chance to apply what they are learning.
5. Tell participants they have finished Part One: The Basics of this training. In the next two parts, participants will be applying everything they have learned in this workshop and from their own experiences to facilitate sessions of their own.
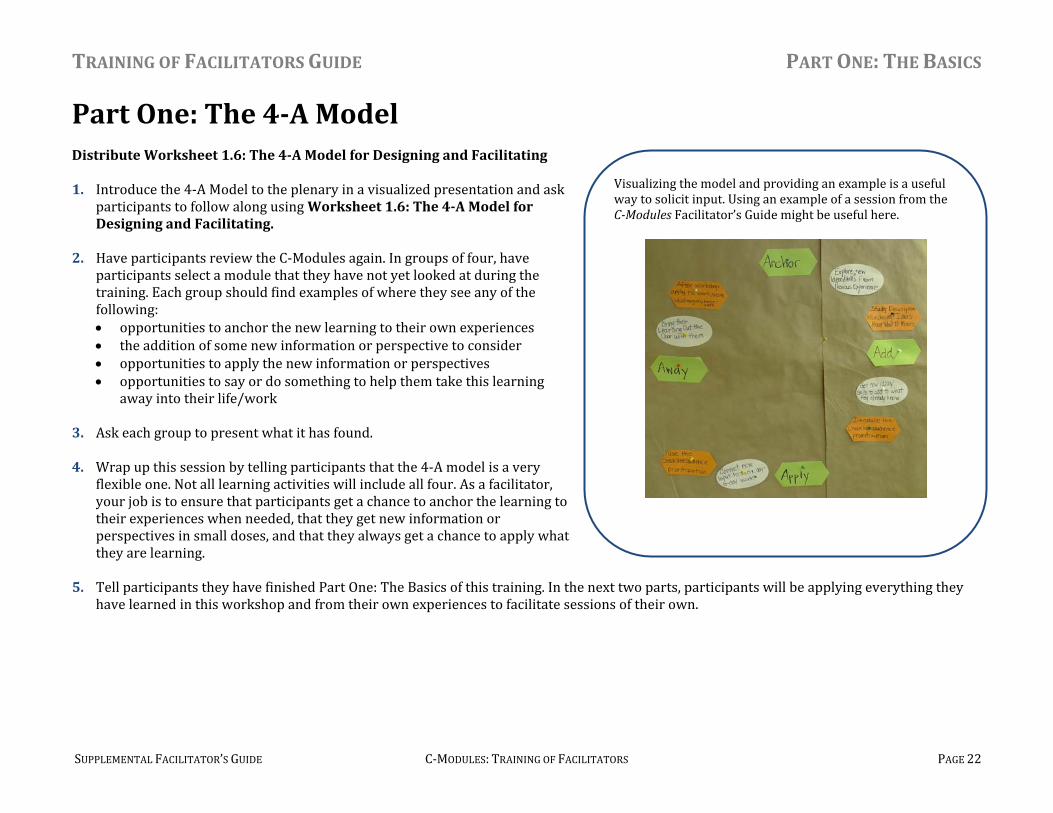
Visualizing the model and providing an example is a useful way to solicit input. Using an example of a session from the CModules Facilitator’s Guide might be useful here.
TRAINING OF FACILITATORS GUIDE PART ONE: THE BASICS
SUPPLEMENTAL FACILITATOR’S GUIDE C‐MODULES: TRAINING OF FACILITATORS PAGE 23
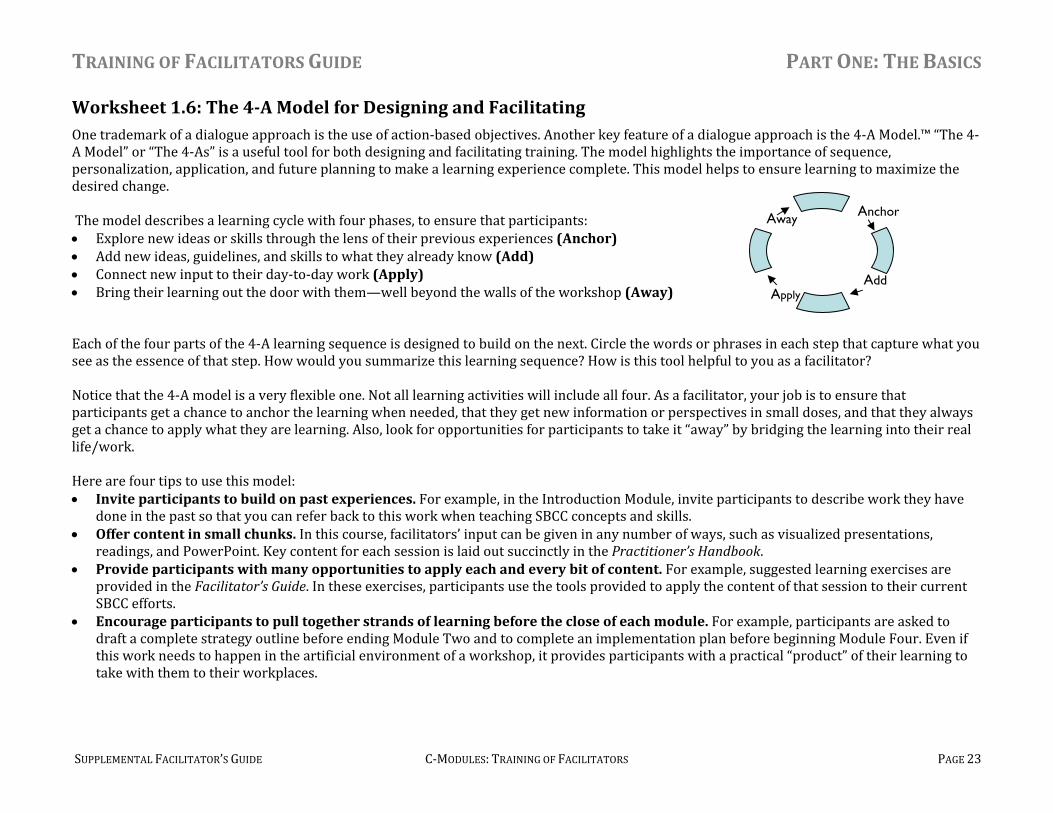
Worksheet 1.6: The 4A Model for Designing and Facilitating One trademark of a dialogue approach is the use of action‐based objectives. Another key feature of a dialogue approach is the 4‐A Model.™ “The 4‐A Model” or “The 4‐As” is a useful tool for both designing and facilitating training. The model highlights the importance of sequence, personalization, application, and future planning to make a learning experience complete. This model helps to ensure learning to maximize the desired change. The model describes a learning cycle with four phases, to ensure that participants: Explore new ideas or skills through the lens of their previous experiences (Anchor) Add new ideas, guidelines, and skills to what they already know (Add) Connect new input to their day‐to‐day work (Apply) Bring their learning out the door with them—well beyond the walls of the workshop (Away)
Each of the four parts of the 4‐A learning sequence is designed to build on the next. Circle the words or phrases in each step that capture what you see as the essence of that step. How would you summarize this learning sequence? How is this tool helpful to you as a facilitator? Notice that the 4‐A model is a very flexible one. Not all learning activities will include all four. As a facilitator, your job is to ensure that participants get a chance to anchor the learning when needed, that they get new information or perspectives in small doses, and that they always get a chance to apply what they are learning. Also, look for opportunities for participants to take it “away” by bridging the learning into their real life/work. Here are four tips to use this model: Invite participants to build on past experiences. For example, in the Introduction Module, invite participants to describe work they have
done in the past so that you can refer back to this work when teaching SBCC concepts and skills. Offer content in small chunks. In this course, facilitators’ input can be given in any number of ways, such as visualized presentations,
readings, and PowerPoint. Key content for each session is laid out succinctly in the Practitioner’s Handbook. Provide participants with many opportunities to apply each and every bit of content. For example, suggested learning exercises are
provided in the Facilitator’s Guide. In these exercises, participants use the tools provided to apply the content of that session to their current SBCC efforts.
Encourage participants to pull together strands of learning before the close of each module. For example, participants are asked to draft a complete strategy outline before ending Module Two and to complete an implementation plan before beginning Module Four. Even if this work needs to happen in the artificial environment of a workshop, it provides participants with a practical “product” of their learning to take with them to their workplaces.
Add
Anchor Away
Apply
TRAINING OF FACILITATORS GUIDE PART TWO: PREPARING TO COFACILITATE
SUPPLEMENTAL FACILITATOR’S GUIDE C‐MODULES: TRAINING OF FACILITATORS PAGE 24
Part Two: Preparing to CoFacilitate Objectives:
Recommended Worksheets and Materials All participants need:
C‐Modules Practitioner’s Handbook (a complete set of modules 0–5) C‐Modules Facilitator’s Guide
By the end of Part Two, participants will have: Determined their own strengths in the “big picture” of facilitation: assessment, design and planning, facilitation, and evaluation Planned for success in their practice facilitation of the C‐Modules with colleagues Practiced adapting the C‐Modules as needed for their colleagues Prepared for their facilitation as a team
TRAINING OF FACILITATORS GUIDE PART TWO: PREPARING TO COFACILITATE
SUPPLEMENTAL FACILITATOR’S GUIDE C‐MODULES: TRAINING OF FACILITATORS PAGE 25
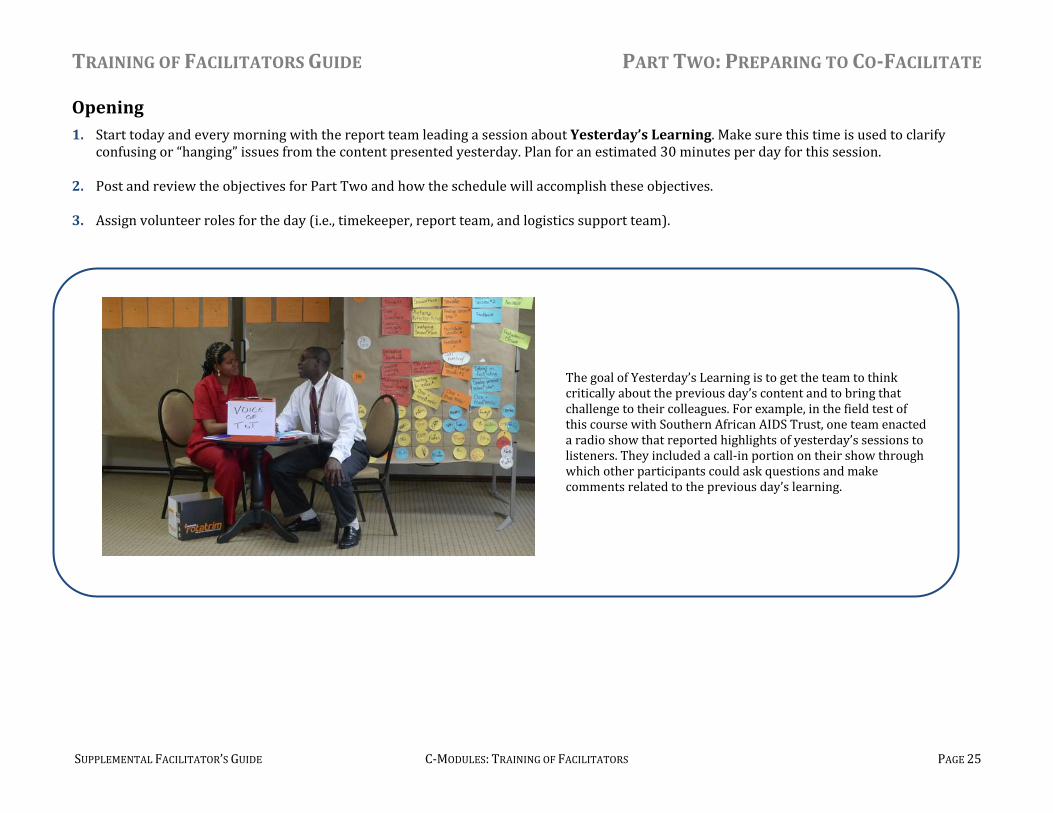
Opening 1. Start today and every morning with the report team leading a session about Yesterday’s Learning. Make sure this time is used to clarify
confusing or “hanging” issues from the content presented yesterday. Plan for an estimated 30 minutes per day for this session.
2. Post and review the objectives for Part Two and how the schedule will accomplish these objectives.
3. Assign volunteer roles for the day (i.e., timekeeper, report team, and logistics support team).
The goal of Yesterday’s Learning is to get the team to think critically about the previous day’s content and to bring that challenge to their colleagues. For example, in the field test of this course with Southern African AIDS Trust, one team enacted a radio show that reported highlights of yesterday’s sessions to listeners. They included a call‐in portion on their show through which other participants could ask questions and make comments related to the previous day’s learning.
TRAINING OF FACILITATORS GUIDE PART TWO: PREPARING TO COFACILITATE
SUPPLEMENTAL FACILITATOR’S GUIDE C‐MODULES: TRAINING OF FACILITATORS PAGE 26
Part Two: The Complete Learning Picture Distribute Worksheet 2.1: The Complete Learning Picture—CPlanning 1. Congratulate participants on completing Part One. Tell them in Part Two that they will apply what they have learned to design a session for
facilitation.
2. Review the agenda for Part Two and Three of the training, pointing out when the groups will be preparing and facilitating their sessions.
3. Remind the participants about the role of the facilitator as discussed in the beginning of the workshop and in Worksheet 1.1.
4. Revisit the six posters of the adult learning principles (previously posted). Ask participants to call out which principles they see being honored during the training thus far.
5. Ask participants to study Worksheet 2.1: The Complete Learning Picture—CPlanning. Ask: How is this helpful to you? What are your questions?
If participants would like to explore the entire learning picture, you can use this alternate activity. 1. Ask each individual to use a large poster sheet and markers to draw the C‐Planning graphic as you see on the next page. 2. Once the C‐Planning graphic is drawn, they should:
Label the steps of the complete learning picture that they already know and have accomplished before Use a different color to label those areas where they hope to deepen and strengthen their competency Circle those steps and activities where they feel strong enough as a facilitator to teach others
3. Once participants have completed the poster, they should be displayed around the room. A few participants should present their poster to the group.
4. After all presentations are done, ask: Where is it that you need the most practice? Where is it that you already feel strong?

TRAINING OF FACILITATORS GUIDE PART TWO: PREPARING TO COFACILITATE
SUPPLEMENTAL FACILITATOR’S GUIDE C‐MODULES: TRAINING OF FACILITATORS PAGE 27
Worksheet 2.1: The Complete Learning Picture In this worksheet, C‐planning is used to help you see the whole picture of your role in facilitation. Look at the steps carefully and what issues to consider in each step. Too often facilitators “jump” to the decision to design and implement training, when in reality their situation requires a different set of strategies for change! Use the steps below to plan and determine what decisions to make at each step.
TRAINING OF FACILITATORS GUIDE PART TWO: PREPARING TO COFACILITATE
SUPPLEMENTAL FACILITATOR’S GUIDE C‐MODULES: TRAINING OF FACILITATORS PAGE 28
Part Two: Choosing Topics to Facilitate 1. Display a sign‐up chart for sessions to facilitate.
2. Explain to the participants that in their facilitation teams they will sign up for
two sessions to facilitate—one session on content from Module 0–2 and another session for content from Modules 3–5.
3. Guide the participants through the selection of sessions to facilitate. To select the sessions fairly, facilitators can put numbers into a hat to determine the order in which teams will select their sessions. Once the order is determined for the first round, instruct teams to discuss briefly among themselves what topics they want to facilitate. After a team has selected a session, make sure other duplicates of the sessions are turned over so each session is unique. Continue until all sessions have been selected.
4. Each facilitation team should select two sessions, one for the first round and one for the second round. After each team has made its selection, make a list of teams and topics and check to avoid duplication of sessions.
5. Remind participants: the purpose of this practice facilitation is for everyone to increase confidence and skills in facilitation of all the C‐Modules. While the group is only preparing and facilitating two sessions, learning is happening from participation in all the sessions. Emphasize that the particular sessions that the groups have selected to facilitate are less important than how the sessions are led. Groups should draw from their own experience—and share their own struggles—as it will aid in everyone’s learning.
Think carefully about how you will structure the trainer teams, the sessions, and the schedule. For 4 ½–day training there will not be enough time to facilitate the entire CModules. Let the participants select which sessions they want to learn more about. Before selecting sessions to facilitate, conduct an activity with the participants in plenary to review the CModules and identify those sessions/content they would like to learn more about. The sessions to be facilitated are developed from this list.
This training is designed for two rounds of preparation followed by co‐facilitation and feedback. In a group of 20 participants, for example, you might want five teams of four trainers. Each team can plan and practice facilitating, and two trainers can co‐facilitate each session so that everyone gets a chance to facilitate and receive feedback on his or her facilitation. Each team could have one team leader.
TRAINING OF FACILITATORS GUIDE PART TWO: PREPARING TO COFACILITATE
SUPPLEMENTAL FACILITATOR’S GUIDE C‐MODULES: TRAINING OF FACILITATORS PAGE 29
Part Two: Designing the Session 1. After the facilitation teams have selected their sessions, post the assignment
for the sessions. Explain that each team will develop two sessions that are 40 minutes each. Each session should: Include an opener/closer/energizer Follow the 4‐A Model
o Content input by facilitating team o Group activity o Facilitation of group sharing
Plan for a review/evaluation of the session (for second session)
2. Refer to Worksheet 2.1: The Complete Learning Picture and have participants study Step 1 and Step 2, emphasizing the importance of completing these steps before developing the actual content of the training.
3. In facilitation teams, complete Worksheet 2.2: Developing a Program Structure for at least one of the sessions they will facilitate. Once teams have finished, have each team share with the full plenary.
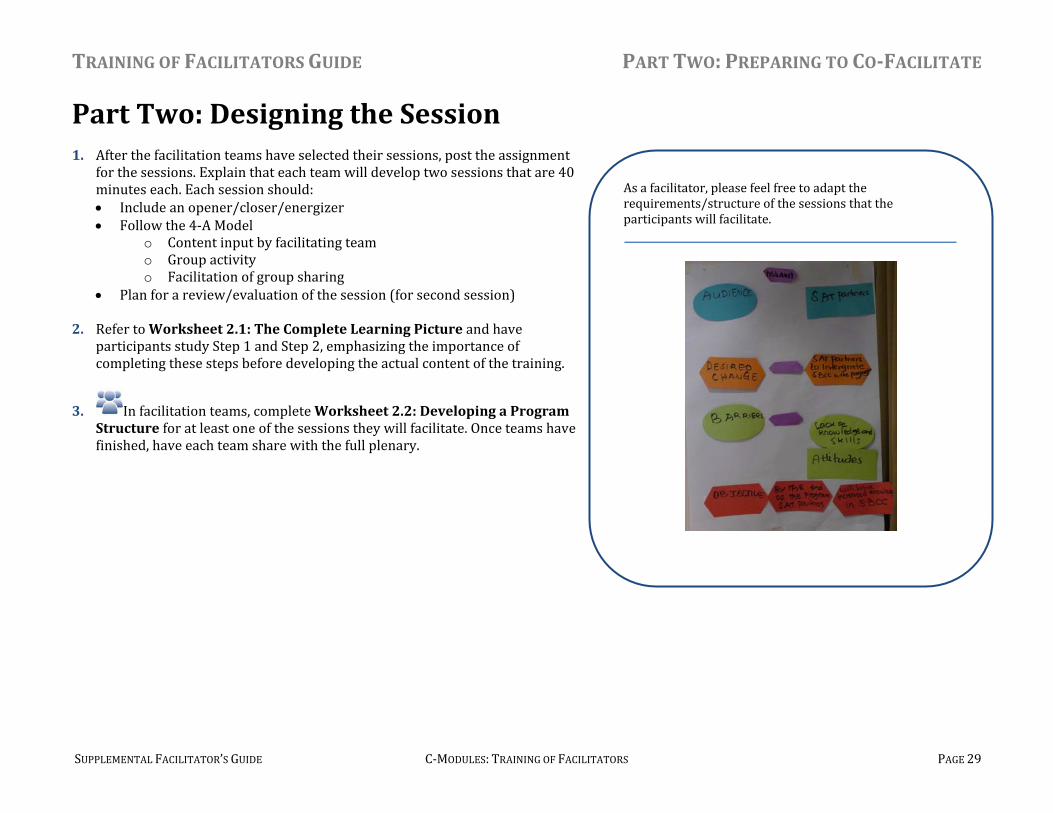
As a facilitator, please feel free to adapt the requirements/structure of the sessions that the participants will facilitate.

TRAINING OF FACILITATORS GUIDE PART TWO: PREPARING TO COFACILITATE
SUPPLEMENTAL FACILITATOR’S GUIDE C‐MODULES: TRAINING OF FACILITATORS PAGE 30
Worksheet 2.2: Developing a Program Structure As you plan your sessions, think about the C‐Planning graphic (Worksheet 2.1) that lays out what is accomplished at each step. Before thinking about specific session activities, complete Steps 1 and 2—Understanding the Situation and Focusing and Designing. As when designing a program/intervention, these two steps are essential to any training. Complete the table below to develop your program structure. Step 1: Understanding the Situation Guiding Questions Your Program Structure Audience for training: Who is the training for?
Desired change (what do you want your participants to be able to do, know at the end of the training):
What do they know about SBCC (from pre‐assessment survey)?
What do they want or need to know about SBCC (from pre‐assessment survey)?
Barriers audience faces (why are they not achieving the desired change):
What do you think they struggle with and what would be most helpful for them?
Step 2: Focusing and Designing Objective of Training: What do you want the training to achieve? Use information
gathered in Step 1 to answer this.
Key Content Areas: What topics do you want to cover?
Approach: What approach will you take for the training? What is the learning approach (4‐A model, or other)?
What materials will you need to gather or develop? What visuals are needed?
Other considerations: What time is your session? How long do you have? What are the roles and responsibilities of the facilitation
team?
TRAINING OF FACILITATORS GUIDE PART TWO: PREPARING TO COFACILITATE
SUPPLEMENTAL FACILITATOR’S GUIDE C‐MODULES: TRAINING OF FACILITATORS PAGE 31
Part Two: Developing the Content Distribute Worksheet 2.3: Session Plan Template and Worksheet 2.4: Tips for Developing Session Plans 1. In plenary introduce Worksheet 2.3: Session Plan Template and
Worksheet 2.4: Tips for Developing Session Plans.
2. Explain that as a program structure is developed, facilitation teams will fill in the content and details.
3. Review each component of the session plan template.
4. In groups of five, have participants review Worksheet 2.4: Tips for Developing Session Plans and discuss: What is useful in the tips? Is anything missing that they would like to add? What questions do they have about developing session plans?
5. Have each group write down the questions they have about developing session plans. Collect the questions and redistribute them among the
group. Be sure to mix up the questions before handing them out.
6. Ask each group to answer the questions they have and share their responses.
7. Explain that the facilitation groups will develop their session plans for their two sessions.
8. After the groups have met and started to develop the content, ask them to start presenting the draft sessions to each other to obtain feedback. If the groups have not completed the drafts completely, this is fine as they can present what they have.
9. After the feedback session, have the facilitation group meet again to incorporate their colleagues’ suggestions and finalize the session plans.
Much of the development and finalization of the session plans will happen after training hours. Emphasize to the participants that preparation takes time and that they will not be able to complete their session plans during this group work. As in the real world, they will probably have to coordinate and work in the evenings and before the session training to finalize the content. Emphasize that they should focus on understanding and developing a skeleton of the session plan now and arrange a meeting time later to finalize the content.
TRAINING OF FACILITATORS GUIDE PART TWO: PREPARING TO COFACILITATE
SUPPLEMENTAL FACILITATOR’S GUIDE C‐MODULES: TRAINING OF FACILITATORS PAGE 32
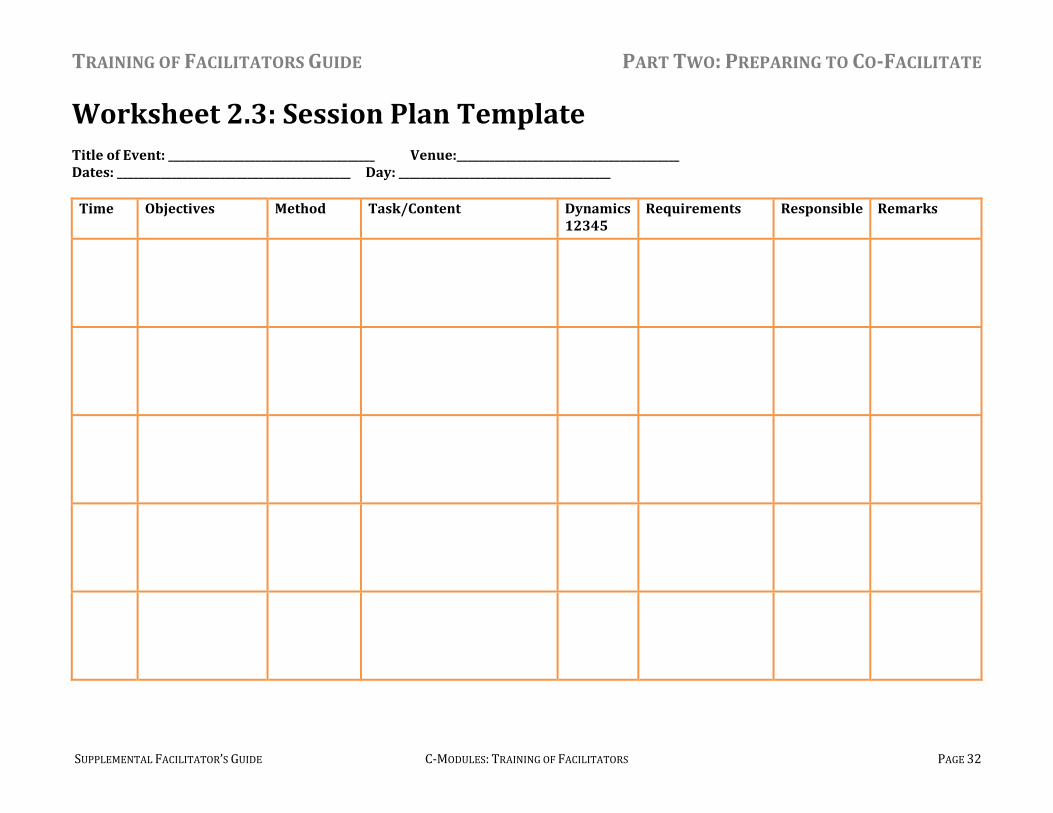
Worksheet 2.3: Session Plan Template Title of Event: ______________________________________ Venue:_________________________________________ Dates: ___________________________________________ Day: _______________________________________ Time Objectives Method Task/Content Dynamics
12345 Requirements Responsible Remarks
TRAINING OF FACILITATORS GUIDE PART TWO: PREPARING TO COFACILITATE
SUPPLEMENTAL FACILITATOR’S GUIDE C‐MODULES: TRAINING OF FACILITATORS PAGE 33
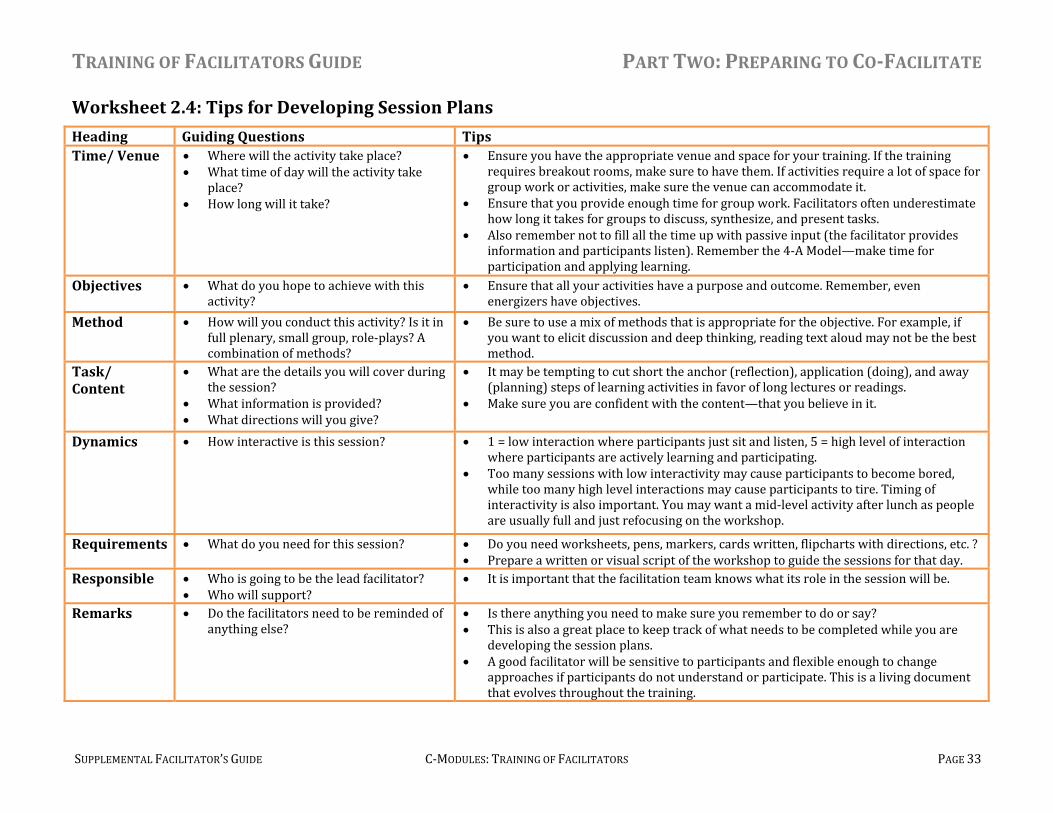
Worksheet 2.4: Tips for Developing Session Plans
Heading Guiding Questions Tips Time/ Venue Where will the activity take place?
What time of day will the activity take place?
How long will it take?
Ensure you have the appropriate venue and space for your training. If the training requires breakout rooms, make sure to have them. If activities require a lot of space for group work or activities, make sure the venue can accommodate it.
Ensure that you provide enough time for group work. Facilitators often underestimate how long it takes for groups to discuss, synthesize, and present tasks.
Also remember not to fill all the time up with passive input (the facilitator provides information and participants listen). Remember the 4‐A Model—make time for participation and applying learning.
Objectives What do you hope to achieve with this activity?
Ensure that all your activities have a purpose and outcome. Remember, even energizers have objectives.
Method How will you conduct this activity? Is it in full plenary, small group, role‐plays? A combination of methods?
Be sure to use a mix of methods that is appropriate for the objective. For example, if you want to elicit discussion and deep thinking, reading text aloud may not be the best method.
Task/ Content
What are the details you will cover during the session?
What information is provided? What directions will you give?
It may be tempting to cut short the anchor (reflection), application (doing), and away (planning) steps of learning activities in favor of long lectures or readings.
Make sure you are confident with the content—that you believe in it.
Dynamics How interactive is this session? 1 = low interaction where participants just sit and listen, 5 = high level of interaction where participants are actively learning and participating.
Too many sessions with low interactivity may cause participants to become bored, while too many high level interactions may cause participants to tire. Timing of interactivity is also important. You may want a mid‐level activity after lunch as people are usually full and just refocusing on the workshop.
Requirements What do you need for this session? Do you need worksheets, pens, markers, cards written, flipcharts with directions, etc. ? Prepare a written or visual script of the workshop to guide the sessions for that day.
Responsible Who is going to be the lead facilitator? Who will support?
It is important that the facilitation team knows what its role in the session will be.
Remarks Do the facilitators need to be reminded of anything else?
Is there anything you need to make sure you remember to do or say? This is also a great place to keep track of what needs to be completed while you are
developing the session plans. A good facilitator will be sensitive to participants and flexible enough to change
approaches if participants do not understand or participate. This is a living document that evolves throughout the training.
TRAINING OF FACILITATORS GUIDE PART TWO: PREPARING TO COFACILITATE
SUPPLEMENTAL FACILITATOR’S GUIDE C‐MODULES: TRAINING OF FACILITATORS PAGE 34
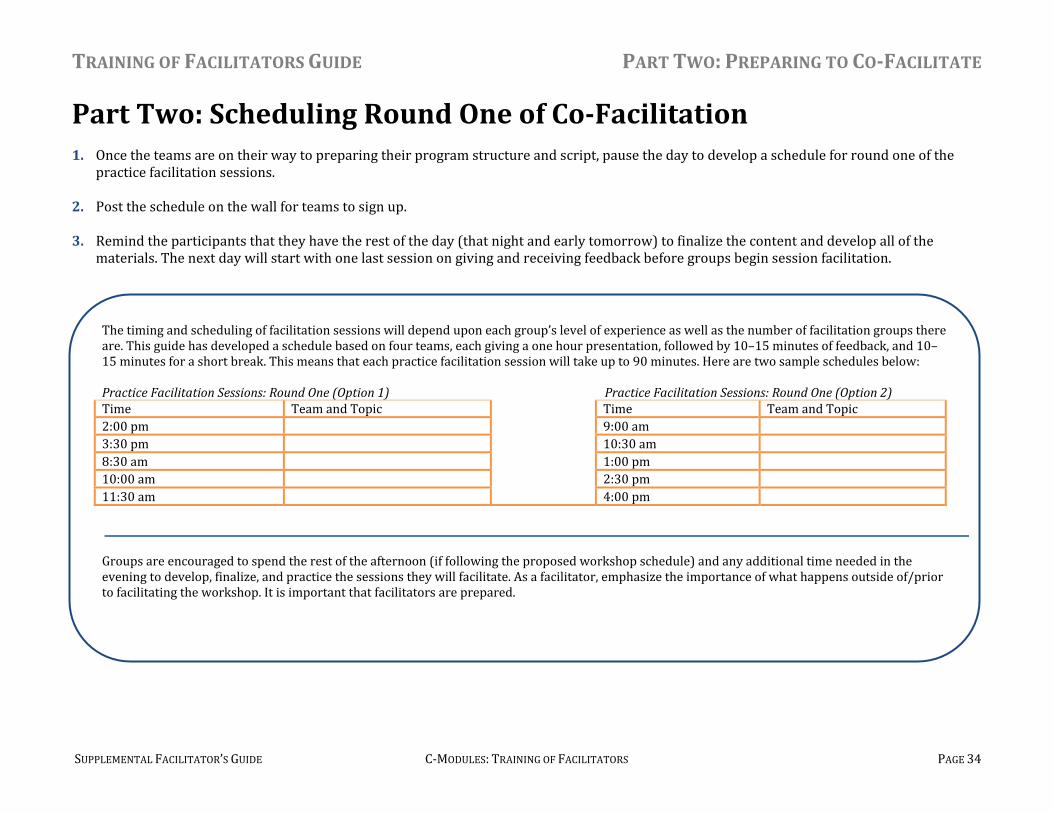
Part Two: Scheduling Round One of CoFacilitation 1. Once the teams are on their way to preparing their program structure and script, pause the day to develop a schedule for round one of the
practice facilitation sessions.
2. Post the schedule on the wall for teams to sign up.
3. Remind the participants that they have the rest of the day (that night and early tomorrow) to finalize the content and develop all of the materials. The next day will start with one last session on giving and receiving feedback before groups begin session facilitation.
The timing and scheduling of facilitation sessions will depend upon each group’s level of experience as well as the number of facilitation groups there are. This guide has developed a schedule based on four teams, each giving a one hour presentation, followed by 10–15 minutes of feedback, and 10–15 minutes for a short break. This means that each practice facilitation session will take up to 90 minutes. Here are two sample schedules below: Practice Facilitation Sessions: Round One (Option 1) Practice Facilitation Sessions: Round One (Option 2) Time Team and Topic Time Team and Topic2:00 pm 9:00 am 3:30 pm 10:30 am8:30 am 1:00 pm 10:00 am 2:30 pm 11:30 am 4:00 pm
Groups are encouraged to spend the rest of the afternoon (if following the proposed workshop schedule) and any additional time needed in the evening to develop, finalize, and practice the sessions they will facilitate. As a facilitator, emphasize the importance of what happens outside of/prior to facilitating the workshop. It is important that facilitators are prepared.
TRAINING OF FACILITATORS GUIDE PART THREE: COFACILITATING AND GIVING FEEDBACK
SUPPLEMENTAL FACILITATOR’S GUIDE C‐MODULES: TRAINING OF FACILITATORS PAGE 35
Part Three: CoFacilitating and Giving Feedback Objectives:
Recommended Worksheets and Materials All participants need:
C‐Modules Practitioner’s Handbook (a complete set of modules 0–5) C‐Modules Facilitator’s Guide
By the end of Part Three, participants will have: Examined and used a safe model for giving and receiving feedback Co‐facilitated a session of the CModules and received feedback on their facilitation, twice!
TRAINING OF FACILITATORS GUIDE PART THREE: COFACILITATING AND GIVING FEEDBACK
SUPPLEMENTAL FACILITATOR’S GUIDE C‐MODULES: TRAINING OF FACILITATORS PAGE 36
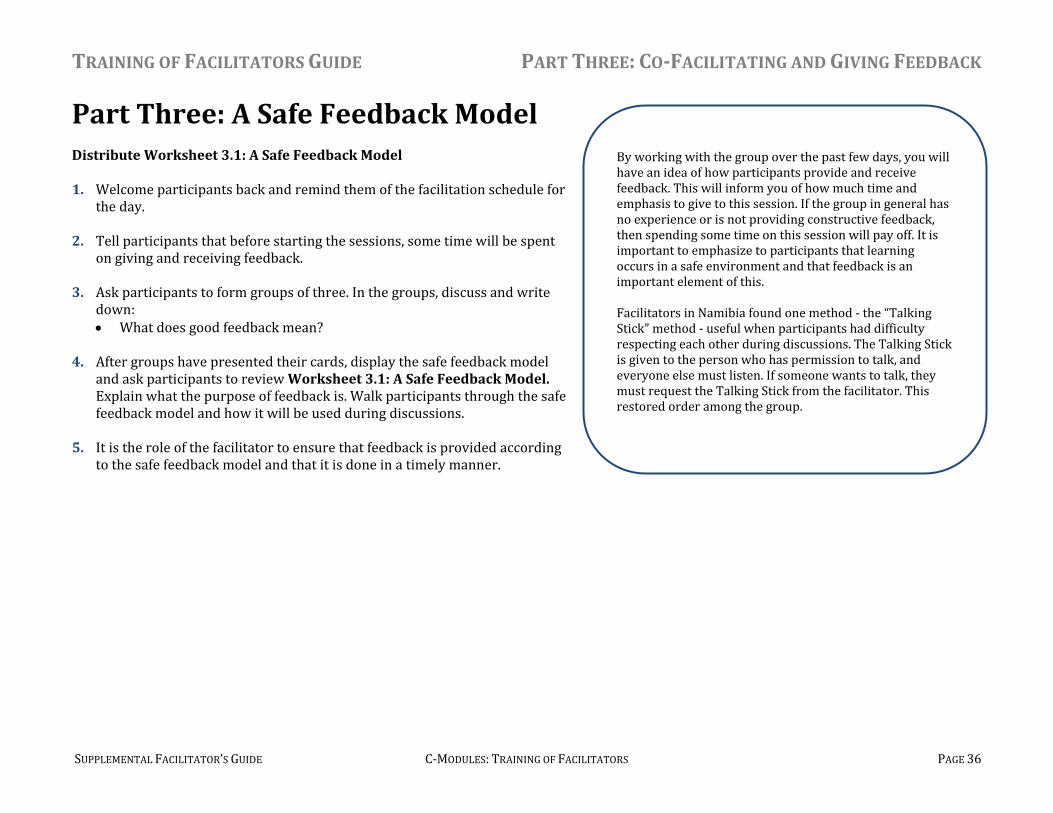
Part Three: A Safe Feedback Model Distribute Worksheet 3.1: A Safe Feedback Model 1. Welcome participants back and remind them of the facilitation schedule for
the day.
2. Tell participants that before starting the sessions, some time will be spent on giving and receiving feedback.
3. Ask participants to form groups of three. In the groups, discuss and write down: What does good feedback mean?
4. After groups have presented their cards, display the safe feedback model and ask participants to review Worksheet 3.1: A Safe Feedback Model. Explain what the purpose of feedback is. Walk participants through the safe feedback model and how it will be used during discussions.
5. It is the role of the facilitator to ensure that feedback is provided according to the safe feedback model and that it is done in a timely manner.
By working with the group over the past few days, you will have an idea of how participants provide and receive feedback. This will inform you of how much time and emphasis to give to this session. If the group in general has no experience or is not providing constructive feedback, then spending some time on this session will pay off. It is important to emphasize to participants that learning occurs in a safe environment and that feedback is an important element of this. Facilitators in Namibia found one method ‐ the “Talking Stick” method ‐ useful when participants had difficulty respecting each other during discussions. The Talking Stick is given to the person who has permission to talk, and everyone else must listen. If someone wants to talk, they must request the Talking Stick from the facilitator. This restored order among the group.
TRAINING OF FACILITATORS GUIDE PART THREE: COFACILITATING AND GIVING FEEDBACK
SUPPLEMENTAL FACILITATOR’S GUIDE C‐MODULES: TRAINING OF FACILITATORS PAGE 37
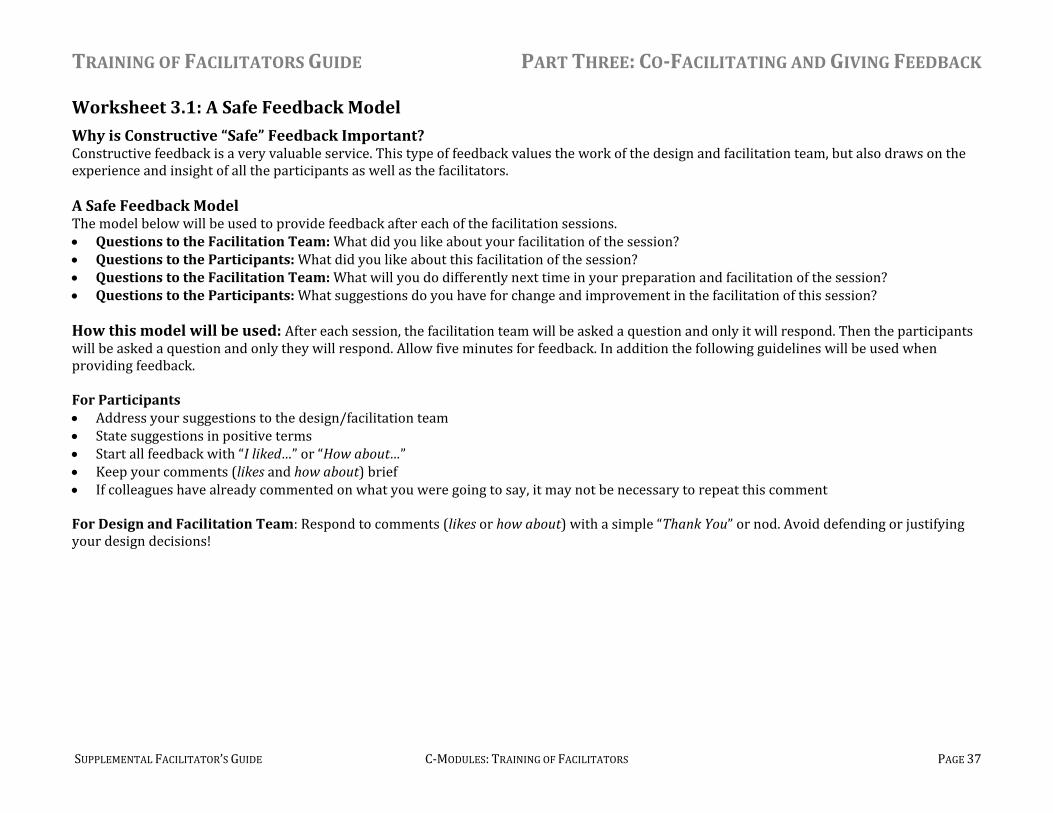
Worksheet 3.1: A Safe Feedback Model
Why is Constructive “Safe” Feedback Important? Constructive feedback is a very valuable service. This type of feedback values the work of the design and facilitation team, but also draws on the experience and insight of all the participants as well as the facilitators. A Safe Feedback Model The model below will be used to provide feedback after each of the facilitation sessions. Questions to the Facilitation Team: What did you like about your facilitation of the session? Questions to the Participants: What did you like about this facilitation of the session? Questions to the Facilitation Team: What will you do differently next time in your preparation and facilitation of the session? Questions to the Participants: What suggestions do you have for change and improvement in the facilitation of this session? How this model will be used: After each session, the facilitation team will be asked a question and only it will respond. Then the participants will be asked a question and only they will respond. Allow five minutes for feedback. In addition the following guidelines will be used when providing feedback. For Participants Address your suggestions to the design/facilitation team State suggestions in positive terms Start all feedback with “I liked…” or “How about…” Keep your comments (likes and how about) brief If colleagues have already commented on what you were going to say, it may not be necessary to repeat this comment
For Design and Facilitation Team: Respond to comments (likes or how about) with a simple “Thank You” or nod. Avoid defending or justifying your design decisions!
TRAINING OF FACILITATORS GUIDE PART THREE: COFACILITATING AND GIVING FEEDBACK
SUPPLEMENTAL FACILITATOR’S GUIDE C‐MODULES: TRAINING OF FACILITATORS PAGE 38
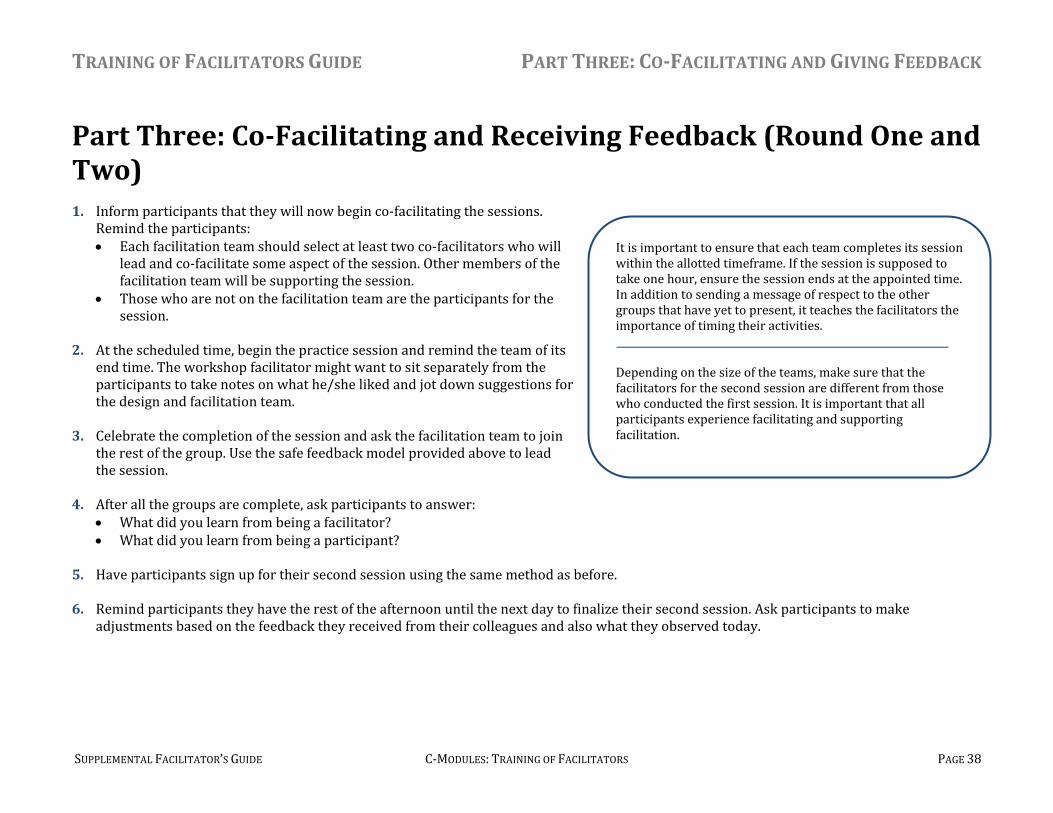
Part Three: CoFacilitating and Receiving Feedback (Round One and Two) 1. Inform participants that they will now begin co‐facilitating the sessions.
Remind the participants: Each facilitation team should select at least two co‐facilitators who will
lead and co‐facilitate some aspect of the session. Other members of the facilitation team will be supporting the session.
Those who are not on the facilitation team are the participants for the session.
2. At the scheduled time, begin the practice session and remind the team of its
end time. The workshop facilitator might want to sit separately from the participants to take notes on what he/she liked and jot down suggestions for the design and facilitation team.
3. Celebrate the completion of the session and ask the facilitation team to join the rest of the group. Use the safe feedback model provided above to lead the session.
4. After all the groups are complete, ask participants to answer: What did you learn from being a facilitator? What did you learn from being a participant?
5. Have participants sign up for their second session using the same method as before.
6. Remind participants they have the rest of the afternoon until the next day to finalize their second session. Ask participants to make
adjustments based on the feedback they received from their colleagues and also what they observed today.
It is important to ensure that each team completes its session within the allotted timeframe. If the session is supposed to take one hour, ensure the session ends at the appointed time. In addition to sending a message of respect to the other groups that have yet to present, it teaches the facilitators the importance of timing their activities.
Depending on the size of the teams, make sure that the facilitators for the second session are different from those who conducted the first session. It is important that all participants experience facilitating and supporting facilitation.

TRAINING OF FACILITATORS GUIDE PART FOUR: FOLLOWUP AND NEXT STEPS
SUPPLEMENTAL FACILITATOR’S GUIDE C‐MODULES: TRAINING OF FACILITATORS PAGE 39
Part Four: FollowUp and Next Steps Objectives:
By the end of this final part of the training, participants will have: Clarified their questions about C‐Change and Social and Behavior Change Communication Written a Personal Training Action Plan
TRAINING OF FACILITATORS GUIDE PART FOUR: FOLLOWUP AND NEXT STEPS
SUPPLEMENTAL FACILITATOR’S GUIDE C‐MODULES: TRAINING OF FACILITATORS PAGE 40
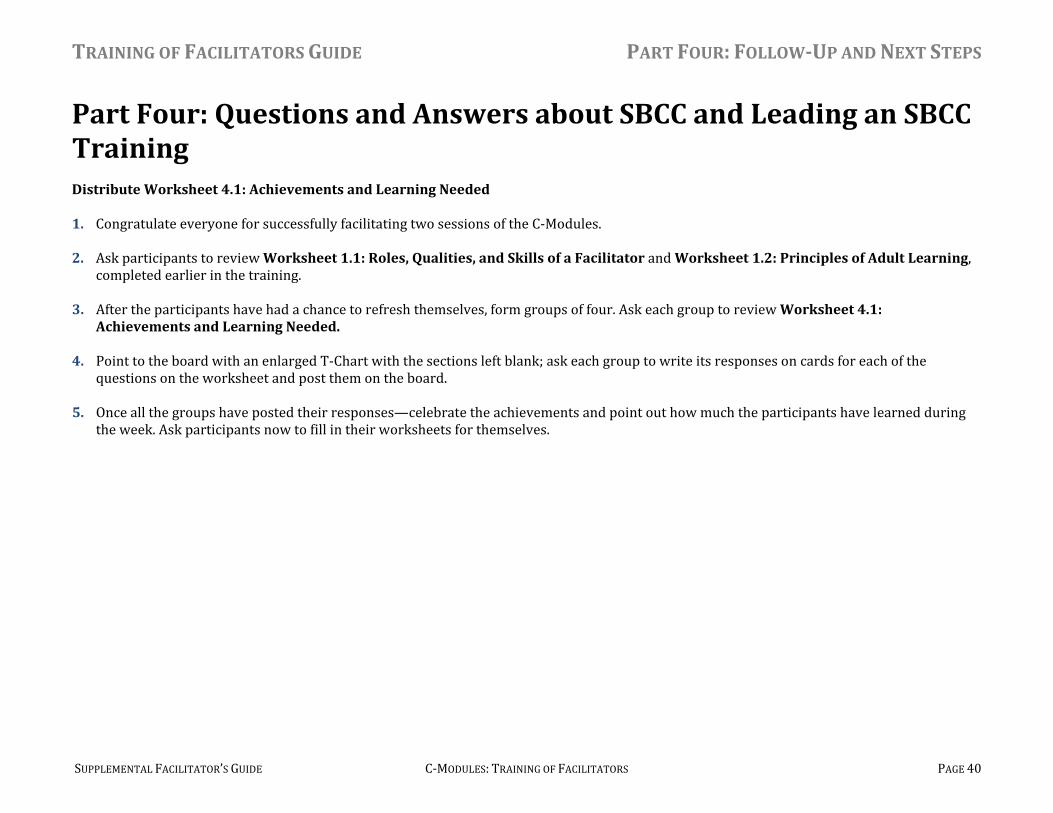
Part Four: Questions and Answers about SBCC and Leading an SBCC Training Distribute Worksheet 4.1: Achievements and Learning Needed 1. Congratulate everyone for successfully facilitating two sessions of the C‐Modules.
2. Ask participants to review Worksheet 1.1: Roles, Qualities, and Skills of a Facilitator and Worksheet 1.2: Principles of Adult Learning,
completed earlier in the training.
3. After the participants have had a chance to refresh themselves, form groups of four. Ask each group to review Worksheet 4.1: Achievements and Learning Needed.
4. Point to the board with an enlarged T‐Chart with the sections left blank; ask each group to write its responses on cards for each of the questions on the worksheet and post them on the board.
5. Once all the groups have posted their responses—celebrate the achievements and point out how much the participants have learned during the week. Ask participants now to fill in their worksheets for themselves.
TRAINING OF FACILITATORS GUIDE PART FOUR: FOLLOWUP AND NEXT STEPS
SUPPLEMENTAL FACILITATOR’S GUIDE C‐MODULES: TRAINING OF FACILITATORS PAGE 41
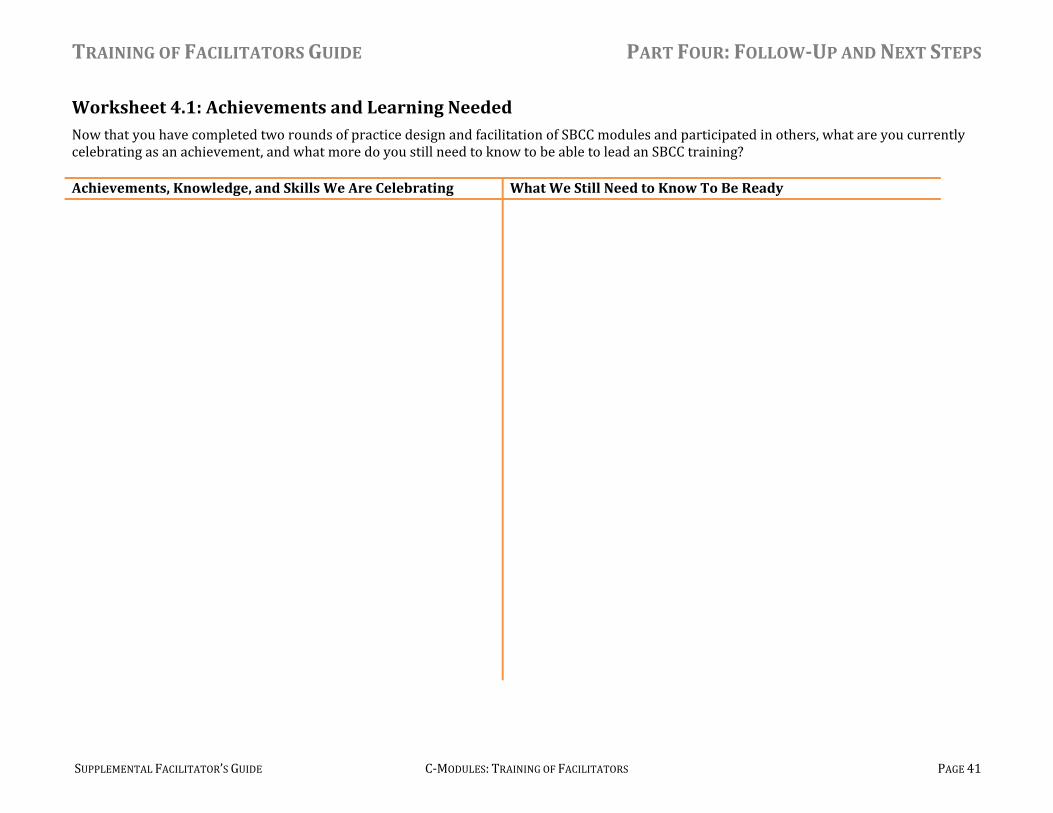
Worksheet 4.1: Achievements and Learning Needed Now that you have completed two rounds of practice design and facilitation of SBCC modules and participated in others, what are you currently celebrating as an achievement, and what more do you still need to know to be able to lead an SBCC training? Achievements, Knowledge, and Skills We Are Celebrating What We Still Need to Know To Be Ready

TRAINING OF FACILITATORS GUIDE PART FOUR: FOLLOWUP AND NEXT STEPS
SUPPLEMENTAL FACILITATOR’S GUIDE C‐MODULES: TRAINING OF FACILITATORS PAGE 42
Part Four: Creating a Personal Action Plan Distribute Worksheet 4.2: Facilitation and Capacity Strengthening Plan 1. Tell participants that they have now completed the Training of Facilitators workshop. It is time to consider how they will use the skills gained
this week.
2. Explain that it is time to develop a personal action plan. Use Worksheet 4.1: Achievements and Learning Needed and complete Worksheet 4.2: Personal Facilitation Capacity Strengthening Plan.
TRAINING OF FACILITATORS GUIDE PART FOUR: FOLLOWUP AND NEXT STEPS
SUPPLEMENTAL FACILITATOR’S GUIDE C‐MODULES: TRAINING OF FACILITATORS PAGE 43
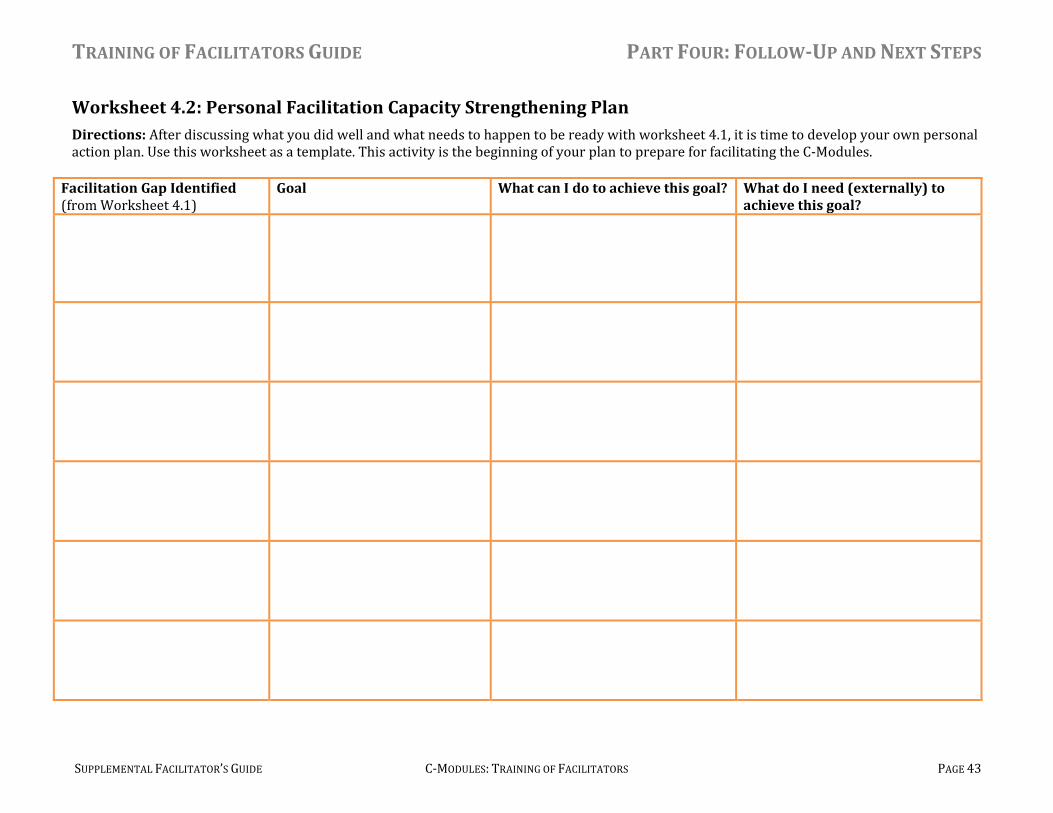
Worksheet 4.2: Personal Facilitation Capacity Strengthening Plan Directions: After discussing what you did well and what needs to happen to be ready with worksheet 4.1, it is time to develop your own personal action plan. Use this worksheet as a template. This activity is the beginning of your plan to prepare for facilitating the C‐Modules.
Facilitation Gap Identified (from Worksheet 4.1)
Goal What can I do to achieve this goal? What do I need (externally) to achieve this goal?

TRAINING OF FACILITATORS GUIDE PART FOUR: FOLLOWUP AND NEXT STEPS
SUPPLEMENTAL FACILITATOR’S GUIDE C‐MODULES: TRAINING OF FACILITATORS PAGE 44
Closing 1. Ask two volunteer participants to practice their facilitation skills by designing and conducting the closing. They can use ideas from the C‐
Modules Facilitator’s Guide Appendix. Work with the volunteers to ensure that all points and logistics are covered.
TRAINING OF FACILITATORS GUIDE REFERENCES CITED
SUPPLEMENTAL FACILITATOR’S GUIDE C‐MODULES: TRAINING OF FACILITATORS PAGE 45
References Cited Global Learning Partners. 2011 at http://www.globalearning.com Salas et. al. 2010. Visualisation in Participatory Programmes: How to Facilitate and Visualise Participatory Group Processes. Malcolm Knowles and Jane Vella at http://www.globalearning.com
TRAINING OF FACILITATORS GUIDE REFERENCES CITED
SUPPLEMENTAL FACILITATOR’S GUIDE C‐MODULES: TRAINING OF FACILITATORS PAGE 46
Credit for Graphics A Planning Process for SBCC—Focusing & Designing (page 27)
Health Communication Partnership. 2003. The new PProcess: Steps in strategic communication. Baltimore: Johns Hopkins Bloomberg School of Public Health, Center for Communication Programs, Health Communication Partnership.
McKee, Neill, Erma Manoncourt, Chin Saik Yoon, and Rachel Carnegie, eds. 2000. Involving people, evolving behavior. New York: UNICEF; Penang: Southbound.
Parker, Warren, Lynn Dalrymple, and Emma Durden. 1998. Communicating beyond AIDS awareness: A manual for South Africa. 1st ed. Auckland Park, South Africa: Beyond Awareness Consortium.
Academy for Educational Development (AED). 1995. A tool box for building health communication capacity. SARA Project, Social Development Division. Washington, DC: AED.
National Cancer Institute. 1989. Making health communications work: A planner’s guide. Rockville, Md.: U.S. Department of Health and Human Services.


![[Facilitator’s Name] [Date]](https://img.pdfslide.us/doc/110x75/56815d4a550346895dcb5375/facilitators-name-date.jpg)