Embed Size (px)
Citation preview
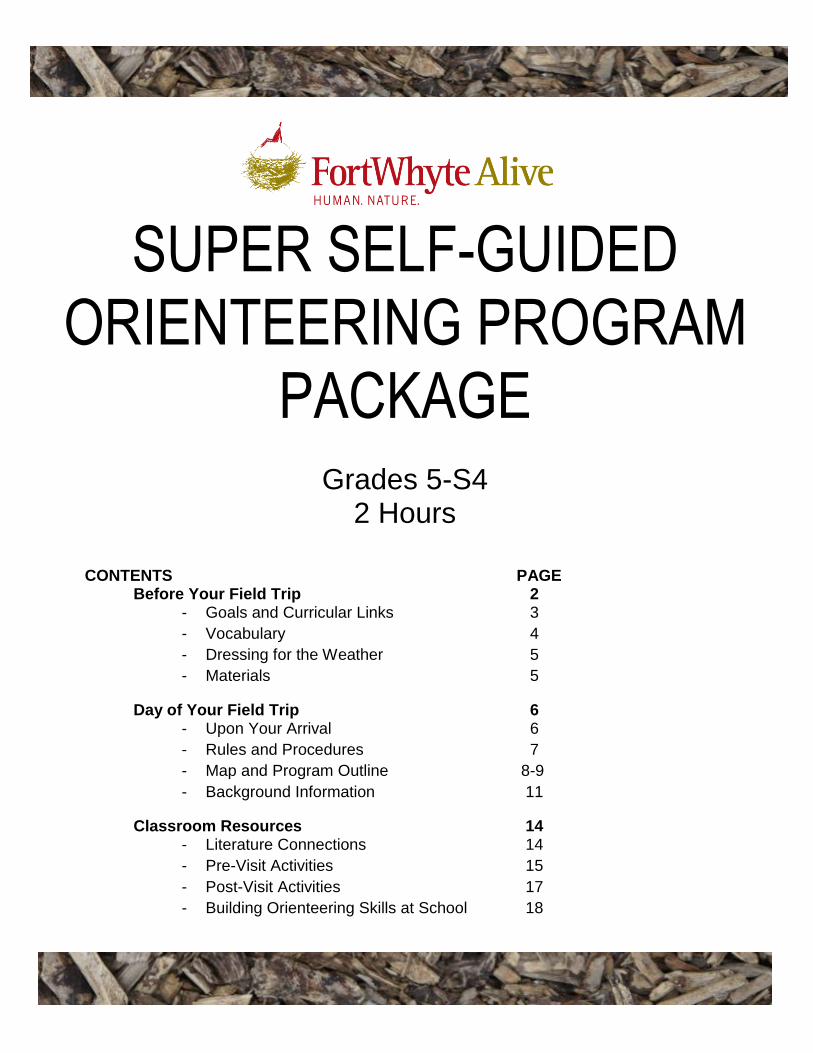
SUPER SELF-GUIDED ORIENTEERING PROGRAM
PACKAGE
Grades 5-S4 2 Hours
CONTENTS PAGE Before Your Field Trip 2
- Goals and Curricular Links 3
- Vocabulary 4
- Dressing for the Weather 5
- Materials 5
Day of Your Field Trip 6 - Upon Your Arrival 6
- Rules and Procedures 7
- Map and Program Outline 8-9
- Background Information 11
Classroom Resources 14 - Literature Connections 14
- Pre-Visit Activities 15
- Post-Visit Activities 17
- Building Orienteering Skills at School 18
2
*Please share this information with other teachers that are coming to
FWA with your group.
BEFORE YOUR FIELD TRIP
3
GOAL
To learn about the sport of orienteering and the techniques used in the sport, and to have an outdoor physical recreation experience using FortWhyte Alive’s permanent orienteering course.
OBJECTIVES
Students will:
1. Use a map to find their location, and make plans to move from one place to another.
2. Understand the symbols used on an orienteering map.
3. Gain an appreciation for the sport of orienteering
4. Using a map, run through an orienteering event on FortWhyte Alive’s permanent course.
CURRICULAR LINKS
GRADE CURRICULUM SKILLS OBJECTIVES (SLO)
5-S-, 6-S-, 7-S-, 8-S-
Group collaboration, managing information and ideas including map interpretation, selecting and using appropriate tools and technologies to accomplish tasks, and landscape orientation.
100, 200, 203, 206, 207A, 208
9-S-, S2-S- Group collaboration, managing information and ideas including map interpretation, and selecting and using appropriate tools and technologies to accomplish tasks.
100, 200, 202, 204
S3, S4 Understand and demonstrate the ability to access and use information to make informed decisions about safety, responsibility and risk management related to physical activity participation.
11.PA.2, 11.PA.3 12.PA.2, 12.PA.3
4
VOCABULARY
Control Point:
A square-shaped waypoint divided into two colours (white and orange) along the diagonal. Used in orienteering where it is located in the orienteering area, marked both on an orienteering map and in the terrain, and described on a control description sheet.
Course: In orienteering, a course is composed of a start point, a series of control points, and a finish point. The challenge is to complete the course by visiting all control points in the shortest possible time, aided only by a map (and often a compass).
Landmark:
A significant, easily observable, and immobile landscape feature. Used
to determine one’s position on the landscape, where one is traveling,
and where one has been
Legend: The wording on a map or diagram explaining the symbols used.
Map: A picture of the landscape. Different maps contain different information, depending on the purpose of the map (road, topographical, aerial photo, orienteering etc.).
Navigation: The process of finding one’s location in space, and the process of moving from one place to another.
Orienteering: A sport involving cross-country navigation, using a map and compass, to find fixed points. The sport can be recreational, or a competitive racing activity.
Scale: A ratio of size in a map or drawing where things such as length, distance, and height are presented as an accurate proportion of their true measurements.
5
DRESSING FOR THE WEATHER
To ensure that students get the most out of their FortWhyte experience, we ask that they be appropriately dressed for a multi-hour outdoor excursion. All of our programs include time outdoors, regardless of weather. Comfort and safety are key in making this an enjoyable and memorable experience.
Suggestions for Outdoor Dress
Layering of clothing is very important in maintaining body temperature and in remaining dry. Four thin garments may offer the same degree of warmth as one thick overcoat, but the four layers allow much greater flexibility. Layers can be shed or added as temperature, wind, exertion, or other variables dictate. Waterproof outer layers are also important. Rain may get us wet but so will dew on grass, melting snow on pants and puddles in the spring. Boots in the winter are always important to keep moisture out and heat in.
MATERIALS
Your “Super Self-Guided Orienteering” Kit will contain:
Orienteering maps Dry erase markers Control Point example Control Points (these are permanently set up on the property and maintained by the
Manitoba Orienteering Association)
You Will Need to Bring From School:
At least one watch or other time-telling device per group
6
DAY OF YOUR FIELD TRIP UPON YOUR ARRIVAL…
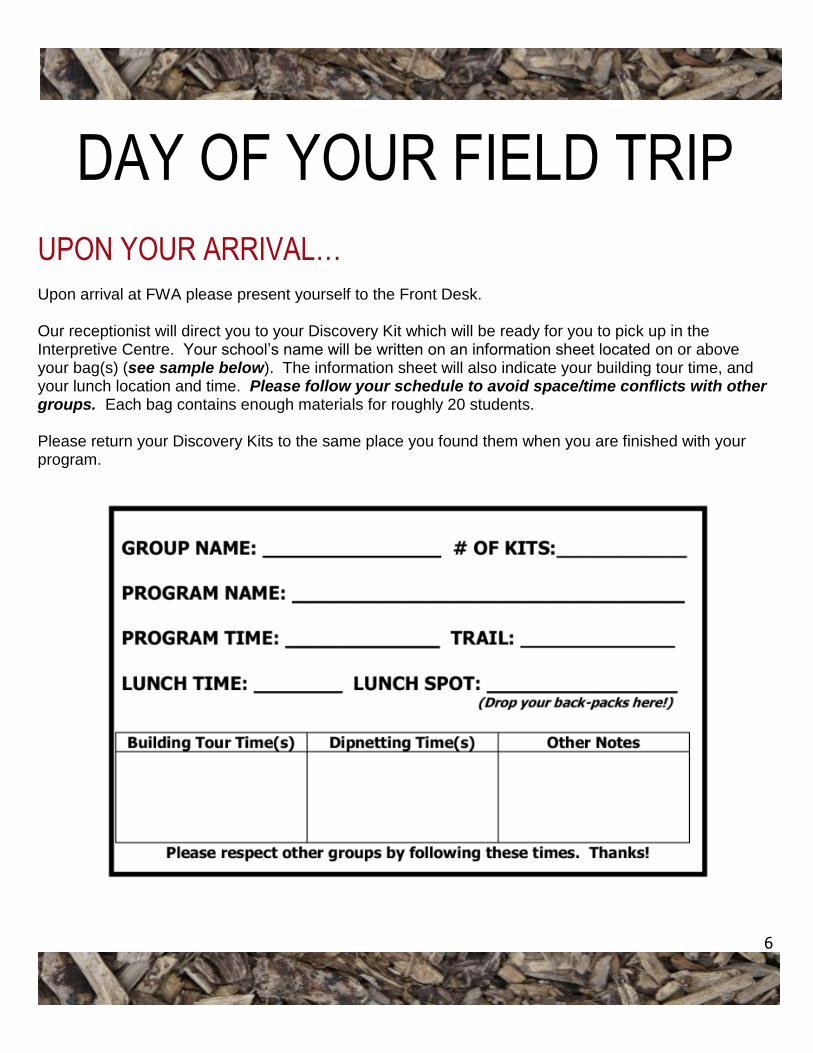
Upon arrival at FWA please present yourself to the Front Desk. Our receptionist will direct you to your Discovery Kit which will be ready for you to pick up in the Interpretive Centre. Your school’s name will be written on an information sheet located on or above your bag(s) (see sample below). The information sheet will also indicate your building tour time, and your lunch location and time. Please follow your schedule to avoid space/time conflicts with other groups. Each bag contains enough materials for roughly 20 students. Please return your Discovery Kits to the same place you found them when you are finished with your program.
7
RULES AND PROCEDURES
You can expect FWA will:
Provide a suitable venue for self-guided education programs;
Provide program equipment and materials for self-guided programming, including written educator/leader instructions (either online or on paper), as required for booked activities;
Advise you of your group’s schedule, lunch location, and suggested area for your self-guided program;
Advise you of any changes to environmental, weather, trail, or other conditions before your program.
FWA can expect you will:
Read the provided self-guided program materials (this package) before arrival at FortWhyte Alive;
Enforce all school rules and codes of conduct, and FortWhyte Alive’s Rule of Respect (See Below), reviewing both school and FortWhyte Alive rules with your students before your program;
Follow FortWhyte Alive’s schedule, program guidelines, and instructions – (these have been developed with all user groups in mind!)
Supervise all participants during self-guided programming. For independent group work (eg. orienteering), ensure students understand and follow boundaries, the Rule of Respect, and schedule;
Do frequent head counts throughout the day;
Check in with reception staff before your program, and advise them you are leaving at the end of your day.
FortWhyte Alive’s Rule of Respect
All students, educators, group leaders, staff and volunteers are asked to:
Respect others: in their group, on the trail, in our buildings (give other groups room on trails, keep noise volume appropriate, etc.);
Respect our place: leave nature outside, be kind to living things, clean up litter;
Respect equipment: Self-guided equipment is used by thousands of students each year; please give them the same chance to use it that you have.
Following these guidelines and rules will help us provide the best experience for every FWA visitor today!
Thanks!
8
9
PROGRAM OUTLINE
GAME SET-UP
We recommend choosing a meeting place to serve as a home base, such as the south deck of the Alloway Reception Centre. The course, permanently installed, is laid out on the south part of FortWhyte’s property.
If you have booked this course in advance, a FortWhyte staff person will be introducing the course to your students.
Your Super Self-Guided Orienteering Kit will have markers and orienteering maps (1 for every 4-5 students; more may be available depending on other concurrent programming)
INTRODUCTION
The Introductory Question for this program is “What is Orienteering?” The FortWhyte staff person will have the students thinking on this question as they break into groups of 4-6 people.
Discuss the Answers: o Orienteering is a sport, open to all ages. o It is very easy to do, but very difficult to do at the highest level of competition. o Even at its lowest intensity, orienteering requires walking outdoors, thus it is
cardiovascular exercise. o Orienteers: use a map, find their own way, and often use a compass. All other
answers are options. o The goal of orienteering when competing is to find all the control stations, or marked
points on the map, faster than other individuals or teams. The goal in a non-competitive sense is to have fun outdoors, and to test one’s skills at navigating and movement.
o Orienteering competitions can take place anywhere, from crowded cities to remote national parks.
o The three pieces of equipment an orienteer needs are: shoes/outdoor clothes, a map, and a compass. For an event like FortWhyte, one does not even need a compass!
o The skills an orienteer must possess are map reading, route planning, and a degree of physical fitness.
COURSE EXPLANATION
The course at FortWhyte Alive is comprised of 17 control points. Each point consists of a number and two letters on an orange and white metal placard on a steel pole. On the map, the control points are indicated by red circles; somewhere within the circle one will find the control point. Though none are hidden, most are not immediately obvious. The letters, put in order on the score card, spell two messages. A legend and control descriptions also appear on the map, and the map’s scale is 1:5,000; meaning that 1 cm on the map = 5,000 cm or 50 m on the ground.
10
The orienteer’s job is to find as many (or all) of the control points in the time allotted to them. Because this will be a first orienteering experience for many participants, competition (racing against each other) is discouraged. Teamwork within small groups, e.g. making route decisions together, is encouraged. Before letting any team start, be sure to cover the following safety rules:
Water features such as ponds are off limits.
Though you will have to leave the trail, no running in the woods.
Ensure each team has a watch, so they know how much time they have left in the game.
Climbing any feature is not allowed.
Interfering with another team will result in a team’s disqualification, and possible further sanction from the participants’ school.
Advise the students that school staff will be on the trails with them to answer questions and administer first aid if necessary. FortWhyte staff and volunteers are nearby both in and around the Interpretive Centre and Reception Centre as well if students require any assistance.
Be sure each group has all their necessary materials (orienteering map, marker, watch), and that they know to write down the letters on their map beside each corresponding number. With 17 control points, they will find 34 letters, and uncover two messages. All teams start from the same location. If desired, you can ask to stagger a few teams at a time, or have the teams start looking for different control points (for instance, Team A starts at point 1, Team B at point 17, etc.).
The outdoor orienteering portion of this activity should take about an hour and fifteen minutes. After starting the teams, be available to answer questions. Teachers and supervisors should be encouraged to participate, either as team members with students, as individuals, or as a supervisor team.
WRAP
The wrap for this activity is a debriefing discussion, led by the supervising adults of the group. Use the questions below as a guideline for how to wrap up.
How did the groups do? How many were able to find all the control stations? 75% of the control stations? How many did each group find? What is the secret message spelled out by the letters of the control stations?
Did the groups who were most successful work as teams? What was good about working as a team? Was it ever frustrating?
How well was each team able to keep track of its location on the map?
Discuss how this event differs from other orienteering (no compass work, distance/time).
Thank and congratulate the group; thank the teachers and supervisors, and wish the group well.
11
BACKGROUND INFORMATION
WHAT IS ORIENTEERING?
Orienteering involves using a detailed map and a compass to find a series of checkpoints (control points) on the ground. An orange and white marker (called a “control”) is located at each checkpoint. Either a card-punching device or an electronic timing unit is attached to each control so that competitors can prove they found it. At most events, the objective is to visit all of the controls, in the specified order, in the fastest time.
Orienteering is a great sport because:
It is easy to learn and requires no special equipment to get started. It can be enjoyed as a walk in the outdoors or as a competitive sport. Courses of varying length and difficulty are offered so that anyone can compete, regardless of
age or experience. (This makes it a good sport for families.) For serious competitors, the sport is challenging both physically and mentally. Elite competitors
have to run quickly while simultaneously navigating through complex terrain.
HISTORY OF ORIENTEERING
Orienteering began as a military exercise for Swedish officer candidates in the late 19th century. In the 1930’s, affordable compasses became available, and the sport quickly caught on as a pastime in Sweden. Other European nations, such as Switzerland, Finland, the Soviet Union, and Hungary also developed orienteering clubs who pursued the activity as a sport.
Following the Second World War, many other countries developed sport orienteering traditions. The United States, Canada, Japan, Australia, and New Zealand are now all active participants in the International Orienteering Federation.
Orienteering is not currently an Olympic sport; however, it is an event at the World Games.
Foot orienteering is the original form of the sport, and still the most popular, but other methods of transportation (such bicycles, canoes, etc.) have led to different forms of the sport.
12
FORTWHYTE PERMANENT ORIENTEERING COURSE
This facility has been developed by the Manitoba Orienteering Association, Inc., in cooperation with FortWhyte Alive. We hope that you will enjoy this activity and that you will join us for other Orienteering activities around the province.
CONTROL DESCRIPTIONS
# Description Points (for Score Orienteering)
1 Slide, West side 5
2 Sign, East Side 20
3 Trail Junction 25
4 Trail Junction 5
5 Arch Post 5
6 Hill Top 10
7 Building, East Side 10
8 Marsh Edge 5
9 Hill Foot, Southeast 25
10 Knoll, Eastside 20
11 Railway Track Junction 10
12 Clearing, Southeast Edge 20
13 Trail Junction 20
14 Hilltop 25
15 Bench 20
16 Clearing, Westside 15
17 Stump 15
NOTES:
Please be aware that you are running through a living area. Take care and do not damage plants, trees or shrubs in the park. You are also likely to encounter other individuals and groups while completing this course. Please do not disturb other users by running through their activities. Note that admission is required to FortWhyte in order to use the course.
OTHER WAYS TO USE THE COURSE:
Once you have completed the course you can have more fun by trying the following activities:
1. Score Orienteering - Set a time limit for yourself or your group. See how many points you can get before the time is up. Subtract one point for each minute you are over the allotted time. If you

13
use the points listed with the control descriptions you should start from the triangle on the map.
2. Make your own course - Pick a number of controls. Decide on what order to visit them. See who can finish the course in the fastest time.
TIPS AND TRICKS:
Knowing where one is on the map may be more important than moving quickly.
Continual contact between one’s map and one’s surroundings are essential.
The large red arrow on the map points north. To keep the map “oriented”, and thus a true representation of the land, the map must be turned as the group moves.
Information has been used with permission from the Manitoba Orienteering Association website, originally accessed 2008-SEP-08. http://www.orienteering.mb.ca/
14
CLASSROOM RESOURCES
LITERATURE CONNECTIONS All of the books listed below relate to the theme of navigation, are recommended for young children and youth, and are available through the Winnipeg Public Libraries and/or the Manitoba Education Instructional Resources Library. You may wish to make these titles available in your classroom surrounding your Super Self-Guided Orienteering field trip.
Books and activities with an Indigenous perspective are indicated with a
medicine wheel.
Fiction
Quest by Kathleen Benner Duble
Relates events of explorer Henry Hudson's final voyage in 1602 from four points of view.
Hatchet and The River by Gary Paulsen
Stories of a young boy’s survival and navigation in the northern Canadian wilderness.
The Lost Voyage of John Cabot by Henry Garfield A fictionalized account of the voyages of explorer John Cabot, particularly his 1498 journey to the New
World.
Carry On, Mr. Bowditch by Jean Lee Latham
A fictionalized biography of the mathematician and astronomer who realized his childhood desire to become
a ship's captain and authored The American Practical Navigator.
Rabbit Proof Fence by Doris Pilkington
The story of three Indigenous girls in Australia running from a residential school and navigating their way
through the wilderness. There are many connections to similar stories from Canadian residential schools
(DVD available through public library; book only available on special order).
Non-Fiction
The Wayfinders: Why Ancient Wisdom Matters in the Modern World by Wade Davis
This book is best suited to senior high students.
Extraordinary Women Explorers by Frances Rooney
Where Am I? The Story of Maps and Navigation by Albert Gray Smith
The First Ships Around the World by Walter D. Brownlee

15
PRE-VISIT ACTIVITIES
LANDMARK NAVIGATION PART 1 (10-15 minutes)
Movement Break
Have students make a list of significant landmarks in the classroom, and around the school or school grounds. Ask them to note a list of at least three landmarks between the classroom and the cafeteria, or gym, or other important area of their school or school grounds. Can the route the students take to get from one location to another be described or represented as a series of landmarks?
THE MAP GAME (1 lesson)
Social Studies/Physical Education
The Map Game is a distinctly Métis Game that helped develop children’s ability to follow directions as well as give them and to promote interaction between boys and girls. Instructions:
1. Divide your group in two.
2. Choose one captain for each of the two groups.
3. One of the groups will hide while the other group is not looking. Only the Captain of the team may look and see where the opposing team has hidden and will then draw a map for his/her team, detailing the position of all the hidden children.
4. Using the map that the captain has drawn, the team will attempt to find the members of opposing team.
5. The Captain cannot contribute to the actual search but if his/her team is having trouble understanding the map then he/she may help to guide them.
6. Once the team with the map has found the hidden team the other group will hide and the captain for that team will draw a map.
7. Repeat as many times as you would like with a new Captain each time! (time permitting)
What did this game teach you? Why do you think this game was important to the Métis?
OUTDOOR LEARNING

16
STORIES OF BEING LOST (1-3 lessons)
Language Arts
Compare personal experiences of being lost or stranded. Almost everyone has been lost at one time or another, even if it is only in a store with their parents. What does it feel like to be lost? Did anyone have stories in which they panicked or felt like panicking? Have students share their stories orally, write them down, illustrate them, or dramatize them.
CREATE YOUR OWN MAP (1-3 lessons)
Social Studies/Math/Art
Using graph paper, have your students draw a map of the classroom, noting physical features such as windows, doors, boards, etc. Using measuring tapes, metre sticks, and the grid on the graph paper, your students can draw the map to scale.
Outdoor Option: Have students create a to-scale map of the school grounds or a nearby park/neighborhood. Students can measure distances in paces and create an aerial view of a familiar area including features such as roads, buildings, bus stops, and other notable landmarks. These maps can be used for the “Building Orienteering Skills at School” Post-Visit Activity.
TOPOGRAPHICAL MAP EXPLORATION (1-2 lessons)
Social Studies
Learn how to read a topographical map. Discuss the features of a topographical map, and how these maps give more information than a standard road map. If possible, obtain a topographical map of your school’s neighborhood or another familiar site. Compare topographical maps with other types of maps and discuss their different purposes (e.g. road maps, physical maps, political maps).
Art Extension: Have students match the features of a topographical map with actual life pictures of these features (e.g. mountains, valleys, wetlands, landmarks located on a legend).
Language Arts Extension: Have students use the topographical map to describe their route from an arbitrary point A to point B using map landscape features.
Relief Map extension: Using recycled materials, have students create a relief map of a particular area (could be as small as the school grounds or as large as the country of Canada). Egg cartons can be used for mountains/hills, bits of material can add texture for water or plains, paint and paper can add splashes of colour. Get creative!
OUTDOOR LEARNING
17
MAKE A COMPASS (1 lesson)
Social Studies/Science
Students can construct their own simple compass using a bowl of water, a piece of cork, and a magnetized needle. To magnetize the needle, stroke a magnet in one direction along the length of the needle repeatedly. Poke the needle through the cork, or tape it to the top of the cork. Left still in the bowl of water, the needle and cork will spin until the needle is oriented North-South. This is similar to the first compasses. Research Extension (2-4 lessons): Have students research early methods of navigation from around the world. Here in Canada, how did Indigenous peoples navigate prior to European contact? How did explorers navigate their way across the ocean and through unfamiliar land? What other instruments were used besides compasses and how did they work? Students can research the science behind historic and modern navigation tools. They might also use the design process to create (or re-create) a navigation tool of their own.
POST-VISIT ACTIVITIES
LANDMARK NAVIGATION PART 2 (10-15 minutes)
Movement Break
Show students a tray of ten random objects, give them two minutes to look at them and see how many they can recall immediately after, ten minutes later, and an hour later. Next, using ten new random objects have students associate each item with one of the landmarks they identified in the Pre-Activity “Landmark Navigation Part 1”. Go for a walk past the landmarks and see how accurately students can recall the objects immediately, after ten minutes, and after one hour. Which method resulted in the greatest recall? How can landmarks help improve our memory and awareness of our surroundings?
> Examples of keystone species in Canada’s six regions include:
> Canadian Shield – Spruce > Arctic Region – Arctic Fox > Western Cordillera – Salmon > Appalachian Region – Lobster > Prairies – Prairie Dog > St. Lawrence-Great Lakes Lowlands – Sugar Maple
Research these and other keystone species to identify why they are so important to their ecosystems. Who eats them and who do they eat in the food chain? Do other species rely on them for shelter?
Go to http://education.nationalgeographic.com/education/encyclopedia/keystone-species/?ar_a=1
> Create a mural of one of Canada’s regions. Assign each student a specific plant or animal to research and have students work collaboratively with paints or other media to bring the habitat to life in detail.
Habitats of Manitoba:
If we zoom in on just the province of Manitoba we see that there are two major Canadian regions included in our province – Prairie and Canadian Shield (Boreal Forest). But there are also some more detailed regions. One of these is the transition zone between Prairie and Boreal Forest known as the Parkland Region. This habitat is characterized by a mix of prairie grassland and stands of trees, primarily Aspen. The city of Winnipeg and FortWhyte Alive are both located within the Parkland Region.
See Attachment #3 for a detailed map of Manitoba’s ecological regions. Research the plants and animals that live in Manitoba. What are their special physical and behavioural adaptations? The animals you saw in the Touch Museum and on FortWhyte’s property are a good starting place for inquiry.
Local Habitats:
On the smallest scale, we all live and go to school within local habitats. Go outside with your class and find evidence of the animals that live in your neighborhood—tracks, scat, chewed leaves, spiderwebs, nests, and holes are all great starting points. Start a list of plants and animals you would like to know more about and create a class field guide to your
18
BUILDING ORIENTEERING SKILLS AT SCHOOL (3 or more lessons)
Social Studies/Physical Education
Simple Map Treasure Hunt
Have students create a simple map of the school, school grounds, a local park, or neighborhood (you could use the maps from the “Create Your Own Map” Pre-Visit Activity). Have them work in pairs or small groups to hide numbered clues at various locations and mark these hiding spots on the map (e.g. Clue #1 is marked with a 1 on the map). Have groups trade maps and see if they can find each other’s’ clues. Afterwards, discuss what factors made this challenging? Were the maps to scale? Were hiding places marked properly? What would they do differently next time? What did they learn about map-making and navigation?
Digital/Art Extension: Have students take macro photographs of objects and mark their locations on the map. When other students complete the “treasure hunt” they have to identify what object the macro-photograph is a close-up of.
Compass Work
Learning to use a compass is a fun and useful skill to practice direction-finding. The following websites provide excellent instructions: http://www.compassdude.com/compass-reading.php https://www.wikihow.com/Use-a-Compass http://www.learn-orienteering.org/old/lesson1.html
Student-Designed Orienteering Course
After practicing direction-finding with a compass, have students create their own orienteering courses. Have students work in pairs and clearly mark a starting point for accuracy (this could be a mark on the ground, a hula hoop, a flag, etc.). Each pair of students will have cards numbered from 1-5. They will select a landmark, determine the direction of travel to get to it from the starting point (noted in degrees), and pace out the distance in average-sized paces (the size of an average-sized pace should be discussed by the whole group and demonstrated prior to sending students out to create their courses). They will record the direction of travel in degrees and the number of paces as Clue #1 on a separate sheet of paper (e.g. Clue #1: 117°, 32 paces). They will leave the card with a “1” on it at this first landmark and then will repeat the process with their other four cards, finding new landmarks and directions of travel each time. These short courses may or may not make a loop back to the starting point. At the end, each pair of students should be able to trade their clue sheets with other students and follow each other’s courses. *It is important to remind students to look ahead rather than at the compass when following a direction of travel. Otherwise they may trip!
Manitoba Orienteering Association (MOA)
For more excellent orienteering and navigation skill-building ideas visit the Teacher Resource page of the MOA: http://www.orienteering.mb.ca/educators/index.html