Embed Size (px)
Citation preview

RS-232 Universal PCI Multi-Port Communication Board _______________________________
User’s Manual
Second Edition, Aug 2005
SUNIX Co., Ltd. Tel : +886-2-8913-1987 Fax: +886-2-8913-1986 Http://www.sunix.com.tw [email protected]

RS-232 Universal PCI Multi-Port Communication Board
User’s Manual
Copyright Copyright© 2005 SUNIX Co., Ltd. All Rights Reserved.
No part of this publication may be reproduced, transcribed, stored in a retrieval system,
translated into any language, or transmitted in any from or by any means, photocopying,
manual, or otherwise, without prior written permission from SUNIX Co., Ltd.
Disclaimer SUNIX Co., Ltd. Shall not be liable for any incidental or consequential damages resulting from
the performance or use of this equipment.
SUNIX Co., Ltd. makes no representations or warranties regarding the contents of this manual.
Information in this manual has been carefully checked for reliability; however, no guarantee is
given as to the correctness of this content. In the interest of continued product improvement,
this company reserves the right to revise the manual or include change in the specifications of
the product described within it at any time without notice and without obligation to notify any
person of such revision or changes. The information contained in this manual is provided for
general use by the customers.
Trademarks SUNIX is a registered trademark of SUNIX Co., Ltd.
Other registered marks used herein are for identification purposes only and may be
trademarks of their respective owners.
Safety Information 1. Keep this User’s Manual for future reference.
2. Always read the safety information carefully.
3. Keep this equipment away from direct sunlight, or in humid or damp places.
4. Do not place this equipment in an unstable position, or on vibrating surface before setting
it up.
5. Do not use or place this equipment near magnetic fields, televisions, or radios to avoid
electronic interface that affects device performance.
6. Do not attempt to disassemble or repair the equipment or the warranty would be useless.
7. To avoid damaging your system and equipment, please make sure that your computer is
off before you install the product.

INDEX
Chapter 1 Introduction............................................................................................1-1 Overview...................................................................................................... 1-2
Package Checklist....................................................................................... 1-2
Product Features......................................................................................... 1-3
Product Specifications….............................................................................. 1-4
Chapter 2 Hardware Installation.............................................................................2-1 Hardware Installation .................................................................................. 2-2
Pin Assignment ........................................................................................... 2-2
Chapter 3 Software Installation .............................................................................3-1 Windows 2000/XP/2003 (32bit)…................................................................ 3-2
Windows 2000/XP/2003 (32bit WHQL)….................................................. 3-11
Windows XP/2003 (64bit)………….............................................................3-17
Windows 95/98/Me …................................................................................ 3-24
Windows NT ..............................................................................................3-32
Windows 3.1 ..............................................................................................3-36
Windows CE.NET...................................................................................... 3-39
DOS........................................................................................................... 3-48
Linux.......................................................................................................... 3-51
Chapter 4 Trouble Shooting ..................................................................................4-1
Appendix ……………………………................................................................................5-1 Core Technologies..................................................................................... 5-2
Contract Information.................................................................................. 5-5

1.
Introduction ______________________________________________
RS-232 Golden I/O series, a line of Universal PCI Multi-port Serial Communication Board, is designed for both 3.3V / 5V and 32 / 64-bit PCI Bus with Plug and Play feature. Its can be installed in virtually any available PC system and compatible with all major operating systems. Users do not need to manually set jumpers to configure I/O addresses and IRQ locations.
These boards offer independent serial ports for connecting terminals, modems, printers, scanners, cash registers, bar code readers, keypads, numeric displays, electrical scales, data acquisition equipment, and other serial devices for the PC and compatible systems. This board offers a reliable and high performance solution for serial multi-port communications.
The following topics covered in this chapter:
Overview Package Checklist Product Features Product Specifications
1-1

Overview
Thanks for purchasing Universal PCI Multi-Port Communication Board compatible RS-232.V24 standard serial interfaces. The Multi-port PCI serial card equips with 1, 2, 4, or 8 independent DB9 or DB25 RS-232 high-speed serial ports which accessed through DB-9 or DB-25 male connectors for industrial communication and automation applications. Each serial port has built-in 32byte hardware FIFO, on-chip hardware flow control, and provides data transfer speed up to 921Kb/Sec with industry standard 16C650 asynchronous communication chip.
Package Checklist
Please check if the following items are present and in good condition upon opening your package. Contract your vendor if any item is damaged or missing. 1. Hardware:
Serial Communication Board: RS-232 Universal PCI Multi-Port Communication Board × 1
Cable: (Depend on what product you bought)
4 ports PCI series: DB37M to 4 ports DB9/25 Male Cable × 1 RJ45 to 1 port DB9/25 Male Cable × 4 8 ports PCI series: DB62M to 8 ports DB9/25 Male Cable × 1 DB37M to 4 ports DB9/25 Male Cable × 2
2. CD Driver 3. Quick Installation Guide 4. User's Manual (This document)
1-2

Product Features
Fully compatible with PCI Spec. Ver2.2 standard. Support 1, 2 , 4 or 8 independent RS-232 serial ports. Supports both 64-bit & 32-bit PCI Bus and 3.3V &5V connector keys. Low repair rate with ASIC design. Data transmission speeds up to 921.6Kbps. Certified by Microsoft WHQL, CE, FCC approval. Each serial port has built-in 32 byte hardware FIFO and 128K byte FIFO
under Windows 2000, XP, and 2003 operation system. High speed 16C650 compatible communication controller with SUN1889
single chip hardware flow control to guarantee no data loss and best technical support.
Hardware supports Re-map function for legacy COM I/O ISA address 3F8, 2F8, 3E8, 2E8. (Re-Map card only)
Support DOS, Linux, Microsoft Windows CE.NET, 3.x, 95, 98, Me, NT, 2000, XP, and 2003.
Ready for the Intel® Itanium® and AMD® Athlon 64® 64-bit CPU system on the Microsoft Windows® XP 64-bit Edition Version 2003 and Windows® Sever 2003 for 64-bit Itanium-based or Extended Systems.
Operation Temperature: 0 to 60 ℃ Operation Humidity: 5~95% RH Storage Temperature: -20 to 85℃
NOTE: You can get more core technologies detail in Appendix chapter.
1-3

Product Specifications
Function Type Universal PCI Multi-Port Communication Board Mode of Operation Hand-Shaking Bus Transceivers RS-232 Full-Duplex Drivers per Line RS-232 1 Driver Receivers per Line RS-232 1 Receivers Hardware
IC SUN1889 Controller 16C650 compatible UART
Bus Interface 64-bit & 32-bit PCI Bus 3.3V & 5V Connector Key
Number of Ports 1, 2, 4 or 8 ports Bracket Standard 121 mm, Low Profile79.2 mm Communication
IRQ & I/O address Assigned by BIOS / O.S. 32 byte hardware FIFO
FIFO 128K byte FIFO under Windows 2000, XP, and 2003 OS
Baud rate 75bps ~ 921.6 Kbps Data bit 5,6,7,8 Stop bit 1,1.5,2 Parity even, odd, none, mark, space Flow Control None, Xon/Xoff, Hardware Signal TxD, RxD, RTS, CTS, DTR, DSR, DCD, RI, GND Driver support
Microsoft Windows CE4.2/CE5.0/3.x/95/98SE/Me/NT/2000/XP/2003 Driver Support DOS, Linux 2.0.x / 2.2.x / 2.4.x / 2.6.x
Dimensions
Dimensions (W × D)
1 port: 120 × 52 mm 2 port: 120 × 74 mm 4 port: 120 × 80 mm 8 port: 144 × 102 mm
Regulatory Approvals Regulatory Approvals CE, FCC, Microsoft WHQL
1-4

2.
Hardware Installation ______________________________________________ This chapter includes information about hardware installation for RS-232 Universal PCI Multi-Port Communication Board. The following topics are covered:
Hardware Installation Pin Assignments
2-1

Hardware Installation The hardware installation of PCI serial boards is easy to carry out. Before inserting the card into the PCI bus, please follow the detailed steps given below to install the PCI serial board in your computer.
Step 1: Turn your PC’s power off, and shut off the power to any peripheral. Step 2: Remove the power plug from the plug socket. Step 3: Remove the cover from the computer case. Step 4: If fitted. Remove the metal cover plate on the rear of a free PCI slot. Step 5: Insert Universal PCI Multi-Port Communication Board into the free PCI
slot and screw it firmly on the bracket side. Step 6: Place the cover back onto the computer. Step 7: Insert the plug into the plug socket.
Pin Assignment
Safety First To avoid damaging your system and boards, make sure your PC’s power is turned off before installing PCI card.
2-2

3.
Software Installation ______________________________________________ After installing the RS-232 Universal PCI Multi-Port Communication Board in your system successfully, please follow the step by step software installation guide to confirm how to install appropriate driver and configure the serial port settings. The driver for PCI serial board supports various operating systems, and you can select your requirement in the following chapter:
The following topics covered in this chapter:
Windows 2000/XP/2003 (32-bit) Windows 2000/XP/2003 (32-bit WHQL) Windows XP/2003 (64-bit) Windows 95/98/Me Windows NT Windows 3.1 Windows CE.NET DOS Linux
3-1

Windows 2000/XP/2003 (32-bit)
Installing Driver On booting up, system will detect present of the PCI Serial Board and prompt for driver installation wizard, but ignore it. Please insert the driver CD in your CD/DVD ROM drive and run point directory setup file:
: \IO\PCI IO\win2k and xp\setup.exe (1) Please click “Next” to continue when Multi-IO Adapter PCI Driver window
shows up.
Note: The driver program will detect and uninstall the previous I/O driver which you installed before. This step may take a few minutes and please be patient of the process.
3-2
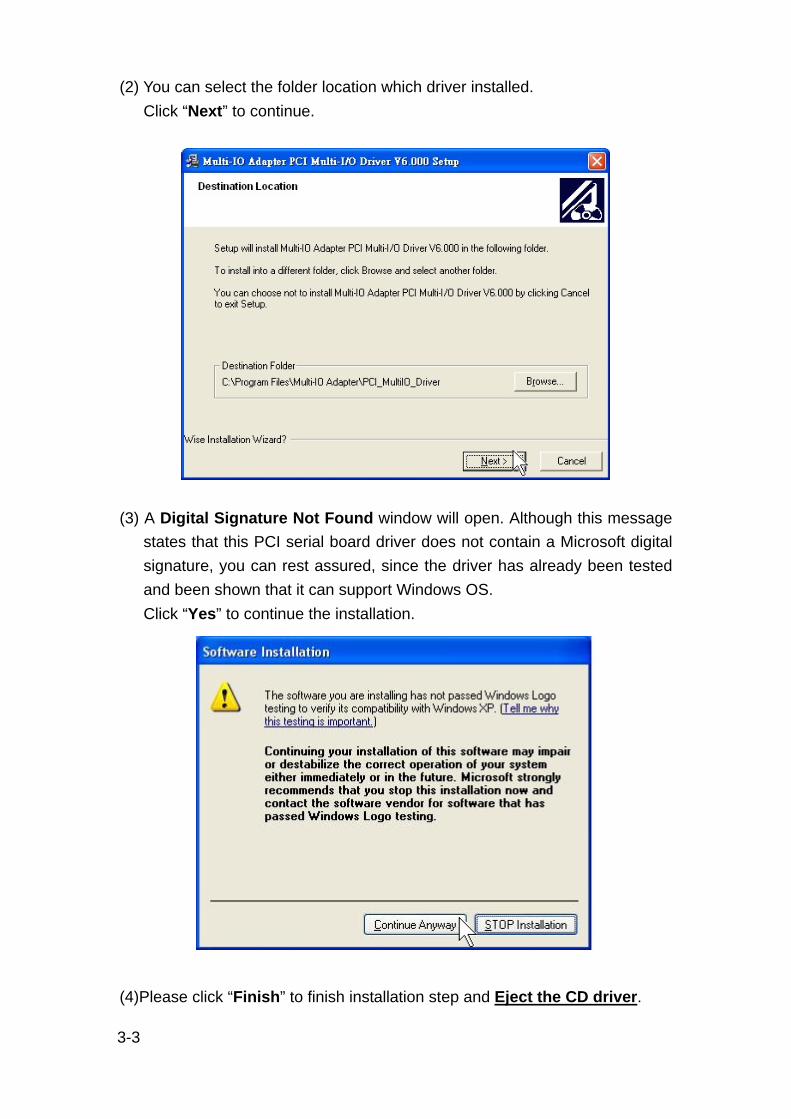
(2) You can select the folder location which driver installed. Click “Next” to continue.
(3) A Digital Signature Not Found window will open. Although this message
states that this PCI serial board driver does not contain a Microsoft digital signature, you can rest assured, since the driver has already been tested and been shown that it can support Windows OS. Click “Yes” to continue the installation.
(4)Please click “Finish” to finish installation step and Eject the CD driver. 3-3

(5)New “PCI Serial Port” will be found in Found New Hardware Wizard window. Select “Install the software automatically (Recommend) ” and click “Next”.
(6)A Digital Signature Not Found window will open. Although this message
states that this PCI serial board driver does not contain a Microsoft digital signature, you can rest assured, since the driver has already been tested and been shown that it can support Windows OS. Click “Continue Anyway” to continue the installation.
3-4

(7)System will install “PCI Serial Port” driver automatically.
(8)Please click “Finish” to finish installation step.
Note: The “Found New Hardware Wizard” windows will show up and re-install driver several times until you finish installing each serial port. Please repeat step(5) to step(8) installation steps.
3-5

3-6
Configure the Serial Port Settings 1. Please launch the “Device Manager” from Start Control Panel System 2. Right click the “PCI Serial Port (COMXXX)” item from the “Ports (COM &
LPT)” sub-tree and click “Properties”.
3. Click “Port Settings” tab page and click “Advanced” for advanced settings.

4. Click “Defaults” button for restoring default advanced settings.
5. Check/un-check the “Enable CTS/RTS Auto Flow Control” checkbox to
enable/ disable the hardware auto flow control feature.
3-7

6. Check/Un-check the “Use FIFO buffers control” checkbox to enable / disable the hardware FIFO buffering feature or you can select the size of FIFO if “Use FIFO buffers control” is enabled.
Also you can use software FIFO length from 128 byte to 128K byte. There is more detail introduction in trouble shooting chapter FAQ8.
3-8

7. Re-map the COM port number by select a free COM port number from the “COM Port Number” combo box. The (in use) means this COM port number is used by another COM port.
8. Click “OK” to save your settings, and repeat above steps for each serial port.
3-9

Uninstalling Device (1) Please launch the “Add or Remove Programs” in control panel
Start > Control Panel > Add or Remove Programs (2) Please select PCI Multi-I/O Driver, and click “Change/Remove” button to
uninstall driver.
(3) Please click “Uninstall” in Multi-IO Adapter Uninstall Wizard then system
will uninstall your PCI serial board automatically.
3-10

Windows 2000/XP/2003 (32-bit WHQL) The following procedure is for installing PCI serial board driver under 32- bit hardware system under Windows 2000, XP and 2003. This driver is certified by Microsoft. You can get more detail in trouble shootings chapter FAQ9.
Installing Driver On booting up, system will detect present of the PCI Serial Board and prompt for driver installation wizard. Please insert the CD driver bound with PCI serial board into you CD/DVD ROM.
(1) Please select “Install from a list or specific location (Advanced)” and click “Next” to continue in Found New Hardware Wizard window.
(2) Click “Browse..”, and specify the driver locate within the CD driver.
Click “Next” to continue.
:\IO\PCI IO\WHQL Driver for 2K_XP_2003\
3-11

(3) System will install the appropriate driver automatically.
(4) Please click “Finish” to end of PCI serial board installation steps.
Note: The “Found New Hardware Wizard” windows will show up and re-install driver several times until you finish installing each serial port. Please repeat step(1) to step(4) installation steps.
3-12

3-13
Configure the Serial Port Settings 1. Please launch the “Device Manager” from Start Control Panel System 2. Right click the “PCI Serial Port (COMXXX)” item from the “Ports (COM &
LPT)” sub-tree and click “Properties”.
3. Click “Port Settings” tab page and click “Advanced” for advanced settings.

4. Click “Defaults” button for restoring default advanced settings.
5. Check/un-check the “Enable CTS/RTS Auto Flow Control” checkbox to
enable/ disable the hardware auto flow control feature.
3-14

6. Check/Un-check the “Use FIFO buffers control” checkbox to enable / disable the hardware FIFO buffering feature or you can select the size of FIFO if “Use FIFO buffers control” is enabled.
7. Re-map the COM port number by select a free COM port number from the “COM Port Number” combo box. The (in use) means this COM port number is used by another COM port.
8. Click “OK” to save your settings, and repeat above steps for each serial port. 3-15

Uninstalling Device 1. Please launch the “Device Manager” from Start Control Panel System 2. Expand the “Multifunction adapter” sub-tree and right-click the mouse on
“PCI xxxx Multi-I/O Adapter” item, and select “Uninstall”.
3. A “Confirm Device Removal” Warning window will open. Click “OK” to uninstall the device.
3-16
Windows XP/2003 (64-bit) The following procedure is for installing PCI serial board driver under 64- bit operation system Windows XP and 2003 including both INTEL and AMD 64-bit hardware systems. INTEL: Windows XP 64-Bit Edition Version 2003 for 64-Bit Itanium-based Systems (IA64) & Windows Server 2003 for 64-Bit Itanium-based Systems (IA64) AMD: Windows XP 64-Bit Edition Version 2003 for 64-Bit Extended Systems (AMD64) & Windows Server 2003 for 64-Bit Extended Systems (AMD64)
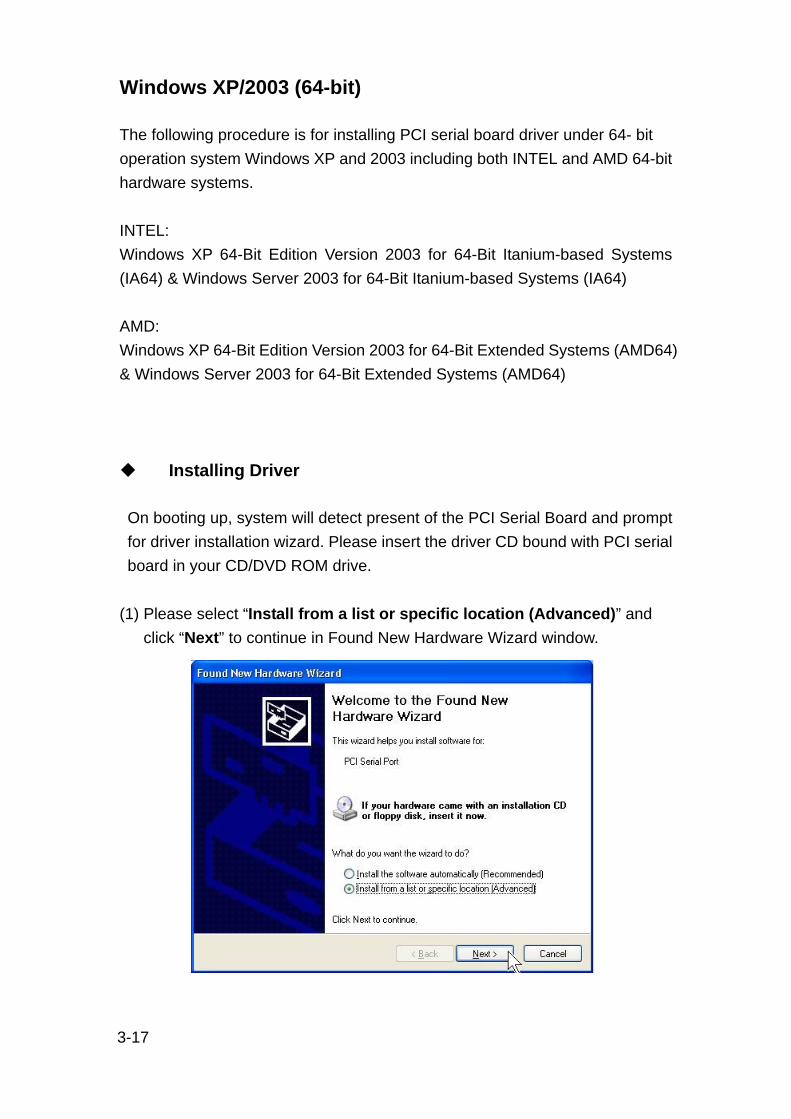
Installing Driver On booting up, system will detect present of the PCI Serial Board and prompt for driver installation wizard. Please insert the driver CD bound with PCI serial board in your CD/DVD ROM drive.
(1) Please select “Install from a list or specific location (Advanced)” and
click “Next” to continue in Found New Hardware Wizard window.
3-17

(2) Click “Browse..”, and specify the driver locate within the CD drive as bound with PCI serial board. Click “Next” to continue.
(3) A Digital Signature Not Found window will open. Although this message
states that this PCI serial board driver does not contain a Microsoft digital signature, you can rest assured, since the driver has already been tested and been shown that it can support Windows OS.
Click “Continue Anyway” to continue the installation.
:\IO\PCI IO\Win2K and XP_64 bit\
3-18

(4)System will install the appropriate driver automatically.
(5) Please click “Finish” to end of PCI serial board installation steps.
Note: The “Found New Hardware Wizard” windows will show up and re-install driver several times until you finish installing each serial port. Please repeat step(1) to step(5) installation steps.
3-19
3-20
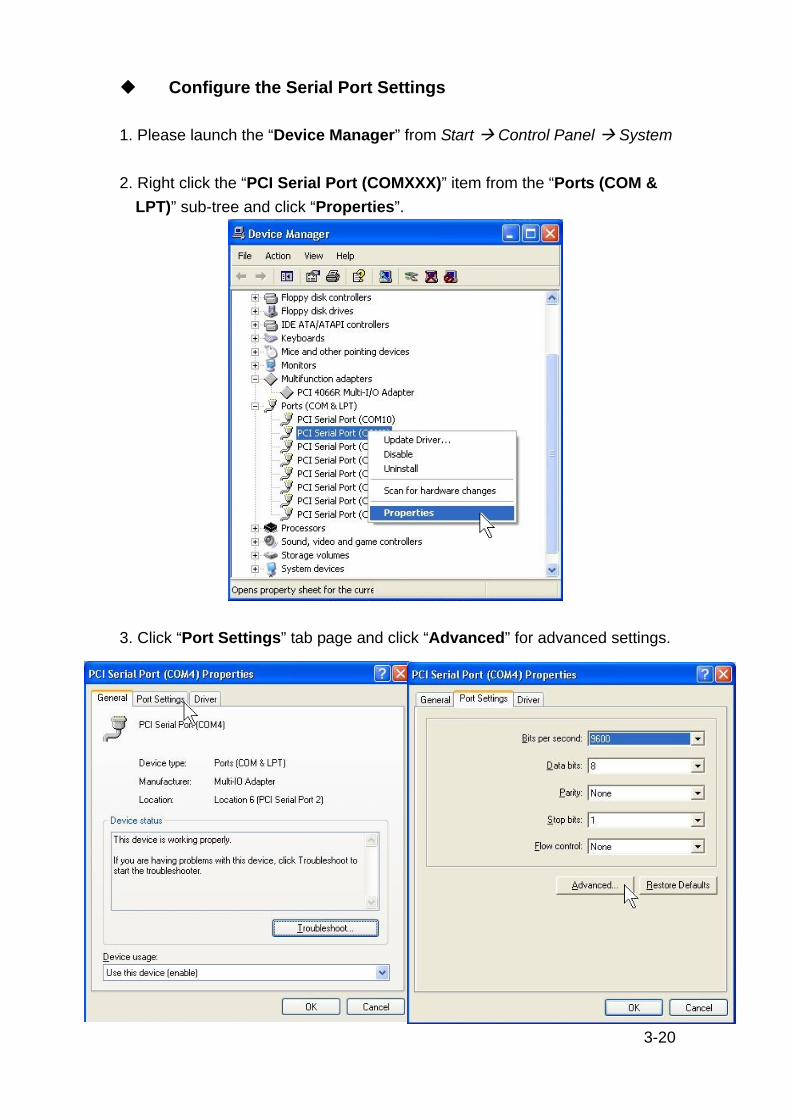
Configure the Serial Port Settings 1. Please launch the “Device Manager” from Start Control Panel System 2. Right click the “PCI Serial Port (COMXXX)” item from the “Ports (COM &
LPT)” sub-tree and click “Properties”.
3. Click “Port Settings” tab page and click “Advanced” for advanced settings.

4. Click “Defaults” button for restoring default advanced settings.
5. Check/un-check the “Enable CTS/RTS Auto Flow Control” checkbox to
enable/ disable the hardware auto flow control feature.
3-21
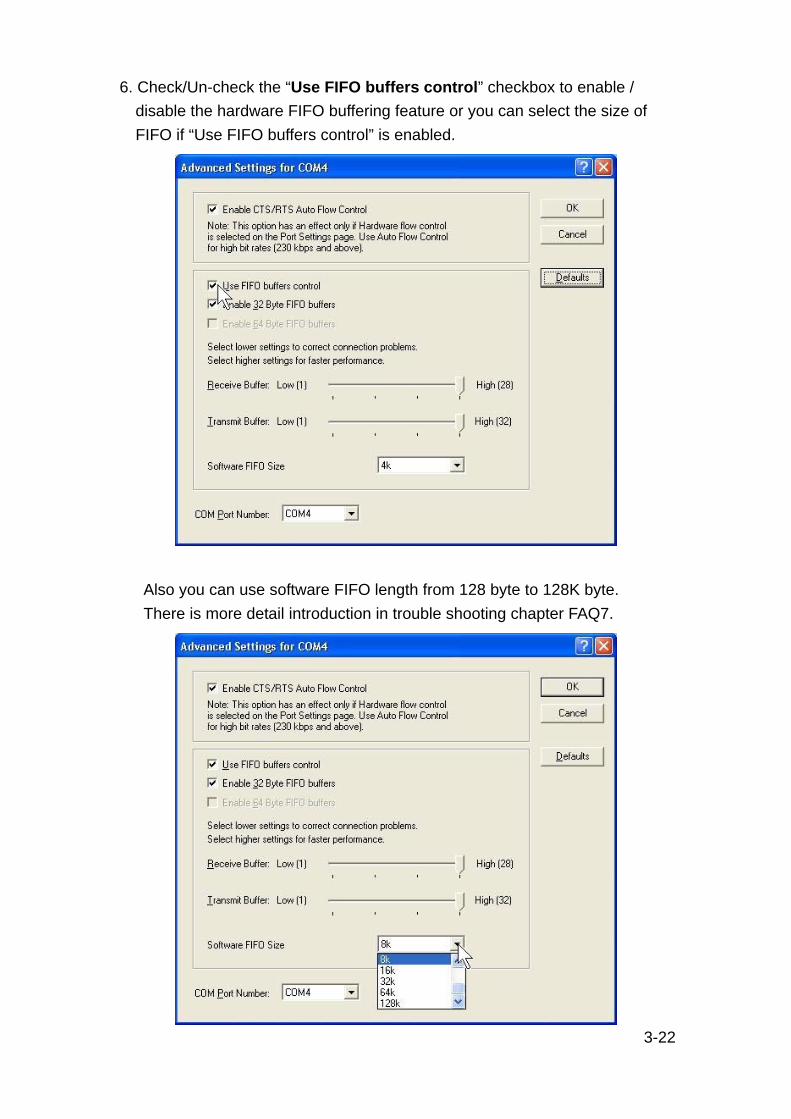
6. Check/Un-check the “Use FIFO buffers control” checkbox to enable / disable the hardware FIFO buffering feature or you can select the size of FIFO if “Use FIFO buffers control” is enabled.
Also you can use software FIFO length from 128 byte to 128K byte. There is more detail introduction in trouble shooting chapter FAQ7.
3-22

7. Re-map the COM port number by select a free COM port number from the “COM Port Number” combo box. The (in use) means this COM port number is used by another COM port.
8. Click “OK” to save your settings, and repeat above steps for each serial port.
3-23

Uninstalling Device 1. Please launch the “Device Manager” from Start Control Panel System 2. Expand the “Multifunction adapter” sub-tree and right-click the mouse on
“PCI xxxx Multi-I/O Adapter” item, and select “Uninstall”.
3. A “Confirm Device Removal” Warning window will open. Click “OK” to uninstall the device.
3-24

Windows 95/98/Me The following procedure is for installing PCI serial board driver under Windows 95/98/Me.
Installing Driver 1. System will detect a new PCI Serial Card installing, and “Add New Hardware
Wizard” will show up to assist you in setting up the new device. Click “Next” to continue.
2. Please select “Search for the best driver for your device (Recommended)”
and click “Next” to continue.
3-25

3. Please select “Specify a location” and click “Browse” button to specify the driver locate within the CD drive as bound with PCI serial board. Click “Next” to continue.
:\IO\PCI IO\Win9x\
3-26

4. System will detect a “Multi IO Controller” and search the appropriate driver for PCI Serial Board. Click “Next” to continue.
5. System will install the driver automatically, then click “Finish” to end of
installation steps.
Note: System will detect and install each serial port automatically, and please be patient with the installation process. 3-27

3-28
Configure the Serial Port Settings 1. Please launch the “Device Manager” from Start Control Panel System 2. Right click the “PCI Serial Port (COMXXX)” item from the “Ports (COM &
LPT)” sub-tree and click “Properties”.
3. Click “Port Settings” tab page and click “Advanced” for advanced settings.

4. Click “Defaults” button for restoring default advanced settings.
5. Check/un-check the “Enable CTS/RTS Auto Flow Control” checkbox to
enable/ disable the hardware auto flow control feature.
6. Check/Un-check the “Use 16 Byte FIFO buffers” or “Use 32 Byte FIFO buffers” checkbox to enable / disable the hardware FIFO buffering feature or you can select the size of FIFO if “Use FIFO buffers control” is enabled.
7. Click “OK” to save your settings. Repeat above steps for each serial port. 3-29

Uninstalling Device 1. Please launch the “Add/Remove Programs” from Start Control Panel
Add/Remove Programs
2. Please select “PCI Multi-I/O Card”, and click “Add/Remove”.
3-30

3. Please click “Yes” to remove PCI Multi-I/O card.
4. System will uninstall both driver and device automatically. Please click “Yes”
to restart your computer.
3-31

Windows NT The following procedure is for installing PCI serial board driver under Windows NT.
Installing Driver 1. Please insert the CD Driver bound with PCI serial board into your CD/ DVD
ROM, and then run under the Setup.exe program.
2. Press “Continue” to install the driver. 3. Click “OK” to reboot computer to load the new installed driver to NT.
: \IO\PCI IO\WinNT\Setup.exe
3-32

4. Please launch the “Windows NT Diagnostics” from Start Programs Administrative Tools [Common] Windows NT Diagnostics
5. Please press “Resources” tab page and click “I/O Port. Yu can find the I/O
address of four serial ports (SNXSER). Or you can find the IRQ information by press “IRQ” tab page.
3-33

3-34
Configure the Serial Port Settings 1. Double click “Add/Remove Programs” in control panel.
2. Press “PCI/ISA Serial Ports” and select the serial port you want to configure,
press “Setup” to configure the serial port.
3. Set the 32 byte FIFO or Auto Flow Control or Receive Trigger Level, click
“Ok”.

3-35
Uninstalling Device 1. Double click “Add/Remove Programs” in control panel. 2. Select “Multi-I/O Card Uninstall” and click “Add/Remove” button.
3. Click “OK” to remove Multi-I/O card driver and click “OK” to reboot your PC.

Windows 3.1 This installation guide describes the procedures to install the PCI Serial Board in Microsoft Windows 3.1 operation system. Normally PCI Serial Board can be supported by Windoes 3.1 default driver. However there are only 4 serial ports (3F8h,2F8h, 3E8h,2E8h) are supported by default. Most likely the PCI serial ports are different from the above configuration (eg. I/O address or IRQ), these ports setting need to changed / modified in WIindoes 3.1 manually. However it is necessary to inquire these PCI Serial Board's resources in advance.
Installing Driver 1. Please insert the CD Driver bound with PCI serial board into your CD/ DVD
ROM, and then run PCIDOS.exe program. 2. Start the Windows 3.1.
: \IO\PCI IO\DOS\PCIDOS.exe
On-Board/ISA Serial COM1 3f8H On-Board/ISA Serial COM2 2f8H PCI Serial COM3 b800H,IRQ 10 PCI Serial COM4 b808H,IRQ 10 On-Board/ISA Parallel LPT1 3bcH
3-36

2. Change the port settings in Control Panel
3. Restart the system
3-37

Check the new settings 1. After system restart, the I/O port settings maybe become DEFAULT.
At this time, it is possible to check the PCI serial port setting in \windows\system.ini file. ….. ….. [386Enh] ….. ….. COM3Base=B800 COM4Base=B808 COM3Irq=10 COM4Irq=10 …..
NOTE : Since the PCI Serial Board is drive by a higher CLK (14.7456 Mhz), thus the actual baud rate is 8 times higher than the BIOS/DOS baud rate setting. The following table shows the relation. Clock= 14.7456 Mhz for all non-remapable port
Item Actual Baud rate BIOS/DOS setting Remark 1 921600 115200 2 460800 57600 3 230400 28800 Non BIOS standard 4 115200 14400 Non BIOS standard 5 57600 7200 Non BIOS standard 6 38400 4800 7 19200 2400 8 9600 1200 9 4800 600 Non BIOS standard 10 2400 300 11 1200 150 12 300 37.5 Non BIOS standard
3-38

Windows CE.NET This installation guide describes the procedures to install the PCI Serial Board in Microsoft Windows CE.NET (Ver4.2 or 5.0) operation system on x86 systems.
Driver Compiling 1. Preparation prior to installation: Copy driver file into the your platform BSP "File" folder. :\IO\PCI IO\WinCE\
(SUN1889.DLL, SUN1699.DLL, SerialCardControl.exe) Path Example : _WINCEROOT\Platform\MyBSP\File\ ("_WINCEROOT" is your platform builder folder name) ("MyBSP" is your platform BSP base name) 2. Install PCI Serial Board Driver for PCI Bus The platform setting must meet the following requirements. (1) Edit the _WINCEROOT\Platform\MyBSP\Files\Platform.bib file, Insert CopyFile command into the MODULES section. ("_WINCEROOT" is your platform builder folder name) ("MyBSP" is your platform BSP base name) ;Example : SUN1699.dll $(_FLATRELEASEDIR)\SUN1699.dll NK SH SUN1889.dll $(_FLATRELEASEDIR)\SUN1889.dll NK SH SerialDriverControl.exe
$(_FLATRELEASEDIR)\SerialDriverControl.exe NK SH (2) Edit the _WINCEROOT\Platform\MyBSP\Files\Platform.reg file,
Insert your serial card PCI Bus setting of file end, ** Property illustration at [9.Other information] step(1). ("_WINCEROOT" is your platform builder folder name) ("MyBSP" is your platform BSP base name) 3-39

;Example : ;----------------------------------------------------------------------- ; Sun1889 PCI Serial Card Bus Driver Setting ; Property illustrations at [9.Other information] step(1). ; Please puts Bus Driver setting in the PCI Template folder,
ex:[...Drivers\BuiltIn\PCI\Template\Sunix] [HKEY_LOCAL_MACHINE\Drivers\BuiltIn\PCI\Template\SUN1889] "Prefix"="SUN" "Dll"="SUN1889.Dll" "Class"=dword:07 "SubClass"=dword:00 "ProgIF"=dword:02 "VendorID"=multi_sz:"1409" "DeviceID"=multi_sz:"7168" "DeviceArrayIndex"=dword:0 "IsrDll"="giisr.dll" "IsrHandler"="ISRHandler" ;----------------------------------------------------------------------- (3) Edit the _WINCEROOT\Platform\MyBSP\Files\Platform.reg file,
Insert your Serial Port setting of file end, ** Property illustration at [3.Other information] step(2). ("_WINCEROOT" is your platform builder folder name) ("MyBSP" is your platform BSP base name) ;Example : ;-----------------------------------------------------------------------
[HKEY_LOCAL_MACHINE\Drivers\BuiltIn\PCI\Template\SUN1889\MySerial]
"Prefix"="COM" "Dll"="SUN1699.Dll" "Class"=dword:07 "SubClass"=dword:00 "ProgIF"=dword:02 "VendorID"=multi_sz:"1409" "DeviceID"=multi_sz:"7168" "DeviceArrayIndex"=dword:1 "UARTIndex"=dword:1 "Index"=dword:2 "EnableRTSCTSAutoFlowControl"=dword:0
3-40

"WaterMarkerMode"=dword:1 "WaterMarker"=dword:1C [HKEY_LOCAL_MACHINE\Drivers\BuiltIn\PCI\Template\SUN1889\MySer
ial\Unimodem] "Tsp"="Unimodem.dll" "DeviceType"=dword:0 "FriendlyName"=LOC_FRIENDLYNAME_SERIAL2 "DevConfig"=hex: 10,00, 00,00, 05,00,00,00, 10,01,00,00,
00,4B,00,00, 00,00, 08, 00, 00, 00,00,00,00 ;----------------------------------------------------------------------- ;Example the second Port ;----------------------------------------------------------------------- [HKEY_LOCAL_MACHINE\Drivers\BuiltIn\PCI\Template\SUN1889\MySer
ial2] "Prefix"="COM" "Dll"="SUN1699.Dll" "Class"=dword:07 "SubClass"=dword:00 "ProgIF"=dword:02 "VendorID"=multi_sz:"1409" "DeviceID"=multi_sz:"7168" "DeviceArrayIndex"=dword:2 "UARTIndex"=dword:2 "Index"=dword:3 "EnableRTSCTSAutoFlowControl"=dword:0 "WaterMarkerMode"=dword:1 "WaterMarker"=dword:1C [HKEY_LOCAL_MACHINE\Drivers\BuiltIn\PCI\Template\SUN1889\MySeri
al2\Unimodem] "Tsp"="Unimodem.dll" "DeviceType"=dword:0 "FriendlyName"=LOC_FRIENDLYNAME_SERIAL3 "DevConfig"=hex: 10,00, 00,00, 05,00,00,00, 10,01,00,00,
00,4B,00,00, 00,00, 08, 00, 00, 00,00,00,00 ;----------------------------------------------------------------------- 3-41

;Example the three Port; ;----------------------------------------------------------------------- [HKEY_LOCAL_MACHINE\Drivers\BuiltIn\PCI\Template\SUN1889\MySer
ial3] "Prefix"="COM" "Dll"="SUN1699.Dll" "Class"=dword:07 "SubClass"=dword:00 "ProgIF"=dword:02 "VendorID"=multi_sz:"1409" "DeviceID"=multi_sz:"7168" "DeviceArrayIndex"=dword:3 "UARTIndex"=dword:3 "Index"=dword:4 "EnableRTSCTSAutoFlowControl"=dword:0 "WaterMarkerMode"=dword:1 "WaterMarker"=dword:1C [HKEY_LOCAL_MACHINE\Drivers\BuiltIn\PCI\Template\SUN1889\MySer
ial3\Unimodem] "Tsp"="Unimodem.dll" "DeviceType"=dword:0 "FriendlyName"=LOC_FRIENDLYNAME_SERIAL4 "DevConfig"=hex: 10,00, 00,00, 05,00,00,00, 10,01,00,00,
00,4B,00,00, 00,00, 08, 00, 00, 00,00,00,00 ;----------------------------------------------------------------------- (4) Build your platform system.
3-42

3-43
3. Other information (1) PCI Bus property : (to be careful of dword is hexadecimal) "Prefix"="SUN" (Set "SUN")) "Dll"="SUN1889.Dll" (Set "SUN1889.Dll)) "Class"=dword:07 (Serial Card Class Number) "SubClass"=dword:00 (Serial Card SubClass Number) "ProgIF"=dword:02 (Serial Card ProgIF Number) "VendorID"=multi_sz:"1409" (Serial Card VendorID Number) "DeviceID"=multi_sz:"7168" (Serial Card DeviceID Number) "DeviceArrayIndex"=dword:0 (Device Array Index,zero is initializes) "IsrDll"="giisr.dll" (Set "giisr.dll") "IsrHandler"="ISRHandler" (Set "ISRHandler") Serial Port property : (to be careful of dword is hexadecimal) "Prefix"="COM" (Set "COM") "Dll"="SUN1699.DLL" (Set "SUN1699.DLL") "IoBase"=dword:0268 (This is you serial card IoBase jump
Setting) ※How to keeps IoBase.please reference Windows CE
menu,Resource manager section "IoLen"=dword:8 (Set 8) "SysIntr"=dword:1C (This is you serial card IRQ jump setting value add 16)(example : IRQ = 3, SysIntr = 13)(HEX). ※How to keeps IRQ.please reference Windows CE menu,Resource manager section) "Index"=dword:2 (This is you serial port number)
(This property can be ignored.) "EnableRTSCTSAutoFlowControl"=dword:0 (This property is setting hardware flow control state. this property can be ignored. defauld is disabled. "WaterMarkerMode"=dword:1 (This property is setting Buffer Size (16/32 Bytes). this property can be ignored. defauld is 32 Bytes.(16 Bytes : 0,32 Bytes : 1) "WaterMarker"=dword:1C (This property is setting FIFO level. this property can be ignored. defauld is 28bytes.(16 bytes: 1 / 4 / 8 / 15(E), 32 bytes: 1 / 16(10) / 24(18) / 28(1C)) Unimodem property : "Tsp"="Unimodem.dll" (Set "Unimodem.dll") "DeviceType"=dword:0 (please reference Windows CE menu)

"FriendlyName"=LOC_FRIENDLYNAME_SERIAL3 (**Attention!!) (if you want use "LOC_FRIENDLYNAME_SERIAL5" ( > 4) key words, you maybe need string define of the language file, please reference Windows CE menu) "DevConfig"=hex: 10,00, ...... (please reference Windows CE menu) (2) If you sure, want use the same motherboard standard serial port IoBase
or IRQ( 02F8, 03E8, 02E8... IRQ3, IRQ4, IRQ5). Then, Your mainboard standard serial port must be disabled. And also need to mark standard serial port registry in the platform.reg please following step.
(please reference Windows CE menu) (1) Disabled motherboard step. BIOS --> CHIPSET FEATURES SETUP --> Onboard Serial Port 1-->
change setting to disabled. BIOS --> CHIPSET FEATURES SETUP --> Onboard Serial Port 2-->
change setting to disabled. BIOS --> CHIPSET FEATURES SETUP --> Parallel Port --> change
setting to disabled. (2) Mark standard serial port registry. please open platform.reg. Find string "[HKEY_LOCAL_MACHINE\Drivers\BuiltIn\Serial]" You will find this section. ; @CESYSGEN IF CE_MODULES_SERIAL IF BSP_NOSERIAL ! [HKEY_LOCAL_MACHINE\Drivers\BuiltIn\Serial] "SysIntr"=dword:13 "IoBase"=dword:02F8 "IoLen"=dword:8 "DeviceArrayIndex"=dword:0 "Prefix"="COM" "IClass"="{CC5195AC-BA49-48a0-BE17-DF6D1B0173DD}" "Dll"="Com16550.Dll" "Order"=dword:0 "Priority"=dword:0 ; Turn on follows for Installable ISR (isr16550 supporting SOFTWARE
FIFO ; "Irq"=dword:3
3-44

; "IsrDll"="isr16550.dll" ; "IsrHandler"="ISRHandler" [HKEY_LOCAL_MACHINE\Drivers\BuiltIn\Serial\Unimodem] "Tsp"="Unimodem.dll" "DeviceType"=dword:0 "FriendlyName"=LOC_FRIENDLYNAME_SERIAL "DevConfig"=hex: 10,00, 00,00, 05,00,00,00, 10,01,00,00, 00,4B,00,00, 00,00, 08, 00, 00, 00,00,00,00 ENDIF BSP_NOSERIAL ! IF BSP_SERIAL2 [HKEY_LOCAL_MACHINE\Drivers\BuiltIn\Serial2] "SysIntr"=dword:14 "IoBase"=dword:03E8 "IoLen"=dword:8 "DeviceArrayIndex"=dword:1 "Prefix"="COM" "IClass"="{CC5195AC-BA49-48a0-BE17-DF6D1B0173DD}" "Dll"="Com16550.Dll" "Order"=dword:0 [HKEY_LOCAL_MACHINE\Drivers\BuiltIn\Serial2\Unimodem] "Tsp"="Unimodem.dll" "DeviceType"=dword:0 "FriendlyName"=LOC_FRIENDLYNAME_SERIAL2 "DevConfig"=hex: 10,00, 00,00, 05,00,00,00, 10,01,00,00, 00,4B,00,00, 00,00, 08, 00, 00, 00,00,00,00 ENDIF BSP_SERIAL2 IF BSP_SERIAL3 [HKEY_LOCAL_MACHINE\Drivers\BuiltIn\Serial3] "SysIntr"=dword:15 "IoBase"=dword:02E8 "IoLen"=dword:8 "DeviceArrayIndex"=dword:2 "Prefix"="COM" "IClass"="{CC5195AC-BA49-48a0-BE17-DF6D1B0173DD}" "Dll"="Com16550.Dll" "Order"=dword:0 3-45

[HKEY_LOCAL_MACHINE\Drivers\BuiltIn\Serial3\Unimodem] "Tsp"="Unimodem.dll" "DeviceType"=dword:0 "FriendlyName"=LOC_FRIENDLYNAME_SERIAL3 "DevConfig"=hex: 10,00, 00,00, 05,00,00,00, 10,01,00,00, 00,4B,00,00, 00,00, 08, 00, 00, 00,00,00,00 ENDIF BSP_SERIAL3 (3) Please use ";" character mark all registry. IF BSP_NOSERIAL ! ;[HKEY_LOCAL_MACHINE\Drivers\BuiltIn\Serial] ; "SysIntr"=dword:13 ; "IoBase"=dword:02F8 ; "IoLen"=dword:8 ; "DeviceArrayIndex"=dword:0 ; "Prefix"="COM" ; "IClass"="{CC5195AC-BA49-48a0-BE17-DF6D1B0173DD}" ; "Dll"="Com16550.Dll" ; "Order"=dword:0 ; "Priority"=dword:0 ;; Turn on follows for Installable ISR (isr16550 supporting SOFTWARE FIFO ;; "Irq"=dword:3 ;; "IsrDll"="isr16550.dll" ;; "IsrHandler"="ISRHandler" ;[HKEY_LOCAL_MACHINE\Drivers\BuiltIn\Serial\Unimodem] ; "Tsp"="Unimodem.dll" ; "DeviceType"=dword:0 ; "FriendlyName"=LOC_FRIENDLYNAME_SERIAL ; "DevConfig"=hex: 10,00, 00,00, 05,00,00,00, 10,01,00,00, 00,4B,00,00, 00,00, 08, 00, 00, 00,00,00,00 ENDIF BSP_NOSERIAL ! IF BSP_SERIAL2 ;[HKEY_LOCAL_MACHINE\Drivers\BuiltIn\Serial2] ; "SysIntr"=dword:14 ; "IoBase"=dword:03E8
3-46

; "IoLen"=dword:8 ; "DeviceArrayIndex"=dword:1 ; "Prefix"="COM" ; "IClass"="{CC5195AC-BA49-48a0-BE17-DF6D1B0173DD}" ; "Dll"="Com16550.Dll" ; "Order"=dword:0 ;[HKEY_LOCAL_MACHINE\Drivers\BuiltIn\Serial2\Unimodem] ; "Tsp"="Unimodem.dll" ; "DeviceType"=dword:0 ; "FriendlyName"=LOC_FRIENDLYNAME_SERIAL2 ; "DevConfig"=hex: 10,00, 00,00, 05,00,00,00, 10,01,00,00, 00,4B,00,00, 00,00, 08, 00, 00, 00,00,00,00 ENDIF BSP_SERIAL2 IF BSP_SERIAL3 ;[HKEY_LOCAL_MACHINE\Drivers\BuiltIn\Serial3] ; "SysIntr"=dword:15 ; "IoBase"=dword:02E8 ; "IoLen"=dword:8 ; "DeviceArrayIndex"=dword:2 ; "Prefix"="COM" ; "IClass"="{CC5195AC-BA49-48a0-BE17-DF6D1B0173DD}" ; "Dll"="Com16550.Dll" ; "Order"=dword:0 ;[HKEY_LOCAL_MACHINE\Drivers\BuiltIn\Serial3\Unimodem] ; "Tsp"="Unimodem.dll" ; "DeviceType"=dword:0 ; "FriendlyName"=LOC_FRIENDLYNAME_SERIAL3 ; "DevConfig"=hex: 10,00, 00,00, 05,00,00,00, 10,01,00,00, 00,4B,00,00, 00,00, 08, 00, 00, 00,00,00,00 ENDIF BSP_SERIAL3 (3) SerialDriverControl.exe application reference "Microsoft Foundation
Classes (MFC)" Library, and your platform must be include this item.(use catalog add this item) (please reference Windows CE menu)
3-47

3-48
DOS This installation guide describes the procedures to install the PCI serial board in MS-DOS environment. Normally serial I/O ports can be supported by BIOS call services in DOS environment. However there are only support 4 serial ports (3F8h, 2F8h, 3E8h, 2E8h) are supported by BIOS/DOS. In case the RS-232 serial ports are different from the above configurations (e.g. I/O address or more than 4 serial ports), they are not supported by BIOS/DOS directly. However some applications (e.g. "PComm Plus" could support 8 serial ports and each I/O address is settable) have their own driver, thus PCI Serial Board could work correctly.
Installing Driver 1. Please insert the CD Driver bound with PCI serial board into your CD/ DVD
ROM, and then run PCIDOS.exe program.
2. Enter the destination subdirectory
You could enter your preferred destination subdirectory for installation, RETURN for default path. Once the dos driver has been installed successfully, the response looks like below.
Note:
(1). The installation program will add the dos driver (one command line) "C:\PCI_DOS\PciDos.exe AUTO" to autoexec.bat file. The original batch file will be saved to autoexec.SNX.
(2). For uninstallation, just restore autoexec.snx into autoexec.bat.
Please enter the directory path for installation C:\PCI_DOS (return for default)
succeed ...Press Any Key
: \IO\PCI IO\DOS\PCIDOS.exe

3. Start the dos driver automatically
Once the installation is completed, Install.exe will start the dos driver (PciDos.exe) automatically. This means that it is not necessary to restart the system once again.
Note : This display is dependent on which PCI card you have.
4. Check / inquire the PCI card information
You could run SunixPCI.exe any time to inquire the PCI serial and parallel port's I/O address & IRQ information.
ISA PCI Setup Card About On-Board/ISA Serial COM1 3f8H On-Board/ISA Serial COM2 2f8H PCI Serial COM3 Remap 3e8H,IRQ 11 PCI Serial COM4 Remap 2e8H,IRQ 11 On-Board/ISA Parallel LPT1 3bcH
ESC: Exit
ISA (ALT-I) : Detect on-board/ISA legacy serial /parallel ports. PCI (ALT-P) : Find PCI serial /paralles ports.
Setup (ALT-S) : Remap PCI serial port to legacy port/display port resources. Card (ALT-C) : Display PCI card model.
Store (ALT-R) : Store a configuration file to c:\snxcfg.txt In this file the user find detailed information of every port from all PCI cards in the Slot. In the program window the user can see only the fisrt ten
ports, in the file snxcfg.txt all ports of all PCI Cards are listed. About (ALT-A) : Version Information.
On-Board/ISA Serial COM1 3f8H On-Board/ISA Serial COM2 2f8H PCI Serial COM3 Remap 3e8H,IRQ 11 PCI Serial COM4 Remap 2e8H,IRQ 11 On-Board/ISA Parallel LPT1 3bcH
3-49

NOTE : Since the PCI Serial Board is drive by a higher CLK (14.7456 Mhz), thus the actual baud rate is 8 times higher than the BIOS/DOS baud rate setting. The following table shows the relation. Clock= 14.7456 Mhz for all non-remapable port
Item Actual Baud rate BIOS/DOS setting Remark 1 921600 115200 2 460800 57600 3 230400 28800 Non BIOS standard 4 115200 14400 Non BIOS standard 5 57600 7200 Non BIOS standard 6 38400 4800 7 19200 2400 8 9600 1200 9 4800 600 Non BIOS standard 10 2400 300 11 1200 150 12 300 37.5 Non BIOS standard
3-50

Linux This installation guide describes the procedures to install the PCI serial board in Linux kernel 2.0.x, 2.2.x, 2.4.x and 2.6.x. The following demonstration is showing the compiling steps under kernel 2.4.x or 2.6.x. Or you can check the other Kernel version in CD driver as bound with PCI serial board.
Overview 1. Please insert the CD driver as bound with PCI serial board into you CD or
DVD ROM. Then open the folder :
This package contains patches to the Linux kernel sources for both 2.4.x and 2.6.x series kernels. The patch modifies the serial driver provided by the kernel and will add an additional kernel module which handles card detection.
2. There are separate patches for 2.4.x and 2.6.x kernel versions in the folder.
The 2.4.x patch has been tested with the Linux kernel source version 2.4.20 and 2.4.27. However, it should work with other versions as well.
The 2.6.x patch has been tested with the Linux kernel source version 2.6.8.1. However, it should work with other versions as well.
: \IO\PCI IO\Linux\
: \IO\PCI IO\Linux\Kernel2.6.x\
3-51

Installation Steps In order to apply the patch the Linux kernel sources need to be installed and the kernel needs to be compiled. Refer to the documentation that came with your Linux distribution for information on how to do that. Normally, the kernel sources will be installed under /usr/src/linux. Often, this directory is a symbolic link that points to the location where the sources reside. When the kernel sources are installed and you are able to successfully build a kernel then follow the installation instructions given below to apply the patch. Kernel 2.4.x 1. Copy the patch file sunix_multi_io_patch_2.4.x.diff to /usr/src. 2. Change to the directory /usr/src/linux. 3. To apply the patch issue the following command: patch -p1 < ../sunix_multi_io_patch_2.4.x.diff Warnings produced by patch can be ignored. 4. To configure the kernel run the following command: make menuconfig Alternatively, you can use the command recommended by your Linux distribution, e.g. make xconfig 5. In the kernel configuration menus make sure that the options parport, parport_pc and serial are selected. These options can be found at the following locations: Parallel port support -> parport Parallel port support -> PC-style hardware -> parport_pc Character devices -> Standard/generic (8250/16550 and compatible UARTs) serial support
-> serial
3-52

If one of these options is selected to compile as a module then the PCI serial board support has also to be compiled as a module. See the next step for details. 6. Now the following new kernel config option is available: Character devices -> Standard/generic (8250/16550 and compatible UARTs) serial support -> Sunix Multi I/O PCI Card support Enable the option "Sunix Multi I/O PCI Card support". If one of the options
parport, parport_pc or serial in the previous step was selected to compile as a module then this option has also to be compiled as a module.
7. Build and install the kernel. Refer to the documentation of your Linux distribution for more information on the required steps. 8. When the new kernel is running, the driver will be automatically loaded and
initialized if compiled as a static driver. If the SUNIX driver was compiled as a module then it needs to be loaded with the following command:
modprobe snx_multi_io You can decide to add this command to an init script. Now the PCI Serial Board driver should work and the serial ports are available to the system. 3-53

Kernel 2.6.x 1. Copy the patch file sunix_multi_io_patch_2.6.x.diff to /usr/src. 2. Change to the directory /usr/src/linux. 3. To apply the patch issue the following command: patch -p1 < ../sunix_multi_io_patch_2.6.x.diff Warnings produced by patch can be ignored. 4. To configure the kernel run the following command: make menuconfig Alternatively, you can use the command recommended by your Linux distribution, e.g. make xconfig 5. In the kernel configuration menus make sure that the options parport, parport_pc and serial are selected. These options can be found at the following locations: Device Drivers -> Parallel port support -> parport Device Drivers -> Parallel port support -> PC-style hardware -> parport_pc Device Drivers -> Character devices -> Serial drivers -> 8250/16550 and compatible serial support -> serial If one of these options is selected to compile as a module then the PCI
serial board support has also to be compiled as a module. See the next step for details.
6. Now the following new kernel config option is available: Device Drivers -> Character devices -> Serial drivers -> Sunix Multi I/O PCI Card support 3-54

Enable the option "Sunix Multi I/O PCI Card support". If one of the options
parport, parport_pc or serial in the previous step was selected to compile as a module then this option has also to be compiled as a module.
7. Check the following kernel configuration parameter: Device Drivers -> Character devices -> Serial drivers -> 8250/16550 and compatible serial support -> Maximum number of non-legacy 8250/16550 serial ports Make sure that this parameter is set to the number of external serial ports available on PCI cards + 4. For example, if you use an 8 serial ports card then this parameter needs to be set to 12. If you use two such cards then the parameter needs to be set to 20. 8. Build and install the kernel. Refer to the documentation of your Linux distribution for more information on the required steps. 9. When the new kernel is running, the SUNIX driver will be automatically loaded and initialized if compiled as a static driver. If the SUNIX driver was compiled as a module then it needs to be loaded with the following command: modprobe snx_multi_io You can decide to add this command to an init script. Now the PCI serial board driver should work and the serial ports of your card are available to the system. 3-55

Device Files ------------ After you installed your Linux system there will be a default set of device files in /dev. For each serial port you plan to use there needs to be a device file named /dev/ttySN, where N is an integer number usually starting at zero. Issue the following command to list the existing serial device files: # ls -al /dev/ttyS* Note that usually the first 4 device files (/dev/ttyS0../dev/ttyS3) will be assigned to on-board serial ports (COM1..COM4). External serial ports, which include the SUNIX ports, will be assigned to /dev/ttyS4 and higher numbers. If there are not enough /dev/ttySN device files available by default, you have to create further device files manually. For example, if you use an 8 ports serial card then you have to ensure that /dev/ttyS4 to /dev/ttyS11 do exist in your system. How to create additional device files? You should first try to use the MAKEDEV script. This script is usually located in /dev/MAKEDEV but might also have a copy (or a symbolic link) in /sbin/MAKEDEV. The command is used as follows: # /dev/MAKEDEV -v ttyS8 Repeat this command for any device file you need to create. Note: On some Linux distributions it may be necessary to use the mknod command to create device files. Consult your Linux documentation for information on how to do that. Using MAKEDEV is the preferred way. After you created additional device files you should set the correct ownership and access mode on these files. Issue an # ls -al /dev/ttyS0 command to see the mode set on the first device file. Use the chown and chmod commands to set the same rights on the newly created files, for example: # chown root:root /dev/ttyS8 # chmod 555 /dev/ttyS8 Repeat these commands for any device file you created.
3-56
4.
Troubleshooting ______________________________________________
This chapter shows some problems that user came with usually. Also you can check it if the PCI serial board can not work properly in your system after following hardware and software installation steps.
4-1

Troubleshooting 1. System fails to find the PCI serial board or COM port. A: It may cause by following issue:
a. The board is not properly plugged into the PCI slot. b. Please clean the golden finger. c. The PCI slot is defective. Please try other slots until you find one that
works. d. The mainboard does not have an available IRQ for the PCI serial board.
Enter the PC.s BIOS and make sure an IRQ setting is available in the PCI/PnP settings.
e. The board itself might be defective. You can try another mainboard testing this board working or not.
2. There is a blue screen when I entry operation system. A: The possible reason is an IRQ or I/O address conflict with other PCI bus
adapters, such as LAN or serial boards, or with the system BIOS. Refer to the corresponding problem in the previous FAQ for solutions.
3. After the system reboots, I can not see this PCI Serial Board shown on the “PCI DeviceList” display.
A: After rebooting (before operation system starting), system will show the following information in the PCI devive list:
Bus No Device No Func No Vendor ID Device ID Device Class IRQ
2 9 0 1409 7168 Simple Comm. Controller
10
This indicates that this serial board was found. If you do not see this information, please confirm the IRQ conflicts with another adapter. Check the PCI BIOS IRQ settings and then select an available IRQ for the serial boards. Also the board itself might be defective. You can try another mainboard testing this board working or not.
4-2

4. There are some exclamation marks in device manager and serial ports can not work properly.
A: It caused by the wrong driver installing or hardware settings. Please turn off your computer firtly and re-install hardware and software.
5. The PCI serial board cannot be detected by the attached driver while
installing the driver. A: It may cause by following issue:
a. The board is not installed. Please install the board in an empty PCI slot. b. The board is not properly plugged into the system’s PCI slot. If that is the
case, re-plug the board in a 32-bit PCI slot. It may also be the case that the PCI slot is defective. In this case, try other PCI slots until you find one that works.
6. How large FIFO length I should set? A: PCI serial board supports 32 bytes FIFO, and you can use 0,16 or 32 4
bytes FIFO. The default value is 16 Byte FIFO buffers.
Set the Receive/Transmit Buffer to higher value will get faster performance because the interrupts will be reduced, but the time for interrupt service routine will become shorter. The receive buffer overflow will be easily happened if the CPU speed is not enough to handle. If the system is not stable, select the lower value to correct problems.
4-3

4-4
7. Shall I set Software FIFO? A: FIFO (First-in-First-out) buffers are used to reduce the frequency of interrupt
processes for UART chips. The size of the buffer will determines the number of times the cards need to interrupt the computer’s CPU in order to process a string of data. With larger FIFO buffer size; there is more data flow and less interruption to the CPU, therefore allowing the CPU to be free to handle other more crucial tasks. This Serial I/O Communication Boards can provide users with up to 128K byte of FIFO buffer size for high system performance. Embedded within unique serial driver, we have added the function which allows users to assign part of the system’s DRAM memory to act as the FIFO buffer for the cards. Users can also assign various size of memory depends on their requirement. With the large buffer capacity, users can have more improved performance and increased efficiency to their systems. PCI serial board driver supports software FIFO for serial port under Windows 2000, XP and 2003 operation system.
This FIFO is used to buffer data on the receive path. The size of the FIFO can be configured in the advanced property page of the driver. It allows setting between 128byte to 128 kilo byte. The setting of the software size can be chosen individually for each port. The selected software FIFO size is allocated from kernel memory. This memory can not be used by different application. If a lot of serial ports are used on a system with a small memory size selection of a large software FIFO size may cause problem. Increase the size of the physical memory of the PC in the case. The software FIFO may help to make data transfer on the serial port more reliable.
You can go to page 3-8 checking how to set software FIFO.

8. Should I enable auto flow control features? A: Enable Auto CTS/RTS Flow Control means the CTS/RTS flow control is
controlled by hardware automatically. System will be more stable if the function is enabled.
9. I am confused in installing Windows 2000, XP, and 2003 driver. One is
Microsoft WHQL certified, and the other is not. Which one I should install ?
A: Both WHQL and none-WHQL drivers all can work finely under Windows 2000, XP and 2003. None-WHQL driver equips 128K byte software FIFO features but WHQL driver does NOT. If you install none-WHQL driver into your system, there will be an Digital Signature Warring message show up. You can skip this message.
10. What’s WHQL certified driver? A: This logo represent that this driver pass through Microsoft
Windows Hardware Quality Labs (WHQL). It had been verified by Microsoft® Windows® Logo Program for hardware with the hardware and software compatibility testing. This driver will working finely on your system without any conflicting with your operation system.
4-5

5.
Appendix ______________________________________________ This chapter shows PCI serial board core technologies and shows you how to contact with us for information about this and other products. In this appendix, we cover the following topics.
Core Technologies Contract Information
5-1

Core Technologies Our R&D team is experienced and expert at many advanced technologies needed for manufacturing highly- reliable data communication products. This PCI serial board equips many hardware and software features for users easily equipping in kinds of critical or harsh factory and industrial environment. It’s also the best solution for all of industrial communication and automation application.
High Performance & Intelligent ASIC SUN1889 & SUN1699 SUN1889 and SUN1699 are high performance and intelligent 16C650 UART. It’s not only for full compatibility with Microsoft OS series and Linux, but also allowing us to offer complete support for driver and technological change on kinds of Serial interface including RS-232 / 422 / 485.
Microsoft WHQL Certification Approval In order to make the systems more stable and compatible, We design our own chipsets which enable us to provide full support for our I/O products with WHQL certified. This logo represent that this driver pass through Microsoft Windows Hardware Quality Labs (WHQL). It had been verified by Microsoft® Windows® Logo Program for hardware with the hardware and software compatibility testing. This driver will working finely on your system without any conflicting with your operation system. 5-2

High Efficiency 128K byte FIFO
FIFO (First-in-First-out) buffer size decides the interrupt frequency to the computer’s CPU. The bigger the size of the FIFO buffer, the more of the data flow, the system will work consistently at anytime and the resource of CPU will be saved, therefore the system performance can be dramatically increased. We provide large capacity size of 128K byte FIFO buffer memory; it is 1024 times faster than the current existing PCI-Bus serial card on the market. The unique 128K FIFO technology design is the leader in the I/O industrial circles.
Universal PCI With the trend of sharing maximum bandwidth, reducing power consumption, and speed up transmission speed, the PCI bus standard has moved from 32-bit PCI/5V to 64-bit PCI/3.3V. RS-232 Universal PCI Card allows users to plug into both a 3.3V/5V and 32/64-bit slot with fully compliance with PCI Spec.Ver2.2 standard. The hardware configuration for the IRQ and I/O address is automatically assigned by the PCI BIOS.
Ready for 64-bit System RS-232 Universal PCI Communication Board series support 64-bit system:
Windows XP 64-Bit Edition Version2003 for 64-Bit Extended Systems (AMD64)
Windows Server 2003 for 64-Bit Extended Systems (AMD64) Windows XP 64-Bit Edition Version2003 for 64-Bit Itanium-based
Systems (IA64) Windows Server 2003 for 64-Bit Itanium-based Systems (IA64)
5-3
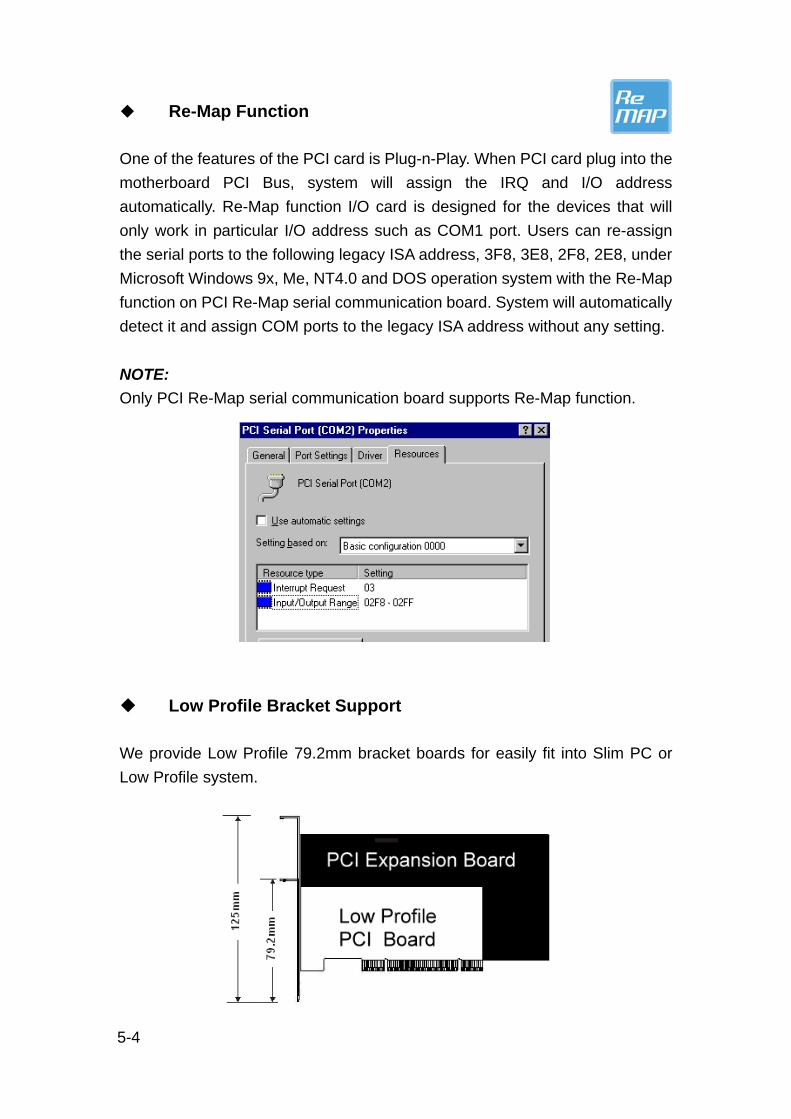
Re-Map Function
One of the features of the PCI card is Plug-n-Play. When PCI card plug into the motherboard PCI Bus, system will assign the IRQ and I/O address automatically. Re-Map function I/O card is designed for the devices that will only work in particular I/O address such as COM1 port. Users can re-assign the serial ports to the following legacy ISA address, 3F8, 3E8, 2F8, 2E8, under Microsoft Windows 9x, Me, NT4.0 and DOS operation system with the Re-Map function on PCI Re-Map serial communication board. System will automatically detect it and assign COM ports to the legacy ISA address without any setting. NOTE: Only PCI Re-Map serial communication board supports Re-Map function.
Low Profile Bracket Support We provide Low Profile 79.2mm bracket boards for easily fit into Slim PC or Low Profile system.
5-4

Contract Information Customer satisfaction is our number one concern, and to ensure that customers receive the full benefit of our products, SUNIX services has been set up to provide technical support, driver updates, product information, and user’s manual updates. The following services are provided E-mail for technical support
................................... [email protected] World Wide Web (WWW) Site for product information:
............................http://www.sunix.com.tw
5-5