Embed Size (px)
Citation preview
Sun Server X2-4(formerly Sun Fire X4470 M2)
Installation Guide for Windows Operating System
Part No.: E20786-03September 2012

Copyright © 2011, 2012, Oracle and/or its affiliates. All rights reserved.This software and related documentation are provided under a license agreement containing restrictions on use and disclosure and are protected byintellectual property laws. Except as expressly permitted in your license agreement or allowed by law, you may not use, copy, reproduce, translate,broadcast, modify, license, transmit, distribute, exhibit, perform, publish, or display any part, in any form, or by any means. Reverse engineering,disassembly, or decompilation of this software, unless required by law for interoperability, is prohibited.The information contained herein is subject to change without notice and is not warranted to be error-free. If you find any errors, please report them to usin writing.If this is software or related software documentation that is delivered to the U.S. Government or anyone licensing it on behalf of the U.S. Government, thefollowing notice is applicable:U.S. GOVERNMENT END USERS. Oracle programs, including any operating system, integrated software, any programs installed on the hardware,and/or documentation, delivered to U.S. Government end users are "commercial computer software" pursuant to the applicable Federal AcquisitionRegulation and agency-specific supplemental regulations. As such, use, duplication, disclosure, modification, and adaptation of the programs, includingany operating system, integrated software, any programs installed on the hardware, and/or documentation, shall be subject to license terms and licenserestrictions applicable to the programs. No other rights are granted to the U.S. Government.This software or hardware is developed for general use in a variety of information management applications. It is not developed or intended for use in anyinherently dangerous applications, including applications that may create a risk of personal injury. If you use this software or hardware in dangerousapplications, then you shall be responsible to take all appropriate fail-safe, backup, redundancy, and other measures to ensure its safe use. OracleCorporation and its affiliates disclaim any liability for any damages caused by use of this software or hardware in dangerous applications.Oracle and Java are registered trademarks of Oracle and/or its affiliates. Other names may be trademarks of their respective owners.Intel and Intel Xeon are trademarks or registered trademarks of Intel Corporation. All SPARC trademarks are used under license and are trademarks orregistered trademarks of SPARC International, Inc. AMD, Opteron, the AMD logo, and the AMD Opteron logo are trademarks or registered trademarks ofAdvanced Micro Devices. UNIX is a registered trademark of The Open Group.This software or hardware and documentation may provide access to or information on content, products, and services from third parties. OracleCorporation and its affiliates are not responsible for and expressly disclaim all warranties of any kind with respect to third-party content, products, andservices. Oracle Corporation and its affiliates will not be responsible for any loss, costs, or damages incurred due to your access to or use of third-partycontent, products, or services.
Copyright © 2011, 2012, Oracle et/ou ses affiliés. Tous droits réservés.Ce logiciel et la documentation qui l’accompagne sont protégés par les lois sur la propriété intellectuelle. Ils sont concédés sous licence et soumis à desrestrictions d’utilisation et de divulgation. Sauf disposition de votre contrat de licence ou de la loi, vous ne pouvez pas copier, reproduire, traduire,diffuser, modifier, breveter, transmettre, distribuer, exposer, exécuter, publier ou afficher le logiciel, même partiellement, sous quelque forme et parquelque procédé que ce soit. Par ailleurs, il est interdit de procéder à toute ingénierie inverse du logiciel, de le désassembler ou de le décompiler, excepté àdes fins d’interopérabilité avec des logiciels tiers ou tel que prescrit par la loi.Les informations fournies dans ce document sont susceptibles de modification sans préavis. Par ailleurs, Oracle Corporation ne garantit pas qu’ellessoient exemptes d’erreurs et vous invite, le cas échéant, à lui en faire part par écrit.Si ce logiciel, ou la documentation qui l’accompagne, est concédé sous licence au Gouvernement des Etats-Unis, ou à toute entité qui délivre la licence dece logiciel ou l’utilise pour le compte du Gouvernement des Etats-Unis, la notice suivante s’applique :U.S. GOVERNMENT END USERS. Oracle programs, including any operating system, integrated software, any programs installed on the hardware,and/or documentation, delivered to U.S. Government end users are "commercial computer software" pursuant to the applicable Federal AcquisitionRegulation and agency-specific supplemental regulations. As such, use, duplication, disclosure, modification, and adaptation of the programs, includingany operating system, integrated software, any programs installed on the hardware, and/or documentation, shall be subject to license terms and licenserestrictions applicable to the programs. No other rights are granted to the U.S. Government.Ce logiciel ou matériel a été développé pour un usage général dans le cadre d’applications de gestion des informations. Ce logiciel ou matériel n’est pasconçu ni n’est destiné à être utilisé dans des applications à risque, notamment dans des applications pouvant causer des dommages corporels. Si vousutilisez ce logiciel ou matériel dans le cadre d’applications dangereuses, il est de votre responsabilité de prendre toutes les mesures de secours, desauvegarde, de redondance et autres mesures nécessaires à son utilisation dans des conditions optimales de sécurité. Oracle Corporation et ses affiliésdéclinent toute responsabilité quant aux dommages causés par l’utilisation de ce logiciel ou matériel pour ce type d’applications.Oracle et Java sont des marques déposées d’Oracle Corporation et/ou de ses affiliés.Tout autre nom mentionné peut correspondre à des marquesappartenant à d’autres propriétaires qu’Oracle.Intel et Intel Xeon sont des marques ou des marques déposées d’Intel Corporation. Toutes les marques SPARC sont utilisées sous licence et sont desmarques ou des marques déposées de SPARC International, Inc. AMD, Opteron, le logo AMD et le logo AMD Opteron sont des marques ou des marquesdéposées d’Advanced Micro Devices. UNIX est une marque déposée d’The Open Group.Ce logiciel ou matériel et la documentation qui l’accompagne peuvent fournir des informations ou des liens donnant accès à des contenus, des produits etdes services émanant de tiers. Oracle Corporation et ses affiliés déclinent toute responsabilité ou garantie expresse quant aux contenus, produits ouservices émanant de tiers. En aucun cas, Oracle Corporation et ses affiliés ne sauraient être tenus pour responsables des pertes subies, des coûtsoccasionnés ou des dommages causés par l’accès à des contenus, produits ou services tiers, ou à leur utilisation.
PleaseRecycle

Contents
Using This Documentation vii
Part I Windows Server Installations
1. Assisted OS Installation With Oracle Hardware Installation Assistant 3
Oracle Hardware Installation Assistant Task Overview 4
How to Obtain Oracle Hardware Installation Assistant 4
Oracle Hardware Installation Assistant Documentation Resources 5
2. Getting Started 7
Supported Windows Server Operating Systems 7
Windows Installation Prerequisites 8
Windows Server Installation Task Overview 10
SAS PCIe HBAs Requiring LSI Mass Storage Driver for Windows Server 2008SP2 11
3. Installing Windows Server 2008 13
Before You Begin 13
Installing Windows Server Using Local or Remote Media 14
▼ Install Windows Server 2008 (SP2 or R2) Using Local or Remote Media14
Windows Server Installation Using a PXE Network Boot 24
iii
Before You Begin 24
▼ Install Windows Server 2008 (SP2 or R2) Using PXE Network Boot25
4. Post Installation of Windows Server 2008 27
Before You Begin 27
Installing Critical Device Drivers and Supplemental Software 28
▼ Install Server-Specific Device Drivers 28
Installing Supplemental Software 29
▼ Install the Supplemental Software 30
Configuring Support for TPM 31
Configuring Intel NIC Teaming 31
5. Getting Server Firmware and Software 33
Firmware and Software Updates 33
Firmware and Software Access Options 34
Available Software Release Packages 34
Accessing Firmware and Software 35
▼ Download Firmware and Software Using My Oracle Support 35
Requesting Physical Media 36
Gathering Information for the Physical Media Request 36
▼ Request Physical Media (Online) 37
▼ Request Physical Media (By Phone) 38
Installing Updates 39
Installing Firmware 39
Installing Hardware Drivers and OS Tools 40
Part II Windows Server System Administrator References
A. Supported Installation Methods 43
Console Outputs 43
iv Sun Server X2-4 Installation Guide for Windows Operating Systems • September 2012

Installation Boot Media 45
Installation Targets 47
B. Supported Operating Systems 49
Supported Operating Systems 49
C. BIOS Defaults for New Installations 51
Verification of BIOS Factory Defaults 51
Before You Begin 51
▼ View or Edit BIOS Settings for New Installations 52
D. Incorporating Device Drivers Into Windows Server 2008 WIM Images forWindows Deployment Services 55
Getting Started 56
Location of Device Drivers on Tools and Drivers Firmware DVD 56
Which Device Drivers to Incorporate Into WIM Image(s) 57
Prerequisites and Task Overview 58
Procedures for Incorporating Drivers Into WIM Image(s) 60
Before you Begin 61
▼ Create an ImageUnattend.xml Setup Script – Windows Server 2008(SP2 or R2) 61
▼ Add Device Driver(s) to Boot WIM – Windows Server 2008 SP2 Only65
▼ Map ImageUnattend.xml Setup Script to Windows Server 2008 (SP2or R2) Install Image 67
Index 73
Contents v

vi Sun Server X2-4 Installation Guide for Windows Operating Systems • September 2012
Using This Documentation
This installation guide contains installation and configuration procedures forWindows operating systems. You perform these procedures to bring the server to aconfigurable and usable state.
Note – The Sun Server X2-4 was formerly named the Sun Fire X4470 M2 server. Thisformer name might still appear in the software. The new product name does notindicate any change in system features or functionality.
This document is intended for system administrators, network administrators, andservice technicians who have an understanding of server systems.
■ “Getting the Latest Software and Firmware” on page vii
■ “About This Documentation” on page viii
■ “Related Documentation” on page viii
■ “Feedback” on page viii
■ “Support and Accessibility” on page ix
Getting the Latest Software andFirmwareFirmware, drivers, and other hardware-related software for each Oracle x86 server,server module (blade), and blade chassis are updated periodically.
For instructions, see Chapter 5.
vii
About This DocumentationThis documentation set is available in both PDF and HTML formats. A PDF versionthat includes all information on a particular topic subject (such as hardwareinstallation or product notes) can be generated by clicking the PDF button in theupper left corner of the HTML page.
Related Documentation
FeedbackYou can provide feedback on this documentation at:
http://www.oracle.com/goto/docfeedback
Documentation Link
All Oracle documentation http://www.oracle.com/documentation
Sun Server X2-4 http://www.oracle.com/pls/topic/lookup?ctx=SunServerX2-4
Oracle Integrated LightsOut Manager (ILOM) 3.0
http://www.oracle.com/pls/topic/lookup?ctx=ilom30
Oracle Integrated LightsOut Manager (ILOM) 3.1(for Sun Server X2-4Software Release 1.3 andabove)
http://www.oracle.com/pls/topic/lookup?ctx=ilom31
Oracle HardwareInstallation Assistant
http://www.oracle.com/pls/topic/lookup?ctx=hia
viii Sun Server X2-4 Installation Guide for Windows Operating Systems • September 2012
Support and Accessibility
Description Links
Access electronic supportthrough My Oracle Support
http://support.oracle.com
For hearing impaired:http://www.oracle.com/accessibility/support.html
Learn about Oracle’scommitment to accessibility
http://www.oracle.com/us/corporate/accessibility/index.html
Using This Documentation ix

x Sun Server X2-4 Installation Guide for Windows Operating Systems • September 2012
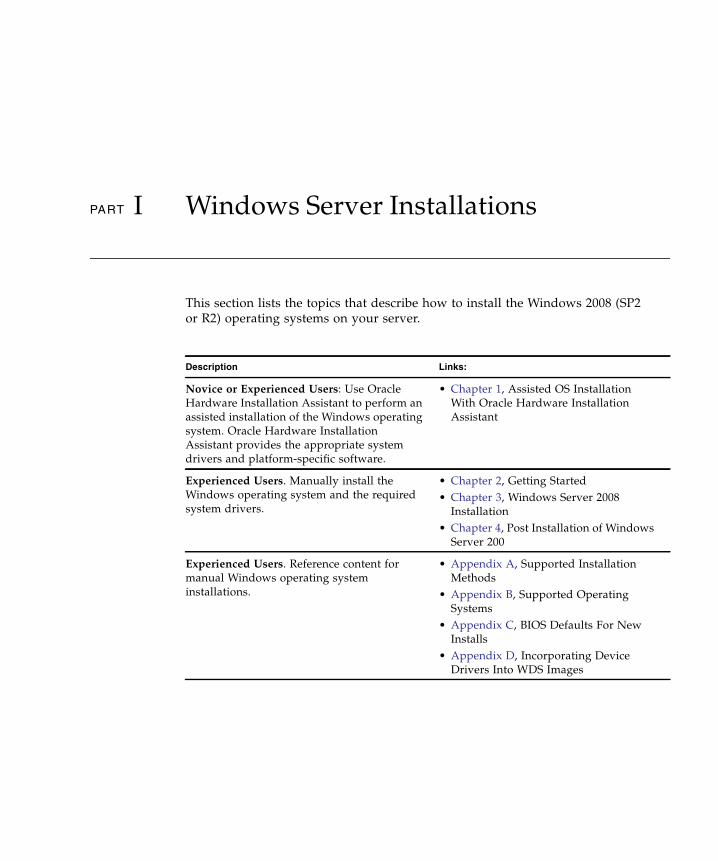
PART I Windows Server Installations
This section lists the topics that describe how to install the Windows 2008 (SP2or R2) operating systems on your server.
Description Links:
Novice or Experienced Users: Use OracleHardware Installation Assistant to perform anassisted installation of the Windows operatingsystem. Oracle Hardware InstallationAssistant provides the appropriate systemdrivers and platform-specific software.
• Chapter 1, Assisted OS InstallationWith Oracle Hardware InstallationAssistant
Experienced Users. Manually install theWindows operating system and the requiredsystem drivers.
• Chapter 2, Getting Started• Chapter 3, Windows Server 2008
Installation• Chapter 4, Post Installation of Windows
Server 200
Experienced Users. Reference content formanual Windows operating systeminstallations.
• Appendix A, Supported InstallationMethods
• Appendix B, Supported OperatingSystems
• Appendix C, BIOS Defaults For NewInstalls
• Appendix D, Incorporating DeviceDrivers Into WDS Images


CHAPTER 1
Assisted OS Installation With OracleHardware Installation Assistant
The Oracle Hardware Installation Assistant makes operating system installationeasy. With the Oracle Hardware Installation Assistant, all you need to begin is alicensed copy of Linux or Windows OS distribution media supported for yourserver. All software and required server-specific drivers are supplied by OracleHardware Installation Assistant. With a graphical wizard interface and flexibleinstallation options, Oracle Hardware Installation Assistant brings simplicity, speed,and reliability to your server deployments.
To use Oracle Hardware Installation Assistant, simply boot the program from theserver's CD drive, a USB flash drive, or from a network image. Check for the latestprogram updates available. Select your OS distribution from the menu and followthe on-screen instructions. Oracle Hardware Installation Assistant scans your systemto ensure that it has the drivers it needs to configure your server components[1]. Italso provides you the option of having the program check for the latest driversavailable. Oracle Hardware Installation Assistant will prompt you for theappropriate media as needed and any other required information during the OSinstallation process (such as license keys).
Note – [1] Some option card drivers are downloaded to the server, but requiremanual installation. Feature enhancements are made to Oracle Hardware InstallationAssistant regularly; therefore, you should check the Oracle Hardware InstallationAssistant information page for the latest updates and supported features:http://www.oracle.com/goto/hia.
Topics discussed in this chapter include:
■ “Oracle Hardware Installation Assistant Task Overview” on page 4
■ “How to Obtain Oracle Hardware Installation Assistant” on page 4
■ “Oracle Hardware Installation Assistant Documentation Resources” on page 5
3

Oracle Hardware Installation AssistantTask OverviewYou can perform the following tasks using Oracle Hardware Installation Assistant:
Note – The supported Oracle Hardware Installation Assistant installation andrecovery tasks listed below are server-dependent and might vary.
■ Perform an assisted installation of a Linux or Windows operating system on yourSun x86 server from Oracle. Oracle Hardware Installation Assistant provides theappropriate drivers and platform-specific software, eliminating the need to createa separate driver disk.
■ Optionally create RAID-0 or RAID-1 volumes on internal storage devices.
■ Optionally upgrade your system’s Oracle Integrated Lights Out Manager (ILOM)service processor (SP), BIOS, and storage device firmware (regardless of the OS onyour server).
■ Optionally update your Oracle Hardware Installation Assistant session with thelatest firmware and drivers.
■ Optionally recover from a corrupt or inaccessible Oracle ILOM service processor.
How to Obtain Oracle HardwareInstallation AssistantOracle Hardware Installation Assistant ships with the Sun Server X2-4 and isavailable in CD format or a web download. Regular updates are made available toensure that the latest OS versions are supported. You can download, per yourplatform server, the latest version of Oracle Hardware Installation Assistant at:
https://support.oracle.com
4 Sun Server X2-4 Installation Guide for Windows Operating Systems • September 2012
Oracle Hardware Installation AssistantDocumentation ResourcesIf you have determined that you want to install a Windows or Linux operatingsystem on your Sun x86 server using Oracle Hardware Installation Assistant, refer tothe following document for detailed installation instructions:
■ Oracle Hardware Installation Assistant 2.5 User’s Guide for x86 Servers at:
http://www.oracle.com/pls/topic/lookup?ctx=hia
Chapter 1 Assisted OS Installation With Oracle Hardware Installation Assistant 5

6 Sun Server X2-4 Installation Guide for Windows Operating Systems • September 2012
CHAPTER 2
Getting Started
This chapter describes how to get started installing the Microsoft Windows Server2008 SP2 and the Microsoft Windows Server 2008 R2 operating systems manually onyour server.
Note – The term “manually” refers to performing the installation by following theinstructions provided in Chapters 2 through 4 of this guide, and not using the OracleHardware Installation Assistant. If you prefer to perform an assisted Windowsinstallation by using Oracle Hardware Installation Assistant, see Chapter 1 of thisguide.
Topics discussed in this chapter include:
■ “Supported Windows Server Operating Systems” on page 7
■ “Windows Installation Prerequisites” on page 8
■ “Windows Server Installation Task Overview” on page 10
■ “SAS PCIe HBAs Requiring LSI Mass Storage Driver for Windows Server 2008SP2” on page 11
Supported Windows Server OperatingSystemsThe Sun Server X2-4 supports the following Microsoft Windows operating systems:
7
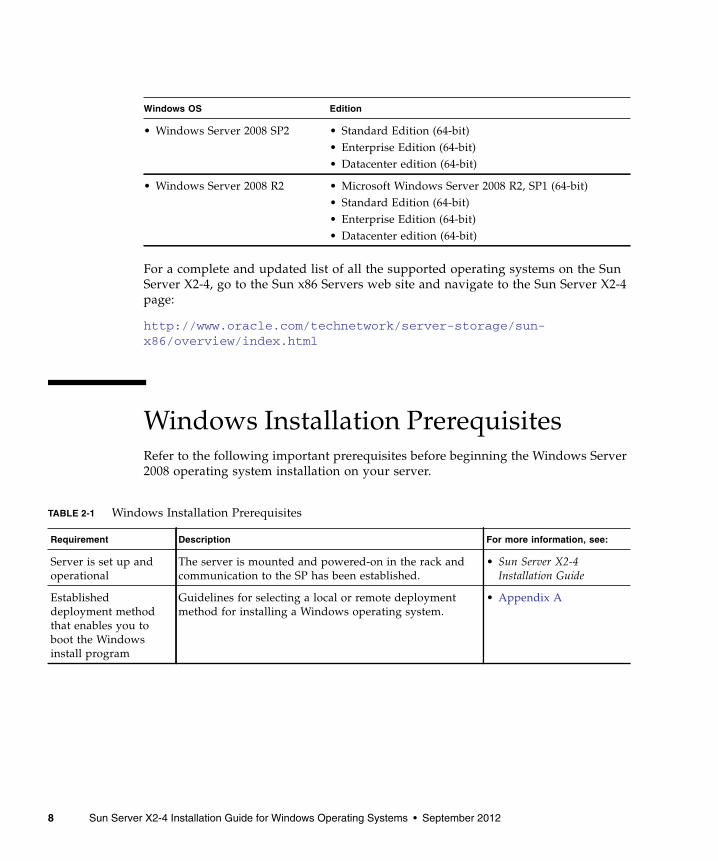
For a complete and updated list of all the supported operating systems on the SunServer X2-4, go to the Sun x86 Servers web site and navigate to the Sun Server X2-4page:
http://www.oracle.com/technetwork/server-storage/sun-x86/overview/index.html
Windows Installation PrerequisitesRefer to the following important prerequisites before beginning the Windows Server2008 operating system installation on your server.
Windows OS Edition
• Windows Server 2008 SP2 • Standard Edition (64-bit)• Enterprise Edition (64-bit)• Datacenter edition (64-bit)
• Windows Server 2008 R2 • Microsoft Windows Server 2008 R2, SP1 (64-bit)• Standard Edition (64-bit)• Enterprise Edition (64-bit)• Datacenter edition (64-bit)
TABLE 2-1 Windows Installation Prerequisites
Requirement Description For more information, see:
Server is set up andoperational
The server is mounted and powered-on in the rack andcommunication to the SP has been established.
• Sun Server X2-4Installation Guide
Establisheddeployment methodthat enables you toboot the Windowsinstall program
Guidelines for selecting a local or remote deploymentmethod for installing a Windows operating system.
• Appendix A
8 Sun Server X2-4 Installation Guide for Windows Operating Systems • September 2012

RAID volume creation If you want to include your boot drive as part of a RAIDconfiguration, you need to configure a RAID volume onit. Use the LSI integrated RAID controller setup utilitybefore you install the operating system.If you are using the optional SGX-SAS6-R-INT- Z hostbus adapter (HBA), you must use the LSI integratedRAID controller setup utility to configure a RAIDvolume. For instructions, see the LSI MegaRAID SASSoftware User’s Guide.If you are using the optional SGX-SAS6-INT-Z HBA, youmust use the BIOS Configuration Utility to configure aRAID volume. For instructions, see the Sun Storage 6 GbSAS PCIe HBA Internal Installation Guide.
• LSI MegaRAID SoftwareSAS User’s Guide at:http://www.lsi.com/support/sun/
• Sun Storage 6 Gb SASHBA Internal InstallationGuide at:http://docs.oracle.com/cd/E19221-01/E22410/E22410.pdf
Verification of BIOSsettings for new OSinstallations
Prior to installing the Windows Server 2008 operatingsystem, you should verify that the BIOS factory-defaultproperties are set.
• Appendix C
Installation ofserver-specific devicedrivers and optionalsupplemental software
After performing the Windows Server 2008 installation,you might need to:• Install server-specific device drivers to support
additional hardware.Note the Windows 2008 SP2 does not include the LSImass storage drivers for the SAS PCIe host busadapters (HBAs). If you have a SAS PCIe HBA optioninstalled, the LSI mass storage driver for the SAS PCIeHBA option must be made accessible from the toolsand drivers firmware DVD during installation. For alist of supported SAS PCIe HBAs, see TABLE 2-2.
• Install Windows Server optional supplemental softwarethat is available for your x86 server.
• Chapter 4• “SAS PCIe HBAs
Requiring LSI MassStorage Driver forWindows Server 2008SP2” on page 11
Incorporate server-specific device driversin a WIM image
Advanced users can incorporate the post installationsystem device drivers into WDS boot and install images.
• Appendix D
Access to late-breaking informationand patches for OSinstallations
Review the Sun Server X2-4 Product Notes for late-breaking information about supported operating systemsoftware and patches.
• Sun Server X2-4 ProductNotes
TABLE 2-1 Windows Installation Prerequisites (Continued)
Requirement Description For more information, see:
Chapter 2 Getting Started 9

Windows Server Installation TaskOverviewTo manually install Windows Server 2008 (SP2 or R2), complete the followingprocedures in order:
1. Obtain the tools and drivers firmware by downloading the latest drivers andutilities available for your Sun x86 server platform as described in Chapter 5.
The install program for the Windows Server 2008 SP2 does not include the LSIdrivers for the Sun Storage SAS PCIe HBA options. Therefore, if you have a SASPCIe HBA configured on your server and you are installing Windows 2008 SP2,the LSI mass storage driver for the SAS PCIe HBA option must be madeaccessible from the tools and drivers firmware DVD during the installationprocess.
For a list of SAS PCIe HBAs supported on the Sun Server X2-4, see “SAS PCIeHBAs Requiring LSI Mass Storage Driver for Windows Server 2008 SP2” onpage 11.
Note – Optionally, advanced users might prefer to incorporate the drivers into WDSimages. For instructions on how to incorporate the drivers into WDS images, seeAppendix D.
2. Choose and set up an installation method for deploying the Windows Serverinstallation as described in Appendix A.
3. Follow the instructions for performing a manual installation of the WindowsServer operating system as described in Chapter 3.
4. Follow the instructions for performing the Windows Server post installation tasksas described in Chapter 4.
10 Sun Server X2-4 Installation Guide for Windows Operating Systems • September 2012
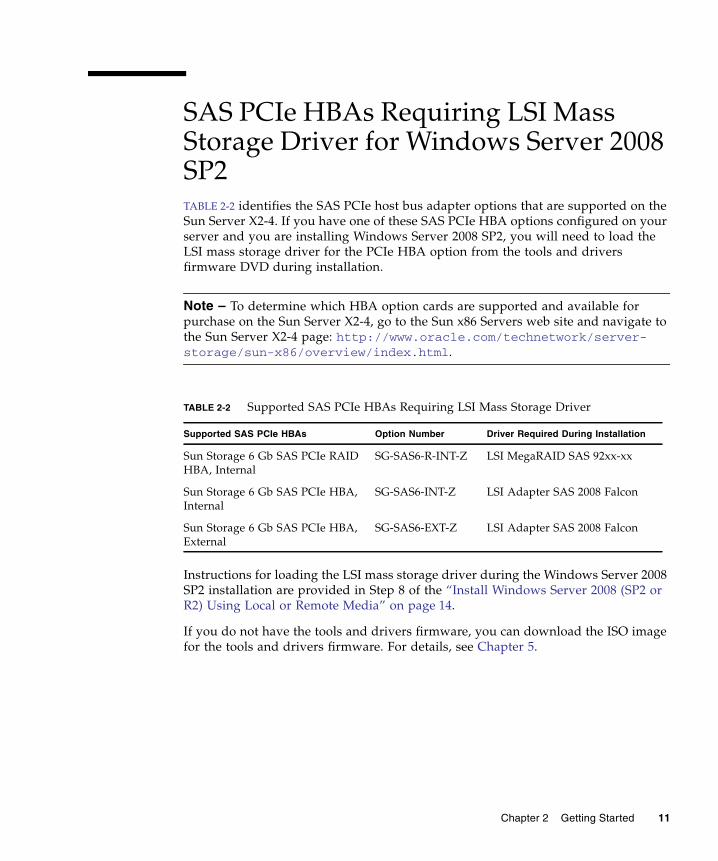
SAS PCIe HBAs Requiring LSI MassStorage Driver for Windows Server 2008SP2TABLE 2-2 identifies the SAS PCIe host bus adapter options that are supported on theSun Server X2-4. If you have one of these SAS PCIe HBA options configured on yourserver and you are installing Windows Server 2008 SP2, you will need to load theLSI mass storage driver for the PCIe HBA option from the tools and driversfirmware DVD during installation.
Note – To determine which HBA option cards are supported and available forpurchase on the Sun Server X2-4, go to the Sun x86 Servers web site and navigate tothe Sun Server X2-4 page: http://www.oracle.com/technetwork/server-storage/sun-x86/overview/index.html.
Instructions for loading the LSI mass storage driver during the Windows Server 2008SP2 installation are provided in Step 8 of the “Install Windows Server 2008 (SP2 orR2) Using Local or Remote Media” on page 14.
If you do not have the tools and drivers firmware, you can download the ISO imagefor the tools and drivers firmware. For details, see Chapter 5.
TABLE 2-2 Supported SAS PCIe HBAs Requiring LSI Mass Storage Driver
Supported SAS PCIe HBAs Option Number Driver Required During Installation
Sun Storage 6 Gb SAS PCIe RAIDHBA, Internal
SG-SAS6-R-INT-Z LSI MegaRAID SAS 92xx-xx
Sun Storage 6 Gb SAS PCIe HBA,Internal
SG-SAS6-INT-Z LSI Adapter SAS 2008 Falcon
Sun Storage 6 Gb SAS PCIe HBA,External
SG-SAS6-EXT-Z LSI Adapter SAS 2008 Falcon
Chapter 2 Getting Started 11

12 Sun Server X2-4 Installation Guide for Windows Operating Systems • September 2012

CHAPTER 3
Installing Windows Server 2008
This chapter provides information about manually installing the Windows Server2008 SP2 or Windows Server 2008 R2 operating system.
Note – The term “manually” refers to performing the installation by following theinstructions provided in Chapters 2 through 4 of this guide, and not using the OracleHardware Installation Assistant. If you prefer to perform an assisted Windowsinstallation by using Oracle Hardware Installation Assistant, see Chapter 1 of thisguide for details.
This chapter includes the following topics:
■ “Before You Begin” on page 13
■ “Installing Windows Server Using Local or Remote Media” on page 14
■ “Windows Server Installation Using a PXE Network Boot” on page 24
Before You BeginEnsure that the following requirements are met before you proceed with theinstructions in this chapter for manually installing the Windows Server operatingsystem.
■ All applicable installation prerequisites for installing an operating system shouldhave been met. For further information about these prerequisites, see “WindowsInstallation Prerequisites” on page 8.
■ An installation method (for example: console output, boot media, and installtarget) should have been chosen and established prior to performing theinstallation. For more information about these setup requirements, see AppendixA.
13

■ Use the Microsoft Windows Server 2008 (SP2 or R2) operating systemdocumentation in conjunction with the Windows Server operating systeminstructions provided in this chapter. You can obtain a copy of Microsoft’sWindows Server 2008 installation documentation at:http://www.microsoft.com/windowsserver2008/en/us/product-documentation.aspx
After completing this procedure, you should review and perform the required postinstallation tasks described later in this guide. For more details, see Chapter 4.
Installing Windows Server Using Localor Remote MediaThe procedure in this section describes how to boot the Windows Server 2008 (SP2or R2) operating system from local or remote media. It assumes that you are bootingthe Windows installation media from one of the following sources:
■ Windows Server 2008 SP2 or Windows Server 2008 R2 (or subsequent release) CDor DVD
■ Windows Server 2008 SP2 or Windows Server 2008 R2 (or subsequent release) ISOimage
Note – The Windows Server 2008 (SP 2 or R2) ISO image can be used for remoteinstallation or for creating an installation CD or DVD.
Note – If you are booting the installation media from a PXE environment, refer to“Windows Server Installation Using a PXE Network Boot” on page 24 forinstructions.
▼ Install Windows Server 2008 (SP2 or R2) UsingLocal or Remote Media1. Ensure that the installation media is available to boot.
■ For Distribution CD/DVD. Insert the Windows 2008 Distribution media (CDlabeled number 1 or the single DVD) into the local or remote USB CD/DVD-ROM drive.
14 Sun Server X2-4 Installation Guide for Windows Operating Systems • September 2012

■ For ISO image. Ensure that the ISO images are available and that the OracleILOM Remote Console application is aware of the first ISO image location.
For additional information about how to set up the installation media, see“Boot Media Options for Performing the OS Installation” on page 45.
2. Reset or power on the server.
Note – The following steps use Oracle ILOM 3.1 command syntax. If you are usingOracle ILOM 3.0, refer to the Oracle ILOM 3.0 Documentation Collection athttp://www.oracle.com/pls/topic/lookup?ctx=ilom30.
For example:
■ From the Oracle ILOM web interface, select Host Management > PowerControl in the navigation tree. Then, select Power Cycle from the Select Actionlist box and click Save.
■ From the local server, press the Power button (approximately 1 second) on thefront panel of the server to power off the server, then press the Power buttonagain to power on the server.
■ From the Oracle ILOM CLI, type: reset /System
The BIOS screen appears.
Note – The next events occur very quickly; therefore, focused attention is neededfor the following steps. Watch carefully for these messages as they appear on thescreen for a brief time. You might want to enlarge the size of your screen to eliminatescroll bars.
3. In the BIOS power-on self-test screen, press F8 to specify a temporary bootdevice for the Windows installation.
The Please Select Boot Device menu appears.
Note – The dialog that appears in your installation might differ depending on thetype of disk controller installed in your server.
Chapter 3 Installing Windows Server 2008 15
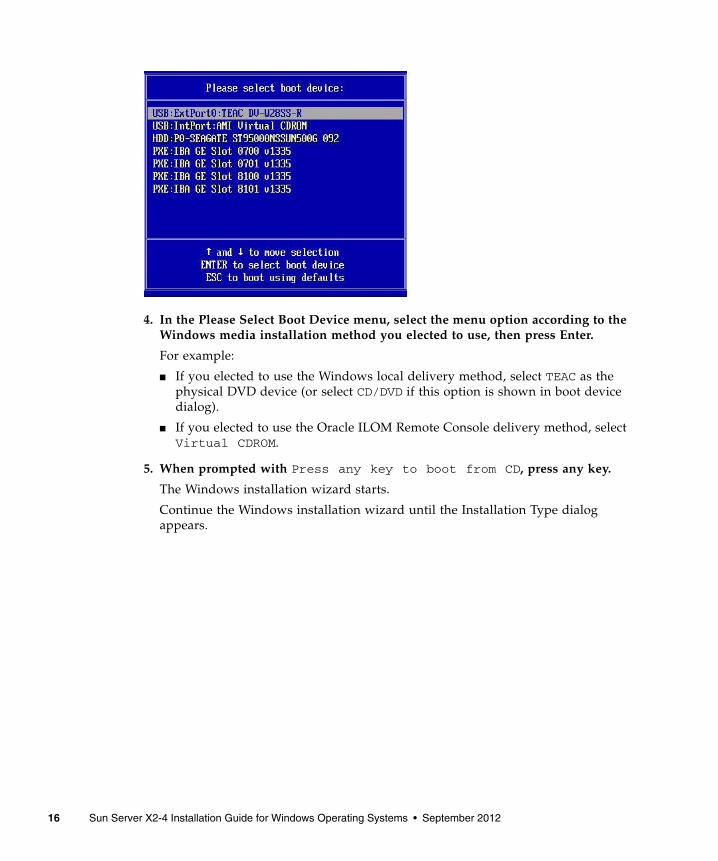
4. In the Please Select Boot Device menu, select the menu option according to theWindows media installation method you elected to use, then press Enter.
For example:
■ If you elected to use the Windows local delivery method, select TEAC as thephysical DVD device (or select CD/DVD if this option is shown in boot devicedialog).
■ If you elected to use the Oracle ILOM Remote Console delivery method, selectVirtual CDROM.
5. When prompted with Press any key to boot from CD, press any key.
The Windows installation wizard starts.
Continue the Windows installation wizard until the Installation Type dialogappears.
16 Sun Server X2-4 Installation Guide for Windows Operating Systems • September 2012
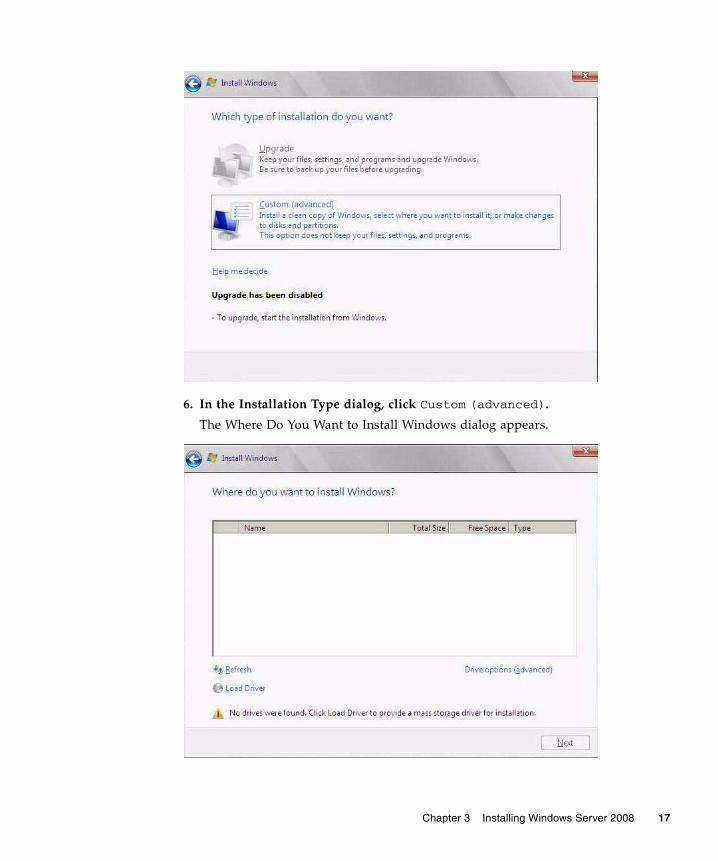
6. In the Installation Type dialog, click Custom (advanced).
The Where Do You Want to Install Windows dialog appears.
Chapter 3 Installing Windows Server 2008 17

7. In the Where Do You Want to Install Windows dialog, perform one of thefollowing tasks in the table below to specify a storage target for the WindowsServer operating system edition.
8. (Load HBA Storage Driver) In the Load Drive dialog, do the following:
For Windows Server Edition Task
Windows Server 2008 SP2(or subsequent Windows 2008SP release)
Perform one of the following:• If you do not see any storage targets listed and have
a Sun Storage SAS PCIe RAID HBA optionconfigured on your server, click Load Driver thenproceed to Step 8.- or -
• If you see the storage target where you want toinstall the operating system but want to change thedefault partition settings associated with that target,select the target, click Drive Options, thenproceed to Step 9.- or -
• If you see the storage target where you want toinstall the operating system and do not want tochange the default partition settings for that target,select the target and click Next, then proceed toStep 10.
Windows Server 2008 R2(or subsequent Windows 2008R2 release)
Perform one of the following:• If you see the storage target where you want to
install the operating system but want to change thedefault partition settings associated with that target,select the target, click Drive Options, thenproceed to Step 9.- or -
• If you see the storage target where you want toinstall the operating system and do not want tochange the default partition settings for that target,select the target and click Next, then proceed toStep 10.
18 Sun Server X2-4 Installation Guide for Windows Operating Systems • September 2012

a. Ensure the storage driver(s) are accessible according to the installationmethod chosen (described in Appendix A).
For example:
■ Floppy Disk Local. Storage driver(s) on a floppy disk in floppy drive A onthe server.
■ Floppy Disk Remote. Storage driver(s) on a floppy disk in a floppy drivemounted as a device from the Oracle ILOM Remote Console.
■ Floppy Image. Storage driver floppy.img file is mounted as a device fromthe Oracle ILOM Remote Console.
■ Non-floppy Media. Storage driver(s) are on a local physical storage media(USB flash drive or CD/DVD) or virtual media mounted from the OracleILOM Remote Console.
b. In the Load Driver dialog, click Browse to navigate to the appropriate drivermedia folder.
■ For systems configured wit the SAS PCIe HBA option card SG-SAS6-R-INT-Z, navigate to the following directory to load the appropriate LSI driver:windows/w2k8/drivers/64bit/hba/lsi/megaraid
■ For a system configured with either of these SAS PCIe HBA optioncards—SG-SAS6-INT-Z or SG-SAS6-EXT-Z, navigate to the followingdirectory to load the appropriate driver:windows/w2k8/drivers/64bit/hba/lsi/mpt2
Chapter 3 Installing Windows Server 2008 19
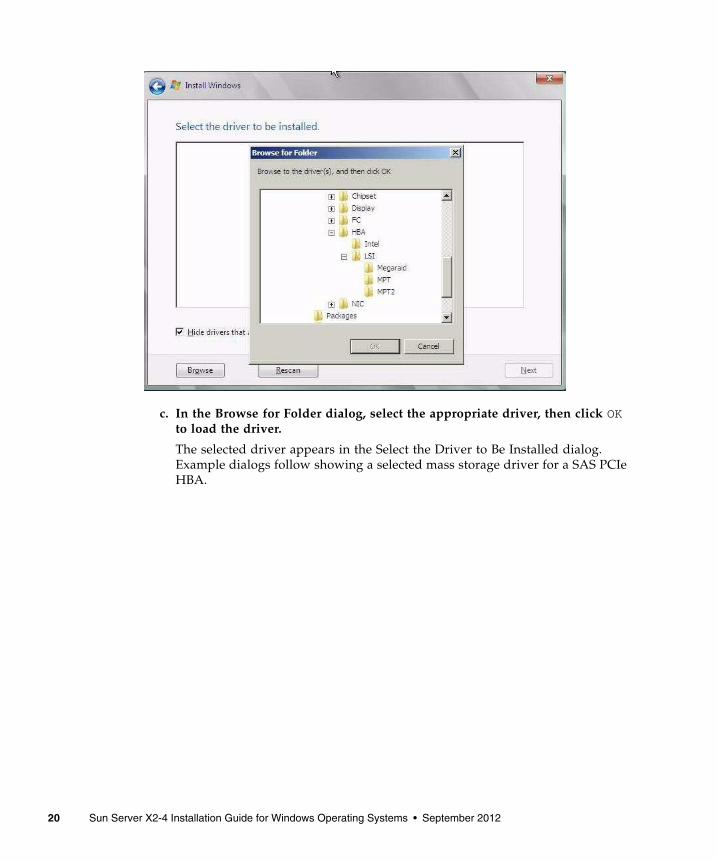
c. In the Browse for Folder dialog, select the appropriate driver, then click OKto load the driver.
The selected driver appears in the Select the Driver to Be Installed dialog.Example dialogs follow showing a selected mass storage driver for a SAS PCIeHBA.
20 Sun Server X2-4 Installation Guide for Windows Operating Systems • September 2012
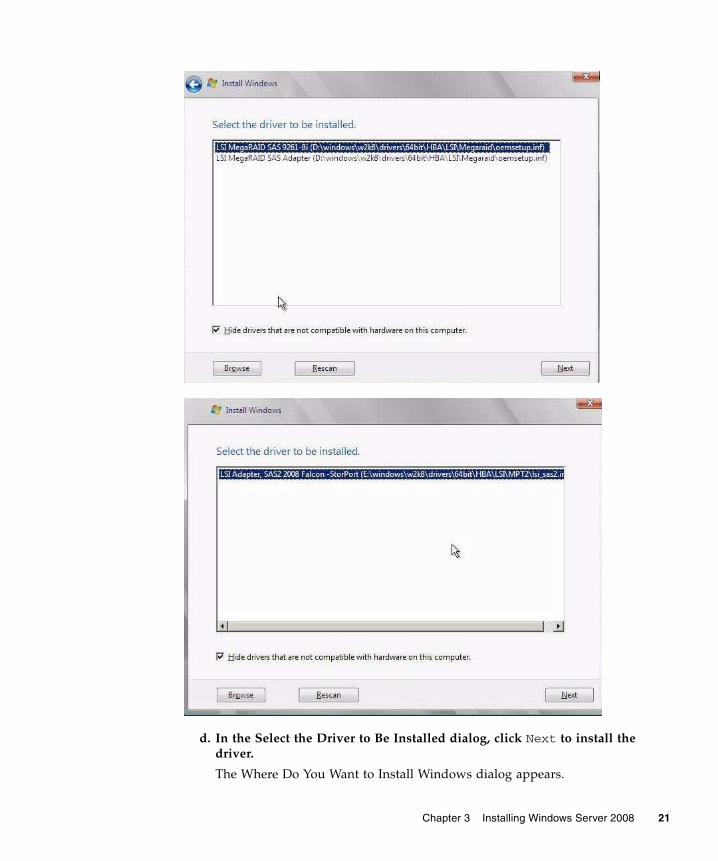
d. In the Select the Driver to Be Installed dialog, click Next to install thedriver.
The Where Do You Want to Install Windows dialog appears.
Chapter 3 Installing Windows Server 2008 21
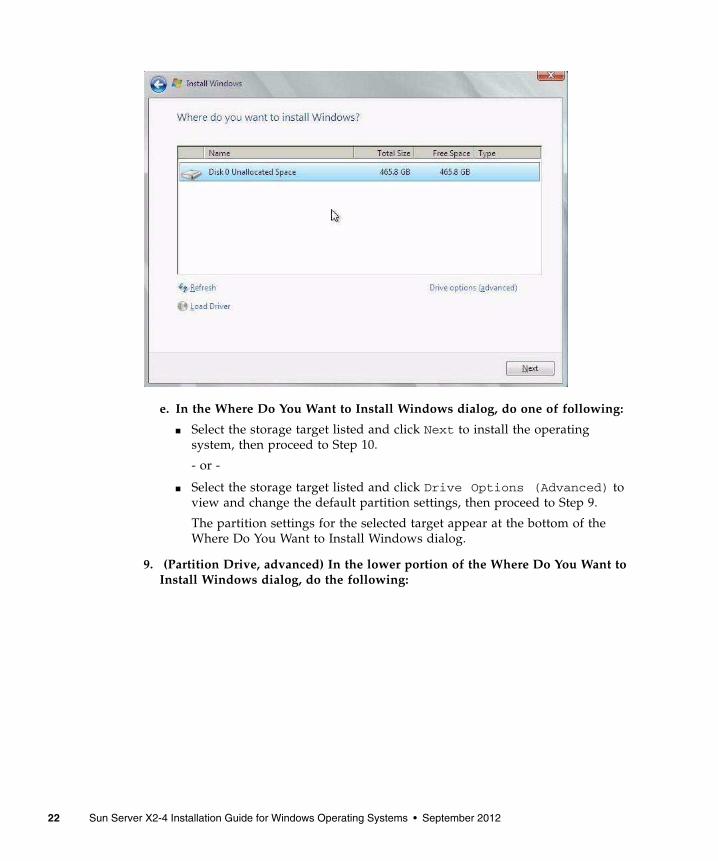
e. In the Where Do You Want to Install Windows dialog, do one of following:
■ Select the storage target listed and click Next to install the operatingsystem, then proceed to Step 10.
- or -
■ Select the storage target listed and click Drive Options (Advanced) toview and change the default partition settings, then proceed to Step 9.
The partition settings for the selected target appear at the bottom of theWhere Do You Want to Install Windows dialog.
9. (Partition Drive, advanced) In the lower portion of the Where Do You Want toInstall Windows dialog, do the following:
22 Sun Server X2-4 Installation Guide for Windows Operating Systems • September 2012

a. Click Delete to delete the selected storage target existing partitionconfiguration.
A confirmation window appears.
b. Click OK to confirm the partition deletion.
c. Click New to create a new partition on the selected storage target.
d. In the Size scroll box, increase or decrease the partition size as needed, thenclick Apply.
The partition is created.
e. Click Next to install the operating system to the selected storage target.
10. The Windows installation program begins and will reboot the server multipletimes during the installation process.
11. When the Windows installation is complete, Windows starts and prompts youto change the user password.
12. In the user password dialog, click OK and set up the initial user login account.
Chapter 3 Installing Windows Server 2008 23
Note – Windows Server 2008 enforces stronger password schemes for user accounts.Password standards include restrictions on length, complexity, and history. For moredetails, click the Accessibility link at the account creation page.
After the initial user account is created, the Windows Server 2008 desktopappears.
13. Proceed to Chapter 4 to perform the post installation tasks.
Windows Server Installation Using aPXE Network BootThis section explains the initial information you will need to install the WindowsServer 2008 (SP2 or R2) operating system over an established PXE-based networkusing a customer-provided Windows Imaging Format (WIM) image.
Topics included in this section:
■ “Before You Begin” on page 24
■ “Install Windows Server 2008 (SP2 or R2) Using PXE Network Boot” on page 25
Note that the procedure presented in this section documents the initial steps toinstall Windows Server 2008 over the network using a Windows DeploymentServices (WDS). Specifically, it explains the steps for selecting the server PXEnetwork interface card that will communicate with your WDS installation server. Forfurther information about using WDS to install the Windows Server 2008 operatingsystem, see Microsoft’s Windows Deployment Services documentation.
Before You Begin■ To use PXE to boot the installation media over the network, you must:
■ Configure the network (NFS, FTP, HTTP) server to export the installation tree.
■ Configure the files on the TFTP server that are necessary for PXE booting.
■ Configure the server’s MAC network port address to boot from the PXEconfiguration.
■ Configure Dynamic Host Configuration Protocol (DHCP).
■ To use WDS to perform the installation, you must:
■ Add the required system device drivers to the install.wim image and, ifnecessary, the boot.wim image.
24 Sun Server X2-4 Installation Guide for Windows Operating Systems • September 2012

For guidelines for adding drivers to the WIM installation image(s), seeAppendix D.
■ Obtain the WIM Administrator password.
▼ Install Windows Server 2008 (SP2 or R2) Using PXENetwork Boot1. Reset or power on the server.
Note – The following steps use Oracle ILOM 3.1 command syntax. If you are usingOracle ILOM 3.0, refer to the Oracle ILOM 3.0 Documentation Collection athttp://www.oracle.com/pls/topic/lookup?ctx=ilom30.
For example:
■ From the Oracle ILOM web interface, select Host Management > PowerControl in the navigation tree. Then, select Power Cycle from the Select Actionlist box and click Save.
■ From the local server, press the Power button (approximately 1 second) on thefront panel of the server to turn off the server, then press the Power buttonagain to power on the server.
■ From the Oracle ILOM CLI, type: reset /System
The BIOS screen appears.
Note – The next events occur very quickly; therefore, focused attention is neededfor the following steps. Watch carefully for these messages as they appear on thescreen for a brief time. You might want to enlarge the size of your screen to eliminatescroll bars.
2. Press F8 to specify a temporary boot device.
The Please Select Boot Device menu appears.
3. In the Please Select Boot Device menu, select the appropriate PXE installationboot device and press Enter.
The PXE installation boot device is the physical network port configured tocommunicate with your network installation server.
The Boot Agent dialog appears.
4. In the Boot Agent dialog, press F12 for a network service boot.
Chapter 3 Installing Windows Server 2008 25
5. Continue the normal Windows Server 2008 SP2 or 2008 R2 WDS networkinstallation.
For additional information, consult Microsoft’s Windows Deployment Servicesproduct documentation.
6. When the installation completes, proceed to Chapter 4 to perform the postinstallation tasks.
26 Sun Server X2-4 Installation Guide for Windows Operating Systems • September 2012
CHAPTER 4
Post Installation of Windows Server2008
After completing the installation of the Windows Server 2008 (SP2 or R2) operatingsystem and rebooting the server, you should review the following post installationtasks and, if necessary, perform the tasks that are applicable to your server.
■ “Installing Critical Device Drivers and Supplemental Software” on page 28
■ “Installing Supplemental Software” on page 29
■ “Configuring Support for TPM” on page 31
■ “Configuring Intel NIC Teaming” on page 31
Before You BeginThe procedures in this chapter assume that you have:
■ Installed the Microsoft Windows Server operating system
■ Obtained a copy of the Tools and Drivers firmware DVD
If you do not have a copy of the tools and drivers firmware, you can downloadthe latest tools and drivers firmware from the My Oracle support site. ForInstructions see, Chapter 5.
27
Installing Critical Device Drivers andSupplemental SoftwareAn installation wizard is provided on the Tools and Drivers firmware DVD to installserver-specific device drivers and Supplemental Software. The server-specific devicedrivers are provided to support optional hardware devices that can be installed onyour server.
▼ Install Server-Specific Device Drivers1. Insert the Tools and Drivers firmware DVD into a local or remote USB DVD
drive and do one of the following:
■ If the DVD automatically starts, click Install Drivers and SupplementSoftware.
■ If the DVD does not automatically start, navigate to one of the followingfolders containing the appropriate InstallPack file (for example,InstallPack_1_0_1.exe), and double-click it.
■ <DVD>/Windows/W2K8/Packages
■ <DVD>/Windows/W2K8R2/Packages
The Server Installation Package dialog appears.
2. In the Install Pack dialog, click Next to accept the default installable items.
Note – You should always accept the “default installable items” to ensure that themost recent versions of the drivers are installed.
The Install Pack notice dialog appears.
3. In the Install Pack notice dialog, read the message, then click Next.
The Welcome to the Sun Fire Installation Wizard appears.
4. In the Welcome to the Sun Fire Installation Wizard dialog, click Next.
The End User License Agreement page appears.
5. In the End User License Agreement page, select I Accept This Agreement,then click Next.
The platform-specific drivers are installed. A green check mark verifies that eachdriver was installed successfully.
28 Sun Server X2-4 Installation Guide for Windows Operating Systems • September 2012
6. In the Driver Installation Pack dialog, click Finish.
The System Settings Change dialog appears.
Note – If you plan on installing Supplemental Software (highly recommended), donot restart your system at this time. Once the Supplemental Software has beeninstalled, you will be prompted to restart the system.
7. Perform one of the following:
■ If you accepted the default installable settings in Step 2, click No to proceedto “Installing Supplemental Software” on page 29.
■ If you are not installing the Supplemental Software, click Yes to restart yourcomputer.
Installing Supplemental SoftwareThere are several Supplemental Software components available for your Sun ServerX2-4. You have two options for installation:
■ Typical. Installs all Supplemental Software applicable for your server.
■ Custom. Installs only the Supplement Software selected for installation.
TABLE 4-1 identifies the optional Supplemental Software components available foryour server.
TABLE 4-1 Install Pack Optional Supplemental Software
Available Supplemental Software Components
Servers With LSIIntegrated RAID
Controller
Servers With IntelIntegrated Disk
Controller
LSI MegaRAID Storage Manager, click Yes to restart yourcomputerEnables you to configure, monitor, and maintain RAID on the SASinternal RAID host bus adapter.
Typical Not applicable
IPMItool command-line utilityThe IPMItool command-line utility reads the sensor data repository(SDR) and displays sensor values, system event log (SEL), and field-replaceable unit (FRU) inventory information; gets and sets LANconfiguration parameters; and performs chassis power controloperations via the BMC, which is also called the service processor(SP).
Typical Typical
Chapter 4 Post Installation of Windows Server 2008 29
▼ Install the Supplemental Software
Caution – If you have already installed the Supplemental Software, running theinstallation again will not necessarily reinstall the Supplemental Software. It mightresult in the components being removed. Carefully review the dialog boxes duringSupplemental Software installation to ensure that the results are as expected.
1. Do one of the following:
■ If you did not select the Supplemental Software when you ran the procedure“Installing Critical Device Drivers and Supplemental Software” on page 28,refer back to that procedure and run it again, but this time accept the defaultsettings in Step 2 (the default is to install the Supplemental Software), andselect No in Step 7. Then proceed to Step 2 of this procedure.
■ If you did select Supplemental Software at the Server Installation Packagedialog box in Step 2 of “Installing Critical Device Drivers and SupplementalSoftware” on page 28, and selected No in Step 7, the Install Pack SupplementalSoftware dialog appears. Proceed to Step 2 of this procedure.
2. In the Install Pack Supplemental Software dialog, click Next to accept thetypical settings; or select Custom to choose the options to install (seedescriptions of the Supplemental Software in TABLE 4-1).
The Component Installation wizard will guide you through the installation ofeach of the selected Supplemental Software components.
3. After the Supplemental Software has been installed, click Finish.
4. Click Yes at the System Setting Change dialog to restart your system.
If you ran the Sun Server Installation Package software from the Tools andDrivers firmware DVD, remove the DVD from your system.
Intel NIC TeamingEnables the network interfaces on a server to be grouped togetherinto a team of physical ports called a virtual interface.
Typical Typical
TABLE 4-1 Install Pack Optional Supplemental Software (Continued)
Available Supplemental Software Components
Servers With LSIIntegrated RAID
Controller
Servers With IntelIntegrated Disk
Controller
30 Sun Server X2-4 Installation Guide for Windows Operating Systems • September 2012

Configuring Support for TPMIf you intend to use the Trusted Platform Module (TPM) feature set that is providedin Windows Server 2008, you must configure your server to support this feature. Forinstructions, see the service manual for your server:
■ Sun Server X2-4 Service Manual
Note – TPM enables you to administer the TPM security hardware in your server.For additional information about implementing this feature, refer to the WindowsTrusted Platform Module Management documentation provided by Microsoft.
Configuring Intel NIC TeamingFor more information on setting up NIC teaming for your environment, refer to theIntel Connectivity web page on Advanced Networking Services Teaming at:
http://support.intel.com/support/network/sb/CS-009747.htm
Additionally, you can download the complete set of Intel Network Connections UserGuides for your server’s network adapters at:
http://support.intel.com/support/network/sb/cs-009715.htm
Chapter 4 Post Installation of Windows Server 2008 31

32 Sun Server X2-4 Installation Guide for Windows Operating Systems • September 2012
CHAPTER 5
Getting Server Firmware andSoftware
This section explains the options for accessing server firmware and software.
■ “Firmware and Software Updates” on page 33
■ “Firmware and Software Access Options” on page 34
■ “Available Software Release Packages” on page 34
■ “Accessing Firmware and Software” on page 35
■ “Installing Updates” on page 39
Firmware and Software UpdatesFirmware and software, such as hardware drivers and tools for the server, areupdated periodically. These are made available as a software release. The softwarerelease is a set of downloads (patches) that includes all available firmware, hardwaredrivers, and utilities for the server. All these have been tested together. The ReadMedocument that is included with the download explains what has changed and whathas not changed from the prior software release.
You should update your server firmware and software as soon as possible after thesoftware release becomes available. Software releases often include bug fixes, andupdating ensures that your server software is compatible with the latest serverfirmware and other component firmware and software.
The ReadMe file in the download package contains information about the updatedfiles in the download package, as well as bugs that are fixed with the current release.The product notes also provide information about which server software versionsare supported.
33
Firmware and Software Access OptionsUse one of the following options to obtain the latest set of firmware and software foryour server:
■ Oracle Hardware Installation Assistant – Oracle Hardware Installation Assistantis a factory-installed feature for the Sun Server X2-4 that allows you to easilyupdate server firmware and software.
■ For more information about Oracle Hardware Installation Assistant, refer to theOracle Hardware Installation Assistant 2.5 User’s Guide for x86 Servers athttp://www.oracle.com/pls/topic/lookup?ctx=hia.
■ My Oracle Support – All system firmware and software are available from theMy Oracle Support web site.
For more information about what is available on the My Oracle Support web site,see http://support.oracle.com.
For instructions on how to download software releases from My Oracle Support,see “Download Firmware and Software Using My Oracle Support” on page 35.
■ Physical Media Request (PMR) – You can request a DVD that contains any of thedownloads (patches) that are available from My Oracle Support.
For information see, “Requesting Physical Media” on page 36.
Available Software Release PackagesDownloads on My Oracle Support are grouped by product family, then product,then version. The version contains one or more downloads (patches).
For servers and blades, the pattern is similar. The product is the server. Each servercontains a set of releases. These releases are not true software product releases, butrather are releases of updates for the server. These updates are called softwarereleases and comprise several downloads, all tested together. Each downloadcontains firmware, drivers, or utilities.
My Oracle Support has the same set of download types for this server family asshown in the following table. These can also be requested through a physical mediarequest (PMR).
34 Sun Server X2-4 Installation Guide for Windows Operating Systems • September 2012

Accessing Firmware and SoftwareThis section covers instructions for downloading or requesting software release files.See:
■ “Download Firmware and Software Using My Oracle Support” on page 35
■ “Requesting Physical Media” on page 36
▼ Download Firmware and Software Using MyOracle Support1. Navigate to the following web site: http://support.oracle.com.
2. Sign in to My Oracle Support.
3. At the top of the page, click the Patches and Updates tab.
The Patches and Updates screen appears.
4. In the Search screen, click Product or Family (Advanced).
The screen appears with search fields.
Package Name DescriptionWhen to Download ThisPackage
X4470 M2 SERVER SW 1.3 –ILOM_AND_BIOS
Oracle ILOM and BIOS You need the latestplatform firmware.
X4470 M2 SERVER SW 1.3 –ORACLE_HARDWARE_INSTALLATION_ASSISTANT
Oracle HardwareInstallation Assistantrecovery and ISO updateimage.
You need to manuallyrecover or update OracleHardware InstallationAssistant.
X4470 M2 SERVER SW 1.3 –TOOLS_DRIVERS_AND_FIRMWARE_DVD
Includes the tools anddrivers and platformfirmware. This DVDimage does not includeOracle VTS.
You need to update acombination of systemfirmware and OS-specificsoftware.
X4470 M2 SERVER SW 1.0 –DIAGNOSTICS
Oracle VTS diagnosticsimage.
You need the Oracle VTSdiagnostics image.
Chapter 5 Getting Server Firmware and Software 35
5. In the Product field, select the product from the drop-down list.
Alternatively, type a full or partial product name (for example, Sun Server X2-4)until a match appears.
6. In the Release field, select a software release from the drop-down list.
Expand the folders to see all available software releases.
7. Click Search.
The software release comprises a set of downloads (patches).
See “Available Software Release Packages” on page 34 for a description of theavailable downloads.
8. To select a patch, click the check box next to the patch name. (You can use theShift key to select more than one patch.)
A pop-up action panel appears. The panel contains several action options.
9. To download the update, click Download in the pop-up panel.
The File Download dialog box appears.
10. In the File Download dialog box, click on the patch zip file.
The patch file downloads.
Requesting Physical MediaIf your processes do not allow downloads from Oracle web sites, you can access thelatest software release through a physical media request (PMR).
The following table describes the high-level tasks for making a physical mediarequest and provides links for further information.
Gathering Information for the Physical Media RequestYou must have a warranty or support contract for your server in order to make aphysical media request (PMR).
Description Link
Gather information you will need toprovide for the request.
“Gathering Information for the Physical MediaRequest” on page 36
Make the physical media request eitheronline or by calling Oracle Support.
“Request Physical Media (Online)” on page 37“Request Physical Media (By Phone)” onpage 38
36 Sun Server X2-4 Installation Guide for Windows Operating Systems • September 2012
Before you make the PMR, gather the following information:
Obtain product name, software release version, and patches required. It will beeasier to make the request if you know the latest software release and the name ofthe download packages (patches) that you are requesting.
■ If you have access to My Oracle Support – Follow the instructions in “DownloadFirmware and Software Using My Oracle Support” on page 35 to determine thelatest software release and view available downloads (patches). After viewing thelist of patches, you can navigate away from the Patch Search Results page, if youdo not want to continue with the download steps.
■ If you do not have access to My Oracle Support – Use the information in “AvailableSoftware Release Packages” on page 34 to determine which packages you want,then request those packages for the latest software release.
■ Have the shipping information ready. You will need to provide a contact, phonenumber, email address, company name, and shipping address as part of therequest.
▼ Request Physical Media (Online)Gather the information described in “Gathering Information for the Physical MediaRequest” on page 36 before making the request.
1. Go to the following web site: http://support.oracle.com.
2. Sign in to My Oracle Support.
3. Click on the Contact Us link in the upper right corner of the page.
4. In the Request Description section, fill in the following:
a. In the Request Category drop-down menu, select the following:
Software and OS Media Requests
b. In the Request Summary field, type: PMR for latest software releasefor Sun Server X2-4.
5. In the Request Details section, answer the questions shown in the followingtable:
Question Your Answer
Is this a physical software media shipmentrequest?
Yes
Which product line does the media requestinvolve?
Sun Products
Chapter 5 Getting Server Firmware and Software 37

6. Fill in the Ship-To contact, phone number, email address, company name, andshipping address information.
7. Click Next.
8. In the Upload Files, Relevant Files screen, click next.
You do not need to supply any information.
9. In the Related Knowledge screen, review Knowledge Articles applicable toyour request.
10. Click Submit.
▼ Request Physical Media (By Phone)Gather the information described in “Gathering Information for the Physical MediaRequest” on page 36 before making the request.
1. Call Oracle support, using the appropriate number from the Oracle GlobalCustomer Support Contacts Directory at:
http://www.oracle.com/us/support/contact-068555.html
2. Tell Oracle support that you want to make a physical media request (PMR) forthe Sun Server X2-4.
■ If you are able to access the specific software release and patch numberinformation from My Oracle Support, provide this information to the supportrepresentative.
Are you requesting a required passwordfor a patch download?
No
Are you requesting a patch on CD/DVD? Yes
If requesting a patch on CD/DVD, pleaseprovide the patch number andOS/platform?
Enter the patch number for each downloadthat you want from the software release.
List the product name and versionrequested for the physical mediashipment?
Product Name: Sun Server X2-4Version: Latest software release number
What is the OS/platform for the requestedmedia?
If you are requesting OS-specific downloads,specify the OS here. If you are requestingsystem firmware only, enter Generic.
Are any languages required for thisshipment?
No
Question Your Answer
38 Sun Server X2-4 Installation Guide for Windows Operating Systems • September 2012

■ If you are unable to access the software release information, request the latestsoftware release for the Sun Server X2-4.
Installing UpdatesThe following sections provide information about installing firmware and softwareupdates:
■ “Installing Firmware” on page 39
■ “Installing Hardware Drivers and OS Tools” on page 40
Installing FirmwareUpdated firmware can be installed using one of the following:
■ Oracle Hardware Installation Assistant – Oracle Hardware Installation Assistantcan download and install the latest firmware from Oracle.
■ For more information about Oracle Hardware Installation Assistant, refer to theOracle Hardware Installation Assistant 2.5 User’s Guide for x86 Servers at:http://www.oracle.com/pls/topic/lookup?ctx=hia
■ Oracle Enterprise Manager Ops Center – Ops Center Enterprise Controller canautomatically download the latest firmware from Oracle, or firmware can beloaded manually into the Enterprise Controller. In either case, Ops Center caninstall the firmware onto one or more servers, blades, or blade chassis.
For more information, go to:http://www.oracle.com/us/products/enterprise-manager/044497.html
■ Oracle Hardware Management Pack – The fwupdate CLI Tool within the OracleHardware Management Pack can be used to update firmware within the system.
For more information, refer to the Oracle Hardware Management PackDocumentation Library at:http://www.oracle.com/pls/topic/lookup?ctx=ohmp
■ Oracle ILOM – Oracle ILOM and BIOS firmware are the only firmware that canbe updated using either the Oracle ILOM web interface or the command-lineinterface.
For more information, refer to the Oracle Integrated Lights Out Manager (ILOM)3.0 Documentation Library at:http://www.oracle.com/pls/topic/lookup?ctx=ilom30
Chapter 5 Getting Server Firmware and Software 39

You can access the Oracle Integrated Lights Out Manager (ILOM) 3.1Documentation Library at:http://www.oracle.com/pls/topic/lookup?ctx=ilom31
Installing Hardware Drivers and OS ToolsUpdated hardware drivers and operating system (OS)-related tools, such as OracleHardware Management Pack, can be installed using the Oracle Enterprise ManagerOps Center. For more information, go to:http://www.oracle.com/us/products/enterprise-manager/044497.html
40 Sun Server X2-4 Installation Guide for Windows Operating Systems • September 2012

PART II Windows Server System AdministratorReferences
Refer to the following system administrator references as needed to perform orcomplete the installation of the Windows Server 2008 (SP2 or R2) operating system.
Description Link
Guidelines for selecting and setting up an installationenvironment for deploying the Windows Server installationprogram
Appendix A
A complete list of operating systems supported on the SunServer X2-4 at the time of this publication
Appendix B
Instructions for ensuring that the BIOS default properties areset prior to performing the Windows Server installation
Appendix C
Instructions for advanced users who prefer to incorporate theserver-specific drivers in a Windows Imaging Format (WIM)file
Appendix D

APPENDIX A
Supported Installation Methods
To determine which installation method is best for you when installing the Windowsoperating system on your server, consider the following options summarized in thisappendix:
■ “Console Outputs” on page 43
■ “Installation Boot Media” on page 45
■ “Installation Targets” on page 47
Console OutputsTABLE A-1 lists the consoles you use to capture the output and input of the operatingsystem installation.
43
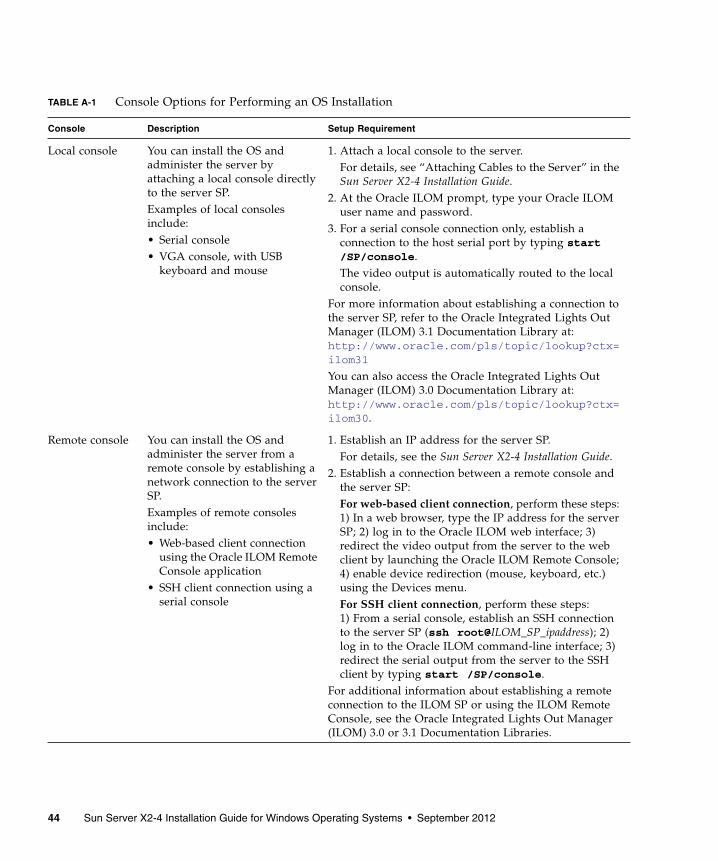
TABLE A-1 Console Options for Performing an OS Installation
Console Description Setup Requirement
Local console You can install the OS andadminister the server byattaching a local console directlyto the server SP.Examples of local consolesinclude:• Serial console• VGA console, with USB
keyboard and mouse
1. Attach a local console to the server.For details, see “Attaching Cables to the Server” in theSun Server X2-4 Installation Guide.
2. At the Oracle ILOM prompt, type your Oracle ILOMuser name and password.
3. For a serial console connection only, establish aconnection to the host serial port by typing start/SP/console.The video output is automatically routed to the localconsole.
For more information about establishing a connection tothe server SP, refer to the Oracle Integrated Lights OutManager (ILOM) 3.1 Documentation Library at:http://www.oracle.com/pls/topic/lookup?ctx=ilom31
You can also access the Oracle Integrated Lights OutManager (ILOM) 3.0 Documentation Library at:http://www.oracle.com/pls/topic/lookup?ctx=ilom30.
Remote console You can install the OS andadminister the server from aremote console by establishing anetwork connection to the serverSP.Examples of remote consolesinclude:• Web-based client connection
using the Oracle ILOM RemoteConsole application
• SSH client connection using aserial console
1. Establish an IP address for the server SP.For details, see the Sun Server X2-4 Installation Guide.
2. Establish a connection between a remote console andthe server SP:For web-based client connection, perform these steps:1) In a web browser, type the IP address for the serverSP; 2) log in to the Oracle ILOM web interface; 3)redirect the video output from the server to the webclient by launching the Oracle ILOM Remote Console;4) enable device redirection (mouse, keyboard, etc.)using the Devices menu.For SSH client connection, perform these steps:1) From a serial console, establish an SSH connectionto the server SP (ssh root@ILOM_SP_ipaddress); 2)log in to the Oracle ILOM command-line interface; 3)redirect the serial output from the server to the SSHclient by typing start /SP/console.
For additional information about establishing a remoteconnection to the ILOM SP or using the ILOM RemoteConsole, see the Oracle Integrated Lights Out Manager(ILOM) 3.0 or 3.1 Documentation Libraries.
44 Sun Server X2-4 Installation Guide for Windows Operating Systems • September 2012
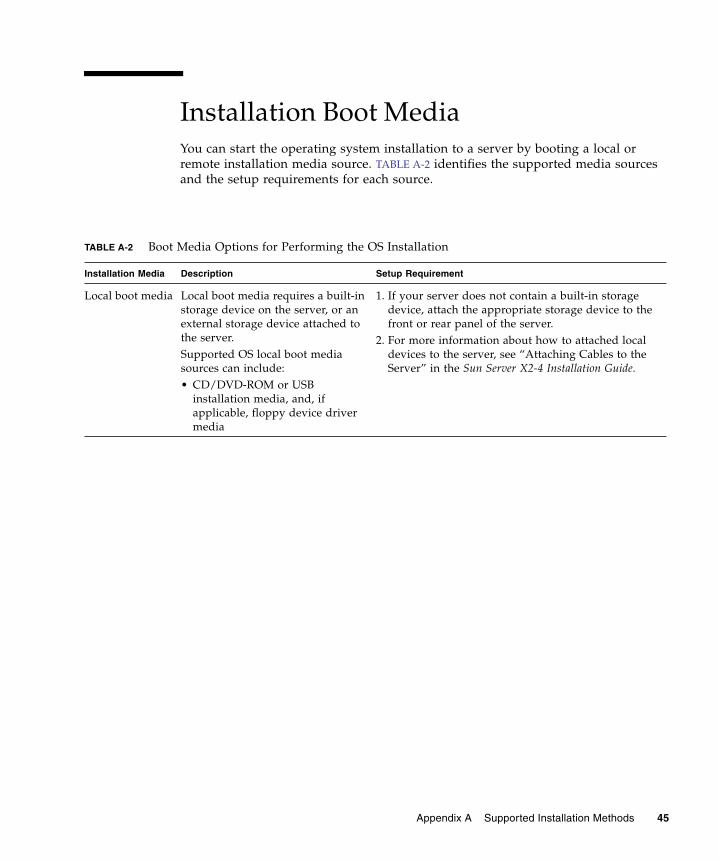
Installation Boot MediaYou can start the operating system installation to a server by booting a local orremote installation media source. TABLE A-2 identifies the supported media sourcesand the setup requirements for each source.
TABLE A-2 Boot Media Options for Performing the OS Installation
Installation Media Description Setup Requirement
Local boot media Local boot media requires a built-instorage device on the server, or anexternal storage device attached tothe server.Supported OS local boot mediasources can include:• CD/DVD-ROM or USB
installation media, and, ifapplicable, floppy device drivermedia
1. If your server does not contain a built-in storagedevice, attach the appropriate storage device to thefront or rear panel of the server.
2. For more information about how to attached localdevices to the server, see “Attaching Cables to theServer” in the Sun Server X2-4 Installation Guide.
Appendix A Supported Installation Methods 45

Remote bootmedia
Remote media requires you to bootthe install over the network. Youcan start the network install from aredirected boot storage device oranother networked system thatexports the installation over thenetwork using a Pre-Boot eXecutionenvironment (PXE).
To redirect the boot media from a remote storagedevice, perform these steps:1. Insert the boot media into the storage device, for
example:For CD/DVD-ROM, insert media into the built-in orexternal CD/DVD-ROM drive.For CD/DVD-ROM ISO image, ensure that ISOimage(s) are readily available on a network sharedlocation.For device driver floppy media, if applicable, insertfloppy media into the external floppy drive.For device driver floppy ISO image, ensure that ISOimage, if applicable, is readily available on anetwork shared location or on a USB drive.
2. Establish a web-based client connection to the serverOracle ILOM SP and launch the Oracle ILOMRemote Console application. For more details, seethe Setup Requirements for web-based clientconnection in TABLE A-1.
3. In the Devices menu of the Oracle ILOM RemoteConsole application, specify the location of the bootmedia, for example:For CD/DVD-ROM boot media, select CD-ROM.For CD/DVD-ROM ISO image boot media, selectCD-ROM Image.For floppy device driver boot media, if applicable,select Floppy.For floppy image device driver boot media, ifapplicable, select Floppy Image.
For more information about the Oracle ILOM RemoteConsole, see the Oracle Integrated Lights Out Manager(ILOM) 3.0 or 3.1 Documentation Libraries.
Supported OS remote media sourcescan include:• CD/DVD-ROM installation
media, and, if applicable, floppydevice driver media
• CD/DVD-ROM ISO installationimage and, if applicable, floppyISO device driver media
• Automated installation image(requires PXE boot)
TABLE A-2 Boot Media Options for Performing the OS Installation (Continued)
Installation Media Description Setup Requirement
46 Sun Server X2-4 Installation Guide for Windows Operating Systems • September 2012
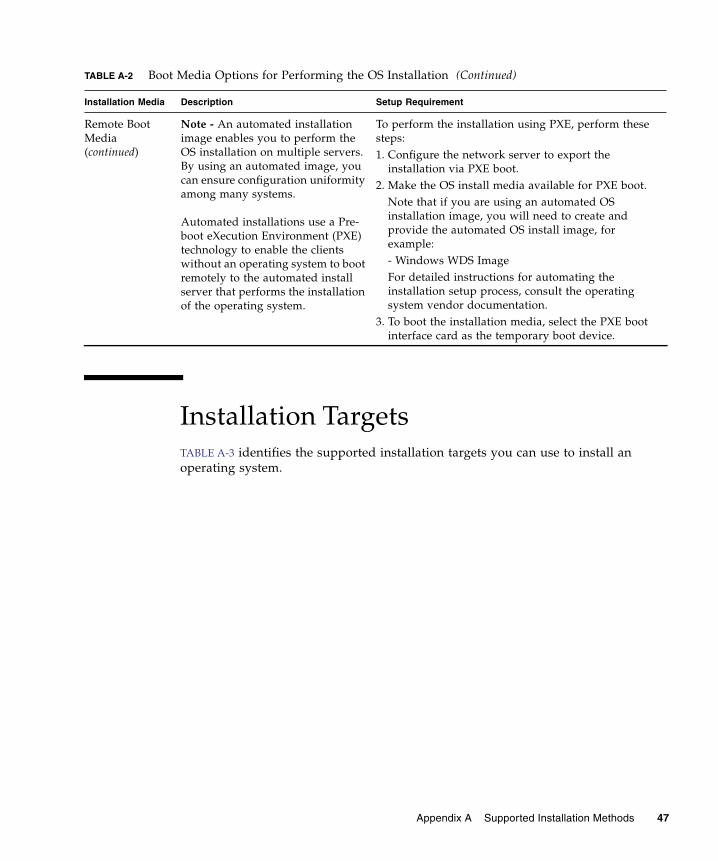
Installation TargetsTABLE A-3 identifies the supported installation targets you can use to install anoperating system.
Remote BootMedia(continued)
Note - An automated installationimage enables you to perform theOS installation on multiple servers.By using an automated image, youcan ensure configuration uniformityamong many systems.
Automated installations use a Pre-boot eXecution Environment (PXE)technology to enable the clientswithout an operating system to bootremotely to the automated installserver that performs the installationof the operating system.
To perform the installation using PXE, perform thesesteps:1. Configure the network server to export the
installation via PXE boot.2. Make the OS install media available for PXE boot.
Note that if you are using an automated OSinstallation image, you will need to create andprovide the automated OS install image, forexample:- Windows WDS ImageFor detailed instructions for automating theinstallation setup process, consult the operatingsystem vendor documentation.
3. To boot the installation media, select the PXE bootinterface card as the temporary boot device.
TABLE A-2 Boot Media Options for Performing the OS Installation (Continued)
Installation Media Description Setup Requirement
Appendix A Supported Installation Methods 47
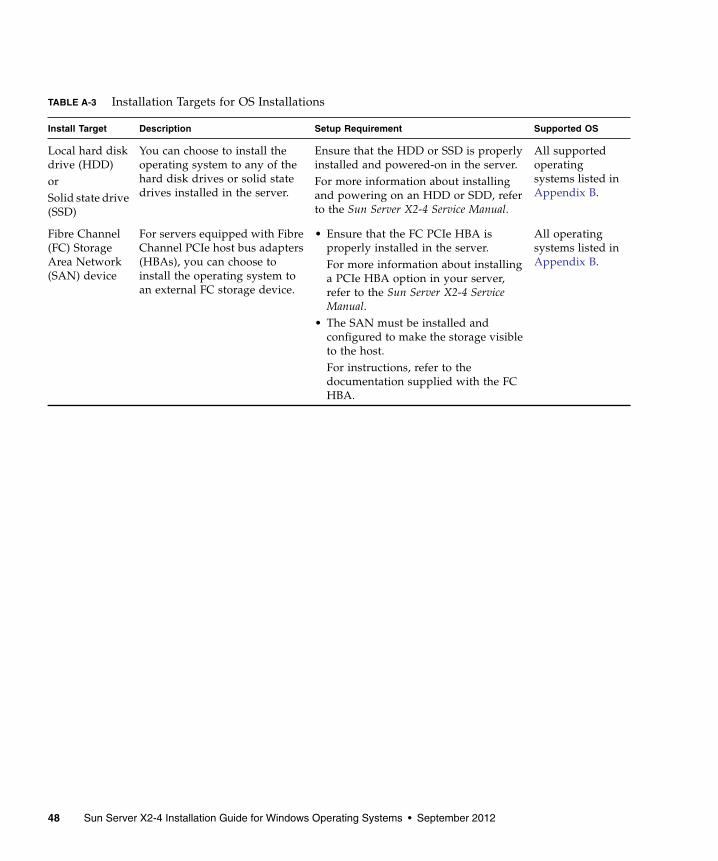
TABLE A-3 Installation Targets for OS Installations
Install Target Description Setup Requirement Supported OS
Local hard diskdrive (HDD)orSolid state drive(SSD)
You can choose to install theoperating system to any of thehard disk drives or solid statedrives installed in the server.
Ensure that the HDD or SSD is properlyinstalled and powered-on in the server.For more information about installingand powering on an HDD or SDD, referto the Sun Server X2-4 Service Manual.
All supportedoperatingsystems listed inAppendix B.
Fibre Channel(FC) StorageArea Network(SAN) device
For servers equipped with FibreChannel PCIe host bus adapters(HBAs), you can choose toinstall the operating system toan external FC storage device.
• Ensure that the FC PCIe HBA isproperly installed in the server.For more information about installinga PCIe HBA option in your server,refer to the Sun Server X2-4 ServiceManual.
• The SAN must be installed andconfigured to make the storage visibleto the host.For instructions, refer to thedocumentation supplied with the FCHBA.
All operatingsystems listed inAppendix B.
48 Sun Server X2-4 Installation Guide for Windows Operating Systems • September 2012
APPENDIX B
Supported Operating Systems
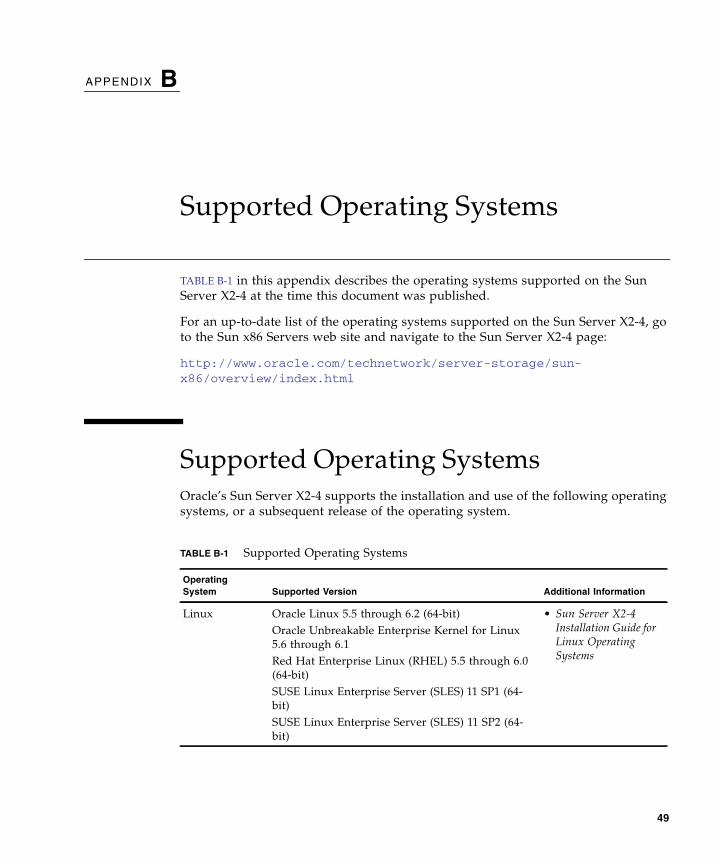
TABLE B-1 in this appendix describes the operating systems supported on the SunServer X2-4 at the time this document was published.
For an up-to-date list of the operating systems supported on the Sun Server X2-4, goto the Sun x86 Servers web site and navigate to the Sun Server X2-4 page:
http://www.oracle.com/technetwork/server-storage/sun-x86/overview/index.html
Supported Operating SystemsOracle’s Sun Server X2-4 supports the installation and use of the following operatingsystems, or a subsequent release of the operating system.
TABLE B-1 Supported Operating Systems
OperatingSystem Supported Version Additional Information
Linux Oracle Linux 5.5 through 6.2 (64-bit)Oracle Unbreakable Enterprise Kernel for Linux5.6 through 6.1Red Hat Enterprise Linux (RHEL) 5.5 through 6.0(64-bit)SUSE Linux Enterprise Server (SLES) 11 SP1 (64-bit)SUSE Linux Enterprise Server (SLES) 11 SP2 (64-bit)
• Sun Server X2-4Installation Guide forLinux OperatingSystems
49
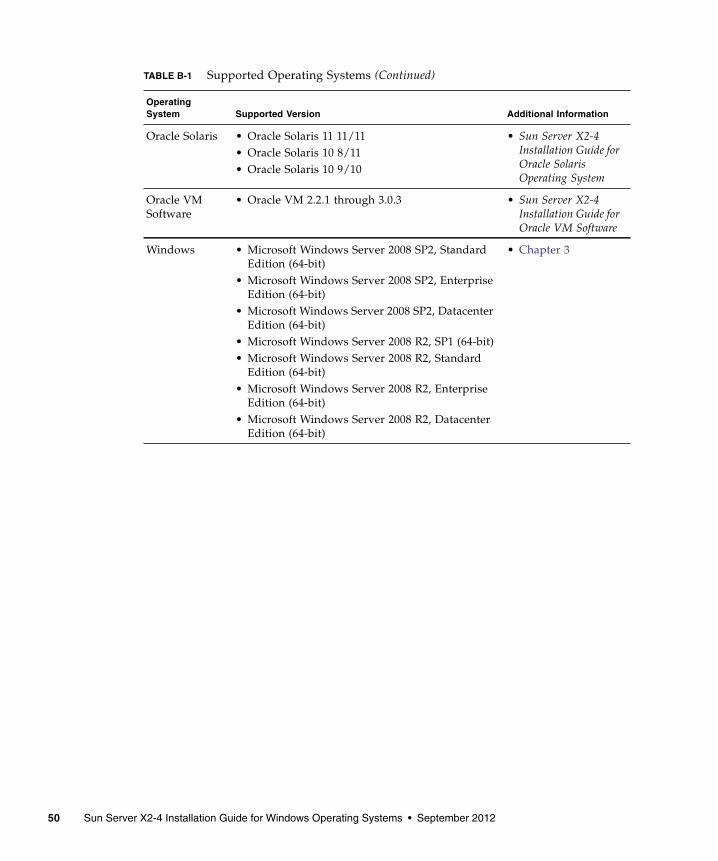
Oracle Solaris • Oracle Solaris 11 11/11• Oracle Solaris 10 8/11• Oracle Solaris 10 9/10
• Sun Server X2-4Installation Guide forOracle SolarisOperating System
Oracle VMSoftware
• Oracle VM 2.2.1 through 3.0.3 • Sun Server X2-4Installation Guide forOracle VM Software
Windows • Microsoft Windows Server 2008 SP2, StandardEdition (64-bit)
• Microsoft Windows Server 2008 SP2, EnterpriseEdition (64-bit)
• Microsoft Windows Server 2008 SP2, DatacenterEdition (64-bit)
• Microsoft Windows Server 2008 R2, SP1 (64-bit)• Microsoft Windows Server 2008 R2, Standard
Edition (64-bit)• Microsoft Windows Server 2008 R2, Enterprise
Edition (64-bit)• Microsoft Windows Server 2008 R2, Datacenter
Edition (64-bit)
• Chapter 3
TABLE B-1 Supported Operating Systems (Continued)
OperatingSystem Supported Version Additional Information
50 Sun Server X2-4 Installation Guide for Windows Operating Systems • September 2012

APPENDIX C
BIOS Defaults for New Installations
When installing a new operating system on a disk drive, you should verify that thefollowing BIOS settings are properly configured before you perform the operatingsystem installation:
■ System time
■ System date
■ Boot order
Verification of BIOS Factory DefaultsIn the BIOS Setup Utility, you can set optimal defaults, as well as view and edit BIOSsettings as needed. Any changes you make in the BIOS Setup Utility (by pressing F2)are permanent until the next time you change them.
In addition to using the F2 key to view or edit the system’s BIOS settings, you canuse F8 during the BIOS start-up to specify a temporary boot device. If you use F8 toset a temporary boot device, this change is only in effect for the current system boot.The permanent boot device specified through F2 will be in effect after booting fromthe temporary boot device.
Before You BeginEnsure that the following requirements are met prior to accessing the BIOS SetupUtility.
■ The server is equipped with a hard disk drive (HDD) or solid state drive (SSD).
■ The HDD or SSD is properly installed in the server. For details, see the Sun ServerX2-4 Service Manual.
51

■ A console connection is established to the server. For details, see “Console Optionsfor Performing an OS Installation” on page 44.
▼ View or Edit BIOS Settings for New Installations1. Reset the power on the server.
Note – The following steps use Oracle ILOM 3.1 command syntax. If you are usingOracle ILOM 3.0, refer to the Oracle ILOM 3.0 Documentation Collection athttp://www.oracle.com/pls/topic/lookup?ctx=ilom30.
For example:
■ From the Oracle ILOM web interface, select Host Management > PowerControl in the navigation tree. Then, select Reset from the Select Action list boxand click Save.
■ From the local server, press the Power button (approximately 1 second) on thefront panel of the server to turn the server off, then press the Power buttonagain to power on the server.
■ From the Oracle ILOM CLI, type: reset /System
The BIOS screen appears.
2. When prompted in the BIOS screen, press F2 to access the BIOS Setup Utility.
After a few moments, the BIOS Setup Utility appears.
3. To ensure that the factory defaults are set, do the following:
a. Press F9 to automatically load the optimal factory default settings.
A message appears prompting you to continue this operation by selecting OK orto cancel this operation by selecting CANCEL.
b. In the message, highlight OK then press Enter.
The BIOS Setup Utility screen appears with the cursor highlighting the firstvalue in the system time field.
4. In the BIOS Setup Utility, do the following to edit the values associated withthe system time or date.
a. Highlight the values you want to change.
Use up or down arrow keys to change between the system time and dateselection
b. To change the values in the highlighted fields, use these keys:
■ PLUS (+) to increment the current value shown
52 Sun Server X2-4 Installation Guide for Windows Operating Systems • September 2012

■ MINUS (-) to decrement the current value shown
■ ENTER to move the cursor to the next value field
5. To access the boot settings, select the Boot menu.
The Boot Settings menu appears.
6. In the Boot Settings menu, use the down arrow key to select Boot DevicePriority, then press Enter.
The Boot Device Priority menu appears listing the order of the known bootabledevices. The first device in the list has the highest boot priority.
7. In the Boot Device Priority menu, do the following to edit the first boot deviceentry in the list:
a. Use the up and down arrow keys to select the first entry in the list, then pressEnter.
b. In the Options menu, use the up and down arrow keys to select the defaultpermanent boot device, then press Enter.
The device strings listed on the Boot Device Priority menu and Options menuare in the format of: device type, slot indicator, and product ID string.
Note – You can change the boot order for other devices in the list by repeating Steps7a and 7b for each device entry you want to change.
8. To save changes and exit the BIOS Setup Utility, press F10.
Alternatively, you can save the changes and exit the BIOS Setup Utility byselecting Save on the Exit menu. A message appears prompting you to savechanges and exit setup.
In the message dialog, select OK, then press Enter.
Note – When using the Oracle ILOM Remote Console, F10 is trapped by the localOS. You must use the F10 option listed in the Keyboard drop-down menu that isavailable at the top of the console.
Appendix C BIOS Defaults for New Installations 53

54 Sun Server X2-4 Installation Guide for Windows Operating Systems • September 2012
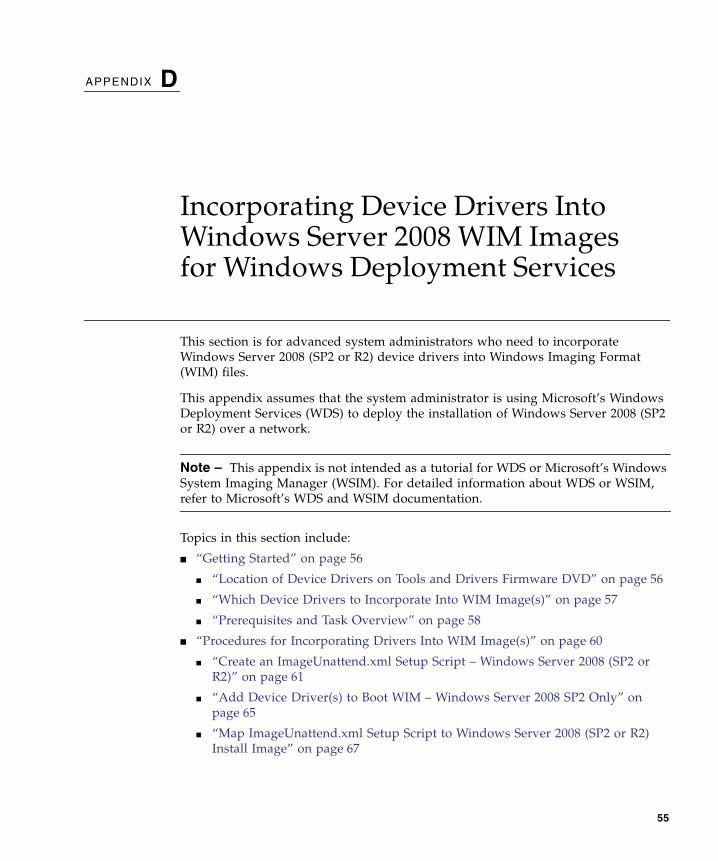
APPENDIX D
Incorporating Device Drivers IntoWindows Server 2008 WIM Imagesfor Windows Deployment Services
This section is for advanced system administrators who need to incorporateWindows Server 2008 (SP2 or R2) device drivers into Windows Imaging Format(WIM) files.
This appendix assumes that the system administrator is using Microsoft’s WindowsDeployment Services (WDS) to deploy the installation of Windows Server 2008 (SP2or R2) over a network.
Note – This appendix is not intended as a tutorial for WDS or Microsoft’s WindowsSystem Imaging Manager (WSIM). For detailed information about WDS or WSIM,refer to Microsoft’s WDS and WSIM documentation.
Topics in this section include:
■ “Getting Started” on page 56
■ “Location of Device Drivers on Tools and Drivers Firmware DVD” on page 56
■ “Which Device Drivers to Incorporate Into WIM Image(s)” on page 57
■ “Prerequisites and Task Overview” on page 58
■ “Procedures for Incorporating Drivers Into WIM Image(s)” on page 60
■ “Create an ImageUnattend.xml Setup Script – Windows Server 2008 (SP2 orR2)” on page 61
■ “Add Device Driver(s) to Boot WIM – Windows Server 2008 SP2 Only” onpage 65
■ “Map ImageUnattend.xml Setup Script to Windows Server 2008 (SP2 or R2)Install Image” on page 67
55

Getting StartedTopics included in this section include:
■ “Location of Device Drivers on Tools and Drivers Firmware DVD” on page 56
■ “Which Device Drivers to Incorporate Into WIM Image(s)” on page 57
■ “Prerequisites and Task Overview” on page 58
Location of Device Drivers on Tools and DriversFirmware DVDTABLE D-1 identifies the location of the device driver directories on the Tools andDrivers firmware DVD.
Note – To obtain the latest device drivers available for the Sun Server X2-4,download the ISO image for the tools and drivers firmware from the My Oraclesupport web site at: http://support.oracle.com. For instructions, see Chapter5.
TABLE D-1 Device Driver Directory Location on Tools and Drivers Firmware DVD
Device Drivers Directory Location on Tools and Driver Firmware DVD
Intel Network Driver • For Windows 2008 R2:windows\W2K8R2\drivers\NIC\intel
• For Windows 2008 SP2:windows\w2K8\drivers\NIC\intel
Aspeed Driver • For Windows 2008 R2:windows\W2K8R2\drivers\display\aspeed
• For Windows 2008 SP2:windows\w2K8\drivers\display\aspeed
56 Sun Server X2-4 Installation Guide for Windows Operating Systems • September 2012
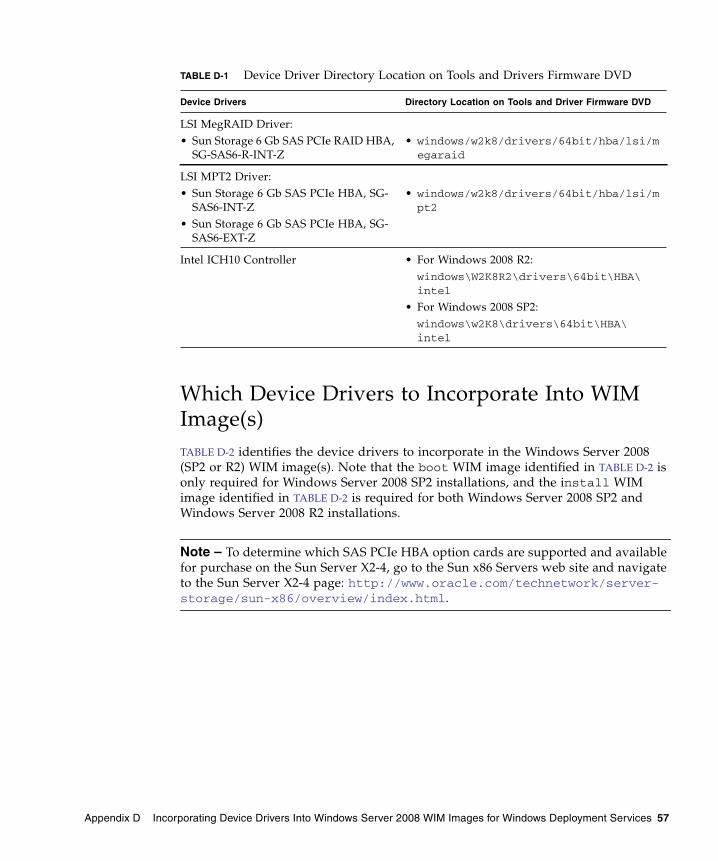
Which Device Drivers to Incorporate Into WIMImage(s)TABLE D-2 identifies the device drivers to incorporate in the Windows Server 2008(SP2 or R2) WIM image(s). Note that the boot WIM image identified in TABLE D-2 isonly required for Windows Server 2008 SP2 installations, and the install WIMimage identified in TABLE D-2 is required for both Windows Server 2008 SP2 andWindows Server 2008 R2 installations.
Note – To determine which SAS PCIe HBA option cards are supported and availablefor purchase on the Sun Server X2-4, go to the Sun x86 Servers web site and navigateto the Sun Server X2-4 page: http://www.oracle.com/technetwork/server-storage/sun-x86/overview/index.html.
LSI MegRAID Driver:• Sun Storage 6 Gb SAS PCIe RAID HBA,
SG-SAS6-R-INT-Z• windows/w2k8/drivers/64bit/hba/lsi/megaraid
LSI MPT2 Driver:• Sun Storage 6 Gb SAS PCIe HBA, SG-
SAS6-INT-Z• Sun Storage 6 Gb SAS PCIe HBA, SG-
SAS6-EXT-Z
• windows/w2k8/drivers/64bit/hba/lsi/mpt2
Intel ICH10 Controller • For Windows 2008 R2:windows\W2K8R2\drivers\64bit\HBA\intel
• For Windows 2008 SP2:windows\w2K8\drivers\64bit\HBA\intel
TABLE D-1 Device Driver Directory Location on Tools and Drivers Firmware DVD
Device Drivers Directory Location on Tools and Driver Firmware DVD
Appendix D Incorporating Device Drivers Into Windows Server 2008 WIM Images for Windows Deployment Services 57
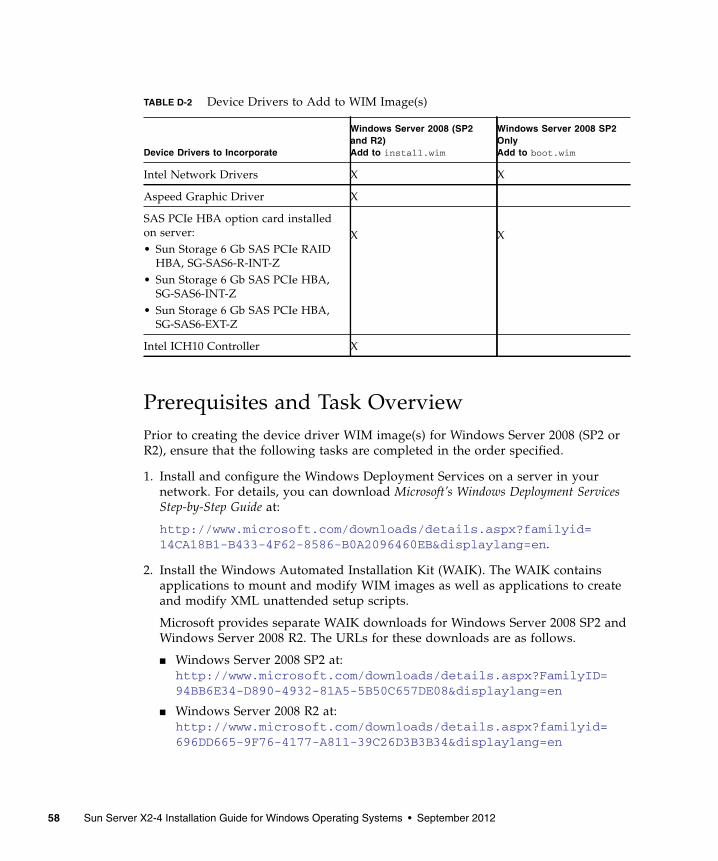
Prerequisites and Task OverviewPrior to creating the device driver WIM image(s) for Windows Server 2008 (SP2 orR2), ensure that the following tasks are completed in the order specified.
1. Install and configure the Windows Deployment Services on a server in yournetwork. For details, you can download Microsoft’s Windows Deployment ServicesStep-by-Step Guide at:
http://www.microsoft.com/downloads/details.aspx?familyid=14CA18B1-B433-4F62-8586-B0A2096460EB&displaylang=en.
2. Install the Windows Automated Installation Kit (WAIK). The WAIK containsapplications to mount and modify WIM images as well as applications to createand modify XML unattended setup scripts.
Microsoft provides separate WAIK downloads for Windows Server 2008 SP2 andWindows Server 2008 R2. The URLs for these downloads are as follows.
■ Windows Server 2008 SP2 at:http://www.microsoft.com/downloads/details.aspx?FamilyID=94BB6E34-D890-4932-81A5-5B50C657DE08&displaylang=en
■ Windows Server 2008 R2 at:http://www.microsoft.com/downloads/details.aspx?familyid=696DD665-9F76-4177-A811-39C26D3B3B34&displaylang=en
TABLE D-2 Device Drivers to Add to WIM Image(s)
Device Drivers to Incorporate
Windows Server 2008 (SP2and R2)Add to install.wim
Windows Server 2008 SP2OnlyAdd to boot.wim
Intel Network Drivers X X
Aspeed Graphic Driver X
SAS PCIe HBA option card installedon server:• Sun Storage 6 Gb SAS PCIe RAID
HBA, SG-SAS6-R-INT-Z• Sun Storage 6 Gb SAS PCIe HBA,
SG-SAS6-INT-Z• Sun Storage 6 Gb SAS PCIe HBA,
SG-SAS6-EXT-Z
X X
Intel ICH10 Controller X
58 Sun Server X2-4 Installation Guide for Windows Operating Systems • September 2012
3. Locate the Windows device drivers on the Tools and Driver firmware DVD. Forinformation about where the device drivers on the Tools and Drivers firmwareDVD are located, see “Location of Device Drivers on Tools and Drivers FirmwareDVD” on page 56.
4. Establish a network-shared device driver repository. For example:
■ Create a device driver repository containing the Windows Server 2008 (SP2 orR2) device drivers.
Note that for Windows Server 2008 WDS installation environments, a devicedriver repository is provided, which you can modify. For Windows Server 2003SP2 WDS installation environments, a device driver repository is not providedand you must manually create one. The following is an example of how youmight want to set up the directory structure for a new device driver repository:
C:\unattend\drivers\{w2K8|W2k8R2}\catalogs\vendor\version
Where:
– unattend is the unattend device driver store
– drivers is the name for device driver directory
– {W2K8 or W2K8R2} is the name for Windows Server 2008 (SP2 or R2) devicedrivers directory
– catalogs is the name for Windows Server 2008 (SP2 or R2) catalog files
– vendor is the name of directory for device driver vendor
– version is the name of directory for device driver version
■ Ensure that the directories (folders) in the device driver repository are sharedand accessible to the Windows Deployment Services (WDS) during the networkinstallation.
For example, the device driver repository network shares referenced in thisappendix are set up as follows:
■ Extract the Windows Server 2008 device drivers on the Tools and Driversfirmware DVD and place them into the device driver repository.
For details about where the Windows Server 2008 device drivers are located onthe Tools and Drivers firmware DVD, see “Location of Device Drivers on Toolsand Drivers Firmware DVD” on page 56.
If you do not have a copy of the tools and drivers firmware, you can downloadthe ISO image for the Tools and Drivers firmware. For details, see Chapter 5.
Repository Folder Network Shares
C:\Unattended\Drivers\W2K8 \\wds-server\W2K8-Drivers
C:\Unattended\Drivers\W2K8R2 \\wds-server\W2K8R2-Drivers
Appendix D Incorporating Device Drivers Into Windows Server 2008 WIM Images for Windows Deployment Services 59
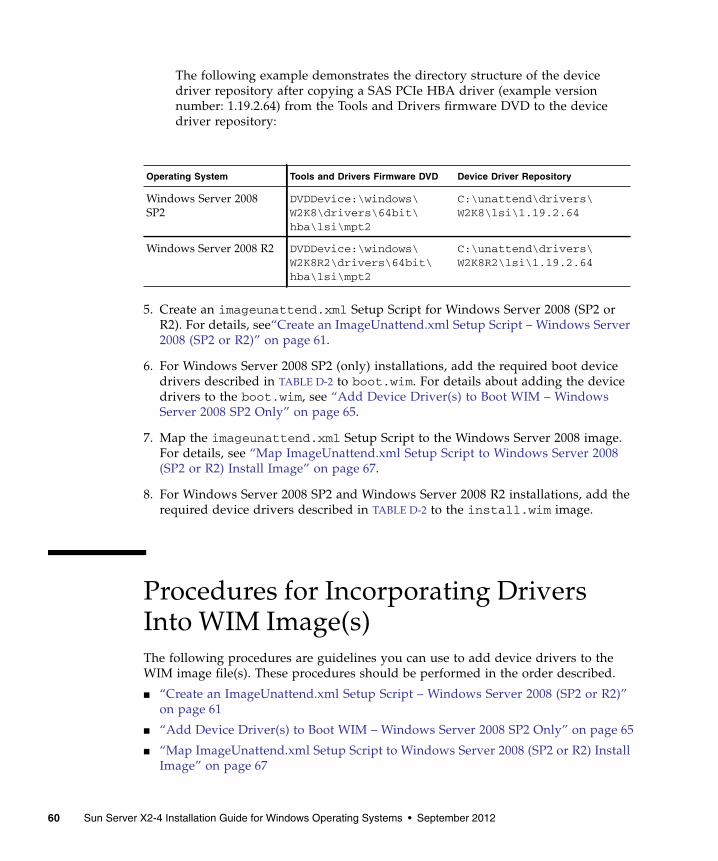
The following example demonstrates the directory structure of the devicedriver repository after copying a SAS PCIe HBA driver (example versionnumber: 1.19.2.64) from the Tools and Drivers firmware DVD to the devicedriver repository:
5. Create an imageunattend.xml Setup Script for Windows Server 2008 (SP2 orR2). For details, see“Create an ImageUnattend.xml Setup Script – Windows Server2008 (SP2 or R2)” on page 61.
6. For Windows Server 2008 SP2 (only) installations, add the required boot devicedrivers described in TABLE D-2 to boot.wim. For details about adding the devicedrivers to the boot.wim, see “Add Device Driver(s) to Boot WIM – WindowsServer 2008 SP2 Only” on page 65.
7. Map the imageunattend.xml Setup Script to the Windows Server 2008 image.For details, see “Map ImageUnattend.xml Setup Script to Windows Server 2008(SP2 or R2) Install Image” on page 67.
8. For Windows Server 2008 SP2 and Windows Server 2008 R2 installations, add therequired device drivers described in TABLE D-2 to the install.wim image.
Procedures for Incorporating DriversInto WIM Image(s)The following procedures are guidelines you can use to add device drivers to theWIM image file(s). These procedures should be performed in the order described.
■ “Create an ImageUnattend.xml Setup Script – Windows Server 2008 (SP2 or R2)”on page 61
■ “Add Device Driver(s) to Boot WIM – Windows Server 2008 SP2 Only” on page 65
■ “Map ImageUnattend.xml Setup Script to Windows Server 2008 (SP2 or R2) InstallImage” on page 67
Operating System Tools and Drivers Firmware DVD Device Driver Repository
Windows Server 2008SP2
DVDDevice:\windows\W2K8\drivers\64bit\hba\lsi\mpt2
C:\unattend\drivers\W2K8\lsi\1.19.2.64
Windows Server 2008 R2 DVDDevice:\windows\W2K8R2\drivers\64bit\hba\lsi\mpt2
C:\unattend\drivers\W2K8R2\lsi\1.19.2.64
60 Sun Server X2-4 Installation Guide for Windows Operating Systems • September 2012
Before you BeginPrior to performing the procedures in this section, you should ensure that all theprerequisites as described in “Prerequisites and Task Overview” on page 58 havebeen met.
▼ Create an ImageUnattend.xml Setup Script –Windows Server 2008 (SP2 or R2)Follow these steps to create an ImageUnattend.xml Setup Script for a WindowsServer 2008 (SP2 or R2) installation. After the Setup Script is generated, it will besaved to the device driver repository.
Note – The ImageUnattend.xml Setup Script (in a later procedure described inthis section) will be mapped to a Windows Server 2008 (SP2 or R2) install image.After the setup script is mapped to the install image, the install image will install thespecified device drivers during the Windows Server 2008 (SP2 or R2) networkinstallation.
1. Insert the Windows Server 2008 (SP2 or R2) DVD media into the DVD reader ofthe system that is hosting the Windows Deployment Services.
2. Copy all the Windows Server 2008 (SP2 or R2) catalog files into the Catalogsfolder of the device driver repository.
For example:
copy DVDDrive:\source\*.clg C:\Unattend\Drivers\{WSK8|W28R2}\Catalogs
3. Launch the Windows System Manager application and create a newImageUnattend.xml Setup Script by doing the following:
a. Click Start-->All Programs -->Microsoft Windows AIK -->WindowsSystem Image Manager.
b. In the Answer File pane, right-click and select New Answer File.
c. If a message dialog appears asking to open a new Windows image now, clickNo.
4. Do the following to specify the Windows Server 2008 (SP2 or R2) Catalog filethat matches the Windows Server 2008 (SP2 or R2) edition (Standard,Datacenter, or Enterprise) that you are installing:
a. In the Windows Image pane, right-click and select Select WindowsImage.
Appendix D Incorporating Device Drivers Into Windows Server 2008 WIM Images for Windows Deployment Services 61

b. In the Files Type list box, select Catalog files (*.clg), then click Browse tospecify the Catalogs folder in the device driver repository.
Ensure that you select the Catalog file that matches the Windows Server 2008(SP2 or R2) edition you are installing.
For example, for Windows Server 2008 SP2 Datacenter, select:
C:\Unattend\Drivers\{W2K8|W2K8R2}\Catalogs\install_Windows_Server_2008_SERVERDATACENTER.clg
5. Do the following to set the component packages topass 2 offlineServing.
a. In the Windows Image pane, click and expand thearchitecture_Microsoft-Windows-PnPCustomizationNonWinPE_version.
b. Right -click PathAndCredientials and select Add Setting to Pass 2OfflineServing.
62 Sun Server X2-4 Installation Guide for Windows Operating Systems • September 2012
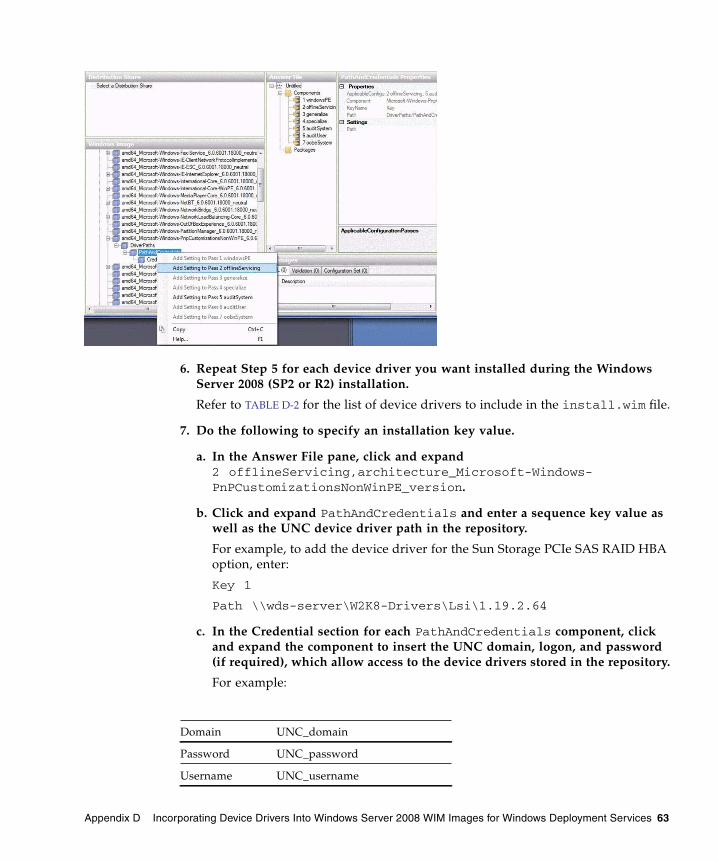
6. Repeat Step 5 for each device driver you want installed during the WindowsServer 2008 (SP2 or R2) installation.
Refer to TABLE D-2 for the list of device drivers to include in the install.wim file.
7. Do the following to specify an installation key value.
a. In the Answer File pane, click and expand2 offlineServicing,architecture_Microsoft-Windows-PnPCustomizationsNonWinPE_version.
b. Click and expand PathAndCredentials and enter a sequence key value aswell as the UNC device driver path in the repository.
For example, to add the device driver for the Sun Storage PCIe SAS RAID HBAoption, enter:
Key 1
Path \\wds-server\W2K8-Drivers\Lsi\1.19.2.64
c. In the Credential section for each PathAndCredentials component, clickand expand the component to insert the UNC domain, logon, and password(if required), which allow access to the device drivers stored in the repository.
For example:
Domain UNC_domain
Password UNC_password
Username UNC_username
Appendix D Incorporating Device Drivers Into Windows Server 2008 WIM Images for Windows Deployment Services 63

d. Repeat Steps 7a through 7c for each device driver you want installed duringthe Windows Server 2008 (SP2 or R2) installation.
8. Validate the ImageUnattend.xml file using the Windows System ImageManager application:
■ In the Windows System Image Manager application, click the Tools menu andselect Validate Answer File.
A message appears in the Message pane indicating that No Warnings or Errorsare found.
9. Save the .xml Setup Script as ImageUnattend.xml using the WindowsSystem Image Manager application:
a. In the Windows System Image Manager application, click the File menuand select Save Answer File as.
b. Save the .xml Setup Script in the device driver repository as:
c:\Unattend\Drivers\W2K8\Catalogs\ImageUnattend.xml
c. Exit the Windows System Image Manager application.
10. The creation of the ImageUnattend.xml Setup Script is complete. Proceed toone of the following:
■ For Windows Server 2008 R2 installation, proceed to “Map ImageUnattend.xmlSetup Script to Windows Server 2008 (SP2 or R2) Install Image” on page 67.
■ For Windows Server 2008 SP2 installations, proceed to “Add Device Driver(s)to Boot WIM – Windows Server 2008 SP2 Only” on page 65 prior to mappingthe ImageUnattend.xml Setup Script to the install.wim image.
64 Sun Server X2-4 Installation Guide for Windows Operating Systems • September 2012

▼ Add Device Driver(s) to Boot WIM – Windows Server2008 SP2 Only
Note – If you are performing a Windows Server 2008 R2 installation, skip thisprocedure. Device drivers are not required at boot time for Windows Server 2008 R2installations.
For Windows Server 2008 SP2 installations only, perform the following steps to addthe appropriate PCIe SAS HBA LSI device driver (MegaRAID or MPT2) to theboot.wim image. Note that if the required PCIe SAS HBA device driver (asdescribed in TABLE D-1 and TABLE D-2) is not added to the boot.wim image, theWindows Server 2008 SP2 installation will fail.
1. Insert the Windows Server 2008 SP2 DVD media into the DVD reader of thesystem that is hosting the Windows Deployment Services.
2. Perform the following to launch the Windows Deployment ServicesAdministration tool and import the Windows Server 2008 SP2 Boot WIM.
a. Click Start -->All Programs -->Windows Deployment Services.
b. Right-click Boot Images and select Add a Boot Image, then click Browseto specify the Windows Server 2008 SP2 boot WIM file.
For example: DVDDrive:\sources\boot.wim
c. Click Open then Next.
3. To import the Windows Server 2008 SP2 boot image, click Next twice then clickFinish.
4. Disable the Windows Server 2008 SP2 boot WIM using the WindowsDeployment Services Administration:
Appendix D Incorporating Device Drivers Into Windows Server 2008 WIM Images for Windows Deployment Services 65
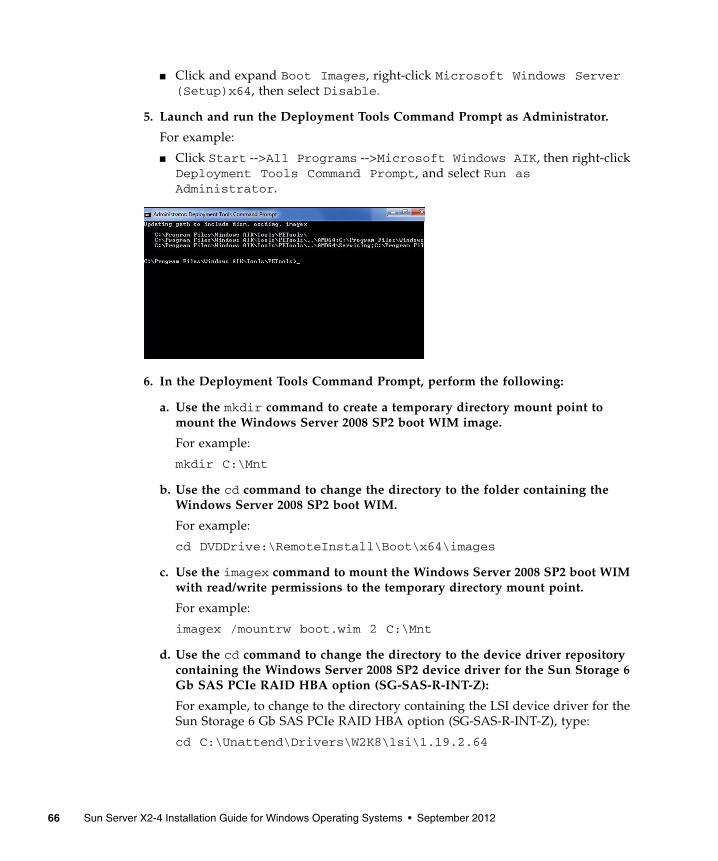
■ Click and expand Boot Images, right-click Microsoft Windows Server(Setup)x64, then select Disable.
5. Launch and run the Deployment Tools Command Prompt as Administrator.
For example:
■ Click Start -->All Programs -->Microsoft Windows AIK, then right-clickDeployment Tools Command Prompt, and select Run asAdministrator.
6. In the Deployment Tools Command Prompt, perform the following:
a. Use the mkdir command to create a temporary directory mount point tomount the Windows Server 2008 SP2 boot WIM image.
For example:
mkdir C:\Mnt
b. Use the cd command to change the directory to the folder containing theWindows Server 2008 SP2 boot WIM.
For example:
cd DVDDrive:\RemoteInstall\Boot\x64\images
c. Use the imagex command to mount the Windows Server 2008 SP2 boot WIMwith read/write permissions to the temporary directory mount point.
For example:
imagex /mountrw boot.wim 2 C:\Mnt
d. Use the cd command to change the directory to the device driver repositorycontaining the Windows Server 2008 SP2 device driver for the Sun Storage 6Gb SAS PCIe RAID HBA option (SG-SAS-R-INT-Z):
For example, to change to the directory containing the LSI device driver for theSun Storage 6 Gb SAS PCIe RAID HBA option (SG-SAS-R-INT-Z), type:
cd C:\Unattend\Drivers\W2K8\lsi\1.19.2.64
66 Sun Server X2-4 Installation Guide for Windows Operating Systems • September 2012
e. Use the peimg command to add the LSI MegaRAID device driver for the SunStorage 6 Gb SAS PCIe RAID HBA option (SG-SAS-R-INT-Z) to theWindows Server 2008 SP2 boot WIM image.
For example, to add the LSI MegaRAID device driver for the Sun Storage 6 GbSAS PCIe RAID HBA option (SG-SAS-R-INT-Z), type:
peimg /INF=*.inf C:\Mnt\Windows
f. Repeat Steps 7d and 7e for each additional device driver (as described inTABLE D-2) that is required in the boot WIM image:
■ Sun Storage 6 Gb SAS PCIe HBA option (SG-SAS-INT-Z or SG-SAS-EXT-Z)
■ Intel Network Driver
g. Use the imagex command to unmount and commit the modified WindowsServer 2008 SP2 boot WIM image.
For example:
imagex /unmount/commit C:\Mnt
7. To enable the Windows Server 2008 SP2 boot WIM image, do the following.
a. Launch the Windows Deployment Services administration tool.
Click Start-->All Programs-->Windows Deployment Services.
b. In the Windows Deployment Services (WDS) Administration tool, click andexpand Boot Images.
c. Right-click Microsoft Windows Server (Setup) x64 and select Enable.
8. The modifications to include the device drivers into the boot.wim image arecomplete. Exit the Deployment Tools Command Prompt and the WDSAdministration tool, then proceed to “Map ImageUnattend.xml Setup Script toWindows Server 2008 (SP2 or R2) Install Image” on page 67.
▼ Map ImageUnattend.xml Setup Script to WindowsServer 2008 (SP2 or R2) Install ImageFollow the steps in this procedure to map the ImageUnattend.xml Setup Script(created in an earlier procedure in this section) to the Windows Server 2008 (SP2 orR2) install.wim.
1. Insert the Windows Server 2008 SP2 DVD media into the DVD reader of thesystem that is hosting the Windows Deployment Services.
2. Perform the following to launch the Windows Deployment Servicesadministration tool and import the Windows Server 2008 SP2 install WIM.
a. Click Start-->All Programs -->Windows Deployment Services.
Appendix D Incorporating Device Drivers Into Windows Server 2008 WIM Images for Windows Deployment Services 67

b. Right-click Install Images and select Add Install Image.
Note that if no image groups exist, create a new image group named WindowsServer 2008 SP2 or Windows Server 2008 R2 and click Next.
c. Click Browse to select the Windows Server 2008 SP2 Install WIM imagelocated at: DVDDrive:\sources\install.wim; then proceed by clickingOpen then Next.
d. Select the Windows Server 2008 (SP2 or R2) edition (Data Center, Standard,or Enterprise) to import into Windows Deployment Services, then click Next.
e. To import the specified Windows Server 2008 (SP2 or R2) edition installimage, click Next twice, then click Finish.
68 Sun Server X2-4 Installation Guide for Windows Operating Systems • September 2012
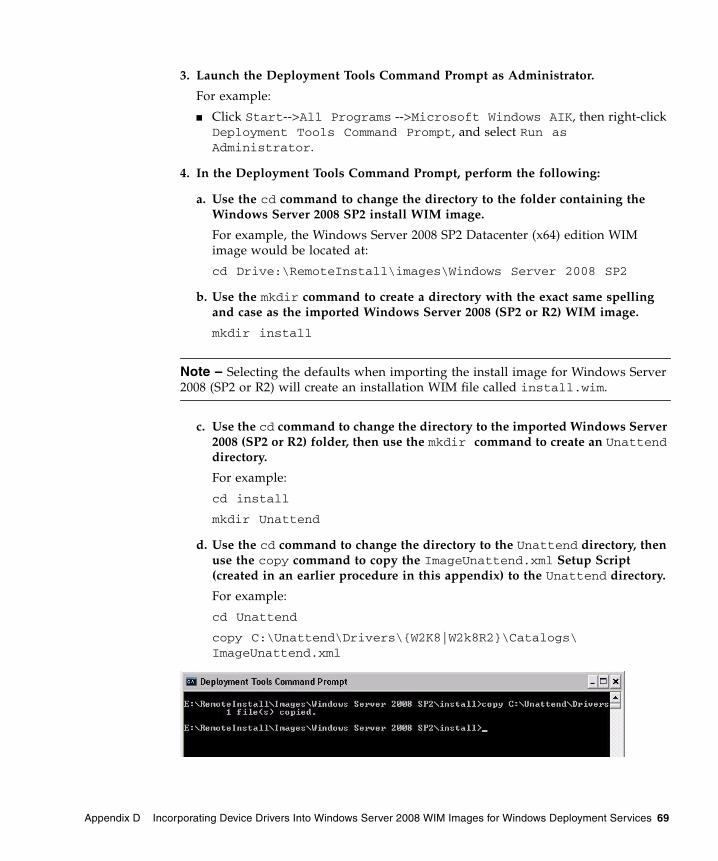
3. Launch the Deployment Tools Command Prompt as Administrator.
For example:
■ Click Start-->All Programs -->Microsoft Windows AIK, then right-clickDeployment Tools Command Prompt, and select Run asAdministrator.
4. In the Deployment Tools Command Prompt, perform the following:
a. Use the cd command to change the directory to the folder containing theWindows Server 2008 SP2 install WIM image.
For example, the Windows Server 2008 SP2 Datacenter (x64) edition WIMimage would be located at:
cd Drive:\RemoteInstall\images\Windows Server 2008 SP2
b. Use the mkdir command to create a directory with the exact same spellingand case as the imported Windows Server 2008 (SP2 or R2) WIM image.
mkdir install
Note – Selecting the defaults when importing the install image for Windows Server2008 (SP2 or R2) will create an installation WIM file called install.wim.
c. Use the cd command to change the directory to the imported Windows Server2008 (SP2 or R2) folder, then use the mkdir command to create an Unattenddirectory.
For example:
cd install
mkdir Unattend
d. Use the cd command to change the directory to the Unattend directory, thenuse the copy command to copy the ImageUnattend.xml Setup Script(created in an earlier procedure in this appendix) to the Unattend directory.
For example:
cd Unattend
copy C:\Unattend\Drivers\{W2K8|W2k8R2}\Catalogs\ImageUnattend.xml
Appendix D Incorporating Device Drivers Into Windows Server 2008 WIM Images for Windows Deployment Services 69
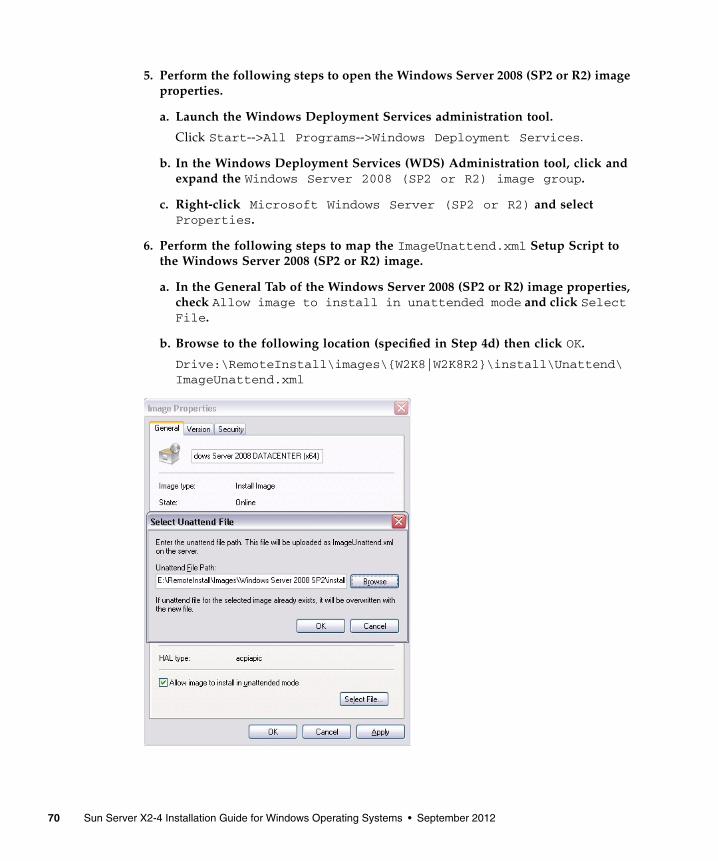
5. Perform the following steps to open the Windows Server 2008 (SP2 or R2) imageproperties.
a. Launch the Windows Deployment Services administration tool.
Click Start-->All Programs-->Windows Deployment Services.
b. In the Windows Deployment Services (WDS) Administration tool, click andexpand the Windows Server 2008 (SP2 or R2) image group.
c. Right-click Microsoft Windows Server (SP2 or R2) and selectProperties.
6. Perform the following steps to map the ImageUnattend.xml Setup Script tothe Windows Server 2008 (SP2 or R2) image.
a. In the General Tab of the Windows Server 2008 (SP2 or R2) image properties,check Allow image to install in unattended mode and click SelectFile.
b. Browse to the following location (specified in Step 4d) then click OK.
Drive:\RemoteInstall\images\{W2K8|W2K8R2}\install\Unattend\ImageUnattend.xml
70 Sun Server X2-4 Installation Guide for Windows Operating Systems • September 2012
c. Click OK to map the ImageUnattend.xml Setup Script to the WindowsServer 2008 (SP2 or R2) WIM image.
The Windows Server 2008 (SP2 or R2) WIM image is ready to be installed usingthe Windows Deployment Services.
d. Exit the Deployment Tools Command Prompt and the Windows DeploymentServices Administration tool.
7. To deploy the Windows Server 2008 (SP2 or R2), refer to the followingprocedure:
“Install Windows Server 2008 (SP2 or R2) Using PXE Network Boot” on page 25.
Appendix D Incorporating Device Drivers Into Windows Server 2008 WIM Images for Windows Deployment Services 71

72 Sun Server X2-4 Installation Guide for Windows Operating Systems • September 2012

Index
BBIOS
defaults for new installations, 51view or edit BIOS settings, 52
boot media, 45, 46
Ddevice drivers
location on Tools and Drivers DVD, 56post installation, 28prerequisite, 9SAS PCIe HBAs requiring drivers, 11
Hhard disk drive, as install target, 48
Iinstall boot media, 45installation
using local or remote media, 14using PXE network boot, 24
installation methodsoverview, 43
installation targets, 47Intel NIC teaming configuration
post installation, 31
LLinux OS
RAID volume disk requirement, 9local console, used for OS install, 44
OOracle Hardware Installation Assistant
documentation URL, 5overview, 3software download URL, 4
Ppost installation tasks
configuring Intel NIC teaming, 31configuring TPM, 31install device drivers, 28installing supplemental software, 29overview, 27
Rremote console, used for OS install, 44
Ssolid state drive, as install target, 48supplemental software
post installation, 30supported operating systems
update-to-date list URL, 49
TTools and Driver DVD
device driver locations, 56TPM configuration
post installation, 31
WWindows Deployment Services
73
boot WIM driver procedure, 65create imageunattend.xml script, 61device drivers for WIM images, 58device drivers on Tools and Driver DVD, 56getting started, 56install WIM driver procedure, 61network install overview, 55procedures, 60task overview, 58
Windows Server 2008before you begin, 13installation considerations, 8installation overview tasks, 10media installation, 14PXE network installation, 24
supported operating systems, 7
74 Sun Server X2-4 Installation Guide for Windows Operating Systems • September 2012