Embed Size (px)
Citation preview

1 Part Number : 820-5757
Sun Microsystems, Inc.4150 Network CircleSanta Clara, CA 95054U.S.A.
Sun Role Manager 4.1User's Guide

©2008 Sun Microsystems, Inc. 4150 Network Circle Santa Clara, CA 95054 U.S.A.
Sun Microsystems, Inc. has intellectual property rights relating to technology embodied in the product that is described in this document. In particular, and without limitation, these intellectual property rights may include one or more U.S. patents or pending patent applications in the U.S. and in other countries.
U.S. Government Rights – Commercial software. Government users are subject to the Sun Microsystems, Inc. standard license agreement and applicable provisions of the FAR and its supplements.
This distribution may include materials developed by third parties.
Parts of the product may be derived from Berkeley BSD systems, licensed from the University of California. UNIX is a registered trademark in the U.S. and other countries, exclusively licensed through X/Open Company, Ltd.
Sun, Sun Microsystems, the Sun logo, the Solaris logo, the Java Coffee Cup logo, docs.sun.com, Java, and Solaris are trademarks or registered trademarks of Sun Microsystems, Inc. in the U.S. and other countries. All SPARC trademarks are used under license and are trademarks or registered trademarks of SPARC International, Inc. in the U.S. and other countries. Products bearing SPARC trademarks are based upon an architecture developed by Sun Microsystems, Inc. FireWire is a trademark of Apple Computer, Inc., used under license. Netscape and Netscape Navigator are trademarks or registered trademarks of Netscape Communications Corporation. Mozilla is a trademark or registered trademark of Netscape Communications Corporation in the United States and other countries. PostScript is a trademark or registered trademark of Adobe Systems, Incorporated, which may be registered in certain jurisdictions. OpenGL is a registered trademark of Silicon Graphics, Inc. ORACLE is a registered trademark of ORACLE CORPORATION.
The OPEN LOOK and SunTM Graphical User Interface was developed by Sun Microsystems, Inc. for its users and licensees. Sun acknowledges the pioneering efforts of Xerox in researching and developing the concept of visual or graphical user interfaces for the computer industry. Sun holds a non-exclusive license from Xerox to the Xerox Graphical User Interface, which license also covers Sun's licensees who implement OPEN LOOK GUIs and otherwise comply with Sun's written license agreements.
Products covered by and information contained in this publication are controlled by U.S. Export Control laws and may be subject to the export or import laws in other countries. Nuclear, missile, chemical or biological weapons or nuclear maritime end uses or end users, whether direct or indirect, are strictly prohibited. Export or reexport to countries subject to U.S. embargo or to entities identified on U.S. export exclusion lists, including, but not limited to, the denied persons and specially designated nationals lists is strictly prohibited.
DOCUMENTATION IS PROVIDED “AS IS” AND ALL EXPRESS OR IMPLIED CONDITIONS, REPRESENTATIONS AND WARRANTIES, INCLUDING ANY IMPLIED WARRANTY OF MERCHANTABILITY, FITNESS FOR A PARTICULAR PURPOSE OR NON-INFRINGEMENT, ARE DISCLAIMED, EXCEPT TO THE EXTENT THAT SUCH DISCLAIMERS ARE HELD TO BE LEGALLY INVALID.
Sun Microsystems, Inc. détient les droits de propriété intellectuelle relatifs à la technologie incorporée dans le produit qui est décrit dans ce document. En particulier, et ce sans limitation, ces droits de propriété intellectuelle peuvent inclure un ou plusieurs brevets américains ou des applications de brevet en attente aux Etats-Unis et dans d'autres pays.
Cette distribution peut comprendre des composants développés par des tierces personnes.
Certaines composants de ce produit peuvent être dérivées du logiciel Berkeley BSD, licenciés par l'Université de Californie. UNIX est une marque déposée aux Etats-Unis et dans d'autres pays; elle est licenciée exclusivement par X/Open Company, Ltd.
Sun, Sun Microsystems, le logo Sun, le logo Solaris, le logo Java Coffee Cup, docs.sun.com, Java et Solaris sont des marques de fabrique ou des marques déposées de Sun Microsystems, Inc. aux Etats-Unis et dans d'autres pays. Toutes les marques SPARC sont utilisées sous licence et sont des marques de fabrique ou des marques déposées de SPARC International, Inc. aux Etats-Unis et dans d'autres pays. Les produits portant les marques SPARC sont basés sur une architecture développée par Sun Microsystems, Inc. FireWire est une marque de Applex Computer, Inc., utilisé sous le permis. Netscape est une marque de Netscape Communications Corporation. Netscape Navigator est une marque de Netscape Communications Corporation. Mozilla est une marque de Netscape Communications Corporation aux Etats-Unis et à d'autres pays. PostScript est une marque de fabrique d'Adobe Systems, Incorporated, laquelle pourrait être déposée dans certaines juridictions. OpenGL est une marque d?pos?e de Silicon Graphics, Inc. ORACLE est une marque d'pos'e registre de ORACLE CORPORATION.
L'interface d'utilisation graphique OPEN LOOK et Sun a été développée par Sun Microsystems, Inc. pour ses utilisateurs et licenciés. Sun reconnaît les efforts de pionniers de Xerox pour la recherche et le développement du concept des interfaces d'utilisation visuelle ou graphique pour l'industrie de l'informatique. Sun détient une licence non exclusive de Xerox sur l'interface d'utilisation graphique Xerox, cette licence couvrant également les licenciés de Sun qui mettent en place l'interface d'utilisation graphique OPEN LOOK et qui, en outre, se conforment aux licences écrites de Sun.
Les produits qui font l'objet de cette publication et les informations qu'il contient sont régis par la legislation américaine en matière de contrôle des exportations et peuvent être soumis au droit d'autres pays dans le domaine des exportations et importations. Les utilisations finales, ou utilisateurs finaux, pour des armes nucléaires, des missiles, des armes chimiques ou biologiques ou pour le nucléaire maritime, directement ou indirectement, sont strictement interdites. Les exportations ou réexportations vers des pays sous embargo des Etats-Unis, ou vers des entités figurant sur les listes d'exclusion d'exportation américaines, y compris, mais de manière non exclusive, la liste de personnes qui font objet d'un ordre de ne pas participer, d'une façon directe ou indirecte, aux exportations des produits ou des services qui sont régis par la legislation américaine en matière de contrôle des exportations et la liste de ressortissants spécifiquement designés, sont rigoureusement interdites.
LA DOCUMENTATION EST FOURNIE "EN L'ETAT" ET TOUTES AUTRES CONDITIONS, DECLARATIONS ET GARANTIES EXPRESSES OU TACITES SONT FORMELLEMENT EXCLUES, DANS LA MESURE AUTORISEE PAR LA LOI APPLICABLE, Y COMPRIS NOTAMMENT TOUTE GARANTIE IMPLICITE RELATIVE A LA QUALITE MARCHANDE, A L'APTITUDE A UNE UTILISATION PARTICULIERE OU A L'ABSENCE DE CONTREFACON.

Table of Contents
Chapter 1: Role Manager – An Introduction.......................................13Identity Warehouse........................................................................................................................................14
Role Engineering & Management................................................................................................................14
Identity Certification......................................................................................................................................15
Identity Auditing.............................................................................................................................................16
Chapter 2: My Settings ..................................................................17Home...............................................................................................................................................................17
Understanding the Graphical Representation of Data..............................................................................19
My Profile .......................................................................................................................................................24
Change My Password.....................................................................................................................................24
My Proxy Assignments..................................................................................................................................25
Chapter 3: Role Manager Components.............................................29Business Units/Business Structures.............................................................................................................30
Users/Business Users....................................................................................................................................31
User Store........................................................................................................................................................31
Roles................................................................................................................................................................31
Policy................................................................................................................................................................32
Application......................................................................................................................................................32
Endpoints........................................................................................................................................................32
User..................................................................................................................................................................32
Create User......................................................................................................................................................33
Search a User..................................................................................................................................................34
Set User Status................................................................................................................................................37
Rename a User................................................................................................................................................39
3 Part Number : 820-5757

View User Accounts (Entitlements).............................................................................................................40
Account Type.................................................................................................................................................41
Associate User to Role(s)..............................................................................................................................42
Associate User to Business Unit...................................................................................................................43
Delete a User...................................................................................................................................................44
Endpoints........................................................................................................................................................44
Create / Modify Endpoints...........................................................................................................................44
Policies.............................................................................................................................................................45
Create / Modify Policies................................................................................................................................46
Associate Policy / Endpoints.......................................................................................................................49
Associate Policy / Role..................................................................................................................................50
Associate Policy Owner to Policy.................................................................................................................51
Roles................................................................................................................................................................51
Create Roles....................................................................................................................................................52
Role Search......................................................................................................................................................61
Manage Roles (Rename/Modify/Decommission).....................................................................................62
Role Hierarchy................................................................................................................................................63
Setting Segregation of Duties at Role and Policy Level.............................................................................65
Associate Role to Business Unit...................................................................................................................66
Associate Role Owners to Role....................................................................................................................67
Chapter 4: Role Engineering............................................................69Role Discovery................................................................................................................................................70
Set Minable Attributes...................................................................................................................................70
Create/Run a Role Mining Task...................................................................................................................71
Analyze, Configure and Save Role Mining Results....................................................................................79
Role Entitlement Discovery..........................................................................................................................90
Rules Discovery..............................................................................................................................................93
Chapter 5: Role Management & My Requests....................................99Role Status.....................................................................................................................................................100
Pending Requests.........................................................................................................................................102
Analyzing a Request.....................................................................................................................................103
Completed Requests....................................................................................................................................103
Role Versioning............................................................................................................................................105

Role History..................................................................................................................................................110
Chapter 6: Identity Certification....................................................117Understanding the Actors...........................................................................................................................118
Identity Certification Dashboard................................................................................................................119
New Identity Certification...........................................................................................................................120
View And Search Certification...................................................................................................................130
Completing a User Access Certification....................................................................................................133
Step 1.............................................................................................................................................................135
Step 2.............................................................................................................................................................137
Completing a Role Entitlement Certification...........................................................................................143
Completing an Application Owner Certification.....................................................................................147
Chapter 7: Identity Auditing..........................................................153Audit Rules and Policies..............................................................................................................................154
Create Audit Rule.........................................................................................................................................156
Create Audit Policy......................................................................................................................................158
Scan Audit Policy Violations.......................................................................................................................163
Exception Lifecycle Management..............................................................................................................165
Manage Lifecycle of Audit Violations........................................................................................................167
Chapter – 8: Reports.....................................................................171Business Unit Reports.................................................................................................................................171
System Reports.............................................................................................................................................172
Audit Reports................................................................................................................................................173
Custom Reports............................................................................................................................................174
Generating Reports......................................................................................................................................174
Generating Custom Report.........................................................................................................................176
Steps to Sign off a Report ..........................................................................................................................178
Reporting Dashboard..................................................................................................................................178
Appendix A..................................................................................180


Preface
Who should read this guideThe guide is intended for business users, managers, role engineers and security administrators who serve as the end users of the SunTM Role Manager software (formerly Vaau's Sun Role Manager product). This guide will help you understand the functionality and operation from the point of the product's Role Manager and Identity Compliance Manager Solution areas. The next section serves as an overview of the product and describes what the solution provides. We suggest that you read this section first to familiarize yourself with Role Manager terms and concepts.
7


1 C H A P T E R 1
1 Role Manager – An Introduction
Sun Microsystems understands that organizations today need to be in complete control of their enterprise security. The SunTM Role Manager 4.1 software (formerly Vaau's RBACx) addresses all aspects of Role Based Access Control (RBAC), enabling an enterprise to quickly and effectively embrace new opportunities, improve operational efficiencies, reduce costs, and actively manage virtually all security threats and risks to the IT security of the organization. The Sun Role Manager software contains areas that are grouped as follows: Identity Warehouse, Role Engineering & Management, Identity Certification and Identity Auditing.
9

Identity Warehouse
Identity WarehouseThe Role Manager Identity Warehouse captures and stores relevant entitlement data from systems containing simple to a complex entitlement structure. These entitlement feeds are imported on a scheduled basis and Role Manager accommodates an n-level entitlement structure which can be stored in the Role Manager data repository. Role Manager has an import engine which supports complex entitlement feeds from a text or xml file and also includes ETL (Extract, Transform, Load) processing capabilities. Role Manager also captures the glossary description of each entitlement and this can be inputted as a separate feed to Role Manager. Glossary information provides business descriptions that are associated with the raw entitlement data for improved usability and understandability. The complete entitlement data can be correlated during the certification phase and the entitlement hierarchy can be shown as part of the drill-down entitlements.
Role Engineering & ManagementOne of the most challenging problems in managing large networks is the complexity of security administration. Role based access control (also called role based security), has become the predominant model for advanced access control because it reduces the complexity and cost of security administration in large networked applications. Most information technology vendors have incorporated RBAC into their product line, and the technology is finding applications in areas ranging from health care to defense, in addition to the mainstream commerce systems for which it was designed.
RBAC is emerging as an alternative to traditional access control methodologies as it established a framework to facilitate management of users and information assets across an enterprise in a controlled and effective manner. The primary concept of RBAC is that access to information assets is assigned by using pre-defined and approved roles.
Role Manager provides a complete mechanism to define roles which are based on different access levels on different platforms. Roles can be defined based on the collected user entitlements or can be generated using the software’s Role Mining Interface. The Role Mining component in Role Manager uses sophisticated algorithms to generate roles based on user entitlements and the cuts the role definition time to about 50 %.
Role Manager offers an enhanced workflow engine to manage the lifecycle of roles. This new workflow engine provides the ability to design various workflow processes and also allows users to call external functions from the workflow. It also provides a complete setup of security, workflow and auditing features to manage the lifecycle of rules. This functionality will help companies obtain greater efficiencies from a role-based access control model. You can define multiple rules to assign new and existing users specific role-based access. The rule management feature provides a robust rule creation engine with a vast combination of user attributes (such as job codes, department, location, etc.) and multiple conditions to assign and de-assign roles from users.
10 September 2008 · Sun Role Manager 4.1 User's Guide
Identity Certification
Identity CertificationManaging enterprise-wide attestation is a major challenge. Organizations must align a strategy to provide review of granular entitlements of a user’s access within the organization to the user’s manager(s). Today, there are various challenges involving this with a single user having access to a multitude of platforms, systems, and applications. Organizations must be able to manage increasing costs associated with gathering the user entitlements and distributing them across to the managers. They must also be able to manage increased security risks associated with the escalating volume of gathering and distributing these entitlements. Additionally, Federal requirements mandate the needs to address Time-Based Certifications, Granular Entitlements, certify Contractors on Unique Schedules, Set Baseline and Certify Incremental Changes and provide a Certification Dashboard of all the certifications issued.
To help solve these needs, Role Manager provides an Identity Certification module which enables easy handling of the collecting and distributing user entitlements and provides scheduled certifications on these entitlements. In addition, Role Manager provides unique features which allow users to certify granular entitlements and entitlements which are outside of user roles. Furthermore, business-friendly glossary names can be stored and displayed for each entitlement during certification and can be stored in Role Manager.
This powerful Identity Certification module is further extended in Role Manager to provide the ability to perform certifications at the instance or server level of a resource, providing advanced drill down capabilities for users, and advanced filtering and searching capabilities on the certification interface.
The Role Manager Identity Certification module also adds two important Certification types:
1) User Access Certification – Allows certifiers to certify roles and entitlements associated with a user
2) Role Entitlement Certification - Allows role owners to certify roles and role content
3) Application Certification - Allows application owners to certify entitlements pertaining to an application narrowed down by each instance of the application
Identity AuditingException Monitoring is an integral piece of Identity Auditing and Management. In organizations today, there are numerous exceptions of user accounts on various target systems. A detective mechanism to monitor and acquire exceptions is needed in organizations where a centralized store for all the exceptions would be available. Organizations must be able to manage Continuous Exception Monitoring, Segregation of Duty (SoD) Violations, Detective Scanning, Inter & Intra-Application SoD Enforcement, Actual vs. Assigned Exceptions, Exception Lifecycle Management. These exceptions can be captured in Role Manager and produced in a central repository. Role
Chapter 1 · Role Manager – An Introduction 11

Identity Auditing
Manager provides the capability to define Audit policies and the ability to capture and report any exceptions from these policies.
Role Manager provides a Compliance Dashboard for Executives/Auditors which enable them to monitor these exceptions from a central point. Also, the various exceptions generated are stored in Role Manager and a security analyst can accept them or mitigate these risks and exceptions.
12 September 2008 · Sun Role Manager 4.1 User's Guide
2 C H A P T E R 2
2 My Settings
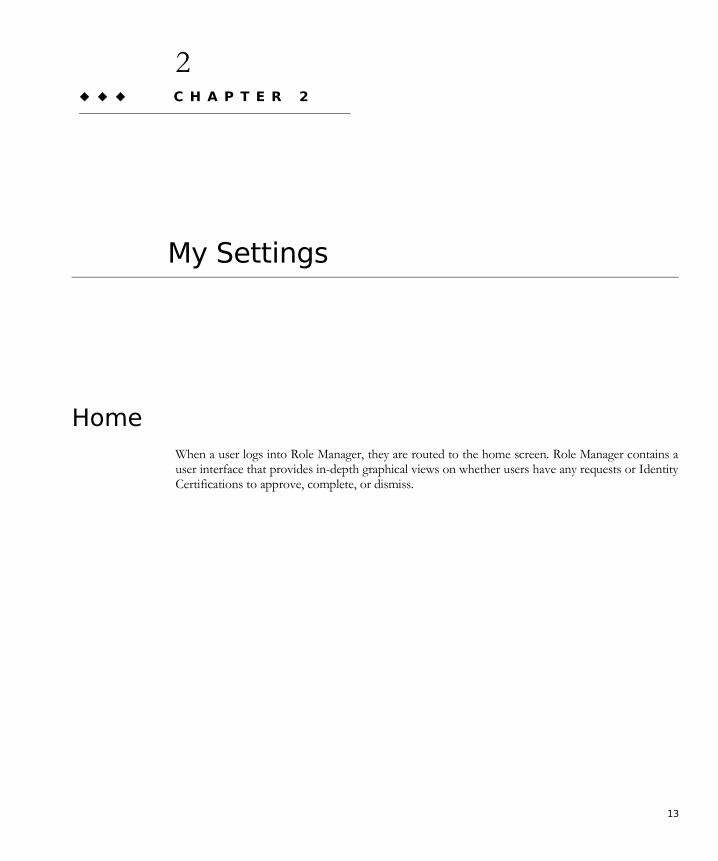
HomeWhen a user logs into Role Manager, they are routed to the home screen. Role Manager contains a user interface that provides in-depth graphical views on whether users have any requests or Identity Certifications to approve, complete, or dismiss.
13
Home
Figure 2.1 – Role Manager Home Screen
14 September 2008 · Sun Role Manager 4.1 User's Guide

Understanding the Graphical Representation of Data
Understanding the Graphical Representation of Data
1. My Requests
Figure 2.2 –My Requests
The My Requests graph shows Pending vs. Completed Requests. The Pending and Completed links guide the user to the Requests approval page. For more information on My Approval Requests,
refer to chapter 5. Clicking the icons provides a different chart view of the data.
Chapter 2 · My Settings 15
Understanding the Graphical Representation of Data
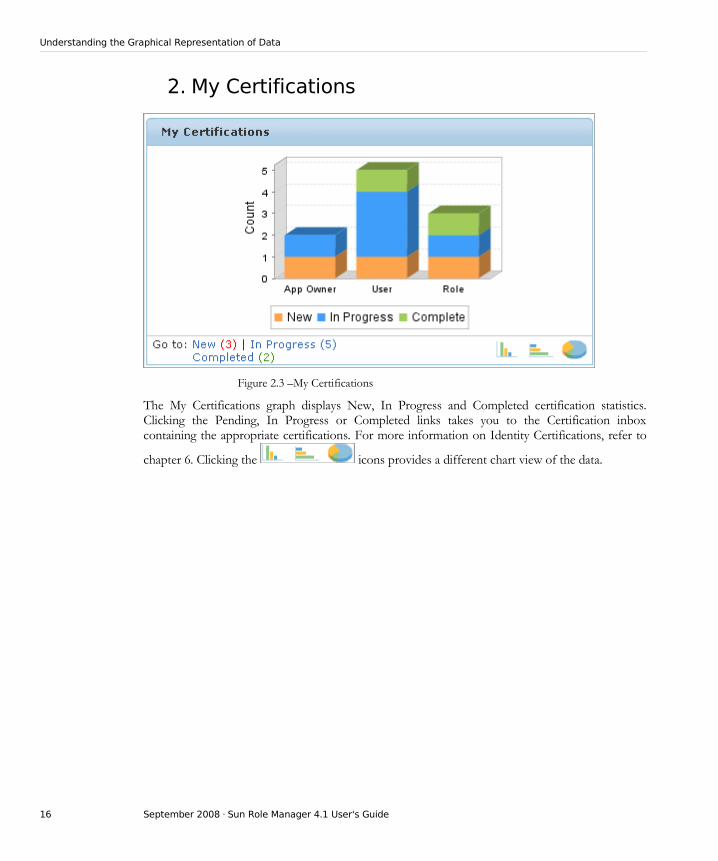
2. My Certifications
Figure 2.3 –My Certifications
The My Certifications graph displays New, In Progress and Completed certification statistics. Clicking the Pending, In Progress or Completed links takes you to the Certification inbox containing the appropriate certifications. For more information on Identity Certifications, refer to
chapter 6. Clicking the icons provides a different chart view of the data.
16 September 2008 · Sun Role Manager 4.1 User's Guide
Understanding the Graphical Representation of Data
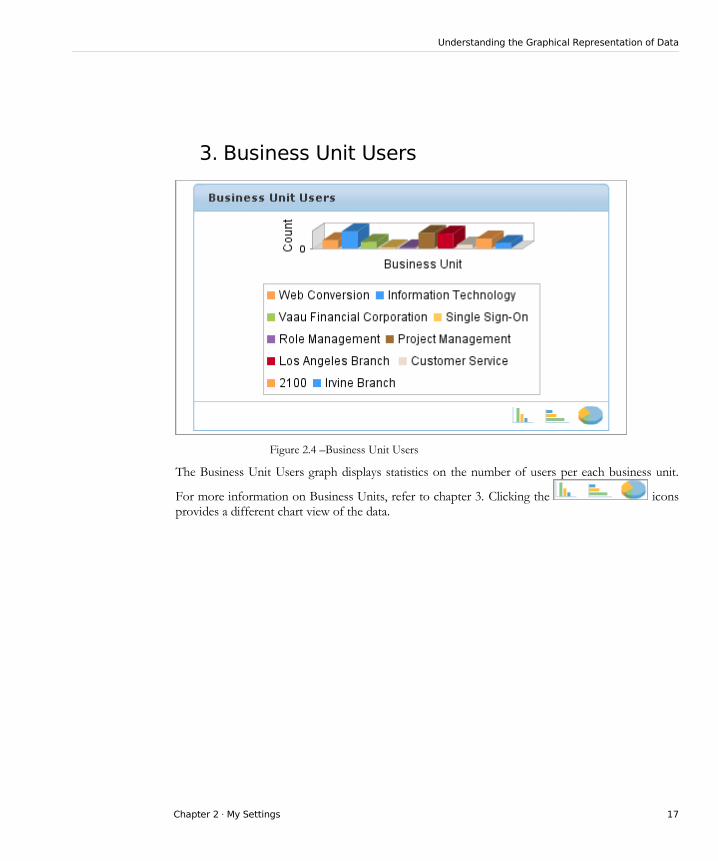
3. Business Unit Users
Figure 2.4 –Business Unit Users
The Business Unit Users graph displays statistics on the number of users per each business unit.
For more information on Business Units, refer to chapter 3. Clicking the icons provides a different chart view of the data.
Chapter 2 · My Settings 17
Understanding the Graphical Representation of Data
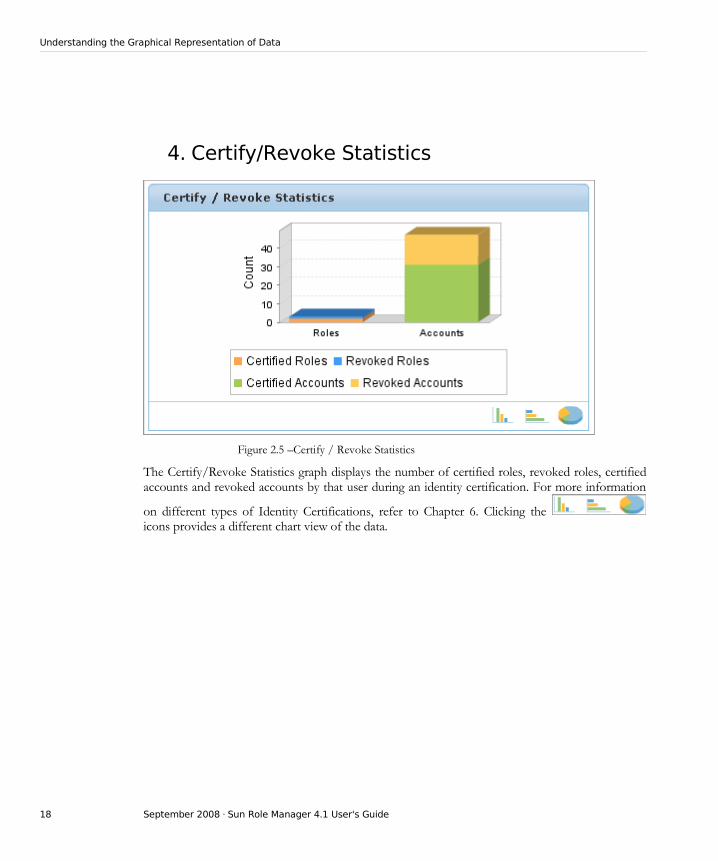
4. Certify/Revoke Statistics
Figure 2.5 –Certify / Revoke Statistics
The Certify/Revoke Statistics graph displays the number of certified roles, revoked roles, certified accounts and revoked accounts by that user during an identity certification. For more information
on different types of Identity Certifications, refer to Chapter 6. Clicking the icons provides a different chart view of the data.
18 September 2008 · Sun Role Manager 4.1 User's Guide
Understanding the Graphical Representation of Data
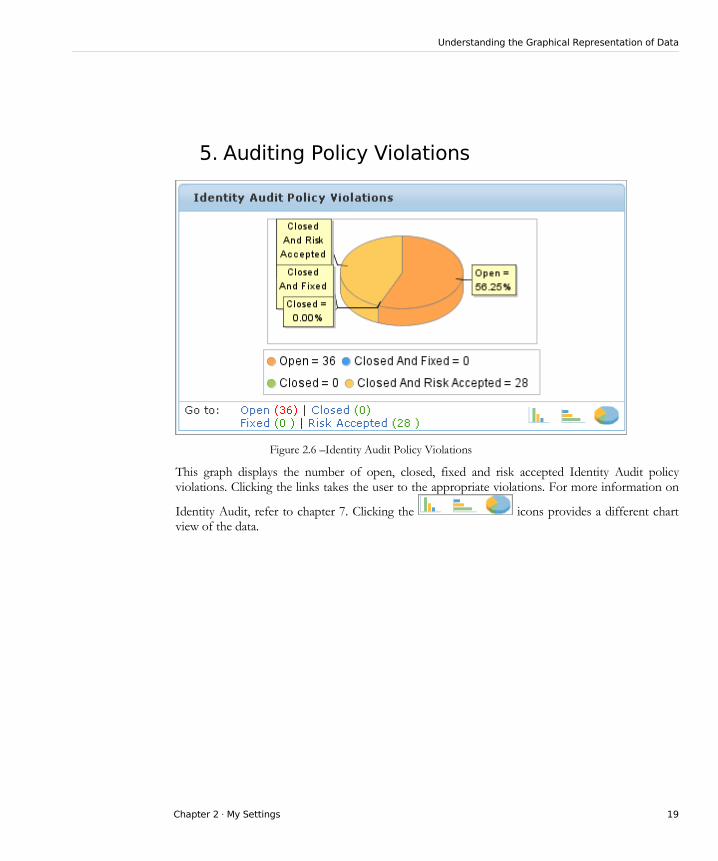
5. Auditing Policy Violations
Figure 2.6 –Identity Audit Policy Violations
This graph displays the number of open, closed, fixed and risk accepted Identity Audit policy violations. Clicking the links takes the user to the appropriate violations. For more information on
Identity Audit, refer to chapter 7. Clicking the icons provides a different chart view of the data.
Chapter 2 · My Settings 19

My Profile
My Profile
The My Profile tab displays the user’s name and email information.
Figure 2.7 – My Profile
▼ Steps to change My Profile Information
1. Start Role Manager by clicking the Role Manager Icon
2. The login dialog box appears. Enter your credentials and login to Role Manager
3. Go to My Settings G My Profile
4. To change the existing information, edit the required First Name, Last Name or E Mail
field and click
Change My Password
This option is used to change the password of the current user.
20 September 2008 · Sun Role Manager 4.1 User's Guide
Change My Password
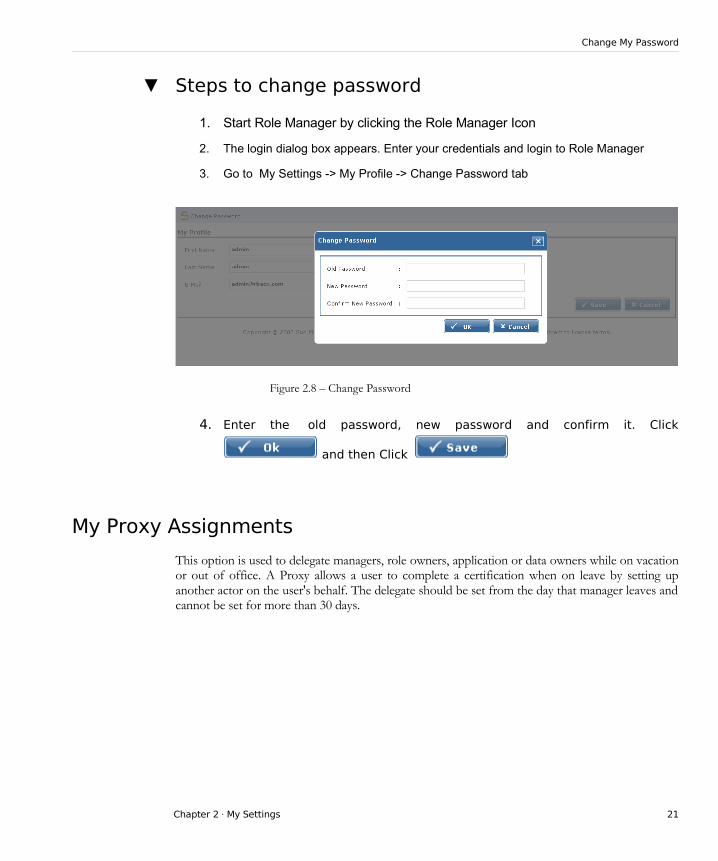
▼ Steps to change password
1. Start Role Manager by clicking the Role Manager Icon
2. The login dialog box appears. Enter your credentials and login to Role Manager
3. Go to My Settings -> My Profile -> Change Password tab
Figure 2.8 – Change Password
4. Enter the old password, new password and confirm it. Click
and then Click
My Proxy Assignments
This option is used to delegate managers, role owners, application or data owners while on vacation or out of office. A Proxy allows a user to complete a certification when on leave by setting up another actor on the user's behalf. The delegate should be set from the day that manager leaves and cannot be set for more than 30 days.
Chapter 2 · My Settings 21
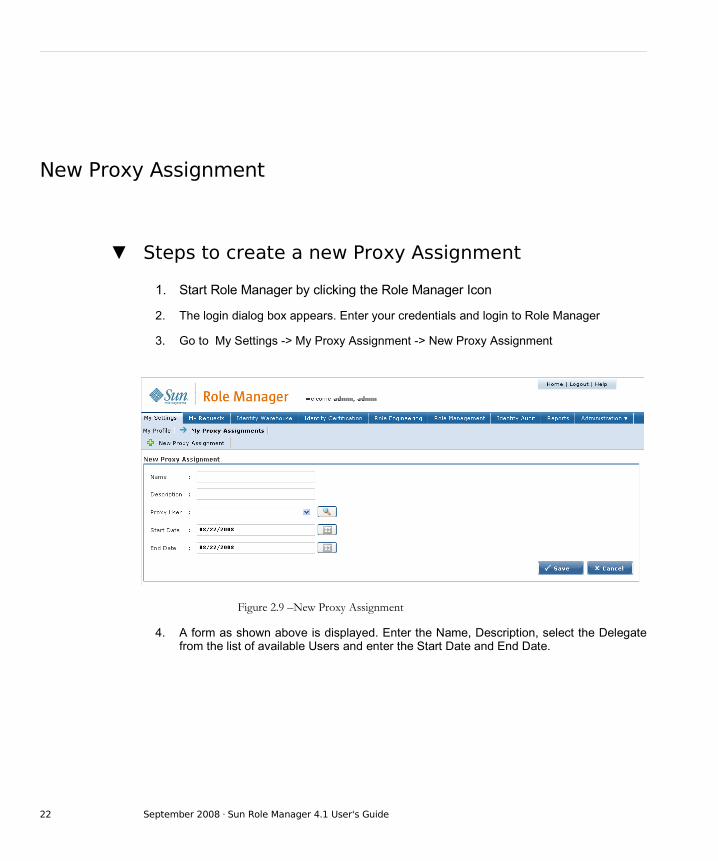
New Proxy Assignment
▼ Steps to create a new Proxy Assignment
1. Start Role Manager by clicking the Role Manager Icon
2. The login dialog box appears. Enter your credentials and login to Role Manager
3. Go to My Settings -> My Proxy Assignment -> New Proxy Assignment
Figure 2.9 –New Proxy Assignment
4. A form as shown above is displayed. Enter the Name, Description, select the Delegate from the list of available Users and enter the Start Date and End Date.
22 September 2008 · Sun Role Manager 4.1 User's Guide

New Proxy Assignment
Figure 2.10 –Enter Proxy Details
5. Click
6. A new Proxy Assignment will be created. The designated proxy can now log into Role Manager and perform all tasks designated to this user until the specified end date.
Chapter 2 · My Settings 23


3 C H A P T E R 3
3 Role Manager Components
User Identities are stored on multiple systems within organizations. The complexity of managing and tracking user identities is compounded by various organizational lifecycle changes – mergers, acquisitions, outsourcing, job enrichment, employee transfers, contractors, terminations, business unit amalgamation and business unit break ups. Each transformation within the organization brings about a movement of user identities and change in user access on the systems.
The mandates by various privacy acts ask for more control over the access that users have to the various systems owned by the organization. The threat to data security is more from within the organization then from outside elements. These attacks can be mitigated and avoided by the advent of a framework – Role Based Access Control (RBAC). Role based access control in simplified terms implements a framework that allows for the access of systems based on the roles assigned to an individual. Administering users in this manner controls the access that users need across diverse systems.
25

Role Manager Components
The components illustrated above have a “many to many” relationship and are described in detail below.
Business Units/Business Structures
A business unit in Role Manager is defined as a department or sub-department within an organization. An organization can be segregated into as many business units as required to replicate the business structure, with as many levels of hierarchy as desired to represent teams and sub-teams within the organization. The maximum number of users that can be assigned to a business unit can be configured and does not have a ceiling. All operations in Role Manager such as Role Based Access Control, Identity Auditing and Identity Certification are performed on basis of a Business Unit or Business Structure.
Users/Business Users
A User is defined as a discrete, identifiable entity that has a business needs to access or modify enterprise information assets. Typically, a user is an individual user but can also be a program, a process or a piece of computer hardware.
26 September 2008 · Sun Role Manager 4.1 User's Guide

Users/Business Users
Business Users or Users are associated to business units in various ways. A user can be assigned to several business units based on his access level and details in an organization. A Business user has a Manager or an Application Approver who handles the various operations of user and role management on a user.
User Store
A user store is the platform / database / directory where the users are stored. Examples of these are Active Directory, Exchange, ORACLE®, SAP, UNIX®, RDBMS Tables.
The entitlements from the various applications are stored in a centralized user store in Role Manager. The user store can be a relational database which handles the various user entitlements. Once the entitlements are in the user store, role engineering, identity certification and identity auditing pieces can be carried out on them.
Roles
A role represents a job function. Roles contain policies that describe the access that individuals have on a directory. They represent unique job function performed by users in the domain. For example, a person can function as a manager, developer, and trainer. In this case, you have three roles that represent each job function because each requires different privileges and access to different Endpoints.
Roles give you the flexibility and power to enforce enterprise standards by being able to:
Manage users who perform the same tasks the same way no matter where they are located in the enterprise.
Perform less work when managing users because you do not have to manually specify privileges every time a change is made to a person’s job function.
A role can be embedded inside a role as a nested role. Role hierarchy can be defined to any level of subnets have role ordering in an organization.
Policy
Policies define account attributes and privileges that users have on different platforms or applications. A policy has a specific privilege on specific data resource. Policies are assigned to roles and roles are assigned to users. Policies provide consistent directory permissions and user
Chapter 3 · Role Manager Components 27
Policy
rights across and within the organization for all of the users in a role.
Application
An application is a data resource that requires access by an entity. These applications may be individual assets or grouped under a common owner. Primarily applications are either platforms (Windows 2000, Win NT, UNIX, Mainframe) or Business Applications (such as, Billing, Accounts Payable). Each Application has an application owner who handles the various operations on the application like reviewing user entitlements. The user entitlements are collected from the different applications and stored in a centralized repository.
Endpoints
Endpoints are instances of a namespace. A Namespace can have multiple end-points assigned to it. For example an ORACLE namespace can have the various databases as End-Points.
User
A user is a global identity to which various accounts are associated. A user can have multiple accounts but all of the accounts are associated with a single global identity in Role Manager. This global identity is defined under the Users View. The ‘Users View’ shows the entire list of users that belong to the organization. In an organization the initial feed of the users is done by getting a feed from the HR system and create all the global identities in Role Manager. Alternatively the global identities can be created from a provisioning system such as Sun System Identity Manager.
A naming convention for all users should be established. A common naming convention is a combination of a user’s name in lowercase letters and a set of numbers. For example, John Smith’s user name might be josmit01. User names must be unique.
28 September 2008 · Sun Role Manager 4.1 User's Guide
Create User
Create User
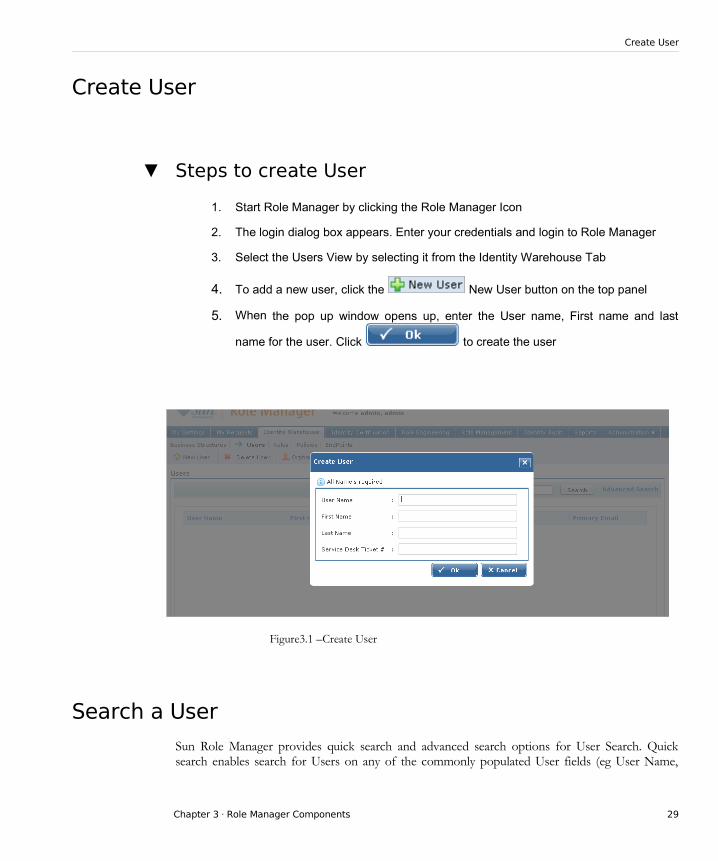
▼ Steps to create User
1. Start Role Manager by clicking the Role Manager Icon
2. The login dialog box appears. Enter your credentials and login to Role Manager
3. Select the Users View by selecting it from the Identity Warehouse Tab
4. To add a new user, click the New User button on the top panel
5. When the pop up window opens up, enter the User name, First name and last
name for the user. Click to create the user
Figure3.1 –Create User
Search a User
Sun Role Manager provides quick search and advanced search options for User Search. Quick search enables search for Users on any of the commonly populated User fields (eg User Name,
Chapter 3 · Role Manager Components 29
Search a User
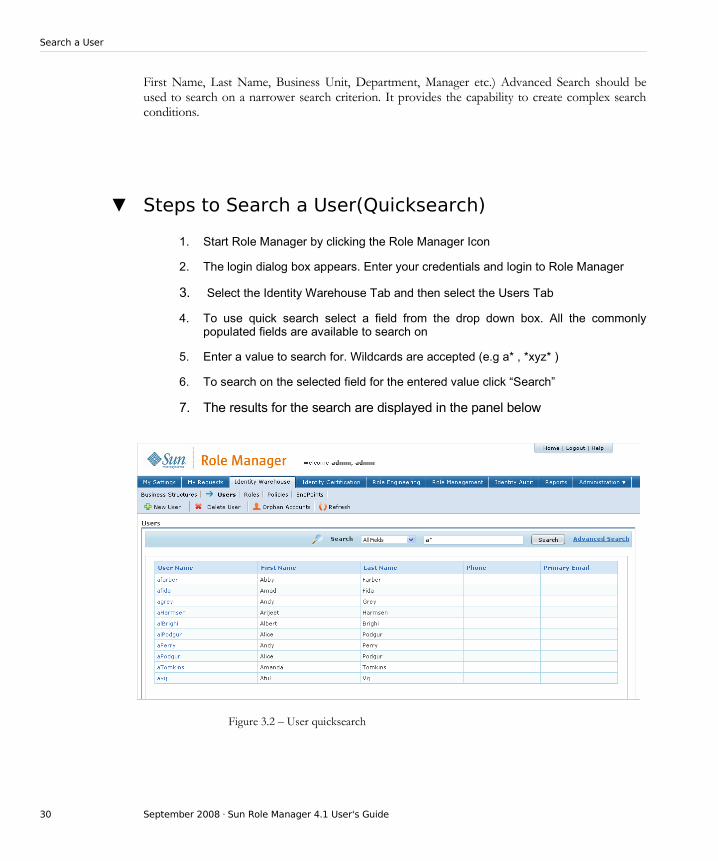
First Name, Last Name, Business Unit, Department, Manager etc.) Advanced Search should be used to search on a narrower search criterion. It provides the capability to create complex search conditions.
▼ Steps to Search a User(Quicksearch)
1. Start Role Manager by clicking the Role Manager Icon
2. The login dialog box appears. Enter your credentials and login to Role Manager
3. Select the Identity Warehouse Tab and then select the Users Tab
4. To use quick search select a field from the drop down box. All the commonly populated fields are available to search on
5. Enter a value to search for. Wildcards are accepted (e.g a* , *xyz* )
6. To search on the selected field for the entered value click “Search”
7. The results for the search are displayed in the panel below
Figure 3.2 – User quicksearch
30 September 2008 · Sun Role Manager 4.1 User's Guide

Search a User
▼ Steps to Search a User (Advanced Search):
1. Start Sun Role Manager by clicking the Sun Role Manager Icon
2. The login dialog box appears. Enter your credentials and login to Sun Role Manager
3. Select the Identity Warehouse Tab and then select the Users Tab
Figure 3.3 - User Advanced Search
4. Select the Advanced Search Tab
5. Create a condition by selecting values for “Attribute”, “Condition” and “Value”. Attribute can be selected over an extensive range including endpoints, business units and any other commonly populated user field. Value supports wildcards (eg. a* or *xyz*)
6. To create more conditions click “Add”
7. To remove any condition(s) select the condition(s) by selecting its corresponding checkbox and click “Remove”
8. n the case of multiple conditions set “Operation” to “AND” or “OR” to specify the logical operation between the conditions.
9. To group two conditions together select them and click “Group”
10. Groupings are displayed by a different color coding for each group. In the case of nested groups the outermost grouping will have one color code with each component group having its own color code.
11. To ungroup a grouped conditional select the grouped conditional by selecting its corresponding checkbox and click “Ungroup”
Chapter 3 · Role Manager Components 31

Search a User
12. The created search condition is dynamically displayed in a high-lighted line under the “Group” and “Ungroup” tags as a single logical condition
13. To search on the created condition click “Search”
Figure 3.4 – User Advanced Search Conditions
Set User Status
User status allows the user to set the status as active or inactive. A User in Role Manager can be terminated and the end date of the user can be specified. Depending on the User status in an organization this field can be set.
▼ Steps to Set User Status
1. Start Role Manager by clicking the Role Manager Icon
2. The login dialog box appears. Enter your credentials and login to Role Manager
3. Select the Identity Warehouse Tab and then select the User Tab
32 September 2008 · Sun Role Manager 4.1 User's Guide

Set User Status
4. Select a User by double clicking it
5. Browse to the General tab of the User
6. Scroll down to the Status field
7. Select the Status as Active or Inactive from the drop down dialog box
Figure 3.5 – Set Status of User
8. If the user is set as Inactive specify the End Date of the user.
Chapter 3 · Role Manager Components 33

Rename a User
▼ Steps to Rename a User
1. Start Role Manager by clicking the Role Manager Icon
2. The login dialog box appears. Enter your credentials and login to Role Manager
3. Select the Identity Warehouse Tab and then select the User Tab
4. Right click a User and select Rename
Figure 3.6 – Rename User
5. Enter the new User name for the User
34 September 2008 · Sun Role Manager 4.1 User's Guide
View User Accounts (Entitlements)
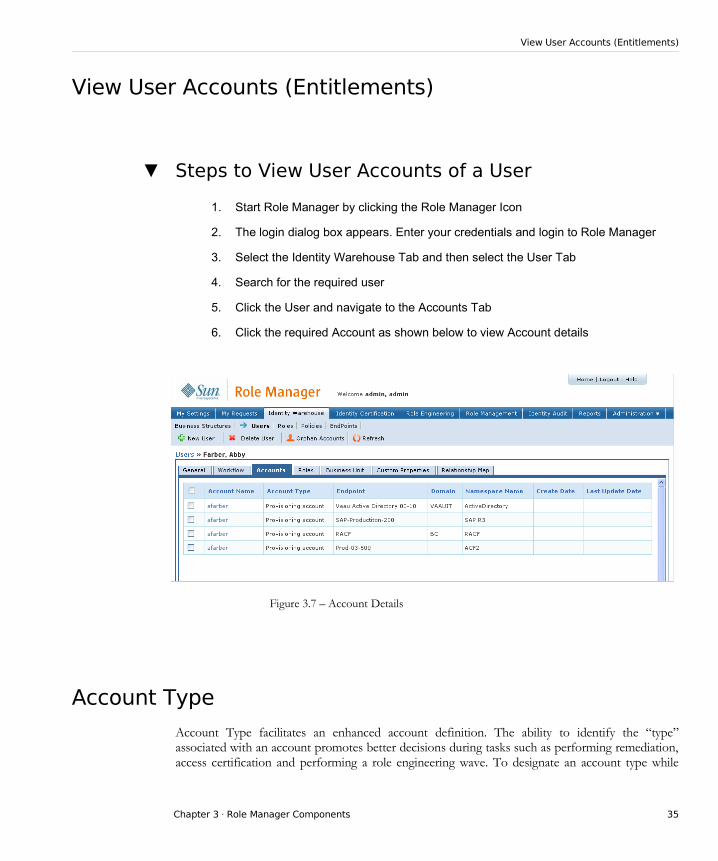
View User Accounts (Entitlements)
▼ Steps to View User Accounts of a User
1. Start Role Manager by clicking the Role Manager Icon
2. The login dialog box appears. Enter your credentials and login to Role Manager
3. Select the Identity Warehouse Tab and then select the User Tab
4. Search for the required user
5. Click the User and navigate to the Accounts Tab
6. Click the required Account as shown below to view Account details
Figure 3.7 – Account Details
Account Type
Account Type facilitates an enhanced account definition. The ability to identify the “type” associated with an account promotes better decisions during tasks such as performing remediation, access certification and performing a role engineering wave. To designate an account type while
Chapter 3 · Role Manager Components 35

Account Type
importing accounts using the Role Manager automated import process a “type” attribute should be provided in the .rbx schema file. This predefined account “type” could then be leveraged while performing Identity Certifications, Role Engineering and remediation allowing the different Role Manager actors to make educated decisions.
▼ Steps to view Account Type:
1. Start Sun Role Manager by clicking the Sun Role Manager Icon
2. The login dialog box appears. Enter your credentials and login to Sun Role Manager
3. Select the Identity Warehouse Tab and then select the Users Tab
4. Search for a User using the quick search or Advanced Search feature
5. Select a user by clicking the User Name
6. Select the Accounts Tab
7. “Type” of the account is visible under the Account Type field
Figure 3.8 – Account Type
36 September 2008 · Sun Role Manager 4.1 User's Guide
Associate User to Role(s)
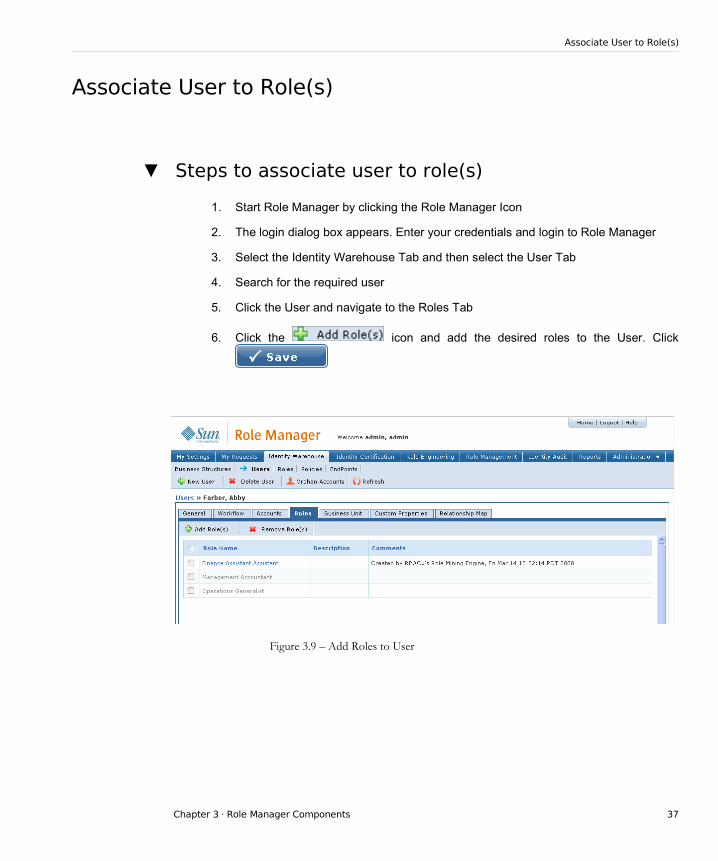
Associate User to Role(s)
▼ Steps to associate user to role(s)
1. Start Role Manager by clicking the Role Manager Icon
2. The login dialog box appears. Enter your credentials and login to Role Manager
3. Select the Identity Warehouse Tab and then select the User Tab
4. Search for the required user
5. Click the User and navigate to the Roles Tab
6. Click the icon and add the desired roles to the User. Click
Figure 3.9 – Add Roles to User
Chapter 3 · Role Manager Components 37

Associate User to Business Unit
Associate User to Business Unit
▼ Steps to associate user to Business Unit
1. Start Role Manager by clicking the Role Manager Icon
2. The login dialog box appears. Enter your credentials and login to Role Manager
3. Select the Identity Warehouse Tab and then select the User Tab
4. Search for the required user
5. Click the User and navigate to the Business Unit Tab
7. Click and add the desired Business Unit(s) to the
User. Click
Figure 3.10 – Add Business Unit(s) to User
38 September 2008 · Sun Role Manager 4.1 User's Guide
Delete a User
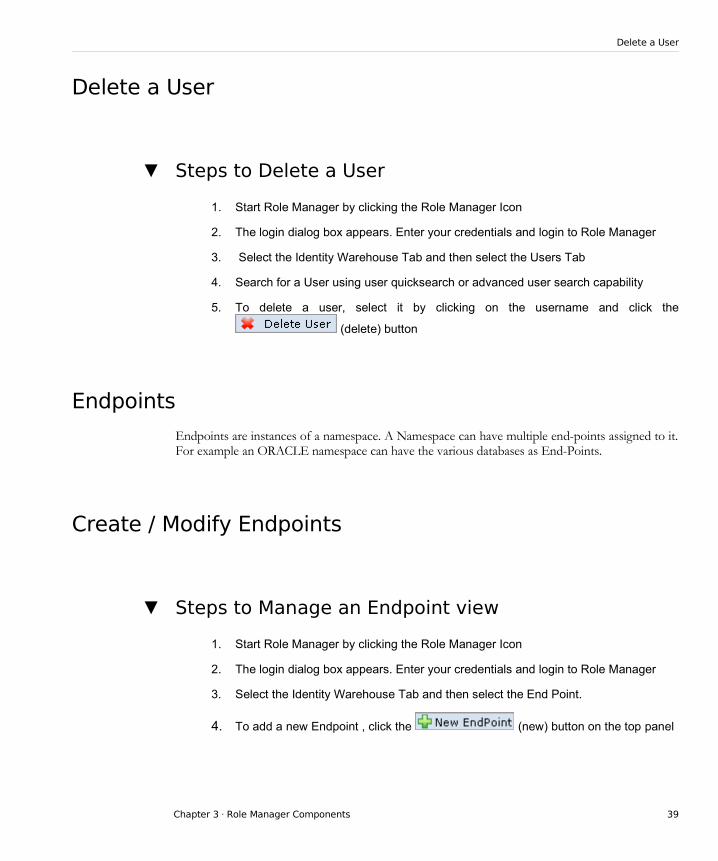
Delete a User
▼ Steps to Delete a User
1. Start Role Manager by clicking the Role Manager Icon
2. The login dialog box appears. Enter your credentials and login to Role Manager
3. Select the Identity Warehouse Tab and then select the Users Tab
4. Search for a User using user quicksearch or advanced user search capability
5. To delete a user, select it by clicking on the username and click the
(delete) button
Endpoints
Endpoints are instances of a namespace. A Namespace can have multiple end-points assigned to it. For example an ORACLE namespace can have the various databases as End-Points.
Create / Modify Endpoints
▼ Steps to Manage an Endpoint view
1. Start Role Manager by clicking the Role Manager Icon
2. The login dialog box appears. Enter your credentials and login to Role Manager
3. Select the Identity Warehouse Tab and then select the End Point.
4. To add a new Endpoint , click the (new) button on the top panel
Chapter 3 · Role Manager Components 39

Create / Modify Endpoints
Figure 3.11 – New Endpoint
5. This opens a new pop up window from where you select the namespace to which the new end point/directory would belong to, Endpoint Name, Host Name, etc. and
click
Policies
Policies are templates which define the various access levels a user has on the target systems. Policies are uniquely defined for the end-points and Roles consist of Policies. The Polices component displays all available policies that exist for the organization categorized according to
namespaces. Namespaces are depicted as . Under each Namespace the available policies are shown.
Create / Modify Policies
▼ Steps to manage a policy
1. Start Role Manager by clicking the Role Manager Icon
40 September 2008 · Sun Role Manager 4.1 User's Guide
Create / Modify Policies
2. The login dialog box appears. Enter your credentials and login to Role Manager
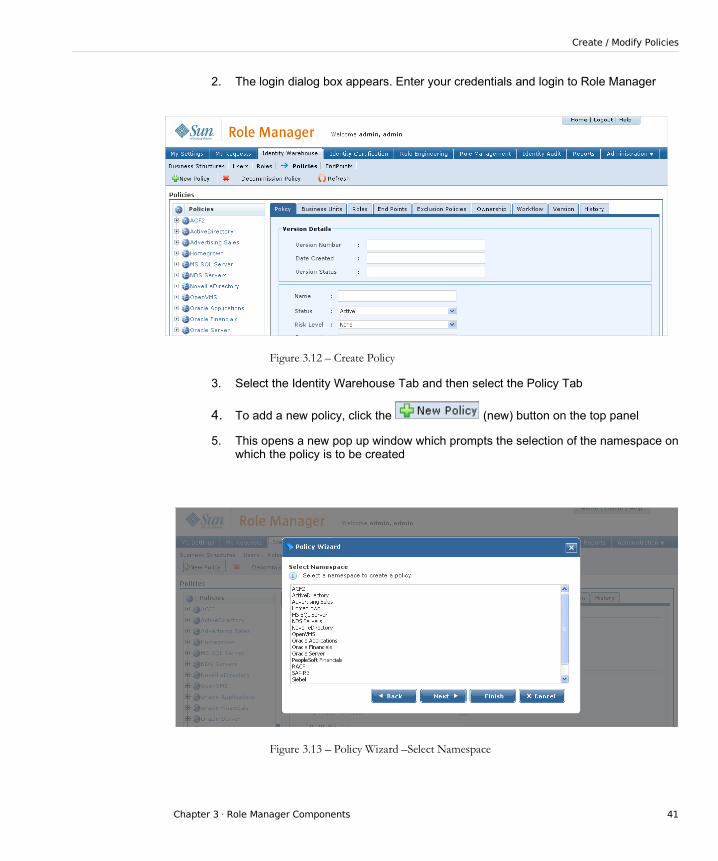
Figure 3.12 – Create Policy
3. Select the Identity Warehouse Tab and then select the Policy Tab
4. To add a new policy, click the (new) button on the top panel
5. This opens a new pop up window which prompts the selection of the namespace on which the policy is to be created
Figure 3.13 – Policy Wizard –Select Namespace
Chapter 3 · Role Manager Components 41

Create / Modify Policies
6. After you select the above options click
Figure 3.14 – Policy Wizard – Select Directory (Endpoint)
7. After the namespace is selected the Endpoints in the namespace will be displayed. Select the directory / end point on which the access level need to be defined
Figure 3.15 – Policy Wizard – Policy Properties
8. Once the Directory is selected the Policy property sheet is displayed. The Property sheet is different for different namespaces. Enter the details of the policy and save the policy. Once it is saved it will be shown under its namespace.
42 September 2008 · Sun Role Manager 4.1 User's Guide

Create / Modify Policies
9. To rename a policy select the policy by clicking on the policy name. Change the name of the policy under “Policy” Tab and click “Save”
Figure 3.16 – Rename Policy
10. To delete a policy, select the policy to be deleted and click the button.
Associate Policy / Endpoints
▼ Steps to Associate Policy with Endpoints
1. Start Role Manager by clicking the Role Manager Icon
2. The login dialog box appears. Enter your credentials and login to Role Manager
3. Select the Identity Warehouse tab and then select the Policy Tab
4. A Directory is added when a Policy is created
5. The Association between a Policy and Directory is shown in the Directory tab
Chapter 3 · Role Manager Components 43
Associate Policy / Endpoints
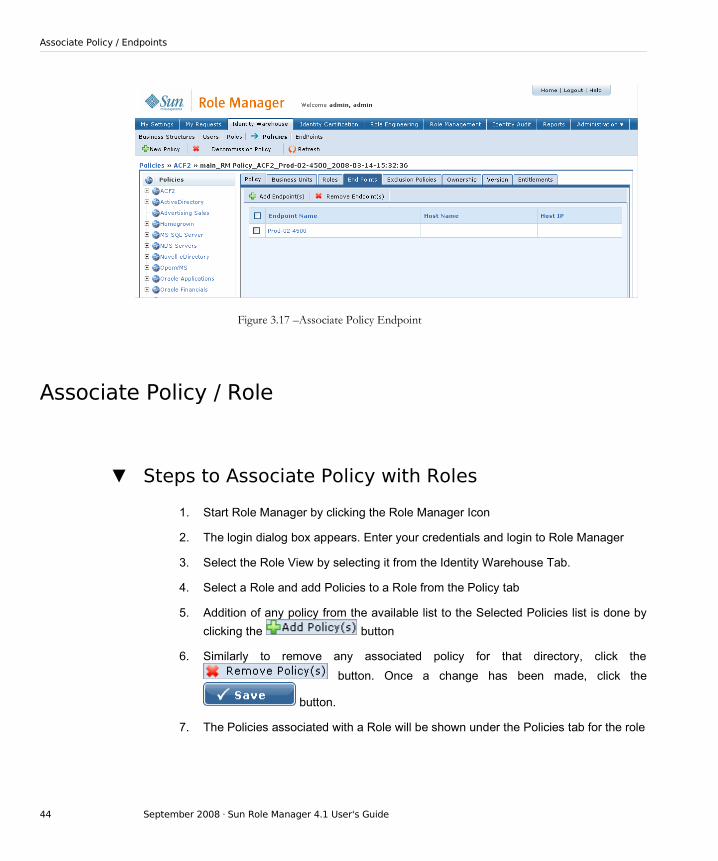
Figure 3.17 –Associate Policy Endpoint
Associate Policy / Role
▼ Steps to Associate Policy with Roles
1. Start Role Manager by clicking the Role Manager Icon
2. The login dialog box appears. Enter your credentials and login to Role Manager
3. Select the Role View by selecting it from the Identity Warehouse Tab.
4. Select a Role and add Policies to a Role from the Policy tab
5. Addition of any policy from the available list to the Selected Policies list is done by
clicking the button
6. Similarly to remove any associated policy for that directory, click the
button. Once a change has been made, click the
button.
7. The Policies associated with a Role will be shown under the Policies tab for the role
44 September 2008 · Sun Role Manager 4.1 User's Guide

Associate Policy / Role
Figure 3.18 – Associate Policy to Role
Associate Policy Owners to Policy
▼ Steps to associate policy owners to policy
1. Start Role Manager by clicking the Role Manager Icon
2. The login dialog box appears. Enter your credentials and login to Role Manager
3. Select the Policy View by selecting it from the Identity Warehouse Tab
4. Click a Role and browse to the Ownership Tab
5. Click Add Owners and select the desired User(s) . Click
Chapter 3 · Role Manager Components 45
Associate Policy Owners to Policy
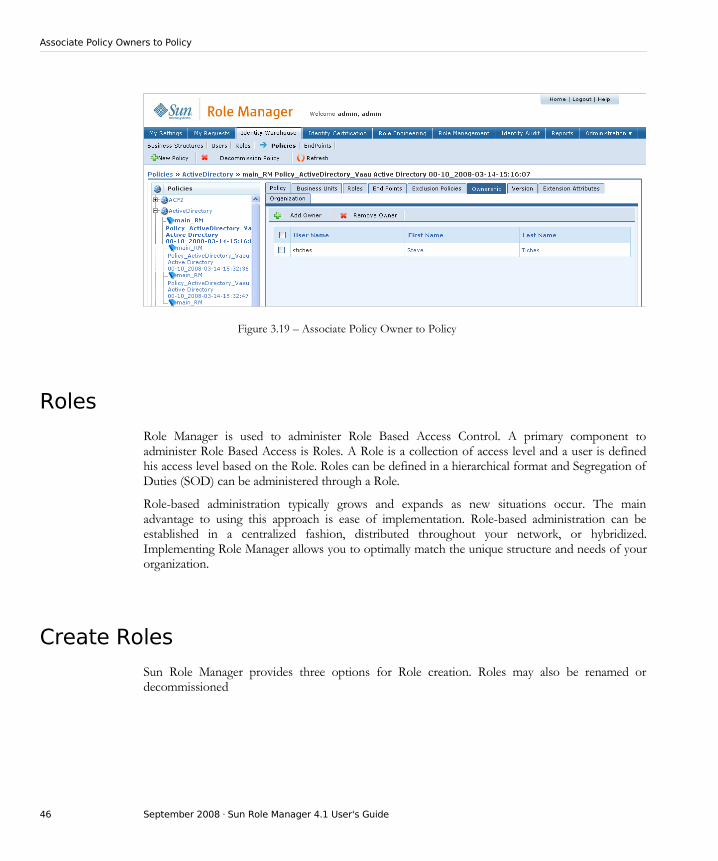
Figure 3.19 – Associate Policy Owner to Policy
Roles
Role Manager is used to administer Role Based Access Control. A primary component to administer Role Based Access is Roles. A Role is a collection of access level and a user is defined his access level based on the Role. Roles can be defined in a hierarchical format and Segregation of Duties (SOD) can be administered through a Role.
Role-based administration typically grows and expands as new situations occur. The main advantage to using this approach is ease of implementation. Role-based administration can be established in a centralized fashion, distributed throughout your network, or hybridized. Implementing Role Manager allows you to optimally match the unique structure and needs of your organization.
Create Roles
Sun Role Manager provides three options for Role creation. Roles may also be renamed or decommissioned
46 September 2008 · Sun Role Manager 4.1 User's Guide
Create Roles
Create Role Manually
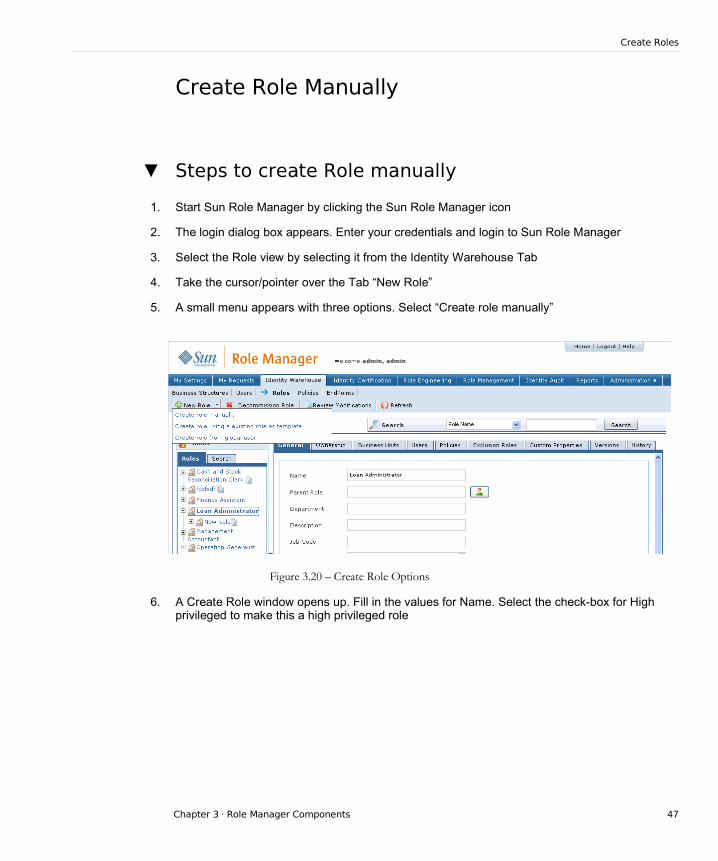
▼ Steps to create Role manually
1. Start Sun Role Manager by clicking the Sun Role Manager icon
2. The login dialog box appears. Enter your credentials and login to Sun Role Manager
3. Select the Role view by selecting it from the Identity Warehouse Tab
4. Take the cursor/pointer over the Tab “New Role”
5. A small menu appears with three options. Select “Create role manually”
Figure 3.20 – Create Role Options
6. A Create Role window opens up. Fill in the values for Name. Select the check-box for High privileged to make this a high privileged role
Chapter 3 · Role Manager Components 47

Create Roles
Figure 3.21 – Create Role Manually – General Details
7. To select a parent for the Role click on the icon next to the Parent Role field. This opens a Select Role window. Select the Role to be made the parent Role and click “Ok”
Figure 3.22 – Create Role Manually – Select Parent Role
8. After filling in values in the Create Role window click “Save” to create the Role. The Role is now available in the Roles view under Identity Warehouse Tab
48 September 2008 · Sun Role Manager 4.1 User's Guide

Create Roles
Figure 3.23 – Create Role Manually – Created Role
Create Role from Existing Role
Sun Role Manager allows the creation of a Role from an existing Role as template. The new Role created will be an exact copy of the template Role. It can then be modified as required.
▼ Steps to Create a Role from an Existing Role
1. Start Sun Role Manager by clicking the Sun Role Manager icon
2. The login dialogue box appears. Enter your credentials and login to Sun Role Manager
3. Select the Role view by selecting it from the Identity Warehouse Tab
4. Take the cursor/pointer over the Tab “New Role”
5. A small menu appears with three options. Select “Create role using an existing role as template”
Chapter 3 · Role Manager Components 49
Create Roles
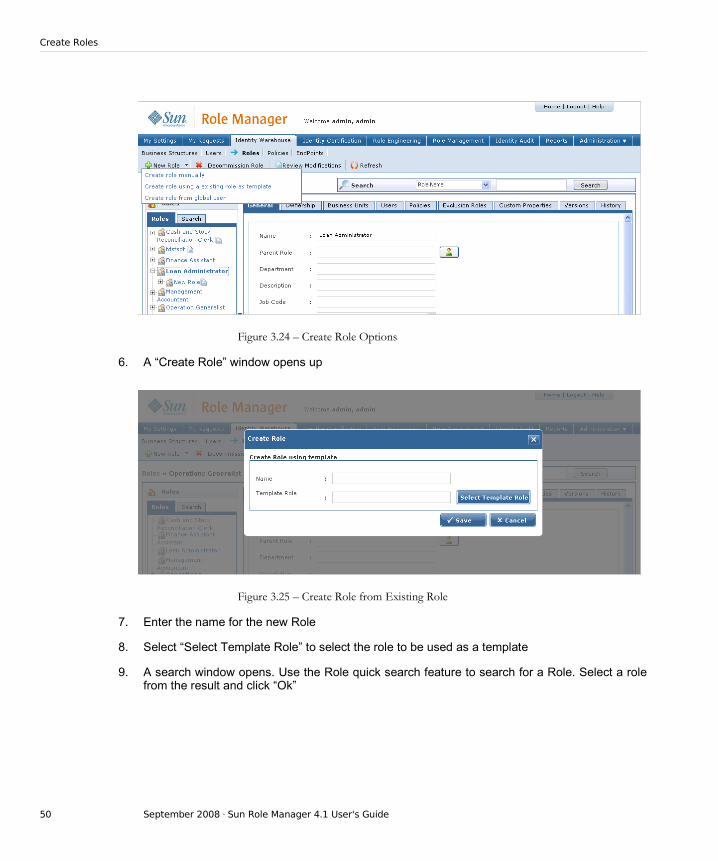
Figure 3.24 – Create Role Options
6. A “Create Role” window opens up
Figure 3.25 – Create Role from Existing Role
7. Enter the name for the new Role
8. Select “Select Template Role” to select the role to be used as a template
9. A search window opens. Use the Role quick search feature to search for a Role. Select a role from the result and click “Ok”
50 September 2008 · Sun Role Manager 4.1 User's Guide

Create Roles
Figure 3.26 – Select Template Role from Role Search Results
10. Select “Save” on the “Create Role” window to create the Role
Figure 3.27 – Create Role using Template – click “Save”
Chapter 3 · Role Manager Components 51

Create Roles
Create Role from Global User
Sun Role Manager allows the creation of a new Role from a Global User. All the entitlements that the selected Global User has are used to create corresponding policies that are assigned to the new Role.
▼ Steps to Create a Role from a Global User
1. Start Sun Role Manager by clicking the Sun Role Manager icon
2. The login dialogue box appears. Enter your credentials and login to Sun Role Manager
3. Select the Role view by selecting it from the Identity Warehouse Tab
4. Take the cursor/pointer over the Tab “New Role”
5. A small menu appears with three options. Select “Create role from global user”
Figure 3.28 – Create Role Options
6. A “Create Role” window opens up
52 September 2008 · Sun Role Manager 4.1 User's Guide

Create Roles
Figure 3.29 – Create Role from Global User
7. Enter the name for the new Role
8. Select “Select Global User” to select the Global User to be used
9. A search window opens. Use the User quick search or Advanced Search feature to search for a User. Select a User from the result and click “Ok”
Figure 3.30 – Select User from User Search Result
10. Select “Save” on the “Create Role” window to create the Role
Chapter 3 · Role Manager Components 53
Create Roles
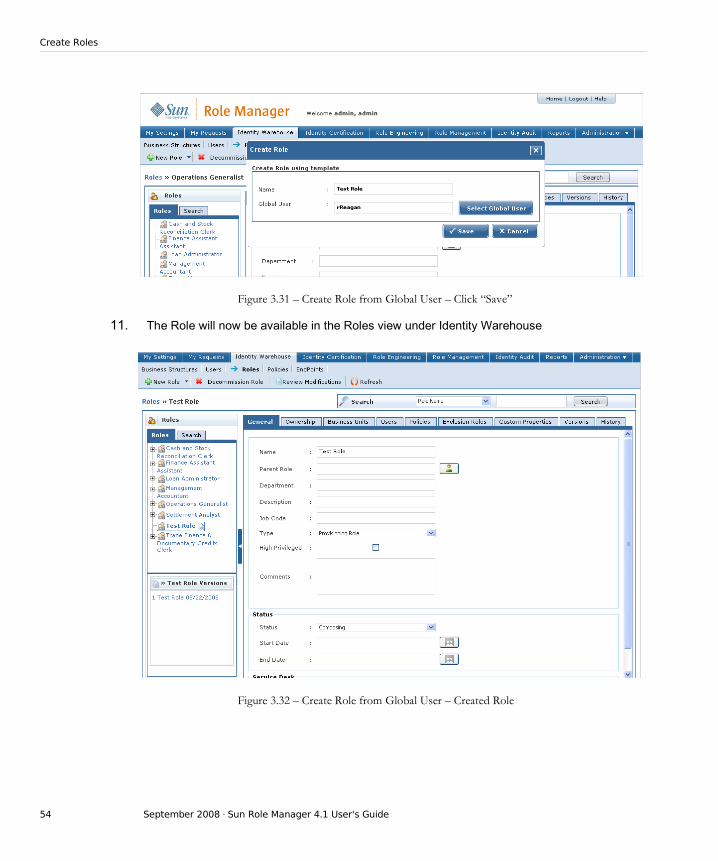
Figure 3.31 – Create Role from Global User – Click “Save”
11. The Role will now be available in the Roles view under Identity Warehouse
Figure 3.32 – Create Role from Global User – Created Role
54 September 2008 · Sun Role Manager 4.1 User's Guide
Role Search
Role Search
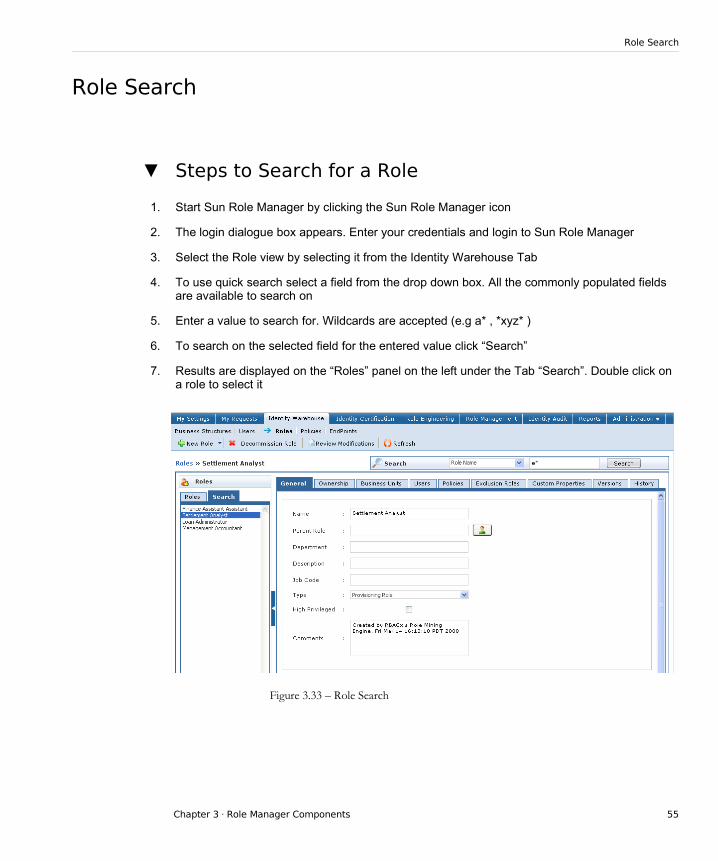
▼ Steps to Search for a Role
1. Start Sun Role Manager by clicking the Sun Role Manager icon
2. The login dialogue box appears. Enter your credentials and login to Sun Role Manager
3. Select the Role view by selecting it from the Identity Warehouse Tab
4. To use quick search select a field from the drop down box. All the commonly populated fields are available to search on
5. Enter a value to search for. Wildcards are accepted (e.g a* , *xyz* )
6. To search on the selected field for the entered value click “Search”
7. Results are displayed on the “Roles” panel on the left under the Tab “Search”. Double click on a role to select it
Figure 3.33 – Role Search
Chapter 3 · Role Manager Components 55

Manage Roles (Rename/Modify/Decommission)
Manage Roles (Rename/Modify/Decommission)
▼ Steps to manage roles
1. Start Role Manager by clicking on the Role Manager Icon
2. The login dialog box appears. Enter your credentials and login to Role Manager
3. Select Roles view under the Identity Warehouse Tab
4. Search for a Role using the Role Search or select a role from the Roles panel on the left
5. To rename a Role navigate to the General Tab. Fill the in the desired role name in the Name field and click “Save”
6. To modify a Role by changing properties like Description, Type etc modify these values and click “Save”
Figure 3.34 – Role Details
7. To de-commission a Role use the “Decommission Role” button. Decommissioning a role leads to the removal of all role-user associations. The Role itself however is made inactive and stored in Role Manager. The role cannot be made active again. It
56 September 2008 · Sun Role Manager 4.1 User's Guide

Manage Roles (Rename/Modify/Decommission)
cannot be modified in any way or assigned to the user.
Figure 3.35 – Role Decommission
Role Hierarchy
Similar to Business Unit hierarchy, an n-level Role Hierarchy can be defined in Role Manager. A role can have various roles under it as ‘Child Roles’. The Role Hierarchy is defined when a new Role is added. When a child role is added to a user, the parent role automatically is assigned to the user. Role Hierarchy defines an organized structure of roles. Roles defined in an organization may have a hierarchy associated with them and also Enterprise Level Role and Application Level Role might be defined. Role Hierarchy will help address these points.
▼ Steps to Create Role Hierarchy
1. Start Role Manager by clicking the Role Manager Icon
2. The login dialog box appears. Enter your credentials and login to Role Manager
3. Select the Role View by selecting it from the Identity Warehouse Tab
Chapter 3 · Role Manager Components 57
Role Hierarchy
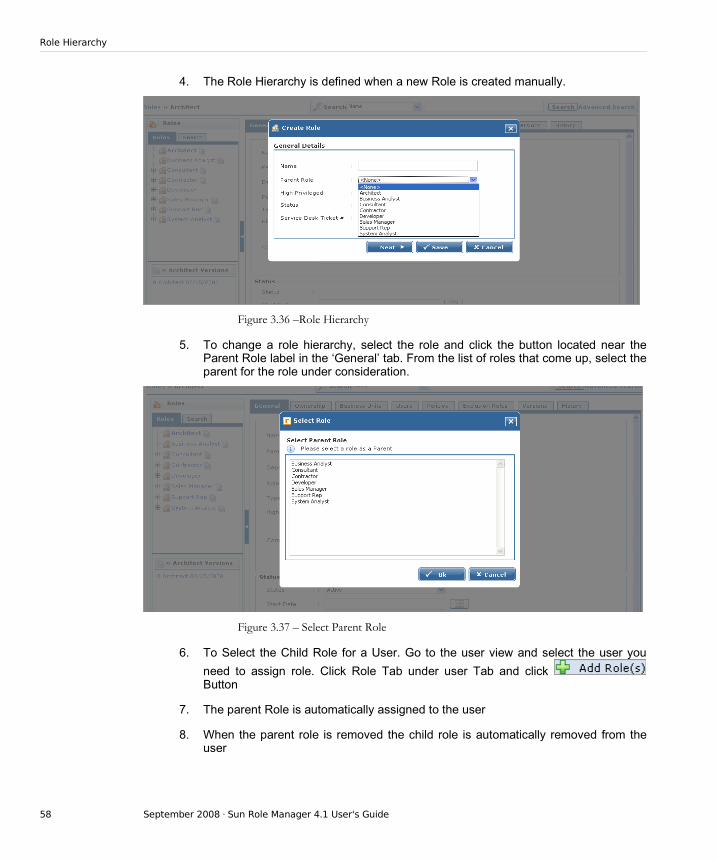
4. The Role Hierarchy is defined when a new Role is created manually.
Figure 3.36 –Role Hierarchy
5. To change a role hierarchy, select the role and click the button located near the Parent Role label in the ‘General’ tab. From the list of roles that come up, select the parent for the role under consideration.
Figure 3.37 – Select Parent Role
6. To Select the Child Role for a User. Go to the user view and select the user you
need to assign role. Click Role Tab under user Tab and click Button
7. The parent Role is automatically assigned to the user
8. When the parent role is removed the child role is automatically removed from the user
58 September 2008 · Sun Role Manager 4.1 User's Guide

Setting Segregation of Duties at Role and Policy Level
Setting Segregation of Duties at Role and Policy Level
Segregation of Duties (SoD) are defined for separation of the management or execution of certain duties or of areas of responsibility is required in order to prevent and reduce opportunities for unauthorized modification or misuse of data or service. Segregation of duties is a primary internal control intended to prevent, or decrease the risk of, errors or irregularities; identify problems; and ensure that corrective action is taken. This is done by assuring that no single individual should have control over all phases of a transaction. Role Manager performs this SOD at the Role and Policy Level.
▼ Steps to Define Segregation of Duties
1. Start Role Manager by clicking the Role Manager Icon
2. The login dialog box appears. Enter your credentials and login to Role Manager
3. Select the Role View by selecting it from the Identity Warehouse Tab
4. Click a Role and browse to the Exclusion Roles tab
5. Add the Roles which need to be excluded from the one selected.
Figure 3.38- Business Unit Users
Chapter 3 · Role Manager Components 59

Setting Segregation of Duties at Role and Policy Level
6. Similar to Roles, Segregation of Duties can be defined at the Policy level as well. Go to the Policy View from the View Menu.
7. Select a Policy by double clicking it and go to the Exclusion Policies tab
8. Add the policies which are to be excluded from the one selected
9. Similar to the Role, when a Policy is added to a Role, the excluded policies cannot be assigned to a Role
Associate Role to Business Unit
▼ Steps to associate role to business unit(s)
1. Start Role Manager by clicking the Role Manager Icon
2. The login dialog box appears. Enter your credentials and login to Role Manager
3. Select the Role View by selecting it from the Identity Warehouse Tab
4. Click a Role and browse to the Business Unit Tab
5. Click and select the desired Business Units. Click
60 September 2008 · Sun Role Manager 4.1 User's Guide
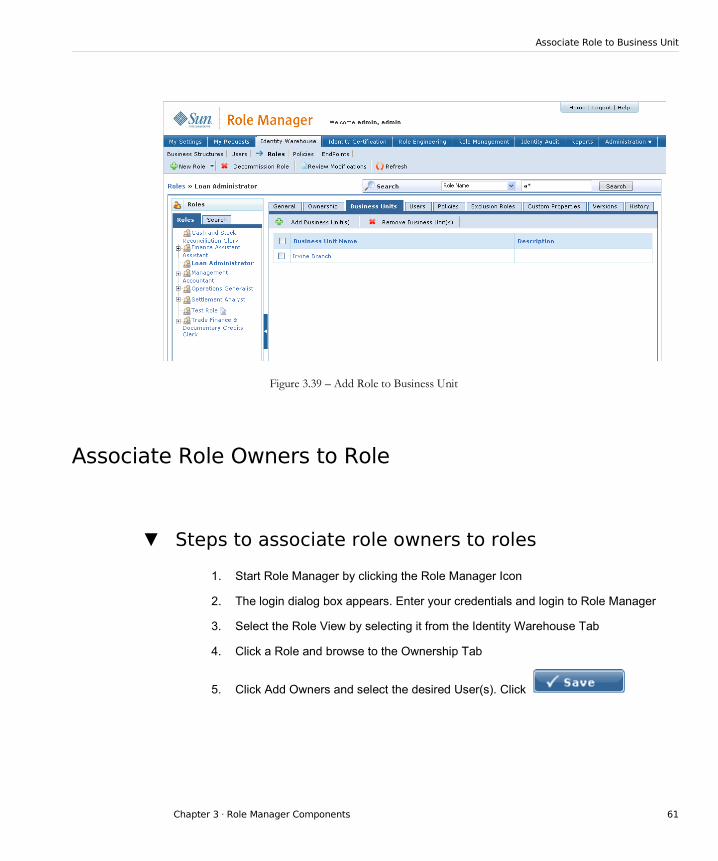
Associate Role to Business Unit
Figure 3.39 – Add Role to Business Unit
Associate Role Owners to Role
▼ Steps to associate role owners to roles
1. Start Role Manager by clicking the Role Manager Icon
2. The login dialog box appears. Enter your credentials and login to Role Manager
3. Select the Role View by selecting it from the Identity Warehouse Tab
4. Click a Role and browse to the Ownership Tab
5. Click Add Owners and select the desired User(s). Click
Chapter 3 · Role Manager Components 61

Associate Role Owners to Role
Figure 3.40 – Add Role Owner to Role
62 September 2008 · Sun Role Manager 4.1 User's Guide
4 C H A P T E R 4
4 Role Engineering
The Role Engineering module in Role Manager delivers sophisticated role mining, identity correlation, and risk management functionalities. Robust 'identity correlation reengineering' capabilities offer an innovative approach towards traditional role engineering techniques. Role Manager defines Role Engineering in three process steps, which are as follows:
1. Role Discovery – describes the process of discovering relationships between users based on similar access permissions that can logically be grouped to form a role
2. Role Entitlement Discovery – describes the process of mining role content or discovering the content of these roles by analyzing and finding correlations in user access patterns in applications across the Enterprise
3. Rules Discovery – describes the process of discovering rules that can be used to govern assigning mined roles to new users, a powerful graphical feature that is embedded with the role mining process
Sun’s Role Engineering methodology supports the top down, bottom up, and recommended hybrid approaches. A hybrid approach is one that accounts for a users job function and HR attributes such as manager or geographical location along with account permissions (entitlements) when mining for roles.
The Role Manager Role Mining feature uses Expectation Maximization and Cob Web Clustering algorithms for role discovery and J48 and C45 Decision Tree Classification Algorithms for Rule Discovery. Role Mining supports minable attributes which are can be set in the attributes configuration screen as described below. This gives the role engineer flexibility to include only relevant applications and relevant attributes for best data mining results. Irrelevant attributes can thus be discarded from the role mining exercise.
63
Role Discovery
Role DiscoverySun Role Manager performs role discovery by allowing users to create and run role mining tasks. All role mining tasks are stored by Sun Role Manager. This enables users to create tasks at one instant and then run or schedule tasks to be run at any later instant. Sun Role Manager provides a sophisticated scheduling mechanism which makes it easy to run periodic as well as one time tasks. Results of tasks that are completed are stored. This enables users to run a task at one instant and review results to configure and save roles at any later instant. A role mining task can be run any number of times. The results obtained by different instances of a task are stored and time-stamped. These capabilities allow flexibility in dealing with role mining tasks. Tasks can be executed on demand or scheduled for a future time. Users can view the list of role mining tasks and retrieve results for completed tasks. Tasks and results are permanently stored in Sun Role Manager unless they are explicitly deleted.
The Role Discovery process consists of 3 discrete steps
1. Set Minable Attributes
2. Create/Run a role mining task
3. Analyze role mining results and configure and save Roles
Set Minable Attributes
Minable attribute settings should be checked before a Role Mining effort is initiated to ensure that the appropriate applications and input data are accounted for while the algorithm is running. This can also be checked by previewing input data as shown in the next demonstration. Role mining run without any attributes set as minable will throw an error. It is also important to determine attributes that are critical in terms of defining access to a particular application/target system and set them as mineable as adding attributes that are not important will affect the accuracy of the role mining effort.
▼ Steps to set minable attributes before role mining
1. Start Sun Role Manager by clicking the Sun Role Manager icon
2. The login dialogue box appears. Enter your credentials and login to Sun Role Manager
3. Open attributes configuration screen under Administration->Configuration->Namespaces
4. Select the namespace whose attributes are to be selected or deselected for role mining by clicking on the namespace in the Namespaces panel on the left
64 September 2008 · Sun Role Manager 4.1 User's Guide
Set Minable Attributes
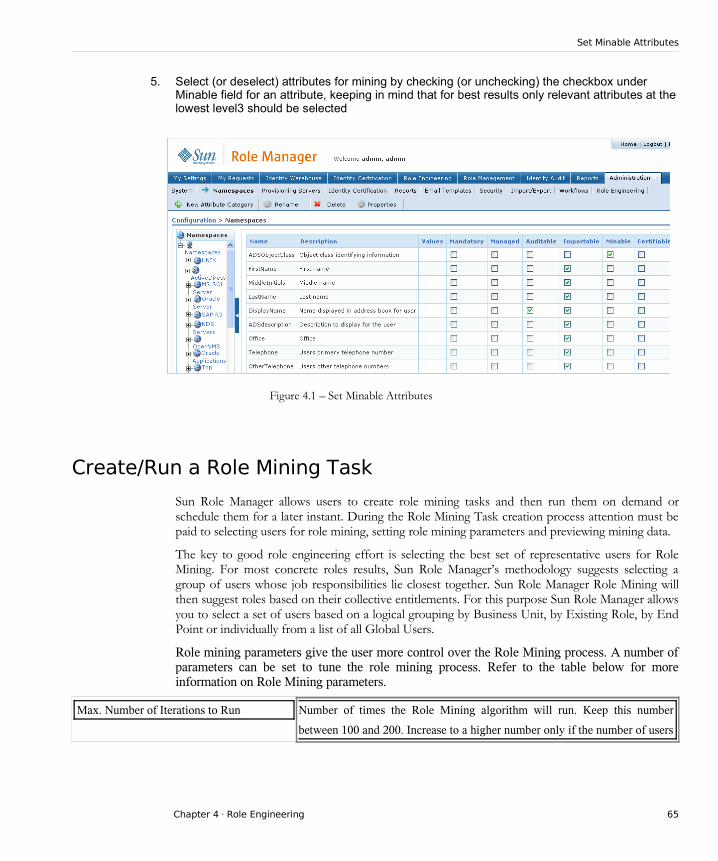
5. Select (or deselect) attributes for mining by checking (or unchecking) the checkbox under Minable field for an attribute, keeping in mind that for best results only relevant attributes at the lowest level3 should be selected
Figure 4.1 – Set Minable Attributes
Create/Run a Role Mining Task
Sun Role Manager allows users to create role mining tasks and then run them on demand or schedule them for a later instant. During the Role Mining Task creation process attention must be paid to selecting users for role mining, setting role mining parameters and previewing mining data.
The key to good role engineering effort is selecting the best set of representative users for Role Mining. For most concrete roles results, Sun Role Manager’s methodology suggests selecting a group of users whose job responsibilities lie closest together. Sun Role Manager Role Mining will then suggest roles based on their collective entitlements. For this purpose Sun Role Manager allows you to select a set of users based on a logical grouping by Business Unit, by Existing Role, by End Point or individually from a list of all Global Users.
Role mining parameters give the user more control over the Role Mining process. A number of parameters can be set to tune the role mining process. Refer to the table below for more information on Role Mining parameters.
Max. Number of Iterations to Run Number of times the Role Mining algorithm will run. Keep this number
between 100 and 200. Increase to a higher number only if the number of users
Chapter 4 · Role Engineering 65

Create/Run a Role Mining Task
selected exceeds 200
Stop when found this number of Roles Criteria to Stop the Algorithm
Min. Standard Deviation Number of Breath strokes for the Role Mining Algorithm to capture user
detail. Use values between – (0, 1, 2) and + (0, 1, 2). A greater number will
give more outliners in role.
Single instance per user Keep this always checked to select a single instance per user
Resample data % Best threshold value is 300%
User Properties A list of attributes which include a user criteria’s in the search algorithm.
Using these parameters along with logical grouping of users by job
responsibility can give best results for a hybrid role mining effort.
Rules Parameters These values are for statistical purposes only and we recommend not
changing them
Sub-tree Raising Check this to cut off users that are in the lowest tree
A good practice before running a Role Mining task is to preview the input data selected for the Role Mining exercise. We do this to ensure that all and only correct attributes are accounted for and check for any visible inconsistencies in data.
▼ Steps to Create and Run/Schedule a Role Mining Task
1. Start Sun Role Manager by clicking the Sun Role Manager icon
2. The login dialogue box appears. Enter your credentials and login to Sun Role Manager
3. Select the Role Engineering Tab
4. Select the New Role Mining Tasks Tab
5. In the New Role Mining Task Window enter values for Name and Description Fields. Select the
66 September 2008 · Sun Role Manager 4.1 User's Guide
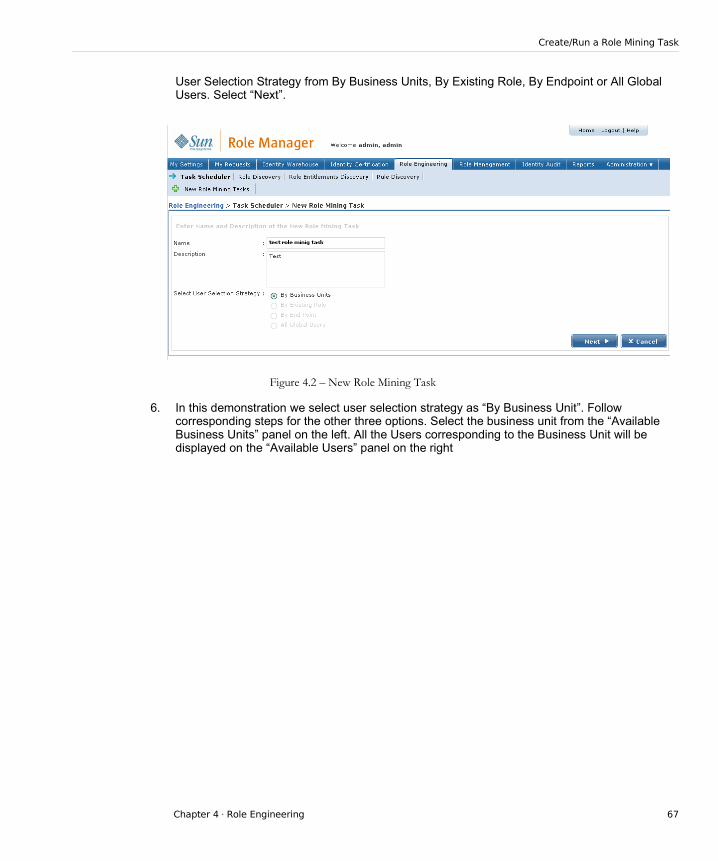
Create/Run a Role Mining Task
User Selection Strategy from By Business Units, By Existing Role, By Endpoint or All Global Users. Select “Next”.
Figure 4.2 – New Role Mining Task
6. In this demonstration we select user selection strategy as “By Business Unit”. Follow corresponding steps for the other three options. Select the business unit from the “Available Business Units” panel on the left. All the Users corresponding to the Business Unit will be displayed on the “Available Users” panel on the right
Chapter 4 · Role Engineering 67

Create/Run a Role Mining Task
Figure 4.3 – Select Users by Business Units
7. Use the “All” and “Page” checkboxes to select users. All selects all the users in the “Available Users” panel. “Page” selects all the users being displayed on the current page. Use the drop down box next to “Display” to change the number of users displayed on one page. Use page numbers or “Next” button in the “Available Users” panel to scroll the pages. Individual checkboxes as well as the “All” and “Page” checkboxes can be used to select/deselect users to get the desired representative set of users for the role mining exercise.
8. As users are selected a new panel opens up at the bottom of the same page that dynamically displays the chosen set of users. This panel can be used to review the users selected.
68 September 2008 · Sun Role Manager 4.1 User's Guide

Create/Run a Role Mining Task
Figure 4.4 – Selected Users View
9. Select “Next” when the user set desired for the role mining task have been selected
Chapter 4 · Role Engineering 69

Create/Run a Role Mining Task
Figure 4.5 – Role Mining Parameters
10. Select parameters for the Role Mining task to better control the effort. Refer to the Role Mining Parameters table earlier in the section for more description of various parameters
11. To preview and analyze Role Mining Input Data select “Preview”
12. A Role Engineering Data Preview window opens up. Select individual Namespaces or Endpoints from the “Namespaces” panel on the left to view the data associated with them. To click the data associated with the entire user set selected select “Namespaces”. Use the “Filter” feature to filter users by GlobalUserId. Use “Clear” to clear the filtering. Select “Export to CSV” to get the Role Mining Input Data in the form of a CSV file
70 September 2008 · Sun Role Manager 4.1 User's Guide
Create/Run a Role Mining Task
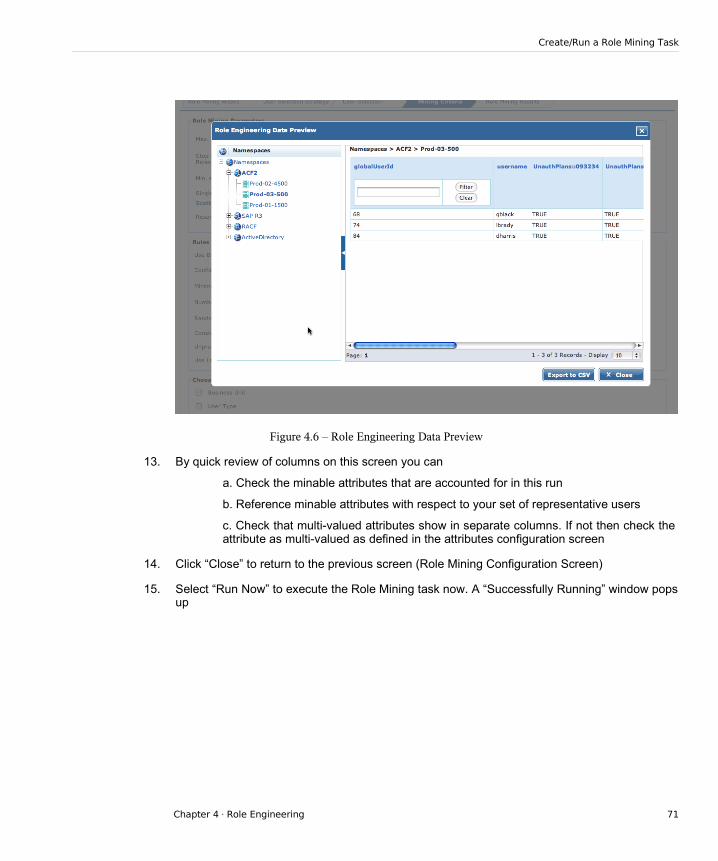
Figure 4.6 – Role Engineering Data Preview
13. By quick review of columns on this screen you can
a. Check the minable attributes that are accounted for in this run
b. Reference minable attributes with respect to your set of representative users
c. Check that multi-valued attributes show in separate columns. If not then check the attribute as multi-valued as defined in the attributes configuration screen
14. Click “Close” to return to the previous screen (Role Mining Configuration Screen)
15. Select “Run Now” to execute the Role Mining task now. A “Successfully Running” window pops up
Chapter 4 · Role Engineering 71

Create/Run a Role Mining Task
Figure 4.7 – Role Mining Task Successfully Running
Figure 4.8 – Role Mining Task Scheduler
16. Select “Run Later” to schedule the task. Scheduler window opens up. Select a daily, weekly, monthly or one-time only task by selecting the corresponding radio button. Depending on this selection further select values to setup the task. Select “Schedule” to schedule the task
17. To save the task and run/schedule the task at a later time select “Save and Exit”
72 September 2008 · Sun Role Manager 4.1 User's Guide

Create/Run a Role Mining Task
18. To run/schedule a saved task go to the main Role Mining Task window by selecting Role Engineering =>Task Scheduler and use the “Run” or “Schedule” buttons for the saved task
Figure 4.9 – Role Mining Tasks View
Analyze, Configure and Save Role Mining Results
Validate Role Mining Results
To better understand the role mining results and how well the Role Mining algorithm performed, the following Statistics and Rules Matrix can be examined.
The Result screen shows us the following statistics to interpret Role Mining results:
% of Users correctly/ incorrectly
assigned
The Mining statistics tell us that the Algorithm delivered an
acceptable result with 100% accuracy the Users have been
Chapter 4 · Role Engineering 73

Analyze, Configure and Save Role Mining Results
assigned correctly and 0 % of the Users have been assigned
incorrectly, which is very satisfactory.
Kappa Value The Kappa value of 1.0 should be understood as “The higher the
value of Kappa, the stronger the agreement”. Depending on the
application, Kappa less than 0.7 indicates that your measurement
system needs improvement. Kappa values greater than 0.9 are
considered excellent.
Kononenko & Bratko Relative score A score for the data mining algorithm, not to be used for
interpretation of these results
Configure and Save Roles
Sun Role Manager Role Mining identifies users with nearly identical access entitlements and shows the role content (entitlements and associated endpoints) for analysis in the role configuration screen. Role engineers can decide to assign all or a partial list of these entitlements to the role based on a level of accepted risk.
If the need is to match users with exact entitlements only, then a set cutoff percentage of 100% will save entitlements only where one hundred percent of users in that role have that access entitlement. An accepted risk of selecting any percentage below 100% allows Sun Role Manager to save all entitlements above the set cutoff to the role as a primary or parent role policy and those entitlements below the set cutoff as a secondary policy or child role. The end user can then later decide if they wish to maintain the child role policy for a transitional period of time or remove access altogether.
▼ Steps to Validate Role Mining Results and Configure Role(s) to be saved
1. Start Sun Role Manager by clicking the Sun Role Manager icon
2. The login dialogue box appears. Enter your credentials and login to Sun Role Manager
74 September 2008 · Sun Role Manager 4.1 User's Guide

Analyze, Configure and Save Role Mining Results
3. Select the Role Engineering Tab
4. Select the Task Scheduler Tab. This gives a list of all the saved and completed tasks
Figure 4.10 – Role Mining Tasks View
5. Select the task whose result is to be viewed by clicking on the task name. A new panel opens up at the bottom of the same page which contains results for all the instances that this task has been run
Chapter 4 · Role Engineering 75

Analyze, Configure and Save Role Mining Results
Figure 4.11 – Role Mining Task Results
6. Select “View Reports” under “View Reports” for the instance whose Role Mining Report is to be viewed
76 September 2008 · Sun Role Manager 4.1 User's Guide
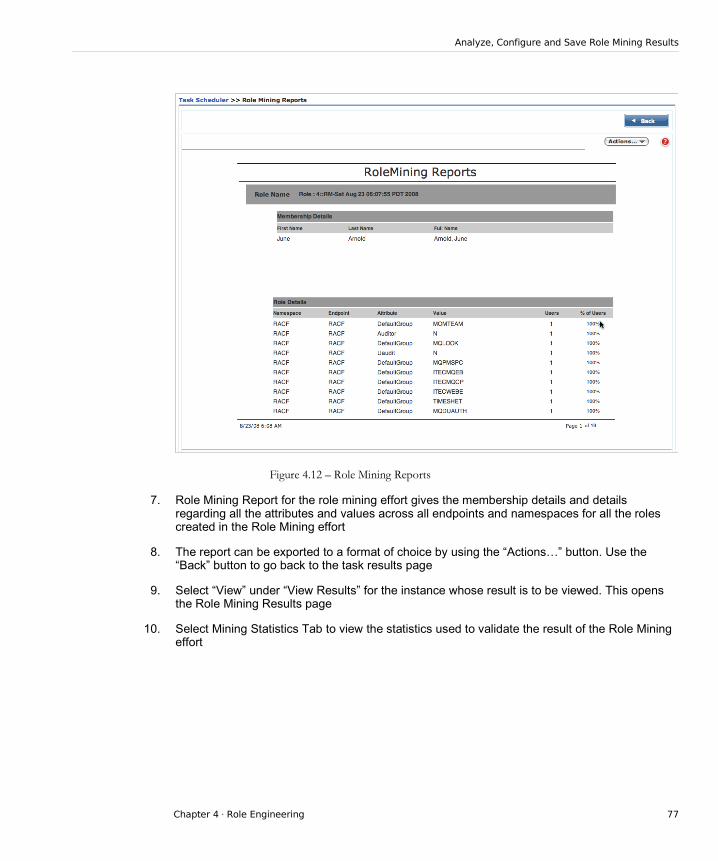
Analyze, Configure and Save Role Mining Results
Figure 4.12 – Role Mining Reports
7. Role Mining Report for the role mining effort gives the membership details and details regarding all the attributes and values across all endpoints and namespaces for all the roles created in the Role Mining effort
8. The report can be exported to a format of choice by using the “Actions…” button. Use the “Back” button to go back to the task results page
9. Select “View” under “View Results” for the instance whose result is to be viewed. This opens the Role Mining Results page
10. Select Mining Statistics Tab to view the statistics used to validate the result of the Role Mining effort
Chapter 4 · Role Engineering 77

Analyze, Configure and Save Role Mining Results
Figure 4.13 – Role Mining Results - Statistics
11. Select Classification Rules Tab to view the classification rules used in the creation of each role in the result
78 September 2008 · Sun Role Manager 4.1 User's Guide

Analyze, Configure and Save Role Mining Results
Figure 4.14 – Role Mining Results – Classification Rules
12. Select Users in Roles Tab to view a pie chart depicting the participation percentages of the Role Mining User Set in the new roles created
Chapter 4 · Role Engineering 79
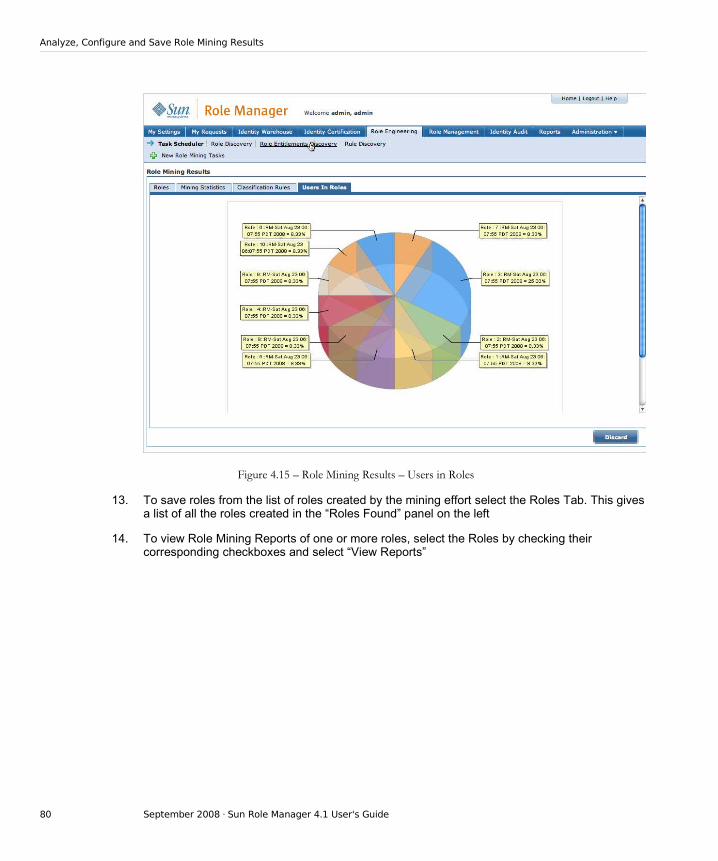
Analyze, Configure and Save Role Mining Results
Figure 4.15 – Role Mining Results – Users in Roles
13. To save roles from the list of roles created by the mining effort select the Roles Tab. This gives a list of all the roles created in the “Roles Found” panel on the left
14. To view Role Mining Reports of one or more roles, select the Roles by checking their corresponding checkboxes and select “View Reports”
80 September 2008 · Sun Role Manager 4.1 User's Guide

Analyze, Configure and Save Role Mining Results
Figure 4.16 – Role Mining Report
15. Role Mining Report for a role gives the membership details and details regarding all the attributes and values associated with the role across all endpoints and namespaces.
16. The report can be exported to a format of choice by using the “Actions…” button
17. Select a role from this list to view the details of the created role. Each Role on the Roles Found panel on the left has further drill down capability to view namespaces, endpoints and attributes associated with the role. Click on a namespace, endpoint or attribute within a Role to view role membership details.
Chapter 4 · Role Engineering 81
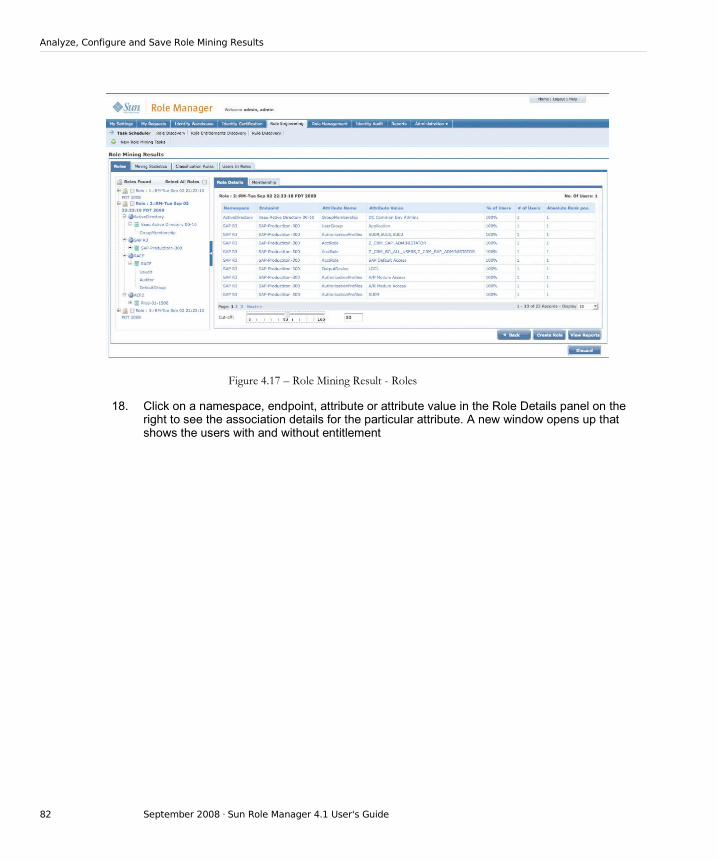
Analyze, Configure and Save Role Mining Results
Figure 4.17 – Role Mining Result - Roles
18. Click on a namespace, endpoint, attribute or attribute value in the Role Details panel on the right to see the association details for the particular attribute. A new window opens up that shows the users with and without entitlement
82 September 2008 · Sun Role Manager 4.1 User's Guide

Analyze, Configure and Save Role Mining Results
Figure 4.18 – Role Mining Results – Users with and without Entitlement
19. The value “ No. of Users” indicates the number of users from those found in the role that have correlation to the attribute listed in that role
20. The “% of Users” indicates the number of users that have access to the selected attribute
21. Slide the cutoff ruler to the desired accepted risk percentage. All attributes above the cutoff percentage will be set to a primary or parent role policy and those below will be set to a secondary policy for child roles.
22. Select “Create Role” to save the role in the Sun Role Manager Identity Warehouse
23. The Role is displayed in the Identity Warehouse with the appropriate timestamp. Navigate to Identity Warehouse -> Roles menu to view the saved role
24. The Role can now be renamed and its corresponding policy viewed and modified as required. Generally, a feedback from the business or a role owner committee is recommended before changing the policies (associated access attributes) is done.
Chapter 4 · Role Engineering 83
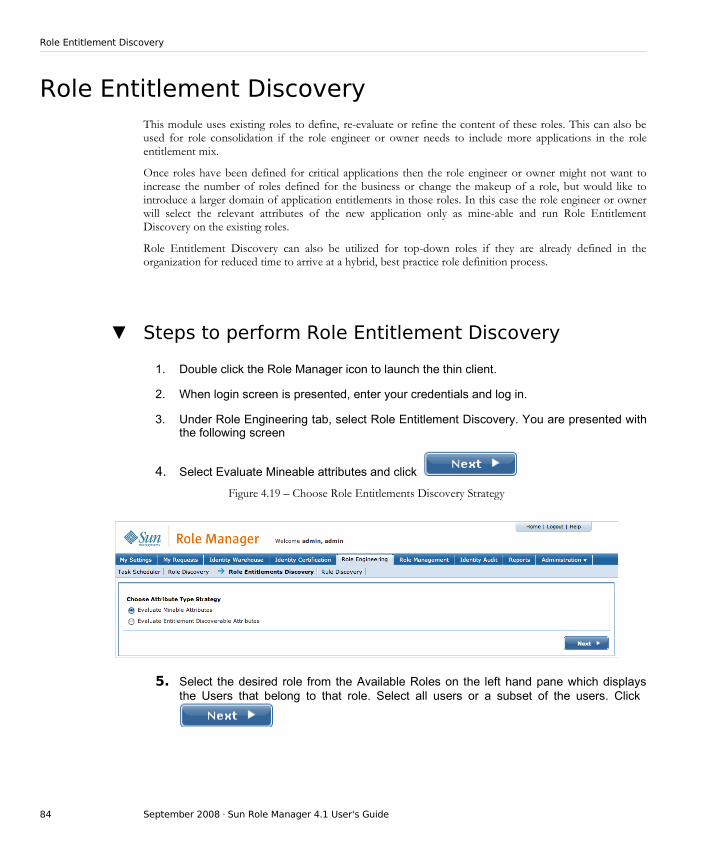
Role Entitlement Discovery
Role Entitlement DiscoveryThis module uses existing roles to define, re-evaluate or refine the content of these roles. This can also be used for role consolidation if the role engineer or owner needs to include more applications in the role entitlement mix.
Once roles have been defined for critical applications then the role engineer or owner might not want to increase the number of roles defined for the business or change the makeup of a role, but would like to introduce a larger domain of application entitlements in those roles. In this case the role engineer or owner will select the relevant attributes of the new application only as mine-able and run Role Entitlement Discovery on the existing roles.
Role Entitlement Discovery can also be utilized for top-down roles if they are already defined in the organization for reduced time to arrive at a hybrid, best practice role definition process.
▼ Steps to perform Role Entitlement Discovery
1. Double click the Role Manager icon to launch the thin client.
2. When login screen is presented, enter your credentials and log in.
3. Under Role Engineering tab, select Role Entitlement Discovery. You are presented with the following screen
4. Select Evaluate Mineable attributes and click
Figure 4.19 – Choose Role Entitlements Discovery Strategy
5. Select the desired role from the Available Roles on the left hand pane which displays the Users that belong to that role. Select all users or a subset of the users. Click
84 September 2008 · Sun Role Manager 4.1 User's Guide

Role Entitlement Discovery
Figure 4.20 – Available Roles
6. On the left hand part of the screen, select the Role and click View Details.
Figure 4.21 – Role Details
Chapter 4 · Role Engineering 85

Role Entitlement Discovery
7. Select Cut-off percentage and click Save Policies. This will save the Policies in the Identity Warehouse. Click Identity Warehouse -> Policies to view the time stamped policies.
Figure 4.22 – New Policies Saved in Policies View
8. The access (attributes) related to these policies can be evaluated and added or removed as required. Generally, a feedback from the business or a role owner committee is recommended before changing the policies (associated access attributes) is done. These policies, once renamed and finalized, can be re-associated to the original role.
Rules DiscoveryRole Manager can also be used to help find and design rules to assign Roles to users based on current HR attributes. The Rules Discovery wizard prompts for a selection of a subset of users to learn the classification model from them and their associated HR attributes. These HR attributes are assumed to be associated to the user when they are imported into the Role Manager Identity Warehouse.
▼ Steps to perform Rules Discovery
1. Double click the Role Manager icon to launch the thin client.
2. When login screen is presented, enter your credentials and log in.
3. Under Role Engineering tab, select Rule Discovery.
4. Users can be selected on the basis of Business Units, End Point or from a selection of all
users. For this example, we will select By Business Units. Click
86 September 2008 · Sun Role Manager 4.1 User's Guide
Rules Discovery
Chapter 4 · Role Engineering 87
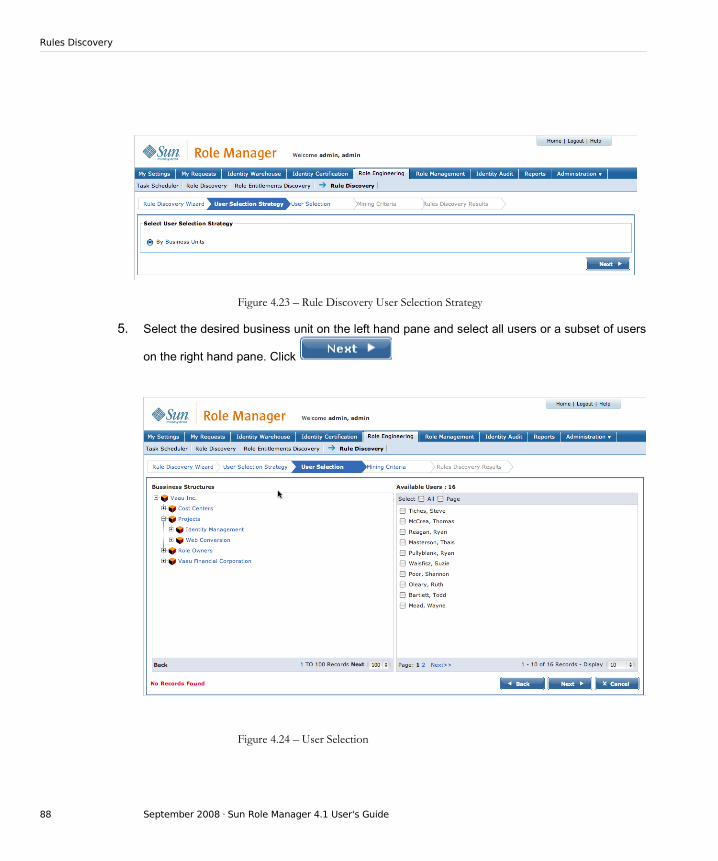
Rules Discovery
Figure 4.23 – Rule Discovery User Selection Strategy
5. Select the desired business unit on the left hand pane and select all users or a subset of users
on the right hand pane. Click
Figure 4.24 – User Selection
88 September 2008 · Sun Role Manager 4.1 User's Guide
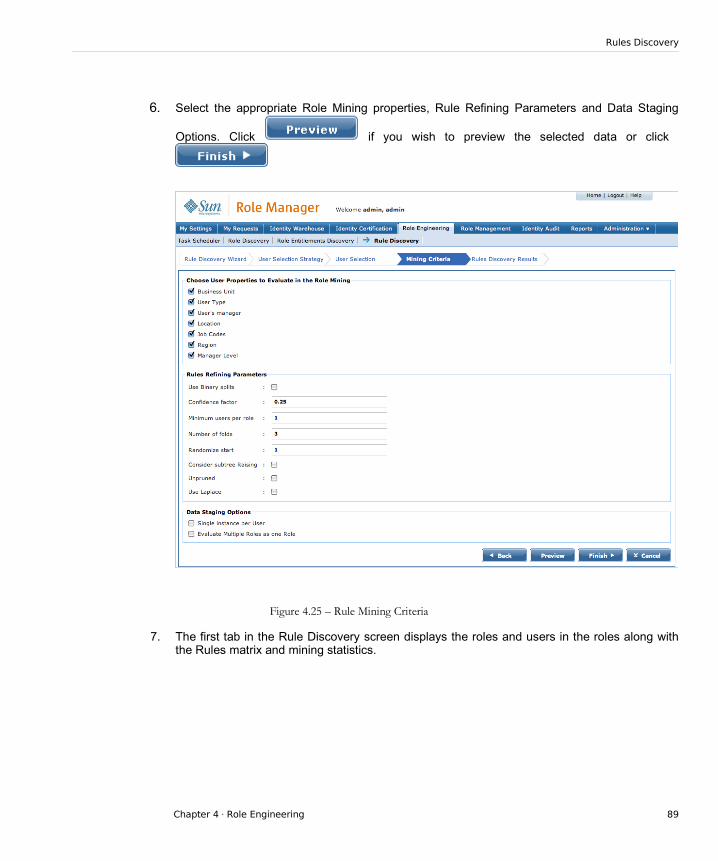
Rules Discovery
6. Select the appropriate Role Mining properties, Rule Refining Parameters and Data Staging
Options. Click if you wish to preview the selected data or click
Figure 4.25 – Rule Mining Criteria
7. The first tab in the Rule Discovery screen displays the roles and users in the roles along with the Rules matrix and mining statistics.
Chapter 4 · Role Engineering 89

Rules Discovery
Figure 4.26 – Rule Discovery Result
8. The second tab, Classification Rules, displays the rules on the basis of which a role can be assigned to a user.
90 September 2008 · Sun Role Manager 4.1 User's Guide

Rules Discovery
Figure 4.27 – Classification Rules
9. The third tab, users In Roles, displays a graphical percentage of users to roles they belong to.
Chapter 4 · Role Engineering 91

Rules Discovery
Figure 4.28 – Users in Roles
10. Click Export Classification Rules to export to a .csv file. The .csv file contains the description of the rule which can then be used for Rule Engineering (Refer to the Sun Role Manager 4.1 Administration Guide).
Figure 4.29 – Classification Rules in csv format
92 September 2008 · Sun Role Manager 4.1 User's Guide
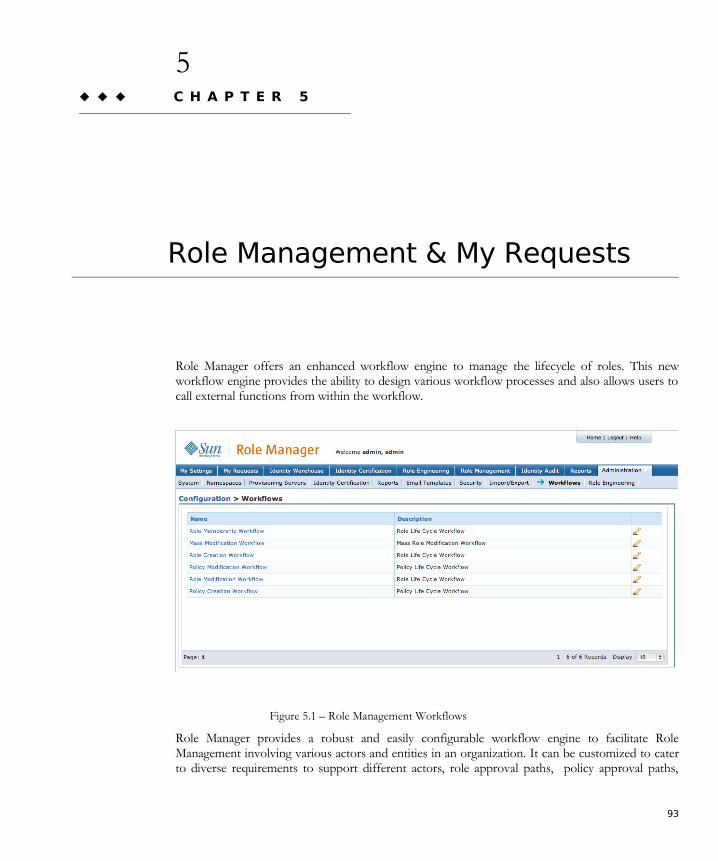
5 C H A P T E R 5
5 Role Management & My Requests
Role Manager offers an enhanced workflow engine to manage the lifecycle of roles. This new workflow engine provides the ability to design various workflow processes and also allows users to call external functions from within the workflow.
Figure 5.1 – Role Management Workflows
Role Manager provides a robust and easily configurable workflow engine to facilitate Role Management involving various actors and entities in an organization. It can be customized to cater to diverse requirements to support different actors, role approval paths, policy approval paths,
93

Role Management & My Requests
email integration, and also exposes web services to communicate with third party applications.
Role Manager allows for the creation of six types of workflow:
1. Role Membership Workflow: An ‘n’ level approval process to approve any Role-User Membership changes
2. Role Creation Workflow: An ‘n’ level approval process to approve the creation of a role and its underlying access
3. Role Modification Workflow: An ‘n’ level approval process to approve the modification of roles and its underlying access
4. Policy Creation Workflow: An ‘n’ level approval process to approve the creation of a policy and its underlying access
5. Policy Modification Workflow: An ‘n’ level approval process to approve the modification of a policy and its underlying access
6. Mass Modification Workflow:
Hence, these six workflow types can each generate individual request types depending on the action performed on any role or policy and its lifecycle in Role Manager.
Role Status
Role Manager provides a Role Status feature, with pre-defined statuses, to further enhance the lifecycle of roles. These statuses provide important information on the state of a role at any given point in time.
94 September 2008 · Sun Role Manager 4.1 User's Guide

Role Status
Figure 5.2 – Role Status
Every time a new role is created, it enlists a status of “Composing”. This role, along with its members (users) and its underlying access (associated policies) is sent for Approval by a Role Owner or Role Manager administrator. It is then up to the Role Approver to approve the Role Creation, Role Modification or Role Membership request so that the status of the role can be changed to “Active” and it can then be officially used for role based access control purposes.
Chapter 5 · Role Management & My Requests 95
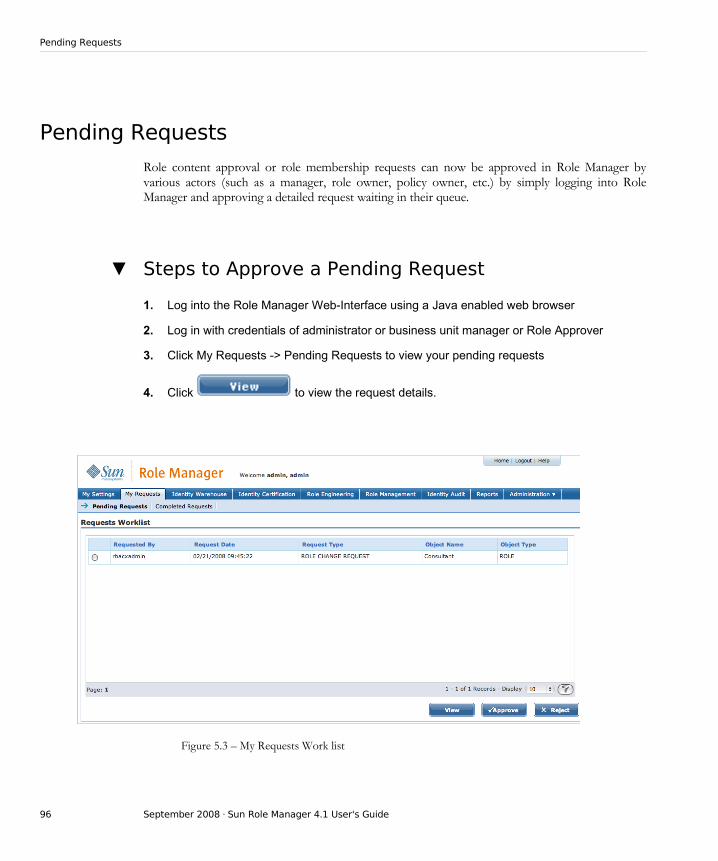
Pending Requests
Pending Requests
Role content approval or role membership requests can now be approved in Role Manager by various actors (such as a manager, role owner, policy owner, etc.) by simply logging into Role Manager and approving a detailed request waiting in their queue.
▼ Steps to Approve a Pending Request
1. Log into the Role Manager Web-Interface using a Java enabled web browser
2. Log in with credentials of administrator or business unit manager or Role Approver
3. Click My Requests -> Pending Requests to view your pending requests
4. Click to view the request details.
Figure 5.3 – My Requests Work list
96 September 2008 · Sun Role Manager 4.1 User's Guide
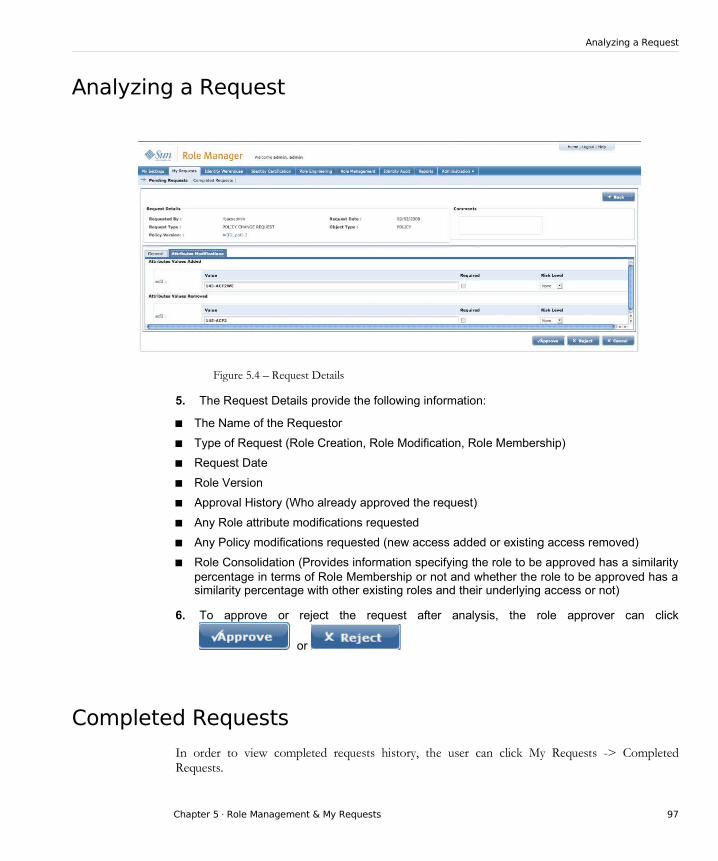
Analyzing a Request
Analyzing a Request
Figure 5.4 – Request Details
5. The Request Details provide the following information:
The Name of the Requestor
Type of Request (Role Creation, Role Modification, Role Membership)
Request Date
Role Version
Approval History (Who already approved the request)
Any Role attribute modifications requested
Any Policy modifications requested (new access added or existing access removed)
Role Consolidation (Provides information specifying the role to be approved has a similarity percentage in terms of Role Membership or not and whether the role to be approved has a similarity percentage with other existing roles and their underlying access or not)
6. To approve or reject the request after analysis, the role approver can click
or
Completed Requests
In order to view completed requests history, the user can click My Requests -> Completed Requests.
Chapter 5 · Role Management & My Requests 97

Completed Requests
Figure 5.5 –Completed Requests
Click to view the request details.
Figure 5.6 – Request History Details
98 September 2008 · Sun Role Manager 4.1 User's Guide

Role Versioning
Role Versioning
Sun Role Manager provides sophisticated role versioning capabilities, allowing role engineers and administrators to create different versions of roles so that modifications made to a role do not affect the original role. Sun Role Manager allows ‘n’ number of versions to be created for any particular role, requiring a version to be approved before it is made active. This feature assists in managing the lifecycle of roles ensuring no role modifications are made without approval and that there is always a previous version of the role to fall back on. Sun Role Manager provides sophisticated role version management with the ability to compare versions and revert to any version. All versions have an audit trail of when and by whom they were created and approved. Comparing two versions gives an individual comparison all the attributes, owners, business units, policies and exclusion roles of a role in a tabular fashion. Different color codes are used to indicate values that are unmodified, modified, added or deleted.
The key Role Versioning features in Sun Role Manager are:
● Version Creation: Sun Role Manager automatically creates a new version for a Role when the definition of a Role is changed. Role definition changes due to number of actions on role properties such as policy addition/removal, change in an associated policy, addition/removal of owners, change in name, manual change in status etc
● Version Comparison: Sun Role Manager allows the comparison of two versions of role. Role properties are divided into General, Ownership, Business Units, Policies or Exclusion Roles modules for comparison. All properties for the compared versions are displayed side by side and the changes are highlighted with color codes for modification, addition and deletion
● Reverting to a Version: Sun Role Manager stores all created versions of a role. Only one version of a role can be active at an instant. A Role can easily be reverted to any of the inactive versions using the Revert to Version capability
▼ Steps to Manage Role Versions (View, Compare, Revert)
1. Start Sun Role Manager by clicking the Sun Role Manager icon
2. The login dialogue box appears. Enter your credentials and login to Sun Role Manager
3. Select the Role view by selecting it from the Identity Warehouse Tab
4. Select a Role from the Roles panel on the left
5. Select the Versions Tab
Chapter 5 · Role Management & My Requests 99

Role Versioning
Figure 5.7 – Role Versions
6. To compare two versions select them by selecting their corresponding checkboxes and select “Compare Versions”
100 September 2008 · Sun Role Manager 4.1 User's Guide
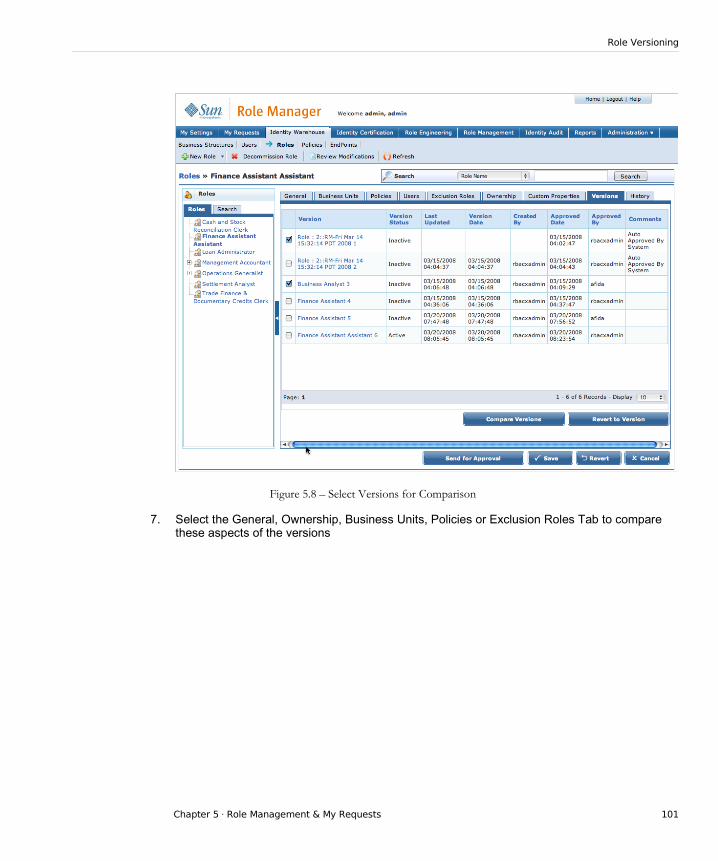
Role Versioning
Figure 5.8 – Select Versions for Comparison
7. Select the General, Ownership, Business Units, Policies or Exclusion Roles Tab to compare these aspects of the versions
Chapter 5 · Role Management & My Requests 101

Role Versioning
Figure 5.9 – Compare Versions
8. To revert to an inactive version of the Role select a version by selecting its checkbox and select “Revert to Version”.
Figure 5.10 – Revert to Version
102 September 2008 · Sun Role Manager 4.1 User's Guide

Role Versioning
9. A “Confirm Revert to Version” Window opens. Select “Yes”. The version status of the version reverted to will change from “Inactive” to “Pending Approval”
Role History
Role History creates a complete snapshot of the Role. Role History provides at a glance all instances of addition/removal of members, policies and owners as well as modification to attribute values of the Role. An audit trail is created by recording and displaying when and by whom a change is made.
The aspects covered by Sun Role Manager Role History are:
● Role Membership History: provides a view of all members added to or removed from the Role along with the Sun Role Manager User responsible for the action and the date of member addition/removal
● Policy History: provides a view of all policies added to or removed from the Role along with the Sun Role Manager User responsible for the action and the date of policy removal
● Owner History: provides a view of all owners added to or removed from the Role along with the Sun Role Manager User responsible for the action and the date of owner addition/removal
● Attribute History: provides a view of all modifications made to attributes associated with a role. The Attribute name, old value of the attribute and the new value after modification are displayed. Also displayed are the Sun Role Manager User responsible for the modification and the date of the change.
● Certification History: provides a view of all certifications done on a Role. Details of Certification creator, creation date, Certification period, Certifier, Certification Status and Certification date are displayed.
▼ Steps to view Role History
1. Start Sun Role Manager by clicking the Sun Role Manager icon
2. The login dialog box appears. Enter your credentials and login to Sun Role Manager
3. Select the Role view by selecting it from the Identity Warehouse Tab
4. Select a Role from the Roles panel on the left
5. Select the History Tab
Chapter 5 · Role Management & My Requests 103

Role History
Figure 5.11 – Role History
6. To view member addition/deletion history select “Show Details” corresponding to “Role Member History”
104 September 2008 · Sun Role Manager 4.1 User's Guide
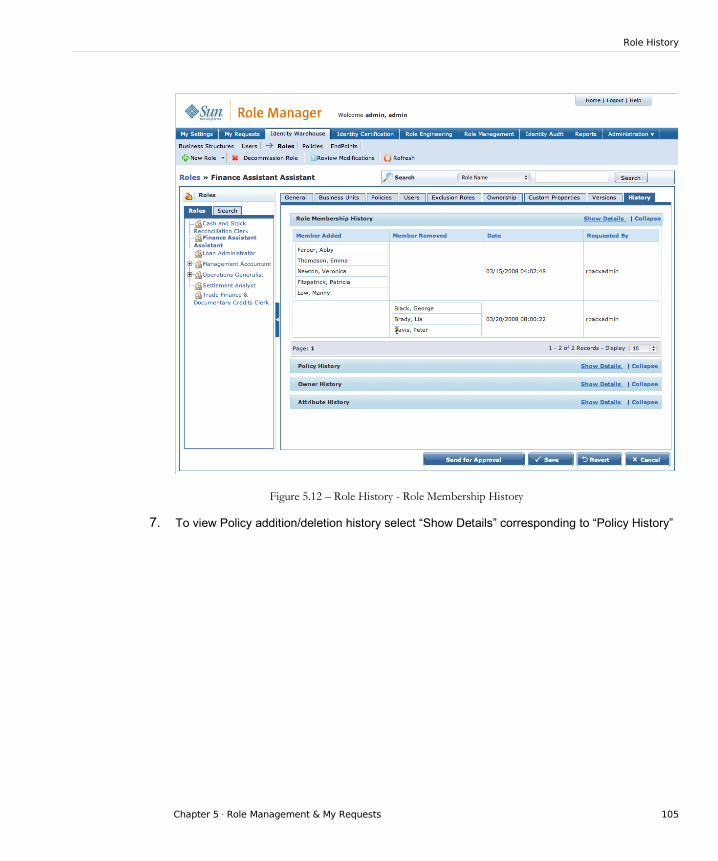
Role History
Figure 5.12 – Role History - Role Membership History
7. To view Policy addition/deletion history select “Show Details” corresponding to “Policy History”
Chapter 5 · Role Management & My Requests 105

Role History
Figure 5.13 – Role History – Policy History
8. To view Owner addition/deletion history select “Show Details” corresponding to “Owner History”
106 September 2008 · Sun Role Manager 4.1 User's Guide

Role History
Figure 5.14 – Role History – Owner History
9. To view Attribute modification history, select “Show Details” corresponding to “Attribute History”. This displays the Attribute Name, Old Value and New Value along with timestamp and User.
Chapter 5 · Role Management & My Requests 107

Role History
Figure 5.15 – Role History – Attribute History
10. To view Certification history, select “Show Details” corresponding to “Certification History”.
108 September 2008 · Sun Role Manager 4.1 User's Guide
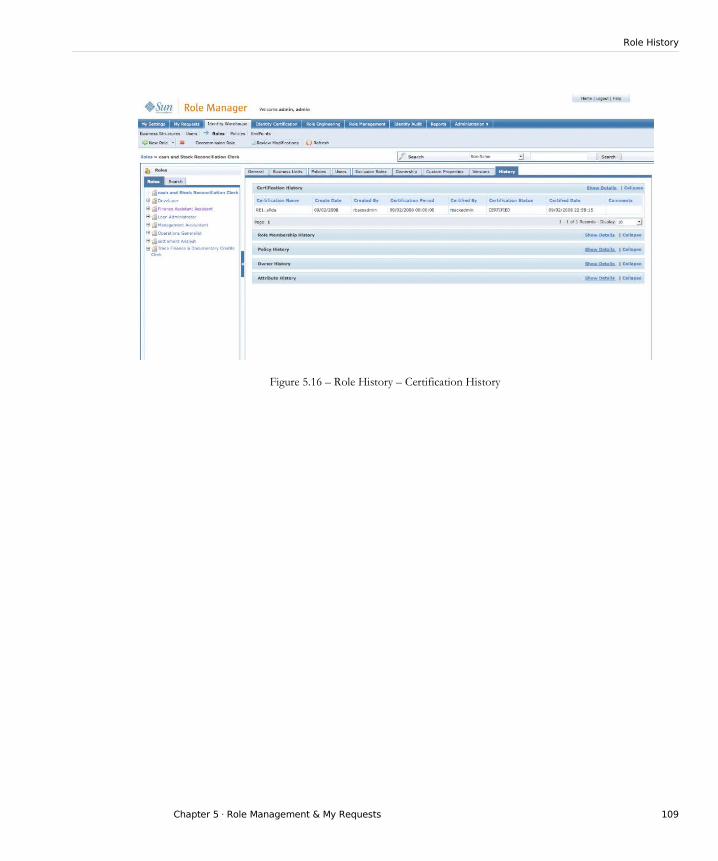
Role History
Figure 5.16 – Role History – Certification History
Chapter 5 · Role Management & My Requests 109

6 C H A P T E R 6
6 Chapter 6: Identity Certification
Sun Role Manager is the Industry leading solution that provides enterprise level certifications of user entitlements, role content and application access. It supports periodic certification of user entitlements (access) by business managers, role owners and application owners. Sun Role Manager also supports granular certifications – to support systems that have complex security models for authorization.
Sun Role Manager includes a robust and fully customizable glossary feature, which helps translate cryptic access permissions into business friendly terms. Certifications in progress and completed certifications can be viewed under the Compliance dashboard, enabling auditing analysts to view reports of certified certifications.
The Identity Certification module includes a configurable workflow functionality which has the ability to send reminder notices and escalations to various actors designated to be a part of the certification process. This is more of an administrator level function and has been explained in detail in the Sun Role Manager 4.1 Administrators Guide.
This powerful Identity Certification module is extended in Sun Role Manager 4.1 to provide the ability to perform certifications at the instance or server level of a resource, provides advanced drill down capabilities for users, and advanced filtering and searching capabilities on the certification interface.
The Identity Certification module has three Certification types:
1) User Access Certification: Allows certifier to certify Role Membership and User Entitlements
2) Role Entitlement Certification: Allows certifier to certify roles and role content
111

Chapter 6: Identity Certification
3) Application Owner Certification: Allows certifier to certify entitlements pertaining to an application narrowed down by each instance of the application
Understanding the Actors
The Identity Certification module in Sun Role Manager assists various personnel in an organization to review and certify user entitlement data, role content data and application access data, which further assists in cleaning up entitlement access and ensures that users have access to the correct entitlements across various target systems. It is important to understand the various actors that are a part of the Identity Certification process, as described in the table below:
Actor Name Description Identity Certification Type
CertifierGeneric term representing personnel responsible for reviewing and completing any kind of certification
User Access Certification, Role Entitlement Certification, Application Certification
User Manager An employee’s direct “reports to” manager
User Access Certification
Access Reviewer Designated personnel responsible for reviewing user access
User Access Certification, Application Certification
Application Owner Designated personnel (usually) responsible for reviewing a users access in a particular target system by endpoint or domain
Application Certification
Role Owner Designated personnel (usually) responsible for reviewing role and its content
Role Entitlement
Sun Role Manager Administrator Administrator with full access to the Sun Role Manager application; has the ability to create and view progress of all certifications
User Access Certification, Role Entitlement Certification, Application Certification
Certification Administrator Limited access to the Sun Role Manager application; has the ability to create and view progress of all certifications only
User Access Certification, Role Entitlement Certification, Application Certification
Audit Analyst/Auditor Accesses the Identity Certification Dashboards to view progress of each certification and view reports of completed certifications
Identity Certification Dashboard
Identity Certification Dashboard
The Identity Certification Dashboard provides a single view for statistical information regarding
112 September 2008 · Sun Role Manager 4.1 User's Guide
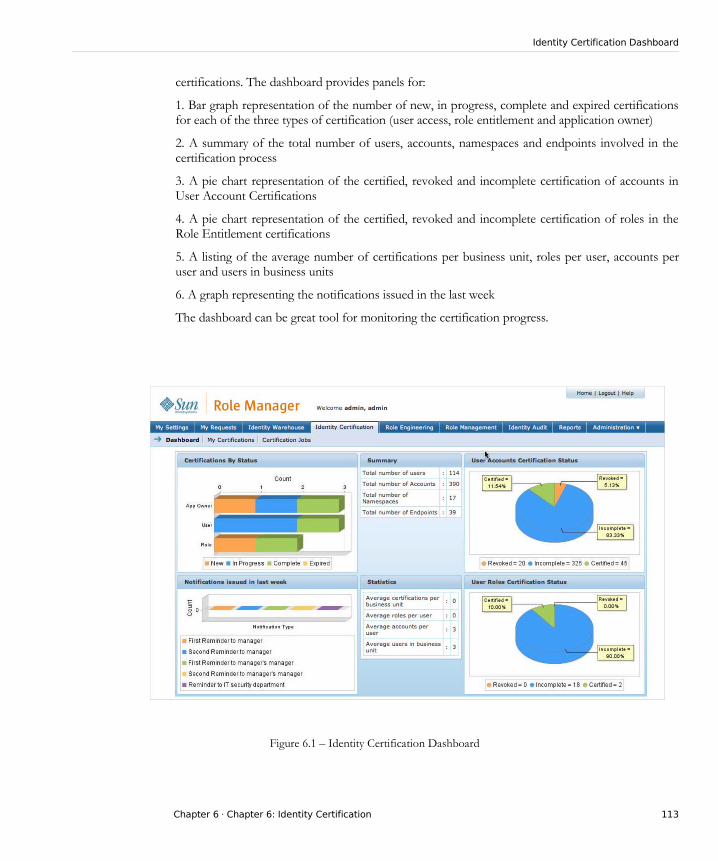
Identity Certification Dashboard
certifications. The dashboard provides panels for:
1. Bar graph representation of the number of new, in progress, complete and expired certifications for each of the three types of certification (user access, role entitlement and application owner)
2. A summary of the total number of users, accounts, namespaces and endpoints involved in the certification process
3. A pie chart representation of the certified, revoked and incomplete certification of accounts in User Account Certifications
4. A pie chart representation of the certified, revoked and incomplete certification of roles in the Role Entitlement certifications
5. A listing of the average number of certifications per business unit, roles per user, accounts per user and users in business units
6. A graph representing the notifications issued in the last week
The dashboard can be great tool for monitoring the certification progress.
Figure 6.1 – Identity Certification Dashboard
Chapter 6 · Chapter 6: Identity Certification 113

New Identity Certification
New Identity Certification
▼ Steps to Create a New Identity Certification Job
1. Log into the Sun Role Manager Web-Interface using a Java-enabled web browser
2. Log in with credentials of administrator or business units manager
3. Select the My Certifications Tab under Identity Certification Tab
4. Click New Certification
5. The Create Certification window opens. Fill in the Certification Name. Select the type of certification to be created from User Access, Role Entitlement and Application Owner. To create an incremental Certification select the Checkbox for Incremental. Select Next
Figure 6.2 – New Certification
6. Select the User Selection Strategy. This step is applicable only if the type of certification is
114 September 2008 · Sun Role Manager 4.1 User's Guide

New Identity Certification
selected as “User Access”. For Role Entitlement and Application Owner Certification type User selection is done on the basis of Business units. For User Access certifications there is the option of doing a custom user selection
7. For Role Entitlement Certifications, Application Owner Certifications and User Access certifications where User Selection Strategy is selected as “By Business Unit” the Business Unit Selection window opens. Click Add Business Unit(s) button to add business units for user
selection
Figure 6.3 – New Certification – User Selection Strategy
8. The Select Business Unit(s) window opens up. Drill down into business units to select the business unit for selecting users. To select a business unit select the corresponding checkbox(s) and click “Ok”
Chapter 6 · Chapter 6: Identity Certification 115

New Identity Certification
Figure 6.4 – New Certification – User Selection by Business Unit
9. Use the corresponding checkboxes and “Remove Business Units” button to remove business units. Select “Next”
10. If the certification type is “User Access” and the user selection strategy is “By User Selection” a user selection window opens up that allows users to be selected using the advanced user search or quicksearch capabilities. Select users for certification from the search result by using corresponding checkboxes. No users are included by default. Select “Next”
116 September 2008 · Sun Role Manager 4.1 User's Guide
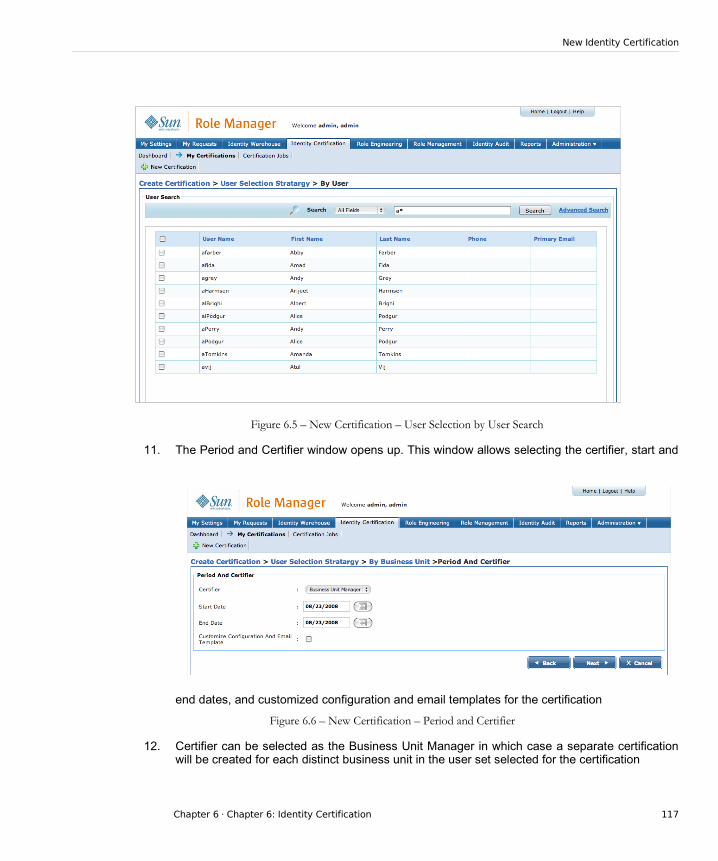
New Identity Certification
Figure 6.5 – New Certification – User Selection by User Search
11. The Period and Certifier window opens up. This window allows selecting the certifier, start and
end dates, and customized configuration and email templates for the certification
Figure 6.6 – New Certification – Period and Certifier
12. Certifier can be selected as the Business Unit Manager in which case a separate certification will be created for each distinct business unit in the user set selected for the certification
Chapter 6 · Chapter 6: Identity Certification 117

New Identity Certification
13. The “Select” option for certifier allows the use of the advanced user search and quicksearch capability to search for the global user that is to be selected as the certifier. Click the search button that appears when “Select” option is set for certifier
Figure 6.7 – New Certification - Select Certifier by User Search
14. Select the User from the Search result that is to be selected as Certifier and click “Ok”
15. Sun Role Manager uses a customizable notification mechanism to send reminders and notifications to the various parties involved. The notifications are sent relative to the Start Date and End Date. End date should be set to give sufficient time to the certifier to complete the certification. Once the End date is passed the Certification is marked as “Expired” and cannot be edited or completed
118 September 2008 · Sun Role Manager 4.1 User's Guide

New Identity Certification
Figure 6.8 – New Certification – Start and End Date
16. The general Identity Certification workflow is set by navigating to Configuration=>Identity Certification Tab. However each certification can be customized by setting these values. Select the checkbox for Customize Configuration and Email Template. For more information on these fields refer to the Identity Certification section in the chapter on Sun Role Manager – Configuration. Click “Next”
Chapter 6 · Chapter 6: Identity Certification 119

New Identity Certification
Figure 6.9 – New Certification – Customized Configuration
17. The final configuration summary page opens. The certifier field will display the name of the user selected if the “Select” option was used and “Business Unit Manager” if business unit manager option was chosen. If user selection strategy used was “By Business Unit”, number of business units selected will be displayed. If user selection strategy used was “By User Selection”, the number of users selected will be displayed. Click the “view” button to view the names of business units or users
120 September 2008 · Sun Role Manager 4.1 User's Guide

New Identity Certification
Figure 6.10 – New Certification - Summary
18. There are two options for running the certification. It can be run at the current instant by selecting “Now” for Run Certification field, or it can be scheduled as a daily, weekly, monthly or one time task to be run at any particular data/time. Select “Later” to schedule a task. A new panel opens up for the scheduler. Select a name and description for the scheduled task. Select the type of the task and the corresponding fields
Chapter 6 · Chapter 6: Identity Certification 121

New Identity Certification
Figure 6.11 – New Certification – Run Later
19. Select “Create” to create the certification
122 September 2008 · Sun Role Manager 4.1 User's Guide

New Identity Certification
Figure 6.12 – New Certification – Created Certification
20. The Certification Jobs window opens and displays the new task created
21. The created certification Jobs can be viewed from the “Certification Jobs” view. When a job is run using the “Run now” or schedule features it will be available in the certifier’s “My Certifications” view
View and Search Certifications
The “My Certifications” view under the “Identity Certifications” Tab provides the main interface in Sun Role Manager to view and access certifications. By default the view shows New and In Progress certifications. Filters are provided to view All or any combination of New, In Progress, Complete and Expired certifications. For further precision a certification search capability is provided that can be used in conjunction with the filters to quickly search for a certification
Chapter 6 · Chapter 6: Identity Certification 123
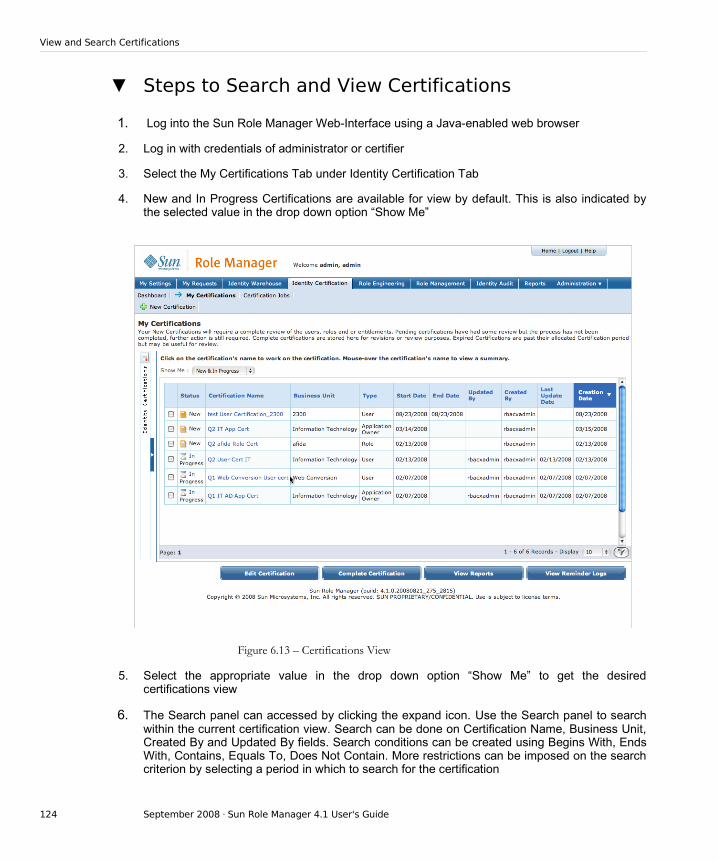
View and Search Certifications
▼ Steps to Search and View Certifications
1. Log into the Sun Role Manager Web-Interface using a Java-enabled web browser
2. Log in with credentials of administrator or certifier
3. Select the My Certifications Tab under Identity Certification Tab
4. New and In Progress Certifications are available for view by default. This is also indicated by the selected value in the drop down option “Show Me”
Figure 6.13 – Certifications View
5. Select the appropriate value in the drop down option “Show Me” to get the desired certifications view
6. The Search panel can accessed by clicking the expand icon. Use the Search panel to search within the current certification view. Search can be done on Certification Name, Business Unit, Created By and Updated By fields. Search conditions can be created using Begins With, Ends With, Contains, Equals To, Does Not Contain. More restrictions can be imposed on the search criterion by selecting a period in which to search for the certification
124 September 2008 · Sun Role Manager 4.1 User's Guide
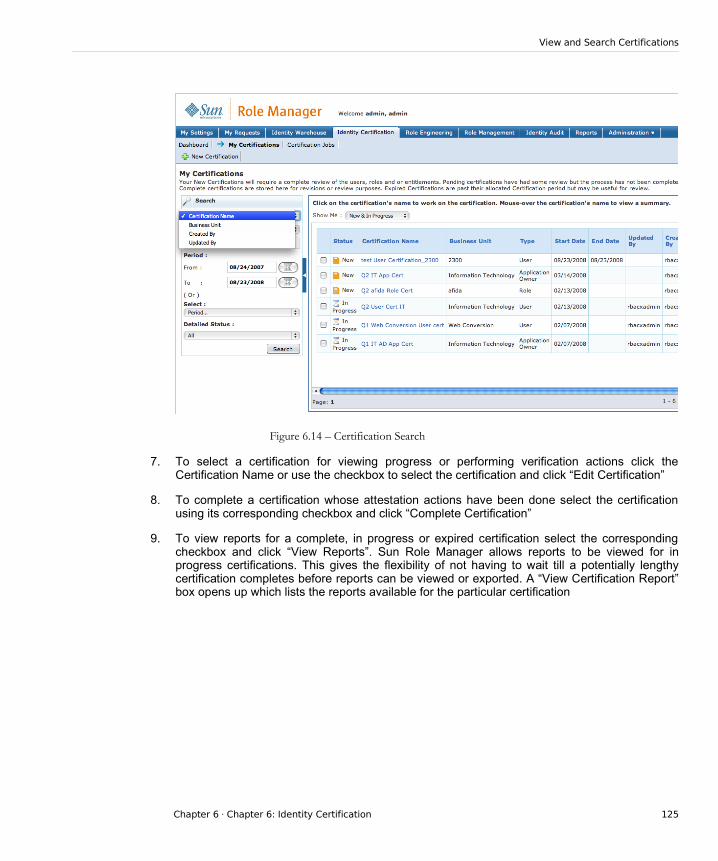
View and Search Certifications
Figure 6.14 – Certification Search
7. To select a certification for viewing progress or performing verification actions click the Certification Name or use the checkbox to select the certification and click “Edit Certification”
8. To complete a certification whose attestation actions have been done select the certification using its corresponding checkbox and click “Complete Certification”
9. To view reports for a complete, in progress or expired certification select the corresponding checkbox and click “View Reports”. Sun Role Manager allows reports to be viewed for in progress certifications. This gives the flexibility of not having to wait till a potentially lengthy certification completes before reports can be viewed or exported. A “View Certification Report” box opens up which lists the reports available for the particular certification
Chapter 6 · Chapter 6: Identity Certification 125

View and Search Certifications
Figure 6.15 – Certification Reports
10. Select the type of report that is to be viewed and click “Ok”
11. To view the reminder logs for a certification select the corresponding checkbox and click “View Reminder Logs”
The following modules provide instructions for certifiers (User Managers, Role Owners and Application Owners) to sign off the different types of Certifications.
Completing a User Access Certification
This sub-section describes how to sign off a user access certification for attestation and reporting purposes. User Access Certification in Role Manager is a two step process.
● Step 1: Employment Verification. This step entails confirming or denying whether the certifier is responsible for the accesses of the user being certified. Various options such as 'Terminated', 'Does not work for me' and 'Works for someone else' can be used for
126 September 2008 · Sun Role Manager 4.1 User's Guide
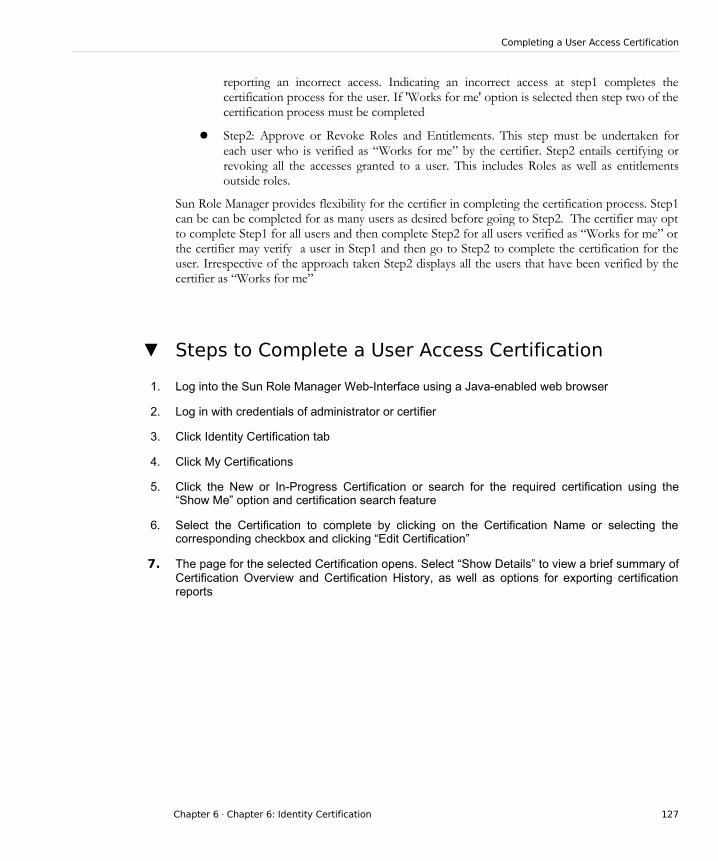
Completing a User Access Certification
reporting an incorrect access. Indicating an incorrect access at step1 completes the certification process for the user. If 'Works for me' option is selected then step two of the certification process must be completed
● Step2: Approve or Revoke Roles and Entitlements. This step must be undertaken for each user who is verified as “Works for me” by the certifier. Step2 entails certifying or revoking all the accesses granted to a user. This includes Roles as well as entitlements outside roles.
Sun Role Manager provides flexibility for the certifier in completing the certification process. Step1 can be can be completed for as many users as desired before going to Step2. The certifier may opt to complete Step1 for all users and then complete Step2 for all users verified as “Works for me” or the certifier may verify a user in Step1 and then go to Step2 to complete the certification for the user. Irrespective of the approach taken Step2 displays all the users that have been verified by the certifier as “Works for me”
▼ Steps to Complete a User Access Certification
1. Log into the Sun Role Manager Web-Interface using a Java-enabled web browser
2. Log in with credentials of administrator or certifier
3. Click Identity Certification tab
4. Click My Certifications
5. Click the New or In-Progress Certification or search for the required certification using the “Show Me” option and certification search feature
6. Select the Certification to complete by clicking on the Certification Name or selecting the corresponding checkbox and clicking “Edit Certification”
7. The page for the selected Certification opens. Select “Show Details” to view a brief summary of Certification Overview and Certification History, as well as options for exporting certification reports
Chapter 6 · Chapter 6: Identity Certification 127

Completing a User Access Certification
Figure 6.16 – Certification Details
Step 1
8. Complete Employee Verification . Select “Works for Me’, ‘Does Not Work for Me’, ‘Terminated’ or ‘Reports to Another Person’. “Click to change for all” can be used to change all the users to the same status. The ‘Does Not Work for Me’, ‘Terminated’ and ‘Reports to Another Person’ options prompt a corresponding comments box where further information can be provided.
9. The ‘Reports to Another Person’ option allows the selection of another Global User as the correct certifier for the user. This causes a new workflow where a new certification is created for the newly selected “Correct Certifier” to certify the particular user’s accesses. This new process will take place only if in the general Identity Certification configurations or in the custom configurations for the certification under consideration “Reporting Changes” and “Create New Certification per Reporting Manager” have been enabled. Refer to Sun Role Manager- Configuration => Identity Certification portion of Sun Role Manager 4.1 Admin Guide for more information on these settings. After filling in appropriate comment and clicking “Ok” a new window opens that allows use of the Advanced User Search or quicksearch feature to select a Global User as the appropriate certifying authority
128 September 2008 · Sun Role Manager 4.1 User's Guide

Completing a User Access Certification
Figure 6.17 – Employee Verification – Reports to Another Person
10. Selecting “Works For Me” makes the user eligible for review in Step2.
11. When one or more users have been verified by selecting “Works for me” and their roles and entitlements are to be certified select “Go To Step2”
Chapter 6 · Chapter 6: Identity Certification 129
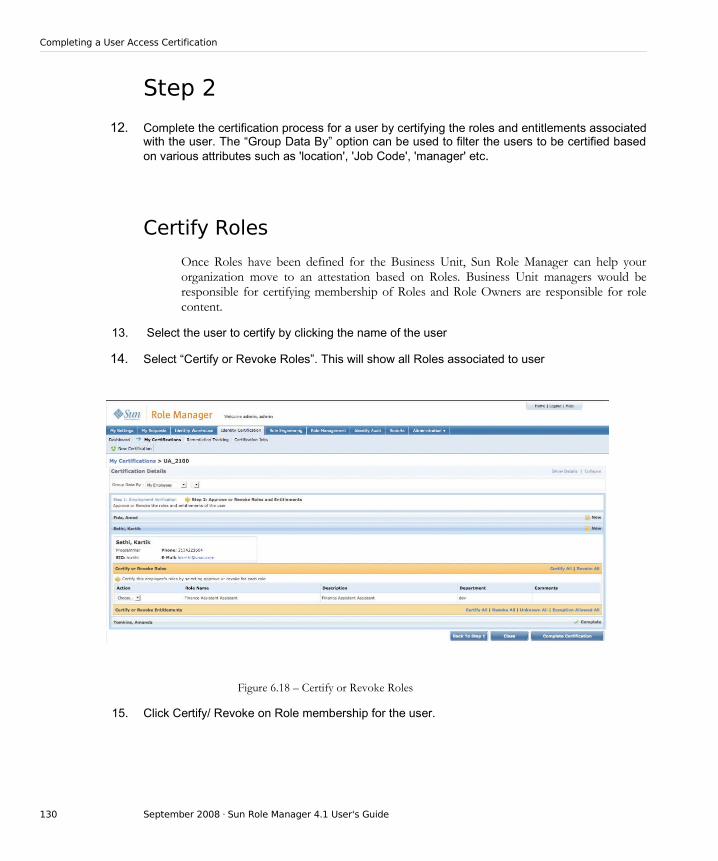
Completing a User Access Certification
Step 2
12. Complete the certification process for a user by certifying the roles and entitlements associated with the user. The “Group Data By” option can be used to filter the users to be certified based on various attributes such as 'location', 'Job Code', 'manager' etc.
Certify Roles
Once Roles have been defined for the Business Unit, Sun Role Manager can help your organization move to an attestation based on Roles. Business Unit managers would be responsible for certifying membership of Roles and Role Owners are responsible for role content.
13. Select the user to certify by clicking the name of the user
14. Select “Certify or Revoke Roles”. This will show all Roles associated to user
Figure 6.18 – Certify or Revoke Roles
15. Click Certify/ Revoke on Role membership for the user.
130 September 2008 · Sun Role Manager 4.1 User's Guide

Completing a User Access Certification
Certify Access Outside Roles
Sun Role Manager Identity Certification allows configuration of certifications that will show entitlements for each user that only lie outside a Role. This combined with the above Certify by Role completes a Role Based Access Attestation procedure. This allows an organization to identify and treat Actual versus Assigned access as an exception with high priority.
16. Select a User for certification. Select certify or revoke entitlements
17. This will list all the user’s accounts in the various namespaces with detailed access permissions on each endpoint
18. The certification options at this stage are Certify, Revoke, Unknown and Exception allowed. Use Certify option to confirm valid access for the user. Use Revoke to revoke access for the user. Use Unknown when the accurate nature of the User’s access is not known. Use Exception allowed to certify access to the user while acknowledging the undesirable or irregular nature of the access. These options can be used at 4 levels:
a. Use the “All” option in the first 4 columns on this page to apply ‘Certify’, ‘Revoke’, ‘Unknown’ or ‘Exception Allowed’ across all attributes of all accounts of the userb. Use the checkboxes in the first 4 columns for individual accounts to apply ‘Certify’, ‘Revoke’, ‘Unknown’ or ‘Exception Allowed’ across all attributes of an individual account of the userc. Use the “All” option in the 4 columns under the “Attributes” field to apply ‘Certify’, ‘Revoke’, ‘Unknown’ or ‘Exception Allowed’ across all attribute values for an individual attribute of an single account of the userd. Use the individual checkboxes in the 4 columns to apply ‘Certify’, ‘Revoke’, ‘Unknown’ or ‘Exception Allowed’ for individual attribute values of a single attribute of an account of the user
Chapter 6 · Chapter 6: Identity Certification 131

Completing a User Access Certification
Figure 6.19 – Certify or Revoke Entitlements
19. Sun Role Manager provides a Glossary feature which translates the cryptic access entitlements into business friendly terms. Click the highlighted access entitlement (with hyperlink) to display the actual attribute value and its corresponding definition and comments
132 September 2008 · Sun Role Manager 4.1 User's Guide

Completing a User Access Certification
Figure 6.20 – Glossary Display in Certification
Revoking a Role or Access outside Role
20. To revoke any access whether it lies in a Role or Entitlement, select the Revoke radio button. This will bring up a comments field which must be filled for post certification (remediation) activities
Chapter 6 · Chapter 6: Identity Certification 133

Completing a User Access Certification
Figure 6.21 – Revoke Comments
Sign-off on Certification
Identity Certification supports a series of post certification activities which include reports, revoke emails and kicking off a workflow process if integrated with an IAM solution. To complete and sign off on a certification, complete the above steps to certify or revoke access for each user.
21. Complete attesting access of all users. Role Manager detects when a certification is completed and prompts for sign-off on the certification. Select “Yes” on the sign-off certification screen to sign-off certification
134 September 2008 · Sun Role Manager 4.1 User's Guide
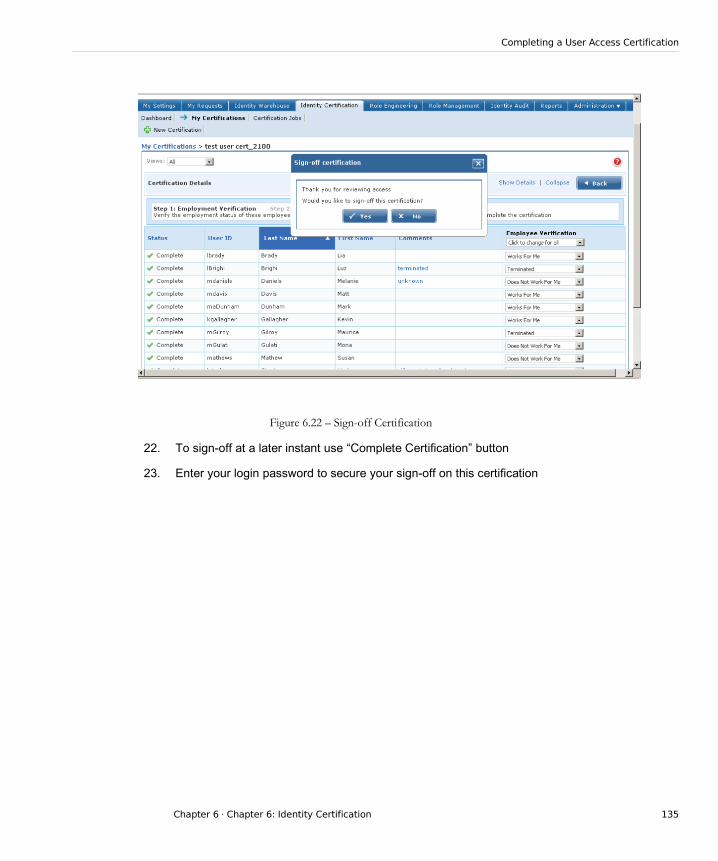
Completing a User Access Certification
Figure 6.22 – Sign-off Certification
22. To sign-off at a later instant use “Complete Certification” button
23. Enter your login password to secure your sign-off on this certification
Chapter 6 · Chapter 6: Identity Certification 135

Completing a User Access Certification
Figure 6.23 – Sign-off Authorization
Completing a Role Entitlement Certification
This sub-section describes how to sign off a role entitlement certification for attestation and reporting purposes.
▼ Steps to Complete a Role Entitlement Certification
1. Log into the Sun Role Manager Web-Interface using a Java-enabled web browser
2. Log in with credentials of administrator or certifier
3. Click Identity Certification tab
4. Click My Certifications
5. Click the New or In-Progress Certification or search for the required certification using
136 September 2008 · Sun Role Manager 4.1 User's Guide
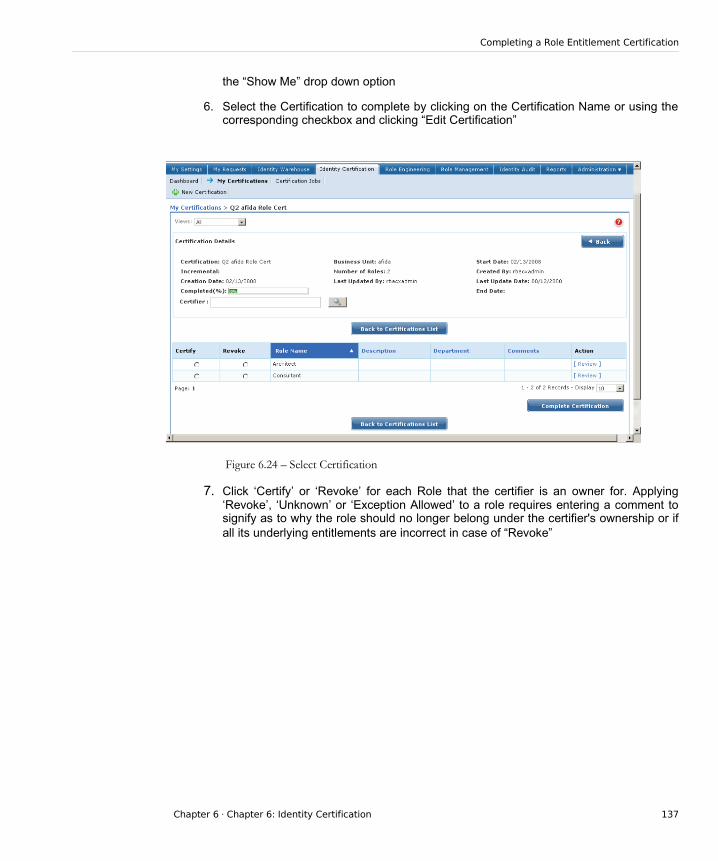
Completing a Role Entitlement Certification
the “Show Me” drop down option
6. Select the Certification to complete by clicking on the Certification Name or using the corresponding checkbox and clicking “Edit Certification”
Figure 6.24 – Select Certification
7. Click ‘Certify’ or ‘Revoke’ for each Role that the certifier is an owner for. Applying ‘Revoke’, ‘Unknown’ or ‘Exception Allowed’ to a role requires entering a comment to signify as to why the role should no longer belong under the certifier's ownership or if all its underlying entitlements are incorrect in case of “Revoke”
Chapter 6 · Chapter 6: Identity Certification 137

Completing a Role Entitlement Certification
Figure 6.25 – Revoke Comments
8. Click [Review] to review the Role Entitlements
138 September 2008 · Sun Role Manager 4.1 User's Guide
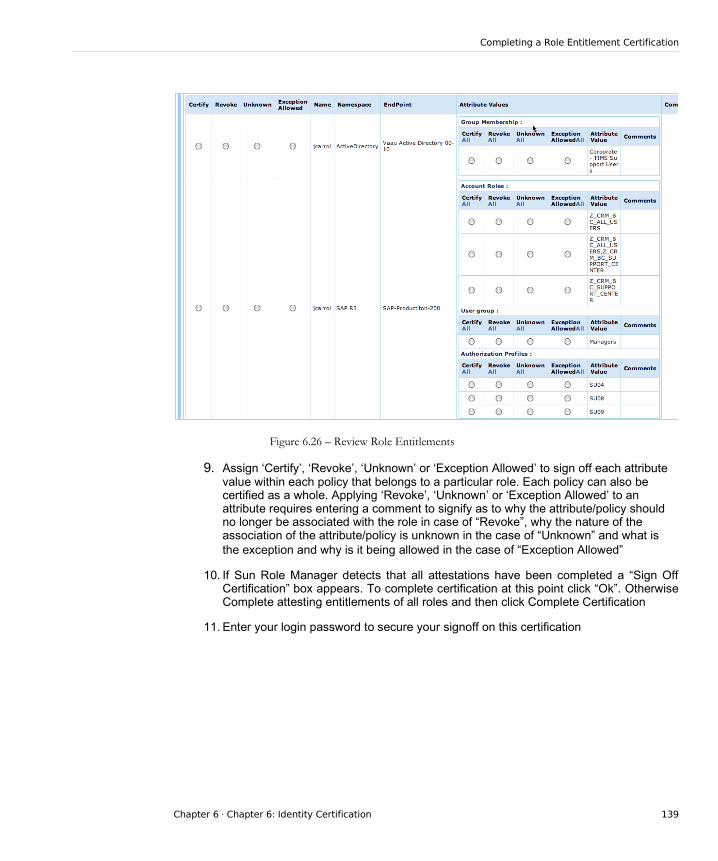
Completing a Role Entitlement Certification
Figure 6.26 – Review Role Entitlements
9. Assign ‘Certify’, ‘Revoke’, ‘Unknown’ or ‘Exception Allowed’ to sign off each attribute value within each policy that belongs to a particular role. Each policy can also be certified as a whole. Applying ‘Revoke’, ‘Unknown’ or ‘Exception Allowed’ to an attribute requires entering a comment to signify as to why the attribute/policy should no longer be associated with the role in case of “Revoke”, why the nature of the association of the attribute/policy is unknown in the case of “Unknown” and what is the exception and why is it being allowed in the case of “Exception Allowed”
10. If Sun Role Manager detects that all attestations have been completed a “Sign Off Certification” box appears. To complete certification at this point click “Ok”. Otherwise Complete attesting entitlements of all roles and then click Complete Certification
11. Enter your login password to secure your signoff on this certification
Chapter 6 · Chapter 6: Identity Certification 139

Completing a Role Entitlement Certification
Figure 6.27 – Sign-off Authorization
Completing an Application Owner Certification
This sub-section describes how to sign off an application owner certification for attestation and reporting purposes.
▼ Steps to Complete an Application Owner Certification
1. Log into the Sun Role Manager Web-Interface using a Java-enabled web browser
2. Log in with credentials of administrator or certifier
3. Click Identity Certification tab
4. Click My Certifications
140 September 2008 · Sun Role Manager 4.1 User's Guide
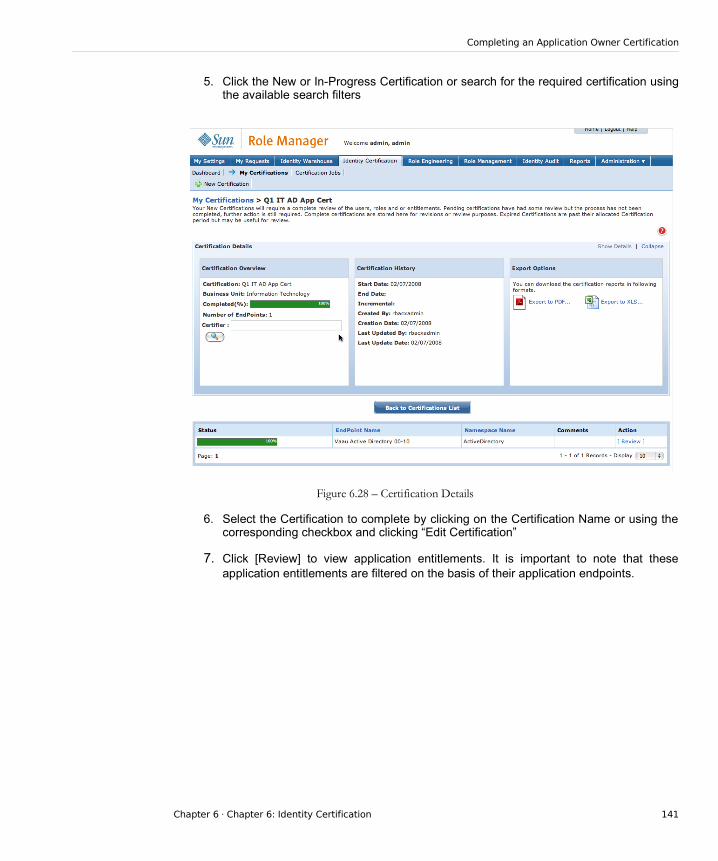
Completing an Application Owner Certification
5. Click the New or In-Progress Certification or search for the required certification using the available search filters
Figure 6.28 – Certification Details
6. Select the Certification to complete by clicking on the Certification Name or using the corresponding checkbox and clicking “Edit Certification”
7. Click [Review] to view application entitlements. It is important to note that these application entitlements are filtered on the basis of their application endpoints.
Chapter 6 · Chapter 6: Identity Certification 141

Completing an Application Owner Certification
Figure 6.29 – Review Entitlements
8. Click ‘Certify’, ‘Revoke’, ‘Unknown’ or ‘Exception Allowed’ for each User’s access account. Glossary definitions are useful in determining the true meaning of a cryptic or system level attribute value
9. Click Certify or Revoke to sign off each attribute value within each user’s account that belongs to a particular endpoint. Each account can also be certified as a whole.
10. If Sun Role Manager detects that all attestations have been completed a “Sign Off Certification” box appears. To complete certification at this point click “Ok”. Otherwise Complete attesting entitlements of all accounts and then click Complete Certification
142 September 2008 · Sun Role Manager 4.1 User's Guide

Completing an Application Owner Certification
Figure 6.30 – Sign-off Certification
11. Enter your login password to secure your signoff on this certification
Chapter 6 · Chapter 6: Identity Certification 143

Completing an Application Owner Certification
Figure 6.31 – Sign-off Authorization
144 September 2008 · Sun Role Manager 4.1 User's Guide
7 C H A P T E R 7
7 Identity Auditing
Exception Monitoring is an integral piece of Identity Auditing and Management. In organizations today, there are various exceptions of user accounts on the various target systems. A detective mechanism to monitor and get exceptions is needed in organizations where a centralized store for all the exceptions is available. Organizations must be able to manage Continuous Exception Monitoring,Segregation of Duty (SoD) Violations, Detective Scanning, Inter & Intra-Application SoD Enforcement, Actual vs. Assigned Exceptions, and Exception Lifecycle Management. All of these exceptions can be captured in Role Manager and produced in a central repository. Role Manager provides the capability to define Audit policies and the ability to capture/report any exceptions from these policies.
Role Manager provides a Compliance Dashboard for Executives/Auditors which enable them to monitor these exceptions from a central point. Also, the various exceptions generated are stored in Role Manager and a security analyst can accept them or mitigate these risks/exceptions.
The Role Manager Audit Module ensures that users only have the access that they should for their job responsibility. Following are some of the key features of the Identity Auditing module:
Actual Account Scanning - Role Manager scans actual accounts for Identity Audit exceptions. Irrespective of how an account is provisioned or modified (directly or through a provisioning solution), Role Manager will be able to detect any audit exceptions, since the scanning is done at the actual account details level.
Compliance Dashboard - Role Manager provides a detailed dashboard for auditors, security administrators and compliance teams to review the status, history and trend of identity audit exceptions in the enterprise.
Exception Lifecycle Management - Role Manager stores every action that is conducted on an audit exception and creates a history of the exception. This allows administrators to get a complete step-by-step history and lifecycle of the exception if required.
By closely monitoring user access privileges, who approved these access privileges, and what access
145
Identity Auditing
privileges shouldn’t be there, Role Manager provides organizations with the data required to take informed corrective actions in order to remediate policy violations. Role Manager provides a platform to enforce policies and generate audit trails that can be used to certify compliance with various laws and regulations.
The following types of exceptions are monitored by the system on a scheduled basis:
Actual vs. Assigned: The system will monitor all instances where a user’s actual access in the target system does not match the access assigned to the user based on the roles assigned to the user
Terminated User with Accounts: The system will monitor all instances where a terminated user has active accounts
This section describes the concept of Audit Policies and Audit Rules and how to scan the Role Manager Identity Warehouse for exceptions. Thereafter, this module will cover how Role Manager helps manage a life-cycle of an exception or Audit Violation from assigning a remediator to opening and closing the exception tickets.
Audit Rules and Policies
Create Audit Rules and Audit Policies
Set Auditable Attributes
The strength of Role Manager lies in its granular metadata definition. Here you can define properties for attributes, the lowest level of metadata, and set them as auditable to allow the system to scan for violations across applications. This gives flexibility in defining audit rules and audit policies that span the breadth of the enterprise considering user attributes along with access entitlements across all applications for the most flexible and comprehensive audit policy definition.
Note – Auditable attribute settings should be checked before Identity Audit effort is initiated to ensure that appropriate applications are accounted for while the system is being scanned. This may be an administrator level functionality and you may not have the rights to perform this action. If you do not see this option when you log into Role Manager, please talk to your administrator or refer to the Sun Role Manager 4.1 Administration Guide.
146 September 2008 · Sun Role Manager 4.1 User's Guide

Audit Rules and Policies
▼ Steps to set Auditable Attributes before Identity Audit
1. Log into the Role Manager Web-Interface from your Java enabled web browser.
2. The login dialog box appears. Enter the relevant credentials and login to Role Manager
3. Click the Configuration tab and then Namespaces link
4. Select desired namespace and check or uncheck ‘Auditable’ dialog box for each attribute
Figure 7.1 – Set Auditable Attributes
Create Audit Rules
An Audit Rule is a predefined condition for a set of Role Manager objects which can be user attributes or account attributes. Various types of audit rules with a combination of user and account attributes can be defined. A collection of Audit Rules defines an Audit Policy.
Chapter 7 · Identity Auditing 147

Audit Rules and Policies
▼ Steps to Create an Audit Rule
1. Log into the Role Manager Web-Interface
2. Click Identity Audit tab and click Rules link
Figure 7.2 – Audit Rules
3. Click
4. Enter a relevant Rule name and description
5. Select an Role Manager object from the drop down list – options will include User and each defined Namespace.
6. Selecting the Object will bring up a pull down list of Object’s attributes.
7. Select desired attributes, condition and value
8. To add another object to the Audit Rule, click [Add]
148 September 2008 · Sun Role Manager 4.1 User's Guide

Audit Rules and Policies
Figure 7.3 – Add Audit Rules
9. Click when rule creation is complete.
Figure 7.4 - Completed Rule Creation
Chapter 7 · Identity Auditing 149

Create Audit Policy
Create Audit Policy
An Audit Policy definition includes predefined Audit Rules with a logical condition operator, and a Remediator who is an actor later assigned to each policy violation. The Remediator is responsible for assigning a status to the violation.
▼ Steps to Create Audit Policy
1. In the Identity Audit tab, click Policies.
2. Select New Policy and assign Policy name and description
Figure 7.5 – Create Audit Policy
3. To add an Audit Rule, select [Add]. This will bring up a pop up window with all listed Audit Rules and dates of creation.
150 September 2008 · Sun Role Manager 4.1 User's Guide

Create Audit Policy
Figure 7.6 – Add Rules to Policy
4. Check all desired Rules and click
Chapter 7 · Identity Auditing 151

Create Audit Policy
Figure 7.7 - Check Rules
5. Set the logical condition operator between Rules. Options are AND, OR and add more rules if required.
6. Click to go to the remediators tab.
7. All violations of said policy will be assigned to this remediator and appropriate email notifications will be sent. Click [Search] to display a search box for users. Select one
user and click and then to save the policy.
152 September 2008 · Sun Role Manager 4.1 User's Guide

Create Audit Policy
Figure 7.8 – Search Remediator
Chapter 7 · Identity Auditing 153

Scan Audit Policy Violations
Scan Audit Policy Violations
▼ Steps to Scan System for Audit Violations
1. Click the Identity Audit -> Policies -> Scan Policies tabs.
Figure 7.9 – Scan Policy
2. Click to add certain business units from the selection or check All Business Units to scan against the entire warehouse.
154 September 2008 · Sun Role Manager 4.1 User's Guide
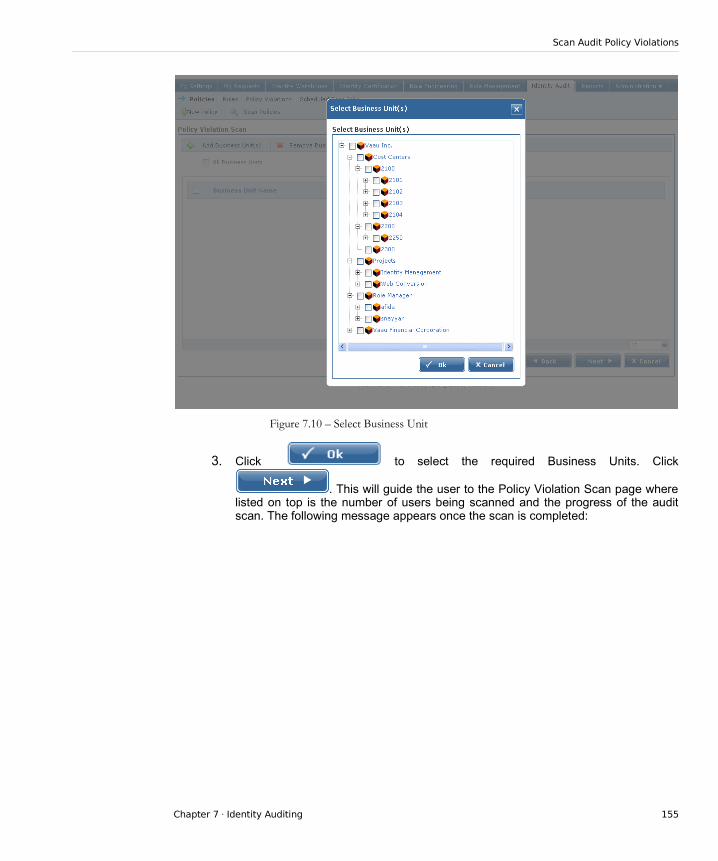
Scan Audit Policy Violations
Figure 7.10 – Select Business Unit
3. Click to select the required Business Units. Click
. This will guide the user to the Policy Violation Scan page where listed on top is the number of users being scanned and the progress of the audit scan. The following message appears once the scan is completed:
Chapter 7 · Identity Auditing 155
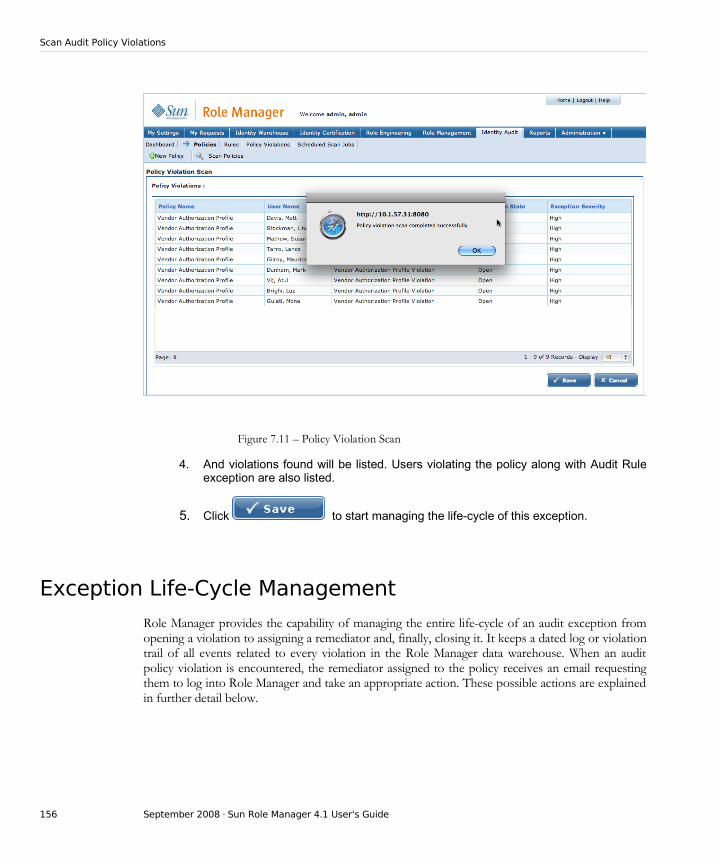
Scan Audit Policy Violations
Figure 7.11 – Policy Violation Scan
4. And violations found will be listed. Users violating the policy along with Audit Rule exception are also listed.
5. Click to start managing the life-cycle of this exception.
Exception Life-Cycle Management
Role Manager provides the capability of managing the entire life-cycle of an audit exception from opening a violation to assigning a remediator and, finally, closing it. It keeps a dated log or violation trail of all events related to every violation in the Role Manager data warehouse. When an audit policy violation is encountered, the remediator assigned to the policy receives an email requesting them to log into Role Manager and take an appropriate action. These possible actions are explained in further detail below.
156 September 2008 · Sun Role Manager 4.1 User's Guide

Exception Life-Cycle Management
▼ Steps to View Policy Lifecycle
1. Log into Role Manager Web Interface and click the Identity Audit tab.
2. Click Policy Violations to list all saved violations from your Audit scans.
Figure 7.12 – Policy Violations
3. Click an Open exception.
4. The Audit Violation lists the Policy that was violated, current state of Exception, Date of Detection, Remediator assigned to this Violation, and details of the User in violation.
5. Scroll down the screen to list Account being violated including account name and target machine.
6. Further below note the violation trail.
Chapter 7 · Identity Auditing 157

Manage Life-Cycle of Audit Violation
Manage Life-Cycle of Audit Violation
▼ Steps to Manage life-cycle of an Audit Violation
1. The options for a remediator are to assign the violation to another person, immediately close the violation or close with an accepted risk with an end date for this risk.
2. Click Close as Risk Accepted.
3. This will bring up a screen where you need to assign a future date until when this risk is acceptable.
4. Assign a mitigating control in the comments for this accepted risk.
5. Click . Your action will show up in the violation trail for auditors and management/auditors to keep track of.
Figure 7.13 – Close as Risk Accepted
6. To assign another Remediator to this violation, click Assign.
158 September 2008 · Sun Role Manager 4.1 User's Guide
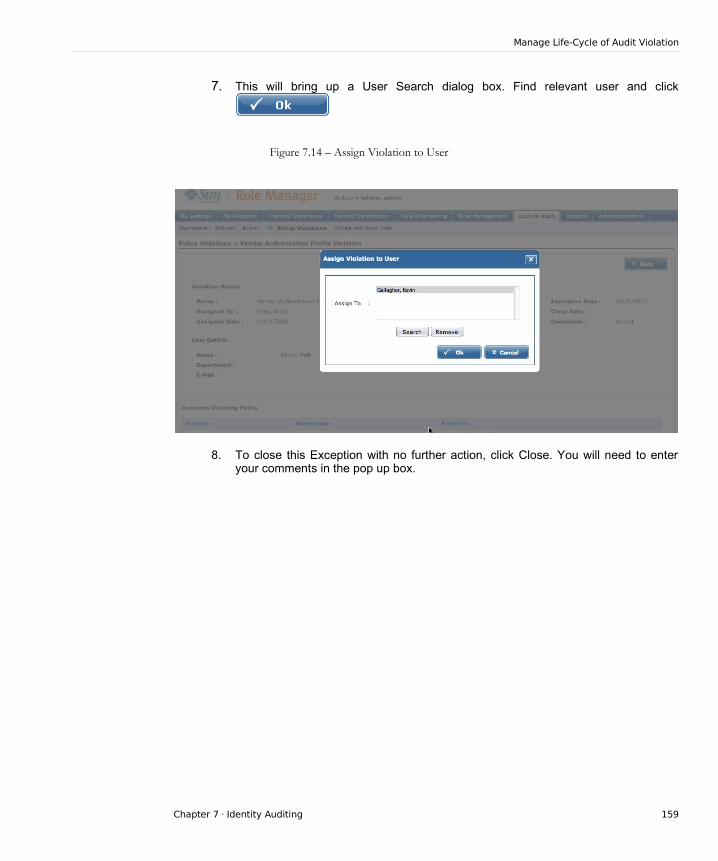
Manage Life-Cycle of Audit Violation
7. This will bring up a User Search dialog box. Find relevant user and click
Figure 7.14 – Assign Violation to User
8. To close this Exception with no further action, click Close. You will need to enter your comments in the pop up box.
Chapter 7 · Identity Auditing 159
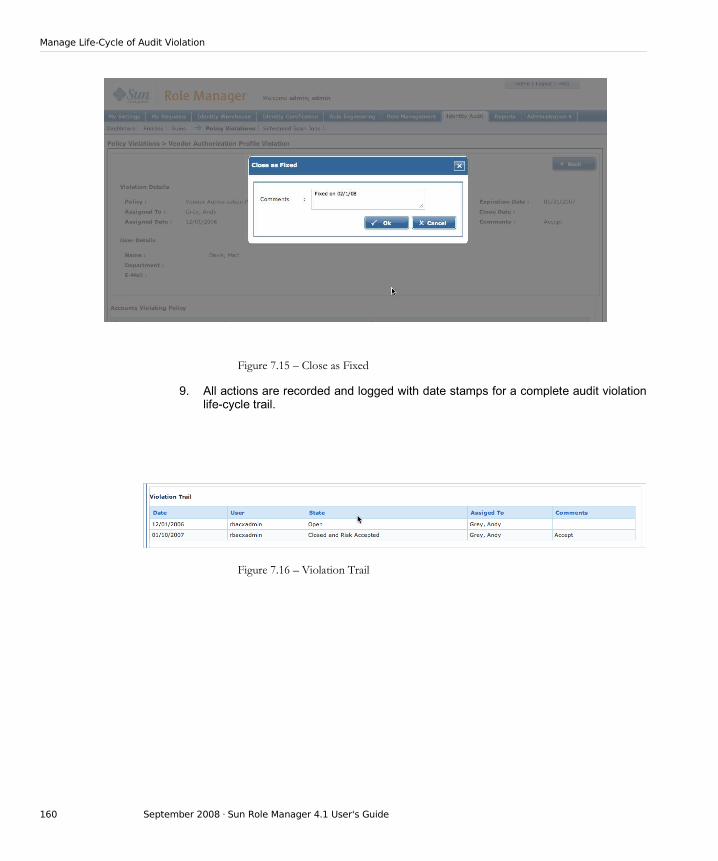
Manage Life-Cycle of Audit Violation
Figure 7.15 – Close as Fixed
9. All actions are recorded and logged with date stamps for a complete audit violation life-cycle trail.
Figure 7.16 – Violation Trail
160 September 2008 · Sun Role Manager 4.1 User's Guide
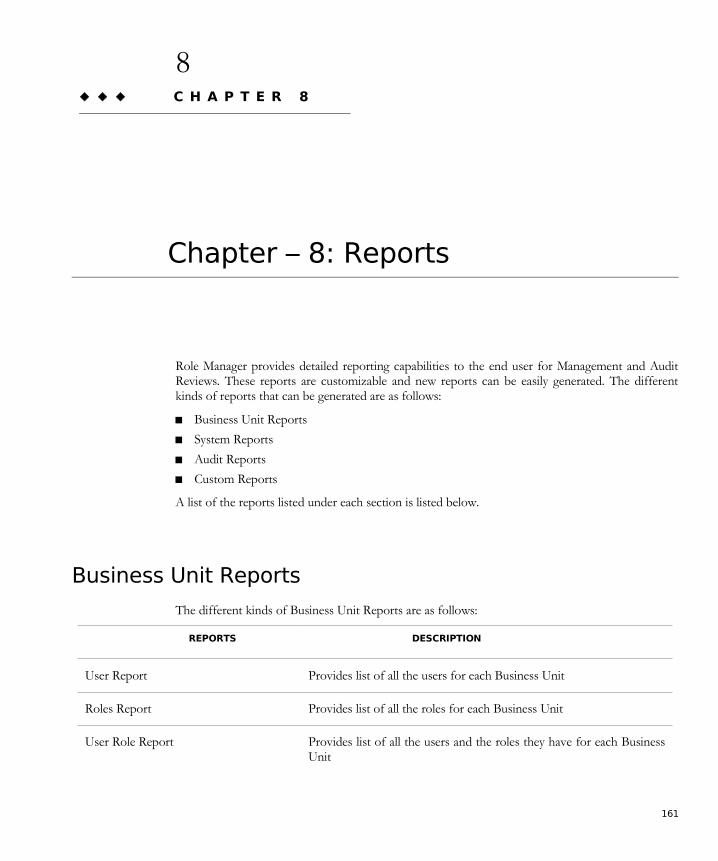
8 C H A P T E R 8
8 Chapter – 8: Reports
Role Manager provides detailed reporting capabilities to the end user for Management and Audit Reviews. These reports are customizable and new reports can be easily generated. The different kinds of reports that can be generated are as follows:
Business Unit Reports
System Reports
Audit Reports
Custom Reports
A list of the reports listed under each section is listed below.
Business Unit Reports
The different kinds of Business Unit Reports are as follows:
REPORTS DESCRIPTION
User Report Provides list of all the users for each Business Unit
Roles Report Provides list of all the roles for each Business Unit
User Role Report Provides list of all the users and the roles they have for each Business Unit
161
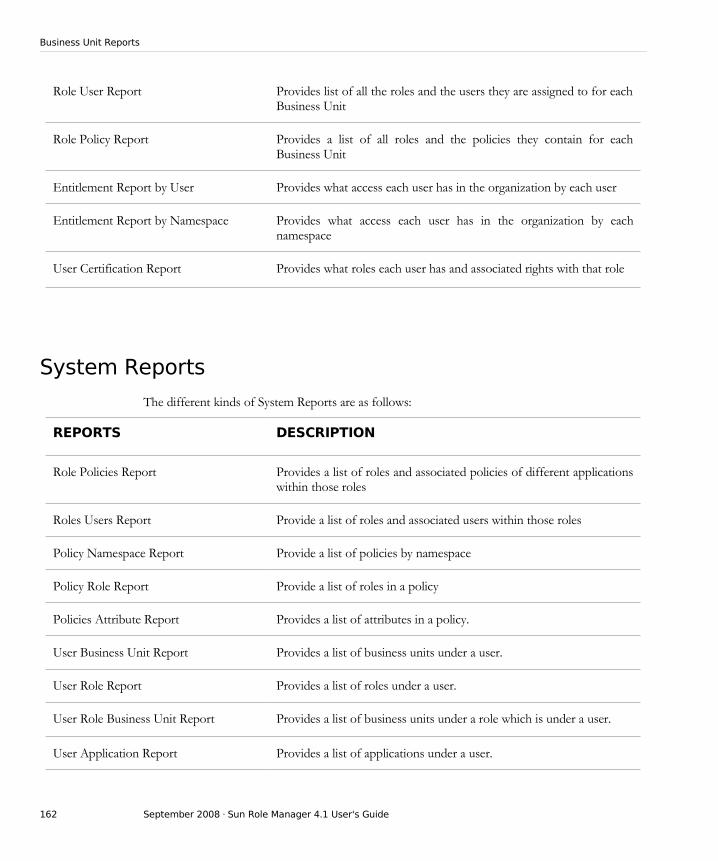
Business Unit Reports
Role User Report Provides list of all the roles and the users they are assigned to for each Business Unit
Role Policy Report Provides a list of all roles and the policies they contain for each Business Unit
Entitlement Report by User Provides what access each user has in the organization by each user
Entitlement Report by Namespace Provides what access each user has in the organization by each namespace
User Certification Report Provides what roles each user has and associated rights with that role
System Reports
The different kinds of System Reports are as follows:
REPORTS DESCRIPTION
Role Policies Report Provides a list of roles and associated policies of different applications within those roles
Roles Users Report Provide a list of roles and associated users within those roles
Policy Namespace Report Provide a list of policies by namespace
Policy Role Report Provide a list of roles in a policy
Policies Attribute Report Provides a list of attributes in a policy.
User Business Unit Report Provides a list of business units under a user.
User Role Report Provides a list of roles under a user.
User Role Business Unit Report Provides a list of business units under a role which is under a user.
User Application Report Provides a list of applications under a user.
162 September 2008 · Sun Role Manager 4.1 User's Guide

System Reports
User Account Report Provides a list of accounts under a user.
User Role based access Report Provides a list of attributes under a policy in a namespace under a user.
Operational Exception Report Reports on missing data required for correlations in Role Manager
Import Validation Report A set of reports, displaying the data which has not been imported into Role Manager from the daily scheduled dumps.
Expiration Forecast Report It contains three sub-reports. User expiration, Role expiration and User- Role association expiration. It provides a list of all the above mentioned expirations occurring within the current week.
Audit Reports
The different kinds of Audit Reports are as follows:
REPORTS DESCRIPTION
Audit Exception Report
a) ALL Open Identity Audit Exceptions
b) Latest Open Identity Audit Exceptions
Provides a list of audit related exceptions which are: Segregation of Duties, Assigned Vs Actual Rights Violation and Terminated User. Report a) lists out all the Open Exceptions Report b) Lists out all exceptions for the current day.
Custom Reports
Role Manager provides the capability to generate custom reports. Custom reports can be generated by importing .jrxml files for the reports and generating reports through Role Manager
Chapter 8 · Chapter – 8: Reports 163

Generating Reports
Generating Reports
▼ Steps to generate reports
1. Start Role Manager by clicking on the Role Manager Icon
2. The login dialog box appears. Enter your credentials and login to Role Manager
3. Select a Report Type from the Reports Menu
4. Browse and Select for example, the ‘Entitlement Report by User’ report and click Run
5. Select the Business Unit on which the Report is to be generated
6. Click to generate the report
Figure 8.1 – Generating Reports
164 September 2008 · Sun Role Manager 4.1 User's Guide

Generating Reports
Figure 8.2 – Entitlement Report by User
The Report generated can be saved in different formats by clicking on the Actions button. The report can also be downloaded in .csv or .pdf format by clicking the “Download” button.
Generating Custom Reports
▼ Steps to create custom reports
1. Start Role Manager by clicking on the Role Manager Icon
2. The login dialog box appears. Enter your credentials and login to Role Manager
3. Select the Reports Tab
4. Select the Add Custom Reports Tab
5. The Custom Reports Details page opens. Select New Custom Report Tab
Chapter 8 · Chapter – 8: Reports 165

Generating Custom Reports
Figure 8.3 – New Custom Report
6. The New Custom Report window opens up. Fill in the value for Report Name. Select Sub Report checkbox if sub reports are required. Select appropriate checkboxes for prompts that the report should require. Click browse to upload the file from which the custom report is to be generated. A file upload box opens up that allows selecting the file to generate the custom report from
166 September 2008 · Sun Role Manager 4.1 User's Guide
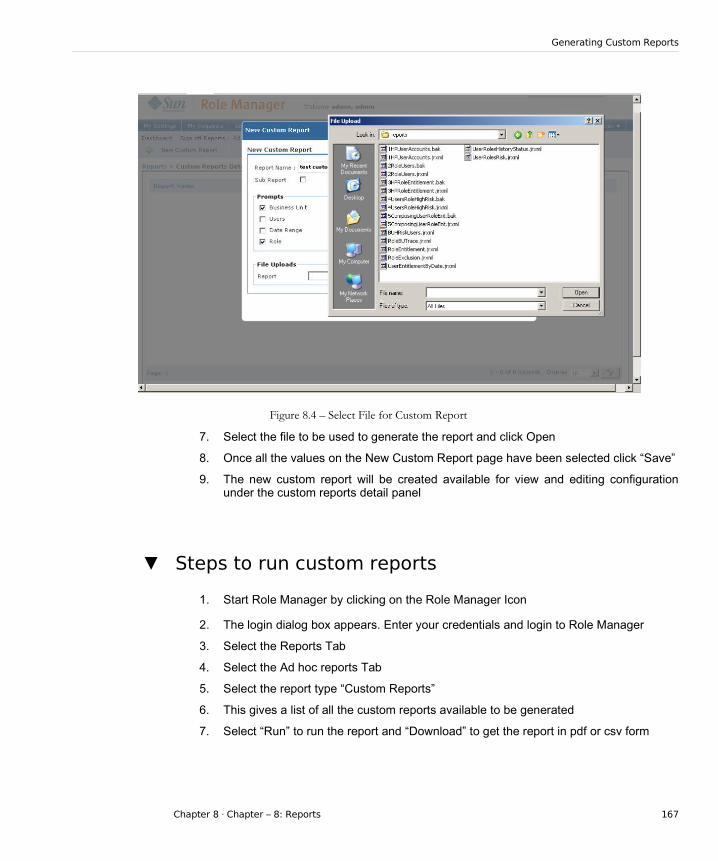
Generating Custom Reports
Figure 8.4 – Select File for Custom Report
7. Select the file to be used to generate the report and click Open
8. Once all the values on the New Custom Report page have been selected click “Save”
9. The new custom report will be created available for view and editing configuration under the custom reports detail panel
▼ Steps to run custom reports
1. Start Role Manager by clicking on the Role Manager Icon
2. The login dialog box appears. Enter your credentials and login to Role Manager
3. Select the Reports Tab
4. Select the Ad hoc reports Tab
5. Select the report type “Custom Reports”
6. This gives a list of all the custom reports available to be generated
7. Select “Run” to run the report and “Download” to get the report in pdf or csv form
Chapter 8 · Chapter – 8: Reports 167

Generating Custom Reports
▼ Steps to Sign off a Report
1. Start Role Manager by clicking on the Role Manager Icon
2. The login dialog box appears. Enter your credentials and login to Role Manager
3. Click Reports -> Sign Off Reports to display the list of Pending/Completed reports
4. Generate a Report by clicking [View Report]
5. Select the Sign Off to Sign – off on a Report By Accepting or Rejecting the Report
Figure 8.5 – Report Details
Reporting Dashboard
The reporting dashboard allows administrators to validate the number of reports that are pending, approved or rejected by data owners or managers and the number of reports that have been generated per business unit as shown below.
168 September 2008 · Sun Role Manager 4.1 User's Guide
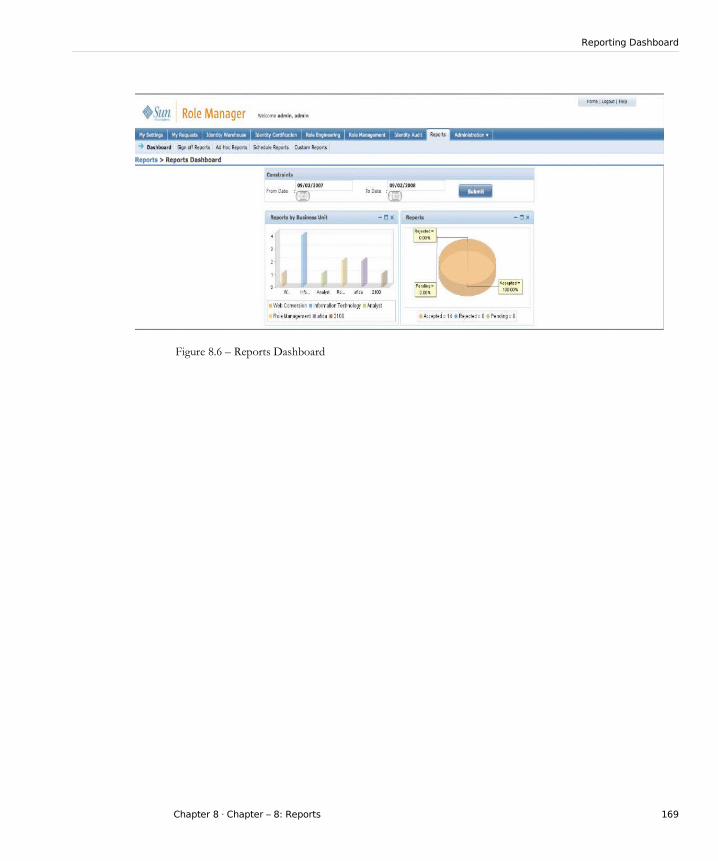
Reporting Dashboard
Figure 8.6 – Reports Dashboard
Chapter 8 · Chapter – 8: Reports 169

Appendix A
TABLE OF FIGURES
Figure Number Figure Description
Figure 2.1 Role Manager Home Screen
Figure 2.2 My Requests
Figure 2.3 My Certifications
Figure 2.4 Business Unit Users
Figure 2.5 Certify / Revoke Statistics
Figure 2.6 Identity Audit Policy Violations
Figure 2.7 My Profile
Figure 2.8 Change Password
Figure 2.9 New Proxy Assignment
Figure 2.10 Enter Proxy Details
Figure 3.1 Create User
Figure 3.2 User Quicksearch
Figure 3.3 User Advanced Search
Figure 3.4 User Advanced Search Conditions
Figure 3.5 Set Status of User
Figure 3.6 Rename User
Figure 3.7 Account Details

Figure 3.8 Account Type
Figure 3.9 Add Roles to User
Figure 3.10 Add Business Unit(s) to User
Figure 3.11 New Endpoint
Figure 3.12 Create Policy
Figure 3.13 Policy Wizard – Select Namespace
Figure 3.14 Policy Wizard – Select Directory (Endpoint)
Figure 3.15 Policy Wizard – Policy Properties
Figure 3.16 Rename Policy
Figure 3.17 Associate Policy Endpoint
Figure 3.18 Associate Policy to Role
Figure 3.19 Associate Policy Owner to Policy
Figure 3.20 Create Role Options
Figure 3.21 Create Role Manually – General Details
Figure 3.22 Create Role Manually – Select Parent Role
Figure 3.23 Create Role Manually – Created Role
Figure 3.24 Create Role Options
Figure 3.25 Create Role from Existing Role
Figure 3.26 Select Template Role from Role Search Results
Figure 3.27 Create Role using Template – Click “Save”
Figure 3.28 Create Role Options
Figure 3.29 Create Role from Global User
Figure 3.30 Select User from User Search Result
Figure 3.31 Create Role from Global User – Click “Save”
Figure 3.32 Create Role from Global User – Created Role
Figure 3.33 Role Search
Sun Role Manager 4.1 Users Guide Page 171 of 176

Figure 3.34 Role Details
Figure 3.35 Role Decommission
Figure 3.36 Role Hierarchy
Figure 3.37 Select Parent Role
Figure 3.38 Business Unit Users
Figure 3.39 Add Role to Business Unit
Figure 3.40 Add Role Owner to Role
Figure 4.1 Set Minable Attributes
Figure 4.2 New Role Mining Task
Figure 4.3 Select Users by Business Units
Figure 4.4 Selected Users View
Figure 4.5 Role Mining Parameters
Figure 4.6 Role Engineering Data Preview
Figure 4.7 Role Mining Task Successfully Running
Figure 4.8 Role Mining Task Scheduler
Figure 4.9 Role Mining Tasks View
Figure 4.10 Role Mining Tasks View
Figure 4.11 Role Mining Task Results
Figure 4.12 Role Mining Reports
Figure 4.13 Role Mining Results - Statistics
Figure 4.14 Role Mining Results – Classification Rules
Figure 4.15 Role Mining Results – Users in Roles
Figure 4.16 Role Mining Report
Figure 4.17 Role Mining Results - Roles
Figure 4.18 Role Mining Results – Users with and without Entitlements
Sun Role Manager 4.1 Users Guide Page 172 of 176
Figure 4.19 Choose Role Entitlement Discovery Strategy
Figure 4.20 Available Roles
Figure 4.21 Role Details
Figure 4.22 New Policies Saved in Policies View
Figure 4.23 Rule Discovery User Selection Strategy
Figure 4.24 User Selection
Figure 4.25 Rule Mining Criteria
Figure 4.26 Rule Discovery Result
Figure 4.27 Classification Rules
Figure 4.28 Users in Roles
Figure 4.29 Classification Rules in csv format
Figure 5.1 Role Management Workflows
Figure 5.2 Role Status
Figure 5.3 My Requests Work list
Figure 5.4 Request Details
Figure 5.5 Completed Requests
Figure 5.6 Request History Details
Figure 5.7 Role Versions
Figure 5.8 Select Versions for Comparison
Figure 5.9 Compare Versions
Figure 5.10 Revert To Version
Figure 5.11 Role History
Figure 5.12 Role History – Role Membership History
Figure 5.13 Role History – Policy History
Figure 5.14 Role History – Owner History
Sun Role Manager 4.1 Users Guide Page 173 of 176
Figure 5.15 Role History – Attribute History
Figure 5.16 Role History – Certification History
Figure 6.1 Identity Certification Dashboard
Figure 6.2 New Certification
Figure 6.3 New Certification – User Selection Strategy
Figure 6.4 New Certification – User Selection by Business Unit
Figure 6.5 New Certification – User Selection by User Search
Figure 6.6 New Certification – Period and Certifier
Figure 6.7 New Certification – Select Certifier by User Search
Figure 6.8 New Certification – Start and End Dates
Figure 6.9 New Certification – Customized Configuration
Figure 6.10 New Certification - Summary
Figure 6.11 New Certification – Run Later
Figure 6.12 New Certification – Created Certification
Figure 6.13 Certifications View
Figure 6.14 Certification Search
Figure 6.15 Certification Reports
Figure 6.16 Certification Details
Figure 6.17 Employee Verification – Reports to Another Person
Figure 6.18 Certify or Revoke Roles
Figure 6.19 Certify or Revoke Entitlements
Figure 6.20 Glossary Display in Certification
Figure 6.21 Revoke Comments
Figure 6.22 Sign-off Certification
Figure 6.23 Sing-off Authorization
Sun Role Manager 4.1 Users Guide Page 174 of 176

Figure 6.24 Select Certification
Figure 6.25 Revoke Comments
Figure 6.26 Review Role Entitlements
Figure 6.27 Sign-off Authorization
Figure 6.28 Certification Details
Figure 6.29 Review Entitlements
Figure 6.30 Sign-off Certification
Figure 6.31 Sign-off Authorization
Figure 7.1 Set Auditable Attributes
Figure 7.2 Audit Rules
Figure 7.3 Add Audit Rules
Figure 7.4 Completed Rule Creation
Figure 7.5 Create Audit Policy
Figure 7.6 Add Rules to Policy
Figure 7.7 Check Rules
Figure 7.8 Search Remediator
Figure 7.9 Scan Policy
Figure 7.10 Select Business Unit
Figure 7.11 Policy Violation Scan
Figure 7.12 Policy Violations
Figure 7.13 Close as Risk Accepted
Figure 7.14 Assign Violation to User
Figure 7.15 Close as Fixed
Figure 7.16 Violation Trail
Sun Role Manager 4.1 Users Guide Page 175 of 176

Figure 8.1 Generating Reports
Figure 8.2 Entitlement Report by User
Figure 8.3 New Custom Report
Figure 8.4 Select File for Custom Report
Figure 8.5 Report Details
Figure 8.6 Reports Dashboard
Sun Role Manager 4.1 Users Guide Page 176 of 176


![Designing a Complete Model of Role-based Access Control ......Role-Based-Access-Control (RBAC) as a key security technology was proposed [1]. Compared with DAC, RBAC determines access](https://img.pdfslide.us/doc/110x75/5f2440264e04424d445c653b/designing-a-complete-model-of-role-based-access-control-role-based-access-control.jpg)