Embed Size (px)
Citation preview

Sun Ray Software
Administration Guide for Release 5.4.x
E41121-03December 2013

Sun Ray Software: Administration Guide for Release 5.4.xCopyright © 2013, Oracle and/or its affiliates. All rights reserved.
Oracle and Java are registered trademarks of Oracle and/or its affiliates. Other names may be trademarks of their respective owners.
Intel and Intel Xeon are trademarks or registered trademarks of Intel Corporation. All SPARC trademarks are used under license and aretrademarks or registered trademarks of SPARC International, Inc. AMD, Opteron, the AMD logo, and the AMD Opteron logo are trademarks orregistered trademarks of Advanced Micro Devices. UNIX is a registered trademark of The Open Group.
This software and related documentation are provided under a license agreement containing restrictions on use and disclosure and are protectedby intellectual property laws. Except as expressly permitted in your license agreement or allowed by law, you may not use, copy, reproduce,translate, broadcast, modify, license, transmit, distribute, exhibit, perform, publish, or display any part, in any form, or by any means. Reverseengineering, disassembly, or decompilation of this software, unless required by law for interoperability, is prohibited.
The information contained herein is subject to change without notice and is not warranted to be error-free. If you find any errors, please report themto us in writing.
If this is software or related documentation that is delivered to the U.S. Government or anyone licensing it on behalf of the U.S. Government, thefollowing notice is applicable:
U.S. GOVERNMENT END USERS: Oracle programs, including any operating system, integrated software, any programs installed on the hardware,and/or documentation, delivered to U.S. Government end users are "commercial computer software" pursuant to the applicable Federal AcquisitionRegulation and agency-specific supplemental regulations. As such, use, duplication, disclosure, modification, and adaptation of the programs,including any operating system, integrated software, any programs installed on the hardware, and/or documentation, shall be subject to licenseterms and license restrictions applicable to the programs. No other rights are granted to the U.S. Government.
This software or hardware is developed for general use in a variety of information management applications. It is not developed or intended foruse in any inherently dangerous applications, including applications that may create a risk of personal injury. If you use this software or hardwarein dangerous applications, then you shall be responsible to take all appropriate fail-safe, backup, redundancy, and other measures to ensure itssafe use. Oracle Corporation and its affiliates disclaim any liability for any damages caused by use of this software or hardware in dangerousapplications.
This software or hardware and documentation may provide access to or information on content, products, and services from third parties. OracleCorporation and its affiliates are not responsible for and expressly disclaim all warranties of any kind with respect to third-party content, products,and services. Oracle Corporation and its affiliates will not be responsible for any loss, costs, or damages incurred due to your access to or use ofthird-party content, products, or services.
Oracle Virtual Desktop Client software is an included component of Oracle's Sun Ray Software and Oracle Virtual Desktop Infrastructure softwareproducts that must be separately downloaded from Oracle Software Delivery Cloud (https://edelivery.oracle.com). Use of Oracle Virtual DesktopClient is subject to the Oracle software license agreement provided with and/or applying to Sun Ray Software and Oracle Virtual DesktopInfrastructure.
Abstract
This guide describes how to install, configure, and manage Sun Ray Software 5.4.x releases.
Document generated on: 2013-12-06 (revision: 2579)

iii
Table of ContentsPreface ............................................................................................................................................ xiii1 Overview ......................................................................................................................................... 1
1.1 What is Sun Ray Computing? ............................................................................................... 11.1.1 Stateless ................................................................................................................... 11.1.2 Secure ...................................................................................................................... 11.1.3 Available .................................................................................................................... 2
1.2 Parts of the Sun Ray Environment ........................................................................................ 21.2.1 Desktop Clients ......................................................................................................... 31.2.2 Physical Network ....................................................................................................... 41.2.3 Sun Ray Server ......................................................................................................... 41.2.4 Desktop Environments ............................................................................................... 4
1.3 Management Areas .............................................................................................................. 52 Planning a Sun Ray Network Environment ....................................................................................... 7
2.1 Using a Shared Network Configuration .................................................................................. 72.1.1 Configuring a Shared Network .................................................................................... 82.1.2 VPN Capability .......................................................................................................... 82.1.3 IP MultiPathing (Oracle Solaris 10) ............................................................................. 92.1.4 IPv4 and IPv6 ............................................................................................................ 92.1.5 Network Performance Considerations ......................................................................... 9
2.2 Configuring Sun Ray Server Discovery .................................................................................. 92.2.1 Firmware Server ...................................................................................................... 102.2.2 Session Server ........................................................................................................ 112.2.3 Using Domain Name Service (DNS) ......................................................................... 11
3 Installing and Configuring ............................................................................................................... 133.1 Product Requirements ......................................................................................................... 13
3.1.1 Operating System Requirements .............................................................................. 143.1.2 Sun Ray Operating Software .................................................................................... 143.1.3 Windows Remote Desktop Support ........................................................................... 143.1.4 Feature Differences Between Oracle Solaris and Oracle Linux Platforms ..................... 153.1.5 Differences Between Oracle Solaris 10 and Oracle Solaris 11 Platforms ...................... 163.1.6 Disk Space Requirements ........................................................................................ 163.1.7 Oracle Solaris 10 Prerequisites ................................................................................. 163.1.8 Oracle Solaris 11 Prerequisites ................................................................................. 173.1.9 Oracle Linux Prerequisites ........................................................................................ 183.1.10 Java Runtime Environment (JRE) Requirements ...................................................... 213.1.11 Sun Ray Admin GUI Web Server Requirements ...................................................... 223.1.12 Sun Ray Admin GUI Web Browser Requirements .................................................... 233.1.13 Sun Ray Data Store Port Requirements .................................................................. 233.1.14 Ports and Protocols ................................................................................................ 23
3.2 Installing ............................................................................................................................. 263.2.1 Using the utsetup Command ................................................................................. 263.2.2 Not Using the utsetup Command ........................................................................... 273.2.3 Automating Sun Ray Software Installations ............................................................... 273.2.4 Installing Firmware Before Sun Ray Software Installation ........................................... 283.2.5 How to Install Sun Ray Software .............................................................................. 283.2.6 Post-Installation Configuration ................................................................................... 303.2.7 How to Install the Windows Connector Components on a Windows System ................. 323.2.8 How to Clone a Sun Ray Server .............................................................................. 353.2.9 How to Install and Configure a Sun Ray Server With Default Settings .......................... 363.2.10 How to List the Current Sun Ray Software Version .................................................. 373.2.11 How to Remove Sun Ray Software ......................................................................... 37

Sun Ray Software
iv
3.2.12 Installation (utinstall) Error Messages ...................................................................... 383.3 Configuring Oracle Solaris 11 Trusted Extensions ................................................................ 39
3.3.1 How to Configure Sun Ray Software on Oracle Solaris 11 Trusted Extensions ............. 403.4 Configuring Oracle Solaris 10 Trusted Extensions ................................................................ 42
3.4.1 How to Configure a Private Network on Oracle Solaris 10 Trusted Extensions .............. 423.4.2 How to Configure Shared Multilevel Ports (MLP) for Sun Ray Services ........................ 433.4.3 How to Increase the Number of X Server Ports ......................................................... 433.4.4 How to Configure the Windows Connector on Oracle Solaris Trusted Extensions ......... 44
3.5 Upgrading ........................................................................................................................... 463.5.1 Installing Firmware Before Sun Ray Software Upgrade .............................................. 463.5.2 How to Upgrade Sun Ray Software .......................................................................... 463.5.3 Planning Upgrades Using Failover Groups ................................................................ 503.5.4 How to Preserve Sun Ray Software Configuration Data ............................................. 50
4 Admin GUI and Commands ........................................................................................................... 534.1 Sun Ray Software Commands ............................................................................................ 53
4.1.1 How to Set Up Access to the Sun Ray Software Man Pages ...................................... 564.2 Administration Tool (Admin GUI) ......................................................................................... 56
4.2.1 Administrative Name and Password .......................................................................... 574.2.2 Admin GUI Tab Descriptions .................................................................................... 574.2.3 How to Log In to the Administration Tool (Admin GUI) ............................................... 594.2.4 How to Change the Admin GUI Locale ..................................................................... 604.2.5 How to Change the Admin GUI to English Locale ...................................................... 604.2.6 How to Change the Admin GUI Timeout ................................................................... 604.2.7 How to Enable or Disable Multiple Administration Accounts (Oracle Linux) ................... 614.2.8 How to Enable or Disable Multiple Administration Accounts (Oracle Solaris 11) ............ 624.2.9 How to Enable or Disable Multiple Administration Accounts (Oracle Solaris 10) ............ 634.2.10 How to Audit Admin GUI Sessions .......................................................................... 64
5 Sun Ray Server and Networking .................................................................................................... 655.1 Log Files ............................................................................................................................ 655.2 How to Start or Stop Sun Ray Services ............................................................................... 67
5.2.1 How to Stop Sun Ray Services ................................................................................ 675.2.2 How to Start Sun Ray Services (Warm Restart) ......................................................... 675.2.3 How to Start Sun Ray Services (Cold Restart) ........................................................... 67
5.3 How to Check and Fix Corrupted Configuration Files (Oracle Solaris 10) ................................ 685.4 How to Unconfigure a Sun Ray Server ................................................................................ 695.5 How to Disconnect a Sun Ray Server From the Interconnect ................................................ 705.6 User Fields in the Sun Ray Data Store ................................................................................ 705.7 Network Troubleshooting ..................................................................................................... 70
5.7.1 Network Load .......................................................................................................... 705.7.2 The utcapture Utility ............................................................................................. 715.7.3 utcapture Examples ............................................................................................. 715.7.4 The utquery Command .......................................................................................... 72
6 Failover Groups ............................................................................................................................. 736.1 Failover Groups Overview ................................................................................................... 736.2 Failover Process ................................................................................................................. 746.3 Load Balancing ................................................................................................................... 746.4 Mixing Different Sun Ray Servers ........................................................................................ 746.5 Authentication Requirements ............................................................................................... 756.6 Dedicated Primary Servers for Data Store ........................................................................... 756.7 Setting Up a Failover Group ................................................................................................ 75
6.7.1 How to Configure a Primary Server .......................................................................... 766.7.2 How to Add a Secondary Server .............................................................................. 766.7.3 How to Synchronize Primary and Secondary Sun Ray Servers ................................... 776.7.4 How to Change the Group Manager Signature .......................................................... 77

Sun Ray Software
v
6.8 Additional Failover Group Tasks .......................................................................................... 786.8.1 How to Take a Server Offline and Online .................................................................. 786.8.2 How to Disable Load Balancing ................................................................................ 786.8.3 How to Show the Current Sun Ray Data Store Replication Configuration ..................... 786.8.4 How to Remove the Replication Configuration ........................................................... 796.8.5 How to View the Failover Group Status ..................................................................... 79
6.9 Recovery Issues and Procedures ........................................................................................ 796.9.1 How to Rebuild the Primary Server's Administration Data Store .................................. 796.9.2 How to Replace the Primary Server with a Secondary Server ..................................... 806.9.3 Secondary Server Recovery ..................................................................................... 81
6.10 Group Manager Details ..................................................................................................... 816.10.1 Group Manager Configuration ................................................................................. 82
6.11 Load Balancing Troubleshooting ........................................................................................ 826.11.1 How Load Balancing Works .................................................................................... 826.11.2 Verifying Load Balancing Configuration ................................................................... 836.11.3 Fixing Poor Load Balancing Situations .................................................................... 85
7 Sessions and Tokens .................................................................................................................... 877.1 Sessions Overview ............................................................................................................. 87
7.1.1 Authentication Manager ............................................................................................ 887.1.2 Session Manager ..................................................................................................... 89
7.2 Managing Sessions ............................................................................................................. 907.2.1 How to Redirect a Session ....................................................................................... 907.2.2 How to Disconnect a Session ................................................................................... 917.2.3 How to Terminate a Session .................................................................................... 927.2.4 How To Identify a Hung Session .............................................................................. 927.2.5 How To Kill a Hung Session ..................................................................................... 92
7.3 Tokens ............................................................................................................................... 927.3.1 Registering Tokens .................................................................................................. 937.3.2 How to Register a Token ......................................................................................... 937.3.3 How to Register a Pseudo-Token ............................................................................. 937.3.4 How to Enable, Disable, or Delete a Token ............................................................... 94
7.4 Token Readers ................................................................................................................... 947.4.1 How to Configure a Token Reader ........................................................................... 947.4.2 How to Locate a Token Reader ................................................................................ 957.4.3 How to Get a Token ID From a Token Reader .......................................................... 95
7.5 Session Troubleshooting ..................................................................................................... 967.5.1 Problem: The dtlogin daemon cannot start the Xsun or Xnewt server properly. ......... 96
8 Smart Card Services ..................................................................................................................... 978.1 Overview ............................................................................................................................ 978.2 Smart Card Bus Protocol .................................................................................................... 988.3 Smart Card Configuration Files ........................................................................................... 988.4 Smart Card Probe Order ..................................................................................................... 988.5 Hotdesking with Smart Cards .............................................................................................. 998.6 Configuring Smart Card Services ......................................................................................... 99
8.6.1 How to Configure Primary Smart Card Readers for Hotdesking and Authentication ....... 998.6.2 How to Configure External CCID-Compliant USB Smart Card Readers forAuthentication (Oracle Solaris) ........................................................................................ 1008.6.3 How to Add a Smart Card Configuration File ........................................................... 1018.6.4 How to Change the Smart Card Probe Order .......................................................... 1018.6.5 How to Change the Smart Card Bus Protocol (Oracle Solaris) .................................. 101
8.7 Configuring Access to Smart Card Readers ....................................................................... 1028.7.1 Determining Smart Card Device Names .................................................................. 1038.7.2 Smart Card Reader Access Policy Example ............................................................ 1038.7.3 How to Add a Smart Card Reader Access Policy ..................................................... 104

Sun Ray Software
vi
8.7.4 How to Modify a Smart Card Reader Access Policy ................................................. 1058.7.5 How to List Access Policies for Smart Card Readers ............................................... 1058.7.6 How to Disable a Smart Card Reader Access Policy ................................................ 1068.7.7 How to Disable Access to a Smart Card Reader ...................................................... 106
8.8 Troubleshooting Smart Card Services ................................................................................ 1078.8.1 Smart Card Transaction Problems .......................................................................... 107
8.9 CCID IFD Handler for External USB Smart Card Readers (Oracle Solaris) ........................... 1088.9.1 How to Install CCID IFD Handler ............................................................................ 1088.9.2 How to Uninstall CCID IFD Handler ........................................................................ 1088.9.3 Known Issues ........................................................................................................ 109
9 Hotdesking .................................................................................................................................. 1119.1 Hotdesking Overview ........................................................................................................ 1119.2 Hotdesking Without Smart Cards ....................................................................................... 111
9.2.1 NSCM and Failover Groups .................................................................................... 1129.2.2 How to Enable NSCM Sessions .............................................................................. 1129.2.3 How to Log in to an NSCM Session ........................................................................ 113
9.3 Regional Hotdesking ......................................................................................................... 1149.3.1 Regional Hotdesking Process ................................................................................. 1159.3.2 Regional Hotdesking Site Requirements .................................................................. 1159.3.3 Providing Site Integration Logic ............................................................................... 1159.3.4 How to Configure a Site-specific Mapping Library .................................................... 1169.3.5 How to Use Token Readers with Regional Hotdesking ............................................. 1169.3.6 How to Configure the Sample Data Store ................................................................ 117
9.4 Remote Hotdesk Authentication (RHA) .............................................................................. 1179.4.1 How to Disable Remote Hotdesk Authentication ...................................................... 1189.4.2 How to Re-enable Remote Hotdesk Authentication .................................................. 118
10 Kiosk Mode ............................................................................................................................... 11910.1 Kiosk Overview ............................................................................................................... 11910.2 Kiosk Mode Security and Failover Considerations ............................................................. 12010.3 Kiosk User Accounts ....................................................................................................... 120
10.3.1 Characteristics ...................................................................................................... 12010.3.2 Restrictions and Safe Guards ............................................................................... 12110.3.3 Administering the Kiosk User Pool ........................................................................ 121
10.4 Session Type Components .............................................................................................. 12110.4.1 Session Descriptor ............................................................................................... 12110.4.2 Session Script ...................................................................................................... 122
10.5 How to Configure Kiosk Mode and User Accounts ............................................................ 12210.6 How to Add Kiosk User Accounts .................................................................................... 12210.7 How to Configure a Kiosk Mode Session Type ................................................................. 12310.8 How to Enable and Disable Kiosk Mode .......................................................................... 126
10.8.1 Unconfiguring Kiosk Mode Disables Kiosk Policy ................................................... 12710.9 How to Override the Default Kiosk Mode Policy ................................................................ 12810.10 Configuring the Windows Connector Kiosk Session Type ................................................ 130
10.10.1 How to Configure a Kiosk Mode Session Type for the Windows Connector ............. 13110.11 Configuring the VMware View Connector Kiosk Session Type ......................................... 132
11 Client-Server Security ................................................................................................................ 13311.1 Client-Server Security Overview ....................................................................................... 13311.2 Encryption and Authentication .......................................................................................... 134
11.2.1 Security Modes .................................................................................................... 13411.2.2 How to Force Encryption ...................................................................................... 13511.2.3 How to Force Server Authentication ...................................................................... 13511.2.4 How to Disable Client Authentication ..................................................................... 13611.2.5 How to Force Client Authentication From All Clients ............................................... 136
11.3 Managing Client Keys ..................................................................................................... 137

Sun Ray Software
vii
11.3.1 Key Fingerprint ..................................................................................................... 13811.3.2 How to Deny Access to Clients With Unconfirmed Keys ......................................... 13811.3.3 How to Confirm a Specific Client Key .................................................................... 13911.3.4 How to Confirm All Unconfirmed Client Keys ......................................................... 13911.3.5 How to Display a Client's Fingerprint Key from a Sun Ray Client ............................. 14011.3.6 How to Display All Client Keys .............................................................................. 14011.3.7 How to Display All Keys for a Specific Client ......................................................... 14011.3.8 How to Delete a Specific Client Key ...................................................................... 14111.3.9 How to Delete All Client Keys for a Specific Client ................................................. 141
11.4 Displaying Security Status ............................................................................................... 14111.4.1 How to Display Security Status for a Sun Ray Client .............................................. 14111.4.2 How to Display Security Status for All Sessions ..................................................... 141
11.5 Authentication Troubleshooting ........................................................................................ 14211.5.1 Error Messages .................................................................................................... 142
12 Multiple Monitor Configurations ................................................................................................... 14512.1 Multi-Monitor ................................................................................................................... 145
12.1.1 How to Set a Sun Ray Client's Multi-Monitor Configuration With Optimal Settings ..... 14612.1.2 How to Set a Sun Ray Client's Multi-Monitor Configuration With CustomizedSettings .......................................................................................................................... 146
12.2 Multihead Groups ............................................................................................................ 14812.2.1 Creating a Multihead Group .................................................................................. 14812.2.2 Multihead Group Screen Indicator ......................................................................... 14912.2.3 Creating a Single Screen Across Several Monitors (Xinerama) ................................ 14912.2.4 How to Create a New Multihead Group ................................................................. 14912.2.5 How to Enable the Multihead Group Policy ............................................................ 15012.2.6 How to Manually Set Multihead Group Screen Dimensions ..................................... 15112.2.7 How to Manually Set Multihead Group Geometry ................................................... 15112.2.8 How to Disable Multihead Group for a Session ...................................................... 15212.2.9 How to Enable and Disable Xinerama ................................................................... 15212.2.10 How to Disconnect a Secondary Client ................................................................ 153
13 Desktop Clients ......................................................................................................................... 15513.1 Managing Desktop Clients ............................................................................................... 156
13.1.1 Client ID Differences Between Oracle Virtual Desktop Clients and Sun Ray Clients ... 15613.1.2 Dynamic Session Resizing .................................................................................... 15713.1.3 How to List Available Sun Ray Servers ................................................................. 16013.1.4 How to List the Available Clients ........................................................................... 16013.1.5 How to Display Sun Ray Client Information ............................................................ 16013.1.6 How to Configure a Client's Location and Information ............................................. 16113.1.7 Audio Output Troubleshooting (Oracle Solaris 10 and Oracle Linux 5) ..................... 16113.1.8 Audio Output Troubleshooting (Oracle Solaris 11 and Oracle Linux 6) ..................... 164
13.2 Sun Ray Clients .............................................................................................................. 16513.2.1 How to Centralize Sun Ray Client Configurations (.parms) ...................................... 16513.2.2 Sun Ray Client Hot Keys ...................................................................................... 16813.2.3 How to Change Sun Ray Client Audio and Display Settings (Sun Ray SettingsGUI) ............................................................................................................................... 17113.2.4 How to Modify Screen Resolutions ........................................................................ 17213.2.5 How to Power Cycle a Sun Ray Client .................................................................. 17313.2.6 How to Enable or Disable XRender ....................................................................... 17313.2.7 How to Configure Screen Rotation ........................................................................ 17413.2.8 How to Disable Screen Blanking on a Sun Ray Client ............................................ 17413.2.9 How to Enable the NumLock Key for All Sun Ray Sessions .................................... 17613.2.10 Keyboard Country Codes .................................................................................... 17713.2.11 Sun Ray Client Boot Process .............................................................................. 178
13.3 Oracle Virtual Desktop Clients ......................................................................................... 181
Sun Ray Software
viii
13.3.1 Oracle Virtual Desktop Clients Overview ................................................................ 18113.3.2 Using External Devices on the Client Computer ..................................................... 18213.3.3 How to Enable Access for Oracle Virtual Desktop Clients ....................................... 18213.3.4 How to Enable the Clipboard Service for Oracle Virtual Desktop Clients ................... 18413.3.5 Oracle Virtual Desktop Client Troubleshooting ....................................................... 184
14 Sun Ray Client Firmware ........................................................................................................... 18914.1 Firmware Overview ......................................................................................................... 18914.2 Firmware Server Discovery .............................................................................................. 19014.3 How to Update Firmware on Sun Ray Clients ................................................................... 19014.4 How to Enable and Disable the Configuration GUI on All Sun Ray Clients .......................... 19214.5 How to Modify a Sun Ray Client's Local Configuration (Configuration GUI) ......................... 193
14.5.1 Security Configuration Repository ......................................................................... 19414.5.2 Configuration GUI Menu Descriptions .................................................................... 19414.5.3 How to Load a Remote Configuration File ............................................................. 199
14.6 VPN Support .................................................................................................................. 20114.6.1 How to Configure VPN Using Cisco Hybrid Authentication ...................................... 202
14.7 IPsec .............................................................................................................................. 20214.8 802.1x Authentication ...................................................................................................... 203
14.8.1 How to Configure and Enable 802.1x Authentication on a Sun Ray Client ................ 20314.9 How to Display Firmware Versions for All Currently Connected Sun Ray Clients ................. 20514.10 How to Display the Firmware Version from a Sun Ray Client ........................................... 20514.11 How to Synchronize the Sun Ray Client Firmware .......................................................... 20514.12 How to Downgrade Firmware on a Sun Ray Client ......................................................... 20514.13 How to Disable All Sun Ray Client Firmware Updates ..................................................... 207
15 Peripherals ................................................................................................................................ 20915.1 Peripherals Overview ...................................................................................................... 20915.2 Enabling and Disabling Device Services ........................................................................... 210
15.2.1 How to Determine the Current State of Device Services ......................................... 21015.2.2 How to Enable or Disable USB Device Services .................................................... 211
15.3 Device Availability Per Session ........................................................................................ 21115.4 Accessing Serial Devices and USB Printers ..................................................................... 211
15.4.1 Device Links ........................................................................................................ 21215.4.2 Device Nodes ...................................................................................................... 21215.4.3 Device Node Ownership ....................................................................................... 21315.4.4 Hotdesking and Device Node Ownership ............................................................... 21315.4.5 Setting Up Serial Devices ..................................................................................... 21315.4.6 Setting Up USB Printers ....................................................................................... 214
15.5 Accessing USB Mass Storage Devices ............................................................................ 21615.5.1 Device Nodes and Links (Oracle Solaris) ............................................................... 21615.5.2 Device Nodes and Links (Oracle Linux) ................................................................. 21715.5.3 Mount Points ........................................................................................................ 21715.5.4 Device Ownership and Hotdesking ........................................................................ 21715.5.5 Mass Storage Devices and Idle Sessions .............................................................. 21715.5.6 Commands for Common Disk Operation (Oracle Solaris) ........................................ 21815.5.7 Commands for Common Disk Operation (Oracle Linux) .......................................... 21815.5.8 How to Unmount a Mass Storage Device From a Client ......................................... 21915.5.9 Troubleshooting Mass Storage Devices ................................................................. 219
15.6 USB Headsets ................................................................................................................ 22015.6.1 Tested USB Headsets .......................................................................................... 22015.6.2 Tested Applications .............................................................................................. 22015.6.3 Additional Notes ................................................................................................... 221
15.7 USB Device Operations Failing After Idle Timeout Limit .................................................... 22116 Troubleshooting Icons ................................................................................................................ 223
16.1 On-Screen Display (OSD) Icons ...................................................................................... 223

Sun Ray Software
ix
16.2 Server Policy Icons ......................................................................................................... 22416.3 Troubleshooting Icon Quick Reference ............................................................................. 22516.4 DHCP State Codes ......................................................................................................... 22716.5 Encryption and Authentication States ............................................................................... 22816.6 Power LEDs ................................................................................................................... 22816.7 (1) Sun Ray Client Startup Icon ....................................................................................... 22916.8 (2) Firmware Download in Progress Icon .......................................................................... 22916.9 (3) Updating Firmware Icon ............................................................................................. 23016.10 (4) Firmware Download Diagnostics Icon ........................................................................ 23016.11 (11-14) Network Status Icons ......................................................................................... 23116.12 (15) Session Refused Icon ............................................................................................ 23216.13 (16) Bus Busy Icon ....................................................................................................... 23216.14 (20) 802.1x Authentication Icon ...................................................................................... 23316.15 (21) Network Connection Verified Icon ........................................................................... 23316.16 (22) Waiting to Connect to Authentication Manager Icon .................................................. 23416.17 (23) No Ethernet Signal Icon ......................................................................................... 23516.18 (25) Redirection Icon ..................................................................................................... 23616.19 (26) Wait for Session Icon ............................................................................................. 23616.20 (27) DHCP Broadcast Failure Icon ................................................................................. 23716.21 (28) Establishing VPN Connection Icon .......................................................................... 23716.22 (29) VPN Connection Established Icon ........................................................................... 23816.23 (30) VPN Connection Error ............................................................................................ 23816.24 (31-34) Network Status Icons ......................................................................................... 23816.25 (41-44) Network Status Icons ......................................................................................... 23916.26 (46) No Access to Server Icon ....................................................................................... 24016.27 (47) No Access for Oracle Virtual Desktop Clients Icon ................................................... 24016.28 (48) No Access: Registration Required Icon ................................................................... 24016.29 (49) No Access: Key Rejected Icon ................................................................................ 24116.30 (50) No Access: Security Policy Violation Icon ................................................................ 24116.31 (51-54) Network Status Icons ......................................................................................... 24116.32 (60) Insert Card Icon ..................................................................................................... 24116.33 (61) Waiting for Primary Sun Ray Client Icon .................................................................. 24216.34 (62) Token Reader Icon ................................................................................................ 24216.35 (63) Card Error Icon ...................................................................................................... 24216.36 (64) Waiting For Access Icon ......................................................................................... 243
17 Windows Connector ................................................................................................................... 24517.1 Windows Connector Overview ......................................................................................... 24617.2 Requirements .................................................................................................................. 24817.3 Using the Windows Connector ......................................................................................... 248
17.3.1 How to Start a Windows Session .......................................................................... 24817.3.2 How to Start a Windows Session Within Java Desktop System (Oracle Solaris 10) ... 25017.3.3 How to Lock a Windows Session .......................................................................... 25117.3.4 How to Set Up Access to the uttsc Command ..................................................... 25117.3.5 How to Set Up a Desktop Shortcut to Start a Windows Session .............................. 25117.3.6 How to Separate Settings for Session Locale and Keyboard Layout ........................ 251
17.4 Audio Input ..................................................................................................................... 25217.4.1 Enabling Audio Input on Windows 7 and Windows Server 2008 R2 ......................... 252
17.5 Video Acceleration .......................................................................................................... 25217.5.1 Video Acceleration Requirements .......................................................................... 25217.5.2 Videos Accelerated ............................................................................................... 25317.5.3 Audio Accelerated ................................................................................................ 25517.5.4 Additional Notes ................................................................................................... 25517.5.5 How to Enable Video Redirection on Windows Server 2008 R2 ............................... 25717.5.6 Video Acceleration Troubleshooting ....................................................................... 257

Sun Ray Software
x
17.6 USB Device Redirection .................................................................................................. 26217.6.1 Device Access ..................................................................................................... 26317.6.2 Supported Configurations ...................................................................................... 26317.6.3 Tested USB Devices ............................................................................................ 26317.6.4 Additional Notes ................................................................................................... 26317.6.5 How to Add USB Drivers to a Virtual Machine ....................................................... 26417.6.6 USB Redirection Troubleshooting .......................................................................... 265
17.7 Hotdesking ...................................................................................................................... 26617.7.1 Hotdesking Behavior ............................................................................................. 26717.7.2 Location Awareness ............................................................................................. 267
17.8 Session Directory ............................................................................................................ 26917.9 Network Security ............................................................................................................. 269
17.9.1 Built-in RDP Network Security ............................................................................... 27017.9.2 Enhanced Network Security .................................................................................. 270
17.10 Automatic Reconnection ................................................................................................ 27217.11 Compression ................................................................................................................. 272
17.11.1 How to Disable Compression .............................................................................. 27217.12 Licensing ...................................................................................................................... 272
17.12.1 Per-user Mode Versus Per-device Mode .............................................................. 27317.13 Smart Cards ................................................................................................................. 274
17.13.1 How to Enable Smart Card Readers on a Windows System .................................. 27417.13.2 How to Set Up Smart Card Login for Windows ..................................................... 274
17.14 Multi-Monitor Support .................................................................................................... 27417.15 Dynamic Session Resizing ............................................................................................ 27517.16 Printing ......................................................................................................................... 275
17.16.1 How to Set Up Print Queues (Oracle Solaris 10) .................................................. 27617.16.2 How to Set Up Print Queues (Oracle Linux) ......................................................... 27617.16.3 How to Make Sun Ray Printers Available to a Windows Session ........................... 27717.16.4 How to Manage Printer Configurations for Users .................................................. 27817.16.5 Printers Troubleshooting ..................................................................................... 278
17.17 Accessing Serial Devices .............................................................................................. 27817.18 uttsc Error Messages ................................................................................................. 279
17.18.1 General Troubleshooting ..................................................................................... 28018 VMware View Connector ............................................................................................................ 281
18.1 VMware View Connector Overview .................................................................................. 28118.2 Requirements .................................................................................................................. 28118.3 Configuring the VMware View Environment ...................................................................... 282
18.3.1 How to Disable Secure Tunnel Connections to View Desktops ................................ 28218.3.2 How to Enable Non-SSL Connections to the View Connection Server ...................... 28218.3.3 How to Enable SSL Connections to the View Connection Server ............................. 282
18.4 Configuring the VMware View Connector Kiosk Session Type ........................................... 28318.4.1 How to Configure a Kiosk Mode Session Type for the VMware View Connector ........ 283
18.5 VMware View Connector Troubleshooting ........................................................................ 28418.5.1 Error Messages .................................................................................................... 28418.5.2 Desktop tries to open, but immediately disconnects ................................................ 285
19 Alternate Network Configurations ................................................................................................ 28719.1 Alternate Network Configurations Overview ...................................................................... 28719.2 Updating the Default /etc/hosts File Before Configuring Sun Ray Network (OracleLinux) ..................................................................................................................................... 28819.3 Using a Shared Network Configuration Without External DHCP Services ............................ 288
19.3.1 Shared Network Configuration Worksheet .............................................................. 28819.3.2 How to Configure a Sun Ray Server on a Shared Network to Provide DHCPServices ......................................................................................................................... 28919.3.3 How to List the Current Network Configuration ....................................................... 290

Sun Ray Software
xi
19.3.4 How to Delete a LAN Subnet ................................................................................ 29019.3.5 Example Shared Network Setups .......................................................................... 291
19.4 Using a Private Network Configuration ............................................................................. 29919.4.1 Private Network Configuration Worksheet .............................................................. 30019.4.2 How to Configure a Sun Ray Server in a Private Network ....................................... 30219.4.3 How to List the Current Network Configuration ....................................................... 30319.4.4 How to Print a Private Network Configuration ........................................................ 30319.4.5 How to Delete an Interface ................................................................................... 30419.4.6 Example Private Network Setup ............................................................................ 304
19.5 Sun Ray Client Initialization Requirements Using DHCP ................................................... 30619.5.1 DHCP Basics ....................................................................................................... 30719.5.2 DHCP Parameter Discovery .................................................................................. 30819.5.3 DHCP Relay Agent .............................................................................................. 30819.5.4 Simplifying DHCP Configuration of Remote Sun Ray Clients ................................... 30819.5.5 Standard DHCP Parameters ................................................................................. 31019.5.6 Vendor-specific DHCP Options ............................................................................. 31019.5.7 Encapsulated Options ........................................................................................... 312
19.6 Failover Groups .............................................................................................................. 31319.6.1 Network Topologies .............................................................................................. 31319.6.2 Setting Up IP Addressing ..................................................................................... 31519.6.3 Sun Ray Server Failover Group Worksheet ........................................................... 319
20 Performance Tuning ................................................................................................................... 32120.1 How to Gain Network Performance for Sun Ray 3 Series Clients ....................................... 32120.2 How to Improve Network Performance by Disabling CPU Binding (Oracle Solaris 11) .......... 32120.3 How to Improve Sun Ray Client Performance by Decreasing Buffering on the NetworkSwitch (Oracle Solaris) ........................................................................................................... 32120.4 Improving Sun Ray Client Start-Up Time by Disabling Spanning Tree Protocol on theNetwork Switch ....................................................................................................................... 32220.5 Applications .................................................................................................................... 32220.6 Tuning the Java Desktop System .................................................................................... 32320.7 Excessive Disk Swapping ................................................................................................ 32320.8 Screensaver Resource Consumption ............................................................................... 323
20.8.1 How to Disable Screensavers (Oracle Solaris 10) .................................................. 323A IPsec Support ............................................................................................................................. 325
A.1 Overview .......................................................................................................................... 325A.2 IKE Configuration ............................................................................................................. 325
A.2.1 remote Directive .................................................................................................... 326A.2.2 sainfo Directive ...................................................................................................... 328A.2.3 Example IKE Configuration Files ............................................................................ 328
A.3 IPsec Configuration GUI Menu .......................................................................................... 329A.4 IPsec Configuration Examples ........................................................................................... 330
A.4.1 Oracle Linux 5 Pre-Shared Key .............................................................................. 330A.4.2 Oracle Linux 5 Certificates ..................................................................................... 331A.4.3 Oracle Linux 6 Pre-Shared Key .............................................................................. 332A.4.4 Oracle Linux 6 Certificates ..................................................................................... 333A.4.5 Oracle Solaris Pre-Shared Key ............................................................................... 335A.4.6 Oracle Solaris Certificates ...................................................................................... 336A.4.7 Sun Ray Client Configuration ................................................................................. 338A.4.8 IPsec Verification ................................................................................................... 338
B Admin GUI Help .......................................................................................................................... 339B.1 Servers Tab ..................................................................................................................... 339
B.1.1 Server Details ........................................................................................................ 340B.2 Sessions Tab ................................................................................................................... 341B.3 Desktop Units Tab ............................................................................................................ 343

Sun Ray Software
xii
B.3.1 Desktop Units Properties ........................................................................................ 344B.4 Tokens Tab ...................................................................................................................... 345
B.4.1 Token Properties ................................................................................................... 347B.5 Advanced Tab .................................................................................................................. 348
B.5.1 Security ................................................................................................................. 348B.5.2 System Policy ........................................................................................................ 349B.5.3 Kiosk Mode ........................................................................................................... 351B.5.4 Card Probe Order .................................................................................................. 352B.5.5 Data Store Password ............................................................................................. 352
B.6 Log Files Tab ................................................................................................................... 353C Third Party Licenses ................................................................................................................... 355Glossary ......................................................................................................................................... 377

xiii
PrefaceThis document provides information for the Sun Ray Software 5.4.x product.
Audience
This document is intended for users with system administration experience. It is assumed that readers arefamiliar with Web technologies and have a general understanding of Windows and UNIX platforms.
Documentation Accessibility
For information about Oracle's commitment to accessibility, visit the Oracle Accessibility Program websiteat http://www.oracle.com/pls/topic/lookup?ctx=acc&id=docacc.
Related Documents
The entire set of documentation for this product is available at:
http://www.oracle.com/technetwork/server-storage/sunrayproducts/docs
The documentation set includes the following manuals:
• Sun Ray Software Administration Guide
• Sun Ray Software Release Notes
• Sun Ray Software Security Guide
• Oracle Enterprise Manager System Monitoring Plug-in Installation Guide for Sun Ray Software
Conventions
The following text conventions are used in this document:
Convention Meaning
boldface Boldface type indicates graphical user interface elements associated withan action, or terms defined in text or the glossary.
italic Italic type indicates book titles, emphasis, or placeholder variables forwhich you supply particular values.
monospace Monospace type indicates commands within a paragraph, URLs, code inexamples, text that appears on the screen, or text that you enter.

xiv

1
Chapter 1 Overview
Table of Contents1.1 What is Sun Ray Computing? ....................................................................................................... 1
1.1.1 Stateless ........................................................................................................................... 11.1.2 Secure .............................................................................................................................. 11.1.3 Available ............................................................................................................................ 2
1.2 Parts of the Sun Ray Environment ................................................................................................ 21.2.1 Desktop Clients ................................................................................................................. 31.2.2 Physical Network ............................................................................................................... 41.2.3 Sun Ray Server ................................................................................................................. 41.2.4 Desktop Environments ....................................................................................................... 4
1.3 Management Areas ...................................................................................................................... 5
This chapter provides an overview of the Sun Ray technology and describes the major areas and featuresof the Sun Ray environment.
1.1 What is Sun Ray Computing?
Sun Ray computing is a thin client implementation that offers both desktop-like user functionality andsufficient speed and reliability for mission-critical applications. Sun Ray Software supports both hardwareand software-based clients and runs on both Oracle Linux and Oracle Solaris, including Oracle SolarisTrusted Extensions.
Other client-server models typically use combinations of remote and local operating systems, applications,memory, and storage, but the Sun Ray computing model moves all computing to a server. Instead ofrunning applications, storing data, and doing computation on a desktop device like a PC, the Sun Raymodel simply passes input and output data between clients and the Sun Ray server, where the operatingsystem and applications are located.
The following descriptions of the Sun Ray Computing attributes are based on the Sun Ray Clients,although many of the points also apply to Oracle Virtual Desktop Clients.
1.1.1 Stateless
Sun Ray Clients have no local disks, applications, or operating systems and are therefore consideredstateless. This setup is what makes them true thin clients. Stateless devices are inexpensive to maintainbecause they do not require administrators or technicians to install, upgrade, or configure software or toreplace mechanical components on the desktop.
A Sun Ray Client contains only a firmware module that performs a small set of tasks: it sends keyboardand mouse events and displays pixel data. If a desktop device contains an operating system that canexecute code at the request of a user, it has state and it is not a true thin client. This type of devicerequires updating and maintenance at the desktop rather than server level and it is susceptible to viruses.
1.1.2 Secure
Sun Ray Clients are also extremely secure. For instance, managing USB mass storage devices, that is,controlling the ability to enable or disable their use, is done at the server or group level. This ability enables

Available
2
sites with particular security or intellectual property concerns to eliminate many of the risks imposed byPCs and other fat clients, which rely on local operating systems, local applications, and local data caches.Critical data can be compromised or lost when the physical device hosting the "fat" client is stolen ordamaged.
1.1.3 Available
A Sun Ray session is a group of services controlled by a session manager and associated with a userthrough an authentication token. The sessions reside on a server rather than on the desktop. Because SunRay Clients are stateless, a session can be directed or redirected to any Sun Ray Client on the appropriatenetwork or subnetwork when a user logs in or inserts a smart card.
Although the session continues to reside on a server, the session appears to follow the user to the newclient. This functionality, called hotdesking, provides the ability of users to access their sessions from anyclient on their network. Hotdesking can be implemented with smart cards or without smart cards throughthe non-smart card session mobility (NSCM) feature.
Most large Sun Ray implementations also include one failover group of Sun Ray servers to ensureuninterrupted service whenever a server is off-line. When a failover group is configured, the Sun RaySoftware optimizes performance by spreading the computing load among the servers in the group.
1.2 Parts of the Sun Ray Environment
The Sun Ray Software is the central piece of the overall Sun Ray environment. From a high-levelperspective, a Sun Ray environment consists of three main areas: the clients, the physical network,and the Sun Ray server, where the Sun Ray Software is installed. Figure 1.1, “Parts of the Sun RayEnvironment” shows the high-level connections within a Sun Ray environment.

Desktop Clients
3
Figure 1.1 Parts of the Sun Ray Environment
The following sections provide a high-level overview of each area.
1.2.1 Desktop Clients
Currently, there are two main types of desktop clients: a Sun Ray Client and an Oracle Virtual DesktopClient.
1.2.1.1 Sun Ray Client
A Sun Ray Client is a hardware unit that can potentially exceed the full functionality of a desktop computer,but with less administrative and environmental costs. A Sun Ray Client acts as a frame buffer on the clientside of the network. Applications run on a Sun Ray server and render their output to a virtual frame buffer.The Sun Ray Software formats the rendered output and sends it to the appropriate Sun Ray Client, wherethe output is interpreted and displayed.
From the point of view of network servers, Sun Ray Clients are identical except for their Ethernet macaddress. If a Sun Ray Client ever fails, it can be easily replaced because no data resides on it. An IPaddresses is leased to each Sun Ray Client when it is connected and it can be reused when the client isdisconnected. IP address leasing is managed by DHCP.

Physical Network
4
Various models of Sun Ray Clients are available, differing primarily with respect to size, type, andsupported monitor resolution. However, all Sun Ray Clients include a smart card reader, a keyboard, and amouse.
For the smart card reader, the industry standard PC/SC-lite API is included for developers who want toencode custom applications or other information in their users' smart cards.
By default, a Sun Ray Client uses the same Oracle Solaris or Oracle Linux operating system as theassociated Sun Ray server, known as a regular Sun Ray session. However, the Windows and VMwareView connectors enable users to access a remote Windows desktop session or a VMware View session onthe client. By configuring kiosk mode, users can bypass the regular Oracle Solaris or Oracle Linux Sun Raysession altogether and be taken directly to the assigned connector session.
1.2.1.2 Oracle Virtual Desktop Client
An Oracle Virtual Desktop Client is a software version of a Sun Ray Client. The Oracle Virtual DesktopClient application runs on an ordinary computer or tablet and provides access to a Sun Ray session. It issupported and can be installed on Windows, Linux, Mac OS X, iPad, or Android. An Oracle Virtual DesktopClient supports most of the standard Sun Ray Client functionality.
1.2.2 Physical Network
As with most networked environments, the Sun Ray environment needs a well-designed network, and itcan be configured in one of several ways.
For detailed descriptions of the network configuration types and instructions on configuring each networktype, see Chapter 2, Planning a Sun Ray Network Environment.
1.2.3 Sun Ray Server
The Sun Ray server runs the Sun Ray Software and it is the foundation of the Sun Ray environment. Itprovides all the necessary administrative support for Sun Ray Clients and Oracle Virtual Desktop Clients.
The important first step is determining what operating system environment your users need, and thenyou can set up your Sun Ray environment accordingly. If your users need an Oracle Linux environment,you can install Oracle Linux on the Sun Ray servers. Vice versa for users who need an Oracle Solarisenvironment. If your users only plan to use a remote Windows desktop session, you can choose eitherOracle Linux or Oracle Solaris on the Sun Ray server, since the underlying desktop will be hidden from theusers. There are a few differences when using Oracle Linux versus the Oracle Solaris operating system forthe Sun Ray server, so take that into consideration.
When providing your users with a Windows environment, it is also important to understand how the SunRay Software features are supported on different versions of the Windows operating systems in a remotedesktop environment. Although most features are provided for all of the supported Windows platforms,there are differences in how they are implemented.
To communicate with the desktop clients, the Sun Ray server uses the Appliance Link Protocol (ALP),which is a suite of network protocols that are automatically available as part of the Sun Ray Software. TheSun Ray server also uses the standard Microsoft Remote Desktop Protocol (RDP) to access the remoteWindows desktops when used.
1.2.4 Desktop Environments
When providing access to remote Windows desktops, the Windows systems must be accessible to the SunRay server and the Sun Ray network. Then, you can configure the Windows connector or VMware Viewconnectors for users to access the remote Windows desktops, including using kiosk mode to automaticallyprovide the Windows desktop when the user logs in to the desktop client.

Management Areas
5
1.3 Management Areas
Table 1.1, “Sun Ray Software Management Areas” provides a brief introduction to all the areas in the SunRay Software that require management and administration. Every item on this list has a correspondingchapter that provides detailed information.
Table 1.1 Sun Ray Software Management Areas
Management Area Description
CLI and Admin GUI Sun Ray Software has both a command-line interface (CLI) and an Admin GUIfor administrative functions. The GUI presents a clear view of administrativefunctions, with a tab-based navigational model and context-sensitive help.
Sun Ray Server The Sun Ray server runs the Sun Ray Software and provides sessions toclients.
Failover Group A failover group consists of two or more servers that provide users with a highlevel of availability in case one server becomes unavailable.
Hotdesking Hotdesking, or session mobility, is the ability for a session to "follow" a userbetween clients. This enables the user to have instantaneous access to theuser's windowing environment and current applications from multiple clients.Hotdesking can be implemented with smart cards or without smart cardsthrough the non-smart card session mobility (NSCM) feature.
Regional hotdesking promotes hotdesking among server groups, letting usersaccess their sessions across a wider domain.
Kiosk Mode A way to provide an unlimited variety of desktops or applications to users, eventhough the actual desktop or application may be running elsewhere. Kiosk modebypasses the normal authentication methods of the platform and runs anythingthat the administrator defines. It is the primary way to provide user's access tothe Windows connector or VMware View Manager connector sessions withoutthe user ever seeing the client's default desktop.
Client-Server Security Sun Ray Software provides the ability to manage the security and authenticationpolicies between the desktop clients and the Sun Ray server.
For more information about all the security aspects of Sun Ray Software, referto Sun Ray Software Security Guide.
Multiple Monitor Configurations Sun Ray Software enables you to merge and control multiple Sun Ray Clientscreens or heads, using a single keyboard and mouse attached to a primaryclient. This functionality is important for users who need to monitor manyapplications or systems simultaneously or to accommodate a single application,such as a large spreadsheet, across multiple screens. To use multiple screens,the administrator sets up multihead groups, consisting of two or more clients.
There is also multi-monitor support to provide a single desktop for Sun RayClients with dual video connectors.
Desktop Clients A Sun Ray Client is a hardware unit that can potentially exceed the fullfunctionality of a desktop computer, but with less administrative andenvironmental costs.
An Oracle Virtual Desktop Client is a software application that runs on acommon client operating system and provides the ability to connect to a desktopsession running on a Sun Ray server, just like a physical Sun Ray Client.

Management Areas
6
Management Area Description
Sun Ray Client Firmware A small firmware module in each Sun Ray Client is managed from the SunRay server. The firmware module checks the hardware with a power-on selftest (POST) and initializes the client. Maintaining the latest firmware on SunRay Clients is an important part of administering the Sun Ray environment. Ifthe GUI mode is enabled on the firmware, the user can also modify a Sun RayClient's local configuration through a tool called the Configuration GUI.
Windows Connector Desktop clients can access a remote Windows desktop from a Windows system.Windows support on a Sun Ray Client includes video acceleration and access toUSB devices.
VMware View Connector Desktop clients can access virtual Windows desktops provided through theVMware View Manager.
Citrix XenDesktop Connector Desktop clients can access virtual Windows desktops provided through theCitrix XenDesktop Web Interface Server. The Citrix XenDesktop connectoris not provided with Sun Ray Software. You must download and install theCitrix XenDesktop connector separately. See the Sun Ray Connector for CitrixXenDesktop Administration Guide for details.

7
Chapter 2 Planning a Sun Ray Network Environment
Table of Contents2.1 Using a Shared Network Configuration .......................................................................................... 7
2.1.1 Configuring a Shared Network ............................................................................................ 82.1.2 VPN Capability .................................................................................................................. 82.1.3 IP MultiPathing (Oracle Solaris 10) ..................................................................................... 92.1.4 IPv4 and IPv6 .................................................................................................................... 92.1.5 Network Performance Considerations ................................................................................. 9
2.2 Configuring Sun Ray Server Discovery .......................................................................................... 92.2.1 Firmware Server .............................................................................................................. 102.2.2 Session Server ................................................................................................................ 112.2.3 Using Domain Name Service (DNS) ................................................................................. 11
This chapter provides detailed information about setting up the network environment to support Sun RayClients and Oracle Virtual Desktop Clients. There are many options for configuring the network to supportboth firmware provisioning and Sun Ray server discovery, but the recommended approach is a sharednetwork configuration, detailed below.
For other network configurations that are far less common and require advanced configuration of the SunRay server and network, see Chapter 19, Alternate Network Configurations.
2.1 Using a Shared Network Configuration
By supporting various network configurations, Sun Ray Clients and Oracle Virtual Desktop Clients canbe deployed virtually anywhere, subject only to a sufficient quality of network service between the clientsand the Sun Ray server. The most common and recommended configuration is a shared network, wherethe Sun Ray server and clients are part of a Local Area Network (LAN) or Wide Area Network (WAN) andwhere network services such as DHCP and DNS are already provided by existing servers. The defaultinstallation and configuration procedures in this document target this configuration.
A client subnet in a typical shared network configuration meets the following criteria:
• DHCP services are available for Sun Ray Client's IP/network configuration (Sun Ray Clients can beindividually configured for static addressing using the Configuration GUI on the Sun Ray Client).
• DNS services are available to resolve the Sun Ray servers providing firmware (sunray-config-servers) and the Sun Ray servers providing sessions (sunray-servers).
• The subnet must be able to route to the Sun Ray servers.
• Sun Ray Clients can be behind a Network Address Translation (NAT) device, such as a router or firewallthat implements NAT.
• Sun Ray servers must not be behind a NAT device, such as a router or firewall that implements NAT.
• A Sun Ray server requires both a fixed host name and a static IP address. A Sun Ray server cannot bea DHCP client.
Figure 2.1, “Shared Network Configuration Example” shows an example of using a shared network for aSun Ray environment.

Configuring a Shared Network
8
Figure 2.1 Shared Network Configuration Example
Note
Given the topology, Sun Ray traffic on shared networks is potentially exposed to aneavesdropper. Modern switched network infrastructures are far less susceptible tosnooping activity than earlier shared technologies, but to obtain additional securitythe administrator may choose to activate the client's encryption and authenticationfeatures. These capabilities are discussed in Chapter 11, Client-Server Security.
2.1.1 Configuring a Shared Network
If you use the utsetup command for the installation, you are asked to configure the Sun Ray Software tosupport a shared network with external DHCP/DNS services.
Do you want to enable LAN access for Sun Ray clients at this time?
If you accept, the utsetup command runs the utadm -L on command to configure a shared network.See Section 3.2.1, “Using the utsetup Command” for more information.
2.1.2 VPN Capability
Sun Ray Clients are able to provide a VPN solution for remote users. The IPsec capability in the Sun RayClient firmware enables the Sun Ray Client to act as a VPN endpoint device. The most commonly usedencryption, authentication, and key exchange mechanisms are supported, along with Cisco extensions thatenable a Sun Ray Client to interoperate with Cisco gateways that support the Cisco EzVPN protocol. SunRay Clients currently support IPsec VPN concentrators from Cisco and Netscreen (Juniper).

IP MultiPathing (Oracle Solaris 10)
9
For more information, see Chapter 14, Sun Ray Client Firmware.
2.1.3 IP MultiPathing (Oracle Solaris 10)
Sun Ray Software supports arbitrary IP MultiPathing, or IPMP. IPMP provides failure detection andtransparent network access failover for a system with multiple interfaces on the same IP link. IPMP canalso provide load spreading of packets for systems with multiple interfaces.
This feature can be very useful on a Sun Ray server by increasing its network availability and performance.IPMP is supported only on Sun Ray servers running Oracle Solaris 10 in a shared network configuration(LAN with fully-routed subnets).
For more information about the IPMP feature in Oracle Solaris and how to configure it, see the SystemAdministration Guide: IP Services manual.
When configuring IPMP, use the if_mpadm command to test NIC failure.
2.1.4 IPv4 and IPv6
Sun Ray Software supports both the IPv4 and IPv6 internet protocols. By default, the Sun Ray Clientsare configured for the IPv4 protocol. For the Sun Ray Clients to work with IPv6, you need to update thefirmware configuration on each client with by using the Configuration GUI or remote configuration file. SeeChapter 14, Sun Ray Client Firmware for more information.
2.1.5 Network Performance Considerations
2.1.5.1 Packet Loss
The Sun Ray Software protocol is designed to operate well in conditions where other protocols would fail.However, if you detect sustained packet loss greater than 10 percent in the network, it may indicate othernetwork problems. See Chapter 20, Performance Tuning for help.
2.1.5.2 Latency
Network latency between any Sun Ray client and its server is an important determinant of the quality ofthe user experience. The lower the latency, the better; latencies under 50 milliseconds for round trip delayare preferred. However, like familiar network protocols, the Sun Ray Client does tolerate higher latencies,but with degraded performance. Latencies up to 300 milliseconds provide usable, if somewhat sluggish,performance.
2.1.5.3 Out-of-Order Packets
Sun Ray Clients can tolerate small occurrences of out-of-order packet delivery, such as might beexperienced on an Internet or wide-area intranet connection. Current Sun Ray firmware maintains areordering queue that restores the correct order to packets when they are received out of order.
The process used to reorder packets can handle up to eight packets in a row that are out of order. Forexample, if the packets arrive as 7, 6, 5, 4, 3, 2, 1, the reorder process will hold packets 2 through 7 untilpacket 1 arrives and then it will process the packets in the correct sequence. Typically, packets do not getout of order unless they are traveling over a complex wide area network. Most out-of-order packets occurwhen packets can travel over a choice of paths, and most corporate networks provide very few redundantpaths for packets to be routed over.
2.2 Configuring Sun Ray Server DiscoveryThere are two types of services that need to be discovered and used by a client:

Firmware Server
10
• A firmware server that provides the latest firmware for a Sun Ray Client.
• A session server that provides a Sun Ray session to a client.
By default, these services are provided by the same server but they may be separated. There are manyways to configure how these servers are discovered. This section describes using pre-defined DNS entriesto enable clients to find the servers. For other discovery methods that may provide more granularity orflexibility, see Chapter 19, Alternate Network Configurations.
The on-screen display (OSD), when enabled, shows status during a client's server discoveries. Forexample, during DNS lookups, a status line in the OSD window shows the name being looked up and, ifone is found, the IP address.
2.2.1 Firmware Server
Starting with Sun Ray Software 5.3, the firmware for Sun Ray Clients (called Sun Ray Operating Software)must be downloaded and installed separately on Sun Ray servers. Any Sun Ray server providing thelatest Sun Ray Operating Software for Sun Ray Clients is considered a firmware server. For details, seeSection 3.2.4, “Installing Firmware Before Sun Ray Software Installation”.
When a Sun Ray Client boots in a properly configured environment, it checks with a firmware serverto determine if it needs a Sun Ray Operating Software update. A Sun Ray Client's firmware server isdiscovered in the following order:
1. Locally configured value (configured through Configuration GUI)
2. DHCP Sun Ray vendor option (FWSrvr)
3. Standard DHCP option 66 (TftpSrvr) (IP Address or DNS name)
4. DNS lookup of sunray-config-servers (if mapped to multiple addresses, choose one randomly)
Each of these values are attempted in order until one succeeds. Although it is the last value attempted, theDNS lookup is the recommended firmware discovery configuration, as described below.
If the local configuration value is used and fails, none of the others are attempted. This prevents theoverwriting of custom-configured firmware in a situation where the controlling firmware server happens tobe temporarily unresponsive. See Section 13.2.11, “Sun Ray Client Boot Process” for more details on howa Sun Ray Client finds its firmware server.
Once a firmware server is discovered by a Sun Ray Client, the client retrieves a parameter file (.parms)via TFTP. This file is used by the client to determine if its currently installed Sun Ray Operating Software isolder than the version on the firmware server. If so, the newer firmware is automatically downloaded andinstalled on the client.
In the event of an error in the firmware download, error messages through OSD display icons (ifenabled) provide additional information that can be useful in diagnosing and correcting the problem. SeeChapter 16, Troubleshooting Icons for details.
Note
By default, a client's firmware uses the configuration provided by the Sun Rayserver's .parms file, which provides a centralized mechanism to administerfirmware. However, you can enable the Configuration GUI on a client, whichenables users to modify a Sun Ray Client's local configuration. See Chapter 14,Sun Ray Client Firmware for details.

Session Server
11
2.2.2 Session Server
Once a client resolves whether it has the latest firmware installed, the next step in the boot process is toobtain a session from a Sun Ray server. As with discovering a firmware server, the client searches for asession server in the following order:
1. Locally configured value (configured through Configuration GUI)
2. Standard DHCP option 49 (IP Address or DNS name)
3. The servers= key in the client's .parms file
4. DNS lookup of sunray-servers (if mapped to multiple addresses, choose one randomly)
Each of these values are attempted in order until one succeeds. Although it is the last value attempted, theDNS lookup is the recommended session server discovery, as described in Section 2.2.3, “Using DomainName Service (DNS)”.
See Section 13.2.11, “Sun Ray Client Boot Process” for more details on how a Sun Ray Client finds itssession server.
2.2.3 Using Domain Name Service (DNS)
Although there are multiple ways to configure server discovery, the recommended way is through DNSentries. If the Sun Ray DNS entries are defined appropriately for the Sun Ray Clients, no extra DHCPparameters are required by the Sun Ray Client beyond the basic network information. When the defaultDNS method for server resolution is used, the TFTP transport is the only method available for Sun RayClient configuration and firmware updates.
The DNS entries for Sun Ray server discovery are as follows:
• sunray-config-servers for firmware servers
• sunray-servers for session servers
In both cases, if the DNS entry contains multiple server addresses, one is picked randomly. And, bothentries should consist of several servers in your failover group for redundancy purposes.
Note
A DNS client incorporated in a Sun Ray Client's firmware allows many valuesto be names rather than IP addresses. Most values can be either a name oran IP address. If a name is specified, the DNS lookup appends the DHCP (orConfiguration GUI) provided domain name. Components or the domain name arestripped successively until the lookup succeeds or only two components are left. Ifnone of those lookups succeed, the name is looked up by itself. If the name itselfends with a dot character ("."), the name is taken to be a rooted name, and it islooked up without domain name components appended.

12

13
Chapter 3 Installing and Configuring
Table of Contents3.1 Product Requirements ................................................................................................................. 13
3.1.1 Operating System Requirements ...................................................................................... 143.1.2 Sun Ray Operating Software ............................................................................................ 143.1.3 Windows Remote Desktop Support ................................................................................... 143.1.4 Feature Differences Between Oracle Solaris and Oracle Linux Platforms ............................. 153.1.5 Differences Between Oracle Solaris 10 and Oracle Solaris 11 Platforms .............................. 163.1.6 Disk Space Requirements ................................................................................................ 163.1.7 Oracle Solaris 10 Prerequisites ......................................................................................... 163.1.8 Oracle Solaris 11 Prerequisites ......................................................................................... 173.1.9 Oracle Linux Prerequisites ................................................................................................ 183.1.10 Java Runtime Environment (JRE) Requirements .............................................................. 213.1.11 Sun Ray Admin GUI Web Server Requirements .............................................................. 223.1.12 Sun Ray Admin GUI Web Browser Requirements ............................................................ 233.1.13 Sun Ray Data Store Port Requirements .......................................................................... 233.1.14 Ports and Protocols ........................................................................................................ 23
3.2 Installing ..................................................................................................................................... 263.2.1 Using the utsetup Command ......................................................................................... 263.2.2 Not Using the utsetup Command ................................................................................... 273.2.3 Automating Sun Ray Software Installations ....................................................................... 273.2.4 Installing Firmware Before Sun Ray Software Installation ................................................... 283.2.5 How to Install Sun Ray Software ...................................................................................... 283.2.6 Post-Installation Configuration ........................................................................................... 303.2.7 How to Install the Windows Connector Components on a Windows System ......................... 323.2.8 How to Clone a Sun Ray Server ...................................................................................... 353.2.9 How to Install and Configure a Sun Ray Server With Default Settings ................................. 363.2.10 How to List the Current Sun Ray Software Version .......................................................... 373.2.11 How to Remove Sun Ray Software ................................................................................. 373.2.12 Installation (utinstall) Error Messages .............................................................................. 38
3.3 Configuring Oracle Solaris 11 Trusted Extensions ........................................................................ 393.3.1 How to Configure Sun Ray Software on Oracle Solaris 11 Trusted Extensions ..................... 40
3.4 Configuring Oracle Solaris 10 Trusted Extensions ........................................................................ 423.4.1 How to Configure a Private Network on Oracle Solaris 10 Trusted Extensions ..................... 423.4.2 How to Configure Shared Multilevel Ports (MLP) for Sun Ray Services ............................... 433.4.3 How to Increase the Number of X Server Ports ................................................................. 433.4.4 How to Configure the Windows Connector on Oracle Solaris Trusted Extensions ................. 44
3.5 Upgrading ................................................................................................................................... 463.5.1 Installing Firmware Before Sun Ray Software Upgrade ...................................................... 463.5.2 How to Upgrade Sun Ray Software .................................................................................. 463.5.3 Planning Upgrades Using Failover Groups ........................................................................ 503.5.4 How to Preserve Sun Ray Software Configuration Data ..................................................... 50
This chapter provides an overview of installing and configuring Sun Ray Software on a system, whichmakes it a Sun Ray server.
3.1 Product Requirements
This section provides the product requirements for the Sun Ray Software 5.4.x releases.

Operating System Requirements
14
3.1.1 Operating System Requirements
Table 3.1, “Supported Sun Ray Software Operating Systems” lists the supported Sun Ray Softwareoperating systems.
Table 3.1 Supported Sun Ray Software Operating Systems
Operating System Supported Releases
Oracle Solaris 10 on SPARC andx86 platforms
• Oracle Solaris 10 8/11 or later
• Oracle Solaris 10 8/11 or later with Trusted Extensions
Oracle Solaris 11 on SPARC andx86 platforms
• Oracle Solaris 11.1 or later
• Oracle Solaris 11.1 or later with Trusted Extensions
Oracle Linux on x86 platform (64-bit)
• Oracle Linux 5 Update 8 (5.8)
• Oracle Linux 6 Update 3 (6.3)
• Oracle Linux 6 Update 4 (6.4)
Sun Ray Software is supported and can be installed in an Oracle virtualized environment. If you encountera problem when using an unsupported virtualization environment, you may be asked to demonstratethe issue on a non-virtualized operating system to ensure the problem is not related to the virtualizationproduct.
Both Oracle Solaris and Oracle Solaris with Trusted Extensions can use zones to permit multiplevirtualized operating system environments to coexist in a single instance of Oracle Solaris, allowingprocesses to run in isolation from other activity on the system for added security and control. Sun RaySoftware is supported only in the global zone.
Note
Oracle products certified on Oracle Linux are also certified and supported on RedHat Enterprise Linux due to implicit compatibility between both distributions. Oracledoes not run any additional testing on Red Hat Enterprise Linux products.
To prepare the servers before installing the Sun Ray Software, see Section 3.1.7, “Oracle Solaris10 Prerequisites”, Section 3.1.8, “Oracle Solaris 11 Prerequisites”, and Section 3.1.9, “Oracle LinuxPrerequisites”.
3.1.2 Sun Ray Operating Software
To benefit from all the latest Sun Ray Software features and to gain the best user experience, make sureto always install the latest Sun Ray Operating Software on your Sun Ray Clients. Refer to the Sun RayOperating Software Documentation for details.
See Section 3.2.4, “Installing Firmware Before Sun Ray Software Installation” for details on how to installthe Sun Ray Operating Software on Sun Ray Clients.
3.1.3 Windows Remote Desktop Support
The following Windows remote desktops are supported with Sun Ray Software:
• Windows XP Professional with SP2 (64-bit)
• Windows XP Professional with SP3 (32-bit)

Feature Differences Between Oracle Solaris and Oracle Linux Platforms
15
• Windows Server 2003 R2 SP2 Enterprise Edition (32-bit and 64-bit)
• Windows 7 SP1 Enterprise Edition (32-bit and 64-bit)
Sun Ray Software is tested on and supports Windows 7 SP1 Enterprise Edition. Windows 7Professional, Ultimate, or other Enterprise editions can be used, but in the event of an issue, you mustbe able to reproduce the issue in Windows 7 SP1 Enterprise Edition.
Multiple monitor and audio recording (input audio) are only available in Windows 7 Ultimate andEnterprise editions. Windows 7 Professional does support a single desktop spanned across multiplemonitors (spanned mode).
• Windows Server 2008 R2 SP1 Enterprise Edition (64-bit)
• Windows 8 Enterprise Edition (32-bit and 64-bit)
Sun Ray Software is tested on and supports Windows 8 Enterprise Edition. Windows 8 Professional canbe used, but in the event of an issue, you must be able to reproduce the issue in Windows 8 EnterpriseEdition.
• Windows Server 2012 (64-bit)
Table 3.2, “Supported Features for Windows Remote Desktops” shows what features are supported foreach Windows remote desktop. Some Windows releases require a Windows connector component tobe installed for specific feature support. For detailed information, see Section 3.2.7, “How to Install theWindows Connector Components on a Windows System”.
Table 3.2 Supported Features for Windows Remote Desktops
WindowsXP SP2 (64-bit)
WindowsXP SP3(32-bit)
WindowsServer2003 R2SP2 (32-bit/64-bit)
Windows7 SP1 (32-bit/64-bit)
WindowsServer2008 R2SP1 (64-bit)
Windows 8(32-bit/64-bit)
WindowsServer2012 (64-bit)
Video Acceleration ✓ ✓ ✓ ✓ ✓USB Redirection ✓ ✓ ✓ ✓ ✓ ✓ ✓Audio Input ✓ ✓ ✓ ✓ ✓ ✓ ✓Enhanced NetworkSecurity
✓ ✓ ✓ ✓ ✓ ✓ ✓
Session Directory/Session Broker
n/a n/a ✓ n/a ✓ n/a ✓
Smart Card Services ✓ ✓ ✓ ✓ ✓
Note
Video acceleration support is dependent on the Windows desktop version,the application being used, and the client used to connect to the desktop. SeeSection 17.5, “Video Acceleration” for details.
3.1.4 Feature Differences Between Oracle Solaris and Oracle Linux Platforms
The following Sun Ray Software features are not supported on a Sun Ray server running the Oracle Linuxplatform.

Differences Between Oracle Solaris 10 and Oracle Solaris 11 Platforms
16
• Using mass storage devices without the USB redirection Windows component provides much lowerperformance on Oracle Linux than Oracle Solaris due to the design of the Oracle Linux mass storagesubsystem. Use USB redirection for optimum performance with mass storage devices.
• Predefined kiosk session types are not available, which provide a desktop, a window manager, andthe ability to configure a set of applications. Sun Java Desktop (JDS), Release 3, is an example of apredefined session type provided for Oracle Solaris 10. See Section 10.1, “Kiosk Overview” for moreinformation.
• The CCID IFD handler, which provides access to external CCID-compliant USB smart card readersconnected to desktop clients, is not supported on Sun Ray servers running Oracle Linux.
• The scbus v1 smart card protocol is not supported on Sun Ray servers running Oracle Linux.
• Smart card reader device access management is not supported on Sun Ray servers running OracleLinux.
• When hotdesking without smart cards, the Options menu in the NSCM login screen is not available forOracle Linux. This includes both the QuickLogin and Exit options. See Section 9.2.3, “How to Log in toan NSCM Session” for details.
3.1.5 Differences Between Oracle Solaris 10 and Oracle Solaris 11 Platforms
The following list describes the differences between a Sun Ray server running the Oracle Solaris 10 andOracle Solaris 11 platforms.
• Predefined kiosk session types are available only for Oracle Solaris 10. There are no predefined kiosksession types for Oracle Solaris 11.
• IP MultiPathing (IPMP) is supported only on Sun Ray servers running Oracle Solaris 10 in a sharednetwork configuration (LAN with fully-routed subnets).
3.1.6 Disk Space Requirements
Table 3.3, “Disk Space Requirements ” lists the disk space requirements for specific directories.
Table 3.3 Disk Space Requirements
Default Installation Path Requirements
/ 1 Mbyte
/etc/opt/SUNWut/srds 0.1 Mbytes
/opt 70 Mbytes
/opt/SUNWut/srds 4.6 Mbytes
/var/adm/log (Oracle Solaris) 5 Mbytes
/var/log (Oracle Linux) 2.5 Mbytes
/var/opt/SUNWut Allow enough disk space for the data store and log files.
For 1,000 entries, allocate roughly 1.5 Mbytes of disk space,64 Mbytes of RAM, and 528 Mbytes of swap space.
/var/tmp 5 Mbytes
3.1.7 Oracle Solaris 10 Prerequisites
This section describes the prerequisites when using Oracle Solaris 10 for a Sun Ray server:

Oracle Solaris 11 Prerequisites
17
• The Entire Distribution software cluster is required and must be installed.
• The latest Recommended Patchset must be installed prior to the Sun Ray Software installation, whichyou can download from My Oracle Support.
• The Common Desktop Environment (CDE) might not be available in a future Oracle Solaris 10 release.Users should migrate to the Java Desktop System. CDE will not be supported on future versions of SunRay Software when CDE is officially removed from the Oracle Solaris 10 release.
• To increase the performance of the Sun Ray Clients, make the following configuration update:
1. Add the following line to the Sun Ray server's /etc/system file.
set hires_tick=1
For more information about this setting, see Section 20.3, “How to Improve Sun Ray ClientPerformance by Decreasing Buffering on the Network Switch (Oracle Solaris)”.
2. Reboot the Sun Ray server.
3.1.8 Oracle Solaris 11 Prerequisites
This section describes the prerequisites when using Oracle Solaris 11 for a Sun Ray server:
• The default Oracle Solaris 11 packages, which are provided through the solaris package publisher,are required for Sun Ray Software and must be installed on the Sun Ray server.
• The latest Oracle Solaris 11 Support Repository Update must be installed on the Sun Ray server.
• Additional packages are required, which you can install using the utpkgcheck command provided inthe Sun Ray Software media pack.
The utpkgcheck command uses the Oracle Solaris 11 Image Packaging System (IPS) to install theadditional packages. The utpkgcheck command uses the repository URI that is configured for thesolaris package publisher.
Use the following command to install the additional packages on an Oracle Solaris 11 server:
# utpkgcheck -i
• To increase the performance of the Sun Ray Clients, make the following configuration updates:
1. Add the following line to the Sun Ray server's /etc/system file.
set hires_tick=1
For more information about this setting, see Section 20.3, “How to Improve Sun Ray ClientPerformance by Decreasing Buffering on the Network Switch (Oracle Solaris)”.
2. Add the following line to the Sun Ray server's /etc/system file.
set mac:mac_cpu_binding_on=0
For more information about this setting, see Section 20.2, “How to Improve Network Performance byDisabling CPU Binding (Oracle Solaris 11)”.

Oracle Linux Prerequisites
18
3. Reboot the Sun Ray server.
• To provide desktop client users an optimized desktop, enable the multi-user desktop service on the SunRay server:
# svcadm enable application/gconf/multi-user-desktop
See Optimizing the Oracle Solaris 11 Desktop for a Multi-User Environment for more details.
• To optimize the shared memory used by PulseAudio, add the following line to the /etc/pulse/client.conf file on the Sun Ray server:
shm-size-bytes = 131072
See Section 13.1.8, “Audio Output Troubleshooting (Oracle Solaris 11 and Oracle Linux 6)” for detailsabout PulseAudio.
3.1.9 Oracle Linux Prerequisites
This section describes the prerequisites when using Oracle Linux for a Sun Ray server:
• For Oracle Linux 5, the default package set is required for Sun Ray Software and must be installed onthe Sun Ray server.
• For Oracle Linux 6, the Desktop package set is required for Sun Ray Software and must be installed onthe Sun Ray server.
• Additional packages are required, which you can install using the utpkgcheck command providedin the Sun Ray Software media pack. See Section 3.1.9.1, “How to Install Required Packages Usingutpkgcheck” for details.
• The firewall and SELinux services must be disabled.
For Oracle Linux 6, you must disable these services after installing the operating system. To disablefirewall services, use the Firewall Configuration dialog (System > Administration > Firewall). To disableSELinux services, edit the /etc/selinux/config file as follows and restart the server:
SELINUX=disabled
• For Oracle Linux 6, optimize the shared memory used by PulseAudio. Add the following line to the /etc/pulse/client.conf file on the Sun Ray server:
shm-size-bytes = 131072
See Section 13.1.8, “Audio Output Troubleshooting (Oracle Solaris 11 and Oracle Linux 6)” for detailsabout PulseAudio.
3.1.9.1 How to Install Required Packages Using utpkgcheck
The utpkgcheck command uses the yum command to retrieve and install the required packages for SunRay Software, which relies on the server being configured with Oracle Unbreakable Linux Network (ULN)or the Oracle Public Yum Server. For servers running Oracle 6, you must also configure yum to includethe multiseat GDM repository, which is an enhanced version of GDM that supports multi-seat capabilityrequired in Sun Ray environments.

Oracle Linux Prerequisites
19
If the server does not have the ULN or Public Yum Server configured, utpkgcheck will try to install thenecessary packages from the automounted Oracle Linux DVD if available. This option is useful only forservers running Oracle Linux 5, because the multiseat GDM channel is not required.
Use the following steps to install the required packages:
1. Make sure yum is configured properly on the server, as described in Section 3.1.9.2, “ConfiguringULN Channels for utpkgcheck” and Section 3.1.9.3, “Configuring Public Yum Repositories forutpkgcheck”.
Note
Make sure to unsubscribe from the specified *_latest ULN channels or disablethe specified *_latest yum repositories as instructed. Otherwise, the server willupdate to a later version of Oracle Linux that is not supported by this versionof Sun Ray Software. If there are any Oracle Linux bugs affecting Sun RaySoftware that have been fixed through an Oracle Linux patch, you must useULN to get those fixes.
2. Install the required packages on the Oracle Linux server:
# utpkgcheck -i
In some instances, you must reboot the system if the following warning message is displayed:
WARNING: System must be rebooted in order to complete installation.
3. Update the server with the latest package versions.
# yum update
4. Reboot the system.
# reboot
5. (Oracle Linux 6 only). To enable root login to GDM, comment out or remove the following line from the/etc/pam.d/gdm file.
auth required pam_succeed_if.so user != root quiet
The multiseat GDM repository disables root login by default.
3.1.9.2 Configuring ULN Channels for utpkgcheck
Before running utpkgcheck, make sure the server is subscribed to the required channels on ULN. Forinformation about ULN, see the Oracle Linux Unbreakable Linux Network User's Guide.
After you have enabled and disabled repositories, use the yum clean all command to clear theyum cache, and then use the yum repolist command to check that you have enabled the correctrepositories.
ULN Channel Subscriptions for Oracle Linux 6 Platforms
• Unsubscribe from the following channels:

Oracle Linux Prerequisites
20
Channel Label Channel Name
ol6_x86_64_latest Oracle Linux 6 Latest (x86_64)
ol6_x86_64_UEK_latest Latest Unbreakable Enterprise Kernel for Oracle Linux 6 (x86_64)
• For Oracle Linux 6 Update 3 (6.3) platforms, subscribe to the following channels:
Channel Label Channel Name
ol6_u3_x86_64_patch Oracle Linux 6 Update 3 Patch (x86_64)
ol6_u3_x86_64_base Oracle Linux 6 Update 3 installation media copy (x86_64)
ol6_x86_64_UEK_base Unbreakable Enterprise Kernel for Oracle Linux 6 (x86_64)
ol6_x86_64_gdm_multiseat Oracle Linux 6 GDM Multiseat
• For Oracle Linux 6 Update 4 (6.4) platforms, subscribe to the following channels:
Channel Label Channel Name
ol6_u4_x86_64_patch Oracle Linux 6 Update 4 Patch (x86_64)
ol6_u4_x86_64_base Oracle Linux 6 Update 4 installation media copy (x86_64)
ol6_x86_64_UEK_base Unbreakable Enterprise Kernel for Oracle Linux 6 (x86_64)
ol6_x86_64_gdm_multiseat Oracle Linux 6 GDM Multiseat
ULN Channel Subscriptions for Oracle Linux 5 Platforms
• Unsubscribe from the following channels:
Channel Label Channel Name
el5_x86_64_latest Enterprise Linux 5 Latest (x86_64)
ol5_x86_64_latest Oracle Linux 5 Latest (x86_64)
ol5_x86_64_UEK_latest Latest Unbreakable Enterprise Kernel for Oracle Linux 5 (x86_64)
• Subscribe to the following channels:
Channel Label Channel Name
ol5_u8_x86_64_patch Oracle Linux 5 Update 8 Patch (x86_64)
ol5_u8_x86_64_base Oracle Linux 5 Update 8 installation media copy (x86_64)
ol5_x86_64_UEK_base Unbreakable Enterprise Kernel for Oracle Linux 5 (x86_64)
3.1.9.3 Configuring Public Yum Repositories for utpkgcheck
Before running utpkgcheck, make sure the server has the appropriate repositories configured for thePublic Yum Server. For information about the Public Yum Server, see http://public-yum.oracle.com. ForOracle Linux 6, see the Oracle Linux Administrator's Solutions Guide for Release 6.
Note
For Oracle Linux 6 platforms, you must download the latest yum configurationfile (http://public-yum.oracle.com/public-yum-ol6.repo) and copy it to the /etc/yum.repos.d directory on the server. The latest yum configuration file containsentries for the required Oracle Linux 6 GDM Multiseat repository.

Java Runtime Environment (JRE) Requirements
21
After you have enabled and disabled repositories, use the yum clean all command to clear theyum cache, and then use the yum repolist command to check that you have enabled the correctrepositories.
Repository Configuration for Oracle Linux 6 Platforms
• Disable the following repositories:
Repository Name
[ol6_latest] Oracle Linux 6 Latest (x86_64)
[ol6_UEK_latest] Latest Unbreakable Enterprise Kernel for Oracle Linux 6 (x86_64)
• For Oracle Linux 6 Update 3 (6.3) platforms, enable the following repositories:
Repository Name
[ol6_u3_base] Oracle Linux 6 Update 3 installation media copy (x86_64)
[ol6_UEK_base] Unbreakable Enterprise Kernel for Oracle Linux 6 (x86_64)
[ol6_gdm_multiseat] Oracle Linux 6 GDM Multiseat (x86_64)
• For Oracle Linux 6 Update 4 (6.4) platforms, enable the following repositories:
Repository Name
[ol6_u4_base] Oracle Linux 6 Update 4 installation media copy (x86_64)
[ol6_UEK_base] Unbreakable Enterprise Kernel for Oracle Linux 6 (x86_64)
[ol6_gdm_multiseat] Oracle Linux 6 GDM Multiseat (x86_64)
Repository Configuration for Oracle Linux 5 Platforms
• Disable the following repositories:
Repository Name
[ol5_latest] Oracle Linux 5 Latest (x86_64)
[ol5_UEK_latest] Latest Unbreakable Enterprise Kernel for Oracle Linux 5 (x86_64)
• Enable the following repositories:
Repository Name
[ol5_u8_base] Oracle Linux 5 Update 8 installation media copy (x86_64)
[ol5_UEK_base] Unbreakable Enterprise Kernel for Oracle Linux 5 (x86_64)
3.1.10 Java Runtime Environment (JRE) Requirements
Sun Ray Software Admin GUI requires a 32-bit implementation of a Java(TM) 2 Platform, StandardEdition JRE(TM) of at least 1.6. To check what JRE version is installed on your system, use the followingcommand:
# java -version
It is recommended that you install the latest Java release, which is available at http://www.oracle.com/technetwork/java/javase/downloads. A supported version of JRE is bundled in the unzipped Sun RaySoftware media pack in the Supplemental directory.

Sun Ray Admin GUI Web Server Requirements
22
The Sun Ray Software installation script assumes JRE is installed in the /usr/java directory by default.For example, if you want to accept the default when installing the Sun Ray Software on an Oracle Linuxserver, install JRE 1.6 or later on the server and then create a symlink from /usr/java to the newlycreated jre directory. The following sequence of commands installs the JRE in the /usr directory andcreates a symbolic link from /usr/java to the new jrel.6.0_version directory.
# cd /usr# Supplemental-dir/Java_Runtime_Environment/Linux/jre-6uversion-linux-i586.bin# ln -s jre1.6.0_version /usr/java
Note
A 64-bit JRE is not suitable for use with Sun Ray Software. The 32-bit JRE isrequired, even when the platform is capable of supporting a 64-bit JRE.
Note
If you are using JRE version 1.6 on a server running Oracle Solaris 11, a SecureConnection Failed error may occur when launching the Admin GUI througha secure URL. To resolve this problem, either update the JRE version to 1.7 ordisable TLS 1.0 encryption in the browser's preferences.
3.1.11 Sun Ray Admin GUI Web Server Requirements
The Sun Ray Administration Tool (Admin GUI) requires that a Web server be installed and running on eachSun Ray server. The Admin GUI must be hosted in a web container that supports the JavaServlet 2.4 andJavaServer Pages 2.0 specification. The Apache Tomcat 5.5 Web container implements these standardsand runs on any operating system that has a Java Runtime Environment (JRE).
The utconfig script prompts for the location of an Apache Tomcat HTTP Server and asks whether itshould be configured automatically.
• To configure the server automatically, supply the path and answer Yes.
• To configure the HTTP server later by using the utconfig -w command, answer No.
The Sun Ray configuration script uses port 1660 for the Sun Ray Administration Tool (Admin GUI) bydefault. If this port is unavailable, you can configure a new port while running the utconfig command.
An Apache Tomcat 5.5 archive is included in the Sun Ray Software media pack under Supplemental/Apache_Tomcat. The most recent version of Tomcat 5.5 can be downloaded from http://tomcat.apache.org.
See How to Install Apache Tomcat for details.
3.1.11.1 How to Install Apache Tomcat
If Tomcat 5.5 is already installed on your system, you can omit the steps below and specify the path, ifnecessary, during the Sun Ray Software configuration.
1. As superuser, open a shell window on the Sun Ray server.
% su -
2. Change to the Apache_Tomcat directory. For example:
# cd media_pack_dir/Supplemental/Apache_Tomcat

Sun Ray Admin GUI Web Browser Requirements
23
3. Extract the Tomcat archive into a suitable directory, such as /opt.
For Oracle Solaris
The Tomcat archive uses GNU tar extensions and must be untarred with a GNU-compatible version ofthe tar command, such as gtar.
# /usr/sfw/bin/gtar -xvz -C /opt -f apache-tomcat-5.5.36.tar.gz
For Oracle Linux
# tar -xvz -C /opt -f apache-tomcat-5.5.36.tar.gz
(Optional) Create a symbolic link to the default location for the Sun Ray Software installation script.
# ln -s apache-tomcat-5.5.36 /opt/apache-tomcat
3.1.12 Sun Ray Admin GUI Web Browser Requirements
The Sun Ray Administration Tool (Admin GUI) has been tested and works with the default browsersprovided by the operating systems listed in Table 3.1, “Supported Sun Ray Software Operating Systems”.
3.1.13 Sun Ray Data Store Port Requirements
When you configure a new Sun Ray server in a failover environment that uses Sun Ray Software only,service port 7012 is used by default.
If you already have an LDAP (Lightweight Data Access Protocol) server configured on the Sun Ray server,it can coexist with the Sun Ray data store. However, it must not use port 7012, which is reserved for use bythe Sun Ray data store.
If you configure a new Sun Ray server in a failover group with mixed versions of Sun Ray Software, youmust make sure that the primary server is running the latest Sun Ray Software. For secondary servers, nospecial care is required. The utreplica utility automatically synchronizes with the port number on theprimary.
Note
Although configuring mixed failover groups consisting of servers running variousversions of Sun Ray Server Software is possible, this practice is discouraged. Formore information, see Chapter 6, Failover Groups.
3.1.14 Ports and Protocols
The following section summarize Sun Ray system port and protocol usage.
The range of dynamic/UDP and dynamic/TCP ports on the server is constrained to the range defined bythe utservices-low and utservices-high UDP service definitions, whose default values in /etc/services are 40000 and 42000 respectively. This range should not be redefined to constrain ports tootightly. The range of ports must be sufficient to provide several ports per connected Sun Ray Client.
Ranges used by the client include the following:
• Dynamic/TCP ports on the client are in the range 32768-65535.
• Dynamic/UDP ports on the client are in the range 4096-65535.

Ports and Protocols
24
• ALP rendering traffic (ALP-RENDER) always uses a UDP port number greater than 32767 at the client.
3.1.14.1 Sun Ray Client-to-Server Ports and Protocols
Table 3.4, “Sun Ray Client-to-Server Ports and Protocols” lists the Sun Ray Client-to-server portsand protocols. In the table, a double-headed arrow in the Flow column indicates the direction of theinitial packet. In most cases, the client (a Sun Ray Client or Oracle Virtual Desktop Client) initiates theinteraction.
Table 3.4 Sun Ray Client-to-Server Ports and Protocols
Client Port / Flow Protocol Server Port / Flow Peer Importance/Comments
66/UDP (BOOTPC/DHCPC)
broadcast=>>
unicast=>>
DHCP 67/UDP (BOOTPS/DHCPS)
<=broadcast
<=unicast
DHCP Service Mandatory.
Network andconfiguration parameterdiscovery.
Dynamic/UDP
unicast=>>
TFTP 69/UDP (TFTP)
<=unicast
TFTP Service Recommended.
Firmware download(Configurationparameter download).
Dynamic/UDP
unicast=>>
DNS 53/UDP (domain)
<=unicast
DNS Service Optional.
For server namelookups.
514/UDP (syslog)
unicast=>>
Syslog 514/UDP (syslog) Syslog Service Optional.
Event reporting.
Dynamic/TCP
unicast=>>
pcscd 4120/TCP (pcscd)
<=unicast
Sun Ray Server Mandatory.
PC/SC-lite smart cardservice.
Used to be TCP port5999.
Dynamic/UDP
broadcast=>>
ALP-DISCOVERY
7009/UDP (utauthd-gm)
<=unicast
Sun Ray Server Optional.
On-subnet Sun Rayserver discovery.
Dynamic/TCP
unicast=>>
ALP-AUTH 7009/TCP (utauthd)
<=unicast
Sun Ray Server Mandatory.
Presence, control,status.
Dynamic/UDP with portnumber >= 32768
unicast=> orunicast=>> when NATis in use
ALP-RENDER Dynamic/UDPconstrained byutservices-low andutservices-high
<<=unicast or<=unicast when NAT isin use
Sun Ray Server Mandatory.
On-screen drawing,user input, audio.

Ports and Protocols
25
Client Port / Flow Protocol Server Port / Flow Peer Importance/Comments
5498/UDP
unicast=>>
ALP-AUDIO-IN Dynamic/UDPconstrained byutservices-low andutservices-high
Sun Ray Server Optional.
Inbound audio.
Dynamic/TCP
unicast=>>
ALP-DEVMGR 7011/TCP (utdevmgr)
<=unicast
Sun Ray Server Optional.
Device management.
Dynamic/TCP with portnumber >= 32768
unicast=>
ALP-DEVDATA Dynamic/TCPconstrained byutservices-low andutservices-high
<<=unicast
Sun Ray Server Optional.
Device communicationwhen accessingexternal device,including USBredirection.
7777/TCP
unicast=>
ALP-DEVDATA Dynamic/TCP
<<=unicast
Sun Ray Server Optional.
Device communicationwhen accessingexternal devicesconnected to Sun RayClients running olderfirmware. Not used withUSB redirection.
7013/UDP (utquery)
unicast=>
ALP-QUERY Dynamic/UDP
<<=unicast
<<=broadcast
Any Optional.
utquery support.
Note
Due to CR 12301209, the keyboard may become unresponsive to input. To workaround this issue, allow ICMP messages to flow from the Sun Ray server to theclient.
3.1.14.2 Sun Ray Server-to-Server Protocols
Table 3.5, “Sun Ray Server-to-Server Ports” lists the Sun Ray server-to-server ports. In the table, a double-headed arrow indicates the direction of the initial packet.
Table 3.5 Sun Ray Server-to-Server Ports
Sun Ray ServerPort
Protocol Port Peer Notes
<<=ARP=>> All on subnet IP-to-MAC mapping.
<<=ICMP ECHO=> Any Admin: presence.
Transient SYSLOG/UDP unicast=>> 514 (SYSLOG) SyslogServer
Status reporting, if required.
1660 (HTTP) <<=HTTP/TCP=> Transient Localhost Admin GUI, if configured.
1661 (HTTPS) <<=HTTPS/TCP=> Transient Localhost Admin GUI, if configured.

Installing
26
Sun Ray ServerPort
Protocol Port Peer Notes
7007(UTSESSIOND)
<<=UTSESSION/TCP=> Transient Any Session members.
7007(UTSESSIOND)
<<=UTSESSION/TCP=> Privileged Localhost Session management.
7008 (UTRCMD) <<=UTRCMD/TCP=> Privileged Sun RayGroupMember
Remote execution.
7009 (UTAUTHD) <<=UTAUTHD-GM/UDP=>>
broadcast or multicast
7009 (UTAUTHD) Sun RayServer
Group discovery, if required.
7010 (UTAUTH-CB) <<=UTAUTH-CB/TCP=> Transient Any Admin: control and status.
7011(UTDEVMGRD)
<<=UTDEVMGRD/TCP=>> 7011 (UTDEVMGR) Sun RayGroupMember
Device control and status.
7011 (UTDEVMGR) <<=UTDEVMGR/TCP=> Transient Any Device clients.
7012 (UTDS) <<=UTDS/TCP=> Transient Any Data store, if required.
7014 (UTTSCPD) <<=UTTSCPD/TCP=> Privileged Sun RayWindowsConnectorfromLocalhost
Bridge/Proxy betweenWindows connector and theSun Ray server.
3.1.14.3 Windows Connector
For basic Windows connector operations (RDP port access), the Windows server firewall needs TCPport 3389 open for inbound connections. The Sun Ray server (where the Windows connector is running)firewall needs TCP port 3389 open for outbound connections.
3.1.14.4 Multimedia Redirection
For multimedia redirection on Windows XP and Windows Server 2003 R2, the Windows server firewallmust have a TCP port between 6000 and 10000 open for inbound connections. The Sun Ray server(where the Windows connector is running) firewall must have a TCP port between 6000 and 10000 openfor outbound connections.
3.2 Installing
This section provides detailed information about how to install Sun Ray Software.
3.2.1 Using the utsetup Command
The utinstall and utconfig commands are the basic commands to install and configure Sun Raysoftware on a system. There are also a number of additional commands that you need to run to configure abasic Sun Ray server and make it ready to provide sessions to clients.
The utsetup command provides a way to run all the appropriate commands, including utinstalland utconfig, in the appropriate sequence to install and configure a Sun Ray server. By design, theutsetup command configures a Sun Ray server to use a shared network (LAN) and it generates a set

Not Using the utsetup Command
27
of .parms files in the TFTP home directory for managing Sun Ray Client firmware. This recommendedconfiguration is detailed in Chapter 2, Planning a Sun Ray Network Environment.
When you use utsetup command to initially install a Sun Ray server, it runs the following commands insequence:
• utinstall
• utconfig
• utpolicy -a -z both -g -M
• utreplica (if HA/failover group selected)
• utfwadm -A -a -V (optional)
• utadm -L on (optional)
• utstart -c
See Section 3.2.5, “How to Install Sun Ray Software” for installation instructions using the utsetupcommand.
3.2.2 Not Using the utsetup Command
If you need to install and configure a Sun Ray server in a different way than what the utsetup commandprovides, you must run the individual commands as noted in Section 3.2.1, “Using the utsetupCommand”. The following situations may force you to do this:
• Using Kickstart (Oracle Linux), Automated Installer (Oracle Solaris 11), or JumpStart (Oracle Solaris 10)to install the software.
• Configuring the Sun Ray Software without the Sun Ray data store, which is known as zeroadministration mode.
This document does not provide detailed instructions about how to use the individual commands insteadof using the utsetup command. Refer to the man pages for detailed information about the alternativecommands.
3.2.3 Automating Sun Ray Software Installations
The utsetup command enables you to clone the Sun Ray Software installation and configuration processby recording the user responses to the installation prompts and then using those responses at anothertime and even on another Sun Ray server. User responses are stored in the /var/opt/SUNWut/utdialog.d/*.utdialog_responses.props files and are known as response files.
With utsetup and response files, you have the ability to clone a Sun Ray server installation andconfiguration setup or to provide default settings for a hands-free, automated installation and configurationsolution. Cloning Sun Ray servers can be helpful in many situations, including setting up a number of SunRay servers in a failover group.
Note
Using the utsetup command without any options performs an actual install andconfiguration on the server you run it on.
The following commands can use the information recorded in the response files:
• utsetup

Installing Firmware Before Sun Ray Software Installation
28
• utinstall
• utconfig
• utpolicy
• utpw
• utgroupsig
• utreplica
See the following procedures for automating Sun Ray Software installations:
• Section 3.2.8, “How to Clone a Sun Ray Server”
• Section 3.2.9, “How to Install and Configure a Sun Ray Server With Default Settings”
3.2.4 Installing Firmware Before Sun Ray Software Installation
Starting with Sun Ray Software release 5.3, the Sun Ray Operating Software, formerly known as Sun RayClient firmware, is no longer included with Sun Ray Software and must be downloaded from My OracleSupport separately. Updating the Sun Ray Clients with the latest Sun Ray Operating Software ensures thatthe latest Sun Ray Software features are provided. The Sun Ray Client firmware is now officially called SunRay Operating Software, but the term "firmware" will continue to be used throughout the documentation.Refer to the Sun Ray Operating Software Documentation for details.
If you download and install the latest Sun Ray Operating Software before you install Sun Ray Softwareon a server, the utsetup command enables you to configure the installed firmware and make it availableto clients through the utfwadm command similar to previous releases. The current installation procedureprovides steps on how to download and install the firmware.
Installing the latest Sun Ray Operating Software before installing Sun Ray Software is recommended, butyou can still install and configure the firmware after installing Sun Ray Software. To update the firmwareon Sun Ray Clients outside of the Sun Ray Software installation process, refer to Section 14.3, “How toUpdate Firmware on Sun Ray Clients”.
If the firmware is not installed on the server, the Sun Ray Software installation script will provide thefollowing warning:
Sun Ray Operating Software (firmware) is not installed.It is recommended that you install the latest firmwarebefore installing Sun Ray Software. Continue without firmware? (Y/N) [Y]
Also, if an older firmware version is installed on the server, the Sun Ray Software installation script willprovide the following warning:
You are attempting to install SRS on a system with an old versionof Sun Ray Operating Software.Continue with old firmware? (Y/N) [N]
3.2.5 How to Install Sun Ray Software
This procedure uses the utsetup command to install and configure a Sun Ray server for both the OracleLinux or Oracle Solaris operating system.

How to Install Sun Ray Software
29
The utsetup command optionally configures a Sun Ray server to use a shared network (LAN) andgenerates a set of .parms files in the TFTP home directory for managing Sun Ray Client firmware (DHCPis not configured to manage firmware downloads). This configuration is detailed in Chapter 2, Planning aSun Ray Network Environment.
Before You Begin
• Make sure the server targeted to become the Sun Ray server meets the Sun Ray Software productrequirements, including the prerequisites sections.
• A Sun Ray server requires both a fixed host name and a static IP address. A Sun Ray server cannot bea DHCP client.
• It is recommended that you download and install the latest Sun Ray Operating Software (firmware)before starting the Sun Ray Software installation. Updating the Sun Ray Clients with the latest firmwareensures that the latest Sun Ray Software features are provided.
• (Oracle Linux only) The Sun Ray Software installation script removes the Shutdown/Restart options fromthe console; however, you can open a terminal and execute the commands.
• (Oracle Linux only) When Sun Ray Software is activated as part of the installation process, theNetworkManager service on the Sun Ray server is disabled to avoid DHCP and network serviceconflicts. If there are scenarios where the NetworkManager service is needed (using a mobile Sun Rayserver for demo purposes), then you must manually configure the server's NICs. When you uninstall SunRay Software, the NetworkManager service is enabled to restore the default configuration.
Steps
1. Download and unzip the Sun Ray Software media pack and make it accessible to the Sun Ray server.
See http://www.oracle.com/technetwork/server-storage/sunrayproducts/downloads/index.html
2. (Optional) Download and unzip the latest Sun Ray Operating Software (firmware) and make itaccessible to the Sun Ray server.
See http://www.oracle.com/technetwork/server-storage/sunrayproducts/downloads/index.html
Updating the Sun Ray Clients with the latest firmware ensures that the latest Sun Ray Softwarefeatures are provided.
3. Become superuser on the Sun Ray server.
To avoid installation script errors that can occur if user environment settings are carried forward, usethe following command:
% su - root
4. If you downloaded the latest Sun Ray Operating Software (firmware), change directory to the unzippedfirmware directory and install the firmware to make it available to the Sun Ray Software installationscript.
# ./utfwinstall
5. Change directory to the unzipped Sun Ray Software media pack and install Sun Ray Software on theSun Ray server.

Post-Installation Configuration
30
# ./utsetup
When the installation script ends, the log files are available at:
Oracle Linux:
/var/log/utsetup.year_month_date_hour:minute:second.log
Oracle Solaris:
/var/adm/log/utsetup.year_month_date_hour:minute:second.log
The values in the file names reflect a time stamp of when the command was started. Check these filesfor notices of problems.
See Section 3.2.12, “Installation (utinstall) Error Messages” for a listing of utinstall error messages.
6. Repeat steps 3 through 5 for each secondary server if in a failover group.
If you choose the HA group (failover group) configuration during the utsetup installation of the primaryserver, you can copy the generated response files to each secondary server and use the utsetupcommand to replicate the failover group configuration. For example, you can save the response files tothe secondary's server's /tmp directory and then use the utsetup -a -D /tmp command.
This strategy reduces the time needed to re-enter the same configuration information and can minimizeconfiguration errors. See Section 3.2.8, “How to Clone a Sun Ray Server” for details.
7. Add the Sun Ray server's host name or IP address to the sunray-config-servers and sunray-servers DNS entries, which will make the server available to clients for firmware updates and SunRay sessions, respectively.
See Chapter 2, Planning a Sun Ray Network Environment for details.
8. To configure any site-wide settings for the Sun Ray Clients, such as the automatic poweroff feature,you need to update the .parms file for each client. You need to do this on each designated firmwareserver.
See Section 13.2.1, “How to Centralize Sun Ray Client Configurations (.parms)” for details.
9. Reboot the Sun Ray Clients to download and update to the new Sun Ray Operating Software(firmware) provided by the Sun Ray server.
Note
When installing Sun Ray Operating Software on Sun Ray 3 Series Clients,the smart card LED will blink for approximately 40 seconds as the smart cardcontroller firmware is being updated. This is normal.
10. If you plan to use the Windows connector, install the Windows Connector Components on yourdesignated Windows Server. See Section 3.2.7, “How to Install the Windows Connector Componentson a Windows System” for details.
3.2.6 Post-Installation Configuration
This section includes various configuration procedures that you can perform on the Sun Ray server afterinstalling the Sun Ray Software.

Post-Installation Configuration
31
3.2.6.1 How to Install the JDS Integration Package (Oracle Solaris 10)
Note
The Java Desktop System (JDS) integration package is a deprecated feature andwill be removed in a later release.
The Java Desktop System (JDS) integration package, which delivers a CLI called uttscwrap thatimproves integration of the Windows connector with the JDS desktop on Oracle Solaris 10. For moreinformation about the uttscwrap command, see Section 17.3.2, “How to Start a Windows Session WithinJava Desktop System (Oracle Solaris 10)”.
1. Change to the media pack location where the JDS integration package is located.
# cd media_pack_directory/Supplemental/JDS_Integrator/Solaris*/arch/Packages
2. Install the JDS integration package (SUNWuttscwrap).
# pkgadd -d .
The uttscwrap command is installed in the /opt/SUNWuttscwrap/bin directory.
3.2.6.2 How to Configure a Headless Sun Ray Server (Oracle Linux)
If you plan to use a headless Sun Ray server running Oracle Linux and Sun Ray Clients using GNOMEDisplay Manager (GDM), then this configuration will generate errors on the Sun Ray Client and consumeCPU processes. The errors occur because GDM assumes that the console display is present and GDM willcontinually attempt to (and fail to) service a non-existent console device.
The workaround is to add the -no-console option to the preadm command in the Sun Ray server's /etc/inittab file:
x:5:respawn:/etc/X11/prefdm --nodaemon --no-console
This workaround is not required for Oracle servers, since they have the Integrated Lights Out Manager(ILOM) Service Processor that provides a virtual console.
3.2.6.3 How to Limit Administrative Privileges for Non-root Users (Oracle Linux)
Many Oracle Linux systems come configured with liberal administrative privileges for non-root users.These privileges should not be made available to users who log in using a Sun Ray Client.
To limit administrative access, do the following:
• Review the man pages for pam_console, console.perms, and console.apps.
• Edit the /etc/security/console.perms file to remove display numbers from the definition ofconsole. If a definition exists for xconsole, it should be removed.
For example, a line that reads:
<console>=tty[0-9][0-9]* vc/[0-9][0-9]* :[0-9]?[0-9] :[0-9]
should instead read:
<console>=tty[0-9][0-9]* vc/[0-9][0-9]*
And a line such as the following example should be removed:

How to Install the Windows Connector Components on a Windows System
32
<xconsole>=:[0-9]?[0-9] :[0-9]
3.2.7 How to Install the Windows Connector Components on a WindowsSystem
The Windows connector feature enables you to provide Windows remote desktop services on Sun RayClients. Sun Ray Software provides a number of Windows connector components that you should install ona Windows system to improve the performance and functionality of the remote desktop services.
Note
By default, remote desktop services is not enabled on a Windows system, so youmust specifically enable it. See the Windows documentation for details.
This procedure provides the steps to install the Windows connector components on a Windows system:
• USB redirection - Enables access to USB devices connected to a Sun Ray Client from a Windowssession.
• Multimedia redirection - Enhanced performance for Windows Media Player (Windows XP and WindowsServer 2003 R2).
• Adobe Flash acceleration - Enhanced playback capabilities for Adobe Flash content.
• Audio/video synchronization - Enhanced audio and video synchronization for multimedia content(Windows XP and Windows Server 2003 R2).
• Audio input - Enables audio recording on a Sun Ray Client from a Windows session (Windows XP andWindows Server 2003 R2).
• Client Information Agent - Enables the client name to be updated across hotdesking and to provide theability to execute actions on disconnects and reconnects of a Windows session.
If you want to install the Sun Ray Connector Windows components by using the *.msi files, you can usea srs-winstaller.exe /S /D=c:path to extract the *.msi files from the srs-wininstaller.exeexecutable.
Note
To bypass the installation UI, you can run srs-winstaller /S from thecommand line.
Note
The Adobe Flash acceleration and Audio/video synchronization components requirehardware that supports the Windows Performance Counter API. If the WindowsPerformance Counter API is not working properly, the components might fail toload or behave unexpectedly. In one known example, this problem occurs whena computer has the AMD Cool'n'Quiet technology enabled in the BIOS, which isdocumented in http://support.microsoft.com/kb/895980.
Steps
1. Log in to the Windows system as Administrator.
2. If you plan to install the USB redirection component on a Virtual Machine (VM), you must add USBdrivers on some VMs if they do not provide drivers by default. See Section 17.6.5, “How to Add USBDrivers to a Virtual Machine” for details.

How to Install the Windows Connector Components on a Windows System
33
3. Make sure the Windows system has access to the Sun Ray Connector Windows Components installerin the unzipped Sun Ray Software media pack.
media_pack_image/Components/20-SRWC/Content/Sun_Ray_Connector_Windows_Components_2.6
4. Copy the srs-winstaller.exe file to the Windows system.
5. Double-click the srs-winstaller icon to start the Sun Ray Connector Windows Components SetupWizard.
6. Review the License Agreement and click I Agree.
7. Choose which components you want to install and click Install.
Figure 3.1 Windows Components Setup Window
8. Click Finish once the installation has finished.
Restart the Windows system if instructed.
9. Go to the following sections (next steps) based on the features you installed.
• Multimedia Redirection - Next Steps
• Adobe Flash Acceleration - Next Steps

How to Install the Windows Connector Components on a Windows System
34
• Audio/Video Synchronization - Next Steps
• USB Redirection - Next Steps
3.2.7.1 Multimedia Redirection - Next Steps
The multimedia redirection component does not include an audio/video demuxer for MPEG-2 and H.264video streams. To ensure that video is accelerated, download and install a third-party or freeware solution,such as the MatroskaSplitter freeware.
3.2.7.2 Adobe Flash Acceleration - Next Steps
For Adobe Flash videos, users must enable the Third party browser extensions option in InternetExplorer, which is located in the Advanced tab of Tools > Internet Options.
3.2.7.3 Audio/Video Synchronization - Next Steps
Note
For audio to work properly, the Sun Ray audio driver must be set as the default.If users have changed their default audio driver, they must perform the followingprocedure to make the Sun Ray audio driver the default.
1. From the Windows Desktop, choose Settings > Control Panel.
2. Click Sounds & Audio Devices.
3. Click the Audio tab.
4. If the Sun Ray RDP Audio Driver is not the default, select it and click Apply.
5. Close your browser and reopen it.
3.2.7.4 USB Redirection - Next Steps
To verify that USB redirection is installed properly, see Figure 17.8, “Verifying USB Redirection in WindowsDevice Manager”.
To verify that USB redirection is working from a Windows connector session, see Section 17.6.6.1, “How toVerify that USB Redirection is Active”.
3.2.7.5 How to Repair the Windows Connector Components
The srs-winstaller.exe executable is an archive, which extracts two .msi files into a temporarydirectory and then transfers control to the Microsoft Windows installer. If the installed Windows ConnectorComponents software needs to be repaired, the .msi files may no longer be available.
There are two ways to repair the Windows Connector Components software. The easiest method is touninstall the software using the add/remove interface and then reinstall using the procedure above.
The other repair method is to select the Windows Connector Components in the add/remove interface andclick Repair. If the repair process requests the location of the .msi files, use the following procedure toextract the files from the srs-winstaller.exe executable:
1. Create a new directory with no blanks in the path or name. The example in this procedure uses c:\srwc).
2. In a command shell window, run the following command:

How to Clone a Sun Ray Server
35
srs-winstaller.exe /S /D=c:\srwc
The .msi files are now available in the c:\srwc directory.
3.2.8 How to Clone a Sun Ray Server
The utsetup command enables you to install and configure a Sun Ray server with the Sun Ray Software.You can then use the created response files to install and configure other servers. See Section 3.2.3,“Automating Sun Ray Software Installations” for more information about automating Sun Ray Softwareinstallations.
Figure 3.2, “Cloning a Sun Ray Server” shows how you can use the utsetup command to clone Sun Rayservers.
Figure 3.2 Cloning a Sun Ray Server
Note
The *.utdialog_responses.props files may contain passwords that amalicious user could potentially decode if read, so make sure to use sufficient

How to Install and Configure a Sun Ray Server With Default Settings
36
security precautions when copying them. For example, the files should have securepermissions (not readable by group or "other"), and you should remove the filesfrom their temporary locations after you complete the configuration.
1. From the unzipped Sun Ray Software media pack, run the utsetup command to install and configurea Sun Ray server.
The responses you provide are saved in the /var/opt/SUNWut/utdialog.d/*.utdialog_responses.props files.
2. Copy the response files to another server. In this example, the files are copied to Server B's /tmpdirectory.
3. From the unzipped Sun Ray Software media pack, run the utsetup -a -D /tmp command to clonethe installation and configuration on the server that you created in Step 1.
For members of the same failover group, you can typically apply the configuration withoutchanges. For a new failover group, you may need to edit the response files to create a newconfiguration (for example to specify a new primary and secondaries for replication). Theutdialog_responses.props(5) man page gives detail about the format of the files.
3.2.9 How to Install and Configure a Sun Ray Server With Default Settings
Another way to use the utsetup command is to quickly install and configure a server with the defaultsettings.
1. Install, configure, and activate the basic Sun Ray Software product features for standalone use (nofailover group configuration) with a minimum of user interaction required (JRE 1.6 must be installed at /usr/java before proceeding).
utsetup -d
2. Complete the configuration:
a. Optionally configure the system in a failover group (if you did not specify identical administrationpasswords with the utsetup command for each system, then you must run the utpw command atthis time).
# utgroupsig
# utreplica -p secondary-server1 [secondary-server2...]
or
# utreplica -s primary-server
b. Optionally configure the kiosk functionality.
# utconfig -k -d
c. Optionally configure the browser web administration interface (Apache Tomcat must be installed at/opt/apache-tomcat before proceeding).

How to List the Current Sun Ray Software Version
37
utconfig -w -d
d. Configure the Sun Ray network services.
# utadm -L on
or
# utadm -A subnet
or
# utadm -a interface
e. Start the Sun Ray services
# utstart
3.2.10 How to List the Current Sun Ray Software Version
This procedure lists the current version of Sun Ray Software running on the Sun Ray server.
1. Log in as the superuser of the Sun Ray server.
2. List the current version.
# /opt/SUNWut/sbin/utrelease
3.2.11 How to Remove Sun Ray Software
To remove Sun Ray Software in its entirety, follow this procedure.
1. Log in as the superuser of the Sun Ray server.
2. Open a shell window and change to the /opt/SUNWut/sbin directory.
# cd /opt/SUNWut/sbin
3. If you are removing Sun Ray Software from a server in a failover group, disable Sun Ray Clientfirmware updates.
See Section 14.13, “How to Disable All Sun Ray Client Firmware Updates” for details.
4. Remove the replication configuration.
# ./utreplica -u
5. Remove the Sun Ray network interfaces.
# ./utadm -r
6. Unconfigure Sun Ray Software.

Installation (utinstall) Error Messages
38
# ./utconfig -u
Answer y to all of the prompts.
7. Uninstall Sun Ray Software.
# cd /# /opt/SUNWut/sbin/utinstall -u
Answer y to all of the prompts.
8. Reboot the system.
9. Repeat the steps in this procedure for all remaining Sun Ray servers.
3.2.12 Installation (utinstall) Error Messages
If during an installation, upgrade, or uninstall the utinstall script returns an error, refer to the followingtable for assistance.
3.2.12.1 All Installations
Message Meaning Resolution
utinstall: fatal, media-diris not a valid directory.
You called the -d option, but media-dir is incomplete.
The media-dir directory requiresrelevant patches and packages forinstallation. The media-dir directoryincludes the Sun Ray directory.
xxxxxx not successfullyinstalled
Might occur for the installation ofany application or patch if relevantpackages have not been properlyinstalled.
Verify that he component xxxxxxis present in the installation mediadirectory path and has the correctpermissions, then run the utinstallscript again.
A different versionx.x of product has beendetected. The other-product Software is onlycompatible with producty.y. You must either upgradeor remove the currentproduct installation beforeproceeding. Exiting ...
Some of the applications providedwith Sun Ray Software are compatibleonly with certain versions of otherapplications.
Compatible and necessaryapplications are included withSun Ray Software. Remove olderversions, then run the utinstallscript again.
error, no Sun Ray softwarepackages installed.
None of the Sun Ray components areinstalled on this system.
No action is required as the product isnot installed.
The following files werenot successfully replacedduring this upgrade. Thesaved copies can be found indirectory
Some files were not properly replacedas part of the upgrade.
Manually copy the listed files from thedirectory, overwriting the newer files ifapplicable.
Space Required and SpaceAvailable table
Not enough disk space was allocatedfor partition. Repartition the disk andrun utinstall again.

Configuring Oracle Solaris 11 Trusted Extensions
39
3.2.12.2 Oracle Linux Installations
Message Meaning Resolution
The following packages werenot successfully removedxxxxxx ...
The packages listed have not beenproperly removed.
Use the rpm -e command to removeeach listed rpm manually, then runutinstall -u again.
Removal of product was notsuccessfully completed. Seelog file for more details.
Removal of Sun Ray Software wasincomplete.
Check the log file for the packagethat started the problem and manuallyremove it with the rpm -e command,then run utinstall -u again.
3.2.12.3 Oracle Solaris Installations
Message Meaning Resolution
Cannot open for read admin-file
The admin_default file isunreadable, or you called the -a option and the admin-file isunreadable.
Verify that the installationadministration file exists(admin_default or other) and thepermissions are correct.
For SPARC platforms: SunOSrelease is x.x, validreleases are: 10
You are attempting to install SunRay Software onto an Oracle Solarisversion that does not support the SunRay Software release.
Upgrade to the supported version10 of the Oracle Solaris OS beforeinstalling Sun Ray Software.
For x86 platforms: SunOS releaseis x.x, valid releases are:10
You are not running a valid OSrelease for this platform.
Upgrade to the supported version10 of the Oracle Solaris OS beforeinstalling Sun Ray Software.
Please clean up thedirectory /var/tmp/SUNWut.upgrade beforererunning utinstall.
Other unrelated files were found in thepreserve directory.
Remove unrelated files from thedirectory.
Please remove theexisting preserved file,preserved_tarfilename,before rerunning utinstall.
You decided not to restore from theindicated tar file.
Remove the tar file before runningutinstall again.
utpreserve: unable topreserve data. Error whilecreating archive file
The utinstall script failed topreserve existing configuration files.
Either exit and manually preservethese files or just continue.
The following packages werenot successfully removedxxxxxx ...
The packages listed have not beenproperly removed.
Use the pkgrm command to removeeach listed package manually, thenrun utinstall -u again.
Removal of product was notsuccessfully completed. Seelog file for more details.
Removal of Sun Ray Software wasincomplete.
Check the log file for the packagethat started the problem and manuallyremove it with the pkgrm command,then run utinstall -u again.
3.3 Configuring Oracle Solaris 11 Trusted Extensions
This section provides the procedure that needs to be done when using Sun Ray Software on OracleSolaris 11 Trusted Extensions. For more information, refer to the Oracle Solaris 11 Trusted ExtensionsConfiguration and Administration Guide.

How to Configure Sun Ray Software on Oracle Solaris 11 Trusted Extensions
40
Oracle Solaris 11 uses zones to permit multiple virtualized operating system environments to coexist in asingle instance of Oracle Solaris 11, allowing processes to run in isolation from other activity on the systemfor added security and control. Sun Ray Software is supported only in the global zone.
Based on your Sun Ray environment, perform the following procedure as root from ADMIN_LOW (globalzone).
3.3.1 How to Configure Sun Ray Software on Oracle Solaris 11 TrustedExtensions
This procedure is required to configure Sun Ray Software on Oracle Solaris 11 Trusted Extensions. Thelabeled zone named public is used in examples throughout this procedure.
1. Become root from ADMIN_LOW (global zone).
2. Configure the following Multilevel ports for the global zone.
a. Run the txzonemgr script:
# txzonemgr
b. Choose Global Zone > Configure Multilevel Ports > Add MLP-shared-tcp
c. Add the following Multilevel ports:
• 4120 - Smart card service daemon (pcscd)
• 6000-6050 - Xserver ports (if more than 50 sessions are needed, increase this port rangeaccordingly.)
• 7007 - Session manager daemon (utsessiond)
• 7010 - Authentication manager daemon (utauth-cb)
• 7012 - Data store daemon (utds)
• 7014 - Windows connector daemon (uttscpd)
• 7015 - Audio daemon
3. If you are providing Windows remote desktops through the Windows connector, enable access to eachsystem through the labeled zone:
a. Add an entry for each Windows system to the /etc/security/tsol/tnrhdb file:
windows-IP:labeled-zone
The following example enables access to a Windows system with an IP address of 10.178.231.24from the public zone:
10.178.231.24:public
b. Restart network services:
# svcadm restart tnctl

How to Configure Sun Ray Software on Oracle Solaris 11 Trusted Extensions
41
4. (Optional) For TLS peer verification to work, make sure the CA certificates to be trusted are availableunder the /etc/sfw/openssl/certs folder in each labeled zone.
5. Loopback mount the following directories and applications for each labeled zone. The followingexample shows how to do this for the public zone.
Note
Setting up a loopback mount for libmlib.so and libmlib.so.2 is requiredonly for SPARC-based Sun Ray servers
# zoneadm -z public halt# zonecfg -z public
zonecfg:public> add fszonecfg:public:fs> set dir=/opt/SUNWutzonecfg:public:fs> set special=/opt/SUNWutzonecfg:public:fs> set type=lofszonecfg:public:fs> endzonecfg:public> add fszonecfg:public:fs> set dir=/etc/opt/SUNWutzonecfg:public:fs> set special=/etc/opt/SUNWutzonecfg:public:fs> set type=lofszonecfg:public:fs> endzonecfg:public> add fszonecfg:public:fs> set dir=/usr/lib/libpcsclite.sozonecfg:public:fs> set special=/usr/lib/libpcsclite.sozonecfg:public:fs> set type=lofszonecfg:public:fs> endzonecfg:public> add fszonecfg:public:fs> set dir=/usr/lib/libpcsclite.so.1zonecfg:public:fs> set special=/usr/lib/libpcsclite.so.1zonecfg:public:fs> set type=lofszonecfg:public:fs> endzonecfg:public> add fszonecfg:public:fs> set dir=/etc/opt/SUNWuttsczonecfg:public:fs> set special=/etc/opt/SUNWuttsczonecfg:public:fs> set type=lofszonecfg:public:fs> endzonecfg:public> add fszonecfg:public:fs> set dir=/opt/SUNWuttsczonecfg:public:fs> set special=/opt/SUNWuttsczonecfg:public:fs> set type=lofszonecfg:public:fs> endzonecfg:public> add fszonecfg:public:fs> set dir=/usr/lib/libmlib.sozonecfg:public:fs> set special=/usr/lib/libmlib.sozonecfg:public:fs> set type=lofszonecfg:public:fs> endzonecfg:public> add fszonecfg:public:fs> set dir=/usr/lib/libmlib.so.2zonecfg:public:fs> set special=/usr/lib/libmlib.so.2zonecfg:public:fs> set type=lofszonecfg:public:fs> endzonecfg:public> exit
# zoneadm -z public boot
6. Reboot the Sun Ray server.
# reboot

Configuring Oracle Solaris 10 Trusted Extensions
42
3.4 Configuring Oracle Solaris 10 Trusted Extensions
This section provides all the procedures that may need to be done when using Sun Ray Software onOracle Solaris 10 Trusted Extensions. For more information, refer to the Oracle Solaris 10 8/11 TrustedExtensions Administrator's Procedures.
Oracle Solaris 10 uses zones to permit multiple virtualized operating system environments to coexist in asingle instance of Oracle Solaris, allowing processes to run in isolation from other activity on the system foradded security and control. Sun Ray Software is supported only in the global zone.
Based on your Sun Ray environment, perform the following procedures as root from ADMIN_LOW (globalzone).
3.4.1 How to Configure a Private Network on Oracle Solaris 10 TrustedExtensions
This procedure is required if your Sun Ray server is configured on a private network. See Chapter 19,Alternate Network Configurations for more information.
Use the Solaris Management Console (SMC) Security Templates to assign the cipso template to theSun Ray server. Assign all other Sun Ray devices on the network an admin_low label. The admin_lowtemplate is assigned to the range of IP addresses you are planning to use in the utadm command.
The /etc/security/tsol/tnrhdb file should contain the following entries when you finish:
192.168.128.1:cipso192.168.128.0:admin_low
1. Become root from ADMIN_LOW (global zone).
2. Start the Solaris Management Console (SMC).
# smc &
3. Make the following selections:
a. In the SMC, select Management Tools > Select hostname:Scope=Files, Policy=TSOL.
b. Select System Configuration > Computers and Networks > Security Templates > cipso.
c. From the menu bar, choose Action > Properties > Hosts Assigned to Template.
d. Select Host and type the IP Address of the Sun Ray interconnect (for example, 192.168.128.1).
e. Click Add and then OK.
f. Select System Configuration > Computers and Networks > Security Families > admin_low.
g. From the menu bar, choose Action > Properties > Hosts Assigned to Template.
h. Select Wildcard.
i. Type the IP Address of the Sun Ray Interconnect Network (192.168.128.0).
j. Click Add and then OK.

How to Configure Shared Multilevel Ports (MLP) for Sun Ray Services
43
4. Assign all Sun Ray servers in the failover group a cipso label.
a. Select System Configuration > Computers and Networks > Security Families > cipso.
b. From the menu bar, choose Action > Properties > Hosts Assigned to Template.
c. Select Host and type the IP Address of the other Sun Ray server.
d. Click Add and then OK.
5. Reboot the Sun Ray server.
# /usr/sbin/reboot
3.4.2 How to Configure Shared Multilevel Ports (MLP) for Sun Ray Services
A shared multilevel port has to be added to the global zone for Sun Ray services in order to have accessfrom a labeled zone.
1. Become root from ADMIN_LOW (global zone).
2. Start the Solaris Management Console (SMC).
# smc &
3. Go to Management Tools.
4. Select hostname:Scope=Files, Policy=TSOL.
5. Select System Configuration > Computers and Networks > Trusted Network Zones > global.
6. From the menu bar, choose Action > Properties.
7. Click Add under Multilevel Ports for Shared IP Addresses.
8. Add 7007 as Port Number, select TCP as Protocol, and click OK.
9. Repeat the previous step for ports 4120, 7010, and 7015.
10. Restart network services by running the following command:
# svcadm restart svc:/network/tnctl
11. Verify that these ports are listed as shared ports by running the following command:
# /usr/sbin/tninfo -m global
12. Reboot the Sun Ray server.
# /usr/sbin/reboot
3.4.3 How to Increase the Number of X Server Ports
The default entry in /etc/security/tsol/tnzonecfg makes three displays available (6001-6003).Increase the number of available X server ports per requirements.
1. Become root from ADMIN_LOW (global zone).

How to Configure the Windows Connector on Oracle Solaris Trusted Extensions
44
2. Start the Solaris Management Console (SMC).
# smc &
3. Go to Management Tools.
4. Select hostname:Scope=Files, Policy=TSOL option.
5. Select System Configuration > Computers and Networks > Trusted Network Zones > global.
6. From the menu bar, choose Action > Properties.
7. Under Multilevel Ports for Zone's IP Addresses, select 6000-6003/tcp.
8. Click Remove.
9. Choose Add > Enable Specify A Port Range.
10. Type 6000 in Begin Port Range Number and 6050 (for 50 displays) in End Port Range Number.
11. Select TCP as the Protocol.
12. Click OK.
13. Reboot the Sun Ray server.
# /usr/sbin/reboot
3.4.4 How to Configure the Windows Connector on Oracle Solaris TrustedExtensions
This procedure describes how to configure the Windows connector on Oracle Solaris Trusted Extensions.
For the Windows connector to function properly on a Oracle Solaris Trusted Extensions server, theWindows terminal server must be made available at the desired level.
1. As superuser, open a shell window on the Sun Ray server.
To avoid errors that can occur if user environment settings are carried forward, use the followingcommand:
% su - root
2. Make a Windows system available to the public template.
a. Start the Solaris Management Console.
# smc &
b. Make the following selections under Management Tools:
i. Select hostname:Scope=Files, Policy=TSOL.
ii. Select System Configuration > Computers and Networks > Security Templates > public.
c. Choose Action > Properties > Hosts Assigned to Template.

How to Configure the Windows Connector on Oracle Solaris Trusted Extensions
45
d. Select Host.
e. Type the IP Address of the Windows system, for example, 10.6.100.100.
f. Click Add.
g. Click OK.
3. Configure port 7014 as a shared multilevel port for the uttscpd daemon.
a. If the Solaris Management Console is not already running, start it:
# smc &
b. Select hostname:Scope=Files, Policy=TSOL.
c. Select System Configuration > Computers and Networks > Trusted Network Zones > global.
d. Choose Action > Properties.
e. Enable ports by clicking Add under Multilevel Ports for Shared IP Addresses.
f. Add 7014 as Port Number, select TCP as the Protocol, and click OK.
g. Restart network services.
# svcadm restart svc:/network/tnctl
h. Verify that this port is listed as a shared port.
# /usr/sbin/tninfo -m global
4. Create entries for the uttscpd daemon in each local zone.
The /etc/services file entry for the SRWC proxy daemon is created automatically in the global zoneat configuration time. Corresponding entries need to be created in the local zones.
These entries can be created manually or by loopback-mounting the global zone /etc/services fileinto the local zones for read access.
To create this entry manually, insert the following entry in the local zone file.
uttscpd 7014/tcp # SRWC proxy daemon
5. Loopback mount the /etc/opt/SUNWuttsc directory in each local zone. The following exampleshows how to do this for the local zone named public.
# zoneadm -z public halt# zonecfg -z public
zonecfg:public> add fszonecfg:public:fs> set dir=/etc/opt/SUNWuttsczonecfg:public:fs> set special=/etc/opt/SUNWuttsczonecfg:public:fs> set type=lofszonecfg:public:fs> end

Upgrading
46
# zoneadm -z public boot
6. (Optional) For TLS peer verification to work, make sure the CA certificates to be trusted are availableunder the /etc/sfw/openssl/certs folder in each local zone.
7. Reboot the Sun Ray server.
# /usr/sbin/reboot
3.5 UpgradingThis section provides instructions on how to upgrade a previously installed Sun Ray server.
3.5.1 Installing Firmware Before Sun Ray Software Upgrade
As described in Section 3.2.4, “Installing Firmware Before Sun Ray Software Installation”, it isrecommended that you install the latest firmware on the existing Sun Ray server before performing anupgrade. The firmware is not provided with the Sun Ray Software media pack.
The current upgrade procedure provides steps on how to download and install the firmware. To updateclient firmware outside of the Sun Ray Software upgrade process, refer to Section 14.3, “How to UpdateFirmware on Sun Ray Clients”.
3.5.2 How to Upgrade Sun Ray Software
This procedure describes how to upgrade Sun Ray Software on an existing Sun Ray server. Thisprocedure relies on a specific Sun Ray configuration. See Chapter 2, Planning a Sun Ray NetworkEnvironment for details.
Note the following information before performing the upgrade.
• Make sure the operating system on the Sun Ray server complies with the Sun Ray Server requirementslisted in Section 3.1.1, “Operating System Requirements”. If not, you'll have to upgrade the operatingsystem on the Sun Ray server as part of the Sun Ray Software upgrade.
• Upgrades from Sun Ray Software 5.2 or later are supported with Sun Ray Software 5.4.x. You canupgrade directly to a 5.4.x release, you do not have to upgrade to Sun Ray Software 5.4 first.
• You cannot migrate a Sun Ray server configuration to a hardware platform of a different Instruction SetArchitecture. For example, you cannot migrate an existing SPARC-based Sun Ray server configurationto a new x86-based Sun Ray server.
• You cannot migrate a Sun Ray server configuration to a different operating system, for example,from Oracle Linux to Oracle Solaris. Although, you can upgrade between major releases of the sameoperating system when specified, such as Oracle Solaris 10 to Oracle Solaris 11.
• Although not necessary in most circumstances, you should preserve the configuration data on the SunRay server and copy the backup file to another location. See Section 3.5.4, “How to Preserve Sun RaySoftware Configuration Data” for details.
Steps
1. Inform users about the upgrade.
Before you upgrade Sun Ray Software, inform your users of your plans, and have them terminate theirsessions. An effect of the upgrade procedure is that all active and suspended sessions are lost.

How to Upgrade Sun Ray Software
47
2. If you are upgrading Sun Ray servers in a failover group, consider ways to reduce downtime.
See Section 3.5.3, “Planning Upgrades Using Failover Groups” for details.
3. Become superuser on the Sun Ray server.
To avoid installation script errors that can occur if user environment settings are carried forward, usethe following command:
% su - root
4. List the current Sun Ray network configuration and retain the information. You need to reconfigure theSun Ray network after the upgrade.
# /opt/SUNWut/sbin/utadm -l
5. If necessary, upgrade the operating system on the Sun Ray server to meet the requirements listed inSection 3.1.1, “Operating System Requirements”.
Upgrading Oracle Linux 5.x to 5.8
a. Preserve the configuration data on the Sun Ray server and copy the backup file to a safe location.See Section 3.5.4, “How to Preserve Sun Ray Software Configuration Data” for details.
b. Uninstall the Sun Ray Software on the Sun Ray server. See Section 3.2.11, “How to Remove SunRay Software” for details.
Note
If the utkiosk group is still configured on the system, remove it. Otherwise,the kiosk mode user account configuration will fail during the Sun RaySoftware upgrade.
c. Upgrade Oracle Linux on the Sun Ray server.
d. If necessary, copy the Sun Ray server configuration data backup file created earlier, /var/tmp/SUNWut.upgrade/preserve_version.tar.gz, to the same location on the upgraded Sun Rayserver. The Oracle Linux upgrade should have retained this file.
e. Go to Step 6.
Upgrading Oracle Linux 5.x to 6.3
a. Preserve the configuration data on the Sun Ray server and copy the backup file to a safe location.See Section 3.5.4, “How to Preserve Sun Ray Software Configuration Data” for details.
b. Upgrade Oracle Linux on the Sun Ray server.
In-place upgrades are not supported between major Oracle Linux releases, so it is recommendedthat you perform a fresh install of Oracle Linux 6.3 on the Sun Ray server after backing up theexisting system. Refer to the Oracle Linux documentation for details on upgrading between majorOracle Linux releases.
c. Copy the Sun Ray server configuration data backup file created earlier, /var/tmp/SUNWut.upgrade/preserve_version.tar.gz, to the same location on the upgraded Sun Rayserver.
d. Go to Step 6.

How to Upgrade Sun Ray Software
48
Upgrading Oracle Solaris 10
a. (Optional) Preserve the configuration data on the Sun Ray server and move the backup file toa safe location. See Section 3.5.4, “How to Preserve Sun Ray Software Configuration Data” fordetails.
This step is not necessary because the Oracle Solaris 10 upgrade will not affect the Sun RaySoftware configuration data. However, backing up data before performing an operating systemupgrade is always good practice.
b. Upgrade Oracle Solaris on the Sun Ray server.
c. Go to Step 6.
Upgrading Oracle Solaris 10 to Oracle Solaris 11
a. Preserve the configuration data on the Sun Ray server and copy the backup file to a safe location.See Section 3.5.4, “How to Preserve Sun Ray Software Configuration Data” for details.
b. Upgrade Oracle Solaris on the Sun Ray server.
There is no upgrade program to upgrade Oracle Solaris 10 to Oracle Solaris 11. You must performa fresh install of Oracle Solaris 11 on the Sun Ray server after backing up the existing system.Refer to the Oracle Solaris 11 documentation for details on upgrading to Oracle Solaris 11.
c. Copy the Sun Ray server configuration data backup file created earlier, /var/tmp/SUNWut.upgrade/preserve_version.tar.gz, to the same location on the upgraded Sun Rayserver.
d. Go to Step 6.
6. Download and unzip the Sun Ray Software media pack and make it accessible to the Sun Ray server.
See http://www.oracle.com/technetwork/server-storage/sunrayproducts/downloads/index.html
7. (Optional) Download and unzip the latest Sun Ray Operating Software (firmware) and make itaccessible to the Sun Ray server.
See http://www.oracle.com/technetwork/server-storage/sunrayproducts/downloads/index.html
If you decide to install and configure client firmware after the upgrade, refer to Section 14.3, “How toUpdate Firmware on Sun Ray Clients”.
8. Disable all Sun Ray Client firmware updates until all the servers in a failover group are upgraded.
See Section 14.13, “How to Disable All Sun Ray Client Firmware Updates” for details.
9. If you downloaded the latest Sun Ray Operating Software (firmware), change directory to the unzippedfirmware directory and update the current firmware to make it available to the Sun Ray Softwareinstallation upgrade.
# ./utfwinstall
The utfwinstall script overwrites the existing firmware installed on the Sun Ray server.
10. Change directory to the unzipped Sun Ray Software media pack and upgrade Sun Ray Software on theSun Ray server.

How to Upgrade Sun Ray Software
49
# ./utsetup
The utsetup script preserves the current Sun Ray Software configuration data on the Sun Rayserver, upgrades Sun Ray Software to the new version, and then restores the Sun Ray Softwareconfiguration data after the upgrade. If you had to create a /var/tmp/SUNWut.upgrade/preserve_version.tar.gz backup file and copy it to the newly installed OS as described in Step 5,the utsetup script will prompt you to use the backup file to restore the Sun Ray Software configurationdata.
When the script ends, a log file is available at:
Oracle Linux:
/var/log/utsetup.year_month_date_hour:minute:second.log
Oracle Solaris:
/var/adm/log/utsetup.year_month_date_hour:minute:second.log
The values in the file name reflect a time stamp of when the commands are started. Check these filesfor notices of installation problems.
See Section 3.2.12, “Installation (utinstall) Error Messages” for a listing of utinstall error messages.
11. Reconfigure the Sun Ray network based on the previous configuration you confirmed in step 4.
For a shared network (LAN) with external DHCPserver support (used utadm -L on)
No action is required. This configuration ispreserved during the upgrade.
For a shared network (LAN) with Sun Ray serverDHCP support
# /opt/SUNWut/sbin/utadm -A subnet
For a private network # /opt/SUNWut/sbin/utadm -a intf
12. If you used a preserve file as part of the upgrade, you must run utconfig -w to complete theupgrade.
The utconfig -w command will prompt you for the Admin GUI settings, including the location of theTomcat installation, and the Admin GUI will be started automatically.
13. If the Windows connector groupname was not previously configured or the groupname was set toroot or sys, reconfigure the Windows connector. Errors regarding these scenarios will be listed in theinstallation log.
# /opt/SUNWut/sbin/utconfig -c
14. Repeat Steps 1 through 13 for each server in failover group.
15. Synchronize the updated Sun Ray Operating Software (firmware) on the Sun Ray clients.
You must perform this task on a stand-alone Sun Ray server or the last Sun Ray server upgraded ina failover group. The utfwsync takes the currently installed and configured firmware on the Sun Rayserver and updates all the Sun Ray servers in the failover group, and then it updates all the firmwareon the Sun Ray Clients. The Sun Ray Clients reboot themselves and update to the new firmware ifneeded.
# /opt/SUNWut/sbin/utfwsync

Planning Upgrades Using Failover Groups
50
16. If you plan to use the Windows connector, upgrade the Windows Connector Components on yourdesignated Windows Server.
There is no upgrade program for the Windows connector components. To upgrade a Windows systemwith the previous components installed, remove the current Windows connector components and installthe new versions.
3.5.3 Planning Upgrades Using Failover Groups
By configuring two or more Sun Ray servers in a failover group, you can reduce interruption of new serviceavailability in the event that one server fails. If you plan to combine existing Sun Ray servers into a failovergroup, or to upgrade an existing failover group, please consider the following:
• You should always upgrade the secondary servers first before upgrading the primary server. Newfunctionality from the release may not work until all the servers in the failover group are upgraded.
• Before you upgrade a given server, make sure that Sun Ray Client users terminate their sessions.
Note
If upgrading servers in a large configuration at once is not convenient, upgrade oneor two servers at a time until the entire configuration is complete.
• For best results in groups of four or more servers, configure the primary server so that it serves onlythe Sun Ray data store. Configure the secondary servers so that they serve users directly in addition toserving the data store.
• While upgrading the primary server, secondary servers will not be able to do any updates to the datastore.
• To take advantage of the new features in this release, do not mix different Sun Ray Softwareversions within a failover group. Failover groups that use more than one software version revert to thefunctionality of the earliest version.
• Using the Admin GUI to restart or reset Sun Ray services does not work across servers with differentSun Ray releases. For example, even if you use the Admin GUI to restart all the servers in a failovergroup that are running the latest Sun Ray Software release, you should still restart or reset any Sun Rayservers running earlier versions of Sun Ray Software.
• Disable all Sun Ray Client firmware updates until all the servers in a failover group are upgraded. Fordetails, see Section 14.13, “How to Disable All Sun Ray Client Firmware Updates”.
Note
Even if you upgrade one or two servers per week, you must wait until all servers inthe group are upgraded before you enable firmware updates.
• If your configuration is a dedicated private interconnect, disconnect the server from the Sun Rayinterconnect.
See Chapter 6, Failover Groups for a more general discussion of failover groups, including diagrams offailover topologies.
3.5.4 How to Preserve Sun Ray Software Configuration Data
When you choose an upgrade, the utsetup script automatically preserves your existing configurationinformation. You must preserve your existing configuration before running the utsetup script only in thefollowing situations:

How to Preserve Sun Ray Software Configuration Data
51
• Upgrading the operating system on an existing Sun Ray server that requires you to reformat the server'sdisk.
• Replacing an existing Sun Ray server hardware with a new server.
• Upgrading the operating system on the Sun Ray server, in most situations, as part of the Sun RaySoftware upgrade.
In all of these cases, you will need to create a Sun Ray Software configuration data backup file, saved in/var/tmp/SUNWut.upgrade/preserve_version.tar.gz, and copy it to the same location on thenewly installed or upgraded server before you start the utsetup script. The utsetup script automaticallyrestores the configuration data in the /var/tmp/SUNWut.upgrade/preserve_version.tar.gz afterit installs Sun Ray Software.
The utpreserve script in the Sun Ray Software image directory preserves the following information:
• X user settings
• Sun Ray data store
• Authentication Manager configuration files
• utslaunch properties
• Failover group information
• Kiosk mode configuration
• Group name used by the Windows connector
The utpreserve script does not preserve the following information:
• The Sun Ray server's network and DHCP configuration settings (utadm -A or utadm -a configurationinformation). You must reconfigure those settings after upgrading Sun Ray Software.
• The server's PAM configuration is not saved. The PAM configuration is located in /etc/pam.conf onOracle Solaris 10 and /etc/pam.d/* on Oracle Solaris 11 or Oracle Linux. You need to back up andrestore the PAM configuration manually.
Before You Begin
Depending on the size of your configuration, this procedure, including the operating system softwareupgrade, might take anywhere from five minutes to several hours or even more to complete.
Note
Running the utpreserve script stops all Sun Ray daemons and services, includingthe Sun Ray data store, causing users to lose all of their sessions, both active anddisconnected. Make sure to inform them of your plans.
Steps
1. Change directory to the unzipped Sun Ray Software media pack.
2. Preserve the Sun Ray configuration:
# ./utpreserve

How to Preserve Sun Ray Software Configuration Data
52
The utpreserve script warns that it will stop all Sun Ray services, consequently terminating all usersessions, and asks whether it should continue.
If you answer y, the utpreserve script:
• Stops the Sun Ray services and the Sun Ray data store daemon.
• Lists the files that are saved.
• Tars and compresses the entire list of files as the /var/tmp/SUNWut.upgrade/preserve_version.tar.gz file, where version is the currently installed version of Sun RaySoftware.
• Indicates that a log file containing notices of errors is available at /var/adm/log/utpreserve.year_month_date_hour:minute:second.log for Oracle Solaris or /var/log/SUNWut/utpreserve.year_month_date_hour:minute:second.log for Oracle Linux
where year, month, and so on are represented by numeric values reflecting the time utpreservewas started.
• Recommends that the /var/tmp/SUNWut.upgrade/preserve_version.tar.gz backup file becopied to a safe location.
Note
If you have modified the PAM configuration in a previous version of Sun RaySoftware, your changes might be lost when Sun Ray Software is upgraded. Toavoid losing your modifications, be sure to save a copy before performing theupdate, then use the saved copy to restore your earlier modifications.

53
Chapter 4 Admin GUI and Commands
Table of Contents4.1 Sun Ray Software Commands .................................................................................................... 53
4.1.1 How to Set Up Access to the Sun Ray Software Man Pages .............................................. 564.2 Administration Tool (Admin GUI) ................................................................................................. 56
4.2.1 Administrative Name and Password .................................................................................. 574.2.2 Admin GUI Tab Descriptions ............................................................................................ 574.2.3 How to Log In to the Administration Tool (Admin GUI) ....................................................... 594.2.4 How to Change the Admin GUI Locale ............................................................................. 604.2.5 How to Change the Admin GUI to English Locale .............................................................. 604.2.6 How to Change the Admin GUI Timeout ........................................................................... 604.2.7 How to Enable or Disable Multiple Administration Accounts (Oracle Linux) .......................... 614.2.8 How to Enable or Disable Multiple Administration Accounts (Oracle Solaris 11) .................... 624.2.9 How to Enable or Disable Multiple Administration Accounts (Oracle Solaris 10) .................... 634.2.10 How to Audit Admin GUI Sessions .................................................................................. 64
This chapter provides the list of Sun Ray Software commands and details about the Sun Ray SoftwareAdministration GUI, known as the Admin GUI.
4.1 Sun Ray Software CommandsTable 4.1, “Sun Ray Software Commands” lists the important commands used to administer the Sun Rayenvironment. For further information, see the man page for the command in question.
The Sun Ray Software commands are located in the following directories:
• /opt/SUNWut/bin
• /opt/SUNWut/sbin
• /opt/SUNWuttsc/bin/
• /opt/SUNWuttscwrap/bin/ (Oracle Solaris)
Add these directories to your PATH variable, so you don't need to provide the full path when using thecommands.
Table 4.1 Sun Ray Software Commands
Command Definition
utaction Execute commands when a Sun Ray Client session is connected, disconnected, orterminated.
utadm Manage the private network, shared network, and DHCP (Dynamic Host ConfigurationProtocol) configuration for the Sun Ray interconnect.
utadminuser Add, list, and delete UNIX user names from the list of users authorized to administer Sun Rayservices. The list is stored in the Sun Ray data store.
utamghadm Configure or disable regional hotdesking, which enables users to access their sessionsacross multiple failover groups.
utaudio Enable Sun Ray audio services.
utcapture Monitor packets sent and dropped between the Sun Ray server and the Sun Ray Clients.

Sun Ray Software Commands
54
Command Definition
utcard Enable the configuration of different types of smart cards in the Sun Ray data store.
utconfig Perform the initial configuration of the Sun Ray server and supporting administrationframework software.
utcrypto Configure the Sun Ray server security.
utdesktop Manage Sun Ray Clients connected to the Sun Ray server on which the command is run.
utdetach Disconnect the current non-smart card mobile session or authenticated smart card sessionfrom its respective Sun Ray Client. The session is not destroyed but put into a detachedstate. The session can be accessed again only after authentication. When Remote HotdeskAuthentication (RHA) is disabled (through utpolicy or the Admin GUI), utdetach affectsonly authenticated smart card sessions and non-smart card mobile sessions.
utdevadm Enable or disable Sun Ray device services. The services include USB devices connectedthrough USB ports, embedded serial ports, clipboard, internal smart card reader in the SunRay Client, and the scbus protocol.
utdiskadm Manage Sun Ray mass storage.
utdssync Convert the port number for the Sun Ray data store service to the new default port on serversin a failover group, then forces all servers in the group to restart Sun Ray services.
uteject Eject media from a removable storage media device.
utfwadm Manage firmware versions on the Sun Ray Clients.
utfwinstall Install the Sun Ray Operating Software (Sun Ray Client firmware).
utfwload Force the download of new firmware to a Sun Ray Client running older firmware than itsserver.
utfwsync Refresh the firmware level on the Sun Ray Clients to the level available on the Sun Rayservers in a failover group. It then forces all the Sun Ray Clients within the group to restart.
utfwuninstall Uninstall the Sun Ray Operating Software (Sun Ray Client firmware).
uthashpwd Create a hashed version of a password used for authenticating the enabling or disabling ofthe Configuration GUI.
utgmtarget Manage a group-wide list of explicit destinations for Sun Ray group membershipannouncements.
utgroupsig Set the failover group signature for a group of Sun Ray servers. The utgroupsig commandalso sets the Sun data store rootpw used by Sun Ray to a value based on the groupsignature. Although utgroupsig sets the rootpw in the utdsd.conf file, it does not setthe admin password, which is a separate entity, in the data store.
utgstatus View the failover status information for the local server or for the named server. Theinformation that the command displays is specific to that server at the time the command isrun.
utinstall Install, upgrade, and remove the Sun Ray Software.
utkeyadm Manage Sun Ray Client device keys for authentication.
utkeylock Modify the state of certain locking modifier keys on a user's keyboard.
utkiosk Import or export kiosk configuration information into the data store. It also supports storage ofmultiple named kiosk session configurations in the data store.
utkioskoverride Set the session type associated with a token, to select a kiosk session configuration fora token associated with a kiosk session, or to query the session type and kiosk sessioncurrently associated with a token.

Sun Ray Software Commands
55
Command Definition
utlicenseadm Manage Sun Ray device licenses.
utmhadm Manage multihead groups using a CLI.
utmhconfig Manage multihead groups using a GUI.
utmount Mount a file system on a Sun Ray mass storage device.
utpolicy Set and report the policy configuration of the Sun Ray Authentication Manager, utauthd.
utpreserve Save existing Sun Ray Software configuration data to the /var/tmp/SUNWut.upgradedirectory.
utpw Change the Sun Ray administrator password (also known as the UT admin password) usedby the Web-based and command-line administration applications.
utquery Display a Sun Ray Client's current parameter values.
utreader Add, remove, and configure token readers.
utrelease Display the version of the Sun Ray Software and the Sun Ray Operating Software installedon the server.
utreplica Configure the Sun Ray data store server to enable replication of administered data from adesignated primary server to each secondary server in a failover group. The data stores ofthe secondary servers remain synchronized automatically unless there is a power outage.
utresadm Control the resolution and refresh rate of the video monitor signal (persistent monitorsettings) produced by the Sun Ray Client.
utresdef Create, delete, and view resolution definitions, that is, monitor signal timing definitions formonitors attached to Sun Ray Clients.
utscreenresize Resize user's screen to its optimal size, which is useful for hotdesking.
utselect Present the output of utswitch -l as a list of servers in the current host group, to be usedfor reconnection of the current Sun Ray Client. A user can either select a server from this listor specify a server not in the current host group by typing its full name in the utselect textbox.
utsession List and manage Sun Ray sessions on the local Sun Ray server.
utset View and change Sun Ray Client settings.
utsettings Open the Sun Ray Settings GUI to view or change audio and visual settings for the Sun RayClient.
utsetup Run all the appropriate commands, including utinstall and utconfig, in the appropriatesequence to install and configure a Sun Ray server.
utstart Start Sun Ray services.
utstop Stop Sun Ray services.
utswitch Switch a Sun Ray Client session to another Sun Ray server. The utswitch command canalso list existing sessions for the current token.
uttsc Start a Windows connector session, providing a remote desktop.
uttscwrap Start a Windows connector session, providing a remote desktop. This command is anoptimized version of the uttsc command when using JDS on a Sun Ray server runningOracle Solaris.
utumount Unmount a file system from a Sun Ray mass storage device.

How to Set Up Access to the Sun Ray Software Man Pages
56
Command Definition
utuser Report Sun Ray user token registrations and manage those registrations. The utusercommand is able to obtain smart card token values from Sun Ray Clients that are configuredas dedicated token reader devices.
utwall Send a message or an audio file to users having an Xnewt or Xsun (X server unique to SunRay) process. The messages can be sent in email and displayed in a pop-up window.
utwho Assemble information about display number, token, logged-in user, and the like, in a compactformat.
utxconfig Manage X server configuration parameters for users of Sun Ray Client sessions.
utxlock Lock a Sun Ray desktop session.
4.1.1 How to Set Up Access to the Sun Ray Software Man Pages
Add the following paths to the MANPATH environment variable:
• /opt/SUNWut/man
• /opt/SUNWkio/man
• /opt/SUNWuttsc/man
• /opt/SUNWuttscwrap/man
4.2 Administration Tool (Admin GUI)
The Sun Ray Administration Tool (Admin GUI) is organized around primary Sun Ray objects such asservers, sessions, desktop units, and tokens. Each type of object has a dedicated tab that provides relatedfunctionality. Figure 4.1, “Admin GUI Home Screen” shows the home screen.

Administrative Name and Password
57
Figure 4.1 Admin GUI Home Screen
4.2.1 Administrative Name and Password
The default user name for the administration account is admin.
The password is set during the Sun Ray server configuration. If you can't remember the administrationpassword, you can use the utconfig -w command to reconfigure the administration software, includingthe password. To change the administration password, use the Advanced tab in the Admin GUI or theutpw command.
To allow another user account to perform administrative functions, see How to Enable or Disable MultipleAdministration Accounts (Oracle Linux) or How to Enable or Disable Multiple Administration Accounts(Oracle Solaris).
4.2.2 Admin GUI Tab Descriptions
Table 4.2, “Admin GUI Tab Descriptions” describes tabs provided with the Admin GUI. See Appendix B,Admin GUI Help for detailed reference information.
Table 4.2 Admin GUI Tab Descriptions
Tab Functions
Servers From the Servers tab, you can do the following tasks:

Admin GUI Tab Descriptions
58
Tab Functions• List all of the servers in the failover group.
• Display the host group's network connectivity status.
• Show the host group's installed Sun Ray packages.
• Display details about each server.
• Perform a warm restart of Sun Ray services on a local or failover group basis. A warm restartdoes not terminate sessions prior to the restart.
• Perform a cold restart of Sun Ray services on a local or failover group basis. A cold restartterminates all sessions on the selected servers prior to the restart.
Sessions From the Sessions tab, you can do the following tasks:
• List all the sessions, sorted by user sessions and idle sessions.
• Use the search function to find specific sessions such as those running on a single server orsessions where a specific user is logged in.
• Select a session's server to display details about the server or client and to select andterminate sessions.
Desktop Units From the Desktop Units tab, which includes the Sun Ray Clients and Oracle Virtual DesktopClients, you can do the following tasks:
• List all registered clients.
• List all connected clients.
• List all clients configured as token readers.
• List all clients participating in multihead groups.
Tokens From the Tokens tab, you can do the following tasks:
• Manage the tokens associated with users.
• Manage the pseudo-tokens associated with clients.
Advanced The Advanced tab includes the following subtabs:
Security Subtab
From the Security subtab, you can disable and re-enable security settings, such as encryptionof communication between client and server, server authentication, security mode, and deviceaccess.
System Policy Subtab
From the System Policy subtab, you can regulate authentication manager policy settings, suchas:
• Access for card users and non-card users, which includes enabling Kiosk Mode, Oracle VirtualDesktop Client access, or Mobile Sessions.
• Enabling Client Authentication

How to Log In to the Administration Tool (Admin GUI)
59
Tab Functions• Enabling the Multihead feature,
• Session Access when Hotdesking
Kiosk Mode Subtab
From the Kiosk Mode subtab, you can configure Kiosk Mode for your system.
Card Probe Order Subtab
From the Card Probe Order subtab, you can rearrange the order that smart cards are probed.You can move the cards that are used most frequently to the top of the list.
Data Store Password Subtab
From the Data Store Password subtab, you can change the password for the administratoraccount.
Log Files From the Log Files tab, you can do the following tasks:
• View Sun Ray system messages.
• View authentication events.
• View server administration events.
• View mount messages.
• View storage events.
All actions performed within the Admin GUI that modify system settings are logged in an audit trail.
4.2.3 How to Log In to the Administration Tool (Admin GUI)
This procedure describes how to log in to the Sun Ray Administration tool.
Note
If a session is inactive for 30 minutes, you must log in again. To change the timeoutvalue, see How to Change the Admin GUI Timeout.
1. Log in to your Sun Ray server's console or to any client attached to it.
2. Open a browser window and type the following URL:
http://localhost:1660
Note
If you specified a different port number when you configured the SunRay Software, use that port number in the URL. If you enabled securecommunication, the browser might be redirected to a secure port. The defaultsecure port is 1661.
3. In the User Name window, type the administrator user name and click OK.
4. In the password challenge screen, type the administration password and click OK.

How to Change the Admin GUI Locale
60
The Sun Ray Administration tool is displayed.
If you get a message denying access, check the following items:
• You are running a browser on a Sun Ray server or one of its clients.
• The browser is not using a different machine as an HTTP proxy server.
If you get a blank browser page:
• To access the Admin GUI from a system instead of the Sun Ray server, you must have remote accessenabled (it is disabled by default). To enable remote access to the Admin GUI, unconfigure the AdminGUI using the utconfig -w -u command and then run utconfig -w to reconfigure. Choose Yes toenable remote access.
4.2.4 How to Change the Admin GUI Locale
To display the locale correctly in the Admin GUI, change your browser's language preferences to thedesired locale.
4.2.5 How to Change the Admin GUI to English Locale
This procedure describes how to change the Admin GUI to display English if it is displaying an undesiredlanguage.
1. Become superuser on the Sun Ray server.
2. Export the English locale.
export LC_ALL=C
3. Stop the web admin services.
/etc/init.d/utwadmin stop
4. Start the web admin services.
/etc/init.d/utwadmin start
For a more permanent solution, you can remove the non-English Sun Ray Software packages from theserver. The following example removes the French packages and restarts the web admin services.
# /etc/init.d/utwadmin stop# pkgrm SUNWfuta SUNWfutwa SUNWfutwh SUNWfutwl# /etc/init.d/utwadmin start
4.2.6 How to Change the Admin GUI Timeout
This procedure describes how to change the timeout for the Admin GUI. By default, the Admin GUI timeoutvalue is 30 minutes.
1. Become superuser on the Sun Ray server.
2. Edit the /etc/opt/SUNWut/webadmin/webadmin.conf configuration file.

How to Enable or Disable Multiple Administration Accounts (Oracle Linux)
61
3. Change the following timeout value:
...# The session timeout (specified in minutes)session.timeout=30...
4. Restart the webadmin program.
# /opt/SUNWut/lib/utwebadmin restart
This tool automatically updates the web.xml file used by the web server hosting the Admin GUI.
4.2.7 How to Enable or Disable Multiple Administration Accounts (OracleLinux)
The Sun Ray server administrator can allow any valid UNIX user ID, which has been added to theutadmin authorized user list, to administer Sun Ray services using the Admin GUI. An audit trail of activityon these accounts is provided. The utadminuser command enables you to add existing UNIX users tothe utadmin authorized user list.
Authentication for accounts with administrative privileges is based on the PAM authentication framework.
4.2.7.1 How to Configure Admin GUI Privileges for UNIX Users (Oracle Linux)
Use the following procedure to configure the Sun Ray Admin GUI to allow access by the UNIX users in theutadmin authorized user list instead of the default admin account. Once you enable Admin GUI privilegesfor authorized users, you can add or remove users to the utadmin authorized list to manage access to theAdmin GUI.
1. For each UNIX user that needs authorization to the Admin GUI, add the user to the authorized user list.
# utadminuser -a username
You can run the utadminuser command without any options to list the current authorized users orwith the -d option to delete a user.
2. Add the following auth entries to the /etc/pam.d/utadmingui file:
#%PAM-1.0# BEGIN: added to utadmingui by SunRay Server Software -- utadminguiauth include system-auth# END: added to utadmingui by SunRay Server Software -- utadmingui
Note
Make sure to include the comment lines, which are needed for the cleanup to workproperly.
4.2.7.2 How to Limit Admin GUI Privileges to the Admin User (Oracle Linux)
This is the default Admin GUI privilege configuration when the Sun Ray Software is installed.
To limit Admin GUI privileges to the default admin user, replace the PAM entries in the /etc/pam.d/utadmingui file with the pam_sunray_admingui.so.1 module.

How to Enable or Disable Multiple Administration Accounts (Oracle Solaris 11)
62
# BEGIN: added to utadmingui by SunRay Server Software -- utadminguiauth sufficient /opt/SUNWut/lib/pam_sunray_admingui.so.1# END: added to utadmingui by SunRay Server Software -- utadmingui
Note
Make sure to include the comment lines, which are needed for the cleanup to workproperly.
4.2.8 How to Enable or Disable Multiple Administration Accounts (OracleSolaris 11)
The Sun Ray server administrator can allow any valid UNIX user ID, which has been added to theutadmin authorized user list, to administer Sun Ray services using the Admin GUI. An audit trail of activityon these accounts is provided. The utadminuser command enables you to add existing UNIX users tothe utadmin authorized user list.
Authentication for accounts with administrative privileges is based on the PAM authentication framework.
4.2.8.1 How to Configure Admin GUI Privileges for UNIX Users (Oracle Solaris 11)
Use the following procedure to configure the Sun Ray Admin GUI to allow access by the UNIX users in theutadmin authorized user list instead of the default admin account. Once you enable Admin GUI privilegesfor authorized users, you can add or remove users to the utadmin authorized list to manage access to theAdmin GUI.
1. For each UNIX user that needs authorization to the Admin GUI, add the user to the authorized user list.
# utadminuser -a username
You can run the utadminuser command without any options to list the current authorized users orwith the -d option to delete a user.
2. Add the following auth entries to the /etc/pam.d/utadmingui file:
#%PAM-1.0# BEGIN: added to utadmingui by SunRay Server Software -- utadminguiauth requisite pam_authtok_get.so.1auth required pam_dhkeys.so.1auth required pam_unix_cred.so.1auth required pam_unix_auth.so.1
Note
Make sure to include the comment lines, which are needed for the cleanup to workproperly.
4.2.8.2 How to Limit Admin GUI Privileges to the Admin User (Oracle Solaris 11)
This is the default Admin GUI privilege configuration when the Sun Ray Software is installed.
To limit Admin GUI privileges to the default admin user, replace the PAM entries in the /etc/pam.d/utadmingui file with the pam_sunray_admingui.so.1 module.
#%PAM-1.0 # BEGIN: added to utadmingui by SunRay Server Software -- utadmingui

How to Enable or Disable Multiple Administration Accounts (Oracle Solaris 10)
63
auth sufficient /opt/SUNWut/lib/pam_sunray_admingui.so.1
Note
Make sure to include the comment lines, which are needed for the cleanup to workproperly.
4.2.9 How to Enable or Disable Multiple Administration Accounts (OracleSolaris 10)
The Sun Ray server administrator can allow any valid UNIX user ID which has been added to the utadminauthorized user list to administer Sun Ray services using the Admin GUI. An audit trail of activity onthese accounts is provided. The utadminuser command enables you to add existing UNIX users to theutadmin authorized user list.
Authentication for accounts with administrative privileges is based on the PAM authentication framework.
4.2.9.1 How to Configure Admin GUI Privileges for UNIX Users (Oracle Solaris 10)
Use the following procedure to configure the Sun Ray Admin GUI to allow access by the UNIX users in theutadmin authorized user list instead of the default admin account. Once you enable Admin GUI privilegesfor authorized users, you can add or remove users to the utadmin authorized list to manage access to theAdmin GUI.
1. For each UNIX user that needs authorization to the Admin GUI, add the user to the authorized user list.
# utadminuser -a username
You can run the utadminuser command without any options to list the current authorized users orwith the -d option to delete a user.
2. Modify the /etc/pam.conf file to use the other authentication PAM stack auth entries to create thePAM stack for utadmingui
# BEGIN: added to utadmingui by SunRay Server Software -- utadminguiutadmingui auth requisite pam_authtok_get.so.1utadmingui auth required pam_dhkeys.so.1utadmingui auth required pam_unix_cred.so.1utadmingui auth required pam_unix_auth.so.1
Note
Make sure to include the comment line, which is needed for the cleanup to workproperly.
4.2.9.2 How to Limit Admin GUI Privileges to the Admin User (Oracle Solaris 10)
This is the default Admin GUI privilege configuration when the Sun Ray Software is installed.
To limit Admin GUI privileges to the default admin user, modify the /etc/pam.conf file and replace thePAM stack for utadmingui with the pam_sunray_admingui.so.1 module.
# BEGIN: added to utadmingui by SunRay Server Software -- utadminguiutadmingui auth sufficient /opt/SUNWut/lib/pam_sunray_admingui.so.1

How to Audit Admin GUI Sessions
64
Note
Make sure to include the comment line, which is needed for the cleanup to workproperly.
4.2.10 How to Audit Admin GUI Sessions
The administration framework provides an audit trail of the Admin GUI. The audit trail is an audit log of theactivities performed by multiple administration accounts. All events that modify system settings are loggedin the audit trail. Sun Ray Software uses the syslog implementation.
The events are logged in the following log file:
/var/opt/SUNWut/log/messages
All audit events are prefixed with the keyword utadt:: so you can filter events from the messages file.
For example, session termination from the Admin GUI generates the following audit event:
Jun 6 18:49:51 sunrayserver usersession[17421]: [ID 521130 user.info] utadt:: username= /{demo} hostname={sunrayserver} service={Sessions}cmd={/opt/SUNWut/lib/utrcmd sunrayserver /opt/SUNWut/sbin/utsession -x -d 4 -t /Cyberflex_Access_FullCrypto.1047750b1e0e -k 2>&P1}message={terminated User "Cyberflex_Access_FullCrypto.1047750b1e0e" with display number="4" on /"sunrayserver"}status={0} return_val={0}
where:
• username = User's UNIX ID
• hostname = Host on which the command is executed
• service = Name of the service being executed
• cmd = Name of the command being executed
• message = Details about the action being performed

65
Chapter 5 Sun Ray Server and Networking
Table of Contents5.1 Log Files .................................................................................................................................... 655.2 How to Start or Stop Sun Ray Services ....................................................................................... 67
5.2.1 How to Stop Sun Ray Services ........................................................................................ 675.2.2 How to Start Sun Ray Services (Warm Restart) ................................................................. 675.2.3 How to Start Sun Ray Services (Cold Restart) .................................................................. 67
5.3 How to Check and Fix Corrupted Configuration Files (Oracle Solaris 10) ....................................... 685.4 How to Unconfigure a Sun Ray Server ........................................................................................ 695.5 How to Disconnect a Sun Ray Server From the Interconnect ........................................................ 705.6 User Fields in the Sun Ray Data Store ........................................................................................ 705.7 Network Troubleshooting ............................................................................................................. 70
5.7.1 Network Load .................................................................................................................. 705.7.2 The utcapture Utility ..................................................................................................... 715.7.3 utcapture Examples ..................................................................................................... 715.7.4 The utquery Command .................................................................................................. 72
This chapter provides information about administering the Sun Ray server, including log files andmanaging Sun Ray services. Network troubleshooting information is also provided.
5.1 Log Files
Significant activity occurring on the Sun Ray server is logged and saved. The server stores this informationin text files.
The structure and content of the various messages written to these files and other Sun Ray Softwarelog files is arbitrary and might change at any time. The messages do not provide a stable interface forprogrammatic consumption.
Table 5.1, “Sun Ray Server Log Files” describes the log files that are maintained on the Sun Ray server.
Table 5.1 Sun Ray Server Log Files
Log File Path Description
Administration /var/opt/SUNWut/log/admin_log Lists operations performed during serveradministration. This log is updated daily.Archived files are stored on the system forup to one week and are annotated usingnumeric extensions, for example, from filename admin_log.0 to admin_log.5.
Authentication /var/opt/SUNWut/log/auth_log Lists events logged from the AuthenticationManager. The auth_log file is updatedup to a limit of 10 every time the server'sauthentication policy is changed or started.The archived authentication files areannotated using numeric extensions, forexample, from auth_log.0 to auth_log.9.

Log Files
66
Log File Path Description
Automatic mounting /var/opt/SUNWut/log/utmountd.log Lists mount messages for mass storagedevices. The archived utmountd filesare annotated using numeric extensions,for example, from utmountd.log.0 toutmountd.log.9.
Mass storage devices /var/opt/SUNWut/log/utstoraged.log Lists mass storage device events.The archived storage files areannotated using numeric extensions, forexample, from utstoraged.log.0 toutstoraged.log.9.
Messages /var/opt/SUNWut/log/messages Lists events from the server's clients,including details of registering, inserting, orremoving smart cards. This file is updateddaily. Archived files are stored up to sevendays or 3.5 MB, annotated with numericextensions, for example, from messages.0to messages.5.
When using a shared network (LAN) withexternal DHCP server support (configurednetwork using utadm -L on), loggingfor each event type is disabled unlessthe LogXXX value and the LogHost valueare set. See Table 13.4, “Sun Ray ClientConfiguration Parameters (.parms)” fordetails.
Web administration /var/opt/SUNWut/log/utwebadmin.log Lists web administration-related messages.The archived log files are annotated withnumeric extensions.
USB redirection /var/opt/SUNWut/log/uttscpd.log Lists USB redirection messages from theWindows connector.
Table 5.2, “Sun Ray Server Installation and Configuration Log Files” list the specific installation andconfiguration logs files.
Table 5.2 Sun Ray Server Installation and Configuration Log Files
Log File Path Description
Activation • Oracle Solaris - /var/adm/log/utctl.*
• Oracle Linux - /var/log/SUNWut/utctl.*
List events logged during post-installationproduct activation. The archived logfiles are annotated with time stampextensions.
Installation • Oracle Solaris - /var/adm/log/utinstall.*
• Oracle Linux - /var/log/utinstall.*
List events logged during installation. Thearchived log files are annotated with timestamp extensions.
Setup • Oracle Solaris - /var/adm/log/utsetup.*
• Oracle Linux - /var/log/SUNWut/utsetup.*
List events logged during installation/configuration when performed by utsetup.The archived log files are annotated withtime stamp extensions.

How to Start or Stop Sun Ray Services
67
5.2 How to Start or Stop Sun Ray Services
The following procedures describe how to start and stop the Sun Ray services. There are many situationswhen Sun Ray services need to be restarted, such as when you change one of the configurationparameters in the Sun Ray data store.
5.2.1 How to Stop Sun Ray Services
1. Become superuser on the Sun Ray server.
2. Stop the Sun Ray services.
# /opt/SUNWut/sbin/utstop
Once stopped, the Sun Ray services will not restart even after the server is rebooted. You must use theutstart command to start Sun Ray services.
5.2.2 How to Start Sun Ray Services (Warm Restart)
This procedure, known as a warm restart, starts Sun Ray services without clearing existing sessions.
Note
A disconnect will occur for a brief time on active Sun Ray Clients before theyreconnect again.
1. Become superuser on the Sun Ray server.
2. Start the Sun Ray services.
# /opt/SUNWut/sbin/utstart
Note
The following warning may display: WARNING: The current DBus filedescriptor limit can only support up to approximately 120logged-in desktops. Please reboot the system if you requiresupport for more desktops. As instructed, reboot the server if the Sun Rayserver is supporting more than 120 desktops.
5.2.3 How to Start Sun Ray Services (Cold Restart)
This procedure, known as a cold restart, starts Sun Ray services and clears existing sessions.
Note
Be sure to notify your users before performing a cold restart, which terminatesall existing sessions on a server. To restart Sun Ray services without terminatingsessions, perform a warm restart.
1. Become superuser on the Sun Ray server.
2. Start the Sun Ray services.

How to Check and Fix Corrupted Configuration Files (Oracle Solaris 10)
68
# /opt/SUNWut/sbin/utstart -c
Note
The following warning may display: WARNING: The current DBus filedescriptor limit can only support up to approximately 120logged-in desktops. Please reboot the system if you requiresupport for more desktops. As instructed, reboot the server if the Sun Rayserver is supporting more than 120 desktops.
5.3 How to Check and Fix Corrupted Configuration Files (OracleSolaris 10)
If the dtlogin daemon cannot start the Xsun or Xnewt server properly, the following configuration filesmight be corrupted:
• /etc/dt/config/Xservers
• /etc/dt/config/Xconfig
The following procedure explains how to correct this problem.
Note
This procedure shows output from a simplified example. Your output may havetens of lines between the BEGIN SUNRAY CONFIGURATION and END SUNRAYCONFIGURATION comments.
1. As a user of the Sun Ray server, open a shell window and compare the /usr/dt/config/Xserversand /etc/dt/config/Xservers files.
% diff /usr/dt/config/Xservers /etc/dt/config/Xservers
This command compares a known good file with the suspect file. The output should be similar to thefollowing example.
106a107,130> # BEGIN SUNRAY CONFIGURATION> :3 SunRay local@none /etc/opt/SUNWut/basedir/lib/utxsun :3 -nobanner..> :18 SunRay local@none /etc/opt/SUNWut/basedir/lib/utxsun :18 -nobanner> # END SUNRAY CONFIGURATION
The first line of output contains 106a107,130. The 106 means that the two files are identical to the106th line of the files. The a107,130 means that the information on lines 107 through 130 of the secondfile would have to be added to the first file to make it the same as the second file.
If your output shows the first three digits to be a number less than 100, the /etc/dt/config/Xservers file is corrupt.
2. Compare the /usr/dt/config/Xconfig and /etc/dt/config/Xconfig files.
% diff /usr/dt/config/Xconfig /etc/dt/config/Xconfig
The output should be similar to the following example.

How to Unconfigure a Sun Ray Server
69
156a157,180> # BEGIN SUNRAY CONFIGURATION> Dtlogin.*_8.environment: SUN_SUNRAY_TOKEN=ZeroAdmin.m1.at88sc1608.6d0400aa..> Dtlogin.*_9.environment: SUN_SUNRAY_TOKEN=ZeroAdmin.m1.at88sc1608.a10100aa> # END SUNRAY CONFIGURATION
If your output shows the first three digits to be a number less than 154, the /etc/dt/config/Xconfig file is corrupt.
3. If either file is corrupted, continue this procedure to replace the configuration files.
4. Become superuser on the Sun Ray server and shut down the Sun Ray Client services.
Note
Replacing the Xservers file requires shutting down all Sun Ray Client services.Remember to inform users of the outage.
# /opt/SUNWut/sbin/utstop
5. Replace the Xservers and Xconfig files as appropriate.
# /bin/cp -p /usr/dt/config/Xservers /etc/dt/config/Xservers# /bin/cp -p /usr/dt/config/Xconfig /etc/dt/config/Xconfig
Note
For headless servers, comment out or remove the :0 entry from the Xserversfile.
6. Re-initialize the authentication policy.
# /opt/SUNWut/sbin/utstart -c
The extra lines within the previous Xservers and Xconfig files are automatically rebuilt.
5.4 How to Unconfigure a Sun Ray Server
1. Become superuser on the Sun Ray server.
2. Remove the replication configuration.
# /opt/SUNWut/sbin/utreplica -u
3. Unconfigure Sun Ray Software.
# /opt/SUNWut/sbin/utconfig -u
4. Answer y to all the prompts.

How to Disconnect a Sun Ray Server From the Interconnect
70
5.5 How to Disconnect a Sun Ray Server From the Interconnect
Note
This procedure disconnects users from their sessions on the Sun Ray server. Makesure users terminate their sessions before you continue.
1. Become superuser on the Sun Ray server.
2. Disconnect the Sun Ray server from the Sun Ray interconnect.
# /opt/SUNWut/sbin/utadm -r
Note
(Oracle Solaris Only) If you press Ctrl-C while performing utadm configuration, theAdmin GUI may not function correctly the next time you invoke it. To correct thiscondition, use the dhtadm -R command.
5.6 User Fields in the Sun Ray Data Store
The Sun Ray data store is a private data store service used for access to Sun Ray Software administrationand configuration data. The data store is useful for maintaining consistency across failover groups.
Table 5.3, “Sun Ray Data Store User Fields” describes the user fields in the Sun Ray data store.
Table 5.3 Sun Ray Data Store User Fields
Fields Description
Token ID User's unique token type and ID. For smart cards, this value is a manufacturer type andthe card's serial ID. For clients, this value is the type "pseudo" and the client's Ethernetaddress. Examples: mondex.9998007668077709 pseudo.080020861234
Server Name Name of the Sun Ray server that the user is using. This setting is optional.
Server Port Sun Ray server's communication port. This field should generally be set to 7007. Thissetting is optional.
User Name User's name.
Other Info Any additional information you want to associate with the user, for example, an employeeor department number. This setting is optional.
5.7 Network Troubleshooting
This section describes some potential reasons for slow network performance and the tools to helptroubleshoot network problems.
To help you tune the network performance in a Sun Ray environment, see Chapter 20, PerformanceTuning.
5.7.1 Network Load
In situations where network load or packet loss is too high, network cables or switch equipment might bedefective in very rare cases.

The utcapture Utility
71
1. Verify that network connections are 100F.
2. Use utcapture to assess network latency and packet loss.
As latency and packet loss increase, performance suffers.
5.7.2 The utcapture Utility
The utcapture utility connects to the Sun Ray Authentication Manager and reports packet loss statisticsand round-trip latency timings for each client connected to this server. See the utcapture man page tolearn more about this command.
Table 5.4, “utcapture Output” describes the information that utcapture outputs.
Table 5.4 utcapture Output
Data Element Description
TERMINALID The MAC address of the client.
TIMESTAMP The time the loss occurred in year-month-day-hour-minute-second format, for example,20041229112512.
TOTALPACKET
Total number of packets sent from the server to the client.
TOTAL LOSS Total number of packets reported as lost by the client.
BYTES SENT Total number of bytes sent from the server to the client.
PERCENTLOSS
Percentage of packets lost between the current and previous polling interval.
LATENCY Time in milliseconds for a round trip from the client to the server.
5.7.3 utcapture Examples
The following command captures data every 15 seconds from the Authentication Manager running on thelocal host and then writes it to stdout if any change occurs in packet loss for a client.
% utcapture -h |
The following command captures data every 15 seconds from the Authentication Manager running on thelocal host and then writes it to stdout.
% utcapture -r > raw.out
The following command captures data every 15 seconds from the Authentication Manager running onserver5118.eng and then writes the output to stdout if any change occurs in packet loss for the client withID 080020a893cb or 080020b34231.
% utcapture -s sunray_server5118.eng 080020a893cb 080020b34231
The following command processes the raw data from the input file raw-out.txt and then writes to stdoutthe data only for those clients that had packet loss.
% utcapture -i raw-out.txt

The utquery Command
72
5.7.4 The utquery Command
The utquery command interrogates a client and displays the client's initialization parameters withthe IP addresses of the DHCP services that supplied those parameters. This command can be helpfulin determining whether a client was able to obtain the parameters that were expected in a particulardeployment and in determining specific DHCP servers that contributed to the clients initialization. See theutquery man page to learn more about this command.

73
Chapter 6 Failover Groups
Table of Contents6.1 Failover Groups Overview ........................................................................................................... 736.2 Failover Process ......................................................................................................................... 746.3 Load Balancing ........................................................................................................................... 746.4 Mixing Different Sun Ray Servers ................................................................................................ 746.5 Authentication Requirements ....................................................................................................... 756.6 Dedicated Primary Servers for Data Store ................................................................................... 756.7 Setting Up a Failover Group ....................................................................................................... 75
6.7.1 How to Configure a Primary Server .................................................................................. 766.7.2 How to Add a Secondary Server ...................................................................................... 766.7.3 How to Synchronize Primary and Secondary Sun Ray Servers ........................................... 776.7.4 How to Change the Group Manager Signature .................................................................. 77
6.8 Additional Failover Group Tasks .................................................................................................. 786.8.1 How to Take a Server Offline and Online .......................................................................... 786.8.2 How to Disable Load Balancing ........................................................................................ 786.8.3 How to Show the Current Sun Ray Data Store Replication Configuration ............................. 786.8.4 How to Remove the Replication Configuration ................................................................... 796.8.5 How to View the Failover Group Status ............................................................................ 79
6.9 Recovery Issues and Procedures ................................................................................................ 796.9.1 How to Rebuild the Primary Server's Administration Data Store .......................................... 796.9.2 How to Replace the Primary Server with a Secondary Server ............................................. 806.9.3 Secondary Server Recovery ............................................................................................. 81
6.10 Group Manager Details ............................................................................................................. 816.10.1 Group Manager Configuration ......................................................................................... 82
6.11 Load Balancing Troubleshooting ................................................................................................ 826.11.1 How Load Balancing Works ............................................................................................ 826.11.2 Verifying Load Balancing Configuration ........................................................................... 836.11.3 Fixing Poor Load Balancing Situations ............................................................................ 85
This chapter describes how to setup and manage a failover group.
6.1 Failover Groups OverviewA failover group consists of two or more Sun Ray servers that provide users with a high level of availabilityin case one server becomes unavailable. When a server in a failover group becomes unavailable, whetherfor maintenance, a power outage, or any other reason, each desktop client connected to it reconnects toanother server in the failover group that has an existing session for the client's current token. If the clientcan't find an existing session for the current token, it connects to a server selected by the load balancingalgorithm. This server presents a login screen to the user, who then logs in to create a new session. Thesession on the failed server is lost.
A failover group consists of a primary server and one or more secondary servers, configured with theutreplica command. Each Sun Ray server hosts its own local Sun Ray data store. However, onlyread access is permitted on the local data stores. Any data changes (write access) are first written on theprimary server and later replicated on the secondary servers' Sun Ray data stores.
Servers in a failover group authenticate (or learn to trust) one another by using a common group signature,a key used to sign messages sent between servers in the group. The group signature must be configured,using the utgroupsig command, to be identical on each server. See Section 6.7.4, “How to Change theGroup Manager Signature” for details. The admin password asked during utconfig or utsetup also

Failover Process
74
needs to be identical on all the Sun Ray servers in a failover group. See Section 4.2.1, “AdministrativeName and Password” for details.
You can use the utgstatus command or the Servers tab in the Admin GUI to see the status of all serversin a failover group. The following server modes affect how the server participates in a failover group:
• Online: The server participates in the normal session creation process controlled by the load balancingalgorithm in the failover group.
• Offline: The server does not participate in load balancing (the load balancing algorithm does not selectthis server for new sessions), although sessions can still be created on it, either explicitly, through theuse of the utswitch or utselect command, or implicitly, if all other servers are down.
When using a failover group, clients are automatically redirected to servers based on load balancingbefore sessions are created. However, users can use the utselect or utswitch commands for manualredirection. The utselect GUI is the preferred method to use for server selection. For more information,see the utselect man page.
For more information about how to set up multiple failover groups that use regional hotdesking, seeChapter 9, Hotdesking.
6.2 Failover ProcessIn Sun Ray Software, the Group Manager manages the failover process. For every server in a failovergroup, the Group Manager does the following actions:
• Detects the presence of other Sun Ray servers belonging to the same group.
• Monitors the availability (liveness) of the other servers.
• Exchanges information about allocation of sessions and server load for load balancing purposes.
• Facilitates the redirection of clients to other servers when needed.
6.3 Load BalancingWhen the Group Manager receives a token from a desktop client for which no server owns an existingsession, it redirects the client. This redirection is determined according to the result of a load-sensitivesession placement lottery conducted among the servers in the group, based on each server's capacity(number and speed of its CPUs), load, number of sessions, and other factors.
Note
Load balancing is handled automatically, as described. The administrator maychoose to turn load balancing off but cannot assign values or otherwise modify thealgorithm.
When a server in a failover group fails, the Group Manager on each remaining server distributes the failedserver's clients to create new sessions among the remaining servers.
For details on how load balancing works and load balancing troubleshooting information, see Section 6.11,“Load Balancing Troubleshooting”.
6.4 Mixing Different Sun Ray ServersThere may be situations when you need to mix different Sun Ray servers in a failover group, either basedon the hardware architecture, operating system, or Sun Ray Software version. The following list describeswhich mix of Sun Ray servers are supported in a failover group.

Authentication Requirements
75
• Mixing SPARC-based and x86-based servers running Oracle Solaris in the same failover group issupported.
• Mixing servers running Oracle Solaris and Oracle Linux in the same failover group is not supported.
• Mixing servers running different versions of Sun Ray Software is supported. However, this is notrecommended for long-term use in a production environment. Failover groups that use more than oneversion of Sun Ray Software will be unable to use all the features provided in the latest releases.
Note
When multiple versions of Sun Ray Software are used in a failover group,the primary server should run the oldest of the versions in use. Otherwise,the presence of a newer feature on the primary server might prevent properreplication of the Sun Ray data store to secondary servers that are running olderversions.
• If a Sun Ray environment has Unix desktop users, then all the Sun Ray servers in the failover groupshould run the same version of the operating system. Otherwise, using different GNOME desktopversions from the same home directory can lead to a corrupted desktop state.
6.5 Authentication RequirementsAll of the servers in a failover group should use the same authentication mechanism and name service. Forexample, a failover group should not use one server with NIS authentication and other servers with NIS+authentication.
If a failover group does have different authentication mechanisms, the servers might fail to obtain theirexisting non-smart card mobile (NSCM) sessions if a user name contains the same characters but the caseis different, for example, ps121664, PS121664, or Ps121664.
6.6 Dedicated Primary Servers for Data StoreWhen configuring failover groups, the Sun Ray data store is automatically configured to enable replicationof the Sun Ray administration data across the primary and secondary Sun Ray servers. In large failovergroups, significant loads may be pushed onto the primary server from various sources. In addition,runaway processes from user applications on the primary can degrade the health of the entire failovergroup.
Failover groups of more than four servers should have a dedicated primary server solely devoted to servethe Sun Ray data store. For example, a dedicated primary server should not host any Sun Ray sessions.To configure the primary server so that it serves only the Sun Ray data store, use the utadm -f commandto take the server offline. Secondary servers should always serve user sessions and the data store.
6.7 Setting Up a Failover GroupUse the following procedures to set up a failover group.
1. Set up server addresses and client addresses. This step is needed only when using a private networkor a when using a Sun Ray server that provides DHCP services. See Chapter 19, Alternate NetworkConfigurations for details.
2. Configure a primary server.
3. Add secondary servers.
4. Synchronize the primary and secondary servers.

How to Configure a Primary Server
76
5. Change the Group Manager signature.
6.7.1 How to Configure a Primary Server
Layered administration of the failover group takes place on the primary server, where the master copy ofthe Sun Ray data store resides. The utreplica command designates a primary server, configures theserver of its administration primary status, and configures the host names of all the secondary servers.
The term primary server reflects the replication relationship, not the failover order.
Before You Begin
• Configure the primary server before you add the secondary servers.
• If a common home directory is mounted on machines with different GNOME versions, conflicts betweenor among the versions cause unpredictable behavior. Do not try to use multiple GNOME versions with acommon home directory.
Steps
1. Become superuser on the primary Sun Ray server.
2. If you did not initially configure the server as part of a failover group during the Sun Ray Softwareinstallation, you must configure it now using the utconfig command.
# /opt/SUNWut/sbin/utconfig
Answer y to this question:
Configure this server for a failover group? (y/[n])? y
You will also be asked for the group signature.
3. Configure this server as the primary Sun Ray server and identify all secondary servers.
# /opt/SUNWut/sbin/utreplica -p secondary-server1 [secondary-server2...]
where secondary_server1 [secondary_server2...] is a space-separated list of unique hostnames of the secondary servers.
When the script ends, a log file is available at:
For Oracle Solaris:
/var/adm/log/utreplica.Year_Month_Date_Hour:Minute:Second.log
For Oracle Linux:
/var/log/SUNWut/utreplica.Year_Month_Date_Hour:Minute:Second.log
6.7.2 How to Add a Secondary Server
The secondary servers in the group store a replicated version of the primary server's administration data.
How to Synchronize Primary and Secondary Sun Ray Servers
77
Use the utreplica command to configure each secondary server of its secondary status and also thehost name of the primary server for the group. Adding or removing secondary servers requires services tobe restarted on the primary server.
1. If the secondary server has not been configured on the primary server, become superuser on theprimary server and rerun the utreplica command with the new secondary server.
# /opt/SUNWut/sbin/utreplica -p -a secondary-server1 [secondary-server2...]
where secondary_server1 [secondary_server2...] is a space-separated list of unique hostnames of the secondary servers.
2. Become superuser on the secondary server.
3. If you did not initially configure the server as part of a failover group during the Sun Ray Softwareinstallation, you must configure it now using the utconfig command.
# /opt/SUNWut/sbin/utconfig
Answer y to this question:
Configure this server for a failover group? (y/[n])? y
You will also be asked for the group signature.
4. Add the secondary server.
# /opt/SUNWut/sbin/utreplica -s primary-server
where primary-server is the host name of the primary server.
6.7.3 How to Synchronize Primary and Secondary Sun Ray Servers
Log files for Sun Ray servers contain time-stamped error messages that can be difficult to interpret if thetime is out of sync. To make troubleshooting easier, make sure that all secondary servers periodicallysynchronize with their primary server.
The Network Time Protocol (NTP) is the recommended protocol to synchronize primary and secondaryservers. With NTP, you can synchronize to an absolute time source and it provides additionalsynchronization capabilities. In some deployments, the simpler TIME protocol configured through therdate command may be sufficient.
Note
Both the NTP and TIME protocols are disabled by default on Oracle Solaris servers.
6.7.4 How to Change the Group Manager Signature
The utconfig command asks for a Group Manager signature if you chose to configure for failover. Thesignature, which is stored in the /etc/opt/SUNWut/gmSignature file, must be the same on all serversin the group.
The location can be changed in the gmSignatureFile property of the auth.props file.

Additional Failover Group Tasks
78
To form a fully functional failover group, the signature file must meet the following criteria:
• Owned by root with only root permissions.
• Contain at least eight characters, in which at least two characters are letters and at least one character isnot.
Note
For slightly better security, use long passwords.
Steps
1. Become superuser on the Sun Ray server.
2. Start the utgroupsig command.
# /opt/SUNWut/sbin/utgroupsig
You are prompted for the signature.
3. Enter the signature twice identically for acceptance.
4. For each Sun Ray server in the group, repeat this procedure.
Note
Be sure to use the utgroupsig command rather than any other method to providethe signature. utgroupsig also ensures proper internal replication.
6.8 Additional Failover Group TasksHere are some additional tasks that you may need to perform for failover group administration.
6.8.1 How to Take a Server Offline and Online
Being able to take servers offline makes maintenance easier. In an offline state, no new sessions arecreated. However, old sessions continue to exist and can be reactivated unless the Sun Ray Software isaffected.
• Take a server offline:
# /opt/SUNWut/sbin/utadm -f
• Take a server online:
# /opt/SUNWut/sbin/utadm -n
6.8.2 How to Disable Load Balancing
In the auth.props file, set enableLoadBalancing to false.
6.8.3 How to Show the Current Sun Ray Data Store Replication Configuration
# /opt/SUNWut/sbin/utreplica -l

How to Remove the Replication Configuration
79
The result indicates whether the server is stand-alone, primary (with the secondary host names), orsecondary (with the primary host name).
6.8.4 How to Remove the Replication Configuration
# /opt/SUNWut/sbin/utreplica -u
6.8.5 How to View the Failover Group Status
Note
Sun Ray server broadcasts do not traverse routers or servers other than Sun Rayservers.
Command-Line Steps
• View the failover group status for the local Sun Ray server:
# /opt/SUNWut/sbin/utgstatus
Admin GUI Steps
1. Click the Servers tab.
The Mode column lists the status for all the servers in the failover group.
2. Select a server name to display its Server Details screen.
3. Click View Network Status.
The Network Status screen is displayed.
The Network Status screen provides information on group membership and network connectivity fortrusted servers, which are those servers in the same failover group.
6.9 Recovery Issues and ProceduresIf one of the servers of a failover group fails, the remaining group members operate from the administrationdata that existed prior to the failure. The recovery procedure depends on the severity of the failure andwhether a primary or secondary server has failed.
Note
When the primary server fails, you cannot make administrative changes to thesystem. For replication to work, all changes must succeed on the primary server.
6.9.1 How to Rebuild the Primary Server's Administration Data Store
Use this procedure to rebuild the primary server's data store from a secondary server, and perform theprocedure on the server that was the primary server after it is fully operational again. This procedure usesthe same host name for the replacement server.
Caution
Be sure to set umask appropriately before running utldbmcat. Otherwise,unprivileged users can gain access to the utadmin password.

How to Replace the Primary Server with a Secondary Server
80
1. On one of the secondary servers, capture the current data store to a file called /tmp/store.
# /opt/SUNWut/srds/lib/utldbmcat /var/opt/SUNWut/srds/dbm.ut/id2entry.dbb > /tmp/store
This command provides an LDIF format file of the current data store.
2. Use FTP to send this file to the /tmp directory on the primary server.
3. Follow the Sun Ray Software installation instructions.
4. After running utinstall, configure the server as a primary server for the group.
Make sure that you use the same admin password and group signature.
# utconfig:# utreplica -p secondary-server1 [secondary-server2...]
5. Shut down the Sun Ray services, including the data store.
# /opt/SUNWut/sbin/utstop
6. Restore the data.
# /opt/SUNWut/srds/lib/utldif2ldbm -c -j 10 -i /tmp/store
This command populates the primary server and synchronizes its data with the secondary server. Thereplacement server is now ready for operation as the primary server.
7. Restart Sun Ray services.
# /opt/SUNWut/sbin/utstart -c
8. (Optional) Confirm that the data store is repopulated.
# /opt/SUNWut/sbin/utuser -l
9. (Optional) Perform any additional configuration procedures.
6.9.2 How to Replace the Primary Server with a Secondary Server
Note
This procedure is also known as promoting a secondary server to primary.
1. Choose a server in the existing failover group to be promoted and configure it as the primary server.
# utreplica -u# utreplica -p secondary-server1 [secondary-server2...]
2. Reconfigure each of the remaining secondary servers in the failover group to use the new primaryserver:

Secondary Server Recovery
81
# utreplica -u# utreplica -s new-primary-server
This command resynchronizes the secondary server with the new primary server.
Note
This process may take some time to complete, depending on the size of the datastore. Since Sun Ray services will be offline during this procedure, you may wantto schedule your secondary servers' downtime accordingly. Be sure to perform thisprocedure on each secondary server in the failover group.
6.9.3 Secondary Server Recovery
If a secondary server fails, administration of the group can continue. A log of updates is maintained andapplied automatically to the secondary server once it has recovered. If the secondary server needs to bereinstalled, repeat the steps described in the Sun Ray Software installation instructions.
6.10 Group Manager Details
Every server has a Group Manager module that monitors availability and facilitates redirection. It is coupledwith the Authentication Manager.
In setting policies, the Authentication Manager uses the selected authentication modules and decides whattokens are valid and which users have access.
Caution
The same policy must exist on every server in the failover group or undesirableresults might occur.
The Group Managers create maps of the failover group topology by exchanging keepalive messagesamong themselves. These keepalive messages are sent to a UDP port (typically 7009) on all of theconfigured network interfaces. The keepalive message contains enough information for each Sun Rayserver to construct a list of servers and the common subnets that each server can access. In addition, theGroup Manager tracks the last time that a keepalive message was received from each server on eachinterface.
The keepalive message contains the following information about the server:
• Server's host name
• Server's primary IP address
• Elapsed time since the server was booted
• IP information for every interface the server can reach
• Machine information, such as the number and speed of CPUs, configured RAM, and so on
• Load information, such as the CPU and memory utilization, number of sessions, and so on
The last two items are used to facilitate load balancing.
The information maintained by the Group Manager is used primarily for server selection when a tokenis presented. The server and subnet information is used to determine the servers to which a given client

Group Manager Configuration
82
can connect. These servers are queried about sessions belonging to the token. Servers whose lastkeepalive message is older than the timeout are deleted from the list, because either the networkconnection or the server is probably down.
6.10.1 Group Manager Configuration
The Authentication Manager configuration file, /etc/opt/SUNWut/auth.props, contains propertiesused by the Group Manager at runtime. The properties are:
• gmport
• gmKeepAliveInterval
• enableGroupManager
• enableLoadBalancing
• enableMulticast
• multicastTTL
• gmSignatureFile
• gmDebug
• gmTarget
Note
These properties have default values that are rarely changed. Only Oracle supportpersonnel should direct you to change these values to help tune or debug yoursystems. Any properties that are changed must be changed for all servers in thefailover group because the auth.props file must be the same on all servers in afailover group.
Property changes do not take effect until the Authentication Manager is restarted, which you can do byperforming a warm restart of the Sun Ray services.
6.11 Load Balancing Troubleshooting
There may be times when load balancing is not working properly. This section provides details about howload balancing works and ways to troubleshoot any problems that may occur.
6.11.1 How Load Balancing Works
The first step to troubleshoot load balancing is to understand how it works. When a desktop client initiatesor re-initiates a connection to the Authentication Manager (such as when a smart card is inserted or a username is entered at the NSCM login GUI), a token is presented to the Authentication Manager (utauthd).The Authentication Manager checks whether a user session for the token is available on any of the SunRay servers in the failover group. If no user session is available, a load balancing process is initiated. Idlesessions are ignored during the load balancing process.
For the load balancing process, various load-related parameters and the server's total CPU power arecombined into a parameter called "desirability." Then, a weighted random selection is made between all"online" servers in the same failover group, where the token is more likely to be redirected to a server witha higher desirability. Once the token is redirected to a Sun Ray server according to the load balancing

Verifying Load Balancing Configuration
83
process, the Authentication Manager on the selected server checks whether an idle session already existsfor the redirected token on this server. If no idle session exists for the redirected token on the server, thenthe Authentication Manager initiates a new session.
Note
The reason to incorporate a weighted random selection into the load balancingalgorithm is to avoid all sessions ending up on the same server when many userslog in simultaneously, for example, specific times in the morning when everybodygets into the office.
Here are some examples to show when load balancing occurs:
• A smart card user logs out, pulls out the card, and reinserts the card. Load balancing occurs when thecard is reinserted.
• An NSCM user logs out. Load balancing always occurs when the user next logs in at the NSCM loginGUI.
• A user terminates the session on a Sun Ray Client by pressing Ctrl-Alt-Bksp-Bksp. Load balancingoccurs on the next login.
Here are some more general notes about load balancing:
• A Sun Ray server that is "offline" will still provide the NSCM login GUI if NSCM is enabled. However, ifa user then logs in, load balancing is triggered and the actual user session will be created on anotherserver.
• DHCP options that define the Sun Ray server to which a desktop client connects affects only the initialconnection. The Authentication Manager then assigns the client to an online server in the failover groupbased on the normal load balancing process.
• The initial connection to the Authentication Manager can be load balanced by adding several hosts tothe servers= line of the .parms file and adding the select=random line. The select=random lineforces the Sun Ray Client to randomly select one of the hosts in the servers= line.
• The load balancing algorithm relies on the Sun Ray server's OS to provide correct system information.Some CPUs have support for running multiple threads per core. If the OS represents this CPUfunctionality as additional cores in the CPU, this can cause poor load balancing in a heterogeneousfailover group.
• Load balancing is completely unrelated to assigning DHCP addresses to desktop clients. Load balancingoccurs after a desktop client obtains a DHCP address and connects to the Authentication Manager.
• NSCM sessions are automatically terminated at log out, and newly created when the user name isentered at the NSCM login GUI. Because of this, NSCM usually leads to much better load balancing.
6.11.2 Verifying Load Balancing Configuration
Use the following list to verify if load balancing is properly configured in your failover group.
• Make sure that all the servers are configured as part of a failover group through the utconfig orutsetup command, as shown below:
Configure this server for a failover group? (y/[n])? yAbout to configure the following software products:.

Verifying Load Balancing Configuration
84
.
.Failover group: yes You have chosen to configure this server for a failover group.
All servers in a failover group must share a unique signature,which is a string of 8 or more characters where at least twocharacters are letters and at least one is not.
Enter signature:Re-enter signature:
The utconfig or utsetup command creates a log file in /var/adm/log (Oracle Solaris) or /var/log/SUNWut (Oracle Linux). Check this log file to verify if the server was configured for a failover group.You can also verify that the /etc/opt/SUNWut/utadmin.conf file exists on each server.
• Make sure all the servers are using the same group signature, which is requested by the utconfig orutsetup command.
You can use the utgstatus command on a server to show the list of Sun Ray servers that are in thesame failover group, meaning they share the same group signature. If a server is not on the list, you canuse the utgroupsig command to update the group signature on the missing server.
• Make sure session selection policy is enabled on each server in the failover group by using the -g optionof the utpolicy command.
Beyond the session selection policy, all Sun Ray Software policy options must be identical across allservers in a failover group.
Note
The currently configured utpolicy options are synced from the primary server'sSun Ray data store to all the secondary servers when they are configured.Once the primary and secondary servers are configured, making any utpolicychanges on any server in a failover group are automatically replicated to all theother servers.
• It is recommended that all servers in a failover group have an identical /etc/opt/SUNWut/auth.props file.
• Make sure the Group Manager and load balancing are enabled in the server's /etc/opt/SUNWut/auth.props file:
enableLoadBalancing = trueenableGroupManager = true
If these values are false, the Sun Ray server will not be included in load balancing.
• If all Sun Ray servers in the failover group are in the same subnet and the network components aredropping multicast packets, change the communication to broadcast by disabling the multicast setting inthe /etc/opt/SUNWut/auth.props file:
enableMulticast = false
By default, Sun Ray servers within the same failover group use multicast communication.
• Make sure all the Sun Ray servers in the failover group are "online" by using the Admin GUI or theutgstatus command.

Fixing Poor Load Balancing Situations
85
• Make sure all the Sun Ray interfaces are up and reachable through the utgstatus command.
Also, check the /var/opt/SUNWut/log/auth_log* file for token query timed out messages,for example:
token query timed out to host labhost2 interface 192.168.128.2
In this example, labhost2 was unreachable on interface 192.168.128.2, so this interface was ignoredduring load balancing.
Note
If the group signatures match but utgstatus shows some servers or interfacesas down or unreachable even though they are up, it is likely that some networkcomponent (such as bad firmware or a bad port on a switch) is dropping multicastpackets. Try disabling the mulitcast setting as described above. Also, check thepatch state of the interface driver, especially if complex configurations such asIPMP are used.
• If different network interfaces are connected to the same physical switch, make sure the networkinterfaces have different ethernet addresses.
• If a network issue is likely, run the following commands to display any errors or collisions:
/bin/netstat -in /bin/netstat -sn
Also, collect a few minutes of /opt/SUNWut/sbin/utcapture output to check for packet loss. Theutcapture checks only server-to-client UDP traffic.
• Make sure you are following the rules for mixing Sun Ray servers in a failover group. See Section 6.4,“Mixing Different Sun Ray Servers” for details.
• Make sure the utauthd daemon is running on the Sun Ray servers in order to accept new sessions.
6.11.3 Fixing Poor Load Balancing Situations
After a server outage in a failover group with two servers, there may be a situation when almost all usersare hosted on the live server while the second server is idle. This occurs because during an outage of oneserver, the remaining servers have to host all user sessions. This session imbalance will not change evenafter all servers are available, because load balancing is strictly limited to Sun Ray session creation. Again,session creation occurs when a token is presented and it currently has no user session, such as when asmart card is inserted that does not have a user session for its token.
There is no way to move an existing user session to another server in order to balance the load. To fix thisparticular problem, at least half of the current users should force the creation of new sessions so they canbe properly load balanced. For example, they could log out of an NSCM session or log out of a smart cardsession and pull out and reinsert their smart card. You can also affect load balancing by taking a server"offline" to temporarily prevent Sun Ray servers that are under a high load from being assigned any newsessions.

86

87
Chapter 7 Sessions and Tokens
Table of Contents7.1 Sessions Overview ..................................................................................................................... 87
7.1.1 Authentication Manager .................................................................................................... 887.1.2 Session Manager ............................................................................................................. 89
7.2 Managing Sessions ..................................................................................................................... 907.2.1 How to Redirect a Session ............................................................................................... 907.2.2 How to Disconnect a Session ........................................................................................... 917.2.3 How to Terminate a Session ............................................................................................ 927.2.4 How To Identify a Hung Session ...................................................................................... 927.2.5 How To Kill a Hung Session ............................................................................................ 92
7.3 Tokens ....................................................................................................................................... 927.3.1 Registering Tokens .......................................................................................................... 937.3.2 How to Register a Token ................................................................................................. 937.3.3 How to Register a Pseudo-Token ..................................................................................... 937.3.4 How to Enable, Disable, or Delete a Token ....................................................................... 94
7.4 Token Readers ........................................................................................................................... 947.4.1 How to Configure a Token Reader ................................................................................... 947.4.2 How to Locate a Token Reader ........................................................................................ 957.4.3 How to Get a Token ID From a Token Reader .................................................................. 95
7.5 Session Troubleshooting ............................................................................................................. 967.5.1 Problem: The dtlogin daemon cannot start the Xsun or Xnewt server properly. ................. 96
This chapter provides details on desktop sessions and tokens used to manage the sessions.
7.1 Sessions OverviewA desktop session is a group of services or applications associated with an authentication token andcontrolled by the Session Manager. Desktop sessions reside on a Sun Ray server and can be directedto any Sun Ray Client or Oracle Virtual Desktop Client. From a user's perspective, a desktop session isusually an instance of an OS desktop.
Sessions can be in one of two states, Connected or Disconnected:
• Connected: Every session with a connected status is displayed on client. The session is automaticallydisconnected when the user removes the smart card or explicitly switches the client to a differentsession, for example, with the utswitch or utselect commands.
• Disconnected: These sessions are still executed on a server but are not connected to a client and,consequently, are not displayed. However, a user can reconnect to a disconnected session, for exampleby inserting a smart card containing the appropriate token into the card reader on a client. This changesthe session's state to connected and causes it to be displayed on that client.
Sessions can further be grouped into two categories:
• Idle sessions: These sessions typically display only a login screen (or login greeter such as dtlogin)where no user has been logged in yet. The lifetime of these sessions is controlled by the Sun Raysystem. For example, disconnected idle sessions are automatically terminated (reaped off) by thesystem after a specific time interval.
• User sessions (or non-idle sessions): These are sessions with UNIX users logged in. Users may startup additional applications from within the sessions, thus potentially consuming a lot of system resources.

Authentication Manager
88
User sessions are therefore of more interest to administrators than idle sessions. To free systemresources, monitor the number of long-running disconnected user sessions and, when appropriate,terminate sessions that are no longer in use.
7.1.1 Authentication Manager
The Authentication Manager implements chosen policies for identifying and authenticating users on thedesktop clients using pluggable components called modules to verify user identities, and implements siteaccess policies defined by the administrator. It also supplies an audit trail of the actions of users who havebeen granted administrative privileges for Sun Ray services. The Authentication Manager is not visible tousers.
The interaction between the Authentication Manager and the client is shown in Figure 7.1, “Authenticationand Session Manager Interaction” and works as follows:
1. A user accesses a client.
2. The client sends the user's token information to the Authentication Manager and requests access. If theuser inserts a smart card in the client, the card's type and ID are used as the token. If not, the client'sEthernet address is used as a pseudo-token.
3. Based on the policy defined by the system administration, the Authentication Manager accepts ordenies the access request.
4. If the user's access request is accepted, the Authentication Manager tells the Session Manager to startan X Windows session, which displays the login screen. Oracle Solaris 10 implementations use thedtlogin display manager. Oracle Linux and Oracle Solaris 11 implementations use the gdm displaymanager, or GNOME Display Manager (GDM).
Figure 7.1 Authentication and Session Manager Interaction
If no Sun Ray server is found to provide a session (see Chapter 2, Planning a Sun Ray NetworkEnvironment), the client sends a broadcast request for any Authentication Manager on its subnet.

Session Manager
89
7.1.2 Session Manager
The Session Manager interacts with the Authentication Manager and directs services to the user. A serviceis any application that can connect directly to the Sun Ray Client. Such applications can include audio,video, Xservers, and device control of the client. For example, a typical mail application is not a servicebecause it is accessed through an Xserver rather than directly.
The Session Manager is used at startup for services, for managing screen space, and as a rendezvous forthe Authentication Manager.
The Session Manager keeps track of sessions and services by mapping services to sessions and bindingand unbinding related services to or from a specific client. The Session Manager takes authentication onlyfrom authorized Authentication Managers listed in the /etc/opt/SUNWut/auth.permit file.
The following sequence describes how the process starts, ends, and restarts:
1. After a user's token is authenticated, the Authentication Manager determines whether a sessionexists for that token. If a session does not exist, the Authentication Manager asks the SessionManager to create a session and then starts the appropriate services for the session according to theauthentication policy decisions taken by the administrator. Creating a session usually requires startingan Xserver process for the session.
2. When services are started, they join the session explicitly by contacting the Session Manager.
3. The Authentication Manager informs the Session Manager that the session associated with the tokenis to be connected to a specific desktop client. The Session Manager then informs each service in thesession that it must connect directly to the client.
4. The user can then interact with the session. The Session Manager mediates control of the screenspace between competing services in a session and notifies the services of changes in screen spaceallocation.
5. When the user removes the smart card, or presses Shift-Pause in an NSCM session, or power cyclesthe client, or is inactive for longer than the screen lock idle timeout interval, the Authentication Managerdetermines that the session associated with that token must be disconnected from that client. TheAuthentication Manager notifies the Session Manager, which in turn notifies all the services in thesession and any USB devices to disconnect.
6. When the user re-inserts the smart card, or logs in again to get access to an NSCM session, theAuthentication Manager requests the Session Manager to create a new temporary session and thenuses it to authenticate the user. This is known as Remote Hotdesk Authentication (RHA). After the userhas been authenticated, the desktop client is connected directly to the user's session.
Note
RHA does not apply to anonymous Kiosk Mode or to token readers. Sun RaySoftware can be configured to turn this security policy feature off.
The Session Manager is consulted only if the state of the session changes or if other services are added.When a user's token is no longer mapped to a client, for example, when a card is removed, the SessionManager disconnects the services from the client, but the services remain active on the server. Forexample, programs attached to the Xserver continue to run although their output is not visible. The SessionManager daemon must continue running. To verify that the Session Manager daemon is running, use theps command and look for utsessiond.
If the Authentication Manager quits, the Session Manager disconnects all the authorized sessions andrequires them to be reauthenticated. These services are disconnected but still active. If the Session

Managing Sessions
90
Manager is disrupted, it restarts automatically. Each service contacts the Session Manager to requestreattachment to a particular session.
7.2 Managing Sessions
This section the list the tasks to manage sessions on a Sun Ray server.
7.2.1 How to Redirect a Session
A desktop session is automatically redirected to the appropriate Sun Ray server based on the followingsituations:
• Failover group redirection occurs after token insertion.
• Regional Hotdesking redirection (if configured) occurs after token or user identification and before userauthentication.
To manually redirect a session to a different server, use the utselect GUI or the utswitch command.
7.2.1.1 How to Manually Redirect to a Different Sun Ray Server (utselect)
• From a shell window on the desktop client, type the following command:
% utselect
The selections in the window are sorted in order of the most current to least current active sessions for thetoken ID.
As shown in Figure 7.2, “Server Selection (utselect) GUI”, the Server column lists the servers accessiblefrom the desktop client. The Session column reports the DISPLAY variable X session number on theserver if one exists. In the Status column, Up indicates that the server is available. The first server in thelist is selected by default. Select a server from the list or type the name of a server in the Enter server field.If a server without an existing session is selected, a new session is created on that server.

How to Disconnect a Session
91
Figure 7.2 Server Selection (utselect) GUI
7.2.1.2 How to Manually Redirect to a Different Sun Ray Server (utswitch)
• In a shell window on the desktop client, type the following command:
% utswitch -h host
where host is the host name or IP address of the Sun Ray server to which the selected client isredirected.
7.2.2 How to Disconnect a Session
When you disconnect a desktop session, the client stops displaying the user's desktop and requiresauthentication to re-access the session again in most situations. Disconnecting a session is important forsecurity reasons when you have to leave a client unattended.
When using smart cards, the session disconnects when you remove the smart card from the client. ForNSCM and RHA sessions, you can disconnect a client session through any of the following methods:
• (Oracle Solaris only) Lock the desktop through the current desktop manager. For example, in the JavaDesktop System, choose Launch > Lock Screen. Locking the desktop forces the session to disconnect.A disconnect will also occur if the desktop screen lock idle time interval is exceeded.
Locking an Oracle Linux desktop locks only the desktop and does not disconnect the session. If a newuser wants needs to use the desktop client where the desktop is locked, the user must reset the clientto disconnect the session and make the client available for use. So, for Oracle Linux desktops, using theutdetach command is recommended.
• Use the utdetach command:

How to Terminate a Session
92
% /opt/SUNWut/bin/utdetach
• Press Shift-Pause.
To change the disconnect hot key combination, see Section 13.2.2, “Sun Ray Client Hot Keys”.
Note
The hot key combination does not work with a full-screen Windows session.
• Connect to your session through another client, either by inserting your smart card and authenticating toRHA or by logging in through NSCM.
7.2.3 How to Terminate a Session
To terminate the current session and the current X server process, perform one of the following actions:
• Log out from your current desktop session.
• Press the key combination Ctrl-Alt-Bksp-Bksp.
A momentary delay might occur before the session terminates.
Note
Use Ctrl-Alt-Bksp-Bksp only for emergencies when you are unable to log out fromthe desktop. When using this method, applications will not have the opportunity toexit properly and save data, and some application data corruption might result.
7.2.4 How To Identify a Hung Session
1. Become superuser on the Sun Ray server.
2. Type the following command:
# /opt/SUNWut/sbin/utdesktop -l -w
7.2.5 How To Kill a Hung Session
1. Become superuser
2. Type the following command:
# /opt/SUNWut/sbin/utsession -k -t token
7.3 Tokens
As described earlier, the Authentication Manager implements the chosen policies for identifying andauthenticating users on Sun Ray Clients. Tokens are the key piece for this process.
Sun Ray tokens are authentication keys used to associate a session with a user. A token is a string thatconsist of a token type and an identifier. If a user inserts a smart card into a client, the card's type andidentifier are used as the token (for example mondex.9998007668077709). If the user is not using a

Registering Tokens
93
smart card, the token type pseudo and the client's identifier (MAC address) are supplied as the token (forexample pseudo.080020861234).
The initial token is used to check access rights and to determine the user's session. During this process,the token is eventually translated into other token types (such as escape token, auth token, etc.) usedinternally by the Sun Ray system. As an administrator, you rarely need to deal with these internal tokentypes, focusing instead on the initial tokens provided on smart cards or as pseudo-tokens.
7.3.1 Registering Tokens
You can also register smart card tokens and pseudo-tokens in the Sun Ray data store to assign them tospecific users (also known as token owners).
Although it requires more setup and administration to register smart cards, there a number of reasons toregister tokens:
• Storing the owner's name as well as any other information that helps you to manage tokens in yourorganization.
• Creating alias tokens to enable users to access the same session with multiple tokens. For example, if auser loses a smart card, you can register a new smart card as a replacement. This will be an alias token.
• Overriding the group-wide kiosk mode setting specified on the System Policy page. If kiosk modefunctionality has been configured on your system, you can also specify, for each token, whether the usershould be directed to a regular (non-kiosk) session or a Kiosk session when the token is inserted.
Much like the utuser command, the Tokens tab in the Admin GUI lists all tokens currently registeredin the Sun Ray data store. You can search for specific tokens by entering a search string that includesparts of either the token identifier, owner, or other information. The Search menu enables you to limit thescope of the search further, so that it is also possible to display all currently used tokens, regardless oftheir registration.
The Policy tab (under the Advanced tab) makes it possible to define high-level access rules for either smartcard access or pseudo-token access as well as access rights for registered tokens (see the Policy helppage).
You can administer tokens through the utuser command or the Admin GUI.
7.3.2 How to Register a Token
This procedure describes how to register a token using the Admin GUI.
1. Click the Tokens tab.
2. Select a token to display that token's properties.
3. Click New.
4. Type an identifier or select a token reader.
7.3.3 How to Register a Pseudo-Token
This procedure describes how to register a pseudo-token with the Admin GUI.
1. Click the Desktop Units tab.
2. Select any Desktop Unit Identifier to view properties for that client.

How to Enable, Disable, or Delete a Token
94
3. On the Desktop Unit Properties page, click View Token Details.
4. Click Edit to display the Edit Token Properties page.
5. Provide details such as ownership and to specify a session type: Default, Kiosk, or Regular.
7.3.4 How to Enable, Disable, or Delete a Token
This procedure describes how to enable, disable, or delete a token with the Admin GUI.
1. Select the token's identifier on the Token Properties page.
2. Click Enable, Disable, or Delete.
7.4 Token ReadersA token reader is a specific Sun Ray Client that you can set up to administer user's tokens, such asregistering smart cards. This token reader is not the same as hardware devices into which users inserttheir smart cards, which are typically called smart card readers. Site administrators can use these tokenreaders to administer Sun Ray tokens, such as assigning a token to a user (token owner).
Sun Ray Software provides a way to designate one or more specific Sun Ray Clients as dedicatedtoken readers. A dedicated token reader is not used for normal Sun Ray services, so it does not need akeyboard, mouse, or monitor. Inserting a smart card in a token reader does not enable hotdesking. It doesallow the administrator to assign the card to a user.
When you enable an authentication policy with registered users or token owners, be sure to specify smartcard IDs for them. To use token readers with regional hotdesking based on Sun Ray pseudo-tokens, usethe Site-specific Mapping Library.
Figure 7.3, “Token Reader Setup” shows that the second client is used as a token reader.
Figure 7.3 Token Reader Setup
7.4.1 How to Configure a Token Reader
Command Line Steps
The utreader command enables a client to be used as a token reader for registering smart cards.When a client is configured as a token reader, inserting or removing a smart card does not initiate sessionmobility. Any session connected to that client remains connected to it regardless of card movement events.

How to Locate a Token Reader
95
Token reader mode is useful when you want to determine the raw token ID of a smart card.
• To configure the Sun Ray Client with MAC address 0800204c121c as a token reader:
# utreader -a 0800204c121c
• To re-enable the Sun Ray Client with MAC address 0800204c121c to recognize card movement eventsand perform session mobility based on the smart card inserted into the client:
# utreader -d 0800204c121c
• To unconfigure all token readers on this server:
# utreader -c
Admin GUI Steps
1. Click the Desktop Units tab.
2. Click the identifier of the client that you want to use as a token reader.
3. On the Desktop Units Properties window, click Edit.
4. On the Edit Desktop Unit Properties window, select the Token Reader option.
5. Click OK.
The client you have selected is now set up to read smart card tokens.
6. Restart Sun Ray services.
The client is now a token reader.
7.4.2 How to Locate a Token Reader
This procedure describes how to locate a token reader using the Admin GUI.
1. Click the Desktop Units tab.
2. Select Token Readers from the drop-down list.
3. Click Search.
The default search finds all possible matches.
To change the search criteria, type text in the Search text box.
7.4.3 How to Get a Token ID From a Token Reader
You can access the token card reader by invoking utuser -r from any server in the relevant failovergroup.
Type the following command:
# utuser -r token-reader

Session Troubleshooting
96
where token-reader is the MAC address of the client containing the smart card whose ID you want toread. Insert the smart card into the client and run the utuser command. This command queries the clientfor the smart card token's ID and, if successful, displays it. For example:
# /opt/SUNWut/sbin/utuser -r 08002086e18fInsert token into token reader '08002086e18f' and press return.Read token ID 'mondex.9998007668077709'
7.5 Session Troubleshooting
The Sun Ray administration model has seven types of user sessions:
• Default - Normal user login
• Register - User self-registration
• Kiosk - Anonymous user operation
• Insert card - User smart card required
• Card error - Unrecognized user smart card type
• No entry - User's smart card token is blocked
• Session Refused - The server refuses to grant a session to a client that does not meet the server'ssecurity requirements
The Default, Register, and Kiosk session types have normal login processes. When a problem occurs,investigate the following:
• Sun Ray server configuration files. However, the Sun Ray Software itself modifies some configurationfiles. In most cases, these changes are identified with Sun Ray Software specific comments. Do notchange these modifications.
• Any X server startup files that have been modified
• dtlogin or gdm status
Although the last four session types display icons on the Sun Ray Client, they do not have login processes.If the user removes and reinserts the smart card immediately, the icon disappears but the Wait for SessionOSD icon remains. These session types and their OSDs do not cause concern. The user can perform oneof the following actions:
• Insert a recognized smart card in the correct orientation
• Ask the Sun Ray administrator to grant access
• Ask the Sun Ray administrator to download the correct firmware
7.5.1 Problem: The dtlogin daemon cannot start the Xsun or Xnewt serverproperly.
See Section 5.3, “How to Check and Fix Corrupted Configuration Files (Oracle Solaris 10)”.

97
Chapter 8 Smart Card Services
Table of Contents8.1 Overview .................................................................................................................................... 978.2 Smart Card Bus Protocol ............................................................................................................ 988.3 Smart Card Configuration Files ................................................................................................... 988.4 Smart Card Probe Order ............................................................................................................. 988.5 Hotdesking with Smart Cards ...................................................................................................... 998.6 Configuring Smart Card Services ................................................................................................ 99
8.6.1 How to Configure Primary Smart Card Readers for Hotdesking and Authentication ............... 998.6.2 How to Configure External CCID-Compliant USB Smart Card Readers for Authentication(Oracle Solaris) ....................................................................................................................... 1008.6.3 How to Add a Smart Card Configuration File ................................................................... 1018.6.4 How to Change the Smart Card Probe Order .................................................................. 1018.6.5 How to Change the Smart Card Bus Protocol (Oracle Solaris) .......................................... 101
8.7 Configuring Access to Smart Card Readers ............................................................................... 1028.7.1 Determining Smart Card Device Names .......................................................................... 1038.7.2 Smart Card Reader Access Policy Example .................................................................... 1038.7.3 How to Add a Smart Card Reader Access Policy ............................................................. 1048.7.4 How to Modify a Smart Card Reader Access Policy ......................................................... 1058.7.5 How to List Access Policies for Smart Card Readers ....................................................... 1058.7.6 How to Disable a Smart Card Reader Access Policy ........................................................ 1068.7.7 How to Disable Access to a Smart Card Reader .............................................................. 106
8.8 Troubleshooting Smart Card Services ........................................................................................ 1078.8.1 Smart Card Transaction Problems .................................................................................. 107
8.9 CCID IFD Handler for External USB Smart Card Readers (Oracle Solaris) ................................... 1088.9.1 How to Install CCID IFD Handler .................................................................................... 1088.9.2 How to Uninstall CCID IFD Handler ................................................................................ 1088.9.3 Known Issues ................................................................................................................ 109
This chapter provides details about the smart card services provided by Sun Ray Software.
8.1 OverviewSun Ray Software automatically provides smart card services, such as smart card authentication, throughthe PC/SC-lite API. PC/SC (Personal Computer/Smart Card) is the standard framework for smart carddevice access on multiple OS platforms.
Smart card services include interoperability with the integrated smart card reader on a Sun Ray Client oran enabled smart card reader connected to a client computer running Oracle Virtual Desktop Client. ForSun Ray servers running Oracle Solaris, external CCID-compliant USB smart card readers on both SunRay Clients and Oracle Virtual Desktop Clients are supported with the CCID IFD handler, which can bedownloaded separately.
Custom applications are frequently used to provide the following solutions:
• Strong smart card-based authenticated logins and PKCS#11
• S/MIME digital signature message signing and encryption
All Sun Ray 2 Series Clients and Sun Ray 3 Series Clients support smart cards that operate at all threeof the ISO-7816 defined Vcc voltages of 1.8 Volts (Class C), 3 Volts (Class B), and 5 Volts (Class A).

Smart Card Bus Protocol
98
The client firmware automatically chooses the most appropriate voltage to operate the card. There are noadministrator settings available or required to control this feature.
For the latest list of smart cards tested with Sun Ray Software, see the Smart Cards for Hotdesking pageon Oracle Technology Network.
8.2 Smart Card Bus Protocol
Sun Ray Software uses a customized smart card bus protocol, called scbus, to exchange smart cardtransactions between a Sun Ray server and its desktop clients. Previous to Sun Ray Software 5.3, therewas only one version of the scbus protocol, which is referred to as scbus v1. With Sun Ray Software 5.4 orlater, scbus v2 is available and it provides the following enhancements:
• Extended APDU support (ISO-7816-4 2005 rev)
• Compliance with the PC/SC 2.0 IFD Handler API
• Smart card services for Oracle Virtual Desktop Clients
• Protocol and parameters selection (PPS) for Sun Ray 3 Series Clients
The scbus v2 protocol is supported on all Sun Ray 2 Series Clients, Sun Ray 3 Series Clients, and OracleVirtual Desktop Client version 3.1 or later. Sun Ray 1 Series Clients do not support the scbus v2 protocol.If the scbus v2 protocol is enabled on a Sun Ray server, Sun Ray 1 Series Clients will not be able to usesmart card services either natively on the default desktop or through the Windows connector.
By default, scbus v1 is enabled on Sun Ray servers running Oracle Solaris and scbus v2 is enabled onSun Ray servers running Oracle Linux. The scbus v1 protocol is not supported on Sun Ray servers runningOracle Linux. If you need to change the smart card bus protocol on Sun Ray servers running OracleSolaris, see Section 8.6.5, “How to Change the Smart Card Bus Protocol (Oracle Solaris)”.
8.3 Smart Card Configuration Files
When using a smart card on a desktop client, the Sun Ray server must identify the smart card type beingused and extract a unique identifier from the card. The smart card types are identified through smart cardconfiguration files, which are written in the SwapDrop language and located in the: /etc/opt/SUNWut/smartcard directory. All files end with a .cfg suffix, as in, acme_card.cfg.
When a user inserts a smart card into a desktop client, the available smart card configuration files are runin order based on the smart card probe order, as described in Section 8.4, “Smart Card Probe Order”.When run, the configuration file performs an I/O action with the smart card to try to identify it.
If a configuration file identifies the smart card, a unique token ID is sent to the server and the sessionassociated with that token ID becomes the active session connected to the client. If no configuration filescan identify the card, then the Card Error icon is displayed on the client and there is no session activatedfor the client.
8.4 Smart Card Probe Order
The order in which smart cards are inspected is called the probe order. Every time a smart card is insertedinto a desktop client, the Sun Ray server tries to identify the card type using the specified probe order. Theutcard command or the Advanced > Card Probe Order page in the Admin GUI enables you to set upa group-wide probe order, which is stored in the Sun Ray data store. Only smart cards identified by oneof the configuration files specified in the probe order list are accepted. You can add or remove smart cardconfiguration files from this list to restrict session access to specific card types.

Hotdesking with Smart Cards
99
In the absence of a group-wide probe order, the Sun Ray server uses the local probe order defined in the/etc/opt/SUNWut/smartcard/probe_order.conf file. If no local probe order has been set up, adefault probe order is used. Changes in smart card probe order require Sun Ray services to be restarted.
8.5 Hotdesking with Smart CardsUnless you use the non-smart card mobility (NSCM) feature, smart cards must be used to hotdesk fromone client to another. For Sun Ray Clients, only the internal smart card reader can be used for hotdesking.External smart card readers for hotdesking are not supported.
For Oracle Virtual Desktop Clients, any connected smart card reader can be used for hotdesking. Toconfigure a smart card reader for hotdesking, you need to use the Smart Card setting to enable smart cardaccess and to choose the smart card reader if there is more than one connected. Once configured, thesmart card reader uses the scbus channel and is handled just like the internal smart card reader on a SunRay Client. See the Oracle Virtual Desktop Client User's Guide for details.
8.6 Configuring Smart Card ServicesThis section provides the various procedures needed to configure smart card services on a Sun Rayserver, so users can use smart cards on their desktop clients for hotdesking and authentication.
8.6.1 How to Configure Primary Smart Card Readers for Hotdesking andAuthentication
This procedure describes how to configure smart card services for the primary smart card reader on adesktop client, which is the internal smart card reader on a Sun Ray Client or the configured smart cardreader connected to a client computer running Oracle Virtual Desktop Client. To configure a smart cardreader on Oracle Virtual Desktop Client, you need to use the Smart Card setting to enable smart cardaccess and to choose the smart card reader if there is more than one connected. Once configured, thesmart card reader uses the scbus channel and is handled just like the internal smart card reader on a SunRay Client.
1. Become superuser on the Sun Ray server.
2. Enable smart card services for the primary smart card reader.
By default, smart card services for the primary smart card reader is enabled. You can use theutdevadm command to display which services are enabled or disabled. If smart card services aredisabled, use the following steps to enable it.
# /opt/SUNWut/sbin/utdevadm -e -s internal_smartcard_reader
Note
You can also use the Admin GUI to enable smart card services. Select theInternal Smart Card Reader option on the Advanced > Security page.
3. (Oracle Solaris only) To gain the latest smart card services functionality, including support for OracleVirtual Desktop Clients, make sure the scbus v2 protocol is enabled.
The scbus v1 protocol is enabled by default. See Section 8.6.5, “How to Change the Smart Card BusProtocol (Oracle Solaris)” for details.
4. Restart Sun Ray services.
# /opt/SUNWut/sbin/utstart -c

How to Configure External CCID-Compliant USB Smart Card Readers for Authentication (Oracle Solaris)
100
5. (Windows connector) To enable the smart card reader for the Windows desktop, use the -rscard:on of the uttsc command.
See Section 17.13, “Smart Cards” for more details.
8.6.2 How to Configure External CCID-Compliant USB Smart Card Readers forAuthentication (Oracle Solaris)
This procedure describes how to configure smart card services for external CCID-compliant USB smartcard readers connected to a Sun Ray Client or a client computer running Oracle Virtual Desktop Client.CCID-compliant USB smart card readers are redirected through the Windows RDP smart card channel,which enables the smart card to be used for Windows session authentication.
This procedure applies only to Sun Ray servers running Oracle Solaris, because the CCID IFD handlersoftware is not supported on Sun Ray servers running Oracle Linux.
Note
You can use external USB smart card readers that are not CCID-compliant, butthey will be redirected to the Windows desktop through USB redirection. BecauseUSB redirection is available after the user logs in, those smart card readers cannotbe used for Windows authentication.
1. Become superuser on the Sun Ray server.
2. Enable USB devices on the Sun Ray server.
By default, external USB device services are enabled. You can use the utdevadm command to displaywhich services are enabled or disabled. If USB devices disabled, use the following steps to enable it.
# /opt/SUNWut/sbin/utdevadm -e -s usb
Note
You can also use the Admin GUI to enable smart card services. Select the USBPort option on the Advanced > Security page.
3. To gain the latest smart card services functionality, including support for Oracle Virtual Desktop Clients,make sure the scbus v2 protocol is enabled.
The scbus v1 protocol is enabled by default. See Section 8.6.5, “How to Change the Smart Card BusProtocol (Oracle Solaris)” for details.
4. Install the CCID IFD handler software.
See Section 8.9, “CCID IFD Handler for External USB Smart Card Readers (Oracle Solaris)” forinstallation and troubleshooting information.
5. Restart Sun Ray services.
# /opt/SUNWut/sbin/utstart -c
6. (Windows connector) To enable the smart card reader for the Windows desktop, use the -rscard:on of the uttsc command.
See Section 17.13, “Smart Cards” for the additional steps to configure smart card services on aWindows system.

How to Add a Smart Card Configuration File
101
8.6.3 How to Add a Smart Card Configuration File
This procedure describes how to add a smart card configuration file to the Sun Ray data store. Onceadded, the configuration file is automatically assigned the last position in the smart card probe order.
1. Become superuser on the Sun Ray server.
2. Copy the smart card configuration file to the /etc/opt/SUNWut/smartcard directory.
The file name must end with a .cfg suffix.
3. Add the smart card configuration file.
# /opt/SUNWut/sbin/utcard -a filename
4. Restart the Sun Ray services.
# /opt/SUNWut/sbin/utstart -c
5. Verify that the card was added.
# /opt/SUNWut/sbin/utcard -l
8.6.4 How to Change the Smart Card Probe Order
Admin GUI Steps
1. Click the Advanced tab.
2. Click the Card Probe Order subtab.
3. Change the order of the smart cards.
4. Click Set Probe Order.
5. Click Cold Restart on the Servers page to restart Sun Ray services.
Command Line Steps
1. Become superuser on the Sun Ray server.
2. List the current order of the smart cards.
# /opt/SUNWut/sbin/utcard -l
3. Change the probe order of a smart card.
# /opt/SUNWut/sbin/utcard -r name,version,new-position
4. Restart the Sun Ray services for the new order to take effect.
# /opt/SUNWut/sbin/utstart -c
8.6.5 How to Change the Smart Card Bus Protocol (Oracle Solaris)
Note
The scbus v2 protocol is the default protocol for Oracle Linux and it cannot bechanged.

Configuring Access to Smart Card Readers
102
By default, scbus v1 is enabled on a Sun Ray server running Oracle Solaris. Choose the scbus versionbased on your environment:
• scbus v1 - Specify if managing Sun Ray Clients running Sun Ray Software 5.2 firmware or earlier.
• scbus v2 - Specify if managing Sun Ray Clients running Sun Ray Operating Software 11.0 or later or ifmanaging Oracle Virtual Desktop Clients version 3.1 or later.
Admin GUI Steps
1. Click the Advanced tab.
2. Click the Security subtab.
3. In the Devices section, choose the scbus version in the Internal Smart Card Reader field under theDevices section.
4. Click Save.
5. Click Cold Restart on the Servers page to restart Sun Ray services.
Command Line Steps
1. Become superuser on the Sun Ray server.
2. Change the smart card bus protocol.
# /opt/SUNWut/sbin/utdevadm -p scbus -v version-number
where version-number can be v1 or v2. You can use the -p scbus with no other options to viewthe current scbus version set on the Sun Ray server.
3. Restart the Sun Ray services for the new protocol to take effect.
# /opt/SUNWut/sbin/utstart -c
8.7 Configuring Access to Smart Card Readers
By default, smart card readers attached to Sun Ray Clients are accessible to all users. Sun Ray Softwarenow enables you to configure user access to smart card readers based on the zones configured on theSun Ray server. Specifically, you can configure which smart card readers are accessible in which zones.Once you configure a smart card reader as being accessible in a zone, users with the appropriate zonepermissions can access the smart card reader.
The utdevpolicy command enables you to configure access to smart card readers through deviceaccess policies. If you add a policy for at least one smart card reader, all smart card readers are controlledby the currently configured policies.
This access policy feature is available only on Sun Ray servers running Oracle Solaris Trusted Extensionsand for internal or external smart card readers attached to Sun Ray Clients.
Here are some general device access policy rules and notes when using the utdevpolicy command,which apply to smart card reader access:
• Smart card services must be configured on the Sun Ray server before you can configure access to thesmart card readers. This prerequisite includes configuring the CCID IFD handler for external smart cardreaders. See Section 8.6, “Configuring Smart Card Services” for details.

Determining Smart Card Device Names
103
• Device access policy is maintained in the Sun Ray data store and is available to all Sun Ray servers inthe same failover group.
• You can configure device access policy at the device type or individual device level. For example, youcan set a policy for all smart card readers or a specific smart card reader.
• When you add a device access policy for a device, the policy is automatically enabled but the device isdisabled. You must explicitly enable a device so it can be accessed through its policy.
• You must perform a cold restart of Sun Ray services for device access policy changes to take effect.
Refer to the utdevpolicy man page for more details.
8.7.1 Determining Smart Card Device Names
The utdevpolicy command requires the smart card reader device name when setting policy access.
For a Sun Ray Client's internal smart card reader, the device name is Sun Ray Smartcard Reader v100 00 when using scbus v1 and Sun Ray Smartcard Reader v2 00 00 when using scbus v2. Youcan use wildcarding to help shorten this name, such as Sun Ray Smartcard*.
For external smart card readers, the device names are listed in the /usr/lib/smartcard/ifd-ccid.bundle/Contents/Info.plist on the Sun Ray server, under the ifdFriendlyName key. Thisfile is available after you install the CCID Handler.
8.7.2 Smart Card Reader Access Policy Example
The following example using the utdevpolicy -l shows a list of currently configured smart card readeraccess policies.
# utdevpolicy -lDevice Name Device Type Device Policy pI Device Access Policy-------------------------------------------------------------------------------? pcscscr ENABLED ENABLED ZONE=GLOBAL iT ZONE=RESTRICTED* pcscscr ENABLED ENABLED sT ZONE=RESTRICTEDSCM SCR 3310 pcscscr ENABLED ENABLED ZONE=secret iT ZONE=RESTRICTEDSun Ray Smartcard* pcscscr ENABLED ENABLED ZONE=CLASSIFIED iT ZONE=RESTRICTEDAthena ASE IIIe pcscscr DISABLED ENABLED ZONE=public iT ZONE=RESTRICTED
In this example, the following policy configurations exist for the following devices:
• "?" - Any smart card reader that does not match any of the specific device names is accessible in theGLOBAL zone and is accessible in the RESTRICTED zone from the pcscscr device type.
• "*" wildcard - All smart card readers with policies are accessible in the RESTRICTED zone.
• SCM SCR 3310 - The SCM smart card reader inherits the RESTRICTED zone access from the pcscscrdevice type and it is also accessible in the secret zone.
• Sun Ray Smartcard* - The Sun Ray Client's internal smart card reader inherits the RESTRICTEDzone access from the pcscscr device type and it is also accessible in the CLASSIFIED zone.
• Athena ASE IIIe - The Athena smart card reader is not accessible because the device is currentlydisabled.
The value of iT in the pI column shows the policies that are inherited from the pcscscr device type.

How to Add a Smart Card Reader Access Policy
104
8.7.3 How to Add a Smart Card Reader Access Policy
This procedure describes how to add an access policy for a smart card reader. You can use the -m optioninstead of the -a option to modify the access policy.
1. Become superuser on the Sun Ray server.
2. Add an access policy for a smart card reader.
# utdevpolicy -a -t pcscscr -n 'device-name' -p 'key=value[,value]'
device-name is the name of a smart card reader. See Section 8.7.1, “Determining Smart Card DeviceNames” for information about how to get the device name. Add single quotes around the device nameto prevent expansion by the shell.
• You can specify a wildcard character (*) in the device name to provide an access policy for deviceswith similar names. For example, the SCM* device name provides an access policy for all devicenames starting with SCM.
• You can use the wildcard character (*) for the device name to specify an access policy for all smartcard readers. Each added smart card reader will inherit the access policy from the wildcard devicename.
• You can use the (?) character for the device name to specify an access policy for smart card readersthat do not have a specified policy.
key=value is a policy key and its value. You can provide multiple values separated by commas andthe entire policy specification should be quoted to prevent expansion by the shell. The following policykey is available for smart card readers:
• ZONE - This key specifies the zone in which the smart card reader is accessible. Value is a zonename, which must be case sensitive and an exact match of the actual zone name.
3. Enable the smart card reader to use the access policy.
# utdevpolicy -e -t pcscscr -n 'device-name'
4. Restart Sun Ray services.
# /opt/SUNWut/sbin/utstart -c
5. Verify that the access policy was added properly.
# utdevpolicy -l
Examples
• The following example adds access to the Sun Ray Client's internal smart card reader in theCLASSIFIED zone.
# utdevpolicy -a -t pcscscr -n 'Sun Ray Smartcard*' -p 'ZONE=CLASSIFIED'
• The following example adds access to the external SCM SCR 3310 smart card reader in the secretand CLASSIFIED zone.

How to Modify a Smart Card Reader Access Policy
105
# utdevpolicy -a -t pcscscr -n 'SCM SCR 3310' -p 'ZONE=secret,CLASSIFIED'
• The following example adds access to all smart card readers in the GLOBAL zone.
# utdevpolicy -a -t pcscscr -n '*' -p 'ZONE=GLOBAL'
8.7.4 How to Modify a Smart Card Reader Access Policy
This procedure describes how to modify an access policy for an existing smart card reader. Modifying apolicy replaces the current policy values with the new policy values.
1. Become superuser on the Sun Ray server.
2. Modify an access policy for a smart card reader.
# utdevpolicy -m -t pcscscr -n 'device-name' -p 'key=value[,value]'
device-name is the device name of a smart card reader. Add single quotes around the device nameto prevent expansion by the shell. See Section 8.7.1, “Determining Smart Card Device Names” formore details.
key=value is a policy key and its value. You can provide multiple values separated by commas, andadd single quotes around the entire policy specification to prevent expansion by the shell. The followingpolicy key is available for smart card readers:
• ZONE - This key specifies the zone in which the smart card reader is accessible. Value is a zonename, which must be case sensitive and an exact match of the actual zone name.
3. Restart Sun Ray services.
# /opt/SUNWut/sbin/utstart -c
4. Verify that the access policy was modified properly.
# utdevpolicy -l
Examples
• The following example modifies access to the Sun Ray Client's internal smart card reader and it is nowaccessible in the secret zone.
# utdevpolicy -m -t pcscscr -n 'Sun Ray Smartcard*' -p 'ZONE=secret'
• The following example modifies access to all smart card readers and they are now all accessible inCLASSIFIED zone.
# utdevpolicy -m -t pcscscr -n '*' -p 'ZONE=CLASSIFIED'
8.7.5 How to List Access Policies for Smart Card Readers
This procedure describes how to list all policies currently configured for smart card readers.
• List the current access policies for smart card readers.

How to Disable a Smart Card Reader Access Policy
106
# utdevpolicy -l
8.7.6 How to Disable a Smart Card Reader Access Policy
This procedure describes how to disable the current policy for a smart card reader. When you add a policyfor a smart card reader, the policy is enabled by default.
When you disable the policy for a smart card reader, the smart card reader is accessible in all zones asif the access policy control feature is not being used. If you want to completely disable access to a smartcard reader, you can disable the device as described in Section 8.7.7, “How to Disable Access to a SmartCard Reader”.
1. Become superuser on the Sun Ray server.
2. Disable the current policy for a smart card reader.
# utdevpolicy -z policy -t pcscscr -n 'device-name'
You can use the -e policy option to enable the policy again, and you can use the -A -z policyoption to enable/disable the policies for all smart card readers.
3. Restart Sun Ray services.
# /opt/SUNWut/sbin/utstart -c
4. Verify that the access policy was modified properly.
# utdevpolicy -l
Example
The following example disables the access policy for the Sun Ray Clients' internal smart card reader.
# utdevpolicy -l
Device Name Device Type Device Policy pI Device Access Policy-------------------------------------------------------------------------------SCM SCR 3310 pcscscr ENABLED ENABLED ZONE=secret Sun Ray Smartcard* pcscscr ENABLED ENABLED ZONE=CLASSIFIED
# utdevpolicy -z policy -t pcscscr -n 'Sun Ray Smartcard*'
# utdevpolicy -l
Device Name Device Type Device Policy pI Device Access Policy-------------------------------------------------------------------------------SCM SCR 3310 pcscscr ENABLED ENABLED ZONE=secret Sun Ray Smartcard* pcscscr ENABLED DISABLED ZONE=CLASSIFIED
8.7.7 How to Disable Access to a Smart Card Reader
This procedure describes how to disable access to a smart card reader.
When you disable a smart card reader, the smart card reader is inaccessible as if it does not exist.
1. Become superuser on the Sun Ray server.

Troubleshooting Smart Card Services
107
2. Disable access to a smart card reader.
# utdevpolicy -z device -t pcscscr -n 'device-name'
You can use the -e device option to enable the device again, and you can use the -A -z deviceoption to enable/disable all smart card readers.
3. Restart Sun Ray services.
# /opt/SUNWut/sbin/utstart -c
4. Verify that the access policy was modified properly.
# utdevpolicy -l
Example
The following example disables access to the Sun Ray Client's internal smart card reader.
# utdevpolicy -l
Device Name Device Type Device Policy pI Device Access Policy-------------------------------------------------------------------------------SCM SCR 3310 pcscscr ENABLED ENABLED ZONE=secret Sun Ray Smartcard* pcscscr ENABLED ENABLED ZONE=CLASSIFIED
# utdevpolicy -z device -t pcscscr -n 'Sun Ray Smartcard*'
# utdevpolicy -l
Device Name Device Type Device Policy pI Device Access Policy-------------------------------------------------------------------------------SCM SCR 3310 pcscscr ENABLED ENABLED ZONE=secret Sun Ray Smartcard* pcscscr DISABLED ENABLED ZONE=CLASSIFIED
8.8 Troubleshooting Smart Card ServicesHere are some basic checks to make when troubleshooting smart card services.
• Are the smart card readers configured? See Section 8.6.1, “How to Configure Primary Smart CardReaders for Hotdesking and Authentication” or Section 8.6.2, “How to Configure External CCID-Compliant USB Smart Card Readers for Authentication (Oracle Solaris)” for details.
• Is the expected smart card bus protocol configured? See Section 8.6.5, “How to Change the Smart CardBus Protocol (Oracle Solaris)” for details.
• Are the appropriate smart card configuration files available? See Section 8.6.3, “How to Add a SmartCard Configuration File” for details.
• Is the expected smart card probe order configured? See Section 8.6.4, “How to Change the Smart CardProbe Order” for details.
• Check for any core dumps in the /tmp/SUNWut/pcscd directory.
8.8.1 Smart Card Transaction Problems
Here are some guidelines and workarounds when using authenticated smart cards.

CCID IFD Handler for External USB Smart Card Readers (Oracle Solaris)
108
• When a smart card transaction is occurring on a Sun Ray Client (smart card LED is flashing), avoidhotdesking or resetting the Sun Ray Client. If a problem occurs, you may have to log out of the session.
• If you reset a Sun Ray Client that has smart card-related applications currently running, the applicationsmay freeze for up to two minutes or the smart cards may be inaccessible for up to two minutes. Theapplications should recover without user intervention.
• When hotdesking with a Windows connector session running, the PIN dialog may fail to display. You willget a password prompt. If this happens, log out of the Windows session, restart the Windows connectorsession, and log into Windows again.
• When rapidly hotdesking a Sun Ray Client, it may fail to recognize the smart card and OSD icon 63 willdisplay instead of the session. Remove and reinsert the card to resolve the issue.
8.9 CCID IFD Handler for External USB Smart Card Readers (OracleSolaris)
Sun Ray Software supports the CCID IFD handler V1.3.10 on Sun Ray servers running Oracle Solaris),which provides access to external CCID-compliant USB smart card readers connected to Sun Ray Clientsand client computers running Oracle Virtual Desktop Client. CCID IFD handler V1.3.10 is a Sun Rayimplementation of the Interface Device Handler (IFD) for the PC/SC-lite API. When used in conjunctionwith the smart card services provided by the Sun Ray Software, this CCID IFD handler enables PC/SC-compliant applications and middleware to use external CCID-compliant USB smart card readers ondesktop clients.
See Section 8.6.2, “How to Configure External CCID-Compliant USB Smart Card Readers forAuthentication (Oracle Solaris)” for details on all the steps required.
8.9.1 How to Install CCID IFD Handler
Follow these instructions to install the CCID IFD handler.
Note
To install the CCID IFD handler in an Oracle Solaris Trusted Extensionsenvironment, perform the installation as root from ADMIN_LOW (global zone).
1. Download and unpack the CCID IFD handler.
The CCID IFD Handler is not provided with the Sun Ray Software release. However, you can downloadthe PC/SC-lite 1.3 component from the 5.1.1 Media Pack, which includes the CCID IFD Handlerv1.3.10 distribution. Only the CCID IFD handler needs to be installed. PC/SC-lite is already installedwith Sun Ray Software.
2. Become superuser on the Sun Ray server.
3. Install the CCID IFD handler:
# svcadm disable pcscd# /usr/sbin/pkgadd -d . SUNWusb-scrdr# svcadm enable pcscd
8.9.2 How to Uninstall CCID IFD Handler
Follow these instructions to remove the CCID IFD handler.

Known Issues
109
Note
To uninstall the CCID IFD handler from an Oracle Solaris Trusted Extensionsenvironment, perform the uninstallation as root from ADMIN_LOW (global zone).
1. Become superuser on the Sun Ray server.
2. Uninstall the CCID IFD handler:
# svcadm disable pcscd# /usr/sbin/pkgrm SUNWusb-scrdr# svcadm enable pcscd
8.9.3 Known Issues
Here are some known issues when using external USB smart card readers.
8.9.3.1 PC/SC-lite USB Enumeration Delays
Currently, there is a delay of a few seconds before external USB readers become visible to PC/SC-lite client applications. This delay occurs whenever a PC/SC-lite instance is started for a user sessionas well as any other time the USB bus needs to be re-enumerated. Specifically, an enumeration delaywhere external USB readers are not immediately visible to an application occur under the followingcircumstances:
• The first time a PC/SC-lite instance is started. That is, when an application attempts to access PC/SC-lite from within a given session for the first time.
• Whenever a PC/SC-lite instance is automatically restarted after the PC/SC-lite self-terminates due to anidle period of inactivity. This is similar to the first case.
• Whenever a Session Mobility event occurs, it causes a delay in reader visibility while external USBreaders on the target Sun Ray Client are re-enumerated. Session Mobility is not currently supported bythe CCID IFD handler for external USB readers on Sun Rays Clients.
• Resetting or power-cycling the Sun Ray Client in a Sun Ray session.
8.9.3.2 Enumeration Delay Causes Problems for Some Applications
Certain applications, such as the Windows Smart Card login over the Windows connector, are notdesigned to accommodate enumeration delays associated with the USB hotplug model. Such applicationsdo not see readers that appear after they have initially scanned the PC/SC-lite reader list. In other words,readers that appear late may be missed by an application due to any of the scenarios described above.
Sometimes applications will use the first reader they find. On Sun Ray Clients, this is invariably the internalreader, unless that reader has been disabled with the following command:
# utdevadm -d -s internal_smartcard_reader
An additional solution is to ensure that the USB reader list is visible to the application before the applicationscans the reader list. One way to address this is by preventing PC/SC-lite instances from timing out after apre-specified idle period. You can disable the instance timeout by editing the /etc/smartcard/pcscd-SunRay.conf file and changing the INSTANCE_TIMEOUT parameter to -1. The shipping default value is600 seconds (10 minutes).

Known Issues
110
When you disable inactivity timeouts by changing INSTANCE_TIMEOUT, PC/SC-lite instances stay arounduntil the user's session is terminated, which can mean that many PC/SC-lite processes may be in theprocess table, using system resources.
We currently have no data on how much of an impact that might cause as the number of user sessions ona system grows (i.e., we have insufficient data on how that scales). In many cases, it may not be a problemat all, except that the process table will be more cluttered with inactive processes than otherwise.
111
Chapter 9 Hotdesking
Table of Contents9.1 Hotdesking Overview ................................................................................................................ 1119.2 Hotdesking Without Smart Cards ............................................................................................... 111
9.2.1 NSCM and Failover Groups ............................................................................................ 1129.2.2 How to Enable NSCM Sessions ...................................................................................... 1129.2.3 How to Log in to an NSCM Session ............................................................................... 113
9.3 Regional Hotdesking ................................................................................................................. 1149.3.1 Regional Hotdesking Process ......................................................................................... 1159.3.2 Regional Hotdesking Site Requirements .......................................................................... 1159.3.3 Providing Site Integration Logic ...................................................................................... 1159.3.4 How to Configure a Site-specific Mapping Library ............................................................ 1169.3.5 How to Use Token Readers with Regional Hotdesking ..................................................... 1169.3.6 How to Configure the Sample Data Store ........................................................................ 117
9.4 Remote Hotdesk Authentication (RHA) ...................................................................................... 1179.4.1 How to Disable Remote Hotdesk Authentication .............................................................. 1189.4.2 How to Re-enable Remote Hotdesk Authentication .......................................................... 118
This chapter describes how to configure regional hotdesking and hotdesking without smart cards.
9.1 Hotdesking OverviewA Sun Ray session is a group of services controlled by a Session Manager and associated with a userthrough an authentication token. The sessions reside on a server rather than on the desktop. Because SunRay Clients are stateless, a session can be directed or redirected to any Sun Ray Client on the appropriatenetwork or subnetwork when a user logs in or inserts a smart card.
Hotdesking, or session mobility, is the ability for a user to remove a smart card, insert it into any otherclient within a failover group, and have the user's session "follow" the user, thus allowing the user to haveinstantaneous access to the user's windowing environment and current applications from multiple clients.Every Sun Ray Client is equipped with a smart card reader, and hotdesking is configured and enabled bydefault.
Sun Ray Software also provides Non-Smart Card Mobility (NSCM), or hotdesking without smart cards.
9.2 Hotdesking Without Smart CardsConfiguring Sun Ray Software with non-smart card mobility (NSCM) sessions provides the benefits ofhotdesking without the use of smart cards. This section explains NSCM sessions, how to configure them,and how to enable users to access their Sun Ray sessions across multiple failover groups.
NSCM can use regional hotdesking and it automatically provides similar protection as remote hotdeskauthentication (RHA).
In an NSCM session, the user can:
• Type a user name and password instead of inserting a smart card.
• Type the utdetach command instead of removing a smart card.
If a user does not want to use the NSCM session, inserting a smart card causes the session to bedisconnected and replaced by a smart card session.

NSCM and Failover Groups
112
9.2.1 NSCM and Failover Groups
The user login experience for NSCM sessions may be different than expected when systems areconfigured as part of a failover group.
The following situations might produce unfamiliar behavior:
• Load Balancing Between Servers - If server A is heavily loaded when a user logs into it with the NSCMGUI, the server redirects the user to server B.
• Switching Between Servers - A user with a session on server A who wants to switch to a session onserver B invokes the utselect GUI to access the other session. In doing so, the user is required tolog in with the NSCM GUI. Users familiar with the ease of the utselect GUI might be displeased thatanother login is necessary.
• Escape Token Sessions - The user bypasses the NSCM GUI by clicking the Exit button and logs intoserver A using the display manager (dtlogin or gdm). The user now has a standard escape tokensession and invokes the utselect GUI to switch to server B, causing the NSCM GUI to be presentedagain. The user must click Exit again to get to the escape token session on server B. Users accustomedto switching rapidly might find this behavior annoying.
9.2.2 How to Enable NSCM Sessions
This procedure describes how to enable NSCM sessions by using the Admin GUI or the utpolicycommand.
Admin GUI Steps
1. Use the utwall command to inform your users that all active and detached sessions will be lost.
For example:
# /opt/SUNWut/sbin/utwall -d -t 'System policy will change in 10 minutes.All active and detached sessions will be lost.Please save all data and terminate your session now.' ALL
The following message is displayed in a pop-up window for all users:
System policy will change in 10 minutes.All active and detached sessions will be lost.Please save all data and terminate your session now.
2. Log in to the Admin GUI.
3. Go to the System Policy tab.
4. In the Non-Card Users panel, select the Enabled option next to Mobile Sessions.
5. Go to the Servers tab.
6. Click Cold Restart to restart Sun Ray services and terminate all users' sessions.
Command Line Steps
1. Use the utwall command to inform your users that all active and detached sessions will be lost.

How to Log in to an NSCM Session
113
For example:
# /opt/SUNWut/sbin/utwall -d -t 'System policy will change in 10 minutes.All active and detached sessions will be lost.Please save all data and terminate your session now.' ALL
The following message is displayed in a pop-up window for all users:
System policy will change in 10 minutes.All active and detached sessions will be lost.Please save all data and terminate your session now.
2. As superuser, type the utpolicy command with the -M argument for your authentication policy.
For example:
# /opt/SUNWut/sbin/utpolicy -a -M -s both -r both
This example configures the Authentication Manager to allow self-registration of users both with orwithout smart cards, and NSCM sessions are enabled.
3. Initialize Sun Ray services by restarting the Authentication Manager on the server, including eachsecondary Sun Ray server if in a failover group.
# /opt/SUNWut/sbin/utstart -c
This command clears all active and detached sessions.
9.2.3 How to Log in to an NSCM Session
1. Type your user name into the user entry field.
Figure 9.1 NSCM Login Dialog Box User Field
2. Type your password into the password field.

Regional Hotdesking
114
Figure 9.2 NSCM Login Dialog Box Password Field
An Options menu is available for Oracle Solaris. Right clicking the Options menu displays a panel withthe following options:
• QuickLogin - Applicable only to a new session. Selecting Off enables the user to log in with the sameoptions available through dtlogin. Selecting On enables the user to bypass the option selectionphase. QuickLogin is On by default. Although this option is provided with Oracle Solaris 11, it doesnot work with the gdm display manager.
• Exit - Selecting Exit temporarily disables the NSCM session. An escape token session is started,and the dialog box is replaced by the dtlogin or gdm screen. A user without a valid account in thisserver group can exit to dtlogin or gdm and attempt a remote X (XDMCP) login to some otherserver where that user has a valid account.
Note
When using Oracle Linux, the Oracle Linux login screen may briefly displaybefore the desktop is presented. No action is necessary.
If no NSCM session exists for this user, the Authentication Manager creates an NSCM session tokenwith the format: mobile.IEEE802-MACID.
9.2.3.1 Session Redirection
The user might be redirected to another server for the following reasons:
• If the Sun Ray server is part of a failover group, the load-balancing algorithm might redirect the user toanother Sun Ray server.
• If the user has an NSCM session on a different Sun Ray server in a failover group, the user will beredirected to the server with the most current NSCM session.
The Sun Ray Mobile Session Login dialog box is redisplayed with the host name of the new Sun Rayserver. The user must retype the password.
9.3 Regional Hotdesking
Regional hotdesking, previously referred to as Automatic Multi-Group Hotdesking (AMGH), is requiredwhen users need to move from one location to another, such as between corporate headquarters andvarious branch offices, and they want access to their existing session across multiple failover groups.
Multiple failover groups are useful for various reasons, such as:

Regional Hotdesking Process
115
• Availability - It is sometimes advantageous to have multiple, geographically-separate locations, eachwith a failover group, so that if an outage occurs at one location, another location can continue tofunction.
• Organizational Policies - Some sites have different administrative policies at different locations. It canbe advantageous to keep separate failover groups at these locations.
For further technical detail, please refer to the utamghadm(8), ut_amgh_get_server_list(3), andut_amgh_script_interface(3) man pages.
Note
Regional hotdesking is not enabled for multihead groups.
9.3.1 Regional Hotdesking Process
Once regional hotdesking is configured, user login information and sessions are handled as follows:
1. When a smart card is inserted or removed from the system or a user logs in via the greeter GUI,parameters such as the user name (if known at the time), smart card token, and terminal identifier arepassed to a piece of site integration logic.
2. The site-integration software uses these parameters to determine to which Sun Ray servers it shoulddirect the Sun Ray Client.
3. If the smart card token is associated with a local session, then that session gets preference, andregional hotdesking is not invoked.
4. Otherwise, the regional hotdesking software redirects the Sun Ray Client to connect to the appropriateSun Ray server.
Thus, if the user has an existing session, the client connects to that session; if not, the regional hotdeskingsoftware creates a new session for that user.
9.3.2 Regional Hotdesking Site Requirements
To use regional hotdesking, a site must provide some site integration logic that can utilize enterprise datato determine which users or Sun Ray Clients should connect to which failover groups. This is ordinarilyprovided through the use of a dynamic C library or a shell script that implements a particular interface usedby regional hotdesking software. Sun Ray Software provides some reference code that you use as anexample or adapt as required. An administrator must configure the regional hotdesking software to utilize aspecified library or shell script, then implement the PAM stack of the login applications, as described below.
Note
To ensure continuous operation, be sure to include enough servers in the targetgroup to provide availability for session location and placement in the event that aparticular server becomes unavailable. Two servers should be minimally sufficientfor most sites; three servers provide a conservative margin of error.
9.3.3 Providing Site Integration Logic
To determine where given Sun Ray Clients or users should be connected when creating or accessingsessions, you must utilize enterprise data. Sun Ray Software includes the following software for thispurpose:

How to Configure a Site-specific Mapping Library
116
• Man pages, such as ut_amgh_get_server_list(3), which describe the appropriate C API for ashared library implementation.
• A shell-script API, ut_amgh_script_interface(3), which can be used as an alternative.
• Reference C code and script code, located at /opt/SUNWutref/amgh. This code can serve asexample or be directly adapted for use.
• A functional Makefile.
9.3.4 How to Configure a Site-specific Mapping Library
For each site, you must determine what mapping library to use. It may be a site-specific implementation, orone of the sample implementations provided with the Sun Ray Software.
Note
If you are using Oracle Linux, library mapping for the 32-bit platform should be /opt/SUNWutref/amgh/lib, as shown below, and library mapping for the 64-bitplatform should be /opt/SUNWutref/amgh/lib64.
After configuring the library, you must perform a cold restart of the Sun Ray services using either theutstart CLI or the Admin GUI.
• How to Configure the Token-based Mapping Implementation Provided as a Sample
# /opt/SUNWut/sbin/utamghadm -l /opt/SUNWutref/amgh/lib/libutamghref_token.so
• How to Configure the User Name-based Mapping Implementation Provided as a Sample
# /opt/SUNWut/sbin/utamghadm -l /opt/SUNWutref/amgh/lib/libutamghref_username.so
• How to Configure a Script-based Back-end Mapping
# /opt/SUNWut/sbin/utamghadm -s /opt/SUNWutref/amgh/utamghref_script
9.3.5 How to Use Token Readers with Regional Hotdesking
To utilize token readers with regional hotdesking based on Sun Ray pseudo-tokens, use the Site-specificMapping Library to produce the desired behavior for them.
Configured token readers should have the following value formats:
Key Value
insert_token pseudo.MAC_address
token TerminalId.MAC_address
If a registered policy is in place, use the insert_token key instead of the token key, which is not globallyunique.
Note
The RHA security feature does not affect token readers. It is assumed that tokenreaders are deployed in physically secure environments.

How to Configure the Sample Data Store
117
9.3.6 How to Configure the Sample Data Store
Each site must configure a data store to contain site-specific mapping information for regionalhotdesking. This data store is used by the site mapping library to determine whether regional hotdeskingshould be initiated for the parameters presented. The data store can be a simple flat file. The sampleimplementations included with the Sun Ray Software require a simple flat file configuration.
To create the back-end database file under /opt/SUNWutref/amgh/back_end_db on the Sun Rayserver, do the following:
• For a token-based mapping, use entries of the form:
token=XXXXXXX [username=XXXXX] host=XXXXX
• Comments (lines beginning with #) are ignored.
• username is optional. If the same token is associated with more than one non-null username, anerror is returned.
• For a user name-based mapping, use entries of the form:
username=XXXXX host=XXXXX
• Comments (lines beginning with #) are ignored.
• Key/value pairs other than those mentioned above are ignored.
• The order of key/value pairs is not significant.
• For a combined mapping, use entries of the form:
Any combination of TOKEN BASED and USERNAME BASED lines.
• Comments (lines beginning with #) are ignored.
• A token match is attempted first.
• If no token match is made (or if no username is included in the matches) the user is prompted for ausername.
• A lookup is made for this username. If there is no match, a local session is created; otherwise, theSun Ray Client is forwarded to the first host reported as available.
A sample line for this file would look like the following:
token=MicroPayflex.5001436700130100 username=user1 host=ray-207
9.4 Remote Hotdesk Authentication (RHA)
By default, when a user hotdesks, the desktop's screen lock is activated and the user is forced toauthenticate again. However, screen locks are inherently insecure in a number of ways. RemoteHotdesk Authentication (RHA) is designed to provide a more secure hotdesk environment instead of theauthentication performed by a desktop screen lock in the user's existing session. The "Remote" in RHArefers to the fact that the hotdesk authentication step takes place outside the user's existing session and

How to Disable Remote Hotdesk Authentication
118
applications cannot interfere with the authentication. From a user's perspective, there is minimal change ifRemote Hotdesk Authentication is enabled.
When RHA is enabled and a reconnection is attempted, the Sun Ray Software creates a temporary newsession for the client and uses that session to present an authentication dialog to the user. (This RHAdialog looks very similar to the NSCM authentication dialog.) After the user successfully authenticatesthrough the dialog, the temporary session is dismissed and the user's existing session is connected to theclient.
For environments where the in-session screen lock provides acceptable security or where no hotdeskauthentication is desired, you can configure Sun Ray Software to disable the RHA security feature.
RHA is enabled for smart cards by default and NSCM automatically provides similar protection as RHA.Authentication does not apply to anonymous Kiosk Mode.
Note
The RHA security feature does not affect token readers. It is assumed that tokenreaders are deployed in physically secure environments.
9.4.1 How to Disable Remote Hotdesk Authentication
Note
Disabling the RHA feature may present a security risk under some circumstances.
1. To disable RHA configuration for a group, type the following command:
For example, if your policy allows smart cards and non-smart card logins and failover groups, use thefollowing command and options to disable RHA:
# utpolicy -a -z both -g -D
2. Perform a cold restart of the Sun Ray services:
# utstart -c
9.4.2 How to Re-enable Remote Hotdesk Authentication
1. Restate your policy using utpolicy without the -D option.
For example, to reinstate a policy that allows smart cards and non-smart card logins and failovergroups with RHA, use the following command and options:
# utpolicy -a -z both -g
2. Perform a cold restart of the Sun Ray services:
# utstart -c

119
Chapter 10 Kiosk Mode
Table of Contents10.1 Kiosk Overview ....................................................................................................................... 11910.2 Kiosk Mode Security and Failover Considerations ..................................................................... 12010.3 Kiosk User Accounts ............................................................................................................... 120
10.3.1 Characteristics ............................................................................................................. 12010.3.2 Restrictions and Safe Guards ....................................................................................... 12110.3.3 Administering the Kiosk User Pool ................................................................................ 121
10.4 Session Type Components ...................................................................................................... 12110.4.1 Session Descriptor ....................................................................................................... 12110.4.2 Session Script .............................................................................................................. 122
10.5 How to Configure Kiosk Mode and User Accounts .................................................................... 12210.6 How to Add Kiosk User Accounts ............................................................................................ 12210.7 How to Configure a Kiosk Mode Session Type ......................................................................... 12310.8 How to Enable and Disable Kiosk Mode .................................................................................. 126
10.8.1 Unconfiguring Kiosk Mode Disables Kiosk Policy ........................................................... 12710.9 How to Override the Default Kiosk Mode Policy ........................................................................ 12810.10 Configuring the Windows Connector Kiosk Session Type ........................................................ 130
10.10.1 How to Configure a Kiosk Mode Session Type for the Windows Connector .................... 13110.11 Configuring the VMware View Connector Kiosk Session Type ................................................. 132
This chapter describes the kiosk mode functionality provided by the Sun Ray Software.
10.1 Kiosk Overview
Sun Ray Software offers two modes of operation:
• Regular mode - Delivers a desktop based on the platform that is installed on the Sun Ray server. Forinstance, if the Sun Ray Software is installed on Oracle Linux, users get an Oracle Linux desktop. Usersauthenticate on this platform and traditionally execute applications located on the platform.
• Kiosk mode - Delivers an almost unlimited variety of desktops or applications to users, even thoughthe actual desktop or application may be running elsewhere. Kiosk mode bypasses the normalauthentication methods of the Sun Ray server platform and runs anything that the administrator defines.By creating customized session types, a kiosk session can be anything from a full screen instance of aFirefox web browser to a full screen Windows 7 desktop running in a virtual machine.
By default, Sun Ray Software provides the following pre-defined session types that you can configure forusers.
• Sun Ray Connector for Windows OS - Provides a windows desktop through the Windows connector.
• VMware View Manager Session - Provides a Windows virtual machine through the VMware Viewconnector.
• Sun Java Desktop System 3 - Provides a locked-down Oracle Solaris 10 desktop environment that canrun other applications (Oracle Solaris 10 Sun Ray server only).
• Common Desktop Environment (Obsolete) - Provides a locked-down Oracle Solaris 10 desktopenvironment that can run other applications (Oracle Solaris 10 Sun Ray server only).

Kiosk Mode Security and Failover Considerations
120
Kiosk mode can also provide unauthenticated access for settings such as public kiosks, where userscannot be expected to provide authentication credentials.
10.2 Kiosk Mode Security and Failover ConsiderationsBecause kiosk mode bypasses the system login mechanism, you must consider the security of theapplications added to the user environment. Many custom applications provide built-in security, butapplications that do not are not suitable for kiosk mode.
For example, adding an application such as xterm provides users with access to a command-lineinterface from a kiosk mode session. This access is not desirable in a public environment and is notadvised. However, using a custom application for a call center is perfectly acceptable.
In a failover environment, the kiosk mode administrative settings are copied from the primary server to thesecondary servers. Be sure that all application descriptors and executable paths added to the kiosk modesessions are copied across the servers in the failover group. For example, if a Mozilla application is addedto the sessions with the executable path /usr/sfw/bin/mozilla, make sure that the path to the binaryis available to all servers in the failover group.
One way to ensure that sessions and applications are available on all servers in a failover group is to putthem into a shared network directory, which is available on all hosts in the failover group. You can do thisthrough a highly available file share, such as the Oracle Solaris Cluster product.
10.3 Kiosk User AccountsAll computer applications must run under some type of user account and kiosk sessions are no different.To enable real users to access applications without requiring the need to authenticate to the underlyingoperating system of the Sun Ray Software, kiosk mode manages a pool of local user accounts. If the kioskservice determines that an administrator has configured the system policy or the current token ID to run akiosk session, unauthenticated access to the system is granted.
While kiosk user accounts do not correspond to a real user, their role in kiosk mode allows a real userto use the applications defined by the administrator in a unauthenticated manner. Without a kiosk useraccount, a kiosk session cannot run.
See Section 10.5, “How to Configure Kiosk Mode and User Accounts” for details on setting up kiosk modeuser accounts.
10.3.1 Characteristics
Kiosk user accounts have the following characteristics:
• A default naming scheme of utkux, where x is a range from 0 to N-1 and N is the specified number ofkiosk user accounts to create.
• A different naming prefix can be chosen if the default of utku has risk of a collision. If you needto change the existing kiosk mode user accounts due to a collision problem, you can use thekioskuseradm command.
• UID by default starts at 150000 (starting UID can be specified).
• UID range must be contiguous.
• Home directories are located in /var/opt/SUNWkio/home/$USER.
• Local accounts only (/etc/passwd). Centralized NIS or LDAP kiosk user accounts are not supported.

Restrictions and Safe Guards
121
10.3.2 Restrictions and Safe Guards
To limit the impact a kiosk user can have on the system and prevent unauthenticated access frombecoming uncontrolled access, the following restrictions and safe guards are placed on kiosk useraccounts:
• Kiosk user accounts are locked for normal logins (GDM, SSH, Telnet, etc).
• Kiosk user accounts belong to a local Unix group (utkiosk) that has minimal rights on the system.
• No two sessions use the same kiosk user account at the same time on the same server.
• The home directory associated with a kiosk user account is completely cleared after a session ends.
• The home directory associated with a kiosk user account is created and then populated from theprototypes directory when a session is started.
• Residual processes owned by the kiosk user account are killed when a kiosk session ends and before anew session is started.
• All files in the /tmp and /var/tmp directories owned by the kiosk user account are deleted when akiosk session ends and before a new session is started.
10.3.3 Administering the Kiosk User Pool
If you need to change the number of kiosk user accounts after the initial Sun Ray Software installationand configuration, you can manage the user pool after the initial configuration using the kioskuseradmcommand located in the /opt/SUNWkio/bin directory. With this command, you can view the poolsettings, see how many kiosk user accounts are in use, and modify the pool settings such as adding ordecreasing the number of kiosk user accounts. You can increase or decrease the pool of users while kiosksessions are active, but changing other pools settings such as group membership or UID range requiresthat no kiosk sessions are active.
Note
The kiosk user accounts in the kiosk user pool must have contiguous user IDs. Ifany user accounts were added after the configuration of the initial pool of kiosk useraccounts, you cannot use the kioskuseradm extend command. The extendoption relies on kiosk user accounts with contiguous user IDs.
To work around this issue, you must delete all the kiosk user accounts and recreatethem by using the kioskuseradm modify command. This process requiresyou to stop the Sun Ray services on the Sun Ray server. If you have a failovergroup, performing these steps on each Sun Ray server separately will avoid userdowntime.
10.4 Session Type ComponentsA session type is a collection of scripts and files used to deliver a kiosk session to a user, such as the pre-defined Sun Ray Connector for Windows OS session type. Each session type has a session descriptor anda session script, which are located in the /etc/opt/SUNWkio/sessions directory.
10.4.1 Session Descriptor
The session descriptor defines a number of attributes useful for the administration and launching of thesession. Table 10.1, “Kiosk Session Descriptors” provides the list of key session descriptors.

Session Script
122
Table 10.1 Kiosk Session Descriptors
Kiosk Session Descriptors Descriptor Description
KIOSK_SESSION_EXEC Identifies the location of the session script.
KIOSK_SESSION_LABEL
KIOSK_SESSION_DESCRIPTION
Identify a label and description respectively to be used by theAdmin GUI.
KIOSK_SESSION_ARGS Identifies default session script arguments.
10.4.2 Session Script
The session script is used to launch the session type, and it is usually a simple wrapper of an executable.
Both uttsc and specific session type arguments are accepted by session scripts, and you can specifythem through the Admin GUI when configuring the session type. Any uttsc arguments are simply passeddirectly to the Windows connector and not processed by the session script. Other arguments specific tothe session type are processed by the session script. Each kiosk session type supports a different set ofarguments.
10.5 How to Configure Kiosk Mode and User Accounts
As part of the initial configuration during the Sun Ray Software installation, you are given the opportunityto initially configure kiosk mode, which consists of configuring the kiosk user accounts. See Section 10.3,“Kiosk User Accounts” for more information.
If you don't initially configure kiosk mode, you can always use the utconfig -k command toconfigure it later. You can also perform additional kiosk mode account management tasks by using thekioskuseradm command.
10.6 How to Add Kiosk User Accounts
This procedure describes how to add more kiosk user accounts to the user account pool. You can increasethe number of kiosk user accounts even while there are existing kiosk sessions.
See Section 10.3, “Kiosk User Accounts” for more details.
Note
The kiosk user accounts in the kiosk user pool must have contiguous user IDs. Ifany user accounts were added after the configuration of the initial pool of kiosk useraccounts, you cannot use the kioskuseradm extend command. The extendoption relies on kiosk user accounts with contiguous user IDs.
To work around this issue, you must delete all the kiosk user accounts and recreatethem by using the kioskuseradm delete and kioskuseradm createcommands, respectively. This process requires you to stop the Sun Ray services onthe Sun Ray server. If you have a failover group, performing these steps on eachSun Ray server separately will avoid user downtime.
1. Become superuser on the Sun Ray server.
2. Increase the number of kiosk user accounts.

How to Configure a Kiosk Mode Session Type
123
# /opt/SUNWkio/bin/kioskuseradm extend -c number_of_new_users
10.7 How to Configure a Kiosk Mode Session Type
This procedure describes how to configure a kiosk mode session type, which determines what type ofsession is launched in kiosk mode.
You can use the Admin GUI to configure a kiosk mode session type. On the Kiosk Mode tab, accessedfrom the Advanced tab, you can choose a predefined session type. You can also specify other generalproperties that control kiosk mode behavior, such as Timeout, Maximum CPU Usage, and Maximum VMSize.
Some session types allow additional kiosk applications to be launched. Not all session types support thisability. For example, a kiosk full-screen web browser session does not need to have this capability. Theapplications table on the Kiosk Mode tab page is displayed or hidden depending on what session type isselected.
You can add a new kiosk application by clicking the New button in the applications table and specifyit using either a predefined application descriptor file or by specifying the path to an executable or anapplication descriptor on the server. All predefined application descriptors are located in the /etc/opt/SUNWkio/applications directory. For a detailed explanation of kiosk mode functionality, see the kioskman page.
To configure the pre-defined session types, the following procedures are provided:
• Section 10.10.1, “How to Configure a Kiosk Mode Session Type for the Windows Connector”
• Section 18.4.1, “How to Configure a Kiosk Mode Session Type for the VMware View Connector”
Admin GUI Steps
Note
Kiosk session and application configuration data created with the Admin GUI isstored as the default kiosk session type under the name session. To store non-default kiosk session types, use the utkiosk command on the command line.
1. Click the Advanced tab.
2. Click the Kiosk Mode tab from the Advanced tab, as shown in Figure 10.1, “Edit Kiosk Mode Screen”.

Admin GUI Steps
124
Figure 10.1 Edit Kiosk Mode Screen
3. Click Edit.
4. Select your preferred Session (Session Type) from the drop-down list.
5. Provide appropriate values for the remaining settings, which are described in Table 10.2, “ulimitSettings”. For more information, see the ulimit man page.
Note
Choosing unsuitable values for ulimit settings could cause kiosk sessions tostart incorrectly or to crash due to lack of resources.
Table 10.2 ulimit Settings
Value Description
Timeout Indicates the number of seconds after which a disconnected session will beterminated. If you provide no value for this setting, termination of disconnectedsessions will be disabled.
Maximum CPUTime
Indicates the maximum number of CPU seconds per process for kiosk sessions.By default, the system default is applied to all kiosk sessions.

Command Line Steps
125
Value Description
Maximum VM Size Indicates the maximum Virtual Memory size per process for kiosk sessions. Bydefault, the system default is applied to all kiosk sessions.
Maximum Numberof Files
Indicates the maximum number of open files per process for kiosk sessions. Bydefault, the system default is applied to all kiosk sessions.
Maximum File Size Indicates the maximum file size per process for kiosk sessions. By default, thesystem default is applied to all kiosk sessions.
Locale Indicates the locale to be used by the kiosk session. By default, the systemdefault is applied to all kiosk sessions.
Arguments Indicates a list of arguments that should be passed to kiosk sessions as theystart. This setting is specific to the kiosk session. For more information aboutsupported arguments, consult the session-specific documentation for yourselected session.
6. Click OK.
Changes to the kiosk mode settings are applied automatically to kiosk sessions started after youconfigure the session type. You do not have to restart Sun Ray services for changes to take effect.
Command Line Steps
1. Create a session configuration file.
a. To start with an existing configuration, export the settings to a file. For example:
utkiosk -e session -s > mysession.conf
b. Edit the mysession.conf file.
See the session.conf man page for a description of available settings. The following exampleuses the Sun Ray Windows Connector kiosk session:
KIOSK_SESSION=uttscKIOSK_SESSION_LIMIT_VMSIZE=20000KIOSK_SESSION_ARGS=-h -- -r sound:low -E theming winserver.example.org
2. If applicable, create an application list file.
If you are using a kiosk session that can serve as a container for multiple applications, you shouldcreate an application list file.
a. To start with existing settings, export the application list to a file:
utkiosk -e session -a > myapps.list
b. Edit the myapps.list file.
See the kiosk man page for a description of application list files.
3. Import your settings into the Sun Ray data store.
• To import your session settings without an application list as the default session configuration:
How to Enable and Disable Kiosk Mode
126
utkiosk -i session -f mysession.conf
• To import your session settings and application list as the default session configuration:
utkiosk -i session -f mysession.conf -A myapps.list
• To import your session settings as non-default session configuration:
utkiosk -i MySpecialSession -f mysession.conf
10.8 How to Enable and Disable Kiosk Mode
Kiosk mode can be enabled as the default session type for smart card users, non-smart card users, orboth. When kiosk mode is enabled for a class of tokens, this choice can be overridden for individualtokens. For example, when kiosk mode is enabled for card users, regular non-kiosk session access canbe configured for individual cards. Alternatively, a kiosk session other than the default kiosk session canbe configured for individual tokens. Enabling and disabling kiosk mode for individual tokens is described inSection 10.9, “How to Override the Default Kiosk Mode Policy”.
Before enabling kiosk mode, you must configure the kiosk mode user accounts.
Admin GUI Steps
Kiosk mode functionality can be enabled and disabled from the System Policy section of the Advanced tab,which provides options to enable kiosk mode for smart card users, non-smart card users, or both.
Command-Line Steps
1. Become superuser on the Sun Ray server.
2. Enable a kiosk mode through the utpolicy -k command.
The following options determine whether access to the Sun Ray server is granted to certain tokens:
-z both/pseudo/card
or
-r both/pseudo/card [-s both/pseudo/card]
The -k both/pseudo/card option determines whether some or all of the granted sessions are kiosksessions.
How to Enable Kiosk Mode for All Users (Smart Card and Non-Smart Card)
# /opt/SUNWut/sbin/utpolicy -a -M -s both -r both -k both
All users are directed to kiosk sessions.
How to Allow Only Smart Card Sessions in Kiosk Mode
# /opt/SUNWut/sbin/utpolicy -z card -k card
All sessions are in kiosk mode and available only to smart card users unless you specify overrides.

Unconfiguring Kiosk Mode Disables Kiosk Policy
127
How to Enable Kiosk Mode for Smart Card Users Only
# /opt/SUNWut/sbin/utpolicy -a -M -s both -r both -k card
Only smart card users are directed to kiosk sessions.
How to Enable Kiosk Mode for Non-Smart Card Users Only
# /opt/SUNWut/sbin/utpolicy -a -s both -r both -k pseudo
Only non-smart card users are directed to kiosk sessions.
How to Enable Regular Sessions for Smart Card Users and Kiosk Sessions for Non-Smart CardUsers
# /opt/SUNWut/sbin/utpolicy -z both -k pseudo
Smart card sessions are non-kiosk (ordinary login) sessions. Non-smart card sessions are kiosk sessions.
How to Enable Regular Sessions for Registered Smart Cards and Kiosk Sessions for Non-SmartCard Users
# /opt/SUNWut/sbin/utpolicy -r card -z pseudo -k pseudo
Non-kiosk smart card sessions are allowed only for registered tokens. Non-smart card sessions are kiosksessions.
How to Enable Kiosk Sessions for Registered Smart Cards and Regular Sessions on RegisteredClients
# /opt/SUNWut/sbin/utpolicy -r both -s both -k card
Smart card sessions are kiosk sessions, non-smart card sessions are non-kiosk (ordinary login) sessions.Users can self-register smart card tokens and clients.
How to Allow Only Card Sessions in Kiosk Mode
# /opt/SUNWut/sbin/utpolicy -z card -k card
All sessions are in kiosk mode and available only to smart card users unless you specify overrides.
10.8.1 Unconfiguring Kiosk Mode Disables Kiosk Policy
If Kiosk mode is enabled for smart card and/or for non-card sessions, then disabling Kiosk mode (usingutconfig -u -k) also disables the Kiosk policy.
This behavior may be surprising in a failover group, where the Kiosk policy is disabled for the entire groupwhen Kiosk Mode is unconfigured on any server in the group.
Before unconfiguring Kiosk Mode on any host in a failover group, disable the Kiosk policy, and perform acold restart of the server group.

How to Override the Default Kiosk Mode Policy
128
To perform maintenance tasks on Kiosk user accounts without unconfiguring Kiosk Mode completely, usethe /opt/SUNWkio/bin/kioskuseradm tool instead of utconfig.
10.9 How to Override the Default Kiosk Mode Policy
You might need to assign a different authentication policy setting for a particular smart card or SunRay Client, or subset of smart cards or Sun Ray Clients. Only registered tokens can be assigned policyoverrides.
Admin GUI Steps
Note
The Edit Token Properties page does not show whether a non-default kiosk sessionhas been assigned to a token. If you use the Admin GUI to assign a kiosk sessiontype to a token, the default kiosk session configuration is used for that token.
1. Click the Tokens tab.
2. Select the token of interest from the list of tokens.
This token can be a card owner's smart card token or a pseudo-token associated with a client's MACaddress. However, only registered tokens can be overridden. For more information, see Chapter 7,Sessions and Tokens.
3. Click Edit.

Command-Line Steps
129
Figure 10.2 Edit Token Properties Screen
4. Select the desired Session Type from the list of available session types.
The available session types are Default, Kiosk, and Regular.
• Select Default to prevent the kiosk mode policy from being overridden for this token.
• Select Kiosk to use a kiosk session for this token regardless of the kiosk mode policy.
• Select Regular to ensure that a kiosk session is not used for this token regardless of the kiosk modepolicy.
5. Click OK.
Command-Line Steps
• Use the utkioskoverride command to override the policy.
/opt/SUNWut/sbin/utkioskoverride
The following examples demonstrate how to override the kiosk mode policy from the command line. Formore detailed information about overriding kiosk mode policy, see the utkioskoverride man page.

Configuring the Windows Connector Kiosk Session Type
130
How to Enable Kiosk Sessions Regardless of the Kiosk Mode Policy for a Registered Smart Card
To enable kiosk sessions regardless of the kiosk mode policy for the registered smart cardMicroPayFlex.12345678:
# /opt/SUNWut/sbin/utkioskoverride -s kiosk -r MicroPayFlex.12345678
How to Disable Kiosk Session Regardless of the Kiosk Mode Policy for a Registered Smart Card
To disable kiosk sessions regardless of the kiosk mode policy for the registered smart cardMicroPayFlex.12345678:
# /opt/SUNWut/sbin/utkioskoverride -s regular -r MicroPayFlex.12345678
How to Disable Kiosk Sessions Regardless of the Kiosk Mode Policy for a Logical Token
To disable kiosk sessions regardless of the kiosk mode policy for the logical token user.12345678:
# /opt/SUNWut/sbin/utkioskoverride -s regular -t user.12345678
How to Assign and Enable a Non-Default Kiosk Session
To assign and enable the non-default kiosk session MySession2, stored using utkiosk, to the logicaltoken user.12345678, regardless of the kiosk mode policy:
# /opt/SUNWut/sbin/utkioskoverride -s kiosk -c MySession2 -t user.123456-78
10.10 Configuring the Windows Connector Kiosk Session Type
By using kiosk mode, you can set up a Sun Ray Client to behave just like a Windows system, which meansusers will not have to interact with the Oracle Solaris or Oracle Linux login screen and no longer need tospecify the uttsc command.
Sun Ray Software provides a pre-defined Windows connector session type (called the Sun Ray Connectorfor Windows OS), which can be set up to provide the Windows connector kiosk session to users. The corecomponents of the Windows connector session type are:
• Session descriptor - /etc/opt/SUNWkio/sessions/uttsc.conf
• Session script - /etc/opt/SUNWkio/sessions/uttsc/uttsc
Added applications are not supported.
The /opt/SUNWuttsc/bin/uttsc script is used to launch the Windows connector. This script providesa simple wrapper for the uttsc executable.
A two-minute timeout is imposed on Windows sessions that remain at the Windows login screen.When this timeout elapses, the associated Windows session is terminated and the Windows connectorterminates subsequently. If no Windows login takes place, the client appears to reset every two minutes.
To avoid the two-minute timeout, the session script supports its own timeout mechanism, which is initiatedwhen the script detects that the Windows connector has terminated. If the session script timeout intervalhas not elapsed, the session script relaunches the Windows connector. If the session script timeout has

How to Configure a Kiosk Mode Session Type for the Windows Connector
131
elapsed, the session script terminates, and the Kiosk session also terminate as a result. The timeout maybe specified as a session script argument. It has a default value of 30 minutes.
10.10.1 How to Configure a Kiosk Mode Session Type for the WindowsConnector
1. Log in to the Admin GUI.
2. Click the Advanced tab and Kiosk Mode sub-tab. Then click Edit.
3. Choose Sun Ray Connector for Windows OS from the Session (Session Type) menu, as shown inFigure 10.3, “Edit Kiosk Mode Screen for Windows Connector”.
Figure 10.3 Edit Kiosk Mode Screen for Windows Connector
Note
Once the Windows connector session is selected, most of the fields on the mainKiosk page are not available. The Applications list is not available because theWindows connector session does not support the addition of applications.
4. Add session arguments to the Arguments field at the bottom in the format:
[session-type-arguments] [-- uttsc-arguments] myhost.mydomain

Configuring the VMware View Connector Kiosk Session Type
132
See Table 10.3, “Kiosk Session Arguments for Windows Connector” for the list of valid sessionarguments.
Table 10.3 Kiosk Session Arguments for Windows Connector
Argument Description
-t timeout Sets the value of a timeout interval (in seconds) after which thesession script will terminate in the event of a Windows connectortermination. If Windows connector terminates before the timeouthas elapsed it will be restarted by the session script. The defaultvalue for timeout is 1800 (30 minutes). Values less than orequal to 0 indicate that the session script should never restart theWindows connector.
-h Disables the default behavior of starting uttsc with the -m -boptions. Only the -m option is used, which means both full screenmode and the pull-down header are enabled.
-- uttsc-argumentsmyhost.mydomain
Specify any valid uttsc arguments. For detailed information onthese options, refer to the uttsc man page.
The -m and -b uttsc arguments are used by default. Thesearguments enable full-screen mode and disable the pull-downheader respectively. USB redirection is also enabled by default. Theminimal required argument is the host name, so the field shouldcontain, at minimum, myhost.mydomain.
The following example line specifies:
• A 10-minute timeout (specified in seconds) until the session is cycled if the user does not log in
• Printer forwarding
• Smart card redirection
• Optimized Windows connector hotdesking behavior
-t 600 -- -r printer:officelaser -r scard:on -O myhost.mydomain.com
5. Configure the server to use kiosk mode for card and non-card users.
a. Click the System Policy sub-tab on the Advanced menu.
b. Enable Kiosk Mode for both card and non-card users.
6. Click Save.
All new or restarted sessions matching the policy configuration to use kiosk mode will access the newsession type.
10.11 Configuring the VMware View Connector Kiosk Session Type
See Section 18.4, “Configuring the VMware View Connector Kiosk Session Type” for details.

133
Chapter 11 Client-Server Security
Table of Contents11.1 Client-Server Security Overview ............................................................................................... 13311.2 Encryption and Authentication ................................................................................................. 134
11.2.1 Security Modes ............................................................................................................ 13411.2.2 How to Force Encryption .............................................................................................. 13511.2.3 How to Force Server Authentication .............................................................................. 13511.2.4 How to Disable Client Authentication ............................................................................. 13611.2.5 How to Force Client Authentication From All Clients ....................................................... 136
11.3 Managing Client Keys ............................................................................................................. 13711.3.1 Key Fingerprint ............................................................................................................. 13811.3.2 How to Deny Access to Clients With Unconfirmed Keys ................................................. 13811.3.3 How to Confirm a Specific Client Key ............................................................................ 13911.3.4 How to Confirm All Unconfirmed Client Keys ................................................................. 13911.3.5 How to Display a Client's Fingerprint Key from a Sun Ray Client ..................................... 14011.3.6 How to Display All Client Keys ...................................................................................... 14011.3.7 How to Display All Keys for a Specific Client ................................................................. 14011.3.8 How to Delete a Specific Client Key .............................................................................. 14111.3.9 How to Delete All Client Keys for a Specific Client ......................................................... 141
11.4 Displaying Security Status ....................................................................................................... 14111.4.1 How to Display Security Status for a Sun Ray Client ...................................................... 14111.4.2 How to Display Security Status for All Sessions ............................................................. 141
11.5 Authentication Troubleshooting ................................................................................................ 14211.5.1 Error Messages ............................................................................................................ 142
This chapter provides details on the security aspects of the interactions between the desktop clients andthe Sun Ray server.
For more information about all the security aspects of Sun Ray Software, refer to the Sun Ray Software 5.4Security Guide.
11.1 Client-Server Security Overview
When configuring the security for a Sun Ray environment, you should evaluate the security requirements.You can choose one of the following security policies between the Sun Ray server and clients:
• Enable encryption for upstream traffic only (client to server)
• Enable encryption for downstream traffic only (server to client)
• Enable bidirectional encryption
• Enable server authentication
• Disable client authentication
Additionally, you must decide whether to enable hard security mode for encryption and clientauthentication.
You can use the utcrypto command or the Admin GUI to configure the encryption option, authenticationoption, and security mode.

Encryption and Authentication
134
11.2 Encryption and Authentication
By default, data packets between the Sun Ray server and client are sent "in the clear." This policy meansthat outsiders can easily "snoop" the traffic and recover vital and private user information, which malicioususers might misuse. To avoid this type of attack, Sun Ray Software administrators can enable trafficencryption through the ARCFOUR encryption algorithm.
The ARCFOUR encryption algorithm, selected for its speed and relatively low CPU overhead, supports ahigher level (128-bit) of security between Sun Ray services and clients.
However, encryption alone does not provide complete security. Spoofing a Sun Ray server or a Sun RayClient and posing as either is still possible, if not necessarily easy. Here are some examples:
• A man-in-the-middle attack, in which an impostor claims to be the Sun Ray server for the clients andpretends to be the client for the server. The imposter then intercepts all messages and has access to allsecure data.
• Manipulating a client to pretend to be another client in order to gain access to sessions connected to thespoofed client.
Server and client authentication provided by Sun Ray Software can resolve these types of attacks. Serverauthentication uses a single pre-configured, public-private key pair in the Sun Ray Software and firmware,and client authentication uses an automatically generated public-private key pair in every client.
Sun Ray Software uses the Digital Signature Algorithm (DSA) to verify that clients are communicating witha valid Sun Ray server and that the server is communicating with a legitimate client. This authenticationscheme is not completely foolproof, but it mitigates trivial man-in-the-middle attacks and makes spoofingSun Ray servers or Sun Ray Clients harder for attackers.
Enabling encryption and authentication is optional. The system or network administrator can configure itbased on site requirements. By default only client authentication is enabled.
11.2.1 Security Modes
When you configure encryption and client authentication, you must decide between hard and softsecurity modes. Security mode can be configured separately for encryption requirements includingserver authentication and for client authentication requirements. Security mode settings are intended forcompatibility with older firmware, which did not support the affected security feature.
• Hard Security Mode - Hard security mode ensures that every session is secure. If security requirementscannot be met, the session is refused.
• Soft Security Mode - Soft security mode ensures that connection requests are granted even for SunRay Clients that don't support the configured security requirements. If security requirements cannot bemet, the session is granted but not secure.
By default, the security modes for encryption and client authentication are both set to soft, which allowsunauthenticated and unencrypted access to Sun Ray Clients running older firmware.
Note
Security mode settings don't apply to Oracle Virtual Desktop Clients. Oracle VirtualDesktop Clients will always be treated as if hard security mode for encryption orauthentication is in effect.
Table 11.1, “Security Modes” describes what happens when the different security modes are used.

How to Force Encryption
135
Table 11.1 Security Modes
Situation Hard Security Mode Soft Security Mode
Encryption - The Sun Ray Client does notsupport encryption or server authenticationbecause of old firmware.
Sun Ray server denies thesession.
Sun Ray server grants the clienta non-secure session. The usermust then decide whether tocontinue using a non-securesession.
Client Authentication - The Sun Ray Client doesnot support client authentication because of oldfirmware.
Sun Ray server denies thesession.
Sun Ray server grants the clienta non-secure session.
Client Authentication - The client supportsauthentication, but the authentication fails.
Sun Ray server denies thesession.
Sun Ray server denies thesession.
11.2.2 How to Force Encryption
By default, upstream and downstream encryption is disabled. This procedure provides the steps needed toforce upstream and downstream encryption.
Command-Line Steps
• Use the following command to force upstream and downstream encryption:
# utcrypto -a enc_up_type=ARCFOUR enc_down_type=ARCFOUR mode=hard
Use -m instead of -a if a non-default security policy already exists.
Admin GUI Steps
1. Navigate to the Advanced > Security page.
2. Select the Upstream Encryption and Downstream Encryption options and select Hard as theSecurity Mode.
3. Click Save.
11.2.3 How to Force Server Authentication
By default, server authentication is disabled. This procedure provides the steps needed to force serverauthentication for all clients.
Command-Line Steps
• Use the following command to force server authentication.
# utcrypto -a auth_down_type=simple mode=hard
Use -m instead of -a if a non-default security policy already exists.
Admin GUI Steps
1. Navigate to the Advanced > Security page.

How to Disable Client Authentication
136
2. Select the Server Authentication option and select Hard as the Security Mode.
3. Click Save.
11.2.4 How to Disable Client Authentication
Some reasons to disable client authentication are:
• Reduce administrative overhead: At the cost of security, disabling client authentication saves timerequired to manage client keys on the servers.
• Eliminate log messages during upgrade: If you upgrade a Sun Ray server in a failover group with olderservers, the upgraded server will repeatedly produce log messages indicated that it cannot store keydata and the server will treat all keys as unconfirmed. Client authentication should be enabled once theentire group is upgraded.
Note
Disabling client authentication creates a security risk. Make sure you understandthe consequences before disabling client authentication.
Before You Begin
• Disabling client authentication applies to all future connections without restarting the Sun Ray server.
Command-Line Steps
• Use the following command to disable client authentication:
# utcrypto -a auth_up_type=none
Use -m instead of -a if a non-default security policy already exists.
To enable client authentication, set the auth_up_type value to default.
Admin GUI Steps
On the Advanced > Security page, deselect Client Authentication and click Save.
11.2.5 How to Force Client Authentication From All Clients
If you don't need to allow access to clients running older versions of firmware, you can improve security byrequiring client authentication from all clients.
Command-Line Steps
• Use the following command to force client authentication.
# utcrypto -a auth_up_type=DSA auth_mode=hard
Use -m instead of -a if a non-default security policy already exists.
Admin GUI Steps
1. Navigate to the Advanced > Security page.

Managing Client Keys
137
2. Select the Client Authentication option and select Hard as the Security Mode.
3. Click Save.
11.3 Managing Client Keys
A client (a Sun Ray Client or Oracle Virtual Desktop Client) that supports client authentication has a public-private key pair for client authentication. The key pair for a client is generated when the client first bootswith the appropriate firmware.
Note
Older versions of firmware or the firmware that is preinstalled on Sun RayClients delivered from the factory do not generate keys and do not support clientauthentication. To help you identify preinstalled firmware, note that versions ofpreinstalled firmware start with MfgPkg. You must update the firmware on the SunRay Clients in order to have keys generated.
When a client connects to a server and client authentication is enabled, the client sends its public key anda client identifier to the server. For a Sun Ray Client, the client identifier is its MAC address. Initially theserver can verify only that the client is the owner of the submitted key, but it cannot verify that the clientlegitimately uses the submitted client ID.
The Sun Ray server stores a list of known clients and their public keys in the Sun Ray data store. Astored key can be marked as confirmed to indicate that authenticity of the key for the given client hasbeen confirmed through human intervention. As long as no key has been marked confirmed for a client,the client authentication feature can ensure only that a client identifier is not used by multiple differentclients with different keys. Only when the key has been verified and marked confirmed can the clientauthentication actually authenticate the identity of the client.
Note
Keys for Oracle Virtual Desktop Clients are not stored in the data store and they arenot displayed by the utkeyadm command or Admin GUI. Instead, an Oracle VirtualDesktop Client uses its key fingerprint as a client identifier so that the authenticityof the key for the given ID is established automatically. For more information, seeSection 11.3.1, “Key Fingerprint”.
By default, a client with an unconfirmed key is granted a session unless the identity of the client has beenused with a different key. Multiple keys submitted for a client might indicate an attack on sessions for thisclient, so session access is denied for this client. A user needs to explicitly confirm one of the keys asbeing authentic to re-enable access for the client.
You can select a stricter policy that requires authenticated client identities and denies access to anyclient whose key is not verified and confirmed by using the utpolicy command or the Admin GUI. If youchoose to use this policy, you must explicitly mark the key for every new client as 'confirmed' before theclient can be used. To use this policy to full effect, you should also set the client authentication mode to'hard' in the security configuration.
You can use the utkeyadm command to manage client identities and their associated keys. All keys thatare used for a client are listed by the key management tools.
With the utkeyadm command, you can perform the following actions:
• List keys associated to known clients and their status

Key Fingerprint
138
• Confirm a client key after verifying its authenticity. If multiple unconfirmed keys are stored for a client, allother keys are deleted when one is confirmed as authentic.
• Delete invalid or stale key entries
• Export key data for all or selected client identities for backup and for transfer to other Sun Ray serverinstances
• Import key data that has been exported on this or another Sun Ray server instance
You can also view, confirm, or delete associated keys for a client through the client's Desktop Propertiespage in the Admin GUI.
11.3.1 Key Fingerprint
A key fingerprint is a name for a key and it is what the user can see. A key fingerprint is generated by anMD5 hash based on the public key data.
You can view the key fingerprint for a client in the key panel. To display the key panel, press Stop-K or Ctrl-Pause-K. To verify the authenticity of a client key, you can compare the key fingerprint displayed in theclient's key panel with the one shown by the utkeyadm command for the same client.
11.3.2 How to Deny Access to Clients With Unconfirmed Keys
Sun Ray Client keys are initially considered unconfirmed and need to be confirmed as authentic forthe specific client by human intervention. Oracle Virtual Desktop Client keys are always consideredautomatically confirmed (auto-confirmed), because the ID by which a Desktop Access Client is identified isuniquely derived from its key.
The following procedure sets the policy that a confirmed key is required before access to a clientis granted. To enact a stronger policy, you should also set up the security policy to require clientauthentication from all clients, as described in Section 11.2.5, “How to Force Client Authentication From AllClients”.
Command-Line Steps
1. View the current policies:
# utpolicyCurrent Policy:-a -g -z both -k pseudo -u pseudo
2. Set the client authentication policy with the -c option:
# utpolicy -a -g -z both -k pseudo -u pseudo -c
3. Restart the Sun Ray services:
# utstart
Admin GUI Steps
1. On the Advanced > System Policy tab page, select the Client Key Confirmation Required option inthe Client Authentication section.
2. Restart all servers in the server group.

How to Confirm a Specific Client Key
139
11.3.3 How to Confirm a Specific Client Key
This procedure is required if a client receives a Keyerror (49) or Session Refused (50) icon due toconflicting or unconfirmed keys. Once the key is confirmed, you must disconnect the client by rebooting orinserting and removing a smart card to access a session after the change.
Before You Begin
• View the unconfirmed keys (key fingerprints) for all or specific clients.
• To determine whether an unconfirmed client key really belongs to that client, display the key fingerprintfor the client by pressing Stop-K or Ctrl-Pause-K.
Command-Line Steps
# utkeyadm -a -c IEEE802.000000ee0d6b1 key confirmed .# utkeyadm -a -c IEEE802.00000f85f52f -k 1c:d4:b9:31:9d:f0:00:ba:db:ad:65:6c:8e:80:4d:b31 key confirmed .
Admin GUI Steps
1. Go to the Desktop Unit Properties page for a single client.
2. In the Client Keys table, select a single key and click Confirm.
11.3.4 How to Confirm All Unconfirmed Client Keys
If you are certain that all clients requiring key confirmation have been connected to the server group (theirgenuine keys are stored on the server) and if you are certain that no unwanted clients have keys stored onthe server, then you can summarily confirm all known unconfirmed keys. If conflicting keys exist for a client,that client will be skipped.
1. Display all the client keys.
# utkeyadm -l -H
For example:
# utkeyadm -l -HCID TYPE KEY-FINGERPRINT STATUSIEEE802.00000adc1a7a DSA* 4f:98:25:60:3b:fe:00:ba:db:ad:56:32:c3:e2:8b:3e confirmedIEEE802.00000f85f52f DSA* 1c:d4:b9:31:9d:f0:00:ba:db:ad:65:6c:8e:80:4d:b3 unconfirmedIEEE802.00000f85f52f DSA* 4f:98:25:60:3b:fe:00:ba:db:ad:56:32:c3:e2:8b:3e unconfirmedIEEE802.00000fe4d445 DSA* 13:d0:d4:47:aa:7f:00:ba:db:ad:26:3a:17:25:11:24 unconfirmedIEEE802.000000ee0d6b DSA* d0:d7:d0:57:12:18:00:ba:db:ad:b7:0f:5a:c0:8b:13 unconfirmed
2. Confirm all unconfirmed client keys.
# utkeyadm -a -USkipping cid=IEEE802.00000f85f52f: Multiple (2) keys found.2 keys confirmed.
Using the previous example, the unconfirmed client keys for IEEE802.00000fe4d445 andIEEE802.000000ee0d6b are confirmed.

How to Display a Client's Fingerprint Key from a Sun Ray Client
140
11.3.5 How to Display a Client's Fingerprint Key from a Sun Ray Client
To display the key fingerprint for a client, press Stop-K or Ctrl-Pause-K.
If the key panel does not display, the client might have old firmware installed that doesn't support clientauthentication.
If the message No key available is displayed, the client still has preinstalled MfgPkg firmware or abug exists.
11.3.6 How to Display All Client Keys
This procedure shows how to display client keys in the data store. For additional options to display clientkeys, see the utkeyadm man page.
Command Line Steps
• Use the utkeyadm command.
# utkeyadm -l -H
For example:
# utkeyadm -l -HCID TYPE KEY-FINGERPRINT STATUSIEEE802.00000adc1a7a DSA* 4f:98:25:60:3b:fe:00:ba:db:ad:56:32:c3:e2:8b:3e confirmedIEEE802.00000f85f52f DSA* 1c:d4:b9:31:9d:f0:00:ba:db:ad:65:6c:8e:80:4d:b3 unconfirmedIEEE802.00000f85f52f DSA* 4f:98:25:60:3b:fe:00:ba:db:ad:56:32:c3:e2:8b:3e unconfirmedIEEE802.00000fe4d445 DSA* 13:d0:d4:47:aa:7f:00:ba:db:ad:26:3a:17:25:11:24 unconfirmedIEEE802.000000ee0d6b DSA* d0:d7:d0:57:12:18:00:ba:db:ad:b7:0f:5a:c0:8b:13 unconfirmed
Admin GUI Steps
• For multiple clients, click the Desktop Units tab.
The Client Key Status column indicates whether the client has a key in a confirmed or unconfirmedstatus, whether the client has multiple unconfirmed keys creating a conflict, or whether a key exists forthe client. The possible Client Key Status values are None, Unconfirmed, Confirmed, Conflict, Automatic,or Invalid.
11.3.7 How to Display All Keys for a Specific Client
This procedure shows how to display client keys in the data store. For additional options to display clientkeys, see the utkeyadm man page.
Command-Line Steps
• Use the utkeyadm command.
# utkeyadm [-l|-L] -c cid -H
where cid is the desktop ID of the client and -L displays additional auditing information.
Example
The following example displays all keys for the IEEE802.0003ba0d93af client with additional auditinginformation.

How to Delete a Specific Client Key
141
# utkeyadm -L -c IEEE802.0003ba0d93af -HCID TYPE KEY-FINGERPRINT STATUS CREATED CONFIRMED CONFIRMED BYIEEE802.0003ba0d93af DSA* 4f:98:25:60:3b:fe:d6:f8:fb:38:56:32:c3:e2:8b:3e unconfirmed 2009-06-01 05:08:50 UTC -
Admin GUI Steps
• For a single client, go to the Desktop Unit Properties page.
The Client Keys table shows the known keys and their status for the client.
11.3.8 How to Delete a Specific Client Key
• To delete a specific client key, use the following command:
# utkeyadm -d -c cid -k key-id
where cid is the desktop ID of the desktop to which the key belongs and key-id is the key fingerprint.
For example:
# utkeyadm -d -c IEEE802.00000f85f52f -k 1c:d4:b9:31:9d:f0:00:ba:db:ad:65:6c:8e:80:4d:b31 key deleted .
11.3.9 How to Delete All Client Keys for a Specific Client
• To delete all client keys for a specific client, type the following command:
# utkeyadm -d -c cid
where cid is the desktop id of the desktop to which the keys belong.
For example:
# utkeyadm -d -c IEEE802.00000f85f52f2 keys deleted.
11.4 Displaying Security Status
This section shows how to display the current security status for Sun Ray Clients.
11.4.1 How to Display Security Status for a Sun Ray Client
Once a connection has been successfully established between a client and a server, you can display aclient's security status by pressing Stop-N or Ctrl-Pause-N to display a security status icon and the SunRay Client's MAC.
For a description of OSD icons and their respective codes, see Chapter 16, Troubleshooting Icons.
11.4.2 How to Display Security Status for All Sessions
To display the security status for all sessions on a Sun Ray server, type the following command:
Authentication Troubleshooting
142
# utsession -p
Output similar to the following example will be displayed.
Token ID Registered Name Unix ID Disp StatePayflex.0000074500000202 ??? ??? 2 IEAMicropayflex.000003540004545 ??? ??? 3 D
The State column displays the encrypted/authenticated state of the session, as shown in Table 11.2,“utsession State Descriptions”
Table 11.2 utsession State Descriptions
StateColumnValue
Description
E Encrypted session
A Server is authenticated
C Authenticated client with confirmed identity, including software clients with automaticallyconfirmed keys
U Authenticated clients with unconfirmed identity. Such connections might not have regularsession access if the current policy requires a confirmed identity.
X Clients that have successfully authenticated with an unconfirmed key, but that key is inconflict with other equally unconfirmed keys that have been used with the same client ID.Clients that have a conflicting key will not be granted session access and you need toconfirm one of the known keys as authentic in order to admit the affected clients again.
For more information, see the utsession man page.
Note
A multihead group might have clients at different firmware levels. The utsessionoutput shows the lowest security level across the set of all clients participating inthe multihead group. For example, if at least one of the clients does not supportencryption or authentication, the session will be marked as not encrypted or notauthenticated.
11.5 Authentication Troubleshooting
This section provides the possible error messages for client and server authentication.
11.5.1 Error Messages
Errors in authentication are reported in the following log files:
• Installation logs:
• /var/adm/log (Oracle Solaris only)
• /var/log (Oracle Linux only)
• Configuration logs:

Error Messages
143
• /var/adm/log (Oracle Solaris only)
• /var/log/SUNWut (Oracle Linux only)
• General log files:
• /var/opt/SUNWut/log
• /var/opt/SUNWut/srds/log
• /var/opt/SUNWut/srds/replog
Messages logged into /var/opt/SUNWut/log/messages are delivered through the syslog servicedescribed in the syslogd man page. The general format of these messages is:
timestamp thread_name message_class message
For example:
May 7 15:01:57 e47c utauthd: [ID 293833 user.info] Worker3 NOTICE: SESSION_OK pseudo.080020f8a5ee
Message components are defined as follows:
• timestamp format: year.month.day hours:minutes:seconds
• thread_name:
• Worker# - Handles client authentication, access control, and session monitoring. Messages with thesame thread name are related. The exception occurs when a Worker# thread disconnects a client andthen purges the connection information from memory. After a Worker# DESTROY message, the nextuse of that Worker# thread name has no relation to previous uses of the thread name. In other words,thread names are reused.
• SessionManager# - Communicates with utsessiond on behalf of a Worker# thread.
• AdminJobQ - Used in the implementation to wrap a library that would not otherwise be thread-safe.
• CallBack# - Communicates with applications such as utload.
• WatchID - Used to poll data or terminals from connections
• Terminator - Cleans up terminal sessions
• Group Manager - Main group manager thread
• message_class:
• CLIENT_ERROR - Indicates unexpected behavior from a client. These messages can be generatedduring normal operation if a client is rebooted.
• CONFIG_ERROR - Indicates a system configuration error. The Authentication Manager exits after thiserror is detected.
• NOTICE - Indicates a normal event.
• UNEXPECTED - Logs events or conditions that were not anticipated for normal operation but are notfatal.

Error Messages
144
• DEBUG - Occurs only if explicitly enabled and is used by the development team. Debug messagescan reveal session IDs, which must be kept secret to ensure proper security.
Table 11.3 Server and Client Authentication Error Message Examples
Error class Message Description
CLIENT_ERROR ...Exception ... : cannot send keepAliveInf Error encountered while attempting to send akeep-alive message to a client.
...keepAlive timeout A client has failed to respond withinthe allotted time. The session is beingdisconnected.
duplicate key: Client does not properly implement theauthentication protocol.
invalid key: Client does not properly implement theauthentication protocol.
CONFIG_ERROR attempt to instantiate CallBack 2nd time. Program error.
AuthModule.load Problem encountered while loadingconfiguration module.
Cannot find module Program or installation error.
NOTICE "discarding response: " + param No controlling application is present to receiveclient response.
"NOT_CLAIMED PARAMETERS: " + param A token was not claimed by anyauthentication module.
...authentication module(s) loaded. Notification that authentication modules haveloaded.
...DISCONNECT ... Normal notification of disconnection.
UNEXPECTED "CallBack: malformed command" Bad syntax from a user application such asutload or utidle.
.../ ... read/0:" + ie Possible program error.
.../ ... read/1: ... Exception ... Error encountered while reading messagesfrom the client.
.../... protocolError: ... Various protocol violations are reported withthis message. This error condition is also away for utauthd to force the client to reset.

145
Chapter 12 Multiple Monitor Configurations
Table of Contents12.1 Multi-Monitor ........................................................................................................................... 145
12.1.1 How to Set a Sun Ray Client's Multi-Monitor Configuration With Optimal Settings ............. 14612.1.2 How to Set a Sun Ray Client's Multi-Monitor Configuration With Customized Settings ....... 146
12.2 Multihead Groups .................................................................................................................... 14812.2.1 Creating a Multihead Group .......................................................................................... 14812.2.2 Multihead Group Screen Indicator ................................................................................. 14912.2.3 Creating a Single Screen Across Several Monitors (Xinerama) ....................................... 14912.2.4 How to Create a New Multihead Group ......................................................................... 14912.2.5 How to Enable the Multihead Group Policy .................................................................... 15012.2.6 How to Manually Set Multihead Group Screen Dimensions ............................................. 15112.2.7 How to Manually Set Multihead Group Geometry ........................................................... 15112.2.8 How to Disable Multihead Group for a Session .............................................................. 15212.2.9 How to Enable and Disable Xinerama ........................................................................... 15212.2.10 How to Disconnect a Secondary Client ........................................................................ 153
This chapter describes how to administer two different types of monitor configurations that Sun RaySoftware supports: multi-monitor and multihead groups.
A multi-monitor configuration supports multiple monitors connected to the dual video connectors on a SunRay 2FS or Sun Ray 3 Plus Client.
A multihead group configuration enables you to merge and control multiple Sun Ray Clients, referred to inthis context as heads, and their screens using a single keyboard and mouse attached to a primary client.
12.1 Multi-Monitor
This section describes the multi-monitor support for the Sun Ray 2FS and Sun Ray 3 Plus Clients with dualvideo connectors. Figure 12.1, “Multi-monitor Example” shows a Sun Ray 3 Plus Client using the multi-monitor feature and the Windows connector.
Figure 12.1 Multi-monitor Example

How to Set a Sun Ray Client's Multi-Monitor Configuration With Optimal Settings
146
Multi-monitor support for Sun Ray Clients is provided by the X Resize, Rotate, and Reflect (RandR) 1.2extension, which provides a way to use the multiple monitors as one screen. Features include:
• Configuration changes can be applied dynamically to a session.
• Application windows are aware of monitor boundaries to avoid placement issues.
• No size restrictions. Hotdesking is supported to other clients with different monitor resolutions, whetherthey are smaller or larger.
RandR 1.2 support is provided with the default Xserver, Xnewt, which is automatically installed andconfigured with the Sun Ray Software. The optimal multi-monitor configuration is applied automaticallywhen a Sun Ray Client sessions starts, unless the utxconfig -r command is used to set theDIMENSIONS parameter. In that case, the utxconfig value will be used to size the screen.
A session's multi-monitor configuration is preserved after hotdesking, which means hotdesking betweenclients with different monitor configurations can produce unacceptable results. The dynamic sessionresizing feature solves this problem and automatically reconfigures the session's display based on the newscreen configuration. See Section 13.1.2, “Dynamic Session Resizing” for details.
If dynamic session resizing is not enabled, then you have two ways to update the new display configurationafter hotdesking, either automatically with optimal settings or manually with customized settings. SeeSection 12.1.1, “How to Set a Sun Ray Client's Multi-Monitor Configuration With Optimal Settings” andSection 12.1.2, “How to Set a Sun Ray Client's Multi-Monitor Configuration With Customized Settings” fordetails.
Note
The gnome-display-properties GUI monitor configuration tool should not be usedon Oracle Solaris or Oracle Linux. Using this tool may adversely affect the client'sRandR 1.2 configuration.
12.1.1 How to Set a Sun Ray Client's Multi-Monitor Configuration With OptimalSettings
The following command sets a Sun Ray Client's multi-monitor configuration using the optimal settingsprovided by xrandr. This command is not needed if dynamic session resizing is enabled.
/opt/SUNWut/bin/utscreenresize -s all
12.1.2 How to Set a Sun Ray Client's Multi-Monitor Configuration WithCustomized Settings
There may be times when you want to create a specific multi-monitor configuration for a Sun RayClient. This example shows how to use the xrandr command to view and set a specific multi-monitorconfiguration. For more details, refer to the xrandr man page. This procedure will not work if dynamicsession resizing is enabled.
Note
Sun Ray Software provides an updated version of the xrandr command for OracleLinux, and it is installed in the /opt/SUNWut/bin directory during the installationprocess. The /opt/SUNWut/bin/xrandr command provides the requiredfunctionality for the Sun Ray Software environment.

How to Set a Sun Ray Client's Multi-Monitor Configuration With Customized Settings
147
Issuing the xrandr command without any options shows a client's current multi-monitor configuration.For example, here is the xrandr output for a session created on a client with one monitor displaying at1280x1024 resolution:
(use /opt/SUNWut/bin/xrandr on Oracle Linux)% xrandrScreen 0: minimum 640 x 480, current 1280 x 1024, maximum 10240 x 10240DVI1 connected 1280x1024+0+0 (normal left inverted right) 361mm x 288mm 1280x1024 59.9*+ 74.9 65.9 1152x900 65.8 1024x768 74.9 69.8 59.9 800x600 59.9 640x480 59.4
In this output, the Screen line provides the current overall screen resolution (1280x1024) and the availablemaximum resolution (10240x10240). There is a single Output named DVI1 that shows a 1280x1024monitor connected to the client's DVI port (or the first DVI port on a dual-DVI client). All resolutionsavailable for this Output are listed. The current mode is indicated by a '*' and the optimal mode indicatedwith a '+'.
After hotdesking to a dual-monitor client, the client's Screen configuration does not change, but the RandRinformation is updated to reflect optimal modes. For example, hotdesking to a client with 1600x1200 and1920x1200 monitors would show the following xrandr output:
(use /opt/SUNWut/bin/xrandr on Oracle Linux)% xrandrScreen 0: minimum 640 x 480, current 1280 x 1024, maximum 10240 x 10240DVI1 connected 1280x1024+0+0 (normal left inverted right) 451mm x 338mm 1600x1200 59.9 + 1280x1024 74.9* 65.9 59.9 1152x900 75.8 75.0 65.8 1024x768 74.9 59.9 800x600 59.9 640x480 59.4DVI2 connected (normal left inverted right) 1920x1200 59.9 + 1600x1200 59.9 1280x1024 74.9 65.9 59.9 1152x900 75.8 75.0 65.8 1024x768 74.9 59.9 800x600 59.9 640x480 59.4
For this new client, two Outputs are listed, DVI1 and DVI2. Although DVI2 is "connected," it is notconfigured with a current mode. Both Outputs have their optimal modes indicated with a '+', but DVI1 stillhas 1280x1024 as its current mode.
The best way to reconfigure this Screen with the optimal modes for both DVI1 and DVI2 would be touse the utscreenresize command described in the previous section. However, if you wanted toselect specific resolutions for each monitor, you would need to use the --output option of the xrandrcommand. For example, if you wanted both monitors to use 1600x1200, you would issue the followingxrandr command:
(use /opt/SUNWut/bin/xrandr on Oracle Linux)% xrandr --output DVI1 --mode 1600x1200 --output DVI2 --mode 1600x1200 --right-of DVI1
Here is the new multi-monitor configuration, with both DVI1 and DVI2 at 1600x1200 resolution and DVI2starting at 1600,0 on the screen:

Multihead Groups
148
(use /opt/SUNWut/bin/xrandr on Oracle Linux)% xrandrScreen 0: minimum 640 x 480, current 3200 x 1200, maximum 10240 x 10240DVI1 connected 1600x1200+0+0 (normal left inverted right) 451mm x 338mm 1600x1200 59.9*+ 1280x1024 74.9 65.9 59.9 1152x900 75.8 75.0 65.8 1024x768 74.9 59.9 800x600 59.9 640x480 59.4DVI2 connected 1600x1200+0+0 (normal left inverted right) 519mm x 324mm 1920x1200 59.9 + 1600x1200 59.9* 1280x1024 74.9 65.9 59.9 1152x900 75.8 75.0 65.8 1024x768 74.9 59.9 800x600 59.9 640x480 59.4
Note that 1920x1200 is still marked as "optimal" for DVI2, but it is currently using 1600x1200.
12.2 Multihead Groups
A multihead group configuration enables you to merge and control multiple Sun Ray Clients, referredto in this context as heads, and their screens using a single keyboard and mouse attached to a primaryclient. The maximum number of clients that can be connected to a single Sun Ray session as a multiheadgroup is 16, and a multihead group can be composed of virtually any mix of Sun Ray Clients. If you useclients that support up to two monitors, such as the Sun Ray 2FS Client or Sun Ray 3 Plus Client, then amultihead group can control as many as 32 monitors. Each Sun Ray Client presents an X screen of themultihead X display.
All peripherals are attached to the primary client. The remaining clients, called the secondary clients,provide the additional displays. If a secondary client tries to connect when the primary client is notavailable, a Waiting for Primary icon is displayed on the secondary client until the primary client isdiscovered.
Ordinarily, a multihead group session has a separate desktop toolbar and separate workspaces on eachmonitor. Windows cannot be moved from one monitor to another within the multihead group.
Xinerama, by contrast, enables all the monitors in a multihead group to be treated as a single screen. SeeSection 12.2.9, “How to Enable and Disable Xinerama” for more details.
If you hotdesk from a multihead group to a Sun Ray Client that is not part of a multihead group, you canstill view all the screens created in the original multihead group on the single screen by panning to eachscreen in turn. This action is called screen flipping.
12.2.1 Creating a Multihead Group
There are two main steps to create a multihead group:
• Create the multihead group using the utmhconfig (GUI) or utmhadm command. The command mustbe run on the primary client. You can use a smart card to identify the terminals.
• Enable the multihead policy using either the utpolicy command or the Admin GUI.
Note the following limitations:

Multihead Group Screen Indicator
149
• The Sun Ray 2FS and Sun Ray 3 Plus Clients are designed to run a single display across two monitorswithout additional configuration, using a single frame buffer for two monitors, always treating them as asingle, unified display surface to be controlled with a single mouse and keyboard and displayed to the Xserver as a single screen.
• Video acceleration works only on the primary client. In a multihead group, the audio stream is directedonly to the primary client, so audio/video synchronization is provided only on the primary client.
• Regional hotdesking is not enabled for multihead groups.
12.2.2 Multihead Group Screen Indicator
When the multihead feature is used, a small window indicating the current session on each screen isdisplayed, with the current screen highlighted for easy identification. This window is automatically displayedfor users during session creation. For example, Figure 12.2, “Multihead Group Screen Indicator” indicatesthat the user is on the second screen of a three-screen display.
Figure 12.2 Multihead Group Screen Indicator
12.2.3 Creating a Single Screen Across Several Monitors (Xinerama)
The Xinerama extension to X11 creates a single large screen displayed across several monitors. WithXinerama, only one toolbar is displayed, and a window can be moved smoothly from one part of the screento the next. When Xinerama is enabled, the RandR extension is automatically disabled.
For CDE desktop sessions, a single CDE toolbar and set of workspaces manages the configured monitors.A window including the CDE toolbar itself can span monitors, because the monitor displays are still withinthe same screen.
See Section 12.2.9, “How to Enable and Disable Xinerama” for more details.
Xinerama can also be used with the Windows connector uttsc command.
12.2.4 How to Create a New Multihead Group
1. On the primary client, start the Multi-head Administration GUI.
# /opt/SUNWut/sbin/utmhconfig
2. On the initial screen, click Create New Group.

How to Enable the Multihead Group Policy
150
Figure 12.3 utmhconfig Home Screen
The Create New Multiheaded Group dialog box is displayed. The number of rows and the number ofcolumns you provide are displayed as the group geometry when the group is created.
3. Follow the instructions in the wizard to complete the procedure.
The main step in the wizard is to select the clients within the multihead group and insert a smart card ineach Sun Ray Client in turn to establish the order of the group.
4. Click the Finish button.
5. Exit the session or disconnect by removing your card.
6. Enable the Multihead policy.
See Section 12.2.5, “How to Enable the Multihead Group Policy” for more details.
12.2.5 How to Enable the Multihead Group Policy
Command-Line Steps
The following command enables the multihead group policy for the failover group and restarts the Sun RaySoftware with the new policy on the local server without disrupting existing sessions.
# /opt/SUNWut/sbin/utpolicy -a -m -g your_policy_flags# /opt/SUNWut/sbin/utstart
Note
Issue the utstart command on every server in the failover group.

How to Manually Set Multihead Group Screen Dimensions
151
Admin GUI Steps
1. Click the Advanced tab.
2. Click the System Policy tab.
3. Select the Multihead Feature Enabled option.
4. Click Save.
If a system restart is needed, an advisory message will display.
12.2.6 How to Manually Set Multihead Group Screen Dimensions
Screen dimensions for the multihead group are automatically set, by default, to the largest dimensionsupported by the primary client.
To override the automatic sizing of screen dimensions, use the utxconfig -r command.
Note
If explicit screen dimensions are chosen, or if the resolutions of the monitors differ,you may have problems with unwanted on-screen movement called panning, orlarge black bands around the visible screen area.
12.2.6.1 How to Override Automatic Sizing of Screen Dimensions
% utxconfig -r widthxheight
For example:
% utxconfig -r 1280x1024
12.2.6.2 How to Restore Automatic Sizing Behavior on the Next Login
% utxconfig -r auto
12.2.7 How to Manually Set Multihead Group Geometry
A multihead group can have its screens arranged in various configurations. For example, a user canarrange a multihead group of four screens as two rows of two screens (2x2) or as a single row of fourscreens (4x1). By default, when a user logs into a multihead group, the session uses the number ofscreens available. The layout or geometry of these displays is generated automatically.
When the mouse pointer is moved past the edge between two screens, it moves from one screen to thenext. The geometry of the multihead group determines which screen is displayed at that moment.
You can use the utxconfig -R command to manipulate the automatic geometry.
12.2.7.1 How to Override the Automatic Geometry
% utxconfig -R columnsxrows
12.2.7.2 How to Restore the Automatic Geometry on the Next Login
How to Disable Multihead Group for a Session
152
% utxconfig -R auto
12.2.8 How to Disable Multihead Group for a Session
% utxconfig -m off
12.2.9 How to Enable and Disable Xinerama
Users can enable or disable Xinerama as part of their X preferences. The utxconfig command handlesthis setting on an individual token basis. The user must log off for the changes to take effect. WhenXinerama is enabled, the RandR extension is automatically disabled.
Note
Video acceleration is not available for Xinerama sessions. Video played withoutvideo acceleration can be dragged from one Sun Ray Client to another or can spanmultiple clients.
Note
Xinerama tends to consume noticeable amounts of CPU, memory, and networkbandwidth. For optimal performance, set the shmsys:shminfo_shmmaxparameter in the /etc/system file to at least LARGEST_NUMBER_OF_HEADS *width * height * 4.
12.2.9.1 How to Enable Xinerama
1. Log in to the Sun Ray session.
2. Enable Xinerama.
% utxconfig -x on
3. Log off the session and log back in for the changes to take effect.
12.2.9.2 How to Disable Xinerama
1. Log in to the Sun Ray session.
2. Disable Xinerama.
% utxconfig -x off
3. Log off the session and log back in for the changes to take effect.
12.2.9.3 How to Enable Xinerama as Default for All Clients
1. Become superuser on the Sun Ray server.
2. Enable Xinerama for all clients.
# utxconfig -a -x on
If users are currently logged in, they need to log off the session and log back in for the changes to takeeffect.

How to Disconnect a Secondary Client
153
12.2.10 How to Disconnect a Secondary Client
If you disconnect the secondary clients without deleting the multihead group to which they belong, thescreens are not displayed on the single primary client. The primary client is still part of the multihead group,and the mouse cursor can appear to get lost when it goes to the disconnected secondary client.
To recover from this situation, you can do one of the following actions:
1. Reconnect the missing client.
2. Delete the multihead group using the utmhconfig or utmhadm command.
3. Replace the missing client.
4. Create a new multihead group that incorporates the replacement client.

154

155
Chapter 13 Desktop Clients
Table of Contents13.1 Managing Desktop Clients ....................................................................................................... 156
13.1.1 Client ID Differences Between Oracle Virtual Desktop Clients and Sun Ray Clients .......... 15613.1.2 Dynamic Session Resizing ............................................................................................ 15713.1.3 How to List Available Sun Ray Servers ......................................................................... 16013.1.4 How to List the Available Clients ................................................................................... 16013.1.5 How to Display Sun Ray Client Information ................................................................... 16013.1.6 How to Configure a Client's Location and Information ..................................................... 16113.1.7 Audio Output Troubleshooting (Oracle Solaris 10 and Oracle Linux 5) ............................. 16113.1.8 Audio Output Troubleshooting (Oracle Solaris 11 and Oracle Linux 6) ............................. 164
13.2 Sun Ray Clients ...................................................................................................................... 16513.2.1 How to Centralize Sun Ray Client Configurations (.parms) .............................................. 16513.2.2 Sun Ray Client Hot Keys .............................................................................................. 16813.2.3 How to Change Sun Ray Client Audio and Display Settings (Sun Ray Settings GUI) ......... 17113.2.4 How to Modify Screen Resolutions ................................................................................ 17213.2.5 How to Power Cycle a Sun Ray Client .......................................................................... 17313.2.6 How to Enable or Disable XRender ............................................................................... 17313.2.7 How to Configure Screen Rotation ................................................................................ 17413.2.8 How to Disable Screen Blanking on a Sun Ray Client .................................................... 17413.2.9 How to Enable the NumLock Key for All Sun Ray Sessions ............................................ 17613.2.10 Keyboard Country Codes ............................................................................................ 17713.2.11 Sun Ray Client Boot Process ...................................................................................... 178
13.3 Oracle Virtual Desktop Clients ................................................................................................. 18113.3.1 Oracle Virtual Desktop Clients Overview ....................................................................... 18113.3.2 Using External Devices on the Client Computer ............................................................. 18213.3.3 How to Enable Access for Oracle Virtual Desktop Clients ............................................... 18213.3.4 How to Enable the Clipboard Service for Oracle Virtual Desktop Clients .......................... 18413.3.5 Oracle Virtual Desktop Client Troubleshooting ............................................................... 184
This chapter provides information about the desktop clients supported by Sun Ray Software, whichincludes Sun Ray Clients and Oracle Virtual Desktop Clients. Each desktop client has its own chapterdetailing specific information. This chapter specifies topics that pertain to both types of clients.
Refer to the following sections and chapters for more specific information about the desktop clients.
Sun Ray Clients
• Section 13.2, “Sun Ray Clients”
• Chapter 14, Sun Ray Client Firmware
• Chapter 15, Peripherals
• Chapter 16, Troubleshooting Icons
Oracle Virtual Desktop Clients
• Section 13.3, “Oracle Virtual Desktop Clients”
• Chapter 15, Peripherals

Managing Desktop Clients
156
• Chapter 16, Troubleshooting Icons
See the Oracle Virtual Desktop Client documentation (http://www.oracle.com/technetwork/server-storage/sunrayproducts/docs/index.html) for detailed information about the Oracle Virtual Desktop Clientapplication and its command-line equivalent, the ovdc command.
13.1 Managing Desktop ClientsThis section provides the list of common management tasks or feature information for both Sun RayClients and Oracle Virtual Desktop Clients. For information specific to the respective clients, seeSection 13.2, “Sun Ray Clients” and Section 13.3, “Oracle Virtual Desktop Clients”.
13.1.1 Client ID Differences Between Oracle Virtual Desktop Clients and SunRay Clients
If you have existing scripts using the Sun Ray Software commands, or you plan to create scripts, you mustbe aware of the client ID differences between Oracle Virtual Desktop Clients and Sun Ray Clients.
All clients are represented in the Sun Ray Software administration tools by a client ID, also called CID,terminal CID, or client identifier. A client ID has both a full ID and a short ID version:
• Full client ID: namespace.id-part
• Short client ID: id-part
The namespace value is a tag that determines the format of the id-part value. Short client IDs areusually used and accepted because the current namespaces, one for Sun Ray Clients and one for OracleVirtual Desktop Clients, use different id-part formats. The full client ID is used to help distinguishbetween these different types of clients more easily.
See Table 13.1, “Oracle Virtual Desktop Client ID Details” for the details of the client ID.
Table 13.1 Oracle Virtual Desktop Client ID Details
Client namespace Value id-part Meaning id-part Format
Sun Ray Client IEEE802 MAC address of Sun RayClient
12 hex digits
Oracle Virtual DesktopClient
MD5 MD5 hash of client key 32 hex digits
Note
The client key is part of an Oracle Virtual Desktop Client profile, so every OracleVirtual Desktop Client profile has its own client ID.
See Table 13.2, “Example Sun Ray Client IDs” and Table 13.3, “Example Oracle Virtual Desktop ClientIDs” for examples of client IDs.
Table 13.2 Example Sun Ray Client IDs
Short ID Full CID
0003badc1b9d IEEE802.0003badc1b9d
00144f85f52f IEEE802.00144f85f52f
080020b5ca55 IEEE802.080020b5ca55

Dynamic Session Resizing
157
Table 13.3 Example Oracle Virtual Desktop Client IDs
Short ID Full CID
1bd97b44ea9458fac256a7a778a282fe MD5.1bd97b44ea9458fac256a7a778a282fe
d8b3a4eb29497e0c6fbb0f2a810267f5 MD5.d8b3a4eb29497e0c6fbb0f2a810267f5
13.1.1.1 How to Display Client ID Information
The format of the client ID for an Oracle Virtual Desktop Client is different to the client ID for a Sun RayClient. See Section 13.1.1, “Client ID Differences Between Oracle Virtual Desktop Clients and Sun RayClients” for more information.
To display a Sun Ray Client's short ID, press Stop-N or Ctrl-Pause-N.
You can display an Oracle Virtual Desktop Client's short ID in the following ways:
• Keyboard - Host-N (By default, Host is the right Ctrl key.)
• Command - Use the -i or --clientid command option of the ovdc command.
13.1.2 Dynamic Session Resizing
Dynamic session resizing allows the remote desktop to be resized automatically to fit the optimized size ofyour local desktop client session. When you hotdesk to a session from a different device, or use a clientdevice like a tablet, which can be rotated, the new screen configuration is detected and the session screendimensions are adapted accordingly.. See Section 13.1.2.1, “Resizing Scenarios” for a list of scenarioswhen dynamic session resizing is used.
With dynamic session resizing, any change in a desktop client's screen configuration is detected and theremote desktop is automatically changed accordingly. Changes to the desktop client's screen configurationcan include the number of monitors, monitor resolutions, monitor orientations, tablet rotation, or screenmode, such as window mode or full screen mode. These changes can happen at any time during asession, for example, even when a tablet changes orientation from landscape to portrait.
To enable dynamic session resizing for Sun Ray sessions, you must use one of the following methods toinvoke the -l option of the utscreenresize command, which runs utscreenresize in a session'sbackground:
• GNOME autostart - For users that use regular Oracle Solaris or Oracle Linux sessions, use the GNOMEautostart configuration to invoke the utscreenresize -l command when the user's GNOME desktopis initialized. Since this method uses the standard GNOME autostart configuration, users will have theability to disable it through their GNOME desktop preferences. See Section 13.1.2.2, “How to EnableDynamic Session Resizing Using GNOME Autostart” for details.
• Session initialization script - For all other non-regular sessions, such as kiosk sessions, use thesession initialization script to invoke the utscreenresize -l command when a session initializes.See Section 13.1.2.3, “How to Enable Dynamic Session Resizing Using a Session Initialization Script”for details.
For Oracle Virtual Desktop Clients, users can also enable or disable this feature on the client side throughthe configuration settings, and it is enabled by default.
If dynamic session resizing is enabled for a session, all other display resizing operations are ignored,such as the utxconfig -r or xrandr commands. If users want to configure their own specific screenconfiguration or desktop resolutions, you must disable dynamic session resizing for those users so theycan use other commands and tools to manage their screen or desktop configurations. Or, in the case of theGNOME autostart configuration, users can disable it themselves.

Dynamic Session Resizing
158
Dynamic session resizing is available for all Sun Ray Clients, Oracle Virtual Desktop Client, Oracle VirtualDesktop Client for iPad 1.2 or later, and Oracle Virtual Desktop Client for Android 1.2 or later. OracleVirtual Desktop Client 3.2 or later is required to provide users an optimal display when resizing the windowwhile in window mode.
Note
Dynamic session resizing will not work if the Xinerama extension is enabled. SeeSection 12.2.9, “How to Enable and Disable Xinerama” for more details.
13.1.2.1 Resizing Scenarios
Dynamic session resizing will automatically resize the remote desktop in the following situations:
• Hotdesking from a Sun Ray Client to another Sun Ray Client with a different monitor configuration,monitor resolution, or monitor orientation.
• Hotdesking from a Sun Ray Client to an Oracle Virtual Desktop Client running on a client computer, andvice versa.
• Resizing the window while running Oracle Virtual Desktop Client in window mode. The session's displayautomatically resizes to the new window size. If you reduce the size of a window without desktop sessionresizing, you must use scroll bars to view the entire display, because the session's display does notautomatically resize and is too big to fit in the smaller window.
• Rotating a tablet from landscape to portrait mode while running the Oracle Virtual Desktop Clientapplication, and vice versa. The remote desktop automatically rotates with the tablet.
13.1.2.2 How to Enable Dynamic Session Resizing Using GNOME Autostart
This procedure shows how to enable dynamic session resizing for all users when their GNOME desktopstarts. This method is best for regular Oracle Solaris and Oracle Linux sessions.
1. Become superuser on the Sun Ray server.
2. (Sun Ray Clients only) If there are any Sun Ray Clients that have monitors in a non-standardorientation, set the Sun Ray Client's firmware with the valid orientation values (orient1 and orient2)for the connected monitors.
Use the -e option of the utfwadm command to update the firmware for a specific Sun Ray Client. SeeSection 13.2.1, “How to Centralize Sun Ray Client Configurations (.parms)” for details.
3. Add the utscreenresize command with the -s all -l option to the GNOME autostart directory.
For Oracle Solaris 11, Oracle Linux 6, and Oracle Linux 5
Add the following file named utscreen.desktop to the /usr/share/gnome/autostart directory.
[Desktop Entry]Type=ApplicationExec=/opt/SUNWut/bin/utscreenresize -s all -lHidden=falseX-GNOME-Autostart-enabled=trueName[en_US]=Sun Ray Session Screen ResizeName=Sun Ray Session Screen ResizeComment[en_US]=Start utscreenresize on login.Comment=Start utscreenresize on login.
With this file in place, all users will have dynamic session resizing enabled by default. Individual usersmay disable this feature by choosing System > Preferences > Startup Applications and unchecking
Dynamic Session Resizing
159
the Sun Ray Screen Resize application. The user will have to log out and log in for the change to haveeffect.
If dynamic session resizing is not enabled for all users through /usr/share/gnome/autostart,individual users can still enable this feature by creating a Startup Application for the utscreenresize-s all -l command. They can choose System > Preferences > Startup Applications and clickAdd in the Startup Applications Properties window.
For Oracle Solaris 10
To enable dynamic session resizing, individual users must create a Startup Program for theutscreenresize -s all -l command. Click Launch > Preferences > Desktop Preferences >Sessions, click the Startup Programs tab, and click Add.
13.1.2.3 How to Enable Dynamic Session Resizing Using a Session Initialization Script
This procedure shows how to enable dynamic session resizing when the user's session initializes. Thismethod is required for non-regular sessions, such as kiosk sessions.
1. Become superuser on the Sun Ray server.
2. (Sun Ray Clients only) If there are any Sun Ray Clients that have monitors in a non-standardorientation, set the Sun Ray Client's firmware with the valid orientation values (orient1 and orient2)for the connected monitors.
Use the -e option of the utfwadm command to update the firmware for a specific Sun Ray Client. SeeSection 13.2.1, “How to Centralize Sun Ray Client Configurations (.parms)” for details.
3. Change directory to the session initialization directory.
• Oracle Solaris 10:
# cd /usr/dt/config/Xsession.d
• Oracle Linux or Oracle Solaris 11:
# cd /etc/X11/xinit/xinitrc.d
4. Create the following customized script to enable dynamic session resizing (the script is called0050.desktopresize.sh in this procedure).
#!/bin/sh
# Enable dynamic session resizing each time a user hotdesks /opt/SUNWut/bin/utscreenresize -s all -l &
Note
The script name should have the 0050. prefix to make sure it is run at theappropriate time. For Oracle Linux and Oracle Solaris 11, the script name musthave the .sh extension, otherwise the script will not get sourced.
5. Save the script and make the script executable for everyone.
# chmod 775 0050.desktopresize.sh
6. Start a new session, so the script gets sourced.

How to List Available Sun Ray Servers
160
13.1.3 How to List Available Sun Ray Servers
• In a shell window on the client, type the following command:
% utswitch -l
The available Sun Ray servers to the client within the current server group are displayed.
13.1.4 How to List the Available Clients
This procedure describes how to list all the available Sun Ray Clients and Oracle Virtual Desktop Clientson the Sun Ray server.
Command-Line Steps
1. Become superuser on the Sun Ray server.
2. Display all the available clients.
# utdesktop -l
Admin GUI Steps
1. Start the Admin GUI.
2. Click the Desktop Units tab.
The list of available clients are displayed. You can use the drop-down menu and Search field to displaythe specific clients you want to view.
13.1.5 How to Display Sun Ray Client Information
This procedure describes how to view detailed information about registered desktop clients, including theirclient ID. If you have access to the physical Sun Ray Client, you can press Stop-V or Ctrl-Pause-V to viewthe client's current information.
Command-Line Steps
1. Become superuser on the Sun Ray server.
2. Display information about a client.
# utdesktop -p clientID
where clientID is the short ID of the client, as described in Section 13.1.1, “Client ID DifferencesBetween Oracle Virtual Desktop Clients and Sun Ray Clients”. You can use the utdesktop -lcommand to list all the desktop clients and their client IDs.
Admin GUI Steps
Note
To facilitate the searching process, you can use the Admin GUI to edit desktopclient properties. Click the DTU Identifier and then click Edit. You can then providea location or other information.

How to Configure a Client's Location and Information
161
1. Start the Admin GUI.
2. Click the Desktop Units tab.
3. From the Desktop Units tab, choose the information to display:
• To display information about a specific desktop client, click on the DTU Identifier (MAC address) orenter a search string in the text field.
• To display information about a group of desktop clients, select an option from the drop-down menu(All Connected Desktop Units, Token Readers, or Multihead Groups) and/or enter a search string inthe text field to narrow your search.
13.1.6 How to Configure a Client's Location and Information
This procedure enables you to add the location and other information about a desktop client. This is usefulfor various applications like the location awareness feature.
Command-Line Steps
• Edit the client location and other client information for a Sun Ray Client:
# utdesktop -e "client_id,location,[other_info]"
• Edit the client location and other client information for a batch of Sun Ray Clients:
# utdesktop -e -f filename
filename must be a comma-separated format (CSV) file.
• List the configured client location and other client information for all Sun Ray Clients:
# utdesktop -l
Admin GUI Steps
1. Click the Desktop Units tab.
2. Select a client ID to display its Desktop Unit Properties screen.
3. Click Edit to display the Edit Desktop Unit Properties screen.
4. Enter a location and other information about the client.
5. Click Save.
13.1.7 Audio Output Troubleshooting (Oracle Solaris 10 and Oracle Linux 5)
This section provides troubleshooting information for audio output on Sun Ray Clients and Oracle VirtualDesktop Clients running Oracle Solaris 10 or Oracle Linux 5 sessions.
13.1.7.1 Audio Frequencies Used With Applications
A desktop client uses whatever audio frequency an application needs, which enables you to configureapplication audio requirements to help reduce bandwidth and increase scalability. For example, if a VoIPapplication requests 8kHz mono, a desktop client will transmit only 8kHz mono.

Audio Output Troubleshooting (Oracle Solaris 10 and Oracle Linux 5)
162
13.1.7.2 Tracking Audio Sessions
Each time a user logs in to a desktop client, a script automatically assigns the $AUDIODEV environmentvariable to that session. One utaudio process is assigned to each session. Refer to the utaudio andaudio man pages for more information.
13.1.7.3 Audio Device Emulation During Hotdesking
During hotdesking, an emulated audio device follows the user to the new session. The name of theemulated device is carried in the $AUDIODEV environment variable. It is the responsibility of the audioapplication to inspect $AUDIODEV and direct its output to that device.
The emulated audio devices are created as device nodes in the /tmp/SUNWut/dev/utaudio directory.This directory tree is recreated at boot time.
Note
Do not remove the /tmp/SUNWut/dev/utaudio directory. If you delete thisdirectory, users with utaudio sessions cannot use their audio pseudo devicenodes.
13.1.7.4 Problem: Audio is not working
• Use the Oracle keyboard audio keys and check the volume and mute buttons.
• Display the Sun Ray session's audio settings:
$ utsettings
and verify that the audio output is selected properly, for example, for headphones or speakers.
• Make sure the volume is not muted in your desktop session.
• Try a set of external speakers plugged into the Sun Ray Client's audio out or headphones port. If thatworks, the Sun Ray Client might have a broken speaker.
• To test whether the audio is working, type the following:
$ cat audiofile > $AUDIODEV
Oracle Solaris provides suitable sample PCM-encoded audio files in /usr/share/audio/samples/au, so for instance this command:
$ cat /usr/share/audio/samples/au/gong.au > $AUDIODEV
should produce the sound of a gong.
Linux generally does not provide PCM-encoded audio files. If you can not locate a suitable file then thiscommand can be used to generate a continuous tone:
$ perl -e 'foreach(-8..8){push(@v,pack("n",4*$_))} while(1){print @v}' > $AUDIODEV
If the cat or perl command hangs, you might need to quit any other applications that are currentlytrying to play audio, for example, a browser.

Audio Output Troubleshooting (Oracle Solaris 10 and Oracle Linux 5)
163
13.1.7.5 Problem: Audio is not working with Firefox
• Check the current release of the Flash plugin and make sure it is at version 9.0.r125 or later. To checkthe Flash plugin version, type about:plugins as the URL in the browser.
• Try quitting Firefox and explicitly restart it in a terminal window.
• If all else fails, quit Firefox, go to your .mozilla directory, and rename the "firefox" directory tosomething else, for example, firefox.jan09. Then, restart Firefox and see whether the audio workswith a completely clean configuration.
If the audio works with the clean configuration, then something is wrong in your browser's previousconfiguration.
13.1.7.6 Problem: Audio is not working with latest versions of Firefox or Adobe FlashPlayer (Oracle Linux 5)
This problem is likely occurring because you are using the latest releases of Firefox or Adobe FlashPlayer, which provide only ALSA sound support. Oracle Linux 5 provides only OSS sound support. For aworkaround to this problem, see Knowledge Article 1464502.1.
13.1.7.7 Problem: An application ignores the $AUDIODEV environment variable
Some applications fail to honor $AUDIODEV and unconditionally use a specific audio device node such as/dev/audio or /dev/dsp. To work around this shortcoming, Sun Ray Software provides a preloadableshared library libc_ut.so that can be used to interpose on an application and redirect its activities to thedevice specified by $AUDIODEV. To put this redirection into effect:
1. Navigate to the shell or wrapper from which you started the audio player.
2. Set the environment variable LD_PRELOAD in the player application's environment to refer to thelibc_ut.so interposer:
$ LD_PRELOAD=libc_ut.so$ export LD_PRELOAD
3. Restart the application.
13.1.7.8 xmms Player Configuration (Oracle Linux)
To configure an xmms player to play mp3 files, perform the following steps:
1. Change the preferences on xmms output plugin to add more buffering.
2. Change the buffer size to 10000 ms and the Pre-Buffer percent to 90.
When you run xmms, from command line or menu, click on the O (letter O) on the left side of the panelto bring up the Preferences menu.
3. Under the Audio I/O Plugins button, select Output Plugin OSS Driver and click Configure.
4. Select Buffering.
a. The default Buffer size is 3000 ms. Change this to 10000 ms.
b. The default Pre-buffer percent is 25. Change this to 90.
5. Click OK, then click OK on the Preferences panel.

Audio Output Troubleshooting (Oracle Solaris 11 and Oracle Linux 6)
164
6. Exit xmms and restart it.
13.1.8 Audio Output Troubleshooting (Oracle Solaris 11 and Oracle Linux 6)
This section provides troubleshooting information for audio output on Sun Ray Clients and Oracle VirtualDesktop Clients running Oracle Solaris 11 or Oracle Linux 6 sessions.
The PulseAudio sound server is used to provide audio output for desktop client sessions when using theseplatforms. An instance of utaudio, running in PulseAudio mode, is created for each session to deliveraudio from the PulseAudio server.
In this environment, applications do not use $AUDIODEV to send audio to the PulseAudio sound server.$AUDIODEV is applicable only if you need to open an audio device file, such as /dev/audio or /dev/dsp.
13.1.8.1 Additional Notes
Here are some additional notes and restrictions for audio output on Oracle Solaris 11 and Oracle Linux 6.
• To optimize the shared memory used by PulseAudio, add the following line to the /etc/pulse/client.conf file on the Sun Ray server:
shm-size-bytes = 131072
• When using Oracle Solaris 11, the Oracle Solaris 10 SADA audio interface is automatically availableif needed for compatibility reasons. An additional SADA-specific utaudio process is started for eachsession. See Section 13.1.7, “Audio Output Troubleshooting (Oracle Solaris 10 and Oracle Linux 5)” formore details.
• For Oracle Solaris 11, the Adobe Flash Player is a SADA application that uses the $AUDIODEV interface.A device lockout may occur if multiple SADA applications share the same $AUDIODEV. To fix thisproblem, launch a separate utaudio command for each SADA application.
• For Oracle Solaris 11 Trusted Extensions, two audio devices should be displayed in the DeviceAllocation Manager, one for the SADA interface device and another one for PulseAudio. Make sure toallocate both audio devices.
13.1.8.2 Problem: Audio Output is not working (PulseAudio)
• Use the Oracle keyboard audio keys and check the volume and mute buttons.
• Display the Sun Ray session's audio settings:
$ utsettings
and verify that the audio output is selected properly, for example, for headphones or speakers.
• Make sure the volume is not muted in your desktop session.
• Try a set of external speakers plugged into the Sun Ray Client's audio out or headphones port. If thatworks, the Sun Ray Client might have a broken speaker.
• Make sure the pulseaudio process is running. If it was not started with the user session, remove the$HOME/.pulse directory, exit the session, and start a session again.
• Make sure there is a utaudio process running with the -p option to accept streaming from thePulseAudio sound server. If the process does not exist, check the /var/opt/SUNWut/log/messageslog file to see if there is any error message from the pulseaudio or utaudio command.

Sun Ray Clients
165
• If audio does not work when using GStreamer-based programs, such as Totem or Rhythmbox, makesure GStreamer is configured to use PulseAudio by running gstreamer-properties. The PulseAudioSound Server setting must be selected for both Audio Input and Output.
• For Oracle Linux 6, make sure ALSA is configured to use PulseAudio. To verify the configuration,make sure the /etc/asound.conf ( server preference) or $HOME/.asoundrc file (user preference)includes the following:
pcm.pulse { type pulse}ctl.pulse { type pulse}pcm.!default { type pulse}ctl.!default { type pulse}
If both files exist, the $HOME/.asoundrc file takes precedence.
• If audio does not work with OSS applications on Oracle Linux 6, make sure the $AUDIODEVenvironment variable is set to an instance of utaudio. For Oracle Linux 6, the $AUDIODEV environmentvariable is not defined by default. Here is an example of setting $AUDIODEV:
$ export AUDIODEV=`/opt/SUNWut/bin/utaudio`
• OSS applications on Oracle Linux 6 can also work with PulseAudio by using the OSS wrapper (padsp):.
$ padsp OSS_program
13.2 Sun Ray Clients
This chapter provides information about managing Sun Ray Clients and provides a list of typicalprocedures when using a Sun Ray Client. To start a session on a Sun Ray Client once it is properlyconfigured, all you need to do is power on the Sun Ray Client, log in after it boots, and wait for the desktopto display.
The following chapters also provide more specific administration information for Sun Ray Clients:
• Chapter 14, Sun Ray Client Firmware
• Chapter 16, Troubleshooting Icons
• Chapter 15, Peripherals
13.2.1 How to Centralize Sun Ray Client Configurations (.parms)
Once a Sun Ray Client discovers the firmware server, it downloads its corresponding *.parms file. Thisfile contains the firmware revision, which is checked against the client to make sure its firmware is up-to-date. The .parms file can also be used to centralize and provide other Sun Ray Client configurationvalues, such as the servers keyword used to specify the Sun Ray servers if the sunray-serversDNS entry isn't used. See Table 13.4, “Sun Ray Client Configuration Parameters (.parms)” for the list ofconfiguration values.

How to Centralize Sun Ray Client Configurations (.parms)
166
By default, utsetup creates an initial set of .parms files for each Sun Ray model type. You can use the-i option of the utfwadm command and a template file to centralized updates for all the .parms file. Thekey/value entries in the template will be appended to each model-specific .parms file.
Steps
1. Become superuser on the Sun Ray server.
2. Change directory to the TFTP home directory.
This example uses the /tftpboot directory as the TFTP home directory.
# mkdir /tftpboot
3. Create the template for the .parms file.
This template is a text file with key/value pairs, and it can be located anywhere on your file system. It iscommon practice to store it in the TFTP home directory. In this example, the file is named srsconfig,and it resides in the /tftpboot directory.
# vi /tftpboot/srconfig
See Table 13.4, “Sun Ray Client Configuration Parameters (.parms)” for the list of key/value pairs thatyou can add to the .parms file.
4. Use the utfwadm command to update the .parms files.
The utfwadm command automatically uses the latest firmware installed on the Sun Ray server. Again,the following example uses /tftpboot/srsconfig for the template file location.
# /opt/SUNWut/sbin/utfwadm -AaV -i /tftpboot/srconfig
Note
You can also update the .parms file for a specific Sun Ray Client using the -eMAC_address option.
Table 13.4, “Sun Ray Client Configuration Parameters (.parms)” lists the key/value pairs.
Additional key/value pairs included in the .parms files are in key=value format, with case sensitivityand no spaces allowed. Options that take values of 0 or 1 have a default value of 0 if not specified. Thefollowing table lists the options that are allowed. For details on the options that can be used to configurethe .parms files, see the utfwadm man page.
Table 13.4 Sun Ray Client Configuration Parameters (.parms)
Key Description
bandwidth=bits_per_second Sets the maximum bandwidth limit used by the Sun Ray Client, in bits persecond.
cmdcashsize=size Sets the command cache used to store the list of recent commands, inKbytes. Default value is 512 Kbytes, maximum value is 8192 Kbytes, and azero value disables the command cache.
compress={0 | 1} When set to 1, forces compression on. Default is 1 (compression on).
fastload={0 | 1} When set to 1, forces the maximum TFTP transfer size if the TFTP serversupports it. The default is 512-byte packets. Over a high latency connection,using this setting typically doubles the speed of firmware downloads.

How to Centralize Sun Ray Client Configurations (.parms)
167
Key Description
fulldup={0 | 1} When set to 1, forces full duplex setting.
enablegui={force | none | hashed-passwd | prompt | off}
disablegui={force | none | hashed-passwd | prompt | off}
Enables or disables the Configuration GUI. These keywords should bechanged only with the utfwadm -G or utfwadm -g command, respectively.See Chapter 14, Sun Ray Client Firmware for details.
excludedev=vendor_id,product_id [; vendor_id,device_id]*
Disables the Sun Ray Client's local USB HID driver for a specific USB deviceand makes the device available only to the Windows connector's USBredirection feature. You should use this option only if you need to make anon-standard device function (that does not function using the local HIDdriver) while connected to an Oracle VM VirtualBox VRDP port.
You must specify both the USB device's vendor identifier (vendor_id)and device identifier (device_id) separated by a comma. Youcan specify more devices separated by a semi-colon. For example,excludedev=0x0437,0x30;801,92.
Vendor identifiers are assigned by the USB standards organization and eachvendor manages their own device identifiers.
kbcountry=code Forces the keyboard country code number (keyboard map) for a non-U.S.USB keyboard that reports a country code value of 0. This value can also beset on the Advanced menu of the Configuration GUI.
See Section 13.2.10, “Keyboard Country Codes” for the list of code numbers.
LogXXX=detail-level Sets the logging level for various classes of logging events, where XXX isone of Appl, Vid, USB, Net, or Kern. Valid values are 1 through 7, with7 providing the most detailed logging output. A separate entry must bespecified for each type. The logging information is saved in the /var/opt/SUNWut/log/messages file on the LogHost.
When using a shared network (LAN) with external DHCP server support(configured network using utadm -L on), logging for each event type isdisabled unless the LogXXX value and the LogHost value are set.
LogHost= The Sun Ray server where logging output is saved when one or moreLogXXX entries are specified. Valid value is a resolvable DSN host name oran IP address of a Sun Ray server. When using a failover group, the primarySun Ray server should be specified.
lossless={0 | 1]} When set to 1, does not permit lossy compression to be used.
MTU= Sets the network MTU. The value used is the minimum of those suppliedfrom various sources.
orient1={0 | 90 | 180 | 270}
orient2={0 | 90 | 180 | 270}
Specifies the clockwise physical rotation, in degrees, of the monitorsattached to the Sun Ray Client. orient1 is for the first monitor andorient2 is for the second monitor. If the key is not specified, the default is0.
This setting is used to provide the screen orientation to Xnewt, which in turnprovides the value to the utscreenresize and xrandr commands to set asession's screen orientation accordingly.

Sun Ray Client Hot Keys
168
Key DescriptionNote that video acceleration with Windows sessions is not currentlysupported with non-default screen orientations and should be disabled. Youcan use the -B off, -F off, and -M off options of the uttsc commandto disable video acceleration.
poweroff= Sets how much time a Sun Ray 3 Series Client will be idle before it turnsoff. The default power off time is 30 minutes. Setting poweroff=0 disablesthe power off feature. When the power off feature is enabled, the firmwareenforces a minimum power off value of 10 minutes and a maximum power offvalue of 30 days. The value for the power off feature is in minutes.
For example, poweroff=15 sets the idle power off timer to 15 minutes.
select={inorder | random} Permissible values are inorder or random. Selects a server from theserver list either starting at the beginning or at random, respectively.
servers= Specifies a comma-separated mixture of host names or IP addressesindicating the available session servers.
stopkeys={keyn[-keyn]* | none} Specifies an alternative combination of modifier keys to perform the samefunction as the Stop key (Oracle Type 7 keyboard) or the Ctrl-Pause keysequence. By default, this alternative combination is Ctrl-Shift-Alt-Meta. SeeSection 13.2.2, “Sun Ray Client Hot Keys” for details.
The value of keyn can be any combination of the Ctrl-Shift-Alt-Meta keys,but at least two of the keys must be used. For example, you can set thisvalue to Ctrl-Alt or Meta-Ctrl-Shift.
If this parameter is set to none, the alternative key combination is disabled.
Note that the Meta key has different names on different keyboards: on aPC keyboard, it is the "Windows" key, and on a Mac keyboard, it is the"Command" key.
stopqon={0 | 1} When set to 1, enables the Stop-Q key sequence to be used to disconnect aSun Ray Client from a server, in particular, if it's using a VPN connection.
utloadoff={0 | 1} When set to 1, disables the ability to use the utload program to force a SunRay Client to load firmware.
videoindisable={0 | 1} When set to 1, disables the input source on the front of a Sun Ray 270Client, and it locks the monitor into displaying only the client output.
13.2.2 Sun Ray Client Hot Keys
For a Sun Ray Client, there are a number of predefined hot keys that can trigger an activity or event ona client, which are shown in Table 13.5, “Sun Ray Client Hot Keys”. The key sequences can be either anOracle-specific key combination (using keys that might exist only on Oracle keyboards) or by an alternativekey combination that does not require Oracle-specific keys.
The activities controlled by these hot keys are specific to a Sun Ray Client. Desktop software running in theSun Ray session might provide a separate keyboard shortcut facility that provides additional hot keys fordesktop activities, perhaps including the ability to launch certain programs.
By default, the alternative prefix key combinations for the Stop key (Oracle Type 7 keyboard) are Ctrl-Pause and Ctrl-Shift-Alt-Meta. The Ctrl-Pause key sequence is used throughout this documentation. TheCtrl-Shift-Alt-Meta key combination can be changed through the Advanced menu of the Configuration

Sun Ray Client Hot Keys
169
GUI (Enter Alternative STOP modifiers) or the stopkeys keyword in the .parms file. It can be set to anycombination of the four keys, but at least two must be used.
Note
The Meta key has different names on different keyboards: on a PC keyboard, it isthe "Windows" key, and on a Mac keyboard, it is the "Command" key.
Table 13.5 Sun Ray Client Hot Keys
Oracle Type 7 KeyboardHot Key
Oracle SK-9025 KeyboardHot Key
Action
Mute Mute or Ctrl-Pause-CursorDown
Mute and unmute audio.
Softer Softer or Ctrl-Pause-CursorLeft
Decreases the audio volume.
Louder Louder or Ctrl-Pause-CursorRight
Increases the audio volume.
Stop-A or Ctrl-Power Ctrl-Pause-A or Ctrl-Power Power cycles the Sun Ray Client. On an Oracle keyboard,the Power key has a crescent moon glyph.
Stop-C Ctrl-Pause-C Clears any local configuration data on the Sun Ray Client.
Stop-K Ctrl-Pause-K Displays Encryption Information menu
Stop-N or Mute-Softer-Louder
Ctrl-Pause-N or Mute-Softer-Louder
Displays the Sun Ray Client's MAC and IP addresses andserver IP address.
Stop-O Ctrl-Pause-O Enables or disables the On-Screen Display (OSD)troubleshooting icons when a Sun Ray Client boots.
Stop-S or Stop-M Ctrl-Pause-S or Ctrl-Pause-M
Opens the Configuration GUI to modify how to initializethe client. The Configuration GUI must be enabled on theclient.
Stop-V Ctrl-Pause-V Displays the Sun Ray Client's model, MAC address, andfirmware version.
Ctrl-Alt-Bksp-Bksp Ctrl-Alt-Bksp-Bksp Terminates a session. This hot key cannot bereconfigured to another value, but it can be disabled. Fordetails, see the utxconfig man page.
Note
The Ctrl-Pause key sequences listed for the Oracle SK-9025 keyboard can be usedwith standard PC keyboards.
There are also hot keys used to launch the utsettings or utdetach Sun Ray utilities. You canconfigure these hot key sequences through your $HOME/.utslaunch.properties file, or they can beset by the administrator per a site-wide basis. See Section 13.2.2.1, “How to Configure the Utility Hot Keys”for details.
13.2.2.1 How to Configure the Utility Hot Keys
Hot keys can be configured to launch the utsettings or utdetach Sun Ray utilities. The scopes forthese hot keys are as follows:
• System-wide default setting

Sun Ray Client Hot Keys
170
• User default setting
• System-wide mandatory setting
To support these levels of customization, the Sun Ray Client at session startup examines the followingproperty files in the order shown in Table 13.6, “Sun Ray Settings Property Files”.
Table 13.6 Sun Ray Settings Property Files
File Scope Description
/etc/opt/SUNWut/utslaunch_defaults.properties
System This file contains the default properties. Anyproperties specified override any defaults builtinto the application itself.
$HOME/.utslaunch.properties User This file contains the user's preferred values,which override any application or system-widedefaults.
/etc/opt/SUNWut/utslaunch_mandatory.properties
System This file contains system-wide mandatorysettings that cannot be overridden by the user.These properties override any application,system-wide, or user defaults.
If your policy is for all users to use the same standard hot key, modify the system-wide mandatory defaultsfile to specify this standard key. This setting prevents users from specifying their own hot key preferences.
The format of the hot key entry in these property files is utility_name.hotkey=value, whereutility_name_is the name of the utility (currently either utsettings or utdetach) and value is avalid X keysym name preceded by one or more of the supported modifiers (Ctrl, Shift, Alt, Meta) inany order. Default values are shown in Table 13.7, “Defaults for Configurable Hot Key Values”.
Table 13.7 Defaults for Configurable Hot Key Values
Configuration Property Name Default Hot Key Action
utsettings.hotkey Shift-Props Invokes the Sun Ray Settings GUI.
The Shift-Props default hot key works only withthe Oracle Type 7 keyboard. You must change thedefault if other keyboards are used.
utdetach.hotkey Shift-Pause Detaches the session from this Sun Ray Client.(Often used to detach a non-smart card mobilitysession.)
How to Change Utility Hot Key Settings for All Users
If you don't want your users to use the default hot keys to launch the utilities, you can set up the system-wide defaults file to specify different hot keys. Users can still specify their preferences in the user defaultsfile.
1. As superuser, open the /etc/opt/SUNWut/utslaunch_defaults.properties file in a texteditor.
Note
If you want to make the change mandatory for all users even if theyhave user defaults set, change the value in the /etc/opt/SUNWut/utslaunch_mandatory.properties file.

How to Change Sun Ray Client Audio and Display Settings (Sun Ray Settings GUI)
171
2. Locate the original hot key entry for the utility you want to change and place a # in front of it tocomment it out.
For example:
# utdetach.hotkey=Shift Pause
3. Type the new hot key property after the first statement.
For example:
utdetach.hotkey=Alt F9
4. Save the utslaunch_defaults.properties file.
5. Log out and log back in to enable the new hot key.
How to Change the Utility Hot Key Settings for a Single User
A user's hot key settings override any system-wide default settings, unless they are mandatory.
1. In the user's home directory, create the .utslaunch.properties file.
Note
Make sure that the user owns and can read this file.
2. Add a line to the .utslaunch.properties file with the value for the hot key.
For example:
utsettings.hotkey=Shift F8
3. Save the .utslaunch.properties file.
4. Log out and log back in to enable the new hot key.
13.2.3 How to Change Sun Ray Client Audio and Display Settings (Sun RaySettings GUI)
The Sun Ray Settings GUI enables you to view and change the audio and display settings for a SunRay Client that you are currently logged into. The utset command provides a non-GUI mechanism forreporting and modifying Sun Ray Client settings. For details, refer to the utset man page.
1. Press the Settings hot key or run the utsettings command.
The default Settings hot key combination is Shift-Props, but this assignment can be reconfigured asdescribed in Section 13.2.2.1, “How to Configure the Utility Hot Keys”.
The Sun Ray Settings GUI is displayed, as shown in Figure 13.1, “Sun Ray Settings GUI”.

How to Modify Screen Resolutions
172
Figure 13.1 Sun Ray Settings GUI
2. Use the Category menu to view the Audio Output, Audio Input, Display, or Video settings panels.
3. To change a setting, move the appropriate scroll bar, checkbox, or pull-down menu.
Changes to the monitor signal timing through the Resolution/Refresh Rate setting require confirmationbefore and after the change is applied to the client. All other changes take effect immediately.
4. Dismiss the Sun Ray Settings GUI.
• If the window was launched by the Settings hot key, press the hot key again or apply the windowmanager's close action to that window.
• If the window was launched by invoking utsettings directly, apply the window manager's closeaction to that window.
13.2.4 How to Modify Screen Resolutions
You can modify a Sun Ray Client's screen resolution settings by invoking the utsettings command.
Any resolution selection made within a session remains effective whenever the session is displayed onthat particular Sun Ray Client. The selection is not lost if the unit goes into power-save mode or is power-cycled; however, the resolution settings selected through the utsettings command apply only to theclient where the command is run.
When you move to another Sun Ray Client, the resolution settings do not accompany you to the new client,but the settings remain effective for your session on the original client if you return to the session throughhotdesking.

How to Power Cycle a Sun Ray Client
173
If the session is associated with a personal mobile token, such as a smart card or an NSCM credential, amessage displays offering to make the selected timing permanent. If you accept that offer, then the timingis retained and reused on your subsequent personal mobile token sessions on the same client.
In addition, an administrator can use the utresadm command to arrange for particular monitor timing to beused in the following situations:
• Whenever a specific token is presented on a specific client
• On a specific client regardless of the token that is presented at the client
• On all clients regardless of the token that is presented at the client
Any conflict among settings is resolved in favor of the most specific configuration rule. That is, aconfiguration record for a specific token at a specific Sun Ray Client takes precedence over a recordfor any token at that specific client, and a configuration record for any token at a specific client takesprecedence over a record for any token at any client.
For further details, see the utsettings and utresadm man pages.
13.2.5 How to Power Cycle a Sun Ray Client
To power cycle a Sun Ray Client with a hard reset:
• Disconnect and then reconnect the power cord.
• Press the power button if one is available.
To power cycle a Sun Ray Client with a soft reset, press Stop-A, Ctrl-Power, or Ctrl-Pause-A.
The Power key on an Oracle keyboard has a crescent moon icon. Therefore, the soft reset key sequenceis often called Ctrl-Moon.
13.2.6 How to Enable or Disable XRender
Sun Ray Software includes the Xserver process, Xnewt, as the default Xserver. Xnewt also includesthe capability to use the X Rendering Extension (Render), which allows applications on a client to use arendering model based on Porter-Duff compositing. XRender is enabled by default because many new Xapplications require XRender to improve performance or to even function properly.
However, some applications use of XRender may conflict with optimizations in the Sun Ray protocol andcreate an increase in both CPU loading and network bandwidth consumption. In these instances, theapplications may see a performance benefit by disabling the XRender extension.
By default, XRender is enabled. If a Sun Ray Client experiences performance degradation with a particularapplication, use the following procedure to disable XRender.
Note
After enabling or disabling XRender, you must restart your current Sun Ray session(Ctrl-Alt-Bksp-Bksp) for the change to take affect. Or, you can log out from yourcurrent session and log back in.
To disable XRender on a client:
% utxconfig -n off
To enable XRender on a client:

How to Configure Screen Rotation
174
% utxconfig -n on
Note
You can use the -A option to supersede all user configured and system defaultsettings.
13.2.7 How to Configure Screen Rotation
You can configure the orientation of the monitors connected to a Sun Ray Client, so a session's screenautomatically rotates to the appropriate monitor orientation. For example, if the connected monitorsare in portrait mode, setting the orientation for these monitors will ensure that the session's screen willautomatically output in portrait mode. The default orientation is the standard landscape position.
Note
The On-Screen Display (OSD) icons will not automatically rotate if a non-defaultorientation is configured. Also, video acceleration with Windows sessions is notcurrently supported with non-default screen orientations and should be disabled.You can use the -B off, -F off, and -M off options of the uttsc command todisable video acceleration.
See Section 13.2.1, “How to Centralize Sun Ray Client Configurations (.parms)” for details on using theorient1 and orient2 keywords to configure monitor orientation.
13.2.8 How to Disable Screen Blanking on a Sun Ray Client
There may be times when you do not want your Sun Ray Client in power saving mode, during which thescreen goes blank after a specific period of non use. Power management is a feature of the Sun RaySoftware and it is enabled by default.
You may also want to disable the desktop's power management or screensaver feature.
To Disable Screen Blanking at the Sun Ray Client Level
Set the Advanced > Video > Blanking parameter to 0 in the Configuration GUI, if enabled. For moredetails, see Section 14.5, “How to Modify a Sun Ray Client's Local Configuration (Configuration GUI)”.
To Disable Screen Blanking at the Desktop Level
Refer to your desktop documentation about how to disable the power management feature or screensaverfeature.
Here are some examples:
• Use the xset s noblank;xset s 0 0;xset -dpms;xset s off command.
• For Oracle Solaris, make sure that xscreensaver is disabled or configured to not blank or lock thescreen. If active, xscreensaver overrides any settings you have made using the xset command. Seethe xscreensaver(1) man page for details.
Here is a sample .xscreensaver configuration file that you can add to the root of your home directoryto disable xscreensaver.
# Parameters to disable Xscreensavertimeout: 0cycle: 0

How to Disable Screen Blanking on a Sun Ray Client
175
lock: FalsedpmsEnabled: Falsemode: off
• For Oracle Linux, make sure that gnome-screensaver is disabled or configured to not blank orlock the screen. You can use the gnome-screensaver-command --exit command to disablethe screensaver for the current session or add it to a session script. See the gnome-screensaver-command(1) man page for details.
You can also use the following script to permanently disable gnome-screensaver for a user throughthe GConf settings.
#!/bin/sh# Script to disable gnome-screensaver, including keybindings,# and power management UI icon
theGConf="/usr/bin/gconftool-2";export theGConfBOOL="--type bool --set";export BOOLSTRING="--type string --set";export STRINGINT="--type int --set";export INTUNSET="--recursive-unset";export UNSET
$theGConf $UNSET /apps/gnome_settings_daemon/keybindings/screensaver$theGConf $BOOL /apps/gnome-screensaver/embedded_keyboard_enabled false$theGConf $STRING /apps/gnome-screensaver/mode "blank-only"$theGConf $BOOL /apps/gnome-screensaver/lock_enabled false$theGConf $BOOL /apps/gnome-screensaver/idle_activation_enabled false$theGConf $INT /apps/gnome-screensaver/lock_delay "0"$theGConf $STRING /apps/gnome-power-manager/ui/icon_policy "never"$theGConf $INT /apps/gnome-power-manager/ac_sleep_display "0"
13.2.8.1 How to Disable Screen Blanking for All Sun Ray Sessions
The following procedure describes how to disable screen blanking for all Sun Ray sessions.
Note
This configuration works for all kiosk sessions, but it does not work for sessionsusing the GNOME Display Manager through a regular session mode.
1. Become superuser on the Sun Ray server.
2. Change directory to the session initialization directory.
• Oracle Solaris 10:
# cd /usr/dt/config/Xsession.d
• Oracle Linux or Oracle Solaris 11:
# cd /etc/X11/xinit/xinitrc.d
3. Create the following customized script (the script is called 0050.utblank.sh in this procedure).
#!/bin/sh
# This script disables the X Server from blanking# for both Oracle Solaris and Oracle Linux

How to Enable the NumLock Key for All Sun Ray Sessions
176
# Check for OS and add the path to xset for Oracle Solaris
TheOS=`uname`if [ "$TheOS" = "SunOS" ];thenPATH=$PATH:/usr/openwin/bin;export PATHfi
# Disable the Xserver from screen blanking and# disable Display Power Management Signaling
xset s 0 0xset s noblankxset -dpmsxset s off
# End of Script
Note
The script name should have the 0050. prefix to make sure it is run at theappropriate time.
Note
For Oracle Linux and Oracle Solaris 11, the script name must have the .shextension, otherwise the script will not get sourced.
4. Save the script and make the script executable for everyone.
# chmod 775 0050.utblank.sh
5. Start a new session, so the script gets sourced.
13.2.9 How to Enable the NumLock Key for All Sun Ray Sessions
The utkeylock command can modify the state of certain locking modifier keys on a user's keyboard.Currently, only the NumLock key is supported. This command may be useful to invoke during sessioncreation to enable NumLock for users who expect NumLock to be on by default, which is typical forWindows PCs. By default, the NumLock key is disabled on a Sun Ray Client.
Note
This configuration works for all kiosk sessions, but it does not work for sessionsusing the GNOME Display Manager through a regular session mode.
The following procedure describes how to enable the NumLock key for all Sun Ray sessions.
1. Become superuser on the Sun Ray server.
2. Change directory to the session initialization directory.
• Oracle Solaris 10:
# cd /usr/dt/config/Xsession.d
• Oracle Linux or Oracle Solaris 11:
# cd /etc/X11/xinit/xinitrc.d
3. Create one of the following customized scripts based on the result you want (the script is called0050.utnumlock.sh in this procedure).

Keyboard Country Codes
177
• Enable the NumLock key when a session initializes.
#!/bin/sh
# Enable NumLock key for each session/opt/SUNWut/bin/utkeylock -n on
• Enable the NumLock key when a session initializes and on all subsequent connections throughhotdesking.
#!/bin/sh
# Enable NumLock key on and make sure it stays on each time a user hotdesks /opt/SUNWut/bin/utaction -i -c "/opt/SUNWut/bin/utkeylock -n on" &
Note
The script name should have the 0050. prefix to make sure it is run at theappropriate time.
Note
For Oracle Linux and Oracle Solaris 11, the script name must have the .shextension, otherwise the script will not get sourced.
4. Save the script and make the script executable for everyone.
# chmod 775 0050.utnumlock.sh
5. Start a new session, so the script gets sourced.
13.2.10 Keyboard Country Codes
A keyboard country code is a number representing a specific USB keyboard map that can be set in theSun Ray Client firmware to provide better non-US keyboard support. This code is needed if the keyboardreturns a country code of 0.
The code can be set through the Configuration GUI or the .parms file.
Note
There is currently no way to get the keyboard type information for a Sun Ray Client.
This is the list of valid keyboard country codes.
• 1 Arabic
• 2 Belgian
• 3 Canada_Bi
• 4 French-Canadian
• 5 Czech
• 6 Denmark

Sun Ray Client Boot Process
178
• 7 Finnish
• 8 France
• 9 Germany
• 10 Greek
• 12 Hungarian
• 14 Italy
• 15 Japan
• 16 Korea
• 17 Latin-American
• 18 Netherland
• 19 Norway
• 21 Polish
• 22 Portugal
• 23 Russia
• 24 Slovakian
• 25 Spain
• 26 Sweden
• 27 Switzerland
• 28 Switzerland_Ge
• 30 Taiwan
• 31 TurkeyQ
• 32 UK-English
• 33 US-English
• 35 TurkeyF
13.2.11 Sun Ray Client Boot Process
This process flow shows how a Sun Ray Client obtains its basic network parameters, firmware server, andsession server. Many of the configuration options listed in this process flow are described in Chapter 19,Alternate Network Configurations.
Note
The Configuration GUI must be enabled on the client for the user to locallyconfigure the Sun Ray parameters. Locally configured parameter values overridenetwork values with the exception of MTU, which is always the minimum of thevalues seen.
1. Power unit on.
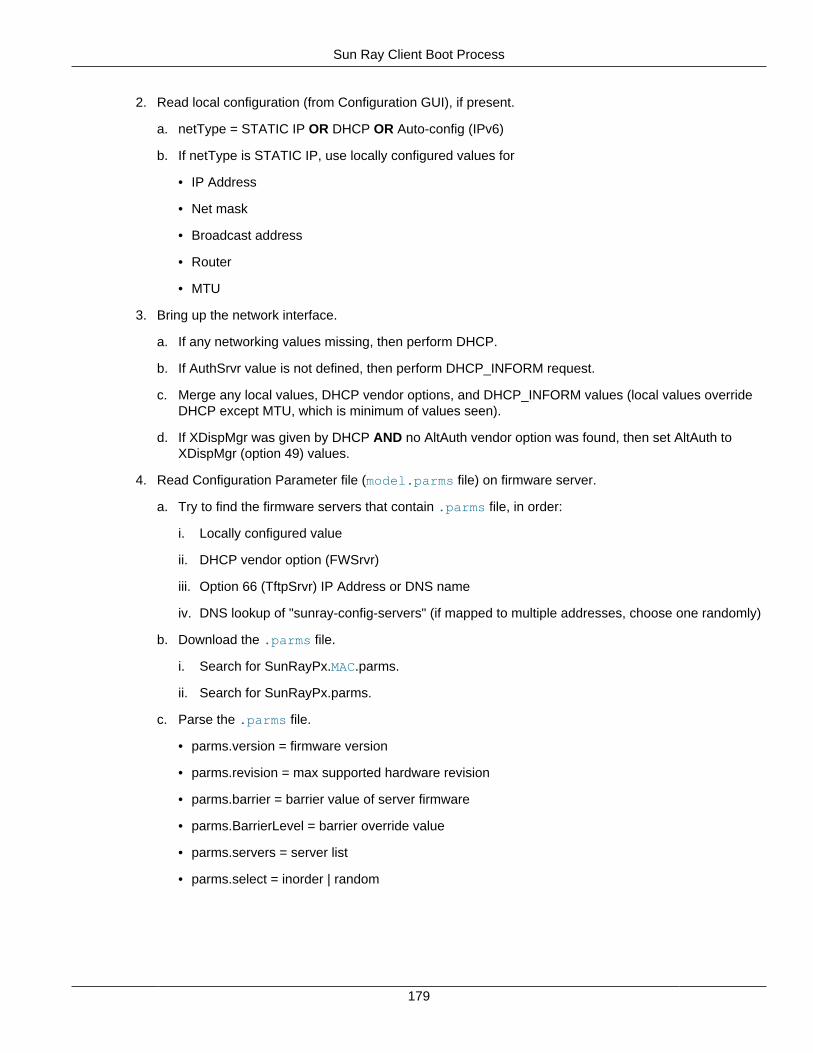
Sun Ray Client Boot Process
179
2. Read local configuration (from Configuration GUI), if present.
a. netType = STATIC IP OR DHCP OR Auto-config (IPv6)
b. If netType is STATIC IP, use locally configured values for
• IP Address
• Net mask
• Broadcast address
• Router
• MTU
3. Bring up the network interface.
a. If any networking values missing, then perform DHCP.
b. If AuthSrvr value is not defined, then perform DHCP_INFORM request.
c. Merge any local values, DHCP vendor options, and DHCP_INFORM values (local values overrideDHCP except MTU, which is minimum of values seen).
d. If XDispMgr was given by DHCP AND no AltAuth vendor option was found, then set AltAuth toXDispMgr (option 49) values.
4. Read Configuration Parameter file (model.parms file) on firmware server.
a. Try to find the firmware servers that contain .parms file, in order:
i. Locally configured value
ii. DHCP vendor option (FWSrvr)
iii. Option 66 (TftpSrvr) IP Address or DNS name
iv. DNS lookup of "sunray-config-servers" (if mapped to multiple addresses, choose one randomly)
b. Download the .parms file.
i. Search for SunRayPx.MAC.parms.
ii. Search for SunRayPx.parms.
c. Parse the .parms file.
• parms.version = firmware version
• parms.revision = max supported hardware revision
• parms.barrier = barrier value of server firmware
• parms.BarrierLevel = barrier override value
• parms.servers = server list
• parms.select = inorder | random

Sun Ray Client Boot Process
180
d. If .parms file was successfully parsed OR firmware server was obtained by locally configuredvalue, then go to Step 5.
Note
If a locally configured firmware server is unreachable or the correctconfiguration parameter file does not exist, the Sun Ray Client will notattempt any of the other methods in Step 4 to locate configuration parameterfiles. This setup prevents the unintentional loading of a different firmwareversion than is provided by the locally designated firmware server.
e. If no .parms file found AND not at end of firmware server list, then go to Step 4 and pick nextfirmware server on the list.
f. If no firmware servers left to try, then set following values:
• parms.version = DHCP vendor option NewTVer (set to NULL string if none provided by DHCP)
• parms.BarrierLevel = DHCP BarrierLevel (set to current_barrier if none provided by DHCP)
• set parms.revision to current_revision
• set parms.barrier to current_barrier
• set parms.select = inorder
5. Determine if there is new firmware to load.
If:
• parms.version is not equal to the current firmware version
• AND parms.version is not equal to "_NONE_"
• AND parms.revision is >= to current hardware revision
• AND either parms.barrier is >= to parms.BarrierLevel or parms.barrier is >= current firmware's barrierlevel
Then:
a. Download firmware.
b. Write firmware to flash.
c. Reboot.
Else:
No firmware is loaded.
6. Determine a Sun Ray server to connect to.
a. If AlthAuth/AuthSrvr/parms.servers are all empty, then set server_list to "sunray-servers". Otherwiseset server_list to parms.servers.
b. If untried server_list addresses are left, then:

Oracle Virtual Desktop Clients
181
i. Select a name in order (or randomly if parms.select=random).
ii. Translate the name to a list of IP addresses (either DNS lookup, or IP address notation).
iii. Select an address from the list in order (or randomly if parms.select=random).
iv. Set that the broadcast address was seen if the selected address is the broadcast address, andselect the next address.
v. Go to Step 6h.
c. If untried AltAuth addresses are left, then:
i. Select an address in order (or randomly if parms.select=random).
ii. Set that the broadcast address was seen if the selected address is the broadcast address, andselect the next address
iii. Go to Step 6h.
d. If AuthSrvr is defined, then:
i. Set address to AuthSrvr.
ii. Go to Step 6h.
e. If broadcast address was seen, then perform broadcast protocol.
f. If broadcast response received, then:
i. Set selected address to responder.
ii. Go to Step 6h.
g. Timeout in 30 seconds and reboot.
h. Try to connect to selected address.
i. If connection fails, then go to Step 6b.
7. Sun Ray Client is connected.
13.3 Oracle Virtual Desktop Clients
This chapter describes how to enable access for Oracle Virtual Desktop Clients, explains client IDdifferences with Sun Ray Clients, and provides troubleshooting information.
13.3.1 Oracle Virtual Desktop Clients Overview
An Oracle Virtual Desktop Client is a software version of a Sun Ray Client. The Oracle Virtual DesktopClient application runs on an ordinary PC or tablet and provides a Sun Ray session in a desktop window.It is supported and can be installed on Windows, Linux, Mac OS X, iPad, and Android. An Oracle VirtualDesktop Client supports most of the standard Sun Ray Client functionality.
Instead of relying only on a Sun Ray Client for session access, a user can install and run the OracleVirtual Desktop Client application on a laptop or a desktop. This is useful, for example, if users use a Sun

Using External Devices on the Client Computer
182
Ray Client at the office, but they want to access the same Sun Ray session at home from their laptop ordesktop.
Note
Most Sun Ray Client references in this document also apply to Oracle VirtualDesktop Clients, unless otherwise specified.
The Oracle Virtual Desktop Client product is not provided with the Sun Ray Software media image. Itmust be downloaded separately, which is available from the Sun Ray Products Download page at http://www.oracle.com/technetwork/server-storage/sunrayproducts/downloads/index.html.
See the Oracle Virtual Desktop Client documentation (http://www.oracle.com/technetwork/server-storage/sunrayproducts/docs/index.html) for detailed information about the Oracle Virtual Desktop Clientapplication.
13.3.2 Using External Devices on the Client Computer
You can access many of the external devices connected to the client computer when using Oracle VirtualDesktop Clients. In most cases, device access is automatic and can be configured. For Oracle VirtualDesktop Client 3.x or later, you can configure device access through the Settings tab. Here is the listof devices that you can access through Oracle Virtual Desktop Client, including any configuration stepsrequired on the Sun Ray server.
• Keyboard and pointing devices - Provides access to the available keyboard and pointing deviceconnected to the client computer. You can configure the keyboard through the Settings tab.
• Audio devices - Provides access to one input and one output audio device connected to the clientcomputer. You can choose which audio devices to use through the Settings tab.
• Smart card readers - Provides access to a single smart card reader connected to the client computer.You can choose which smart card reader to use through the Settings tab.
• Serial devices - Provides access to serial devices connected to the client computer running theWindows operating system. Serial devices on Mac OS X and Linux computers cannot be accessed.Serial devices are automatically mounted and made available to Oracle Solaris and Oracle Linuxsessions, and you must configure logical mappings to the serial devices when using the Windowsconnector. See Section 15.4, “Accessing Serial Devices and USB Printers” and Section 17.17,“Accessing Serial Devices” for details.
• USB devices - Provides access to any USB device that is attached to the client computer when usingthe Windows connector and Oracle Virtual Desktop Client 3.2 or later. You can choose which USBdevices to use through the Settings tab. If you choose a USB device to use, that device is disconnectedfrom the local environment, so it can be used by Oracle Virtual Desktop Client. The device is no longeravailable to the local system. As with Sun Ray Clients, USB devices that use isochronous interfaces willnot work.
See the Oracle Virtual Desktop Client User Guide for more detailed information about accessing deviceson the client computer.
13.3.3 How to Enable Access for Oracle Virtual Desktop Clients
This procedure describes how to enable access for Oracle Virtual Desktop Clients either through theutpolicy command or the Admin GUI. By default, access for Oracle Virtual Desktop Clients is disabledon a Sun Ray server. The on-screen display (OSD) 47 icon is displayed if users try to use Oracle Virtual

How to Enable Access for Oracle Virtual Desktop Clients
183
Desktop Client and access is currently disabled. See Section 13.3.5, “Oracle Virtual Desktop ClientTroubleshooting” for more information.
You might also need to configure firewall settings as follows:
• Client computers. Ensure that firewall settings on the client computers allow Oracle Virtual DesktopClient to access the Internet.
• Sun Ray servers. See Section 3.1.14, “Ports and Protocols” for information on the ports used by OracleVirtual Desktop Clients.
Oracle Virtual Desktop Clients can be used to access both smart card sessions and non-smart cardsessions. Session mobility, or hotdesking, is supported with or without smart cards.
Note
The following procedures use a warm restart of Sun Ray services. If you disableaccess for Oracle Virtual Desktop Clients, use a cold restart.
Admin GUI Steps
1. Click the Advanced tab.
2. Click the Security subtab.
3. Select the Oracle Virtual Desktop Client option in the Card Users and Non-Card Users sections.
This enables both smart card and non-smart card sessions.
4. Click Warm Restart on the Servers page to restart Sun Ray services.
Command Line Steps
1. View the current policy.
Use the utpolicy command, as follows:
# /opt/SUNWut/sbin/utpolicyCurrent Policy:-a -g -z both -M
Note
The -M option enables non-smart card mobile (NSCM) sessions.
2. Edit the current policy, to enable access for Oracle Virtual Desktop Clients.
Do one of the following:
a. To enable both smart card and non-smart card sessions, add the -u both option to your policyoptions.
# /opt/SUNWut/sbin/utpolicy -a -g -z both -M -u both
b. To enable only non-smart card sessions, add the -u pseudo option to your policy options.
# /opt/SUNWut/sbin/utpolicy -a -g -z both -M -u pseudo

How to Enable the Clipboard Service for Oracle Virtual Desktop Clients
184
c. To enable only smart card sessions, add the -u card option to your policy options.
# /opt/SUNWut/sbin/utpolicy -a -g -z both -M -u card
3. Restart the Sun Ray services.
# /opt/SUNWut/sbin/utstart
After enabling or disabling access for Oracle Virtual Desktop Clients, a restart of Sun Ray services inthe server group is required.
13.3.4 How to Enable the Clipboard Service for Oracle Virtual Desktop Clients
This procedure describes how to enable copy and paste text between an application running in an OracleVirtual Desktop Client session and an application running on the local desktop. When enabled, OracleVirtual Desktop Client users can copy and paste text between an application running in an Oracle VirtualDesktop Client session and an application running on the local desktop. Copying and pasting Unicodecharacters is supported.
For the copy and paste functionality to work, the clipboard service must be enabled on the Sun Ray serverand clipboard sharing must be enabled on Oracle Virtual Desktop Client running on the client computer.You can use the utdevadm command or the Advanced>Security page on the Admin GUI to check if theclipboard service is enabled.
Note
This feature is not available on Sun Ray servers running Oracle Solaris TrustedExtensions.
Follow these steps to enable the clipboard service on the Sun Ray server.
Admin GUI Steps
1. Click the Advanced tab.
2. Click the Security subtab.
3. Select the Oracle Virtual Desktop Client Clipboard option in the Devices section.
4. Restart Sun Ray services using the Warm Restart button on the Servers page.
Command Line Steps
1. Become superuser on the Sun Ray server.
2. Enable the clipboard service on Oracle Virtual Desktop Clients.
# /opt/SUNWut/sbin/utdevadm -e -s clipboard
3. Restart the Sun Ray services.
# /opt/SUNWut/sbin/utstart
13.3.5 Oracle Virtual Desktop Client Troubleshooting
This section provides troubleshooting information for Oracle Virtual Desktop Clients. Any troubleshootinginformation that involves the command line is not applicable to tablets running Oracle Virtual DesktopClient.

Oracle Virtual Desktop Client Troubleshooting
185
13.3.5.1 Connection Problems When Using a VPN or WAN
The Maximum Transmission Unit (MTU) is the maximum packet size for connections. By default, the MTUis set to 1500 bytes.
If you experience problems when using a Virtual Private Network (VPN) or a wide area network (WAN), theMTU setting might be too high for your network.
To diagnose the correct MTU setting for your network, use the ping command to find the largest packetsize that can be transmitted successfully.
On Windows platforms:
ping server-name -l bytes -f
where server-name is the name of the Sun Ray server and bytes is the packet size.
On Mac OS X platforms:
ping -s bytes -D server-name
where server-name is the name of the Sun Ray server and bytes is the packet size.
On Linux platforms:
ping server-name -s bytes
where server-name is the name of the Sun Ray server and bytes is the packet size.
To calculate the MTU setting, add eight bytes to the packet size.
To set the MTU, either change the setting on the Network tab or run the following command:
ovdc --mtu bytes server-name
where bytes is the MTU, in bytes and server-name is the name of the Sun Ray server.
13.3.5.2 Screen Rendering Problems
Screen rendering problems, such as slow screen redraw or blocks of black pixels, can occur if theMaximum Transmission Unit (MTU) setting is too high for the network.
The MTU is the maximum packet size for connections. By default, the MTU is set to 1500 bytes.
See Section 13.3.5.1, “Connection Problems When Using a VPN or WAN” for details of how to diagnosethe correct MTU setting for your network.
13.3.5.3 How to Set the Logging Level
To help you to diagnose problems with Oracle Virtual Desktop Clients, you can increase the logging level.
Table 13.8, “Oracle Virtual Desktop Client Logging Levels” shows the available logging levels.
Table 13.8 Oracle Virtual Desktop Client Logging Levels
Level Description
0 No logging

Oracle Virtual Desktop Client Troubleshooting
186
Level Description
1 Critical messages
2 Warnings
3 Informational messages
By default, the logging level is 0, which sets logging to off. You can also set the logging domains(categories to log) with the --logging-domains option, but all logging domains are logged by default.
The logging level is cumulative. For example, the maximum logging level 3 includes informationalmessages, warnings, and critical messages.
To set the logging level, run the following command:
ovdc --logging-level num server-name
where num is the logging level and server-name is the name of the Sun Ray server.
For example, to record warnings and critical messages for a connection to the sr-1.example.com SunRay server, run the following command:
ovdc --logging-level 2 sr-1.example.com
13.3.5.4 How to Change the Log File Location
By default, log messages are written to a .log text file on the client computer. The .log file is namedafter the profile used. For example, the log file for the default profile is called default.log.
The default location of the log file depends on the installation platform, as follows:
• Microsoft Windows XP platforms – C:\Documents and Settings\username\ApplicationData\OVDC\profilename.log
• Microsoft Windows 7 and Microsoft Windows 8 platforms – C:\Users\username\AppData\Roaming\OVDC\profilename.log
• Mac OS X platforms – $HOME/.OVDC/profilename.log
• Linux platforms – $HOME/.OVDC/profilename.log
If you use the --profile command option to specify the path to a profile, the log file is createdautomatically in the same directory as the profile. In the following example, log messages are written to theC:\temp\fullscreen.log file.
ovdc --profile C:\temp\fullscreen
Using the --logfile Command Option
You can use the --logfile command option to change the name and location of the log file. If the pathto the log file contains spaces, surround the path with straight quotation marks (").
The following example uses the default profile and writes log messages to the mylog.txt file in thedefault location.

Oracle Virtual Desktop Client Troubleshooting
187
ovdc --logfile mylog.txt
The following example uses the default profile and writes log messages to the C:\temp\logfile.txtfile.
ovdc --logfile C:\temp\logfile.txt
The following example uses the C:\profiles\fullscreen profile and writes log messages to the C:\temp\logfile.txt file.
ovdc --profile C:\profiles\fullscreen --logfile C:\temp\logfile.txt
The following example uses the C:\profiles\fullscreen profile and writes log messages to themylog.txt file in the default location.
ovdc --profile C:\profiles\fullscreen --logfile mylog.txt
13.3.5.5 How to Diagnose Connection Problems
Sun Ray Software uses a combination of the on-screen display (OSD) icons and localized error messagesto display the status of a connection. The OSD icons can be used to diagnose connection problems withOracle Virtual Desktop Clients.
The following OSD icon is displayed if users try to use Oracle Virtual Desktop Client and access iscurrently disabled.
Figure 13.2 Access Not Enabled OSD Icon
See Section 13.3.3, “How to Enable Access for Oracle Virtual Desktop Clients” to fix this problem.
See Chapter 16, Troubleshooting Icons for details about all the available OSD icons.

188
189
Chapter 14 Sun Ray Client Firmware
Table of Contents14.1 Firmware Overview ................................................................................................................. 18914.2 Firmware Server Discovery ...................................................................................................... 19014.3 How to Update Firmware on Sun Ray Clients ........................................................................... 19014.4 How to Enable and Disable the Configuration GUI on All Sun Ray Clients .................................. 19214.5 How to Modify a Sun Ray Client's Local Configuration (Configuration GUI) ................................. 193
14.5.1 Security Configuration Repository ................................................................................. 19414.5.2 Configuration GUI Menu Descriptions ............................................................................ 19414.5.3 How to Load a Remote Configuration File ..................................................................... 199
14.6 VPN Support .......................................................................................................................... 20114.6.1 How to Configure VPN Using Cisco Hybrid Authentication .............................................. 202
14.7 IPsec ...................................................................................................................................... 20214.8 802.1x Authentication .............................................................................................................. 203
14.8.1 How to Configure and Enable 802.1x Authentication on a Sun Ray Client ........................ 20314.9 How to Display Firmware Versions for All Currently Connected Sun Ray Clients ......................... 20514.10 How to Display the Firmware Version from a Sun Ray Client ................................................... 20514.11 How to Synchronize the Sun Ray Client Firmware .................................................................. 20514.12 How to Downgrade Firmware on a Sun Ray Client ................................................................. 20514.13 How to Disable All Sun Ray Client Firmware Updates ............................................................. 207
This chapter describes how to manage the Sun Ray Operating Software (firmware) on Sun Ray Clients.The Sun Ray Operating Software must be downloaded and installed separately from My Oracle Support.The firmware is officially called Sun Ray Operating Software, but the term "firmware" will continue to beused throughout the documentation.
14.1 Firmware Overview
Every Sun Ray Client contains a firmware module that handles the following items:
• Power-on self test (POST)
• Client initialization
• Authentication
• Low-level input and output, such as keyboard, mouse, and display information.
To accommodate customers with differing requirements for flexibility and security, the Sun Ray Clientfirmware can be used in two ways:
• Default mode where the firmware uses the configuration provided by the Sun Ray server's .parms file.
• Local configuration mode where the firmware uses the Sun Ray Client's local configuration that a usercan update through a Graphical User Interface (GUI) tool, called the Sun Ray Local Configuration GUI orConfiguration GUI (previously called the Pop-up GUI).
A Sun Ray Client's local configuration values are checked first during the Sun Ray Client initialization,so this mode enables users to individually configure a Sun Ray Client's behavior at the local level. Tomake the Configuration GUI available to users on Sun Ray Clients, you must specifically enable it with theutfwadm command.

Firmware Server Discovery
190
14.2 Firmware Server Discovery
Starting with Sun Ray Software 5.3, the firmware for Sun Ray Clients (called Sun Ray Operating Software)must be downloaded and installed separately on Sun Ray servers. Any Sun Ray server providing thelatest Sun Ray Operating Software for Sun Ray Clients is considered a firmware server. For details, seeSection 3.2.4, “Installing Firmware Before Sun Ray Software Installation”.
When a Sun Ray Client boots in a properly configured environment, it checks with a firmware serverto determine if it needs a Sun Ray Operating Software update. A Sun Ray Client's firmware server isdiscovered in the following order:
1. Locally configured value (configured through Configuration GUI)
2. DHCP Sun Ray vendor option (FWSrvr)
3. Generic DHCP option 66 (TftpSrvr) (IP Address or DNS name)
4. DNS lookup of sunray-config-servers (if mapped to multiple addresses, choose one randomly)
Each of these values are attempted in order until one succeeds. Although it is the last value attempted, theDNS lookup is the recommended firmware discovery configuration, as described below.
If the local configuration value is used and fails, none of the others are attempted. This prevents theoverwriting of custom-configured firmware in a situation where the controlling firmware server happens tobe temporarily unresponsive. See Section 13.2.11, “Sun Ray Client Boot Process” for more details on howa Sun Ray Client finds its firmware server.
Once a firmware server is discovered by a Sun Ray Client, the client retrieves a parameter file (.parms)via TFTP. This file is used by the client to determine if its currently installed Sun Ray Operating Software isolder than the version on the firmware server. If so, the newer firmware is automatically downloaded andinstalled on the client.
In the event of an error in the firmware download, error messages through OSD display icons (ifenabled) provide additional information that can be useful in diagnosing and correcting the problem. SeeChapter 16, Troubleshooting Icons for details.
Note
By default, a client's firmware uses the configuration provided by the Sun Rayserver's .parms file, which provides a centralized mechanism to administerfirmware. However, you can enable the Configuration GUI on a client, whichenables users to modify a Sun Ray Client's local configuration. See Chapter 14,Sun Ray Client Firmware for details.
14.3 How to Update Firmware on Sun Ray Clients
Note
This separate procedure is not needed if you install and update the firmware as partof a Sun Ray Software installation.
This procedure shows how to download and install the latest Sun Ray Operating Software (firmware) ona Sun Ray server and update the server's .parms files with the new firmware. Once the firmware serveris updated, the Sun Ray Clients using that firmware server will download and update the new firmware ontheir next reboot.

How to Update Firmware on Sun Ray Clients
191
This procedure is provided for Sun Ray servers that have been configured on a shared network (LAN) withexternal DHCP server support. For alternate network configuration, see the examples after the procedure.
If you need to enable the Configuration GUI on Sun Ray Clients once their firmware is updated, seeSection 14.4, “How to Enable and Disable the Configuration GUI on All Sun Ray Clients”.
1. Download and unzip the latest Sun Ray Operating Software and make it accessible to the Sun Rayserver.
See http://www.oracle.com/technetwork/server-storage/sunrayproducts/downloads/index.html
2. Become superuser on the Sun Ray server.
3. Change directory to the unzipped firmware directory and install the firmware.
# ./utfwinstall
4. Make the firmware accessible to the Sun Ray Clients:
# utfwadm -AaV
This command is for a Sun Ray server configured on a shared network (LAN) with external DHCPserver support (used utadm -L on for network configuration). See the examples following thisprocedure for alternate network configurations.
5. Power-cycle the Sun Ray Clients to update to the new firmware.
Note
You can also use the utfwload command to force a firmware update on allSun Ray Clients that have an older firmware. The -l option forces an updateon all clients connected to sessions with no user logged in, and the -L optionforces an update on all clients connected to sessions.
6. Repeat this procedure on each Sun Ray server in a failover group being used as a firmware server.
Note
To update firmware versions for a specific client, use the utfwadm -eMAC_address option.
Alternate Network Configuration Examples
Use the following utfwadm command examples for alternate network configurations:
• On a shared network (LAN) with Sun Ray server DHCP support (used utadm -A subnet for networkconfiguration)
# utfwadm -Aa -N all
• On a private network (used utadm -a intf for network configuration):
# utfwadm -Aa -n all

How to Enable and Disable the Configuration GUI on All Sun Ray Clients
192
14.4 How to Enable and Disable the Configuration GUI on All SunRay Clients
This procedure describes how to enable the Configuration GUI on all Sun Ray Clients, so users can locallyconfigure how the clients initialize and boot. Enabling the Configuration GUI essentially enables the clientto use its local configuration values first (if any) when initializing.
In previous versions of the Sun Ray Software 5.2 release, two versions of firmware were shipped: onefirmware with GUI capability and another firmware without GUI capability. Enabling the firmware with GUIcapability was accomplished by loading the GUI firmware onto a Sun Ray Client.
Now, the two firmware versions are combined into a single version, and additional control mechanismsare provided to enable or disable the Configuration GUI. In order to provide a reasonable migration pathfrom the previous configuration, the Configuration GUI will be enabled automatically if there is any localconfiguration defined on the Sun Ray Client. The new control mechanisms provide a way for you to forcethe Configuration GUI on or off, or provide a way for each user to enable the Configuration GUI through theuse of a password you define.
Enabling or disabling the Configuration GUI is managed using two new keywords in the .parms files,enablegui and disablegui. In order to provide some security, there are also two new control files,SunRay.enableGUI and SunRay.disableGUI, that act like keys to unlock enabling or disabling theConfiguration GUI. These control files must be installed along with the firmware and .parms files, andthey must be readable by the managed Sun Ray clients. The utfwadm command has options to set thesekeywords and automatically install the control files, as needed.
Once you enable the Configuration GUI on a Sun Ray Client, you can use the Configuration GUI to updatethe client's local configuration. See Section 14.5, “How to Modify a Sun Ray Client's Local Configuration(Configuration GUI)” for more information.
1. Become superuser on the Sun Ray server.
2. Enable the Configuration GUI on Sun Ray Clients in a shared network (LAN) configuration with externalDHCP support (configured network using utadm -L on):
# utfwadm -AaV -G GUI-control
The options for GUI-control are:
off The Configuration GUI cannot be enabled. This is the default option.
none Enables the Configuration GUI after using Stop-M or Stop-C on the client. Nopassword is required.
force Enables the Configuration GUI.
hashed-passwd The hashed password that the user must enter to enable the ConfigurationGUI. This option requires you to get the generated hashed password from theuthashpwd command, which takes a password from standard input and printsthe hashed result.
prompt Prompts you to enter the password that the user must enter to enable theConfiguration GUI. The password is processed by the uthashpwd command andthe resulting value is assigned to the enablegui value.
This command updates the enablegui keyword in the .parms file. For more details, see theutfwadm man page.

How to Modify a Sun Ray Client's Local Configuration (Configuration GUI)
193
Note
The -g option disables the Configuration GUI and accepts the same options.
3. Power-cycle the clients to put the new firmware mode into effect.
4. Repeat these steps on each Sun Ray server in a failover group.
Note
To enable the Configuration GUI for a specific client, use the utfwadm -eMAC_address option.
Alternate Network Configuration Examples
Use the following utfwadm command examples for alternate network configurations:
• On a shared network (LAN) with Sun Ray server DHCP support (configured network using utadm -Asubnet):
# utfwadm -Aa -N all -G GUI-control
• On a private network (configured network using utadm -a intf):
# utfwadm -Aa -n all -G GUI-control
14.5 How to Modify a Sun Ray Client's Local Configuration(Configuration GUI)
Sun Ray Software provides optional functionality to modify a Sun Ray Client's local configuration througha Graphical User Interface (GUI) tool. A Sun Ray Client's local configuration is checked first before usingthe configuration from the Sun Ray server, so this enables you to individually configure a Sun Ray Client'sbehavior at the local level.
Most of the firmware values are stored in the Sun Ray Client's flash memory. Certain control keycombinations are used to invoke the Configuration GUI, which enables you to examine and set the localconfiguration values.
The Configuration GUI enables several features that require the ability to set and store configurationinformation on the Sun Ray Client itself, including:
• Non-DHCP network configuration for standalone operation, when configuring local DHCP operation isimpossible
• Local configuration of Sun Ray specific parameters, such as server list, firmware server, MTU, andbandwidth limits
• DNS servers and domain name for DNS bootstrapping
• VPN configuration
• 802.1x configuration
• IPsec configuration

Security Configuration Repository
194
The firmware server specified in a client's local configuration is the default server used to provideconfiguration information for download, such as certificate files, .pcf files, the .parms file, andconfiguration files.
14.5.1 Security Configuration Repository
A security configuration repository is provided in a Sun Ray Client's firmware to store specific configurationfiles and certificates/keys for features such as VPN or 802.1x authentication. You can copy files to afirmware's repository through the file copy entry in a remote configuration file. See Table 14.3, “RemoteConfiguration File Key Values” for details.
Files stored in the firmware's repository are typed by the directory in which they are placed. The currentdirectories and types are:
• 802.1x authentication
• /certs - X509 certificate files
• /keys - Public/private key files
• /wpa - wpa_supplicant configuration files
• IPsec
• /ike/default.conf - IKE configuration file (racoon configuration file)
• /preshared/keys - Pre-shared key file (used when authentication_method statement set topre_shared_key)
• VPN
• /profiles - Cisco VPN configuration profiles (.pcf files)
In addition to the files that you copy to the firmware's repository, other files may be created by someconfiguration operations.
14.5.2 Configuration GUI Menu Descriptions
Table 14.1, “Configuration GUI Main Menu Items” and Table 14.2, “Configuration GUI Advanced MenuItems” provide descriptions for the Configuration GUI menu items.
• Press one of the following key combinations on a Sun Ray Client to open the Configuration GUI anddisplay the main menu:
• Stop-S or Ctrl-Pause-S
• Stop-M or Ctrl-Pause-M
Some of the menus have an Exit entry, but the Escape key always invokes one level higher than thecurrent menu. Escape at the top level prompts for any changes to be saved or discarded. If changes havebeen written to the flash memory, the Escape key resets the Sun Ray Client.
Table 14.1 Configuration GUI Main Menu Items
Main Menu Item Menu Item Descriptions
VPN Setup Cisco EzVPN authentication model
• Enable - On/Off

Configuration GUI Menu Descriptions
195
Main Menu Item Menu Item Descriptions• Import profile - Profile name
• Peer type - Cisco or Netscreen (Juniper Networks)
• Auth method - Xauth, Preshared, or Hybrid
• Peer - Gateway peer (name or IP address)
• Group - Group name
• Set Group Key
• Username - Xauth user name (if static)
• Set Password - Xauth password (if static)
• Set PIN - If the PIN has been set, the user is prompted for it before a locally stored Xauthuser name and password are used.
• Advanced
• DH Group - Diffie-Hellman group
• PFS Group
• IKE Lifetime - IKE Phase 1 lifetime
• IPsec Lifetime
• Dead Peer Detection
• Session timeout - Idle timeout, after which VPN connection is dropped
• Save - Save the VPN configuration.
802.1x Configuration • Enable and initialize - Enables 802.1x authentication. If you choose this menu item and thewired.conf file does not exist. you are prompted to create the file in the Sun Ray Clientfirmware and the Sun Ray Client reboots if you accept. The reboot is required to completethe 802.1x initialization. After rebooting, choose Configure to add configuration values tothe wired.conf file.
• Disable - Disable 802.1x authentication. This menu item removes the wired.conffile from the Sun Ray Client firmware. The Sun Ray Client must reboot to complete theprocess.
• Configure - Provides a list of configuration values that can be changed in the wired.conffile.
All string values, including file names, need to be enclosed in double quotes, otherwise,they will be parsed as hexadecimal strings. You can specify NULL (without quotes) in afield to represent a variable that has no value and causes a value to be cleared. Selectionsfor file names (keys or certificates) are displayed as a list of the available files of the correcttype from the corresponding directories, including the NULL selection.
The full description of these values are provided in the wpa_supplicant exampleconfiguration file.
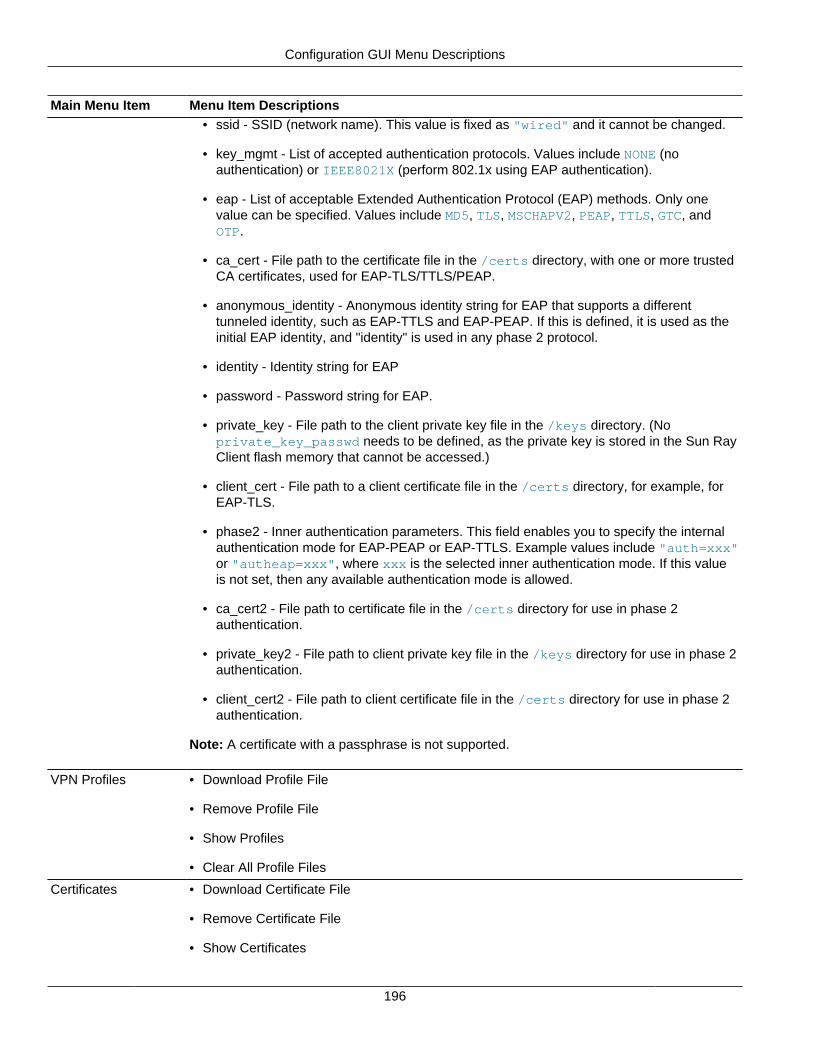
Configuration GUI Menu Descriptions
196
Main Menu Item Menu Item Descriptions• ssid - SSID (network name). This value is fixed as "wired" and it cannot be changed.
• key_mgmt - List of accepted authentication protocols. Values include NONE (noauthentication) or IEEE8021X (perform 802.1x using EAP authentication).
• eap - List of acceptable Extended Authentication Protocol (EAP) methods. Only onevalue can be specified. Values include MD5, TLS, MSCHAPV2, PEAP, TTLS, GTC, andOTP.
• ca_cert - File path to the certificate file in the /certs directory, with one or more trustedCA certificates, used for EAP-TLS/TTLS/PEAP.
• anonymous_identity - Anonymous identity string for EAP that supports a differenttunneled identity, such as EAP-TTLS and EAP-PEAP. If this is defined, it is used as theinitial EAP identity, and "identity" is used in any phase 2 protocol.
• identity - Identity string for EAP
• password - Password string for EAP.
• private_key - File path to the client private key file in the /keys directory. (Noprivate_key_passwd needs to be defined, as the private key is stored in the Sun RayClient flash memory that cannot be accessed.)
• client_cert - File path to a client certificate file in the /certs directory, for example, forEAP-TLS.
• phase2 - Inner authentication parameters. This field enables you to specify the internalauthentication mode for EAP-PEAP or EAP-TTLS. Example values include "auth=xxx"or "autheap=xxx", where xxx is the selected inner authentication mode. If this valueis not set, then any available authentication mode is allowed.
• ca_cert2 - File path to certificate file in the /certs directory for use in phase 2authentication.
• private_key2 - File path to client private key file in the /keys directory for use in phase 2authentication.
• client_cert2 - File path to client certificate file in the /certs directory for use in phase 2authentication.
Note: A certificate with a passphrase is not supported.
VPN Profiles • Download Profile File
• Remove Profile File
• Show Profiles
• Clear All Profile Files
Certificates • Download Certificate File
• Remove Certificate File
• Show Certificates

Configuration GUI Menu Descriptions
197
Main Menu Item Menu Item Descriptions• Clear All Certificate Files
Note: A certificate with a passphrase is not supported.
Servers • Server list - A list of comma-separated server names or IP addresses
• Firmware server - Name or IP address
[{tftp|http}://]server-name-or-IP
Trivial File Transfer Protocol (TFTP) is the default transport and server-name-or-IP specifies the default server used to provide configuration information for download,including certificate files, .pcf files, .parms file, firmware, and configuration files.
When using TFTP, the files must be accessible from the server's TFTP home directory.When using HTTP, the files must be located in or linked to the web server's documentdirectory.
• Log host - IP address of syslog host
Network • Network configuration - IPv4 (default) or IPv6
TCP/IP • Auto (available for IPv6)
• DHCP - MTU (available for IPv4)
• Static - IP address, netmask, router, broadcast address, MTU (IPv4) or IP address, PrefixLength, Router, MTU (IPv6)
DNS • Domain name - One only
• DNS server list - List of IP addresses
Authentication Set if network connection requires a simple HTTP authentication before it can be used.
• Enable/Disable switch
• Port number
Security Set password (lock configuration under password control)
Status Version (equivalent to Stop-V)
Advanced See below.
Clear Configuration Equivalent to Stop-C.
Exit Exit the Configuration GUI.
Table 14.2 Configuration GUI Advanced Menu Items
Main Menu Item Description
DownloadConfiguration
Prompts for a server name and the file name of a remote configuration file to be downloadedfrom the server, in the form:
[{tftp|http}://][server-name-or-IP/]file-name
This field can be overwritten when selected. Pressing Return causes the correspondingremote configuration file to be read and the configuration values parsed and set on the client.For configuration values, see Table 14.3, “Remote Configuration File Key Values”.

Configuration GUI Menu Descriptions
198
Main Menu Item DescriptionThe default transport used is TFTP and the default port is the corresponding port for thetransport, 69 for TFTP and 80 for HTTP. The default server is the firmware server value inthe local configuration (if server-name-or-IP is not defined) and the default file name isconfig.MAC, where MAC is the unit's MAC address in upper-case hexadecimal.
When using TFTP, the remote configuration file must be accessible from the server's TFTPhome directory. When using HTTP, the remote configuration file must be located in or linkedto the web server's document directory.
Keyboard CountryCode
A keyboard country code (keyboard map) that is applied to a keyboard that returns a countrycode of 0, for use with non-U.S. USB keyboards that do not report a country code. For the listof valid keyboard country code values, see Section 13.2.10, “Keyboard Country Codes”.
Bandwidth Limit The maximum amount of network bandwidth in bits per second that a given client will use.
Session Disconnect(Stop-Q)
Enables or disables the ability to terminate a session by pressing Stop-Q. This feature isuseful when you want to terminate a VPN connection and leave the Sun Ray in an inactivestate. Pressing the Escape key after the session has terminated reboots the Sun Ray Client.
Force Compression Sets a tag sent from the Sun Ray Client to the Xserver telling it to enable compressionregardless of available bandwidth.
LosslessCompression
Disables the use of lossy compression for image data.
Disallow utload Disables the ability to explicitly force a firmware load into a Sun Ray Client. In this way,firmware can be tightly controlled using .parms files or DHCP parameters.
Force Full Duplex Allows the Sun Ray Client to operate correctly when the network port that it is connected todoes not auto-negotiate. In that case, the auto-negotiation results in the Sun Ray running athalf duplex, which significantly impacts network performance. This setting allows the Sun Rayto operate with better performance in this situation.
Enable FastDownload
If set, the Sun Ray Client uses the maximum TFTP transfer size if the TFTP server supportsit. Over a high latency connection, this setting typically doubles the speed of firmwaredownloads. There are no disadvantages to enabling fast downloads on low latency LANs.
This parameter is disabled by default and the transfer size is set at 512-byte packets. It isdisabled by default for backwards compatibility with TFTP servers that might not support themore advanced protocol. If this parameter were on by default and a firmware download wereto fail, there would be no way to recover.
Power Off Timer Energy star power off feature for Sun Ray 3 Series Clients. The value for the power offfeature is in minutes. The default power off time is 30 minutes. A value of 0 disables thepower off feature.
Enter Alternate STOPmodifiers
Specifies an alternative combination of modifier keys to perform the same function asthe Stop key (Oracle Type 7 keyboard) or the Ctrl-Pause key sequence. By default, thisalternative combination is Ctrl-Shift-Alt-Meta. See Section 13.2.2, “Sun Ray Client Hot Keys”for details.
You can change Ctrl-Shift-Alt-Meta to any other combination of the same keys, but at leasttwo of the keys must be used. For example, you can set this value to Ctrl-Alt or Meta-Ctrl-Shift.
If this parameter is set to none, the alternative key combination is disabled.
Note that the Meta key has different names on different keyboards: on a PC keyboard, it isthe "Windows" key, and on a Mac keyboard, it is the "Command" key.

How to Load a Remote Configuration File
199
Main Menu Item Description
Command Cache Size Specifies the size, in Kbytes, of the command cache look-back buffer. This area is used tostore a list of recent commands used by the firmware, and the commands are replayed fromthe cache if used again. The default value is 512 Kbytes, maximum value is 8192 Kbytes,and a zero value disables the command cache.
Video • Blanking - Specifies the blanking timeout, which is the time until the screen is put to sleep,in minutes. Specify 0 to disable.
Video input disable Sun Ray 270 Client only. If set, turns off the input selector on the front of the client and locksthe monitor so that it displays only the Sun Ray output. This feature prevents users fromconnecting a PC to the VGA video input connector on a client and using it as a monitor.
14.5.3 How to Load a Remote Configuration File
To help avoid error-prone manual entry of local configuration data or to help configure a lot of Sun RayClients more quickly, you can use the Download Configuration menu item to download a pre-definedremote configuration file from a server via TFTP or HTTP.
The keywords shown in Table 14.3, “Remote Configuration File Key Values” correspond to configurationvalues that can be set from the Configuration GUI menus. To group items that are logically related, someof the keywords take the form family.field.
Table 14.3 Remote Configuration File Key Values
Key Values Description
target-file-path=file-to-copy (filecopy entry)
You can copy configuration files and certificates/keys to the firmware's securityconfiguration repository by using a file copy entry. A file copy entry follows the normalkey=value format, except the key used is the absolute path name of the target fileand it must begin with a "/" character. The value used is the configuration file to becopied, which needs to be located in the same location as the remote configuration file.You can use the file copy entries for both VPN and wpa_supplicant configuration files.
For example, the file copy entry /wpa/wired.conf=wired_config will copy thefile wired_config from the configuration server to the /wpa/wired.conf file onthe Sun Ray Client. Once you add all the necessary file copy entries, you can chooseAdvanced > Download Configuration in the Configuration GUI to download theremote configuration file and copy the files specified. See Section 14.5.1, “SecurityConfiguration Repository” for more information.
VPN/IPsec Submenu
vpn.enabled Enable toggle
vpn.peer Remote gateway name/IP address
vpn.group VPN group
vpn.key VPN key
vpn.user Xauth user
vpn.passwd Xauth password
vpn.pin PIN lock for use of user/passwd
vpn.peertype Cisco or Netscreen
vpn.authtype Xauth, Preshared, or Hybrid
vpn.dhgroup Diffie-Hellman group to use
vpn.pfsgroup PFS group to use

How to Load a Remote Configuration File
200
Key Values Description
vpn.lifetime Lifetime of IKE connection
vpn.ipsectime Lifetime of IPsec connection
vpn.dpdswitch Dead peer detection
vpn.killtime Idle timeout value to drop VPN connection.
DNS Submenu
dns.domain Domain name
dns.servers Server list (comma-separated IP addresses)
Servers Submenu
servers Sun Ray server
tftpserver Firmware (TFTP) server
loghost Syslog host
Security Submenu
password Set administrator password
Network Submenu
network Type of network (IPv4 or IPv6)
TCP/IP Submenu
ip.ip Static IPv4 address
ip.mask Static netmask
ip.bcast Static broadcast address
ip.router Static router
ip.mtu MTU
ip.type IP address source (DHCP or Static)
TCP/IPv6 Submenu
ip.ip6 Static IPv6 address
ip.prefix Static IPv6 prefix
ip.router Static router
ip.mtu MTU
ip.type IP address source (Auto or Static)
Advanced Submenu
kbcountry Keyboard country code
bandwidth Bandwidth limit in bits per second.
stopqon Enable (1) or Disable (0) Stop-Q for disconnect
compress Force compression on when 1
lossless Force use of lossless compression when 1
utloadoff Disallow use of utload to force firmware download when 1
fastload Force maximum TFTP transfer rate when 1
fulldup Force full-duplex when 1
poweroff Poweroff time in minutes
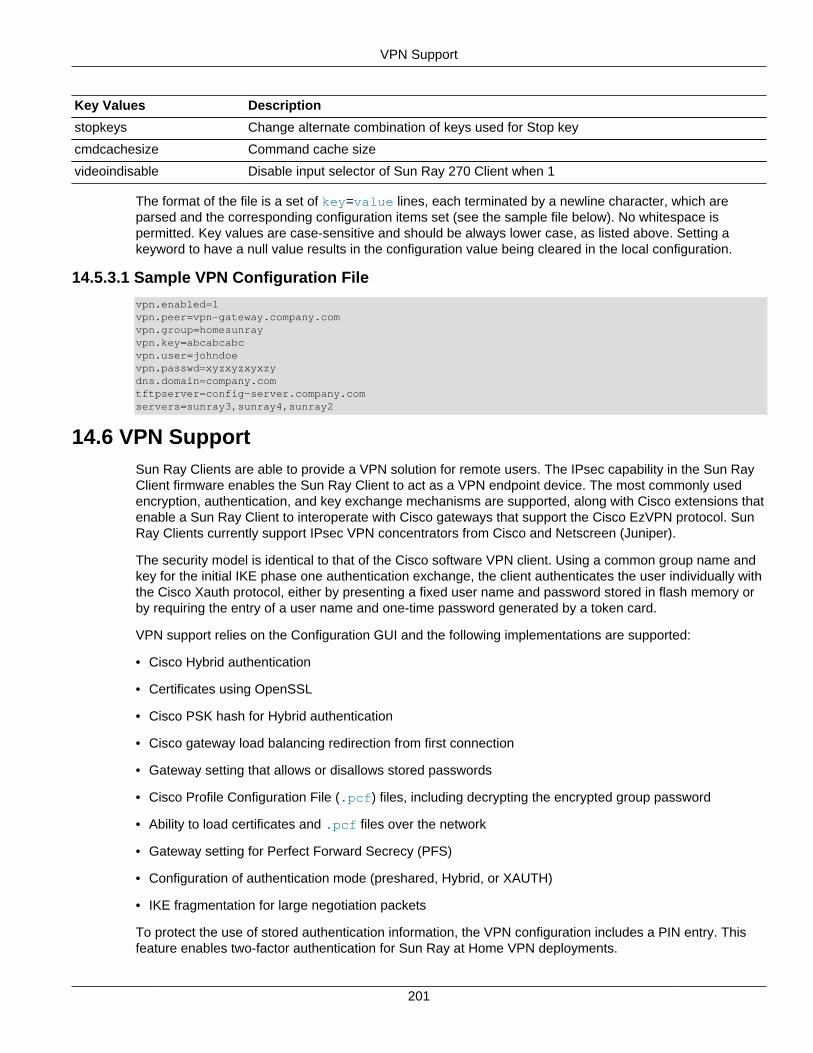
VPN Support
201
Key Values Description
stopkeys Change alternate combination of keys used for Stop key
cmdcachesize Command cache size
videoindisable Disable input selector of Sun Ray 270 Client when 1
The format of the file is a set of key=value lines, each terminated by a newline character, which areparsed and the corresponding configuration items set (see the sample file below). No whitespace ispermitted. Key values are case-sensitive and should be always lower case, as listed above. Setting akeyword to have a null value results in the configuration value being cleared in the local configuration.
14.5.3.1 Sample VPN Configuration File
vpn.enabled=1vpn.peer=vpn-gateway.company.comvpn.group=homesunrayvpn.key=abcabcabcvpn.user=johndoevpn.passwd=xyzxyzxyxzydns.domain=company.comtftpserver=config-server.company.comservers=sunray3,sunray4,sunray2
14.6 VPN SupportSun Ray Clients are able to provide a VPN solution for remote users. The IPsec capability in the Sun RayClient firmware enables the Sun Ray Client to act as a VPN endpoint device. The most commonly usedencryption, authentication, and key exchange mechanisms are supported, along with Cisco extensions thatenable a Sun Ray Client to interoperate with Cisco gateways that support the Cisco EzVPN protocol. SunRay Clients currently support IPsec VPN concentrators from Cisco and Netscreen (Juniper).
The security model is identical to that of the Cisco software VPN client. Using a common group name andkey for the initial IKE phase one authentication exchange, the client authenticates the user individually withthe Cisco Xauth protocol, either by presenting a fixed user name and password stored in flash memory orby requiring the entry of a user name and one-time password generated by a token card.
VPN support relies on the Configuration GUI and the following implementations are supported:
• Cisco Hybrid authentication
• Certificates using OpenSSL
• Cisco PSK hash for Hybrid authentication
• Cisco gateway load balancing redirection from first connection
• Gateway setting that allows or disallows stored passwords
• Cisco Profile Configuration File (.pcf) files, including decrypting the encrypted group password
• Ability to load certificates and .pcf files over the network
• Gateway setting for Perfect Forward Secrecy (PFS)
• Configuration of authentication mode (preshared, Hybrid, or XAUTH)
• IKE fragmentation for large negotiation packets
To protect the use of stored authentication information, the VPN configuration includes a PIN entry. Thisfeature enables two-factor authentication for Sun Ray at Home VPN deployments.

How to Configure VPN Using Cisco Hybrid Authentication
202
Note
You can also copy VPN configuration and certificate files to the firmware byusing the file copy entry in a remote configuration file. See Table 14.3, “RemoteConfiguration File Key Values” for details.
14.6.1 How to Configure VPN Using Cisco Hybrid Authentication
This procedures describes the steps to modify the Configuration GUI to use Cisco Hybrid authentication.
The procedure assumes that the Sun Ray Client has access to an appropriate server supplying thenecessary configuration files.
1. Press Stop-M or Ctrl-Pause-M to open the Configuration GUI.
2. Choose Certificates > Load Certificate File.
• Enter the URL of a file containing the root certificate in PEM format, which is used to sign thegateway certificates.
• Exit the menu.
3. Choose VPN Profiles > Load Profile File.
• Load any appropriate Cisco .pcf files.
• Exit the menu.
4. Choose VPN Setup > Import VPN profile.
• Cycle through the existing .pcf files by hitting Enter until the desired profile is selected. The valuesfrom this file will be populated into the submenu entries, but they will not be stored until the valuesare saved. Cycling back to the initial entry with no .pcf file selected will restore the initial values.
5. Set more values in the VPN-Setup menu.
• Set Enable to on.
• Set any other VPN values desired, such as Username.
• Save the VPN settings.
6. (Optional) Choose Advanced > Download Configuration to download the VPN settings
The new Auth method is specified in the configuration file as "vpn.authmethod", and the valid valuesare case-insensitive "xauth", "preshared", and "hybrid".
7. Enter ESC from the main menu and save the Configuration GUI settings.
The Sun Ray Client will reboot and try to make the VPN connection.
14.7 IPsecBeyond the IPsec capability to make Sun Ray Client as a VPN endpoint device, Sun Ray Software alsosupports IPsec to provide high quality, cryptographically-based security between Sun Ray Clients and SunRay servers. After configuring and enabling IPsec on the Sun Ray server and the Sun Ray Client, the SunRay Client will negotiate a secure end-to-end IPsec tunnel with the Sun Ray server before interacting withSun Ray services on the server.

802.1x Authentication
203
The Sun Ray Software implementation of IPsec is incorporated into the Sun Ray Client firmware. The SunRay Client will always be the initiator of a connection, so it does not have to respond to inbound connectionrequests. This type of negotiation is similar to the current IPsec VPN behavior, where IPsec is establishedwith a VPN gateway before Sun Ray services are invoked. However, both IPsec implementations requiredifferent configurations.
See Appendix A, IPsec Support for details.
14.8 802.1x AuthenticationThe 802.1x authentication feature in the Sun Ray Client firmware is based on an Open Source projectcalled wpa_supplicant, which is described at http://hostap.epitest.fi/wpa_supplicant/. With the 802.1xauthentication feature, Sun Ray Clients can be configured to provide proper credentials to successfullyauthenticate and gain access to the local area network under 802.1x access control. Sun Ray Clientssupport the Extensible Authentication Protocol Modes: MD5, TLS, MSCHAPV2, PEAP, TTLS, GTC, andOTP.
wpa_supplicant supports the implementation of the WPA supplicant protocol for wireless authentication,which includes the 802.1x port authentication protocol. As a result, the configuration of 802.1x depends onthe mechanisms and configuration file format provided by wpa_supplicant.
Note
Although the WPA supplicant protocol is primarily targeted for wirelessauthentication, Sun Ray Clients do not currently supported wireless operation.
wpa_supplicant uses a main configuration file to configure the 802.1x authentication, along with a fewsecondary files containing certificates and public/private key pairs. The main configuration file used withthe Sun Ray Software is named wired.conf. In order for wpa_supplicant to access the configurationfiles, you need to copy them to the Sun Ray Client firmware's security configuration repository by usingfile copy entries in a remote configuration file. See Table 14.3, “Remote Configuration File Key Values” fordetails.
The wired.conf file must be present on a Sun Ray Client in order to start the wpa_supplicant componentand to attempt 802.1x authentication. The presence or absence of this configuration file is the primarymechanism used to enable or disable wpa_supplicant. The 802.1x Configuration menu item in theConfiguration GUI enables you to manage the wired.conf file, which uses only a reduced set ofconfiguration values required for various authentication modes of 802.1x. The configuration options arefurther refined depending on the particular Extended Authentication Protocol (EAP) mode selected. SeeTable 14.1, “Configuration GUI Main Menu Items” for details.
Currently, private keys cannot be generated on the Sun Ray Client itself, so you must generate the privatekeys and corresponding certificates by other means and provide them through the remote configurationfile.
If you create and modify the wired.conf file outside of the Configuration GUI, make sure the appropriatefields are provided and the file is formatted correctly. The file must have the single network definition ofssid="wired" included. If the wired.conf file does not follow the expected format, wpa_supplicant willfail to operate correctly. See the contents of the wired.conf file in the following example.
14.8.1 How to Configure and Enable 802.1x Authentication on a Sun RayClient
This procedure describes how to configure and enable 802.1x authentication on a Sun Ray Client. Thesteps include examples to set up an 802.1x authentication using the EAP-TLS mode of operation.

How to Configure and Enable 802.1x Authentication on a Sun Ray Client
204
Note
The configuration files listed in the procedure must be available in the same locationas the remote configuration file, which is usually the firmware server defined in thelocal configuration.
1. Create the configuration files for wpa_supplicant, including the main configuration file, wired.conf,and the secondary files containing certificates and public/private keys.
For the list of valid wired.conf values, see the 802.1x Configuration menu descriptions in Table 14.1,“Configuration GUI Main Menu Items”.
Here are some examples of secondary files and the wired.conf file.
someca_cert.pem - a Certificate Authority root certificate from "someca"
-----BEGIN CERTIFICATE-----MIID3DCCA0WgAwIBAgIBADANBgkqhkiG9w0BAQUFADCB0zETMBEGCgmSJomT8ixkARkWA2NvbTETMBEGCgmSJomT8ixkARkWA3N1bjEVMBMGCgmSJomT8ixkARkWBXNm....CkS0he0fm5xVRd6D+nQQAbUkFy0MZO39QjXbopBxaY5Vm5hg2U+O0JJ5UHQXGGMksxyGuzhrnu09oYF7Zje1BlO2fGhC/JrSJhKFQtgqNBQ=-----END CERTIFICATE-----
sunray_key.pem - a RSA key pair for the Sun Ray Client
-----BEGIN RSA PRIVATE KEY-----MIICXAIBAAKBgQCvGwBJjv/Uzp81QAd9B9uqehZqmS9BVA9xcfJtNf6Feou3FnKE8tHcCISAXFdujYZSqhzcInzn/ZWnKk2cRQl8//IupuMcwPi10QebBmXhxfrTTW5L....FEmkooUWFa6mUpAcpQJBANCe64twQ3RjNfIc3n4LpCEPgw7y5pgk8xmKIDiSZ/+UXwJQ4gpzmsakaZWBEcdxrJWkK6chvcFcwcfAN7rkOBc=-----END RSA PRIVATE KEY-----
sunray_cert.pem - a client certificate for the Sun Ray Client RSA key, signed by "someca"
-----BEGIN CERTIFICATE-----MIIE+TCCBGKgAwIBAgIBCTANBgkqhkiG9w0BAQUFADCB0zETMBEGCgmSJomT8ixkARkWA2NvbTETMBEGCgmSJomT8ixkARkWA3N1bjEVMBMGCgmSJomT8ixkARkWBXNm....vv7TQOtlSlwPessnDJOFJ+oYoAMbc3f8bmvVOMvqQ98zZGdJ/VDK+siFJKeTpkoLocRIJUFegNu4W0+pvgPY/ZBsbUchBA2rpdhwWnc=-----END CERTIFICATE-----
wired.conf - wpa_supplicant configuration file for 802.1x/EAP-TLS
network={ ssid="wired" key_mgmt=IEEE8021X eap=TLS ca_cert="/certs/someca.pem" identity="[email protected]" private_key="/keys/sunray.pem" client_cert="/certs/sunray.pem"}
2. Create a remote configuration file with the needed file assignment entries, which will be used to copythe wpa_supplicant configuration files to the Sun Ray Client.
Here is an example of a remote configuration file:
/certs/someca.pem=someca_cert.pem/keys/sunray.pem=sunray_key.pem

How to Display Firmware Versions for All Currently Connected Sun Ray Clients
205
/certs/sunray.pem=sunray_cert.pem/wpa/wired.conf=wired.conf
The /wpa/wired.conf=wired.conf entry is required.
3. Download the remote configuration file to a Sun Ray Client by choosing Advanced > DownloadConfiguration in the Configuration GUI.
Once the wired.conf file is loaded, 802.1x authentication is automatically enabled if the key_mgmtkey is set to IEEE8021X.
4. (Optional) Make changes to the wired.conf file by choosing 802.1x Configuration in theConfiguration GUI.
5. Plug the Sun Ray Client into a port that provides 802.1x authentication and test the authentication.
See Section 16.14, “(20) 802.1x Authentication Icon” for information about possible error codes orstatus messages.
14.9 How to Display Firmware Versions for All Currently ConnectedSun Ray Clients
1. Become superuser on the Sun Ray server
2. Display the firmware versions.
# /opt/SUNWut/sbin/utfwload -a
You can also use the utquery -d command.
14.10 How to Display the Firmware Version from a Sun Ray ClientPress Stop-V or Ctrl-Pause-V.
14.11 How to Synchronize the Sun Ray Client FirmwareThis procedure uses the utfwsync command to synchronize the currently installed and configuredfirmware on a Sun Ray server with all the other Sun Ray servers in its failover group and to enablefirmware updates to occur on the Sun Ray Clients. This command also forces a reboot on all the Sun RayClients to update to the new firmware if needed. The utfwsync command is primarily used during a SunRay Software upgrade
1. Become superuser on the Sun Ray server.
2. Synchronize the Sun Ray Client firmware.
# /opt/SUNWut/sbin/utfwsync
The Sun Ray Clients reboot themselves and update to the new firmware if needed.
14.12 How to Downgrade Firmware on a Sun Ray ClientAs a general recommendation, your Sun Ray Clients should always have the latest firmware installed.However, there may be times when you need to downgrade the firmware to a previous release.

How to Downgrade Firmware on a Sun Ray Client
206
Every firmware has its own barrier level value, which is used to determine if the firmware installed on theSun Ray server is newer than the one installed on the Sun Ray Client as it boots up. In most cases, if thefirmware barrier level on the Sun Ray Client is lower than the firmware barrier level on the Sun Ray server,the new firmware will be automatically updated on the Sun Ray Client when it boots.
To downgrade firmware on a Sun Ray Client, you can use the -F option of the utfwadm command tomanipulate the barrier level and force the downgrade to occur. When using this option, the BarrierLevelkey is set in the client-specific .parms entry.
Use the following procedure to downgrade the firmware on a specific Sun Ray Client.
1. Download and unzip the Sun Ray Software media pack containing the firmware you want to install andmake it accessible to the Sun Ray server.
Note
In Sun Ray Software releases before the 5.3 release, the Sun Ray Clientfirmware images were part of the Sun Ray Software media pack. Starting withthe Sun Ray Software 5.3, the firmware images were separated into the SunRay Operating Software release.
See http://www.oracle.com/technetwork/server-storage/sunrayproducts/downloads/index.html
2. Become superuser on the Sun Ray server.
3. Configure the firmware downgrade for a Sun Ray Client.
# utfwadm -AVF -e enetAddr -f firmware
Where enetAddr is the MAC address of the Sun Ray Client to downgrade and firmware is therelative path to the firmware image. The firmware image is located in the firmware package in the SunRay Software media pack. For example, in the Sun Ray Software 5.2 media pack, it is located in thesrss_4.3/Components/10-SRSS/Content/Sun_Ray_Core_Services_4.3/Solaris_10+/sparc/Packages/SUNWutfw/reloc/SUNWut/lib/firmware directory.
This command is for a Sun Ray server configured on a shared network (LAN) with external DHCPserver support (used utadm -L on for network configuration). See the examples following thisprocedure for alternate network configurations.
4. Power-cycle the Sun Ray Client to downgrade the firmware.
Note
If you want to update the Sun Ray Client back to the latest firmware installed on theSun Ray server, use the following command on the server to remove the specificclient's entry from the .parms file and power-cycle the Sun Ray Client:
# utfwadm -DV -e enetAddr
Alternate Network Configuration Examples
Use the following utfwadm command examples for alternate network configurations:
• On a shared network (LAN) with Sun Ray server DHCP support (used utadm -A subnet for networkconfiguration)

How to Disable All Sun Ray Client Firmware Updates
207
# utfwadm -AF -f firmware -e enetAddr
• On a private network (used utadm -a intf for network configuration):
# utfwadm -AF -f firmware -e enetAddr
14.13 How to Disable All Sun Ray Client Firmware Updates
This procedure is needed when upgrading Sun Ray Software on Sun Ray servers in a failover group.
1. Become superuser on the Sun Ray server.
2. Disable all firmware updates.
For a shared network (LAN) with external DHCPserver support (used utadm -L on for networkconfiguration)
# ./utfwadm -D -a -V
For a shared network (LAN) with Sun Ray serverDHCP support (used utadm -A subnet fornetwork configuration)
# ./utfwadm -D -a -N all
For a private network (used utadm -a intf fornetwork configuration)
# ./utfwadm -D -a -n all

208

209
Chapter 15 Peripherals
Table of Contents15.1 Peripherals Overview .............................................................................................................. 20915.2 Enabling and Disabling Device Services ................................................................................... 210
15.2.1 How to Determine the Current State of Device Services ................................................. 21015.2.2 How to Enable or Disable USB Device Services ............................................................ 211
15.3 Device Availability Per Session ................................................................................................ 21115.4 Accessing Serial Devices and USB Printers ............................................................................. 211
15.4.1 Device Links ................................................................................................................ 21215.4.2 Device Nodes .............................................................................................................. 21215.4.3 Device Node Ownership ............................................................................................... 21315.4.4 Hotdesking and Device Node Ownership ....................................................................... 21315.4.5 Setting Up Serial Devices ............................................................................................. 21315.4.6 Setting Up USB Printers ............................................................................................... 214
15.5 Accessing USB Mass Storage Devices .................................................................................... 21615.5.1 Device Nodes and Links (Oracle Solaris) ....................................................................... 21615.5.2 Device Nodes and Links (Oracle Linux) ......................................................................... 21715.5.3 Mount Points ................................................................................................................ 21715.5.4 Device Ownership and Hotdesking ................................................................................ 21715.5.5 Mass Storage Devices and Idle Sessions ...................................................................... 21715.5.6 Commands for Common Disk Operation (Oracle Solaris) ................................................ 21815.5.7 Commands for Common Disk Operation (Oracle Linux) .................................................. 21815.5.8 How to Unmount a Mass Storage Device From a Client ................................................. 21915.5.9 Troubleshooting Mass Storage Devices ......................................................................... 219
15.6 USB Headsets ........................................................................................................................ 22015.6.1 Tested USB Headsets .................................................................................................. 22015.6.2 Tested Applications ...................................................................................................... 22015.6.3 Additional Notes ........................................................................................................... 221
15.7 USB Device Operations Failing After Idle Timeout Limit ............................................................ 221
This chapter describes how to access peripherals or devices connected to a Sun Ray Client's USB andserial ports or connected to an Oracle Virtual Desktop Client's serial ports (when on a Windows-basedclient computer).
Most of this chapter pertains to Sun Ray Clients. To find out how to access external peripherals whenusing an Oracle Virtual Desktop Client, see Section 13.3.2, “Using External Devices on the ClientComputer”.
15.1 Peripherals Overview
Sun Ray Software works with various mass storage USB devices such as flash disks, memory cardreaders, zip drives, and disk drives on Sun Ray Clients. Data CDs and DVDs can be read but not written.Other end-user peripherals such as USB headsets, printers, and serial devices can also be used.
There are multiple ways to access peripherals connected to a Sun Ray Client, based on the type of SunRay session you are using:
• Oracle Linux or Oracle Solaris Sessions - You can access the device through the device links andnodes automatically created on the Sun Ray server. See Section 15.4, “Accessing Serial Devices and

Enabling and Disabling Device Services
210
USB Printers” for details. USB mass storage devices are automatically mounted, which is described inSection 15.5, “Accessing USB Mass Storage Devices”.
USB-to-serial adapters are not accessible through the generated device nodes. You must use USBredirection in a Windows session to access a serial device connected through a USB-to-serial adapter.
• Windows Sessions Using USB Redirection - USB redirection is the recommended way to accessUSB devices connected to Sun Ray Clients when using Windows sessions. USB device redirectionrequires that the USB device redirection component is installed on the Windows system. SeeSection 17.6, “USB Device Redirection” for details. Although most of the information in this chapter is notapplicable when using USB redirection, device services still need to be enabled.
• Windows Sessions Using Logical Device Mapping - Without USB redirection, you can use the -r option of the uttsc command to create a logical device mapping to the device being managed onthe Sun Ray server, as described in this chapter. For example, the -r disk:drive=path enablesyou to create a logical device mapping to a USB mass storage device, where path is the mounted disklocated at /tmp/SUNWut/mnt/user on the Sun Ray server. Other devices, such as serial devices, canalso be configured. For details about accessing serial devices when using the Windows connecter, seeSection 17.17, “Accessing Serial Devices”.
Using logical device mapping with USB mass storage devices provides much lower performance onOracle Linux than Oracle Solaris due to the design of the Linux mass storage subsystem. For Windowssessions, use USB redirection for optimum performance with mass storage devices.
For the latest list of peripherals tested to work with Sun Ray Software, see the Sun Ray Client and OracleVirtual Desktop Client Peripherals document.
Note
Once the latest firmware is installed on a Sun Ray Client, no special installation isrequired for USB headsets to work. Just connect the USB headset to the Sun RayClient. See Section 15.6, “USB Headsets” for details.
15.2 Enabling and Disabling Device ServicesBefore devices can be accessed on a Sun Ray Client, Sun Ray device services for the device must beenabled. Sun Ray device services can be enabled and disabled with the utdevadm command line toolor from the Security tab on the Admin GUI Advanced tab. Sun Ray device services include USB devicesconnected through USB ports, internal serial ports, and internal smart card readers on the Sun Ray Client.
Here are the available device services for external peripheral devices:
• Internal serial port - Enables users to access the embedded serial ports on their Sun Ray Clients.
• USB port - Enables users to access any devices connected to USB ports. This situation does not affectHID devices such as the keyboard, mouse, or barcode reader.
After you install Sun Ray Software, all device services are enabled by default. You can use the utdevadmcommand to enable or disable device services only in the configured mode, that is, after the Sun Ray Datastore is activated.
This configuration affects all the servers in a group and all the clients connected to that group.
15.2.1 How to Determine the Current State of Device Services
The utdevadm command displays the enabled or disabled state of device services.

How to Enable or Disable USB Device Services
211
# utdevadm
15.2.2 How to Enable or Disable USB Device Services
• To enable USB services, use the utdevadm command.
# utdevadm -e -s usb
• To disable USB services, use the utdevadm command.
# utdevadm -d -s usb
15.3 Device Availability Per Session
For every Sun Ray Client or Oracle Virtual Desktop Client session on a Sun Ray server, Sun RaySoftware creates a subdirectory under /tmp/SUNWut/units. The subdirectory matches the name ofthe client’s identifier, or CID. A Sun Ray Client’s CID is named IEEE802.MACID, where MACID is the SunRay Client’s MAC Address. An Oracle Virtual Desktop Client’s CID is named MD5.CLIENTID whereCLIENTID is the hexadecimal representation of each Oracle Virtual Desktop Client profile’s MD5 hashkey. For more information on the difference between Sun Ray and Oracle Virtual Desktop Client CIDs, seeSection 13.1.1, “Client ID Differences Between Oracle Virtual Desktop Clients and Sun Ray Clients”.
Each session has a $UTDEVROOT environment variable, which is an alias to that session’s current CIDsubdirectory. $UTDEVROOT is a dynamic variable that updates whenever the user hotdesks betweendevices. If the $UTDEVROOT variable is not available, such as in kiosk mode, you can always display theclient ID as described in Section 13.1.1.1, “How to Display Client ID Information”.
The following example shows how to find the CID subdirectory for a Sun Ray Client through the$UTDEVROOT variable (using bash shell):
# echo $UTDEVROOT/tmp/SUNWut/sessions/4/unit # cd -P $UTDEVROOT # pwd/tmp/SUNWut/units/IEEE802.0003badc1b9d
The subdirectory for each client contains dev and devices directories. The Sun Ray dev directorycontains a representation of the logical topology of the devices connected to the client. The devicesdirectory contains a representation of the physical topology of some of the devices connected to the client.
When accessing or referencing devices connected to the current client, always use the dev directory,because the logical device gets updated whenever a user moves from client to client and the path to thedevice does not contain any special characters that may need special handling in a script.
Note
Sun Ray Software does not create device nodes for every USB device. Some USBdevice drivers export their device interfaces through other mechanisms than atraditional UNIX device node.
15.4 Accessing Serial Devices and USB Printers
This section provides information about how to manage serial devices and USB printers connected to aclient.

Device Links
212
15.4.1 Device Links
Device links are created under the dev directory. A link to each serial node is created in dev/term, and alink to each locally attached printer is created in dev/printers.
Typical device links are:
/tmp/SUNWut/units/IEEE802.080020cf428a/dev/term/manufacturer_name-67a/tmp/SUNWut/units/IEEE802.080020cf428a/dev/printers/1608b-64
The device link for the first example is manufacturer_name-serial_numberindex, where index is anincreasing alphabetical character, starting at a. If the manufacturer name is not available, the vendor andproduct ID numbers are used for the name of the device link.
Here is an example of the dev directory from a Sun Ray 3 Client, which has an onboard serial port.
# cd $UTDEVROOT/dev# pwd/tmp/SUNWut/units/IEEE802.002128587259/dev# ls term # cd $UTDEVROOT/dev/term# pwd/tmp/SUNWut/units/IEEE802.002128587259/dev/term# ls -llrwxrwxrwx 1 root root 22 Jul 28 17:23 a -> ../../devices/serial:a
15.4.2 Device Nodes
Note
USB-to-serial adapters are not accessible through the generated device nodesin an Oracle Solaris or Oracle Linux session. You must use USB redirection in aWindows session to access a serial device connected through a USB-to-serialadapter.
In the devices directory, device nodes are created for each serial or printer port on an attached USBdevice. The device nodes are created in the hub directory corresponding to the hub to which they areattached. The nodes are named as follows:
manufacturer_name,model_name@upstream_hub_port
If the USB device has multiple identical ports (for example, two serial ports), the name is followed by :nwhere n is a numerical index, starting at 1.
The following example is a typical device node:
/tmp/SUNWut/units/IEEE802.MACID/devices/usb@1/hub@1/manufacturer_name,model_name@3:1
Here are the definitions of the naming conventions.
Term Definition
physical-topology The physical-topology is hub@port/hub@port and so on. The portrefers to the port on the parent hub into which the device or child hub isplugged.

Device Node Ownership
213
Term Definition
printer-name-1, terminal-name-1
The printer and terminal name in the Sun Ray devices directory ismanufacturer,model@port with a colon separating the numerical indexwhen the string just described is not unique in the directory.
printer-name-2, terminal-name-2
The printer and terminal name in the Sun Ray dev directory is themanufacturer and serial number concatenated with an alphabetic index whenthe serial number is not unique.
15.4.3 Device Node Ownership
Some device nodes are owned by the user whose session is active on the client, while others might beowned by root or by other users that had previously active sessions on the client. Device permissions,access controls and ownership rules are determined by the class of device. For serial devices, only theuser whose session is active on the client or the superuser have permission to use the attached device. Ifno user has an active session, superuser owns the serial device nodes. This rule might not be applicablefor other classes of USB devices connected to the client.
15.4.4 Hotdesking and Device Node Ownership
The following description of the behavior of USB devices when sessions are connected and disconnectedfrom a client applies only to serial devices. Other device classes may have different semantics regardingownership and device lease times.
Changing the active session on a client changes the ownership of the device nodes to the user associatedwith the new session. A session change occurs whenever a user inserts or removes a smart card from aclient or logs into a session.
In a failover environment, you can use the utselect or utswitch command to change a session. Asession change causes all devices currently open by a non-root user to be closed after 15 seconds. Anyinput to or output from any affected device results in an error. For a serial device node, if the originalsession is restored within 15 seconds, the ownership is not relinquished, and input and output continueuninterrupted.
Devices currently opened by the superuser, including normal printing, remain unaffected by a sessionchange.
15.4.5 Setting Up Serial Devices
To use serial attached devices with a client, you must attach them to the internal serial ports or througha USB-to-serial adaptor. You must use USB redirection in a Windows session to access a serial deviceconnected through a USB-to-serial adapter.
Symbolic links to the serial port device nodes are located under $UTDEVROOT/dev/term. Built-in portsare named "a" or "b".
Serial ports become unowned during hotdesking, so you should make sure any serial port activity isstopped before removing your smart card or resetting the client.
Note
All serial ports except port A on the Sun Ray 170 support full handshakingand standard UNIX semantics. Port A on the Sun Ray 170 has no hardwarehandshaking pins, so it can't be used when a hardware handshake is required.

Setting Up USB Printers
214
15.4.6 Setting Up USB Printers
This section provides instructions on how to setup PostScript and non-attached PostScript printers thatare attached to the Sun Ray Client. For details on how to print from Windows while using the Windowsconnector, see Chapter 17, Windows Connector.
15.4.6.1 How to Set Up an Attached PostScript Printer (Oracle Solaris)
Sun Ray Software works with PostScript printers connected directly to a USB port on the Sun Ray Client.For non-PostScript printer support, refer to Section 15.4.6.3, “How to Set Up an Attached Non-PostScriptPrinter”.
Note
The printer naming conventions in Sun Ray Software differ from those in an OracleSolaris operating environment.
Note
The lp subsystem opens the device node as superuser for each print request, soprint jobs are not affected by hotdesking.
Starting a print queue on a printer attached to a Sun Ray Client, either directly or through an adapter, is thesame process as starting a print queue in Oracle Solaris.
1. On the Sun Ray Client where the printer is attached, log in to a new session as superuser (root).
2. To determine the MAC address of the Sun Ray Client, press Stop-N or Ctrl-Pause-N.
The alphanumeric string displayed below the connection icon is the MAC address.
3. To locate the Sun Ray Client, type:
# cd /tmp/SUNWut/units/*MAC_address# pwd/tmp/SUNWut/units/IEEE802.MACID
The path to the extended MAC address for your particular Sun Ray Client is displayed.
4. Locate the port for the printer by typing:
# cd dev/printers# pwd/tmp/SUNWut/units/IEEE802.MACID/dev/printers# lsprinter-node-name
5. In the directory, locate the printer node.
6. Add the new printer.
a. Start the Oracle Solaris Print Manager.
# /usr/sbin/printmgr &
b. Click OK to choose files for repository.

Setting Up USB Printers
215
c. Go to Printer > New Attached Printer.
d. Type the following information:
• Printer name: printername
• Description (optional)
• Printer port
• Printer make
• Printer model
Choose Other to type the printer port path name. To locate the printer port, refer to Step 4.
7. Verify that the printer has been set up correctly.
# lpstat -d printername
15.4.6.2 How to Set Up an Attached PostScript Printer (Oracle Linux)
Sun Ray Software works with PostScript printers connected directly to a USB port on the Sun Ray Client.For non-PostScript printer support, refer to Section 15.4.6.3, “How to Set Up an Attached Non-PostScriptPrinter”.
Note
The lp subsystem opens the device node as superuser for each print request, soprint jobs are not affected by hotdesking.
The following generic instructions might vary slightly from one operating system implementation to another,but they should provide enough information to enable an administrator to set up basic printing services.
1. On the Sun Ray Client where the printer is attached, log in to a new session as superuser (root).
2. To determine the MAC address of the Sun Ray Client, press Stop-N or Ctrl-Pause-N.
The alphanumeric string displayed below the connection icon is the MAC address.
3. Locate the Sun Ray Client.
# cd /tmp/SUNWut/units/*MAC_address# pwd/tmp/SUNWut/units/IEEE802.MACID
The path to the extended MAC address for your particular Sun Ray Client is displayed.
4. Locate the port for the printer.
# cd dev/printers# pwd/tmp/SUNWut/units/IEEE802.MACID/dev/printers# lsprinter-node-name
5. In the directory, locate the printer node.

Accessing USB Mass Storage Devices
216
6. Use the Oracle Linux administration tools to set up the printer.
Choose Other so that you can provide the device node from Step 4.
7. Verify that the printer has been set up correctly.
# lpstat -d printername
8. Create a soft link to the Sun Ray printer node in /dev/usb
For example, if the device node is
/tmp/SUNWut/units/IEEE802.mac-address/dev/printers/device_node,
you would use the following command:
# ln -s /tmp/SUNWut/units/IEEE802.mac-address/dev/printers/device_node /dev/usb/sunray-printer
Use this soft link (/dev/usb/sunray-printer) as the Device URI while creating the print queue.
9. Update /etc/cups/cupsd.conf to set the RunAsUser property to No.
10. Restart the cups daemon.
# /etc/init.d/cups restart
15.4.6.3 How to Set Up an Attached Non-PostScript Printer
Printers that do not use PostScript, such as engineering plotters, are best supported by third-partysoftware. Low-cost inkjet printers require third-party software such as the following:
• Easy Software's ESP PrintPro, available from http://www.easysw.com
• Ghostscript, available from http://www.ghostscript.com
• Vividata PShop, available from http://www.vividata.com
Check with the vendors for pricing and the precise printer models supported.
15.5 Accessing USB Mass Storage Devices
This section provides information about how to manage USB mass storage devices connected to a SunRay Client.
15.5.1 Device Nodes and Links (Oracle Solaris)
Mass storage devices have two types of device nodes, block and raw, which are created in the client's devdirectory. A link to the block device is created in the client's dev/dsk directory and a link to the raw deviceis created in the dev/rdsk directory.
Device links have a suffix denoting their slice number. Slice s2 is known as the backup slice, signifyingthe complete disk. Other slices are numbered accordingly on the file system on the disk. For UFS disks,slice numbers are derived from the disk label. For FAT disks, slices (partitions in this case) are numberedstarting from s0. Disk operations such as format or eject should be directed at slice s2. Partition operations

Device Nodes and Links (Oracle Linux)
217
such as mount or fstyp should be directed at the individual slice concerned. See Section 15.5.5, “MassStorage Devices and Idle Sessions” for examples.
15.5.2 Device Nodes and Links (Oracle Linux)
Mass storage device nodes are block special nodes. They are created in the dev/dsk directory. Note thatfor mass storage devices, device nodes are not created in the devices directory and no device links arecreated.
Device nodes are named with a partition identifier suffix. The device node representing the whole disk doesnot have such a suffix. For example:
• disk3p2 represents partition 2 of disk3.
• disk3 represents the whole disk.
Disk operations such as eject should be directed at the whole disk. Partition operations such as mountshould be directed at individual partitions. See Table 15.2, “Commands for Common Disk Operation(Oracle Linux)” for examples.
15.5.3 Mount Points
When a mass storage device is plugged into the client, if it has an OS-recognizable file system, it isautomatically mounted on a directory under the user's mount parent directory. The mount parent directoryis located in $DTDEVROOT/mnt/. The user can also locate mount points by using the -l option of theutdiskadm command.
% utdiskadm -l
15.5.4 Device Ownership and Hotdesking
When the user's session disconnects from the client, the user loses access rights to the mass storagedevice, and all pending I/O to the device halts. This situation can cause the data on the device to becorrupted. Users should use utdiskadm -r to unmount all file systems safely before hotdesking orunplugging the disk from the client. They should also close all references to files and directories in themount point to ensure that the device in question is not busy.
15.5.5 Mass Storage Devices and Idle Sessions
If you are using Remote Hotdesk Authentication (RHA), Non-Smart Card Mobility (NSCM), or smart card-based authentication, long I/O operations might fail when using mass storage devices on Sun Ray Clients.
If these types of sessions become idle due to keyboard and mouse inactivity long enough to activate thescreen lock, the session is detached. The user loses access to the storage device, causing any I/O inprogress to halt, and data may become corrupted.
To avoid this situation, the following options are available:
• Maintain keyboard or mouse activity
• Increase the screen lock idle time sufficiently to allow I/O operations to complete
• Disable the screen lock program
• Disable the NSCM or RHA policies

Commands for Common Disk Operation (Oracle Solaris)
218
• Find an alternative way to perform the I/O operation more securely, for example, plug the device directlyinto the Sun Ray server in a locked server room
Note
Some of these options have security and convenience implications that should becarefully weighed against the timeout issue to determine what is best for your site.
15.5.6 Commands for Common Disk Operation (Oracle Solaris)
Table 15.1, “Commands for Common Disk Operation (Oracle Solaris)” is a summary of common diskoperations and the commands used to perform them. Refer to the Oracle Solaris documentation and manpages for more information on the individual commands.
Table 15.1 Commands for Common Disk Operation (Oracle Solaris)
Operation Command Device Name Argument Examples(SPARC)
Device Name Argument Examples(x86)
Format rmformat Path of whole disk $UTDEVROOT/dev/rdsk/disk3s2
Path of whole disk $UTDEVROOT/dev/rdsk/disk3p0
Create file system mkfs Path of partition $UTDEVROOT/dev/rdsk/disk3s0
Path of partition $UTDEVROOT/dev/rdsk/disk3p1
Create UFS filesystem
newfs Path of slice $UTDEVROOT/dev/rdsk/disk3s0
Path of slice $UTDEVROOT/dev/rdsk/disk3s0
Mount utdiskadm -m Partition name disk3s0 Partition name disk3p1
Unmount utdiskadm -u Mount point $DTDEVROOT/mnt/label1
Mount point $DTDEVROOT/mnt/label1
Prepare to unplug utdiskadm -r Device alias disk3 Device alias disk3
Eject media utdiskadm -e Device alias disk3 Device alias disk3
Check for media utdiskadm -c Device alias disk3 Device alias disk3
Create fdisktable
fdisk Path of whole disk $UTDEVROOT/dev/rdsk/disk3s2
Path of whole disk $UTDEVROOT/dev/rdsk/disk3p0
Repair file system fsck Path of raw slice $UTDEVROOT/dev/rdsk/disk3s0
Path of raw partition $UTDEVROOT/dev/rdsk/disk3p1
Display file systemcapacity
df -k Mount point $DTDEVROOT/mnt/label1
Mount point $DTDEVROOT/mnt/label1
Display slicecapacity
prtvtoc Path of backup slice $UTDEVROOT/dev/rdsk/disk3s2
Path of backup slice $UTDEVROOT/dev/rdsk/disk3s2
List devices utdiskadm -l None None
15.5.7 Commands for Common Disk Operation (Oracle Linux)
Table 15.2, “Commands for Common Disk Operation (Oracle Linux)” is a summary of common diskoperations and the commands used to perform them.
Table 15.2 Commands for Common Disk Operation (Oracle Linux)
Operation Command Device Name Argument Examples
Create file system mkfs Path of partition $UTDEVROOT/dev/dsk/disk3p1

How to Unmount a Mass Storage Device From a Client
219
Operation Command Device Name Argument Examples
Mount utdiskadm -m Partition name disk3p1
Unmount utdiskadm -u Mount point $DTDEVROOT/mnt/label1
Prepare to unplug utdiskadm -r Device alias disk3
Eject media utdiskadm -e Device alias disk3
Check for media utdiskadm -c Device alias disk3
Create fdisk table fdisk Path of whole disk $UTDEVROOT/dev/dsk/disk3
Repair file system fsck Path of partition $UTDEVROOT/dev/dsk/disk3p1
Display file system capacity df -k Mount point $DTDEVROOT/mnt/label1
List devices utdiskadm -l None
15.5.8 How to Unmount a Mass Storage Device From a Client
Note
Oracle Linux does not immediately write data to disks. Failure to run utdiskadm -r before unplugging mass storage devices will cause loss of data and stale mountpoints. Make sure to run utdiskadm -r before unplugging any mass storagedevice.
% /opt/SUNWut/bin/utdiskadm -r device_name
15.5.9 Troubleshooting Mass Storage Devices
This section provides troubleshooting information for mass storage.
15.5.9.1 Problem: Device nodes are not created.
Check the log file /var/opt/SUNWut/log/utstoraged.log for a message about why device nodeswere not created. Some mass storage device types are not supported.
15.5.9.2 Problem: The device is not automatically mounted.
Check the log file /var/opt/SUNWut/log/utmountd.log for an error message.
This condition occurs when the Sun Ray operating system does not recognize the storage devices's filesystem.
15.5.9.3 Problem: The device is not automatically unmounted.
This condition occurs when a user still has an open reference to the mount point at the time the storagedevice is unplugged or the user's session is disconnected. The mount point becomes a stale mount pointand persists until the system is rebooted or until the administrator removes it.
Use the following procedure to find and remove stale mount points.
1. Search for stale mount points:
# utdiskadm -s
2. For each stale mount point, close all references to the mount point.

USB Headsets
220
3. For each stale mount point, terminate all processes that refer to the mount point.
4. Remove the mount point.
# umount stale_mount_path
15.6 USB Headsets
There are a number of USB headsets that have been tested to work on Sun Ray 2 Series and Sun Ray 3Series Clients.
Once the latest firmware is installed on a Sun Ray Client, no other special installation is required for USBheadsets to work. When using USB headsets in a Windows session (uttsc), the USB redirection featureis not required. However, for Windows XP and Windows Server 2003 R2, you do need to install the AudioInput component. See Section 17.4, “Audio Input” for details.
For some USB headsets, you must use the utsettings command (Sun Ray Settings GUI) to change themute and volume settings, even though there may be inline buttons or controls on the headset. For most ofthe USB headsets, the Sun Ray Settings GUI can be used to adjust the audio settings.
See Section 13.2.3, “How to Change Sun Ray Client Audio and Display Settings (Sun Ray Settings GUI)”for details.
15.6.1 Tested USB Headsets
For the list of tested USB Headsets, see the Sun Ray Client and Oracle Virtual Desktop Client Peripheralsdocument.
Note
When using a USB headset in a Window session (uttsc command or fullscreenWindows kiosk mode), the Sun Ray Settings GUI is not available. In this situation,use the audio settings from the Windows desktop.
Note
When using the Sun Ray Settings GUI, setting Mic Gain to 0 or de-selecting theMicrophone button will not mute the microphone. To ensure the microphone ismuted, disable the audio input in your application.
When using uttsc, sound input redirection from the Sun Ray Client to theWindows server is disabled by default, which means the microphone is muted forall applications running on the Windows server. You need to use the uttsc -rsoundin: option to enable it.
15.6.2 Tested Applications
The following applications have been tested to work with USB headsets when using a remote desktopsession through the Windows connector:
• Skype 5.2 - Windows 7, Windows XP
• Ekiga - Windows 7
• Adobe ConnectNow - Windows 7

Additional Notes
221
15.6.3 Additional Notes
• When both an analog headset and a USB headset are connected to a Sun Ray Client, the USB headsetis used.
• Only one USB headset per Sun Ray Client is supported. If more than one USB headset is connected toa Sun Ray Client at the same time, the last USB headset connected will work. Disconnecting any one ofthe USB headsets will cause the audio to switch back to the Sun Ray Client's built-in audio device.
• Connecting two different USB audio devices to a Sun Ray Client is not supported. For example,connecting one USB speaker and one USB microphone to a Sun Ray Client is not supported.
• A USB headset and a Sun Ray Client's built-in speaker cannot provide audio output at the same time.
• When using the uttsc command, you can use the -r sound: and -r soundin: options of theuttsc command to change the sample rate quality of the audio input or output for a Windows session.
15.7 USB Device Operations Failing After Idle Timeout Limit
If a user fails to access a given session for longer than the screen lock idle timeout interval while anapplication is accessing a USB device -- for instance, while copying a large number of files to or from aUSB flash drive -- the session will be locked. With RHA, NSCM, and authenticated smart cards, this meansthe session detaches and all USB devices disconnect from the session. This can interrupt or abort theapplication's access to the device.
The following workarounds are available:
• Advise users to monitor their USB device usage to avoid being timed out
• Set the timeout interval value high enough to allow I/O to complete before the interval elapses
• Disable the screen saver
• Disable RHA
Note
The last two alternatives are less desirable because they each remove a level ofsecurity. Also, screen savers and RHA are not applicable to kiosk mode.

222

223
Chapter 16 Troubleshooting Icons
Table of Contents16.1 On-Screen Display (OSD) Icons .............................................................................................. 22316.2 Server Policy Icons ................................................................................................................. 22416.3 Troubleshooting Icon Quick Reference ..................................................................................... 22516.4 DHCP State Codes ................................................................................................................. 22716.5 Encryption and Authentication States ....................................................................................... 22816.6 Power LEDs ........................................................................................................................... 22816.7 (1) Sun Ray Client Startup Icon ............................................................................................... 22916.8 (2) Firmware Download in Progress Icon .................................................................................. 22916.9 (3) Updating Firmware Icon ..................................................................................................... 23016.10 (4) Firmware Download Diagnostics Icon ................................................................................ 23016.11 (11-14) Network Status Icons ................................................................................................ 23116.12 (15) Session Refused Icon .................................................................................................... 23216.13 (16) Bus Busy Icon ............................................................................................................... 23216.14 (20) 802.1x Authentication Icon .............................................................................................. 23316.15 (21) Network Connection Verified Icon ................................................................................... 23316.16 (22) Waiting to Connect to Authentication Manager Icon ......................................................... 23416.17 (23) No Ethernet Signal Icon ................................................................................................. 23516.18 (25) Redirection Icon ............................................................................................................. 23616.19 (26) Wait for Session Icon ..................................................................................................... 23616.20 (27) DHCP Broadcast Failure Icon ......................................................................................... 23716.21 (28) Establishing VPN Connection Icon .................................................................................. 23716.22 (29) VPN Connection Established Icon ................................................................................... 23816.23 (30) VPN Connection Error .................................................................................................... 23816.24 (31-34) Network Status Icons ................................................................................................ 23816.25 (41-44) Network Status Icons ................................................................................................ 23916.26 (46) No Access to Server Icon ............................................................................................... 24016.27 (47) No Access for Oracle Virtual Desktop Clients Icon ........................................................... 24016.28 (48) No Access: Registration Required Icon ........................................................................... 24016.29 (49) No Access: Key Rejected Icon ........................................................................................ 24116.30 (50) No Access: Security Policy Violation Icon ........................................................................ 24116.31 (51-54) Network Status Icons ................................................................................................ 24116.32 (60) Insert Card Icon ............................................................................................................. 24116.33 (61) Waiting for Primary Sun Ray Client Icon ......................................................................... 24216.34 (62) Token Reader Icon ........................................................................................................ 24216.35 (63) Card Error Icon .............................................................................................................. 24216.36 (64) Waiting For Access Icon ................................................................................................. 243
This chapter provides details on the troubleshooting icons that display when a Sun Ray Client boots. Someof the server policy icons also display for an Oracle Virtual Desktop Client.
16.1 On-Screen Display (OSD) IconsWhen a Sun Ray Client boots, a spinning wheel icon is displayed by default. To show the details of theboot process and to help identify problems, you can enable the on-screen display (OSD) icons by pressingStop-O or Ctrl-Pause-O. This condition persists across reboots, so if you want to disable the OSD icons,you need to press Stop-O or Ctrl-Pause-O again.
OSD icons are also displayed if you simultaneously press Stop-N or Ctrl-Pause-N, if a warning or erroroccurs on the Sun Ray Client while it boots, or if a state change does not occur for more than ten seconds.

Server Policy Icons
224
If you see older versions of the icons, the firmware has not been upgraded or is failing. To make sure thatthe Sun Ray Client is using the latest firmware, see Chapter 14, Sun Ray Client Firmware.
OSD icons are shown as rectangular, light grey icons, such as the following example:
Figure 16.1 On-Screen Display Icon Example
OSD icons can display even if the client is not connected to a server, and they typically provide thefollowing detailed information:
• A unique graphic
• Ethernet address
• IP address of the Sun Ray Client
• Status of link to Sun Ray server
• IP address of authentication server
• Numeric code for icon message
• Alphabetic code for DHCP State
• Encryption and authentication information, when appropriate
• Alphabetic code for Firmware Download Error Codes
16.2 Server Policy Icons
Server policy icons indicate a problem based on a specific server policy that needs attention. They are sentby the server in place of a regular session, they may be overlaid by a concurrent client state OSD icon, andthey are not available if the client is behind a NAT router.
Server policy icons are shown as dark grey icons, such as the following example:

Troubleshooting Icon Quick Reference
225
Figure 16.2 Server Policy Icon Example
16.3 Troubleshooting Icon Quick Reference
Note
Press Stop-N or Ctrl-Pause-N to display the Network Status icons 31-34 or 51-54.
Table 16.1 Troubleshooting Icon Quick Reference
Icon Code(Click for MoreInformation)
General Category Meaning
1 Startup Sun Ray Client is starting up and is waiting for Ethernet link.
2 Firmware Download Sun Ray Client is downloading new firmware.
3 Firmware Download Sun Ray Client is updating its firmware.
4 Firmware Download Either the download or update of new firmware has failed.
5 Session Connection There is no session to connect with the Sun Ray.
6 Session Connection The server is denying access to the Sun Ray.
7 Smart Card Local PIN entry to the smart card has failed.
8 Smart Card In local smart card PIN entry mode.
9 USB There is an "overcurrent" condition on the USB bus, that is, the totalnumber of devices draws too much current. Consider using a poweredhub.
11 Network Status The network link is up, the server is authenticated and the graphic/keyboard network connection is encrypted.
12 Network Status The network link is up, the server is not authenticated and the graphic/keyboard network connection is encrypted.
13 Network Status The network link is up, the server is authenticated and the graphic/keyboard network connection is not encrypted.
14 Network Status The network link is up, the server is not authenticated and the graphic/keyboard network connection is not encrypted.
15 Session Connection Sun Ray Client is refusing to talk to the server due to the server's refusalor inability to authenticate or encrypt the network connection.
16 USB USB bus is busy servicing a high-speed device, and the keyboard ormouse might not be responsive to user input.

Troubleshooting Icon Quick Reference
226
Icon Code(Click for MoreInformation)
General Category Meaning
20 Authentication Sun Ray Client is attempting 802.1x authentication and this icon indicatesthe current progress.
21 Startup Sun Ray Client is booting up and is waiting for DHCP IP address andparameter assignment.
22 Startup Sun Ray Client is booting up and is waiting for the initial connection to aSun Ray server.
23 Network Status The connection between the Sun Ray Client and the network is down.Check the network drop cable. If the network drop cable is okay, checkthe network switch.
24 Session Connection Sun Ray Client has disconnected from the previous server.
25 Session Connection Sun Ray Client is being redirected to a new server.
26 Session Connection Sun Ray Client has connected to the server and is waiting for graphicstraffic.
27 Startup Sun Ray Client is broadcasting to locate a Sun Ray server since eitherit was not provided with Sun Ray specific DHCP parameters or all of thespecified servers are not responding.
28 Startup VPN connection being attempted.
29 Startup VPN connection established.
30 Startup VPN connection error.
31 Network Status The network link is up, the server is authenticated, and graphics/keyboard network connection is not encrypted.
32 Network Status The network link is up, the server is not authenticated, and graphics/keyboard network connection is encrypted.
33 Network Status The network link is up, the server is authenticated, and graphics/keyboard network connection is encrypted.
34 Network Status The network link is up, the server is not authenticated, and graphics/keyboard network connection is not encrypted.
35 Startup Sun Ray Client has been disconnected from its server, either by a STOP-Q session disconnect event or by the VPN session timeout value havingbeen set and exceeded.
41 Network Status The network link is up, the server is authenticated, the client isauthenticated, and the graphic/keyboard network connection isencrypted.
42 Network Status The network link is up, the server is not authenticated, the clientis authenticated, and the graphic/keyboard network connection isencrypted.
43 Network Status The network link is up, the server is authenticated, the client isauthenticated, and the graphic/keyboard network connection is notencrypted.
44 Network Status The network link is up, the server is not authenticated, the client isauthenticated, and the graphic/keyboard network connection is notencrypted.

DHCP State Codes
227
Icon Code(Click for MoreInformation)
General Category Meaning
46 Server Policy No access to server.
47 Server Policy No access for Oracle Virtual Desktop Clients.
48 Server Policy No access: registration required.
49 Server Policy No access: client key is rejected.
50 Server Policy No access: security policy violation.
51 Network Status The network link is up, the server is authenticated, the client isauthenticated, and graphics/keyboard network connection is notencrypted.
52 Network Status The network link is up, the server is not authenticated, the client isauthenticated, and graphics/keyboard network connection is encrypted.
53 Network Status The network link is up, the server is authenticated, the client isauthenticated, and graphics/keyboard network connection is encrypted.
54 Network Status The network link is up, the server is not authenticated, the client isauthenticated, and graphics/keyboard network connection is notencrypted.
60 Server Policy Insert card. If the site's authentication policy allows access only by card,this icon is displayed to prompt the user to insert a card. Access without acard is disabled.
61 Server Policy Waiting for primary Sun Ray Client. The client is a secondary client in amultihead group, and the primary client is not currently connected.
62 Server Policy Token reader. The Sun Ray Client is a token reader. When a site policydisallows pseudo-sessions, a Sun Ray Client configured as a tokenreader displays the Token Reader icon instead of the Login dialog box.
63 Server Policy Smart card not recognized. The smart card is not recognized by the SunRay server or there is a reader error.
64 Server Policy Waiting for session access. Access is temporarily denied, but the SunRay Client automatically retries when this condition is resolved.
16.4 DHCP State Codes
Some icons also show a state code after the number to provide more information, which are described inTable 16.2, “DHCP State Codes”.
Table 16.2 DHCP State Codes
DHCP StateCode
Meaning
A DHCP only provided IP address with no additional parameters.
B DHCP provided IP address, subnet mask, and router, but Sun Ray vendor-specificparameters are missing.
C DHCP provided IP address and Sun Ray vendor-specific parameters, but subnet maskand router are missing.
D DHCP provided all expected parameters.

Encryption and Authentication States
228
16.5 Encryption and Authentication States
In many of the OSD icons, symbols are used to indicate the encryption and authentication states for theSun Ray Client, which are described in Table 16.3, “Encryption and Authentication States” These symbolsare typically seen in the Network Status icons.
Table 16.3 Encryption and Authentication States
Symbol Meaning
Graphics/keyboard network connection is encrypted.
Graphics/keyboard network connection is not encrypted.
Server/client is authenticated.
Server/client is not authenticated.
16.6 Power LEDs
Table 16.4, “Power LEDs” lists the actions to take based on the state of the power LED on Sun RayClients.
Table 16.4 Power LEDs
Sun Ray ClientHardware State
Action to Take
Off Check to see whether the Sun Ray Client is plugged in. Replace the Sun RayClient.
Green Normal operation.
Amber Hardware fault. Replace the Sun Ray Client.
Blinking PROM is corrupted. Check that firmware downloads are configured andenabled, then power cycle the Sun Ray Client.
Card reader LED remainson even when card isremoved
Card reader hardware problem. Replace the Sun Ray Client.

(1) Sun Ray Client Startup Icon
229
16.7 (1) Sun Ray Client Startup Icon
The Sun Ray Client Startup icon indicates that the Sun Ray Client has passed the power-on self test buthas not yet detected an Ethernet signal. The icon is displayed for a few seconds as part of the normalstartup process. When an Ethernet signal is detected, the Network Connection Verified (21) OSD isdisplayed.
Problem: The Sun Ray Client Startup OSD is displayed for more than 10 seconds.
• Check that the Ethernet cable is plugged into the Sun Ray Client correctly and that the other end isplugged in to the correct hub, switch, or network outlet.
• If the Sun Ray Client is connected through a hub or a switch, verify that the hub or switch is powered onand configured correctly. A link LED on the switch or hub indicates that the connection is alive.
16.8 (2) Firmware Download in Progress Icon
The Firmware Download in Progress icon indicates that the Sun Ray Client is downloading new firmwarefrom a Sun Ray server. The following message is also displayed: Reading firmware.
Downloading the firmware takes less than a minute. If you interrupt the download, the Sun Ray Client hasto download the new firmware the next time it reboots.

(3) Updating Firmware Icon
230
Note
When downloading the firmware on Sun Ray 2 Series Clients, pixel artifacts fill thescreen. This is normal.
16.9 (3) Updating Firmware Icon
The Updating Firmware icon indicates that the downloaded firmware is being updated on the Sun RayClient. The following messages are also displayed:
• Erasing flash. DO NOT POWER OFF!
• Programming flash. DO NOT POWER OFF!
The Sun Ray Client reboots after updating the firmware.
Caution
Do not interrupt the firmware update. Interrupting the firmware update may makethe Sun Ray Client unusable.
Note
If there is an additional firmware update for the internal smart card controller, theUpdating Firmware icon is displayed again and the smart card LED flashes whilethe update occurs. The following message is also displayed: Programming SmartCard Controller. DO NOT POWER OFF!. The Sun Ray Client reboots afterupdating the firmware for the internal smart card controller.
16.10 (4) Firmware Download Diagnostics Icon
The Firmware Download icon is displayed with a code or a message when an error occurs during adownload of firmware. The following table lists the error codes. These error messages appear in Englisheven in localized versions of Sun Ray Software.

(11-14) Network Status Icons
231
Table 16.5, “Firmware Download Error Codes and Messages” lists the firmware download error codes andmessages. Firmware download error codes are valid only with OSD icon 4.
Table 16.5 Firmware Download Error Codes and Messages
Error Code Error Message
E FW Load: No server
F FW Load: Name too long
G FW Load: Bad read
H FW Load: Bad signature
I FW Load: Failed decompression
J FW Load: Invalid module type
K FW Load: Version mismatch
L FW Load: Not enough memory
M FW Load: Prevented by barrier
N FW Load: Invalid HW version
O FW Load: Flash write error
The Firmware Download with a 4 error code icon is displayed when the Sun Ray Client fails to downloadnew firmware. The message "FW Load: Prevented by barrier" indicates that the Sun Ray Client alreadyhas a later version of the firmware.
In the syslog, the following message indicates that a barrier level has been set to prevent Sun RayClients from downloading an earlier version of the firmware.
Firmware upgrade/downgrade not allowed! Barrier is 310 Firmware level is 0
Check /var/opt/SUNWut/log/messages to confirm that your configuration is set up properly.
16.11 (11-14) Network Status Icons
The 11-14 Network Status icons are similar to the 31-34 icons. The only difference is the level of thecurrent authentication. See Table 16.1, “Troubleshooting Icon Quick Reference” for more information for adescription of each icon.

(15) Session Refused Icon
232
16.12 (15) Session Refused Icon
The Session Refused icons are displayed during a possible security breach because authentication hasfailed.
Problem: Icon shows the 15D message.
The Sun Ray Client is refusing to connect to a server because it is unable to verify the validity of the SunRay server. This error can occur only if an unknown Sun Ray server tries to emulate a valid Sun Rayserver. This situation is a session security breach.
Problem: Icon shows the 50D message.
The Sun Ray server is refusing to grant a session to the Sun Ray Client because the client is unable tofulfill the server's security requirements.
• Upgrade the Sun Ray Client's firmware version. This error can occur with firmware versions earlier than2.0 when the server is configured for hard security mode.
• As an alternative, determine whether your site requires hard security mode. If not, the session can beenabled with soft security mode.
16.13 (16) Bus Busy Icon

(20) 802.1x Authentication Icon
233
The Bus Busy OSD indicates that the Sun Ray USB bus is servicing a high-speed device and the keyboardor mouse might not be responsive to user input.
This icon is displayed during an unusually long print job and disappears when the job is done. No action isneeded unless killing the print job is necessary.
16.14 (20) 802.1x Authentication IconTable 16.6, “802.1x Authentication Error Codes and Messages” lists the 802.1x authentication error codesand messages. During the authentication, you may be prompted to provide required wpa_supplicantvalues that are not defined, such as passwords. Also, wpa_authentication status messages aredisplayed as the authentication progresses.
Table 16.6 802.1x Authentication Error Codes and Messages
Error Code Error Message
A - D Authentication has completed
E 802.1x initialized
F Extended Authentication Protocol (EAP) started
G EAP succeeded
H EAP failed
16.15 (21) Network Connection Verified Icon
The Network Connection Verified icon indicates that the Sun Ray Client has detected the Ethernet carrierbut has not yet received its initial parameters or IP address from the DHCP server. The icon is displayedfor a few seconds as part of the normal startup process.
After the DHCP server has allocated an IP address, the icon is updated with the Sun Ray Client's assignedIP address. When the network connection is verified, the Sun Ray Client connects to the Sun Ray server.
Problem: The icon is displayed for more than 10 seconds.
• Verify that the DHCP server is running and has not run out of IP addresses to assign to clients.
• Verify that the DHCP server is configured properly for network parameters.
Problem: The icon displays an IP address and an icon message, either 21A or 21B, depending onwhether the Sun Ray server is on a LAN network or a dedicated interconnect.

(22) Waiting to Connect to Authentication Manager Icon
234
This condition occurs when the Sun Ray Client receives an IP address from the DHCP but no otherparameters. The Sun Ray Client issues a DHCP_INFORM request to obtain the Sun Ray-specificparameters.
• Code 21 A indicates that the Sun Ray Client received an IP address and is waiting for a response to itsDHCP inform request.
• Code 21 B indicates that the Sun Ray Client received an IP address and IP router and is waiting for aresponse to its DHCP inform request.
If no response is received, the Sun Ray Client continues the startup process using only the IP address. Ina private interconnect or simple LAN configuration, the Sun Ray Client can function successfully. However,performance of the Sun Ray Client might be affected. If the Sun Ray Client is part of a complex LANconfiguration, it can fail later in the start up process because it requires the additional parameters andSun Ray-specific vendor options to handle network operations, such as when a Sun Ray Client is locatedseveral hops away from the Sun Ray server's subnet.
Continue with the startup process, if possible, and at the next opportunity, do the following:
• For LAN configurations with other non-Sun Ray DHCP services but no bootp proxy agent, verify theDHCP server and the Sun Ray vendor tags.
• For routed configurations, verify that the bootp proxy agent is configured correctly in the Sun RayClient's subnet and that it points to one of the Sun Ray servers in the failover group.
• For non-routed private interconnect configurations, the Sun Ray server performs the functions of aDHCP server. Verify that it is configured properly for DHCP services.
When the Sun Ray Client concludes the interaction with the DHCP server, it connects to a Sun Rayserver and then interacts with the server's Authentication Manager, indicated by the Waiting to Connect toAuthentication Manager OSD. Occasionally, the Sun Ray Client is first routed to another Sun Ray server.In this case, the Redirection OSD icon is displayed for a few seconds and then, as the Sun Ray Clientinteracts with the new server's Authentication Manager, the Waiting to Connect to Authentication ManagerOSD is displayed.
16.16 (22) Waiting to Connect to Authentication Manager Icon
The Waiting to Connect to Authentication Manager icon indicates that the Sun Ray Client has received itsparameters from the DHCP server and it has connected to the Sun Ray server but has not yet completed itauthentication. The icon is displayed for a few seconds as part of the normal startup process.

(23) No Ethernet Signal Icon
235
Problem: The icon displays for more than 10 seconds or the Sun Ray Client resets after the icon isdisplayed.
• Verify that Sun Ray services, including the Authentication Manager, are running on the Sun Ray server.
In a LAN configuration or other routed environment:
• Verify that the Sun Ray Client's IP address can reach the Authentication Manager.
• Verify that the Sun Ray Client's routing information, received from the Sun Ray server, is correct.
• Verify that the bootp proxy agent is configured correctly in the Sun Ray Client's subnet and that it pointsto one of the Sun Ray servers in the failover group.
• Run utquery for the Sun Ray Client's IP address to see the parameters that the Sun Ray Clientreceived. If the parameters do not include an AuthSrvr parameter, the DHCP server might not havesent the Sun Ray parameters or the parameters might not be correct.
• To confirm that the DHCP server can be reached, check the value of the DHCPServer parameter.
• To confirm that the DHCP server sends the proper Sun Ray-specific parameter values, check thevalue of the INFORMServer parameter.
If a value is incorrect, look at your bootp relay configurations and DHCP server configurations fornetwork and Sun Ray parameters. For details of these parameters, see the utquery man page.
• To restart DHCP on a Oracle Solaris server, type the following as superuser:
# /etc/init.d/dhcp stop# /etc/init.d/dhcp start
16.17 (23) No Ethernet Signal Icon
The No Ethernet Signal OSD indicates that the Sun Ray Client had an Ethernet address and an IP addressbut later lost the Ethernet signal.
• Check that the Ethernet cable has not become unplugged from the Sun Ray Client or from the switch ornetwork outlet.
• If the Sun Ray Client is connected through a hub or switch, make sure that the hub or switch is stillpowered on.

(25) Redirection Icon
236
16.18 (25) Redirection Icon
The Redirection OSD indicates that the Sun Ray Client is being redirected to a new Sun Ray server. Thisredirection can occur for any of several reasons, including load balancing. The icon is displayed for a fewseconds while the Sun Ray Client connects to the new Sun Ray server and then the Waiting to Connect toAuthentication Manager OSD is displayed.
16.19 (26) Wait for Session Icon
The Wait for Session OSD indicates that the Sun Ray Client is waiting for its X Window session. The iconis displayed for a few seconds as part of the normal startup process.
If this icon is displayed for a long time, display traffic from the server is not arriving to the client. Somepossible reasons for this problem are:
• The network (routers, switches, firewalls) is not correctly transmitting UDP traffic from the server to theclient.
• The server is attempting to display one of the Server Policy icons, but the client is behind a NAT routeror gateway.
• The X server (Xnewt or Xsun) that is the source of the display traffic on the Sun Ray server side is notworking properly. It might be crashed or hung.

(27) DHCP Broadcast Failure Icon
237
• The display manager (dtlogin on Oracle Solaris or gdm on Oracle Linux) has failed to start an X serverfor the session. It might be crashed, hung, or not configured properly. If you suspect that dtloginconfiguration files have been corrupted, see Section 5.3, “How to Check and Fix Corrupted ConfigurationFiles (Oracle Solaris 10)”.
16.20 (27) DHCP Broadcast Failure Icon
The DHCP Broadcast Failure icon is displayed if the Sun Ray Client is attempting to locate a Sun Rayserver and either no servers respond or the Sun Ray-specific DHCP parameters are not correct.
16.21 (28) Establishing VPN Connection Icon
The Establishing VPN Connection icon is displayed while a Sun Ray Client is trying to connect to the SunRay server through a VPN connection. This icon can also include one of the following state codes shown inTable 16.7, “VPN Connection State Codes”.
Table 16.7 VPN Connection State Codes
State Code Meaning
E VPN Phase 1 IKE initiated.
F VPN Phase 1 IKE complete.
G VPN connection expired.
H VPN Phase 2 initiated.

(29) VPN Connection Established Icon
238
State Code Meaning
I VPN Phase 2 complete.
16.22 (29) VPN Connection Established Icon
When the VPN connection is established, the VPN Connection Established icon is displayed.
16.23 (30) VPN Connection Error
There is a problem with the VPN connection. This icon can also include one of the following state codesshown in Table 16.7, “VPN Connection State Codes”. Make sure the VPN configuration is valid. SeeChapter 14, Sun Ray Client Firmware for more information.
Table 16.8 VPN Connection Error State Codes
State Code Meaning
L Invalid group or group key.
K Invalid Xauth user name or password.
16.24 (31-34) Network Status Icons

(41-44) Network Status Icons
239
The Network Status OSD icon shows the Ethernet address, the assigned IP address, the connectedserver, encryption status, DHCP state, link speed and link mode.
To display current information about the Ethernet link, do one of the following at any time.
• Press Stop-N or Ctrl-Pause-N.
• Disconnect and reconnect the Ethernet cable.
A value of 10 indicates a link speed of 10 Mbps; 100 indicates 100 Mbps. A value of F indicates that thelink mode is full duplex. A value of H indicates half-duplex mode.
16.25 (41-44) Network Status Icons
The 41-44 Network Status icons are similar to the 31-34 icons. The only difference is the level of thecurrent authentication. See Table 16.1, “Troubleshooting Icon Quick Reference” for more information for adescription of each icon.

(46) No Access to Server Icon
240
16.26 (46) No Access to Server Icon
This icon usually displays if the policy disallows card access and a card is inserted.
16.27 (47) No Access for Oracle Virtual Desktop Clients Icon
This icon indicates that access for Oracle Virtual Desktop Clients is disabled. To enable access for OracleVirtual Desktop Clients, refer to the Oracle Virtual Desktop Client documentation.
16.28 (48) No Access: Registration Required Icon
The card or Sun Ray Client is not registered. If ATI is configured for a site, the ATI script is run when thisicon is first displayed. If the script registers the card, this state might not last long.
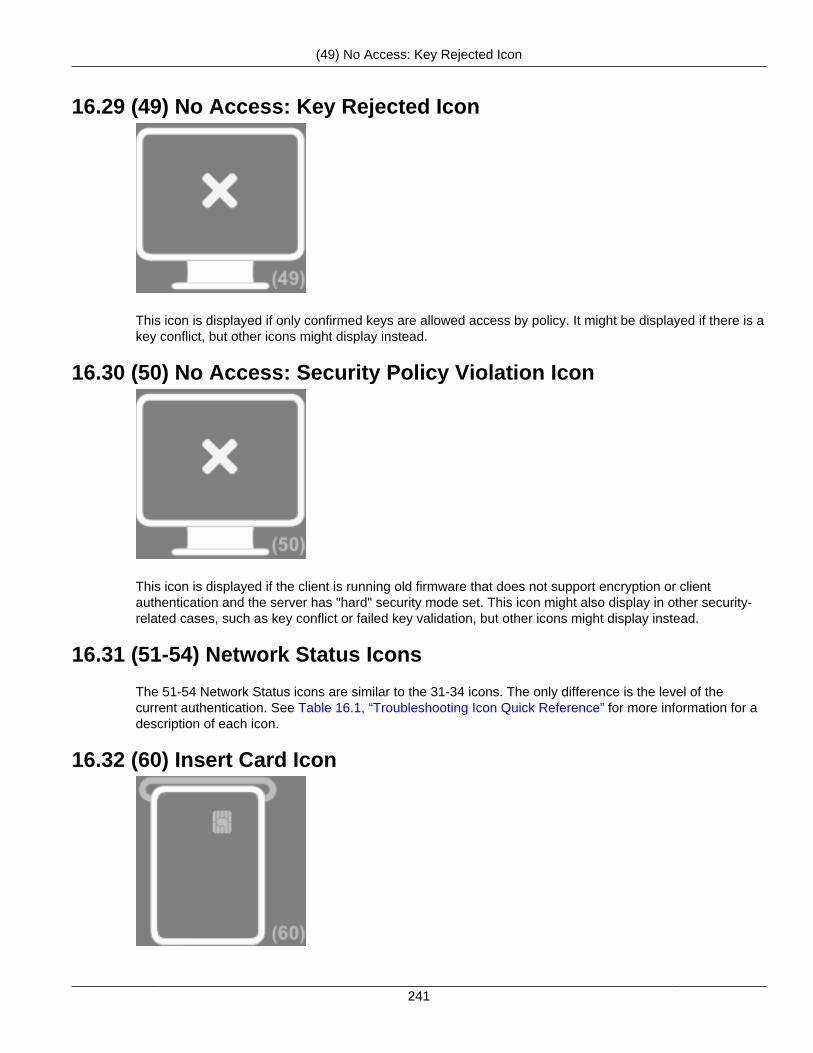
(49) No Access: Key Rejected Icon
241
16.29 (49) No Access: Key Rejected Icon
This icon is displayed if only confirmed keys are allowed access by policy. It might be displayed if there is akey conflict, but other icons might display instead.
16.30 (50) No Access: Security Policy Violation Icon
This icon is displayed if the client is running old firmware that does not support encryption or clientauthentication and the server has "hard" security mode set. This icon might also display in other security-related cases, such as key conflict or failed key validation, but other icons might display instead.
16.31 (51-54) Network Status Icons
The 51-54 Network Status icons are similar to the 31-34 icons. The only difference is the level of thecurrent authentication. See Table 16.1, “Troubleshooting Icon Quick Reference” for more information for adescription of each icon.
16.32 (60) Insert Card Icon

(61) Waiting for Primary Sun Ray Client Icon
242
If the site's authentication policy allows access only by card, this icon is displayed to prompt the user toinsert a card. Access without card is disabled.
16.33 (61) Waiting for Primary Sun Ray Client Icon
The Sun Ray Client is a secondary client in a multihead group, and the primary client is not currentlyconnected.
16.34 (62) Token Reader Icon
The Sun Ray Client is a token reader. When a site policy disallows pseudo-sessions, a Sun Ray Clientconfigured as a token reader displays the Token Reader icon instead of the Login dialog box.
16.35 (63) Card Error Icon
The smart card is not recognized by the Sun Ray server or there is a reader error. The following reasonsmay include:
• The Sun Ray Client is running an older firmware.

(64) Waiting For Access Icon
243
• The smart card's contacts are dirty, the contacts on the smart card reader are dirty, or the card is notproperly inserted.
• The smart card is malfunctioning.
• The Sun Ray server is not configured to read this type of smart card or an error exists in theconfiguration file.
To fix this problem, try one of the following actions:
• Upgrade the firmware on the Sun Ray Client.
• Clean the smart card.
• Replace the smart card.
• Verify that the Sun Ray server has the appropriate smart card configuration files installed andconfigured.
16.36 (64) Waiting For Access Icon
This icon indicates that the server is not allowing access at the current time. This problem occurs whena Sun Ray Client loses power or the network connection to the server is interrupted and the smart cardfrom the Sun Ray Client is inserted into a different Sun Ray Client before the server has timed out the lostconnection. Because the old connection is still active, new connections using the same smart card areunable to gain access.
When this conditions occurs, the server checks the status of the old connection. After the time reserved forthis check has elapsed (an initial default of 10 seconds), the Sun Ray Client connection is restarted andthe condition should be automatically resolved. Either the session access is granted or the Sun Ray Clientremains in this Waiting for Access state (64).
If a Sun Ray Client continues to remain in this state, the same token is being used with another connection.Specifically, two physical tokens (smart card, Sun Ray Client, Oracle Virtual Desktop Client profile) aretrying to connect to the same session.
Possible reasons for this issue include the following:
• A security incident where a copied or fake smart card is used to gain access to the session.
• A security incident where a copy of an Oracle Virtual Desktop Client profile is used to gain access to thesession. This situation might also indicate a user error. Oracle Virtual Desktop Client profile files shouldnot be copied to a different computer or user account.
• A registered token policy is in effect, alias tokens have been configured, and an alias token is stillconnected to the session the user is trying to access. If access is denied because of a currently

(64) Waiting For Access Icon
244
connected alias token, the connected alias token needs to be disconnected to regain access. Forexample, the aliased smart card must be removed from its Sun Ray Client.

245
Chapter 17 Windows Connector
Table of Contents17.1 Windows Connector Overview ................................................................................................. 24617.2 Requirements .......................................................................................................................... 24817.3 Using the Windows Connector ................................................................................................. 248
17.3.1 How to Start a Windows Session .................................................................................. 24817.3.2 How to Start a Windows Session Within Java Desktop System (Oracle Solaris 10) ........... 25017.3.3 How to Lock a Windows Session .................................................................................. 25117.3.4 How to Set Up Access to the uttsc Command ............................................................. 25117.3.5 How to Set Up a Desktop Shortcut to Start a Windows Session ...................................... 25117.3.6 How to Separate Settings for Session Locale and Keyboard Layout ................................ 251
17.4 Audio Input ............................................................................................................................. 25217.4.1 Enabling Audio Input on Windows 7 and Windows Server 2008 R2 ................................. 252
17.5 Video Acceleration .................................................................................................................. 25217.5.1 Video Acceleration Requirements .................................................................................. 25217.5.2 Videos Accelerated ....................................................................................................... 25317.5.3 Audio Accelerated ........................................................................................................ 25517.5.4 Additional Notes ........................................................................................................... 25517.5.5 How to Enable Video Redirection on Windows Server 2008 R2 ...................................... 25717.5.6 Video Acceleration Troubleshooting ............................................................................... 257
17.6 USB Device Redirection .......................................................................................................... 26217.6.1 Device Access ............................................................................................................. 26317.6.2 Supported Configurations ............................................................................................. 26317.6.3 Tested USB Devices .................................................................................................... 26317.6.4 Additional Notes ........................................................................................................... 26317.6.5 How to Add USB Drivers to a Virtual Machine ............................................................... 26417.6.6 USB Redirection Troubleshooting .................................................................................. 265
17.7 Hotdesking .............................................................................................................................. 26617.7.1 Hotdesking Behavior .................................................................................................... 26717.7.2 Location Awareness ..................................................................................................... 267
17.8 Session Directory .................................................................................................................... 26917.9 Network Security ..................................................................................................................... 269
17.9.1 Built-in RDP Network Security ....................................................................................... 27017.9.2 Enhanced Network Security .......................................................................................... 270
17.10 Automatic Reconnection ........................................................................................................ 27217.11 Compression ......................................................................................................................... 272
17.11.1 How to Disable Compression ...................................................................................... 27217.12 Licensing .............................................................................................................................. 272
17.12.1 Per-user Mode Versus Per-device Mode ..................................................................... 27317.13 Smart Cards ......................................................................................................................... 274
17.13.1 How to Enable Smart Card Readers on a Windows System .......................................... 27417.13.2 How to Set Up Smart Card Login for Windows ............................................................. 274
17.14 Multi-Monitor Support ............................................................................................................ 27417.15 Dynamic Session Resizing .................................................................................................... 27517.16 Printing ................................................................................................................................. 275
17.16.1 How to Set Up Print Queues (Oracle Solaris 10) .......................................................... 27617.16.2 How to Set Up Print Queues (Oracle Linux) ................................................................. 27617.16.3 How to Make Sun Ray Printers Available to a Windows Session ................................... 27717.16.4 How to Manage Printer Configurations for Users .......................................................... 27817.16.5 Printers Troubleshooting ............................................................................................. 278

Windows Connector Overview
246
17.17 Accessing Serial Devices ...................................................................................................... 27817.18 uttsc Error Messages ......................................................................................................... 279
17.18.1 General Troubleshooting ............................................................................................. 280
This chapter provides information about managing the Windows connector.
17.1 Windows Connector Overview
The Windows connector is a Microsoft Remote Desktop Protocol (RDP) client that enables Sun Ray usersto access applications running on remote Microsoft Windows systems. This client is especially useful tothose who are accustomed to Windows-based applications or who want to access documents in certainformats from a desktop client, either a Sun Ray Client or an Oracle Virtual Desktop Client. Users canaccess their Windows desktop on a desktop client at full screen or in a window.
Kiosk mode is the recommended way to configure the Windows connector. By using kiosk mode, you canset up a desktop client to behave just like a Windows system, which means users do not have to interactwith the Oracle Solaris or Oracle Linux login screen and they do not need to specify the uttsc command.See Chapter 10, Kiosk Mode for more information.
As stated, the Windows connector mediates between the desktop client and a Windows system. It usesthe Remote Desktop Protocol (RDP) to communicate with the Windows system and the Appliance LinkProtocol (ALP) to communicate with the desktop client, as shown in Figure 17.1, “Windows ConnectorOverview”.
Figure 17.1 Windows Connector Overview
Once the Windows connector is configured, a user has to use the uttsc command to connect to aWindows system if the kiosk mode is not configured. The user can modify the command to accommodate avariety of preferences or options, such as specifying screen size or a list of available printers.

Windows Connector Overview
247
Table 17.1, “Windows Connector Features” lists the features provided by the Windows connector.
Table 17.1 Windows Connector Features
Feature Description
Section 17.6, “USB DeviceRedirection”
Enables users to access USB devices connected to a Sun Ray Client from theirWindows sessions, provided that the appropriate device drivers are installed on theWindows system.
Section 17.5, “VideoAcceleration”
The Windows connector provides features to increase the performance for videostreams and Adobe Flash content. The support provided is dependent on the WindowsOS.
Section 17.4, “Audio Input” Users can play sound files on their Sun Ray Clients (audio out) with audio applicationslocated on the Windows system. Recording from the Sun Ray Client to the Windowssystem (audio in) is also supported.
Clipboard The Windows connector enables cut-and-paste text functionality between Windowsapplications and the applications running on the Oracle Solaris or Oracle Linuxdesktop. Copying and pasting is enabled for all supported languages, including double-byte languages such as Chinese, Japanese, and Korean. The Windows connectordoes not support copying and pasting functionality for Rich Text Format.
The following behaviors, although similar, are caused by limitations in differentapplications:
• Once a copy-and-paste operation has been performed from a dtterm window,subsequent copy-and-paste operations from the same window to a Windowsapplication always show the data from the first such operation.
• Cut-and-paste operations do not work from dtpad to Windows applications.
• Cut-and-paste menu options do not work correctly in transfers from StarOfficeapplications.
Section 17.11,“Compression”
The Windows connector uses RDP bulk compression to compress data between theSun Ray server, which runs the Windows connector, and the Windows system.
Section 17.9, “NetworkSecurity”
The Windows connector uses RSA Security's RC4 cipher, which encrypts data ofvarying size with a 56-bit or a 128-bit key, to secure all data being transferred to andfrom the Windows system. Alternatively, using TLS/SSL or CredSSP through theenhanced network security option, all traffic is encrypted as per protocol specificationsand system configuration.
Local Drive Mapping File systems from removable media devices, such as flash drives, can be connected tothe Sun Ray Client's USB ports and mapped to the Windows environment, where theyare displayed as locally mounted drives. Any file can be mounted and mapped fromthe Sun Ray environment to the Windows environment. In most cases, USB redirectionshould be used instead.
Section 17.16, “Printing” From a Windows session, a user can print from a Windows application using any of thefollowing configurations: a network printer or a locally attached printer on the Windowssystem, a network printer or a locally-attached printer on the Sun Ray server, or a localprinter attached to the Sun Ray Client.
Serial Port Mapping From a Windows session, users can access external serial devices connected to a SunRay Client or an Oracle Virtual Desktop Client running on a Windows client computer.
Section 17.8, “SessionDirectory”
The Windows connector supports server session reconnection based on load balancinginformation and the Session Directory, a database that keeps track of which users are

Requirements
248
Feature Descriptionrunning which sessions on which Windows systems. Session Directory functionalityenables users to reconnect automatically to the right Windows session. Terminalservices session load balancing is handled transparently by the Windows TerminalServer.
Section 17.13, “SmartCards”
The Windows connector uses the PC/SC framework to enable applications on theWindows system to access smart cards inserted in the desktop client. Typically, thisfeature is used to provide two-factor authentication with digital certificates or to permitthe use of electronic signatures or other information stored on a smart card.
17.2 Requirements
For the list of supported Windows remote desktops, see Section 3.1.3, “Windows Remote DesktopSupport”.
17.3 Using the Windows Connector
This section describes how to start a Windows session on a Sun Ray Client or an Oracle Virtual DesktopClient. The Windows connector and the remote Windows system must be configured beforehand. You canconfigure the Windows connector as part of the Sun Ray Software installation or through the utconfig-c command. By default, remote desktop services is not enabled on a Windows system, so you mustspecifically enable it. See the Windows documentation for details.
The uttsc command enables you to establish a remote connection with a Windows system through theWindows connector. An alternative uttscwrap command is also provided for users that use JDS onOracle Solaris.
Many of the functions provided by a local Windows desktop are provided with a Windows session on adesktop client, including the ability to access USB devices connected directly to a Sun Ray Client usingUSB redirection.
17.3.1 How to Start a Windows Session
Once the Windows connector has been configured, you can start a Windows session on a desktop clientfrom a Windows system.
1. Log in to a desktop client.
2. Start a Windows session on a Windows system.
% /opt/SUNWuttsc/bin/uttsc options hostname.domain
If the Windows system is in the same domain as the Sun Ray Client, you do not have tospecify the domain name. However, if you prefer, you may specify the full IP address instead ofhostname.domain.
Issuing the uttsc command with no options except the name or address of a Windows system displays aWindows session on the desktop client, as shown in Figure 17.2, “Windows Connector (uttsc) Example”.
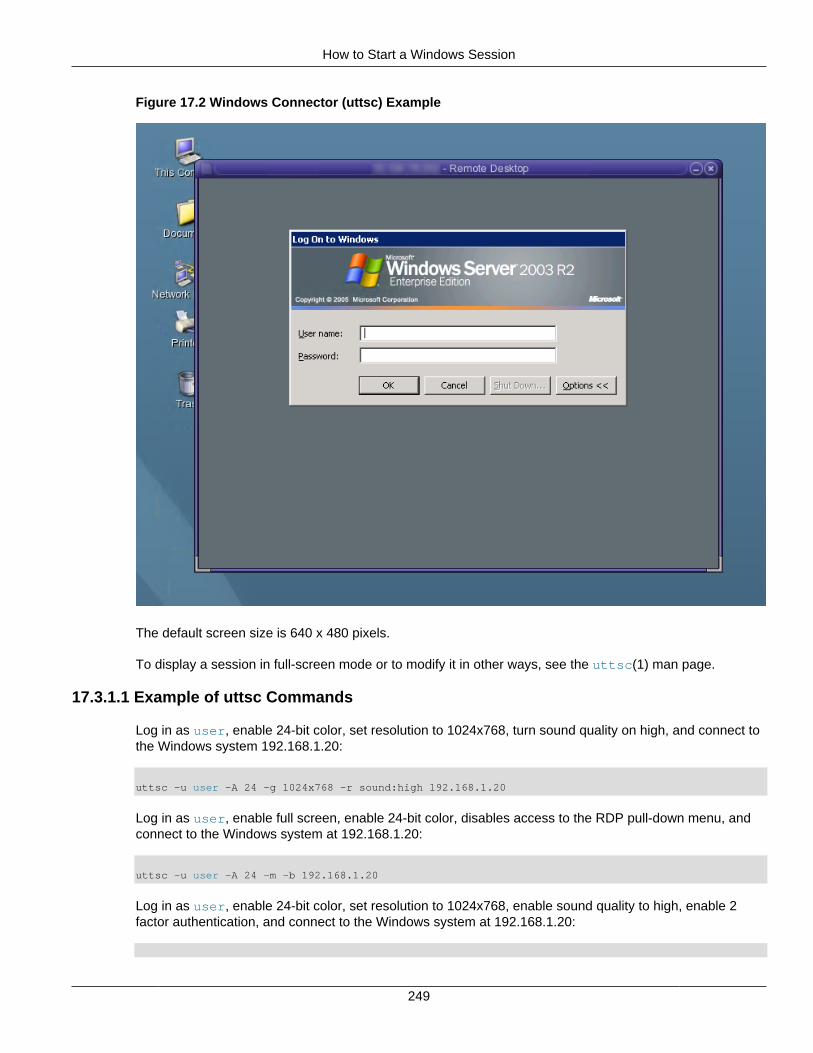
How to Start a Windows Session
249
Figure 17.2 Windows Connector (uttsc) Example
The default screen size is 640 x 480 pixels.
To display a session in full-screen mode or to modify it in other ways, see the uttsc(1) man page.
17.3.1.1 Example of uttsc Commands
Log in as user, enable 24-bit color, set resolution to 1024x768, turn sound quality on high, and connect tothe Windows system 192.168.1.20:
uttsc -u user -A 24 -g 1024x768 -r sound:high 192.168.1.20
Log in as user, enable full screen, enable 24-bit color, disables access to the RDP pull-down menu, andconnect to the Windows system at 192.168.1.20:
uttsc -u user -A 24 -m -b 192.168.1.20
Log in as user, enable 24-bit color, set resolution to 1024x768, enable sound quality to high, enable 2factor authentication, and connect to the Windows system at 192.168.1.20:

How to Start a Windows Session Within Java Desktop System (Oracle Solaris 10)
250
uttsc -u user -A 24 -g 1024x768 -r sound:high -r scard:on 192.168.1.20
Log in as user, enable 24-bit color, set resolution to 1024x768, enable sound quality to high, map thehome directory to Windows H: drive, and connect to the Windows system at 192.168.1.20:
uttsc -u user -A 24 -g 1024x768 -r sound:high -r disk:H=path 192.168.1.20
Enable full screen session with smart card authentication enabled and connect to the Windows systemwindows_system:
uttsc -r scard:on -m windows_system
17.3.2 How to Start a Windows Session Within Java Desktop System (OracleSolaris 10)
Note
The Java Desktop System (JDS) integration package is a deprecated feature andwill be removed in a later release.
The Java Desktop System (JDS) integration package for Oracle Solaris 10 delivers the commanduttscwrap command, which improves integration of the Windows connector with the JDS desktop onOracle Solaris 10. The JDS integration package is included in the Supplemental folder of the Sun RaySoftware Media Pack. See Section 3.2.6.1, “How to Install the JDS Integration Package (Oracle Solaris10)” for detailed installation instructions.
To use the uttscwrap command, specify the same parameters as the uttsc command line. Theuttscwrap command provides a login dialog that enables you to input credentials for password-basedauthentication (username/domain/password). The credentials can be saved through the dialog forsubsequent invocations. At the next launch, the dialog displays the credentials.
Credentials are saved separately for each Windows system and application combination. This conventionenables you to save different credentials in the following ways:
• For different applications on the same server
• For different applications on different servers
• For different server sessions with no applications launched
Any new credentials saved for a server or application replace previously saved credentials.
Note
uttscwrap is designed for credential caching for password-based authenticationonly. It cannot be used with smart card authentication. For smart cardauthentication, use the uttsc command.
Steps
1. Log in to a Sun Ray Client.
2. Start a Windows session on a Windows system.
% /opt/SUNWuttscwrap/bin/uttscwrap options hostname.domain

How to Lock a Windows Session
251
If the Windows system is in the same domain as the Sun Ray desktop, you do not have tospecify the domain name. However, if you prefer, you may specify the full IP address instead ofhostname.domain.
17.3.3 How to Lock a Windows Session
This procedure describes how to lock a Windows session when a session moves away from a given SunRay Client.
Note
Implementation of this feature relies on technology not available by default, andit uses non-public Sun Ray interfaces as well as the use of certain public SunRay interfaces for purposes other than their intended use. For these reasons, thisfeature is not provided as a supported feature.
A commonly used approach to implement session locking is to send the lockscreen keystrokes to theWindows Session using xvkbd, which is invoked by utaction.
You can invoke the utaction command from an Xsession.d or xinitrc.d script as follows:
#!/bin/shXVKBD=/usr/openwin/bin/xvkdb/opt/SUNWut/bin/utaction -d "$XVKBD -text 'Ml'" &
Because xvkbd is not available by default, you should modify the XVKBD setting in the example so that itcorrectly identifies the installation location of xvkbd.
Note
The keystroke sequence Ml activates the Windows lock for Windows XP andWindows Server 2003 R2 sessions. You might need to substitute a differentkeystroke sequence for other Windows versions.
17.3.4 How to Set Up Access to the uttsc Command
To access the uttsc command directly, add the following entry to your PATH variable:
/opt/SUNWuttsc/bin, /opt/SUNWuttsc/sbin, /opt/SUNWuttscwrap/bin
The /opt/SUNWuttscwrap/bin path is required only if you are using the JDS integration package.
17.3.5 How to Set Up a Desktop Shortcut to Start a Windows Session
A graphical user interface is not available for the Windows connector at this time. However, you can set upa launcher to create a desktop icon or menu item to connect to the Windows session.
For details about how to set up launchers, consult the desktop documentation for your operating system.
17.3.6 How to Separate Settings for Session Locale and Keyboard Layout
The Windows connector provides the ability to separate settings for the session local and keyboard layout.The -G option specifies the language/locale for the session and the -Y option specifies the keyboardlayout used to process the keyboard input. For example, you can specify the nl-NL Dutch locale with a USinternational keyboard layout as follows: uttsc -G nl-NL -Y en-US:INT.

Audio Input
252
See the uttsc man page for more details. The -l option is still available and sets both the language/locale and keyboard layout.
17.4 Audio InputAudio input redirection connects the audio streams captured on a Sun Ray Client to a Windows session.When a user connects an analog audio input device (such as a microphone or headset) to a Sun RayClient, the Windows connector automatically detects and redirects the audio stream to the user's Windowsdesktop. See Section 15.6, “USB Headsets” for details on using USB headsets.
Audio input through RDP is not supported for Windows XP or Windows Server 2003 R2, so you mustinstall the audio input Windows connector component. Audio input is automatically provided for Windows 7,Windows Server 2008 R2, Windows 8, and Windows Server 2012.
Audio input redirection for uttsc is disabled by default. You can enable audio input by using the followinguttsc option:
-r soundin:[low|medium|high|off]
Note
Audio input is not available through VPN connections.
17.4.1 Enabling Audio Input on Windows 7 and Windows Server 2008 R2
Windows 7 and Windows Server 2008 R2 have audio recording redirection disabled by default. Audiorecording redirection must be enabled for the audio input feature to work properly.
• To enable audio recording redirection on Windows 7, see Microsoft knowledge article 2020918.
• To enable audio recording redirection on Windows Server 2008 R2, see http://technet.microsoft.com/en-us/library/dd759231.aspx.
17.5 Video AccelerationThis section describes the video acceleration features provided with Sun Ray Software. The availablefeatures depend on the Windows desktop and the desktop client being used.
Video acceleration improves the user experience for video playback on the client devices. And, by usingcompressed video streams and client-side decoding and rendering, video acceleration also reduces theuse of server CPU cycles and network bandwidth when providing multimedia content.
17.5.1 Video Acceleration Requirements
Video acceleration is available on Windows desktop sessions when the following requirements are met.
Table 17.2 Video Acceleration Requirements
WindowsDesktop
Video Type Required Applications Required WindowsConnector Component
AdditionalRequirements
Windows 7, 2008,XP, and 2003
Adobe Flashcontent
32-bit Internet Explorer 8and 9
Adobe Flash Player
Adobe Flashacceleration component
None

Videos Accelerated
253
WindowsDesktop
Video Type Required Applications Required WindowsConnector Component
AdditionalRequirements
Windows 7 and2008
MPEG-2, H.264,and VC-1 video
Windows Media Player12
None
(Uses RDP 7 videoredirection virtualchannel extension)
Audio and videoplayback in the RemoteDesktop Server rolemust be enabled onWindows Server 2008R2. See Section 17.5.5,“How to Enable VideoRedirection on WindowsServer 2008 R2”.
When using OracleVirtual Desktop Client,release 3.2 or later isrequired.
Windows XP and2003
MPEG-2, H.264,and VC-1 video
Windows Media Player10, 11, or 12
Multimedia redirectioncomponent
Audio/Video demuxerfor MPEG-2 and H.264videos (for example,MatroskaSplitter). Thisis required becauseWindows XP andWindows Server 2003R2 do not decodeMPEG-2 and H.264natively.
Note
For Windows 7 and Windows Server 2008 R2, Sun Ray Software provides anadditional heuristic video detection and acceleration algorithm that may benefitother video players. You can enable this additional feature through the -B onoption of the uttsc command. Enabling this feature will not affect the videoacceleration feature.
17.5.2 Videos Accelerated
Video acceleration is provided up to a maximum resolution size based on what Sun Ray Client is beingused, as specified in the following tables.
Note
The maximum resolution sizes listed in the following tables indicate the largestvideo size that can be used for a reliable user experience on local area networks.The final frame rate provided on the Sun Ray Client is a combination of videocontent, encoded bitrate, network conditions, upstream software performance, andpipeline efficiency.
Table 17.3 Video Acceleration on Sun Ray 2 Clients
Windows Desktop Video Type Profiles Maximum Resolution Size
Windows 7, 2008, XP, and2003
Adobe Flash content n/a 1024x768

Videos Accelerated
254
Windows Desktop Video Type Profiles Maximum Resolution Size
MPEG-2 Main Profile Main Level 720x480
H.264 • Baseline Profile Level 2.0
• Extended Profile minusData Partitioning
• Main Profile minusCABAC Entropy Coding
352x288
Simple Profile Low andMedium Level
352x288
Main Profile Low, Medium,and High Level
320x240
Windows 7, 2008, XP, and2003
VC-1
Advanced Profile Level 0, 1,2, and 3
352x288
Table 17.4 Video Acceleration on Sun Ray 3 and 3i Clients
Windows Desktop Video Type Profiles Maximum Resolution Size
Windows 7, 2008, XP, and2003
Adobe Flash content n/a 1024x768
MPEG-2 Main Profile Main Level 720x480
H.264 • Baseline Profile Level 2.0
• Extended Profile minusData Partitioning
• Main Profile minusCABAC Entropy Coding
720x480
Windows 7, 2008, XP, and2003
VC-1 • Simple Profile Low andMedium Level
• Main Profile Low,Medium, and High Level
• Advanced Profile Level 0,1, and 2
720x480
Table 17.5 Video Acceleration on Sun Ray 3 Plus Clients
Windows Desktop Video Codec Profiles Maximum Resolution Size
Windows 7, 2008, XP, and2003
Adobe Flash content n/a 1280x720
MPEG-2 Main Profile Main Level 1280x720Windows 7, 2008, XP, and2003 H.264 • Baseline Profile Level 2.0
• Extended Profile minusData Partitioning
• Main Profile minusCABAC Entropy Coding
1280x720
Audio Accelerated
255
Windows Desktop Video Codec Profiles Maximum Resolution Size
VC-1 • Simple Profile Low andMedium Level
• Main Profile Low,Medium, and High Level
• Advanced Profile Level 0,1, and 2
1280x720
17.5.3 Audio Accelerated
The following audio formats are decoded to increase audio performance when using video acceleration:
• AAC
• MPEG
• WMA
17.5.4 Additional Notes
Here are some additional notes and restrictions when using video acceleration.
Videos on Windows XP and Windows Server 2003 R2 Desktops
• Some video playback features in Windows Media Player may not work due to decoding video remotelyfrom the host where the player is running. This includes frame-by-frame playback, variable speedplayback, repeat mode, the Playlist option, skin mode, moving the slider backward and forward multipletimes, and quitting Windows Media Player while playing a video.
• The Mute button and volume slider in the Windows Media Player do not work while playing videos in aWindows session connected from a Sun Ray server running Oracle Linux.
• Multimedia redirection is not supported in a Windows Session Directory environment.
• Third-party video decoders can be installed on the same Windows system as the multimedia redirectioncomponent, but the decoders will not be used by the multimedia redirection component when streamingvideo.
• Creating video content at 15 fps may provide better overall results.
• Pausing a video in Windows Media Player will mute other applications. When resuming the video, thevolume level for Windows Media Player and other applications will be set back to the Window MediaPlayer's current volume setting. Any volume level changes made during video playback with the volumekeys on the Sun Ray Client are ignored.
• When hotdesking a Windows XP or Windows Server 2003 R2 session while currently playing a video,the audio and video may become out-of-sync or a run-time error may occur. The workaround is torestart Windows Media Player and replay the video. This is a current issue with the MS-RDP client. SeeSection 17.5.6.7, “Windows Media Player Error During Session Reconnection” for an example of theWindows Media Player error message.
• Using the Windows Media Player to change volume levels will also change the volume level on otherapplications. The Windows connector does not provide a per-application volume setting.

Additional Notes
256
Videos on Windows 7 and Windows Server 2008 R2 Desktops
• The Mute button and volume slider in the Windows Media Player do not work while playing videos.
• If you hotdesk a Windows 7 and Windows Server 2008 R2 session that is currently playing video,an error will occur. This may also happen after resetting the Sun Ray Client. See Section 17.5.6.7,“Windows Media Player Error During Session Reconnection” for details.
• In some instances, Windows 7 and Windows Server 2008 R2 delivers H.264 video packets in the wrongorder, which makes the video flicker. If this happens, click the Windows Media Player slider near thecurrent position to fix the problem.
• With high resolution video streams, video play may take a longer time to start than expected. A delay inresuming a video clip may also occur if you change the position of the Windows Media Player slider. Thefollowing workaround may resolve these issues. In Windows Media Player, choose Options from theTools menu, click Buffer on the Performance tab, and enter 1 in the seconds of content field.
Videos on All Windows Desktops
• Video acceleration is not supported in Xinerama sessions (using a single screen across severalmonitors). For more information about Xinerama, see Section 17.14, “Multi-Monitor Support”.
• Video acceleration is supported only on the primary head of a multihead configuration.
• The volume controller in the Windows task bar cannot be used when playing videos with Windows MediaPlayer.
• Playing video while a copy operation is in progress is not supported.
• Playing video from a USB flash disk attached to a Sun Ray Client is not supported.
• Playing multiple videos simultaneously with Windows Media Player is not supported.
• In some instances, video play may stop. If this happens, click the Windows Media Player slider near thecurrent position to fix the problem.
Adobe Flash Content on All Windows Desktops
• Playing windowless Adobe Flash content with Adobe Flash Player 11 in Internet Explorer 9 is notsupported.
• Adobe Flash content playback performance may not be comparable to a stand-alone desktopenvironment because of various network latency and lossy video compression issues.
• The audio and video may become out-of-sync during Adobe Flash playback on Windows 7 and WindowsServer 2008 R2.
• Adobe Flash acceleration is not supported in Xinerama sessions (using a single screen across severalmonitors). For more information about using Xinerama, see Section 17.14, “Multi-Monitor Support”.
• Adobe Flash acceleration is supported only on the primary head of a multihead configuration.
• When using 64-bit versions of Windows 7 and Windows Server 2008 R2, a task bar pop-up menu willdisplay behind any Adobe Flash playback area that covers the menu area. If this happens, you need tomove the playback area to access the pop-up menu.
• Adobe Flash playback problems may occur when using Adobe Flash Player 11 on Windows Server 2003R2. Try using Adobe Flash Player 10.x instead.

How to Enable Video Redirection on Windows Server 2008 R2
257
• Third-party software providing similar media acceleration may conflict with the Flash Accelerationcomponent and make it unusable. To make the Flash Acceleration work properly in this situation, youneed to uninstall the third-party software and remove/reinstall the Windows connector components onthe Windows system.
• Playing multiple videos simultaneously with Internet Explorer is not supported.
• Some or all control elements of the Adobe Flash settings dialog might not react to mouse or keyboardevents, including the button to close the dialog. To workaround this issue, reload the entire web page inthe browser.
17.5.5 How to Enable Video Redirection on Windows Server 2008 R2
For Sun Ray Software video acceleration to work from a Windows Server 2008 R2 system, the WindowsServer 2008 R2 system must have the Remote Desktop Server role installed and the audio and videoplayback enabled. For detailed instructions on how to install the Remote Desktop Server role, refer toInstalling and Configuring Remote Desktop Session Host. During the installation, select the Audio andvideo playback option on the Configure Client Experience page, as shown in Figure 17.3, “Enabling VideoRedirection on Windows Server 2008 R2”.
Figure 17.3 Enabling Video Redirection on Windows Server 2008 R2
17.5.6 Video Acceleration Troubleshooting
This section provides troubleshooting information for the video acceleration feature.

Video Acceleration Troubleshooting
258
17.5.6.1 How to Enable Video Acceleration Logging
When video acceleration is in use and if logging is enabled, video acceleration status messages andperformance statistics are logged in the following files:
• /var/dt/Xerrors (Oracle Solaris 10)
• /var/log/gdm/$DISPLAY.log (Oracle Linux and Oracle Solaris 11)
Video acceleration logging is disabled by default.
Steps
1. Become superuser on the Sun Ray server.
2. Enable video acceleration logging:
# kill -USR2 Xnewt-pid
Note
To disable messages, use the same command.
The Xnewt-pid value is the Xnewt process ID for an individual Sun Ray session.
You can find the Xnewt process ID by using the following commands:
For Oracle Solaris:
# ps -aef | grep Xnewt | grep userid
For Oracle Linux:
# /opt/SUNWut/sbin/utsession -p | grep userid# ps -aef | grep Xnewt | grep ":display"
Where display is the session display number listed from the utsession command.
17.5.6.2 Video Acceleration Status Messages
The video acceleration status messages identify the rendering mechanism used to display the videocontent on the client. The video acceleration status messages have the following format:
Display display-id Video port Id video-port-id stream Id stream-id status-message
Here is an example of a status message:
Display :3.0 Video port Id 91 stream Id 3 Compressed: H.264
You can use the Video port Id and stream Id values to find the corresponding performance statisticsfor the video stream, as described in Section 17.5.6.3, “Video Acceleration Performance Statistics”.
In a multihead configuration, Display indicates the head on which the video is being played. For example,Display :3.1 and Display :3.2. And, each head's Video port Id is in a different range.
Table 17.6, “Video Acceleration Status Messages” provides the list of the video acceleration statusmessages.

Video Acceleration Troubleshooting
259
Table 17.6 Video Acceleration Status Messages
Message Comments
Compressed: MPEG-1 Audio
Compressed: MPEG-1/2 Video
Compressed: VC-1
Compressed: WMA
Compressed: H.264
Compressed: AAC
Start of a compressed video stream (multimedia redirection).
Compressed: JPEG-D Start of a compressed video stream (Adobe Flash acceleration). Thismessage is also provided when improved rendering occurs on Windows 7and 2008.
Compressed: codec hotdeskedfirmware does not supportcompressed video
A compressed video stream tried to connect to a client that does not supportdecoding, either because of the hardware or outdated firmware.
Compressed: codec error. Replayingheaders.
The Sun Ray Client signalled an error and the acceleration feature isresending the video header buffers.
YUV: YV12
YUV: I420
Start of an XVideo stream. Note that the XVideo protocol does not requirestart/stop, so an application may send multiple streams without a new debugmessage.
YUV: YV12 low bandwidth on
YUV: YV12 low bandwidth ended
An XVideo stream is using the low bandwidth logic or the bandwidth hasincreased so it is resuming the normal logic.
YUV: YV12 hotdesked or swappedcodec hotdesked or swapped
The session running a video stream has been hotdesked.
If Adobe Flash acceleration has occurred (indicated by the video acceleration icon), but there are no statusmessages in the log file, then the Adobe Flash content was decompressed on the Sun Ray server anddisplayed through the X11 API.
17.5.6.3 Video Acceleration Performance Statistics
In addition to the general status messages logged for video acceleration, performance statistics for eachvideo stream are logged at approximately one second intervals. The performance statistics can quicklyincrease the size of the log file by approximately 100 bytes for each second a video runs (or more for largervideos).
Here is an example output of the performance statistics:
XvEnc +delta scrn prt strm codec WxH @ X:Y avg fps frames dropped lost overflow ms tpf dtu idleXvEnc +1.054 :3.0 91 3 JPEG-D(h) 640x390 @ 24:302 26 fps 0 drop 0 lost 0 oflow 18 tpf 145 idle XvEnc +1.099 :3.0 91 3 JPEG-D(h) 640x390 @ 24:302 28 fps 0 drop 0 lost 0 oflow 3 tpf 238 idle XvEnc +1.007 :3.0 91 3 JPEG-D(h) 640x390 @ 24:302 31 fps 0 drop 0 lost 0 oflow 3 tpf 202 idle XvEnc +1.005 :3.0 91 3 JPEG-D(h) 640x390 @ 24:302 28 fps 2 (d) drop 0 lost 0 oflow 21 tpf 209 idle XvEnc +1.038 :3.0 91 3 JPEG-D(h) 640x390 @ 24:302 27 fps 5 (d) drop 0 lost 0 oflow 38 tpf 151 idle XvEnc +1.068 :3.0 91 3 MPEG-1/2 Video(se) 352x240 @ 46:96 25 fps 0 drop 0 lost 0 oflow -1

Video Acceleration Troubleshooting
260
tpf 174 idle XvEnc +1.009 :3.0 91 3 MPEG-1/2 Video(se) 352x240 @ 54:232 30 fps 0 drop 0 lost 0 oflow -1 tpf 156 idle XvEnc +1.001 :3.0 91 3 MPEG-1/2 Video(se) 352x240 @ 54:232 30 fps 0 drop 0 lost 0 oflow -1 tpf 110 idle XvEnc +1.117 :3.0 91 3 H.264(se) 320x240 @ 70:232 14 (22 d) fps 8 (r) drop 0 lost 0 oflow -1 tpf 10 idle XvEnc +1.003 :3.0 91 3 H.264(se) 320x240 @ 70:232 15 (31 d) fps 16 (r) drop 0 lost 0 oflow -1 tpf 0 idle XvEnc +1.103 :3.0 91 3 H.264(se) 320x240 @ 70:232 16 (30 d) fps 14 (r) drop 0 lost 0 oflow -1 tpf 0 idle XvEnc +1.102 :3.0 91 3 H.264(se) 320x240 @ 70:232 17 (36 d) fps 19 (r) drop 0 lost 0 oflow -1 tpf 0 idle XvEnc +1.010 :3.0 91 3 VC-1(se) 321x240 @ 70:232 15 fps 0 drop 0 lost 0 oflow -1 tpf 115 idle XvEnc +1.000 :3.0 91 3 VC-1(se) 321x240 @ 70:232 15 fps 0 drop 0 lost 0 oflow -1 tpf 143 idle XvEnc +1.000 :3.0 91 3 VC-1(se) 321x240 @ 70:232 15 fps 0 drop 0 lost 0 oflow -1 tpf 125 idle
The column titles in the output are as follows:
• XvEnc - The name of the accelerated video path.
• +delta - The delta time (in seconds) from the previous performance entry for the video. This value maybe higher (+3) in the first entry when the video is buffering.
• scrn - The screen on which the video is displaying.
• prt - The video port ID the video is using. Use this value to find the corresponding status message.
• strm - The stream ID of the video. Use this value to find the corresponding status message.
• codec - The video's codec and whether it is using software or hardware decoding. Values include (s)for software decoding without extended firmware, (h) for hardware decoding with extended firmware,and (se) software decoding with extended firmware.
• WxH - The width by height of the video's output size.
• X:Y - The X and Y coordinates of the video window's upper-left corner on the screen.
• avg fps - The average frames per second for the last measured second of the video stream. Examplesinclude:
• 21 fps = 21 fps rendered
• 17 (26 d) fps = 26 fps were decoded but only 17 were rendered to the screen
• frames dropped - Used by Oracle support.
• frames lost - Used by Oracle support.
• overflow - Used by Oracle support.
• ms tpf - Used by Oracle support.
• dtu idle - The average amount of idle time on the Sun Ray Client's CPU. This value ranges from0-254.
17.5.6.4 How to Verify that Video Acceleration is Active
When video acceleration is active, a video acceleration taskbar icon is displayed in the Windows desktoptaskbar. It is displayed on Windows XP and Windows Server 2003 R2 with multimedia redirection enabled

Video Acceleration Troubleshooting
261
and on all Windows platforms with Adobe Flash acceleration enabled. Hovering the mouse over the icondisplays the type of acceleration, the media type, and size, as shown in the following screenshots.
Figure 17.4 Verifying Video Acceleration is Active (Multimedia Redirection)
Figure 17.5 Verifying Video Acceleration is Active (Adobe Flash Acceleration)
17.5.6.5 Adobe Flash Acceleration Not Working (Icon Not Displaying)
Check the following:
• Make sure the Adobe Flash acceleration Windows component is installed on the Windows system.See Section 3.2.7, “How to Install the Windows Connector Components on a Windows System” for thedetails.
• Make sure that Internet Explorer has the "Third party browser extensions" option enabled, which islocated in the Advanced tab of Tools > Internet Options.
17.5.6.6 Audio/Video is Out of Sync When Playing VC-1 Movies
If the video acceleration play icon tool tip shows Audio:NONE instead of Audio:PCM, the audio device forthe Windows Media Player is not configured properly.

USB Device Redirection
262
Workaround
Delete the following Windows registry key to revert back to the default audio device for the Windows MediaPlayer:
HKEY_CURRENT_USER/Software/Microsoft/MediaPlayer/Preferences/DefaultAudioDevice
Caution
Always back up the registry on the Windows system before modifying registry keys.
17.5.6.7 Windows Media Player Error During Session Reconnection
If a Windows connector session is relaunched or hotdesked while a supported media format clip is playing,a Windows Media Player error alert box might be displayed, as shown in Figure 17.6, “Windows MediaPlayer Error During Session Reconnection”.
Figure 17.6 Windows Media Player Error During Session Reconnection
Workaround
Restart Windows Media Player and replay the video.
17.5.6.8 How to Disable Multimedia Redirection
By default, multimedia redirection for Windows XP and Windows Server 2003 R2 is enabled when usingthe uttsc command. The standard RDP protocol is used for video and audio when the multimediaredirection feature is disabled.
• To disable multimedia redirection, use the -M off option when issuing the uttsc command.
% uttsc -M off other_uttsc_options
17.5.6.9 How to Disable Adobe Flash Acceleration
By default, Adobe Flash acceleration is enabled when using the uttsc command. The standard RDPprotocol is used for Adobe Flash content when the Adobe Flash acceleration feature is disabled.
• To disable Adobe Flash acceleration, use the -F off option when issuing the uttsc command.
% uttsc -F off other_uttsc_options
17.6 USB Device RedirectionThe USB redirection feature enables users to access USB devices connected to a Sun Ray Client fromtheir Windows sessions, provided that the appropriate device drivers are installed on the Windows system.

Device Access
263
Once you install the USB redirection component and add USB Drivers to the Virtual Machines (whenneeded), users can simply plug in and access the USB devices from their Sun Ray Client.
Note
Human Interface Devices (HID) such as keyboards and mice do not use the USBredirection component.
The USB device service is enabled by default on the Sun Ray server, which enables the USB redirectionfunctionality to work on the clients. You can use the utdevadm command or the Advanced > Securitypage on the Admin GUI to check if the USB device service is enabled.
17.6.1 Device Access
The accessibility of USB devices through USB redirection is determined by what Windows operatingsystem you are using for the remote desktop connection.
When using the single-user Windows XP, Windows 7, and Windows 8 platforms, the USB devicesconnected to a client are accessible only to the user logged into the client's Windows session.
When using the Windows Server 2003 R2, Windows Server 2008 R2, and Windows Server 2012platforms, the USB devices connected to a client are accessible and visible to all desktops running on theWindows system. Sharing USB devices between multiple clients does not require any additional setup.Users are always prompted to verify if it is acceptable to share their USB device with others.
17.6.2 Supported Configurations
For the list of supported Windows operating systems, see Section 3.1.3, “Windows Remote DesktopSupport”.
USB redirection is available through the following configurations:
• Windows connector in kiosk mode
• VMware View connector in kiosk mode
17.6.3 Tested USB Devices
For the list of USB devices tested to work with the USB redirection feature, see the Sun Ray Client andOracle Virtual Desktop Client Peripherals document on the Oracle Technology Network.
Note
USB headsets do not require or use USB redirection. See Section 15.6, “USBHeadsets” for details.
17.6.4 Additional Notes
• Devices should be connected to a user's session only after a Windows session is established. Whenusers exit their session, the device should be disconnected.
• If a device is connected before a Windows session is established and the device is not available in theWindows session, hotplugging the device will make it available to the Windows session.
• Before disconnecting a USB device being used through USB redirection during a live Windows session,users must follow the same steps to safely remove the USB device as if the device were directlyconnected to Windows.
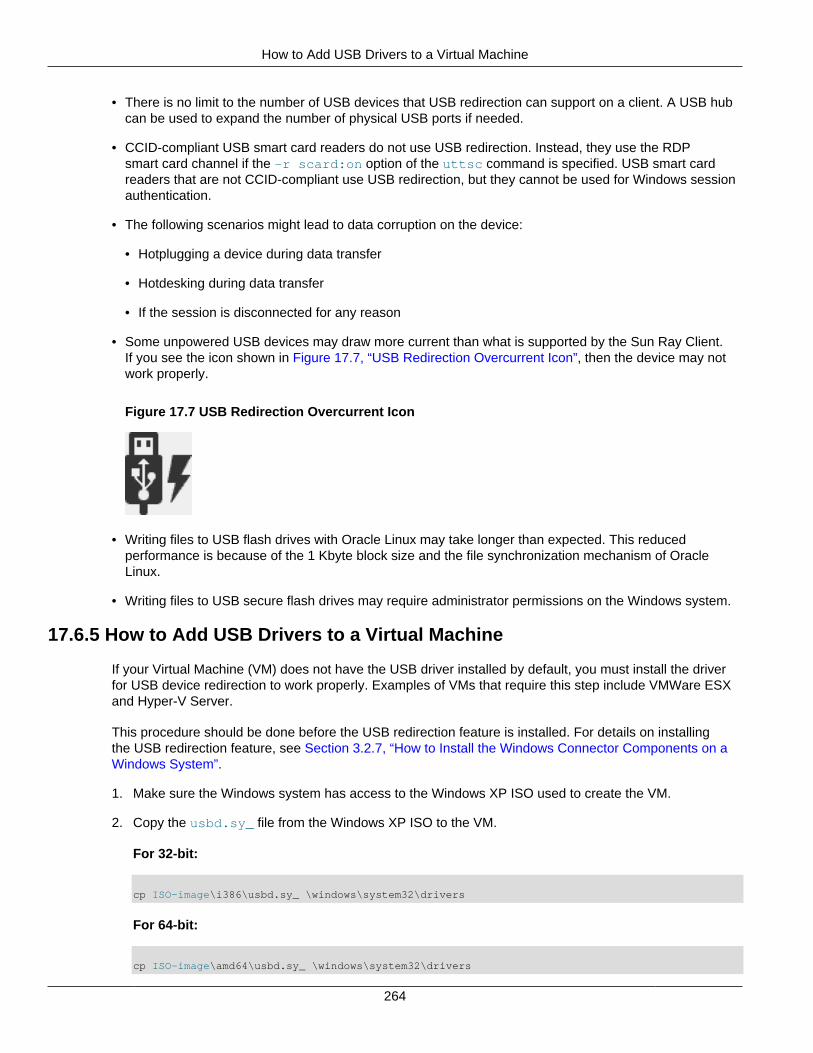
How to Add USB Drivers to a Virtual Machine
264
• There is no limit to the number of USB devices that USB redirection can support on a client. A USB hubcan be used to expand the number of physical USB ports if needed.
• CCID-compliant USB smart card readers do not use USB redirection. Instead, they use the RDPsmart card channel if the -r scard:on option of the uttsc command is specified. USB smart cardreaders that are not CCID-compliant use USB redirection, but they cannot be used for Windows sessionauthentication.
• The following scenarios might lead to data corruption on the device:
• Hotplugging a device during data transfer
• Hotdesking during data transfer
• If the session is disconnected for any reason
• Some unpowered USB devices may draw more current than what is supported by the Sun Ray Client.If you see the icon shown in Figure 17.7, “USB Redirection Overcurrent Icon”, then the device may notwork properly.
Figure 17.7 USB Redirection Overcurrent Icon
• Writing files to USB flash drives with Oracle Linux may take longer than expected. This reducedperformance is because of the 1 Kbyte block size and the file synchronization mechanism of OracleLinux.
• Writing files to USB secure flash drives may require administrator permissions on the Windows system.
17.6.5 How to Add USB Drivers to a Virtual Machine
If your Virtual Machine (VM) does not have the USB driver installed by default, you must install the driverfor USB device redirection to work properly. Examples of VMs that require this step include VMWare ESXand Hyper-V Server.
This procedure should be done before the USB redirection feature is installed. For details on installingthe USB redirection feature, see Section 3.2.7, “How to Install the Windows Connector Components on aWindows System”.
1. Make sure the Windows system has access to the Windows XP ISO used to create the VM.
2. Copy the usbd.sy_ file from the Windows XP ISO to the VM.
For 32-bit:
cp ISO-image\i386\usbd.sy_ \windows\system32\drivers
For 64-bit:
cp ISO-image\amd64\usbd.sy_ \windows\system32\drivers

USB Redirection Troubleshooting
265
3. Change to the drivers directory.
cd \windows\system32\drivers
4. Install the USB drivers.
expand usbd.sy_ usbd.sys
5. Reboot the VM.
17.6.6 USB Redirection Troubleshooting
Here is a list of questions if USB redirection is not working.
• Is the USB redirection taskbar icon displayed in the Window's System Tray.
• Are you using a tested USB device? Check the Sun Ray Client and Oracle Virtual Desktop ClientPeripherals document for the list of tested USB devices.
• Are you using USB redirection in a supported configuration. See Section 17.6.2, “SupportedConfigurations” for details.
• Is the USB device service enabled on the Sun Ray server? Use the utdevadm command or theAdvanced > Security page on the Admin GUI to check if the USB device service is enabled.
• Are you using a USB device that draws more current than what is supported by the Sun Ray Client. Ifthere is a power problem with the device, the overcurrent icon is displayed, as shown in Figure 17.7,“USB Redirection Overcurrent Icon”.
• Was the USB device was plugged in after the Windows session was established? If not, disconnect theUSB device and plug it in again.
• Are you using a USB external smart card reader for session authentication. If so, this will produceunpredictable behaviors.
• Is the device driver for the USB device configured properly in the Windows Device Manager?
If the device driver is not configured properly, a yellow question mark is displayed next to the USBdevice's entry in the Device Manager. You must install the device driver for the USB device on theWindows system.
• Are the USB redirection device drivers (utSrServerBus and utSrDtuBus) configured properly in theWindows Device Manager?
Figure 17.8, “Verifying USB Redirection in Windows Device Manager” shows that the USB redirectioncomponent is configured properly (utSrServerBus under Device Manager/System devices andutSrDtuBus under Device Manager/Universal Serial Bus controllers). If they are missing, you mustreinstall the USB redirection component. See Section 3.2.7, “How to Install the Windows ConnectorComponents on a Windows System” for details.
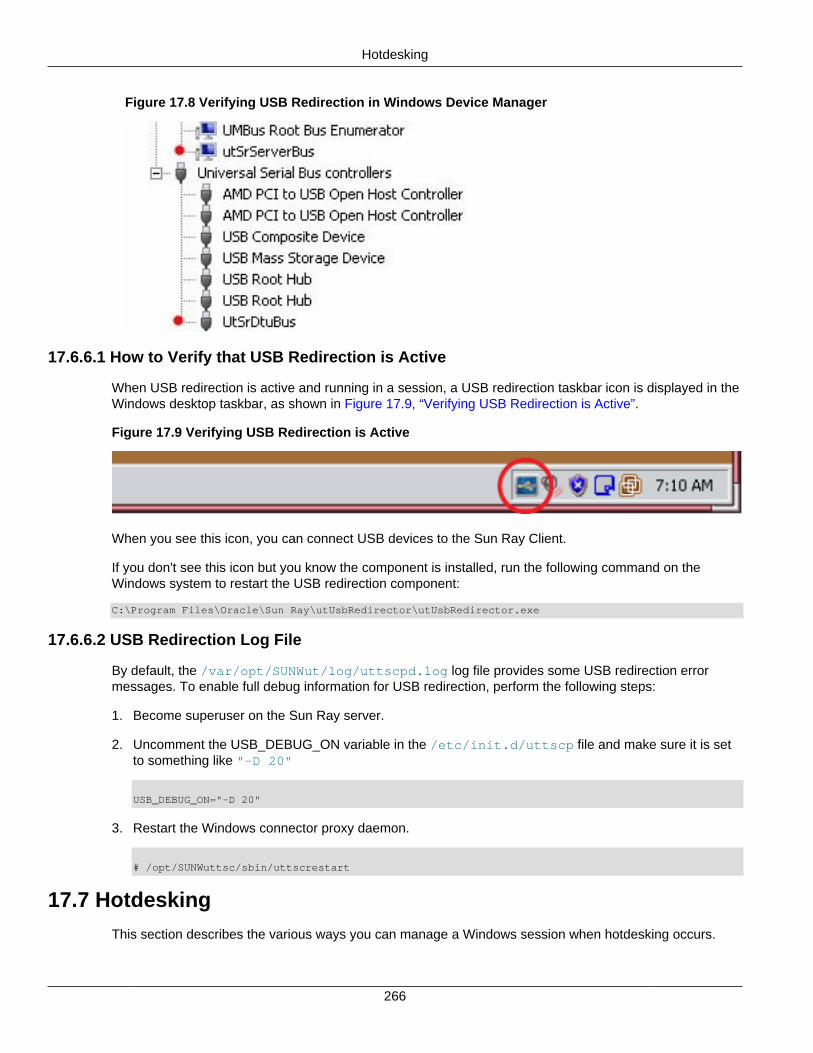
Hotdesking
266
Figure 17.8 Verifying USB Redirection in Windows Device Manager
17.6.6.1 How to Verify that USB Redirection is Active
When USB redirection is active and running in a session, a USB redirection taskbar icon is displayed in theWindows desktop taskbar, as shown in Figure 17.9, “Verifying USB Redirection is Active”.
Figure 17.9 Verifying USB Redirection is Active
When you see this icon, you can connect USB devices to the Sun Ray Client.
If you don't see this icon but you know the component is installed, run the following command on theWindows system to restart the USB redirection component:
C:\Program Files\Oracle\Sun Ray\utUsbRedirector\utUsbRedirector.exe
17.6.6.2 USB Redirection Log File
By default, the /var/opt/SUNWut/log/uttscpd.log log file provides some USB redirection errormessages. To enable full debug information for USB redirection, perform the following steps:
1. Become superuser on the Sun Ray server.
2. Uncomment the USB_DEBUG_ON variable in the /etc/init.d/uttscp file and make sure it is setto something like "-D 20"
USB_DEBUG_ON="-D 20"
3. Restart the Windows connector proxy daemon.
# /opt/SUNWuttsc/sbin/uttscrestart
17.7 Hotdesking
This section describes the various ways you can manage a Windows session when hotdesking occurs.

Hotdesking Behavior
267
17.7.1 Hotdesking Behavior
The uttsc command enables you to specify what happens to the Windows session when a user hotdesksto another client. You can set this behavior by using the -H option.
The modes include:
• -H reconnect - If the remote desktop server is configured in Device Client Access License Mode,hotdesking a Sun Ray session disconnects and reconnects the existing remote desktop session. Theuser must re-enter credentials. This is the default mode.
• -H nodisconnect - Hotdesking the Sun Ray session does not disconnect and restart the remotedesktop session. The remote desktop session remains connected. Previously the -O option.
• -H autoreconnect - If the Automatic Reconnection feature is enabled on the Windows remotedesktop server, hotdesking a Sun Ray session always reconnects to the remote desktop session. Thisaction updates the client information on the remote desktop server. The user does not have to re-entercredentials. See Section 17.10, “Automatic Reconnection” for more information.
17.7.2 Location Awareness
Location awareness is a feature that provides additional hotdesking capabilities for a Windows session,which enables you to:
• Obtain the unique client's name in a Windows session after session startup or even after hotdesking.The client's name is forwarded during hotdesking.
• Set up actions through commands or scripts to execute in a Windows session when the associated clientsession disconnects and reconnects during hotdesking. Actions set up for reconnection also occur atsession startup.
Note
In the context of the Windows connector, the client's name is the client ID of theSun Ray Client or Oracle Virtual Desktop Client, also known as the DTU ID. SeeSection 13.1.1, “Client ID Differences Between Oracle Virtual Desktop Clients andSun Ray Clients” for more details.
In some situations, this feature replaces the need to use the utaction at the Sun Ray server operatingsystem level.
Location awareness sets several environment variables, which can be used when actions are executed ina Windows session. Table 17.7 lists the environment variables and the information they contain.
Table 17.7 Location Awareness Environment Variables
Environment Variable Description
UTCINFO_CLIENTIPA IP address of the Sun Ray Client or Oracle Virtual Desktop Client.
UTCINFO_CLIENTNAME The client ID of the Sun Ray Client or Oracle Virtual Desktop Client.
UTCINFO_CLIENTLOCATION The location of the client, as defined by a Sun Ray serveradministrator. See Section 13.1.6, “How to Configure a Client'sLocation and Information” for details.
UTCINFO_CLIENTOTHERINFO Other information about the client, as defined by a Sun Ray serveradministrator. See Section 13.1.6, “How to Configure a Client'sLocation and Information” for details.

Location Awareness
268
When a session starts or reconnects, the value of the UTCINFO_CLIENTNAME variable is copied to theWindows CLIENTNAME environment variable and the HKey_Current_User\Volatile Environment\CLIENTNAME registry key.
To enable location awareness, you must install the Client Information Agent on the Windows systemusing the Sun Ray Windows Components installer, which is described in Section 3.2.7, “How to Install theWindows Connector Components on a Windows System”. Once installed, location awareness is enabledby default and is automatically used when a Windows session starts.
17.7.2.1 Obtaining a Client's Name in a Windows Session
The location awareness feature enables you to obtain a client's name after session startup or even afterhotdesking. The client name can be used for various configuration scenarios. You can obtain a client'sname by using one of the standard Windows interfaces:
• The CLIENTNAME environment variable.
• The HKCU\Volatile Environment\CLIENTNAME registry key.
• Using the GetComputerName() function in a Windows desktop session.
• Using the WTSSessionQueryInformation() function in a Terminal Services session.
17.7.2.2 Setting Up Actions for a Windows Session
The location awareness feature enables you to set up commands or scripts to execute in a Windowssession when the associated client session disconnects or reconnects during hotdesking, and when aWindows session starts. To do this as administrator, specify one or more registry values, name=datapairs, to the following registry keys:
For 32-bit systems
• For session disconnects - HKLM\Software\Oracle\Sun Ray\ClientInfoAgent\DisconnectActions
• For session reconnects and session startup - HKLM\Software\Oracle\Sun Ray\ClientInfoAgent\ReconnectActions
For 64-bit systems
• For session disconnects - HKLM\Software\Wow6432Node\Oracle\Sun Ray\ClientInfoAgent\DisconnectActions
• For session reconnects and session startup - HKLM\Software\Wow6432Node\Oracle\Sun Ray\ClientInfoAgent\ReconnectActions
Caution
Always back up the registry on the Window system before modifying registry keys.
Here are some examples of registry values for the registry keys mentioned above, where the Commandnname is used to imply order.
Command1=notepad.exeCommand2=wscript.exe c:\tmp\myscript.vbs

Session Directory
269
The data value specifies the command or script to be executed, and you can specify either a 'String' orREG_SZ value type.
For an executable command, such as a .exe file, you can specify an absolute path. If you do not providea path, the executable is searched for in the following order: the current directory, the Windows systemdirectory, the Windows directory, and the directories in the PATH environment.
For a script, you should specify the script to be run in an interpreter or shell and the script path must beabsolute. For example cmd.exe /c c:\foo\script.bat or wscript.exe c:\foo\script2.vbs
17.7.2.3 Location Awareness Examples
There are a number of ways to use location awareness for real-world situations. Here are just a fewexamples.
• A health care provider requires access to the local printer in each patient's room. By using theReconnectActions registry key, you can specify a script to run whenever a health care providerlogs in to a room's Sun Ray Client. For this situation, you would need to create a script to read thenew client's name (Sun Ray Client's unique ID), perform a lookup to determine the printer in the room,and configure the Windows session's default printer to be the room's printer. You could also use theDisconnectActions registry key to run another script that removes the currently configured printerwhen the health care provider disconnects from the Sun Ray Client.
• An instructor wants to automatically display the student's daily syllabus and lab instructions when thestudents log in. Since you know the client's name of the Sun Ray Clients in the training room, you canset up a script to automatically display the training content when the students log in to any of the SunRay Clients in the classroom. Again, this script would be run by the ReconnectActions registry key.
17.8 Session DirectoryThe Windows connector supports server session reconnection based on load-balancing informationand the Session Directory, a database that keeps track of which users are running which sessions onwhich Windows system. Session Directory functionality enables Windows connector users to reconnectautomatically to the right Windows session.
Both IP address-based and token-based reconnection are supported. However, token-based redirectionrequires the use of a hardware-based load balancer for Windows systems configured as a server farm.The capacity to use server farms and load balancing enables Windows systems to accommodate a largernumber of Sun Ray users and clients.
Note
To participate in a Session Directory-enabled server farm, the Windows systemsmust run Windows Server 2003 R2, Windows Server 2008 R2, or Windows Server2012. Session Directory is an optional component that can be configured to useMicrosoft proprietary or third-party load balancing products.
Terminal services session load balancing is handled transparently by the Windows Terminal Server.
For details about setting up and managing a Session Directory and load balancing, refer to the Microsoftdocumentation.
17.9 Network SecurityTo secure all data being transferred to and from the Windows server, the Windows connector supportsbuilt-in RDP network security and enhanced network security options. The built-in RDP security uses the

Built-in RDP Network Security
270
RC4 cipher, which encrypts data of varying size with a 56-bit or a 128-bit key. The enhanced networksecurity options include TLS/SSL (with optional server verification) and Network Level Authentication (NLA)using CredSSP.
17.9.1 Built-in RDP Network Security
The Windows connector uses RSA Security's RC4 cipher to secure all data being transferred to and fromthe Windows system. This cipher encrypts data of varying size with a 56-bit or a 128-bit key.
Table 17.8, “Encryption Levels for Network Security” lists the four levels of encryption that can beconfigured on the Windows system.
Table 17.8 Encryption Levels for Network Security
Level Description
Low All data from client to server is encrypted based on maximum key strength supportedby the client.
Client-compatible All data between client and server in both directions is encrypted based on themaximum key strength supported by the client.
High All data between the client and server in both directions is encrypted based onthe server's maximum key strength. Clients that do not support this strength ofencryption cannot connect.
FIPS-Compliant FIPS-compliant encryption is not supported.
Note
Data encryption is bidirectional except at the Low setting, which encrypts data onlyfrom the client to the server.
17.9.2 Enhanced Network Security
The enhanced network security options include TLS/SSL (with optional server verification) and NetworkLevel Authentication (NLA) using CredSSP. These options protect the Windows session from malicioususers and software before a full session connection is established.
Table 17.9, “Command Line Examples for Enhanced Network Security” provides a list of uttsc commandline examples that show which security mechanism is used when the Windows remote desktop service isconfigured to negotiate with the client. A result of "RDP" means that the built-in RDP security is used.
Table 17.9 Command Line Examples for Enhanced Network Security
uttsc Command Line Examples Windows XP Windows Server2003 R2
Windows 7,Windows Server2008 R2
Windows 8,Windows Server2012
-u user -p RDP SSL/TLS NLA NLA
-u user -j VerifyPeer:on RDP SSL/TLS SSL/TLS SSL/TLS
-u user -j VerifyPeer:on -p RDP SSL/TLS NLA NLA
-N off RDP RDP RDP RDP
17.9.2.1 TLS/SSL Security
Use the following notes to configure TLS/SSL security:

Enhanced Network Security
271
• The RDP host must be running Windows Server 2003 R2, Windows 7, Windows Server 2008 R2,Windows 8, or Windows Server 2012.
• The Windows system's security layer must be configured as "SSL (TLS 1.0)" or "Negotiate."
• In order to connect to a Windows host with TLS/SSL peer verification enabled (-j VerifyPeer:on),you must add the root certificate to the client's OpenSSL cert store or specify an additional search path/PEM file by using the -j CAPath:path or -j CAfile:pem-file options of the uttsc command.
• TLS/SSL connections require a certificate to be present on the Windows system. If that is not the case,the connection might fall back to the built-in RDP security (if allowed) or fail.
17.9.2.2 NLA Security
Use the following notes to configure NLA security:
• The RDP host must be running Windows 7, Windows Server 2008 R2, Windows 8, or Windows Server2012.
• The Windows system's security layer must be configured as "SSL (TLS 1.0)" or "Negotiate."
• You can enforce NLA security on a Windows system. For example, when using Windows Server 2008R2, select the following option on the Remote tab of the System Properties window: "Allow connectionsonly from computers running Remote Desktop with Network Level Authentication (more secure)". Withthis option selected, users must use the -u and -p options with the uttsc command to connect to theserver.
• By default, Kerberos authentication is used for NLA security. If the Windows connector cannot obtaina Kerberos ticket for the remote desktop service, it will use NT LAN Manager (NTLM) authentication.You can specify the -N kerberos option of the uttsc command to force it to use only Kerberosauthentication or the -N ntlm option to force it to use only NTLM authentication.
• When using Kerberos authentication, the user name specified must be a valid Kerberos principal name.Use the kinit command to verify if a principal name is valid.
• When using Kerberos authentication, Kerberos must be configured on the Sun Ray server as describedin Section 17.9.2.3, “Setting Up Kerberos Authentication for NLA Security”.
17.9.2.3 Setting Up Kerberos Authentication for NLA Security
If you want to use Kerberos authentication for NLA security, Kerberos must be configured properly on theSun Ray server. Refer to the following information about setting up Kerberos authentication:
• krb5.conf(4) man page - http://docs.oracle.com/docs/cd/E19253-01/816-5174/6mbb98ufn/index.html
• Kerberos Service on Oracle Solaris - http://docs.oracle.com/docs/cd/E19253-01/816-4557/seamtm-1/index.html
• Kerberos on Oracle Linux - http://docs.redhat.com/docs/en-US/Red_Hat_Enterprise_Linux/5/html/Deployment_Guide/ch-kerberos.html
Once configured, you can check that Kerberos and its name resolution requirements are configuredproperly by using the getent, nslookup, and kinit commands.
For example:
• # getent hosts my.windows.host must return the IP address and the hostname
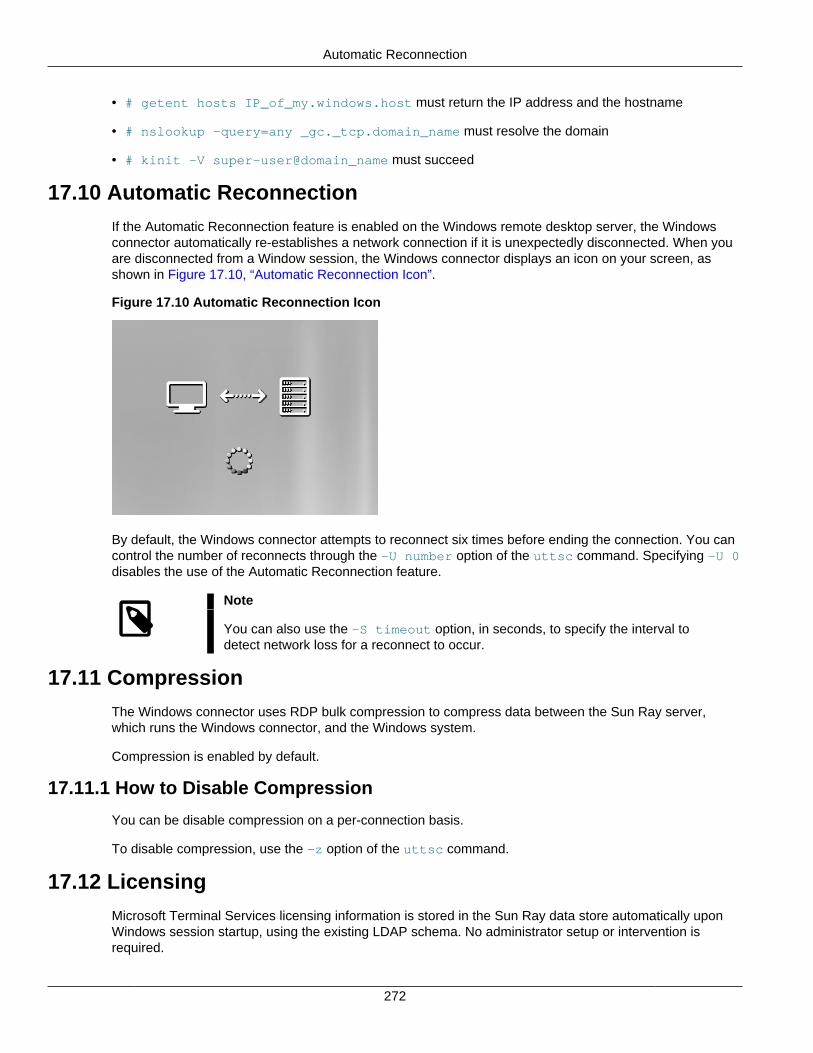
Automatic Reconnection
272
• # getent hosts IP_of_my.windows.host must return the IP address and the hostname
• # nslookup -query=any _gc._tcp.domain_name must resolve the domain
• # kinit -V super-user@domain_name must succeed
17.10 Automatic ReconnectionIf the Automatic Reconnection feature is enabled on the Windows remote desktop server, the Windowsconnector automatically re-establishes a network connection if it is unexpectedly disconnected. When youare disconnected from a Window session, the Windows connector displays an icon on your screen, asshown in Figure 17.10, “Automatic Reconnection Icon”.
Figure 17.10 Automatic Reconnection Icon
By default, the Windows connector attempts to reconnect six times before ending the connection. You cancontrol the number of reconnects through the -U number option of the uttsc command. Specifying -U 0disables the use of the Automatic Reconnection feature.
Note
You can also use the -S timeout option, in seconds, to specify the interval todetect network loss for a reconnect to occur.
17.11 CompressionThe Windows connector uses RDP bulk compression to compress data between the Sun Ray server,which runs the Windows connector, and the Windows system.
Compression is enabled by default.
17.11.1 How to Disable Compression
You can be disable compression on a per-connection basis.
To disable compression, use the -z option of the uttsc command.
17.12 LicensingMicrosoft Terminal Services licensing information is stored in the Sun Ray data store automatically uponWindows session startup, using the existing LDAP schema. No administrator setup or intervention isrequired.

Per-user Mode Versus Per-device Mode
273
Licenses can be administered, such as listing and deleting licenses, with the utlicenseadm command.See the utlicenseadm man page for details.
The Windows connector supports both per-user and per-device Terminal Server Client Access Licenses(TS-CAL):
• Per-user mode - The user's hotdesking experience is virtually seamless.
• Per-device mode - The user must reauthenticate every time they hotdesk to a different client to ensurecorrect TS-CAL license handling.
Note
If you access terminal server functionality provided by Microsoft operatingsystem products, you need to purchase additional licenses to use such products.Consult the license agreements for the Microsoft operating system productsthat you are using to determine which licenses you must acquire. Currently,information regarding Terminal Services can be found at: http://www.microsoft.com/windowsserver2008/en/us/how-to-buy.aspx
17.12.1 Per-user Mode Versus Per-device Mode
To show the different behavior between the per-user and per-device modes, let's start with the user logginginto a Sun Ray session with a smart card and opening a connection to a Windows session. Table 17.10,“Windows Licensing Modes” shows what happens next when the user removes the smart card and insertsit again.
Table 17.10 Windows Licensing Modes
The User Removes theSmart Card and...
Per-user Mode Per-device Mode
Reinserts the Smart Card inthe same client.
The user is instantlyreconnected to the existingWindows session.
The user is instantly reconnected to the existing Windowssession.
Inserts the Smart Card in adifferent client.
The user is instantlyreconnected to the existingWindows session.
The Windows login screen prompts the user for usernameand password, after which the user is reconnected to theexisting Windows session. Other features and servicesare similarly affected. For example:
• Windows Media Player stops playing audio/video file,although the application is still active on the Windowssession. The user needs to replay the audio/video file.
• Any serial port transfer is stopped. All the commandline options specified remain valid.
Note
You can use the -H nodisconnect option of the uttsc command to prevent theWindows connector from disconnecting upon detection of hotdesking events.
Note
With the -H nodisconnect option, the Windows connector does not disconnectand reconnect when a hotdesk event occurs, nor does it refresh licenses ondifferent clients. Instead, it uses the original license granted upon connection to the
Smart Cards
274
first client. This behavior might cause you to inadvertently violate your MicrosoftTerminal Server license agreement. Because you have full responsibility for licensecompliance, be aware of the danger and use the -H nodisconnect option onlywith caution.
17.13 Smart CardsIn addition to normal Sun Ray smart card functionality, such as hotdesking, the Windows connectorenables additional smart card functionality, such as the following:
• Strong, two-factor authentication for access control with digital certificates
• PIN-based logins
• Digital signing, encrypting, and decrypting of email messages from Windows-based email clients
The Windows connector uses the smart card services on the Sun Ray server and smart card middlewareon the Windows system. For detailed information about the smart card services and the configurationdetails, see Chapter 8, Smart Card Services .
If you want to use an external smart card reader for Windows session authentication, a CCID-compliantUSB smart card reader must be used. See Section 17.13.1, “How to Enable Smart Card Readers on aWindows System” for details.
17.13.1 How to Enable Smart Card Readers on a Windows System
This section describes how to redirect a smart card reader connected to a desktop client so it can be usedby the Windows system. The smart card services on the Sun Ray server must still be configured, which isdescribed in Section 8.6, “Configuring Smart Card Services”.
To enable internal or external smart card readers, you must use the -r scard:on option of the uttsccommand.
CCID-compliant USB smart card readers are redirected through the Windows RDP smart card channel,which enables the smart card to be used for Windows session authentication. USB smart card readers thatare not CCID-compliant use USB redirection, but they cannot be used for Windows session authentication.
17.13.2 How to Set Up Smart Card Login for Windows
This procedure describes how to set up smart card login for Windows.
1. Set up Active Directory and Certification Authority (CA) on the Windows system.
2. Install the smart card middleware product on the Windows system.
Note
If you use ActivClient middleware, set the Disable PIN Obfuscation option to Yesthrough the ActivClient user console on the Windows system.
3. Enroll the necessary certificates onto the smart card using either a Sun Ray token reader or an externalsmart card reader connected to the Windows system.
17.14 Multi-Monitor SupportSun Ray Software supports specific multiple monitor configurations as described in Chapter 12, MultipleMonitor Configurations. When using the Windows connector, the following monitor configurations are

Dynamic Session Resizing
275
supported by the multi-monitor feature on a Windows 7, Windows Server 2008 R2, Windows 8, andWindows Server 2012 remote desktop session:
• A multi-monitor configuration on a Sun Ray Client with dual video connectors, specifically a Sun Ray2FS Client or Sun Ray Client 3 Plus Client. You must specify the -X xrandr option of the uttsccommand.
• A multi-monitor configuration with Oracle Virtual Desktop Clients. The default -X xinerama option ofthe uttsc command is used.
• A multihead group configuration with Xinerama enabled. Two monitors connected to Sun Ray 2FSClients or Sun Ray 3 Plus Clients in a multihead group will be enumerated to Windows as a singlemonitor with the combined dimensions of the two monitors. The default -X xinerama option of theuttsc command is used.
Note
When playing a video in the primary display, the video will stop playing if you dragthe video window to the secondary display. This is a limitation in Windows.
The Xinerama enumeration is enabled by default for the Windows connector. To disable this feature, usethe -X off option of the uttsc command. Refer to the uttsc man page for more information about the -X option.
For detailed information about how to configure the remote desktop session to use multiple monitors, seeConfigure Monitor Settings for a Remote Session.
The supported configurations for multihead group size and geometry are the same when using a Windowssession. If you want to span the remote desktop session across multiple monitors, you can use the fullscreen mode (-m option of the uttsc command) together with a multihead group.
17.15 Dynamic Session ResizingDynamic session resizing allows the remote desktop to be resized automatically to fit the optimized size ofyour local desktop client session. See Section 13.1.2, “Dynamic Session Resizing” for details on enablingthis feature.
If dynamic session resizing is enabled, the Windows desktop will automatically resize if you use the -fall option (full screen mode) or the -g option (window mode) of the uttsc command.
17.16 PrintingThe Windows connector supports printing for the following printer configurations:
• Network printers visible on the Windows system
• Network printers visible on the Sun Ray server
• Local printers attached to the Windows system
• Local printers attached to the Sun Ray server
• Local printers attached to the client
Here are some important notes about setting up printers for the Windows connector.
• Network printers are not affected by hotdesking. Printers connected to clients are available for printingfrom any client connected to the same Sun Ray server.

How to Set Up Print Queues (Oracle Solaris 10)
276
• For printers accessible through the Sun Ray server (network visible or local), you need to perform someinitial configuration to make the printers accessible through the Windows connector.
17.16.1 How to Set Up Print Queues (Oracle Solaris 10)
This procedure describes how to set up a raw print queue on a Sun Ray server running Oracle Solaris 10so that a Windows system can access it. This procedure is typically needed for printers locally attached tothe Sun Ray server.
If a network printer is visible on the Sun Ray server, this typically indicates that the queue has been set upalready and you should not have to perform this task. These instructions pertain to raw print queues, whichare print queues configured without a printer driver. Please consult your operating system documentationfor instructions about setting up queues for PostScript drivers. See also the lp and lpadmin man pages.
1. Specify the printer and printer device node using the lpadmin command.
# /usr/sbin/lpadmin -p printer-name \-v /tmp/SUNWut/units/IEEE802.mac-address/dev/printers/device-node
2. Enable the print queue.
# /usr/bin/enable printer-name
3. Accept the print queue.
# /usr/sbin/accept printer-name
To update the Windows session with the available print queues on the Sun Ray server, you must restartthe Windows connector with the relevant print queues specified on the command line. See Section 17.16.3,“How to Make Sun Ray Printers Available to a Windows Session” for details.
17.16.2 How to Set Up Print Queues (Oracle Linux)
This procedure describes how to set up a raw print queue on a Sun Ray server running Oracle Linux,so that it can be accessed by a Windows system. This procedure is typically needed for printers locallyattached to the Sun Ray server.
If a network printer is visible on the Sun Ray server, the queue has been set up already and you should nothave to perform this task. These instructions pertain to raw print queues, which is a print queue configuredwithout a printer driver. Please consult your operating system documentation for instructions on setting upqueues for PostScript drivers. See also the lp and lpadmin man pages.
1. Uncomment the following line from the /etc/cups/mime.convs file:
application/octet-stream application/vnd.cups-raw 0 -
2. Uncomment the following line from the /etc/cups/mime.types file:
application/octet-stream
3. Restart the cups daemon.
# /etc/init.d/cups restart

How to Make Sun Ray Printers Available to a Windows Session
277
4. Create a soft link to the Sun Ray printer node in /dev/usb
For example, if the device node is /tmp/SUNWut/units/IEEE802.mac-address/dev/printers/device-node, then use the following command:
# ln -s /tmp/SUNWut/units/IEEE802.mac-address/dev/printers/device-node \/dev/usb/sunray-printer
Use this soft link (/dev/usb/sunray-printer) as the Device URI while creating the print queue.
Note
After rebooting, you might have to create the /dev/usb directory and re-createthe soft link.
5. To complete the procedure, set up a raw print queue.
# /usr/sbin/lpadmin -p printer-name -E -v usb:/dev/usb/sunray-printer
To update the Windows session with the available print queues on the Sun Ray server, you must restartthe Windows connector with the relevant print queues specified on the command line. See Section 17.16.3,“How to Make Sun Ray Printers Available to a Windows Session” for details.
17.16.3 How to Make Sun Ray Printers Available to a Windows Session
The Windows session is aware only of the print queues specified in the command line when the Windowsconnector is started. To update the Windows session with the available print queues on the Sun Rayserver, you must restart the Windows connector with the relevant print queues specified on the commandline.
Before You Begin
• Make sure the print queues are set up on the Sun Ray server. See Section 17.16.1, “How to Set UpPrint Queues (Oracle Solaris 10)” and Section 17.16.2, “How to Set Up Print Queues (Oracle Linux)” fordetails.
• Printer data is created on the Windows system, so make sure to specify the name of the printer'sWindows driver and install it on the Windows system. If you make a printer available without specifying adriver, the Windows connector defaults to a PostScript driver.
• To find the printer driver name on a Windows system, check the Windows Registry key at:
MyComputer/HKEY_LOCAL_MACHINE/System/CurrentControlSet\/Control/Print/Environments/Windows NT x86/Drivers/Version-3
All the printer drivers installed on the system are displayed on this list.
Steps
• To specify a printer's Windows driver:
% /opt/SUNWuttsc/bin/uttsc -r printer:printer-name="windows-printer-driver-name" hostname.domain
where printer-name is a valid raw print queue on the Sun Ray server and windows-printer-driver-name is the name of the printer exactly as shown on the Windows server. Double quotes arerequired around the name of the printer.

How to Manage Printer Configurations for Users
278
• To make a printer available without specifying a driver:
% /opt/SUNWuttsc/bin/uttsc -r printer:printer-name hostname.domain
where printer-name is a valid raw print queue on the Sun Ray server.
• To make multiple printers available:
% /opt/SUNWuttsc/bin/uttsc -r printer:printer1=driver1,printer2=driver2 hostname.domain
17.16.4 How to Manage Printer Configurations for Users
Sun Ray Software automatically keeps track of the printer configuration changes on a remote Windowssystem for each user. Whenever a user changes the printer configuration on a remote Window system forany of the printers specified through the uttsc command, the Sun Ray server saves those changes to theSun Ray data store. The Sun Ray server then restores the saved printer configurations whenever the userreconnects to the Windows system through the Windows connector.
The uttscprinteradm command helps you manage this information. You can use it to list the availableprinter information and to perform cleanup in case of user or printer deletion. See the uttscprinteradmman page for details.
17.16.5 Printers Troubleshooting
17.16.5.1 Problem: "Failed to open the printer port" message.
Verify that the printer node used for configuring the printer has been created and is available under /tmp/SUNWut/units/IEEE802.macid/dev/printers.
If the printer node is not available, reboot the client.
17.17 Accessing Serial DevicesThe Windows connector provides serial device mapping, which enables users to access external serialdevices connected to a Sun Ray Client or an Oracle Virtual Desktop Client running on a Windows clientcomputer. When initiating the Windows connecter, you need to configure the device mapping through the -r comport: option of the uttsc command.
Here is an example of mapping a serial device mounted on $UTDEVROOT/dev/term/a to the devicename SER_A.
uttsc -r comport:SER_A=$UTDEVROOT/dev/term/a ip_addr
For details on how to determine where serial devices are mounted for a desktop client, see Section 15.4,“Accessing Serial Devices and USB Printers”.
Note
USB-to-serial adapters are not accessible through the generated device nodes.You must use USB redirection in a Windows session to access a serial deviceconnected through a USB-to-serial adapter.
Once the serial device is mapped, there are various ways to verify that the serial device is available asmapped, such as SER_A in the previous example. See Table 17.11, “Windows Commands to VerifyAvailable Serial Devices” for the list of some recommended commands and the notes that follow.

uttsc Error Messages
279
Table 17.11 Windows Commands to Verify Available Serial Devices
Windows Version chgport /q net use mode PuTTY
Windows XP Yes, see notes No No Yes
Windows Server 2003 R2 Yes No No Yes
Windows 7, Windows 8, WindowsServer 2008 R2, Windows Server2012
Yes No Yes Yes
Here are some notes for Table 17.11, “Windows Commands to Verify Available Serial Devices”.
• chgport /q - This command is not part of Windows XP. However, you can copy both the change.exeand chgport.exe executable files from a Windows Server 2003 R2 system to a Windows XP systemand use them. Under Windows XP, the chgport \q command will display the device if you map itusing the following command, where COMn: is an unused COM port and mapped_name is the name ofthe mapped device:
net use \\COMn:\\tsclient\mapped_name
• net use and mode - You should run both of these commands from the Windows command prompt.
• PuTTY - This command is available free at http://www.chiark.greenend.org.uk/%7Esgtatham/putty/download.html. Do not type a colon (:) when entering a serial port in PuTTY, even if the mapped namecontains a colon.
17.18 uttsc Error Messages
Table 17.12, “uttsc Error Messages” provides the list of uttsc error messages.
Table 17.12 uttsc Error Messages
Message Comments
Error (%d): Unable to establish data store connection. The Windows connector was unable to open a connectionto the Sun Ray data store. Ensure that the Sun Ray datastore has been configured for Sun Ray software and isreachable. Also, ensure that the Windows connector hasbeen successfully configured before launching it.
Error(%d): Unable to determine SRSS version. The Windows connector could not determine the SunRay Software version information. Ensure that the correctversion is installed and configured successfully.
Error(%d): Unable to launch Sun Ray Connector. OnlySRSS x.x and above are supported.
Ensure that the correct version of Sun Ray Software isinstalled.
Sun Ray session is not connected, please try again. Ensure that the Windows connector is being launchedfrom a valid connected Sun Ray session.
Cannot obtain client MAC address. The Windows connector was unable to contact the SunRay Authentication Manager to retrieve the client's MACaddress. Ensure that this daemon is reachable.
Error: Sun Ray Token ID cannot be determined. Sun RayConnector can only be launched from a Sun Ray session.
The Windows connector was launched from a non-SunRay session (for example, telnet or console). It can onlybe launched from a connected client session.

General Troubleshooting
280
Message Comments
Unable to create new audio device. Using default audiodevice.
utaudio failed to create a new audio device. Check themessages logged by utaudio for more information. TheWindows connector will try to use the default audio devicefor the session.
Device device_name is not allocated. Audio will notwork in this session. Continuing..
On Oracle Solaris Trusted Extensions platforms, if thedefault audio device is not allocated, then the Windowsconnector will not be able to use any new audio deviceor the default audio device. In this case, the Windowsconnector session will proceed but without audio support.
Warning. Printer preferences will not be stored. Pleaserun utconfig -c to complete configuration beforelaunching Sun Ray Connector.
If utconfig -c has not been run before the Windowsconnector is launched, the printer preferences as sent bythe Windows system will not be stored and hence cannotlater be reused. This error is not fatal. The session willcontinue to be launched.
Unable to connect to Sun Ray Connector Proxy. Pleaseensure utconfig -c has been run before launching theWindows connector.
Make sure the proxy daemon (uttscpd) is up andrunning. If the Windows connector is launched beforeutconfig -c has been run to configure it, then theWindows connector proxy is not reachable. This messageoccurs only on Oracle Solaris systems.
Unable to launch Sun Ray Connector.
Please ensure utconfig has been run before launchingthe Sun Ray Connector.
If the Windows connector is launched without havingconfigured Sun Ray data store using utconfig (fromSun Ray Software), then the connector cannot be used.
17.18.1 General Troubleshooting
17.18.1.1 Problem: Unexpected Time Zone Value
uttsc only considers time zones listed in /usr/share/lib/zoneinfo/tab/zone_sun.tab (forOracle Solaris) and /usr/share/zoneinfo/zone.tab (for Oracle Linux), as valid zones that can beconverted into the equivalent time zones in the Windows session. If the time zone is set to a value otherthan those defined in these files, then the time zone value in the Windows session can be unexpected.

281
Chapter 18 VMware View Connector
Table of Contents18.1 VMware View Connector Overview .......................................................................................... 28118.2 Requirements .......................................................................................................................... 28118.3 Configuring the VMware View Environment .............................................................................. 282
18.3.1 How to Disable Secure Tunnel Connections to View Desktops ........................................ 28218.3.2 How to Enable Non-SSL Connections to the View Connection Server ............................. 28218.3.3 How to Enable SSL Connections to the View Connection Server .................................... 282
18.4 Configuring the VMware View Connector Kiosk Session Type ................................................... 28318.4.1 How to Configure a Kiosk Mode Session Type for the VMware View Connector ............... 283
18.5 VMware View Connector Troubleshooting ................................................................................ 28418.5.1 Error Messages ............................................................................................................ 28418.5.2 Desktop tries to open, but immediately disconnects ....................................................... 285
This chapter describes how to configure the VMware View connector, so desktop users can connect totheir Windows virtual desktops provided through the VMware View Manager.
18.1 VMware View Connector OverviewSun Ray Software provides a VMware View connector, which is an RDP client that enables desktop clientusers to connect to their Windows virtual desktop provided through the VMware View Manager. TheVMware View connector is an extension of the Windows connector. Once the VMware View connectoris configured through kiosk mode, users can log in to their View desktop using their Active Directory username and password. Users do not have to reenter their password at the Windows login screen.
The Sun Ray Clients are a certified VMware View and VMware Virtual Desktop Manager (VDM) clientsolution. They are listed in VMware's Hardware Compatibility Guide at http://www.vmware.com/resources/compatibility.
For details on how to install and configure the VMware View product, refer to the VMware Viewdocumentation.
18.2 RequirementsThe following VMware View releases are supported:
• VMware View 5.2 (Sun Ray Software release 5.4.2 and later only)
• VMware View 5.1
• VMware View 5.0
• VMware View 4.6
• VMware View 4.5
• VMware View 4.0
• VMware View 3.1
For the latest list of supported VMware View releases, refer to VMware's Hardware Compatibility Guide athttp://www.vmware.com/resources/compatibility.

Configuring the VMware View Environment
282
For the list of supported Windows remote desktops, see Section 3.1.3, “Windows Remote DesktopSupport”.
18.3 Configuring the VMware View EnvironmentThis section describes the changes needed to the VMware View environment before configuring and usingthe VMware View connector. It is assumed that the VMware View environment is properly configured andworking before using the VMware View connector. Refer to the VMware View documentation for details.
18.3.1 How to Disable Secure Tunnel Connections to View Desktops
The VMware View connector does not support tunneled connections when accessing View desktops.The following steps describe how to disable secure tunnel connections to View desktops through a ViewConnection Server.
This procedure is based on the VMware View 5.0 release.
1. Log in to the VMware View Administrator.
2. From the View Configuration menu in the left-hand navigation pane, click Servers.
3. From the Servers panel, select the appropriate View Connection Server and click Edit.
4. From the Edit View Connection Server Settings pop-up screen, deselect Use Secure Tunnelconnection to desktop.
5. Click OK.
18.3.2 How to Enable Non-SSL Connections to the View Connection Server
If (Secure Sockets Layer) SSL is not required, use the following steps to enable non-SSL connections tothe View Connection Server.
Note
This configuration is not possible in VMware View 5.1 or later, because only SSLconnections are supported.
This procedure is based on the VMware View 5.0 release.
1. Log in to the VMware View Administrator.
2. From the View Configuration menu in the left-hand navigation pane, click Global Settings.
3. Click Edit.
4. Deselect Require SSL for client connections and View Administrator in the pop-up screen.
5. Click OK.
18.3.3 How to Enable SSL Connections to the View Connection Server
The default SSL certificate created from the VMware View Manager installation must be imported intothe Sun Ray server to enable SSL connections to desktops. The following steps assume that you havegenerated and stored a new certificate on the View Connection Server.
1. Export the certificate from the keystore on the View Connection Server:

Configuring the VMware View Connector Kiosk Session Type
283
# keytool -export -keystore keys.p12 -storetype pkcs12 -file vmware.cer
2. Copy the vmware.cer file to the Sun Ray server.
3. Import the certificate into a keystore on the Sun Ray server:
# keytool -import -file vmware.cer -trustcacerts -v -keystore \/etc/opt/SUNWkio/sessions/vdm/keystore
4. Edit the kiosk script (/etc/opt/SUNWkio/sessions/vdm/vdm) and modify the line that begins withjavaKeyStorePass= to include the password for the keystore.
5. Restart the Sun Ray server via the Admin GUI.
Note
The administrator may choose to import the certificate into the default keystoreof the server's Java installation instead of following steps 3 and 4. If this is done,the kiosk script must be modified and all references to javaKeyStore andjavaKeyStorePass should be removed.
18.4 Configuring the VMware View Connector Kiosk Session Type
The following steps describe how to configure the VMware View connector, which is provided as a pre-defined kiosk session type.
To set up the VMware View environment for Sun Ray Software, see Section 18.3, “Configuring theVMware View Environment”.
For more information about configuring kiosk mode, see Chapter 10, Kiosk Mode.
18.4.1 How to Configure a Kiosk Mode Session Type for the VMware ViewConnector
1. Log in to the Admin GUI.
2. Click the Advanced tab and Kiosk Mode sub-tab. Then click Edit.
3. Choose VMware View Manager Session from the Session (Session Type) menu.
4. Modify the session parameters.
5. Add session arguments to the Arguments field at the bottom in the format:
[session-type-arguments] [-- uttsc-arguments]
See Table 18.1, “Kiosk Session Arguments for VMware View Connector” for the list of valid sessionarguments.
Table 18.1 Kiosk Session Arguments for VMware View Connector
Argument Description
-s server VMware View Connection Server hostname.
VMware View Connector Troubleshooting
284
Argument Description
-https Use SSL connection to VMware View Connection Server (default).
-http Do not use SSL connection to VMware View Connection Server.
-p port-number VMware View Connection Server port number.
-t seconds If no smart card is used, the length of inactivity before the user isautomatically logged out of the desktop selection dialog. Defaultvalue is 3 minutes.
-no-auto-login Users are automatically forwarded to their desktop if there is onlyone desktop. This flag disables this behavior.
-d domain This domain name will be preselected in the login screen, ifavailable.
-- uttsc-arguments Specify any valid uttsc arguments. For detailed information onthese options, refer to the uttsc man page.
Note
The Sun Ray Software is capable of supporting Windows Network LevelAuthentication (NLA), but VMware View does not support NLA on non-Windowsbased View clients. You must use the standard RDP authentication withVMware View. To configure RDP authentication, enable RDP authentication onthe guest OS and add the -N off option to the uttsc arguments field.
6. Configure the server to use kiosk mode for card and non-card users.
a. Click the System Policy sub-tab on the Advanced menu.
b. Enable Kiosk Mode for both card and non-card users.
7. Click Save.
All new or restarted sessions matching the policy configuration to use kiosk mode will access the newsession type.
18.5 VMware View Connector Troubleshooting
This section provides troubleshooting tips for the VMware View connector.
18.5.1 Error Messages
In the event the software does not work as expected, look at the log messages located in the Sun Rayserver's /var/opt/SUNWut/log/messages file. Error messages related to the VMware View connectorbegin with kiosk:vdm. There may also be useful information in the /var/dt/Xerrors file.
18.5.1.1 Error connecting to VDMserver:javax.net.ssl.SSLException:java.lang.RuntimeException:Unexpectederror:java.security.InvalidAlgorithmParameterException:the trustAnchors parameter mustbe non-empty
The SSL certificate is not set up correctly on the Sun Ray server.
Solution: See Section 18.3.3, “How to Enable SSL Connections to the View Connection Server”.

Desktop tries to open, but immediately disconnects
285
18.5.1.2 This desktop is currently not available. Please try connecting to this desktop againlater, or contact your system administrator. The desktop sources for this desktop arenot responding. Please try connecting to the desktop again later, or contact your systemadministrator
The desktop is not set up properly or is already in use. For example:
• Someone is logged into the machine (over remote desktop or via the console in VMware vCenter).
• The machine is powering on/off, or suspending.
• No free desktops exist for that user.
• VMware View Agent is not installed on the desktop, or it is not working correctly. Check that the desktopstatus is available in the VMware View Connection Server.
• Active Directory and/or DNS is not set up properly on the desktop.
• There is a network communication problem between VMware View Connection Server and the desktop.
• A Windows firewall is blocking connections to the desktop.
18.5.1.3 Exception in thread "main" java.lang.NoClassDefFoundError
An incorrect version of Java software is in use.
Solution: Install Java version 1.5 or 1.6.
18.5.1.4 Connection tunneling is required to connect to the desktop, but it is not supportedby this client
Connection tunneling is not supported by the VMware View connector.
Solution: See Section 18.3.1, “How to Disable Secure Tunnel Connections to View Desktops”.
18.5.1.5 Error connecting to VMware View Manager: java.io.FileNotFoundException:http://ip_address//broker/xml: 404: Not Found
The VMware View connector is trying to use HTTP to connect to the View desktop, and non-SSLconnections are not configured or not supported.
Solution: For VMware View 5.1 or later, HTTP is not supported. So, you must configure the kiosk sessiontype to use HTTPS (which is the default) and make sure your VMware View environment is properlyconfigured as described in Section 18.3.3, “How to Enable SSL Connections to the View ConnectionServer”. If you are using VMware View 5.0 or earlier and you want to use HTTP, you must configurenon-SSL connections as described in Section 18.3.2, “How to Enable Non-SSL Connections to the ViewConnection Server”.
18.5.2 Desktop tries to open, but immediately disconnects
Solution: Try to connect to the desktop manually from the Sun Ray server using the /opt/SUNWuttsc/bin/uttsc desktop-IP command. A remote desktop connection to the virtual machine should open. Ifit fails, it can provide an error message with further information.

286

287
Chapter 19 Alternate Network Configurations
Table of Contents19.1 Alternate Network Configurations Overview .............................................................................. 28719.2 Updating the Default /etc/hosts File Before Configuring Sun Ray Network (Oracle Linux) ....... 28819.3 Using a Shared Network Configuration Without External DHCP Services ................................... 288
19.3.1 Shared Network Configuration Worksheet ...................................................................... 28819.3.2 How to Configure a Sun Ray Server on a Shared Network to Provide DHCP Services ....... 28919.3.3 How to List the Current Network Configuration ............................................................... 29019.3.4 How to Delete a LAN Subnet ........................................................................................ 29019.3.5 Example Shared Network Setups .................................................................................. 291
19.4 Using a Private Network Configuration ..................................................................................... 29919.4.1 Private Network Configuration Worksheet ...................................................................... 30019.4.2 How to Configure a Sun Ray Server in a Private Network ............................................... 30219.4.3 How to List the Current Network Configuration ............................................................... 30319.4.4 How to Print a Private Network Configuration ................................................................ 30319.4.5 How to Delete an Interface ........................................................................................... 30419.4.6 Example Private Network Setup .................................................................................... 304
19.5 Sun Ray Client Initialization Requirements Using DHCP ........................................................... 30619.5.1 DHCP Basics ............................................................................................................... 30719.5.2 DHCP Parameter Discovery .......................................................................................... 30819.5.3 DHCP Relay Agent ...................................................................................................... 30819.5.4 Simplifying DHCP Configuration of Remote Sun Ray Clients .......................................... 30819.5.5 Standard DHCP Parameters ......................................................................................... 31019.5.6 Vendor-specific DHCP Options ..................................................................................... 31019.5.7 Encapsulated Options ................................................................................................... 312
19.6 Failover Groups ...................................................................................................................... 31319.6.1 Network Topologies ...................................................................................................... 31319.6.2 Setting Up IP Addressing ............................................................................................. 31519.6.3 Sun Ray Server Failover Group Worksheet ................................................................... 319
This chapter provides alternative network configurations that are supported for Sun Ray Software.
19.1 Alternate Network Configurations Overview
In the alternate network configurations, the Sun Ray server is also used as a DHCP server. Using ashared network configuration with external DHCP services is the recommended way to set up a Sun Rayenvironment, which is described in Chapter 2, Planning a Sun Ray Network Environment.
The utadm command is used to manage the Sun Ray network interfaces. Note the following information:
• If the IP addresses and DHCP configuration data are not set up properly when the interfaces areconfigured, then the failover feature will not work as expected. In particular, configuring the Sun Rayserver's interconnect IP address as a duplicate of any other server's interconnect IP address may causethe Sun Ray Authentication Manager to generate "Out of Memory" errors.
• If you make manual changes to your DHCP configuration, you will have to make them again wheneveryou run utadm or utfwadm.
• (Oracle Solaris only) If you press Ctrl-C while performing utadm configuration, utadm might not functioncorrectly the next time it is invoked. To correct this condition, type dhtadm -R.

Updating the Default /etc/hosts File Before Configuring Sun Ray Network (Oracle Linux)
288
19.2 Updating the Default /etc/hosts File Before Configuring SunRay Network (Oracle Linux)
The utadm command is not able to parse the default /etc/hosts file when trying to configure the SunRay network. The following error may occur when using the utadm -a or utadm -A commands on anOracle Linux-based Sun Ray server:
Error: host IP address must be set.Set host IP address and try again
On Oracle Linux systems, you must make sure that the system's host name specified during the OracleLinux installation is configured properly in the /etc/hosts file. The system's host name must be on aseparate line in the /etc/hosts file with an IP address matching the host's primary IP address.
Here is an example of an etc/hosts file that contains the system's host name, srshost, on the sameline as localhost:
127.0.0.1 srshost localhost.localdomain localhost::1 localhost6.localdomain6 localhost6
The srshost host name must be on its own line for the utadm command to work:
127.0.0.1 localhost.localdomain localhost::1 localhost6.localdomain6 localhost6192.168.1.1 srshost
19.3 Using a Shared Network Configuration Without External DHCPServices
If you have a shared network configuration where DHCP services are not available, the Sun Ray servercan be configured to provide those services. This configuration adds more complexity to the initial andongoing Sun Ray network administration. See Chapter 2, Planning a Sun Ray Network Environment foroverall information about using shared networks with available DHCP services.
You can use the utadm -A subnet command to configure a Sun Ray server to provide DHCP services.The Sun Ray server can be configured to respond with network/IP information, device configurationinformation, or both.
19.3.1 Shared Network Configuration Worksheet
Fill out Table 19.1, “Shared Network Configuration Worksheet”, so that the information is readily availableduring the actual configuration process. This worksheet is for configuring a Sun Ray server in a sharednetwork without an external DHCP service.
• Values that are provided in italics are only examples and should not be used.
• Values provided in normal font are defaults and can be used.
• Superscripted numbers (#) refer to footnotes at the end of each section.
Note
The blank rows in the worksheets are provided for you to add additional informationabout your environment if you choose to print the worksheets.
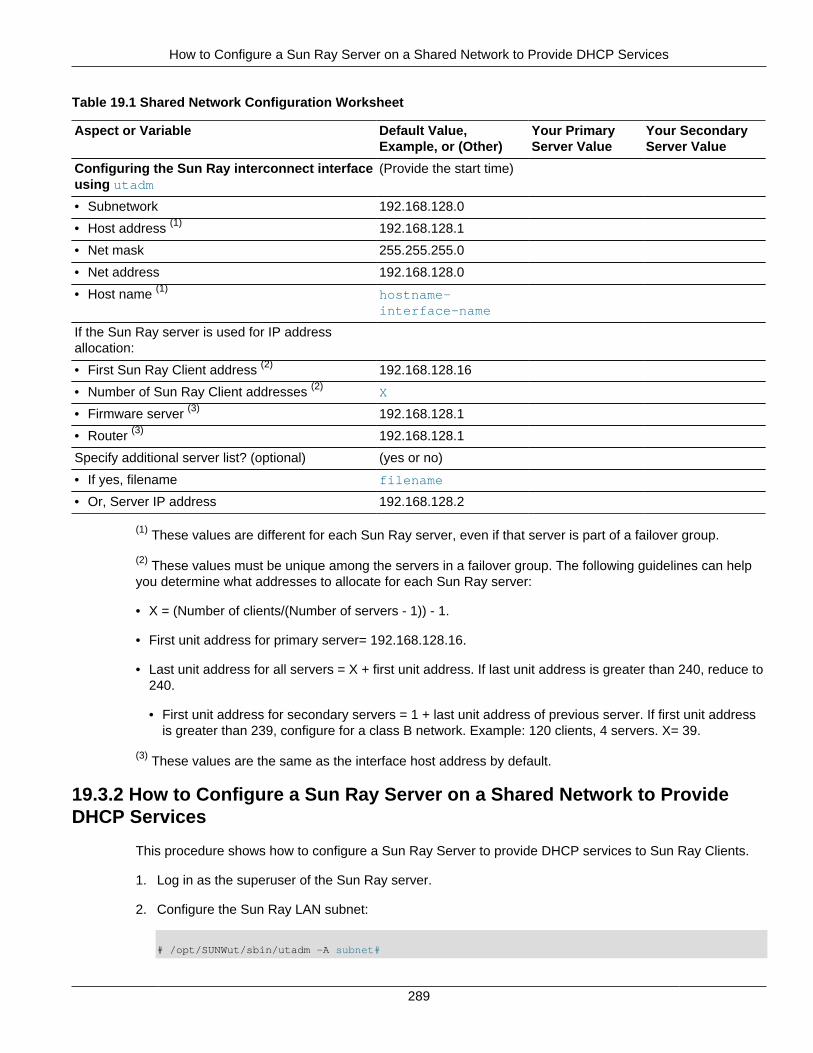
How to Configure a Sun Ray Server on a Shared Network to Provide DHCP Services
289
Table 19.1 Shared Network Configuration Worksheet
Aspect or Variable Default Value,Example, or (Other)
Your PrimaryServer Value
Your SecondaryServer Value
Configuring the Sun Ray interconnect interfaceusing utadm
(Provide the start time)
• Subnetwork 192.168.128.0
• Host address (1) 192.168.128.1
• Net mask 255.255.255.0
• Net address 192.168.128.0
• Host name (1) hostname-interface-name
If the Sun Ray server is used for IP addressallocation:
• First Sun Ray Client address (2) 192.168.128.16
• Number of Sun Ray Client addresses (2) X
• Firmware server (3) 192.168.128.1
• Router (3) 192.168.128.1
Specify additional server list? (optional) (yes or no)
• If yes, filename filename
• Or, Server IP address 192.168.128.2
(1) These values are different for each Sun Ray server, even if that server is part of a failover group.
(2) These values must be unique among the servers in a failover group. The following guidelines can helpyou determine what addresses to allocate for each Sun Ray server:
• X = (Number of clients/(Number of servers - 1)) - 1.
• First unit address for primary server= 192.168.128.16.
• Last unit address for all servers = X + first unit address. If last unit address is greater than 240, reduce to240.
• First unit address for secondary servers = 1 + last unit address of previous server. If first unit addressis greater than 239, configure for a class B network. Example: 120 clients, 4 servers. X= 39.
(3) These values are the same as the interface host address by default.
19.3.2 How to Configure a Sun Ray Server on a Shared Network to ProvideDHCP Services
This procedure shows how to configure a Sun Ray Server to provide DHCP services to Sun Ray Clients.
1. Log in as the superuser of the Sun Ray server.
2. Configure the Sun Ray LAN subnet:
# /opt/SUNWut/sbin/utadm -A subnet#

How to List the Current Network Configuration
290
where subnet# is the identifying number of the subnet, such as 192.168.128.0.
The utadm script begins configuring DHCP for the Sun Ray interconnect, restarts the DHCP daemon,and configures the interface. The script then lists the default values and asks whether they areacceptable.
Note
If the IP addresses and DHCP configuration data are not set up correctly whenthe interfaces are configured, the failover feature cannot work properly. Inparticular, configuring the Sun Ray server's subnet IP address as a duplicateof any other server's subnet IP address may cause the Sun Ray AuthenticationManager to issue Out of Memory errors.
3. Evaluate the default values.
• If you are satisfied with the default values and the server is not part of a failover group, answer y.
• Otherwise, answer n and accept whatever default values are shown by pressing Return or providethe correct values from the worksheet.
The utadm script prompts for the following:
• New netmask (255.255.255.0)
• New first Sun Ray Client address (192.168.128.16)
• Total number of Sun Ray Client addresses
• New authorization server address (192.168.128.1)
• New firmware server address (192.168.128.10)
• New router address (192.168.128.1)
• An additional server list.
If you answer yes, it requests either a file name (_filename_) or a server IP address (192.168.128.2)
4. The utadm script again lists the configuration values and asks whether they are acceptable.
• If not, answer n and revise the answers you provided in Step 3.
• If the values are correct, answer y. The utadm script configures the Sun Ray Client firmwareversions and restarts the DHCP daemon.
5. Repeat this procedure for each of the secondary servers in your failover group.
6. If a router is between the Sun Ray server and the Clients, configure bootp forwarding in the routers.
19.3.3 How to List the Current Network Configuration
# utadm -l
19.3.4 How to Delete a LAN Subnet

Example Shared Network Setups
291
# utadm -D subnet#
19.3.5 Example Shared Network Setups
The following section presents an example of a Sun Ray Client deployment on shared networks B, C, andD as shown in Figure 19.1, “Example of Alternate Shared Network Topology”.
Figure 19.1 Example of Alternate Shared Network Topology
19.3.5.1 Deployment on a Directly Connected Shared Subnet
Subnet B in Figure 19.1, “Example of Alternate Shared Network Topology” is a directly connectedshared subnet that uses IP addresses in the range 130.146.59.0/24. The Sun Ray server helios isattached to the interconnect through its hme0 network interface, which has been assigned the IP address130.146.59.5. The answers to the three predeployment questions are as follows:

Example Shared Network Setups
292
• From which DHCP server will Clients on this subnet get their basic IP networking parameters?
In a shared subnet scenario, you must choose whether a DHCP service on the Sun Ray server or someexternal DHCP service will provide the client with basic network parameters. If the enterprise already hasa DHCP infrastructure that covers this subnet, it probably supplies basic network parameters. If no suchinfrastructure exists, configure the Sun Ray server to provide basic network parameters.
• From which DHCP server will clients on this subnet get additional configuration parameters tosupport features such as firmware download?
The administrator must choose whether to supply additional configuration parameters to the clientand, if so, whether to use a DHCP service on the Sun Ray server or some external DHCP service forthis purpose. On a directly connected shared subnet, it is possible to deploy clients without providingadditional parameters at all, but this configuration is not desirable because it deprives the client of anumber of features, including the ability to download new firmware.
Administrators of an already established DHCP infrastructure might be unable or unwilling to reconfigurethat infrastructure to provide additional Sun Ray configuration parameters, so having the Sun Rayserver provide these parameters is usually more convenient. This setup can be desirable even whenthe established infrastructure is capable of delivering the additional parameters. This setup enablesSRSS commands to be used to manage the values of the additional configuration parameters whenthose values need to be changed in response to software upgrades or patch installations on the Sun Rayserver.
For instance, a patch that delivers new client firmware could automatically update the firmware versionstring that is delivered to the client. However, if the firmware version parameter is supplied by someexternal DHCP service, an administrator must manually edit the firmware version parameter string inthe external DHCP configuration rules to reflect the new firmware version delivered by the patch. Thisactivity is time-consuming and error-prone, as well as unnecessary.
• How will clients on this subnet locate their Sun Ray server?
Use one of the optional additional configuration parameters to report the location of the Sun Ray serverto the client. If additional configuration parameters are not supplied to the client at all, the client hasno indication of the location of any Sun Ray server. In these circumstances, the client attempts todiscover the location of a Sun Ray server by using a broadcast-based mechanism. However, the clientsbroadcast packets propagate only on the local subnet so, in the case of a remote subnet, the broadcastcannot reach the Sun Ray server, and contact cannot be established.
The following examples illustrate two configurations of the directly connected shared subnet. In the firstexample, the Sun Ray server delivers both basic networking parameters and additional parameters. Inthe second example, an external DHCP service supplies basic networking parameters but no additionalparameters are provided to the client, which must establish contact with the Sun Ray server through itslocal subnet broadcast discovery mechanism.
The most likely case, where an external DHCP service provides basic networking parameter andthe Sun Ray server provides additional parameters, is illustrated by an example in Section 19.3.5.2,“Deployment on a Remote Subnet”.
Directly Connected Shared Subnet: Example 1
In this example, the answers to the three predeployment questions are as follows:
• From which DHCP server will clients on this subnet get their basic IP networking parameters?
From the Sun Ray server.

Example Shared Network Setups
293
• From which DHCP server will clients on this subnet get additional configuration parameters tosupport features such as firmware download?
From the Sun Ray server.
• How will clients on this subnet locate their Sun Ray server?
The clients will be informed of the location of the Sun Ray server through an additional configurationparameter delivered when Sun Ray services are restarted.
1. Configure the Sun Ray server to provide both basic and additional parameters to the shared subnet.
DHCP service for clients on a shared subnet is configured through the utadm -A subnet command.In this example, the shared subnet has network number 130.146.59.0, so the appropriate commandis utadm -A 130.146.59.0.
# /opt/SUNWut/sbin/utadm -A 130.146.59.0Selected values for subnetwork "130.146.59.0"net mask: 255.255.255.0no IP addresses offeredauth server list: 130.146.59.5firmware server: 130.146.59.5router: 130.146.59.1Accept as is? ([Y]/N): nnetmask: 255.255.255.0 (cannot be changed - system defined netmask)Do you want to offer IP addresses for this subnet? (Y/[N]): ynew first Sun Ray address: [130.146.59.4] 130.146.59.200number of Sun Ray addresses to allocate: [55] 20new auth server list: [130.146.59.5]To read auth server list from file, enter file name:Auth server IP address (enter <CR> to end list):If no server in the auth server list responds, should an auth server be located by broadcasting on the network? ([Y]/N):new firmware server: [130.146.59.5]new router: [130.146.59.1]Selected values for subnetwork "130.146.59.0"net mask: 255.255.255.0first unit address: 130.146.59.200last unit address: 130.146.59.219auth server: 130.146.59.5firmware server: 130.146.59.5router: 130.146.59.1auth server list: 130.146.59.5Accept as is? ([Y]/N):### Building network tables - this will take a few minutes### Configuring firmware version for Sun RayAll the units served by "helios" on the 130.146.59.0network interface, running firmware other than version"2.0_37.b,REV=2002.12.19.07.46" will be upgraded attheir next power-on.### Configuring Sun Ray Logging Functions### stopped DHCP daemon### started DHCP daemon#
The default values initially suggested by utadm were not appropriate. Specifically, this server wouldnot have offered any IP addresses on the 130.146.59.0 subnet because utadm assumes that basicnetworking parameters, including IP addresses, are provided by some external DHCP service whenthe client is located on a shared subnet. In this example, however, the Sun Ray server is required toprovide IP addresses, so the administrator replied n to the first "Accept as is?" prompt and was giventhe opportunity to provide alternative values for the various parameters. Twenty IP addresses, startingat 130.146.59.200, were made available for allocation to DHCP clients on this subnet.

Example Shared Network Setups
294
2. Restart Sun Ray services on the Sun Ray server by issuing the utstart command to fully activateSun Ray services on the shared subnet.
# /opt/SUNWut/sbin/utstartA warm restart has been initiated... messages will be logged to /var/opt/SUNWut/log/messages.
Directly Connected Shared Subnet: Example 2
In this example, the answers to the three predeployment questions are as follows:
• From which DHCP server will clients on this subnet get their basic IP networking parameters?
From an external DHCP service.
• From which DHCP server will clients on this subnet get additional configuration parameters tosupport features such as firmware download?
The clients will not be supplied with additional parameters.
• How will clients on this subnet locate their Sun Ray server?
By using the local subnet broadcast discovery mechanism.
In this example, the Sun Ray server does not participate in client initialization at all. Configuration stepsare still required on the Sun Ray server because it responds by default only to clients located on directlyconnected dedicated interconnects. It responds to clients on shared subnets only if the utadm -L oncommand has been executed. Running the utadm -A subnet command to activate DHCP on theSun Ray server for a shared subnet, as in this example, implicitly executes utadm -L on. If utadm -Asubnet has not been run, the administrator must run utadm -L on manually to enable the server to offersessions to clients on the shared subnet.
1. Configure the external DHCP service.
Determining how to configure the external DHCP infrastructure to provide basic networking parametersto the clients on this subnet is beyond the scope of this document. Note the following guidelines:
• If the external DHCP service does not have its own direct connection to this subnet, the administratormust configure a DHCP Relay Agent to deliver DHCP traffic on this subnet to the external DHCPservice. The most likely location for such a Relay Agent would be on a router in this subnet, in thiscase, the router named r22-59 in Figure 19.1, “Example of Alternate Shared Network Topology”.For a brief introduction to this topic, refer to Section 19.5, “Sun Ray Client Initialization RequirementsUsing DHCP”.
• An existing external DHCP service might need to have its IP address allocation for this subnetincreased in order to support the new clients. This requirement applies whenever additional DHCPclients are placed on a subnet. You might also want to reduce the lease time of addresses on thissubnet so that addresses become eligible for reuse quickly.
2. Configure the Sun Ray server to accept client connections from shared subnets by running thefollowing command:
# /opt/SUNWut/sbin/utadm -L on### Turning on Sun Ray LAN connectionNOTE: utstart must be run before LAN connections will be allowed
3. Restart Sun Ray services on the Sun Ray server by issuing the utstart command to fully activateSun Ray services on the shared subnet.

Example Shared Network Setups
295
# /opt/SUNWut/sbin/utstartA warm restart has been initiated... messages will be logged to /var/opt/SUNWut/log/messages.
19.3.5.2 Deployment on a Remote Subnet
Subnets C and D in Figure 19.1, “Example of Alternate Shared Network Topology” are remote sharedsubnets.
Subnet C uses IP addresses in the range 130.146.22.0/24. Subnet D uses IP addresses in the range130.146.71.0/24. The Sun Ray server named helios has no direct attachment to either of these subnets.This characteristic defines them as remote. The answers to the three predeployment questions are asfollows:
• From which DHCP server will clients on this subnet get their basic IP networking parameters?
In a shared subnet scenario, the administrator must choose whether a DHCP service on the Sun Rayserver or some external DHCP service will provide the client with basic network parameters.
If the enterprise already has a DHCP infrastructure that covers this subnet, it probably supplies basicnetwork parameters. If no such infrastructure exists, configure the Sun Ray server to provide basicnetwork parameters.
• From which DHCP server will clients on this subnet get additional configuration parameters tosupport features such as firmware download?
The administrator must choose whether additional configuration parameters will be supplied to the client,and, if so, whether they will be supplied by a DHCP service on the Sun Ray server or by some externalDHCP service.
Administrators of an established DHCP infrastructure might be unable or unwilling to reconfigure itto provide additional Sun Ray configuration parameters, so having the Sun Ray server provide themis usually more convenient. This setup can be desirable even when the established infrastructure iscapable of delivering the additional parameters. This setup enables you to use Sun Ray Softwarecommands to manage the values of the additional configuration parameters, when those values need tobe changed in response to software upgrades or patch installations on the Sun Ray server.
For instance, a patch that delivers new client firmware could automatically update the firmware versionstring delivered to the client. However, if the firmware version parameter is supplied by some externalDHCP service, an administrator must manually edit the firmware version parameter string in the externalDHCP configuration rules to reflect the new firmware version delivered by the patch. This kind of activityis time-consuming and error-prone as well as unnecessary.
• How will clients on this subnet locate their Sun Ray server?
Use one of the optional additional configuration parameters to report the location of the Sun Ray serverto the client. If additional configuration parameters are not supplied to the client at all, the client cannotlocate a Sun Ray server, so it tries to discover the location of a Sun Ray server by using a broadcast-based mechanism. However, the clients broadcast packets propagate only on the local subnet so theycannot reach a Sun Ray server located on a remote subnet, and cannot establish contact.
The next two examples illustrate representative remote shared subnet configurations. In the firstexample, an external DHCP service provides basic networking parameters, and the Sun Ray serverprovides additional parameters. This configuration is by far the most likely for a Sun Ray deployment inan enterprise that has an established DHCP infrastructure.
Example Shared Network Setups
296
In the second example, basic networking parameters and a bare minimum of additional parameters, justenough to enable the client to contact a Sun Ray server, are supplied by an external DHCP. In this case,the DHCP service is in a Cisco router. This scenario is less than ideal.
No firmware parameters are delivered to the client, so it cannot download new firmware. Theadministrator must make some other arrangement to provide the client with new firmware, for instance,by rotating it off this subnet periodically onto an interconnect or onto some other shared subnet where afull set of additional configuration parameters is offered.
Remote Shared Subnet: Example 1
In this example, in which clients are deployed on subnet C in Figure 19.1, “Example of Alternate SharedNetwork Topology”, the answers to the three predeployment questions are as follows:
• From which DHCP server will clients on this subnet get their basic IP networking parameters?
From an external DHCP service.
• From which DHCP server will clients on this subnet get additional configuration parameters tosupport features such as firmware download?
From the Sun Ray server.
• How will clients on this subnet locate their Sun Ray server?
The clients will be informed of the location of the Sun Ray server through an additional configurationparameter delivered once Sun Ray services are restarted. Use the utadm -A subnet command asfollows to configure DHCP service for clients on a shared subnet.
1. Configure the external DHCP service.
Determining how to configure the external DHCP infrastructure to provide basic networking parametersto the clients on this subnet is beyond the scope of this document. Note the following guidelines:
• If the external DHCP service does not have its own direct connection to this subnet, the administratormust configure a DHCP Relay Agent to deliver DHCP traffic on this subnet to the external DHCPservice. The most likely location for such a Relay Agent would be on a router in this subnet, in thiscase, the router named r22-59 in Figure 19.1, “Example of Alternate Shared Network Topology”.For a brief introduction to this topic, refer to Section 19.5, “Sun Ray Client Initialization RequirementsUsing DHCP”.
• An existing external DHCP service might need to have its IP address allocation increased for thissubnet to support the new clients. This requirement applies whenever additional DHCP clients areplaced on a subnet. You might also want to reduce the lease time of addresses on this subnet so thataddresses become eligible for re-use quickly.
2. Arrange to deliver DHCP traffic to the Sun Ray server.
Because the Sun Ray server does not have its own direct connection to this subnet, the administratormust configure a DHCP Relay Agent to deliver the subnet's DHCP traffic to the Sun Ray server.The most likely location for such a Relay Agent would be on a router in this subnet, in this case, therouter named r22-59 in Figure 19.1, “Example of Alternate Shared Network Topology”. For a briefintroduction to this topic, refer to Section 19.5, “Sun Ray Client Initialization Requirements UsingDHCP”.

Example Shared Network Setups
297
• If r22-59 is running the Cisco IOS, the ip helper-address command can be used to activate itsDHCP Relay Agent to relay DHCP broadcasts from its 10/100 Ethernet port number 4 to the Sun Rayserver at 130.146.59.5
r22-59> interface fastethernet 4r22-59> ip helper-address 130.146.59.5r22-59>
• If the external DHCP service also lacks a connection to this subnet, configure a DHCP Relay Agentto forward requests from the client to the following services:
• The external DHCP service so that the client can obtain basic networking parameters
• The DHCP service on the Sun Ray server so that the client can obtain additional parameters
The Cisco IOS ip helper-address command accepts multiple relay destination addresses, soif, for example, the external DHCP service could be contacted at 130.146.59.2 on subnet B inFigure 19.1, “Example of Alternate Shared Network Topology”, the appropriate sequence wouldbe:
r22-59> interface fastethernet 4r22-59> ip helper-address 130.146.59.2 130.146.59.5r22-59>
Note
Details of the IOS interaction vary according to the specific release of IOS, themodel of the router, and the hardware installed in the router.
3. Configure the Sun Ray server to provide additional parameters to the shared subnet.
Use the utadm -A subnet command to configure DHCP service for clients on a shared subnet. Inthis example, the shared subnet has network number 130.146.22.0, so the appropriate command isutadm -A 130.146.22.0.
# /opt/SUNWut/sbin/utadm -A 130.146.22.0Selected values for subnetwork "130.146.22.0"net mask: 255.255.255.0no IP addresses offeredauth server list: 130.146.59.5firmware server: 130.146.59.5router: 130.146.22.1Accept as is? ([Y]/N): nnew netmask:[255.255.255.0]Do you want to offer IP addresses for this subnet? (Y/[N]):new auth server list: [130.146.59.5]To read auth server list from file, enter file name:Auth server IP address (enter <CR> to end list):If no server in the auth server list responds, should an auth server be located by broadcasting on the network? ([Y]/N):new firmware server: [130.146.59.5]new router: [130.146.22.1] 130.146.22.6Selected values for subnetwork "130.146.59.0"net mask: 255.255.255.0no IP addresses offeredauth server list: 130.146.59.5firmware server: 130.146.59.5router: 130.146.22.6

Example Shared Network Setups
298
Accept as is? ([Y]/N):### Building network tables - this will take a few minutes### Configuring firmware version for Sun RayAll the units served by "helios" on the 130.146.22.0network interface, running firmware other than version"2.0_37.b,REV=2002.12.19.07.46" will be upgraded at theirnext power-on.### Configuring Sun Ray Logging Functions### stopped DHCP daemon### started DHCP daemon#
In this example, the default values initially suggested by utadm were not appropriate. Specifically, thedefault router address to be used by clients on this subnet was not correct because utadm guessesthat the address of the default router for any shared subnet will have a host part equal to 1. This was agreat guess for the directly connected subnet B in Figure 19.1, “Example of Alternate Shared NetworkTopology”, but it is not correct for subnet C.
The appropriate router address for clients on this subnet is 130.146.22.6 (port 4 of router r22-59),so the administrator replied n to the first Accept as is? prompt and was given the opportunity toprovide alternative values for the various parameters.
4. Restart Sun Ray services on the Sun Ray server by issuing the utstart command to fully activateSun Ray services on the shared subnet.
# /opt/SUNWut/sbin/utstartA warm restart has been initiated... messages will be logged to /var/opt/SUNWut/log/messages.
Remote Shared Subnet: Example 2
In this example, deploying clients on subnet D in Figure 19.1, “Example of Alternate Shared NetworkTopology”, the answers to the three predeployment questions are as follows:
• From which DHCP server will clients on this subnet get their basic IP networking parameters?
From an external DHCP service.
• From which DHCP server will clients on this subnet get additional configuration parameters tosupport features such as firmware download?
The clients will not be supplied with the additional parameters required to support firmware download orto activate other advanced client features.
• How will clients on this subnet locate their Sun Ray server?
The external DHCP service will supply a single additional parameter to inform the client of the location ofa Sun Ray server.
In this example, the Sun Ray server does not participate in client initialization at all. Configuration stepsare still required on the Sun Ray server because it responds by default only to clients located on directlyconnected dedicated interconnects. It responds to clients on shared subnets only if the utadm -L oncommand has been executed. Running the utadm -A subnet command to activate DHCP on theSun Ray server for a shared subnet, as in this example, implicitly executes utadm -L on. If utadm -A subnet has not been run, the administrator must run utadm -L on manually to enable the server tooffer sessions to clients on the shared subnet.
1. Configure the external DHCP service.

Using a Private Network Configuration
299
Determining how to configure the external DHCP infrastructure to provide basic networking parametersto the clients on this subnet is beyond the scope of this document. However, for this example, assumethat DHCP service is provided by Cisco IOS-based router r22-71 in Figure 19.1, “Example ofAlternate Shared Network Topology”, attached to the 130.146.71.0 subnet through its 10/100Ethernet port 3. This router can be configured to provide basic networking parameters and the locationof a Sun Ray server as follows:
r22-71> interface fastethernet 3r22-71> ip dhcp excluded-address 130.146.71.1 130.146.71.15r22-71> ip dhcp pool CLIENTr22-71/dhcp> import allr22-71/dhcp> network 130.146.71.0 255.255.255.0r22-71/dhcp> default-router 130.146.71.4r22-71/dhcp> option 49 ip 130.146.59.5r22-71/dhcp> lease 0 2r22-71/dhcp> ^Zr22-71>
Note
Details of the IOS interaction vary according to the specific release of IOS, themodel of router and the hardware installed in the router.
DHCP option 49, the standard option of the X Window Display Manager, identifies 130.146.59.5 asthe address of a Sun Ray server. In the absence of AltAuth and Auth-Srvr vendor-specific options,the client tries to find a Sun Ray server by broadcasting on the local subnet. If the broadcasts evoke noresponse, the client uses the address supplied in t option of the X Window Display Manager.
Note
This example is an unorthodox use of the option of the X Window DisplayManager, but in a remote subnet deployment where vendor-specific optionscan not be delivered, it might be the only way of putting a client in touch with aserver.
2. Configure the Sun Ray server to accept client connections from shared subnets by running utadm -Lon.
# /opt/SUNWut/sbin/utadm -L on### Turning on Sun Ray LAN connectionNOTE: utstart must be run before LAN connections will be allowed#
3. Restart Sun Ray services on the Sun Ray server by issuing the utstart command to fully activateSun Ray services on the shared subnet.
# /opt/SUNWut/sbin/utstartA warm restart has been initiated... messages will be logged to /var/opt/SUNWut/log/messages.
19.4 Using a Private Network ConfigurationThis section provides information about using a private network configuration for a Sun Ray environment.This is a supported configuration, but it adds more complexity to the initial and ongoing Sun Ray networkadministration.
A private network configuration meets the following criteria:

Private Network Configuration Worksheet
300
• A private network segment is connected to one of the interfaces of the Sun Ray server.
• The Sun Ray server handles all the Sun Ray Client's IP and device configurations.
• The Sun Ray server defines the subnet's characteristics (such as the IP range and subnet).
• Only Sun Ray Clients are connected to the subnet.
• The Sun Ray server provides DHCP services.
• The private network is configured by using the utadm -a interface command.
Figure 19.2, “Private Network Example” shows an example of a private network configuration.
Figure 19.2 Private Network Example
19.4.1 Private Network Configuration Worksheet
Fill out Table 19.2, “Private Network Configuration Worksheet”, so that the information is readily availableduring the actual configuration process. This worksheet is for configuring a Sun Ray server in a privatenetwork.
• Values that are provided in italics are only examples and should not be used.
• Values provided in normal font are defaults and can be used.
• Superscripted numbers (#) refer to footnotes at the end of each section.
Note
The blank rows in the worksheets are provided for you to add additional informationabout your environment if you choose to print the worksheets.
Table 19.2 Private Network Configuration Worksheet
Aspect or Variable Default Value,Example, or (Other)
Your PrimaryServer Value
Your SecondaryServer Value
Configuring the Sun Ray interconnect interfaceusing utadm
(Provide the start time)
Interface name hme1 (Oracle Solaris),eth1 (Oracle Linux)

Private Network Configuration Worksheet
301
Aspect or Variable Default Value,Example, or (Other)
Your PrimaryServer Value
Your SecondaryServer Value
• Host address (1) 192.168.128.1
• Net mask 255.255.255.0
• Net address 192.168.128.0
• Host name (1) hostname-interface-name
If the Sun Ray server is used for IP addressallocation:
• First Sun Ray Client address 192.168.128.16
• Number of Sun Ray Client addresses (2) X
Firmware server (3) 192.168.128.1
Router (3) 192.168.128.1
Specify additional server list? (optional) (yes or no)
• If yes, filename filename
• Or, Server IP address 192.168.128.2
Configuring Sun Ray Software using utconfig (Provide the start time)
Admin password adminpass
Configure Admin GUI? If yes, then:
• Apache Tomcat installation directory /opt/apache-tomcat
• Sun Ray admin server port number 1660
• Enable remote administration? (optional) (yes or no)
• Enable secure connection? (optional) (yes or no)
Configure Kiosk Mode? (optional) (yes or no)
• If yes, User prefix utku
• Group name utkiosk
• User ID range start 150000
• Number of users (4) 25
Configure failover group? (optional) (yes or no)
• If yes, Failover group signature (5) signature1
(1) These values are different for each Sun Ray server, even if that server is part of a failover group.
(2) These values must be unique among the servers in a failover group. The following guidelines can helpyou determine what addresses to allocate for each Sun Ray server:
• X = (Number of clients/(Number of servers - 1)) - 1
• First unit address for primary server= 192.168.128.16
• Last unit address for all servers = X + first unit address. If last unit address is greater than 240, reduce to240.
• First unit address for secondary servers = 1 + last unit address of previous server. If first unit addressis greater than 239, configure for a class B network. Example: 120 clients, 4 servers. X= 39

How to Configure a Sun Ray Server in a Private Network
302
(3) These values are the same as the interface host address by default.
(4) The value entered for the number of users is the greater of:
• The total number of Sun Ray Clients
• The total number of disconnected and active sessions
(5) This signature^ must be the same for every Sun Ray server in a failover group. The signature requiresat least one numeric character.
19.4.2 How to Configure a Sun Ray Server in a Private Network
This procedure shows how to configure a Sun Ray server in a private network.
1. Log in as the superuser of the Sun Ray server, either locally or remotely.
Note
Make sure that the /etc/hosts file contains the IP address of the system hostname.
2. Configure the Sun Ray interconnect interface:
# /opt/SUNWut/sbin/utadm -a interface-name
where interface-name is the name of the interface to the Sun Ray interconnect, for example: hme1,qfe0, or ge0 (Oracle Solaris) or eth1 (Oracle Linux).
The utadm script begins configuring DHCP for the Sun Ray interconnect, restarts the DHCP daemon,and configures the interface. The script then lists the default values and asks whether they areacceptable.
Note
If the IP addresses and DHCP configuration data are not set up correctlywhen the interfaces are configured, the failover feature cannot work properly.In particular, configuring the Sun Ray server's interconnect IP address as aduplicate of any other server's interconnect IP address may cause the Sun RayAuthentication Manager to generate Out of Memory errors.
3. Evaluate the default values:
• If you are satisfied with the default values, and the server is not part of a failover group, answer y.
• Otherwise, answer n and accept whatever default values are shown by pressing Return, or providethe correct values from the worksheet.
The utadm script prompts for the following:
• New host address (192.168.128.1)
• New netmask (255.255.255.0)
• New host name (hostname-interface-name)
• Offer IP addresses for this interface? ([Y]/N)

How to List the Current Network Configuration
303
• New first Sun Ray Client address (92.168.128.16)
• Total number of Sun Ray Client address (X)
• New authorization server address (192.168.128.1)
• New firmware server address (192.168.128.1)
• New router address (192.168.128.1)
• An additional server list.
If you answer yes, it requests either a file name (filename) or a Server IP Address (192.168.128.2).
4. The utadm script again lists the configuration values and asks whether they are acceptable.
• If not, answer n and revise the answers provided in Step 3.
• If the values are correct, answer y. The following Sun Ray files are configured:
For Oracle Solaris:
/etc/hostname.interface-name/etc/inet/hosts/etc/inet/netmasks/etc/inet/networks
For Oracle Linux:
/etc/opt/SUNWut/net/dhcp/SunRay-options/etc/opt/SUNWut/net/dhcp/SunRay-interface-eth1/etc/opt/SUNWut/net/hostname.eth1/etc/hosts/etc/opt/SUNWut/net/netmasks/etc/opt/SUNWut/net/networks/etc/dhcpd.conf
The utadm script configures the Sun Ray Client firmware versions and restarts the DHCP daemon.
5. Repeat this procedure for each of the secondary servers in your failover group.
19.4.3 How to List the Current Network Configuration
# utadm -l
19.4.4 How to Print a Private Network Configuration
# utadm -p
For each interface, this command displays the host name, network, netmask, and number of IP addressesassigned to Sun Ray Clients by DHCP.
Note
Sun Ray servers require static IP addresses; therefore, they cannot be DHCPclients.

How to Delete an Interface
304
19.4.5 How to Delete an Interface
# utadm -d interface_name
This command deletes the entries that were made in the hosts, networks, and netmasks files anddeactivates the interface as a Sun Ray interconnect.
19.4.6 Example Private Network Setup
The following section presents an example of a Sun Ray Client deployment on the private networkinterconnect A (directly-connected dedicated interconnect) as shown in Figure 19.3, “Example of AlternatePrivate Network Topology”.
Figure 19.3 Example of Alternate Private Network Topology

Example Private Network Setup
305
Subnet A is a private network. Its subnet will use IP addresses in the range 192.168.128.0/24. The SunRay server named helios is attached to the interconnect through its qfe2 network interface, which will beassigned the IP address 192.168.128.3.
In an interconnect scenario, the DHCP service on the Sun Ray server always provides both basicnetworking parameters and additional configuration parameters to the Sun Ray Client. The answers to thethree predeployment questions are as follows:
• From which DHCP server will clients on this subnet get their basic IP networking parameters?
On a directly connected dedicated interconnect, basic networking parameters are always supplied by theDHCP service on the Sun Ray server.
• From which DHCP server will clients on this subnet get additional configuration parameters tosupport features such as firmware download?
On a directly connected dedicated interconnect, additional configuration parameters are always suppliedby the DHCP service on the Sun Ray server.
• How will clients on this subnet locate their Sun Ray server?
On a directly connected dedicated interconnect, the Sun Ray Client is always notified of the location ofthe Sun Ray server through an additional configuration parameter supplied when Sun Ray services arerestarted.
This example shows the DHCP service for the directly connected dedicated interconnect A shown inFigure 19.3, “Example of Alternate Private Network Topology”.
1. Configure the Sun Ray server to provide both basic and additional parameters to the interconnect.
Use the utadm -a interface-name command to configure DHCP service for clients on aninterconnect. In this example, the interconnect is attached through interface qfe2:
# /opt/SUNWut/sbin/utadm -a qfe2### Configuring /etc/nsswitch.conf### Configuring Service information for Sun Ray### Disabling Routing### configuring qfe2 interface at subnet 192.168.128.0Selected values for interface "qfe2"host address: 192.168.128.1net mask: 255.255.255.0net address: 192.168.128.0host name: helios-qfe2net name: SunRay-qfe2first unit address: 192.168.128.16last unit address: 192.168.128.240auth server list: 192.168.128.1firmware server: 192.168.128.1router: 192.168.128.1Accept as is? ([Y]/N): nnew host address: [192.168.128.1] 192.168.128.3new netmask: [255.255.255.0]new host name: [helios-qfe2]Do you want to offer IP addresses for this interface? ([Y]/N):new first Sun Ray address: [192.168.128.16]number of Sun Ray addresses to allocate: [239]new auth server list: [192.168.128.3]To read auth server list from file, enter file name:Auth server IP address (enter <CR> to end list):If no server in the auth server list responds, should an auth server be located by broadcasting on the network? ([Y]/N):

Sun Ray Client Initialization Requirements Using DHCP
306
new firmware server: [192.168.128.3]new router: [192.168.128.3]Selected values for interface "qfe2"host address: 192.168.128.3net mask: 255.255.255.0net address: 192.168.128.0host name: helios-qfe2net name: SunRay-qfe2first unit address: 192.168.128.16last unit address: 192.168.128.254auth server list: 192.168.128.3firmware server: 1 192.168.128.3router: 192.168.128.3Accept as is? ([Y]/N):### successfully set up "/etc/hostname.qfe2" file### successfully set up "/etc/inet/hosts" file### successfully set up "/etc/inet/netmasks" file### successfully set up "/etc/inet/networks" file### finished install of "qfe2" interface### Building network tables - this will take a few minutes### Configuring firmware version for Sun RayAll the units served by "helios" on the 192.168.128.0network interface, running firmware other than version"2.0_37.b,REV=2002.12.19.07.46" will be upgraded at theirnext power-on.### Configuring Sun Ray Logging FunctionsDHCP is not currently running, should I start it? ([Y]/N):### started DHCP daemon#
In this example, the default values initially suggested by utadm were not appropriate. Specifically,the suggested value for the server's IP address on the interconnect was not the desired value. Theadministrator replied n to the first "Accept as is?" prompt and was given the opportunity to providealternative values for the various parameters.
2. Restart Sun Ray services on the Sun Ray server by issuing the utstart command to fully activateSun Ray services on the newly defined interconnect.
# /opt/SUNWut/sbin/utstartA warm restart has been initiated... messages will be logged to /var/opt/SUNWut/log/messages.
19.5 Sun Ray Client Initialization Requirements Using DHCP
Because Sun Ray Clients are stateless, they rely entirely on network services to provide the configurationdata they need to complete their initialization.
• Each Sun Ray Client must first acquire basic network parameters, such as a valid IP address, on thenetwork to which it is connected.
• The Sun Ray Client can also be supplied with additional configuration information to support advancedproduct features, such as the ability to update the Sun Ray Client firmware and to report exceptionconditions to a syslog service.
• The Sun Ray Client must locate and contact a Sun Ray server that can offer desktop services to the SunRay user.
The Sun Ray Client uses the Dynamic Host Configuration Protocol (DHCP) to obtain this information.

DHCP Basics
307
19.5.1 DHCP Basics
The Sun Ray Client is a DHCP client that solicits configuration information by broadcasting DHCP packetson the network. The requested information is supplied by one or more DHCP servers in response to theclient's solicitations. DHCP service may be provided by a DHCP server process executing on a Sun Rayserver, by DHCP server processes executing on other systems, or by some combination of the two. Anyconforming implementation of a DHCP service can be used to satisfy the DHCP requirements of the SunRay Client. The Oracle Solaris DHCP service is one such implementation. Third-party implementationsexecuting on non-Sun platforms can also be configured to deliver information to Sun Ray Clients.
The DHCP protocol defines a number of standard options that can be used to inform the client of avariety of common network capabilities. DHCP also allows a number of vendor-specific options that carryinformation that is meaningful only to individual products. For more information, see Table 19.4, “AlternateVendor-Specific DHCP Options”.
The Sun Ray Client depends on a small number of standard options to establish its basic networkparameters. It depends on several standard and vendor-specific options to provide the additionalinformation that constitutes a complete client configuration. If these additional configuration parameters arenot supplied, the client cannot perform certain activities, the most important of which is the downloadingof new Sun Ray Client firmware. Table 19.4, “Alternate Vendor-Specific DHCP Options” lists the vendor-specific options.
Note
If an administrator chooses not to make this additional configuration informationavailable to the Sun Ray Clients, a procedure must be established to deliverfirmware updates to them. One solution would be a small, dedicated interconnecton one Sun Ray server. Then, the administrator can transfer the clients one-by-onewhen new firmware becomes available on the server, for example, through a patchor Sun Ray product upgrade.
The location of the Sun Ray server is usually conveyed to the Sun Ray Client through one of a pair ofDHCP vendor-specific options, AuthSrvr and AltAuth.
If the Sun Ray Client does not receive this information, it uses a broadcast-based discovery mechanismto find a Sun Ray server on its subnet. If the broadcast-based discovery mechanism fails, the Sun RayClient interprets the DHCP standard option (option 49) of the X Window Display Manager as a list of SunRay server addresses where it attempts to contact Sun Ray services. This feature can simplify the DHCPconfiguration of LAN-deployed Sun Rays by removing the need for a DHCP vendor option to carry thisinformation.
Table 19.3, “DHCP Service Parameters Available” provides the list of available DHCP service parameters.
Table 19.3 DHCP Service Parameters Available
Parameters Sun Ray ServerDHCP Service
External DHCPService WithVendor-SpecificOptions
External DHCPService WithoutVendor-SpecificOptions
No DHCP Service
Basic networkparameters
Yes Yes Yes No
Additional parameters(for firmwaredownload, etc.)
Yes Yes No No
Sun Ray serverlocation
Yes Yes Yes, throughbroadcast discovery
Yes, throughbroadcast discovery

DHCP Parameter Discovery
308
Parameters Sun Ray ServerDHCP Service
External DHCPService WithVendor-SpecificOptions
External DHCPService WithoutVendor-SpecificOptions
No DHCP Service
or the X DisplayManager standardoption
19.5.2 DHCP Parameter Discovery
DHCP enables two stages of parameter discovery. The initial DHCPDISCOVER stage discovers basicnetwork parameters. This stage may be followed by a DHCPINFORM, which finds additional information thatwas not provided during DHCPDISCOVER.
All Sun Ray Clients must have access to at least one DHCP service, which provides network parametersin response to a DHCPDISCOVER request from the client. Sun Ray Clients can exploit the DHCPINFORMfeature, which enables full configuration of the client, even when an external DHCP service that is notcapable of providing complete configuration data provides the network parameters of the Sun Ray Client.
19.5.3 DHCP Relay Agent
The Sun Ray Client sends DHCP requests as broadcast packets that propagate only on the local LANsegment or subnet. If the Sun Ray Client resides on the same subnet as the DHCP server, the DHCPserver can see the broadcast packet and respond with the information the Sun Ray Client needs. If theSun Ray Client resides on a different subnet than the DHCP server, the client must depend on a localDHCP Relay Agent to collect the broadcast packet and forward it to the DHCP server. Depending on thephysical network topology and DHCP server strategy, the administrator might need to configure a DHCPRelay Agent on each subnetwork to which Sun Ray clients are connected. Many IP routers provide DHCPRelay Agent capability. If a deployment plan requires the use of a DHCP Relay Agent and the administratordecides to activate this capability on a router, the appropriate instructions can be found in the routerdocumentation, usually under the heading of "DHCP Relay" or "BOOTP forwarding." DHCP is derived froman earlier protocol called BOOTP. Some documentation uses these names interchangeably.
In certain cases, an existing enterprise DHCP service provides the Sun Ray Client with its IP address whilea Sun Ray server provides it with firmware version details and Sun Ray server location. If a deploymentplan calls for DHCP parameters to be provided to the client by multiple servers, and none of those serversis connected to the subnet where the client resides, the DHCP Relay Agent should be configured so thatthe clients subnet can deliver broadcasts to all the DHCP servers. For example, in routers controlled bya Cisco IOS Executive, the ip helper-address command activates a DHCP Relay Agent. Specifyingmultiple arguments to the ip helper-address command enables relaying to multiple DHCP servers.For more information, see Section 19.3.5.2, “Deployment on a Remote Subnet”.
19.5.4 Simplifying DHCP Configuration of Remote Sun Ray Clients
You can simplify the DHCP configuration of Sun Ray Clients at remote sites by using the X WindowSystem Display Manager option to supply a list of available Sun Ray servers. This option eliminates theneed for Sun Ray vendor options as well as the need to forward DHCPINFORM requests to a Sun Rayserver.
For a more complete treatment of network configuration, including DHCP and vendor-specific options,see Table 19.3, “DHCP Service Parameters Available” and Table 19.4, “Alternate Vendor-Specific DHCPOptions”.
The following example is a sample DHCP configuration for a Cisco IOS-based router.

Simplifying DHCP Configuration of Remote Sun Ray Clients
309
ip dhcp excluded-address 129.149.244.161ip dhcp pool CLIENTimport all network 129.149.244.160 255.255.255.248default-router 129.149.244.161option 26 hex 0556option 49 ip 10.6.129.67 129.146.58.136lease 0 2
Option 49, the X Window System Display Manager option, lists IP addresses 10.6.129.67 and129.146.58.136 as Sun Ray servers. The Sun Ray Client tries to connect to those servers when itreceives a DHCP response from the router. Option 26 sets the Maximum Transmission Unit (MTU), whichdefines the maximum packet size for the Sun Ray connections, in this case, 1366 bytes rather than thedefault Ethernet MTU of 1500 bytes. This setting is necessary to provide space for the IPSec headers toimplement a virtual private network (VPN) connection.
The DHCP service, either directly from an ISP or from a home firewall, is also required to assign the routerits IP address behind the firewall.
The router's WAN port either plugs directly into the DSL/Cable modem or into the home firewall orgateway. The Sun Ray Client then plugs into one of the four LAN ports on the router. A VPN routerplugged directly into the DSL or cable modem can be connected only to a Sun Ray Client. If the routerhas been configured to supply DHCP parameters to the Sun Ray Client, it will instruct the client to try toconnect to the appropriate Sun Ray server.
The router should start a VPN tunnel when it is plugged in, which it should always be on. Each routershould be connected to the VPN gateway and programmed with a user name based on an user's ID and arandom password. The VPN gateway should be configured to allow only Sun Ray traffic to pass, and onlyto a limited number of hosts, so that users cannot connect anything else to the LAN side of the router andthen connect into the corporate network. However, users may connect more than one Sun Ray Client.
Whenever a VPN or other tunnel is being used, you need to take account of the IP MTU across the pathbetween the server and the Sun Ray Client. The VPN typically packs additional control data into eachpacket, which reduces the available space for application data.
The latest Sun Ray firmware attempts to compensate for this reduction automatically, but this processis not always possible. Make sure that the Sun Ray Client has the latest firmware. Installing the latestpatch on the server is not sufficient. You must also make sure that the client was configured to update itsfirmware and then check that the update occurred.
If the Sun Ray Client has the latest firmware but the problem still occurs, then the client must be set towork with a reduced MTU. You can update the client through whatever mechanism you use to give the SunRay its basic configuration data, such as DHCP, TFTP or, if the client is running GUI-capable firmware,local configuration on the Sun Ray Client itself.
The site should know what the effective MTU is across the VPN. If not, see any available technicalarchives or the ThinkThin blog on http://blogs.oracle.com/ThinkThin/. If a precise MTU is not important,then a low estimate, such as 1350 (the standard value is 1500), should be sufficient to let you verify thatMTU is the cause of the problem.
After you update and restart the Sun Ray Client, the client reports the new MTU value to the server, andthe server adjusts its packet-construction strategy to fit within that MTU. The client should no longer sendSun Ray traffic that is too big to be delivered in one piece through the VPN tunnel.
Note
Local settings on the Sun Ray Client generally override values obtained from othersources, such as .parms files or DHCP. Therefore, you must provide the ability
Standard DHCP Parameters
310
to clear a setting so that the value from a .parms file is not overridden and canbe used for configuration. For numeric values, include an empty field. For switchsettings, click the Clear button when modifying a setting. The utquery output froma client reflects the values that are defined in the local configuration.
19.5.5 Standard DHCP Parameters
A set of Sun Ray Clients can be started with only standard DHCP parameters, shifting the burden ofdefining the server list to the Domain Name Service (DNS) and firmware management to TFTP.
If sunray-config-servers and sunray-servers are defined appropriately by the DNS serving a setof remote Sun Rays Clients, no extra DHCP parameters are required other than basic network information.
• A DNS client incorporated in the firmware allows many values to be names rather than IP addresses.Most values can be either a name or an IP address. If a name is specified, the DNS lookup appends theconfigured domain name. Components are stripped successively until the lookup succeeds or only twocomponents are left in the domain name. If none of those lookups succeed, the name is looked up byitself. If the name itself ends with a dot character ("."), the name is taken to be a rooted name, and it islooked up without domain name components appended.
• DHCP option 66 (TFTP server name) is supported as an alternative to the FWSrvr vendor-specificoption listed in Section 19.5.6, “Vendor-specific DHCP Options”. This string value must either be a singleIP address or a DNS host name that resolves to a list of IP addresses. If it is a list of IP addresses, oneis chosen randomly.
• A firmware maintenance mechanism creates *.parms files in the TFTP home directory (one for eachmodel type), which are read in lieu of using the NewTVer DHCP vendor option. Thus, remote firmwareupgrades are possible without DHCP access to the NewTVer value. The *.parms files contain theversion, hardware revision, and barrier levels, eliminating unnecessary file reads in cases where thebarrier would have prevented writing the firmware to flash memory. For details on options that can beused to configure the .parms files, see the utfwadm man page.
• A default DNS name for the firmware server, sunray-config-servers, is used when neither option66 nor FWSrvr given. Defining this name in DNS provides the firmware server address without DHCPoptions, just DNS servers and domain name.
• Inclusion of servers=_server name list_ and select=inorder|random in the *.parms files enablesspecification of a list of server names and specification of whether the names should be used in order,or at random. If a name resolves to multiple addresses, an IP address is chosen according to the selectkeyword.
• When neither a server list nor an AltAuth list is provided, the default name
sunray-servers is looked up in DNS and the list of IP addresses is used in place of the AltAuth list.
In the event of an error in the firmware download, error messages provide additional information that canbe useful in diagnosing and correcting the problem. See Chapter 16, Troubleshooting Icons.
Also, during DNS lookups, a status line in the OSD icon shows the name being looked up and, if one isfound, the IP address.
19.5.6 Vendor-specific DHCP Options
Table 19.4, “Alternate Vendor-Specific DHCP Options” lists the vendor-specific DHCP options that SunRay defines and uses.

Vendor-specific DHCP Options
311
Table 19.4 Alternate Vendor-Specific DHCP Options
OptionCode
Parameter Name Client Class Data Type Required? Granularity MaxCount
Comments
21 AuthSrvr SUNW.NewT.SUNW IP Mandatory 1 1 Single SunRay serverIP addresses
22 AuthPort SUNW.NewT.SUNW NUMBER Optional 2 1 Sun Rayserver port
23 NewTVer SUNW.NewT.SUNW ASCII Optional 1 0 Desiredfirmwareversion
24 LogHost SUNW.NewT.SUNW IP Optional 1 1 Syslogserver IPaddress
25 LogKern SUNW.NewT.SUNW NUMBER Optional 1 1 Log level forkernel
26 LogNet SUNW.NewT.SUNW NUMBER Optional 1 1 Log level fornetwork
27 LogUSB SUNW.NewT.SUNW NUMBER Optional 1 1 Log level forUSB
28 LogVid SUNW.NewT.SUNW NUMBER Optional 1 1 Log level forvideo
29 LogAppl SUNW.NewT.SUNW NUMBER Optional 1 1 Log levelfor firmwareapplication
30 NewTBW SUNW.NewT.SUNW NUMBER Optional 4 1 Bandwidthcap, valueis bits persecond
31 FWSrvr SUNW.NewT.SUNW IP Optional 1 1 FirmwareTFTP serverIP address
32 NewTDispIndx SUNW.NewT.SUNW NUMBER Optional 4 1 Obsolete. Donot use.
33 Intf SUNW.NewT.SUNW ASCII Optional 1 0 Sun Rayserverinterfacename
34 NewTFlags SUNW.NewT.SUNW NUMBER Optional 4 1 Obsolete. Donot use.
35 AltAuth SUNW.NewT.SUNW IP Optional 1 0 List of SunRay serverIP addresses
36 BarrierLevel SUNW.NewT.SUNW NUMBER Mandatory 4 1 FirmwareDownload:
barrier level
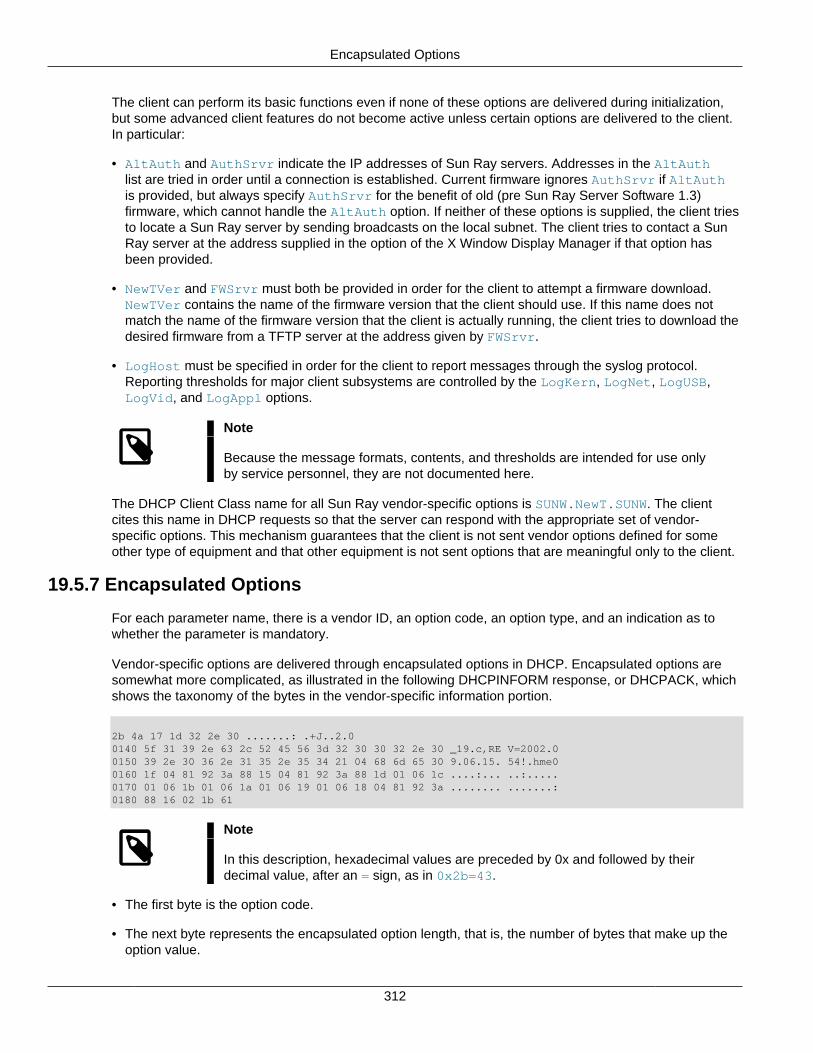
Encapsulated Options
312
The client can perform its basic functions even if none of these options are delivered during initialization,but some advanced client features do not become active unless certain options are delivered to the client.In particular:
• AltAuth and AuthSrvr indicate the IP addresses of Sun Ray servers. Addresses in the AltAuthlist are tried in order until a connection is established. Current firmware ignores AuthSrvr if AltAuthis provided, but always specify AuthSrvr for the benefit of old (pre Sun Ray Server Software 1.3)firmware, which cannot handle the AltAuth option. If neither of these options is supplied, the client triesto locate a Sun Ray server by sending broadcasts on the local subnet. The client tries to contact a SunRay server at the address supplied in the option of the X Window Display Manager if that option hasbeen provided.
• NewTVer and FWSrvr must both be provided in order for the client to attempt a firmware download.NewTVer contains the name of the firmware version that the client should use. If this name does notmatch the name of the firmware version that the client is actually running, the client tries to download thedesired firmware from a TFTP server at the address given by FWSrvr.
• LogHost must be specified in order for the client to report messages through the syslog protocol.Reporting thresholds for major client subsystems are controlled by the LogKern, LogNet, LogUSB,LogVid, and LogAppl options.
Note
Because the message formats, contents, and thresholds are intended for use onlyby service personnel, they are not documented here.
The DHCP Client Class name for all Sun Ray vendor-specific options is SUNW.NewT.SUNW. The clientcites this name in DHCP requests so that the server can respond with the appropriate set of vendor-specific options. This mechanism guarantees that the client is not sent vendor options defined for someother type of equipment and that other equipment is not sent options that are meaningful only to the client.
19.5.7 Encapsulated Options
For each parameter name, there is a vendor ID, an option code, an option type, and an indication as towhether the parameter is mandatory.
Vendor-specific options are delivered through encapsulated options in DHCP. Encapsulated options aresomewhat more complicated, as illustrated in the following DHCPINFORM response, or DHCPACK, whichshows the taxonomy of the bytes in the vendor-specific information portion.
2b 4a 17 1d 32 2e 30 .......: .+J..2.00140 5f 31 39 2e 63 2c 52 45 56 3d 32 30 30 32 2e 30 _19.c,RE V=2002.00150 39 2e 30 36 2e 31 35 2e 35 34 21 04 68 6d 65 30 9.06.15. 54!.hme00160 1f 04 81 92 3a 88 15 04 81 92 3a 88 1d 01 06 1c ....:... ..:.....0170 01 06 1b 01 06 1a 01 06 19 01 06 18 04 81 92 3a ........ .......:0180 88 16 02 1b 61
Note
In this description, hexadecimal values are preceded by 0x and followed by theirdecimal value, after an = sign, as in 0x2b=43.
• The first byte is the option code.
• The next byte represents the encapsulated option length, that is, the number of bytes that make up theoption value.

Failover Groups
313
• The next one or more bytes make up the multi-byte option value.
The option value is followed by another encapsulated option code, and so on.
The example begins with 0x2b=43, the DHCP option for vendor-specific information. It has a length of0x4a=74 bytes, which is the total number of bytes that follow. These bytes contain the encapsulatedvendor options.
The remainder of the example represents the value of the vendor-specific information options. The firstbyte contains the first encapsulated option, whose value is 0x17=23, and the NewTVer option, whosevalue type is ASCII. The next byte is 0x1d=29, which is the length of the NewTVer string. These optionsare followed by 29 bytes that represent the string itself.
The ASCII interpretation at the right of the DHCPACK, is 2.0_19.c,REV=2002.09.06.15.54. This isthe end of the first encapsulated option. The next byte is the beginning of the next option, Intf, representedby 0x21=33. The next byte, the length, is 0x04=4, and the next four bytes are the ASCII value hme0.That's the end of the second encapsulated option.
The next byte is 0x1f=31, which represents the FWSrvr parameter, whose function is to indicate theIP address of the firmware TFTP server. The next byte is the length, 4, which is always be true for anIP address. The hexadecimal value is 0x81 0x92 0x3a 0x88, which corresponds to the IP address129.146.58.136.
19.6 Failover GroupsThis section provides information about configuring a failover group in a network configuration when usinga private network or when using a Sun Ray server as a DHCP server.
If you have Sun Ray dedicated interconnects, all services required by Sun Ray clients should be providedby multiple, redundant servers to ensure continuity of Sun Ray service in the case of a network or systemfailure. For example, you must configure DHCP (IP address assignment and configuration) or DNS (nameresolution) on all servers.
Note
The failover feature cannot work properly if the IP addresses and DHCPconfiguration data are not set up properly when the interfaces are configured. Inparticular, if any Sun Ray server's interconnect IP address is a duplicate of anyother server's interconnect IP address, the Sun Ray Authentication Manager will failto operate properly.
19.6.1 Network Topologies
A failover group can consist of servers in either a common, dedicated interconnect or servers within aLAN. However, the servers in a failover group must still be able to reach one another, using multicast orbroadcast, over at least one shared subnet. Servers in a group authenticate (or "trust") one another using acommon group signature. The group signature is a key used to sign messages sent between servers in thegroup. This key must be configured to be identical on each server.
When a dedicated interconnect is used, all servers in the failover group should have access to, and beaccessible by, all the Sun Ray Clients on a given sub-net. Routers should not be attached to a dedicatedinterconnect. The failover environment supports the same interconnect topologies that are supported by asingle-server Sun Ray environment; however, switches should be multicast-enabled.
If multicast does not work in your network, you may use broadcast instead. To disable multicast, use theenableMulticast property in the auth.props file. In special cases, you may configure an explicit list

Network Topologies
314
of group servers using utgmtarget. For example, you would use utgmtarget to integrate servers on adifferent subnet into a failover group. Communication to these servers use unicast. Note that adding such aserver to the group will require a restart of the entire server group.
Figure 19.4, “Simple Failover Group” shows a simple failover group setup.
Figure 19.4 Simple Failover Group
When a server in a failover group fails for any reason, each Sun Ray Client connected to that serverreconnects to another server in the same failover group. The failover occurs at the user authenticationlevel: the client connects to a previously existing session for the user's token. If session exists, the clientconnects to a server selected by the load-balancing algorithm. This server then presents a login screen tothe user, and the user must relogin to create a new session. The state of the session on the failed server islost.
Figure 19.5, “Redundant Failover Group” shows an example of a redundant failover group.
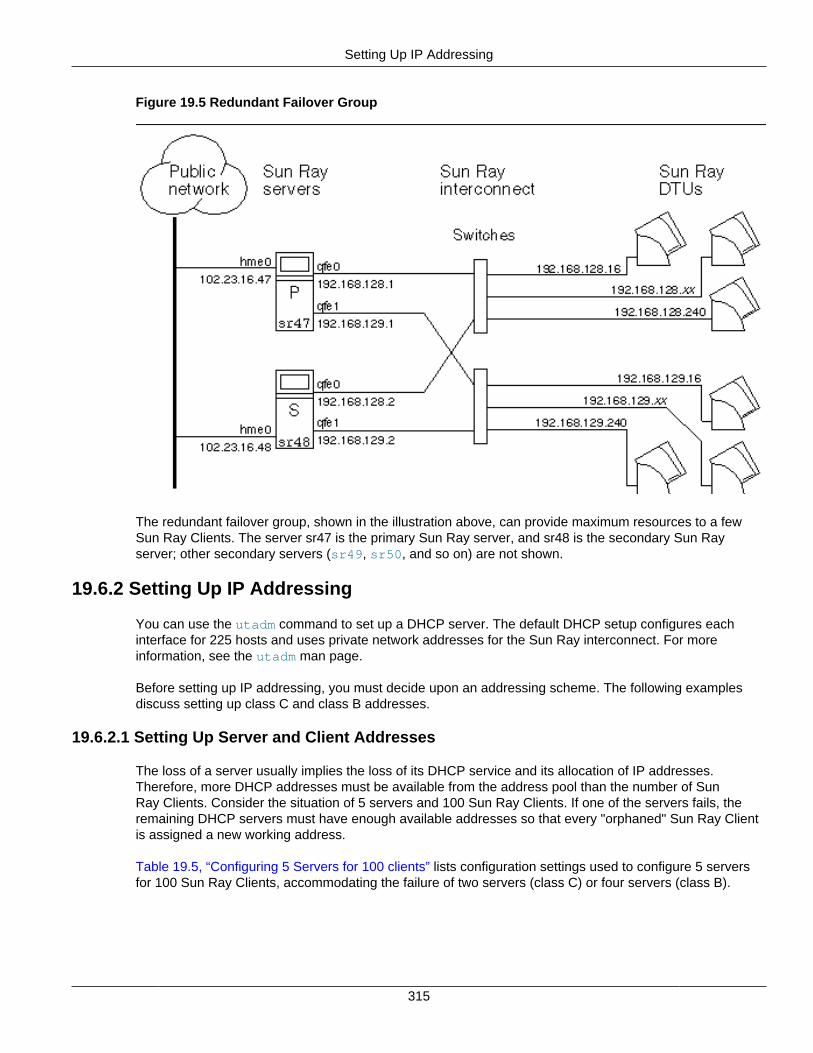
Setting Up IP Addressing
315
Figure 19.5 Redundant Failover Group
The redundant failover group, shown in the illustration above, can provide maximum resources to a fewSun Ray Clients. The server sr47 is the primary Sun Ray server, and sr48 is the secondary Sun Rayserver; other secondary servers (sr49, sr50, and so on) are not shown.
19.6.2 Setting Up IP Addressing
You can use the utadm command to set up a DHCP server. The default DHCP setup configures eachinterface for 225 hosts and uses private network addresses for the Sun Ray interconnect. For moreinformation, see the utadm man page.
Before setting up IP addressing, you must decide upon an addressing scheme. The following examplesdiscuss setting up class C and class B addresses.
19.6.2.1 Setting Up Server and Client Addresses
The loss of a server usually implies the loss of its DHCP service and its allocation of IP addresses.Therefore, more DHCP addresses must be available from the address pool than the number of SunRay Clients. Consider the situation of 5 servers and 100 Sun Ray Clients. If one of the servers fails, theremaining DHCP servers must have enough available addresses so that every "orphaned" Sun Ray Clientis assigned a new working address.
Table 19.5, “Configuring 5 Servers for 100 clients” lists configuration settings used to configure 5 serversfor 100 Sun Ray Clients, accommodating the failure of two servers (class C) or four servers (class B).

Setting Up IP Addressing
316
Table 19.5 Configuring 5 Servers for 100 clients
CLASS C (2 ServersFail)
CLASS B (4 ServersFail)
Servers Interface Address Client AddressRange
Interface Address Client AddressRange
serverA 192.168.128.1 192.168.128.16 to192.168.128.49
192.168.128.1 192.168.128.16 to192.168.128.116
serverB 192.168.128.2 192.168.128.50 to192.168.128.83
192.168.129.1 192.168.129.16 to192.168.129.116
serverC 192.168.128.3 192.168.128.84 to192.168.128.117
192.168.130.1 192.168.130.16 to192.168.130.116
serverD 192.168.128.4 192.168.128.118 to192.168.128.151
192.168.131.1 192.168.131.16 to192.168.131.116
serverE 192.168.128.5 192.168.128.152 to192.168.128.185
192.168.132.1 192.168.132.16 to192.168.132.116
The formula for address allocation is: address range (AR) = number of clients/(total servers - failedservers). For example, in the case of the loss of two servers, each DHCP server must be given a range of100/(5-2) = 34 addresses.
Ideally, each server would have an address for each client. This setup requires a class B network.Consider these conditions:
• If AR multiplied by the total number of servers is less than or equal to 225, configure for a class Cnetwork
• If AR multiplied by the total number of servers is greater than 225, configure for a class B network
Note
If all available DHCP addresses are allocated, a Sun Ray Client could request anaddress and still not find one available, perhaps because another unit has beenallocated IP addresses by multiple servers. To prevent this condition, provide eachDHCP server with enough addresses to serve all the Sun Ray Clients in a failovergroup.
19.6.2.2 Server Addresses
Server IP addresses assigned for the Sun Ray interconnect should all be unique. Use the utadm tool toassign them.
When the Sun Ray Client boots, it sends a DHCP broadcast request to all possible servers on the networkinterface. One or more servers respond with an IP address allocated from its range of addresses. Theclient accepts the first IP address that it receives and configures itself to send and receive at that address.
The accepted DHCP response also contains information about the IP address and port numbers of theAuthentication Managers on the server that sent the response.
The client then tries to establish a TCP connection to an Authentication Manager on that server. If it isunable to connect, it uses a protocol similar to DHCP, in which it uses a broadcast message to ask theAuthentication Managers to identify themselves. The client then tries to connect to the AuthenticationManagers that respond in the order in which the responses are received.

Setting Up IP Addressing
317
Note
For the broadcast feature to be enabled, the broadcast address (255.255.255.255)must be the last one in the list. Any addresses after the broadcast address areignored. If the local server is not on the list, Sun Ray Clients cannot attempt tocontact it.
Once a TCP connection to an Authentication Manager has been established, the client presents its token.The token is either a pseudo-token representing the individual client (its unique Ethernet address) or asmart card. The Session Manager then starts an X Window/X server session and binds the token to thatsession.
The Authentication Manager then sends a query to all the other Authentication Managers on the samesubnet and asks for information about existing sessions for the token. The other Authentication Managersrespond, indicating whether a session for the token exists and the last time the token was connected to thesession.
The requesting Authentication Manager selects the server with the latest connection time and redirects theclient to that server. If no session is found for the token, the requesting Authentication Manager selects theserver with the lightest load and redirects the token to that server. A new session is created for the token.
The Authentication Manager enables both implicit (smart card) and explicit switching.
19.6.2.3 Configuring DHCP
In a large IP network, a DHCP server distributes the IP addresses and other configuration information forinterfaces on that network.
Coexistence of the Sun Ray Server With Other DHCP Servers
The Sun Ray DHCP server can coexist with DHCP servers on other subnets, provided that you isolate theSun Ray DHCP server from other DHCP traffic. Verify that all routers on the network are configured not torelay DHCP requests, which is the default behavior for most routers.
Caution
If the IP addresses and DHCP configuration data are not set up correctly when theinterfaces are configured, the failover feature cannot work properly. In particular,configuring the Sun Ray server's interconnect IP address as a duplicate of anyother server's interconnect IP address may cause the Sun Ray AuthenticationManager to issue "Out of Memory" errors.
19.6.2.4 Administering Other Clients
If the Sun Ray server has multiple interfaces, one of which is the Sun Ray interconnect, the Sun RayDHCP server should be able to manage both the Sun Ray interconnect and the other interfaces withoutcross-interference.
19.6.2.5 How to Set Up IP Addressing on Multiple Servers, Each with One Sun Ray Interface
1. Log in to the Sun Ray server as superuser and, open a shell window. Type:
# /opt/SUNWut/sbin/utadm -a interface_name
where interface_name is the name of the Sun Ray network interface to be configured; for example,hme[0-9], qfe[0-9], or ge[0-9]. You must be logged on as superuser to run this command. Theutadm script configures the interface (for example, hme1) at the subnet (in this example, 128).

Setting Up IP Addressing
318
The script displays default values, such as the following:
Selected values for interface "hme1"host address: 192.168.128.1net mask: 255.255.255.0net address: 192.168.128.0host name: serverB-hme1net name: SunRay-hme1first unit address: 192.168.128.16last unit address: 192.168.128.240auth server list: 192.168.128.1firmware server: 192.168.128.1router: 192.168.128.1 |
The default values are the same for each server in a failover group. Certain values must be changed tobe unique to each server.
2. When you are asked to accept the default values, type n
Accept as is? ([Y]/N): n
3. Change the second server's IP address to a unique value, in this case 192.168.128.2:
new host address: [192.168.128.1] 192.168.128.2 |
4. Accept the default values for netmask, host name, and net name:
new netmask: [255.255.255.0]new host name: [serverB-hme1]
5. Change the client address ranges for the interconnect to unique values. For example:
Do you want to offer IP addresses for this interface? [Y/N]:new first Sun Ray address: [192.168.128.16] 192.168.128.50number of Sun Ray addresses to allocate: [205] 34
6. Accept the default firmware server and router values:
new firmware server: [192.168.128.2]new router: [192.168.128.2]
The utadm script asks if you want to specify an authentication server list:
auth server list: 192.168.128.1To read auth server list from file, enter file name:Auth server IP address (enter <CR> to end list):If no server in the auth server list responds, should an auth server be located by broadcasting on the network? ([Y]/N):
These servers are specified by a file containing a space-delimited list of server IP addresses or bymanually entering the server IP addresses.
The newly selected values for interface hme1 are displayed:
Selected values for interface "hme1"

Sun Ray Server Failover Group Worksheet
319
host address: 192.168.128.2net mask: 255.255.255.0net address: 192.168.128.0host name: serverB-hme1net name: SunRay-hme1first unit address: 192.168.128.50last unit address: 192.168.128.83auth server list: 192.168.128.1firmware server: 192.168.128.2router: 192.168.128.2
7. If these are correct, accept the new values:
Accept as is? ([Y]/N): y
8. Stop and restart the server and power cycle the clients to download the firmware.
For additional information, see the utadm man page.
19.6.3 Sun Ray Server Failover Group Worksheet
Fill out Table 19.6, “Sun Ray Server Failover Group Worksheet” and Table 19.7, “First and Last UnitAddress in a Failover Group”, so that the information is readily available during the actual configurationprocess.
• Values that are provided in italics are only examples and should not be used.
• Values provided in normal font are defaults and can be used.
• Superscripted numbers (#) refer to footnotes at the end of each section.
Note
The blank rows in the worksheets are provided for you to add additional informationabout your environment if you choose to print the worksheets.
If you are configuring for a failover group, fill in this portion of the worksheet:
Table 19.6 Sun Ray Server Failover Group Worksheet
Aspect or Variable Default Value,Example, or (Other)
Your PrimaryServer Value
YourSecondaryServer Value
Configuring the Sun Ray server hierarchyusing utreplica (required for failover groups)
(Provide the starttime)
Primary Sun Ray server host name (1) primary-server
Secondary Sun Ray server host name (1) secondary-server
(1) These values are different for each Sun Ray server, even if that server is part of a failover group.
Table 19.7 First and Last Unit Address in a Failover Group
Server First Unit Address Last Unit Address
Primary
Secondary
192.168.128.16
192.168.128.56
192.168.128.55
192.168.128.95

Sun Ray Server Failover Group Worksheet
320
Server First Unit Address Last Unit AddressSecondary
Secondary
192.168.128.96
192.168.128.136
192.168.128.135
192.168.128.175
Note
If you forget the address range, use utadm -l to list the addresses you specifiedor utadm -p to print them.

321
Chapter 20 Performance Tuning
Table of Contents20.1 How to Gain Network Performance for Sun Ray 3 Series Clients ............................................... 32120.2 How to Improve Network Performance by Disabling CPU Binding (Oracle Solaris 11) .................. 32120.3 How to Improve Sun Ray Client Performance by Decreasing Buffering on the Network Switch(Oracle Solaris) ............................................................................................................................... 32120.4 Improving Sun Ray Client Start-Up Time by Disabling Spanning Tree Protocol on the NetworkSwitch ............................................................................................................................................ 32220.5 Applications ............................................................................................................................ 32220.6 Tuning the Java Desktop System ............................................................................................ 32320.7 Excessive Disk Swapping ........................................................................................................ 32320.8 Screensaver Resource Consumption ....................................................................................... 323
20.8.1 How to Disable Screensavers (Oracle Solaris 10) .......................................................... 323
This chapter provides tuning information for a Sun Ray environment.
20.1 How to Gain Network Performance for Sun Ray 3 Series Clients
To gain optimal network performance for Sun Ray 3 Series Clients, enable link-level flow control (IEEE802.3 link pause) on the network switches to which the clients are connected.
20.2 How to Improve Network Performance by Disabling CPUBinding (Oracle Solaris 11)
If the performance of the Sun Ray Clients starts degrading after a few days, such as delayed characterechoes or out-of-sync window and mouse actions, then this configuration update may help.
The following procedure disables CPU binding on the server.
1. Add the following line to the /etc/system file:
set mac:mac_cpu_binding_on=0
2. Reboot the system.
20.3 How to Improve Sun Ray Client Performance by DecreasingBuffering on the Network Switch (Oracle Solaris)
Some network switches do not work well with Sun Ray Clients when the server-side connection isconfigured to run at 1 Gbps. Because the Sun Ray Clients run at 100 Mbps and the data is sent from theX Windows server in periodic bursts, these switches are required to buffer a certain amount of data. Thissituation can happen even when the average data rate from the X server is well under 100 Mbps.
The X server is programmed in such a way that a certain allowed amount of data is sent at tick intervals.The original implementation had 50 ticks per second. The X server is allowed to send at a certain specificrate granted by the Sun Ray Client.
For example, if the Sun Ray Client's grant is 40 Mbps, it can send 5 MB per second in bursts that are sentevery 1/50th of a second. This means that at each tick, the server can send 100 KB of data at a rate of 1
Improving Sun Ray Client Start-Up Time by Disabling Spanning Tree Protocol on the Network Switch
322
Gbps. This rate would cause a queue buildup in the switch of close to 100 KB, which would then drain outat 100 Mbps over the next 1/50th of a second.
The first action to mitigate this type of issue is to increase the number of ticks per second to 100 persecond from 50. Thus, in the example above, the X server would send 50 KB every 10 ms rather than 100KB every 20 ms. This setting would improve the situation considerably, but the problem would still remain.The 100 ticks per second rate was chosen because it corresponded to the normal resolution of the timer inOracle Solaris and Oracle Linux.
To increase the number of ticks per second beyond 100, the operating system's timer must also beincreased. For Oracle Solaris, use the following procedure.
Steps
1. Add the following line to the /etc/system file:
set hires_tick=1
2. Reboot the system.
The hires_tick=1 setting increases the system timer resolution to 1000 ticks per second.
Because the X server code uses the system setting, the X server's bursts of data now use the same value,1000 ticks = 1 second, that is, 1 tick = 1 ms. In the example, using the new tick duration results in the Xserver sending 5 KB of data every 1 ms.
Because the change to the tick duration decreases the amount of buffering required on the network switch,the performance of the Sun Ray Clients should improve.
20.4 Improving Sun Ray Client Start-Up Time by Disabling SpanningTree Protocol on the Network Switch
The Sun Ray Clients are designed to power on and be fully operational in a very short time--typically lessthan 10 seconds.
Some network switches have initial configurations that can cause this start-up time to be considerablylonger, often taking 30 seconds or longer to achieve a fully working state. Longer start-on times typicallyare due to the configuration of the Ethernet switch that implements capabilities not needed in the SunRay environment. The most common of these capabilities is enabling the spanning tree protocol, which isdesigned to detect and compensate for loops in the network.
In the Sun Ray environment, the spanning tree protocol should be disabled or deferred for ports connecteddirectly to the Sun Ray Clients. Some manufacturers support a feature that immediately puts a port intothe spanning tree forwarding mode. This feature is an acceptable alternative to disabling the spanning treeprotocol on the port.
If the spanning tree protocol is disabled and the start-up time is still excessive, contact the switchmanufacturer to determine if there are other features or proprietary protocols that might be interfering withthe Sun Ray Client. Some switches might have features designed into the switch that cannot be changed;if this is the case, then it may not be possible to reduce the start-up time.
20.5 Applications
Some applications, such as intensive 3-D visual simulations, might run very slowly on a Sun Ray Client.

Tuning the Java Desktop System
323
Applications that use double-buffering such as pseudo-stereo viewers and applications that use high-frequency dynamic color table flips on 8-bit visual displays might not show the proper result. Turn offantialiasing to save screen resources.
Install interactive applications such as web browsers and PC interoperability tools such as Oracle SecureGlobal Desktop (SGD) software on the Sun Ray server. The applications benefit from faster transport ofcommands to the Sun Ray Client's X server and network traffic is reduced.
If an application can be configured to use shared memory instead of DGA or OpenGL(R), using sharedmemory results in improved performance.
20.6 Tuning the Java Desktop System
To tune desktop performance, use solid backdrops and wireframe window moves.
For more instructions and recommendations, refer to the following information:
• Java Desktop System documentation
• GNOME Performance Enhancement Tips for the Oracle Solaris Platform
• GNOME Performance Script for Oracle Solaris
20.7 Excessive Disk Swapping
If the Sun Ray server does not have enough virtual memory available, the X Window server instance doesnot start and the user experiences a slow response. When virtual memory is insufficient, the Sun Rayserver performs excessive disk swapping.
To determine whether the Sun Ray server is swapping to disk excessively, use the vmstat command:
# vmstat 5
If excessive swapping is occurring, the system might be undersized or overutilized.
The solution is to add more memory or increase the size of the swap partition.
20.8 Screensaver Resource Consumption
Many graphics-intensive screensaver programs consume large amounts of CPU, memory, and networkbandwidth. To avoid excessive resource consumption on the Sun Ray servers, disable them.
20.8.1 How to Disable Screensavers (Oracle Solaris 10)
Remove the screensaver packages.
# pkgrm SUNWxscreensaver-hacks# pkgrm SUNWxscreensaver-hacks-gl
If the SUNWxscreensaver-hacks-gl package is not removed successfully, remove the gl package andthen remove the SUNWxscreensaver-hacks-gl package.

324

325
Appendix A IPsec Support
Table of ContentsA.1 Overview .................................................................................................................................. 325A.2 IKE Configuration ..................................................................................................................... 325
A.2.1 remote Directive ............................................................................................................ 326A.2.2 sainfo Directive .............................................................................................................. 328A.2.3 Example IKE Configuration Files .................................................................................... 328
A.3 IPsec Configuration GUI Menu .................................................................................................. 329A.4 IPsec Configuration Examples ................................................................................................... 330
A.4.1 Oracle Linux 5 Pre-Shared Key ...................................................................................... 330A.4.2 Oracle Linux 5 Certificates ............................................................................................. 331A.4.3 Oracle Linux 6 Pre-Shared Key ...................................................................................... 332A.4.4 Oracle Linux 6 Certificates ............................................................................................. 333A.4.5 Oracle Solaris Pre-Shared Key ....................................................................................... 335A.4.6 Oracle Solaris Certificates .............................................................................................. 336A.4.7 Sun Ray Client Configuration ......................................................................................... 338A.4.8 IPsec Verification ........................................................................................................... 338
This appendix provides information about IPsec support for IPv4 in Sun Ray Software.
A.1 OverviewSun Ray Software supports Internet Protocol security (IPsec) to provide high quality, cryptographically-based security between Sun Ray Clients and Sun Ray servers. The security services offered with IPsecinclude access control, connectionless integrity, data origin authentication, protection against replays (aform of partial sequence integrity), confidentiality (encryption), and limited traffic flow confidentiality. Theseservices are provided at the IP layer, offering protection for IP and upper-layer protocols.
The Sun Ray Software implementation of IPsec is incorporated into the Sun Ray Client firmware and isderived from an Open Source implementation provided at http://ipsec-tools.sourceforge.net. There are noIPsec implementation changes needed on the Sun Ray server, but the Sun Ray server requires the samegeneral capabilities to configure IPsec, such as an IKE implementation and a tool to manage the securitypolicy. The IPsec implementation is composed of three parts: the network stack implementation of IPsecitself that provides the security of the actual traffic; the Internet Key Exchange (IKE) implementation thatmanages the dynamic generation of keying material and authentication of the endpoints; and the policymanagement, through the Security Policy Database (SPD), that specifies which traffic should be protectedand how.
After configuring and enabling IPsec on the Sun Ray server and the Sun Ray Client, the Sun Ray Clientwill negotiate a secure end-to-end IPsec tunnel with the Sun Ray server before interacting with Sun Rayservices on the server. The Sun Ray Client will always be the initiator of a connection, so it does not haveto respond to inbound connection requests. This type of negotiation is similar to the current IPsec VPNbehavior, where IPsec is established with a VPN gateway before Sun Ray services are invoked. However,both IPsec implementations require different configurations.
A.2 IKE ConfigurationThe base configuration required for IPsec on the Sun Ray Client is the IKE configuration file, whichis derived from the racoon.conf file. The IKE configuration file defines how to establish a secureconnection between two hosts using the racoon daemon. For Sun Ray Software, only a subset of the

remote Directive
326
directives and statements in the IKE configuration file are required. The complete documentation for theIKE configuration file is available in the racoon.conf man page.
The IKE configuration file contains a set of directives that each consist of a keyword and a set ofparameters. Some directives can be followed by a set of nested statements. An IKE configuration file mustbe stored in the firmware's security configuration repository at /ike/default.conf. The use of the /ikedirectory is consistent with the strategy that the directory containing a file indicates its type or format.
There are only two directives that are required for the Sun Ray IKE configuration file:
• remote - Specifies the parameters for IKE negotiations.
• sainfo - Specifies the parameters for protecting the actual IPsec traffic.
Normally, there can be multiple remote and sainfo directives, tagged with either a name, address, or thedefault anonymous keyword. The Sun Ray Software implementation allows for only one of each directive.
The following directives are not required, but they are supported to provide more advanced configuration:
• padding - Specifies the padding parameters for traffic.
• timer - Specifies the configuration timers.
Other parameters, such as the location of various ancillary files and ports, are fixed in value.
A.2.1 remote Directive
The remote directive specifies the parameters for IKE negotiations.
The following statements are supported. Specific notes and restrictions are provided where necessary.
• ca_type - Root certificate type (X509 only) and root certificate file name.
• certificate_type - Client certificate type (X509 only), private key file name, and certificate file name.
• dpd - Switch to enable Dead Peer Detection (DPD). Default is on.
• dpd_delay - Time between liveness requests. 0 disables checking. Default is 0.
• dpd_maxfail - If dpd_delay is set, this statement sets the maximum number of proof of liveness torequest (without reply) before considering the peer is dead. The default value is 5.
• dpd_retry - If dpd_delay is set, this statement sets the delay (in seconds) to wait for a proof ofliveness before considering it as failed and sending another request. The default value is 5.
• exchange_mode - Exchange mode to use as the IKE initiator. Values: main, aggressive, or base.The aggressive mode is not supported on Oracle Solaris.
• ike_frag - Switch to enable IKE fragmentation.
• lifetime - IKE lifetime proposed.
• my_identifier - Type and value of the IKE identifier for phase 1. The following identifier types areallowed:
• address - IP address. This is the default, although this is not appropriate for Sun Ray Clients that gettheir addresses using DHCP.
• asn1dn - ASN.1 distinguished name. This value is taken from the certificate Subject field if a value isnot specified.
remote Directive
327
• fqdn - Fully-qualified domain name.
• keyid - An arbitrary string.
• subnet - IP subnet.
• user_fqdn - User fully-qualified name.
• nat_traversal - Switch to enable NAT traversal.
• nonce_size - Size of the nonces used in the IKE exchange. The default is 16 bytes.
• peers_certfile - Locally stored peer certificate type (X509 only) and certificate file name.
• peers_identifier - Type and value of the expected peer identifier. The following identifier types areallowed:
• address - IP address. This is the default.
• asn1dn - ASN.1 distinguished name. This value is taken from the certificate Subject field if a value isnot specified.
• fqdn - Fully-qualified domain name.
• keyid - An arbitrary string.
• subnet - IP subnet.
• user_fqdn - User fully-qualified name.
• proposal - List of proposal statements. Only one proposal statement is allowed.
• authentication_method - Specify the authentication method used. Values: pre_shared_key orrsasig.
The pre-shared key file is used when the authentication mode is pre_shared_key, and the filemust be stored in the firmware's security configuration repository at /preshared/keys file. The pre-shared key file consists of lines containing pairs of ids and keys, separated by some number of blanksor tab characters. Keys starting with "0x" are interpreted as hexadecimal strings. Any referencedcertificate files must be stored in the /certs directory, and public/private key pairs provided in filesmust be stored in the /keys directory.
• dh_group - Specify the group used for Diffie-Hellman exponentiation. Values: modp768, modp1024,modp1536, modp2048, modp3072, modp4096, modp6144, or the corresponding DH group number,1, 2, 5, 14, 15, 16, 17, or 18.
• encryption_algorithm - Specify the encryption algorithm used for the phase 1 negotiation.Values: aes, 3des, or null. aes may be followed by a key size of 128, 192, or 256, separated by aspace.
• hash_algorithm - Specify the hash algorithm used for phase 1 negotiation. Values: md5(deprecated), sha1, sha256, sha384, or sha512. Oracle Linux 5.8 and Oracle Linux 6.3 does notsupport the sha384 or sha512 hash algorithm.
• lifetime - Specify IKE lifetime.
• remote_address - Remote IP address of the other end of the connection.

sainfo Directive
328
• proposal_check - Type of proposal checking. Values: claim, exact, obey, or strict.
• send_cert - Switch to enable sending client certificate. Default is on.
• send_cr - Switch to enable sending certificate request. Default is on.
• verify_cert - Switch to verify the peer's certificate. Defaults is on.
• verify_identifier - Switch to enable verification of identity between ID and certificate. Default is off.
A.2.2 sainfo Directive
The sainfo directive is used to specify the security parameters for creating an IPsec Security Association(SA) used to protect associated traffic. For Sun Ray Software, only the Encapsulating Security Payload(ESP) is supported, and the Authentication Header (AH) protocol is not supported.
A full implementation of the Security Policy Database (SPD) for Sun Ray Software is not required, becausethe communication between the Sun Ray Client and other peers requires only a few switch selections,which have been incorporated into the IPsec configuration menu in the firmware Configuration GUI.
The following statements are supported. Specific notes and restrictions are provided where necessary.
• authentication_algorithm - Specify the comma-separated list of authentication algorithms. Valuesinclude hmac forms of the hash_algorithm values, such as hmac_md5, hmac_sha1, hmac_sha256,hmac_sha384, or hmac_sha512.
• encryption_algorithm - Specify the comma-separated set of encryption algorithms that can be usedin a phase 2 proposal. Values: aes or 3des. The aes value may be followed by a key size, for example,aes 256.
• lifetime - Define how long an IPsec SA will be used.
• pfs_group - Define the group used for Perfect Forward Secrecy (PFS) in phase 2. The same valuesare used as dh_group. If omitted, PFS is not used.
• sha2_trunc - Switch that sets the truncation of SHA-2 hashes to 96 bits, rather than the 128 specifiedin RFC 4868. This allows interoperation with some Oracle Linux systems that exhibit this behavior. Thismust be set on when using the sha256 hash algorithm for Oracle Linux.
The proposals generated during the phase 2 negotiation consist of all of the possible combinations ofencryption_algorithm and authentication_algorithm.
A.2.3 Example IKE Configuration Files
Here is an example of a Sun Ray IKE configuration file used to specify the connection between a Sun RayClient with a fixed IP address (10.213.25.230) and a Sun Ray server (10.213.21.43) using a pre-sharedkey.
remote address 10.213.21.43 { my_identifier address 10.213.25.230; exchange_mode main; proposal { authentication_method pre_shared_key; encryption_algorithm aes; hash_algorithm sha1; dh_group 2;

IPsec Configuration GUI Menu
329
} proposal_check claim;}sainfo address 10.213.25.230 address 10.213.21.43 { lifetime time 12 hour; encryption_algorithm aes; authentication_algorithm hmac_sha1;}
Note
If you specify main for the exchange_mode statement, the identifiers for the IKEconnection must be IP addresses when using pre-shared keys.
Here is another example of a Sun Ray IKE configuration file for certificate-based authentication
remote anonymous { exchange_mode main; my_identifier asn1dn; ca_type x509 "cacert.pem"; certificate_type x509 "mycert.pem" "mykey.pem"; proposal { authentication_method rsasig; encryption_algorithm 3des; hash_algorithm md5; dh_group modp1024; } lifetime time 24 hour; proposal_check claim;}sainfo anonymous { authentication_algorithm hmac_sha1; encryption_algorithm aes; lifetime time 8 hour;}
A.3 IPsec Configuration GUI Menu
The firmware Configuration GUI provides the Server/IPsec menu to configure and enable IPsec. Thetop-level IPsec menu has the following entries:
• IPsec Enable - Switch to enable the use of IPsec.
• Manage Policy - Switches to enable or disable IPsec for individual types of access, for example,firmware and remote configuration file downloads.
• Show Configuration - Display the current IKE configuration file contents (/ike/default.conf).
• Download Configuration - Read a IKE configuration file from the /tftpboot directory and write it to/ike/default.conf. Loading other files, which can include the IKE configuration file, must be donethrough the Advanced > Download Configuration menu.
• Initialize Configuration - Set the IKE configuration file to a known state, either as an empty file, or froma template.
• Edit Configuration - Read the existing IKE configuration file and edit individual statements in the file.
• Manage Preshared Keys - Display the current pre-shared keys, and create, delete, or modify entries.
• Manage Public Keys - Display the list of public keys and delete individual entries.

IPsec Configuration Examples
330
A.4 IPsec Configuration ExamplesThis sections provides examples show how to configure and enable IPsec on a Sun Ray server and a SunRay Client. For all of the examples, the following configuration information is used:
• Sun Ray Client - 10.25.198.65
• Sun Ray server - 10.213.21.168
• sunray_ike.conf - Sun Ray IKE configuration file
• ikeload - Remote configuration file
• cacert.pem - root certificate file
• mycert.pem - Certificate file
• mykey.pem - Secret key file
A.4.1 Oracle Linux 5 Pre-Shared Key
The following example shows how to configure IPsec using a pre-shared key on a Sun Ray server runningOracle Linux 5 and prepare an IKE configuration file for the Sun Ray Client.
1. Become superuser on the Sun Ray server.
2. Edit the /etc/racoon/racoon.conf file as follows:
path include "/etc/racoon";path pre_shared_key "/etc/racoon/psk.txt";
remote anonymous { exchange_mode main; proposal { authentication_method pre_shared_key; encryption_algorithm 3des; hash_algorithm sha1; dh_group modp1024; } lifetime time 24 hour; proposal_check claim;}sainfo anonymous { authentication_algorithm hmac_sha1; encryption_algorithm 3des; lifetime time 8 hour; compression_algorithm deflate ;}
3. Edit the /etc/racoon/psk.txt file to include the pre-shared key.
<ip-address_of_Sun_Ray_Client> <key>
10.25.198.65 0x12345678
4. Configure the SPD.
# setkey -c << EOFspdadd 10.213.21.168 10.25.198.65 any -P out ipsec esp/transport//require;spdadd 10.25.198.65 10.213.21.168 any -P in ipsec esp/transport//require;

Oracle Linux 5 Certificates
331
Note that 10.213.21.168 is the Sun Ray server IP address and 10.25.198.65 is the Sun Ray Client IPaddress.
5. Create a sunray_ike.conf file for the Sun Ray Client with the following contents and save it to the /tftpboot directory.
remote anonymous { exchange_mode main; proposal { authentication_method pre_shared_key; encryption_algorithm 3des; hash_algorithm sha1; dh_group modp1024; } lifetime time 24 hour; proposal_check claim;}sainfo anonymous { authentication_algorithm hmac_sha1; encryption_algorithm 3des; lifetime time 8 hour;}
6. Enable IPsec on the server if necessary.
# racoon
This manual step may not be necessary if IPsec is already enabled on the server. You can change thedebug level by adding one or more -d options, such as -ddd.
A.4.2 Oracle Linux 5 Certificates
The following example shows how to configure IPsec using certificates on a Sun Ray server runningOracle Linux 5 and prepare an IKE configuration file for the Sun Ray Client.
1. Become superuser on the Sun Ray server.
2. Copy the cacert.pem, mycert.pem, and mykey.pem files to the /etc/racoon/certs and /tftpboot directories.
3. Edit the /etc/racoon/racoon.conf file as follows:
path include "/etc/racoon";path certificate "/etc/racoon/certs";
remote anonymous { exchange_mode main; generate_policy on; passive on; ca_type x509 "cacert.pem"; certificate_type x509 "mycert.pem" "mykey.pem"; my_identifier asn1dn; peers_identifier asn1dn; proposal_check claim; lifetime time 24 hour; proposal { encryption_algorithm 3des; hash_algorithm md5; authentication_method rsasig;

Oracle Linux 6 Pre-Shared Key
332
dh_group modp1024; }}
sainfo anonymous { pfs_group modp1024; encryption_algorithm 3des; authentication_algorithm hmac_sha1; lifetime time 8 hour; compression_algorithm deflate;}
4. Create a sunray_ike.conf file for the Sun Ray Client with the following contents and save it to the /tftpboot directory.
remote anonymous { exchange_mode main; my_identifier asn1dn; ca_type x509 "cacert.pem"; certificate_type x509 "mycert.pem" "mykey.pem"; proposal { authentication_method rsasig; encryption_algorithm 3des; hash_algorithm md5; dh_group modp1024; } lifetime time 24 hour; proposal_check claim;}sainfo anonymous { pfs_group modp1024; authentication_algorithm hmac_sha1; encryption_algorithm 3des; lifetime time 8 hour;}
5. Create a remote configuration file named ikeload with the following contents and save it to the /tftpboot directory.
/certs/cacert.pem=cacert.pem/keys/mykey.pem=mykey.pem/certs/mycert.pem=mycert.pem/ike/default.conf=sunray_ike.conf
6. Enable IPsec on the server if necessary.
# racoon
This manual step may not be necessary if IPsec is already enabled on the server. You can change thedebug level by adding one or more -d options, such as -ddd.
A.4.3 Oracle Linux 6 Pre-Shared Key
The following example shows how to configure IPsec using a pre-shared key on a Sun Ray server runningOracle Linux 6 and prepare an IKE configuration file for the Sun Ray Client..
1. Become superuser on the Sun Ray server.
2. If not already installed, install the openswan-2.6.32-16.el6.x86_64.rpm RPM.
3. Uncomment the following line in the /etc/ipsec.conf file:

Oracle Linux 6 Certificates
333
include /etc/ipsec.d/*.conf
4. Make sure the /etc/ipsec.secrets file contains only the following line:
include /etc/ipsec.d/*.secrets
5. Create the /etc/ipsec.d/shared.conf file with the following contents, which includes the Sun Rayserver and the Sun Ray Client IP addresses for the left and right entries, respectively:
conn new left=10.213.21.168 right=10.25.198.65 authby=secret type=transport ike=3des-md5;modp1024 esp=3des-md5 keyexchange=ike pfs=no rekey=no aggrmode=no phase2=esp salifetime=8h auto=add
6. Create the /etc/ipsec.d/shared.secrets file with the following contents, which includes an entrycontaining the Sun Ray server and Sun Ray Client IP addresses and the pre-shared key:
10.213.21.168 10.25.198.65: PSK "12345678"
7. Create a sunray_ike.conf file for the Sun Ray Client with the following contents and save it to the /tftpboot directory.
remote anonymous { exchange_mode main; proposal { authentication_method pre_shared_key; encryption_algorithm 3des; hash_algorithm sha1; dh_group modp1024; } lifetime time 24 hour; proposal_check claim;}sainfo anonymous { authentication_algorithm hmac_sha1; encryption_algorithm 3des; lifetime time 8 hour;}
8. Start the IPsec services.
# /etc/init.d/ipsec start
A.4.4 Oracle Linux 6 Certificates
The following example shows how to configure IPsec using certificates on a Sun Ray server runningOracle Linux 6 and prepare an IKE configuration file for the Sun Ray Client.

Oracle Linux 6 Certificates
334
1. Become superuser on the Sun Ray server.
2. If not already installed, install the openswan-2.6.32-16.el6.x86_64.rpm RPM.
3. Uncomment the following line in the /etc/ipsec.conf file:
include /etc/ipsec.d/*.conf
4. Make sure the /etc/ipsec.secrets file contains only the following line:
include /etc/ipsec.d/*.secrets
5. Create the /etc/ipsec.d/certs.conf file with the following contents:
conn new1 left=10.213.21.168 right=%any leftcert="server_certificate" rightcert="client_certificate" leftid=%fromcert rightid=%fromcert authby=rsasig leftrsasigkey=%cert type=transport ike=aes-sha2_256;modp1024 phase2alg=aes-sha2_256 keyexchange=ike keyingtries=3 pfs=no rekey=no aggrmode=no phase2=esp salifetime=8h auto=add
The right=%any entry enables any client to connect with the proper certificate.
6. Create the /etc/ipsec.d/certs.secrets file with the following contents, which includes the SunRay server:
%any : RSA 10.213.21.168
7. Create a sunray_ike.conf file for the Sun Ray Client with the following contents and save it to the /tftpboot directory.
remote anonymous { exchange_mode main; my_identifier asn1dn; ca_type x509 "cacert.pem"; certificate_type x509 "mycert.pem" "mykey.pem"; proposal { authentication_method rsasig; encryption_algorithm 3des; hash_algorithm sha1; dh_group modp1024; } lifetime time 24 hour; proposal_check claim;}sainfo anonymous {

Oracle Solaris Pre-Shared Key
335
authentication_algorithm hmac_sha1; encryption_algorithm 3des; lifetime time 8 hour;}
8. Create a remote configuration file named ikeload with the following contents and save it to the /tftpboot directory.
/certs/cacert.pem=cacert.pem/keys/mykey.pem=mykey.pem/certs/mycert.pem=mycert.pem/ike/default.conf=sunray_ike.conf
9. Start the IPsec services.
# /etc/init.d/ipsec start
A.4.5 Oracle Solaris Pre-Shared Key
The following example shows how to configure IPsec using a pre-shared key on a Sun Ray server runningOracle Solaris 10 or Oracle Solaris 11 and prepare an IKE configuration file for the Sun Ray Client.
1. Become superuser on the Sun Ray server.
2. Edit the /etc/inet/ike/config file as follows:
p1_lifetime_secs 86400p1_nonce_len 16
p2_lifetime_secs 28800
## Parameters that may also show up in rules.
p1_xform { auth_method preshared oakley_group 2 auth_alg sha1 encr_alg aes }
p2_pfs 0
### Now some rules...
{ label "SRSS Rule"
# Use whatever "host" (e.g. IP address) identity is appropriate local_addr 0.0.0.0/0 remote_addr 0.0.0.0/0
p1_xform { auth_method preshared oakley_group 2 auth_alg sha encr_alg aes }
p2_pfs 0}
3. Edit the /etc/inet/secret/ike.preshared file to include the pre-shared key.
{ localidtype IP localid 10.213.21.168 remoteidtype IP remoteid 10.25.198.65 key 12345678

Oracle Solaris Certificates
336
}
4. Configure the IPsec policy by adding the following line to the /etc/inet/ipsecinit.conf file:
{ laddr 10.213.21.168 raddr 10.25.198.65 } ipsec {encr_algs aes encr_auth_algs sha1}
5. Create a sunray_ike.conf file for the Sun Ray Client with the following contents and save it to the /tftpboot directory.
remote anonymous { exchange_mode main; proposal { authentication_method pre_shared_key; encryption_algorithm aes; hash_algorithm sha1; dh_group 2; } lifetime time 24 hour; proposal_check claim;}sainfo anonymous { authentication_algorithm hmac_sha1; encryption_algorithm aes; lifetime time 8 hour;}
6. Enable IPsec on the server.
# svcadm restart svc:/network/ipsec/ipsecalgs:default # svcadm restart svc:/network/ipsec/policy:default # /usr/lib/inet/in.iked
You can use the svcs | grep ipsec command to verify that IPsec is enabled. You can use the -doption of the in.iked command to keep it in the foreground and produce debugging output.
A.4.6 Oracle Solaris Certificates
The following example shows how to configure IPsec using certificates on a Sun Ray server runningOracle Solaris 10 or Oracle Solaris 11 and prepare an IKE configuration file for the Sun Ray Client..
1. Become superuser on the Sun Ray server.
2. Copy the cacert.pem, mycert.pem, and mykey.pem files to the /etc/racoon/certs and /tftpboot directories.
3. Edit the /etc/inet/ike/config file as follows:
####
cert_root "C=US, L=Redwood Shores, ST=CA, O=Company, OU=Sun Ray, CN=First Last, [email protected]"
ignore_crls
p1_lifetime_secs 86400p1_nonce_len 16
p2_lifetime_secs 28800

Oracle Solaris Certificates
337
p1_xform { auth_method rsa_sig oakley_group 2 auth_alg sha encr_alg 3des }
p2_pfs 0
{ label "SRSS Rule"
local_id_type dn local_id "C=US, L=Redwood Shores, ST=CA, O=Company, OU=Sun Ray, CN=server-fqdn" remote_id ""
local_addr 0.0.0.0/0 remote_addr 0.0.0.0/0
p1_xform { auth_method rsa_sig oakley_group 2 auth_alg md5 encr_alg 3des }
p2_pfs 0}
####
4. Configure the IPsec policy by adding the following line to the /etc/inet/ipsecinit.conf file:
{ laddr 10.213.21.168 raddr 10.25.198.65 } ipsec {encr_algs 3des encr_auth_algs sha1}
5. Create a sunray_ike.conf file for the Sun Ray Client with the following contents and save it to the /tftpboot directory.
remote anonymous { exchange_mode main; my_identifier asn1dn; ca_type x509 "cacert.pem"; certificate_type x509 "mycert.pem" "mykey.pem"; proposal { authentication_method rsasig; encryption_algorithm 3des; hash_algorithm md5; dh_group 2; } lifetime time 24 hour; proposal_check claim;}sainfo anonymous { pfs_group modp1024; authentication_algorithm hmac_sha1; encryption_algorithm 3des; lifetime time 8 hour;}
6. Create a remote configuration file named ikeload with the following contents and save it to the /tftpboot directory.
/certs/cacert.pem=cacert.pem/keys/mykey.pem=mykey.pem/certs/mycert.pem=mycert.pem/ike/default.conf=sunray_ike.conf
7. Enable IPsec on the server.
# svcadm restart svc:/network/ipsec/ipsecalgs:default # svcadm restart svc:/network/ipsec/policy:default

Sun Ray Client Configuration
338
# /usr/lib/inet/in.iked
You can use the svcs | grep ipsec command to verify that IPsec is enabled. You can use the -doption of the in.iked command to keep it in the foreground and produce debugging output.
A.4.7 Sun Ray Client Configuration
Once you configure IPsec on the Sun Ray server, including the adding the appropriate Sun Ray IKEconfiguration file and certificates to the /tftpboot directory, there are only a few steps remaining toconfigure IPsec on the Sun Ray Client using the Configuration GUI. The following steps continue theprevious Sun Ray server configuration examples.
1. Open the Configuration GUI on the Sun Ray Client.
See Section 14.5.2, “Configuration GUI Menu Descriptions” for details.
2. Load the configuration files on Sun Ray Client from the server's /tftpboot directory:
a. If you have only a Sun Ray IKE configuration file to load, choose Server/IPsec > DownloadConfiguration and specify the server and the IKE configuration file. For the pre-sharedexamples in this section, you would enter 10.213.21.168/sunray_ike.conf to populate the /ike/default.conf file in the Sun Ray Client's firmware.
b. If you are using a remote configuration file to load a number of files, choose Advanced >Download Configuration and enter the server and the remote configuration file. For thecertificate examples in this section, you would enter 10.213.21.168/ikeload to populate theIKE configuration file and the certificate files in the Sun Ray Client's firmware.
3. Choose Server/IPsec.
4. For the pre-shared key examples in this section, choose Manage Preshared Keys to create the pre-shared key:
10.25.198.65 0x12345678
You can also use the remote configuration file to load a pre-shared key.
5. Choose IPsec Enable and enable IPsec.
6. Exit the Configuration GUI.
A.4.8 IPsec Verification
After configuring IPsec on the Sun Ray server and Sun Ray Client, you can verify if IPsec is workingby rebooting the Sun Ray Client with the OSD icons enabled. If the IPsec OSD network status icons isdisplayed with the up arrow, IPsec should be working.
To verify if the traffic is being encrypted between the server and the Sun Ray, use a network monitoringtool (for example, snoop or tcpdump) and confirm that the packets seen are using the ESP protocol.

339
Appendix B Admin GUI Help
Table of ContentsB.1 Servers Tab ............................................................................................................................. 339
B.1.1 Server Details ................................................................................................................ 340B.2 Sessions Tab ........................................................................................................................... 341B.3 Desktop Units Tab .................................................................................................................... 343
B.3.1 Desktop Units Properties ................................................................................................ 344B.4 Tokens Tab .............................................................................................................................. 345
B.4.1 Token Properties ........................................................................................................... 347B.5 Advanced Tab .......................................................................................................................... 348
B.5.1 Security ......................................................................................................................... 348B.5.2 System Policy ................................................................................................................ 349B.5.3 Kiosk Mode ................................................................................................................... 351B.5.4 Card Probe Order .......................................................................................................... 352B.5.5 Data Store Password ..................................................................................................... 352
B.6 Log Files Tab ........................................................................................................................... 353
This appendix provides reference help for the Sun Ray Software Administration GUI, or Admin GUI. SeeSection 4.2, “Administration Tool (Admin GUI)” for more information.
B.1 Servers TabThis page lists all the Sun Ray servers that are in the same failover group, which means they share thesame group signature.
To ensure uninterrupted service, several Sun Ray servers can be configured as a failover group. Servers ina group authenticate (or learn to trust) one another by using a common group signature, a key used to signmessages sent between servers in the group. See Chapter 6, Failover Groups for more information.
Actions
• Display the high-level details for all the Sun Ray servers in the same failover group, including theservers' availability to the failover group.
• Display more details on a server by clicking on the name of the server. See Section B.1.1, “ServerDetails” for details.
• Perform a warm or cold restart on one or more servers.
Restart Buttons
Some configuration changes do not take effect until the Sun Ray services on each server are restarted. Ifa change requires Sun Ray services to be restarted, a notification message is displayed in the upper left-hand side of the Admin GUI.
To perform a group-wide restart, select all servers in the servers table (either individually or with the SelectAll button) before clicking the Warm Restart or Cold Restart button.
• Warm Restart - Existing Sun Ray sessions are preserved. Use this option if a minor configurationchange was made. With minor changes, it is not necessary to terminate existing sessions.
• Cold Restart - All existing Sun Ray sessions are terminated. Use this option if a significant change hasbeen made.

Server Details
340
Servers Table
• Name - Domain Name System (DNS) name of the server. Click on the name to display the serverdetails.
• IP Address - The primary IP address of the server.
• Mode - Specifies if the server is Online or Offline.
• Online - The server participates in the normal session creation process controlled by the loadbalancing algorithm in the failover group.
• Offline - The server does not participate in load balancing (the load balancing algorithm does notselect this server for new sessions), although sessions can still be created on it, either explicitly,through the use of the utswitch or utselect command, or implicitly, if all other servers are down.
• LAN Connections - Specifies if the server is configured as a shared network and can accept clientconnections from the shared network.
• Start Time - Time of the last cold or warm restart on the sever.
Related Commands
• utgstatus
• utstart
• utstop
B.1.1 Server Details
This page provides details on a specific Sun Ray server.
Actions
• Display specific details about a Sun Ray server, including the Sun Ray Software version installed, statusof connected clients and sessions, and system information.
• Perform a warm or cold restart on the Sun Ray server.
Restart Buttons
See Section B.1, “Servers Tab” for details.
General Section
• Sun Ray Software - The Sun Ray Software version installed on the server. Click View InstalledSun Ray Packages to display the list of packages or RPMs.
• Primary IP Address - The primary IP address of the server.
• Type - [need description] Standalone
• Mode - Specifies if the server is Online or Offline. See Section B.1, “Servers Tab” for details.
• LAN Connections - Specifies if the server is configured as a shared network and can accept clientconnections from the shared network.

Sessions Tab
341
• Connectivity - Click View Network Status to display the network status for all the trusted servers inthe failover group from the perspective of the selected server.
• Start Time - Time of the last cold or warm restart on the sever.
Status Section
• Connected Desktop Units - Number of Sun Ray Clients and Oracle Virtual Desktop Clients currentlyconnected to the Sun Ray server. If there are connected clients, click View Desktop Units to displaymore details about the clients, which is described in Section B.3.1, “Desktop Units Properties”.
• Total User Sessions - Number of user sessions currently running on the Sun Ray server. If there areuser sessions currently running, click View Session Details to display more details about thesessions, which is described in Section B.2, “Sessions Tab”.
• Logged in Users - Number of users currently logged in to a session.
• Login Greeter/Idle Sessions - Number of login greeter or idle sessions currently running. If there arelogin greeter or idle sessions running. click View Session Details to display more details about thesessions, which is described in Section B.2, “Sessions Tab”.
System Information Section
• Operating System - The operating system version installed on the Sun Ray server.
• Disk Space - A table displaying all the server's file systems and their usage.
Related Commands
• utgstatus
• utrelease
• utstart
• utstop
B.2 Sessions TabThis page lists the Sun Ray sessions, including the user sessions and login greeter/idle sessions. SunRay sessions are groups of services or applications that are associated with an authentication token. Theyreside on a Sun Ray server and can be directed to any client. See Chapter 7, Sessions and Tokens formore information.
Actions
• Filter the list of sessions by using the Search field, such as sessions running on all Sun Ray servers or asingle server.
• Display the sessions on all the servers or a specific server, sorted by user sessions and idle sessions.
• Display details about the server or client associated with the session.
• Terminate one or more sessions.
Search Field
The search field enables you to filter what sessions are displayed in the Sessions table. The drop-downmenu enables you to filter the sessions on all the Sun Ray servers in the failover group or a single server.

Sessions Tab
342
By default, a wildcard (*) is in the search field to display all the sessions based on the selected filter. Youcan also specify a session token name or partial name in the field to further filter the list of sessions thatare displayed. After you specify a new search string, you can always click Reset Search Criteria toreset the search back to the default.
Terminate Button
To terminate one or more sessions, select the sessions in the sessions list (either individually or with theSelect All button) and then click Terminate.
Sessions Table
• User Sessions - List of the user sessions based on the current search filter. These are sessions withUNIX users logged in, also known as non-idle sessions. Users may start up additional applications fromwithin the sessions, thus potentially consuming a lot of system resources. User sessions are thereforeof more interest to administrators than idle sessions. To free system resources, monitor the number oflong-running disconnected user sessions and, when appropriate, terminate sessions that are no longerin use.
• Login Greeter/Idle Sessions - List of sessions at the login greeter stage based on the current searchfilter. These sessions typically display only a login screen (or login greeter such as dtlogin or gdm)where no user has been logged in yet. The lifetime of these sessions is controlled by the Sun Raysystem. For example, disconnected idle sessions are automatically terminated (reaped off) by thesystem after a specific time interval.
• Token - The token ID for the session.
• Owner - The owner of the session, which is set if the token for the session is registered.
• Unix ID - The Unix ID of the session owner.
• Server - The Sun Ray server on which the session is currently running. Click on the server name formore details on the server. See Section B.1, “Servers Tab” for details.
• Display - The number of the X server display for the session.
• Status - Specifies if the session is Connected or Disconnected.
• Connected - Sessions with a connected status are currently displayed on a client. The session isautomatically disconnected when the user removes the smart card or explicitly switches the client to adifferent session, for example, with the utswitch or utselect commands.
• Disconnected - Sessions still running on a server but are not connected to a client and, consequently,are not displayed. However, a user can reconnect to a disconnected session, such as insertinga smart card containing the appropriate token into the card reader on a client. This changes thesession's state to connected and causes it to be displayed on that client.
• Desktop Unit - The client ID (full version) of the client currently connected to thesession. Examples include IEEE802.080020b5ca55 for a Sun Ray Client andMD5.d8b3a4eb29497e0c6fbb0f2a810267f5 for an Oracle Virtual Desktop Client. Click the client IDfor more details on the client. See Section B.3, “Desktop Units Tab” for details.
Related Commands
• utdetach
• utsession

Desktop Units Tab
343
B.3 Desktop Units TabThis page lists all the registered desktop units (DTUs), which include the Sun Ray Clients and OracleVirtual Desktop Clients. The term desktop client or client is also used for desktop unit or DTU.
Whenever a client connects for the first time to a Sun Ray server, it is automatically registered in the SunRay data store. (You can add new clients to the data store manually if you want to register any informationbefore the first connection time.) It is also possible to store the client’s location or other information thatmight help you to manage the clients in your organization.
Each Sun Ray Client also has a public-private key pair stored in the Sun Ray data store used for clientauthentication. Each stored key is annotated with a status, which indicates whether the authenticity ofthe key for the client with a given MAC address has been verified and confirmed by the server. Keys forOracle Virtual Desktop Clients are not stored with the data store entry for the client, as the client identifieris directly related to the key.
If client authentication and hard security are enabled as part of your Sun Ray Software policy, Sun RayClients cannot be used until its client key is confirmed. The client key for an Oracle Virtual Desktop Client isautomatically confirmed.
See Chapter 11, Client-Server Security for more information.
Actions
• Filter the list of desktop units displayed by using the Search field. You can filter the list from the followinggroupings: desktop units, connected desktop units, token readers, and multihead groups.
• Add a new desktop unit to the list. A client is automatically added to the Sun Ray data store when aclient first connects, but you can preregister information for a client.
• Delete one or more desktop units. This removes all the information for the client from the Sun Ray datastore.
• Display details about the desktop units.
• Edit details about a desktop unit by clicking on the client identifier. See Section B.3.1, “Desktop UnitsProperties” for details.
Search Field
The search field enables you to filter what is displayed in the Desktop Units table. The drop-down menuenables you to display different types of desktop units, including all desktop units, connected desktopunits, token readers, or multihead groups. By default, a wildcard (*) is in the search field to display all thedesktop units that match the current type. You can also specify the client IDs or partial IDs in the searchfield to further filter the list of desktop units that are displayed. After you specify a new search string, youcan always click Reset Search Criteria to reset the search back to the default.
New and Delete Buttons
If nothing is selected in the table, the New button is available. You can use the New button to preregisterinformation about clients to be used. If you select one or more existing clients in the table (eitherindividually or with the Select All button), you can use the Delete button to delete them from the Sun Raydata store.
Desktop Units Table
• Identifier - The client ID (short version) of the client connected to the session. Examples include080020b5ca55 for a Sun Ray Client and d8b3a4eb29497e0c6fbb0f2a810267f5 for an Oracle
Desktop Units Properties
344
Virtual Desktop Client. Click the client ID for more details on the client. See Section B.3, “Desktop UnitsTab” for details.
• Location - The location of the desktop unit (user defined).
• Other Information - General information about the desktop unit (user defined).
• Client Key Status - Specifies the status of the client authentication.
• Automatic - The client key for an Oracle Virtual Desktop Client is automatically confirmed.
• Confirmed - The client key has been confirmed by the server.
• Conflict - If different keys are used with the same client identifier and none of the keys have beenconfirmed to be authentic, then this may indicate a security incident and is marked as a conflict. In thiscase, connection attempts from this client are rejected until one of the keys is confirmed to be valid.
• Unconfirmed - The client key has not been confirmed by the server. If hard security is set, the clientwill not be able to connect.
Related Commands
• utdesktop
B.3.1 Desktop Units Properties
This page provides details on a desktop unit and enables you to edit its properties.
Actions
• Display more details about a desktop unit.
• Edit details about a desktop unit, including location and other information.
• Confirm or delete the client keys for the desktop unit.
• Configure a Sun Ray Client to be a token reader.
Edit Button
The Edit button enables you to edit the location and other information for a desktop unit. You can alsoconfigure a Sun Ray Client to be a token reader.
General Section
• Location - The location of the desktop unit (user defined).
• Other Information - General information about the desktop unit (user defined).
• Model - The model name for the desktop unit. The model names are the same names used in theserver's TFTP home directory. The SunRayS1 model name specifies an Oracle Virtual Desktop Client.
• Firmware - If connected, displays the Sun Ray Operating Software version currently installed on the SunRay Client.
Status Section
• Current Token - If connected, displays the current token used for the connection. Click View TokenDetails for more details.

Tokens Tab
345
• Unix User - If connected, displays the Unix user ID logged in to the desktop unit. Click TerminateSession or Terminate Idle Session to terminate the session on the desktop unit.
• Server - If connected, displays the Sun Ray server to which the desktop unit is connected. Click ViewServer Details for more details (see Section B.1.1, “Server Details” for details).
• Status - Specifies if the session is Connected or Disconnected.
• Connected - Sessions with a connected status are currently displayed on a client. The session isautomatically disconnected when the user removes the smart card or explicitly switches the client to adifferent session, for example, with the utswitch or utselect commands.
• Disconnected - Sessions still running on a server but are not connected to a client and, consequently,are not displayed. However, a user can reconnect to a disconnected session, such as insertinga smart card containing the appropriate token into the card reader on a client. This changes thesession's state to connected and causes it to be displayed on that client.
• Client Keys - List the client keys for the Sun Ray Client. Once selected, you can confirm or delete aclient key.
Advanced
• Token Reader - Specifies if the Sun Ray Client is a token reader. Click Edit to configure the desktop unitas a token reader. Sun Ray Clients configured as token readers do not support hotdesking. They areused for registration of new tokens.
Related Commands
• utdesktop
• utkeyadm
• utreader
B.4 Tokens TabTokens are authentication keys used to associate a session with a user. A token is a string that consistof a token type and an identifier. If a user inserts a smart card into a client, the card's type and identifierare used as the token (for example mondex.9998007668077709). If the user is not using a smart card,the token type pseudo and the client's identifier (MAC address) are supplied as the token (for examplepseudo.080020861234).
You can register smart card tokens and pseudo-tokens in the Sun Ray data store to assign them to specificusers (also known as token owners). You can store the owner's name as well as any other information thathelps you to manage tokens in your organization. You can also register alias tokens to enable users toaccess the same session with multiple tokens. For example, if a user loses a smart card, you can register anew smart card as a replacement. This will be an alias token.
If kiosk mode is configured, you can also specify, for each token, whether the user should be directed to aregular (non-kiosk) session or a kiosk session when the token is inserted. This enables you to override thegroup-wide kiosk mode setting specified on the System Policy page.
See Chapter 7, Sessions and Tokens for more information.
Actions
• Filter the list of tokens displayed by using the Search field. You can filter the list from the followinggroupings: registered tokens or currently used tokens.
Tokens Tab
346
• Display details about the tokens.
• Pre-register smart card tokens and pseudo-tokens.
• Delete one or more tokens.
• Enable or disable session access for a specific token.
• Assign a regular (non-kiosk) session or kiosk session to a token.
• Edit a token, including registering it, by clicking on the token identifier. See Section B.4.1, “TokenProperties” for details.
Search Field
The search field enables you to filter what tokens are displayed in the Tokens table. The drop-down menuenables you to filter the tokens by registered tokens or currently used tokens. By default, a wildcard (*) isin the search field to display all the tokens for the specific filter. You can also specify a token ID or partialID in the field to further filter the list of tokens that are displayed. After you specify a new search string, youcan always click Reset Search Criteria to reset the search back to the default.
New and Delete Buttons
If nothing is selected in the table, the New button is available. You can use the New button to preregistera token, which enables you to specify the identifier for a token and its owner. You can also specify thesession type used for the token, which overrides the current policy settings.
If you select one or more existing tokens in the table (either individually or with the Select All button), youcan use the Delete button to delete them.
Enable and Disable Buttons
If you have the system policy set to accept access from only registered tokens, you can then enable ordisable session access at the token level. For example, if you disable a token, the smart card or clientassociated with that token will not be able to access a session.
Session Type Actions
If you select one or more existing tokens in the table (either individually or with the Select All button), youcan use the Session Type Actions menu to specify the session type used for the token, which overrides thecurrent policy settings. This is a good way to change the session type for a group of tokens.
Token Table
The Token table content changes based on which filter is selected, either Registered Tokens or CurrentlyUsed Tokens. The buttons are available only when the Registered Token filter is used.
• Token - The token ID. Examples include mondex.9998007668077709 for a smart card token orpseudo.080020861234 for a pseudo token. Click the token ID for more details on the token. SeeSection B.4.1, “Token Properties” for details.
• Status - Enabled or Disabled. If you have the system policy set to accept access from only registeredtokens, you can then enable or disable access at the token level.
• Session Type - The session type defined for the token, which overrides the system policy.
• Default - Use the default system policy.

Token Properties
347
• Regular - Use the regular (non-kiosk) mode session, which is the Sun Ray server's operating system.
• Kiosk - Use the configured kiosk session type, which is listed in the Kiosk tab.
• Owner - The owner registered to the token (user defined).
• Other Information - Additional information provided for the token (user defined).
• Server - The Sun Ray server to which the token is currently assigned.
• Desktop Unit - The client to which the token is currently assigned.
Related Commands
• utsession
• utuser
B.4.1 Token Properties
This page provides details on a token and enables you to edit its properties.
Actions
• Display more details about a token.
• Edit details about a token, including owner, other information, and session type. Adding an ownerregisters the token.
• Add alias tokens.
Edit Button
The Edit button enables you to edit the owner, other information, status, and session type for the token.
General Section
• Owner - The owner registered to the token (user defined).
• Other Information - General information about the token (user defined).
• Status - Enabled or disabled. If you have the system policy set to accept access from only registeredtokens, you can then enable or disable access at the token level.
Advanced Section
• Sessions - Specifies the number of running sessions associated with the token. If there are one or moresessions, you can click View Session Details to view the list of sessions.
• Session Type - Specifies the session type assigned to the token.
• Alias Tokens - Enables you to create alias tokens for the current token.
Related Commands
• utsession

Advanced Tab
348
• utuser
B.5 Advanced Tab
This tab provides various subpages to administer the following features:
• Security - Configure encryption and authentication between client and server and to enable or disabledevices globally.
• System Policy - Configure group-wide Sun Ray Software policies.
• Kiosk Mode - Configure the kiosk session type used for kiosk sessions.
• Card Probe Order - Display all the smart card types configured in the Sun Ray data store and set thesmart card prob order.
• Data Store Password - Change the password of the administrative user.
B.5.1 Security
This page enables you to configure the security policies for the Sun Ray server. See Chapter 11, Client-Server Security for more information.
Actions
• Configure encryption and server authentication.
• Configure client authentication.
• Enable or disable access to client devices attached to the Sun Ray Clients.
• Enable or disable the clipboard on Oracle Virtual Desktop Clients.
Encryption and Server Authentication Section
• Upstream Encryption - Select to enable encryption from the client to the Sun Ray server.
• Downstream Encryption - Select to enable encryption from the Sun Ray server to the client.
• Server Authentication - Select to force a server to be authenticated before providing a session to aclient.
• Security Mode - Choose the security mode for the encryption and server authentication:
• Soft - Ensures that connection requests are granted even for Sun Ray Clients that don't support theconfigured security requirements. If security requirements cannot be met, the session is granted butnot secure.
• Hard - Ensures that every session is secure. If security requirements cannot be met, the session isrefused.
Note
Security mode settings don't apply to Oracle Virtual Desktop Clients. OracleVirtual Desktop Clients will always be treated as if hard security mode forencryption or authentication is in effect.

System Policy
349
Client Authentication Section
• Client Authentication - Select to force a client to be authenticated before obtaining a session. A SunRay Client whose key has not been confirmed as valid for the given Sun Ray Client will still be allowedaccess to Sun Ray sessions by default, unless there is a conflict when the client ID (the MAC address) isused with multiple keys. To force client key confirmation, see the See Section B.5.2, “System Policy” fordetails.
• Security Mode - Choose the security mode for client authentication:
• Soft - Ensures that connection requests are granted even for Sun Ray Clients that don't support theconfigured security requirements. If security requirements cannot be met, the session is granted butnot secure.
• Hard - Ensures that every session is secure. If security requirements cannot be met, the session isrefused.
Note
Security mode settings don't apply to Oracle Virtual Desktop Clients. OracleVirtual Desktop Clients will always be treated as if hard security mode forauthentication is in effect.
Devices Section
• Internal Serial Port - Select to enable access to the serial port on the Sun Ray Clients.
• Internal Smart Card Reader - Select to enable access to the smart card readers on the Sun RayClients. Choose the smart card protocol to use, either scbus v1 or scbus v2. Choose scbus v2unless you are managing Sun Ray Clients running Sun Ray Software 5.2 firmware or earlier.
• USB Port - Select to enable access to the USB ports on the Sun Ray Clients.
• Oracle Virtual Desktop Client Clipboard - Select to enable copy and paste text between an applicationrunning in an Oracle Virtual Desktop Client session and an application running on the local desktop.
Related Commands
• utcrypto
• utdevadm
• utpolicy
B.5.2 System Policy
This page enables you to configure group-wide policies. Some policy setting combinations are not allowed,and settings are disabled accordingly to enforce these rules.
Actions
• Set session polices for smart cards.
• Set session polices for non-smart cards.
• Enable or disable client key confirmation for client authentication.
• Enable or disable the multihead group policy.
System Policy
350
• Enable or disable Remote Hotdesk Authentication (RHA).
Card Users Section
These policies apply to users who try to access a session with a smart card.
• Access - Select who can access sessions with a smart card:
• None - Select to disable session access with a smart card.
• All Users - Select to enable session access to all smart card users.
• Users with Registered Tokens - Select to enable session access to all smart card users with aregistered token. If enabled, you can also enable self-registration of tokens and if user accountauthentication is required.
• Oracle Virtual Desktop Clients - Select to enable session access on Oracle Virtual Desktop Clientswith a smart card.
• Kiosk Mode - Select to force the user session to be the kiosk mode session (if configured) when a smartcard is used.
Non-Card Users Section
These policies apply to users who try to access a session without a smart card.
• Access - Select who can access sessions without a smart card:
• None - Select to disable session access to users without a smart card.
• All Users - Select to enable session access to users without a smart card.
• Users with Registered Tokens - Select to enable session access to all users without a smart cardand with a registered token. If enabled, you can also enable self-registration of tokens and if useraccount authentication is required.
• Oracle Virtual Desktop Clients - Select to enable session access on Oracle Virtual Desktop Clientswithout a smart card.
• Kiosk Mode - Select to force the user session to be the kiosk mode session (if configured) without asmart card.
• Mobile Sessions - Select to enable Non-Smart Card Mobility (NSCM) for sessions, or hotdeskingwithout smart cards. You can also enable the ability for users to exit from Mobile Sessions.
Client Authentication Section
• Client Key Confirmation Required - Select to force client key confirmation for session access if clientauthentication is enabled in the Security page. Once enabled, any new Sun Ray Client will be denieda regular session when first used. To allow session access, you must first inspect and confirm thesubmitted key as valid. You should also set the Client Authentication Security Mode to hard in theSecurity page, so clients that do not participate in client authentication are rejected as well.
Multihead Feature Section
• Multihead Feature - Select to enable the multihead group feature for the failover group. SeeSection 12.2, “Multihead Groups” for details.

Kiosk Mode
351
Session Access when Hotdesking Section
• Direct Session Access Allowed - Select to enable direct access to a session after hotdesking whenusing smart cards, which is really disabling Remote Hotdesk Authentication (RHA). If you disable RHA,users won't be presented with a login screen when hotdesking. Although this reduces the time it takes forusers to hotdesk, it introduces a security risk. For example, if you have a current session and someonegains access to your smart card, the user can gain access to your session without having your logininformation.
Related Commands
• utreader
• utpolicy
B.5.3 Kiosk Mode
This page enables you to set the kiosk session type and general properties used when kiosk mode isenabled, such as with the Windows connector or VMware View connector. This page is available onlyif you have configured kiosk mode as part of the initial Sun Ray Software installation or by using theutconfig command after post installation.
See Chapter 10, Kiosk Mode for more information.
Actions
• Configure a specific kiosk session type, including general properties and any Windows connector(uttsc command) arguments.
Session Type Fields
To configure a kiosk session type, fill in the following fields and click OK. Most of the fields are notrequired, and the system default is applied.
• Session - The session type to use for the Kiosk session.
• Timeout - Indicates the number of seconds after which a disconnected session will be terminated. If youprovide no value for this setting, termination of disconnected sessions will be disabled.
• Maximum CPU Time - Indicates the maximum number of CPU seconds per process for kiosk sessions.
• Maximum VM Size - Indicates the maximum Virtual Memory size per process for kiosk sessions.
• Maximum number of Files - Indicates the maximum number of open files per process for kiosksessions.
• Maximum File Size - Indicates the maximum file size per process for kiosk sessions.
• Locale - Indicates the locale to be used by the kiosk session.
• Arguments - Indicates a list of Windows connector (uttsc command) arguments that are passed to thekiosk session as it starts. This setting is specific to the kiosk session type. For more information aboutsupported arguments, see Chapter 10, Kiosk Mode.
Edit and Delete Buttons
If a kiosk session is currently configured, the Edit button is displayed, which enables you to edit thecurrently configured kiosk session type, and the Delete button is displayed, which enables you to delete

Card Probe Order
352
the currently configured kiosk session type. You can also use the Edit button to change the current kiosksession type, or you can disable kiosk mode policy to ignore the currently configured session type.
Related Commands
• utkiosk
B.5.4 Card Probe Order
This page enables you to set the group-wide smart card probe order, which is an ordered list of the smartcard configuration files. Every time a smart card is inserted into a Sun Ray Client, the Sun Ray servertries to identify the card type using the specified probe order. Only smart cards identified by one of theconfiguration files specified in the probe order list are accepted. You can add or remove smart cardconfiguration files from this list to restrict session access to specific card types.
In the absence of a group-wide probe order, the Sun Ray server uses the local probe order defined in the/etc/opt/SUNWut/smartcard/probe_order.conf file. If no local probe order has been set up, adefault probe order is used. Changes in smart card probe order require Sun Ray services to be restarted.
See Chapter 8, Smart Card Services for more information.
Actions
• Add smart card configuration files to the group-wide smart card probe order.
• Rearrange the smart card configuration files in the smart card probe order.
Set Probe Order Button
Click this button to add, remove, and order the group-wide probe order for the smart card configurationfiles. The available smart card list contains the list of configuration files located in the server's /etc/opt/SUNWut/smartcard directory. All files end with a .cfg suffix, as in, acme_card.cfg.
Related Commands
• utcard
B.5.5 Data Store Password
This page enables you to change the password of the administrative user for privileged access to the SunRay data store. By default, the Admin GUI uses the same account to authenticate users during login. Theinitial password of this admin user is specified during the Sun Ray Software configuration.
If you change the password using the Admin GUI, the new password is applied to the Sun Ray data storeas well as to the password file on the local server.
Note
In a failover group each server uses its own local password file. Thus, afterchanging the data store password, you must also manually update the passwordfiles on all the other servers, by using the Admin GUI or running the utpw commandon each server.
Related Commands
• utpw

Log Files Tab
353
B.6 Log Files Tab
This tab enables you to view the following log files on the Sun Ray server that you are logged in to.
Actions
• Display Sun Ray system messages.
• Display authentication events.
• Display server administration events.
• Display mount messages.
• Display storage events.
Log File Pages
Each log file page provides a File dropdown file menu that enables you to view the current and pastversions of the log file. All the log files are stored under /var/opt/SUNWut/log. The Size field specifiesthe size of the log file.
Click on each subheading to view the associated message file:
• Messages - Displays Sun Ray system messages (messages.*). The log files are archived daily.
• Authentication - Displays authentication events (auth_log.*). The log files are archived whenever theAuthentication Manager is restarted.
• Administration - Displays operations performed during server administration (admin_log.*). The logfiles are archived daily.
• Mount - Displays mount messages from mass storage devices (utmountd.log.*). The log files arearchived whenever the mounter service is restarted.
• Storage - Displays mass storage device events (utstoraged.log.*). The log files are archivedwhenever the storage service is restarted.

354

355
Appendix C Third Party LicensesThis appendix includes the licenses for the third-party products included with the Sun Ray Software.
Free BSD--------Copyright 1994-2009 The FreeBSD Project. All rights reserved.
Redistribution and use in source and binary forms, with or without modification, are permitted provided that the following conditions are met:
1. Redistributions of source code must retain the above copyright notice, this list of conditions and the following disclaimer.
2. Redistributions in binary form must reproduce the above copyright notice, this list of conditions and the following disclaimer in the documentation and/or other materials provided with the distribution.
THIS SOFTWARE IS PROVIDED BY THE FREEBSD PROJECT ``AS IS'' AND ANY EXPRESS OR IMPLIED WARRANTIES, INCLUDING, BUT NOT LIMITED TO, THE IMPLIED WARRANTIES OF MERCHANTABILITY AND FITNESS FOR A PARTICULAR PURPOSE ARE DISCLAIMED. IN NO EVENT SHALL THE FREEBSD PROJECT OR CONTRIBUTORS BE LIABLE FOR ANY DIRECT, INDIRECT, INCIDENTAL, SPECIAL, EXEMPLARY, OR CONSEQUENTIAL DAMAGES (INCLUDING, BUT NOT LIMITED TO, PROCUREMENT OF SUBSTITUTE GOODS OR SERVICES; LOSS OF USE, DATA, OR PROFITS; OR BUSINESS INTERRUPTION) HOWEVER CAUSED AND ON ANY THEORY OF LIABILITY, WHETHER IN CONTRACT, STRICT LIABILITY, OR TORT (INCLUDING NEGLIGENCE OR OTHERWISE) ARISING IN ANY WAY OUT OF THE USE OF THIS SOFTWARE, EVEN IF ADVISED OF THE POSSIBILITY OF SUCH DAMAGE. The views and conclusions contained in the software and documentation are those of the authors and should not be interpreted as representing official policies, either expressed or implied, of the FreeBSD Project.
==========================================================================================
libcurl--------Copyright (c) 1996 - 2010, Daniel Stenberg, <[email protected]>.All rights reserved.Permission to use, copy, modify, and distribute this software for any purpose with or without fee is hereby granted, provided that the above copyright notice and this permission notice appear in all copies.
THE SOFTWARE IS PROVIDED "AS IS", WITHOUT WARRANTY OF ANY KIND, EXPRESS OR IMPLIED, INCLUDING BUT NOT LIMITED TO THE WARRANTIES OF MERCHANTABILITY, FITNESS FOR A PARTICULAR PURPOSE AND NONINFRINGEMENT OF THIRD PARTY RIGHTS. IN NO EVENT SHALL THE AUTHORS OR COPYRIGHT HOLDERS BE LIABLE FOR ANY CLAIM, DAMAGES OR OTHER LIABILITY, WHETHER IN AN ACTION OF CONTRACT, TORT OR OTHERWISE, ARISING FROM, OUT OF OR IN CONNECTION WITH THE SOFTWARE OR THE USE OR OTHER DEALINGS IN THE SOFTWARE.
Except as contained in this notice, the name of a copyright holder shall not be used in advertising or otherwise to promote the sale, use or other dealings in this Software without prior written authorization of the copyright holder.
==========================================================================================
SSCEP---------Copyright (c) 2003 Jarkko Turkulainen. All rights reserved.Redistribution and use in source and binary forms, with or without modification, are permitted provided that the following conditions are met:
1. Redistributions of source code must retain the above copyright notice, this list of conditions and the following disclaimer.
2. Redistributions in binary form must reproduce the above copyright notice, this list of conditions and the following disclaimer in the documentation and/or other materials provided with the distribution.

356
THIS SOFTWARE IS PROVIDED BY JARKKO TURKULAINEN ``AS IS'' AND ANY EXPRESS OR IMPLIED WARRANTIES, INCLUDING, BUT NOT LIMITED TO, THE IMPLIED WARRANTIES OF MERCHANTABILITY AND FITNESS FOR A PARTICULAR PURPOSE ARE DISCLAIMED. IN NO EVENT SHALL JARKKO TURKULAINEN BE LIABLE FOR ANY DIRECT, INDIRECT, INCIDENTAL, SPECIAL, EXEMPLARY, OR CONSEQUENTIAL DAMAGES (INCLUDING, BUT NOT LIMITED TO, PROCUREMENT OF SUBSTITUTE GOODS OR SERVICES; LOSS OF USE, DATA, OR PROFITS; OR BUSINESS INTERRUPTION) HOWEVER CAUSED AND ON ANY THEORY OF LIABILITY, WHETHER IN CONTRACT, STRICT LIABILITY, OR TORT (INCLUDING NEGLIGENCE OR OTHERWISE) ARISING IN ANY WAY OUT OF THE USE OF THIS SOFTWARE, EVEN IF ADVISED OF THE POSSIBILITY OF SUCH DAMAGE.
==========================================================================================
wpa_supplicant-----------------Oracle elects to license all wpa_suppliant code under the BSD license./** WPA Supplicant* Copyright (c) 2003-2009, Jouni Malinen <[email protected]>** This program is free software; you can redistribute it and/or modify* it under the terms of the GNU General Public License version 2 as* published by the Free Software Foundation.** Alternatively, this software may be distributed under the terms of BSD* license.** See README and COPYING for more details.** This file implements functions for registering and unregistering* %wpa_supplicant interfaces. In addition, this file contains number of* functions for managing network connections.*/Redistribution and use in source and binary forms, with or withoutmodification, are permitted provided that the following conditions aremet:
1. Redistributions of source code must retain the above copyrightnotice, this list of conditions and the following disclaimer.
2. Redistributions in binary form must reproduce the above copyrightnotice, this list of conditions and the following disclaimer in thedocumentation and/or other materials provided with the distribution.
3. Neither the name(s) of the above-listed copyright holder(s) nor thenames of its contributors may be used to endorse or promote productsderived from this software without specific prior written permission.
THIS SOFTWARE IS PROVIDED BY THE COPYRIGHT HOLDERS AND CONTRIBUTORS"AS IS" AND ANY EXPRESS OR IMPLIED WARRANTIES, INCLUDING, BUT NOTLIMITED TO, THE IMPLIED WARRANTIES OF MERCHANTABILITY AND FITNESS FORA PARTICULAR PURPOSE ARE DISCLAIMED. IN NO EVENT SHALL THE COPYRIGHTOWNER OR CONTRIBUTORS BE LIABLE FOR ANY DIRECT, INDIRECT, INCIDENTAL,SPECIAL, EXEMPLARY, OR CONSEQUENTIAL DAMAGES (INCLUDING, BUT NOTLIMITED TO, PROCUREMENT OF SUBSTITUTE GOODS OR SERVICES; LOSS OF USE,DATA, OR PROFITS; OR BUSINESS INTERRUPTION) HOWEVER CAUSED AND ON ANYTHEORY OF LIABILITY, WHETHER IN CONTRACT, STRICT LIABILITY, OR TORT(INCLUDING NEGLIGENCE OR OTHERWISE) ARISING IN ANY WAY OUT OF THE USEOF THIS SOFTWARE, EVEN IF ADVISED OF THE POSSIBILITY OF SUCH DAMAGE.
wpa_supp/ctrl_iface_dbus.h
/** WPA Supplicant / dbus-based control interface* Copyright (c) 2006, Dan Williams <[email protected]> and Red Hat, Inc.** This program is free software; you can redistribute it and/or modify

357
* it under the terms of the GNU General Public License version 2 as* published by the Free Software Foundation.** Alternatively, this software may be distributed under the terms of BSD* license.** See README and COPYING for more details.*/Redistribution and use in source and binary forms, with or withoutmodification, are permitted provided that the following conditions aremet:
1. Redistributions of source code must retain the above copyrightnotice, this list of conditions and the following disclaimer.
2. Redistributions in binary form must reproduce the above copyrightnotice, this list of conditions and the following disclaimer in thedocumentation and/or other materials provided with the distribution.
3. Neither the name(s) of the above-listed copyright holder(s) nor thenames of its contributors may be used to endorse or promote productsderived from this software without specific prior written permission.
THIS SOFTWARE IS PROVIDED BY THE COPYRIGHT HOLDERS AND CONTRIBUTORS"AS IS" AND ANY EXPRESS OR IMPLIED WARRANTIES, INCLUDING, BUT NOTLIMITED TO, THE IMPLIED WARRANTIES OF MERCHANTABILITY AND FITNESS FORA PARTICULAR PURPOSE ARE DISCLAIMED. IN NO EVENT SHALL THE COPYRIGHTOWNER OR CONTRIBUTORS BE LIABLE FOR ANY DIRECT, INDIRECT, INCIDENTAL,SPECIAL, EXEMPLARY, OR CONSEQUENTIAL DAMAGES (INCLUDING, BUT NOTLIMITED TO, PROCUREMENT OF SUBSTITUTE GOODS OR SERVICES; LOSS OF USE,DATA, OR PROFITS; OR BUSINESS INTERRUPTION) HOWEVER CAUSED AND ON ANYTHEORY OF LIABILITY, WHETHER IN CONTRACT, STRICT LIABILITY, OR TORT(INCLUDING NEGLIGENCE OR OTHERWISE) ARISING IN ANY WAY OUT OF THE USEOF THIS SOFTWARE, EVEN IF ADVISED OF THE POSSIBILITY OF SUCH DAMAGE.
wpa_supp/mlme.h
/** WPA Supplicant - Client mode MLME* Copyright (c) 2003-2007, Jouni Malinen <[email protected]>* Copyright (c) 2004, Instant802 Networks, Inc.* Copyright (c) 2005-2006, Devicescape Software, Inc.** This program is free software; you can redistribute it and/or modify* it under the terms of the GNU General Public License version 2 as* published by the Free Software Foundation.** Alternatively, this software may be distributed under the terms of BSD* license.** See README and COPYING for more details.*/Redistribution and use in source and binary forms, with or withoutmodification, are permitted provided that the following conditions aremet:
1. Redistributions of source code must retain the above copyrightnotice, this list of conditions and the following disclaimer.
2. Redistributions in binary form must reproduce the above copyrightnotice, this list of conditions and the following disclaimer in thedocumentation and/or other materials provided with the distribution.
3. Neither the name(s) of the above-listed copyright holder(s) nor thenames of its contributors may be used to endorse or promote productsderived from this software without specific prior written permission.

358
THIS SOFTWARE IS PROVIDED BY THE COPYRIGHT HOLDERS AND CONTRIBUTORS"AS IS" AND ANY EXPRESS OR IMPLIED WARRANTIES, INCLUDING, BUT NOTLIMITED TO, THE IMPLIED WARRANTIES OF MERCHANTABILITY AND FITNESS FORA PARTICULAR PURPOSE ARE DISCLAIMED. IN NO EVENT SHALL THE COPYRIGHTOWNER OR CONTRIBUTORS BE LIABLE FOR ANY DIRECT, INDIRECT, INCIDENTAL,SPECIAL, EXEMPLARY, OR CONSEQUENTIAL DAMAGES (INCLUDING, BUT NOTLIMITED TO, PROCUREMENT OF SUBSTITUTE GOODS OR SERVICES; LOSS OF USE,DATA, OR PROFITS; OR BUSINESS INTERRUPTION) HOWEVER CAUSED AND ON ANYTHEORY OF LIABILITY, WHETHER IN CONTRACT, STRICT LIABILITY, OR TORT(INCLUDING NEGLIGENCE OR OTHERWISE) ARISING IN ANY WAY OUT OF THE USEOF THIS SOFTWARE, EVEN IF ADVISED OF THE POSSIBILITY OF SUCH DAMAGE.
common/ieee802_11_defs.h
/** WPA Supplicant - Client mode MLME* Copyright (c) 2003-2007, Jouni Malinen <[email protected]>* Copyright (c) 2004, Instant802 Networks, Inc.* Copyright (c) 2005-2006, Devicescape Software, Inc.** This program is free software; you can redistribute it and/or modify* it under the terms of the GNU General Public License version 2 as* published by the Free Software Foundation.** Alternatively, this software may be distributed under the terms of BSD* license.** See README and COPYING for more details.*/Redistribution and use in source and binary forms, with or withoutmodification, are permitted provided that the following conditions aremet:
1. Redistributions of source code must retain the above copyrightnotice, this list of conditions and the following disclaimer.
2. Redistributions in binary form must reproduce the above copyrightnotice, this list of conditions and the following disclaimer in thedocumentation and/or other materials provided with the distribution.
3. Neither the name(s) of the above-listed copyright holder(s) nor thenames of its contributors may be used to endorse or promote productsderived from this software without specific prior written permission.
THIS SOFTWARE IS PROVIDED BY THE COPYRIGHT HOLDERS AND CONTRIBUTORS"AS IS" AND ANY EXPRESS OR IMPLIED WARRANTIES, INCLUDING, BUT NOTLIMITED TO, THE IMPLIED WARRANTIES OF MERCHANTABILITY AND FITNESS FORA PARTICULAR PURPOSE ARE DISCLAIMED. IN NO EVENT SHALL THE COPYRIGHTOWNER OR CONTRIBUTORS BE LIABLE FOR ANY DIRECT, INDIRECT, INCIDENTAL,SPECIAL, EXEMPLARY, OR CONSEQUENTIAL DAMAGES (INCLUDING, BUT NOTLIMITED TO, PROCUREMENT OF SUBSTITUTE GOODS OR SERVICES; LOSS OF USE,DATA, OR PROFITS; OR BUSINESS INTERRUPTION) HOWEVER CAUSED AND ON ANYTHEORY OF LIABILITY, WHETHER IN CONTRACT, STRICT LIABILITY, OR TORT(INCLUDING NEGLIGENCE OR OTHERWISE) ARISING IN ANY WAY OUT OF THE USEOF THIS SOFTWARE, EVEN IF ADVISED OF THE POSSIBILITY OF SUCH DAMAGE.
==========================================================================================
libXrandr---------Copyright 2000, Compaq Computer Corporation,Copyright 2002, Hewlett Packard, Inc.
Permission to use, copy, modify, distribute, and sell this software and its documentation for any purpose is hereby granted without fee, provided that the above copyright notice appear in all copies and that both that copyright notice and this permission notice appear in supporting documentation, and that the name of Compaq or HP not be used in advertising
359
or publicity pertaining to distribution of the software without specific, written prior permission. HP makes no representations about the suitability of this software for any purpose. It is provided "as is" without express or implied warranty.
HP DISCLAIMS ALL WARRANTIES WITH REGARD TO THIS SOFTWARE, INCLUDING ALL IMPLIED WARRANTIES OF MERCHANTABILITY AND FITNESS, IN NO EVENT SHALL HP BE LIABLE FOR ANY SPECIAL, INDIRECT OR CONSEQUENTIAL DAMAGES OR ANY DAMAGES WHATSOEVER RESULTING FROM LOSS OF USE, DATA OR PROFITS, WHETHER IN AN ACTION OF CONTRACT, NEGLIGENCE OR OTHER TORTIOUS ACTION, ARISING OUT OF OR IN CONNECTION WITH THE USE OR PERFORMANCE OF THIS SOFTWARE.
==========================================================================================
xrandr------Copyright 2001 Keith Packard, member of The XFree86 Project, Inc. Copyright 2002 Hewlett Packard Company, Inc.Copyright 2006 Intel Corporation
Permission to use, copy, modify, distribute, and sell this software and its documentation for any purpose is hereby granted without fee, provided that the above copyright notice appear in all copies and that both that copyright notice and this permission notice appear in supporting documentation, and that the name of the copyright holders not be used in advertising or publicity pertaining to distribution of the software without specific, written prior permission. The copyright holders make no representations about the suitability of this software for any purpose. It is provided "as is" without express or implied warranty.
THE COPYRIGHT HOLDERS DISCLAIM ALL WARRANTIES WITH REGARD TO THIS SOFTWARE, INCLUDING ALL IMPLIED WARRANTIES OF MERCHANTABILITY AND FITNESS, IN NO EVENT SHALL THE COPYRIGHT HOLDERS BE LIABLE FOR ANY SPECIAL, INDIRECT OR CONSEQUENTIAL DAMAGES OR ANY DAMAGES WHATSOEVER RESULTING FROM LOSS OF USE, DATA OR PROFITS, WHETHER IN AN ACTION OF CONTRACT, NEGLIGENCE OR OTHER TORTIOUS ACTION, ARISING OUT OF OR IN CONNECTION WITH THE USE OR PERFORMANCE OF THIS SOFTWARE.
==========================================================================================
OpenSSL-------
OpenSSL License Copyright (c) 1998-2008 The OpenSSL Project. All rights reserved.
Redistribution and use in source and binary forms, with or without modification, are permitted provided that the following conditions are met:
1. Redistributions of source code must retain the above copyright notice, this list of conditions and the following disclaimer.
2. Redistributions in binary form must reproduce the above copyright notice, this list of conditions and the following disclaimer in the documentation and/or other materials provided with the distribution.
3. All advertising materials mentioning features or use of this software must display the following acknowledgment: "This product includes software developed by the OpenSSL Project for use in the OpenSSL Toolkit. (http://www.openssl.org/)"
4. The names "OpenSSL Toolkit" and "OpenSSL Project" must not be used to endorse or promote products derived from this software without prior written permission. For written permission, please contact [email protected].
5. Products derived from this software may not be called "OpenSSL" nor may "OpenSSL" appear in their names without prior written permission of the OpenSSL Project.
6. Redistributions of any form whatsoever must retain the following acknowledgment: "This product includes software developed by the OpenSSL Project for use in the OpenSSL Toolkit (http://www.openssl.org/)"
THIS SOFTWARE IS PROVIDED BY THE OpenSSL PROJECT ``AS IS'' AND ANY EXPRESSED OR IMPLIED

360
WARRANTIES, INCLUDING, BUT NOT LIMITED TO, THE IMPLIED WARRANTIES OF MERCHANTABILITY AND FITNESS FOR A PARTICULAR PURPOSE ARE DISCLAIMED. IN NO EVENT SHALL THE OpenSSL PROJECT OR ITS CONTRIBUTORS BE LIABLE FOR ANY DIRECT, INDIRECT, INCIDENTAL, SPECIAL, EXEMPLARY, OR CONSEQUENTIAL DAMAGES (INCLUDING, BUT NOT LIMITED TO, PROCUREMENT OF SUBSTITUTE GOODS OR SERVICES; LOSS OF USE, DATA, OR PROFITS; OR BUSINESS INTERRUPTION) HOWEVER CAUSED AND ON ANY THEORY OF LIABILITY, WHETHER IN CONTRACT, STRICT LIABILITY, OR TORT (INCLUDING NEGLIGENCE OR OTHERWISE) ARISING IN ANY WAY OUT OF THE USE OF THIS SOFTWARE, EVEN IF ADVISED OF THE POSSIBILITY OF SUCH DAMAGE.
This product includes cryptographic software written by Eric Young ([email protected]). This product includes software written by Tim Hudson ([email protected])
Original SSLeay License
Copyright (C) 1995-1998 Eric Young ([email protected])All rights reserved.
This package is an SSL implementation written by Eric Young ([email protected]). The implementation was written so as to conform with Netscapes SSL.
This library is free for commercial and non-commercial use as long as the following conditions are aheared to. The following conditions apply to all code found in this distribution, be it the RC4, RSA, lhash, DES, etc., code; not just the SSL code. The SSL documentation included with this distribution is covered by the same copyright terms except that the holder is Tim Hudson ([email protected]).
Copyright remains Eric Young's, and as such any Copyright notices in the code are not to be removed. If this package is used in a product, Eric Young should be given attribution as the author of the parts of the library used. This can be in the form of a textual message at program startup or in documentation (online or textual) provided with the package.
Redistribution and use in source and binary forms, with or without modification, are permitted provided that the following conditions are met:1. Redistributions of source code must retain the copyright notice, this list of conditions and the following disclaimer.2. Redistributions in binary form must reproduce the above copyright notice, this list of conditions and the following disclaimer in the documentation and/or other materials provided with the distribution.3. All advertising materials mentioning features or use of this software must display the following acknowledgement: "This product includes cryptographic software written by Eric Young ([email protected])" The word 'cryptographic' can be left out if the rouines from the library being used are not cryptographic related :-).4. If you include any Windows specific code (or a derivative thereof) from the apps directory (application code) you must include an acknowledgement: "This product includes software written by Tim Hudson ([email protected])"
THIS SOFTWARE IS PROVIDED BY ERIC YOUNG ``AS IS'' AND ANY EXPRESS OR IMPLIED WARRANTIES, INCLUDING, BUT NOT LIMITED TO, THE IMPLIED WARRANTIES OF MERCHANTABILITY AND FITNESS FOR A PARTICULAR PURPOSE ARE DISCLAIMED. IN NO EVENT SHALL THE AUTHOR OR CONTRIBUTORS BE LIABLE FOR ANY DIRECT, INDIRECT, INCIDENTAL, SPECIAL, EXEMPLARY, OR CONSEQUENTIAL DAMAGES (INCLUDING, BUT NOT LIMITED TO, PROCUREMENT OF SUBSTITUTE GOODS OR SERVICES; LOSS OF USE, DATA, OR PROFITS; OR BUSINESS INTERRUPTION) HOWEVER CAUSED AND ON ANY THEORY OF LIABILITY, WHETHER IN CONTRACT, STRICT LIABILITY, OR TORT (INCLUDING NEGLIGENCE OR OTHERWISE) ARISING IN ANY WAY OUT OF THE USE OF THIS SOFTWARE, EVEN IF ADVISED OF THE POSSIBILITY OF SUCH DAMAGE.
The licence and distribution terms for any publically available version or derivative of this code cannot be changed. i.e. this code cannot simply be copied and put under another distribution licence [including the GNU Public Licence.]
==========================================================================================
Assembly instructions for JPEG compression on x86:--------------------------------------------------

361
The assembly code has a different license than the rest of the TurboJpeg package and it is listed in simd/jsimdext.inc.
Copyright 2009 Pierre Ossman for Cendio AB Copyright 2010 D. R. Commander
Based onx86 SIMD extension for IJG JPEG library - version 1.02
Copyright (C) 1999-2006, MIYASAKA Masaru.
This software is provided 'as-is', without any express or implied warranty. In no event will the authors be held liable for any damages arising from the use of this software. Permission is granted to anyone to use this software for any purpose, including commercial applications, and to alter it and redistribute it freely, subject to the following restrictions:
1. The origin of this software must not be misrepresented; you must not claim that you wrote the original software. If you use this software in a product, an acknowledgment in the product documentation would be appreciated but is not required. 2. Altered source versions must be plainly marked as such, and must not be misrepresented as being the original software. 3. This notice may not be removed or altered from any source distribution.
==========================================================================================
The Independent JPEG Group's JPEG software:-------------------------------------------
LEGAL ISSUES============
In plain English:
1. We don't promise that this software works. (But if you find any bugs, please let us know!)2. You can use this software for whatever you want. You don't have to pay us.3. You may not pretend that you wrote this software. If you use it in a program, you must acknowledge somewhere in your documentation that you've used the IJG code.
In legalese:
The authors make NO WARRANTY or representation, either express or implied, with respect to this software, its quality, accuracy, merchantability, or fitness for a particular purpose. This software is provided "AS IS", and you, its user, assume the entire risk as to its quality and accuracy.
This software is copyright (C) 1991-2010, Thomas G. Lane, Guido Vollbeding.All Rights Reserved except as specified below.
Permission is hereby granted to use, copy, modify, and distribute this software (or portions thereof) for any purpose, without fee, subject to these conditions:(1) If any part of the source code for this software is distributed, then this README file must be included, with this copyright and no-warranty notice unaltered; and any additions, deletions, or changes to the original files must be clearly indicated in accompanying documentation.(2) If only executable code is distributed, then the accompanying documentation must state that "this software is based in part on the work of the Independent JPEG Group".(3) Permission for use of this software is granted only if the user accepts full responsibility for any undesirable consequences; the authors accept NO LIABILITY for damages of any kind.
These conditions apply to any software derived from or based on the IJG code, not just to the unmodified library. If you use our work, you ought to acknowledge us.
Permission is NOT granted for the use of any IJG author's name or company name in advertising or publicity relating to this software or products derived from it. This

362
software may be referred to only as "the Independent JPEG Group's software".
We specifically permit and encourage the use of this software as the basis of commercial products, provided that all warranty or liability claims are assumed by the product vendor.
ansi2knr.c is included in this distribution by permission of L. Peter Deutsch, sole proprietor of its copyright holder, Aladdin Enterprises of Menlo Park, CA. ansi2knr.c is NOT covered by the above copyright and conditions, but instead by the usual distribution terms of the Free Software Foundation; principally, that you must include source code if you redistribute it. (See the file ansi2knr.c for full details.) However, since ansi2knr.c is not needed as part of any program generated from the IJG code, this does not limit you more than the foregoing paragraphs do.
The Unix configuration script "configure" was produced with GNU Autoconf. It is copyright by the Free Software Foundation but is freely distributable. The same holds for its supporting scripts (config.guess, config.sub, ltmain.sh). Another support script, install-sh, is copyright by X Consortium but is also freely distributable.
The IJG distribution formerly included code to read and write GIF files. To avoid entanglement with the Unisys LZW patent, GIF reading support has been removed altogether, and the GIF writer has been simplified to produce "uncompressed GIFs". This technique does not use the LZW algorithm; the resulting GIF files are larger than usual, but are readable by all standard GIF decoders.
We are required to state that"The Graphics Interchange Format(c) is the Copyright property of CompuServe Incorporated. GIF(sm) is a Service Mark property of CompuServe Incorporated."
==========================================================================================
JPEG Encoding:--------------The libjpeg-turbo toplevel license text is this:
Some of the optimizations to the Huffman encoder (jchuff.c) and decoder (jdhuff.c) were borrowed from VirtualGL, and thus any distribution of libjpeg-turbo which includes those optimizations must, as a whole, be subject to the terms of the wxWindows Library Licence, Version 3.1. A copy of this license can be found in this directory under LICENSE.txt. The wxWindows Library License is based on the LGPL but includes provisions which allow the Library to be statically linked into proprietary libraries and applications without requiring the resulting binaries to be distributed under the terms of the LGPL.
The rest of the source code, apart from the Huffman codec optimizations, falls under a less restrictive, BSD-style license (see README.) You can choose to distribute libjpeg-turbo, as a whole, under this BSD-style license by simply replacing the optimized jchuff.c and jdhuff.c with their unoptimized counterparts from the libjpeg v6b source.
We only use the code that falls under the less restrictive BSD style license, the text for that is:
LEGAL ISSUES============
In plain English:
1. We don't promise that this software works. (But if you find any bugs, please let us know!)2. You can use this software for whatever you want. You don't have to pay us.3. You may not pretend that you wrote this software. If you use it in a program, you must acknowledge somewhere in your documentation that you've used the IJG code.
In legalese:
The authors make NO WARRANTY or representation, either express or implied, with respect to this software, its quality, accuracy, merchantability, or fitness for a particular purpose. This software is provided "AS IS", and you, its user, assume the entire risk as to its quality and accuracy.

363
This software is copyright (C) 1991-1998, Thomas G. Lane.All Rights Reserved except as specified below.
Permission is hereby granted to use, copy, modify, and distribute this software (or portions thereof) for any purpose, without fee, subject to these conditions:(1) If any part of the source code for this software is distributed, then this README file must be included, with this copyright and no-warranty notice unaltered; and any additions, deletions, or changes to the original files must be clearly indicated in accompanying documentation.(2) If only executable code is distributed, then the accompanying documentation must state that "this software is based in part on the work of the Independent JPEG Group".(3) Permission for use of this software is granted only if the user accepts full responsibility for any undesirable consequences; the authors accept NO LIABILITY for damages of any kind.
These conditions apply to any software derived from or based on the IJG code, not just to the unmodified library. If you use our work, you ought to acknowledge us.
Permission is NOT granted for the use of any IJG author's name or company name in advertising or publicity relating to this software or products derived from it. This software may be referred to only as "the Independent JPEG Group's software".
We specifically permit and encourage the use of this software as the basis of commercial products, provided that all warranty or liability claims are assumed by the product vendor. ansi2knr.c is included in this distribution by permission of L. Peter Deutsch, sole proprietor of its copyright holder, Aladdin Enterprises of Menlo Park, CA.
ansi2knr.c is NOT covered by the above copyright and conditions, but instead by the usual distribution terms of the Free Software Foundation; principally, that you must include source code if you redistribute it. (See the file ansi2knr.c for full details.) However, since ansi2knr.c is not needed as part of any program generated from the IJG code, this does not limit you more than the foregoing paragraphs do.
The Unix configuration script "configure" was produced with GNU Autoconf. It is copyright by the Free Software Foundation but is freely distributable. The same holds for its supporting scripts (config.guess, config.sub, ltconfig, ltmain.sh). Another support script, install-sh, is copyright by M.I.T. but is also freely distributable.
It appears that the arithmetic coding option of the JPEG spec is covered by patents owned by IBM, AT&T, and Mitsubishi. Hence arithmetic coding cannot legally be used without obtaining one or more licenses. For this reason, support for arithmetic coding has been removed from the free JPEG software. (Since arithmetic coding provides only a marginal gain over the unpatented Huffman mode, it is unlikely that very many implementations will support it.) So far as we are aware, there are no patent restrictions on the remaining code.
The IJG distribution formerly included code to read and write GIF files. To avoid entanglement with the Unisys LZW patent, GIF reading support has been removed altogether, and the GIF writer has been simplified to produce "uncompressed GIFs". This technique does not use the LZW algorithm; the resulting GIF files are larger than usual, but are readable by all standard GIF decoders.
We are required to state that"The Graphics Interchange Format(c) is the Copyright property of CompuServe Incorporated. GIF(sm) is a Service Mark property of CompuServe Incorporated."
==========================================================================================
Cryptolib:----------
* This is version 1.2 of CryptoLib** The authors of this software are Jack Lacy, Don Mitchell and Matt Blaze* Copyright (c) 1991, 1992, 1993, 1994, 1995 by AT&T.* Permission to use, copy, and modify this software without fee* is hereby granted, provided that this entire notice is included in

364
* all copies of any software which is or includes a copy or* modification of this software and in all copies of the supporting* documentation for such software.** NOTE:* Some of the algorithms in cryptolib may be covered by patents.* It is the responsibility of the user to ensure that any required* licenses are obtained.*** SOME PARTS OF CRYPTOLIB MAY BE RESTRICTED UNDER UNITED STATES EXPORT* REGULATIONS.*** THIS SOFTWARE IS BEING PROVIDED "AS IS", WITHOUT ANY EXPRESS OR IMPLIED* WARRANTY. IN PARTICULAR, NEITHER THE AUTHORS NOR AT&T MAKE ANY* REPRESENTATION OR WARRANTY OF ANY KIND CONCERNING THE MERCHANTABILITY* OF THIS SOFTWARE OR ITS FITNESS FOR ANY PARTICULAR PURPOSE.
?
1. Rijmen.x: Vincent Rijmen "This code is hereby placed in the public domain"2. MD5.c: RSA Data Security Inc., 19913. des_xxx and podd.c: Eric Young 1995-98 (various similar but not identical forms and years depending on the source module) Copies of the notices in the code follow:
=============================================================
1. Vincent Rijmen "This code is hereby placed in the public domain"------
/* * @author Vincent Rijmen * @author Antoon Bosselaers * @author Paulo Barreto * * This code is hereby placed in the public domain. * * THIS SOFTWARE IS PROVIDED BY THE AUTHORS ''AS IS'' AND ANY EXPRESS * OR IMPLIED WARRANTIES, INCLUDING, BUT NOT LIMITED TO, THE IMPLIED * WARRANTIES OF MERCHANTABILITY AND FITNESS FOR A PARTICULAR PURPOSE * ARE DISCLAIMED. IN NO EVENT SHALL THE AUTHORS OR CONTRIBUTORS BE * LIABLE FOR ANY DIRECT, INDIRECT, INCIDENTAL, SPECIAL, EXEMPLARY, OR * CONSEQUENTIAL DAMAGES (INCLUDING, BUT NOT LIMITED TO, PROCUREMENT OF * SUBSTITUTE GOODS OR SERVICES; LOSS OF USE, DATA, OR PROFITS; OR * BUSINESS INTERRUPTION) HOWEVER CAUSED AND ON ANY THEORY OF LIABILITY, * WHETHER IN CONTRACT, STRICT LIABILITY, OR TORT (INCLUDING NEGLIGENCE * OR OTHERWISE) ARISING IN ANY WAY OUT OF THE USE OF THIS SOFTWARE, * EVEN IF ADVISED OF THE POSSIBILITY OF SUCH DAMAGE. */
=============================================================
2. RSA Data Security Inc., 1991------
/* MD5C.C - RSA Data Security, Inc., MD5 message-digest algorithm *//* Copyright (C) 1991, RSA Data Security, Inc. All rights reserved. License to copy and use this software is granted provided that it is identified as the "RSA Data Security, Inc. MD5 Message-Digest Algorithm" in all material mentioning or referencing this software or this function. License is also granted to make and use derivative works provided that such works are identified as "derived from the RSA Data Security, Inc. MD5 Message-Digest Algorithm" in all material mentioning or referencing the derived work. RSA Data Security, Inc. makes no representations concerning either the merchantability of this software or the suitability of this software for any particular purpose. It is provided "as is" without express or implied warranty of any kind. These notices must be retained in any copies of any part of this documentation and/or software. */

365
=============================================================
3. Eric Young 1995-98 (various forms and years depending on the source module)
Eric Young 1------des.h
/* $NetBSD: des.h,v 1.5 2001/09/09 11:01:02 tls Exp $ *//* $KAME: des.h,v 1.7 2000/09/18 20:59:21 itojun Exp $ *//* lib/des/des.h *//* Copyright (C) 1995-1996 Eric Young ([email protected]) * All rights reserved. * * This file is part of an SSL implementation written * by Eric Young ([email protected]). * The implementation was written so as to conform with Netscapes SSL * specification. This library and applications are * FREE FOR COMMERCIAL AND NON-COMMERCIAL USE * as long as the following conditions are aheared to. * * Copyright remains Eric Young's, and as such any Copyright notices in * the code are not to be removed. If this code is used in a product, * Eric Young should be given attribution as the author of the parts used. * This can be in the form of a textual message at program startup or * in documentation (online or textual) provided with the package. * * Redistribution and use in source and binary forms, with or without * modification, are permitted provided that the following conditions * are met: * 1. Redistributions of source code must retain the copyright * notice, this list of conditions and the following disclaimer. * 2. Redistributions in binary form must reproduce the above copyright * notice, this list of conditions and the following disclaimer in the * documentation and/or other materials provided with the distribution. * 3. All advertising materials mentioning features or use of this software * must display the following acknowledgement: * This product includes software developed by Eric Young ([email protected]) * * THIS SOFTWARE IS PROVIDED BY ERIC YOUNG ``AS IS'' AND * ANY EXPRESS OR IMPLIED WARRANTIES, INCLUDING, BUT NOT LIMITED TO, THE * IMPLIED WARRANTIES OF MERCHANTABILITY AND FITNESS FOR A PARTICULAR PURPOSE * ARE DISCLAIMED. IN NO EVENT SHALL THE AUTHOR OR CONTRIBUTORS BE LIABLE * FOR ANY DIRECT, INDIRECT, INCIDENTAL, SPECIAL, EXEMPLARY, OR CONSEQUENTIAL * DAMAGES (INCLUDING, BUT NOT LIMITED TO, PROCUREMENT OF SUBSTITUTE GOODS * OR SERVICES; LOSS OF USE, DATA, OR PROFITS; OR BUSINESS INTERRUPTION) * HOWEVER CAUSED AND ON ANY THEORY OF LIABILITY, WHETHER IN CONTRACT, STRICT * LIABILITY, OR TORT (INCLUDING NEGLIGENCE OR OTHERWISE) ARISING IN ANY WAY * OUT OF THE USE OF THIS SOFTWARE, EVEN IF ADVISED OF THE POSSIBILITY OF * SUCH DAMAGE. * * The licence and distribution terms for any publically available version or * derivative of this code cannot be changed. i.e. this code cannot simply be * copied and put under another distribution licence * [including the GNU Public Licence.] */
Eric Young 2-------------------------des_cbc.c
/* Copyright (C) 1995-1998 Eric Young ([email protected]) * All rights reserved. * * This package is an SSL implementation written * by Eric Young ([email protected]).

366
* The implementation was written so as to conform with Netscapes SSL. * * This library is free for commercial and non-commercial use as long as * the following conditions are aheared to. The following conditions * apply to all code found in this distribution, be it the RC4, RSA, * lhash, DES, etc., code; not just the SSL code. The SSL documentation * included with this distribution is covered by the same copyright terms * except that the holder is Tim Hudson ([email protected]). * * Copyright remains Eric Young's, and as such any Copyright notices in * the code are not to be removed. * If this package is used in a product, Eric Young should be given attribution * as the author of the parts of the library used. * This can be in the form of a textual message at program startup or * in documentation (online or textual) provided with the package * * Redistribution and use in source and binary forms, with or without * modification, are permitted provided that the following conditions * are met: * 1. Redistributions of source code must retain the copyright * notice, this list of conditions and the following disclaimer. * 2. Redistributions in binary form must reproduce the above copyright * notice, this list of conditions and the following disclaimer in the * documentation and/or other materials provided with the distribution. * 3. All advertising materials mentioning features or use of this software * must display the following acknowledgement: * "This product includes cryptographic software written by * Eric Young ([email protected])" * The word 'cryptographic' can be left out if the rouines from the library * being used are not cryptographic related :-) . * 4. If you include any Windows specific code (or a derivative thereof) from * the apps directory (application code) you must include an acknowledgement: * "This product includes software written by Tim Hudson ([email protected])" * * THIS SOFTWARE IS PROVIDED BY ERIC YOUNG ``AS IS'' AND * ANY EXPRESS OR IMPLIED WARRANTIES, INCLUDING, BUT NOT LIMITED TO, THE * IMPLIED WARRANTIES OF MERCHANTABILITY AND FITNESS FOR A PARTICULAR PURPOSE * ARE DISCLAIMED. IN NO EVENT SHALL THE AUTHOR OR CONTRIBUTORS BE LIABLE * FOR ANY DIRECT, INDIRECT, INCIDENTAL, SPECIAL, EXEMPLARY, OR CONSEQUENTIAL * DAMAGES (INCLUDING, BUT NOT LIMITED TO, PROCUREMENT OF SUBSTITUTE GOODS * OR SERVICES; LOSS OF USE, DATA, OR PROFITS; OR BUSINESS INTERRUPTION) * HOWEVER CAUSED AND ON ANY THEORY OF LIABILITY, WHETHER IN CONTRACT, STRICT * LIABILITY, OR TORT (INCLUDING NEGLIGENCE OR OTHERWISE) ARISING IN ANY WAY * OUT OF THE USE OF THIS SOFTWARE, EVEN IF ADVISED OF THE POSSIBILITY OF * SUCH DAMAGE. * * The licence and distribution terms for any publically available version or * derivative of this code cannot be changed. i.e. this code cannot simply be * copied and put under another distribution licence * [including the GNU Public Licence.] */
Eric Young 3-------------
/* $NetBSD: des_ecb.c,v 1.7 2002/11/02 07:19:51 perry Exp $ *//* $KAME: des_ecb.c,v 1.5 2000/11/06 13:58:08 itojun Exp $ *//* crypto/des/ecb_enc.c *//* Copyright (C) 1995-1998 Eric Young ([email protected]) * All rights reserved. * * This file is part of an SSL implementation written * by Eric Young ([email protected]). * The implementation was written so as to conform with Netscapes SSL * specification. This library and applications are * FREE FOR COMMERCIAL AND NON-COMMERCIAL USE * as long as the following conditions are aheared to.

367
* * Copyright remains Eric Young's, and as such any Copyright notices in * the code are not to be removed. If this code is used in a product, * Eric Young should be given attribution as the author of the parts used. * This can be in the form of a textual message at program startup or * in documentation (online or textual) provided with the package. * * Redistribution and use in source and binary forms, with or without * modification, are permitted provided that the following conditions * are met: * 1. Redistributions of source code must retain the copyright * notice, this list of conditions and the following disclaimer. * 2. Redistributions in binary form must reproduce the above copyright * notice, this list of conditions and the following disclaimer in the * documentation and/or other materials provided with the distribution. * 3. All advertising materials mentioning features or use of this software * must display the following acknowledgement: * This product includes software developed by Eric Young ([email protected]) * * THIS SOFTWARE IS PROVIDED BY ERIC YOUNG ``AS IS'' AND * ANY EXPRESS OR IMPLIED WARRANTIES, INCLUDING, BUT NOT LIMITED TO, THE * IMPLIED WARRANTIES OF MERCHANTABILITY AND FITNESS FOR A PARTICULAR PURPOSE * ARE DISCLAIMED. IN NO EVENT SHALL THE AUTHOR OR CONTRIBUTORS BE LIABLE * FOR ANY DIRECT, INDIRECT, INCIDENTAL, SPECIAL, EXEMPLARY, OR CONSEQUENTIAL * DAMAGES (INCLUDING, BUT NOT LIMITED TO, PROCUREMENT OF SUBSTITUTE GOODS * OR SERVICES; LOSS OF USE, DATA, OR PROFITS; OR BUSINESS INTERRUPTION) * HOWEVER CAUSED AND ON ANY THEORY OF LIABILITY, WHETHER IN CONTRACT, STRICT * LIABILITY, OR TORT (INCLUDING NEGLIGENCE OR OTHERWISE) ARISING IN ANY WAY * OUT OF THE USE OF THIS SOFTWARE, EVEN IF ADVISED OF THE POSSIBILITY OF * SUCH DAMAGE. * * The licence and distribution terms for any publically available version or * derivative of this code cannot be changed. i.e. this code cannot simply be * copied and put under another distribution licence * [including the GNU Public Licence.] */
Eric Young 4------------------
/* crypto/des/des_enc.c */ /* Copyright (C) 1995-1998 Eric Young ([email protected]) * All rights reserved. * * This package is an SSL implementation written * by Eric Young ([email protected]). * The implementation was written so as to conform with Netscapes SSL. * * This library is free for commercial and non-commercial use as long as * the following conditions are aheared to. The following conditions * apply to all code found in this distribution, be it the RC4, RSA, * lhash, DES, etc., code; not just the SSL code. The SSL documentation * included with this distribution is covered by the same copyright terms * except that the holder is Tim Hudson ([email protected]). * * Copyright remains Eric Young's, and as such any Copyright notices in * the code are not to be removed. * If this package is used in a product, Eric Young should be given attribution * as the author of the parts of the library used. * This can be in the form of a textual message at program startup or * in documentation (online or textual) provided with the package. * * Redistribution and use in source and binary forms, with or without * modification, are permitted provided that the following conditions * are met: * 1. Redistributions of source code must retain the copyright * notice, this list of conditions and the following disclaimer.

368
* 2. Redistributions in binary form must reproduce the above copyright * notice, this list of conditions and the following disclaimer in the * documentation and/or other materials provided with the distribution. * 3. All advertising materials mentioning features or use of this software * must display the following acknowledgement: * "This product includes cryptographic software written by * Eric Young ([email protected])" * The word 'cryptographic' can be left out if the rouines from the library * being used are not cryptographic related :-) . * 4. If you include any Windows specific code (or a derivative thereof) from * the apps directory (application code) you must include an acknowledgement: * "This product includes software written by Tim Hudson ([email protected])" * * THIS SOFTWARE IS PROVIDED BY ERIC YOUNG ``AS IS'' AND * ANY EXPRESS OR IMPLIED WARRANTIES, INCLUDING, BUT NOT LIMITED TO, THE * IMPLIED WARRANTIES OF MERCHANTABILITY AND FITNESS FOR A PARTICULAR PURPOSE * ARE DISCLAIMED. IN NO EVENT SHALL THE AUTHOR OR CONTRIBUTORS BE LIABLE * FOR ANY DIRECT, INDIRECT, INCIDENTAL, SPECIAL, EXEMPLARY, OR CONSEQUENTIAL * DAMAGES (INCLUDING, BUT NOT LIMITED TO, PROCUREMENT OF SUBSTITUTE GOODS * OR SERVICES; LOSS OF USE, DATA, OR PROFITS; OR BUSINESS INTERRUPTION) * HOWEVER CAUSED AND ON ANY THEORY OF LIABILITY, WHETHER IN CONTRACT, STRICT * LIABILITY, OR TORT (INCLUDING NEGLIGENCE OR OTHERWISE) ARISING IN ANY WAY * OUT OF THE USE OF THIS SOFTWARE, EVEN IF ADVISED OF THE POSSIBILITY OF * SUCH DAMAGE. * * The licence and distribution terms for any publically available version or * derivative of this code cannot be changed. i.e. this code cannot simply be * copied and put under another distribution licence * [including the GNU Public Licence.] */
Eric Young 5------------
/* $NetBSD: des_locl.h,v 1.4 2001/09/09 11:01:02 tls Exp $ */ /* $KAME: des_locl.h,v 1.6 2000/11/06 13:58:09 itojun Exp $ *//* crypto/des/des_locl.h *//* Copyright (C) 1995-1997 Eric Young ([email protected]) * All rights reserved. * * This file is part of an SSL implementation written * by Eric Young ([email protected]). * The implementation was written so as to conform with Netscapes SSL * specification. This library and applications are * FREE FOR COMMERCIAL AND NON-COMMERCIAL USE * as long as the following conditions are aheared to. * * Copyright remains Eric Young's, and as such any Copyright notices in * the code are not to be removed. If this code is used in a product, * Eric Young should be given attribution as the author of the parts used. * This can be in the form of a textual message at program startup or * in documentation (online or textual) provided with the package. * * Redistribution and use in source and binary forms, with or without * modification, are permitted provided that the following conditions * are met: * 1. Redistributions of source code must retain the copyright * notice, this list of conditions and the following disclaimer. * 2. Redistributions in binary form must reproduce the above copyright * notice, this list of conditions and the following disclaimer in the * documentation and/or other materials provided with the distribution. * 3. All advertising materials mentioning features or use of this software * must display the following acknowledgement: * This product includes software developed by Eric Young ([email protected]) * * THIS SOFTWARE IS PROVIDED BY ERIC YOUNG ``AS IS'' AND * ANY EXPRESS OR IMPLIED WARRANTIES, INCLUDING, BUT NOT LIMITED TO, THE
369
* IMPLIED WARRANTIES OF MERCHANTABILITY AND FITNESS FOR A PARTICULAR PURPOSE * ARE DISCLAIMED. IN NO EVENT SHALL THE AUTHOR OR CONTRIBUTORS BE LIABLE * FOR ANY DIRECT, INDIRECT, INCIDENTAL, SPECIAL, EXEMPLARY, OR CONSEQUENTIAL * DAMAGES (INCLUDING, BUT NOT LIMITED TO, PROCUREMENT OF SUBSTITUTE GOODS * OR SERVICES; LOSS OF USE, DATA, OR PROFITS; OR BUSINESS INTERRUPTION) * HOWEVER CAUSED AND ON ANY THEORY OF LIABILITY, WHETHER IN CONTRACT, STRICT * LIABILITY, OR TORT (INCLUDING NEGLIGENCE OR OTHERWISE) ARISING IN ANY WAY * OUT OF THE USE OF THIS SOFTWARE, EVEN IF ADVISED OF THE POSSIBILITY OF * SUCH DAMAGE. * * The licence and distribution terms for any publically available version or * derivative of this code cannot be changed. i.e. this code cannot simply be * copied and put under another distribution licence * [including the GNU Public Licence.] */
Eric Young 6--------------------
/* $NetBSD: des_setkey.c,v 1.8 2002/11/07 07:04:13 thorpej Exp $ *//* $KAME: des_setkey.c,v 1.6 2001/07/03 14:27:53 itojun Exp $ *//* crypto/des/set_key.c *//* Copyright (C) 1995-1996 Eric Young ([email protected]) * All rights reserved. * * This file is part of an SSL implementation written * by Eric Young ([email protected]). * The implementation was written so as to conform with Netscapes SSL * specification. This library and applications are * FREE FOR COMMERCIAL AND NON-COMMERCIAL USE * as long as the following conditions are aheared to. * * Copyright remains Eric Young's, and as such any Copyright notices in * the code are not to be removed. If this code is used in a product, * Eric Young should be given attribution as the author of the parts used. * This can be in the form of a textual message at program startup or * in documentation (online or textual) provided with the package. * * Redistribution and use in source and binary forms, with or without * modification, are permitted provided that the following conditions * are met: * 1. Redistributions of source code must retain the copyright * notice, this list of conditions and the following disclaimer. * 2. Redistributions in binary form must reproduce the above copyright * notice, this list of conditions and the following disclaimer in the * documentation and/or other materials provided with the distribution. * 3. All advertising materials mentioning features or use of this software * must display the following acknowledgement: * This product includes software developed by Eric Young ([email protected]) * * THIS SOFTWARE IS PROVIDED BY ERIC YOUNG ``AS IS'' AND * ANY EXPRESS OR IMPLIED WARRANTIES, INCLUDING, BUT NOT LIMITED TO, THE * IMPLIED WARRANTIES OF MERCHANTABILITY AND FITNESS FOR A PARTICULAR PURPOSE * ARE DISCLAIMED. IN NO EVENT SHALL THE AUTHOR OR CONTRIBUTORS BE LIABLE * FOR ANY DIRECT, INDIRECT, INCIDENTAL, SPECIAL, EXEMPLARY, OR CONSEQUENTIAL * DAMAGES (INCLUDING, BUT NOT LIMITED TO, PROCUREMENT OF SUBSTITUTE GOODS * OR SERVICES; LOSS OF USE, DATA, OR PROFITS; OR BUSINESS INTERRUPTION) * HOWEVER CAUSED AND ON ANY THEORY OF LIABILITY, WHETHER IN CONTRACT, STRICT * LIABILITY, OR TORT (INCLUDING NEGLIGENCE OR OTHERWISE) ARISING IN ANY WAY * OUT OF THE USE OF THIS SOFTWARE, EVEN IF ADVISED OF THE POSSIBILITY OF * SUCH DAMAGE. * * The licence and distribution terms for any publically available version or * derivative of this code cannot be changed. i.e. this code cannot simply be * copied and put under another distribution licence * [including the GNU Public Licence.] */

370
Eric Young 7-----------------------
/* $NetBSD: podd.h,v 1.1 2000/06/14 19:45:36 thorpej Exp $ *//* $KAME: podd.h,v 1.3 2000/03/27 04:36:34 sumikawa Exp $ *//* crypto/des/podd.h *//* Copyright (C) 1995-1996 Eric Young ([email protected]) * All rights reserved. * * This file is part of an SSL implementation written * by Eric Young ([email protected]). * The implementation was written so as to conform with Netscapes SSL * specification. This library and applications are * FREE FOR COMMERCIAL AND NON-COMMERCIAL USE * as long as the following conditions are aheared to. * * Copyright remains Eric Young's, and as such any Copyright notices in * the code are not to be removed. If this code is used in a product, * Eric Young should be given attribution as the author of the parts used. * This can be in the form of a textual message at program startup or * in documentation (online or textual) provided with the package. * * Redistribution and use in source and binary forms, with or without * modification, are permitted provided that the following conditions * are met: * 1. Redistributions of source code must retain the copyright * notice, this list of conditions and the following disclaimer. * 2. Redistributions in binary form must reproduce the above copyright * notice, this list of conditions and the following disclaimer in the * documentation and/or other materials provided with the distribution. * 3. All advertising materials mentioning features or use of this software * must display the following acknowledgement: * This product includes software developed by Eric Young ([email protected]) * * THIS SOFTWARE IS PROVIDED BY ERIC YOUNG ``AS IS'' AND * ANY EXPRESS OR IMPLIED WARRANTIES, INCLUDING, BUT NOT LIMITED TO, THE * IMPLIED WARRANTIES OF MERCHANTABILITY AND FITNESS FOR A PARTICULAR PURPOSE * ARE DISCLAIMED. IN NO EVENT SHALL THE AUTHOR OR CONTRIBUTORS BE LIABLE * FOR ANY DIRECT, INDIRECT, INCIDENTAL, SPECIAL, EXEMPLARY, OR CONSEQUENTIAL * DAMAGES (INCLUDING, BUT NOT LIMITED TO, PROCUREMENT OF SUBSTITUTE GOODS * OR SERVICES; LOSS OF USE, DATA, OR PROFITS; OR BUSINESS INTERRUPTION) * HOWEVER CAUSED AND ON ANY THEORY OF LIABILITY, WHETHER IN CONTRACT, STRICT * LIABILITY, OR TORT (INCLUDING NEGLIGENCE OR OTHERWISE) ARISING IN ANY WAY * OUT OF THE USE OF THIS SOFTWARE, EVEN IF ADVISED OF THE POSSIBILITY OF * SUCH DAMAGE. * * The licence and distribution terms for any publically available version or * derivative of this code cannot be changed. i.e. this code cannot simply be * copied and put under another distribution licence * [including the GNU Public Licence.] */
==========================================================================================
libusb: -------
Oracle elects to license libusb under the BSD license.
Copyright (c) 2000-2003 Johannes ErdfeltThis file (and only this file) may alternatively be licensed under the BSD license as well, read LICENSE for details.
Redistribution and use in source and binary forms, with or without modification, are permitted provided that the following conditions are met:1. Redistributions of source code must retain the above copyright notice, this list of
371
conditions and the following disclaimer.2. Redistributions in binary form must reproduce the above copyright notice, this list of conditions and the following disclaimer in the documentation and/or other materials provided with the distribution.3. The name of the author may not be used to endorse or promote products derived from this software without specific prior written permission.
THIS SOFTWARE IS PROVIDED BY THE AUTHOR ``AS IS'' AND ANY EXPRESS OR IMPLIED WARRANTIES, INCLUDING, BUT NOT LIMITED TO, THE IMPLIED WARRANTIES OF MERCHANTABILITY AND FITNESS FOR A PARTICULAR PURPOSE ARE DISCLAIMED. IN NO EVENT SHALL THE AUTHOR BE LIABLE FOR ANY DIRECT, INDIRECT, INCIDENTAL, SPECIAL, EXEMPLARY, OR CONSEQUENTIAL DAMAGES (INCLUDING, BUT NOT LIMITED TO, PROCUREMENT OF SUBSTITUTE GOODS OR SERVICES; LOSS OF USE, DATA, OR PROFITS; OR BUSINESS INTERRUPTION) HOWEVER CAUSED AND ON ANY THEORY OF LIABILITY, WHETHER IN CONTRACT, STRICT LIABILITY, OR TORT (INCLUDING NEGLIGENCE OR OTHERWISE) ARISING IN ANY WAY OUT OF THE USE OF THIS SOFTWARE, EVEN IF ADVISED OF THE POSSIBILITY OF SUCH DAMAGE.
==========================================================================================
XWindow:--------
Copyright 1987, 1998? The Open Group
Permission to use, copy, modify, distribute, and sell this software and its documentation for any purpose is hereby granted without fee, provided that the above copyright notice appear in all copies and that both that copyright notice and this permission notice appear in supporting documentation.
The above copyright notice and this permission notice shall be included in all copies or substantial portions of the Software.
THE SOFTWARE IS PROVIDED "AS IS", WITHOUT WARRANTY OF ANY KIND, EXPRESS OR IMPLIED, INCLUDING BUT NOT LIMITED TO THE WARRANTIES OF MERCHANTABILITY, FITNESS FOR A PARTICULAR PURPOSE AND NONINFRINGEMENT.? IN NO EVENT SHALL THE OPEN GROUP BE LIABLE FOR ANY CLAIM, DAMAGES OR OTHER LIABILITY, WHETHER IN AN ACTION OF CONTRACT, TORT OR OTHERWISE, ARISING FROM, OUT OF OR IN CONNECTION WITH THE SOFTWARE OR THE USE OR OTHER DEALINGS IN THE SOFTWARE.
Except as contained in this notice, the name of The Open Group shall not be used in advertising or otherwise to promote the sale, use or other dealings in this Software without prior written authorization from The Open Group.
Copyright 1987 by Digital Equipment Corporation, Maynard, Massachusetts.
All Rights Reserved
Permission to use, copy, modify, and distribute this software and its documentation for any purpose and without fee is hereby granted, provided that the above copyright notice appear in all copies and that both that copyright notice and this permission notice appear in supporting documentation, and that the name of Digital not be used in advertising or publicity pertaining to distribution of the software without specific, written prior permission.
DIGITAL DISCLAIMS ALL WARRANTIES WITH REGARD TO THIS SOFTWARE, INCLUDING ALL IMPLIED WARRANTIES OF MERCHANTABILITY AND FITNESS, IN NO EVENT SHALL DIGITAL BE LIABLE FOR ANY SPECIAL, INDIRECT OR CONSEQUENTIAL DAMAGES OR ANY DAMAGES WHATSOEVER RESULTING FROM LOSS OF USE, DATA OR PROFITS, WHETHER IN AN ACTION OF CONTRACT, NEGLIGENCE OR OTHER TORTIOUS ACTION, ARISING OUT OF OR IN CONNECTION WITH THE USE OR PERFORMANCE OF THIS SOFTWARE.
******************************************************************//* The panoramix components contained the following notice *//*****************************************************************
Copyright (c) 1991, 1997 Digital Equipment Corporation, Maynard, Massachusetts.
Permission is hereby granted, free of charge, to any person obtaining a copy of this software and associated documentation files (the "Software"), to deal in the Software
372
without restriction, including without limitation the rights to use, copy, modify, merge, publish, distribute, sublicense, and/or sell copies of the Software.
The above copyright notice and this permission notice shall be included in all copies or substantial portions of the Software.
THE SOFTWARE IS PROVIDED "AS IS", WITHOUT WARRANTY OF ANY KIND, EXPRESS OR IMPLIED, INCLUDING BUT NOT LIMITED TO THE WARRANTIES OF MERCHANTABILITY, FITNESS FOR A PARTICULAR PURPOSE AND NONINFRINGEMENT.? IN NO EVENT SHALL DIGITAL EQUIPMENT CORPORATION BE LIABLE FOR ANY CLAIM, DAMAGES, INCLUDING, BUT NOT LIMITED TO CONSEQUENTIAL OR INCIDENTAL DAMAGES, OR OTHER LIABILITY, WHETHER IN AN ACTION OF CONTRACT, TORT OR OTHERWISE, ARISING FROM, OUT OF OR IN CONNECTION WITH THE SOFTWARE OR THE USE OR OTHER DEALINGS IN THE SOFTWARE.
Except as contained in this notice, the name of Digital Equipment Corporation shall not be used in advertising or otherwise to promote the sale, use or other dealings in this Software without prior written authorization from Digital Equipment Corporation. Newer files in the distribution have licenses similar to this one, except the author/organization may be different:
/*?* Copyright ? 2000 Compaq Computer Corporation?* Copyright ? 2002 Hewlett-Packard Company?* Copyright ? 2006 Intel Corporation?*?* Permission to use, copy, modify, distribute, and sell this software and its?* documentation for any purpose is hereby granted without fee, provided that?* the above copyright notice appear in all copies and that both that copyright?* notice and this permission notice appear in supporting documentation, and?* that the name of the copyright holders not be used in advertising or ?* publicity pertaining to distribution of the software without specific,?* written prior permission.? The copyright holders make no representations?* about the suitability of this software for any purpose.? It is provided "as?* is" without express or implied warranty.?*?* THE COPYRIGHT HOLDERS DISCLAIM ALL WARRANTIES WITH REGARD TO THIS SOFTWARE,?* INCLUDING ALL IMPLIED WARRANTIES OF MERCHANTABILITY AND FITNESS, IN NO?* EVENT SHALL THE COPYRIGHT HOLDERS BE LIABLE FOR ANY SPECIAL, INDIRECT OR?* CONSEQUENTIAL DAMAGES OR ANY DAMAGES WHATSOEVER RESULTING FROM LOSS OF USE,?* DATA OR PROFITS, WHETHER IN AN ACTION OF CONTRACT, NEGLIGENCE OR OTHER?* TORTIOUS ACTION, ARISING OUT OF OR IN CONNECTION WITH THE USE OR PERFORMANCE?* OF THIS SOFTWARE.?*?* Author:? Jim Gettys, Hewlett-Packard Company, Inc.?*????????? Keith Packard, Intel Corporation ?*/
==========================================================================================
TurboJPEG:----------
Copyright (C) 1998-2005 Julian Smart, Robert Roebling et al
Everyone is permitted to copy and distribute verbatim copies of this licence document, but changing it is not allowed.
WXWINDOWS LIBRARY LICENCETERMS AND CONDITIONS FOR COPYING, DISTRIBUTION AND MODIFICATION
This library is free software; you can redistribute it and/or modify it under the terms of the GNU Library General Public Licence as published by the Free Software Foundation; either version 2 of the Licence, or (at your option) any later version.
This library is distributed in the hope that it will be useful, but WITHOUT ANY WARRANTY; without even the implied warranty of MERCHANTABILITY or FITNESS FOR A PARTICULAR PURPOSE. See the GNU Library General Public Licence for more details.

373
You should have received a copy of the GNU Library General Public Licence along with this software, usually in a file named COPYING.LIB. If not, write to the Free Software Foundation, Inc., 59 Temple Place, Suite 330, Boston, MA 02111-1307 USA.
EXCEPTION NOTICE
1. As a special exception, the copyright holders of this library give permission for additional uses of the text contained in this release of the library as licenced under the wxWindows Library Licence, applying either version 3.1 of the Licence, or (at your option) any later version of the Licence as published by the copyright holders of version 3.1 of the Licence document.
2. The exception is that you may use, copy, link, modify and distribute under your own terms, binary object code versions of works based on the Library.
3. If you copy code from files distributed under the terms of the GNU General Public Licence or the GNU Library General Public Licence into a copy of this library, as this licence permits, the exception does not apply to the code that you add in this way. To avoid misleading anyone as to the status of such modified files, you must delete this exception notice from such code and/or adjust the licensing conditions notice accordingly.
4. If you write modifications of your own for this library, it is your choice whether to permit this exception to apply to your modifications. If you do not wish that, you must delete the exception notice from such code and/or adjust the licensing conditions notice accordingly.
==========================================================================================
IPSEC ipsec_tools:------------------
* Copyright (C) 1995, 1996, 1997, and 1998 WIDE Project. * All rights reserved. * * Redistribution and use in source and binary forms, with or without * modification, are permitted provided that the following conditions * are met: * 1. Redistributions of source code must retain the above copyright * notice, this list of conditions and the following disclaimer. * 2. Redistributions in binary form must reproduce the above copyright * notice, this list of conditions and the following disclaimer in the * documentation and/or other materials provided with the distribution. * 3. Neither the name of the project nor the names of its contributors * may be used to endorse or promote products derived from this software * without specific prior written permission. * * THIS SOFTWARE IS PROVIDED BY THE PROJECT AND CONTRIBUTORS ``AS IS'' AND * ANY EXPRESS OR IMPLIED WARRANTIES, INCLUDING, BUT NOT LIMITED TO, THE * IMPLIED WARRANTIES OF MERCHANTABILITY AND FITNESS FOR A PARTICULAR PURPOSE * ARE DISCLAIMED. IN NO EVENT SHALL THE PROJECT OR CONTRIBUTORS BE LIABLE * FOR ANY DIRECT, INDIRECT, INCIDENTAL, SPECIAL, EXEMPLARY, OR CONSEQUENTIAL * DAMAGES (INCLUDING, BUT NOT LIMITED TO, PROCUREMENT OF SUBSTITUTE GOODS * OR SERVICES; LOSS OF USE, DATA, OR PROFITS; OR BUSINESS INTERRUPTION) * HOWEVER CAUSED AND ON ANY THEORY OF LIABILITY, WHETHER IN CONTRACT, STRICT * LIABILITY, OR TORT (INCLUDING NEGLIGENCE OR OTHERWISE) ARISING IN ANY WAY * OUT OF THE USE OF THIS SOFTWARE, EVEN IF ADVISED OF THE POSSIBILITY OF * SUCH DAMAGE. */
Some files have:
/* * Copyright (C) 2004 Emmanuel Dreyfus * All rights reserved. * * Redistribution and use in source and binary forms, with or without

374
* modification, are permitted provided that the following conditions * are met: * 1. Redistributions of source code must retain the above copyright * notice, this list of conditions and the following disclaimer. * 2. Redistributions in binary form must reproduce the above copyright * notice, this list of conditions and the following disclaimer in the * documentation and/or other materials provided with the distribution. * 3. Neither the name of the project nor the names of its contributors * may be used to endorse or promote products derived from this software * without specific prior written permission. * * THIS SOFTWARE IS PROVIDED BY THE PROJECT AND CONTRIBUTORS ``AS IS'' AND * ANY EXPRESS OR IMPLIED WARRANTIES, INCLUDING, BUT NOT LIMITED TO, THE * IMPLIED WARRANTIES OF MERCHANTABILITY AND FITNESS FOR A PARTICULAR PURPOSE * ARE DISCLAIMED. IN NO EVENT SHALL THE PROJECT OR CONTRIBUTORS BE LIABLE * FOR ANY DIRECT, INDIRECT, INCIDENTAL, SPECIAL, EXEMPLARY, OR CONSEQUENTIAL * DAMAGES (INCLUDING, BUT NOT LIMITED TO, PROCUREMENT OF SUBSTITUTE GOODS * OR SERVICES; LOSS OF USE, DATA, OR PROFITS; OR BUSINESS INTERRUPTION) * HOWEVER CAUSED AND ON ANY THEORY OF LIABILITY, WHETHER IN CONTRACT, STRICT * LIABILITY, OR TORT (INCLUDING NEGLIGENCE OR OTHERWISE) ARISING IN ANY WAY * OUT OF THE USE OF THIS SOFTWARE, EVEN IF ADVISED OF THE POSSIBILITY OF * SUCH DAMAGE. */
and some files have:
/* * Copyright (C) 2004 SuSE Linux AG, Nuernberg, Germany. * Contributed by: Michal Ludvig , SUSE Labs * All rights reserved. * * Redistribution and use in source and binary forms, with or without * modification, are permitted provided that the following conditions * are met: * 1. Redistributions of source code must retain the above copyright * notice, this list of conditions and the following disclaimer. * 2. Redistributions in binary form must reproduce the above copyright * notice, this list of conditions and the following disclaimer in the * documentation and/or other materials provided with the distribution. * 3. Neither the name of the project nor the names of its contributors * may be used to endorse or promote products derived from this software * without specific prior written permission. * * THIS SOFTWARE IS PROVIDED BY THE PROJECT AND CONTRIBUTORS ``AS IS'' AND * ANY EXPRESS OR IMPLIED WARRANTIES, INCLUDING, BUT NOT LIMITED TO, THE * IMPLIED WARRANTIES OF MERCHANTABILITY AND FITNESS FOR A PARTICULAR PURPOSE * ARE DISCLAIMED. IN NO EVENT SHALL THE PROJECT OR CONTRIBUTORS BE LIABLE * FOR ANY DIRECT, INDIRECT, INCIDENTAL, SPECIAL, EXEMPLARY, OR CONSEQUENTIAL * DAMAGES (INCLUDING, BUT NOT LIMITED TO, PROCUREMENT OF SUBSTITUTE GOODS * OR SERVICES; LOSS OF USE, DATA, OR PROFITS; OR BUSINESS INTERRUPTION) * HOWEVER CAUSED AND ON ANY THEORY OF LIABILITY, WHETHER IN CONTRACT, STRICT * LIABILITY, OR TORT (INCLUDING NEGLIGENCE OR OTHERWISE) ARISING IN ANY WAY * OUT OF THE USE OF THIS SOFTWARE, EVEN IF ADVISED OF THE POSSIBILITY OF * SUCH DAMAGE. */
==========================================================================================
PC/SC-lite:-----------Copyright (c) 1999-2003 David CorcoranAll rights reserved.
Redistribution and use in source and binary forms, with or without modification, are permitted provided that the following conditions are met:1. Redistributions of source code must retain the above copyright notice, this list of conditions and the following disclaimer.

375
2. Redistributions in binary form must reproduce the above copyright notice, this list of conditions and the following disclaimer in the documentation and/or other materials provided with the distribution.3. The name of the author may not be used to endorse or promote products derived from this software without specific prior written permission. Changes to this license can be made only by the copyright author with explicit written consent.
THIS SOFTWARE IS PROVIDED BY THE AUTHOR ``AS IS'' AND ANY EXPRESS OR IMPLIED WARRANTIES, INCLUDING, BUT NOT LIMITED TO, THE IMPLIED WARRANTIES OF MERCHANTABILITY AND FITNESS FOR A PARTICULAR PURPOSE ARE DISCLAIMED. IN NO EVENT SHALL THE AUTHOR BE LIABLE FOR ANY DIRECT, INDIRECT, INCIDENTAL, SPECIAL, EXEMPLARY, OR CONSEQUENTIAL DAMAGES (INCLUDING, BUT NOT LIMITED TO, PROCUREMENT OF SUBSTITUTE GOODS OR SERVICES; LOSS OF USE, DATA, OR PROFITS; OR BUSINESS INTERRUPTION) HOWEVER CAUSED AND ON ANY THEORY OF LIABILITY, WHETHER IN CONTRACT, STRICT LIABILITY, OR TORT (INCLUDING NEGLIGENCE OR OTHERWISE) ARISING IN ANY WAY OUT OF THE USE OF THIS SOFTWARE, EVEN IF ADVISED OF THE POSSIBILITY OF SUCH DAMAGE.
==========================================================================================

376

377
Glossaryalias token
An alias token enables a card owner to access the same Sun Ray session with more than one physical token.This setup can be useful, for example, when a user needs a duplicate smart card.
ALPThe Sun Appliance Link Protocol, a suite of network protocols that enable communication between Sun Rayservers and Sun Ray Clients.
AMGHAutomatic Multigroup Hotdesking. See regional hotdesking.
authentication policyThe Authentication Manager, using the selected authentication modules, decides what tokens are valid and whichusers, as token owners, have access to the system and sessions.
authentication tokenAlthough all tokens are used by the Authentication Manager to grant or deny access to Sun Ray sessions, thisterm usually refers to a user's smart card token. See token.
backplane bandwidthSometimes also referred to as switch fabric. A switch's backplane is the pipe through which data flows from aninput port to an output port. Backplane bandwidth usually refers to the aggregate bandwidth available amongst allports within a switch.
barrier mechanismTo prevent clients from downloading firmware that is older than the firmware they already have, the administratorcan set a barrier mechanism. The barrier mechanism symbol BarrierLevel is defined by default in the DHCP tableof Sun Ray servers.
bppBits per pixel.
CAMControlled Access Mode, was renamed to kiosk mode.
card readerSee token reader.
clientSee desktop client.
client IDThe unique identifier for a client. For Sun Ray Clients, it is the client's MAC address. For Oracle Virtual DesktopClients, it is an MD5 hash of the client key. Client ID is also referred to as CID, terminal CID, client identifier, ordesktop ID.
client keyAn automatically generated public-private key pair that represents a Sun Ray Client or an Oracle Virtual DesktopClient. A client key is used to authenticate the device when it connects to a server.
client-serverA common way to describe network services and the user processes (programs) of those services.
codecA device or program capable of encoding or decoding a digital data stream or signal.
378
cold restartSee restart.
Configuration GUIA tool to modify a Sun Ray Client's local configuration for initialization and booting.
desktop clientIn Sun Ray Software documentation, used to refer to both a Sun Ray Client or Oracle Virtual Desktop Client. Theabbreviated term client is also used.
DHCPDynamic Host Configuration Protocol, which is a means of distributing IP addresses and initial parameters to theclients.
displayOne or more screens from a single Sun Ray session.
DTUSee Sun Ray Client.
dynamic session resizingA feature that allows the remote desktop to be resized automatically to fit the optimized size of your local desktopclient session. When you hotdesk to a session from a different device, or use a client device like a tablet, whichcan be rotated, the new screen configuration is detected and the session screen dimensions are adaptedaccordingly.
failoverThe process of transferring processes from a failed Sun Ray server to a functional Sun Ray server.
failover groupTwo or more Sun Ray servers configured to provide continuity of service in the event of a network or systemfailure. Sometimes abbreviated as FOG or HA (for high availability). The term high availability refers to the benefitof this type of configuration; the term failover group refers to the functionality.
firmwareA small piece of software residing on Sun Ray Clients that handles power-on self test (POST), client initialization,authentication, and low-level input an output. See Sun Ray Operating Software.
firmware barrierSee barrier mechanism.
FOGSee failover group.
fpsFrames per second.
frame bufferVideo output device that drives the video display. See virtual frame buffer.
group-wideAcross a failover group.
HAHigh availability. See failover group.
headA Sun Ray Client, with one or two monitors, used in a multihead group.

379
high availabilitySee failover group.
hot keyA predefined key that causes an activity to occur. For example, a hot key is used to display the Settings screen onthe Sun Ray Client.
hot-pluggableA property of a hardware component that can be inserted into or removed from a system that is powered on. USBdevices connected to Sun Ray Clients are hot-pluggable.
hotdeskingThe ability for a user to remove a smart card, insert it into any other client within a failover group, and have theuser's session "follow" the user, thus allowing the user to have instantaneous access to the user's windowingenvironment and current applications from multiple clients.
idle sessionA session that is running on a Sun Ray server but to which no user (identified by a smart card token or a pseudo-token) is logged in.
keyboard country codeA number representing a specific USB keyboard map that can be set in the Sun Ray client firmware to providebetter Non-US keyboard support. This code is used if the keyboard returns a country code of 0.
kiosk modeA facility to deliver an almost unlimited variety of desktops or applications to users, even though the actualdesktop or application may be running elsewhere. Kiosk mode bypasses the normal authentication methods ofthe platform and runs anything that the administrator defines. Kiosk sessions are configured through a Kiosksession type.
kiosk sessionA user session running in kiosk mode. Also called kiosk mode session.
kiosk session typeA set of scripts and configuration files, which are described by a kiosk session descriptor file. A kiosk session typedefines the kind of user session that will run in kiosk mode. A session type is sometimes referred to as a sessionconfiguration.
mobile tokenIf mobile sessions are enabled, a user can log into an existing session from different locations without a smartcard, in which case the user name is associated with the session. This type of pseudo-token is called a mobiletoken.
mobilityFor the purposes of the Sun Ray Software, the property of a session that allows it to follow a user from one clientto another within a server group. On the Sun Ray system, mobility requires the use of a smart card or otheridentifying mechanism.
monitorThe physical monitor connected to a client.
MTUMaximum Transmission Unit, used to specify the number of bytes in the largest packet a network can transmit.
multi-monitorA type of multiple monitor configuration that supports multiple monitors connected to the dual video connectors ona Sun Ray 2FS or Sun Ray 3 Plus Client. By using RandR 1.2, the multiple monitors are managed as one screen.

380
multicastingThe process of enabling communication between Sun Ray servers over their Sun Ray network interfaces in afailover environment.
multihead groupA type of multiple monitor configuration that enables you to merge and control multiple Sun Ray Clients, referredto in this context as heads, and their screens using a single keyboard and mouse attached to a primary client.
network latencyThe time delay associated with moving information through a network. Interactive applications such as voice,video displays and multimedia applications are sensitive to these delays.
non-smart card mobilityNSCM. A mobile session on a Sun Ray Client that does not rely on a smart card. NSCM requires a policy thatallows pseudo-token.
NSCMSee non-smart card mobility.
offlineA specific mode for a server in a failover group, which means the server does not participate in load balancingany more (the load balancing algorithm does not select this server for new sessions). New sessions can still bemanually created on it.
Oracle Virtual Desktop ClientA software application that runs on a common client operating system and provides the ability to connect to adesktop session running on a Sun Ray server. It is a software version of a Sun Ray Client. The desktop runningthe application is also referred to as an Oracle Virtual Desktop Client in this document.
OSDOn-screen display. The Sun Ray Client uses OSD icons to alert the user about potential start-up or connectivityproblems.
outputA single instance of a physical monitor. Each output has a physical video connector.
PAMPluggable Authentication Module. A set of dynamically loadable objects that gives system administrators theflexibility of choosing among available user authentication services.
PAM sessionA single PAM handle and runtime state associated with all PAM items, data, and the like.
policySee authentication policy.
Pop-up GUISee configuration GUI.
power cyclingUsing the power cord to restart a client.
private networkA network configuration where Sun Ray Clients are directly connected to the Sun Ray server, that is, the serverhas a network interface connected to the subnet and the server is devoted entirely to carrying Sun Ray traffic.Also known as directly-connected dedicated interconnect or private interconnect.

381
pseudo-sessionA Sun Ray session associated with a pseudo-token rather than a smart card token.
pseudo-tokenA user accessing a Sun Ray session without a smart card is identified by the client's built-in type and MACaddress, known as a pseudo-token. See token.
RDPMicrosoft Remote Desktop Protocol.
RDSRemote Desktop Services. Formally known as Terminal Services. See Windows Terminal Services.
regional hotdeskingEnables users to access their sessions across wider domains and greater physical distances. You can enablethis feature by defining how user sessions are mapped to an expanded list of servers in multiple failover groups.Originally known as Automatic Multigroup Hotdesking (AMGH).
restartSun Ray services can be restarted either from the utstart command or with the Warm Restart or Cold Restartbuttons through the Admin GUI. A cold restart terminates all Sun Ray sessions; a warm restart does not.
RHARemote Hotdesk Authentication, a security enhancement that requires Sun Ray Software authentication beforeusers can reconnect to an existing session. RHA does not apply to kiosk sessions, which are designed foranonymous access without authentication. RHA policy can be administered either through the Admin GUI or withthe utpolicy command.
screenA monitor or group of monitors that show a single desktop to a user. A screen can be provided by a single monitoror by multiple monitors on a Sun Ray Client with dual video connectors, such as the Sun Ray 3 Plus Client. Amultihead group can also show a single desktop when using Xinerama.
screen flippingThe ability to pan to individual screens that were originally created by a multihead group on a client with a singlehead.
serviceFor the purposes of Sun Ray Software, any application that can directly connect to the Sun Ray Client. It caninclude audio, video, X servers, access to other machines, and device control of the client.
sessionA group of services or applications associated with an authentication token. Desktop sessions reside on aSun Ray server and can be directed to any Sun Ray Client or Oracle Virtual Desktop Client. From a user'sperspective, a desktop session is usually an instance of an OS desktop. A session may be associated with atoken embedded on a smart card. Also known as desktop session or Sun Ray session. See token.
session mobilitySee mobility.
smart cardGenerically, a plastic card containing a microprocessor capable of making calculations. Smart cards that canbe used to initiate or connect to Sun Ray sessions contain identifiers such as the card type and ID. Smartcard tokens may also be registered in the Sun Ray data store, either by the Sun Ray administrator or, if theadministrator chooses, by the user.

382
smart card-based authenticationUsing a smart card to authenticate a card holder based on credentials supplied by the card and authenticationinformation from the card holder, such as a PIN or biometric data.
smart card-based session mobilityUsing a smart card to provide a unique token ID and token type that enables Sun Ray Software to locate the cardholder's session. In some cases, card holders might be required to authenticate themselves using smart card-based authentication.
smart tokenAn authentication token contained on a smart card. See token.
Sun Ray ClientA hardware client that obtains a desktop session from a Sun Ray server. The software client counterpart is calledan Oracle Virtual Desktop Client. Previously referred to as Sun Ray thin clients, Sun Ray virtual display terminals,and Sun Ray DTUs (Desktop Terminal Units).
Sun Ray Operating SoftwareThe name of the Sun Ray Client firmware. See firmware.
Sun Ray systemThe Sun Ray system consists of Sun Ray Clients, servers, server software, and the physical networks thatconnect them.
thin clientThin clients remotely access some resources of a computer server such as compute power and large memorycapacity. The Sun Ray Clients rely on the server for all computing power and storage.
tokenThe Sun Ray system requires each user to present a token that the Authentication Manager uses to allow or denyaccess to the system and to sessions. A token consists of a type and an ID. If the user uses a smart card, thesmart card's type and ID are used as the token. If the user is not using a smart card, the client's built-in type andID (the unit's Ethernet, or MAC, address) are used instead as a pseudo-token. If mobile sessions are enabled, auser can log into an existing session from different locations without a smart card, in which case the user name isassociated with the session. A pseudo-token used for mobile sessions is called a mobile token. Alias tokens canalso be created to enable users to access the same session with more than one physical token.
token readerA Sun Ray Client that is dedicated to reading smart cards and returning their identifiers, which can be associatedwith card owners (that is, with users).
trusted-serverServers in the same failover group that "trust" one another through a common group signature.
USB redirectionA Sun Ray Software feature that enables users to access USB devices connected to a Sun Ray Client from theirWindows sessions, provided that the appropriate device drivers are installed on the Windows system.
user sessionA session that is running on a Sun Ray server and to which a user, identified by a smart card token or a pseudotoke, is logged in.
video accelerationA feature provided in the Windows connector to improve video playback performance, which consists of themultimedia redirection and Adobe Flash acceleration components.

383
virtual desktopA virtual machine containing a desktop instance that is executed and managed within the virtual desktopinfrastructure, usually a Windows desktop accessed through RDP.
virtual frame bufferA region of memory on the Sun Ray server that contains the current state of a user's display.
VMware View connectorEnables Sun Ray Client users to connect to Windows virtual machines through the VMware View Manager.
warm restartSee restart.
Windows connectorA Microsoft Remote Desktop Protocol (RDP) client that enables Sun Ray users to access applications running onremote Microsoft Windows systems.
Windows systemA generic term used throughout the Sun Ray Software documentation to indicate a remote desktop server runningthe Windows OS that can be accessed remotely from a Sun Ray Client using the Windows connector. SeeWindows Terminal Services for the different ways a remote desktop is provided based on the Windows OS.
Windows Terminal ServicesA Microsoft Windows component that makes Windows applications and desktops accessible to remote usersand clients. Depending on the Windows release, this feature may be called Terminal Services, Remote DesktopServices, or Remote Desktop Connection.
X serverA process that controls a bitmap display device in an X Window System. It performs operations on request fromclient applications. Sun Ray Software contains two X servers: Xsun, which was the default Xserver in previousversions of Sun Ray Software on Oracle Solaris 10, and Xnewt, which is the default Xserver for Sun Ray Softwareon all platforms. Xnewt enables the latest multimedia capabilities.
XineramaAn extension to the X Window System that enables the use of two or more monitors as one large virtual display.Xinerama mode allows the display of a single desktop across multiple monitors.
XnewtThe default X server for Sun Ray Software on Oracle Solaris.
xrandrThe X Resize, Rotate and Reflect extension to the X Window System, which enables clients to resize, rotate, andchange screen resolution settings dynamically. For Sun Ray Software, this extension is especially useful when auser hotdesks to Sun Ray Clients that use monitors of different sizes or resolutions than the one where a givensession began.

384