Embed Size (px)
Citation preview
Hunger Games
The DistrictsOn the first day campers would be placed in the different districts color wars using pennies. Each group would be assigned a district to represent. It would be neat to have customized challenge coins made for each district’s “citizens”. In each district there would be a specific craft and activity that depicts the strengths of their “homeland”. During the week campers visit other districts to partake in their “traditional” crafts and activities.
Have the kids name their own district. Or use the was the one already named.
If you have to do Hunger Games color war outside, make sure that you add a water feature to the activity. Use something like running through a sprinkler first to get to the start of the activities. (Slip n slides, water wiggles, small pools) Making sure they are staying cooled off. Etc…
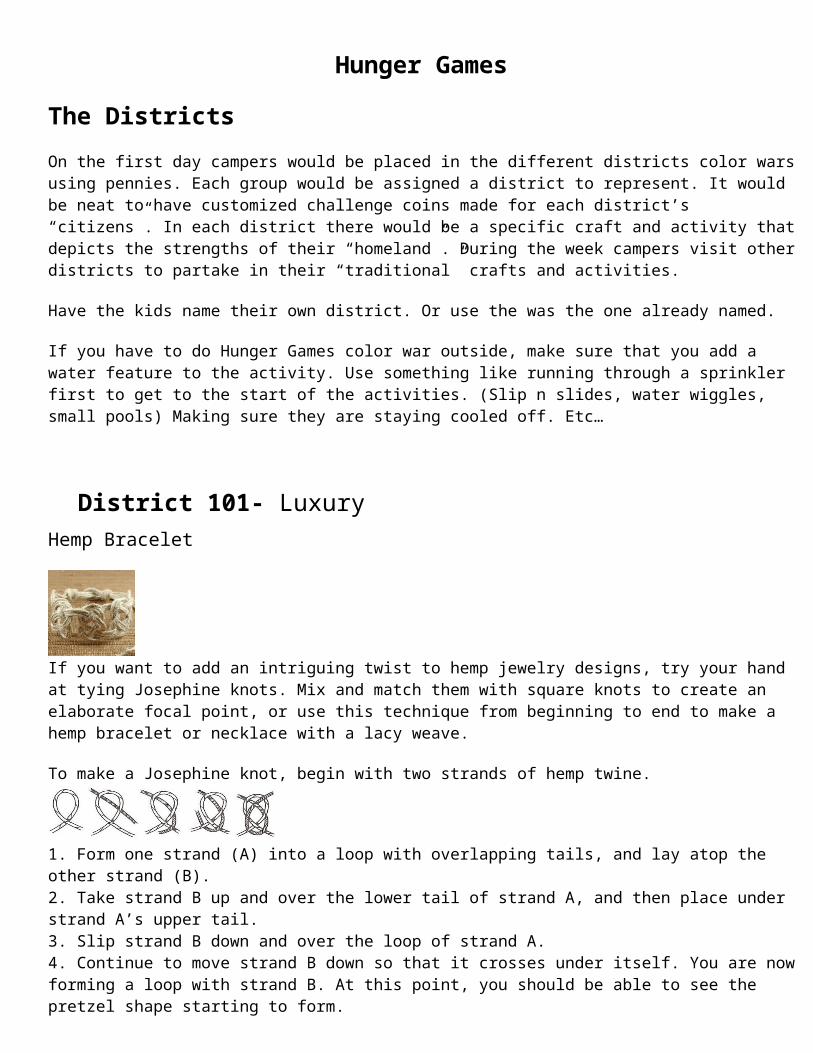
District 101- Luxury
Hemp Bracelet
If you want to add an intriguing twist to hemp jewelry designs, try your hand at tying Josephine knots. Mix and match them with square knots to create an elaborate focal point, or use this technique from beginning to end to make a hemp bracelet or necklace with a lacy weave.
To make a Josephine knot, begin with two strands of hemp twine.
1. Form one strand (A) into a loop with overlapping tails, and lay atop the other strand (B).2. Take strand B up and over the lower tail of strand A, and then place under strand A’s upper tail.3. Slip strand B down and over the loop of strand A.4. Continue to move strand B down so that it crosses under itself. You are now forming a loop with strand B. At this point, you should be able to see the pretzel shape starting to form.5. Bring strand B over strand A’s loop to form a loop inside a loop.6. Pull both strands with even tension to tighten the knot.
For more striking Josephine knots, use four strands (two As and two Bs), or 6 (three As and 3 Bs) and mix-and-match colors. Once you learn the ropes, it’s a cinch to incorporate Josephine knots into your current hemp bracelet and necklace designs.
Knot Tying - Have kids attempt to tie a variety of different knots. You should have book resources in your library or you can visit the web. You can also purchase this game if you have the funds http://www.mindware.com/p/Knot-So-Fast/48014?sg=PMDG2&gclid=CJKOrv7X3akCFRIH2godonGvZA

District 102-Electronics
Fireflies
Remember when you were a kid how magical it was when the summer sun finally set at the end of the day and the fireflies came out and you never wanted to come inside even though your older sister told you your house was built on a graveyard and the zombies would come out at night? Well, here's a super quick craft to help your kids feel a little bit of that magic. Click below to see them lit up!
These fireflies are super easy to make. Just pop a flameless LED tealight into a plastic Easter egg. You don't even need glue! Poke holes through the egg with a thumbtack to insert the pipe cleaners. The eyes are drawn onto white sticky labels, and the wings are silver duct tape. Quick, easy, and totally cute!
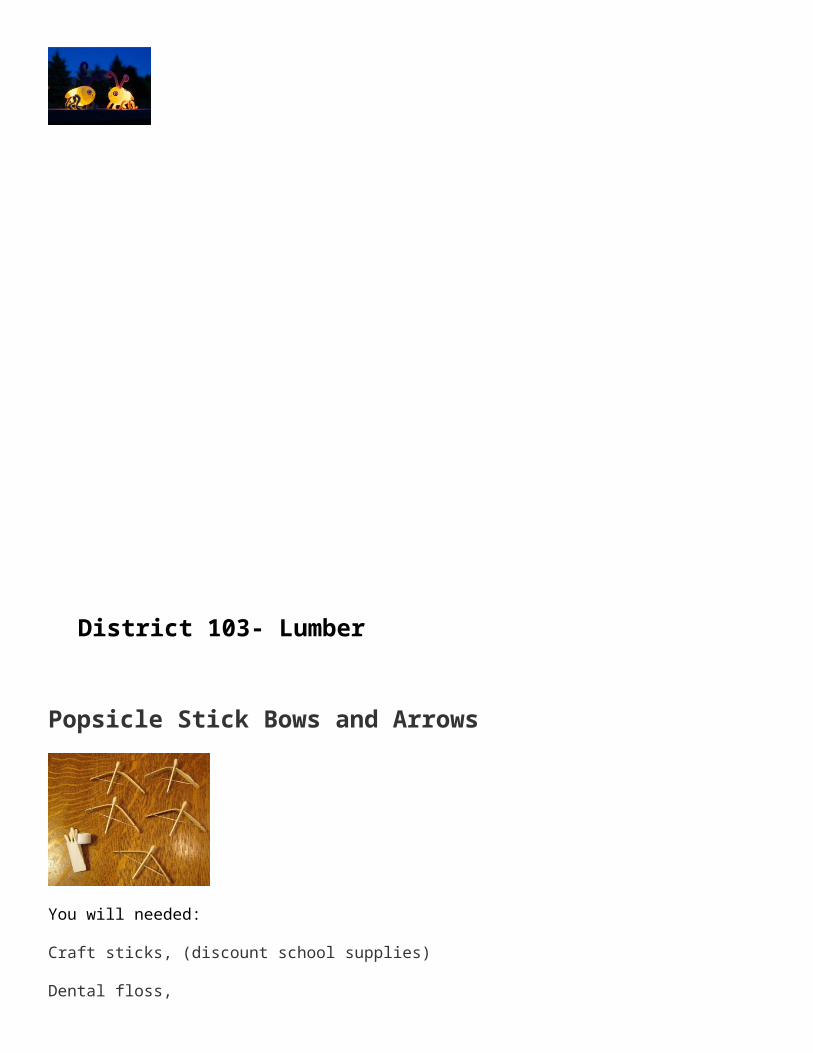
District 103- Lumber
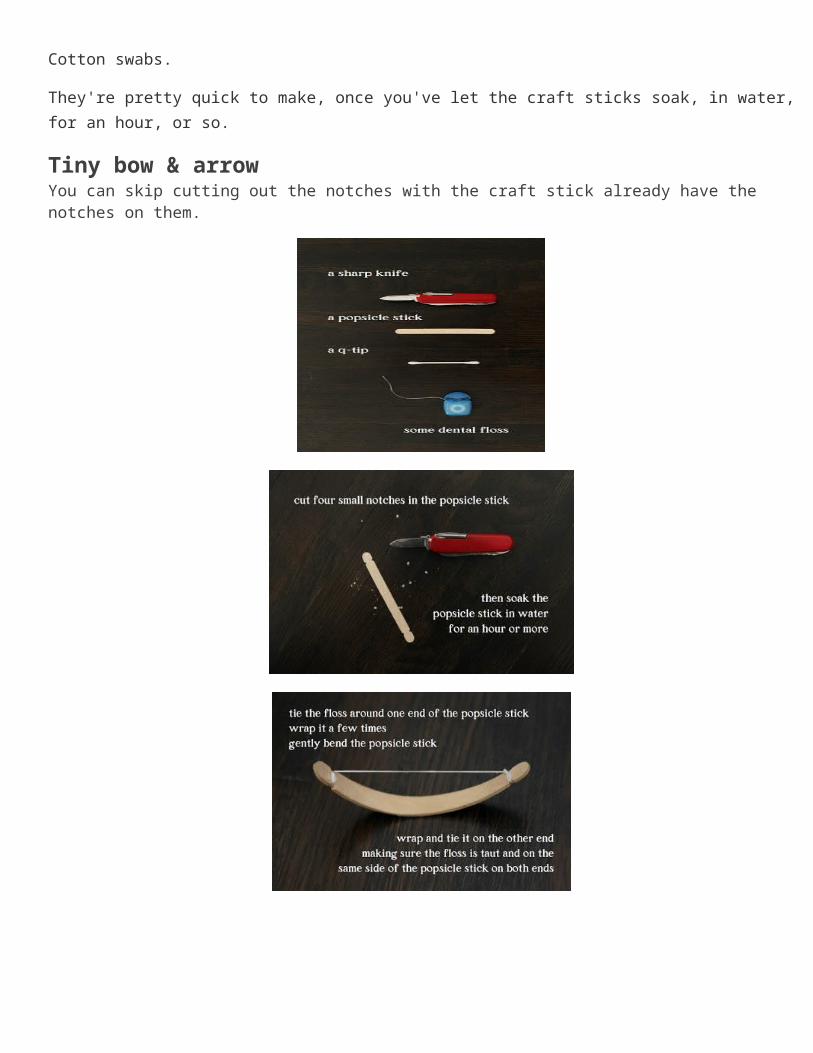
Popsicle Stick Bows and Arrows
You will needed:
Craft sticks, (discount school supplies)
Dental floss,
Cotton swabs.
They're pretty quick to make, once you've let the craft sticks soak, in water, for an hour, or so.
Tiny bow & arrow You can skip cutting out the notches with the craft stick already have the notches on them.
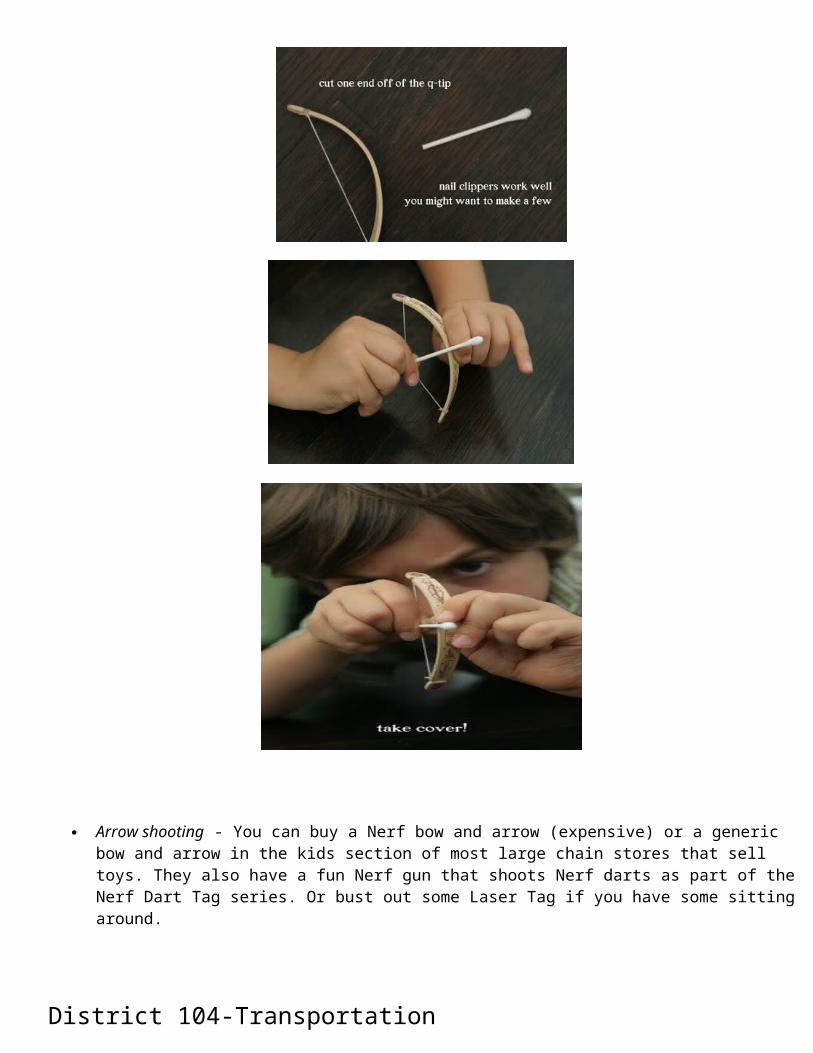
Arrow shooting - You can buy a Nerf bow and arrow (expensive) or a generic bow and arrow in the kids section of most large chain stores that sell toys. They also have a fun Nerf gun that shoots Nerf darts as part of the Nerf Dart Tag series. Or bust out some Laser Tag if you have some sitting around.
District 104-Transportation
Make a Hovercraft!
Here’s a fun activity that will introduce your fourth grader to the concept of frictionless motion by constructing a hovercraft. A hovercraft is a vehicle that travels on a layer of compressed air just above any kind of land or water surface. The compressed air serves as an invisible cushion that eliminates almost all friction between the vehicle and the surfaces.
What You Need:Piece of cardboard/card stockPaper hole punchWhite glueBalloonPair of scissorsRulerSmall spoolSheet of paper
What You Do:1. Cut a 4-inch square out of the cardboard.2. Punch a hole in the center of the cardboard. The hole should be the same size as the hole in the spool. If using a spool with yarn or string wrapped around it remove the string.3. Glue the spool to the cardboard on top of the hole. Make sure the holes line up. Use enough glue to assure that no air can escape between the spool and the piece of cardboard.4. Cover the top of the spool with a circle of paper. Glue it to the spool and allow to dry.5. Punch a hole in the middle of the paper cover where the hole of the spool is. Now your hole should run through the paper, spool, and cardboard without any obstructions.6. Inflate the balloon and pinch the end to keep the air from escaping. Stretch the balloon over the top of the spool.7. Set the hovercraft on a level surface (table top, floor, etc) and let go of the balloon. Give the hovercraft a few gently pushes.The air flowing from the balloon through the holes forms an air cushion between the craft and the flat surface, which reduces the force of friction (the resistance that occurs when two object rub against each other). With little friction to slow it down the hovercraft shoots across the table!

District 105- Power
Hunger Games Color Wars
LEAN ON ME
Objective: To be the first team to get everyone through the activity.Formation: 2 groups from each class. Each group has 4 pairs of students.Safety:Try to maintain the speed of your travels.Procedures:
Each set of partners will attach the head band around the inside legs. On the signal to begin, the first pair will move as quickly as possible around the cone and back. Once back, hand off the headband to the next group for their turn. If time permits, run the activity again.
Equipment: 4 head bands, and 4 cones.
SOURCE OF LIFE
Objective: Be the first team to fill the 2-liter bottle to the line.Formation: Students will be in relay formation.Safety: Do not throw the sponges ‐ be careful not to slip on the wet ground.Procedures:
Students will be in a single file line behind their designated color. On the signal the first person from each team will run up to the pool Bring the wet sponge back and wring it out into the 2 liter bottle (if you place the 2liter in a big bucket
you save and can conserve more water) Hand the sponge off to the next person. First team to fill the water up to the line will win. Repeat procedure if time allows.
Equipment: 4 sponges, 4 2-liter bottles, 4 buckets, 1 smallpool, and 1 set of color markers
TRACKER JACKER STINGObjective: Students will travel within a designated area avoiding the “sting” (tagger) by the “tracker jackers”.Formation: Students will be working to keep from being stung!Safety: Do not throw the bee at anyone. ‐Hands off (maintain personal space) ‐ Travel at a safe speedProcedures:
3 people to be the tracker jackers (taggers) and 3 people to be the antidote (leaves) Once tagged the students must spin around in circles, until a person with the antidote comes over and
hands them the leaves. People with the leaves cannot get tagged. Switch taggers frequently. Equipment : 3 people to act as Bees, boundary lines and 3 leaves/fake or an object in place of the leave
PROTECTOR
Objective: Implement the skill of rolling to knock down the peg. Formation: Students are in a circular formation (use the lines guides) the whole class can
participate at the same time. Safety: Do not kick or throw the soccer balls Make sure the person in the middle is keeping their face away from the pin Procedure: Person in the middle of the circle is protecting the pin by pushing the soft foam balls away from the peg 3 ways the person in the middle gets out Whoever rolls a ball and they knock the peg down, they become the new “protector” If the “protector” kicks a ball If they knock down the peg themselves 3 times (3 strikes and your out) The people on the outside are not allowed to roll while inside of the circle.
Equipment: 4 soccer balls, 15 cones and 1 peg
TRIBUTE TRAINING
Objective: To be the first person to complete the obstacle course.Formation: Students will be paired up with another student from the other team. On the signal both participants will begin the obstacle course as quickly as they can.Safety:
Make sure you travel as fast as you can throughout the obstacle course, but make sure you maintain self-control as you go.
Procedures: Have the first pair of students line up in a starting line. Allow the students time to go through the obstacle course before sending the next group.
Equipment (per course): Belly bumpers, tennis balls, stacking cups, cones, sm pool, jump ropes, tires, hurdles, etc….Obstacle 1 = over and under (used 2 cones to hold a jump ropeto go over, have someone hole the rope to go under.Obstacle 2 = by using their feet they need to place 2 tennis balls into cones that are laying down on their sideObstacle 3 = they must stack cups into a pyramid (base of 4 then 3 then 2 then 1), then break it down as fast as they canObstacle 4= running through the pool and each of the tiresObstacle 5 = adding more obstacles to complete have them run through the rest of the course back to the beginning of the line.
HOVERCRAFTObjective: Be the first team to stand all 4 sets of bottles up using the “snares”Formation: Students will be in a 4 relay teamsSafety:
Be careful not to get hit with the pole or magnet when moving Do not throw the pole
Procedures:
Each group will start with the pole in the cone by their playing area. On the signal, the first person in each group will run to the cone to pick up their pole Once there the students must try and use the magnet to stand one bottle up using the magnet. Once his/her bottle is standing, place the pole back in the cone, and then run back to tag the next
person in line. Not allowed to touch the bottle with hands. Must use the magnet
Replay if time permitsEquipment: 4 poles with magnets attached, 4 cones and 32 water bottles with magnets glued to the lib (8 for each color team)
NIGHTLOCK
Objective: Collect as much “food” as you can for your team’s stash, and place as many “nightlock” berries into the other team’s stash. The team with the most food and least amount of nightlock berries at the end of the designated time will win.Formation: 2 groups from each homeroom will be participating at the same time (total of 4 groups moving per round). However, the students are allowed to steal food from ANY team’s area (every team for themselves)Safety:
DO NOT throw the objects AT ALL Be careful not to run into/bump heads with others Do not step on the equipment No guarding
Procedures: 4 teams, each starting at their own area The “food” will be spread out throughout the playing area Students run around collecting 2 PIECES OF “FOOD” at a time. Students can steal from other areas Students can place the “nightlock” berries into other team areas The winner is the team who has the most objects in their hula hoop at the end of the allotted time
(play each round for about 2 minutes). Every “nightlock” berry will eliminate 2 pieces of food when counting.
Equipment: 30 noodletts, 4 drawn home bases Hula hoops, and 24 poison berries (Junk food)
PROTAGONIST VS. ANTAGONIST
Objective: To be the first team to spell either the protagonist or antagonist on their card by using the letter chips.Formation: 2 groups from each group competing against each other in a relay race formation.Safety:
Do not throw the chips Do not step on the chips or word cards Be careful by the wooden boards
Procedures: On the signal, the first student in each group will run to letter board to pick up ONE CHIP AT A
TIME (Cannot flip over other chips just to find the letter they need. They touch it they take it) Bring the chip back to their group. If they need the letter they place it in the circle on their word card. If it is a letter they do not need, they hand it to the next person in line who will take the chip back and
pick up a new chip. The first team to spell out the word will win. Start another word if time permits.
Protagonist = Katniss Antagonist = Arena
Equipment: 50 poker chips, and 4 sets of character cards
Scavenger Hunt - Create a scavenger hunt and see if teens can "track" down the prize object, or cup if you will.
District 106- Agriculture
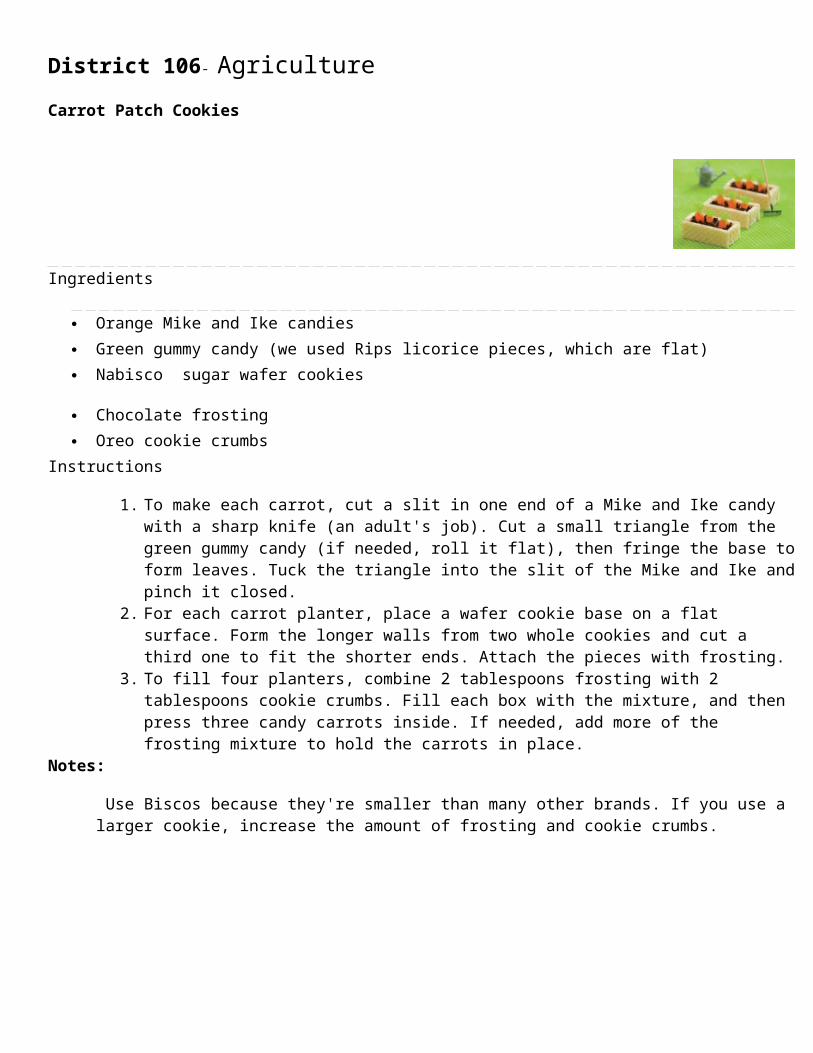
Carrot Patch Cookies
Ingredients
Orange Mike and Ike candies Green gummy candy (we used Rips licorice pieces, which are flat) Nabisco sugar wafer cookies
Chocolate frosting Oreo cookie crumbs
Instructions
1. To make each carrot, cut a slit in one end of a Mike and Ike candy with a sharp knife (an adult's job). Cut a small triangle from the green gummy candy (if needed, roll it flat), then fringe the base to form leaves. Tuck the triangle into the slit of the Mike and Ike and pinch it closed.
2. For each carrot planter, place a wafer cookie base on a flat surface. Form the longer walls from two whole cookies and cut a third one to fit the shorter ends. Attach the pieces with frosting.
3. To fill four planters, combine 2 tablespoons frosting with 2 tablespoons cookie crumbs. Fill each box with the mixture, and then press three candy carrots inside. If needed, add more of the frosting mixture to hold the carrots in place.
Notes:
Use Biscos because they're smaller than many other brands. If you use a larger cookie, increase the amount of frosting and cookie crumbs.
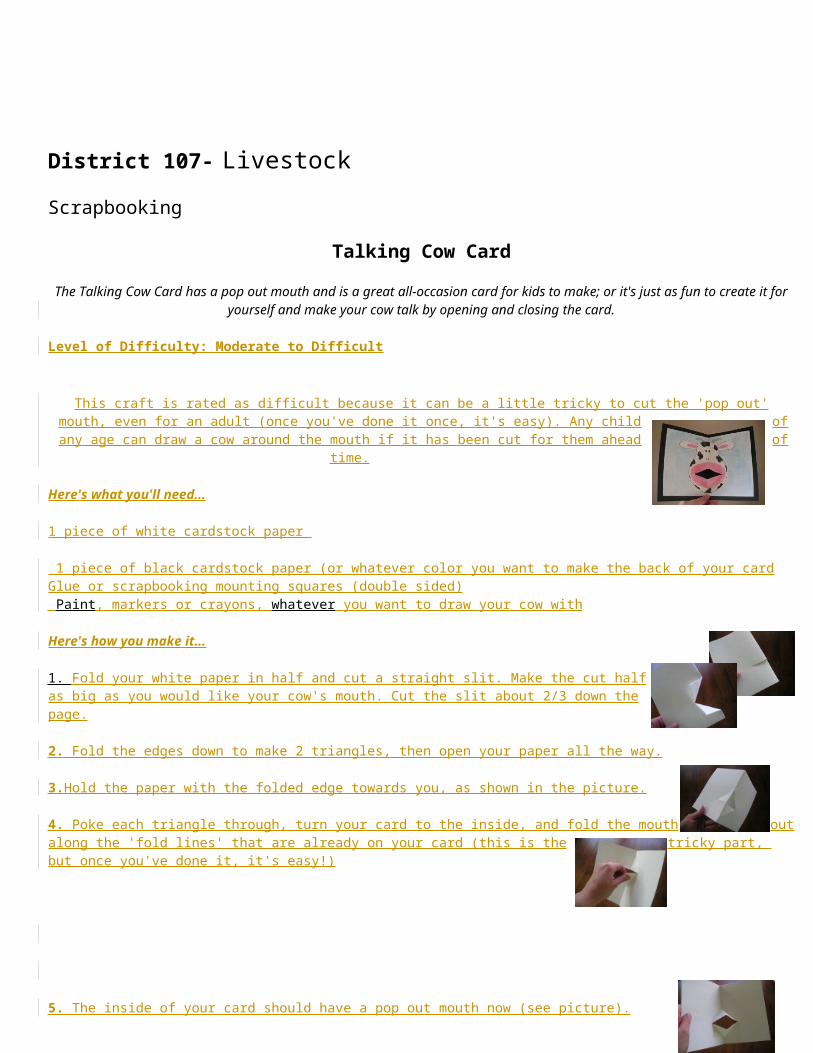
District 107- Livestock
Scrapbooking
Talking Cow Card
The Talking Cow Card has a pop out mouth and is a great all-occasion card for kids to make; or it's just as fun to create it for yourself and make your cow talk by opening and closing the card.
Level of Difficulty: Moderate to Difficult
This craft is rated as difficult because it can be a little tricky to cut the 'pop out' mouth, even for an adult (once you've done it once, it's easy). Any child of any age can draw a cow around the mouth if it has been cut for them
ahead of time.
Here's what you'll need...
1 piece of white cardstock paper
1 piece of black cardstock paper (or whatever color you want to make the back of your cardGlue or scrapbooking mounting squares (double sided) Paint , markers or crayons, whatever you want to draw your cow with
Here's how you make it...
1. Fold your white paper in half and cut a straight slit. Make the cut half as big as you would like your cow's mouth. Cut the slit about 2/3 down the page.
2. Fold the edges down to make 2 triangles, then open your paper all the way.
3. Hold the paper with the folded edge towards you, as shown in the picture.
4. Poke each triangle through, turn your card to the inside, and fold the mouth out along the 'fold lines' that are already on your card (this is the tricky part, but once you've done it, it's easy!)
5. The inside of your card should have a pop out mouth now (see picture).
6. Now your ready to paint or draw on your cow. Once you've finished your drawing you will need to glue or stick on your card back (which is also the color inside your cow's mouth).
Now make your cow talk! Keep it, or give it to a friend!
Huger Games Assassin
Instructions
1. Prepare to Play Assassin
1 Decide whether to play one-on-one or by teams.
2 Choose an area of play. This can be a yard, a park, an entire city block or more. Find a place that won't be disturbed by other people during your game.
3 Agree on a time limit. Play until 1 winner is left or for a set amount of time, such as 1 hour. Then whoever has the most "kills" wins.
4 Pair up victims and assassins by name or by picking sealed envelopes with photos inside. Bring pictures or take some just before the game. Each player is both Assassin and victim, and gets the same number of "marks."
2. Play the Game Assassin
5 Prepare your weapons and space players around the perimeter of the playing field. You can set a timer for a few minutes, and the beep means: "Assassins, go!"
6 Stalk your particular victim. At first he won't know who is his assassin, so he may be easy to surprise. Victims are allowed to shoot in defense, though, and if shot, Assassins have to go back to the starting place and begin over.
7 Shoot your victim to win a "kill." Then take your victim's next assignment and proceed to assassinate that person.
You can rename your Districts with one of these or make up your own.
Districts
District 1- Luxury
District 2- Masonry
District 3- Electronics
District 4- Fishing
District 5- Power
District 6- Transportation
District 7- Lumber
District 8- Textiles
District 9- Grain
District 10- Livestock
District 11- Agriculture
District 12- Coal Mining
The Costume Game - Have teens come dressed ready to kick of the Hunger Games pageant style and award a prize for the best dressed. They can recreate costumes right from the books, although I don't recommend setting oneself on fire, or they can simply create any unique costume worthy of a HG opening pageant.