Embed Size (px)
Citation preview

HealthOffice Anywhere 2014 Revised 11/17/2014
Suggested Best Practice Guidelines
Suggested Best Practice Guidelines
to Complete a Group Event Via HealthOffice® Anywhere
Healthmaster Holdings© LLC is issuing this document strictly as a guide in populating a Group Event. Healthmaster© LLC takes no responsibility for State, District, or Individual School regulations mandated for School Nurses. Healthmaster has included this document as part of the Release Information for reference purposes only.

HealthOffice Anywhere 2014 Revised 11/17/2014
Suggested Best Practice Guidelines
This page is left intentionally blank.

HealthOffice Anywhere 2014 1 Suggested Best Practices Guidelines for Group Events
Intent The general intent of this document is to provide a guide to encourage
consistent documentation into the HealthOffice Anywhere program for optimal results documenting Group Events.
Assumptions To ensure these guidelines work correctly, the following must be done:
Student demographics data as well as their contacts are in place
All required health screenings have been documented.
Populating a Group Event
Overview A Group Event is designed to track specific events in one of two ways; 1) By adding students one by one. An example of this use is to
keep track of Physicals for the football team. 2) Using the auto add feature. This is intended to keep a school in
compliance for specific requirements.
Group Event Name
The group event name is a descriptive name given to the Group Event to easily identify the Group Event. It is suggested that you use a very descriptive name, for example; 2014 Healthmaster High Football Physicals, or 2014 Healthmaster Elem. 1st Grade Vision Screenings.
HealthOffice Anywhere 2014 2 Suggested Best Practices Guidelines for Group Events
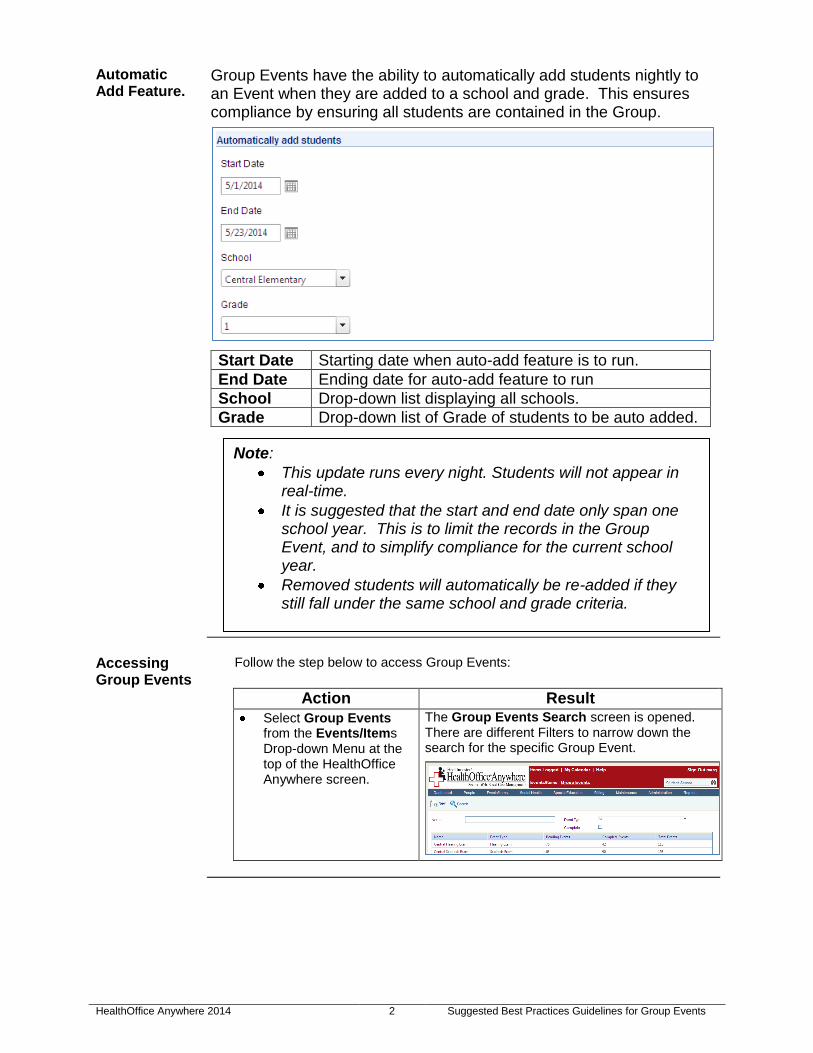
Automatic Add Feature.
Group Events have the ability to automatically add students nightly to an Event when they are added to a school and grade. This ensures compliance by ensuring all students are contained in the Group.
Start Date Starting date when auto-add feature is to run.
End Date Ending date for auto-add feature to run
School Drop-down list displaying all schools.
Grade Drop-down list of Grade of students to be auto added.
Accessing Group Events
Follow the step below to access Group Events:
Action Result
Select Group Events from the Events/Items Drop-down Menu at the top of the HealthOffice Anywhere screen.
The Group Events Search screen is opened. There are different Filters to narrow down the search for the specific Group Event.
Note:
This update runs every night. Students will not appear in real-time.
It is suggested that the start and end date only span one school year. This is to limit the records in the Group Event, and to simplify compliance for the current school year.
Removed students will automatically be re-added if they still fall under the same school and grade criteria.
HealthOffice Anywhere 2014 3 Suggested Best Practices Guidelines for Group Events
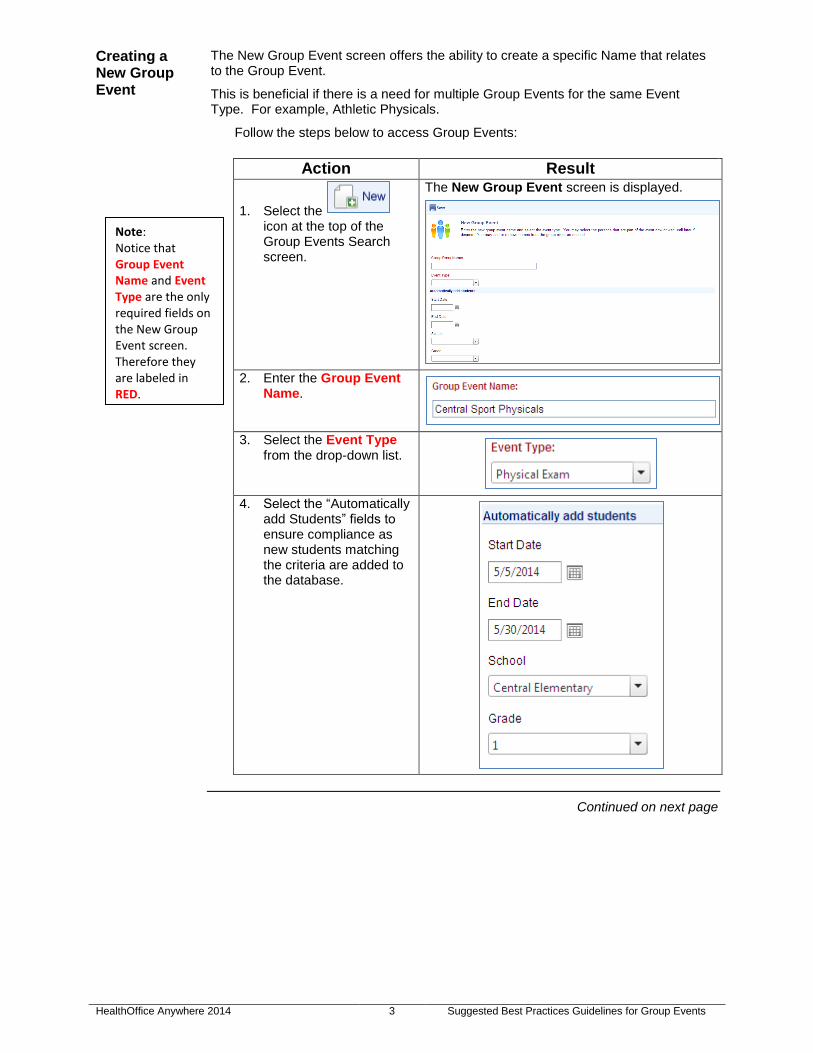
Creating a New Group Event
The New Group Event screen offers the ability to create a specific Name that relates to the Group Event.
This is beneficial if there is a need for multiple Group Events for the same Event Type. For example, Athletic Physicals.
Follow the steps below to access Group Events:
Action Result
1. Select the icon at the top of the Group Events Search screen.
The New Group Event screen is displayed.
2. Enter the Group Event Name.
3. Select the Event Type from the drop-down list.
4. Select the “Automatically add Students” fields to ensure compliance as new students matching the criteria are added to the database.
Continued on next page
Note: Notice that Group Event Name and Event Type are the only required fields on the New Group Event screen. Therefore they are labeled in RED.

HealthOffice Anywhere 2014 4 Suggested Best Practices Guidelines for Group Events
Action Result
5. Select the icon on the Toolbar.
The saved Group Event is opened, displaying the name of the group event, the event type, the number of pending events to be performed, the number of completed events and the total number of events for this group. Below this information is a demographic breakdown of each person that has been linked to the Group Event.
HealthOffice Anywhere 2014 5 Suggested Best Practices Guidelines for Group Events
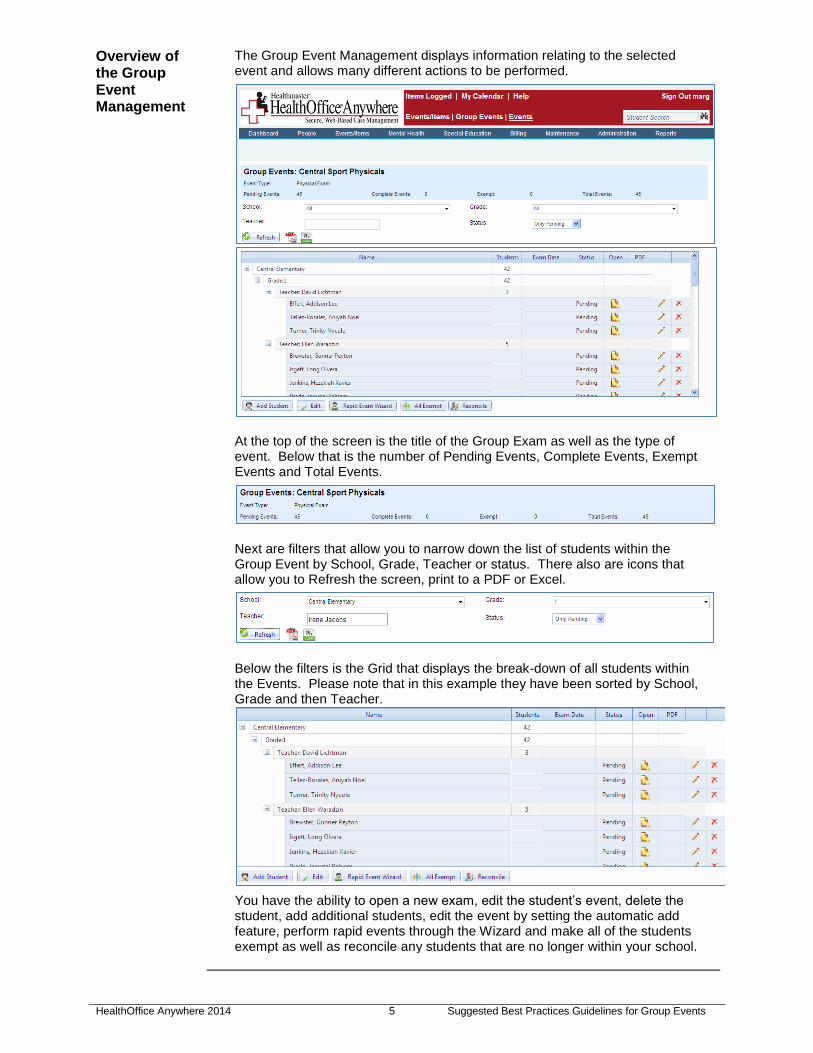
Overview of the Group Event Management
The Group Event Management displays information relating to the selected event and allows many different actions to be performed.
At the top of the screen is the title of the Group Exam as well as the type of event. Below that is the number of Pending Events, Complete Events, Exempt Events and Total Events.
Next are filters that allow you to narrow down the list of students within the Group Event by School, Grade, Teacher or status. There also are icons that allow you to Refresh the screen, print to a PDF or Excel.
Below the filters is the Grid that displays the break-down of all students within the Events. Please note that in this example they have been sorted by School, Grade and then Teacher.
You have the ability to open a new exam, edit the student’s event, delete the student, add additional students, edit the event by setting the automatic add feature, perform rapid events through the Wizard and make all of the students exempt as well as reconcile any students that are no longer within your school.
HealthOffice Anywhere 2014 6 Suggested Best Practices Guidelines for Group Events
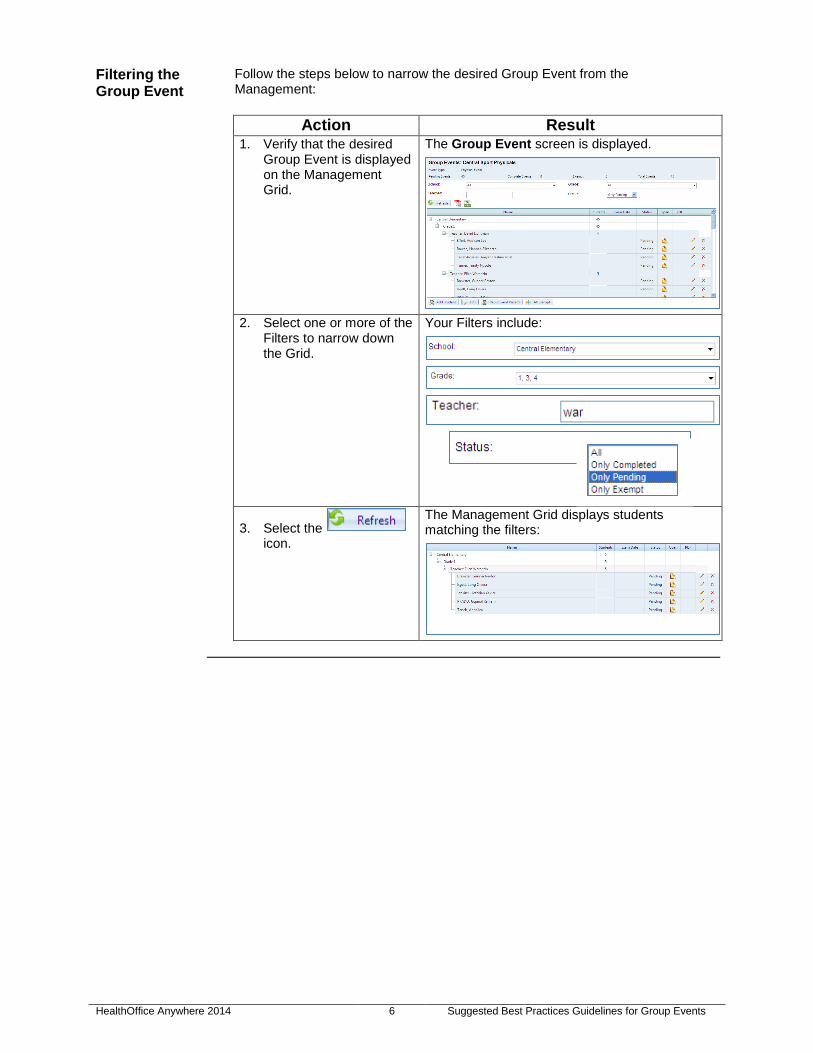
Filtering the Group Event
Follow the steps below to narrow the desired Group Event from the Management:
Action Result 1. Verify that the desired
Group Event is displayed on the Management Grid.
The Group Event screen is displayed.
2. Select one or more of the Filters to narrow down the Grid.
Your Filters include:
3. Select the icon.
The Management Grid displays students matching the filters:

HealthOffice Anywhere 2014 7 Suggested Best Practices Guidelines for Group Events
Adding a Student
Follow the steps below to add additional students to an existing Group Event on the Group Event Management:
Action Result 1. Verify that the desired
Group Event is displayed on the Management Grid.
The Group Event screen is displayed.
2. Select the
icon at the bottom left of the Management Grid.
The Select Students screen is displayed.
3. Select the desired “School” from the Selection List.
Once you select the button, the School is displayed in the “Select Students” screen:
Continued on next page

HealthOffice Anywhere 2014 8 Suggested Best Practices Guidelines for Group Events
Action Result 4. Select the desired
“Grade” from the Selection List.
Once you select the button, the Grade is displayed in the “Select Students” screen:
5. Select the button.
All students that are within the desired search criteria are displayed in the Available Students field.
6. Highlight the desired students and select the
icon.
The student(s) is displayed in the Selected Students field.
Continued on next page
HealthOffice Anywhere 2014 9 Suggested Best Practices Guidelines for Group Events
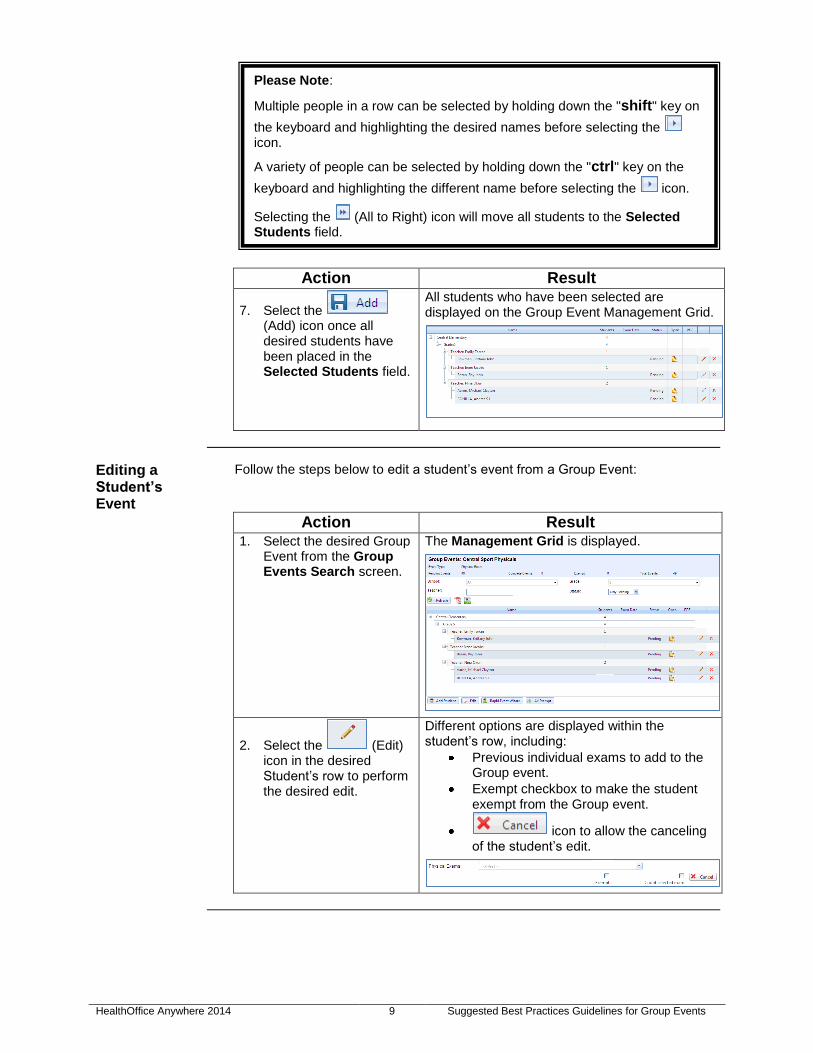
Action Result
7. Select the (Add) icon once all desired students have been placed in the Selected Students field.
All students who have been selected are displayed on the Group Event Management Grid.
Editing a Student’s Event
Follow the steps below to edit a student’s event from a Group Event:
Action Result 1. Select the desired Group
Event from the Group Events Search screen.
The Management Grid is displayed.
2. Select the (Edit) icon in the desired Student’s row to perform the desired edit.
Different options are displayed within the student’s row, including:
Previous individual exams to add to the Group event.
Exempt checkbox to make the student exempt from the Group event.
icon to allow the canceling of the student’s edit.
Please Note:
Multiple people in a row can be selected by holding down the "shift" key on
the keyboard and highlighting the desired names before selecting the icon.
A variety of people can be selected by holding down the "ctrl" key on the
keyboard and highlighting the different name before selecting the icon.
Selecting the (All to Right) icon will move all students to the Selected Students field.

HealthOffice Anywhere 2014 10 Suggested Best Practices Guidelines for Group Events
Counting a Student’s Previous Exam
Follow the steps below to count a previous individual exam within a current Group Event:
Action Result 1. Select the desired Group
Event from the Group Events Search screen and then select the
(Edit) icon in the desired Student’s row.
Different options are displayed within the student’s row including
Previous individual exams to add to the Group event.
2. Select the (Drop-down arrow) in the Exam field to display previous individual exams for the desired student.
A list of exams is displayed.
3. Select the desired individual exam.
The exam’s date is displayed in the Group Management Grid.
4. Select the “Count selected exam” check box.
The exam is automatically documented as completed within the Group Event.
Exempting a Student’s Exam
Follow the steps below to exempt a student from the current Group Event:
Action Result 1. Verify that the desired
student’s edit information is displayed.
2. Select the (Exempt this student) check box.
The exam is automatically documented as exempt within the Group Event.

HealthOffice Anywhere 2014 11 Suggested Best Practices Guidelines for Group Events
Exempting all Student Exams
Follow the steps below to exempt all students from the current Group Event:
Action Result 1. Select the desired Group
Event from the Group Events Search screen.
The Management Grid is displayed.
2. Select the
icon below the Grid.
The Management Grid is shown as “No records to display”.
3. Select the Status of “Only Exempt”.
All exams that were set as exempt are displayed.
HealthOffice Anywhere 2014 12 Suggested Best Practices Guidelines for Group Events
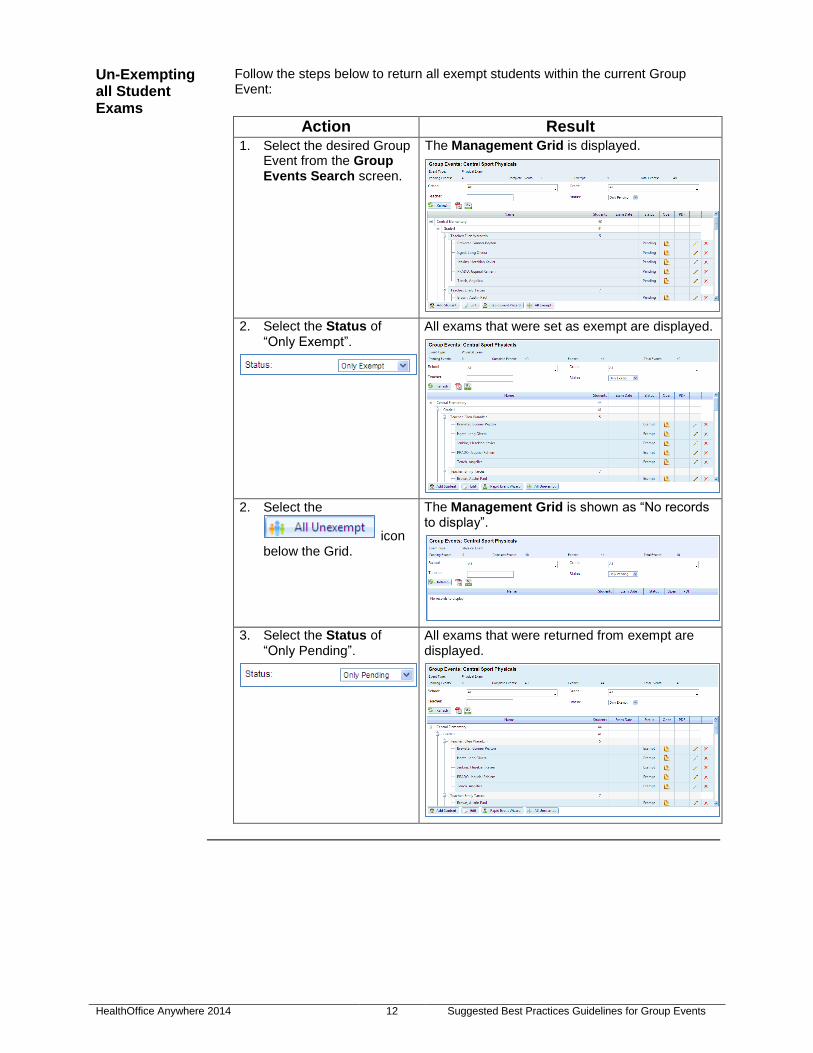
Un-Exempting all Student Exams
Follow the steps below to return all exempt students within the current Group Event:
Action Result 1. Select the desired Group
Event from the Group Events Search screen.
The Management Grid is displayed.
2. Select the Status of “Only Exempt”.
All exams that were set as exempt are displayed.
2. Select the
icon below the Grid.
The Management Grid is shown as “No records to display”.
3. Select the Status of “Only Pending”.
All exams that were returned from exempt are displayed.

HealthOffice Anywhere 2014 13 Suggested Best Practices Guidelines for Group Events
Deleting a Student’s Exam
Follow the steps below to delete a student from the current Group Event:
Action Result 1. Verify that the desired
Group Event is displayed on the Management Grid.
2. Select the (Delete) icon for the desired student.
The exam is deleted from the Group Event.
Opening a New Exam for a Student
Follow the steps below to open a new exam for a student from the Management Grid:
Action Result 1. Verify that the desired
Group Event is displayed on the Management Grid.
2. Select the (Open New Exam) icon for the desired student.
The exam is opened as an individual exam from the Group Event grid.
3. Perform the exam as normal and save.
The exam is saved to the student’s Summary.
Note: Please be aware that when the Auto-Add student feature is in use, you will not be able to delete an exam from a Group Event.

HealthOffice Anywhere 2014 14 Suggested Best Practices Guidelines for Group Events
Administering Multiple Events
Multiple events can be completed simultaneously using the Rapid Event Wizard icon within the Group Event Management.
Follow the steps below to administer multiple events from a Group Event:
Action Result 1. Select the desired Group
Event. The Group Event Management is displayed.
2. Select the
icon at the bottom of the Grid.
The Rapid Event Wizard is displayed.
3. Enter the Event Date, if it is different than displayed.
Continued on next page

HealthOffice Anywhere 2014 15 Suggested Best Practices Guidelines for Group Events
Action Result 4. Select the Time In of the
Group Event.
5. Enter the Time Out Minutes.
6. Select the Template that relates to the exam.
7. Select a different Examiner, if applicable.
8. Select the button.
Step 2: Select the Students is displayed.
9. Using the Filters, narrow down the Available Students, if desired.
Continued on next page
Note: Please be aware that all Templates must be previously created and saved before using them during Group Exams.

HealthOffice Anywhere 2014 16 Suggested Best Practices Guidelines for Group Events
Action Result
10. Select the button.
The Available Students field is narrowed down to your selected criteria.
11. Select the (All to Right) icon.
All Available Students are moved to the Selected Students field.
12. Select the button.
Step3: Process the events…is displayed.
13. Select the button.
The Group Event is processed and the completed students are displayed.
Continued on next page
Note: If the “Automatically add students” feature has been populated, new students that fit within the criteria will display once they have been added to the District’s database.
Please Note:
Multiple people in a row can be selected by holding down the "shift" key on
the keyboard and highlighting the desired names before selecting the icon.
A variety of people can be selected by holding down the "ctrl" key on the
keyboard and highlighting the different name before selecting the icon.

HealthOffice Anywhere 2014 17 Suggested Best Practices Guidelines for Group Events
Action Result
14. Select the (Export to PDF or Export to CSV) icons, if desired.
The File Download screen is displayed.
15. Select the button.
The PDF (or CSV) with the list of students within the current Group Exam is displayed allowing you to print, if desired.
16. Select the (Close) icon in the upper right corner, once you have printed the PDF or CSV.
The completed students are displayed once again.
17. Select the button.
All completed exams are displayed on the Group Event Management when the status of “Only Completed” is selected.
HealthOffice Anywhere 2014 18 Suggested Best Practices Guidelines for Group Events
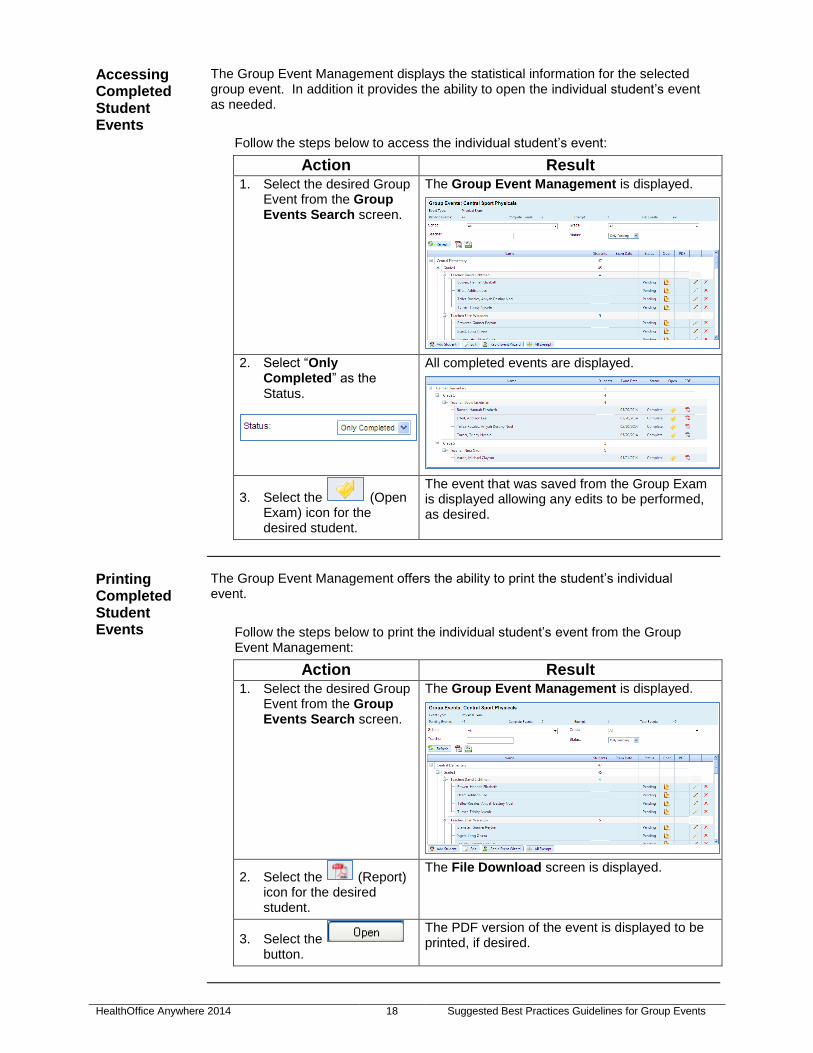
Accessing Completed Student Events
The Group Event Management displays the statistical information for the selected group event. In addition it provides the ability to open the individual student’s event as needed.
Follow the steps below to access the individual student’s event:
Action Result 1. Select the desired Group
Event from the Group Events Search screen.
The Group Event Management is displayed.
2. Select “Only Completed” as the Status.
All completed events are displayed.
3. Select the (Open Exam) icon for the desired student.
The event that was saved from the Group Exam is displayed allowing any edits to be performed, as desired.
Printing Completed Student Events
The Group Event Management offers the ability to print the student’s individual event.
Follow the steps below to print the individual student’s event from the Group Event Management:
Action Result 1. Select the desired Group
Event from the Group Events Search screen.
The Group Event Management is displayed.
2. Select the (Report) icon for the desired student.
The File Download screen is displayed.
3. Select the button.
The PDF version of the event is displayed to be printed, if desired.
HealthOffice Anywhere 2014 19 Suggested Best Practices Guidelines for Group Events
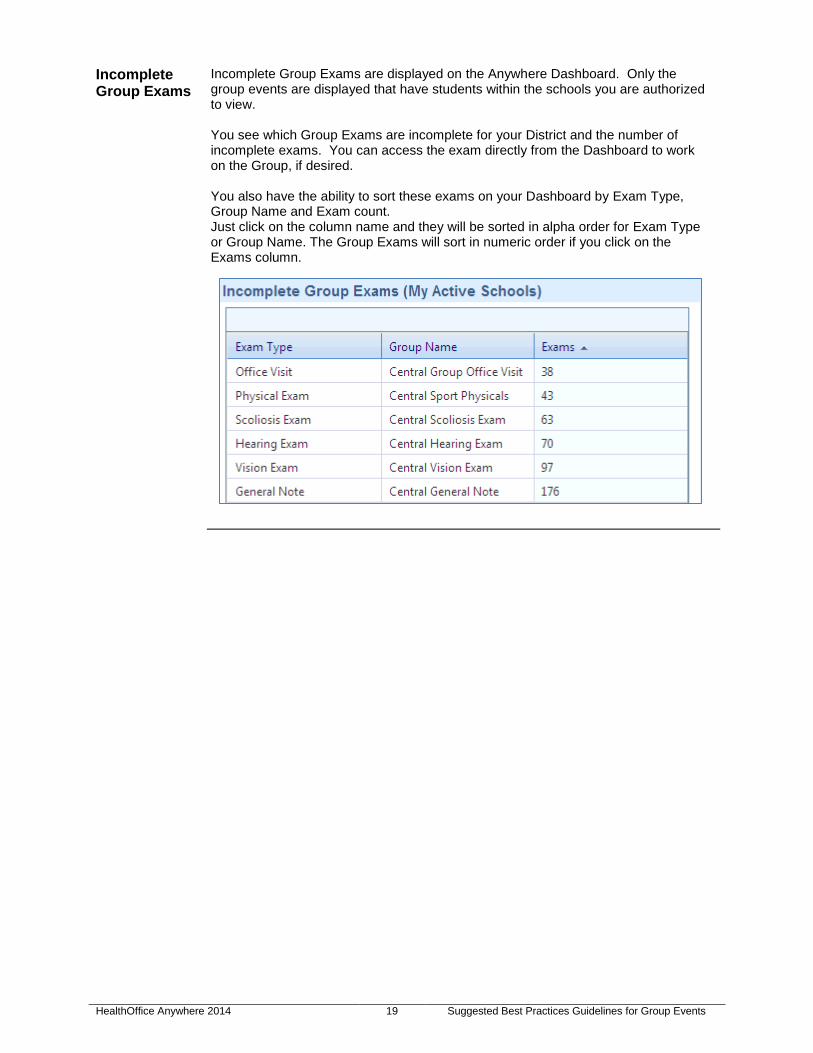
Incomplete Group Exams
Incomplete Group Exams are displayed on the Anywhere Dashboard. Only the group events are displayed that have students within the schools you are authorized to view. You see which Group Exams are incomplete for your District and the number of incomplete exams. You can access the exam directly from the Dashboard to work on the Group, if desired. You also have the ability to sort these exams on your Dashboard by Exam Type, Group Name and Exam count. Just click on the column name and they will be sorted in alpha order for Exam Type or Group Name. The Group Exams will sort in numeric order if you click on the Exams column.

HealthOffice Anywhere 2014 20 Suggested Best Practices Guidelines for Group Events
Reconciling Transferred Students
There may be students who have transferred or are no longer assigned to a Group
Event. In that case the button is used to clean up the Group Event.
Follow the steps below to print the individual student’s event from the Group Event Management:
Action Result 1. Select the desired
Group Event from the Group Events Search screen.
The Group Event Management is displayed with "No records to display".
2. Select the
button at the bottom of the Group Event Management.
The Select students to reconcile screen is displayed.
3. Check the box next to the students to be reconciled or select the "Select All" check box at the top of the first column. (Please be aware that this check box is not labeled.)
Continued on next page

HealthOffice Anywhere 2014 21 Suggested Best Practices Guidelines for Group Events
Action Result 4. Select the
button.
The selected students are removed from the Group Event and the Select students to reconcile screen is displayed.
5. Select the button to close the Select students to reconcile screen.
The Group Event Management is displayed and the desired students have been removed from the Group Event.