Embed Size (px)
Citation preview

1SWRU533–October 2017Submit Documentation Feedback
Copyright © 2017, Texas Instruments Incorporated
Sub-1 GHz Sensor-to-Cloud Linux® E14 Kit
Getting Started GuideSWRU533–October 2017
Sub-1 GHz Sensor-to-Cloud Linux® E14 Kit
This guide provides steps to run the out-of-box Sensor-to-Cloud example. This kit allows you to view andcontrol sensors on a Sub-1 GHz network from the cloud. All the devices in the kit are preprogrammed withrequired software. The kit includes two methods of operation: a cloud-connected gateway and a localgateway. The cloud-connected gateway lets you leverage cloud services such as Amazon WebServices™ (AWS) and IBM Watson® Internet of Things (IoT). The local gateway lets you run a gatewaywithin a local IP network for privately managed networks that do not require external connectivity. It isimportant to note that the design lets you quickly add any desired cloud service.
Kit Contents• 5-V Power Supply• BeagleBone Black• BeagleBone Wireless Connectivity Cape• FTDI Cable• Preflashed MicroSD• 2× TI SimpleLink™ CC1350 LaunchPad™• 2× Micro-USB Type B Cable
Contents1 Hardware Setup.............................................................................................................. 22 Running the Demo........................................................................................................... 23 Running Local Gateway..................................................................................................... 44 Running Cloud Gateway .................................................................................................... 55 Using Amazon Web Services (AWS) ..................................................................................... 76 Using IBM Quickstart ........................................................................................................ 97 Using IBM Cloud Service.................................................................................................. 10
7.1 Download and Install Cloud Foundry CLI ...................................................................... 107.2 Open IBM Bluemix Account...................................................................................... 107.3 Create a Service................................................................................................... 117.4 Upload the Provided Cloud Foundry Application.............................................................. 157.5 Launching the Demo.............................................................................................. 17
8 Troubleshooting ............................................................................................................ 198.1 Sensor Will Not Join the Network ............................................................................... 198.2 How to Determine if the Sensor is Connected to a Network ................................................ 208.3 BeagleBone Black Will Not Connect to a Cloud Service..................................................... 208.4 Local Gateway Fails to Start..................................................................................... 20
9 Next Steps................................................................................................................... 219.1 Get More Details on the Software Design ..................................................................... 219.2 Sensor Examples.................................................................................................. 219.3 SimpleLink™ Sub-1 GHz Embedded Sensor-to-Cloud Gateway ........................................... 219.4 Support ............................................................................................................. 21

USB connecting BBB &LaunchPad
5 V Power Supply BBB + WiFiConnectivity Cape
Hardware Setup www.ti.com
2 SWRU533–October 2017Submit Documentation Feedback
Copyright © 2017, Texas Instruments Incorporated
Sub-1 GHz Sensor-to-Cloud Linux® E14 Kit
TrademarksSimpleLink, LaunchPad, Sitara, E2E are trademarks of Texas Instruments.Amazon Web Services is a trademark of Amazon Web Services, Inc.IBM Watson is a registered trademark of IBM Corporation.Bluemix is a registered trademark of IBM.Linux is a registered trademark of Linus Torvalds.Wi-Fi is a registered trademark of Wi-Fi Alliance.All other trademarks are the property of their respective owners.
1 Hardware SetupThe BeagleBone Black (BBB) comes equipped with a BeagleBone Wireless Connectivity Cape and apreinserted microSD card with necessary software. Connect the BBB to the CC1350 LaunchPad labeledMAC co-processor as shown in Figure 1. Connect the 5-V power supply to the BBB and an electricaloutlet. The CC1350 LaunchPad labeled Sensor in Figure 1 should be connected to any USB powersource using the provided USB cable.
Figure 1. Sensor-to-Cloud Hardware Setup
2 Running the DemoThe BBB operates out of the box as a Wi-Fi® access point with SSID: SitaraAP. Connect to the networkwith a PC by using the password: sensor-to-cloud. Once connected, open a browser and type in theaddress bar: http://192.168.43.1:1310. This opens the Sensor-to-Cloud welcome page hosted on the BBB(see Figure 2).

www.ti.com Running the Demo
3SWRU533–October 2017Submit Documentation Feedback
Copyright © 2017, Texas Instruments Incorporated
Sub-1 GHz Sensor-to-Cloud Linux® E14 Kit
Figure 2. Sensor-to-Cloud Welcome Page
Select the method of operation for the demo:• Cloud Gateway (see Section 3)
The Cloud Gateway allows you to monitor and control the Sub-1 GHz network using AWS or IBMCloud Service. The IBM Quickstart method is easy and requires no setup, while other methods requireadditional steps.
• Local Gateway (see Section 8)The Local Gateway is the best method to start with. This method allows you to monitor and control theSub-1 GHz network using a local IP network for privately managed networks that do not need externalconnectivity.
Figure 3. Sensor-to-Cloud Main Portal
Running Local Gateway www.ti.com
4 SWRU533–October 2017Submit Documentation Feedback
Copyright © 2017, Texas Instruments Incorporated
Sub-1 GHz Sensor-to-Cloud Linux® E14 Kit
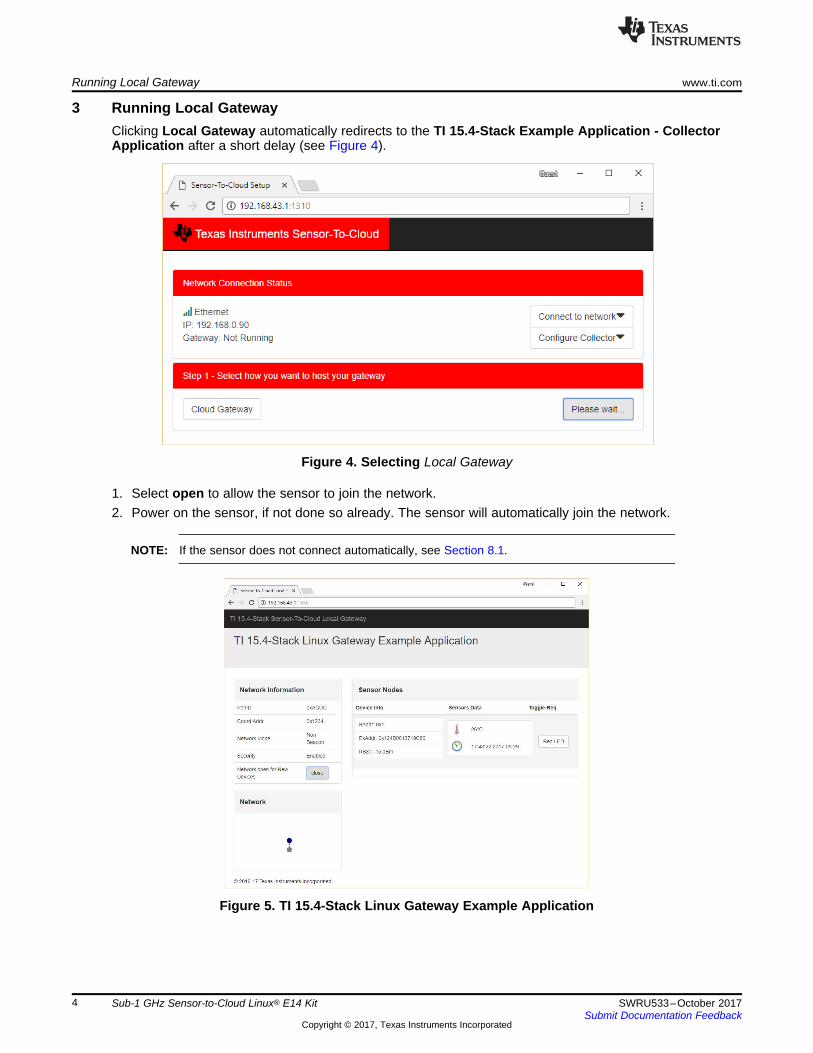
3 Running Local GatewayClicking Local Gateway automatically redirects to the TI 15.4-Stack Example Application - CollectorApplication after a short delay (see Figure 4).
Figure 4. Selecting Local Gateway
1. Select open to allow the sensor to join the network.2. Power on the sensor, if not done so already. The sensor will automatically join the network.
NOTE: If the sensor does not connect automatically, see Section 8.1.
Figure 5. TI 15.4-Stack Linux Gateway Example Application
www.ti.com Running Cloud Gateway
5SWRU533–October 2017Submit Documentation Feedback
Copyright © 2017, Texas Instruments Incorporated
Sub-1 GHz Sensor-to-Cloud Linux® E14 Kit
3. The sensor is now reporting data to the Sub-1 GHz gateway and allows you to control and visualizedata on a local cloud platform. Use the Red LED option to control the red LED on the CC1350LaunchPad labeled Sensor.
NOTE: There may be a few seconds of delay with the Toggle command.
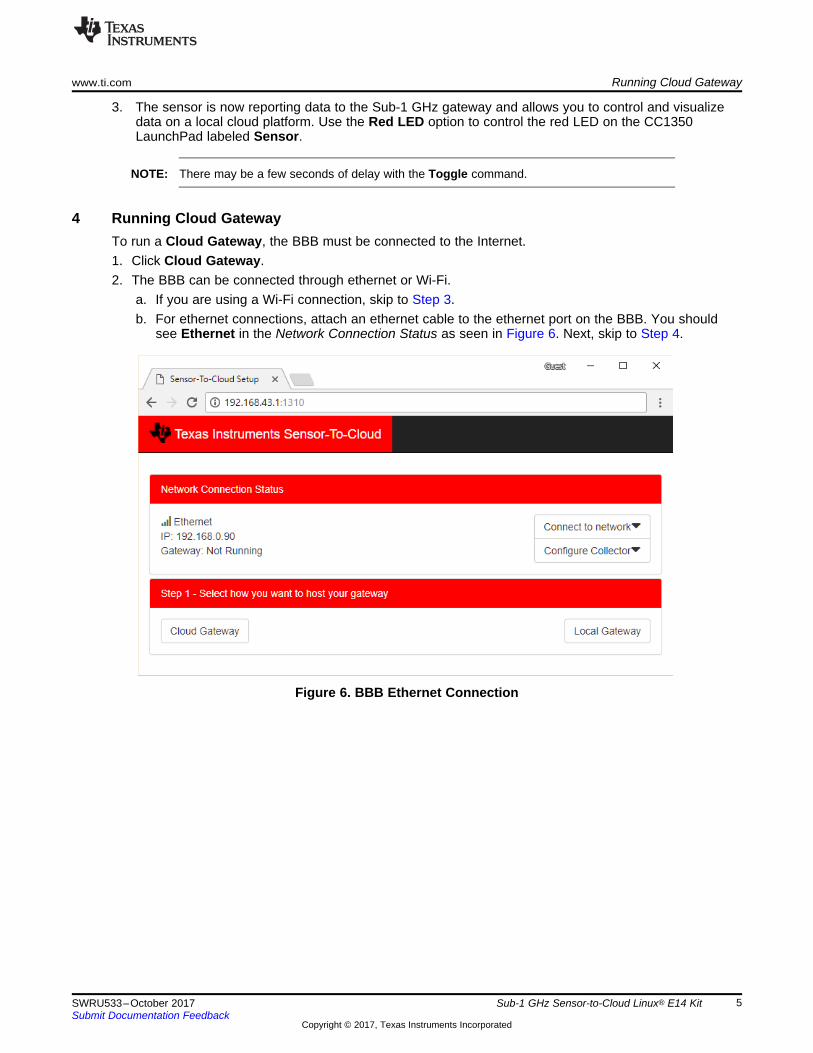
4 Running Cloud GatewayTo run a Cloud Gateway, the BBB must be connected to the Internet.1. Click Cloud Gateway.2. The BBB can be connected through ethernet or Wi-Fi.
a. If you are using a Wi-Fi connection, skip to Step 3.b. For ethernet connections, attach an ethernet cable to the ethernet port on the BBB. You should
see Ethernet in the Network Connection Status as seen in Figure 6. Next, skip to Step 4.
Figure 6. BBB Ethernet Connection

Running Cloud Gateway www.ti.com
6 SWRU533–October 2017Submit Documentation Feedback
Copyright © 2017, Texas Instruments Incorporated
Sub-1 GHz Sensor-to-Cloud Linux® E14 Kit
3. To begin a 10-second network scan, select the drop-down menu adjacent to the SSID labeled Clickhere to scan for available networks. Select from the list of available networks and provide theNetwork Key. Selecting Remember Network causes the BBB to automatically connect to the selectednetwork when possible. This is true even after the device has been reset.
Figure 7. Internet Connection Configuration
4. After successfully connecting to the Internet, select the desired cloud service (see Figure 8). The LocalGateway option may be selected even though it does not require an Internet connection. Amazon WebServices is provided through stackArmor.
Figure 8. Cloud Service Selections

www.ti.com Using Amazon Web Services (AWS)
7SWRU533–October 2017Submit Documentation Feedback
Copyright © 2017, Texas Instruments Incorporated
Sub-1 GHz Sensor-to-Cloud Linux® E14 Kit
5 Using Amazon Web Services (AWS)Use the following steps for Amazon Web Services:1. Section 2 and Section 3 should be followed before continuing here (see Section 2 and Section 3,
respectively).2. Request credentials from stackArmor.
If approved, stackArmor will provide the security credentials necessary for the steps that follow.3. Use Choose File to select the security credentials received from stackArmor.4. Click Submit to upload the selected files.
Figure 9. Uploading Security Credentials
5. After uploading the security files, select Start AWS Gateway. You will be prompted to enter theusername and password provided through email from stackArmor.

Using Amazon Web Services (AWS) www.ti.com
8 SWRU533–October 2017Submit Documentation Feedback
Copyright © 2017, Texas Instruments Incorporated
Sub-1 GHz Sensor-to-Cloud Linux® E14 Kit
6. You will automatically be redirected to the AWS IoT Dashboard through stackArmor, as shown inFigure 10.
Figure 10. Internet-of-Things (IoT) Dashboard
6. Power-on the sensor, if this is not already done. The sensor automatically joins the network andappears in the Network Chart and Sensor Nodes table, as shown in Figure 10.
NOTE: If sensor does not connect automatically, see Section 8.1.
7. The sensor is now reporting data to the Sub-1 GHz gateway and allows you to control and visualizedata through AWS. Use the Toggle option to control the red LED on the CC1350 LaunchPad labeledSensor.
NOTE: There may be a few seconds of delay with the Toggle command.

www.ti.com Using IBM Quickstart
9SWRU533–October 2017Submit Documentation Feedback
Copyright © 2017, Texas Instruments Incorporated
Sub-1 GHz Sensor-to-Cloud Linux® E14 Kit
6 Using IBM QuickstartSection 2 and Section 3 should be followed before continuing here (see Section 2 and Section 3,respectively).
Selecting IBM Quickstart launches the IBM Watson IoT Platform.
NOTE: Currently, IBM Quickstart does not support a way to send commands from the cloud to theSub-1 GHz gateway.
Figure 11. IBM Quickstart
1. Power on the sensor, if not done so already. The platform automatically detects the sensor, and theweb page updates with a list of sensor data.
NOTE: If sensor does not connect automatically, see Section 8.1.
2. From the list of sensor data, select a sensor data point to see its value graphed. In Figure 12,smart_objects.temperature.0.sensorValue is selected.
Figure 12. IBM Quickstart Graph
3. The sensor is now reporting data to the Sub-1 GHz gateway and allows you to visualize data throughIBM Quickstart.

Using IBM Cloud Service www.ti.com
10 SWRU533–October 2017Submit Documentation Feedback
Copyright © 2017, Texas Instruments Incorporated
Sub-1 GHz Sensor-to-Cloud Linux® E14 Kit
7 Using IBM Cloud Service
7.1 Download and Install Cloud Foundry CLIUse the steps that follow to install the Cloud Foundry CLI tool on your PC.1. On your PC, download and install the program from Cloud Foundry CLI.2. Verify installation by typing the command cf on the command line terminal. You should see output
similar to that shown in Figure 13.
Figure 13. S2C IBM cfTool
7.2 Open IBM Bluemix AccountIf you do not have an IBM Bluemix® account, you must open one and use the steps that follow.1. Create an IBM Bluemix account and register for a 30-day trial account.2. Confirm the Bluemix account using the link provided by IBM through email.3. Log into the Bluemix account page that is shown in Figure 14.
Figure 14. Sensor-to-Cloud IBM Bluemix

www.ti.com Using IBM Cloud Service
11SWRU533–October 2017Submit Documentation Feedback
Copyright © 2017, Texas Instruments Incorporated
Sub-1 GHz Sensor-to-Cloud Linux® E14 Kit
7.3 Create a ServiceUse the steps that follow to create a service.1. From the IBM Bluemix Dashboard, select Catalog from the upper-right corner.2. Select Internet of Things from the menu on the left, as shown in Figure 15.
Figure 15. IBM Apps Menu
3. Select the Internet of Things Platform.
Figure 16. IoT Platform
4. Use myService as the Service name, though any name may be used. The service name, myService,will be used later in this user's guide. All other options can remain unchanged. Click Create. Youshould now see a screen as shown in Figure 17.
Figure 17. Service Launch

Using IBM Cloud Service www.ti.com
12 SWRU533–October 2017Submit Documentation Feedback
Copyright © 2017, Texas Instruments Incorporated
Sub-1 GHz Sensor-to-Cloud Linux® E14 Kit
5. Select Launch.6. Hover the mouse over the left side menu and select Devices. Click + Add Device, as shown in
Figure 18.
Figure 18. Devices Menu
7. Select Create device type (see Figure 19).
Figure 19. Create Device Type
8. Select Create gateway type on the next prompt (see Figure 20).
Figure 20. Create Gateway Device
9. Enter gateway as the Name, and add an optional description (see Figure 21). Click Next.

www.ti.com Using IBM Cloud Service
13SWRU533–October 2017Submit Documentation Feedback
Copyright © 2017, Texas Instruments Incorporated
Sub-1 GHz Sensor-to-Cloud Linux® E14 Kit
Figure 21. Device Name Gateway
10. Click Next—ignoring the subsequent options—until reaching the Add Device screen that is shown inFigure 22. From the Choose Device Type drop-down menu, select gateway. Click Next.
Figure 22. Choose Device Type
11. Enter a Device ID (see Figure 23).
NOTE: It is important to remember the Device ID because it will be needed in a later step. Thisuser's guide uses myGatewayDevice as the Device ID.
Figure 23. myGatewayDevice
12. Click Next until reaching the security options screen, as shown in Figure 24. Enter a token. ClickNext.
NOTE: It is important to remember the token because it will be used in a later step.

Using IBM Cloud Service www.ti.com
14 SWRU533–October 2017Submit Documentation Feedback
Copyright © 2017, Texas Instruments Incorporated
Sub-1 GHz Sensor-to-Cloud Linux® E14 Kit
Figure 24. Providing a Token for a New Gateway Device
13. Use the Summary view to verify the Device ID and Authentication Token. Use the Back button toedit any items. When you are finished, click Add. You should now see your device credentials, asshown in Figure 25.
Figure 25. Gateway Device Credentials
14. Keep this web page open for later use.

www.ti.com Using IBM Cloud Service
15SWRU533–October 2017Submit Documentation Feedback
Copyright © 2017, Texas Instruments Incorporated
Sub-1 GHz Sensor-to-Cloud Linux® E14 Kit
7.4 Upload the Provided Cloud Foundry Application1. Go to Gitortious. Click Download master as tar.gz to download the application source file.2. Unzip the master.gz and master file. You will then have a directory called ~master.3. Navigate to the master~/apps-tidep0084/examples/ibm-frontend folder, and use a text editor to modify
the manifest.yml file shown in Figure 26. Select a name and unique hostname (host). The host willbe used to generate a unique link to your cloud application. You will be able to tell if your selectedhostname is already used in Step 4. Add your service name to services using the service name fromStep 4 in the previous subsection.
Figure 26. S2C manifest.yml
4. Open a command line terminal and navigate to the master~/apps-tidep0084/examples/ibm-frontenddirectory. Enter the command cf api https://api.ng.bluemix.net. Then use the cf login command andlog in with your account credentials created in Step 2.
Figure 27. Logging In Using the Cloud Foundry Tool
Using IBM Cloud Service www.ti.com
16 SWRU533–October 2017Submit Documentation Feedback
Copyright © 2017, Texas Instruments Incorporated
Sub-1 GHz Sensor-to-Cloud Linux® E14 Kit
5. After successful login, use cf push to upload the application (this may take a few minutes). If a uniquehostname is not used, an error message will be generated. In that case, return to the manifest.yml,modify the host, and try again.
6. Open the IBM Bluemix Dashboard. As shown in Figure 28, the application will now be visible underCloud Foundry Apps with the name used in the manifest.yml file from Step 3. The ROUTE columndisplays a unique URL for the application. Select the application by clicking the row.
NOTE: Do not click the URL in the ROUTE column—doing so will open the application overview.
Figure 28. IBM Bluemix Dashboard Displaying Cloud Foundry Apps
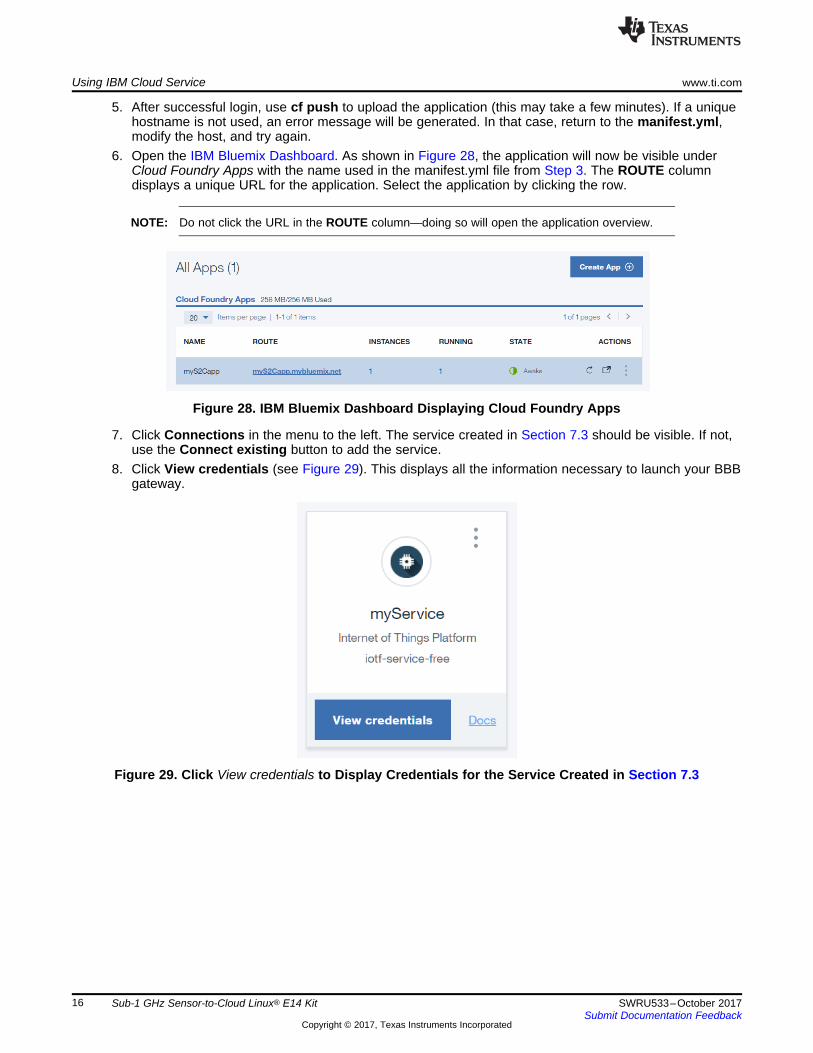
7. Click Connections in the menu to the left. The service created in Section 7.3 should be visible. If not,use the Connect existing button to add the service.
8. Click View credentials (see Figure 29). This displays all the information necessary to launch your BBBgateway.
Figure 29. Click View credentials to Display Credentials for the Service Created in Section 7.3

www.ti.com Using IBM Cloud Service
17SWRU533–October 2017Submit Documentation Feedback
Copyright © 2017, Texas Instruments Incorporated
Sub-1 GHz Sensor-to-Cloud Linux® E14 Kit
7.5 Launching the DemoUse the following steps to launch the demo.1. In a new web browser window, open the IBM Bluemix Dashboard. Click the application URL in the
ROUTE column that is highlighted in Figure 30. This action launches the TI 15.4-Stack Linux GatewayExample Application web page.
Figure 30. Use the URL of the Cloud Foundry App to Access theTI 15.4-Stack Linux Gateway Example Application
2. Click the gear icon located in the title header of the web page. Using the credentials from Step 5, enterthe following information. For Device Type, use gateway. Use the same Device ID used in Step 6.Click Save changes. See Figure 31.
(1) Service credentials from Step 5 appear on the left.(2) Use these service credentials to populate fields in the IBM IoT Credentials.
Figure 31. Service Credentials
3. In another web browser window, access the BBB Sensor-to-Cloud portal and select IBM as thegateway type.
NOTE: Ensure your PC is connected to the SitaraAP wireless network. Access the BBB Sensor-to-Cloud portal by entering http://192.168.43.1:1310 into your web browser. Select CloudGateway and then IBM. See Section 2 and Section 4 if necessary.
4. Use the Org listed in the service credentials from Step 7. For Type use gateway, and for ID use thedevice ID from Step 11 of Section 7.3. Lastly, use the token created in Step 12 of Section 7.3. ClickStart IBM Gateway.

Using IBM Cloud Service www.ti.com
18 SWRU533–October 2017Submit Documentation Feedback
Copyright © 2017, Texas Instruments Incorporated
Sub-1 GHz Sensor-to-Cloud Linux® E14 Kit
(1) Service credentials from Step 5 appear on the left.(2) Use these service credentials to populate fields in Sensor-to-Cloud application settings.
Figure 32. Start IBM Gateway
5. Return to the TI 15.4-Stack Linux Gateway Example Application.6. The web page should automatically update, as shown in Figure 33.
Figure 33. TI 15.4-Stack Linux Gateway Example Application
7. Select open to allow the sensors to join the network.8. Power on the sensors, if not done so already. The sensors will automatically join the network.
NOTE: If the sensor does not connect automatically, see Section 8.1.

www.ti.com Troubleshooting
19SWRU533–October 2017Submit Documentation Feedback
Copyright © 2017, Texas Instruments Incorporated
Sub-1 GHz Sensor-to-Cloud Linux® E14 Kit
8 Troubleshooting
8.1 Sensor Will Not Join the Network1. To ensure the network is open, toggle the Network Open/Close or On/Off option.2. Sensors use nonvolatile storage to remember previous networks. Press and hold the BTN-2/DIO014
button, and toggle the Reset button (see Figure 34). This action clears the nonvolatile storage andcauses the sensor to search for new networks.
Figure 34. The Reset and BTN-2/DIO014 Buttons are Outlined
3. If the sensor still does not join the network, restart the gateway and apply the previous step.

Troubleshooting www.ti.com
20 SWRU533–October 2017Submit Documentation Feedback
Copyright © 2017, Texas Instruments Incorporated
Sub-1 GHz Sensor-to-Cloud Linux® E14 Kit
8.2 How to Determine if the Sensor is Connected to a NetworkIf the sensor does not have a saved network in nonvolatile storage after a reset, the LEDs labeledRed:DIO06 and Green:DIO07 on the CC1350 LaunchPad Sensor will both be off. Both LEDs will remainoff until the sensor connects to a network. When the sensor joins a network, the red LED will turn on andthe green LED will periodically blink.
If the sensor has a saved network in nonvolatile storage after a reset, the red LED will be on. The greenLED will periodically blink.
NOTE: In some instances, the red LED may be toggled from the cloud user interface.
8.3 BeagleBone Black Will Not Connect to a Cloud ServiceEnsure that the BBB is connected to the Internet. While your PC is connected to the SitaraAP accesspoint, you should be able to access the Internet. If not, the BBB is not connected to the Internet. In thiscase, verify that the connection source for the BBB has Internet access.
8.4 Local Gateway Fails to StartThe Local Gateway fails to start if the CC1350 LaunchPad Co-Processor is not properly connected to theBBB.

www.ti.com Next Steps
21SWRU533–October 2017Submit Documentation Feedback
Copyright © 2017, Texas Instruments Incorporated
Sub-1 GHz Sensor-to-Cloud Linux® E14 Kit
9 Next StepsYou have seen a sensor-to-cloud network in action and you are ready to proceed. TI provides a completeportfolio to accelerate your product from the drawing board to your consumers. Review the softwaredesign to get a comprehensive understanding of the system design. Then use a TI Design reference as atemplate to develop your own custom home or industrial automation network. How quickly can youconnect?
9.1 Get More Details on the Software DesignFor a detailed description of the design and software, download the Sub-1 GHz Sensor to Cloud IndustrialIoT Gateway Reference Design (TIDEP0084). The TIDEP0084 reference design demonstrates how toconnect sensors to the cloud over a long-range Sub-1 GHz wireless network, suitable for industrialsettings such as building control and asset tracking. The reference design is powered by a TI Sitara™AM335x processor and the SimpleLink™ Sub-1 GHz CC1310/CC1350 devices. The reference design pre-integrates the TI 15.4-Stack Software Development Kit (SDK) for Sub-1 GHz star network connectivity andthe AM335x Sitara™ Processors SDK. TI Design Network partner stackArmor supports the cloudapplication services for cloud connectivity and visualization of the sensor node data.
9.1.1 Get Software UpdatesTo get software updates, visit the TIDEP0084 git repository.
9.2 Sensor Examples
9.2.1 Develop Your Custom Sensor ApplicationTo develop your own custom sensor application, download the CC13x0 SimpleLink™ Sub-1 GHzSoftware Development Kit. This SDK provides a comprehensive Sub-1 GHz software package for theCC1310 SimpleLink™ Sub-1 GHz Wireless Microcontroller (MCU) LaunchPad™ Development Kit and theCC1350 Simplelink™ Sub-1 GHz and Bluetooth® low energy Wireless Microcontroller LaunchPad™Development Kit and includes the TI 15.4-Stack sensor example applications, which may be used as aframework for your custom application.
9.2.1.1 Adding New SensorsTo add support for new sensors, visit the Adding New Sensor Support wiki page.
9.2.2 Get Sensor TI DesignsSee these sensor-to-cloud-enabled TI Designs that let you quickly create home automation or industrialautomation networks.• TIDA-01476 Low Power Wireless PIR Motion Detector
– Get the software here.
9.3 SimpleLink™ Sub-1 GHz Embedded Sensor-to-Cloud GatewayFor a low-cost embedded sensor-to-cloud gateway, download the SimpleLink™ Sub-1 GHz EmbeddedSensor-to-Cloud Reference Design (TIDC-01002). The TIDC-01002 gateway solution is based on the low-power, CC3220SF SimpleLink™ Wi-Fi® Wireless Microcontroller LaunchPad™, which hosts the gatewayapplication and the CC1310 SimpleLink™ Sub-1 GHz Wireless Microcontroller (MCU) LaunchPad™Development Kit as the MAC-CO Processor. This reference design also includes sensor node exampleapplications running on the CC1350 Simplelink™ Sub-1 GHz and Bluetooth® low energy WirelessMicrocontroller LaunchPad™ Development Kit.
9.4 SupportFor questions and support, visit TI's E2E™ community forum.

IMPORTANT NOTICE FOR TI DESIGN INFORMATION AND RESOURCES
Texas Instruments Incorporated (‘TI”) technical, application or other design advice, services or information, including, but not limited to,reference designs and materials relating to evaluation modules, (collectively, “TI Resources”) are intended to assist designers who aredeveloping applications that incorporate TI products; by downloading, accessing or using any particular TI Resource in any way, you(individually or, if you are acting on behalf of a company, your company) agree to use it solely for this purpose and subject to the terms ofthis Notice.TI’s provision of TI Resources does not expand or otherwise alter TI’s applicable published warranties or warranty disclaimers for TIproducts, and no additional obligations or liabilities arise from TI providing such TI Resources. TI reserves the right to make corrections,enhancements, improvements and other changes to its TI Resources.You understand and agree that you remain responsible for using your independent analysis, evaluation and judgment in designing yourapplications and that you have full and exclusive responsibility to assure the safety of your applications and compliance of your applications(and of all TI products used in or for your applications) with all applicable regulations, laws and other applicable requirements. Yourepresent that, with respect to your applications, you have all the necessary expertise to create and implement safeguards that (1)anticipate dangerous consequences of failures, (2) monitor failures and their consequences, and (3) lessen the likelihood of failures thatmight cause harm and take appropriate actions. You agree that prior to using or distributing any applications that include TI products, youwill thoroughly test such applications and the functionality of such TI products as used in such applications. TI has not conducted anytesting other than that specifically described in the published documentation for a particular TI Resource.You are authorized to use, copy and modify any individual TI Resource only in connection with the development of applications that includethe TI product(s) identified in such TI Resource. NO OTHER LICENSE, EXPRESS OR IMPLIED, BY ESTOPPEL OR OTHERWISE TOANY OTHER TI INTELLECTUAL PROPERTY RIGHT, AND NO LICENSE TO ANY TECHNOLOGY OR INTELLECTUAL PROPERTYRIGHT OF TI OR ANY THIRD PARTY IS GRANTED HEREIN, including but not limited to any patent right, copyright, mask work right, orother intellectual property right relating to any combination, machine, or process in which TI products or services are used. Informationregarding or referencing third-party products or services does not constitute a license to use such products or services, or a warranty orendorsement thereof. Use of TI Resources may require a license from a third party under the patents or other intellectual property of thethird party, or a license from TI under the patents or other intellectual property of TI.TI RESOURCES ARE PROVIDED “AS IS” AND WITH ALL FAULTS. TI DISCLAIMS ALL OTHER WARRANTIES ORREPRESENTATIONS, EXPRESS OR IMPLIED, REGARDING TI RESOURCES OR USE THEREOF, INCLUDING BUT NOT LIMITED TOACCURACY OR COMPLETENESS, TITLE, ANY EPIDEMIC FAILURE WARRANTY AND ANY IMPLIED WARRANTIES OFMERCHANTABILITY, FITNESS FOR A PARTICULAR PURPOSE, AND NON-INFRINGEMENT OF ANY THIRD PARTY INTELLECTUALPROPERTY RIGHTS.TI SHALL NOT BE LIABLE FOR AND SHALL NOT DEFEND OR INDEMNIFY YOU AGAINST ANY CLAIM, INCLUDING BUT NOTLIMITED TO ANY INFRINGEMENT CLAIM THAT RELATES TO OR IS BASED ON ANY COMBINATION OF PRODUCTS EVEN IFDESCRIBED IN TI RESOURCES OR OTHERWISE. IN NO EVENT SHALL TI BE LIABLE FOR ANY ACTUAL, DIRECT, SPECIAL,COLLATERAL, INDIRECT, PUNITIVE, INCIDENTAL, CONSEQUENTIAL OR EXEMPLARY DAMAGES IN CONNECTION WITH ORARISING OUT OF TI RESOURCES OR USE THEREOF, AND REGARDLESS OF WHETHER TI HAS BEEN ADVISED OF THEPOSSIBILITY OF SUCH DAMAGES.You agree to fully indemnify TI and its representatives against any damages, costs, losses, and/or liabilities arising out of your non-compliance with the terms and provisions of this Notice.This Notice applies to TI Resources. Additional terms apply to the use and purchase of certain types of materials, TI products and services.These include; without limitation, TI’s standard terms for semiconductor products http://www.ti.com/sc/docs/stdterms.htm), evaluationmodules, and samples (http://www.ti.com/sc/docs/sampterms.htm).
Mailing Address: Texas Instruments, Post Office Box 655303, Dallas, Texas 75265Copyright © 2017, Texas Instruments Incorporated