Embed Size (px)
Citation preview
KEY FEATURES – JUNE 2016 RELEASE
Revised: 06/28/2016 Page 1 of 45 Version 05.16.06.00.02
Student Management Suite
Additional information about these and other changes is available via the Release Notes
area of Skyward's Support Center. To see only the Key Features, select “Yes” from the Key
Feature drop-down list on the Release Notes filter screen. Verify that the Release selected is
05.16.06.00.00 – June 2016 Release PMP0 Addendum0, and that the option to “Include
Future Release Notes” is checked.
A link to this information has also been added to the Software Update Notes section of the
Skyward Documentation (SkyDoc).
June Release and Addendum 01
Addendum 02
Addendum 09
KEY FEATURES – JUNE 2016 RELEASE
Revised: 06/28/2016 Page 2 of 45 Version 05.16.06.00.02
June Release and Addendum 01
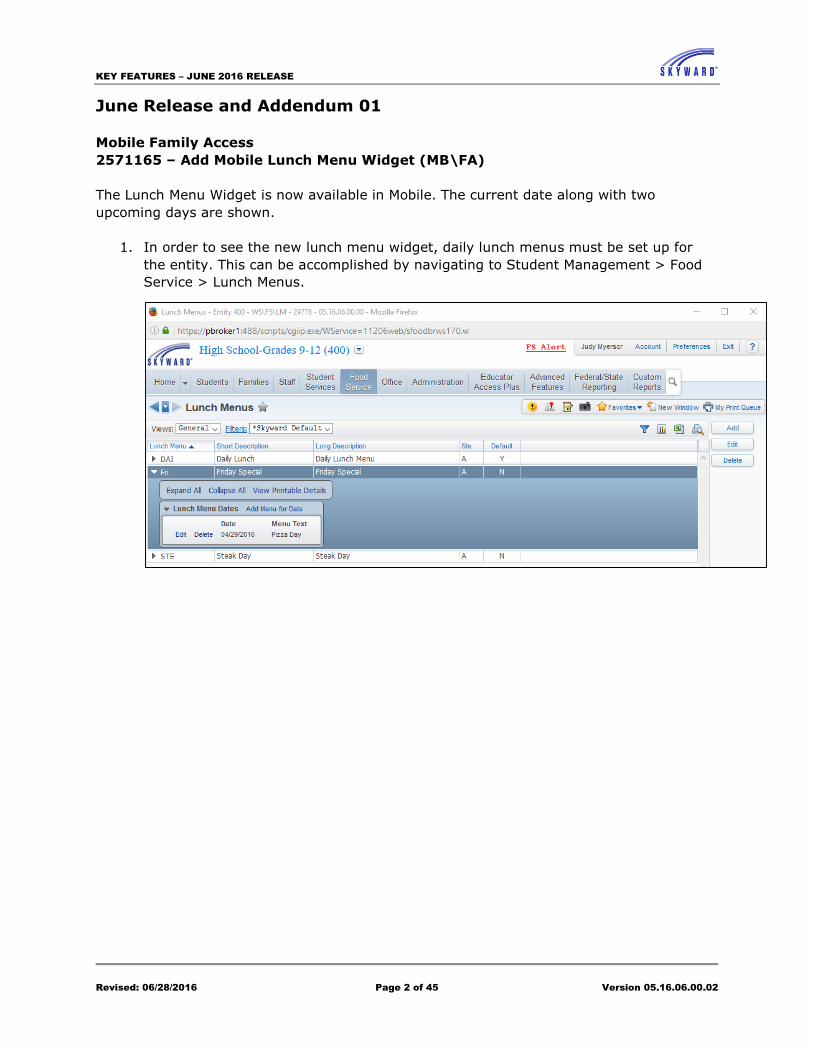
Mobile Family Access
2571165 – Add Mobile Lunch Menu Widget (MB\FA)
The Lunch Menu Widget is now available in Mobile. The current date along with two
upcoming days are shown.
1. In order to see the new lunch menu widget, daily lunch menus must be set up for
the entity. This can be accomplished by navigating to Student Management > Food
Service > Lunch Menus.

KEY FEATURES – JUNE 2016 RELEASE
Revised: 06/28/2016 Page 3 of 45 Version 05.16.06.00.02
2. Next, navigate to Student Management > Family > Family Access > Setup >
Configuration > Entity Configuration, and select the Edit link for Food Service. Make
sure that the Do not show “Today’s Lunch Menu” section in Family Access/Student
Access is not checked.
3. Log in as a Family Access user.
4. To view the user widgets, expand the top right menu option and navigate to User >
User Preferences > Widgets; select the new Lunch Menu option and click Save.

KEY FEATURES – JUNE 2016 RELEASE
Revised: 06/28/2016 Page 4 of 45 Version 05.16.06.00.02
5. Navigate back to your Home page.
6. The Widget will be displayed on your Home page.
KEY FEATURES – JUNE 2016 RELEASE
Revised: 06/28/2016 Page 5 of 45 Version 05.16.06.00.02
New Student On-line Enrollment
3013997 - NSOE: Address validation upon student add (WA\OE)
A “Validate Address before adding student” configuration option has been added to Product
Setup, Contact Access, Student, Configuration, Address Validation. When enabled, this
option requires guardians to enter an address when creating a New Student Online
Enrollment account. Additionally, a new Auto Email option, “Enrollment Changes – NSOE
Application Submitted is Outside Path for Address/Grade” has been added that will notify
district recipients when a guardian submits an NSOE application with an address that falls
outside of the address path for that student’s grade.
Navigate to Student Management > Students > Online Enrollment > Setup > Configuration,
and select Enrollment Portal Configuration.
Note: Note: Your Address Range Defaults (Student Management > Advanced Features >
Address > Setup > Codes) must be set up so the address validation functions properly.
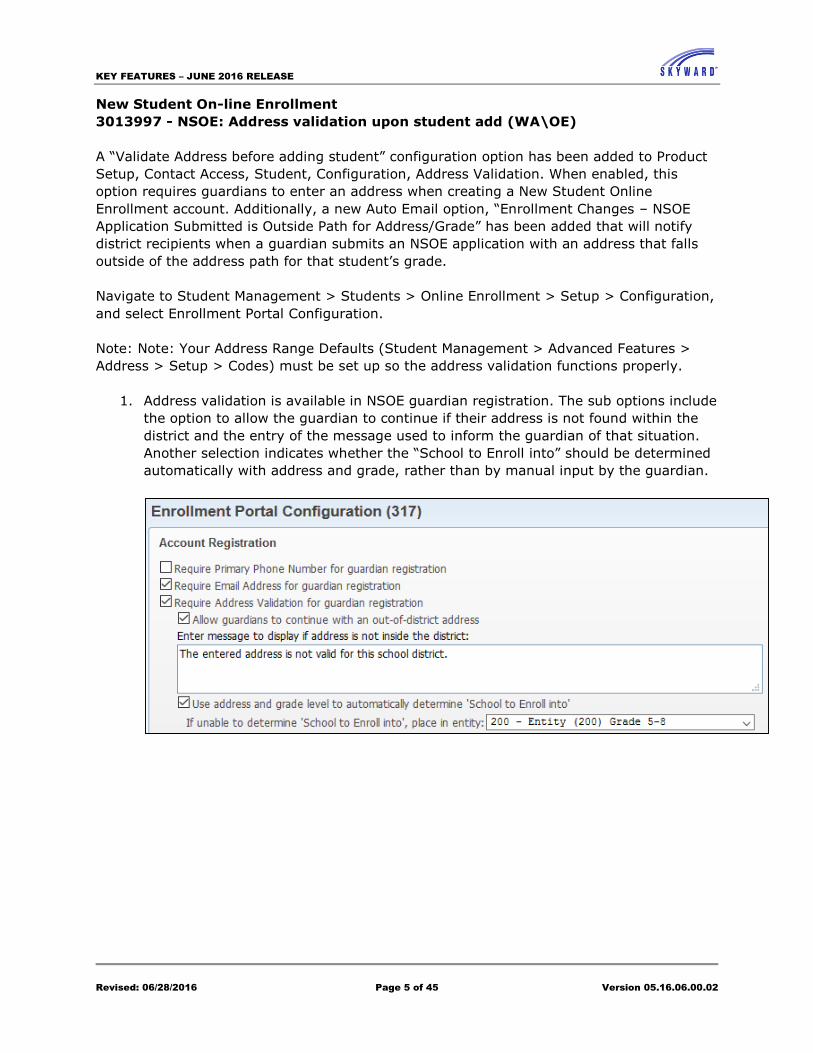
1. Address validation is available in NSOE guardian registration. The sub options include
the option to allow the guardian to continue if their address is not found within the
district and the entry of the message used to inform the guardian of that situation.
Another selection indicates whether the “School to Enroll into” should be determined
automatically with address and grade, rather than by manual input by the guardian.

KEY FEATURES – JUNE 2016 RELEASE
Revised: 06/28/2016 Page 6 of 45 Version 05.16.06.00.02
2. Open the Portal Account Request page and start entering the required information.
The address will now appear on the registration screen. The Street Name is an EEL
that displays valid values, but also allows new street names to be entered.
KEY FEATURES – JUNE 2016 RELEASE
Revised: 06/28/2016 Page 7 of 45 Version 05.16.06.00.02
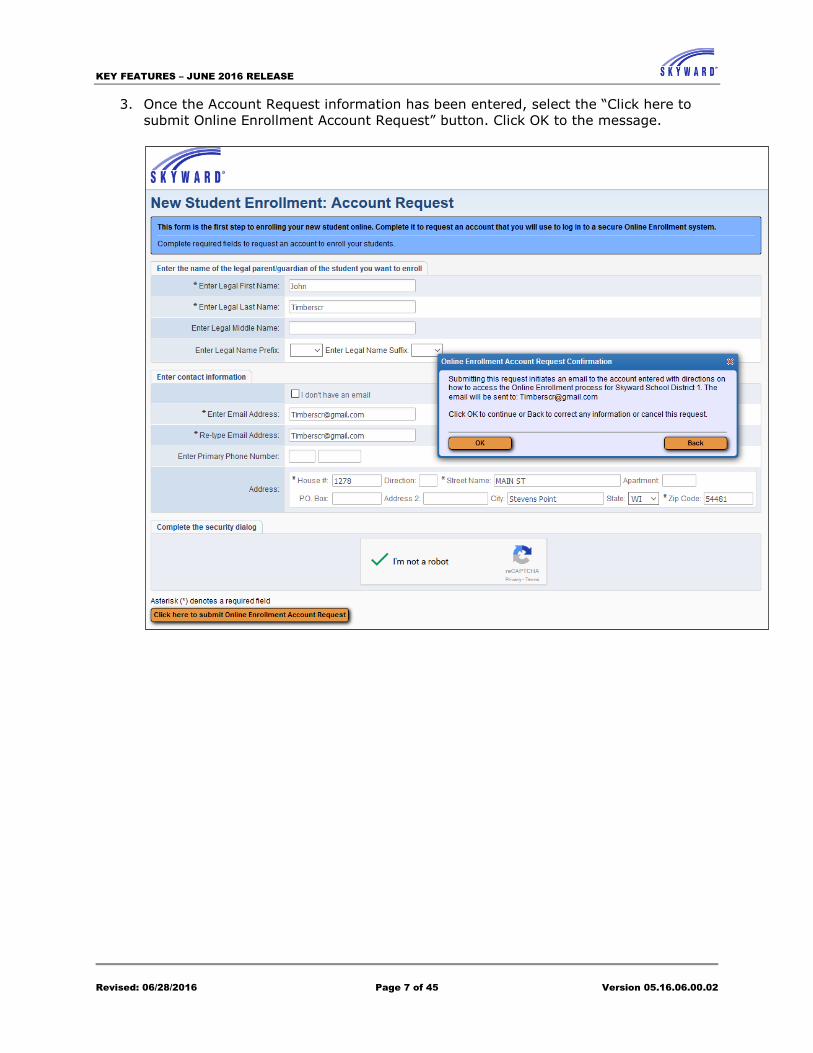
3. Once the Account Request information has been entered, select the “Click here to
submit Online Enrollment Account Request” button. Click OK to the message.
KEY FEATURES – JUNE 2016 RELEASE
Revised: 06/28/2016 Page 8 of 45 Version 05.16.06.00.02
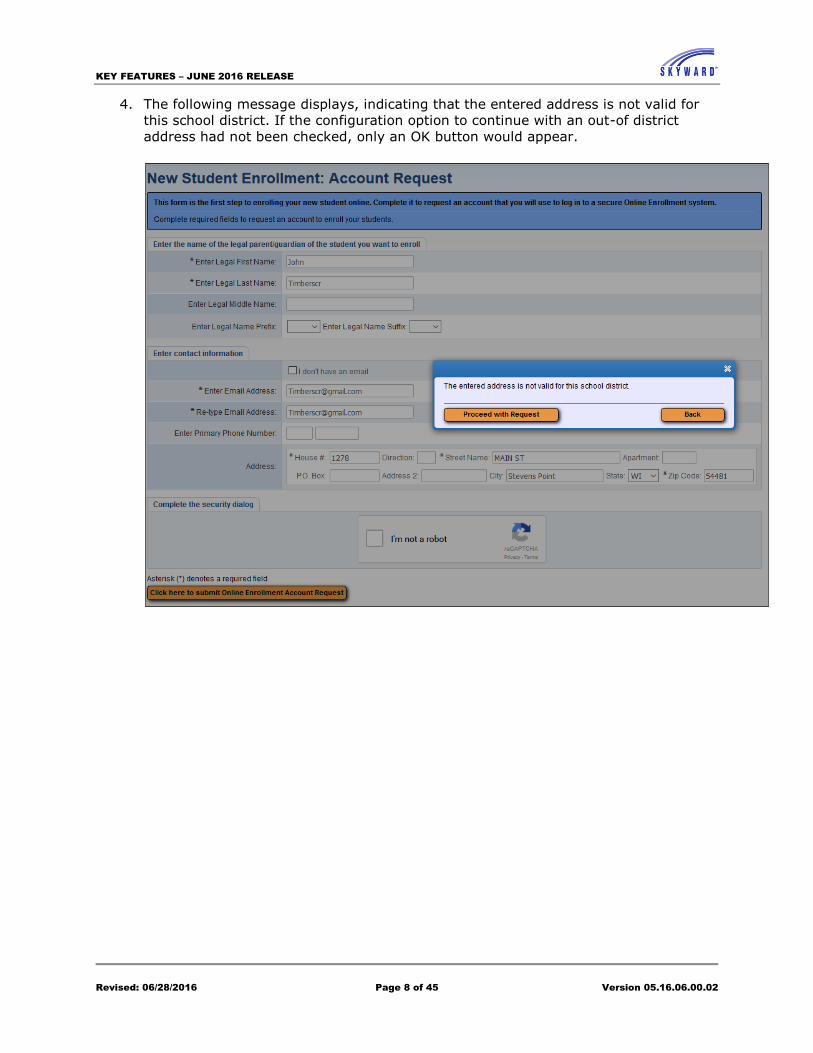
4. The following message displays, indicating that the entered address is not valid for
this school district. If the configuration option to continue with an out-of district
address had not been checked, only an OK button would appear.
KEY FEATURES – JUNE 2016 RELEASE
Revised: 06/28/2016 Page 9 of 45 Version 05.16.06.00.02
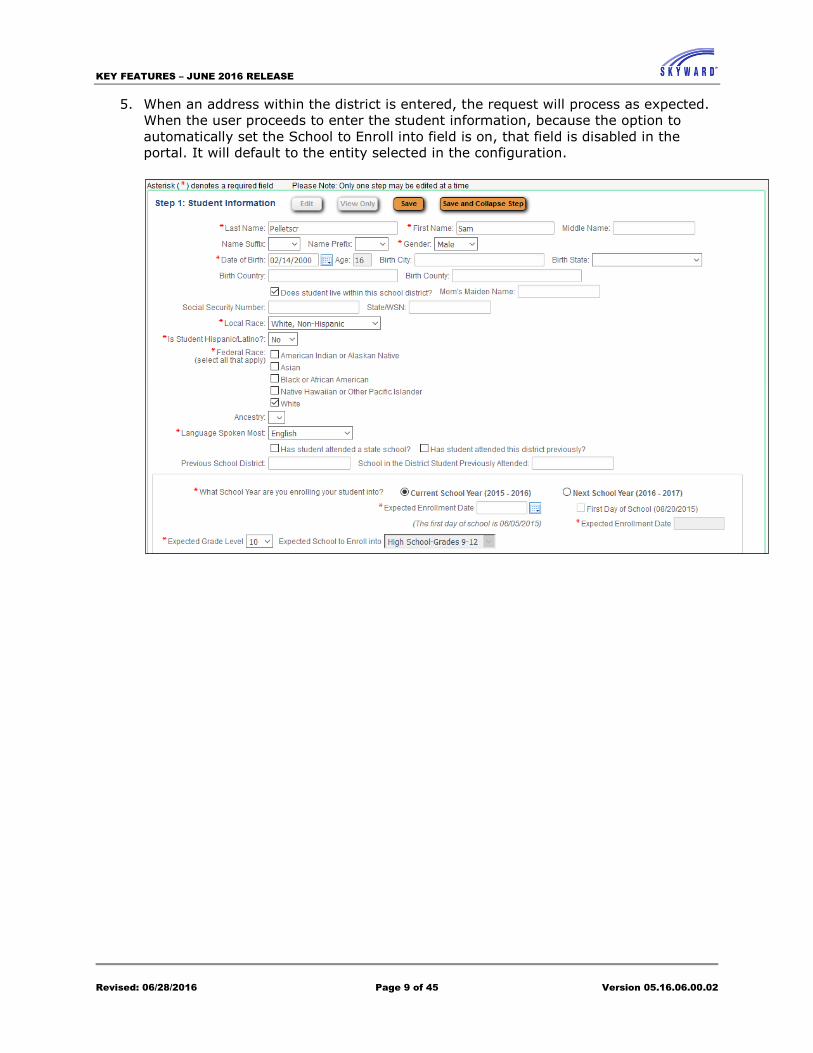
5. When an address within the district is entered, the request will process as expected.
When the user proceeds to enter the student information, because the option to
automatically set the School to Enroll into field is on, that field is disabled in the
portal. It will default to the entity selected in the configuration.
KEY FEATURES – JUNE 2016 RELEASE
Revised: 06/28/2016 Page 10 of 45 Version 05.16.06.00.02
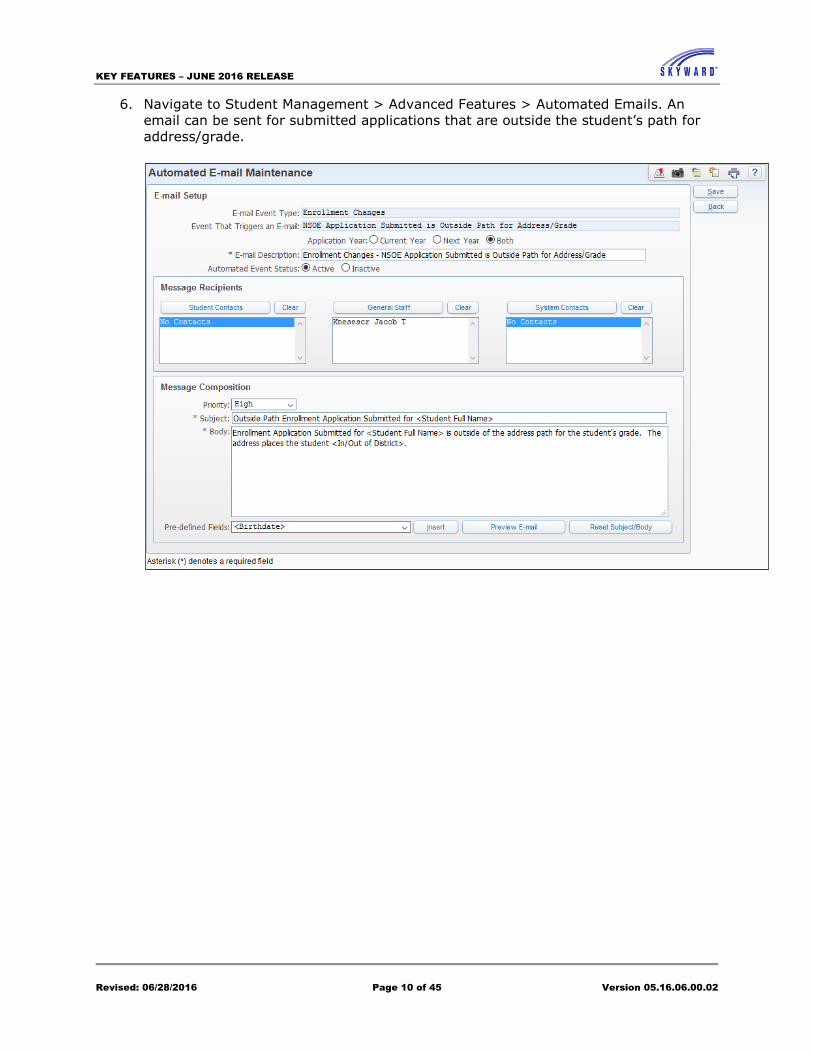
6. Navigate to Student Management > Advanced Features > Automated Emails. An
email can be sent for submitted applications that are outside the student’s path for
address/grade.

KEY FEATURES – JUNE 2016 RELEASE
Revised: 06/28/2016 Page 11 of 45 Version 05.16.06.00.02
7. Navigate to Product Setup > System Administration > Email History. When an
application is submitted for an address that is out of district, the following auto-email
is triggered.
8. Naviagate to Student Management > Students > Online Enrollment, and select
Enrollment Application Processing. The browse indicates that the entity is outside the
path of the address/grade by adding an asterisk.
KEY FEATURES – JUNE 2016 RELEASE
Revised: 06/28/2016 Page 12 of 45 Version 05.16.06.00.02
Print Application Letters
2719104 – Email Food Service Letters (WS\FS\PM\LE\AL)
Food Service Application Letters now include the option to be emailed to recipients with an
email address in the system.
1. A report will print listing emails that were sent.
2. An exception report will also print with any letters not sent due to the absence of an
email address or because the recipient opted out of receiving the emails.
3. Copies to print and mail will be generated for those listed on the exception report.
Navigate to Student Management > Food Service > Payor/Customer Maintenance >
Application Letters, and select Print Application Letters.
1. Select Add to create a new Application Letter and enter a template description.
2. Expand the Letter Selection.
a. Select a Letter Type.
b. Select whether the letter should be by Guardian or Payor.
c. Click the Selected Merge Letter(s) link to select a custom Food Service letter.
If desired, a Default Merge Letter may also be selected.
3. Expand the Application Ranges and use these ranges to assist in limiting the
applications that will be printed.
4. Expand the Letter Setup area and enter the fields as needed.
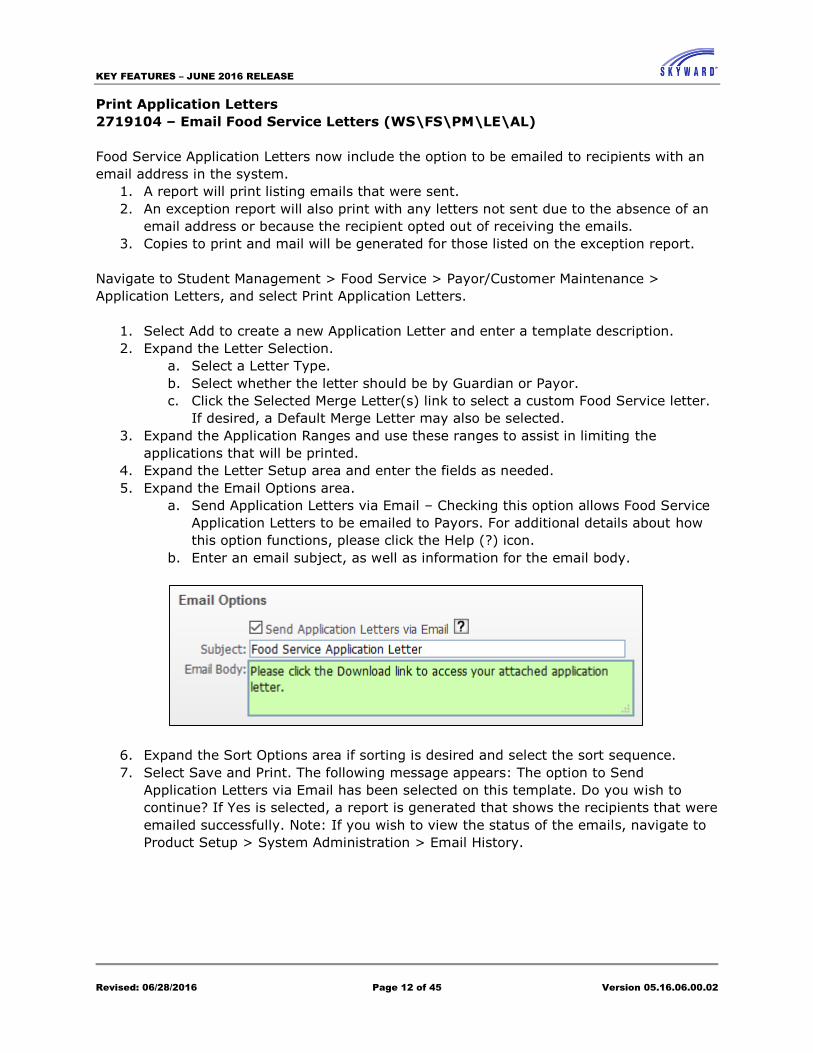
5. Expand the Email Options area.
a. Send Application Letters via Email – Checking this option allows Food Service
Application Letters to be emailed to Payors. For additional details about how
this option functions, please click the Help (?) icon.
b. Enter an email subject, as well as information for the email body.
6. Expand the Sort Options area if sorting is desired and select the sort sequence.
7. Select Save and Print. The following message appears: The option to Send
Application Letters via Email has been selected on this template. Do you wish to
continue? If Yes is selected, a report is generated that shows the recipients that were
emailed successfully. Note: If you wish to view the status of the emails, navigate to
Product Setup > System Administration > Email History.
KEY FEATURES – JUNE 2016 RELEASE
Revised: 06/28/2016 Page 13 of 45 Version 05.16.06.00.02
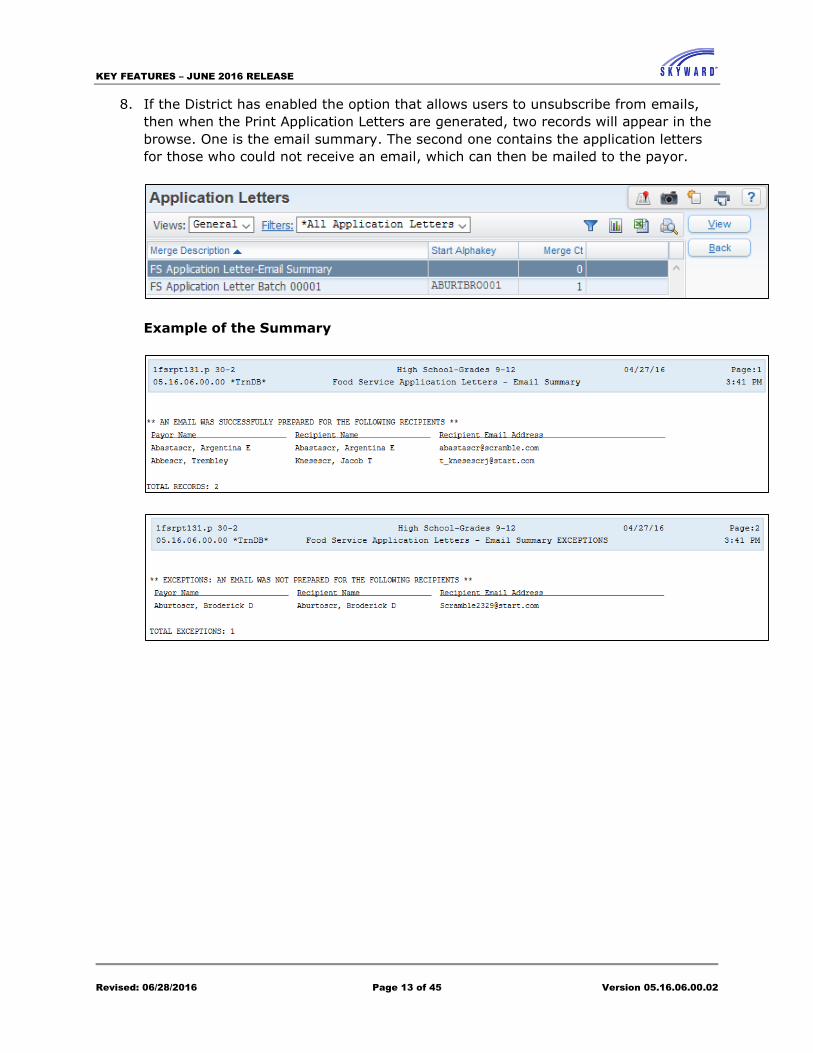
8. If the District has enabled the option that allows users to unsubscribe from emails,
then when the Print Application Letters are generated, two records will appear in the
browse. One is the email summary. The second one contains the application letters
for those who could not receive an email, which can then be mailed to the payor.
Example of the Summary
KEY FEATURES – JUNE 2016 RELEASE
Revised: 06/28/2016 Page 14 of 45 Version 05.16.06.00.02
Point of Sale
2168155 – Add Override Stop Purchase Options (WS\FS\PU\PO)
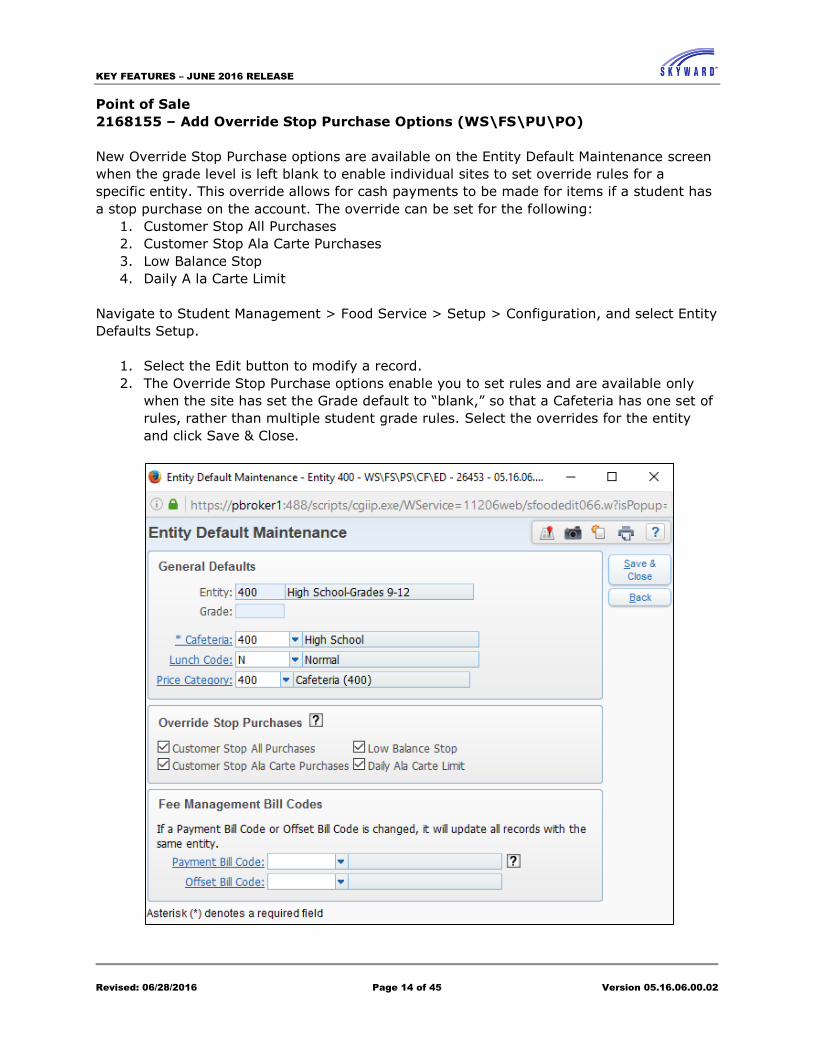
New Override Stop Purchase options are available on the Entity Default Maintenance screen
when the grade level is left blank to enable individual sites to set override rules for a
specific entity. This override allows for cash payments to be made for items if a student has
a stop purchase on the account. The override can be set for the following:
1. Customer Stop All Purchases
2. Customer Stop Ala Carte Purchases
3. Low Balance Stop
4. Daily A la Carte Limit
Navigate to Student Management > Food Service > Setup > Configuration, and select Entity
Defaults Setup.
1. Select the Edit button to modify a record.
2. The Override Stop Purchase options enable you to set rules and are available only
when the site has set the Grade default to “blank,” so that a Cafeteria has one set of
rules, rather than multiple student grade rules. Select the overrides for the entity
and click Save & Close.
KEY FEATURES – JUNE 2016 RELEASE
Revised: 06/28/2016 Page 15 of 45 Version 05.16.06.00.02
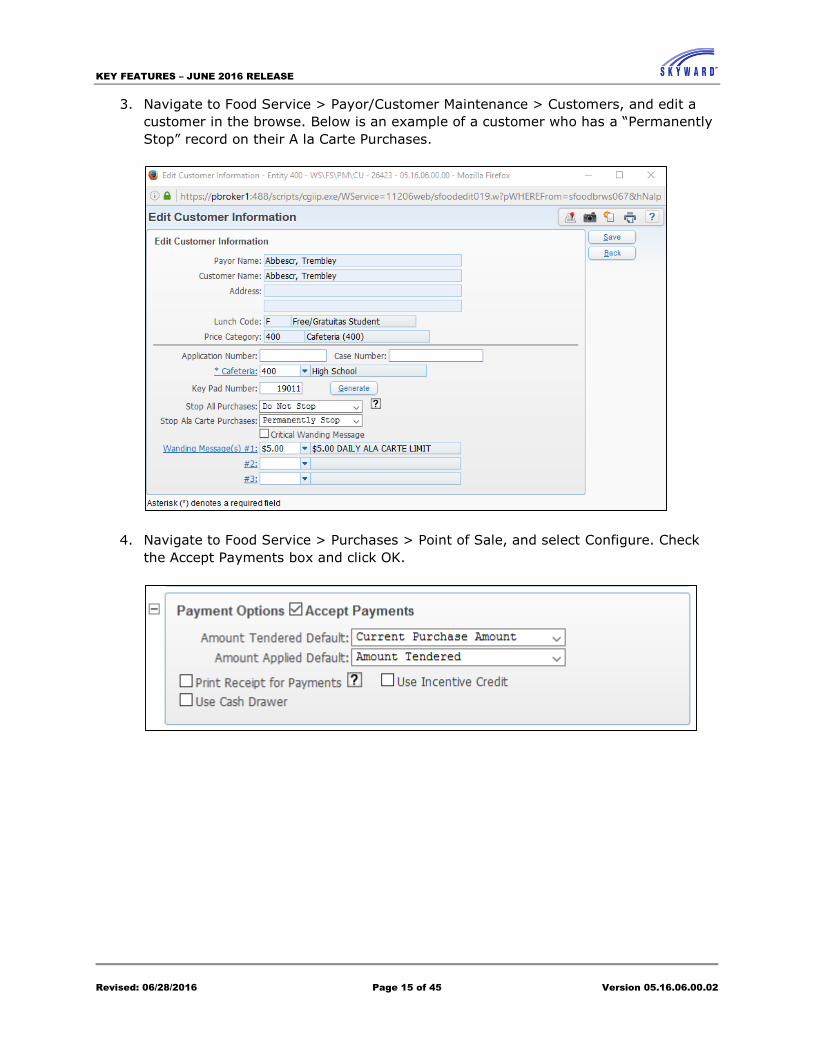
3. Navigate to Food Service > Payor/Customer Maintenance > Customers, and edit a
customer in the browse. Below is an example of a customer who has a “Permanently
Stop” record on their A la Carte Purchases.
4. Navigate to Food Service > Purchases > Point of Sale, and select Configure. Check
the Accept Payments box and click OK.
KEY FEATURES – JUNE 2016 RELEASE
Revised: 06/28/2016 Page 16 of 45 Version 05.16.06.00.02
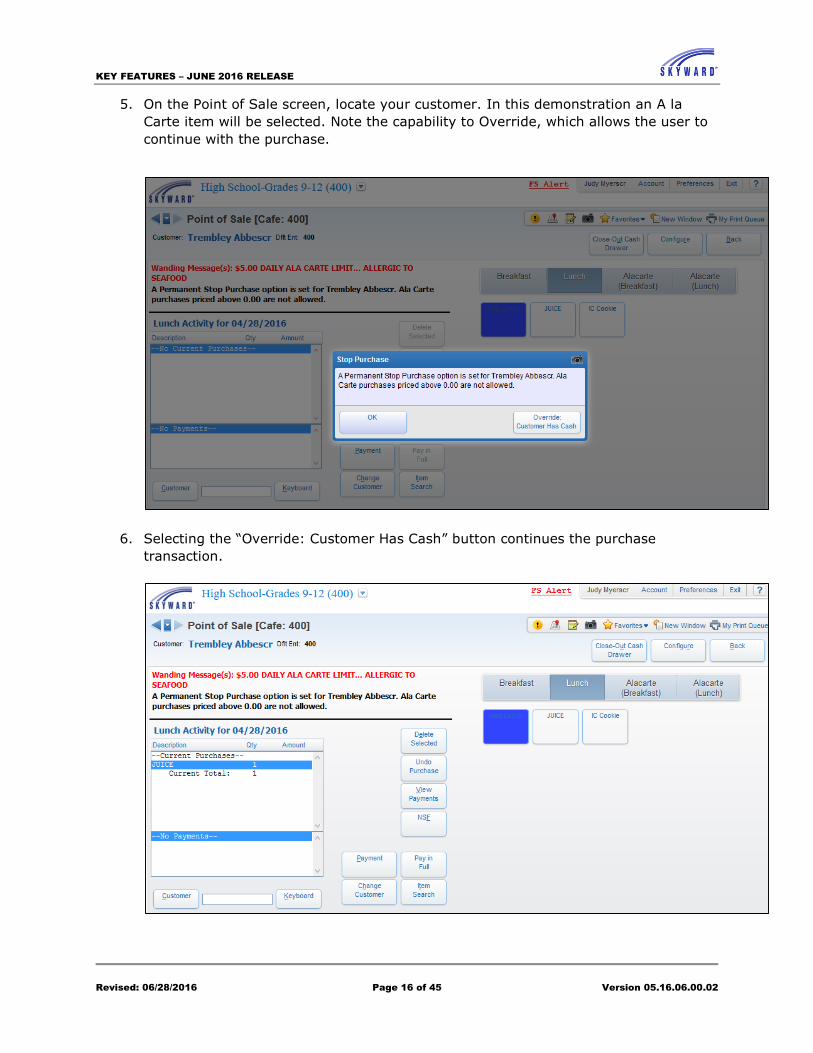
5. On the Point of Sale screen, locate your customer. In this demonstration an A la
Carte item will be selected. Note the capability to Override, which allows the user to
continue with the purchase.
6. Selecting the “Override: Customer Has Cash” button continues the purchase
transaction.
KEY FEATURES – JUNE 2016 RELEASE
Revised: 06/28/2016 Page 17 of 45 Version 05.16.06.00.02
Food Service Reports
2796962 – Ability to Run Food Service Reports for Current Date (WS\FS\RE)
The following reports now have an option on the template to print for Today's Date:
1. Lunch Code Totals By Day
2. Amount Tendered
3. Check Deposits
4. Payment Totals
5. Item Purchases by Customer/Date
6. Items Purchased in EA+
Note: Only one of the above reports will be demonstrated in this document.
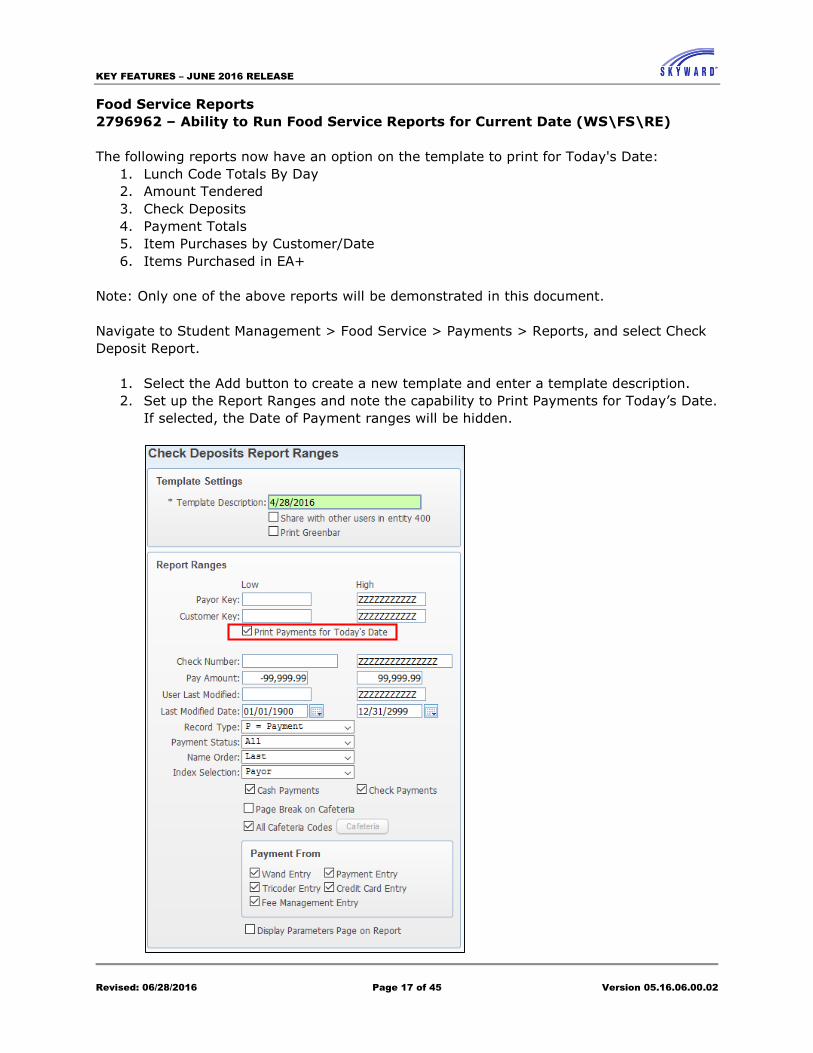
Navigate to Student Management > Food Service > Payments > Reports, and select Check
Deposit Report.
1. Select the Add button to create a new template and enter a template description.
2. Set up the Report Ranges and note the capability to Print Payments for Today’s Date.
If selected, the Date of Payment ranges will be hidden.
KEY FEATURES – JUNE 2016 RELEASE
Revised: 06/28/2016 Page 18 of 45 Version 05.16.06.00.02
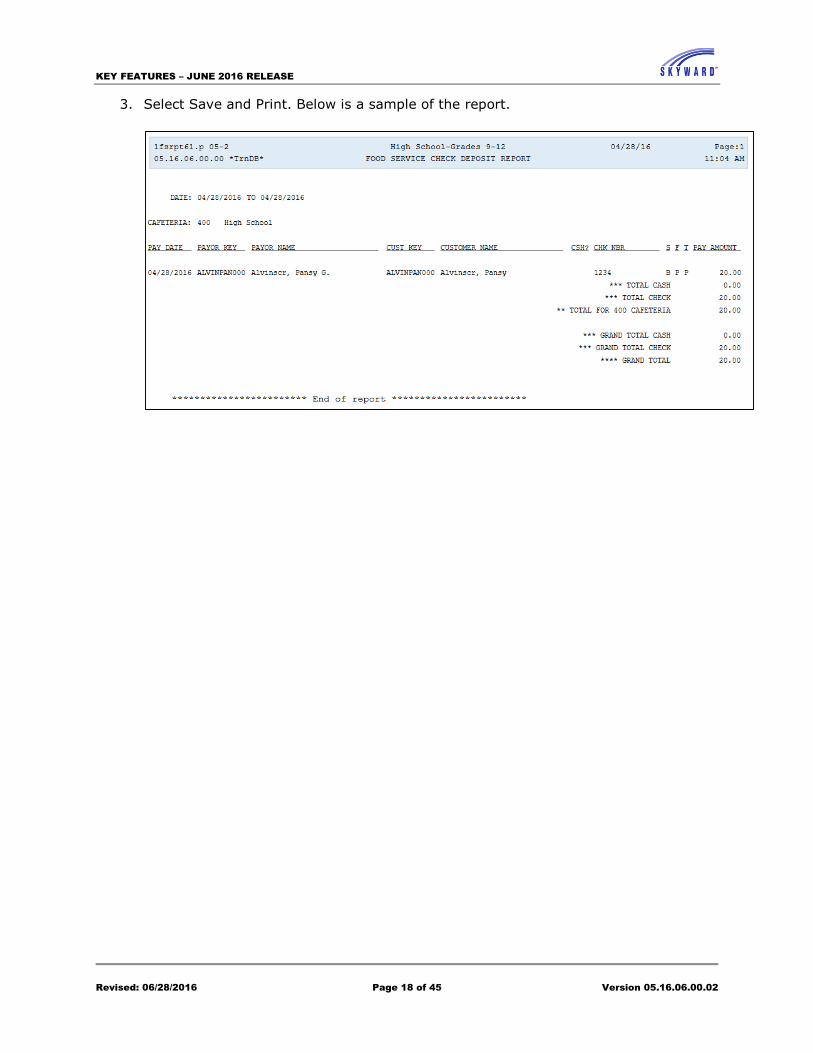
3. Select Save and Print. Below is a sample of the report.

KEY FEATURES – JUNE 2016 RELEASE
Revised: 06/28/2016 Page 19 of 45 Version 05.16.06.00.02
Medications
2994650 – Add the ability to track and report on Medication Inventory
(WS\OF\HR\ME)
A Medication Inventory enhancement has been added to the Medication tab. This includes
an option to Save and Add Medication Inventory when adding a new Medication for a
student, an option to choose to Track Medication Inventory Medication, and an option to
display historical Medication Inventory records. These options will be available within the
Health Entry by Student browse, the Medication by Student browse, and Medication
maintenance screens. In addition, the All Health report and Medication reports have been
modified to report the Medication Inventory information. Change Logs have also been
added.
Navigate to Student Management > Office > Health Records > Student Profile, and select
the Medication link.
1. Click Add to create a new medication record and enter the Medication information.
2. Instructions for administering the medication may be entered under the Medication
Administration Instructions area.
3. If this medication will be tracked, then check the Track Medication Inventory
checkbox and expand the section.
a. Quantity – Enter the number of doses received or removed. A negative
number can be used to signify a destroyed or returned medication.
b. Date – Enter the date the medication was received.
c. Rx Number – Enter the prescription number.
d. Expiration Date – Enter the medication expiration date.
e. Note - Enter a note or reason for the medication inventory record.
4. If this will be a scheduled medication, then expand the Schedule section and click
Add Medication Schedule to enter the information needed.
5. If needed, referral information may be entered. Expand the Referral Information
section to enter this information.
6. A student health note may also be entered under the Secured Note section.
7. Click Save.
KEY FEATURES – JUNE 2016 RELEASE
Revised: 06/28/2016 Page 20 of 45 Version 05.16.06.00.02
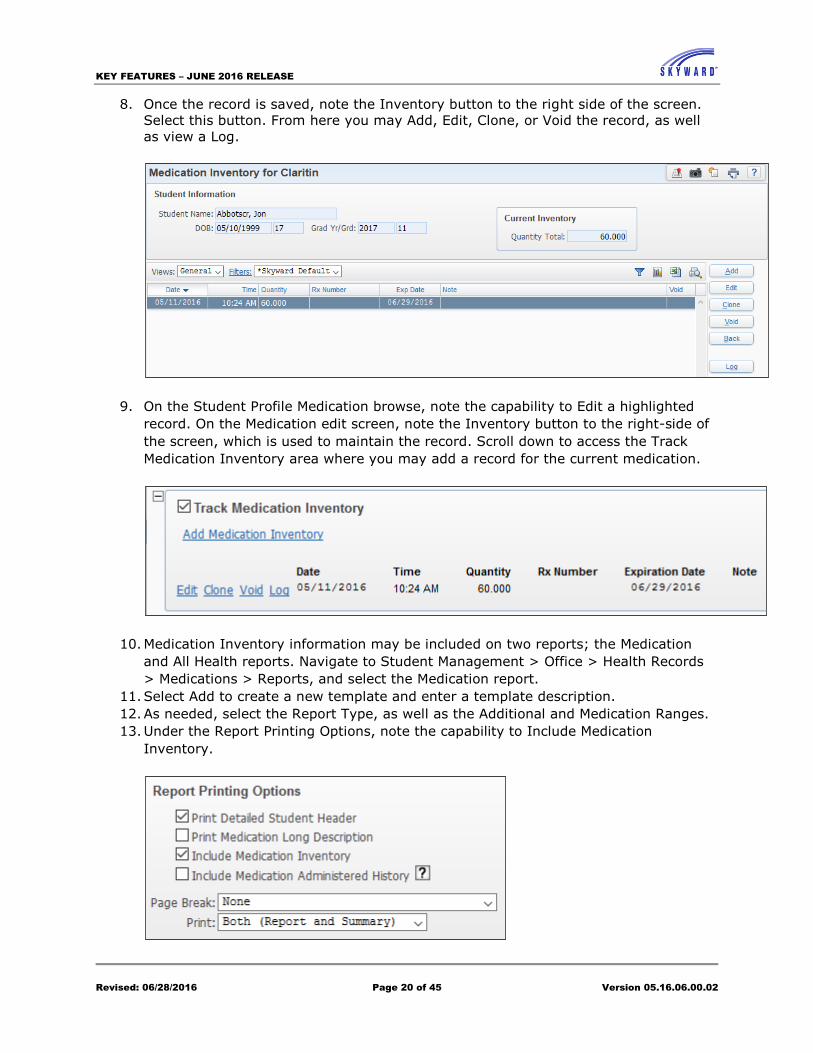
8. Once the record is saved, note the Inventory button to the right side of the screen.
Select this button. From here you may Add, Edit, Clone, or Void the record, as well
as view a Log.
9. On the Student Profile Medication browse, note the capability to Edit a highlighted
record. On the Medication edit screen, note the Inventory button to the right-side of
the screen, which is used to maintain the record. Scroll down to access the Track
Medication Inventory area where you may add a record for the current medication.
10. Medication Inventory information may be included on two reports; the Medication
and All Health reports. Navigate to Student Management > Office > Health Records
> Medications > Reports, and select the Medication report.
11. Select Add to create a new template and enter a template description.
12. As needed, select the Report Type, as well as the Additional and Medication Ranges.
13. Under the Report Printing Options, note the capability to Include Medication
Inventory.
KEY FEATURES – JUNE 2016 RELEASE
Revised: 06/28/2016 Page 21 of 45 Version 05.16.06.00.02
14. If needed, Referral Ranges may also be entered.
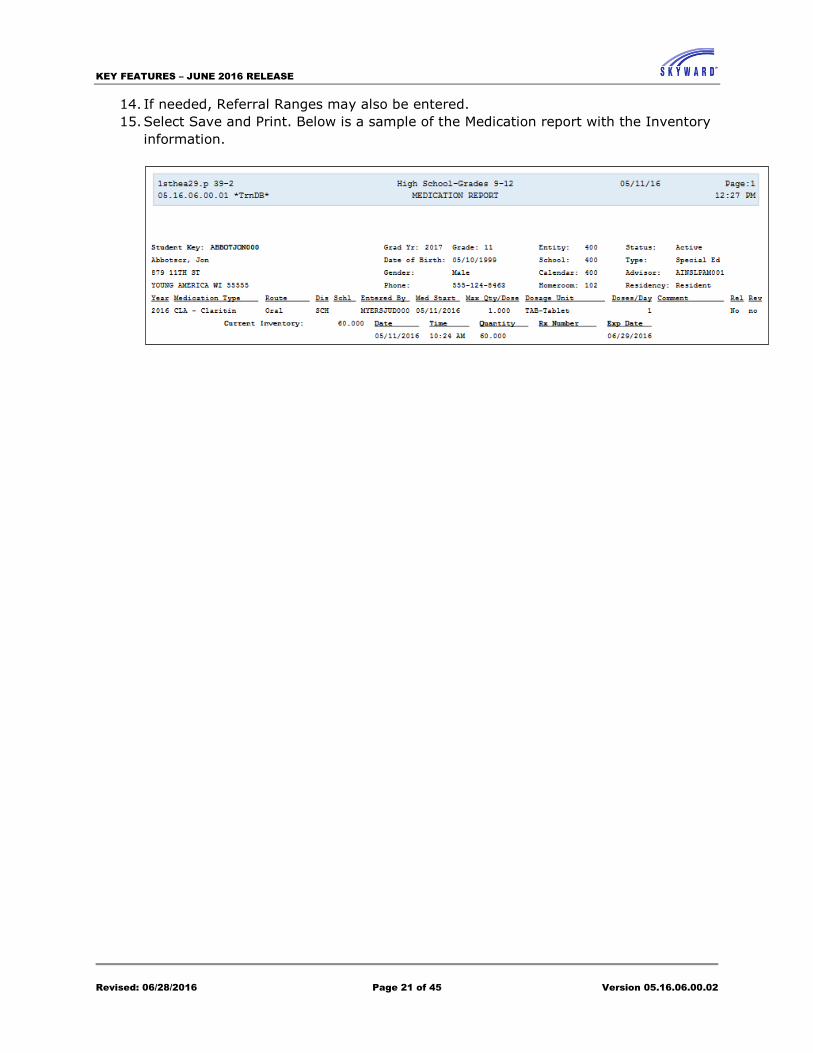
15. Select Save and Print. Below is a sample of the Medication report with the Inventory
information.
KEY FEATURES – JUNE 2016 RELEASE
Revised: 06/28/2016 Page 22 of 45 Version 05.16.06.00.02
Medication Utilities
2635455 – Need Mass Add Option for Medication Records (WS\OF\HR\ME\PS\UT)
A utility has been created to mass add medication records. In addition, a Processing List
may be utilized to mass create these records. Also, a new security setting has been added
for this Mass Add Medication utility.
Navigate to Student Management > Health Records > Medications > Setup > Utilities, or
Product Setup > Student Management > Health Records > Medications > Utilities, and
select Mass Add Medications.
1. Click Add to create a new template and enter a template description.
2. Student Ranges - This process can be completed by Range or by Individual. You
can also set a Date of Birth range and a Page Break.
3. Medication – As needed, set up the Medication ranges.
a. School Year
b. Reviewed – Check this box if the medication has been reviewed.
c. Start Date and End Date – Enter the date the medication will begin and
the date it will end.
d. Distribute – Select the method of distribution.
e. Duration – Enter the duration of the medication in days.
f. End Status – Switching to Stopped will cause the End Date to be set to
today’s date.
g. Office Number – Enter the medication office identification number.
h. Doctor Form Received – Check if a doctor form has been received.
i. Parent Release Form Received – Check if a parent release form has been
received.
j. Medication – Select the medication.
k. Route – Select a route code.
l. Dosage Unit – Select a dosage unit code.
m. Max Units Per Dose – Enter the maximum number of units that can be
administered per dose.
n. Max Doses Per Day - Enter the maximum number of units that can be
administered per day.
o. Location – Select a location.
p. Prescribed By – Enter the name of the health professional who prescribed
this medication.
q. Comment – Enter an applicable comment.
r. Note – Enter any notes pertaining to this record.
4. Medication Administration Instructions – Enter any instructions for administering
this medication.
5. Click Save and Process.
6. Click the Preview Data to Process button to review the students who will have
this medication record created. Note the capability to remove students from the
process by clicking the Remove from the Update button.
7. Once you are satisfied with the list, click Back and then Run the Update to
process the records.
8. Once the process has completed, you will be provided with a report of those
students who had the medication record created.
KEY FEATURES – JUNE 2016 RELEASE
Revised: 06/28/2016 Page 23 of 45 Version 05.16.06.00.02
504 Configuration
2840268 – Section 504 Email Notifications (WS\SS\SC\PS\CF)
Nightly Automated Emails are now available for Section 504. The user can set up a nightly
process to email specified contacts for the following date triggers:
IAP Begin Date
IAP End Date
IAP End Date Past Due
IAP Review Date
IAP Review Date Past Due
Navigate to Student Management > Student Services > Section 504 > Setup >
Configuration, or Product Setup > Student Services > Section 504 > Configuration, and
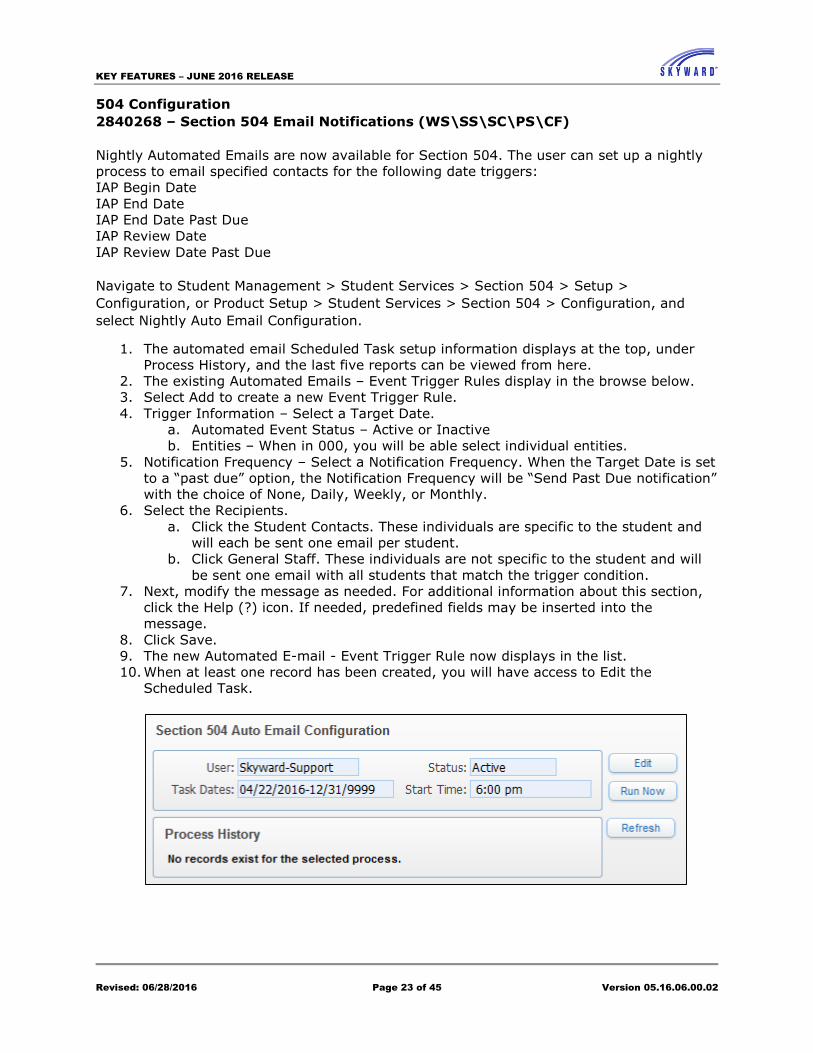
select Nightly Auto Email Configuration.
1. The automated email Scheduled Task setup information displays at the top, under
Process History, and the last five reports can be viewed from here.
2. The existing Automated Emails – Event Trigger Rules display in the browse below.
3. Select Add to create a new Event Trigger Rule.
4. Trigger Information – Select a Target Date.
a. Automated Event Status – Active or Inactive
b. Entities – When in 000, you will be able select individual entities.
5. Notification Frequency – Select a Notification Frequency. When the Target Date is set
to a “past due” option, the Notification Frequency will be “Send Past Due notification”
with the choice of None, Daily, Weekly, or Monthly.
6. Select the Recipients.
a. Click the Student Contacts. These individuals are specific to the student and
will each be sent one email per student.
b. Click General Staff. These individuals are not specific to the student and will
be sent one email with all students that match the trigger condition.
7. Next, modify the message as needed. For additional information about this section,
click the Help (?) icon. If needed, predefined fields may be inserted into the
message.
8. Click Save.
9. The new Automated E-mail - Event Trigger Rule now displays in the list.
10. When at least one record has been created, you will have access to Edit the
Scheduled Task.

KEY FEATURES – JUNE 2016 RELEASE
Revised: 06/28/2016 Page 24 of 45 Version 05.16.06.00.02
11. Note the availability to Preview the Email and the Email Config button to the right of
the screen. The Email Config button allows you to choose not to send emails to
inactive staff and inactive secured users.
KEY FEATURES – JUNE 2016 RELEASE
Revised: 06/28/2016 Page 25 of 45 Version 05.16.06.00.02
Custom Forms
2861438 - Add Custom Forms to Section 504 (WS\SS\SC\PS\CF\CS)
Section 504 now includes the capability to add Custom Forms similar to the Student Profile
and Special Education areas.
1. Custom Forms Security and Custom Forms Setup is available in the Section 504
Configuration.
2. The Section 504 Entry by Student browse has a new expansion screen for Custom
Forms, which is enabled by the WS\SS\SC\SI\CF security.
3. Custom security can be set for individual screens using the Secure Screen checkbox
on the Custom screen to assign security groups and the Custom Forms and Screens
button on PS\CA\SE\SG\WS to assign the access levels.
The following link is to the Custom Forms Guide.
Custom Forms Guide
KEY FEATURES – JUNE 2016 RELEASE
Revised: 06/28/2016 Page 26 of 45 Version 05.16.06.00.02
504 Reports
2861442 – Add Print Forms Report (WS\SS\SC\RE)
The Section 504 Print Forms report was added to provide a printout of 504 forms similar to
the Special Education Print Forms report.
Navigate to Student Management > Student Services > Section 504 > Reports, and select
Print Forms.
1. Click Add to create a new template and enter a template description.
2. Student Ranges - This process can be completed by Range or by Individual.
Note: A maximum of 50 forms will print and then a new print job will be created.
3. Print Form Ranges – Use these ranges to limit which forms will be printed for the
students within the range.
a. Case Manager – Uncheck the box to select specific Case Managers.
b. Section 504 Status
c. Printing Options – Sort
4. Select the forms you wish to have printed for the students within the range.
5. Click Save and Print.
KEY FEATURES – JUNE 2016 RELEASE
Revised: 06/28/2016 Page 27 of 45 Version 05.16.06.00.02
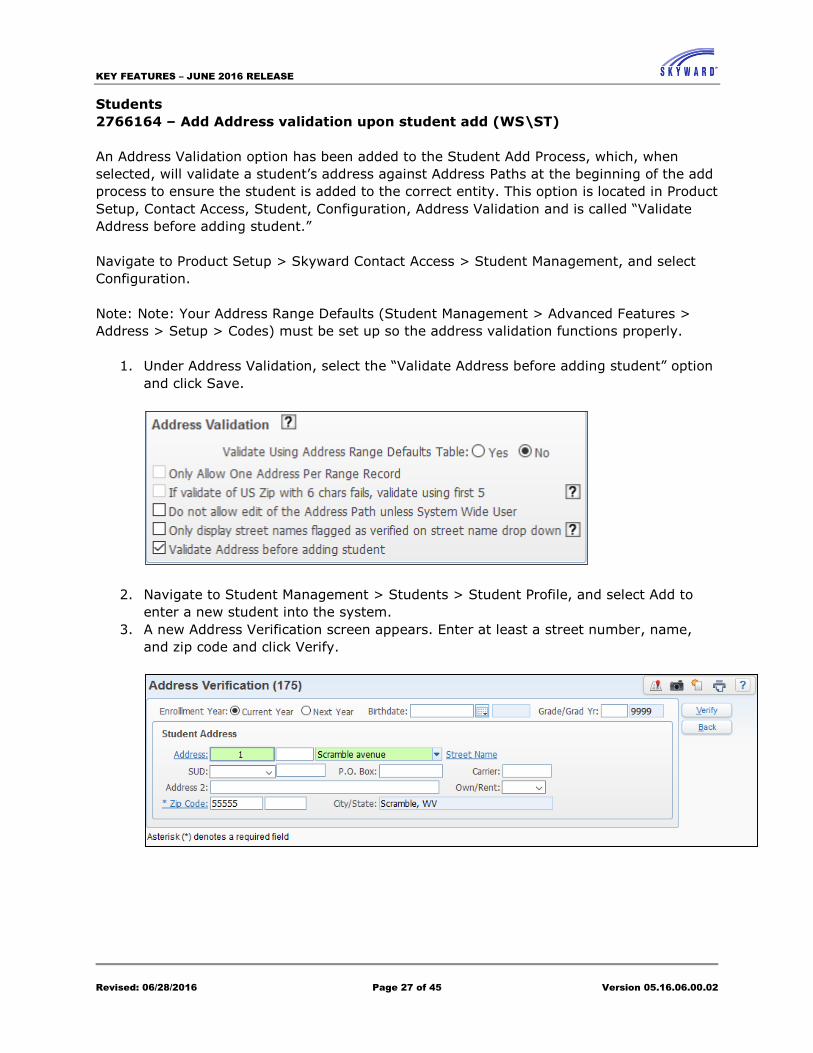
Students
2766164 – Add Address validation upon student add (WS\ST)
An Address Validation option has been added to the Student Add Process, which, when
selected, will validate a student’s address against Address Paths at the beginning of the add
process to ensure the student is added to the correct entity. This option is located in Product
Setup, Contact Access, Student, Configuration, Address Validation and is called “Validate
Address before adding student.”
Navigate to Product Setup > Skyward Contact Access > Student Management, and select
Configuration.
Note: Note: Your Address Range Defaults (Student Management > Advanced Features >
Address > Setup > Codes) must be set up so the address validation functions properly.
1. Under Address Validation, select the “Validate Address before adding student” option
and click Save.
2. Navigate to Student Management > Students > Student Profile, and select Add to
enter a new student into the system.
3. A new Address Verification screen appears. Enter at least a street number, name,
and zip code and click Verify.
KEY FEATURES – JUNE 2016 RELEASE
Revised: 06/28/2016 Page 28 of 45 Version 05.16.06.00.02
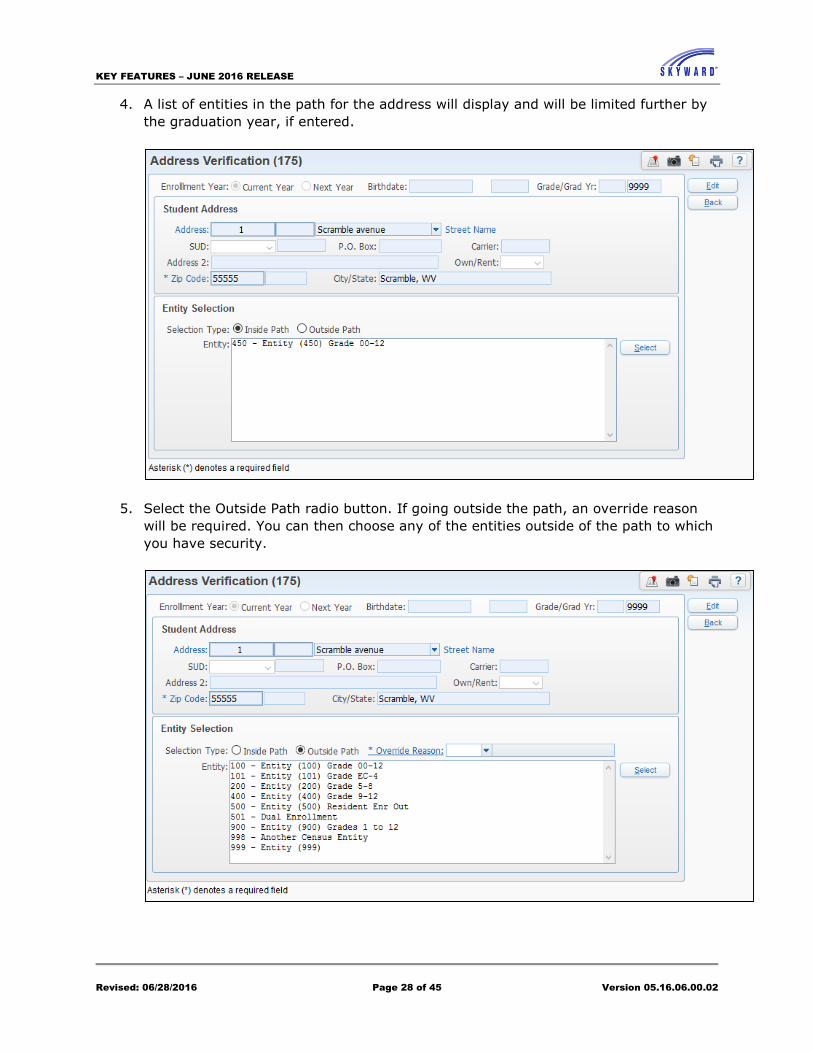
4. A list of entities in the path for the address will display and will be limited further by
the graduation year, if entered.
5. Select the Outside Path radio button. If going outside the path, an override reason
will be required. You can then choose any of the entities outside of the path to which
you have security.

KEY FEATURES – JUNE 2016 RELEASE
Revised: 06/28/2016 Page 29 of 45 Version 05.16.06.00.02
6. For this demonstration, the Inside Path radio button and Entity 450 will be selected.
7. Continue working through the screens to add the new student. Enter their
demographic information.
8. When on the Enrollment Information screen, if “Inside Path” was previously selected,
the school will default to the school in the path that is tied to the entity.
KEY FEATURES – JUNE 2016 RELEASE
Revised: 06/28/2016 Page 30 of 45 Version 05.16.06.00.02
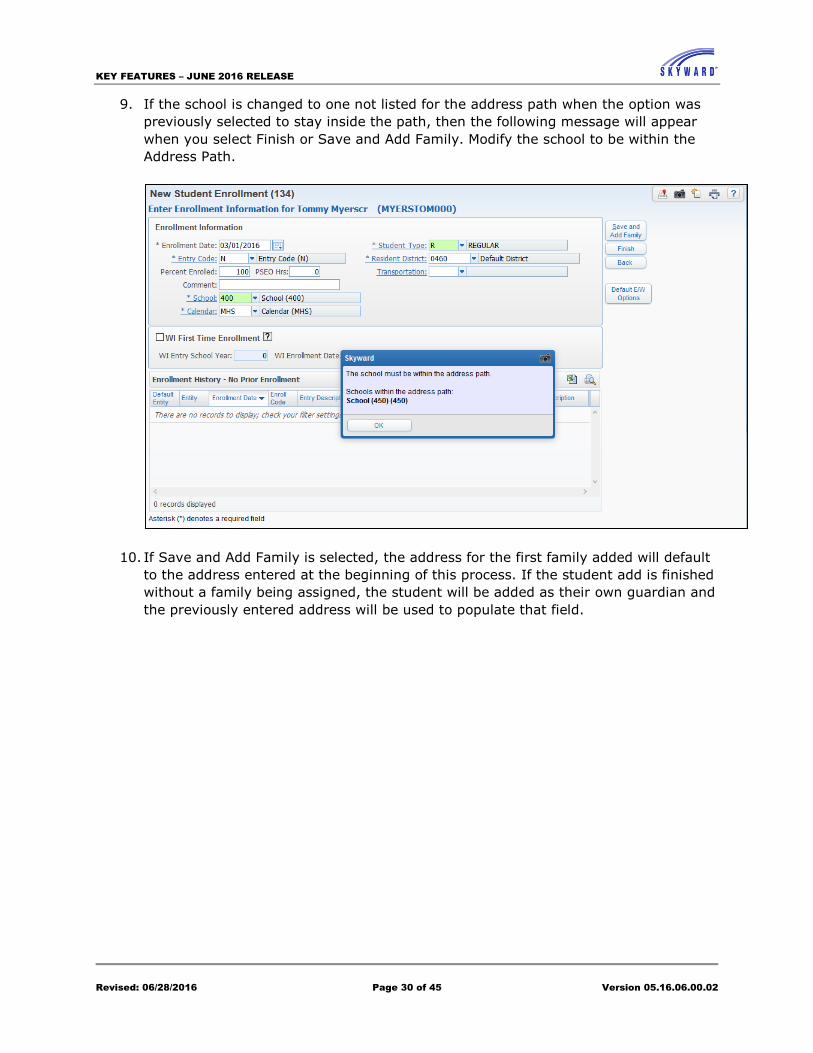
9. If the school is changed to one not listed for the address path when the option was
previously selected to stay inside the path, then the following message will appear
when you select Finish or Save and Add Family. Modify the school to be within the
Address Path.
10. If Save and Add Family is selected, the address for the first family added will default
to the address entered at the beginning of this process. If the student add is finished
without a family being assigned, the student will be added as their own guardian and
the previously entered address will be used to populate that field.
KEY FEATURES – JUNE 2016 RELEASE
Revised: 06/28/2016 Page 31 of 45 Version 05.16.06.00.02
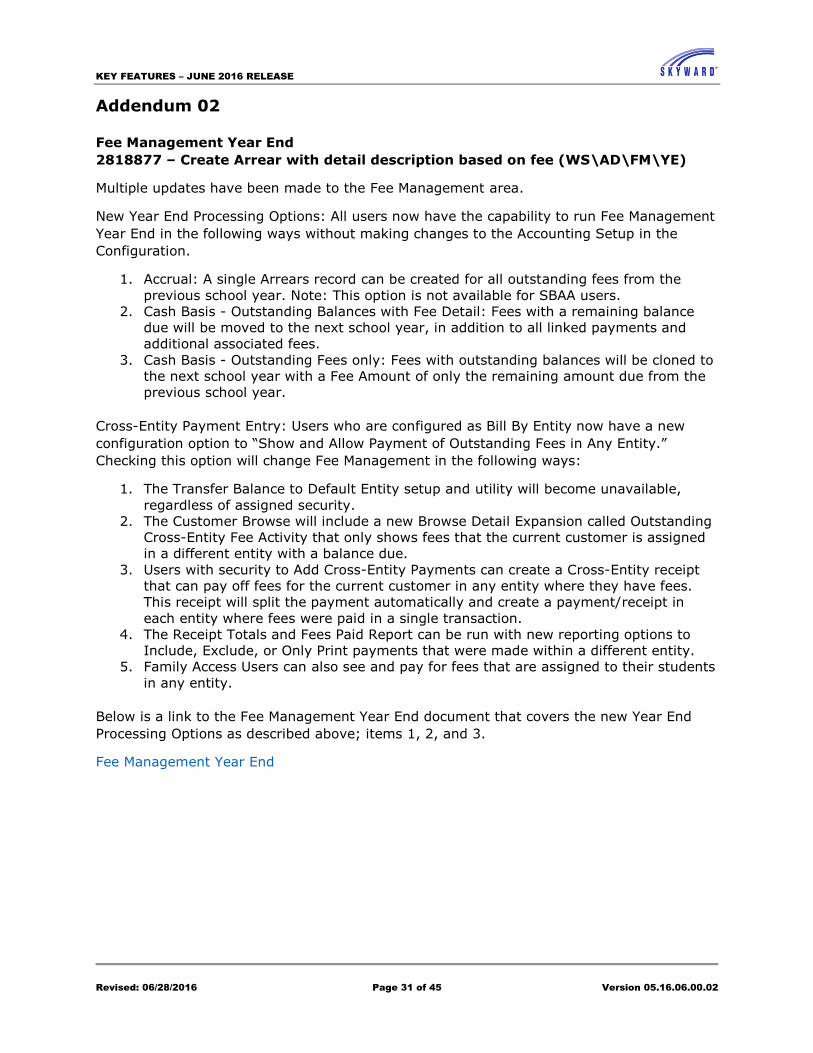
Addendum 02
Fee Management Year End
2818877 – Create Arrear with detail description based on fee (WS\AD\FM\YE)
Multiple updates have been made to the Fee Management area.
New Year End Processing Options: All users now have the capability to run Fee Management
Year End in the following ways without making changes to the Accounting Setup in the
Configuration.
1. Accrual: A single Arrears record can be created for all outstanding fees from the
previous school year. Note: This option is not available for SBAA users.
2. Cash Basis - Outstanding Balances with Fee Detail: Fees with a remaining balance
due will be moved to the next school year, in addition to all linked payments and
additional associated fees.
3. Cash Basis - Outstanding Fees only: Fees with outstanding balances will be cloned to
the next school year with a Fee Amount of only the remaining amount due from the
previous school year.
Cross-Entity Payment Entry: Users who are configured as Bill By Entity now have a new
configuration option to “Show and Allow Payment of Outstanding Fees in Any Entity.”
Checking this option will change Fee Management in the following ways:
1. The Transfer Balance to Default Entity setup and utility will become unavailable,
regardless of assigned security.
2. The Customer Browse will include a new Browse Detail Expansion called Outstanding
Cross-Entity Fee Activity that only shows fees that the current customer is assigned
in a different entity with a balance due.
3. Users with security to Add Cross-Entity Payments can create a Cross-Entity receipt
that can pay off fees for the current customer in any entity where they have fees.
This receipt will split the payment automatically and create a payment/receipt in
each entity where fees were paid in a single transaction.
4. The Receipt Totals and Fees Paid Report can be run with new reporting options to
Include, Exclude, or Only Print payments that were made within a different entity.
5. Family Access Users can also see and pay for fees that are assigned to their students
in any entity.
Below is a link to the Fee Management Year End document that covers the new Year End
Processing Options as described above; items 1, 2, and 3.
Fee Management Year End
KEY FEATURES – JUNE 2016 RELEASE
Revised: 06/28/2016 Page 32 of 45 Version 05.16.06.00.02
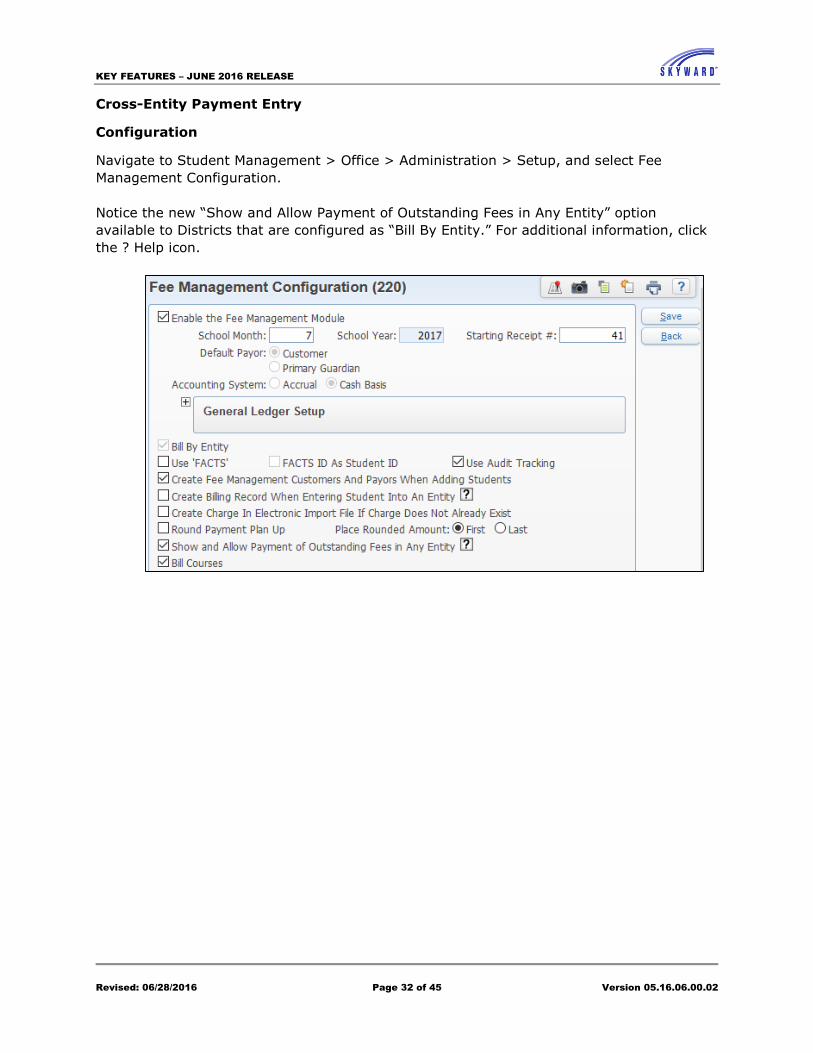
Cross-Entity Payment Entry
Configuration
Navigate to Student Management > Office > Administration > Setup, and select Fee
Management Configuration.
Notice the new “Show and Allow Payment of Outstanding Fees in Any Entity” option
available to Districts that are configured as “Bill By Entity.” For additional information, click
the ? Help icon.

KEY FEATURES – JUNE 2016 RELEASE
Revised: 06/28/2016 Page 33 of 45 Version 05.16.06.00.02
Fee Management Utilities
Navigate to Student Management > Administration > Fee Management > Setup > Utilities.
With the Configuration option to “Show and Allow Payment of Outstanding Fees in Any
Entity” selected, the Transfer Balance to Default Entity option is no longer available.

KEY FEATURES – JUNE 2016 RELEASE
Revised: 06/28/2016 Page 34 of 45 Version 05.16.06.00.02
Add Cross-Entity Receipt
Navigate to Student Management > Administration > Fee Management, and select
Customers.
1. Locate your customer and expand their record. The Customer browse includes a
browse detail expansion labeled Outstanding Cross-Entity Fee Activity that only
shows fees that the current customer is assigned in a different entity with a balance
due. In the example below, Michael has a Math 9 fee for $5.00 and an “Outstanding”
$50.00 fee from Entity 200 for Science 8th Grade.
2. Select the Add Cross-Entity Receipt link under the Fee Activity area or the
Outstanding Cross-Entity Fee Activity area.
KEY FEATURES – JUNE 2016 RELEASE
Revised: 06/28/2016 Page 35 of 45 Version 05.16.06.00.02
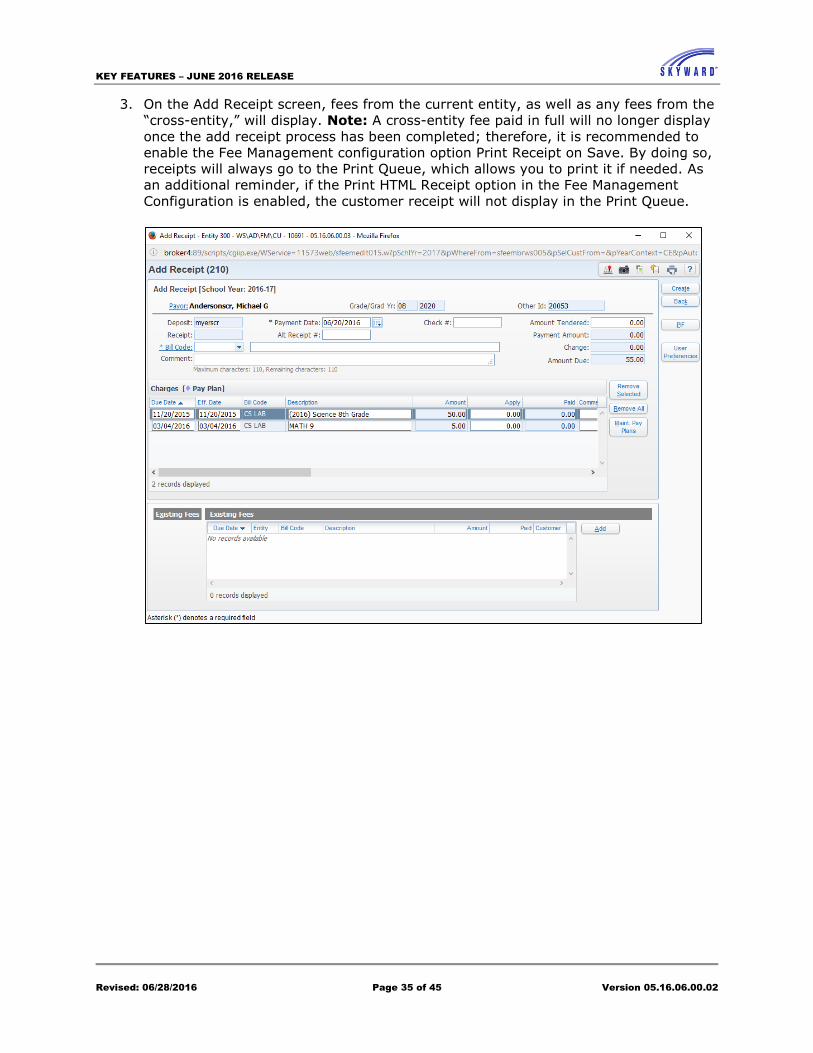
3. On the Add Receipt screen, fees from the current entity, as well as any fees from the
“cross-entity,” will display. Note: A cross-entity fee paid in full will no longer display
once the add receipt process has been completed; therefore, it is recommended to
enable the Fee Management configuration option Print Receipt on Save. By doing so,
receipts will always go to the Print Queue, which allows you to print it if needed. As
an additional reminder, if the Print HTML Receipt option in the Fee Management
Configuration is enabled, the customer receipt will not display in the Print Queue.
KEY FEATURES – JUNE 2016 RELEASE
Revised: 06/28/2016 Page 36 of 45 Version 05.16.06.00.02
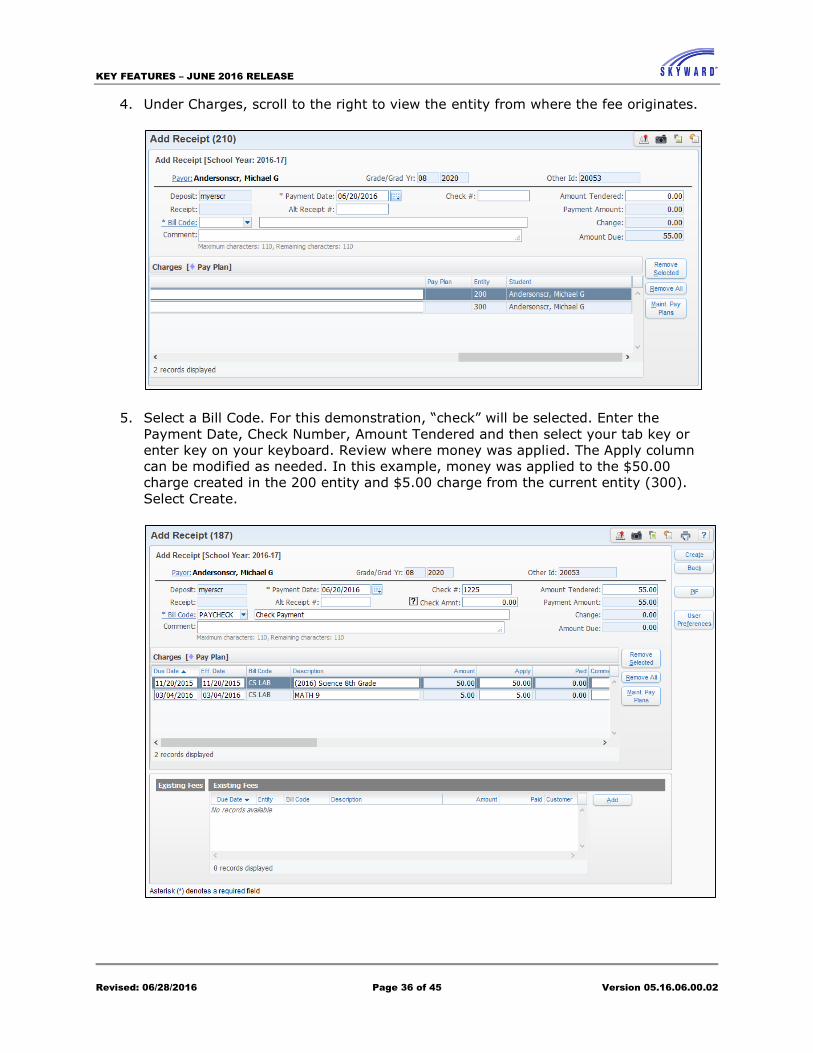
4. Under Charges, scroll to the right to view the entity from where the fee originates.
5. Select a Bill Code. For this demonstration, “check” will be selected. Enter the
Payment Date, Check Number, Amount Tendered and then select your tab key or
enter key on your keyboard. Review where money was applied. The Apply column
can be modified as needed. In this example, money was applied to the $50.00
charge created in the 200 entity and $5.00 charge from the current entity (300).
Select Create.
KEY FEATURES – JUNE 2016 RELEASE
Revised: 06/28/2016 Page 37 of 45 Version 05.16.06.00.02
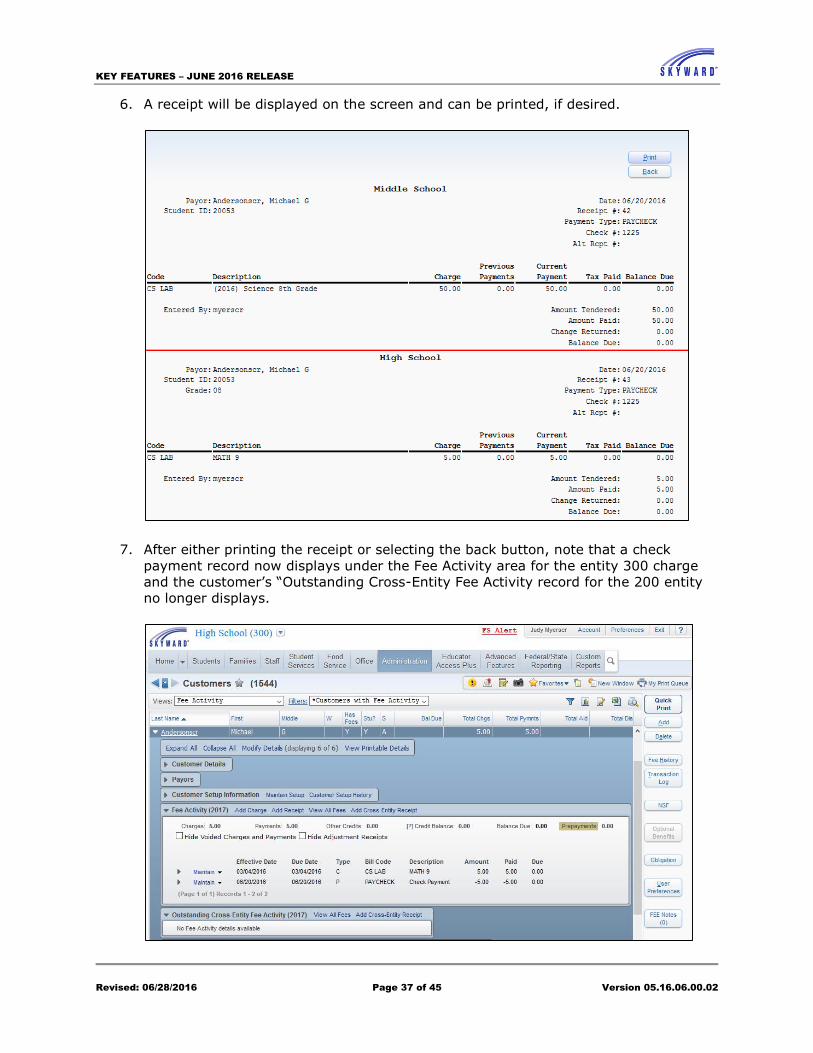
6. A receipt will be displayed on the screen and can be printed, if desired.
7. After either printing the receipt or selecting the back button, note that a check
payment record now displays under the Fee Activity area for the entity 300 charge
and the customer’s “Outstanding Cross-Entity Fee Activity record for the 200 entity
no longer displays.
KEY FEATURES – JUNE 2016 RELEASE
Revised: 06/28/2016 Page 38 of 45 Version 05.16.06.00.02
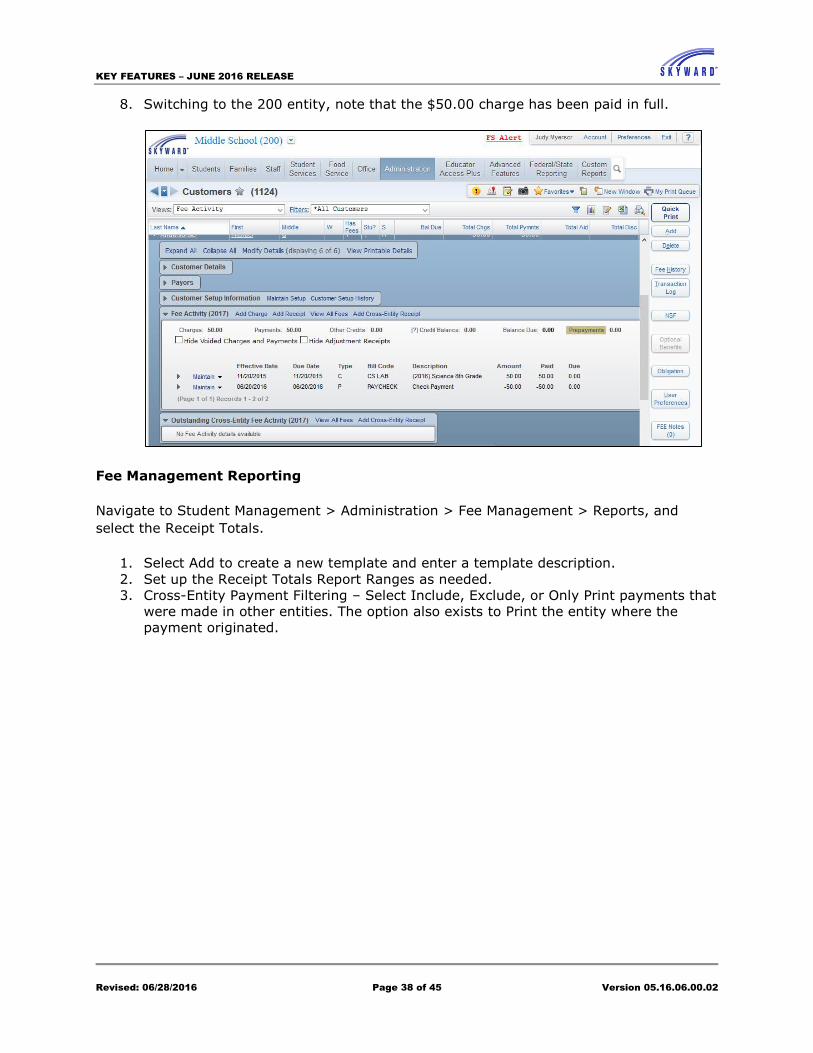
8. Switching to the 200 entity, note that the $50.00 charge has been paid in full.
Fee Management Reporting
Navigate to Student Management > Administration > Fee Management > Reports, and
select the Receipt Totals.
1. Select Add to create a new template and enter a template description.
2. Set up the Receipt Totals Report Ranges as needed.
3. Cross-Entity Payment Filtering – Select Include, Exclude, or Only Print payments that
were made in other entities. The option also exists to Print the entity where the
payment originated.
KEY FEATURES – JUNE 2016 RELEASE
Revised: 06/28/2016 Page 39 of 45 Version 05.16.06.00.02
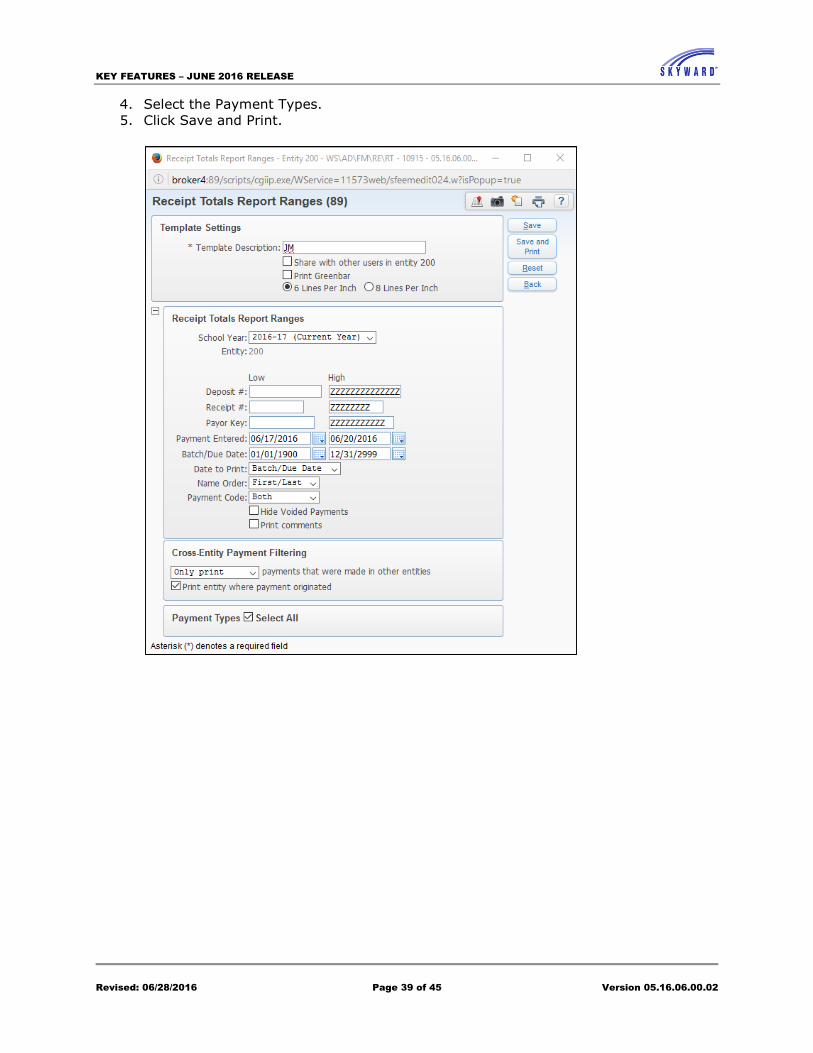
4. Select the Payment Types.
5. Click Save and Print.
KEY FEATURES – JUNE 2016 RELEASE
Revised: 06/28/2016 Page 40 of 45 Version 05.16.06.00.02
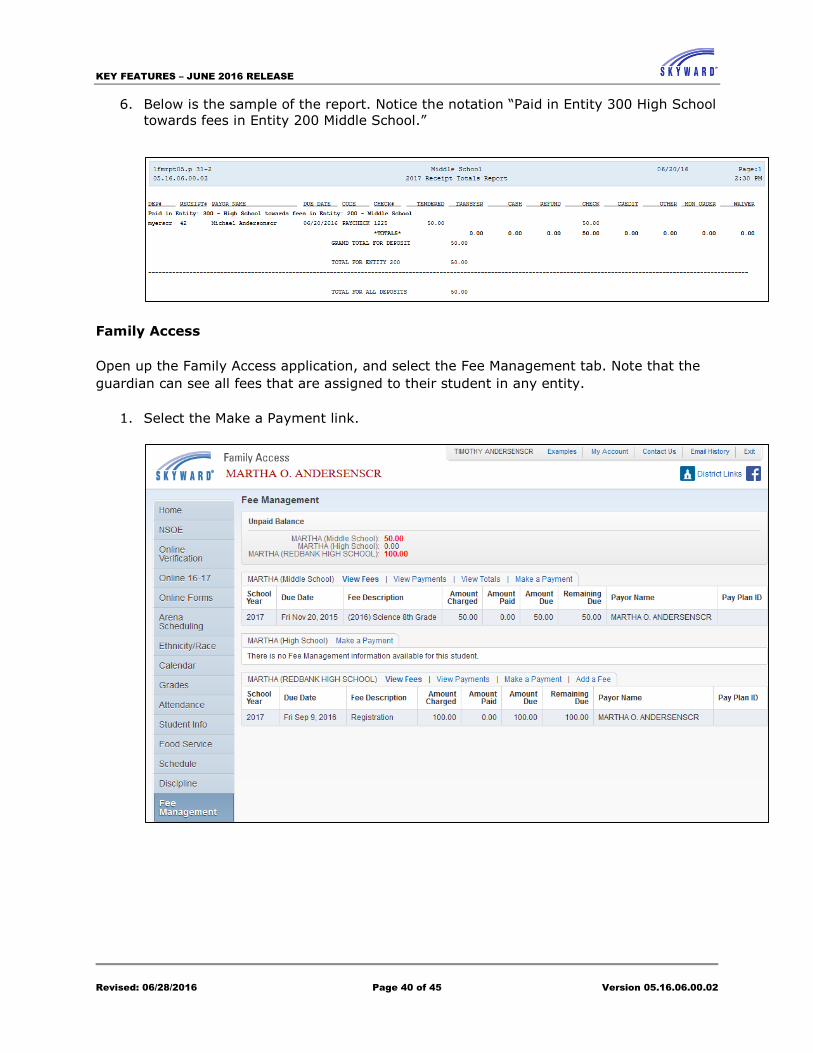
6. Below is the sample of the report. Notice the notation “Paid in Entity 300 High School
towards fees in Entity 200 Middle School.”
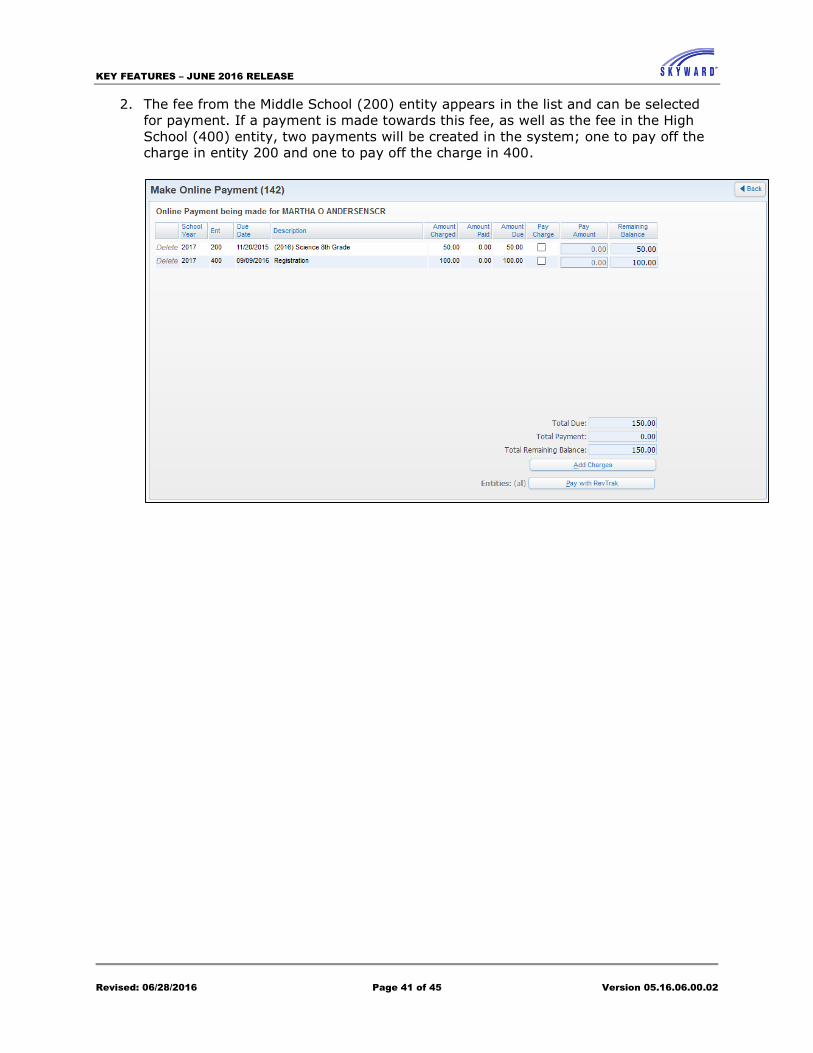
Family Access
Open up the Family Access application, and select the Fee Management tab. Note that the
guardian can see all fees that are assigned to their student in any entity.
1. Select the Make a Payment link.
KEY FEATURES – JUNE 2016 RELEASE
Revised: 06/28/2016 Page 41 of 45 Version 05.16.06.00.02
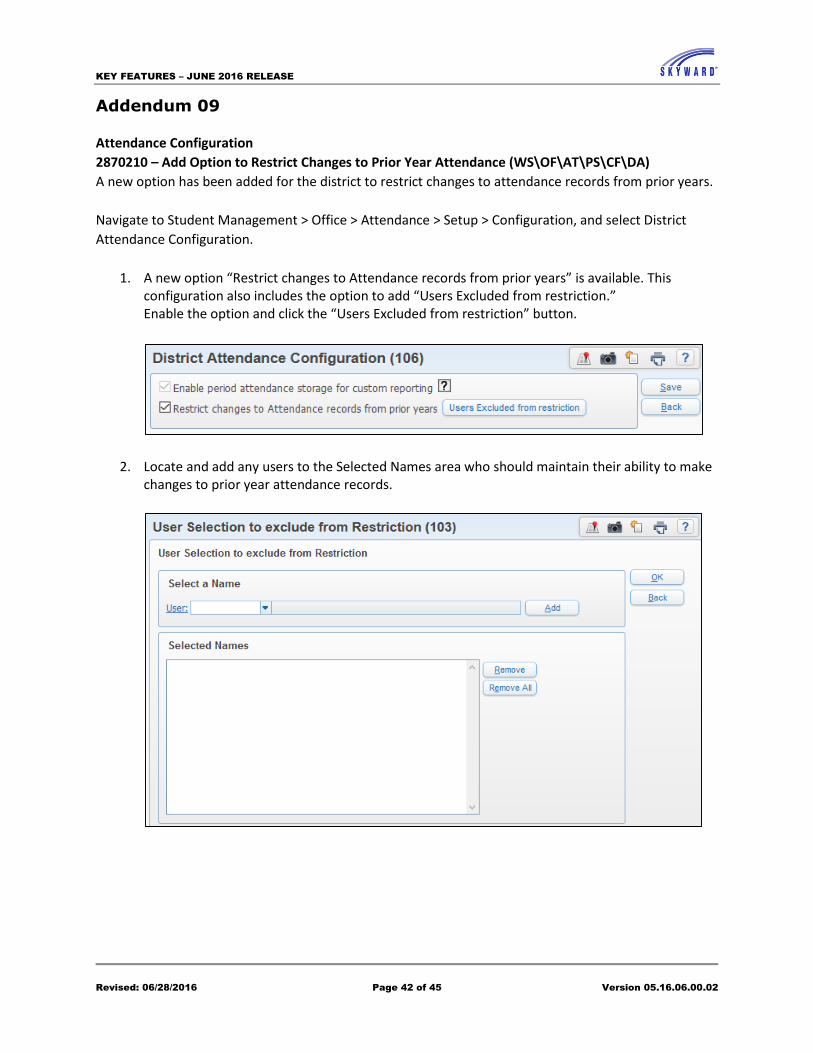
2. The fee from the Middle School (200) entity appears in the list and can be selected
for payment. If a payment is made towards this fee, as well as the fee in the High
School (400) entity, two payments will be created in the system; one to pay off the
charge in entity 200 and one to pay off the charge in 400.
KEY FEATURES – JUNE 2016 RELEASE
Revised: 06/28/2016 Page 42 of 45 Version 05.16.06.00.02
Addendum 09
Attendance Configuration
2870210 – Add Option to Restrict Changes to Prior Year Attendance (WS\OF\AT\PS\CF\DA)
A new option has been added for the district to restrict changes to attendance records from prior years.
Navigate to Student Management > Office > Attendance > Setup > Configuration, and select District
Attendance Configuration.
1. A new option “Restrict changes to Attendance records from prior years” is available. This configuration also includes the option to add “Users Excluded from restriction.” Enable the option and click the “Users Excluded from restriction” button.
2. Locate and add any users to the Selected Names area who should maintain their ability to make changes to prior year attendance records.

KEY FEATURES – JUNE 2016 RELEASE
Revised: 06/28/2016 Page 43 of 45 Version 05.16.06.00.02
3. Navigate to Student Management > Students > Student Profile, and select the Attendance tab. The Attendance browse has been updated and the Edit and Delete buttons are available for current year attendance. If a prior year record is selected, then the Delete button becomes disabled and the Edit becomes a View button.
KEY FEATURES – JUNE 2016 RELEASE
Revised: 06/28/2016 Page 44 of 45 Version 05.16.06.00.02
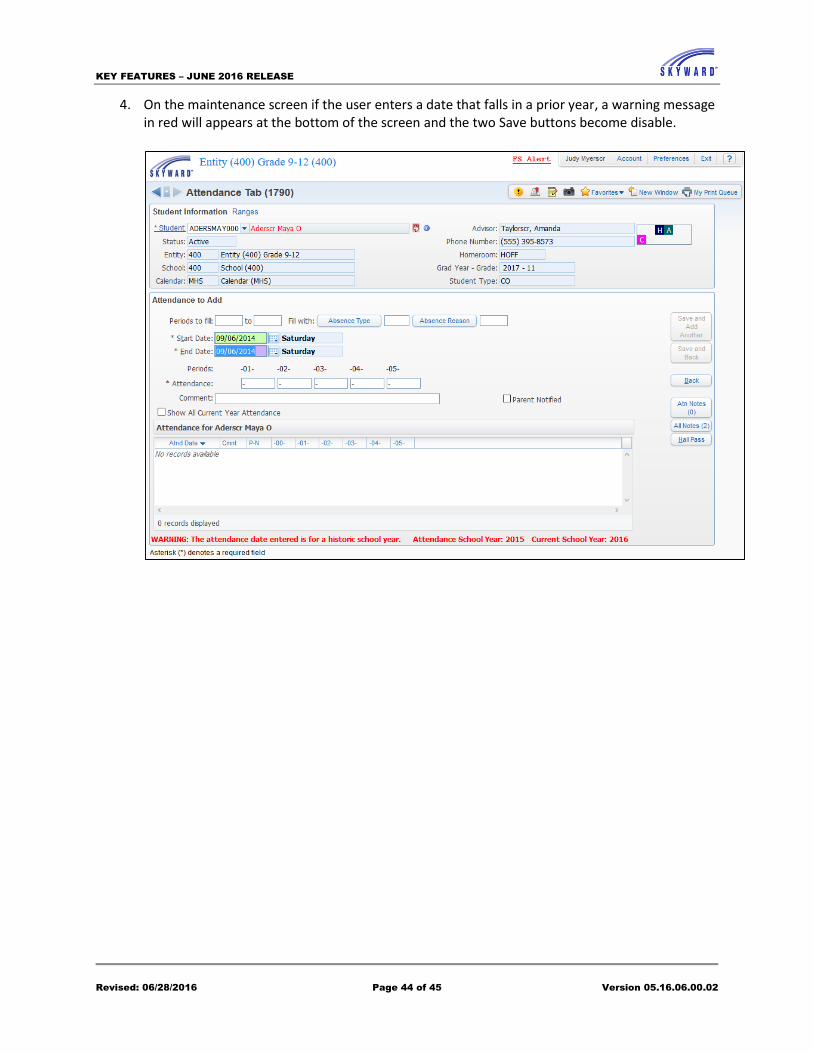
4. On the maintenance screen if the user enters a date that falls in a prior year, a warning message in red will appears at the bottom of the screen and the two Save buttons become disable.
KEY FEATURES – JUNE 2016 RELEASE
Revised: 06/28/2016 Page 45 of 45 Version 05.16.06.00.02
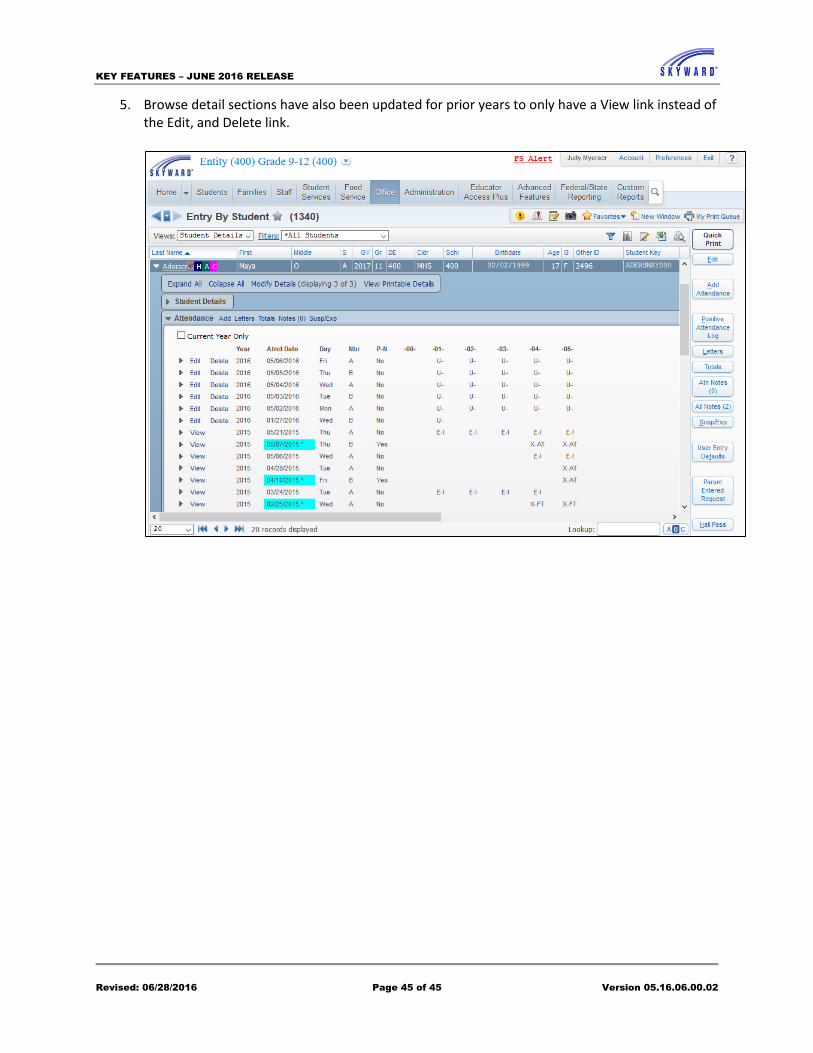
5. Browse detail sections have also been updated for prior years to only have a View link instead of the Edit, and Delete link.