Embed Size (px)
Citation preview

Information Technology Department 2
nd Floor, Benilde Hall, 2544 Taft Ave. Manila
Notice: The information in this document is subject to change without prior notice. The Information Technology Department (ITD) and De La Salle-College of Saint Benilde accept no liability for the content in this manual, or for the consequences of any actions taken on the basis of the information provided.
User’s Manual
Student Involvement Project Management System (SIPMS)
Version 2.0

INFORMATION TECHNOLOGY DEPARTMENT
Student Involvement Project Management System Version 2.0 Page 2 of 36
Preface and Acknowledgment
The concept of the Student Involvement Project Management System (SIPMS) was initiated and requested by the Student Involvement Office (SIO). The original purpose of which was to facilitate the Student Involvement Projects creation & approval, and Student Organization membership record management through online system. By having the SIPMS in place will help SIO Administrators, Organization Advisers and Student Officers improve their management on Student Organization membership and Project creation & approval given that some manual processes can be eliminated, records and information can easily be accessed, modified & tracked, and amount of time for reports generation can be lessened. The original scope of the project covers the following areas: Student Organization Membership Management and Student Involvement Project Management. The scope of this project has now expanded as other DSL Offices may now use the system. Also, it now includes the facilitation of encoding of projects with sponsorship/ fundraising and approval by CPRM (Center for Partnership and Resource Management). Project rating is also enhanced as it has now categorization. In addition, the system now has facility for encoding and approval of Activities of GPOA (General Plan of Actions). Additional features of this system, as well, are the sending of email notification during approvals, uploading of attachments, and saving of project attendance. The following organizations & officers contributed in the development of the project: Systems Analyst : Goldelin C. Nava, ITD Programmer : Jonathan M. Manaois, ITD Testing : Goldelin C. Nava, ITD Dexter L. Basunillo, SIO Princess D. Tolentino, CPRM Lerma D. Nadonza, CPRM Kevin Christian N. Salazar, ITD Subject Matter Expert(s) : Dexter L. Basunillo, SIO Ms. Mary Jane B. Inocencio, CPRM Princess D. Tolentino, CPRM Lerma D. Nadonza, CPRM We would like to thank Ms. Norie M. Ador Dionisio, Mr. Robin R. Serrano, Mr. Leandro A. Loyola, Ms. Jhoann O. Tandoc, and Mr. Jimbo S. Mendoza for their contribution and support.
INFORMATION TECHNOLOGY DEPARTMENT
Student Involvement Project Management System Version 2.0 Page 3 of 36
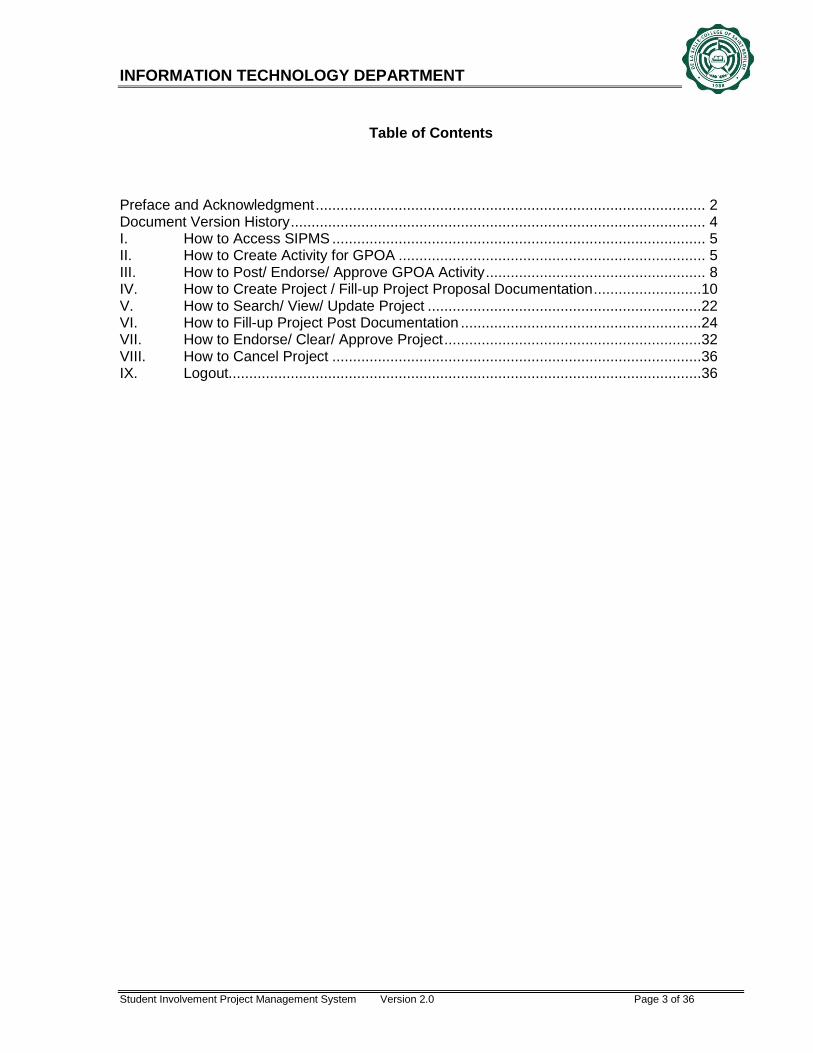
Table of Contents
Preface and Acknowledgment .............................................................................................. 2 Document Version History .................................................................................................... 4 I. How to Access SIPMS .......................................................................................... 5 II. How to Create Activity for GPOA .......................................................................... 5 III. How to Post/ Endorse/ Approve GPOA Activity ..................................................... 8 IV. How to Create Project / Fill-up Project Proposal Documentation ..........................10 V. How to Search/ View/ Update Project ..................................................................22 VI. How to Fill-up Project Post Documentation ..........................................................24 VII. How to Endorse/ Clear/ Approve Project ..............................................................32 VIII. How to Cancel Project .........................................................................................36 IX. Logout..................................................................................................................36

INFORMATION TECHNOLOGY DEPARTMENT
Student Involvement Project Management System Version 2.0 Page 4 of 36
Document Version History
Date Version Description Author
10/6/2011 1.0 SIPMS User’s Manual for Project Creation and Approval
Goldelin P. Cabiltes
10/1/2015 2.0 SIPMS Phase 2 User’s Manual for Project Creation and Approval
Goldelin C. Nava Kevin Christian N. Salazar

INFORMATION TECHNOLOGY DEPARTMENT
Prepared by:
Goldelin C. Nava Kevin Christian N. Salazar
Business Systems Analyst , ITD Trainee, ITD
Date: November 24, 2015 Date: November 24, 2015
Student Involvement Project Management System Version 2.0 Page 5 of 36
I. How to Access SIPMS
1. Open a browser.
2. Go to http://www.benilde.edu.ph/sipms.
3. Login using your CSB Infonet Account.
Figure 1.1 SIPMS Login Page
II. How to Create Activity for GPOA
1. To create an activity for GPOA, click on the Activity link from the SIPMS Menu (Figure
2.1) to display the GPOA page (Figure 2.2).
Please note that only Org/Group Secretary can create/modify an Activity of GPOA.
. Figure 2.1 SIPMS Menu

INFORMATION TECHNOLOGY DEPARTMENT
Prepared by:
Goldelin C. Nava Kevin Christian N. Salazar
Business Systems Analyst , ITD Trainee, ITD
Date: November 24, 2015 Date: November 24, 2015
Student Involvement Project Management System Version 2.0 Page 6 of 36
2. Select the School Year (SY), Office, and Org/Group from the dropdown list and click Ok button. After clicking Ok, the Create Activity button will become available. Click Create Activity button, then, you will see Encode Activity Page (Figure 2.3).
Figure 2.2 GPOA Page
Figure 2.3 Encode Activity Page

INFORMATION TECHNOLOGY DEPARTMENT
Prepared by:
Goldelin C. Nava Kevin Christian N. Salazar
Business Systems Analyst , ITD Trainee, ITD
Date: November 24, 2015 Date: November 24, 2015
Student Involvement Project Management System Version 2.0 Page 7 of 36
3. Fill-up all the necessary information in the Encode Activity Page (Figure 2.3) a. Select the Project Classification of the activity from the dropdown list.
b. Click search for the Project Manager details and the list of available officers will
appear (Figure 2.4 Select Project Manager). Click your desired Project Manager
and his details will automatically be retrieved.
c. Input the remaining details and click the Create button to save the activity.
d. Click Back to return to the GPOA Page (Figure 2.2).
Figure 2.4 Select Project Manager
Please refer to section V. How to Search/ View/ Update Project to search, view, and update your Org/Group’s projects.

INFORMATION TECHNOLOGY DEPARTMENT
Prepared by:
Goldelin C. Nava Kevin Christian N. Salazar
Business Systems Analyst , ITD Trainee, ITD
Date: November 24, 2015 Date: November 24, 2015
Student Involvement Project Management System Version 2.0 Page 8 of 36
III. How to Post/ Endorse/ Approve GPOA Activity
1. To post/ endorse/ approve GPOA, click on the Activity link from the SIPMS Menu.
(Figure 2.1 SIPMS Menu).
2. Select the SY, Office, and Org/Group and click Ok. (Figure 2.2 GPOA Page).
If you wish to see the details of the Activity, you may display Encode Activity Page (Figure 2.3) by clicking your desired Activity Title in GPOA Page (Figure 2.2).
3. Tick the checkbox of the Activity you want to approve. (Figure 2.2 GPOA Page). 4. Click the appropriate button for approval:
Org/Group Presidents click Post Activity button to post the Activity of GPOA.
You can also click the “Notify Adviser and Coordinator to see Updates” button,
which will send an email to the advisers and coordinators to inform them that
there are pending GPOAs for their approval.
Org/Group Advisers click Endorse Activity button to endorse the Activity of
GPOA. If not, you can click the “Notify Org/Group to see Comment” button which
will send an email to the Org/Group, informing them that they have an activity
that have comments and needs to be revised. Please note that you are allowed
to endorse those activities with status “Posted” only.
Office Admin click Approve Activity button to approve the Activity of GPOA. If
not, you can click the “Notify Org/Group to see Comment” button which will send
an email to the Org/Group, informing them that they have an activity that have
comments and needs to be revised. If the activity needs to be disapproved,
kindly click the Disapprove button. Please note that you are allowed to approve/
disapprove those activities with status “Endorsed” only.
Reminder: * The sequence of approval after creation of Activity will be:
- Post which is done by the Org/Group President
- Endorse which is done by the Adviser
- Approve which is done by the Office Admin
* Once Activity of GPOA has been approved, the said Activity is not allowed to be updated anymore.

INFORMATION TECHNOLOGY DEPARTMENT
Prepared by:
Goldelin C. Nava Kevin Christian N. Salazar
Business Systems Analyst , ITD Trainee, ITD
Date: November 24, 2015 Date: November 24, 2015
Student Involvement Project Management System Version 2.0 Page 9 of 36
* Once Activity of GPOA has been approved, the system automatically creates a new Project for the said activity. The Project Manager will take charge of the encoding of PPF and PDR of the Project. Please refer to section V. How to Search/ View/ Update Project to search, view, and update your Org/Group’s projects.

INFORMATION TECHNOLOGY DEPARTMENT
Prepared by:
Goldelin C. Nava Kevin Christian N. Salazar
Business Systems Analyst , ITD Trainee, ITD
Date: November 24, 2015 Date: November 24, 2015
Student Involvement Project Management System Version 2.0 Page 10 of 36
IV. How to Create Project / Fill-up Project Proposal Documentation
1. To create a project, click on the Create Student Involvement Project link from the
SIPMS Menu (Figure 4.1) to display Create Student Involvement Project/Project Title
Page (Figure 4.2).
Figure 4.1 SIPMS Menu
2. Fill-up all necessary information in Create Student Involvement Project/ Project Title
Page (Figure 4.2).
a. Select SY, Office, and Organization then click Ok button (Note that Ok button will
become disabled once Save button has already been clicked).
b. Fill-up all necessary information then click Save Button.
Figure 4.2 Create Student Involvement Project/Project Title Page
c. If “With Tie-up” = No, proceed to next step.
If “With Tie-up” = Yes, add Tie-up record in With Tie-up Organization section (Figure 4.3) located in Create Student Involvement Project /Project Title Page.

INFORMATION TECHNOLOGY DEPARTMENT
Prepared by:
Goldelin C. Nava Kevin Christian N. Salazar
Business Systems Analyst , ITD Trainee, ITD
Date: November 24, 2015 Date: November 24, 2015
Student Involvement Project Management System Version 2.0 Page 11 of 36
Figure 4.3 With Tie-up Organization section
Steps to add Tie-up Record
i. Select Organization from Organization dropdown/field
ii. Click Search Button, a page displaying a list of Student names will appear
iii. Click Student Name. The student’s details will be displayed in the
required boxes/fields.
iv. Click Add button. The added record will be displayed in the table/grid.
* If you want to add another record, simply repeat the steps.
Steps to delete Tie-up Record i. Click the record from the table/grid. The system will display the record in
the appropriate fields/boxes.
ii. Click Delete button. The deleted record will be removed in the table/grid. * If you want to delete another record, simply repeat the steps.
d. Click Back button to go to Project Proposal Documentation Page (Figure 4.4).

INFORMATION TECHNOLOGY DEPARTMENT
Prepared by:
Goldelin C. Nava Kevin Christian N. Salazar
Business Systems Analyst , ITD Trainee, ITD
Date: November 24, 2015 Date: November 24, 2015
Student Involvement Project Management System Version 2.0 Page 12 of 36
3. In Project Proposal Documentation Page (Figure 3.4), click the desired Form to
update.
Figure 4.4 Project Proposal Documentation Page
INFORMATION TECHNOLOGY DEPARTMENT
Prepared by:
Goldelin C. Nava Kevin Christian N. Salazar
Business Systems Analyst , ITD Trainee, ITD
Date: November 24, 2015 Date: November 24, 2015
Student Involvement Project Management System Version 2.0 Page 13 of 36
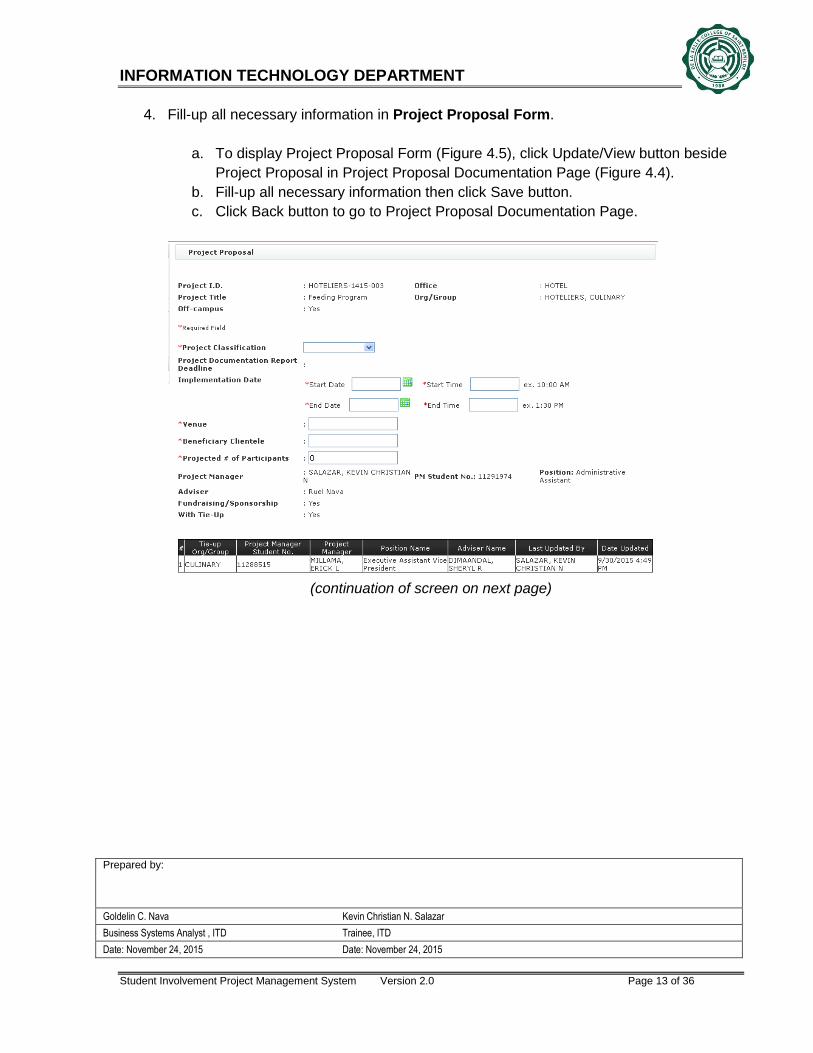
4. Fill-up all necessary information in Project Proposal Form.
a. To display Project Proposal Form (Figure 4.5), click Update/View button beside
Project Proposal in Project Proposal Documentation Page (Figure 4.4).
b. Fill-up all necessary information then click Save button.
c. Click Back button to go to Project Proposal Documentation Page.
(continuation of screen on next page)

INFORMATION TECHNOLOGY DEPARTMENT
Prepared by:
Goldelin C. Nava Kevin Christian N. Salazar
Business Systems Analyst , ITD Trainee, ITD
Date: November 24, 2015 Date: November 24, 2015
Student Involvement Project Management System Version 2.0 Page 14 of 36
(continuation of screen)
Figure 4.5 Project Proposal Form

INFORMATION TECHNOLOGY DEPARTMENT
Prepared by:
Goldelin C. Nava Kevin Christian N. Salazar
Business Systems Analyst , ITD Trainee, ITD
Date: November 24, 2015 Date: November 24, 2015
Student Involvement Project Management System Version 2.0 Page 15 of 36
5. Fill-up all necessary information in Accompanying Faculty Form. Note that this is
applicable to Off-Campus projects only.
a. To display Accompanying Faculty Form (Figure 4.6), click Update/View button
beside Accompanying Faculty (Off-campus) in Project Proposal Documentation
Page (Figure 4.4).
b. Add Accompanying Faculty
Figure 4.6 Accompanying Faculty Form
Steps to add Accompanying Faculty
i. Fill-up all required fields/boxes.
ii. Click Add button. The added record will be displayed in the table/grid. * If you want to add another record, simply repeat the steps.
Steps to update Accompanying Faculty i. Click the record from the table/grid. The system will display the record in
the appropriate fields/boxes.
ii. Modify the information in the appropriate fields/boxes.
iii. Click Update button. The modified record will be displayed in the
table/grid.
* If you want to update another record, simply repeat the steps.
Steps to delete Accompanying Faculty i. Click the record from the table/grid. The system will display the record in
the appropriate fields/boxes.
ii. Click Delete button. The deleted record will be removed in the table/grid. * If you want to delete another record, simply repeat the steps.
c. Click Back button to go to Project Proposal Documentation Page.

INFORMATION TECHNOLOGY DEPARTMENT
Prepared by:
Goldelin C. Nava Kevin Christian N. Salazar
Business Systems Analyst , ITD Trainee, ITD
Date: November 24, 2015 Date: November 24, 2015
Student Involvement Project Management System Version 2.0 Page 16 of 36
6. Fill-up all necessary information in Program Form.
a. To display Program Form (Figure 4.7), click Update/View button beside Program
in Project Proposal Documentation Page (Figure 4.4).
b. Add Program
Figure 4.7 Program Form
Steps to add Activity Program
i. Fill-up all required fields/boxes.
ii. Click Add button. The added record will be displayed in the table/grid. * If you want to add another record, simply repeat the steps.
Steps to update Activity Program i. Click the record from the table/grid. The system will display the record in
the appropriate fields/boxes.
ii. Modify the information in the appropriate fields/boxes.
iii. Click Update button. The modified record will be displayed in the table/grid.
* If you want to update another record, simply repeat the steps.
Steps to delete Activity Program i. Click the record from the table/grid. The system will display the record in
the appropriate fields/boxes.
ii. Click Delete button. The deleted record will be removed in the table/grid. * If you want to delete another record, simply repeat the steps.
c. Click Back button to go to Project Proposal Documentation Page.
INFORMATION TECHNOLOGY DEPARTMENT
Prepared by:
Goldelin C. Nava Kevin Christian N. Salazar
Business Systems Analyst , ITD Trainee, ITD
Date: November 24, 2015 Date: November 24, 2015
Student Involvement Project Management System Version 2.0 Page 17 of 36
7. Fill-up all necessary information in Project Assignment Matrix Form.
a. To display Project Assignment Matrix Form (Figure 4.8), click Update/View
button beside Project Assignment Matrix in Project Proposal Documentation
Page (Figure 4.4).
b. Add Project Assignment
Figure 4.8 Project Assignment Matrix Form
Steps to add Project Assignment
i. Fill-up all required fields/boxes.
ii. Click Add button. The added record will be displayed in the table/grid. * If you want to add another record, simply repeat the steps.
Steps to update Project Assignment i. Click the record from the table/grid. The system will display the record in
the appropriate fields/boxes.
ii. Modify the information in the appropriate fields/boxes.
iii. Click Update button. The modified record will be displayed in the table/grid.
* If you want to update another record, simply repeat the steps.
Steps to delete Project Assignment i. Click the record from the table/grid. The system will display the record in
the appropriate fields/boxes.
ii. Click Delete button. The deleted record will be removed in the table/grid. * If you want to delete another record, simply repeat the steps.
c. Click Back button to go to Project Proposal Documentation Page.

INFORMATION TECHNOLOGY DEPARTMENT
Prepared by:
Goldelin C. Nava Kevin Christian N. Salazar
Business Systems Analyst , ITD Trainee, ITD
Date: November 24, 2015 Date: November 24, 2015
Student Involvement Project Management System Version 2.0 Page 18 of 36
8. Fill-up all necessary information in Project Budget Statement Form.
a. To display Project Budget Statement Form (Figure 4.9), click Update/View button
beside Project Budget Statement in Project Proposal Documentation Page
(Figure 4.4)
b. Select Account from which budget will be taken if Operational or Depository, then
click Save
Figure 4.9 Project Budget Statement Form (Operational or Depository)
c. Add Budget Breakdown
Figure 4.10 Project Budget Statement Form (Total Budget Breakdown section)
Steps to add Budget Item
i. Fill-up all required fields/boxes.
ii. Click Add button. The added record will be displayed in the table/grid. * If you want to add another record, simply repeat the steps.
Steps to update Budget Item
i. Click the record from the table/grid. The system will display the record in
the appropriate fields/boxes.
ii. Modify the information in the appropriate fields/boxes.
iii. Click Update button. The modified record will be displayed in the table/grid.
* If you want to update another record, simply repeat the steps.

INFORMATION TECHNOLOGY DEPARTMENT
Prepared by:
Goldelin C. Nava Kevin Christian N. Salazar
Business Systems Analyst , ITD Trainee, ITD
Date: November 24, 2015 Date: November 24, 2015
Student Involvement Project Management System Version 2.0 Page 19 of 36
Steps to delete Budget Item
i. Click the record from the table/grid. The system will display the record in
the appropriate fields/boxes.
ii. Click Delete button. The deleted record will be removed in the table/grid. * If you want to delete another record, simply repeat the steps.
d. Add Income Projection
Figure 4.11 Project Budget Statement Form (Income Project section)
Steps to add Source of Income
i. Fill-up all required fields/boxes.
ii. Click Add button. The added record will be displayed in the table/grid. * If you want to add another record, simply repeat the steps.
Steps to update Source of Income
i. Click the record from the table/grid. The system will display the record in
the appropriate fields/boxes.
ii. Modify the information in the appropriate fields/boxes.
iii. Click Update button. The modified record will be displayed in the table/grid.
* If you want to update another record, simply repeat the steps. Steps to delete Source of Income
i. Click the record from the table/grid. The system will display the record in
the appropriate fields/boxes.
ii. Click Delete button. The deleted record will be removed in the table/grid. * If you want to delete another record, simply repeat the steps.
e. Click Back button to go to Project Proposal Documentation Page.

INFORMATION TECHNOLOGY DEPARTMENT
Prepared by:
Goldelin C. Nava Kevin Christian N. Salazar
Business Systems Analyst , ITD Trainee, ITD
Date: November 24, 2015 Date: November 24, 2015
Student Involvement Project Management System Version 2.0 Page 20 of 36
9. Fill-up all necessary information in Proposal Attachment.
a. To display Proposal Attachment Form (Figure 4.12), click Update/View button
beside Attachment in Project Proposal Documentation Page (Figure 4.4)
b. Input all the required details
c. Click Upload and choose your proposal document from your local machine
d. Click add when finished to save
Figure 4.12 Proposal Attachment Form
Steps to delete an Attachment
i. Click Delete button. The deleted record will be removed in the table/grid. * If you want to delete another record, simply repeat the steps.
Steps to Download an Attachment
i. Click Download button. The file will be saved on your downloads folder. * If you want to download another record, simply repeat the steps.
e. Click Back button to go to Project Proposal Documentation Page.

INFORMATION TECHNOLOGY DEPARTMENT
Prepared by:
Goldelin C. Nava Kevin Christian N. Salazar
Business Systems Analyst , ITD Trainee, ITD
Date: November 24, 2015 Date: November 24, 2015
Student Involvement Project Management System Version 2.0 Page 21 of 36
10. Fill-up all necessary information in Project Information Data Sheet (PIDS).
a. To display Project Information Data Sheet (PIDS) Form, click Update/View button
beside Project Information Data Sheet (PIDS) in Project Proposal Documentation
Page (Figure 4.4)
b. Input all the required details
c. Add Location Map
Figure 4.13 PIDS (Location Map)
Steps to add Location Map
i. Click Browse button. Select your image file for the location map and click Open. The image will be saved as the activity’s Location Map
Steps to view Location Map
i. To check the image you uploaded, click View Location Map, the image will pop-up allowing you to check the file.
Steps to replace Location Map
i. Click remove file ii. Click browse and select your new location map image
d. Add Sponsors’ Contact Persons
Figure 4.14 PIDS (Contact Persons)
Steps to add a Contact Person
i. Fill-up all required fields/boxes.
ii. Click Add button. The added record will be displayed in the table/grid. * If you want to add another record, simply repeat the steps.
Steps to delete a Contact Person
i. Click Delete button. The deleted record will be removed in the table/grid.
e. Click save when finished.
INFORMATION TECHNOLOGY DEPARTMENT
Prepared by:
Goldelin C. Nava Kevin Christian N. Salazar
Business Systems Analyst , ITD Trainee, ITD
Date: November 24, 2015 Date: November 24, 2015
Student Involvement Project Management System Version 2.0 Page 22 of 36
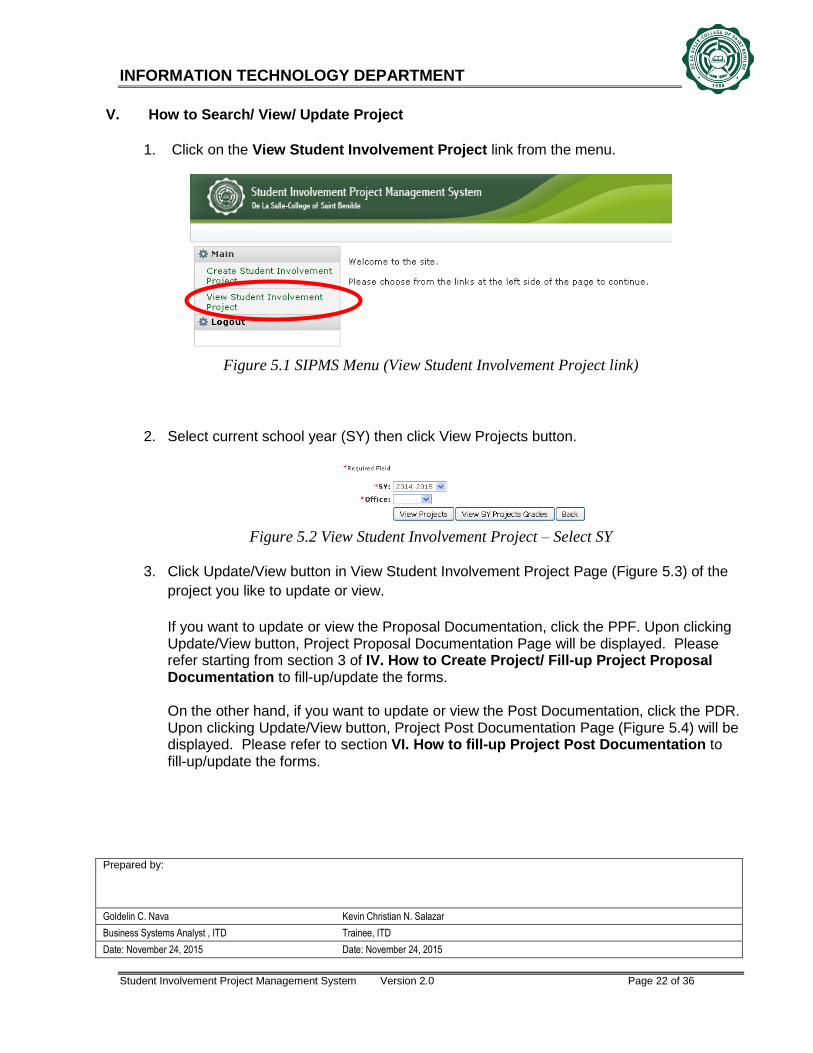
V. How to Search/ View/ Update Project
1. Click on the View Student Involvement Project link from the menu.
Figure 5.1 SIPMS Menu (View Student Involvement Project link)
2. Select current school year (SY) then click View Projects button.
Figure 5.2 View Student Involvement Project – Select SY
3. Click Update/View button in View Student Involvement Project Page (Figure 5.3) of the
project you like to update or view.
If you want to update or view the Proposal Documentation, click the PPF. Upon clicking Update/View button, Project Proposal Documentation Page will be displayed. Please refer starting from section 3 of IV. How to Create Project/ Fill-up Project Proposal Documentation to fill-up/update the forms. On the other hand, if you want to update or view the Post Documentation, click the PDR. Upon clicking Update/View button, Project Post Documentation Page (Figure 5.4) will be displayed. Please refer to section VI. How to fill-up Project Post Documentation to fill-up/update the forms.

INFORMATION TECHNOLOGY DEPARTMENT
Prepared by:
Goldelin C. Nava Kevin Christian N. Salazar
Business Systems Analyst , ITD Trainee, ITD
Date: November 24, 2015 Date: November 24, 2015
Student Involvement Project Management System Version 2.0 Page 23 of 36
Figure 5.3 View Student Involvement Project Page
Figure 5.4 Project Post Documentation Page

INFORMATION TECHNOLOGY DEPARTMENT
Prepared by:
Goldelin C. Nava Kevin Christian N. Salazar
Business Systems Analyst , ITD Trainee, ITD
Date: November 24, 2015 Date: November 24, 2015
Student Involvement Project Management System Version 2.0 Page 24 of 36
VI. How to Fill-up Project Post Documentation
1. Search the project. (Refer to section IV. How to Search/ View/ Update Project)
2. Fill-up necessary information in Post Activity Evaluation Form.
a. To display Post Activity Evaluation Form (Figure 6.1), click Update/View button
beside Post Activity Evaluation in Project Post Documentation Page (Figure 5.4).
b. Fill-up all necessary information then click Save Button.
c. Click Back button to go to Project Post Documentation Page.
Figure 6.1 Post Activity Evaluation Form

INFORMATION TECHNOLOGY DEPARTMENT
Prepared by:
Goldelin C. Nava Kevin Christian N. Salazar
Business Systems Analyst , ITD Trainee, ITD
Date: November 24, 2015 Date: November 24, 2015
Student Involvement Project Management System Version 2.0 Page 25 of 36
3. Fill-up necessary information in Project Documentation Report Form
a. To display Project Documentation Report Form (Figure 6.2), click Update/View
button beside Project Documentation Report in Project Post Documentation
Page (Figure 5.4)
b. Fill-up all necessary information then click Save Button.
c. Click Back button to go to Project Post Documentation Page.
Figure 6.2 Project Documentation Report Form

INFORMATION TECHNOLOGY DEPARTMENT
Prepared by:
Goldelin C. Nava Kevin Christian N. Salazar
Business Systems Analyst , ITD Trainee, ITD
Date: November 24, 2015 Date: November 24, 2015
Student Involvement Project Management System Version 2.0 Page 26 of 36
4. Fill-up necessary information in Financial Report Form
a. To display Financial Report Form (Figure 6.3), click Update/View button beside
Financial Report in Project Post Documentation Page (Figure 5.4)
b. Add Actual Expenses
Figure 6.3 Financial Report Form (Actual Expenses)
Steps to add Actual Expenses
i. Fill-up all required fields/boxes.
ii. Click Add button. The added record will be displayed in the table/grid. * If you want to add another record, simply repeat the steps.
Steps to update Actual Expenses
i. Click the record from the table/grid. The system will display the record in
the appropriate fields/boxes.
ii. Modify the information in the appropriate fields/boxes.
iii. Click Update button. The modified record will be displayed in the table/grid.
* If you want to update another record, simply repeat the steps. Steps to delete Actual Expenses
i. Click the record from the table/grid. The system will display the record in
the appropriate fields/boxes.
ii. Click Delete button. The deleted record will be removed in the table/grid. * If you want to delete another record, simply repeat the steps.

INFORMATION TECHNOLOGY DEPARTMENT
Prepared by:
Goldelin C. Nava Kevin Christian N. Salazar
Business Systems Analyst , ITD Trainee, ITD
Date: November 24, 2015 Date: November 24, 2015
Student Involvement Project Management System Version 2.0 Page 27 of 36
c. Add Actual Income
Figure 6.4 Financial Report Form (Actual Income section)
Steps to add Actual Source of Income
i. Fill-up all required fields/boxes.
ii. Click Add button. The added record will be displayed in the table/grid. * If you want to add another record, simply repeat the steps.
Steps to update Actual Source of Income
i. Click the record from the table/grid. The system will display the record in
the appropriate fields/boxes.
ii. Modify the information in the appropriate fields/boxes.
iii. Click Update button. The modified record will be displayed in the table/grid.
* If you want to update another record, simply repeat the steps. Steps to delete Actual Source of Income
i. Click the record from the table/grid. The system will display the record in
the appropriate fields/boxes.
ii. Click Delete button. The deleted record will be removed in the table/grid. * If you want to delete another record, simply repeat the steps.
d. Click Back button to go to Project Post Documentation Page.

INFORMATION TECHNOLOGY DEPARTMENT
Prepared by:
Goldelin C. Nava Kevin Christian N. Salazar
Business Systems Analyst , ITD Trainee, ITD
Date: November 24, 2015 Date: November 24, 2015
Student Involvement Project Management System Version 2.0 Page 28 of 36
5. Fill-up necessary information in Attendance Form
a. To display Attendance Form (Figure 6.5), click Update/View button beside
Attendance in Project Post Documentation Page (Figure 5.4)
Figure 6.5 Attendance Form
b. Add CSB Participant
Steps to add CSB Participants
i. Click Add CSB Participant and a window will pop-up.
ii. Search for students using their surnames or ID numbers iii. Fill-up all the required information and click add.
* If you want to add another record, simply repeat the steps.
Figure 6.6 Attendance Form (Add CSB Participants)

INFORMATION TECHNOLOGY DEPARTMENT
Prepared by:
Goldelin C. Nava Kevin Christian N. Salazar
Business Systems Analyst , ITD Trainee, ITD
Date: November 24, 2015 Date: November 24, 2015
Student Involvement Project Management System Version 2.0 Page 29 of 36
c. Add Non-CSB Participant
Steps to add Non-CSB Participants
i. Click Add Non-CSB Participant and a window will pop-up.
ii. Fill-up all the required information and click add. * If you want to add another record, simply repeat the steps.
Figure 6.7 Attendance Form (Add Non-CSB Participants)
d. Add Non-CSB Participant
Steps to upload a Batch Attendance File
i. Click Add Batch Upload Attendance and a window will pop-up.
ii. Click browse, select your desired csv file and click upload * If you want to upload another file, simply repeat the steps.
Figure 6.8 Attendance Form (Batch Upload)

INFORMATION TECHNOLOGY DEPARTMENT
Prepared by:
Goldelin C. Nava Kevin Christian N. Salazar
Business Systems Analyst , ITD Trainee, ITD
Date: November 24, 2015 Date: November 24, 2015
Student Involvement Project Management System Version 2.0 Page 30 of 36
e. Delete Participants
Steps to Delete Participants
i. Tick the checkboxes of the participants you want to delete (Figure 6.5
Attendance Form)
ii. Click Delete Participant * If you want to delete another record, simply repeat the steps.
f. Print Attendance
Steps to Print Attendance
i. Click Print Attendance (Figure 6.5 Attendance Form) ii. You will be redirected to a page, print using your browser (usually ctrl + p)
g. Click Back button to go to Project Post Documentation Page (Figure 5.4).
6. Fill-up necessary information in Post Attachment Form
a. To display Post Attachment Form (Figure 6.9), click Update/View button beside
Attachments in Project Post Documentation Page (Figure 5.4)
b. Fill-up all necessary information.
c. Click Browse, and select the file you wish to attach, then click add, then save
d. Click Back button to go to Project Post Documentation Page.
Figure 6.9 Post Attachment Form

INFORMATION TECHNOLOGY DEPARTMENT
Prepared by:
Goldelin C. Nava Kevin Christian N. Salazar
Business Systems Analyst , ITD Trainee, ITD
Date: November 24, 2015 Date: November 24, 2015
Student Involvement Project Management System Version 2.0 Page 31 of 36
7. Fill-up necessary information in Post Evaluation Activity Report Form (PERF).
a. To display PERF Screen, click Update/View button beside Post Evaluation
Activity Report in Project Post Documentation Page (Figure 5.4)
b. Fill-up all necessary information.
c. Print form
Steps to Print PERF
i. Click Print ii. You will be redirected to a page, print using your browser (usually ctrl + p)
d. Click Save
e. Click Back button to go to Project Post Documentation Page.
8. Cancel Project
a. Refer to Section VIII. How to Cancel a Project

INFORMATION TECHNOLOGY DEPARTMENT
Prepared by:
Goldelin C. Nava Kevin Christian N. Salazar
Business Systems Analyst , ITD Trainee, ITD
Date: November 24, 2015 Date: November 24, 2015
Student Involvement Project Management System Version 2.0 Page 32 of 36
VII. How to Endorse/ Clear/ Approve Project
1. Search/view the project you will be approving. (Refer to section V. How to Search/ View/
Update Project).
2. In Project Proposal Documentation Page/ Project Post Documentation Page, click
approval button (Figure 7.1).
A. For Project Proposal Documentation or PPF (Figure 7.1):
Org/Group Project Manager/s click Ok or Not Ok button under Prepared By
section/table.
Org/Group Treasurer/s click Ok or Not Ok button under Reviewed By
section/table.
Org/Group President/s click Ok or Not Ok button under Noted By
section/table.
Org/Group Adviser/s click Endorse or See Comment button under Endorsed
By (Adviser) section/table.
Office Coordinator click Endorse or See Comment button under Endorsed
By (Office) section/table.
Office Dean click Ok or See Comment button under Noted By (Dean)
section/table.
Office Admin click Pre-Endorse or See Comment button under Pre-Endorsed
By (Office) section/table.
CPRM click Endorse or See Comment button under Endorsed By (CPRM)
section/table.
Office Coordinator If project is Off-campus, click Pre Approve, See
Comment, or Pre Disapprove button under Pre Approved By section/table.
While, if project is In-campus, click Approve, See Comment, Disapprove button
under Approved By section/table.
Office Head click Approve, See Comment, Disapprove button under
Approved By section/table (Applicable for Off-campus projects).

INFORMATION TECHNOLOGY DEPARTMENT
Prepared by:
Goldelin C. Nava Kevin Christian N. Salazar
Business Systems Analyst , ITD Trainee, ITD
Date: November 24, 2015 Date: November 24, 2015
Student Involvement Project Management System Version 2.0 Page 33 of 36
Reminder: * The sequence of approval of PPF:
- Prepare which is done by the Org/Group PM
- Review which is done by the Org/Group Treasurer
- Note which is done by the Org/Group President
- Endorse (Adviser) which is done by the Org/Group Adviser
- Endorse (Office) which is done by the Office Coordinator
- Note (Dean) which is done by the Office Dean
- Pre-endorse (CPRM) which is done by the CPRM Coordinator
- Endorse (CPRM) which is done by the CPRM Head
- Pre-approve (Office Coordinator) which is done Office Coordinator
- Approve (Office Head) which is done by the Office Head
* Once Prepared By section has been submitted (or all Project Manager have clicked Ok button), the Project Managers are no longer allowed to update the project proposal forms.
* Clicking Not Ok and See Comment buttons will reverse all approvals to status = “Pending”. This would mean that approval will start again from Prepared By (PM). If all approvals have been reversed to pending, the Project Managers may again update the project forms.
* Note that Disapproved PPF means that the Project is already closed and locked.

INFORMATION TECHNOLOGY DEPARTMENT
Prepared by:
Goldelin C. Nava Kevin Christian N. Salazar
Business Systems Analyst , ITD Trainee, ITD
Date: November 24, 2015 Date: November 24, 2015
Student Involvement Project Management System Version 2.0 Page 34 of 36
B. For Project Post Documentation or PDR (Figure 7.1):
Org/Group Project Manager/s click Ok or Not Ok button under Prepared By
section/table.
Org/Group President/s click Ok or Not Ok button under Noted By
section/table.
Org/Group Adviser/s click Endorse or See Comment button under Endorsed
By (Adviser) section/table.
Office Coordinator click Endorse or See Comment button under Endorsed
By (Office) section/table.
CPRM Coordinator click Clear or See Comment button under Cleared By
(CPRM) section/table.
Office Coordinator If project is Off-campus, click Pre Approve, See
Comment, or Pre Disapprove button under Pre Approved By section/table.
While, if project is In-campus, click Approve, See Comment, Disapprove button
under Approved By section/table.
Office Head click Approve, See Comment, Disapprove button under
Approved By section/table (Applicable for Off-campus projects).
Reminder: * The sequence of approval of PDR:
- Prepare which is done by the Org/Group PM
- Note which is done by the Org/Group President
- Endorse (Adviser) which is done by the Org/Group Adviser
- Endorse (Office) which is done by the Office Coordinator
- Clear (CPRM) which is done by the CPRM Coordinator
- Pre-approve (Office Coordinator) which is done Office Coordinator
- Approve (Office Head) which is done by the Office Head

INFORMATION TECHNOLOGY DEPARTMENT
Prepared by:
Goldelin C. Nava Kevin Christian N. Salazar
Business Systems Analyst , ITD Trainee, ITD
Date: November 24, 2015 Date: November 24, 2015
Student Involvement Project Management System Version 2.0 Page 35 of 36
* Once Prepared By section has been submitted (or all Project Managers have clicked Ok button), the Project Managers are no longer allowed to update the project forms.
* Clicking not Ok and See Comment buttons will reverse all approvals to status = “Pending”. This would mean that approval will start again from Prepared By. If all approvals have been reversed to pending, the Project Managers may again update the post documentation forms.
* Note that Disapproved PDR means that the Project is already closed and locked.
Figure 7.1 Project Proposal/Post Documentation (Approval section/table)

INFORMATION TECHNOLOGY DEPARTMENT
Prepared by: Approved by:
Noted by:
Goldelin C. Nava Kevin Christian N. Salazar Leandro A. Loyola Dexter Basunillo Randy G. Tandoc Jonathan Broqueza Jhoann Tandoc
BSA, ITD Trainee, ITD SIO Head Coordinator, SIO ISPC Director ITDO Head PISSO Head
Date: Nov. 24, 2015 Date: Nov. 24, 2015
Date: Date:
Date: Date: Date:
Student Involvement Project Management System Version 2.0 Page 36 of 36
VIII. How to Cancel Project
1. Search/view the project you will cancel. (Refer to section V. How to Search/ View/
Update Project).
2. In Project Proposal Documentation /Project Post Documentation page, encode your
reason for project cancellation in Cancel Project field/text area (Figure 8.1).
3. Click Cancel Project Button. Note that Cancelled Projects may no longer be restored.
Figure 8.1 Cancel Project field/text area (in Project Proposal/Post Documentation page)
* Note that only Primary Project Manager and President of Org/Group who created the project may cancel it.
IX. Logout
1. When you are finished, click Logout link in menu (left side of the page) for security
purposes.