Embed Size (px)
Citation preview
Unit 2785 (V7) Create a computer spreadsheet to
provide a solution for organisation use
w ith Microsoft Excel 2010
Easy to follow
Step-by-step instructions
Covers Unit Standard Criteria
A Cheryl Price Publication
Student Workbook
Sam
ple D
ocum
ent

Unit Standard 2785 (Version 7) Create a computer spreadsheet to provide a solution for organisation use - Excel 2010 This book covers the course outline for the following New Zealand Qualifications Authority Unit Standard: Unit Standard 2785 - GENERIC COMPUTING (Level 3, Credit 5)
Create a computer spreadsheet to provide a solution for organisation use (Version 7)
All topics in this Unit Standard are included in the Student Workbook. Retrievable exercise files are used with this book. These will be made available to you by your tutor. © Cherylprice.co.nz Limited, May 2012
Cheryl Price T.Dip.WP, T.Dip.T. ISBN 978-1-877562-29-7
Disclaimer All rights reserved. No part of this publication may be reproduced or transmitted in any form or by any means, electronic or mechanical, including photocopying, scanning, recording, or any information storage and retrieval system, without permission in writing from Cherylprice.co.nz Limited. No patent liability is assumed with respect to the use of the information contained herein. While every precaution has been taken in the preparation of this book, the publisher and authors assume no responsibility for errors or omissions. Neither is any liability assumed for damages resulting from the use of the information contained herein.
PO Box 187 Phone: (09) 422 7230 Matakana Mobile: 021 715566 Auckland 0948 Fax: (09) 422 7236
Web address: www.cherylprice.co.nz Published in New Zealand
Sam
ple D
ocum
ent
i
Table of Contents Spreadsheets ......................................................................................................................... 1
Advantages of Electronic Spreadsheets ............................................................................. 1 Samples of Spreadsheets ................................................................................................... 1
The Workbook ........................................................................................................................ 2 Formulas ................................................................................................................................ 3
Basic Formulas ................................................................................................................... 3 Cells and Cell References .............................................................................................. 3 Operators........................................................................................................................ 3 Formulas and Functions ................................................................................................. 4
Creating a Workbook .............................................................................................................. 5 Entering Cell Contents ............................................................................................................ 5
Text .................................................................................................................................... 5 Entering Months using the Fill Handle ................................................................................ 6 Widening Columns ............................................................................................................. 6
Changing the Width of a Single Column ......................................................................... 6 Entering Data into a Spreadsheet ....................................................................................... 7 Editing Within a Cell............................................................................................................ 7 Deleting .............................................................................................................................. 7 Undo ................................................................................................................................... 8 Redo ................................................................................................................................... 8
Applying Bold Text and Totalling a Row .......................................................................... 8 Saving the Workbook .......................................................................................................... 8 Closing a Workbook............................................................................................................ 8
Fonts ...................................................................................................................................... 9 Format Cells, Font tab Dialog Box ...................................................................................... 9 Mini Toolbar ........................................................................................................................ 9
Formatting your Worksheet .................................................................................................. 10 Borders and Patterns ............................................................................................................ 11
Borders Button.................................................................................................................. 11 Format Cells, Border tab Dialog Box ................................................................................. 11 Removing Borders ............................................................................................................ 11 Adding Colour ................................................................................................................... 12 Adding a Pattern ............................................................................................................... 12
Alignment ............................................................................................................................. 13 Aligning Titles ................................................................................................................... 13 Aligning Across a Selection .............................................................................................. 13 Wrap Text ......................................................................................................................... 13 Indenting Text in a Cell ..................................................................................................... 13 Vertical Alignment and Orientation .................................................................................... 14 Distributed (Indent) ........................................................................................................... 15 Turning Off Gridlines......................................................................................................... 16
Formatting Cells ................................................................................................................... 16 Print Preview .................................................................................................................... 17 Page Setup ....................................................................................................................... 18 Printing ............................................................................................................................. 19
Printing a Selection ....................................................................................................... 19 Closing a Workbook.......................................................................................................... 19
Copying and Moving Data Summary .................................................................................... 20 Using the Right Mouse Button .......................................................................................... 20
Calculating with Time Data ................................................................................................... 21 Entering Dates and Times .................................................................................................... 23 Shortcut Menu ...................................................................................................................... 26 Insert Symbol ....................................................................................................................... 26 Inserting and Deleting ........................................................................................................... 27
Sam
ple D
ocum
ent

ii
Inserting ........................................................................................................................... 27 The Ribbon – Home tab................................................................................................ 27 Right Mouse button ...................................................................................................... 27
Deleting ............................................................................................................................ 27 The Ribbon – Home tab................................................................................................ 27 Right Mouse button ...................................................................................................... 27
Absolute Cell References ..................................................................................................... 29 Calculating Percentages ...................................................................................................... 32
Percentage Formula Summary ......................................................................................... 32 Format Painter ..................................................................................................................... 33 Headers and Footers............................................................................................................ 33
Predefined Headers and Footers ...................................................................................... 33 AutoFormat .......................................................................................................................... 36
Applying an AutoFormat ................................................................................................... 36 Cell Styles ............................................................................................................................ 37 Using more than One Cell Range in a Function.................................................................... 38 Checking Data...................................................................................................................... 39
Error Checking Options .................................................................................................... 39 Error Checking ................................................................................................................. 39
Formula Auditing .................................................................................................................. 41 Finding an Error................................................................................................................ 44 Auditing Across Worksheets ............................................................................................. 44 Check Totals Formulas ..................................................................................................... 45
Working with Multiple Worksheets ........................................................................................ 46 Moving Data between Worksheets ................................................................................... 46 Copying Data from Worksheet to Worksheet .................................................................... 47 Moving, Copying, Deleting and Inserting New Worksheets ............................................... 47 Formatting across Worksheets ......................................................................................... 48 Grouping Worksheets ....................................................................................................... 49
Format Painter .............................................................................................................. 50 Formulas across Worksheets ........................................................................................... 50
Creating a Formula using Named Ranges across Worksheets ..................................... 51 Viewing Different Sheets within one Workbook ................................................................ 52 Using the Right Mouse button on Sheet tabs .................................................................... 53
Working with Charts ............................................................................................................. 54 Changing the Chart Type ................................................................................................. 56 Formatting the Chart and Axis Titles ................................................................................. 57 Changing the Vertical (Value) Axis ................................................................................... 58 Printing a Chart ................................................................................................................ 59
Pie Chart .............................................................................................................................. 62 Formatting the Pie Chart .................................................................................................. 62 Changing Data ................................................................................................................. 63 Exploding Segments ........................................................................................................ 63
Exploding all Segments of a Pie Chart.......................................................................... 64 Quick Charts ........................................................................................................................ 65
Add Titles ......................................................................................................................... 65 Adding a Message Arrow ................................................................................................. 65 Changing Colours ............................................................................................................. 67 Adding a Data Table ......................................................................................................... 67 Removing the Legend ...................................................................................................... 67 Changing the Orientation of Labels .................................................................................. 67
AutoComplete (Pick from Drop-down List) ............................................................................ 69 Sorting ................................................................................................................................. 70 Names ................................................................................................................................. 71
Defining a Name............................................................................................................... 71 Create Names .................................................................................................................. 72 Using a Name with a Formula .......................................................................................... 72 Using a Name in the Formula Palette ............................................................................... 72
Sam
ple D
ocum
ent
iii
Using a Name with Go To ................................................................................................. 73 Deleting Names ................................................................................................................ 73
Series ................................................................................................................................... 74 Fill Series Options ............................................................................................................ 74 Using the Shortcut Menu .................................................................................................. 75
Freeze Panes ....................................................................................................................... 76 Hide Columns and Rows ...................................................................................................... 77
Hide Columns ................................................................................................................... 77 Unhide Columns ............................................................................................................... 77
Landscape Printing ............................................................................................................... 78 Simple Functions .................................................................................................................. 79
Average ............................................................................................................................ 79 MAX ................................................................................................................................. 80 MIN ................................................................................................................................... 80 Count ................................................................................................................................ 81 Round ............................................................................................................................... 81
Help with Functions .............................................................................................................. 82 More Functions ..................................................................................................................... 84
IF Function ....................................................................................................................... 84 Multiple IF Function Criteria .............................................................................................. 86 LOOKUP Functions .......................................................................................................... 87
Adding a VLOOKUP Function ....................................................................................... 87 Printing an Entire Workbook ............................................................................................. 89 PMT Function ................................................................................................................... 90 FV Function ...................................................................................................................... 93 Nested Functions .............................................................................................................. 95 STANDARD DEVIATION Function ................................................................................... 97 CHOOSE Function ........................................................................................................... 98 SUMIF Function ................................................................................................................ 99 COUNTIF Function ........................................................................................................... 99 NOW() Function ................................................................................................................ 99
Data Validation ................................................................................................................... 105 Adding a Message to Data Validation Cells .................................................................... 106 Deleting a Validation Message ....................................................................................... 106 Adding a Warning to a Data Validation Cell .................................................................... 107 Inserting a Data Validation List into a Worksheet ............................................................ 108
Conditional Formatting ....................................................................................................... 109 Cell Values ..................................................................................................................... 109 Formula Values .............................................................................................................. 110
Macros ............................................................................................................................... 111 What is a Macro? ............................................................................................................ 111 Macro Security ................................................................................................................ 112 Assigning Macros to ‘This Workbook’ ............................................................................. 113
Recording a Macro ..................................................................................................... 113 Assigning a Macro Shortcut Key ................................................................................. 113 Recording a Macro ..................................................................................................... 114 Viewing the Macro ...................................................................................................... 115 Printing the Contents of a Macro ................................................................................. 116
Executing the Recorded Macro ....................................................................................... 116 Recording a Macro using Relative References ............................................................... 117 Using the Go To Special Dialog Box ............................................................................... 118 Assigning a Macro to a Button ........................................................................................ 118
Workbook Security ............................................................................................................. 121 Password Protection ....................................................................................................... 121 Protecting a Workbook ................................................................................................... 122 Protecting a Worksheet .................................................................................................. 122 Unlocking Cells ............................................................................................................... 122 Entering Data ................................................................................................................. 123
Sam
ple D
ocum
ent

iv
Unprotecting a Workbook/Worksheet ............................................................................. 123 Comments .......................................................................................................................... 124
Adding Comments to Cells ............................................................................................. 124 Editing/Deleting/Printing Comments ............................................................................... 124
Templates .......................................................................................................................... 125 Creating a Template ....................................................................................................... 125 Using a Custom Template .............................................................................................. 127 Changing a Workbook to a Template ............................................................................. 129
Sam
ple D
ocum
ent
High School Student Workbook
© Cherylprice.co.nz Limited US2785 v7 Excel 2010 1
Spreadsheets A spreadsheet is essentially a large working area composed of rows and columns. Electronic spreadsheets are very flexible and are widely used in industry and commerce for tasks such as financial accounts, forecasting results, recording and comparing data, and storing valuable information such as personnel details. Home users can create a budget, work out a savings scheme or calculate travelling expenses, while a school may use it to calculate and store examination results and student records. In addition to Excel 2010, other spreadsheet programs include Lotus 1-2-3, Corel Quattro Pro, SuperCalc.
Advantages of Electronic Spreadsheets • Calculations are performed quickly and easily.
• If data is altered, the results of calculations that use the data automatically adjust.
• Charts can be used to visually display data, eg bar, column, pie, line.
• Data can be manipulated, grouped and sorted into a specific order for lists, databases, etc.
• Data within a well organised spreadsheet can be quickly located.
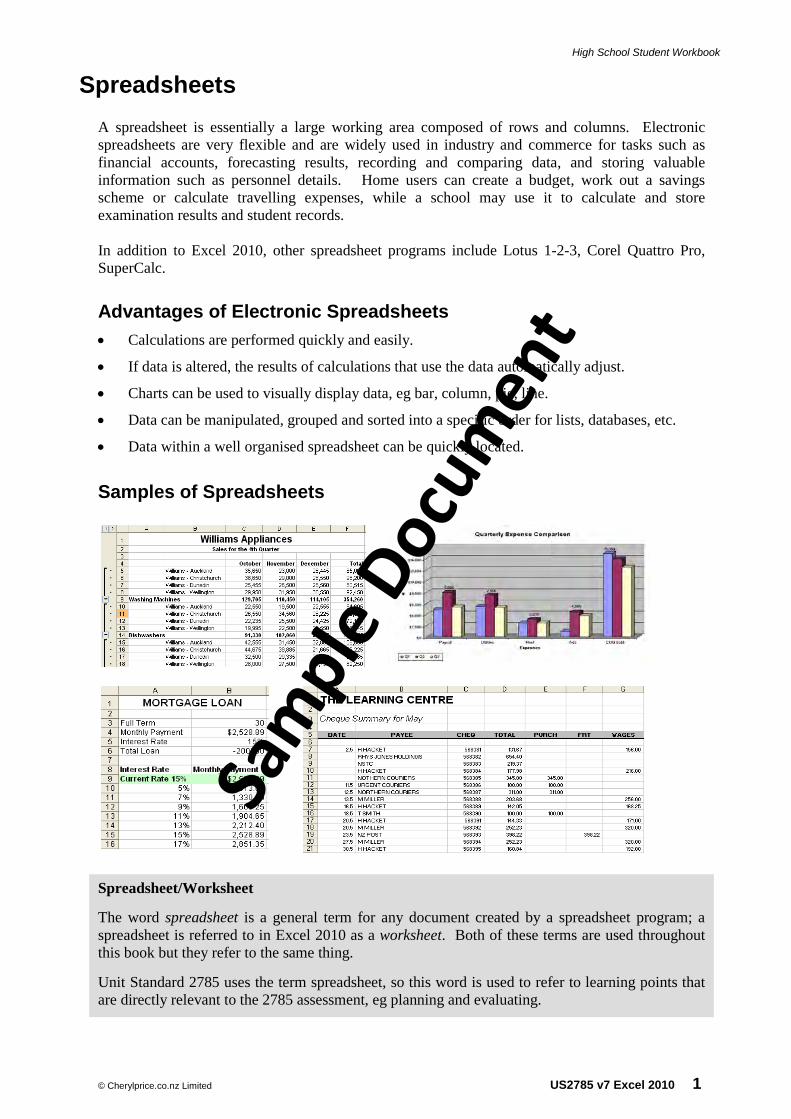
Samples of Spreadsheets
Spreadsheet/Worksheet
The word spreadsheet is a general term for any document created by a spreadsheet program; a spreadsheet is referred to in Excel 2010 as a worksheet. Both of these terms are used throughout this book but they refer to the same thing.
Unit Standard 2785 uses the term spreadsheet, so this word is used to refer to learning points that are directly relevant to the 2785 assessment, eg planning and evaluating.
Sam
ple D
ocum
ent
High School Student Workbook
2 US2785 v7 Excel 2010 © Cherylprice.co.nz Limited
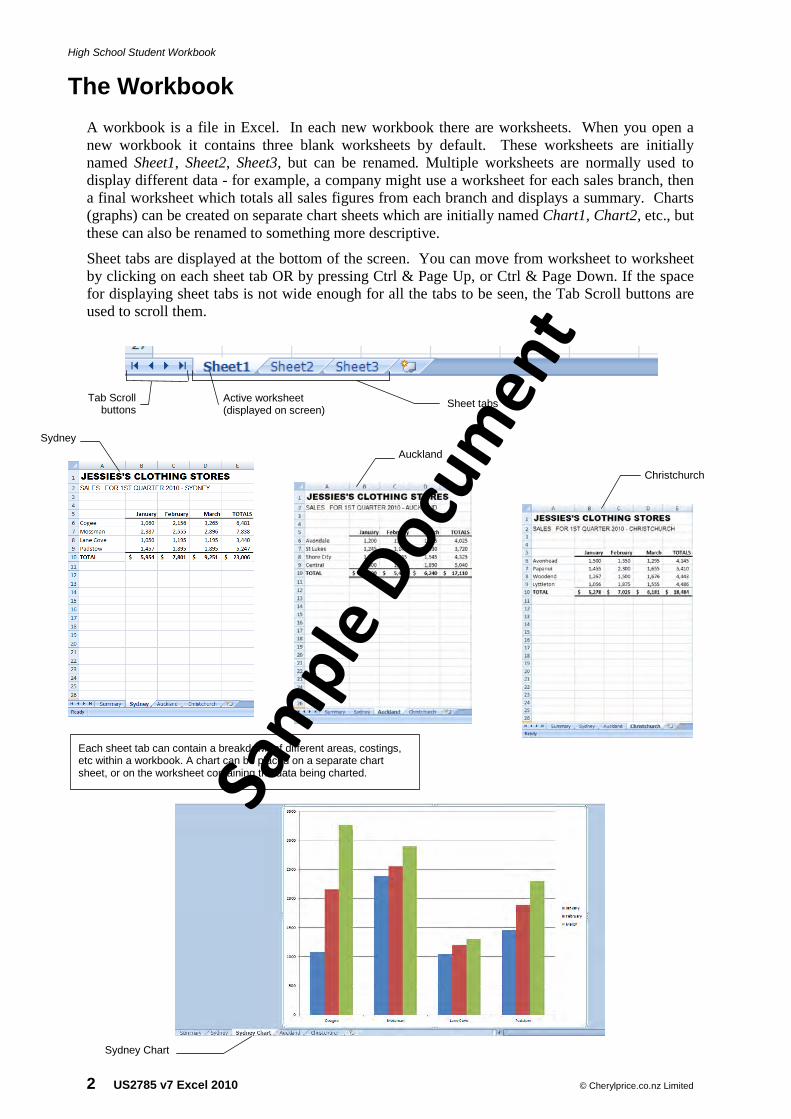
The Workbook A workbook is a file in Excel. In each new workbook there are worksheets. When you open a new workbook it contains three blank worksheets by default. These worksheets are initially named Sheet1, Sheet2, Sheet3, but can be renamed. Multiple worksheets are normally used to display different data - for example, a company might use a worksheet for each sales branch, then a final worksheet which totals all sales figures from each branch and displays a summary. Charts (graphs) can be created on separate chart sheets which are initially named Chart1, Chart2, etc., but these can also be renamed to something more descriptive.
Sheet tabs are displayed at the bottom of the screen. You can move from worksheet to worksheet by clicking on each sheet tab OR by pressing Ctrl & Page Up, or Ctrl & Page Down. If the space for displaying sheet tabs is not wide enough for all the tabs to be seen, the Tab Scroll buttons are used to scroll them.
Active worksheet (displayed on screen)
Tab Scroll buttons Sheet tabs
Sydney Auckland
Christchurch
Each sheet tab can contain a breakdown of different areas, costings, etc within a workbook. A chart can be placed on a separate chart sheet, or on the worksheet containing the data being charted.
Sydney Chart
Sam
ple D
ocum
ent
High School Student Workbook
© Cherylprice.co.nz Limited US2785 v7 Excel 2010 3
Formulas
Basic Formulas In an electronic spreadsheet a formula always starts with =
This identifies that the cell contains a formula and not general data. Cell references, numbers, and operators are used to create formulas.
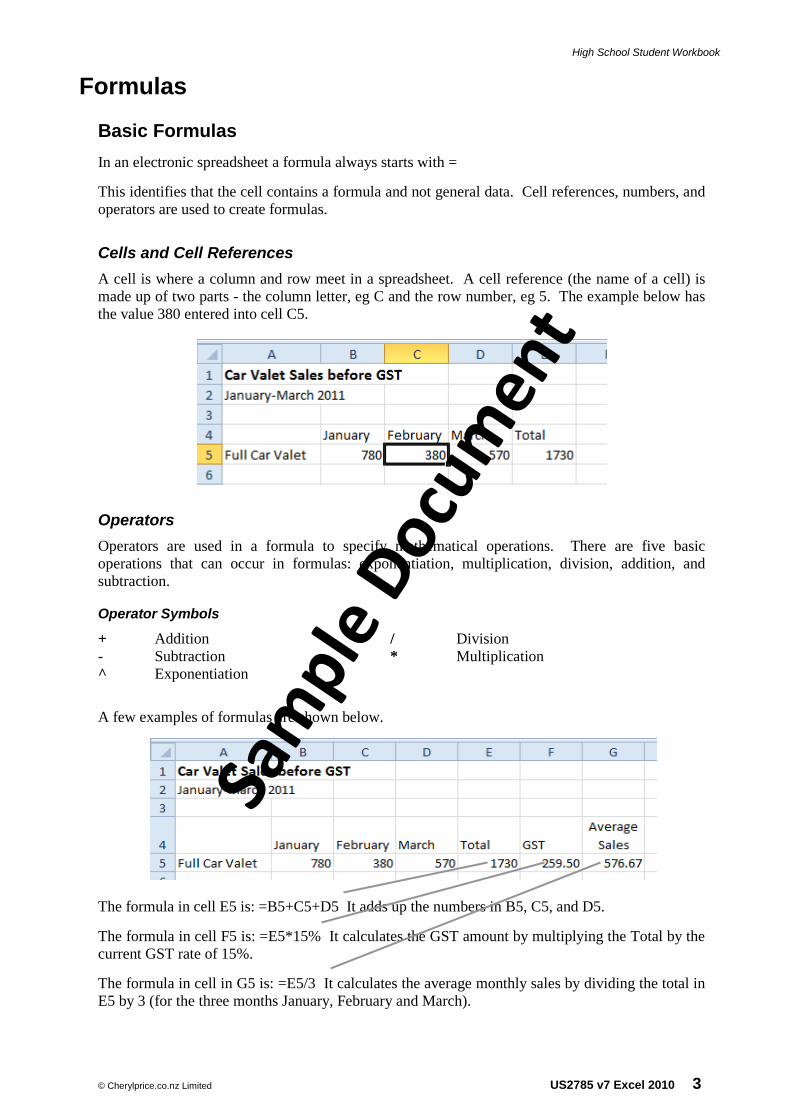
Cells and Cell References A cell is where a column and row meet in a spreadsheet. A cell reference (the name of a cell) is made up of two parts - the column letter, eg C and the row number, eg 5. The example below has the value 380 entered into cell C5.
Operators Operators are used in a formula to specify mathematical operations. There are five basic operations that can occur in formulas: exponentiation, multiplication, division, addition, and subtraction.
Operator Symbols
+ Addition / Division - Subtraction * Multiplication ^ Exponentiation
A few examples of formulas are shown below.
The formula in cell E5 is: =B5+C5+D5 It adds up the numbers in B5, C5, and D5.
The formula in cell F5 is: =E5*15% It calculates the GST amount by multiplying the Total by the current GST rate of 15%.
The formula in cell in G5 is: =E5/3 It calculates the average monthly sales by dividing the total in E5 by 3 (for the three months January, February and March).
Sam
ple D
ocum
ent
High School Student Workbook
4 US2785 v7 Excel 2010 © Cherylprice.co.nz Limited
Formulas and Functions
Formulas can be straightforward calculations as shown in the previous example, or more complicated formulas or functions.
Functions are pre-defined calculations that are part of the Excel program.
The basic syntax for a function is =FUNCTION NAME(arguments). The arguments are usually references to the cells containing the values that the function will use.
Function names often give you an idea of what the function does, eg SUM adds up all the cells in a given range, while AVERAGE calculates the average amount in a given range of cells.
It would have been simpler to use functions to calculate the Total and Average sales in the example on the previous page.
The function in E5 would read: =SUM(B5:D5) The function in G5 would read: =AVERAGE(B5:D5) The colon (:) indicates an inclusive range of cells, in these examples, B5 through D5.
Parentheses
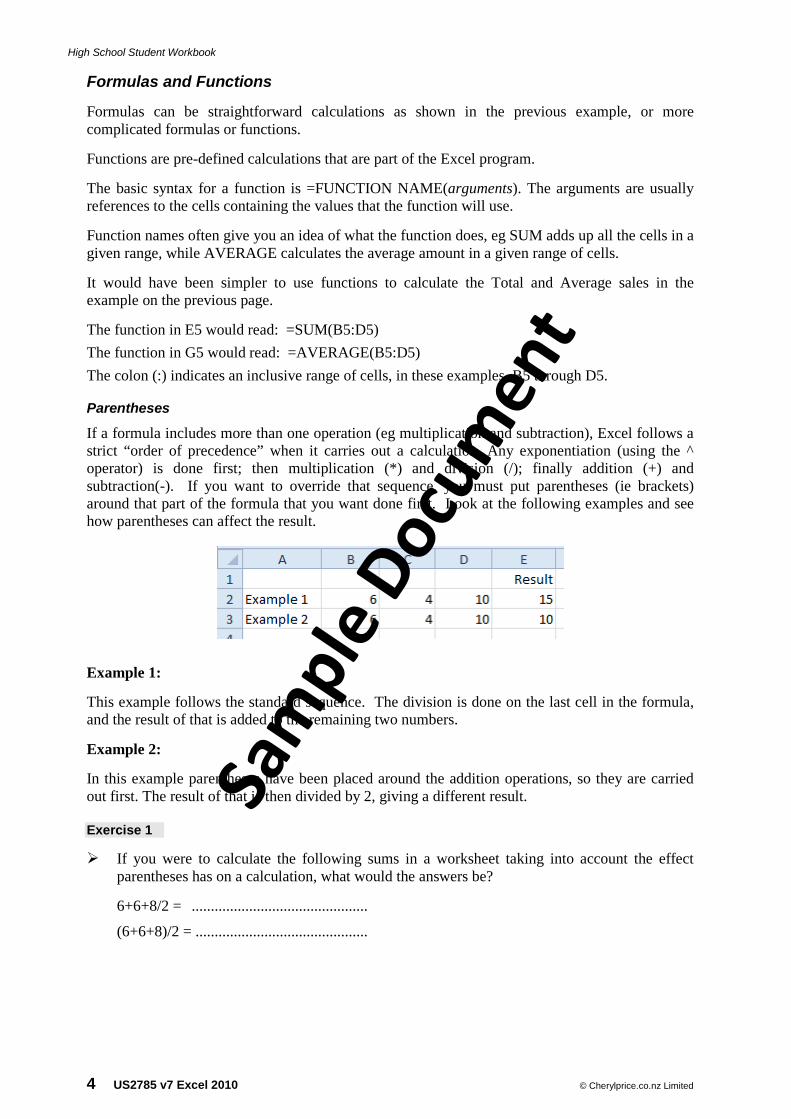
If a formula includes more than one operation (eg multiplication and subtraction), Excel follows a strict “order of precedence” when it carries out a calculation. Any exponentiation (using the ^ operator) is done first; then multiplication (*) and division (/); finally addition (+) and subtraction(-). If you want to override that sequence, you must put parentheses (ie brackets) around that part of the formula that you want done first. Look at the following examples and see how parentheses can affect the result.
Example 1:
This example follows the standard sequence. The division is done on the last cell in the formula, and the result of that is added to the remaining two numbers.
Example 2:
In this example parentheses have been placed around the addition operations, so they are carried out first. The result of that is then divided by 2, giving a different result. Exercise 1
If you were to calculate the following sums in a worksheet taking into account the effect parentheses has on a calculation, what would the answers be?
6+6+8/2 = ..............................................
(6+6+8)/2 = .............................................
Sam
ple D
ocum
ent
High School Student Workbook
© Cherylprice.co.nz Limited US2785 v7 Excel 2010 5
Creating a Workbook In the following exercise you will create a new spreadsheet in an Excel 2010 workbook.
Exercise 2
Click on the Start button at the bottom left of your screen, select All Programs, Microsoft Office then click on Microsoft Excel 2010.
Excel 2010 opens and a new workbook is displayed on the screen.
Entering Cell Contents Data can be entered into any cell in a worksheet. Data can be text, numbers, or formulas. Remember, a formula always begins with the = sign. Data can be entered into a worksheet when the mode indicator at the bottom left of the screen displays Ready. If this is not displayed press the Esc key on the keyboard until Ready appears.
Text Text is any combination of letters, numbers, spaces, punctuation, etc. Text data is automatically aligned at the left of the cell. If the text is wider than the cell, it will display over the top of the adjacent cell(s).
In the exercise that follows you will enter data into a cell.
Exercise 3
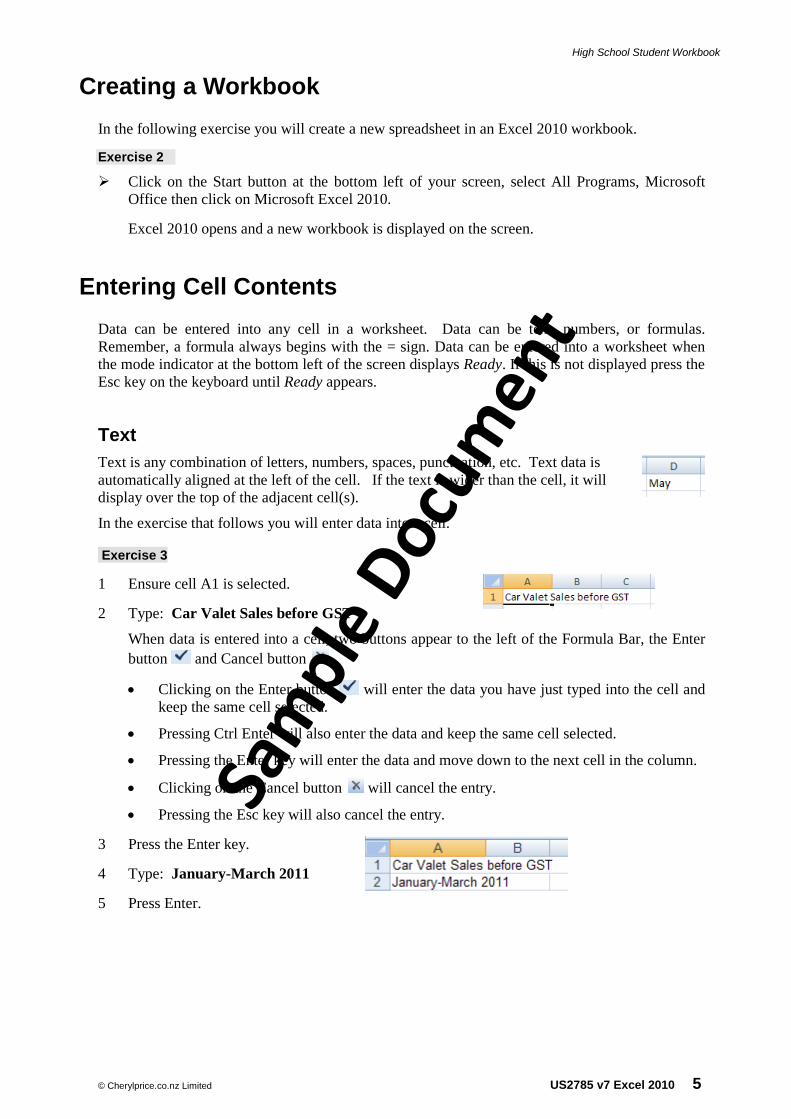
1 Ensure cell A1 is selected.
2 Type: Car Valet Sales before GST
When data is entered into a cell, two buttons appear to the left of the Formula Bar, the Enter button and Cancel button .
• Clicking on the Enter button will enter the data you have just typed into the cell and keep the same cell selected.
• Pressing Ctrl Enter will also enter the data and keep the same cell selected.
• Pressing the Enter key will enter the data and move down to the next cell in the column.
• Clicking on the Cancel button will cancel the entry.
• Pressing the Esc key will also cancel the entry.
3 Press the Enter key.
4 Type: January-March 2011
5 Press Enter.
Sam
ple D
ocum
ent

High School Student Workbook
6 US2785 v7 Excel 2010 © Cherylprice.co.nz Limited
Fill handle
Entering Months using the Fill Handle Exercise 4
1 Click on cell B4.
2 Type: January and press Ctrl Enter (to stay in cell B4).
3 Position the mouse pointer on the fill handle of the cell, as shown at the right.
4 Hold the left mouse button and drag to the right to cell D4. Release the mouse button. You should now have January through to March entered into cells B4 to D4.
5 Click on cell E4 and type: Total Press Enter.
6 Click on cell A5 and type: Full Car Valet Press Enter.
7 Press Ctrl Home to move to cell A1.
Widening Columns When data is inserted into a cell it may extend beyond the width of the cell.
• Text that is wider than the column width may be displayed across several cells - the data is still contained within the one cell, it just covers other cells. If the adjacent cell(s) contain their own data that takes precedence, the display of the data in the left cell will be truncated (ie appears to be cut off), although the full data remains in the cell.
• Numbers entered that exceed the column width will display an exponential figure or will display ##### within the cell. The column will widen slightly.
Changing the Width of a Single Column
Exercise 5
1 To widen column A so that cell A5 can display all its data, position the mouse pointer between the column A and column B headers as shown at the right.
2 Click and hold down the left mouse button. Drag to the right to increase the column width. A box will indicate the width of the column. Drag to the right until 13.00 appears as displayed below, then release the left mouse button.
Sam
ple D
ocum
ent

High School Student Workbook
© Cherylprice.co.nz Limited US2785 v7 Excel 2010 7
Entering Data into a Spreadsheet By pre-selecting cells you can ensure that the data you type is entered only into those selected cells.
Exercise 6
1 Click and drag across cells B5 to D5.
2 Type: 780 Press Enter. This will move the cursor to the next cell.
3 Type: 380 Press Enter.
4 Type: 570 Press Enter.
5 Turn off cell selection by clicking on another cell or moving to another cell using one of the arrow keys.
If you have made an error, select the incorrect cell and amend it using the editing techniques described below.
Editing Within a Cell Exercise 7
Cell entries can be altered directly within the cell. You will now change the entry in cell A2 to read January-March 2012.
1 Double click on cell A2 (OR with cell A2, selected press F2). Press the End key to move to the end of the text. (When you double click on a cell the insertion point is positioned where you double clicked.)
2 Press the Backspace key once, then type: 2
3 Click on the Enter button OR press Ctrl Enter.
Deleting To delete the contents of a cell, click on the cell and press the Delete key. To delete the contents of a range of cells, select the cells then press the Delete key.
Exercise 8
1 Click on cell A5.
2 Press the Delete key.
The Delete key will remove only the contents of the cell.
For other options, click on in the Editing group of the Home tab. You can select the most appropriate action from:
Clear All clears all formats, cell contents and notes Clear Formats clears formatting eg cell alignments, font styles, etc Clear Contents clears only the cell contents Clear Comments clears any comments attached to the cell(s) Clear Hyperlinks clears hyperlinks from the selected cell(s)
Sam
ple D
ocum
ent
High School Student Workbook
8 US2785 v7 Excel 2010 © Cherylprice.co.nz Limited
Undo If you make an error when editing, the Undo feature allows you to cancel your last action.
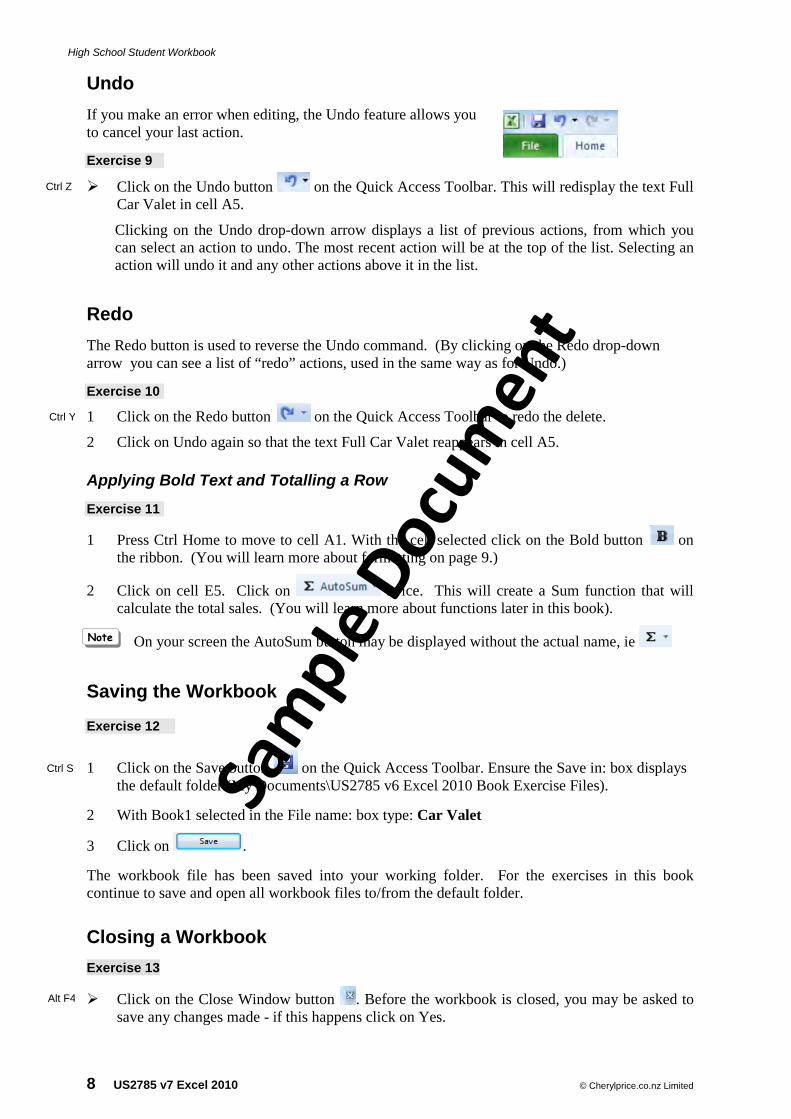
Exercise 9
Click on the Undo button on the Quick Access Toolbar. This will redisplay the text Full Car Valet in cell A5.
Clicking on the Undo drop-down arrow displays a list of previous actions, from which you can select an action to undo. The most recent action will be at the top of the list. Selecting an action will undo it and any other actions above it in the list.
Redo The Redo button is used to reverse the Undo command. (By clicking on the Redo drop-down arrow you can see a list of “redo” actions, used in the same way as for Undo.)
Exercise 10
1 Click on the Redo button on the Quick Access Toolbar to redo the delete.
2 Click on Undo again so that the text Full Car Valet reappears in cell A5.
Applying Bold Text and Totalling a Row Exercise 11
1 Press Ctrl Home to move to cell A1. With the cell selected click on the Bold button on the ribbon. (You will learn more about formatting on page 9.)
2 Click on cell E5. Click on twice. This will create a Sum function that will calculate the total sales. (You will learn more about functions later in this book).
On your screen the AutoSum button may be displayed without the actual name, ie
Saving the Workbook Exercise 12
1 Click on the Save button on the Quick Access Toolbar. Ensure the Save in: box displays the default folder (My Documents\US2785 v6 Excel 2010 Book Exercise Files).
2 With Book1 selected in the File name: box type: Car Valet
3 Click on .
The workbook file has been saved into your working folder. For the exercises in this book continue to save and open all workbook files to/from the default folder.
Closing a Workbook Exercise 13
Click on the Close Window button . Before the workbook is closed, you may be asked to save any changes made - if this happens click on Yes.
Ctrl S
Ctrl Y
Ctrl Z
Alt F4
Note
Sam
ple D
ocum
ent
High School Student Workbook
© Cherylprice.co.nz Limited US2785 v7 Excel 2010 9
Tips
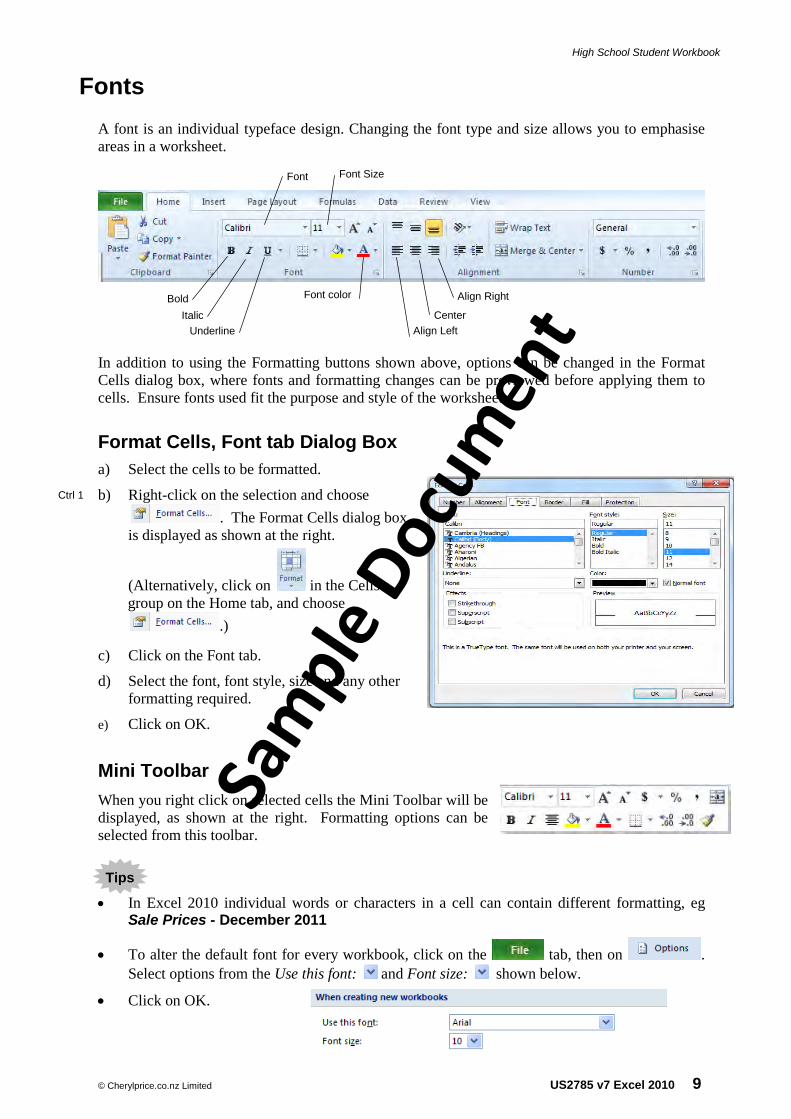
Fonts A font is an individual typeface design. Changing the font type and size allows you to emphasise areas in a worksheet.
In addition to using the Formatting buttons shown above, options can be changed in the Format Cells dialog box, where fonts and formatting changes can be previewed before applying them to cells. Ensure fonts used fit the purpose and style of the worksheet.
Format Cells, Font tab Dialog Box a) Select the cells to be formatted.
b) Right-click on the selection and choose . The Format Cells dialog box
is displayed as shown at the right.
(Alternatively, click on in the Cells group on the Home tab, and choose
.)
c) Click on the Font tab.
d) Select the font, font style, size and any other formatting required.
e) Click on OK.
Mini Toolbar
When you right click on selected cells the Mini Toolbar will be displayed, as shown at the right. Formatting options can be selected from this toolbar.
• In Excel 2010 individual words or characters in a cell can contain different formatting, eg
Sale Prices - December 2011
• To alter the default font for every workbook, click on the tab, then on . Select options from the Use this font: and Font size: shown below.
• Click on OK.
Ctrl 1
Font Font Size
Bold Italic
Underline
Font color
Align Left Center
Align Right
Sam
ple D
ocum
ent
High School Student Workbook
10 US2785 v7 Excel 2010 © Cherylprice.co.nz Limited
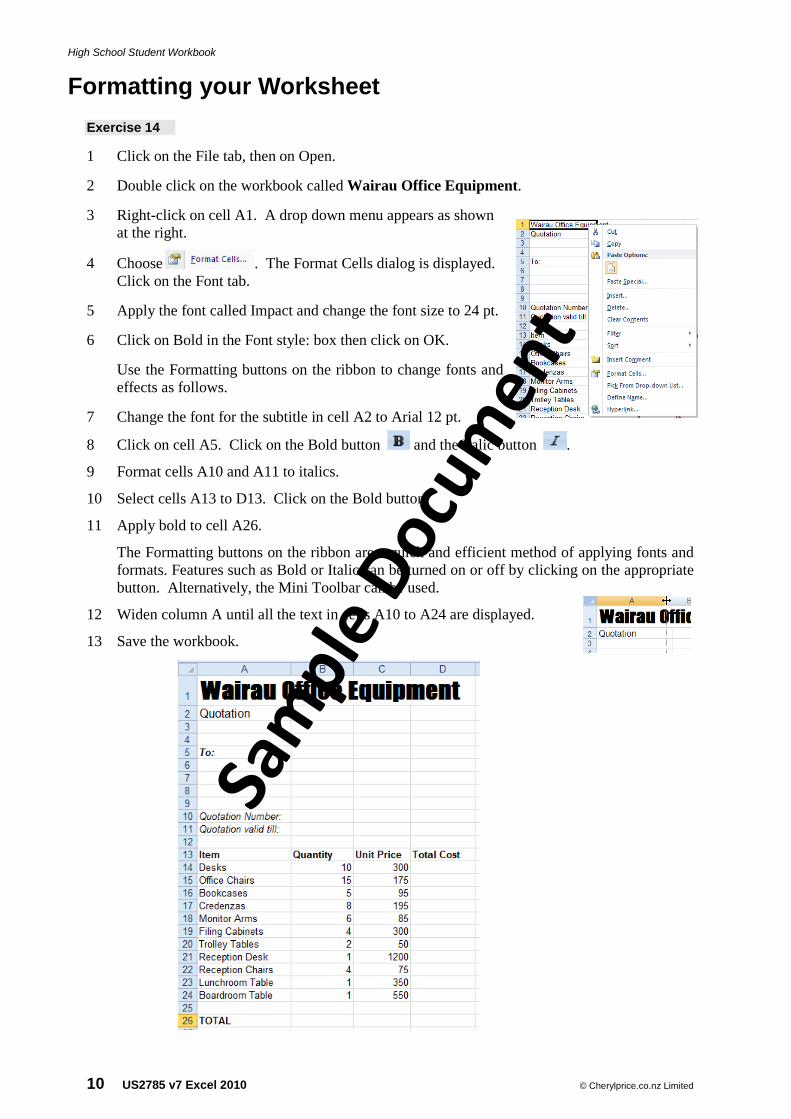
Formatting your Worksheet Exercise 14
1 Click on the File tab, then on Open.
2 Double click on the workbook called Wairau Office Equipment.
3 Right-click on cell A1. A drop down menu appears as shown at the right.
4 Choose . The Format Cells dialog is displayed. Click on the Font tab.
5 Apply the font called Impact and change the font size to 24 pt.
6 Click on Bold in the Font style: box then click on OK.
Use the Formatting buttons on the ribbon to change fonts and effects as follows.
7 Change the font for the subtitle in cell A2 to Arial 12 pt.
8 Click on cell A5. Click on the Bold button and the Italic button .
9 Format cells A10 and A11 to italics.
10 Select cells A13 to D13. Click on the Bold button.
11 Apply bold to cell A26.
The Formatting buttons on the ribbon are a quick and efficient method of applying fonts and formats. Features such as Bold or Italic can be turned on or off by clicking on the appropriate button. Alternatively, the Mini Toolbar can be used.
12 Widen column A until all the text in cells A10 to A24 are displayed.
13 Save the workbook.
Sam
ple D
ocum
ent
High School Student Workbook
© Cherylprice.co.nz Limited US2785 v7 Excel 2010 11
Borders and Patterns
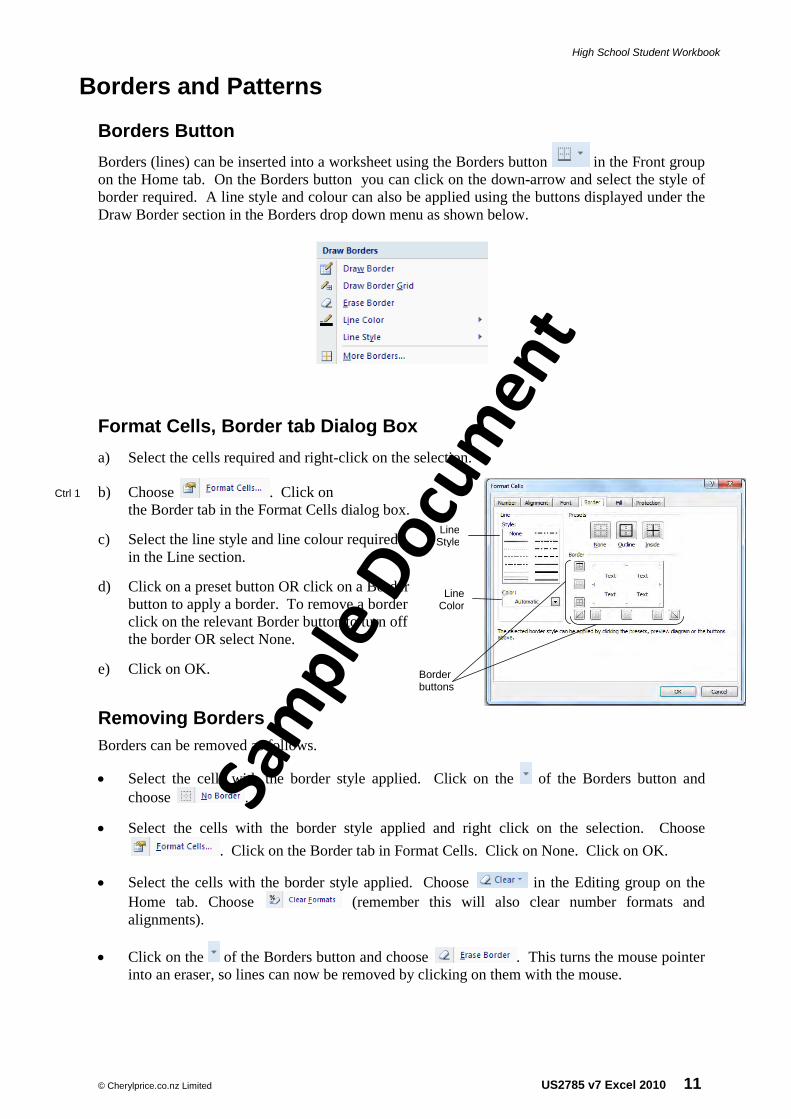
Borders Button Borders (lines) can be inserted into a worksheet using the Borders button in the Front group on the Home tab. On the Borders button you can click on the down-arrow and select the style of border required. A line style and colour can also be applied using the buttons displayed under the Draw Border section in the Borders drop down menu as shown below.
Format Cells, Border tab Dialog Box a) Select the cells required and right-click on the selection.
b) Choose . Click on the Border tab in the Format Cells dialog box.
c) Select the line style and line colour required in the Line section.
d) Click on a preset button OR click on a Border button to apply a border. To remove a border click on the relevant Border button to turn off the border OR select None.
e) Click on OK.
Removing Borders Borders can be removed as follows.
• Select the cells with the border style applied. Click on the of the Borders button and choose .
• Select the cells with the border style applied and right click on the selection. Choose . Click on the Border tab in Format Cells. Click on None. Click on OK.
• Select the cells with the border style applied. Choose in the Editing group on the Home tab. Choose (remember this will also clear number formats and alignments).
• Click on the of the Borders button and choose . This turns the mouse pointer into an eraser, so lines can now be removed by clicking on them with the mouse.
Ctrl 1
Border buttons
Line Style
Line Color
Sam
ple D
ocum
ent
High School Student Workbook
12 US2785 v7 Excel 2010 © Cherylprice.co.nz Limited
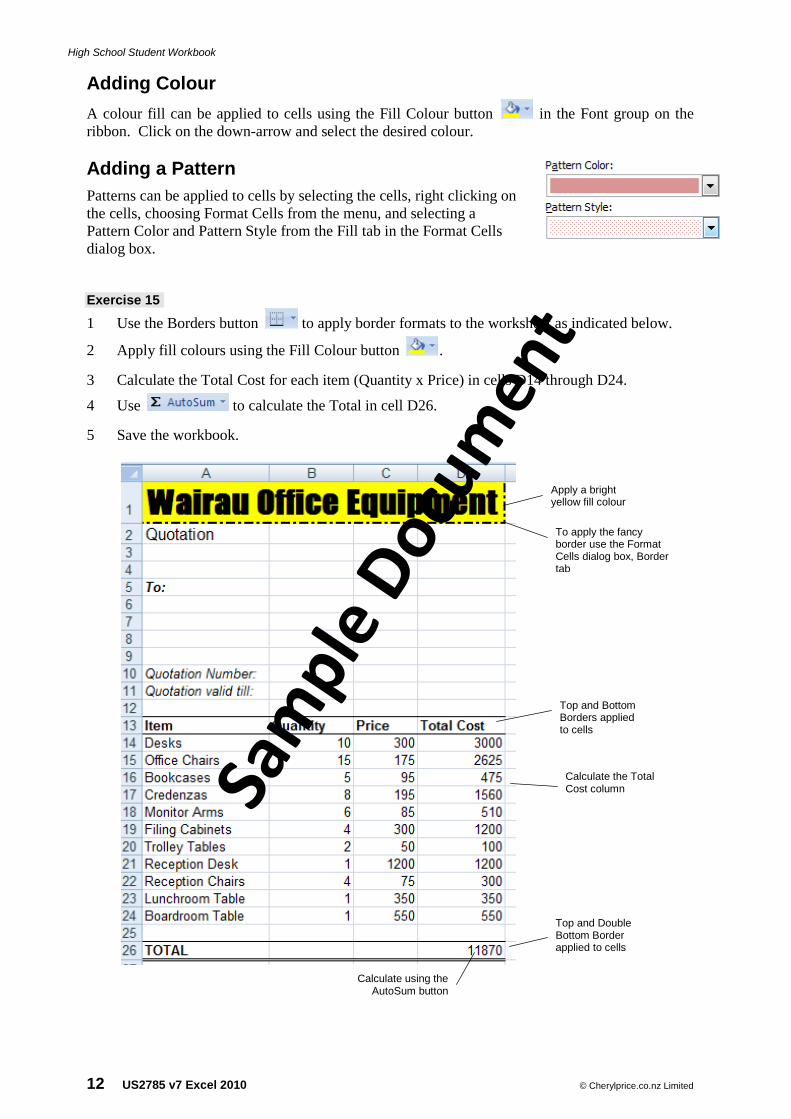
Adding Colour A colour fill can be applied to cells using the Fill Colour button in the Font group on the ribbon. Click on the down-arrow and select the desired colour. Adding a Pattern Patterns can be applied to cells by selecting the cells, right clicking on the cells, choosing Format Cells from the menu, and selecting a Pattern Color and Pattern Style from the Fill tab in the Format Cells dialog box. Exercise 15
1 Use the Borders button to apply border formats to the worksheet as indicated below.
2 Apply fill colours using the Fill Colour button .
3 Calculate the Total Cost for each item (Quantity x Price) in cells D14 through D24.
4 Use to calculate the Total in cell D26.
5 Save the workbook.
Top and Bottom Borders applied to cells
Top and Double Bottom Border applied to cells
Calculate the Total Cost column
To apply the fancy border use the Format Cells dialog box, Border tab
Apply a bright yellow fill colour
Calculate using the AutoSum button
Sam
ple D
ocum
ent
High School Student Workbook
© Cherylprice.co.nz Limited US2785 v7 Excel 2010 13
Tip
Alignment
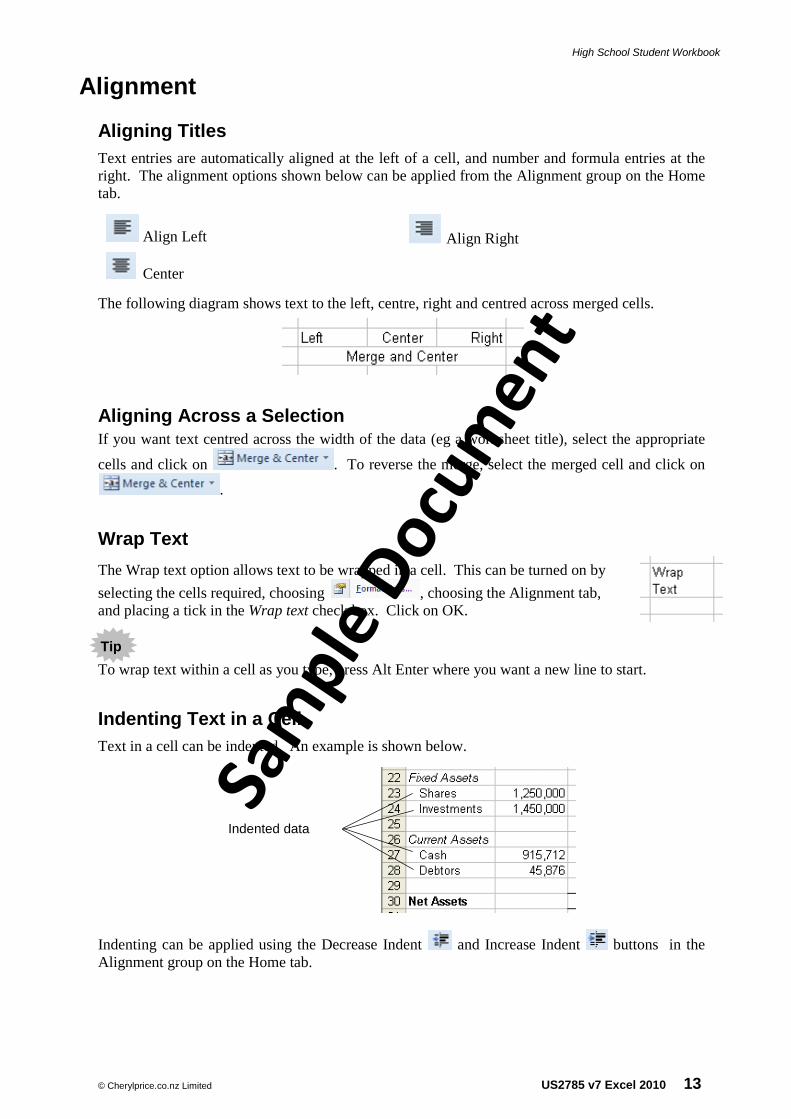
Aligning Titles Text entries are automatically aligned at the left of a cell, and number and formula entries at the right. The alignment options shown below can be applied from the Alignment group on the Home tab.
Align Left Align Right
Center
The following diagram shows text to the left, centre, right and centred across merged cells.
Aligning Across a Selection If you want text centred across the width of the data (eg a worksheet title), select the appropriate
cells and click on . To reverse the merge, select the merged cell and click on
.
Wrap Text The Wrap text option allows text to be wrapped in a cell. This can be turned on by selecting the cells required, choosing , choosing the Alignment tab, and placing a tick in the Wrap text check box. Click on OK.
To wrap text within a cell as you type, press Alt Enter where you want a new line to start.
Indenting Text in a Cell Text in a cell can be indented. An example is shown below.
Indenting can be applied using the Decrease Indent and Increase Indent buttons in the Alignment group on the Home tab.
Indented data
Sam
ple D
ocum
ent
High School Student Workbook
14 US2785 v7 Excel 2010 © Cherylprice.co.nz Limited
Tip
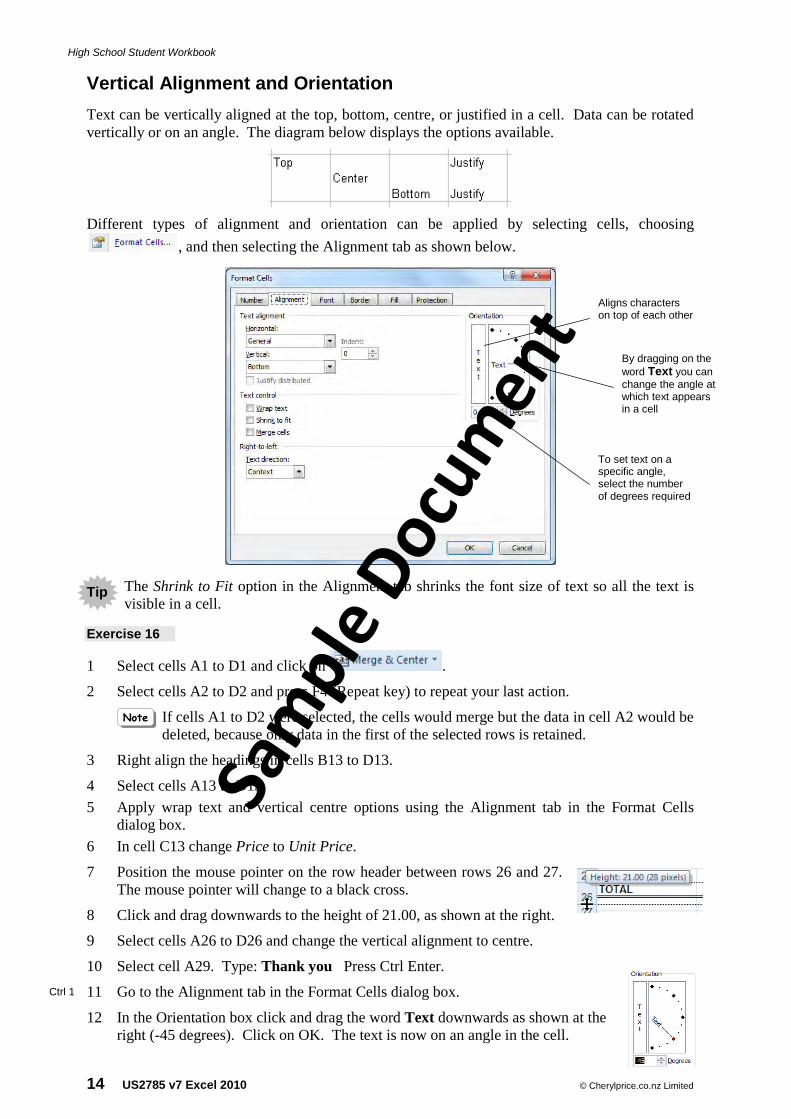
Vertical Alignment and Orientation Text can be vertically aligned at the top, bottom, centre, or justified in a cell. Data can be rotated vertically or on an angle. The diagram below displays the options available.
Different types of alignment and orientation can be applied by selecting cells, choosing
, and then selecting the Alignment tab as shown below.
The Shrink to Fit option in the Alignment tab shrinks the font size of text so all the text is visible in a cell.
Exercise 16
1 Select cells A1 to D1 and click on .
2 Select cells A2 to D2 and press F4 (Repeat key) to repeat your last action.
If cells A1 to D2 were selected, the cells would merge but the data in cell A2 would be deleted, because only data in the first of the selected rows is retained.
3 Right align the headings in cells B13 to D13.
4 Select cells A13 to D13. 5 Apply wrap text and vertical centre options using the Alignment tab in the Format Cells
dialog box. 6 In cell C13 change Price to Unit Price.
7 Position the mouse pointer on the row header between rows 26 and 27. The mouse pointer will change to a black cross.
8 Click and drag downwards to the height of 21.00, as shown at the right.
9 Select cells A26 to D26 and change the vertical alignment to centre.
10 Select cell A29. Type: Thank you Press Ctrl Enter.
11 Go to the Alignment tab in the Format Cells dialog box.
12 In the Orientation box click and drag the word Text downwards as shown at the right (-45 degrees). Click on OK. The text is now on an angle in the cell.
Note
Ctrl 1
By dragging on the word Text you can change the angle at which text appears in a cell
To set text on a specific angle, select the number of degrees required
Aligns characters on top of each other
Sam
ple D
ocum
ent
High School Student Workbook
© Cherylprice.co.nz Limited US2785 v7 Excel 2010 15
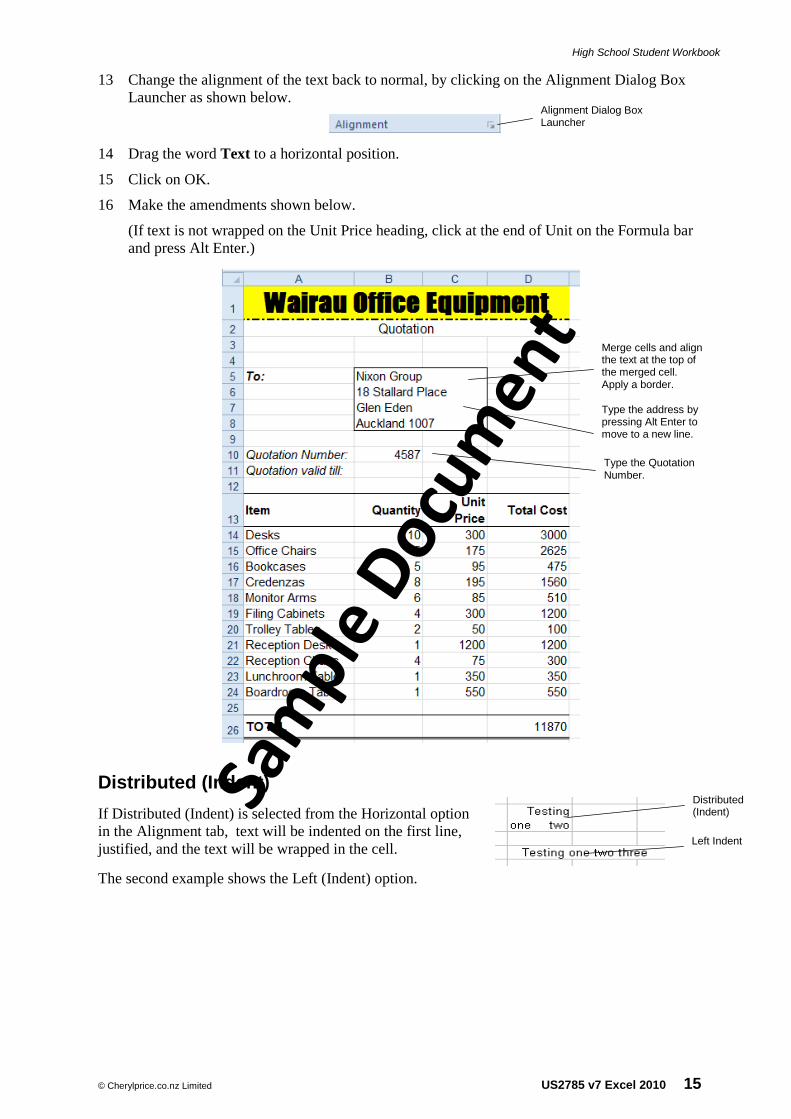
13 Change the alignment of the text back to normal, by clicking on the Alignment Dialog Box Launcher as shown below.
14 Drag the word Text to a horizontal position.
15 Click on OK.
16 Make the amendments shown below.
(If text is not wrapped on the Unit Price heading, click at the end of Unit on the Formula bar and press Alt Enter.)
Distributed (Indent) If Distributed (Indent) is selected from the Horizontal option in the Alignment tab, text will be indented on the first line, justified, and the text will be wrapped in the cell.
The second example shows the Left (Indent) option.
Distributed (Indent)
Left Indent
Merge cells and align the text at the top of the merged cell. Apply a border.
Type the address by pressing Alt Enter to move to a new line.
Type the Quotation Number.
Alignment Dialog Box Launcher
Sam
ple D
ocum
ent
High School Student Workbook
16 US2785 v7 Excel 2010 © Cherylprice.co.nz Limited
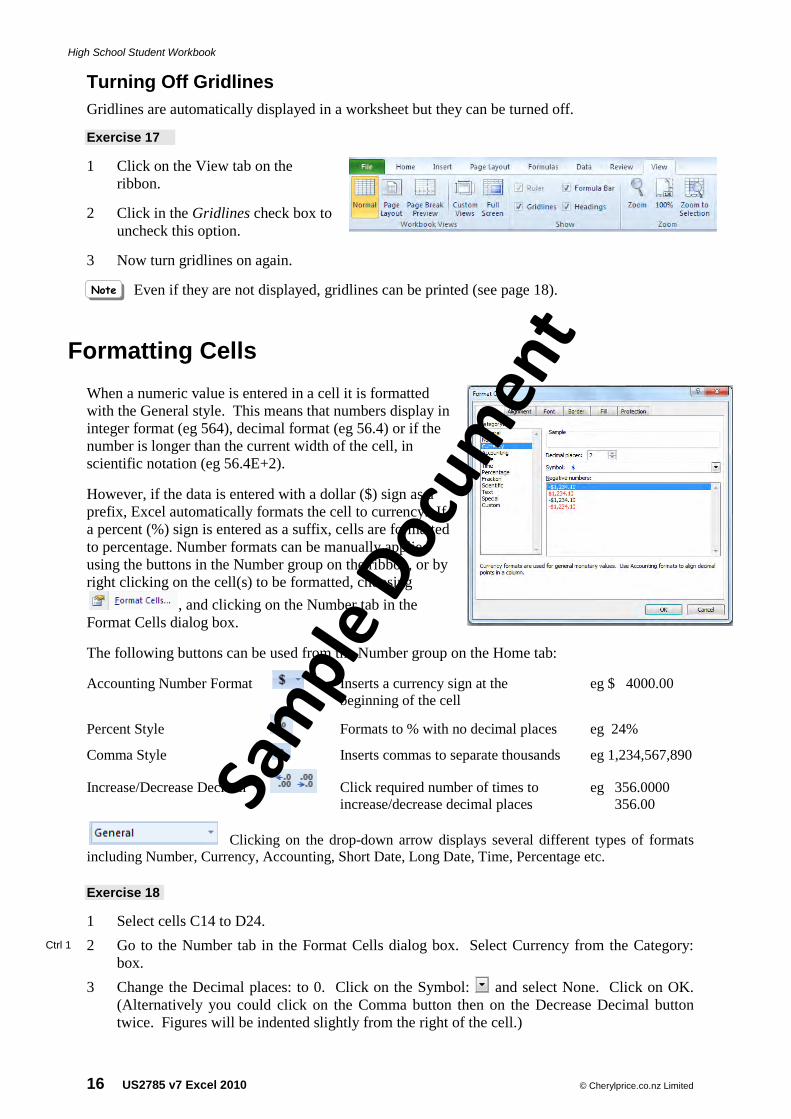
Turning Off Gridlines Gridlines are automatically displayed in a worksheet but they can be turned off.
Exercise 17
1 Click on the View tab on the ribbon.
2 Click in the Gridlines check box to uncheck this option.
3 Now turn gridlines on again.
Even if they are not displayed, gridlines can be printed (see page 18).
Formatting Cells When a numeric value is entered in a cell it is formatted with the General style. This means that numbers display in integer format (eg 564), decimal format (eg 56.4) or if the number is longer than the current width of the cell, in scientific notation (eg 56.4E+2). However, if the data is entered with a dollar ($) sign as a prefix, Excel automatically formats the cell to currency. If a percent (%) sign is entered as a suffix, cells are formatted to percentage. Number formats can be manually applied using the buttons in the Number group on the ribbon, or by right clicking on the cell(s) to be formatted, choosing
, and clicking on the Number tab in the Format Cells dialog box. The following buttons can be used from the Number group on the Home tab:
Accounting Number Format Inserts a currency sign at the eg $ 4000.00 beginning of the cell
Percent Style Formats to % with no decimal places eg 24%
Comma Style Inserts commas to separate thousands eg 1,234,567,890
Increase/Decrease Decimal Click required number of times to eg 356.0000 increase/decrease decimal places 356.00
Clicking on the drop-down arrow displays several different types of formats including Number, Currency, Accounting, Short Date, Long Date, Time, Percentage etc.
Exercise 18
1 Select cells C14 to D24. 2 Go to the Number tab in the Format Cells dialog box. Select Currency from the Category:
box. 3 Change the Decimal places: to 0. Click on the Symbol: and select None. Click on OK.
(Alternatively you could click on the Comma button then on the Decrease Decimal button twice. Figures will be indented slightly from the right of the cell.)
Note
Ctrl 1
Sam
ple D
ocum
ent
High School Student Workbook
© Cherylprice.co.nz Limited US2785 v7 Excel 2010 17
4 Select cell D26. In the Number tab select the Currency category and set the number in the Decimal places: box to 0. Click on the Symbol: and select $ English (New Zealand).
5 Click on OK. While cell D26 is still selected, the format of the cell appears in the Home tab on the ribbon, as shown at the right.
6 Click on the down arrow next to Currency in the Home Tab. Click on . The format of cell D26 is restored to a general number.
7 Click on the Undo button to restore the previous formatting.
8 Save the workbook.
Clicking on the Number or Alignment Dialog Box Launcher buttons will display the relevant tab in the Format Cells dialog box.
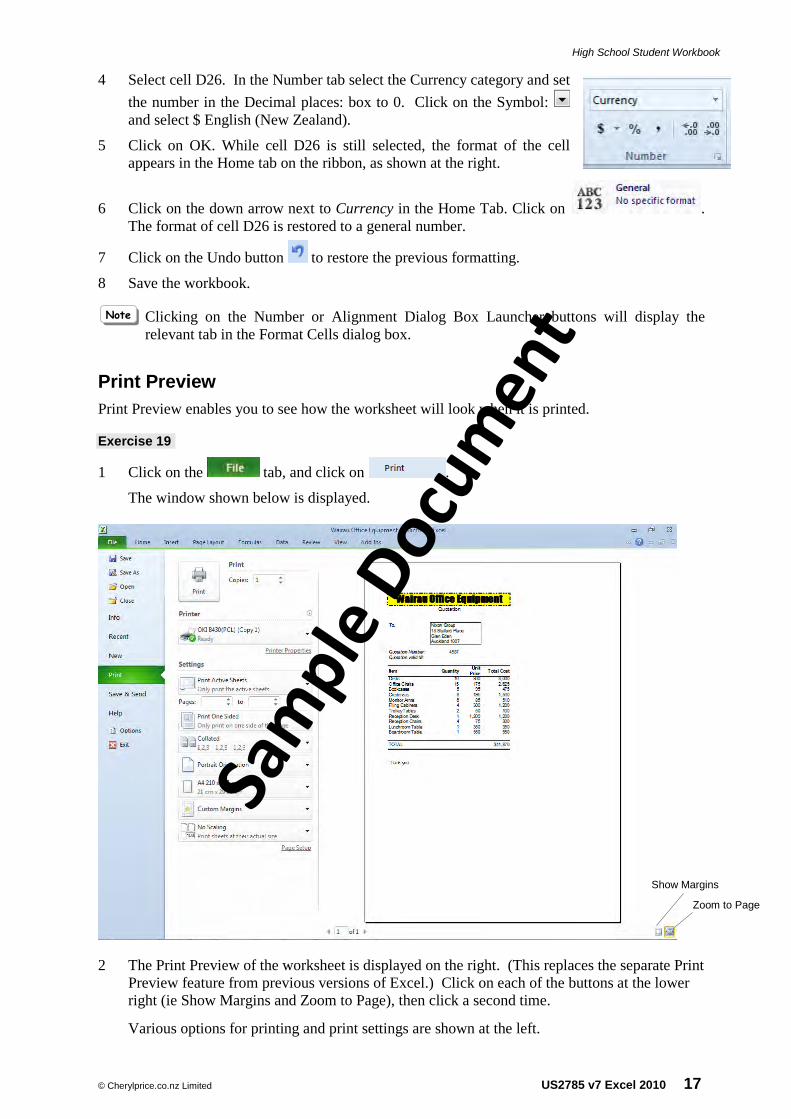
Print Preview Print Preview enables you to see how the worksheet will look when it is printed.
Exercise 19
1 Click on the tab, and click on .
The window shown below is displayed.
2 The Print Preview of the worksheet is displayed on the right. (This replaces the separate Print Preview feature from previous versions of Excel.) Click on each of the buttons at the lower right (ie Show Margins and Zoom to Page), then click a second time.
Various options for printing and print settings are shown at the left.
Note
Zoom to Page
Show Margins
Sam
ple D
ocum
ent