Embed Size (px)
Citation preview

EExxaammSSoofftt SSttuuddeenntt IInn--CCllaassss IInnssttrruuccttiioonnss SSooffTTeesstt UUssee IInnssttrruuccttiioonnss
Student In-Class Exam Instructions
for Windows Users
Page 1 of 24 Updated 10/08/2010

EExxaammSSoofftt SSttuuddeenntt IInn--CCllaassss IInnssttrruuccttiioonnss SSooffTTeesstt UUssee IInnssttrruuccttiioonnss Students who experience technical difficulties with SofTest should contact ExamSoft technical support at 1-866-429-8889 or refer to the frequently asked questions by going to www.examsoft.com/msulaw and clicking “Support” as shown below. Limited assistance is provided by MSU Law’s Technology Services Department in room 208 at 517-432-9292 or [email protected].
Page 2 of 24 Updated 10/08/2010

EExxaammSSoofftt SSttuuddeenntt IInn--CCllaassss IInnssttrruuccttiioonnss SSooffTTeesstt UUssee IInnssttrruuccttiioonnss
Section 1: Downloading the Exam File
Step1 – An exam file may be downloaded prior to the day of the exam. If you have already downloaded the exam file, proceed to Section 2 on Page 7. Otherwise, proceed to Step 2.
Step 2 - Launch SofTest by clicking the SofTest shortcut icon on your Desktop as shown in Figure 1 below. (If you have not installed SofTest, go to www.examsoft.com/msulaw and click “Exam Taker”. You will be asked to provide your Student ID (PID Number) and password (MSU Net ID).
Figure 1
Step 3 – When SofTest Launcher displays, select ‘Download Exam Files’ as shown in Figure 2 below.
Figure 2
Page 3 of 24 Updated 10/08/2010

EExxaammSSoofftt SSttuuddeenntt IInn--CCllaassss IInnssttrruuccttiioonnss SSooffTTeesstt UUssee IInnssttrruuccttiioonnss
Step 4 – Enter your Exam Taker ID number (PID) and Password (MSU NetID) and click ‘Next’ as shown in Figure 3 below.
Figure 3
Step 5 – After clicking “Next” available exam files are displayed. Highlight the Exam File and click ‘Download’ as shown in Figure 4 below. (Note: The “Download” button can only be used if you have highlighted the exam file.)
Page 4 of 24 Updated 10/08/2010
Figure 4

EExxaammSSoofftt SSttuuddeenntt IInn--CCllaassss IInnssttrruuccttiioonnss SSooffTTeesstt UUssee IInnssttrruuccttiioonnss Step 6 – As a file is being downloaded, the response shown in Figure 5 will appear:
Figure 5
Step 7 – When the Exam File has finished downloading, a ‘Success’ message window is displayed as shown in Figure 6 below. Click “OK.”
Figure 6
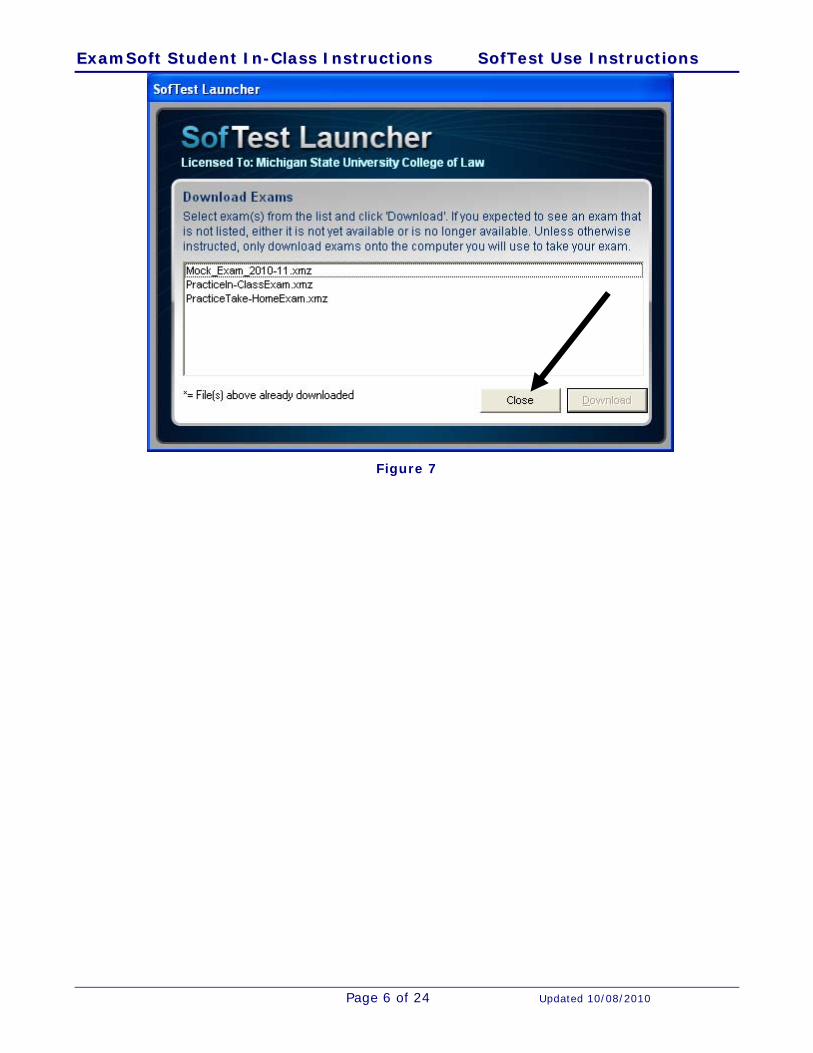
Step 8 – The Exam File has been downloaded and now resides locally on the testing computer inside the ‘Exams’ folder in the SofTest program directory. Click ‘Close’ as shown in Figure 7 below to exit SofTest Launcher. Note: You will not need to be connected to Internet again until you have completed the exam and are ready to exit.
Page 5 of 24 Updated 10/08/2010
EExxaammSSoofftt SSttuuddeenntt IInn--CCllaassss IInnssttrruuccttiioonnss SSooffTTeesstt UUssee IInnssttrruuccttiioonnss
Page 6 of 24 Updated 10/08/2010
Figure 7

EExxaammSSoofftt SSttuuddeenntt IInn--CCllaassss IInnssttrruuccttiioonnss SSooffTTeesstt UUssee IInnssttrruuccttiioonnss
Section 2: Opening the Exam File Step 1 – Launch SofTest by clicking the SofTest shortcut icon.
Step 2 - From SofTest Launcher, select ‘Launch SofTest’ as shown in Figure 8 below.
Note: If your exam was successfully downloaded, as noted in Section 1, Internet access is not required to take your exam. However, you will need Internet access to upload the exam after it is completed.
Page 7 of 24 Updated 10/08/2010
Figure 8

EExxaammSSoofftt SSttuuddeenntt IInn--CCllaassss IInnssttrruuccttiioonnss SSooffTTeesstt UUssee IInnssttrruuccttiioonnss Step 3 – SofTest is now open. Use the drop down menu under “Exam File Location”, as
shown in Figure 9, and select the appropriate exam, as shown in Figure 10.
Page 8 of 24 Updated 10/08/2010
Figure 9
Figure 10

EExxaammSSoofftt SSttuuddeenntt IInn--CCllaassss IInnssttrruuccttiioonnss SSooffTTeesstt UUssee IInnssttrruuccttiioonnss Step 4 – The Exam File is now loaded into SofTest. Your Exam Permit Number, Exam
Name, Instructor and Exam File Location text fields are automatically updated once the Exam File has been loaded, as shown in Figure 11. Note: The Proctor will provide the “Exam Password” when it is time to begin the exam. (The password for the Practice In-Class Exam is MSULAW)
Page 9 of 24 Updated 10/08/2010
Figure 11
Step 5: - Although your exam permit number automatically appears, it is important to confirm that it matches the permit number on your downloaded printout. If not, you should type your correct exam permit number in the box and report the discrepancy to the Registrar’s Office in room 309 IMMEDIATELY AFTER the exam has ended.
Step 6 – When instructed to do so, type and click “Start”. Your computer will reboot.
Once it has rebooted, the SofTest Notice shown in Figure 12 will appear.
Do not proceed beyond Figure 12 until instructed to do so by the proctor!!!!!!!

EExxaammSSoofftt SSttuuddeenntt IInn--CCllaassss IInnssttrruuccttiioonnss SSooffTTeesstt UUssee IInnssttrruuccttiioonnss
Figure 12
Step 7 – Students are to IMMEDIATELY switch to a bluebook if they experience any technical difficulty!!!!!!!!!
NOTE
Your computer will now place you into secure mode and block you from using any other programs or software on your computer.
Page 10 of 24 Updated 10/08/2010

EExxaammSSoofftt SSttuuddeenntt IInn--CCllaassss IInnssttrruuccttiioonnss SSooffTTeesstt UUssee IInnssttrruuccttiioonnss
Step 8 – Type the answer to each question in a separate screen. To move back and forth between questions, click the arrows that are located near the top left hand side of the screen, as shown in Figure 13.
Page 11 of 24 Updated 10/08/2010
Figure 13

EExxaammSSoofftt SSttuuddeenntt IInn--CCllaassss IInnssttrruuccttiioonnss SSooffTTeesstt UUssee IInnssttrruuccttiioonnss Step 9 - Determining Word/Character Count: To find the number of words that have been typed in a question, click on the “Tools” menu at the top of the screen, and then click “Word/Character Count,” as shown in Figure 14.
Page 12 of 24 Updated 10/08/2010
Figure 14
Step 10 - Figure 15 shows the pop-up screen that displays the number of words contained in an answer.
Figure 15
Step 11 – To have a separate word count calculated for each answer, it is important to place each answer in a separate screen, by clicking the arrow located near the top left hand side of the screen, as shown in Figure 16.

EExxaammSSoofftt SSttuuddeenntt IInn--CCllaassss IInnssttrruuccttiioonnss SSooffTTeesstt UUssee IInnssttrruuccttiioonnss
Page 13 of 24 Updated 10/08/2010
Figure 16
Step 12 – When answers are placed in separate screens, the “Word/Character Count” pop-up screen will provide information regarding word count for the current answer and the total word count for all exam answers, as shown in Figure 17.
Figure 17

EExxaammSSoofftt SSttuuddeenntt IInn--CCllaassss IInnssttrruuccttiioonnss SSooffTTeesstt UUssee IInnssttrruuccttiioonnss
Section 3: Closing the Exam File/Uploading the Answer File/ Verifying Upload
Step 1 – Exit the exam by clicking the ‘Exit & Save’, as shown in Figure 18 below.
Page 14 of 24 Updated 10/08/2010
Figure 18
If you exit the exam without answering all questions in the exam, the following notice will appear as a reminder. Note: The template for classroom exams may have more questions than is needed to complete the exam.

EExxaammSSoofftt SSttuuddeenntt IInn--CCllaassss IInnssttrruuccttiioonnss SSooffTTeesstt UUssee IInnssttrruuccttiioonnss
Step 2 – At the conclusion of the exam, click “Close Exam” when this box
appears. (Note: If you are done before time is called, you have the option of re-entering the exam by clicking on the “Return to SofTest” button.) CAUTION: Once “Close Exam” is selected, the Exam File CANNOT be re-opened.
Page 15 of 24 Updated 10/08/2010
Figure 19
Step 3 – When ‘Close Exam’ is selected, the screen shown in Figure 20
below is displayed. Select ‘Exit’ to close SofTest and upload the completed exam (Answer File).

EExxaammSSoofftt SSttuuddeenntt IInn--CCllaassss IInnssttrruuccttiioonnss SSooffTTeesstt UUssee IInnssttrruuccttiioonnss
Page 16 of 24 Updated 10/08/2010
Figure 20
Step 5 - If connected to the Internet, SofTest automatically uploads your
answer file. If not connected to the Internet, connect and click “Yes” when prompted as shown in Figure 21 below.
Figure 21
Step 6 – Upload ‘status’ messages are displayed as shown in Figure 24 below.

EExxaammSSoofftt SSttuuddeenntt IInn--CCllaassss IInnssttrruuccttiioonnss SSooffTTeesstt UUssee IInnssttrruuccttiioonnss
Figure 22
Step 7: After your answer file has been successfully uploaded the SofTest Launcher panel (Figure 23) will reappear to allow you to verify that the upload by clicking “Exam History”.
Figure 23
Page 17 of 24 Updated 10/08/2010

EExxaammSSoofftt SSttuuddeenntt IInn--CCllaassss IInnssttrruuccttiioonnss SSooffTTeesstt UUssee IInnssttrruuccttiioonnss
Step 9 – Verify that the Download/Upload History contains an “Uploaded Answer File” and “Upload Date”, as shown in Figure 24, for the exam you have just completed. Please note that during the exam period the upload may be delayed, so you may need to wait a few minutes before upload history is updated.
Page 18 of 24 Updated 10/08/2010
Figure 24

EExxaammSSoofftt SSttuuddeenntt IInn--CCllaassss IInnssttrruuccttiioonnss SSooffTTeesstt UUssee IInnssttrruuccttiioonnss
Step 10 - Confirmation will automatically be emailed to you in approximately 10 minutes after you have successfully uploaded your answer file, as shown in Figure 25.
Figure 25
Page 19 of 24 Updated 10/08/2010

EExxaammSSoofftt SSttuuddeenntt IInn--CCllaassss IInnssttrruuccttiioonnss SSooffTTeesstt UUssee IInnssttrruuccttiioonnss
IF YOU CANNOT VERIFY THAT YOUR ANSWER FILE UPLOADED EITHER BY REVIEWING THE “DOWNLOAD/UPLOAD HISTORY”, AS SHOWN IN FIGURE 24, OR A CONFIRMATION IS NOT RECEIVED WITHIN 10 MINUTES AFTER LEAVING THE EXAM ROOM, AS SHOWN IN FIGURE 25, YOU SHOULD PROCEED TO SECTION 4: MANUAL UPLOAD OF THE ANSWER FILE.
Page 20 of 24 Updated 10/08/2010

EExxaammSSoofftt SSttuuddeenntt IInn--CCllaassss IInnssttrruuccttiioonnss SSooffTTeesstt UUssee IInnssttrruuccttiioonnss
Section 4: Manual Upload of the Answer File If you are connected to the Internet and your answer file does not automatically upload, follow the following steps.
Step 1 – Open up SofTest and click “Download History”, as shown in Figure 26.
Page 21 of 24 Updated 10/08/2010
Figure 26
Step 2 – Type in your User Login information, as instructed in Figure 27, and hit “Enter”
or click “Next.” Note: You must be connected to the Internet at this point.
Figure 27

EExxaammSSoofftt SSttuuddeenntt IInn--CCllaassss IInnssttrruuccttiioonnss SSooffTTeesstt UUssee IInnssttrruuccttiioonnss Step 3 – If you are connected to the Internet a history of your exam download and
upload history will appear. Confirm that there is an “Upload Date” for the exam in question is showing. If the “Upload Date” is blank, click “Manual Upload”, as shown in Figure 28.
Page 22 of 24 Updated 10/08/2010
Figure 28
Step 4 – Follow the instructions that are found on the “Upload Answer File” screen, as shown in Figure 29.
Figure 29

EExxaammSSoofftt SSttuuddeenntt IInn--CCllaassss IInnssttrruuccttiioonnss SSooffTTeesstt UUssee IInnssttrruuccttiioonnss
Step 5 – After leaving the exam room, wait about 10 minutes or so and you will be able to confirm whether the exam file in question was successfully uploaded by repeating steps 1 through 3 in Section 4. You will also receive a confirmation email from ExamSoft, as shown in Figure 30.
Figure 30
Step 6 - If the answer file does not either automatically or manually
upload, your laptop is to be brought to the Registrar’s Office in room 309.
Page 23 of 24 Updated 10/08/2010

EExxaammSSoofftt SSttuuddeenntt IInn--CCllaassss IInnssttrruuccttiioonnss SSooffTTeesstt UUssee IInnssttrruuccttiioonnss
UNLESS YOU HAVE CLOSELY FOLLOWED STEPS 5 AND 6 ABOVE, YOU ARE NOT DONE!!!!!!!!!
Page 24 of 24 Updated 10/08/2010