Embed Size (px)
Citation preview
Stucco Repair and Patching Guide by Rob Anderson Page 1
Stucco Repair and Patching Guide Helpful information regarding stucco types, patching and stucco defects.
Below is a guide for Stucco Repair and Patching. Each section is to provide pictures of what your stucco will
look like after the cracks are filled and the problems are patched. These are provided to display what “look” to
expect after the work is completed so that you will be more satisfied with the choices you make.
The information presented here is from the perspective of a licensed remodeling contractor and not that of a
new construction contractor or new stucco application company. AA Brite 24/7 specializes in patching and
painting stucco which has typically aged at least five years in the desert sun. We do not address the reasons a
particular type or texture is used.
In the South West, exterior stucco finishes come in several different types and styles. Each has its advantages
and disadvantages. Most stucco has a significant number of flaws or marks in it which in a perfect world would
not exist.
Knowing about stucco defects will give you the ability to detect the flaws or “character marks” similar to a
jeweler when looking at a diamond. The difference is that a magnifying glass is not needed to see the stucco
flaws each time you come into or out of your home or office.
For some, defects and variations are a source of irritation. We want prospective customers to be informed that
all stucco look different from various angles and the difficulty making a perfectly blended patch. This guide will
show pictures and descriptions of the various types of exterior stucco and how the patches appear.
Please feel free to contact me at (520) 406-5900 if you have any questions or to schedule an estimate.
Thank you,
Rob Anderson
Owner
AA Brite 24/7

Stucco Repair and Patching Guide by Rob Anderson Page 2
Table of Contents
I. Shadowing--The Most Important Concept………….……..Page 3
II. Six Types of Stucco…………………………………….…….Page 7
1. Smooth Stucco Texture
2. Sanded Stucco Texture
3. Sprayed Cement Stucco
4. Spanish Lace Stucco
5. Tex Coating Stucco
6. Synthetic Sprayed Stucco
Variations within the Categories
III. Common Stucco Problems………………………………..Page 15
1. Air Voids
2. Caulk Scars
3. Scaffold Lines
4. Window & Corner Cracking
5. Filled In Texture

Stucco Repair and Patching Guide by Rob Anderson Page 3
Shadowing--The Most Important Concept Even though most people think of stucco as flat, or almost flat it the opposite. Stucco is mountainous with hills,
valleys, ridges, peaks, caves and overhangs. In many ways viewing stucco is similar to a mountain from an
airplane. Looking straight down from a high altitude, the mountains do not appear to have much definition,
even flat in appearance. As you move closer, the mountains appear and have more details with jagged edges.
Viewing stucco is similar. When the sun is almost parallel to the stucco wall, even small bumps and variations
cast long shadows. To some, the stucco will look more uneven and less desirable.
Shadows minimized. Photo is taken where the stucco grains cast short shadows. Notice the
defect straight to the left from the upper left corner of the sign.

Stucco Repair and Patching Guide by Rob Anderson Page 4
Understanding that stucco looks different from different angles and always looks worse when viewed from an
angle where shadows are long, everything else with regards to stucco patching and painting can now make
sense.
At a normal viewing angle the splotching above is not noticeable unless you are looking for it.
Shadows maximized. The blotchiness of the
sand pattern is now also much more apparent.
The grains of sand of the stucco are casting
longer shadows from this angle at this time of
day. Note how the different viewing angle makes
the stucco seem rougher--viewing angle has
made the dent almost invisible.
Photo to the right is another example of a sanded
stucco wall with a harsh viewing angle used –
which is maximizing the “shadowing”. Again, the
premium acrylic paint makes the shadowing even
more pronounced.

Stucco Repair and Patching Guide by Rob Anderson Page 5
No Perfect Match.
There is not a great deal of information written about stucco repair. Even determining the types of stucco finishes
available is difficult, and there is an apparent reason for this. Tim Carter, the famous newspaper columnist and
contractor, wrote:
“Patching stucco so that you don’t see the repaired area is as difficult as patching a hole in a piece
of fabric using scrap from the original bolt of cloth. It is virtually impossible to do. A stucco mason
can create an infinite amount of textures depending upon the materials used to create the stucco
and the tools used to finish it. Blending the new texture with the original is a true art and craft. If you
succeed in creating the illusion, go out and immediately purchase a lottery ticket!”
Though he conveys that patching stucco is difficult, for people with experience and patience a good looking (read
not noticeable) stucco patch is possible in some situations.
In many other situations patches that can be seen but are not obvious to casual observers are also achievable. But,
unfortunately, there are still situations where the correct answer is to live with the defects or re-stucco the entire
exterior of the building.
Glad this isn’t your home? The
angle of the sunlight is making
the worst shadowing possible.
When the sun is in front of it, the
defects are not quite as
noticeable. This is an example of
poorly done job of patching the
cracks on this stucco. If we were
going to paint this home, it would
not look much different after
being painted. The defects are
in the stucco.

Stucco Repair and Patching Guide by Rob Anderson Page 6
.
The photo to the right is a typical example
to which Mr. Carter was referring. This is
sharp sanded stucco with air voids. Getting
a perfect patch on just the center area is
not realistic.
Wall photo to the right is a higher
quality patch than the one pictured to
the right. There is a little shadowing
but it is acceptable.
Stucco Repair and Patching Guide by Rob Anderson Page 7
Six types of exterior stucco
1. Smooth Stucco Texture
Advantages: Smooth Stucco Texture is considered the most elegant looking by many.
Disadvantages: The walls using Smooth Stucco Texture can end up wavy if unskilled labor was used to build
them. Cracks are difficult to repair and highly visible.
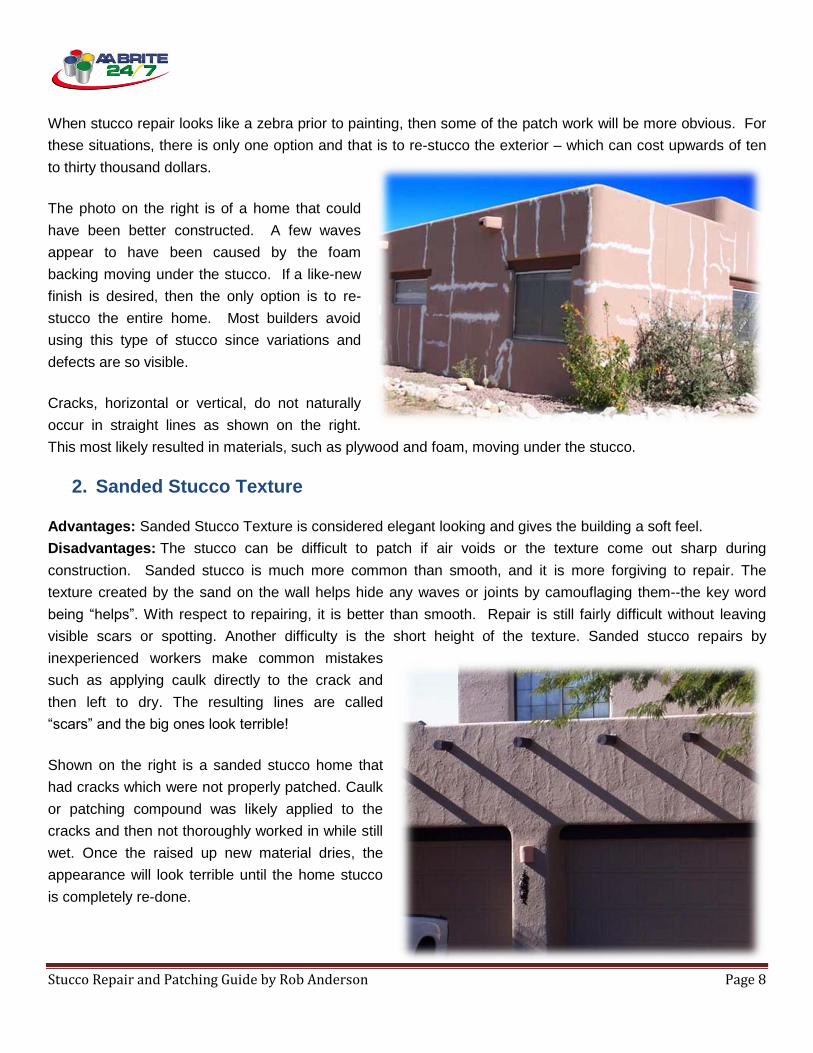
The mansion pictured below has a smooth stucco finish looks great. However, smooth stucco comes with
unique disadvantages. The smoother and flatter a surface the more it shows any defect or variation. This is
similar to a shiny clean glass table with three grains of sand on it. The three grains of sand stand out because
the rest of the table is smooth. Smooth Stucco is also the most difficult stucco to patch. As in the previous
example, try gluing together a broken glass
table without having any witness lines or
scars, even after it is painted. Though we
repair this type of stucco, it is fairly difficult.
Professionally done original flat stucco will
only require minor crack repairs. When
stucco is done well, the building will not
look like a zebra when the preparation is
complete. As the quality of the stucco
construction decreases, the building will be
more and more striped with repair work.
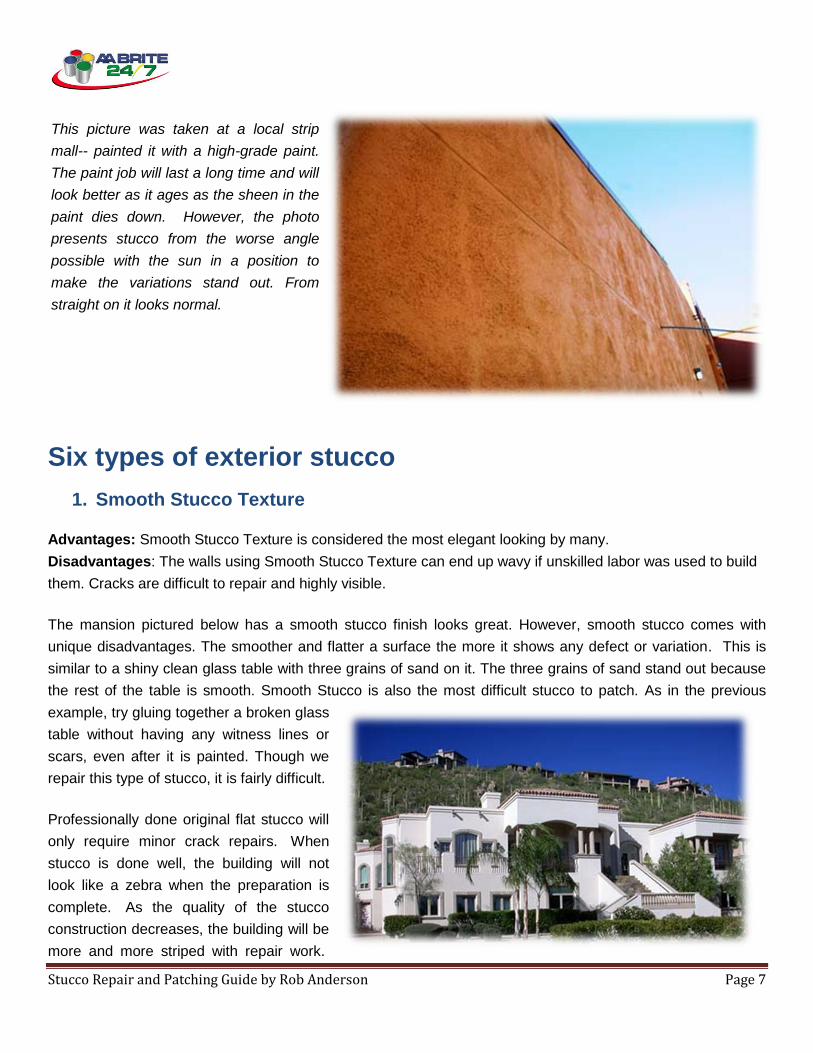
This picture was taken at a local strip
mall-- painted it with a high-grade paint.
The paint job will last a long time and will
look better as it ages as the sheen in the
paint dies down. However, the photo
presents stucco from the worse angle
possible with the sun in a position to
make the variations stand out. From
straight on it looks normal.
Stucco Repair and Patching Guide by Rob Anderson Page 8
When stucco repair looks like a zebra prior to painting, then some of the patch work will be more obvious. For
these situations, there is only one option and that is to re-stucco the exterior – which can cost upwards of ten
to thirty thousand dollars.
The photo on the right is of a home that could
have been better constructed. A few waves
appear to have been caused by the foam
backing moving under the stucco. If a like-new
finish is desired, then the only option is to re-
stucco the entire home. Most builders avoid
using this type of stucco since variations and
defects are so visible.
Cracks, horizontal or vertical, do not naturally
occur in straight lines as shown on the right.
This most likely resulted in materials, such as plywood and foam, moving under the stucco.
2. Sanded Stucco Texture
Advantages: Sanded Stucco Texture is considered elegant looking and gives the building a soft feel.
Disadvantages: The stucco can be difficult to patch if air voids or the texture come out sharp during
construction. Sanded stucco is much more common than smooth, and it is more forgiving to repair. The
texture created by the sand on the wall helps hide any waves or joints by camouflaging them--the key word
being “helps”. With respect to repairing, it is better than smooth. Repair is still fairly difficult without leaving
visible scars or spotting. Another difficulty is the short height of the texture. Sanded stucco repairs by
inexperienced workers make common mistakes
such as applying caulk directly to the crack and
then left to dry. The resulting lines are called
“scars” and the big ones look terrible!
Shown on the right is a sanded stucco home that
had cracks which were not properly patched. Caulk
or patching compound was likely applied to the
cracks and then not thoroughly worked in while still
wet. Once the raised up new material dries, the
appearance will look terrible until the home stucco
is completely re-done.

Stucco Repair and Patching Guide by Rob Anderson Page 9
As a side note, my wife and I chose the sanded stucco texture for the addition at my home. Currently we have
adobe block. My wife prefers sanded stucco for its soft and elegant look. After the addition is complete, we
will redo the stucco as this give the appearance the house and additions were all built at the same time.
Depending on the quality of the material and craftsmanship, sanded stucco has a number of different
appearances.
This is ideal. There are almost no air bubbles
and laminating and waterproofing the surface
will be easily accomplished.
The stucco shown to the right has quite a few
open pores. This is an intermediate level paint
job as a result of the extra preparation required
to minimize the shadowing. Shadowing is the
appearance of darker colors in the air pockets
when looking at the stucco from the side.

Stucco Repair and Patching Guide by Rob Anderson Page 10
3. Sprayed Cement Stucco
For practical purposes “sprayed cement stucco” is only concrete stucco which was left alone after spraying.
The texture could be compared to thousands upon thousands of miniature volcanoes which come to sharp
points. The best advantage for using this type of texture is that it can be quickly sprayed and helps hide defects
and variations of the concrete blocks.
Advantages: Sprayed Cement Stucco Repair applies fast and can be used to blend in new and old
construction.
Disadvantages: Sharp texture. Texture varies in height and density over the building. The patches can vary in
difficulty depending on the texture due to the
frequency of bubbles in the texture. Pure
cement also seems to crack quite a bit easier
than stucco which was formulated for the
purpose of covering a wall. This texture is
usually really sharp and the form of the
texture is a result of how thin or thick the
concrete was when it was sprayed, along with
the distance from the wall and the air
pressure. Frequently the density and height of
the “mini volcanoes” changes significantly
over the course of the building. This makes
matching the texture difficult. Each repair
might require a completely different look.
Extra attention is required when repairing the
Photo shown on the right is one of an aged-
stucco wall with small grains of sand. Notice
how the texture is soft (not pointed or really
lumpy). The crack is a minor problem and can
be filled without causing scarring. Paint and
caulk are similar materials and by forcing paint
into narrow cracks so the cracks will not return
unless there is movement of the stucco.

Stucco Repair and Patching Guide by Rob Anderson Page 11
texture. The person doing the patching needs to mimic these “mini volcanoes” as closely as possible by
controlling the variables.
4. Spanish Lace Stucco
Advantages: Spanish Lace Stucco cracks less than all other kinds; is the best for hiding defects; appears to
be stronger than other types; a popular choice for new construction. It is not readily apparent; however,
Spanish Lace Stucco is by far the most resistant to cracking. When placed side by side, the home constructed
with Spanish-Lace stucco will almost always have considerably less cracking after 10 years than the sanded
stucco home. My only speculation is the added depth of the texture makes the stucco stronger. In addition,
cracks are also more difficult to see in the Spanish Lace Stucco.
Disadvantages: The most notable disadvantage is appearance. It is considered less elegant looking than
sanded- or smooth stucco. Spanish Lace is probably the most common type of stucco in the United States. 1)
It is the easiest stucco to apply. 2) It can be touched up by less skilled workers. 3) Scaring and variations are
less visible 4) Cracks are considerably less visible.
This image of Spanish Lace Stucco is at a higher
magnification. Notice the lack of air bubbles. In my
experience, this is by far the most durable stucco
texture. It is also the least difficult in blending
patches.

Stucco Repair and Patching Guide by Rob Anderson Page 12
5. Tex Coating Stucco
Advantages: Tex Coating Stucco applies fast and can be sprayed on over wood and pipes.
Disadvantages: To my knowledge, it has been unused in the past 20 years. Tex Coating Stucco flakes in
large chunks and new patches could eventually fall off since the material applied was not intended to be for
stucco.
“Tex” is our name for a common, but no longer sold or used elastomeric stuccoing paint with sand in it.
I am unsure the name used for the material was called twenty years ago; however, the name in Tucson used
has been “Tough Tex” and “Dex Coat.” Both of these names are currently registered trade names of existing
products. For arguments sake, I will refer to the 15 year old sanded spayed on plastic coating stucco as “Tex.”
Tex is actually an elastomeric material (plastic) similar to roof coating or really thick paint with sand mixed in it.
The sandy plastic liquid was quickly sprayed from a special sprayer onto the exterior walls, fascia, trim, pipes
and wires of a wood or block home. The texturing process was completed in one day by a painter. The Tex
application process was much less intensive and faster than other stucco application methods since the
material was more or less paint, and applied as such. Until it went out of favor 15 or 20 years ago, Tex was put
on fast, stuck to everything and looked good when new.
A photo of a Tex coated home. This is typical of a home
with a 20 year old Tex coating on it. At one time it looked
great and now it has turned into a giant headache for the
homeowner.
Tex does not get considerably thinner like paint as it
ages; instead, the coating weathers and becomes stiffer
and more brittle. Tex will lose its grip on the surface and
large thick pieces start falling off. Getting a reasonable
match of the texture is not terribly difficult.
The biggest short term problem is dealing with the edge
of the new patch that meets Tex. When the painter
spreads out the new sanded compound, the plastic
becomes double thick on the existing old portions of old
Tex near the edge of the patch, and “ringworm scars” are
easily formed by this small area of double thick patch.
These patches range from horrible looking to slightly noticeable depending on many variables.

Stucco Repair and Patching Guide by Rob Anderson Page 13
The appearance is largely dependent upon the skill and the patience of the professional repairing the patch. In
one exceptionally rare case I met with a 70 year old woman who showed me a patch she did and it took me
almost a minute to see the witness line. She worked in her spare time on the patch the size of a t-shirt. She
told me it took her 30 hours to get the edges perfect. This shows it can be done if a person is willing to put the
necessary man hours into it or to pay someone to do it. Most Tex patch jobs we have completed were actually
“paint jobs” on rental homes, and patching the Tex was secondary. On these types of jobs, our rates have
ranged from $1,200 to $4,000. The goal is always to patch and paint a customer’s house without spending
much large sums of money.
Most painting contractors shy away from Tex repairs because the previous Tex Stucco continues to flake and
they do not want to take responsibility. We will repair and warranty such a job for two years. Before providing a
quote, I will carefully look at the Tex Stucco and provide options for repair.
The following photos are from a job done almost two years ago. The first two photos were taken at the time we
did the job and the last photo was taken recently.
During the repair process over 19 different spots
were patched. This is typical with Tex coats.
Tex Stucco coated home with the first two
patches applied. Notice the scars near the
pieces of blue tape. These are previous repairs
and the caulk lines are visibly raised up making
scars.

Stucco Repair and Patching Guide by Rob Anderson Page 14
After completion, some of the patch work is visible. It is unfortunate that the patches are visible, but the
ringworm scarring stated earlier is visible. The ringworm scars could be removed with LARGE amounts of
additional labor. The conflict is the addition costs involved in patching the home versus re-stucco. It is cheaper
and much more cost effective to re-stucco the home than it is to patch each spot perfectly.
In this case the owner wanted his home to look as good as possible for the least amount of money, which
translated into basic Tex patching and painting. Re-stucco for this small home would cost approximately
$10,000, plus the cost of priming and painting. We patched the home and painted it for about $1,500. To sum
up, Patch and paint $1500 or Re-stucco and paint $11,500.
As the owner of AA Brite 24/7, it is my priority to educate you, the client, on the home appearance when we are
finished BEFORE we start. If we are in agreement prior to starting a job, then you, as the client, will be more
satisfied with the outcome.
6. Synthetic Sprayed Stucco
Advantages: Synthetic Sprayed Stucco looks great and goes on fast and is a newer method.
Disadvantages: The few that I have seen contain lots of
air bubbles when looked at closely and, when patched,
have to be painted twice. This is a close up view. From a
distance it looks great and non-contractors would not
notice the bubbles.
To my knowledge, synthetic sprayed stuccos are
produced by several different manufacturers. We do not
apply this stucco new, so I am not aware of all of the
different properties or why certain types are used.
With regards to painting and patching, synthetic sprayed
on stucco has an interesting set of characteristics.
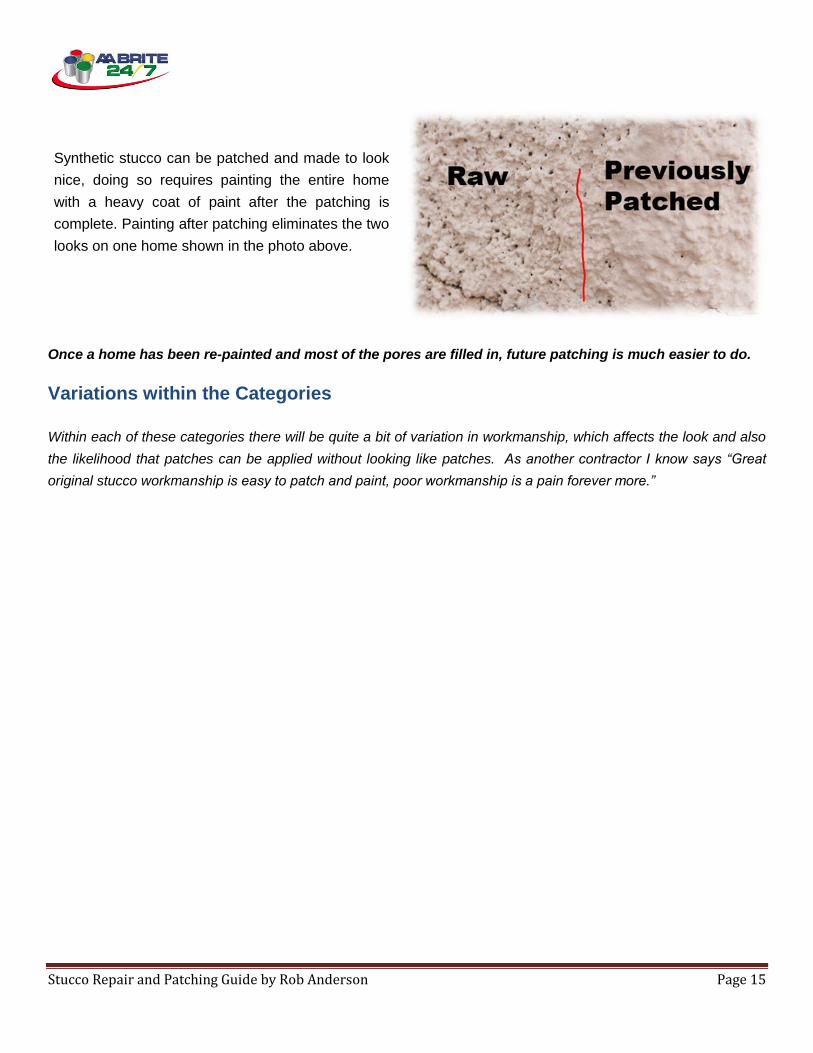
Most new homes are painted with what we colloquially call a “piss coat” and with synthetic stucco like the kind
shown here. When a thin coat of paint is applied to the stucco, it does not fill the pores or air voids. When stucco in
this condition is patched, most of the voids are filled and the texture looks different. The areas with a great deal of
pores and air voids will look darker and rougher since the shadows from the “caves” are showing.
If an area of sprayed on synthetic stucco is patched and painted, it will look completely different than the
surrounding area.
Stucco Repair and Patching Guide by Rob Anderson Page 15
Once a home has been re-painted and most of the pores are filled in, future patching is much easier to do.
Variations within the Categories
Within each of these categories there will be quite a bit of variation in workmanship, which affects the look and also
the likelihood that patches can be applied without looking like patches. As another contractor I know says “Great
original stucco workmanship is easy to patch and paint, poor workmanship is a pain forever more.”
Synthetic stucco can be patched and made to look
nice, doing so requires painting the entire home
with a heavy coat of paint after the patching is
complete. Painting after patching eliminates the two
looks on one home shown in the photo above.

Stucco Repair and Patching Guide by Rob Anderson Page 16
Common Stucco Problems
1. Air Voids
2. Caulk Scars
We see this frequently. A homeowner or “painter”
runs a bead of caulk on top of the stucco texture.
We typically have to cut these out with a diamond
saw.
Most common for air voids is sprayed on
synthetic stucco. The key is to back roll on a
heavy coat of paint.

Stucco Repair and Patching Guide by Rob Anderson Page 17
3. Scaffold Lines
4. Window & Corner Cracking
Once you start looking for scaffold lines they are
more common than you would expect. No
amount of paint is going to get this to go away. If
this result is unacceptable, then the other option
would be to re-stucco the side of the house
Almost all homes have this. Cracks love to start
in sharp corners. Fortunately most of them can
be repaired without too much trouble.

Stucco Repair and Patching Guide by Rob Anderson Page 18
5. Filled In Texture
Stem Wall Was Stucco’d
It is where the stucco is applied down the wall, over the foundation and all the way to the dirt. In my opinion the
foundation of the house should not have stucco texture put on it since the walls and foundation expand and contract
at different rates. Stucco doesn’t stretch, it cracks. Different parts of a building moving at different speeds will cause
the stucco to crack where the two surfaces meet. Of the few homes I’ve seen with the stucco on the foundation, all
were cracked. We can repair it, but its coming back. Its just a question of how long.
We don’t see this too often. There is so much paint
on this stucco that the texture is starting to
disappear.


![Nurse Stucco Inc.nursestucco.com/wp-content/uploads/2017/02/Nurse-Stucco-IIPP-Manual.pdfNurse Stucco Inc. Injury and Illness Prevention Program [High Hazard] Prepared by: Nurse Stucco](https://img.pdfslide.us/doc/110x75/5e7cb411957c795622453e76/nurse-stucco-inc-nurse-stucco-inc-injury-and-illness-prevention-program-high.jpg)