Embed Size (px)
Citation preview
5
Web Programming
Lab BCSL057: WEB PROGRAMMING LAB
Structure Page Nos.
1.0 Introduction 5
1.1 Objectives 5
1.2 Development of a simple website
1.3 Using JavaScript in Netbeans
1.4 Creating and validating XML pages
1.5 Running JSP Programs
1.6 Creating Database Applications
1.6.1 Creating Database and Database connections using netbeans
1.6.2 Creating Form and Connection using JSTL
1.6.3 Storing Student information in the Database 1.6.4 Comments on the Website
1.7 List of Lab Assignments
1.8 Further Readings
1.0 INTRODUCTION
This lab course provides you information about the tool that you need to use for
practical of Web programming course. This lab course supports the course BCS053:
Web Programming. We propose that you use an IDE such as Netbeans, Eclipse or any
other IDE for web development. You are advised to install the latest version of
theseIDEs. This lab course includes 10 practical sessions of 3 hours each. This lab
manual lists the lab exercises that you need to perform during each of the lab sessions.
You should try to use the available time by coming fully prepared with the exercise.
First two sessions are focused on HTML and CSS. You should try to create a
small web site using HTML tags and CSS. Session 3 is about creating simple
XML document and viewing those documents.Session 4 focusses on creating a
small web page using WML that can be viewed on a mobile. Session 5 and 6
focusses on use of JavaScript. Last four sessions are devoted to writing JSP
and JDBC oriented code.
You may need a web server to display the web pagesthat you may create.
Fortunately, the present day IDEs also include a web server.For example
Netbeansis bundled with web servers – Apache and Glassfish. For the purpose
of back end database we will demonstrate the use of MySql. However, you
may use any database technology at your study centre. In such case you have
to use the necessary drivers.
In this lab manual, we have used NetbeansIDE 7.3.1. We first discuss about the
process of installation of Netbeans along with the web server and database
system. We then explain creating HTML, XML, Web Application, JSP pages
etc using it.
1.1 OBJECTIVES
After completing this lab section, you should be able to:
6
Lab Manual Install any IDE for web programming;
Create web pages using several technologies;
Store data in a table using web pages
Display web pages on a web server.
1.2 DEVELOPMENT OF A SIMPLE WEBSITE
Netbeans is an IDE which provided features for developing desktop, mobile and web
applications. It supports Java, HTML5 and other languages. It is an open source
software which is freely available for download. it has its own web
sitehttps://netbeans.org/. You can download it from the download link at this web site.
You may download the bundle that includes all the tools including GlassFish Servers
Open source edition and Apache’s Tomcat Server. Please also note that a number of
tutorials have been created by Netbeans community. These tutors are available on the
web site https://netbeans.org/kb/ . You must take a video tour of key netbeans features
as an IDE.
Once you have downloaded the Netbeans IDE, you can install it on the computer
using the following procedure:
Run the binary installation file
In case your JDK version is older than the supported by Netbeans, it will
inform you to do so. You can obtain the latest JDK from the web site:
http://www.oracle.com/technetwork/java/javase/downloads/ . You may
download the Java version for windows x86, in case you are using a 32 bit
computer. You should install it first and then install Netbeans
Make sure that during this installation web servers are also installed.
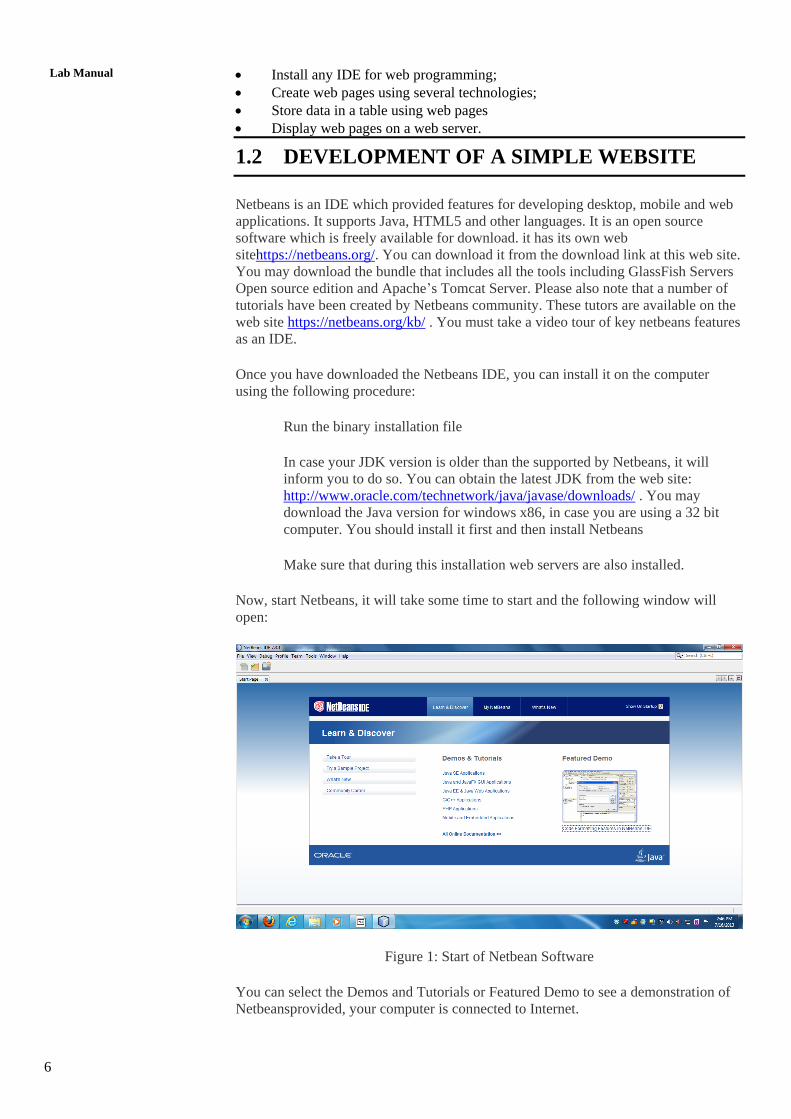
Now, start Netbeans, it will take some time to start and the following window will
open:
Figure 1: Start of Netbean Software
You can select the Demos and Tutorials or Featured Demo to see a demonstration of
Netbeansprovided, your computer is connected to Internet.
7
Web Programming
Lab Once you are a bit familiar with the environment, start a new project. Perform the
following steps:
Select FileNew (CTRL+SHIFT+N) Project from the Menu of Figure 1.
The following window will open:
Figure 2: New Project Window
In this window you can select a category for the new project, for example, when you
will design JSP project, you will select Java Web category. To begin with, you may
open a new HTML 5 project. So select HTML5/JavaScript category and in the option
HTML5 Application. Select the Next button.
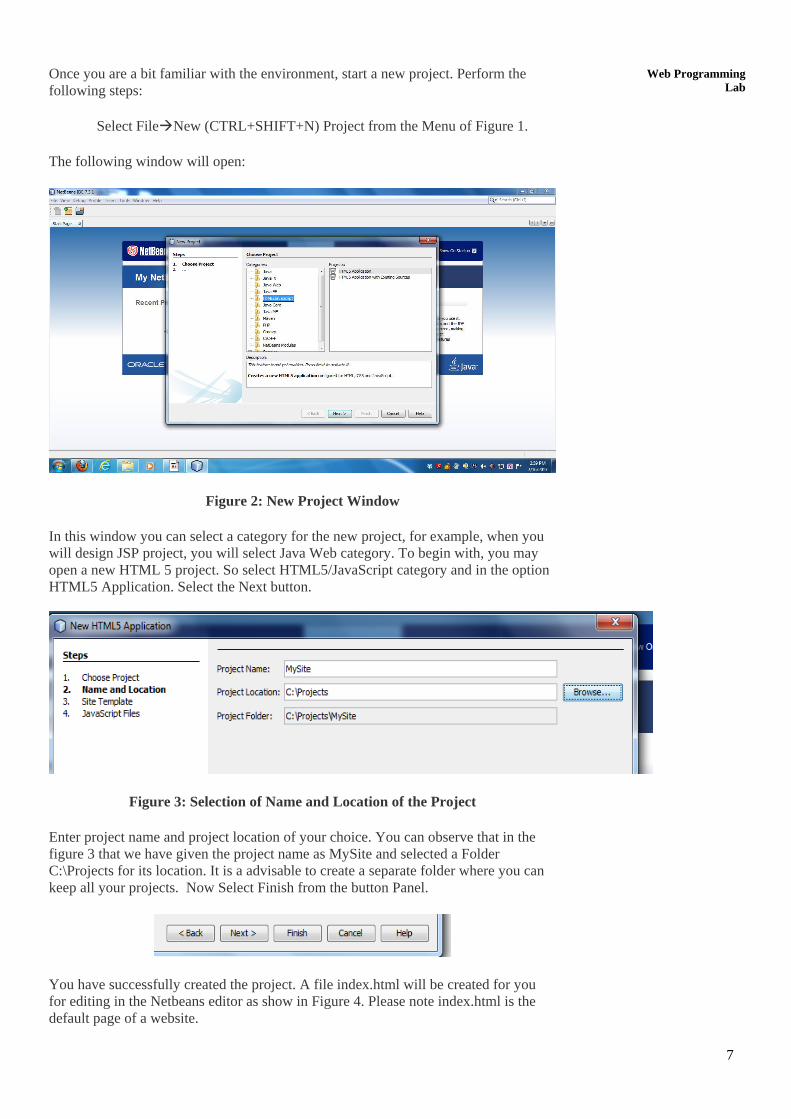
Figure 3: Selection of Name and Location of the Project
Enter project name and project location of your choice. You can observe that in the
figure 3 that we have given the project name as MySite and selected a Folder
C:\Projects for its location. It is a advisable to create a separate folder where you can
keep all your projects. Now Select Finish from the button Panel.
You have successfully created the project. A file index.html will be created for you
for editing in the Netbeans editor as show in Figure 4. Please note index.html is the
default page of a website.
8
Lab Manual Now, you can create your home page of the website. For more details on various
HTML tags and CSS, you may refer to Block 1 Unit 1 and Unit 2 of BCS053: Web
Programming course. For the purpose of demonstration, we have used the example
given in Block 1 Unit 2of BCS053. The example uses div tags for various sections of
the web page. The example uses the CSS, but initially, we have removed the linkage
to CSS and just created the web page. You can format this web page using the Menu
Source Format.
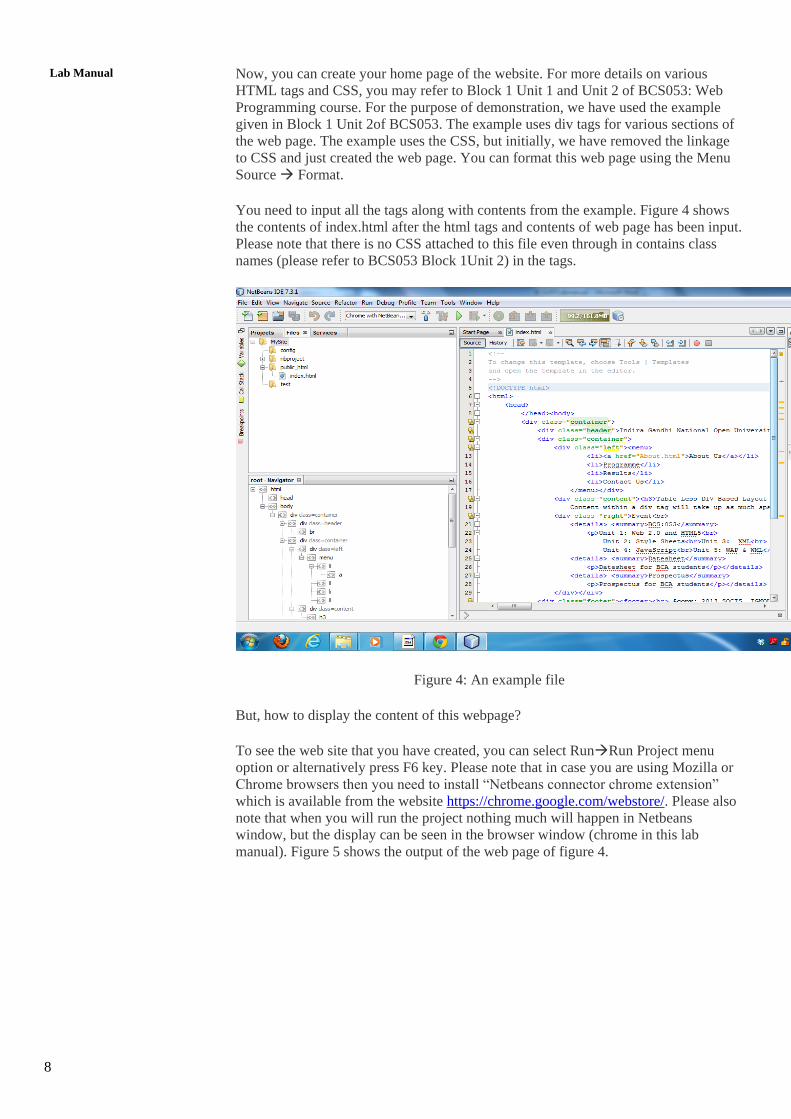
You need to input all the tags along with contents from the example. Figure 4 shows
the contents of index.html after the html tags and contents of web page has been input.
Please note that there is no CSS attached to this file even through in contains class
names (please refer to BCS053 Block 1Unit 2) in the tags.
Figure 4: An example file
But, how to display the content of this webpage?
To see the web site that you have created, you can select RunRun Project menu
option or alternatively press F6 key. Please note that in case you are using Mozilla or
Chrome browsers then you need to install “Netbeans connector chrome extension”
which is available from the website https://chrome.google.com/webstore/. Please also
note that when you will run the project nothing much will happen in Netbeans
window, but the display can be seen in the browser window (chrome in this lab
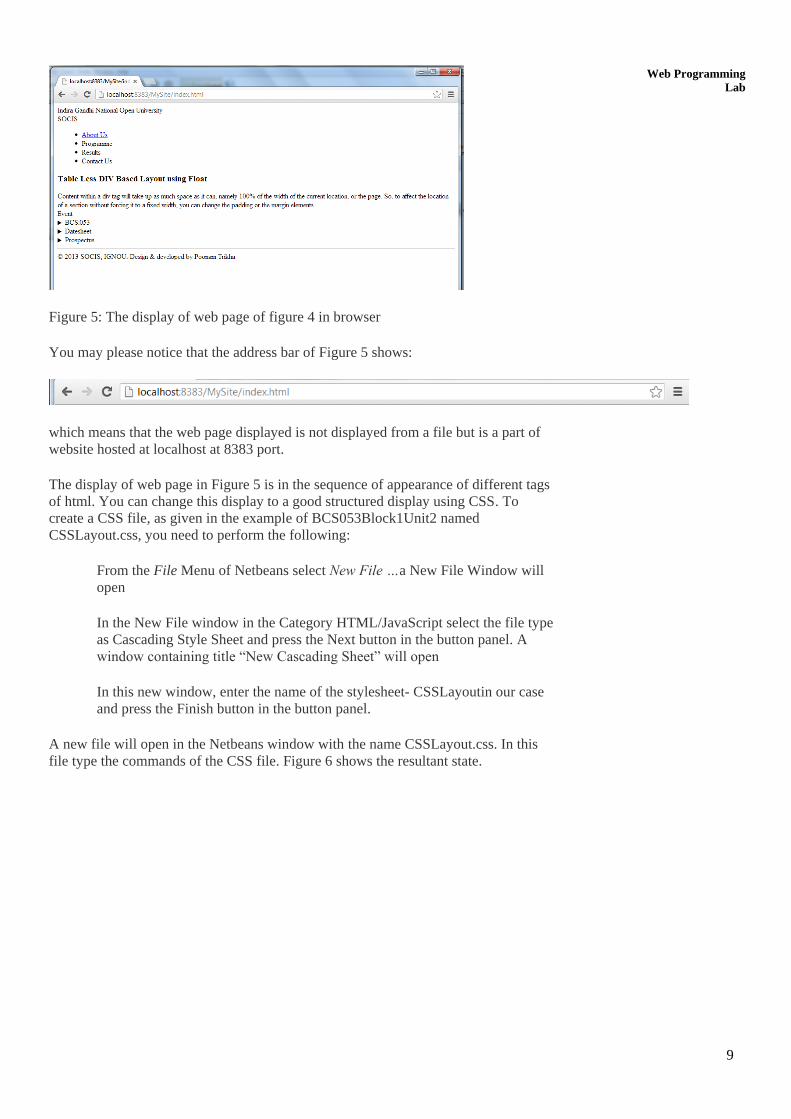
manual). Figure 5 shows the output of the web page of figure 4.
9
Web Programming
Lab
Figure 5: The display of web page of figure 4 in browser
You may please notice that the address bar of Figure 5 shows:
which means that the web page displayed is not displayed from a file but is a part of
website hosted at localhost at 8383 port.
The display of web page in Figure 5 is in the sequence of appearance of different tags
of html. You can change this display to a good structured display using CSS. To
create a CSS file, as given in the example of BCS053Block1Unit2 named
CSSLayout.css, you need to perform the following:
From the File Menu of Netbeans select New File …a New File Window will
open
In the New File window in the Category HTML/JavaScript select the file type
as Cascading Style Sheet and press the Next button in the button panel. A
window containing title “New Cascading Sheet” will open
In this new window, enter the name of the stylesheet- CSSLayoutin our case
and press the Finish button in the button panel.
A new file will open in the Netbeans window with the name CSSLayout.css. In this
file type the commands of the CSS file. Figure 6 shows the resultant state.
10
Lab Manual
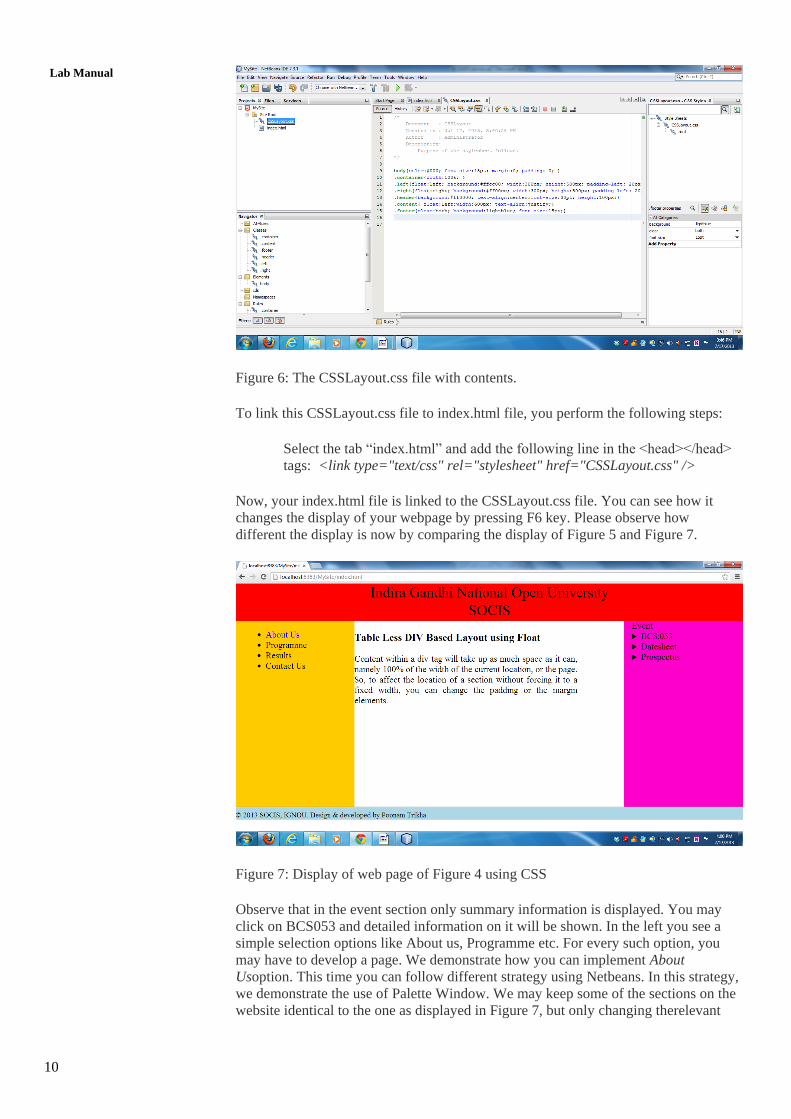
Figure 6: The CSSLayout.css file with contents.
To link this CSSLayout.css file to index.html file, you perform the following steps:
Select the tab “index.html” and add the following line in the <head></head>
tags: <link type="text/css" rel="stylesheet" href="CSSLayout.css" />
Now, your index.html file is linked to the CSSLayout.css file. You can see how it
changes the display of your webpage by pressing F6 key. Please observe how
different the display is now by comparing the display of Figure 5 and Figure 7.
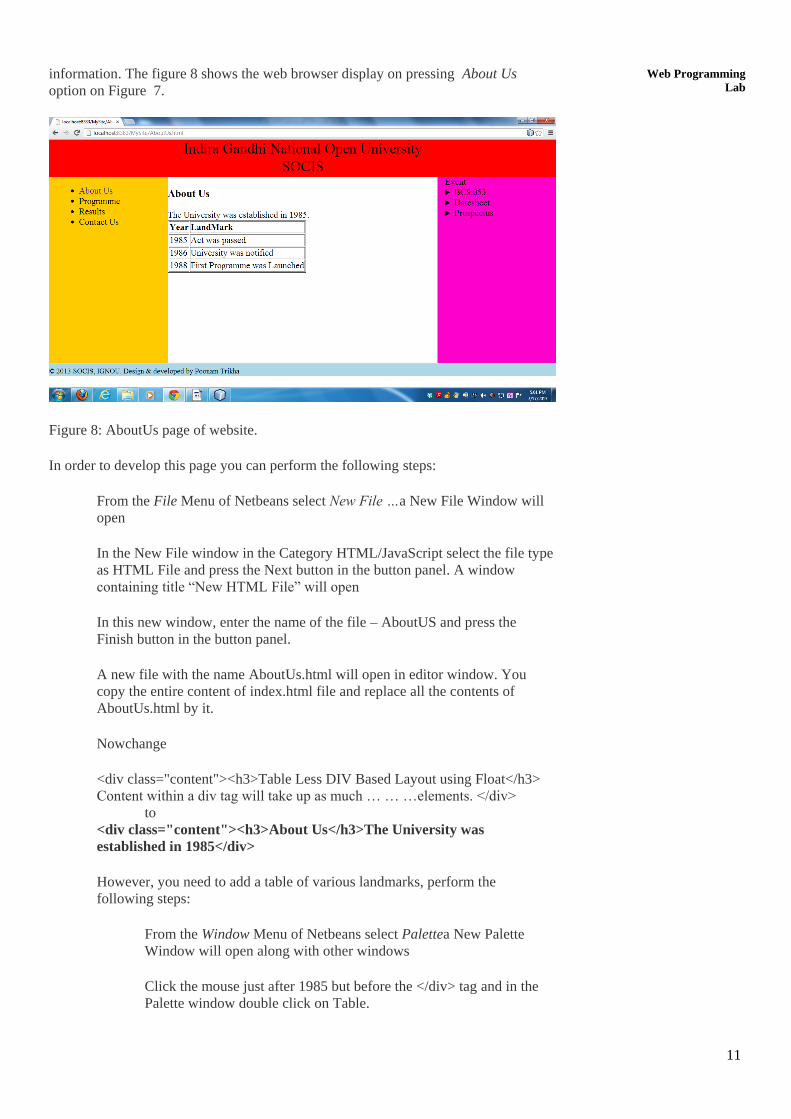
Figure 7: Display of web page of Figure 4 using CSS
Observe that in the event section only summary information is displayed. You may
click on BCS053 and detailed information on it will be shown. In the left you see a
simple selection options like About us, Programme etc. For every such option, you
may have to develop a page. We demonstrate how you can implement About
Usoption. This time you can follow different strategy using Netbeans. In this strategy,
we demonstrate the use of Palette Window. We may keep some of the sections on the
website identical to the one as displayed in Figure 7, but only changing therelevant
11
Web Programming
Lab information. The figure 8 shows the web browser display on pressing About Us
option on Figure 7.
Figure 8: AboutUs page of website.
In order to develop this page you can perform the following steps:
From the File Menu of Netbeans select New File …a New File Window will
open
In the New File window in the Category HTML/JavaScript select the file type
as HTML File and press the Next button in the button panel. A window
containing title “New HTML File” will open
In this new window, enter the name of the file – AboutUS and press the
Finish button in the button panel.
A new file with the name AboutUs.html will open in editor window. You
copy the entire content of index.html file and replace all the contents of
AboutUs.html by it.
Nowchange
<div class="content"><h3>Table Less DIV Based Layout using Float</h3>
Content within a div tag will take up as much … … …elements. </div>
to
<div class="content"><h3>About Us</h3>The University was
established in 1985</div>
However, you need to add a table of various landmarks, perform the
following steps:
From the Window Menu of Netbeans select Palettea New Palette
Window will open along with other windows
Click the mouse just after 1985 but before the </div> tag and in the
Palette window double click on Table.
12
Lab Manual An Insert Table window will open, in which select the number of
rows to 3 and press Ok button.
All the opening and closing tags for table headers and table rows will
be created automatically, you just insert the appropriate values
between an opening and closing tags.
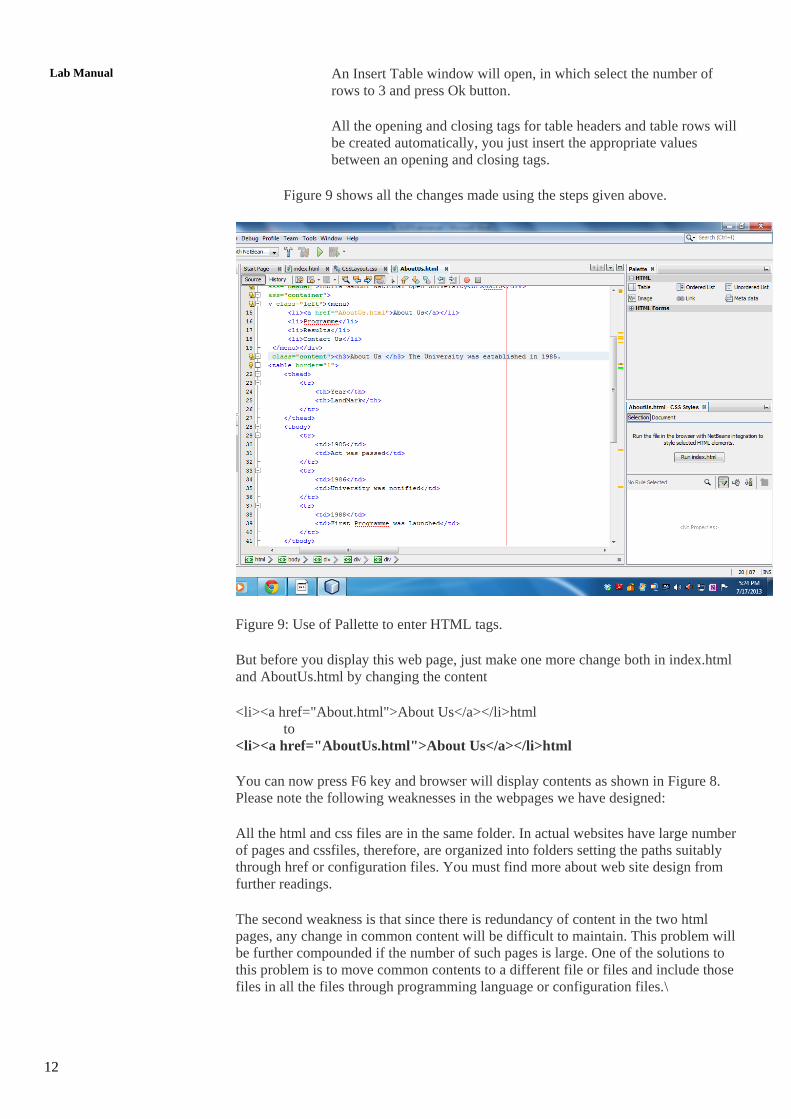
Figure 9 shows all the changes made using the steps given above.
Figure 9: Use of Pallette to enter HTML tags.
But before you display this web page, just make one more change both in index.html
and AboutUs.html by changing the content
<li><a href="About.html">About Us</a></li>html
to
<li><a href="AboutUs.html">About Us</a></li>html
You can now press F6 key and browser will display contents as shown in Figure 8.
Please note the following weaknesses in the webpages we have designed:
All the html and css files are in the same folder. In actual websites have large number
of pages and cssfiles, therefore, are organized into folders setting the paths suitably
through href or configuration files. You must find more about web site design from
further readings.
The second weakness is that since there is redundancy of content in the two html
pages, any change in common content will be difficult to maintain. This problem will
be further compounded if the number of such pages is large. One of the solutions to
this problem is to move common contents to a different file or files and include those
files in all the files through programming language or configuration files.\
13
Web Programming
Lab A detailed discussion on these issues are beyond the scope of this Unit, but we have
introduced these aspects just to remind you that you have to keep exploring about the
web programming beyond the completion of this course.
Another weakness of the website developed so far is that it is static and does not
involve significant interaction with the user. In the next section, we demonstrate how
to add some dynamism in the website with the help of JavaScript
1.3 USING JAVASCRIPT IN NETBEANS
Netbeans allows you to use javascript in two ways, either you can create JavaScript
file and use that file in a script tag to run or you can add your own script tags in head
or the body tags. We will put the JavaScript in the head tag. The event related action
will be put on the body part. We demonstrate the function for change of background
colour given in BCS053: Block 1 Unit4. The function changes the background colour,
if you mouse over a space and changes it back to original when mouse moves out of
that pace. The code to do so is reproduced below from the said Unit (with few
changes)
<!DOCTYPE html>
<html>
<head>
<script>
functionchangebackgroundcolour(bg)
{
document.body.style.background = bg;
}
</script>
</head>
<body>
<p>Mouse over the squares and the background color will change!</p>
<table width="200">
<tr>
<td onmouseover="bgChange('lightblue')"
onmouseout="bgChange('transparent')"
bgcolor="lightblue"> Light Blue
</td>
<td onmouseover="bgChange('lightgreen')"
onmouseout="bgChange('transparent')"
bgcolor="lightgreen">Light Green
</td></tr>
</table>
</body>
</html>
Figure 10: JavaScript code for change of background colour
But, how to use this code in our existing webpages? We demonstrate it using
AboutUs.html. You put the code shown in bold above in the head tag after the link tag
and add the code shown in italics is added in the division having the class “content”
after the table showing year and landmark. Now, you run the project using F6 and
select About Us link in the browser. The browser display is shown in Figure 11. You
can take your mouse over the two colour boxes with titles light blue and light green to
see changes in the background colour. Figure 11 is captured when mouse pointer was
over the box light green.
14
Lab Manual
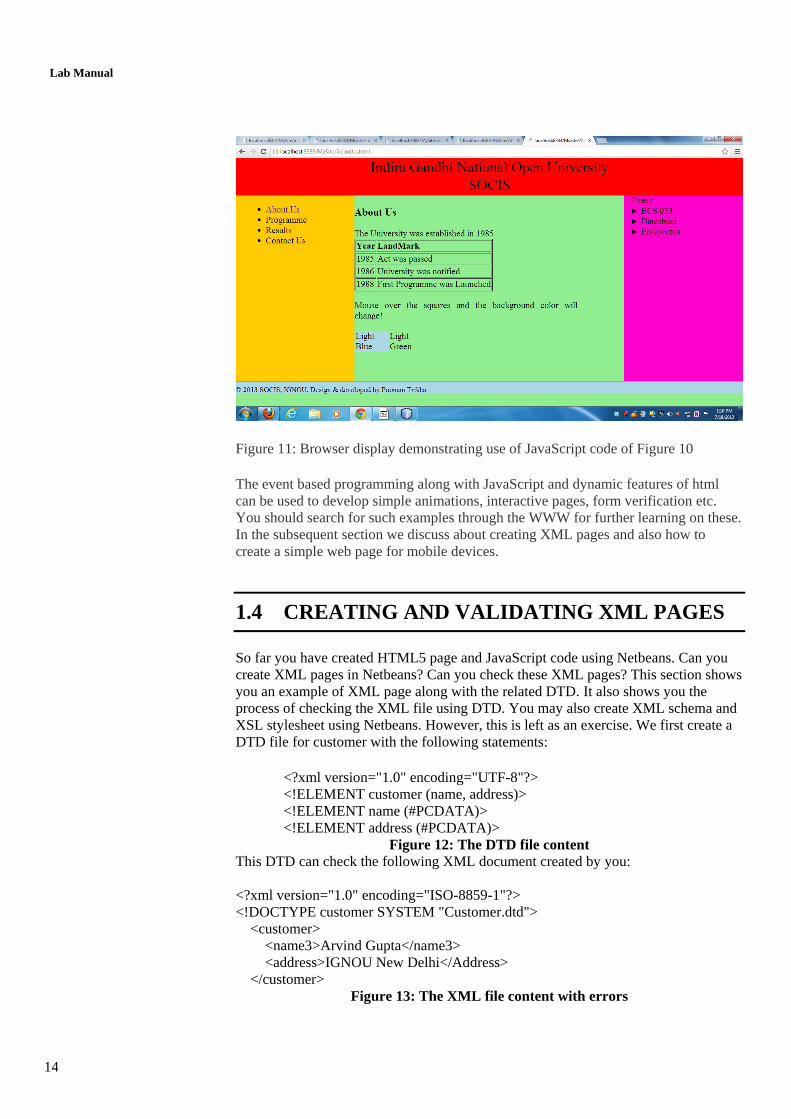
Figure 11: Browser display demonstrating use of JavaScript code of Figure 10
The event based programming along with JavaScript and dynamic features of html
can be used to develop simple animations, interactive pages, form verification etc.
You should search for such examples through the WWW for further learning on these.
In the subsequent section we discuss about creating XML pages and also how to
create a simple web page for mobile devices.
1.4 CREATING AND VALIDATING XML PAGES
So far you have created HTML5 page and JavaScript code using Netbeans. Can you
create XML pages in Netbeans? Can you check these XML pages? This section shows
you an example of XML page along with the related DTD. It also shows you the
process of checking the XML file using DTD. You may also create XML schema and
XSL stylesheet using Netbeans. However, this is left as an exercise. We first create a
DTD file for customer with the following statements:
<?xml version="1.0" encoding="UTF-8"?>
<!ELEMENT customer (name, address)>
<!ELEMENT name (#PCDATA)>
<!ELEMENT address (#PCDATA)>
Figure 12: The DTD file content
This DTD can check the following XML document created by you:
<?xml version="1.0" encoding="ISO-8859-1"?>
<!DOCTYPE customer SYSTEM "Customer.dtd">
<customer>
<name3>Arvind Gupta</name3>
<address>IGNOU New Delhi</Address>
</customer>
Figure 13: The XML file content with errors
15
Web Programming
Lab Please note there are two mistakes in the XML as above. First the tag <name3> ouis
declared as <name> and the tag <address> is closed by tag </Address> which is
incorrect as the A is capital. Let us see if these errors are flagged by the Netbeans
XML validation. But first you need to create the two files. You can first create a New
project with the name XML project. In this project now create a new DTD file using
the steps:
Select the option FileNew File …
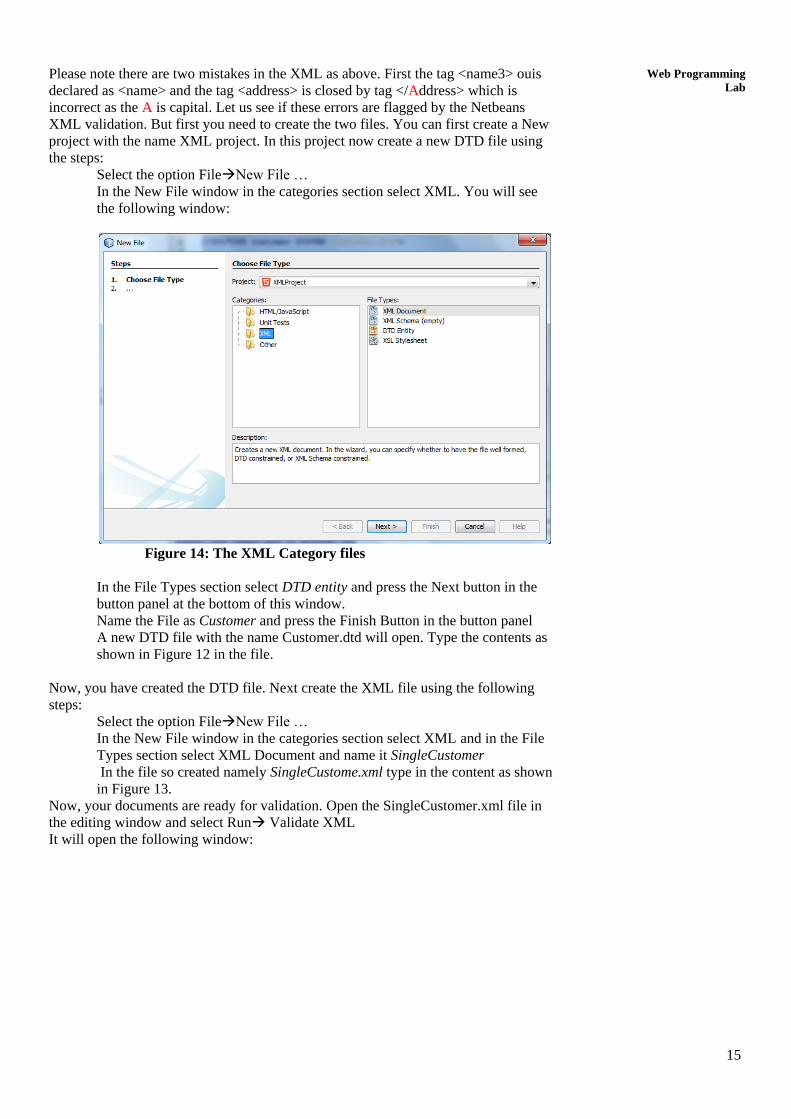
In the New File window in the categories section select XML. You will see
the following window:
Figure 14: The XML Category files
In the File Types section select DTD entity and press the Next button in the
button panel at the bottom of this window.
Name the File as Customer and press the Finish Button in the button panel
A new DTD file with the name Customer.dtd will open. Type the contents as
shown in Figure 12 in the file.
Now, you have created the DTD file. Next create the XML file using the following
steps:
Select the option FileNew File …
In the New File window in the categories section select XML and in the File
Types section select XML Document and name it SingleCustomer
In the file so created namely SingleCustome.xml type in the content as shown
in Figure 13.
Now, your documents are ready for validation. Open the SingleCustomer.xml file in
the editing window and select Run Validate XML
It will open the following window:
16
Lab Manual
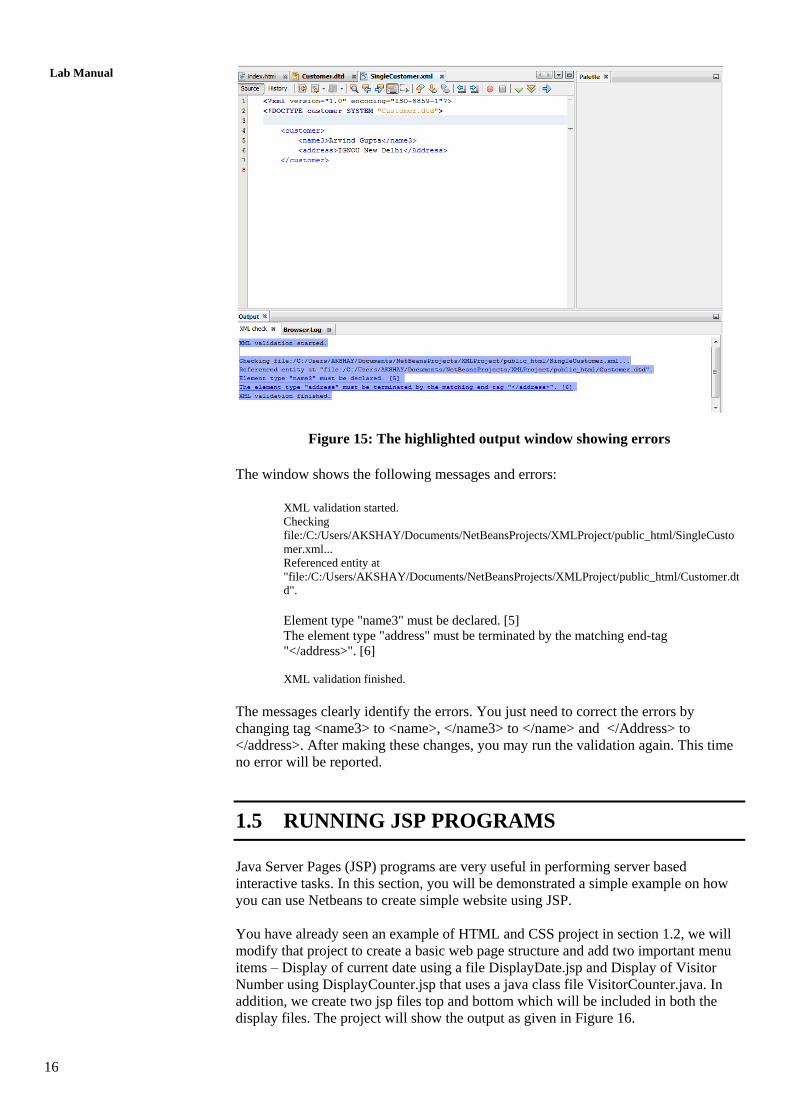
Figure 15: The highlighted output window showing errors
The window shows the following messages and errors:
XML validation started.
Checking
file:/C:/Users/AKSHAY/Documents/NetBeansProjects/XMLProject/public_html/SingleCusto
mer.xml...
Referenced entity at
"file:/C:/Users/AKSHAY/Documents/NetBeansProjects/XMLProject/public_html/Customer.dt
d".
Element type "name3" must be declared. [5]
The element type "address" must be terminated by the matching end-tag
"</address>". [6]
XML validation finished.
The messages clearly identify the errors. You just need to correct the errors by
changing tag <name3> to <name>, </name3> to </name> and </Address> to
</address>. After making these changes, you may run the validation again. This time
no error will be reported.
1.5 RUNNING JSP PROGRAMS
Java Server Pages (JSP) programs are very useful in performing server based
interactive tasks. In this section, you will be demonstrated a simple example on how
you can use Netbeans to create simple website using JSP.
You have already seen an example of HTML and CSS project in section 1.2, we will
modify that project to create a basic web page structure and add two important menu
items – Display of current date using a file DisplayDate.jsp and Display of Visitor
Number using DisplayCounter.jsp that uses a java class file VisitorCounter.java. In
addition, we create two jsp files top and bottom which will be included in both the
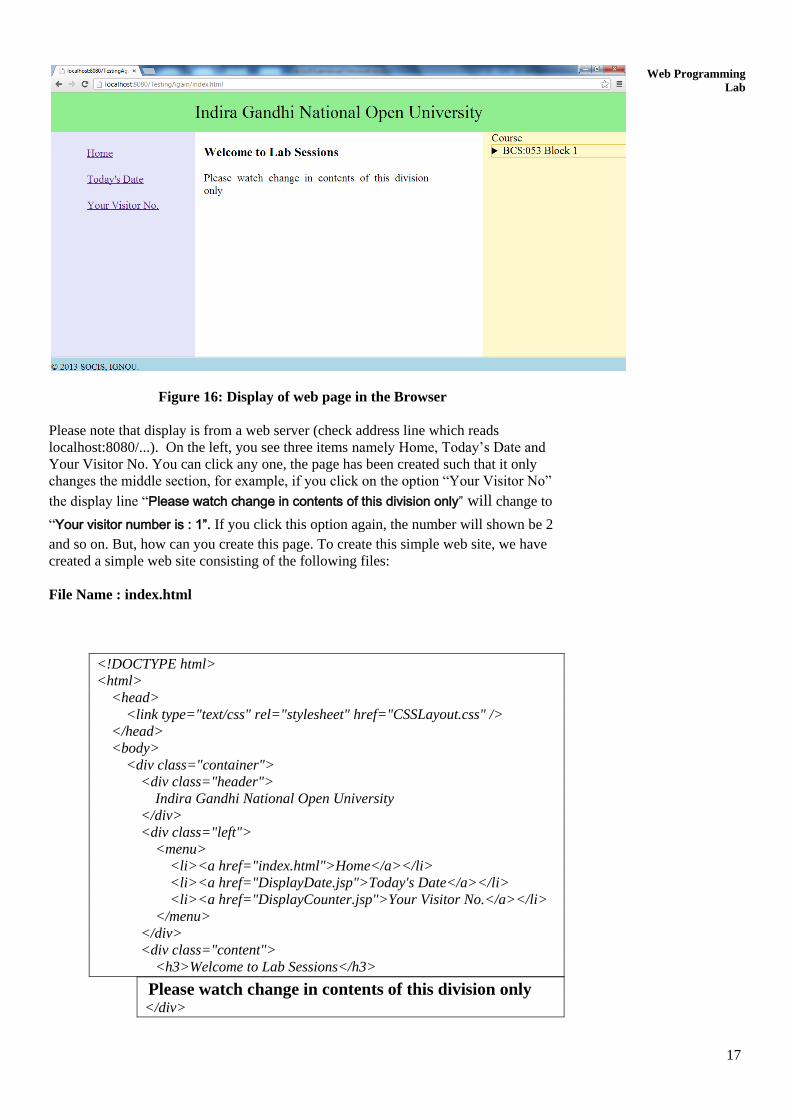
display files. The project will show the output as given in Figure 16.
17
Web Programming
Lab
Figure 16: Display of web page in the Browser
Please note that display is from a web server (check address line which reads
localhost:8080/...). On the left, you see three items namely Home, Today’s Date and
Your Visitor No. You can click any one, the page has been created such that it only
changes the middle section, for example, if you click on the option “Your Visitor No”
the display line “Please watch change in contents of this division only” will change to
“Your visitor number is : 1”. If you click this option again, the number will shown be 2
and so on. But, how can you create this page. To create this simple web site, we have
created a simple web site consisting of the following files:
File Name : index.html
<!DOCTYPE html>
<html>
<head>
<link type="text/css" rel="stylesheet" href="CSSLayout.css" />
</head>
<body>
<div class="container">
<div class="header">
Indira Gandhi National Open University
</div>
<div class="left">
<menu>
<li><a href="index.html">Home</a></li>
<li><a href="DisplayDate.jsp">Today's Date</a></li>
<li><a href="DisplayCounter.jsp">Your Visitor No.</a></li>
</menu>
</div>
<div class="content">
<h3>Welcome to Lab Sessions</h3>
Please watch change in contents of this division only
</div>
18
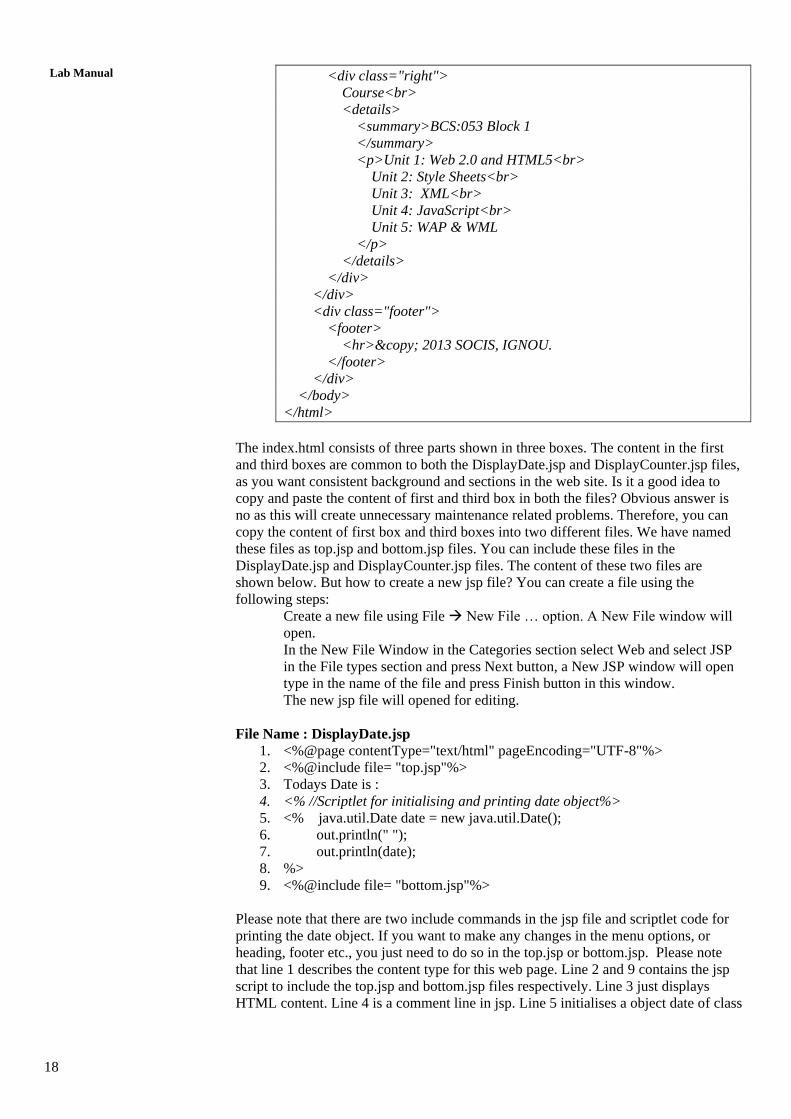
Lab Manual <div class="right">
Course<br>
<details>
<summary>BCS:053 Block 1
</summary>
<p>Unit 1: Web 2.0 and HTML5<br>
Unit 2: Style Sheets<br>
Unit 3: XML<br>
Unit 4: JavaScript<br>
Unit 5: WAP & WML
</p>
</details>
</div>
</div>
<div class="footer">
<footer>
<hr>© 2013 SOCIS, IGNOU.
</footer>
</div>
</body>
</html>
The index.html consists of three parts shown in three boxes. The content in the first
and third boxes are common to both the DisplayDate.jsp and DisplayCounter.jsp files,
as you want consistent background and sections in the web site. Is it a good idea to
copy and paste the content of first and third box in both the files? Obvious answer is
no as this will create unnecessary maintenance related problems. Therefore, you can
copy the content of first box and third boxes into two different files. We have named
these files as top.jsp and bottom.jsp files. You can include these files in the
DisplayDate.jsp and DisplayCounter.jsp files. The content of these two files are
shown below. But how to create a new jsp file? You can create a file using the
following steps:
Create a new file using File New File … option. A New File window will
open.
In the New File Window in the Categories section select Web and select JSP
in the File types section and press Next button, a New JSP window will open
type in the name of the file and press Finish button in this window.
The new jsp file will opened for editing.
File Name : DisplayDate.jsp
1. <%@page contentType="text/html" pageEncoding="UTF-8"%>
2. <%@include file= "top.jsp"%>
3. Todays Date is :
4. <% //Scriptlet for initialising and printing date object%>
5. <% java.util.Date date = new java.util.Date();
6. out.println(" ");
7. out.println(date);
8. %>
9. <%@include file= "bottom.jsp"%>
Please note that there are two include commands in the jsp file and scriptlet code for
printing the date object. If you want to make any changes in the menu options, or
heading, footer etc., you just need to do so in the top.jsp or bottom.jsp. Please note
that line 1 describes the content type for this web page. Line 2 and 9 contains the jsp
script to include the top.jsp and bottom.jsp files respectively. Line 3 just displays
HTML content. Line 4 is a comment line in jsp. Line 5 initialises a object date of class

19
Web Programming
Lab Date with the current date and time. Line 6 output a blank line and line 7 prints the
date object.
File Name : VisitorCounter.java
package JavaPackage;
public class VisitorCounter
{
private static int ctr;
public static int readCounterValue()
{
ctr++;
return ctr;
}
}
This file creates a java class file namely VisitorCounter. This class file is used by the
server to store a static variable ctr. The variable ctr is incremented every time the
readCounterValue() method of the class is called. This class is used by
DisplayCounter.jsp file to keep track of Visitors who click on Visitor No’s link.
Please note that the first line of this file is package JavaPackage. You need to create
this file using the following commands:
File New File … A New File window will open
Select Java in the categories section and Java Class in the File Types in the
New File window and press the Next button. A New Java Class window will
open.
In the New Java Class window, type Class Name - VisitorCounter and
Package JavaPackage as shown in Figure 17 and press the Finish button in
the button panel.
Figure 17: Creating the VisitorCounter class in the package JavaPackage
A new class file with the name VisitorCounter.java will open in the Netbeans editing
window. The file will include the following lines:
package JavaPackage;
public class VisitorCounter {
}
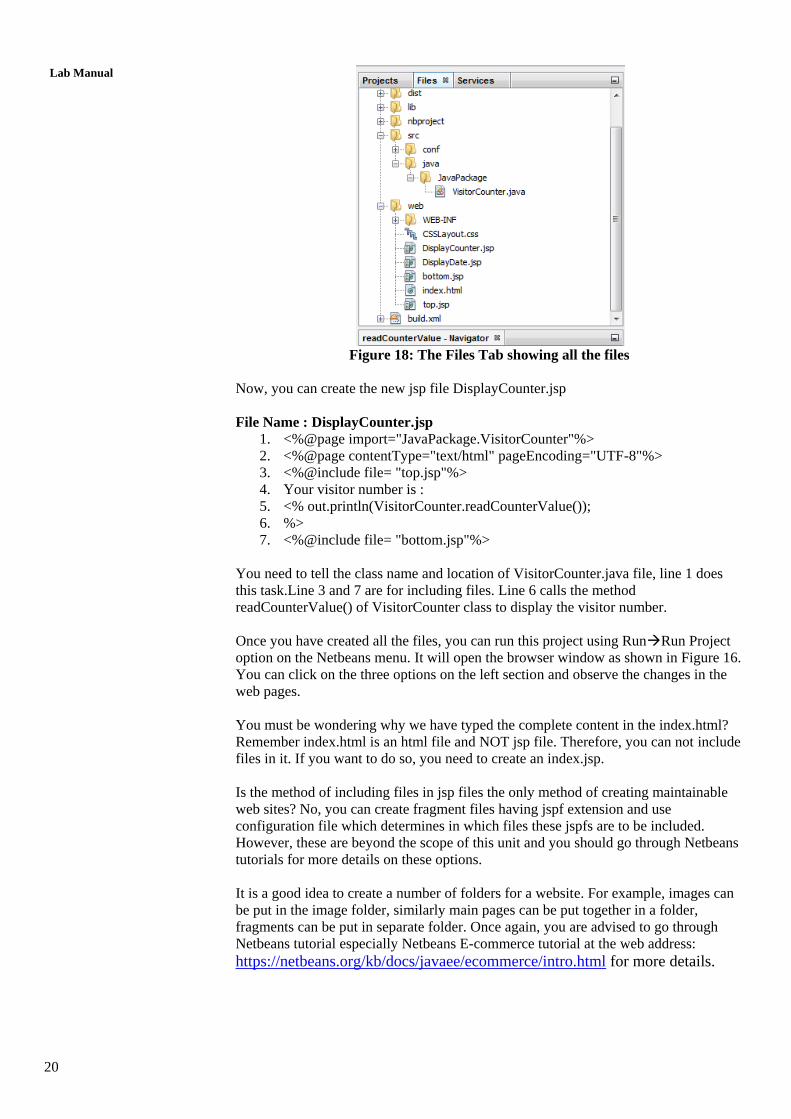
Type the remaining part of the file. Please note this file will be created in folder src—
java—javapackage folder as shown in the Figure 18.
20
Lab Manual
Figure 18: The Files Tab showing all the files
Now, you can create the new jsp file DisplayCounter.jsp
File Name : DisplayCounter.jsp
1. <%@page import="JavaPackage.VisitorCounter"%>
2. <%@page contentType="text/html" pageEncoding="UTF-8"%>
3. <%@include file= "top.jsp"%>
4. Your visitor number is :
5. <% out.println(VisitorCounter.readCounterValue());
6. %>
7. <%@include file= "bottom.jsp"%>
You need to tell the class name and location of VisitorCounter.java file, line 1 does
this task.Line 3 and 7 are for including files. Line 6 calls the method
readCounterValue() of VisitorCounter class to display the visitor number.
Once you have created all the files, you can run this project using RunRun Project
option on the Netbeans menu. It will open the browser window as shown in Figure 16.
You can click on the three options on the left section and observe the changes in the
web pages.
You must be wondering why we have typed the complete content in the index.html?
Remember index.html is an html file and NOT jsp file. Therefore, you can not include
files in it. If you want to do so, you need to create an index.jsp.
Is the method of including files in jsp files the only method of creating maintainable
web sites? No, you can create fragment files having jspf extension and use
configuration file which determines in which files these jspfs are to be included.
However, these are beyond the scope of this unit and you should go through Netbeans
tutorials for more details on these options.
It is a good idea to create a number of folders for a website. For example, images can
be put in the image folder, similarly main pages can be put together in a folder,
fragments can be put in separate folder. Once again, you are advised to go through
Netbeans tutorial especially Netbeans E-commerce tutorial at the web address:
https://netbeans.org/kb/docs/javaee/ecommerce/intro.html for more details.
21
Web Programming
Lab 1.6 CREATING DATABASE APPLICATION
So far you have used the Netbeans environment for creating simple JSP programs.
However, a good website may need to connect to a backend data server. Some such
tasks may involve entering information, checking for login etc. In this section, we will
explain, how a database based application can be created using netbeans. For this
section, you will also require MySQL database. (You may any database instead of
MySQL such as PostgreSQL also). You can download MySQL/PostgreSQL database
from their respective web site. You must install the file and create the password for
the root.
First let us define the problem that you need to solve in this section. You need to
create a Student Information form that stores the information of a student in a
database. You are also required to query the database to retrieve programme wise
student information. This application requires interfaces and database support. As a
first step, you need to analyse and design the problem, however, we have shown here
a very simple implementation (without error checks) using JSP. The following sub-
sections illustrate this example.
1.6.1 Creating Database and Database connections using netbeans
Once you have successfully installed MySQL client, it will be ready to use. You can
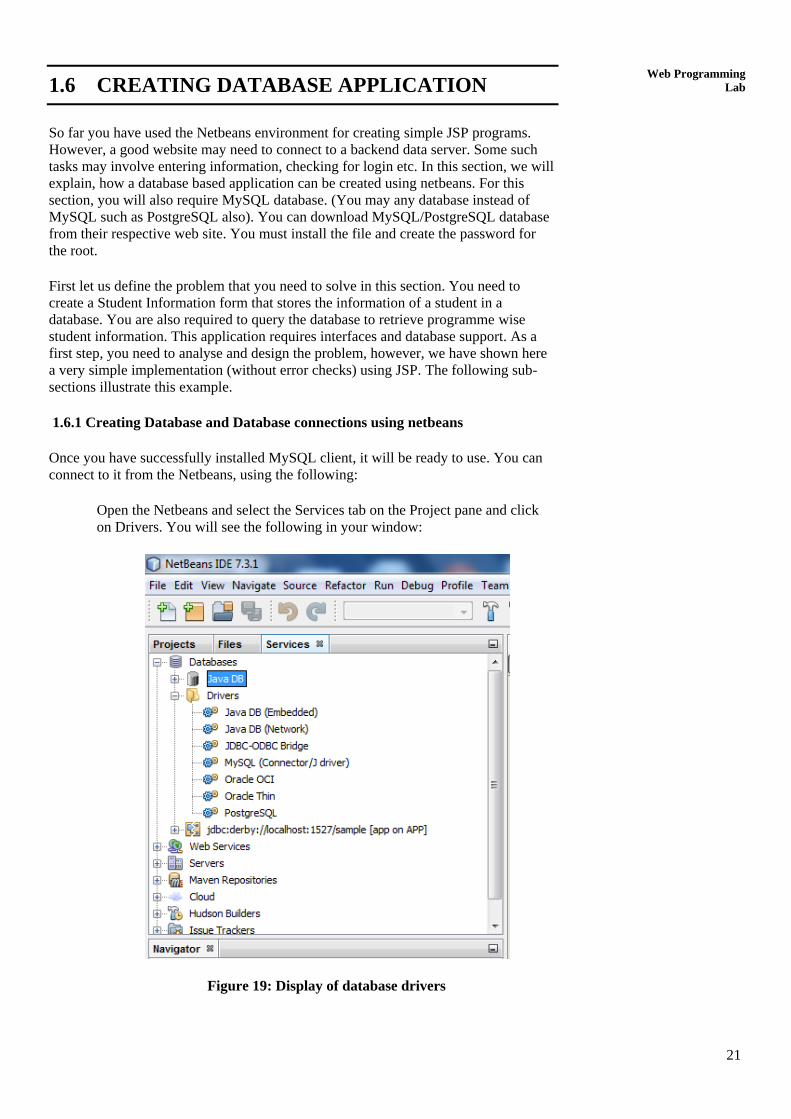
connect to it from the Netbeans, using the following:
Open the Netbeans and select the Services tab on the Project pane and click
on Drivers. You will see the following in your window:
Figure 19: Display of database drivers
22
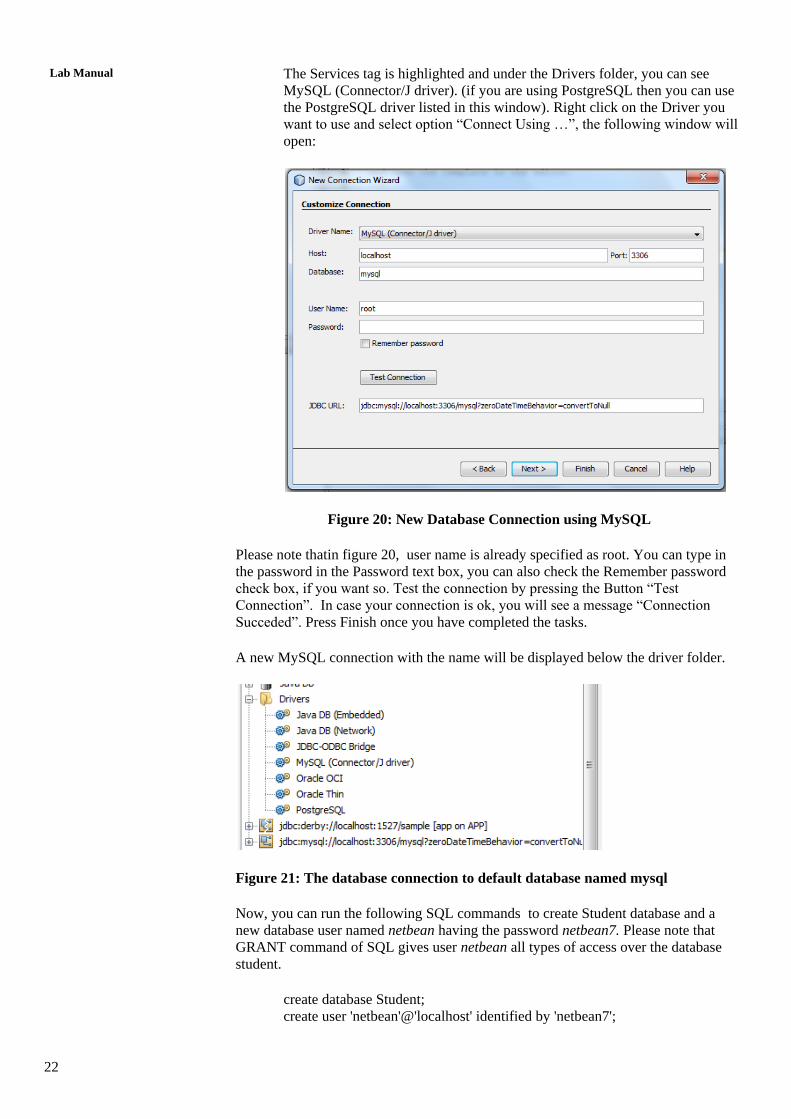
Lab Manual The Services tag is highlighted and under the Drivers folder, you can see
MySQL (Connector/J driver). (if you are using PostgreSQL then you can use
the PostgreSQL driver listed in this window). Right click on the Driver you
want to use and select option “Connect Using …”, the following window will
open:
Figure 20: New Database Connection using MySQL
Please note thatin figure 20, user name is already specified as root. You can type in
the password in the Password text box, you can also check the Remember password
check box, if you want so. Test the connection by pressing the Button “Test
Connection”. In case your connection is ok, you will see a message “Connection
Succeded”. Press Finish once you have completed the tasks.
A new MySQL connection with the name will be displayed below the driver folder.
Figure 21: The database connection to default database named mysql
Now, you can run the following SQL commands to create Student database and a
new database user named netbean having the password netbean7. Please note that
GRANT command of SQL gives user netbean all types of access over the database
student.
create database Student;
create user 'netbean'@'localhost' identified by 'netbean7';
23
Web Programming
Lab grant all on student.* to 'netbean'@'localhost';
But how can you run these commands using netbeans?
You can Right click on the MySQL connection as shown in figure 21 and select the
option “Execute Command …” , a tab with the name “SQL Command 1 will open in
the editor window. Type all the SQL commands in that window and press
CTRL+SHIFT+E keys to run these SQL commands.
Once you have created the database student, you can create tables in this database. But
for this you may have to create a new connection to the student database. You may be
wondering why do you need to create this new connection? This will make sure that
you work with the students database only. In addition, we also propose that you use
different user name and password to for this connection. Why, well the main reason is
that the root user has access to every database resource and giving such permission to
everyone will be dangerous. Therefore, it may be a good idea to give limited access to
user accounts. Please note that netbean account only have access to student database
only. It can perform all the database creation and manipulation commands (specified
by ALL in the grant command) on the database student only.
So, create another MySQL database connection following the same procedure as
given earlier, but enter the following in figure 20.
Databse: student
User Name: netbean
Password: netbean7
The following new connection will be created:
Now, you can execute the following SQL commands using the new database
connection that you have created.
You should execute the following commands to create two tables programme and
studentmaster. Please note that in the command Primary key, check constraint and
Foreign key constraint has been specified.
create table programme (
ProgCode char(5) PRIMARY KEY,
Prname varchar(40) NOT NULL,
NoOfSemester int NOT NULL,
check (NoOfSemester > 0 and NoOfSemester < 15)
);
create table studentmaster (
stID char(9) PRIMARY KEY,
stname varchar(25) NOT NULL,
stphone char(12) NOT NULL,
ProgCode char(10) NOT NULL,
FOREIGN KEY (ProgCode) references programme(ProgCode)
on delete restrict
on update cascade);
You can now insert some data in the programme table using the following commands.
insert into programme VALUES ("MCA","Master of Computer Applications",6);
24
Lab Manual insert into programme VALUES ("BCA","Bachelor of Computer Applications",6);
insert into programme VALUES ("CIT","Certificate in Information Technology",1);
insert into programme VALUES ("MBA","Master of Business Administration",6);
1.6.2 Creating Form and Connection using JSTL
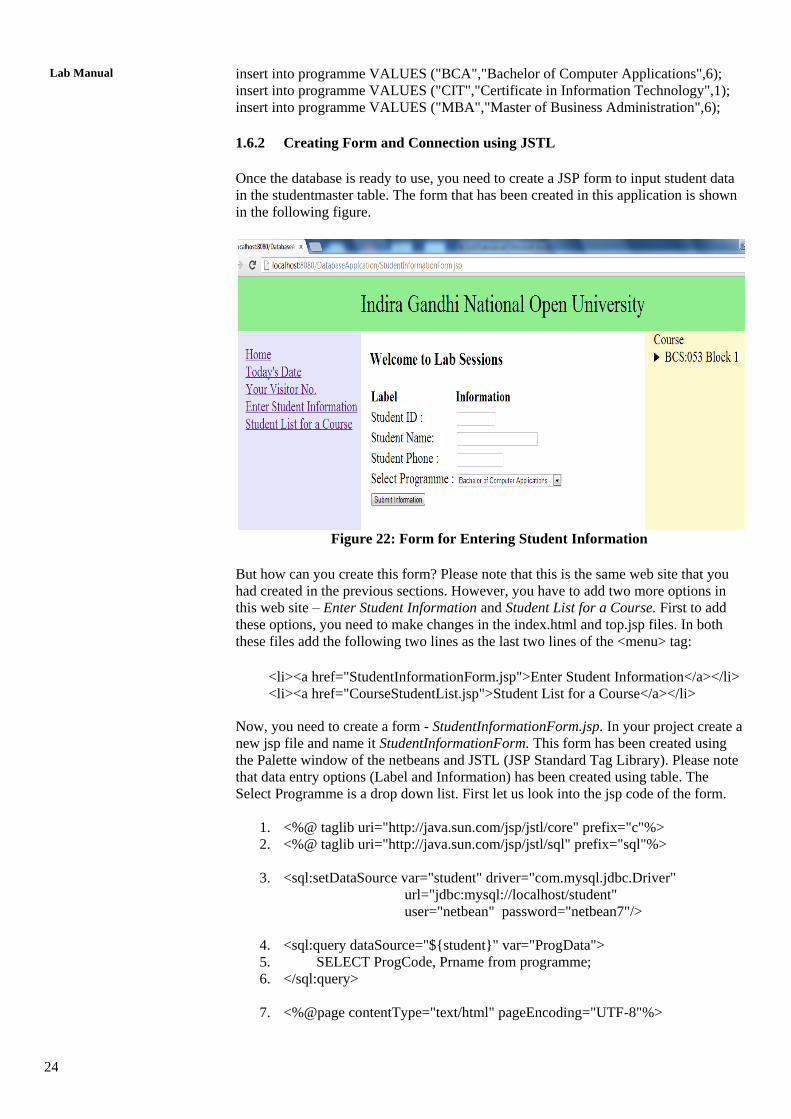
Once the database is ready to use, you need to create a JSP form to input student data
in the studentmaster table. The form that has been created in this application is shown
in the following figure.
Figure 22: Form for Entering Student Information
But how can you create this form? Please note that this is the same web site that you
had created in the previous sections. However, you have to add two more options in
this web site – Enter Student Information and Student List for a Course. First to add
these options, you need to make changes in the index.html and top.jsp files. In both
these files add the following two lines as the last two lines of the <menu> tag:
<li><a href="StudentInformationForm.jsp">Enter Student Information</a></li>
<li><a href="CourseStudentList.jsp">Student List for a Course</a></li>
Now, you need to create a form - StudentInformationForm.jsp. In your project create a
new jsp file and name it StudentInformationForm. This form has been created using
the Palette window of the netbeans and JSTL (JSP Standard Tag Library). Please note
that data entry options (Label and Information) has been created using table. The
Select Programme is a drop down list. First let us look into the jsp code of the form.
1. <%@ taglib uri="http://java.sun.com/jsp/jstl/core" prefix="c"%>
2. <%@ taglib uri="http://java.sun.com/jsp/jstl/sql" prefix="sql"%>
3. <sql:setDataSource var="student" driver="com.mysql.jdbc.Driver"
url="jdbc:mysql://localhost/student"
user="netbean" password="netbean7"/>
4. <sql:query dataSource="${student}" var="ProgData">
5. SELECT ProgCode, Prname from programme;
6. </sql:query>
7. <%@page contentType="text/html" pageEncoding="UTF-8"%>
25
Web Programming
Lab 8. <%@include file= "top.jsp"%>
9. <form name="InputStudentData" action="StudentDataInput.jsp"
method="POST">
10. <table border="0">
11. <thead>
12. <tr>
<th>Label</th>
<th>Information</th>
13. </tr>
14. </thead>
15. <tbody>
16. <tr>
<td>Student ID :</td>
<td><input type="text" name="StudentID" value="" size="9" /></td>
17. </tr>
18. <tr>
<td>Student Name:</td>
<td><input type="text" name="StudentName" value="" size="25" />
</td>
19. </tr>
20. <tr>
<td> Student Phone :</td>
<td><input type="text" name="StudentPhone" value="" size="12" />
</td>
21. </tr>
22. <tr>
<td> Select Programme :</td>
<td>
<select name="ProgData">
<c:forEach var="row" items="${ProgData.rows}">
<option value="<c:out value="${row.ProgCode}"/>">
<c:out value="${row.Prname}"/>
</option>
</c:forEach>
</select>
</td>
23. </tr>
24. </tbody>
25. </table>
26. <input type="submit" value="Submit Information" name="Submit" />
27. </form>
28. <%@include file= "bottom.jsp"%>
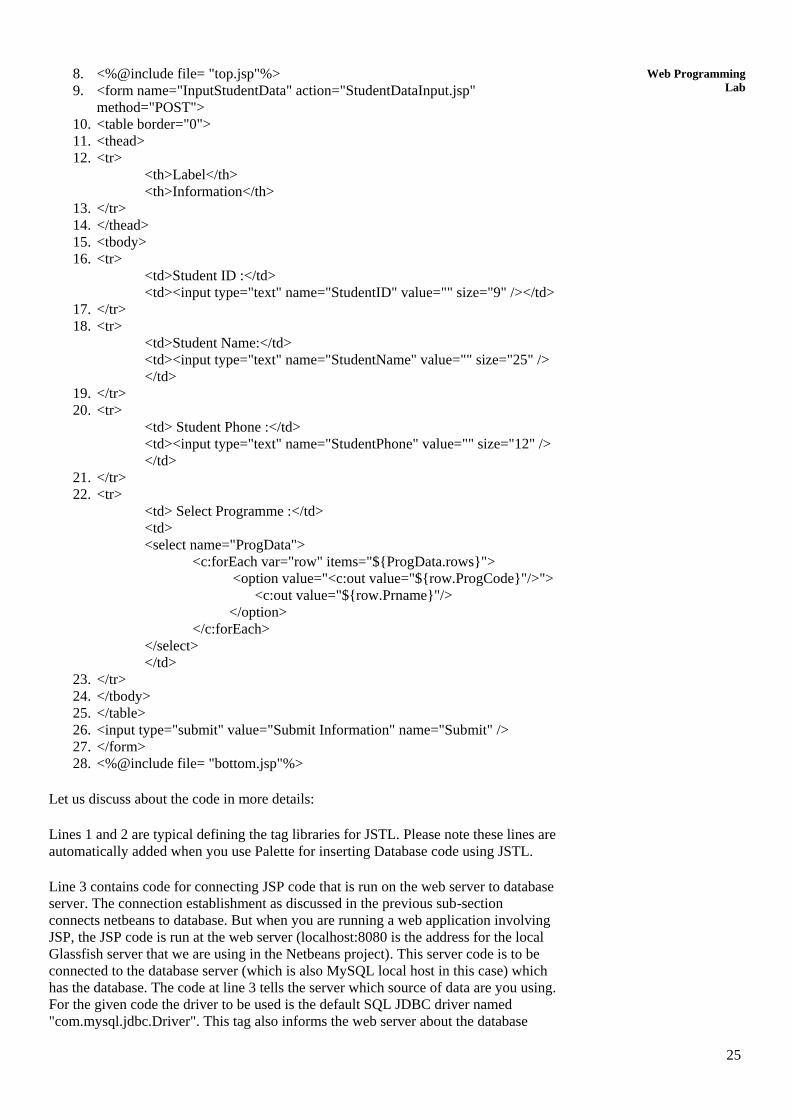
Let us discuss about the code in more details:
Lines 1 and 2 are typical defining the tag libraries for JSTL. Please note these lines are
automatically added when you use Palette for inserting Database code using JSTL.
Line 3 contains code for connecting JSP code that is run on the web server to database
server. The connection establishment as discussed in the previous sub-section
connects netbeans to database. But when you are running a web application involving
JSP, the JSP code is run at the web server (localhost:8080 is the address for the local
Glassfish server that we are using in the Netbeans project). This server code is to be
connected to the database server (which is also MySQL local host in this case) which
has the database. The code at line 3 tells the server which source of data are you using.
For the given code the driver to be used is the default SQL JDBC driver named
"com.mysql.jdbc.Driver". This tag also informs the web server about the database
26
Lab Manual name and location, user name and password (in our example,
"jdbc:mysql://localhost/student", "netbean" and "netbean7" respectively). Please note
that this database connection is attached with a variable name “student” in this lin
Lines 4-6 is the code for the query that is a standard SQL query. This query extracts
the ProgCode and Prname from the Programme table. Please observe the data source
given here is ${student} which refers to variable, i.e. student, that you have created in
line 3. This statement also specified a new variable name ProgData which will be
assigned the output of the query when it is run.
Line 7 defines the content type of this JSP page.
Line 8 and 28 includes the top.jsp and bottom.jsp files in the code.
Line 9 typically identifies the form and the file that will be executed when submit
button is pressed. The method used to transfer parameter is POST in this case.
Line 11-25 describes various label and input fields such as text box. Line 26 creates
the Submit Information button. Line number 22 needs some more discussion. The
HTML code for the Drop Down List of Programme as can be seen in the page source
of the browser is:
<select name="ProgCode">
<option value="BCA"> Bachelor of Computer Applications</option>
<option value="CIT"> Certificate in Information Technology</option>
<option value="MBA"> Master of Business Administration</option>
<option value="MCA"> Master of Computer Applications</option>
</select>
While the JSP code is:
<select name="ProgData">
<c:forEach var="row" items="${ProgData.rows}">
<option value="<c:out value="${row.ProgCode}"/>">
<c:out value="${row.Prname}"/>
</option>
</c:forEach>
</select>
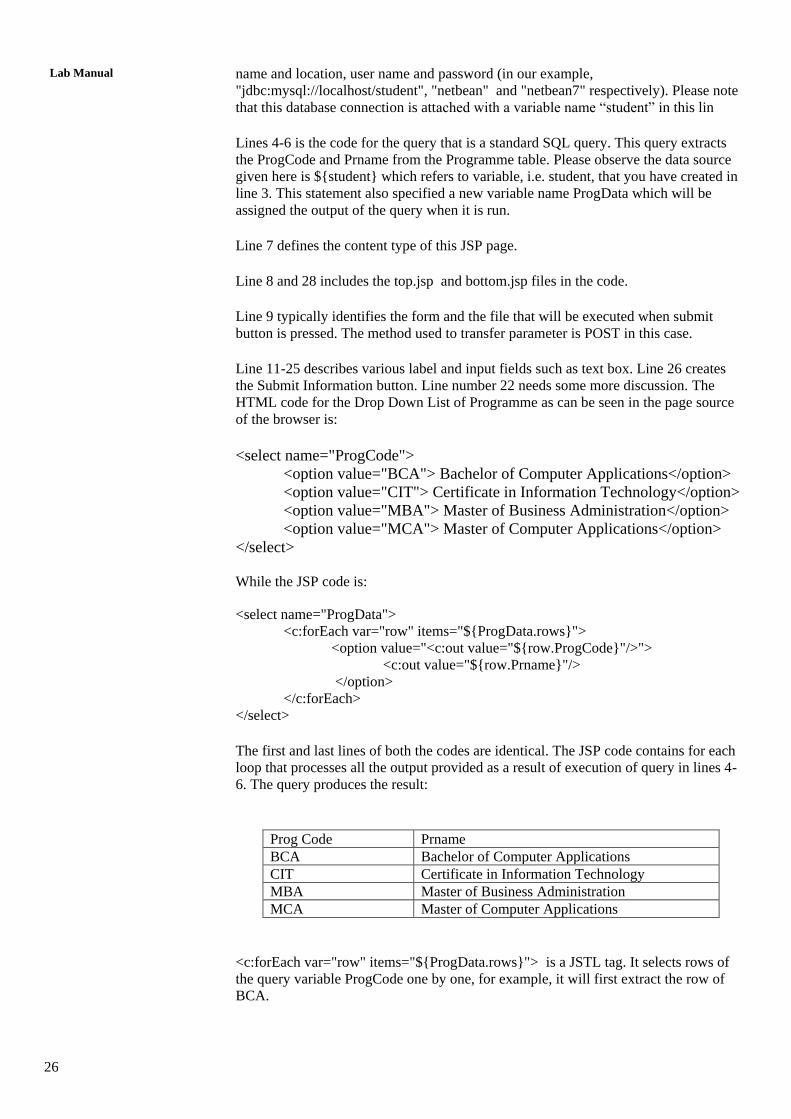
The first and last lines of both the codes are identical. The JSP code contains for each
loop that processes all the output provided as a result of execution of query in lines 4-
6. The query produces the result:
<c:forEach var="row" items="${ProgData.rows}"> is a JSTL tag. It selects rows of
the query variable ProgCode one by one, for example, it will first extract the row of
BCA.
Prog Code Prname
BCA Bachelor of Computer Applications
CIT Certificate in Information Technology
MBA Master of Business Administration
MCA Master of Computer Applications
27
Web Programming
Lab <option value="<c:out value="${row.ProgCode}"/>"> is an HTML tag which
contains a JSTL tag <c:out ……/>. The HTML tag output the content:
<option value="
Next the JSTL tag <c:out value="${row.ProgCode}"/> executes and produces the
ProgCode (the SQL field name) of the first row. This happens to be BCA. Thus, the
output is:
BCA
Finally the last portion "> produces the output
">.
Thus, this line produces the tag:
<option value="BCA">
The line <c:out value="${row.Prname}"/> for the first row simply produces the
output:
Bachelor of Computer Applications
The last line produces the output:
</option>
So when you put together the output of the all these three rows together you get the
HTML code:
<option value="BCA"> Bachelor of Computer Applications</option>
Which is the first line of HTML code of the browser.
Please note that the JSP code is repeated for each row of the data output as shown in
the table, thus, creating the complete HTML code of Select options.
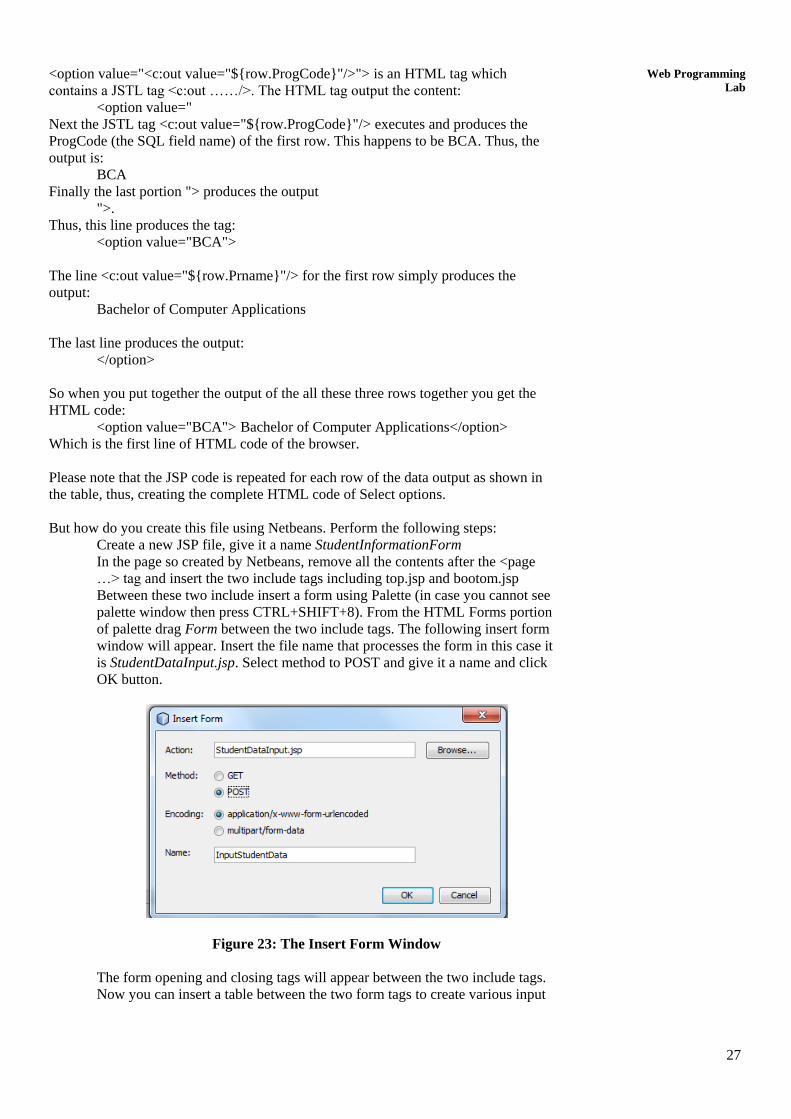
But how do you create this file using Netbeans. Perform the following steps:
Create a new JSP file, give it a name StudentInformationForm
In the page so created by Netbeans, remove all the contents after the <page
…> tag and insert the two include tags including top.jsp and bootom.jsp
Between these two include insert a form using Palette (in case you cannot see
palette window then press CTRL+SHIFT+8). From the HTML Forms portion
of palette drag Form between the two include tags. The following insert form
window will appear. Insert the file name that processes the form in this case it
is StudentDataInput.jsp. Select method to POST and give it a name and click
OK button.
Figure 23: The Insert Form Window
The form opening and closing tags will appear between the two include tags.
Now you can insert a table between the two form tags to create various input
28
Lab Manual options (except the select options). You can also type in the code from the
lines 10 to 26 except the line 22.
Now, you need to insert the HTML code given at line 22. Place your cursor
between the code of line 21 and 23 and create type
<tr>
<td> Select Programme :</td>
<td>
<select name="ProgCode">
<option value="BCA">
Bachelor of Computer Applications
</option>
</select>
</td>
Please note the BCA and Bachelor of Computer Applications are to be
replaced by JSP code which will make sure all the progrrammes are included
in the drop down list. But in which database source programme data is
available? As indicated earlier this data is available in MySQL database
student in the programme table. You have already established a connection
with the database along with user name and password. So enter all this
information at line 1 of your JSP program. Enter the following information at
line 1 of this JSP file.
<sql:setDataSource var="student" driver="com.mysql.jdbc.Driver"
url="jdbc:mysql://localhost/student"
user="netbean" password="netbean7"/>
Once you have informed about the connection and database, you will have to
write a query that will list various programme codes and programme names.
The query in SQL for this purpose is:
SELECT ProgCode, Prname from programme;
Using this data a programme name drop down list is to be created, but for this
list the data that is being passed through POST method will be the ProgCode
such as BCA, MCA only. You need to write JSP code that performs this task.
The data for this purpose will be retrieved as a collection of rows (one row for
each course) and columns (two columns ProgCode and Prname).
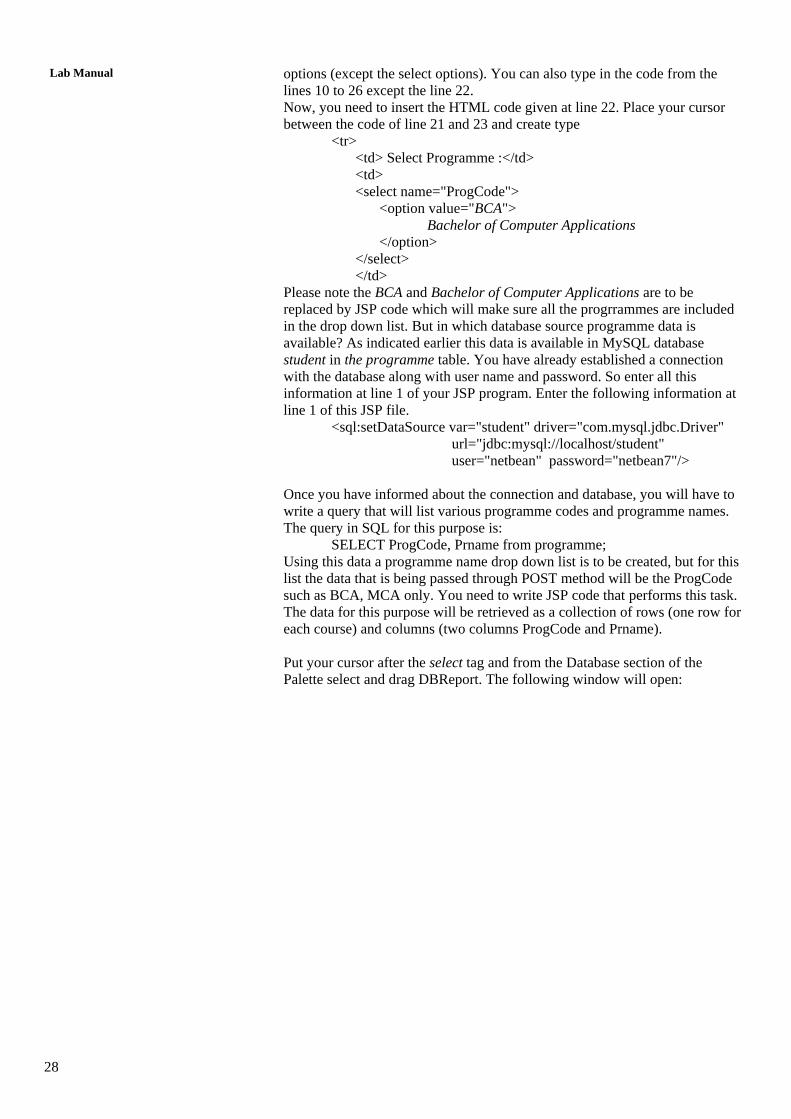
Put your cursor after the select tag and from the Database section of the
Palette select and drag DBReport. The following window will open:
29
Web Programming
Lab
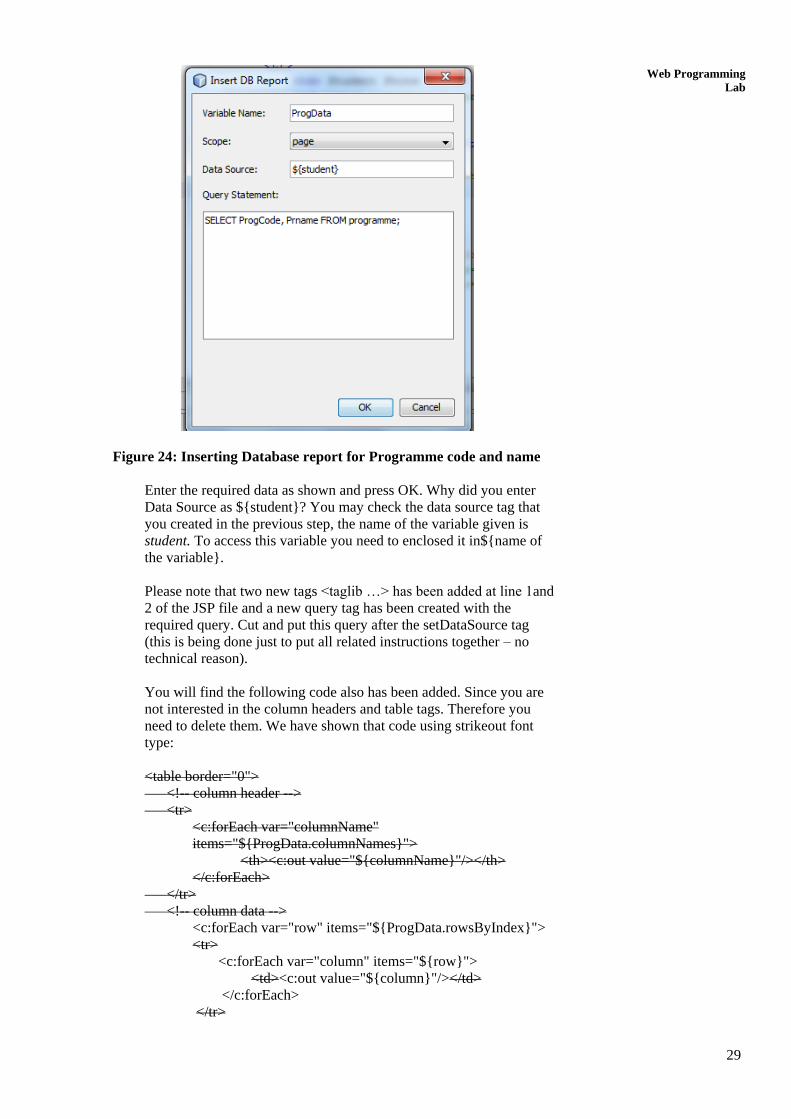
Figure 24: Inserting Database report for Programme code and name
Enter the required data as shown and press OK. Why did you enter
Data Source as ${student}? You may check the data source tag that
you created in the previous step, the name of the variable given is
student. To access this variable you need to enclosed it in${name of
the variable}.
Please note that two new tags <taglib …> has been added at line 1and
2 of the JSP file and a new query tag has been created with the
required query. Cut and put this query after the setDataSource tag
(this is being done just to put all related instructions together – no
technical reason).
You will find the following code also has been added. Since you are
not interested in the column headers and table tags. Therefore you
need to delete them. We have shown that code using strikeout font
type:
<table border="0">
<!-- column header -->
<tr>
<c:forEach var="columnName"
items="${ProgData.columnNames}">
<th><c:out value="${columnName}"/></th>
</c:forEach>
</tr>
<!-- column data -->
<c:forEach var="row" items="${ProgData.rowsByIndex}">
<tr>
<c:forEach var="column" items="${row}">
<td><c:out value="${column}"/></td>
</c:forEach>
</tr>
30
Lab Manual </c:forEach>
</table>
However, we have to create code that is equivalent to code (it is to be repeated for
every programme.):
<option value="BCA">
Bachelor of Computer Applications
</option>
Therefore, we must keep the outer for each loop, with only the change that we want
data by rows. However, the inner loop should contain option tags, therefore, you can
replace the inner loop by the option code as given above. So the new code line is:
<c:forEach var="row" items="${ProgData.rowsByIndex}">
<option value="BCA">
Bachelor of Computer Applications
</option>
</c:forEach>
Now, the term BCA is actually programme code which is stored in ProgCode part of
variable row. This will be replaced by <c:out value="${${ row.ProgCode}”/>,
likewise the Bachelor of Computer Applications will be replaced by <c:out
value="${${ row.Prname}”/>. Thus, you will get the following code.
<select name="ProgData">
<c:forEach var="row" items="${ProgData.rows}">
<option value="<c:out value="${row.ProgCode}"/>">
<c:out value="${row.Prname}"/>
</option>
</c:forEach>
</select>
Now, you form is ready and you can test it, to get the display as shown in figure 22. In
the next section, we describe the process of processing the form data and entering it in
SQL database.
1.6.3 Storing Student information in the Database
The next step will be input the information submitted by the student into the SQL
student database. The file that will process the form data has been specified in the
<form …> tag itsel. This content of this file is given below:
StudentDataInput.jsp
<%@ taglib uri="http://java.sun.com/jsp/jstl/core" prefix="c"%>
<%@ taglib uri="http://java.sun.com/jsp/jstl/sql" prefix="sql"%>
<sql:setDataSource var="student" driver="com.mysql.jdbc.Driver"
url="jdbc:mysql://localhost/student"
user="netbean" password="netbean7"/>
<%@page contentType="text/html" pageEncoding="UTF-8"%>
<%@include file= "top.jsp"%>
<sql:update var="insert" dataSource="${student}">
INSERT INTO studentmaster (stID,stname,stphone,ProgCode)
VALUES(?,?,?,?);
<sql:param value="${param.StudentID}" />
<sql:param value="${param.StudentName}" />
<sql:param value="${param.StudentPhone}" />
<sql:param value="${param.ProgCode}" />

31
Web Programming
Lab </sql:update>
<sql:query var="studentmaster" dataSource="${student}">
SELECT * FROM studentmaster WHERE stID = ? <sql:param
value="${param.StudentID}" />;
</sql:query>
The Record Entered by you is:
<table border="1">
<!-- column headers -->
<tr>
<th>Student ID</th>
<th>Student Name</th>
<th>Phone Number</th>
<th>Programme Code</th>
</tr>
<!-- column data -->
<c:forEach var="row" items="${studentmaster.rowsByIndex}">
<tr>
<c:forEach var="column" items="${row}">
<td><c:out value="${column}"/></td>
</c:forEach>
</tr>
</c:forEach>
</table>
<%@include file= "bottom.jsp"%>
You should create all the components of the file as explained in the previous sub-
section. The portion of the this jsp program that needs explanation is the SQL
statement itself. Please note the use of question marks (?) in the VALUES clause,
followed by <sql:param …> tags. There are four VALUES clauses and thus four
<sql:param …> tags. You may observe that the parameters used in <sql:param …>
tags are ${param.StudentID}, ${param.StudentName}, ${param.StudentPhone} and
${param.ProgCode} conforming to the name fields of the input tages of the form
StudentInformationForm.jsp. The names of these fields are StudentID, StudentName,
StudentPhone and ProgCode respectively. Thus, the data of the form is transferred
through the Insert statement to the studentmaster table of the student database. Once
data is entered in the database, then the second query displays the content entered for
this student. Thus, after filling up the form and submitting it through Submit
Information Button, the data will be entered in the database and displayed in the
browser window as shown in Figure 25.
32
Lab Manual
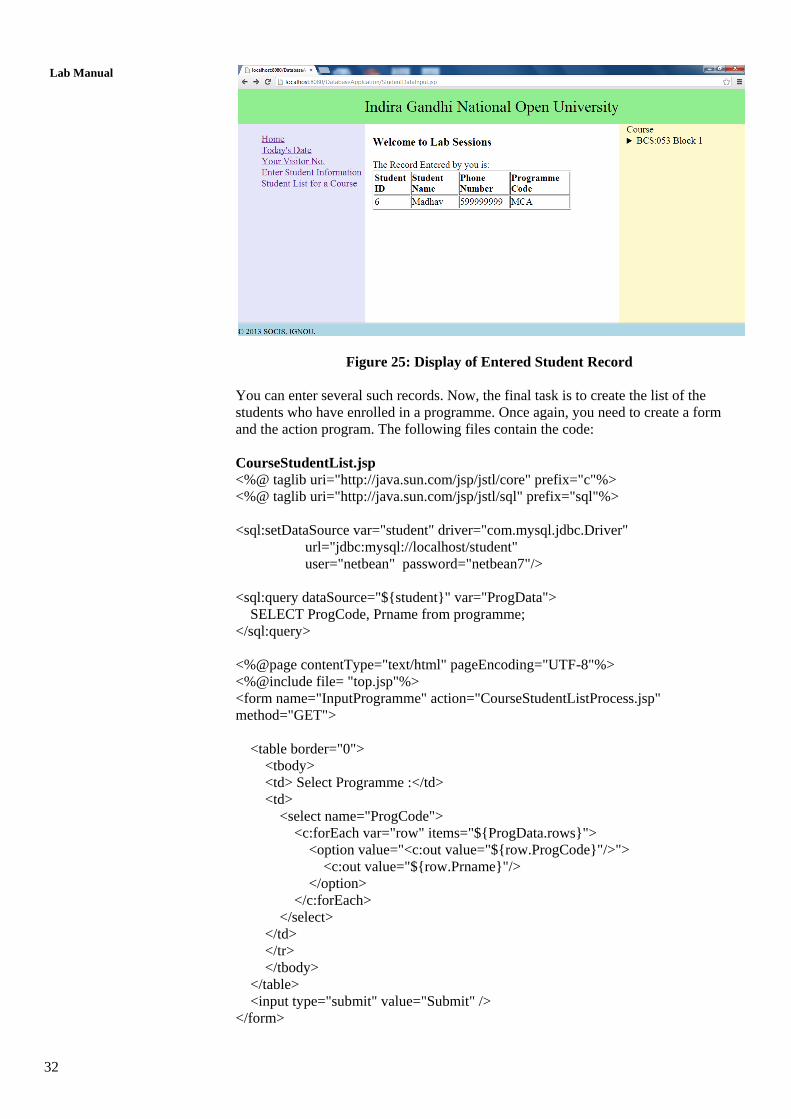
Figure 25: Display of Entered Student Record
You can enter several such records. Now, the final task is to create the list of the
students who have enrolled in a programme. Once again, you need to create a form
and the action program. The following files contain the code:
CourseStudentList.jsp
<%@ taglib uri="http://java.sun.com/jsp/jstl/core" prefix="c"%>
<%@ taglib uri="http://java.sun.com/jsp/jstl/sql" prefix="sql"%>
<sql:setDataSource var="student" driver="com.mysql.jdbc.Driver"
url="jdbc:mysql://localhost/student"
user="netbean" password="netbean7"/>
<sql:query dataSource="${student}" var="ProgData">
SELECT ProgCode, Prname from programme;
</sql:query>
<%@page contentType="text/html" pageEncoding="UTF-8"%>
<%@include file= "top.jsp"%>
<form name="InputProgramme" action="CourseStudentListProcess.jsp"
method="GET">
<table border="0">
<tbody>
<td> Select Programme :</td>
<td>
<select name="ProgCode">
<c:forEach var="row" items="${ProgData.rows}">
<option value="<c:out value="${row.ProgCode}"/>">
<c:out value="${row.Prname}"/>
</option>
</c:forEach>
</select>
</td>
</tr>
</tbody>
</table>
<input type="submit" value="Submit" />
</form>
33
Web Programming
Lab <%@include file= "bottom.jsp"%>
CourseStudentLisProcess.jsp
<%@ taglib uri="http://java.sun.com/jsp/jstl/core" prefix="c"%>
<%@ taglib uri="http://java.sun.com/jsp/jstl/sql" prefix="sql"%>
<sql:setDataSource var="student" driver="com.mysql.jdbc.Driver"
url="jdbc:mysql://localhost/student"
user="netbean" password="netbean7"/>
<%@page contentType="text/html" pageEncoding="UTF-8"%>
<%@include file= "top.jsp"%>
<sql:query var="programmename" dataSource="${student}">
SELECT Prname FROM programme
WHERE ProgCode = ? <sql:param value="${param.ProgCode}" />;
</sql:query>
<sql:query var="studentmaster" dataSource="${student}">
SELECT s.stID, s.stname FROM studentmaster s, programme p
WHERE s.Progcode = p.ProgCode AND p.ProgCode = ? <sql:param
value="${param.ProgCode}" />;
</sql:query>
<h4>Programme:<br>
<c:forEach var="progname" items="${programmename.rows}">
<c:out value="${progname.Prname}"/>
</c:forEach> (${param.ProgCode})
</h4>
<table border="1">
<!-- column headers -->
<tr>
<th>Student ID</th>
<th>Student Name</th>
</tr>
<!-- column data -->
<c:forEach var="row" items="${studentmaster.rows}">
<tr>
<td><c:out value="${row.stID}"/></td>
<td><c:out value="${row.stname}"/></td>
</tr>
</c:forEach>
</table>
<%@include file= "bottom.jsp"%>
You can create these files. The code is not every different to what we have already
explained. The following is the browser displays when you execute these files. Please
notice that one of the query is from two table.
34
Lab Manual
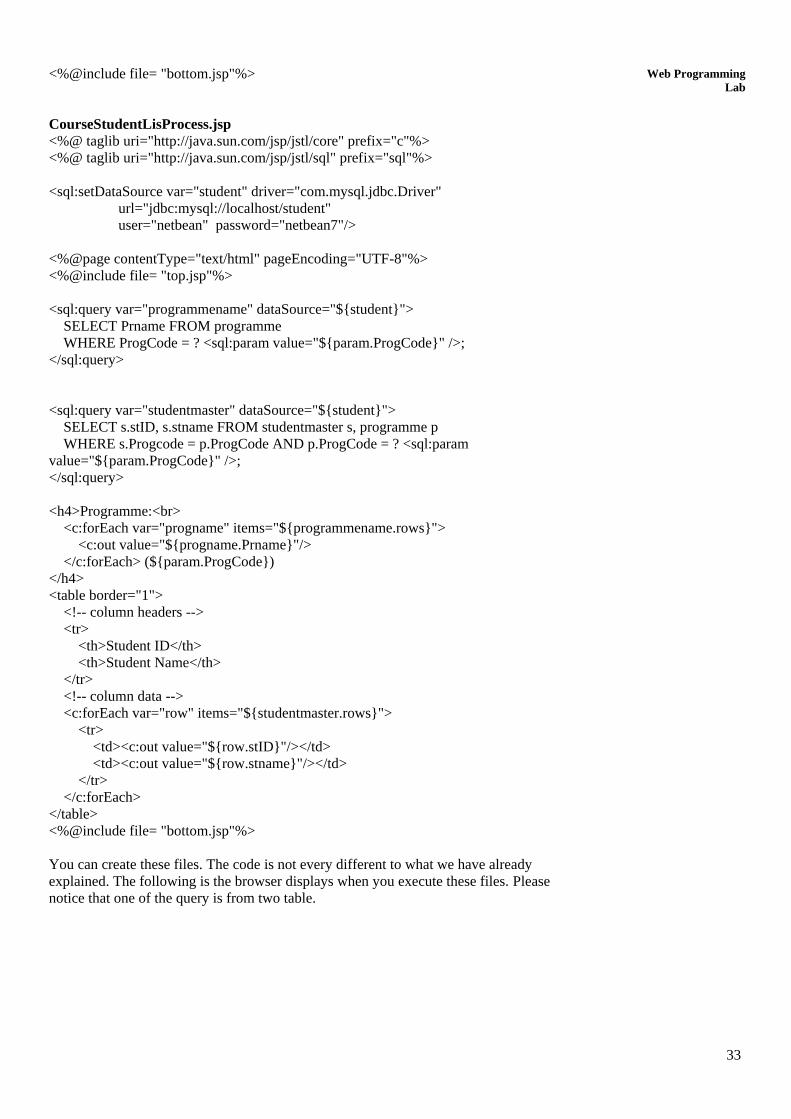
Figure 26: Display on selection of Student List for a Course Option.
The option that is selected is Certificate in Information Technology. Please note that
in the file
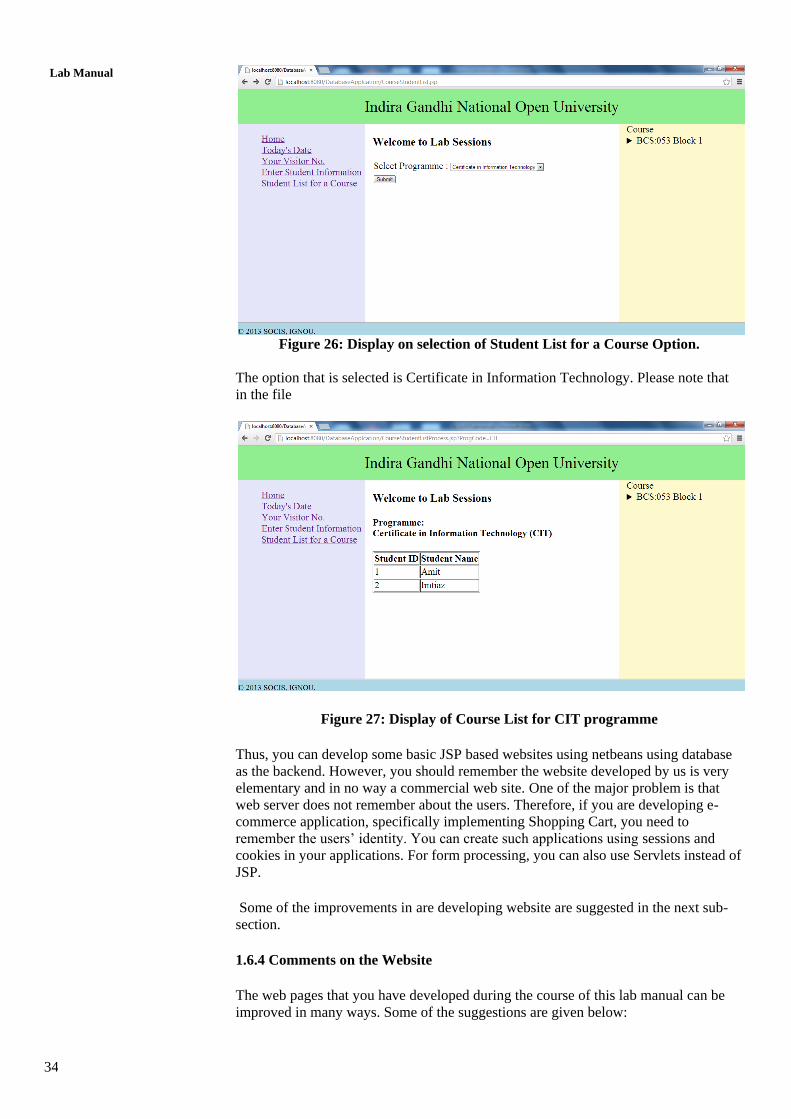
Figure 27: Display of Course List for CIT programme
Thus, you can develop some basic JSP based websites using netbeans using database
as the backend. However, you should remember the website developed by us is very
elementary and in no way a commercial web site. One of the major problem is that
web server does not remember about the users. Therefore, if you are developing e-
commerce application, specifically implementing Shopping Cart, you need to
remember the users’ identity. You can create such applications using sessions and
cookies in your applications. For form processing, you can also use Servlets instead of
JSP.
Some of the improvements in are developing website are suggested in the next sub-
section.
1.6.4 Comments on the Website
The web pages that you have developed during the course of this lab manual can be
improved in many ways. Some of the suggestions are given below:
35
Web Programming
Lab You may develop and use a professional structure of the web site with images,
colours and many more options. This will require an exhaustive study of the
requirements and purpose of the web site that you want develop.
CSS may be further enhanced and you can also use several drop down menus.
You can use JavaScript for checking form validations.
You must perform through check on the data filled by the user by using automated
ways. You may also check if data is being send by a proper user or not.
You may add various error checks and exception handling.
You may use servlets instead of JSP for form validations.
You may use configuration files of Netbeans which keep track of connections.
You may use XML and file Fragments to include HTML code in web pages.
You may use connection pools that can enhance efficiency of web site access.
You may use entity classes, javabeans and persistence classes of Java to enhance
efficiency of access.
You may organize web site in folders for better maintenance.
You may use some framework for creating a website.
You can create sessions and cookies in your applications.
There are many more possibilities. Discussion on these topics is beyond the scope of
this Unit. But remember a web site designer always keep looking for technologies for
better, efficient, maintainable, dynamic web sites. So keep leaning.
Access to Web through Mobile devices
One final point about the development of web sites for mobiles, you have been
introduced in theory to WML. However, that is now an old technology for
development of mobile based web sites. A new initiative called Mobile Web Initiative
(MWI) has been set by World Wide Web Consortium (W3C). This initiative is aimed
at developing the good practices and tools for the access of WWW through mobiles.
The small screen sizes, speed, lack of multiple windows are only some of the many
limitations of web access through mobile. If you notice the current trends, then you
may observe that if you are accessing some good websites through mobiles, the web
address is automatically prefixed with “m.” indicating that the information being
displayed on the mobile device is from the website specially designed for mobiles.
Thus, the present practice is to design a simpler website for the mobile, mostly using
simpler tags and having limited information for the web pages. In the present, case
you are advised to design simpler websites using jsp, servlets for display on mobile
devices. Thus, the WML section of web site design is merged with the Section 9 and
10. You are advised to use either WML or design simpler web pages for the mobile
access.
1.7 LIST OF LAB ASSIGNMENTS
Session 1: Using Web 2.0 and creating pages using XHTML
1. List the features of at least 5 Web 2.0 technologies.
2. Create a simple website about you. The website should contain at least two
tothree pages about you. It should have a table, a menu and some
photographs. You should try to create an image map in your website. You
should demonstrate the use of summary tags, headings, colours etc.
36
Lab Manual 3. Create a feedback form for the website that you have created. Do not create
the action button. Your form should have all possible types of form input
options.
4. Create a form for data entry for the marks of the students of a class. Identify
the requirements for such a form by collecting few sample mark lists and then
design and implement it.
Session 2: Creating Style Sheets for the web pages created in session 1
1. In the HTML pages that you have designed in Session 1, create several
divisions. Identify some classes such that alternative rows of a table have
different shading. The background colour of each division should be different.
Some text should have different display colour and background.
2. Insert a CSS for all the forms designed in session 1. The forms should have a
image as the background.
3. Create four simple web pages linked together. All the web pages should share
a CSS and a drop down Menu that uses CSS and HTML code only. The menu
options should be: Home, Departments, Student Support and Contact Us.
Session 3: Creating sample XML document and displaying it 1. Customer list of an organization includes the name of customers, their Home
or permanent addresses, and at least two phone numbers. Create a customer
list of at least four customer using XML.
2. Create the DTD for the customers you created in problem 1.
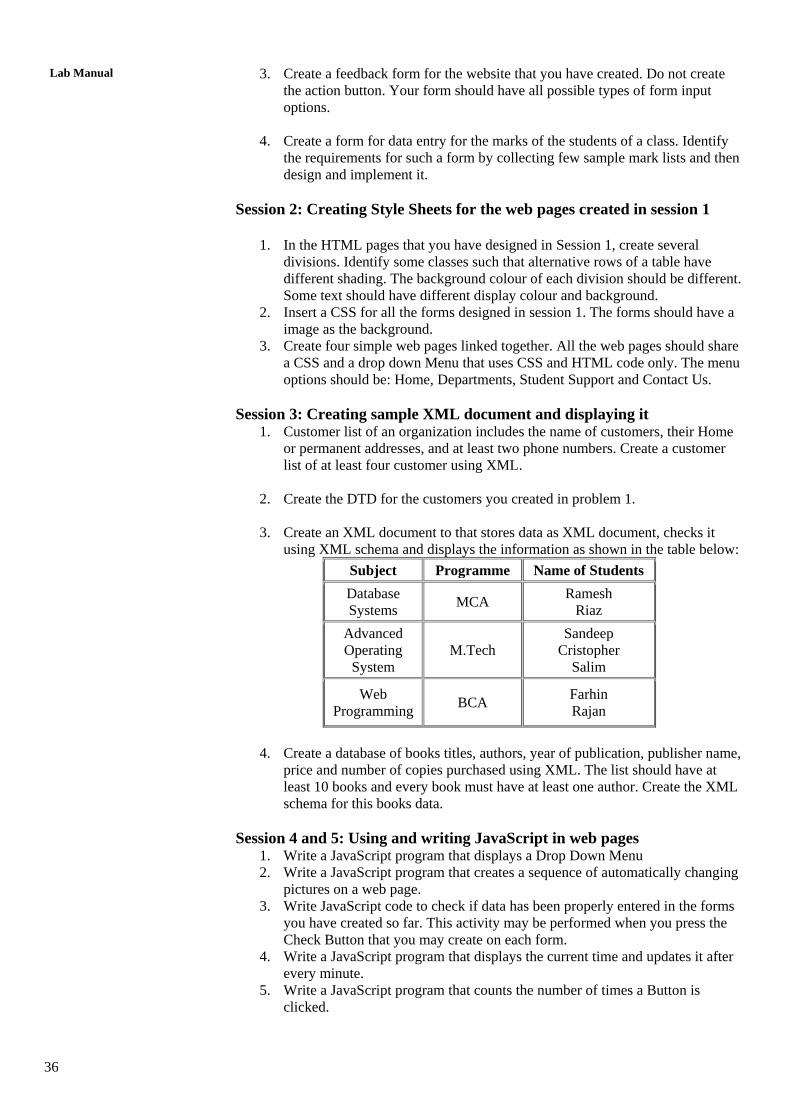
3. Create an XML document to that stores data as XML document, checks it
using XML schema and displays the information as shown in the table below:
Subject Programme Name of Students
Database
Systems MCA
Ramesh
Riaz
Advanced
Operating
System
M.Tech
Sandeep
Cristopher
Salim
Web
Programming BCA
Farhin
Rajan
4. Create a database of books titles, authors, year of publication, publisher name,
price and number of copies purchased using XML. The list should have at
least 10 books and every book must have at least one author. Create the XML
schema for this books data.
Session 4 and 5: Using and writing JavaScript in web pages 1. Write a JavaScript program that displays a Drop Down Menu
2. Write a JavaScript program that creates a sequence of automatically changing
pictures on a web page.
3. Write JavaScript code to check if data has been properly entered in the forms
you have created so far. This activity may be performed when you press the
Check Button that you may create on each form.
4. Write a JavaScript program that displays the current time and updates it after
every minute.
5. Write a JavaScript program that counts the number of times a Button is
clicked.
37
Web Programming
Lab 6. Create a web page with two pictures. Write a JavaScript program that displays
the description of the picture when mouse is brought over the picture.
7. Write a JavaScript program to demonstrate simple animation on a web page.
Session 6, 7: Using JSP/Servlet
1. Write a JSP/Servlet program that takes your name and address from an
HTML Form and displays it on a web page.
2. Write a JSP program that output current time only.
3. Write a JSP program that counts the number of times a link is clicked.
4. Create five pages of a web site having similar top and left panels. The top
should have a logo on the left and name of the organization in the middle. The
left should have a drop down menu. Use JSP to include it in all the web pages.
5. Create a login form and check if the user name and password entered by the
user are correct.
6. Create a quiz of at least five questions and check if the questions have been
answered correctly.
7. Write a JSP program that displays “Good Morning” or “Good Evening” based
on the present time.
Session 8, 9, 10: Writing simple applications using JSP and JDBC and
deploying it on web or mobile devices
1. Create a website using JSP and JDBC that creates employee database of an
organization. The employee database has two tables – employee having fields
empID, name, department, present designation, present salary, emailed, year
of joining the organization, and department having fields department,
department name and manager. Create forms to enter information of
employees and departments. You must also create a form to display list of
employees of a department.
2. Create an application that creates a simple banking database with tables for
customers and customer transactions. You must create a login form to verify
login details from the customer table. You may create a session or use cookies
if possible to perform the transactions.
3. Create a simple Web application for maintaining records of students and
teachers in a School. You may study such a system. Make necessary
assumptions while developing this application.
4. Design and develop any of the above website for mobile devices.
1.8 FURTHER READINGS
1 https://netbeans.org/
2 http://www.w3schools.com/ 3 http://www.oracle.com/
4 www.wikipedia.com/