Embed Size (px)
Citation preview

StrongPhone Z4
www.evolveo.com
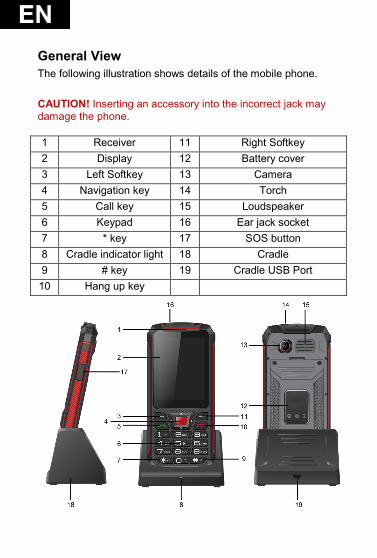
General View The following illustration shows details of the mobile phone. CAUTION! Inserting an accessory into the incorrect jack may damage the phone.
1 Receiver 11 Right Softkey 2 Display 12 Battery cover 3 Left Softkey 13 Camera 4 Navigation key 14 Torch 5 Call key 15 Loudspeaker 6 Keypad 16 Ear jack socket 7 * key 17 SOS button 8 Cradle indicator light 18 Cradle 9 # key 19 Cradle USB Port
10 Hang up key
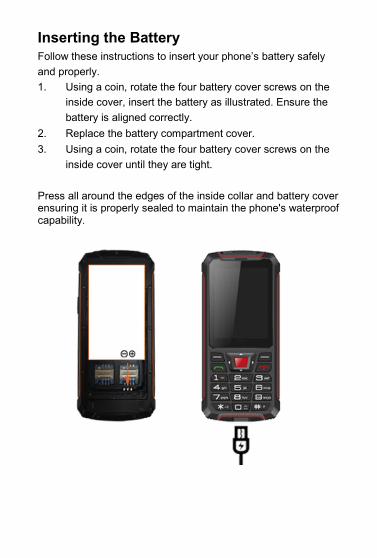
Inserting the Battery Follow these instructions to insert your phone’s battery safely and properly. 1. Using a coin, rotate the four battery cover screws on the
inside cover, insert the battery as illustrated. Ensure the battery is aligned correctly.
2. Replace the battery compartment cover. 3. Using a coin, rotate the four battery cover screws on the
inside cover until they are tight.
Press all around the edges of the inside collar and battery cover ensuring it is properly sealed to maintain the phone's waterproof capability.
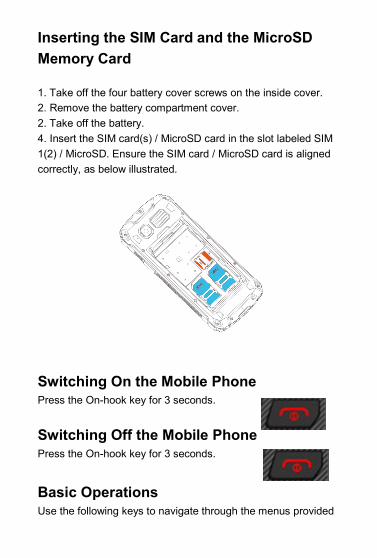
Inserting the SIM Card and the MicroSD Memory Card 1. Take off the four battery cover screws on the inside cover. 2. Remove the battery compartment cover. 2. Take off the battery. 4. Insert the SIM card(s) / MicroSD card in the slot labeled SIM 1(2) / MicroSD. Ensure the SIM card / MicroSD card is aligned correctly, as below illustrated.
Switching On the Mobile Phone Press the On-hook key for 3 seconds. Switching Off the Mobile Phone Press the On-hook key for 3 seconds.
Basic Operations Use the following keys to navigate through the menus provided
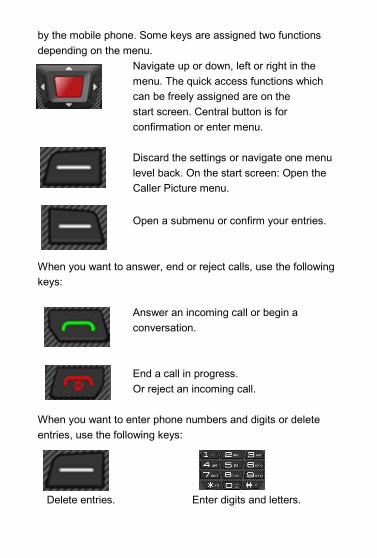
by the mobile phone. Some keys are assigned two functions depending on the menu.
Navigate up or down, left or right in the menu. The quick access functions which can be freely assigned are on the start screen. Central button is for confirmation or enter menu. Discard the settings or navigate one menu level back. On the start screen: Open the Caller Picture menu.
Open a submenu or confirm your entries.
When you want to answer, end or reject calls, use the following keys:
Answer an incoming call or begin a conversation. End a call in progress. Or reject an incoming call.
When you want to enter phone numbers and digits or delete entries, use the following keys:
Delete entries. Enter digits and letters.
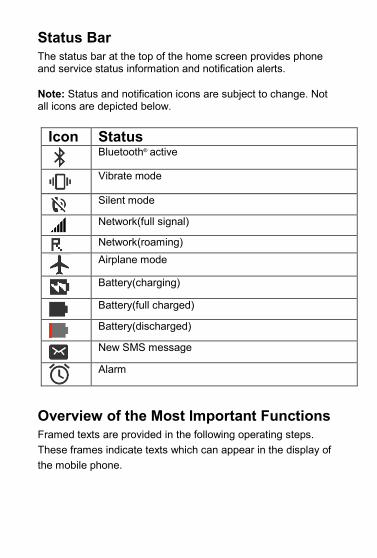
Status Bar The status bar at the top of the home screen provides phone and service status information and notification alerts.
Note: Status and notification icons are subject to change. Not all icons are depicted below.
Overview of the Most Important Functions Framed texts are provided in the following operating steps. These frames indicate texts which can appear in the display of the mobile phone.
Icon Status
Bluetooth® active
Vibrate mode
Silent mode
Network(full signal)
Network(roaming)
Airplane mode
Battery(charging)
Battery(full charged)
Battery(discharged)
New SMS message
Alarm
Message 1. The Messages menu can be used to write text messages
(also called "SMS"), view, answer, forward and delete received and sent text messages, write draft messages and make further settings.
2. The maximum storage capacity built-in mobile phone is 50pcs. External capacity from SIM cards depends on the operator.
Phonebook Under this menu, you can make edit of contacts, like add new contact, move, copy and delete exist contacts. Also you can set speed dials for the Number 2-9. To add a contact to the phone book 1. Press the left soft-key to open the main menu, or directly
press Names on the home screen
2. Navigate to the Phonebook → Add new contact menu options.
3. Select a storage location (To SIM or To phone).
4. Enter the name and phone number.
5. Press the left softkey and select Options →Save. or press the central button to save directly.
To view or search a contact. 1. Press the left softkey to open the main menu, or
directly press Names on the home screen.
2. Navigate to the Phonebook, then you will see the contact list.
To set speed dial. If you want to dial certain phone numbers even more quickly, you can assign the respective phone book entries to digit keys 2 to 9. 1. Press the left softkey to open the main menu. 2. Navigate to Phonebook →Options → Phonebook
settings→ Speed dial → Status → On. 3. Press Set numbers → Edit to assign speed dialing
numbers to contacts who are already stored in the phone book.
Call logs Here you can view as call history and call settings. Call history You can press left softkey or central button to enter into call history under call logs menu. There is a list of your Missed calls, Dialed calls, Received calls, All calls. And you can press left soft-key or central button to get different options for them, e.g. View, Call, Send text message, Save to phonebook, Add to Blacklist, Delete. Call Settings You can press left softkey or central button to get the setting of each SIM card, like call waiting and call divert, also you can choose the answer mode and set blacklist. Call waiting: Define whether a new, incoming call should be indicated by means of the call waiting signal while a call is already in progress. 1. Press the left softkey to open the main menu.
2. Navigate to Call logs → Call settings → SIM 1 (SIM 2) call settings → Call waiting
3. Select Activate or Deactivate, then the setting is saved. 4. You can check whether the service is available in Query
status. Contact your mobile phone provider if you want to enable the service. Please note that the range of functions available can vary according to the mobile phone provider. Call divert: Define whether and in what situations incoming calls to the mobile phone should be diverted to another, specified phone number. 1. Press the left softkey to open the main menu. 2. Navigate to Call logs → Call settings → SIM 1 (SIM 2)
call settings → Call divert 3. Select the required call divert setting (Divert all voice calls,
Divert if unreachable, Divert if no answer, Divert if busy, Divert all data calls.)
4. Select Activate → To new number which your calls should be diverted to.
5. Alternatively, Activate → To Voice mail Confirm with Options → Done then the setting is saved. Blacklist You can set up a blacklist containing up to 20 phone numbers. If you set this function, the phone numbers saved in the list can not call you. In this case, the caller automatically receives a busy signal. This function is useful, for example, if you want to prevent unwanted calls (such as sales calls or opinion polls). Adding a phone number to the blacklist
1. Press the left softkey to open the main menu. 2. Navigate to Call logs → Call settings→Advanced
settings → Blacklist → Reject numbers in blacklist → On.
3. Enter the phone numbers you want to add to the blacklist. 4. Confirm with Options → Done, then the setting is saved. Setting Time and Date 1. Press the left softkey to open the main menu.
2. Navigate to the Settings → Phone Settings → Time
and Date → Set Time/Date menu options.
3. Enter the current time and date.
4. Select Save to activate the setting.
Setting Language There are five languages available for you to choose. Press the left softkey to open the main menu.
1. Navigate to the Settings → Phone settings→
Language menu options.
2. Select the language you prefer
3. Select OK to activate the setting.
Setting SOS function This mobile phone is with an SOS function, by long press the side key for 1.5s, the phone will automatically call and/or send an alert message to a set of emergency contacts which set by you. If no set SOS number, it will show a notification ”No
distress number close SOS”. Then, you should set the SOS numbers first.
1. Press the left softkey to open the main menu.
2. Navigate to the Settings → Phone Settings → SOS
→ SOS→ ON.
3. Press SOS Number -press central button to choose contact from the phonebook or press left softkey to input digit number directly. There is 4numbers available in the list.
4. Press SOS SMS content,you can set SMS content and choose whether send SOS message after emergency call.
5. Press Alarm sound, you can choose the alarm sound status: on/off.
Restore Settings The default password is 1234. Please be noted that, once you make restore settings, everything you stored in the device will be erased! Security Settings SIM 1 (SIM2) security: Here refers to PIN Lock. To activate PIN lock, you need to input the correct PIN code. If you set PIN lock ON, you need to input the PIN code each time when you power on the mobile phone. In case you input a wrong PIN for three consecutive times, you need to input the PIN Unblocking Key (PUK). The PUK is used to unlock and change the locked PIN. To obtain the PUK, contact your SIM card providers.
Phone security: This function enables you to lock/unlock the phone. If you activate it on, each time when you switch on your phone, you need to input the password which is 1234 by default. Profile This mobile phone provides multiple profiles: General, Silent, Meeting and outdoor. You can customize settings to adapt to specific events or environments. Here is the General customization for your reference. 1. Press the left softkey to open the main menu. 2. Navigate to Settings → Profiles →General→ Options
→Activate 3. Navigate to Customize to have different settings
Alert type: Ring only, Vib. only, Vib. and ring, Vib. then ring.
Ring type: Repeat, Beep once Ring tone: Ring 1, Ring2… or select from file. Ringtone volume: Adjust via the navigation key. Message: Silent, Tone 1, Tone 2…Tone5. Keytone volume: Adjust via the navigation key. Power on: Silent, Tone 1, Tone 2…Tone5. Power off: Silent, Tone 1, Tone 2…Tone5.
Multimedia Your mobile phone can display and play various forms of multimedia content (photos, music and videos). There are various applications available for this. 1. Press the left softkey to open the main menu. 2. Navigate to Multimedia
3. Select Audio player to play music stored on your device or a micro-SD memory card.
4. Select Image viewer to view photos stored on your device or a micro-SD memory card.
5. Select Video player to play videos stored on your device or a micro-SD memory card.
6. Select Video recorder to record a video file 7. Select Sound recorder to record a sound file Camera and Video Camera supports photographing function, you can take pictures by pressing OK key. Insert a microSD memory card into your mobile phone before you use the camera. The pictures are taken in JPG format and the videos are taken in AVI format. After downloading to PC, please view with appropriate software. You can also make different settings: 1. Press the left softkey to open the main menu. 2. Navigate to Camera → Options → Camera settings 3. Anti-flicker: 50Hz/ 60Hz 4. Scene mode: Auto/Night 5. White balance: Auto/ Daylight /Tungsten/ Fluorescent/
Cloudy/ Incandescent/ 6. Delay timer: Off/5sec/10sec/15sec You can also make settings for the Image for Image size: 1280*960/1600x1200 and Image quality: Normal/Good/Low. You can also switch to video recorder by Camera → Options →Switch to video recorder FM Radio
The mobile phone is equipped with an integrated radio with which you can receive radio stations in the FM frequency range. 1. Press the left softkey to open the main menu. 2. Navigate to FM Radio→ Options to manual input or auto search the channel. 3. Press central button to play or pause the radio. 4. Press * key and # key to adjust volume. 5. Press left and right navigate key to switch previous or next available channel. 6. Press up and down navigate key to increase or discrease the frequency value. File Manager With the file manager, you can manage the memory of your mobile phone and the memory of an installed microSD memory card. 1 Press the left softkey to open the main menu. 2 Navigate to File Manager. 3 You can manage the files according to your needs. View, copy, move, and perform other housekeeping operations on files such as pictures, videos, music, and applications stored in your phone or on the microSD card.
Bluetooth With the Bluetooth function, you can exchange data with other Bluetooth-capable devices free of charge. Switching Bluetooth On/Off: 1. Press the left softkey to open the main menu. 2. Navigate to Organizer → Bluetooth → Power. 3. Select On or Off, then the Bluetooth function is switched
on or off respectively. Visibility:
You can define whether your mobile phone should be visible for other Bluetooth-capable devices in the environment. 1. Select On or off to get it visible or unvisible. My Device: Search for other Bluetooth-capable devices in your environment with which you want to connect your mobile phone. 1. Press the left softkey to open the main menu. 2. Navigate to Organizer → Bluetooth →My device →
Search new device. Highlight the device you want to pair with and press left softkey or central button to pair.
3. Follow the instructions on the screen. Your mobile phone is connected to the device selected.
My name: You can give your mobile phone a name under which other Bluetooth-capable devices can find it. 1. Press the left-hand softkey to open the main menu. 2. Navigate to Tools → Bluetooth →My Name 3. Enter a name for the mobile phone. The name of the
mobile phone is limited to 18 characters. 4. Confirm with Options → Done. The setting is saved. Receive information via Bluetooth Your phone is capable of receiving a wide variety of file types with Bluetooth, including pictures, music tracks, videos, and documents such as txts, PDFs, xlsxs and docs.
1. When another device attempts to send a file to your phone via Bluetooth, you will see a notification.
2. Press left softkey to accept the file.
Send information using Bluetooth You can send the following types of information, depending on the device you are sending to, including: Images and videos; apps, documents and Audio files.
1. Find the information you want to share, press Options → Send→ Via Bluetooth.
2. Highlight the device name you want to share or search a new device (For more information ,see My Device ),press left softkey to send.
Calendar The calendar provides an overview of the days, weeks and months of the year. Use Calendar to create and manage events, meetings and appointments. 1. Press the left softkey to open the main menu. 2. Navigate to Organizer→ Calendar, an overview of the
current month with the weekdays appearing. 3. Use the navigation keys to navigate horizontally and
vertically. Add an Event to the Calendar
1. Press the left softkey to open the main menu. 2. Navigate to Organizer→ Calendar→ Options→
Add event. 3. Enter the event subject-specify the date and time of
the event-set event type: reminder/meeting/course/date/call/ anniversary - set alarm and repeat way - enter the event location - add the event descriptions-save.
Alarm Your phone comes with a built-in alarm that has multiple alarm capabilities. Five alarm clocks are set deactivated by default. You can activate one, multiple or all of them as needed. For each of the alarm clock, you can have customization settings. 1. Press the left softkey to open the main menu.
2. Navigate to Organizer → Alarm →Highlight an alarm setting→ Edit
3. Select Status → On to activate. 4. Input the time you need. 5. Select a repeat status: Once/Everyday/Custom 6. Select an alarm tone, there are five rings available.→
Save.
Calculator Your phone’s convenient built-in calculator lets you perform basic mathematical equations.
1. Press the left softkey to open the main menu. 2. Navigate to Organizer→ Calculator 3. Enter numbers using your digit keypad. 4. Press the appropriate Navigation key for an arithmetic
option (+-×÷).
5. Press central button (=) for an equation. 6. Press *key to enter 00. 7. Press #key to enter a decimal point. 8. Press left softkey to clear all numbers.
OTG charger Your phone could be used as a powerbank with OTG function to charge for other devices.
1. Press the left softkey to open the main menu. 2. Navigate to Organizer→ OTG charger →on 3. Connect your phone and other device via an OTG
transfer head and USB cable.
Care Instructions Clean the housing surfaces with a soft, fluff-free cloth. Do not use cleaning agents or solvents to clean the equipment. The warranty does NOT apply to: • Installing a different firmware than the one installed in the EVOLVEO phone as original from the factory. • Electromechanical or mechanical damage to the phone caused by improper use (e.g. broken display, broken front or back cover of the phone, damaged microUSB connector, SIM card slot, microSDHC card slot, headphone jack, etc.). • Damage to the speaker and headphones caused by metallic particles. • Damage by natural causes like fire, water, static electricity, high temperatures. • Defects caused by normal wear and tear. • Damaged by unauthorized repairs • Phone's firmware if it requires updating due to changes in mobile network parameters. • Mobile network malfunctions Battery if it does not retain its original capacity after 6 months and more (warranty for battery capacity is for 6 months). • Intentional damage. Warranty and post-warranty service Repairs and servicing may only be carried out in an authorized service centres for EVOLVEO products (see www.evolveo.com), otherwise you may damage your mobile phone and lose the warranty.

Disposal: The symbol of crossed out container on the product, in the literature or on the wrapping means that in the European Union all the electric and electronic products, batteries and accumulators must be placed into the separate salvage after finishing their lifetime. Do not throw these products into the unsorted municipal waste
DECLARATION OF CONFORMITY Hereby, the company Abacus Electric, s.r.o. declares that the EVOLVEO StrongPhone Z4 is in compliance with the requirements of the standards and regulations, relevant for the given type of device.
Find the complete text of Declaration of Conformity at ftp://ftp.evolveo.com/ce
Dovozce / Dovozca / Importer / Importőr Abacus Electric, s.r.o. Planá 2, 370 01, Czech Republic Výrobce / Výrobca / Manufacturer / Gyártó Naxya Limited No. 5, 17/F, Strand 50, 50 Bonham Strand, Sheung Wan, Hong Kong Made in China Copyright © Abacus Electric, s.r.o. www.evolveo.com www.facebook.com/EvolveoCZ All rights reserved. Design and specification may be changed without prior notice.