Embed Size (px)
Citation preview

STRONGHOLD: UNDEAD 2nd EDITION
RULEBOOK
OVERVIEW
A game of Stronghold: Undead is played over a maximum of 8 rounds. Every round, the Invader and the Defender begin by taking supplies and making preparations. The Invader uses their mana and spell cards to cast dark magic. But be careful, every action the Invader takes is accompanied by a reaction from the Defender. The passage of time is represented by hourglasses and the Invader’s spells take time to cast. After each spell, the Defender gains hourglasses, which they must spend on various building and movement actions within the Stronghold. Time can not be wasted—each hourglass the Defender receives must be spent. Timing and accurate placement is crucial.
After the spells are cast, the Invader pushes on by ordering maneuvers for their troops, and again, the Defender uses the gained hourglasses to prepare for final preparations, attempting to outwit the overwhelming Invaders before the assault begins.
When the assault is executed, machines and marksmen attack and defend from a distance in ranged combat, and then the troops and undead fight in melee combat where strength is weighed and units perish at the walls. If the Invader manages to crush the defenses of at least one wall section, they breach the stronghold, the game ends immediately and the Invaders are victorious. But if walls hold strong and refuse to be Breached, it’s time to Clean up the board and start another round.
If the Defender holds back the invading forces until the end of the 8th round, the Stronghold remains unconquered and the Defender wins.
Caution: The file contains some page references to the Stronghold: Undead Almanac (pages 41+). Please ignore them since we are still working on it.
CONTENTS
● 1 Game board ● 1 Round marker (blue wooden disc)
● 1 Panic marker blue wooden disc● This rulebook
INVADER COMPONENTS● Invader Aid sheet
1 Bag● 180 Invader Units
53 Phantom wooden pieces
90 Skeleton wooden pieces
37 Vampire wooden pieces
● 30 Red Mana crystals
● 15 Green Activation crystals
● 3 Graveyard tiles
● 3 Marsh tiles
● 3 Spectral Ballistae tiles
● 3 Bone Throwers tiles
● 12 Bone markers
● 3 Strigoi Lair tiles
● 3 Drum tiles
2
● 3 Mists tiles
● 3 Totems tiles
● 3 Cursed Bat tiles
● 3 Reinforcement tiles
● 3 Marksmen Nightmare tiles
● 3 Phantoms Hunger tiles
● 3 Poisonous Clouds tiles
● 3 Path of the Damned tiles
● 1 Heavy Rain token
● 8 Green Spell cards
● 8 Blue Spell cards
● 8 Red Spell cards
3

● 36 Siege Machine cards
(Back)10 Hit cards
26 Miss cards
● 9 Mana cards
● 1 Altar of Death card
● 1 Camp card
● 1 Supplies card
● 1 Activation card
4
DEFENDER COMPONENTS● Defender Aid sheet
● 45 Defender Units 17 Marksmen wooden pieces
20 Soldiers wooden pieces
4 Veterans wooden pieces
● 4 Priests cardboard pieces
● 25 Hourglass wooden pieces
● 23 Stone Wall wooden pieces
● 3 Skeleton’s Cauldron wooden pieces
● 3 Cannon tiles
● 3 Crossbow tiles
● 3 Stakes tiles
● 3 Cross tiles
● 3 Consecrated Ground tiles
● 3 Inscriptions tiles
● 3 Footbridge tiles
● 3 Trap tiles
5
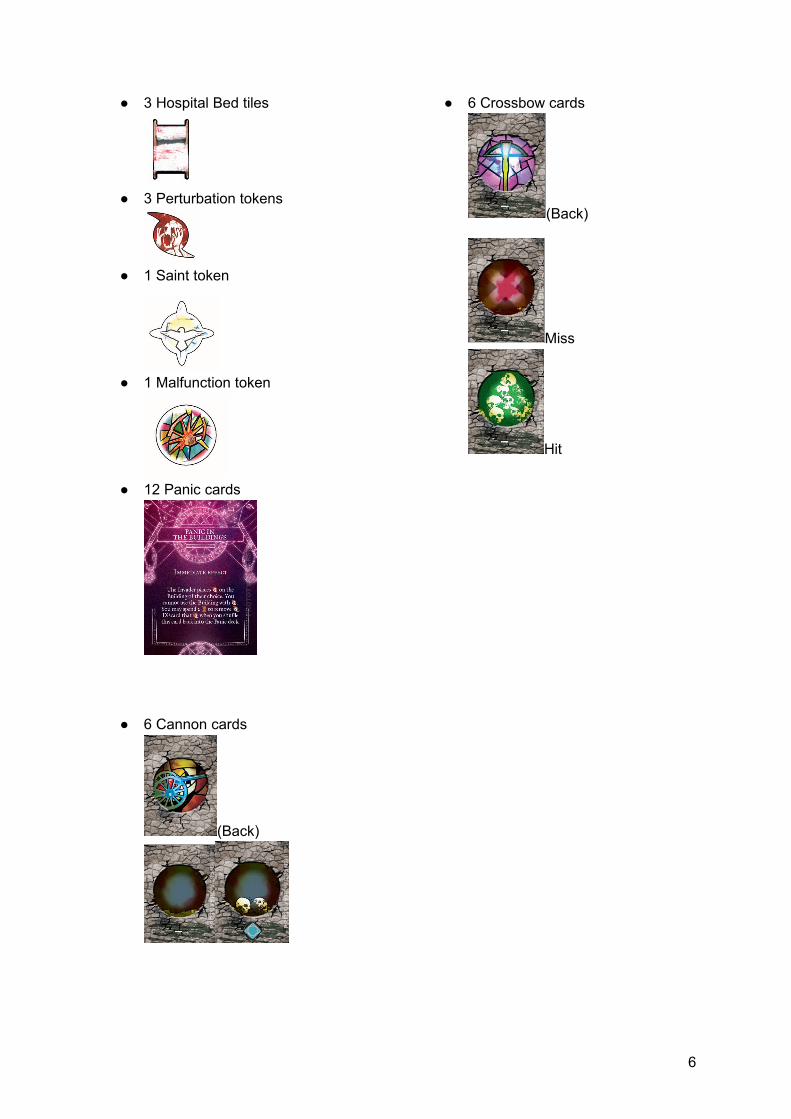
● 3 Hospital Bed tiles
● 3 Perturbation tokens
● 1 Saint token
● 1 Malfunction token
● 12 Panic cards
● 6 Cannon cards
(Back)
● 6 Crossbow cards
(Back)
Miss
Hit
6

Note: With the exception of Hourglasses , Mana Crystals , and Activation Crystals
, all components in the game are limited to those provided. If all the pieces of a given type are in use, no more are available until they become free.(Example: there are 3 Skeleton’s Cauldrons. The Defender can not build a 4th Cauldron, or move any of the existing ones in use on the board).
7
THE BOARD
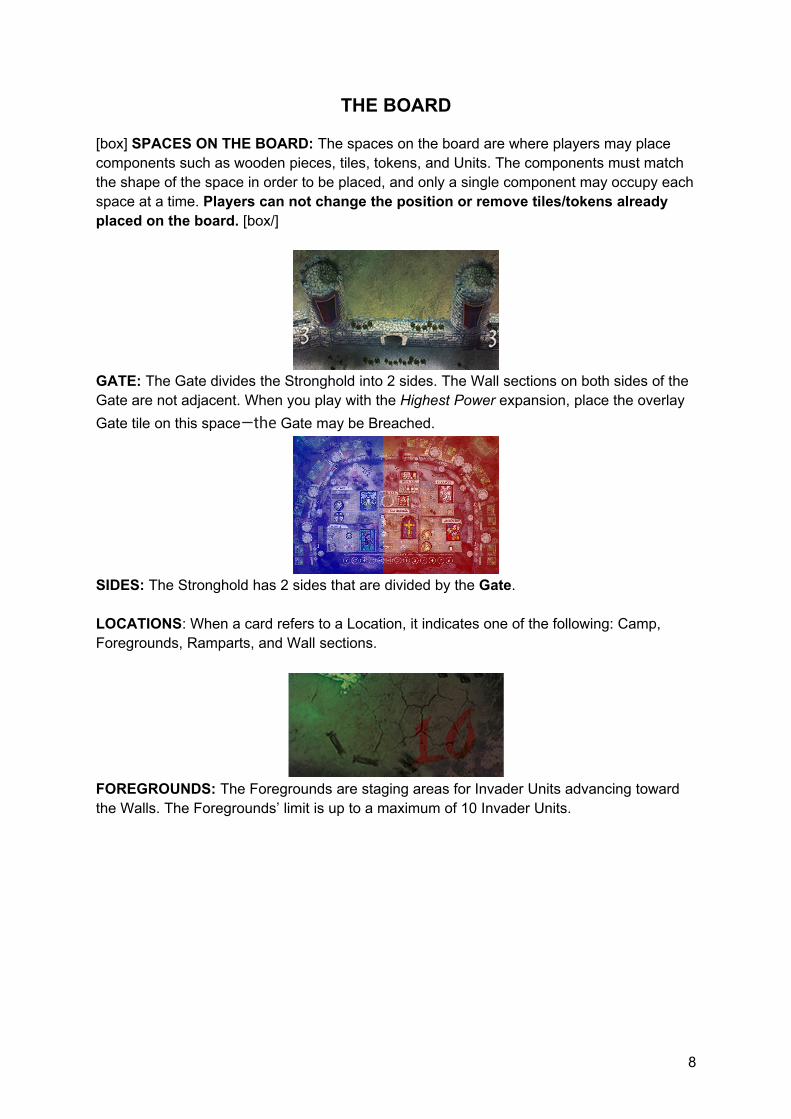
[box] SPACES ON THE BOARD: The spaces on the board are where players may place components such as wooden pieces, tiles, tokens, and Units. The components must match the shape of the space in order to be placed, and only a single component may occupy eachspace at a time. Players can not change the position or remove tiles/tokens already placed on the board. [box/]
GATE: The Gate divides the Stronghold into 2 sides. The Wall sections on both sides of the Gate are not adjacent. When you play with the Highest Power expansion, place the overlay
Gate tile on this space—the Gate may be Breached.
SIDES: The Stronghold has 2 sides that are divided by the Gate.
LOCATIONS: When a card refers to a Location, it indicates one of the following: Camp, Foregrounds, Ramparts, and Wall sections.
FOREGROUNDS: The Foregrounds are staging areas for Invader Units advancing toward the Walls. The Foregrounds’ limit is up to a maximum of 10 Invader Units.
8
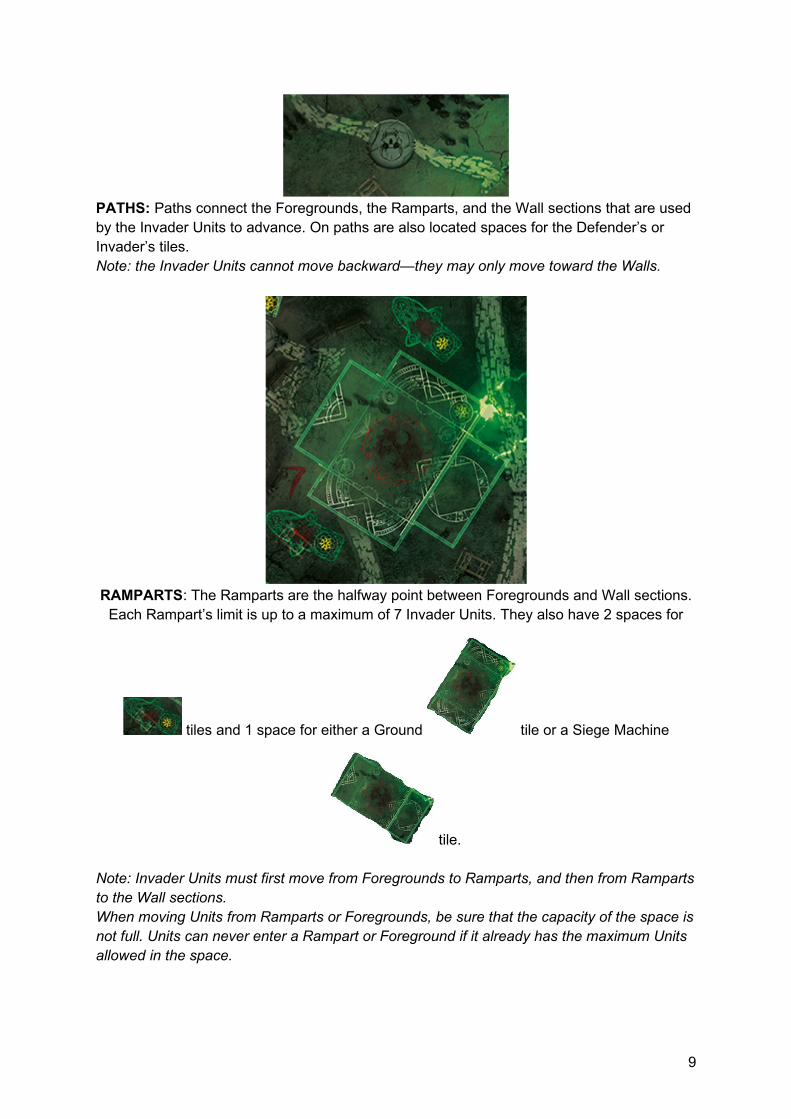
PATHS: Paths connect the Foregrounds, the Ramparts, and the Wall sections that are used by the Invader Units to advance. On paths are also located spaces for the Defender’s or Invader’s tiles.Note: the Invader Units cannot move backward—they may only move toward the Walls.
RAMPARTS: The Ramparts are the halfway point between Foregrounds and Wall sections.Each Rampart’s limit is up to a maximum of 7 Invader Units. They also have 2 spaces for
tiles and 1 space for either a Ground tile or a Siege Machine
tile.
Note: Invader Units must first move from Foregrounds to Ramparts, and then from Rampartsto the Wall sections.When moving Units from Ramparts or Foregrounds, be sure that the capacity of the space isnot full. Units can never enter a Rampart or Foreground if it already has the maximum Units allowed in the space.
9
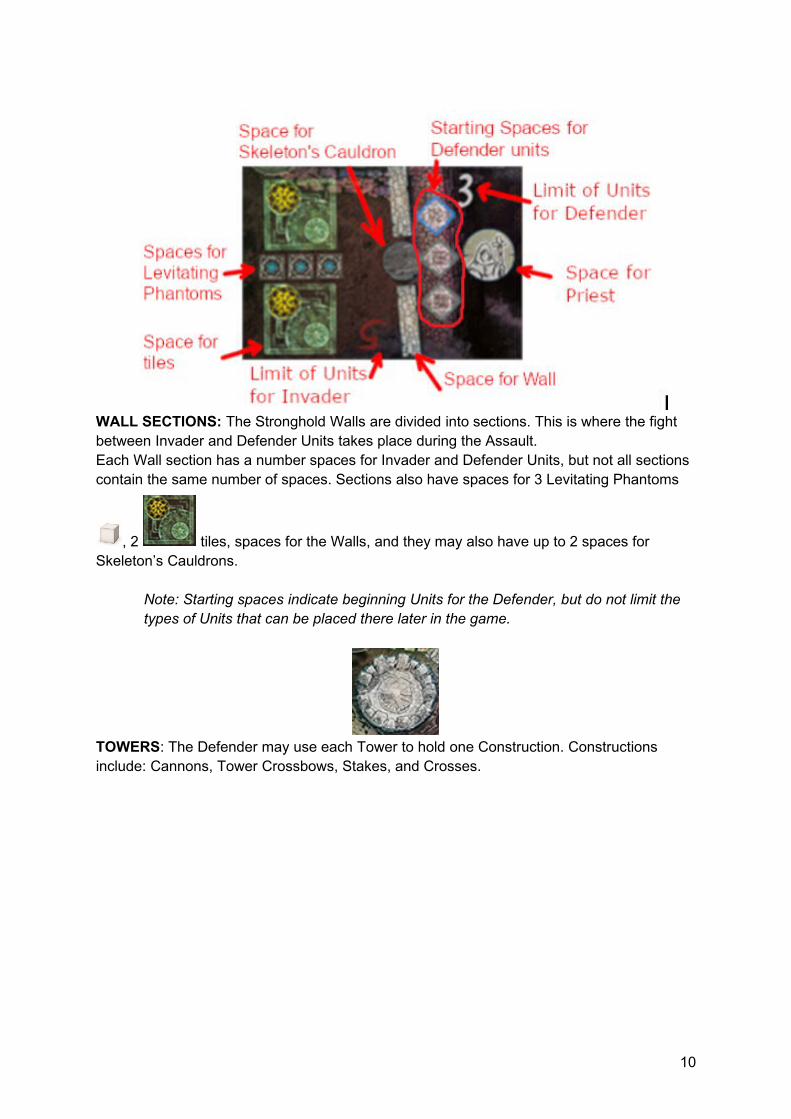
WALL SECTIONS: The Stronghold Walls are divided into sections. This is where the fight between Invader and Defender Units takes place during the Assault.Each Wall section has a number spaces for Invader and Defender Units, but not all sections contain the same number of spaces. Sections also have spaces for 3 Levitating Phantoms
, 2 tiles, spaces for the Walls, and they may also have up to 2 spaces for Skeleton’s Cauldrons.
Note: Starting spaces indicate beginning Units for the Defender, but do not limit the types of Units that can be placed there later in the game.
TOWERS: The Defender may use each Tower to hold one Construction. Constructions include: Cannons, Tower Crossbows, Stakes, and Crosses.
10
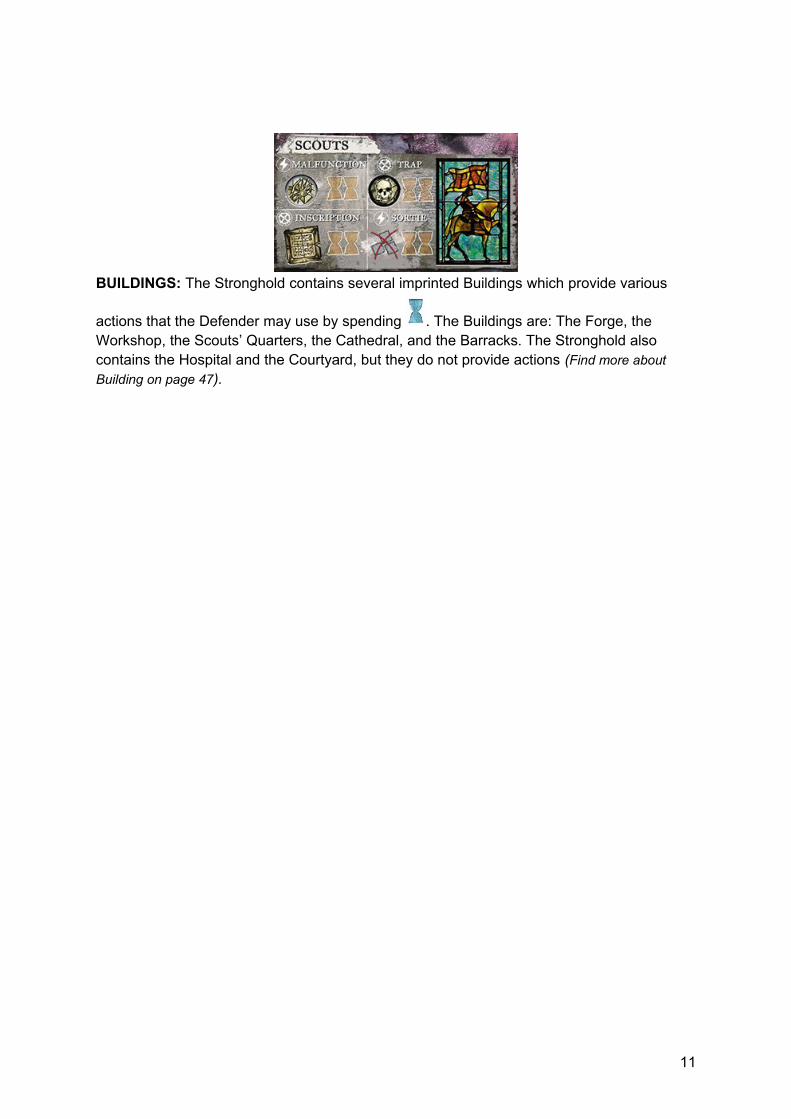
BUILDINGS: The Stronghold contains several imprinted Buildings which provide various
actions that the Defender may use by spending . The Buildings are: The Forge, the Workshop, the Scouts’ Quarters, the Cathedral, and the Barracks. The Stronghold also contains the Hospital and the Courtyard, but they do not provide actions (Find more about
Building on page 47).
11
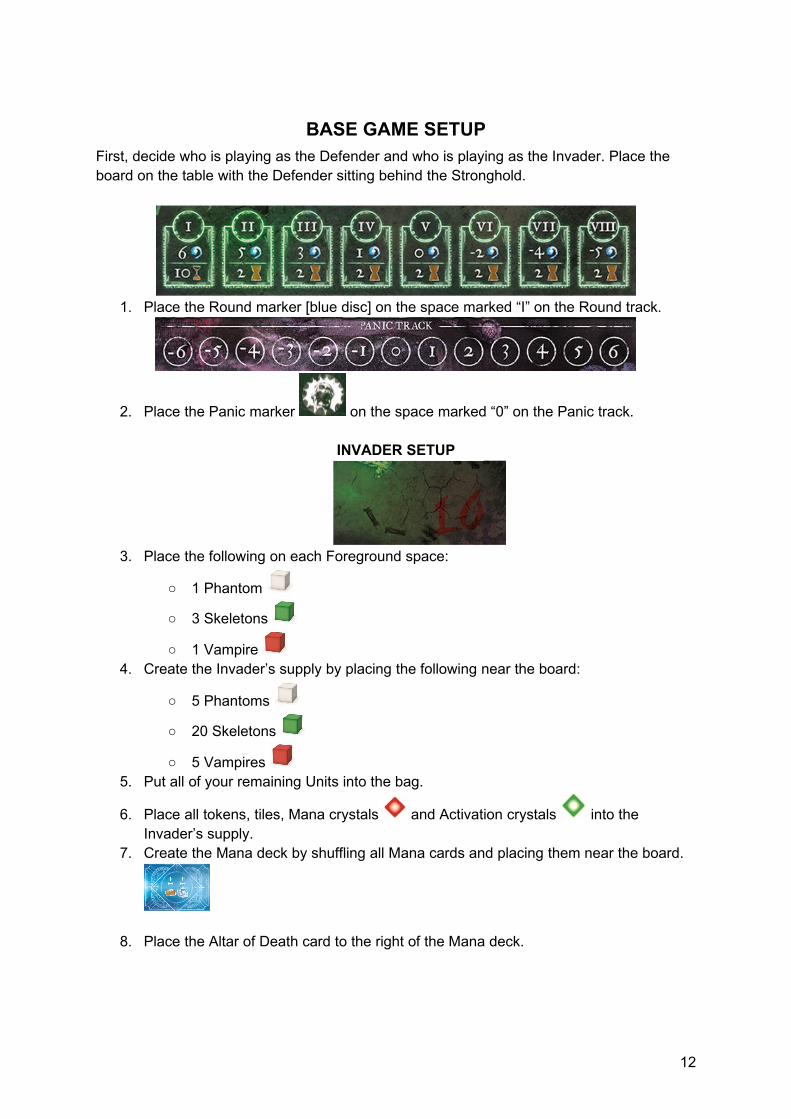
BASE GAME SETUPFirst, decide who is playing as the Defender and who is playing as the Invader. Place the board on the table with the Defender sitting behind the Stronghold.
1. Place the Round marker [blue disc] on the space marked “I” on the Round track.
2. Place the Panic marker on the space marked “0” on the Panic track.
INVADER SETUP
3. Place the following on each Foreground space:
○ 1 Phantom
○ 3 Skeletons
○ 1 Vampire 4. Create the Invader’s supply by placing the following near the board:
○ 5 Phantoms
○ 20 Skeletons
○ 5 Vampires 5. Put all of your remaining Units into the bag.
6. Place all tokens, tiles, Mana crystals and Activation crystals into the Invader’s supply.
7. Create the Mana deck by shuffling all Mana cards and placing them near the board.
8. Place the Altar of Death card to the right of the Mana deck.
12

9. Take all base game Spell cards (marked with [icon] in the upper right corner), divide them into three separate decks according to their colors, which represent different tiers).
○ Create the Spell Tome by taking all the Green Spell cards, shuffling them, and drawing 6 cards. Place them face up, to the right of the Altar of Death, next to each other (in any order). Place remaining Green Spell cards back to box—they will not be used during this game.
○ Create the Necromancer’s Library by repeating the previous step with the Blue Spell cards, and then with the Red Spell cards, but instead of placing them face up, create a face down pile consisting of both those tiers. Place theNecromancer’s Library to the right of the last Green Spell card.
10. Place the Activation card to the right of the last Spell card of the Spell Tome.11. Place the Camp card to the right of the Activation card.12. Place the Supplies card to the left of the Necromancer’s Library.
13. Place the Siege Machine Hit and Miss cards near the board.
[box]Spell Teirs Green Spell cards are helpful at the beginning of the game, Blue Spell cards are recommended for use in the mid-game, while Red Spell cards are best for the final stages ofthe game. [box/]
Note: A random selection of Spell cards enhances the diversity of the game and mayrequire extra Stronghold experience from the Invader.
DEFENDER SETUP
14. Place the following on each Wall section:
○ 1 Marksman on each (blue rim)
○ 1 Soldier on each (grey rim)
○ 1 Stone Wall on each
○ 1 Priest on each (purple rim)15. Place the depicted matching tiles, tokens, and wooden pieces onto the following
Buildings (on the piles if necessary): ○ the Forge ○ the Cathedral○ the Scouts○ the Workshop
16. Place on the Barracks:
13
○ 1 Marksman on each (blue rim)
○ 1 Soldier on (grey rim)17. Create the Cannon deck by shuffling all Cannon cards, then place it near the board.18. Create the Crossbow deck by shuffling all Crossbow cards, then place it near the
board.
19. Create the Defender’s supply by placing near the board Hourglasses and the remaining Units and Priests.
You are all set up and ready to play!
The setup of the game with expansions will be described in different section of this rulebook. We highly recommend playing your first game with the base components only.
14
GOAL OF THE GAME
The Defender’s goal is to defend the Stronghold for the duration of 8 rounds.If, after the 8th round’s Assault phase, the Invader hasn’t Breached the Stronghold, the undead army turns to dust and you win!
The Invader’s goal is to Breach the Stronghold before the end of the 8th round. Time works against you. Your great strength is slowly fading, and your undead army will turnto dust at sunrise (at the end of the eighth round).
BREACHING THE STRONGHOLD
Crossing the WallDuring the Assault, if the Invader kills all of the Defender’s Units on a Wall section and the Invader’s Units can deal further Damage, the game ends immediately, and the Invader wins.
Destroying the Gates (Only if you are playing with the Highest Power expansion).During the Assault, if the Phantom Dragon has been summoned, it will deal Damage to the Gates. Once the third Gate tile is destroyed, the game ends immediately, and the Invader wins.
MANA AND HOURGLASSES
Mana and Hourglasses represent resources that may be spent to empower positions before
the Assault ( for the Invader and for the Defender) .
The Invader may spend Mana crystals to summon Siege Machines, Grounds, and supporting troops. Each of the Invader's preparations gives the Defender precious time to counteract. This time
is represented by Hourglasses .
The Defender may spend Hourglasses to use actions in Buildings, move Units, and use Priest Orders.
COURSE OF THE ROUND
Stronghold: Undead is played over a series of up to 8 rounds. Each round is divided into 4 phases that must be played in the order shown below:
PHASE 1: SUPPLIESPHASE 2: PREPARATIONS
PHASE 3: ASSAULTPHASE 4: CLEANUP
15

During the Supplies and Preparations phases, the Invader and Defender prepare Constructions, use powerful effects, and move their Units. Then, during the Assault phase, they engage with each other using their prepared assets. If, at the end of the Assault phase, the Invader was not able to Breach the Stronghold, players proceed to the Cleanup phase. If, after the 8th round’s Assault phase, the Invader has still not been able to Breach the Stronghold, the Defender wins.
16
SPENDING HOURGLASSES
During the Supplies and Preparations phases the Defender spends they have received for the following actions:
● Building actions to prepare Constructions or temporary effects.● Moving Units and Priests.● Use Priest Orders.
● The Defender may divide and spend between any number and type of actions, Unit movement, and Priest Orders.
● The Defender may spend on actions, even if after spending them, they do not
immediately complete the actions in which they are spent. may be built up over anumber of Preparation phases and rounds.
● may sometimes be spent outside the Supplies and Preparations phases during specific moments dictated by the rulebook.
MOVING AROUND THE STRONGHOLD
MOVING UNITS AND PRIESTS
The Defender may spend 1 Hourglass to move any Unit or Priest to an available space at a Location in the following ways:
● From a Wall section to an adjacent Wall section.● From any Wall section to the Courtyard or the Barracks, and vice-versa.● From the Barracks to the Courtyard and vice-versa.
Priests may only move to dedicated spaces on the Wall sections, and to or from the Courtyard and the Barracks.
The Defender can not move Units to the Forge, the Workshop, the Scouts, the Hospital, or the Cathedral.
17
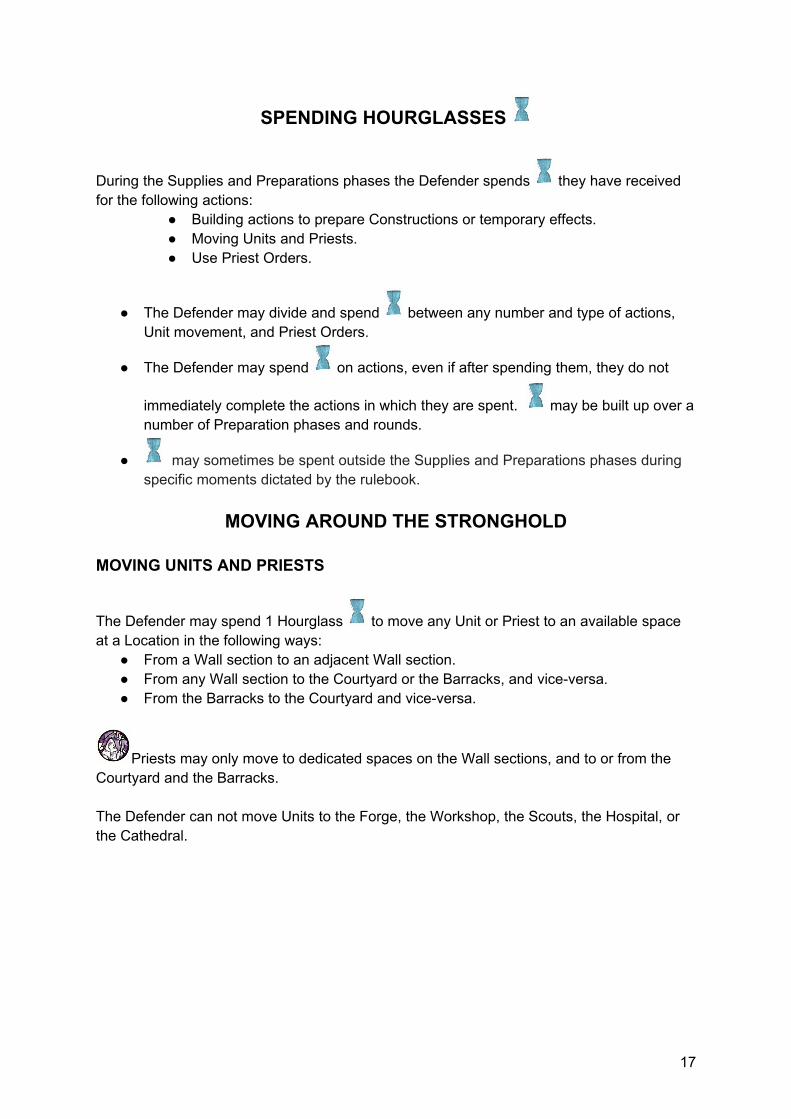
Example: The Defender has 1 . They choose to spend it to move 1 and then move 1
and 1 for free using a Footbridge tile ability (Find more about Building actions on page
47).
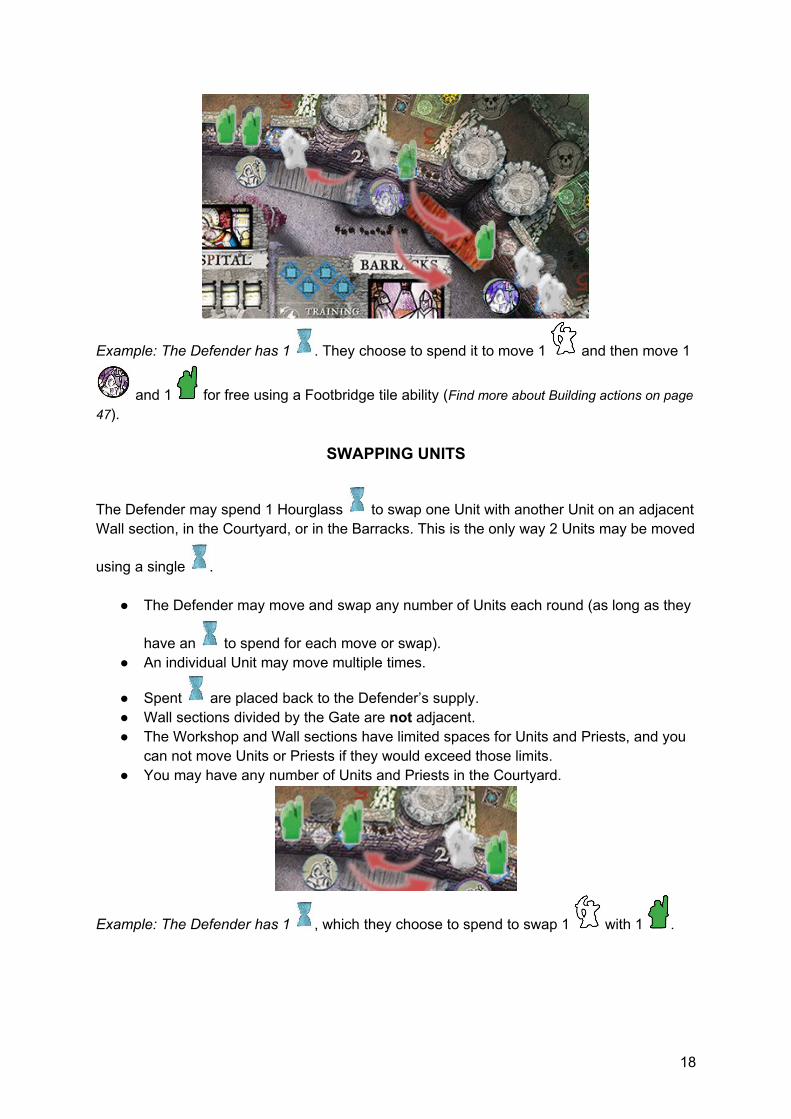
SWAPPING UNITS
The Defender may spend 1 Hourglass to swap one Unit with another Unit on an adjacentWall section, in the Courtyard, or in the Barracks. This is the only way 2 Units may be moved
using a single .
● The Defender may move and swap any number of Units each round (as long as they
have an to spend for each move or swap). ● An individual Unit may move multiple times.
● Spent are placed back to the Defender’s supply.● Wall sections divided by the Gate are not adjacent.● The Workshop and Wall sections have limited spaces for Units and Priests, and you
can not move Units or Priests if they would exceed those limits. ● You may have any number of Units and Priests in the Courtyard.
Example: The Defender has 1 , which they choose to spend to swap 1 with 1 .
18
ACTIONS IN BUILDINGS
The Defender may spend Hourglasses on various available Building actions (Find more
about Buildings actions on page 47). Spent are always placed on the dedicated space
on the Buildings. When the last required is placed on the Action space the Defender resolves that action. There are 3 kinds of actions:
● Instant action : this effect is resolved immediately.● Temporary action (The Saint and Malfunction): this effect only lasts for the current
round.
● Construction action : this effect allows you place a token or tile on any available dedicated space on the board. Constructed pieces last for the rest of the game, unless otherwise stated.
There are also actions with : these actions may be used any number of times during theround.
When an is placed on the last required space, resolve its action and then immediately
discard all from it—you may now place more on the newly available spaces.
Note: Remember that you may only place tiles on empty, available matching spaces on the board. You can not remove or replace tiles from the board unless otherwise stated.
IMPORTANT: The Defender does not need to have all the Hourglasses required to
complete an action at one time—the may be built up over a series of steps or even
rounds. Each available Building action may only be performed once per round (except
actions with ).
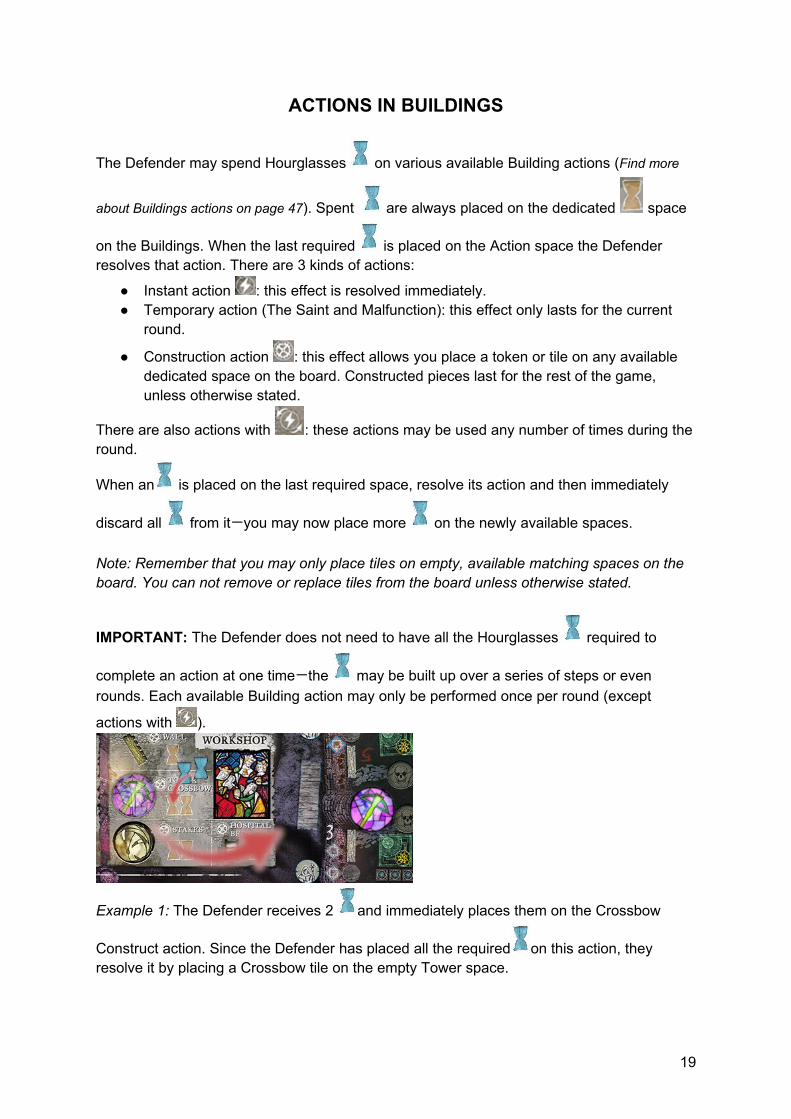
Example 1: The Defender receives 2 and immediately places them on the Crossbow
Construct action. Since the Defender has placed all the required on this action, they resolve it by placing a Crossbow tile on the empty Tower space.
19
Example 2: The Defender receives 2 and immediately places them on the Exorcism
Instant action. Since the Defender has placed all the required on this action, they resolve it by changing 1 Vampire into a Phantom.
Example 3: During the Supplies phase the Defender receives 1 and immediately places it
on the Saint Temporary action. Since the Defender has not yet placed all the required on this action, it does not resolve. During the following phase, the Defender receives another
and places it on the 2nd space of the Saint Temporary action, which completes the action, so they resolve it by placing on any Rampart. At the end of this round the Saint tokenwill be returned back to the supply.
[box]
Bone markers on Buildings
If there is a Bone marker on a Building, the Defender must spend 1 to remove the
before they are able to place an on the space previously covered by (Find
more about Bone Throwers on page 40).[box/]
Priest OrdersEach Priest may perform 1 Priest Order per round to aid the defense. Priest may perform thefollowing Orders: Order to Repel a Vampire, or Speech to lower Panic.
Each of these Orders cost 1 and may only be performed once per round. After
performing an Order, place the spent near the Priest to indicate that they can not move orperform any more Orders this round (Find more about Priest Orders on page 27).
20
PHASE 1: SUPPLIES
The Supplies phase consists of the following steps:
Step 1: Gather ResourcesStep 2: Mana CardsStep 3: Altar of DeathStep 4: Necromancer’s LibraryStep 5: Councils’ DeliberationsStep 6: Defender’s Time
STEP 1: GATHER RESOURCES
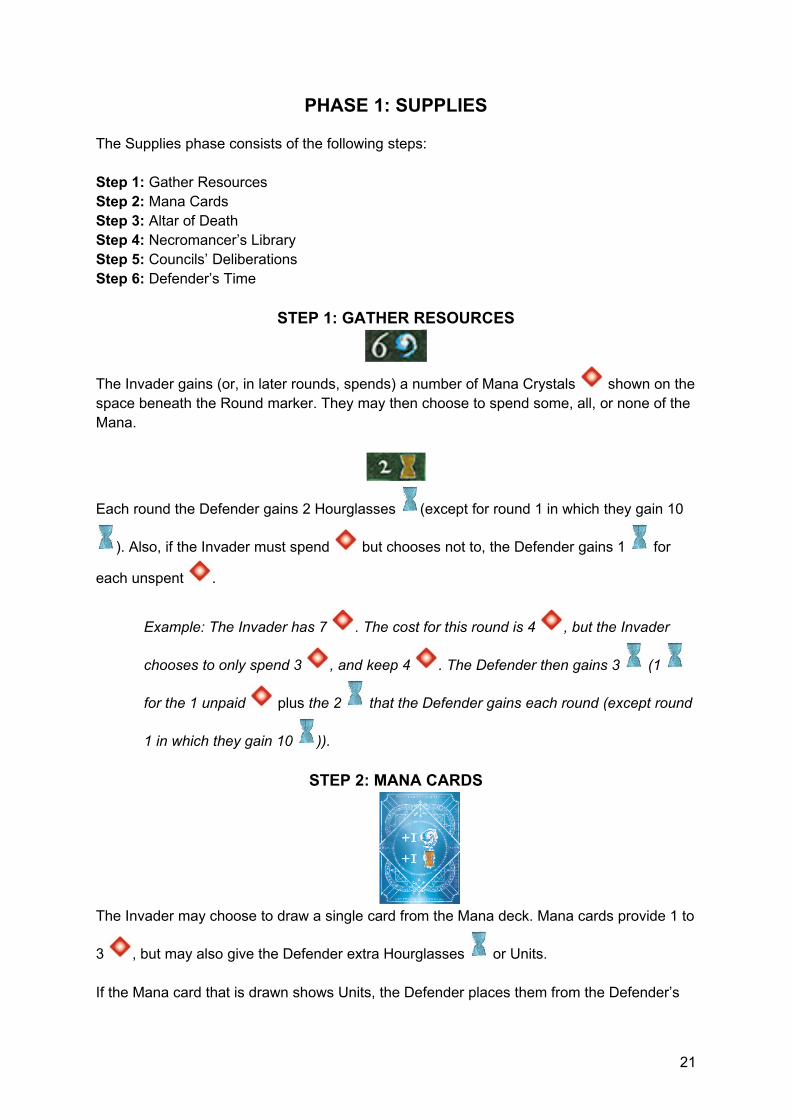
The Invader gains (or, in later rounds, spends) a number of Mana Crystals shown on thespace beneath the Round marker. They may then choose to spend some, all, or none of the Mana.
Each round the Defender gains 2 Hourglasses (except for round 1 in which they gain 10
). Also, if the Invader must spend but chooses not to, the Defender gains 1 for
each unspent .
Example: The Invader has 7 . The cost for this round is 4 , but the Invader
chooses to only spend 3 , and keep 4 . The Defender then gains 3 (1
for the 1 unpaid plus the 2 that the Defender gains each round (except round
1 in which they gain 10 )).
STEP 2: MANA CARDS
The Invader may choose to draw a single card from the Mana deck. Mana cards provide 1 to
3 , but may also give the Defender extra Hourglasses or Units.
If the Mana card that is drawn shows Units, the Defender places them from the Defender’s
21
supply to the Courtyard. If it shows Hourglasses the Defender gains the number of indicated by the card.
Once all the effects from the Mana card have been resolved, remove the card from the game.
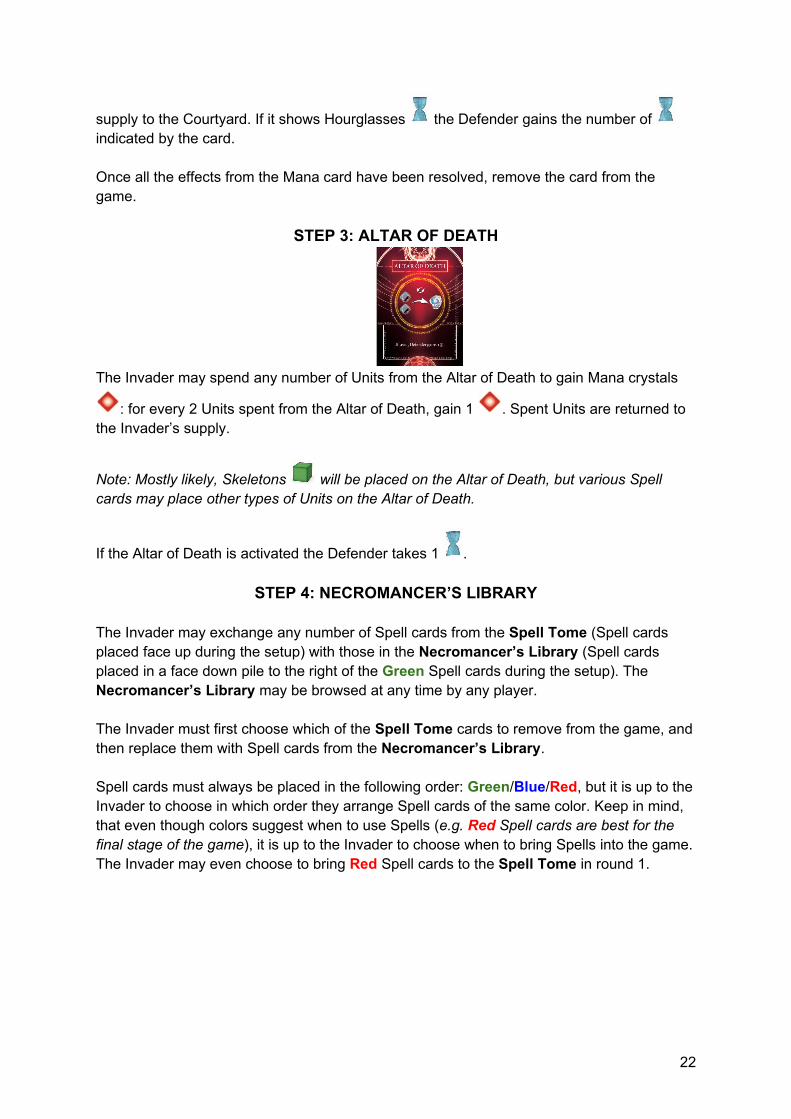
STEP 3: ALTAR OF DEATH
The Invader may spend any number of Units from the Altar of Death to gain Mana crystals
: for every 2 Units spent from the Altar of Death, gain 1 . Spent Units are returned to the Invader’s supply.
Note: Mostly likely, Skeletons will be placed on the Altar of Death, but various Spell cards may place other types of Units on the Altar of Death.
If the Altar of Death is activated the Defender takes 1 .
STEP 4: NECROMANCER’S LIBRARY
The Invader may exchange any number of Spell cards from the Spell Tome (Spell cards placed face up during the setup) with those in the Necromancer’s Library (Spell cards placed in a face down pile to the right of the Green Spell cards during the setup). The Necromancer’s Library may be browsed at any time by any player.
The Invader must first choose which of the Spell Tome cards to remove from the game, andthen replace them with Spell cards from the Necromancer’s Library.
Spell cards must always be placed in the following order: Green/Blue/Red, but it is up to theInvader to choose in which order they arrange Spell cards of the same color. Keep in mind, that even though colors suggest when to use Spells (e.g. Red Spell cards are best for the final stage of the game), it is up to the Invader to choose when to bring Spells into the game.The Invader may even choose to bring Red Spell cards to the Spell Tome in round 1.
22
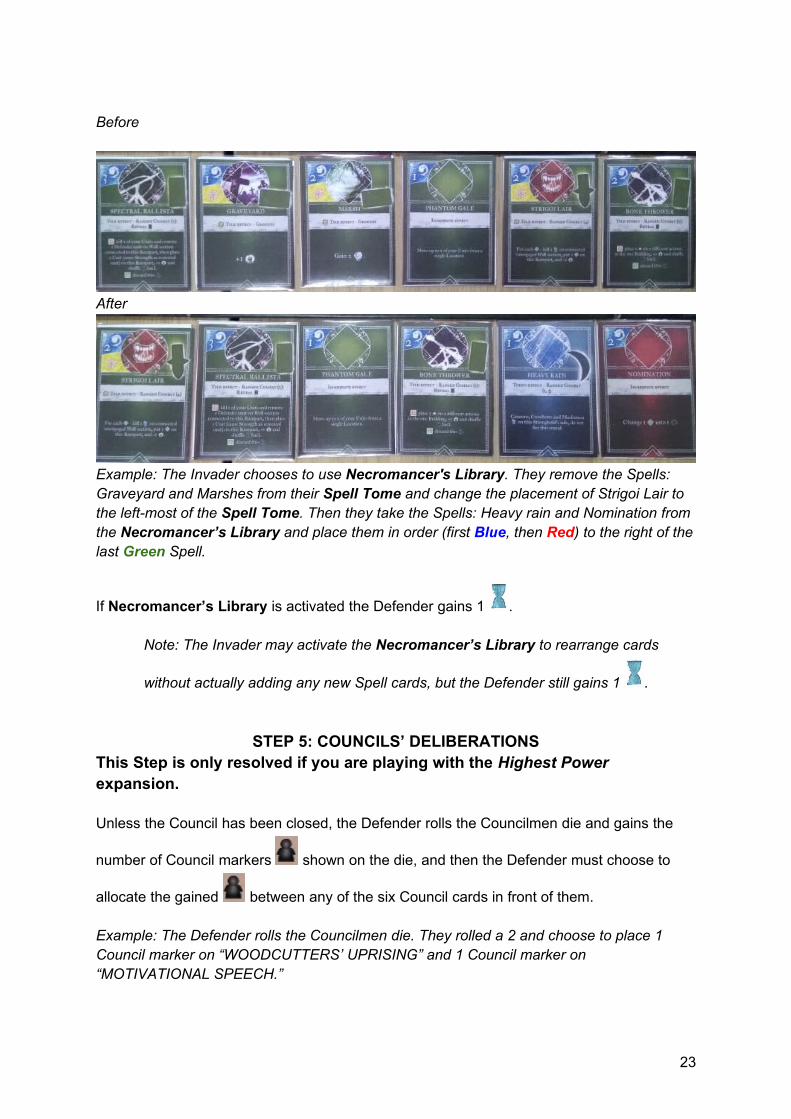
Before
After
Example: The Invader chooses to use Necromancer's Library. They remove the Spells: Graveyard and Marshes from their Spell Tome and change the placement of Strigoi Lair to the left-most of the Spell Tome. Then they take the Spells: Heavy rain and Nomination from the Necromancer’s Library and place them in order (first Blue, then Red) to the right of thelast Green Spell.
If Necromancer’s Library is activated the Defender gains 1 .
Note: The Invader may activate the Necromancer’s Library to rearrange cards
without actually adding any new Spell cards, but the Defender still gains 1 .
STEP 5: COUNCILS’ DELIBERATIONS This Step is only resolved if you are playing with the Highest Power expansion.
Unless the Council has been closed, the Defender rolls the Councilmen die and gains the
number of Council markers shown on the die, and then the Defender must choose to
allocate the gained between any of the six Council cards in front of them.
Example: The Defender rolls the Councilmen die. They rolled a 2 and choose to place 1 Council marker on “WOODCUTTERS’ UPRISING” and 1 Council marker on “MOTIVATIONAL SPEECH.”
23
Step 6: DEFENDER’S TIME
The Defender has to spend all gained (Find more about spending on page 13).
PHASE 2: PREPARATIONS
After all Mana has been gathered the Necromancer may start using their dark powers. The Defender must still use gained time to prepare for the assault. This phase consists of the following steps:
Step 1: Casting SpellsStep 2: ActivationsStep 3: Grounds
Step 4: Maneuvers
STEP 1: CASTING SPELLS
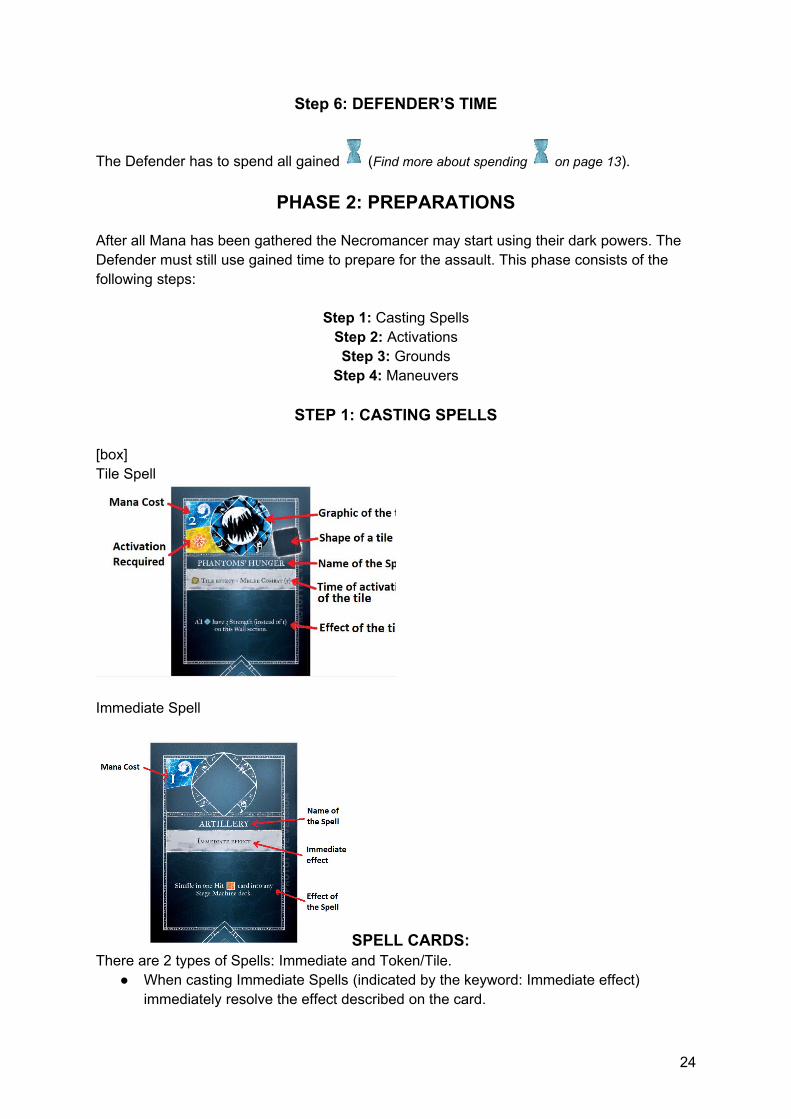
[box]Tile Spell
Immediate Spell
SPELL CARDS:There are 2 types of Spells: Immediate and Token/Tile.
● When casting Immediate Spells (indicated by the keyword: Immediate effect) immediately resolve the effect described on the card.
24
● When casting token/tile Spells (indicated by the keywords: Token effect, or Tile effect) immediately place the matching tile on any available space corresponding to the shape on the board, or token on the chosen side.
Note 1: token/tile Spells are always used to immediately place a matching token/tile on the board. The text on the Spells describe the effect of the tokens or tiles already placed on the
board (and, if necessary, activated ). Token/tile Spells indicate which stage or step of the phase the placed tokens/tiles are resolved.
Note 2: Remember that you may only place tiles on empty matching spaces on the board. You can not remove or replace tiles from the board unless otherwise stated.Note 3: If the Spell effect indicates “this” Location, it always refers to the one on which the tile is placed.
Whenever the Invader casts a Spell to summon a tile with Activation it’s also
activated for the current round—the Invader immediately places an Activation crystal on
the of that tile. During each Cleanup phase, the Invader must discard all from tiles.
To activate them again, the Invader must use (more about activation in the next step).
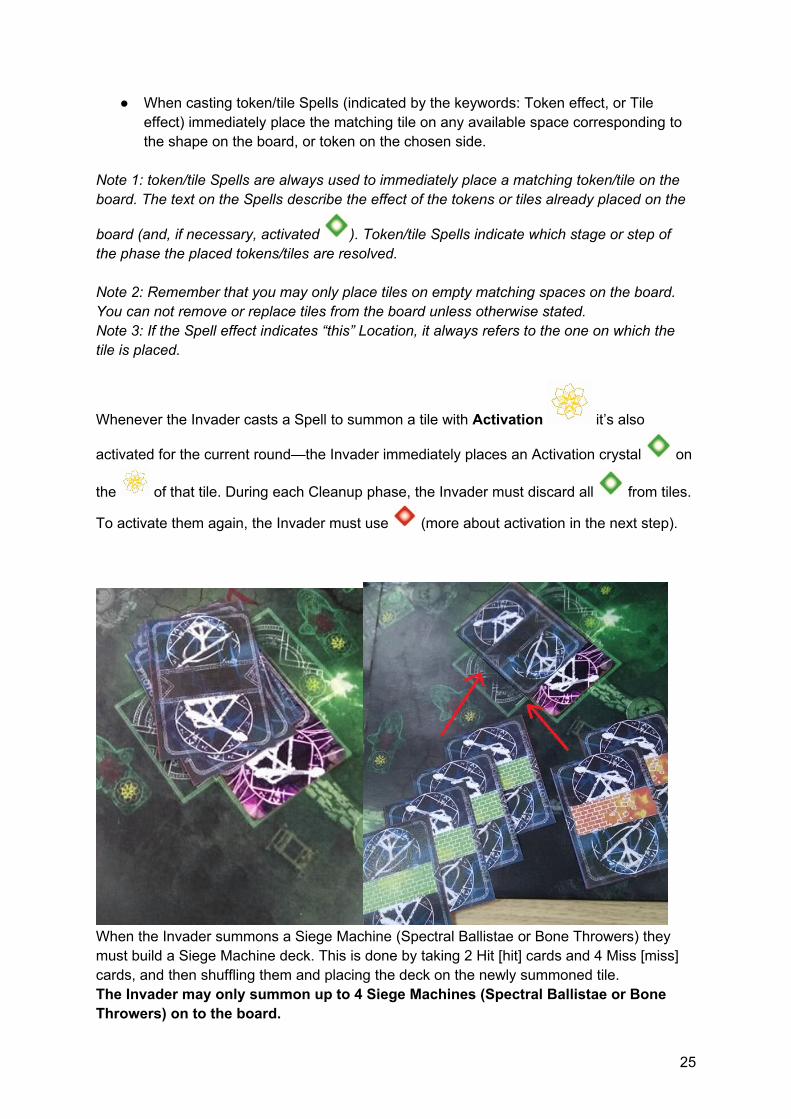
When the Invader summons a Siege Machine (Spectral Ballistae or Bone Throwers) they must build a Siege Machine deck. This is done by taking 2 Hit [hit] cards and 4 Miss [miss] cards, and then shuffling them and placing the deck on the newly summoned tile.The Invader may only summon up to 4 Siege Machines (Spectral Ballistae or Bone Throwers) on to the board.
25
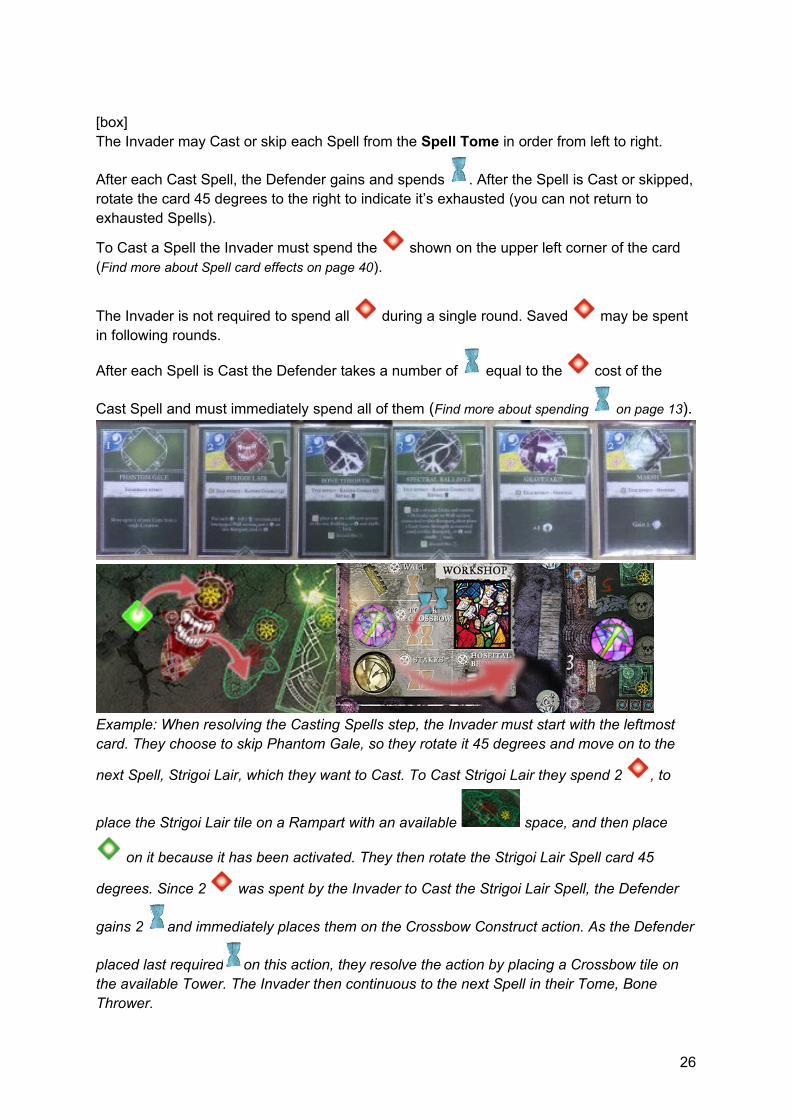
[box]The Invader may Cast or skip each Spell from the Spell Tome in order from left to right.
After each Cast Spell, the Defender gains and spends . After the Spell is Cast or skipped,rotate the card 45 degrees to the right to indicate it’s exhausted (you can not return to exhausted Spells).
To Cast a Spell the Invader must spend the shown on the upper left corner of the card (Find more about Spell card effects on page 40).
The Invader is not required to spend all during a single round. Saved may be spent in following rounds.
After each Spell is Cast the Defender takes a number of equal to the cost of the
Cast Spell and must immediately spend all of them (Find more about spending on page 13).
Example: When resolving the Casting Spells step, the Invader must start with the leftmost card. They choose to skip Phantom Gale, so they rotate it 45 degrees and move on to the
next Spell, Strigoi Lair, which they want to Cast. To Cast Strigoi Lair they spend 2 , to
place the Strigoi Lair tile on a Rampart with an available space, and then place
on it because it has been activated. They then rotate the Strigoi Lair Spell card 45
degrees. Since 2 was spent by the Invader to Cast the Strigoi Lair Spell, the Defender
gains 2 and immediately places them on the Crossbow Construct action. As the Defender
placed last required on this action, they resolve the action by placing a Crossbow tile on the available Tower. The Invader then continuous to the next Spell in their Tome, Bone Thrower.
26
STEP 2: ACTIVATIONS
Requires the Invader to activate the tile.
An activated tile is indicated by the on the space of tile.
Even though all tiles with enter the board with on them, these will be removed during the Cleanup phase.
To activate tiles with the Invader must spend 1 to activate all tiles of the same
type. The Invader may activate any number of tiles on the board (always paying 1 for each activation of a single tile type).
The Defender does not gain any for Invader activations .
Example: There are 3 Strigoi Lairs on the board. The Invader spends 1 to activate
2 Strigoi Lair tiles on the board—1 was placed during step 1 so it already has ,
but the other 2 gain a . During future rounds, the Invader may activate all 3
tokens by spending 1 .
STEP 3: GroundsDuring this step, the Invader resolves effects for activated Marshes and Graveyards (Find
more about Spells on page 40).
STEP 4: ManeuverAt the beginning of this step, the Invader randomly takes 14 Units from the bag and places them on the Camp card. The Invader may move those Units from the Camp card to the Foregrounds during this phase, as long as they have not reached their Unit limit.
Then, the Invader chooses which type of maneuver they want to perform: Minor maneuver, Major maneuver, or both. Both types of maneuvers move the Invader Units toward the Stronghold, following paths and respecting Unit limits. Units may never move away from the Stronghold.
● Minor maneuver allows the Invader to move up to 6 Units from each Rampart, then 6 Units from each Foreground. Then they may move up to 6 Units from the Camp card to each Foreground (12 Units total).
Resolving Minor maneuver allows the Defender to gain 3 .● Major maneuver allows the Invader to move up to 8 Units from each Rampart, then
8 Units from each Foreground. Then they may move up to 8 Units from the Camp
27
card to each Foreground (16 Units total).
Resolving Major maneuver allows the Defender to gain 5 .
Units are moved in the following order:1. From each Rampart to any number of connected the Wall sections.2. From each Foreground to any number of connected Ramparts.3. From the Camp card twice—each to a different Foreground.
The Invader must abide by the following rules:
● The Invader may only resolve 1 Minor and 1 Major maneuver per round (in any order).
● The Invader must resolve at least 1 maneuver each round.● The Units may only move forward, and along the paths on the Board.● Units may only move if there is enough space available for them (7 for the Rampart
and 10 for the Foreground; each Wall section varies).● Units may move from 1 section to any number of other sections connected by paths.● Units can not withdraw from the Wall sections.● When the card effect states “Location” it indicates one of the following: Camp,
Foregrounds, Ramparts, or Wall sections.Note: The paths on the bottom right side of the Stronghold (Defender’s perspective) require Units to move through a Rampart before reaching the outermost Rampart. Toreach the outermost Rampart, Invader Units move in the following order: if necessaryto clear space in the outermost Rampart, Units move from the outermost Rampart to a connected Wall section, then new Units coming from a previous Rampart may move to the outermost Rampart.
As mentioned above, the Defender gains 3 if the Invader resolved Minor maneuver, and/
or 5 if the Invader resolved Major maneuver. In addition, if the Invader left Units on the
Camp card, the Defender may gain extra as shown below:
Invaders Units on the Camp card: Defender gains
0-3 0
4-7 1
8-11 3
12 or more 6
After the Invader resolves all maneuvers, and Units remaining on the Camp card are
counted, the Defender must spend all gained (Find more about spending on page 13).
28

Example: The Invader uses the Minor maneuver action as follows:
● The Invader moves 5 Units from Rampart 1: 1 Unit to Wall section A and 4 Units to Wall section B.
● The Invader also moves 5 Units from Rampart 2. 4 Units to Wall section C and 1 Unit to Wall section D.
● The Invader moves 2 Units from Rampart 3 to Wall section D. Wall section D has reached its Unit limit of 3, so no more Units may be moved to that Wall
section (unless the Units are Phantoms ). ● The Invader moves 2 Units from Rampart 3 to Wall section E. The Invader
moved a total of 4 Units from Rampart 3.
● The Invader now moves 6 Units—the maximum for the Minor maneuver—fromForeground 4 to the following spaces: 4 Units to Rampart 1, and 2 Units to Rampart 5.
● The Invader moves 5 Units from Foreground 6: 2 Units to Rampart 2 and 3 Units to Rampart 3.
● The Invader then moves the maximum number of Units for their Minor maneuver from the Camp card to Foregrounds 4 and 6: 6 Units to each.
● For resolving a Minor maneuver the Defender gains 3 . Also, there are 4
Units left on the Camp card so the Defender gains 1 , which gives them a
total of 4 that the Defender must immediately spend.
29
UNITS
INVADER
The Invader has the following Unit types, each with unique abilities:
Phantoms - Strength 1Levitation: Aside from occupying standard spaces, Phantoms may also occupy the special spaces [blue inside] located on the Wall sections. Each Wall section has 3 spaces for Levitating Phantoms.
Skeletons - Strength 2Magical essence: Skeletons killed in combat or other effects are always placed on the Altar of Death card instead of being removed like other Invader Units (Find more about using the
Altar of Death on page 18).
Vampires - Strength 3Vampire aura: When a Vampire is located on the same Wall section as Phantoms, the Vampire increases the Phantom’s Strength to 2 (instead of 1). This affects up to 3 Phantoms
on the same Wall section of the Vampire, and applies to all Assault steps. (Find more
about Assault on page 28).
DEFENDER
The Defender has the following Unit types with abilities:
Marksmen - Strength 1 Volley: In the Assault phase, during the Marksman’s Volley stage of Ranged Combat, all Marksmen located on Wall sections, who are not currently engaged in Melee Combat, may
fire at Skeletons (Find more about Engaged and Volley on page 31).
Soldiers - Strength 2 No unique abilities.
Veterans - Strength 3No unique abilities.
30
PRIESTS - Strength 2
Priests help defend the Stronghold, despite adding strength to the Wall section and being able to move, they are not Units. They have 1 dedicated space on each Wall section, cannot be killed, nor stop Invader Units from Breaching the Wall.
Phantom Banish: During stage 1 of Melee Combat in the Assault phase, each Priest
automatically repels 1 Phantom from their Wall section. The Invader chooses and
moves the to a Rampart of their choice.
Priest Orders:Each Priest may perform one Priest Order per round to aid the defense. Each Order costs 1
Hourglass and may be used during any Defender phase. Once an Order is performed, the Priest can not move, or perform another Order for the remainder of the round. Place the
spent near the Priest to indicate they can no longer act for the current round.
Orders:
Vampire Repel: A Priest located on a Wall section may repel a single Vampire from
their Wall section. The Invader chooses and moves that into a Rampart of their choice.
Speech: The Panic level is decreased by 1. If Speech is used at the Courtyard, and there are Crosses built on the Towers, the Panic level is additionally lowered by the number of built Crosses.
31
PHASE 3: ASSAULT
Once all Preparations are complete, the Assault phase begins. This phase consists of the following Stages, in order:
Ranged Combat
Stage 1: Cannons and CrossbowsStage 2: Spectral Ballistae and Bone ThrowersStage 3: Marksmen’s VolleyStage 4: Strigoi Lairs
Melee Combat
Stage 1: Priests’ Phantom BanishStage 2: Consecrated GroundsStage 3: Skeletons’ CauldronsStage 4: StakesStage 5: Resolving StrengthStage 6: The Hospital
Dark Presence
Stage 1: Destroying The Gates (only when playing with the Highest Power expansion)Stage 2: Panic in the Stronghold
[box]Golden Rules:
● Killed Invader Units are discarded to the supply (except which are placed onto the Altar of Death).
● Killed Defender Units are placed on the Hospital Building. ● Any time Units are killed as a result of combat or an action, your opponent
chooses which of the Units are killed.● Any time the Invader is forced to move their Units from a Wall section into a
Rampart of their choice, and there is no available space left on the Rampart, any Units that exceed the limit are instead killed.
● Any time a Spell is refers to “This” area on the board, it indicates the space where the tile is placed.
[box/]
32
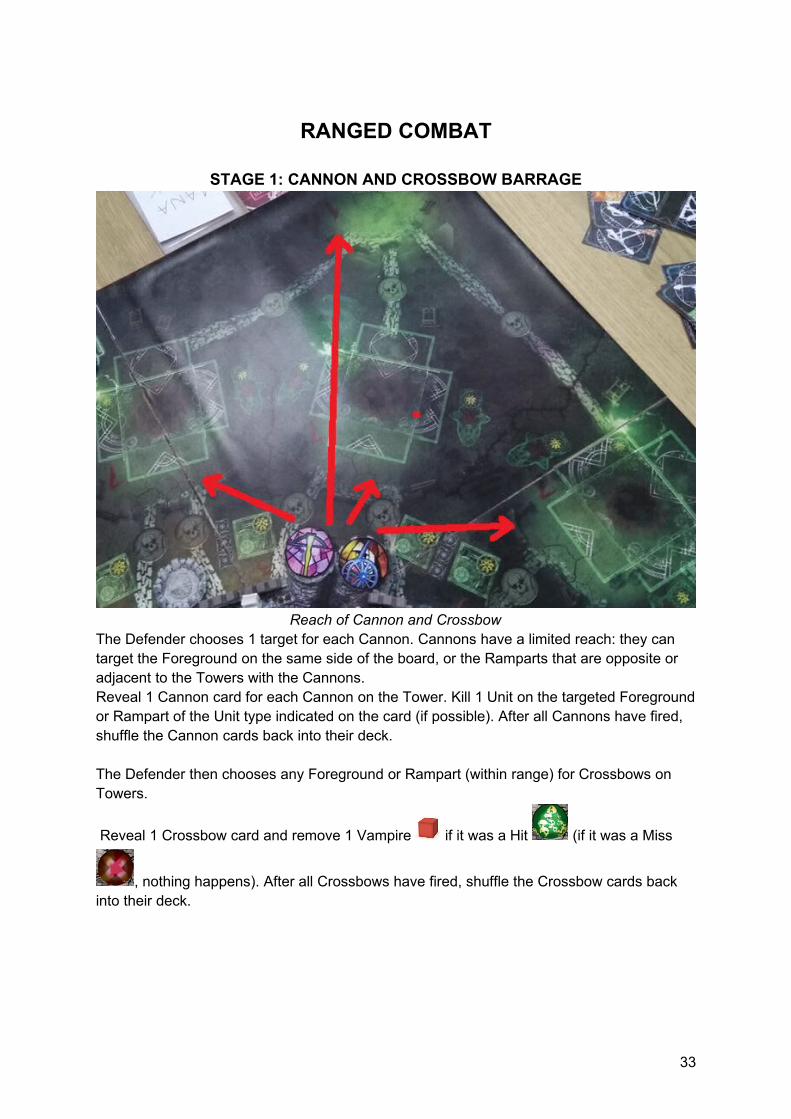
RANGED COMBAT
STAGE 1: CANNON AND CROSSBOW BARRAGE
Reach of Cannon and CrossbowThe Defender chooses 1 target for each Cannon. Cannons have a limited reach: they can target the Foreground on the same side of the board, or the Ramparts that are opposite or adjacent to the Towers with the Cannons. Reveal 1 Cannon card for each Cannon on the Tower. Kill 1 Unit on the targeted Foregroundor Rampart of the Unit type indicated on the card (if possible). After all Cannons have fired, shuffle the Cannon cards back into their deck.
The Defender then chooses any Foreground or Rampart (within range) for Crossbows on Towers.
Reveal 1 Crossbow card and remove 1 Vampire if it was a Hit (if it was a Miss
, nothing happens). After all Crossbows have fired, shuffle the Crossbow cards back into their deck.
33
Card 1 Card 2
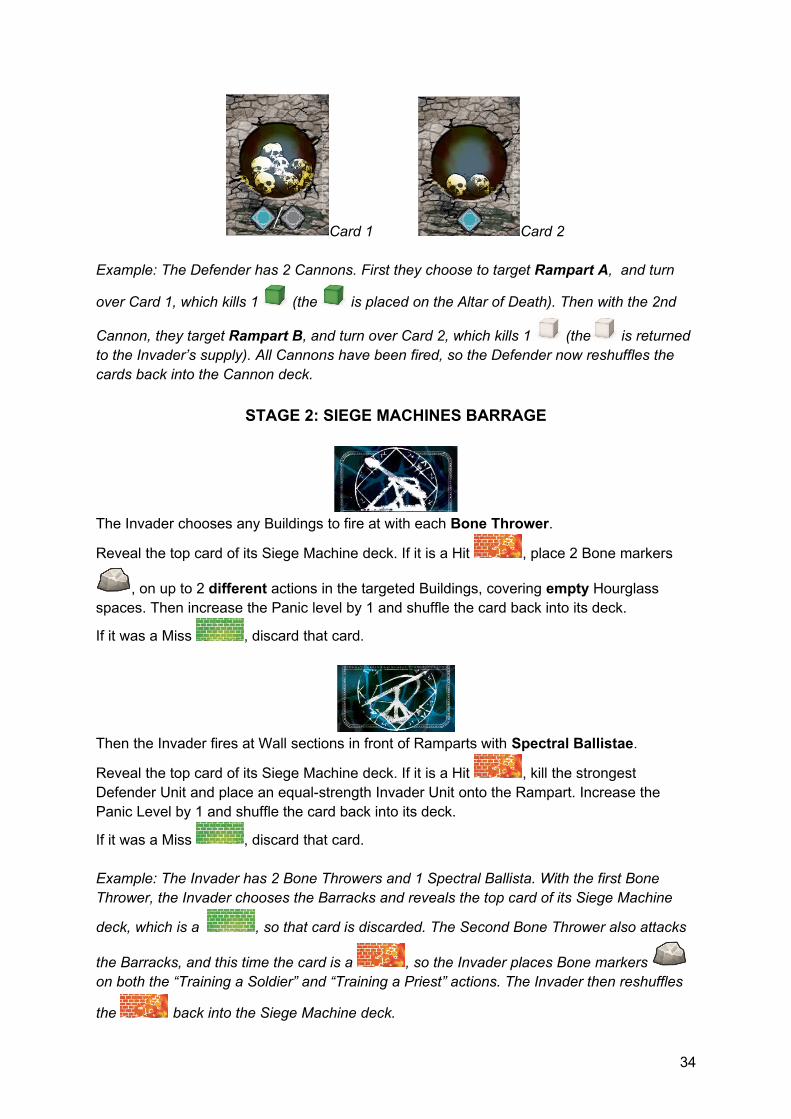
Example: The Defender has 2 Cannons. First they choose to target Rampart A, and turn
over Card 1, which kills 1 (the is placed on the Altar of Death). Then with the 2nd
Cannon, they target Rampart B, and turn over Card 2, which kills 1 (the is returned to the Invader’s supply). All Cannons have been fired, so the Defender now reshuffles the cards back into the Cannon deck.
STAGE 2: SIEGE MACHINES BARRAGE
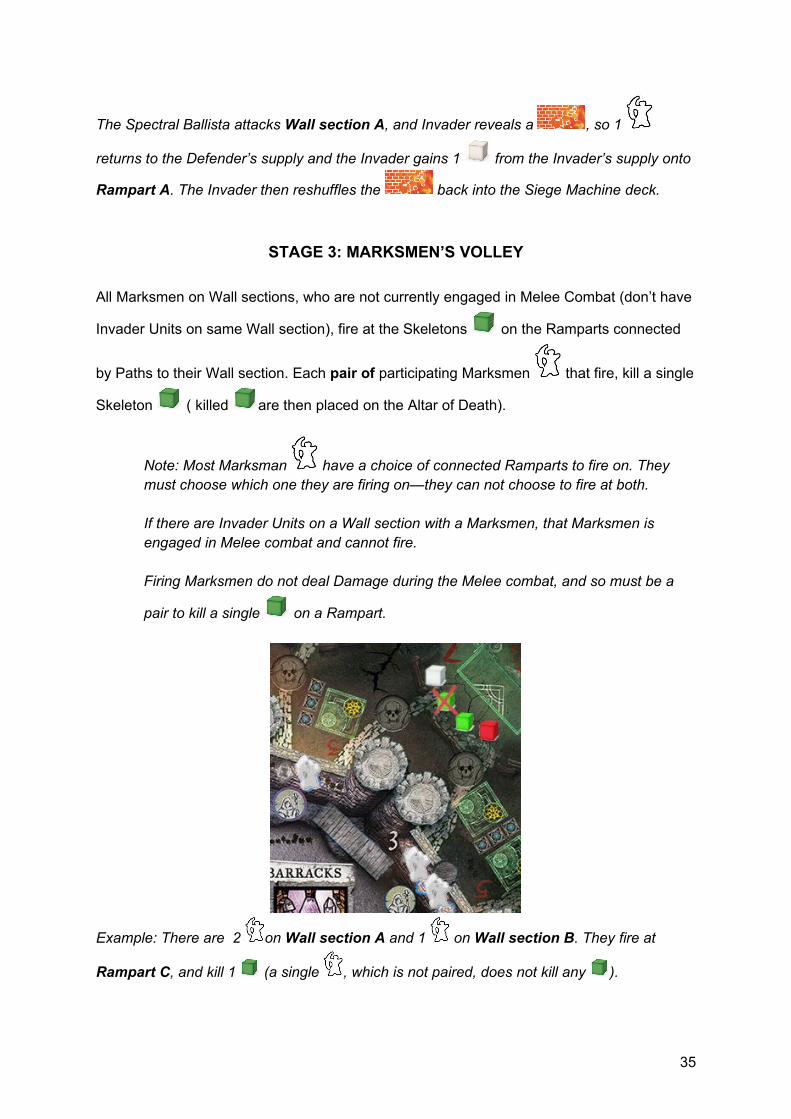
The Invader chooses any Buildings to fire at with each Bone Thrower.
Reveal the top card of its Siege Machine deck. If it is a Hit , place 2 Bone markers
, on up to 2 different actions in the targeted Buildings, covering empty Hourglass spaces. Then increase the Panic level by 1 and shuffle the card back into its deck.
If it was a Miss , discard that card.
Then the Invader fires at Wall sections in front of Ramparts with Spectral Ballistae.
Reveal the top card of its Siege Machine deck. If it is a Hit , kill the strongest Defender Unit and place an equal-strength Invader Unit onto the Rampart. Increase the Panic Level by 1 and shuffle the card back into its deck.
If it was a Miss , discard that card.
Example: The Invader has 2 Bone Throwers and 1 Spectral Ballista. With the first Bone Thrower, the Invader chooses the Barracks and reveals the top card of its Siege Machine
deck, which is a , so that card is discarded. The Second Bone Thrower also attacks
the Barracks, and this time the card is a , so the Invader places Bone markers on both the “Training a Soldier” and “Training a Priest” actions. The Invader then reshuffles
the back into the Siege Machine deck.
34
The Spectral Ballista attacks Wall section A, and Invader reveals a , so 1
returns to the Defender’s supply and the Invader gains 1 from the Invader’s supply onto
Rampart A. The Invader then reshuffles the back into the Siege Machine deck.
STAGE 3: MARKSMEN’S VOLLEY
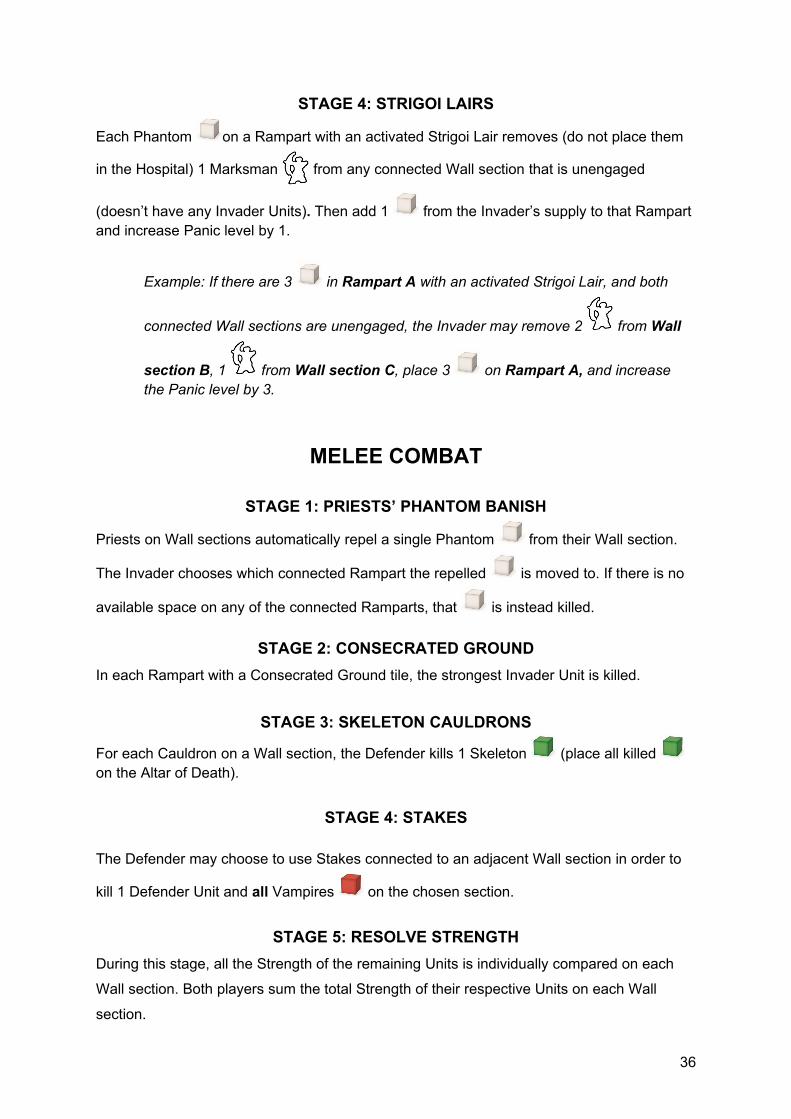
All Marksmen on Wall sections, who are not currently engaged in Melee Combat (don’t have
Invader Units on same Wall section), fire at the Skeletons on the Ramparts connected
by Paths to their Wall section. Each pair of participating Marksmen that fire, kill a single
Skeleton ( killed are then placed on the Altar of Death).
Note: Most Marksman have a choice of connected Ramparts to fire on. They must choose which one they are firing on—they can not choose to fire at both.
If there are Invader Units on a Wall section with a Marksmen, that Marksmen is engaged in Melee combat and cannot fire.
Firing Marksmen do not deal Damage during the Melee combat, and so must be a
pair to kill a single on a Rampart.
Example: There are 2 on Wall section A and 1 on Wall section B. They fire at
Rampart C, and kill 1 (a single , which is not paired, does not kill any ).
35
STAGE 4: STRIGOI LAIRS
Each Phantom on a Rampart with an activated Strigoi Lair removes (do not place them
in the Hospital) 1 Marksman from any connected Wall section that is unengaged
(doesn’t have any Invader Units). Then add 1 from the Invader’s supply to that Rampart and increase Panic level by 1.
Example: If there are 3 in Rampart A with an activated Strigoi Lair, and both
connected Wall sections are unengaged, the Invader may remove 2 from Wall
section B, 1 from Wall section C, place 3 on Rampart A, and increase the Panic level by 3.
MELEE COMBAT
STAGE 1: PRIESTS’ PHANTOM BANISH
Priests on Wall sections automatically repel a single Phantom from their Wall section.
The Invader chooses which connected Rampart the repelled is moved to. If there is no
available space on any of the connected Ramparts, that is instead killed.
STAGE 2: CONSECRATED GROUND
In each Rampart with a Consecrated Ground tile, the strongest Invader Unit is killed.
STAGE 3: SKELETON CAULDRONS
For each Cauldron on a Wall section, the Defender kills 1 Skeleton (place all killed on the Altar of Death).
STAGE 4: STAKES
The Defender may choose to use Stakes connected to an adjacent Wall section in order to
kill 1 Defender Unit and all Vampires on the chosen section.
STAGE 5: RESOLVE STRENGTH
During this stage, all the Strength of the remaining Units is individually compared on each
Wall section. Both players sum the total Strength of their respective Units on each Wall
section.
36
INVADER STRENGTH:
Phantom 1 Strength
OR
With a Vampire on the same Wall section:
Up to 3 have 2 Strength.
OR
With Phantom’s Hunger with :
All have 3 Strength.
Skeleton 2 Strength
Vampire 3 Strength
Bone Giant 4 Strength
Poisonous Clouds with 2 Strength
DEFENDER STRENGTH:
Marksman 1 Strength
Soldier 2 Strength
Veteran 3 Strength
Wall 1 Strength
Priest 2 Strength
DEALING DAMAGEThe player with a higher result is the winner on this Wall section, and deals Damage to the enemy Units on this Wall section. In case of a tie, no Damage is dealt. Subtract the winning player’s sum from the losing player’s sum. The difference between theirStrength is the amount of Damage the winning player deals to the enemy Units. To kill a Unit a player must deal Damage equal to its Strength. Damage that does not kill a Unit is wasted.
Killed Invader Units are discarded to the Invader’s supply (except for Skeletons , which are placed on the Altar of Death). Killed Defender Units are placed in the Hospital Building.
Note: Remember that you can not deal Damage to Priests and Walls.
37
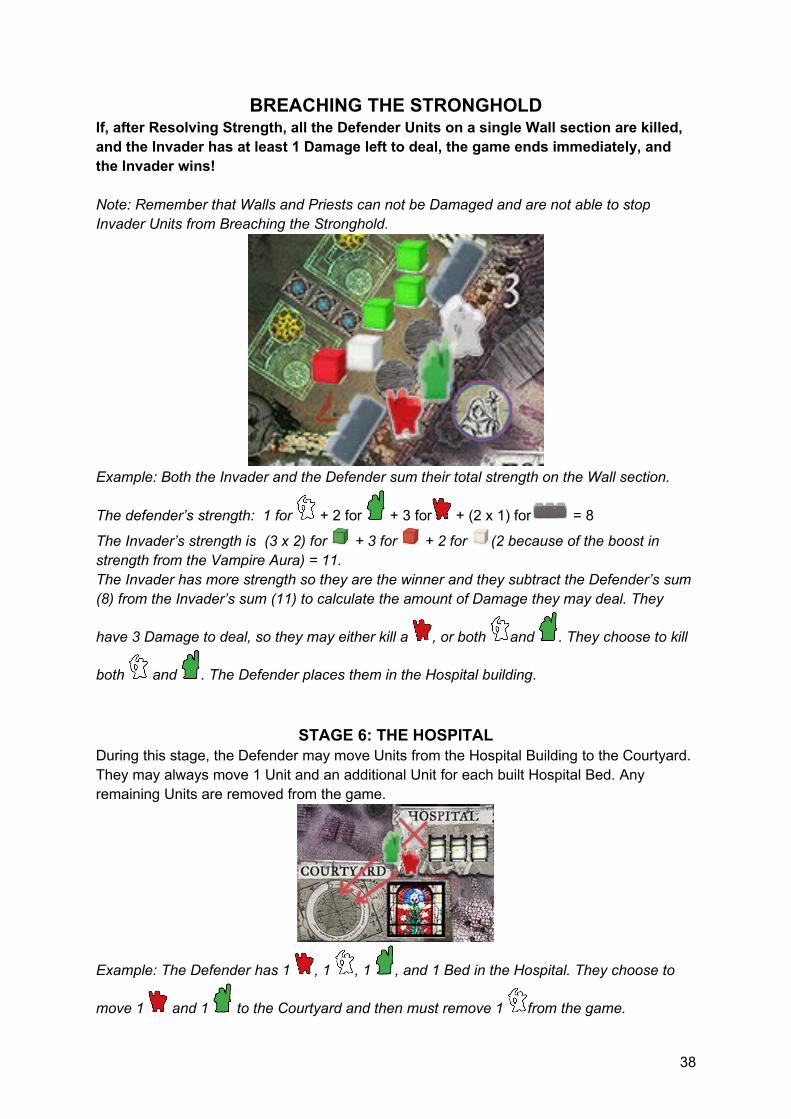
BREACHING THE STRONGHOLDIf, after Resolving Strength, all the Defender Units on a single Wall section are killed, and the Invader has at least 1 Damage left to deal, the game ends immediately, and the Invader wins!
Note: Remember that Walls and Priests can not be Damaged and are not able to stop Invader Units from Breaching the Stronghold.
Example: Both the Invader and the Defender sum their total strength on the Wall section.
The defender’s strength: 1 for + 2 for + 3 for + (2 x 1) for = 8
The Invader’s strength is (3 x 2) for + 3 for + 2 for (2 because of the boost in strength from the Vampire Aura) = 11.The Invader has more strength so they are the winner and they subtract the Defender’s sum(8) from the Invader’s sum (11) to calculate the amount of Damage they may deal. They
have 3 Damage to deal, so they may either kill a , or both and . They choose to kill
both and . The Defender places them in the Hospital building.
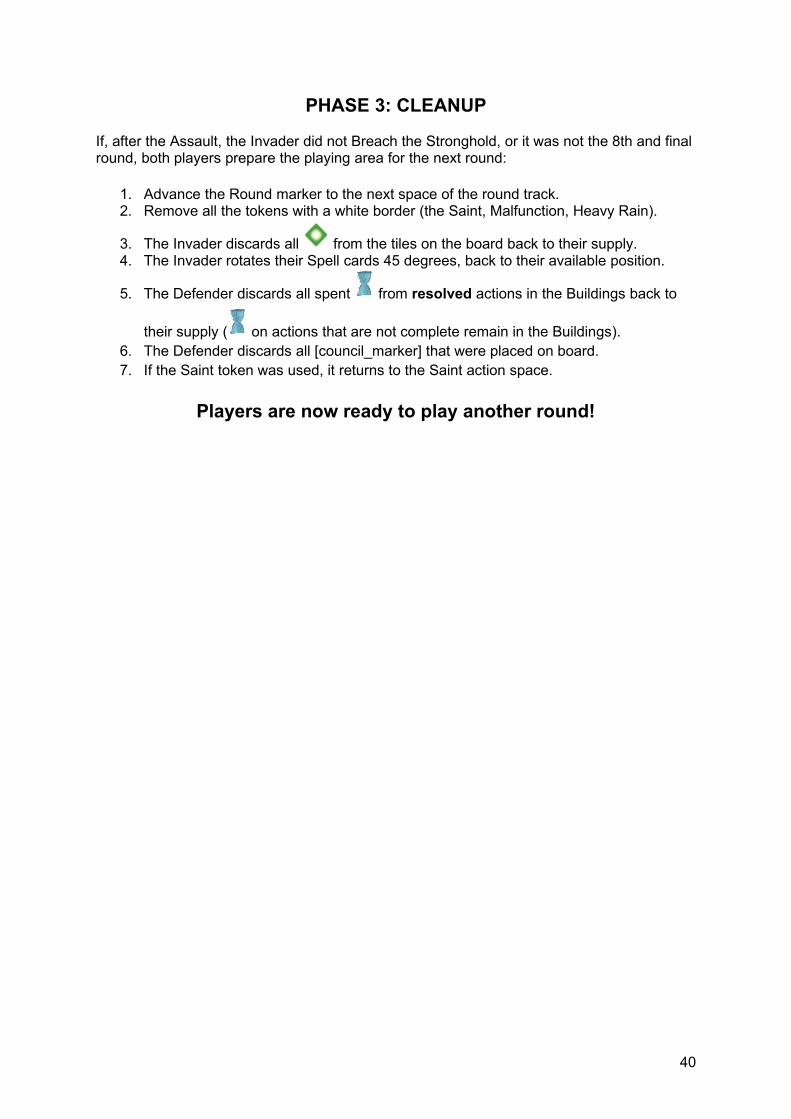
STAGE 6: THE HOSPITALDuring this stage, the Defender may move Units from the Hospital Building to the Courtyard. They may always move 1 Unit and an additional Unit for each built Hospital Bed. Any remaining Units are removed from the game.
Example: The Defender has 1 , 1 , 1 , and 1 Bed in the Hospital. They choose to
move 1 and 1 to the Courtyard and then must remove 1 from the game.
38
DARK PRESENCE
STAGE 1: DESTROYING THE GATES (only when playing with the Highest Power expansion)
If the Phantom Dragon has been summoned, deal Damage to the Gate equal to the following:
● Phantom Dragon’s Strength● Positive Panic level● Previously destroyed Gate tile
Note: Do not increase Gate toughness if the Panic level is negative.
When the Gate’s toughness is reduced to 0, a single Gate tile is destroyed (remove the tile from the board), and the Gate’s toughness marker returns to 8. Any further Damage will reduce the toughness of a remaining Gate tile.
Once the 3rd Gate tile is removed, the game ends immediately, and the Invader wins.
Note: Each Gate tile increases the Panic level by 1 during the next stage.
STAGE 2: PANIC IN THE STRONGHOLD
1. The Defender returns any Panic cards that were drawn during the previous round to the Panic deck and shuffles it (This is ignored the 1st round, since the Defender will not have any Panic cards).
2. The Defender then draws 1 Panic card for each Panic level greater than 0 (if any). Then they read aloud the card effect and place it near the board.
3. If the Panic level is less than or equal to 0, nothing happens. Having the Panic level reduced below 0 helps the Defender by making them more secure before the next Assault.
4. The Panic Level returns to 0.
Note: If you play with the Highest Power expansion, the Panic level immediately increases by 1 for each Gate tile that has been destroyed.
39
PHASE 3: CLEANUP
If, after the Assault, the Invader did not Breach the Stronghold, or it was not the 8th and finalround, both players prepare the playing area for the next round:
1. Advance the Round marker to the next space of the round track.2. Remove all the tokens with a white border (the Saint, Malfunction, Heavy Rain).
3. The Invader discards all from the tiles on the board back to their supply.4. The Invader rotates their Spell cards 45 degrees, back to their available position.
5. The Defender discards all spent from resolved actions in the Buildings back to
their supply ( on actions that are not complete remain in the Buildings).6. The Defender discards all [council_marker] that were placed on board.7. If the Saint token was used, it returns to the Saint action space.
Players are now ready to play another round!
40