Embed Size (px)
Citation preview
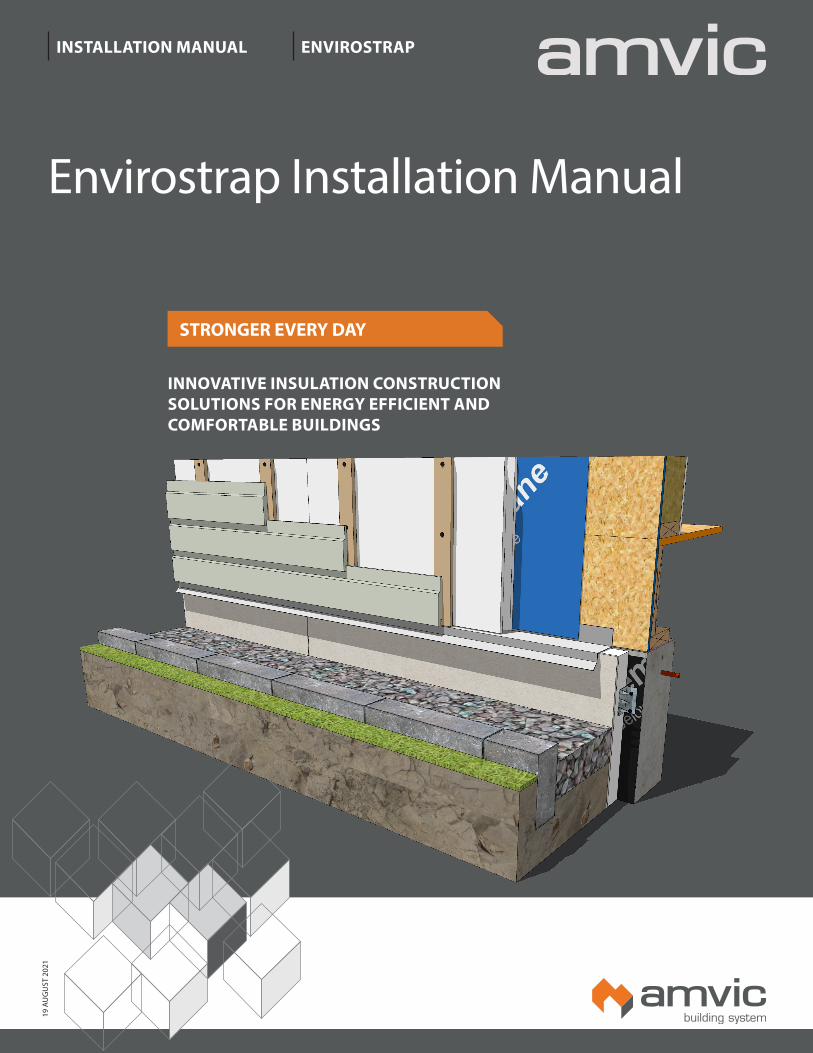
Envirostrap Installation Manual
INSTALLATION MANUAL ENVIROSTRAP
INNOVATIVE INSULATION CONSTRUCTION SOLUTIONS FOR ENERGY EFFICIENT AND COMFORTABLE BUILDINGS
STRONGER EVERY DAY
19 A
ug
ust
202
1
TABLE OF CONTENTS
Part 1 - Introduction ..................................................................................................................................................... 5
Part 2 - Fastening Schedule .......................................................................................................................................... 7
Part 3 - Installation ....................................................................................................................................................... 8
Open Stud Wall - Vertical Orientation ................................................................................................................... 8Open Stud Wall - Horizontal Orientation ............................................................................................................... 8Wood Stud Wall With OSB Sheathing - Vertical Orientation ................................................................................. 9Wood Stud Wall With OSB Sheathing - Horizontal Orientation ............................................................................. 9Outside Corner - Vertical Orientation .................................................................................................................. 10Outside Corner - Horizontal Orientation ............................................................................................................. 11Inside Corner - Vertical Orientation ..................................................................................................................... 12Inside Corner - Horizontal Orientation ................................................................................................................ 13Window ............................................................................................................................................................... 13

PREFACE
The continuity of the thermal envelope is extremely crucial for the overall energy performance of any building. Adding continuous rigid insulation to above grade walls greatly improves the thermal performance of the wall assembly by reducing the effects of thermal bridging and having more insulation. As the energy standards become more stringent and energy efficiency becomes much more important, the need for thermal envelope continuity increases as well. Amvic’s Envirostrap boards offer a highly versatile solution that aims to provide a cost effective product, with great thermal characteristics and simplified installation. The combination of pre-assembled furring strips and expanded polystyrene foam allows the boards to be installed in virtually any orientation, with or without sheathing and can even be used on the interior for below grade applications. Envirostrap is backed-up by Amvic’s renowned customer service and technical support and is available through Amvic’s extensive distributor network across North America.
If any of your questions or concerns are not completely addressed in this manual, feel free to contact us and our staff will be happy to answer your questions. At Amvic, we pride ourselves in offering our customers an exceptional level of customer service.
Amvic WebsiteThe Amvic website is updated regularly with the most updated information including, product data sheets, construction details and installation manuals. This technical and installation manual is posted on the website, see www.amvicsystem.com
Technical SupportPlease contact us for any inquiries pertaining to information included in this manual or if you require other technical assistance.Phone: 1 (877) 470-9991 (toll free)
Email: [email protected]

PREFACE
DisclaimerThis document is provided for informational purposes only. The information contained in this document represents the current views of Amvic Inc. on the issues discussed as of the date of publication. These opinions, as expressed, should not be interpreted to be a commitment on the part of Amvic Inc. and cannot guarantee the accuracy of any information presented after the date of publication. The user assumes the entire risk as to the accuracy and the use of this document.
This manual provides a basic guide for the installation of the Envirostrap and is intended to supplement, rather than replace, the basic construction knowledge of the construction professional. All installations of Envirostrap must be in accordance with all applicable building codes and/or under the guidance of a licensed professional engineer. In all cases, applicable building code regulations take precedence over this manual.
INFORMATION CONTAINED IN THIS DOCUMENT IS PROVIDED “AS IS”, WITHOUT ANY WARRANTY OF ANY KIND, EITHER EXPRESSED OR IMPLIED, INCLUDING, BUT NOT LIMITED TO, THE IMPLIED WARRANTIES OF MERCHANTABILITY, FITNESS FOR A PARTICULAR PURPOSE, AND FREEDOM OF INFRINGEMENT.
CopyrightThis document may not be copied or reproduced in any form without the written consent of Amvic Inc. Copyright© 2021 Amvic Inc.

PART 1 INTRODUCTION
5
Envirostrap is a non-structural, rigid insulation board made from Type 1/Type I closed cell Expanded Polystyrene (EPS) with integrated furring strips offering cost effective performance. This highly effective combination of materials offers a 2-in-1 solution incorporating insulation and finish attachment surfaces that can be used for both above grade and interior below grade applications. The boards come in 32” (813mm) width and are available in both 8’ (2.4m) and 9’ (2.7m) lengths with the furring strips every 16” (406mm) o.c. The furring strips can be either fully recessed inside the foam or can protrude from the surface of the foam by 3/4” (19mm), creating an air gap for a rainscreen exterior cladding installation. A choice of wood or plastic furring strips is available as well. The boards have tongue and groove edges along the long sides which helps expedite construction and eliminates the need for taping or sealing at those joints.

PART 1 INTRODUCTION
6
This Page Intentionally Left Blank

PART 2 FASTENING SCHEDULE
7
Table 1 - Fastening ScheduleEnvirostrap can be either installed over OSB sheathing or directly onto wood studs. The table below outlines different siding types and their fastening requirements for various thicknesses of Envirostrap.
Maximum Weight of Siding, psf (kg/m2)
Vinyl Siding Wood Siding Fiber Cement Siding
1 (4.88) 1.5 (7.32) 5 (24.4)Nominal Insulation Thickness, in (mm)
2-5/8
(67)
3-1/2
(89)
2-5/8
(67)
3-1/2
(89)
2-5/8
(67)
3-1/2
(89)
Fastener Spacing 16x16” (406x406mm) o.c. into Stud
Minimum Size and Length of Fastener:
#8 @ 6”
(152mm)
#10 @ 7”
(178mm)
#8 @ 6”
(152mm)
#12 @ 7”
(178mm)
#12 @ 6”
(152mm)
#14 @ 7”
(178mm)
#8 @ 6”
(152mm)
#10 @ 7”
(178mm)
#8 @ 6”
(152mm)
#12 @ 7”
(178mm)
#12 @ 6”
(152mm)
#14 @ 7”
(178mm)
Fastener Spacing 6x16” (152x406mm) o.c. into 7/16” (11mm) OSB Sheathing
Minimum Size and Length of Fastener:
#6 @ 4”
(102mm)
#6 @ 4”
(102mm)
#8 @ 4”
(102mm)
#8 @ 4”
(102mm)
1. Not bolded data is for reference hourly wind velocity pressure <8.35 psf (0.4 kPa) and 3-second gust basic wind speed of 115 mph (185 kph)
2. Bolded data is for reference hourly wind velocity pressure <12.53 psf (0.6 kPa) and 3-second gust basic wind speed of 140 mph (225 kph)3. The reference wind velocity pressures listed above are for 50-year exceedance periods. Reference wind velocity pressures (as per NBCC
standard) and 3-second gust basic wind speeds (as per ASCE-7 standard) are listed.4. The maximum building height considered for the above fastening requirements is 65.6’ (20m). The building is assumed to be fully enclosed
for the purposes of wind load calculation.5. Fastener yield strength shall not be lower than 36 ksi (248 MPa), conforming to ISO 898-1 requirements.6. Holes for #10 and larger screws in timber framing shall be pre‐drilled.7. Attachment to steel studs shall utilize self tapping screws confirming to AISI S200 requirements.8. All fasteners are secured through a minimum of 1x2-1/2” (25x64mm) plywood strapping at 16” (406mm) spacing.9. For siding weight exceeding 5 psf (24.4 kg/m2), or reference hourly velocity pressures/basic wind speeds exceeding 12.53 psf (0.6 kPa)/140
mph (225 kph), or where any of the above assumptions are not met, a professional engineer shall be consulted for fastening requirements.

PART 3 INSTALLATION
8
Open Stud Wall - Vertical Orientation
Vertical installation of Envirostrap boards to open stud wall assembly is easily done but is currently limited to stud spacing of 16” (406mm) on center. Fasteners spacing is 16x16” (406x406mm) on center while size and length varies with foam thicknesses and hourly wind velocity pressure, see Table 1 for additional information. Table 1 is applicable to both types of Envirostrap panels, flush and raised versions. Spray foam should be used to seal all square edges.
Open Stud Wall - Horizontal Orientation
Horizontal installation of Envirostrap boards to open stud wall assembly is easily done but is currently limited to stud spacing of 16” (406mm) on center. Fasteners spacing is 16x16” (406x406mm) on center while size and length varies with foam thicknesses and hourly wind velocity pressure, see Table 1 for additional information. Table 1 is applicable to both types of Envirostrap panels, flush and raised versions. For boards with the furring strips protruding above the surface of the foam, intermittent (vertical) notches or slots should be cut to allow for any liquid moisture to drain down and out of the wall assembly. Spray foam should be used to seal all square edges.
Figure 2 – Envirostrap horizontal installation with open stud wall
Figure 1 – Envirostrap vertical installation with open stud wall

PART 3 INSTALLATION
9
Wood Stud Wall With OSB Sheathing - Vertical Orientation
Vertical installation of Envirostrap boards to walls with 7/16” (11mm) OSB sheathing is easily done but is limited to lighter siding types (such as vinyl and wood). Heavier siding types, such as fiber cement siding, requires Envirostrap boards to be fastened directly into to the studs or an alternative design provided by an engineering professional. Fasteners spacing is 6x16” (152x406mm) on center while size and length varies with foam thicknesses and hourly wind velocity pressure, see Table 1 for additional information. Table 1 is applicable to both types of Envirostrap panels, flush and raised versions.
Wood Stud Wall With OSB Sheathing - Horizontal Orientation
Horizontal installation of Envirostrap boards to walls with 7/16” (11mm) OSB sheathing is easily done but is limited to lighter siding types (such as vinyl and wood). Heavier siding types, such as fiber cement siding, requires Envirostrap boards to be fastened directly into to the studs or an alternative design provided by an engineering professional. Fasteners spacing is 6x16” (152x406mm) on center while size and length varies with foam thicknesses and hourly wind velocity pressure, see Table 1 for additional information. Table 1 is applicable to both types of Envirostrap panels, flush and raised versions. For boards with the furring strips protruding above the surface of the foam, intermittent (vertical) notches or slots should be cut to allow for any liquid moisture to drain down and out of the wall assembly.
Figure 4 – Envirostrap horizontal installation over OSB sheathing
Figure 3 – Envirostrap vertical installation over OSB sheathing
PART 3 INSTALLATION
10
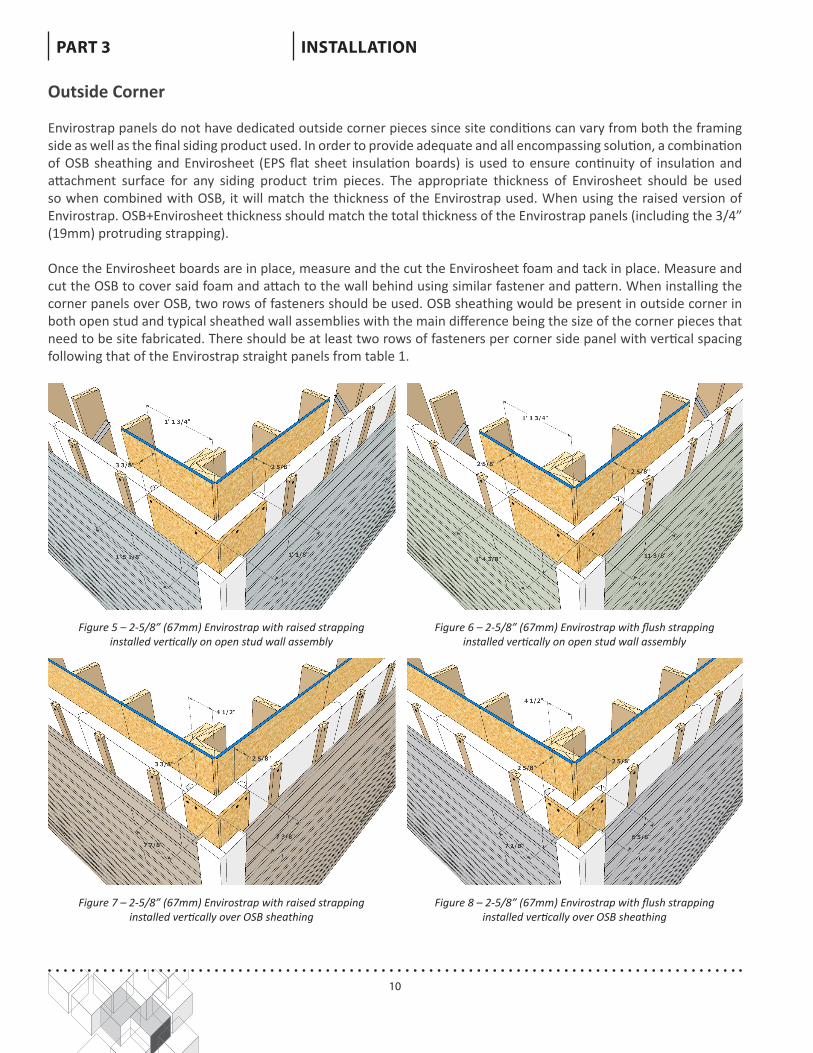
Outside Corner
Envirostrap panels do not have dedicated outside corner pieces since site conditions can vary from both the framing side as well as the final siding product used. In order to provide adequate and all encompassing solution, a combination of OSB sheathing and Envirosheet (EPS flat sheet insulation boards) is used to ensure continuity of insulation and attachment surface for any siding product trim pieces. The appropriate thickness of Envirosheet should be used so when combined with OSB, it will match the thickness of the Envirostrap used. When using the raised version of Envirostrap. OSB+Envirosheet thickness should match the total thickness of the Envirostrap panels (including the 3/4” (19mm) protruding strapping).
Once the Envirosheet boards are in place, measure and the cut the Envirosheet foam and tack in place. Measure and cut the OSB to cover said foam and attach to the wall behind using similar fastener and pattern. When installing the corner panels over OSB, two rows of fasteners should be used. OSB sheathing would be present in outside corner in both open stud and typical sheathed wall assemblies with the main difference being the size of the corner pieces that need to be site fabricated. There should be at least two rows of fasteners per corner side panel with vertical spacing following that of the Envirostrap straight panels from table 1.
Figure 5 – 2-5/8” (67mm) Envirostrap with raised strapping installed vertically on open stud wall assembly
Figure 7 – 2-5/8” (67mm) Envirostrap with raised strapping installed vertically over OSB sheathing
Figure 6 – 2‐5/8” (67mm) Envirostrap with flush strapping installed vertically on open stud wall assembly
Figure 8 – 2‐5/8” (67mm) Envirostrap with flush strapping installed vertically over OSB sheathing

PART 3 INSTALLATION
11
Figure 9 – 2-5/8” (67mm) Envirostrap with raised strapping installed vertically on open stud wall assembly
Figure 11 – 2-5/8” (67mm) Envirostrap with raised strapping installed vertically over OSB sheathing
Figure 10 – 2‐5/8” (67mm) Envirostrap with flush strapping installed vertically on open stud wall assembly
Figure 12 – 2‐5/8” (67mm) Envirostrap with flush strapping installed vertically over OSB sheathing
Inside Corner
Envirostrap panels do not have dedicated inside corner pieces since site conditions can vary from both the framing side well as the final siding product used. In order to provide an adequate and all encompassing solution, a combination of OSB sheathing and Envirosheet (EPS flat sheet insulation boards) is used to ensure continuity of insulation and attachment surface for any siding product trim pieces. The appropriate thickness of Envirosheet should be used so when combined with OSB, it will match the thickness of the Envirostrap used. When using the raised version of Envirostrap. OSB+Envirosheet thickness should match the total thickness of the Envirostrap panels (including the 3/4” (19mm) protruding strapping).
Once the Envirosheet boards are in place, measure and cut the Envirosheet foam and tack in place. Measure and cut the OSB to cover said foam and attach to the wall behind using similar fastener and pattern. When installing the corner panels over OSB, two rows of fasteners should be used. When installing the corner pieces over open stud wall assembly, make sure to attach the panels to at least one stud and top and bottom plate (see detail below). For situations where height of wall is taller than one panel, add blocking where needed to provide horizontal support for panels.

PART 3 INSTALLATION
12
Window (With Raised Vertical Envirostrap and Horizontal Siding)
The following steps illustrate a typical installation for a flanged window with wood/composite siding with the raised version of Envirostrap. For other types of siding, walls with sheathing, flush Envirostrap and orientation, the installation process will be slightly different. Follow window and siding manufacturer installation instructions and check CSA 440A standard for additional information.
Step 1 - Install Envirostrap
• Use the fastener spacing covered in previous sections of the this manual to install the boards.
Step 2 - Window Buck
• Cut the Envirostrap panels to allow for the use 2x4” (38x89mm) dimensional lumber buck to create the rough opening needed for the window.
• Cut OSB or plywood strips to match the thickness of the buck to that of the boards.
• Secure the buck to wood framing behind with screws.• Use sealant to seal Envirostrap boards to the wood buck.
Step 3 - Sill Protection
• Use a self adhering flashing membrane to field fabricate a sill pan.
• Create end dam terminations by extending the self adhering flashing membrane up the vertical surface of the jambs a minimum of 6” (152mm).
• Finish the self adhering flashing membrane a minimum of 2” (51mm) into the cavity opening.
• Flashing membrane should extend a minimum of 4” (102mm) onto the face of the wall below the opening.
• Install self adhering flashing membrane patches/gussets at lower corners. Triangular patch rough dimensions are 2x3” (51x76mm). Bow tie patch rough dimensions are 3x3” (76x76mm).

PART 3 INSTALLATION
13
Step 4 - Install the Window
• Install wood blocking with sealant at the sill.• Use galvanized roofing nails or truss screws.• Do not fasten 3-8” (76-203mm) from corners.• Fasten in center of every other slot (4-8” (102-
203mm) spacing).• Do not dent the nailing fin.• Fastener heads should be flush.
Step 6
• Apply self adhering flashing membrane along the sides of the window.
• Extend membrane a minimum of 2” (51mm) above the edge of the nail fin/flange.
• Provide a minimum 2” (51mm) overlap over the sill flashing.
• A roller can be used to make sure membrane strips are properly adhered by removing gaps and bubbles.
Step 7
• Apply self adhering flashing membrane along the top of the window flange overlapping the side strips.
Step 5
• Apply low expansion spray foam insulation in cavity between the window and the rough opening.
• It is recommended to apply the foam between 40-100°F (4.4-37.8°C) for best results.
• Let the spray foam fully cure and trim it using a sharp knife to be flush with the window frame.

PART 3 INSTALLATION
14
Step 8
• Install preformed metal flashing between the wood buck and Envirostrap.
• Apply sealant at the interface to eliminate potential water ingress.
Step 9
• Install window trim boards.• Apply sealant around the perimeter of the
window between the frame and the trim boards.
• Nail the trim boards together either during or after installation.
Step 10 - Siding
• Install wood/composite siding fastening directly into the Envirostrap furring strips as per siding manufacturer installation instructions.
Step 11 - Interior Finishes
• Install gypsum board up to rough openings.• Install jamb extensions with wood blocking/
shims around the perimeter of the rough opening.
• Install window casing/trim.
PART 3 INSTALLATION
15
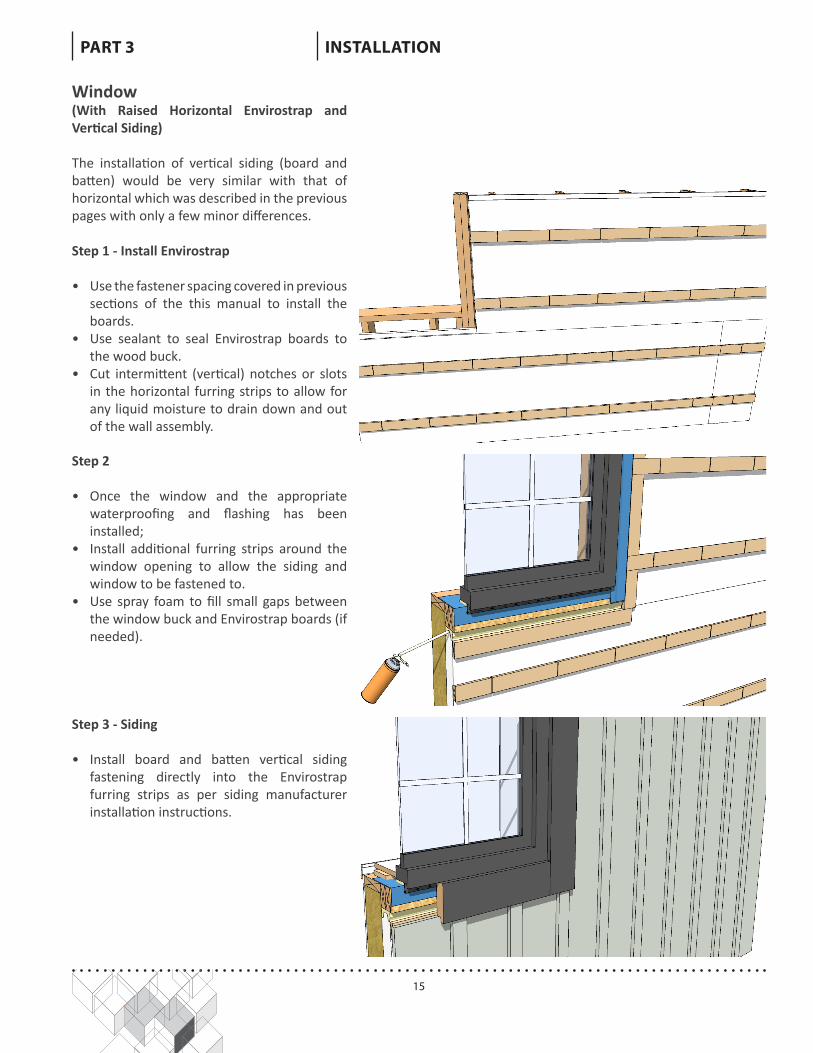
Step 3 - Siding
• Install board and batten vertical siding fastening directly into the Envirostrap furring strips as per siding manufacturer installation instructions.
Step 2
• Once the window and the appropriate waterproofing and flashing has been installed;
• Install additional furring strips around the window opening to allow the siding and window to be fastened to.
• Use spray foam to fill small gaps between the window buck and Envirostrap boards (if needed).
Window (With Raised Horizontal Envirostrap and Vertical Siding)
The installation of vertical siding (board and batten) would be very similar with that of horizontal which was described in the previous pages with only a few minor differences.
Step 1 - Install Envirostrap
• Use the fastener spacing covered in previous sections of the this manual to install the boards.
• Use sealant to seal Envirostrap boards to the wood buck.
• Cut intermittent (vertical) notches or slots in the horizontal furring strips to allow for any liquid moisture to drain down and out of the wall assembly.

Envirostrap is a non-structural, rigid foam insulation board with integrated furring strips designed to be installed on the exterior of above grade walls or interior of below grade walls in low rise residential construction. Competitive pricing, extensive product distribution and excellent technical support are combined to provide our clients with a simplified approach to a superior finished product. If any questions or concerns are not completely addressed in this guide, please contact us and our staff will be happy to answer any question. At Amvic, we pride ourselves in offering our customers an exceptional level of customer service.
Disclaimer
Information contained in this document is provided as a guideline only, without any warranty of any kind, either expressed or implied, including, but not limited to, the implied warranties of merchantability, fitness for a particular purpose, and freedom of infringement.
This document provides a basic guide for installation of Envirostrap and is intended to supplement, rather than replace, the basic construction knowledge of a construction professional. All installations of Envirostrap must be in accordance with all applicable building codes and/or under the guidance of a licensed professional engineer. In all cases, applicable building code regulations take precedence over this manual.
Technical Support
Please contact us for any inquiries pertaining to information included in this guide, or if you require any other technical assistance.
Phone 1 (877) 470-9991 (toll free)
Email [email protected]
The Amvic website is updated regularly with the most current news, including testing reports, technical bulletins and evaluation reports. This document is available both in print and as a downloadable file from www.amvicsystem.com
INSTALLATION MANUAL ENVIROSTRAP
www.amvicsystem.comBUILD TO A HIGHER STANDARDPR
O03
18