Embed Size (px)
Citation preview

LABTECH LTD. MADE IN HUNGARY
Stress Test ECG System
Cardiospy® User Manual
for EC-12R/S; EC-12S recorder
LABTECH LTD.
Address 4031 Debrecen Vág utca 4. HUNGARY
E-mail [email protected]
Tel +36-52-310-128
Fax +36-52-412-023

INTRODUCTION STRESS TEST ECG SYSTEM
2 V5.03_2014_11 LABTECH LTD.
1 Introduction
Dear Customer,
Thank you for purchasing our 12 Channel Stress Test ECG System. We sincerely wish
that our product would help your diagnostic and therapeutic work. Please, read the user
manual carefully regarding the use of the ECG System and the computer programs! You
can also read this User Manual in the software in several languages (in Help menu). A
basic knowledge of computers and Windows based applications is expected.
What is a Stress Test ECG system?
The small sized, compact built ECG device with the attached Software connected to a
PC builds a 12-Channel Stress Test ECG system. You also need a loading device and
blood pressure monitor to make a Stress Test examination.
How is a Stress Test ECG system used?
During an examination made by the Stress Test ECG system, the patient is examined for
about 15-20 minutes. During this time, the patient has to do some exercises on a loading
device (ergometer, treadmill or master step) in order to significantly increase his heart
rate.
The evaluation of data is aided by the interpretation system of the software. The devices
can be operated in network and the patient data are available from a common database..
Quality certifications
The CE mark indicates that it meets the essential
requirements of European Council Directive 93/42/EEC
concerning medical devices.
Labtech operates a quality system certified to ISO 9001:2008
and ISO 13485:2003.

STRESS TEST ECG SYSTEM INTRODUCTION
LABTECH LTD. V5.03_2014_11 3
We wish you success in the use of our resting ECG system.
Should you have any questions, ideas, partnership suggestions please contact us:
LABTECH LTD.
Address 4031 Debrecen Vág utca 4. HUNGARY
E-mail [email protected]
Tel +36-52-310-128
Fax +36-52-412-023

TABLE OF CONTENTS STRESS TEST ECG SYSTEM
4 V5.03_2014_11 LABTECH LTD.
2 Table of contents 1 INTRODUCTION ................................................................................................................. 2
2 TABLE OF CONTENTS ...................................................................................................... 4
3 PREPARATIONS ................................................................................................................. 6
3.1 List of accessories ........................................................................................................ 6
3.2 Instructions for starting a Stress Test ECG recording ................................................ 10
3.3 Warnings and Contraindications: ............................................................................... 10
4 INSTRUCTIONS ................................................................................................................ 13
4.1 EC-12R/S (Bluetooth) Recorder Components ........................................................... 13
4.2 EC-12S (Bluetooth) Recorder Components ............................................................... 14
4.3 Database management interface ................................................................................ 16
4.3.1 Toolbar.................................................................................................................. 16
4.3.2 List of patients ...................................................................................................... 20
4.3.3 Records toolbar ..................................................................................................... 21
4.3.4 List of records ....................................................................................................... 22
4.3.5 Selected System .................................................................................................... 22
4.3.6 Filters .................................................................................................................... 23
4.3.7 Search ................................................................................................................... 23
4.3.8 Database information ............................................................................................ 23
4.4 How to start a new recording ..................................................................................... 24
4.4.1 Connecting ECG device ........................................................................................ 24
4.4.2 Connecting the stress device ................................................................................. 24
4.4.3 Patient preparation ................................................................................................ 27
4.4.4 New recording in stress test mode ........................................................................ 30
4.5 Stress test ECG mode display .................................................................................... 32
4.6 Toolbar ...................................................................................................................... 36
4.6.1 Start monitoring .................................................................................................... 36
4.6.2 Mode ..................................................................................................................... 36
4.6.3 ECG leads ............................................................................................................. 36
4.6.4 Filters .................................................................................................................... 38

STRESS TEST ECG SYSTEM TABLE OF CONTENTS
LABTECH LTD. V5.03_2014_11 5
4.7 Settings ...................................................................................................................... 39
4.7.1 Print Report ........................................................................................................... 41
4.7.2 Print current sample .............................................................................................. 41
4.7.3 Export the Report .................................................................................................. 41
................................................................................................................................ 41
4.7.4 Automatic report ................................................................................................... 42
4.7.5 Printing and export settings ................................................................................... 43
4.7.6 Help ....................................................................................................................... 47
4.7.7 Paper speed ........................................................................................................... 47
4.7.8 Amplitude ............................................................................................................. 47
5 EDITING AND MEASUREMENT POSSIBILITIES ....................................................... 48
5.1 Arrhythmia analysis in resting and stress test ECG systems ...................................... 48
5.2 Edit and delete ectopic events .................................................................................... 50
5.3 Ruler .......................................................................................................................... 51
5.4 Weber function classification ..................................................................................... 51
5.5 Bayes' theorem in the analysis ................................................................................... 52
5.6 Duke – nomogram ..................................................................................................... 52
5.7 Borg rank ................................................................................................................... 54
5.8 QRS frontal axis......................................................................................................... 54
5.9 Exercise and condition plan ....................................................................................... 54
6 ERROR CORRECTION, MAINTENANCE ...................................................................... 56
6.1 USB-02 signs and error messages .............................................................................. 56
6.2 ECG Recorder signs and error messages ................................................................... 57
6.3 General and communication failure ........................................................................... 57
7 TECHNICAL SPECIFICATIONS (EC-12R/S; EC-12S) .................................................. 62
8 HOT KEYS .......................................................................................................................... 65

PREPARATIONS STRESS TEST ECG SYSTEM
6 V5.03_2014_11 LABTECH LTD.
3 Preparations
The table below shows which recorders can be used with each system.
EC-12R EC-12R/S EC-12S
Resting ECG X X X
Continuous ECG X X
Stress ECG X X
3.1 List of accessories
Please check the listed units and accessories before installing the Stress ECG System.
New
Code
No.
Code
No. Specifications
EC
-12
R/S
EC
-12
R/S
(Blu
eto
oth
)
EC
-12
S
(Blu
eto
oth
)
Picture
CAS-
012RS-
01
12RS-
V5-01
Case for
holding the
rest and stress
system
1 1 1
CAS-
00IRD-
01
12RS-
V1-01
Case for
holding the
IRDA and Old
type recorders
1 - -
ACC-
0SWCD-
01
12RS-
V5-02
CD with
installation
software
1 1 1
NOTE: BEFORE STARTING TO USE THE STRESS ECG SYSTEM YOU ARE EXPECTED TO
FOLLOW LABTECH LTD.’S INSTALLATION AND UPDATE GUIDE, WHICH PROVIDES
GUIDANCE ON THE INSTALLATION OF THE SYSTEM.

STRESS TEST ECG SYSTEM PREPARATIONS
LABTECH LTD. V5.03_2014_11 7
New
Code
No.
Code
No. Specifications
EC
-12
R/S
EC
-12
R/S
(Blu
eto
oth
)
EC
-12
S
(Blu
eto
oth
)
Picture
DEV-
0USBA-
02
12RS-
V5-03-A
USB-02/A
Bluetooth
Interface Unit
(rest and
stress; holter
monitoring)
- 1 1
DEV-
012RS-
04
12RS-
V5-04-A
EC-12R ECG
recorder unit 1 - -
DEV-
012RS-
05
12RS-
V5-04-B
ECG recorder
unit (EC-
12R/S
Bluetooth)
- 1 -
DEV-
0012S-
05
12RS-
V5-04-C
ECG recorder
unit (EC-12S
Bluetooth)
- - 1
BAG-
012RS-
01
12RS-
V5-05-A
Recorder bag
(EC-12R, EC-
12RS, non-
wireless)
1 - -
BAG-
012RS-
02
12RS-
V5-05-B
Recorder bag
(EC-12R, EC-
12RS, EC-
12S, wireless)
- 1 1
BEL-
00000-
01
12RS-
V5-06 Waist belt 1 1 1

PREPARATIONS STRESS TEST ECG SYSTEM
8 V5.03_2014_11 LABTECH LTD.
New
Code
No.
Code
No. Specifications
EC
-12
R/S
EC
-12
R/S
(Blu
eto
oth
)
EC
-12
S
(Blu
eto
oth
)
Picture
CHA-
0004X-
01
12RS-
V5-07
Battery
charger MAXI - 1 1
BAT-
00000-
02
12RS-
V5-08
1.2V
Rechargeable
batteries (AA )
- 4 4
CUF-
00LAC-
31
LAC-
3.1*
Stress BP cuff,
Adult (25-
35cm)
- - 1
CAB-
00ECG-
01
12RS-
V5-09-D
12 CH
standard
patient cable
(D-SUB -
Snap
connector)
1 - -
CAB-
00ECG-
03
12RS-
V5-09-A
12 CH
standard
patient cable
(D-SUB -
Banana
connector)
- - -
CAB-
00L12-
05
12RS-
V5-09-C
12 CH
standard
patient cable
(HDMI-Snap
connector)
- 1 1
ELE-
00000-
01
12RS-
V5-11
Single-use
ECG
electrodes
1 1 1

STRESS TEST ECG SYSTEM PREPARATIONS
LABTECH LTD. V5.03_2014_11 9
New
Code
No.
Code
No. Specifications
EC
-12
R/S
EC
-12
R/S
(Blu
eto
oth
)
EC
-12
S
(Blu
eto
oth
)
Picture
CAB-
00USB-
03
12RS-
V5-12-B
PC USB
cable, 5m
(USB A -
USB B)
1 1 1
CAB-
00USB-
01
12RS-
V5-15
Extension
cable for
USB-02
- 1 1
USR-
00000-
01
12RS-
V5-15-A
Installation
and Update
Guide 1 1 1
USR-
00000-
04
12RS-
V5-15-B
User manual
for rest and
stress systems
CAB-
00USB-
06
12RS-
V5-16
USB-SIO
cable (USB A
- D-SUB, for
ergometer,
treadmill)
1 1 1
BAG-
012RS-
04
12RS-
V5-17
Patient cable
bag 1 1 1
PAD-
00000-
01
12RS-
V5-21
Mouse pad
1 1 1
*The manufacturer maintains the right to change at any time.
* Children size LAC-1.1

PREPARATIONS STRESS TEST ECG SYSTEM
10 V5.03_2014_11 LABTECH LTD.
Small adult size LAC-2.1
Adult size LAC-3.1
Adult + size LAC-4.1
Adult ++ size LAC-5.1
3.2 Instructions for starting a Stress Test ECG recording
A regular stress test is considered in the following circumstances:
Patients with symptoms or signs those are suggestive of coronary artery diseases
(CAD), with significant risk factors for CAD or with old or new ECG abnormalities.
- To evaluate exercise tolerance when patients have unexplained fatigue and
shortness of breath.
- To evaluate blood pressure response to exercise in patients with borderline
hypertension.
- To look for exercise-induced serious irregular heartbeats.
The examination is carried out by defined internationally accepted loading protocols –
using ergometer, treadmill, Master-step or Walking.
During the examination the physician pays particular attention to the heart rate, blood
pressure, changes in the ECG pattern, irregular heart rhythm, and the patient's
appearance and symptoms and even stops the test before the planned period of time –
which is generally 8-12 minutes, individualized according to the chosen protocol and to
the patient’s personal parameters – age, weight, etc.
The results of the test may help confirm or rule out a diagnosis of heart disease, perform
prognostication after myocardial infarction. In patients with known coronary artery
disease, the test will help confirm that the patient is in a stable state, or that a new
blockage is developing.
Contraindications of Stress Testing:
Unstable angina, untreated hypertonia, known serious coronary disease, danger of
serious arrhythmia, significant abnormalities in the Resting ECG records.
3.3 Warnings and Contraindications:
General warnings
Never use the recorder:
- in the presence of flammable anaesthetics or explosive surroundings
- in strong heat
- in strong electrostatic field
NOTE: PLEASE REFER TO THE CODE NUMBER ABOVE WHEN PLACING AN ORDER.

STRESS TEST ECG SYSTEM PREPARATIONS
LABTECH LTD. V5.03_2014_11 11
- in wet conditions (the recorder is not waterproof)
Do NOT immerse the recorder in any fluid, it causes electrical failure!
Do NOT remove recorder covers - the recorder does not contain any parts which
could be serviced by users. Do not try to repair it, and do not repair it with someone
who has not received service-training or not authorized to do service.
Usage with other devices:
The system may be used safely in patients with pacemakers, Implanted Cardiac
Defibrillator (ICD) or other implanted devices. The implanted devices will not disrupt
or be influenced by the operation of the recorder, as well as the recorder will not be
influenced by the operation of the above devices.
The recorder may be used simultaneously with a high frequency surgical device, in this
case make sure that the ECG electrodes are placed as far as possible away from the
surgical field.
The ECG recorders are not defibrillator-protected! Never use with
non-implanted defibrillators!
Warnings and contraindications to blood pressure measurement:
- Do not use on patients known to be susceptible to bruising
- Do not attach the cuff to a limb being used for IV infusions. Pumping up the
cuff can block the flow of the infusion liquid which can harm the patient.
- If you change the accessories (Korotkoff microphone, balloon, pneumatic tube,
etc.) to any other than the ones which come from the manufacturer it can cause errors in
the measurements.
- The patient should be instructed on proper and safe removal of the cuff, in case
it fails to deflate.
- Check during test that the device is not causing long-term damage in the
patient’s blood circulation.
- Avoid compression or restriction of pneumatic tubes.
Possible Adverse Reactions:
- Allergic Exanthema (symptomatic eruption) in the area of the cuff Urticaria
(allergic reaction including raised edematous patches of skin or mucous membranes and
intense itching) caused by the fabric material of the cuff.
- Petechia (a minute reddish or purplish spot containing blood that appears in the
skin).
- Rumple-Leede phenomenon (multiple petechia) on the forearm.
- Idiopathic thrombocytopenia (spontaneous persistent decrease in the number of
platelets associated with hemorrhagic conditions).
- Phlebitis (inflammation of a vein).

PREPARATIONS STRESS TEST ECG SYSTEM
12 V5.03_2014_11 LABTECH LTD.
Environmental conditions of storage and operation:
Temperature-range: -10-50oC
Relative humidity: 10-95% non-condensing
Air pressure-range: 700-1060 hPa
Opening the enclosure by unauthorized person may invalidate warranty. Modification of
the ME equipment can only be performed by the manufacturer. In case of problems
contact a professional repair shop.
Symbols:
This equipment meets the requirements of Directive 93/42/EEC Annex II
(excluding section 4).
Do not dispose of this product and batteries as unsorted municipal waste.
Prepare this product for reuse or separate collection as specified by
Directive 2002/96/EC of the European Parliament and the Council of the
European Union on Waste Electronic and ElectricalEquipment (WEEE).
MDD classification IIa. EMC class B. EMC group 1.
Bluetooth Wireless Communication Technology
Pay special attention to the part, marked with the exclamation mark
CF type on patient‟s side
Date of manufacturing
Manufacturer
NOTE: IF ANY ABNORMALITY OCCURS IN THE UNIT, SUSPEND THE OPERATION IMMEDIATELY
AND DISCONNECT THE UNIT FROM THE PATIENT.

STRESS TEST ECG SYSTEM INSTRUCTIONS
LABTECH LTD. V5.03_2014_11 13
4 Instructions
4.1 EC-12R/S (Bluetooth) Recorder Components
FRONT VIEW
REAR VIEW
Recorder status
indicating lamp Patient cable
- easy to replace -
- easy to replace -
Symbols
Recorder ’s
configuration type
Serial
number
Battery cover Battery
EC-12R/S

INSTRUCTIONS STRESS TEST ECG SYSTEM
14 V5.03_2014_11 LABTECH LTD.
4.2 EC-12S (Bluetooth) Recorder Components
FRONT VIEW
REAR VIEW
Recorder status
indicating lamp Patient cable
- easy to replace -
- easy to replace -
BP measurement
cuff with KO
microfone
Symbols
Recorder ’s
configuration type
Serial
number
Battery cover Battery

STRESS TEST ECG SYSTEM INSTRUCTIONS
LABTECH LTD. V5.03_2014_11 15
The EC-12S Stress Test System offers built-in auscultation blood pressure
measurement, high precision sampling and quality ECG curves, automatic load control
and monitoring of HR, ST, ABP, MET, etc. parameters. The user-friendly analysing
program offers efficient and reliable measurements.
The EC-12R/S and EC-12S device could be fixed on the Loading device directly, in
order to make the Stress Test more comfortable to the patient:

INSTRUCTIONS STRESS TEST ECG SYSTEM
16 V5.03_2014_11 LABTECH LTD.
4.3 Database management interface
The database management interface enables us to add physicians and patients by name
and ID number (e.g., social security number), which can be sorted and filtered
according to different criteria. The interface also offers a search option by name or ID.
The database management interface displays the list of patients and the pertaining
number of records. Here we can view previous records and start new recordings as
well.
4.3.1 Toolbar
The toolbar contains buttons which provide access to the most often used functions in
the software.
New patient: Here you can add new patients to the list. Patient’s first and last names,
birth dates and patient IDs are fields which need to be filled in. The
software allows only unique patient IDs to be entered into the database,
which is the reason why it is recommended to use this field for entering the social
security number of each patient (or any other code which uniquely identifies a person).
Entering address and height is optional when registering a patient.
Modify: Patient data can be edited by clicking on the Modify button. The interface
allows every field to be edited except patient ID (social security number)
2.2.2
2.2.8
2.2.5
2.2.6
2.2.1
2.2.4
2.2.7 2.2.3

STRESS TEST ECG SYSTEM INSTRUCTIONS
LABTECH LTD. V5.03_2014_11 17
Medical record: This function gives a summary about the medical record. This
summary can be edited and we can also add explanations and
observations.
Delete: Click on the Delete button for deleting patients. When patient is deleted, all of
its corresponding records are deleted as well. After deleting, there is no
way to restore data.
Settings:
- Select physician: In this menu the physician performing
the current test can login to the software, and also select to
view the records of other physicians whose records are not
password protected.
- Change password: By selecting this option, the physician
performing the current test can change his/her password.
- Administration: Selecting this menu point, we can see
names of Test Physicians. Other names can be added to the
list in this menu point by clicking on “New” button; data of
existing physicians can be edited by clicking on
“Modify”,and “Delete” serves to delete the physician (a
physician can only be removed if there are no records
relegated to his/her name). Security settings and administrator rights can be set under
this menu point. Further information on modifying user authorization can be found in
Cardiospy Installation and Update Guide.
- Select database: In this menu, you can choose to create a new database or to use a
different one. These databases operate independently of each other, so a patient created
in one does not appear in another. The software always uses the database set for the
previous operation.
TO INSERT YOUR OWN INSTITUTION’S LOGO INTO THE PRINTED REPORT, ADD THE DESIRED
LOGO UNDER SETTINGS / ADMINISTRATION TO THE DOCTOR YOU WISH TO USE IT WITH.
EACH THE LOGO HAS TO BE ADDED TO EACH DOCTOR WE WISH TO USE THE LOGO WITH,
ONE BY ONE.

INSTRUCTIONS STRESS TEST ECG SYSTEM
18 V5.03_2014_11 LABTECH LTD.
Clicking on the Add button creates a new
database. If you need to work with a
different one, select it and click on OK.
There are three possible ways to create a
database:
Local database folder: The database is
stored in a local directory on your
computer. Network drives are not
supported. Optimal for single computer
usage. Select the directory for the
database and it is ready.
- Network mode- Microsoft SQL Server:
SEE DESCRIPTION IN INSTALLATION AND
UPDATE GUIDE’S CHAPTER 4.3.
SQLite database: SEE DESCRIPTION IN
INSTALLATION AND UPDATE GUIDE’S
CHAPTER 4.2.
- File names as: The order of first and last name can be set in this menu.
- Input devices: Barcode readers and magnetic card readers can be set here.
- FTP settings: SEE DESCRIPTION IN INSTALLATION AND UPDATE GUIDE’S CHAPTER 5.1.
- Communication: HL7 communication protocol can be started here.
- Select systems:

STRESS TEST ECG SYSTEM INSTRUCTIONS
LABTECH LTD. V5.03_2014_11 19
Here you can select the ECG systems you
wish to use. Inactive systems will not
appear in the field of Selected Systems. A
system is inactivated by removing the
green tick from the box to its left.
Help:
- User manual: Choose the system in the Select systems
panel (further description in point 2.2.5). Once you click on
User manual button, the user manual of the currently
selected system will appear.
- Installation and update guide: The guide on software
installation and system configuration also contains a
description of the software update process.
- What’s new: The novelties of the current software version can be found in this option.
- Languages: The software offers a choice of several languages, from which you can
select the one you wish to work in.
- Multilanguage translator: This function enables the user to translate each term
appearing in the software into the desired target language. A password is necessary to
enter this menu point. In case you would like to use this function, turn to your
distributor for a password.
- About: Information on software version, the operational system and copyrights can be
found here.
INSTRUCTIONS STRESS TEST ECG SYSTEM
20 V5.03_2014_11 LABTECH LTD.
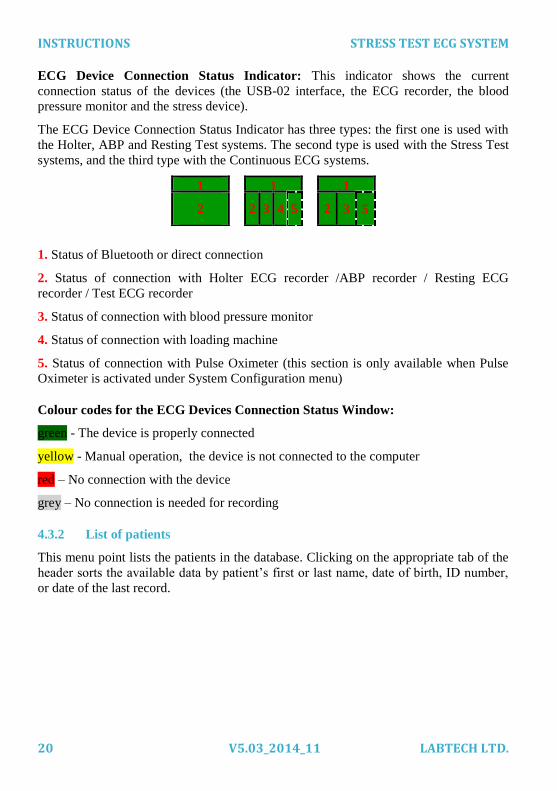
ECG Device Connection Status Indicator: This indicator shows the current
connection status of the devices (the USB-02 interface, the ECG recorder, the blood
pressure monitor and the stress device).
The ECG Device Connection Status Indicator has three types: the first one is used with
the Holter, ABP and Resting Test systems. The second type is used with the Stress Test
systems, and the third type with the Continuous ECG systems.
1
2
1
2 3 4 5
1
2
.
3 5
1. Status of Bluetooth or direct connection
2. Status of connection with Holter ECG recorder /ABP recorder / Resting ECG
recorder / Test ECG recorder
3. Status of connection with blood pressure monitor
4. Status of connection with loading machine
5. Status of connection with Pulse Oximeter (this section is only available when Pulse
Oximeter is activated under System Configuration menu)
Colour codes for the ECG Devices Connection Status Window:
green - The device is properly connected
yellow - Manual operation, the device is not connected to the computer
red – No connection with the device
grey – No connection is needed for recording
4.3.2 List of patients
This menu point lists the patients in the database. Clicking on the appropriate tab of the
header sorts the available data by patient’s first or last name, date of birth, ID number,
or date of the last record.

STRESS TEST ECG SYSTEM INSTRUCTIONS
LABTECH LTD. V5.03_2014_11 21
4.3.3 Records toolbar
This is a toolbar for managing existing records.
Load record: Opens the selected record from the list. Once the record
is open we can edit, analyze or print it.
Import / export: In this menu point we can save the current record to the directory of
our choice. This directory can be on a network drive or on a
portable drive (e.g., USB stick). The name of the exported
record will include the first and last name of the patient, the
date of recording and patient ID, separated by low lines. We
can also import any previously saved (exported) record from
any directory. The imported record is automatically saved to
the current database.
- Import selected records: With this function we can import
records from a directory of our choice. Should you need to
import more records at a time, select records while holding
the CTRL key, then press Import selected records.
- Import records by date: Imports all the records of a selected directory which were
recorded in a given interval.
- Download from FTP: We can download records from the given FTP server. We can
see all the available directories and Cardiospy files in the appearing window, the left
side column is for navigation among folders, the right one is for Cardiospy files. The
files can be arranged according to their Names, IDs, Record dates and Upload dates, and
a search bar is also available to help find the necessary record. Holding the Ctrl button
enables highlighting and downloading multiple records at a time. Records can be
deleted by pressing the Delete button, and triggering the “Delete downloaded records”
automatically erases all records after downloading them.

INSTRUCTIONS STRESS TEST ECG SYSTEM
22 V5.03_2014_11 LABTECH LTD.
- Export selected records: With this function we can export records selected in the list
of records. Should you need to export more records at a time, select records while
holding the CTRL key, then press Export selected records.
- Export records by date: Exports all the records which were recorded in a given
interval.
- Export records of selected patients: Holding CTRL while clicking on several patients
enables the multiple selections of patients. This option saves all the records of the
selected patients.
- Upload to FTP: We can select multiple records from a single patient and upload them
to the given FTP server.
- Upload to FTP by date: Every record is uploaded which fits to all the criteria given
and was recorded within a given period.
- Upload to Labtech: In case you have any problem with the interpretation of a record,
or you face any difficulties you can upload the record to the Labtech server.
- Print rest records by date: Prints every rest record which was made with the given
conditions and recorded in a given interval.
- Import sample data: In case a CD was used for installing the Cardiospy software and
there are no sample records in the database, you can import them by pressing this
button.
Delete selected record: This buttons deletes every selected record from the database.
After deleting, there is no way to restore data. Should you need to
delete more records at a time, select records while holding the
CTRL key, then press Delete selected records.
Delete records by date: Deletes every record recorded in the
given interval according to the criteria selected.
4.3.4 List of records
Displays the records of the patient selected in List of patients (point 2.2.2). Here you
can search among the records. Should you need to select more records at a time, you can
do so while holding the CTRL key.
4.3.5 Selected System
Here you can select the ECG systems you wish to use, configure systems, add new
recorders before you start recording. You can also start Demo recording in this field.
Please keep in mind that a demo recording can only be started if the USB-02 device is
not connected to the PC.

STRESS TEST ECG SYSTEM INSTRUCTIONS
LABTECH LTD. V5.03_2014_11 23
4.3.6 Filters
This field provides a number of filters which enable the filtering of records by different
criteria. Once the database is filtered, List of patients displays only those who fit the
criteria.
You can filter records by:
- Physician: When this filter is used, List of patients displays those patients whose
records have been made by the doctor selected.
- Date: When this filter is used, List of patients displays those patients who have
records made today / in the last 2 days / in the last 7 days / this month / this year.
- Status: When this filter is used, List of patients displays those patients who have
temporary / pre-evaluated / evaluated / approved records.
- Record type: When this filter is used, we can view all types of records or only those
pertaining to the system currently selected in Select system field.
- Pacemaker: When this filter is used, we can view patients who have and those who do
not have a pacemaker in separate lists.
4.3.7 Search
The Search (name or ID) field is used for narrowing down the list of patients
displayed. Once we enter a letter or a number in the field, List of patients will only
display patients whose first or last name, or the ID begins with the pertinent letter or
number. The more letters we type in the field, the more we narrow down the number of
patients appearing in the list. Clicking on the Reset button cancels the filtration and the
default List of patients will appear, where every patient and every record is displayed.
4.3.8 Database information
This field contains general information about the database, such as access path, number
and size of records contained, etc.

INSTRUCTIONS STRESS TEST ECG SYSTEM
24 V5.03_2014_11 LABTECH LTD.
4.4 How to start a new recording
4.4.1 Connecting ECG device
After the installation of the Cardiospy software, connect the USB-02 interface into an
available USB slot on the computer (you can also use the extension cord for the USB-
02). A flashing green light indicates proper connection between the computer and the
ECG device.
If the USB-02 is connected to the computer you just need to check the connection with
the ECG device.
After connecting the ECG device to the computer, attach the electrodes to the patient
and connect the patient cable to the device. Please proceed to read the guide of electrode
placement (in chapter 2.3.1)
4.4.2 Connecting the stress device
Our Stress Test ECG system is developed with a general algorithm. It means that it is
able to control virtually any kind of ergometer, treadmill or master step available on the
market because the software is able to use several types of protocols.
The loading device must be installed according to the relevant user manual before using
it with this software.
You can select the type of the loading device you wish to use by the
Settings/Select Stress Device and Protocol… menu in the program.
Here you can test if the EC12 software found the ECG device and if so, what type of
device it is.

STRESS TEST ECG SYSTEM INSTRUCTIONS
LABTECH LTD. V5.03_2014_11 25
Loading devices
Here you can select (by choosing „New”) which device you want to carry out the Stress
Test with. You can choose an ergometer, a treadmill, a Master-Step or a Walking.
Walking possibility: free walking, or PC Controlled Walking - which requires the five 5
boxes with leds to determine the patient's walking speed and the PC Controller device.
We built in two Master-Step loading methods, the conventional MS-Normal, and the
newly developed MS-RAMP, both of them are fully MET-oriented loading methods
The software is able to communicate with almost any kind of loading device. Please
select the type of your device from the list.
THE SELECT STRESS DEVICE AND PROTOCOL… MENU CAN BE USED IN PASSWORD-
CODED MODE AS WELL :
PASSWORD: 12345
CHANGING THE LOADING DEVICE AND THE PROTOCOL IS RECOMMENDED FOR
EXPERIENCED USERS, SO PLEASE BE CAREFUL DURING PERFORMING CHANGES.
HERE YOU MAY CHOOSE A SPECIAL ENDLESS RECORDING, WHICH GIVES YOU THE
POSSIBILITY FOR SEVERAL HOURS’ RECORDING WITHOUT USING STRESS DEVICES, WITH
BLOOD PRESSURE MEASUREMENTS AND HR, ST TRENDS DISPLAYING.

INSTRUCTIONS STRESS TEST ECG SYSTEM
26 V5.03_2014_11 LABTECH LTD.
Loading Protocols
Here you can choose the protocol according to which you want to conduct the test. You
can choose a protocol from a predefined list (e. g. conventional) or use a user-specified
protocol (e.g. Custom, Special), which you can modify.
Preselected printing: You can set the intervals of the record that had been taken during
the test. You can set the printing during the test process. (In the end of printing interval,
the in end of the stages)
Blood Pressure Meter settings:
Here you can choose the blood pressure meter to be used. You can set the starting
protocol of the automatic blood pressure meters.
The Blood Pressure Monitor can be a separate one or an integrated part of the loading
device or the ECG device (EC-12S) as well.

STRESS TEST ECG SYSTEM INSTRUCTIONS
LABTECH LTD. V5.03_2014_11 27
In case of selecting the “Manual Only” measurement mode, you can start a BP
measurement at any given time during the stress examination.
Pressing the BP Start (after start BP Stop to stop) button enables starting
measurements manually both in monitoring and is stress phases ( Manual loading panel
is on the right side).
Manual loading panel:
The manual loading panel is at the right botton of the screen, under the graphs. With the
plus / minus buttons you can change the level of loading, while the “Hold” button is for
keeping the current level.
By pressing the green button (before loading starts!) the manual load’s possible settings
are displayed:
4.4.3 Patient preparation
Step 1: Place the case of the recorder unit on the right side of the patient and fix it on
the belt on his/her waist. Although the case is washable, it is recommended to avoid
skin-contact.
Step 2: Clean the surface of the skin thoroughly using:
- razor /in case it is necessary/
- abrasive preparation pad and
- alcohol swab
NOTE: A NOISE-FREE RECORD CAN BE OBTAINED ONLY IF ALL THE STEPS OF PATIENT
PREPARATION HAVE BEEN FOLLOWED ACCORDING TO THE INSTRUCTIONS. DO NOT START THE
RECORDING IF ECG SIGN IS NOISY.

INSTRUCTIONS STRESS TEST ECG SYSTEM
28 V5.03_2014_11 LABTECH LTD.
The ECG System is designed for external skin-surface ECG recording. The electrodes
can be applied only on injury-free skin.
In the case of EH (only for one use) electrodes always use good quality, CE marked
electrodes, in this way you can ensure the appropriate quality, stable contact, and also
prevent the infection of the patient’s skin. Do not use expired, dry or used electrodes,
because they deteriorate the record’s quality.
Step 3: Attach the single-use electrodes as it is indicated below, and by keeping to the
instructions shown on the electrode’s package.
Standard 1
IEC label AHA
label Electrode placement
C1 V1 Fourth intercostal space at the right sternal border.
C2 V2 Fourth intercostal space at the left sternal border.
C3 V3 Midway between C4 and C2.
FOR MORE INSTRUCTIONS PLEASE CHECK THE PATIENT’S PREPARATION INSTRUCTIONS.

STRESS TEST ECG SYSTEM INSTRUCTIONS
LABTECH LTD. V5.03_2014_11 29
IEC label AHA
label Electrode placement
C4 V4 Mid-clavicular line in the fifth intercostal space.
C5 V5 Anterior axillary line on the same horizontal level as C4.
C6 V6 Mid-axillary line on the same horizontal level as C4 and C5.
L LA Slightly below left clavicle, far from main muscles.
R RA Slightly below the right clavicle, far from main muscles.
F LL Lower edge of the rib cage, or at the level of the umbilicus at
the left mid-clavicular lines.
N RL Lower edge of the rib cage, or at the level of the umbilicus at
the right mid-clavicular lines.
Step 4: Correct installation of the blood pressure cuff (Only EC-12S recorder), in
order to get usable Korotkoff-signs
Please choose the cuff-size carefully, because if it's not fit to the patient, it could cause
incorrect measurement results.
In order to avoid reducing the pressure fluctuation caused by the moving made the
patient; the patients should avoid excess movement during blood pressure
measurements. They should hold their arm loose, slightly away from their chest.
Step 5: Connect the patient cable to the electrodes.
Step 6: Fix each cable separately under the electrodes in loop shape with plasters to 4-
5 cm distance from the electrode.
Yellow

INSTRUCTIONS STRESS TEST ECG SYSTEM
30 V5.03_2014_11 LABTECH LTD.
4.4.4 New recording in stress test mode
Create a new patient or select one from
the database. Click on Start Recording.
Select a loading device with which you
would like to perform the examination in the
System configuration... menu.
Set a protocol of which you would like to
perform the examination in the System
configuration… menu as well.
Start monitoring by clicking on the start monitoring icon at the top left corner.
The Start Load or „N” (next) button shows the ongoing phase of the stress test. You
can start the next phase with this button. The stress test builds up by five phases,
marked with roman numbers.
Resting phase (before stress)
Warm up phase ( static stress)
Stress phase (increasing stress)
Deduce phase (decreased stress)
Relief phase (after stress)
The stress test stops automatically as the adjusted Rest (Relief) phase time (V) has
finished. The end of the stress is indicated by acoustical signal with 10sec length. If you
would like to finish earlier the ongoing phase, please click on Start Load / ongoing
phase ( I, II, III, IV, V ) as many you phases would like to be skipped.
Reason for finishing of stress:
The stop/finishing of the stress phase is possible by accessing the adjusted value of
Settings/Alarming and stop criterias.
If the adjusted criterias reach the stop value, the phase of the stress will finish
automatically and the program steps forward to phase .

STRESS TEST ECG SYSTEM INSTRUCTIONS
LABTECH LTD. V5.03_2014_11 31
If the stress phase was stopped manually the >> window will appear after phase.
You can select here the reason of stress test stop or write short notice in the textbox. In
case of you would not want to stop just step forward to the next phase, than please
select the Cancel button for continuing the stress test.
You can register the frequently appeared causes by clicking on Customize than Add
button. You can modify the sequence too.
After this you can select the Other reason list item. Please press the „three dots” at the
end of Notes field for opening the Reason men. After selection, press on OK button and
the stress test will stop and the reason of stop will appear on the record as well.
Adding Freeze and Mark signals for arrhythmia events (only in case of 60 minute
long records)
In case an arrhythmia is discovered during the stress measurement, it can be indicated
by the space button. In this case you will be able to check these marked deviations after
finishing the test.
You can also add markers after the resting test or while you are examining the record
(Replay).
During the stress test you can create marks in case of disorder by pressing space button.
You can give names on the records and the reason of marking will be indicated in the
ECG view too. You can select default marking by opening the scroll bar, or define a
new one.
Please use the right-left navigating buttons on the keyboard for navigating between the
markers or delete button for deleting the event. The program indicates the events which
can be inspected later at a place where it is appropriate for you.
INSTRUCTIONS STRESS TEST ECG SYSTEM
32 V5.03_2014_11 LABTECH LTD.
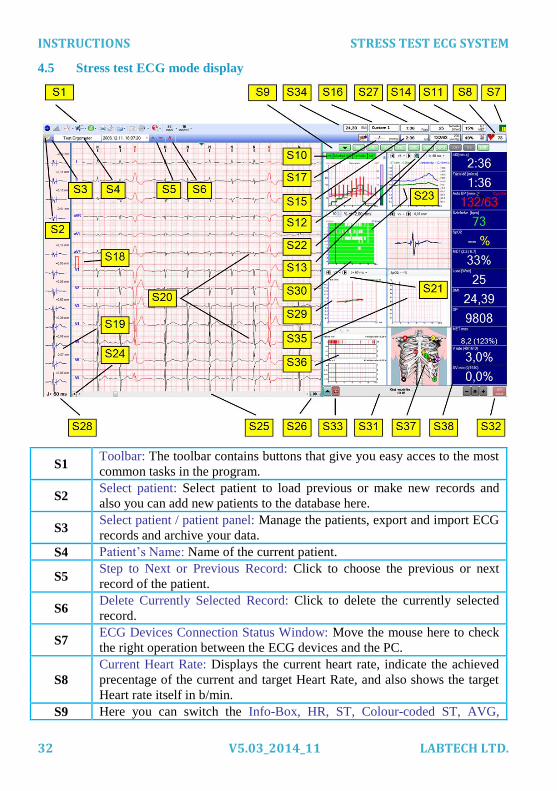
4.5 Stress test ECG mode display
S1 Toolbar: The toolbar contains buttons that give you easy acces to the most
common tasks in the program.
S2 Select patient: Select patient to load previous or make new records and
also you can add new patients to the database here.
S3 Select patient / patient panel: Manage the patients, export and import ECG
records and archive your data.
S4 Patient’s Name: Name of the current patient.
S5 Step to Next or Previous Record: Click to choose the previous or next
record of the patient.
S6 Delete Currently Selected Record: Click to delete the currently selected
record.
S7 ECG Devices Connection Status Window: Move the mouse here to check
the right operation between the ECG devices and the PC.
S8
Current Heart Rate: Displays the current heart rate, indicate the achieved
precentage of the current and target Heart Rate, and also shows the target
Heart rate itself in b/min.
S9 Here you can switch the Info-Box, HR, ST, Colour-coded ST, AVG,

STRESS TEST ECG SYSTEM INSTRUCTIONS
LABTECH LTD. V5.03_2014_11 33
SPO2, Lead-off, Event and MasterStep diagrams on or off. To hide any or
all diagrams only click the buttons again, the order of the diagrams can be
changed also by clicking them on or off.
S10 Here you can switch the HR, Load, MET, Bpa and BPm graphs on or off.
S11
MET: "metabolic equivalent," represents the approximate rate of oxygen
consumption, the best index of exercise capacity and maximal
cardiovascular function. One MET is equal to a unit of basal oxygen
consumption measuring approximately 3.5 ml O2 /kg/min. As a rough
reference, the maximal oxygen uptake of the normal sedentary adult is
approximately 30 ml O2 /kg/min (8.5 METS) and the minimal level for
physical fitness is 40 ml O2 /kg/min (11 METS). External work directly
correlates to oxygen consumed to achieve the applied work level. The
program displays the achieved precentage of the current and predicted
MET, and also shows the predicted MET value itself.
VO2max: is the maximum capacity of an individual's body to transport
and utilize oxygen during incremental exercise, which reflects the physical
fitness of the individual. The name is derived from V - volume per time, O2
- oxygen, max - maximum. VO2 max is expressed either as an absolute rate
in litres of oxygen per minute (l/min) or as a relative rate in millilitres of
oxygen per kilogram of bodyweight per minute (ml/kg/min), the latter
expression is often used to compare the performance of endurance sports
athletes.
S12
Displays HR, Load, MET, BP graphs. You can see the Date and Time in
the HR Graph window. At Replay (examining an older record) it shows
the time of starting, and during the Test you can see the actual time.
S13
Automatic Blood Pressure Systole/diastole: Shows the actual blood
pressure of the patient. Systolic blood pressure should rise with increasing
workload. Diastolic blood pressure usually remains about the same. It can
be automatically measured by the built-in blood pressure meter in the EC-
12S or you can type it into the appropriate boxes manually.
S14 Load: Displays the current load (Watt; km/h, %; Round; stb.)
S15 Exercise time: Shows the elapsed time.
S16
Protocol: A specific set rules and conventions that determine how the
excercies ECG is performed. The program offers a number of well-known
protocols that you can use. In this window you can see the current
protocol which was chosen before starting the stress test.
S17
Manual Blood Pressure: Displays the current blood pressure in mmHg. In
case, there is no automatic blood pressure measurement function built into
the ECG device, when entering a new stage, the BP fields will be
automatically activated and let you enter the BP values manually. First
type the Systole value, then press TAB or Enter, then type the Diastole

INSTRUCTIONS STRESS TEST ECG SYSTEM
34 V5.03_2014_11 LABTECH LTD.
value and press Enter again. The values you type are automatically
displayed on the HR diagram on the right side of the screen.
If the ECG device or the loading device has built-in blood pressure
measurement function the BP fields will be filled automatically. Of course
this may be overridden by the physician and it is possible to enter BP
values manually.
S18 Amplitude: adjustable value: 5; 10; 20 mm/mV
S19
Median: ECG average
The current median is indicated in black, the original one made during
resting phase is indicated in blue.
S20 ECG diversion: Several ECG diversion configuration can be selected in
the Settings/ Diversion menu.
S21 Click on the arrow for the next ST Trend selection.
S22 Enlarge or zoom out of the graph by clicking on the button.
S23 ST Trend: visualize in graph or colour coded format.
S24 Display or hide median you can display or hide the medians by clicking on
the arrow.
S25 Scrollbar: moving of the scrollbar the most important part of the record
can be inspected.
S26 Continuous play: for continuous record playing press on double arrow.
S27
Phase time: displays the elapsed time of the ongoing phase. As an option
the countdown until the end of stress stair/grade. The last 10 ms is
indicated in red.
S28 ST calculation: Displays of the current value of ST calculations.
S29 ST Loop: Displays ST value of the stress and sedation in function of HR.
S30 Colour coded ST: percentage display of ST changes
S31 Manual mode: Stress increasing, decreasing, level keeping during the test
S32 Manual BP start: manual start/stop of blood pressure measuring in
monitoring or test phase.
S33 Manual emergency stop: If the patient feels unwell the stress test can be
stopped, ECG and BP measurement is possible for 60 sec.
S34 BMI / BMI Prime: indicates the BMI index of the patient
S35 SPO2 diagram: displays the patient’s oxygen saturation during the test.
S36 Event tablet displays atrial and ventricular events.
S37 Electrode placement: shows the advanced EH ECG placement and contact
failure
S38 Info-box: test information in bigger size, to be visible even from distance
During Stress/Continuous/Stress recording a whole view displays all previously taken
record divided to one minute intervals, under ECG displaying. This view enables
checking of arrhythmic events detected previously. It displays in 5 minutes intervals and

STRESS TEST ECG SYSTEM INSTRUCTIONS
LABTECH LTD. V5.03_2014_11 35
the scrollbar in the right ensures the navigation within the record. The view of the
record can be selected in the drop-down menu.

INSTRUCTIONS STRESS TEST ECG SYSTEM
36 V5.03_2014_11 LABTECH LTD.
4.6 Toolbar
4.6.1 Start monitoring
Pressing this button to start monitoring the patient before the recording is
started.
4.6.2 Mode
The software can be used in three operating modes:
- Resting ECG mode
- Continous ECG mode
- Stress test mode
4.6.3 ECG leads
In this menu point: you can modify the leads displayed on the screen, the
ST calculation and measuring methods; view displaying from 1column to 2
columns or make display the mean curve and setup the ECG contrast and
millimetre paper.
The renewed Leads menu gives more possibilities and the ECG leads wanted to be
appeared on the screen during recording, and analyzing are more flexible. From now on
seven users can setup and rename the views. Moreover Cabrera and Cabrera +
Pericordial arrangements become default.
You can select if you would like to display the lead in Full view or in Freeze. You can
invert any of the leads.

STRESS TEST ECG SYSTEM INSTRUCTIONS
LABTECH LTD. V5.03_2014_11 37
View menu: here you can modify the display of ST calculation during record taken, or
identification of the measurement point (possible setup of J point: 0, 30, 40, 60, 80 ms)
and the amplitude unit of ECG sign.
You can modify the display of ECG leads here. It is possible to switch between the
common one column display to two column display (standard + unipolar and 6 chest-
separately) by pressing “D” on the keyboard. You can abolish the overlaps of main
curve taken during the stress and resting test.

INSTRUCTIONS STRESS TEST ECG SYSTEM
38 V5.03_2014_11 LABTECH LTD.
Contrast modification of ECG curves
The modification of waves on the monitor is possible. Modify separately the line
stickiness of VES, SVES, normal beat curves. The program enables default settings to
distinguish each event. Modify the settings in Setting menu, ECG contrast tab.
Millimeter paper setting
This window is active in stress and holter system, by clicking view menu, Millimetre
paper menu. Adjustment of millimetre paper size correlating to the monitor is possible.
It is possible to setup real, 1:1 scale appearance of the millimetre paper on screen.
4.6.4 Filters
Here you can switch on/off the filters.
• Smoothing
• Baseline
• Mains (50/60 Hz) –available only at resting mode
Switch on all filters!
Preview: Here you can see the effects
before activating the settings.
Manual setting: setting manually
how many pixels match for 1 mm.
Automatic setting: the cube
underneath is symbolising the
monitor, showing the resolution
and display size. The resolution of
the monitor is defined by the
system setup, but the display size
must be set by rolling the cursor
above the cube. Finalise the new
setting by pressing "Set to
recommended" button. Then press
the set button, and the program
sets the size on 1:1 scale, if the
monitor shows 10mm it will be the
same size in reality too.

STRESS TEST ECG SYSTEM INSTRUCTIONS
LABTECH LTD. V5.03_2014_11 39
4.7 Settings
You can set the various parameters of the software influencing the analysis
in this menu.
Choosing of loading device:
Endless EKG
Ergometer
Runners
MasterStep
Walking
<< select the loading device used during
the stress test
System configuration …:
Select the stress test device and stress protocols used during the stress test. See details in
User Manual, chapter 2.1.3.
Emergency and termination criteria:
You can setup emergency and termination criterias that make alarming or red lightening
as the critical value have been reached or automatically stop the stress test.
Definition and selection of heart target HR became optional in the stress
test/investigation. You can select the convention 220- ages or the percentage of it (85 %,
90 %) or other settings. The selected value will appear in the information box during
recording and on the Summary after recording.

INSTRUCTIONS STRESS TEST ECG SYSTEM
40 V5.03_2014_11 LABTECH LTD.
You can parameterize the marking of event by clicking on rhythm analyzing tab.
Reason of stress test terminating:
Dialog box for the list up the possible reasons of stress test termination that can be
switch on/off.
Colour settings…:
You can find, modify and delete the colouring combinations displayed on the screen of
the program here. Aside from the recommended colour designs you can adjust personal,
user colour combinations from Custom1 to Custom5 and save them by clicking the Save
button.
Lead-off warning:
The displaying methods can be chosen:
Lead-off warning >>
Opportunities for display:
- Always on toolbar: the program gives a warning sign on the toolbar in the
moment of the electrodes’ lead-off.
- •Always in window: the program gives a warning sign in a window appearing
in the middle of the screen in the moment of the electrodes’ lead-off.
- Once in window: the program gives a warning sign of the electrode’s lead-off
once and if you close the appearing window it won’t pop up again.
- Never: the program does not display the electrode’s lead-off.
New analysis
Used to analyse the previous records with new settings (for example: J+ … changes.
Service… :
Here you can find the information about the type of software used during the
measurements, the serial number of the ECG recorder, the actual Firmware version and

STRESS TEST ECG SYSTEM INSTRUCTIONS
LABTECH LTD. V5.03_2014_11 41
the currently chosen record’s settings. Here you can follow the stressing records’
diagnosis settings as well.
4.7.1 Print Report
You can print the record on display by clicking on the printer icon, it will
display a print preview window. In this window you can set the parameters
of printing, like the leads to be printed, printing mode, printing colour,
number of reports and pages to be printed, and the printer itself can be
selected also.
4.7.2 Print current sample
Prints the ECG you actually see on your PC screen.
4.7.3 Export the Report
Export the record into PDF, image formats, DICOM or GDT.
INSTRUCTIONS STRESS TEST ECG SYSTEM
42 V5.03_2014_11 LABTECH LTD.
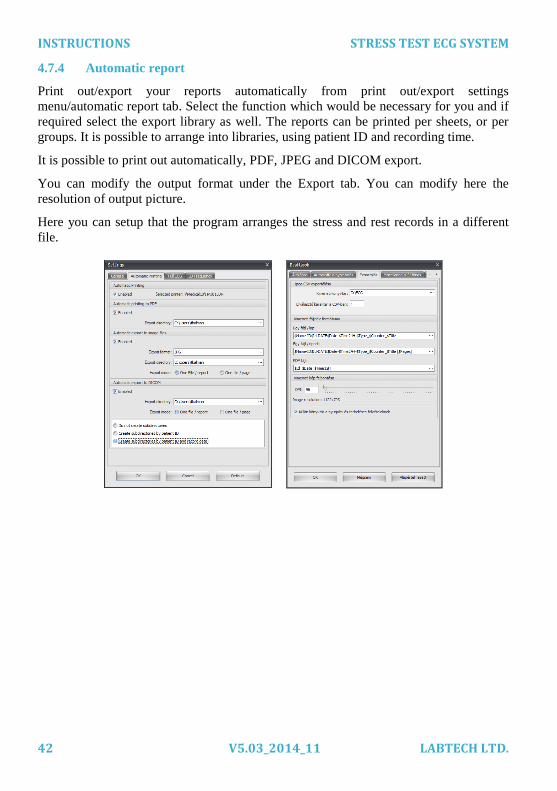
4.7.4 Automatic report
Print out/export your reports automatically from print out/export settings
menu/automatic report tab. Select the function which would be necessary for you and if
required select the export library as well. The reports can be printed per sheets, or per
groups. It is possible to arrange into libraries, using patient ID and recording time.
It is possible to print out automatically, PDF, JPEG and DICOM export.
You can modify the output format under the Export tab. You can modify here the
resolution of output picture.
Here you can setup that the program arranges the stress and rest records in a different
file.
STRESS TEST ECG SYSTEM INSTRUCTIONS
LABTECH LTD. V5.03_2014_11 43
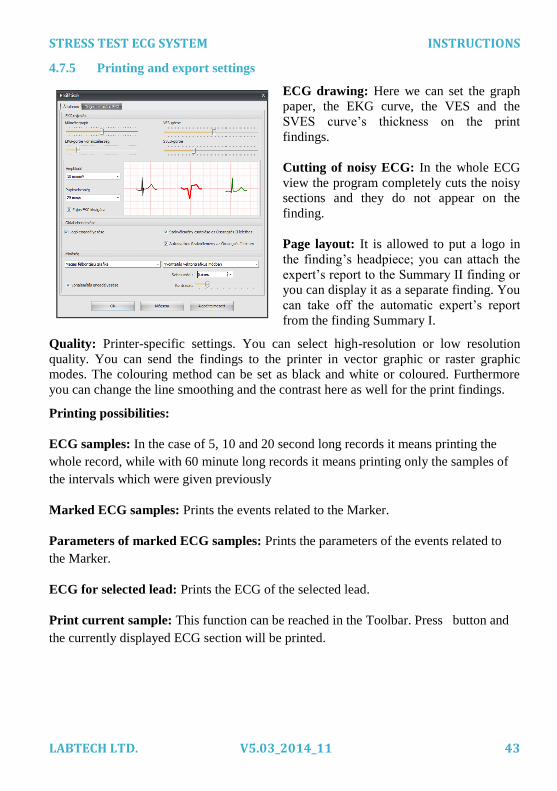
4.7.5 Printing and export settings
ECG drawing: Here we can set the graph
paper, the EKG curve, the VES and the
SVES curve’s thickness on the print
findings.
Cutting of noisy ECG: In the whole ECG
view the program completely cuts the noisy
sections and they do not appear on the
finding.
Page layout: It is allowed to put a logo in
the finding’s headpiece; you can attach the
expert’s report to the Summary II finding or
you can display it as a separate finding. You
can take off the automatic expert’s report
from the finding Summary I.
Quality: Printer-specific settings. You can select high-resolution or low resolution
quality. You can send the findings to the printer in vector graphic or raster graphic
modes. The colouring method can be set as black and white or coloured. Furthermore
you can change the line smoothing and the contrast here as well for the print findings.
Printing possibilities:
ECG samples: In the case of 5, 10 and 20 second long records it means printing the
whole record, while with 60 minute long records it means printing only the samples of
the intervals which were given previously
Marked ECG samples: Prints the events related to the Marker.
Parameters of marked ECG samples: Prints the parameters of the events related to
the Marker.
ECG for selected lead: Prints the ECG of the selected lead.
Print current sample: This function can be reached in the Toolbar. Press button and
the currently displayed ECG section will be printed.

INSTRUCTIONS STRESS TEST ECG SYSTEM
44 V5.03_2014_11 LABTECH LTD.
Print settings:
Leads: You can choose which leads you would like to print (Standard > I, II, III;
Unipolar > aVR, aVL, aVF; Standard and Unipolar; Precordial > V1-V6 and 12 leads.)
Selected Printer: You can select the default printer by clicking on Setup. You can
select local and network printers as well. The software will always save your last
selection.
Printing Colour: Colour or Black & White.
If the amplitude of the ECG is too large and does not have enough space on the report
display, you can modify it by ECG vertical offset scroll bar in the printing setup.
Each curve will appear correctly:
During the stress test and continuous reporting you can put marks on report in the
detailed summarization report for printing.

STRESS TEST ECG SYSTEM INSTRUCTIONS
LABTECH LTD. V5.03_2014_11 45
Setup: Printing setup > Special setup.
. .
. .
. .
INSTRUCTIONS STRESS TEST ECG SYSTEM
46 V5.03_2014_11 LABTECH LTD.
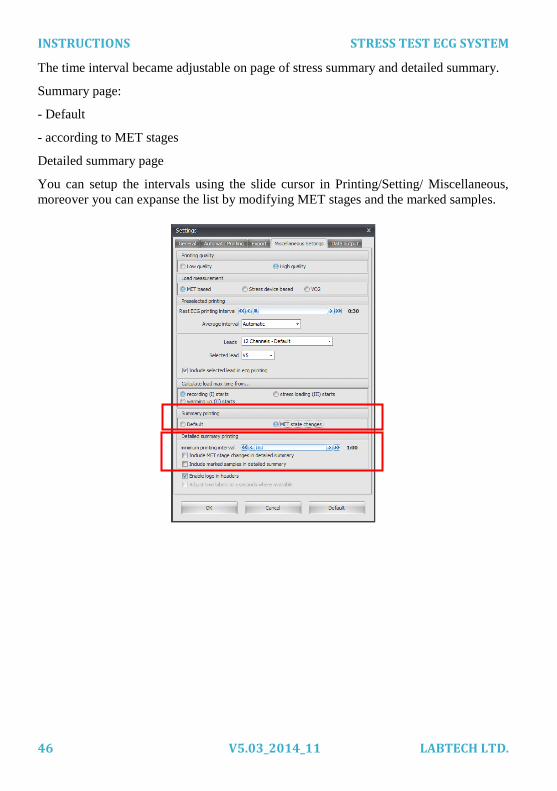
The time interval became adjustable on page of stress summary and detailed summary.
Summary page:
- Default
- according to MET stages
Detailed summary page
You can setup the intervals using the slide cursor in Printing/Setting/ Miscellaneous,
moreover you can expanse the list by modifying MET stages and the marked samples.

STRESS TEST ECG SYSTEM INSTRUCTIONS
LABTECH LTD. V5.03_2014_11 47
4.7.6 Help
In this menu it is possible to invoke the built-in user manual, change the
language of the software or have a look at the Keyboard Usage window.
User Manual
The User Manual is available in different languages. By changing the language of the
software, the user manual (help) will be shown in the same language, as well. However,
if the user manual is not available in the chosen language yet, the English manual will
be shown.
You need to install Adobe
Reader
application to see the User Manual, this is
automatically installed along with the Cardiospy software.
Languages
Here you can select the language of the software. However if the program is not
available in the chosen language yet, the English program version will be worked.
Multilanguage Translator…
The Multilanguage Translator menu offers a great help to translate the text of the
software into any language. This menu can be used only with the password provided by
the manufacturer.
4.7.7 Paper speed
Set here the speed of the paper (mm/sec) to the measurement. The paper
speed can be set for 12.5, 25 or 50 mm/sec.
4.7.8 Amplitude
You can change the amplitudes (mm/mV) here.

EDITING AND MEASUREMENT POSSIBILITIES STRESS TEST ECG SYSTEM
48 V5.03_2014_11 LABTECH LTD.
5 Editing and measurement possibilities
5.1 Arrhythmia analysis in resting and stress test ECG systems
Real-time arrhythmia analysis is available in the software, this means that the VES and
SVES.. events are detected during the resting and stress test monitoring. We can also
add various stop and alarms criteria for such events.
Re-analysing older ECG records (Settings/New analysis) detects and displays V and SV
events.
The info boxes contain the V and SV ectopic rates.
A new panel on the left side displays the V-SV events; we can activate this panel by
pressing the EVN button.
We can set the Arrhythmia and V ectopic rate among the Alarm and stop criteria in
Settings / Parameters.
Clicking on the Rhythm analysis tab the parameters of each event can be specified.

STRESS TEST ECG SYSTEM EDITING AND MEASUREMENT POSSIBILITIES
LABTECH LTD. V5.03_2014_11 49
The events panel is now displayed on the stress test summary, this way we can keep
track of the V - SV events which occurred the examination.

EDITING AND MEASUREMENT POSSIBILITIES STRESS TEST ECG SYSTEM
50 V5.03_2014_11 LABTECH LTD.
5.2 Edit and delete ectopic events
Arrhythmia analysis first appeared in Cardiospy version v5.02.00., now this function
has been extended with various additional functions. VES and SVES beats are not only
detected but can be edited during and after recording. It is possible to delete groups of
events in case it was a false event. The summary table displays the number of ectopic
beats and their frequency in percentage, in comparison to all the beats during the record.
Editing and modifying events can be conducted in the ECG view as well. Use the left
button of the mouse to select beats, and the right button to modify their type.

STRESS TEST ECG SYSTEM EDITING AND MEASUREMENT POSSIBILITIES
LABTECH LTD. V5.03_2014_11 51
5.3 Ruler
We can measure time and amplitude by holding the left mouse button while moving the
cursor, this way you select a certain section of the ECG curve. Time: Represents the
elapsed time of the record. Selected intervall: Represents the intervall since the mouse
was pressed in the blue box provided in ms. Indicated RR intervall: Here we can see
the number of beats, the length of the section between the first and last QRS and the
average HR measured in the intervall from the selected section. Amplitude is measured
by calculating the difference of the two points where the first and second ruler intersects
the ECG curve.
5.4 Weber function classification
You can setup the Weber function classification in System configuration window/ Other
tab. Please switch the loadability from Morris function to Weber functional
classification. After this, please move the cursor to the MET value in the upper menu of
the program and the chart will be appear. The classification will appear in the Summary
report and in Automatic report as well.
Base on the value of MET reached during the stress analysis; the severity of the disease
will be classified:

EDITING AND MEASUREMENT POSSIBILITIES STRESS TEST ECG SYSTEM
52 V5.03_2014_11 LABTECH LTD.
5.5 Bayes' theorem in the analysis
Based on the results population and diagnostic tests and with using Bayes’ theorem it is
possible to give positive or negative predictive (PPV; NPV) value of the test.
You can reach the value in the automatic report. The program calculates regarding the
patient’s sex, age and the type of chest pain reported before the inspection.
general sensitivity: 68%; general specificity: 77%
(Source: AHA 2002 guideline update, Table 7)
P = Pretest probability of positive (N Engl J Med. 1979;300:1350-8.)
PPV = P / (1 - P) * 2.957 / (P / (1 - P) * 2.957 + 1)
NPV = (1 - P) / P * 0.416 / ((1 - P) / P * 0.416 + 1)
You can type into the characteristic of chest pain have the patient had; by pressing F8
key after starting the stress inspection. In case of mistaken type selection you can
modify it anytime, during the stress inspection by repressing F8 key.
5.6 Duke – nomogram
Duke nomogram is a graphical risk assessment procedure.

STRESS TEST ECG SYSTEM EDITING AND MEASUREMENT POSSIBILITIES
LABTECH LTD. V5.03_2014_11 53
http://circ.ahajournals.org/content/99/17/2345/F1.expansion.html
The program makes a nomogram as separately printable report. Information about the
type of the chest pain is important for nomogram creating. You can enter it by pressing
F8 key, than select the time of stress test and type of the pain. If the pain is too high,
you can stop the stress inspection by clicking the square before ’Stop Stress test’, then
click on OK button. You can write comments in connection with the pain, and you can
find among the marked samples.
Duke Treadmill Score = METs - 5x(excercise-induced ST depression in mm) -
4x(treadmill angina index)
Treadmill angina index = 0 if no agnina, 1 if angina occurred during test, 2 if angina
was the reason for stopping

EDITING AND MEASUREMENT POSSIBILITIES STRESS TEST ECG SYSTEM
54 V5.03_2014_11 LABTECH LTD.
5.7 Borg rank
The patient can evaluate by himself the hardness of ongoing loading on a scale of 6-20.
The loading can be recorded in several times in HR/BP diagram, and it is indicated on
the printed out report. The value can be registered by pressing B key during the stress
test.
5.8 QRS frontal axis
During stress test the program displays the QRS frontal axis in degree. You can set this
if you would like to see this value during the examination in the Inbox.
5.9 Exercise and condition plan
The Hungarian exercise plan template was made based on, 2001year (the latest) AHA’ s
protocols for investigation stress test and heart disease patients. You can reach it by
entering diagnosis editor/ import automatic expertise button.
Template example
Exercise and conditioning plan: Initial exercise intensity: light to moderate, 3,2-4,7 MET
Initial target heart rate: 110,4 - 120,6 bpm
Activities corresponding to your initial intensity range: walking 3.0 mph (4.8 km/h); golf, not carrying
clubs; walking 3.4 mph (5.5 km/h); bicycling, <10 mph (16 km/h), leisure, to work or for pleasure; swimming, slow

STRESS TEST ECG SYSTEM EDITING AND MEASUREMENT POSSIBILITIES
LABTECH LTD. V5.03_2014_11 55
Maximal exercise intensity: hard, 4,8-6,7 MET
Maximal target heart rate: 133,35 bpm
Activities corresponding to your target intensity range: bicycling, stationary, 100 watts; swimming,
moderately fast; jogging, 4.5 mph (7.2 km/h); bicycling, 10 mph (16 km/h); hiking Increase exercise intensity gradually once comfortable at a particular level. Intensity may be increased as heart
rate response to exercise decreases with conditioning.
Exercise frequency: 3 to 6 sessions/week Session duration: 30 to 60 minutes
If the following symptoms occur, obtain medical consultation before continuing exercise: 1)Discomfort in the upper body, including the chest, arm, neck, or jaw during exercise. 2)Faintness accompanying the exercise.
3)Shortness of breath during exercise.
4)Discomfort in bones and joints either during or after exercise.
Although the above-mentioned symptoms are the most important, any symptom should be clarified and
discussed with your physician.
Non-cardiac medical conditions and cardiac conditions not detected during the stress test session may impose additional limitations on exercise ability.
--- AUTOMATICALLY GENERATED EXERCISE PLAN, NOT VALIDATED BY QUALIFIED
HEALTH-CARE PROFESSIONAL. --- --

ERROR CORRECTION, MAINTENANCE STRESS TEST ECG SYSTEM
56 V5.03_2014_11 LABTECH LTD.
6 Error correction, maintenance
Before going through this chapter please read the Installation and Update Guide
carefully in which we detail how you should install and operate the program and the
devices. If you cannot solve the problem based on these manuals, then read the
information below.
6.1 USB-02 signs and error messages
Light Description Countermeasure
red Power LED
USB-02connected to
the PC but it does not
operate
Terminate the USB connection. After 5-
10 ms reconnect it to the PC. If the USB -
02 is still red, follow the below
instruction:
Install the USB-02 drivers again by
deleting and reinstalling the Cardiospy
program. Go to Start menu / Programs /
Labtech Ltd / Uninstall Cardiospy –
Wizard: put checkmark in the Remove
USB-02 drive switch and dele the
program. Terminate the USB-02 device
during the reinstallation process.
green Power LED
USB-02 connected to
the PC and operates
properly
-----
Wireless LED in
orange flashing
USB-02 sign offline
status.
The recorder is not connected to the
device. Switch on the (insert full charged
batteries) EC-12R / EC-12R/S / EC-12S
for the communication connection.
Wireless LED in
green flashing
Bluetooth
communication
between ECG
recorder.
You can start recording.
red Wireless LED
Bluetooth module has
failure in USB-02
interface.
Please contact the service support.

STRESS TEST ECG SYSTEM ERROR CORRECTION, MAINTENANCE
LABTECH LTD. V5.03_2014_11 57
6.2 ECG Recorder signs and error messages
Light Description Countermeasure
NO light
sign ----
Please check the status of the batteries or change
them for new charged ones. If the problem is still
exists despite of using new charged batteries, please
contact service support.
Orange
flashing
Three pieces of
short beep after
inserting charged
batteries
Offline operation. Start the Cardiospy program to
enable the connection to USB-02 interface. The
light of the recorder becomes green.
Green
flashing
Two pieces of
short beep
Normal operation, the recorder and the USB-02
interface are connected with each other, you can
start the recording.
Continuous
red
Continuous
beeping
See the General communication failure: NO 1. The
ECG led lights in red, and beeping
* The light sign of the recorder means the Led sign on the front side of the device.
6.3 General and communication failure
NO Error / Symptom Countermeasure
1.
THE ECG LED
LIGHTS IN RED
AND BEEPING
Discharged battery charged status. Please use properly
charged batteries or use new fully charged batteries.
Please insert the batteries into the charger and wait until
the charging time finished. If beeping does not finish
after batteries changing, the recorder has been damaged.
POWER LED
WIRELESS LED

ERROR CORRECTION, MAINTENANCE STRESS TEST ECG SYSTEM
58 V5.03_2014_11 LABTECH LTD.
NO Error / Symptom Countermeasure
Please contact service support.
2. NO OR BROKEN
ECG DRAWING
Distance between USB-02 interface and recorder should
not be more than 6 meters. For proper communication
between USB-02 interface and recorder (in linear
distance) should not be an object that makes radio
frequency interfere. Using the lengthened cable put the
USB-02 interface a well visible place. For better
communication you can stick it to the monitor or to a
stand.
3. *
CANNOT START
THE BLOOD
PREASSURE
MEASUREMENT.
PROGRAM SHOWS
THE
MEASUREMENT
STARTED BUT
THE DEVICE DOES
NOT MEASURE
Check the battery status (Status display or
Setup/service/battery status menu). Open the record and
navigate to the Service menu.
Properly charged batteries: marked with green line.
Battery voltage only slightly decreases during blood
pressure measurement.
Improperly charged or old batteries: give high voltage at
the first measurement. Please charge the batteries and
check their status. If the symptom is the same please
change the batteries to new ones.

STRESS TEST ECG SYSTEM ERROR CORRECTION, MAINTENANCE
LABTECH LTD. V5.03_2014_11 59
NO Error / Symptom Countermeasure
If the batteries has not got problem, but not able to
measure the blood pressure then please check the
drawing. If it is broken that might indicate a Bluetooth
connection failure. Distance between USB-02 interface
and recorder should not be more than 6 meters. For
proper communication between USB-02 interface and
recorder (in linear distance) should not be an object that
makes radio frequency interfere. Using the lengthened
cable put the USB-02 interface a well visible place.
4. *
NO CONNECTION
WITH THE BLOOD
PREASSURE DEVICE
OR NOT SELECTED
Check if the proper blood reassure device is selected in
System Configuration menu and if the device
application is switched.
Check the connection of the devices.
If you use different type blood pressure monitor, you can
enter the data manually into the SW by the manual blood
pressure.
5. *
SOFTWARE
MESSAGE:
MICROPHONE IS
NOT CONNECTED
Check the connection of the KO microphone’s
connector to the ECG device. It connects from the BP
cuff with a black cable to the ECG device.

ERROR CORRECTION, MAINTENANCE STRESS TEST ECG SYSTEM
60 V5.03_2014_11 LABTECH LTD.
NO Error / Symptom Countermeasure
6.
**
STRESS TEST
DEVICE
CONNECTION
FAILURE
Check the connection between the computer and the
stress test device (connection of communication cable),
and the charging status (if the stress test device’s main
switch is on), and if under the System Configuration
menu/Loading device menu is the right loading device
was selected. In case of treadmill: check if the
Emergency Stop button is ejected. Perform chapter 4.1.3
in the Installation and Update Guide.
7. NOISY ECG SIGN
Examine if all the ECG electrodes were attached to the
patient appropriately. To produce high quality record the
electrodes should be attached carefully by qualified
staff.
8. PRINTOUT DOES
NOT START
Check if the selected printer is switched on. If you have
selected a local printer, then examine if the connection
to the PC is appropriate (connection of communication
cable).
* in case of EC-12S built-in blood pressure ECG device
** EC-12R/S, EC-12S Stress ECG systems

STRESS TEST ECG SYSTEM ERROR CORRECTION, MAINTENANCE
LABTECH LTD. V5.03_2014_11 61
Further steps
If the above description does not solve the problem, please send an e-mail with the
following
PLEASE DESCRIBE THE FAULT:what has happened.
- SEND A BLACKBOX: Cardiospy Blackbox: after the installation you can find a
Generate black box shortcut under the Start Menu / Labtech / Cardiospy/ . Please send
the blackbox file to our e-mail address.
- SEND A REPORT ABOUT THE FAULT: Export the report from Cardiospy program
(Patient menu – Import Export – export record), and send us the record. If the record is
too big (more than 2-4mb) ask for our ftp details via our e-mail address
-SEND SCREENSHOT ABOUT THE FAULT: You can make it with Print Screen
button, then import it to Paint with CTRL+Vand save the file.
Maintenance and Calibration
If the ECG device is used according to the preset parameters as prescribed, there is no
need for calibration or maintenance.
The case of the recorder unit may be cleaned, if necessary.
The accuracy of controls is assured by using long lasting parts and techniques that are
able to preserve their accuracy during the life cycle of the product.
Cleaning of device and patient cable
Do not dip the device in liquid, for device-cleaning use moistened wipes with a
moderate acting (not agressive) disinfectant or cleaning agent. Liquid getting inside of
the device can cause electric failures! Length of patient cable: 65-85 cm
BP cuff cleaning
Before cleaning of textile cuff please take off the rubber hose and Korotkoff-
microphone.
Wipe or wash the cuff off with moderate effect (not aggressive) and temperature (max.
30 °C) antiseptic or cleaning agent. After its dry on room temperature put back the
rubber hose and Korotkoff-microphone.
Validation
Blood Pressure device validation in accordance with the requirements of the applicable
standards and as the validation term expired.

TECHNICAL SPECIFICATIONS (EC-12R/S; EC-12S) STRESS TEST ECG SYSTEM
62 V5.03_2014_11 LABTECH LTD.
7 Technical specifications (EC-12R/S; EC-12S)
Technical specification EC-12R/S EC-12S
Leads I, II, II, aVR, aVL, aVF, V1, V2, V3, V4, V5, V6
BP measurement method - Auscultational
BP interval of measurement -
30-260 mmHg; Device’s
measuring limit: 20-280
mmHg
BP measurement’s accurary - ± 3 mmHg
PC connection Bluetooth (wireless type)
Patient protection EN 60601 (IEC-601-1), CF type
Power supply / Can be exchanged
during recording! /
2 x 1,2 V rechargeable batteries
(or 2 x 1.5 V AA alkaline battery)
Dynamic interval ±20 mV
DC offszet range ±1000 mV
Frequency response 0.05 Hz … 150Hz
Sampling rate 1000 Hz
A/D resolution 16 bit
Input impedance ≥100 MΩ
Size 125 x 70 x 25 mm (non-wireless type)
125 x 70 x 33 mm (wireless type)
Weight
~ 100 g (non-
wireless type)
~ 110 g (wireless
type)
~ 200 g

STRESS TEST ECG SYSTEM TECHNICAL SPECIFICATIONS (EC-12R/S; EC-12S)
LABTECH LTD. V5.03_2014_11 63
Software specification
Simple, user friendly software with multiple functions
Precise QRS classification
Built-in expert system,
Short and long resting ECG record
BP measurement based on auscultation method
colour-coded ST level, slope and ST loop graphs
SAECG
MET computation
HR, BP, LOAD, MET graphs
Various printable reports
Customizable alarm and stop criteria
Ergometer and treadmill database
Comparing measurements
DICOM, GDT, MFER, HL7
Local and network operation
Export and import functions
Arrhythmia analysis
Weber function classification
Bayes theorem in the analysis
Duke-nomogram
Borg rank
QRS frontal axis
Exercise and condition plan
Pacemaker detection

TECHNICAL SPECIFICATIONS (EC-12R/S; EC-12S) STRESS TEST ECG SYSTEM
64 V5.03_2014_11 LABTECH LTD.
Software minimum configuration
Processor: Min. Core 2 Duo (2 Ghz)
RAM: Min. 1,5 GB (Windows XP) recommended: 2 GB
Min. 2 GB (Windows Vista, Windows 7)
HDD: 200 GB
Display: min: 19” display 1024X768 resolution, Color XGA
recommended 22” display 1680X1050 resolution
Interface: 1 USB port for EC-ABP
2 USB ports for EC-1-12H
Printer: Laser or LaserJet (Min 15-20 pages/minutes)
Operating
systems:
Windows XP ( Service Pack 2 )
Windows Vista
Windows 7
( 32 and 64 bit ) with Windows Update enabled

STRESS TEST ECG SYSTEM HOT KEYS
LABTECH LTD. V5.03_2014_11 65
8 Hot keys
1. Tab In case of stress test it is used to switch between the manual BP
measurement’s Systole / Diastole windows
2. N – Next Starts stress test or moves to the next step of stress test
3. Space Stops the drawing of the ECG lead which was selected previously and
places a Marker sign during the stress test measurement
4. Enter By pressing you can fix the BP measurement values entered manually
5. Del – Delete Deletes the Freeze and Marker signs
6. Left, Right Used for navigation between Freeze and Marker signs
7. Numeric keypad For entering BP measurement values manually
8. F10 Manual start and stop of BP measurement 9. D Switch between the 4 possible ECG displays
10. Num. – and + Increases and decreases the load in case of manually controlled
stress test
11. F2 Opens the Patient’s database
12. C Switch between the ECG lead’s displays
13. I Displays/Hides the larger automatic BP measurements and HR boxes
14 (A) Coloured EKG curve
15. (B) Entering Borg value during stress test
16. (F8) Pain in the chest


![Comparing Stress ECG Enhancement Algorithms - [email protected] Home](https://img.pdfslide.us/doc/110x75/61fb2fae2e268c58cd5b2d1f/comparing-stress-ecg-enhancement-algorithms-emailprotected-home.jpg)


