Embed Size (px)
Citation preview

Streamlabs Chatbot
Documentation

©Streamlabs.com 2
HOW TO SETUP STREAMLABS CHATBOT?! ....................................................................................................... 4
TWITCH BOT ............................................................................................................................................................................. 4 TWITCH STREAMER ..................................................................................................................................................................... 5 DISCORD BOT ............................................................................................................................................................................ 7 GAMEWISP ............................................................................................................................................................................ 11 STREAMLABS ........................................................................................................................................................................... 13 SPOTIFY ................................................................................................................................................................................. 14 CLOUD ................................................................................................................................................................................... 16 OBS REMOTE.......................................................................................................................................................................... 18 IMPORTING DATA FROM ANOTHER BOT ......................................................................................................................................... 19
FEATURES ...................................................................................................................................................... 21
CONSOLE ................................................................................................................................................................................ 21 DASHBOARD............................................................................................................................................................................ 22 COMMANDS ............................................................................................................................................................................ 23 TIMERS .................................................................................................................................................................................. 25 QUOTES ................................................................................................................................................................................. 26 EXTRA QUOTES ........................................................................................................................................................................ 27 COUNTER ............................................................................................................................................................................... 28 GIVE AWAY ............................................................................................................................................................................. 29 SFX ...................................................................................................................................................................................... 30 CURRENCY .............................................................................................................................................................................. 31 BETTING ................................................................................................................................................................................. 33 POLL ..................................................................................................................................................................................... 34 MINIGAMES - HEIST .................................................................................................................................................................. 35 MINIGAMES – DUEL ................................................................................................................................................................. 36 MINIGAMES – FREE FOR ALL ....................................................................................................................................................... 37 MINIGAMES – BOSS BATTLE ....................................................................................................................................................... 38 EVENTS .................................................................................................................................................................................. 40 SONGREQUEST ......................................................................................................................................................................... 41 QUEUE................................................................................................................................................................................... 42 NOTIFICATIONS ........................................................................................................................................................................ 43 MOD TOOLS ........................................................................................................................................................................... 44 DISCORD ................................................................................................................................................................................ 45
SETTINGS ....................................................................................................................................................... 46
GENERAL ................................................................................................................................................................................ 46 LOCALIZATION ......................................................................................................................................................................... 48 USAGE ................................................................................................................................................................................... 48 MACROS ................................................................................................................................................................................ 49 HOTKEYS ................................................................................................................................................................................ 49 STYLE..................................................................................................................................................................................... 50 CHANGELOGS .......................................................................................................................................................................... 50
PERMISSION LEVELS ...................................................................................................................................... 51
USAGE LEVELS ................................................................................................................................................ 51
PARAMETERS ................................................................................................................................................. 52
BASIC PARAMETERS .................................................................................................................................................................. 52 CURRENCY PARAMETERS ............................................................................................................................................................ 55 TWITCH API PARAMETERS ......................................................................................................................................................... 57 FILE READING PARAMETERS ........................................................................................................................................................ 58 CUSTOM API READING PARAMETER ............................................................................................................................................. 59 SAVE FILE PARAMETERS ............................................................................................................................................................. 59 MISCELLANEOUS PARAMETERS .................................................................................................................................................... 59
GENERATED TEXT FILES .................................................................................................................................. 60
©Streamlabs.com 3
STREAMLABS CHATBOT PYTHON SCRIPTING ................................................................................................. 62
SETUP .................................................................................................................................................................................... 62 CREATING UI : SETTINGS ............................................................................................................................................................ 63 PLACEMENT OF SCRIPTS & NAMING ............................................................................................................................................. 67 BASIC STRUCTURE .................................................................................................................................................................... 68 DATA OBJECT (EXECUTE FUNCTION) ............................................................................................................................................. 70 PARENT OBJECT AKA PARENT ...................................................................................................................................................... 71
STREAMLABS CHATBOT WEBSOCKETS ........................................................................................................... 77
INTRODUCTION ........................................................................................................................................................................ 77 CREATING UI : SETTINGS ............................................................................................................................................................ 77 SETUP .................................................................................................................................................................................... 77 BUILT IN EVENTS ...................................................................................................................................................................... 80
FAQ ................................................................................................................................................................ 89

©Streamlabs.com 4
How to setup Streamlabs
Chatbot?!
Twitch Bot
Step 1: Make sure you’ve made a Twitch.tv account for the bot
Go to Twitch.tv and create a new account for the bot to use.
Step 2: Make sure you’ve signed in to the Bot’s account
Make sure you’re signed in with the bot’s account on Twitch.tv since this will be
connected so the bot actually has a custom username and can chat.
Step 3: Go to Connections
Simply navigate to the bottom left corner of the screen and click on which will
open the Connections window and then click on "Twitch Bot".
Step 4: Generating a Token
Click on Generate Oauth-Token , this will open a the Authorization page on the bot.

©Streamlabs.com 5
Step 5: Click Authorize
Click "Authorize" and this will automatically fill in the token in to the token field.
Step 6: Picking your Connection Type
There are two options here "Regular or Secure". If you connect under Regular you will
be connecting through Port 80. If you decide to connect under Secure you will be
connecting through Port 443.
Step 7: Click Connect
If you’ve done everything correctly your account will be connected to chat. If you get a
pop up telling you the token does not belong to the Twitch name you typed into the
username field then you were probably logged into the wrong account on Twitch.tv.
Twitch Streamer
Step 1: Make sure you’re signed in on Twitch.tv
Make sure you’re signed in with your own account on Twitch.tv since this will be
connected.
Step 2: Go to Connections
Simply navigate to the bottom left corner of the screen and click on which will
open the Connections window and then click on "Twitch Streamer".

©Streamlabs.com 6
Step 3: Generating a Token
Click on Generate Oauth-Token , this will open a the Authorization page on the bot.
Step 4: Click Authorize
Click "Authorize" and this will automatically fill in the token in to the token field.
Step 5: Click Connect
If you’ve done everything correctly your account will be connected to chat. If you get a
pop up telling you the token does not belong to the Twitch name you typed into the
username field then you were probably logged into the wrong account on Twitch.tv.
Step 6: Access to Features
Features such as Host, Follow, Cheer and Subscriber Notifications require you to have
your own Twitch account connected under Twitch Streamer. This will also give you
access to the Dashboard so you can run Commercials if you're partnered or change
your Game & Title and run Auto Hosts from within the bot. Also this is required to check
that your stream is live in order to pay out currency.

©Streamlabs.com 7
Discord Bot
Step 1: Go to this website
Go to https://discordapp.com/developers/applications/me
Step 2: Click on New App
Click on "New App" to start the creation process.
Step 3: Create your Application
In order for the bot to connect to Discord you’ll have to setup an application. This is
what you will be doing on this page. Fill in the AppName this will be the name of your
bot on Discord. I suggest using the same name on Twitch so it’s easier for your viewers.
If you want the bot to have a nice little icon be sure to set it as well. The Description
doesn’t matter too much but you can just put anything you like in there.
©Streamlabs.com 8
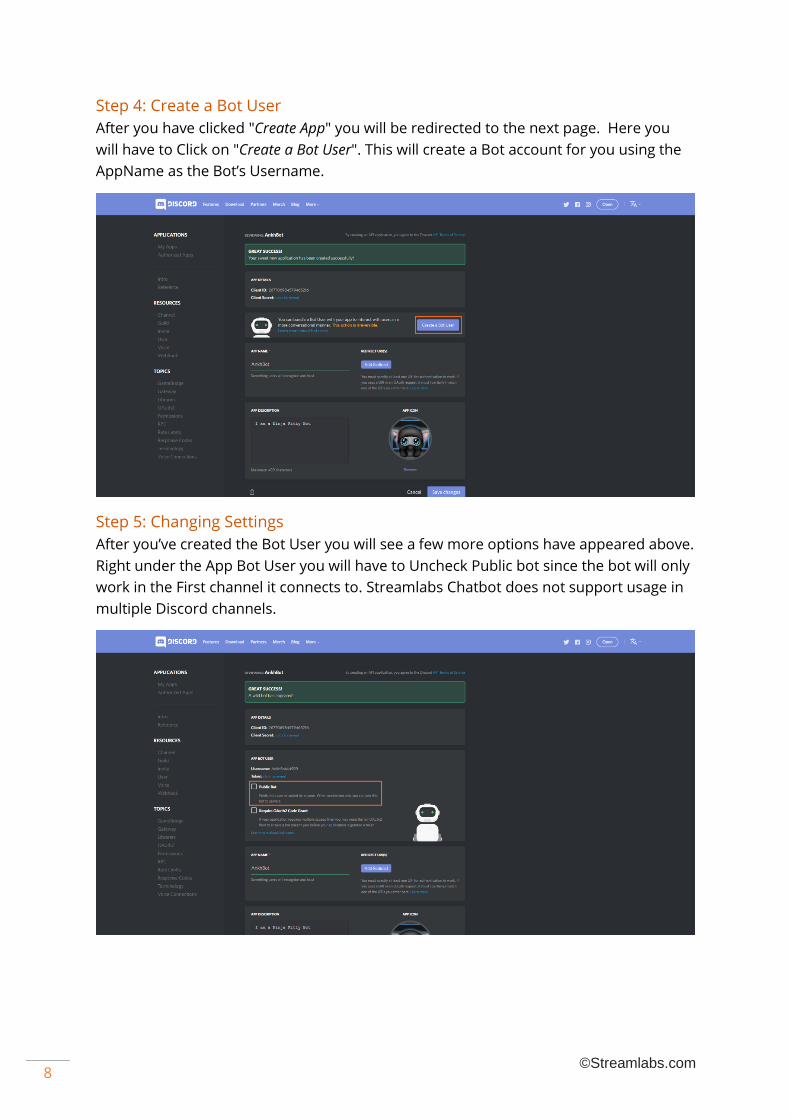
Step 4: Create a Bot User
After you have clicked "Create App" you will be redirected to the next page. Here you
will have to Click on "Create a Bot User". This will create a Bot account for you using the
AppName as the Bot’s Username.
Step 5: Changing Settings
After you’ve created the Bot User you will see a few more options have appeared above.
Right under the App Bot User you will have to Uncheck Public bot since the bot will only
work in the First channel it connects to. Streamlabs Chatbot does not support usage in
multiple Discord channels.

©Streamlabs.com 9
Step 5: Client ID & Token
Click on "click to reveal" right next to the Token of the App Bot User. You will need the
Client ID & Token in the next few steps so be sure to keep this page open.
Step 6: Go to Connections
Simply navigate to the bottom left corner of the screen and click on which will
open the Connections window and then click on "Discord Bot".
Step 7: Enter Client ID & Token
Enter your Client ID into the Client ID field, the Token into the Oauth-Token field. Next
up enter the channel the bot will moderate in, by default this is "bot". This requires the
text channel to actually exist on your discord server.

©Streamlabs.com 10
Step 8: Joining your Discord Server
You’ve done all the hard work now. The only thing that remains to be done is to have
the bot Join your Discord Server. After filling out the fields as specified in the previous
step click on "Join Server".
This will open a web page in which you will be able to pick which server the bot
connects to. Pick the server and finally click on "Authorize".
On a side note the bot will only work in the first server it connects to. So be sure it’s the
right one otherwise you’ll have to ask the server owner to kick the bot from their server
or you have to restart the process by creating a new Application and App Bot User.
Step 9: Connecting the Bot to your Discord Server
Simply click on "Connect" and the bot should connect to Discord if you’ve done
everything correctly.
Step 10: Linking Twitch & Discord Accounts to use Commands
The bot will not reply to users that are attempting to use commands if they’ve not linked
their Twitch and Discord account. This is especially important seeing as the bot needs to
know who the actual user of the command is on Twitch to Display their points, handle
permissions, etc…
This process can be started by DMing the bot on Discord with !linkdiscord. The bot will
tell you to message it something through Twitch Whispers. If that has been done
correctly the accounts will be linked together and the user can use commands just as
they would on twitch.
In case a user wants to unlink their accounts they can simply DM the bot !unlinkdiscord
and it will be done.

©Streamlabs.com 11
GameWisp
Step 1: Make sure you have a GameWisp account
If you’re not partnered on Twitch but you want a way for your Viewers to Subscribe to
you and support you then GameWisp is a good idea. Simply go to http://GameWisp.com
and create an account. If you already have one simply go to Step 2.
Step 2: Go to Connections
Simply navigate to the bottom left corner of the screen and click on which will
open the Connections window and then click on "GameWisp".
Step 3: Generating a Token
Click on "Generate Token" this will open the Authorization page on the bot.

©Streamlabs.com 12
Step 4: Click Authorize
Click "Authorize" and this will automatically fill in the token in to the token field.
Step 5: Click Connect
In case you’re also partnered on Twitch and want GameWisp subscribers to be able to
join Twitch Subscriber giveaways and make use of Twitch Subscriber commands check
the checkbox.
Finally click "Connect" and if everything went well then your GameWisp will be
connected.
Step 6: Refreshing the Database
Next go to the Subscribers tab on the Main UI and click the Refresh button to grab all
your current GameWisp Subscribers.

©Streamlabs.com 13
Streamlabs
Step 1: Go to Connections
Simply navigate to the bottom left corner of the screen and click on which will
open the Connections window and then click on "Streamlabs".
Step 2: Generating a Token
Click on "Generate Token" this will open the Authorization page in on the bot.
Step 3: Click Authorize
Click "Approve" and this will automatically fill in the token in to the token field.
Step 4: Click Connect
Finally click "Connect" and if everything went well then your Streamlabs will be
connected. Now you can set how much someone gains for every $/€/… someone
donates under the currency system.
If you wish for the bot to post an in chat notification then go to Notifications and enable
the Streamlabs Donate Notification.

©Streamlabs.com 14
Spotify
Step 1: Go to Connections
Simply navigate to the bottom left corner of the screen and click on which will
open the Connections window and then click on "Spotify".
Step 2: Generating a Token
Click on "Generate Token" this will open the Authorization page on the bot.
Step 3: Click Authorize
Click "Okay" and this will automatically fill in the token in to the token field.
Step 4: Make sure your Spotify Client is open
If your Spotify Client is not open make sure it's running since the bot will be connecting
to your local client and take control of that to play the songs that're requested or added
to your playlist.
For Spotify to function properly make sure that you DO NOT have Spotify set to Repeat
or Shuffle otherwise this will conflict with Streamlabs Chatbot.
Also be sure to enable the Spotify Web Helpe. This can be enabled by going to Edit ->
Preferences on Spotify. Scroll down to the bottom and Show Advanced settings. In the
©Streamlabs.com 15
Advanced Setting under Startup and Window Behaviour make sure that Allow Spotify to
be opened from the Web is Enabled. Afterwards restart Spotify entirely.
Step 5: Click Connect
Finally click "Connect" and if everything went well then Streamlabs Chatbot will be
connected to Spotify. Now Spotify can be used for Songrequest.
Though there are a few limitations, Volume cannot be controlled from within
Streamlabs Chatbot due to a Limitation on Spotify's end. It is not recommended to
move the seek bar to the end manually on Spotify as this will prevent Streamlabs
Chatbot from moving to the next song by itself.
If you want users to requests songs and use Spotify to play them then you can enable
this under the Songrequest controls.
If you no longer want Streamlabs Chatbot to directly control your Spotify simply
uncheck the box and it will only create a SpotifySong.txt file for you. More info on .txt
files can be found in the GeneratedTextFiles section of the documentation.

©Streamlabs.com 16
Cloud
Step 1: Disclaimer
In order to use this you will either have to have Dropbox, Google Drive or another
similar Cloud service’s client installed on your system.
These services usually come with a dedicated server on your Computer from where
data will automatically be synced to the cloud.
You’ll have to set these up on your own seeing as there are more than enough tutorials
on youtube.
Dropbox: https://www.dropbox.com/install
Google Drive: https://www.google.com/drive/download/
Step 2: Go to Connections
Simply navigate to the bottom left corner of the screen and click on which will
open the Connections window and then click on "Cloud".
Step 3: Picking your Cloud Folder Path
Click on "Pick Folder" and Navigate to Cloud Service of Choice’s Local folder and click
"Save". This is where the bot will be able to output Automated Backups and Excel files
which you can share with the stream.
In case you want the bot to create automated backups check the box and set the
interval of the backups. Do mind though that the bot does not delete older backups so
this is your responsibility. Once in a while be sure to delete some of the older ones so
your Cloud data doesn’t get capped out.
Click "Save Settings" to finish the process.
Step 4: Sharing a Link to Excel Files
Click "Create Excel Files" this will generate 3 excel files based on your data. The
Data.xlxs will contain your Commands, Timers, SFX, Events, Points, Ranks, … As for the
Songlist.xlsx this will contain your Songlist. The Queue.xlsx will contain your Queue.
Now that those files exist navigate to your Cloud folder, right click on the file for which
you want a link.

©Streamlabs.com 17
In case you’re using Dropbox click on "Copy Dropbox Link" this will have a link copied to
your clipboard.
In case you’re using Google Drive click on "Google Drive" -> "Share" -> "Get Shareable Link"
and copy the link.
Now you can either a short link using http://tinyurl.com or use the full link in your
commands.
The Songlist & Queue excel files get updated every 2.5 minutes. The Data files only get
created whenever you click "Create Read Only Excel Files".

©Streamlabs.com 18
OBS Remote
Step 1: Open your Browser
Next up make sure you have the OBS Remote Plugin installed if you do not then go
here: https://obsproject.com/forum/resources/obs-websocket-remote-control-of-obs-
studio-made-easy.466/ and install the plugin.
Step 2: Open OBS
Go to Tools -> Websocket Server Settings inside of OBS and it will pop up a small
window that allows you to configure the OBS Remote Plugin. Set which port you wish to
use there and Enable Authentication. After doing so plug in a password that you wish to
use so only authorized clients may connect to your OBS.
Once you are done just click OK to save your settings.
Step 3: Go to Connections
Simply navigate to the bottom left corner of the screen and click on which will
open the Connections window and then click on "OBS Remote".
Step 4: Fill in the fields
If Streamlabs Chatbot is running on the same PC as your OBS then simply leave the IP to
127.0.0.1 if you are running a two PC setup and OBS is on another system the fill in the
IP of your second PC which is running OBS.
If you changed the port in the OBS Websocket Server Settings then change it here as
well. If you are using Authentication then fill in your password.
Step 5: Click Connect
Finally click connect and the bot will connect to your OBS allowing you to create
commands and scripts which hide/show specific sources, Unmute your mic when you're
being a dummy, Stop your stream when you pass out directly from chat so people can't
watch you snooze away,…

©Streamlabs.com 19
Importing Data from another Bot Simply click on the ? in the top Right -> Open External Bot Importer
DeepBot
In order to import Data from Deepbot you need to have Deepbot Premium. If you have
DeepBot Premium follow these simple steps in order:
1. Open DeepBot
2. Navigate to your Master Settings
3. Look for your API Secret
4. If the secret is empty simply refresh it
5. Copy your API Secret
6. Click Save in the Master Settings
7. Then open Streamlabs Chatbot
8. Plug your API Secret into the API Key Field
9. Select what type of data you wish to Import
10. Click Import to start Importing data
PhantomBot
In order to Import Data from Phantombot you need to navigate to your phantombot.db
file. Once you have done that select which data you want to import and afterwards start
the import by clicking on Import Data.

©Streamlabs.com 20
StreamElements
In order to Import Data from StreamElements you have to retrieve your JWT token from
your StreamElements account page. After you have done this place it in to the JWT
Token field, fill in your channel name ex: ankhheart , select which data you want to
import and start the process by clicking Import Data.
Other
In case you are importing data from a service we are not supporting make use of the
Other tab. Here you will be able to import .txt files for both Quotes & Points. Once you
have select the files that you want to import start the process by clicking Import Data
Points.txt Structure
ankhheart 8500
momo 3450
castorr91 500
Quotes.txt Structure
"I am a cat!" – AnkhHeart
"I am a cow!" – Momo
"This is me saying something stupid/funny!" – AnkhHeart

©Streamlabs.com 21
Features
Console
On the console you will see all the incoming chat messages and the viewer list. In case
you dislike seeing who’s watching you can simply click the small button left of the viewer
list to dock it to the side.
Aside from this at the top of the console you have access to Macro buttons which you
can bind commands to. Further in the document this will be explained in more detail.

©Streamlabs.com 22
Dashboard
In order to access the full capability of the Dashboard you need to have your own
Twitch account connected under Connections -> Twitch Streamer. This should be done
if you followed the entire setup guide in the beginning.
This is where you will be able to change your Title & Game, run commercials if you’re
partnered with Twitch, have the bot automatically host streams of your choosing and
where the bot will track news Followers, Subscribers, Raiders, Hosts and GameWisp
Subscribers.
We also have Raid Assist which is a system which allows you to reward viewers for
joining you on a raid.
The Session Event View which is located at the bottom of the Dashboard will have to be
manually cleared before each stream by right clicking and Clearing the data. Otherwise
new Hosts, Raids, Subs/Resubs won't be logged if they're done by the same person.
!Status (message) [EDITOR]
Example !Status [24h] Charity Stream!
Response {user} -> Title has been updated: [24h] Charity Stream! !Game (message) [EDITOR]
Example !Game The Last of Us
Response {user} --> Game has been updated: The Last of Us !StartHost [EDITOR]
Example !StartHost
Response {user} --> Started Automated Hosting! !StopHost [EDITOR]
Example !StopHost
Response {user} --> Stopped Automated Hosting!
©Streamlabs.com 23
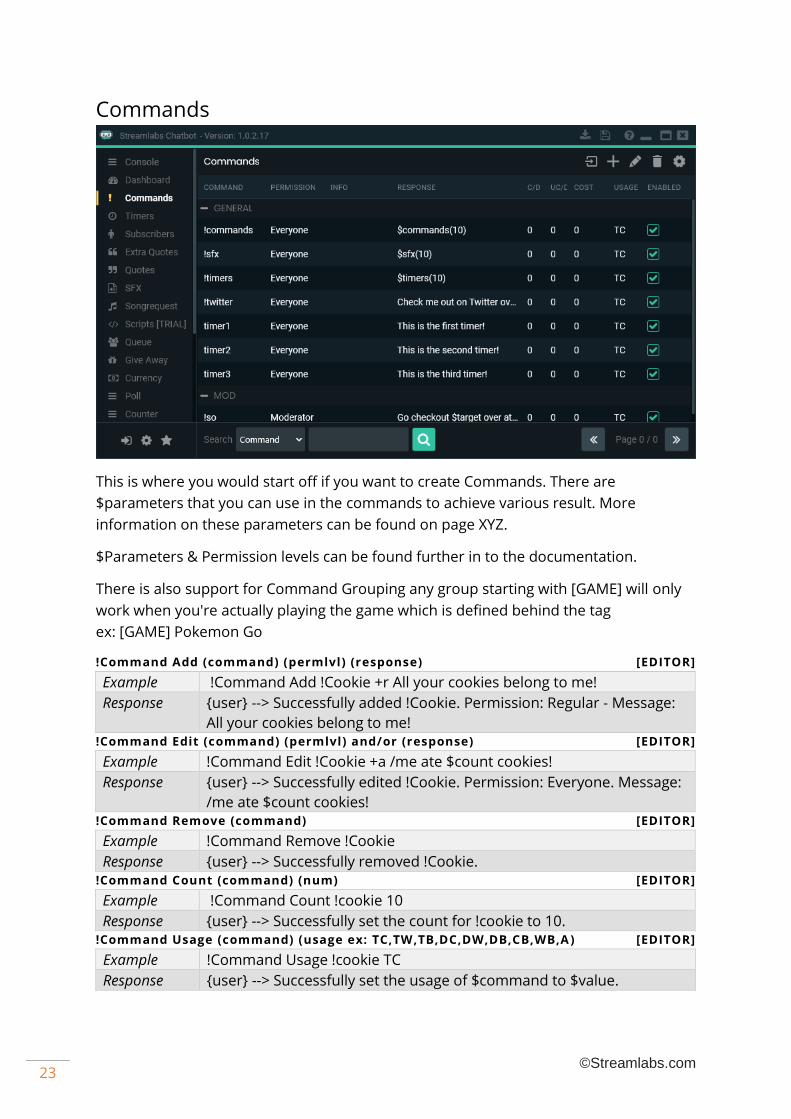
Commands
This is where you would start off if you want to create Commands. There are
$parameters that you can use in the commands to achieve various result. More
information on these parameters can be found on page XYZ.
$Parameters & Permission levels can be found further in to the documentation.
There is also support for Command Grouping any group starting with [GAME] will only
work when you're actually playing the game which is defined behind the tag
ex: [GAME] Pokemon Go
!Command Add (command) (permlvl) (response) [EDITOR]
Example !Command Add !Cookie +r All your cookies belong to me!
Response {user} --> Successfully added !Cookie. Permission: Regular - Message:
All your cookies belong to me! !Command Edit (command) (permlvl) and/or (response) [EDITOR]
Example !Command Edit !Cookie +a /me ate $count cookies!
Response {user} --> Successfully edited !Cookie. Permission: Everyone. Message:
/me ate $count cookies! !Command Remove (command) [EDITOR]
Example !Command Remove !Cookie
Response {user} --> Successfully removed !Cookie. !Command Count (command) (num) [EDITOR]
Example !Command Count !cookie 10
Response {user} --> Successfully set the count for !cookie to 10. !Command Usage (command) (usage ex: TC,TW,TB,DC,DW,DB,CB,WB,A ) [EDITOR]
Example !Command Usage !cookie TC
Response {user} --> Successfully set the usage of $command to $value.

©Streamlabs.com 24
!Enable (command) (true/false) [EDITOR]
Example !Enable !cookie true
Response {user} --> Succesfully enabled !Cookie !Command Cooldown (command) (minutes) [EDITOR]
Example !Command Cooldown !cookie 2
Response {user} --> Successfully set the cooldown of !cookie to 2. !Command UserCooldown (command) (minutes) [EDITOR]
Example !Command Cooldown !cookie 5
Response {user} --> Successfully set the user cooldown of !cookie to 5.
Sharing Commands
If you wish to share commands with your fellow streamer you can export them as
.abcom (Streamlabs Chatbot Command) or .abcomg (Streamlabs Chatbot Command
Group) by right clicking on a command. You have two options Export Command to
export the single command or Export Group to Export all commands in that specific
Group.
Importing Commands
Importing a script is simple. Simply click the Import Button in the Command Tab,
Navigate to the Zip File and Open it. Afterwards the bot will import the script for you
and reload your scripts so it's ready to go.

©Streamlabs.com 25
Timers
This is where you will create your own Timers. These are messages that the bot will
automatically post into chat after an interval of X minutes. The interval is completely
based on the Setting at the top.
All the timers will follow this same interval so this means the bot will post the first timer
after the interval passes. Then it will start timing again, once the interval passes again it
will post the second timer and so on eventually going through all of them and then
starting back at the top.
There is also support for Timer Grouping any group starting with [GAME] will only
trigger when you're actually playing the game which is defined behind the tag
ex: [GAME] Pokemon Go
!Timer Add (name) (response) [EDITOR]
Example !Timer Add !Meow /me meows at $randuser
Response {user} --> Successfully added !meow. Permission: Everyone - Message:
/me meows at $randuser !Timer Edit (name) (response) [EDITOR]
Example !Timer Edit !Meow /me growls at $randuser
Response {user} --> Successfully edited !Meow. Message: /me growls at
$randuser !timer remove (name) / Doesn’t remove command [Ed !Timer Remove (name) [EDITOR]
Example !Timer Remove !Meow
Response {user} --> Successfully removed !Meow. !Activate (name) (true/false) [EDITOR]
Example !Activate !Meow false
Response {user} --> Succesfully de-activated !Cookie

©Streamlabs.com 26
Quotes
This is where things you’ve said on stream can be stored. You can change the
permission on who can request a random quote and who can add them for you
through chat.
You can also set the Cooldown and the Date Format. Every quote that gets added will
automatically contain the Game & Date when the quote was created. So whenever
someone calls upon the random quote they’ll see when it happened and what you were
playing at the time.
!Quote Add (text) [ADD PERMISSION]
Example !Quote Add "I am a cat!" - AnkhHeart
Response {user} --> Succesfully added Quote #0: "I am a cat!" – AnkhHeart [Thief]
[01/01/2015] !Quote Edit (id) (text) [EDITOR]
Example !Quote Edit 0 "I am not a cat!" – AnkhHeart [Thief] [02/01/2015]
Response {user} --> Successfully edited Quote #0: "I am not a cat!" – AnkhHeart
[Thief] [02/01/2015] !Quote Remove (id) [EDITOR]
Example !Quote Remove 0
Response {user} --> Successfully deleted Quote #0 !Quote [VIEW PERMISSION]
Example !Quote
Response Quote #2: "Duct tape solves all problems!" - AnkhHeart !Quote (id) [VIEW PERMISSION]
Example !Quote 0
Response Quote #0: "I am not a cat!" - AnkhHeart

©Streamlabs.com 27
Extra Quotes
Using the Extra Quotes you can create your own version of the Quote System to store
things that aren’t specifically quotes. You can change the command, decide whether you
want the Game & Date to show or not, change the Permissions and Response.
The underlying chat commands function the same way except if you do change the
command you will also have to adjust the commands. By default this is !Gif if you
change it to !Pun then you will have to use the commands starting with !Pun instead of
!Gif.
!Gif Add (text) [ADD PERMISSION]
Example !Gif Add http://tinyurl.com/randomGif.gif
Response {user} --> Succesfully added Gif #0: http://tinyurl.com/randomGif.gif !Gif Edit (id) (text) [EDITOR]
Example !Gif Edit 0 http://tinyurl.com/randomGif2.gif
Response {user} --> Successfully edited Gif #0: http://tinyurl.com/randomGif2.gif !Gif Remove (id) [EDITOR]
Example !Gif Remove 0
Response {user} --> Successfully deleted Gif #0 !Gif [VIEW PERMISSION]
Example !Gif
Response Gif #2: http://randomURL.com/randomGif15.gif !Gif (id) [VIEW PERMISSION]
Example !Gif 0
Response Gif #0: http://randomURL.com/randomGif2.gif

©Streamlabs.com 28
Counter
You can use the Counter to create a Death Counter, Hug Counter, Cookie Counter, etc..
It’s used to count anything. You can change the settings to your liking just be sure to
keep a # in the Msg Template since this will be replaced by the number.
In case you want to use the Counter but do not want to Capture the Display Area you
can make use of a Death.txt file that is Located in the Bot’s Install Directory -> Twitch ->
Files Folder.
This file will be generated when you’ve added your first death. If you want to manually
create this file then simply type !death 0 in chat. This will create the file with 0 Deaths
inside. Do mind though if you changed the Command to something else you will have to
use that instead.
!Death + [MOD]
Example !Death +
Response [Increased] Deaths: 124 !Death - [MOD]
Example !Death -
Response [Decreased] Deaths: 123 !Death (num) [MOD]
Example !Death 10
Response [Set] Deaths: 10 !Death [EVERYONE]
Example !Death
Response Deaths: 10

©Streamlabs.com 29
Give Away
This is where you will be able to start Give Aways. You can either have people join the
Give Away for free or have them pay a fee to enter or have them pay per ticket using in
Channel Currency.
On the left side you will find all the people that are entered in the Give Away and how
many tickets they possess. At the bottom of the window you will see all the messages
posted by the Winner when one has been picked. That way you’ll know if the user is
active in case chat is moving really quickly.
!Giveaway Start Command|Prize|MaxEntriesPerUser|EntryCost|Permission [EDITOR]
Example !Giveaway Start !raffle|cookies|1|25|regular
Description This starts a giveaway through chat with your own settings !GiveAway Start Command|Prize|Permission [EDITOR]
Example !Giveaway Start !raffle|cookies|everyone
Description This starts a very simple give away without tickets and entry costs !GiveAway Close [EDITOR]
Example !Giveaway Close
Description Prevents anyone from entering past this point !GiveAway Winner [EDITOR]
Example !Giveaway Winner
Description Randomly picks the winner for the Give Away

©Streamlabs.com 30
SFX
The SFX System is an interactive System that allows anyone of your choosing to trigger
Sound Effects. This is a great way for your viewers to interact with you and the game
that you’re playing. In case you’re playing a Scary Game you could fill it with scary
sounds and have your viewers scare you when you least expect it.
In case you don’t want people to spam SFX then you can set a cooldown on the
command. You can also add a cost to the SFX so they have to spend their in channel
currency.
The User Delay is a delay that gets put on each person if they just used a SFX. This
prevents them from going down the list of all your SFX and triggering each one in quick
succession.
If you don’t want a SFX to trigger when a single person does it then you can set the Min
Votes. Which is the minimum amount of people that have to use the command before it
triggers.
There is also support for Command Grouping any group starting with [GAME] will only
work when you're actually playing the game which is defined behind the tag
ex: [GAME] Pokemon Go

©Streamlabs.com 31
Currency
If the currency System is enabled everyone in your chat will start earning points based
on your settings. These can be spent using the various other Systems in the bot such as
Give Aways, SFX, Bet/Vote and enter Minigames.
The bot also supports Streamlabs currency. For this you need to connect Streamlabs
and enable this functionality in your currency settings inside of the bot.
You can create up to four Ranking Trees: One for Viewers, Subscribers, Mods and
GameWisp Subscribers. Ranks are only assigned whenever the bot pays out points or
when you use !points add +viewers 1 for example.
There is also room for customizing your own Payout amounts and intervals. This way
you have full control over how many points people can accumulate in your stream.
If the Offline Payout amount is set to 0 the bot will not pay out any points with the
stream is offline. Also replace !points with your own custom currency command.
!Points Add (name) (amount) [EDITOR]
Example !Points Add AnkhHeart 10000
Response {user} --> Successfully given AnkhHeart 10000 Points !Points Remove (name) (amount) [EDITOR]
Example !Points Remove AnkhHeart 1234
Response {user} --> Successfully removed 1234 Points from AnkhHeart !Points Add +Viewers / +active (amount) [EDITOR]
Example !Points Add +viewers 100
Response {user} --> Done giving 100 Points to everyone in chat !Points Remove +Viewers / +active (amount) [EDITOR]
Example !Points Remove +viewers 100
Response {user} --> Done removing 50 Points from everyone in chat

©Streamlabs.com 32
!Points [EVERYONE]
Example !Points
Response AnkhHeart [Ninja Kitty] - Hours: 13 - Points: 1337
!Transfer [EDITOR]
Example !Transfer AnkhHeart MohammedBaraax1
Response {user} --> Successfully transferred currency from AnkhHeart to
MohammedBaraax1

©Streamlabs.com 33
Betting
Using the Betting System you can open up the ability for Viewers to bet on the outcome
of situations. These options can be saved into a present and loaded later in case you are
playing the same game again.
If you wish to pick a winning option simply right click on the option and Pick it as the
Winner. In case there are multiple correct Options this can be done for each of them.
!Bet (id) (amount) [EVERYONE]
Example !Bet 0 1000
Response [None to prevent chat spam from the bot] !Betting Start BettingOn|PayoutPercent|Min|Max|MultiBetting|Options [EDITOR]
Example !Betting Start Will Ankh Survive?|35|1|100|true|Yes|No|Maybe
Description This starts a custom betting session with custom settings !Betting Start BettingOn|Options [EDITOR]
Example !Betting Start Will Ankh Survive?|Yes|No|Maybe
Description This starts a custom betting session that will use the settings that have
been set in the UI !Betting Stop [EDITOR]
Example !Betting Stop
Description Prevents anyone from betting once used !Betting Abort [EDITOR]
Example !Betting Abort
Description Cancels betting entirely and refunds anyone that has bet !Betting Winner (id) [EDITOR]
Example !Betting Winner 0
Description Picks the winning option and pay out points to everyone that bet on it

©Streamlabs.com 34
Poll
The Poll System allows you to start a poll in your channel and have your viewers vote. In
case you want people to spend points for each vote they cast then you can enable this
by checking Allow Multi Voting and increase the limit.
!Vote (id) [VOTE PERMISSION]
Example !Vote 1
Response [None to prevent chat spam from the bot] !Poll Start VotingOn|Cost|MaxVotes|MultiVoting|Options [EDITOR]
Example !poll start What Game should I play Next?|10|1|false|Witcher
III|Pokemon
Description This starts a custom poll with your own settings (overwrites UI
settings) !Poll Start VotingOn|Options [EDITOR]
Example !poll start What Game should I play Next?|Witcher III|Pokemon
Description This starts a custom poll that will use the settings that have been set in
the UI !Poll Stop [EDITOR]
Example !Poll Stop
Description Ends the poll and posts the result in chat

©Streamlabs.com 35
Minigames - Heist
The Group Minigame allows you to create your own Minigame. You can start the
customization by determining the Command that will be used, what the cooldown is,
how many users have to enter before it starts, the Max amount someone can invest and
who can Join.
Aside from all those options you can set the Probability for each usergroup. This
determines how much chance people within that usergroup have to survive. The Payout
can also be set that way you can choose how much someone gets ontop of the amount
they invested in the minigame.
Finally you can fully customize all the messages that the bot will be posting in chat
depending on the situation and how well/bad things are going for the ones that have
joined. So if you wanted you could turn it into something completely different and not
use the default Heist preset.
!Heist (amount) [JOIN PERMISSION]
Example !Heist 123
Response(1x) {user} is trying to get a team together in order to hit the nearest bank.
-Everyone can Join!- In order to join type !Heist (amount).
©Streamlabs.com 36
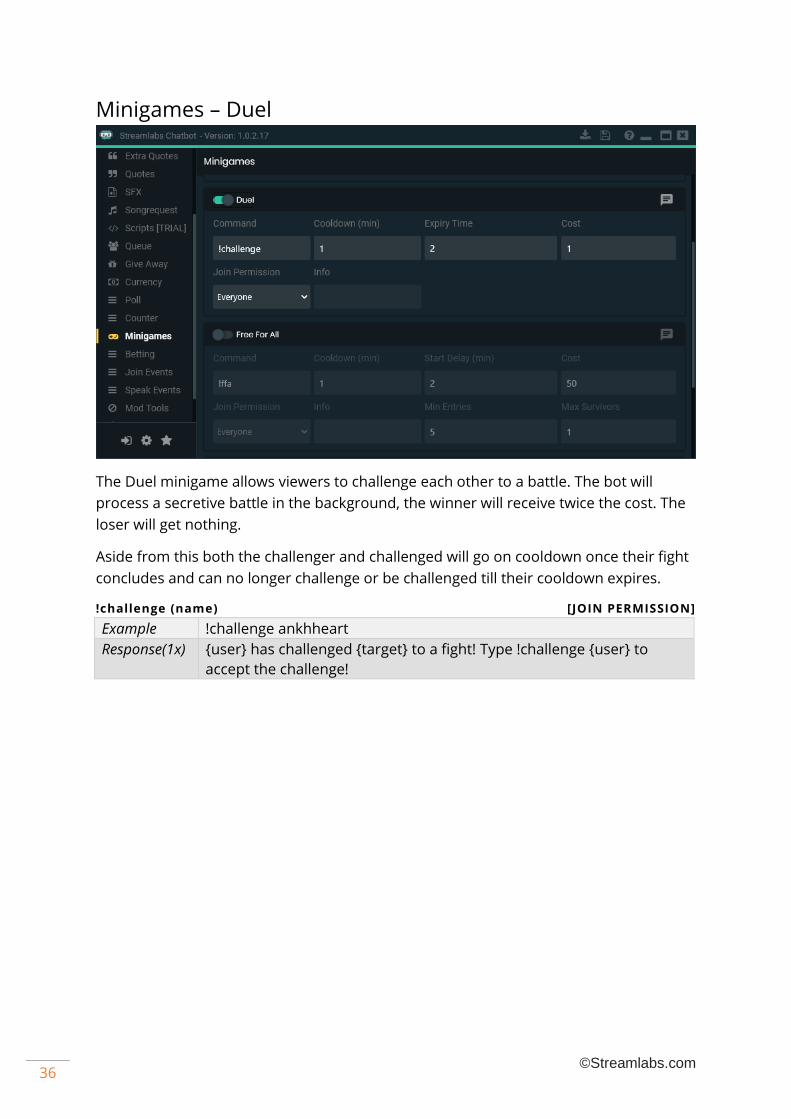
Minigames – Duel
The Duel minigame allows viewers to challenge each other to a battle. The bot will
process a secretive battle in the background, the winner will receive twice the cost. The
loser will get nothing.
Aside from this both the challenger and challenged will go on cooldown once their fight
concludes and can no longer challenge or be challenged till their cooldown expires.
!challenge (name) [JOIN PERMISSION]
Example !challenge ankhheart
Response(1x) {user} has challenged {target} to a fight! Type !challenge {user} to
accept the challenge!
©Streamlabs.com 37
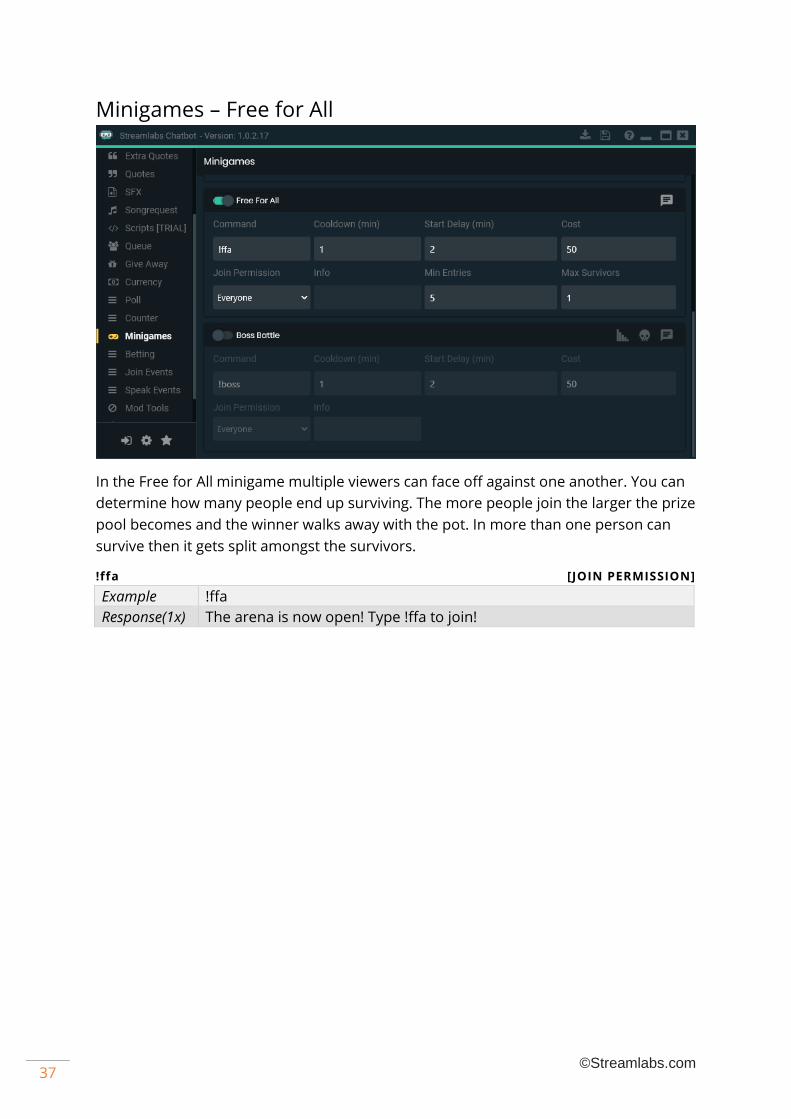
Minigames – Free for All
In the Free for All minigame multiple viewers can face off against one another. You can
determine how many people end up surviving. The more people join the larger the prize
pool becomes and the winner walks away with the pot. In more than one person can
survive then it gets split amongst the survivors.
!ffa [JOIN PERMISSION]
Example !ffa
Response(1x) The arena is now open! Type !ffa to join!

©Streamlabs.com 38
Minigames – Boss Battle
This allows you to create custom bosses for your viewers to fight based on how many
people join. The difficulty / loot is completely up to you do mind that balancing it fairly is
also your responsibility.
The Basics:
Balancing of the minigame is completely up to you so let's go down some of the basic
concepts so you know how it functions in the background. That way you can determine
what values would be best.
1) Players sign up for the battle and get a Stat sheet assigned based on their
permission
2) Boss gets picked based on the group size (Between Min – Max Entries)
3) The fight starts against the boss
4) Damage Calculation: (User Attack – Target Defense) ex: 10 att – 5 def = 5 dmg that
the target will receive
5) Attack order: The boss has to be attacked 3 times before it counters the last
attacker. So let's say we have a group with Ankh, Momo and Gooru and Ankh attacks
first and then Momo and then Gooru. After Gooru finishes his attack he would get
countered by the boss and be the only person to receive damage. Now prior to
every attack phase taking place the order of people attacking will be shuffled so it's
not always the same person getting countered.

©Streamlabs.com 39
6) Make sure to keep the Boss's Defense lower than Player's Attack at all times so they
at least have a chance to beat him
7) Balance the health based on the Min – Max Entries for this you will have to do a bit
of math yourself based on the prior information given such as: Dmg Calculation and
Attack Order
8) The Max Defense a player/boss can have is half their attack if this is higher than it
will be capped out during calculation at 50%
9) Loot will get distributed evenly amongst all of the survivors at the end. In case no
one survives then there is no loot to be distributed
!boss [JOIN PERMISSION]
Example !boss
Response(1x) {user} is trying to get a group of adventurers together to fight a boss!
Type !boss to join him!

©Streamlabs.com 40
Events
The Event System will allow the bot to automatically Greet/Shoutout the person of your
choice and play a SFX if you wish. The system consists of two modes Join events and
Speak events.
Join Events will perform its action when the person of your choice joins the channel.
Then it will post its message and/or play its SFX.
Speak Events will perform its action when the person of your choice speaks in your
channel for the first time. Then it will post its message and/or play its SFX.
In order for the bot to re-execute the events it has to be restarted. So the best thing is
to restart it before a cast.

©Streamlabs.com 41
Songrequest
The Song Request System allow you to create your own youtube and/or spotify playlist
through the bot have them play whenever you want. Aside from that your viewers can
request songs and spend currency to do so.
!Songrequest (url/token) [REQUEST PERMISSION]
Example !Songrequest TY9cSlOhqTk
Response {user} --> The song Amv - [MEP] Ѕο Lοng Ѕеntimеnt 720p has been
added to the queue !Skip [SKIP PERMISSION]
Example !Skip
Response {user} --> Your vote to skip has been successfully registered! !Veto [VETO PERMISSION]
Example !Veto
Response Amv - [MEP] Ѕο Lοng Ѕеntimеnt 720p has been successfully skipped! !Songblacklist add (id) [EDITOR]
Example !songblacklist add dQw4w9WgXcQ
Response {user} --> dQw4w9WgXcQ has been successfully Blacklisted! !Songblacklist remove (id) [EDITOR]
Example !songblacklist remove dQw4w9WgXcQ
Response {user} --> dQw4w9WgXcQ has been successfully Un-Blacklisted! !WrongSong [EVERYONE]
Example !WrongSong
Response {user}, Successfully removed the last song you requested. !Songlist
Example !Songlist
Note If you have Setup Cloud Syncing you should be able to get a Share link
to the Songlist.xlsx file which you can use to create the !songlist
command.

©Streamlabs.com 42
!Volume (number) [EDITOR]
Example !Volume 50
Response {user}, Volume set to 50
Queue
You can setup a Game Queue using this which allows your viewers to sign up to join you
in a multiplayer game. You can have them spend currency to enter and you can even set
it to Sub only in case you only want Subscribers to be able to sign up.
!Join <note> [EVERYONE]
Example !Join AnkhHeart#4798
Response [None unless enabled under Settings -> Localization] !Queuelist [EVERYONE]
Example !QueueList
Note If you have Setup Cloud Syncing you should be able to get a Share link
to the Queue.xlsx file which you can use to create the !Queuelist
command. !Queue Open <game> [EDITOR]
Example !Queue Open Warframe
Response A queue has opened up for: Warframe - Cost: 0 points - Type !join
(optional:Note) to join! !Queue Close [EDITOR]
Example !Queue Open Warframe
Response The queue has been closed! You can no longer enter! !Queue Clear [EDITOR]
Example !Queue Open Warframe
Response The Queue has been cleared!

©Streamlabs.com 43
Notifications
You will find various in Chat Notifications here ranging from Follower, Host, Subscriber
Notifications to GameWisp Notifications. You can customize each of these to your liking.
The Subscriber Notification & Cheer Notification are only available if you have
connected your account under Connections -> Twitch Streamer.
The GameWisp Subscriber Notification is only available if you have connected your
Gamewisp under Connections -> GameWisp.

©Streamlabs.com 44
Mod Tools
Using the Mod Tools you can have the bot punish viewers that post Links without
permission, Spam Caps/Symbols or very offensive words/sentences.
Each of these can be fully customized. When it comes to Link Protection you can exempt
certain websites from being punished.
For the Word/Sentence Blacklist you can also make use wildcards such as * or ?. More
information about Wildcards can be found on the internet ex:
https://en.wikipedia.org/wiki/Wildcard_character
©Streamlabs.com 45
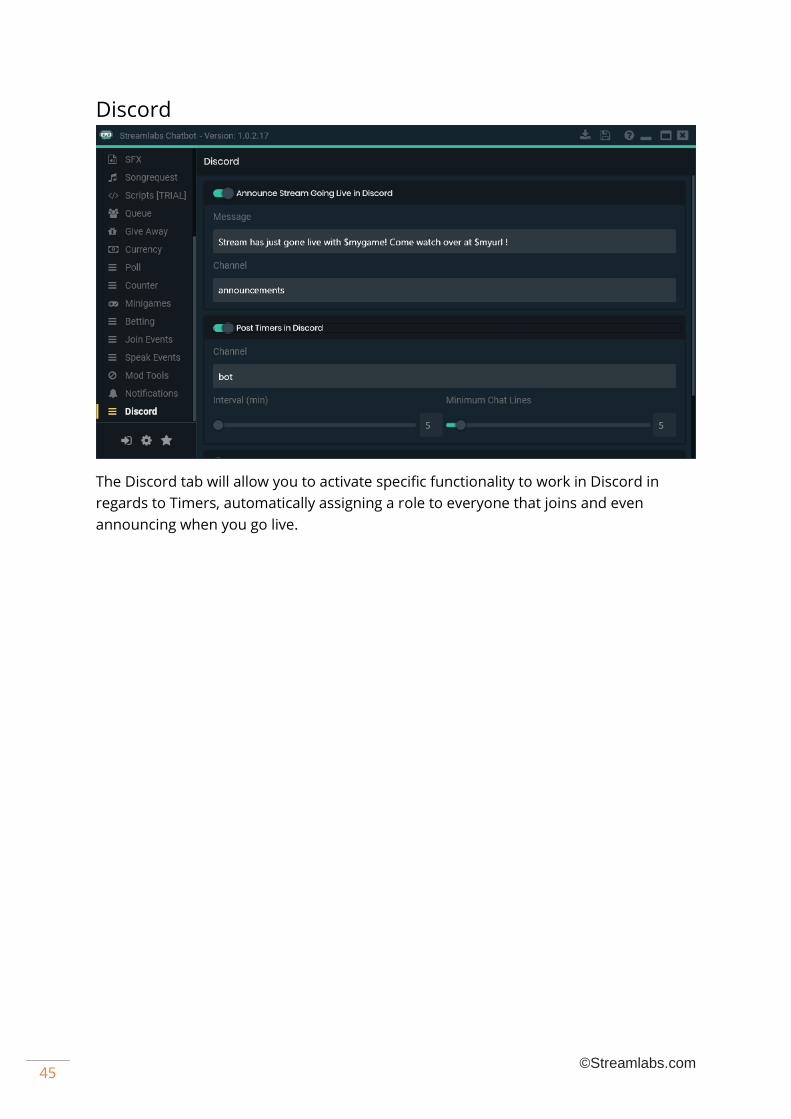
Discord
The Discord tab will allow you to activate specific functionality to work in Discord in
regards to Timers, automatically assigning a role to everyone that joins and even
announcing when you go live.

©Streamlabs.com 46
Settings
General
In the General Settings you will find some basic functionality such as the delay between
bot messages. Whether the bot should display Cooldown messages for commands or if
it should automatically connect when you open it up,…
Aside from this you can also setup a !raider command that can be used by Mods to save
out a list of users that have raided your channel. These users will also get added to the
Data.xlsx file in your Cloud folder if you have set that up.
This is also the location where you can add/remove Regulars, Blacklist users from using
certain functionality in the bot and add Editors.
Bot Editors are not the same as Twitch Editors so in order for mods to use certain
commands in the bot that are marked as EDITOR they will need to be added to the list.
This gives them access to all the chat based Streamlabs Chatbot Commands such as
adding/removing points, commands, timers, etc..
Simply have all the Editors you’ve added read the Streamlabs Chatbot Documentation
so they’re up to speed about which commands they can use.
!Reg Add/Remove (Name) [EDITOR]
Example !Reg Add AnkhHeart / !Reg Remove AnkhHeart
Response AnkhHeart has become a Regular! / AnkhHeart is no longer a Regular. !Sub Add/Remove (Name) [EDITOR]
Example !Sub Add AnkhHeart / !Sub Remove AnkhHeart
Response AnkhHeart has become a Subscriber! / AnkhHeart is no longer a
Subscriber. !Blacklist Add/Remove (Name) [EDITOR]

©Streamlabs.com 47
Example !Blacklist Add AnkhHeart / !Blacklist Remove AnkhHeart
Response AnkhHeart has been Blacklisted! / AnkhHeart has been removed from
the Blacklist.

©Streamlabs.com 48
Localization
Within the Localization you have the ability to change any of the default responses
though try to keep most of the $parameters unless you really don’t want them to be
there.
Usage
Within the Usage you can change where and how commands can be used. Whether it
be Chat, Whispers or Discord or everywhere.
In the Core you can determine if users have to be in your Channel to use Whisper
commands with the bot or not.

©Streamlabs.com 49
Macros
This is where you are able to setup Macros for the 7 buttons in the Console UI. It’s a
simple way to setup a few buttons to automatically post commands / messages in chat
for you when you click them.
Hotkeys
Using the Hotkeys you can set up Global Hotkeys for various actions within the bot such
as Pausing a song, adding it to your playlist, skipping, increasing the volume,… Aside
from this you’re also able to setup Hotkeys for the previously Mentioned Macros so you
don’t have to click the buttons yourself. You can just hit your hotkey and it will execute
them for you. Also don't forget to click Apply at the bottom to save your Hotkeys

©Streamlabs.com 50
Style
In case you’re unhappy with the colours of Streamlabs Chatbot’s UI then this is where
you would go. You can change every single colour here though you have to set the Style
to Custom. Once you’re done with your changes and you like the result simply click on
Save Custom Style and it will be saved.
ChangeLogs This is where you will be to read up on the Changelogs in case you didn't read them
prior to updating to a newer version.

©Streamlabs.com 51
Permission Levels +a
Description Everyone +r
Description Regular +s
Description Subscriber +gw
Description GameWisp Subscriber +m
Description Moderator +e
Description Editor +i
Description Invisible +u(name) ex: +u(ankhheart)
Description User_Specific: AnkhHeart +r(MinRank) ex: +r(Lion)
Description Min_Rank: Lion +p(MinPoints) ex: +p(1000)
Description Min_Points: 1000 +h(MinHours) ex: +h(13)
Description Min_Hours: 13
Usage Levels TC
Description Twitch Chat TW
Description Twitch Whisper TB
Description Twitch Both DC
Description Discord Chat DW
Description Discord Whisper DB
Description Discord Both CB
Description Chat Both WB
Description Whisper Both A
Description All
©Streamlabs.com 52
Parameters
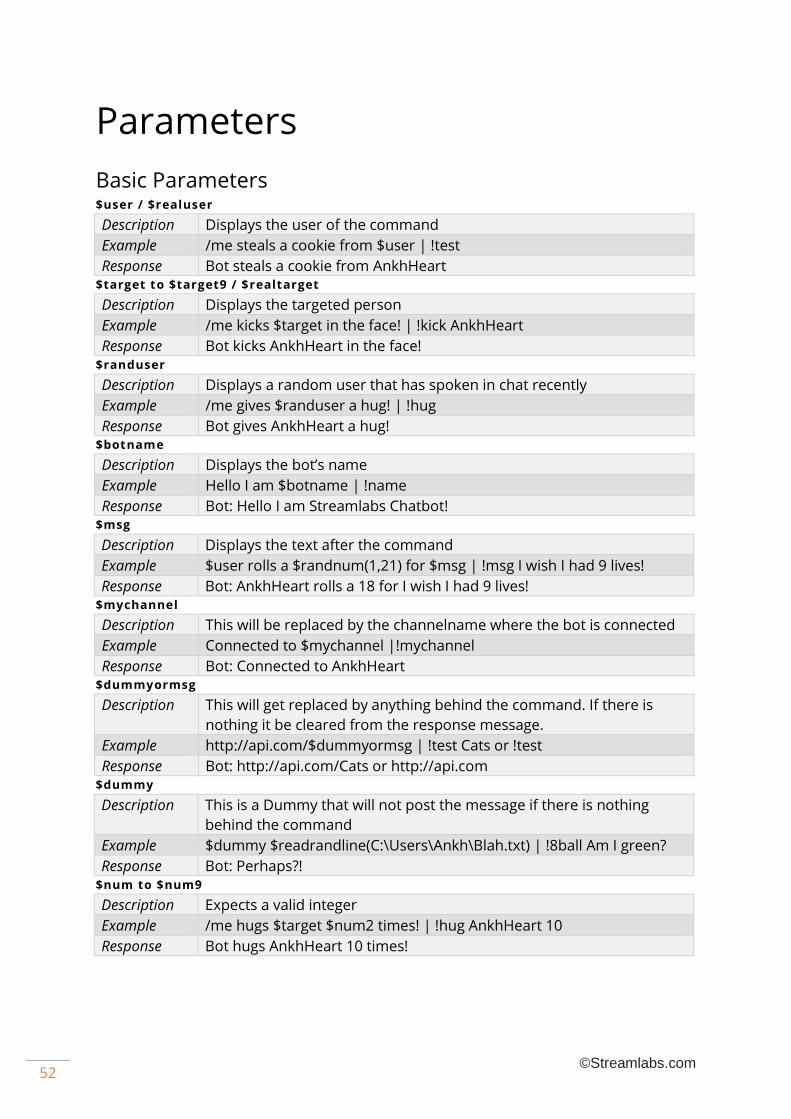
Basic Parameters $user / $realuser
Description Displays the user of the command
Example /me steals a cookie from $user | !test
Response Bot steals a cookie from AnkhHeart $target to $target9 / $realtarget
Description Displays the targeted person
Example /me kicks $target in the face! | !kick AnkhHeart
Response Bot kicks AnkhHeart in the face! $randuser
Description Displays a random user that has spoken in chat recently
Example /me gives $randuser a hug! | !hug
Response Bot gives AnkhHeart a hug! $botname
Description Displays the bot’s name
Example Hello I am $botname | !name
Response Bot: Hello I am Streamlabs Chatbot! $msg
Description Displays the text after the command
Example $user rolls a $randnum(1,21) for $msg | !msg I wish I had 9 lives!
Response Bot: AnkhHeart rolls a 18 for I wish I had 9 lives! $mychannel
Description This will be replaced by the channelname where the bot is connected
Example Connected to $mychannel |!mychannel
Response Bot: Connected to AnkhHeart $dummyormsg
Description This will get replaced by anything behind the command. If there is
nothing it be cleared from the response message.
Example http://api.com/$dummyormsg | !test Cats or !test
Response Bot: http://api.com/Cats or http://api.com $dummy
Description This is a Dummy that will not post the message if there is nothing
behind the command
Example $dummy $readrandline(C:\Users\Ankh\Blah.txt) | !8ball Am I green?
Response Bot: Perhaps?! $num to $num9
Description Expects a valid integer
Example /me hugs $target $num2 times! | !hug AnkhHeart 10
Response Bot hugs AnkhHeart 10 times!

©Streamlabs.com 53
$randnum(max) or $randnum(min,max)
Description Displays a random number in a specified range
Example /me rolls a $randnum(1,7)! | !roll
Response Bot rolls a 3! $randquote
Description Displays a random quote
Example $randquote | !randquote
Response Bot: I am not a cat! – AnkhHeart [Thief] [01/01/2015] $randextra $randextra
Description Displays a random value from the extra quotes
Example $randextra | !randgif
Response Bot: http://randomURL.com/gif12.gif $quotes
Description Displays the amount of quotes
Example There are $quotes quotes. | !quotes
Response Bot: There are 123 quotes. $maxquotes
Description Displays the highest number quote
Example There are $quotes quotes. Ranging from 0 to $maxquotes. | !quotes
Response Bot: There are 123 quotes. Ranging from 0 to 122. $count
Description Counts amount of times a command has been used
Example /me has $count jars of salt. | !count
Response Bot has 3 jars of salt. | Bot has 4 jars of salt. | Bot has 5 jars of salt |
etc… $checkcount(command)
Description Displays the count of a specific command
Example Cookie Count: $checkcount(!cookie) | !check
Response Bot: Cookie Count: 10 $commands(NumCommandsPerPage)
Description Displays a list of all available commands for the user
Example Commands: $commands(3) | !commands or !commands
(PageNumber)
Response Bot: Commands: !Cookie, !Slap, !Caster [Page 0/2] $queuepos(target)
Description This will display the target’s position in the queue
Example $user you are in Position $queuepos($user) | !MyPos
Response AnkhHeart you are in Position 1 $queue(amount)
Description This will display the first X amount of people in the queue
Example Next Up in Queue: $queue(3) | !NextUp
Response Next Up in Queue: #0 mohammedbaraax1, #1 ankhheart, #2
gamegooru21

©Streamlabs.com 54
$timers(NumTimersPerPage)
Description Displays a list of all available Timers
Example Timers: $timers(3) | !timers or !timers (PageNumber)
Response Bot: Timers: !ctt, !twitter, !youtube [Page 0/1] $date
Description Displays the Date based on the format under Quote Settings
Example Currently it is $date
Response Bot: Currently it is 08/09/2015 $sfx(NumSFXPerPage)
Description Displays a list of all available SFX for the user
Example SFX: $sfx(3) | !sfx or !sfx (PageNumber)
Response Bot: SFX: !scream, !pika, !morph [Page 0/0] $time
Description Displays the caster’s time
Example Currently it is $time over at AnkhHeart’s part of the world.
Response Bot: Currently it is 10:20 PM over at AnkhHeart’s part of the world. $currencyname
Description Displays currencyname
Example In this channel you can collect $currencyname | !currency
Response Bot: In this channel you can collect Cookies! $currentsong and $requestedby
Description Return the current song that is being played through songrequest
Example Current Song: $currentsong – Requested By $requestedby|
!currentsong
Response Bot: Current song: ONE MORE FIGHT – Requested By AnkhHeart $nextsong and $nextrequestedby
Description Return the current song that is next in queue
Example Next Song: $nextsong – Requested By $nextrequestedby| !nextsong
Response Bot: Next song: ONE MORE FIGHT – Requested By AnkhHeart $countdown(12:00 AM) or $countdown(04/05/2015 12:00 AM)
Description Allows you to start a countdown from the current time to the set
time/date
Example $countdown(04/05/2015 12:00 AM) | !sleep
Response Bot: 1 day 2 hours 48 minutes 36 seconds $countup(12:00 AM) or $countup(04/05/2015 12:00 AM)
Description Allows you to set a start date for when the bot should start counting
Example $countup(07/03/2016 12:00 AM) | !UsingStreamlabs Chatbot
Response Bot: 1 day 2 hours 48 minutes 36 seconds $math[MathFunction]
Description Allows you to perform math functions inside of Streamlabs Chatbot
Example $math[10+5/2] | !Math
Response Bot: 12 $extralifegoal
Description Grabs your Extra Life goal
Example $extralifegoal | !goal
Response Bot: 5000
©Streamlabs.com 55
$extralifeamount
Description Grabs the amount you currently raised for Extra Life
Example $extralifeamount | !amount
Response Bot: 100
Currency Parameters $points
Description Displays the num of points of the user or target
Example $user has $points $currencyname | !cookies or !cookies ankhheart
Response Bot: AnkhHeart has 1234 Cookies! $pointstext
Description Displays the num of points of the user or target nicely formatted
Example $user has $pointstext $currencyname | !cookies or !cookies ankhheart
Response Bot: AnkhHeart has 1,234 Cookies! $raids
Description Displays amount of times the user or target has raided the channel
Example $user has raided the channel $raids time(s) so far! | !raids or !raids
AnkhHeart
Response Bot: AnkhHeart has raided the channel 3 time(s) so far! $rank
Description Displays the users rank
Example $user is Rank: $rank | !rank or !rank AnkhHeart
Response Bot: AnkhHeart is Rank: Ninja Kitty $hours
Description Displays amount of hours the user has been in the stream for
Example $user spent $hours in the stream! | !hrs
Response Bot: AnkhHeart spent 10.5 hrs in the stream! $level
Description Displays the users level
Example $user is Level $level! | !Lvl
Response Bot: AnkhHeart is Level 10 $toppoints(num)
Description Displays top X amount of users based on points (Except Caster & Bots)
Example Top 3: $toppoints(3) } !top3
Response Bot: Top 3: #1 Promouse(10000), #2 Gamegooru21(9999), #3
EdeMonster(9998) $tophours(num)
Description Displays top X amount of users based on hours(Except Caster & Bots)
Example Top 2: $tophours(2) | !top2
Response Bot: Top 2: #1 KrystalRayne(123 Hrs), #2 Pixelmonkey (120 Hrs) $pointspos
Description Displays the users position in the ranking based on amount of points
Example $user is ranked #$pointspos | !mypos
Response Bot: AnkhHeart is ranked #1

©Streamlabs.com 56
$hourspos
Description Displays the users position in the ranking based on amount of hours
Example $user is ranked #$hourspos | !hrspos
Response Bot: AnkhHeart is ranked #2 $nxtrankreq
Description Displays the amount of points/hours the user requires for his next
rank
Example $user, You need $nxtrankreq points to become a $nxtrank!
Response Bot: AnkhHeart, You need 13 points to become a Ninja Kitty! $nxtrank
Description Displays the next rank that the user can achieve
Example $user, The next rank that you can achieve is $nxtrank!
Response Bot: AnkhHeart, The next rank that you can achieve is Ninja Kitty! $addpoints("target","min","max","succeed","fail")
Description Adds points to a certain user and sends a message upon succeeding /
failing
Example $addpoints("ankhheart","10","50","ankhheart Got $value
points","Failed to give points!") | !addpoints
Response Bot: AnkhHeart got 25 points $removepoints("target","min","max","succeed","fail" ,"forceremove true or false")
Description Removes points from a certain user and sends a message upon
succeeding/failing.
Force remove(true/false) removes points even if the user doesn’t have
enough.
Example $removepoints("ankhheart","10","100","Removed $value points from
ankhheart.","Unable To remove $value points from
ankhheart!","false")
|!removepoints
Response Bot: Removed 85 points from ankhheart. $givepoints("from","to","num","succeed","fail","forcegive true or false")
Description Removes points from a certain user and sends a message upon
succeeding/failing. Force remove(true/false) removes points even if
the user doesn’t have enough.
Example $givepoints("$user","$target","50","$user gave $value points to
$target","$user
didn't have enough points to give to $target!","false")| !give
gamegooru21
Response Bot: AnkhHeart gave 50 gamegooru21 $value [Only Works inside of $addpoints, $givepoints or $removepoints]
Description Gets replaced with the random value between min & max
Example $givepoints("$user","$target","50","$user gave $value points to
$target","$user
didn't have enough points to give to $target!","false")| !give
gamegooru21
Response Bot: AnkhHeart gave 50 gamegooru21

©Streamlabs.com 57
$newbalance(person) [Only Works inside of $addpoints, $givepoints or $removepoints]
Description Gets replaced with the remaining balance after a $removepoints,
$addpoints or $givepoints transaction
Example $givepoints("$user","$target","50","$user gave $value points to
$target. $target: $newbalance($target) points
remaining.","fail","false")| !give gamegooru21
Response Bot: AnkhHeart gave 50 gamegooru21. AnkhHeart 50 remaining
Twitch API Parameters
User Channel Data $userurl
Description Displays the user’s twitch channel URL
Example $user’s twitch channel is: $userurl | !userurl
Response Bot: AnkhHeart’s twitch channel is: http://twitch.tv/AnkhHeart $usergame
Description Displays the user’s last played/current game
Example $user’s was/is playing: $usergame | !usergame
Response Bot: AnkhHeart was/is playing: Bloodborne $userstatus
Description Displays the user’s stream title
Example $user’s Stream title is: $userstatus | !userstatus
Response Bot: AnkhHeart’s Stream title is: [720p] Fable: The Lost Chapters [PC]
Target Channel Data $url
Description Displays the target’s twitch channel URL
Example $target can be found streaming at: $url | !url AnkhHeart
Response Bot: AnkhHeart can be found streaming at: http://twitch.tv/AnkhHeart $game
Description Displays the target’s current/last played game
Example $target has last played: $game | !game AnkhHeart
Response Bot: AnkhHeart has last played: Bloodborne $status
Description Displays the target’s stream title
Example $target Stream title is: $title | !title AnkhHeart
Response Bot: AnkhHeart Stream title is: [720p] Fable: The Lost Chapters [PC]
My Channel Data $myurl
Description Displays the twitch channel URL for your stream
Example My channel is: $myurl. | !myurl
Response Bot: My channel is: http://twitch.tv/AnkhHeart $mygame
Description Displays the game you are currently playing
Example I am playing: $mygame | !currentgame
Response Bot: I am playing: Bloodborne

©Streamlabs.com 58
$mystatus
Description Displays your stream title
Example Status: $mystatus | !mystatus
Response Bot: Status: [720p] Fable: The Lost Chapters [PC] $uptime
Description Displays for how long the stream has been Live
Example The stream has been live for: $uptime | !uptime
Response Bot: The stream has been live for: 1 hour 25 minutes 58 seconds
Sub / Follower Counts $followercount
Description Displays your streams follower count
Example AnkhHeart has $followercount followers! !followercount
Response Bot: AnkhHeart has 1070 followers! $subcount
Description Displays your streams sub count
Example AnkhHeart has $subcount subs! !subcount
Response Bot: AnkhHeart has 0 subs! $gwsubcount
Description Displays your gamewisp sub count
Example AnkhHeart has $gwsubcount subs! !gwsubcount
Response Bot: AnkhHeart has 0 gamewisp subs!
Miscellaneous $currenthosts(NumHostsPerPage)
Description Displays everyone that is currently hosting the stream (Only works
when you’re live)
Example Current Hosts: $currenthosts(2)
Response Bot: Current Hosts: EdeMonster, Promouse [Page 0/1] $setgame(game) and $settitle(title)
Description Allows you to set the game & title through a command and create
presets for certain games
Example $setgame(Dungeon Defenders II) $settitle(MMO Mornings)| !dd2
Response No response as the bot will simply update the game & title
File Reading Parameters $readline(FileLocation)
Description Reads the first line of the document
Example $readline(C:\test.txt) | !currentsong
Response Bot: Currently playing: Popskyy - Rize Up $readrandline(FileLocation)
Description Reads a random line from the file
Example /me slaps $randuser with a $readrandline(C:\test2.txt)! | !slap
Response Bot slaps AnkhHeart with a Tuna! | Bot slaps AnkhHeart with a Brick! |
etc..

©Streamlabs.com 59
$readspecificline(FileLocation,LineNum)
Description Reads a specific line from the file (Starts from 0)
Example /me slaps $randuser with a $readspecificline(C:\test2.txt,3)! | !slap
Response Bot slaps AnkhHeart with a Shovel!
Custom API Reading Parameter $readapi(URL)
Description Displays the text on the URL’s page. Max 500 characters
Example $readapi(https://nightdev.com/hosted/followers.php?channel=ankhhe
art&limit=5)
Response Bot: 1. BensGaming808, 2. Gamakuro, 3. GENERAL_XROS, 4.
wulleybully, 5. NorQuel
Save File Parameters $savetofile("FileLocation","Text")
$savetofile("FileLocation","Text","SucceedMsg","FailMsg")
Description Adds to the end of the file
Example $savetofile("C:\test.txt","$msg","Succeeded :D","Failed! ") | !save I am a
cat
Response Bot: Succeeded! $overwritefile("FileLocation","Text")
$overwritefile("FileLocation","Text","SucceedMsg","FailMsg")
Description Overwrites all the data in the .txt file with the added text
Example $overwritefile("C:\test.txt","$msg","Succeeded :D","Failed! ") | !save I
am a cat
Response Bot: Succeeded!
Miscellaneous Parameters $tier
Description Only usable in the GameWisp Chat Notification
Example $user just subbed Tier: $tier!
Response Bot: AnkhHeart just subbed Tier: 1! $months
Description Only usable in the GameWisp Chat Resub / Twitch Resub Notification
Example $user just subbed for $months months in a row!
Response Bot: AnkhHeart just subbed for 3 months in a row! $reward
Description Only usable in the GameWisp Chat Notification
Example $user just subbed for $months months in a row and received $reward
points!
Response Bot: AnkhHeart just subbed for 3 months in a row and received 10,000
points!

©Streamlabs.com 60
$bits / $totalbits
Description Only usable in the Cheer Chat Notification
Example $user just cheered $bits bits for a total of $totalbits bits!
Response Bot: AnkhHeart just cheered 100 bits for a total of 1234 bits! $donationmsg
Description Only usable in the Streamlabs Chat Notification
Example $user just donated $amount USD! Message: $donationmsg
Response Bot: AnkhHeart just donated 10 USD! Message: Harro <3 $viewers
Description Only usable in the Host Chat Notification
Example $user just hosted you for $viewers viewer(s)!
Response Bot: AnkhHeart just hosted you for 10 viewer(s)!
Generated Text Files The bot automatically generates text files that can be used to display information on
stream. These files can be found in the Bot's Install Directory -> Twitch -> Files folder. If
you don't remember where you installed the bot just Right click on its shortcut and
select Open File Location. If this leads you to the Startup folder instead do it once more
on the shortcut there and eventually you will end up in the Bot's install Directory.
Follower Amount (per session)
File AmountOfFollowers.txt New Follower List (per session)
File Followers.txt Last Follower
File RecentFollower.txt
GameWisp Sub Amount (per session)
File AmountOfGameWispSubs.txt New GameWisp Subs (per session)
File GameWispSubs.txt Last GameWisp Sub
File RecentGameWispSub.txt
Host Amount (per session)
File AmountOfHosts.txt New Hosts (per session)
File Hosts.txt Last Host
File RecentHost.txt
Twitch Sub Amount (per session)
File AmountOfSubs.txt New Subs (per session)
File Subs.txt

©Streamlabs.com 61
Last Sub
File RecentSub.txt
Current Song
File CurrentSong.txt Requested By
File RequestedBy.txt Complete Current Song + Requested By
File CurrentlyPlaying.txt
Death Counter
File Deaths.txt
Recent Donator
File Streamlabs_Recent_Donator.txt
Spotify Song (Only available when Spotify is Connected)
File SpotifySong.txt
Extra Life (Raised / Goal)
File ExtraLife.txt Extra Life Team (Raised / Goal)
File ExtraLife_Team.txt Extra Life Donations (per Session)
File ExtraLife_Donators.txt Extra Life Last Donator
File ExtraLife_Recent_Donator.txt
©Streamlabs.com 62
Streamlabs Chatbot Python
Scripting
Setup
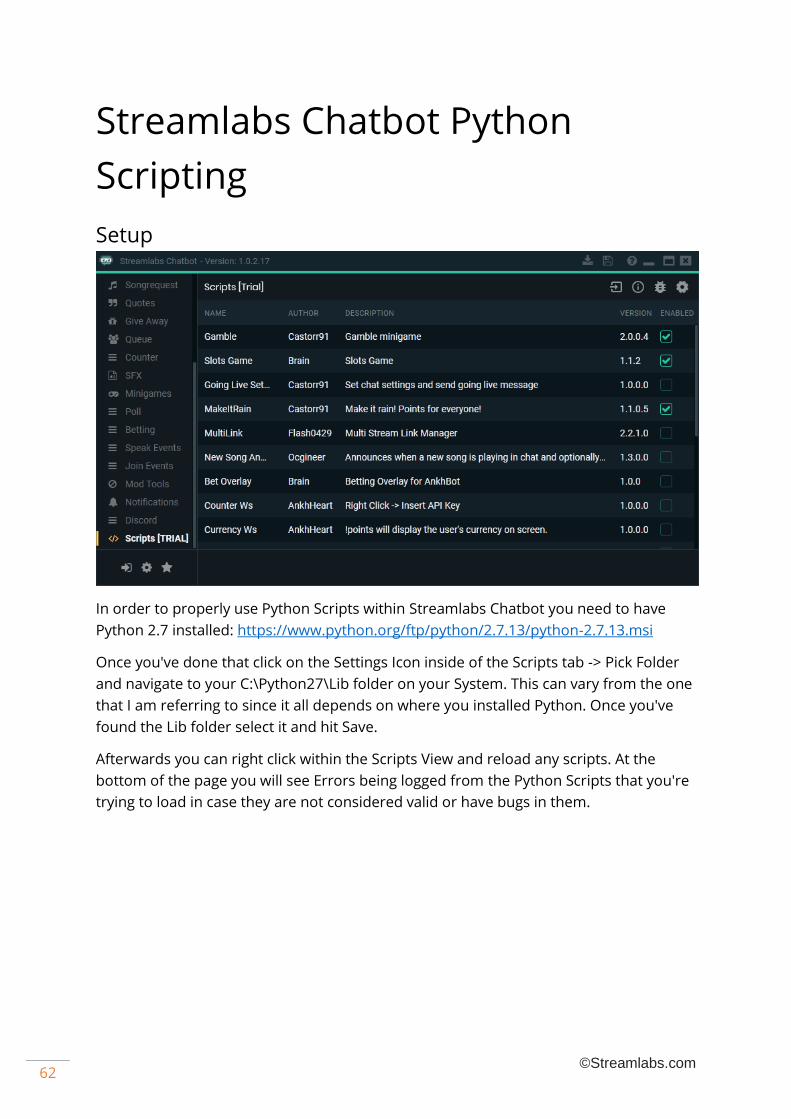
In order to properly use Python Scripts within Streamlabs Chatbot you need to have
Python 2.7 installed: https://www.python.org/ftp/python/2.7.13/python-2.7.13.msi
Once you've done that click on the Settings Icon inside of the Scripts tab -> Pick Folder
and navigate to your C:\Python27\Lib folder on your System. This can vary from the one
that I am referring to since it all depends on where you installed Python. Once you've
found the Lib folder select it and hit Save.
Afterwards you can right click within the Scripts View and reload any scripts. At the
bottom of the page you will see Errors being logged from the Python Scripts that you're
trying to load in case they are not considered valid or have bugs in them.

©Streamlabs.com 63
Creating UI : Settings You can create a Basic UI Interface which shows up on the right side of the selected
script inside of Streamlabs Chatbot. This interface will be displayed if Streamlabs
Chatbot finds a UI_Config.json file inside of your Scripts folder, based on that script
elements will be generated and upon clicking Save settings it will output both a .json
and .js file.
The .js file is to be used inside of your .html and the .json inside of your Python Script.
{
"output_file": "settings.json",
"cd_response": {
"type": "textbox",
"value": "{0} the command is still on cooldown for {1} seconds!",
"label": "Cooldown Response",
"tooltip": "The message that the bot will display.",
"group": "Responses"
},
"use_cd": {
"type": "checkbox",
"value": false,
"label": "Use Cooldown Message",
"tooltip": "To display CoolDown Message?",
"group": "Checkboxes"
},
"cd": {
"type": "numberbox",
"label": "COOLDOWN (seconds)",
"value": 10,
"tooltip": "Cooldown in seconds.",
"group": "Numbers"
},
"choice": {
"type": "dropdown",
"label": "Mode",
"value": "Mode 1",
"tooltip": "This will determine the mode.",
"items": ["Mode 1","Mode 2","Mode 3"],
"group": "Dropdowns"
},
"headcolor": {
"type": "colorpicker",
"label": "Header Color",
"value": "rgba(255,0,0,1.0)",
"tooltip": "",
"group": "Color Pickers"
},
"interval": {
"type": "slider",
"label": "Interval",

©Streamlabs.com 64
"value": 1,
"min": 0,
"max": 10,
"ticks": 0.1,
"tooltip": "",
"group": "Sliders"
},
"btnStart":{
"type": "button",
"label": "Start Timer",
"tooltip": "Starts the Timer!",
"function": "StartTimer",
"wsevent": "EVENT_START_TIMER",
"group": "buttons"
}
}
UI Elements
OUTPUT FILE
"output_file": "settings.json", Each UI_Config file has to start off with the first element being "output_file" this will tell
the bot where the file should be saved to and how it should be called. This file has to
always be of type .json.
TEXTBOX
"cd_response": {
"type": "textbox",
"value": "{0} the command is still on cooldown for {1} seconds!",
"label": "Cooldown Response",
"tooltip": "The message that the bot will display.",
"group": "Responses"
} In order to create a Textbox you need to follow this format. The group label will be used
to sort all your UI elements in nice Expander boxes so everything looks clean.
CHECKBOX
"use_cd": {
"type": "checkbox",
"value": false,
"label": "Use Cooldown Message",
"tooltip": "To display CoolDown Message?",
"group": "Checkboxes"
} In order to create a Checkbox you need to follow this format.

©Streamlabs.com 65
NUMBERBOX
"cd": {
"type": "numberbox",
"label": "COOLDOWN (seconds)",
"value": 10,
"tooltip": "Cooldown in seconds.",
"group": "Numbers"
} In order to create a Numberbox which is a Textbox that only allows Numbers to be
typed you would need to follow this format.

©Streamlabs.com 66
DROPDOWN
"choice": {
"type": "dropdown",
"label": "Mode",
"value": "Mode 1",
"tooltip": "This will determine the mode.",
"items": ["Mode 1","Mode 2","Mode 3"],
"group": "Dropdowns"
} In order to create a Dropdown you will need to follow this format.
COLORPICKER
"headcolor": {
"type": "colorpicker",
"label": "Header Color",
"value": "rgba(255,0,0,255)",
"tooltip": "",
"group": "Color Pickers"
} In order to create a Colorpicker you will need to follow this format.
SLIDER
"interval": {
"type": "slider",
"label": "Interval",
"value": 1,
"min": 0,
"max": 10,
"ticks": 0.1,
"tooltip": "Determines the polling interval.",
"group": "Sliders"
} In order to create a Slider you will need to follow this format.
BUTTON
"btnStart":{
"type": "button",
"label": "Start Timer",
"tooltip": "Starts the Timer!",
"function": "StartTimer",
"wsevent": "EVENT_START_TIMER",
"group": "buttons"
} In order to create a Button you will need to follow this format. The function refers to the
Python Script function that should be called. The wsevent refers to the Websocket Event
that should be sent when clicking the button.

©Streamlabs.com 67
Placement of Scripts & Naming Naming Conventions
StreamlabsSystem
Files ending with *_StreamlabsSystem.py are System files that contain a Init(),
Execute(data) and Tick() function. These are used to extend the core functionality of
Streamlabs Chatbot and create your own advanced commands.
StreamlabsParameter
Files ending with *_StreamlabsParameter.py are Parameter files that contains a Parse()
function. These are used to create your own $parameters and add to the standard
Streamlabs Chatbot Parameter Library.
Placement
StreamlabsSystem & StreamlabsParameter files are to be placed inside of the
Streamlabs Chatbot Directory -> Twitch -> Scripts Folder inside of a Folder named after
the Script Itself in order to keep things clean and easily share-able with other users.
Distribution
The best way to distribute your Script is to Zip everything up nicely. Here a small
example of what a proper Streamlabs Chatbot Script would look like in the form of a
.Zip file.
The Zip file should contain 1 single folder with the script name:
Fill the folder with your script(s) and dependencies.
Importing
Importing a script is simple. Simply click the Import Button in the Scripts Tab,
Navigate to the Zip File and Open it. Afterwards the bot will import the script for you
and reload your scripts so it's ready to go.

©Streamlabs.com 68
Basic Structure
Import Libraries [StreamlabsSystem & StreamlabsParameter]
#---------------------------------------
# Import Libraries
#---------------------------------------
import sys
import clr
clr.AddReference("IronPython.SQLite.dll")
clr.AddReference("IronPython.Modules.dll")
import datetime This is where you will import any necessary libraries that you require for your Python
Script.
Include Script Information [StreamlabsSystem & StreamlabsParameter]
#---------------------------------------
# [Required] Script Information
#---------------------------------------
ScriptName = "DemoScript"
Website = "https://www.Streamlabs Chatbot.com"
Description = "!test will post a message in chat."
Creator = "AnkhHeart"
Version = "1.0.0.0" These variables are required since they will be used to Display Errors in the
PythonScriptErrorlog.txt located in the Logs folder / Scripts Tab under settings in case a
script is not behaving properly. This is required for both StreamlabsSystems &
StreamlabsParameters.
Declare Global Variables
#---------------------------------------
# Set Variables
#---------------------------------------
m_Response = "This is a test message"
m_Command = "!test"
m_CooldownSeconds = 10
m_CommandPermission = "moderator"
m_CommandInfo = "" Declare your Global Variables next. You will be able to use these within the Init, Tick and
Execute functions. Once you want to edit a Global Variable you will need to use ex:
global m_Response
m_Response = "This is the replacement"
Initialize Function [StreamlabsSystem & StreamlabsParameter]
#---------------------------------------
# [Required] Intialize Data (Only called on Load)
#---------------------------------------

©Streamlabs.com 69
def Init():
global m_Response
m_Response = "This is a overwritten test message!"
return Initialize anything that you want here. This function will only be called when the script is
loaded.
Execute Function [StreamlabsSystem Only]
#---------------------------------------
# [Required] Execute Data / Process Messages
#---------------------------------------
def Execute(data):
if data.IsChatMessage():
if data.GetParam(0).lower() == m_Command and not
Parent.IsOnCooldown(ScriptName,m_Command) and
Parent.HasPermission(data.User,m_CommandPermission,m_CommandInfo):
Parent.SendTwitchMessage(m_Response)
return The execute function will be called when there is a new chat message to be processed.
If there are no new messages then this function will not be called. It also receives data
which you can process to create to create your own commands, games, … More info on
the data type can be found below.
Tick Function [StreamlabsSystem Only]
#---------------------------------------
# [Required] Tick Function
#---------------------------------------
def Tick():
return This is the Tick function and will be executed every time the program progresses. As you
can see there is no data variable here. So use this function when you don't require data
but want to do something while there is no data.
Parse Function [StreamlabsParameter & StreamlabsSystem]
def Parse(parseString,user,target,message):
if "$myparameter" in parseString:
return parseString.replace("$myparameter","I am a cat!")
return parseString The Parse function is used to create your own parameters and extend the built in ones.
When dealing with Parsing make sure to always return the parseString but replace your
parameter inside of the string. In case the parameter is not present inside of the string
just pass the parseString back so other Parameters can continue parsing.
ReloadSettings Function [Optional]
def ReloadSettings(jsonData):
#execute json reloading here
return

©Streamlabs.com 70
The ReloadSettings function is an optional function that you can add that will
automatically be called once a user clicks on the Save Settings button in the scripts tab.
The entire Json object will be passed to the function so you can load that back into your
settings.
Unload Function [Optional: StreamlabsSystem]
def Unload():
#Triggers when the bot closes / script is reloaded
return The Unload function is an optional function that gets called when a script is getting
reloaded , unloaded or Streamlabs Chatbot gets closed.
ScriptToggled Function [Optional: StreamlabsSystem]
def ScriptToggled(state):
#Tells you if your script is enabled or not
return The ScriptToggled function is an optional function that gets called when your script is
Enabled/Disabled through the Streamlabs Chatbot UI. The state object is just a plain
Boolean which either contains True or False.
Data Object (Execute Function) The Data Object will give you access to the incoming Chat & Discord messages.
Variables
string User
This will return the User who has posted the message
string Message
This will return the Message that the user has posted.
string RawData
This will return the Raw Data sent by Twitch/Discord. This is completely unparsed so if
you need extra information from a message then you can parse this.
ServiceType Service
This is a ServiceType enum which can contains ServiceType.Twitch or
ServiceType.Discord so you know where the message has originated from.
Functions
bool IsChatMessage()
This will return whether the message is a Chat Message or not. This message can come
from either Discord or Twitch Chat.
bool IsRawData()
This will return whether the message only contains RawData and no actual Chat
Message.

©Streamlabs.com 71
bool IsFromTwitch()
This will return whether the message or data has come from Twitch or not.
string IsFromDiscord()
This will return whether the message or data has come from Discord ot not.
bool IsWhisper()
This will return whether the message is a whisper (Twitch) or direct message(Discord).
string GetParam(int id)
This will return the parameter at the requested position.
int GetParamCount()
This will return how many words are in the sentence.
Parent Object aka Parent This Object will allow you to Send / Redirect Messages, Check if someone has certain
permission rank or Add/Remove Points. This is a global Object that you have access to
and can be called by using ex: Parent.AddPoints("ankhheart",100)
Currency Manipulation
bool AddPoints(string user, long amount)
This will allow you to add Points to one specific user. If the person is in the Viewer List
this will succeed but if they aren't it will fail.
bool RemovePoints(string user, long amount)
This will allow you to remove Points from one specific user and will return whether it
succeeded or not. If the user does not have enough points it will return false otherwise
true and it will deduct those points.
List<string> AddPointsAll(PythonDictionary<string,long> data)
List<string> AddPointsAllAsync(PythonDictionary<string,long> data, Action
callback)
This will allow you to add points to large amounts of users. Be careful the more users
the longer this process will take so don't overdo it. If the users are not in chat / the
Viewer List they simply won't receive points. The users that did not receive any currency
will be returned in list format.
long GetPoints(string user)
This will return the amount of points the user has.
long GetHours(string user)
This will return the amount of hours the user has spent in your stream.
string GetRank(string user)
This will return the Rank that the user has.

©Streamlabs.com 72
List<string> RemovePointsAll(PythonDictionary<string,long> data)
List<string> RemovePointsAll(PythonDictionary<string,long> data, Action
callback)
This will allow you to deduct currency from a list of users. Be careful the more users the
longer this process will take so don't overdo it. The return type will return a list of the
users who did not possess enough currency so they didn't lose any currency.
PythonDictionary<string,long> GetTopCurrency(int top)
This will return the top x amount of users in the currency database based on their
points.
PythonDictionary<string,string> GetTopHours(int top)
This will return the top x amount of users in the currency database based on their hours
watched.
PythonDictionary<string,long> GetPointsAll(List<string> users)
This will return a dictionary of name / points of all users that you are requesting.
PythonDictionary<string,string> GetRanksAll(List<string> users)
This will return a dictionary of name / rank of all users that you are requesting.
PythonDictionary<string,long> GetHoursAll(List<string> users)
This will return a dictionary of name / hours of all users that you are requesting.
Permission Checking
bool HasPermission(string user, string permission, string info)
This will allow you to verify if a user has a specified permission. The supported
permissions are: Everyone, Regular, Subscriber, GameWisp Subscriber, User_Specific,
Min_Rank, Min_Points, Min_Hours, Moderator, Editor, Caster
The info refers to the Info Field which is the same thing as inside of the Commands tab
of Streamlabs Chatbot.
Message / Event Sending
void SendTwitchMessage(string message)
This will send a Twitch Message using the Bot's Account.
void SendTwitchWhisper(string target, string message)
This will send a Twitch Whisper to a specified user using the Bot's Account.
void SendDiscordMessage(string message)
This will send a Discord Message using the Bot's Account.
void SendDiscordDM(string target, string message)
This will send a Discord DM to a specified user using the Bot's Account.
void BroadcastWsEvent(string eventName, string jsonData)
This will send the jsonData to all WebSocket Clients that are listening to the specific
event.

©Streamlabs.com 73
Get Viewers / Users
List<string> GetViewerList()
This will return a List of all the viewers currently in Chat.
List<string> GetActiveUsers()
This will return a list of all Active Users from the past 15 minutes.
string GetRandomActiveUser()
This will return one Random Active User that has been Active in the past 15 minutes.
string GetDisplayName(string user)
This will return the DisplayName of the specified User. Careful NOT to use Display
Names when Adding / Removing Currency.
Cooldown Management
void AddCooldown(string scriptName, string command, int seconds)
This will add the command to the Cooldown Manager.
bool IsOnCooldown(string scriptName, string command)
This will return whether the command is on Cooldown.
int GetCooldownDuration(string scriptName, string command)
This will return the remainder of the Cooldown in seconds.
void AddUserCooldown(string scriptName, string command, string user, int
seconds)
This will add the command to the UserCooldown Manager.
bool IsOnUserCooldown(string scriptName, string command, string user)
This will return whether the command is on UserCooldown.
int GetUserCooldownDuration(string scriptName, string command, string user)
This will return the remainder of the UserCooldown in seconds.
Check Stream State
bool IsLive()
This will return whether the stream is Live.
GameWisp
int GetGwTierLevel(string user)
This will return the user's GameWisp Tier level. If it returns 0 they're clearly not a sub.
OBS
SCENE
void SetOBSCurrentScene(string sceneName, Action<string> callback = null)
Using this function you can swap scenes in OBS. The callback is an optional parameter
in case you want to do once it has swapped.
©Streamlabs.com 74
Response Callback String: Always OK if scene exists, error if it doesn't. (Json Format)
void SetOBSSourceRender(string source, bool render, string sceneName = null,
Action<string> callback = null)
Using this function you can enable / disable sources in a specific or your current scene.
The sceneName is optional as is the callback.
Response Callback String: Ok if source exists in the current scene, error otherwise. (Json
Format)
void StopOBSStreaming(Action<string> callback = null)
Using this function you can stop the stream. It's main purpose is to create a command
that allows a mod to shutdown the stream in case the streamer passed out.
Response Callback String: Always OK . (Json Format)
AUDIO
void GetOBSSpecialSources(Action<string> callback)
Using this function you can retrieve all Special Sources (Audio Sources) from OBS. This
will need to be chained with SetOBSVolume for proper functionality.
Response Callback String: Always OK with additional fields: desktop-1, desktop-2, mic-1,mic-
2,… (Json Format)
void SetOBSVolume(string source, double volume, Action<string> callback = null)
Using this function you can set the Volume of a Specific Audio Source inside of OBS.
Response Callback String: Ok if specified source exists, error otherwise. (Json Format)
void GetOBSVolume(string source, Action<string> callback)
Using this function you can get the Volume of a Specified Audio Source inside of OBS.
Response Callback String: Ok if source exists, with these additional fields: name, volume,
muted (Json Format)
void GetOBSMute(string source, Action<string> callback)
Using this function you can get whether the Specified Audio Source is Muted inside of
OBS or not. (Json Format)
Response Callback String: Ok if source exists, with these additional fields: name, muted
void SetOBSMute(string source, bool mute, Action<string> callback = null)
Using this function you can mute a specified Audio Source inside of OBS.
Response Callback String: Ok if source exists, error otherwise. (Json Format)
void ToggleOBSMute(string source, Action<string> callback = null)
Using this function you can toggle the Mute state of a specified Audio Source inside of
OBS.
Response Callback String: Ok if source exists, error otherwise. (Json Format)

©Streamlabs.com 75
API Requests
string GetRequest(string url, PythonDictionary headers)
Using this function you are able to make GET request which will return a string of data if
there is any.
string PostRequest(string url, PythonDictionary headers, PythonDictionary
content, bool isJsonContent = true)
Using this function you are able to make POST request which will return a string of data
if there is any.
isJsonContent (true) tells the bot that you are trying to send data using "Content-Type" :
"application/json". If this is false the bot will simply use a form-encoded body instead.
string DeleteRequest(string url, PythonDictionary headers)
Using this function you are able to make DELETE request which will return a string of
data if there is any.
string PutRequest(string url, PythonDictionary headers, PythonDictionary
content, bool isJsonContent = true)
Using this function you are able to make a PUT request which will return a string of data
if there is any.
isJsonContent (true) tells the bot that you are trying to send data using "Content-Type" :
"application/json". If this is false the bot will simply use a form-encoded body instead.
Misc
int GetRandom(int min, int max)
This will return a random number within the range of min-max.
string GetChannelName()
This will return the Twitch channel that the bot is connected to.
string GetCurrencyName()
This will return the Currency Name that is being used.
void Log(string scriptName, string message)
This will print out a debug log in the Script Logs window inside of Streamlabs Chatbot.
bool PlaySound(string filePath, float volume)
This will allow you to play MP3 sound files through Python. It returns True when the file
has been successfully played and False when another file is already playing. If
something is already playing and you want to play a sound you will simply have to wait
till it's done playing and request PlaySound again to see if it's free.

©Streamlabs.com 76

©Streamlabs.com 77
Streamlabs Chatbot Websockets
Introduction Once your Streamer Account connects a local Websocket server will be started which
you can connect to and receive Events from custom created Python Scripts. The Clients
that do connect to the server cannot send any information to the server they're simply
listening for things to do.
The server itself runs on Port 3337 and can only be connected to using a proper
authentication process.
Creating UI : Settings For this you can refer back to the Python Creating UI Section.
Setup In order to use the Websocket Server you need to create a simply Javascript websocket
client file which will handle all the logic and the Authentication. The Javascript file
should follow this template:
Declare your Variables
//---------------------------------
// Variables
//---------------------------------
var serviceUrl = "ws://127.0.0.1:3337/streamlabs"
var socket = new WebSocket(serviceUrl); Create your Client which will connect to your ws://127.0.0.1:3337/streamlabs Chatbot
this is where the Server is being run on your system.

©Streamlabs.com 78
Setup your OnOpen Event
//---------------------------------
// Open Event
//---------------------------------
socket.onopen = function()
{
// Format your Authentication Information
var auth = {
author: "AnkhHeart",
website: "https://Streamlabs Chatbot.com",
api_key: "7ce3489a331f4f6db487a9203709eadb",
events: [
"EVENT_SUB",
"EVENT_FOLLOW",
"EVENT_HOST",
"EVENT_CHEER",
"EVENT_DONATION"
]
}
// Send your Data to the server
socket.send(JSON.stringify(auth));
}; Within this event you will immediately send your Authorization data in json format. This
data includes data such as your name, website and the events you wish to subscribe to.
The ones listen in the above example are the default events that come with Streamlabs
Chatbot so you can make use of these to create your own notifications if you so wish.
Aside from that you need to send a valid api_key this Api Key can be found under
Settings (cogwheel) -> Scripts.
The Api Key in question can be refreshed whenever you wish. Though in this case you
will need to update each client.js file so it uses the appropriate key. This key is used as a
password so only clients which you have granted access may connect to the server.

©Streamlabs.com 79
Setup your OnError Event
//---------------------------------
// Error Event
//---------------------------------
socket.onerror = function(error)
{
// Something went terribly wrong... Respond?!
console.log("Error: " + error);
} Things can always go wrong when working with code so make use of this even and
process any errors that might pop up.
Setup your OnMessage Event
//---------------------------------
// Message Event
//---------------------------------
socket.onmessage = function (message)
{
// You have received new data now process it
console.log(message.data);
} This is the core event that you will be working with. Every event that gets sent will arrive
in the onmessage function. This data arrives in json format so it's easy to use in
javascript.
Setup your OnClose Event
//---------------------------------
// Message Event
//---------------------------------
socket.onclose = function ()
{
// Connection has been closed by you or the server
console.log("Connection Closed!");
} This event will fire as soon as your connection is terminated by either you or the server.
Create your HTML file
<!DOCTYPE html>
<html>
<head lang="en">
<meta charset="UTF-8">
<title>Task List Example</title>
</head>
<body id="output">
<script src="client.js"></script>
</body>
</html>

©Streamlabs.com 80
The next step would be to create a simple HTML file which would run the javascript
either within your local browser or an OBS browsersource. This will allow you to create
animations, notifications, whichever crazy ideas you can come up with 😊
Create some CSS
In order to handle animations and make everything look pretty you need to create a .css
file that the html file would reference. This would style any elements that you would
create. Now go out and learn!
Built in Events The bot comes with a few built in events that you can listen to create some animations /
notifications if you so wish.
Sub Event
{
"event" : "EVENT_SUB",
"data": {
"name": "ankhheart",
"display_name": "AnkhHeart",
"tier": "24$",
"is_resub ": false,
"months": 1,
"message": "I subbed like a boss!"
}
} This is what a Sub Event looks like and what information will come with it once you
receive it in your onmessage event.
GameWisp Sub Event
{
"event" : "EVENT_GW_SUB",
"data": {
"name": "ankhheart",
"display_name": "AnkhHeart",
"tier": 1,
"is_resub ": false,
"months": 1
}
} This is what a GameWisp Sub Event looks like and what information will come with it
once you receive it in your onmessage event.
Follow Event
{
"event" : "EVENT_FOLLOW",
"data": {
"name": "ankhheart",

©Streamlabs.com 81
"display_name": "AnkhHeart",
}
} This is what a Follow Event looks like and what information will come with it once you
receive it in your onmessage event.
Cheer Event
{
"event" : "EVENT_CHEER",
"data": {
"name": "ankhheart",
"display_name": "AnkhHeart",
"bits": 100,
"total_bits": 1100,
"message": "cheer1 cheer1 cheer1 Yah Pleb!"
}
} This is what a Cheer Event looks like and what information will come with it once you
receive it in your onmessage event.
Host Event
{
"event" : "EVENT_HOST",
"data": {
"name": "ankhheart",
"display_name": "AnkhHeart",
"viewers": 10
}
} This is what a Host Event looks like and what information will come with it once you
receive it in your onmessage event.
Donation Event
{
"event" : "EVENT_DONATION",
"data": {
"name": "ankhheart",
"display_name": "AnkhHeart",
"amount": "10",
"currency": "EUR",
"message": "Take muh money!"
}
} This is what a Donation Event looks like and what information will come with it once you
receive it in your onmessage event.
Poll Events
POLL START
{

©Streamlabs.com 82
"event": "EVENT_POLL_START",
"data": {
"voting_on": "ABC",
"is_timed": false,
"timer": 60,
"options": [{
"Key": "A",
"Value": 0
}, {
"Key": "B",
"Value": 0
}
],
"cost": "0",
"total_votes": 0,
"is_multi_vote": false,
"max_votes_per_user": 1,
"currency_name": "Clouds"
}
} When the poll starts you will receive the EVENT_POLL_START with its included data.
POLL END
{
"event" : "EVENT_POLL_END",
"data": {}
} When the poll is closed will receive the EVENT_POLL_END with its included data.
POLL VOTE
{
"event" : "EVENT_POLL_VOTE",
"data": {
"name": "ankhheart",
"option": 0
}
} Whenever there is a new vote you will receive the EVENT_POLL_VOTE with its included
data.
POLL WIN
{
"event" : "EVENT_POLL_WIN",
"data": {
"option_id": 1,
"option": "Xenoverse 2",
"votes": 10
}
} Whenever there is a winner you will receive the EVENT_POLL_WIN with its included data.

©Streamlabs.com 83
POLL TIE
{
"event" : "EVENT_POLL_TIE",
"data": {
"options": [0,1,3,7],
"votes": 10
}
} Whenever there is a tie you will receive the EVENT_POLL_TIE with its included data.
Counter Events
COUNT INCREASE
{
"event" : "EVENT_COUNTER_INCREASE",
"data": {
"deaths": 10,
"template_msg": "Died # Times"
}
} Whenever the Death Count is increased it will sent EVENT_DEATH_INCREASE with the
associated data.

©Streamlabs.com 84
COUNT DECREASE
{
"event" : "EVENT_COUNTER_DECREASE",
"data": {
"deaths": 9,
"template_msg": "Died # Times"
}
} Whenever the Death Count is increased it will sent EVENT_DEATH_DECREASE with the
associated data.
COUNT SET
{
"event" : "EVENT_COUNTER_SET",
"data": {
"deaths": 15,
"template_msg": "Died # Times"
}
} Whenever the Death Count is set it will sent EVENT_DEATH_SET with the associated
data.
Betting Events
BET START
{
"event": "EVENT_BET_START",
"data": {
"betting_on": "How many tries till Ankh beats this boss ?",
"is_timed": false,
"timer": 60,
"options": [{
"Key": "One",
"Value": 0
}, {
"Key": "Two to Five",
"Value": 0
}
],
"min_bet": "1",
"max_bet": "100",
"total_bets": 0,
"is_multi_bet": false,
"payout_percent": 10,
"currency_name": "Clouds"
}
} When betting starts you will receive the EVENT_BET_START with its included data.

©Streamlabs.com 85
BET END
{
"event": "EVENT_BET_END",
"data": {}
} When betting ends / closes you will receive the EVENT_BET_END with its included data.
BET ABORT
{
"event": "EVENT_BET_ABORT",
"data": {}
} When betting gets aborted and users have been refunded you will receive the
EVENT_BET_ABORT with its included data.
BET ENTER
{
"event": "EVENT_BET_ENTER",
"data": {
"name": "ankhheart",
"option": 0,
"amount": 10
}
} When someone bets you will receive the EVENT_BET_ENTER with its included data.
BET WINNER
{
"event": "EVENT_BET_WINNER",
"data": {
"option_id": "0",
"option": "A",
"bets": 2,
"winners": [{
"Key": "ankhheart",
"Value": 11
},{
"Key": "mohammedbaraax1",
"Value": 22
}
]
}
} When the winning option has been decided you will receive the EVENT_BET_WINNER
with its included data.

©Streamlabs.com 86
Giveaway Events
GIVEAWAY START
{
"event": "EVENT_GIVEAWAY_START",
"data": {
"command": "!raffle",
"prize": "cookie",
"permission": "Everyone",
"info": "",
"fee": 10,
"is_timed": false,
"timer": 1,
"use_cost": false,
"use_multi_entry": false,
"max_tickets": 2,
"currency_name": "Clouds",
"entries": [{
"Key": "ankhheart",
"Value": 1
}, {
"Key": "mohammedbaraax1",
"Value": 1
}
]
}
} When a giveaway starts you will receive the EVENT_GIVEAWAY_START with its included
data.
GIVEAWAY STOP
{
"event": "EVENT_GIVEAWAY_STOP",
"data": {}
} When the giveaway closes you will receive the EVENT_GIVEAWAY_STOP with its included
data.
GIVEAWAY ABORT
{
"event": "EVENT_GIVEAWAY_ABORT",
"data": {}
} When the giveaway gets aborted and users have been refunded you will receive the
EVENT_GIVEAWAY_ABORT with its included data.

©Streamlabs.com 87
GIVEAWAY ENTER
{
"event": "EVENT_GIVEAWAY_ENTER",
"data": {
"user": "ankhheart",
"tickets": 1
}
} When someone enters you will receive the EVENT_GIVEAWAY_ENTER with its included
data.
GIVEAWAY WINNER
{
"event": "EVENT_GIVEAWAY_WINNER",
"data": {
"user": "ankhheart",
"tickets": 1
}
} When the winner has been decided you will receive the EVENT_GIVEAWAY_WINNER
event with its included data.

©Streamlabs.com 88

©Streamlabs.com 89
FAQ For the FAQ please check the website!
http://www.Streamlabs Chatbot.com/faq/