Embed Size (px)
Citation preview
Point, Click, Extract. That’s It!
M Data Extractor
User Manual
Strategic Reporting Systems, Inc.

Copyright 2007. Strategic Reporting Systems, Inc. All rights reserved. All Strategic Reporting names are trademarks of Strategic Reporting Systems, Inc. Other brand names are trademarks or registered trademarks of their respective holders.
MDE Introduction
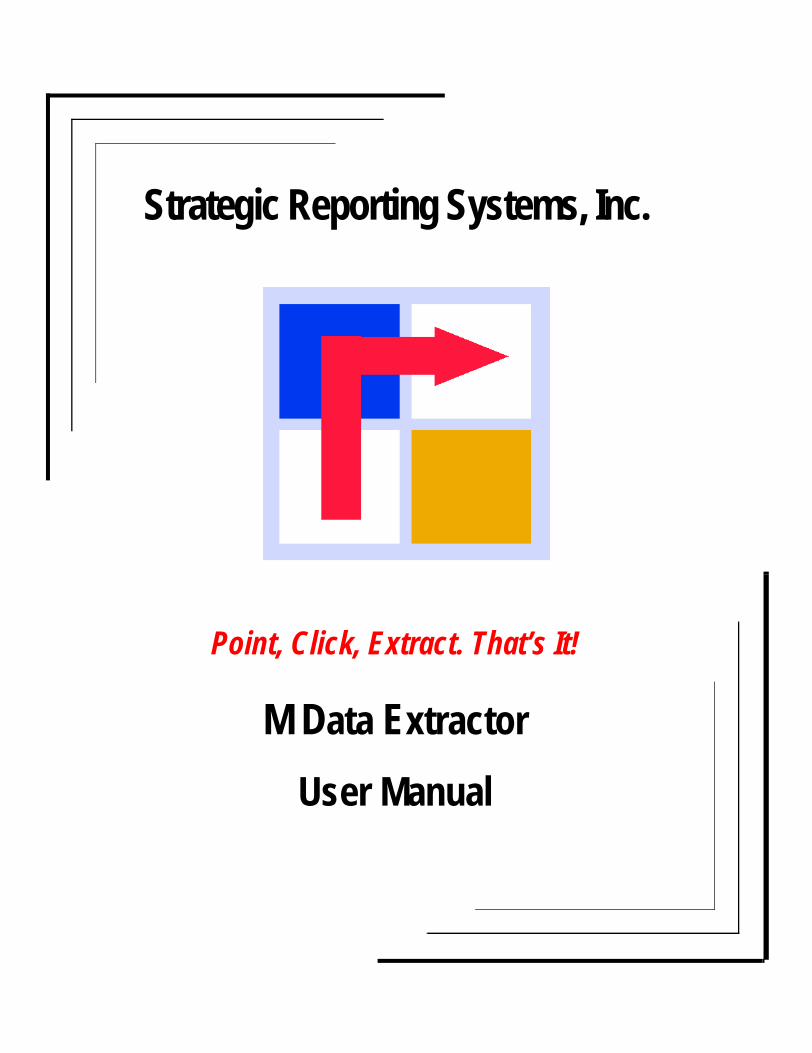
Section 1: MDE IntroductionThe M Data Extractor (MDE) is a software application designed to quickly and efficiently extract
data from a FileMan (VistA or CHCS) database and store it in a relational database. Presently,
the MDE supports Microsoft SQL Server, Oracle, and Microsoft Access databases.
After the MDE stores the data, you are able to query the data in the relational database and,
using third-party desktop tools, generate reports, perform data warehousing functions and utilize
decision support systems.
What's in this manual?This manual is designed to help you get up and running quickly and efficiently and contains the
following sections:
Section: 1 MDE Introduction Provides information on the contents of the manual, definitions of terms used, conventions used, and the various methods for contacting Strategic Reporting Systems for support, upgrades, and customizing.
Section: 2 MDE Overview Briefly describes the functions of the MDE, the technological benefits of this application and the practical advantages to the end user.
Section: 3 MDE Installation Over-view
Briefly outlines the installation tasks and describes in detail the MDE’s system requirements.
Section: 4 MDE Server Installation Describes in detail how to install the MDE Server and configure the MDE Listener.
Section: 5 MDE Client Installation Describes in detail how to install the MDE Client.
Section: 6 MDE Client Configura-tion
Describes in detail how to configure the MDE Client.
Section: 7 MDE Client Overview Briefly describes the functionality available in the MDE Client and basic concepts used.
Section 1 - 1
M Data Extractor User Manual
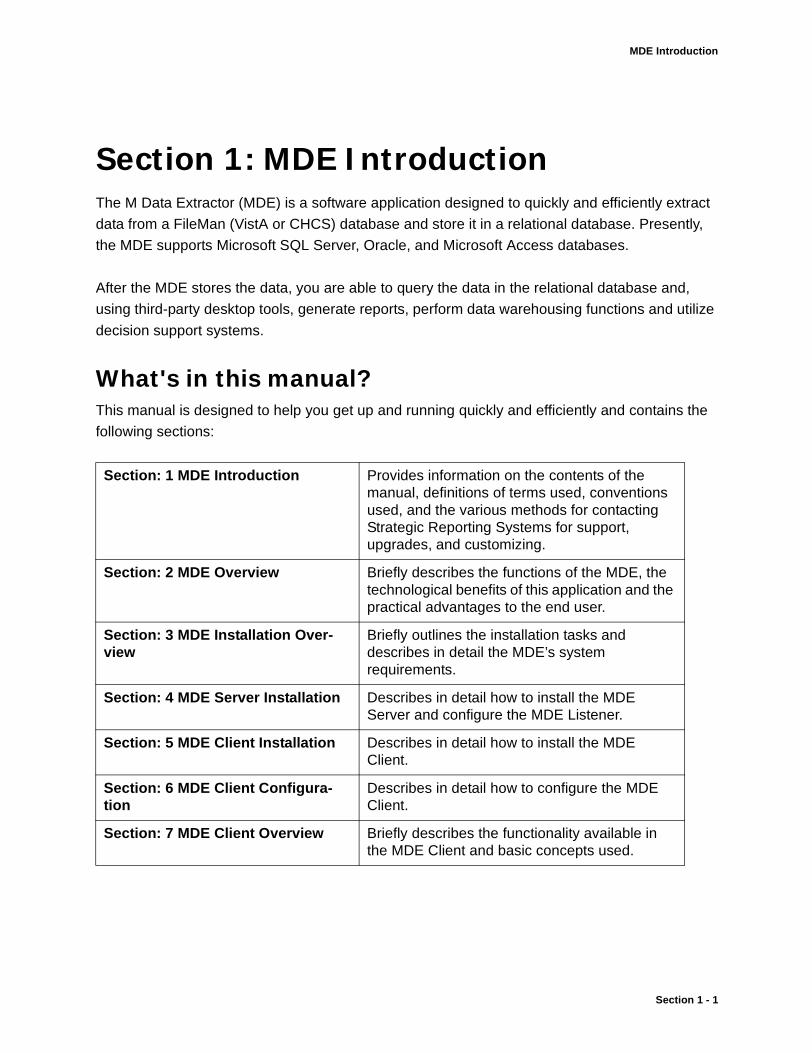
Definition of terms used in this manualThis manual uses the following terms:
Section: 8 Using the MDE Client Describes in detail how to use the MDE Client application, including:• Creating extraction definitions
• Executing data transfers
• Using the Extraction Catalog
• Scheduling data extractions and transfers
Appendix Miscellaneous MDE functions.
Term Meaning
FileMan The file and data management component of CHCS and VistA.
RDBMS Relational Database Management System. Usually refers to the target database.
Source Database The M Server where FileMan resides and where the MDE Server is installed. It con-tains the data to be extracted.
Target Database The RDBMS to where extracted data will be transferred.
MDE Server The server component of the MDE installed on the M Server where the source database resides.
MDE Listener The MDE Server component which “listens” on the assigned TCP Port for connection requests from the MDE Client Scheduler to initiate new MDE sessions.
MDE Session An active connection to the source and tar-get database by either the MDE Client or the MDE Scheduler.
MDE Site Represents the defined configuration parameters on the MDE Client which con-tains the necessary information to connect to the source and target database.
Section 1 - 2 Strategic Reporting Systems, Inc.
MDE Introduction
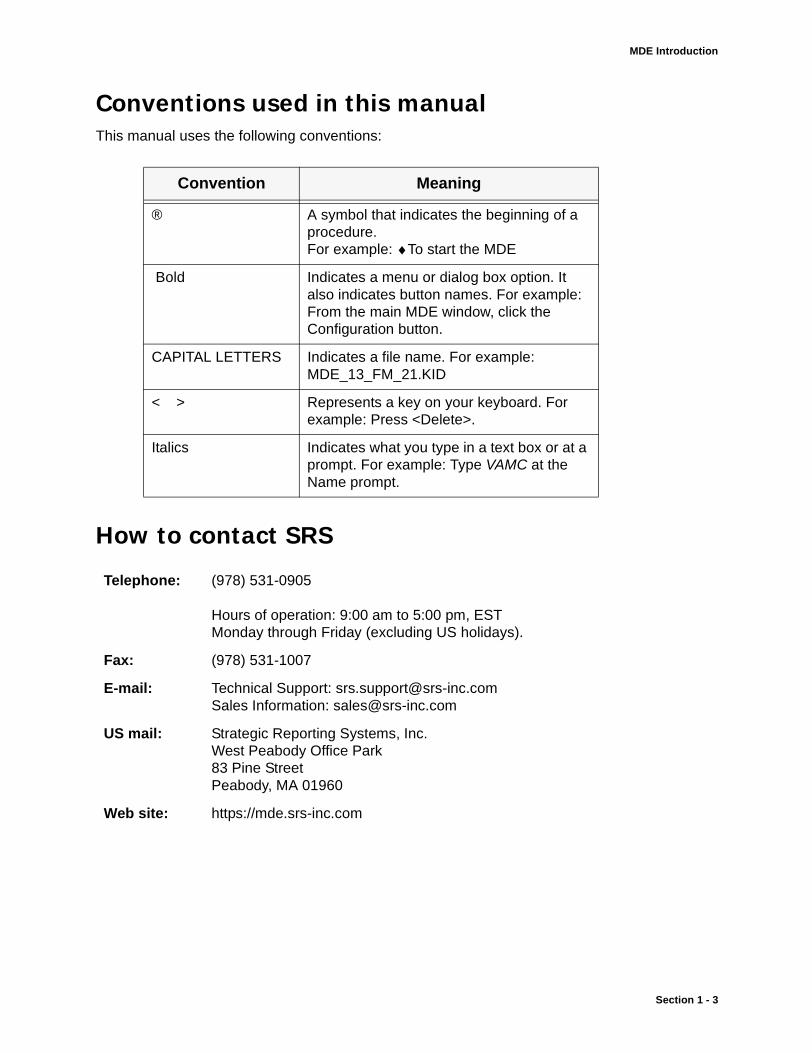
Conventions used in this manualThis manual uses the following conventions:
How to contact SRS
Convention Meaning
® A symbol that indicates the beginning of a procedure.For example: ♦To start the MDE
Bold Indicates a menu or dialog box option. It also indicates button names. For example: From the main MDE window, click the Configuration button.
CAPITAL LETTERS Indicates a file name. For example: MDE_13_FM_21.KID
< > Represents a key on your keyboard. For example: Press <Delete>.
Italics Indicates what you type in a text box or at a prompt. For example: Type VAMC at the Name prompt.
Telephone: (978) 531-0905
Hours of operation: 9:00 am to 5:00 pm, ESTMonday through Friday (excluding US holidays).
Fax: (978) 531-1007
E-mail: Technical Support: [email protected] Information: [email protected]
US mail: Strategic Reporting Systems, Inc.West Peabody Office Park83 Pine StreetPeabody, MA 01960
Web site: https://mde.srs-inc.com
Section 1 - 3

M Data Extractor User Manual
Section 1 - 4 Strategic Reporting Systems, Inc.
MDE Overview
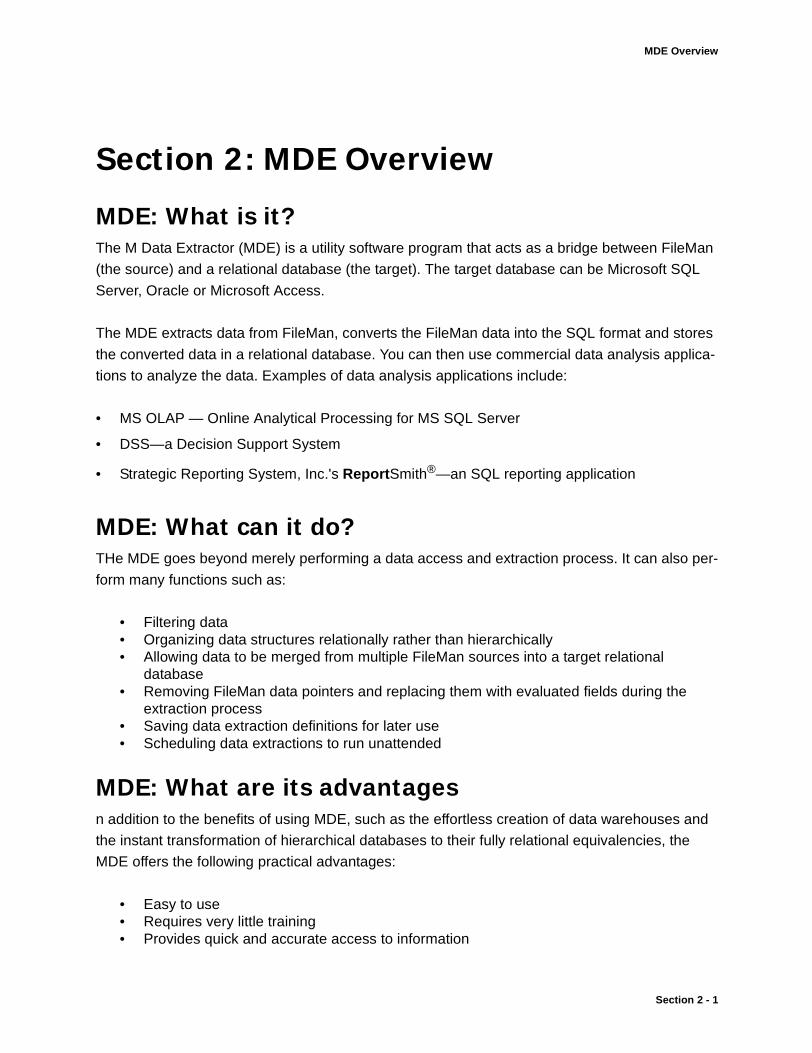
Section 2: MDE Overview
MDE: What is it?The M Data Extractor (MDE) is a utility software program that acts as a bridge between FileMan
(the source) and a relational database (the target). The target database can be Microsoft SQL
Server, Oracle or Microsoft Access.
The MDE extracts data from FileMan, converts the FileMan data into the SQL format and stores
the converted data in a relational database. You can then use commercial data analysis applica-
tions to analyze the data. Examples of data analysis applications include:
• MS OLAP — Online Analytical Processing for MS SQL Server
• DSS—a Decision Support System
• Strategic Reporting System, Inc.'s ReportSmith®—an SQL reporting application
MDE: What can it do?THe MDE goes beyond merely performing a data access and extraction process. It can also per-
form many functions such as:
• Filtering data• Organizing data structures relationally rather than hierarchically• Allowing data to be merged from multiple FileMan sources into a target relational
database• Removing FileMan data pointers and replacing them with evaluated fields during the
extraction process• Saving data extraction definitions for later use• Scheduling data extractions to run unattended
MDE: What are its advantagesn addition to the benefits of using MDE, such as the effortless creation of data warehouses and
the instant transformation of hierarchical databases to their fully relational equivalencies, the
MDE offers the following practical advantages:
• Easy to use• Requires very little training• Provides quick and accurate access to information
Section 2 - 1
M Data Extractor User Manual
• Extracts Internal Entry Numbers (IEN) to maintain referential integrity• Allows you to automatically update your data warehouse• Ability to extract data for all file formats including word processing fields
Section 2 - 2 Strategic Reporting Systems, Inc.
MDE Installation Overview
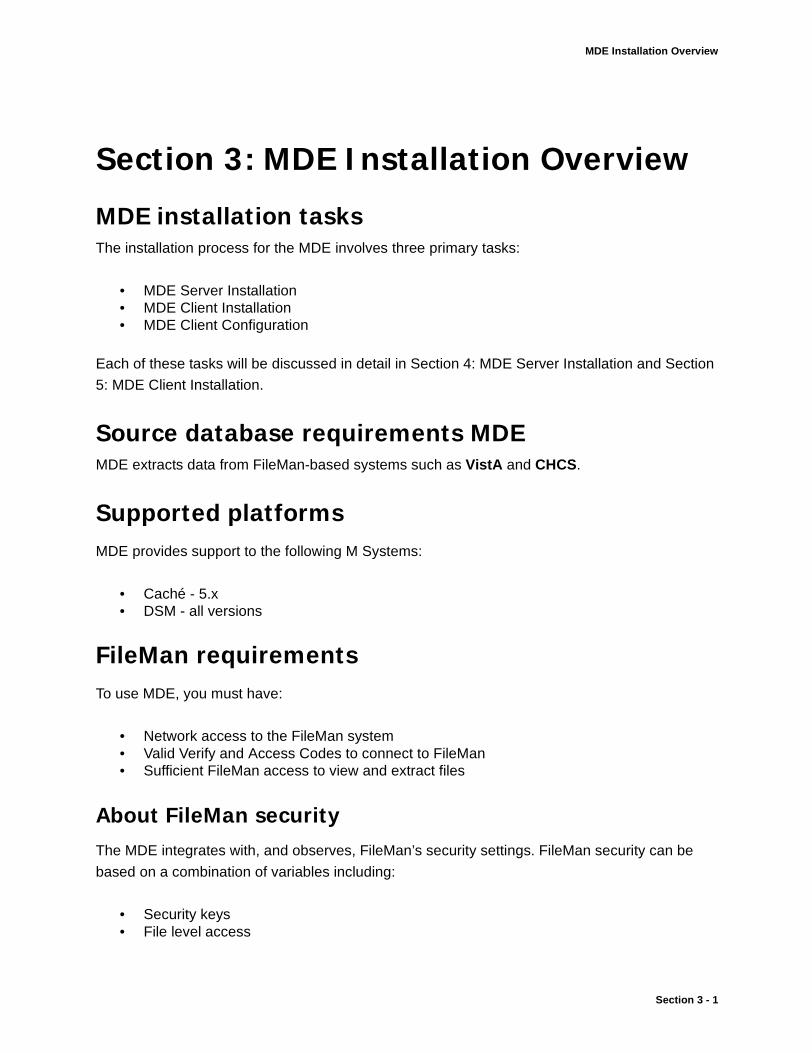
Section 3: MDE Installation Overview
MDE installation tasksThe installation process for the MDE involves three primary tasks:
• MDE Server Installation• MDE Client Installation• MDE Client Configuration
Each of these tasks will be discussed in detail in Section 4: MDE Server Installation and Section
5: MDE Client Installation.
Source database requirements MDEMDE extracts data from FileMan-based systems such as VistA and CHCS.
Supported platformsMDE provides support to the following M Systems:
• Caché - 5.x• DSM - all versions
FileMan requirementsTo use MDE, you must have:
• Network access to the FileMan system• Valid Verify and Access Codes to connect to FileMan• Sufficient FileMan access to view and extract files
About FileMan securityThe MDE integrates with, and observes, FileMan’s security settings. FileMan security can be
based on a combination of variables including:
• Security keys• File level access
Section 3 - 1
M Data Extractor User Manual
• Field level access• Record level access
As the MDE is integrated with the FileMan Security Kernel, MDE Clients can only access data for
which they have defined permissions.
Note: The security setting of the user who will be performing data extractions to populate a data warehouse/mart may need to be expanded in order to fully populate the data warehouse.
Target database requirements for MDEBefore you begin the MDE installation process, you must have a relational database manage-
ment system (RDBMS) installed and configured for use as the target database. The MDE cur-
rently supports the following as target databases:
• Microsoft SQL Server• Oracle• Microsoft Access
Microsoft SQL Server requirementsThe MDE currently supports the following versions of Microsoft SQL Server:
• Microsoft SQL Server 2000
Microsoft SQL Server prerequisitesIf you have selected Microsoft SQL Server as your target database, please verify that the follow-
ing requirements have been met before beginning the MDE installation process:
1. Configured the installation of Microsoft SQL Server 7 or Microsoft SQL Server 2000.
2. Network access to Microsoft SQL Server.
3. Appropriate user/network credentials to access Microsoft SQL Server based on Microsoft SQL Server’s authentication mode.
4. Configured database in Microsoft SQL Server for use with the MDE.
5. Appropriate Microsoft SQL Server permissions to create, drop, and append tables in the database configured for use the with MDE.
MDE Client system requirements for Microsoft SQL ServerThere are no additional system requirements for the workstation where you plan to install the
MDE Client when Microsoft SQL Server is the target database.
Section 3 - 2 Strategic Reporting Systems, Inc.
MDE Installation Overview
Oracle requirementsMDE currently supports Oracle 8i.
Oracle prerequisitesIf you have selected Oracle as your target database, please verify that the following requirements
have been met before beginning the MDE installation process:
1. Configured installation of Oracle 8i.
2. Network access to the Oracle server.
3. Appropriate user/network credentials to access the Oracle server.
4. Configured/identified table space in the Oracle database for use with the MDE.
5. Appropriate Oracle permissions to create, drop, and append tables in the table space configured for use the with MDE.
MDE Client system requirements for OracleWhen Oracle is used as the target database, the following system requirements must be met on
the workstation where you plan to install the MDE Client:
1. Installed Oracle Client Network Utilities.
2. Configured net service name to the Oracle server.
3. Installed Oracle ODBC driver (no ODBC driver configuration is required).
4. Installed Oracle database utilities.
Section 3 - 3

M Data Extractor User Manual
Microsoft Access requirementsThe MDE currently supports Microsoft Access 97 and 2000.
Microsoft Access prerequisitesIf you have selected Microsoft Access as your target database, please verify that the following
requirements have been met before beginning the MDE installation process:
1. Configured the installation of Microsoft Access 97 or 2000.
2. Appropriate user/network credentials to the Microsoft Access database.
3. Configured Microsoft Access database for use with MDE.
MDE Client system requirements for Microsoft AccessThere are no additional system requirements for the workstation where you plan to install the
MDE Client when Microsoft Access is the target database.
General system requirements for MDE ClientThe computer on which you plan to install the MDE Client must meet the following system
requirements:
• 2 Ghz Pentium Processor• Operating System: Windows , 2000 SP2, XP Professional 2003 Server • 100 MB of free disk space (for temporary files)• 256 MB of RAM• Network connection with access to the FileMan database (source database)
Section 3 - 4 Strategic Reporting Systems, Inc.
MDE Server Installation
Section 4: MDE Server Installation
MDE Server installation overviewThe MDE Server installation process consists of three basic steps:
1. Preparations on the server.
2. MDE Server installation.
3. MDE Listener configuration.
Details of the MDE Server installation process will vary depending on the M Platform, operating
system and application (VistA or CHCS) of your source database.
Note: For DSM support, contact Strategic Reporting Systems at (978) 531-0905.
Section 4 - 1
M Data Extractor User Manual
MDE Server installation for Caché 2.x - 4.x on OpenVMS and Windows 2000/NT for VistA Systems
Installation overviewThe MDE Server installation consists of three primary procedures:
1. Preparations on the Caché server.
2. Installing the MDE Server.
3. Configuring and managing the MDE Listener.
MDE Server installation should be performed by a staff member who is familiar with Caché and VistA administrative tasks and who has sufficient system privileges to:
• Create globals• Set global permissions• Perform a KIDS installation in the VistA System
Please review the entire MDE Server installation process before beginning the installation.
Preparations in Caché for VistAPreparing the Caché server consists of the following:
1. Creating globals and setting global permissions.
2. Identifying the available TCP port.
3. Routines deleted in MDE - informational only, no action required.
Creating globals and setting global permissionsThis step allows the creation and setting of permissions to read/write/purge for the following
MDE-specific globals, which have been moved to the DES* namespace:
Note: DES* may appear as DESA, DESB or some other variance in the fourth letter of the name, but all such routines function in the same way.
• ^TMP($J) (temporary)• ^DESATMP($J) (temporary, MDE-specific, previously ^XTEMP)• ^DESARKB (MDE-specific, previously ^ZRKB)• ^DESAUTL (MDE-specific, previously ^ZSQLINT)
Section 4 - 2 Strategic Reporting Systems, Inc.
MDE Server Installation
Identifying the available TCP portCheck that the following TCP network port is not in use: 18020. This port will be used later during
the MDE Listener configuration. If port 18020 is already in use, you must identify a different Port
Number to assign to the MDE Listener.
Routines deleted in MDE
If you are upgrading from a prior version of MDE, be aware that the following 37 routines will be
deleted.
Installing the MDE Server: Caché for VistA
The MDE Server installation for Caché consists of the following tasks:
1. Locating and copying the MDE Server installation files.
2. Performing the KIDS installation.
Locating and copying MDE Server installation filesDuring this step you will locate and transfer the files required for the MDE Server installation from
the MDE installation CD to the Caché server.
If any of the files are present on the Caché server they can be overwritten with the new installa-
tion files.
♦To locate and copy files:
1. Insert the MDE CD into the CD-ROM drive.
2. Start Windows Explorer.
Table 1:
MUSCUM MUSGMTS MUSOPS ZDDUTIL ZDDUTIL1 ZDDUTIL2
ZPCDI ZPCDI1 ZPCDIAG ZPCDSS ZPCENV ZPCLABC
ZPCMBCP2 ZPCMBCP3 ZPCMFUNC ZPCPINS ZPCRAD ZPCSQLI
ZPCSTART ZPCTCP ZPCUTL1 ZPCUTL2 ZPCUTL3 ZRESP
ZRESUTL2 ZRESUTL3 ZRGET ZRESUTL1 ZVBUTL1 ZVBUTL2
ZPCAPPT1 ZPCMBCP1 ZPCSTAR1 ZPCAPPT ZPCMBCP ZPCSRMV
ZPCSTART1
Section 4 - 3
M Data Extractor User Manual
3. Navigate to the following folder:
X:\M_Server\M_Code\Cache\Cache_219-41x
where X is the letter representing the CD-ROM drive.
Note: Caché 2.1.9 object code format is compatible with newer versions of Caché.
4. Copy the following files to the root directory of the Caché server:
• MDE_CACHE_219-41x.OBJ5. On the MDE CD navigate to the following folder:
X:\M_Server\FileMan_Distribution
6. Copy the KIDS file to the root directory of the Caché server:
• MDE_FM_22.KID - FileMan Version 22
Performing the KIDS installationDuring this step you will perform a KIDS installation on your VistA system using the distribution
file and object code file from the MDE Installation CD.
The KIDS installation process consists of two steps:
1. Loading the KIDS distribution.
2. Executing the KIDS install package.
Loading the KIDS distribution
♦To load the KIDS distribution:
1. Log onto your VistA System.
2. Access the KIDS (Kernel Installation & Distribution) Menu.
3. Select Installation from the Kernel Installation & Distribution System (KIDS) Option prompt.
4. Select Load A Distribution from the Select Installation Option prompt.
5. Enter the KIDS installation file name at the Enter A Host File prompt.
Be sure to include the complete path, such as: D:\CacheSys\MDE_FM_22.KID. KIDS displays the distribution information. Following is a sample output:
KIDS Distribution saved on May 14, 2004@17:36:31
Comment: MDE X.xx KIDS Installation
This Distribution contains Transport Globals for the following Package(s):
MDE X.xx
MDEOPT X.xx
Distribution OK!
Want to Continue with Load? YES//
Section 4 - 4 Strategic Reporting Systems, Inc.
MDE Server Installation
6. Enter YES at the prompt WANT TO CONTINUE WITH LOAD? KIDS now begins to load the distribution. Following is a sample output:
Loading Distribution...
MDE X.xx
Build MDEOPT X.xx has an Environmental Check Routine
Want to RUN the Environment Check Routine? YES//
7. Enter YES at the prompt Want to RUN the Environment Check Routine?
KIDS now loads the distribution file and identifies the INSTALL NAME to use during the KIDS Installation. Following is a sample output:
MDEOPT X.xx
Will firstrun the Environment Check Routine, DESAENV
Use INSTALL NAME: MDE X.xx to install this Distribution.
8. KIDS returns to the Select Installation Option.
Executing the KIDS install package
♦To execute the KIDS install package:
1. Log onto your VistA System.
2. Access the KIDS (Kernel Installation & Distribution) Menu.
3. Select Installation from the Kernel Installation & Distribution System (KIDS) Option prompt.
4. Select INSTALL Package(s) at the Select <SMA> Installation Option prompt.
KIDS displays the Select INSTALL NAME prompt.
5. Enter the INSTALL NAME provided by the KIDS Distribution Load.
For example: MDE X.xx
KIDS displays the INSTALL name along with a series of messages. Following is a sample output:
Select <SMA> INSTALL NAME: MDE X.xx Loaded from Distribution 5/24/04@12:19:35
=>MDE DISTRIBUTION ;Created on May 14, 2004@12:19:35
This Distribution was loaded on May 24, 2004@12:19:35 with header of MDE KIDS Installation ; Created on May 14, 2004@17:36:31
It consisted of the following Install(s):
MDE X.xx MDEOPT X.xx
Checking Install for Package MDE X.xx
Install Questions for MDE X.xx
Incoming Files:
3.5 DEVICE(including data)
Note: You already have the ‘DEVICE’ File.
I will MERGE your data with mine. MDEOPT X.xx
Section 4 - 5

M Data Extractor User Manual
Checking Install for Package MDEOPT X.xx
Will first run the Environment Check Routine, DESAENV
Install Questions for MDEOPT X.xx
Want KIDS to Rebuild Menu Trees Upon Completion of Install? YES//
6. Enter YES at the prompt Want KIDS to Rebuild Menu Trees Upon Completion of Install?
Want KIDS to INHIBIT LOGONS during install? YES//
7. Enter NO at the prompt Want KIDS to INHIBIT LOGONs during install?Want to DISABLE Scheduled Options, Menu Options, and Protocols? YES//
8. Enter NO at the prompt Want to DISABLE Scheduled Options, Menu Options, and Protocols?
It is not necessary to disable menu options while executing the KIDS installation package. KIDS displays the following messages:
Enter the Device you want to print the Install messages.
You can queue the install by enter a 'Q' at the device prompt.
Enter a '^' to abort the install.
DEVICE: HOME//
9. Press <Enter> at the DEVICE prompt or enter your TERMINAL DEVICE.
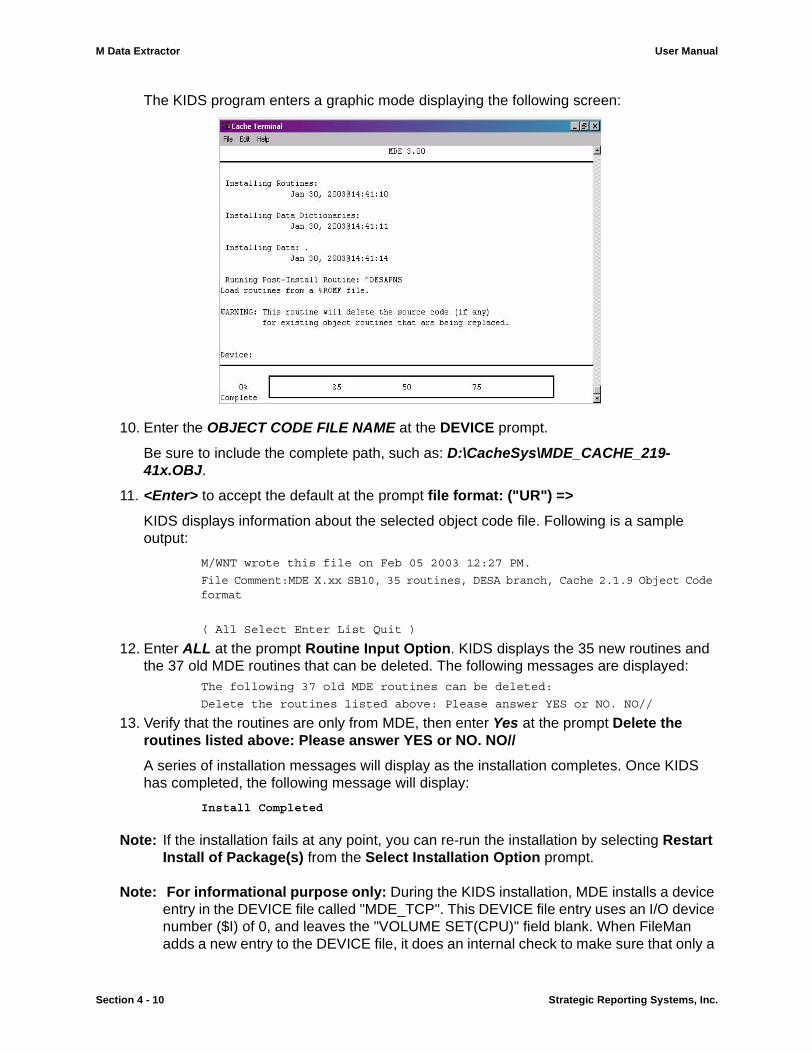
The KIDS program enters a graphic mode displaying the following screen:
10. Enter the OBJECT CODE FILE NAME at the DEVICE prompt.
Be sure to include the complete path, such as: D:\CacheSys\MDE_CACHE_219-41x.OBJ.
11. <Enter> to accept the default at the prompt File format: ("UR") =>
KIDS displays information about the selected object code file. Following is a sample output:
Section 4 - 6 Strategic Reporting Systems, Inc.
MDE Server Installation
M/WNT wrote this file on May 14 2004 5:42 PM.
File Comment:MDE X.xx SB01, 35 routines, Cache 2.1.9 Object Code format
( All Select Enter List Quit )
12. Enter ALL at the prompt Routine Input Option. KIDS displays the installation message:If a selected routine has the same name as one already on file, shall it replace the one on file? No =>
13. Enter YES at the prompt ...shall it replace the one on file? No =>
A series of installation messages now display as the installation completes. Once KIDS has completed, the following message will display:
Install Completed
Note: If the installation fails at any point, you can re-run the installation by selecting Restart Install of Package(s) from the Select Installation Option prompt.
KIDS installation for the MDE Server upgradeBefore beginning the KIDS installation for the MDE Server upgrade, the MDE Listener must be
shut down if it is running. See “Stopping the MDE Listener: Caché for VistA” on page 12, for
detailed information on how to stop the MDE Listener.
During this step you will perform a KIDS installation on your VistA system using the distribution
file and object code file from the MDE Installation CD.
The KIDS installation process consists of two steps:
1. Loading the KIDS distribution.
2. Executing the KIDS install package.
Loading the KIDS distribution
♦To load the KIDS distribution:
1. Log onto your VistA System.
2. Access the KIDS (Kernel Installation & Distribution) Menu.
3. Select Installations from the Kernel Installation & Distribution System (KIDS) Option prompt.
4. Select Load A Distribution from the Select Installation Option prompt.
5. Enter the KIDS installation File Name at the “Enter A Host File” prompt.
Be sure to include the complete path, for example: D:\CacheSys\MDE_FM_22.KID. KIDS displays the distribution information.
If the KIDS build and install files from the previous MDE Server installation have not been purged from your VistA System, KIDS may display messages similar to:
KIDS Distribution saved on May 14, 2004@17:36:31
Section 4 - 7
M Data Extractor User Manual
Comment: MDE X.xx KIDS Installation
This Distribution contains Transport Globals for the following Package(s):
MDE X.xx
MDEOPT X.xx
Distribution OK!
Want to Continue with Load? YES//
6. Enter YES at the prompt OK to continue with Load?Build MDEOPT X.xx has been loaded before, here is when:
MDEOPT X.xx Install completed
was loaded on May 14, 2004@14:41:10
MDE X.xx
MDEOPT X.xx
The following Entries already exist in the INSTALL file:
MDE X.xx Install Completed
was loaded on May 14, 2003@14:44:44
OK to continue with Load? NO//
7. Enter YES at the prompt OK to Continue?
KIDS may now display additional messages similar to:
Distribution OK
Want to Continue with Load? NO//
8. Enter YES at the prompt OK to Continue?
KIDS will now display the following message:
Want to Continue with Load? YES// <Enter>
KIDS now begins to load the distribution. Following is a sample output:
Loading Distribution...
MDE X.xx
Build MDEOPT X.xx has an Environmental Check Routine
Want to RUN the Environment Check Routine? YES//
9. Enter YES at the prompt Want to RUN the Environment Check Routine?
KIDS now loads the distribution file and identifies the INSTALL NAME to use during the KIDS Installation. Following is a sample output:
MDEOPT X.xx
Will first run the Environment Check Routine, DESAENV
Use INSTALL NAME: MDE X.xx to install this Distribution.
10. KIDS returns to the Select Installation Option.
Executing the KIDS install package
♦To execute the KIDS install package:
1. Log onto your VistA System.
2. Access the KIDS (Kernel Installation & Distribution) Menu.
Section 4 - 8 Strategic Reporting Systems, Inc.
MDE Server Installation
3. Select Installations from the Kernel Installation & Distribution System (KIDS) Option prompt.
4. Select INSTALL Package(s) at the Select Installation Option prompt.
KIDS displays the Select INSTALL NAME prompt.
5. Enter the INSTALL NAME provided by the KIDS Distribution Load.
For example: MDE
KIDS displays the INSTALL name along with a series of messages. Following is a sample output:
Select <SMA> INSTALL NAME: MDE X.xx Loaded from Distribution 1/30/03@11:47:05
=>MDE Distribution ;Created on Jan 30, 2003@22:41:32
This Distribution was loaded on Jan 30, 2003@14:27:07 with header of MDE DISTRIBUTION ; created on Jan 30, 2003@9:21:22
It consisted of the following Install(s):
MDE X.xx MDEOPT X.xx MDE X.xx
Install Questions for MDE X.xx
I will MERGE your data with mine. MDEOPT X.xx
Will first run the Environment Check Routine, DESAENV
Install Questions for MDEOPT X.xx
Want KIDS to Rebuild Menu Trees Upon Completion of Install? YES//
6. Enter YES at the prompt Want KIDS to Rebuild Menu Trees Upon Completion of Install?
Want KIDS to INHIBIT LOGONs during the install? YES//
7. Enter NO at the prompt Want to INHIBIT LOGONs during the install?Want to DISABLE Scheduled Options, Menu Options, and Protocols?YES//NO
8. Enter NO at the prompt Want to DISABLE Scheduled Options, Menu Options, and Protocols?
It is not necessary to disable menu options while executing the KIDS installation package. KIDS displays the following messages:
Enter the Device you want to print the Install messages.
You can queue the install by entering a 'Q' at the device prompt.
Enter a '^' to abort the install.
DEVICE: HOME//
9. Press <Enter> at the DEVICE prompt, or enter your TERMINAL DEVICE.
Section 4 - 9
M Data Extractor User Manual
The KIDS program enters a graphic mode displaying the following screen:
10. Enter the OBJECT CODE FILE NAME at the DEVICE prompt.
Be sure to include the complete path, such as: D:\CacheSys\MDE_CACHE_219-41x.OBJ.
11. <Enter> to accept the default at the prompt file format: ("UR") =>
KIDS displays information about the selected object code file. Following is a sample output:
M/WNT wrote this file on Feb 05 2003 12:27 PM.
File Comment:MDE X.xx SB10, 35 routines, DESA branch, Cache 2.1.9 Object Code format
( All Select Enter List Quit )
12. Enter ALL at the prompt Routine Input Option. KIDS displays the 35 new routines and the 37 old MDE routines that can be deleted. The following messages are displayed:
The following 37 old MDE routines can be deleted:
Delete the routines listed above: Please answer YES or NO. NO//
13. Verify that the routines are only from MDE, then enter Yes at the prompt Delete the routines listed above: Please answer YES or NO. NO//
A series of installation messages will display as the installation completes. Once KIDS has completed, the following message will display:
Install Completed
Note: If the installation fails at any point, you can re-run the installation by selecting Restart Install of Package(s) from the Select Installation Option prompt.
Note: For informational purpose only: During the KIDS installation, MDE installs a device entry in the DEVICE file called "MDE_TCP". This DEVICE file entry uses an I/O device number ($I) of 0, and leaves the "VOLUME SET(CPU)" field blank. When FileMan adds a new entry to the DEVICE file, it does an internal check to make sure that only a
Section 4 - 10 Strategic Reporting Systems, Inc.
MDE Server Installation
single entry in the DEVICE file can have the field "SIGN-ON/SYSTEM DEVICE" set to "YES", when those same entries also have the same values for the "$I" field and have the same value (among them) for the "VOLUME SET(CPU)" field. If this is not the case, FileMan will display error messages for each such field, naming the problem fields and removing the "YES" value from the "SIGN-ON/SYSTEM DEVICE" field. The MDE does not specify a value for the "SIGN-ON/SYSTEM DEVICE". However, FileMan does its own cross-checking when a new entry is added. Here is an example of the error messages:
CONFLICT OCCURRED. DELETING SIGN-ON/SYSTEM DEVICE FROM DEVICE RA1CONFLICT OCCURRED. DELETING SIGN-ON/SYSTEM DEVICE FROM DEVICE RA2
In the example above, this FileMan system had more than 2 entries that had a "YES" for the field, "SIGN-ON/SYSTEM DEVICE", where the $I was 0 and the VOLUME SET(CPU) field was blank. When the MDE's DEVICE file entry was added, FileMan "cleaned out" the improperly defined field values.
If these errors occur this inconsistency existed in your DEVICE file and the MDE's installation merely triggered the built-in FileMan cross-check to occur. In this situation, MDE's DEVICE file entry does install correctly.
The MDE KIDS install includes an environment check routine called DESAENV that runs regardless of the type of M system (e.g., DSM, Cache) to determine whether or not the install is taking place on a Cache system. On Cache systems, the install defines menu options for controlling the MDE Listener.
Configuring the MDE Listener: Caché for VistAWhen you install the MDE, a set of options are created under the Application Utilities menu
(under the EVE menu). The top level menu, called the “MDE Server Options” contains three sub-
options:
• MDES Start MDE Listener• MDET Stop MDE Listener• MDEC Change MDE Default Listener Port
Configuring the MDE Listener consists of the following five procedures:
1. Starting the MDE Listener.
2. Stopping the MDE Listener.
3. Changing the MDE Listener’s default port.
4. Starting the MDE Listener automatically at Caché system startup.
5. Stopping the MDE Listener automatically at Caché system shutdown.
Starting the MDE Listener: Caché for VistA The Start MDE Listener (MDES) option starts the MDE Listener. You only need to run this option
once after starting your Caché system unless the Listener is stopped.
Section 4 - 11
M Data Extractor User Manual
This MDE Listener process runs continuously in the background and executes additional MDE
Server processes only when an MDE Client requests a connection. At that time, the MDE Lis-
tener creates a new job for the client and continues to wait until another MDE Client requests a
connection.
♦To start the MDE Listener
1. Log onto your VistA System.
2. Access the MDE Server Options Menu.
3. Select START MDE LISTENER from the MDE Server Options Menu.
4. Press Enter to accept the default number or enter a different TCP port number on which to start the MDE Listener.
5. A message display will show the port number the MDE Listener was started on and the job number assigned to the process.
Stopping the MDE Listener: Caché for VistAThe Stop MDE Listener (MDET) option checks whether the MDE Listener is running and if so,
allows you to stop it. If the MDE Listener is not running and you use the menu option no action
will be taken.
Note: Shutting down the MDE Listener does not affect MDE Server jobs that are active (already running) when the MDE Listener is shut down. Those jobs will remain active until completed or the MDE Client exits. Shutting down the MDE Listener only prevents new MDE Client connections to the MDE server.
♦To stop the MDE Listener
1. Log onto your VistA System.
2. Access the MDE Server Options Menu.
3. Select STOP MDE LISTENER from the MDE Server Options Menu.
4. Press Enter to stop the MDE Listener on the displayed TCP port number.
Changing the MDE Listener’s default port: Caché for VistAThe Change MDE Default Listener Port (MDEC) option lets you modify the MDE Listener’s
default TCP port. The MDE Listener uses port 18020 as an installation default, but this setting
can be changed using this option.
♦To change the MDE Listener’s default port
1. Log onto your VistA System.
2. Access the MDE Server Options Menu.
Section 4 - 12 Strategic Reporting Systems, Inc.
MDE Server Installation
3. Select CHANGE MDE DEFAULT LISTENER from the MDE Server Options Menu.
4. Press Enter to accept the default MDE Listener TCP port number or enter a new available TCP port number.
Starting the MDE Listener automatically at Caché system startup
Note: This should only be performed by a Caché system administrator.
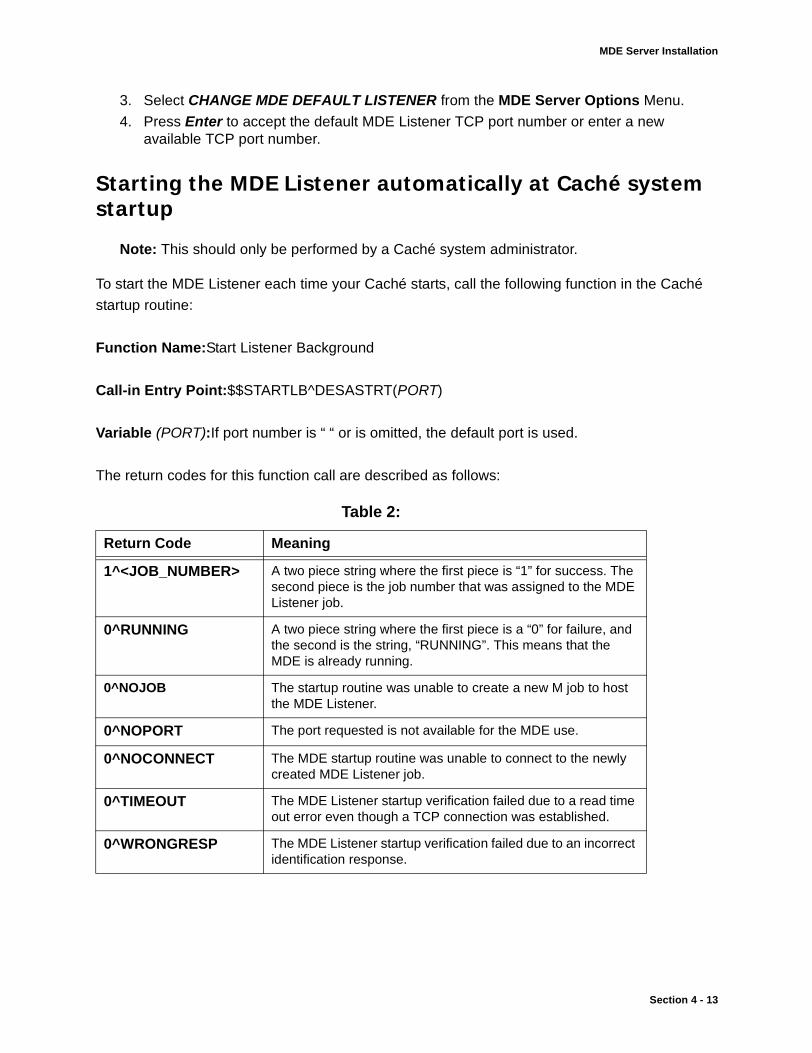
To start the MDE Listener each time your Caché starts, call the following function in the Caché
startup routine:
Function Name:Start Listener Background
Call-in Entry Point:$$STARTLB^DESASTRT(PORT)
Variable (PORT):If port number is “ “ or is omitted, the default port is used.
The return codes for this function call are described as follows:
Table 2:
Return Code Meaning
1^<JOB_NUMBER> A two piece string where the first piece is “1” for success. The second piece is the job number that was assigned to the MDE Listener job.
0^RUNNING A two piece string where the first piece is a “0” for failure, and the second is the string, “RUNNING”. This means that the MDE is already running.
0^NOJOB The startup routine was unable to create a new M job to host the MDE Listener.
0^NOPORT The port requested is not available for the MDE use.
0^NOCONNECT The MDE startup routine was unable to connect to the newly created MDE Listener job.
0^TIMEOUT The MDE Listener startup verification failed due to a read time out error even though a TCP connection was established.
0^WRONGRESP The MDE Listener startup verification failed due to an incorrect identification response.
Section 4 - 13
M Data Extractor User Manual
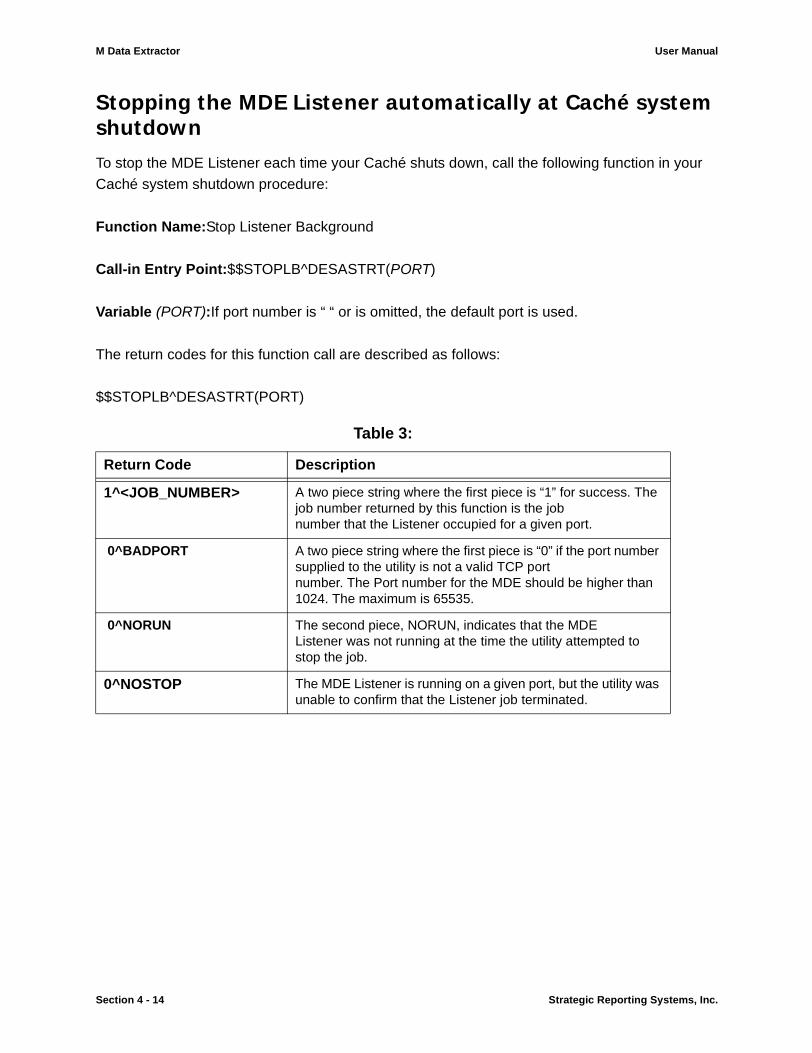
Stopping the MDE Listener automatically at Caché system shutdownTo stop the MDE Listener each time your Caché shuts down, call the following function in your
Caché system shutdown procedure:
Function Name:Stop Listener Background
Call-in Entry Point:$$STOPLB^DESASTRT(PORT)
Variable (PORT):If port number is “ “ or is omitted, the default port is used.
The return codes for this function call are described as follows:
$$STOPLB^DESASTRT(PORT)
Table 3:
Return Code Description
1^<JOB_NUMBER> A two piece string where the first piece is “1” for success. The job number returned by this function is the job number that the Listener occupied for a given port.
0^BADPORT A two piece string where the first piece is “0” if the port number supplied to the utility is not a valid TCP port number. The Port number for the MDE should be higher than 1024. The maximum is 65535.
0^NORUN The second piece, NORUN, indicates that the MDE Listener was not running at the time the utility attempted to stop the job.
0^NOSTOP The MDE Listener is running on a given port, but the utility was unable to confirm that the Listener job terminated.
Section 4 - 14 Strategic Reporting Systems, Inc.
MDE Client Installation
Section 5: MDE Client Installation
MDE Client installation overviewAfter you have installed the MDE Server and configured the MDE Listener, you are ready to pro-
ceed with the MDE Client installation.
The MDE Client installation consists of the following primary tasks:
• Installing the MDE Client software
• Configuring the MDE Scheduler
In order to install the software correctly and configure the necessary services, you must have
local administrative privileges on the workstation where you are installing the MDE Client.
The MDE Client Software installation is further divided into two sub-sections:
• Upgrading from a previous version of the MDE (beginning on page 5 - 1)• Installing the MDE Client for the first time (beginning on page 5 - 3)
Upgrading from a previous version of the MDEIf the MDE Client installation detects a prior version of the MDE, you are prompted to upgrade to
the newer version. Unlike earlier upgrades, you are not required to uninstall the previous version
before installing the new version.
If the installation detects a previous version of the MDE, it automatically creates a backup copy of
the existing schedule.mdb file (extraction catalog) in the same database folder where the previ-
ous MDE installation is located.
The backup schedule.mdb file is created in the format: “schedule YYYYMMDD_HH-MM,” where
YYYY is the current year, MM is the current month, DD is the current day, HH is the current hour,
and MM is the current minute.
If you lose the data in the catalog during the upgrade installation, navigate to the folder where the
database file is located and rename the backup copy to schedule.mdb. You will need to run the
MDE_Cat_Upgrade.exe utility on the backup schedule.mdb file in order to convert the file to the
latest format.
Section 5 - 1

M Data Extractor User Manual
Note: Please see the APPENDIX for instruction on how to run this utility.
♦To upgrade a previous client version of MDE for Windows 2000/NT
1. Insert the MDE CD into the CD-ROM drive.
2. Open Windows Explorer and browse to the CD-ROM drive.
3. On the installation CD, navigate to the Win_Client folder and double-click the setup.exe file.
4. If a previous version of the MDE Client exists, a message appears indicating that the previous version has been detected and will be upgraded.
Click Yes to proceed with the upgrade. Click No to stop and exit the installation.
The installation displays the Select Program Files Location dialog box showing the location of the previous version of the MDE. The upgraded version of the MDE is installed in this location.
5. In the Welcome dialog box, read the on-screen instructions and click Next.
The installation displays the Select Program Folder Location dialog box showing the location of the previous version of the MDE (i.e. C:\Program Files\MDE). The upgraded version of MDE will be installed in this same location.
6. Read the on-screen instructions then click Next.
The installation displays the Start Copying Files dialog box showing the current installation settings.
7. Click Next to continue. There may be a delay before the files start copying.
When the installation completes, you will be prompted to restart the computer.
8. Select the option you want, then click Finish.
If you select Yes, I want to restart my computer now, your computer shuts down and is restarted.
♦To upgrade a previous client version of MDE for Windows XP
1. Insert the MDE CD into the CD-ROM drive.
2. If the installation CD folder does not display automatically, open Windows Explorer and browse to the CD-ROM drive.
3. On the installation CD, navigate to the Win_Client folder and double-click the setup.exe file.
4. If a previous version of the MDE Client exists, a message appears indicating that the previous version has been detected and will be upgraded.
Click Yes to proceed with the upgrade. Click No if you want to stop and exit the installation.
The installation displays the Select File Location dialog box showing the location of the previous version of the MDE (i.e. C:\Program Files\MDE). The upgraded version of the MDE is installed in this location.
5. In the Welcome dialog box, read the on-screen instructions and click Next.
Section 5 - 2 Strategic Reporting Systems, Inc.
MDE Client Installation
The installation displays the Select Program Folder Location dialog box, showing the location of the previous version of the MDE. The upgraded version of MDE will be installed in this same location.
6. Read the on-screen instructions then click Next.
The installation displays the Start Copying Files dialog box showing the current installation settings.
7. Click Next to continue. There may be a delay before the files start copying.
When the installation completes, you may be prompted to restart the computer.
8. Select the option you want, then click Finish.
If you select Yes, I want to restart my computer now, your computer shuts down and is restarted.
Installing the MDE Client for the first time♦To install the MDE Client for the first time on Windows 2000/NT
1. Insert the MDE CD into the CD-ROM drive.
2. If the installation does not automatically start, open Windows Explorer and locate the CD-ROM drive.
3. On the installation CD, navigate to the Win_Client folder and double-click the Setup.exe file.
4. In the Welcome dialog box, read the on-screen instructions then click Next.
The installation displays the Choose Destination Location dialog box. The default location for the MDE installation is C:\PROGRAM FILES\MDE.
5. Click Next to accept the default location.
- or -
Click the Browse button and specify a different location. In the Path box, type the new installation path or double-click an existing folder and specify the location you want the MDE to be installed to, then click OK.
6. Click Next to continue.
7. In the Select Program Folder dialog box, accept the MDE folder or type a new folder in the Program Folders box.
8. Click Next.
There may be a delay before the files start copying.
9. In the Question dialog box, select Yes or No when prompted to create a shortcut to the MDE on your desktop.
The Information dialog box displays the statement, “Set parameters of MDE_Scheduler service.”
10. Windows 2000/NT users: Click the OK button to display the Services dialog box.
a. In the Services list, select MDE_Scheduler then click Startup.
Section 5 - 3
M Data Extractor User Manual
b. Windows displays the Services dialog box.
c. Under Startup Type select the Automatic option.
d. In the Services dialog box click OK, then click Close to continue with the installation.
11. Select the option to restart your computer now or at a later time then click Finish. If you select Yes, I want to restart my computer now, your computer is restarted.
Proceed to Configuring the MDE Scheduler (beginning on page 5 - 5), to complete the MDE Scheduler configuration tasks.
Once you have configured the MDE Scheduler, proceed to Section 5: Configuring DCOM in Win-
dows NT or Windows 2000 on page 5 - 10.
♦To install the MDE Client for the first time on Windows XP
1. Insert the MDE CD into the CD-ROM drive.
2. If the installation does not automatically start, open Windows Explorer and locate the CD-ROM drive.
3. On the installation CD, navigate to the Win_Client folder and double-click the Setup.exe file.
4. In the Welcome dialog box, read the on-screen instructions then click Next.
The installation displays the Choose Destination Location dialog box. The default location for the MDE installation is C:\PROGRAM FILES\MDE.
5. Click Next to accept the default location.
- or -
Click the Browse button and specify a different location. In the Path box, type the new installation path or double-click an existing folder and specify the location you want the MDE to be installed to, then click OK.
6. Click Next to continue.
7. In the Select Program Folder dialog box, accept the MDE folder or type a new folder in the Program Folders box.
8. Click Next.
There may be a delay before the files start copying.
9. In the Question dialog box, select Yes or No when prompted to create a shortcut to the MDE on your desktop.
The Information dialog box displays the statement, “Set parameters of MDE_Scheduler service.”
10. Click the OK button to display the Services dialog box.
a. In the Services (local) list, select MDE_Scheduler, then click on the Start the service link.
Section 5 - 4 Strategic Reporting Systems, Inc.
MDE Client Installation
b. The Service Control dialog box displays. The MDE Scheduler is assigned a status of “Started.”
c. Close the Services window to continue with the MDE installation.
The Setup Complete dialog box displays.
11. Select the option to restart your computer now or at a later time then click Finish. If you select Yes, I want to restart my computer now, your computer is restarted.
Proceed to Configuring the MDE Scheduler (beginning on page 5 - 5), to complete the MDE Scheduler configuration tasks.
Once you have configured the MDE Scheduler, proceed to Section 5: Configuring DCOM in Win-
dows XP on page 5 - 13.
Configuring the MDE SchedulerThe MDE Scheduler configuration consists of the following tasks:
• Configuring the MDE Scheduler
• Configuring Distributed COM (DCOM)
Configuring the MDE Scheduler ServiceIf the MDE Client is installed on a system running the Windows 98 operating system, no configu-
ration is required for the Scheduler. Please proceed to Section 6: MDE Client Configuration on
page 6 - 1.
If the MDE Client is installed on a Windows NT, 2000 or XP operating system, the MDE Sched-
uler service is automatically set up and started as part of the installation.
As a service, the MDE Scheduler runs as a background process, allowing your scheduled extrac-
tions to execute even if you log off your computer.
The MDE Scheduler service is setup by default to “Log On As” the local system account. How-
ever, the local system account does not have the necessary privileges required by the MDE
Scheduler to:
• Load data into the target relational database• E-mail extraction results
The “Log On As” parameter of the MDE Scheduler service needs to be modified to indicate a user account with e-mail capabilities and sufficient network permissions to access the target database.
Section 5 - 5
M Data Extractor User Manual
Configuring the MDE Scheduler service for Windows NT
♦To configure the MDE Scheduler service for Windows NT:
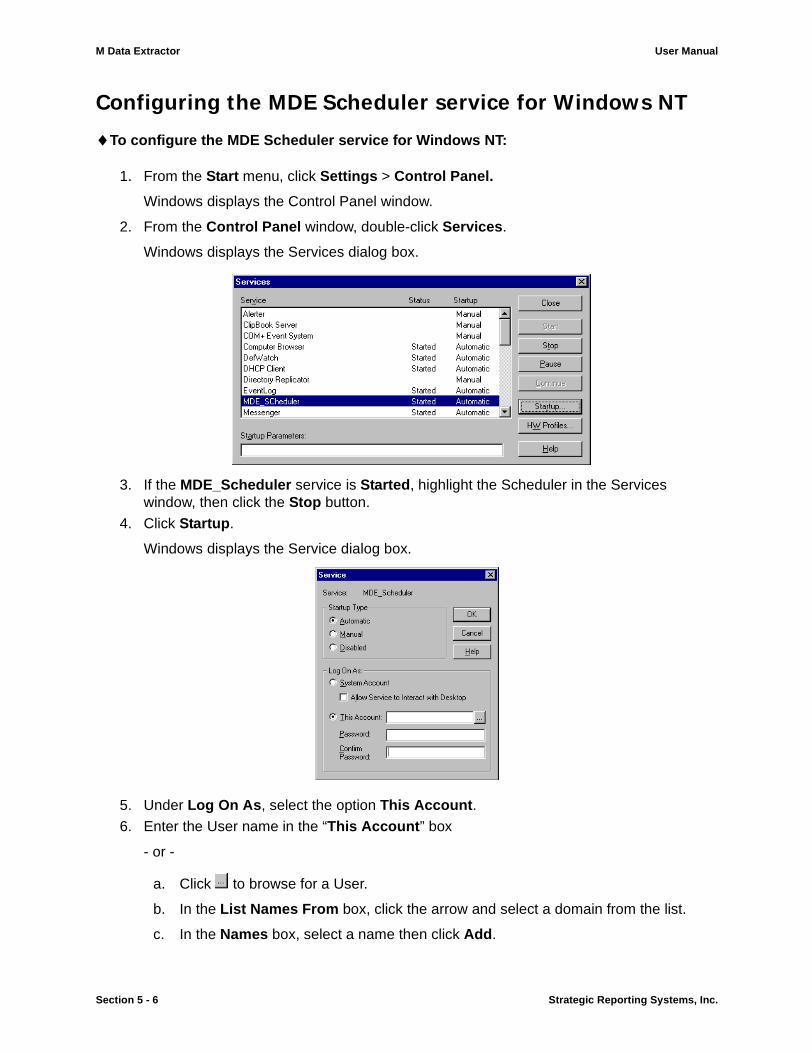
1. From the Start menu, click Settings > Control Panel.
Windows displays the Control Panel window.
2. From the Control Panel window, double-click Services.
Windows displays the Services dialog box.
3. If the MDE_Scheduler service is Started, highlight the Scheduler in the Services window, then click the Stop button.
4. Click Startup.
Windows displays the Service dialog box.
5. Under Log On As, select the option This Account. 6. Enter the User name in the “This Account” box
- or -
a. Click to browse for a User.
b. In the List Names From box, click the arrow and select a domain from the list.
c. In the Names box, select a name then click Add.
Section 5 - 6 Strategic Reporting Systems, Inc.
MDE Client Installation
d. Click OK.
Note: Ensure that you enter an active e-mail account.
Windows closes the Add User dialog box and returns you to the Service dialog box.
7. Enter the password in the Password box.
8. Re-enter the password in the Confirm Password box.
9. Click OK.
Windows closes the Service dialog box and returns you to the Services dialog box.
10. In the Services dialog box, make sure that MDE_Scheduler is still selected, then click Start.
The MDE_Scheduler service starts.
Configuring the MDE Scheduler Service for Windows 2000
♦To configure the MDE Scheduler service for Windows 2000:
1. From the Start menu, click Settings > Control Panel.
Windows displays the Control Panel window.
2. From the Control Panel window, double-click Administrative Tools to display the Administrative Tools window.
3. From the Administrative Tools window, double-click Services.
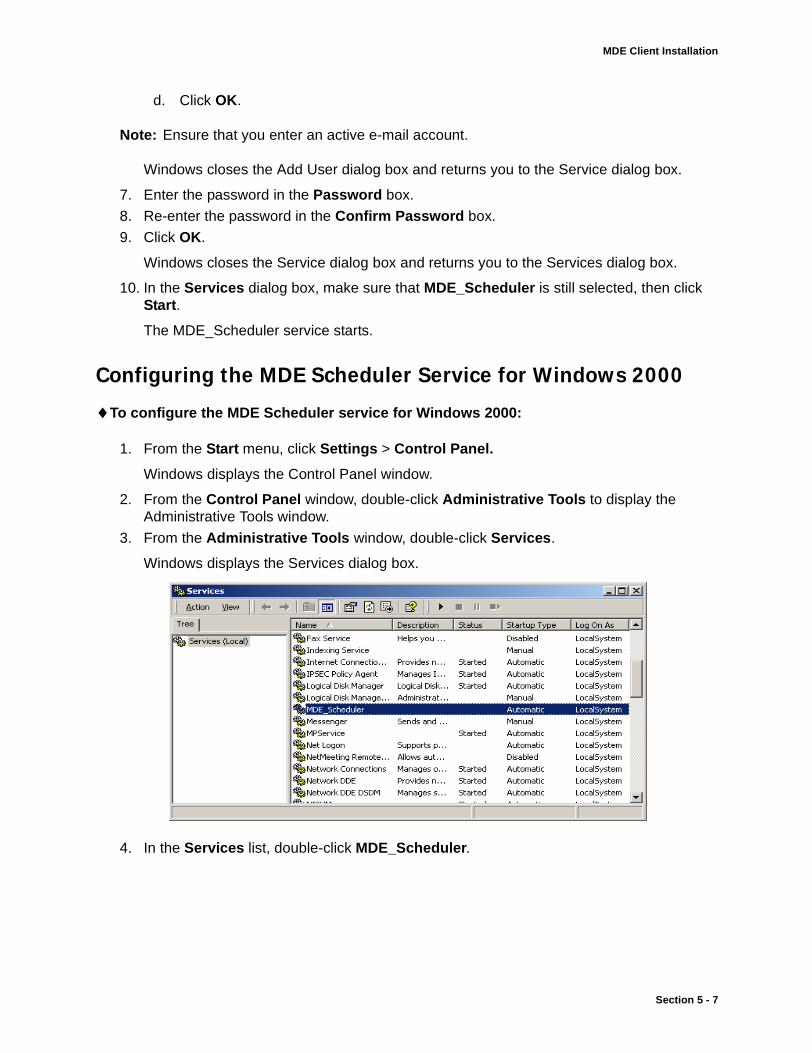
Windows displays the Services dialog box.
4. In the Services list, double-click MDE_Scheduler.
Section 5 - 7
M Data Extractor User Manual
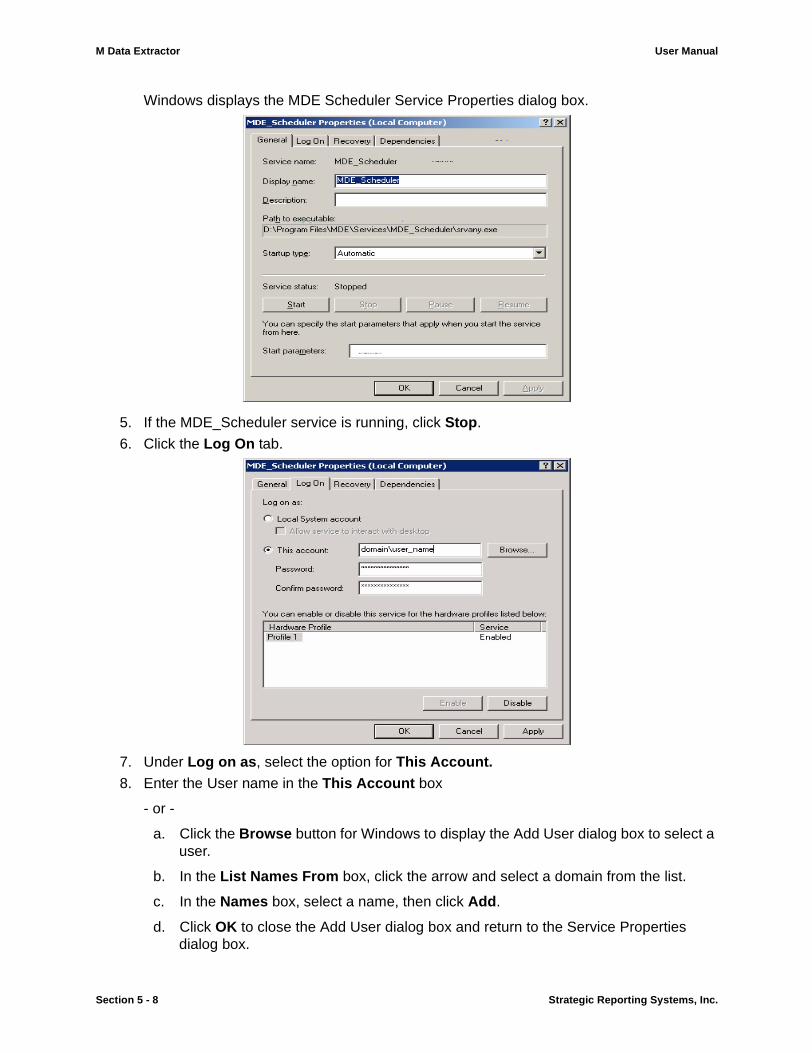
Windows displays the MDE Scheduler Service Properties dialog box.
5. If the MDE_Scheduler service is running, click Stop.
6. Click the Log On tab.
7. Under Log on as, select the option for This Account.8. Enter the User name in the This Account box
- or -
a. Click the Browse button for Windows to display the Add User dialog box to select a user.
b. In the List Names From box, click the arrow and select a domain from the list.
c. In the Names box, select a name, then click Add.
d. Click OK to close the Add User dialog box and return to the Service Properties dialog box.
Section 5 - 8 Strategic Reporting Systems, Inc.
MDE Client Installation
Note: Make sure that you enter an account that can be configured to send e-mail to if you want the MDE to send an e-mail when an extraction completes.
9. In the Password box, enter the password.
10. In the Confirm Password box, re-enter the password.
11. Click Apply to set your changes.
12. Click General tab.
13. Click Start to start the MDE_Scheduler service.
Configuring the MDE Scheduler Service for Windows XP
♦To configure the MDE Scheduler service for Windows XP:
1. From the Start menu, click Control Panel.
Windows displays the Control Panel window.
2. From the Control Panel window, double-click Administrative Tools to display the Administrative Tools window.
3. From the Administrative Tools window, double-click Services.
4. In the Services list, double-click MDE_Scheduler.
Windows displays the MDE_Scheduler Properties dialog box
5. If the MDE_Scheduler service is running, click Stop.
6. Click the Log On tab.
7. Under Log on as, select the option for This Account.8. Enter the User name in the This Account box
- or -
a. Click the Browse button for Windows to display the Add User dialog box to select a user.
b. Enter the User name in the Enter the object name to select text box
c. Click OK to close the Add User dialog box and return to the Service Properties dialog box.
Note: Make sure that you enter an account that can be configured to send e-mail to if you want the MDE to send an e-mail when an extraction completes.
9. In the Password box, enter the password.
10. In the Confirm Password box, re-enter the password.
11. Click Apply to set your changes.
12. Click the General tab.
13. Click the Start button to start the MDE_Scheduler service.
Section 5 - 9
M Data Extractor User Manual
Configuring DCOM for the MDE SchedulerTo complete the MDE Scheduler configuration for Windows 2000/NT and XP, you must run the
Windows utility “DCOMCNFG.” This utility is a standard part of the Windows operating systems.
You use the Distributed COM (DCOM) Configuration Properties dialog box to give the account
you want to use to run the MDE as a service the permission it needs to both launch and access
any application installed on the computer (default DCOM permissions).
Note that even if your primary account on the computer is contained within the Administrator’s
group, you may not necessarily have adequate permissions with DCOM. By default, the DCOM
launch and access permissions sometimes include the Administrator user of the local domain,
but does not necessarily contain the permission for the Administrator group. You may choose
either a user or a group, depending on what is appropriate for your system.
Configuring DCOM in Windows NT or Windows 2000
♦To Configure DCOM in Windows NT or Windows 2000:
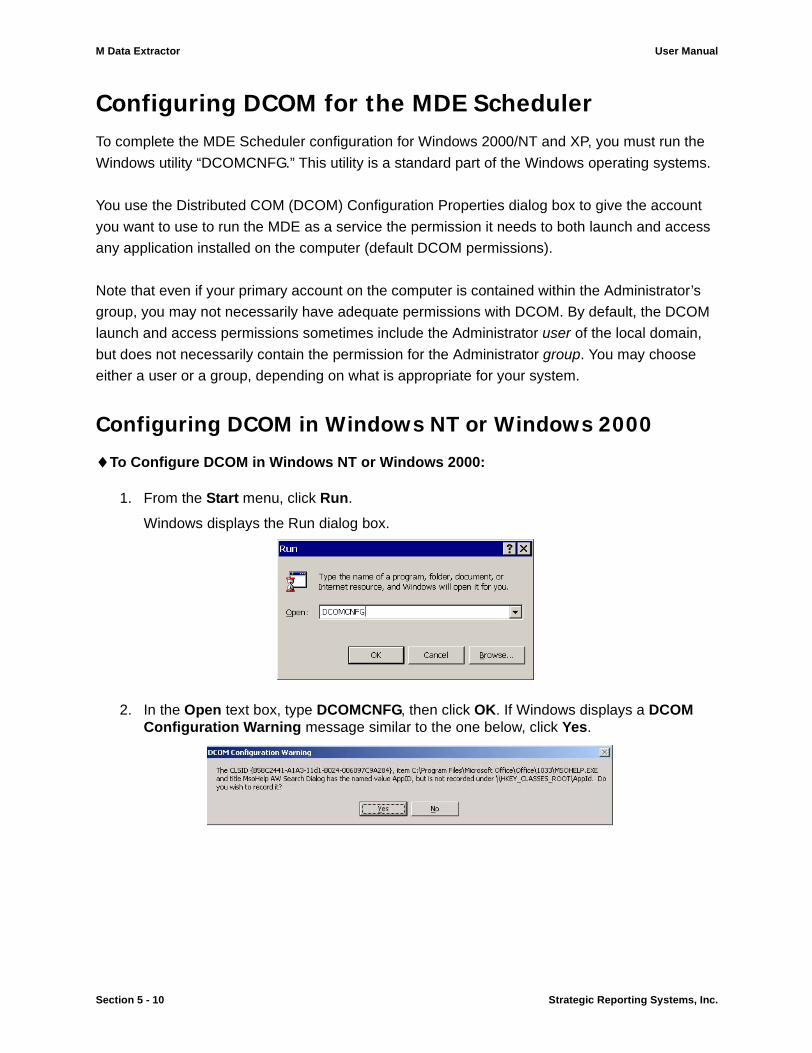
1. From the Start menu, click Run.
Windows displays the Run dialog box.
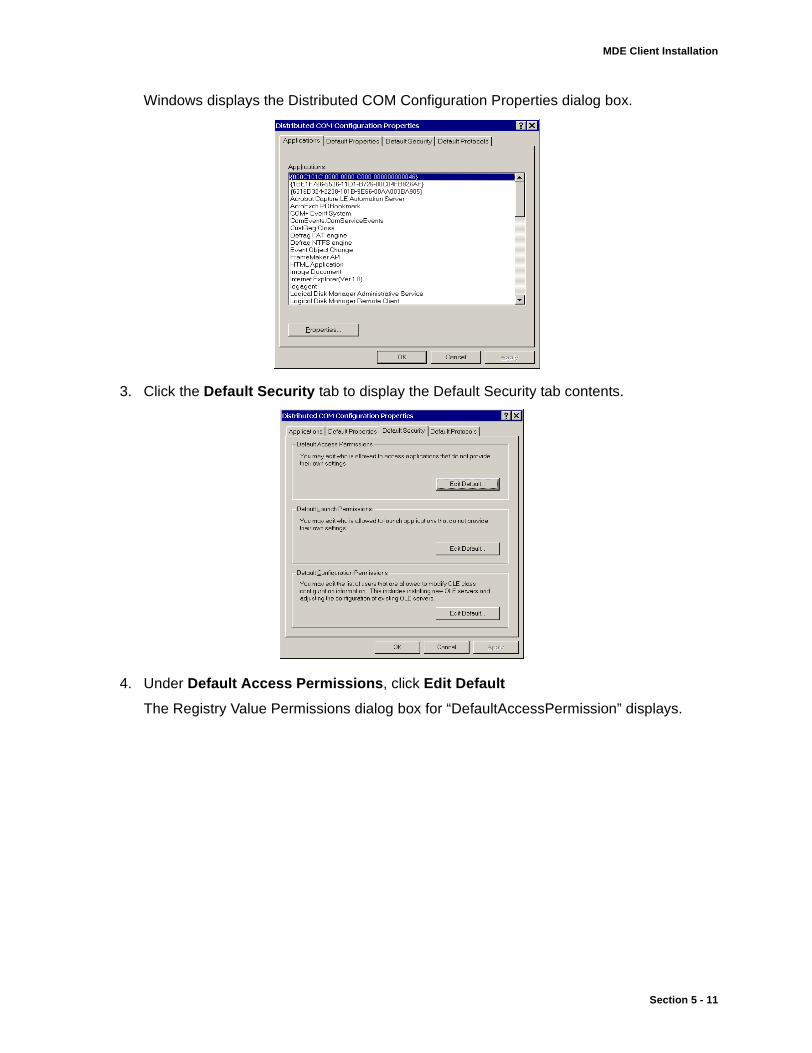
2. In the Open text box, type DCOMCNFG, then click OK. If Windows displays a DCOM Configuration Warning message similar to the one below, click Yes.
Section 5 - 10 Strategic Reporting Systems, Inc.
MDE Client Installation
Windows displays the Distributed COM Configuration Properties dialog box.
3. Click the Default Security tab to display the Default Security tab contents.
4. Under Default Access Permissions, click Edit Default
The Registry Value Permissions dialog box for “DefaultAccessPermission” displays.
Section 5 - 11
M Data Extractor User Manual
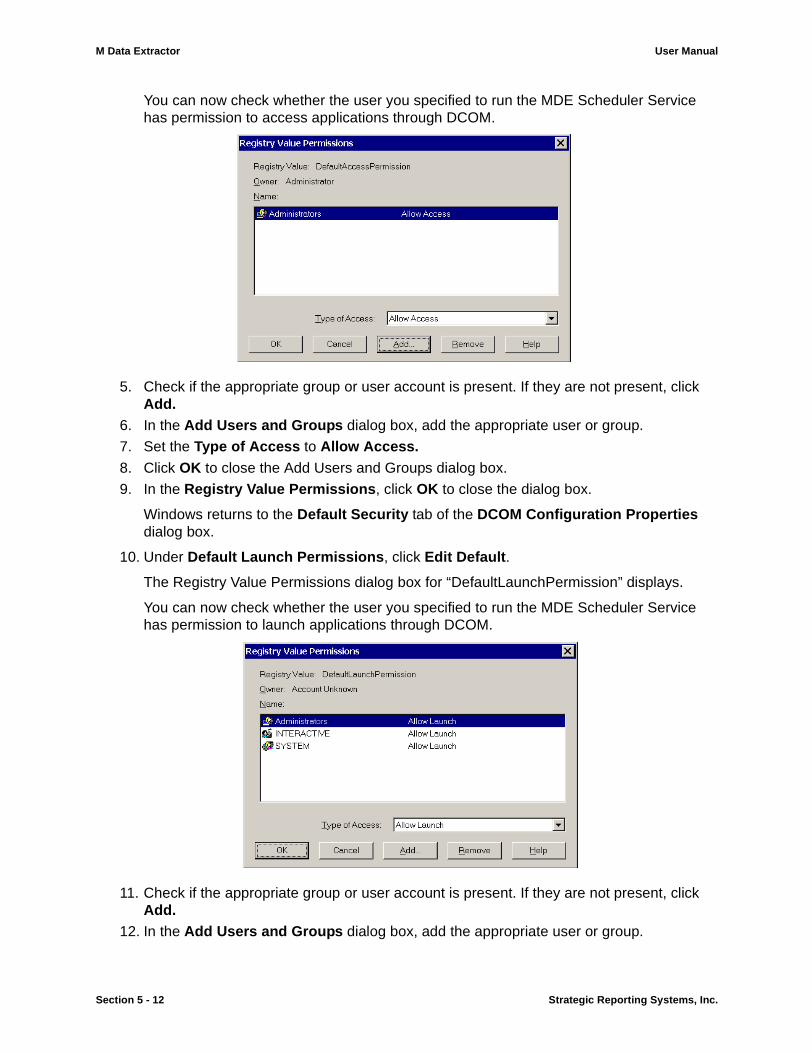
You can now check whether the user you specified to run the MDE Scheduler Service has permission to access applications through DCOM.
5. Check if the appropriate group or user account is present. If they are not present, click Add.
6. In the Add Users and Groups dialog box, add the appropriate user or group.
7. Set the Type of Access to Allow Access.8. Click OK to close the Add Users and Groups dialog box.
9. In the Registry Value Permissions, click OK to close the dialog box.
Windows returns to the Default Security tab of the DCOM Configuration Properties dialog box.
10. Under Default Launch Permissions, click Edit Default.
The Registry Value Permissions dialog box for “DefaultLaunchPermission” displays.
You can now check whether the user you specified to run the MDE Scheduler Service has permission to launch applications through DCOM.
11. Check if the appropriate group or user account is present. If they are not present, click Add.
12. In the Add Users and Groups dialog box, add the appropriate user or group.
Section 5 - 12 Strategic Reporting Systems, Inc.
MDE Client Installation
13. Set the Type of Access to Allow Access.14. Click OK to close the Add Users and Groups dialog box.
15. In the Registry Value Permissions, click OK to close the dialog box.
Windows returns to the Default Security tab of the DCOM Configuration Properties dialog box.
16. Click OK to exit the DCOM Configuration Properties dialog box.
The MDE Scheduler is now configured for Windows NT and Windows 2000. You are ready to
schedule extractions with the MDE.
Configuring DCOM in Windows XP
♦To Configure DCOM in Windows XP:
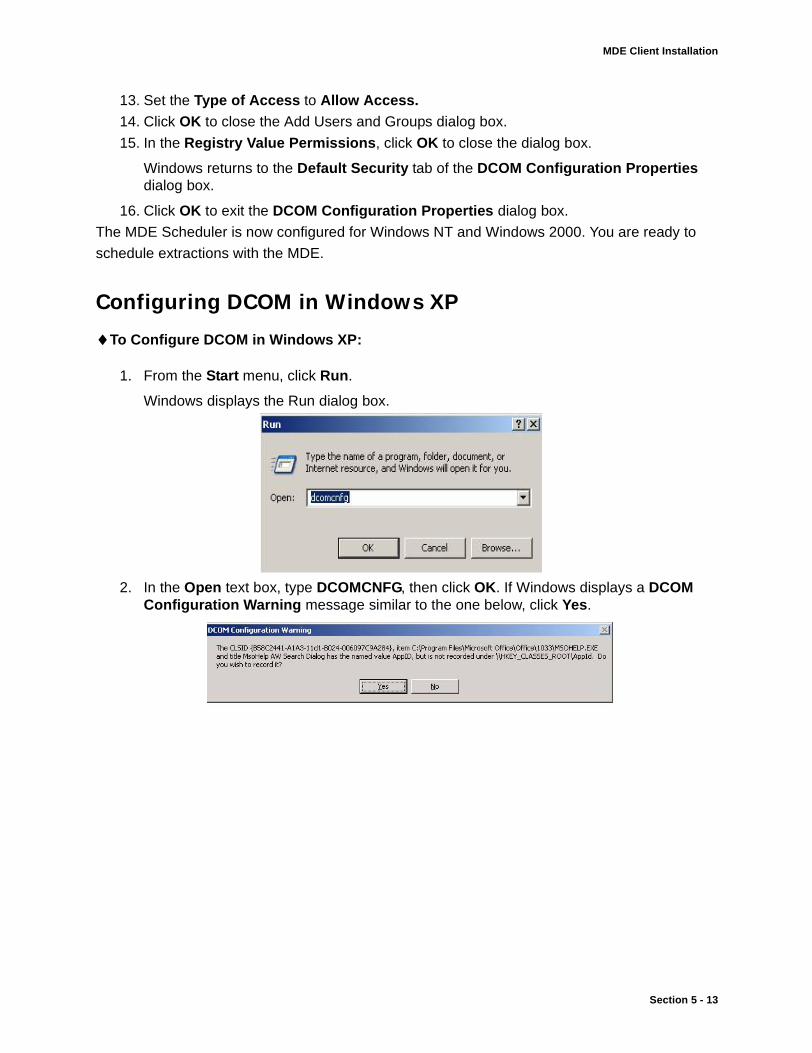
1. From the Start menu, click Run.
Windows displays the Run dialog box.
2. In the Open text box, type DCOMCNFG, then click OK. If Windows displays a DCOM Configuration Warning message similar to the one below, click Yes.
Section 5 - 13
M Data Extractor User Manual
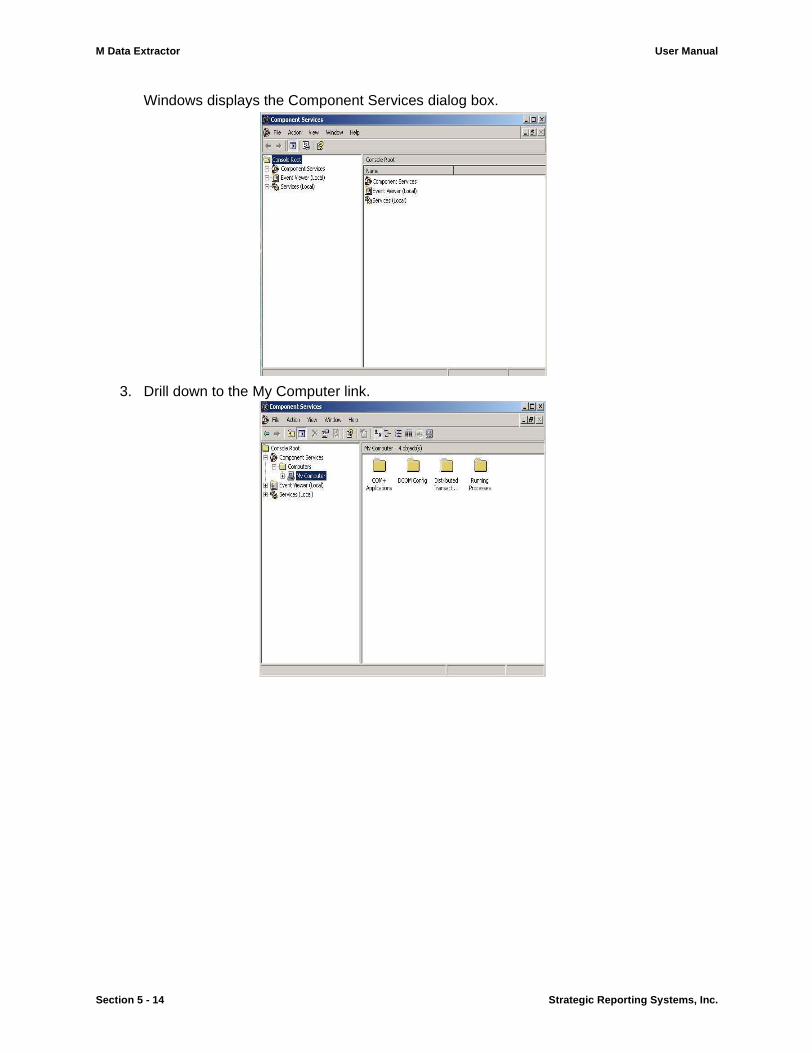
Windows displays the Component Services dialog box.
3. Drill down to the My Computer link.
Section 5 - 14 Strategic Reporting Systems, Inc.
MDE Client Installation
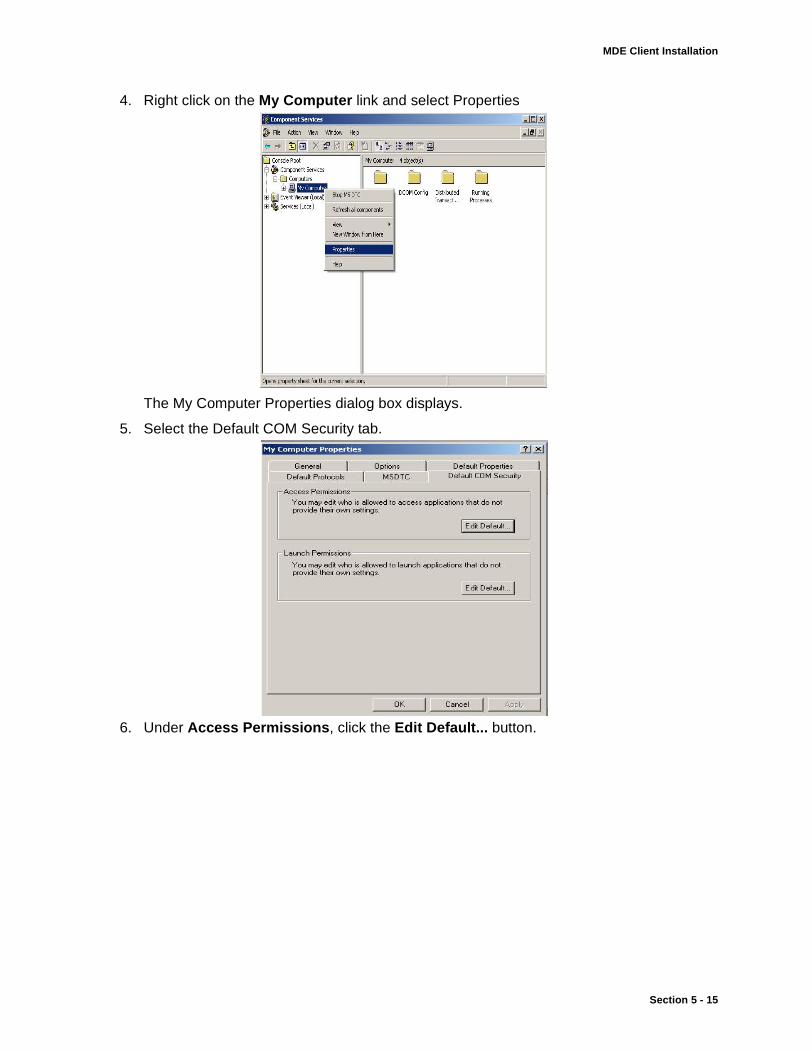
4. Right click on the My Computer link and select Properties
The My Computer Properties dialog box displays.
5. Select the Default COM Security tab.
6. Under Access Permissions, click the Edit Default... button.
Section 5 - 15
M Data Extractor User Manual
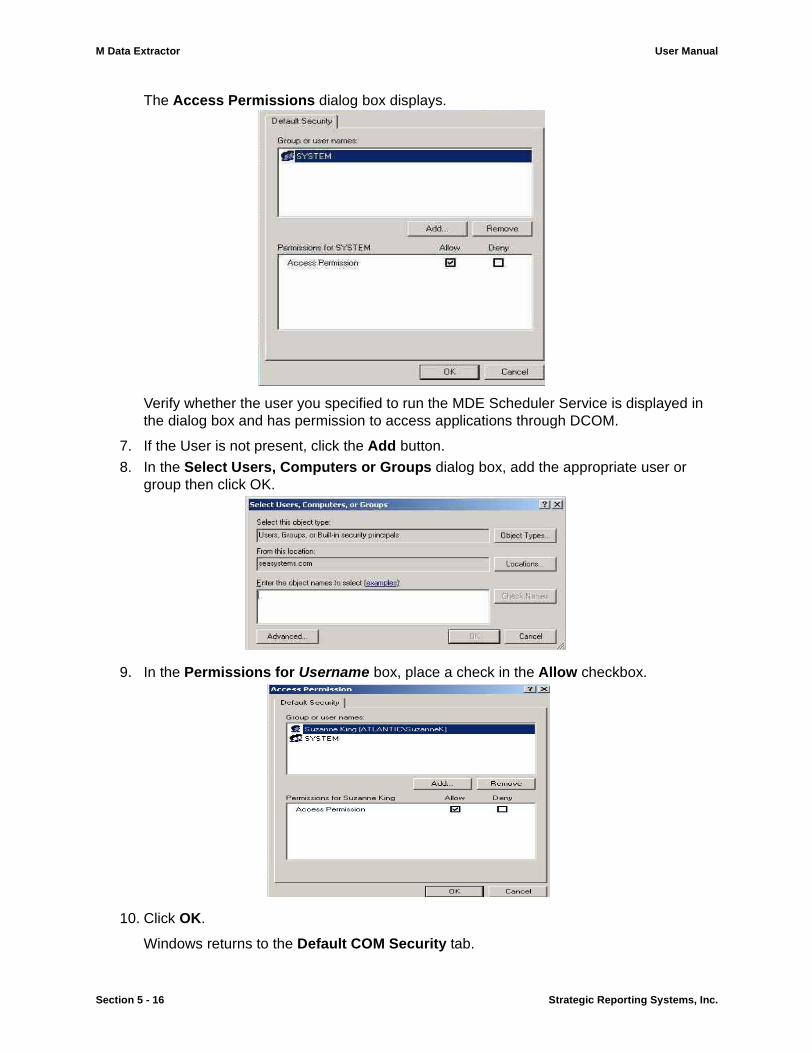
The Access Permissions dialog box displays.
Verify whether the user you specified to run the MDE Scheduler Service is displayed in the dialog box and has permission to access applications through DCOM.
7. If the User is not present, click the Add button.
8. In the Select Users, Computers or Groups dialog box, add the appropriate user or group then click OK.
9. In the Permissions for Username box, place a check in the Allow checkbox.
10. Click OK.
Windows returns to the Default COM Security tab.
Section 5 - 16 Strategic Reporting Systems, Inc.
MDE Client Installation
11. Under Launch Permissions, click the Edit Default button.
The Launch Permissions dialog box displays.
Verify whether the user you specified to run the MDE Scheduler Service is displayed in the dialog box and has permission to access applications through DCOM.
12. Check if the appropriate group or user account is present. If they are not present, click Add.
13. In the Add Users and Groups dialog box, add the appropriate user or group.
14. In the Permissions for Username box, place a check in the Allow check box.15. Click OK.
Windows returns to the Default COM Security.
16. Click OK to exit the DCOM Configuration Properties dialog box.
The MDE Scheduler is now configured for Windows XP. You are ready to schedule extractions with the MDE.
Section 5 - 17

M Data Extractor User Manual
Section 5 - 18 Strategic Reporting Systems, Inc.
MDE Client Configuration
Section 6: MDE Client ConfigurationMDE Site configuration parameters must be defined before using MDE. This process instructs
the MDE on how to communicate with the source and target databases and where to store tem-
porary data files.
Configuring the MDE Client consists of the following primary tasks:
• Reviewing the MDE Site configuration parameters
• Adding a MDE Site configuration
MDE Site configuration parametersBefore you begin configuring the MDE Client, you should familiarize yourself with the configura-
tion parameters. You configure the MDE from the MDE Site Configuration window which consists
of four tabs:
• MDE Site• Database Server• Data Transformation Services (DTS)• Bulk Copy Procedure (BCP)
MDE Site settingsThe MDE Site name contains information regarding the source database (M System) and serves
as an identifier for the site configuration. Additionally, the remaining MDE Site configuration
parameters are associated with this name. It represents the source and target databases you will
connect to when using this site.
You can define multiple MDE Sites to connect to the same source M system if you have multiple
targets. Additionally, if you use a single target for multiple M systems, you can define multiple
MDE sites to populate the same target databases.
The MDE Site tab contains:
• Current MDE Site
• Select MDE Site
• Add MDE Site
Section 6 - 1
M Data Extractor User Manual
The Current MDE Site is informational only and displays:
• A traffic light indicating your connection status to the MDE Site:- a green light indicates an active connection- a red light indicates you are not currently connected
• The name of the currently selected MDE Site• The IP address or computer name of the server that hosts your source database
(FileMan)
The Select MDE Site allows you to:
• View your currently defined MDE Sites• Select an MDE Site• Select an MDE Site to modify the site configuration• Delete an MDE Site configuration
The Add MDE Site allows you to add a new site. You must define the following parameters to add a new site:
• MDE Site NameThe user defined name for the site. This name will display in all the MDE Site configuration tabs. It is also displayed when using the MDE and you are connected to the site.
• MDE Site Computer Name or IP AddressThe network name or IP address of the M Server (source database).
• MDE Site Server PortThe TCP port number configured in the MDE Server for the MDE Client.
When you add a new site, it also becomes the current MDE site (allowing you to complete its
configuration) until another site is selected.
Note: The Current MDE Site section displays at the top of all the configuration tabs.
Database server settingsThe database server settings consist of three sections:
• Current MDE Site
• Database type
• Oracle, Microsoft SQL Server or Microsoft Access server settings
The Current MDE Site section displays the name of the site to which the information in the Data-
base Server Tab applies.
Section 6 - 2 Strategic Reporting Systems, Inc.
MDE Client Configuration
The Database Type section displays a drop-down list from which you select the type of database
server to use as the target relational database. Currently the MDE supports the following data-
base servers:
• Oracle (page 6-3)
• Microsoft SQL Server (page 6-5)
• Microsoft Access (page 6-6)
The database server settings will change based on the selection of database server type.
Database server settings for OraclePlease verify that you have met the Oracle requirements on page 3 - 3 and the MDE Client system requirements for Oracle on page 3 - 3.
When you select Oracle from the Database Type list, MDE prompts you for information specific
to Oracle.
The Oracle configuration parameters include:
• Oracle Settings
• Table Space Settings
• User ID
• Database Temporary File Path
The Oracle Settings contains four parameters:
• Service NameThis is the Oracle Net Service Name defined in your Oracle Net Client Configuration used to establish the connection between your computer and the Oracle Server. The service name is sometimes referred to as the TNS Name.
• Oracle ODBCThis dropdown box lists each of the ODBC drivers installed on your computer.
• Max ErrorsThis is the maximum number of errors allowed by Oracle’s SQL*Loader before aborting the data load process into the Oracle database. When SQL*Loader detects more errors than the number you specify here, it aborts the data load process. The default value is 50.
• Allow Direct ModeThis check box by default is not selected. When this check box is unselected, the SQL*Loader process uses the standard mode to load data and observes the rules defined in Oracle’s SQL engine. This is the preferred method to maintain data integrity.
Section 6 - 3
M Data Extractor User Manual
When this check box is selected, SQL*Loader will use “Direct Mode” to load the data into Oracle. With direct mode the MDE loads data at nearly twice the speed of the standard mode. However, Direct Mode bypasses the Oracle SQL engine and ignores table constraints and unique indexes.
WARNING:When data is loaded into Oracle using direct mode, the Oracle SQL Engine is bypassed ignoring table constraints and unique indexes. This may result in corrupt or inaccurate data, including duplicate or overwritten records.
Note: Direct Mode will not be used if a word processing field has been selected as this datatype is not supported by SQL Loader’s Direct Mode operation.
The Table Space Settings contains the following parameters:
• Use Default Table SpacesThis check box is selected by default. Oracle table spaces are typically associated to the Oracle user creating the tables. The user’s Oracle table space assignment is configured and maintained on the Oracle Server. Your Oracle database administrator may want you to specify a different table space when loading the extracted data.
When you clear this check box, three parameters become available:
• Table Space IndexThe table space name in which to create indexes.
• Table Space TableThe table space name in which to create tables.
• Table Space CLOBThe table space name in which to create Character Large Objects (CLOBs), such as word processing fields.
Note: Do not specify table spaces without consulting with your Oracle database administrator. MDE does not validate the table space configuration parameters against the Oracle Server until it performs a data extraction.
Below the Table Space Settings are two additional parameters:
• User IDThe user name you use to log into the Oracle database server.
• Temporary File PathThe path to the shared directory where the temporary data file(s) extracted from the M Server will be stored before the data is loaded into the target Oracle database. This is also the directory where the MDE stores the SQL Loader Execution results, as well as the BAT file to reload data (see Appendix).
This path must be entered as the UNC SHARE name. For example, if the folder you want has the following path C:\MDE\TempData and only the TempData folder is shared, the UNC would be \\MDE Workstation\TempData.
Section 6 - 4 Strategic Reporting Systems, Inc.
MDE Client Configuration
The Data Transformation Services and Bulk Copy Procedure settings are not available for
use with Oracle. Please proceed to Adding an MDE Site configuration on page 6-10.
Database server settings for Microsoft SQL ServerPlease verify that you meet the Microsoft SQL Server requirements on page 3 - 2 and the MDE Client system requirements for Microsoft SQL Server on page 3 - 2.
When you select SQL Server from the Database Type list, the MDE prompts you for information
specific to SQL Server.
The Microsoft SQL Server configuration parameters include:
• SQL Server settings• User authentication• User ID• Temporary (database) file path
The Microsoft SQL Server Settings consist of two parameters:
• Server NameThe recognized network name of the configured MS SQL Server where the target database resides.
• Database NameThe name of the database in Microsoft SQL Server that is designated as the target to receive data from the M system.
The Microsoft SQL Server User Authentication options:
The User Authentication method you select depends on the configured user authentication
options of your Microsoft SQL Server. If you are unsure which authentication method is sup-
ported in your installation of Microsoft SQL Server, please contact you database administrator.
Microsoft’s SQL Server offers two user authentication methods:
• Windows NTMS SQL Server validates users based on their Windows NT users information. When you select this option, the User ID text box in the Database Server information section (at the bottom) becomes unavailable.
• SQL ServerMS SQL Server validates users as they log into the database. When you select this option, the User ID box in the Database Server information section becomes available.
Below the User Authentication are two additional parameters:
• User ID
Section 6 - 5
M Data Extractor User Manual
The User ID text box is only available when you choose SQL Server Authentication. Here you specify the MS SQL Server User ID to use when connecting MDE to Microsoft SQL Server. The MDE Client prompts you for the password when you establish a connection.
• Temporary File PathThe path to a shared directory where MDE will store temporary data files extracted from the M Server before the data is subsequently loaded into SQL Server.
This path must be entered as the UNC SHARE name. For example, if the desired folder has the following path C:\MDE\TempData and only the TempData folder is shared, the UNC would be \\MDE Workstation\TempData.
Database server settings for Microsoft AccessWhen you select Microsoft Access from the Database Type list, MDE prompts you for information
specific to Access.
Note: You must have the Microsoft Access software installed and configured on your workstation for MDE to function properly.
The Microsoft Access option displays the Access section and prompts for the following information:
• Database FileThis file stores the database file you create in Access. You must first create and share this file in Access before MDE will let you specify it as a valid database. You can also protect this database by requiring users to have passwords before gaining access to the database. This file has the .mdb file extension.
• Security LevelThis option you to specify the security level you want for the users to access the MS Access database.
Note: If you want to control user access to the database, you must set up the security level by providing permissions in Access. For more information about setting up security levels, see Access documentation.
You can select any of the following security options:
None: This option allows you to access the database file without providing a user ID and password.
DB Security: This option lets you read and access the database and does not require security setup. Any user can have access to the database file. You will be prompted for the DB password when you connect.
Section 6 - 6 Strategic Reporting Systems, Inc.
MDE Client Configuration
User Security: This option requires you to provide a user ID and password to the database file. You must also specify the system database file. You will be prompted for the user password when you connect.
DB and User Security: This option requires you to provide a user ID and password to the database file. You must also specify the system database file. You will be prompted for both the DB and user password when you connect.
• System Database FileThis is the workgroup information file that contains information about the users in a workgroup. This file includes user’s account names, their passwords, and the groups of which they are members. This file has the .mdw extension.
Below the Table Space Settings are two additional parameters:
• User IDThe User ID text box is only available when you select User Security and DB and User Security options in the Security Level box. Here you specify the Access User ID to use when connecting to the Access database. The MDE Client prompts you for the password when you establish a connection.
• Temporary File PathThe path to a shared directory where MDE stores temporary data files extracted from the M Server before the data is subsequently loaded into the MS Access database.
This path must be entered as the UNC SHARE name. For example, if the folder you want has the following path C:\MDE\TempData and only the TempData folder is shared, the UNC would be \\MDE Workstation\TempData.
Data Transformation Services (DTS)The MDE uses the Data Transformation Service (DTS) to quickly load data into the target MS
SQL Server database.
Note: The DTS tab is available only when you select Microsoft SQL Server or Microsoft Access database types.
The DTS tab contains of two sections:
• Current MDE Site
• DTS settings
The Current MDE Site section displays the name of the site to which the information in the DTS
Tab applies.
The DTS Settings include the following parameters:
Section 6 - 7

M Data Extractor User Manual
• Write to NT Event LogSelecting this check box will cause the MDE to write an entry in the Windows NT/2000 Event log when a DTS package is executed. This check box is unselected by default.
• Use LineageThe Use Lineage check box is not selected by default. When you select this option, MDE saves the DTS package and the source data files in the MS SQL Server DTS repository database from where you can later view it.
The package traces information such as name of the package, the description of the package, and when the data was transferred.
When you transfer data using the Interactive Transfer and the Bulk Copy Procedure with the Use Lineage option selected, MDE displays the DTS Package Options dialog box.
Note: Do not select this check box if you plan to schedule extractions for this site configuration. The lineage option is not supported by the MDE Scheduler.
• Repository DatabaseThis is the Microsoft SQL Server database where the MDE saves the DTS package. If you select Use Lineage, MDE automatically inserts the name of the default Repository Database in this text box.
Note: The database must be configured as a DTS repository database in MS SQL Server.
• Log File PathThe path to a shared directory where the MDE will create, and store when instructed to, the DTS log file at the end of each data transfer. This can be the same path as the Database File Path.
This path must be entered as the UNC SHARE name. For example, if the desired folder has the following path: C:\MDE\TempData and only the TempData folder is shared, the UNC would be \\MDE Workstation\TempData.
• Exception File PathThis is the path to a shared directory where MDE will create, and store when instructed, the Exception File, which contains any errors that occur during the DTS data load. This can be the same path as the Database File Path or Log File Path.
This path must be entered as the UNC SHARE name. For example, if the folder you want has the following path, C:\MDE\TempData and only the TempData folder is shared, the UNC would be \\MDE Workstation\TempData.
Bulk Copy Procedure settingsThe Bulk Copy Procedure (BCP) settings are available when you select Microsoft SQL Server or
Microsoft Access database servers.
Section 6 - 8 Strategic Reporting Systems, Inc.
MDE Client Configuration
The Bulk Copy Procedure settings consist of three sections:
• Current MDE Site
• Bulk Copy Procedure
• FTP options
The Current MDE Site section displays the name of the site to which the information in the Bulk
Copy Procedure section applies.
The Bulk Copy Procedure section includes the following settings:
• BCP Data File pathThis is the path to the shared directory where the M Server (source database) will place the temporary extracted data files before the data load into MS SQL Server occurs.
This path must be entered as the UNC SHARE name. For example, if the desired folder has the following path, C:\MDE\TempData and only the TempData folder is shared, the UNC would be \\MDE Workstation\TempData.
• Use FTPSelect the Use FTP check box when your M Server cannot directly access this shared directory, such as with VMS.
FTP Settings are enabled when you select the FTP Options check box.
The FTP Options section includes the following settings:
• FTP User NameThe user name used to connect to the M Server (VMS) during Bulk Copy Procedure operations. This user must have FTP privileges.
• VMS PathThe path of the directory where the temporary data files should be stored on the M Server. If you do not specify a path, the MDE will use the default directory of the FTP User.
Note: MDE prompts you for your FTP password when you click the Bulk Copy Procedure button on the MDE main window.
Now that you have familiarized yourself with the configuration parameters, the following sections
describe the steps required to add an MDE Site configuration and modify the configuration
parameters.
Section 6 - 9
M Data Extractor User Manual
Adding an MDE Site configurationWhen you add a new MDE Site configuration you complete each of the MDE Site Configuration
tabs required for your selected target relational database. Depending on your selected database
server type, proceed to the appropriate section to add an MDE Site.
1. Adding an MDE Site configuration: Oracle on page 6-10.
2. Adding an MDE Site configuration: Microsoft SQL Server on page 6-14.
3. Adding an MDE Site configuration: Microsoft Access on page 6-19.
Adding an MDE Site configuration: OracleWhen you select Oracle as the target database the following configuration tabs must be com-
pleted:
• MDE Site
• Database server
Adding the MDE Site configuration name
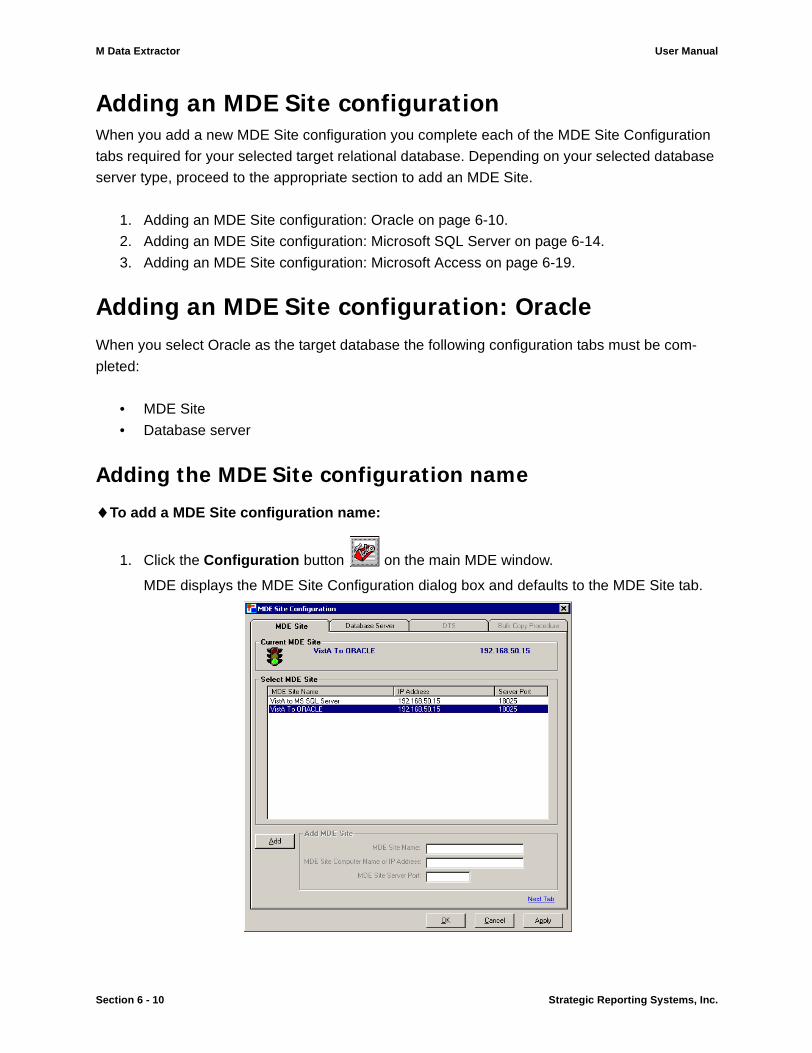
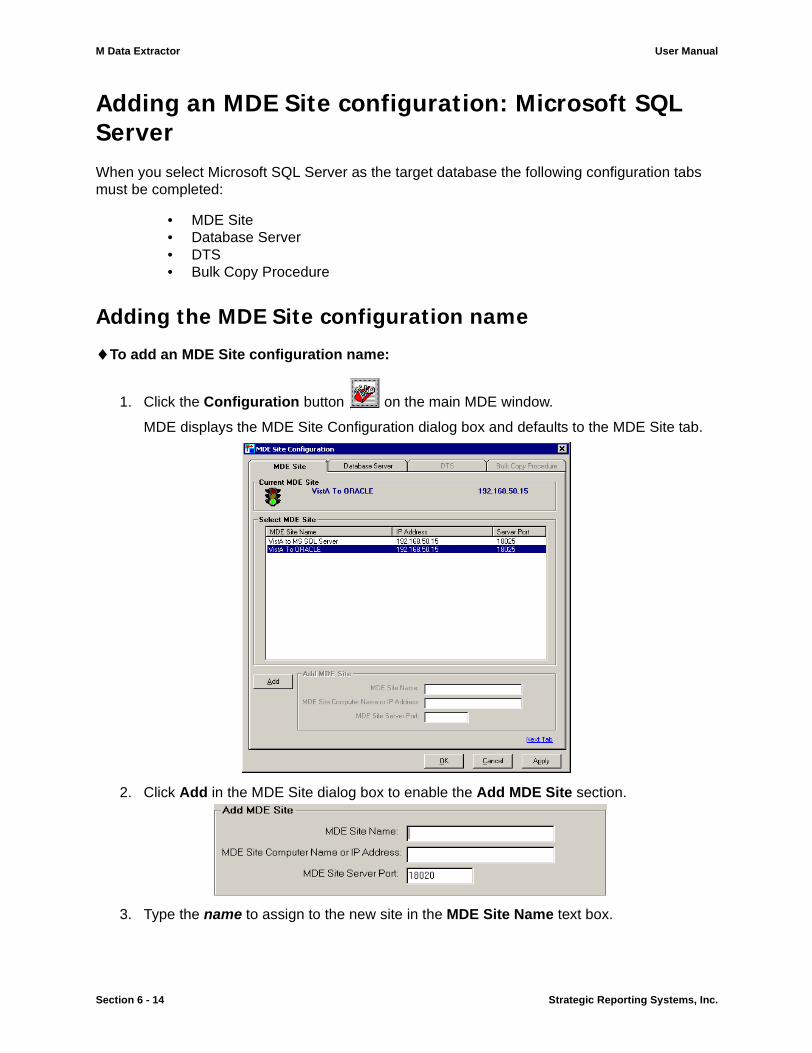
♦To add a MDE Site configuration name:
1. Click the Configuration button on the main MDE window.
MDE displays the MDE Site Configuration dialog box and defaults to the MDE Site tab.
Section 6 - 10 Strategic Reporting Systems, Inc.
MDE Client Configuration
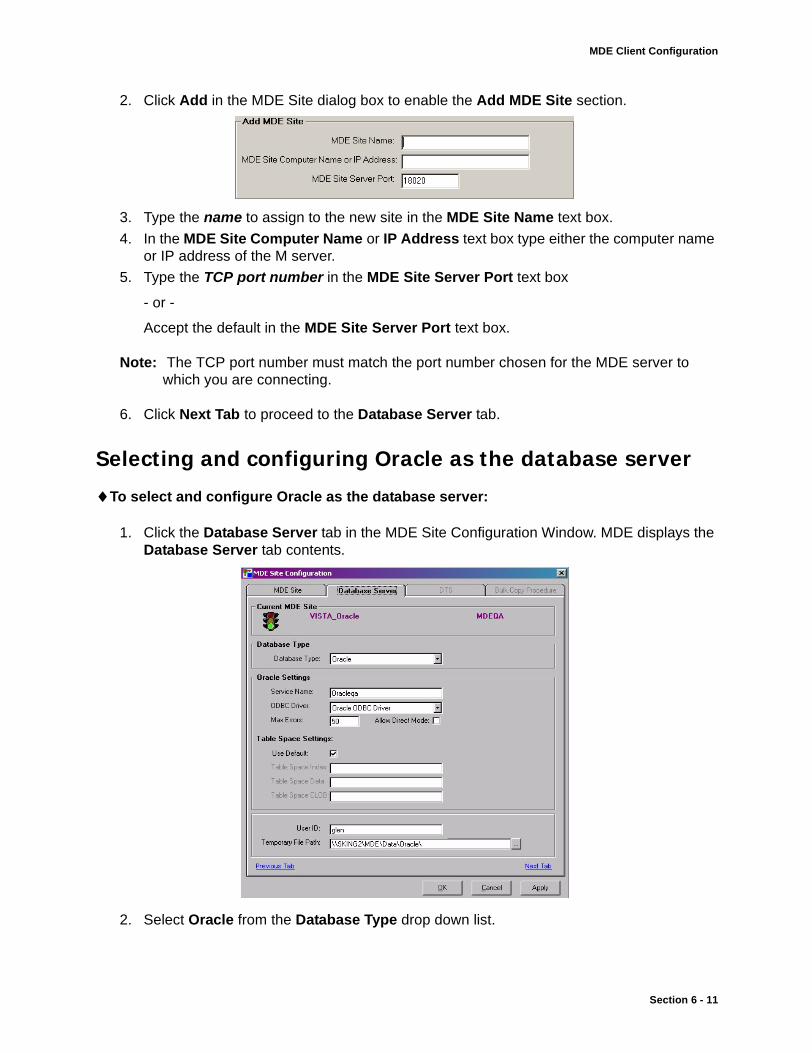
2. Click Add in the MDE Site dialog box to enable the Add MDE Site section.
3. Type the name to assign to the new site in the MDE Site Name text box.
4. In the MDE Site Computer Name or IP Address text box type either the computer name or IP address of the M server.
5. Type the TCP port number in the MDE Site Server Port text box
- or -
Accept the default in the MDE Site Server Port text box.
Note: The TCP port number must match the port number chosen for the MDE server to which you are connecting.
6. Click Next Tab to proceed to the Database Server tab.
Selecting and configuring Oracle as the database server
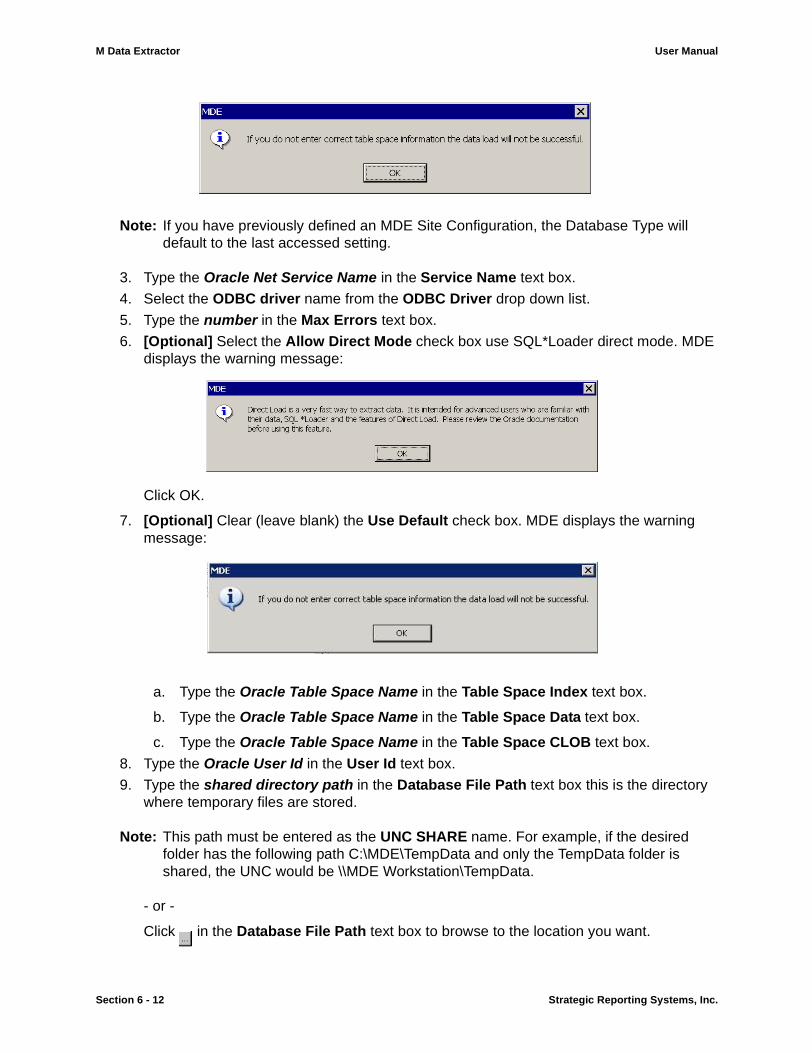
♦To select and configure Oracle as the database server:
1. Click the Database Server tab in the MDE Site Configuration Window. MDE displays the Database Server tab contents.
2. Select Oracle from the Database Type drop down list.
Section 6 - 11
M Data Extractor User Manual
Note: If you have previously defined an MDE Site Configuration, the Database Type will default to the last accessed setting.
3. Type the Oracle Net Service Name in the Service Name text box.
4. Select the ODBC driver name from the ODBC Driver drop down list.
5. Type the number in the Max Errors text box.
6. [Optional] Select the Allow Direct Mode check box use SQL*Loader direct mode. MDE displays the warning message:
Click OK.
7. [Optional] Clear (leave blank) the Use Default check box. MDE displays the warning message:
a. Type the Oracle Table Space Name in the Table Space Index text box.
b. Type the Oracle Table Space Name in the Table Space Data text box.
c. Type the Oracle Table Space Name in the Table Space CLOB text box.
8. Type the Oracle User Id in the User Id text box.
9. Type the shared directory path in the Database File Path text box this is the directory where temporary files are stored.
Note: This path must be entered as the UNC SHARE name. For example, if the desired folder has the following path C:\MDE\TempData and only the TempData folder is shared, the UNC would be \\MDE Workstation\TempData.
- or -
Click in the Database File Path text box to browse to the location you want.
Section 6 - 12 Strategic Reporting Systems, Inc.
MDE Client Configuration
Note: When using this method, the MDE Client will resolve the UNC to include all the folders (directories) in the path. If all folders in the path are not shared, the UNC share name will be incorrect. You must then edit the UNC to reflect only the share name.
10. Click Apply to save your settings, connect to the site and remain in the MDE Site Configuration window
- or -
Click OK to save your settings, connect to the site and close the MDE Site Configuration window.
The MDE returns you to the main MDE window.
Section 6 - 13
M Data Extractor User Manual
Adding an MDE Site configuration: Microsoft SQL ServerWhen you select Microsoft SQL Server as the target database the following configuration tabs must be completed:
• MDE Site• Database Server• DTS• Bulk Copy Procedure
Adding the MDE Site configuration name
♦To add an MDE Site configuration name:
1. Click the Configuration button on the main MDE window.
MDE displays the MDE Site Configuration dialog box and defaults to the MDE Site tab.
2. Click Add in the MDE Site dialog box to enable the Add MDE Site section.
3. Type the name to assign to the new site in the MDE Site Name text box.
Section 6 - 14 Strategic Reporting Systems, Inc.
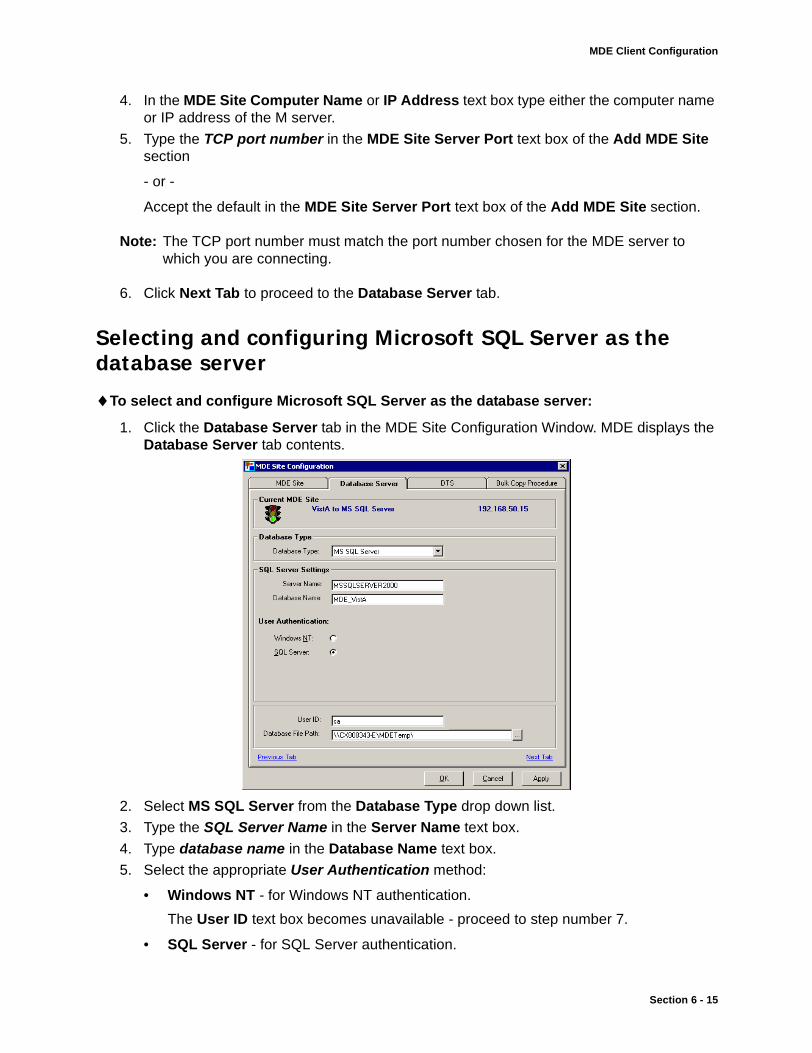
MDE Client Configuration
4. In the MDE Site Computer Name or IP Address text box type either the computer name or IP address of the M server.
5. Type the TCP port number in the MDE Site Server Port text box of the Add MDE Site section
- or -
Accept the default in the MDE Site Server Port text box of the Add MDE Site section.
Note: The TCP port number must match the port number chosen for the MDE server to which you are connecting.
6. Click Next Tab to proceed to the Database Server tab.
Selecting and configuring Microsoft SQL Server as the database server
♦To select and configure Microsoft SQL Server as the database server:
1. Click the Database Server tab in the MDE Site Configuration Window. MDE displays the Database Server tab contents.
2. Select MS SQL Server from the Database Type drop down list.
3. Type the SQL Server Name in the Server Name text box.
4. Type database name in the Database Name text box.
5. Select the appropriate User Authentication method:
• Windows NT - for Windows NT authentication.
The User ID text box becomes unavailable - proceed to step number 7.
• SQL Server - for SQL Server authentication.
Section 6 - 15
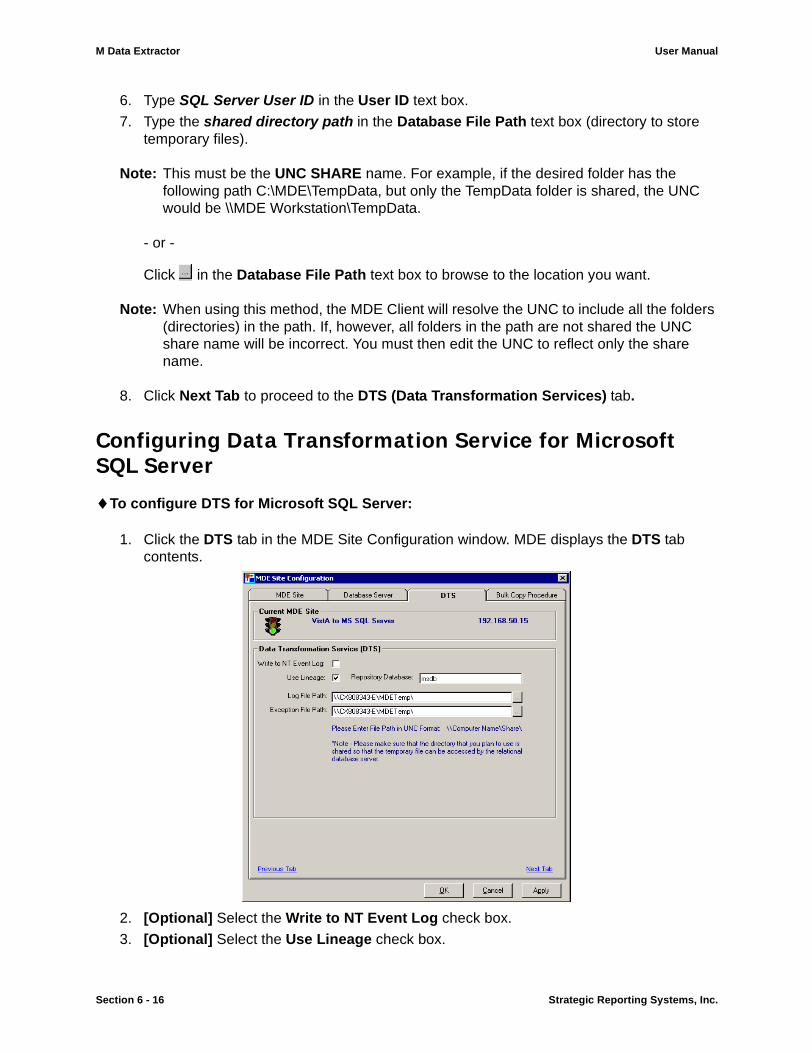
M Data Extractor User Manual
6. Type SQL Server User ID in the User ID text box.
7. Type the shared directory path in the Database File Path text box (directory to store temporary files).
Note: This must be the UNC SHARE name. For example, if the desired folder has the following path C:\MDE\TempData, but only the TempData folder is shared, the UNC would be \\MDE Workstation\TempData.
- or -
Click in the Database File Path text box to browse to the location you want.
Note: When using this method, the MDE Client will resolve the UNC to include all the folders (directories) in the path. If, however, all folders in the path are not shared the UNC share name will be incorrect. You must then edit the UNC to reflect only the share name.
8. Click Next Tab to proceed to the DTS (Data Transformation Services) tab.
Configuring Data Transformation Service for Microsoft SQL Server
♦To configure DTS for Microsoft SQL Server:
1. Click the DTS tab in the MDE Site Configuration window. MDE displays the DTS tab contents.
2. [Optional] Select the Write to NT Event Log check box.
3. [Optional] Select the Use Lineage check box.
Section 6 - 16 Strategic Reporting Systems, Inc.
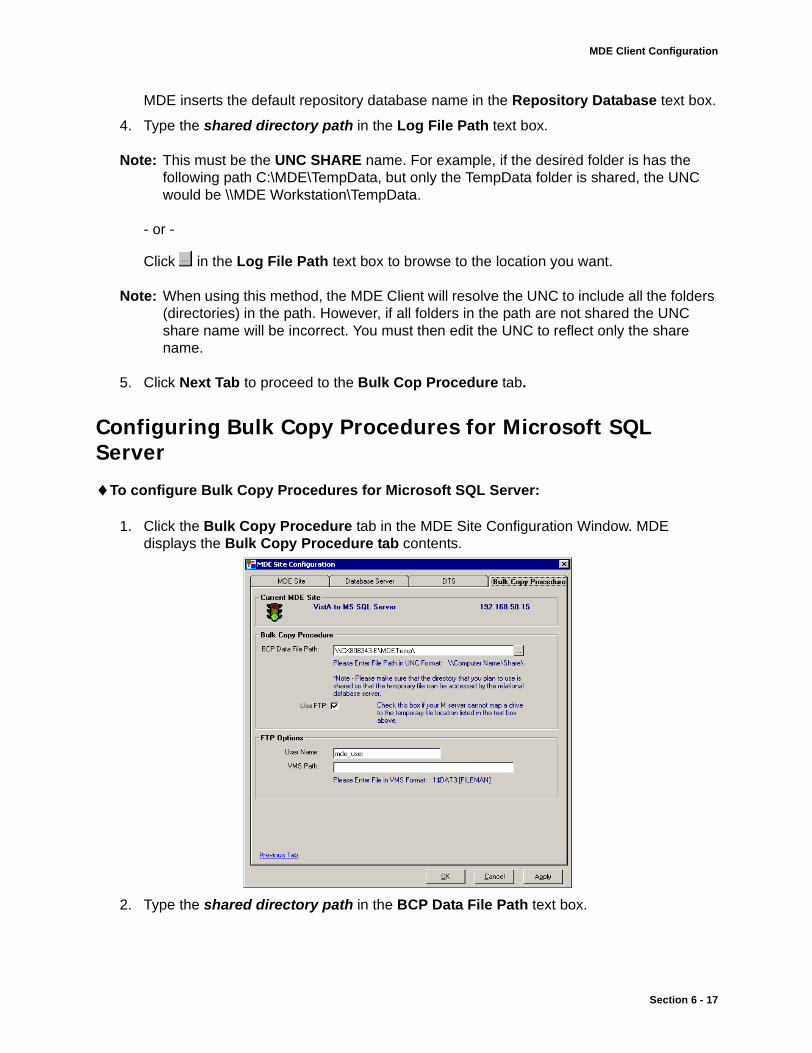
MDE Client Configuration
MDE inserts the default repository database name in the Repository Database text box.
4. Type the shared directory path in the Log File Path text box.
Note: This must be the UNC SHARE name. For example, if the desired folder is has the following path C:\MDE\TempData, but only the TempData folder is shared, the UNC would be \\MDE Workstation\TempData.
- or -
Click in the Log File Path text box to browse to the location you want.
Note: When using this method, the MDE Client will resolve the UNC to include all the folders (directories) in the path. However, if all folders in the path are not shared the UNC share name will be incorrect. You must then edit the UNC to reflect only the share name.
5. Click Next Tab to proceed to the Bulk Cop Procedure tab.
Configuring Bulk Copy Procedures for Microsoft SQL Server
♦To configure Bulk Copy Procedures for Microsoft SQL Server:
1. Click the Bulk Copy Procedure tab in the MDE Site Configuration Window. MDE displays the Bulk Copy Procedure tab contents.
2. Type the shared directory path in the BCP Data File Path text box.
Section 6 - 17
M Data Extractor User Manual
Note: This must be the UNC SHARE name. For example, if the desired folder has the following path C:\MDE\TempData, but only the TempData folder is shared, the UNC would be \\MDE Workstation\TempData.
- or -
Click in the BCP Database File Path text box to browse to the location you want.
Note: When using this method, MDE Client will resolve the UNC to include all the folders (directories) in the path. However, if all folders in the path are not shared, the UNC share name will be incorrect. The UNC must be edited to reflect only the share name.
3. [Optional] Select the FTP check box when your M Server does not have direct network access to the directory in the BCP Database File Path text box. The FTP Options section becomes available.
a. Type the User Name for the M Server in the User Name text box.
b. [Optional] Type the Directory of the FTP user in the VMS Path text box.
4. Click Apply to save your settings, connect to the site, and remain in the MDE Site Configuration window
- or -
Click OK to save your settings, connect to the site and close the MDE Site Configuration window.
MDE returns you to the main MDE window.
Section 6 - 18 Strategic Reporting Systems, Inc.
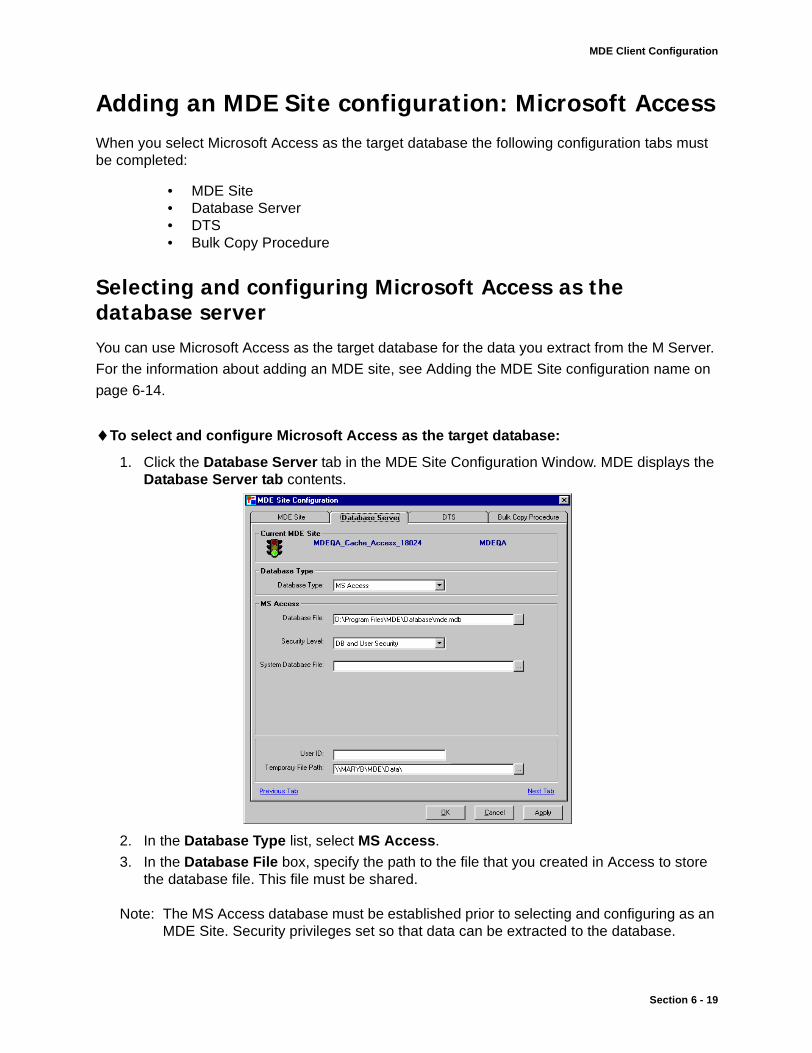
MDE Client Configuration
Adding an MDE Site configuration: Microsoft AccessWhen you select Microsoft Access as the target database the following configuration tabs must be completed:
• MDE Site• Database Server• DTS• Bulk Copy Procedure
Selecting and configuring Microsoft Access as the database serverYou can use Microsoft Access as the target database for the data you extract from the M Server.
For the information about adding an MDE site, see Adding the MDE Site configuration name on
page 6-14.
♦To select and configure Microsoft Access as the target database:
1. Click the Database Server tab in the MDE Site Configuration Window. MDE displays the Database Server tab contents.
2. In the Database Type list, select MS Access.
3. In the Database File box, specify the path to the file that you created in Access to store the database file. This file must be shared.
Note: The MS Access database must be established prior to selecting and configuring as an MDE Site. Security privileges set so that data can be extracted to the database.
Section 6 - 19
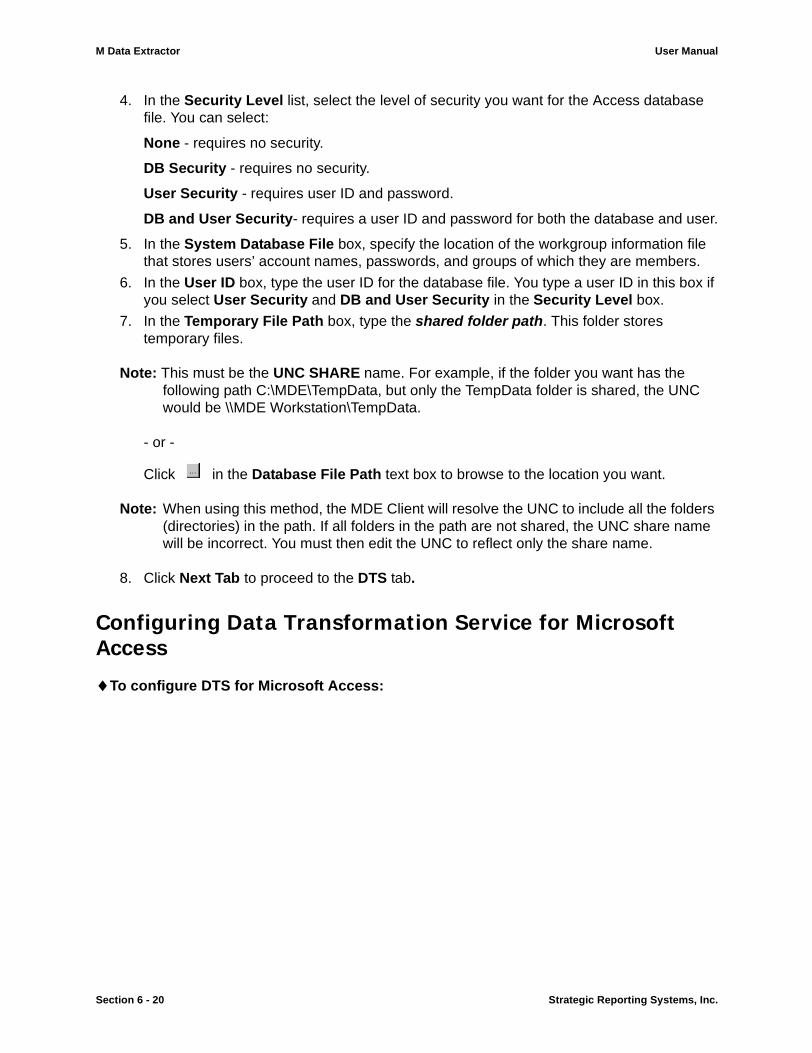
M Data Extractor User Manual
4. In the Security Level list, select the level of security you want for the Access database file. You can select:
None - requires no security.
DB Security - requires no security.
User Security - requires user ID and password.
DB and User Security- requires a user ID and password for both the database and user.
5. In the System Database File box, specify the location of the workgroup information file that stores users’ account names, passwords, and groups of which they are members.
6. In the User ID box, type the user ID for the database file. You type a user ID in this box if you select User Security and DB and User Security in the Security Level box.
7. In the Temporary File Path box, type the shared folder path. This folder stores temporary files.
Note: This must be the UNC SHARE name. For example, if the folder you want has the following path C:\MDE\TempData, but only the TempData folder is shared, the UNC would be \\MDE Workstation\TempData.
- or -
Click in the Database File Path text box to browse to the location you want.
Note: When using this method, the MDE Client will resolve the UNC to include all the folders (directories) in the path. If all folders in the path are not shared, the UNC share name will be incorrect. You must then edit the UNC to reflect only the share name.
8. Click Next Tab to proceed to the DTS tab.
Configuring Data Transformation Service for Microsoft Access
♦To configure DTS for Microsoft Access:
Section 6 - 20 Strategic Reporting Systems, Inc.
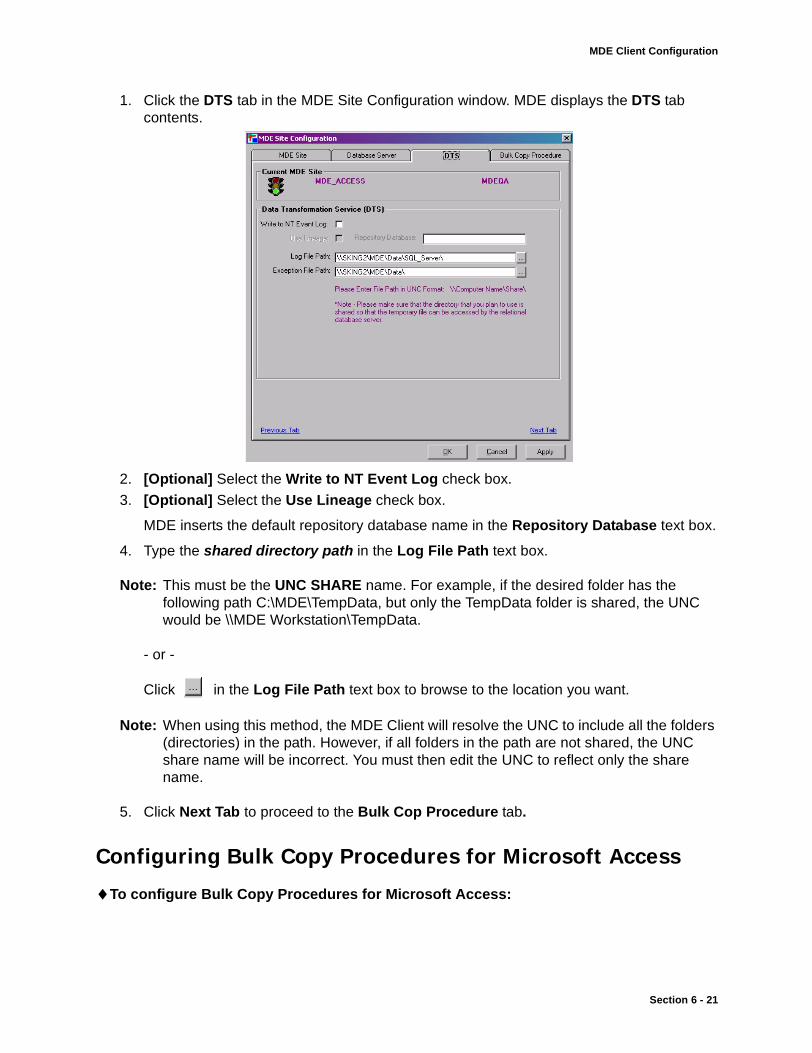
MDE Client Configuration
1. Click the DTS tab in the MDE Site Configuration window. MDE displays the DTS tab contents.
2. [Optional] Select the Write to NT Event Log check box.
3. [Optional] Select the Use Lineage check box.
MDE inserts the default repository database name in the Repository Database text box.
4. Type the shared directory path in the Log File Path text box.
Note: This must be the UNC SHARE name. For example, if the desired folder has the following path C:\MDE\TempData, but only the TempData folder is shared, the UNC would be \\MDE Workstation\TempData.
- or -
Click in the Log File Path text box to browse to the location you want.
Note: When using this method, the MDE Client will resolve the UNC to include all the folders (directories) in the path. However, if all folders in the path are not shared, the UNC share name will be incorrect. You must then edit the UNC to reflect only the share name.
5. Click Next Tab to proceed to the Bulk Cop Procedure tab.
Configuring Bulk Copy Procedures for Microsoft Access
♦To configure Bulk Copy Procedures for Microsoft Access:
Section 6 - 21
M Data Extractor User Manual
1. Click the Bulk Copy Procedure tab in the MDE Site Configuration Window. MDE displays the Bulk Copy Procedure tab contents.
2. Type the shared directory path in the BCP Data File Path text box.
Note: This must be the UNC SHARE name. For example, if the desired folder has the following path C:\MDE\TempData, but only the TempData folder is shared, the UNC would be \\MDE Workstation\TempData.
- or -
Click in the BCP Database File Path text box to browse to the location you want.
Note: When using this method, MDE Client will resolve the UNC to include all the folders (directories) in the path. However, if all folders in the path are not shared, the UNC share name will be incorrect. The UNC must be edited to reflect only the share name.
3. [Optional] Select the FTP check box when your M Server does not have direct network access to the directory in the BCP Database File Path text box. The FTP Options section becomes available.
a. Type the User Name for the M Server in the User Name text box.
b. [Optional] Type the Directory of the FTP user in the VMS Path text box.
4. Click Apply to save your settings, connect to the site, and remain in the MDE Site Configuration window
- or -
Click OK to save your settings, connect to the site and close the MDE Site Configuration window.
MDE returns you to the main MDE window.
Section 6 - 22 Strategic Reporting Systems, Inc.
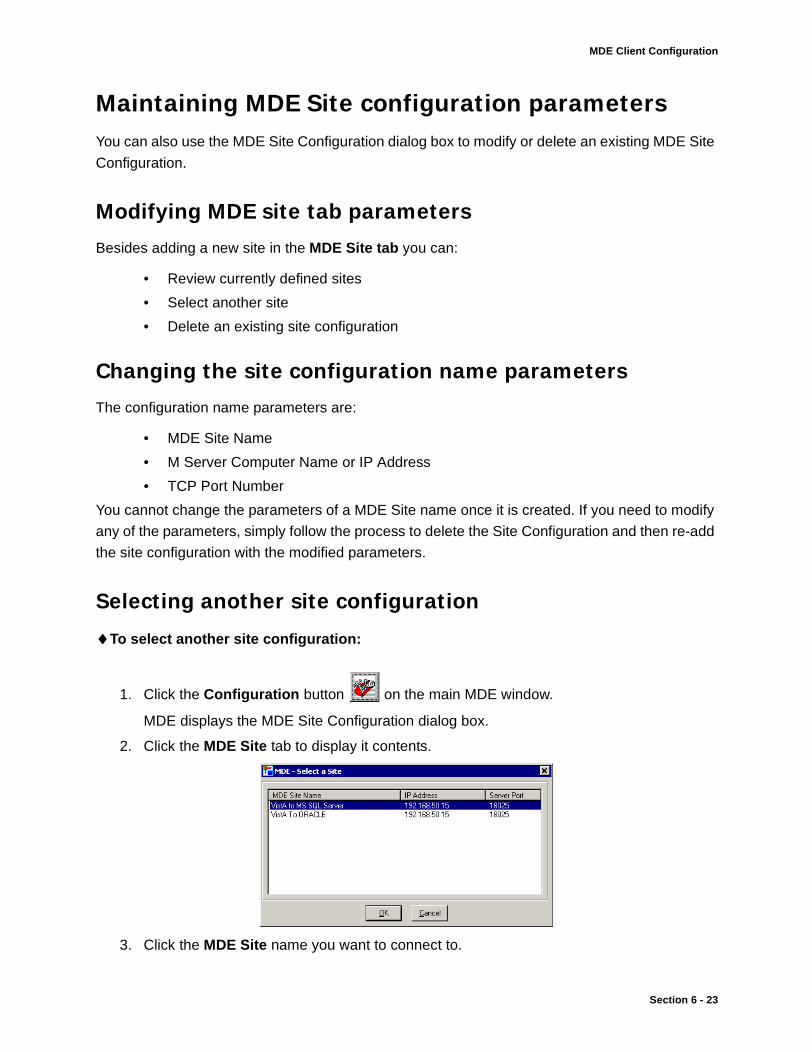
MDE Client Configuration
Maintaining MDE Site configuration parametersYou can also use the MDE Site Configuration dialog box to modify or delete an existing MDE Site
Configuration.
Modifying MDE site tab parameters
Besides adding a new site in the MDE Site tab you can:
• Review currently defined sites
• Select another site
• Delete an existing site configuration
Changing the site configuration name parameters
The configuration name parameters are:
• MDE Site Name
• M Server Computer Name or IP Address
• TCP Port Number
You cannot change the parameters of a MDE Site name once it is created. If you need to modify
any of the parameters, simply follow the process to delete the Site Configuration and then re-add
the site configuration with the modified parameters.
Selecting another site configuration
♦To select another site configuration:
1. Click the Configuration button on the main MDE window.
MDE displays the MDE Site Configuration dialog box.
2. Click the MDE Site tab to display it contents.
3. Click the MDE Site name you want to connect to.
Section 6 - 23
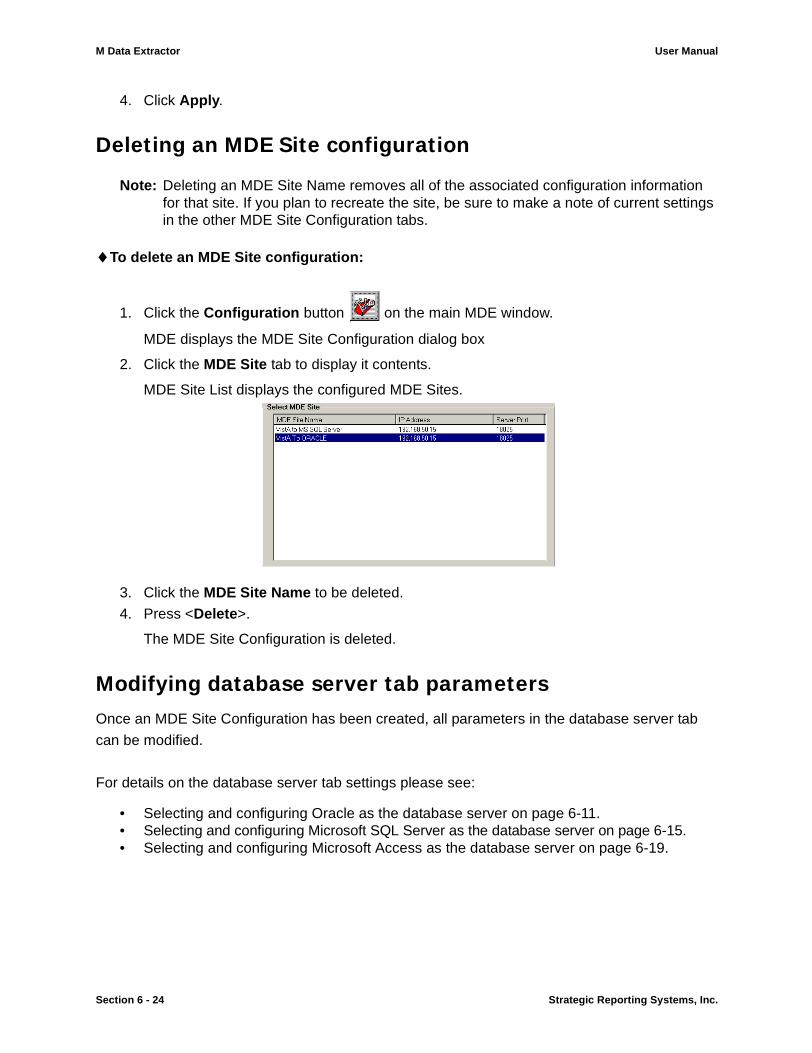
M Data Extractor User Manual
4. Click Apply.
Deleting an MDE Site configuration
Note: Deleting an MDE Site Name removes all of the associated configuration information for that site. If you plan to recreate the site, be sure to make a note of current settings in the other MDE Site Configuration tabs.
♦To delete an MDE Site configuration:
1. Click the Configuration button on the main MDE window.
MDE displays the MDE Site Configuration dialog box
2. Click the MDE Site tab to display it contents.
MDE Site List displays the configured MDE Sites.
3. Click the MDE Site Name to be deleted.
4. Press <Delete>.
The MDE Site Configuration is deleted.
Modifying database server tab parametersOnce an MDE Site Configuration has been created, all parameters in the database server tab
can be modified.
For details on the database server tab settings please see:
• Selecting and configuring Oracle as the database server on page 6-11.• Selecting and configuring Microsoft SQL Server as the database server on page 6-15.• Selecting and configuring Microsoft Access as the database server on page 6-19.
Section 6 - 24 Strategic Reporting Systems, Inc.
MDE Client Configuration
Modifying DTS tab parametersOnce an MDE Site configuration has been created, all parameters in the DTS tab can be
modified.
For details on DTS tab settings refer to:
• Configuring Data Transformation Service for Microsoft SQL Server on page 6-16.• Configuring Data Transformation Service for Microsoft Access on page 6-20.
Modifying BCP tab parametersOnce an MDE Site Configuration has been created, all parameters in the BCP tab can be
modified.
For details on the Bulk Copy Procedure settings refer to:
• Configuring Bulk Copy Procedures for Microsoft SQL Server on page 6-17.• Configuring Bulk Copy Procedures for Microsoft Access on page 6-21.
Section 6 - 25

M Data Extractor User Manual
Section 6 - 26 Strategic Reporting Systems, Inc.
MDE Client Overview
Section 7: MDE Client Overview This section of the MDE User Manual addresses:
• Basic concepts of the MDE• MDE Client application and components
Understanding the MDEMDE extracts data from FileMan, converts the extracted data to standard SQL format and then
stores the converted data in a relational database management system.
The MDE Client provides you with a graphical interface where files and fields from the source
database are presented in an easy to browse tree-view structure. From this interface you select
the file (including multiples) and fields to be included as part of a data extraction.
To extract data using the MDE, you must have access to both the source database and the tar-
get relational database. The MDE Client then acts as a pipeline between the source and target
databases, using your existing network to transfer data across a TCP.
A single MDE Server installation can dynamically support any number of MDE Client sessions.
Each user who signs on to FileMan from MDE Client initiates a new MDE Session which runs as
a separate job on the M Server. When the MDE Client application is exited, the job on the M
Server corresponding to the MDE Session is automatically terminated. However, the MDE
Listener remains running on the M Server, ready to initiate new sessions when requested from
the Client.
MDE’s integration with FileMan securityMDE is integrated with the FileMan security kernel, and as such adheres to the defined security
parameters of your source database. FileMan security is created using the various administrative
tools available in FileMan, CHCS and VistA. This can include security keys, file level access, field
level access and record level access.
When attempting to connect to an MDE Site with the MDE Client, users are prompted for their
Verify and Access Codes. The source database then validates the users’ credentials and will
establish or reject the connection.
R
M Data Extractor User Manual
Once the connection is established, the user is permitted to extract data from the FileMan files
and fields they have access to based on their security settings. FileMan files and fields that the
user does not have permission to access are not displayed within the MDE Client.
Screened file entriesMDE does not normally extract FileMan records if they have been marked as inactive or if they
are hidden by other special file screen parameters. The Interactive Transfer module contains a
feature on the toolbar called Extract Screened File Entries. This feature offers two options:
• No—This option is the default, and inactive or hidden files are not extracted by MDE.• Yes—When this option is selected, MDE extracts screened records, such as inactive
records. Selecting this option does not violate FileMan’s file level security.
Internal Entry NumbersThe source database contains a hierarchical data structure and uses fields with “pointers” to
another file. These pointers contain the Internal Entry Number (IEN) corresponding to a record in
the other file. In this way, the FileMan database is able to draw information from one file to
another. When viewing data from a field containing an IEN, either the external resolved value or
the internal unresolved value can be viewed.
For example, the PTF file contains the field PATIENT NAME. The PATIENT NAME field is actu-
ally a pointer to the PATIENT file and contains the IEN of the corresponding record in the
PATIENT file. In this example, the external resolved value of the PATIENT NAME field in the
PTF file would be “John Smith”. The internal unresolved value would be “9876543”.
The target database contains a relational data structure and uses table joins to reference infor-
mation from one table to another. In order to create the database joins and establish relation-
ships between tables in the target database, the internal unresolved value from these fields
needs to be extracted.
When a field with an IEN is selected in a data extraction, you have the option of extracting:
• External resolved value• Internal unresolved value• Both external and internal values
Section 7 - 2 Strategic Reporting Systems, Inc.
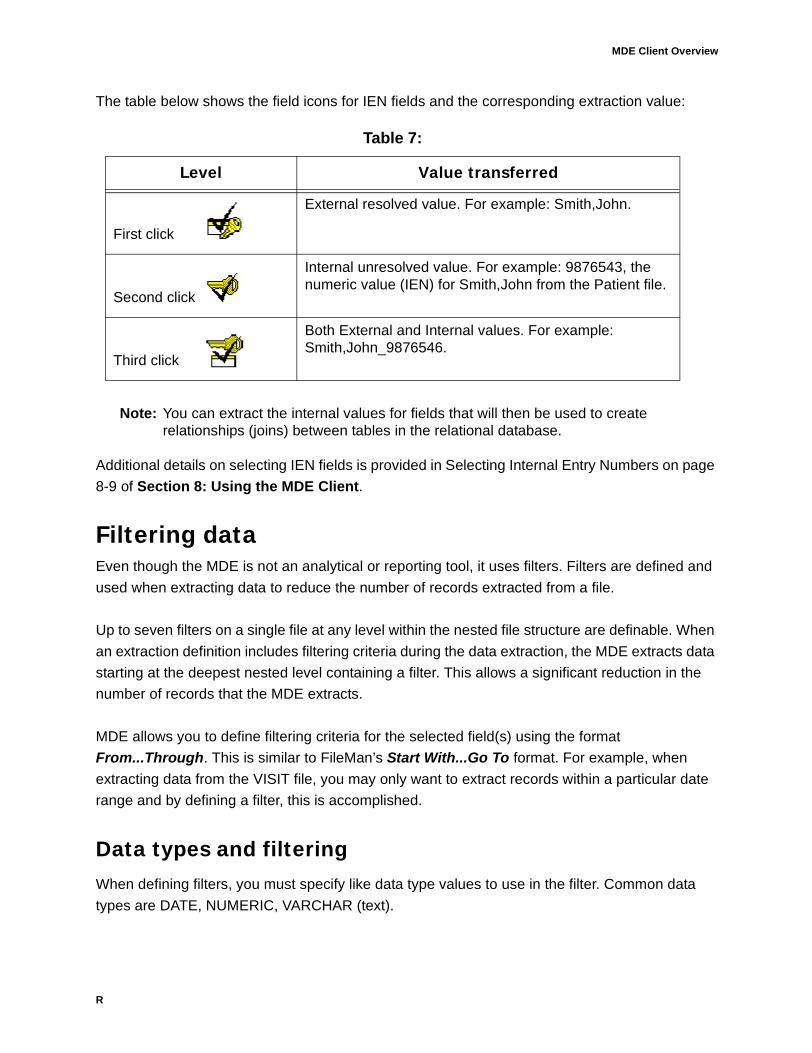
MDE Client Overview
The table below shows the field icons for IEN fields and the corresponding extraction value:
Note: You can extract the internal values for fields that will then be used to create relationships (joins) between tables in the relational database.
Additional details on selecting IEN fields is provided in Selecting Internal Entry Numbers on page
8-9 of Section 8: Using the MDE Client.
Filtering dataEven though the MDE is not an analytical or reporting tool, it uses filters. Filters are defined and
used when extracting data to reduce the number of records extracted from a file.
Up to seven filters on a single file at any level within the nested file structure are definable. When
an extraction definition includes filtering criteria during the data extraction, the MDE extracts data
starting at the deepest nested level containing a filter. This allows a significant reduction in the
number of records that the MDE extracts.
MDE allows you to define filtering criteria for the selected field(s) using the format
From...Through. This is similar to FileMan’s Start With...Go To format. For example, when
extracting data from the VISIT file, you may only want to extract records within a particular date
range and by defining a filter, this is accomplished.
Data types and filteringWhen defining filters, you must specify like data type values to use in the filter. Common data
types are DATE, NUMERIC, VARCHAR (text).
Table 7:
Level Value transferred
First click
External resolved value. For example: Smith,John.
Second click
Internal unresolved value. For example: 9876543, the numeric value (IEN) for Smith,John from the Patient file.
Third click
Both External and Internal values. For example: Smith,John_9876546.
R
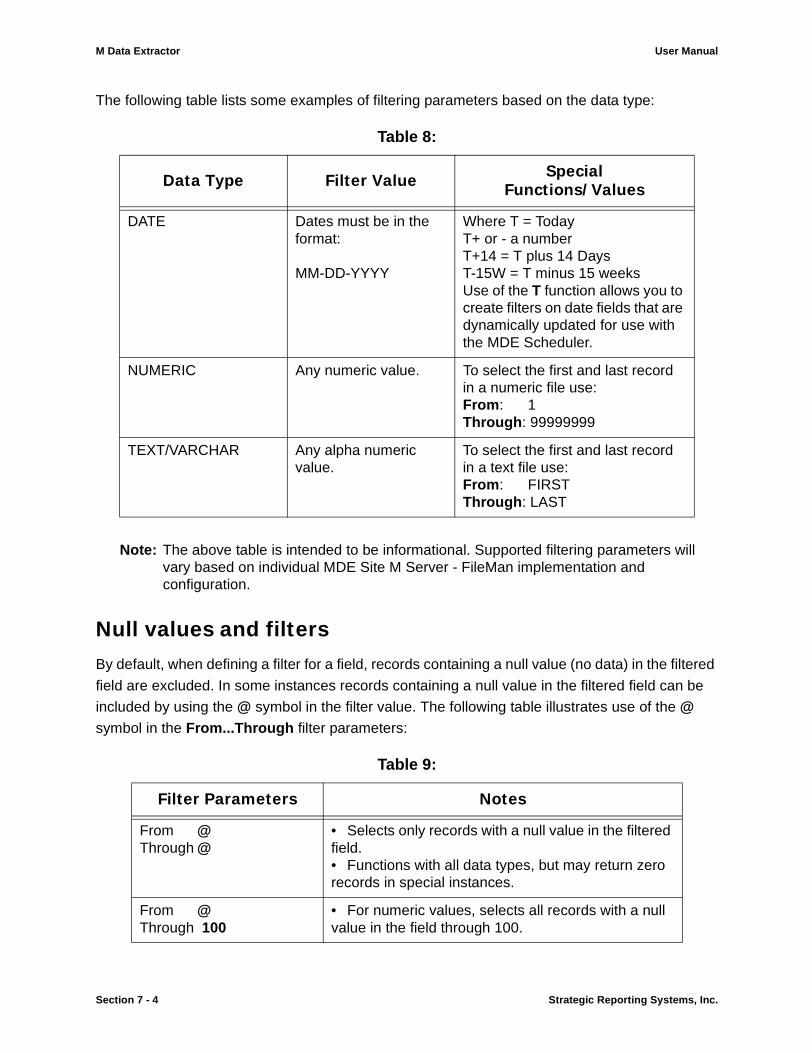
M Data Extractor User Manual
The following table lists some examples of filtering parameters based on the data type:
Note: The above table is intended to be informational. Supported filtering parameters will vary based on individual MDE Site M Server - FileMan implementation and configuration.
Null values and filtersBy default, when defining a filter for a field, records containing a null value (no data) in the filtered
field are excluded. In some instances records containing a null value in the filtered field can be
included by using the @ symbol in the filter value. The following table illustrates use of the @
symbol in the From...Through filter parameters:
Table 8:
Data Type Filter Value SpecialFunctions/Values
DATE Dates must be in the format:
MM-DD-YYYY
Where T = TodayT+ or - a numberT+14 = T plus 14 DaysT-15W = T minus 15 weeksUse of the T function allows you to create filters on date fields that are dynamically updated for use with the MDE Scheduler.
NUMERIC Any numeric value. To select the first and last record in a numeric file use:From: 1Through: 99999999
TEXT/VARCHAR Any alpha numeric value.
To select the first and last record in a text file use:From: FIRSTThrough: LAST
Table 9:
Filter Parameters Notes
From @Through @
• Selects only records with a null value in the filtered field.• Functions with all data types, but may return zero records in special instances.
From @Through 100
• For numeric values, selects all records with a null value in the field through 100.
Section 7 - 4 Strategic Reporting Systems, Inc.
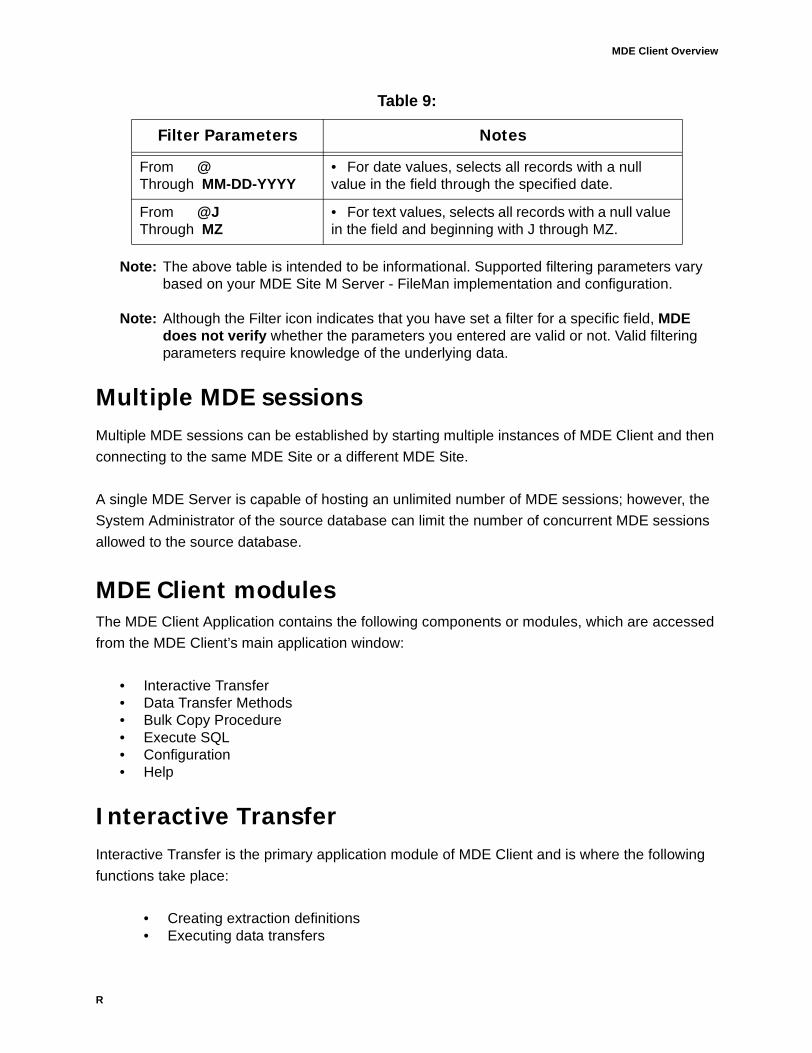
MDE Client Overview
Note: The above table is intended to be informational. Supported filtering parameters vary based on your MDE Site M Server - FileMan implementation and configuration.
Note: Although the Filter icon indicates that you have set a filter for a specific field, MDE does not verify whether the parameters you entered are valid or not. Valid filtering parameters require knowledge of the underlying data.
Multiple MDE sessionsMultiple MDE sessions can be established by starting multiple instances of MDE Client and then
connecting to the same MDE Site or a different MDE Site.
A single MDE Server is capable of hosting an unlimited number of MDE sessions; however, the
System Administrator of the source database can limit the number of concurrent MDE sessions
allowed to the source database.
MDE Client modulesThe MDE Client Application contains the following components or modules, which are accessed
from the MDE Client’s main application window:
• Interactive Transfer• Data Transfer Methods• Bulk Copy Procedure• Execute SQL• Configuration• Help
Interactive TransferInteractive Transfer is the primary application module of MDE Client and is where the following
functions take place:
• Creating extraction definitions• Executing data transfers
From @Through MM-DD-YYYY
• For date values, selects all records with a null value in the field through the specified date.
From @JThrough MZ
• For text values, selects all records with a null value in the field and beginning with J through MZ.
Table 9:
Filter Parameters Notes
R
M Data Extractor User Manual
• Using the Extraction Catalog• Scheduling data extractions and transfers
Data Transfer Methods
AutomaticThe Automatic Data Transfer is a single click operation during which the MDE performs the fol-
lowing functions:
• Extracts data from the source database and performs data transformations to meet SQL data formats
• Defines tables and indexes in the target relational database• Loads data using SQL*Loader (Oracle), DTS (Microsoft SQL Server) or Microsoft Access
into the target database
ManualThe Manual Data Transfer steps through the transfer operations, allowing you to control aspects
of the extraction process. During a manual transfer the MDE performs the following functions:
• Extracts data from the source database and performs data transformations to meet SQL data formats
• Defines SQL Statements to create tables and indexes in the target database• Allows you to review/modify the defined SQL statements• Allows you to review/modify the extracted data prior to loading• Loads data using SQL*Loader (Oracle), DTS (Microsoft SQL Server) or Microsoft Access
into the target database
Bulk Copy ProcedureBulk Copy Procedures (BCP) are only supported for VistA systems using MS SQL Server as the
target database.
A BCP is a predefined data extraction definition which is hard coded into the MDE application.
Execute SQLThis feature allows you to create and execute SQL statements against information already stored
in the target database. This function is only supported for MS SQL Server and requires an under-
standing of the T-SQL language.
Section 7 - 6 Strategic Reporting Systems, Inc.
MDE Client Overview
ConfigurationThis feature provides access to the MDE Site Configuration screens.
HelpThis feature provides access to MDE’s on-line help topics.
The Extraction CatalogThe Extraction Catalog is a feature of the MDE Client that lets you store user defined data extrac-
tion definitions (the file, fields and other parameters that make up a data extraction) for re-use,
and for use with the MDE Scheduler. By using the Extraction Catalog in conjunction with the
MDE Scheduler you can automate data transfers to populate your data warehouse, data store or
data mart.
The MDE SchedulerThe MDE Scheduler allows you to execute previously user defined data extractions that are
saved in the extraction catalog. Using the MDE Scheduler you can create single instance, daily,
weekly or monthly schedules.
Details on using each of the MDE Client’s modules are provided in Section 8: Using the MDE Client beginning on page 8-1.
R

M Data Extractor User Manual
Section 7 - 8 Strategic Reporting Systems, Inc.
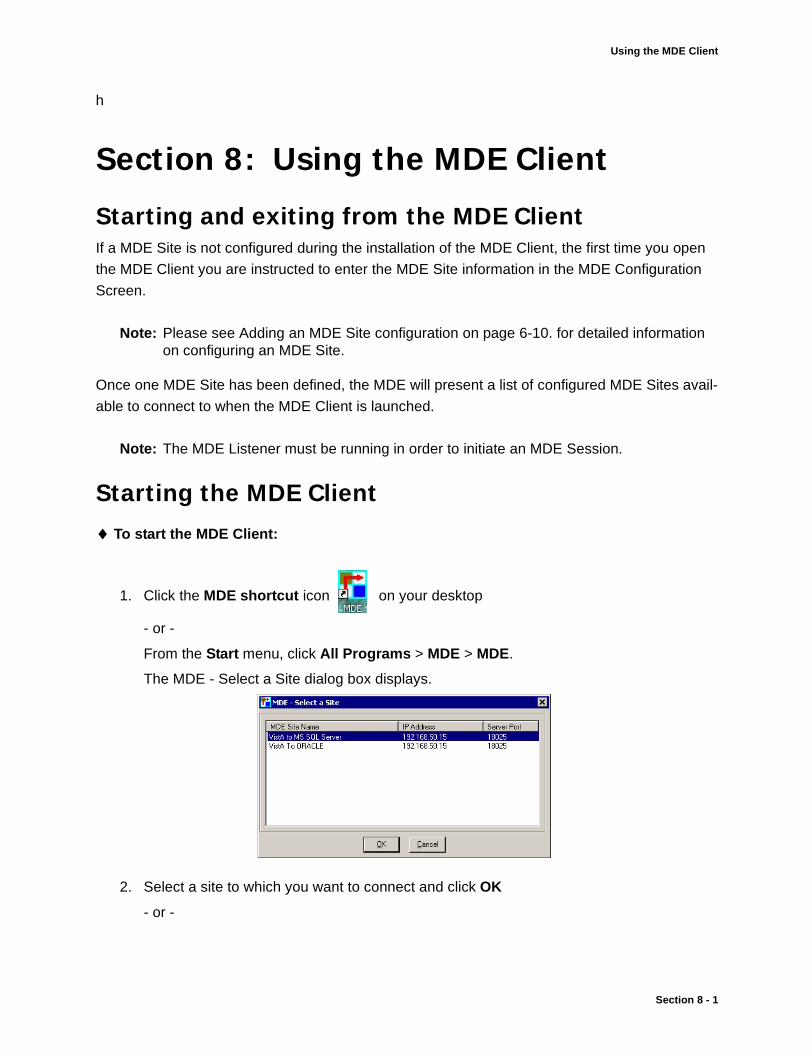
Using the MDE Client
h
Section 8: Using the MDE Client
Starting and exiting from the MDE ClientIf a MDE Site is not configured during the installation of the MDE Client, the first time you open
the MDE Client you are instructed to enter the MDE Site information in the MDE Configuration
Screen.
Note: Please see Adding an MDE Site configuration on page 6-10. for detailed information on configuring an MDE Site.
Once one MDE Site has been defined, the MDE will present a list of configured MDE Sites avail-
able to connect to when the MDE Client is launched.
Note: The MDE Listener must be running in order to initiate an MDE Session.
Starting the MDE Client♦ To start the MDE Client:
1. Click the MDE shortcut icon on your desktop
- or -
From the Start menu, click All Programs > MDE > MDE.
The MDE - Select a Site dialog box displays.
2. Select a site to which you want to connect and click OK
- or -
Section 8 - 1
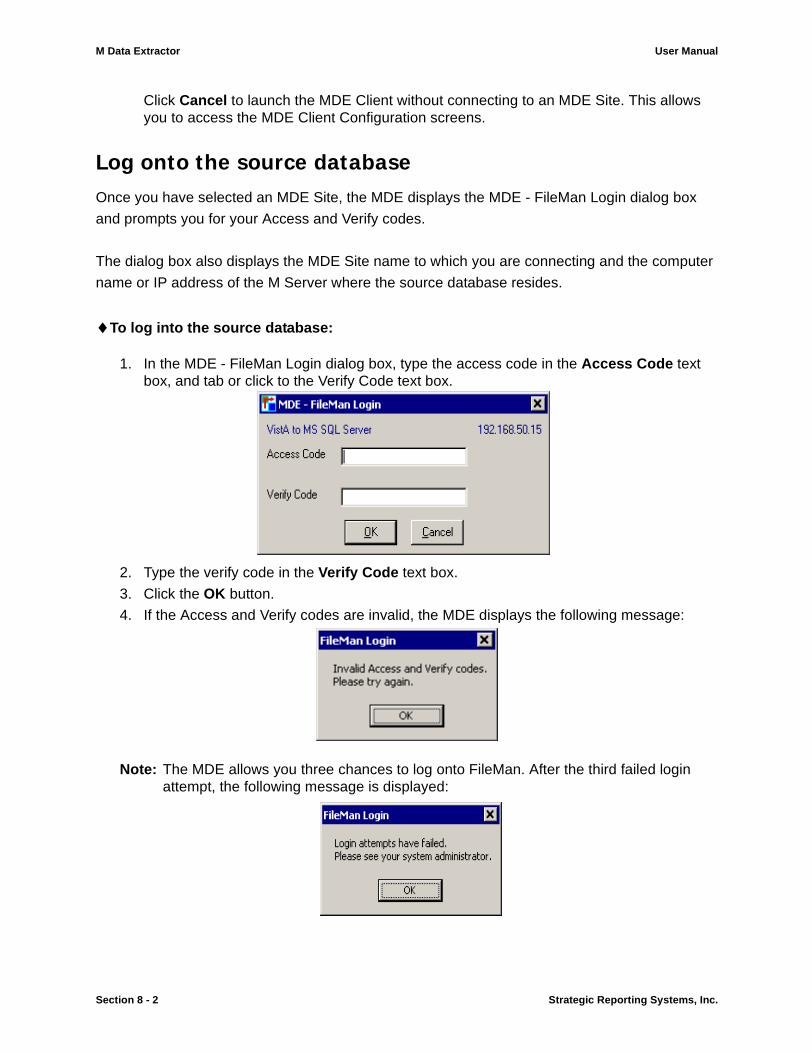
M Data Extractor User Manual
Click Cancel to launch the MDE Client without connecting to an MDE Site. This allows you to access the MDE Client Configuration screens.
Log onto the source database Once you have selected an MDE Site, the MDE displays the MDE - FileMan Login dialog box
and prompts you for your Access and Verify codes.
The dialog box also displays the MDE Site name to which you are connecting and the computer
name or IP address of the M Server where the source database resides.
♦To log into the source database:
1. In the MDE - FileMan Login dialog box, type the access code in the Access Code text box, and tab or click to the Verify Code text box.
2. Type the verify code in the Verify Code text box.
3. Click the OK button.
4. If the Access and Verify codes are invalid, the MDE displays the following message:
Note: The MDE allows you three chances to log onto FileMan. After the third failed login attempt, the following message is displayed:
Section 8 - 2 Strategic Reporting Systems, Inc.
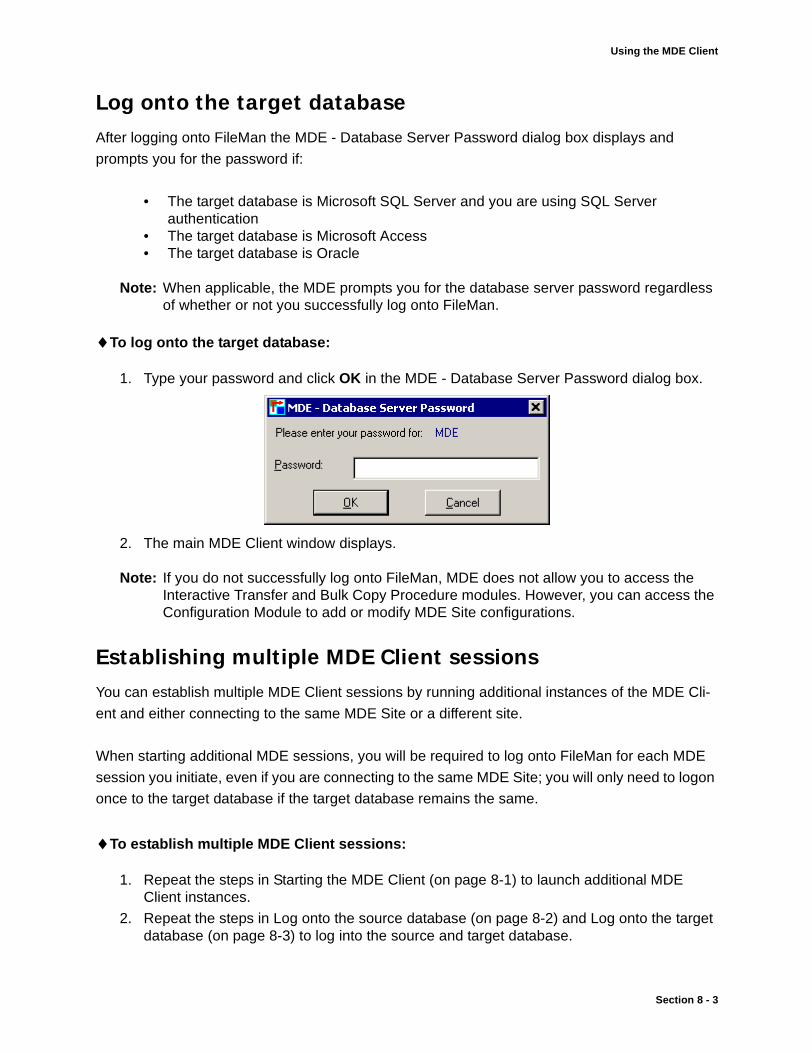
Using the MDE Client
Log onto the target databaseAfter logging onto FileMan the MDE - Database Server Password dialog box displays and
prompts you for the password if:
• The target database is Microsoft SQL Server and you are using SQL Server authentication
• The target database is Microsoft Access• The target database is Oracle
Note: When applicable, the MDE prompts you for the database server password regardless of whether or not you successfully log onto FileMan.
♦To log onto the target database:
1. Type your password and click OK in the MDE - Database Server Password dialog box.
2. The main MDE Client window displays.
Note: If you do not successfully log onto FileMan, MDE does not allow you to access the Interactive Transfer and Bulk Copy Procedure modules. However, you can access the Configuration Module to add or modify MDE Site configurations.
Establishing multiple MDE Client sessionsYou can establish multiple MDE Client sessions by running additional instances of the MDE Cli-
ent and either connecting to the same MDE Site or a different site.
When starting additional MDE sessions, you will be required to log onto FileMan for each MDE
session you initiate, even if you are connecting to the same MDE Site; you will only need to logon
once to the target database if the target database remains the same.
♦To establish multiple MDE Client sessions:
1. Repeat the steps in Starting the MDE Client (on page 8-1) to launch additional MDE Client instances.
2. Repeat the steps in Log onto the source database (on page 8-2) and Log onto the target database (on page 8-3) to log into the source and target database.
Section 8 - 3
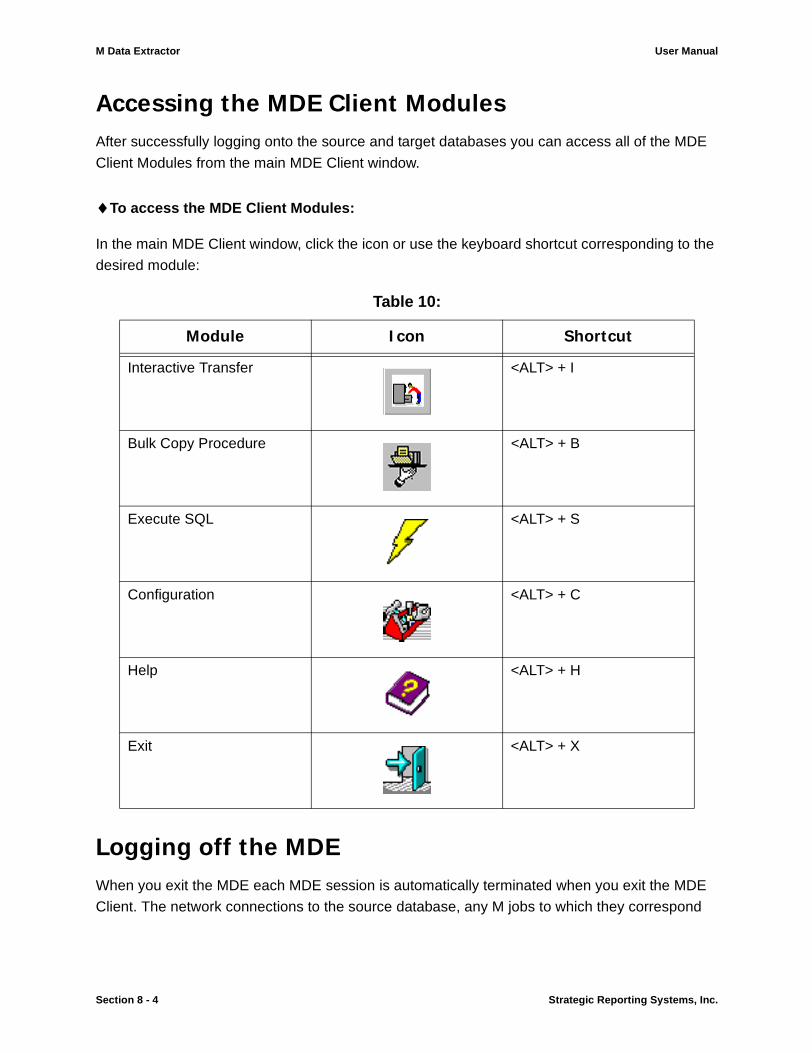
M Data Extractor User Manual
Accessing the MDE Client ModulesAfter successfully logging onto the source and target databases you can access all of the MDE
Client Modules from the main MDE Client window.
♦To access the MDE Client Modules:
In the main MDE Client window, click the icon or use the keyboard shortcut corresponding to the
desired module:
Logging off the MDEWhen you exit the MDE each MDE session is automatically terminated when you exit the MDE
Client. The network connections to the source database, any M jobs to which they correspond
Table 10:
Module Icon Shortcut
Interactive Transfer <ALT> + I
Bulk Copy Procedure <ALT> + B
Execute SQL <ALT> + S
Configuration <ALT> + C
Help <ALT> + H
Exit <ALT> + X
Section 8 - 4 Strategic Reporting Systems, Inc.
Using the MDE Client
and the network connections to all target databases are closed automatically. When you restart
the MDE you must log on again.
Note: When you open a connection to an MDE Site, the connection to that site remains open until you shut down the MDE Client. You cannot voluntarily close a connection to an individual site, even though each site was opened separately. Connections to MDE sites can only be closed when the MDE Client is shut down. As an example, if an individual MDE Site loses its connection due to a network problem, the MDE still maintains its connection to any other MDE sites that may be open.
♦To log off the MDE:
1. Click Exit from any MDE module window in which you are working.
MDE closes the window you are working in and displays the main MDE window.
2. Click the Exit button on the MDE main window.
MDE closes the window and connections, as well as the corresponding MDE Server jobs, to all sites.
The Interactive Transfer ModuleThe Interactive Transfer Module is the location from which the majority of the MDE Client tasks
are performed. In the Interactive Transfer, you perform the following tasks:
• Create extraction definitions (page 8-7)
• Execute data transfers (page 8-13)
• Use the Extraction Catalog (page 8-21)
• Schedule data extractions and transfers (page 8-28)
Section 8 - 5
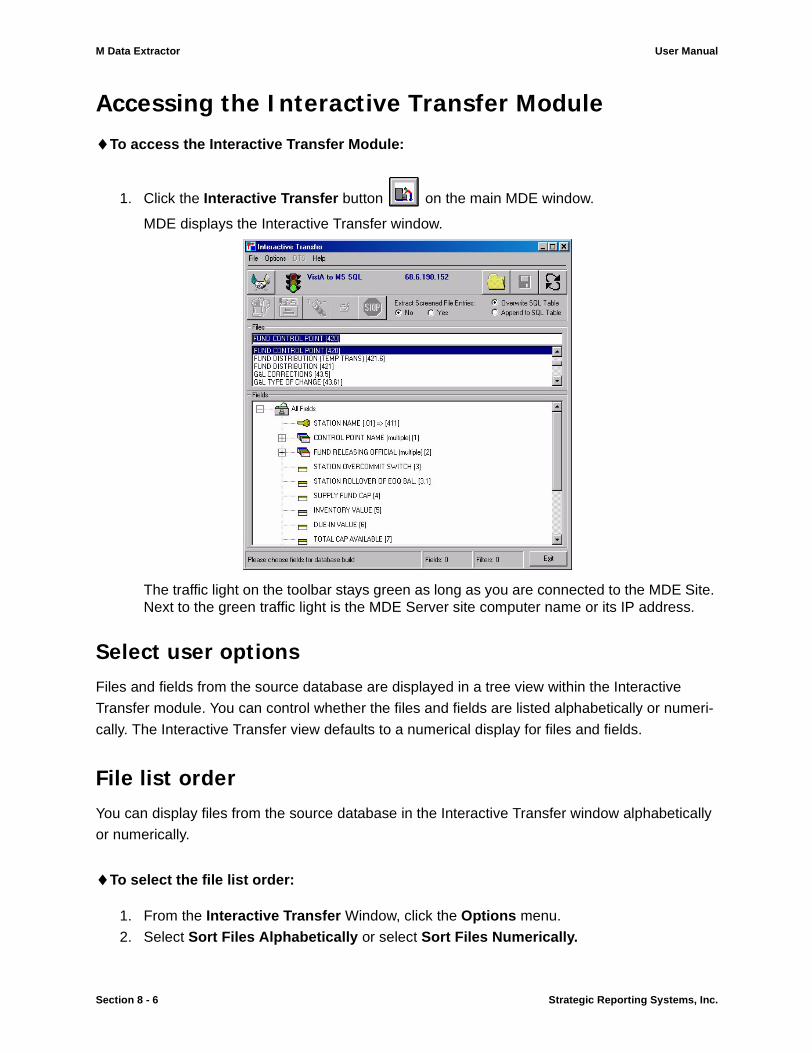
M Data Extractor User Manual
Accessing the Interactive Transfer Module♦To access the Interactive Transfer Module:
1. Click the Interactive Transfer button on the main MDE window.
MDE displays the Interactive Transfer window.
The traffic light on the toolbar stays green as long as you are connected to the MDE Site. Next to the green traffic light is the MDE Server site computer name or its IP address.
Select user optionsFiles and fields from the source database are displayed in a tree view within the Interactive
Transfer module. You can control whether the files and fields are listed alphabetically or numeri-
cally. The Interactive Transfer view defaults to a numerical display for files and fields.
File list orderYou can display files from the source database in the Interactive Transfer window alphabetically
or numerically.
♦To select the file list order:
1. From the Interactive Transfer Window, click the Options menu.
2. Select Sort Files Alphabetically or select Sort Files Numerically.
Section 8 - 6 Strategic Reporting Systems, Inc.
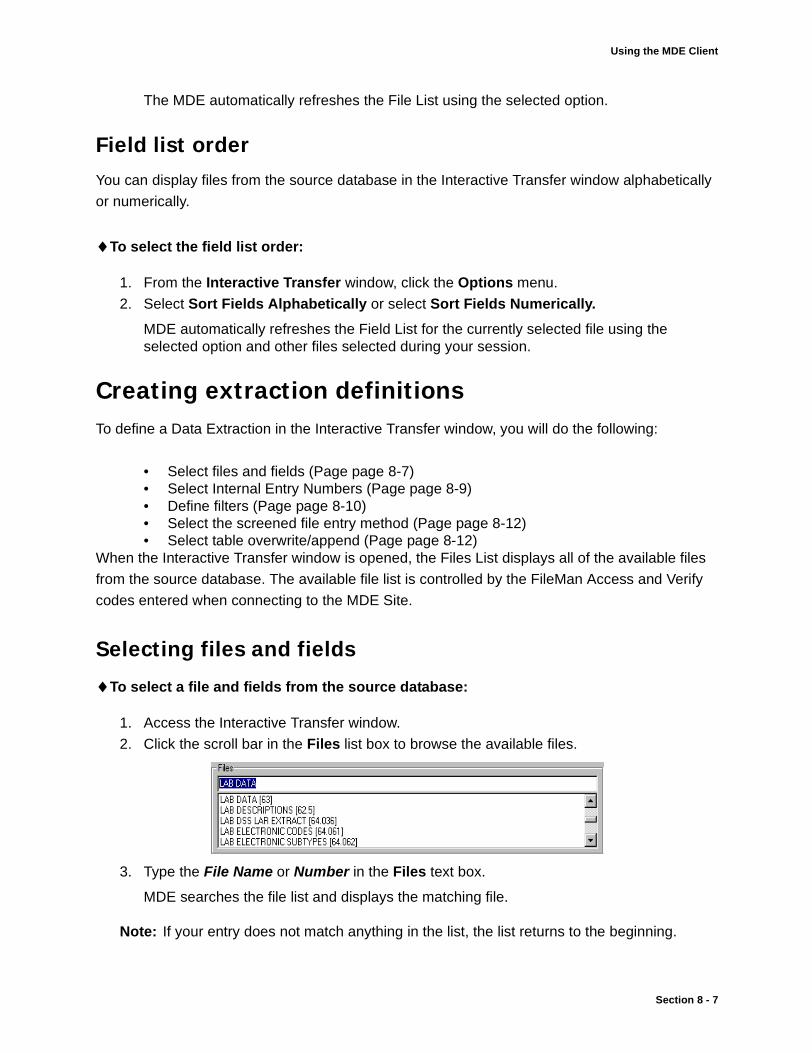
Using the MDE Client
The MDE automatically refreshes the File List using the selected option.
Field list orderYou can display files from the source database in the Interactive Transfer window alphabetically
or numerically.
♦To select the field list order:
1. From the Interactive Transfer window, click the Options menu.
2. Select Sort Fields Alphabetically or select Sort Fields Numerically.
MDE automatically refreshes the Field List for the currently selected file using the selected option and other files selected during your session.
Creating extraction definitionsTo define a Data Extraction in the Interactive Transfer window, you will do the following:
• Select files and fields (Page page 8-7)• Select Internal Entry Numbers (Page page 8-9)• Define filters (Page page 8-10)• Select the screened file entry method (Page page 8-12)• Select table overwrite/append (Page page 8-12)
When the Interactive Transfer window is opened, the Files List displays all of the available files
from the source database. The available file list is controlled by the FileMan Access and Verify
codes entered when connecting to the MDE Site.
Selecting files and fields
♦To select a file and fields from the source database:
1. Access the Interactive Transfer window.
2. Click the scroll bar in the Files list box to browse the available files.
3. Type the File Name or Number in the Files text box.
MDE searches the file list and displays the matching file.
Note: If your entry does not match anything in the list, the list returns to the beginning.
Section 8 - 7
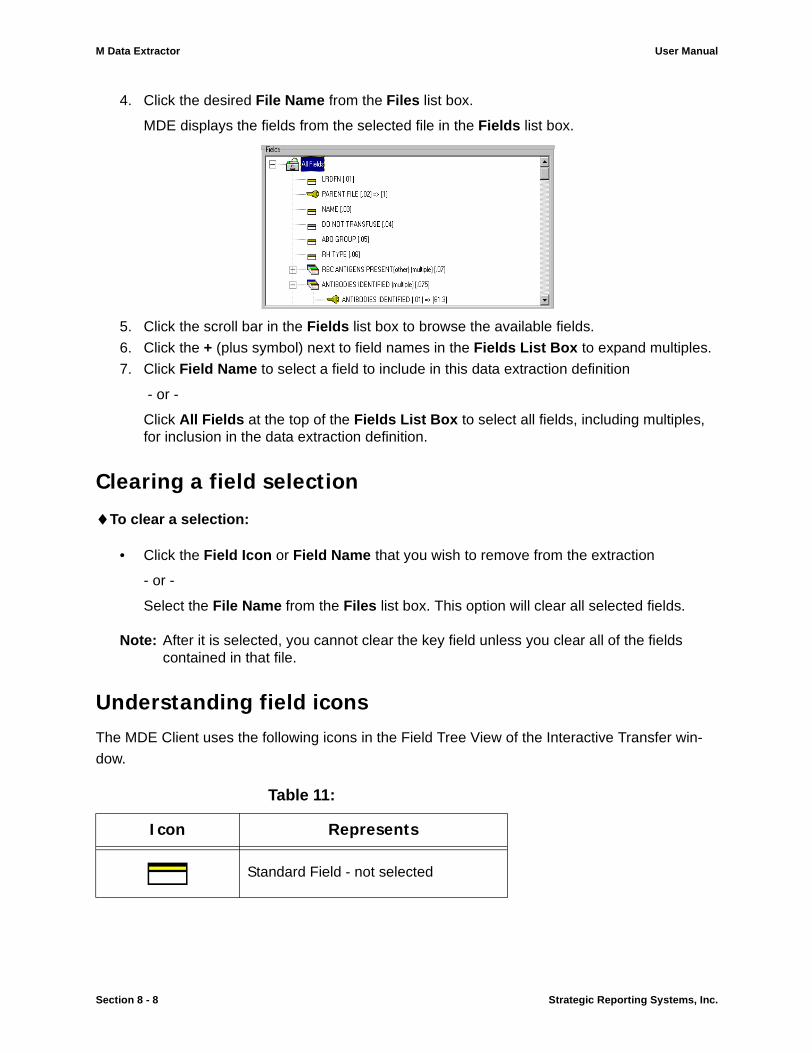
M Data Extractor User Manual
4. Click the desired File Name from the Files list box.
MDE displays the fields from the selected file in the Fields list box.
5. Click the scroll bar in the Fields list box to browse the available fields.
6. Click the + (plus symbol) next to field names in the Fields List Box to expand multiples.
7. Click Field Name to select a field to include in this data extraction definition
- or -
Click All Fields at the top of the Fields List Box to select all fields, including multiples, for inclusion in the data extraction definition.
Clearing a field selection
♦To clear a selection:
• Click the Field Icon or Field Name that you wish to remove from the extraction
- or -
Select the File Name from the Files list box. This option will clear all selected fields.
Note: After it is selected, you cannot clear the key field unless you clear all of the fields contained in that file.
Understanding field iconsThe MDE Client uses the following icons in the Field Tree View of the Interactive Transfer win-
dow.
Table 11:
Icon Represents
Standard Field - not selected
Section 8 - 8 Strategic Reporting Systems, Inc.

Using the MDE Client
Selecting Internal Entry NumbersThe key icon next to a field name indicates that the field contains an Internal Entry Number (IEN),
also referred to as a pointer, from another file. These fields also display the symbol => after the
field name, followed by the file number in brackets, which the IEN points to. For example, the
Standard Field - selected
Standard Field - selected with filter
Multiple Field - not selected
Multiple Field - all selected
IEN Field - not selected
IEN Field - External selected
IEN Field - Internal selected
IEN Field - both selected
IEN Field - External selected with filter
IEN Field - Internal selected with filter
IEN Field - Both selected with filter
Table 11:
Icon Represents
Section 8 - 9
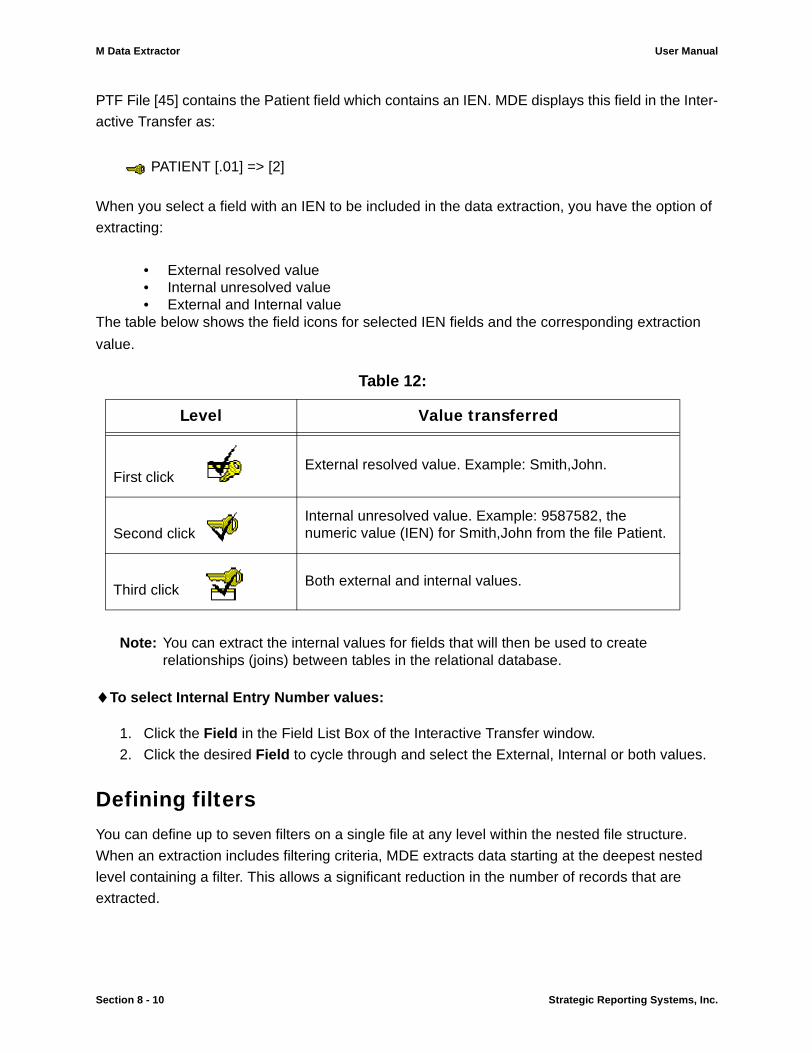
M Data Extractor User Manual
PTF File [45] contains the Patient field which contains an IEN. MDE displays this field in the Inter-
active Transfer as:
PATIENT [.01] => [2]
When you select a field with an IEN to be included in the data extraction, you have the option of
extracting:
• External resolved value• Internal unresolved value• External and Internal value
The table below shows the field icons for selected IEN fields and the corresponding extraction
value.
Note: You can extract the internal values for fields that will then be used to create relationships (joins) between tables in the relational database.
♦To select Internal Entry Number values:
1. Click the Field in the Field List Box of the Interactive Transfer window.
2. Click the desired Field to cycle through and select the External, Internal or both values.
Defining filtersYou can define up to seven filters on a single file at any level within the nested file structure.
When an extraction includes filtering criteria, MDE extracts data starting at the deepest nested
level containing a filter. This allows a significant reduction in the number of records that are
extracted.
Table 12:
Level Value transferred
First click External resolved value. Example: Smith,John.
Second click Internal unresolved value. Example: 9587582, the numeric value (IEN) for Smith,John from the file Patient.
Third click Both external and internal values.
Section 8 - 10 Strategic Reporting Systems, Inc.
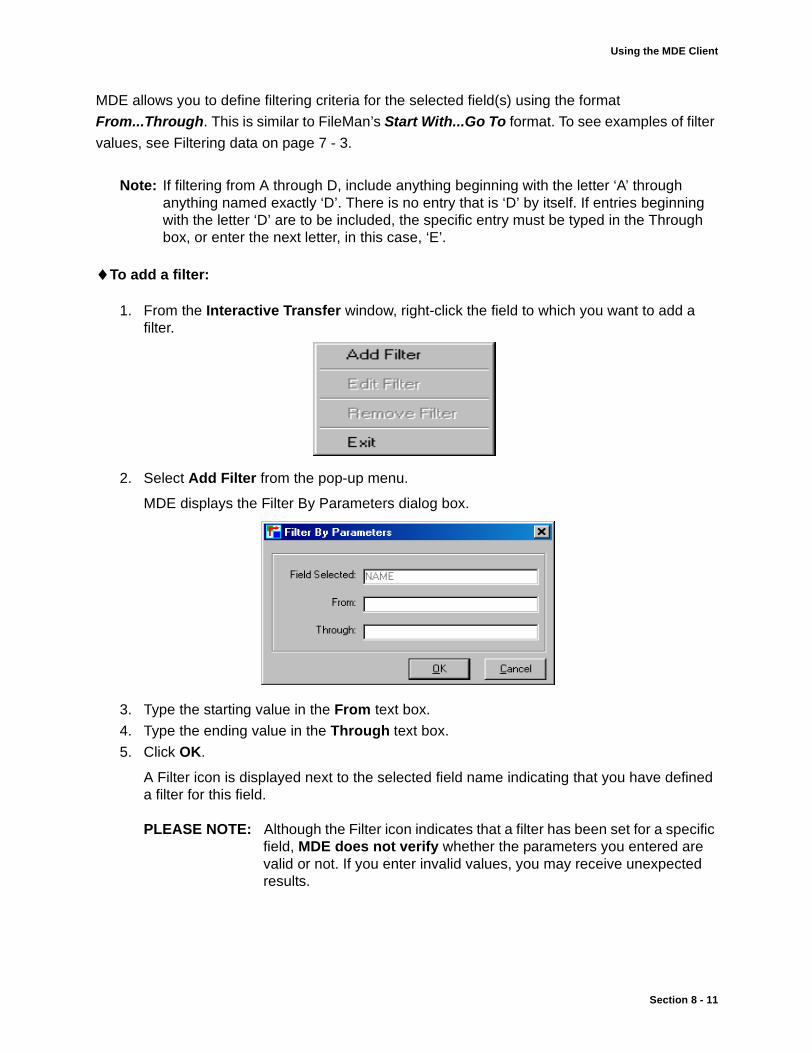
Using the MDE Client
MDE allows you to define filtering criteria for the selected field(s) using the format
From...Through. This is similar to FileMan’s Start With...Go To format. To see examples of filter
values, see Filtering data on page 7 - 3.
Note: If filtering from A through D, include anything beginning with the letter ‘A’ through anything named exactly ‘D’. There is no entry that is ‘D’ by itself. If entries beginning with the letter ‘D’ are to be included, the specific entry must be typed in the Through box, or enter the next letter, in this case, ‘E’.
♦To add a filter:
1. From the Interactive Transfer window, right-click the field to which you want to add a filter.
2. Select Add Filter from the pop-up menu.
MDE displays the Filter By Parameters dialog box.
3. Type the starting value in the From text box.
4. Type the ending value in the Through text box.
5. Click OK.
A Filter icon is displayed next to the selected field name indicating that you have defined a filter for this field.
PLEASE NOTE: Although the Filter icon indicates that a filter has been set for a specific field, MDE does not verify whether the parameters you entered are valid or not. If you enter invalid values, you may receive unexpected results.
Section 8 - 11

M Data Extractor User Manual
Editing a filter
♦To edit a filter:
1. Right-click the field that contains the filter you want to edit.
2. From the pop-up menu, click Edit Filter.3. From the Filter By Parameters dialog box, edit the filter.
4. Click OK.
Removing a filter
♦To remove a filter:
1. Right-click the field that contains the filter you want to remove.
2. From the pop-up menu that appears, click Remove Filter.The Filter icon is removed from the field.
Selecting the screened file entry methodMDE does not normally extract FileMan records that have been marked as inactive or hidden by
other special file screen parameters.
♦To select screened file entries:
1. From the Interactive Transfer window, select one of the two options under Extract Screened File Entries:
• No - select this option if you do not want to extract records, such as records marked inactive, which are normally excluded from data extractions by FileMan file screening;
• Yes - select this option if you want to extract records, such as records marked inactive, which are normally excluded from data extraction by FileMan file screening.
Note: If you select Yes and there are no screened file entries, the data extraction process is not adversely affected.
Selecting table overwrite/append
Overwrite is the default for this option. During the data load portion of an extraction, if the tables already exist in the target database, MDE will either:
• Overwrite Table: this option deletes the existing table and replaces it with the data from the current extraction
• Append to Table: this option adds new records to the end of the existing table
Section 8 - 12 Strategic Reporting Systems, Inc.
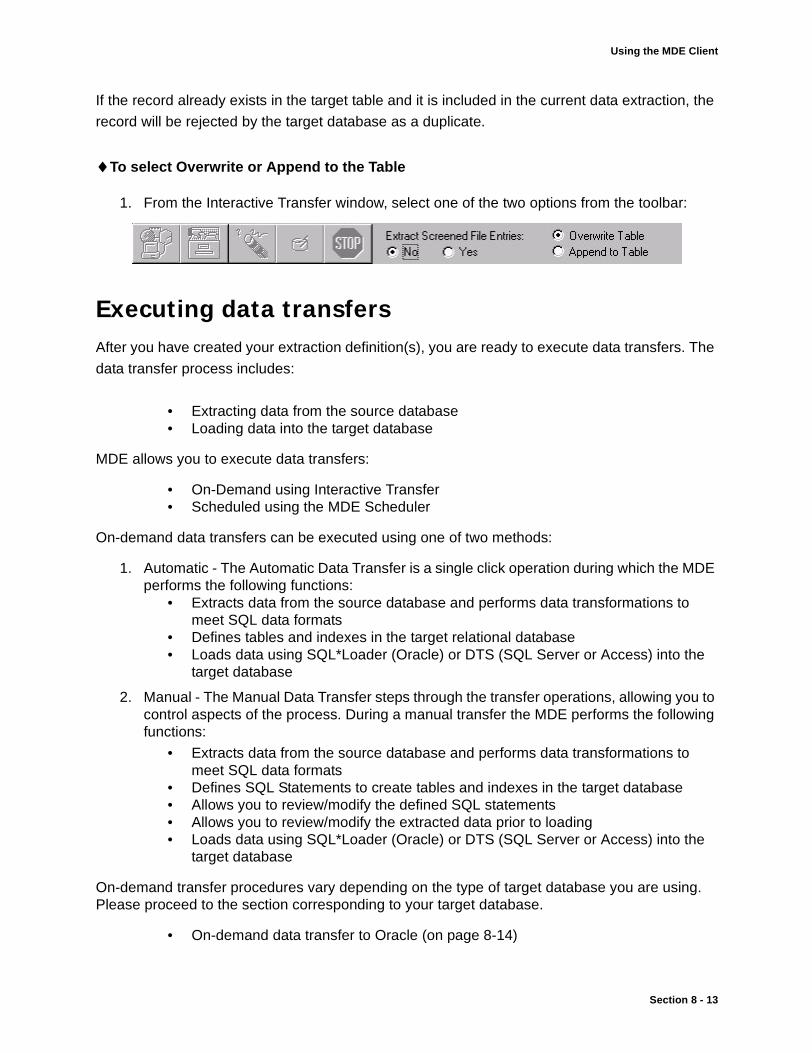
Using the MDE Client
If the record already exists in the target table and it is included in the current data extraction, the
record will be rejected by the target database as a duplicate.
♦To select Overwrite or Append to the Table
1. From the Interactive Transfer window, select one of the two options from the toolbar:
Executing data transfersAfter you have created your extraction definition(s), you are ready to execute data transfers. The
data transfer process includes:
• Extracting data from the source database• Loading data into the target database
MDE allows you to execute data transfers:
• On-Demand using Interactive Transfer• Scheduled using the MDE Scheduler
On-demand data transfers can be executed using one of two methods:
1. Automatic - The Automatic Data Transfer is a single click operation during which the MDE performs the following functions:
• Extracts data from the source database and performs data transformations to meet SQL data formats
• Defines tables and indexes in the target relational database• Loads data using SQL*Loader (Oracle) or DTS (SQL Server or Access) into the
target database
2. Manual - The Manual Data Transfer steps through the transfer operations, allowing you to control aspects of the process. During a manual transfer the MDE performs the following functions:
• Extracts data from the source database and performs data transformations to meet SQL data formats
• Defines SQL Statements to create tables and indexes in the target database• Allows you to review/modify the defined SQL statements• Allows you to review/modify the extracted data prior to loading• Loads data using SQL*Loader (Oracle) or DTS (SQL Server or Access) into the
target database
On-demand transfer procedures vary depending on the type of target database you are using. Please proceed to the section corresponding to your target database.
• On-demand data transfer to Oracle (on page 8-14)
Section 8 - 13
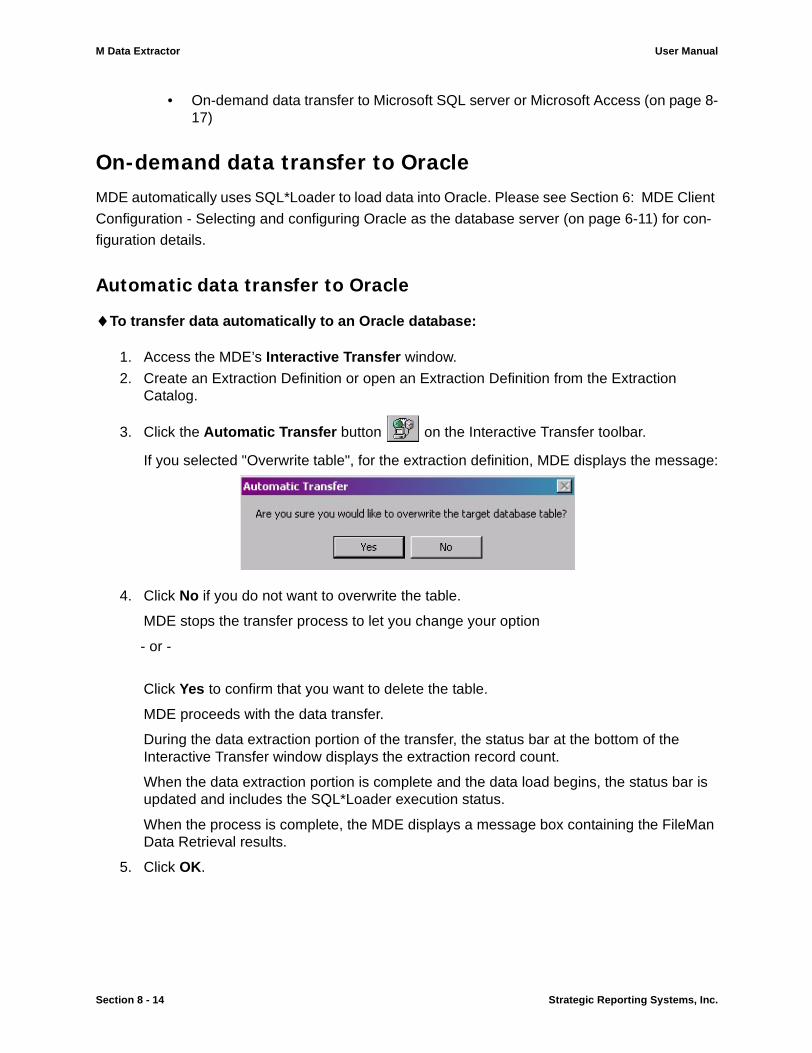
M Data Extractor User Manual
• On-demand data transfer to Microsoft SQL server or Microsoft Access (on page 8-17)
On-demand data transfer to OracleMDE automatically uses SQL*Loader to load data into Oracle. Please see Section 6: MDE Client
Configuration - Selecting and configuring Oracle as the database server (on page 6-11) for con-
figuration details.
Automatic data transfer to Oracle
♦To transfer data automatically to an Oracle database:
1. Access the MDE’s Interactive Transfer window.
2. Create an Extraction Definition or open an Extraction Definition from the Extraction Catalog.
3. Click the Automatic Transfer button on the Interactive Transfer toolbar.
If you selected "Overwrite table", for the extraction definition, MDE displays the message:
4. Click No if you do not want to overwrite the table.
MDE stops the transfer process to let you change your option
- or -
Click Yes to confirm that you want to delete the table.
MDE proceeds with the data transfer.
During the data extraction portion of the transfer, the status bar at the bottom of the Interactive Transfer window displays the extraction record count.
When the data extraction portion is complete and the data load begins, the status bar is updated and includes the SQL*Loader execution status.
When the process is complete, the MDE displays a message box containing the FileMan Data Retrieval results.
5. Click OK.
Section 8 - 14 Strategic Reporting Systems, Inc.
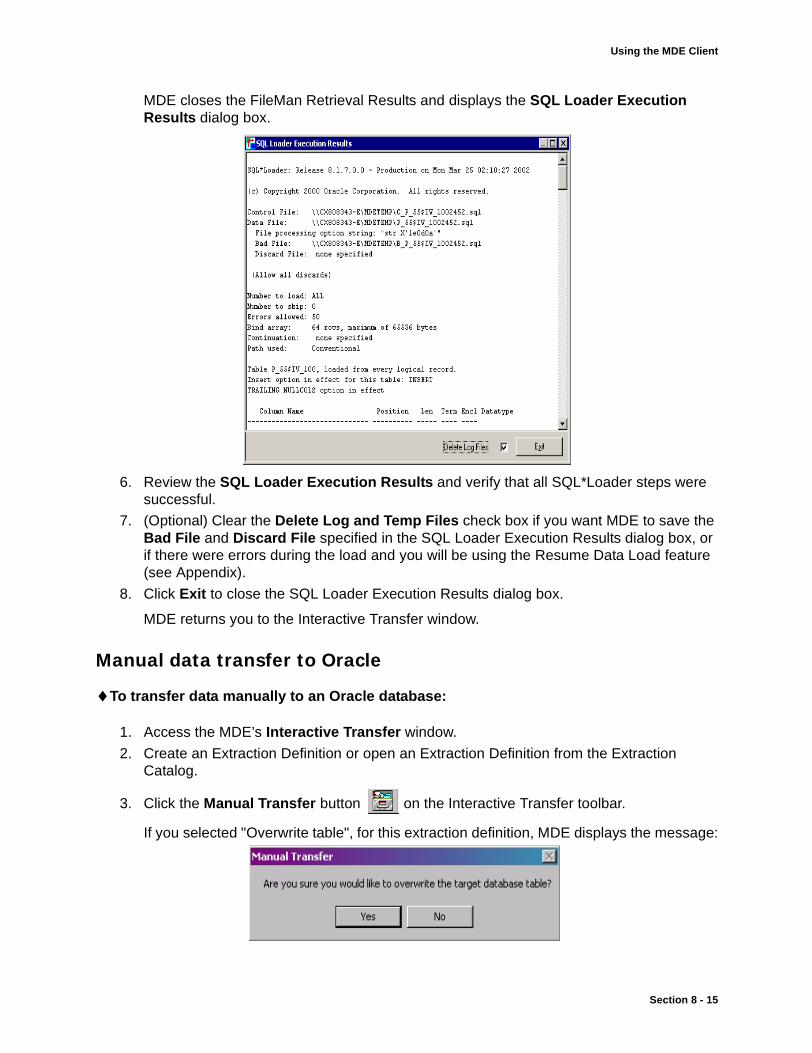
Using the MDE Client
MDE closes the FileMan Retrieval Results and displays the SQL Loader Execution Results dialog box.
6. Review the SQL Loader Execution Results and verify that all SQL*Loader steps were successful.
7. (Optional) Clear the Delete Log and Temp Files check box if you want MDE to save the Bad File and Discard File specified in the SQL Loader Execution Results dialog box, or if there were errors during the load and you will be using the Resume Data Load feature (see Appendix).
8. Click Exit to close the SQL Loader Execution Results dialog box.
MDE returns you to the Interactive Transfer window.
Manual data transfer to Oracle
♦To transfer data manually to an Oracle database:
1. Access the MDE’s Interactive Transfer window.
2. Create an Extraction Definition or open an Extraction Definition from the Extraction Catalog.
3. Click the Manual Transfer button on the Interactive Transfer toolbar.
If you selected "Overwrite table", for this extraction definition, MDE displays the message:
Section 8 - 15
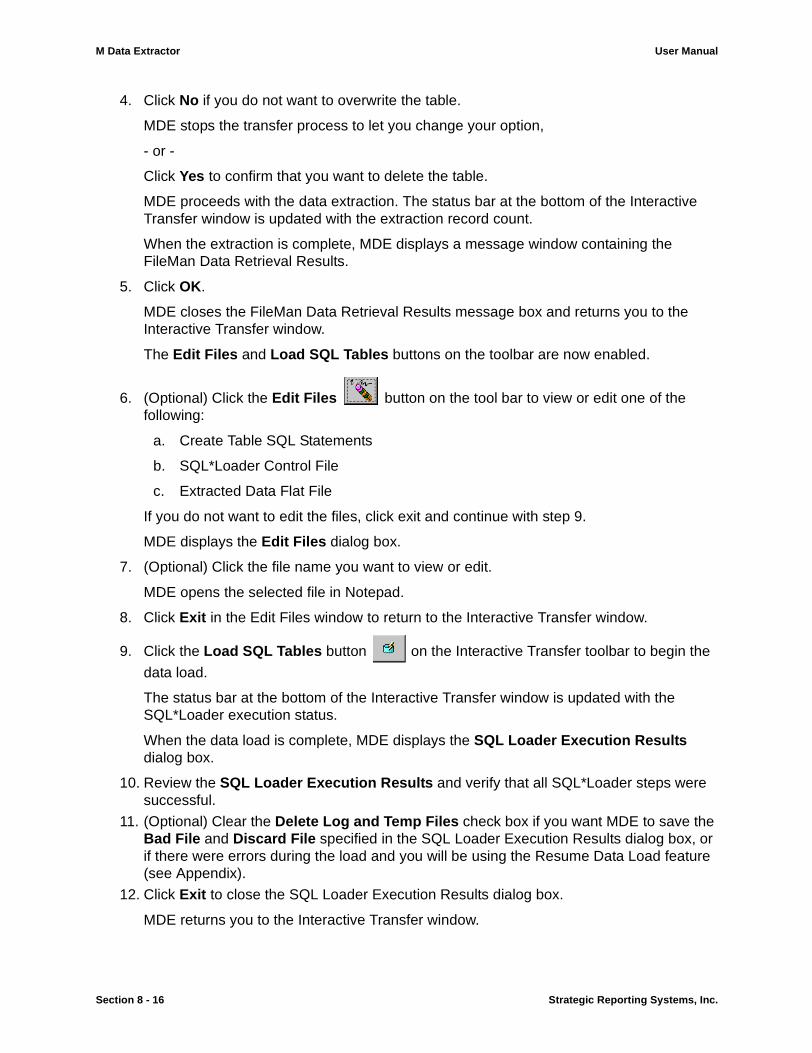
M Data Extractor User Manual
4. Click No if you do not want to overwrite the table.
MDE stops the transfer process to let you change your option,
- or -
Click Yes to confirm that you want to delete the table.
MDE proceeds with the data extraction. The status bar at the bottom of the Interactive Transfer window is updated with the extraction record count.
When the extraction is complete, MDE displays a message window containing the FileMan Data Retrieval Results.
5. Click OK.
MDE closes the FileMan Data Retrieval Results message box and returns you to the Interactive Transfer window.
The Edit Files and Load SQL Tables buttons on the toolbar are now enabled.
6. (Optional) Click the Edit Files button on the tool bar to view or edit one of the following:
a. Create Table SQL Statements
b. SQL*Loader Control File
c. Extracted Data Flat File
If you do not want to edit the files, click exit and continue with step 9.
MDE displays the Edit Files dialog box.
7. (Optional) Click the file name you want to view or edit.
MDE opens the selected file in Notepad.
8. Click Exit in the Edit Files window to return to the Interactive Transfer window.
9. Click the Load SQL Tables button on the Interactive Transfer toolbar to begin the
data load.
The status bar at the bottom of the Interactive Transfer window is updated with the SQL*Loader execution status.
When the data load is complete, MDE displays the SQL Loader Execution Results dialog box.
10. Review the SQL Loader Execution Results and verify that all SQL*Loader steps were successful.
11. (Optional) Clear the Delete Log and Temp Files check box if you want MDE to save the Bad File and Discard File specified in the SQL Loader Execution Results dialog box, or if there were errors during the load and you will be using the Resume Data Load feature (see Appendix).
12. Click Exit to close the SQL Loader Execution Results dialog box.
MDE returns you to the Interactive Transfer window.
Section 8 - 16 Strategic Reporting Systems, Inc.
Using the MDE Client
On-demand data transfer to Microsoft SQL server or Microsoft AccessMDE uses Data Transformation Services (DTS) to load data into Microsoft SQL Server or the
Microsoft Access database. Please refer to Selecting and configuring Microsoft SQL Server as the database server on page 6-15 in Section 6: MDE Client Configuration for details.
Transferring data automatically to Microsoft SQL server or Microsoft Access
♦To transfer data automatically to an SQL server or Access database:
1. Access the MDE’s Interactive Transfer window.
2. Create an Extraction Definition or Open an Extraction Definition from the Extraction Catalog.
3. Click the Automatic Transfer button on the Interactive Transfer toolbar.
If you selected "Overwrite table", for this extraction definition, MDE displays the message:
4. Click No if you do not want to overwrite the table.
MDE stops the transfer process to let you change your option.
- or -
Click Yes to confirm that you want to delete the table.
MDE proceeds with the data transfer.
During the data extraction portion of the transfer, the status bar at the bottom of the Interactive Transfer window displays the extraction record count.
When the data extraction portion is complete and the data load begins, the status bar is updated and displays the DTS Package Execution status.
When the process is complete, MDE displays a message box containing the FileMan Data Retrieval results.
5. Click OK.
MDE closes the FileMan Retrieval Results, and then displays the DTS Package Execution Results dialog box.
6. Review the DTS Package Execution Results and verify that all the DTS transfer steps were successful.
Section 8 - 17
M Data Extractor User Manual
7. (Optional) Clear the Delete Log Files check box if you want MDE to save the Log Files and the Exception Files specified in the DTS Package Execution Results.
8. Click Exit to close the DTS Package Execution Results dialog box.
MDE returns you to the Interactive Transfer window.
If you selected the Use Lineage check box on the DTS tab (see, “Configuring the DTS”), MDE displays the DTS Package Options dialog box. Continue with step 7.
If you cleared the Use Lineage check box on the DTS tab, continue with step 12.
Manual data transfer to Microsoft SQL Server or MS Access database
♦To transfer data manually to an SQL Server or Access database:
1. Access MDE’s Interactive Transfer window.
2. Create an Extraction Definition or Open an Extraction Definition from the Extraction Catalog.
3. Click the Manual Transfer button on the Interactive Transfer toolbar.
If you selected "Overwrite table" for this extraction definition, MDE displays the message:
4. Click No if you do not want to overwrite the table.
MDE stops the transfer process to let you change your option
- or -
Click Yes to confirm that you want to delete the table.
MDE proceeds with the data extraction. The status bar at the bottom of the Interactive Transfer window is updated with the extraction record count.
When the extraction is complete, MDE displays a message window containing the FileMan Data Retrieval Results.
5. Click OK.
MDE closes the FileMan Data Retrieval Results message box and returns you to the Interactive Transfer window.
The Edit Files and Load SQL Tables buttons on the toolbar are now enabled.
6. (Optional) Click the Edit Files button on the tool bar to view or edit one of the following:
a. Create Table SQL Statement
Section 8 - 18 Strategic Reporting Systems, Inc.
Using the MDE Client
b. Extracted Data Flat File
If you do not want to edit the files, click Exit and proceed to step 9.
MDE displays the Edit Files dialog box.
7. (Optional) Click the file name you want to view or edit.
MDE opens the selected file with Notepad.
8. Click Exit in the Edit Files window to return to the Interactive Transfer window.
9. Click the Load SQL Tables button on the Interactive Transfer toolbar to begin the
data load.
The status bar is updated and displays the DTS Package Execution status.
When the data load is complete, MDE displays the DTS Package Execution Results dialog box.
10. Review the DTS Package Execution Results and verify that all the DTS transfer steps were successful.
11. (Optional) Clear the Delete Log Files check box if you want MDE to save the Log Files and the Exception Files specified in the DTS Package Execution Results.
12. Click Exit to close the DTS Package Execution Results dialog box.
MDE returns you to the Interactive Transfer window.
♦To stop the data transfer:
1. Click the STOP button located on any of the toolbars of the following windows or dialog boxes to stop the data transfer process:• Interactive Transfer window• Create SQL Table dialog box• Load SQL Table dialog box• Interactive SQL dialog box
DTS Lineage options
If you selected Use Lineage on the DTS tab of the MDE Site Configuration window, MDE
prompts you for the appropriate information. Note that both SQL Server and Access databases
use DTS to transfer data.
1. Select the Execute Package check box if you want to create and execute the package.
- or -
Clear the Execute Package check box if you want to create the package but not execute it.
2. Select one of the two Package Type options:
• Existing Package, if you want to use an existing package type.• New Package, if you want to create a new package type.
3. If you selected the Existing Package option:
Section 8 - 19
M Data Extractor User Manual
• Select a package in the Name list• Select the New Version check box if you want MDE to use an existing package, but
append a new version to the package it creates
4. If you selected the New Package option:
• Type the name of the package in the Name text box• Type the description of the package in the Description text box
5. Click OK.
Section 8 - 20 Strategic Reporting Systems, Inc.
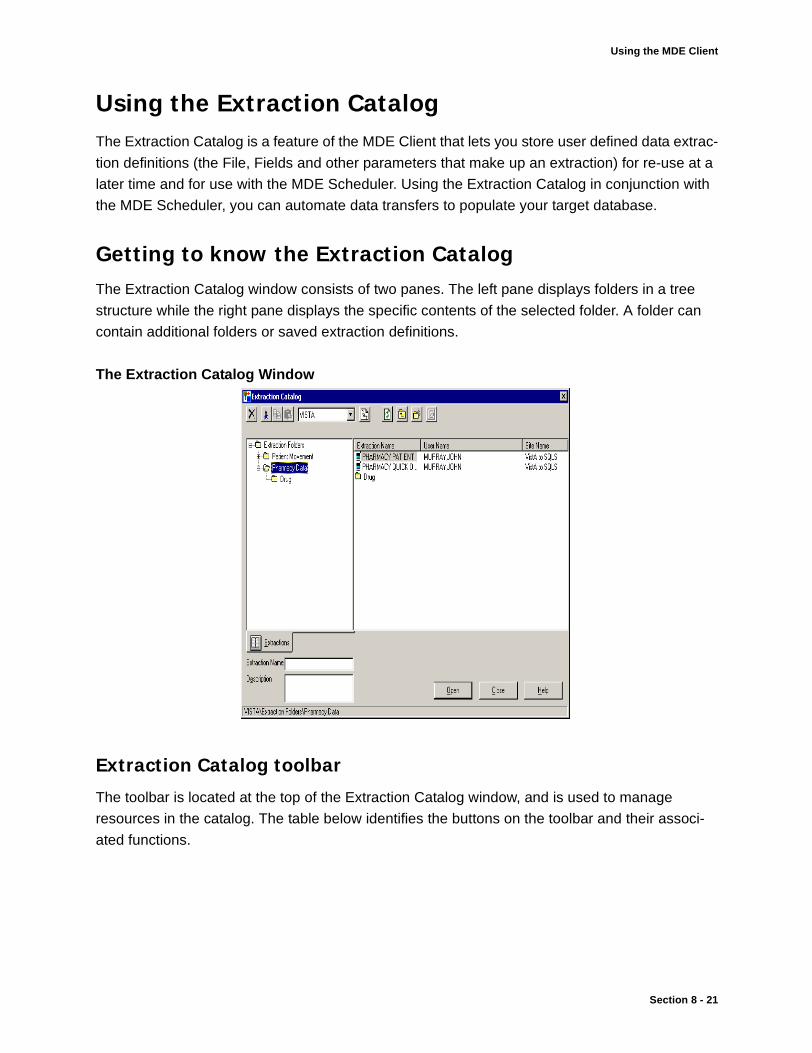
Using the MDE Client
Using the Extraction CatalogThe Extraction Catalog is a feature of the MDE Client that lets you store user defined data extrac-
tion definitions (the File, Fields and other parameters that make up an extraction) for re-use at a
later time and for use with the MDE Scheduler. Using the Extraction Catalog in conjunction with
the MDE Scheduler, you can automate data transfers to populate your target database.
Getting to know the Extraction CatalogThe Extraction Catalog window consists of two panes. The left pane displays folders in a tree
structure while the right pane displays the specific contents of the selected folder. A folder can
contain additional folders or saved extraction definitions.
The Extraction Catalog Window
Extraction Catalog toolbar
The toolbar is located at the top of the Extraction Catalog window, and is used to manage
resources in the catalog. The table below identifies the buttons on the toolbar and their associ-
ated functions.
Section 8 - 21
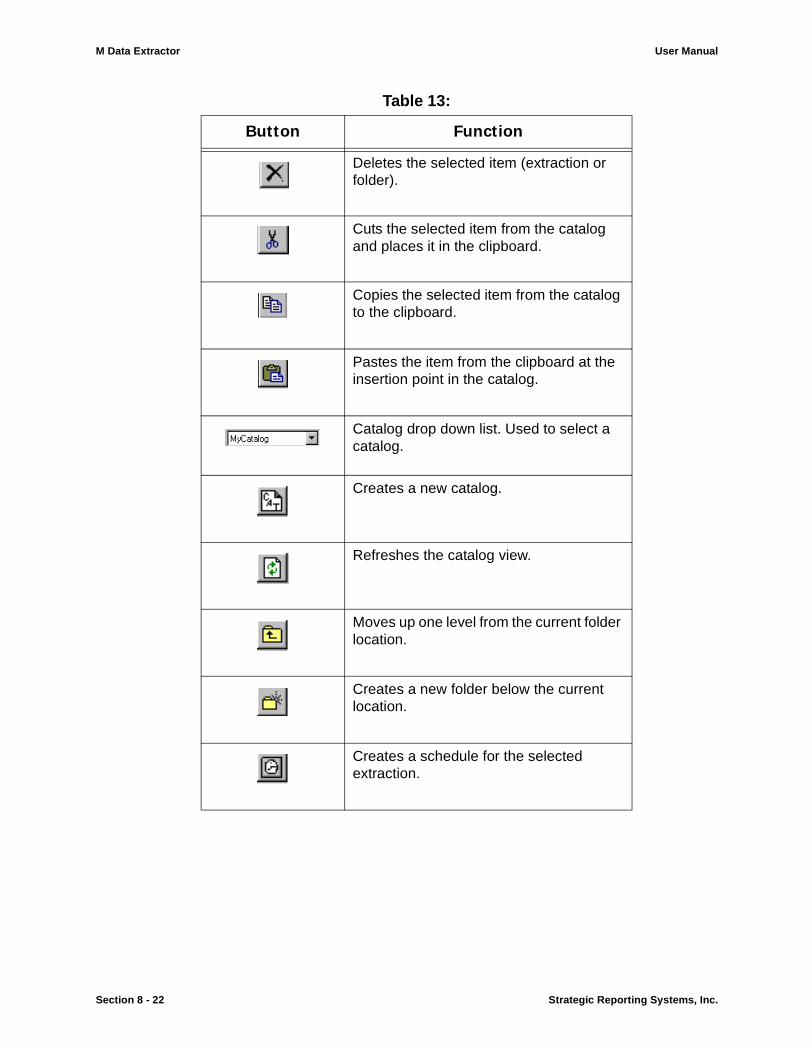
M Data Extractor User Manual
Table 13:
Button Function
Deletes the selected item (extraction or folder).
Cuts the selected item from the catalog and places it in the clipboard.
Copies the selected item from the catalog to the clipboard.
Pastes the item from the clipboard at the insertion point in the catalog.
Catalog drop down list. Used to select a catalog.
Creates a new catalog.
Refreshes the catalog view.
Moves up one level from the current folder location.
Creates a new folder below the current location.
Creates a schedule for the selected extraction.
Section 8 - 22 Strategic Reporting Systems, Inc.
Using the MDE Client
Extraction Catalog text boxes
The Extraction Catalog contains two text boxes, located in the lower left-hand corner under the
Extractions tab.
• Extraction Name - Use this text box to enter a name when saving a new extraction definition. The name of the presently selected extraction is also displayed in this box.
• Description - This text box is used to enter an optional extraction description when saving an extraction definition.
Accessing and opening the Extraction CatalogThe Extraction Catalog is accessed from the MDE’s Interactive Transfer window.
♦To open the Extraction Catalog:
1. Open the Interactive Transfer window.
2. Click the Open File Extraction Catalog button on the Interactive Transfer toolbar
- or -
From the File menu, click Open File Extraction Catalog.
The Extraction Catalog window is displayed.
Selecting a Catalog
Before you can view folders or extraction definitions, you must select a catalog from which to
work. When you open the catalog the first time for each MDE Site, you are prompted to select a
catalog. From that point forward, the Extraction Catalog will default to the selected Catalog for
that site.
♦To select a Catalog:
1. From the Extraction Catalog window toolbar, click the down arrow in the Catalog Drop Down list and select a catalog from the list.
MDE displays the name of the catalog and the folders under that catalog in the left pane.
Section 8 - 23
M Data Extractor User Manual
Opening an extraction definition
♦To open an extraction definition:
1. Select the Catalog that contains the extraction definition you want to open from the Catalog Drop Down List.
The folders are displayed in the selected catalog.
2. Select the Folder in the left pane that contains the extraction definition you want to open.
3. Double Click the Extraction Name that you want to open
- or -
Right-click the Extraction Name to open, and then click Open from the pop-up menu
- or -
Highlight the Extraction Name and click Open in the Extraction Catalog.
MDE closes the Extraction Catalog and opens the extraction definition in the Interactive Transfer window.
Customizing the Extraction Catalog
To organize your extraction definitions, you can customize the catalog by:
• Creating Catalogs• Creating Folders• Renaming Folders• Deleting Folders
Creating a new catalog
The Extraction Catalog contains an installation catalog called “Default”. You can store extraction
definitions in the default catalog or create additional catalogs to meet your organizations needs.
♦To create a new catalog:
1. Click the Create New Catalog button from the Extraction Catalog toolbar
- or -
Right-click anywhere in the left-hand pane and click New Catalog from the pop-up menu.
Section 8 - 24 Strategic Reporting Systems, Inc.
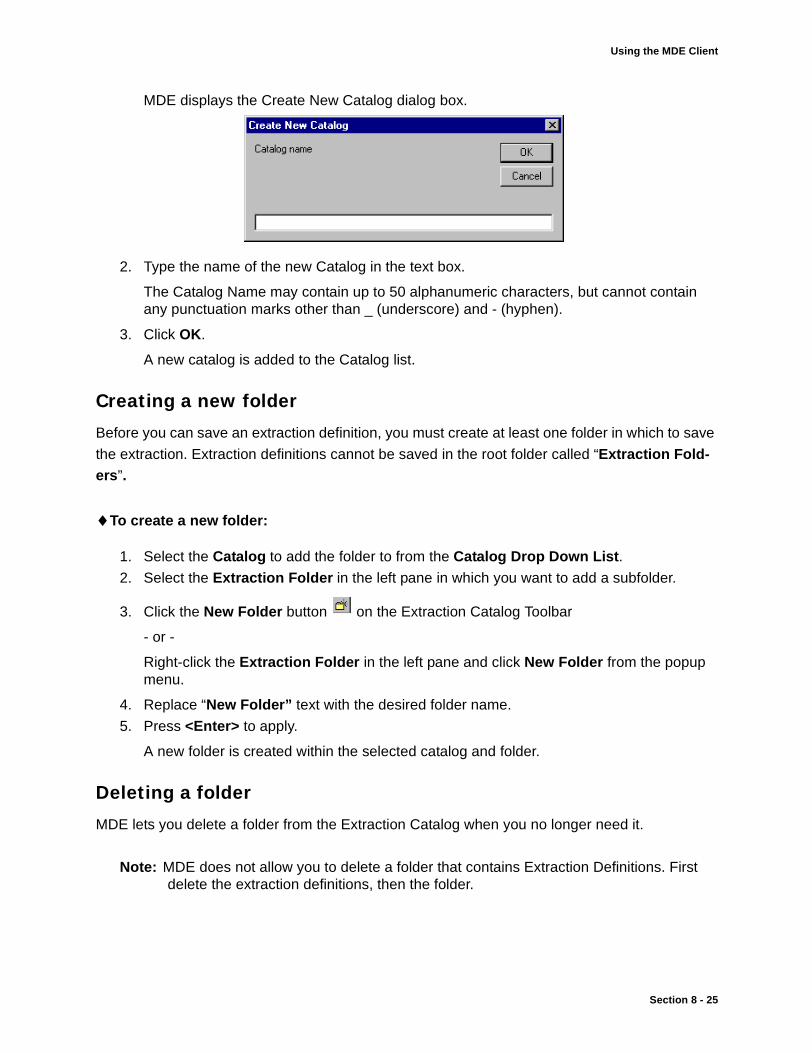
Using the MDE Client
MDE displays the Create New Catalog dialog box.
2. Type the name of the new Catalog in the text box.
The Catalog Name may contain up to 50 alphanumeric characters, but cannot contain any punctuation marks other than _ (underscore) and - (hyphen).
3. Click OK.
A new catalog is added to the Catalog list.
Creating a new folder
Before you can save an extraction definition, you must create at least one folder in which to save
the extraction. Extraction definitions cannot be saved in the root folder called “Extraction Fold-ers”.
♦To create a new folder:
1. Select the Catalog to add the folder to from the Catalog Drop Down List.2. Select the Extraction Folder in the left pane in which you want to add a subfolder.
3. Click the New Folder button on the Extraction Catalog Toolbar
- or -
Right-click the Extraction Folder in the left pane and click New Folder from the popup menu.
4. Replace “New Folder” text with the desired folder name.
5. Press <Enter> to apply.
A new folder is created within the selected catalog and folder.
Deleting a folder
MDE lets you delete a folder from the Extraction Catalog when you no longer need it.
Note: MDE does not allow you to delete a folder that contains Extraction Definitions. First delete the extraction definitions, then the folder.
Section 8 - 25
M Data Extractor User Manual
♦To delete a folder:
1. Select the Catalog containing the folder to be deleted from the Catalog Drop Down List.
The folders in the selected catalog are displayed.
2. Highlight the Folder you want to delete.
3. Click the Delete button on the Extraction Catalog Tool bar
- or -
Right-click the Folder and click Delete from the pop-up menu.
4. Click Yes to confirm.
The folder is deleted from the catalog.
Renaming a folder
You can easily rename a folder in the catalog.
♦To rename a folder:
1. Select the Catalog containing the desired folder from the Catalog Drop Down List.
MDE displays the folders in the selected catalog.
2. Right-click the Folder that you want to rename.
3. Click Rename from the pop-up menu.
4. When the folder is selected, type the new name for the extraction definition in the provided text box.
5. Press <Enter> to apply the change.
The folder is renamed.
Saving an extraction definition
MDE allows you to save an extraction in a specific catalog and folder.
♦To save an extraction definition:
1. Click the Save File Extraction button
- or -
From the File menu, click Save File Extraction.
MDE displays the catalog dialog box.
Section 8 - 26 Strategic Reporting Systems, Inc.

Using the MDE Client
Note: If this is the first time you are saving the extraction and you click the Save File Extraction button from the toolbar, the MDE displays the Extraction Catalog dialog box to let you specify the catalog in which to save your extraction.
2. At the top of the Extraction Catalog dialog box, click the arrow and select the catalog in which you want to save the extraction.
3. In the left pane (under Extraction Folders), select the folder in which you want to save the extraction.
4. In the Extraction Name box, type the name of the extraction. If you want, you can leave the name the MDE auto inserts in this box.
5. [Optional] In the Description box, type a description of the extraction.
6. Click Save.
MDE saves your extraction to the selected folder and catalog.
Renaming an Extraction Definition
♦To rename an extraction definition:
1. Select the Catalog that contains the desired extraction definition from the Catalog Drop Down List.
MDE displays the folders in the selected catalog.
2. Select the Folder in the left pane that contains the desired Extraction Definition.
3. Right-click the Extraction Name that you want to rename.
4. Click Rename from the popup menu that appears.
5. Type the new name for the extraction definition in the provided text box.
6. Press <Enter> to apply the name change.
Deleting an Extraction Definition
You can delete an extraction you no longer want to have saved.
♦To delete an Extraction Definition:
1. Select the Catalog that contains the desired extraction definition from the Catalog Drop Down List.
MDE displays the folders in the selected catalog.
2. Select the Folder in the left pane that contains the desired extraction definition.
3. Highlight the Extraction Name you want to delete.
4. Click the Delete button on the Extraction Catalog’s Tool bar
- or -
Right-click the Extraction Name and click Delete from the shortcut menu.
Section 8 - 27
M Data Extractor User Manual
MDE displays the Delete Extraction confirmation dialog box.
5. Click Yes to permanently delete the extraction definition.
Scheduling data extractions and transfersWhen you schedule an extraction, you instruct MDE to run an extraction at a specific time, day,
and interval. An extraction can be scheduled to run once, daily, weekly, or monthly.
Accessing the MDE SchedulerBefore you can schedule extractions, you must access the Scheduler. You can access the
Extraction Scheduler from the Extraction Catalog dialog box within the MDE.
♦To access the extraction scheduler:
1. Start the MDE Client.
2. From the Interactive Transfer window, click the Open File Extraction Catalog button
.
MDE displays the Extraction Catalog dialog box.
3. In the left pane, under Extraction Folders, select the folder that contains the extraction you want to schedule.
MDE displays the extractions in the selected folder in the right pane.
4. In the right pane, select the extraction you want to schedule.
5. From the toolbar, click the Schedule an Extraction button.
MDE displays the Scheduler dialog box showing name of the selected extraction in the Title bar.
Starting and stopping the MDE Scheduler in Windows XP Professional
♦To start the MDE Scheduler in Windows XP Professional:
In Windows XP Professional the MDE Scheduler starts automatically when you turn on your workstation and runs in the background as a service.
1. From the Start menu, click Control Panel.2. From the Control Panel dialog box, double-click Administrative Tools.
3. Double-click on Services.
4. In the Services window right click on MDE_Scheduler.5. Select Properties.
6. Click on the Log On tab, and set the Log on as: properties for the user.
Section 8 - 28 Strategic Reporting Systems, Inc.
Using the MDE Client
7. Click on the General tab, and click the Start button to activate the MDE Scheduler service.
8. Click the OK button.
The MDE Scheduler starts running.
♦To stop the MDE Scheduler in Windows XP Professional:
1. From the Start menu, click Control Panel.2. From the Control Panel dialog box, double-click Administrative Tools.
3. Double-click on Services.
4. In the Services window, select MDE_Scheduler, then click Stop.
The MDE Scheduler stops running.
Starting and stopping the MDE Scheduler in Windows 2000/NT
♦To start the MDE Scheduler in Windows 2000/NT:
In Windows 2000/NT the MDE Scheduler starts automatically when you turn on your workstation and runs in the background as a service.
1. From the Start menu, click Settings > Control Panel.2. From the Control Panel dialog box, double-click Services.
3. In the Services window, select MDE_Scheduler, then click Start.
The MDE Scheduler starts running.
♦To stop the MDE Scheduler in Windows 2000/NT:
1. From the Start menu, click Settings > Control Panel.2. From the Control Panel dialog box, double-click Services.
3. In the Services window, select MDE_Scheduler, then click Stop.
The MDE Scheduler stops running.
Starting and stopping the MDE Scheduler in Windows 98
♦To start the MDE Scheduler in Windows 98:
1. From the Start menu, click Programs > MDE > MDE Scheduler2. The MDE Scheduler starts and is visible in the System Tray.
You can customize you Windows 98 MDE environment to automatically start the MDE Scheduler
when you log into Windows.
Section 8 - 29
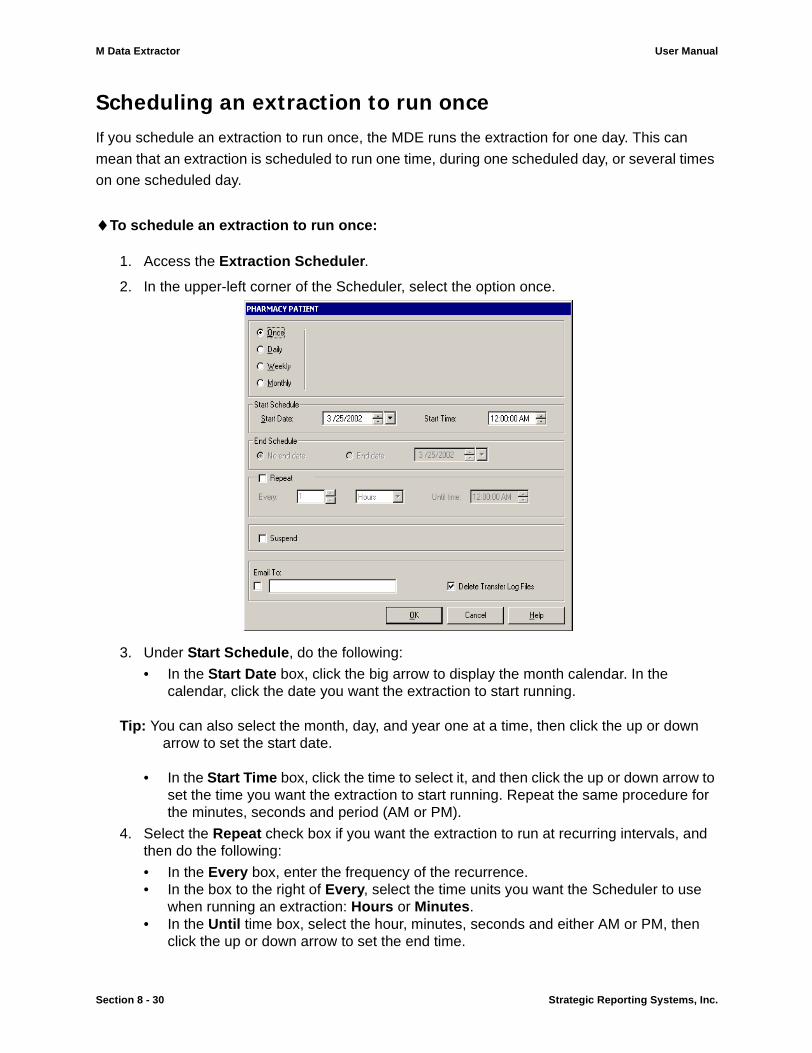
M Data Extractor User Manual
Scheduling an extraction to run onceIf you schedule an extraction to run once, the MDE runs the extraction for one day. This can
mean that an extraction is scheduled to run one time, during one scheduled day, or several times
on one scheduled day.
♦To schedule an extraction to run once:
1. Access the Extraction Scheduler.
2. In the upper-left corner of the Scheduler, select the option once.
3. Under Start Schedule, do the following:
• In the Start Date box, click the big arrow to display the month calendar. In the calendar, click the date you want the extraction to start running.
Tip: You can also select the month, day, and year one at a time, then click the up or down arrow to set the start date.
• In the Start Time box, click the time to select it, and then click the up or down arrow to set the time you want the extraction to start running. Repeat the same procedure for the minutes, seconds and period (AM or PM).
4. Select the Repeat check box if you want the extraction to run at recurring intervals, and then do the following:
• In the Every box, enter the frequency of the recurrence.• In the box to the right of Every, select the time units you want the Scheduler to use
when running an extraction: Hours or Minutes.• In the Until time box, select the hour, minutes, seconds and either AM or PM, then
click the up or down arrow to set the end time.
Section 8 - 30 Strategic Reporting Systems, Inc.
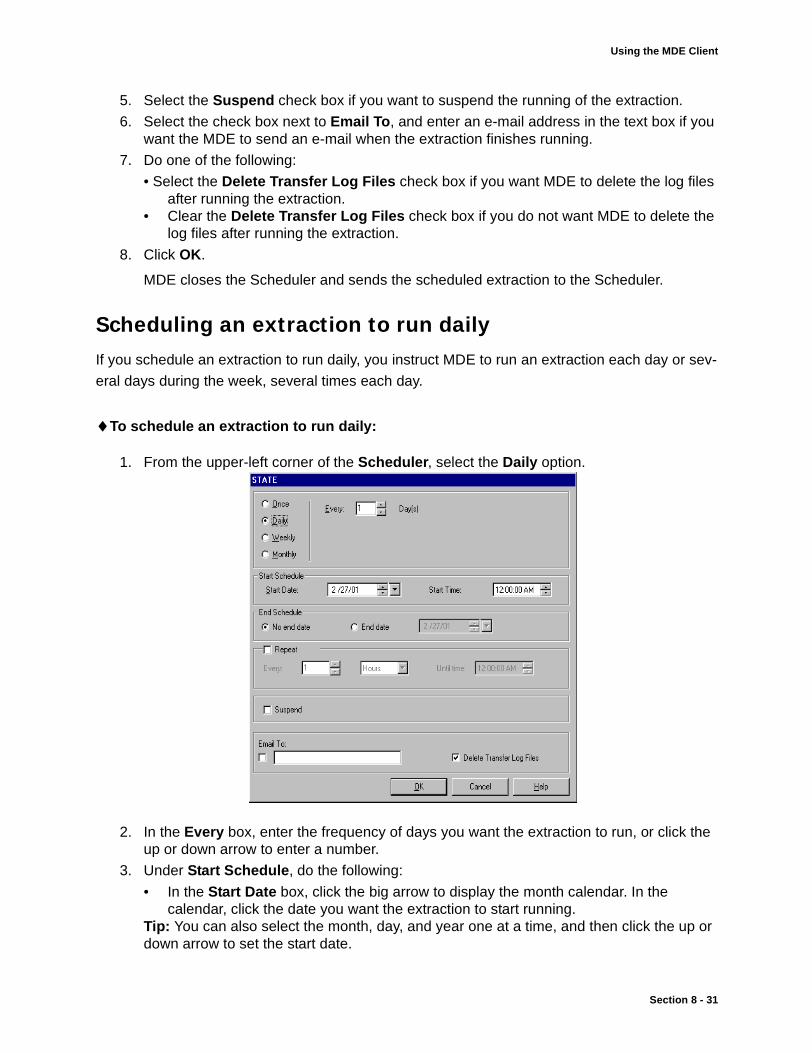
Using the MDE Client
5. Select the Suspend check box if you want to suspend the running of the extraction.
6. Select the check box next to Email To, and enter an e-mail address in the text box if you want the MDE to send an e-mail when the extraction finishes running.
7. Do one of the following:
• Select the Delete Transfer Log Files check box if you want MDE to delete the log files after running the extraction.
• Clear the Delete Transfer Log Files check box if you do not want MDE to delete the log files after running the extraction.
8. Click OK.
MDE closes the Scheduler and sends the scheduled extraction to the Scheduler.
Scheduling an extraction to run dailyIf you schedule an extraction to run daily, you instruct MDE to run an extraction each day or sev-
eral days during the week, several times each day.
♦To schedule an extraction to run daily:
1. From the upper-left corner of the Scheduler, select the Daily option.
2. In the Every box, enter the frequency of days you want the extraction to run, or click the up or down arrow to enter a number.
3. Under Start Schedule, do the following:
• In the Start Date box, click the big arrow to display the month calendar. In the calendar, click the date you want the extraction to start running.
Tip: You can also select the month, day, and year one at a time, and then click the up or down arrow to set the start date.
Section 8 - 31
M Data Extractor User Manual
• In the Start Time box, click the time to select it, and then click the up or down arrow to set the time you want the extraction to start running. Repeat the same procedure for the minutes, seconds and period (AM or PM).
4. Under End Schedule, select one of the two options:
• Select the No end date option if you want the extraction to run continuously.• Select the End date option if you want to set the date for the extraction to stop
running. In the End Date box, click the big arrow to display the calendar, and then select the year, month, and date that you want the extraction to stop running.
The MDE inserts the date in the End Date box.
5. Select the Repeat check box if you want the extraction to run at recurring intervals (on the selected day), and then do the following:
• In the Every box, enter the frequency of the recurrence.• In the box to the right of Every, select the time units you want the Scheduler to use
when running an extraction: Hours or Minutes.• In the Until time box, select the hour, minutes, seconds, and period (AM or PM), and
then click the up or down arrow to set the time for the recurrence to stop.
6. Select the Suspend check box if you want to suspend the running of the extraction.
7. Select the check box under Email To, if you want MDE to send an e-mail to the specified e-mail address. In the box, type the e-mail address to which you want MDE to send e-mail when the extraction runs.
8. Do one of the following:
• Select the Delete Transfer Log Files check box if you want MDE to delete the log files after running the extraction.
• Clear the Delete Transfer Log Files check box if you do not want MDE to delete the log files after running the extraction.
9. Click OK.
MDE closes the Scheduler and sends the scheduled extraction to the Scheduler.
Scheduling an extraction to run weeklyWhen you schedule an extraction to run weekly, MDE runs the extraction every number of weeks
(for example, every one week or every three weeks) on one day, multiple days, or all the days of
the week.
Section 8 - 32 Strategic Reporting Systems, Inc.
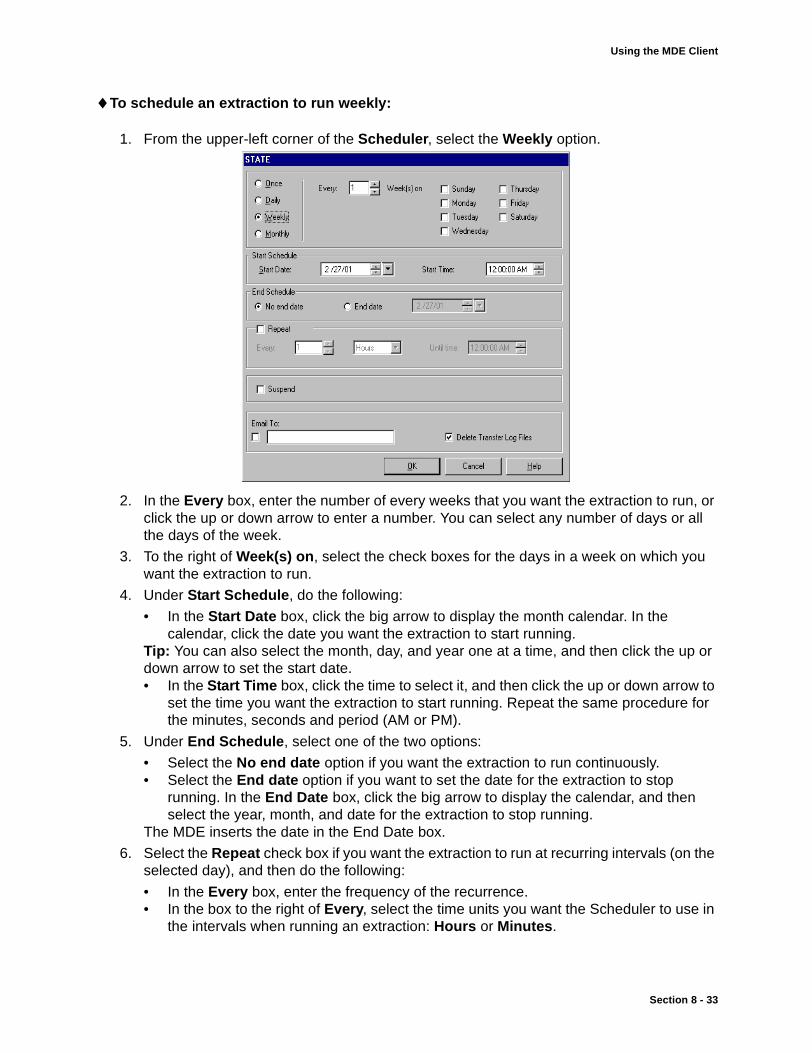
Using the MDE Client
♦To schedule an extraction to run weekly:
1. From the upper-left corner of the Scheduler, select the Weekly option.
2. In the Every box, enter the number of every weeks that you want the extraction to run, or click the up or down arrow to enter a number. You can select any number of days or all the days of the week.
3. To the right of Week(s) on, select the check boxes for the days in a week on which you want the extraction to run.
4. Under Start Schedule, do the following:
• In the Start Date box, click the big arrow to display the month calendar. In the calendar, click the date you want the extraction to start running.
Tip: You can also select the month, day, and year one at a time, and then click the up or down arrow to set the start date.• In the Start Time box, click the time to select it, and then click the up or down arrow to
set the time you want the extraction to start running. Repeat the same procedure for the minutes, seconds and period (AM or PM).
5. Under End Schedule, select one of the two options:
• Select the No end date option if you want the extraction to run continuously.• Select the End date option if you want to set the date for the extraction to stop
running. In the End Date box, click the big arrow to display the calendar, and then select the year, month, and date for the extraction to stop running.
The MDE inserts the date in the End Date box.
6. Select the Repeat check box if you want the extraction to run at recurring intervals (on the selected day), and then do the following:
• In the Every box, enter the frequency of the recurrence.• In the box to the right of Every, select the time units you want the Scheduler to use in
the intervals when running an extraction: Hours or Minutes.
Section 8 - 33
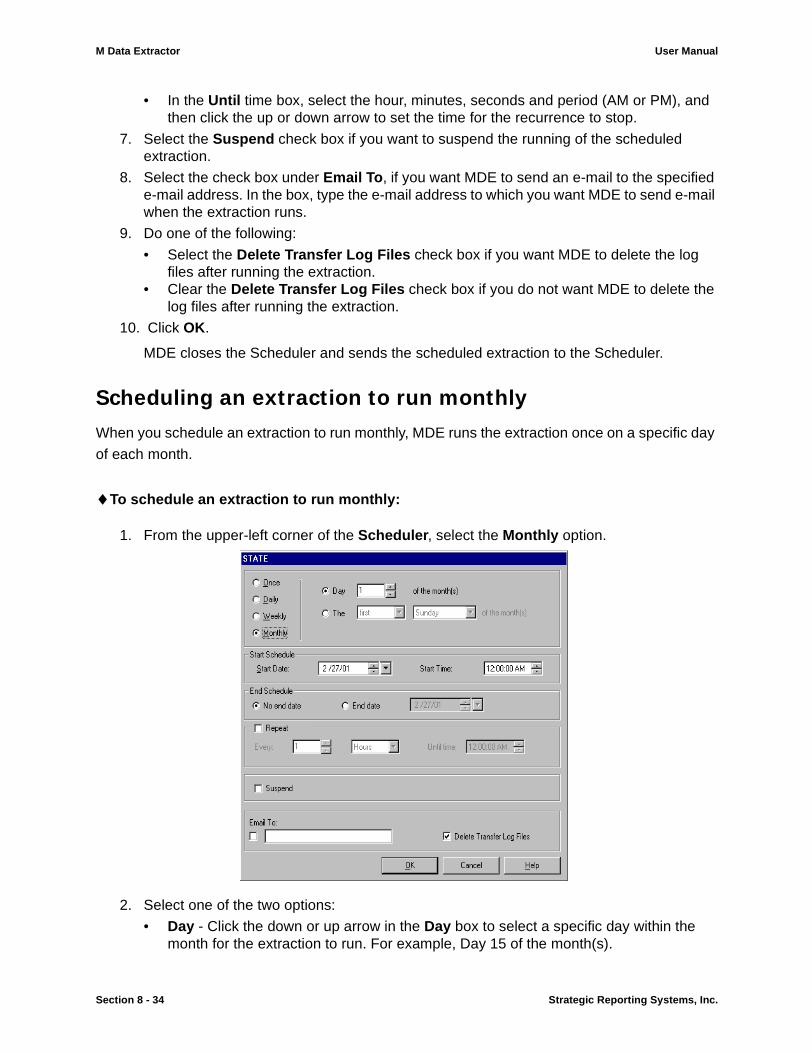
M Data Extractor User Manual
• In the Until time box, select the hour, minutes, seconds and period (AM or PM), and then click the up or down arrow to set the time for the recurrence to stop.
7. Select the Suspend check box if you want to suspend the running of the scheduled extraction.
8. Select the check box under Email To, if you want MDE to send an e-mail to the specified e-mail address. In the box, type the e-mail address to which you want MDE to send e-mail when the extraction runs.
9. Do one of the following:
• Select the Delete Transfer Log Files check box if you want MDE to delete the log files after running the extraction.
• Clear the Delete Transfer Log Files check box if you do not want MDE to delete the log files after running the extraction.
10. Click OK.
MDE closes the Scheduler and sends the scheduled extraction to the Scheduler.
Scheduling an extraction to run monthlyWhen you schedule an extraction to run monthly, MDE runs the extraction once on a specific day
of each month.
♦To schedule an extraction to run monthly:
1. From the upper-left corner of the Scheduler, select the Monthly option.
2. Select one of the two options:
• Day - Click the down or up arrow in the Day box to select a specific day within the month for the extraction to run. For example, Day 15 of the month(s).
Section 8 - 34 Strategic Reporting Systems, Inc.
Using the MDE Client
Note: If you select day 31 of the month, the Scheduler uses the last day of the month as the default for the months that have only 28 or 30 days.
• Click the arrow in the first box and select the sequence from the list. In the of the month(s) box, click the arrow and select a day of the week.
Note: If you want the extraction to run on the same day but at different sequences, you must schedule the extraction for each day. For example, if you want the extraction to run on the second and fourth Monday of the same month, you must create one schedule for the second Monday of the month, and another one for the fourth Monday of the month.
3. Under Start Schedule, do the following:
• In the Start Date box, click the big arrow to display the month calendar. In the calendar, click the date you want the extraction to start running.
MDE inserts the date in the Start Date box.• In the Start Time box, click the time to select it, and then click the up or down arrow to
set the time you want the extraction to start running. Repeat the same procedure for the minutes, seconds and period (AM or PM).
4. Under End Schedule, select one of the two options:
• Select the No end date option if you want the extraction to run continuously.• Select the End date option if you want to set the date for the extraction to stop
running. In the End Date box, click the big arrow to display the calendar, and then select the year, month, and date for the extraction to stop running.
MDE inserts the date in the End Date box.
5. Select the Repeat check box if you want the extraction to run at recurring intervals (on the selected day), and then do the following:
• In the Every box, enter the frequency of the recurrence.• In the box to the right of Every, select the time units you want the Scheduler to use
when running an extraction: Hours or Minutes.• In the Until time box, select the hour, minutes, seconds and period (AM or PM), and
then click the up or down arrow to set the time for the recurrence to stop.
6. Select the Suspend check box if you want to suspend the running of the scheduled extraction.
7. Select the check box under Email To, if you want MDE to send an e-mail to the specified e-mail address. In the box, type the e-mail address to which you want MDE to send e-mail when the extraction finishes to run.
8. Do one of the following:
• Select the Delete Transfer Log Files check box if you want MDE to delete the log files after running the extraction.
• Clear the Delete Transfer Log Files check box if you do not want MDE to delete the log files after running the extraction.
9. Click OK.
MDE closes the Scheduler and sends the scheduled extraction to the Scheduler.
Section 8 - 35
M Data Extractor User Manual
The Bulk Copy Procedure ModuleThe Bulk Copy Procedure (BCP) is an MDE option which provides an efficient method of trans-
ferring large, delimited, flat ASCII data from certain fields of certain FileMan files. MDE uses the
SQL Bulk Copy Command to rapidly insert this data into an SQL server database.
Before using BCP, you must configure it by entering parameters on the Bulk Copy Procedure tab
of the MDE Site Configuration window. In the Configuration window you instruct MDE where the
temporary ASCII file is to be located. You may want to control the location of this file as it can be
very large and you may wish to choose a disk with plenty of free space (50 or more megabytes is
recommended). If you do not specify a location other than the default, the location is named
BCP, which is a directory located under the directory where you installed the MDE Client compo-
nent. Locating this file on the same computer where the target database runs provides the best
network efficiency for the BCP transfer process. The reason for the improved efficiency is that
the data being extracted from the M system is transferred across the network and deposited in a
file on the same computer where the data ultimately resides, all in a single network transfer.
However, the BCP is not as flexible a data extraction process as the MDE's Interactive Transfer
module. BCP uses predefined extractions with specific files and field names to perform extrac-
tions such as patient demographics, laboratory results, medications, diagnoses, admissions or
discharge, and outpatient activity data. On the other hand, the BCP method is faster than the
interactive method at getting data from FileMan into the target database.
When you click the Bulk Copy Procedure button, MDE displays the Bulk Copy Procedure win-
dow. From this window, you can do the following:
• Change the site to which you are connected• Create a new SQL table (or append to an existing table)• Choose the content of the data to transfer• Change the default name of the table that will be created on each SQL server
The Bulk Copy Procedure window consists of two text boxes at the bottom:
Table Name - In this text box, MDE displays a default table name for the type of data you transfer from FileMan. However, you can change the table name if you wish.
Time Out (sec) - The amount of time that the BCP waits while performing either of the following tasks:
(1.) Receiving consecutive records from the FileMan database. Some BCP functions (for example, the Duplicate Social Security Numbers transfer) can incur a long latency period between the sending of consecutive records.
(2.) Waiting for the SQL server’s BCP function to load data into SQL Server.
When you perform the BCP function, the MDE does the following:
Section 8 - 36 Strategic Reporting Systems, Inc.
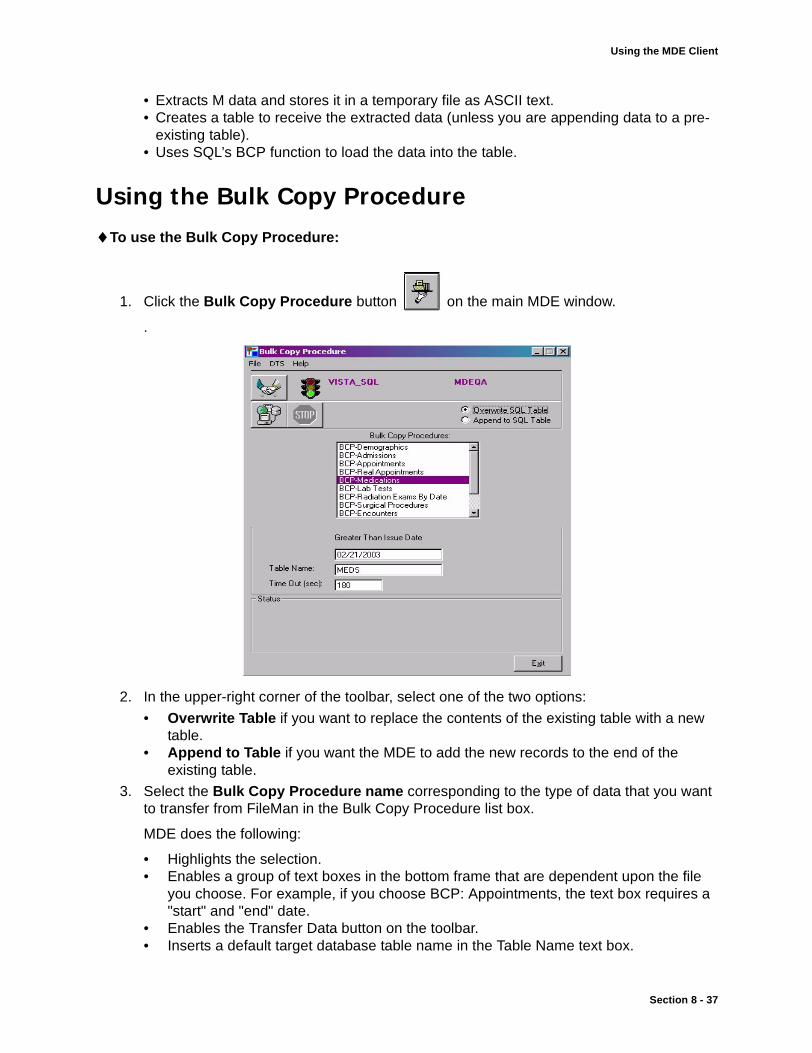
Using the MDE Client
• Extracts M data and stores it in a temporary file as ASCII text.• Creates a table to receive the extracted data (unless you are appending data to a pre-
existing table).• Uses SQL’s BCP function to load the data into the table.
Using the Bulk Copy Procedure♦To use the Bulk Copy Procedure:
1. Click the Bulk Copy Procedure button on the main MDE window.
.
2. In the upper-right corner of the toolbar, select one of the two options:
• Overwrite Table if you want to replace the contents of the existing table with a new table.
• Append to Table if you want the MDE to add the new records to the end of the existing table.
3. Select the Bulk Copy Procedure name corresponding to the type of data that you want to transfer from FileMan in the Bulk Copy Procedure list box.
MDE does the following:
• Highlights the selection.• Enables a group of text boxes in the bottom frame that are dependent upon the file
you choose. For example, if you choose BCP: Appointments, the text box requires a "start" and "end" date.
• Enables the Transfer Data button on the toolbar.• Inserts a default target database table name in the Table Name text box.
Section 8 - 37
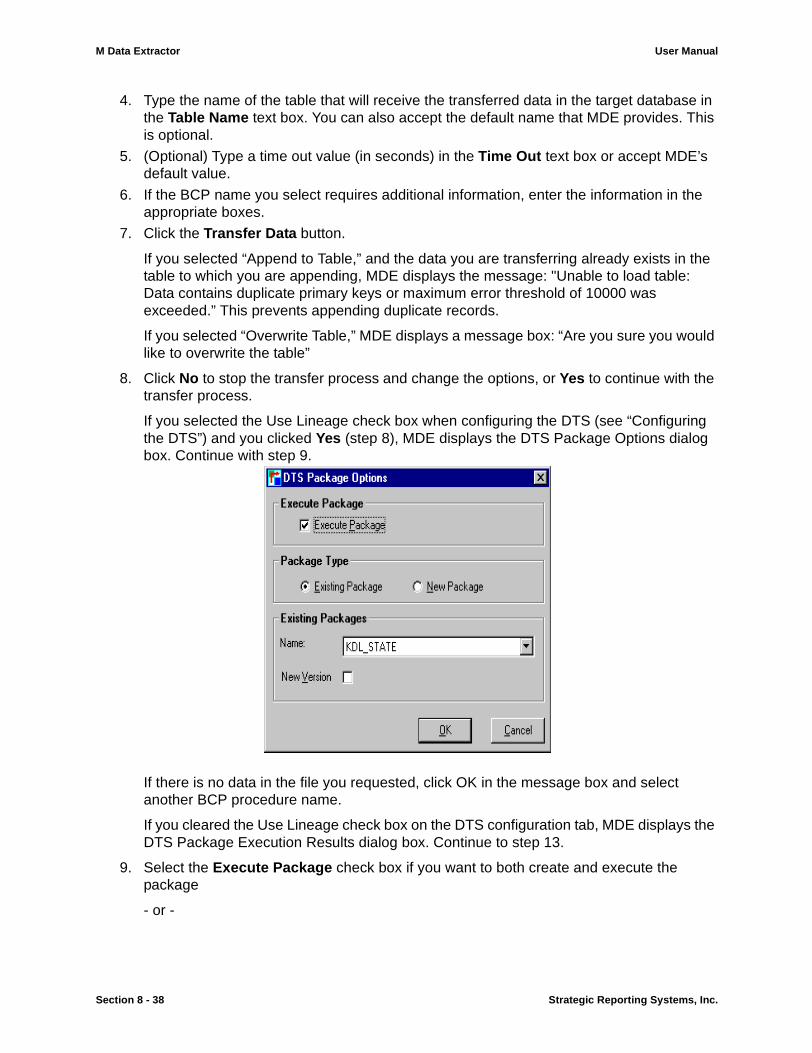
M Data Extractor User Manual
4. Type the name of the table that will receive the transferred data in the target database in the Table Name text box. You can also accept the default name that MDE provides. This is optional.
5. (Optional) Type a time out value (in seconds) in the Time Out text box or accept MDE’s default value.
6. If the BCP name you select requires additional information, enter the information in the appropriate boxes.
7. Click the Transfer Data button.
If you selected “Append to Table,” and the data you are transferring already exists in the table to which you are appending, MDE displays the message: "Unable to load table: Data contains duplicate primary keys or maximum error threshold of 10000 was exceeded.” This prevents appending duplicate records.
If you selected “Overwrite Table,” MDE displays a message box: “Are you sure you would like to overwrite the table”
8. Click No to stop the transfer process and change the options, or Yes to continue with the transfer process.
If you selected the Use Lineage check box when configuring the DTS (see “Configuring the DTS”) and you clicked Yes (step 8), MDE displays the DTS Package Options dialog box. Continue with step 9.
If there is no data in the file you requested, click OK in the message box and select another BCP procedure name.
If you cleared the Use Lineage check box on the DTS configuration tab, MDE displays the DTS Package Execution Results dialog box. Continue to step 13.
9. Select the Execute Package check box if you want to both create and execute the package
- or -
Section 8 - 38 Strategic Reporting Systems, Inc.
Using the MDE Client
Clear the Execute Package check box if you want to create the package, but not execute it.
10. Select one of the two Package Type options:
• Existing Package if you want to use existing package type.• New Package if you want to create a new package type.
11. If you selected the Existing Package option:
• Select a package in the Name list.• Select the New Version check box if you want MDE to use an existing package, but
append a new version to the package it creates.
12. If you selected the New Package option:
• Type the name of the package in the Name text box.• Type the description of the package in the Description text box.
13. Click OK.
MDE displays the DTS Package Execution Result dialog box. This dialog box summarizes the data transfer process and displays any errors.
Note: If there are no records in the procedure you selected, MDE displays a message: “No records found. Select another procedure.”
14. Review the DTS Package Execution results and make sure that all the DTS transfer steps were successful.
15. Select the Delete Log Files check box if you want MDE to delete the Log Exception files at the end of the data transfer process.
16. Click Exit to close the DTS Package Execution Results dialog box.
MDE returns you to the Bulk Copy Procedure window.
Tip: You can also use the Bulk Copy Procedure menu bar to initiate a data transfer, change MDE site, invoke the SQL file module, edit the MDE configuration, execute a package, cancel an execution or access the online help.
Handling BCP ErrorsWhen transferring data into SQL Server using the Bulk Copy Procedure, the database server
determines how to store the data you are transferring based on the data type of each field as
defined in FileMan. For example, a given field may be defined as a Date data type. If the data in
the field from the record to be inserted does not match SQL Server’s definition of the proper for-
mat of that same data type, the record is rejected and MDE puts the error information received
from SQL Server BCP into the BCP error log. You can then use the information in the error log to
go to the M system, correct the errors, and re-run the extraction. You cannot, however, resubmit
the error file to SQL Server’s BCP function. This is because SQL Server includes error text along
with the rejected record and therefore contaminates the format of the original record.
Section 8 - 39
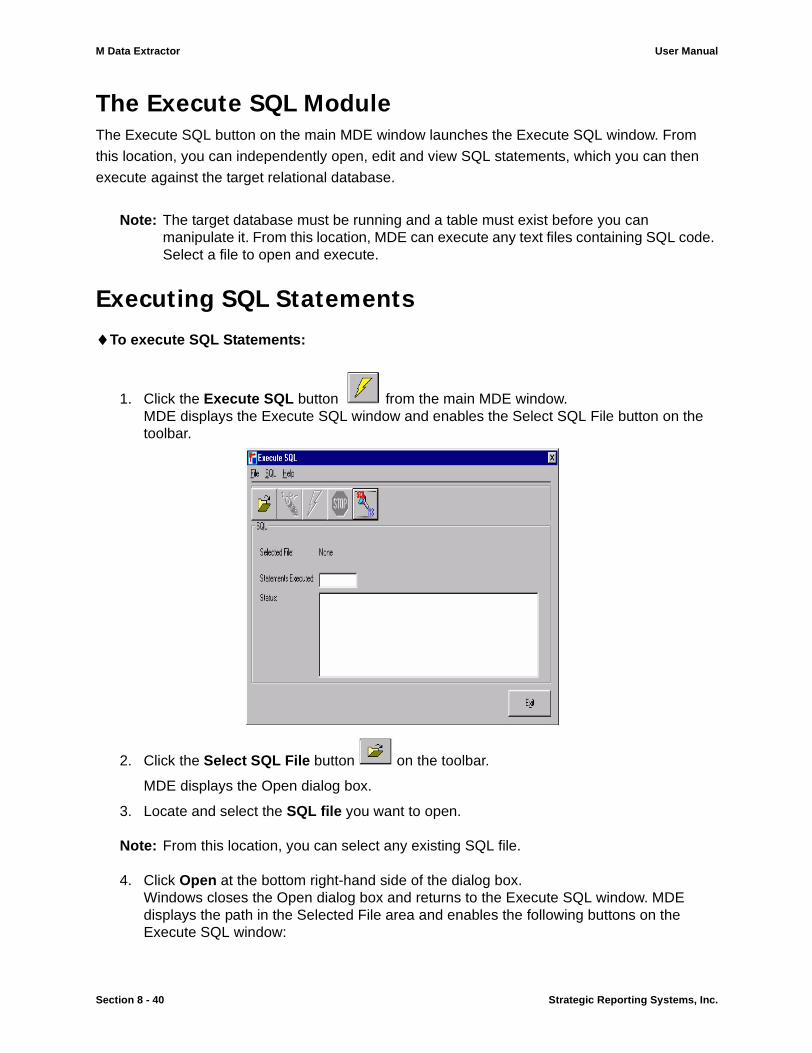
M Data Extractor User Manual
The Execute SQL ModuleThe Execute SQL button on the main MDE window launches the Execute SQL window. From
this location, you can independently open, edit and view SQL statements, which you can then
execute against the target relational database.
Note: The target database must be running and a table must exist before you can manipulate it. From this location, MDE can execute any text files containing SQL code. Select a file to open and execute.
Executing SQL Statements♦To execute SQL Statements:
1. Click the Execute SQL button from the main MDE window.MDE displays the Execute SQL window and enables the Select SQL File button on the toolbar.
2. Click the Select SQL File button on the toolbar.
MDE displays the Open dialog box.
3. Locate and select the SQL file you want to open.
Note: From this location, you can select any existing SQL file.
4. Click Open at the bottom right-hand side of the dialog box.Windows closes the Open dialog box and returns to the Execute SQL window. MDE displays the path in the Selected File area and enables the following buttons on the Execute SQL window:
Section 8 - 40 Strategic Reporting Systems, Inc.
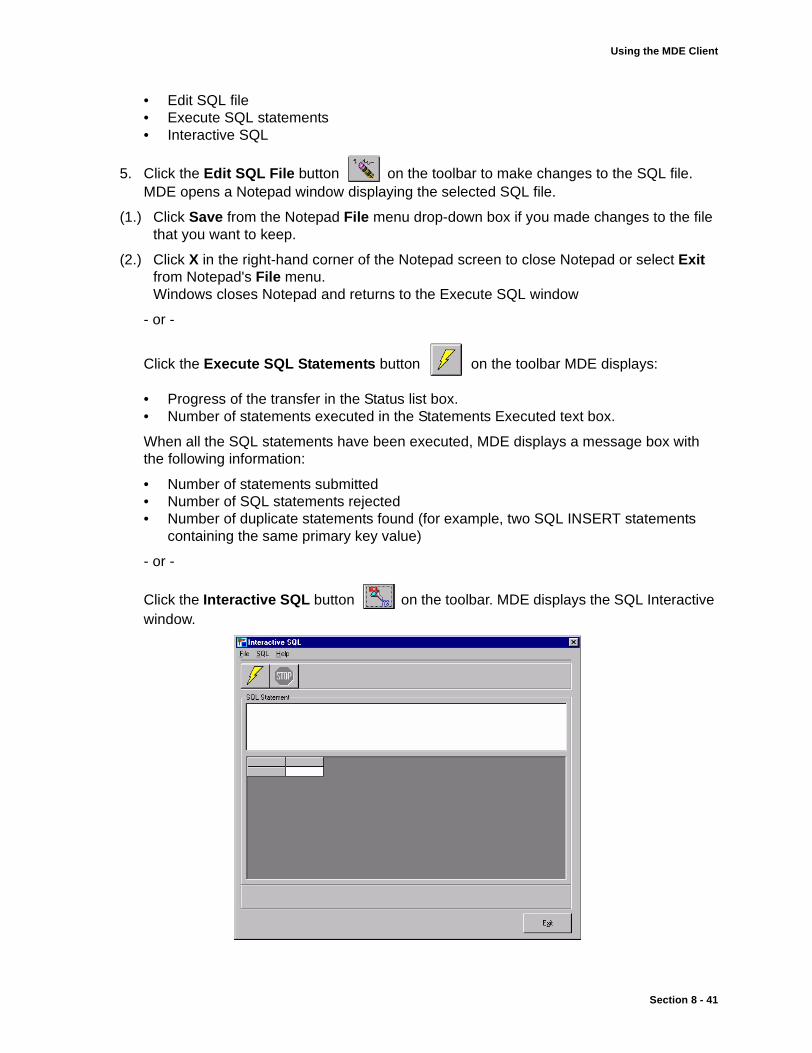
Using the MDE Client
• Edit SQL file• Execute SQL statements• Interactive SQL
5. Click the Edit SQL File button on the toolbar to make changes to the SQL file.MDE opens a Notepad window displaying the selected SQL file.
(1.) Click Save from the Notepad File menu drop-down box if you made changes to the file that you want to keep.
(2.) Click X in the right-hand corner of the Notepad screen to close Notepad or select Exit from Notepad's File menu.Windows closes Notepad and returns to the Execute SQL window
- or -
Click the Execute SQL Statements button on the toolbar MDE displays:
• Progress of the transfer in the Status list box.• Number of statements executed in the Statements Executed text box.
When all the SQL statements have been executed, MDE displays a message box with the following information:
• Number of statements submitted• Number of SQL statements rejected• Number of duplicate statements found (for example, two SQL INSERT statements
containing the same primary key value)
- or -
Click the Interactive SQL button on the toolbar. MDE displays the SQL Interactive window.
Section 8 - 41
M Data Extractor User Manual
(1.) Type a valid SQL statement in the SQL statement text box.
(2.) Click the Execute SQL Statements button on the toolbar.MDE executes the SQL statement and displays the data in the grid box.
(3.) Click the Exit button in the SQL Interactive window.MDE closes the SQL Interactive window and returns to the Execute SQL window.
6. Click Exit.
MDE closes the Execute SQL window and displays the main MDE window.
Viewing DataYou can view data from two locations: Notepad or the Interactive SQL window. Using Notepad,
you can view data before the end of the Manual option of the Interactive Transfer window. This
file is only temporary and is deleted for security reasons after the SQL data load is complete.
MDE displays the data file in the form of SQL INSERT statements and not raw data.
♦To view the data in Notepad:
At the end of the Manual transfer process,
1. Click the Load SQL Table button on the Interactive Transfer window.MDE displays the Load SQL Table window.
2. Click the Edit SQL File button.The data file is displayed in the form of SQL INSERT statements. The table and fields match those that you entered when preparing for the manual transfer. You can edit the SQL file as you wish, then save your changes and exit Notepad.
♦To view the data from the Interactive SQL dialog box:
1. Click the Interactive SQL button from the Execute SQL window.The Interactive SQL window is displayed.
2. Type a valid SQL Statement for the file you want to view.MDE displays your statement in the SQL Statements text box.
3. Click the Execute SQL Statements button.MDE creates the grid and loads the data into the grid.
You can now view the data in a table format.
Section 8 - 42 Strategic Reporting Systems, Inc.
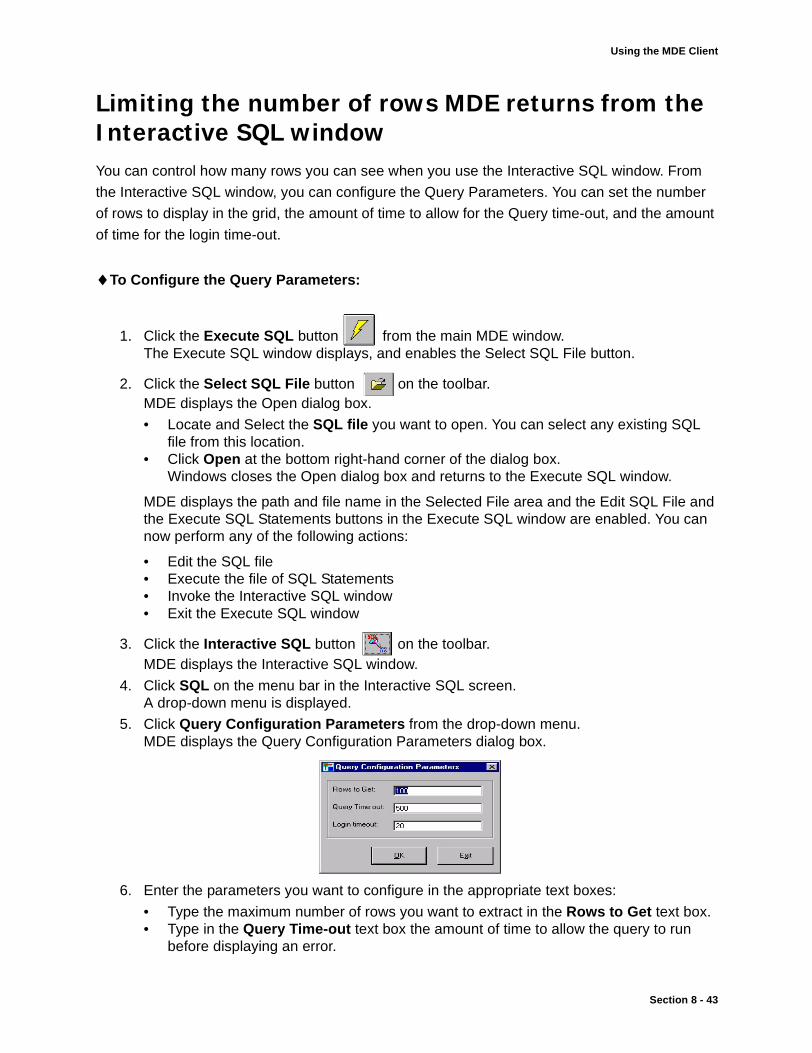
Using the MDE Client
Limiting the number of rows MDE returns from the Interactive SQL window You can control how many rows you can see when you use the Interactive SQL window. From
the Interactive SQL window, you can configure the Query Parameters. You can set the number
of rows to display in the grid, the amount of time to allow for the Query time-out, and the amount
of time for the login time-out.
♦To Configure the Query Parameters:
1. Click the Execute SQL button from the main MDE window. The Execute SQL window displays, and enables the Select SQL File button.
2. Click the Select SQL File button on the toolbar.MDE displays the Open dialog box.
• Locate and Select the SQL file you want to open. You can select any existing SQL file from this location.
• Click Open at the bottom right-hand corner of the dialog box.Windows closes the Open dialog box and returns to the Execute SQL window.
MDE displays the path and file name in the Selected File area and the Edit SQL File and the Execute SQL Statements buttons in the Execute SQL window are enabled. You can now perform any of the following actions:
• Edit the SQL file• Execute the file of SQL Statements• Invoke the Interactive SQL window• Exit the Execute SQL window
3. Click the Interactive SQL button on the toolbar.MDE displays the Interactive SQL window.
4. Click SQL on the menu bar in the Interactive SQL screen.A drop-down menu is displayed.
5. Click Query Configuration Parameters from the drop-down menu.MDE displays the Query Configuration Parameters dialog box.
6. Enter the parameters you want to configure in the appropriate text boxes:
• Type the maximum number of rows you want to extract in the Rows to Get text box.• Type in the Query Time-out text box the amount of time to allow the query to run
before displaying an error.
Section 8 - 43
M Data Extractor User Manual
• Type in the Login Time-out text box the amount of time to allow for a login before displaying an error.
• Click OK at the bottom of the Query Configuration Parameters dialog box.The Query Configuration Parameters dialog box closes, and returns you to the Interactive SQL dialog box.
7. Click the SQL Execution button on the toolbar.MDE executes the SQL code from the file you selected, applying the parameters that you set.
8. Repeat the process.
- or -
Click the Exit button at the bottom of the Interactive SQL window.MDE closes the SQL Interactive window.
Connecting to a different MDE SiteYou can connect to a different MDE site from the following modules:
• MDE Site Configuration window• Bulk Copy Procedure window• Interactive Transfer window
Note: When you connect to a different MDE Site, the BCP configuration at the alternate site may vary from the one to which you were originally connected. If this is the case, you must change your parameters on the BCP tab of the configuration window. For example, if your original site is an MSM M system running under Windows NT, you are able to map the destination drive of the file you are extracting. However, if the next site to which you want to connect is a VMS operating system running DSM, you are not able to create a mapped drive from the VMS system. Therefore, you need to check the FTP check box and fill in the required parameters.
In addition to changing from one MDE site to another, you can modify currently defined MDE Site
Configuration parameters, add a new MDE Site Configuration or delete an MDE Site Configura-
tion.
For detailed information on configuring MDE Sites, please see Section 6: MDE Client Configura-
tion.
♦To select a different MDE Site:
1. Click the Change MDE Site button from the toolbar on the Bulk Copy Procedure window or the Interactive Transfer window.MDE displays the MDE Site tab with information concerning the site to which you are currently connected and other sites to which you can connect.
- or -
Section 8 - 44 Strategic Reporting Systems, Inc.
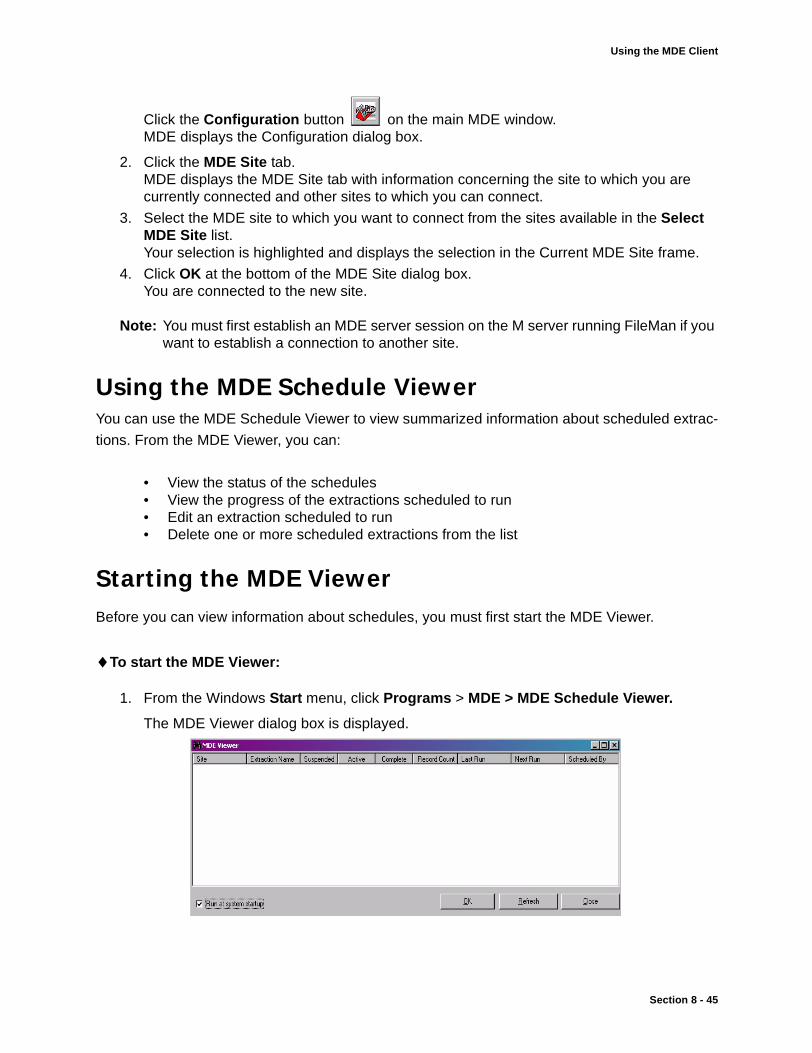
Using the MDE Client
Click the Configuration button on the main MDE window.MDE displays the Configuration dialog box.
2. Click the MDE Site tab.MDE displays the MDE Site tab with information concerning the site to which you are currently connected and other sites to which you can connect.
3. Select the MDE site to which you want to connect from the sites available in the Select MDE Site list.Your selection is highlighted and displays the selection in the Current MDE Site frame.
4. Click OK at the bottom of the MDE Site dialog box.You are connected to the new site.
Note: You must first establish an MDE server session on the M server running FileMan if you want to establish a connection to another site.
Using the MDE Schedule ViewerYou can use the MDE Schedule Viewer to view summarized information about scheduled extrac-
tions. From the MDE Viewer, you can:
• View the status of the schedules• View the progress of the extractions scheduled to run• Edit an extraction scheduled to run• Delete one or more scheduled extractions from the list
Starting the MDE ViewerBefore you can view information about schedules, you must first start the MDE Viewer.
♦To start the MDE Viewer:
1. From the Windows Start menu, click Programs > MDE > MDE Schedule Viewer.
The MDE Viewer dialog box is displayed.
Section 8 - 45
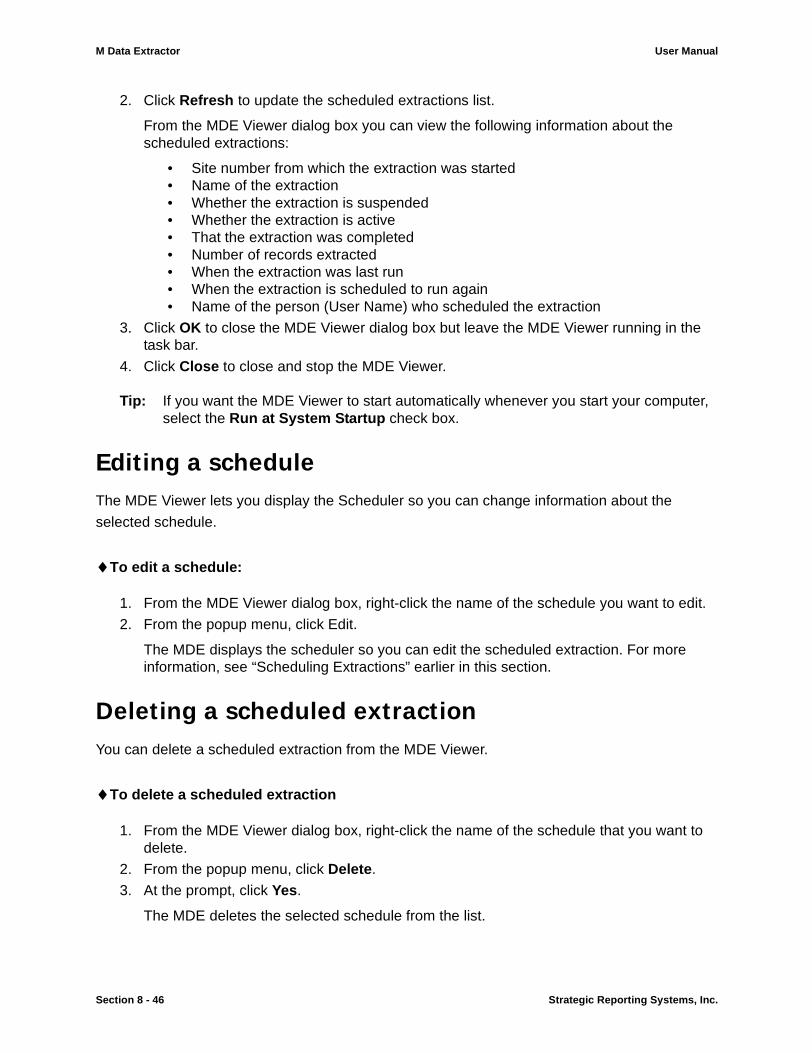
M Data Extractor User Manual
2. Click Refresh to update the scheduled extractions list.
From the MDE Viewer dialog box you can view the following information about the scheduled extractions:
• Site number from which the extraction was started• Name of the extraction• Whether the extraction is suspended• Whether the extraction is active• That the extraction was completed• Number of records extracted• When the extraction was last run• When the extraction is scheduled to run again• Name of the person (User Name) who scheduled the extraction
3. Click OK to close the MDE Viewer dialog box but leave the MDE Viewer running in the task bar.
4. Click Close to close and stop the MDE Viewer.
Tip: If you want the MDE Viewer to start automatically whenever you start your computer, select the Run at System Startup check box.
Editing a scheduleThe MDE Viewer lets you display the Scheduler so you can change information about the
selected schedule.
♦To edit a schedule:
1. From the MDE Viewer dialog box, right-click the name of the schedule you want to edit.
2. From the popup menu, click Edit.
The MDE displays the scheduler so you can edit the scheduled extraction. For more information, see “Scheduling Extractions” earlier in this section.
Deleting a scheduled extractionYou can delete a scheduled extraction from the MDE Viewer.
♦To delete a scheduled extraction
1. From the MDE Viewer dialog box, right-click the name of the schedule that you want to delete.
2. From the popup menu, click Delete.
3. At the prompt, click Yes.
The MDE deletes the selected schedule from the list.
Section 8 - 46 Strategic Reporting Systems, Inc.
Using the MDE Client
Viewing the progress of a scheduleYou can use the MDE Viewer to view the progress of a selected schedule. If any errors occur
during an extraction, the MDE Viewer shows them.
♦To view the progress of a schedule:
1. From the MDE Viewer dialog box, right-click the Extraction Name whose progress you want to view.
2. From the popup menu, click View progress.
The MDE displays a window, which shows the progress of the selected schedule.
Section 8 - 47

M Data Extractor User Manual
Section 8 - 48 Strategic Reporting Systems, Inc.

Appendix
Verifying existing routinesIf this is the first time you are installing the MDE Server, verify that none of the following routines
exist in the Caché namespace where VistA is installed.
Note: The MDE Server is installed in the same namespace as VistA.
If you have previously installed the MDE Server, the routines listed below may exist on your sys-
tem and you can proceed with the next step.
• From the MUS* routine selection mask (3 routines):DESAMUM DESAMGS DESAOP
• From the DESAUIL* routine selection mask (2 routines):DESAUIL DESAUIL1
• From the DESA* routine selection mask (22 routines):
• From the DESARSP* routine selection mask (1 routine): DESARSP
• From the DESARTIL* routine selection mask (1 routine): DESARTIL
• From the DESARTIL* routine selection mask (3 routines):
• From the DESARGT* routine selection mask (1 routine): DESARGT
• From the DESAUTL* routine selection mask (2 routines):
Table 14:
DESAAPT DESAAPT DESADI DESADI1 DESADIA
DESADSS DESAENV DESALBC DESABCP DESABCP1
DESABCP2 DESABCP3 DESAFUNC DESADNS DESARAD
DESASQI DESASRM DESASTRT DESATCP DESAUL1
DESAUL2 DESAUL3
Table 15:
DESARUT1 DESARUT2 DESARUT3
Table 16:
DESAVB1 DESAVB2
Appendix - 1

M Data Extractor User Manual
Total number of routines: 35
Note: If you have not previously installed the MDE Server and any of the above routines exist, please contact Strategic Reporting Systems for assistance before proceeding with this installation.
Connection lost error messageOccasionally when attempting to log into the MDE, you may get an error message stating that the
connection was lost instead of the prompt for the FileMan Access/Verify codes you would nor-
mally see. This message is caused by timing issues in Open VMS TCP versions 5.0 and 5.1,
and indicates that, even though the client makes the initial connection, the connection is lost
immediately, preventing you from logging into FileMan. This can also cause problems with the
Schedule, as it will only try to log in once; if the login fails, the extraction does not run.
In order to resolve issue, you can modify the VMS Command Procedure file by adding a delay
between the time that the VMS command procedure starts execution (the connection is initially
established by the MDE Client) and the time that the DSM environment is entered at the start of
the MDE server session. The command procedure is called by the Open VMS TCP service and
is usually called, "MDE_TCP_SRV.COM". The actual name for this file can be determined by
running the Open VMS TCP configuration program and entering the command to do a full display
of the MDE_TCP listener service information.
The following is an example of what this file may look like:
**************************************$! MDE TCP listener command procedure$!$ DSM/ENV=MDE/UCI=VAH/VOL=VIS/SOURCE=65535 ^ZPCSTART**************************************You can edit the file to add a delay; the edited file would look like the following (the additional
entry is in bold):
**************************************$! MDE TCP listener command procedure$!$ WAIT 00:00:01$ DSM/ENV=MDE/UCI=VAH/VOL=VIS/SOURCE=65535 ^ZPCSTART**************************************The VMS DCL WAIT command is used to create a one-second delay before the DSM command
is issued. It may be that one second is not enough and, if necessary, increase the delay to two
seconds.
Oracle resume data load If you receive an error when loading data into an Oracle database or you are unable to connect to
an Oracle database, you can reload the already downloaded data at a later date.
Appendix - 2 Strategic Reporting Systems, Inc.
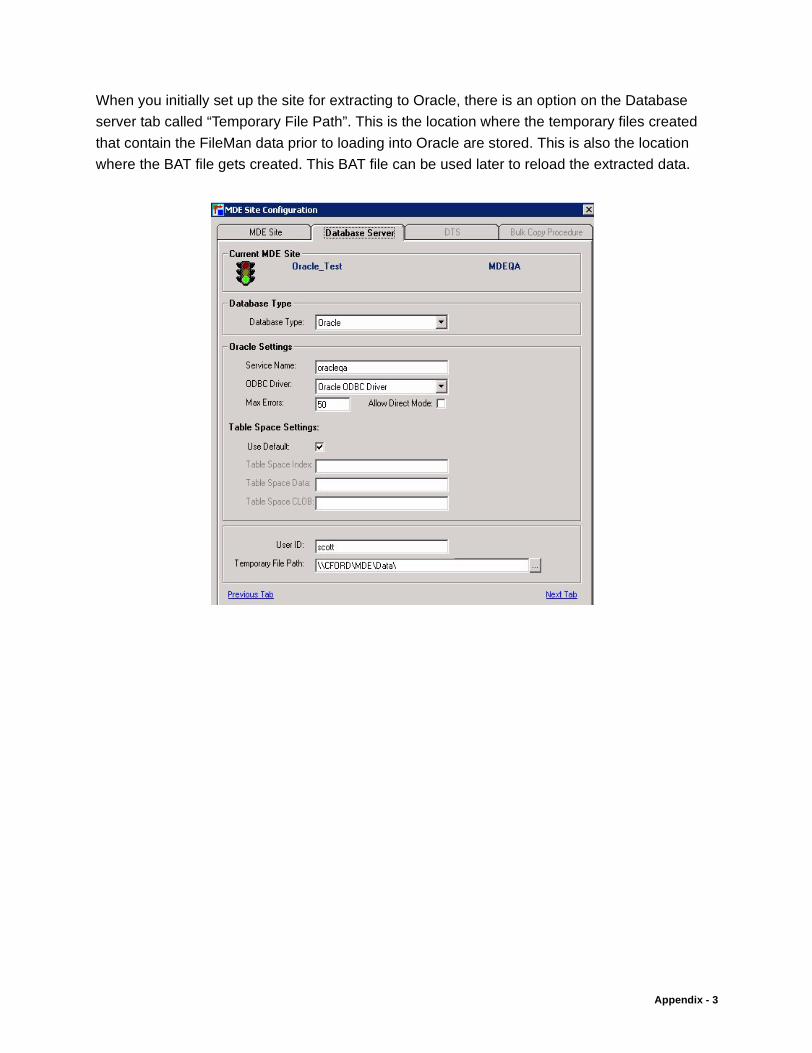
When you initially set up the site for extracting to Oracle, there is an option on the Database
server tab called “Temporary File Path”. This is the location where the temporary files created
that contain the FileMan data prior to loading into Oracle are stored. This is also the location
where the BAT file gets created. This BAT file can be used later to reload the extracted data.
Appendix - 3
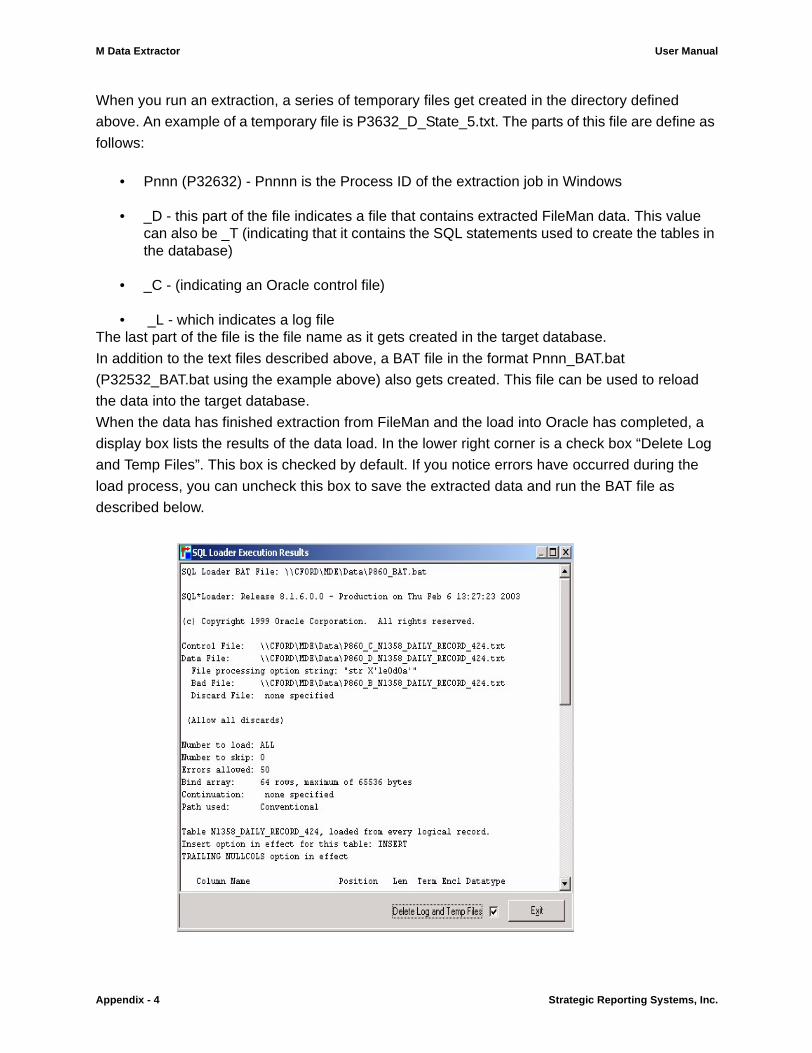
M Data Extractor User Manual
When you run an extraction, a series of temporary files get created in the directory defined
above. An example of a temporary file is P3632_D_State_5.txt. The parts of this file are define as
follows:
• Pnnn (P32632) - Pnnnn is the Process ID of the extraction job in Windows
• _D - this part of the file indicates a file that contains extracted FileMan data. This value can also be _T (indicating that it contains the SQL statements used to create the tables in the database)
• _C - (indicating an Oracle control file)
• _L - which indicates a log fileThe last part of the file is the file name as it gets created in the target database.
In addition to the text files described above, a BAT file in the format Pnnn_BAT.bat
(P32532_BAT.bat using the example above) also gets created. This file can be used to reload
the data into the target database.
When the data has finished extraction from FileMan and the load into Oracle has completed, a
display box lists the results of the data load. In the lower right corner is a check box “Delete Log
and Temp Files”. This box is checked by default. If you notice errors have occurred during the
load process, you can uncheck this box to save the extracted data and run the BAT file as
described below.
Appendix - 4 Strategic Reporting Systems, Inc.
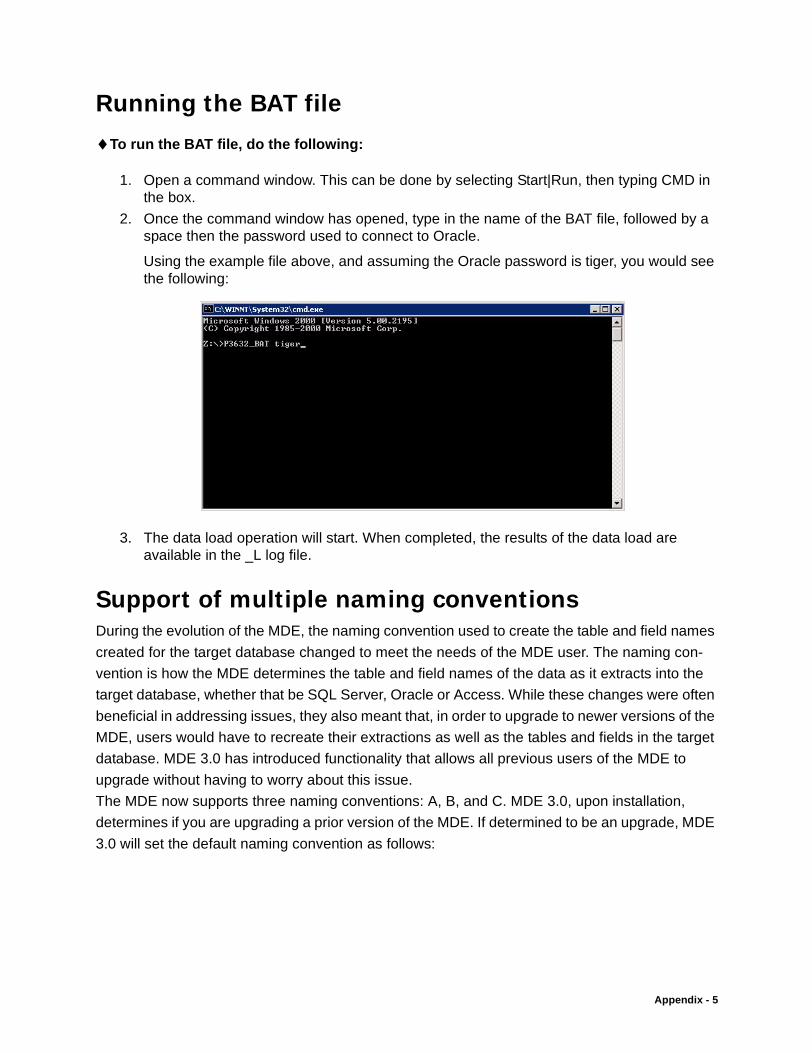
Running the BAT file♦To run the BAT file, do the following:
1. Open a command window. This can be done by selecting Start|Run, then typing CMD in the box.
2. Once the command window has opened, type in the name of the BAT file, followed by a space then the password used to connect to Oracle.
Using the example file above, and assuming the Oracle password is tiger, you would see the following:
3. The data load operation will start. When completed, the results of the data load are available in the _L log file.
Support of multiple naming conventionsDuring the evolution of the MDE, the naming convention used to create the table and field names
created for the target database changed to meet the needs of the MDE user. The naming con-
vention is how the MDE determines the table and field names of the data as it extracts into the
target database, whether that be SQL Server, Oracle or Access. While these changes were often
beneficial in addressing issues, they also meant that, in order to upgrade to newer versions of the
MDE, users would have to recreate their extractions as well as the tables and fields in the target
database. MDE 3.0 has introduced functionality that allows all previous users of the MDE to
upgrade without having to worry about this issue.
The MDE now supports three naming conventions: A, B, and C. MDE 3.0, upon installation,
determines if you are upgrading a prior version of the MDE. If determined to be an upgrade, MDE
3.0 will set the default naming convention as follows:
Appendix - 5
M Data Extractor User Manual
If determined to be a new installation of MDE, naming convention C will be set as the default.
Note: The naming convention for MDE 3.0 is specific to the Client installation of MDE. If multiple clients are installed at your site, please make sure that all are using the same naming convention.
Why support multiple naming conventions:As the user group for the MDE expanded, users began report issues with the way the tables and
fields names for the target database were created. The naming convention changes as they
apply to A, B and C are defined below:
Table 17:
Naming Convention MDE Version
A All versions up to 2.3.0
B Version 2.3.0 only
C Versions 2.3.1 and higher
Table 18:
Naming Convention Issues Resolved
A Naming convention A uses the original structure in creating table and field names
B More than one FileMan field can have the same name for a given file for a give Multiple level. Though most File-Man fields have different alphanumeric names, there is no requirement that the names be unique, only that the corresponding field number be unique. The original ver-sions of the MDE were displaying on the first of any iden-tical field names. Starting with 2.3.0, the field number was appended onto the end of each field name.
C In order to address relational table names that could be identical, the MDE started appending all table names (and any names of fields comprising nested files or multi-ples) with the unique FileMan name. If a given table name is part of a FileMan multiple, then each naming component would also be appended with its own unique field number.Starting with second-level multiples, the names were shortened to the first letter, followed by an underscore, followed by the unique FileMan number.Numbers having decimal points now have the decimal point replaced with ‘#’ and the ‘#’ character is no longer used to indicate an ellipsis mark.
Appendix - 6 Strategic Reporting Systems, Inc.
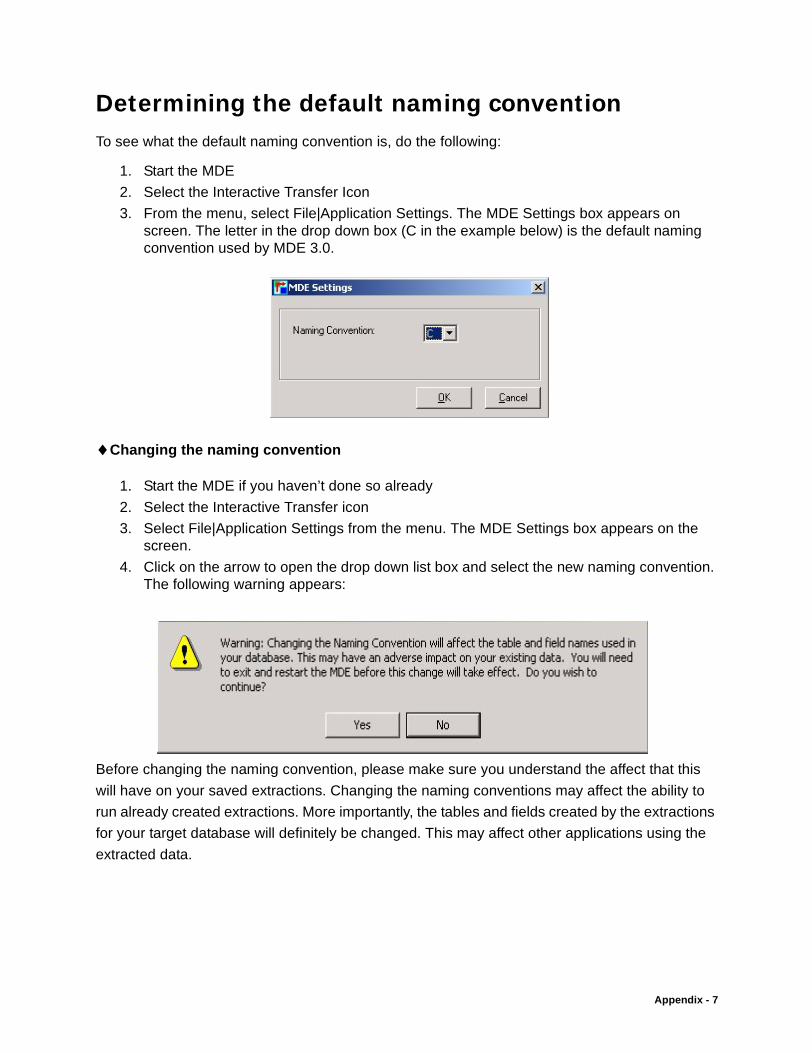
Determining the default naming conventionTo see what the default naming convention is, do the following:
1. Start the MDE
2. Select the Interactive Transfer Icon
3. From the menu, select File|Application Settings. The MDE Settings box appears on screen. The letter in the drop down box (C in the example below) is the default naming convention used by MDE 3.0.
♦Changing the naming convention
1. Start the MDE if you haven’t done so already
2. Select the Interactive Transfer icon
3. Select File|Application Settings from the menu. The MDE Settings box appears on the screen.
4. Click on the arrow to open the drop down list box and select the new naming convention. The following warning appears:
Before changing the naming convention, please make sure you understand the affect that this
will have on your saved extractions. Changing the naming conventions may affect the ability to
run already created extractions. More importantly, the tables and fields created by the extractions
for your target database will definitely be changed. This may affect other applications using the
extracted data.
Appendix - 7
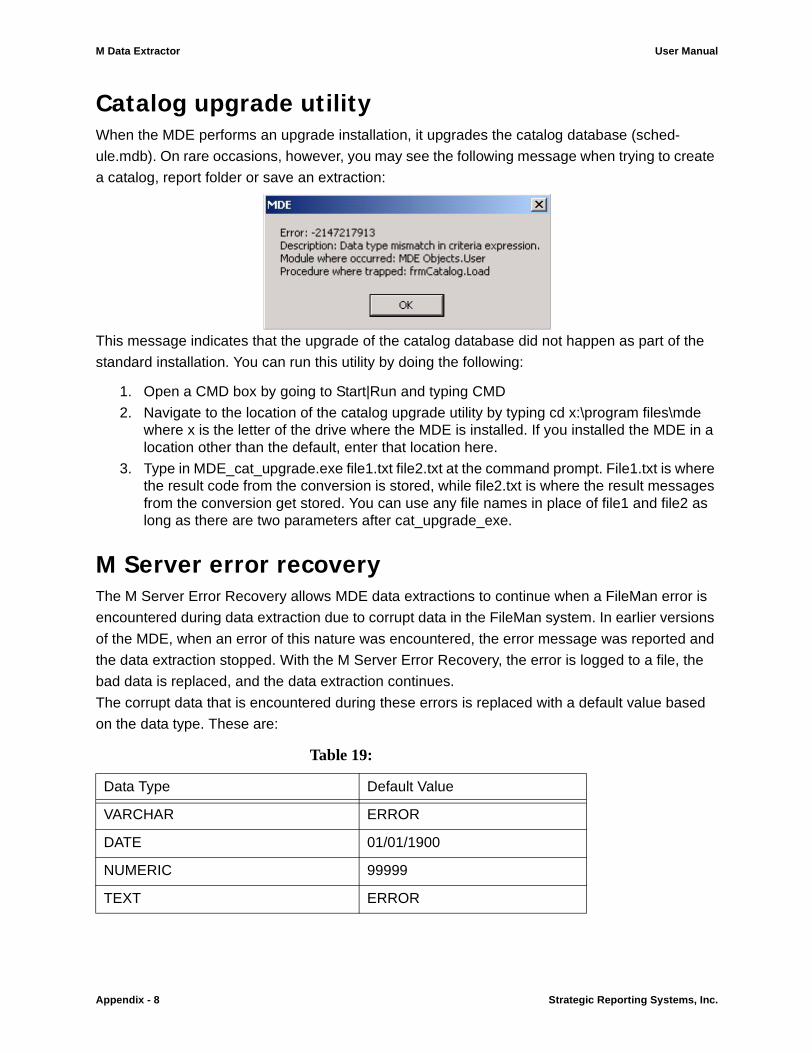
M Data Extractor User Manual
Catalog upgrade utilityWhen the MDE performs an upgrade installation, it upgrades the catalog database (sched-
ule.mdb). On rare occasions, however, you may see the following message when trying to create
a catalog, report folder or save an extraction:
This message indicates that the upgrade of the catalog database did not happen as part of the
standard installation. You can run this utility by doing the following:
1. Open a CMD box by going to Start|Run and typing CMD
2. Navigate to the location of the catalog upgrade utility by typing cd x:\program files\mde where x is the letter of the drive where the MDE is installed. If you installed the MDE in a location other than the default, enter that location here.
3. Type in MDE_cat_upgrade.exe file1.txt file2.txt at the command prompt. File1.txt is where the result code from the conversion is stored, while file2.txt is where the result messages from the conversion get stored. You can use any file names in place of file1 and file2 as long as there are two parameters after cat_upgrade_exe.
M Server error recoveryThe M Server Error Recovery allows MDE data extractions to continue when a FileMan error is
encountered during data extraction due to corrupt data in the FileMan system. In earlier versions
of the MDE, when an error of this nature was encountered, the error message was reported and
the data extraction stopped. With the M Server Error Recovery, the error is logged to a file, the
bad data is replaced, and the data extraction continues.
The corrupt data that is encountered during these errors is replaced with a default value based
on the data type. These are:
Table 19:
Data Type Default Value
VARCHAR ERROR
DATE 01/01/1900
NUMERIC 99999
TEXT ERROR
Appendix - 8 Strategic Reporting Systems, Inc.
Two text files are generated for each extraction that encounters an error. One file contains the
records which encountered the error and the other contains each error message generated by
the M System. A message box displays at the completion of the data extraction with the file
names as well as the directory location.
Sample file names with the explanations of file name componentsFollowing are two sample file names with an explanation of each component of the file name.
20010521_144806_BAD_386.TXT
20010521_144806_BAD_386.TXT
The file name consists of four separate sections, separated by an underscore. These are:
1. The date of the extraction expressed in the following format: YYYYMMDD
2. The time of the data extraction expressed in military time with no punctuation
3. BAD or ERR. BAD is the file that contains the corrupt or bad data records. ERR contains each bad record and the programmatic error information that was returned by the M Server.
4. The MDE Process number of the extraction during which the error was encountered.
MDE Data UsageOnce the MDE has extracted data from FileMan, it stores that information in a separate SQL
database. From this location, using third-party desktop tools, you can custom-query the data
repeatedly without affecting the VistA system.
In addition to creating relational databases, the MDE also reorganizes and cleans the data, giv-
ing you usable data to analyze, generate reports and verify data trends.
An example of a flattened FileMan fileThe following section is an example of how the MDE can flatten VistA files that contain embed-
ded files. In the example State file contains three levels (2 additional levels of file nesting),
STATE, COUNTY, and ZIP CODE.
If you were to use the MDE to extract data from the STATE file, and you chose the following
fields:
STATE: NAME, ABBREVIATION
COUNTY: COUNTY, VA_COUNTY_CODE
ZIP CODE: ZIP CODE
On completion of the extraction, you would see the following tables and their associated fields in
your SQL database:
TABLE NAMELevelFIELDS
STATE1NAME
1ABBREVIATION
1KEY_STATE
COUNTY2COUNTY
Appendix - 9
M Data Extractor User Manual
2VA_COUNTY_CODE
2KEY_STATE
2KEY_COUNTY
ZIP_CODE3ZIP_CODE
3KEY_STATE
3KEY_COUNTY
3KEY_ZIP_CODE
You could then use an outer join to connect these three tables and display all of the data in a sin-
gle query (and sort by state, county, and zip) as follows:
SELECT dbo_STATE.NAME, dbo_STATE.ABBREVIATION, dbo_COUNTY.COUNTY,
dbo_COUNTY.VA_COUNTY_CODE, dbo_ZIP_CODE.ZIP_CODE
FROM (dbo_STATE LEFT JOIN dbo_COUNTY ON dbo_STATE.KEY_STATE =
dbo_COUNTY.KEY_STATE) LEFT JOIN dbo_ZIP_CODE ON (dbo_COUNTY.KEY_COUNTY =
dbo_ZIP_CODE.KEY_COUNTY) AND (dbo_COUNTY.KEY_STATE =
dbo_ZIP_CODE.KEY_STATE)
ORDER BY dbo_STATE.NAME, dbo_COUNTY.COUNTY, dbo_ZIP_CODE.ZIP_CODE;
The MDE has “flattened” the data in the state file because the data, once hierarchically organized
in the state file, is now listed in three separate flat relational files.
Notice that the MDE generates additional key fields at each level, making it possible to perform a
join between the tables. The key fields that the MDE creates are composed of the site number of
the VistA System from which the data was extracted, and the internal file entry number of each
data item from the VistA database. This method creates unique values for each table row, even
when you funnel the data from multiple VistA sites into a single SQL database!
Appendix - 10 Strategic Reporting Systems, Inc.


![Index [drillco-inc.com]](https://img.pdfslide.us/doc/110x75/6212ab94ca04d82b5b23b073/index-drillco-inccom.jpg)


![]d - nwg-inc.com](https://img.pdfslide.us/doc/110x75/624facf12752cd191f0126be/d-nwg-inccom.jpg)