Embed Size (px)
Citation preview
Software Version: Powered by Mobile Center 2.70
StormRunner Functional
Mobile Lab User Guide
Go to HELP CENTER ONLINEhttps://admhelp.microfocus.com/srf/
Document Release Date: June 21, 2018 | Software Release Date: June 2018
Legal Notices
DisclaimerCertain versions of software and/or documents (“Material”) accessible here may contain branding from Hewlett-Packard Company
(now HP Inc.) and Hewlett Packard Enterprise Company. As of September 1, 2017, the Material is now offered by Micro Focus, a
separately owned and operated company. Any reference to the HP and Hewlett Packard Enterprise/HPE marks is historical in nature,
and the HP and Hewlett Packard Enterprise/HPE marks are the property of their respective owners.
WarrantyThe only warranties for products and services of Micro Focus and its affiliates and licensors (“Micro Focus”) are set forth in the
express warranty statements accompanying such products and services. Nothing herein should be construed as constituting an
additional warranty. Micro Focus shall not be liable for technical or editorial errors or omissions contained herein. The information
contained herein is subject to change without notice.
Restricted Rights LegendContains Confidential Information. Except as specifically indicated otherwise, a valid license is required for possession, use or
copying. Consistent with FAR 12.211 and 12.212, Commercial Computer Software, Computer Software Documentation, and
Technical Data for Commercial Items are licensed to the U.S. Government under vendor's standard commercial license.
Copyright Notice© Copyright 2017-2018 Micro Focus or one of its affiliates.
Trademark NoticesAdobe™ is a trademark of Adobe Systems Incorporated.
Microsoft® and Windows® are U.S. registered trademarks of Microsoft Corporation.
UNIX® is a registered trademark of The Open Group.
Oracle and Java are registered trademarks of Oracle and/or its affiliates.
Red Hat® is a registered trademark of Red Hat, Inc. in the United States and other countries.
Apple and the Apple logo are trademarks of Apple Computer, Inc., registered in the U.S. and other countries.
iPad® is a trademark of Apple Inc.
iPhone® is a trademark of Apple Inc.
Google™ and Google Maps™ © 2012 Google Inc. All rights reserved. Google and the Google Logo are registered trademarks of
Google Inc.
Linux® is the registered trademark of Linus Torvalds in the U.S. and other countries.
Mobile Lab User GuideStormRunner Functional
StormRunner Functional (Powered by Mobile Center 2.70) Page 2 of 88
Contents
StormRunner Functional 1
View and manage devices 6Device display 6
Finding specific devices 7
Device management 8
View and manage connectors 9
Upgrade connectors 9
View and manage device reservations 10
Troubleshooting 11
Connect devices to StormRunner Functional 11
Supported devices 11
Certified devices 11
Physical device connectivity 17
Best practice guidelines for devices 18
Initial device setup 18
Android initial device configuration 19
iOS initial device configuration 20
Before you start 20
Connector requirements 20
Install the connector on a Windows machine 21
Install the connector 21
Prepare devices 23
Connect devices and verify the connection 23
Start, stop, and restart the connector 25
Modify a connector 25
Enable localization 25
Troubleshoot the Windows connector 25
Uninstall a connector 27
Install the connector on a Linux machine 27
Install the connector 27
Connect and verify devices 29
Start and stop the connector 30
Enable localization 30
Uninstall the connector 31
Change the configuration of the connector 31
Install the connector on a Mac machine 32
Set up your Mac machine 32
Install the connector with Terminal 33
Verify device connection and connect devices 34
Mobile Lab User GuideStormRunner Functional
StormRunner Functional (Powered by Mobile Center 2.70) Page 3 of 88
Start or stop the Mac connector 35
Reconfigure the Mac connector 35
Uninstall the Mac connector 36
Troubleshooting and tips 36
Troubleshooting Android devices 36
Troubleshooting iOS devices 38
View, upload, and manage apps 45View app details 45
System apps 45
Options toolbar 46
Device provisioning information (iOS only) 48
Upload an app 48
Troubleshooting 49
App packaging and signing 49
When to use a packaged app 49
Considerations when using non-packaged hybrid apps 49
StormRunner Functional packaging and signing tools 50
Certificates required when signing iOS apps 50
Re-sign the Agent apps 51
More about the Agent apps 51
Obtain a development certificate of an Apple Developer account 51
Obtain a development provisioning profile 53
Re-sign and deploy the Agent apps 53
Package an Android app manually 60
Prerequisites 60
Run the enabler on your app 60
Enable remote content debugging of Android apps 62
Manually enable remote content debugging 62
Troubleshooting 64
Package an iOS app manually on a Mac machine 64
Prerequisites 64
MC Enabler on Mac 65
Test generated files 69
Repackage apps for specific iOS devices 69
MC Browser Apps 70
Gestures 72Android native apps 72
Android hybrid apps 73
Android mobile web apps 73
iOS native apps 74
Mobile Lab User GuideStormRunner Functional
StormRunner Functional (Powered by Mobile Center 2.70) Page 4 of 88
iOS hybrid apps 74
iOS mobile web apps 75
Apple Development Certificates and Provisioning Profiles 76Generate a development certificate using a Mac 76
Obtain a development provisioning profile 80
Send Us Feedback 87
Mobile Lab User GuideStormRunner Functional
StormRunner Functional (Powered by Mobile Center 2.70) Page 5 of 88
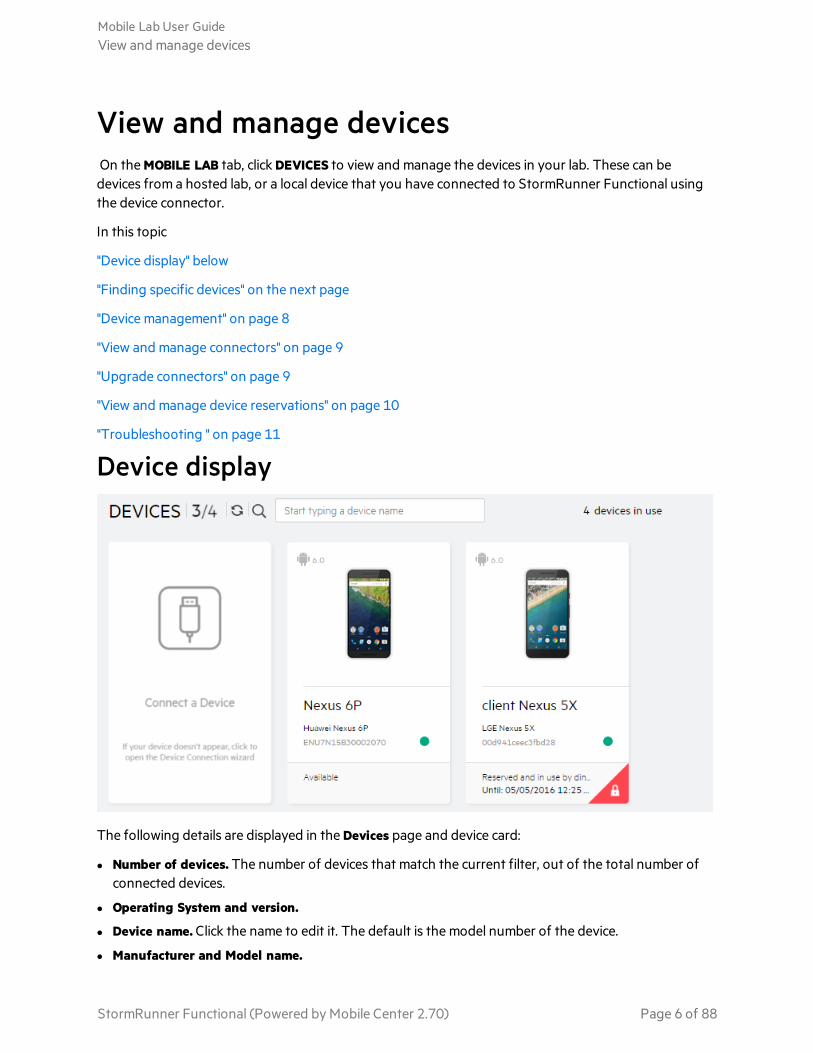
View and manage devicesOn the MOBILE LAB tab, click DEVICES to view and manage the devices in your lab. These can bedevices from a hosted lab, or a local device that you have connected to StormRunner Functional usingthe device connector.
In this topic
"Device display" below
"Finding specific devices" on the next page
"Device management" on page 8
"View and manage connectors" on page 9
"Upgrade connectors" on page 9
"View and manage device reservations" on page 10
"Troubleshooting " on page 11
Device display
The following details are displayed in the Devices page and device card:
l Number of devices. The number of devices that match the current filter, out of the total number ofconnected devices.
l Operating System and version.
l Device name. Click the name to edit it. The default is the model number of the device.
l Manufacturer and Model name.
Mobile Lab User GuideView and manage devices
StormRunner Functional (Powered by Mobile Center 2.70) Page 6 of 88

l Connector latency. When you hover over the latency icon , StormRunner Functional shows theconnector's latency. This is the latency between the client and the connector to which the device isconnected, for example Remote view latency: 18 ms. For optimal remote screen viewer performance,select a device with good latency. The latency is considered good if it is less than 100 ms (green),mediocre if it ranges between 100 and 200 ms (yellow), poor if it ranges between 200 and 300 ms(red), and bad if it exceeds 300 ms (gray).
Note: The latency display is not supported for Internet Explorer or Edge browsers.
l Reservations. The reservations for the device. For example, Available or Reserved by... Until. Clickthis section to view and create reservations. A triangular emblem at the bottom right of the deviceindicates its status:
Reserved for you
Reserved and in use by you
Reserved for someone else
Reserved and in use by someone else
Note: To use iOS devices with StormRunner Functional you must re-sign the Agent apps with adevelopment certificate of an Apple Developer account. For more details, see "Re-sign the Agent apps"on page 51.
Finding specific devicesYou can find a specific device in one of the following ways:
l Search. In the right pane, click the Search button. In the text box, specify the name, device ID, model,or manufacturer of the device.
l Filter. Use the left panel filter in the Devices page to limit what items are displayed, so that you canfocus on the information that is important to you. Using the filter panel, you can specify your criteriain the following areas:
l OS. Operating System: Android, iOS. Use the slider to select an OS version. Note that WindowsPhone devices are not supported for StormRunner Functional.
l Features. Physical or Emulator device, and Phone or Tablet. Note that emulators are notsupported for StormRunner Functional.
l Availability:
Available Available devices
Mobile Lab User GuideView and manage devices
StormRunner Functional (Powered by Mobile Center 2.70) Page 7 of 88
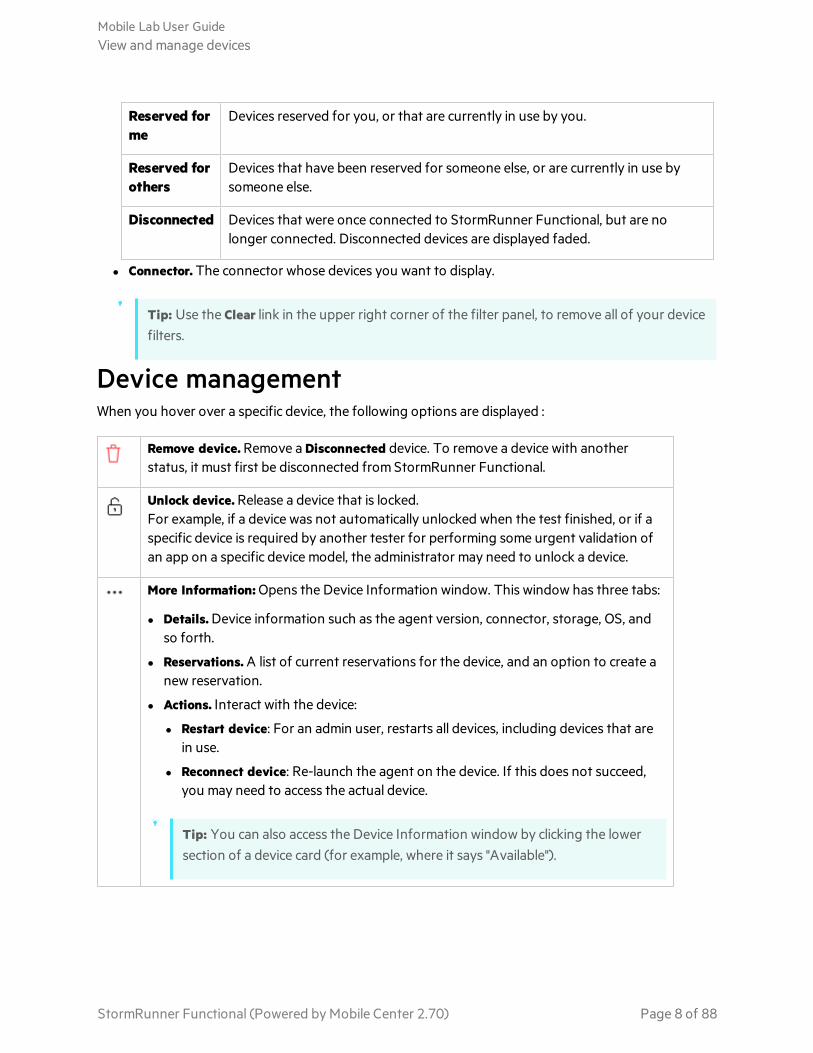
Reserved forme
Devices reserved for you, or that are currently in use by you.
Reserved forothers
Devices that have been reserved for someone else, or are currently in use bysomeone else.
Disconnected Devices that were once connected to StormRunner Functional, but are nolonger connected. Disconnected devices are displayed faded.
l Connector. The connector whose devices you want to display.
Tip: Use the Clear link in the upper right corner of the filter panel, to remove all of your devicefilters.
Device managementWhen you hover over a specific device, the following options are displayed :
Remove device. Remove a Disconnected device. To remove a device with anotherstatus, it must first be disconnected from StormRunner Functional.
Unlock device. Release a device that is locked.For example, if a device was not automatically unlocked when the test finished, or if aspecific device is required by another tester for performing some urgent validation ofan app on a specific device model, the administrator may need to unlock a device.
More Information: Opens the Device Information window. This window has three tabs:
l Details. Device information such as the agent version, connector, storage, OS, andso forth.
l Reservations. A list of current reservations for the device, and an option to create anew reservation.
l Actions. Interact with the device:
l Restart device: For an admin user, restarts all devices, including devices that arein use.
l Reconnect device: Re-launch the agent on the device. If this does not succeed,you may need to access the actual device.
Tip: You can also access the Device Information window by clicking the lowersection of a device card (for example, where it says "Available").
Mobile Lab User GuideView and manage devices
StormRunner Functional (Powered by Mobile Center 2.70) Page 8 of 88
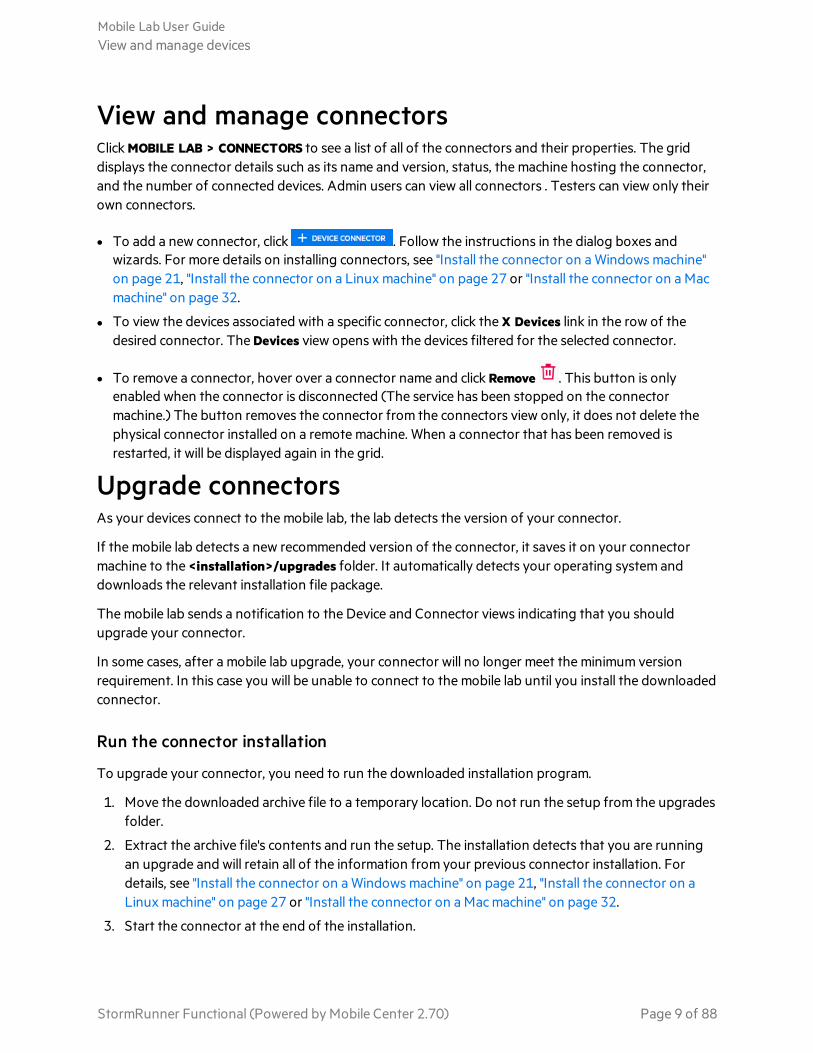
View and manage connectorsClick MOBILE LAB > CONNECTORS to see a list of all of the connectors and their properties. The griddisplays the connector details such as its name and version, status, the machine hosting the connector,and the number of connected devices. Admin users can view all connectors . Testers can view only theirown connectors.
l To add a new connector, click . Follow the instructions in the dialog boxes andwizards. For more details on installing connectors, see "Install the connector on a Windows machine"on page 21, "Install the connector on a Linux machine" on page 27 or "Install the connector on a Macmachine" on page 32.
l To view the devices associated with a specific connector, click the X Devices link in the row of thedesired connector. The Devices view opens with the devices filtered for the selected connector.
l To remove a connector, hover over a connector name and click Remove . This button is onlyenabled when the connector is disconnected (The service has been stopped on the connectormachine.) The button removes the connector from the connectors view only, it does not delete thephysical connector installed on a remote machine. When a connector that has been removed isrestarted, it will be displayed again in the grid.
Upgrade connectorsAs your devices connect to the mobile lab, the lab detects the version of your connector.
If the mobile lab detects a new recommended version of the connector, it saves it on your connectormachine to the <installation>/upgrades folder. It automatically detects your operating system anddownloads the relevant installation file package.
The mobile lab sends a notification to the Device and Connector views indicating that you shouldupgrade your connector.
In some cases, after a mobile lab upgrade, your connector will no longer meet the minimum versionrequirement. In this case you will be unable to connect to the mobile lab until you install the downloadedconnector.
Run the connector installation
To upgrade your connector, you need to run the downloaded installation program.
1. Move the downloaded archive file to a temporary location. Do not run the setup from the upgradesfolder.
2. Extract the archive file's contents and run the setup. The installation detects that you are runningan upgrade and will retain all of the information from your previous connector installation. Fordetails, see "Install the connector on a Windows machine" on page 21, "Install the connector on aLinux machine" on page 27 or "Install the connector on a Mac machine" on page 32.
3. Start the connector at the end of the installation.
Mobile Lab User GuideView and manage devices
StormRunner Functional (Powered by Mobile Center 2.70) Page 9 of 88

4. Verify that your connector upgrade succeeded. On the MOBILE LAB tab, click Connectors and checkthat there is no longer an upgrade notification for your connector.
5. For iOS devices, you will need to re-sign all packaged apps, including the Launcher, Agent, andWebDriverAgent-Runner apps. For details, see "Re-sign the Agent apps" on page 51.
6. Delete the downloaded archive file after you have successfully upgraded your connector.
View and manage device reservationsClick MOBILE LAB>RESERVATIONS to view and manage reservations for a device. This page alsoprovides details about the current reservations: Running Now, Coming Up (next 24 hours), and FutureReservations. By hovering over a reservation, you can edit or delete it.
For a new reservation, click to open the Create Reservation window. Once you reserve
a device, it will be locked for you at that time.
Here are some guidelines to remember:
l You can specify an end time for your reservation, an open-ended reservation with no end time, or areservation until the end of the test.
l By default, reservations are active for 30 minutes and extendable for 5 minute intervals. Youradministrator can modify these values or edit specific reservations.
l After you reserve a device, the Reservations page indicates that you reserved it, and shows the startand end times.
A triangular emblem at the bottom right of the device indicates its status. For details, see Device display- Reservations.
Mobile Lab User GuideView and manage devices
StormRunner Functional (Powered by Mobile Center 2.70) Page 10 of 88

TroubleshootingWhy can't I see all my devices?
Check the filter panel to see what options are selected. StormRunner Functional displays only the itemsthat fit the filter conditions. To display all items, select all the filter options and clear the search field ofany text that you have entered.
Connect devices to StormRunner FunctionalYou can connect devices to StormRunner Functional by installing a device connector. The connectormanages the physical USB connection to the device.
Supported devicesBefore connecting a device, check that the operating system of your device is supported byStormRunner Functional.
StormRunner Functional supports all devices that meet the following OS requirements:
OS OS Version
Android 4.2 - 8.1
iOS 7.x to the latest version, including Apple public beta versions.
Certified devicesStormRunner Functional supports any device that meets the minimum required OS. In addition, themost popular devices have been tested and verified with StormRunner Functional as follows:
Android
These devices have been tested and verified with StormRunner Functional:
Smartphones
Manufacturer Model
Asus Asus ZenFone 2
Coolpad Coolpad S6
Google Nexus 5, 7, 9, 10
Google Pixel, Pixel 2, Pixel XL, Pixel XL 2
Mobile Lab User GuideView and manage devices
StormRunner Functional (Powered by Mobile Center 2.70) Page 11 of 88
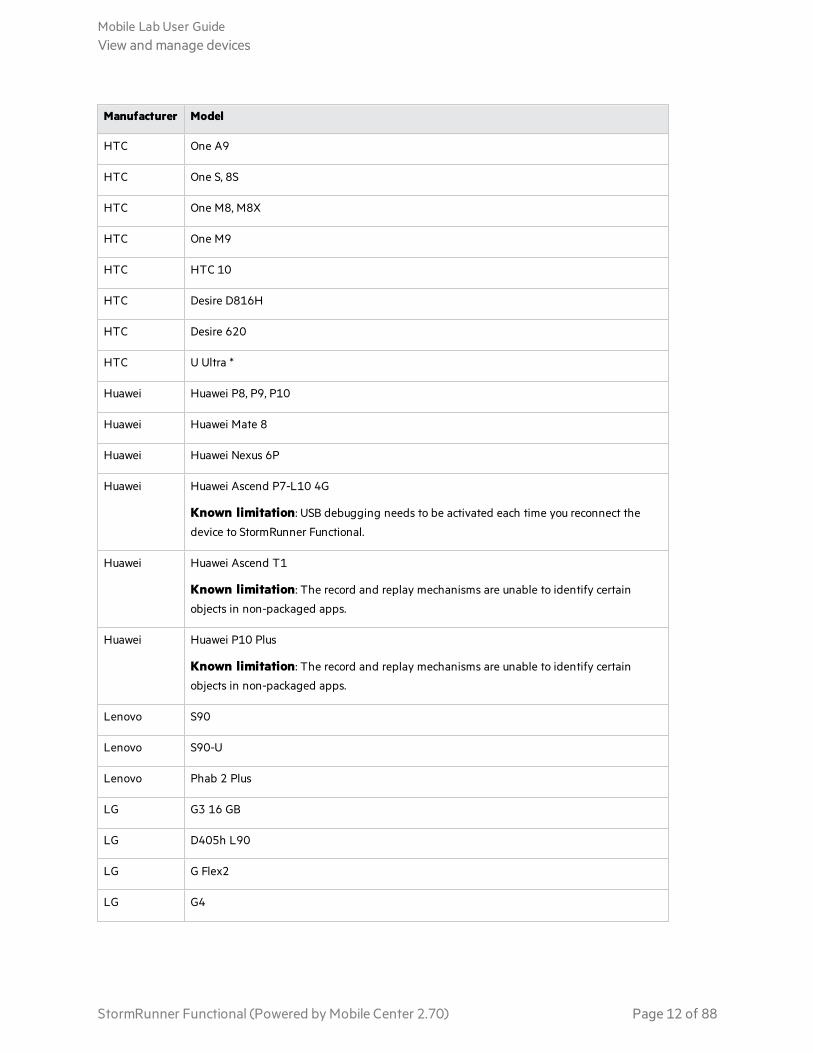
Manufacturer Model
HTC One A9
HTC One S, 8S
HTC One M8, M8X
HTC One M9
HTC HTC 10
HTC Desire D816H
HTC Desire 620
HTC U Ultra *
Huawei Huawei P8, P9, P10
Huawei Huawei Mate 8
Huawei Huawei Nexus 6P
Huawei Huawei Ascend P7-L10 4G
Known limitation: USB debugging needs to be activated each time you reconnect the
device to StormRunner Functional.
Huawei Huawei Ascend T1
Known limitation: The record and replay mechanisms are unable to identify certain
objects in non-packaged apps.
Huawei Huawei P10 Plus
Known limitation: The record and replay mechanisms are unable to identify certain
objects in non-packaged apps.
Lenovo S90
Lenovo S90-U
Lenovo Phab 2 Plus
LG G3 16 GB
LG D405h L90
LG G Flex2
LG G4
Mobile Lab User GuideView and manage devices
StormRunner Functional (Powered by Mobile Center 2.70) Page 12 of 88

Manufacturer Model
LG G5
LG G6
LG Nexus 5X
LG LG V10, V20
Meizu* Meizu MX4 Pro
Meizu Meizu MX6
Meizu Meizu Pro 6
Meizu M3 Note
Motorola Moto G (2nd Generation)
Motorola Moto X
Motorola Moto X (2nd Generation)
Motorola Moto Z
Motorola Nexus 6
Nubia Nubia Z9 mini
OnePlus OnePlus One, OnePlus 2, OnePlus 3, OnePlus 5
OnePlus OnePlus 3T, OnePlus 5T
OnePlus OnePlus X
Oppo Oppo R7
Oppo Oppo R9sk
Qiku Qiku 8681-A01
Samsung Galaxy Ace 3
Note: When connecting the device, the orientation should be set to portrait.
Samsung Galaxy Note
Samsung Galaxy Note 2, 3, 4, 5, 8, 10
Samsung Galaxy Note Edge N915F
Samsung Galaxy S4, S5
Mobile Lab User GuideView and manage devices
StormRunner Functional (Powered by Mobile Center 2.70) Page 13 of 88

Manufacturer Model
Samsung Galaxy S6, S6 Edge, S6 Edge Plus
Samsung Galaxy A5, A5 (2017)
Samsung Galaxy A7, S7, S7 Edge
Samsung Galaxy A8, A8 Plus, S8, S8 Plus
Samsung Galaxy S9, S9 Plus
Sony Xperia Z
Sony Xperia Z3
Sony Xperia Z5
Sony Xperia XZ F8331 *
Sony Xperia XZs (G8232)
Vivo Vivo X6S
Xiaomi* Xiaomi Mi 3, 4, 5, 6
Xiaomi* Xiaomi Mi Max
Xiaomi* Xiaomi Mi Note
Xiaomi* Xiaomi Redmi Note
Xiaomi* Xiaomi Redmi Note 3, 4
* See "Known Issues" on the next page .
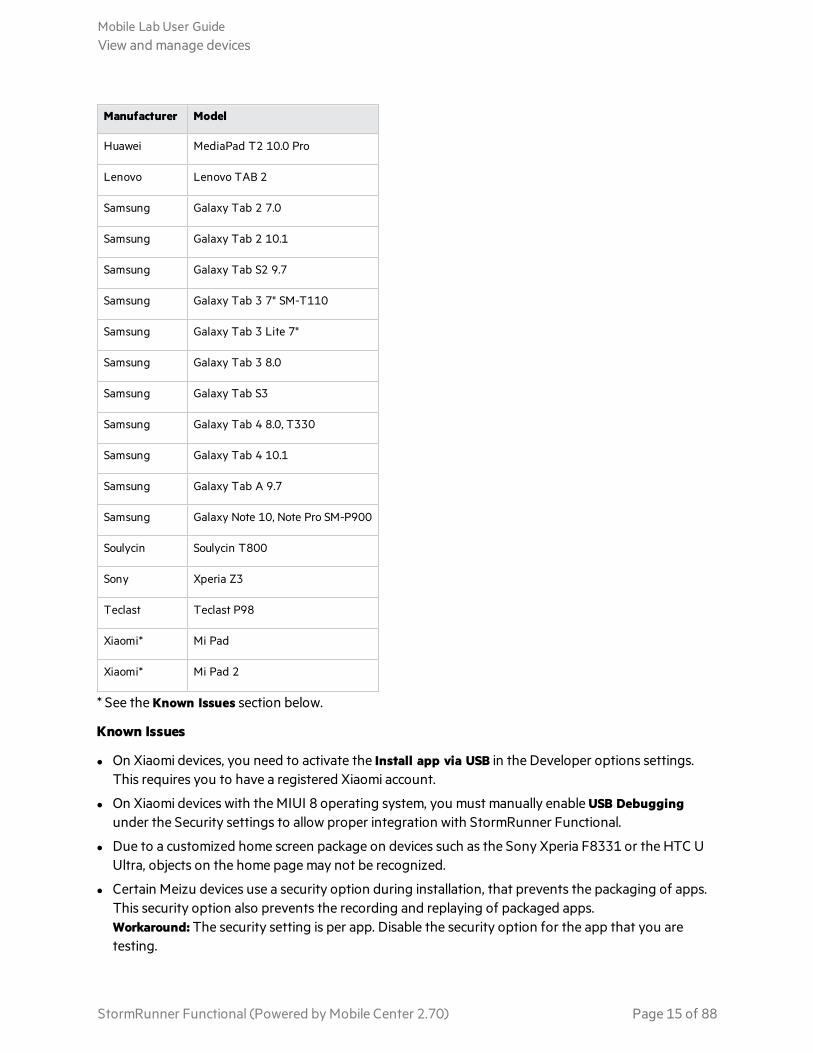
Tablets
Manufacturer Model
Google Nexus 7
Google Nexus 9
Google Nexus 10
HP HP Slate 7 extreme
HP HP Slate S8-7600US 8-Inch
Huawei Honor Tablet
Huawei MediaPad T1 7.0
Mobile Lab User GuideView and manage devices
StormRunner Functional (Powered by Mobile Center 2.70) Page 14 of 88
Manufacturer Model
Huawei MediaPad T2 10.0 Pro
Lenovo Lenovo TAB 2
Samsung Galaxy Tab 2 7.0
Samsung Galaxy Tab 2 10.1
Samsung Galaxy Tab S2 9.7
Samsung Galaxy Tab 3 7" SM-T110
Samsung Galaxy Tab 3 Lite 7"
Samsung Galaxy Tab 3 8.0
Samsung Galaxy Tab S3
Samsung Galaxy Tab 4 8.0, T330
Samsung Galaxy Tab 4 10.1
Samsung Galaxy Tab A 9.7
Samsung Galaxy Note 10, Note Pro SM-P900
Soulycin Soulycin T800
Sony Xperia Z3
Teclast Teclast P98
Xiaomi* Mi Pad
Xiaomi* Mi Pad 2
* See the Known Issues section below.
Known Issues
l On Xiaomi devices, you need to activate the Install app via USB in the Developer options settings.This requires you to have a registered Xiaomi account.
l On Xiaomi devices with the MIUI 8 operating system, you must manually enable USB Debuggingunder the Security settings to allow proper integration with StormRunner Functional.
l Due to a customized home screen package on devices such as the Sony Xperia F8331 or the HTC UUltra, objects on the home page may not be recognized.
l Certain Meizu devices use a security option during installation, that prevents the packaging of apps.This security option also prevents the recording and replaying of packaged apps.Workaround: The security setting is per app. Disable the security option for the app that you aretesting.
Mobile Lab User GuideView and manage devices
StormRunner Functional (Powered by Mobile Center 2.70) Page 15 of 88
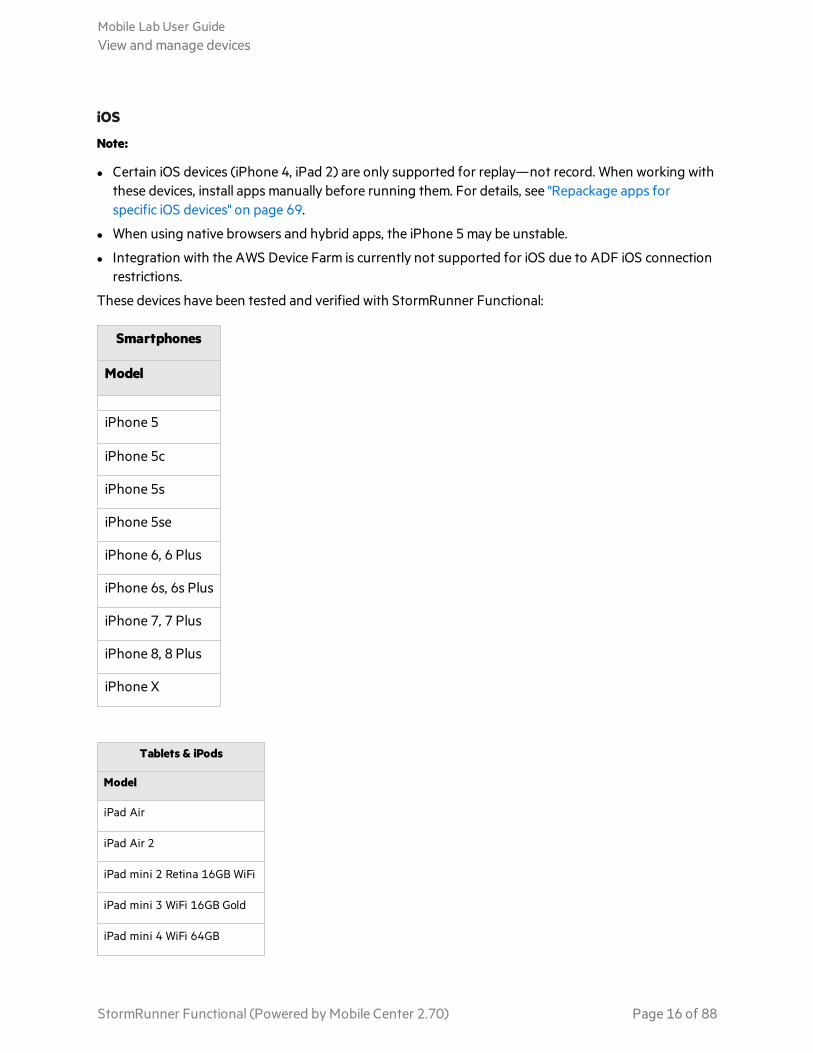
iOS
Note:
l Certain iOS devices (iPhone 4, iPad 2) are only supported for replay—not record. When working withthese devices, install apps manually before running them. For details, see "Repackage apps forspecific iOS devices" on page 69.
l When using native browsers and hybrid apps, the iPhone 5 may be unstable.
l Integration with the AWS Device Farm is currently not supported for iOS due to ADF iOS connectionrestrictions.
These devices have been tested and verified with StormRunner Functional:
Smartphones
Model
iPhone 5
iPhone 5c
iPhone 5s
iPhone 5se
iPhone 6, 6 Plus
iPhone 6s, 6s Plus
iPhone 7, 7 Plus
iPhone 8, 8 Plus
iPhone X
Tablets & iPods
Model
iPad Air
iPad Air 2
iPad mini 2 Retina 16GB WiFi
iPad mini 3 WiFi 16GB Gold
iPad mini 4 WiFi 64GB
Mobile Lab User GuideView and manage devices
StormRunner Functional (Powered by Mobile Center 2.70) Page 16 of 88
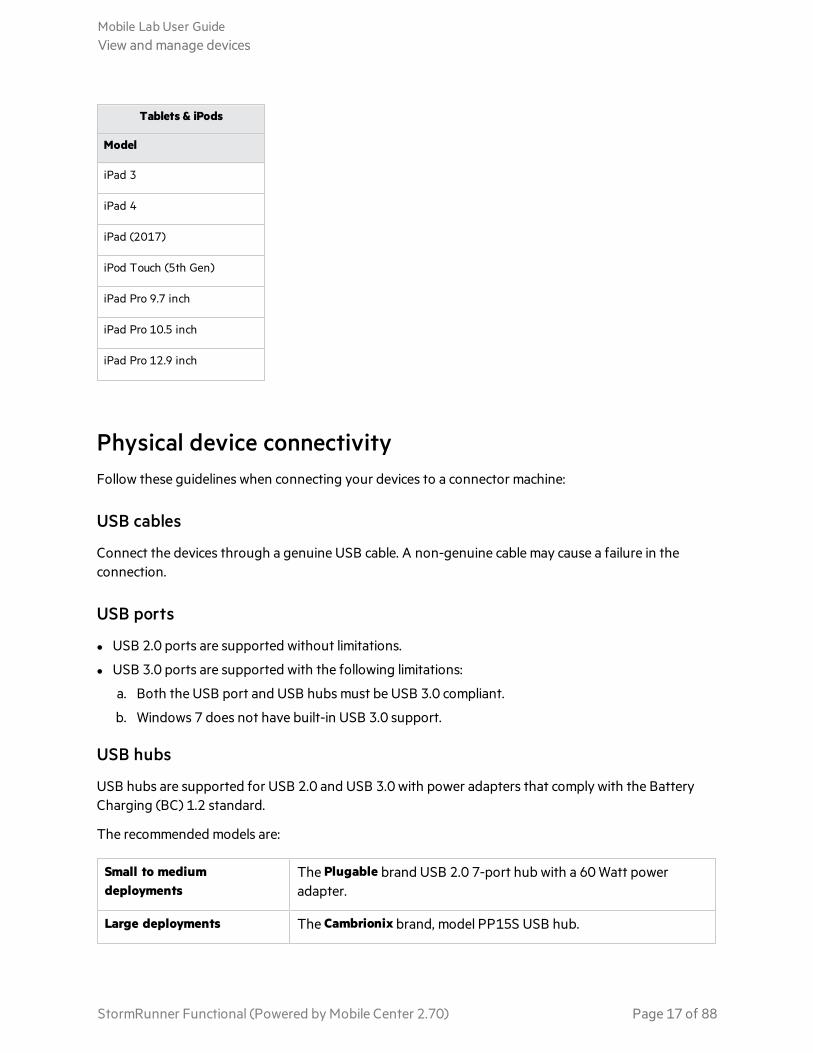
Tablets & iPods
Model
iPad 3
iPad 4
iPad (2017)
iPod Touch (5th Gen)
iPad Pro 9.7 inch
iPad Pro 10.5 inch
iPad Pro 12.9 inch
Physical device connectivityFollow these guidelines when connecting your devices to a connector machine:
USB cables
Connect the devices through a genuine USB cable. A non-genuine cable may cause a failure in theconnection.
USB ports
l USB 2.0 ports are supported without limitations.
l USB 3.0 ports are supported with the following limitations:
a. Both the USB port and USB hubs must be USB 3.0 compliant.
b. Windows 7 does not have built-in USB 3.0 support.
USB hubs
USB hubs are supported for USB 2.0 and USB 3.0 with power adapters that comply with the BatteryCharging (BC) 1.2 standard.
The recommended models are:
Small to mediumdeployments
The Plugable brand USB 2.0 7-port hub with a 60 Watt poweradapter.
Large deployments The Cambrionix brand, model PP15S USB hub.
Mobile Lab User GuideView and manage devices
StormRunner Functional (Powered by Mobile Center 2.70) Page 17 of 88
Best practice guidelines for devicesl Place the devices in a cool space to prevent overheating.
l Reduce the screen brightness of devices to the minimum, to reduce power consumption and heatgeneration.
l Place the devices in a vertical position to facilitate a smooth change in orientation (portrait tolandscape) in the remote device view.
l Disconnect the devices from their power source when not in use, to allow a full battery charge cycle.We recommend that you perform a full charge cycle on a weekly basis.
Swollen Batteries
Swollen batteries are a common problem with any device using lithium-ion batteries. It can affect mobiledevices, laptops, smart watches, and even car batteries.
The primary causes for swollen batteries in mobile devices are:
l Excessive heat: If the device is used extensively, it generates heat that may cause the battery to swell.
l Over-charging: Continuing to charge the device even after it is fully charged, can cause the battery toswell.
l Old age or a defective battery: A device that is 2-3 years old, may also show signs of a swollenbattery.
To avoid swollen batteries for devices under test, follow these guidelines:
l Reduce the device's screen brightness to minimum.
l Store the device in a cool, well-ventilated location.
l Use certified USB hubs that can provide adequate charging power.
l Perform manual battery charging cycles as part of the device maintenance, by disconnecting thedevice from Mobile Center and letting the battery drain completely.
l Make sure the battery is within a reasonable time of its recommended life, as specified by themanufacturer and covered by the warranty.
l Once a week, perform a visual inspection of the battery, and remove any devices with swollenbatteries.
See also:l "Install the connector on a Windows machine" on page 21
l "Install the connector on a Linux machine" on page 27
l "Install the connector on a Mac machine" on page 32
Initial device setupThis topic details the steps that you need to perform before you connect a device for the first time.
Mobile Lab User GuideView and manage devices
StormRunner Functional (Powered by Mobile Center 2.70) Page 18 of 88
Android initial device configuration
When connecting the device for the first time, there are a few steps that you need to perform on eachdevice that you intend to connect to StormRunner Functional. After the initial connection has been setup, the device is "plug-and-play".
1. Check that your devices are supported by StormRunner Functional. For details, see supporteddevices.
2. Enable Developer options. In general, on most devices with Android 4.2 and higher, you can do thisby navigating to Settings > About phone and tapping the Build number seven times.
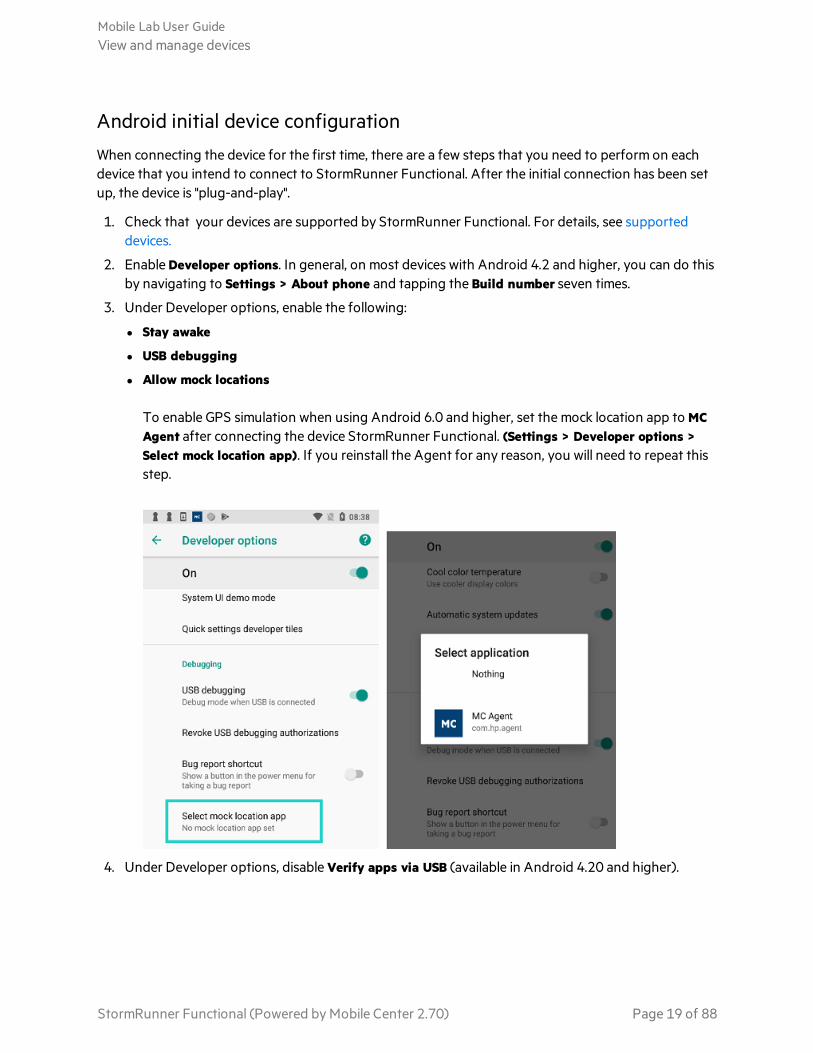
3. Under Developer options, enable the following:
l Stay awake
l USB debugging
l Allow mock locations
To enable GPS simulation when using Android 6.0 and higher, set the mock location app to MCAgent after connecting the device StormRunner Functional. (Settings > Developer options >Select mock location app). If you reinstall the Agent for any reason, you will need to repeat thisstep.
4. Under Developer options, disable Verify apps via USB (available in Android 4.20 and higher).
Mobile Lab User GuideView and manage devices
StormRunner Functional (Powered by Mobile Center 2.70) Page 19 of 88
5. Enable the following additional settings:l In Settings > Display, select Auto rotate screen.
l If you simulate GPS events during your test, prevent collisions with your real location fromWiFi/3G/LTE by enabling GPS only in Settings > Location > Mode.
6. If required by the apps being tested, make sure that there is an active Internet connection.
iOS initial device configuration
Before you connect a device to StormRunner Functional, you need to re-sign the following apps:
l Agent
l Agent Launcher
l WebDriverAgent Runner-Runner
l WebDriverAgentRunner-Runner_xcode9
Re-sign them with a development certificate from an Apple Developer Account, and a developmentprovisioning profile belonging to the same account. These provide the identity of the developer, andthe list of devices on which distribution of the app is allowed.
For details on how to re-sign these apps, see "Re-sign the Agent apps" on page 51.
The first time that you connect a device, perform the following steps on each device you intend toconnect to StormRunner Functional. These are one-time settings. After the initial connection has beenset up, the device is "plug-and-play".
1. If the Auto-lock option is set to on, in Settings > General > Auto-lock set the maximum time forpreventing auto-lock.
2. Set your preferences (such as iCloud) to avoid unnecessary pop-ups.
3. If required by the apps that you are testing, make sure that there is an active Internet connection.
4. For iOS 8 and higher, make sure UI Automation is enabled (Settings > Developer > UIAutomation). If you perform this step after connecting the device, you will need to restart thedevice, or unplug it and plug it in again.
5. Turn off the passcode on the device.
6. For Safari browser support: Enable Javascript and Web Inspector in Settings > Safari > Advanced.
7. Make sure that the Display Zoom, under the Display and Brightness settings, is set to Standard,and not Zoomed.
Before you start
Connector requirements
When installing the Device Connector, make sure that the connector machine meets the followingrequirements:
Mobile Lab User GuideView and manage devices
StormRunner Functional (Powered by Mobile Center 2.70) Page 20 of 88
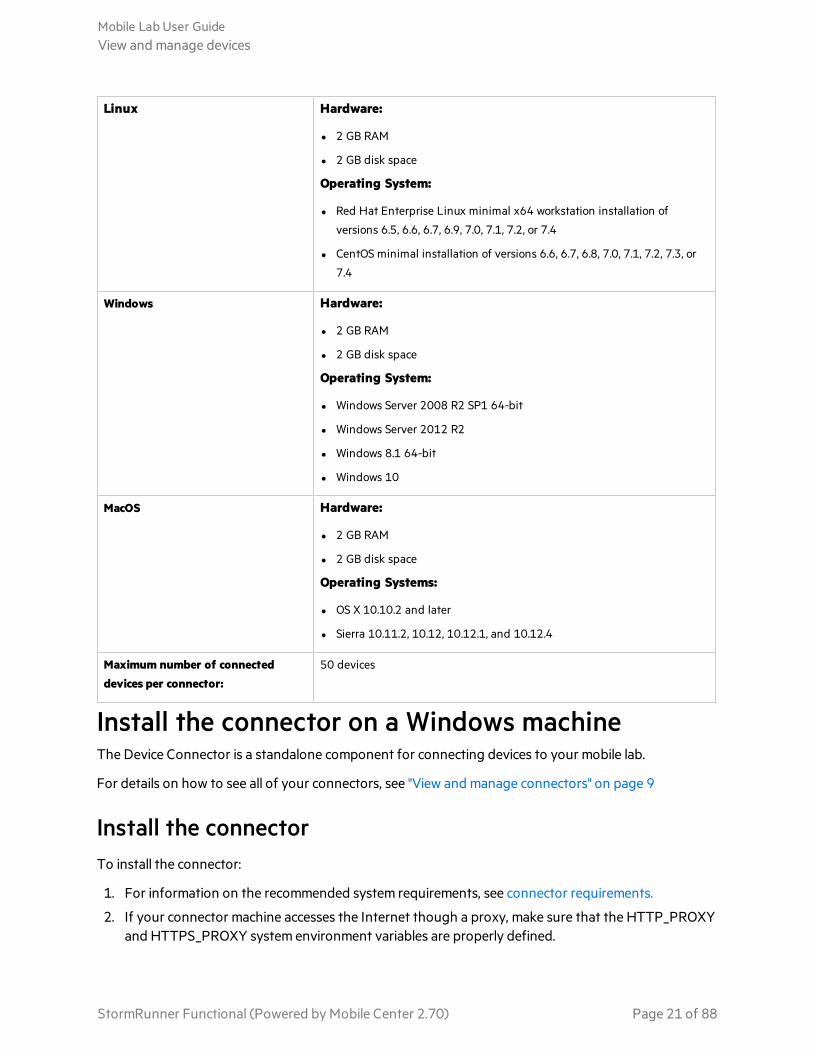
Linux Hardware:
l 2 GB RAM
l 2 GB disk space
Operating System:
l Red Hat Enterprise Linux minimal x64 workstation installation of
versions 6.5, 6.6, 6.7, 6.9, 7.0, 7.1, 7.2, or 7.4
l CentOS minimal installation of versions 6.6, 6.7, 6.8, 7.0, 7.1, 7.2, 7.3, or
7.4
Windows Hardware:
l 2 GB RAM
l 2 GB disk space
Operating System:
l Windows Server 2008 R2 SP1 64-bit
l Windows Server 2012 R2
l Windows 8.1 64-bit
l Windows 10
MacOS Hardware:
l 2 GB RAM
l 2 GB disk space
Operating Systems:
l OS X 10.10.2 and later
l Sierra 10.11.2, 10.12, 10.12.1, and 10.12.4
Maximum number of connecteddevices per connector:
50 devices
Install the connector on a Windows machineThe Device Connector is a standalone component for connecting devices to your mobile lab.
For details on how to see all of your connectors, see "View and manage connectors" on page 9
Install the connectorTo install the connector:
1. For information on the recommended system requirements, see connector requirements.
2. If your connector machine accesses the Internet though a proxy, make sure that the HTTP_PROXYand HTTPS_PROXY system environment variables are properly defined.
Mobile Lab User GuideView and manage devices
StormRunner Functional (Powered by Mobile Center 2.70) Page 21 of 88
3. Click MOBILE LAB > CONNECTORS and click .
4. In the Add Device Connector dialog box, select the Windows operating system and click Download.
5. Click Generate Credentials. Save these credentials for when you run the connector installation.
6. Extract the contents of the connector installation file to your computer.
7. Open the folder that you extracted above, and locate the .exe file. Double-click on the file to openthe Installation wizard. Read the contents and click Next.
8. Fill in the information or answer the questions in each of the Installation wizard pages followingthese guidelines:
Mobile lab
Mobile lab specifications:
l Connect to Mobile Center. For connecting to the lab via an on-premises Mobile Center server,enter the IP address or the fully qualified domain name (FQDN) of the Mobile Center servermachine. If the server was installed using an FQDN, use that same name here.
If the server was configured to work without SSL, disable the Use SSL option and specify thenon-secure port, 8080 by default.
l Connect to StormRunner Functional (SRF). To access the lab via SRF, paste your credentialsin the Credentials to StormRunner Functional (SRF) field. To obtain cloud credentials, openStormRunner Functional. In the MOBILE LAB > CONNECTORS tab, click . In
the Add Device Connector dialog box, click Generate Credentials.
For details on how to change the configuration after the installation, see "Modify a connector"on page 25.
If connecting over a proxy, select Enable in the proxy section, and specify the server, port, andcredentials if required.
Connector configuration
Provide a meaningful name for the connector, as this will allow you to effectively filter devicesbased on connector names. Enter the Connector's IP address or FQDN.
Indicate whether or not the connector should be private. A private connector only allows thecurrent user and the administrator access to the connector's devices.
Caution: To insure integrity and confidentiality of the information stored with StormRunnerFunctional, we strongly recommend that you incorporate filesystem monitoring on theinstallation and temporary folders.
Mobile Lab User GuideView and manage devices
StormRunner Functional (Powered by Mobile Center 2.70) Page 22 of 88
Prepare devicesSet up your Windows machine to detect the devices you want to connect to StormRunner Functional byperforming the following steps:
iOS devices
1. Make sure you have iTunes installed on your computer. For details, seehttps://www.apple.com/itunes/download.
2. If you haven't already done so, follow the steps for setting up iOS devices.
Android devices
1. Download the USB driver for your devices. See http://developer.android.com/tools/extras/oem-usb.html for a list of links to Original Equipment Manufacturers (OEM) USB Drivers. Alternatively,search the Web for a USB driver for Windows, for your device.
For Google Nexus devices, you must download the Google USB driver.
2. Extract the contents of the downloaded driver's archive file.
3. Connect the device(s) to your machine and install the driver per Windows version as described onthe Install OEM USB Drivers page.
Note: When you connect the device through a USB port, a security message may ask you toallow USB debugging or trust the connected computer. Accept the warning.
4. If you haven't already done so, follow the steps for the initial configuration of Android devices.
Connect devices and verify the connection1. Connect your devices to your computer via USB cable. Accept all notification, trust, or location
pop-ups that may be displayed when you connect a device.
2. When the connector is running, the following items are automatically installed on the devicesplugged into the connector machine:l Remote viewer services
l The Agent application
Wait until the Agent is running before interacting with the device. If the Agent crashes, try tounplug the device and then plug it in again. For additional troubleshooting information, see"Troubleshoot the Windows connector" on page 25.
Tip: If you unplug a device, wait 5 seconds before reconnecting it to allow the system tostabilize.
Mobile Lab User GuideView and manage devices
StormRunner Functional (Powered by Mobile Center 2.70) Page 23 of 88
3. If the Agent app does not start up after you connect the devices, check if the devices arerecognized:
Verify Android devices
Navigate to the <Windows Connector folder>\android-sdk-windows\platform-tools folder andrun adb at a command prompt.
adb devices
All your connected devices should be listed.
l If your device is listed as unauthorized, check the device and accept any security pop-ups.
l If your device is not listed, or if there are no devices listed, check for the following:o A hardware problem. The USB port may not be working.o Improper Installation of Windows driver. Select the driver inf file in the File Explorer and
select Install from the right-click menu.o Incorrect drivers for Android devices. Check the vendor website to see that you have the
most recent version of the driver.
Verify iOS devices
To verify iOS devices:
a. Open a command prompt window
b. Navigate to the <Windows Connector folder>\libimobiledevice\windows-amd64 folder
c. Run the idevice_id command:
idevice_id –l
The result of this command should be a list of devices IDs (UDID).
If there are no devices listed when a device is connected to the USB port, check for the following:
l A hardware problem. The USB port may not be working.
l Incorrect version of iTunes. Check that you are using the most up-to-date version of iTunes.
l UI Automation is not enabled. For iOS 8.x and above with a Developer signed Agent app,enable UI Automation in Settings > Developer > Enable UI Automation. Disconnect the device,wait 5 seconds, and then reconnect it.
Additional considerations for iOS devices
iOS 8.x and above
If you have not already done so, enable UI Automation on the device in Settings >Developer> EnableUI Automation. Disconnect the device, wait 5 seconds, and then reconnect it.
Mobile Lab User GuideView and manage devices
StormRunner Functional (Powered by Mobile Center 2.70) Page 24 of 88
Important Note for iOS 8.4.1 and above:
Users who install apps signed with an Enterprise certificate (that do not use a Mobile DeviceManagement (MDM) solution) will be prompted to trust the Enterprise developer the first time the appis installed. To trust the profile, go to Settings > General > Device Management, select the Enterprisedeveloper profile, and trust it. These actions can be performed remotely on the device.
All users who install your enterprise-signed app for the first time will also need an internet connection.Once an Enterprise developer profile has been trusted on a device, additional apps with the same profiledo not need to be trusted again, provided that the devices on which they are opened are connected tothe internet. If the Enterprise developer profile of the application under test is not trusted, the Agentwill not be able to open the app and will issue a 1009 Error: "Cannot communicate with AUT ".
Start, stop, and restart the connectorWhen the installation is complete, the setup program prompts you to start the connector service.
If you chose not to start the connector service after installing it, you can perform a manual Start, Stop,and Restart from the Services console, or directly from the machine's Start menu:
l Start > Mobile Center Connector > Start service
l Start > Mobile Center Connector > Stop service
l Start > Mobile Center Connector > Restart service
Modify a connectorIf you need to modify your connector details, for example to switch between an on-premises MobileCenter server or the StormRunner Functional mobile lab, or to change the connector port, you canmodify them using the Modify configuration tool.
To access the tool, select Start > Mobile Center Connector > Modify configuration. The configurationwizard opens.
When running, the wizard stops the Connector service. The wizard's final page prompts you to start theservice again.
Enable localizationTo display system apps (apps that are used to run the device itself) in a supported language other thanEnglish, after installing the connector, navigate to <path to your Windows connectorfolder>\conf\connector.properties and uncomment the following line in the file:ENABLE_LOCALIZATION=true
Troubleshoot the Windows connectorThis section provides some tips and guidelines for getting your connector to work.
Mobile Lab User GuideView and manage devices
StormRunner Functional (Powered by Mobile Center 2.70) Page 25 of 88
Devices do not appear after starting the connector
If the Windows connector started successfully, but you don't see devices in the StormRunner Functionallab:
l Verify that your machine can detect your device.
l Check the connector.log file located in <Windows connector folder>\connector\log folder andmake sure that there are no "connection refused" messages or other errors.
App features are blocked by a firewall
If, during installation, Windows issues the warning “Windows Firewall has blocked some features of thisapp”, click Allow access or contact your system administrator. When this message is issued, the currentConnector installation is aborted.
Remote device view is blocked
If you cannot view a remote device in StormRunner Functional, this may be a result of the antivirussoftware installed on the machine. For example, McAfee Host Intrusion Prevention blocks access.Workaround: Disable the antivirus while running the test.
Remote access or recording fails
The Windows connector started successfully and the device is displayed in the StormRunner Functionallab, but either remote access or recording are not working. In some cases, StormRunner Functional willissue a message with the problematic IP address and port. In other instances, you may receive a"connection refused" message, indicating an IP address problem:
l Check that the IP address (shown in the error message) that StormRunner Functional is trying toreach, is the correct one for your connector machine. To show the IP address of your machine, open acommand line window and type ipconfig.
If, for example, you were connected to a different network or IP when you installed the connector,you will need to run the Modify configuration utility under Start > Mobile Center Connector andenter the new IP of the connector machine.
l Check that the port shown in the error message, is open for incoming traffic on the connectormachine.
Proxy and SSL
l Proxy machines that require credentials are not supported.
l If you have a device connected when you install the connector using a proxy server, the devices willnot appear in the Mobile Lab. Workaround: Connect the devices after you install the connectorsoftware.
Connection refused or connection timed out message
When trying to run the installation, if the setup program issues a "connection refused" or "connectiontimed out" warning:
Mobile Lab User GuideView and manage devices
StormRunner Functional (Powered by Mobile Center 2.70) Page 26 of 88
Check that you are using the most up-to-date version of the connector, and that there are nonotifications on the Device and Connector pages of the mobile lab, indicating that you should upgradeyour connector.
Port conflicts prevent the connector from starting
If an existing service running on your machine is claiming the port on which the connector runs (Default:8080), there will be a conflict, and the connector will not start up.
To change the port, run the Modify configuration utility under the Start > Mobile Center Connectormenu.
Prior installations of Android SDK
If you installed the Android SDK for a specific user (not the SYSTEM user), the Windows connectorsetup program may be unable to install the Agent, since the manually installed SDK is not accessiblefrom the SYSTEM user.Workaround: Reinstall the Android SDK as a SYSTEM user, and delete the ANDROID_HOMEenvironment variable.
Uninstall a connectorYou can uninstall the connector via the Start menu or through the standard Windows Programs andFeatures > Uninstall or change a program interface.
Install the connector on a Linux machineThe Device Connector is a standalone component for connecting devices to StormRunner Functional.
For details on how to see all of your connectors, see "View and manage connectors" on page 9
Install the connectorTo install the connector:
1. For information on the recommended system requirements, see connector requirements.
2. If your connector machine accesses the Internet though a proxy, make sure that the HTTP_PROXYand HTTPS_PROXY system environment variables are properly defined.
3. Click MOBILE LAB > CONNECTORS and click .
4. In the Add Device Connector dialog box, select the Linux operating system and click Download.
5. Click Generate Credentials. Save these credentials for when you run the connector installation.
1. On your Linux machine, log in as root or as a user in the Linux sudoers file.
2. Copy the connector installation file to your Linux machine and extract the contents:
unzip <Name of connector installation file>.zip –d <Target directory name>
Mobile Lab User GuideView and manage devices
StormRunner Functional (Powered by Mobile Center 2.70) Page 27 of 88
3. Change directory to the Target directory:cd <Target directory name>
4. Run the connector installer:./<install_connector-x64 file name>.bin
5. Read the License Agreement, and select Y to accept the terms and proceed with the installation. Fillin the information or answer the questions in each of the Installation sections following theseguidelines:
User configuration
Enter y to use an existing Linux user, or enter n to use the default new user "hpmc". Enter the password for this
user.
Mobile Lab
Mobile lab specifications:
l Connect to Mobile Center. For connecting to the lab via an on-premises Mobile Center server, enter the IP
address or the fully qualified domain name (FQDN) of the Mobile Center server machine. If the server was
installed using an FQDN, use that same name here.
If the server that you are connecting to was configured to work without SSL, you need to also install the
connector with a non-secure connection. For non-SSL, enter n to indicate that the selected port is not an SSL
port.
When prompted for a port, note that the default secure port using SSL is 8443. For a non-secure server, the
default is port 8080.
l Connect to StormRunner Functional (SRF). To access the lab via SRF, paste your credentials when
prompted. To obtain cloud credentials, open StormRunner Functional. In MOBILE LAB> CONNECTORS,
click . In the Add Device Connector dialog box, click Generate Credentials.
For details on how to change the configuration after the installation, see "Change the configuration of the
connector" on page 31.
If connecting over a proxy, enter y and specify the proxy details.
Connector configuration
Provide a meaningful name for the connector, as this will allow you to effectively filter devices based on connector
names. Enter the Connector's IP address or FQDN.
Specify the connector port or use the default (8080), and the port to be used internally (Default 8081).
Indicate whether or not the connector should be private. A private connector only allows the current user and the
administrator access to the connector's devices.
Review the pre-installation summary and press Enter to continue with the installation of the connector.
Mobile Lab User GuideView and manage devices
StormRunner Functional (Powered by Mobile Center 2.70) Page 28 of 88
Caution: To insure integrity and confidentiality of the information stored with StormRunnerFunctional, we strongly recommend that you incorporate filesystem monitoring on theinstallation and temporary folders.
Connect and verify devices1. If you have not already done so, make sure to follow the steps for initial device configuration when
connecting Android and iOS devices .
2. Connect the device to the connector machine using a USB cable. On some devices, when youconnect the device, there may be notification, trust, or location pop-ups. Accept these pop-ups.
3. Wait until the Agent is running on the device.
4. If the Agent does not start up on the device, verify that the devices are recognized:
Android devices
Run the following command on the Linux connector machine (If you are a root user, changedirectory to /opt/mc/connector/android-sdk-linux/platform-tools):
adb devices
All your connected devices should be listed. The status of the device should be "device" and not anyother state, for example "unauthorized".
Tip: If you are connecting with a C-Type USB device, such as One Plus, Nexus 5, etc, theidVendor value may not have been recognized.
Workaround: Run dmesg to obtain the idVendor value, beginning with 0x. Run sudo toswitch to the hpmc user provided during installation. Run the ~/add_android_vendor.sh<idVendor> script.
iOS devices
a. Navigate to:/opt/mc/Connector/libimobiledevice/linux-amd64/
b. Run idevice_id –l
The result of this command should be a list of devices IDs (UDID). If the command returns anempty result or ERROR message, try the following:
a. On the connector machine, log in as root or as a user on the Linux sudoers list.
b. Locate the process ID of “usbmuxd”"
ps aux | grep '[u]sbmuxd'
Mobile Lab User GuideView and manage devices
StormRunner Functional (Powered by Mobile Center 2.70) Page 29 of 88
c. Kill the process:
kill –9 <processID>d. Start usbmuxd again:
usbmuxde. Run idevice_id –l again to see if the device is recognized.
If the devices are connected correctly, try to manually launch the MC Launcher app. If you see anUntrusted App Developer notification:
l Click Trust.
l Disconnect the device.
l Wait 5 seconds and then reconnect the device.
Additional considerations for iOS devices
iOS 8.x and higher
If you have not already done so, enable UI Automation on the device in Settings >Developer> Enable UIAutomation. Disconnect the device, wait 5 seconds, and then reconnect it.
Important Note for iOS 8.4.1 and higher
Users who install apps signed with an Enterprise certificate (that do not use a Mobile DeviceManagement (MDM) solution) will be prompted to trust the Enterprise developer the first time the appis installed. To trust the profile, go to Settings > General > Device Management, select the Enterprisedeveloper profile, and trust it. These actions can be performed remotely on the device.
All users who install your enterprise-signed app for the first time will also need an internet connection.Once an Enterprise developer profile has been trusted on a device, additional apps with the same profiledo not need to be trusted again, provided that the devices on which they are opened are connected tothe internet. If the Enterprise developer profile of the application under test is not trusted, the Agentwill not be able to open the app and a 1009 Error: "Cannot communicate with AUT " will result.
Start and stop the connectorYou can stop and start the connector with the following commands:
l To start the connector: service hpmc start
l To stop the connector: service hpmc stop
l To restart the connector: service hpmc restart
Enable localizationTo display system apps (apps that are used to run the device itself) in a supported language other thanEnglish, after installing the connector, navigate to /opt/mc/connector/conf/connector.propertiesand uncomment the following line in the file:
ENABLE_LOCALIZATION=true
Mobile Lab User GuideView and manage devices
StormRunner Functional (Powered by Mobile Center 2.70) Page 30 of 88
Uninstall the connectorYou can uninstall the connector for Linux as follows:
1. Log into the Linux connector machine as root user, or as a user in the Linux sudoers file.
2. Change directory to the connector installation directory:cd <path to installation folder> (Default /opt/mc/)
3. Run the uninstall script by entering the following command:./MC_uninstall
4. Press enter to proceed with uninstalling the StormRunner Functional connector.
Change the configuration of the connectorIf you need to modify your connector details, for example to switch between an on-premises MobileCenter server or the StormRunner Functional mobile lab, of if you need to change the connector details,you can use the update tool. When you run the tool, you can update any of the following :
On-premises Mobile Center server details:
l IP address or FQDN
l Port
l Secure or non secure connection (SSL)
l Proxy information
StormRunner Functional Mobile Lab:
l Credentials
Connector details:
l Credentials
l Connector name
l Connector IP address
l Connector port
To change the configuration of the connector:
1. On the connector machine, log in as root or as a user in the Linux sudoers file.
2. Navigate to your connector installation directory.Default opt/mc/
3. Run the following command:
./MC_update4. When prompted, specify the new details.
5. Restart the connector at the end of the process to allow the change to take effect.
Mobile Lab User GuideView and manage devices
StormRunner Functional (Powered by Mobile Center 2.70) Page 31 of 88
Install the connector on a Mac machineThe Device Connector is a standalone component for connecting devices to StormRunner Functional.
This section describes how to install the connector on a Mac machine for testing iOS or Android phones.
For details on how to see all of your connectors, see "View and manage connectors" on page 9
For information on the recommended system requirements see connector requirements.
Set up your Mac machine1. Set up your Mac machine to detect the devices you want to connect to StormRunner Functional by
performing the following steps:
iOS devices
a. Check that you have an updated version of iTunes on your Mac.
b. If you haven't already done so, follow the steps for setting up iOS devices.
Android devices
a. Install the USB drivers for your devices. Each device manufacturer has its own USB drivers forMac. Follow the instructions from the device manufacturer. Seehttp://developer.android.com/tools/extras/oem-usb.html for a list of links to OriginalEquipment Manufacturers (OEM) USB Drivers.
b. If you haven't already done so, follow the steps for the initial configuration of Android devices.
2. Connect your devices to your machine via a USB port. For a new installation of Mac OS, make surethat you open iTunes before plugging in a device.
On some devices, when you connect the device via USB, the device issues a security alert. Acceptthe warning.
Tip: Some phones have USB settings (Swipe left on the app list, tap Settings, and look for aUSB option) that allow the data connection to be enabled separately from the chargingconnection. If your phone has this option, check the settings to ensure your USB dataconnection is enabled.
3. Download the Mac connector :
a. Click MOBILE LAB > CONNECTORS and click .
b. In the Add Device Connector dialog box, select the macOS operating system and clickDownload.
c. Click Generate Credentials. Download the credentials file for when you run the connectorinstallation.
Mobile Lab User GuideView and manage devices
StormRunner Functional (Powered by Mobile Center 2.70) Page 32 of 88
4. If your connector machine accesses the Internet though a proxy, make sure that the HTTP_PROXYand HTTPS_PROXY system environment variables are properly defined.
Install the connector with TerminalTo install the connector:
1. Log in as root or admin user. If you are using macOS Sierra, you must log in as root user, byrunning sudo -i in the Terminal window.
2. Extract the contents of <Name of macOS connector installation file>.zip .
3. Run the following command to move the CONNECTOR folder to the Applications folder:
cp –r /desktop/CONNECTOR/Applications4. Run the following command to get permissions to run the installation file:
chmod -R 777 /Applications/CONNECTOR5. Navigate to the folder:
Aplications/CONNECTOR/install.app/Contents/MacOS6. Run ./install. The wizard is launched. Press Enter and Y/N when prompted to do so, for example
to accept the license agreement.
7. Proceed through the wizard following these guidelines:
Mobile lab
Mobile lab specifications:
l Connect to Mobile Center. For connecting to the lab via an on-premises Mobile Center server,enter the IP address or the fully qualified domain name (FQDN) of the Mobile Center servermachine. If the server was installed using an FQDN, use that same name here.
If the server was configured to work without SSL, disable the Use SSL option and specify thenon-secure port, 8080 by default.
l Connect to StormRunner Functional (SRF). To access the lab via SRF, upload the credentialsfile in the Credentials to StormRunner Functional (SRF). field. To obtain cloud credentials,open StormRunner Functional. In the MOBILE LAB tab, click . In the Add
Device Connector dialog box, click Generate Credentials.
For details on how to change the configuration after the installation, see "Reconfigure the Macconnector" on page 35.
If connecting over a proxy, select Enable in the proxy section, and specify the server, port, andcredentials.
Connector configuration
Mobile Lab User GuideView and manage devices
StormRunner Functional (Powered by Mobile Center 2.70) Page 33 of 88

Mobile lab
Enter the Connector's IP address or FQDN. The FQDN must begin with an English alphabeticalcharacter. FQDNs beginning with numbers are not supported.Provide a meaningful name for the connector, as this will allow you to effectively filter devicesbased on connector names.
In the Connector configuration screen, indicate whether or not the connector should be private.A private connector only allows the current user and the administrator access to the connector'sdevices.
Verify device connection and connect devicesAfter the installation, if you have Xcode installed, you can check whether the machine recognizes an iOSdevice using the instruments command:
instruments -s devices
The result of this command should be a list of devices IDs (UDID). If your device is not listed whenconnected to the USB port, this may mean that:
l The USB port is not working (hardware problem).
l You are not using the most up-to-date version of iTunes. You should upgrade your version ofiTunes
To connect iOS devices through a Mac connector to StormRunner Functional:
1. Codesign the Agent apps (HP4M-Agent.ipa, and HPMC-AgentLauncher.ipaWebDriverAgentRunner-Runner.ipa and WebDriverAgentRunner-Runner_xcode9.ipa) using MCEnabler.
2. Rename the files by removing -Codesigned from the file name. For example, the Agent file shouldbe renamed from HP4M-Agent-Codesigned.ipa to HP4M-Agent.ipa
3. Copy the re-signed apps over to the Agent folder on the Mac connector machine.
4. Run the following commands in the Agent folder:
sudo chown hpmc HP4M-Agent.ipa
sudo chown hpmc HPMC-AgentLauncher.ipa
sudo chown hpmc WebDriverAgentRunner-Runner.ipa
sudo chown hpmc WebDriverAgentRunner-Runner_xcode9.ipa
Mobile Lab User GuideView and manage devices
StormRunner Functional (Powered by Mobile Center 2.70) Page 34 of 88
sudo chmod 755*
5. If the Mac connector is running, restart it.
Caution: To insure integrity and confidentiality of the information stored with StormRunnerFunctional, we strongly recommend that you incorporate filesystem monitoring on theinstallation and temporary folders.
Start or stop the Mac connectorWhen you run the installation, by default the Mac connector is installed as a Mac service. You areprompted to start this service at the end of the installation. To stop the service, perform an uninstall.
If you chose not to start the service at the conclusion of the installation, you can stop and start theconnector at a later time as follows:
From the Terminal window, change directory to /opt/mc/scripts and run:
l To start the connector: sudo launchctl load/Library/LaunchDaemons/com.hpe.mobilecenter.plist
l To stop the connector: sudo launchctl unload/Library/LaunchDaemons/com.hpe.mobilecenter.plist
Note: These commands require root access.
Reconfigure the Mac connectorIf you need to modify your connector details, for example to switch between an on-premises MobileCenter server or the StormRunner Functional mobile lab, of if you need to change the connector details,you can reconfigure the connector’s settings without having to reinstall it.
To reconfigure from the Mac OS:
Double-click MC_Update in the machine's Applications > Mobile Center Connector folder.
To reconfigure from a terminal:
1. Change directory to the installation folder. cd /opt/mc/installation/
2. Run the upgrade script:
./MC_update.command
Mobile Lab User GuideView and manage devices
StormRunner Functional (Powered by Mobile Center 2.70) Page 35 of 88
Uninstall the Mac connectorYou can remove the connector for Mac by running the uninstall program on the Mac OS machine, or viaterminal. The uninstall requires root or admin permissions.
Note: If you installed the connector via terminal (PuTTY), you can only uninstall it from aterminal.
To uninstall from the Mac OS:
Double-click MC_Uninstall in the machine's Applications > Mobile Center Connector folder.
To uninstall from a terminal window:
1. Change directory to the installation folder. cd /opt/mc/installation/
2. Run the uninstall script:
./MC_uninstall.command
Troubleshooting and tips
Troubleshooting Android devicesThis section offers solutions for Android-specific issues.
Samsung device disconnects after 24 hours
Certain Samsung devices running Android 7.0, use a battery optimization tool that causes this issue. Ifyou encounter disconnection issues, perform the following:
1. Open Settings > Apps.
2. Click the More button (three vertical dots) and select Special Access.
3. In the Special Access area, choose Optimize battery usage.
4. In the Optimize battery usage area, choose All apps.
5. Scroll to the MC Agent app and switch it to Off.
Device disconnects on specific devices after several seconds
Certain Android devices, primarily those manufactured by Chinese vendors, use a security tool thataffects the memory and battery usage. If you encounter disconnection issues, perform the following:
1. Enable Autostart for the MC Agent: Open the device’s Security app from the Home page, and clickPermissions. Select Autostart, find the MC Agent app, and enable it.
2. Turn off the battery saver: Open the device’s Security app from the Home page, and click Battery.Set Battery saver to Off. Alternatively, to work with the battery saver on, select App battery saverand find the MC Agent app. Select No Restrictions.
Mobile Lab User GuideView and manage devices
StormRunner Functional (Powered by Mobile Center 2.70) Page 36 of 88
App crashes end recording sessions
If an app crashes or is terminated forcefully during a recording session, your actions will no longer berecorded even if you restart the app. You must re-record your session from the beginning.
Dexguard security
You can work with Dexguard security by compiling your app in Dexguard. Follow these steps:
1. Upload your original, packaged or non-packaged app to StormRunner Functional.
2. Record a test on the original app.
3. Recompile the app in Dexguard with the following options:
"-keepresourcexmlattributenames **/id -keepresources id/*"
4. Upload the Dexguard-wrapped version of the app to StormRunner Functional.
5. Replay the testing using the Dexguard-wrapped version of the app.
iFrame failures
Cross-domain iframe calls are not supported. For example, if your test uses an iframe that points to aweb page in another domain, it will fail.
App installation failures due to insufficient storage
An Android limitation may cause a device to issue the message INSTALL_FAILED_INSUFFICIENT_STORAGE while installing certain apps. Workaround: Restart the device.
Device hanging when in remote screen viewer
If your device hangs when trying to open an app, it may be caused by the app's secure layout flag.Workaround: Manually remove the secure layout flag. If you are testing a packaged app, see "Packagean Android app manually" on page 60 for more details. For non-packaged apps, see "Manually enableremote content debugging " on page 62.
Replay issues with hybrid apps
When working with hybrid non-packaged apps, make sure that remote content debugging is enabled.For details, see "Enable remote content debugging of Android apps" on page 62.
Good Connect client issues
In order to work in the remote view on a device with a Good Connect client, you must set the PreventAndroid Screen Capture policy to Off. The release version of 2.3.18.687.117 and above is required forthe policy to take effect. For details, see the Blackberry Knowledge Base article.
Mobile Lab User GuideView and manage devices
StormRunner Functional (Powered by Mobile Center 2.70) Page 37 of 88
Troubleshooting iOS devices
iOS device best practices
Are there version-specific guidelines for iOS devices?
l For iOS 7 devices, it is not recommended to manually delete the Agent and Agent Launcher apps. Ifyou do so, when you reconnect the device, a black screen will be displayed and the device will notavailable to users. To resolve this, restart the device.
l For devices running iOS < 11, record/replay is not supported for UIWebView in XC mode.
l For iOS 8.x and above, with a Developer signed Agent app: On the device, enable UI Automation inSettings > Developer > Enable UI Automation. Disconnect the device, wait 5 seconds, and thenreconnect it.
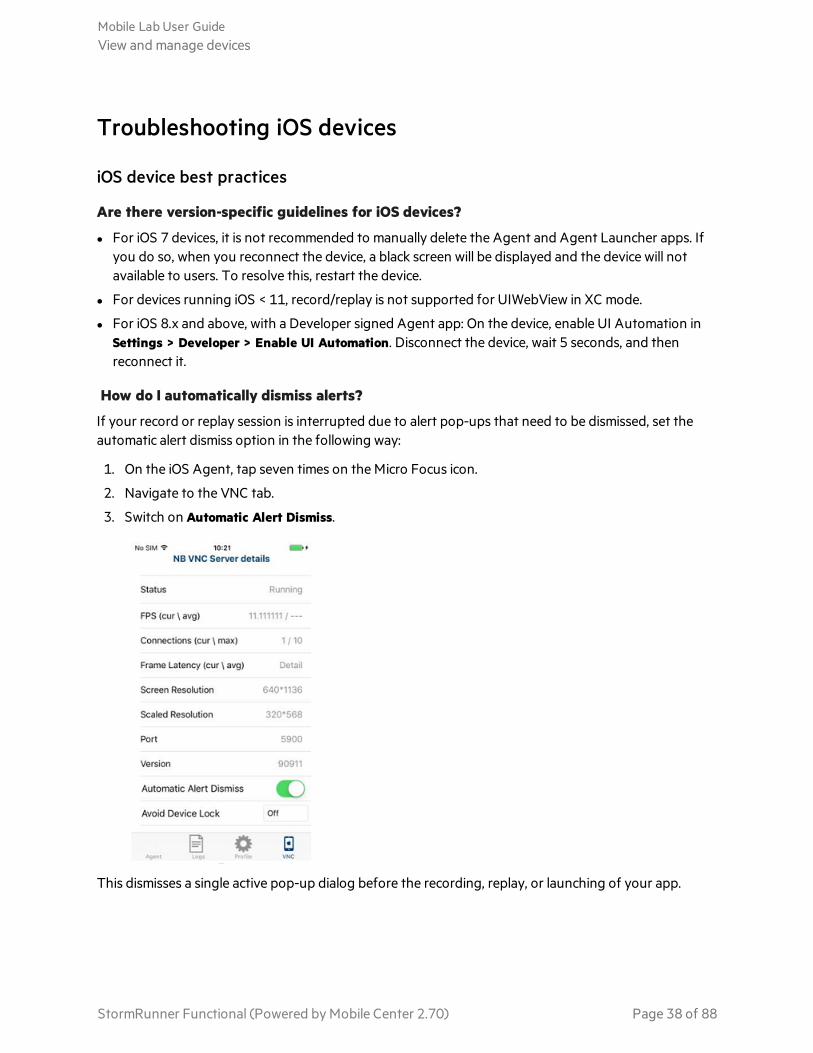
How do I automatically dismiss alerts?
If your record or replay session is interrupted due to alert pop-ups that need to be dismissed, set theautomatic alert dismiss option in the following way:
1. On the iOS Agent, tap seven times on the Micro Focus icon.
2. Navigate to the VNC tab.
3. Switch on Automatic Alert Dismiss.
This dismisses a single active pop-up dialog before the recording, replay, or launching of your app.
Mobile Lab User GuideView and manage devices
StormRunner Functional (Powered by Mobile Center 2.70) Page 38 of 88
What should I know about app certificates?
When installing an app that is already installed on the device, be sure to use the same developercertificate as the installed app. If the certificates do not match, the installation will fail. For example, if theapp on the device is signed with Certificate A you cannot install the same app signed with Certificate B.
The same applies if an app on the device is signed with an Enterprise certificate and you want to installthe same app signed with a Developer certificate.
Workaround: If the certificates do not match, first remove the app that is already installed on the device,and then reinstall the app with the other certificate onto your device.
Note: Non-packaged hybrid apps signed with an Enterprise certificate are not supported.
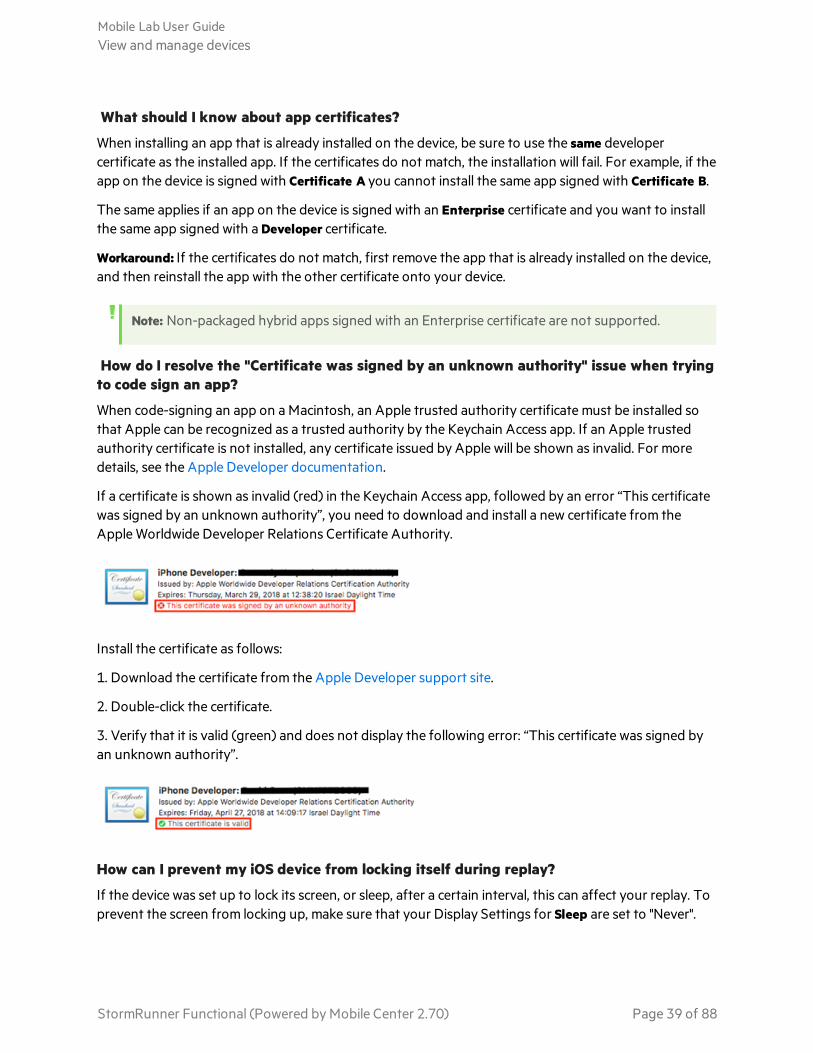
How do I resolve the "Certificate was signed by an unknown authority" issue when tryingto code sign an app?
When code-signing an app on a Macintosh, an Apple trusted authority certificate must be installed sothat Apple can be recognized as a trusted authority by the Keychain Access app. If an Apple trustedauthority certificate is not installed, any certificate issued by Apple will be shown as invalid. For moredetails, see the Apple Developer documentation.
If a certificate is shown as invalid (red) in the Keychain Access app, followed by an error “This certificatewas signed by an unknown authority”, you need to download and install a new certificate from theApple Worldwide Developer Relations Certificate Authority.
Install the certificate as follows:
1. Download the certificate from the Apple Developer support site.
2. Double-click the certificate.
3. Verify that it is valid (green) and does not display the following error: “This certificate was signed byan unknown authority”.
How can I prevent my iOS device from locking itself during replay?
If the device was set up to lock its screen, or sleep, after a certain interval, this can affect your replay. Toprevent the screen from locking up, make sure that your Display Settings for Sleep are set to "Never".
Mobile Lab User GuideView and manage devices
StormRunner Functional (Powered by Mobile Center 2.70) Page 39 of 88
If your device continues to sleep and lock its screen, you can apply a workaround to send a pseudo-action to the device to prevent it from sleeping, and to keep the device unlocked. The pseudo-actionused by this workaround, is the Volume up and Volume down controls. It will not affect the steps inyour test, but you will see the control briefly at certain intervals, on the device screen.
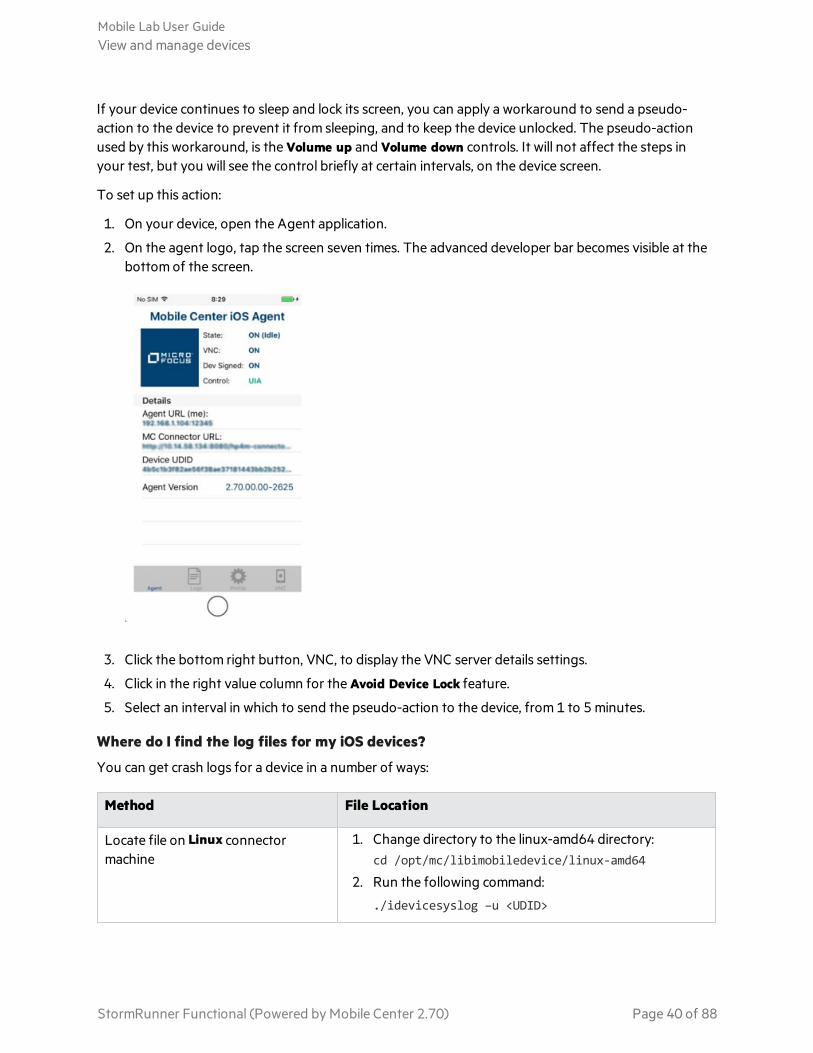
To set up this action:
1. On your device, open the Agent application.
2. On the agent logo, tap the screen seven times. The advanced developer bar becomes visible at thebottom of the screen.
3. Click the bottom right button, VNC, to display the VNC server details settings.
4. Click in the right value column for the Avoid Device Lock feature.
5. Select an interval in which to send the pseudo-action to the device, from 1 to 5 minutes.
Where do I find the log files for my iOS devices?
You can get crash logs for a device in a number of ways:
Method File Location
Locate file on Linux connectormachine
1. Change directory to the linux-amd64 directory:cd /opt/mc/libimobiledevice/linux-amd64
2. Run the following command:
./idevicesyslog –u <UDID>
Mobile Lab User GuideView and manage devices
StormRunner Functional (Powered by Mobile Center 2.70) Page 40 of 88
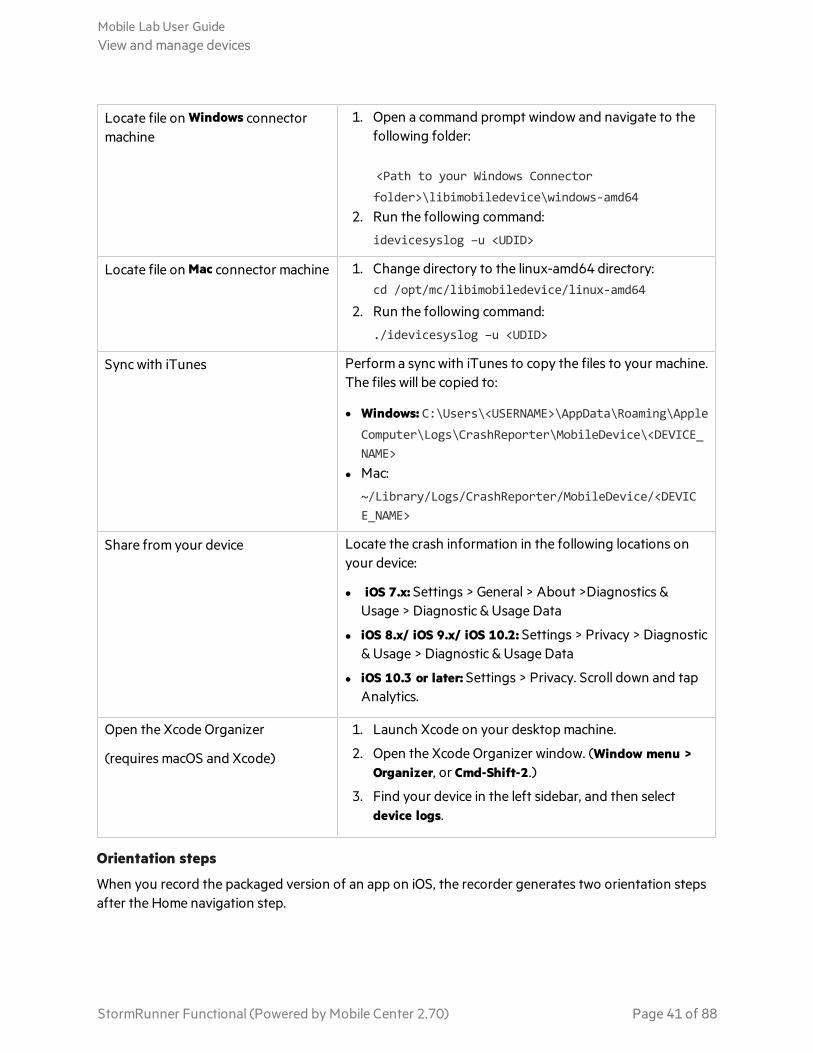
Locate file on Windows connectormachine
1. Open a command prompt window and navigate to thefollowing folder:
<Path to your Windows Connectorfolder>\libimobiledevice\windows-amd64
2. Run the following command:
idevicesyslog –u <UDID>
Locate file on Mac connector machine 1. Change directory to the linux-amd64 directory:cd /opt/mc/libimobiledevice/linux-amd64
2. Run the following command:
./idevicesyslog –u <UDID>
Sync with iTunes Perform a sync with iTunes to copy the files to your machine.The files will be copied to:
l Windows: C:\Users\<USERNAME>\AppData\Roaming\AppleComputer\Logs\CrashReporter\MobileDevice\<DEVICE_NAME>
l Mac:
~/Library/Logs/CrashReporter/MobileDevice/<DEVICE_NAME>
Share from your device Locate the crash information in the following locations onyour device:
l iOS 7.x: Settings > General > About >Diagnostics &Usage > Diagnostic & Usage Data
l iOS 8.x/ iOS 9.x/ iOS 10.2: Settings > Privacy > Diagnostic& Usage > Diagnostic & Usage Data
l iOS 10.3 or later: Settings > Privacy. Scroll down and tapAnalytics.
Open the Xcode Organizer
(requires macOS and Xcode)
1. Launch Xcode on your desktop machine.
2. Open the Xcode Organizer window. (Window menu >Organizer, or Cmd-Shift-2.)
3. Find your device in the left sidebar, and then selectdevice logs.
Orientation steps
When you record the packaged version of an app on iOS, the recorder generates two orientation stepsafter the Home navigation step.
Mobile Lab User GuideView and manage devices
StormRunner Functional (Powered by Mobile Center 2.70) Page 41 of 88
Known issues and problem solving
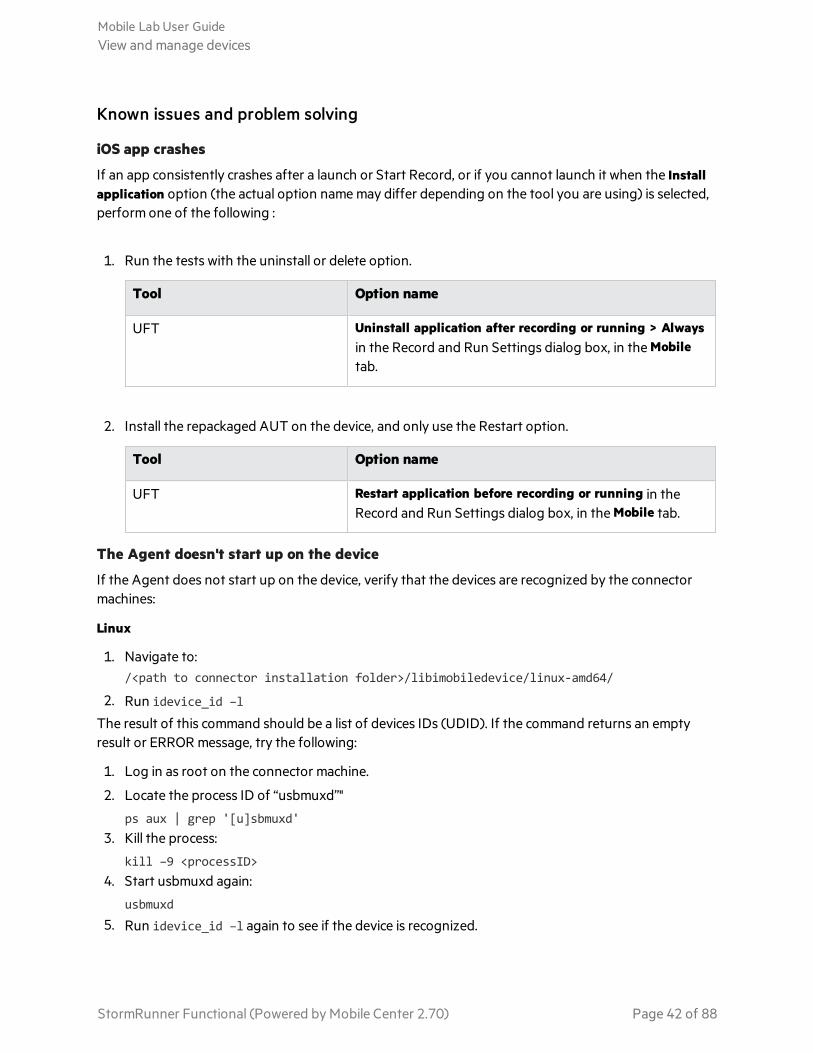
iOS app crashes
If an app consistently crashes after a launch or Start Record, or if you cannot launch it when the Installapplication option (the actual option name may differ depending on the tool you are using) is selected,perform one of the following :
1. Run the tests with the uninstall or delete option.
Tool Option name
UFT Uninstall application after recording or running > Alwaysin the Record and Run Settings dialog box, in the Mobiletab.
2. Install the repackaged AUT on the device, and only use the Restart option.
Tool Option name
UFT Restart application before recording or running in theRecord and Run Settings dialog box, in the Mobile tab.
The Agent doesn't start up on the device
If the Agent does not start up on the device, verify that the devices are recognized by the connectormachines:
Linux
1. Navigate to:/<path to connector installation folder>/libimobiledevice/linux-amd64/
2. Run idevice_id –l
The result of this command should be a list of devices IDs (UDID). If the command returns an emptyresult or ERROR message, try the following:
1. Log in as root on the connector machine.
2. Locate the process ID of “usbmuxd”"
ps aux | grep '[u]sbmuxd'3. Kill the process:
kill –9 <processID>4. Start usbmuxd again:
usbmuxd5. Run idevice_id –l again to see if the device is recognized.
Mobile Lab User GuideView and manage devices
StormRunner Functional (Powered by Mobile Center 2.70) Page 42 of 88
Windows
1. Open a command prompt window and navigate to the following folder:
<Path to your Windows Connector folder>\libimobiledevice\windows-amd642. Run the following command: idevice_id –l
The result of this command should be a list of devices IDs (UDID). If there are no devices listed when adevice is connected to USB port, this may mean that:
l The USB port is not working (hardware problem)
l iTunes is not installed, or you are not using the most up-to-date version of iTunes on the Connectorcomputer. In this case, you should download the latest version of iTunes.
If the devices are connected correctly, try to manually launch the MC Launcher app. If you see anUntrusted App Developer notification:
1. Click Trust.
2. Disconnect the device.
3. Wait 5 seconds and then reconnect the device.
Enterprise certified apps do not launch
When trying to launch an enterprise certified app through your test (for example UFT), the launchingmay fail the first time you start the app, since Apple requires the user to manually approve the app onthe device. The error message asking for approval will not be visible in the testing tool's interface (e.g.UFT). However, if you launch the app manually, it will be visible.
Solution: Manually launch the app and approve its certificate. Then, launch it through your test.
Calls during replay
When a phone call starts on an iOS device, the background apps are suspended, including the Agentapp. The Agent app will therefore be unable to communicate, execute code, or run scripts.
As a workaround, make the call to a wrong number (e.g. "12345"), wait for the operator to report that itis a wrong number, and wait for the call to end. The script will continue to replay once the call has ended.
Failed date picker actions
When using the date picker to select a date, make sure that you make your selection within 30 seconds.If the duration of the time selection exceeds 30 seconds, the agent will time out. This issue only appliesto non-packaged apps on iOS devices.
Unresponsive device
If a device doesn't work as expected, try to reset all settings. For example, if remote access doesn't work,taps don’t respond, apps don’t install, and so forth, revert to the original default settings:
Select General > Reset > Reset All Settings.Follow the steps described in "iOS initial device configuration" on page 20.
Mobile Lab User GuideView and manage devices
StormRunner Functional (Powered by Mobile Center 2.70) Page 43 of 88
Error in connecting during replay
For Mac Connectors connecting to iOS 11.1 devices: If your device cannot connect to the Mobile Lab,check the Connector log for an error when executing ./ideviceadddocument. This indicates a trust issue.
Reconnect the device, open ITunes and press Trust on the device.
Stopped Agent
If the Agent stops working on the device, do the following:
Disconnect the device by unplugging the USB cable.Wait 5 seconds, and reconnect the device by USB cable.
If you're still having problems:
Remove the Agent app, the launcher app, and all applications under test (AUTs) from the device.Close all open apps on the device.Wait 5 seconds and reconnect the device to the USB port.
As a last resort:
Restart the device. The Agent is reinstalled.Accept any system pop-ups on the device.Unplug the device by disconnecting the USB cable. Wait 5 seconds and reconnect the device.
Mobile Lab User GuideView and manage devices
StormRunner Functional (Powered by Mobile Center 2.70) Page 44 of 88
View, upload, and manage apps
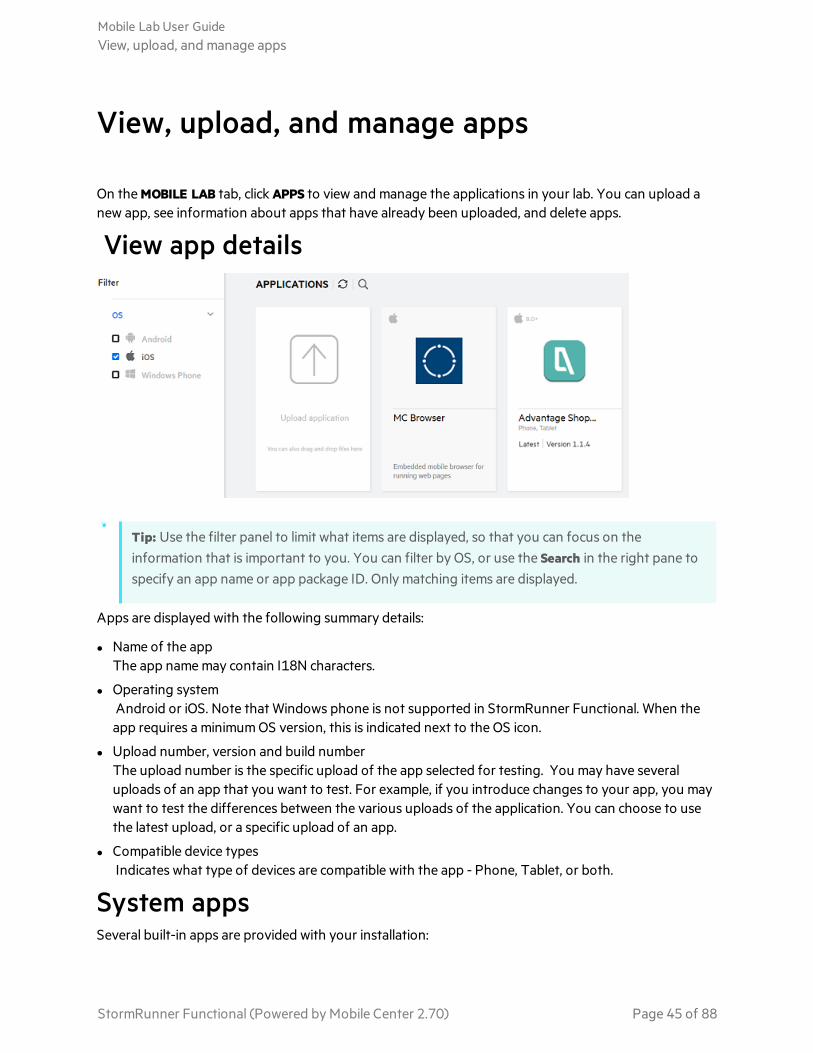
On the MOBILE LAB tab, click APPS to view and manage the applications in your lab. You can upload anew app, see information about apps that have already been uploaded, and delete apps.
View app details
Tip: Use the filter panel to limit what items are displayed, so that you can focus on theinformation that is important to you. You can filter by OS, or use the Search in the right pane tospecify an app name or app package ID. Only matching items are displayed.
Apps are displayed with the following summary details:
l Name of the appThe app name may contain I18N characters.
l Operating systemAndroid or iOS. Note that Windows phone is not supported in StormRunner Functional. When theapp requires a minimum OS version, this is indicated next to the OS icon.
l Upload number, version and build numberThe upload number is the specific upload of the app selected for testing. You may have severaluploads of an app that you want to test. For example, if you introduce changes to your app, you maywant to test the differences between the various uploads of the application. You can choose to usethe latest upload, or a specific upload of an app.
l Compatible device typesIndicates what type of devices are compatible with the app - Phone, Tablet, or both.
System appsSeveral built-in apps are provided with your installation:
Mobile Lab User GuideView, upload, and manage apps
StormRunner Functional (Powered by Mobile Center 2.70) Page 45 of 88
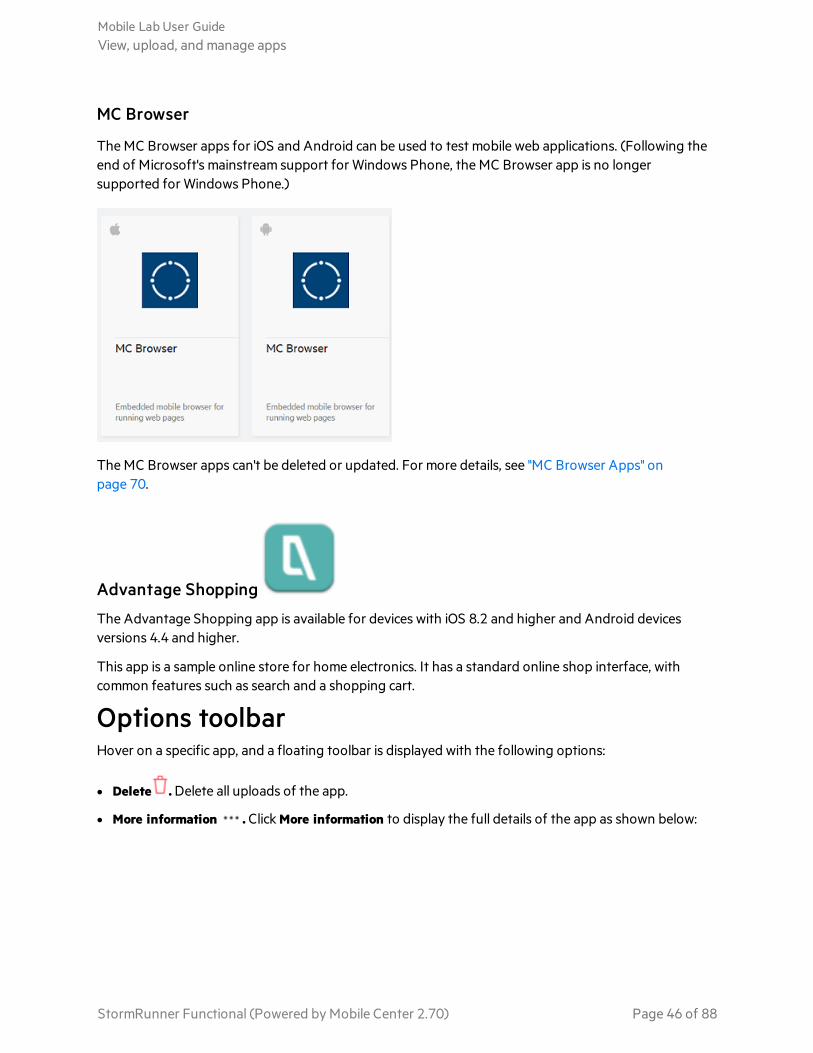
MC Browser
The MC Browser apps for iOS and Android can be used to test mobile web applications. (Following theend of Microsoft's mainstream support for Windows Phone, the MC Browser app is no longersupported for Windows Phone.)
The MC Browser apps can't be deleted or updated. For more details, see "MC Browser Apps" onpage 70.
Advantage Shopping
The Advantage Shopping app is available for devices with iOS 8.2 and higher and Android devicesversions 4.4 and higher.
This app is a sample online store for home electronics. It has a standard online shop interface, withcommon features such as search and a shopping cart.
Options toolbarHover on a specific app, and a floating toolbar is displayed with the following options:
l Delete . Delete all uploads of the app.
l More information . Click More information to display the full details of the app as shown below:
Mobile Lab User GuideView, upload, and manage apps
StormRunner Functional (Powered by Mobile Center 2.70) Page 46 of 88
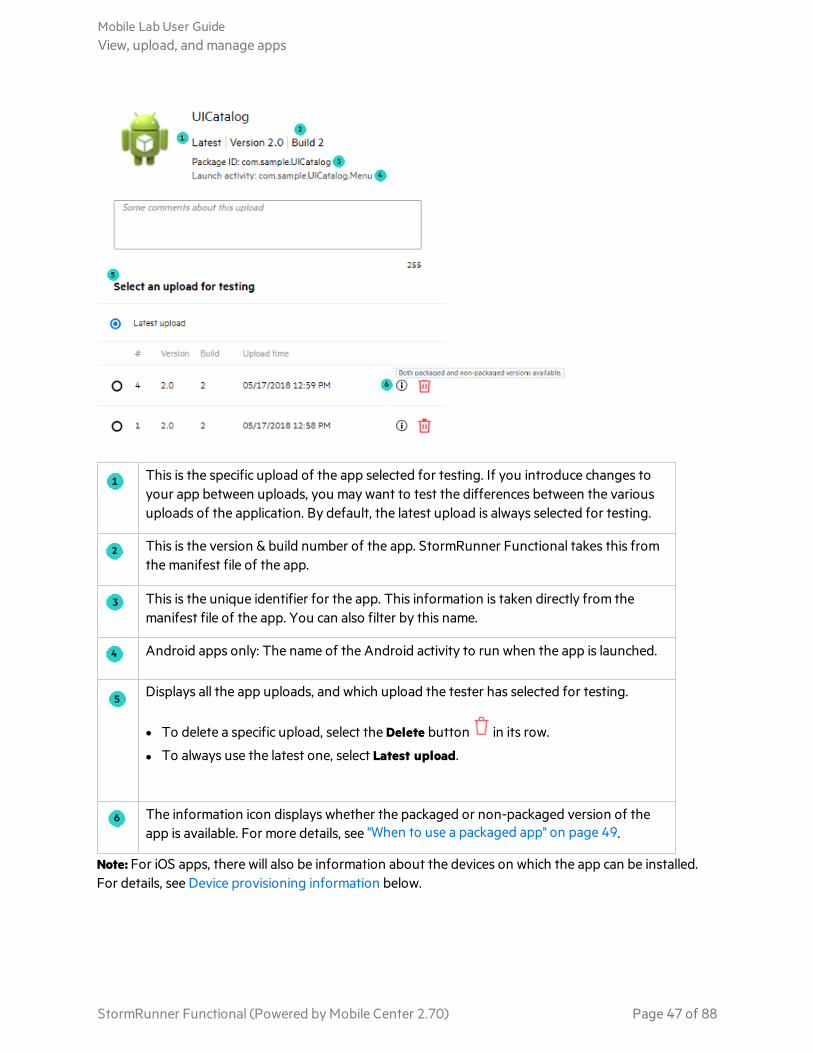
This is the specific upload of the app selected for testing. If you introduce changes toyour app between uploads, you may want to test the differences between the variousuploads of the application. By default, the latest upload is always selected for testing.
This is the version & build number of the app. StormRunner Functional takes this fromthe manifest file of the app.
This is the unique identifier for the app. This information is taken directly from themanifest file of the app. You can also filter by this name.
Android apps only: The name of the Android activity to run when the app is launched.
Displays all the app uploads, and which upload the tester has selected for testing.
l To delete a specific upload, select the Delete button in its row.
l To always use the latest one, select Latest upload.
The information icon displays whether the packaged or non-packaged version of theapp is available. For more details, see "When to use a packaged app" on page 49.
Note: For iOS apps, there will also be information about the devices on which the app can be installed.For details, see Device provisioning information below.
Mobile Lab User GuideView, upload, and manage apps
StormRunner Functional (Powered by Mobile Center 2.70) Page 47 of 88
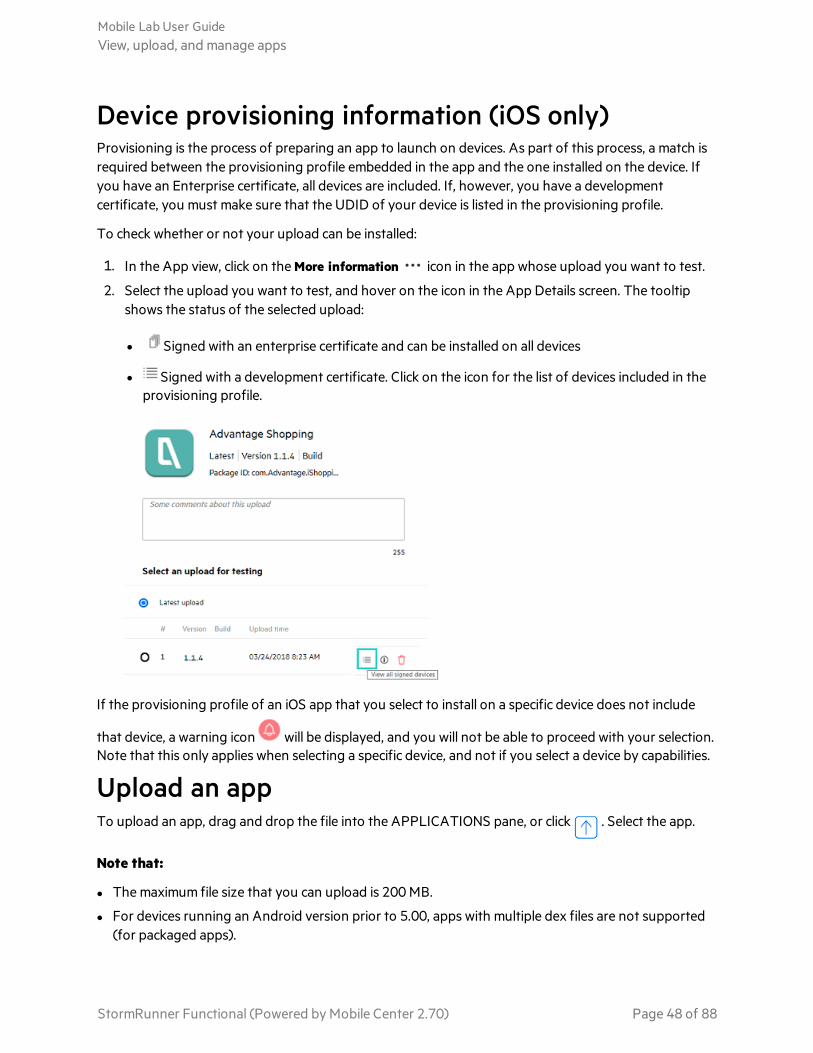
Device provisioning information (iOS only)Provisioning is the process of preparing an app to launch on devices. As part of this process, a match isrequired between the provisioning profile embedded in the app and the one installed on the device. Ifyou have an Enterprise certificate, all devices are included. If, however, you have a developmentcertificate, you must make sure that the UDID of your device is listed in the provisioning profile.
To check whether or not your upload can be installed:
1. In the App view, click on the More information icon in the app whose upload you want to test.
2. Select the upload you want to test, and hover on the icon in the App Details screen. The tooltipshows the status of the selected upload:
l Signed with an enterprise certificate and can be installed on all devices
l Signed with a development certificate. Click on the icon for the list of devices included in theprovisioning profile.
If the provisioning profile of an iOS app that you select to install on a specific device does not include
that device, a warning icon will be displayed, and you will not be able to proceed with your selection.Note that this only applies when selecting a specific device, and not if you select a device by capabilities.
Upload an appTo upload an app, drag and drop the file into the APPLICATIONS pane, or click . Select the app.
Note that:
l The maximum file size that you can upload is 200 MB.
l For devices running an Android version prior to 5.00, apps with multiple dex files are not supported(for packaged apps).
Mobile Lab User GuideView, upload, and manage apps
StormRunner Functional (Powered by Mobile Center 2.70) Page 48 of 88
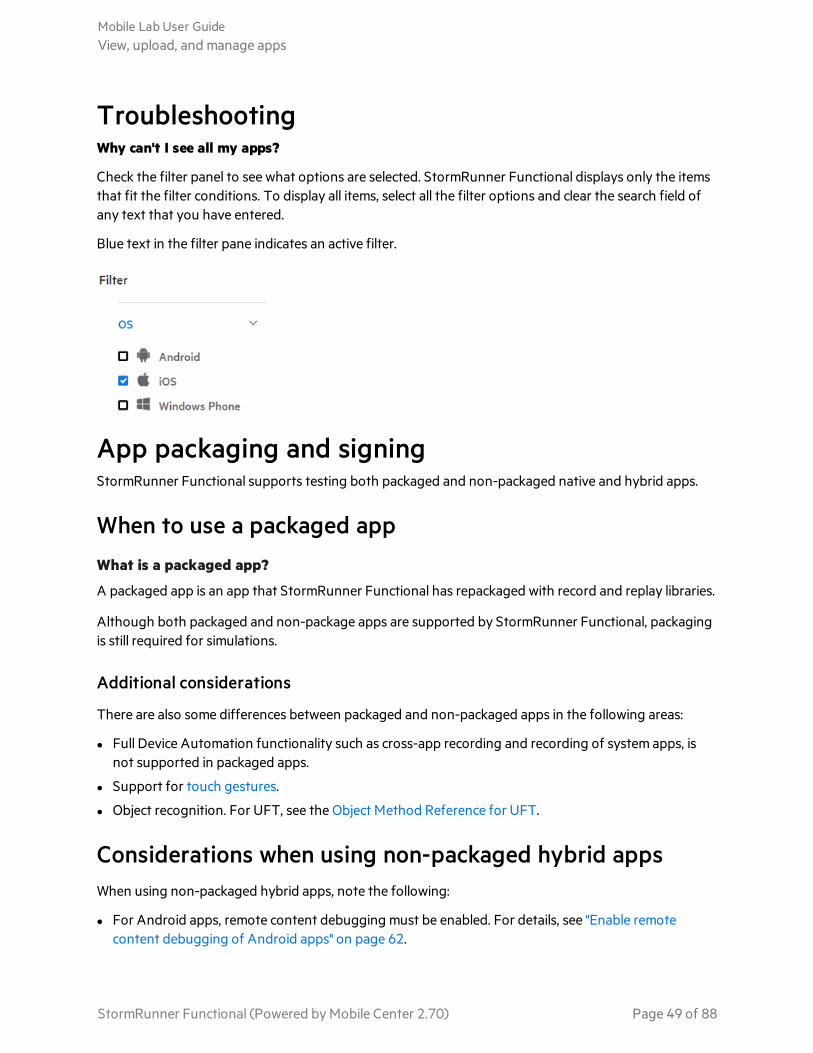
TroubleshootingWhy can't I see all my apps?
Check the filter panel to see what options are selected. StormRunner Functional displays only the itemsthat fit the filter conditions. To display all items, select all the filter options and clear the search field ofany text that you have entered.
Blue text in the filter pane indicates an active filter.
App packaging and signingStormRunner Functional supports testing both packaged and non-packaged native and hybrid apps.
When to use a packaged appWhat is a packaged app?
A packaged app is an app that StormRunner Functional has repackaged with record and replay libraries.
Although both packaged and non-package apps are supported by StormRunner Functional, packagingis still required for simulations.
Additional considerations
There are also some differences between packaged and non-packaged apps in the following areas:
l Full Device Automation functionality such as cross-app recording and recording of system apps, isnot supported in packaged apps.
l Support for touch gestures.
l Object recognition. For UFT, see the Object Method Reference for UFT.
Considerations when using non-packaged hybrid appsWhen using non-packaged hybrid apps, note the following:
l For Android apps, remote content debugging must be enabled. For details, see "Enable remotecontent debugging of Android apps" on page 62.
Mobile Lab User GuideView, upload, and manage apps
StormRunner Functional (Powered by Mobile Center 2.70) Page 49 of 88
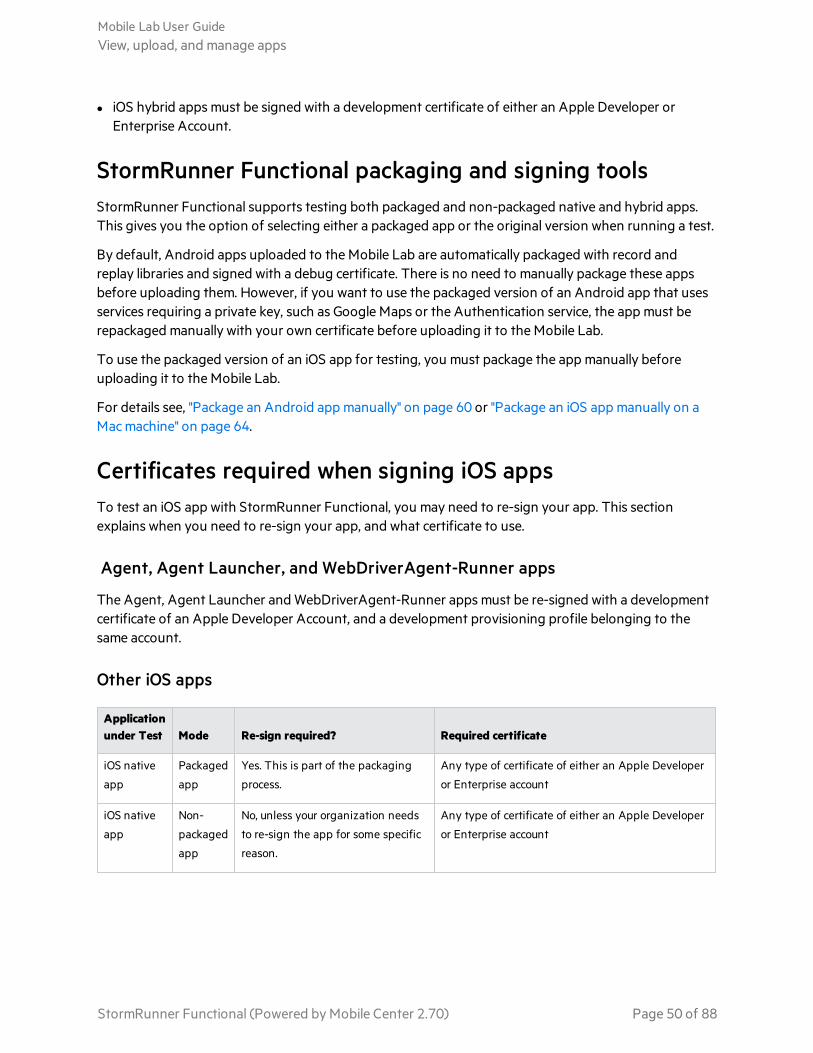
l iOS hybrid apps must be signed with a development certificate of either an Apple Developer orEnterprise Account.
StormRunner Functional packaging and signing toolsStormRunner Functional supports testing both packaged and non-packaged native and hybrid apps.This gives you the option of selecting either a packaged app or the original version when running a test.
By default, Android apps uploaded to the Mobile Lab are automatically packaged with record andreplay libraries and signed with a debug certificate. There is no need to manually package these appsbefore uploading them. However, if you want to use the packaged version of an Android app that usesservices requiring a private key, such as Google Maps or the Authentication service, the app must berepackaged manually with your own certificate before uploading it to the Mobile Lab.
To use the packaged version of an iOS app for testing, you must package the app manually beforeuploading it to the Mobile Lab.
For details see, "Package an Android app manually" on page 60 or "Package an iOS app manually on aMac machine" on page 64.
Certificates required when signing iOS appsTo test an iOS app with StormRunner Functional, you may need to re-sign your app. This sectionexplains when you need to re-sign your app, and what certificate to use.
Agent, Agent Launcher, and WebDriverAgent-Runner apps
The Agent, Agent Launcher and WebDriverAgent-Runner apps must be re-signed with a developmentcertificate of an Apple Developer Account, and a development provisioning profile belonging to thesame account.
Other iOS apps
Applicationunder Test Mode Re-sign required? Required certificate
iOS native
app
Packaged
app
Yes. This is part of the packaging
process.
Any type of certificate of either an Apple Developer
or Enterprise account
iOS native
app
Non-
packaged
app
No, unless your organization needs
to re-sign the app for some specific
reason.
Any type of certificate of either an Apple Developer
or Enterprise account
Mobile Lab User GuideView, upload, and manage apps
StormRunner Functional (Powered by Mobile Center 2.70) Page 50 of 88
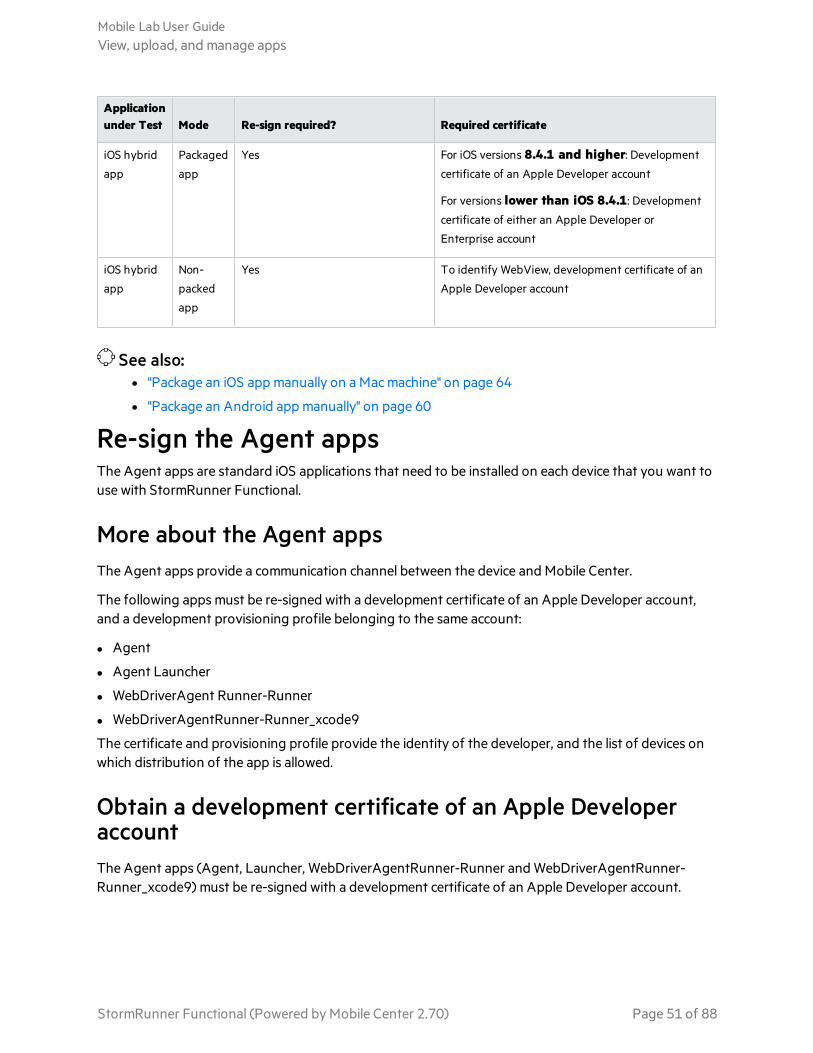
Applicationunder Test Mode Re-sign required? Required certificate
iOS hybrid
app
Packaged
app
Yes For iOS versions 8.4.1 and higher: Development
certificate of an Apple Developer account
For versions lower than iOS 8.4.1: Development
certificate of either an Apple Developer or
Enterprise account
iOS hybrid
app
Non-
packed
app
Yes To identify WebView, development certificate of an
Apple Developer account
See also:l "Package an iOS app manually on a Mac machine" on page 64
l "Package an Android app manually" on page 60
Re-sign the Agent appsThe Agent apps are standard iOS applications that need to be installed on each device that you want touse with StormRunner Functional.
More about the Agent appsThe Agent apps provide a communication channel between the device and Mobile Center.
The following apps must be re-signed with a development certificate of an Apple Developer account,and a development provisioning profile belonging to the same account:
l Agent
l Agent Launcher
l WebDriverAgent Runner-Runner
l WebDriverAgentRunner-Runner_xcode9
The certificate and provisioning profile provide the identity of the developer, and the list of devices onwhich distribution of the app is allowed.
Obtain a development certificate of an Apple DeveloperaccountThe Agent apps (Agent, Launcher, WebDriverAgentRunner-Runner and WebDriverAgentRunner-Runner_xcode9) must be re-signed with a development certificate of an Apple Developer account.
Mobile Lab User GuideView, upload, and manage apps
StormRunner Functional (Powered by Mobile Center 2.70) Page 51 of 88
Create a development certificate on a Mac
If you already have a Developer certificate, you can skip this section.
1. Open the Keychain Access app.
2. Select Certificate Assistant > Request a Certificate From a Certificate Authority.
3. Enter your email address (twice), name, and select Save to disk. Click Continue. This creates a *.csrfile.
4. Open a browser and log in to the Apple Member Center.
5. Select Certificates, Identifiers & Profiles.
6. In the Certificate section, select All.
7. Click the + (Add) button.
8. When you are prompted to indicate the type of certificate, select iOS App Development and clickContinue. Click Continue again in the next screen.
9. Click Choose File and locate the *.csr file created above. Click Generate.
10. Click Download to save the certificate to your machine.
11. Double click on the downloaded certificate to install it to the Keychain Access.
For step-by-step instructions on how to generate a development certificate using a Mac, see "Generatea development certificate using a Mac" on page 76
Export a development certificate from a Mac for use on a Linux machine
If you already have a development certificate installed on your Mac machine, and you want to use it forMC Enabler on Linux, follow these steps to export it:
1. Open the Keychain Access app.
2. In the Category pane, select Certificates to show the installed certificates.
3. In the main pane, select your certificate, and select Export "<Certificate name>" from the right-clickmenu.
4. When prompted to enter a password, leave the fields empty, and click OK. You can use thegenerated *.p12 file to re-sign the Agent and Agent Launcher on a Linux machine.
Create a development certificate in Linux or Windows
1. Generate a *.csr (Certificate Signing Request) file with following set of commands, replacing EMAILwith your own email address, and providing a meaningful NAME. (The sample code below showsLinux format. For Windows, navigate to the OpenSSL installation and switch the direction of theslash.)
cd /etc/openssl/certs/
openssl genrsa -out ios-dev.key 2048
Mobile Lab User GuideView, upload, and manage apps
StormRunner Functional (Powered by Mobile Center 2.70) Page 52 of 88
openssl req -new -key ios-dev.key -out ios-dev.csr -subj"/emailAddress=<EMAIL>, CN=<NAME>, C=US"
2. Open a browser and log in to the Apple Member Center.
3. Click Certificates, Identifiers & Profiles.
4. In the Certificate node, select All.
5. Click on the Add button.
6. Select iOS App Development and click Continue. Click Continue again in the next screen.
7. Browse to the ios-dev.csr file created above and upload it. Click Generate.
8. Click Download to get the generated certificate *.cer file.
9. Convert the *.cer file to a *.p12 file using the following set of commands. (If you used a name otherthan ios-dev.cer, modify the command's arguments.)
openssl x509 -in ios-dev.cer -inform DER -out ios-dev.pem -outform PEM
openssl pkcs12 -export -inkey ios-dev.key -in ios-dev.pem -out ios-dev.p12
Obtain a development provisioning profileTo install an iOS app on a device, the app must be provisioned to launch on the device.
Note: Each device under test must be included in the provision profile (UDID must be included inlist of devices.)
To obtain a provisioning profile:
1. Open a browser and log in to the Apple Member Center.
2. Select Certificates > Identifiers & Profiles.
3. Click All under the Provision Profiles node and select your provision profile, belonging to the sameApple Developer account used to generate the development certificate above. Click Download.
For step-by-step instructions, see "Obtain a development provisioning profile" on page 80
Re-sign and deploy the Agent appsTo simplify and the re-signing process, the MC Enabler utility is provided for both Mac and Linux:
Mobile Lab User GuideView, upload, and manage apps
StormRunner Functional (Powered by Mobile Center 2.70) Page 53 of 88
l The MC Enabler for Mac enables you to re-sign and package (instrument) apps.
l The MC Enabler for Linux only lets you re-sign apps, not package them. For example, you can use itto re-sign the Agent and Launcher apps. A system running with macOS is not required.
Note: The MC Enabler for Linux is no longer supported.
Re-sign apps on a Mac
The following procedure describes how to run the MC Enabler utility to re-sign apps on a Mac.
Prerequisites
l A Mac machine with OS X 10.8 or 10.9 or macOS Sierra 10.11.2, 10.12, 10.12.1, 10.12.4, and 10.13.
l Xcode version 6 and above installed
To check that Xcode is installed:
In the Terminal window, type codesign.The usage of codesign should be displayed. If the codesign command is missing, Xcode is not properlyinstalled, and you should reinstall it.
To re-sign the Agent apps:
1. Download the MC Enabler package for MacOS onto your Mac.We recommend using the GUI version of the app. For details on using the command line version,see " MC Enabler on Mac - command line version" on page 67.
2. Locate the Agent files in the Agent folder of the Device Connector installation files. :HP4M-Agent.ipaHPMC-AgentLauncher.ipaWebDriverAgentRunner-Runner.ipaWebDriverAgentRunner-Runner_xcode9
3. Copy the files to your Mac machine.
4. Copy the provision profile that you created to your Mac machine. For details, see "Obtain adevelopment provisioning profile" on the previous page.
5. Select the Agent/L mode in the MC Enabler window to show the relevant fields.
Mobile Lab User GuideView, upload, and manage apps
StormRunner Functional (Powered by Mobile Center 2.70) Page 54 of 88
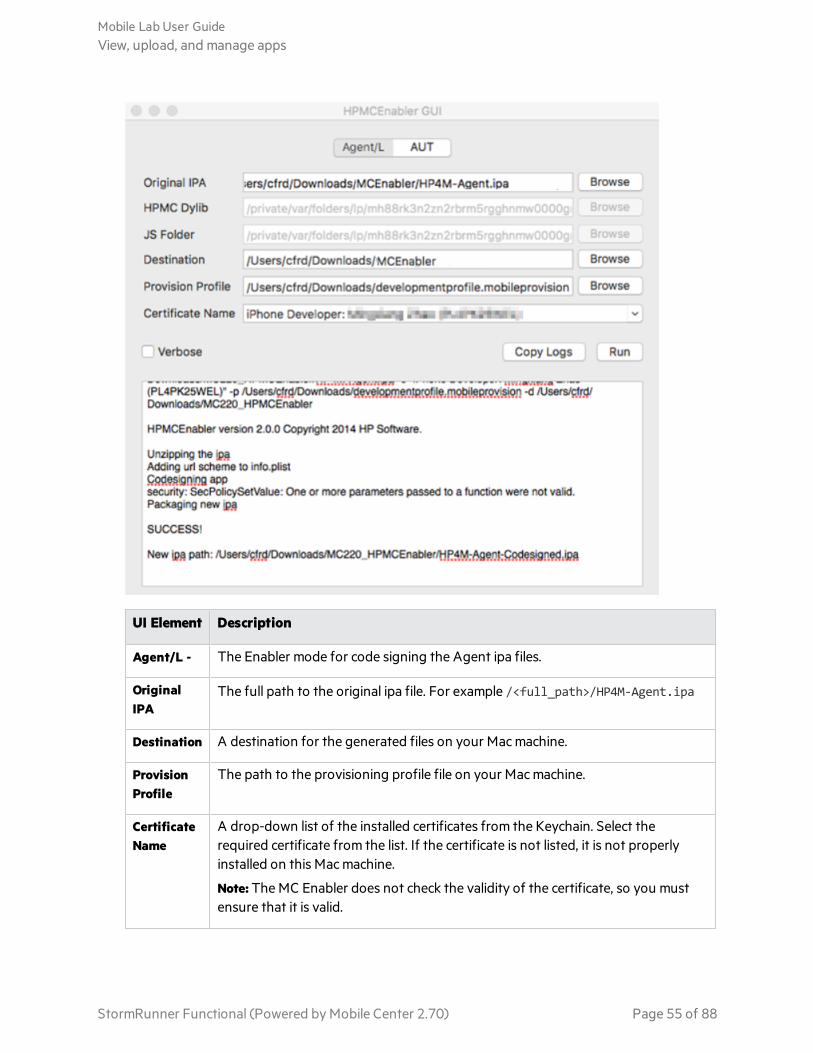
UI Element Description
Agent/L - The Enabler mode for code signing the Agent ipa files.
OriginalIPA
The full path to the original ipa file. For example /<full_path>/HP4M-Agent.ipa
Destination A destination for the generated files on your Mac machine.
ProvisionProfile
The path to the provisioning profile file on your Mac machine.
CertificateName
A drop-down list of the installed certificates from the Keychain. Select therequired certificate from the list. If the certificate is not listed, it is not properlyinstalled on this Mac machine.
Note: The MC Enabler does not check the validity of the certificate, so you mustensure that it is valid.
Mobile Lab User GuideView, upload, and manage apps
StormRunner Functional (Powered by Mobile Center 2.70) Page 55 of 88
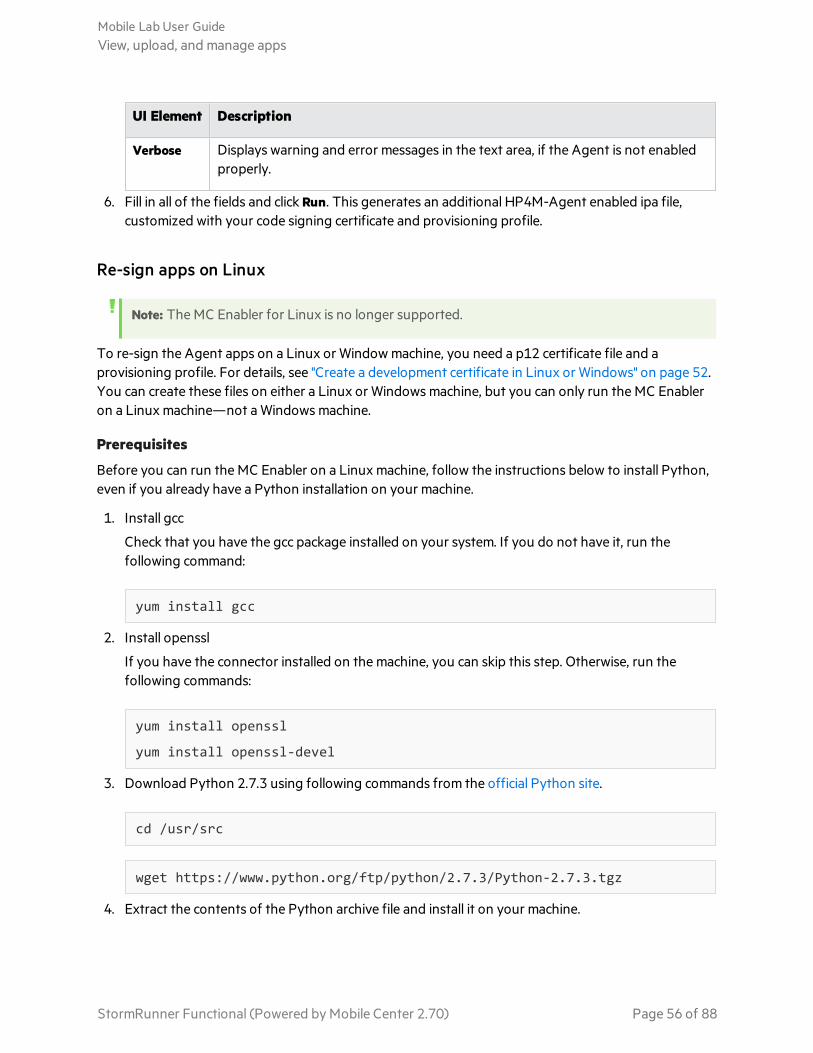
UI Element Description
Verbose Displays warning and error messages in the text area, if the Agent is not enabledproperly.
6. Fill in all of the fields and click Run. This generates an additional HP4M-Agent enabled ipa file,customized with your code signing certificate and provisioning profile.
Re-sign apps on Linux
Note: The MC Enabler for Linux is no longer supported.
To re-sign the Agent apps on a Linux or Window machine, you need a p12 certificate file and aprovisioning profile. For details, see "Create a development certificate in Linux or Windows" on page 52.You can create these files on either a Linux or Windows machine, but you can only run the MC Enableron a Linux machine—not a Windows machine.
Prerequisites
Before you can run the MC Enabler on a Linux machine, follow the instructions below to install Python,even if you already have a Python installation on your machine.
1. Install gcc
Check that you have the gcc package installed on your system. If you do not have it, run thefollowing command:
yum install gcc
2. Install openssl
If you have the connector installed on the machine, you can skip this step. Otherwise, run thefollowing commands:
yum install openssl
yum install openssl-devel
3. Download Python 2.7.3 using following commands from the official Python site.
cd /usr/src
wget https://www.python.org/ftp/python/2.7.3/Python-2.7.3.tgz
4. Extract the contents of the Python archive file and install it on your machine.
Mobile Lab User GuideView, upload, and manage apps
StormRunner Functional (Powered by Mobile Center 2.70) Page 56 of 88
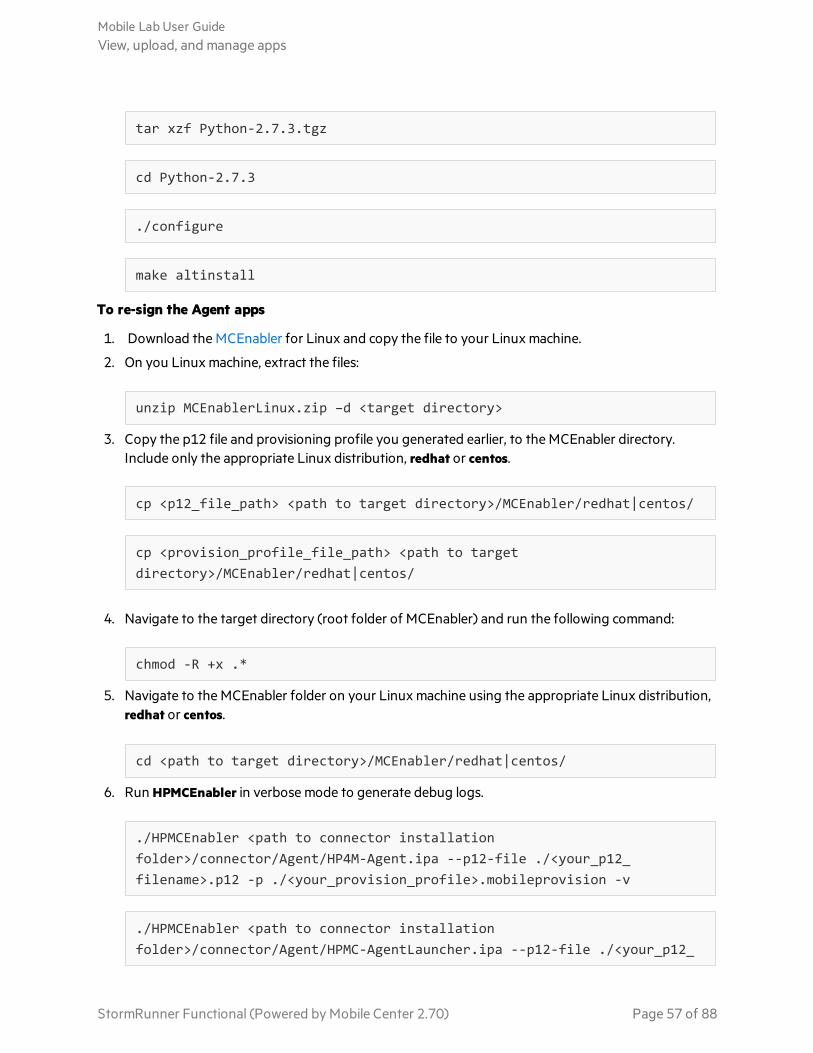
tar xzf Python-2.7.3.tgz
cd Python-2.7.3
./configure
make altinstall
To re-sign the Agent apps
1. Download the MCEnabler for Linux and copy the file to your Linux machine.
2. On you Linux machine, extract the files:
unzip MCEnablerLinux.zip –d <target directory>
3. Copy the p12 file and provisioning profile you generated earlier, to the MCEnabler directory.Include only the appropriate Linux distribution, redhat or centos.
cp <p12_file_path> <path to target directory>/MCEnabler/redhat|centos/
cp <provision_profile_file_path> <path to targetdirectory>/MCEnabler/redhat|centos/
4. Navigate to the target directory (root folder of MCEnabler) and run the following command:
chmod -R +x .*
5. Navigate to the MCEnabler folder on your Linux machine using the appropriate Linux distribution,redhat or centos.
cd <path to target directory>/MCEnabler/redhat|centos/
6. Run HPMCEnabler in verbose mode to generate debug logs.
./HPMCEnabler <path to connector installationfolder>/connector/Agent/HP4M-Agent.ipa --p12-file ./<your_p12_filename>.p12 -p ./<your_provision_profile>.mobileprovision -v
./HPMCEnabler <path to connector installationfolder>/connector/Agent/HPMC-AgentLauncher.ipa --p12-file ./<your_p12_
Mobile Lab User GuideView, upload, and manage apps
StormRunner Functional (Powered by Mobile Center 2.70) Page 57 of 88
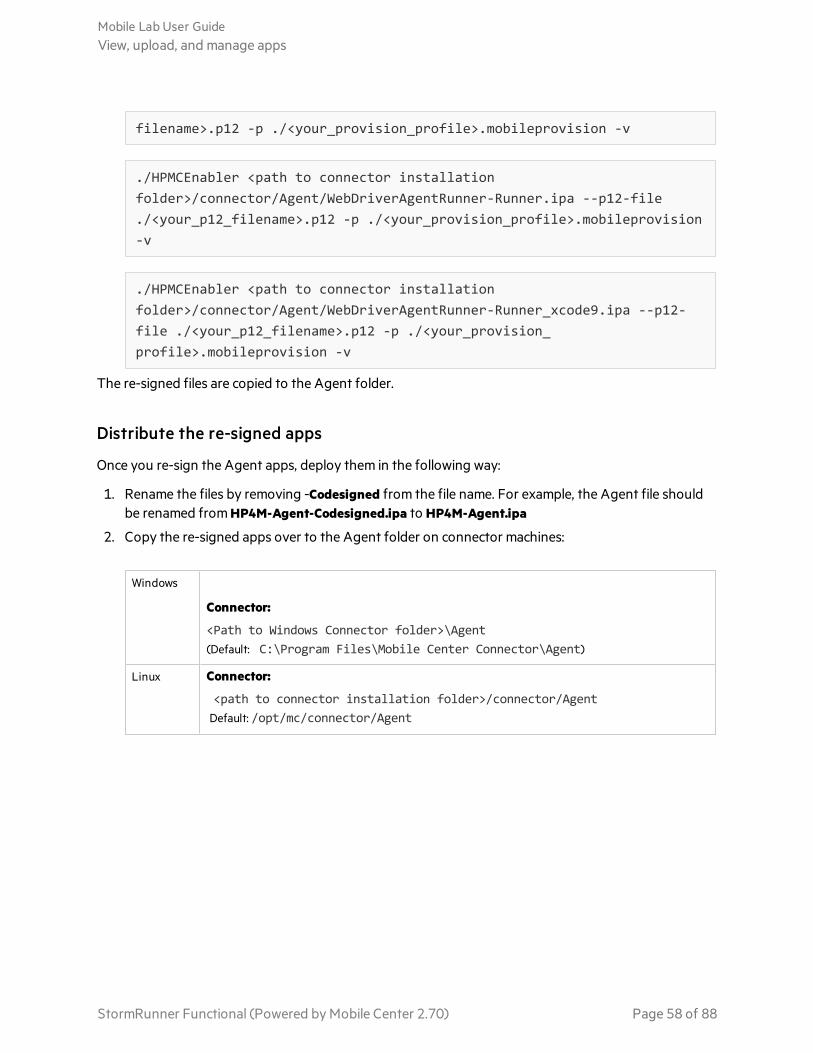
filename>.p12 -p ./<your_provision_profile>.mobileprovision -v
./HPMCEnabler <path to connector installationfolder>/connector/Agent/WebDriverAgentRunner-Runner.ipa --p12-file./<your_p12_filename>.p12 -p ./<your_provision_profile>.mobileprovision-v
./HPMCEnabler <path to connector installationfolder>/connector/Agent/WebDriverAgentRunner-Runner_xcode9.ipa --p12-file ./<your_p12_filename>.p12 -p ./<your_provision_profile>.mobileprovision -v
The re-signed files are copied to the Agent folder.
Distribute the re-signed apps
Once you re-sign the Agent apps, deploy them in the following way:
1. Rename the files by removing -Codesigned from the file name. For example, the Agent file shouldbe renamed from HP4M-Agent-Codesigned.ipa to HP4M-Agent.ipa
2. Copy the re-signed apps over to the Agent folder on connector machines:
Windows
Connector:
<Path to Windows Connector folder>\Agent(Default: C:\Program Files\Mobile Center Connector\Agent)
Linux Connector:
<path to connector installation folder>/connector/AgentDefault: /opt/mc/connector/Agent
Mobile Lab User GuideView, upload, and manage apps
StormRunner Functional (Powered by Mobile Center 2.70) Page 58 of 88
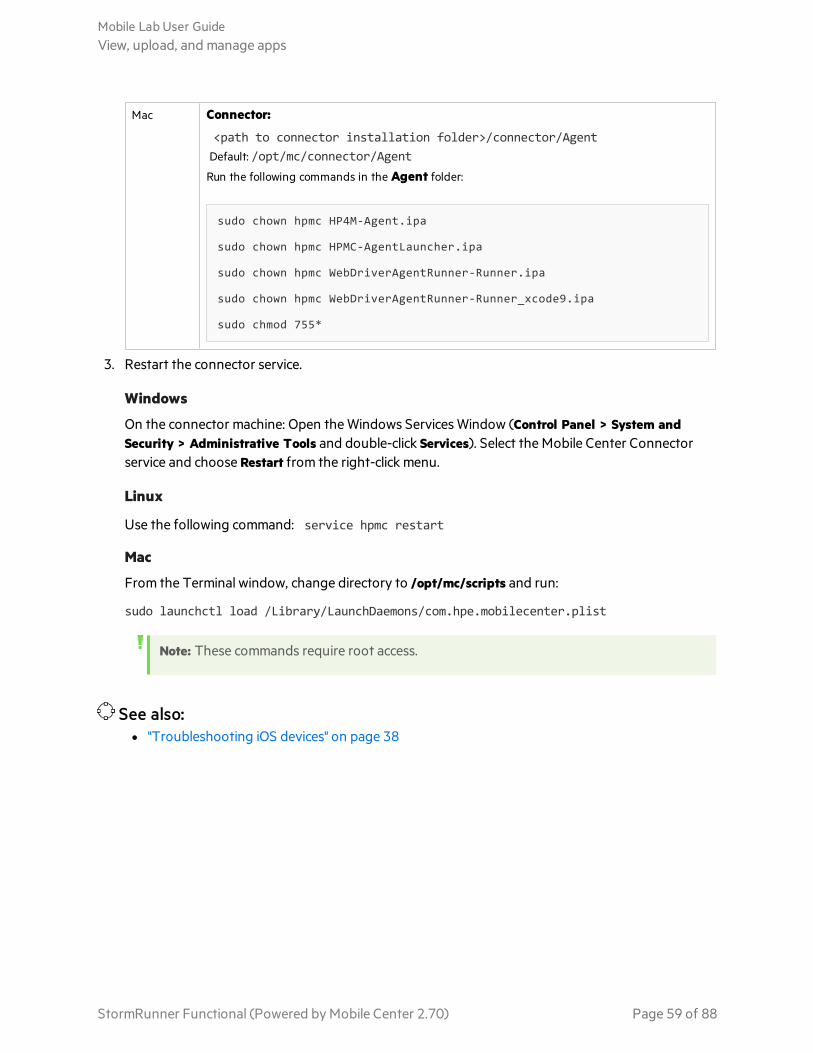
Mac Connector:
<path to connector installation folder>/connector/AgentDefault: /opt/mc/connector/Agent
Run the following commands in the Agent folder:
sudo chown hpmc HP4M-Agent.ipa
sudo chown hpmc HPMC-AgentLauncher.ipa
sudo chown hpmc WebDriverAgentRunner-Runner.ipa
sudo chown hpmc WebDriverAgentRunner-Runner_xcode9.ipa
sudo chmod 755*
3. Restart the connector service.
Windows
On the connector machine: Open the Windows Services Window (Control Panel > System andSecurity > Administrative Tools and double-click Services). Select the Mobile Center Connectorservice and choose Restart from the right-click menu.
Linux
Use the following command: service hpmc restart
Mac
From the Terminal window, change directory to /opt/mc/scripts and run:
sudo launchctl load /Library/LaunchDaemons/com.hpe.mobilecenter.plist
Note: These commands require root access.
See also:l "Troubleshooting iOS devices" on page 38
Mobile Lab User GuideView, upload, and manage apps
StormRunner Functional (Powered by Mobile Center 2.70) Page 59 of 88
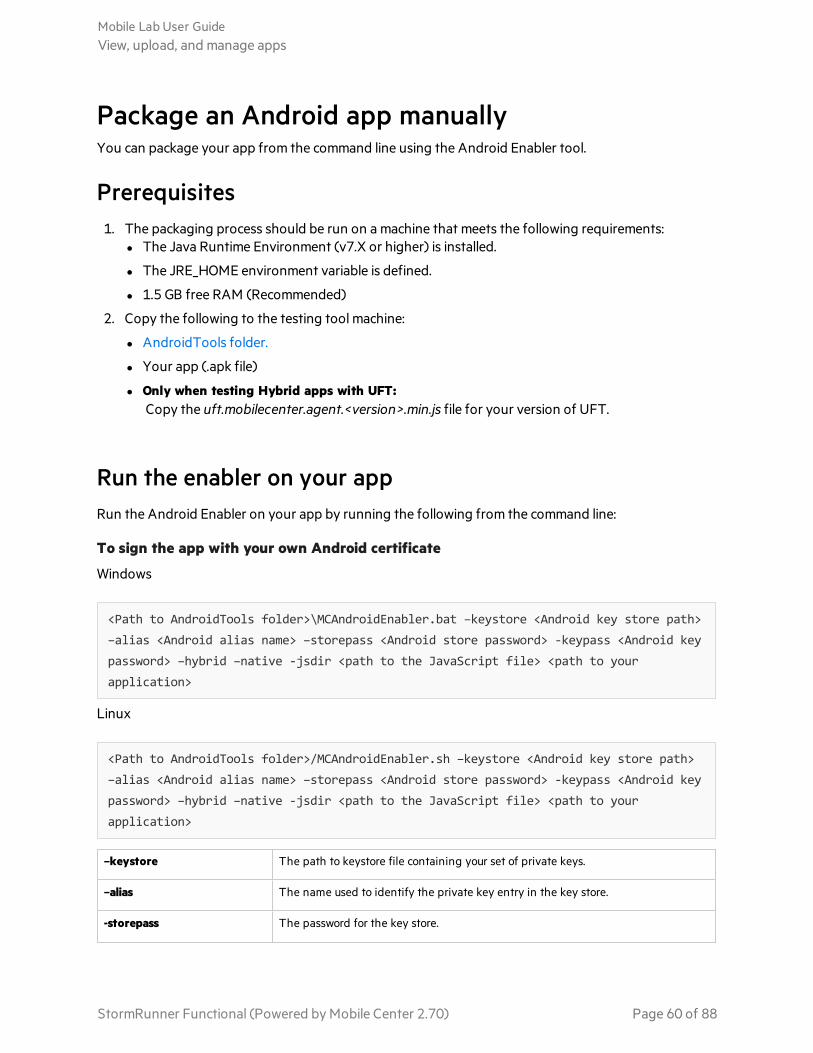
Package an Android app manuallyYou can package your app from the command line using the Android Enabler tool.
Prerequisites1. The packaging process should be run on a machine that meets the following requirements:
l The Java Runtime Environment (v7.X or higher) is installed.
l The JRE_HOME environment variable is defined.
l 1.5 GB free RAM (Recommended)
2. Copy the following to the testing tool machine:
l AndroidTools folder.
l Your app (.apk file)
l Only when testing Hybrid apps with UFT:Copy the uft.mobilecenter.agent.<version>.min.js file for your version of UFT.
Run the enabler on your appRun the Android Enabler on your app by running the following from the command line:
To sign the app with your own Android certificate
Windows
<Path to AndroidTools folder>\MCAndroidEnabler.bat –keystore <Android key store path>–alias <Android alias name> –storepass <Android store password> -keypass <Android keypassword> –hybrid –native -jsdir <path to the JavaScript file> <path to yourapplication>
Linux
<Path to AndroidTools folder>/MCAndroidEnabler.sh –keystore <Android key store path>–alias <Android alias name> –storepass <Android store password> -keypass <Android keypassword> –hybrid –native -jsdir <path to the JavaScript file> <path to yourapplication>
–keystore The path to keystore file containing your set of private keys.
–alias The name used to identify the private key entry in the key store.
-storepass The password for the key store.
Mobile Lab User GuideView, upload, and manage apps
StormRunner Functional (Powered by Mobile Center 2.70) Page 60 of 88

-keypass The password for the private key used to sign your apps.
-hybrid Enable packaging of hybrid app.
-native Enable packaging of native app.
-removeSecuredLayout Remove the LayoutParams.FLAG_SECURE flag, when set, from any detected
Window.setFlag() invocations.
-jsdir Use this only when testing hybrid apps with UFT. Package the app with
the required JavaScript file/s from the given location on the testing machine.
The packaging process consists of a number of steps. Wait for the steps to be completed successfully.The result is an APK file signed with your android certificate. For example, running the above commandon my-android-app.apk generates the file: my-android-app.apk.signed.apk in the same folder as theoriginal APK file.
Upload the generated *.signed.apk file to StormRunner Functional.
To sign the app with a debug Android certificate
Windows
<Path to AndroidTools folder>\MCAndroidEnabler.bat –native –hybrid –signdebug -jsdir
<path to the JavaScript file> <path to your application>
Linux
<Path to AndroidTools folder>/MCAndroidEnabler.sh –native –hybrid –signdebug -jsdir
<path to the JavaScript file> <path to your application>
–signdebug Sign the app with the debug certificate.
-hybrid Enable packaging of hybrid app.
-native Enable packaging of native app.
-removeSecuredLayout Remove the LayoutParams.FLAG_SECURE flag, when set, from any detected
Window.setFlag() invocations.
-jsdir Use this only when testing hybrid apps with UFT. Packages the app with
the required JavaScript file/s from the given location on the testing machine.
The packaging process consists of a number of steps. Wait for the steps to be completed successfully.The result is an APK file signed with the default debug certificate. For example, running the abovecommand on my-android-app.apk generates the file my-android-app.apk.signed.debug.apk in the samefolder as the original APK file.
Mobile Lab User GuideView, upload, and manage apps
StormRunner Functional (Powered by Mobile Center 2.70) Page 61 of 88
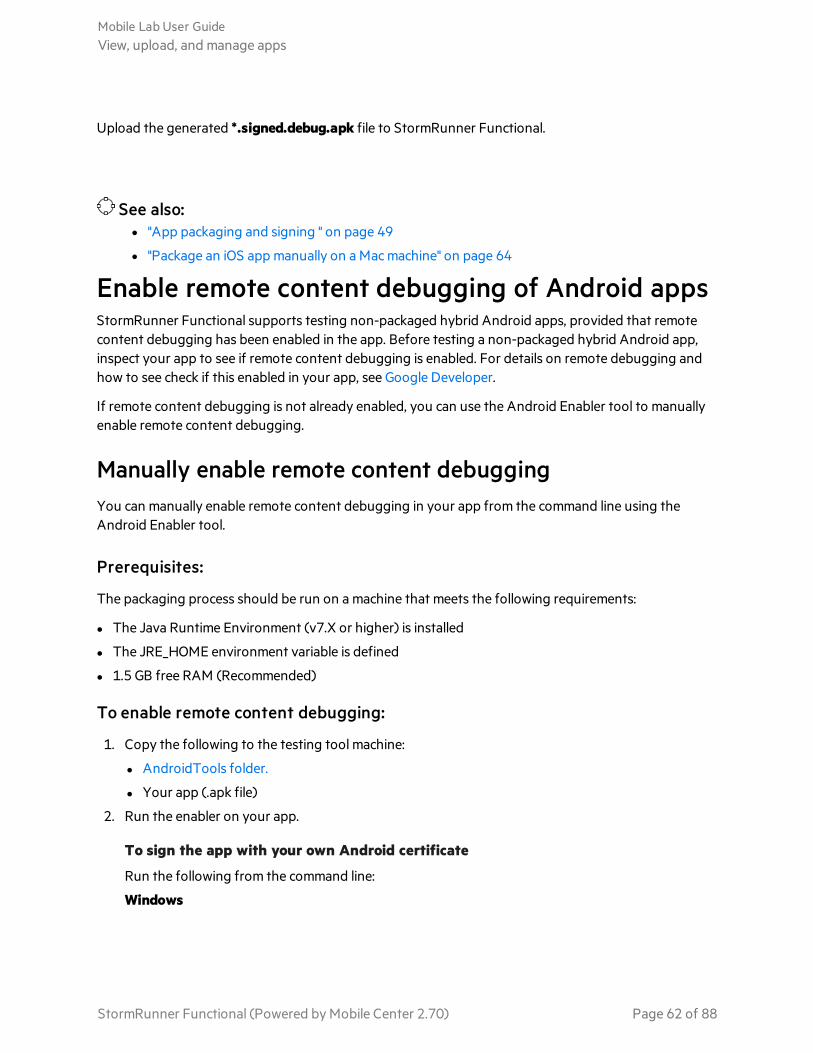
Upload the generated *.signed.debug.apk file to StormRunner Functional.
See also:l "App packaging and signing " on page 49
l "Package an iOS app manually on a Mac machine" on page 64
Enable remote content debugging of Android appsStormRunner Functional supports testing non-packaged hybrid Android apps, provided that remotecontent debugging has been enabled in the app. Before testing a non-packaged hybrid Android app,inspect your app to see if remote content debugging is enabled. For details on remote debugging andhow to see check if this enabled in your app, see Google Developer.
If remote content debugging is not already enabled, you can use the Android Enabler tool to manuallyenable remote content debugging.
Manually enable remote content debuggingYou can manually enable remote content debugging in your app from the command line using theAndroid Enabler tool.
Prerequisites:
The packaging process should be run on a machine that meets the following requirements:
l The Java Runtime Environment (v7.X or higher) is installed
l The JRE_HOME environment variable is defined
l 1.5 GB free RAM (Recommended)
To enable remote content debugging:
1. Copy the following to the testing tool machine:
l AndroidTools folder.
l Your app (.apk file)
2. Run the enabler on your app.
To sign the app with your own Android certificate
Run the following from the command line:
Windows
Mobile Lab User GuideView, upload, and manage apps
StormRunner Functional (Powered by Mobile Center 2.70) Page 62 of 88
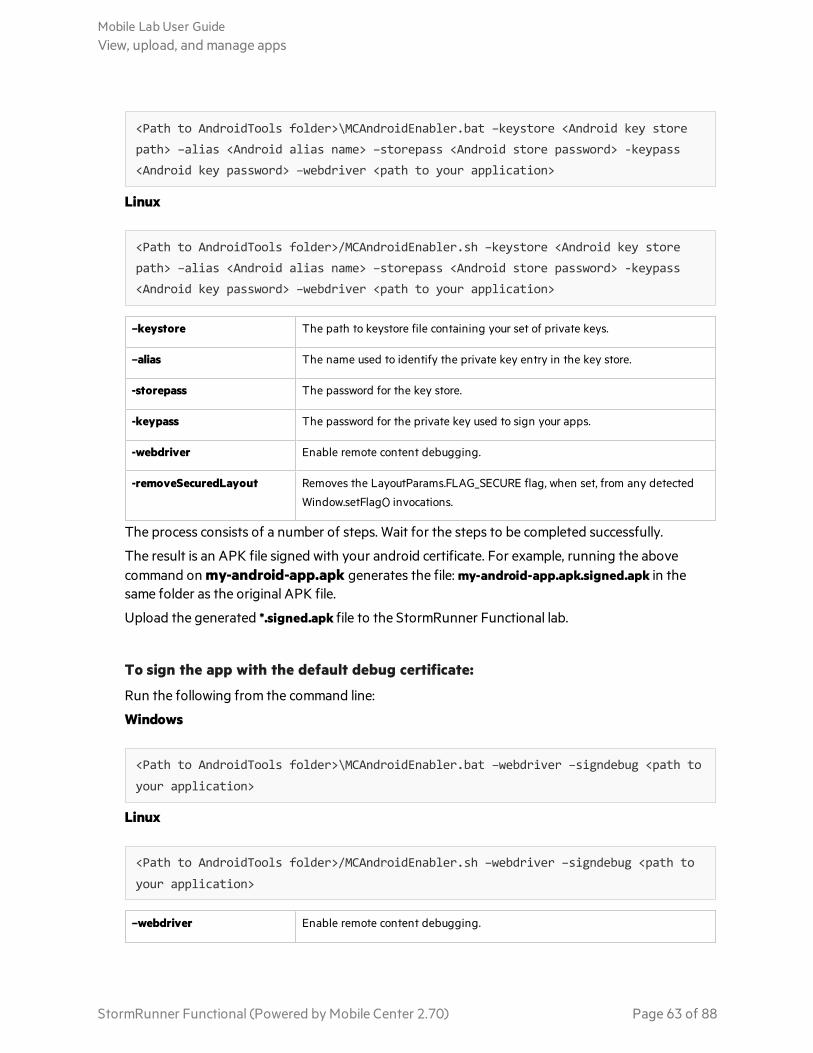
<Path to AndroidTools folder>\MCAndroidEnabler.bat –keystore <Android key storepath> –alias <Android alias name> –storepass <Android store password> -keypass<Android key password> –webdriver <path to your application>
Linux
<Path to AndroidTools folder>/MCAndroidEnabler.sh –keystore <Android key storepath> –alias <Android alias name> –storepass <Android store password> -keypass<Android key password> –webdriver <path to your application>
–keystore The path to keystore file containing your set of private keys.
–alias The name used to identify the private key entry in the key store.
-storepass The password for the key store.
-keypass The password for the private key used to sign your apps.
-webdriver Enable remote content debugging.
-removeSecuredLayout Removes the LayoutParams.FLAG_SECURE flag, when set, from any detected
Window.setFlag() invocations.
The process consists of a number of steps. Wait for the steps to be completed successfully.
The result is an APK file signed with your android certificate. For example, running the abovecommand on my-android-app.apk generates the file: my-android-app.apk.signed.apk in thesame folder as the original APK file.
Upload the generated *.signed.apk file to the StormRunner Functional lab.
To sign the app with the default debug certificate:
Run the following from the command line:
Windows
<Path to AndroidTools folder>\MCAndroidEnabler.bat –webdriver –signdebug <path to
your application>
Linux
<Path to AndroidTools folder>/MCAndroidEnabler.sh –webdriver –signdebug <path to
your application>
–webdriver Enable remote content debugging.
Mobile Lab User GuideView, upload, and manage apps
StormRunner Functional (Powered by Mobile Center 2.70) Page 63 of 88
-signdebug Sign the app with the debug certificate.
-removeSecuredLayout Removes the LayoutParams.FLAG_SECURE flag, when set, from any detected
Window.setFlag() invocations.
The process consists of a number of steps. Wait for the steps to be completed successfully.
The result is an APK file signed with the default debug certificate. For example, running the abovecommand on my-android-app.apk generates the file my-android-app.apk.signed.debug.apk in thesame folder as the original APK file.
Upload the generated *.signed.debug.apk file to the StormRunner Functional lab.
TroubleshootingThere may be times when enabling remote debugging does not succeed. This can happen when:
You tried to upload an app that StormRunner Functional doesn't support
l The maximum file size that you can upload is 200MB.
Package an iOS app manually on a Mac machineThe MC Enabler utility is provided to simplify and support the re-signing and repackaging of apps.
PrerequisitesThe following must be installed on the Mac machine that you use for packaging an iOS app:
l OS X 10.8 or 10.9 or macOS Sierra 10.11.2, 10.12, 10.12.1, and 10.12.4
l Xcode 6 or higher
How can I check that Xcode is installed?
1. In the Terminal window, type codesignThe usage of codesign should be displayed.
2. If the codesign command is missing, Xcode is not properly installed, and you should reinstall it.
Additional required resources
Copy the following resources to your Mac machine:
MC Enabler Download the MC Enabler package for MacOS onto your Mac. .
The MC Enabler tool is available in both GUI and command line versions.
HPMobileCenter.dylib This library enables your apps to work with StormRunner Functional. The library is includedin the MC Enabler package.
Mobile Lab User GuideView, upload, and manage apps
StormRunner Functional (Powered by Mobile Center 2.70) Page 64 of 88
Code signingcertificate
This is the certificate your organization uses to code sign apps. The certificate must be
installed on the Mac machine that you are using, and can be seen in the Keychain Access
program. For more details on the certificates needed, see "Certificates required when signing
iOS apps" on page 50.
Code signingprovisioningprofile
This is the mobile provisioning profile that your organization uses to code-sign apps. This is
originally a file downloaded from the Apple Developer Member Website and installed on
your Mac. For details on how to generate a provisioning profile, see "Apple Development
Certificates and Provisioning Profiles" on page 76.
For hybrid apps only
When using UFT:Copy the uft.mobilecenter.agent.<version>.min.js file for your version of UFT. You can find the file inthe HybridJS folder in the MC Enabler package.
MC Enabler on MacThe MC Enabler tool is available in both GUI and command line versions. The GUI version allows you toenter the required values in an accurate and simple manner, using a graphical interface.
MC Enabler on Mac - GUI version
The MC Enabler GUI enables you to re-sign and repackage your apps for the testing of iOS devices.
1. Extract the files onto your Mac machine from the downloaded HPMCEnabler.zip package.
2. Open HPMCEnabler-GUI.app: Ctrl+click or right-click on the app and select Open from the contextmenu.
Note: Since the GUI version of HPMCEnabler is not distributed via the Mac App Store, if you try toinstall it through the App Store, it will issue a security warning indicating that the applicationcannot be opened since it is from an unidentified developer. Instead, use the method describedabove.
3. Fill in all of the fields in the HPMC Enabler.
Mobile Lab User GuideView, upload, and manage apps
StormRunner Functional (Powered by Mobile Center 2.70) Page 65 of 88
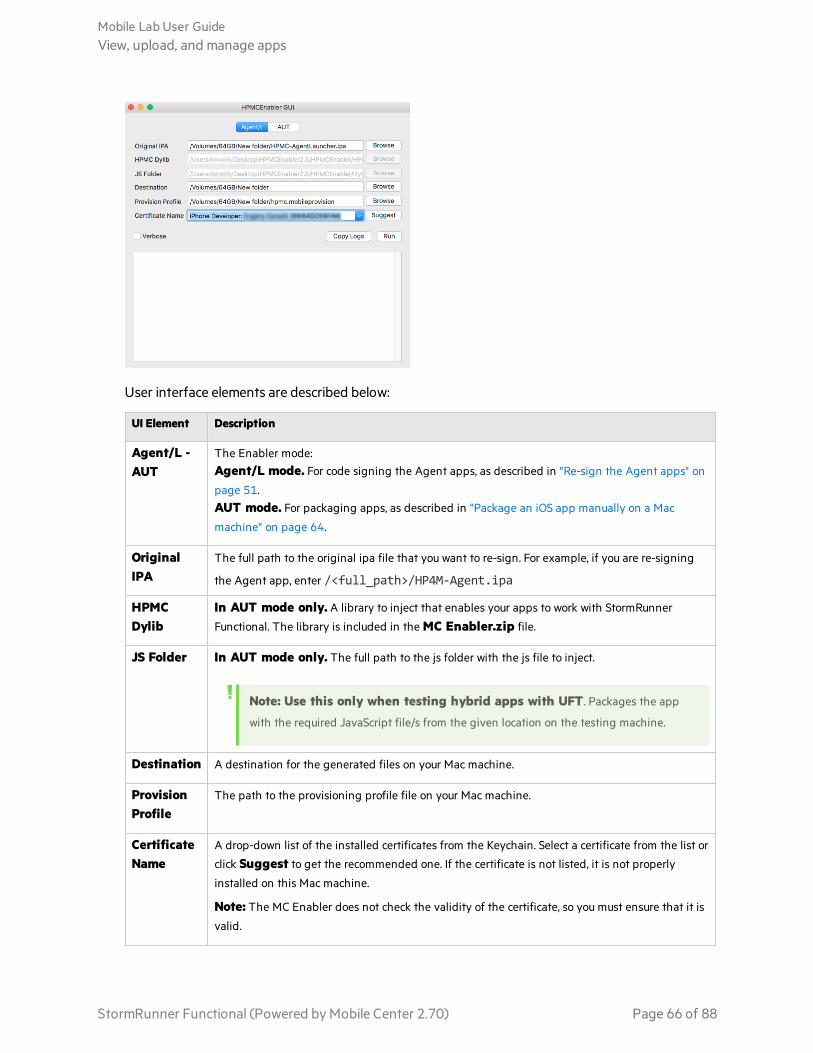
User interface elements are described below:
UI Element Description
Agent/L -AUT
The Enabler mode:Agent/L mode. For code signing the Agent apps, as described in "Re-sign the Agent apps" on
page 51.AUT mode. For packaging apps, as described in "Package an iOS app manually on a Mac
machine" on page 64.
OriginalIPA
The full path to the original ipa file that you want to re-sign. For example, if you are re-signing
the Agent app, enter /<full_path>/HP4M-Agent.ipa
HPMCDylib
In AUT mode only. A library to inject that enables your apps to work with StormRunner
Functional. The library is included in the MC Enabler.zip file.
JS Folder In AUT mode only. The full path to the js folder with the js file to inject.
Note: Use this only when testing hybrid apps with UFT. Packages the app
with the required JavaScript file/s from the given location on the testing machine.
Destination A destination for the generated files on your Mac machine.
ProvisionProfile
The path to the provisioning profile file on your Mac machine.
CertificateName
A drop-down list of the installed certificates from the Keychain. Select a certificate from the list or
click Suggest to get the recommended one. If the certificate is not listed, it is not properly
installed on this Mac machine.
Note: The MC Enabler does not check the validity of the certificate, so you must ensure that it is
valid.
Mobile Lab User GuideView, upload, and manage apps
StormRunner Functional (Powered by Mobile Center 2.70) Page 66 of 88
UI Element Description
Verbose Displays warning and error messages in the text area, if the Agent is not enabled properly.
4. Click Run. This generates an additional ipa file, customized with your code signing certificate and aprovisioning profile.
5. Upload the new ipa to the mobile lab.
Note: Whenever you upload a new or modified ipa file , as a result of adding or changing aniOS device, make sure to unplug the device and plug it in again.
MC Enabler on Mac - command line version
Use the following syntax when running the Enabler from the terminal command line.
$ <path>/HPMCEnabler <path>/<original_ipa>.ipa [<options>]
Command line options:
-inject Inject the dylib into the app. Provide the full path to the HPMobileCenter.dylib.
-codesign Codesign the app with a certificate. This is the certificate your organization uses to code sign apps. The
certificate must be installed on the Mac machine that you are using, and can be seen in the OSX
Keychain Access program.
Use the full name of the certificate as shown in the Keychain.
For more details on the certificates needed, see "Certificates required when signing iOS apps" on
page 50.
-p Attach a mobile provisioning profile to the App. Provide the path to the provisioning profile on your Mac
machine.
-e Entitlements file.
-r Resources rules list. Your custom resource rules file.
--original-res-rules
Use the Resources rules file from the original IPA, ResourceRules.plist.
--generic-res-rules
Apply a generic Resources rules definition. If the codesign fails due to problems with the resources, try
this option. A generic template will be used.
--force-res-rules
Runs the enabler as if the --original-res-rules option was set. If no original rules were found, it runs
the enabler as if the --generic-res-rules option was used.
--no-url-scheme
Do not add a unique URL scheme in Info.plist. By default, it is added. The format of scheme is hpmc-(a 32 char uid)
Mobile Lab User GuideView, upload, and manage apps
StormRunner Functional (Powered by Mobile Center 2.70) Page 67 of 88
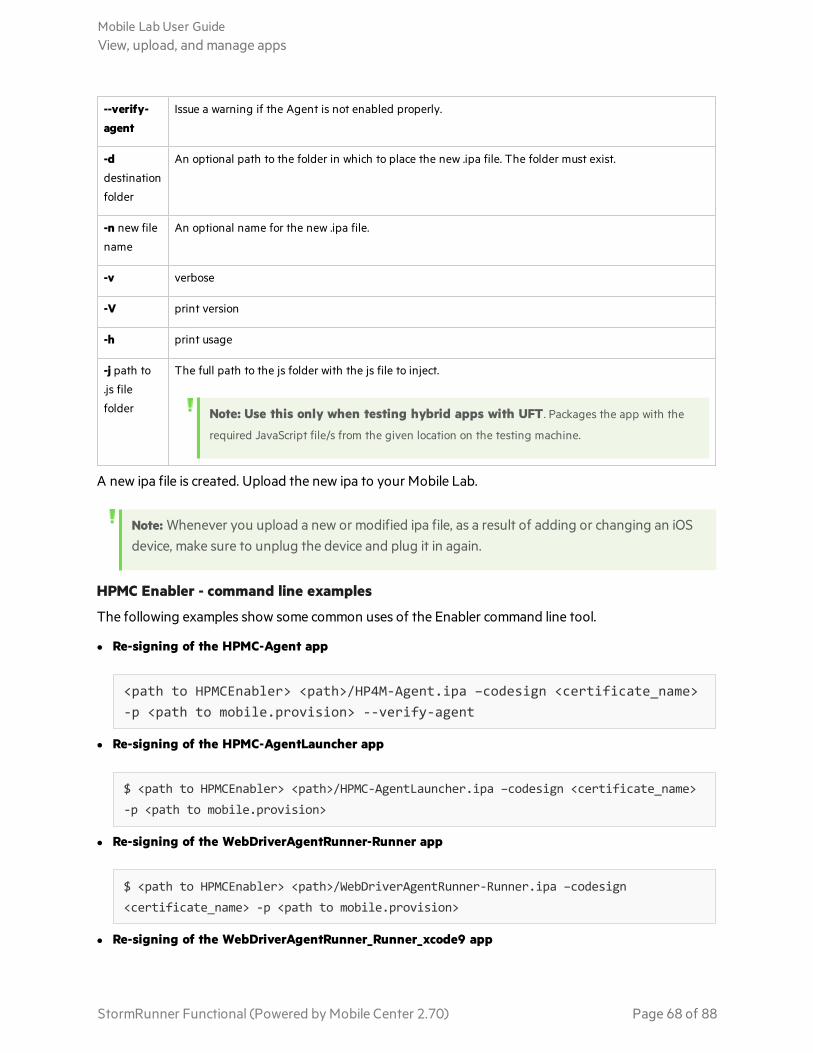
--verify-agent
Issue a warning if the Agent is not enabled properly.
-ddestination
folder
An optional path to the folder in which to place the new .ipa file. The folder must exist.
-n new file
name
An optional name for the new .ipa file.
-v verbose
-V print version
-h print usage
-j path to
.js file
folder
The full path to the js folder with the js file to inject.
Note: Use this only when testing hybrid apps with UFT. Packages the app with the
required JavaScript file/s from the given location on the testing machine.
A new ipa file is created. Upload the new ipa to your Mobile Lab.
Note: Whenever you upload a new or modified ipa file, as a result of adding or changing an iOSdevice, make sure to unplug the device and plug it in again.
HPMC Enabler - command line examples
The following examples show some common uses of the Enabler command line tool.
l Re-signing of the HPMC-Agent app
<path to HPMCEnabler> <path>/HP4M-Agent.ipa –codesign <certificate_name>-p <path to mobile.provision> --verify-agent
l Re-signing of the HPMC-AgentLauncher app
$ <path to HPMCEnabler> <path>/HPMC-AgentLauncher.ipa –codesign <certificate_name>-p <path to mobile.provision>
l Re-signing of the WebDriverAgentRunner-Runner app
$ <path to HPMCEnabler> <path>/WebDriverAgentRunner-Runner.ipa –codesign<certificate_name> -p <path to mobile.provision>
l Re-signing of the WebDriverAgentRunner_Runner_xcode9 app
Mobile Lab User GuideView, upload, and manage apps
StormRunner Functional (Powered by Mobile Center 2.70) Page 68 of 88
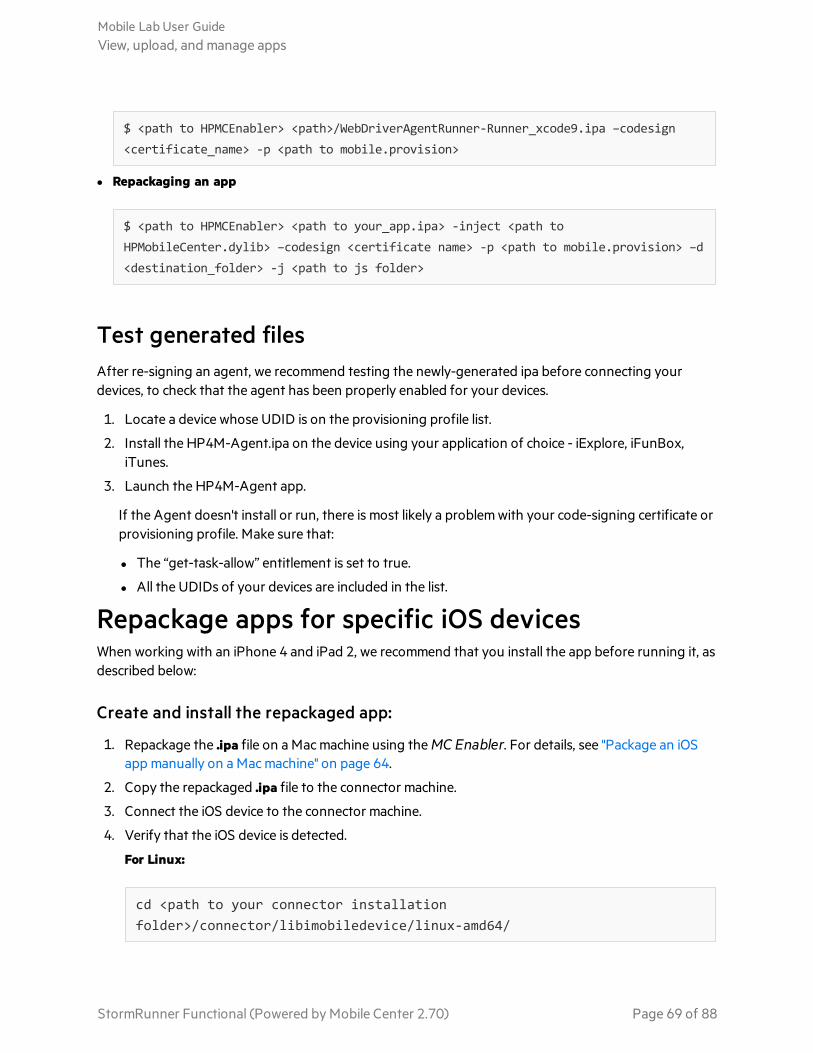
$ <path to HPMCEnabler> <path>/WebDriverAgentRunner-Runner_xcode9.ipa –codesign<certificate_name> -p <path to mobile.provision>
l Repackaging an app
$ <path to HPMCEnabler> <path to your_app.ipa> -inject <path toHPMobileCenter.dylib> –codesign <certificate name> -p <path to mobile.provision> –d<destination_folder> -j <path to js folder>
Test generated filesAfter re-signing an agent, we recommend testing the newly-generated ipa before connecting yourdevices, to check that the agent has been properly enabled for your devices.
1. Locate a device whose UDID is on the provisioning profile list.
2. Install the HP4M-Agent.ipa on the device using your application of choice - iExplore, iFunBox,iTunes.
3. Launch the HP4M-Agent app.
If the Agent doesn't install or run, there is most likely a problem with your code-signing certificate orprovisioning profile. Make sure that:
l The “get-task-allow” entitlement is set to true.
l All the UDIDs of your devices are included in the list.
Repackage apps for specific iOS devicesWhen working with an iPhone 4 and iPad 2, we recommend that you install the app before running it, asdescribed below:
Create and install the repackaged app:
1. Repackage the .ipa file on a Mac machine using the MC Enabler. For details, see "Package an iOSapp manually on a Mac machine" on page 64.
2. Copy the repackaged .ipa file to the connector machine.
3. Connect the iOS device to the connector machine.
4. Verify that the iOS device is detected.
For Linux:
cd <path to your connector installationfolder>/connector/libimobiledevice/linux-amd64/
Mobile Lab User GuideView, upload, and manage apps
StormRunner Functional (Powered by Mobile Center 2.70) Page 69 of 88
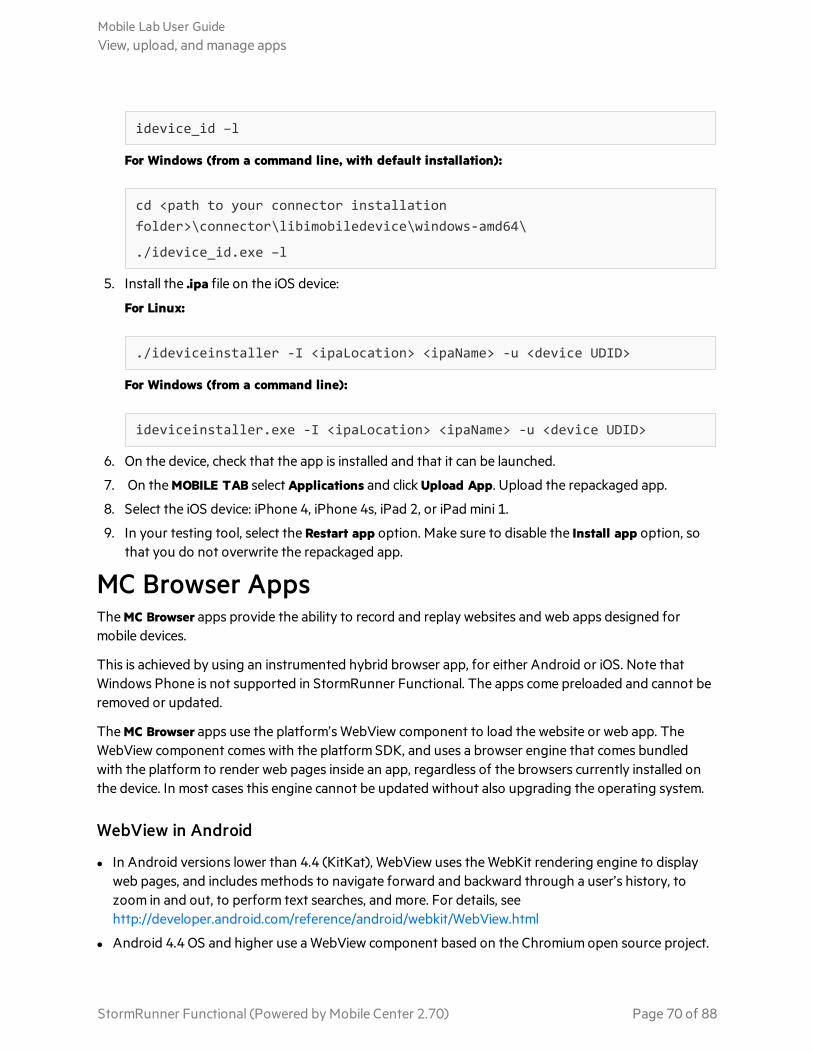
idevice_id –l
For Windows (from a command line, with default installation):
cd <path to your connector installationfolder>\connector\libimobiledevice\windows-amd64\
./idevice_id.exe –l
5. Install the .ipa file on the iOS device:
For Linux:
./ideviceinstaller -I <ipaLocation> <ipaName> -u <device UDID>
For Windows (from a command line):
ideviceinstaller.exe -I <ipaLocation> <ipaName> -u <device UDID>
6. On the device, check that the app is installed and that it can be launched.
7. On the MOBILE TAB select Applications and click Upload App. Upload the repackaged app.
8. Select the iOS device: iPhone 4, iPhone 4s, iPad 2, or iPad mini 1.
9. In your testing tool, select the Restart app option. Make sure to disable the Install app option, sothat you do not overwrite the repackaged app.
MC Browser AppsThe MC Browser apps provide the ability to record and replay websites and web apps designed formobile devices.
This is achieved by using an instrumented hybrid browser app, for either Android or iOS. Note thatWindows Phone is not supported in StormRunner Functional. The apps come preloaded and cannot beremoved or updated.
The MC Browser apps use the platform’s WebView component to load the website or web app. TheWebView component comes with the platform SDK, and uses a browser engine that comes bundledwith the platform to render web pages inside an app, regardless of the browsers currently installed onthe device. In most cases this engine cannot be updated without also upgrading the operating system.
WebView in Android
l In Android versions lower than 4.4 (KitKat), WebView uses the WebKit rendering engine to displayweb pages, and includes methods to navigate forward and backward through a user’s history, tozoom in and out, to perform text searches, and more. For details, seehttp://developer.android.com/reference/android/webkit/WebView.html
l Android 4.4 OS and higher use a WebView component based on the Chromium open source project.
Mobile Lab User GuideView, upload, and manage apps
StormRunner Functional (Powered by Mobile Center 2.70) Page 70 of 88
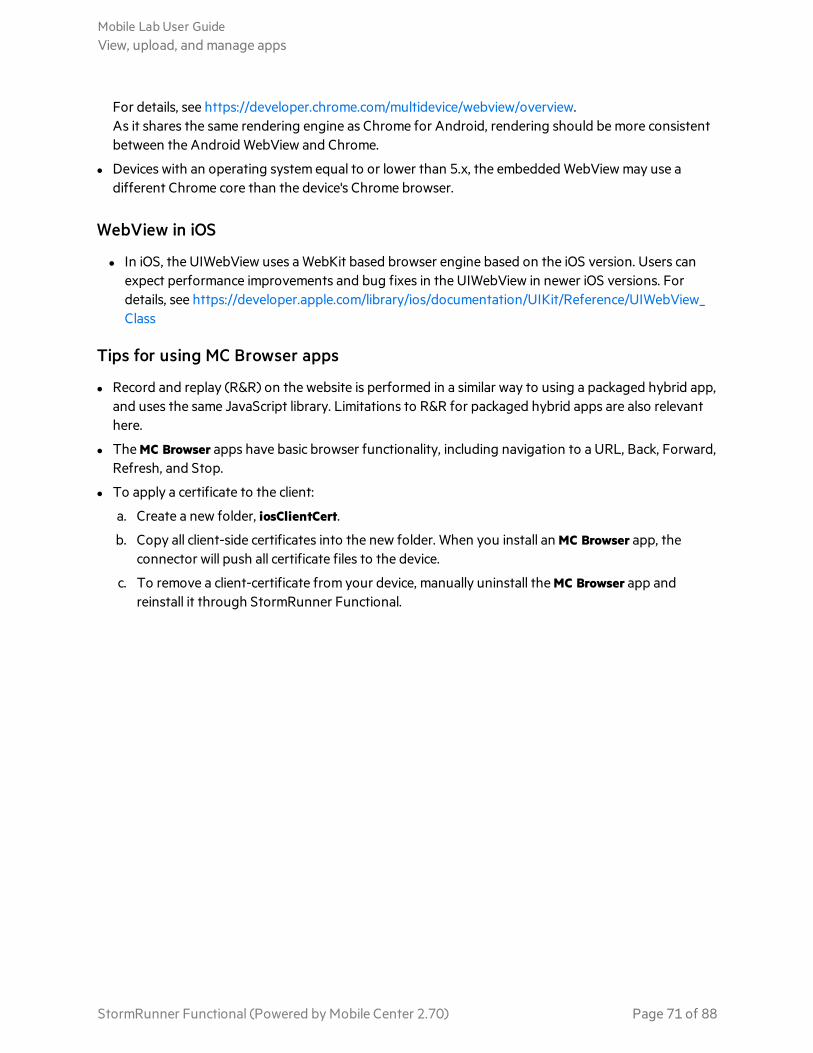
For details, see https://developer.chrome.com/multidevice/webview/overview.As it shares the same rendering engine as Chrome for Android, rendering should be more consistentbetween the Android WebView and Chrome.
l Devices with an operating system equal to or lower than 5.x, the embedded WebView may use adifferent Chrome core than the device's Chrome browser.
WebView in iOS
l In iOS, the UIWebView uses a WebKit based browser engine based on the iOS version. Users canexpect performance improvements and bug fixes in the UIWebView in newer iOS versions. Fordetails, see https://developer.apple.com/library/ios/documentation/UIKit/Reference/UIWebView_Class
Tips for using MC Browser apps
l Record and replay (R&R) on the website is performed in a similar way to using a packaged hybrid app,and uses the same JavaScript library. Limitations to R&R for packaged hybrid apps are also relevanthere.
l The MC Browser apps have basic browser functionality, including navigation to a URL, Back, Forward,Refresh, and Stop.
l To apply a certificate to the client:
a. Create a new folder, iosClientCert.
b. Copy all client-side certificates into the new folder. When you install an MC Browser app, theconnector will push all certificate files to the device.
c. To remove a client-certificate from your device, manually uninstall the MC Browser app andreinstall it through StormRunner Functional.
Mobile Lab User GuideView, upload, and manage apps
StormRunner Functional (Powered by Mobile Center 2.70) Page 71 of 88
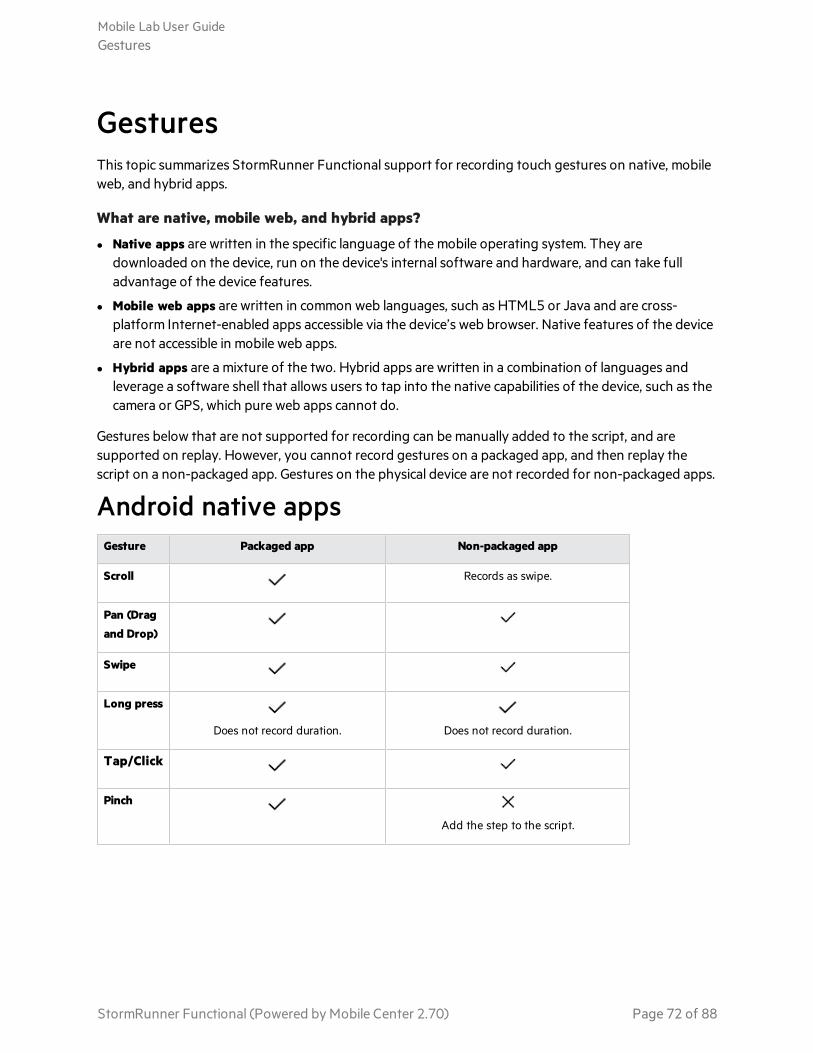
GesturesThis topic summarizes StormRunner Functional support for recording touch gestures on native, mobileweb, and hybrid apps.
What are native, mobile web, and hybrid apps?
l Native apps are written in the specific language of the mobile operating system. They aredownloaded on the device, run on the device's internal software and hardware, and can take fulladvantage of the device features.
l Mobile web apps are written in common web languages, such as HTML5 or Java and are cross-platform Internet-enabled apps accessible via the device’s web browser. Native features of the deviceare not accessible in mobile web apps.
l Hybrid apps are a mixture of the two. Hybrid apps are written in a combination of languages andleverage a software shell that allows users to tap into the native capabilities of the device, such as thecamera or GPS, which pure web apps cannot do.
Gestures below that are not supported for recording can be manually added to the script, and aresupported on replay. However, you cannot record gestures on a packaged app, and then replay thescript on a non-packaged app. Gestures on the physical device are not recorded for non-packaged apps.
Android native appsGesture Packaged app Non-packaged app
Scroll Records as swipe.
Pan (Dragand Drop)
Swipe
Long press
Does not record duration. Does not record duration.
Tap/Click
Pinch
Add the step to the script.
Mobile Lab User GuideGestures
StormRunner Functional (Powered by Mobile Center 2.70) Page 72 of 88
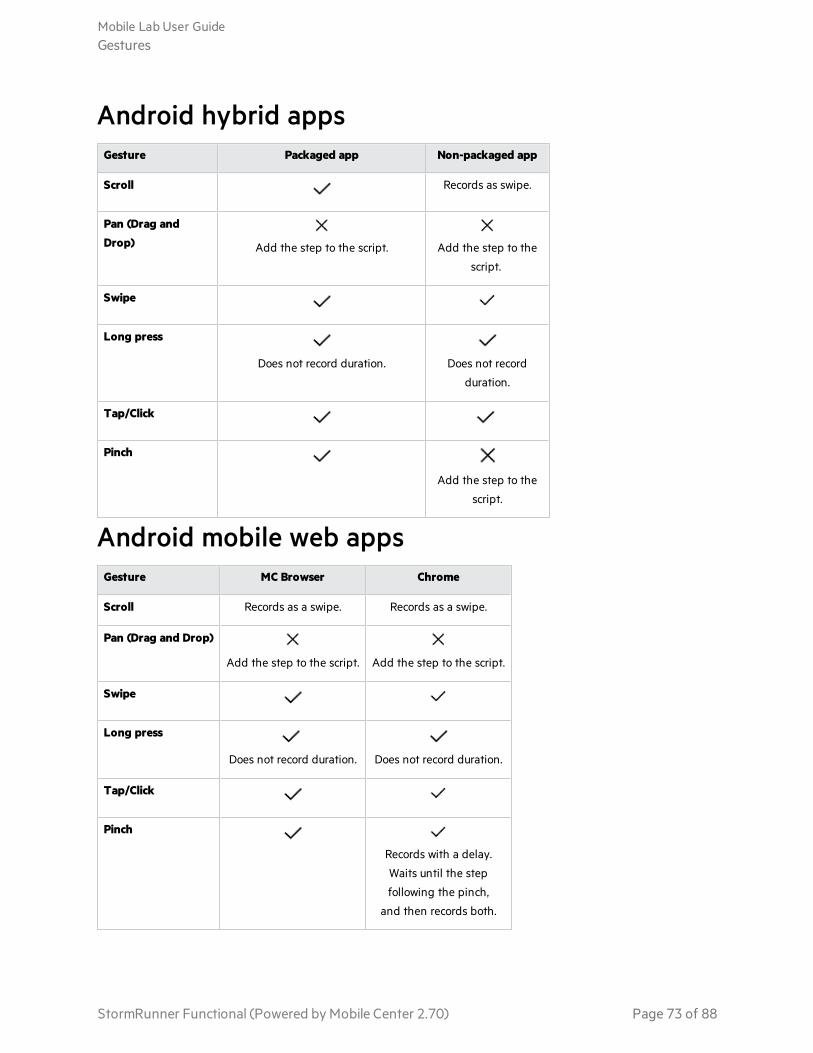
Android hybrid appsGesture Packaged app Non-packaged app
Scroll Records as swipe.
Pan (Drag andDrop) Add the step to the script. Add the step to the
script.
Swipe
Long press
Does not record duration. Does not record
duration.
Tap/Click
Pinch
Add the step to the
script.
Android mobile web appsGesture MC Browser Chrome
Scroll Records as a swipe. Records as a swipe.
Pan (Drag and Drop)
Add the step to the script. Add the step to the script.
Swipe
Long press
Does not record duration. Does not record duration.
Tap/Click
Pinch
Records with a delay.
Waits until the step
following the pinch,
and then records both.
Mobile Lab User GuideGestures
StormRunner Functional (Powered by Mobile Center 2.70) Page 73 of 88
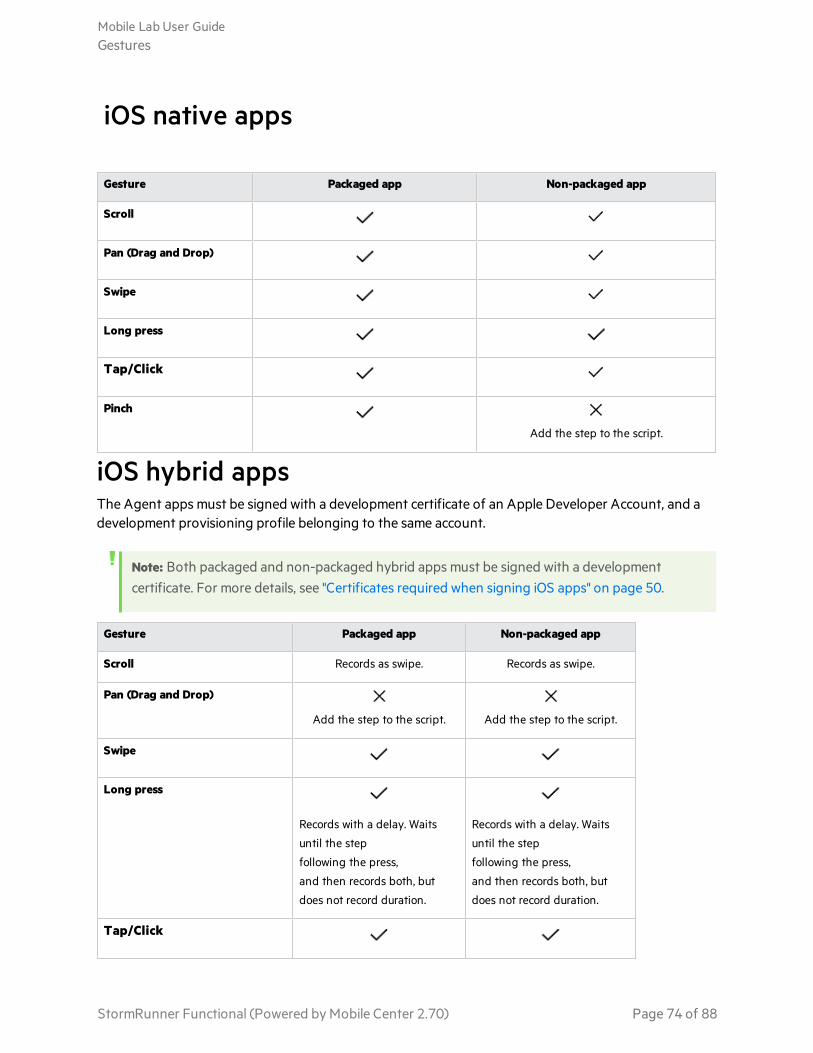
iOS native apps
Gesture Packaged app Non-packaged app
Scroll
Pan (Drag and Drop)
Swipe
Long press
Tap/Click
Pinch
Add the step to the script.
iOS hybrid appsThe Agent apps must be signed with a development certificate of an Apple Developer Account, and adevelopment provisioning profile belonging to the same account.
Note: Both packaged and non-packaged hybrid apps must be signed with a developmentcertificate. For more details, see "Certificates required when signing iOS apps" on page 50.
Gesture Packaged app Non-packaged app
Scroll Records as swipe. Records as swipe.
Pan (Drag and Drop)
Add the step to the script. Add the step to the script.
Swipe
Long press
Records with a delay. Waits
until the step
following the press,
and then records both, but
does not record duration.
Records with a delay. Waits
until the step
following the press,
and then records both, but
does not record duration.
Tap/Click
Mobile Lab User GuideGestures
StormRunner Functional (Powered by Mobile Center 2.70) Page 74 of 88
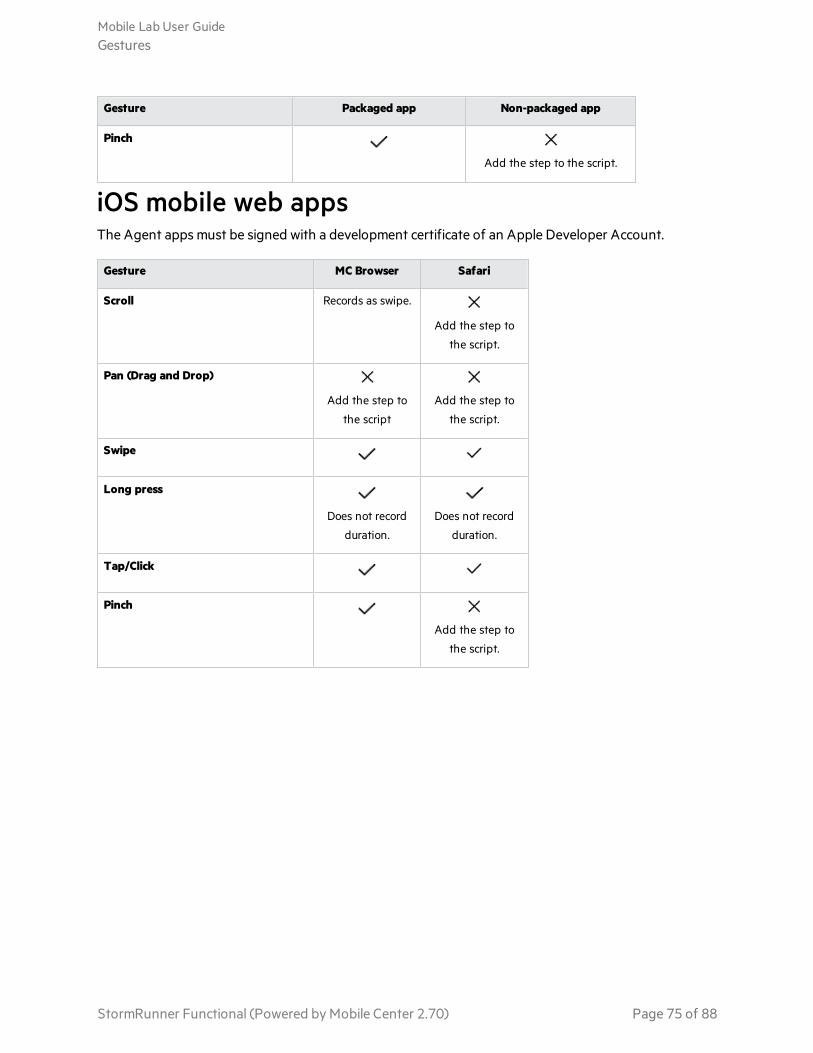
Gesture Packaged app Non-packaged app
Pinch
Add the step to the script.
iOS mobile web appsThe Agent apps must be signed with a development certificate of an Apple Developer Account.
Gesture MC Browser Safari
Scroll Records as swipe.
Add the step to
the script.
Pan (Drag and Drop)
Add the step to
the script
Add the step to
the script.
Swipe
Long press
Does not record
duration.
Does not record
duration.
Tap/Click
Pinch
Add the step to
the script.
Mobile Lab User GuideGestures
StormRunner Functional (Powered by Mobile Center 2.70) Page 75 of 88
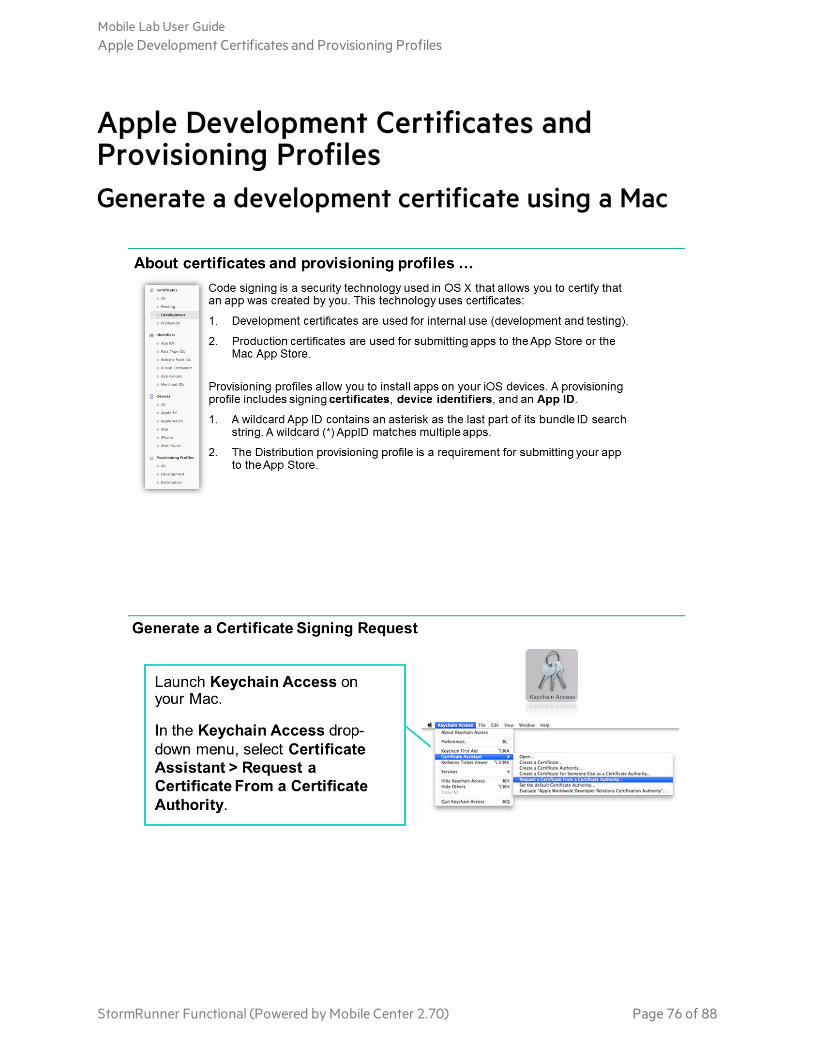
Apple Development Certificates andProvisioning ProfilesGenerate a development certificate using a Mac
Mobile Lab User GuideApple Development Certificates and Provisioning Profiles
StormRunner Functional (Powered by Mobile Center 2.70) Page 76 of 88
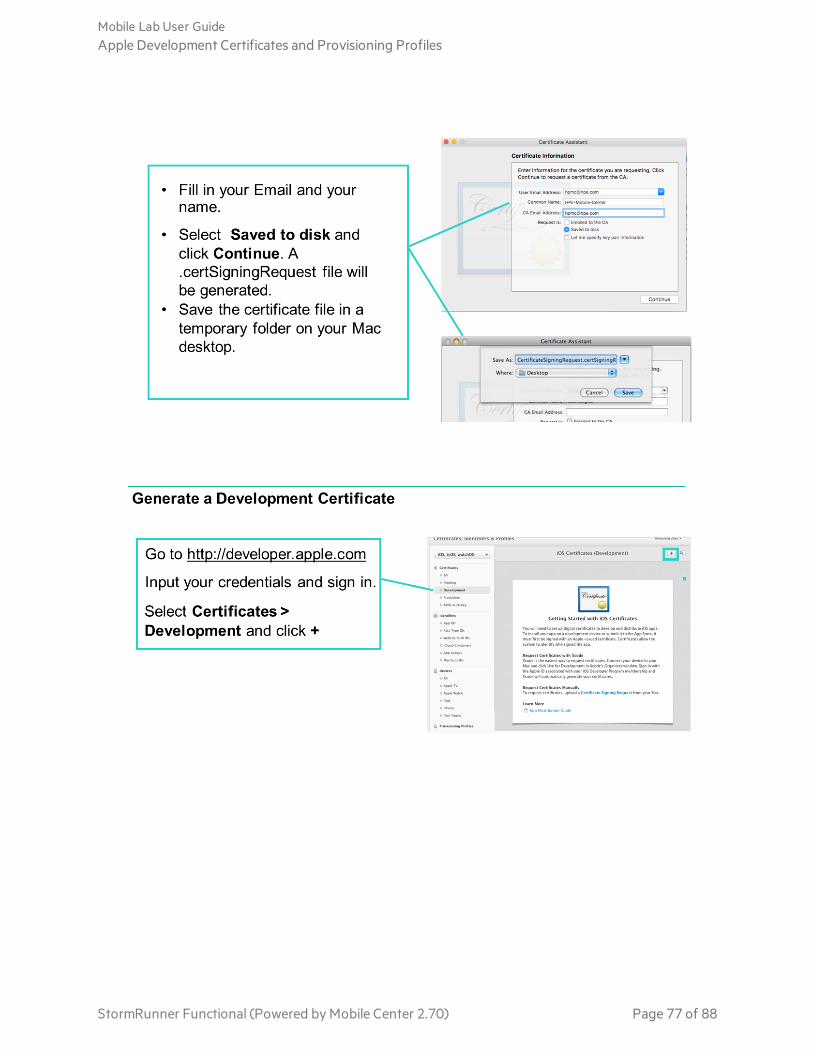
Mobile Lab User GuideApple Development Certificates and Provisioning Profiles
StormRunner Functional (Powered by Mobile Center 2.70) Page 77 of 88
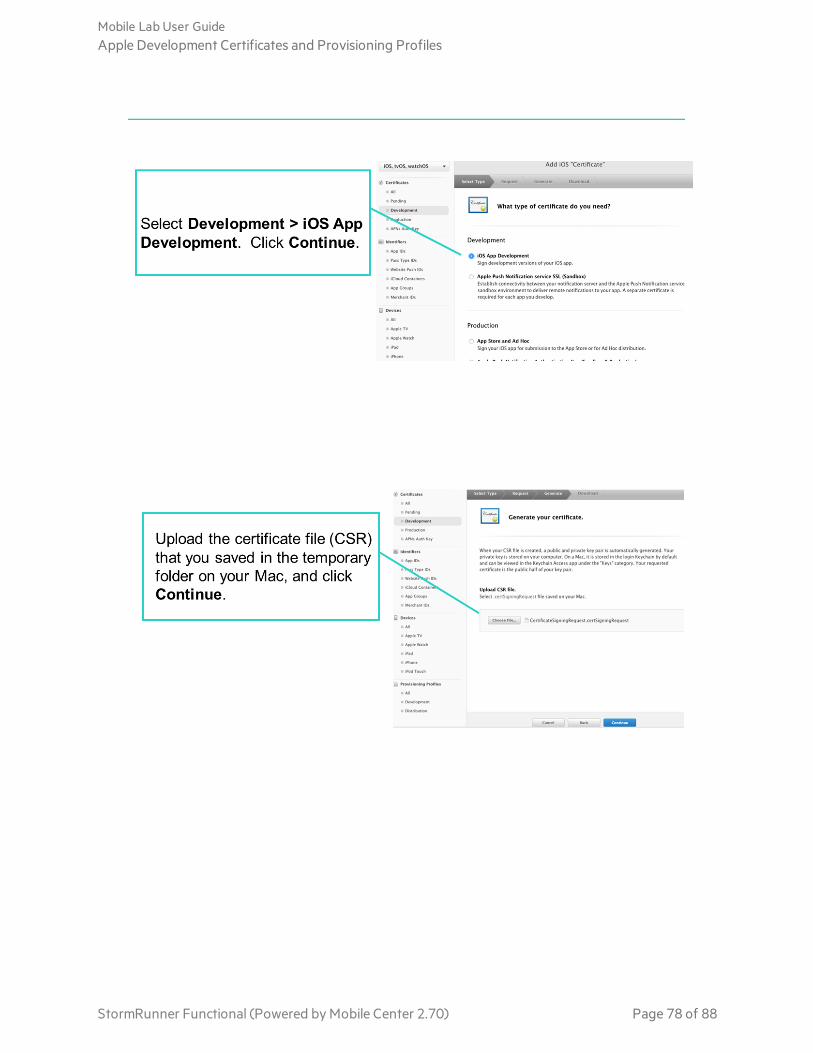
Mobile Lab User GuideApple Development Certificates and Provisioning Profiles
StormRunner Functional (Powered by Mobile Center 2.70) Page 78 of 88
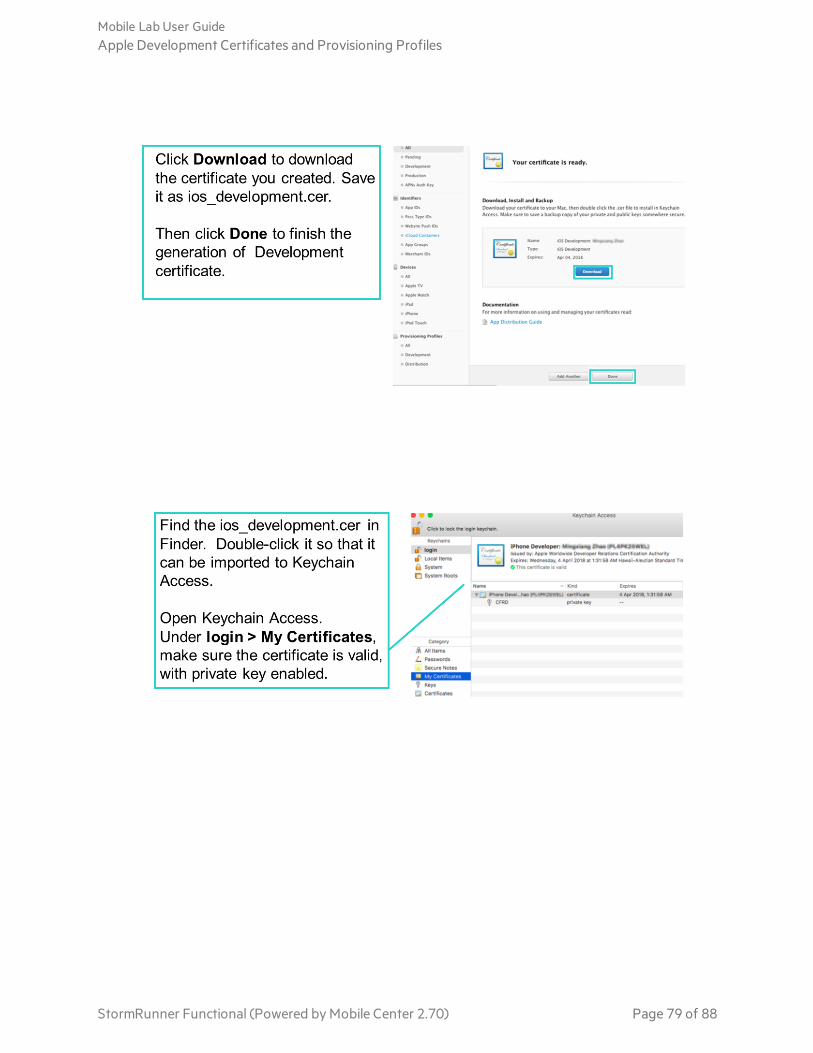
Mobile Lab User GuideApple Development Certificates and Provisioning Profiles
StormRunner Functional (Powered by Mobile Center 2.70) Page 79 of 88
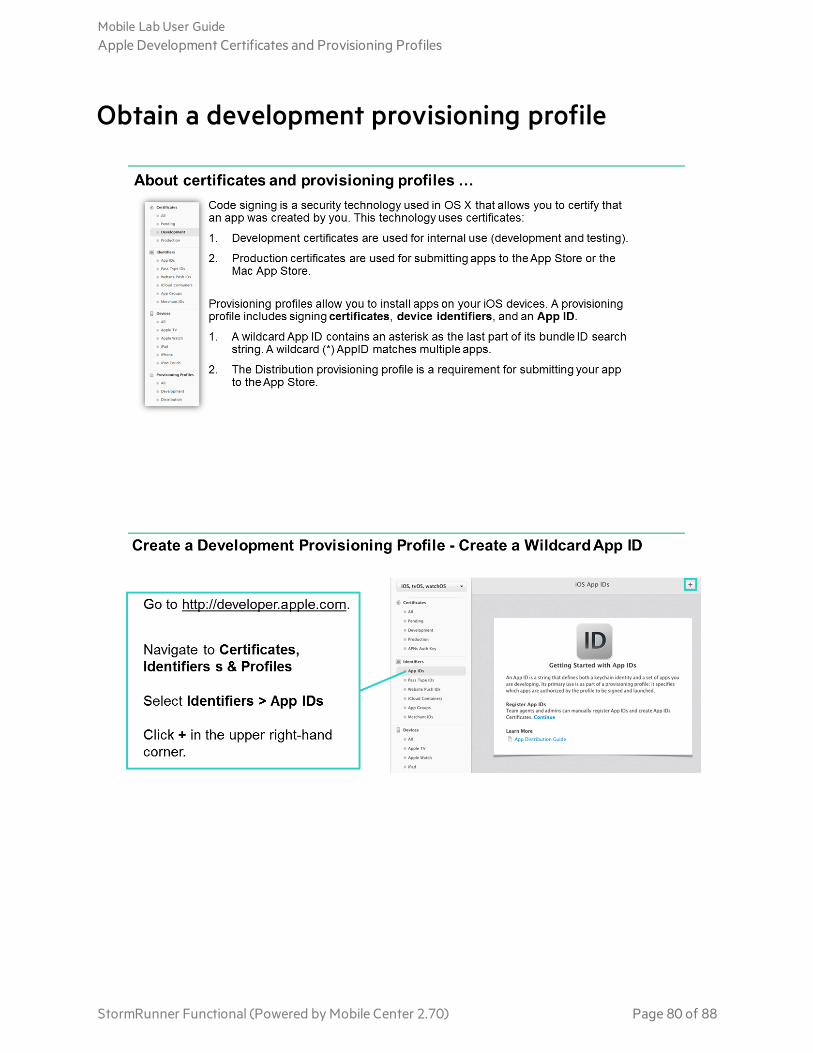
Obtain a development provisioning profile
Mobile Lab User GuideApple Development Certificates and Provisioning Profiles
StormRunner Functional (Powered by Mobile Center 2.70) Page 80 of 88
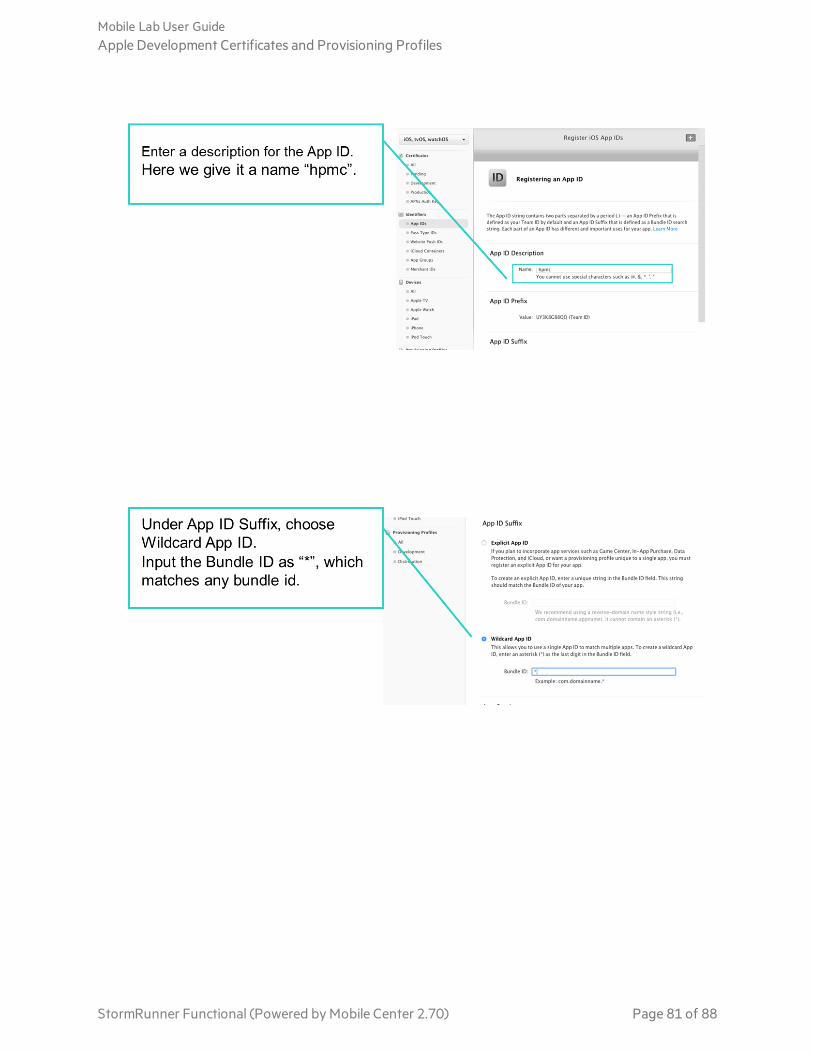
Mobile Lab User GuideApple Development Certificates and Provisioning Profiles
StormRunner Functional (Powered by Mobile Center 2.70) Page 81 of 88
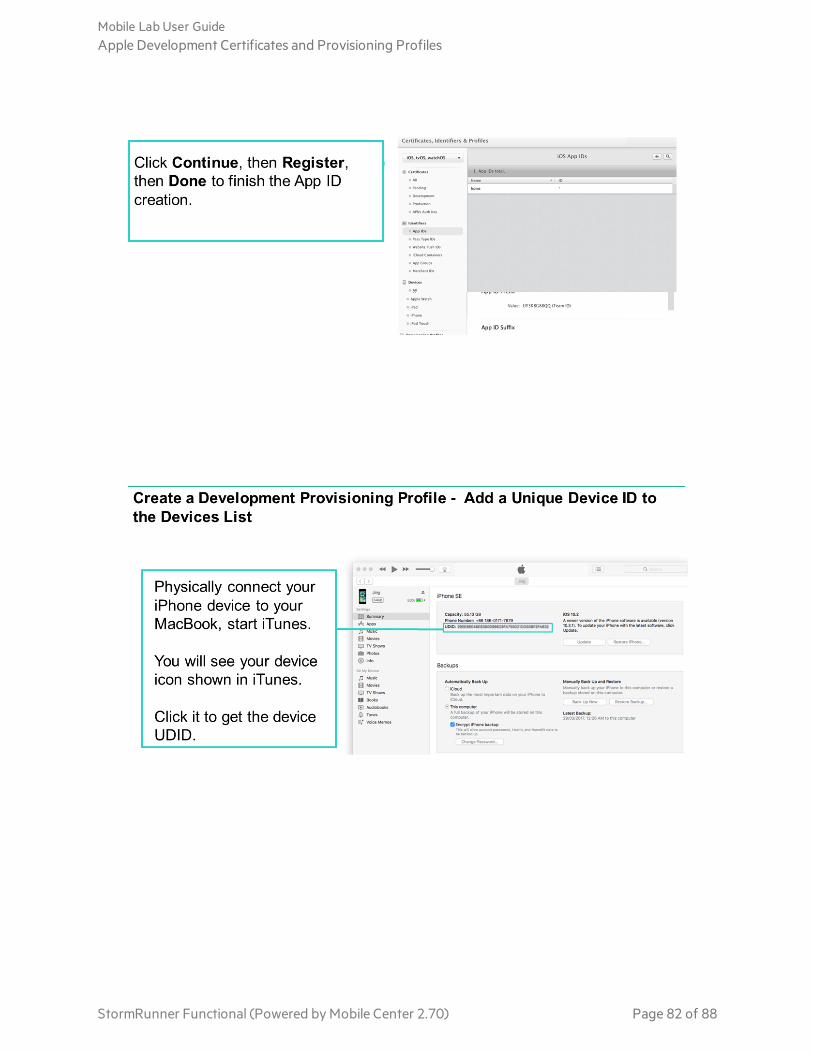
Mobile Lab User GuideApple Development Certificates and Provisioning Profiles
StormRunner Functional (Powered by Mobile Center 2.70) Page 82 of 88

Mobile Lab User GuideApple Development Certificates and Provisioning Profiles
StormRunner Functional (Powered by Mobile Center 2.70) Page 83 of 88
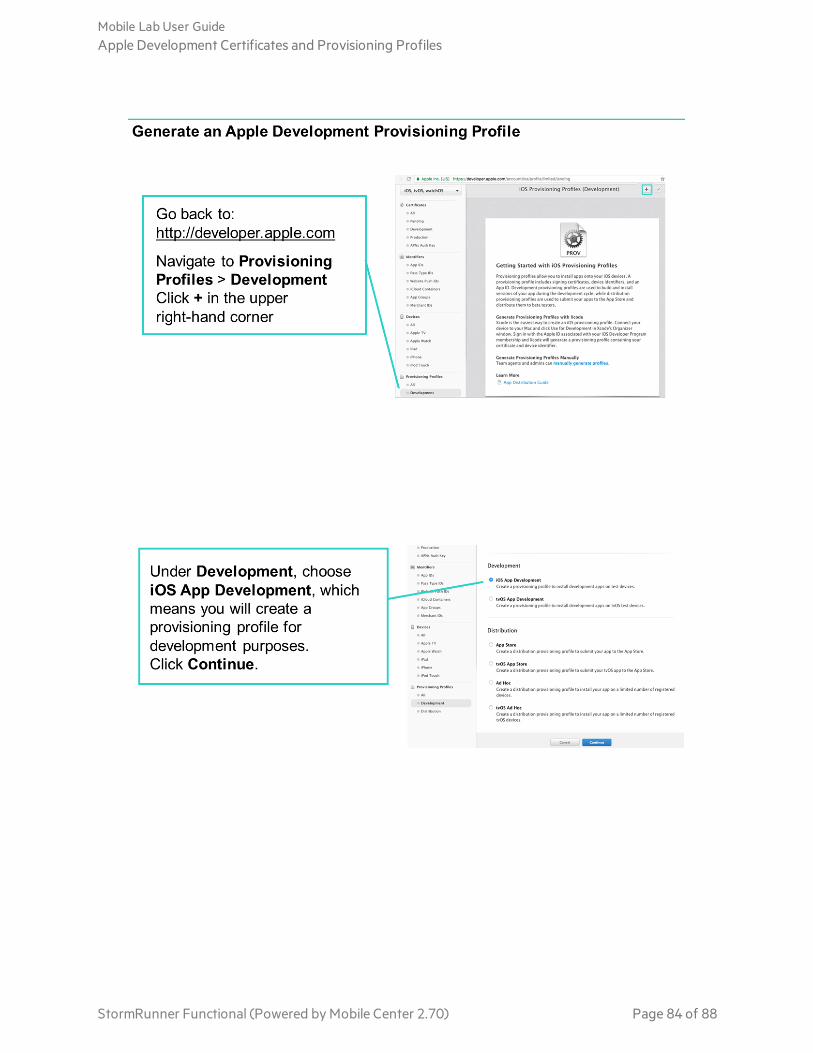
Mobile Lab User GuideApple Development Certificates and Provisioning Profiles
StormRunner Functional (Powered by Mobile Center 2.70) Page 84 of 88
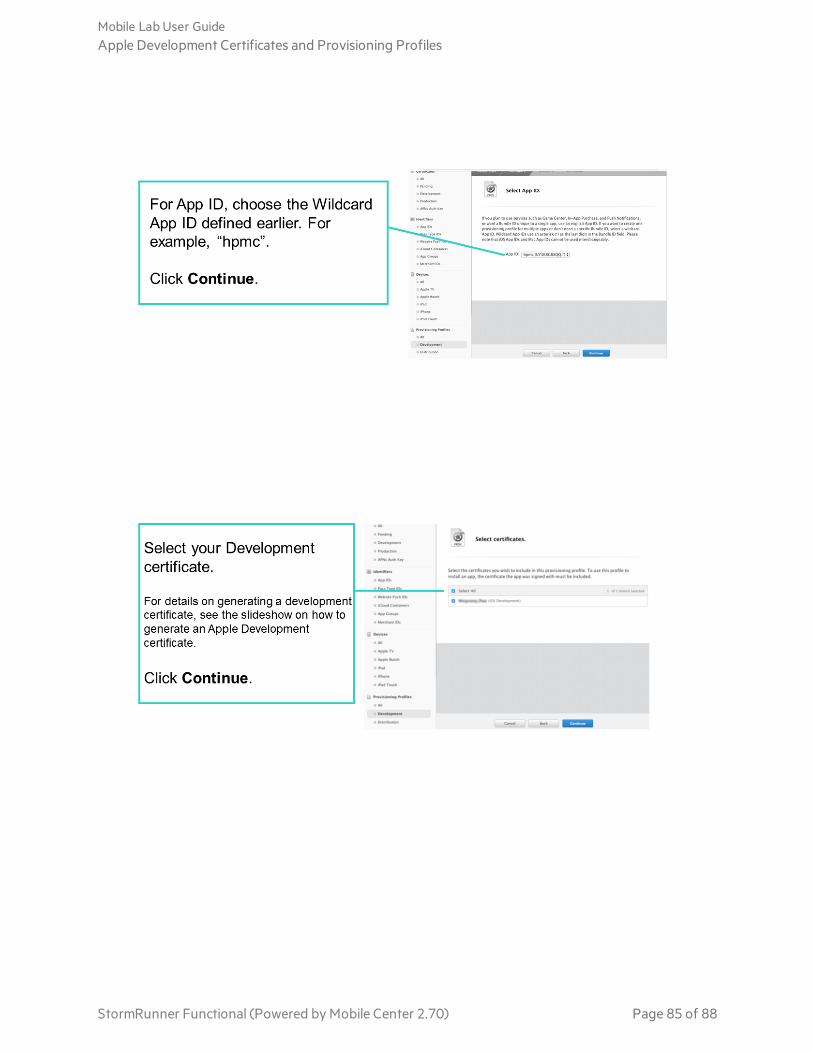
Mobile Lab User GuideApple Development Certificates and Provisioning Profiles
StormRunner Functional (Powered by Mobile Center 2.70) Page 85 of 88
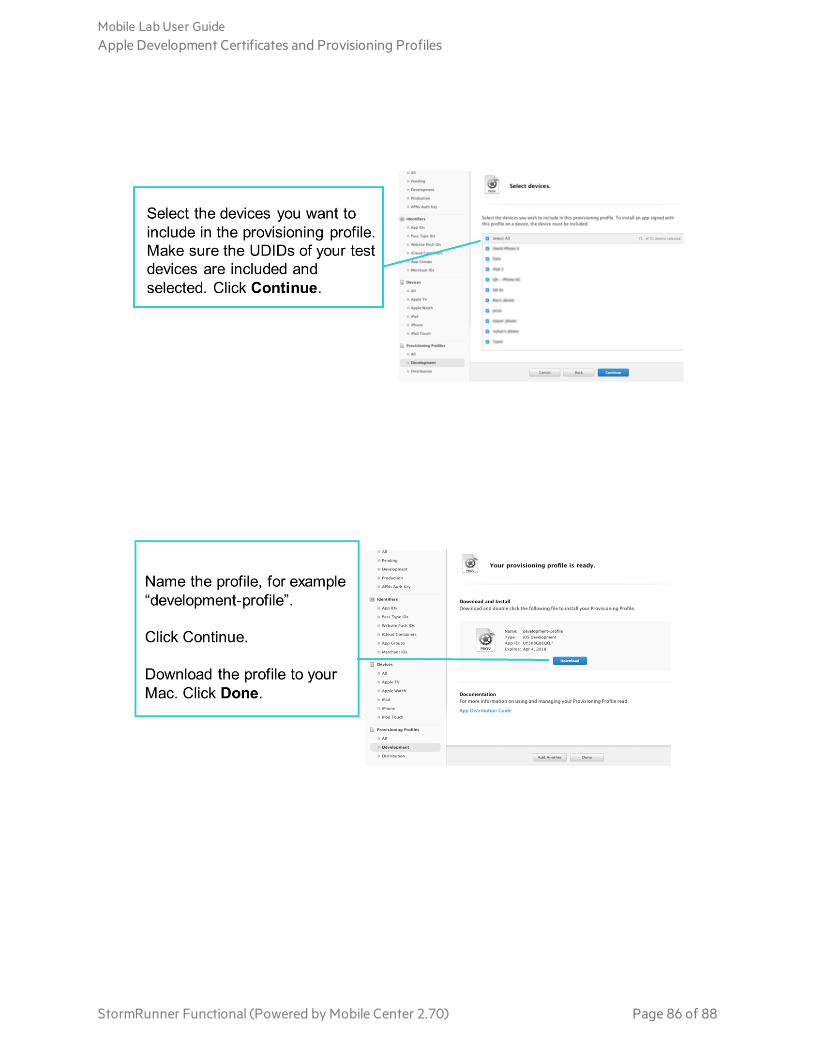
Mobile Lab User GuideApple Development Certificates and Provisioning Profiles
StormRunner Functional (Powered by Mobile Center 2.70) Page 86 of 88

Send Us FeedbackLet us know how we can improve your experience with the Mobile Lab User Guide.Send your email to: [email protected]
StormRunner Functional (Powered by Mobile Center 2.70) Page 87 of 88