Embed Size (px)
Citation preview
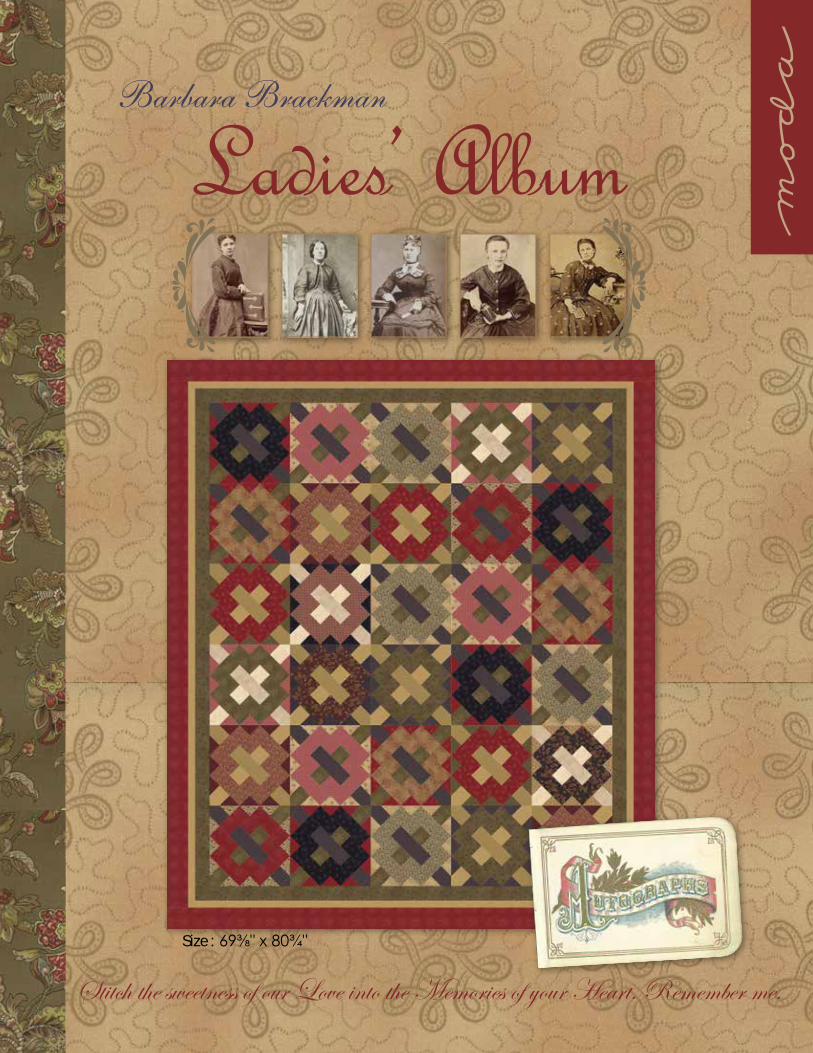
Size: 69⅜" x 80¾"
Stitch the sweetness of our Love into the Memories of your Heart. Remember me.
Fabric 1 – Used in 3 Block 8sCut 2–4⅛"x22" strips Subcut 9–4⅛"x4⅛" squares cut twice diagonally for background
Fabric 2 – Used in 3 Block 2s and Border 1Cut 3–2½"xWOF strips Subcut 6–2½"x2½", 12–2½"x4½" and 6 –2½"x6½" for block center.Cut 7–2½"xWOF strips for Border 1
Fabric 3 – Used in 4 Block 6sCut 4–2½"xWOF strips Subcut 8–2½"x2½", 16–2½"x4½" and 8–2½"x6½" for block center.
Fabric 4 – Used in 3 Block 3s and 3 Block 4sCut 1–4⅛"xWOF strip Subcut 9–4⅛"x4⅛" squares cut twice diagonally for backgroundCut 3–2½"xWOF strips Subcut 6–2½"x2½", 12–2½"x4½" and 6–2½"x6½" for block center.
Fabric 5 – Used in 2 Block 1sCut 2–4⅛"x22" strips Subcut 6–4⅛"x4⅛" squares cut twice diagonally for background
Fabric 6 – Used in 4 Block 7sCut 4–2½"xWOF strips Subcut 8–2½"x2½", 16–2½"x4½" and 8–2½"x6½" for block center.
Fabric 7 – Used in 3 Block 5sCut 6–2½"x22" strips Subcut 6–2½"x2½", 12–2½"x4½" and 6–2½"x6½" for block center.
Fabric 8 – Used in 1 Block 10Cut 2–2½"x22" strips Subcut 2–2½"x2½", 4–2½"x4½" and 2–2½"x6½" for block center.
Fabric 9 – Used in 1 Block 12Cut 2–2½"x22" strips Subcut 2–2½"x2½", 4–2½"x4½" and 2–2½"x6½" for block center.
Fabric 10 – Used in 1 Block 11Cut 2–2½"x22" strips Subcut 2–2½"x2½", 4–2½"x4½" and 2–2½"x6½" for block center.
Fabric 11 – Used in 4 Block 7sCut 3–4⅛"x22" strips Subcut 12–4⅛"x4⅛" squares cut twice diagonally for background
Fabric 12 – Used in 2 Block 1s, 3 Block 4s, 4 Block 6s, 4 Block 7s, 3 Block 8s, 2 Block 9sCut 7–2½"xWOF strips Subcut 84–2½"x2½", 8–2½"x4½" and 4–2½"x6½" for block center. Cut 16 of the 2½" squares once diagonally for corner triangles
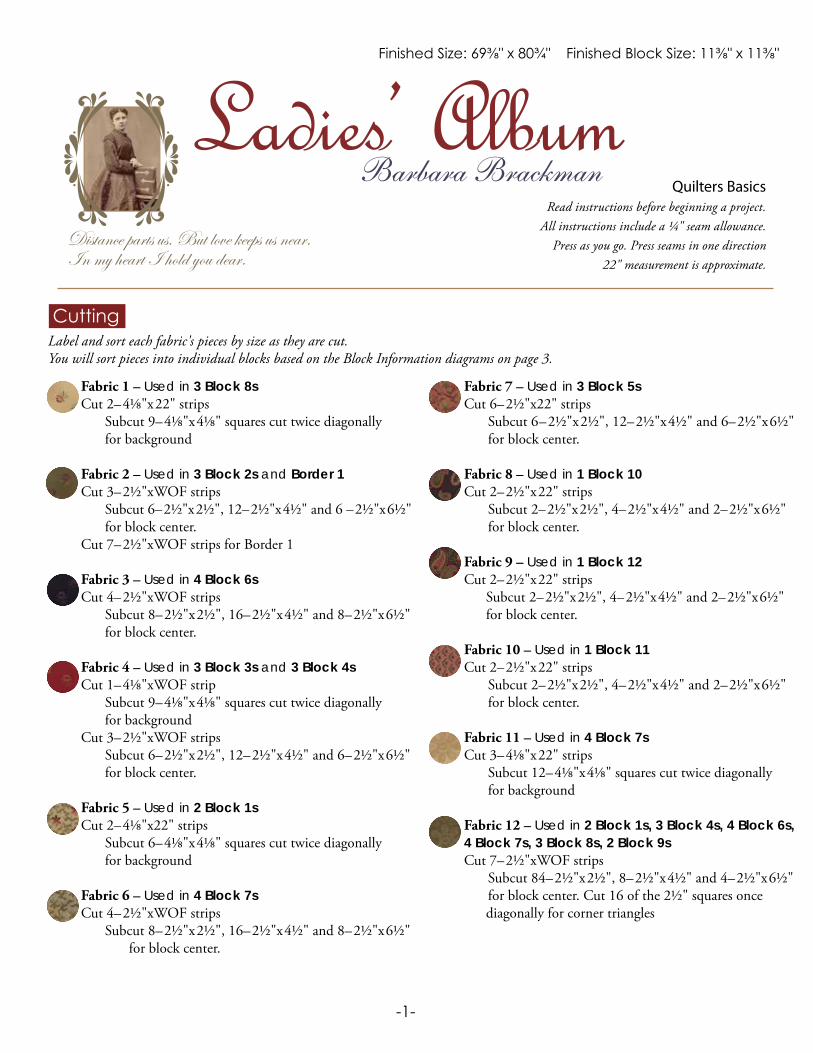
Label and sort each fabric's pieces by size as they are cut. You will sort pieces into individual blocks based on the Block Information diagrams on page 3.
Quilters BasicsRead instructions before beginning a project.
All instructions include a ¼" seam allowance.Press as you go. Press seams in one direction
22" measurement is approximate.
Distance parts us. But love keeps us near. In my heart I hold you dear.
Finished Size: 69⅜" x 80¾" Finished Block Size: 11⅜" x 11⅜"
Cutting
-1-
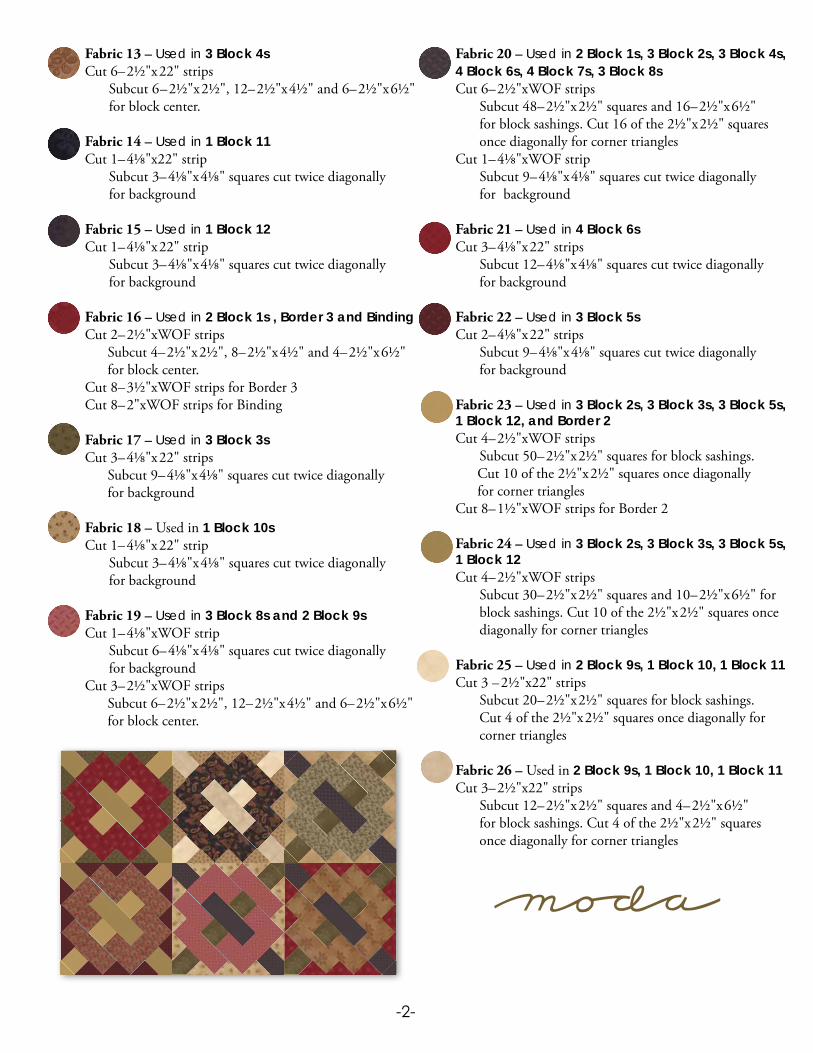
Fabric 13 – Used in 3 Block 4sCut 6–2½"x22" strips Subcut 6–2½"x2½", 12–2½"x4½" and 6–2½"x6½" for block center.
Fabric 14 – Used in 1 Block 11Cut 1–4⅛"x22" strip Subcut 3–4⅛"x4⅛" squares cut twice diagonally for background
Fabric 15 – Used in 1 Block 12Cut 1–4⅛"x22" strip Subcut 3–4⅛"x4⅛" squares cut twice diagonally for background
Fabric 16 – Used in 2 Block 1s , Border 3 and BindingCut 2–2½"xWOF strips Subcut 4–2½"x2½", 8–2½"x4½" and 4–2½"x6½" for block center.Cut 8–3½"xWOF strips for Border 3 Cut 8–2"xWOF strips for Binding
Fabric 17 – Used in 3 Block 3sCut 3–4⅛"x22" strips Subcut 9–4⅛"x4⅛" squares cut twice diagonally for background
Fabric 18 – Used in 1 Block 10sCut 1–4⅛"x22" strip Subcut 3–4⅛"x4⅛" squares cut twice diagonally for background
Fabric 19 – Used in 3 Block 8s and 2 Block 9sCut 1–4⅛"xWOF strip Subcut 6–4⅛"x4⅛" squares cut twice diagonally for backgroundCut 3–2½"xWOF strips Subcut 6–2½"x2½", 12–2½"x4½" and 6–2½"x6½" for block center.
Fabric 20 – Used in 2 Block 1s, 3 Block 2s, 3 Block 4s, 4 Block 6s, 4 Block 7s, 3 Block 8s Cut 6–2½"xWOF strips Subcut 48–2½"x2½" squares and 16–2½"x6½" for block sashings. Cut 16 of the 2½"x2½" squares once diagonally for corner trianglesCut 1–4⅛"xWOF strip Subcut 9–4⅛"x4⅛" squares cut twice diagonally for background
Fabric 21 – Used in 4 Block 6sCut 3–4⅛"x22" strips Subcut 12–4⅛"x4⅛" squares cut twice diagonally for background
Fabric 22 – Used in 3 Block 5sCut 2–4⅛"x22" strips Subcut 9–4⅛"x4⅛" squares cut twice diagonally for background
Fabric 23 – Used in 3 Block 2s, 3 Block 3s, 3 Block 5s, 1 Block 12, and Border 2Cut 4–2½"xWOF strips Subcut 50–2½"x2½" squares for block sashings. Cut 10 of the 2½"x2½" squares once diagonally for corner trianglesCut 8–1½"xWOF strips for Border 2
Fabric 24 – Used in 3 Block 2s, 3 Block 3s, 3 Block 5s, 1 Block 12 Cut 4–2½"xWOF strips Subcut 30–2½"x2½" squares and 10–2½"x6½" for block sashings. Cut 10 of the 2½"x2½" squares once diagonally for corner triangles
Fabric 25 – Used in 2 Block 9s, 1 Block 10, 1 Block 11 Cut 3 –2½"x22" strips Subcut 20–2½"x2½" squares for block sashings. Cut 4 of the 2½"x2½" squares once diagonally for corner triangles
Fabric 26 – Used in 2 Block 9s, 1 Block 10, 1 Block 11 Cut 3–2½"x22" strips Subcut 12–2½"x2½" squares and 4–2½"x6½" for block sashings. Cut 4 of the 2½"x2½" squares once diagonally for corner triangles
-2-
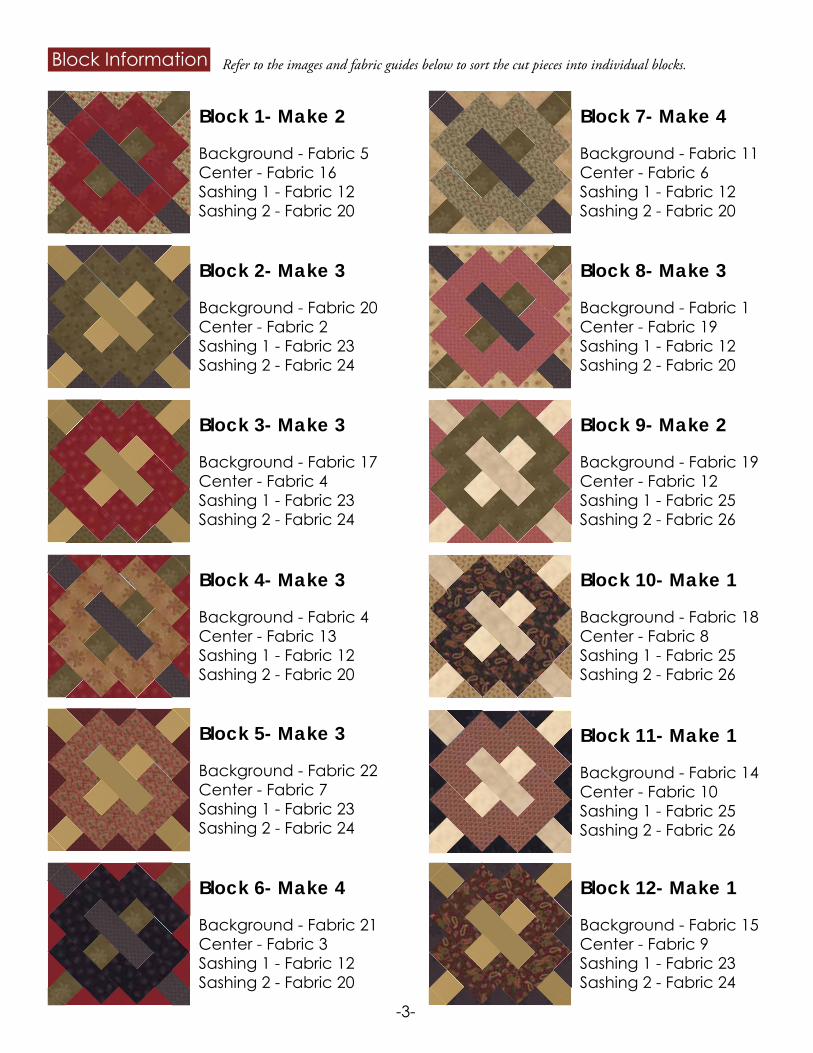
Block 1- Make 2
Background - Fabric 5Center - Fabric 16Sashing 1 - Fabric 12Sashing 2 - Fabric 20
Block 2- Make 3
Background - Fabric 20Center - Fabric 2Sashing 1 - Fabric 23Sashing 2 - Fabric 24
Block 3- Make 3
Background - Fabric 17Center - Fabric 4Sashing 1 - Fabric 23Sashing 2 - Fabric 24
Block 4- Make 3
Background - Fabric 4Center - Fabric 13Sashing 1 - Fabric 12Sashing 2 - Fabric 20
Block 5- Make 3
Background - Fabric 22Center - Fabric 7Sashing 1 - Fabric 23Sashing 2 - Fabric 24
Block 6- Make 4
Background - Fabric 21Center - Fabric 3Sashing 1 - Fabric 12Sashing 2 - Fabric 20
Block 7- Make 4
Background - Fabric 11Center - Fabric 6Sashing 1 - Fabric 12Sashing 2 - Fabric 20
Block 8- Make 3
Background - Fabric 1Center - Fabric 19Sashing 1 - Fabric 12Sashing 2 - Fabric 20
Block 9- Make 2
Background - Fabric 19Center - Fabric 12Sashing 1 - Fabric 25Sashing 2 - Fabric 26
Block 10- Make 1
Background - Fabric 18Center - Fabric 8Sashing 1 - Fabric 25Sashing 2 - Fabric 26
Block 11- Make 1
Background - Fabric 14Center - Fabric 10Sashing 1 - Fabric 25Sashing 2 - Fabric 26
Block 12- Make 1
Background - Fabric 15Center - Fabric 9Sashing 1 - Fabric 23Sashing 2 - Fabric 24
Block Information
-3-
Refer to the images and fabric guides below to sort the cut pieces into individual blocks.
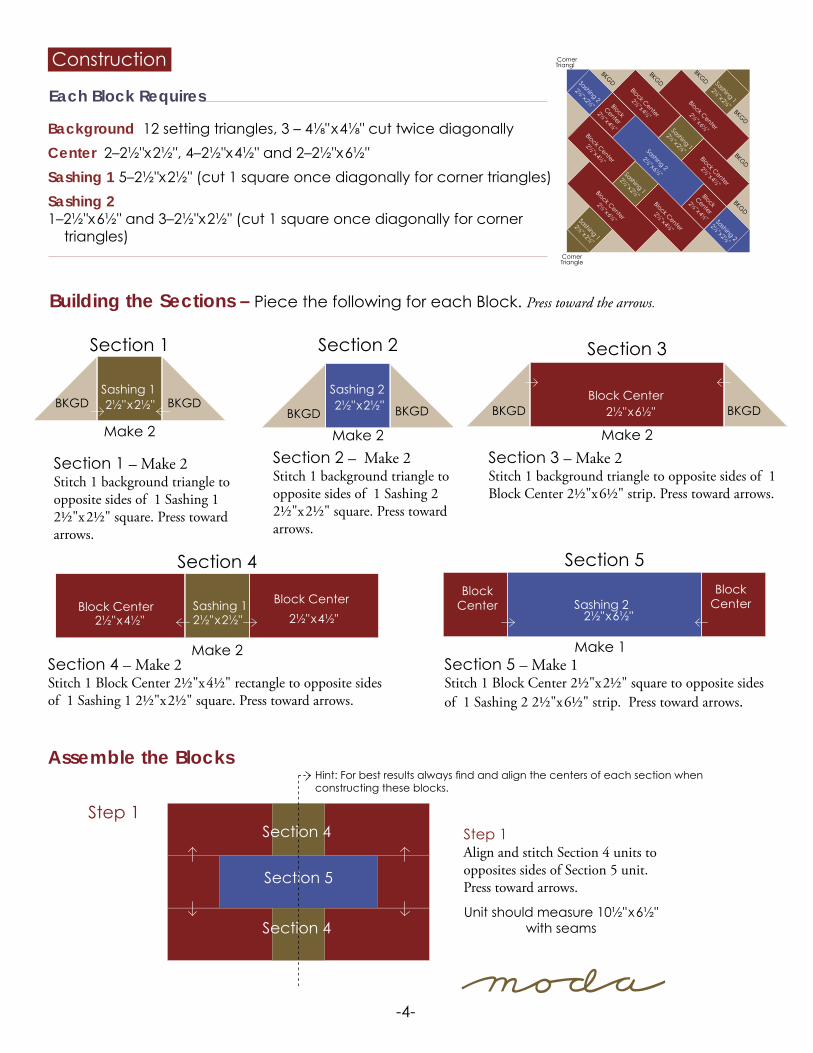
Building the Sections – Piece the following for each Block. Press toward the arrows.
Sashing 1BKGDBKGD 2½"x2½"
Section 1
Make 2
Sashing 2
BKGD2½"x2½"
Section 2
Make 2BKGD
Sashing 1Block Center Block Center2½"x4½"2½"x4½" 2½"x2½"
Section 4
Make 2
Block Center
Block CenterSashing 2
Section 5
Make 1
2½"x6½"
Block CenterBKGD BKGD2½"x6½"
Section 3
Make 2
Section 1 – Make 2 Stitch 1 background triangle to opposite sides of 1 Sashing 1 2½"x2½" square. Press toward arrows.
Section 2 – Make 2 Stitch 1 background triangle to opposite sides of 1 Sashing 2 2½"x2½" square. Press toward arrows.
Section 3 – Make 2 Stitch 1 background triangle to opposite sides of 1 Block Center 2½"x6½" strip. Press toward arrows.
Section 4 – Make 2 Stitch 1 Block Center 2½"x4½" rectangle to opposite sides of 1 Sashing 1 2½"x2½" square. Press toward arrows.
Section 5 – Make 1 Stitch 1 Block Center 2½"x2½" square to opposite sides of 1 Sashing 2 2½"x6½" strip. Press toward arrows.
Section 4
Section 4
Section 5
Step 1 Align and stitch Section 4 units to opposites sides of Section 5 unit. Press toward arrows.
Unit should measure 10½"x6½" with seams
Assemble the Blocks
Construction
Step 1
Hint: For best results always find and align the centers of each section when constructing these blocks.
-4-
Sashing 1
Sashing 1
Sashing 1
Sashing 1
Block Center
Block Center
Block Center
Block Center
Block CenterBlock
Center
Block Center
Sashing 2
Sashing 2
Sashing 2
BKGD
Corner Triangle
Corner Triangle
BKGD
BKGD
BKGD
BKGD
BKGD
Block Center
2½"x6½"
2½"x2½"
2½"x4½"
2½"x4½"
2½"x4½"
2½"x4½"2½"x4½"
2½"x4½"
2½"x6½"
2½"x2½"
2½"x2½"
2½"x6½"
2½"x2½"
2½"x2½"
2½"x2½"
Background 12 setting triangles, 3 – 4⅛"x4⅛" cut twice diagonallyCenter 2–2½"x2½", 4–2½"x4½" and 2–2½"x6½"Sashing 1 5–2½"x2½" (cut 1 square once diagonally for corner triangles)Sashing 21–2½"x6½" and 3–2½"x2½" (cut 1 square once diagonally for corner triangles)
Each Block Requires
Section 4
Section 4
Section 5Se
ctio
n 2 Section 2
Section 4
Section 4
Section 5Se
ctio
n 2 Section 2
Section 1
Section 3Section 1
Section 3
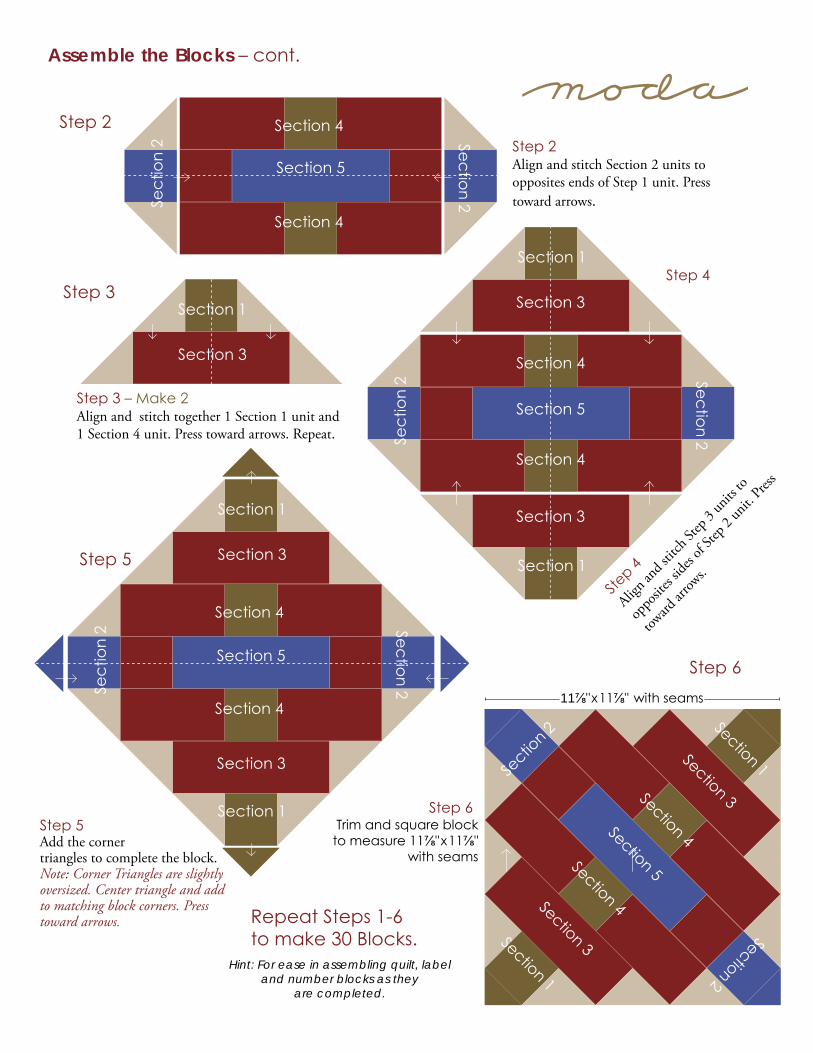
Step 5 Add the corner triangles to complete the block. Note: Corner Triangles are slightly oversized. Center triangle and add to matching block corners. Press toward arrows.
Trim and square block to measure 11⅞"x11⅞"
with seams
Section 4Section 4
Section 5
Sectio
n 2
Section 2
Section 1Section 3
11⅞"x11⅞" with seams
Step 2 Align and stitch Section 2 units to opposites ends of Step 1 unit. Press toward arrows.
Step 3 – Make 2 Align and stitch together 1 Section 1 unit and 1 Section 4 unit. Press toward arrows. Repeat.
Step 4
Align a
nd sti
tch St
ep 3
units
to
oppo
sites si
des o
f Step
2 un
it. Pre
ss
toward
arrow
s.
Section 4
Section 4
Section 5
Sect
ion
2 Section 2
Section 1
Section 3
Section 3
Repeat Steps 1-6to make 30 Blocks.
Hint: For ease in assembling quilt, label and number blocks as they
are completed.
Assemble the Blocks – cont.
Step 2
Step 3
Step 5
Step 6
Step 6
Step 4
Section 1
Section 3
Section 1
Section 3Section 1
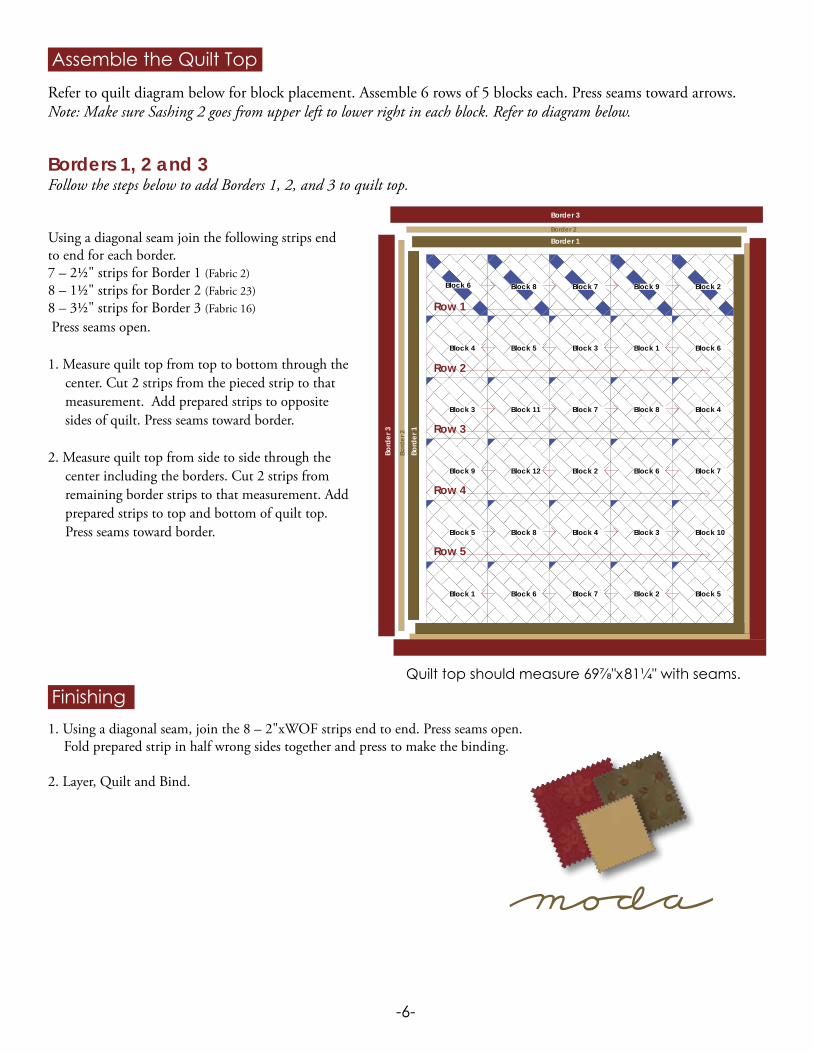
Refer to quilt diagram below for block placement. Assemble 6 rows of 5 blocks each. Press seams toward arrows.Note: Make sure Sashing 2 goes from upper left to lower right in each block. Refer to diagram below.
Borders 1, 2 and 3Follow the steps below to add Borders 1, 2, and 3 to quilt top.
Block 6
Block 4
Block 3
Block 9
Block 5
Block 1
Block 8
Block 5
Block 11
Block 12
Block 8
Block 6
Block 7
Block 3
Block 7
Block 2
Block 4
Block 7
Block 9
Block 1
Block 8
Block 6
Block 3
Block 2
Block 2
Block 6
Block 4
Block 7
Block 10
Block 5
Border 1
Bord
er 1
Border 3
Bord
er 3
Border 2
Bord
er 2
Row 1
Row 2
Row 3
Row 4
Row 5
Quilt top should measure 69⅞"x81¼" with seams.
Using a diagonal seam join the following strips end to end for each border. 7 – 2½" strips for Border 1 (Fabric 2)8 – 1½" strips for Border 2 (Fabric 23)8 – 3½" strips for Border 3 (Fabric 16) Press seams open.
1. Measure quilt top from top to bottom through the center. Cut 2 strips from the pieced strip to that measurement. Add prepared strips to opposite sides of quilt. Press seams toward border.
2. Measure quilt top from side to side through the center including the borders. Cut 2 strips from remaining border strips to that measurement. Add prepared strips to top and bottom of quilt top. Press seams toward border.
Assemble the Quilt Top
1. Using a diagonal seam, join the 8 – 2"xWOF strips end to end. Press seams open. Fold prepared strip in half wrong sides together and press to make the binding.
2. Layer, Quilt and Bind.
Finishing
-6-
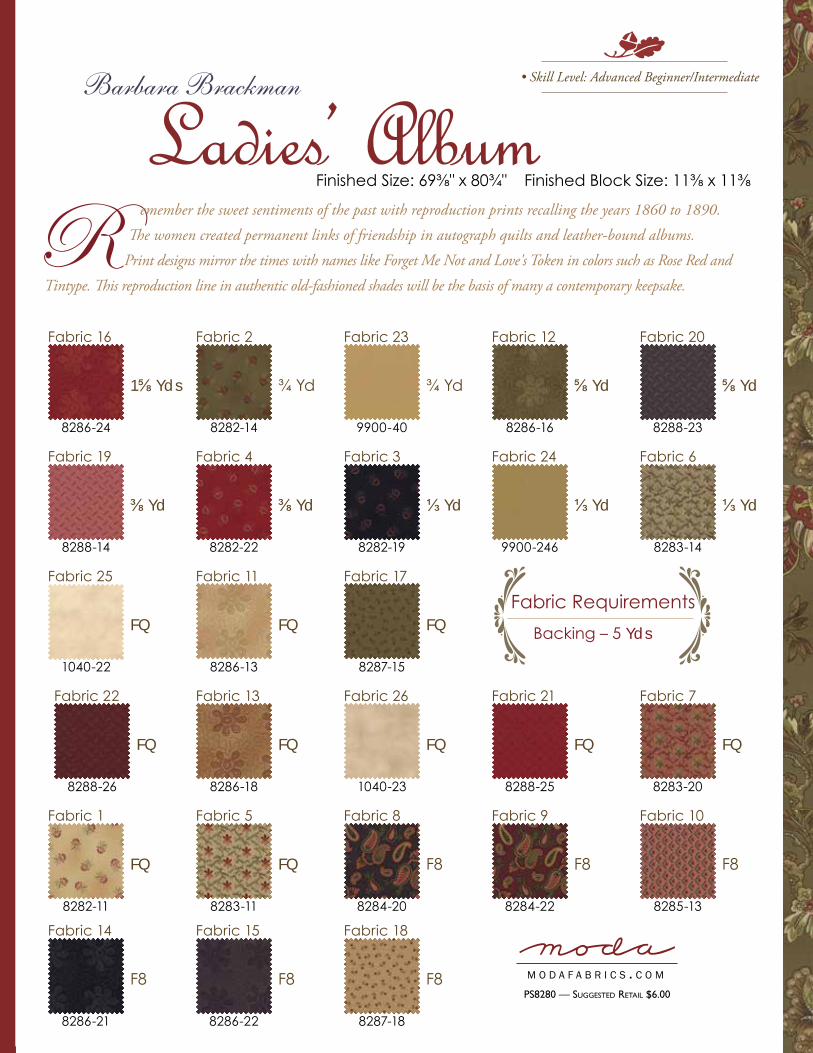
R emember the sweet sentiments of the past with reproduction prints recalling the years 1860 to 1890.
The women created permanent links of friendship in autograph quilts and leather-bound albums.
Print designs mirror the times with names like Forget Me Not and Love's Token in colors such as Rose Red and
Tintype. This reproduction line in authentic old-fashioned shades will be the basis of many a contemporary keepsake.
Finished Size: 69⅜" x 80¾" Finished Block Size: 11⅜ x 11⅜
PS8280 — SuggeSted Retail $6.00
8286-21
Fabric 14
F8
8286-22
Fabric 15
F8
8287-18
Fabric 18
F8
• Skill Level: Advanced Beginner/Intermediate
8286-24
Fabric 16
1⅝ Yds
8287-15
Fabric 17
FQ
8288-26
Fabric 22
FQ
8282-14
Fabric 2
¾ Yd
9900-40
Fabric 23
¾ Yd
8282-19
Fabric 3
⅓ Yd
8283-14
Fabric 6
⅓ Yd
8282-22
Fabric 4
⅜ Yd
8288-14
Fabric 19
⅜ Yd
8288-23
Fabric 20
⅝ Yd
8286-13
Fabric 11
FQ
9900-246
Fabric 24
⅓ Yd
1040-22
Fabric 25
FQ
8283-20
Fabric 7
FQ
8286-16
Fabric 12
⅝ Yd
8286-18
Fabric 13
FQ
1040-23
Fabric 26
FQ
8288-25
Fabric 21
FQ
8282-11
Fabric 1
FQ
8283-11
Fabric 5
FQ
8284-20
Fabric 8
F8
8284-22
Fabric 9
F8
8285-13
Fabric 10
F8
Backing – 5 Yds
Fabric Requirements