Embed Size (px)
Citation preview

61
2Sterilization and Disinfection
LEARNING OBJECTIVES PROCEDURES
Hazard Communication Standard 1.ExplainthepurposeoftheHazardCommunicationStandard. 2.Listanddescribetheinformationthatmustbeincludedonthelabelofahazardouschemical. 3.Listanddescribetheinformationthatmustbeincludedinamaterialsafetydatasheet(MSDS).
ReadandinterpretanMSDS.
Sanitization 4.Statethepurposeofsanitization. 5.Statetheadvantagesofusinganultrasoniccleanertocleaninstruments. 6.Listanddescribetheguidelinesthatshouldbefollowedwhensanitizinginstruments.
Sanitizeinstruments.
Disinfection 7.Statetheusesofthethreelevelsofdisinfection:high,intermediate,andlow. 8.Explainthedifferencesamongthefollowing:criticalitem,semicriticalitem,andnoncriticalitem. 9.Listanddescribetheprimaryuseofdisinfectantsinthemedicaloffice.Sterilization10.Explainhowtheautoclavefunctionstosterilizearticles. Wraparticlestobeautoclaved.11.Listthecomponentsofasterilizationmonitoringprogram. Sterilizearticlesintheautoclave.12.Listanddescribetypesofsterilizationindicators.13.Identifytheadvantagesanddisadvantagesofeachofthefollowingtypesofwraps:sterilization
paper,sterilizationpouches,andmuslin.14.Listtheguidelinesthatshouldbefollowedwhentheautoclaveisloaded.15.Identifythesterilizationtimesforeachofthefollowingcategories:unwrappedarticles,wrapped
articles,liquids,andlargewrappedpacks.16.Describethemethodforstoringwrappedarticles.17.Describethedaily,weekly,andmonthlymaintenanceoftheautoclave.
Maintaintheautoclave.
Other Sterilization Methods18.Statetheprimaryuseofeachofthefollowingtypesofsterilizationmethods:dryheat,ethylene
oxidegas,chemicals,andradiation.
Module_B_2622_Chapter 2_main.indd 61 10/8/2015 4:56:40 PM
To protect the rights of the author(s) and publisher we inform you that this PDF is an uncorrected proof for internal business use only by the author(s), editor(s), reviewer(s), Elsevier and typesetter Toppan Best-set. It is not allowed to publish this proof online or in print. This proof copy is the copyright property of the publisher and is confidential until formal publication.
62 CHAPTER 2 Sterilization and Disinfection
office surgery to be properly sterilized or disinfected, they must first be sanitized.
Decontamination Decontamination refers to the use of physical or chemical means to remove or destroy pathogens on an item so that it is no longer capable of transmitting disease; this makes the item safe to handle.
Detergent A detergent is an agent that cleanses by emulsifying dirt and oil.
Disinfectant A disinfectant is an agent used to destroy pathogenic microorganisms; however, it does not kill the resistant bacterial spores. Disinfectants are generally applied to inanimate objects.
Spore A spore is a hard, thick-walled capsule that some bacteria form by losing moisture and condensing their contents to contain only the essential parts of the protoplasm of the cell. Spores represent a resting and protective stage of the bacterial cell and are more resistant to drying, sunlight, heat, and disinfectants than is the vegetative form of the bacterium. Favorable conditions cause the spore to germinate into a vegetative bacterium again that is capable of reproducing. Two examples of species of bacteria that form spores are Clostridium botulinum, which causes botulism, and Clostridium tetani, which causes tetanus.
Sterilization Sterilization is the process of destroying all forms of microbial life, including bacterial spores. An object that is sterile is free of all living microorganisms and spores. There can be no relative degrees of sterility—an object is either sterile or not sterile. The device most commonly used to sterilize articles in the medical office is the autoclave.
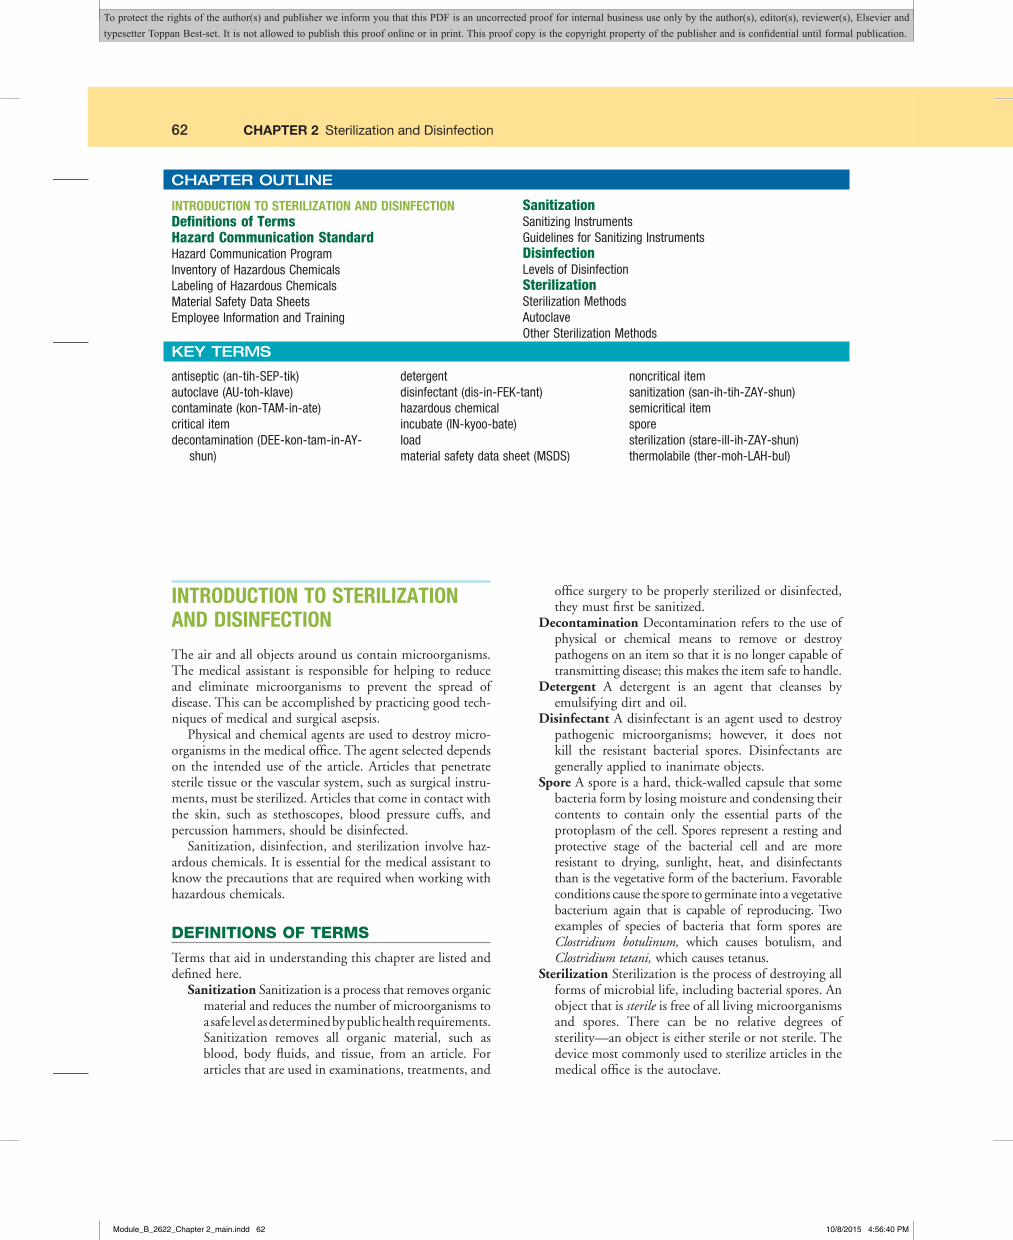
CHAPTER OUTLINE
INTRODUCTION TO STERILIZATION AND DISINFECTIONDefinitions of TermsHazard Communication StandardHazard Communication ProgramInventory of Hazardous ChemicalsLabeling of Hazardous ChemicalsMaterial Safety Data SheetsEmployee Information and Training
SanitizationSanitizing InstrumentsGuidelines for Sanitizing InstrumentsDisinfectionLevels of DisinfectionSterilizationSterilization MethodsAutoclaveOther Sterilization Methods
antiseptic (an-tih-SEP-tik)autoclave (AU-toh-klave)contaminate (kon-TAM-in-ate)critical itemdecontamination (DEE-kon-tam-in-AY-
shun)
detergentdisinfectant (dis-in-FEK-tant)hazardous chemicalincubate (IN-kyoo-bate)loadmaterial safety data sheet (MSDS)
noncritical itemsanitization (san-ih-tih-ZAY-shun)semicritical itemsporesterilization (stare-ill-ih-ZAY-shun)thermolabile (ther-moh-LAH-bul)
KEY TERMS
INTRODUCTION TO STERILIZATION AND DISINFECTION
The air and all objects around us contain microorganisms. The medical assistant is responsible for helping to reduce and eliminate microorganisms to prevent the spread of disease. This can be accomplished by practicing good tech-niques of medical and surgical asepsis.
Physical and chemical agents are used to destroy micro-organisms in the medical office. The agent selected depends on the intended use of the article. Articles that penetrate sterile tissue or the vascular system, such as surgical instru-ments, must be sterilized. Articles that come in contact with the skin, such as stethoscopes, blood pressure cuffs, and percussion hammers, should be disinfected.
Sanitization, disinfection, and sterilization involve haz-ardous chemicals. It is essential for the medical assistant to know the precautions that are required when working with hazardous chemicals.
DEFINITIONS OF TERMS
Terms that aid in understanding this chapter are listed and defined here.
Sanitization Sanitization is a process that removes organic material and reduces the number of microorganisms to a safe level as determined by public health requirements. Sanitization removes all organic material, such as blood, body fluids, and tissue, from an article. For articles that are used in examinations, treatments, and
Module_B_2622_Chapter 2_main.indd 62 10/8/2015 4:56:40 PM
To protect the rights of the author(s) and publisher we inform you that this PDF is an uncorrected proof for internal business use only by the author(s), editor(s), reviewer(s), Elsevier and typesetter Toppan Best-set. It is not allowed to publish this proof online or in print. This proof copy is the copyright property of the publisher and is confidential until formal publication.
CHAPTER 2 Sterilization and Disinfection 63
HAZARD COMMUNICATION STANDARD
The Hazard Communication Standard (HCS) is a require-ment of the Occupational Safety and Health Administra-tion (OSHA). The purpose of the HCS is to ensure that employees are informed of the hazards associated with chemicals in their workplaces. Chemicals can be in the form of a liquid, a solid, or a gas. A hazardous chemical is any chemical that presents a threat to the health and safety of an individual coming into contact with it. Hazardous chem-icals are those that are corrosive, toxic, irritating, carcino-genic, flammable, or reactive.
The HCS is based on the concept that employees have a right to know about the hazardous chemicals in their workplace and the precautions to take to protect themselves when working with hazardous chemicals. In the medical office, sanitization, disinfection, and sterilization proce-dures involve the use of hazardous chemicals; the medical assistant must have a thorough knowledge of the HCS.
The HCS consists of the following components:• Development of a hazard communication program• Inventory of hazardous chemicals• Labeling requirements• Material safety data sheet requirements• Employee information and training
Hazard Communication ProgramAs part of the HCS, employers are required to develop a hazard communication program. The hazard communica-tion program consists of a written plan that describes what
the facility is doing to meet the requirements of the HCS. The information in the plan must be made available and commu nicated to all employees who work with hazardous chemicals.
Inventory of Hazardous ChemicalsThe employer must develop and maintain a list of hazard-ous chemicals that are used and stored in the workplace. This list must include the name of the chemical, the name of the manufacturer, the hazardous ingredients, and the health and safety ratings of the chemical. The list must be updated as new chemicals are introduced into the work-place. In the medical office, hazardous chemicals often include the following:• Products used for sanitization, disinfection, and steriliza-
tion (e.g., chemical disinfectants, autoclave cleaners)• Chemicals used for laboratory testing (e.g., laboratory
testing reagents, developing solutions, controls)• Pharmaceutical products such as local anesthetics (e.g.,
lidocaine [Xylocaine])• Front office products (e.g., toner for copying machine
and laser printer)• Cleaning products (e.g., drain cleaner)
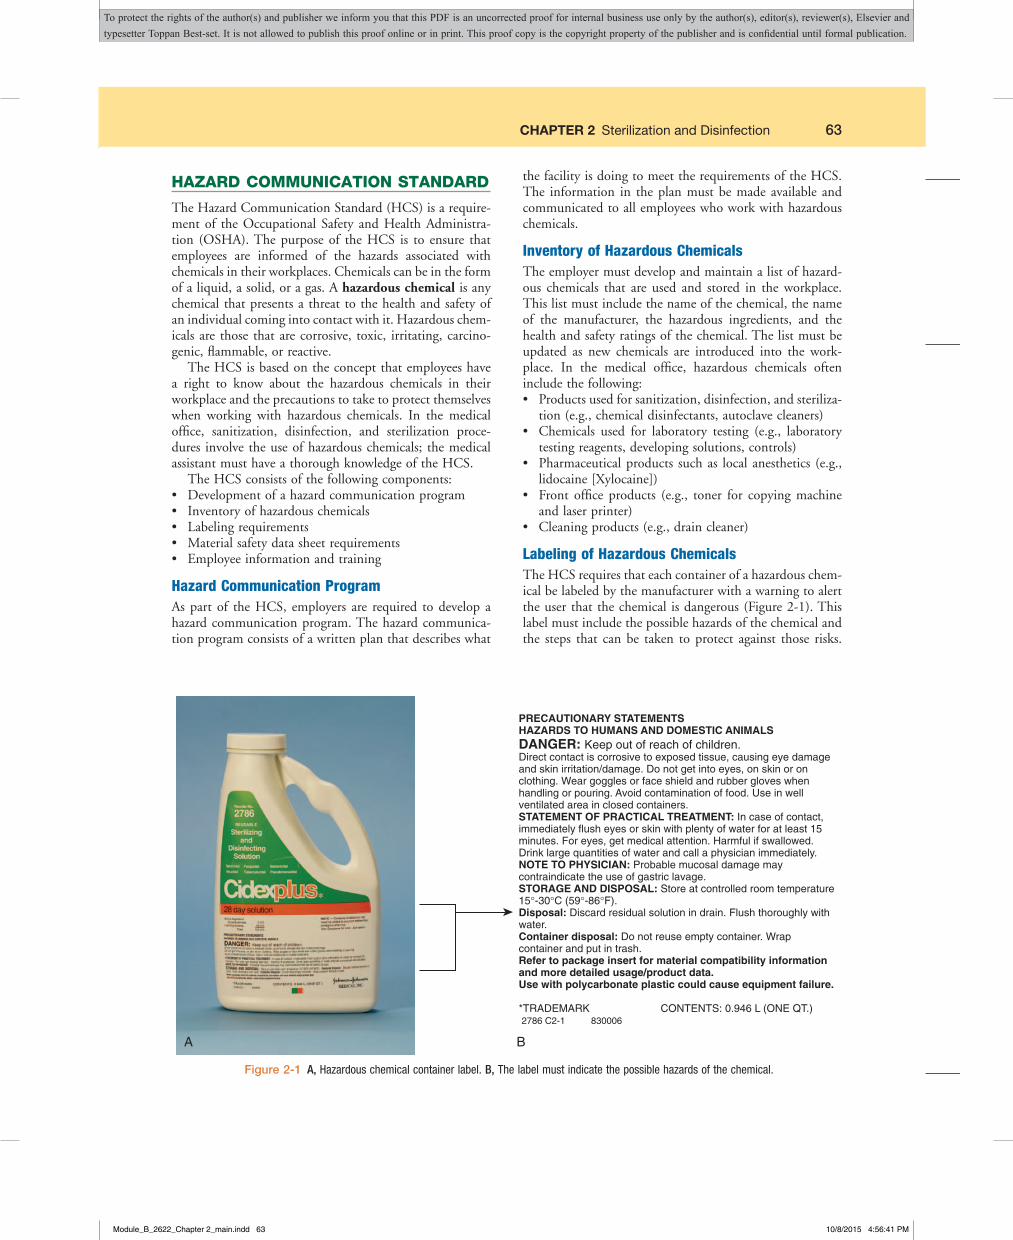
Labeling of Hazardous ChemicalsThe HCS requires that each container of a hazardous chem-ical be labeled by the manufacturer with a warning to alert the user that the chemical is dangerous (Figure 2-1). This label must include the possible hazards of the chemical and the steps that can be taken to protect against those risks.
Figure 2-1 A, Hazardous chemical container label. B, The label must indicate the possible hazards of the chemical.
PRECAUTIONARY STATEMENTSHAZARDS TO HUMANS AND DOMESTIC ANIMALSDANGER: Keep out of reach of children.Direct contact is corrosive to exposed tissue, causing eye damage and skin irritation/damage. Do not get into eyes, on skin or on clothing. Wear goggles or face shield and rubber gloves when handling or pouring. Avoid contamination of food. Use in well ventilated area in closed containers.STATEMENT OF PRACTICAL TREATMENT: In case of contact, immediately flush eyes or skin with plenty of water for at least 15 minutes. For eyes, get medical attention. Harmful if swallowed. Drink large quantities of water and call a physician immediately.NOTE TO PHYSICIAN: Probable mucosal damage may contraindicate the use of gastric lavage.STORAGE AND DISPOSAL: Store at controlled room temperature 15°-30°C (59°-86°F).Disposal: Discard residual solution in drain. Flush thoroughly with water.Container disposal: Do not reuse empty container. Wrap container and put in trash.Refer to package insert for material compatibility information and more detailed usage/product data.Use with polycarbonate plastic could cause equipment failure.
*TRADEMARK CONTENTS: 0.946 L (ONE QT.) 2786 C2-1 830006
A B
Module_B_2622_Chapter 2_main.indd 63 10/8/2015 4:56:41 PM
To protect the rights of the author(s) and publisher we inform you that this PDF is an uncorrected proof for internal business use only by the author(s), editor(s), reviewer(s), Elsevier and typesetter Toppan Best-set. It is not allowed to publish this proof online or in print. This proof copy is the copyright property of the publisher and is confidential until formal publication.
64 CHAPTER 2 Sterilization and Disinfection
Hazard warnings can use words, pictures, or symbols to provide the user with an understanding of the physical and health hazards of the chemical. If a label falls off a product or is damaged or obscured, a replacement label must be applied. If a chemical is transferred to a new container, a label with all the required information must be attached to the new container.
Container Label RequirementsThe HCS requires that manufacturers label the containers of hazardous chemicals they produce with specific informa-tion. This information allows the user of the chemical to tell at a glance the hazards of using the chemical and the basic steps to take to protect oneself. Information required by the HCS includes the following:1. Name of the chemical. The name of the chemical must
be clearly indicated on the label.2. Manufacturer information. The name, address, and
emergency phone number of the company that manu-factures the chemical must be stated on the label.
3. Physical hazards of the chemical. Physical hazards that must be stated include the potential of the chemical to catch fire, explode, or react with other chemicals or materials.
4. Health hazards of the chemical. Health hazards include the potential of the chemical to cause irritation to tissue, cancer, a sensitivity reaction, or a toxic or corrosive reaction.
5. Safety precautions. The protective clothing, equipment, and procedures that are recommended when working with the chemical must be stated on the label. Examples include gloves, protective eyewear, and working with the chemical in a well-ventilated area.
6. Storing, handling, and disposal of the chemical. Information on how the chemical should be stored, handled, and disposed of must be stated on the label.
Material Safety Data SheetsA material safety data sheet (MSDS) provides more detailed information than the container label regarding the chemical, its hazards, and measures to take to prevent injury and illness when handling the chemical (Figure 2-2). The HCS requires that a current MSDS be kept on file for each hazardous chemical used or stored in the workplace. MSDSs must be readily accessible to employees and provided to them on request. It is important that the medical assistant review the MSDS before working with a hazardous chemical.
Companies that manufacture and distribute hazardous chemicals must provide an MSDS with every product. A hazardous chemical should never be used unless an MSDS is available. In the event of an accidental exposure, informa-tion on the MSDS must be readily available as a reference for emergency treatment. If an MSDS is missing, it must be replaced. This can be accomplished by contacting the supplier or the manufacturer of that chemical for a replace-ment or by going to the manufacturer’s website; most
manufacturers post their MSDSs on their websites for easy access.
An MSDS does not have to be kept on file for a hazard-ous chemical that is used in the workplace in the same way that a household consumer would use it. For example, cor-rection fluids, such as Wite-Out and Liquid Paper, contain a hazardous chemical. If the medical assistant uses it in the same way, however, that a household consumer would use it (i.e., to correct errors on a document), an MSDS does not need to be kept on file. If household bleach (sodium hypochlorite) is used to decontaminate blood spills in the medical office, an MSDS would need to be kept on file because the bleach is not being used in the same way that a household consumer would use it.
What Would You Do? What Would You Not Do?
Case Study 1ElbaCorderahasbroughtherdaughterMariainforawell-babyvisit.Maria is 9months old and is just starting to crawl.Mrs.Corderaistakingprecautionstobaby-proofherhousetoprotectMaria fromaccidents.Mrs.Corderawants toknowhow to tellwhetheracleaningproductispoisonous.Shealsowantstoknowwhat she should do if Maria gets into a cleaning product andspillsitonherselforswallowsit. ■
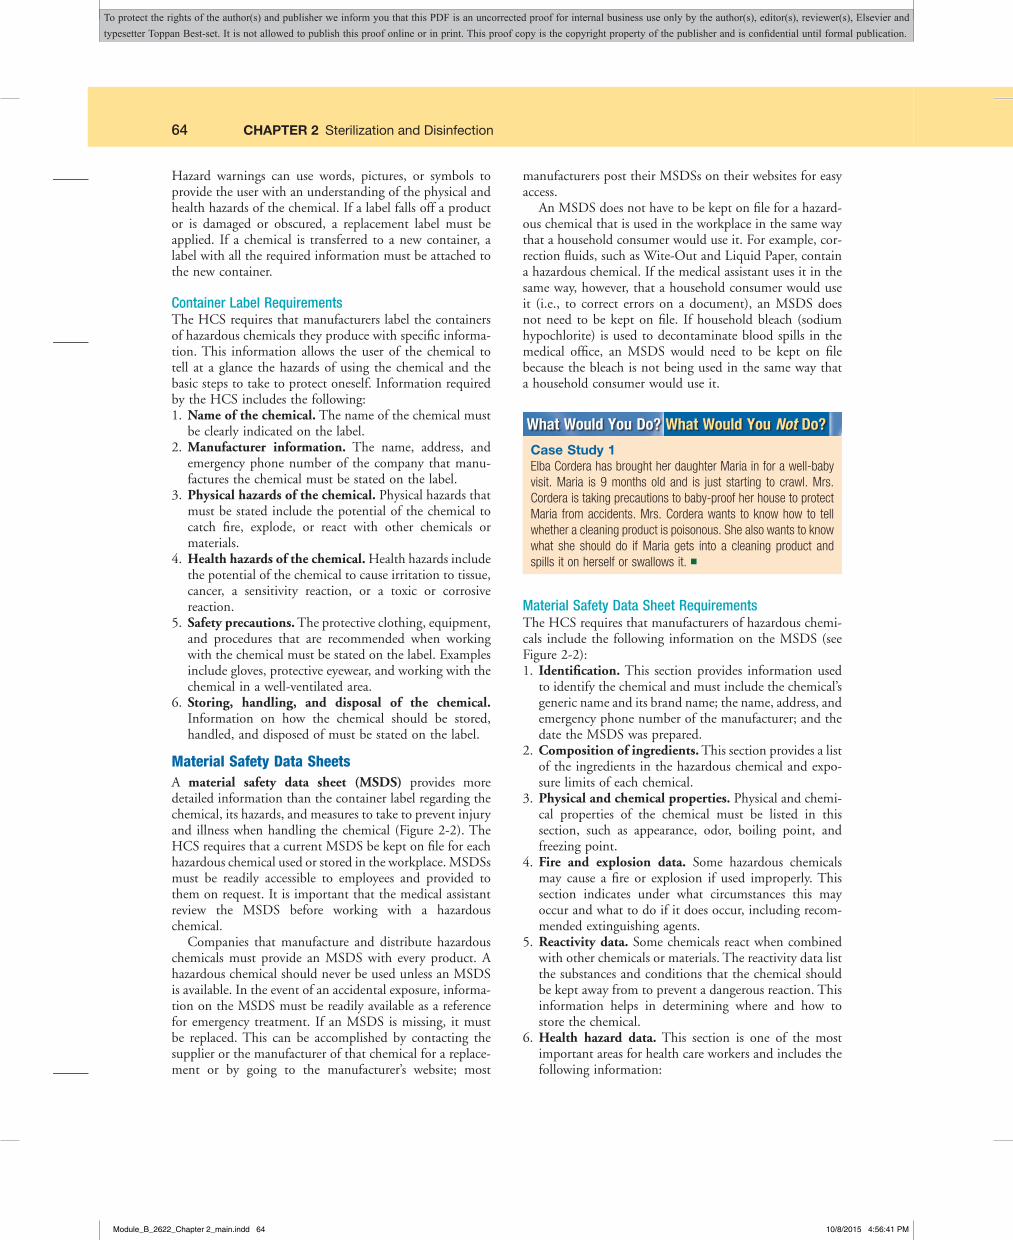
Material Safety Data Sheet RequirementsThe HCS requires that manufacturers of hazardous chemi-cals include the following information on the MSDS (see Figure 2-2):1. Identification. This section provides information used
to identify the chemical and must include the chemical’s generic name and its brand name; the name, address, and emergency phone number of the manufacturer; and the date the MSDS was prepared.
2. Composition of ingredients. This section provides a list of the ingredients in the hazardous chemical and expo-sure limits of each chemical.
3. Physical and chemical properties. Physical and chemi-cal properties of the chemical must be listed in this section, such as appearance, odor, boiling point, and freezing point.
4. Fire and explosion data. Some hazardous chemicals may cause a fire or explosion if used improperly. This section indicates under what circumstances this may occur and what to do if it does occur, including recom-mended extinguishing agents.
5. Reactivity data. Some chemicals react when combined with other chemicals or materials. The reactivity data list the substances and conditions that the chemical should be kept away from to prevent a dangerous reaction. This information helps in determining where and how to store the chemical.
6. Health hazard data. This section is one of the most important areas for health care workers and includes the following information:
Module_B_2622_Chapter 2_main.indd 64 10/8/2015 4:56:41 PM
To protect the rights of the author(s) and publisher we inform you that this PDF is an uncorrected proof for internal business use only by the author(s), editor(s), reviewer(s), Elsevier and typesetter Toppan Best-set. It is not allowed to publish this proof online or in print. This proof copy is the copyright property of the publisher and is confidential until formal publication.
CHAPTER 2 Sterilization and Disinfection 65
SECTION 1 IDENTIFICATION
MATERIAL SAFETY DATA SHEET(MSDS)
GENERIC NAME: Glutaraldehyde INFORMATION TELEPHONE NUMBER: 1 (800) 733-8690
BRAND NAME: Aldecide EMERGENCY TELEPHONE NUMBER:
MANUFACTURER’S NAME: Brennan Corporation
MFG. ADDRESS: P.O. Box 93
CITY: Camden STATE: NJ ZIP: 08106
BOILING POINT: 212° F SPECIFIC GRAVITY (H2O = 1): 1.004
VAPOR PRESSURE (mm Hg): 0.20 at 20° C VAPOR DENSITY (AIR = 1): 1.1
ODOR: Sharp odor pH: 7.5-8.5
SOLUBILITY IN WATER: Complete (100%) MELTING POINT: n/a
APPEARANCE: Bluish-green liquid FREEZING POINT: 32° F
EVAPORATION RATE: 0.98 ODOR THRESHOLD: 0.04 ppm
SECTION 2 COMPOSITION OF INGREDIENTS
SECTION 3 PHYSICAL AND CHEMICAL PROPERTIES
STABILITY: Stable under recommended storage conditions.
CONDITIONS TO AVOID: Avoid direct sunlight and temperatures above 104° F (40° C).
INCOMPATIBILITY (MATERIAL TO AVOID): Strong acids and alkalines will neutralize active ingredient.
HAZARDOUS DECOMPOSITION BYPRODUCTS: None
HAZARDOUS POLYMERIZATION: Will not occur
SECTION 5 REACTIVITY DATA
CAS NUMBER CHEMICAL NAME OF INGREDIENTS PERCENT PEL TLV
111-30-8 Glutaraldehyde 2.5 0.2 ppm 0.2 ppm
7732-18-5 Water 97.4 None None
7632-00-0 Sodium Nitrite <1 None None
FLASH POINT: Not flammable (aqueous solution) NFPA Rating:
FLAMMABILITY LIMITS: LEL: n/a Health: 2
EXTINGUISHING MEDIA: n/a (aqueous solution) Flammability: 0
SPECIAL FIRE FIGHTING PROCEDURES: n/a Reactivity: 0
UNUSUAL FIRE/EXPL HAZARDS: None
SECTION 4 FIRE AND EXPLOSION HAZARD DATA
Date of Issue: 4/28/04 Date of Revision: 8/8/12
1 (800) 331-0766
(Water = 1)
Figure 2-2 Material safety data sheet (MSDS).
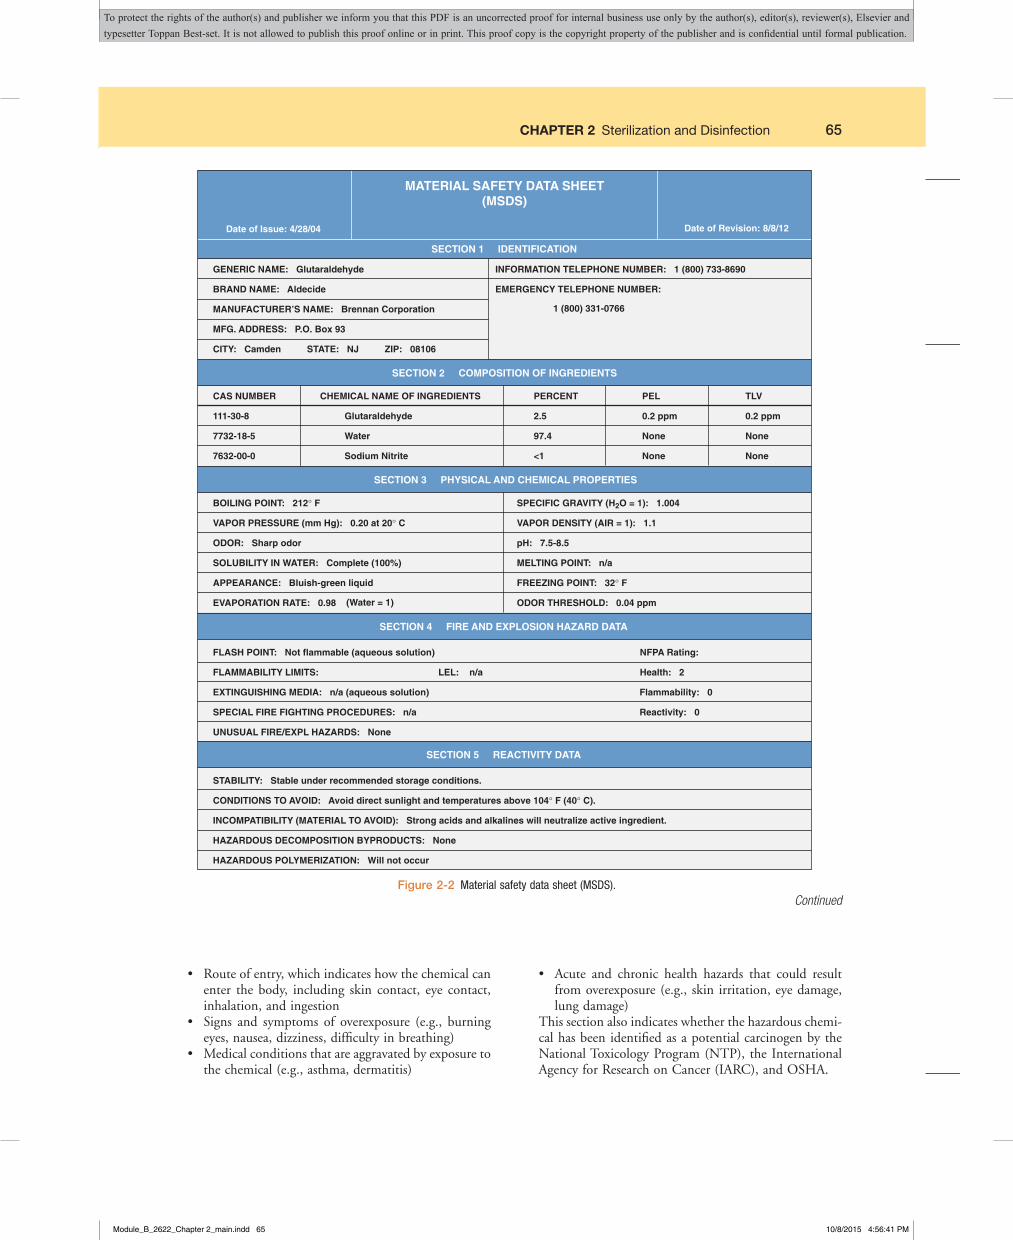
• Route of entry, which indicates how the chemical can enter the body, including skin contact, eye contact, inhalation, and ingestion
• Signs and symptoms of overexposure (e.g., burning eyes, nausea, dizziness, difficulty in breathing)
• Medical conditions that are aggravated by exposure to the chemical (e.g., asthma, dermatitis)
• Acute and chronic health hazards that could result from overexposure (e.g., skin irritation, eye damage, lung damage)
This section also indicates whether the hazardous chemi-cal has been identified as a potential carcinogen by the National Toxicology Program (NTP), the International Agency for Research on Cancer (IARC), and OSHA.
Continued
Module_B_2622_Chapter 2_main.indd 65 10/8/2015 4:56:41 PM
To protect the rights of the author(s) and publisher we inform you that this PDF is an uncorrected proof for internal business use only by the author(s), editor(s), reviewer(s), Elsevier and typesetter Toppan Best-set. It is not allowed to publish this proof online or in print. This proof copy is the copyright property of the publisher and is confidential until formal publication.
66 CHAPTER 2 Sterilization and Disinfection
SECTION 6 HEALTH HAZARD DATA
MATERIAL SAFETY DATA SHEETPAGE 2
ROUTE OF ENTRY: SKIN: yes EYES: yes INHALATION: yes INGESTION: yes
SIGNS AND SYMPTOMS OF OVEREXPOSURE:
SKIN: Wash skin with soap and water for 15 minutes. If skin redness or irritation persists, seek medical attention. Removecontaminated clothing and wash before reuse.
EYES: Immediately flush with water for 15 minutes. Seek medical attention.
INHALATION: Remove to fresh air. If irritation persists, seek medical attention.
INGESTION: Do not induce vomiting. Seek medical attention immediately. Call a physician or Poison Control Center.
SPILL PROCEDURES: Ventilate area, wear protective gloves and eye gear. Wipe with sponge, mop, or towel. Flush with largequantities of water. Collect liquid and discard it.
WASTE DISPOSAL METHOD: Container must be triple rinsed and disposed of in accordance with federal, state, and/or localregulations. Used solution should be flushed thoroughly with water into sewage disposal system in accordance with federal, state,and/or local regulations.
PRECAUTIONS IN HANDLING AND STORAGE: Store in a cool, dry place (59-86° F) away from direct sunlight or sources of intenseheat. Keep container tightly closed when not in use.
SECTION 8 PRECAUTIONS FOR SAFE HANDLING AND USE
SECTION 7 EMERGENCY FIRST AID PROCEDURES
SECTION 9 CONTROL MEASURES
VENTILATION: Ensure adequate ventilation to maintain recommended exposed limit.
RESPIRATORY PROTECTION: None normally required for routine use.
SKIN PROTECTION: Wear chemical resistant protective gloves. Butyl rubber, nitrile rubber, polyethylene, or double-gloved latex.
EYE PROTECTION: Safety goggles or safety glasses
WORK/HYGIENE PRACTICES: Prompt rinsing of hands after contact. Handle in accordance with good personal hygiene and safety practices. These practices include avoiding unnecessary exposure.
CARCINOGENICITY DATA: NTP: No AIRC: No OSHA: No
SKIN: Moderate irritation. May aggravate existing dermatitis.
EYES: Serious eye irritant. May cause irreversible damage which could permanently impair vision.
INHALATION: Vapors may be severely irritating and cause stinging sensations in the eyes, nose, throat, and lungs. May aggravatepre-existing asthma.
INGESTION: May cause irritation or chemical burns of the mouth, throat, esophagus, and stomach. May cause vomiting, diarrhea,epigastric distress, headache, dizziness, faintness, mental confusion, and general systemic illness.
Figure 2-2, cont’d
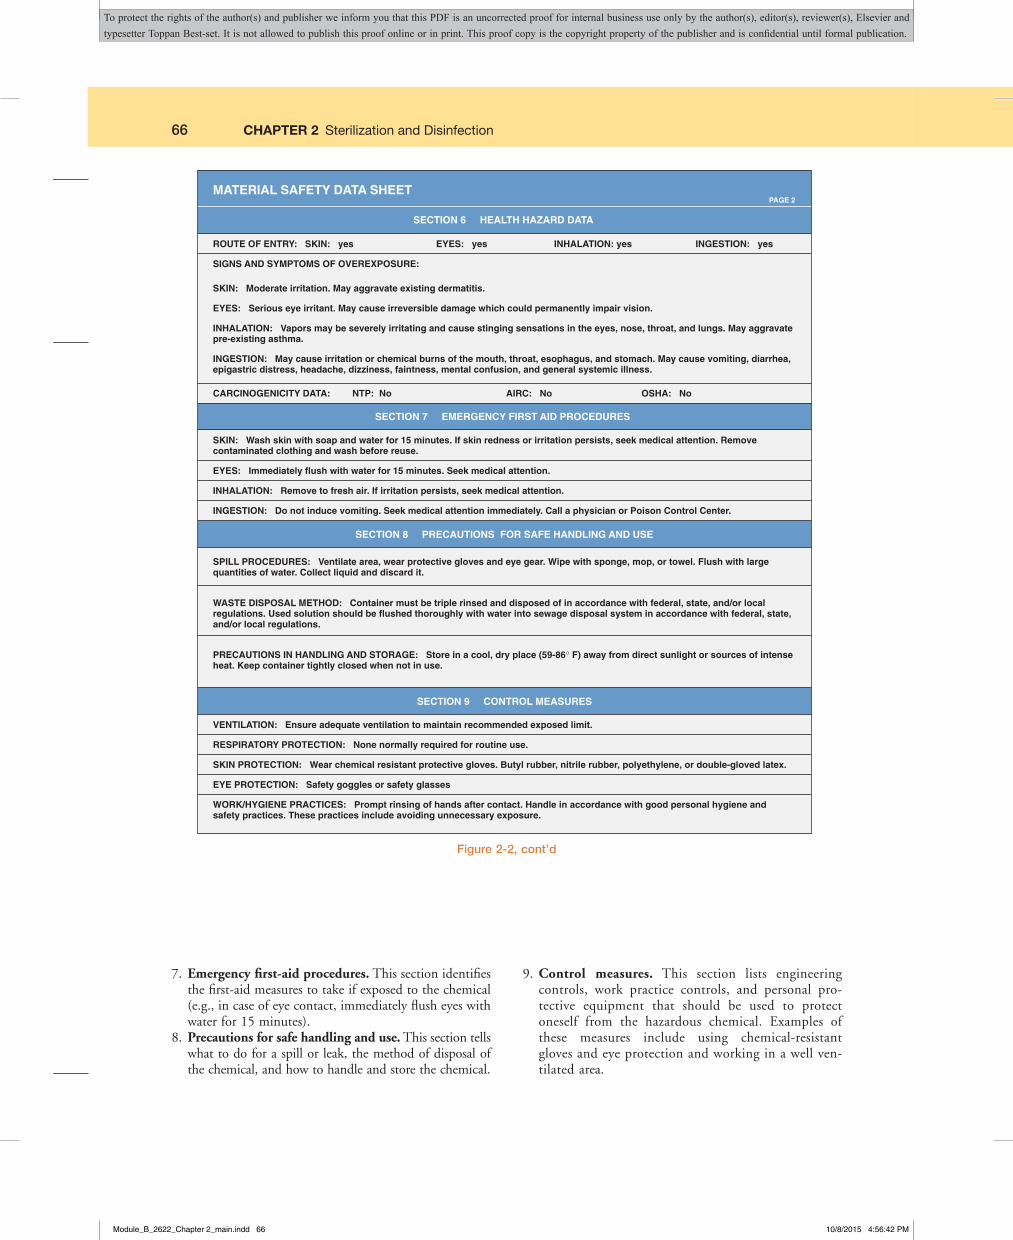
7. Emergency first-aid procedures. This section identifies the first-aid measures to take if exposed to the chemical (e.g., in case of eye contact, immediately flush eyes with water for 15 minutes).
8. Precautions for safe handling and use. This section tells what to do for a spill or leak, the method of disposal of the chemical, and how to handle and store the chemical.
9. Control measures. This section lists engineering controls, work practice controls, and personal pro-tective equipment that should be used to protect oneself from the hazardous chemical. Examples of these measures include using chemical-resistant gloves and eye protection and working in a well ven-tilated area.
Module_B_2622_Chapter 2_main.indd 66 10/8/2015 4:56:42 PM
To protect the rights of the author(s) and publisher we inform you that this PDF is an uncorrected proof for internal business use only by the author(s), editor(s), reviewer(s), Elsevier and typesetter Toppan Best-set. It is not allowed to publish this proof online or in print. This proof copy is the copyright property of the publisher and is confidential until formal publication.
CHAPTER 2 Sterilization and Disinfection 67
Employee Information and Training
The HCS requires that employees be provided with infor-mation and training regarding hazardous chemicals in the workplace. The training session must be offered at the time of an employee’s initial assignment to a work area where hazardous chemicals are present, and whenever a new chem-ical hazard is introduced into the work area. The training program must be an ongoing activity, and each training session must be documented. The HCS requires that the following information be relayed to employees who work with hazardous chemicals:1. Requirements making up the HCS.2. Physical and health hazards associated with exposure to
chemicals in the workplace.3. Measures employees can take to protect themselves from
injury or illness from hazardous chemicals.4. Emergency procedures to carry out in the event of expo-
sure to a hazardous chemical or a chemical spill.5. The meaning of the information on container labels and
how to use that information.6. The meaning of the information on the MSDS and how
to use that information.7. The location of the following: hazard communication
program plan, list of hazardous chemicals in the work-place, and MSDS for each chemical in the workplace.
SANITIZATION
Sanitization involves a series of steps designed to remove organic material from an article and to reduce to a safe level the number of microorganisms on the article (Procedure 2-1). Organic material on an article may result in
incomplete sterilization or disinfection. This is because the organic material acts as a physical barrier preventing the physical or chemical agent from reaching the surface of the article to kill microorganisms.
Sanitizing InstrumentsItems most frequently sanitized in the medical office are medical and surgical instruments. This section focuses on the theory and procedure for sanitizing instruments. The general steps in the sanitization procedure of instruments are as follows:
1. Rinse the instruments to prevent organic material from drying on the instruments.
2. Decontaminate the instruments with a chemical disinfectant to remove pathogenic microorganisms, making the instrument safe to handle.
3. Clean the instruments to remove all organic matter.4. Thoroughly rinse the instruments to remove all deter-
gent residue.5. Dry the instruments to prevent stains on the
instruments.6. Check the instruments for defects and working
condition.7. Lubricate hinged instruments to make the instru-
ments function well and last longer.
Cleaning InstrumentsTwo methods can be used to perform the cleaning step (step 3 in the preceding list) of the sanitization procedure: the manual method and the ultrasound method.
Manual MethodThe manual method is used most often in the medical office. It involves the manual cleaning of instruments using a cleaning solution and a brush. Manual cleaning is recom-mended for delicate instruments because vibrations that occur with the ultrasound method may damage these instruments.
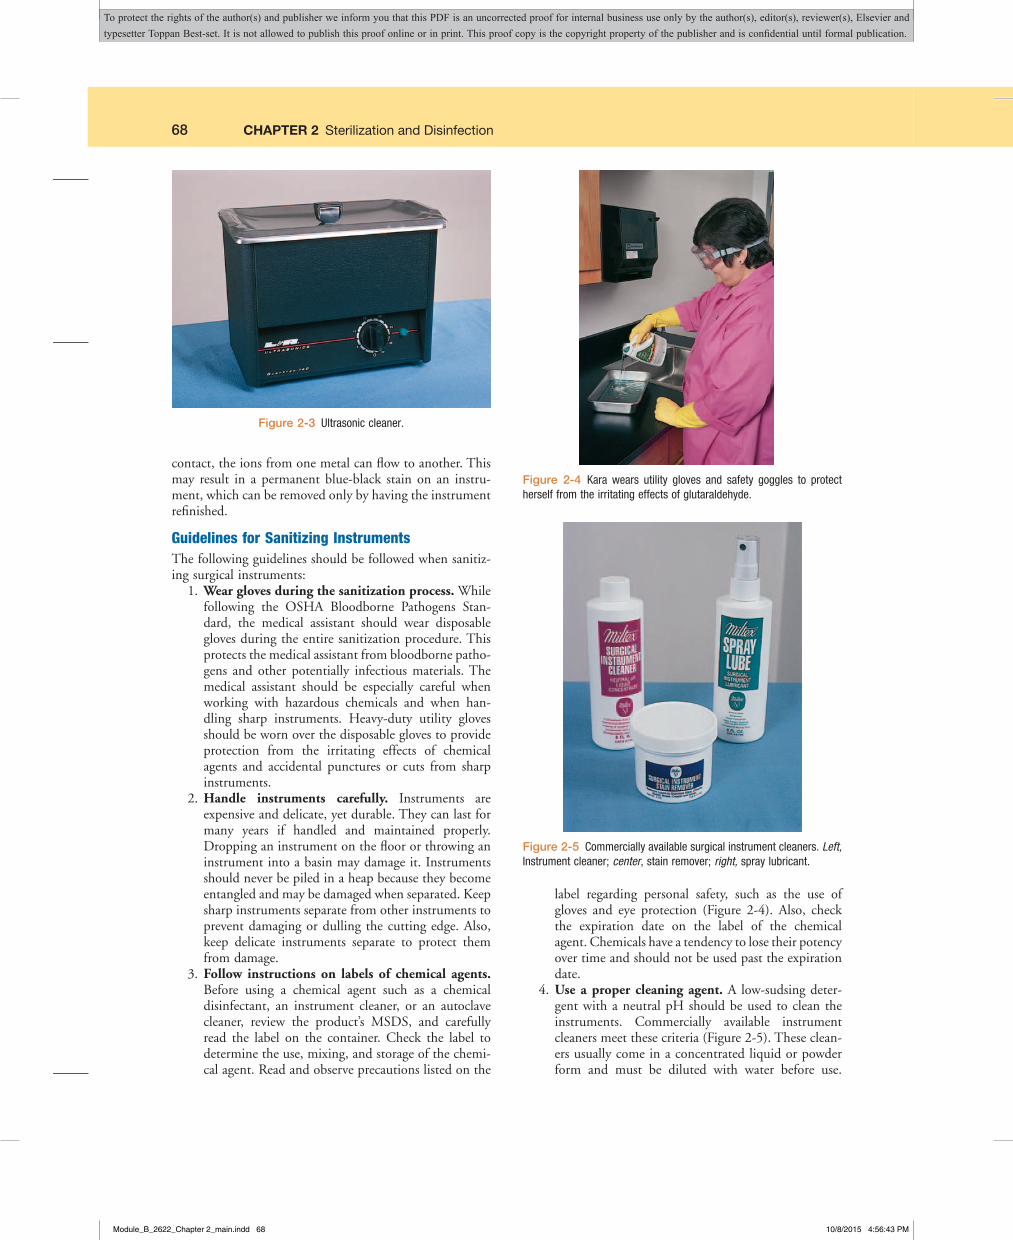
Ultrasound MethodThe ultrasound method uses a machine known as an ultra-sonic cleaner (Figure 2-3). The ultrasound method offers a safety advantage in that instruments do not have to be handled during the cleaning process. This decreases the incidence of an accidental puncture or cut from a sharp instrument. An ultrasonic cleaner works by converting sound waves into mechanical energy, which creates small bubbles all over the instruments. When the bubbles burst, vibrations occur that loosen and remove debris from the instruments. Ultrasonic cleaners are especially good at removing debris from hard-to-reach areas, such as box locks of hemostats and screw locks of scissors.
Before the instruments are placed in the ultrasonic cleaner, they should be separated according to the type of metal (e.g., stainless steel, aluminum, brass). Instruments made of dissimilar metals should not be cleaned together in the ultrasonic cleaner. When different metals are in close
My name is Kara VanDyke, and Iworkfor two physicians in a family practicemedicaloffice.Asamedicalassistant,oneofthesituationsyoudealwithonanalmostdaily basis is drug representatives whocometo theofficetopromotetheirprod-
ucts.Theirjobisanythingbuteasy.Thewaitingandthefrequentrejectionswouldmakemostpeoplethinktwicebeforeapplyingforthejob.
One winter day, I am sure I made one drug representativereallythinktwiceabouthiscareerchoice.Astherepresentativestoppedatouroffice,he,beingapoliteyoungman,letapatiententer the building first with wet, snow-covered feet. Trying tomakeagood impressionwithanewsuit anddress shoes,hesoonfoundhimselfdoinga“Spanish fandango”while trying tomaintainhisbalanceandeventuallycrashedtothefloor.
IthoughtIwouldhelpbymoppingupthesnow-trackedfloor.What I didnot knowwas themophadwaxon it.Needless tosay,whenhereturnedwiththerequesteddrugsamples,wewerenotabletokeephimfromfallingasecondtime! ■
Putting It All into Practice
Module_B_2622_Chapter 2_main.indd 67 10/8/2015 4:56:42 PM
To protect the rights of the author(s) and publisher we inform you that this PDF is an uncorrected proof for internal business use only by the author(s), editor(s), reviewer(s), Elsevier and typesetter Toppan Best-set. It is not allowed to publish this proof online or in print. This proof copy is the copyright property of the publisher and is confidential until formal publication.
68 CHAPTER 2 Sterilization and Disinfection
contact, the ions from one metal can flow to another. This may result in a permanent blue-black stain on an instru-ment, which can be removed only by having the instrument refinished.
Guidelines for Sanitizing InstrumentsThe following guidelines should be followed when sanitiz-ing surgical instruments:
1. Wear gloves during the sanitization process. While following the OSHA Bloodborne Pathogens Stan-dard, the medical assistant should wear disposable gloves during the entire sanitization procedure. This protects the medical assistant from bloodborne patho-gens and other potentially infectious materials. The medical assistant should be especially careful when working with hazardous chemicals and when han-dling sharp instruments. Heavy-duty utility gloves should be worn over the disposable gloves to provide protection from the irritating effects of chemical agents and accidental punctures or cuts from sharp instruments.
2. Handle instruments carefully. Instruments are expensive and delicate, yet durable. They can last for many years if handled and maintained properly. Dropping an instrument on the floor or throwing an instrument into a basin may damage it. Instruments should never be piled in a heap because they become entangled and may be damaged when separated. Keep sharp instruments separate from other instruments to prevent damaging or dulling the cutting edge. Also, keep delicate instruments separate to protect them from damage.
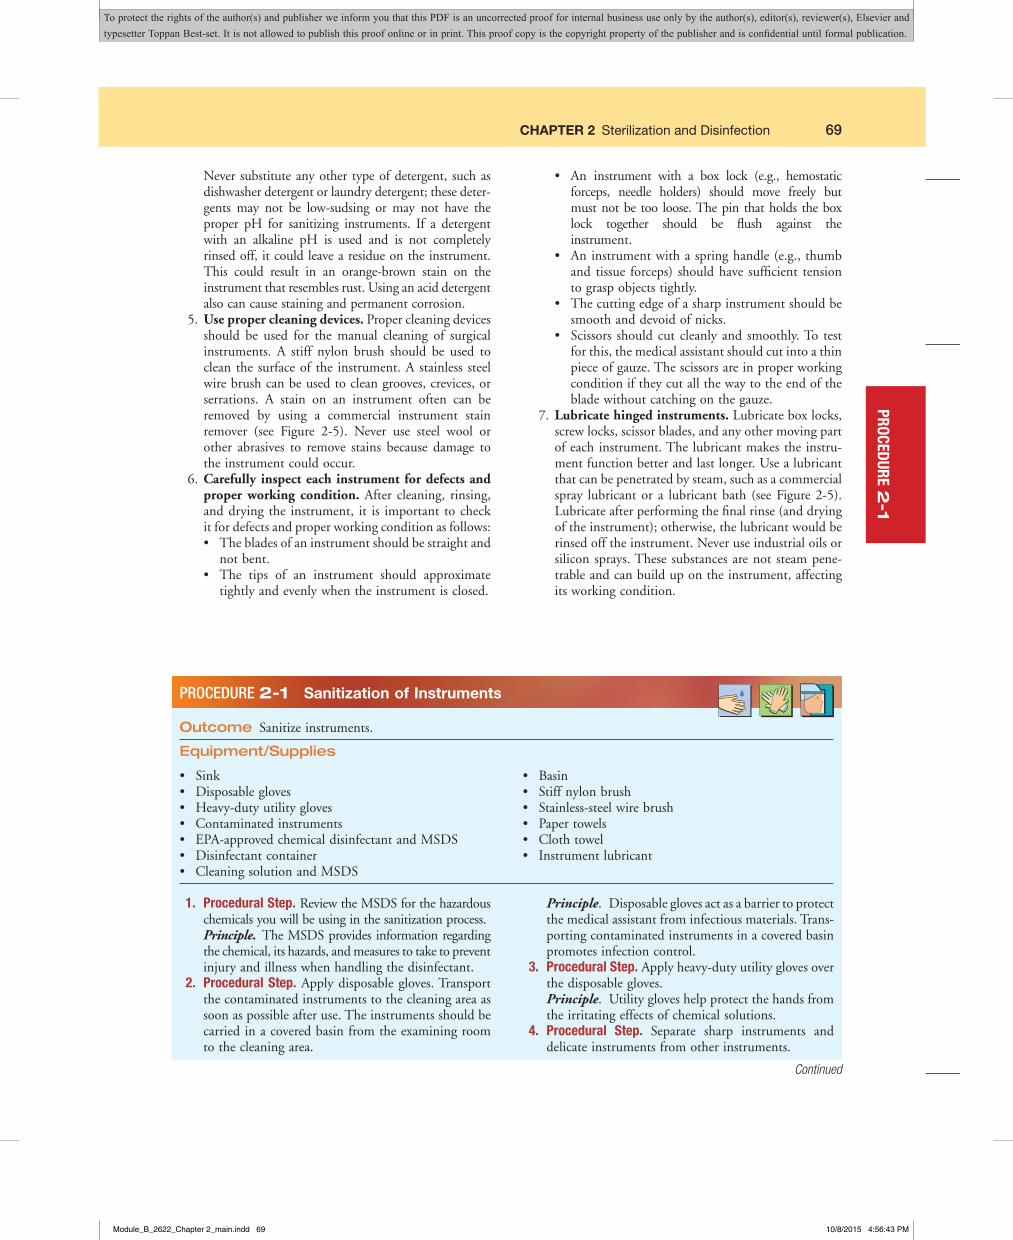
3. Follow instructions on labels of chemical agents. Before using a chemical agent such as a chemical disinfectant, an instrument cleaner, or an autoclave cleaner, review the product’s MSDS, and carefully read the label on the container. Check the label to determine the use, mixing, and storage of the chemi-cal agent. Read and observe precautions listed on the
label regarding personal safety, such as the use of gloves and eye protection (Figure 2-4). Also, check the expiration date on the label of the chemical agent. Chemicals have a tendency to lose their potency over time and should not be used past the expiration date.
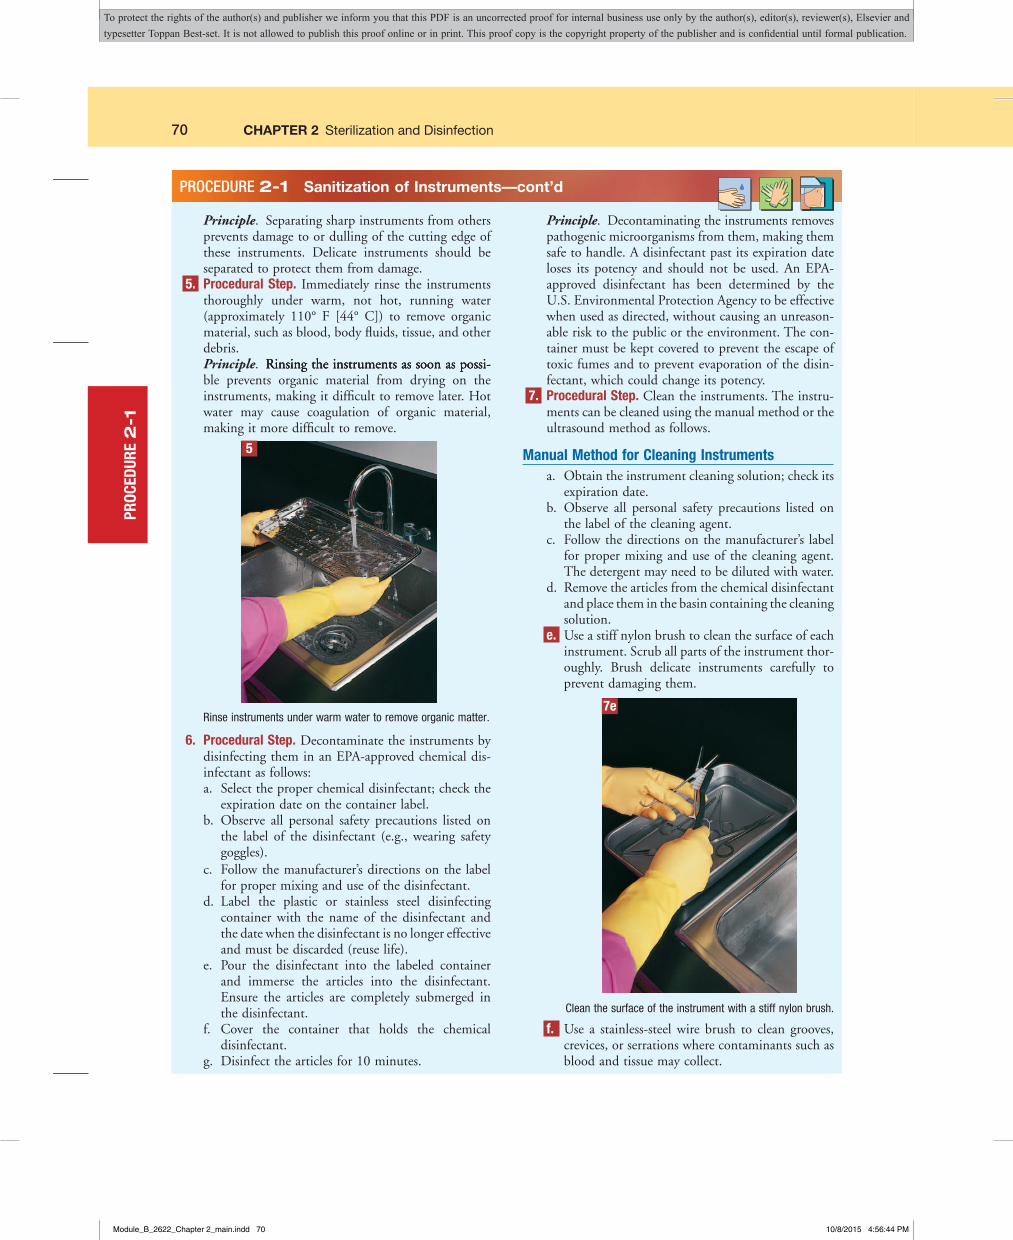
4. Use a proper cleaning agent. A low-sudsing deter-gent with a neutral pH should be used to clean the instruments. Commercially available instrument cleaners meet these criteria (Figure 2-5). These clean-ers usually come in a concentrated liquid or powder form and must be diluted with water before use.
Figure 2-3 Ultrasonic cleaner.
Figure 2-4 Kara wears utility gloves and safety goggles to protect herself from the irritating effects of glutaraldehyde.
Figure 2-5 Commercially available surgical instrument cleaners. Left, Instrument cleaner; center, stain remover; right, spray lubricant.
Module_B_2622_Chapter 2_main.indd 68 10/8/2015 4:56:43 PM
To protect the rights of the author(s) and publisher we inform you that this PDF is an uncorrected proof for internal business use only by the author(s), editor(s), reviewer(s), Elsevier and typesetter Toppan Best-set. It is not allowed to publish this proof online or in print. This proof copy is the copyright property of the publisher and is confidential until formal publication.
CHAPTER 2 Sterilization and Disinfection 69
• An instrument with a box lock (e.g., hemostatic forceps, needle holders) should move freely but must not be too loose. The pin that holds the box lock together should be flush against the instrument.
• An instrument with a spring handle (e.g., thumb and tissue forceps) should have sufficient tension to grasp objects tightly.
• The cutting edge of a sharp instrument should be smooth and devoid of nicks.
• Scissors should cut cleanly and smoothly. To test for this, the medical assistant should cut into a thin piece of gauze. The scissors are in proper working condition if they cut all the way to the end of the blade without catching on the gauze.
7. Lubricate hinged instruments. Lubricate box locks, screw locks, scissor blades, and any other moving part of each instrument. The lubricant makes the instru-ment function better and last longer. Use a lubricant that can be penetrated by steam, such as a commercial spray lubricant or a lubricant bath (see Figure 2-5). Lubricate after performing the final rinse (and drying of the instrument); otherwise, the lubricant would be rinsed off the instrument. Never use industrial oils or silicon sprays. These substances are not steam pene-trable and can build up on the instrument, affecting its working condition.
Never substitute any other type of detergent, such as dishwasher detergent or laundry detergent; these deter-gents may not be low-sudsing or may not have the proper pH for sanitizing instruments. If a detergent with an alkaline pH is used and is not completely rinsed off, it could leave a residue on the instrument. This could result in an orange-brown stain on the instrument that resembles rust. Using an acid detergent also can cause staining and permanent corrosion.
5. Use proper cleaning devices. Proper cleaning devices should be used for the manual cleaning of surgical instruments. A stiff nylon brush should be used to clean the surface of the instrument. A stainless steel wire brush can be used to clean grooves, crevices, or serrations. A stain on an instrument often can be removed by using a commercial instrument stain remover (see Figure 2-5). Never use steel wool or other abrasives to remove stains because damage to the instrument could occur.
6. Carefully inspect each instrument for defects and proper working condition. After cleaning, rinsing, and drying the instrument, it is important to check it for defects and proper working condition as follows:• The blades of an instrument should be straight and
not bent.• The tips of an instrument should approximate
tightly and evenly when the instrument is closed.
Outcome Sanitize instruments.
Equipment/Supplies
PROCEDURE 2-1 Sanitization of Instruments
• Sink• Disposable gloves• Heavy-duty utility gloves• Contaminated instruments• EPA-approved chemical disinfectant and MSDS• Disinfectant container• Cleaning solution and MSDS
• Basin• Stiff nylon brush• Stainless-steel wire brush• Paper towels• Cloth towel• Instrument lubricant
1. Procedural Step. Review the MSDS for the hazardous chemicals you will be using in the sanitization process.
Principle. The MSDS provides information regarding the chemical, its hazards, and measures to take to prevent injury and illness when handling the disinfectant.
2. Procedural Step. Apply disposable gloves. Transport the contaminated instruments to the cleaning area as soon as possible after use. The instruments should be carried in a covered basin from the examining room to the cleaning area.
Principle. Disposable gloves act as a barrier to protect the medical assistant from infectious materials. Trans-porting contaminated instruments in a covered basin promotes infection control.
3. Procedural Step. Apply heavy-duty utility gloves over the disposable gloves.
Principle. Utility gloves help protect the hands from the irritating effects of chemical solutions.
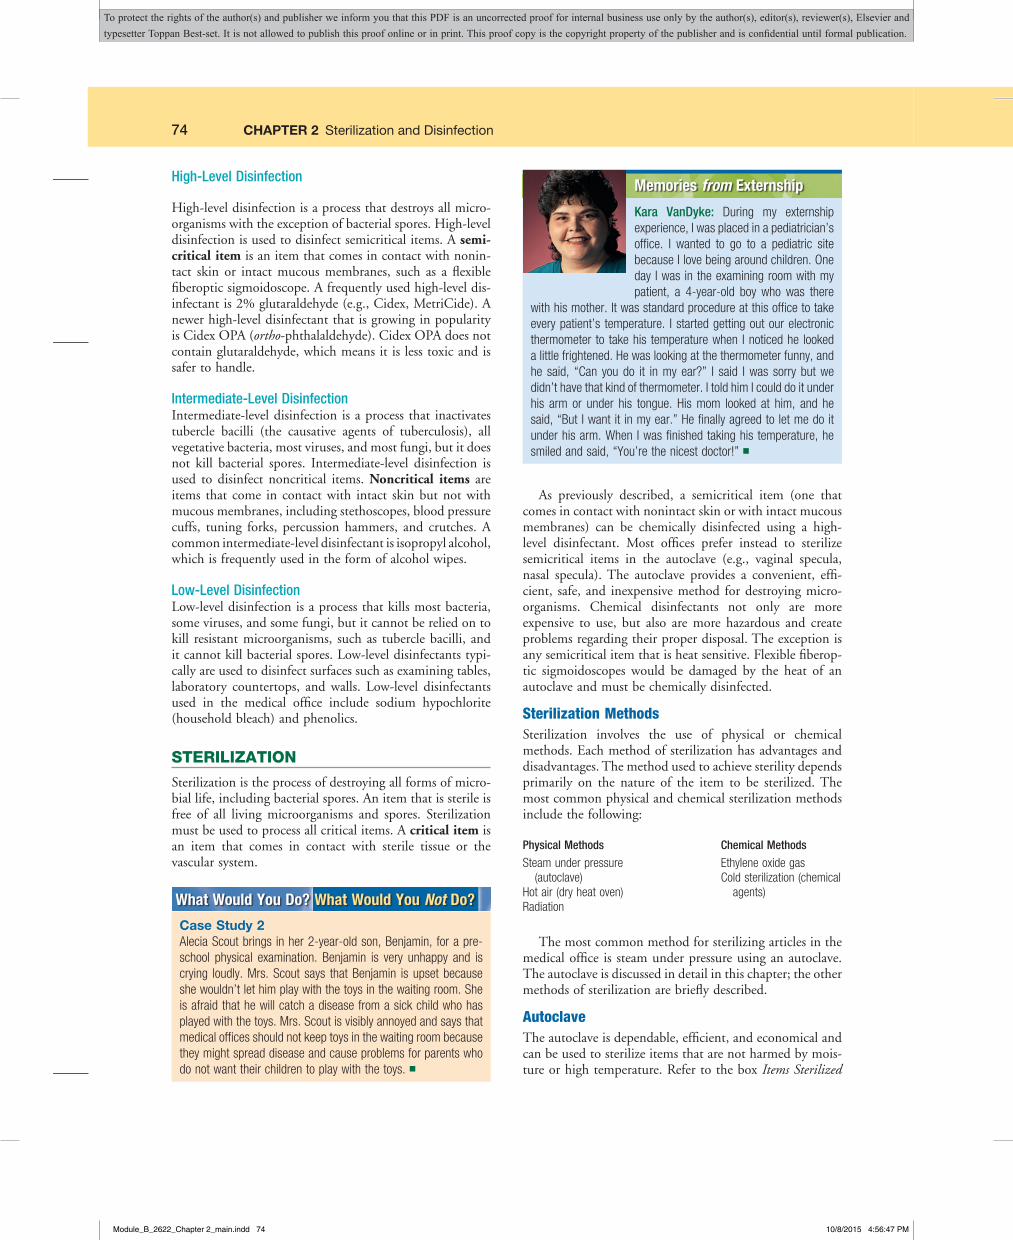
4. Procedural Step. Separate sharp instruments and delicate instruments from other instruments.
Continued
PROCEDURE 2-1
Module_B_2622_Chapter 2_main.indd 69 10/8/2015 4:56:43 PM
To protect the rights of the author(s) and publisher we inform you that this PDF is an uncorrected proof for internal business use only by the author(s), editor(s), reviewer(s), Elsevier and typesetter Toppan Best-set. It is not allowed to publish this proof online or in print. This proof copy is the copyright property of the publisher and is confidential until formal publication.
70 CHAPTER 2 Sterilization and DisinfectionPR
OCED
URE
2-1
Principle. Separating sharp instruments from others prevents damage to or dulling of the cutting edge of these instruments. Delicate instruments should be separated to protect them from damage.
5. Procedural Step. Immediately rinse the instruments thoroughly under warm, not hot, running water (approximately 110° F [44° C]) to remove organic material, such as blood, body fluids, tissue, and other debris.
Principle. Rinsing the instruments as soon as possi- Rinsing the instruments as soon as possi-Rinsing the instruments as soon as possi-ble prevents organic material from drying on the instruments, making it difficult to remove later. Hot water may cause coagulation of organic material, making it more difficult to remove.
6. Procedural Step. Decontaminate the instruments by disinfecting them in an EPA-approved chemical dis-infectant as follows:a. Select the proper chemical disinfectant; check the
expiration date on the container label.b. Observe all personal safety precautions listed on
the label of the disinfectant (e.g., wearing safety goggles).
c. Follow the manufacturer’s directions on the label for proper mixing and use of the disinfectant.
d. Label the plastic or stainless steel disinfecting container with the name of the disinfectant and the date when the disinfectant is no longer effective and must be discarded (reuse life).
e. Pour the disinfectant into the labeled container and immerse the articles into the disinfectant. Ensure the articles are completely submerged in the disinfectant.
f. Cover the container that holds the chemical disinfectant.
g. Disinfect the articles for 10 minutes.
Principle. Decontaminating the instruments removes pathogenic microorganisms from them, making them safe to handle. A disinfectant past its expiration date loses its potency and should not be used. An EPA-approved disinfectant has been determined by the U.S. Environmental Protection Agency to be effective when used as directed, without causing an unreason-able risk to the public or the environment. The con-tainer must be kept covered to prevent the escape of toxic fumes and to prevent evaporation of the disin-fectant, which could change its potency.
7. Procedural Step. Clean the instruments. The instru-ments can be cleaned using the manual method or the ultrasound method as follows.
Manual Method for Cleaning Instrumentsa. Obtain the instrument cleaning solution; check its
expiration date.b. Observe all personal safety precautions listed on
the label of the cleaning agent.c. Follow the directions on the manufacturer’s label
for proper mixing and use of the cleaning agent. The detergent may need to be diluted with water.
d. Remove the articles from the chemical disinfectant and place them in the basin containing the cleaning solution.
e. Use a stiff nylon brush to clean the surface of each instrument. Scrub all parts of the instrument thor-oughly. Brush delicate instruments carefully to prevent damaging them.
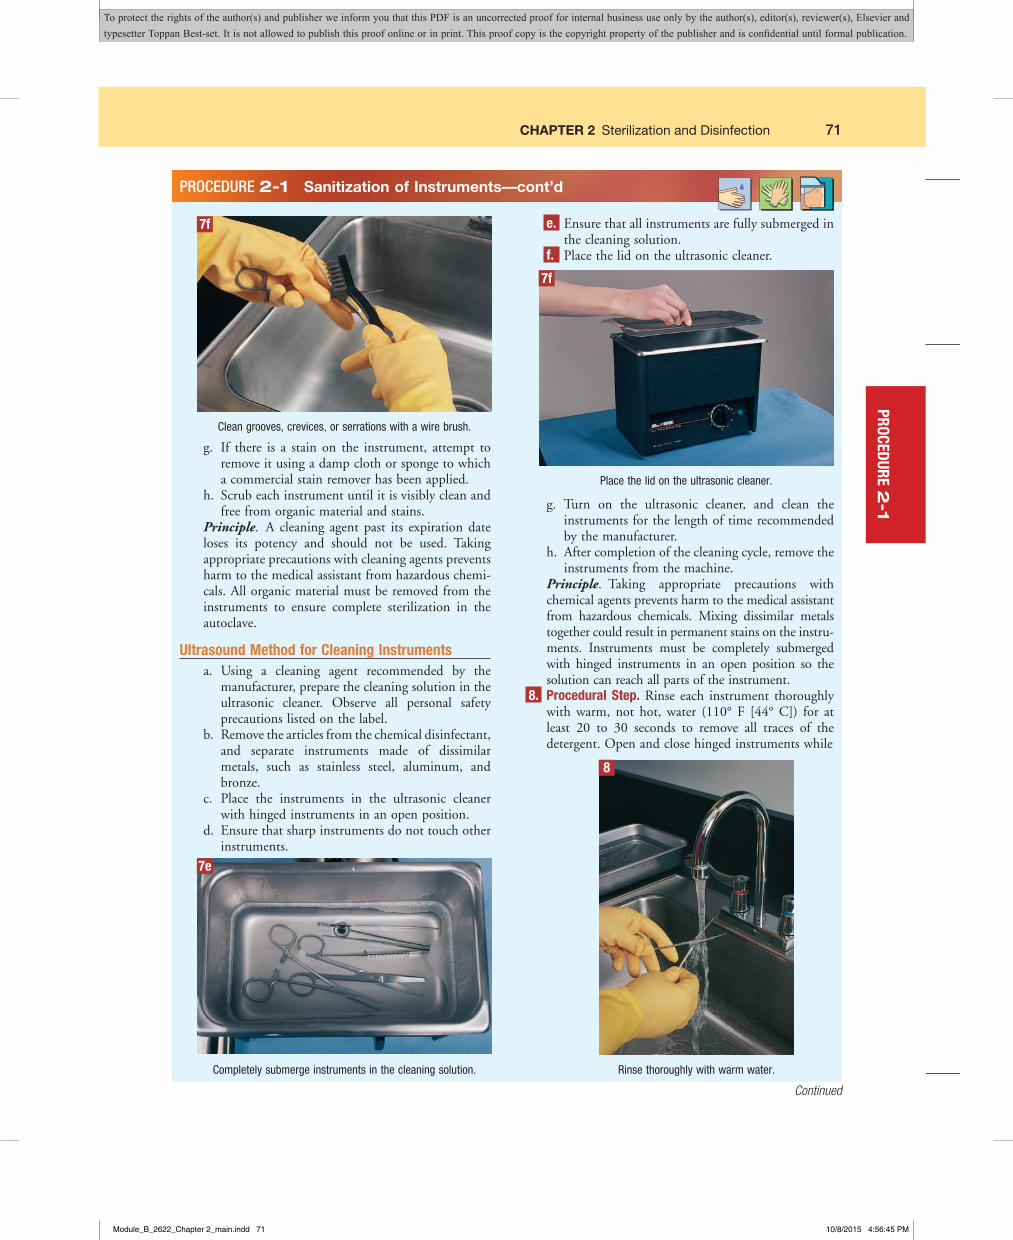
f. Use a stainless-steel wire brush to clean grooves, crevices, or serrations where contaminants such as blood and tissue may collect.
PROCEDURE 2-1 Sanitization of Instruments—cont’d
5
Rinse instruments under warm water to remove organic matter.7e
Clean the surface of the instrument with a stiff nylon brush.
Module_B_2622_Chapter 2_main.indd 70 10/8/2015 4:56:44 PM
To protect the rights of the author(s) and publisher we inform you that this PDF is an uncorrected proof for internal business use only by the author(s), editor(s), reviewer(s), Elsevier and typesetter Toppan Best-set. It is not allowed to publish this proof online or in print. This proof copy is the copyright property of the publisher and is confidential until formal publication.
CHAPTER 2 Sterilization and Disinfection 71
g. If there is a stain on the instrument, attempt to remove it using a damp cloth or sponge to which a commercial stain remover has been applied.
h. Scrub each instrument until it is visibly clean and free from organic material and stains.
Principle. A cleaning agent past its expiration date loses its potency and should not be used. Taking appropriate precautions with cleaning agents prevents harm to the medical assistant from hazardous chemi-cals. All organic material must be removed from the instruments to ensure complete sterilization in the autoclave.
Ultrasound Method for Cleaning Instrumentsa. Using a cleaning agent recommended by the
manufacturer, prepare the cleaning solution in the ultrasonic cleaner. Observe all personal safety precautions listed on the label.
b. Remove the articles from the chemical disinfectant, and separate instruments made of dissimilar metals, such as stainless steel, aluminum, and bronze.
c. Place the instruments in the ultrasonic cleaner with hinged instruments in an open position.
d. Ensure that sharp instruments do not touch other instruments.
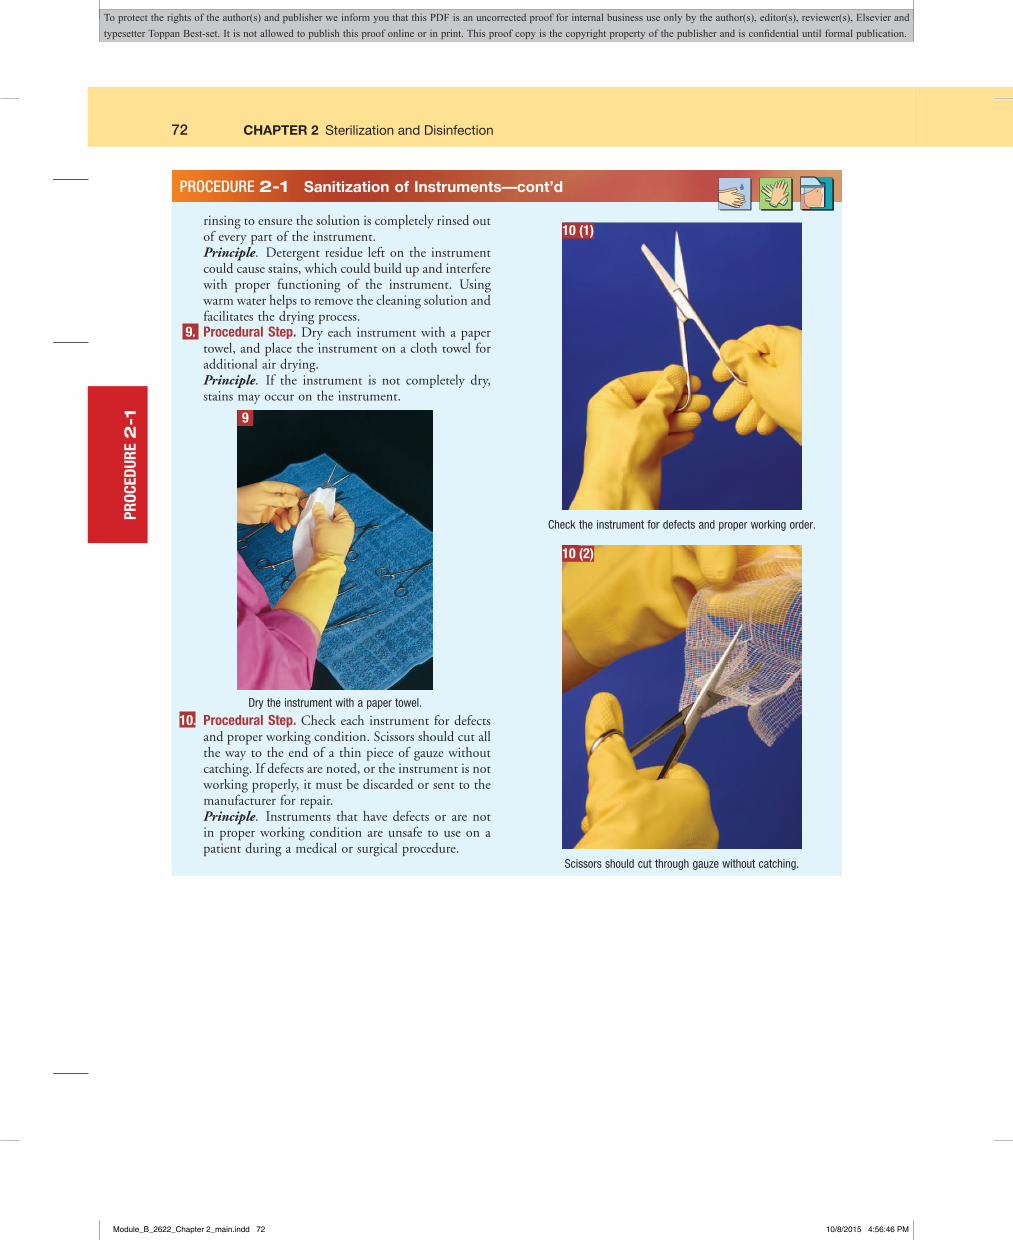
e. Ensure that all instruments are fully submerged in the cleaning solution.
f. Place the lid on the ultrasonic cleaner.
g. Turn on the ultrasonic cleaner, and clean the instruments for the length of time recommended by the manufacturer.
h. After completion of the cleaning cycle, remove the instruments from the machine.
Principle. Taking appropriate precautions with chemical agents prevents harm to the medical assistant from hazardous chemicals. Mixing dissimilar metals together could result in permanent stains on the instru-ments. Instruments must be completely submerged with hinged instruments in an open position so the solution can reach all parts of the instrument.
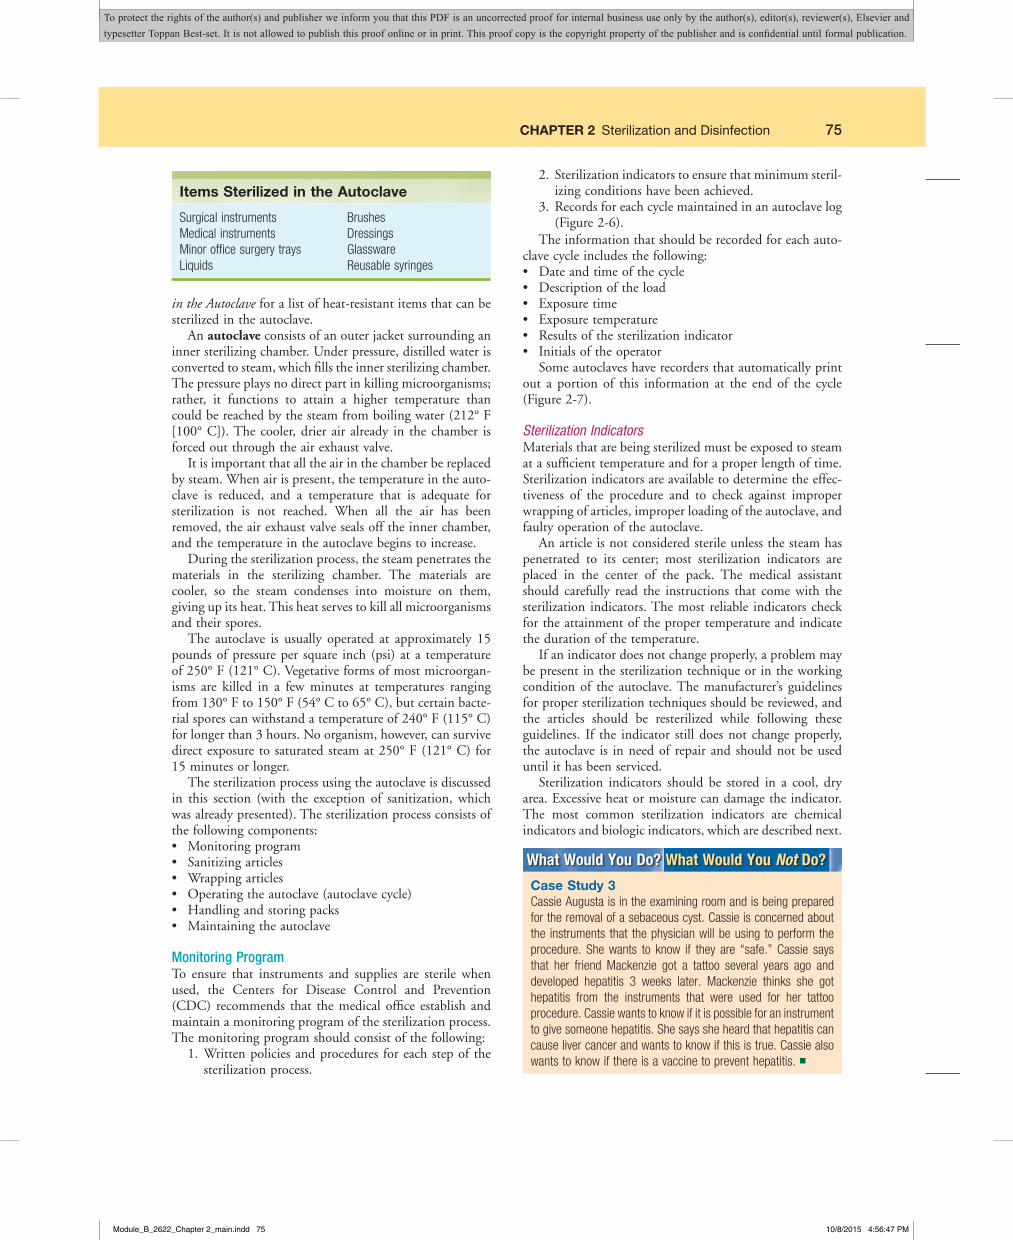
8. Procedural Step. Rinse each instrument thoroughly with warm, not hot, water (110° F [44° C]) for at least 20 to 30 seconds to remove all traces of the detergent. Open and close hinged instruments while
PROCEDURE 2-1 Sanitization of Instruments—cont’d
7f
Clean grooves, crevices, or serrations with a wire brush.
7e
Completely submerge instruments in the cleaning solution.
Continued
PROCEDURE 2-1
Place the lid on the ultrasonic cleaner.
7f
8
Rinse thoroughly with warm water.
Module_B_2622_Chapter 2_main.indd 71 10/8/2015 4:56:45 PM
To protect the rights of the author(s) and publisher we inform you that this PDF is an uncorrected proof for internal business use only by the author(s), editor(s), reviewer(s), Elsevier and typesetter Toppan Best-set. It is not allowed to publish this proof online or in print. This proof copy is the copyright property of the publisher and is confidential until formal publication.
72 CHAPTER 2 Sterilization and Disinfection
rinsing to ensure the solution is completely rinsed out of every part of the instrument.
Principle. Detergent residue left on the instrument could cause stains, which could build up and interfere with proper functioning of the instrument. Using warm water helps to remove the cleaning solution and facilitates the drying process.
9. Procedural Step. Dry each instrument with a paper towel, and place the instrument on a cloth towel for additional air drying.
Principle. If the instrument is not completely dry, stains may occur on the instrument.
10. Procedural Step. Check each instrument for defects and proper working condition. Scissors should cut all the way to the end of a thin piece of gauze without catching. If defects are noted, or the instrument is not working properly, it must be discarded or sent to the manufacturer for repair.
Principle. Instruments that have defects or are not in proper working condition are unsafe to use on a patient during a medical or surgical procedure.
PROCEDURE 2-1 Sanitization of Instruments—cont’d
9
Dry the instrument with a paper towel.
10 (1)
Check the instrument for defects and proper working order.
PROC
EDUR
E 2
-1
10 (2)
Scissors should cut through gauze without catching.
Module_B_2622_Chapter 2_main.indd 72 10/8/2015 4:56:46 PM
To protect the rights of the author(s) and publisher we inform you that this PDF is an uncorrected proof for internal business use only by the author(s), editor(s), reviewer(s), Elsevier and typesetter Toppan Best-set. It is not allowed to publish this proof online or in print. This proof copy is the copyright property of the publisher and is confidential until formal publication.

CHAPTER 2 Sterilization and Disinfection 73
11. Procedural Step. Lubricate hinged instruments using a steam-penetrable lubricant as follows:a. Apply the lubricant to a hinged instrument in its
open position.b. Open and close the instrument after applying the
lubricant so it reaches all parts of the hinged area.c. Place the instrument back on the towel and allow
it to drain. Rinsing or wiping is unnecessary. Principle. Lubricating an instrument makes it func- Lubricating an instrument makes it func-Lubricating an instrument makes it func-
tion better and last longer. 12. Procedural Step. Dispose of the cleaning solution
according to the manufacturer’s instructions. Remove both sets of gloves, and sanitize your hands.
13. Procedural Step. Wrap the instruments and sterilize them in the autoclave according to the medical office policy.
PROCEDURE 2-1 Sanitization of Instruments—cont’d
11
Lubricate hinged instruments.
DISINFECTION
Disinfection is the process of destroying pathogenic micro-organisms, but it does not kill bacterial spores. Disinfection is accomplished in the medical office through the use of liquid chemical agents that are applied to inanimate objects. Chemical disinfection has been discussed with respect to its role in the sanitization process to decontaminate surgical instruments and make them safe to handle. This section discusses the use of chemical disinfection to disinfect
semicritical and noncritical items so they can be used for patient care.
Table 2-1 lists disinfectants most frequently used in the medical office, along with common names and uses for each.
Levels of DisinfectionBased on killing action, disinfection can be classified accord-ing to three levels.
PROCEDURE 2-1
Table 2-1 Disinfectants Used in the Medical Office
Disinfectant Common Names Use in the Medical OfficeGlutaraldehyde Cidex
MetriCideProCideOmnicideWavicide
Disinfectionofflexiblefiberopticsigmoidoscopes.
Alcohol Isopropylalcohol Disinfectionofstethoscopes,bloodpressurecuffs,tuningforks,andpercussionhammers;isopropylalcoholwipesareusedtodisinfectrubberstoppersofmultiple-dosemedicationvials.
Chlorineandchlorinecompounds Sodiumhypochlorite(householdbleach) RecommendedbyOSHAfordecontaminationofbloodspills.Phenolics Carbolicacid
HydroxybenzenePhenicacidPhenylhydroxidePhenylicacid
Disinfectionofwalls,furniture,floors,andlaboratoryworksurfaces.
Quaternaryammoniumcom-pounds
Benzalkoniumchloride Disinfectionofwalls,furniture,floors,andlaboratoryworksurfaces.
FromBonewit-WestK:Clinical procedures for medical assistants,ed8,StLouis,2011,Saunders.
Module_B_2622_Chapter 2_main.indd 73 10/8/2015 4:56:47 PM
To protect the rights of the author(s) and publisher we inform you that this PDF is an uncorrected proof for internal business use only by the author(s), editor(s), reviewer(s), Elsevier and typesetter Toppan Best-set. It is not allowed to publish this proof online or in print. This proof copy is the copyright property of the publisher and is confidential until formal publication.
74 CHAPTER 2 Sterilization and Disinfection
High-Level Disinfection
High-level disinfection is a process that destroys all micro-organisms with the exception of bacterial spores. High-level disinfection is used to disinfect semicritical items. A semi-critical item is an item that comes in contact with nonin-tact skin or intact mucous membranes, such as a flexible fiberoptic sigmoidoscope. A frequently used high-level dis-infectant is 2% glutaraldehyde (e.g., Cidex, MetriCide). A newer high-level disinfectant that is growing in popularity is Cidex OPA (ortho-phthalaldehyde). Cidex OPA does not contain glutaraldehyde, which means it is less toxic and is safer to handle.
Intermediate-Level DisinfectionIntermediate-level disinfection is a process that inactivates tubercle bacilli (the causative agents of tuberculosis), all vegetative bacteria, most viruses, and most fungi, but it does not kill bacterial spores. Intermediate-level disinfection is used to disinfect noncritical items. Noncritical items are items that come in contact with intact skin but not with mucous membranes, including stethoscopes, blood pressure cuffs, tuning forks, percussion hammers, and crutches. A common intermediate-level disinfectant is isopropyl alcohol, which is frequently used in the form of alcohol wipes.
Low-Level DisinfectionLow-level disinfection is a process that kills most bacteria, some viruses, and some fungi, but it cannot be relied on to kill resistant microorganisms, such as tubercle bacilli, and it cannot kill bacterial spores. Low-level disinfectants typi-cally are used to disinfect surfaces such as examining tables, laboratory countertops, and walls. Low-level disinfectants used in the medical office include sodium hypochlorite (household bleach) and phenolics.
STERILIZATION
Sterilization is the process of destroying all forms of micro-bial life, including bacterial spores. An item that is sterile is free of all living microorganisms and spores. Sterilization must be used to process all critical items. A critical item is an item that comes in contact with sterile tissue or the vascular system.
What Would You Do? What Would You Not Do?
Case Study 2AleciaScoutbringsinher2-year-oldson,Benjamin,forapre-school physical examination. Benjamin is very unhappy and iscrying loudly.Mrs.Scout says thatBenjamin isupsetbecauseshewouldn’tlethimplaywiththetoysinthewaitingroom.Sheisafraidthathewillcatchadiseasefromasickchildwhohasplayedwiththetoys.Mrs.Scoutisvisiblyannoyedandsaysthatmedicalofficesshouldnotkeeptoysinthewaitingroombecausetheymightspreaddiseaseandcauseproblemsforparentswhodonotwanttheirchildrentoplaywiththetoys. ■
Kara VanDyke: During my externshipexperience,Iwasplacedinapediatrician’soffice. I wanted to go to a pediatric sitebecauseIlovebeingaroundchildren.OnedayIwasintheexaminingroomwithmypatient, a 4-year-old boy who was there
withhismother.Itwasstandardprocedureatthisofficetotakeeverypatient’s temperature. Istartedgettingoutourelectronicthermometer to takehis temperaturewhen Inoticedhe lookedalittlefrightened.Hewaslookingatthethermometerfunny,andhe said, “Can youdo it inmyear?” I said Iwas sorry butwedidn’thavethatkindofthermometer.ItoldhimIcoulddoitunderhis arm or under his tongue. His mom looked at him, and hesaid,“ButIwantitinmyear.”Hefinallyagreedtoletmedoitunderhisarm.WhenIwasfinishedtakinghistemperature,hesmiledandsaid,“You’rethenicestdoctor!” ■
Memories from Externship
As previously described, a semicritical item (one that comes in contact with nonintact skin or with intact mucous membranes) can be chemically disinfected using a high-level disinfectant. Most offices prefer instead to sterilize semicritical items in the autoclave (e.g., vaginal specula, nasal specula). The autoclave provides a convenient, effi-cient, safe, and inexpensive method for destroying micro-organisms. Chemical disinfectants not only are more expensive to use, but also are more hazardous and create problems regarding their proper disposal. The exception is any semicritical item that is heat sensitive. Flexible fiberop-tic sigmoidoscopes would be damaged by the heat of an autoclave and must be chemically disinfected.
Sterilization MethodsSterilization involves the use of physical or chemical methods. Each method of sterilization has advantages and disadvantages. The method used to achieve sterility depends primarily on the nature of the item to be sterilized. The most common physical and chemical sterilization methods include the following:
Physical Methods Chemical Methods
Steamunderpressure(autoclave)
Hotair(dryheatoven)Radiation
EthyleneoxidegasColdsterilization(chemical
agents)
The most common method for sterilizing articles in the medical office is steam under pressure using an autoclave. The autoclave is discussed in detail in this chapter; the other methods of sterilization are briefly described.
AutoclaveThe autoclave is dependable, efficient, and economical and can be used to sterilize items that are not harmed by mois-ture or high temperature. Refer to the box Items Sterilized
Module_B_2622_Chapter 2_main.indd 74 10/8/2015 4:56:47 PM
To protect the rights of the author(s) and publisher we inform you that this PDF is an uncorrected proof for internal business use only by the author(s), editor(s), reviewer(s), Elsevier and typesetter Toppan Best-set. It is not allowed to publish this proof online or in print. This proof copy is the copyright property of the publisher and is confidential until formal publication.
CHAPTER 2 Sterilization and Disinfection 75
in the Autoclave for a list of heat-resistant items that can be sterilized in the autoclave.
An autoclave consists of an outer jacket surrounding an inner sterilizing chamber. Under pressure, distilled water is converted to steam, which fills the inner sterilizing chamber. The pressure plays no direct part in killing microorganisms; rather, it functions to attain a higher temperature than could be reached by the steam from boiling water (212° F [100° C]). The cooler, drier air already in the chamber is forced out through the air exhaust valve.
It is important that all the air in the chamber be replaced by steam. When air is present, the temperature in the auto-clave is reduced, and a temperature that is adequate for sterilization is not reached. When all the air has been removed, the air exhaust valve seals off the inner chamber, and the temperature in the autoclave begins to increase.
During the sterilization process, the steam penetrates the materials in the sterilizing chamber. The materials are cooler, so the steam condenses into moisture on them, giving up its heat. This heat serves to kill all microorganisms and their spores.
The autoclave is usually operated at approximately 15 pounds of pressure per square inch (psi) at a temperature of 250° F (121° C). Vegetative forms of most microorgan-isms are killed in a few minutes at temperatures ranging from 130° F to 150° F (54° C to 65° C), but certain bacte-rial spores can withstand a temperature of 240° F (115° C) for longer than 3 hours. No organism, however, can survive direct exposure to saturated steam at 250° F (121° C) for 15 minutes or longer.
The sterilization process using the autoclave is discussed in this section (with the exception of sanitization, which was already presented). The sterilization process consists of the following components:• Monitoring program• Sanitizing articles• Wrapping articles• Operating the autoclave (autoclave cycle)• Handling and storing packs• Maintaining the autoclave
Monitoring ProgramTo ensure that instruments and supplies are sterile when used, the Centers for Disease Control and Prevention (CDC) recommends that the medical office establish and maintain a monitoring program of the sterilization process. The monitoring program should consist of the following:
1. Written policies and procedures for each step of the sterilization process.
SurgicalinstrumentsMedicalinstrumentsMinorofficesurgerytraysLiquids
BrushesDressingsGlasswareReusablesyringes
Items Sterilized in the Autoclave 2. Sterilization indicators to ensure that minimum steril-
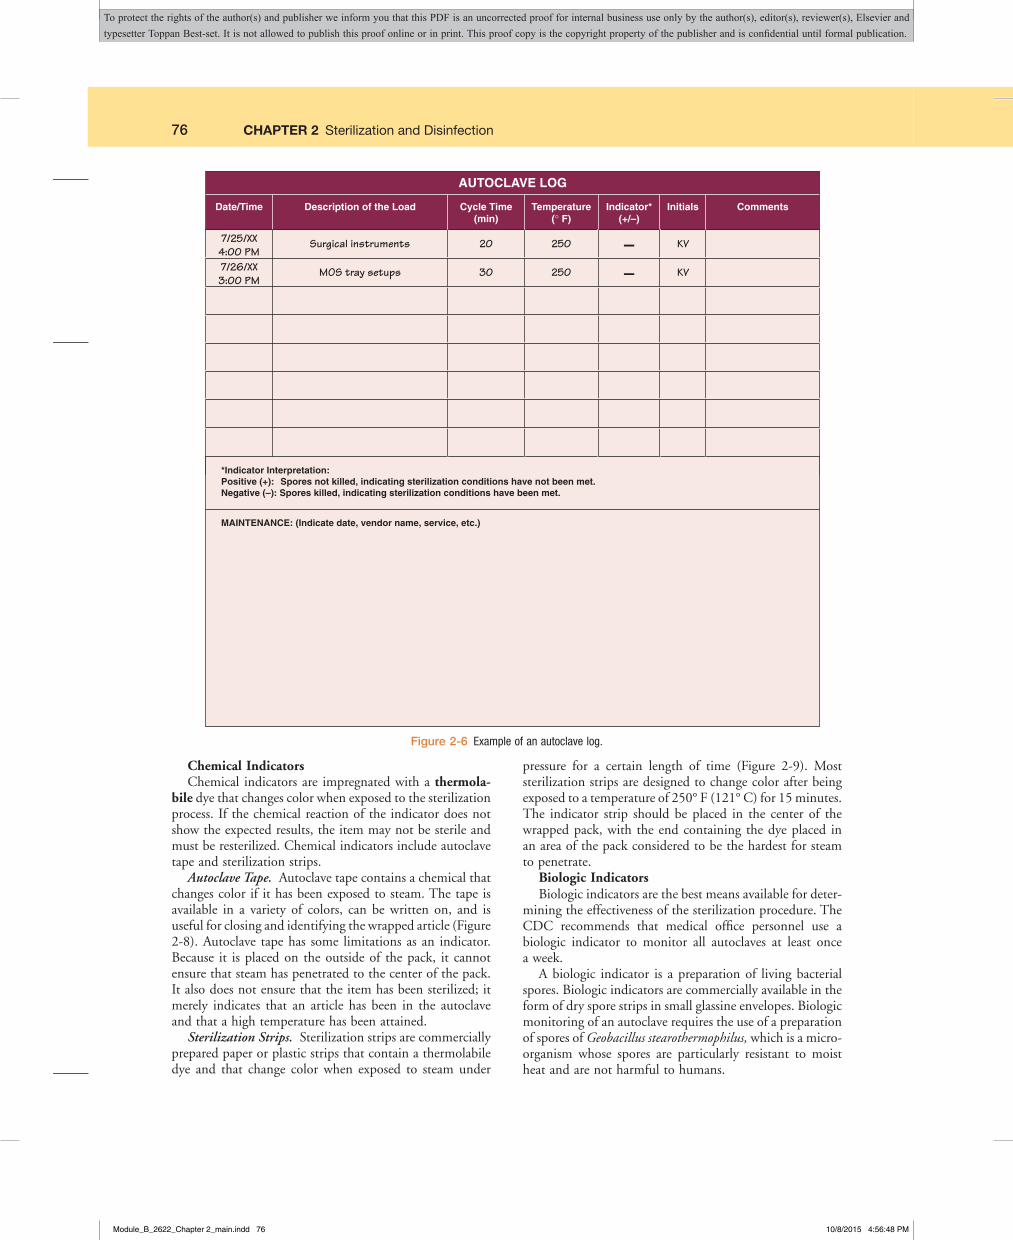
izing conditions have been achieved. 3. Records for each cycle maintained in an autoclave log
(Figure 2-6).The information that should be recorded for each auto-
clave cycle includes the following:• Date and time of the cycle• Description of the load• Exposure time• Exposure temperature• Results of the sterilization indicator• Initials of the operator
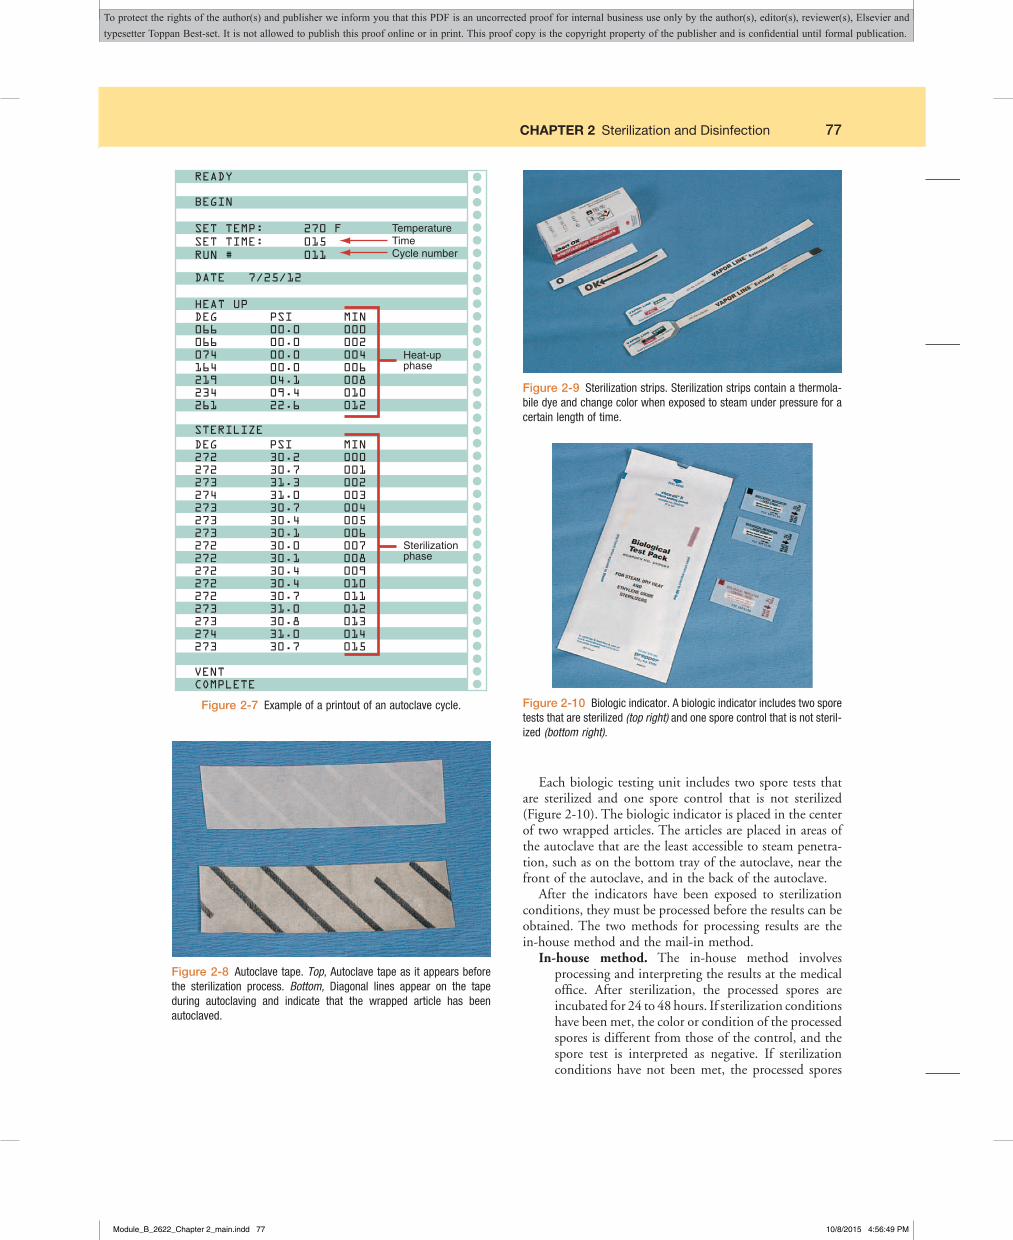
Some autoclaves have recorders that automatically print out a portion of this information at the end of the cycle (Figure 2-7).
Sterilization IndicatorsMaterials that are being sterilized must be exposed to steam at a sufficient temperature and for a proper length of time. Sterilization indicators are available to determine the effec-tiveness of the procedure and to check against improper wrapping of articles, improper loading of the autoclave, and faulty operation of the autoclave.
An article is not considered sterile unless the steam has penetrated to its center; most sterilization indicators are placed in the center of the pack. The medical assistant should carefully read the instructions that come with the sterilization indicators. The most reliable indicators check for the attainment of the proper temperature and indicate the duration of the temperature.
If an indicator does not change properly, a problem may be present in the sterilization technique or in the working condition of the autoclave. The manufacturer’s guidelines for proper sterilization techniques should be reviewed, and the articles should be resterilized while following these guidelines. If the indicator still does not change properly, the autoclave is in need of repair and should not be used until it has been serviced.
Sterilization indicators should be stored in a cool, dry area. Excessive heat or moisture can damage the indicator. The most common sterilization indicators are chemical indicators and biologic indicators, which are described next.
What Would You Do? What Would You Not Do?
Case Study 3CassieAugustaisintheexaminingroomandisbeingpreparedfortheremovalofasebaceouscyst.Cassieisconcernedaboutthe instruments that thephysicianwillbeusing toperformtheprocedure. She wants to know if they are “safe.” Cassie saysthat her friend Mackenzie got a tattoo several years ago anddeveloped hepatitis 3 weeks later. Mackenzie thinks she gothepatitis from the instruments that were used for her tattooprocedure.Cassiewantstoknowifitispossibleforaninstrumenttogivesomeonehepatitis.Shesayssheheardthathepatitiscancauselivercancerandwantstoknowifthisistrue.Cassiealsowantstoknowifthereisavaccinetopreventhepatitis. ■
Module_B_2622_Chapter 2_main.indd 75 10/8/2015 4:56:47 PM
To protect the rights of the author(s) and publisher we inform you that this PDF is an uncorrected proof for internal business use only by the author(s), editor(s), reviewer(s), Elsevier and typesetter Toppan Best-set. It is not allowed to publish this proof online or in print. This proof copy is the copyright property of the publisher and is confidential until formal publication.
76 CHAPTER 2 Sterilization and Disinfection
AUTOCLAVE LOG
*Indicator Interpretation:Positive (+): Spores not killed, indicating sterilization conditions have not been met.Negative (–): Spores killed, indicating sterilization conditions have been met.
MAINTENANCE: (Indicate date, vendor name, service, etc.)
Date/Time Description of the Load Cycle Time(min)
Temperature(° F)
Indicator*(+/–)
Initials
7/25/XX4:00 PM
Surgical instruments 20 250 – KV
Comments
7/26/XX3:00 PM
MOS tray setups 30 250 – KV
Figure 2-6 Example of an autoclave log.
Chemical IndicatorsChemical indicators are impregnated with a thermola-
bile dye that changes color when exposed to the sterilization process. If the chemical reaction of the indicator does not show the expected results, the item may not be sterile and must be resterilized. Chemical indicators include autoclave tape and sterilization strips.
Autoclave Tape. Autoclave tape contains a chemical that changes color if it has been exposed to steam. The tape is available in a variety of colors, can be written on, and is useful for closing and identifying the wrapped article (Figure 2-8). Autoclave tape has some limitations as an indicator. Because it is placed on the outside of the pack, it cannot ensure that steam has penetrated to the center of the pack. It also does not ensure that the item has been sterilized; it merely indicates that an article has been in the autoclave and that a high temperature has been attained.
Sterilization Strips. Sterilization strips are commercially prepared paper or plastic strips that contain a thermolabile dye and that change color when exposed to steam under
pressure for a certain length of time (Figure 2-9). Most sterilization strips are designed to change color after being exposed to a temperature of 250° F (121° C) for 15 minutes. The indicator strip should be placed in the center of the wrapped pack, with the end containing the dye placed in an area of the pack considered to be the hardest for steam to penetrate.
Biologic IndicatorsBiologic indicators are the best means available for deter-
mining the effectiveness of the sterilization procedure. The CDC recommends that medical office personnel use a biologic indicator to monitor all autoclaves at least once a week.
A biologic indicator is a preparation of living bacterial spores. Biologic indicators are commercially available in the form of dry spore strips in small glassine envelopes. Biologic monitoring of an autoclave requires the use of a preparation of spores of Geobacillus stearothermophilus, which is a micro-organism whose spores are particularly resistant to moist heat and are not harmful to humans.
Module_B_2622_Chapter 2_main.indd 76 10/8/2015 4:56:48 PM
To protect the rights of the author(s) and publisher we inform you that this PDF is an uncorrected proof for internal business use only by the author(s), editor(s), reviewer(s), Elsevier and typesetter Toppan Best-set. It is not allowed to publish this proof online or in print. This proof copy is the copyright property of the publisher and is confidential until formal publication.
CHAPTER 2 Sterilization and Disinfection 77
READY
BEGIN
SET TEMP: 270 FSET TIME: 015RUN # 011
DATE 7/25/12
HEAT UPDEG PSI MIN066 00.0 000066 00.0 002074 00.0 004164 00.0 006219 04.1 008234 09.4 010261 22.6 012
STERILIZE
DEG PSI MIN272 30.2 000272 30.7 001273 31.3 002274 31.0 003273 30.7 004273 30.4 005273 30.1 006272 30.0 007272 30.1 008272 30.4 009272 30.4 010272 30.7 011273 31.0 012273 30.8 013274 31.0 014273 30.7 015
VENTCOMPLETE
TemperatureTimeCycle number
Heat-upphase
Sterilizationphase
Figure 2-7 Example of a printout of an autoclave cycle.
Each biologic testing unit includes two spore tests that are sterilized and one spore control that is not sterilized (Figure 2-10). The biologic indicator is placed in the center of two wrapped articles. The articles are placed in areas of the autoclave that are the least accessible to steam penetra-tion, such as on the bottom tray of the autoclave, near the front of the autoclave, and in the back of the autoclave.
After the indicators have been exposed to sterilization conditions, they must be processed before the results can be obtained. The two methods for processing results are the in-house method and the mail-in method.
In-house method. The in-house method involves processing and interpreting the results at the medical office. After sterilization, the processed spores are incubated for 24 to 48 hours. If sterilization conditions have been met, the color or condition of the processed spores is different from those of the control, and the spore test is interpreted as negative. If sterilization conditions have not been met, the processed spores
Figure 2-8 Autoclave tape. Top, Autoclave tape as it appears before the sterilization process. Bottom, Diagonal lines appear on the tape during autoclaving and indicate that the wrapped article has been autoclaved.
Figure 2-9 Sterilization strips. Sterilization strips contain a thermola-bile dye and change color when exposed to steam under pressure for a certain length of time.
Figure 2-10 Biologic indicator. A biologic indicator includes two spore tests that are sterilized (top right) and one spore control that is not steril-ized (bottom right).
Module_B_2622_Chapter 2_main.indd 77 10/8/2015 4:56:49 PM
To protect the rights of the author(s) and publisher we inform you that this PDF is an uncorrected proof for internal business use only by the author(s), editor(s), reviewer(s), Elsevier and typesetter Toppan Best-set. It is not allowed to publish this proof online or in print. This proof copy is the copyright property of the publisher and is confidential until formal publication.

78 CHAPTER 2 Sterilization and Disinfection
Figure 2-11 Sterilization paper wraps. Sterilization paper consists of square sheets of paper that are available in different sizes.
Figure 2-12 Sterilization pouches. Sterilization pouches consist of a combination of paper and plastic and are available in different sizes.
paper is outlined in Procedure 2-2. This method of wrapping can be used for all types of instruments and supplies.
The disadvantage of sterilization paper is that it is dif-ficult to spread open for removal of the contents. It has a “memory” and tends to flip back easily, so it may not open flat to provide a sterile field. (Memory is the ability of a material to retain a specific shape or configuration.) Because sterilization paper is opaque, it is impossible to view the contents of a pack before opening it.
Sterilization PouchesSterilization pouches typically consist of a combination of paper and plastic; paper makes up one side of the pouch, and a plastic film makes up the other side (Figure 2-12). Sterilization pouches are available in different sizes; the most common sizes (in inches) are 3 × 9, 5 × 10, and 7 × 12.
Most pouches have a peel-apart seal on one end that is used later to open the pouch for removal of the sterile item. The other end of the pouch is open and is used to insert the item into the pouch. When the article has been inserted, this end is sealed with heat or adhesive tape. The proper method for wrapping an instrument by using a pouch is outlined in Procedure 2-3.
Sterilization pouches provide good visibility of the con-tents on the plastic side. Most manufacturers include a sterilization indicator on the outside of the pouch. After removing a pouch from the autoclave, the medical assistant should check the indicator for proper color change. If the indicator does not change to the appropriate color (as speci-fied by the manufacturer), the contents of the pouch must be resterilized.
MuslinMuslin is a reusable woven fabric that is available in differ-ent sizes. Muslin is flexible and easy to handle and is con-sidered the most economical sterilization wrap because it can be reused. Because of its durability, muslin is frequently used to wrap large packs, such as tray setups for minor office
and the unprocessed control display the same color or condition, and the spore test is interpreted as positive.
Mail-in method. With this method, the processed bacterial spores and the (unprocessed) control are mailed to a processing laboratory. The test is performed by the laboratory, and the results are returned to the medical office.
If spores are not killed in routine spore tests, the auto-clave should be checked immediately for proper use and function, and the spore test should be repeated. If the spore test remains positive, the autoclave should not be used until it is serviced.
Wrapping ArticlesArticles to be sterilized in the autoclave first must be thor-oughly sanitized (see Procedure 2-1). Next, the articles are prepared for autoclaving by wrapping them. The purpose of wrapping articles is to protect them from recontamina-tion during handling and storage. Articles that are wrapped and handled correctly remain sterile after autoclaving until the package seal is broken.
The wrapping material should be made of a substance that is not affected by the sterilization process and should allow steam to penetrate while preventing contaminants, such as dust, insects, and microorganisms, from entering during handling and storage. It should not tear or puncture easily and should allow the sterilized package to be opened without contamination of the contents. A wrapper should not be used if it is torn or has a hole. Examples of wrapping materials used for autoclaving are sterilization paper, steril-ization pouches, and muslin.
Sterilization PaperSterilization paper is a disposable and inexpensive wrapping material. It consists of square sheets of paper of different sizes (Figure 2-11). The most common sizes (in inches) are 12 × 12, 15 × 15, 18 × 18, 24 × 24, 30 × 30, and 36 × 36. Articles must be wrapped in such a way that they do not become contaminated when the pack is opened. The proper method for wrapping instruments using sterilization
Module_B_2622_Chapter 2_main.indd 78 10/8/2015 4:56:49 PM
To protect the rights of the author(s) and publisher we inform you that this PDF is an uncorrected proof for internal business use only by the author(s), editor(s), reviewer(s), Elsevier and typesetter Toppan Best-set. It is not allowed to publish this proof online or in print. This proof copy is the copyright property of the publisher and is confidential until formal publication.
CHAPTER 2 Sterilization and Disinfection 79
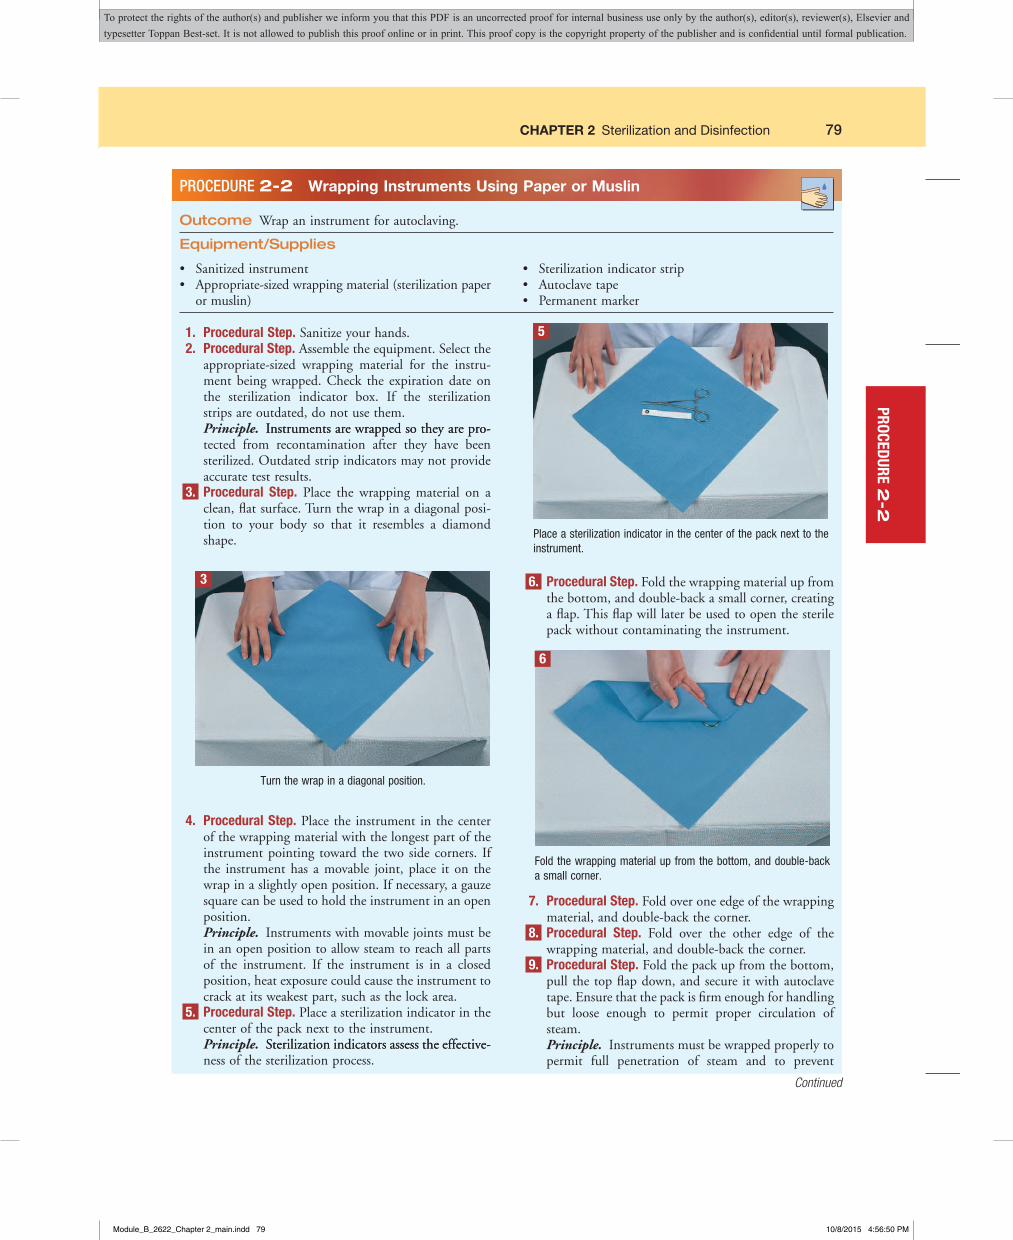
Outcome Wrap an instrument for autoclaving.
Equipment/Supplies
PROCEDURE 2-2 Wrapping Instruments Using Paper or Muslin
• Sanitized instrument• Appropriate-sized wrapping material (sterilization paper
or muslin)
• Sterilization indicator strip• Autoclave tape• Permanent marker
1. Procedural Step. Sanitize your hands. 2. Procedural Step. Assemble the equipment. Select the
appropriate-sized wrapping material for the instru-ment being wrapped. Check the expiration date on the sterilization indicator box. If the sterilization strips are outdated, do not use them.
Principle. Instruments are wrapped so they are pro-Instruments are wrapped so they are pro-tected from recontamination after they have been sterilized. Outdated strip indicators may not provide accurate test results.
3. Procedural Step. Place the wrapping material on a clean, flat surface. Turn the wrap in a diagonal posi-tion to your body so that it resembles a diamond shape.
4. Procedural Step. Place the instrument in the center of the wrapping material with the longest part of the instrument pointing toward the two side corners. If the instrument has a movable joint, place it on the wrap in a slightly open position. If necessary, a gauze square can be used to hold the instrument in an open position.
Principle. Instruments with movable joints must be in an open position to allow steam to reach all parts of the instrument. If the instrument is in a closed position, heat exposure could cause the instrument to crack at its weakest part, such as the lock area.
5. Procedural Step. Place a sterilization indicator in the center of the pack next to the instrument.
Principle. Sterilization indicators assess the effective-Sterilization indicators assess the effective-ness of the sterilization process.
6. Procedural Step. Fold the wrapping material up from the bottom, and double-back a small corner, creating a flap. This flap will later be used to open the sterile pack without contaminating the instrument.
7. Procedural Step. Fold over one edge of the wrapping material, and double-back the corner.
8. Procedural Step. Fold over the other edge of the wrapping material, and double-back the corner.
9. Procedural Step. Fold the pack up from the bottom, pull the top flap down, and secure it with autoclave tape. Ensure that the pack is firm enough for handling but loose enough to permit proper circulation of steam.
Principle. Instruments must be wrapped properly to permit full penetration of steam and to prevent
3
Turn the wrap in a diagonal position.
Place a sterilization indicator in the center of the pack next to the instrument.
5
6
Fold the wrapping material up from the bottom, and double-back a small corner.
Continued
PROCEDURE 2-2
Module_B_2622_Chapter 2_main.indd 79 10/8/2015 4:56:50 PM
To protect the rights of the author(s) and publisher we inform you that this PDF is an uncorrected proof for internal business use only by the author(s), editor(s), reviewer(s), Elsevier and typesetter Toppan Best-set. It is not allowed to publish this proof online or in print. This proof copy is the copyright property of the publisher and is confidential until formal publication.
80 CHAPTER 2 Sterilization and Disinfection
contaminating them when the wrap is opened. Using autoclave tape indicates that the pack has been through the autoclave cycle and prevents mix-ups with packs that have not been processed.
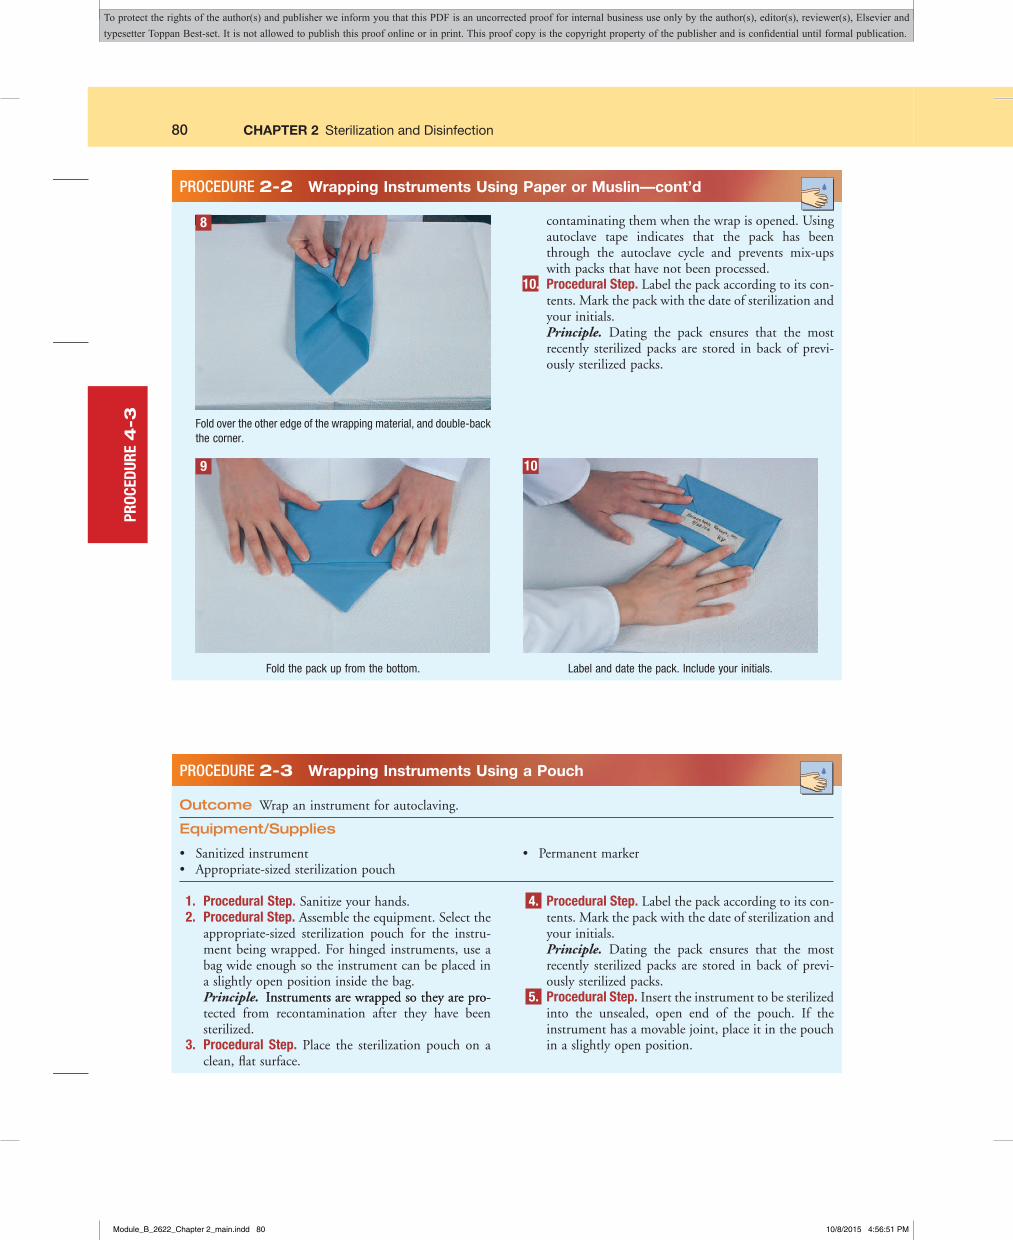
10. Procedural Step. Label the pack according to its con-tents. Mark the pack with the date of sterilization and your initials.
Principle. Dating the pack ensures that the most recently sterilized packs are stored in back of previ-ously sterilized packs.
PROCEDURE 2-2 Wrapping Instruments Using Paper or Muslin—cont’d
8
Fold over the other edge of the wrapping material, and double-back the corner.
9
Fold the pack up from the bottom.
10
Label and date the pack. Include your initials.
Outcome Wrap an instrument for autoclaving.
Equipment/Supplies
PROCEDURE 2-3 Wrapping Instruments Using a Pouch
• Sanitized instrument• Appropriate-sized sterilization pouch
• Permanent marker
1. Procedural Step. Sanitize your hands. 2. Procedural Step. Assemble the equipment. Select the
appropriate-sized sterilization pouch for the instru-ment being wrapped. For hinged instruments, use a bag wide enough so the instrument can be placed in a slightly open position inside the bag.
Principle. Instruments are wrapped so they are pro-Instruments are wrapped so they are pro-tected from recontamination after they have been sterilized.
3. Procedural Step. Place the sterilization pouch on a clean, flat surface.
4. Procedural Step. Label the pack according to its con-tents. Mark the pack with the date of sterilization and your initials.
Principle. Dating the pack ensures that the most recently sterilized packs are stored in back of previ-ously sterilized packs.
5. Procedural Step. Insert the instrument to be sterilized into the unsealed, open end of the pouch. If the instrument has a movable joint, place it in the pouch in a slightly open position.
PROC
EDUR
E 4
-3
Module_B_2622_Chapter 2_main.indd 80 10/8/2015 4:56:51 PM
To protect the rights of the author(s) and publisher we inform you that this PDF is an uncorrected proof for internal business use only by the author(s), editor(s), reviewer(s), Elsevier and typesetter Toppan Best-set. It is not allowed to publish this proof online or in print. This proof copy is the copyright property of the publisher and is confidential until formal publication.
CHAPTER 2 Sterilization and Disinfection 81
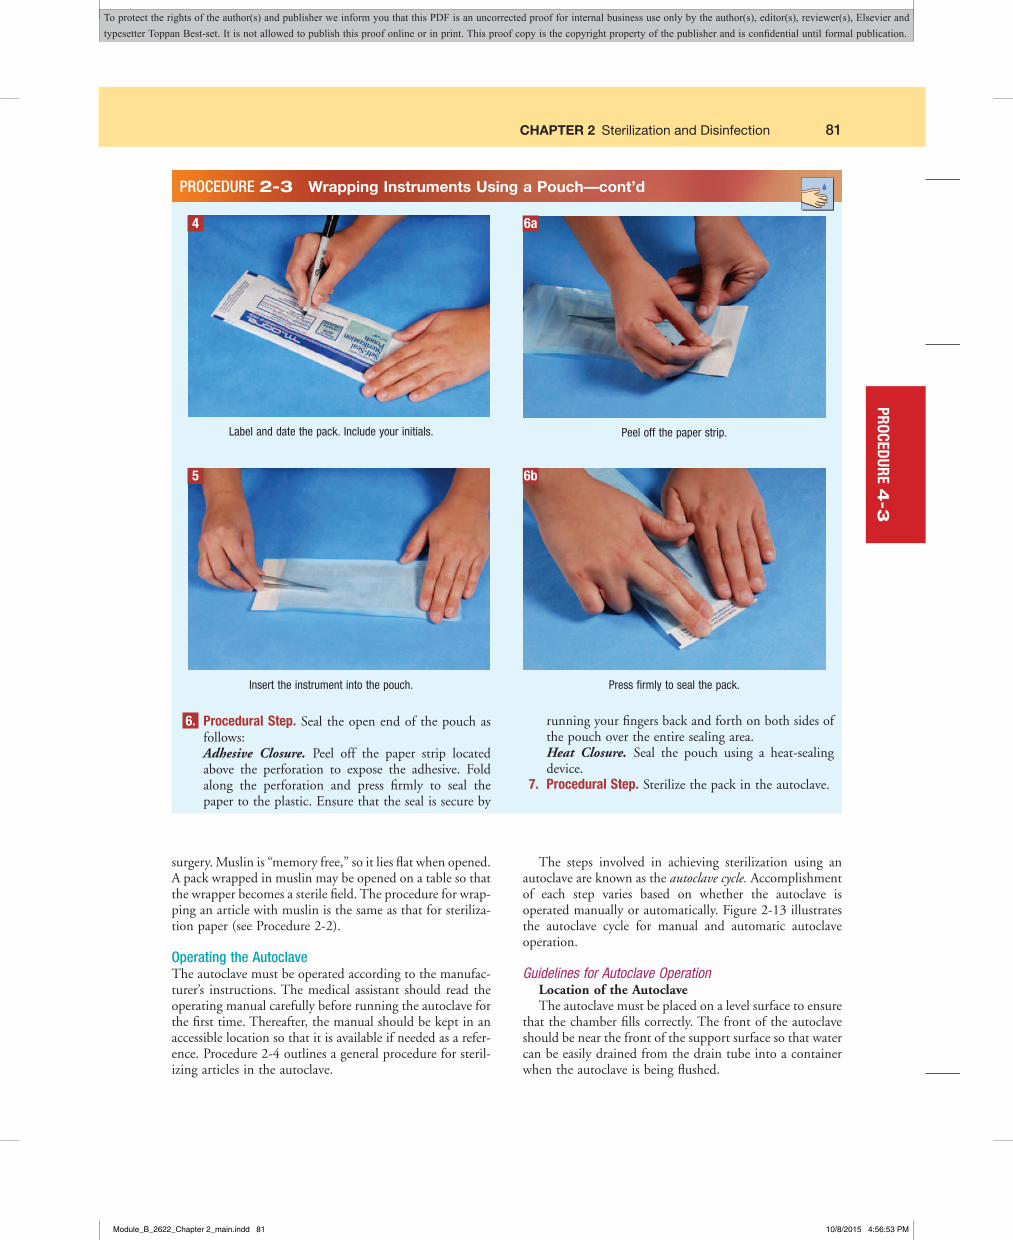
6. Procedural Step. Seal the open end of the pouch as follows:
Adhesive Closure. Peel off the paper strip located above the perforation to expose the adhesive. Fold along the perforation and press firmly to seal the paper to the plastic. Ensure that the seal is secure by
running your fingers back and forth on both sides of the pouch over the entire sealing area.
Heat Closure. Seal the pouch using a heat-sealing device.
7. Procedural Step. Sterilize the pack in the autoclave.
PROCEDURE 2-3 Wrapping Instruments Using a Pouch—cont’d
4
Label and date the pack. Include your initials.
5
Insert the instrument into the pouch.
6a
Peel off the paper strip.
6b
Press firmly to seal the pack.
surgery. Muslin is “memory free,” so it lies flat when opened. A pack wrapped in muslin may be opened on a table so that the wrapper becomes a sterile field. The procedure for wrap-ping an article with muslin is the same as that for steriliza-tion paper (see Procedure 2-2).
Operating the AutoclaveThe autoclave must be operated according to the manufac-turer’s instructions. The medical assistant should read the operating manual carefully before running the autoclave for the first time. Thereafter, the manual should be kept in an accessible location so that it is available if needed as a refer-ence. Procedure 2-4 outlines a general procedure for steril-izing articles in the autoclave.
The steps involved in achieving sterilization using an autoclave are known as the autoclave cycle. Accomplishment of each step varies based on whether the autoclave is operated manually or automatically. Figure 2-13 illustrates the autoclave cycle for manual and automatic autoclave operation.
Guidelines for Autoclave OperationLocation of the AutoclaveThe autoclave must be placed on a level surface to ensure
that the chamber fills correctly. The front of the autoclave should be near the front of the support surface so that water can be easily drained from the drain tube into a container when the autoclave is being flushed.
PROCEDURE 4-3
Module_B_2622_Chapter 2_main.indd 81 10/8/2015 4:56:53 PM
To protect the rights of the author(s) and publisher we inform you that this PDF is an uncorrected proof for internal business use only by the author(s), editor(s), reviewer(s), Elsevier and typesetter Toppan Best-set. It is not allowed to publish this proof online or in print. This proof copy is the copyright property of the publisher and is confidential until formal publication.
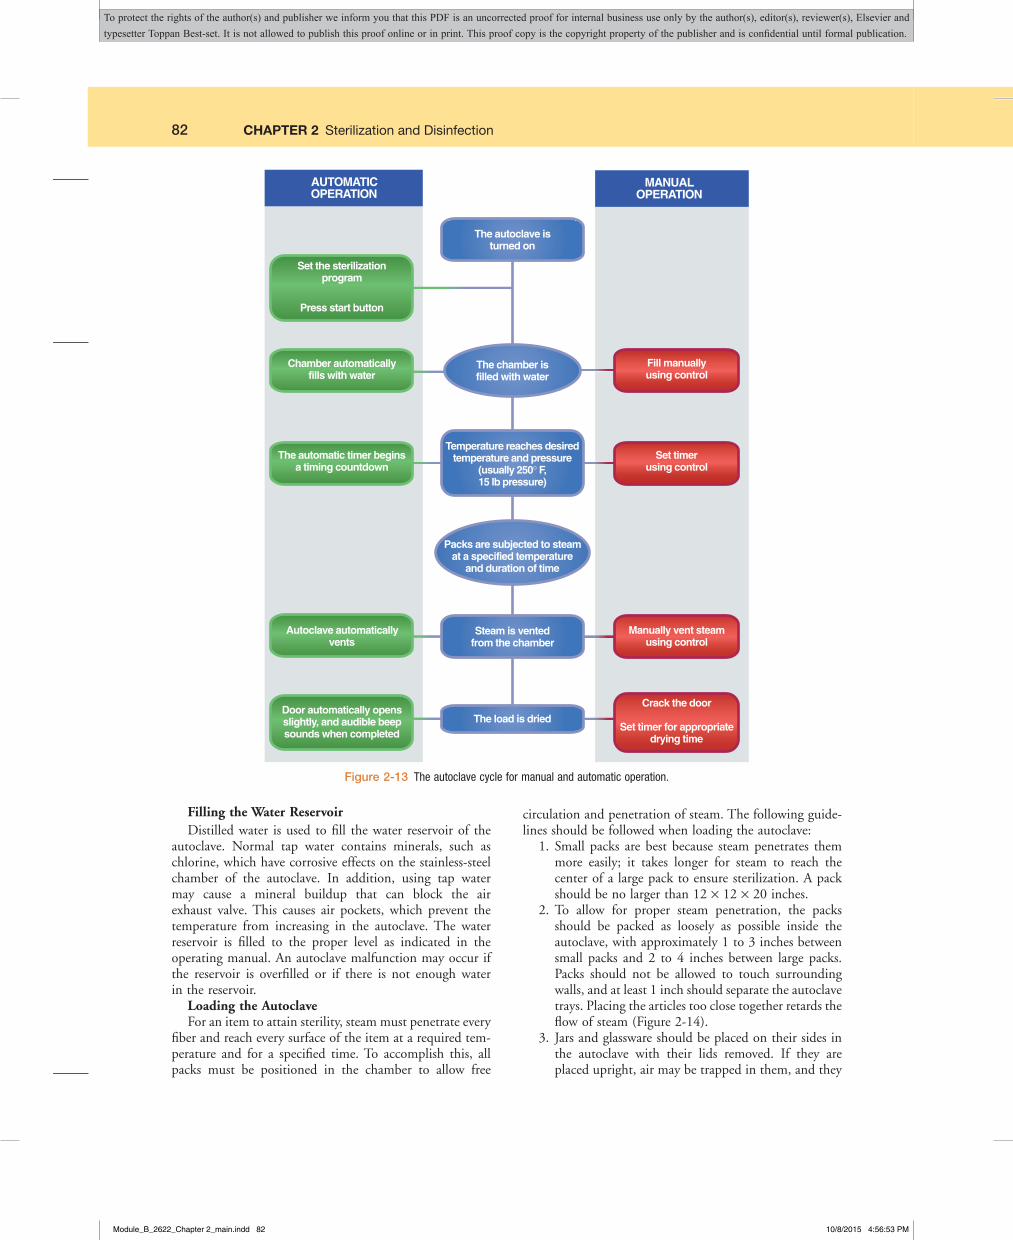
82 CHAPTER 2 Sterilization and Disinfection
Set the sterilizationprogram
Press start button
AUTOMATICOPERATION
The autoclave isturned on
MANUALOPERATION
Chamber automaticallyfills with water
The chamber isfilled with water
Fill manuallyusing control
Temperature reaches desiredtemperature and pressure
(usually 250° F,15 lb pressure)
Set timerusing control
Autoclave automaticallyvents
Steam is ventedfrom the chamber
Manually vent steamusing control
Door automatically opensslightly, and audible beepsounds when completed
The load is dried
Crack the door
Set timer for appropriatedrying time
The automatic timer beginsa timing countdown
Packs are subjected to steamat a specified temperature
and duration of time
Figure 2-13 The autoclave cycle for manual and automatic operation.
Filling the Water ReservoirDistilled water is used to fill the water reservoir of the
autoclave. Normal tap water contains minerals, such as chlorine, which have corrosive effects on the stainless-steel chamber of the autoclave. In addition, using tap water may cause a mineral buildup that can block the air exhaust valve. This causes air pockets, which prevent the temperature from increasing in the autoclave. The water reservoir is filled to the proper level as indicated in the operating manual. An autoclave malfunction may occur if the reservoir is overfilled or if there is not enough water in the reservoir.
Loading the AutoclaveFor an item to attain sterility, steam must penetrate every
fiber and reach every surface of the item at a required tem-perature and for a specified time. To accomplish this, all packs must be positioned in the chamber to allow free
circulation and penetration of steam. The following guide-lines should be followed when loading the autoclave:
1. Small packs are best because steam penetrates them more easily; it takes longer for steam to reach the center of a large pack to ensure sterilization. A pack should be no larger than 12 × 12 × 20 inches.
2. To allow for proper steam penetration, the packs should be packed as loosely as possible inside the autoclave, with approximately 1 to 3 inches between small packs and 2 to 4 inches between large packs. Packs should not be allowed to touch surrounding walls, and at least 1 inch should separate the autoclave trays. Placing the articles too close together retards the flow of steam (Figure 2-14).
3. Jars and glassware should be placed on their sides in the autoclave with their lids removed. If they are placed upright, air may be trapped in them, and they
Module_B_2622_Chapter 2_main.indd 82 10/8/2015 4:56:53 PM
To protect the rights of the author(s) and publisher we inform you that this PDF is an uncorrected proof for internal business use only by the author(s), editor(s), reviewer(s), Elsevier and typesetter Toppan Best-set. It is not allowed to publish this proof online or in print. This proof copy is the copyright property of the publisher and is confidential until formal publication.
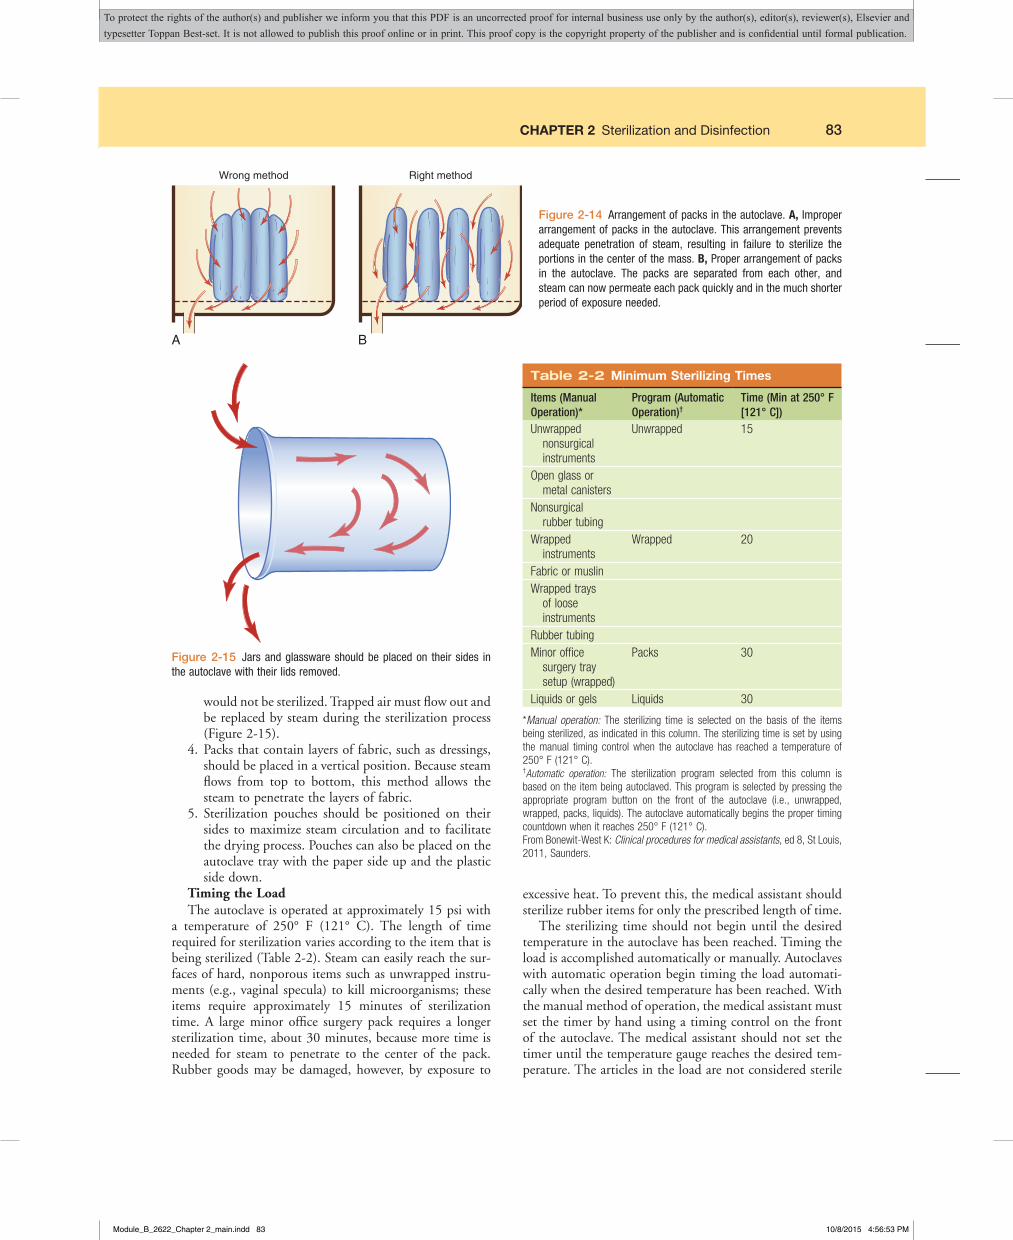
CHAPTER 2 Sterilization and Disinfection 83
Wrong method
A B
Right method
Figure 2-14 Arrangement of packs in the autoclave. A, Improper arrangement of packs in the autoclave. This arrangement prevents adequate penetration of steam, resulting in failure to sterilize the portions in the center of the mass. B, Proper arrangement of packs in the autoclave. The packs are separated from each other, and steam can now permeate each pack quickly and in the much shorter period of exposure needed.
Figure 2-15 Jars and glassware should be placed on their sides in the autoclave with their lids removed.
Table 2-2 Minimum Sterilizing Times
Items (Manual Operation)*
Program (Automatic Operation)†
Time (Min at 250° F [121° C])
Unwrappednonsurgicalinstruments
Unwrapped 15
Openglassormetalcanisters
Nonsurgicalrubbertubing
Wrappedinstruments
Wrapped 20
FabricormuslinWrappedtrays
oflooseinstruments
RubbertubingMinoroffice
surgerytraysetup(wrapped)
Packs 30
Liquidsorgels Liquids 30
*Manual operation: The sterilizing time is selected on the basis of the itemsbeingsterilized,asindicatedinthiscolumn.Thesterilizingtimeissetbyusingthe manual timing control when the autoclave has reached a temperature of250°F(121°C).†Automatic operation: The sterilization program selected from this column isbasedontheitembeingautoclaved.Thisprogramisselectedbypressingtheappropriate program button on the front of the autoclave (i.e., unwrapped,wrapped,packs,liquids).Theautoclaveautomaticallybeginsthepropertimingcountdownwhenitreaches250°F(121°C).FromBonewit-WestK:Clinical procedures for medical assistants,ed8,StLouis,2011,Saunders.
would not be sterilized. Trapped air must flow out and be replaced by steam during the sterilization process (Figure 2-15).
4. Packs that contain layers of fabric, such as dressings, should be placed in a vertical position. Because steam flows from top to bottom, this method allows the steam to penetrate the layers of fabric.
5. Sterilization pouches should be positioned on their sides to maximize steam circulation and to facilitate the drying process. Pouches can also be placed on the autoclave tray with the paper side up and the plastic side down.
Timing the LoadThe autoclave is operated at approximately 15 psi with
a temperature of 250° F (121° C). The length of time required for sterilization varies according to the item that is being sterilized (Table 2-2). Steam can easily reach the sur-faces of hard, nonporous items such as unwrapped instru-ments (e.g., vaginal specula) to kill microorganisms; these items require approximately 15 minutes of sterilization time. A large minor office surgery pack requires a longer sterilization time, about 30 minutes, because more time is needed for steam to penetrate to the center of the pack. Rubber goods may be damaged, however, by exposure to
excessive heat. To prevent this, the medical assistant should sterilize rubber items for only the prescribed length of time.
The sterilizing time should not begin until the desired temperature in the autoclave has been reached. Timing the load is accomplished automatically or manually. Autoclaves with automatic operation begin timing the load automati-cally when the desired temperature has been reached. With the manual method of operation, the medical assistant must set the timer by hand using a timing control on the front of the autoclave. The medical assistant should not set the timer until the temperature gauge reaches the desired tem-perature. The articles in the load are not considered sterile
Module_B_2622_Chapter 2_main.indd 83 10/8/2015 4:56:53 PM
To protect the rights of the author(s) and publisher we inform you that this PDF is an uncorrected proof for internal business use only by the author(s), editor(s), reviewer(s), Elsevier and typesetter Toppan Best-set. It is not allowed to publish this proof online or in print. This proof copy is the copyright property of the publisher and is confidential until formal publication.
84 CHAPTER 2 Sterilization and Disinfection
unless they have been subjected to steam for the proper length of time at the proper temperature.
Drying the LoadThe sterilized articles are moist and must be allowed to
dry before they are removed from the autoclave. Microor-ganisms can move quickly through the moisture on a wet wrap and onto the sterile article inside, resulting in contamination.
When the load has been subjected to steam for the proper length of time and temperature, the chamber must be vented of steam. Venting the chamber permits the pres-sure in the autoclave to decrease to zero and the chamber to cool, making it safe for the door to be opened. Most autoclaves are designed to vent automatically, which elimi-nates having to vent them manually.
The door of the autoclave should be opened approxi-mately ½ inch but no more than 1 inch. Opening the door more than 1 inch causes cold air from the outside to rush into the autoclave, resulting in condensation of water on the packs. Cracking the door allows the moisture on the articles to change from a liquid to a vapor and to escape through the crack. The residual heat in the inner chamber also helps to dry the articles. The load should be allowed to dry for 15 to 60 minutes, depending on the type of auto-clave and the load. Loads that contain large packs require a longer drying time than loads with smaller packs. The medical assistant should follow the manufacturer’s recom-mendations for proper drying times of various loads.
Handling and Storing PacksSterilized wrapped articles should be handled carefully and as little as possible. If a wrapped article is crushed, com-pressed, or dropped, the sterility of the contents cannot be assumed, and the pack must be resterilized. This is known as event-related sterility, meaning that a sterile pack is con-sidered sterile indefinitely, unless an event occurs that inter-feres with the sterility of the article.
Sterilized packs should be stored in clean, dry areas that are free from dust, insects, and other sources of contamina-tion. Wrapped articles should be stored with the most recently sterilized articles placed in the back. The medical assistant should thoroughly check each sterilized pack at least twice: before storing it and before using it. If the pack is torn or opened, or if it is wet, it is no longer sterile and must be rewrapped and resterilized.
Maintaining the AutoclaveFor the autoclave to work efficiently, it must be maintained properly. The operating manual that accompanies the auto-clave provides specific information for the care and main-tenance of that type of autoclave.
Safety precautions should be followed when performing maintenance procedures. Before proceeding with preventive maintenance, the autoclave must be cool, the pressure gauge at zero, and the power cord disconnected from the wall socket. Autoclave maintenance is performed on a daily, weekly, and monthly basis as follows.
Daily Maintenance1. Wipe the outside of the autoclave with a damp cloth
and a mild detergent.2. Wipe the interior of the autoclave and the trays with
a damp cloth.3. Clean the rubber gasket on the door of the autoclave
with a damp cloth.4. Inspect the rubber door gasket for damage that could
prevent a good seal.
Weekly Maintenance1. Wash the inside of the chamber and the trays with a
commercial autoclave cleaner according to the manu-facturer’s instructions, while observing all personal safety precautions. This usually involves the following steps: The water reservoir must be drained first. A soft cloth or a soft brush should be used to clean the chamber. Do not use steel wool, a steel brush, or other abrasive agents because they can damage the chamber. When the chamber is clean, it should be rinsed thoroughly with distilled water. The chamber must be dried thoroughly and the door left open overnight.
2. Wash the metal shelves with an autoclave cleaner, and rinse them thoroughly with distilled water.
Monthly Maintenance1. Flush the system to remove any buildup of residue,
which could cause corrosion of the chamber lines. Carefully follow the manufacturer’s directions in the instruction manual to perform this procedure.
2. Check the air trap jet to ensure it is functioning properly. The air trap jet prevents air pockets from occurring in the chamber, to ensure adequate sterilization.
3. Check the safety valve to ensure it is functioning properly. The safety valve releases pressure in the chamber if it gets too high.
Other Sterilization MethodsIn addition to the autoclave, other methods can be used to sterilize articles. These methods are not generally used in the medical office and are discussed only briefly in this chapter.
Dry Heat OvenDry heat ovens are used to sterilize articles that cannot be penetrated by steam or may be damaged by it. Dry heat is less corrosive than moist heat for instruments with sharp edges; it does not dull their sharp edges. Oil, petroleum jelly, and powder cannot be penetrated by steam and must be sterilized in a dry heat oven. Moist heat sterilization tends to erode the ground-glass surfaces of reusable syringes, whereas dry heat does not.
Dry heat ovens operate similarly to ordinary cooking ovens. A longer exposure period is needed with dry heat
Module_B_2622_Chapter 2_main.indd 84 10/8/2015 4:56:53 PM
To protect the rights of the author(s) and publisher we inform you that this PDF is an uncorrected proof for internal business use only by the author(s), editor(s), reviewer(s), Elsevier and typesetter Toppan Best-set. It is not allowed to publish this proof online or in print. This proof copy is the copyright property of the publisher and is confidential until formal publication.
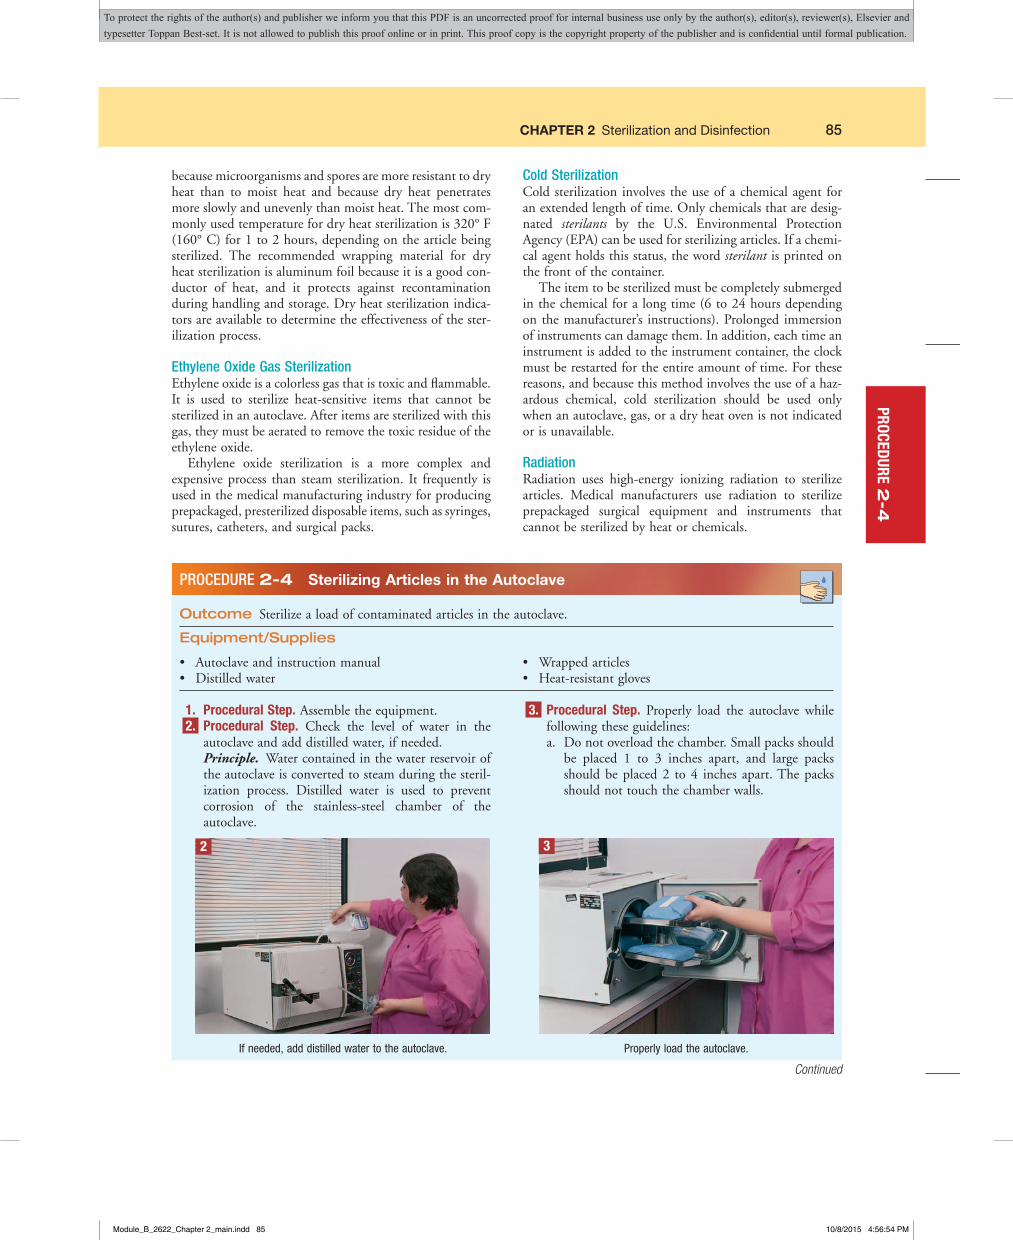
CHAPTER 2 Sterilization and Disinfection 85
because microorganisms and spores are more resistant to dry heat than to moist heat and because dry heat penetrates more slowly and unevenly than moist heat. The most com-monly used temperature for dry heat sterilization is 320° F (160° C) for 1 to 2 hours, depending on the article being sterilized. The recommended wrapping material for dry heat sterilization is aluminum foil because it is a good con-ductor of heat, and it protects against recontamination during handling and storage. Dry heat sterilization indica-tors are available to determine the effectiveness of the ster-ilization process.
Ethylene Oxide Gas SterilizationEthylene oxide is a colorless gas that is toxic and flammable. It is used to sterilize heat-sensitive items that cannot be sterilized in an autoclave. After items are sterilized with this gas, they must be aerated to remove the toxic residue of the ethylene oxide.
Ethylene oxide sterilization is a more complex and expensive process than steam sterilization. It frequently is used in the medical manufacturing industry for producing prepackaged, presterilized disposable items, such as syringes, sutures, catheters, and surgical packs.
Cold SterilizationCold sterilization involves the use of a chemical agent for an extended length of time. Only chemicals that are desig-nated sterilants by the U.S. Environmental Protection Agency (EPA) can be used for sterilizing articles. If a chemi-cal agent holds this status, the word sterilant is printed on the front of the container.
The item to be sterilized must be completely submerged in the chemical for a long time (6 to 24 hours depending on the manufacturer’s instructions). Prolonged immersion of instruments can damage them. In addition, each time an instrument is added to the instrument container, the clock must be restarted for the entire amount of time. For these reasons, and because this method involves the use of a haz-ardous chemical, cold sterilization should be used only when an autoclave, gas, or a dry heat oven is not indicated or is unavailable.
RadiationRadiation uses high-energy ionizing radiation to sterilize articles. Medical manufacturers use radiation to sterilize prepackaged surgical equipment and instruments that cannot be sterilized by heat or chemicals.
Outcome Sterilize a load of contaminated articles in the autoclave.
Equipment/Supplies
PROCEDURE 2-4 Sterilizing Articles in the Autoclave
• Autoclave and instruction manual• Distilled water
• Wrapped articles• Heat-resistant gloves
1. Procedural Step. Assemble the equipment. 2. Procedural Step. Check the level of water in the
autoclave and add distilled water, if needed. Principle. Water contained in the water reservoir of
the autoclave is converted to steam during the steril-ization process. Distilled water is used to prevent corrosion of the stainless-steel chamber of the autoclave.
3. Procedural Step. Properly load the autoclave while following these guidelines:a. Do not overload the chamber. Small packs should
be placed 1 to 3 inches apart, and large packs should be placed 2 to 4 inches apart. The packs should not touch the chamber walls.
2
If needed, add distilled water to the autoclave.
3
Properly load the autoclave.
Continued
PROCEDURE 2-4
Module_B_2622_Chapter 2_main.indd 85 10/8/2015 4:56:54 PM
To protect the rights of the author(s) and publisher we inform you that this PDF is an uncorrected proof for internal business use only by the author(s), editor(s), reviewer(s), Elsevier and typesetter Toppan Best-set. It is not allowed to publish this proof online or in print. This proof copy is the copyright property of the publisher and is confidential until formal publication.
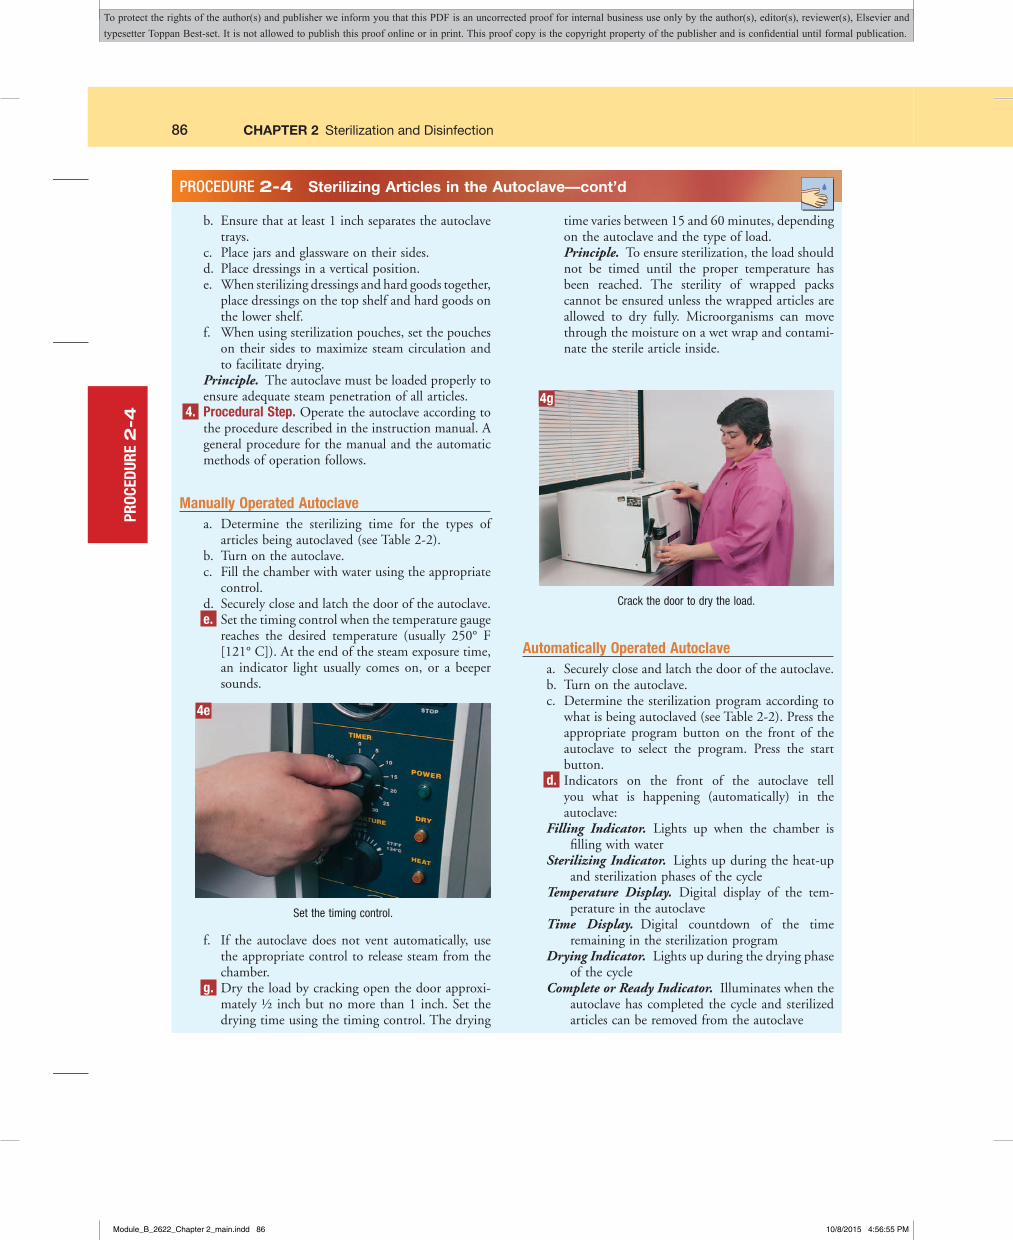
86 CHAPTER 2 Sterilization and Disinfection
b. Ensure that at least 1 inch separates the autoclave trays.
c. Place jars and glassware on their sides.d. Place dressings in a vertical position.e. When sterilizing dressings and hard goods together,
place dressings on the top shelf and hard goods on the lower shelf.
f. When using sterilization pouches, set the pouches on their sides to maximize steam circulation and to facilitate drying.
Principle. The autoclave must be loaded properly to ensure adequate steam penetration of all articles.
4. Procedural Step. Operate the autoclave according to the procedure described in the instruction manual. A general procedure for the manual and the automatic methods of operation follows.
Manually Operated Autoclavea. Determine the sterilizing time for the types of
articles being autoclaved (see Table 2-2).b. Turn on the autoclave.c. Fill the chamber with water using the appropriate
control.d. Securely close and latch the door of the autoclave.e. Set the timing control when the temperature gauge
reaches the desired temperature (usually 250° F [121° C]). At the end of the steam exposure time, an indicator light usually comes on, or a beeper sounds.
f. If the autoclave does not vent automatically, use the appropriate control to release steam from the chamber.
g. Dry the load by cracking open the door approxi-mately ½ inch but no more than 1 inch. Set the drying time using the timing control. The drying
time varies between 15 and 60 minutes, depending on the autoclave and the type of load.Principle. To ensure sterilization, the load should not be timed until the proper temperature has been reached. The sterility of wrapped packs cannot be ensured unless the wrapped articles are allowed to dry fully. Microorganisms can move through the moisture on a wet wrap and contami-nate the sterile article inside.
Automatically Operated Autoclavea. Securely close and latch the door of the autoclave.b. Turn on the autoclave.c. Determine the sterilization program according to
what is being autoclaved (see Table 2-2). Press the appropriate program button on the front of the autoclave to select the program. Press the start button.
d. Indicators on the front of the autoclave tell you what is happening (automatically) in the autoclave:
Filling Indicator. Lights up when the chamber is filling with water
SterilizingIndicator. Lights up during the heat-up and sterilization phases of the cycle
Temperature Display. Digital display of the tem-perature in the autoclave
Time Display. Digital countdown of the time remaining in the sterilization program
DryingIndicator. Lights up during the drying phase of the cycle
CompleteorReadyIndicator. Illuminates when the autoclave has completed the cycle and sterilized articles can be removed from the autoclave
PROCEDURE 2-4 Sterilizing Articles in the Autoclave—cont’d
4e
Set the timing control.
4g
Crack the door to dry the load.
PROC
EDUR
E 2
-4
Module_B_2622_Chapter 2_main.indd 86 10/8/2015 4:56:55 PM
To protect the rights of the author(s) and publisher we inform you that this PDF is an uncorrected proof for internal business use only by the author(s), editor(s), reviewer(s), Elsevier and typesetter Toppan Best-set. It is not allowed to publish this proof online or in print. This proof copy is the copyright property of the publisher and is confidential until formal publication.
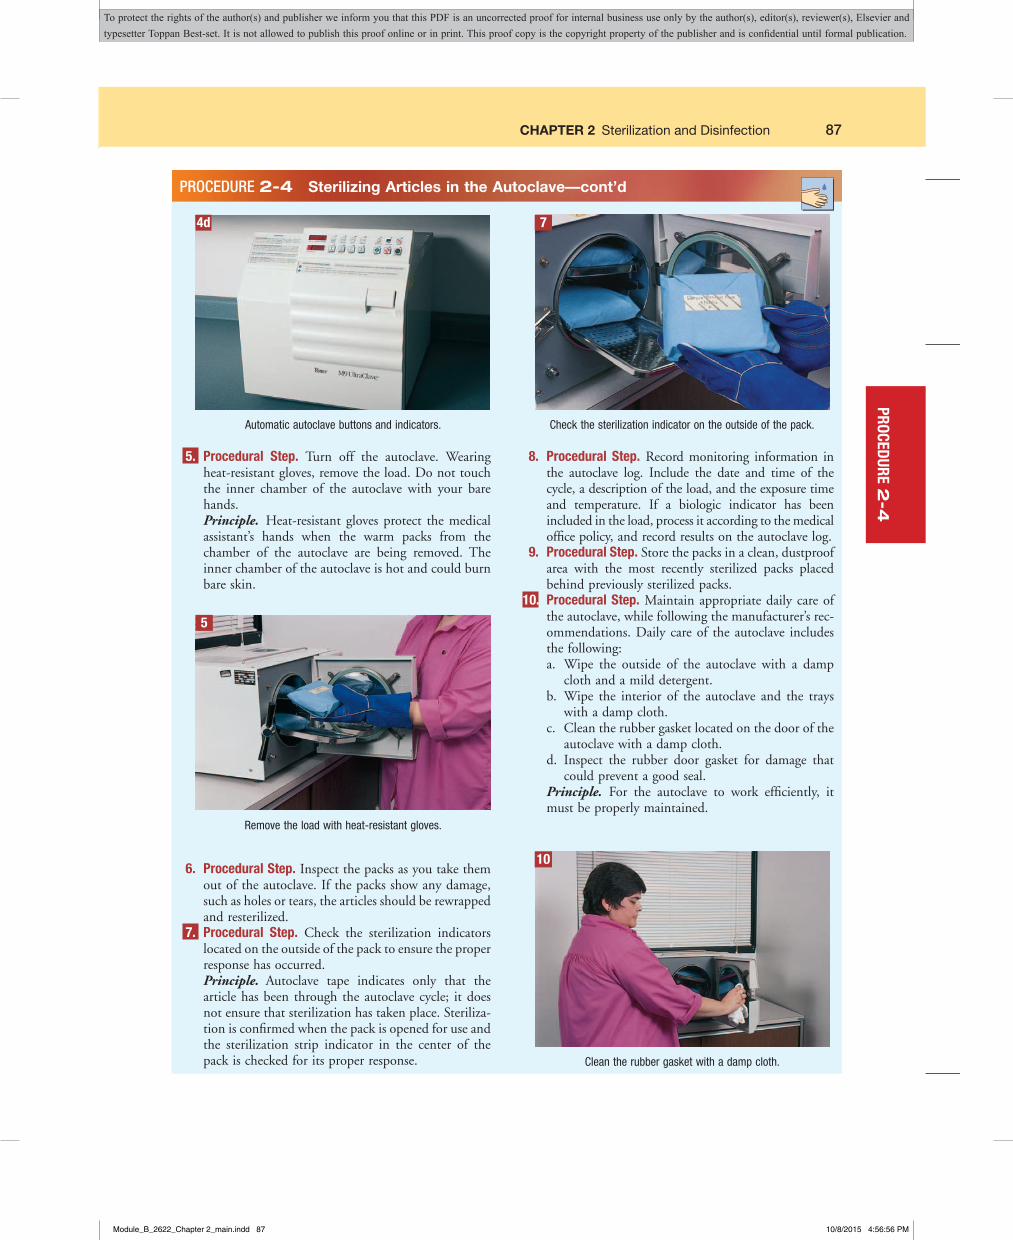
CHAPTER 2 Sterilization and Disinfection 87
5. Procedural Step. Turn off the autoclave. Wearing heat-resistant gloves, remove the load. Do not touch the inner chamber of the autoclave with your bare hands.
Principle. Heat-resistant gloves protect the medical assistant’s hands when the warm packs from the chamber of the autoclave are being removed. The inner chamber of the autoclave is hot and could burn bare skin.
6. Procedural Step. Inspect the packs as you take them out of the autoclave. If the packs show any damage, such as holes or tears, the articles should be rewrapped and resterilized.
7. Procedural Step. Check the sterilization indicators located on the outside of the pack to ensure the proper response has occurred.
Principle. Autoclave tape indicates only that the article has been through the autoclave cycle; it does not ensure that sterilization has taken place. Steriliza-tion is confirmed when the pack is opened for use and the sterilization strip indicator in the center of the pack is checked for its proper response.
8. Procedural Step. Record monitoring information in the autoclave log. Include the date and time of the cycle, a description of the load, and the exposure time and temperature. If a biologic indicator has been included in the load, process it according to the medical office policy, and record results on the autoclave log.
9. Procedural Step. Store the packs in a clean, dustproof area with the most recently sterilized packs placed behind previously sterilized packs.
10. Procedural Step. Maintain appropriate daily care of the autoclave, while following the manufacturer’s rec-ommendations. Daily care of the autoclave includes the following:a. Wipe the outside of the autoclave with a damp
cloth and a mild detergent.b. Wipe the interior of the autoclave and the trays
with a damp cloth.c. Clean the rubber gasket located on the door of the
autoclave with a damp cloth.d. Inspect the rubber door gasket for damage that
could prevent a good seal. Principle. For the autoclave to work efficiently, it
must be properly maintained.
5
Remove the load with heat-resistant gloves.
7
Check the sterilization indicator on the outside of the pack.
10
Clean the rubber gasket with a damp cloth.
PROCEDURE 2-4 Sterilizing Articles in the Autoclave—cont’d
PROCEDURE 2-4
4d
Automatic autoclave buttons and indicators.
Module_B_2622_Chapter 2_main.indd 87 10/8/2015 4:56:56 PM
To protect the rights of the author(s) and publisher we inform you that this PDF is an uncorrected proof for internal business use only by the author(s), editor(s), reviewer(s), Elsevier and typesetter Toppan Best-set. It is not allowed to publish this proof online or in print. This proof copy is the copyright property of the publisher and is confidential until formal publication.
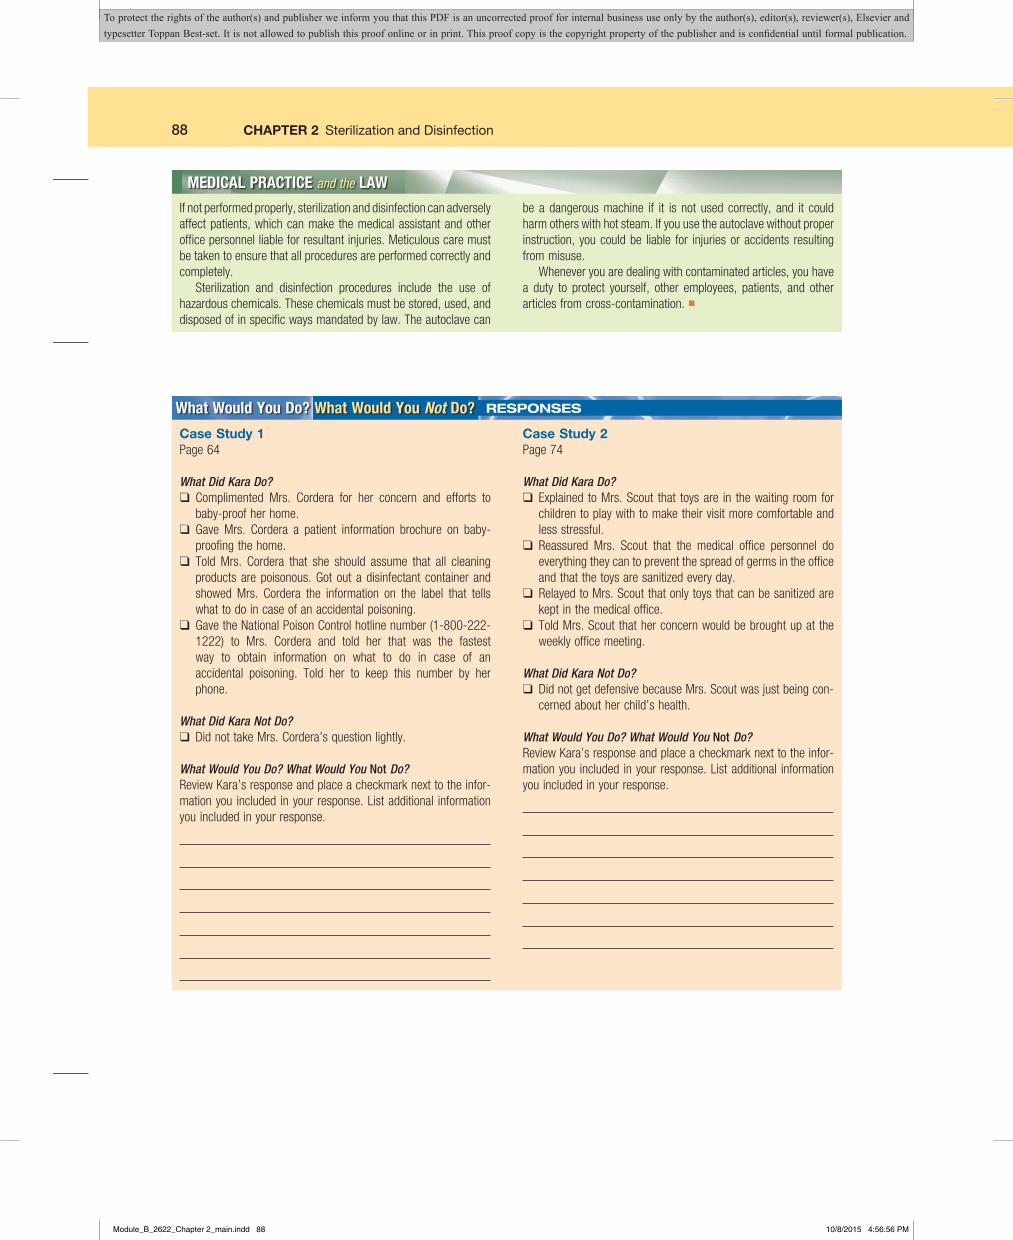
88 CHAPTER 2 Sterilization and Disinfection
What Would You Do? What Would You Not Do?
Case Study 1Page64
What Did Kara Do?q Complimented Mrs. Cordera for her concern and efforts to
baby-proofherhome.q Gave Mrs. Cordera a patient information brochure on baby-
proofingthehome.q Told Mrs. Cordera that she should assume that all cleaning
productsarepoisonous.Got out adisinfectant container andshowed Mrs. Cordera the information on the label that tellswhattodoincaseofanaccidentalpoisoning.
q GavetheNationalPoisonControlhotlinenumber(1-800-222-1222) to Mrs. Cordera and told her that was the fastestway to obtain information on what to do in case of anaccidental poisoning. Told her to keep this number by herphone.
What Did Kara Not Do?q DidnottakeMrs.Cordera’squestionlightly.
What Would You Do? What Would You Not Do?ReviewKara’sresponseandplaceacheckmarknexttotheinfor-mationyou included inyourresponse.Listadditional informationyouincludedinyourresponse.
Case Study 2Page74
What Did Kara Do?q Explained toMrs.Scout that toysare in thewaiting roomfor
childrentoplaywithtomaketheirvisitmorecomfortableandlessstressful.
q Reassured Mrs. Scout that the medical office personnel doeverythingtheycantopreventthespreadofgermsintheofficeandthatthetoysaresanitizedeveryday.
q RelayedtoMrs.Scoutthatonlytoysthatcanbesanitizedarekeptinthemedicaloffice.
q ToldMrs.Scoutthatherconcernwouldbebroughtupattheweeklyofficemeeting.
What Did Kara Not Do?q DidnotgetdefensivebecauseMrs.Scoutwasjustbeingcon-
cernedaboutherchild’shealth.
What Would You Do? What Would You Not Do?ReviewKara’sresponseandplaceacheckmarknexttotheinfor-mationyou included inyourresponse.Listadditional informationyouincludedinyourresponse.
MEDICAL PRACTICE and the LAW
Ifnotperformedproperly,sterilizationanddisinfectioncanadverselyaffectpatients,whichcanmake themedicalassistantandotherofficepersonnelliableforresultantinjuries.Meticulouscaremustbetakentoensurethatallproceduresareperformedcorrectlyandcompletely.
Sterilization and disinfection procedures include the use ofhazardouschemicals.Thesechemicalsmustbestored,used,anddisposedofinspecificwaysmandatedbylaw.Theautoclavecan
beadangerousmachine if it is not used correctly, and it couldharmotherswithhotsteam.Ifyouusetheautoclavewithoutproperinstruction,youcouldbe liable for injuriesoraccidents resultingfrommisuse.
Wheneveryouaredealingwithcontaminatedarticles,youhavea duty to protect yourself, other employees, patients, and otherarticlesfromcross-contamination. ■
RESPONSES
Module_B_2622_Chapter 2_main.indd 88 10/8/2015 4:56:56 PM
To protect the rights of the author(s) and publisher we inform you that this PDF is an uncorrected proof for internal business use only by the author(s), editor(s), reviewer(s), Elsevier and typesetter Toppan Best-set. It is not allowed to publish this proof online or in print. This proof copy is the copyright property of the publisher and is confidential until formal publication.
CHAPTER 2 Sterilization and Disinfection 89
TERMINOLOGY REVIEW
AntisepticAsubstancethatkillsdisease-producingmicroorganismsbutnottheirspores.Anantisepticisusuallyappliedtolivingtissue.
AutoclaveAnapparatusforthesterilizationofmaterials,usingsteamunderpressure.
ContaminateTosoil,stain,orpollute;tomakeimpure.Critical itemAnitemthatcomesincontactwithsteriletissue
orthevascularsystem.DecontaminationTheuseofphysicalorchemicalmeansto
removeordestroypathogensonanitemsothatitisnolongercapableoftransmittingdisease;thismakestheitemsafetohandle.
DetergentAnagentthatcleansesbyemulsifyingdirtandoil.DisinfectantAnagentusedtodestroypathogenic
microorganismsbutnottheirspores.Disinfectantsareusuallyappliedtoinanimateobjects.
Hazardous chemicalAnychemicalthatpresentsathreattothehealthandsafetyofanindividualcomingintocontactwithit.
IncubateToprovideproperconditionsforgrowthanddevelopment.
LoadThearticlesthatarebeingsterilized.Material safety data sheet (MSDS)Asheetthatprovides
informationregardingachemical,itshazards,andmeasurestotaketopreventinjuryandillnesswhenhandlingthechemical.
Noncritical itemAnitemthatcomesintocontactwithintactskin,butnotwithmucousmembranes.
SanitizationAprocesstoremoveorganicmatterfromanarticleandtoreducethenumberofmicroorganismstoasafelevelasdeterminedbypublichealthrequirements.
Semicritical itemAnitemthatcomesintocontactwithnonintactskinorintactmucousmembranes.
SporeAhard,thick-walledcapsuleformedbysomebacteriathatcontainsonlytheessentialpartsoftheprotoplasmofthebacterialcell.
SterilizationTheprocessofdestroyingallformsofmicrobiallife,includingbacterialspores.
ThermolabileEasilyaffectedorchangedbyheat.
What Would You Do? What Would You Not Do?
Case Study 3Page75
What Did Kara Do?q Told Cassie through verbal and nonverbal behavior that her
concernwasvalid.q Told Cassie that hepatitis can be transmitted through dirty
instruments.q ReassuredCassiethatallinstrumentsaresterilizedintheauto-
clave,whichhas special indicators to ensure all germshavebeenkilled.
q GaveCassieapatient informationbrochureonhepatitis.Toldher that individuals with chronic hepatitis can develop livercancer and that the best way to avoid hepatitis is throughmeasuresandbehaviorsrecommendedforprevention.
q ToldCassie thatavaccine isavailable topreventhepatitisB,butnothepatitisC.
What Did Kara Not Do?q Did not dismiss her concern about dirty instruments as
unimportant.q Did not overly alarm her about the consequences of chronic
hepatitis.
What Would You Do? What Would You Not Do?ReviewKara’sresponseandplaceacheckmarknexttotheinfor-mationyou included inyourresponse.Listadditional informationyouincludedinyourresponse.
RESPONSES—cont’d
Module_B_2622_Chapter 2_main.indd 89 10/8/2015 4:56:56 PM
To protect the rights of the author(s) and publisher we inform you that this PDF is an uncorrected proof for internal business use only by the author(s), editor(s), reviewer(s), Elsevier and typesetter Toppan Best-set. It is not allowed to publish this proof online or in print. This proof copy is the copyright property of the publisher and is confidential until formal publication.
90 CHAPTER 2 Sterilization and Disinfection
For information on infection control in the health care setting:
Centers for Disease Control and Prevention: www.cdc.gov
Environmental Protection Agency: www.epa.gov
National Institute of Environmental Health Sciences: www.niehs.nih.gov
National Institute for Occupational Safety and Health: www.cdc.gov/niosh
Infection Control Today: www.infectioncontroltoday.com
Association for Professionals in Infection Control and Epidemiology: www.apic.com
To locate a material safety data sheet:
MSDS-Search: www.msdssearch.com
HazCom: www.hazard.com/msds
ON THE WEB
Module_B_2622_Chapter 2_main.indd 90 10/8/2015 4:56:56 PM
To protect the rights of the author(s) and publisher we inform you that this PDF is an uncorrected proof for internal business use only by the author(s), editor(s), reviewer(s), Elsevier and typesetter Toppan Best-set. It is not allowed to publish this proof online or in print. This proof copy is the copyright property of the publisher and is confidential until formal publication.
CHAPTER 2 Sterilization and Disinfection 91
CHAPTER REVIEW
Name_____________________________________________________________ Date___________________________________
PRETEST
True or False
_____ 1. Abacterialsporeconsistsofahard,thick-walledcapsulethatcanresistadverseconditions._____ 2. Thepurposeofsanitizationistoremoveallmicroorganismsandsporesfromacontaminatedarticle._____ 3. AccordingtoOSHA,glovesdonotneedtobewornduringthesanitizationprocess._____ 4. Glutaraldehyde(Cidex)isahigh-leveldisinfectant._____ 5. High-leveldisinfectionkillsallmicroorganismsbutnotspores._____ 6. Sterilizationistheprocessofdestroyingallformsofmicrobiallifeexceptforbacterialspores._____ 7. Autoclavetapeindicateswhetheranautoclaveditemissterile._____ 8. Thewrapperusedtoautoclavearticlesshouldpreventcontaminantsfromgettinginduringhandlingandstorage._____ 9. Tapwatershouldbeusedintheautoclave._____ 10. Theinsideoftheautoclaveshouldbewipedeverydaywithadampcloth.
Module_B_2622_Chapter 2_main.indd 91 10/8/2015 4:56:56 PM
To protect the rights of the author(s) and publisher we inform you that this PDF is an uncorrected proof for internal business use only by the author(s), editor(s), reviewer(s), Elsevier and typesetter Toppan Best-set. It is not allowed to publish this proof online or in print. This proof copy is the copyright property of the publisher and is confidential until formal publication.
92 CHAPTER 2 Sterilization and Disinfection
Notes
Module_B_2622_Chapter 2_main.indd 92 10/8/2015 4:56:57 PM
To protect the rights of the author(s) and publisher we inform you that this PDF is an uncorrected proof for internal business use only by the author(s), editor(s), reviewer(s), Elsevier and typesetter Toppan Best-set. It is not allowed to publish this proof online or in print. This proof copy is the copyright property of the publisher and is confidential until formal publication.
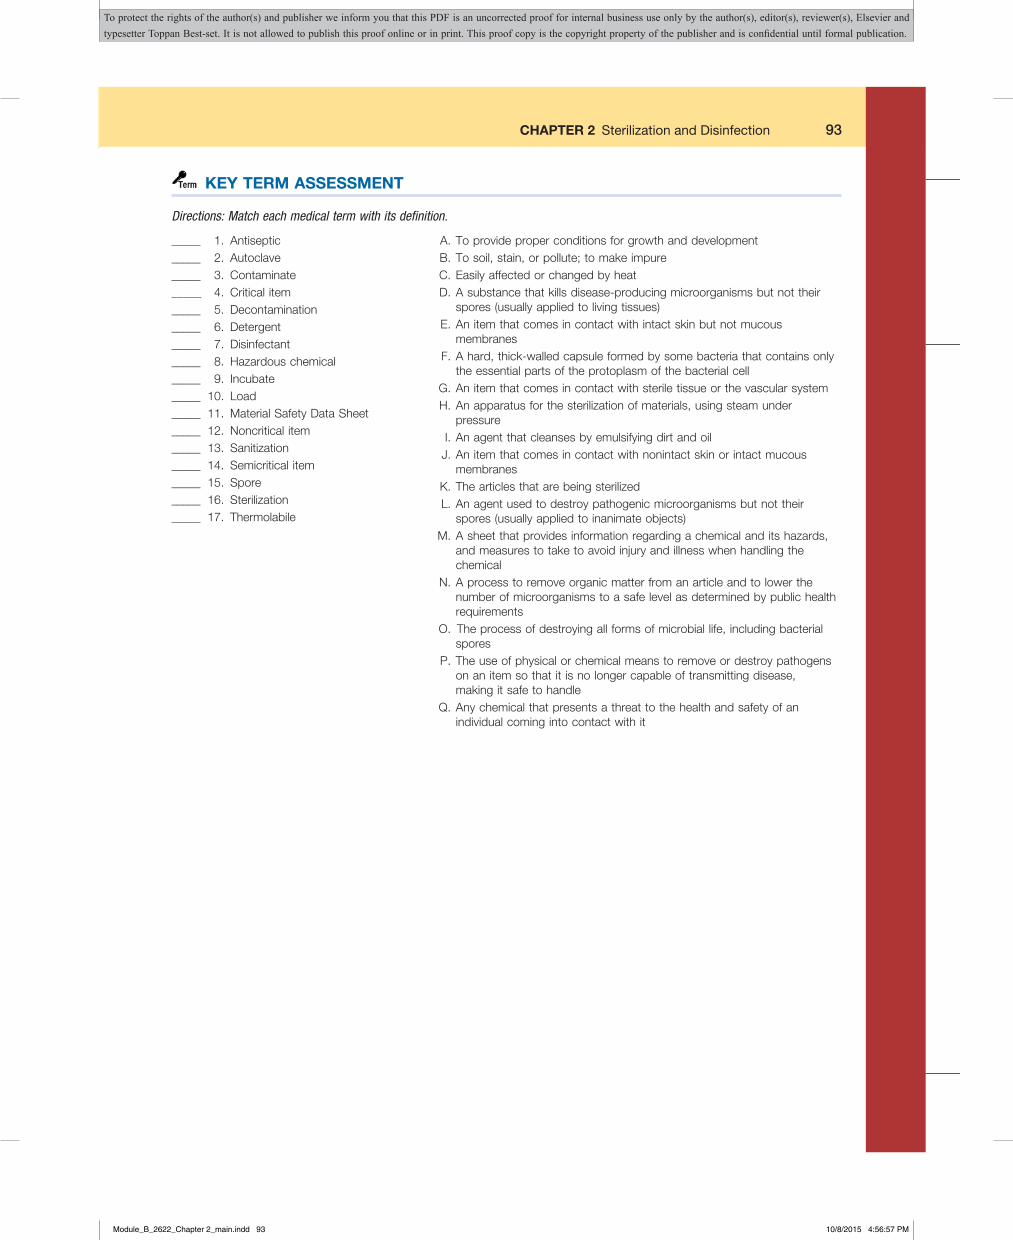
CHAPTER 2 Sterilization and Disinfection 93
KEY TERM ASSESSMENT
Directions: Match each medical term with its definition.
_____ 1. Antiseptic_____ 2. Autoclave_____ 3. Contaminate_____ 4. Criticalitem_____ 5. Decontamination_____ 6. Detergent_____ 7. Disinfectant_____ 8. Hazardouschemical_____ 9. Incubate_____ 10. Load_____ 11. MaterialSafetyDataSheet_____ 12. Noncriticalitem_____ 13. Sanitization_____ 14. Semicriticalitem_____ 15. Spore_____ 16. Sterilization_____ 17. Thermolabile
A.Toprovideproperconditionsforgrowthanddevelopment B.Tosoil,stain,orpollute;tomakeimpure C.Easilyaffectedorchangedbyheat D.Asubstancethatkillsdisease-producingmicroorganismsbutnottheir
spores(usuallyappliedtolivingtissues) E.Anitemthatcomesincontactwithintactskinbutnotmucous
membranes F.Ahard,thick-walledcapsuleformedbysomebacteriathatcontainsonly
theessentialpartsoftheprotoplasmofthebacterialcell G.Anitemthatcomesincontactwithsteriletissueorthevascularsystem H.Anapparatusforthesterilizationofmaterials,usingsteamunder
pressure I.Anagentthatcleansesbyemulsifyingdirtandoil J.Anitemthatcomesincontactwithnonintactskinorintactmucous
membranes K.Thearticlesthatarebeingsterilized L.Anagentusedtodestroypathogenicmicroorganismsbutnottheir
spores(usuallyappliedtoinanimateobjects)M.Asheetthatprovidesinformationregardingachemicalanditshazards,
andmeasurestotaketoavoidinjuryandillnesswhenhandlingthechemical
N.Aprocesstoremoveorganicmatterfromanarticleandtolowerthenumberofmicroorganismstoasafelevelasdeterminedbypublichealthrequirements
O. Theprocessofdestroyingallformsofmicrobiallife,includingbacterialspores
P.Theuseofphysicalorchemicalmeanstoremoveordestroypathogensonanitemsothatitisnolongercapableoftransmittingdisease,makingitsafetohandle
Q.Anychemicalthatpresentsathreattothehealthandsafetyofanindividualcomingintocontactwithit
Module_B_2622_Chapter 2_main.indd 93 10/8/2015 4:56:57 PM
To protect the rights of the author(s) and publisher we inform you that this PDF is an uncorrected proof for internal business use only by the author(s), editor(s), reviewer(s), Elsevier and typesetter Toppan Best-set. It is not allowed to publish this proof online or in print. This proof copy is the copyright property of the publisher and is confidential until formal publication.
94 CHAPTER 2 Sterilization and Disinfection
EVALUATION OF LEARNING
Directions: Fill in each blank with the correct answer.
1. Howdoesonedeterminewhattypeofphysicalorchemicalagenttousetodestroymicroorganismsonanarticle?
2. Listtwodiseasesthatarecausedbybacteriathatproducespores.
3. WhatisthepurposeoftheHazardCommunicationStandard?
4. Listfourexamplesofhazardouschemicalsthatmaybeusedinthemedicaloffice.
5. WhatinformationmustbeincludedonahazardouschemicallabelasrequiredbytheHazardCommunicationStandard?
6. ListanddescribetheinformationthatmustbeincludedinaMaterialSafetyDataSheet.
7. Whatisthepurposeofsanitizinganarticle?
Module_B_2622_Chapter 2_main.indd 94 10/8/2015 4:56:57 PM
To protect the rights of the author(s) and publisher we inform you that this PDF is an uncorrected proof for internal business use only by the author(s), editor(s), reviewer(s), Elsevier and typesetter Toppan Best-set. It is not allowed to publish this proof online or in print. This proof copy is the copyright property of the publisher and is confidential until formal publication.
CHAPTER 2 Sterilization and Disinfection 95
8. Whatistheadvantageofusingtheultrasoundmethodtocleaninstruments?
9. Whyshouldglovesbewornduringthesanitizationprocedure?
10. Whatisthedefinitionofhigh-leveldisinfection?
11. Listoneexampleofanitemthatrequireshigh-leveldisinfection.Listoneexampleofahigh-leveldisinfectant.
12. Listtwoexamplesofitemsthatcanbedisinfectedthroughintermediate-leveldisinfection.Listoneexampleofanintermediate-leveldisinfectant.
13. Listtwoexamplesofitemsthataredisinfectedbylow-leveldisinfection.
14. Whatisthepurposeofthepressureusedintheautoclavingprocess?
15. Whyisitimportantthatallairberemovedfromtheautoclaveduringthesterilizationprocess?
16. Whattemperatureandpressurearethemostcommonlyusedtosterilizematerialswiththeautoclave?
Module_B_2622_Chapter 2_main.indd 95 10/8/2015 4:56:57 PM
To protect the rights of the author(s) and publisher we inform you that this PDF is an uncorrected proof for internal business use only by the author(s), editor(s), reviewer(s), Elsevier and typesetter Toppan Best-set. It is not allowed to publish this proof online or in print. This proof copy is the copyright property of the publisher and is confidential until formal publication.
96 CHAPTER 2 Sterilization and Disinfection
17. WhatinformationdoestheCentersforDiseaseControlandPrevention(CDC)recommendberecordedinanautoclavelogregardingeachcycle?
18. Whatisthefunctionofasterilizationindicator?
19. Whatisthepurposeofwrappingarticlestobeautoclaved?
20. Listtwopropertiesofagoodwrapperforuseinautoclaving.
21. Listthreeexamplesofwrappingmaterialsusedfortheautoclaveandidentifyanadvantageofeachtype.
22. Whyismoretimeneededtoautoclavealargeminorofficesurgerypack?
23. Whatisevent-related sterility?
24. Describethecareanautoclaveshouldreceiveonadailybasis.
25. Whyisalongerexposureperiodneededtoensuresterilizationwhenusingthedry-heatoven?
Module_B_2622_Chapter 2_main.indd 96 10/8/2015 4:56:57 PM
To protect the rights of the author(s) and publisher we inform you that this PDF is an uncorrected proof for internal business use only by the author(s), editor(s), reviewer(s), Elsevier and typesetter Toppan Best-set. It is not allowed to publish this proof online or in print. This proof copy is the copyright property of the publisher and is confidential until formal publication.

CHAPTER 2 Sterilization and Disinfection 97
26. Whateffectdoesmoistheathaveoninstrumentswithsharpcuttingedges?
27. Howdoesthemedicalmanufacturingindustryuseethyleneoxidegassterilization?
28. Whatguidelinesmustbefollowedwhenusingcoldsterilization?
CRITICAL THINKING ACTIVITIES
A. Material Safety Data Sheet
Refer to the Material Safety Data Sheet (MSDS) in the textbook (see Fig. 2-2), and answer the following questions.
1. WhenwasthisMSDSlastrevised?
2. Isglutaraldehydesolubleinwater?
3. Describetheappearanceandodorofglutaraldehyde.
4. WhatisthepHofglutaraldehyde?
5. Isglutaraldehydeflammable?
6. Isglutaraldehydestable?
7. Whatconditionsshouldbeavoidedwithglutaraldehyde?
Module_B_2622_Chapter 2_main.indd 97 10/8/2015 4:56:57 PM
To protect the rights of the author(s) and publisher we inform you that this PDF is an uncorrected proof for internal business use only by the author(s), editor(s), reviewer(s), Elsevier and typesetter Toppan Best-set. It is not allowed to publish this proof online or in print. This proof copy is the copyright property of the publisher and is confidential until formal publication.
98 CHAPTER 2 Sterilization and Disinfection
8. Howcanglutaraldehydeenterthebody?
9. Whatsymptomsoccurifglutaraldehydedoesthefollowing?
a. Comesincontactwiththeskin
b. Issplashedintotheeyes
c. Isinhaled
d. Isingested
10. Whatpreexistingconditionscananindividualpossessthatcanbeaggravatedbyglutaraldehyde?
11. Doesglutaraldehydecausecancer?
12. Whataretheemergencyandfirstaidproceduresforglutaraldehydeforthefollowing?
a. Skin
b. Eyes
c. Inhalation
d. Ingestion
13. Whatshouldbedoneifglutaraldehydeisspilled?
Module_B_2622_Chapter 2_main.indd 98 10/8/2015 4:56:57 PM
To protect the rights of the author(s) and publisher we inform you that this PDF is an uncorrected proof for internal business use only by the author(s), editor(s), reviewer(s), Elsevier and typesetter Toppan Best-set. It is not allowed to publish this proof online or in print. This proof copy is the copyright property of the publisher and is confidential until formal publication.
CHAPTER 2 Sterilization and Disinfection 99
14. Whatisthedisposalmethodforglutaraldehyde?
15. Howshouldglutaraldehydebestored?
16. Whattypeofventilationisneededwhenworkingwithglutaraldehyde?
17. Whatskinandeyeprotectionshouldbetakenwithglutaraldehyde?
B. Obtaining a Material Safety Data Sheet
Obtain an MSDS for one of the following hazardous chemicals, and answer the questions.
To locate an MSDS on the Internet, enter the name of the chemical into a search engine with the abbreviation “MSDS.” (Example: Cidex MSDS)
• Cidex• MetriCide• CidexOPA• CaviCide• MadaCide• Wavicide• Biozide• SporoxII• Vesphene• Envirocide• Cloroxbleach
1. Whatisthechemicalnameofthishazardouschemical?
2. Whatisthetradeorbrandnameofthischemical?
3. Whomanufacturesthischemical?
4. Whatnumberwouldyoucallifanemergencyoccurredwiththischemical?
Module_B_2622_Chapter 2_main.indd 99 10/8/2015 4:56:57 PM
To protect the rights of the author(s) and publisher we inform you that this PDF is an uncorrected proof for internal business use only by the author(s), editor(s), reviewer(s), Elsevier and typesetter Toppan Best-set. It is not allowed to publish this proof online or in print. This proof copy is the copyright property of the publisher and is confidential until formal publication.
100 CHAPTER 2 Sterilization and Disinfection
5. Whattypeofsymptomsoccurifthischemicaldoesthefollowing?
a. Comesincontactwiththeskin
b. Issplashedintotheeyes
c. Isinhaled
d. Isingested
6. Whataretheemergencyandfirstaidproceduresforthischemical?
7. Whatshouldbedoneifthischemicalisspilled?
8. Whatisthedisposalmethodforthischemical?
9. Howshouldthischemicalbestored?
10. Whattypeofprotectionshouldbetakenwhenworkingwiththischemical?
C. Sanitization
For each of the following situations involving sanitization, write C if the technique is correct and I if the technique is incorrect. If the situation is correct, state the principle underlying the technique. If the situation is incorrect, explain what might happen if the technique was performed in the incorrect manner.
___1. Acontaminatedsurgicalinstrumentisleftintheexaminationroom.
___2. Themedicalassistantdoesnotweargloveswhensanitizingsurgicalinstruments.
Module_B_2622_Chapter 2_main.indd 100 10/8/2015 4:56:57 PM
To protect the rights of the author(s) and publisher we inform you that this PDF is an uncorrected proof for internal business use only by the author(s), editor(s), reviewer(s), Elsevier and typesetter Toppan Best-set. It is not allowed to publish this proof online or in print. This proof copy is the copyright property of the publisher and is confidential until formal publication.
CHAPTER 2 Sterilization and Disinfection 101
___3. Themedicalassistantpilesinstrumentswhilepreparingthemforsanitization.
___4. ThemedicalassistantforgetstoreadthematerialsafetydatasheetbeforedecontaminatingsomesurgicalinstrumentsinCidex.
___5. Themedicalassistantuseslaundrydetergenttosanitizesurgicalinstruments.
___6. Driedbloodisnotcompletelycleansedfromhemostaticforcepsbeforetheyaresterilizedintheautoclave.
___7. Themedicalassistantchecksallinstrumentsforproperworkingconditionbeforesterilizingthem.
___8. Themedicalassistantlubricateshemostaticforcepswithasteam-penetrablelubricantbeforesterilizingthem.
D. Sterilization
For each of the following situations involving sterilization of articles in the autoclave, write C if the technique is correct, and I if the technique is incorrect. If the situation is correct, state the principle underlying the technique. If the situation is incorrect, explain what might happen if the technique was performed in the incorrect manner.
___ 1. Themedicalassistantopensahemostatbeforeplacingitinasterilizationpouch.
___ 2. Tapwaterisusedtofillthewaterreservoiroftheautoclave.
Module_B_2622_Chapter 2_main.indd 101 10/8/2015 4:56:57 PM
To protect the rights of the author(s) and publisher we inform you that this PDF is an uncorrected proof for internal business use only by the author(s), editor(s), reviewer(s), Elsevier and typesetter Toppan Best-set. It is not allowed to publish this proof online or in print. This proof copy is the copyright property of the publisher and is confidential until formal publication.
102 CHAPTER 2 Sterilization and Disinfection
___ 3. Whenloadingtheautoclave,themedicalassistantplacesglassjarsinanuprightposition.
___ 4. Themedicalassistantplacesfoursterilizationpouchesontopofeachotherintheautoclave.
___ 5. Themedicalassistantplacessmallpackstobesterilizedapproximately1to3inchesapartintheautoclave.
___ 6. Sporestripsareplacedintheautoclavewheresteamwillpenetratethemmosteasily.
___ 7. Themedicalassistantbeginstimingtheloadintheautoclaveafterthepropertemperatureof250°Fhasbeenreached.
___ 8. Themedicalassistantremovestheloadfromtheautoclavewhileitisstillwet.
___ 9. Themedicalassistantnoticesatearinoneofthewrapperswhileremovingarticlesfromtheautoclave.Heorsherewrapsandresterilizesthearticle.
___ 10. Themedicalassistantnoticesthatasterilizedwrappedarticlestoredonthestorageshelfhasopenedup.Heorsheretapesthepackandplacesitbackonthestorageshelf.
Module_B_2622_Chapter 2_main.indd 102 10/8/2015 4:56:57 PM
To protect the rights of the author(s) and publisher we inform you that this PDF is an uncorrected proof for internal business use only by the author(s), editor(s), reviewer(s), Elsevier and typesetter Toppan Best-set. It is not allowed to publish this proof online or in print. This proof copy is the copyright property of the publisher and is confidential until formal publication.
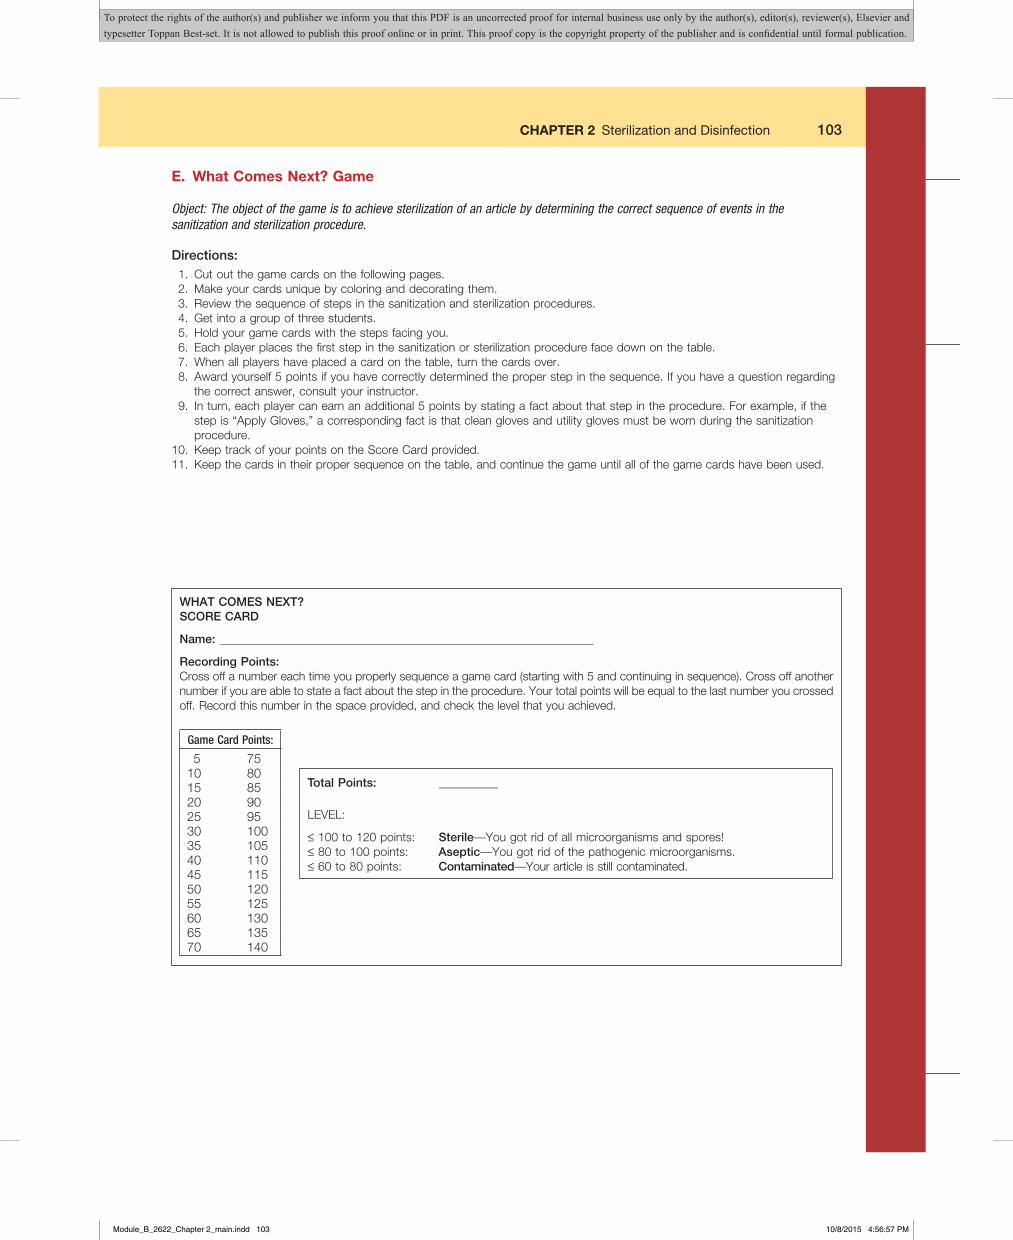
CHAPTER 2 Sterilization and Disinfection 103
E. What Comes Next? Game
Object: The object of the game is to achieve sterilization of an article by determining the correct sequence of events in the sanitization and sterilization procedure.
Directions:1. Cutoutthegamecardsonthefollowingpages.2. Makeyourcardsuniquebycoloringanddecoratingthem.3. Reviewthesequenceofstepsinthesanitizationandsterilizationprocedures.4. Getintoagroupofthreestudents.5. Holdyourgamecardswiththestepsfacingyou.6. Eachplayerplacesthefirststepinthesanitizationorsterilizationprocedurefacedownonthetable.7. Whenallplayershaveplacedacardonthetable,turnthecardsover.8. Awardyourself5pointsifyouhavecorrectlydeterminedtheproperstepinthesequence.Ifyouhaveaquestionregarding
thecorrectanswer,consultyourinstructor.9. Inturn,eachplayercanearnanadditional5pointsbystatingafactaboutthatstepintheprocedure.Forexample,ifthe
stepis“ApplyGloves,”acorrespondingfactisthatcleanglovesandutilityglovesmustbewornduringthesanitizationprocedure.
10. KeeptrackofyourpointsontheScoreCardprovided.11. Keepthecardsintheirpropersequenceonthetable,andcontinuethegameuntilallofthegamecardshavebeenused.
WHAT COMES NEXT?SCORE CARD
Name:
Recording Points:Crossoffanumbereachtimeyouproperlysequenceagamecard(startingwith5andcontinuinginsequence).Crossoffanothernumberifyouareabletostateafactaboutthestepintheprocedure.Yourtotalpointswillbeequaltothelastnumberyoucrossedoff.Recordthisnumberinthespaceprovided,andcheckthelevelthatyouachieved.
Game Card Points:
5 7510 8015 8520 9025 9530 10035 10540 11045 11550 12055 12560 13065 13570 140
Total Points: __________
LEVEL:
≤100to120points: Sterile—Yougotridofallmicroorganismsandspores!≤80to100points: Aseptic—Yougotridofthepathogenicmicroorganisms.≤60to80points: Contaminated—Yourarticleisstillcontaminated.
Module_B_2622_Chapter 2_main.indd 103 10/8/2015 4:56:57 PM
To protect the rights of the author(s) and publisher we inform you that this PDF is an uncorrected proof for internal business use only by the author(s), editor(s), reviewer(s), Elsevier and typesetter Toppan Best-set. It is not allowed to publish this proof online or in print. This proof copy is the copyright property of the publisher and is confidential until formal publication.

104 CHAPTER 2 Sterilization and Disinfection
Notes
Module_B_2622_Chapter 2_main.indd 104 10/8/2015 4:56:57 PM
To protect the rights of the author(s) and publisher we inform you that this PDF is an uncorrected proof for internal business use only by the author(s), editor(s), reviewer(s), Elsevier and typesetter Toppan Best-set. It is not allowed to publish this proof online or in print. This proof copy is the copyright property of the publisher and is confidential until formal publication.

CHAPTER 2 Sterilization and Disinfection 105
Rea
d M
SD
SA
pp
ly g
love
sR
inse
co
ntam
inat
edin
stru
men
tsD
eco
ntam
inat
ein
stru
men
ts
Cle
an in
stru
men
tsm
anua
llyT
horo
ughl
y ri
nse
inst
rum
ents
Dry
inst
rum
ents
Che
ck w
ork
ing
ord
er a
ndlu
bri
cate
inst
rum
ents
Wra
p in
stru
men
tsLo
ad t
he a
uto
clav
eO
per
ate
the
auto
clav
eS
tore
inst
rum
ents
Module_B_2622_Chapter 2_main.indd 105 10/8/2015 4:56:57 PM
To protect the rights of the author(s) and publisher we inform you that this PDF is an uncorrected proof for internal business use only by the author(s), editor(s), reviewer(s), Elsevier and typesetter Toppan Best-set. It is not allowed to publish this proof online or in print. This proof copy is the copyright property of the publisher and is confidential until formal publication.

106 CHAPTER 2 Sterilization and Disinfection
What co
mes next?
What co
mes next?
What co
mes next?
What co
mes next?
What co
mes next?
What co
mes next?
What co
mes next?
What co
mes next?
What co
mes next?
What co
mes next?
What co
mes next?
What co
mes next?
Module_B_2622_Chapter 2_main.indd 106 10/8/2015 4:56:57 PM
To protect the rights of the author(s) and publisher we inform you that this PDF is an uncorrected proof for internal business use only by the author(s), editor(s), reviewer(s), Elsevier and typesetter Toppan Best-set. It is not allowed to publish this proof online or in print. This proof copy is the copyright property of the publisher and is confidential until formal publication.
CHAPTER 2 Sterilization and Disinfection 107
Name_____________________________________________________________ Date___________________________________
POSTTEST
True or False
_____ 1. Theagentusedtodestroymicroorganismsonanarticledependsonthesizeofthearticle._____ 2. ThepurposeoftheHazardCommunicationsStandardistomakesurethatemployeesdonotusehazardous
chemicalsintheworkplace._____ 3. TheHazardCommunicationsStandardrequiresthatthelabelofahazardouschemicalincludeinformationonhowto
storeandhandlethechemical._____ 4. Stethoscopesmustbedecontaminatedusingahigh-leveldisinfectant._____ 5. Themostcommontemperatureandpressureforautoclavingis212°Fat15lbofpressurepersquareinch._____ 6. Asterilizationstripshouldbepositionedinthecenterofawrappedpack._____ 7. Thebestmeansofdeterminingtheeffectivenessofthesterilizationprocessarebiologicindicators._____ 8. Thepropertimeforsterilizinganarticleintheautoclavedependsonwhatisbeingautoclaved._____ 9. Apackthathasbeeninthestoragecupboardfor4weeksshouldberesterilized._____ 10. Ethyleneoxidegasisusedbymedicalmanufacturerstosterilizedisposableitems.
Module_B_2622_Chapter 2_main.indd 107 10/8/2015 4:56:57 PM
To protect the rights of the author(s) and publisher we inform you that this PDF is an uncorrected proof for internal business use only by the author(s), editor(s), reviewer(s), Elsevier and typesetter Toppan Best-set. It is not allowed to publish this proof online or in print. This proof copy is the copyright property of the publisher and is confidential until formal publication.

108 CHAPTER 2 Sterilization and Disinfection
Notes
Module_B_2622_Chapter 2_main.indd 108 10/8/2015 4:56:57 PM
To protect the rights of the author(s) and publisher we inform you that this PDF is an uncorrected proof for internal business use only by the author(s), editor(s), reviewer(s), Elsevier and typesetter Toppan Best-set. It is not allowed to publish this proof online or in print. This proof copy is the copyright property of the publisher and is confidential until formal publication.
CHAPTER 2 Sterilization and Disinfection 109
VIRTUAL MEDICAL OFFICE LESSON: STERILIZATION AND DISINFECTION
READING ASSIGNMENT
Chapter2—SterilizationandDisinfectionChapter4—MinorOfficeSurgery• SurgicalAsepsis• InstrumentsUsedinMinorOfficeSurgery
PATIENT:
JoseImero
LEARNING OBJECTIVES:
• Identifythereasonsforcheckinginstrumentsforrepairsbeforewrapping.• Identifythereasonsforperformingsanitizationbeforesterilization.• Discusstheneedfordouble-wrappingsomeitemsbeforesterilization.• Describetheuseofindicatorstripsinsterilizationtechniquesandqualitycontrol.• Identifytheitemsneededforwrappingarticlesforsterilization.• Identifythestepsrequiredforwrappingitemsforsterilization.• Understandthereasonsforperformingsanitizationbeforesterilization.• Statethereasonforusingindicatorstripsinsterilizationtechniquesandqualitycontrol.• Sequencethestepsrequiredforwrappingitemsforsterilization.• Matchcausesofimpropersterilizationwithproblemsthatwillresultifthepropertechniqueisnotfollowed.• Discussthestoragerequirementsforitemsthathavebeenautoclaved.• Identifyinstrumentsfrequentlyusedinminorofficesurgery.
OVERVIEW:
Inthislessonyouwilllearnthedifferencebetweensanitizationandsterilization.YouwillobserveDanielle,themedicalassistingextern,prepareinstrumentsforsterilizationanddiscusstheproperstepsthatmustbefollowedtoensureeffectivesterilization.
Module_B_2622_Chapter 2_main.indd 109 10/8/2015 4:56:57 PM
To protect the rights of the author(s) and publisher we inform you that this PDF is an uncorrected proof for internal business use only by the author(s), editor(s), reviewer(s), Elsevier and typesetter Toppan Best-set. It is not allowed to publish this proof online or in print. This proof copy is the copyright property of the publisher and is confidential until formal publication.
110 CHAPTER 2 Sterilization and Disinfection
EXERCISE 1: Online Activity—Sanitation and Sterilization
45 minutes
1. Whatdoesitmeantosanitizeequipment?
2. Whatdoesitmeantosterilizeequipment?
3. Listthesevengeneralstepsinthesanitizationprocedureofinstruments.
4. Indicatewhetherthefollowingstatementistrueorfalse.
___________Beforesanitization,instrumentsshouldberinsedincoolwateranddriedthoroughly.
Module_B_2622_Chapter 2_main.indd 110 10/8/2015 4:56:58 PM
To protect the rights of the author(s) and publisher we inform you that this PDF is an uncorrected proof for internal business use only by the author(s), editor(s), reviewer(s), Elsevier and typesetter Toppan Best-set. It is not allowed to publish this proof online or in print. This proof copy is the copyright property of the publisher and is confidential until formal publication.
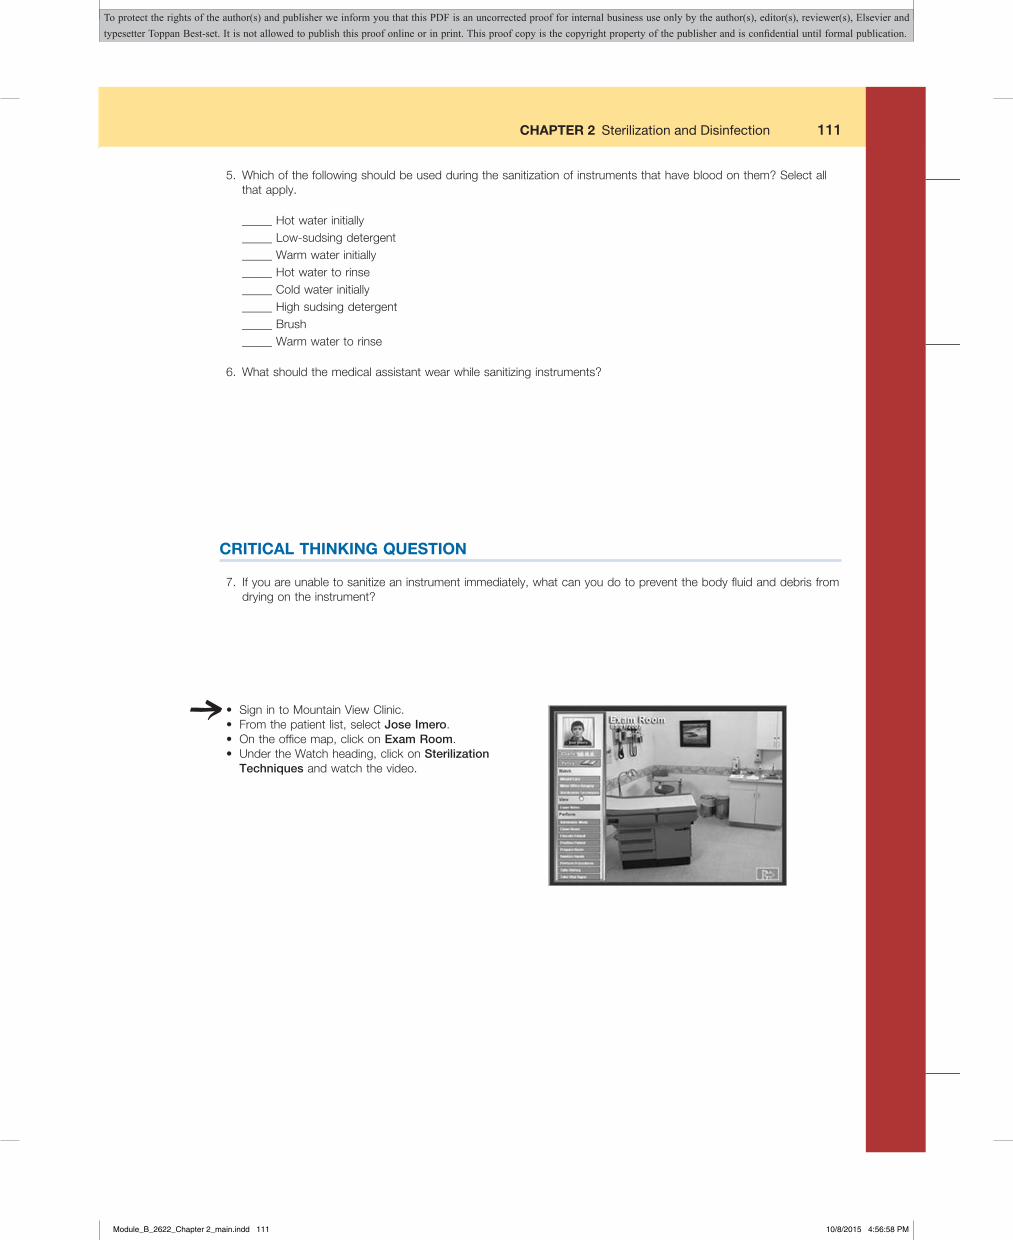
CHAPTER 2 Sterilization and Disinfection 111
5. Whichofthefollowingshouldbeusedduringthesanitizationofinstrumentsthathavebloodonthem?Selectallthatapply.
_____Hotwaterinitially_____Low-sudsingdetergent_____Warmwaterinitially_____Hotwatertorinse_____Coldwaterinitially_____Highsudsingdetergent_____Brush_____Warmwatertorinse
6. Whatshouldthemedicalassistantwearwhilesanitizinginstruments?
CRITICAL THINKING QUESTION
7. Ifyouareunabletosanitizeaninstrumentimmediately,whatcanyoudotopreventthebodyfluidanddebrisfromdryingontheinstrument?
• SignintoMountainViewClinic.• Fromthepatientlist,selectJose Imero.• Ontheofficemap,clickonExam Room.• UndertheWatchheading,clickonSterilization
Techniquesandwatchthevideo.
Module_B_2622_Chapter 2_main.indd 111 10/8/2015 4:56:58 PM
To protect the rights of the author(s) and publisher we inform you that this PDF is an uncorrected proof for internal business use only by the author(s), editor(s), reviewer(s), Elsevier and typesetter Toppan Best-set. It is not allowed to publish this proof online or in print. This proof copy is the copyright property of the publisher and is confidential until formal publication.
112 CHAPTER 2 Sterilization and Disinfection
8. Inthevideo,CharlieasksDaniellewhethershehascheckedtheinstrumentstoensurethatthe“instrumentsapproximate.”Whatdoesitmeanforaninstrumenttoapproximate?(Hint:Useadictionaryorothersourceifneededtoanswerthisquestion.)
9. Inthevideo,CharlieasksDaniellewhethershehascomparedtheinstrumentstoseewhethereverythingthatisneededisonthetray.Whydoyouthinkheaskedthisquestion?
10. WhydoyouthinkCharlieaskswhethertheindicatorstripis“indate?”
11. Whatisthereasonforthechemicalindicatorstrip?
12. Whichofthefollowingsuppliesareneededwhenwrappinginstrumentsandequipmentforsterilization?Selectallthatapply.
___________ Sterilizationpaper,muslin,orsterilizationpouches
___________ Permanentmarker
___________ Sterilizationindicatorstrip
___________ Pen
___________ Autoclavetape
___________ Pencil
Module_B_2622_Chapter 2_main.indd 112 10/8/2015 4:56:58 PM
To protect the rights of the author(s) and publisher we inform you that this PDF is an uncorrected proof for internal business use only by the author(s), editor(s), reviewer(s), Elsevier and typesetter Toppan Best-set. It is not allowed to publish this proof online or in print. This proof copy is the copyright property of the publisher and is confidential until formal publication.
CHAPTER 2 Sterilization and Disinfection 113
13. Aftertheautoclavecycleiscomplete,doesthecoloroftheautoclavetapeindicatewhetherornotthepackageissterile?Supportyouranswer.
14. CharlietoldDanielletobeginwiththewrappingmaterialinadiamondshape.Whyisthisimportantwhenwrappingarticlesforsterilization?
15. AfterDaniellecompletestheautoclaveprocedure,whereshouldshestorethesterilizedarticles?
16. Indicatewhethereachofthefollowingstatementsistrueorfalse.
a. ___________ Wheninstrumentswithmovablepartsarebeingwrapped,thejointshouldbeclosedtopreventmoisturefromadheringtotheinstrumentandcausingrust.
b. ___________ Wheninstrumentswithsharpedgesarebeingwrapped,theedgesshouldfirstbewrappedingauze.
c. ___________ Allinstrumentpacksshouldbeautoclavedforthesameamountoftime,regardlessofthesizeofthepackageorthecontents.
d. ___________ Autoclavetapeindicatesthatthepackageissterile.
e. ___________ Anyballpointpenisacceptableforlabelingapackagefortheautoclave.
f. ___________ Thefirstfoldmadeinwrappinganinstrumentshouldbethefoldclosesttoyourbodyatthebottomofthepackage.
Module_B_2622_Chapter 2_main.indd 113 10/8/2015 4:56:58 PM
To protect the rights of the author(s) and publisher we inform you that this PDF is an uncorrected proof for internal business use only by the author(s), editor(s), reviewer(s), Elsevier and typesetter Toppan Best-set. It is not allowed to publish this proof online or in print. This proof copy is the copyright property of the publisher and is confidential until formal publication.
114 CHAPTER 2 Sterilization and Disinfection
17. Whichofthefollowingshouldappearonthelabelofawrappedarticlefortheautoclave?Selectallthatapply.
_____Typeofinstrumentorequipmentfoundinpackage_____Indicatorstripinside_____Dateofsterilization_____Initialsofpersonpreparingpackage_____Expirationdateforthepackage
18. Matchthecolumnsbelowtoshowthecorrectsequenceofactionsinwrappinganinstrumentforautoclaving.Action Order of Sequence
_____Foldthetopcornerofthewraptowardthecenterandfoldatab.
_____Foldthebottomcornerofthewrappingmaterialtowardthecenterandfoldatab.
_____Placeautoclavetapeacrosstheoutsidecorner._____Fliptheinstrumentinthewrapuntilitisaneatpackage._____Foldeachsideofthewrapintothecenter,leaving
ataboneachside.
a. Step1
b. Step2
c. Step3
d. Step4
e. Step5
• ClicktheXintheupperrightcornertoclosethevideoandreturntotheExamRoom.• Clicktheexitarrowinthelowerrightcornerofthescreentoexittheroom.• OntheSummaryMenu,clickReturn to MapandselectYesatthepop-upmenutoreturntotheofficemaporclick
Exit the Program.
Module_B_2622_Chapter 2_main.indd 114 10/8/2015 4:56:58 PM
To protect the rights of the author(s) and publisher we inform you that this PDF is an uncorrected proof for internal business use only by the author(s), editor(s), reviewer(s), Elsevier and typesetter Toppan Best-set. It is not allowed to publish this proof online or in print. This proof copy is the copyright property of the publisher and is confidential until formal publication.
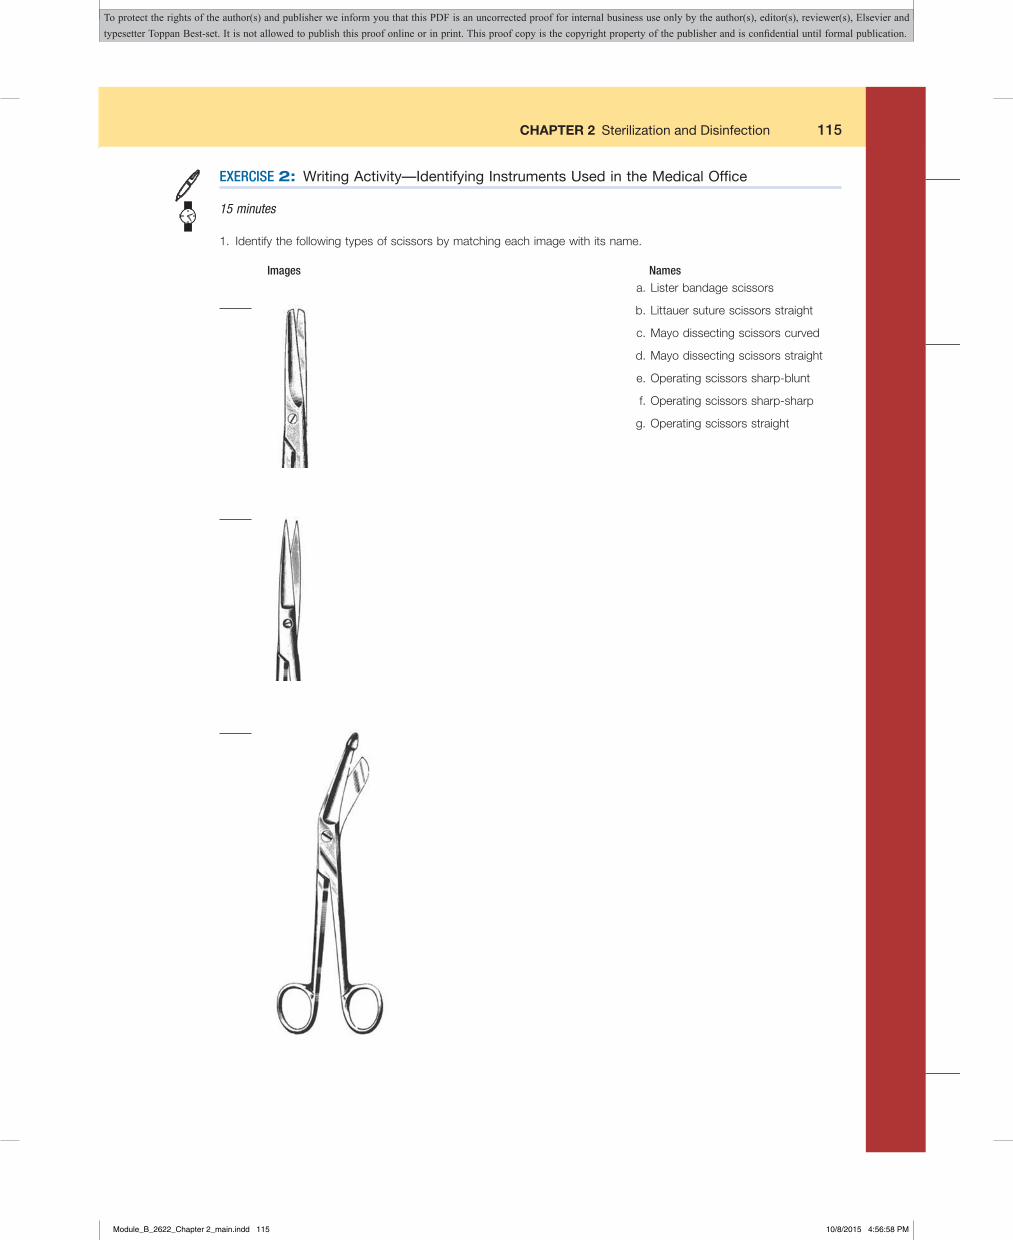
CHAPTER 2 Sterilization and Disinfection 115
EXERCISE 2: Writing Activity—Identifying Instruments Used in the Medical Office
15 minutes
1. Identifythefollowingtypesofscissorsbymatchingeachimagewithitsname.
Images Namesa.Listerbandagescissors
b.Littauersuturescissorsstraight
c.Mayodissectingscissorscurved
d.Mayodissectingscissorsstraight
e.Operatingscissorssharp-blunt
f.Operatingscissorssharp-sharp
g.Operatingscissorsstraight
Module_B_2622_Chapter 2_main.indd 115 10/8/2015 4:56:58 PM
To protect the rights of the author(s) and publisher we inform you that this PDF is an uncorrected proof for internal business use only by the author(s), editor(s), reviewer(s), Elsevier and typesetter Toppan Best-set. It is not allowed to publish this proof online or in print. This proof copy is the copyright property of the publisher and is confidential until formal publication.
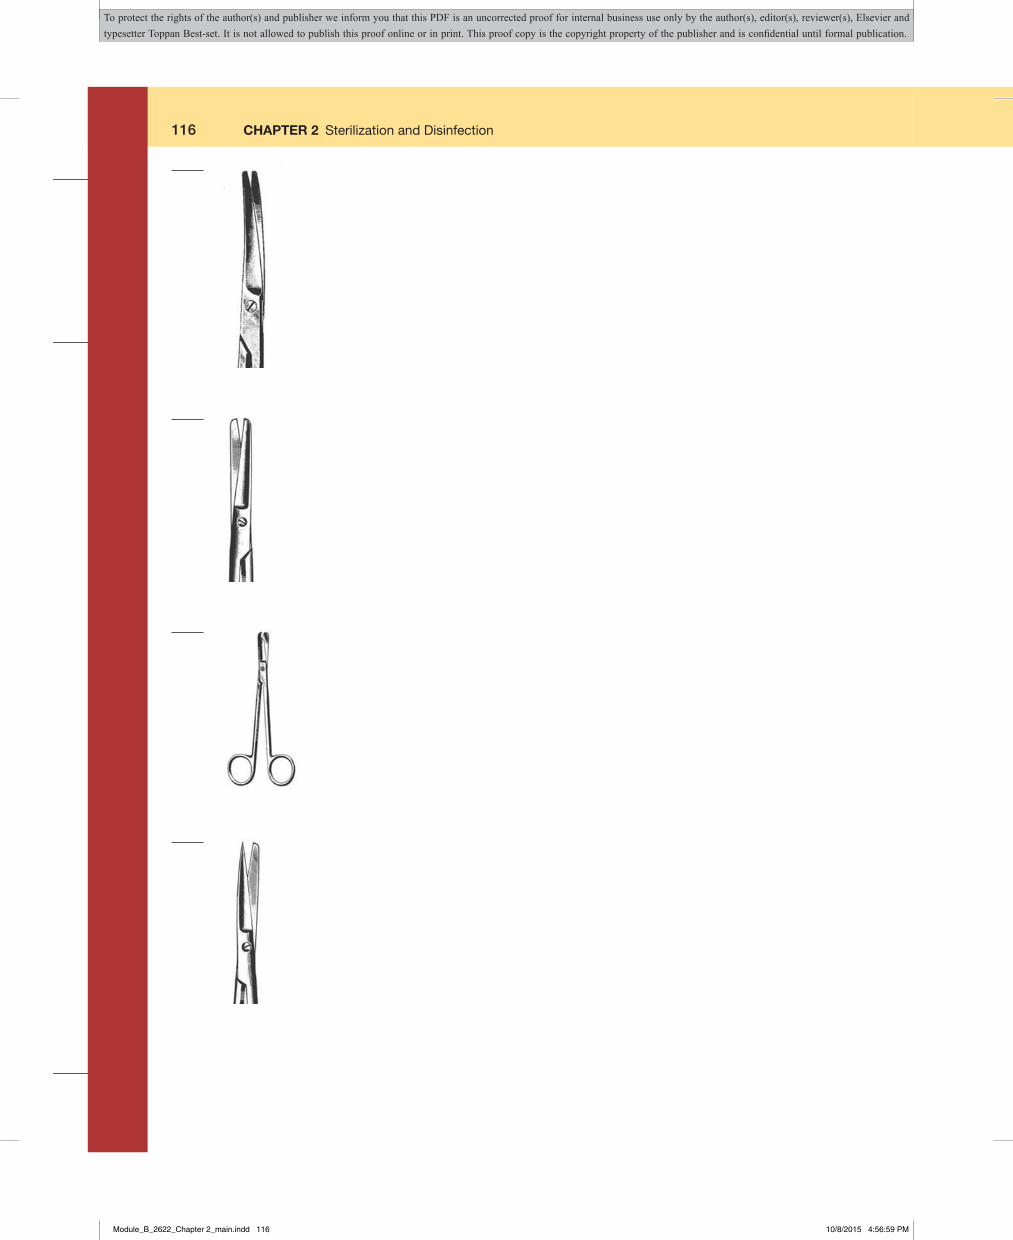
116 CHAPTER 2 Sterilization and Disinfection
Module_B_2622_Chapter 2_main.indd 116 10/8/2015 4:56:59 PM
To protect the rights of the author(s) and publisher we inform you that this PDF is an uncorrected proof for internal business use only by the author(s), editor(s), reviewer(s), Elsevier and typesetter Toppan Best-set. It is not allowed to publish this proof online or in print. This proof copy is the copyright property of the publisher and is confidential until formal publication.
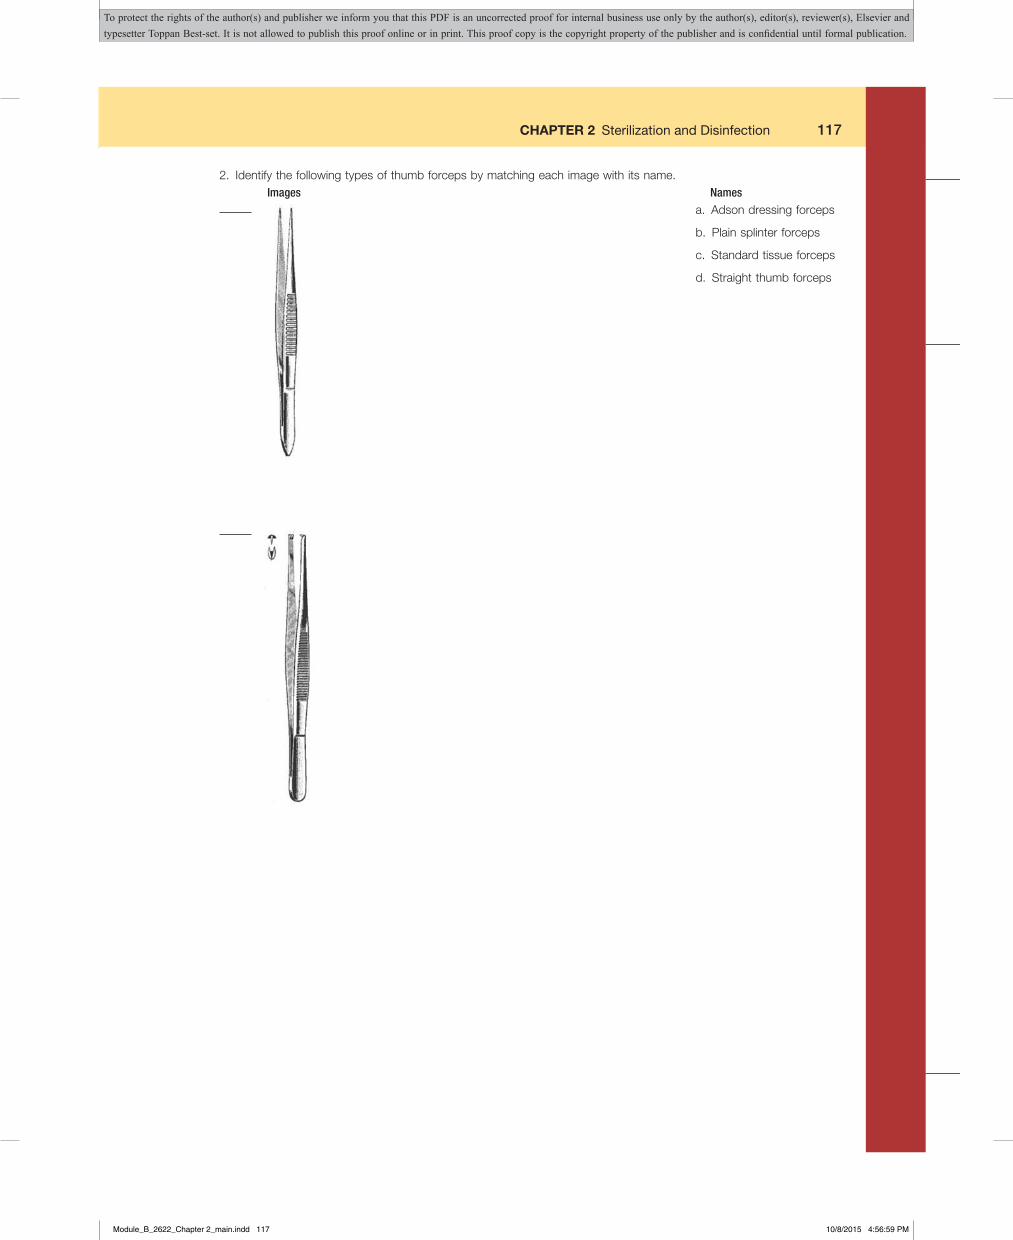
CHAPTER 2 Sterilization and Disinfection 117
2. Identifythefollowingtypesofthumbforcepsbymatchingeachimagewithitsname.Images Names
a. Adsondressingforceps
b. Plainsplinterforceps
c. Standardtissueforceps
d. Straightthumbforceps
Module_B_2622_Chapter 2_main.indd 117 10/8/2015 4:56:59 PM
To protect the rights of the author(s) and publisher we inform you that this PDF is an uncorrected proof for internal business use only by the author(s), editor(s), reviewer(s), Elsevier and typesetter Toppan Best-set. It is not allowed to publish this proof online or in print. This proof copy is the copyright property of the publisher and is confidential until formal publication.

118 CHAPTER 2 Sterilization and Disinfection
Module_B_2622_Chapter 2_main.indd 118 10/8/2015 4:56:59 PM
To protect the rights of the author(s) and publisher we inform you that this PDF is an uncorrected proof for internal business use only by the author(s), editor(s), reviewer(s), Elsevier and typesetter Toppan Best-set. It is not allowed to publish this proof online or in print. This proof copy is the copyright property of the publisher and is confidential until formal publication.
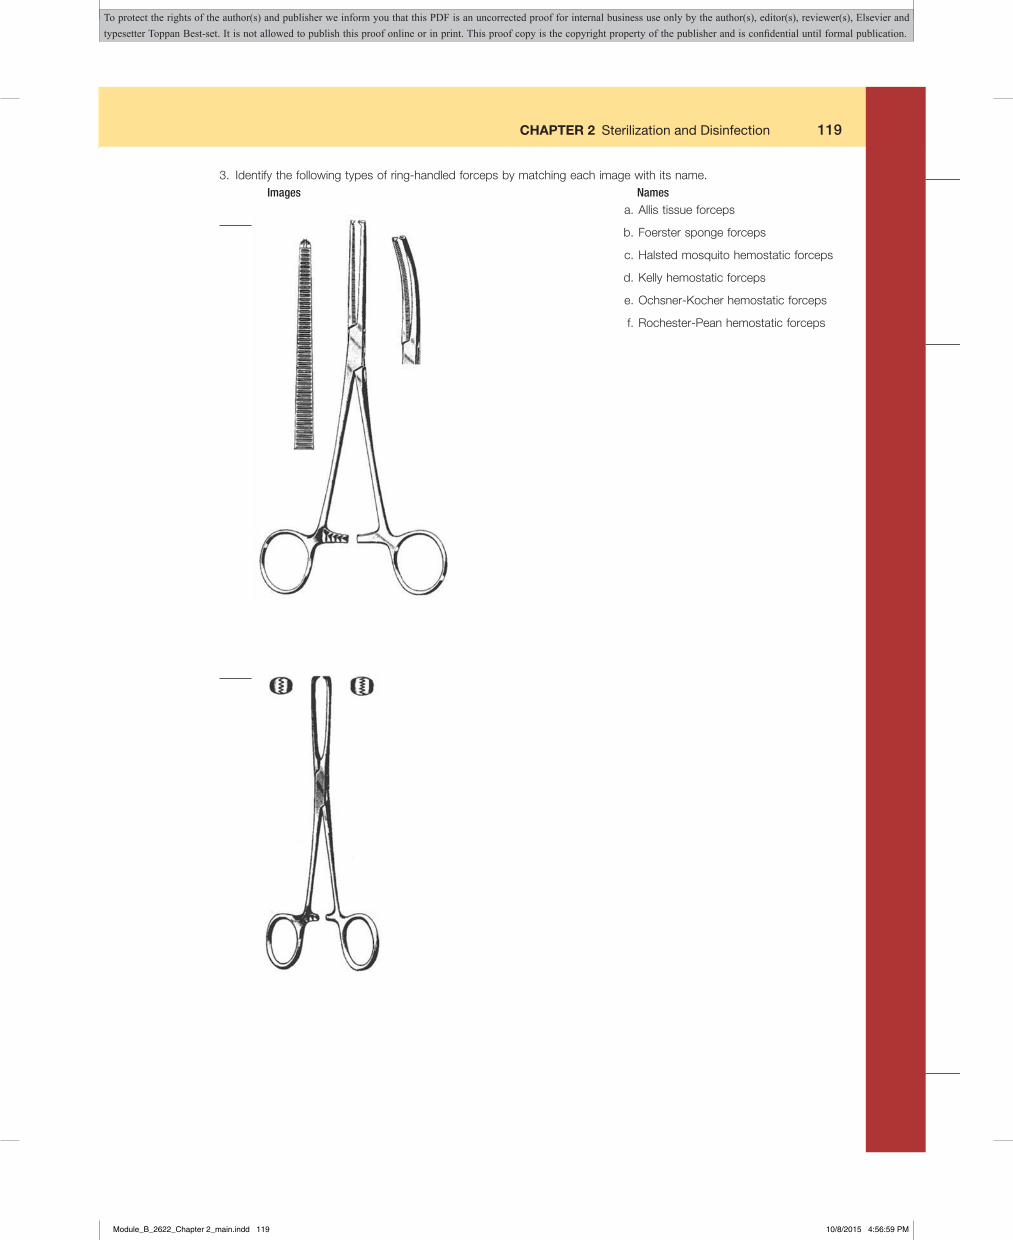
CHAPTER 2 Sterilization and Disinfection 119
3. Identifythefollowingtypesofring-handledforcepsbymatchingeachimagewithitsname.Images Names
a.Allistissueforceps
b.Foersterspongeforceps
c.Halstedmosquitohemostaticforceps
d.Kellyhemostaticforceps
e.Ochsner-Kocherhemostaticforceps
f.Rochester-Peanhemostaticforceps
Module_B_2622_Chapter 2_main.indd 119 10/8/2015 4:56:59 PM
To protect the rights of the author(s) and publisher we inform you that this PDF is an uncorrected proof for internal business use only by the author(s), editor(s), reviewer(s), Elsevier and typesetter Toppan Best-set. It is not allowed to publish this proof online or in print. This proof copy is the copyright property of the publisher and is confidential until formal publication.
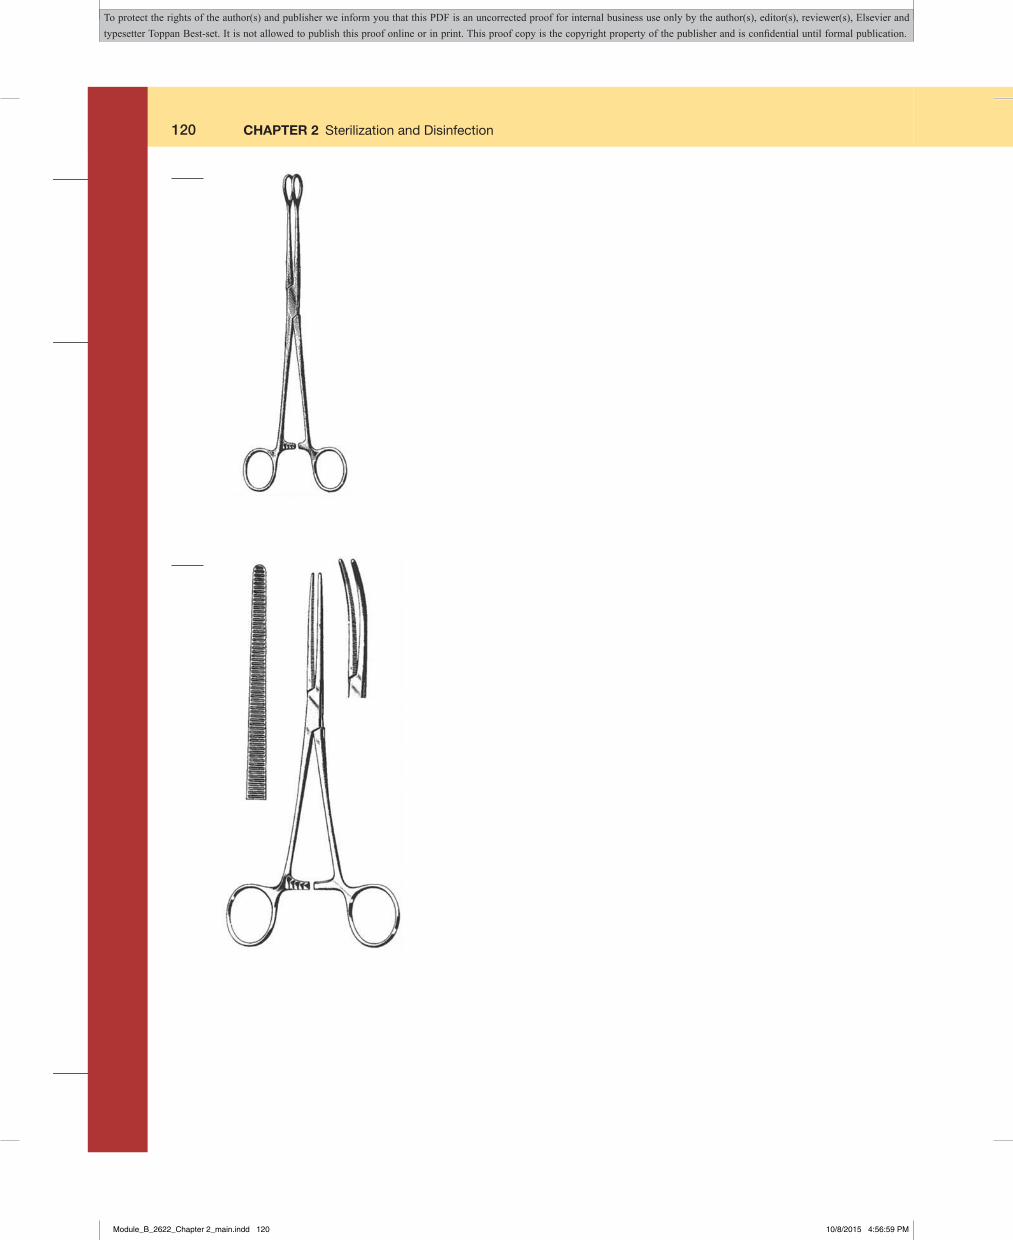
120 CHAPTER 2 Sterilization and Disinfection
Module_B_2622_Chapter 2_main.indd 120 10/8/2015 4:56:59 PM
To protect the rights of the author(s) and publisher we inform you that this PDF is an uncorrected proof for internal business use only by the author(s), editor(s), reviewer(s), Elsevier and typesetter Toppan Best-set. It is not allowed to publish this proof online or in print. This proof copy is the copyright property of the publisher and is confidential until formal publication.
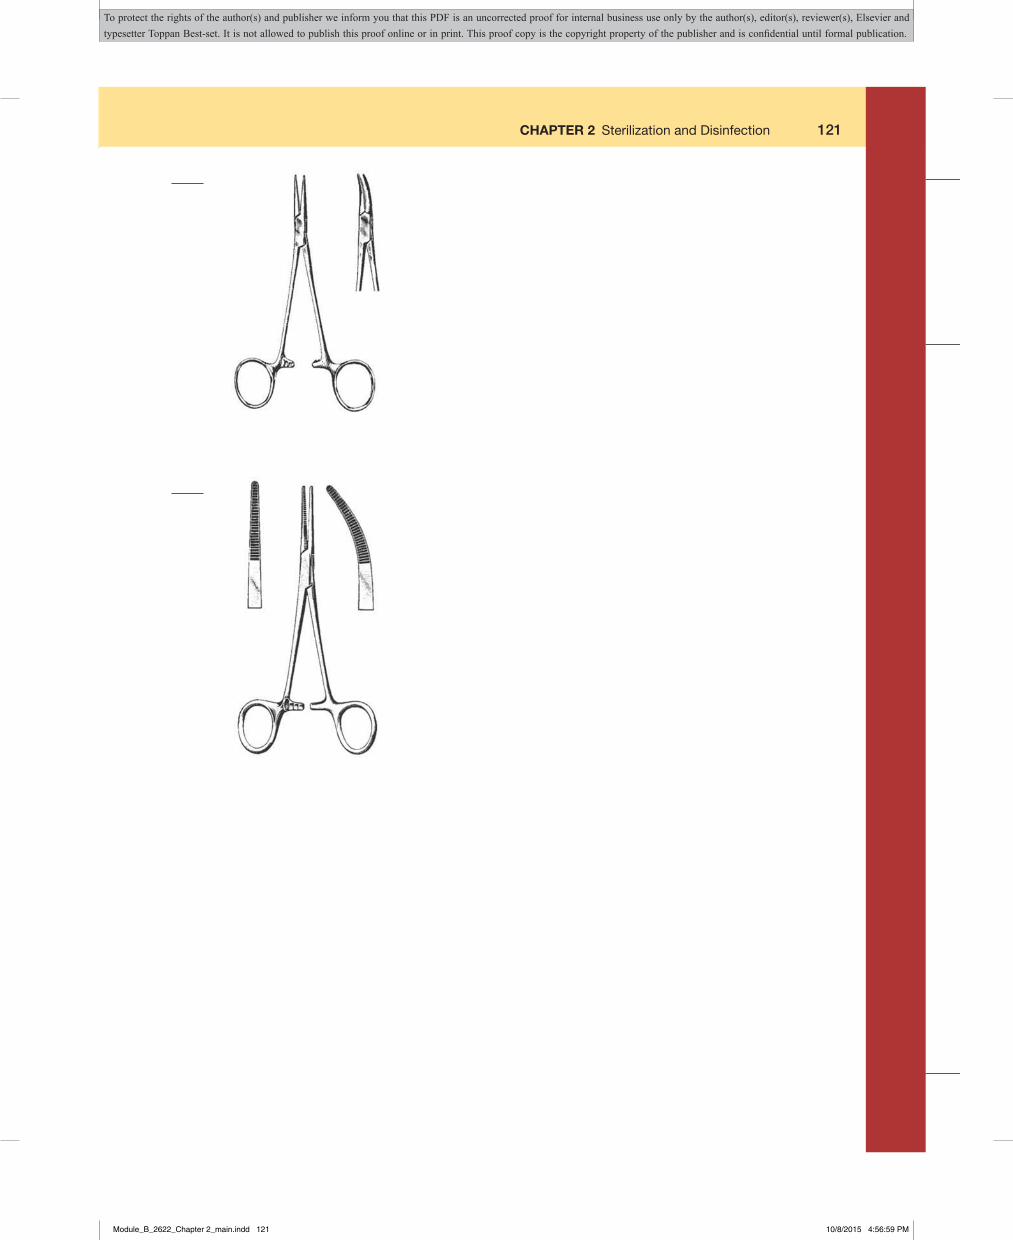
CHAPTER 2 Sterilization and Disinfection 121
Module_B_2622_Chapter 2_main.indd 121 10/8/2015 4:56:59 PM
To protect the rights of the author(s) and publisher we inform you that this PDF is an uncorrected proof for internal business use only by the author(s), editor(s), reviewer(s), Elsevier and typesetter Toppan Best-set. It is not allowed to publish this proof online or in print. This proof copy is the copyright property of the publisher and is confidential until formal publication.

122 CHAPTER 2 Sterilization and Disinfection
Notes
Module_B_2622_Chapter 2_main.indd 122 10/8/2015 4:56:59 PM
To protect the rights of the author(s) and publisher we inform you that this PDF is an uncorrected proof for internal business use only by the author(s), editor(s), reviewer(s), Elsevier and typesetter Toppan Best-set. It is not allowed to publish this proof online or in print. This proof copy is the copyright property of the publisher and is confidential until formal publication.