Embed Size (px)
Citation preview
Honeycomb ShadesSTEP BY STEP INSTALLATION INSTRUCTIONS
Motivia®
Motorization

1 2smithandnoble.com 800.248.8888
TABLE OF CONTENTS
Step 1 - Getting Started . . . . . . . . . . . . . . . . . . . . . . . . . . . . . . . . . . . . . 3
Overview - Honeycomb Motorization . . . . . . . . . . . . . . . . . . . . . . . . . 4
Bracket Quantity & Positioning . . . . . . . . . . . . . . . . . . . . . . . . . . . . . . . . 4
Step 2 - Mounting the Brackets . . . . . . . . . . . . . . . . . . . . . . . . . . . 5 - 7 Inside Mount, Side Mount, Outside Mount, . . . . . . . . . . . . . Outside Mount w/Spacer Block, Spacer Blocks (Optional)
Step 3 - Hanging & Removing the Shade . . . . . . . . . . . . . . . . . . . . . . 8
Step 4 - Link the Remote . . . . . . . . . . . . . . . . . . . . . . . . . . . . . . . . . . . . 9
Step 5 - Operating the Shade . . . . . . . . . . . . . . . . . . . . . . . . . . . . . . . 10
Step 6 - Adjusting the Motor Limits (if desired) . . . . . . . . . . . . 11 - 12
Setting & Using a Favorite Position . . . . . . . . . . . . . . . . . . . . . . . . . . . 13
Advanced Programing . . . . . . . . . . . . . . . . . . . . . . . . . . . . . . . . . . . . . . 14
Replacing the Battery & Charging the Motor . . . . . . . . . . . . . . . . . . . 15
Level the Bottom Rail & Hold Down Brackets (optional) . . . . . . . . . . . . . 16
Care & Cleaning Instructions . . . . . . . . . . . . . . . . . . . . . . . . . . . . . . . . 17
Safety . . . . . . . . . . . . . . . . . . . . . . . . . . . . . . . . . . . . . . . . . . . . . . . . . . 17
Troubleshooting . . . . . . . . . . . . . . . . . . . . . . . . . . . . . . . . . . . . . . . . . . . 18
Warranty . . . . . . . . . . . . . . . . . . . . . . . . . . . . . . . . . . . . . . . . . . Back Cover
A Smooth Set-UpWe want you to love your new window coverings and
that includes having a smooth installation experience . We
recommend saving this guide. If you encounter any difficulties
or questions, please reach out to us for help . It’s why we’re
here . Call us at 800 .248 .8888 for more info on installation .
We recommend you hold on to all packaging until your window
coverings are fully installed . Should something go wrong (we
strongly doubt it), we want any potential returns to be as
painless as possible .
Customer Service Hours Monday — Friday: 6am — 6pm PT Saturday — Sunday: 7am — 4pm PT
smithandnoble .com
EverythingYou Need

3 4smithandnoble.com 800.248.8888
First, make sure you have all the parts and tools required to install your shades .
ALL THE HARDWARE YOU’LL NEED: Pencil, screw-driver, ¼” nut driver, level, and a drill with a 1⁄16” drill bit .
Then find wooden studs where you’ll want to attach the brackets; if you need to mount your shades to wallboard or plaster, use a secure fastener designed for hollow wall applications . For metal surfaces, pre-drill holes and use the included screws . For concrete, stone, brick, or tile surfaces, use a masonry drill and appropriate plugs, anchors, or screws .
It’s important when selecting a fastener to make sure it’s designed to support the weight of the shade . Follow the fastener manufacturer’s instruction from there on out .
Getting Started
STEP 1 — PARTS & TOOLS OVERVIEW
HEADRAIL
REMOTE CONTROL
BRACKET QTY SHADE WIDTH2 up to 40"3 >401⁄8"—72"4 >721⁄8"—84"5 >841⁄8" and up
Shades are shipped with the required number of brackets for proper installation . End brackets should be located approx . 3" from either end . Depending on the width of the shade, additional brackets may be necessary, evenly spaced between the two end brackets .
Brackets must be in line and level . Shim brackets on inside mounts if necessary . The head rail must be level for the shade to operate properly .
Bracket Quantity & Positioning
Motorization
BOTTOM RAIL
EXTENSION BRACKET (OPTIONAL)
SPACER BLOCKS (OPTIONAL)HOLD DOWN BRACKET (OPTIONAL)
CHARGERSCREWS
MOUNTING BRACKETS
PENCIL(NOT INCLUDED)
POWER DRILL(NOT INCLUDED)
LEVEL(NOT INCLUDED)
SCREW DRIVER (NOT INCLUDED)
5 6smithandnoble.com 800.248.8888
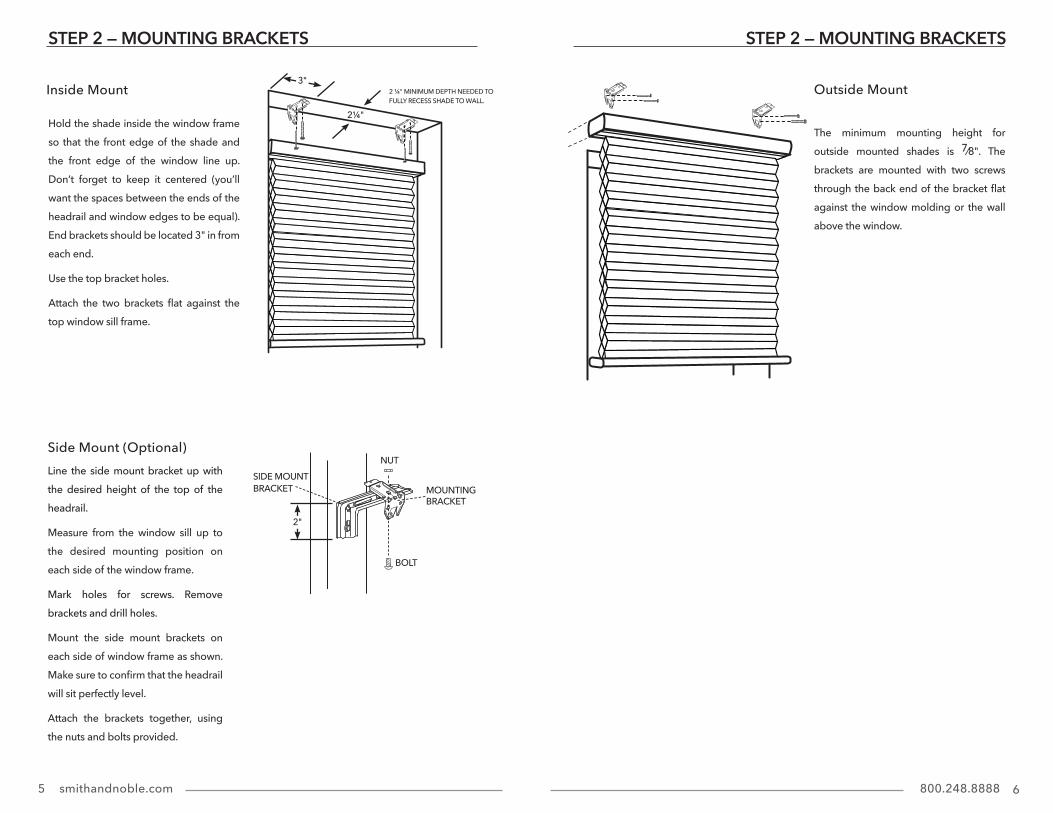
NUT
BOLT
SIDE MOUNTBRACKET MOUNTING
BRACKET
2"
Inside Mount
Hold the shade inside the window frame so that the front edge of the shade and the front edge of the window line up . Don’t forget to keep it centered (you’ll want the spaces between the ends of the headrail and window edges to be equal) . End brackets should be located 3" in from each end .
Use the top bracket holes .
Attach the two brackets flat against the top window sill frame .
Side Mount (Optional) Line the side mount bracket up with the desired height of the top of the headrail .
Measure from the window sill up to the desired mounting position on each side of the window frame .
Mark holes for screws . Remove brackets and drill holes .
Mount the side mount brackets on each side of window frame as shown . Make sure to confirm that the headrail will sit perfectly level .
Attach the brackets together, using the nuts and bolts provided .
Outside Mount
The minimum mounting height for outside mounted shades is 7⁄8". The brackets are mounted with two screws through the back end of the bracket flat against the window molding or the wall above the window .
STEP 2 — MOUNTING BRACKETS STEP 2 — MOUNTING BRACKETS
3"
2¼"
2 ¼" MINIMUM DEPTH NEEDED TO FULLY RECESS SHADE TO WALL .
7 8smithandnoble.com 800.248.8888
STEP 3 — HANGING & REMOVING THE SHADESTEP 2 — MOUNTING BRACKETS
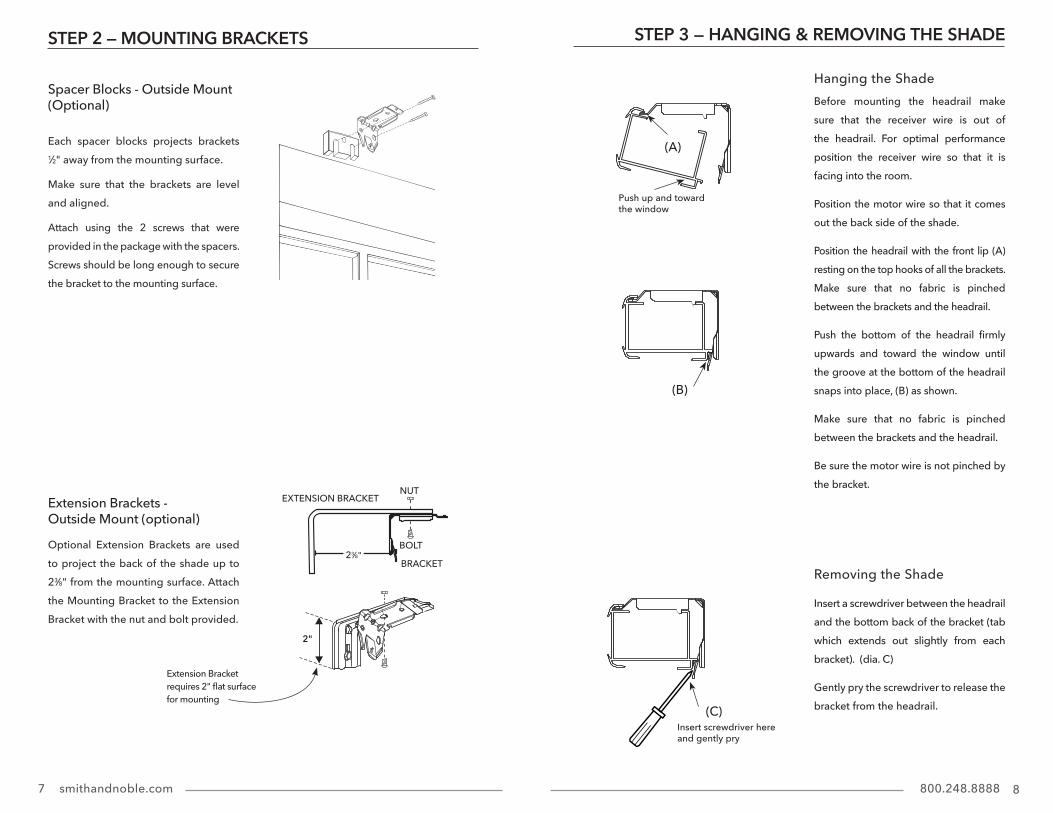
Extension Brackets - Outside Mount (optional)
Optional Extension Brackets are used to project the back of the shade up to 23⁄8" from the mounting surface . Attach the Mounting Bracket to the Extension Bracket with the nut and bolt provided .
Spacer Blocks - Outside Mount (Optional)
Each spacer blocks projects brackets 1⁄2" away from the mounting surface .
Make sure that the brackets are level and aligned .
Attach using the 2 screws that were provided in the package with the spacers . Screws should be long enough to secure the bracket to the mounting surface .
23⁄8" BOLT
NUT
BRACKET
EXTENSION BRACKET
2"
Extension Bracket requires 2" flat surface for mounting
Hanging the ShadeBefore mounting the headrail make sure that the receiver wire is out of the headrail . For optimal performance position the receiver wire so that it is facing into the room .
Position the motor wire so that it comes out the back side of the shade .
Position the headrail with the front lip (A) resting on the top hooks of all the brackets . Make sure that no fabric is pinched between the brackets and the headrail .
Push the bottom of the headrail firmly upwards and toward the window until the groove at the bottom of the headrail snaps into place, (B) as shown .
Make sure that no fabric is pinched between the brackets and the headrail .
Be sure the motor wire is not pinched by the bracket .
Removing the Shade
Insert a screwdriver between the headrail and the bottom back of the bracket (tab which extends out slightly from each bracket) . (dia . C)
Gently pry the screwdriver to release the bracket from the headrail .
(B)
(A)
Push up and toward the window
Insert screwdriver here and gently pry
(C)
9 10smithandnoble.com 800.248.8888
STEP 5 — OPERATING THE SHADESTEP 4 — LINK THE REMOTE CONTROL
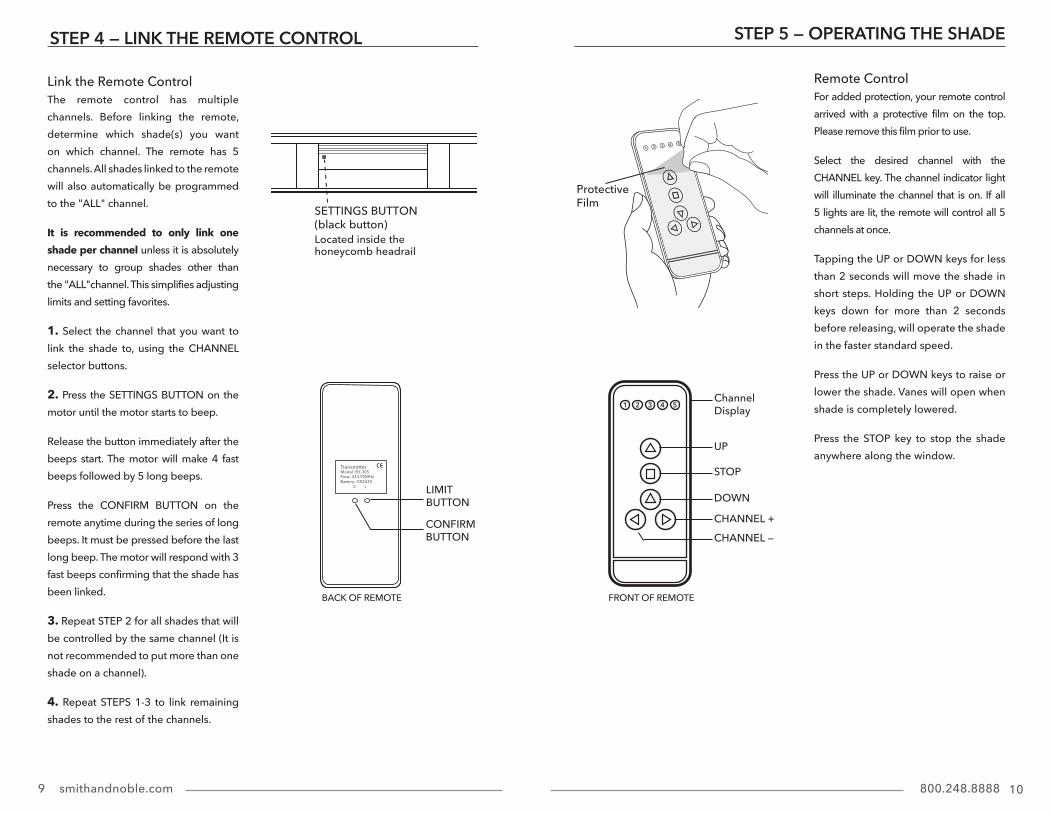
Remote ControlFor added protection, your remote control arrived with a protective film on the top . Please remove this film prior to use .
Select the desired channel with the CHANNEL key . The channel indicator light will illuminate the channel that is on . If all 5 lights are lit, the remote will control all 5 channels at once .
Tapping the UP or DOWN keys for less than 2 seconds will move the shade in short steps . Holding the UP or DOWN keys down for more than 2 seconds before releasing, will operate the shade in the faster standard speed .
Press the UP or DOWN keys to raise or lower the shade . Vanes will open when shade is completely lowered .
Press the STOP key to stop the shade anywhere along the window .
P
Link the Remote ControlThe remote control has multiple channels . Before linking the remote, determine which shade(s) you want on which channel . The remote has 5 channels . All shades linked to the remote will also automatically be programmed to the "ALL" channel .
It is recommended to only link one shade per channel unless it is absolutely necessary to group shades other than the "ALL"channel . This simplifies adjusting limits and setting favorites .
1. Select the channel that you want to link the shade to, using the CHANNEL selector buttons .
2. Press the SETTINGS BUTTON on the motor until the motor starts to beep .
Release the button immediately after the beeps start . The motor will make 4 fast beeps followed by 5 long beeps .
Press the CONFIRM BUTTON on the remote anytime during the series of long beeps . It must be pressed before the last long beep . The motor will respond with 3 fast beeps confirming that the shade has been linked .
3. Repeat STEP 2 for all shades that will be controlled by the same channel (It is not recommended to put more than one shade on a channel) .
4. Repeat STEPS 1-3 to link remaining shades to the rest of the channels .
SETTINGS BUTTON(black button) Located inside the honeycomb headrail
Protective Film
ChannelDisplay
UP
STOP
DOWN
CHANNEL +
CHANNEL —
FRONT OF REMOTE
LIMIT BUTTON
BACK OF REMOTE
CONFIRM BUTTON
11 12smithandnoble.com 800.248.8888
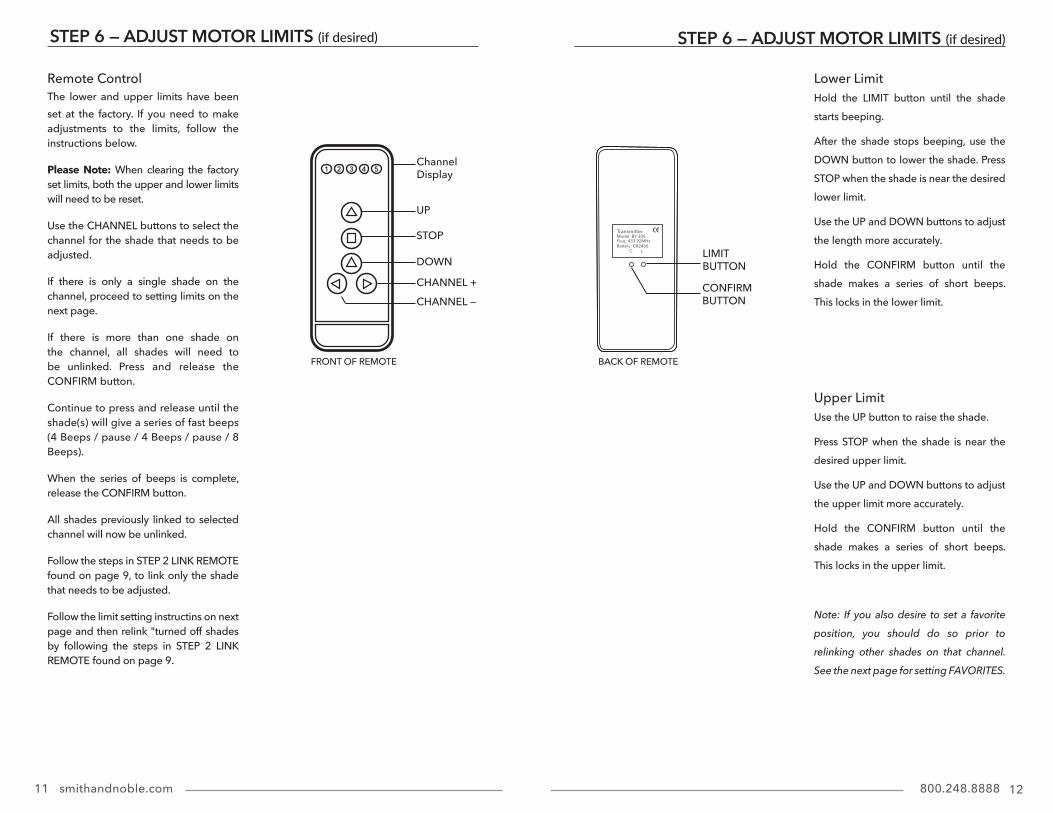
Remote ControlThe lower and upper limits have been set at the factory . If you need to make adjustments to the limits, follow the instructions below .
Please Note: When clearing the factory set limits, both the upper and lower limits will need to be reset .
Use the CHANNEL buttons to select the channel for the shade that needs to be adjusted .
If there is only a single shade on the channel, proceed to setting limits on the next page .
If there is more than one shade on the channel, all shades will need to be unlinked . Press and release the CONFIRM button .
Continue to press and release until the shade(s) will give a series of fast beeps (4 Beeps / pause / 4 Beeps / pause / 8 Beeps) .
When the series of beeps is complete, release the CONFIRM button .
All shades previously linked to selected channel will now be unlinked .
Follow the steps in STEP 2 LINK REMOTE found on page 9, to link only the shade that needs to be adjusted .
Follow the limit setting instructins on next page and then relink "turned off shades by following the steps in STEP 2 LINK REMOTE found on page 9 .
STEP 6 — ADJUST MOTOR LIMITS (if desired) STEP 6 — ADJUST MOTOR LIMITS (if desired)
Lower LimitHold the LIMIT button until the shade starts beeping .
After the shade stops beeping, use the DOWN button to lower the shade . Press STOP when the shade is near the desired lower limit .
Use the UP and DOWN buttons to adjust the length more accurately .
Hold the CONFIRM button until the shade makes a series of short beeps . This locks in the lower limit .
Upper LimitUse the UP button to raise the shade .
Press STOP when the shade is near the desired upper limit .
Use the UP and DOWN buttons to adjust the upper limit more accurately .
Hold the CONFIRM button until the shade makes a series of short beeps . This locks in the upper limit .
Note: If you also desire to set a favorite position, you should do so prior to relinking other shades on that channel. See the next page for setting FAVORITES.
LIMIT BUTTON
BACK OF REMOTE
CONFIRM BUTTON
ChannelDisplay
UP
STOP
DOWN
CHANNEL +
CHANNEL —
FRONT OF REMOTE
13 14smithandnoble.com 800.248.8888
ADVANCED PROGRAMMINGSETTING & USING A FAVORITE POSITION
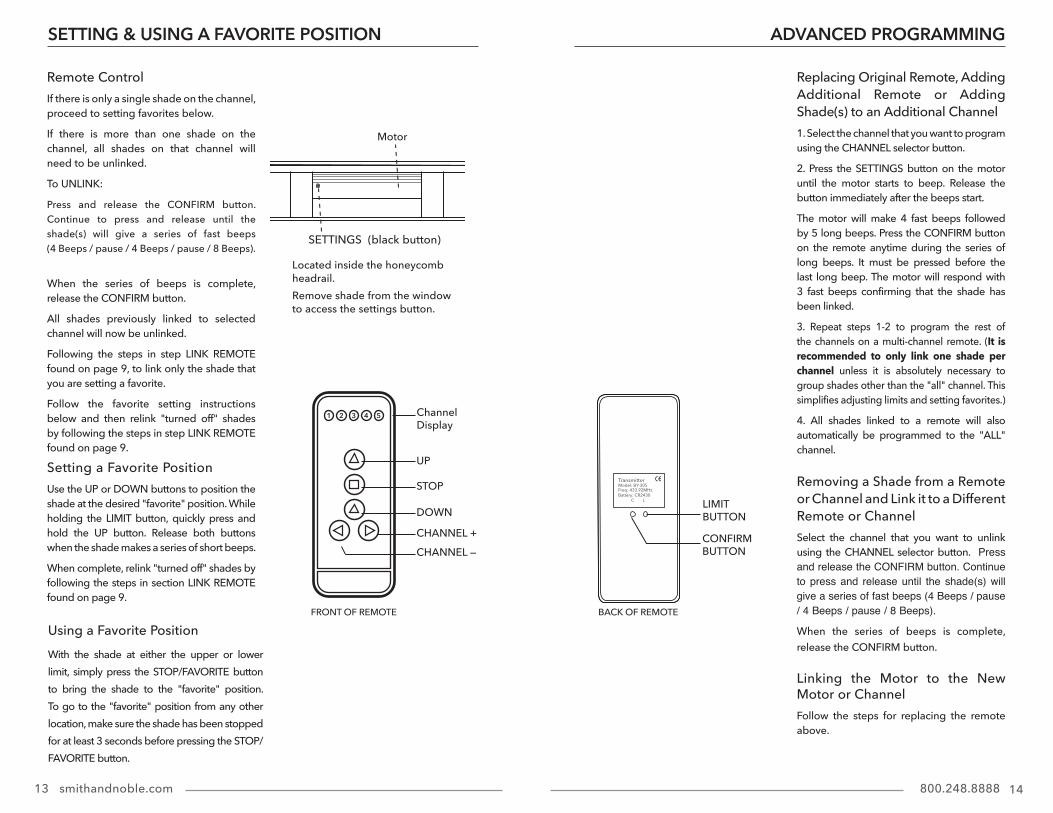
Remote ControlIf there is only a single shade on the channel, proceed to setting favorites below .
If there is more than one shade on the channel, all shades on that channel will need to be unlinked .
To UNLINK:
Press and release the CONFIRM button . Continue to press and release until the shade(s) will give a series of fast beeps (4 Beeps / pause / 4 Beeps / pause / 8 Beeps) .
When the series of beeps is complete, release the CONFIRM button .
All shades previously linked to selected channel will now be unlinked .
Following the steps in step LINK REMOTE found on page 9, to link only the shade that you are setting a favorite .
Follow the favorite setting instructions below and then relink "turned off" shades by following the steps in step LINK REMOTE found on page 9 .
Setting a Favorite PositionUse the UP or DOWN buttons to position the shade at the desired "favorite" position . While holding the LIMIT button, quickly press and hold the UP button . Release both buttons when the shade makes a series of short beeps .
When complete, relink "turned off" shades by following the steps in section LINK REMOTE found on page 9 .
Replacing Original Remote, Adding Additional Remote or Adding Shade(s) to an Additional Channel1 . Select the channel that you want to program using the CHANNEL selector button .
2 . Press the SETTINGS button on the motor until the motor starts to beep . Release the button immediately after the beeps start .
The motor will make 4 fast beeps followed by 5 long beeps . Press the CONFIRM button on the remote anytime during the series of long beeps . It must be pressed before the last long beep . The motor will respond with 3 fast beeps confirming that the shade has been linked .
3 . Repeat steps 1-2 to program the rest of the channels on a multi-channel remote . (It is recommended to only link one shade per channel unless it is absolutely necessary to group shades other than the "all" channel . This simplifies adjusting limits and setting favorites .)
4 . All shades linked to a remote will also automatically be programmed to the "ALL" channel .
Removing a Shade from a Remote or Channel and Link it to a Different Remote or ChannelSelect the channel that you want to unlink using the CHANNEL selector button . Press and release the CONFIRM button. Continue to press and release until the shade(s) will give a series of fast beeps (4 Beeps / pause / 4 Beeps / pause / 8 Beeps).
When the series of beeps is complete, release the CONFIRM button .
Linking the Motor to the New Motor or ChannelFollow the steps for replacing the remote above .
Using a Favorite PositionWith the shade at either the upper or lower limit, simply press the STOP/FAVORITE button to bring the shade to the "favorite" position . To go to the "favorite" position from any other location, make sure the shade has been stopped for at least 3 seconds before pressing the STOP/FAVORITE button .
MotorP
Located inside the honeycomb headrail . Remove shade from the window to access the settings button .
SETTINGS (black button)
LIMIT BUTTON
BACK OF REMOTE
CONFIRM BUTTON
ChannelDisplay
UP
STOP
DOWN
CHANNEL +
CHANNEL —
FRONT OF REMOTE

15 16smithandnoble .com 800 .248 .8888
CHARGING WIRE
HOLD DOWN BRACKET
ADJUSTMENT SCREW
ADJUSTMENT SCREW
REPLACING THE BATTERY, CHARGING MOTOR LEVEL THE BOTTOM RAIL, HOLD DOWN BRACKETS
Honeycomb Shades use a system that allows easy leveling of the bottom rail . It is designed to make slight adjustments (less than 1") to level the bottom rails of your shade . It is not designed to make length adjustments .
Use a fl at head screwdriver or a coin (a quarter works the best) to turn the adjustment screw to raise or lower that side of the bottom rail . The adjustment screw is on the underside of the bottom rail .
One quarter turn of the screw will move the bottom rail up or down approximately 1⁄4" .
Over-turning the adjustment screw (more than 1" of adjustment) can cause the cord to tangle or wedge inside the rail . The screw should turn easily - Do Not Force .
Level the Bottom Rail
Hold Down Brackets (optional)
Optional Hold Down Brackets are mounted with the supplied screws . With the shade at its proper drop, place the pin of each Hold Down into the hole in each End Cap and make sure the pins are level and aligned . Mark the Hold Down screw hole with a pencil . Raise the shade, then screw the Hold Down Bracket into the mounting surface . Slightly flex the hold down brackets to insert the pins into the end caps .
RemoteRemove the battery tray from the remote by inserting a fingernail into the indentation on the back of the remote . To avoid the battery falling out of the remote, remove the ray while the remote is face up .
Insert the new battery (CR2430 lithium) into the battery tray so that the writing is facing up (positive up) when the remote is face up . Slide the tray back into the remote .
Charging the MotorWhen the shade begins to operate slower than normal it is time to charge the motor . Plug the 8 .4v charger into the charging wire . The charging wire is attached to the back of the head rail at the left end .
Plug the charger into an electrical outlet .
A red light on the charger indicates that the motor is charging .
To fully charge the batteries, allow the batteries to charge for 1 hour after the light on the charger turns green . A typical charge cycle can take between 4-6 hours .
ACCESS DOOR
17 18smithandnoble.com 800.248.8888
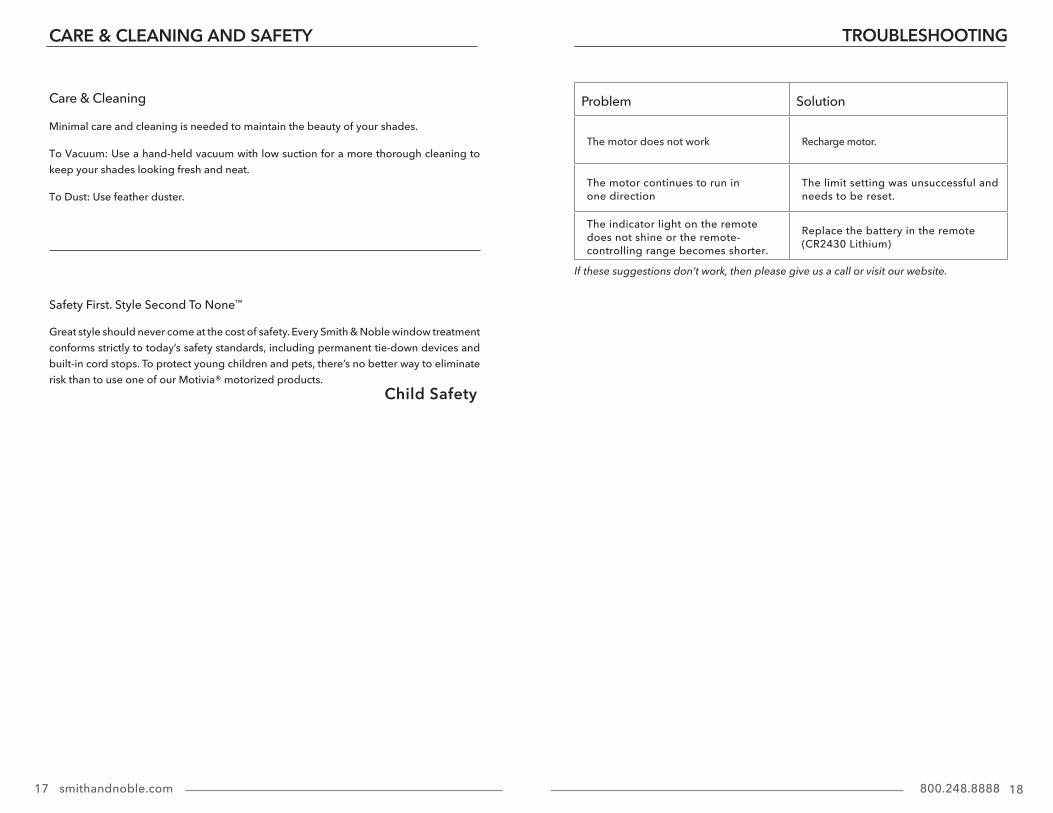
Problem Solution
The motor does not work Recharge motor .
The motor continues to run in one direction
The limit setting was unsuccessful and needs to be reset .
The indicator light on the remote does not shine or the remote-controlling range becomes shorter .
Replace the battery in the remote (CR2430 Lithium)
If these suggestions don’t work, then please give us a call or visit our website.
TROUBLESHOOTINGCARE & CLEANING AND SAFETY
Care & Cleaning
Minimal care and cleaning is needed to maintain the beauty of your shades .
To Vacuum: Use a hand-held vacuum with low suction for a more thorough cleaning to keep your shades looking fresh and neat .
To Dust: Use feather duster .
Safety First . Style Second To None™
Great style should never come at the cost of safety . Every Smith & Noble window treatment conforms strictly to today’s safety standards, including permanent tie-down devices and built-in cord stops . To protect young children and pets, there’s no better way to eliminate risk than to use one of our Motivia® motorized products .
Child Safety
© 2019 Smith & Noble Home, Inc . All Rights Reserved
Warranty Service
The enjoyment of your window coverings should be everlasting, which is why our products come with a limited lifetime warranty . The warranty applies to the original owner, requires a proof of purchase and covers defects in material or craftsmanship . Shades or blinds must have been properly installed . We reserve the right to determine if your window covering warrants a repair or a replacement . In need of warranty service? Call us at 800 .248 .8888 and we’ll arrange for a repair or replacement ASAP .
SN082019
SN_HC_M_2017_8