Embed Size (px)
Citation preview

#1 HyperConverged Appliance for SMB and ROBO
Step-by-Step Guide to Building
a Windows Server 2012 R2
Failover Cluster Using
StarWind Virtual SAN V8
JUNE 2014
WHITE PAPER BY AUGUSTO ALVAREZ
WHITE PAPER 2
Step-by-Step Guide to Building
a Windows Server 2012 R2 Failover Cluster
Using StarWind Virtual SAN V8
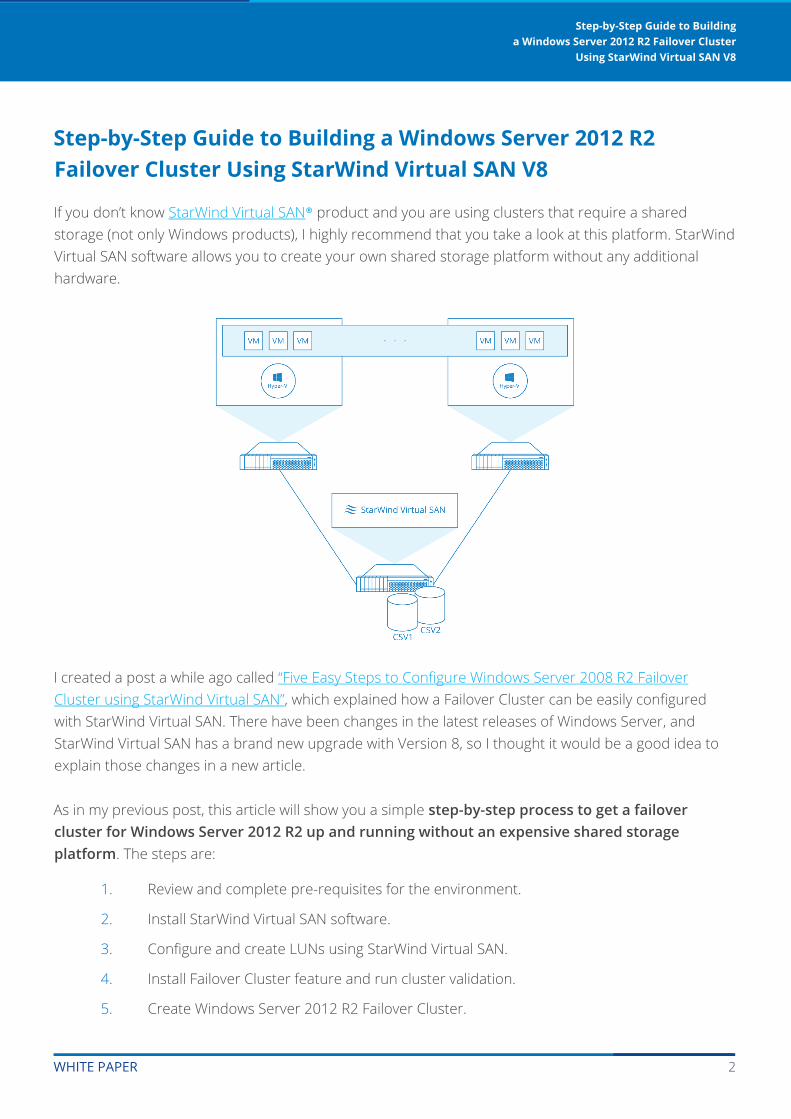
Step-by-Step Guide to Building a Windows Server 2012 R2
Failover Cluster Using StarWind Virtual SAN V8
If you don’t know StarWind Virtual SAN® product and you are using clusters that require a shared
storage (not only Windows products), I highly recommend that you take a look at this platform. StarWind
Virtual SAN software allows you to create your own shared storage platform without any additional
hardware.
I created a post a while ago called “Five Easy Steps to Configure Windows Server 2008 R2 Failover
Cluster using StarWind Virtual SAN”, which explained how a Failover Cluster can be easily configured
with StarWind Virtual SAN. There have been changes in the latest releases of Windows Server, and
StarWind Virtual SAN has a brand new upgrade with Version 8, so I thought it would be a good idea to
explain those changes in a new article.
As in my previous post, this article will show you a simple step-by-step process to get a failover
cluster for Windows Server 2012 R2 up and running without an expensive shared storage
platform. The steps are:
1. Review and complete pre-requisites for the environment.
2. Install StarWind Virtual SAN software.
3. Configure and create LUNs using StarWind Virtual SAN.
4. Install Failover Cluster feature and run cluster validation.
5. Create Windows Server 2012 R2 Failover Cluster.

WHITE PAPER 3
Step-by-Step Guide to Building
a Windows Server 2012 R2 Failover Cluster
Using StarWind Virtual SAN V8
1. Review and Complete Pre-Requisites for the Environment
Windows Server 2012 has introduced changes into failover cluster scenarios that are important
improvements, and fortunately, the basic requirements for Failover Cluster have not changed.
Requirements for Windows Server 2012 R2 Failover Cluster
• Two or more compatible servers: You need hardware that is compatible. It is highly
recommended that you use the same types of hardware to create a cluster. Microsoft requires the
hardware to meet the criteria for the “Certified for Windows Server 2012 logo”. The information
can be found in the Windows Server catalog.
• A shared storage: You can use StarWind Virtual SAN software.
• [Optional] Three network cards on each server: one public network (from which we usually
access Active Directory), a private network for heartbeat between servers and a network dedicated
to iSCSI storage communication. This is an optional requirement because using one network
card is possible but not suitable in most environments.
• All hosts must be members of Active Directory domains: To install and configure a cluster we
don’t need a Domain Admin account, but we do need a Domain account that is included in the
local Administrators of each host.
Here are two important points about changes in requirements introduced by Windows Server 2012:
• We can set up Failover Clusters on all Windows Server 2012 and Windows Server 2012 R2
editions, including Core installations. Previously, the Enterprise or Datacenter Edition were
necessary on Windows Server 2008 R2.
• The concept Active Directory-detached Cluster appears in Windows Server 2012. This means
that a Failover Cluster does not require a Computer object in the Active Directory as the access is
performed by a registration in DNS. But the cluster nodes must be joined to an Active
Directory.

WHITE PAPER 4
Step-by-Step Guide to Building
a Windows Server 2012 R2 Failover Cluster
Using StarWind Virtual SAN V8
Requirements for StarWind Virtual SAN Software
Here are the requirements for installing the component which will be in charge of receiving the iSCSI
connections:
• Windows Server 2008 R2 or Windows Server 2012
• Intel Xeon E5620 (or higher)
• 4 GB (or higher) of RAM
• 10 GB of disk space for StarWind application data and log files
• Storage available for iSCSI LUNs
• SATA/SAS/SSD drive based arrays supported.
• Software based arrays are not supported in iSCSI
• 1 Gigabit Ethernet or 10 Gigabit Ethernet
• iSCSI ports open between hosts and StarWind Virtual SAN Server. The iSCSI ports are 3260 and
3261 for the management console.
General Recommendations for the Environment
There are several Microsoft and StarWind recommendations we have to follow to get the best results.
Keep in mind that each scenario could require different recommendations.
To mention some of the general recommendations:
• NIC Teaming for adapters, excluding iSCSI. Windows Server 2012 significantly improved
performance and supportability of network adapters teaming, and it is highly recommended that
you use this option for improved performance and high availability. But avoid configuring teaming
on iSCSI network adapters!
Microsoft provides a detailed document about handling NIC teaming in Windows Server 2012
(read Windows Server 2012 NIC Teaming (LBFO) Deployment and Management and NIC Teaming
Overview).
• Multi-path for iSCSI network adapters. iSCSI network adapters work better with MPIO than with
NIC teaming because throughput can increase with MPIO, and with NIC teaming the adapter
throughput is not usually improved. Using MPIO is the recommendation with round-robin.
WHITE PAPER 5
Step-by-Step Guide to Building
a Windows Server 2012 R2 Failover Cluster
Using StarWind Virtual SAN V8
• Isolate network traffic on the Failover Cluster. It is almost mandatory that we separate iSCSI
traffic from other networks, and it is highly recommended that other traffic is isolated including
Live Migration in Hyper-V clusters, management networks, public networks, and Hyper-V replica
traffic (if this feature is enabled in Windows Server 2012).
• Drivers and firmware updated. Most hardware vendors will require all drivers and firmware
components to be updated to the latest version prior to starting a new configuration such as a
Failover Cluster. Keep in mind that having different drivers or firmware in a Failover Cluster will
cause the validation tool to fail and the cluster won’t be supported by Microsoft.
• Leave one LUN empty for future validations. The Failover Cluster Validation Tool is a great
resource to retrieve status information about the health of individual cluster components, and we
can run the tool whenever we want without causing disruption. To have a full Storage Validation, it
is necessary to have at least one LUN in the cluster that is not in use.
For more information about best practice, see the following link StarWind High Availability Best
Practices.
One important new feature introduced by StarWind Virtual SAN V8 is the Log-Structured File System
(LSFS). LSFS is a specialized file system that stores multiple files of virtual devices and ensures high
performance during writing operations with a random access pattern. This file system solves the
problem of slow disk operation and it writes data at the speed that can be achieved by the underlying
storage during sequential writes.
LSFS is currently on trial in v8, so use it carefully and validate your cluster services in a lab scenario if you
are going to deploy LSFS.

WHITE PAPER 6
Step-by-Step Guide to Building
a Windows Server 2012 R2 Failover Cluster
Using StarWind Virtual SAN V8
2. Install StarWind Virtual SAN Software
After we have checked the requirements, we can install StarWind Virtual SAN V8 software, which can be
downloaded in trial mode. This is the simplest step.
In this step, the Microsoft iSCSI service will be required to add to the server and the driver for the
software.
After the installation, we can access our console, and the next step is to configure the storage pool.
Select the path for the hard drive where you are going to store LUNs for your shared storage scenario.

WHITE PAPER 7
Step-by-Step Guide to Building
a Windows Server 2012 R2 Failover Cluster
Using StarWind Virtual SAN V8
3. Configure and create LUNs in StarWind Virtual SAN
Once the program has been installed, we can manage it from the console, where the options are quite
intuitive.
The following configuration section is in two parts:
1) Hosting iSCSI LUNs with StarWind Virtual SAN and 2) configuring the iSCSI initiator on each Windows
Server 2012 R2 host in the cluster.
Hosting iSCSI LUNs with StarWind Virtual SAN
Here are the basic steps for configuring StarWind iSCSI to start hosting LUNs for our cluster. The initial
task is to add the host:
3.1 Select the “Connect” option for the local server.
3.2 With the host added, we can create storage that will be published through iSCSI. Right-click the
server and select “Add target” and a new wizard will appear.
3.3 Select the “Target alias” from which we’ll identify the LUN we are about to create and configure to
be able to cluster. The name below will show how we can identify this target in our iSCSI clients. Click
“Next” and then “Create”.

WHITE PAPER 8
Step-by-Step Guide to Building
a Windows Server 2012 R2 Failover Cluster
Using StarWind Virtual SAN V8
3.4 With our target created, we can create devices or LUNs in that target. Click “Add Device”.

WHITE PAPER 9
Step-by-Step Guide to Building
a Windows Server 2012 R2 Failover Cluster
Using StarWind Virtual SAN V8
3.5 Select “Hard Disk Device”.
3.6 Select “Virtual Disk”. One of the other possibilities to use is “Physical Disk”, with which we can select
a hard drive and work in a ‘pass-through’ model.
“RAM Disk” is the other choice, a very interesting option with which we can use a block of RAM to be
treated as a hard drive or, in this case, as LUN. Because the speed of RAM is much faster than most
other kinds of storage, files on a RAM disk can be accessed more quickly. However, because the storage
is actually in RAM, it is volatile memory and will be lost when the computer powers off.
WHITE PAPER 10
Step-by-Step Guide to Building
a Windows Server 2012 R2 Failover Cluster
Using StarWind Virtual SAN V8
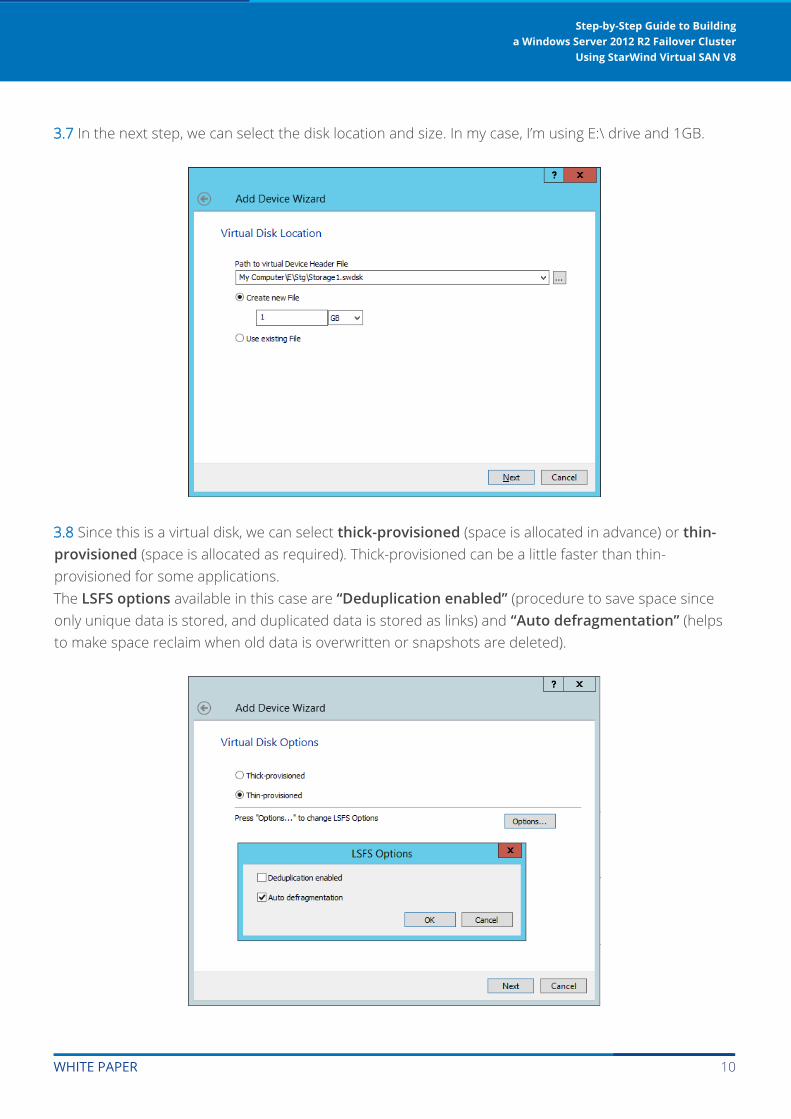
3.7 In the next step, we can select the disk location and size. In my case, I’m using E:\ drive and 1GB.
3.8 Since this is a virtual disk, we can select thick-provisioned (space is allocated in advance) or thin-
provisioned (space is allocated as required). Thick-provisioned can be a little faster than thin-
provisioned for some applications.
The LSFS options available in this case are “Deduplication enabled” (procedure to save space since
only unique data is stored, and duplicated data is stored as links) and “Auto defragmentation” (helps
to make space reclaim when old data is overwritten or snapshots are deleted).

WHITE PAPER 11
Step-by-Step Guide to Building
a Windows Server 2012 R2 Failover Cluster
Using StarWind Virtual SAN V8
3.9 In this step, we can select if we are going to use disk caching to improve performance for read and
writes on this disk. The first opportunity we have works with the memory cache, from which we can
select write-back (asynchronous, better performance but presents a risk of inconsistencies), write-
through (synchronous, slow performance but no risk of data inconsistency) or no caching at all.
Using caching can significantly increase the performance of some applications, particularly databases,
that perform large amounts of disk I/O. High-speed caсhing operates on the principle that server
memory is faster than disk memory. The memory cache stores data that is likely to be required by
applications. If a program turns to the disk for data, a first search is made for the relevant block in the
cache. If the block is found in the cache, then the program uses it, otherwise the data from the disk is
loaded into a new block of memory cache.
3.10 StarWind v8 adds a new layer to caching using L2 cache. This type of cache is represented in a
virtual file that will be placed in SSD drives for high-performance. In this step, we can create an L2 cache
file with which we can also select “write-back” or “write-through caching”.

WHITE PAPER 12
Step-by-Step Guide to Building
a Windows Server 2012 R2 Failover Cluster
Using StarWind Virtual SAN V8
3.11 We need to select a path for the L2 cache file.
3.12 Click on “Finish” and the device will be ready to be used.
3.13 In my case, I’ve created a second device in the same target.

WHITE PAPER 13
Step-by-Step Guide to Building
a Windows Server 2012 R2 Failover Cluster
Using StarWind Virtual SAN V8
Configure Windows Server 2012 R2 iSCSI Initiator
Each host must have access to the file that has been created in order to be able to create a Failover
Cluster. On each host execute the following steps:
3.12 Access “Administrative Tools”, “iSCSI Initiator”.
You will get a notification saying “Microsoft iSCSI service is not running”. Click “Yes” to start the
service.
3.13 Type the IP address used for the target host, your iSCSI server, in the “Target” pane to receive
the connections. Remember to use the IP address dedicated to iSCSI connections. If the StarWind
Virtual SAN server has a public connection, you can use it, but the traffic will be directed using that
network adapter.
3.14 Click “Quick Connect” to be authorized by the host to use these files.

WHITE PAPER 14
Step-by-Step Guide to Building
a Windows Server 2012 R2 Failover Cluster
Using StarWind Virtual SAN V8
Once connected you can access “Disk Management” to verify you can use these files as storage
attached to the operating system.
3.15 As a final step, using the first host in the cluster, put the storage file “Online” and select “Initialize
Disk”. Since these are treated as normal hard disks, the process for initializing a LUN is no different than
initializing a physical and local hard drive in the server.
Now, let’s take a look at the Failover Cluster feature.

WHITE PAPER 15
Step-by-Step Guide to Building
a Windows Server 2012 R2 Failover Cluster
Using StarWind Virtual SAN V8
4. Install Failover Cluster feature and Run Cluster Validation
Prior to configuring the cluster, we need to enable the Failover Cluster feature on all hosts in the cluster.
It is also advisable to run the verification tool provided by Microsoft to validate the consistency and
compatibility of our scenario.
4.1 In “Server Manager”, access the option “Add Roles and Features”.
4.2 Start the wizard. Do not add any role in “Server Roles”. In “Features” enable the “Failover
Clustering” option.
4.2 Once installed, access the console from “Administrative Tools”. Within the console, click “Validate
a Configuration”.

WHITE PAPER 16
Step-by-Step Guide to Building
a Windows Server 2012 R2 Failover Cluster
Using StarWind Virtual SAN V8
4.3 In the new wizard, we are going to add the hosts that will represent the Failover Cluster in order to
validate the configuration. Type in the server’s FQDN names or browse for their names. Click “Next”.
4.4 Select “Run all tests (recommended)” and click “Next”.

WHITE PAPER 17
Step-by-Step Guide to Building
a Windows Server 2012 R2 Failover Cluster
Using StarWind Virtual SAN V8
4.5 In the following screen is a list of all the tests that will be executed. Take note that the storage tests
will take some time. Click “Next”.
If you have carried out all the tasks outlined earlier, then the tests will be completed successfully. In my
case, the report generated a warning but the configuration was still supported for clustering.
The warning report provides explanatory information. In my scenario, the “Network” section generated a
warning “Node <1> is reachable from Node <2> by only one pair of network interfaces. It is
possible that this network path is a single point of failure for communication within the cluster.
Please verify that this single path is highly available or consider adding additional networks to
the cluster”. This is not a critical error and can easily be solved by adding at least one new adapter in
the cluster configuration.
4.6 Click the option “Create the cluster now using the validated nodes”. This will start as soon as you
click “Finish”.

WHITE PAPER 18
Step-by-Step Guide to Building
a Windows Server 2012 R2 Failover Cluster
Using StarWind Virtual SAN V8
5. Create Windows Server 2012 R2 Failover Cluster
By this stage, we have completed all the requirements and validated our configuration successfully. In
the next simple steps, we are going to configure our Windows Server 2012 R2 Failover Cluster.
5.1 In the Failover Cluster console, select the option “Create a cluster”.
5.2 A similar wizard will appear as in the validation tool. The first thing to do is to add the servers we
would like to cluster. Click “Next”.
5.3 In this step, we have to select the cluster name and the IP address assigned. Remember that in a
cluster, all machines are represented by one name and one IP.

WHITE PAPER 19
Step-by-Step Guide to Building
a Windows Server 2012 R2 Failover Cluster
Using StarWind Virtual SAN V8
5.4 In the summary page click “Next”.
After a few seconds, the cluster will be created and we can also see the report for the process.
Now in the Failover Cluster console we’ll get a full description of the cluster that has been created,
including the nodes involved and the storage, networks and events related to the cluster.

WHITE PAPER 20
Step-by-Step Guide to Building
a Windows Server 2012 R2 Failover Cluster
Using StarWind Virtual SAN V8
The default option for a two-node cluster is to use a disk as a witness to help us manage the cluster
quorum. This is a disk we usually assign the letter “Q:\” and it stores a small amount of information
about the cluster configuration. Its main purpose is for cluster voting.
To perform a backup for the Failover Cluster configuration, we need to back up the Q:\ drive alone.
Note that this does not back up the services configured in the Failover Cluster.
Cluster voting is used to determine which nodes and services will remain online in case of a
disconnection. For example, if a node is disconnected from the cluster and from the shared storage, the
remaining node has one ‘vote’ and the quorum disk has another ‘vote’, which together determine that
the cluster and its services will remain online.
This voting is used as a default option but can be modified in the Failover Cluster console. Modifying it
depends on and is recommended for the following scenarios: in a scenario with an odd number of
nodes, cluster voting will be required to provide a ‘Node Majority’ quorum; for a cluster stretched across
different geographical locations, it is advisable to use an even number of nodes but using a file share as
a witness in a third site.
For more information about quorums in Windows Failover clusters, read the following Microsoft
TechNet article: Configure and Manage the Quorum in a Windows Server 2012 Failover Cluster.
More Resources
To find out more about Windows Server 2012 R2 clusters and StarWind Virtual SAN follow these links to
read the articles:
• What’s New in Failover Clustering in Windows Server 2012 R2
• Failover Clustering Hardware Requirements and Storage Options
• Validate Hardware for a Failover Cluster
• Deploy a Hyper-V Cluster
• Use Cluster Shared Volumes in a Failover Cluster
• Network Recommendations for a Hyper-V Cluster in Windows Server 2012
• Cluster-Aware Updating Overview
• StarWind Software Technical Papers

WHITE PAPER 21
Step-by-Step Guide to Building
a Windows Server 2012 R2 Failover Cluster
Using StarWind Virtual SAN V8
Contacts
Augusto Alvarez
Computer geek, totally fan of the latest's IT platform solutions. Since
2006 I've been mentioned as Microsoft Student Partner, I continue
working with them, collaborating on different academic and
technological events.
Working today as IT Manager in Buenos Aires, Argentina: Managing and
coordinating IT areas. Envisioning, designing and implementing client-
driven solutions. Implementing and evangelizing agile and scrum
methodologies. Augusto Alvarez
Web-site: http://blog.augustoalvarez.com.ar Email: [email protected]
StarWind Software
US Headquarters EMEA and APAC
+1-617-449-7717 +44 20 3769 1857 (UK); +49 302 1788 849 (Germany)
+33 097 7197 857 (France);
+7 495 975 94 39 (Russian Federation and CIS)
+1-617-507-5845 1-866-790-2646
Support Portal: https://www.starwind.com/support Sales: [email protected]
Support Forum: https://www.starwind.com/forums General Information: [email protected]
In 2016, Gartner named StarWind “Cool Vendor for Compute Platforms”.
Gartner does not endorse any vendor, product or service depicted in its research publications, and does not
advise technology users to select only those vendors with the highest ratings or other designation. Gartner
research publications consist of the opinions of Gartner's research organization and should not be construed as
statements of fact. Gartner disclaims all warranties, expressed or implied, with respect to this research, including
any warranties of merchantability or fitness for a particular purpose.
www.starwind.com StarWind Software, Inc. 35 Village Rd., Suite 100, Middleton, MA 01949 USA
©2016, StarWind Software Inc. All rights reserved.