Embed Size (px)
Citation preview

Step-by-Step Guide for Setting Up VPN-based Remote Access in a Test LabThis guide provides detailed information about how you can use five computers to create a test lab with which to configure and test virtual
private network (VPN) remote access with the Microsoft® Windows® XP Professional operating system with Service Pack 2 (SP2) and the 32
bit versions of the Microsoft Windows Server™ 2003 operating system with Service Pack 1 (SP1). These instructions are designed to take you
step-by-step through the configuration required for a Point-to-Point Tunneling Protocol (PPTP) connection, a Layer Two Tunneling Protocol
(L2TP) with Internet Protocol security (L2TP/IPsec) connection, and a VPN connection that uses certificate-based Extensible Authentication
Protocol-Transport Level Security (EAP-TLS) authentication.
Setting Up the Test Lab for PPTP, L2TP/IPsec, and EAP-TLS Remote Access VPN Connections
The infrastructure for the VPN test lab network consists of five computers performing the following services:
The following diagram shows the configuration of the VPN test lab.
There is a network segment representing a corporate intranet and a network segment representing the Internet. All computers on the
corporate intranet are connected to a common hub or Layer 2 switch. All computers on the Internet are connected to a separate common hub
or Layer 2 switch. Private addresses are used throughout the test lab configuration. The private network of 172.16.0.0/24 is used for the
intranet. The private network of 10.0.0.0/24 is used for the simulated Internet. Windows Firewall is set up and configured on the RADIUS
Note:
The following instructions are for configuring a test lab using a minimum number of computers. Individual computers are needed to separate
the services provided on the network and to show the desired functionality clearly. This configuration is designed to reflect neither best
practices nor a desired or recommended configuration for a production network. The configuration, including IP addresses and all other
configuration parameters, is designed to work only on a separate test lab network.
• A computer running Windows Server 2003 with SP1, Enterprise Edition, named DC1 that is acting as a domain controller, a Domain
Name System (DNS) server, a Dynamic Host Configuration Protocol (DHCP) server, and a certification authority (CA).
• A computer running Windows Server 2003 with SP1, Standard Edition, named IAS1 that is acting as a Remote Authentication Dial
User Service (RADIUS) server.
• A computer running Windows Server 2003 with SP1, Standard Edition, named IIS1 that is acting as a Web and file server.
• A computer running Windows Server 2003 with SP1, Standard Edition, named VPN1 that is acting as a VPN server. VPN1 has two
network adapters installed.
• A computer running Windows XP Professional with SP2 named CLIENT1 that is acting as a VPN client.
Página 1 de 54Step-by-Step Guide for Setting Up VPN-based Remote Access in a Test Lab
10/04/2008http://technet2.microsoft.com/windowsserver/en/library/1d1f2391-1ef0-4888-8e2b-ce99b...

server (IAS1), the Web and file server (IIS1), and the client computer (CLIENT1). Windows Firewall should not be turned on or configured on
either the domain controller (DC1) or the VPN server (VPN1). In addition, the Windows Firewall/Internet Connection Sharing (ICS) service
should be disabled on VPN1.
IIS1 obtains its IP address configuration using DHCP. CLIENT1 uses DHCP for its IP address configuration; however, it is also configured with
an alternate IP configuration so that it can be placed on either the intranet network segment or the simulated Internet. All other computers
have a manual IP address configuration. There are no Windows Internet Name Service (WINS) servers present.
To reconstruct this test lab, configure the computers in the order presented, beginning with the PPTP-based remote access VPN connection.
Additional sections of this guide describe L2TP/IPsec-based and EAP-TLS-based remote access VPN connections.
PPTP-based Remote Access VPN Connections
The following sections describe how to set up and configure each of the computers in the test lab for a PPTP-based remote access VPN
connection. PPTP is typically used when there is no public key infrastructure (PKI) to issue computer certificates that are required for
L2TP/IPsec connections.
DC1
DC1 is a computer running Windows Server 2003 with SP1, Enterprise Edition, that is providing the following services:
• A domain controller for the example.com Active Directory® domain.
• A DNS server for the example.com DNS domain.
• A DHCP server for the intranet network segment
• The enterprise root certification authority (CA) for the example.com domain.
Note:
Windows Server 2003 with SP1, Enterprise Edition, is used so that autoenrollment of user certificates for EAP-TLS authentication can be
configured. This is described in the "EAP-TLS-based Remote Access VPN Connections" section of this guide.
Configure DC1
1. Install Windows Server 2003 with SP1, Enterprise Edition, as a stand-alone server.
2. Configure the TCP/IP protocol with the IP address of 172.16.0.1 and the subnet mask of 255.255.255.0.
Configure DC1 as a domain controller
1. To start the Active Directory Installation Wizard, click Start, click Run, type dcpromo, and then click OK.
2. In the Welcome to the Active Directory Installation Wizard dialog box, click Next.
3. In the Operating System Compatibility dialog box, click Next.
4. Verify that Domain controller for a new domain option is selected, and then click Next.
5. Verify that Domain in a new forest is selected, and then click Next.
6. Verify that No, just install and configure DNS on this computer is selected, and then click Next.
7. On the New Domain Name page, type example.com, and then click Next.
Página 2 de 54Step-by-Step Guide for Setting Up VPN-based Remote Access in a Test Lab
10/04/2008http://technet2.microsoft.com/windowsserver/en/library/1d1f2391-1ef0-4888-8e2b-ce99b...
8. On the NetBIOS Domain Name page, confirm that the Domain NetBIOS name is EXAMPLE, and then click
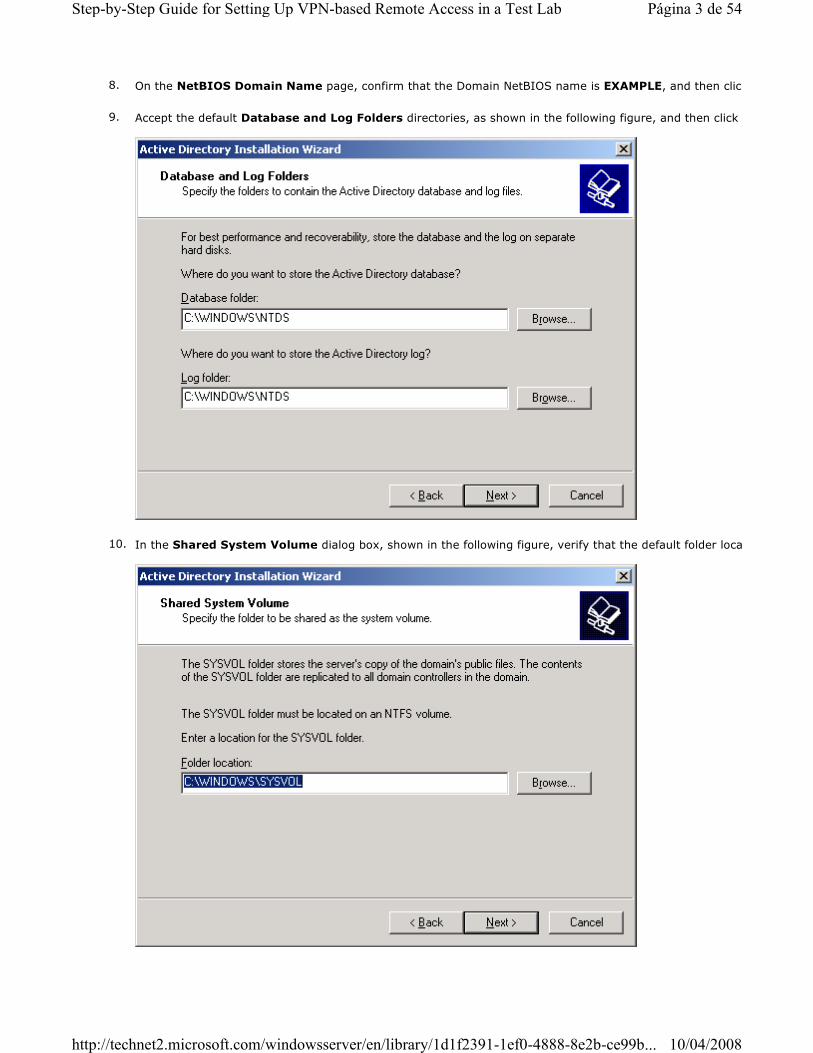
9. Accept the default Database and Log Folders directories, as shown in the following figure, and then click
10. In the Shared System Volume dialog box, shown in the following figure, verify that the default folder location is correct. Click
Página 3 de 54Step-by-Step Guide for Setting Up VPN-based Remote Access in a Test Lab
10/04/2008http://technet2.microsoft.com/windowsserver/en/library/1d1f2391-1ef0-4888-8e2b-ce99b...

11. On the Permissions page, verify that the Permissions compatible only with Windows 2000 or Windows Server 2003
operating systems check box is selected, as shown in the following figure. Click Next.
12. On the Directory Services Restore Mode Administration Password page, leave the passwords blank, and then click
13. Review the information that appears on the Summary page, and then click Next.
Página 4 de 54Step-by-Step Guide for Setting Up VPN-based Remote Access in a Test Lab
10/04/2008http://technet2.microsoft.com/windowsserver/en/library/1d1f2391-1ef0-4888-8e2b-ce99b...

14. On the Completing the Active Directory Installation Wizard page, click Finish.
15. When prompted to restart the computer, click Restart Now.
Raise the domain functional level
1. Open the Active Directory Domains and Trusts snap-in from the Administrative Tools folder, and then right
computer dc1.example.com.
2. Click Raise Domain Functional Level, select Windows Server 2003 on the Raise Domain Functional Level
Raise, as shown in the following figure.
Página 5 de 54Step-by-Step Guide for Setting Up VPN-based Remote Access in a Test Lab
10/04/2008http://technet2.microsoft.com/windowsserver/en/library/1d1f2391-1ef0-4888-8e2b-ce99b...

Install and configure DHCP
1. In Control Panel, double-click Add or Remove Programs, and then install DHCP as a Networking Services component.
2. Open the DHCP snap-in from the Administrative Tools folder.
3. Click Action, and then click Authorize to authorize the DHCP service.
4. In the console tree, right-click dc1.example.com, and then click New Scope.
5. On the Welcome page of the New Scope Wizard, click Next.
6. On the Scope Name page, type CorpNet in Name. This is shown in the following figure.
Página 6 de 54Step-by-Step Guide for Setting Up VPN-based Remote Access in a Test Lab
10/04/2008http://technet2.microsoft.com/windowsserver/en/library/1d1f2391-1ef0-4888-8e2b-ce99b...

7. Click Next. On the IP Address Range page, type 172.16.0.10 in Start IP address, 172.16.0.100 in End IP address
Length. This is shown in the following figure.
8. Click Next. On the Add Exclusions page, click Next.
Página 7 de 54Step-by-Step Guide for Setting Up VPN-based Remote Access in a Test Lab
10/04/2008http://technet2.microsoft.com/windowsserver/en/library/1d1f2391-1ef0-4888-8e2b-ce99b...

9. On the Lease Duration page, click Next.
10. On the Configure DHCP Options page, click Yes, I want to configure DHCP options now. This is shown in the following figure.
11. Click Next. On the Router (Default Gateway) page, click Next.
12. On the Domain Name and DNS Servers page, type example.com in Parent domain. Type 172.16.0.1 in
click Add. This is shown in the following figure.
Página 8 de 54Step-by-Step Guide for Setting Up VPN-based Remote Access in a Test Lab
10/04/2008http://technet2.microsoft.com/windowsserver/en/library/1d1f2391-1ef0-4888-8e2b-ce99b...

13. Click Next. On the WINS Servers page, click Next.
14. On the Activate Scope page, click Yes, I want to activate this scope now. This is shown in the following figure.
15. Click Next. On the Completing the New Scope Wizard page, click Finish.
Página 9 de 54Step-by-Step Guide for Setting Up VPN-based Remote Access in a Test Lab
10/04/2008http://technet2.microsoft.com/windowsserver/en/library/1d1f2391-1ef0-4888-8e2b-ce99b...

Install Certificate Services
1. In Control Panel, double-click Add or Remove Programs, and then install the Certificate Services component as an enterprise root CA
with the name Example CA.
2. Select Enterprise root CA, as shown in the following figure, and then click Next.
3. Type Example CA for the Common name for this CA, as shown in the following figure, and then click Next
Página 10 de 54Step-by-Step Guide for Setting Up VPN-based Remote Access in a Test Lab
10/04/2008http://technet2.microsoft.com/windowsserver/en/library/1d1f2391-1ef0-4888-8e2b-ce99b...

4. Click Next to accept the default Certificate Database Settings shown in the following figure.
5.
Página 11 de 54Step-by-Step Guide for Setting Up VPN-based Remote Access in a Test Lab
10/04/2008http://technet2.microsoft.com/windowsserver/en/library/1d1f2391-1ef0-4888-8e2b-ce99b...

Click Finish.
Add computers, users, and groups to the domain
1. Open the Active Directory Users and Computers snap-in.
2. In the console tree, open example.com.
3. Right-click Users, point to New, and then click Computer.
4. In the New Object - Computer dialog box, type IAS1 in Computer name. This is shown in the following figure.
5. Click Next. In the Managed dialog box, click Next. In the New Object - Computer dialog box, click Finish
6. Use steps 3 through 5 to create additional computer accounts with the following names: IIS1, VPN1, and CLIENT1
7. In the console tree, right-click Users, point to New, and then click User.
8. In the New Object - User dialog box, type VPNUser in First name, and type VPNUser in User logon name
following figure.
Página 12 de 54Step-by-Step Guide for Setting Up VPN-based Remote Access in a Test Lab
10/04/2008http://technet2.microsoft.com/windowsserver/en/library/1d1f2391-1ef0-4888-8e2b-ce99b...
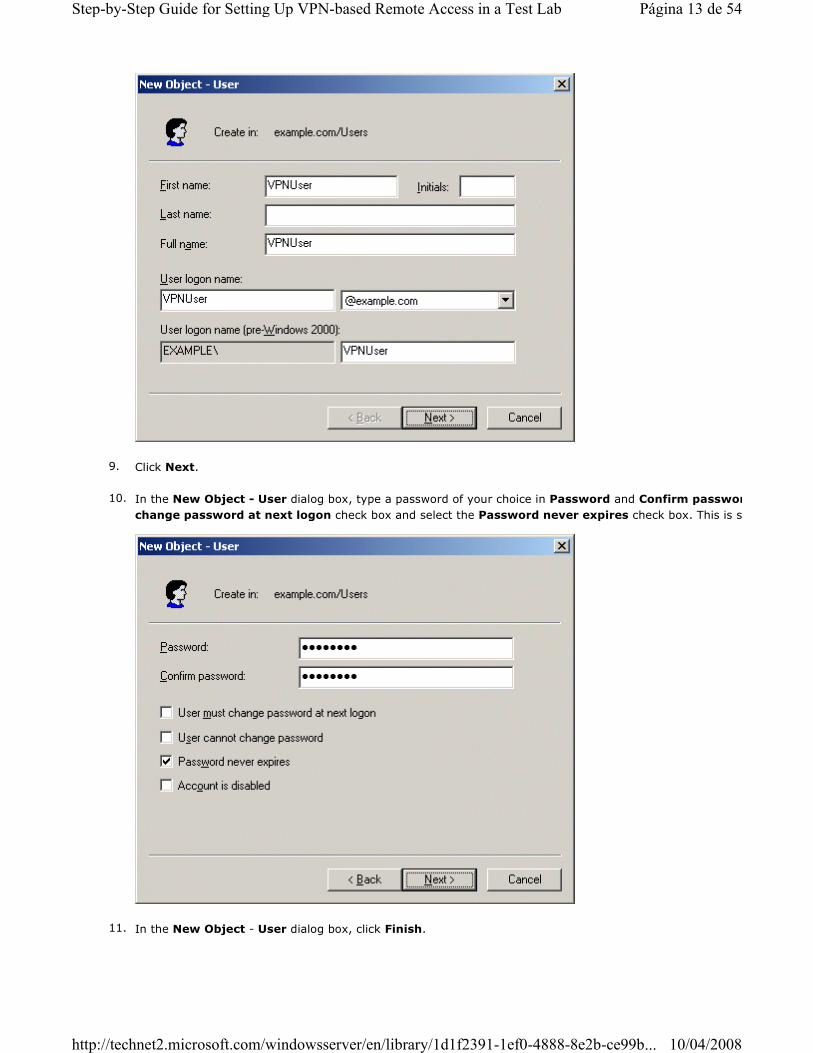
9. Click Next.
10. In the New Object - User dialog box, type a password of your choice in Password and Confirm password
change password at next logon check box and select the Password never expires check box. This is shown in the following figure.
11. In the New Object - User dialog box, click Finish.
Página 13 de 54Step-by-Step Guide for Setting Up VPN-based Remote Access in a Test Lab
10/04/2008http://technet2.microsoft.com/windowsserver/en/library/1d1f2391-1ef0-4888-8e2b-ce99b...

12. In the console tree, right-click Users, point to New, and then click Group.
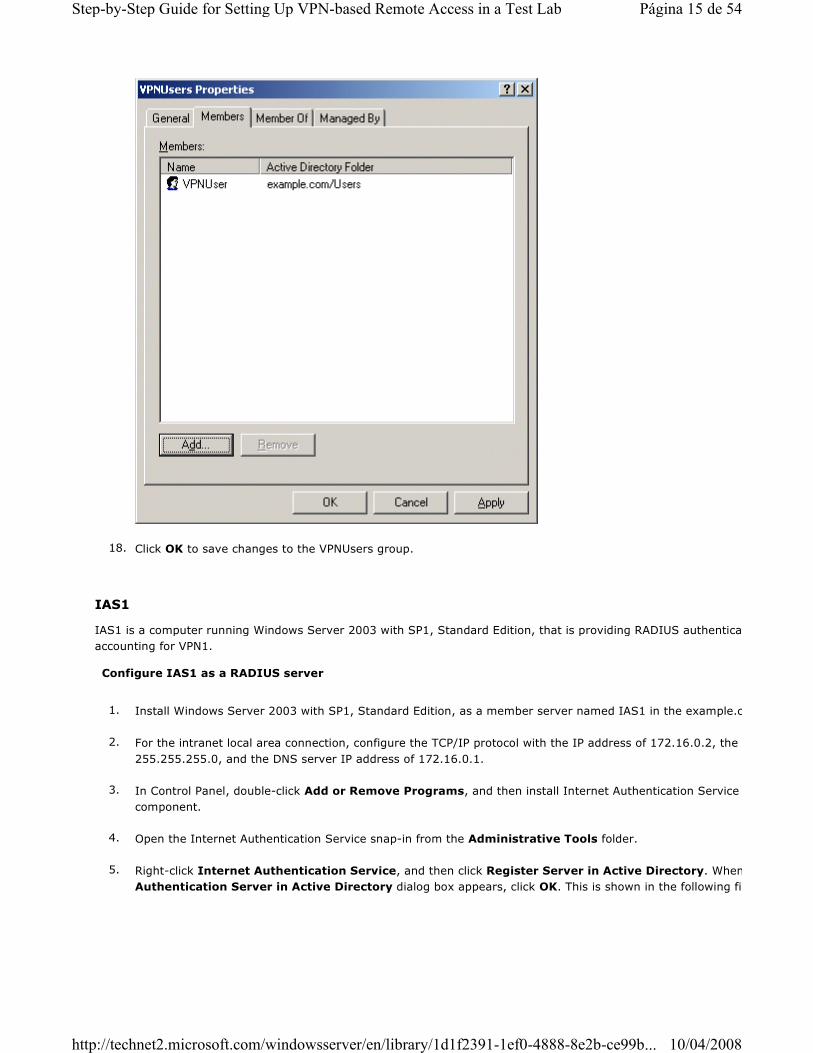
13. In the New Object - Group dialog box, type VPNUsers in Group name, and then click OK. This is shown in the following figure.
14. In the details pane, double-click VPNUsers.
15. Click the Members tab, and then click Add.
16. In the Select Users, Contacts, Users, or Groups dialog box, type vpnuser in Enter the object names to select
the following figure.
17. Click OK. In the Multiple Names Found dialog box, click OK. The VPNUser user account is added to the VPNUsers group. This is
shown in the following figure.
Página 14 de 54Step-by-Step Guide for Setting Up VPN-based Remote Access in a Test Lab
10/04/2008http://technet2.microsoft.com/windowsserver/en/library/1d1f2391-1ef0-4888-8e2b-ce99b...
IAS1
IAS1 is a computer running Windows Server 2003 with SP1, Standard Edition, that is providing RADIUS authentication, authorization, and
accounting for VPN1.
18. Click OK to save changes to the VPNUsers group.
Configure IAS1 as a RADIUS server
1. Install Windows Server 2003 with SP1, Standard Edition, as a member server named IAS1 in the example.com domain.
2. For the intranet local area connection, configure the TCP/IP protocol with the IP address of 172.16.0.2, the subnet mask of
255.255.255.0, and the DNS server IP address of 172.16.0.1.
3. In Control Panel, double-click Add or Remove Programs, and then install Internet Authentication Service as a Networking Services
component.
4. Open the Internet Authentication Service snap-in from the Administrative Tools folder.
5. Right-click Internet Authentication Service, and then click Register Server in Active Directory. When the
Authentication Server in Active Directory dialog box appears, click OK. This is shown in the following figure.
Página 15 de 54Step-by-Step Guide for Setting Up VPN-based Remote Access in a Test Lab
10/04/2008http://technet2.microsoft.com/windowsserver/en/library/1d1f2391-1ef0-4888-8e2b-ce99b...

6. In the console tree, right-click RADIUS Clients, and then click New RADIUS Client.
7. On the Name and Address page of the New RADIUS Client wizard, for Friendly name, type VPN1. In Client address (IP or DNS)
type 172.16.0.4. This is shown in the following figure.
8. Click Next. On the Additional Information page of the New RADIUS Client wizard, for Shared secret, type a shared secret for
VPN1, and then type it again in Confirm shared secret. This is shown in the following figure.
Página 16 de 54Step-by-Step Guide for Setting Up VPN-based Remote Access in a Test Lab
10/04/2008http://technet2.microsoft.com/windowsserver/en/library/1d1f2391-1ef0-4888-8e2b-ce99b...

9. Click Finish.
10. In the console tree, right-click Remote Access Policies, and then click New Remote Access Policy.
11. On the Welcome to the New Remote Access Policy Wizard page, click Next.
12. On the Policy Configuration Method page, type VPN remote access to intranet in Policy name. This is shown in the following
figure.
Página 17 de 54Step-by-Step Guide for Setting Up VPN-based Remote Access in a Test Lab
10/04/2008http://technet2.microsoft.com/windowsserver/en/library/1d1f2391-1ef0-4888-8e2b-ce99b...

13. Click Next. On the Access Method page, select VPN. This is shown in the following figure.
14. Click Next. On the User or Group Access page, click Group. This is shown in the following figure.
Página 18 de 54Step-by-Step Guide for Setting Up VPN-based Remote Access in a Test Lab
10/04/2008http://technet2.microsoft.com/windowsserver/en/library/1d1f2391-1ef0-4888-8e2b-ce99b...

15. Click Add. In the Select Groups dialog box, click Locations, select example.com as the location, and then click
16. Type vpnusers in Enter the object names to select. This is shown in the following figure.
17. Click OK. The VPNUsers group in the example.com domain is added to the list of groups on the User or Group Access
shown in the following figure.
Página 19 de 54Step-by-Step Guide for Setting Up VPN-based Remote Access in a Test Lab
10/04/2008http://technet2.microsoft.com/windowsserver/en/library/1d1f2391-1ef0-4888-8e2b-ce99b...

18. Click Next. On the Authentication Methods page, the Microsoft Encrypted Authentication version 2 (MS
authentication protocol is selected by default. This is shown in the following figure.
19. Click Next. On the Policy Encryption Level page, clear the Basic encryption and Strong encryption check boxes, leaving only
Página 20 de 54Step-by-Step Guide for Setting Up VPN-based Remote Access in a Test Lab
10/04/2008http://technet2.microsoft.com/windowsserver/en/library/1d1f2391-1ef0-4888-8e2b-ce99b...

Strongest encryption selected. This is shown in the following figure.
20. Click Next. On the Completing the New Remote Access Policy page, click Finish.
Configure Windows Firewall on IAS1
1. In Control Panel, double-click Windows Firewall.
2. In the Windows Firewall dialog box, click the Exceptions tab.
3. Click Add Port, and in the Add a Port dialog box add the following port exceptions:
Note:
You must click Add Port on the Exceptions tab for each port exception.
Name Port Number Protocol
Legacy RADIUS 1645 UDP
Legacy RADIUS 1646 UDP
RADIUS Accounting 1812 UDP
RADIUS Authentication 1813 UDP
4. Verify that the four port exceptions that you added are selected on the Exceptions tab, as shown in the following example.
Página 21 de 54Step-by-Step Guide for Setting Up VPN-based Remote Access in a Test Lab
10/04/2008http://technet2.microsoft.com/windowsserver/en/library/1d1f2391-1ef0-4888-8e2b-ce99b...

IIS1
IIS1 is a computer running Windows Server 2003 with SP1, Standard Edition, and Internet Information Services (IIS). It is providing Web and
file server services for intranet clients. To configure IIS1 as a Web and file server and to configure Windows Firewall on IIS1, perform the
following steps.
5. Click the Advanced tab, and then click Settings for Security Logging.
6. In the Log Setting dialog box, select Log dropped packets and Log successful connections. Note the path and file name in
The log file allows you to see where connection errors occur, as well as which source and destination ports the errors occurred on. This
log file should provide you with the information needed in case you need to add more ports to the exception list.
7. Click OK twice to close Windows Firewall.
Configure IIS1 as a Web and file server
1. Install Windows Server 2003 with SP1, Standard Edition, as a member server named IIS1 in the example.com domain.
2. In Control Panel, double-click Add or Remove Programs, and then install Internet Information Services (IIS) as a subcomponent of
the Application Server component in the Windows Components Wizard.
Página 22 de 54Step-by-Step Guide for Setting Up VPN-based Remote Access in a Test Lab
10/04/2008http://technet2.microsoft.com/windowsserver/en/library/1d1f2391-1ef0-4888-8e2b-ce99b...

VPN1
VPN1 is a computer running Windows Server 2003 with SP1, Standard Edition, that is providing VPN server services for Internet
clients.
3. On IIS1, use Windows Explorer to create a new share for the root folder of drive C using the share name ROOT with the default
permissions.
4. To determine whether the Web server is working correctly, run Internet Explorer on IAS1. If the Internet Connection Wizard prompts
you, configure Internet connectivity for a LAN connection. In Internet Explorer, in Address, type
http://IIS1.example.com/iisstart.htm. You should see a message saying the Web site is under construction.
5. To determine whether file sharing is working correctly, on IAS1, click Start, click Run, type \\IIS1\ROOT, and then click
should see the contents of the root folder of drive C on IIS1.
Configure Windows Firewall on IIS1
1. In Control Panel, double-click Windows Firewall.
2. In the Windows Firewall dialog box, click the Exceptions tab.
3. Select File and Print Sharing, and then click Add Program.
4. In the Add a Program dialog box, select Internet Explorer, and then click OK.
5. Click Add a Port.
6. In the Add a Port dialog box, type World Wide Web Publishing Service for the Name, type 80 for the Port number
as the type of traffic processed by the port, and then click OK.
7. Verify that File and Print Sharing, Internet Explorer, and World Wide Web Publishing Service are all selected in the
Exceptions dialog box, and then click the Advanced tab.
8. Click Settings for Security Logging.
9. In the Log Setting dialog box, select Log dropped packets and Log successful connections. Note the path and file name in
Name.
10. Click OK twice to close Windows Firewall.
Configure the VPN server
1. Install Windows Server 2003 with SP1, Standard Edition, as a member server named VPN1 in the example.com domain.
2. Open the Network Connections folder.
3. For the intranet local area connection, rename the connection to CorpNet. For the Internet local area connection, rename the
connection to Internet. This is shown in the following figure.
Página 23 de 54Step-by-Step Guide for Setting Up VPN-based Remote Access in a Test Lab
10/04/2008http://technet2.microsoft.com/windowsserver/en/library/1d1f2391-1ef0-4888-8e2b-ce99b...

Windows Firewall and Routing and Remote Access cannot run simultaneously on VPN1. If Windows Firewall is turned on, you will need to turn it
off; if the Windows Firewall/Internet Connection Sharing (ICS) service has started or is set to automatic before you configure Routing and
Remote Access, you must disable it.
4. Configure the TCP/IP protocol for the CorpNet connection with the IP address of 172.16.0.4, the subnet mask of 255.255.255.0, and the
DNS server IP address of 172.16.0.1.
5. Configure the TCP/IP protocol for the Internet connection with the IP address of 10.0.0.2 and the subnet mask of 255.255.255.0.
Disable the Windows Firewall/Internet Connection Sharing (ICS) service
1. Click Administrative Tools, and then click Services.
2. In the Services details pane, right-click Windows Firewall/Internet Connection Sharing (ICS) service, and then click
3. If the service Startup Type is either Automatic or Manual, change it to Disabled.
4. Click OK to close the Windows Firewall/Internet Connection Sharing (ICS) dialog box, and then close the
Configure Routing and Remote Access
1. Run the Routing and Remote Access snap-in from the Administrative Tools folder.
2. In the console tree, right-click VPN1, then and click Configure and Enable Routing and Remote Access
3. On the Welcome to the Routing and Remote Access Server Setup Wizard page, click Next.
4. On the Configuration page, Remote access (dial-up or VPN) is selected by default. This is shown in the following figure.
Página 24 de 54Step-by-Step Guide for Setting Up VPN-based Remote Access in a Test Lab
10/04/2008http://technet2.microsoft.com/windowsserver/en/library/1d1f2391-1ef0-4888-8e2b-ce99b...

5. Click Next. On the Remote Access page, select VPN. This is shown in the following figure.
Página 25 de 54Step-by-Step Guide for Setting Up VPN-based Remote Access in a Test Lab
10/04/2008http://technet2.microsoft.com/windowsserver/en/library/1d1f2391-1ef0-4888-8e2b-ce99b...

6. Click Next. On the VPN Connection page, click the Internet interface in Network interfaces. This is shown in the following figure.
7. Click Next. On the IP Address Assignment page, Automatically is selected by default. This is shown in the following figure.
Página 26 de 54Step-by-Step Guide for Setting Up VPN-based Remote Access in a Test Lab
10/04/2008http://technet2.microsoft.com/windowsserver/en/library/1d1f2391-1ef0-4888-8e2b-ce99b...

8. Click Next. On the Managing Multiple Remote Access Servers page, click Yes, set up this server to work with a RADIUS
server. This is shown in the following figure.
Página 27 de 54Step-by-Step Guide for Setting Up VPN-based Remote Access in a Test Lab
10/04/2008http://technet2.microsoft.com/windowsserver/en/library/1d1f2391-1ef0-4888-8e2b-ce99b...

9. Click Next. On the RADIUS Server Selection page, type 172.16.0.2 in Primary RADIUS server and the shared secret in
secret. This is shown in the following figure.
10. Click Next. On the Completing the Routing and Remote Access Server Setup Wizard page, click Finish
11. You are prompted with a message describing the need to configure the DHCP Relay Agent. This is shown in the following figure.
12. Click OK.
13. In the console tree, open VPN1 (local), then IP Routing, and then DHCP Relay Agent. Right-click DHCP Relay Agent
click Properties.
14. In the DHCP Relay Agent Properties dialog box, type 172.16.0.1 in Server address. This is shown in the following figure.
Página 28 de 54Step-by-Step Guide for Setting Up VPN-based Remote Access in a Test Lab
10/04/2008http://technet2.microsoft.com/windowsserver/en/library/1d1f2391-1ef0-4888-8e2b-ce99b...

CLIENT1
CLIENT1 is a computer running Windows XP Professional with SP2 that is acting as a VPN client and gaining remote access to intranet
resources across the simulated Internet.
15. Click Add, and then click OK.
Configure Client1 as a VPN client for a PPTP connection
1. Connect CLIENT1 to the intranet network segment.
2. On CLIENT1, install Windows XP Professional with SP2 as a member computer named CLIENT1 of the example.com domain.
Note:
Installing Windows XP Professional with SP2 also installs and automatically turns on Windows Firewall. Leave Windows Firewall turned
on for this scenario. You will not need to configure any port or program exceptions.
3. Add the VPNUser account in the example.com domain to the local Administrators group.
4. Log off and then log on using the VPNUser account in the example.com domain.
5. In Control Panel, open the Network Connections folder, obtain properties on the Local Area Network connection, and then obtain
properties on the Internet protocol (TCP/IP).
6.
Página 29 de 54Step-by-Step Guide for Setting Up VPN-based Remote Access in a Test Lab
10/04/2008http://technet2.microsoft.com/windowsserver/en/library/1d1f2391-1ef0-4888-8e2b-ce99b...

Click the Alternate Configuration tab, and then click User configured.
7. In IP address, type 10.0.0.1. In Subnet mask, type 255.255.255.0. This is shown in the following figure.
8. Click OK to save changes to the TCP/IP properties. Click OK to save changes to the Local Area Network connection.
9. Shut down the CLIENT1 computer.
10. Disconnect CLIENT1 from the intranet network segment, and connect it to the simulated Internet network segment.
11. Restart CLIENT1 and log on using the VPNUser account.
12. On CLIENT1, in Control Panel, open the Network Connections folder.
13. In Network Tasks, click Create a new connection.
14. On the Welcome to the New Connection Wizard page of the New Connection Wizard, click Next.
15. On the Network Connection Type page, click Connect to the network at my workplace. This is shown in the following figure.
Página 30 de 54Step-by-Step Guide for Setting Up VPN-based Remote Access in a Test Lab
10/04/2008http://technet2.microsoft.com/windowsserver/en/library/1d1f2391-1ef0-4888-8e2b-ce99b...
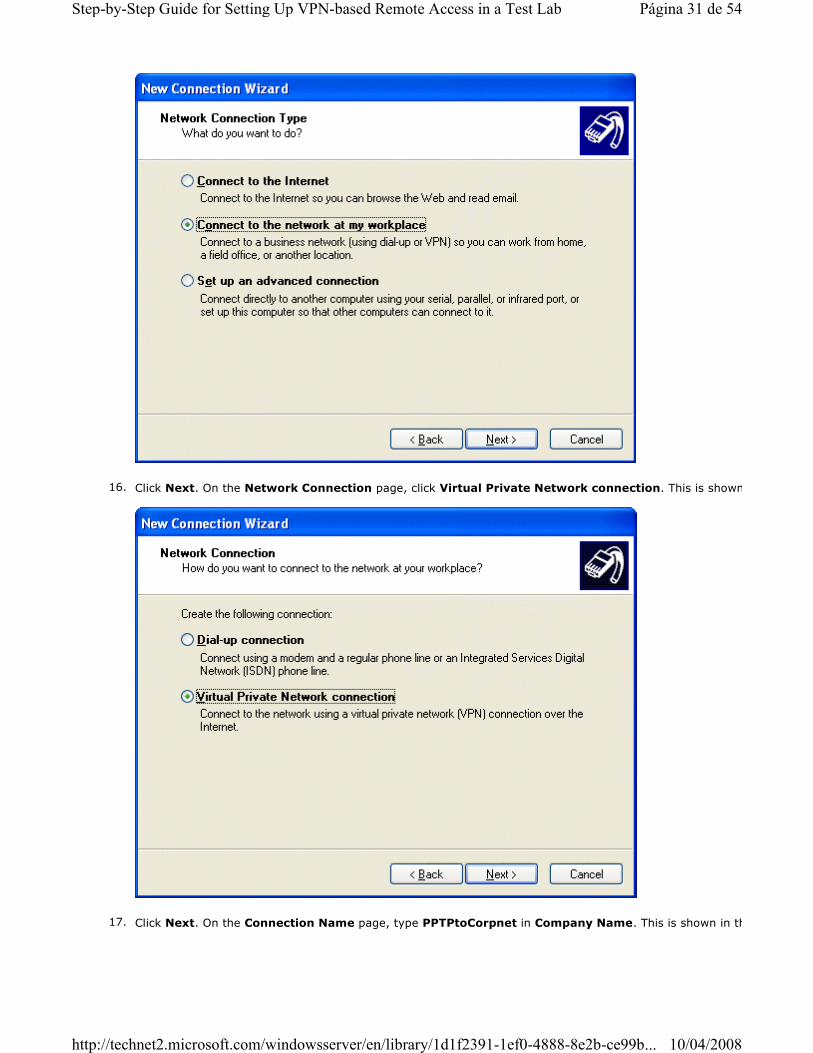
16. Click Next. On the Network Connection page, click Virtual Private Network connection. This is shown in the following figure.
17. Click Next. On the Connection Name page, type PPTPtoCorpnet in Company Name. This is shown in the following figure.
Página 31 de 54Step-by-Step Guide for Setting Up VPN-based Remote Access in a Test Lab
10/04/2008http://technet2.microsoft.com/windowsserver/en/library/1d1f2391-1ef0-4888-8e2b-ce99b...

18. Click Next. On the VPN Server Selection page, type 10.0.0.2 in Host name or IP address. This is shown in the following figure.
19. Click Next. On the Connection Availability page, click Next.
20. On the Completing the New Connection Wizard page, click Finish. The Connect PPTPtoCorpnet dialog box appears. This is
Página 32 de 54Step-by-Step Guide for Setting Up VPN-based Remote Access in a Test Lab
10/04/2008http://technet2.microsoft.com/windowsserver/en/library/1d1f2391-1ef0-4888-8e2b-ce99b...

shown in the following figure.
21. Click Properties, and then click the Networking tab.
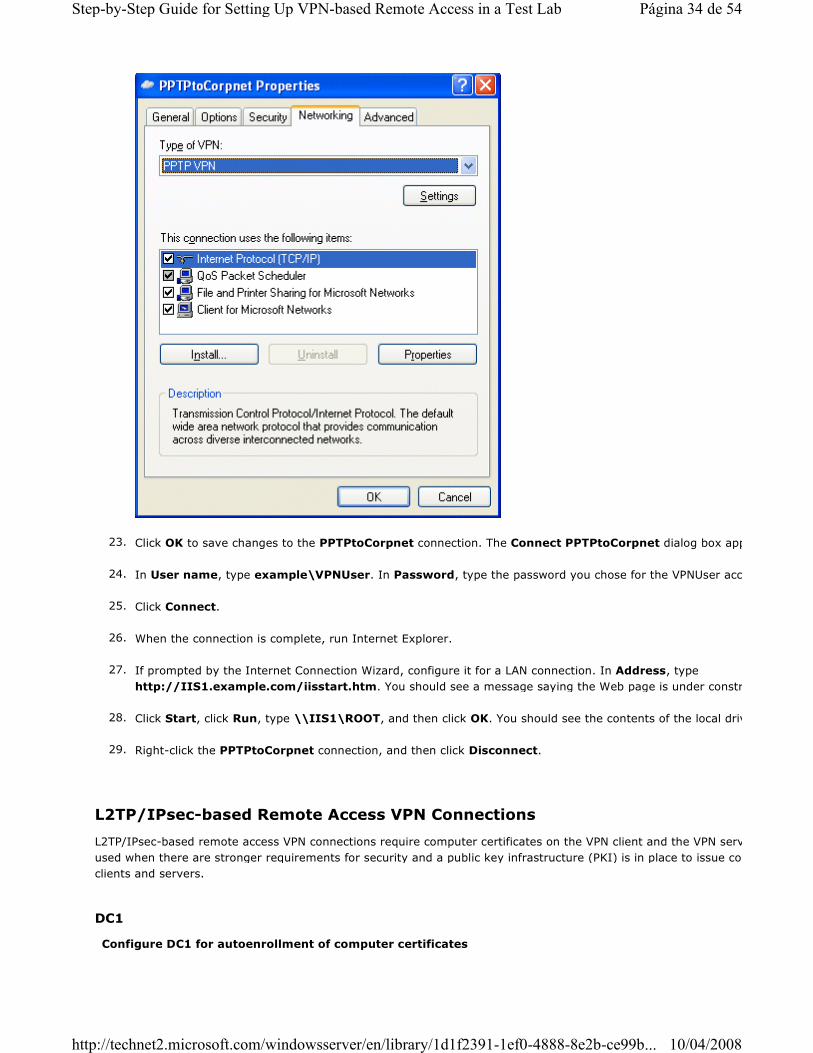
22. On the Networking tab, in Type of VPN, click PPTP VPN. This is shown in the following figure.
Página 33 de 54Step-by-Step Guide for Setting Up VPN-based Remote Access in a Test Lab
10/04/2008http://technet2.microsoft.com/windowsserver/en/library/1d1f2391-1ef0-4888-8e2b-ce99b...
L2TP/IPsec-based Remote Access VPN Connections
L2TP/IPsec-based remote access VPN connections require computer certificates on the VPN client and the VPN server. L2TP/IPsec is typically
used when there are stronger requirements for security and a public key infrastructure (PKI) is in place to issue computer certificates to VPN
clients and servers.
DC1
23. Click OK to save changes to the PPTPtoCorpnet connection. The Connect PPTPtoCorpnet dialog box appears.
24. In User name, type example\VPNUser. In Password, type the password you chose for the VPNUser account.
25. Click Connect.
26. When the connection is complete, run Internet Explorer.
27. If prompted by the Internet Connection Wizard, configure it for a LAN connection. In Address, type
http://IIS1.example.com/iisstart.htm. You should see a message saying the Web page is under construction.
28. Click Start, click Run, type \\IIS1\ROOT, and then click OK. You should see the contents of the local drive (drive C) on IIS1.
29. Right-click the PPTPtoCorpnet connection, and then click Disconnect.
Configure DC1 for autoenrollment of computer certificates
Página 34 de 54Step-by-Step Guide for Setting Up VPN-based Remote Access in a Test Lab
10/04/2008http://technet2.microsoft.com/windowsserver/en/library/1d1f2391-1ef0-4888-8e2b-ce99b...
1. Open the Active Directory Users and Computers snap-in.
2. In the console tree, double-click Active Directory Users and Computers, right-click the example.com domain, and then click
Properties.
3. On the Group Policy tab, click Default Domain Policy, and then click Edit.
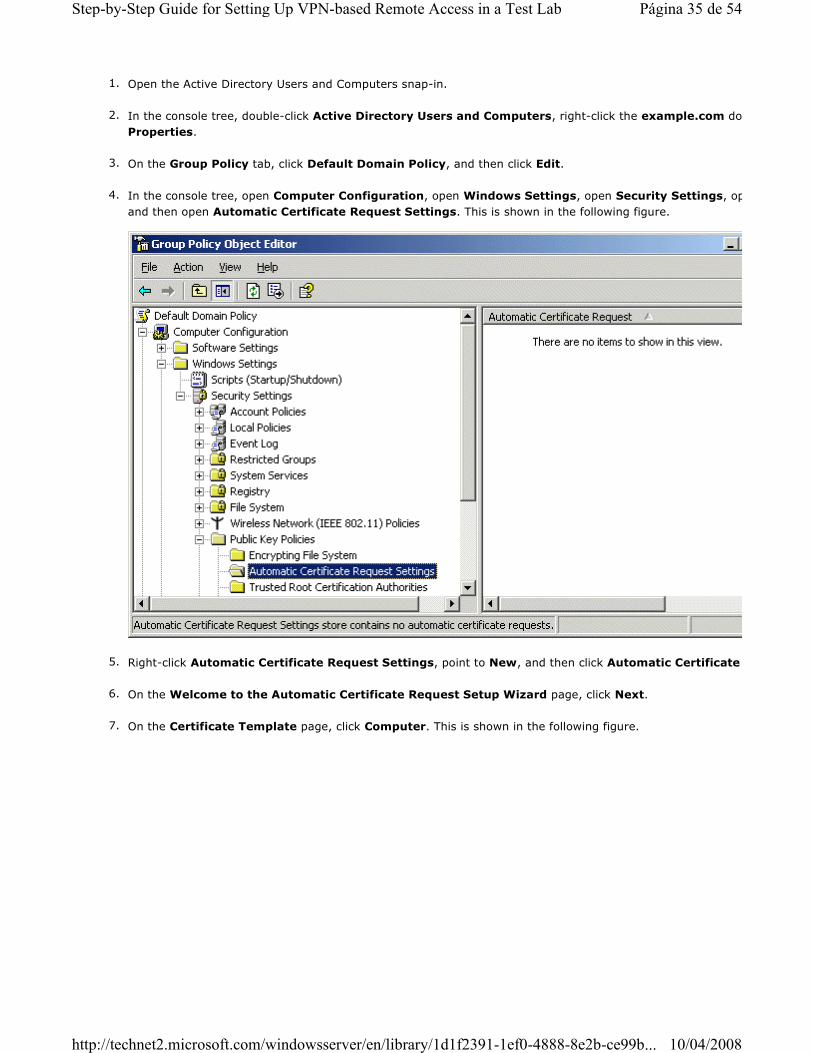
4. In the console tree, open Computer Configuration, open Windows Settings, open Security Settings, open
and then open Automatic Certificate Request Settings. This is shown in the following figure.
5. Right-click Automatic Certificate Request Settings, point to New, and then click Automatic Certificate Request
6. On the Welcome to the Automatic Certificate Request Setup Wizard page, click Next.
7. On the Certificate Template page, click Computer. This is shown in the following figure.
Página 35 de 54Step-by-Step Guide for Setting Up VPN-based Remote Access in a Test Lab
10/04/2008http://technet2.microsoft.com/windowsserver/en/library/1d1f2391-1ef0-4888-8e2b-ce99b...

8. Click Next. On the Completing the Automatic Certificate Request Setup Wizard page, click Finish. The Computer certificate type
now appears in the details pane of the Group Policy Object Editor snap-in. This is shown in the following figure.
9.
Página 36 de 54Step-by-Step Guide for Setting Up VPN-based Remote Access in a Test Lab
10/04/2008http://technet2.microsoft.com/windowsserver/en/library/1d1f2391-1ef0-4888-8e2b-ce99b...

VPN1
After updating VPN1 with the new certificates you need to stop and restart the IPsec Policy Agent and Routing and Remote Access services.
CLIENT1
To obtain a computer certificate on CLIENT1 and then configure an L2TP/IPsec-based remote access VPN connection, perform the following
steps.
Type gpupdate at a command prompt to update Group Policy on DC1.
Update Group Policy on VPN1
• To immediately update Group Policy and request a computer certificate, type gpupdate at a command prompt.
Restart IPsec Policy Agent and Routing and Remote Access
1. Click Start, point to Administrative Tools, and then click Services.
2. In the details pane, point to IPSEC Services, point to Action, and then click Restart.
3. In the details pane, point to Routing and Remote Access, point to Action, and then click Restart.
Obtain a computer certificate and configure an L2TP/IPsec-based remote access VPN connection
1. Shut down the CLIENT1 computer.
2. Disconnect CLIENT1 from the simulated Internet network segment, and connect it to the intranet network segment.
3. Restart CLIENT1 and log on using the VPNUser account. The computer and user Group Policy is automatically updated.
4. Shut down CLIENT1.
5. Disconnect CLIENT1 from the intranet network segment, and connect it to the simulated Internet network segment.
6. Restart CLIENT1 and log on using the VPNUser account.
7. On CLIENT1, in Control Panel, open the Network Connections folder.
8. In Network Tasks, click Create a new connection.
9. On the Welcome to the New Connection Wizard page of the New Connection Wizard, click Next.
10. On the Network Connection Type page, click Connect to the network at my workplace. This is shown in the following figure.
Página 37 de 54Step-by-Step Guide for Setting Up VPN-based Remote Access in a Test Lab
10/04/2008http://technet2.microsoft.com/windowsserver/en/library/1d1f2391-1ef0-4888-8e2b-ce99b...

11. Click Next. On the Network Connection page, click Virtual Private Network connection. This is shown in the following figure.
12. Click Next. On the Connection Name page, type L2TPtoCorpnet in Company Name. This is shown in the following figure.
Página 38 de 54Step-by-Step Guide for Setting Up VPN-based Remote Access in a Test Lab
10/04/2008http://technet2.microsoft.com/windowsserver/en/library/1d1f2391-1ef0-4888-8e2b-ce99b...

13. Click Next. On the Public Network page, click Do not dial the initial connection. This is shown in the following figure.
14. Click Next. On the VPN Server Selection page, type 10.0.0.2 in Host name or IP address. This is shown in the following figure.
Página 39 de 54Step-by-Step Guide for Setting Up VPN-based Remote Access in a Test Lab
10/04/2008http://technet2.microsoft.com/windowsserver/en/library/1d1f2391-1ef0-4888-8e2b-ce99b...

15. Click Next. On the Connection Availability page, click Next.
16. On the Completing the New Connection Wizard page, click Finish. The Connect L2TPtoCorpnet dialog box appears. This is
shown in the following figure.
17.
Página 40 de 54Step-by-Step Guide for Setting Up VPN-based Remote Access in a Test Lab
10/04/2008http://technet2.microsoft.com/windowsserver/en/library/1d1f2391-1ef0-4888-8e2b-ce99b...

EAP-TLS-based Remote Access VPN Connections
EAP-TLS-based remote access VPN connections require a user certificate on the VPN client and a computer certificate on the IAS server. EAP
TLS is for authenticating your VPN connection with the most secure user-level authentication protocol. Locally installed user certificates,
enabled in the following steps, make it easier to set up a test lab. In a production environment, it is recommended that you use smart cards,
rather than locally installed user certificates, for EAP-TLS authentication.
Click Properties, and then click the Networking tab.
18. On the Networking tab, in Type of VPN, click L2TP IPSec VPN. This is shown in the following figure.
19. Click OK to save changes to the L2TPtoCorpnet connection. The Connect L2TPtoCorpnet dialog box appears.
20. In User name, type example\VPNUser. In Password, type the password you chose for the VPNUser account.
21. Click Connect.
22. When the connection is established, run the Web browser.
23. In Address, type http://IIS1.example.com/iisstart.htm. You should see a message saying the Web site is under construction.
24. Click Start, click Run, type \\IIS1\ROOT, and then click OK. You should see the contents of the local drive (drive C) on IIS1.
25. Right-click the L2TPtoCorpnet connection, and then click Disconnect.
Página 41 de 54Step-by-Step Guide for Setting Up VPN-based Remote Access in a Test Lab
10/04/2008http://technet2.microsoft.com/windowsserver/en/library/1d1f2391-1ef0-4888-8e2b-ce99b...

DC1
Configure DC1 for autoenrollment of user certificates
1. Click Start, click Run, type mmc, and then click OK.
2. On the File menu, click Add/Remove Snap-in, and then click Add.
3. Under Snap-in, double-click Certificate Templates, click Close, and then click OK.
4. In the console tree, click Certificate Templates. All of the certificate templates will be displayed in the details pane. This is shown in
the following figure.
5. In the details pane, click the User template.
6. On the Action menu, click Duplicate Template.
7. In the Template display name box, type VPNUser.
8. Verify that the Publish Certificate in Active Directory check box is selected. This is shown in the following figure.
Página 42 de 54Step-by-Step Guide for Setting Up VPN-based Remote Access in a Test Lab
10/04/2008http://technet2.microsoft.com/windowsserver/en/library/1d1f2391-1ef0-4888-8e2b-ce99b...

9. Click the Security tab.
10. In the Group or user names list, click Domain Users.
11. In the Permissions for Domain Users list, select the Read, Enroll, and Autoenroll check boxes so that these permissions are
allowed. This is shown in the following figure.
Página 43 de 54Step-by-Step Guide for Setting Up VPN-based Remote Access in a Test Lab
10/04/2008http://technet2.microsoft.com/windowsserver/en/library/1d1f2391-1ef0-4888-8e2b-ce99b...

12. Click the Subject Name tab.
13. Clear the Include E-mail name in subject name and E-mail name check boxes. Because you did not configure an e
the VPNUser user account, you must clear these check boxes to allow a user certificate to be issued. This is shown in the following
figure.
Página 44 de 54Step-by-Step Guide for Setting Up VPN-based Remote Access in a Test Lab
10/04/2008http://technet2.microsoft.com/windowsserver/en/library/1d1f2391-1ef0-4888-8e2b-ce99b...

14. Click OK.
15. Open the Certification Authority snap-in from the Administrative Tools folder.
16. In the console tree, open Certification Authority, open Example CA, and then open Certificate Templates
following figure.
Página 45 de 54Step-by-Step Guide for Setting Up VPN-based Remote Access in a Test Lab
10/04/2008http://technet2.microsoft.com/windowsserver/en/library/1d1f2391-1ef0-4888-8e2b-ce99b...

17. On the Action menu, point to New, and then click Certificate Template to Issue.
18. Click VPNUser. This is shown in the following figure.
19. Click OK.
20. Open the Active Directory Users and Computers snap-in.
21. In the console tree, double-click Active Directory Users and Computers, right-click the example.com domain, and then click
Properties.
22. On the Group Policy tab, click Default Domain Policy, and then click Edit.
Página 46 de 54Step-by-Step Guide for Setting Up VPN-based Remote Access in a Test Lab
10/04/2008http://technet2.microsoft.com/windowsserver/en/library/1d1f2391-1ef0-4888-8e2b-ce99b...

23. In the console tree, open User Configuration, open Windows Settings, open Security Settings, and then open
Policies. This is shown in the following figure.
24. In the details pane, double-click Autoenrollment Settings.
25. Click Enroll certificates automatically. Select the Renew expired certificates, update pending certificates, and remove
revoked certificates check box. Select the Update certificates that use certificate templates check box. This is shown in the
following figure.
Página 47 de 54Step-by-Step Guide for Setting Up VPN-based Remote Access in a Test Lab
10/04/2008http://technet2.microsoft.com/windowsserver/en/library/1d1f2391-1ef0-4888-8e2b-ce99b...

IAS1
26. Click OK.
Configure IAS1 with a computer certificate for EAP-TLS authentication
These configuration changes will allow the VPN remote access to intranet remote access policy to authorize VPN connections using the
EAP-TLS authentication method.
1. Restart IAS1 to ensure that IAS1 has autoenrolled a computer certificate.
2. Open the Internet Authentication Service snap-in.
3. In the console tree, click Remote Access Policies.
4. In the details pane, double-click VPN remote access to intranet. The VPN remote access to intranet Properties
appears. This is shown in the following figure.
Página 48 de 54Step-by-Step Guide for Setting Up VPN-based Remote Access in a Test Lab
10/04/2008http://technet2.microsoft.com/windowsserver/en/library/1d1f2391-1ef0-4888-8e2b-ce99b...

5. Click Edit Profile, and then click the Authentication tab. This is shown in the following figure.
Página 49 de 54Step-by-Step Guide for Setting Up VPN-based Remote Access in a Test Lab
10/04/2008http://technet2.microsoft.com/windowsserver/en/library/1d1f2391-1ef0-4888-8e2b-ce99b...

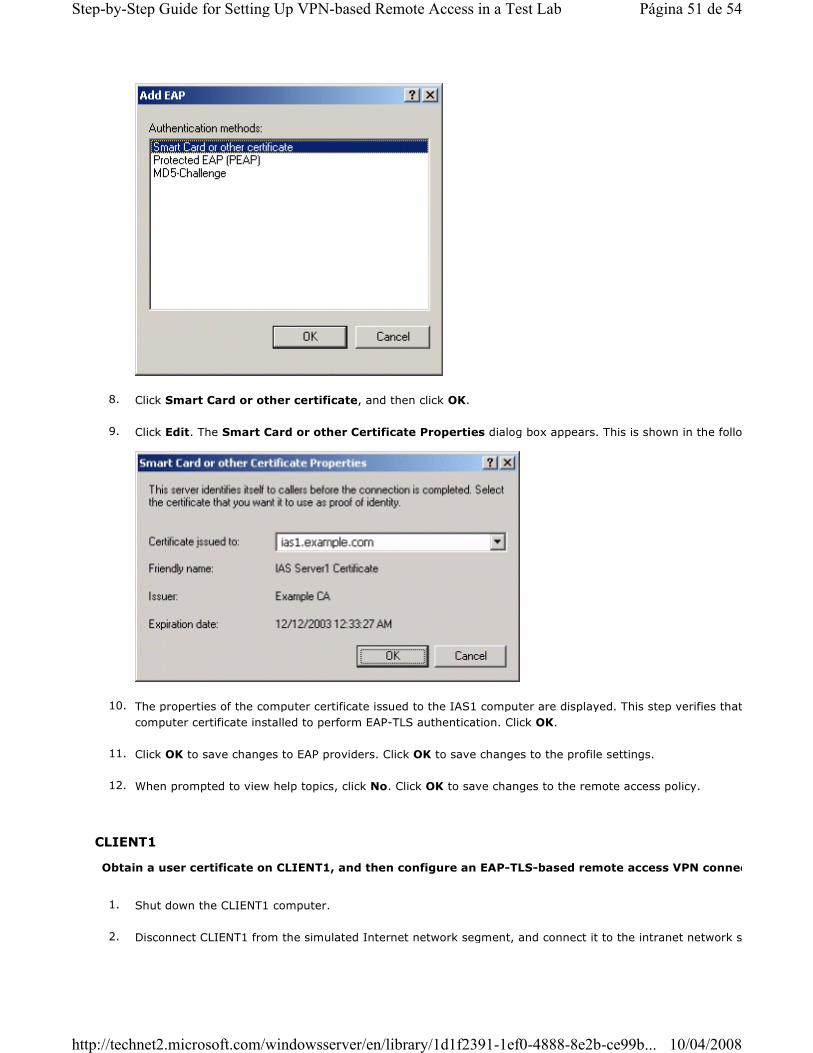
6. On the Authentication tab, click EAP Methods. The Select EAP Providers dialog box appears. This is shown in the following figure.
7. Click Add. The Add EAP dialog box appears. This is shown in the following figure.
Página 50 de 54Step-by-Step Guide for Setting Up VPN-based Remote Access in a Test Lab
10/04/2008http://technet2.microsoft.com/windowsserver/en/library/1d1f2391-1ef0-4888-8e2b-ce99b...
CLIENT1
8. Click Smart Card or other certificate, and then click OK.
9. Click Edit. The Smart Card or other Certificate Properties dialog box appears. This is shown in the following figure.
10. The properties of the computer certificate issued to the IAS1 computer are displayed. This step verifies that IAS1 has an acceptable
computer certificate installed to perform EAP-TLS authentication. Click OK.
11. Click OK to save changes to EAP providers. Click OK to save changes to the profile settings.
12. When prompted to view help topics, click No. Click OK to save changes to the remote access policy.
Obtain a user certificate on CLIENT1, and then configure an EAP-TLS-based remote access VPN connection
1. Shut down the CLIENT1 computer.
2. Disconnect CLIENT1 from the simulated Internet network segment, and connect it to the intranet network segment.
Página 51 de 54Step-by-Step Guide for Setting Up VPN-based Remote Access in a Test Lab
10/04/2008http://technet2.microsoft.com/windowsserver/en/library/1d1f2391-1ef0-4888-8e2b-ce99b...

3. Restart CLIENT1 and log on using the VPNUser account. The computer and user Group Policy is automatically updated.
4. Shut down CLIENT1.
5. Disconnect CLIENT1 from the intranet network segment, and connect it to the simulated Internet network segment.
6. Restart CLIENT1 and log on using the VPNUser account.
7. On CLIENT1, in Control Panel, open the Network Connections folder.
8. In Network Tasks, click Create a new connection.
9. On the Welcome to the New Connection Wizard page of the New Connection Wizard, click Next.
10. On the Network Connection Type page, click Connect to the network at my workplace.
11. Click Next. On the Network Connection page, click Virtual Private Network connection.
12. Click Next. On the Connection Name page, type EAPTLStoCorpnet in Company Name.
13. Click Next. On the Public Network page, click Do not dial the initial connection.
14. Click Next. On the VPN Server Selection page, type 10.0.0.2 in Host name or IP address.
15. Click Next. On the Connection Availability page, click Next.
16. On the Completing the New Connection Wizard page, click Finish. The Connect EAPTLStoCorpnet dialog box appears. This is
shown in the following figure.
17. Click Properties, and then click the Security tab.
Página 52 de 54Step-by-Step Guide for Setting Up VPN-based Remote Access in a Test Lab
10/04/2008http://technet2.microsoft.com/windowsserver/en/library/1d1f2391-1ef0-4888-8e2b-ce99b...

18. On the Security tab, click Advanced, and then click Settings. The Advanced Security Settings dialog box appears.
19. In the Advanced Security Settings dialog box, click Use Extensible Authentication Protocol (EAP). This is shown in the following
figure.
20. Click Properties. In the Smart Card or other Certificate Properties dialog box, click Use a certificate on this computer
shown in the following figure.
Página 53 de 54Step-by-Step Guide for Setting Up VPN-based Remote Access in a Test Lab
10/04/2008http://technet2.microsoft.com/windowsserver/en/library/1d1f2391-1ef0-4888-8e2b-ce99b...

Summary
This guide described in detail the steps required to configure secure VPN remote access using PPTP, L2TP/IPsec, and EAP
five computers simulating an organization intranet and the Internet.
21. Click OK to save changes to the Smart Card or Other Certificate dialog box. Click OK to save changes to the
Settings. Click OK to save changes to the Security tab. The connection is immediately initiated using the installed user certificate.
The first time you try to connect, it may take several attempts to successfully make a connection.
22. When the connection is successful, run the Web browser.
23. In Address, type http://IIS1.example.com/iisstart.htm. You should see a message saying the Web site is under construction.
24. Click Start, click Run, type \\IIS1\ROOT, and then click OK. You should see the contents of the local drive (drive C) on IIS1.
25. Right-click the EAPTLStoCorpnet connection, and then click Disconnect.
Página 54 de 54Step-by-Step Guide for Setting Up VPN-based Remote Access in a Test Lab
10/04/2008http://technet2.microsoft.com/windowsserver/en/library/1d1f2391-1ef0-4888-8e2b-ce99b...