Embed Size (px)
Citation preview

Step-By-Step Guide for Performance Management

Step-By-Step Guide for Performance Management
Table of Contents
I. Launching a New Performance Management Cycle Page 3
II. Recording Ongoing Notes Using the Mid-Year
or Six-month Review Page 23
I. Completing the Mid-Year or Six-Month Review Page 31
II. Launching Upward Feedback Page 42
III. Completing the Year-End Review Page 49
Step-By-Step Guide for Performance Management
The Performance Management Cycle consists of the following steps
1. Launching the Annual Performance Management Cycle
2. Making Periodic Updates based on observed behaviors
3. Mid-year Review
4. Annual Review and Evaluation
This document will cover the steps needed to launch a new performance management cycle.
For questions or concerns please contact Learning and Organizational Development at x77844.
Launching a New Performance Management Cycle

Step-By-Step Guide for Performance Management
Performance Management User GuideManager’s Edition: Launching a New Performance Management Cycle
Forms must be created to begin the Performance Management process. In many cases this will be done automatically for you by HR, If this is the case for you, skip to page 12. If you do need to create forms for your employees, those steps are outlined in the pages 1-11.
Once forms have been created, the first step of the performance management process in PeopleSoft 9.2 is called the “Start” step. Here you will establish the competencies, goals and/or responsibilities for use in driving feedback and evaluation throughout the year. Most people will just want the eight required competencies that you have used in the past. But some may want to add additional competencies, as well as goals and key responsibilities specific to the person you are managing. This is an opportunity for you and your employee(s) to determine what criteria should be included in the Mid-Year and End-Of-Year Review.
For questions or concerns please contact Learning and Organizational Development at x77844.
Launching a New Performance Management Cycle

Step-By-Step Guide for Performance Management
1) Begin by going to the Human Resources page and selecting “Self-Service Login."
2) Type in your user name (Network ID) and password.
Launching a New Performance Management Cycle

Step-By-Step Guide for Performance Management
3) Click on the dropdown menu labeled “Workforce Administration.”
4) Select “Manager Self Service.”
Launching a New Performance Management Cycle

Step-By-Step Guide for Performance Management
5) Click on the “Performance Management” Tile.
6) Check to see if forms have already been created for your employees. If so, skip to step 17 (page 12). If not, click the drop down on “Administrative Tasks.”
Launching a New Performance Management Cycle

Step-By-Step Guide for Performance Management
7) Click on “Create Documents.”
8) Select “Continue.”
Launching a New Performance Management Cycle

Step-By-Step Guide for Performance Management
9) Select employee for whom you want the form by clicking the check box next to their name.
10) Select “Continue.”
Launching a New Performance Management Cycle
Step-By-Step Guide for Performance Management
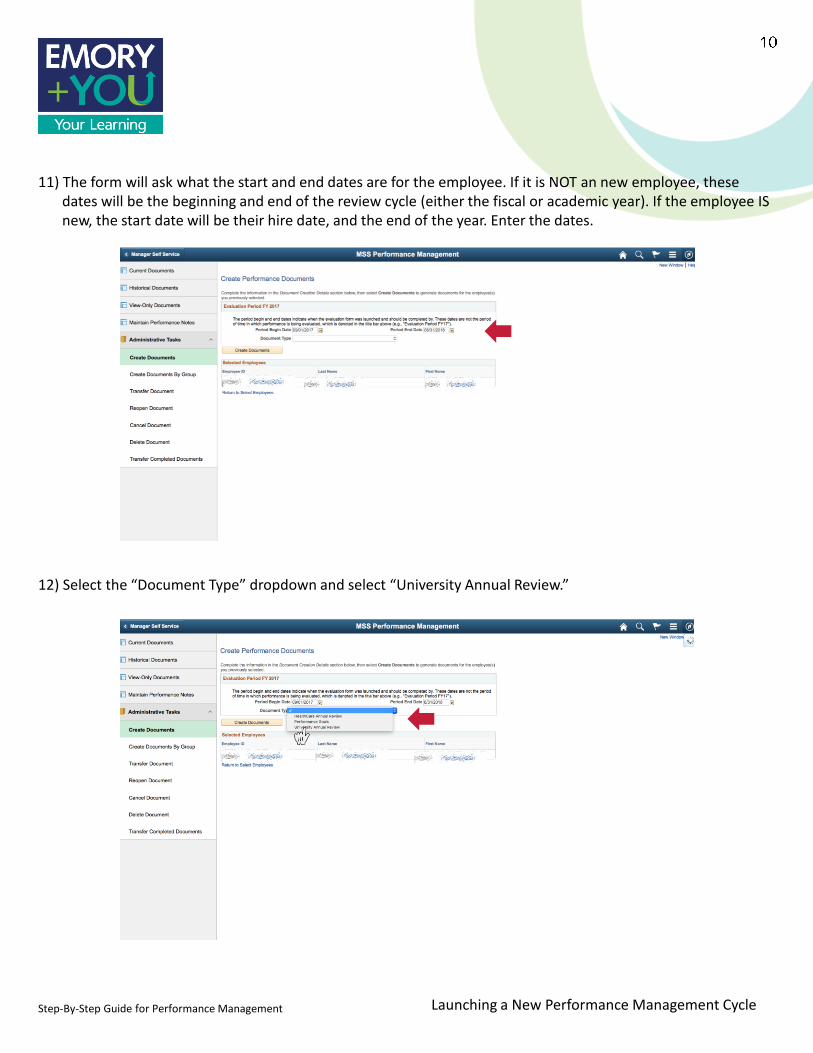
11) The form will ask what the start and end dates are for the employee. If it is NOT an new employee, these dates will be the beginning and end of the review cycle (either the fiscal or academic year). If the employee IS new, the start date will be their hire date, and the end of the year. Enter the dates.
12) Select the “Document Type” dropdown and select “University Annual Review.”
Launching a New Performance Management Cycle

Step-By-Step Guide for Performance Management
13) Select the “Template” dropdown and select the “University Manager” or “University Non-Manager” template depending on the person you are rating.
14) Click on “Create Documents.”
Launching a New Performance Management Cycle

Step-By-Step Guide for Performance Management
15) You will be returned to this screen.
16) Click on “Current Documents” to find the document you just made.
Launching a New Performance Management Cycle

Step-By-Step Guide for Performance Management
17) Click on the document you just created (or that was already created for you).
18) You will see the main page for developing your Performance Management Document. The three sections you may edit, Competencies, Goals, and Responsibilities, can be selected with the tabs below.
Launching a New Performance Management Cycle
Step-By-Step Guide for Performance Management
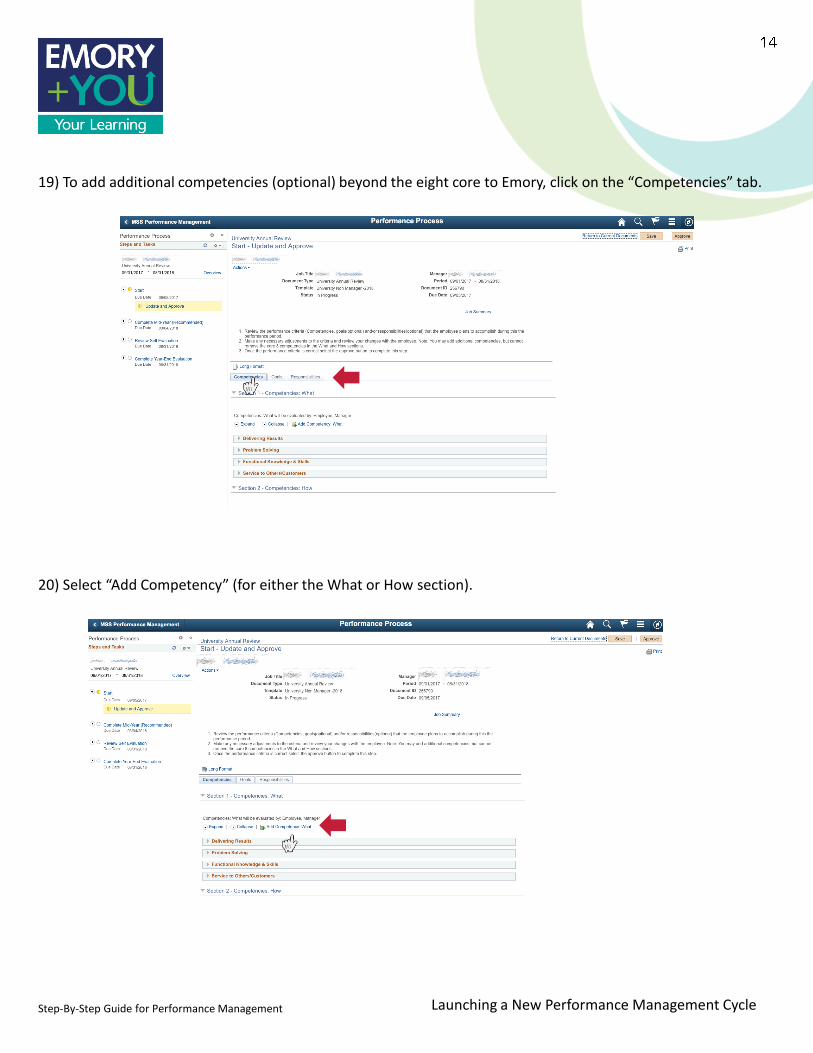
19) To add additional competencies (optional) beyond the eight core to Emory, click on the “Competencies” tab.
20) Select “Add Competency” (for either the What or How section).
Launching a New Performance Management Cycle

Step-By-Step Guide for Performance Management
21) Custom competencies must be reviewed and placed into the system in advance by HR. Once this has be done, select search to find your custom, HR approved competency.
22) In this example, the custom competency available is “Attendance.” Check the box next to your custom competency and click “Add.”
Launching a New Performance Management Cycle

Step-By-Step Guide for Performance Management
23) To add or edit goals (optional), click on the “Goals” tab.
24) Select “Add Goal.”
Launching a New Performance Management Cycle

Step-By-Step Guide for Performance Management
25) Select the type of goal. Some areas will have predefined goals. To make a unique goal, select “Add Your Own Goal”, and then click ”Next.”
26) Type in the title of the goal, and add a description. Make sure to refer to the Emory “Goal Setting Tip Sheet” document when defining your goals which is found here.
Launching a New Performance Management Cycle

Step-By-Step Guide for Performance Management
27) Click on ”Add.”
28) To add responsibilities (optional), click on the “Responsibilities” tab.
Launching a New Performance Management Cycle

Step-By-Step Guide for Performance Management
29) Before you include a job responsibility, you can review your employee’s job description by clicking on the ”Job Summary” link.
30) Your employees job description will launch in a separate window. You can use this description to help identify key responsibilities to emphasize in this year’s review.
Launching a New Performance Management Cycle

Step-By-Step Guide for Performance Management
31) When you are ready to add your responsibilities return to the original internet window, and select “Add Responsibility.”
32) Just like goals, you can add predefined responsibility, or create your own. To create your own responsibility select “Add Your Own Responsibility” and click on “Next.”
Launching a New Performance Management Cycle

Step-By-Step Guide for Performance Management
33) Type in the title and description of the responsibility.
34) Click “Add.”
Launching a New Performance Management Cycle
Step-By-Step Guide for Performance Management
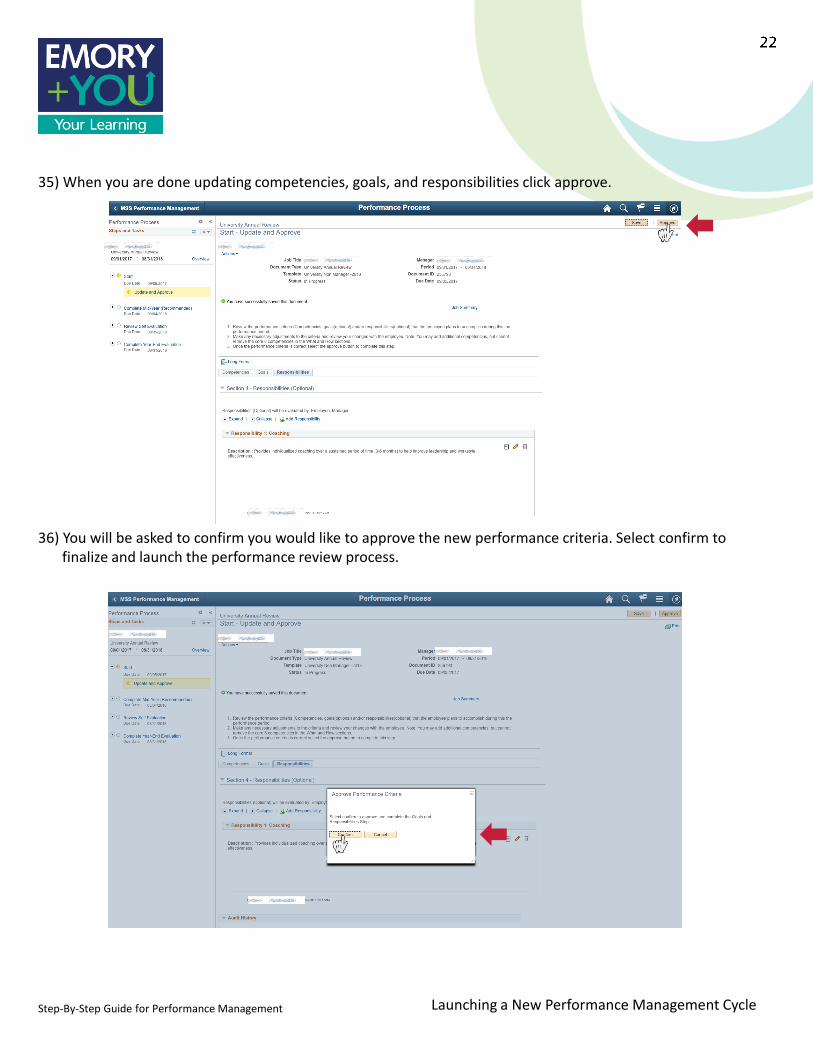
35) When you are done updating competencies, goals, and responsibilities click approve.
36) You will be asked to confirm you would like to approve the new performance criteria. Select confirm to finalize and launch the performance review process.
Launching a New Performance Management Cycle

Step-By-Step Guide for Performance Management
37) You will receive a confirmation that the performance review criteria has been approved. An e-mail will be sent to your employee with a link to their portion of the performance review process.
You have now completed the first step of the performance management process in PeopleSoft 9.2. The competencies, goals and/or responsibilities for use in driving feedback and evaluation throughout the year have been established. You are now ready to begin adding comments as you like to the Mid-Year Review form, and share with your employee when you deem appropriate. To learn more, go to the next section of this document.
Launching a New Performance Management Cycle
Step-By-Step Guide for Performance Management
Performance Management User GuideManager’s Edition: Recording Ongoing Notes Using the Mid-Year or Six-Month Review
The next step in the Performance Management tool is the Mid-Year Review. The Mid-Year Review form is actually a “live” document that you can access and add notes to throughout the first six months of the year. The employee can do the same, and choose to share notes with you for feedback when deemed appropriate.
Mid-Year Reviews are optional, but highly recommended. The main advantage of the Mid-Year Review is to provide important feedback in a more timely manner than an Annual Review alone can provide. In addition, with the PeopleSoft 9.2 system, the comments from the Mid-Year Review are automatically imported into the Year-End Review form. This makes your job as a manager much easier since the form is already half complete.
For questions or concerns please contact Learning and Organizational Development at x77844.
Recording Ongoing Notes Using the Mid-Year or Six-Month Review

Step-By-Step Guide for Performance Management
1) Begin by going to the Human Resources page and selecting “Self-Service Login."
2) Type in your user name (Network ID) and password.
Recording Ongoing Notes Using the Mid-Year or Six-Month Review
Step-By-Step Guide for Performance Management
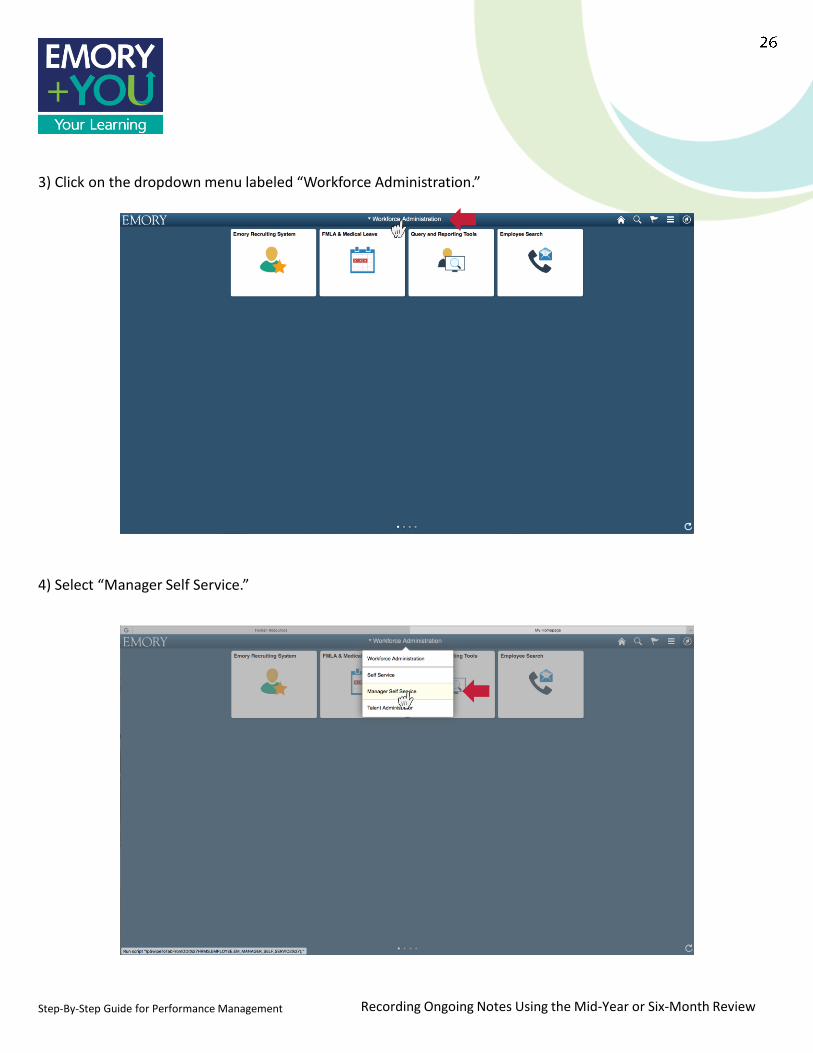
3) Click on the dropdown menu labeled “Workforce Administration.”
4) Select “Manager Self Service.”
Recording Ongoing Notes Using the Mid-Year or Six-Month Review
Step-By-Step Guide for Performance Management
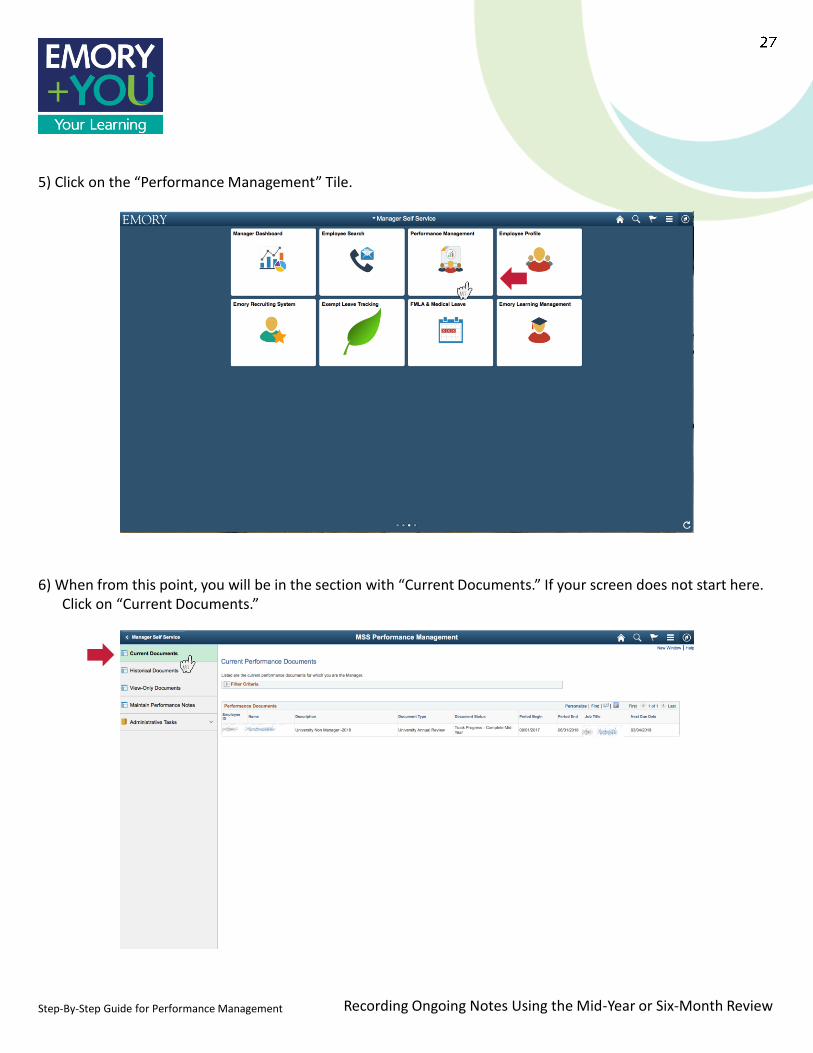
5) Click on the “Performance Management” Tile.
6) When from this point, you will be in the section with “Current Documents.” If your screen does not start here. Click on “Current Documents.”
Recording Ongoing Notes Using the Mid-Year or Six-Month Review

Step-By-Step Guide for Performance Management
7) Click on the name of the employee for whom you would like to add comments.
8) You will be taken to the performance management document where you see tabs for the Mid-Year Review, where you can add comments to competencies, goals and responsibilities. To add comments, click on the ”Competencies” tab.
Recording Ongoing Notes Using the Mid-Year or Six-Month Review
Step-By-Step Guide for Performance Management
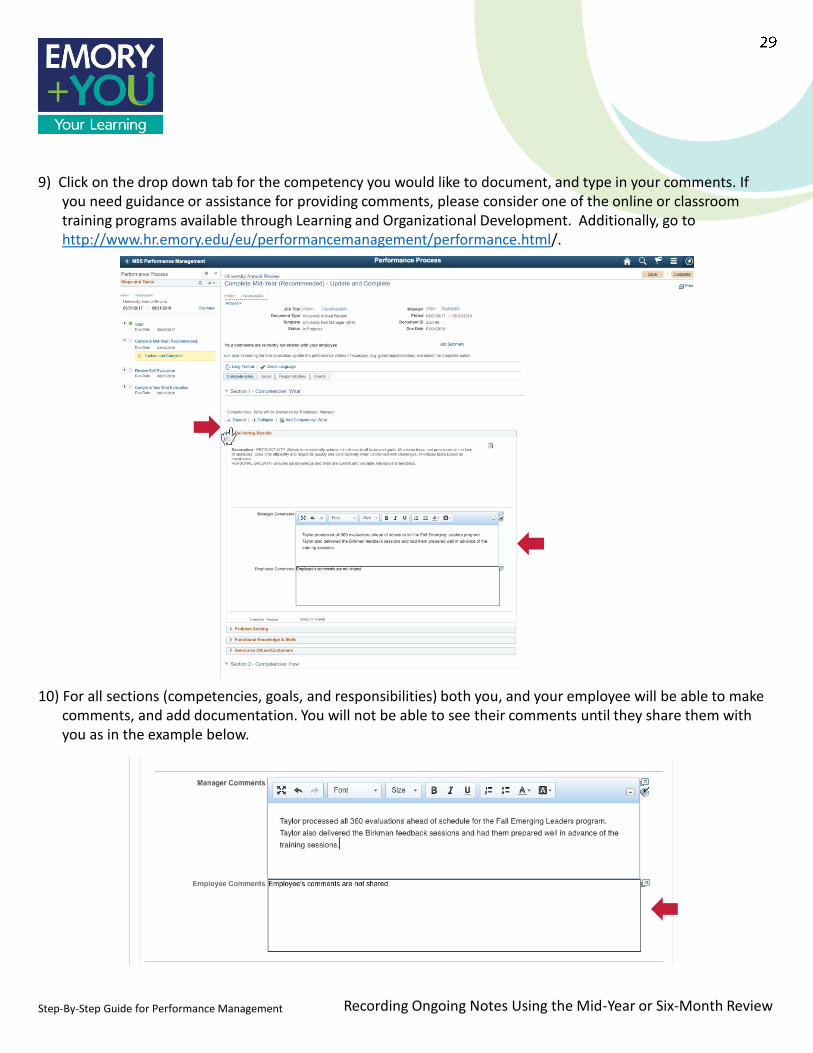
9) Click on the drop down tab for the competency you would like to document, and type in your comments. If you need guidance or assistance for providing comments, please consider one of the online or classroom training programs available through Learning and Organizational Development. Additionally, go to http://www.hr.emory.edu/eu/performancemanagement/performance.html/.
10) For all sections (competencies, goals, and responsibilities) both you, and your employee will be able to make comments, and add documentation. You will not be able to see their comments until they share them with you as in the example below.
Recording Ongoing Notes Using the Mid-Year or Six-Month Review
Step-By-Step Guide for Performance Management
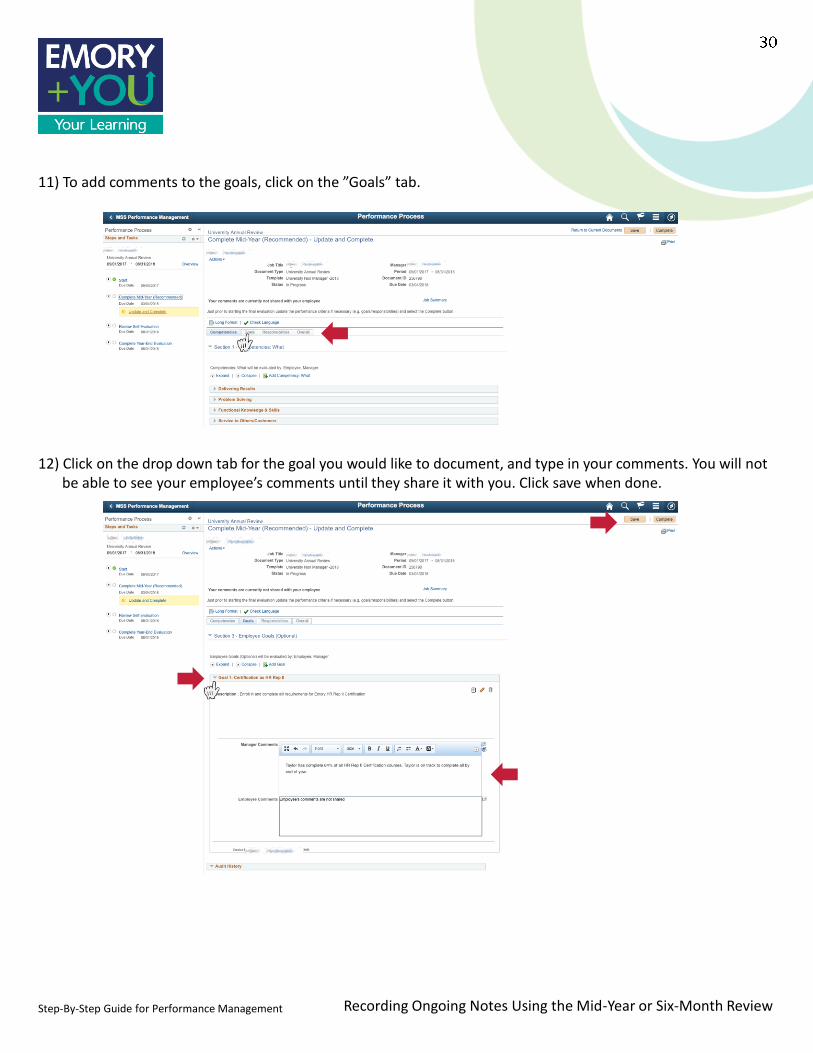
11) To add comments to the goals, click on the ”Goals” tab.
12) Click on the drop down tab for the goal you would like to document, and type in your comments. You will not be able to see your employee’s comments until they share it with you. Click save when done.
Recording Ongoing Notes Using the Mid-Year or Six-Month Review

Step-By-Step Guide for Performance Management
13) To add comments to the responsibilities, click on the ”Responsibilities” tab.
14) Click on the drop down tab for the responsibility you would like to document, and type in your comments. You will be able to see your employee’s comments when they share them with you. Click save when done.
Recording Ongoing Notes Using the Mid-Year or Six-Month Review
You may continue to add notes to Competencies, Goals and/or Responsibilities as needed in preparation for your Mid-Year review. When you are ready to complete the Mid-Year review, please follow the steps in the next section.

Step-By-Step Guide for Performance Management
Performance Management User GuideManager’s Edition: Completing the Mid-Year or Six-Month Review
These next set of steps will walk you through how to complete the Mid-Year Review, which you have hopefully been updating throughout the first six months if you followed the steps in the previous section.
For questions or concerns please contact Learning and Organizational Development at x77844.
Completing the Mid-Year or Six-Month Review

Step-By-Step Guide for Performance Management
1) At this point in time, the Performance Review Document should have been launched from the beginning of the year, and you and your employee should have been updating the document with comments. If you have not created a Performance Review Document, or updated comments, please see the “Launching a new Performance Review Cycle” and the “Recording Ongoing Notes Using the Mid-Year or Six-Month Review” instructions. You can link to both documents below.
Launching a new Performance Review Cycle
Recording Ongoing Notes Using the Mid-Year or Six-Month Review
2) To complete the Mid-Year Review you should ideally see comments in the form from your employee. For this to happen, they will need to share their comments with you. The system creates a deadline for comments and sharing with your employee. After they have shared with you, you may login to the performance management system and finalize your comments, and complete a final Mid-Year or Six-Month Review.
3) Begin the Mid-Year Review by going to the Human Resources page and selecting “Self-Service Login."
EDIT
Completing the Mid-Year or Six-Month Review

Step-By-Step Guide for Performance Management
4) Type in your user name (Network ID) and password.
5) Click on the dropdown menu labeled “Workforce Administration.”
Completing the Mid-Year or Six-Month Review

Step-By-Step Guide for Performance Management
6) Select “Manager Self Service.”
7) Click on the “Performance Management” Tile.
Completing the Mid-Year or Six-Month Review

Step-By-Step Guide for Performance Management
8) From this point, you will be in the section with “Current Documents.” If you’re screen does not start here, click on “Current Documents.”
9) Click on the name of the employee for whom you would like to complete a Mid-Year Review.
Completing the Mid-Year or Six-Month Review

Step-By-Step Guide for Performance Management
10) From this stage, you can see the comments of your employee on the competencies, goals and responsibilities. Below you will se an example from the competencies. You can navigate these sections with the same tabs and dropdown icons as you used while updating the document.
Completing the Mid-Year or Six-Month Review
Step-By-Step Guide for Performance Management
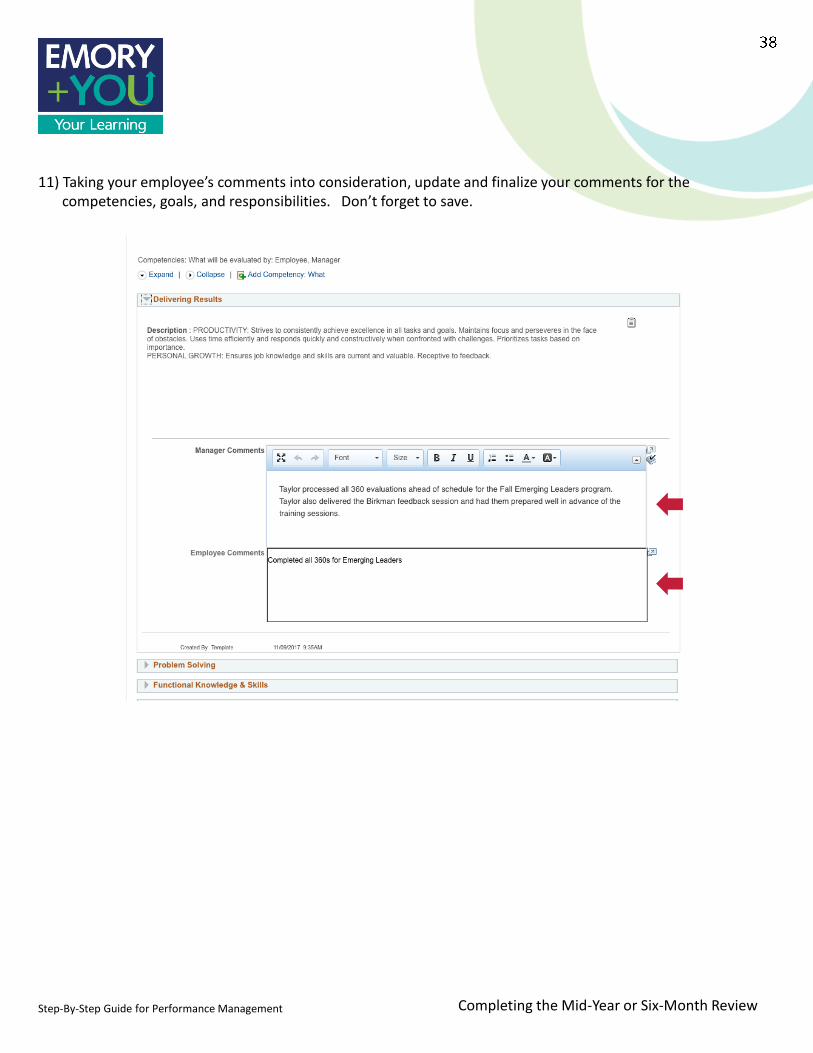
11) Taking your employee’s comments into consideration, update and finalize your comments for the competencies, goals, and responsibilities. Don’t forget to save.
Completing the Mid-Year or Six-Month Review

Step-By-Step Guide for Performance Management
12) When you are done updating your competencies, goals, and responsibilities, finalize the overall review by clicking on the ”Overall” tab.
13) In this tab, you will need to provide a numerical rating, and provide a written summary of the employees overall performance. The numerical rating is a scale of 1 to 3. 1 is “not on track” 2 “on track with some” and 3 “on track with all.” At least 100 characters are required.
Completing the Mid-Year or Six-Month Review

Step-By-Step Guide for Performance Management
14) When you are finished, click on “Save.”
15) At this point in time, you are ready to have your Mid-Year Review meeting with your employee. You can print a copy of your assessment for your employee by clicking on the print icon.
Completing the Mid-Year or Six-Month Review
Step-By-Step Guide for Performance Management
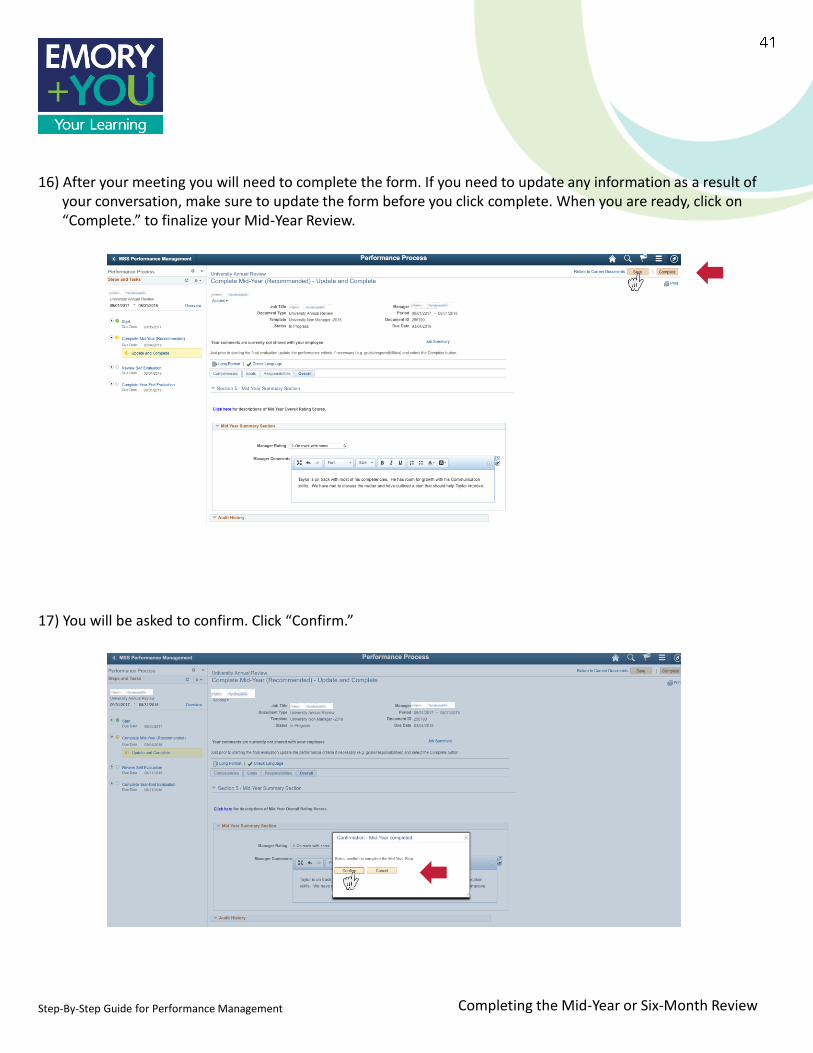
17) You will be asked to confirm. Click “Confirm.”
16) After your meeting you will need to complete the form. If you need to update any information as a result of your conversation, make sure to update the form before you click complete. When you are ready, click on “Complete.” to finalize your Mid-Year Review.
Completing the Mid-Year or Six-Month Review

Step-By-Step Guide for Performance Management
18) You will receive confirmation you have completed your Mid-Year Review. A notification will be sent to the employee as well. Congratulations! Acknowledgement from the employee is not required for the Mid-Year Review.
19) Completing the Mid-Year Review will automatically launch the Year-End Review. You may review the Mid-Year review document at anytime by going to “current documents” > selecting the name of your employee, and clicking on the dropdown of the Mid-Year Review, and selecting “View.” You may also update the Mid-Year Review at any point in the same location. Just make sure to complete it before the Year-End Review.
Completing the Mid-Year or Six-Month Review
Step-By-Step Guide for Performance Management
Performance Management User GuideManager’s Edition: Launching Upward Feedback
If you supervise a manager with two or more direct reports, then you are required to provide those individuals the opportunity to share feedback about that manager with you. Staff members have the opportunity to provide feedback about their supervisor to their supervisor’s leader by answering three questions:
1. What do you see as your supervisor’s greatest strengths?
2. What area(s) do you think your supervisor should develop in order to be more effective?
3. Are there other comments about your supervisor that you would like to share?
Direct reports are not required to answer the above questions; it is entirely optional but strongly encouraged. However, providing the opportunity for upward feedback is required of any supervisor with two or more direct reports. All feedback will be kept anonymous and a supervisor’s leader will only receive the feedback if two or more direct reports complete the questionnaire. These instructions outline how to launch upward feedback.
If you do not supervise a manager with two or more direct reports, please skip to page 49.
For questions or concerns please contact Learning and Organizational Development at x77844.
Launching Upward Feedback

Step-By-Step Guide for Performance Management
1) Begin by going to the Human Resources page and selecting “Self-Service Login."
2) Type in your user name (Network ID) and password.
Launching Upward Feedback

Step-By-Step Guide for Performance Management
3) Click on the dropdown menu labeled “Workforce Administration.”
4) Select “Manager Self Service.”
Launching Upward Feedback

Step-By-Step Guide for Performance Management
5) Click on the “Performance Management” Tile.
6) Click on the name of the employee for whom you would like to create an upward feedback form.
Launching Upward Feedback

Step-By-Step Guide for Performance Management
7) Click on the “Launch Upward Feedback.”
8) You will see the list of direct reports for your employee; please confirm all names are accurate. If they are not accurate contact your HR person.
Launching Upward Feedback
Step-By-Step Guide for Performance Management
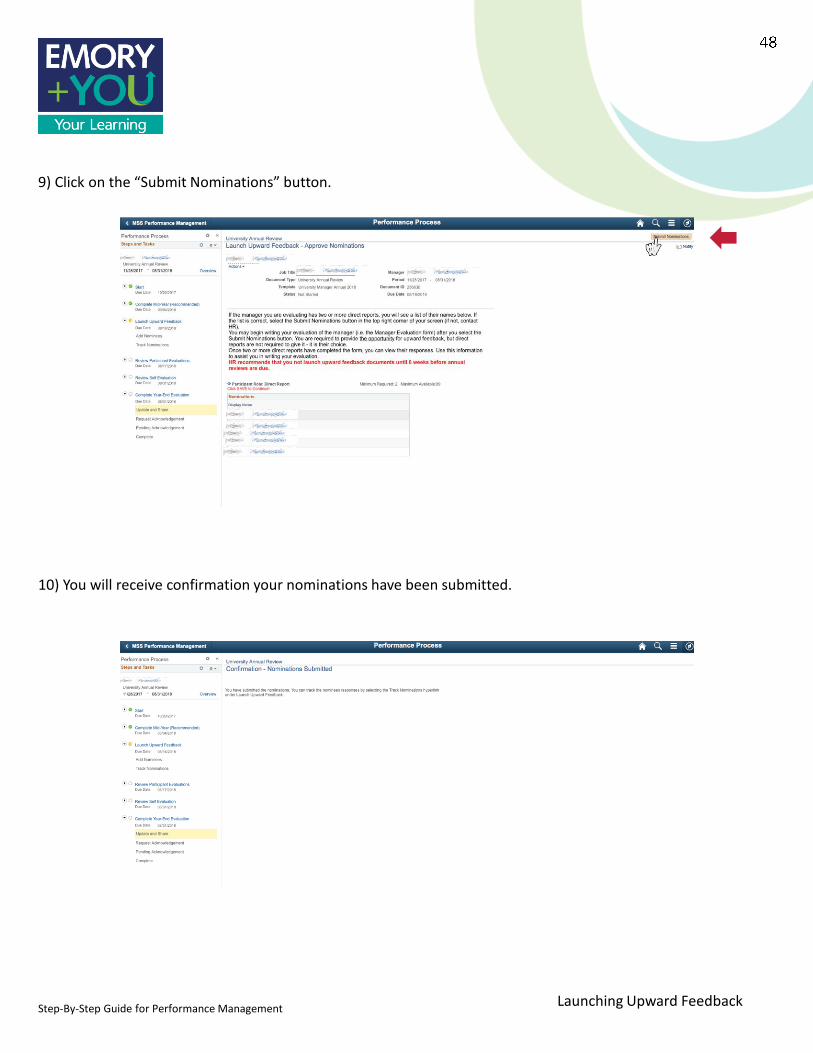
9) Click on the “Submit Nominations” button.
10) You will receive confirmation your nominations have been submitted.
Launching Upward Feedback
Step-By-Step Guide for Performance Management
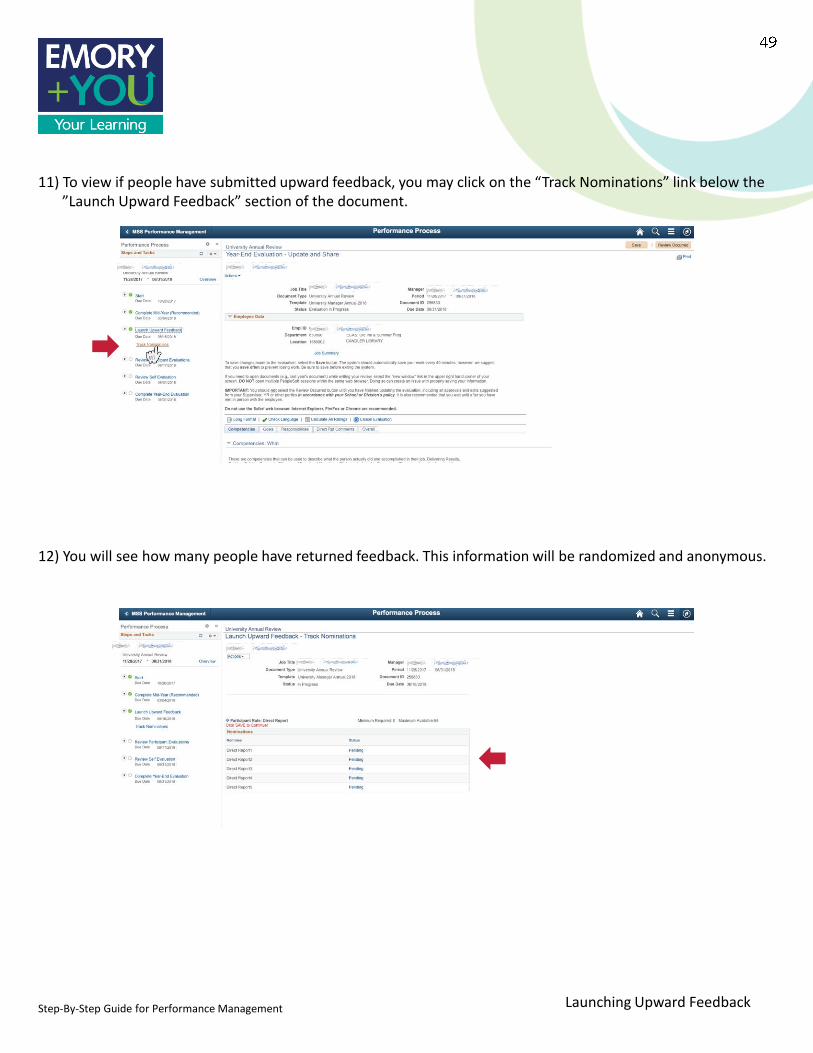
11) To view if people have submitted upward feedback, you may click on the “Track Nominations” link below the ”Launch Upward Feedback” section of the document.
12) You will see how many people have returned feedback. This information will be randomized and anonymous.
Launching Upward Feedback
Step-By-Step Guide for Performance Management
Performance Management User GuideManager’s Edition: Completing the Year-End Review
To complete the Year-End Review, you should review your notes on your employee, the Mid-Year Review, the employee’s self-evaluation, and if the employee has direct reports, you should consider the upward feedback provided. This section of the instructions will show you how to review the self evaluation, and upward feedback. It will finish by showing you the steps to completing the Year-End Review.
For questions or concerns please contact Learning and Organizational Development at x77844.
Completing the Year-End Review

Step-By-Step Guide for Performance Management
1) Begin by going to the Human Resources page and selecting “Self-Service Login."
2) Type in your user name (Network ID) and password.
Completing the Year-End Review

Step-By-Step Guide for Performance Management
3) Click on the dropdown menu labeled “Workforce Administration.”
4) Select “Manager Self Service.”
Completing the Year-End Review
Step-By-Step Guide for Performance Management
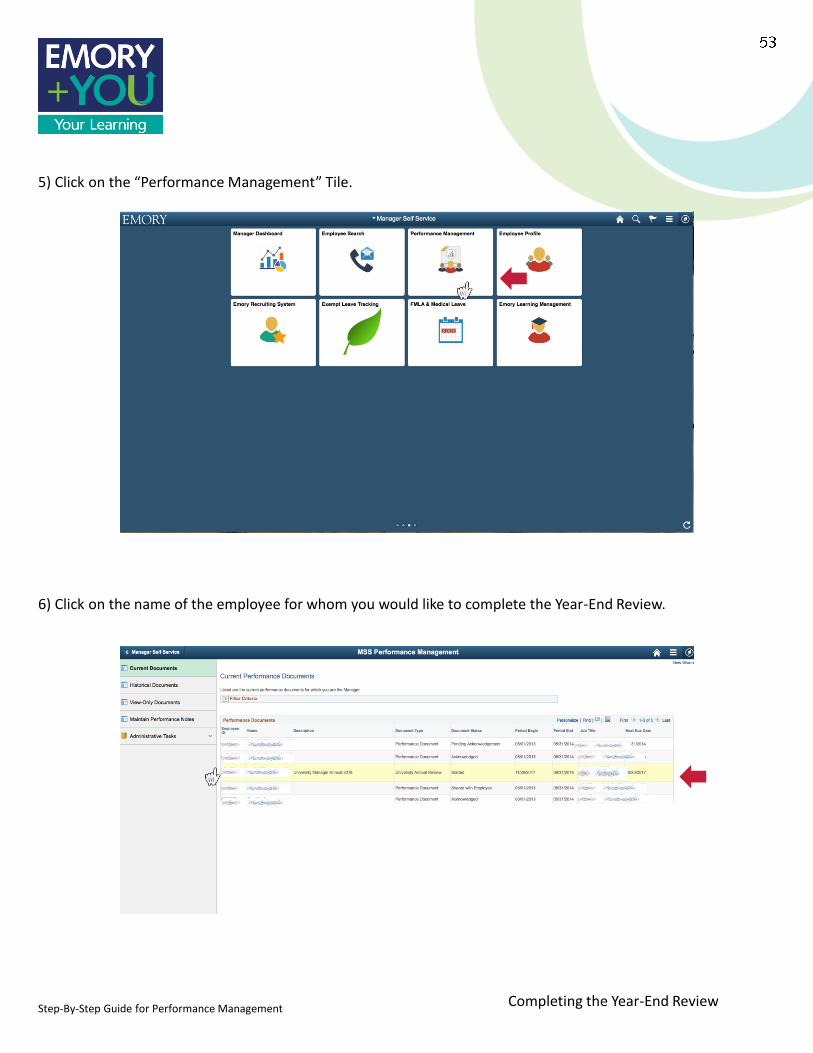
5) Click on the “Performance Management” Tile.
6) Click on the name of the employee for whom you would like to complete the Year-End Review.
Completing the Year-End Review

Step-By-Step Guide for Performance Management
7) Click on the “Review Self Evaluation” drop down icon.
8) Click on “View.”
Completing the Year-End Review

Step-By-Step Guide for Performance Management
9) You will be able to see your employees self evaluation. If you cannot see the information, your employee has not shared the information with you. You can navigate the feedback by selecting the competencies, goals of responsibilities tabs, and by clicking on the drop down icons under each tab.
Completing the Year-End Review
Step-By-Step Guide for Performance Management
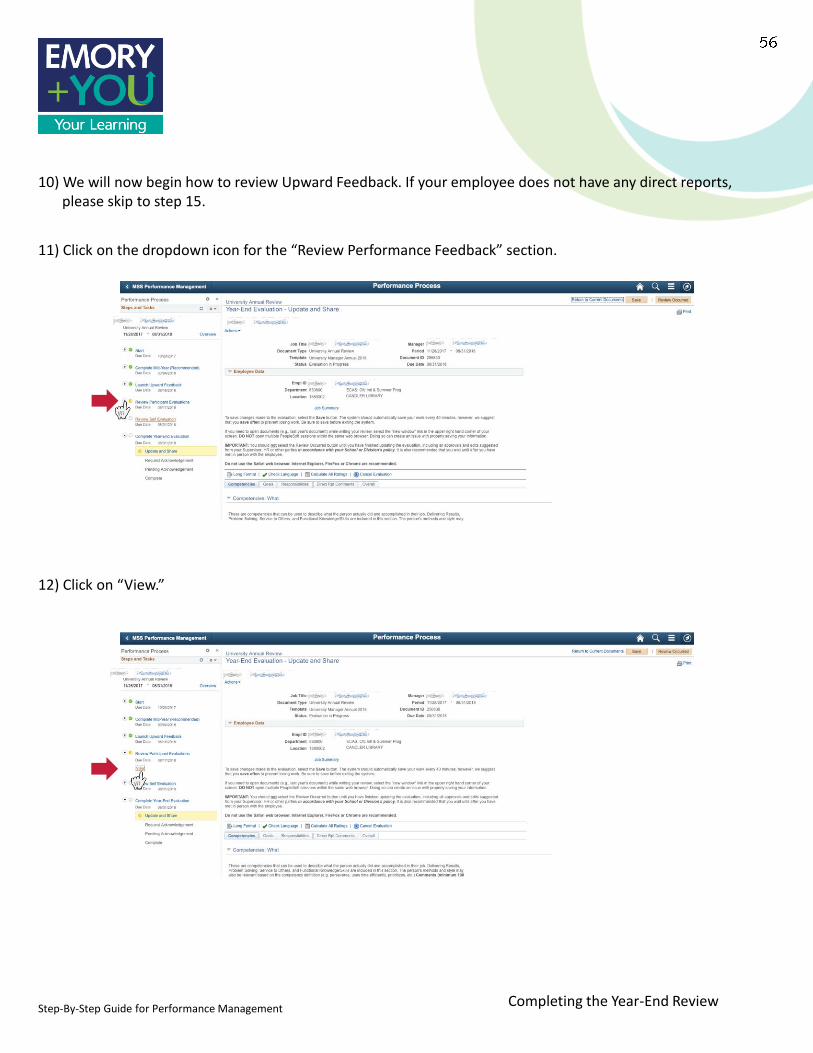
10) We will now begin how to review Upward Feedback. If your employee does not have any direct reports, please skip to step 15.
11) Click on the dropdown icon for the “Review Performance Feedback” section.
12) Click on “View.”
Completing the Year-End Review

Step-By-Step Guide for Performance Management
13) To view each direct report’s feedback of your employee, click on their names. This will launch a separate window with the feedback. Make sure your popup blocker is off.
14) You can navigate the feedback with the dropdown icons.
Completing the Year-End Review
Step-By-Step Guide for Performance Management
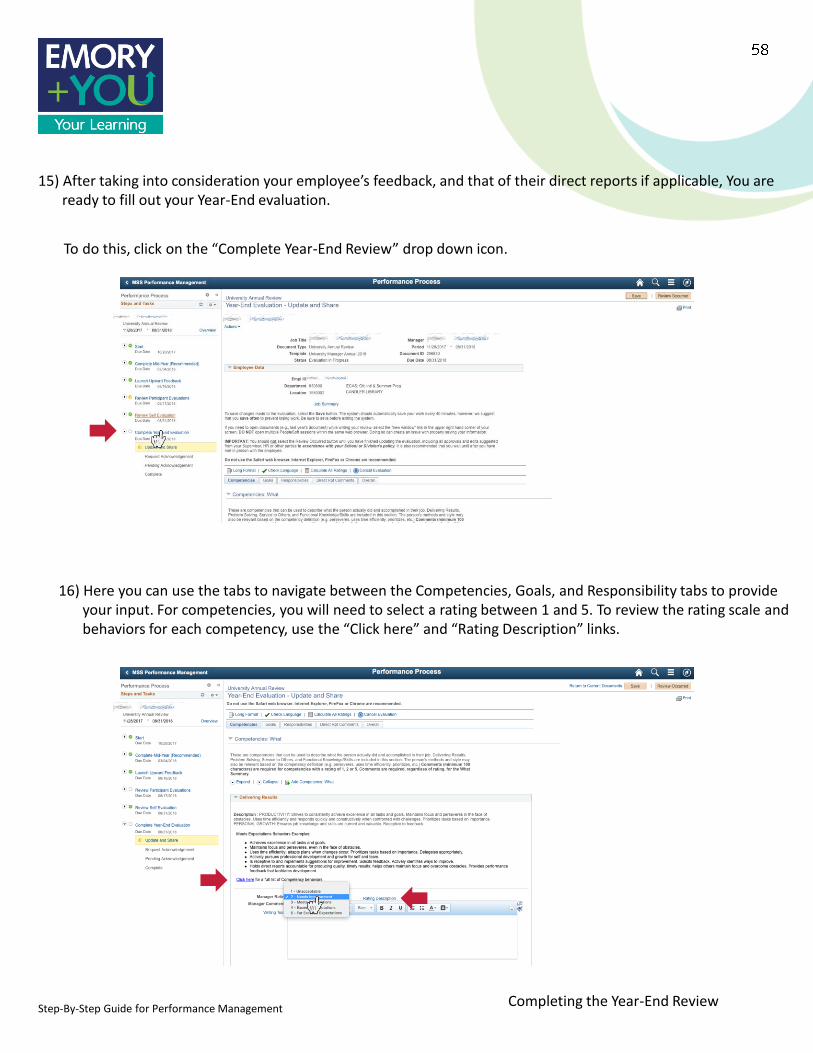
15) After taking into consideration your employee’s feedback, and that of their direct reports if applicable, You are ready to fill out your Year-End evaluation.
To do this, click on the “Complete Year-End Review” drop down icon.
16) Here you can use the tabs to navigate between the Competencies, Goals, and Responsibility tabs to provide your input. For competencies, you will need to select a rating between 1 and 5. To review the rating scale and behaviors for each competency, use the “Click here” and “Rating Description” links.
Completing the Year-End Review

Step-By-Step Guide for Performance Management
17) Complete the comments box for each of the competencies. If you have goals and responsibilities, complete those comments as well. You must provide at least 100 characters for any rating of a 1, 2 or 5.
18) Don’t forget the “What” and “How” summary sections, which also require comments. You may override the suggested rating for each section by clicking the “Final Rating” link, which will provide you a drop down box to select the rating you feel is most appropriate.
Completing the Year-End Review

Step-By-Step Guide for Performance Management
19) If your employee has direct reports, and you received upward feedback, you may review any feedback provided in the upward feedback section mentioned earlier in step 10. You may use the tab shown below to summarize the upward feedback provided. Remember to use this information only in combination with your own observations. Do not share the comments verbatim.
20) If the employee had goals or responsibilities, make sure to review those as well and provide an overall assessment of how well they did on those goals and/or responsibilities. Finally, you will want to provide an overall assessment for your employee. This is where you give the overall assessment of their performance. Click on the “Overall” tab.
Completing the Year-End Review

Step-By-Step Guide for Performance Management
21) You will want to select a rating, and write a summary of your reasoning and thoughts on their performance. You may override the suggested rating by clicking the “Final Rating” link, which will provide you a drop down box to select the rating you feel is most appropriate.
22) Save by clicking on the “Save” button. When you are comfortable with your evaluation, you are ready to perform a meeting with your employee to discuss their Year-End Review. This meeting should be similar to the Mid-Year Review.
Completing the Year-End Review

Step-By-Step Guide for Performance Management
23) After you complete your Year-End Review in person with your employee, return to the document and click on “Review Occurred.”
24) You will be asked to confirm this step. Select “Confirm.”
Completing the Year-End Review
Step-By-Step Guide for Performance Management
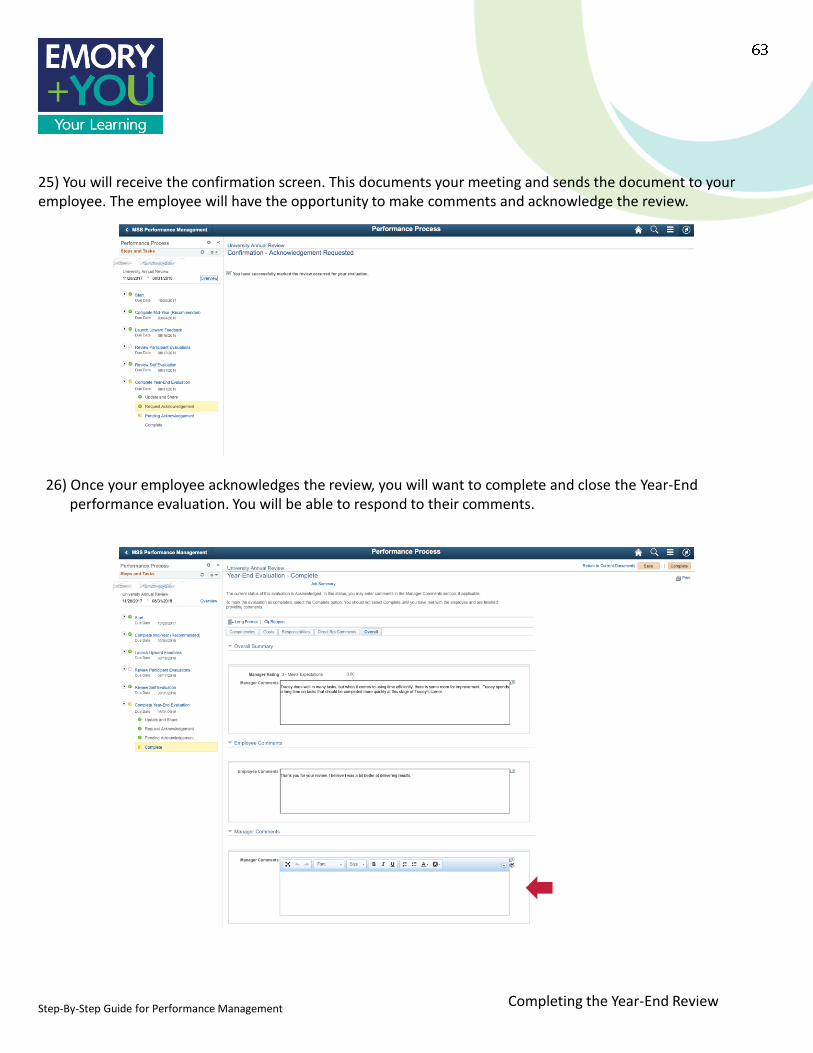
25) You will receive the confirmation screen. This documents your meeting and sends the document to your employee. The employee will have the opportunity to make comments and acknowledge the review.
26) Once your employee acknowledges the review, you will want to complete and close the Year-Endperformance evaluation. You will be able to respond to their comments.
Completing the Year-End Review

Step-By-Step Guide for Performance Management
27) When you are finished, click on “Complete”
28) You will be asked to confirm. Click on “Confirm.”
Completing the Year-End Review

Performance Management User Guide Launching a New Performance Management Cycle
29) You will receive confirmation you completed the Year-End Review. Congratulations! You have completed a full Performance Review Cycle.