Embed Size (px)
Citation preview
1
STEP-BY-STEP GUIDE FOR CREATING A PROFESSIONAL FLYER OR POST CARD FOR YOUR MULTIPLE LISTING
Note – The following instructions will assist you with your order. If you are having difficulties or need additional assistance, you can always call the support Phone Number located beneath the logo on each page – 972-277-8500!
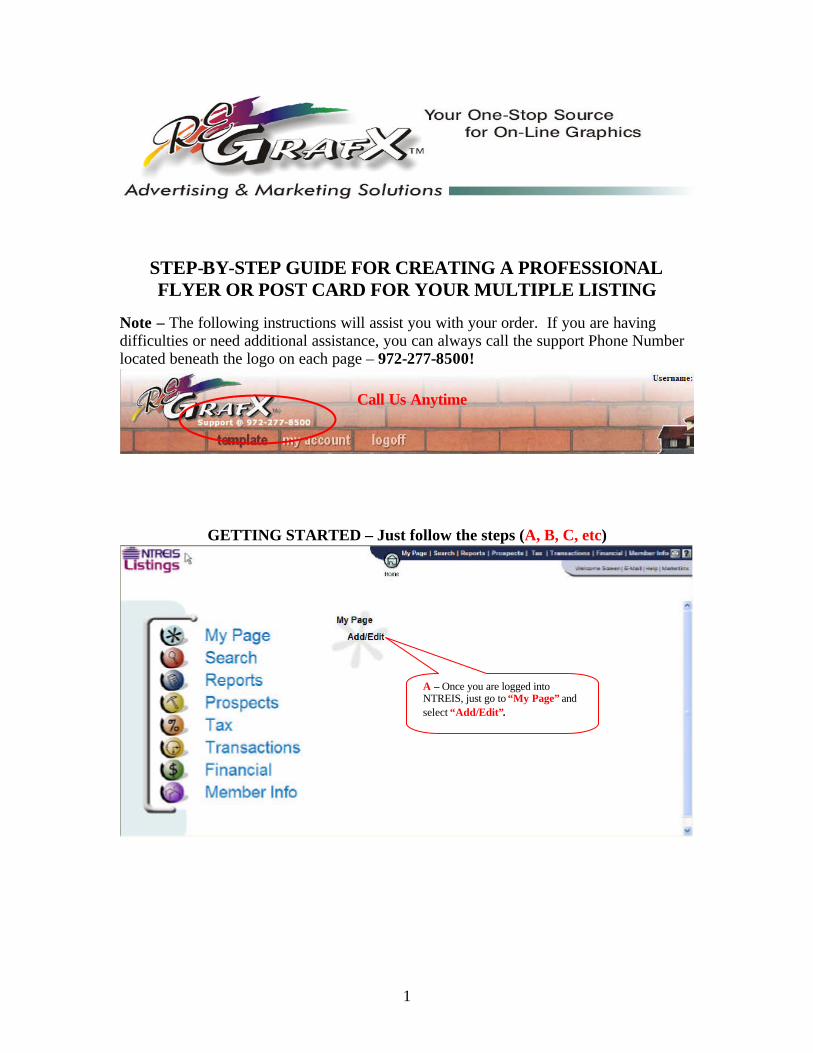
GETTING STARTED – Just follow the steps (A, B, C, etc)
Call Us Anytime
A – Once you are logged into NTREIS, just go to “My Page” and select “Add/Edit”.
2
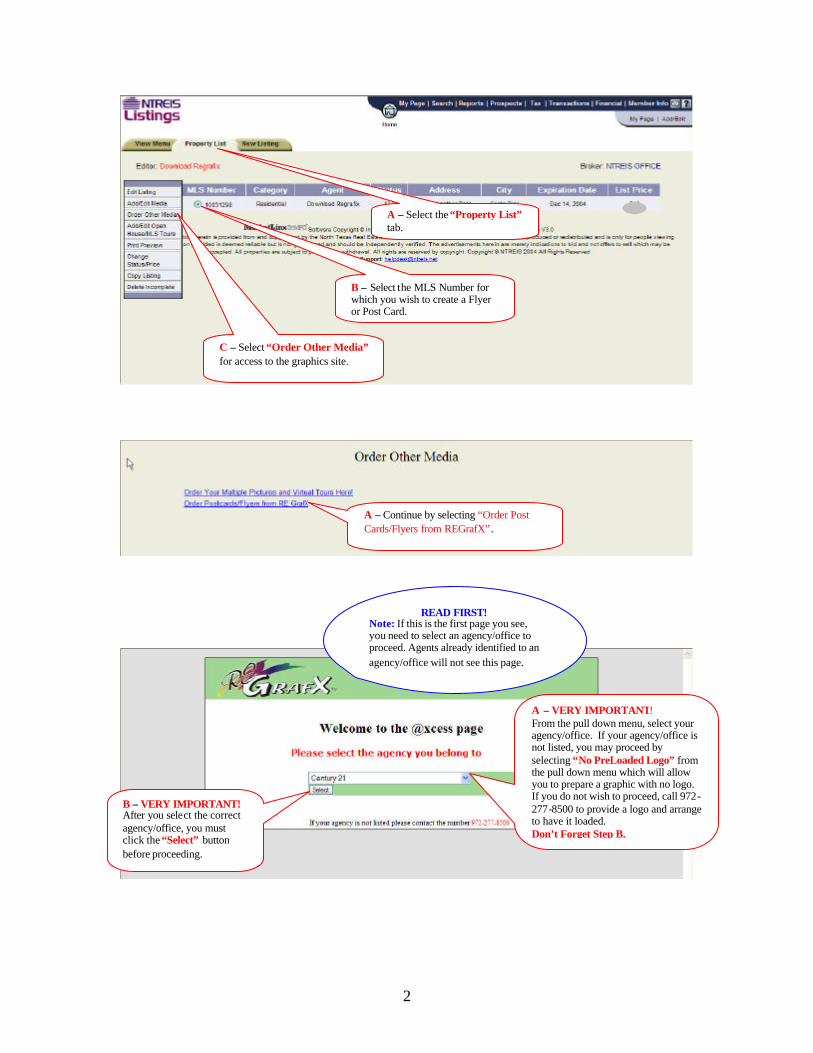
A – Select the “Property List” tab.
B – Select the MLS Number for which you wish to create a Flyer or Post Card.
C – Select “Order Other Media” for access to the graphics site.
A – Continue by selecting “Order Post Cards/Flyers from REGrafX”.
READ FIRST! Note: If this is the first page you see, you need to select an agency/office to proceed. Agents already identified to an agency/office will not see this page.
A – VERY IMPORTANT! From the pull down menu, select your agency/office. If your agency/office is not listed, you may proceed by selecting “No PreLoaded Logo” from the pull down menu which will allow you to prepare a graphic with no logo. If you do not wish to proceed, call 972-277-8500 to provide a logo and arrange to have it loaded. Don’t Forget Step B.
B – VERY IMPORTANT! After you select the correct agency/office, you must click the “Select” button before proceeding.
3
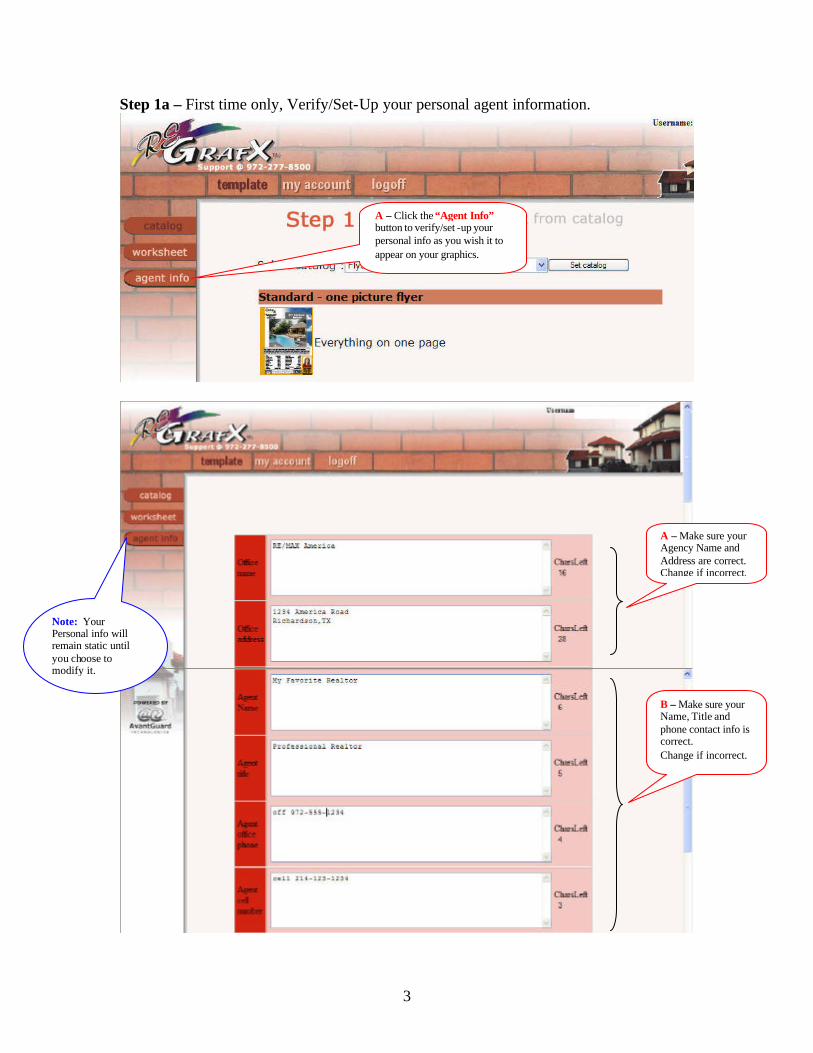
Step 1a – First time only, Verify/Set-Up your personal agent information.
A – Click the “Agent Info” button to verify/set -up your personal info as you wish it to appear on your graphics.
Note: Your Personal info will remain static until you choose to modify it.
A – Make sure your Agency Name and Address are correct. Change if incorrect.
B – Make sure your Name, Title and phone contact info is correct. Change if incorrect.
4
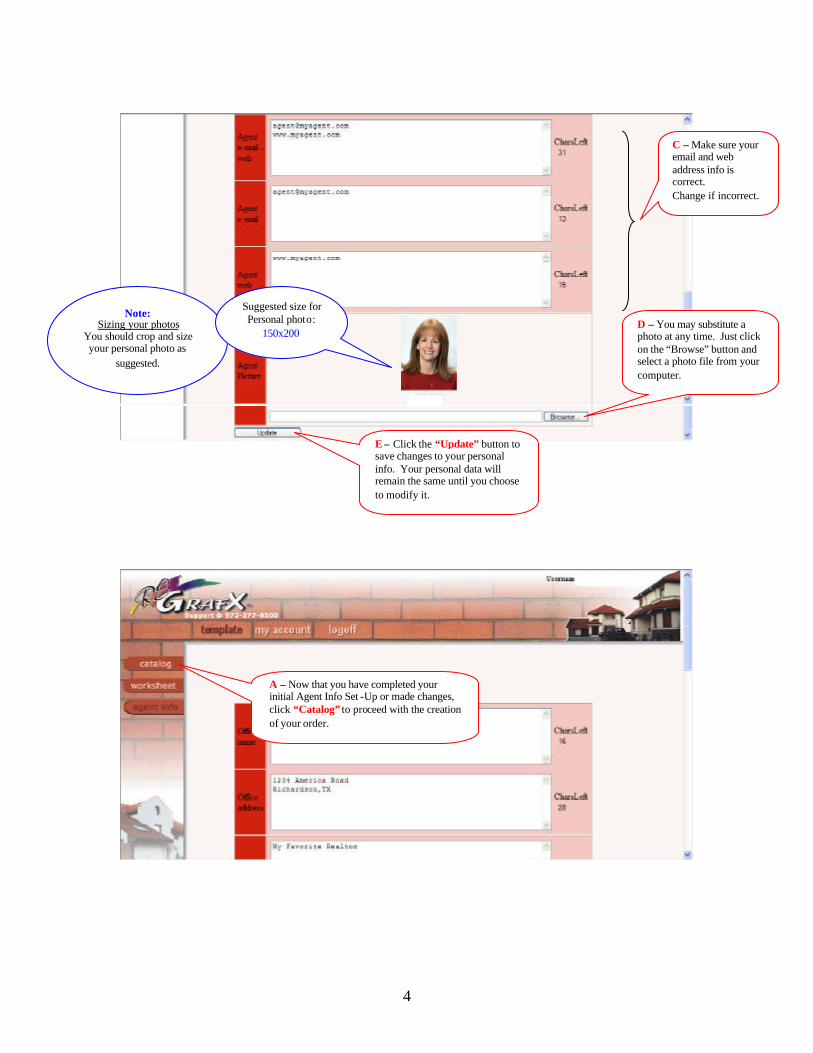
C – Make sure your email and web address info is correct. Change if incorrect.
D – You may substitute a photo at any time. Just click on the “Browse” button and select a photo file from your computer.
Note: Sizing your photos
You should crop and size your personal photo as
suggested.
Suggested size for Personal photo:
150x200
E – Click the “Update” button to save changes to your personal info. Your personal data will remain the same until you choose to modify it.
A – Now that you have completed your initial Agent Info Set -Up or made changes, click “Catalog” to proceed with the creation of your order.
5
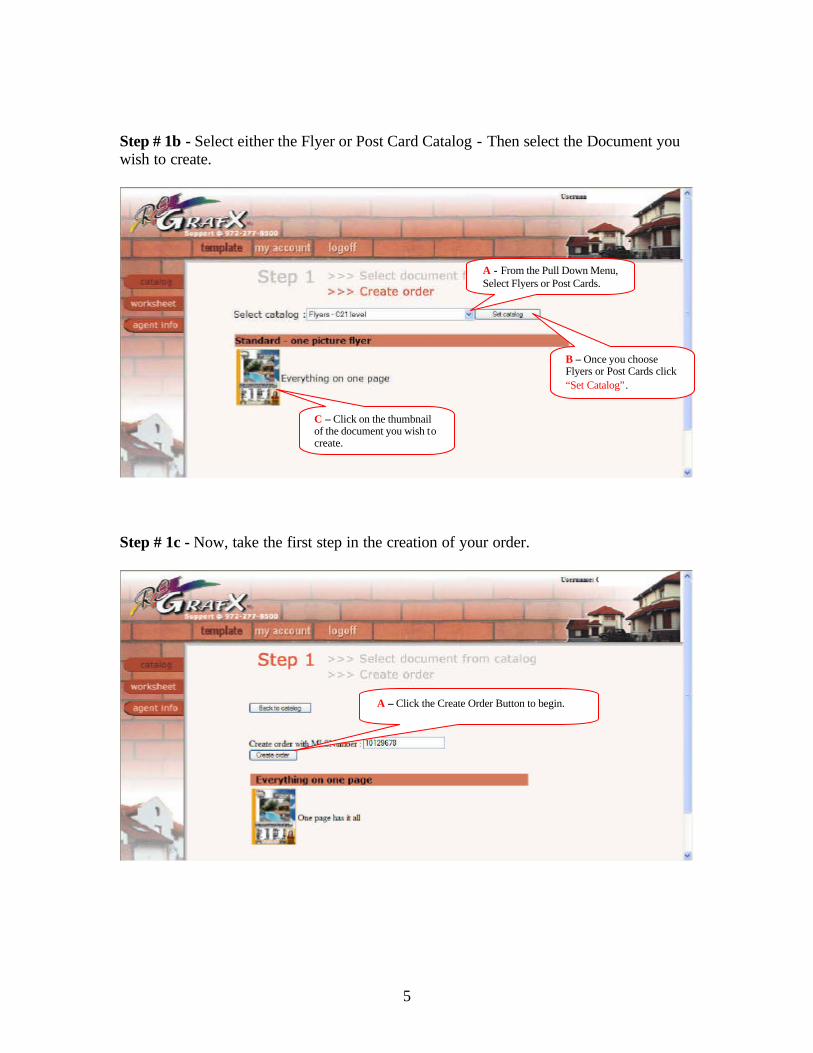
Step # 1b - Select either the Flyer or Post Card Catalog - Then select the Document you wish to create.
Step # 1c - Now, take the first step in the creation of your order.
A - From the Pull Down Menu, Select Flyers or Post Cards.
B – Once you choose Flyers or Post Cards click “Set Catalog”.
C – Click on the thumbnail of the document you wish to create.
A – Click the Create Order Button to begin.
6
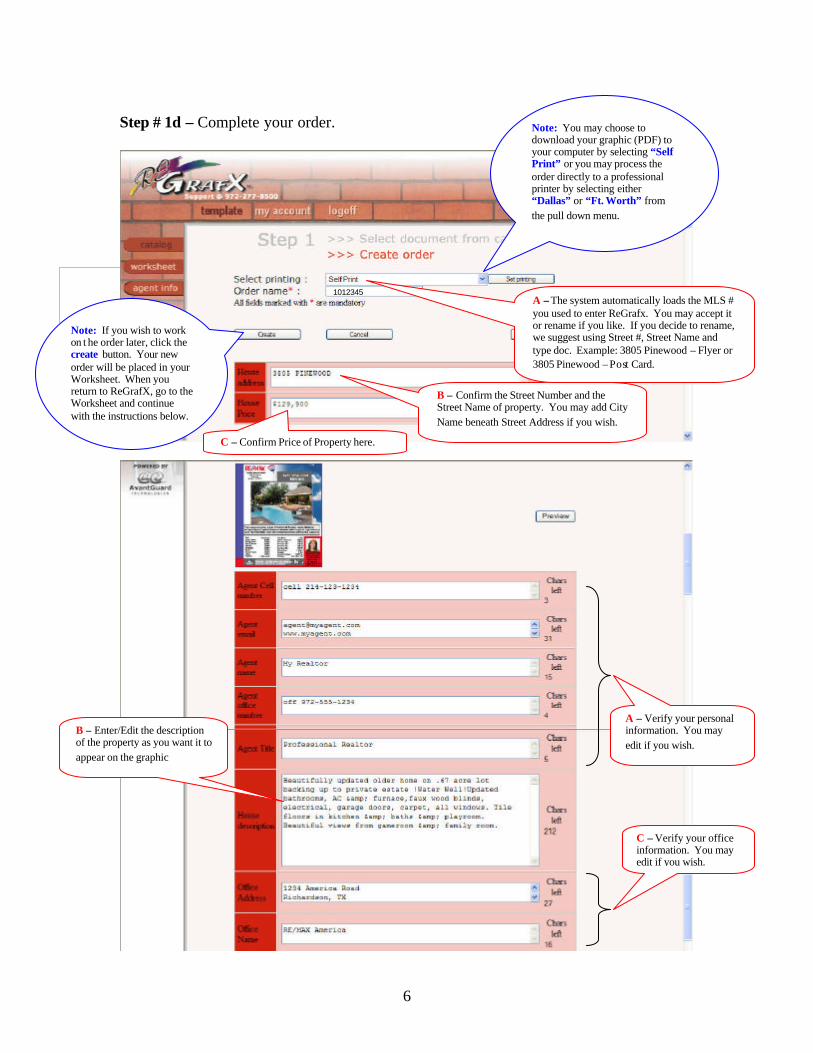
Step # 1d – Complete your order.
B – Confirm the Street Number and the Street Name of property. You may add City Name beneath Street Address if you wish.
C – Confirm Price of Property here.
A – The system automatically loads the MLS # you used to enter ReGrafx. You may accept it or rename if you like. If you decide to rename, we suggest using Street #, Street Name and type doc. Example: 3805 Pinewood – Flyer or 3805 Pinewood – Post Card.
1012345
Note: If you wish to work on t he order later, click the create button. Your new order will be placed in your Worksheet. When you return to ReGrafX, go to the Worksheet and continue with the instructions below.
A – Verify your personal information. You may edit if you wish.
B – Enter/Edit the description of the property as you want it to appear on the graphic
C – Verify your office information. You may edit if you wish.
Note: You may choose to download your graphic (PDF) to your computer by selecting “Self Print” or you may process the order directly to a professional printer by selecting either “Dallas” or “Ft. Worth” from the pull down menu.
7
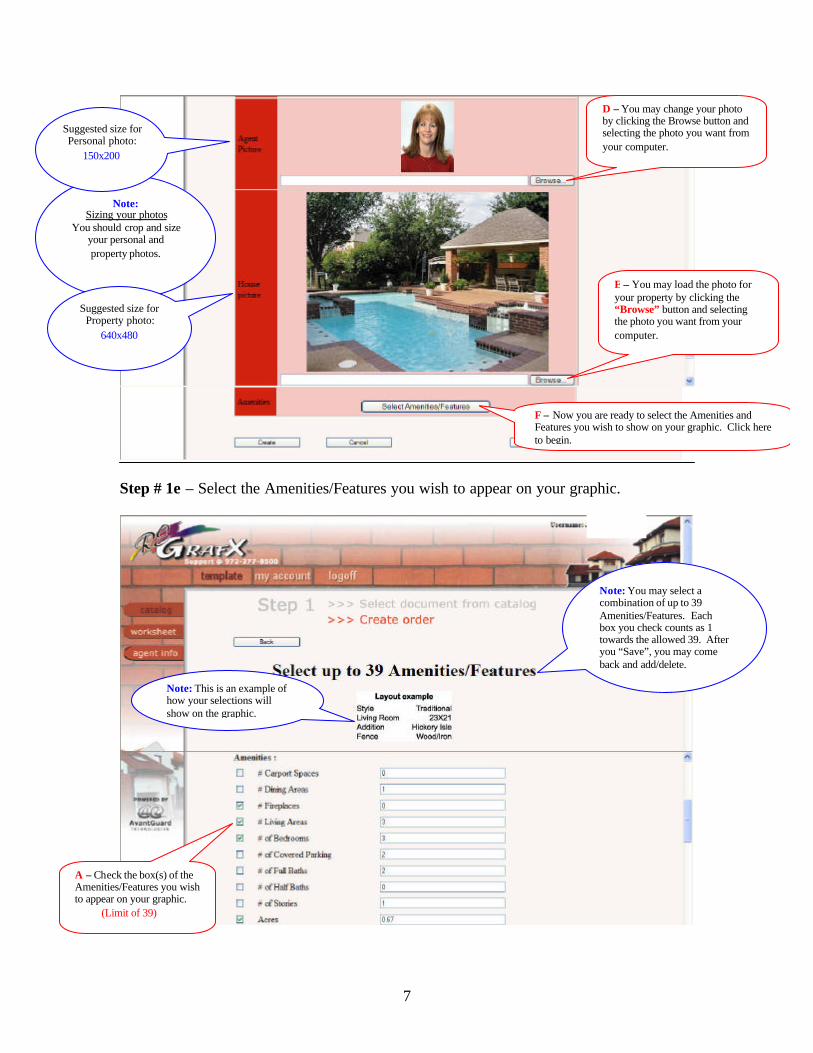
Step # 1e – Select the Amenities/Features you wish to appear on your graphic.
D – You may change your photo by clicking the Browse button and selecting the photo you want from your computer.
E – You may load the photo for your property by clicking the “Browse” button and selecting the photo you want from your computer.
Note: Sizing your photos
You should crop and size your personal and property photos.
Suggested size for Personal photo:
150x200
Suggested size for Property photo:
640x480
F – Now you are ready to select the Amenities and Features you wish to show on your graphic. Click here to begin.
Note: You may select a combination of up to 39 Amenities/Features. Each box you check counts as 1 towards the allowed 39. After you “Save”, you may come back and add/delete.
Note: This is an example of how your selections will show on the graphic.
A – Check the box(s) of the Amenities/Features you wish to appear on your graphic. (Limit of 39)
8
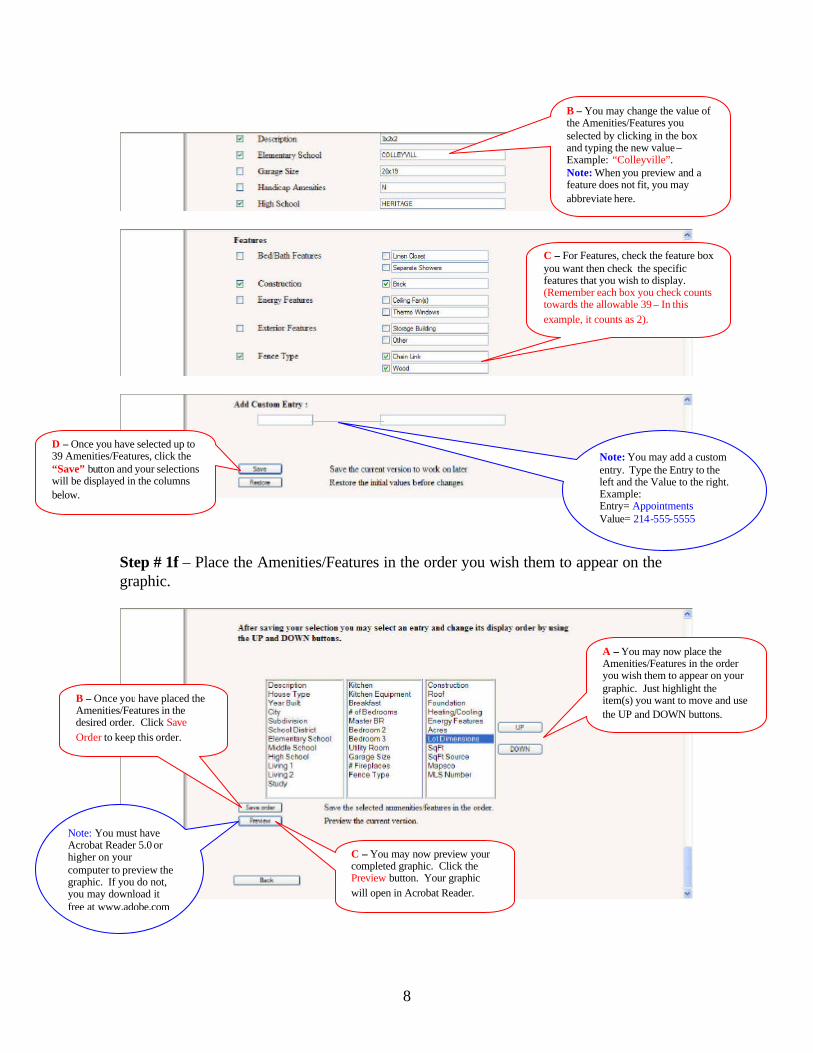
Step # 1f – Place the Amenities/Features in the order you wish them to appear on the graphic.
B – You may change the value of the Amenities/Features you selected by clicking in the box and typing the new value – Example: “Colleyville”. Note: When you preview and a feature does not fit, you may abbreviate here.
C – For Features, check the feature box you want then check the specific features that you wish to display. (Remember each box you check counts towards the allowable 39 – In this example, it counts as 2).
Note: You may add a custom entry. Type the Entry to the left and the Value to the right. Example: Entry= Appointments Value= 214-555-5555
D – Once you have selected up to 39 Amenities/Features, click the “Save” button and your selections will be displayed in the columns below.
A – You may now place the Amenities/Features in the order you wish them to appear on your graphic. Just highlight the item(s) you want to move and use the UP and DOWN buttons.
B – Once you have placed the Amenities/Features in the desired order. Click Save Order to keep this order.
C – You may now preview your completed graphic. Click the Preview button. Your graphic will open in Acrobat Reader.
Note: You must have Acrobat Reader 5.0 or higher on your computer to preview the graphic. If you do not, you may download it free at www.adobe.com
9
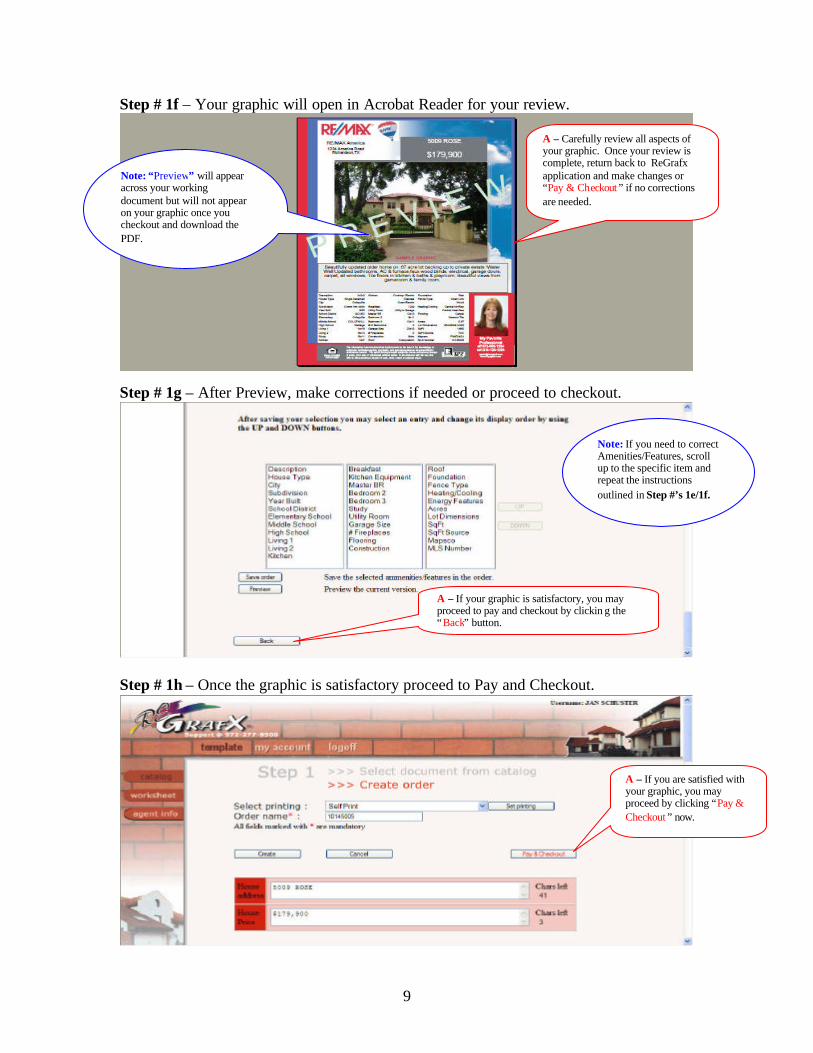
Step # 1f – Your graphic will open in Acrobat Reader for your review.
Step # 1g – After Preview, make corrections if needed or proceed to checkout.
Step # 1h – Once the graphic is satisfactory proceed to Pay and Checkout.
A – Carefully review all aspects of your graphic. Once your review is complete, return back to ReGrafx application and make changes or “Pay & Checkout ” if no corrections are needed.
Note: “Preview” will appear across your working document but will not appear on your graphic once you checkout and download the PDF.
A – If your graphic is satisfactory, you may proceed to pay and checkout by clickin g the “Back” button.
Note: If you need to correct Amenities/Features, scroll up to the specific item and repeat the instructions outlined in Step #’s 1e/1f.
A – If you are satisfied with your graphic, you may proceed by clicking “Pay & Checkout ” now.
10
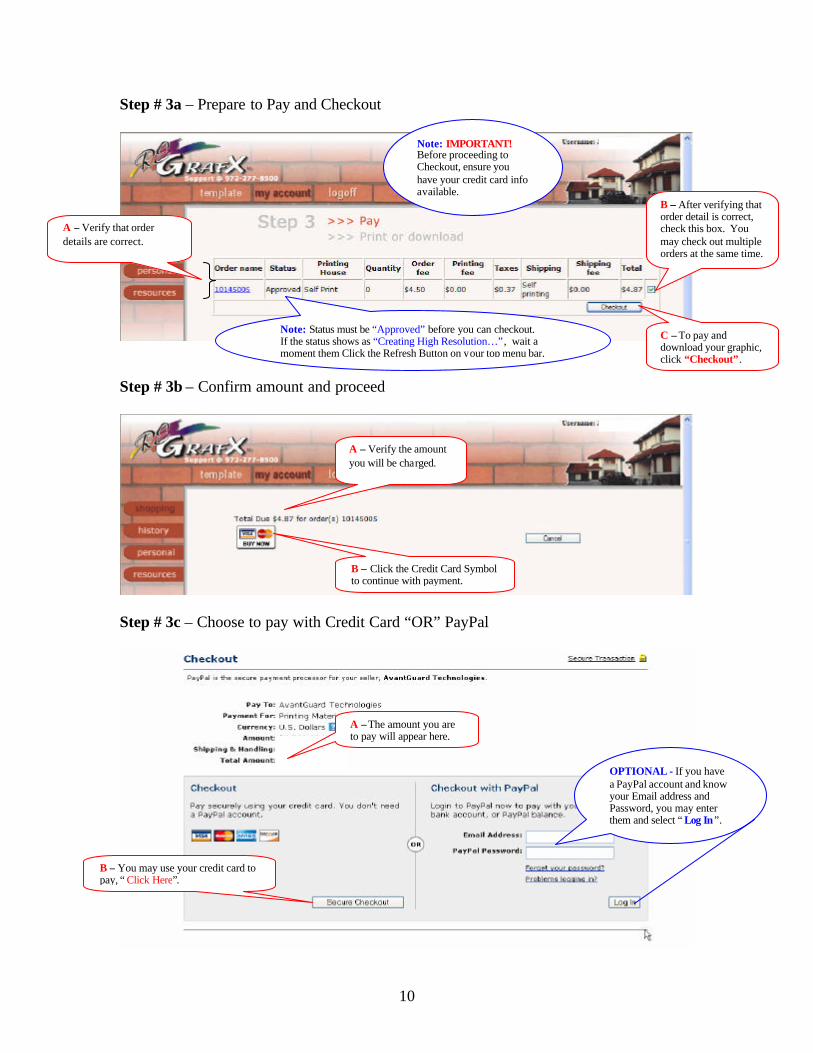
Step # 3a – Prepare to Pay and Checkout
Step # 3b – Confirm amount and proceed
Step # 3c – Choose to pay with Credit Card “OR” PayPal
B – After verifying that order detail is correct, check this box. You may check out multiple orders at the same time.
A – Verify that order details are correct.
C – To pay and download your graphic, click “Checkout”.
A – Verify the amount you will be charged.
B – Click the Credit Card Symbol to continue with payment.
B – You may use your credit card to pay, “ Click Here”.
OPTIONAL - If you have a PayPal account and know your Email address and Password, you may enter them and select “ Log In”.
A – The amount you are to pay will appear here.
Note: IMPORTANT! Before proceeding to Checkout, ensure you have your credit card info available.
Note: Status must be “Approved” before you can checkout. If the status shows as “Creating High Resolution…”, wait a moment them Click the Refresh Button on your top menu bar.
11
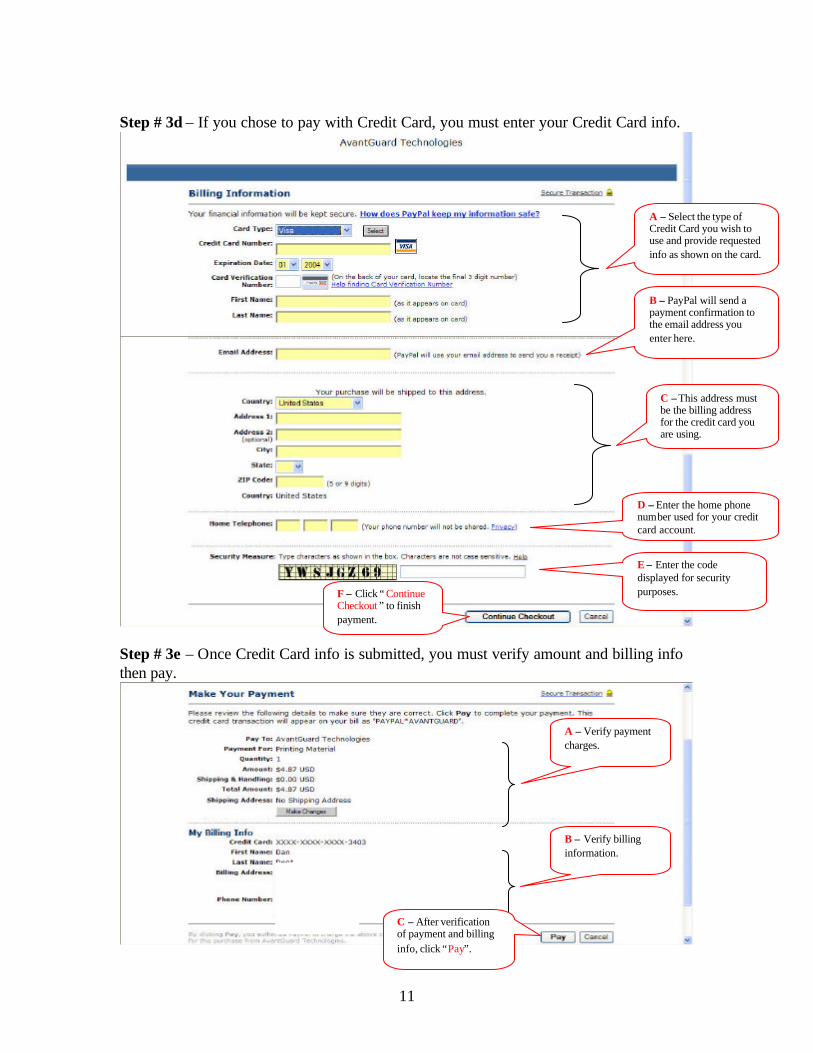
Step # 3d – If you chose to pay with Credit Card, you must enter your Credit Card info.
Step # 3e – Once Credit Card info is submitted, you must verify amount and billing info then pay.
A – Select the type of Credit Card you wish to use and provide requested info as shown on the card.
B – PayPal will send a payment confirmation to the email address you enter here.
C – This address must be the billing address for the credit card you are using.
D – Enter the home phone number used for your credit card account.
E – Enter the code displayed for security purposes. F – Click “ Continue
Checkout ” to finish payment.
A – Verify payment charges.
B – Verify billing information.
C – After verification of payment and billing info, click “Pay”.
12
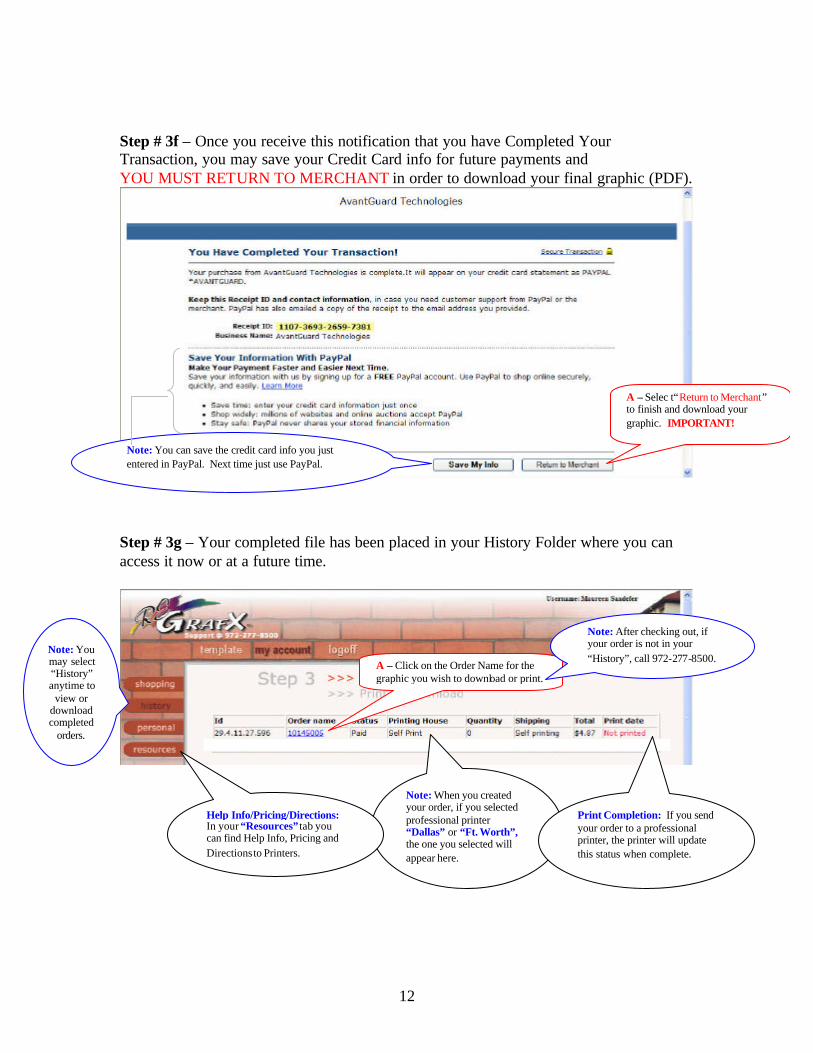
Step # 3f – Once you receive this notification that you have Completed Your Transaction, you may save your Credit Card info for future payments and YOU MUST RETURN TO MERCHANT in order to download your final graphic (PDF).
Step # 3g – Your completed file has been placed in your History Folder where you can access it now or at a future time.
Note: You can save the credit card info you just entered in PayPal. Next time just use PayPal.
A – Selec t“Return to Merchant” to finish and download your graphic. IMPORTANT!
A – Click on the Order Name for the graphic you wish to download or print.
Note: You may select “History” anytime to
view or download completed
orders.
Note: After checking out, if your order is not in your “History”, call 972-277-8500.
Note: When you created your order, if you selected professional printer “Dallas” or “Ft. Worth”, the one you selected will appear here.
Help Info/Pricing/Directions: In your “Resources” tab you can find Help Info, Pricing and Directions to Printers.
Print Completion: If you send your order to a professional printer, the printer will update this status when complete.
13
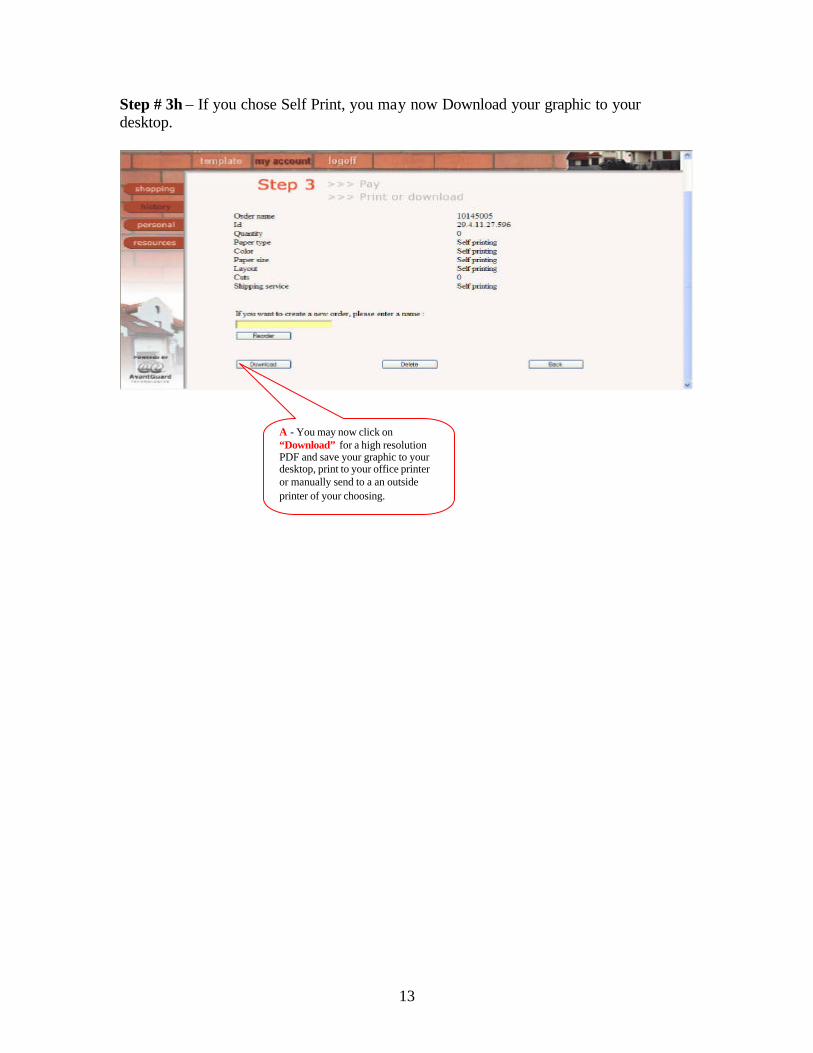
Step # 3h – If you chose Self Print, you may now Download your graphic to your desktop.
A - You may now click on “Download” for a high resolution PDF and save your graphic to your desktop, print to your office printer or manually send to a an outside printer of your choosing.