Embed Size (px)
Citation preview

Installation Guide
Stellar Phoenix® (HP® -UX™) 1.0
Data Recovery Software for JFS (VxFS) file system drives
Stellar Phoenix is a registered trademark of Stellar Information Systems Ltd.

Overview
According to Murphy's Law of Data Loss, "The probabilities of a hard-disk crash increase with the number of days since the drive was last backed up."
No hard disk is ever completely safe from crashing, and losing all the important data on it. A disk can be damaged due to a number of causes such as virus attack, voltage glitches, software malfunction, hard disk format, accidental file/directory deletion, human error or even sabotage. Such events cause corruption or damage to the disk drive, and make the data completely inaccessible to the user.
In most cases, retrieval of such lost data is practically impossible, and this can mean grave losses to the user. The user has to rebuild his files from previous backups and, if improper or no backup has been taken, even reconstruct the information from scratch. In today's age of information technology, data represents time as well as money, and such loss of data could be catastrophic.
This is precisely why a tool like Stellar Phoenix comes in handy to recover your lost data. Stellar Phoenix is a unique product, which allows you to recover precious data from inaccessible hard drives, which have been damaged due to a variety of reasons like
• Accidental format• Partition loss• Virus related corruption• File/directory deletion

How Stellar Phoenix works?
Stellar Phoenix is NON-DESTRUCTIVE and READ-ONLY Software. It will recover your data and copy it to another destination - a removable drive, another working partition, another hard disk, a floppy diskette or a network volume.
Stellar Phoenix is very easy to use. The software's fully automated wizard will walk you through the simple steps:
Evaluate - Phoenix identifies the device and locates all partition(s) on the inaccessible drive and presents them in a list.
Analysis - It examines the remains of the file structure (Super Block, Inodes) and the data area of the inaccessible drive and works out the best path to recover your files and directories.
Recover - All recoverable files and directories are presented in a tree structure. You can select your data files and directories and move the data to a safe location.
NOTE: If you hear any strange noises (grinding or clicking) coming from your hard drive this might be an indication of a hardware/physical problem. Continuing to operate your system may damage your hard drive beyond repair and/or cause irretrievable data loss. If you suspect hardware problems visit : http://www.stellarinfo.com/data-recovery-services.htm

Copyright Notice
Stellar Phoenix (HP-UX) software, accompanied user manual and documentation are copyright of Stellar Information Systems Ltd., with all rights reserved. Under the copyright laws, this user manual cannot be reproduced in any form without the prior written permission of Stellar Information Systems Ltd. No Patent Liability is assumed, however, with respect to the use of the information contained herein.
© 1995 - 2009 Stellar Information Systems Ltd. All rights reserved.

Disclaimer NoticeThe Information contained in this manual, including but not limited to any product specifications, is subject to change without notice.
STELLAR INFORMATION SYSTEMS LTD PROVIDES NO WARRANTY WITH REGARD TO THIS MANUAL OR ANY OTHER INFORMATION CONTAINED HEREIN AND HEREBY EXPRESSLY DISCLAIMS ANY IMPLIED WARRANTIES OF MERCHANTABILITY OR FITNESS FOR ANY PARTICULAR PURPOSE WITH REGARD TO ANY OF THE FOREGOING STELLAR INFORMATION SYSTEMS LTD ASSUMES NO LIABILITY FOR ANY DAMAGES INCURRED DIRECTLY OR INDIRECTLY FROM ANY TECHNICAL OR TYPOGRAPHICAL ERRORS OR OMISSIONS CONTAINED HEREIN OR FOR DISCREPANCIES BETWEEN THE PRODUCT AND THE MANUAL. IN NO EVENT SHALL STELLAR INFORMATION SYSTEMS LTD, BE LIABLE FOR ANY INCIDENTAL, CONSEQUENTIAL SPECIAL, OR EXEMPLARY DAMAGES, WHETHER BASED ON TORT, CONTRACT OR OTHERWISE, ARISING OUT OF OR IN CONNECTION WITH THIS MANUAL OR ANY OTHER INFORMATION CONTAINED HEREIN OR THE USE THEREOF.

Trademarks
Stellar Phoenix®(HP-UX)® is a registered trademark of Stellar Information Systems Ltd.
Windows' 95®, Windows' 98®, Windows' ME®, Windows' NT®, Windows' 2000 Server®, Windows' 2000 Advanced Server®, Windows' 2003 Server®, Windows' XP® and MS-DOS are registered trademarks of Microsoft Corporation.
All other brand and product names are trademarks or registered trademarks of their respective companies.

License
Stellar Phoenix (HP-UX) Copyright © 1995-2005 by Stellar Information Systems Ltd.
All rights reserved.
This license applies to the standard-licensed version of Stellar Phoenix (HP-UX).
Stellar Phoenix (HP-UX) License
Stellar Information Systems Ltd.
Your Agreement to this License
You should carefully read the following terms and conditions before using, installing or distributing this software, unless you have a different license agreement signed by Stellar Information Systems Ltd.
If you do not agree to all of the terms and conditions of this License, then: do not copy, install, distribute or use any copy of Stellar Phoenix (HP-UX) with which this License is included, you may return the complete package unused without requesting an activation key, within 30 days after purchase, for a full refund of your payment.
The terms and conditions of this License describe the permitted use and users of each Licensed Copy of Stellar Phoenix (HP-UX). For purposes of this License, if you have a valid single-copy license, you have the right to use a single Licensed Copy of Stellar Phoenix (HP-UX); if you or your organization has a valid multi-user license, then you or your organization have - has the right to use up to a number of Licensed Copies of Stellar Phoenix (HP-UX) equal to the number of copies indicated in the documents issued by Stellar when granting the license.
Scope of License
Each Licensed Copy of Stellar Phoenix (HP-UX) may either be used by a single person or used non-simultaneously by multiple people who use the software personally installed on a single workstation. This is not a concurrent use license.
All rights of any kind in Stellar Phoenix (HP-UX), which are not expressly granted in this License, are entirely and exclusively reserved to and by Stellar Information Systems Ltd. You may not rent, lease, modify, translate, reverse engineer, decompile, disassemble, or create derivative works based on, Stellar Phoenix (HP-UX), nor permit anyone else to do so. You may not make access to Stellar Phoenix (HP-UX) available to others in connection with a service bureau, application service provider, or similar business, nor permit anyone else to do so.
Warranty Disclaimers and Liability Limitations.
Stellar Phoenix (HP-UX), and any and all accompanying software, files, data and materials, are distributed and provided AS IS and with no warranties of any kind, whether expressed or implied. In particular, there is no warranty for the quality of data recovered. You acknowledge that good data processing procedure dictates that any program, including Stellar Phoenix (HP-UX), must be thoroughly tested with non-critical data before there is any reliance on it, and you hereby assume the entire risk of all use of the copies of Stellar Phoenix (HP-UX) covered by this License. This disclaimer of warranty constitutes an essential part of this License.
In addition, in no event does Stellar authorize you or anyone else to use Stellar Phoenix (HP-UX) in applications or systems where Stellar Phoenix (HP-UX)'s failure to perform can reasonably be expected to result in a significant physical injury, or in loss of life. Any such use is entirely at your own risk, and you agree to hold Stellar harmless from any and all claims or

losses relating to such unauthorized use.
General
This License is the complete statement of the agreement between the parties on the subject matter, and merges and supersedes all other or prior understandings, purchase orders, agreements and arrangements. This License shall be governed by the laws of the State of Delhi. Exclusive jurisdiction and venue for all matters relating to this License shall be in courts and for a located in the State of Delhi, and you consent to such jurisdiction and venue. There are no third party beneficiaries of any promises, obligations or representations made by Stellar herein. Any waiver by Stellar of any violation of this License by you shall not constitute, nor contribute to, a waiver by Stellar of any other or future violation of the same provision, or any other provision, of this License.
Copyright © 1995-2009 by Stellar Information Systems Ltd. All rights reserved.

System Requirements
• Pentium-class processor
• 64 MB RAM (128 MB recommended).
• Windows 9x/ME, Windows NT 3.51 and above, or Windows 2000 / XP / 2003
• 5 MB of free space (Required for Installation).

Connecting IDE Drives
Setting up Stellar Phoenix and recovering data from a damaged disk drive is a very easy and simple procedure.
You need a working computer with a drive having enough free space to store your recovered data.
Identify a PC that confirms to the System Requirements and has a drive that has free space to store your recovered data.
Once you have found a system that conforms to the system requirements, verify that the disk in the PC is connected on the Primary Channel as Master.
You can connect the corrupt disk as:
• Slave on the primary channel OR
• Master or Slave on the secondary channel
The procedure for connecting the drive is detailed in the attach disk topic.
Note: Take the help of a support executive in your office or your maintenance engineer if you are not comfortable with connecting the drives.

Attaching Disk
There are three steps:
• Set the jumpers on the hard disk or CD ROM
• Plug and screw the disk in
• Boot the computer up and make sure the disk is detected
Step 1: Setting the disk up
Let's take a look at the back of a hard disk to see the jumpers and IDE cable connectors.
A = This is the IDE cable plug. Attach one end of the cable here and the other into the motherboard. Remember that the end plug of the cable is the master and the middle plug is the slave. There is a notch that prevents incorrect insertion.
B = These are the jumper pins. Setup your disk as the master and the corrupt disk as the slave. The diagram for this jumper configuration should be on a sticker on the hard disk.
C = This is the power plug. Plug in the power cable from your power supply here.
Here is a picture of an IDE cable:
The master plug is marked with a red arrow. The other end of the cable plugs into the motherboard while the middle plug is for disks in the "slave" configuration.
You can have a "master" and a "slave" on the same cable. That is the whole point of the system!
Another option is to set the drive to "cable select" where it will adjust itself to whatever plug you attach it to. Not all disks support this however.
Step 2: Installing the disk into the case
Here is a picture of a couple of hard disk's installed in a case. The power and IDE cables have been attached.

Simply screw in the disk to secure it in the case. It is time to make sure your system accepts your new disk.
Step 3: Setting up your system
Now you must enter the system BIOS and make sure the appropriate IDE channel is set to AUTO, in order to autodetect the drives. Most motherboards ship with IDE channels set to AUTO by default.
To enter the system BIOS press 'Delete' or 'F2' shortly after powering the system on.
Simply search around until you reach the IDE menu. Remember to save when you exit the BIOS.
Now when the computer powers up the disk should be detected with it's given size.
Once you have attached the disk, you are ready to install the software on a working disk.
Click here to see the installation procedure.

Installation
The software should be installed on a Windows® machine and the crashed HP-UX disk should be connected to the machine as secondary disk or as disk 2, with the Windows® disk serving as disk 1.
Run setup.exe from the Stellar Phoenix software CDROM or diskette. If you have downloaded Stellar Phoenix from www.stellarinfo.com or a download engine, run the setup file from Windows Explorer to begin the installation process.
Note : Make sure you are logged in as administrator before initializing setup, as the software installation requires local admin rights in Windows NT/2000/XP.
Setup installs the software, creates a desktop shortcut and creates an entry in the Program groups menu. The default path for software installation is C:\Program Files\Stellar Phoenix (HP-UX) 1.0\
The install program also creates an entry in the 'Add/Remove Programs' group for software unistallation.
NOTE: Do not install Stellar Phoenix to the partition from which you are trying to recover data. This may result in your lost data getting overwritten and could also cause permanent damage.

Quick Recovery Guide
Once the installation of Stellar Phoenix is complete, you need to run the software from the Programs group in the Start menu. START-->PROGRAMS-->STELAR PHOENIX(HP-UX)-->Stellar Phoenix (HP-UX).EXE
On executing Stellar Phoenix you will see fig (a). Phoenix scans and displays all the physical disks it can find. Select the physical disk from which you wish to recover your data and click the 'OK' button.
Fig: (a)
Phoenix now presents two options (see fig (b)). You can either search for logical drives in the selected disk or use drive information that is stored in the partition table.
Fig: (b)
Use partition table information option to recover lost folders & files. However, do not use this option if partitions have been recreated.
If the partition table is damaged and no information about logical drives is available, or have been recreated, you should select "Search for logical drives".
If you select the option to search for partitions, Stellar Phoenix searches for partitions or logical drives in the hard disk and displays the result, as shown below.

Fig: ( c)
Select the appropriate volume (drive), from which data has to be recovered. Phoenix analyses the selected logical drive.
While Phoenix is scanning the selected logical drive, it displays the search results found in the left panel and creates a tree structure. (It is recommended that you do not stop this process as it may impair the data recovery results)
The file and folder entries are now displayed in a manner that is easy to view and navigate.

Fig : (e)
If the tree doesn't display the desired results, then select the option 'Search Lost File(s) and Folder(s) ' from the 'Tools' menu to locate missing or lost file(s) folder(s).

Recover Drives having corrupted LVM
To recover drives having corrupted LVM, follow these steps:
1. Click the 'Select Physical Disk' button on the 'Icon' toolbar.
2. A dialog box appears listing the physical disk(s) available.
3. Select the physical disk that contains the corrupt or missing logical drive.
4. Another dialog box pops up. Select 'Search for Logical Drives / Volumes'.
5. Phoenix will scan the hard disk for all the lost partitions and would present the list of found partitions.
6. Select the corrupt or missing logical drive from the list.
7. Phoenix analyses the drive data structures and file system attributes and displays the directory tree.
8. Select 'Recover All' or select the file(s) and folder(s) which you feel are important and then, select 'Recover Selected'.

Recover Logical Drives containing Super Block corruption
To recover Logical Drives containing Super Block corruption, follow these steps:
1. Click the 'Select Physical Disk' button on the 'Icon' toolbar.
2. A dialog box appears listing the physical disk available.
3. Select the physical disk that contains the corrupt or missing logical drive.
4. Another dialog box pops up. Select 'Use partition table information to get volume information'.
5. Select the partition which needs to be recovered.
6. Phoenix analyses the drive data structures and file system attributes and displays the directory tree.
7. Select 'Recover All' or select the file(s) and folder(s) which you feel are important and then, select 'Recover Selected'.

Recover Data to a Safe Location
This is the last but the most important process in recovering your lost data. After you have found the files and folders that need to be recovered, you need to transfer them to another media. You can recover the data to another logical drive on the same disk, or another working hard disk, or a network drive.
Select the destination folder in the target drive that will store the recovered data. Stellar Phoenix will copy the desired files and folders to the selected destination folder. Once you click the 'OK' button, a dialog box pops up and gives you a continuous progress on the percentage of files copied.
Phoenix gives two options to recover your data.
• Recover All Files in Drive.
• Recover Selected Files.
Recovering All Files in Drive
Use "Recover All" to recover ALL the files and folders (including deleted, lost and numbered files and folders) from the inaccessible drive. Select 'Recover All ' from the 'Files' menu. Alternatively, you can click the 'Recover All' icon on the Toolbar to start the process.
A dialog box pops up listing the drives and folders. Select a destination folder. Now, you're ready to begin moving data. Click 'OK' to begin.
Recovering Selected Files
Use this option to perform selective file or folder recovery. Select the files and/or folders by selecting the check box displayed next to them. When you have completed the selection, choose "Recover Selected Files" in the 'File' menu. Alternatively, you can also click the 'Recover Selected Files' icon on the toolbar to start this process.
A dialog box pops up prompting you to select the destination path. Select the destination folder. Now, you are ready to begin recovering data. Click 'OK' to begin.
Note: Stellar Phoenix recovers files from HP-UX volumes, but it can write recovered data to FAT or NTFS local disks or network drives.
You can recover data to
a) Another hard disk in the same machine
b) A mapped logical drive on the network (should have full access rights)
c) A USB drive attached to the system
ci) d) A ZIP drive attached to the system
You can restore recovered data to all those storage devices where your Operating System can write data.

Save Scan
What is Save Scan ?
The demo copy gives you a fair idea about chances of data recovery from your hard disk before deciding upon the purchase.
Stellar Phoenix provides a unique feature whereby you can save the scan information that was generated after running the demo version. Once you have purchased the working version of the software, you can resume the data recovery process from the saved scan.
This ensures faster recovery and saves you from the hassle of scanning your hard disk again after purchasing the working version.
Follow the guidelines below on how to save the scan information:
Once scanning is over, select 'Save Scan' fromt the 'Tools' menu.
A window pops up wherein you can specify the name of the scan to be saved.
The file extension is '.dat'.
To recover any data from the same disk again, select 'Open using scan information' from the 'Drive' menu. A window pops up wherein you can specify which saved scan to open. Select the file and click 'OK'. You will find the complete tree structure as it was when you last scanned the drive.
When to use Save Scan?
When you have used the demo version to analyse the crashed logical drive(s), and would like to resume the data recovery process after activating the product, or want to resume the data recovery process later. Use this feature to save time.

File Filter
What is File Filter?
Before transferring data to the destination path, one can include or exclude certain files on the basis of their extensions using 'FileFilter'.
For instance, if you want to recover files having an extension of '.doc' or '.ppt', add these extensions in 'FileFilter' and click 'Include'. After recovery, only the files having these extensions will be transferred.
Similarly, if 'Exclude' is selected, then files not having these extensions will be left out and won't be transferred.
When to use File Filter?
When you want to do selected file(s) recovery, extracting file types individually using file extensions like '.doc', '.xls', '.pdf', '.htm', etc.

Find
What is Find File Option?
When the software displays the tree structure, you can use the 'Find' option in the 'Tools' menu to search for file(s) and folder(s) in the tree.
A dialog box appears, where you can enter a search string based on the file or folder name. Wild cards can be used as well. For example: *.doc, *.pst, etc.
Match Case
On selecting this option, the search becomes case sensitive.
Repeat search can be performed by selecting 'Find Next' in the 'Tools' menu or by pressing the 'F3' key.
When to use File Find?
Use 'Find' when you are not certain about the location of file(s) and folder(s) in the tree structure displayed.
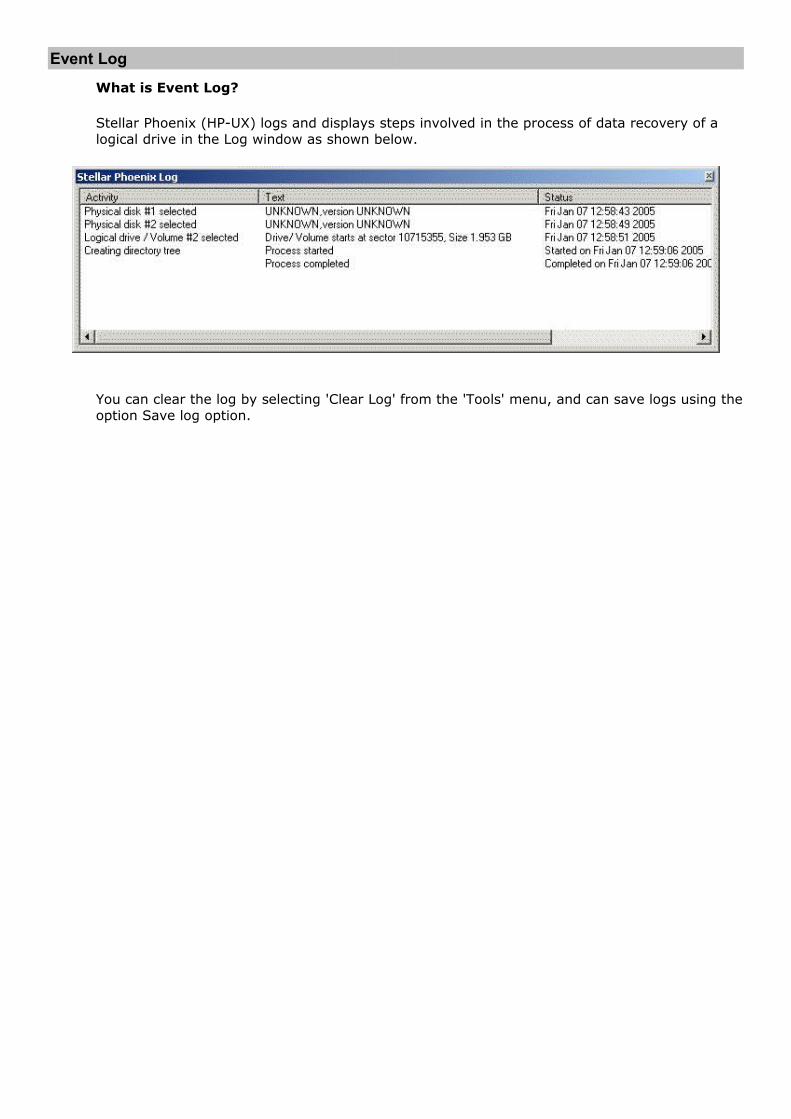
Event Log
What is Event Log?
Stellar Phoenix (HP-UX) logs and displays steps involved in the process of data recovery of a logical drive in the Log window as shown below.
You can clear the log by selecting 'Clear Log' from the 'Tools' menu, and can save logs using the option Save log option.

File Mask
What is File Mask?
Stellar Phoenix shows only those files/folders that match the specified file mask. File mask can also affect files/folders that are processed by Recover and Find commands.
To mask files, do the following: click the File Mask button on toolbar, or select File Mask from the 'Tools' menu.
A File mask dialog window will appear
Options
Files of Type : Type of the file is determined by the extension *.XLS; *.BMP; *.DOC
Match Case : If checked, makes only case sensitive search.
Existing Files : If checked, makes search only in existing file(s) and folder(s).
Size : Specifies size limits.
Date : Specifies file date boundaries, files may be Modified/Created/Last accessed
Specify a file mask and click the 'OK' button.
When to use File Mask ?
Based on the options explained above you can use the File Mask to do selected file(s) recovery.

To undo a tree generated by File Mask option, use the 'Unmask' option from Tools menu.

Search Lost File(s) and Folder(s)
What is Search Lost File(s) and Folder(s)?
To run a search for lost file(s) and folder(s), go to the 'Tools' menu and select 'Search Lost File(s) and Folder(s)'. This rigorous search process looks for still missing file(s) and folder(s) in the selected drive.
THIS PROCESS MAY TAKE A LONG TIME, DEPENDING ON THE SIZE OF THE DISK AND NUMBER OF FILE(S) AND FOLDER(S) STORED.
When to use Search Lost File(s) and Folder(s)?
This feature is helpful in the cases when the file(s) and folder(s) are not visible in standard search. To recover lost files an intensive search process is required.

How to Order ?
Order Online:
You can purchase the software by making payments online through credit card. Please visit http://www.stellarinfo.com/disk-recovery-prices.htm to have a look at the pricing details and to place the order through credit card.
Otherwise
Run the demo version of the software on the machine where you want to install the software, then analyse the crashed drive. Once you select a recovery option i.e. 'Recover selected', 'Recover Deleted' or 'Recover All', the software will launch a wizard as shown below, if the product is not registered.
Step1: If you haven't purchased the product, select the 'Step1' option and click 'OK' - you will be given an option to purchase the software online using a Credit Card. Once you have made the purchase you will receive payment confirmation from the payment gateway, and you will receive an email having your serial number for authorization.
Step2: Once you have received the serial number select the 'Step2' option and click 'OK'. You can directly select the 'Step2' option, if you have already completed the purchasing process and you have the serial number ready with you.
Serial Number : This is the pre-paid key, which is used to activate the product or to get the unlock code.
Site-Key : It is the unlocking code for the software.
Site-Code : It is the unique number for the machine in which Stellar Phoenix is installed. This is required when you are activating the product using manual activation.

How to Activate?
Stellar Phoenix software license is available for instant delivery over the internet by means of electronic software registration.
Once you place the order online you will receive a serial number.
This serial will be emailed to you by our payment processing agent.
Upon entering the serial number, the software registration wizard will automatically complete the activation process.
If the software does not get activated, you need to check your firewall settings, or else you can activate the product using the manual activation method.
Note : All Manual registration process will take a maximum of 1 business day for completion
Detailed description for activation is on this link : http://www.stellarinfo.com/activate-software.htm

Technical Support
If you have any questions/problems with any of Stellar's products, we have an extensive support system available to answer your queries.
You can either call us or go online to our support section (www.stellarinfo.com/support).
Support Help line:
USA (Toll free) 1-866-978-0600
UK (Europe) 44-207-993-2293
Timings: Monday – Friday
05:00 - 20:30 GMT
Midnight - 15:30 EST
Online Help:
Chat live Chat live with an online technician
Search in our extensive Knowledge Base
Submit a Ticket Submit a Ticket (if our Knowledge Base does not answer your question)
Login and view Ticket Status (if you already have a valid Ticket with you)
Download Documents Download Documents on Download Documents on Product Usage Download Documents on Product Usage(for registered members only)

Glossary
File System
File System is a component of operating system which manages data on any storage media.
FAT
FAT (File Allocation Table) is a type of file system which is supported by all Microsoft Operating Systems. It has variants like FAT16 and FAT32. FAT32 is not supported in Windows NT 3.5 / 4.0 operating system.
NTFS
NTFS (New Technology File System) is a file system, which is supported by Windows NT/2000/XP.
NTFS5
NTFS5 is the new version of the NTFS file system, which is only supported by Windows 2000 and Windows XP operating systems.
Partitioning in HP-UXI
In Windows: C: D: E:
In HP-UX: /dev/vgx/vol1;/dev/vgx/vol2;/dev/vgx/vol3
Note:The <partition number>for logical partitions starts from 5.
Blocks
The basic unit of storage on a logical drive. A cluster is a group of sectors. One cluster is allocated to a single file only. Cluster sizes can vary from 512 bytes to 256k bytes, depending on the particular file system and the partition size.
Sector
The smallest storage units on a disk. A sector can hold 512 bytes of information.
SuperBlock
In HP-UX file systems superblock is the area which can be accessed by the super user only. It stores information about the number of free blocks, free inodes, logical block size, and the number of times the volume has been mounted and other accounting information about the file system.
Inode
Inodes are data structures that contain information about files in Unix / HP-UX file systems. Each file has an inode and is identified by an inode number (i-number) in the file system where it resides. inodes provide important information on files such as user and group ownership, access mode (read, write, execute permissions) and type.