Embed Size (px)
Citation preview
WITS End User Guide
for the State of
Mississippifor the
State of Mississippi
State Opioid Response
(SOR) Grant
WITS Customers
Last Updated August 5, 2019
Applies to:
WITS Version 18.41+
Document Status: In Progress
STATE OPIOID RESPONSE (SOR) GRANT | FEI Systems Intended Audience | i
WITS Customers State Opioid Response (SOR) Grant
Preface
“The State Opioid Response (SOR) program aims to address the opioid crisis by increasing access to medication-assisted
treatment using the three FDA-approved medications for the treatment of opioid use disorder, reducing unmet treatment
need, and reducing opioid overdose related deaths through the provision of prevention, treatment and recovery activities
for opioid use disorder (OUD) (including prescription opioids, heroin and illicit fentanyl and fentanyl analogs).”1
Intended Audience This user guide has been prepared for provider agencies that work with the Georgia Department of Behavioral Health and
Developmental Disabilities (DBHDD) to provide SOR services to individuals. DBHDD has decided to use the FEI WITS
system to collect data on individuals receiving services supported by funds from the SAMHSA SOR grant. This guide will
assist providers in understanding the WITS system and the data entry requirements for the SOR grant.
System Requirements WITS is a web-based application accessed through an Internet (web) browser using Internet connection.
Internet Browsers WITS is compatible with up-to-date versions of most modern Internet browsers such as:
Apple® Safari®
Google Chrome™
Mozilla® Firefox®
Windows Internet Explorer 10 or newer (recommended)
Note: Do not allow your Internet browser to save your password, as this information will be routinely updated.
Pop-up Blocker Certain features in WITS, such as Snapshot and Scheduler, will open in a separate browser window when selected. Make
sure your browser allows pop-ups from WITS.
Customer URL Links
Training Site: https://ms-training.witsweb.org/
Production Site: https://ms.witsweb.org/
The Training Site allows staff members to practice using the system before entering actual data in the
Production Site. Do not enter real client information in the training site.
1 Source: https://www.samhsa.gov/grants/grant-announcements/ti-18-015
ii | Preface STATE OPIOID RESPONSE (SOR) GRANT | FEI Systems
Contents
Intended Audience ........................................................................................................................................................................................................................ i
System Requirements .................................................................................................................................................................................................................. i
Internet Browsers ...................................................................................................................................................................................................................... i
Pop-up Blocker .......................................................................................................................................................................................................................... i
Customer URL Links ...................................................................................................................................................................................................................... i
Part 1: Customer Specific Information ............................................................................................................................................. 1
Workflow Diagram ...................................................................................................................................................................................................................... 1
Part 2: Client Setup ............................................................................................................................................................................. 2
Search for a Client ....................................................................................................................................................................................................................... 2
Client Search Tips ................................................................................................................................................................................................................... 3
Create Client Profile .................................................................................................................................................................................................................... 4
Alternate Names ..................................................................................................................................................................................................................... 6
Additional Information ......................................................................................................................................................................................................... 7
Contact Info .............................................................................................................................................................................................................................. 9
Collateral Contacts ............................................................................................................................................................................................................... 10
Other Numbers ...................................................................................................................................................................................................................... 12
History ....................................................................................................................................................................................................................................... 13
Linked Consents ......................................................................................................................................................................................................................... 14
Link to Consented Client ................................................................................................................................................................................................... 15
Part 3: Client Intake and Program Enrollment ..............................................................................................................................18
Client Activity List ....................................................................................................................................................................................................................... 18
Start New Episode (New Clients) ......................................................................................................................................................................................... 20
Intake............................................................................................................................................................................................................................................... 21
Program Enroll ............................................................................................................................................................................................................................ 23
Consent .......................................................................................................................................................................................................................................... 25
Create Client Consent Record ......................................................................................................................................................................................... 25
Referrals ......................................................................................................................................................................................................................................... 28
Create a Client Referral ...................................................................................................................................................................................................... 28
Viewing Referrals ....................................................................................................................................................................................................................... 30
Referrals In ............................................................................................................................................................................................................................... 30
Referrals Out ......................................................................................................................................................................................................................... 32
Removed Consents ................................................................................................................................................................................................................... 33
Part 4: Encounters .............................................................................................................................................................................36
Create Encounter Notes .......................................................................................................................................................................................................... 57
Part 5: Reports ...................................................................................................................................................................................63
Part 6: Overdose Reversal Kit ..........................................................................................................................................................65
Add New Overdose Reversal Kit Event ............................................................................................................................................................................. 66
Naloxone Purchase .............................................................................................................................................................................................................. 68
Naloxone Distribution......................................................................................................................................................................................................... 78
Naloxone Administration .................................................................................................................................................................................................. 83
STATE OPIOID RESPONSE (SOR) GRANT | FEI Systems Customer URL Links | iii
Linked Events ............................................................................................................................................................................................................................... 89
Link a Distribution Event with a Purchase Event ...................................................................................................................................................... 89
Link a Naloxone Administration Event with a Distribution Event ..................................................................................................................... 93
Review an Overdose Reversal Kit ........................................................................................................................................................................................ 97
Note: Notes contain information for users to take note of, as the information may affect what the user does
with the system.
Tip: Tips contain information helpful to the user, such as providing an easier way to do something.
Important: Typically, these highlight details for the user to consider or review before continuing with a step or
action within the system. This information may warn the user about possible error messages that may occur if
the instructions are not followed, or it may indicate/remind users of additional actions to take before
proceeding, such as downloading required software.
The WITS User Guide has been designed using a step-by-step process to guide the end-user through various system
processes and functionalities. This walk-through approach will help the end-user learn the system quickly, while providing
enough depth and explanation to turn the novice user into a power user.


STATE OPIOID RESPONSE (SOR) GRANT | FEI Systems Workflow Diagram | 1
Part 1: Customer Specific Information
WITS allows providers to easily enter information for individuals and services they receive as part of the SOR program.
The initial provider agency that works with an individual will create the client profile, intake, and enroll the client
into a SOR program.
If the provider agency needs to refer an individual to another provider for services, WITS has an automated
consent/referral process that is HIPAA/42 CFR Part 2 compliant. Once the referred-to service provider accepts
the referral, WITS will automatically set up the client profile, intake and SOR program enrollment.
In the future, once SAMHSA has OMB certification for the GPRA, the initial agency can enter GPRAs or the
referred-to agency can enter the GPRAs. WITS will ensure that there are no duplicate GPRAs created for
individuals enrolled in the SOR program. Also, if the providers have entered encounters, WITS will map those
encounters to the SOR discharge GPRA.
Workflow Diagram The following diagram illustrates the standard SOR workflow process. Future processes will be implemented once SAMHSA
receives OMB certification on the SOR GPRA\Data collection tool.
Figure 1-1: Standard SOR Workflow Diagram
Client Profile
Intake
Program Enrollment
GPRA Intake
Provider Agency
Service Provider
Accept the Referral
Client Profile,
Intake, Program
Enrollment
GPRA
Encounter
Consent and
Referral
Encounter
GPRA
3 month Follow up
6 month Follow up
Discharge
SPARS
Automated step
Required step
Optional step
Consents and
Referrals
FUTURE step
2 | Client Setup STATE OPIOID RESPONSE (SOR) GRANT | FEI Systems
Part 2: Client Setup
Search for a Client
Where: Client List Screen
Before creating a new client record, search for your client to make sure the client is not already in WITS.
To view clients within your agency, click on the Client List menu item. A blank Client List screen will appear.
Use the fields in the Client Search section to narrow your results.
Tip: When searching for a client, try to use unique information, such as birthdates or social security numbers, if
possible. You can also enter a partial name (or other field) followed by a “*”. This is called a wild card search.
For instance, if you search for Last Name of “Smit*”, the search results will display people with the last name of
“Smith”, "Smitty”, “Smithson”, etc.
After selecting from the search fields, click Go to view the results.
Figure 2-1: Client List screen, Action links
Look for your client in the Client List. If you find the right person, view their profile by pointing to the pencil icon in
the Actions column and clicking the Profile link. If you do not find your client, you can create a new client record.
STATE OPIOID RESPONSE (SOR) GRANT | FEI Systems Search for a Client | 3
Client Search Tips
Client Name or Number
Use a client’s nickname or alternate names in the First Name or Last Name fields.
Use an asterisk (*) to perform a wildcard search.
Examples:
Find clients whose last name starts with “Jon”: Jon*
Search by the last 4 digits of a client’s SSN: *1123
Client Birthday or Age
Search within a timeframe by separating the two dates with a colon (:). Search for clients born after a certain
date with a greater than sign (>). Search for clients born before a certain date with a less than sign (<).
Examples:
Find clients born in the year 1990: 1/1/1990:12/31/1990
Find clients born after a certain date: >12/30/1959
4 | Client Setup STATE OPIOID RESPONSE (SOR) GRANT | FEI Systems
Create Client Profile
Where: Client List > Client Profile
To add a new client to the system, follow the steps below.
Note: Please search for each client before creating a new record.
On the left menu, click Client List.
On the Client List screen, click Add Client.
Figure 2-2: Client Search/List screen; Add Client link
On the Client Profile screen, enter the required client information. See the table below for information on each field.
Important: When adding new clients to the system, review the Client Profile fields for accuracy before saving
the screen. Once the Client Profile screen is saved, a Unique Client Number (UCN) is created based on the data
provided. It’s important to enter client information correctly to avoid duplicate client entry in the future.
Table 2-1: Client Profile fields
Field Description
First Name Type the client’s current first name.
Middle Name (Optional)
Last Name Type the client’s current last name.
Mother's Maiden Name (Optional)
Suffix (Optional)
Gender Select the client’s gender from the drop-down list.
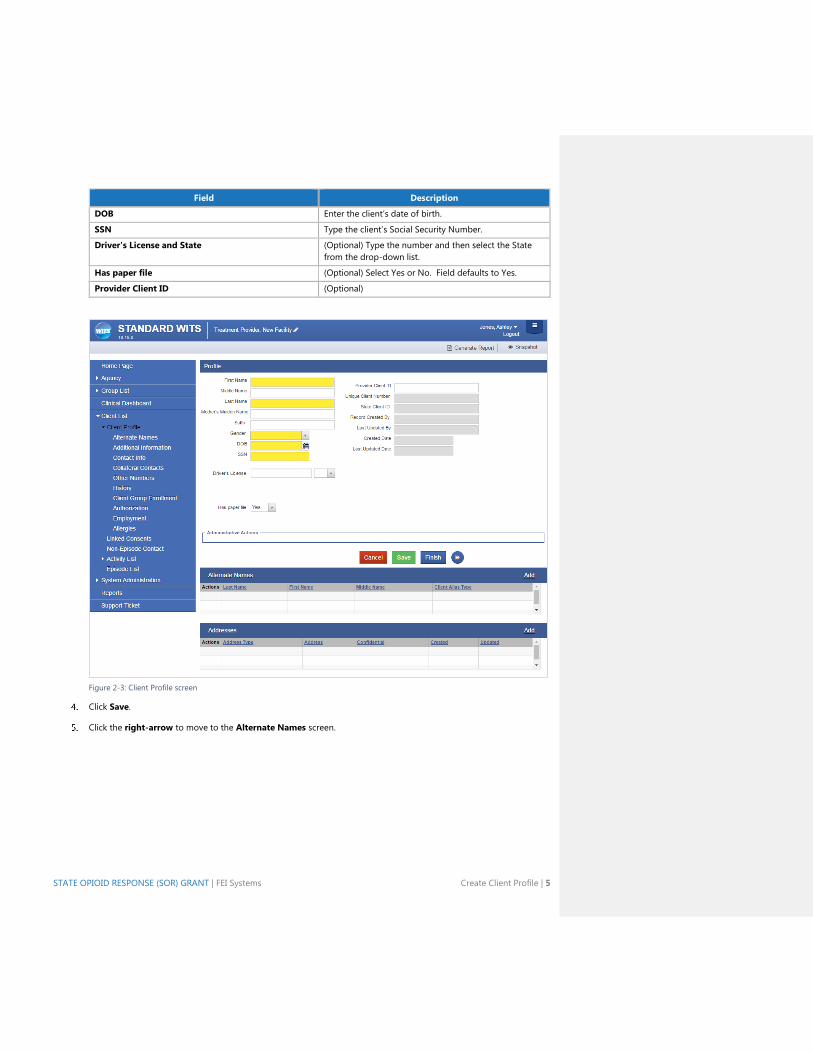
STATE OPIOID RESPONSE (SOR) GRANT | FEI Systems Create Client Profile | 5
Field Description
DOB Enter the client’s date of birth.
SSN Type the client’s Social Security Number.
Driver's License and State (Optional) Type the number and then select the State
from the drop-down list.
Has paper file (Optional) Select Yes or No. Field defaults to Yes.
Provider Client ID (Optional)
Figure 2-3: Client Profile screen
Click Save.
Click the right-arrow to move to the Alternate Names screen.
6 | Client Setup STATE OPIOID RESPONSE (SOR) GRANT | FEI Systems
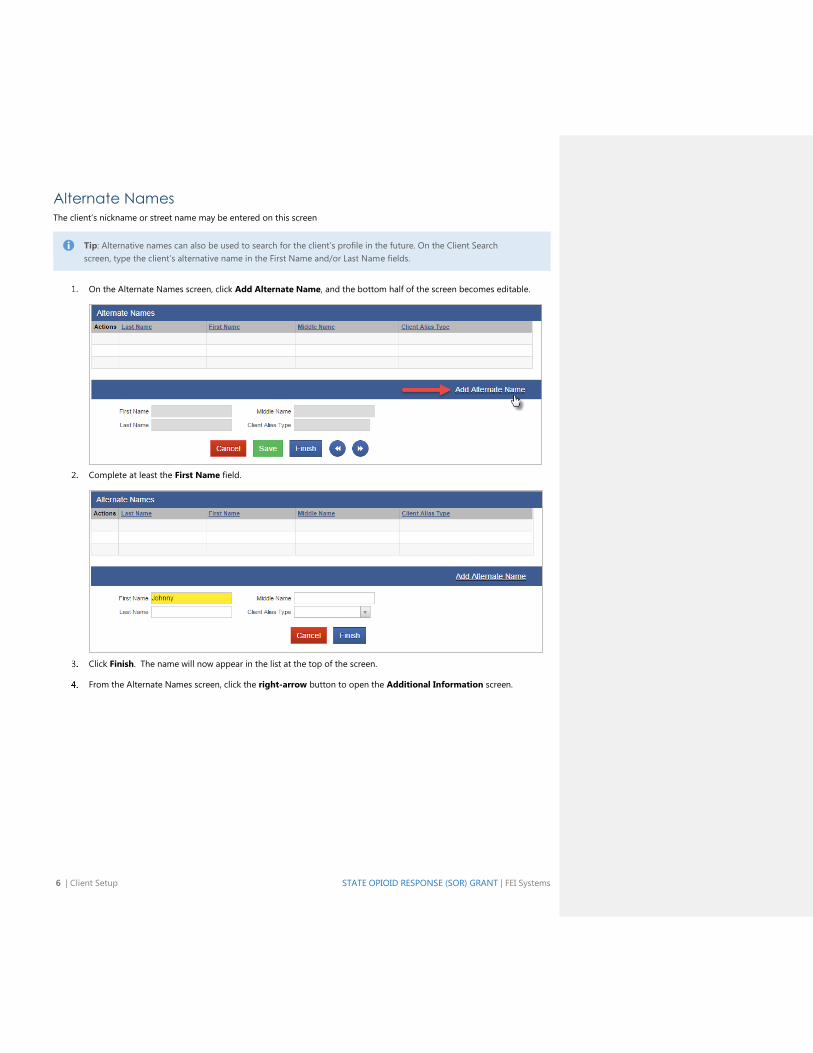
Alternate Names The client’s nickname or street name may be entered on this screen
Tip: Alternative names can also be used to search for the client’s profile in the future. On the Client Search
screen, type the client’s alternative name in the First Name and/or Last Name fields.
On the Alternate Names screen, click Add Alternate Name, and the bottom half of the screen becomes editable.
Complete at least the First Name field.
Click Finish. The name will now appear in the list at the top of the screen.
From the Alternate Names screen, click the right-arrow button to open the Additional Information screen.
STATE OPIOID RESPONSE (SOR) GRANT | FEI Systems Create Client Profile | 7
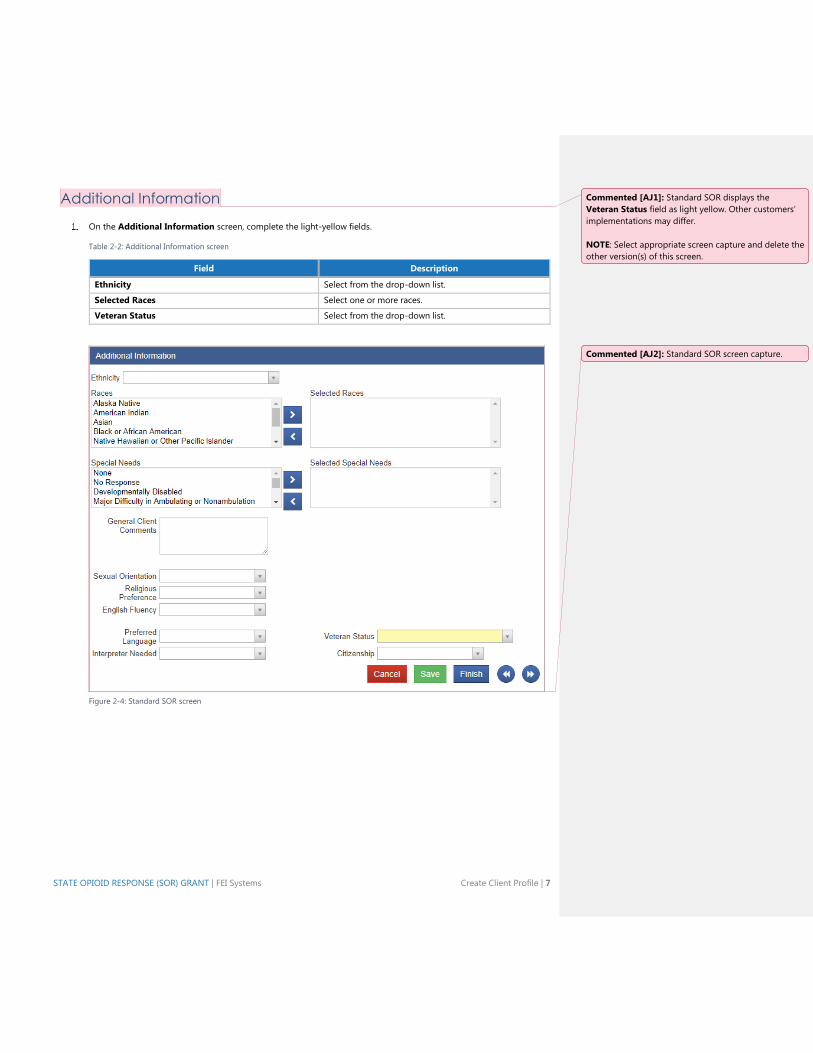
Additional Information
On the Additional Information screen, complete the light-yellow fields.
Table 2-2: Additional Information screen
Field Description
Ethnicity Select from the drop-down list.
Selected Races Select one or more races.
Veteran Status Select from the drop-down list.
Figure 2-4: Standard SOR screen
Commented [AJ1]: Standard SOR displays the
Veteran Status field as light yellow. Other customers’
implementations may differ.
NOTE: Select appropriate screen capture and delete the
other version(s) of this screen.
Commented [AJ2]: Standard SOR screen capture.
8 | Client Setup STATE OPIOID RESPONSE (SOR) GRANT | FEI Systems
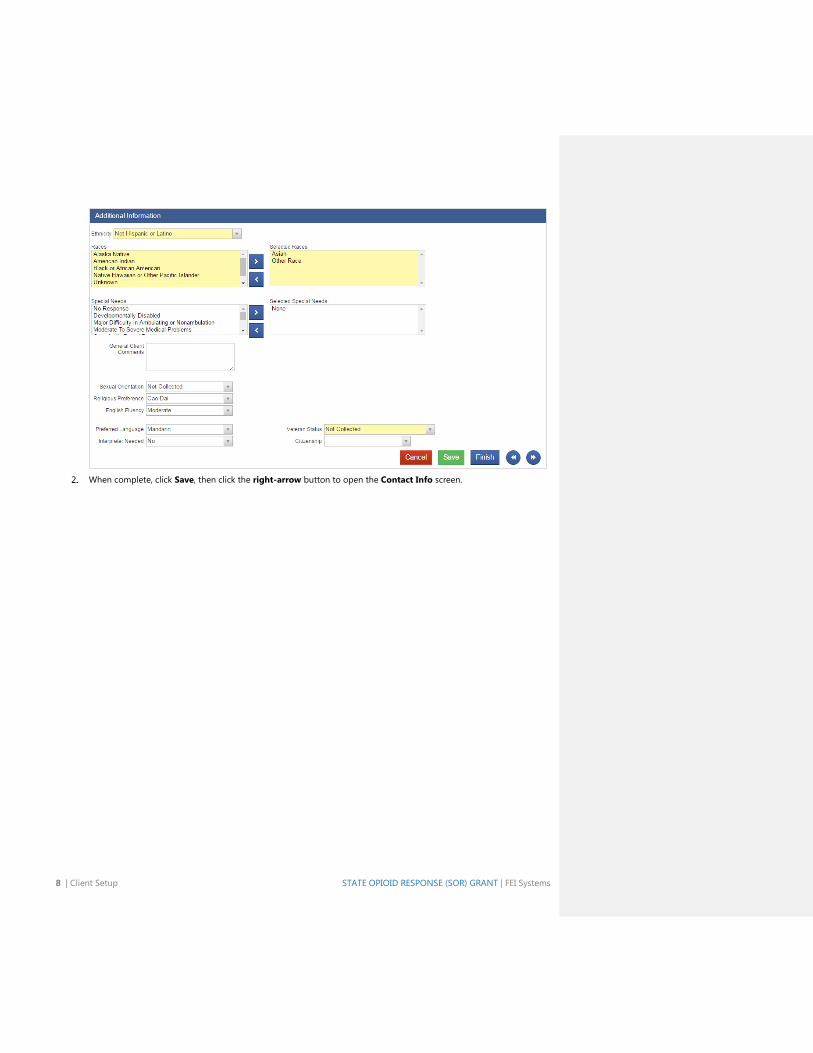
When complete, click Save, then click the right-arrow button to open the Contact Info screen.
STATE OPIOID RESPONSE (SOR) GRANT | FEI Systems Create Client Profile | 9
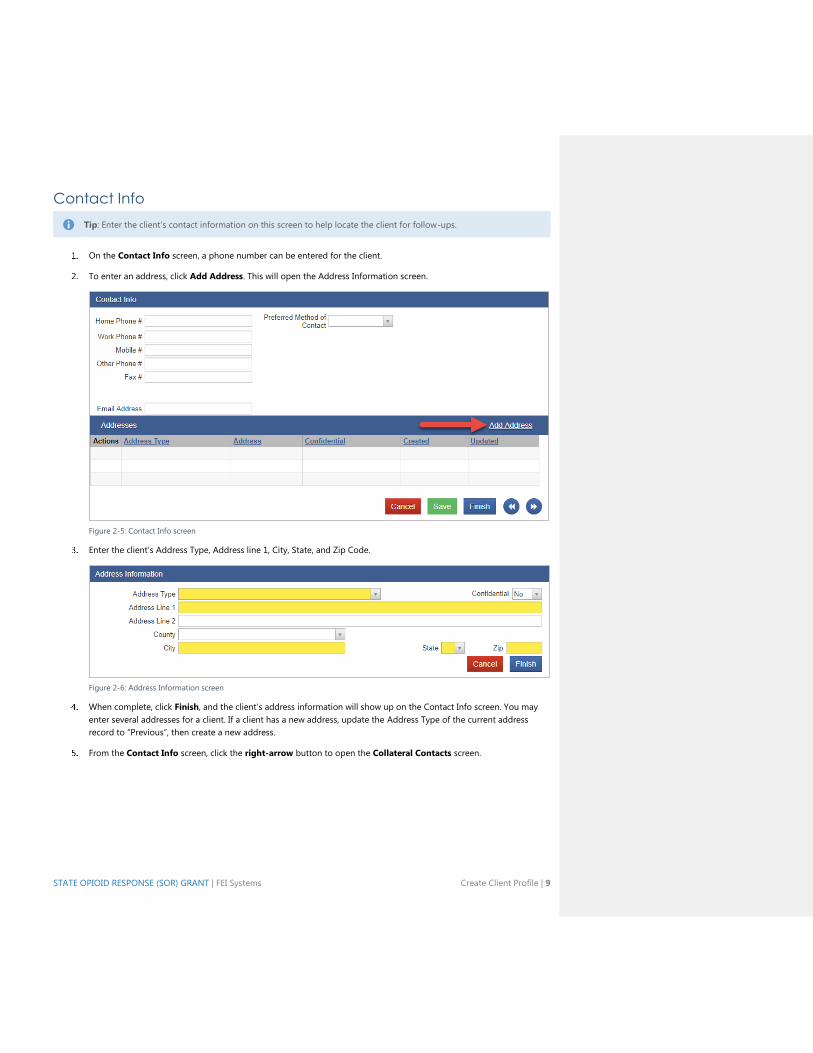
Contact Info
Tip: Enter the client’s contact information on this screen to help locate the client for follow-ups.
On the Contact Info screen, a phone number can be entered for the client.
To enter an address, click Add Address. This will open the Address Information screen.
Figure 2-5: Contact Info screen
Enter the client’s Address Type, Address line 1, City, State, and Zip Code.
Figure 2-6: Address Information screen
When complete, click Finish, and the client’s address information will show up on the Contact Info screen. You may
enter several addresses for a client. If a client has a new address, update the Address Type of the current address
record to “Previous”, then create a new address.
From the Contact Info screen, click the right-arrow button to open the Collateral Contacts screen.
10 | Client Setup STATE OPIOID RESPONSE (SOR) GRANT | FEI Systems
Collateral Contacts
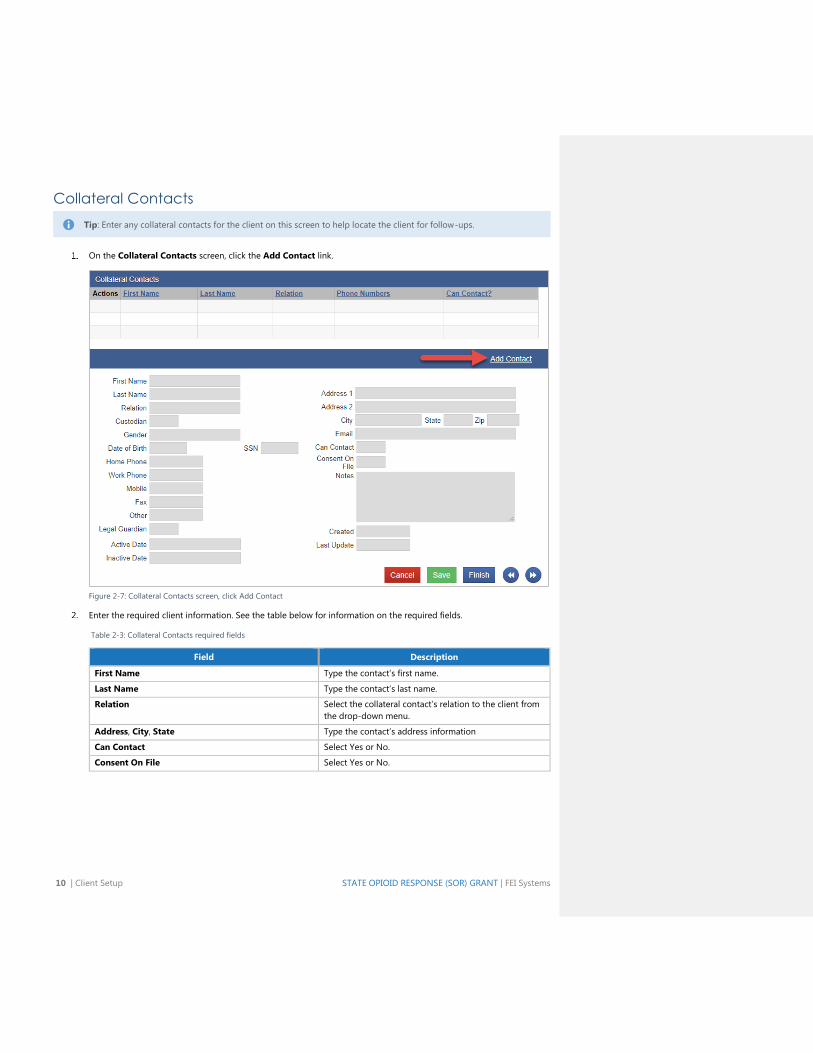
Tip: Enter any collateral contacts for the client on this screen to help locate the client for follow-ups.
On the Collateral Contacts screen, click the Add Contact link.
Figure 2-7: Collateral Contacts screen, click Add Contact
Enter the required client information. See the table below for information on the required fields.
Table 2-3: Collateral Contacts required fields
Field Description
First Name Type the contact’s first name.
Last Name Type the contact’s last name.
Relation Select the collateral contact’s relation to the client from
the drop-down menu.
Address, City, State Type the contact’s address information
Can Contact Select Yes or No.
Consent On File Select Yes or No.
STATE OPIOID RESPONSE (SOR) GRANT | FEI Systems Create Client Profile | 11
Figure 2-8: Add Collateral Contacts screen
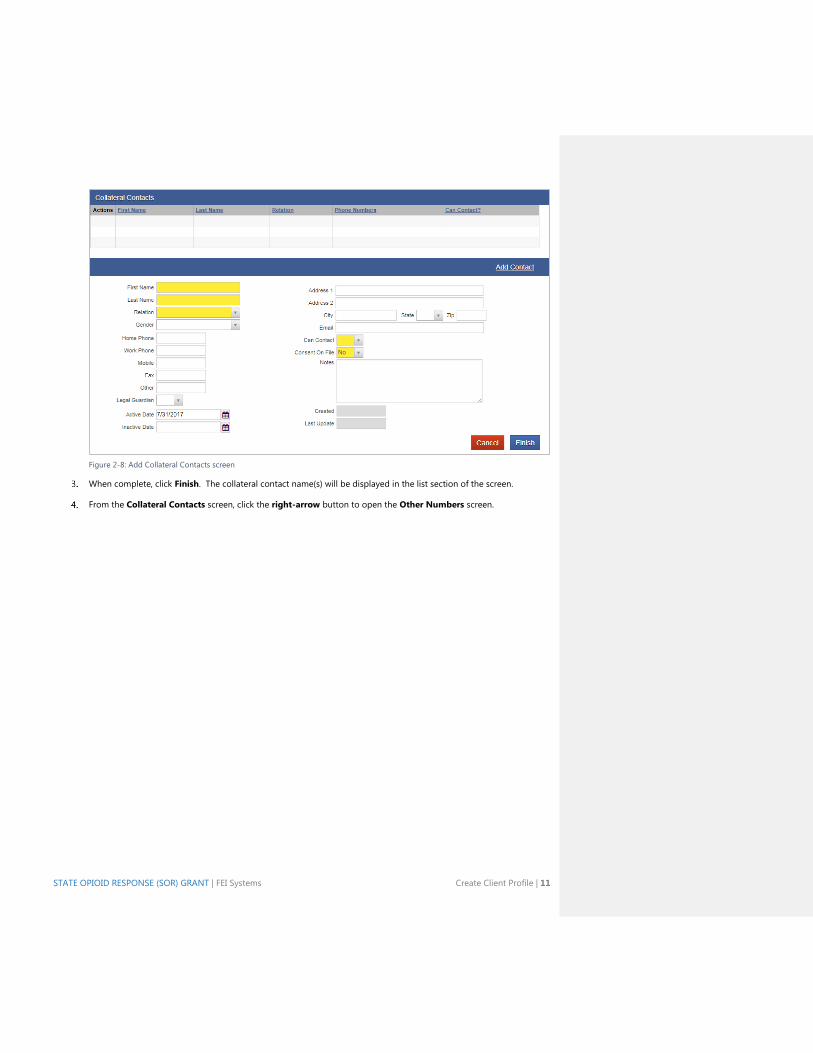
When complete, click Finish. The collateral contact name(s) will be displayed in the list section of the screen.
From the Collateral Contacts screen, click the right-arrow button to open the Other Numbers screen.
12 | Client Setup STATE OPIOID RESPONSE (SOR) GRANT | FEI Systems
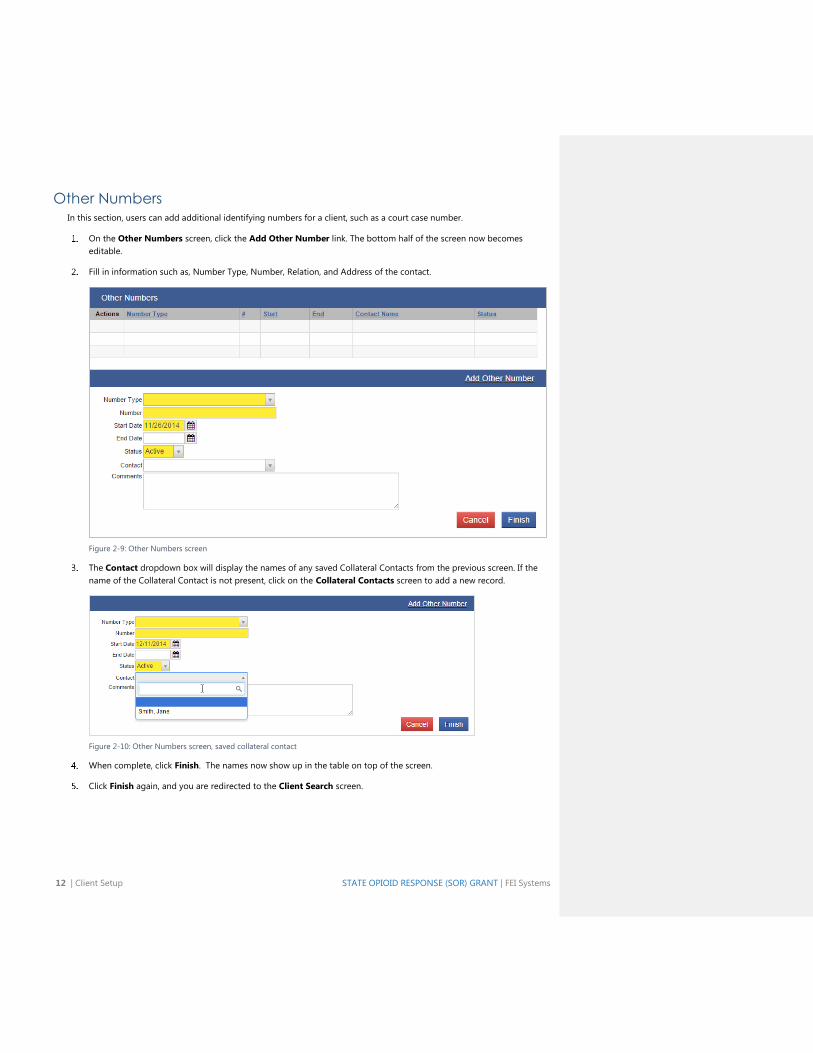
Other Numbers In this section, users can add additional identifying numbers for a client, such as a court case number.
On the Other Numbers screen, click the Add Other Number link. The bottom half of the screen now becomes
editable.
Fill in information such as, Number Type, Number, Relation, and Address of the contact.
Figure 2-9: Other Numbers screen
The Contact dropdown box will display the names of any saved Collateral Contacts from the previous screen. If the
name of the Collateral Contact is not present, click on the Collateral Contacts screen to add a new record.
Figure 2-10: Other Numbers screen, saved collateral contact
When complete, click Finish. The names now show up in the table on top of the screen.
Click Finish again, and you are redirected to the Client Search screen.
STATE OPIOID RESPONSE (SOR) GRANT | FEI Systems Create Client Profile | 13
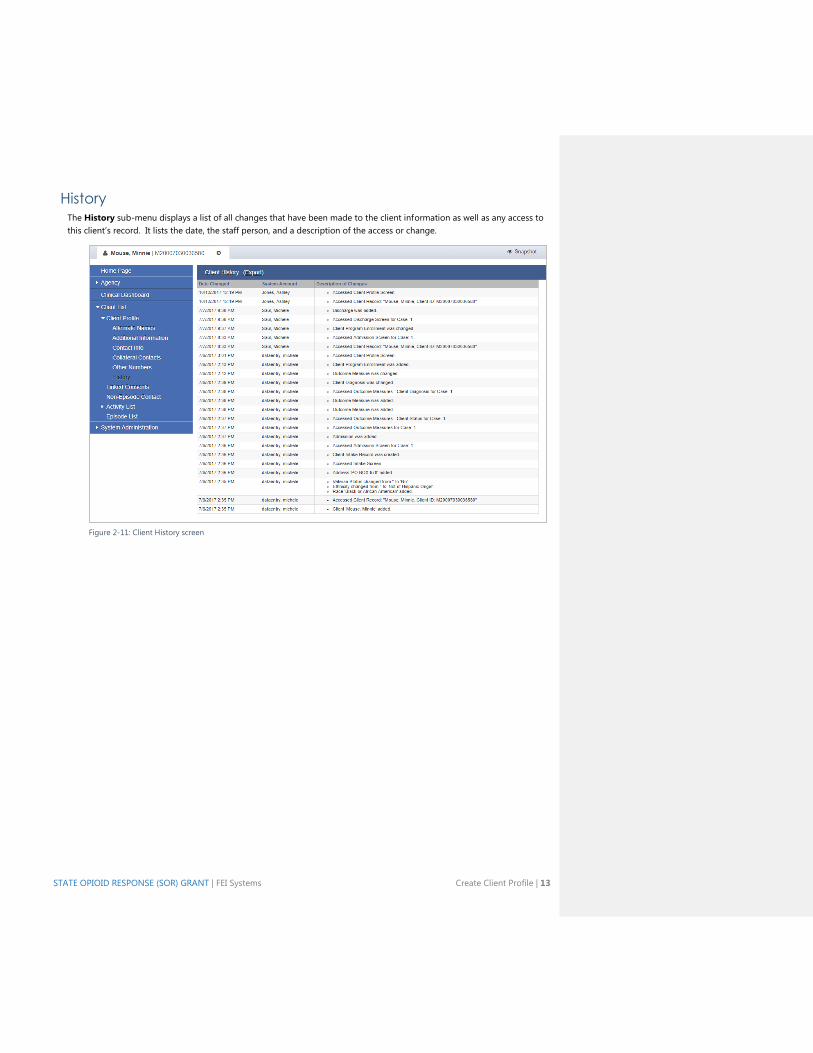
History The History sub-menu displays a list of all changes that have been made to the client information as well as any access to
this client’s record. It lists the date, the staff person, and a description of the access or change.
Figure 2-11: Client History screen
14 | Client Setup STATE OPIOID RESPONSE (SOR) GRANT | FEI Systems
Linked Consents
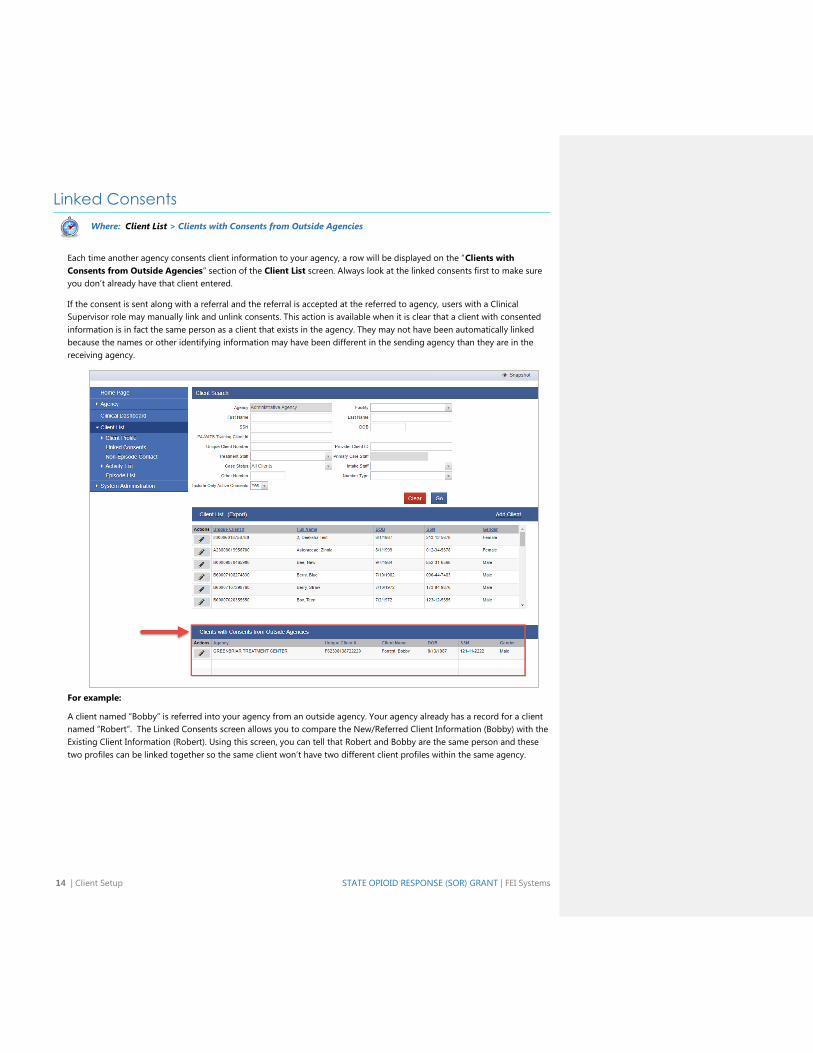
Where: Client List > Clients with Consents from Outside Agencies
Each time another agency consents client information to your agency, a row will be displayed on the “Clients with
Consents from Outside Agencies” section of the Client List screen. Always look at the linked consents first to make sure
you don’t already have that client entered.
If the consent is sent along with a referral and the referral is accepted at the referred to agency, users with a Clinical
Supervisor role may manually link and unlink consents. This action is available when it is clear that a client with consented
information is in fact the same person as a client that exists in the agency. They may not have been automatically linked
because the names or other identifying information may have been different in the sending agency than they are in the
receiving agency.
For example:
A client named “Bobby” is referred into your agency from an outside agency. Your agency already has a record for a client
named “Robert”. The Linked Consents screen allows you to compare the New/Referred Client Information (Bobby) with the
Existing Client Information (Robert). Using this screen, you can tell that Robert and Bobby are the same person and these
two profiles can be linked together so the same client won’t have two different client profiles within the same agency.
STATE OPIOID RESPONSE (SOR) GRANT | FEI Systems Linked Consents | 15
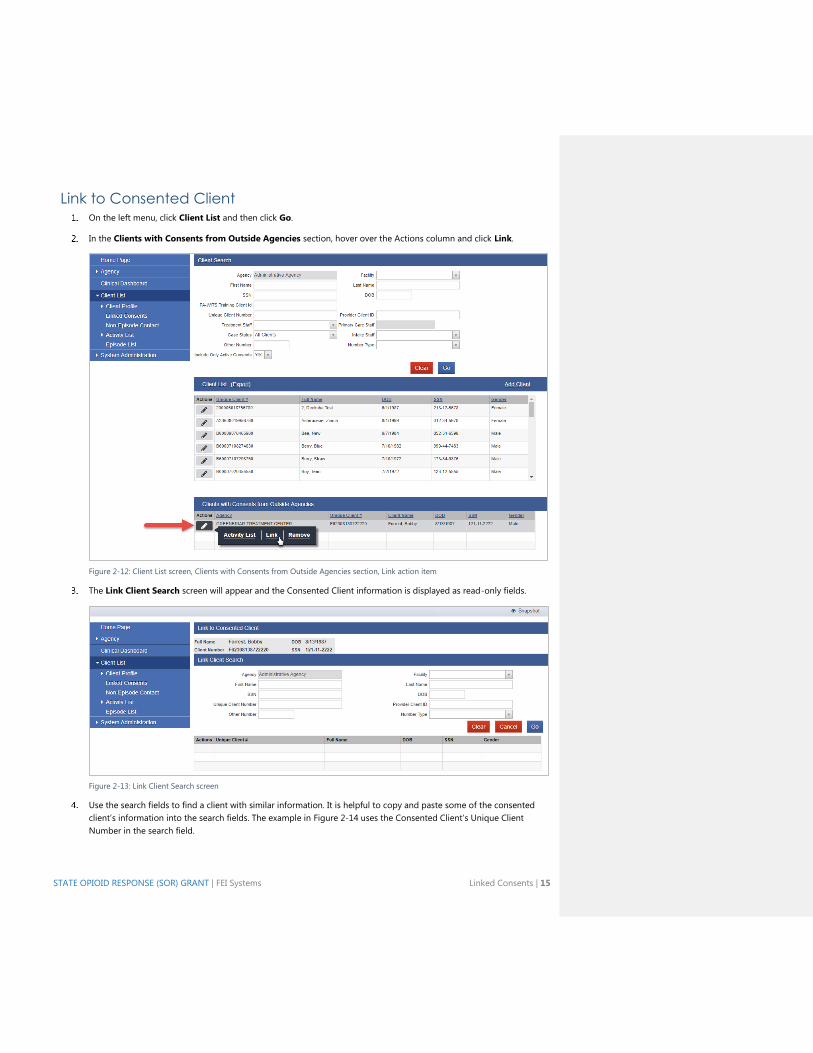
Link to Consented Client On the left menu, click Client List and then click Go.
In the Clients with Consents from Outside Agencies section, hover over the Actions column and click Link.
Figure 2-12: Client List screen, Clients with Consents from Outside Agencies section, Link action item
The Link Client Search screen will appear and the Consented Client information is displayed as read-only fields.
Figure 2-13: Link Client Search screen
Use the search fields to find a client with similar information. It is helpful to copy and paste some of the consented
client’s information into the search fields. The example in Figure 2-14 uses the Consented Client’s Unique Client
Number in the search field.
16 | Client Setup STATE OPIOID RESPONSE (SOR) GRANT | FEI Systems
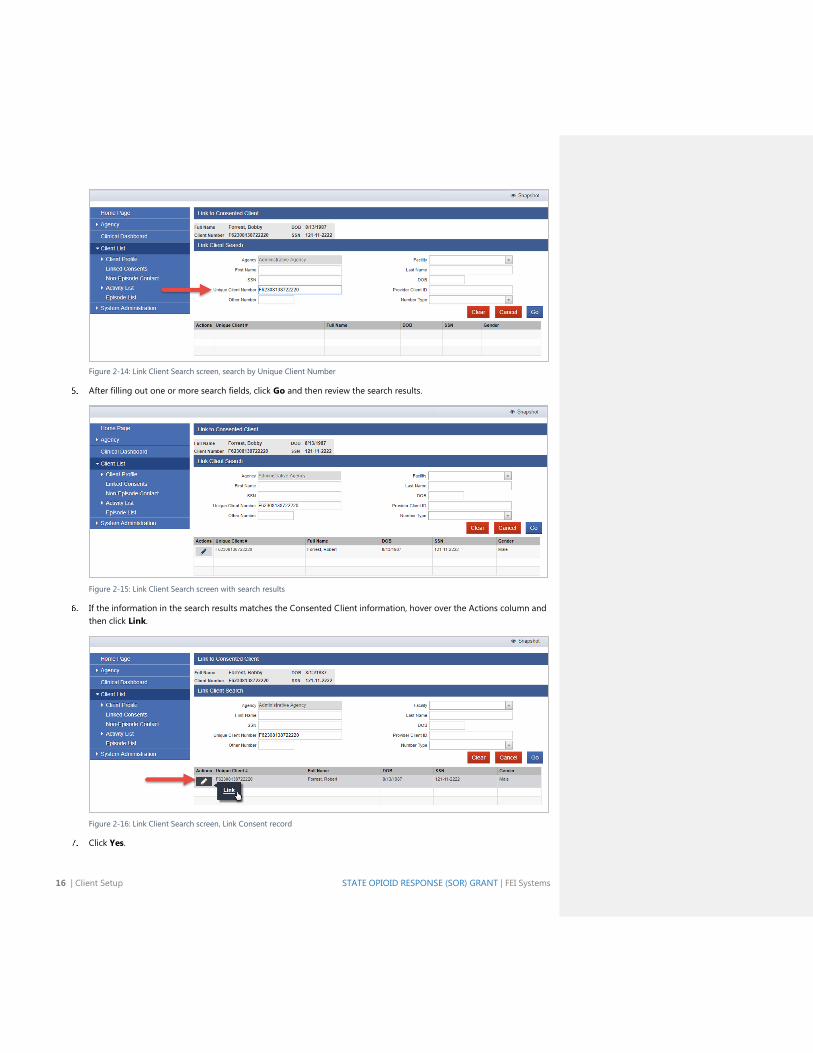
Figure 2-14: Link Client Search screen, search by Unique Client Number
After filling out one or more search fields, click Go and then review the search results.
Figure 2-15: Link Client Search screen with search results
If the information in the search results matches the Consented Client information, hover over the Actions column and
then click Link.
Figure 2-16: Link Client Search screen, Link Consent record
Click Yes.
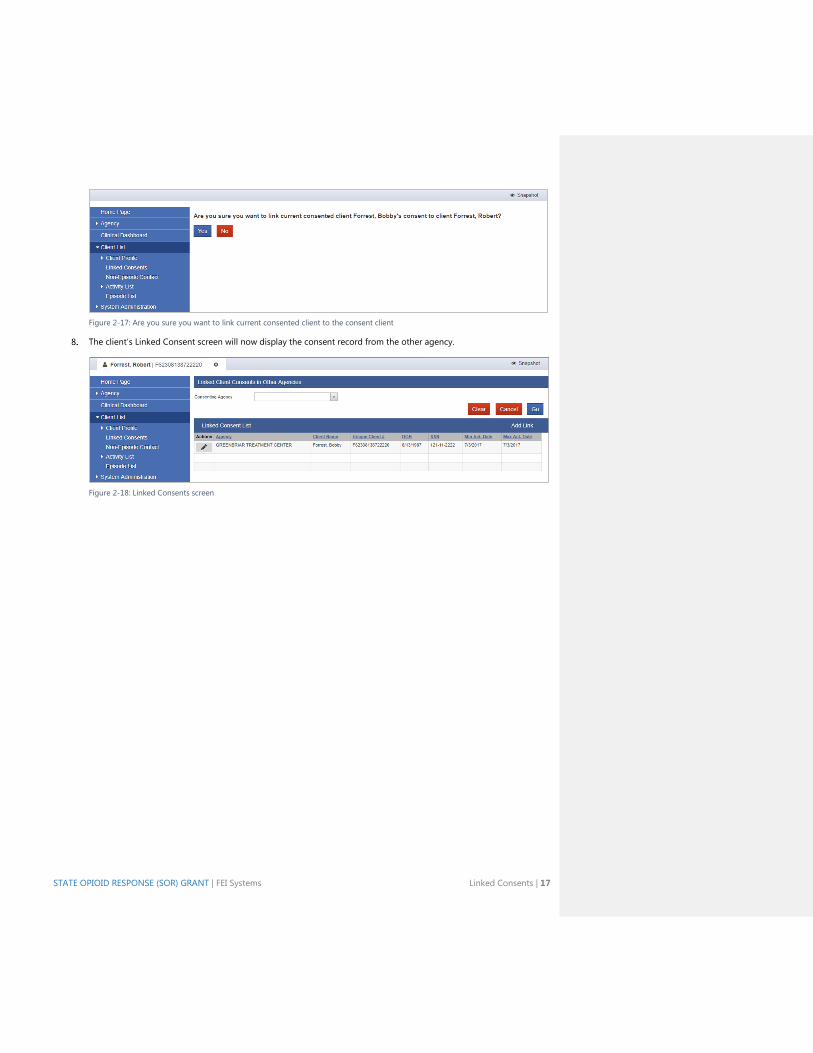
STATE OPIOID RESPONSE (SOR) GRANT | FEI Systems Linked Consents | 17
Figure 2-17: Are you sure you want to link current consented client to the consent client
The client’s Linked Consent screen will now display the consent record from the other agency.
Figure 2-18: Linked Consents screen
18 | Client Intake and Program Enrollment STATE OPIOID RESPONSE (SOR) GRANT | FEI Systems
Part 3: Client Intake and Program Enrollment
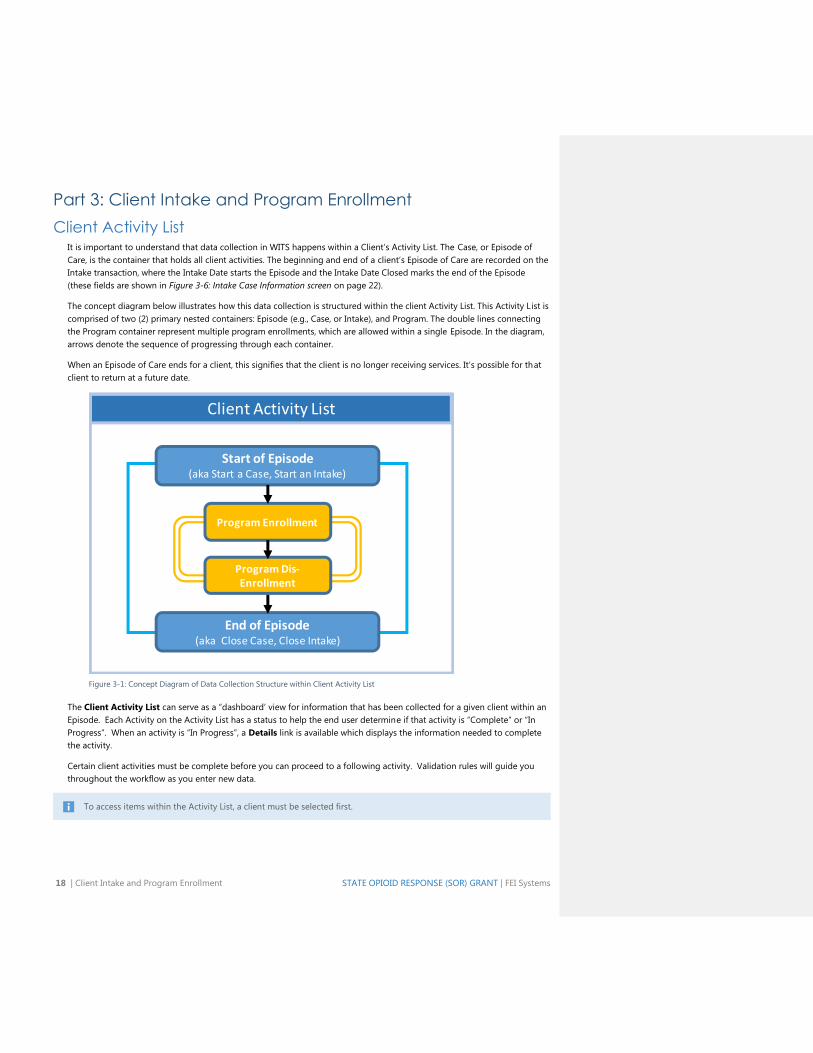
Client Activity List It is important to understand that data collection in WITS happens within a Client’s Activity List. The Case, or Episode of
Care, is the container that holds all client activities. The beginning and end of a client’s Episode of Care are recorded on the
Intake transaction, where the Intake Date starts the Episode and the Intake Date Closed marks the end of the Episode
(these fields are shown in Figure 3-6: Intake Case Information screen on page 22).
The concept diagram below illustrates how this data collection is structured within the client Activity List. This Activity List is
comprised of two (2) primary nested containers: Episode (e.g., Case, or Intake), and Program. The double lines connecting
the Program container represent multiple program enrollments, which are allowed within a single Episode. In the diagram,
arrows denote the sequence of progressing through each container.
When an Episode of Care ends for a client, this signifies that the client is no longer receiving services. It’s possible for that
client to return at a future date.
Figure 3-1: Concept Diagram of Data Collection Structure within Client Activity List
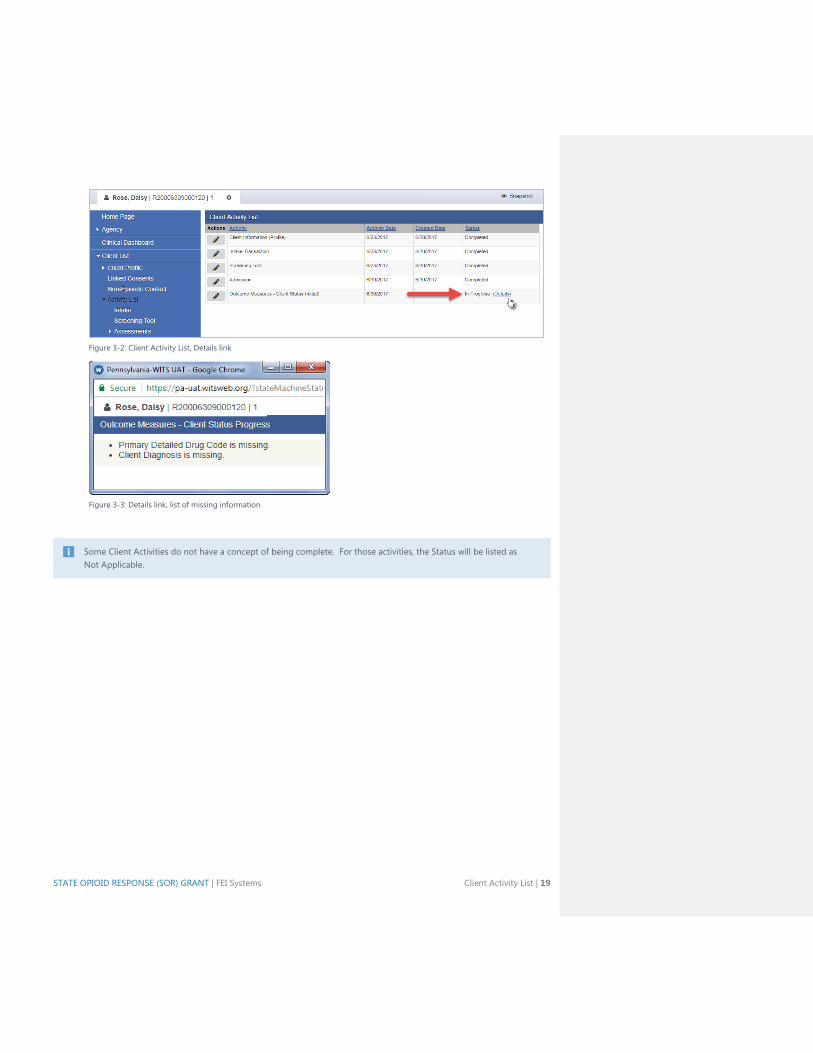
The Client Activity List can serve as a “dashboard’ view for information that has been collected for a given client within an
Episode. Each Activity on the Activity List has a status to help the end user determine if that activity is “Complete” or “In
Progress”. When an activity is “In Progress”, a Details link is available which displays the information needed to complete
the activity.
Certain client activities must be complete before you can proceed to a following activity. Validation rules will guide you
throughout the workflow as you enter new data.
To access items within the Activity List, a client must be selected first.
Client Activity List
Start of Episode(aka Start a Case, Start an Intake)
End of Episode(aka Close Case, Close Intake)
Program Enrollment
Program Dis-Enrollment
STATE OPIOID RESPONSE (SOR) GRANT | FEI Systems Client Activity List | 19
Figure 3-2: Client Activity List, Details link
Figure 3-3: Details link, list of missing information
Some Client Activities do not have a concept of being complete. For those activities, the Status will be listed as
Not Applicable.
20 | Client Intake and Program Enrollment STATE OPIOID RESPONSE (SOR) GRANT | FEI Systems
Start New Episode (New Clients)
Where: Client List > Activity List > Episode List
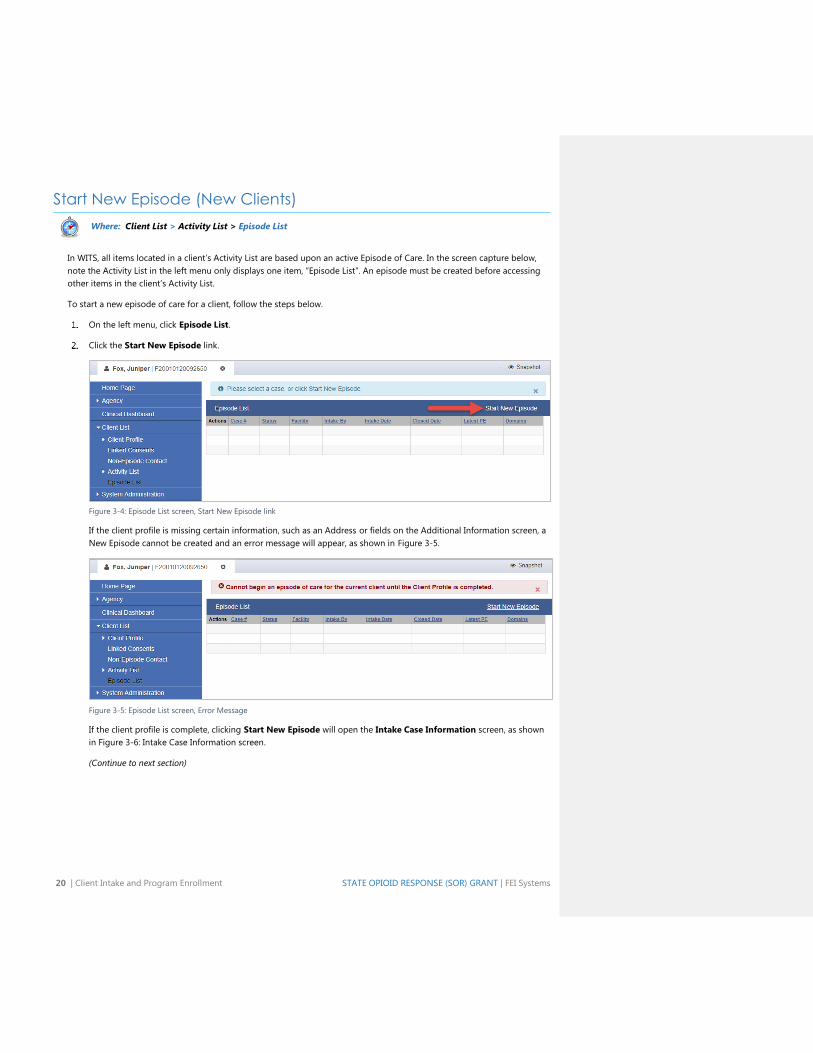
In WITS, all items located in a client’s Activity List are based upon an active Episode of Care. In the screen capture below,
note the Activity List in the left menu only displays one item, “Episode List”. An episode must be created before accessing
other items in the client’s Activity List.
To start a new episode of care for a client, follow the steps below.
On the left menu, click Episode List.
Click the Start New Episode link.
Figure 3-4: Episode List screen, Start New Episode link
If the client profile is missing certain information, such as an Address or fields on the Additional Information screen, a
New Episode cannot be created and an error message will appear, as shown in Figure 3-5.
Figure 3-5: Episode List screen, Error Message
If the client profile is complete, clicking Start New Episode will open the Intake Case Information screen, as shown
in Figure 3-6: Intake Case Information screen.
(Continue to next section)
STATE OPIOID RESPONSE (SOR) GRANT | FEI Systems Intake | 21
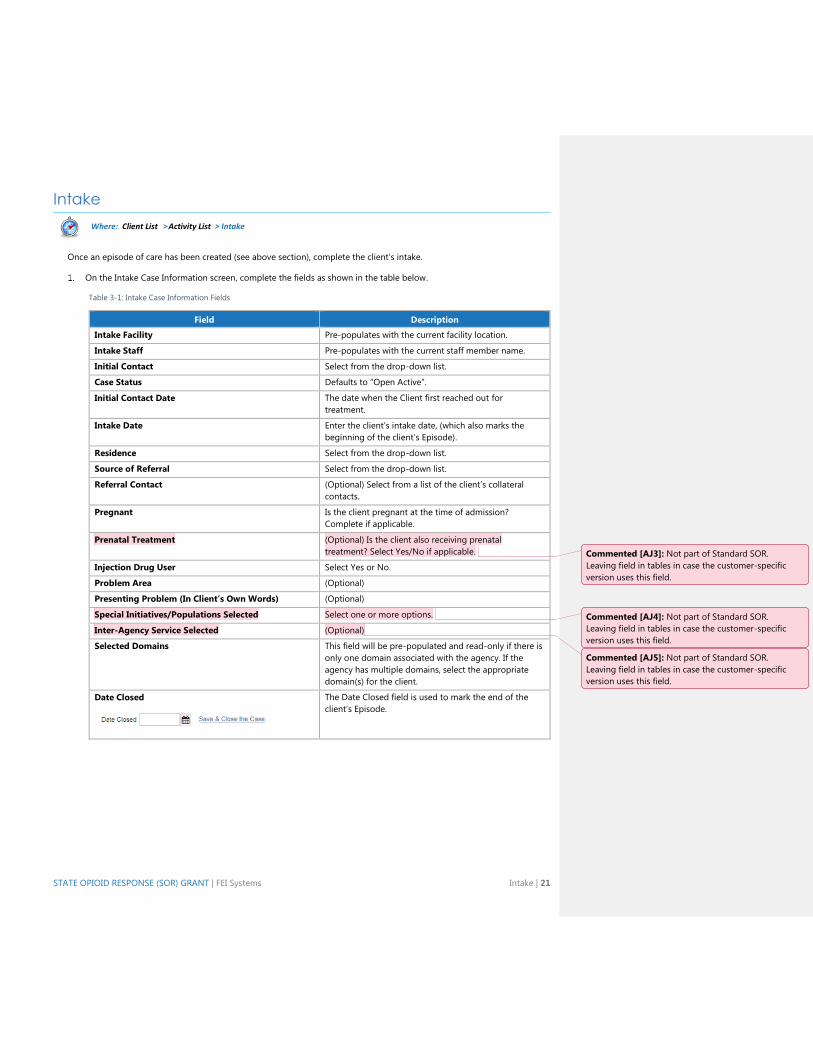
Intake
Where: Client List >Activity List > Intake
Once an episode of care has been created (see above section), complete the client’s intake.
On the Intake Case Information screen, complete the fields as shown in the table below.
Table 3-1: Intake Case Information Fields
Field Description
Intake Facility Pre-populates with the current facility location.
Intake Staff Pre-populates with the current staff member name.
Initial Contact Select from the drop-down list.
Case Status Defaults to “Open Active”.
Initial Contact Date The date when the Client first reached out for
treatment.
Intake Date Enter the client’s intake date, (which also marks the
beginning of the client’s Episode).
Residence Select from the drop-down list.
Source of Referral Select from the drop-down list.
Referral Contact (Optional) Select from a list of the client’s collateral
contacts.
Pregnant Is the client pregnant at the time of admission?
Complete if applicable.
Prenatal Treatment (Optional) Is the client also receiving prenatal
treatment? Select Yes/No if applicable.
Injection Drug User Select Yes or No.
Problem Area (Optional)
Presenting Problem (In Client’s Own Words) (Optional)
Special Initiatives/Populations Selected Select one or more options.
Inter-Agency Service Selected (Optional)
Selected Domains This field will be pre-populated and read-only if there is
only one domain associated with the agency. If the
agency has multiple domains, select the appropriate
domain(s) for the client.
Date Closed
The Date Closed field is used to mark the end of the
client’s Episode.
Commented [AJ3]: Not part of Standard SOR.
Leaving field in tables in case the customer-specific
version uses this field.
Commented [AJ4]: Not part of Standard SOR.
Leaving field in tables in case the customer-specific
version uses this field.
Commented [AJ5]: Not part of Standard SOR.
Leaving field in tables in case the customer-specific
version uses this field.

22 | Client Intake and Program Enrollment STATE OPIOID RESPONSE (SOR) GRANT | FEI Systems
Figure 3-6: Intake Case Information screen
Click Finish.
STATE OPIOID RESPONSE (SOR) GRANT | FEI Systems Program Enroll | 23
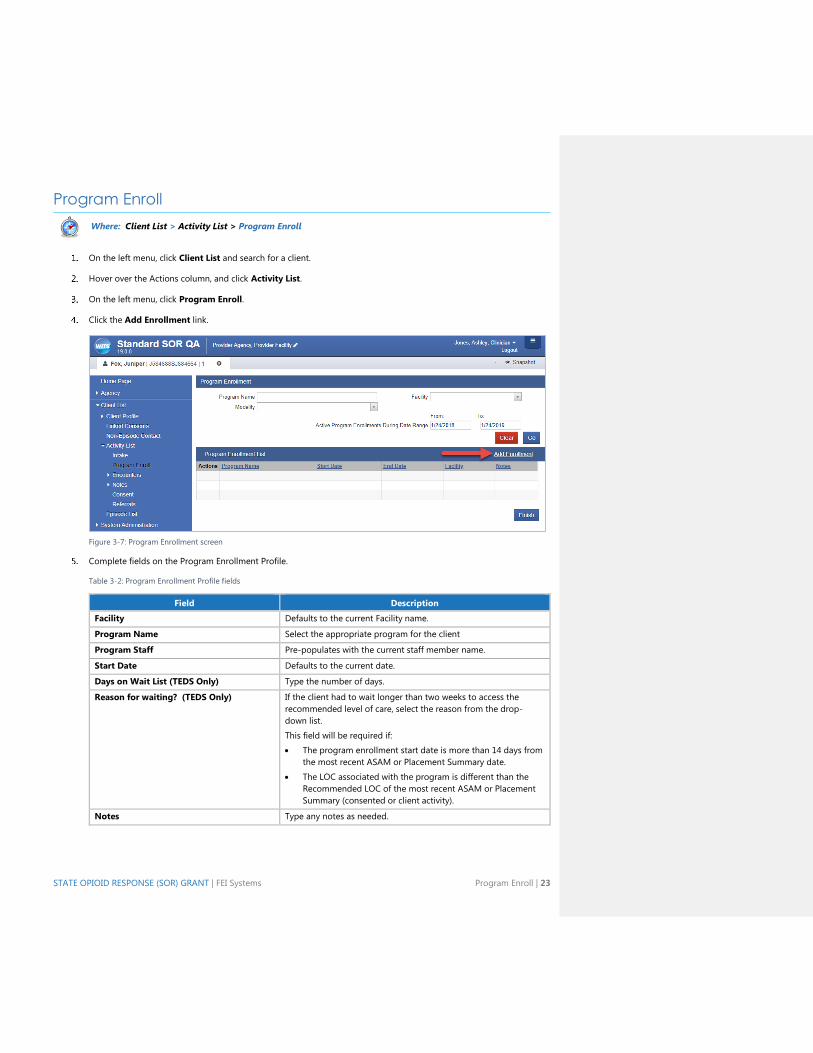
Program Enroll
Where: Client List > Activity List > Program Enroll
On the left menu, click Client List and search for a client.
Hover over the Actions column, and click Activity List.
On the left menu, click Program Enroll.
Click the Add Enrollment link.
Figure 3-7: Program Enrollment screen
Complete fields on the Program Enrollment Profile.
Table 3-2: Program Enrollment Profile fields
Field Description
Facility Defaults to the current Facility name.
Program Name Select the appropriate program for the client
Program Staff Pre-populates with the current staff member name.
Start Date Defaults to the current date.
Days on Wait List (TEDS Only) Type the number of days.
Reason for waiting? (TEDS Only) If the client had to wait longer than two weeks to access the
recommended level of care, select the reason from the drop-
down list.
This field will be required if:
• The program enrollment start date is more than 14 days from
the most recent ASAM or Placement Summary date.
• The LOC associated with the program is different than the
Recommended LOC of the most recent ASAM or Placement
Summary (consented or client activity).
Notes Type any notes as needed.
24 | Client Intake and Program Enrollment STATE OPIOID RESPONSE (SOR) GRANT | FEI Systems
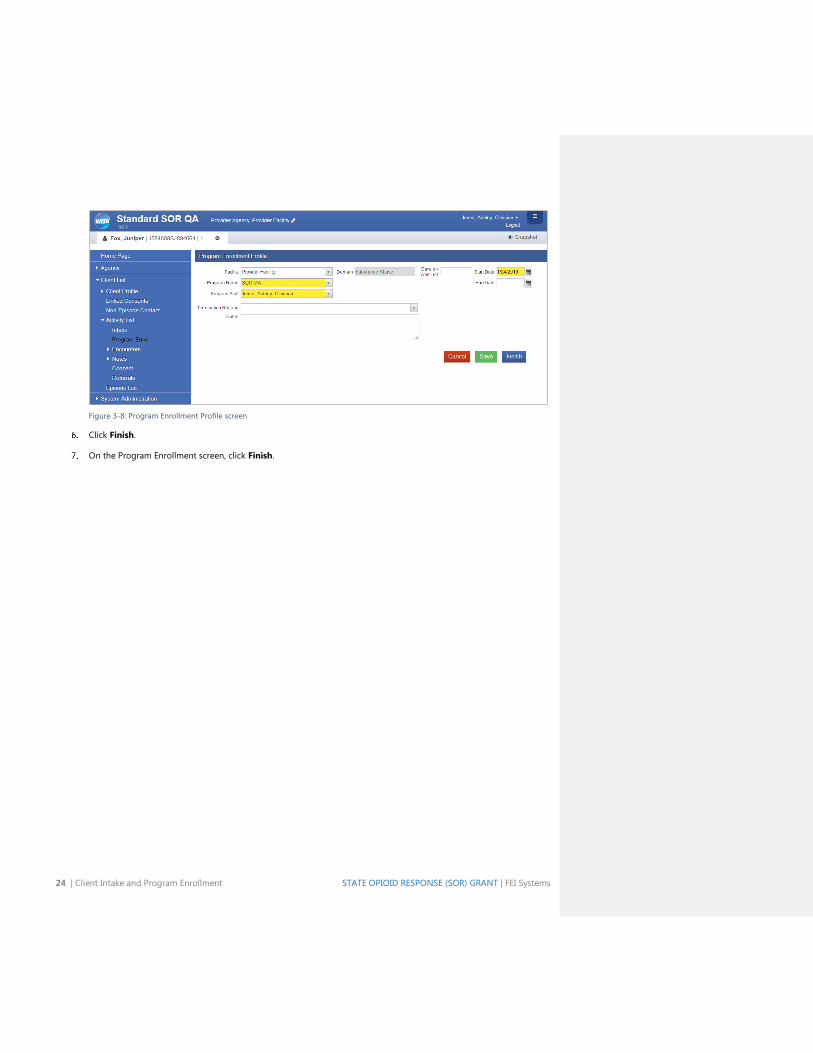
Figure 3-8: Program Enrollment Profile screen
Click Finish.
On the Program Enrollment screen, click Finish.
STATE OPIOID RESPONSE (SOR) GRANT | FEI Systems Consent | 25
Consent
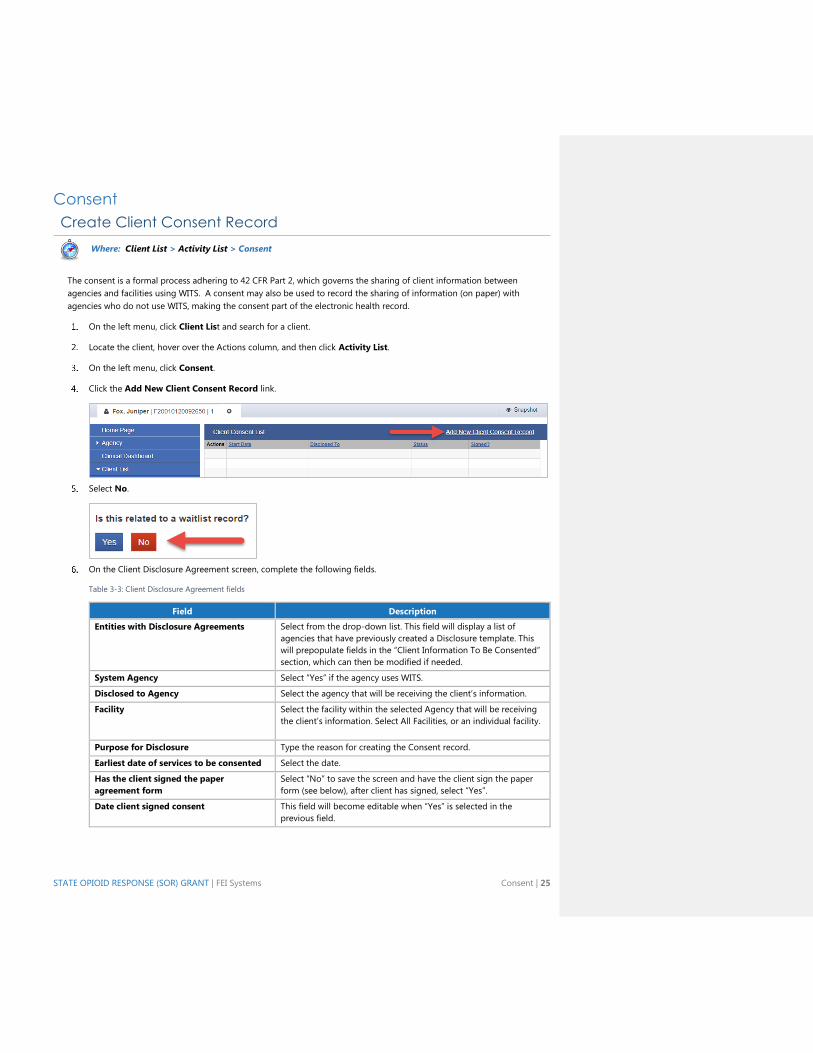
Create Client Consent Record
Where: Client List > Activity List > Consent
The consent is a formal process adhering to 42 CFR Part 2, which governs the sharing of client information between
agencies and facilities using WITS. A consent may also be used to record the sharing of information (on paper) with
agencies who do not use WITS, making the consent part of the electronic health record.
On the left menu, click Client List and search for a client.
Locate the client, hover over the Actions column, and then click Activity List.
On the left menu, click Consent.
Click the Add New Client Consent Record link.
Select No.
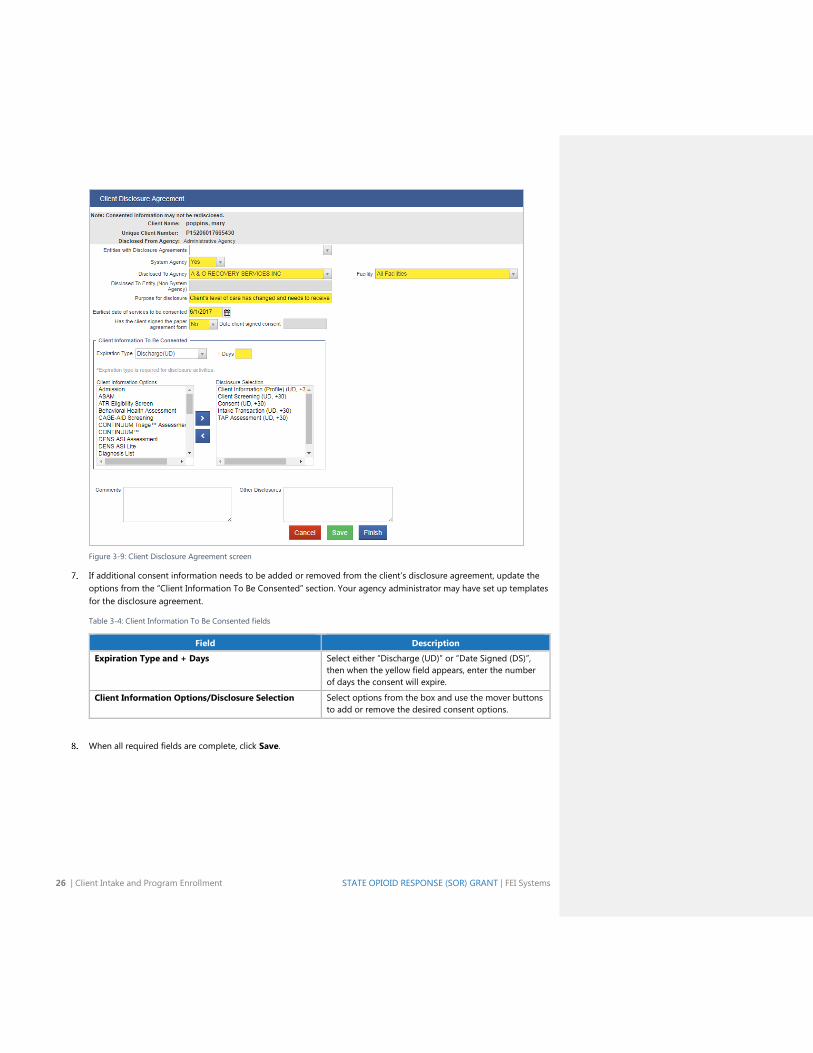
On the Client Disclosure Agreement screen, complete the following fields.
Table 3-3: Client Disclosure Agreement fields
Field Description
Entities with Disclosure Agreements Select from the drop-down list. This field will display a list of
agencies that have previously created a Disclosure template. This
will prepopulate fields in the “Client Information To Be Consented”
section, which can then be modified if needed.
System Agency Select “Yes” if the agency uses WITS.
Disclosed to Agency Select the agency that will be receiving the client’s information.
Facility Select the facility within the selected Agency that will be receiving
the client’s information. Select All Facilities, or an individual facility.
Purpose for Disclosure Type the reason for creating the Consent record.
Earliest date of services to be consented Select the date.
Has the client signed the paper
agreement form
Select “No” to save the screen and have the client sign the paper
form (see below), after client has signed, select “Yes”.
Date client signed consent This field will become editable when “Yes” is selected in the
previous field.
26 | Client Intake and Program Enrollment STATE OPIOID RESPONSE (SOR) GRANT | FEI Systems
Figure 3-9: Client Disclosure Agreement screen
If additional consent information needs to be added or removed from the client’s disclosure agreement, update the
options from the “Client Information To Be Consented” section. Your agency administrator may have set up templates
for the disclosure agreement.
Table 3-4: Client Information To Be Consented fields
Field Description
Expiration Type and + Days Select either “Discharge (UD)” or “Date Signed (DS)”,
then when the yellow field appears, enter the number
of days the consent will expire.
Client Information Options/Disclosure Selection Select options from the box and use the mover buttons
to add or remove the desired consent options.
When all required fields are complete, click Save.
STATE OPIOID RESPONSE (SOR) GRANT | FEI Systems Consent | 27
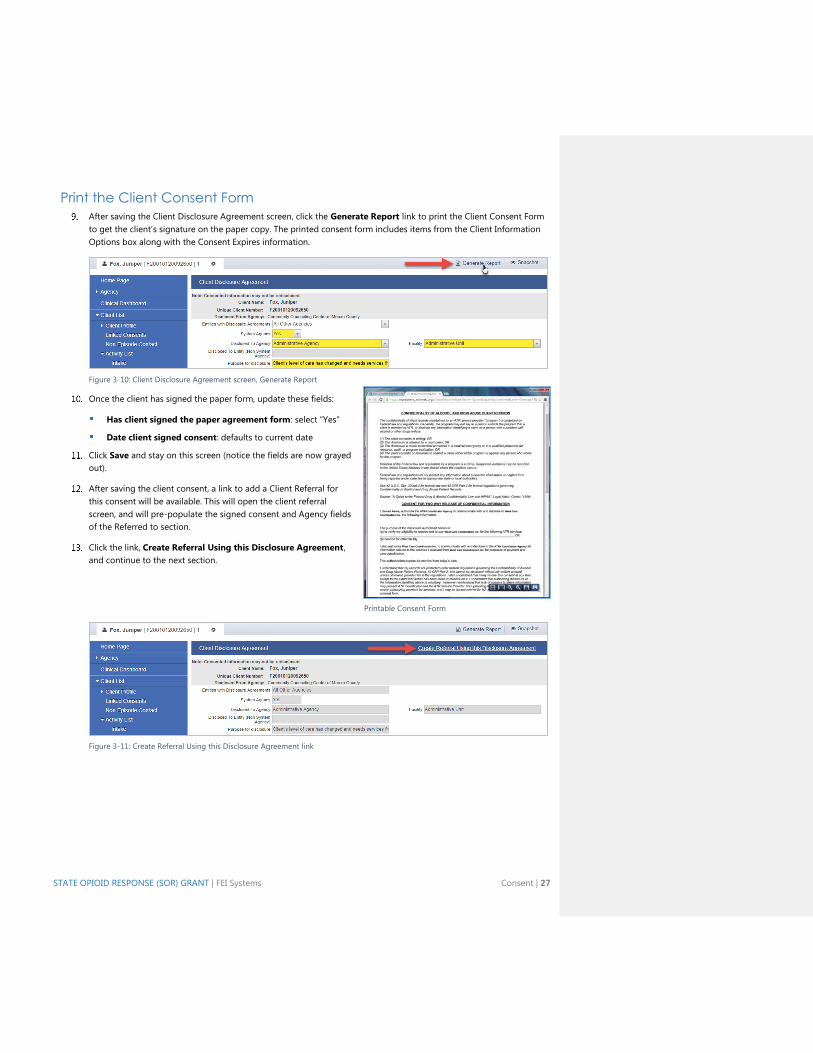
Print the Client Consent Form
After saving the Client Disclosure Agreement screen, click the Generate Report link to print the Client Consent Form
to get the client’s signature on the paper copy. The printed consent form includes items from the Client Information
Options box along with the Consent Expires information.
Figure 3-10: Client Disclosure Agreement screen, Generate Report
Once the client has signed the paper form, update these fields:
Has client signed the paper agreement form: select “Yes”
Date client signed consent: defaults to current date
Click Save and stay on this screen (notice the fields are now grayed
out).
After saving the client consent, a link to add a Client Referral for
this consent will be available. This will open the client referral
screen, and will pre-populate the signed consent and Agency fields
of the Referred to section.
Click the link, Create Referral Using this Disclosure Agreement,
and continue to the next section.
Figure 3-11: Create Referral Using this Disclosure Agreement link
Printable Consent Form
28 | Client Intake and Program Enrollment STATE OPIOID RESPONSE (SOR) GRANT | FEI Systems
Referrals
Create a Client Referral
Where: Client List > Activity List > Referrals
Continuing from previous section…
Once the Client Consent is complete, create the Client Referral Record. A referral is used when the receiving agency
(another WITS agency) will be providing services for the client. Referrals may also be done from one facility to another
facility within the same agency.
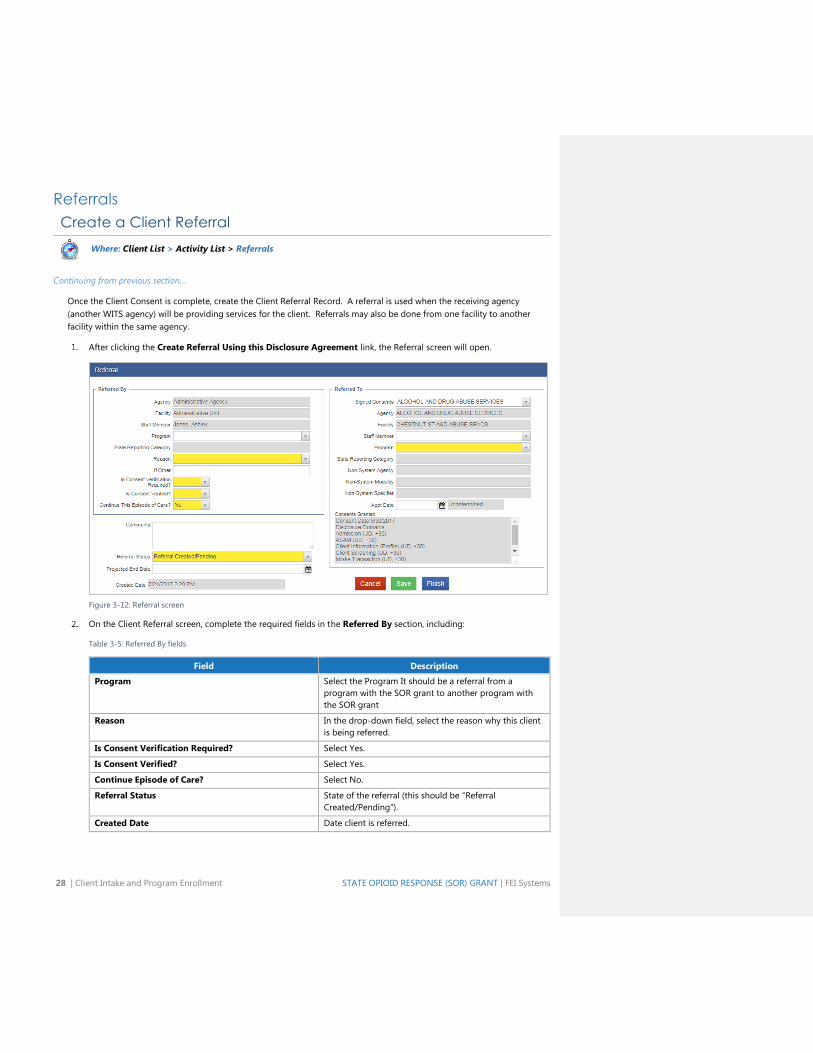
After clicking the Create Referral Using this Disclosure Agreement link, the Referral screen will open.
Figure 3-12: Referral screen
On the Client Referral screen, complete the required fields in the Referred By section, including:
Table 3-5: Referred By fields
Field Description
Program Select the Program It should be a referral from a
program with the SOR grant to another program with
the SOR grant
Reason In the drop-down field, select the reason why this client
is being referred.
Is Consent Verification Required? Select Yes.
Is Consent Verified? Select Yes.
Continue Episode of Care? Select No.
Referral Status State of the referral (this should be “Referral
Created/Pending”).
Created Date Date client is referred.
STATE OPIOID RESPONSE (SOR) GRANT | FEI Systems Referrals | 29
Next, in the Referred To section, complete all the required fields, including:
Table 3-6: Referred To fields
Field Description
Signed Consents Select the consent from list of available consents.
Agency This field will auto populate based on the “Consent”
selected.
Facility The facility the client is being referred to.
Program The program the client is being referred to. It should be
an SOR program.
When complete, click Save.
30 | Client Intake and Program Enrollment STATE OPIOID RESPONSE (SOR) GRANT | FEI Systems
Viewing Referrals
Referrals In
Where: Agency > Agency List > Referrals > Referrals In
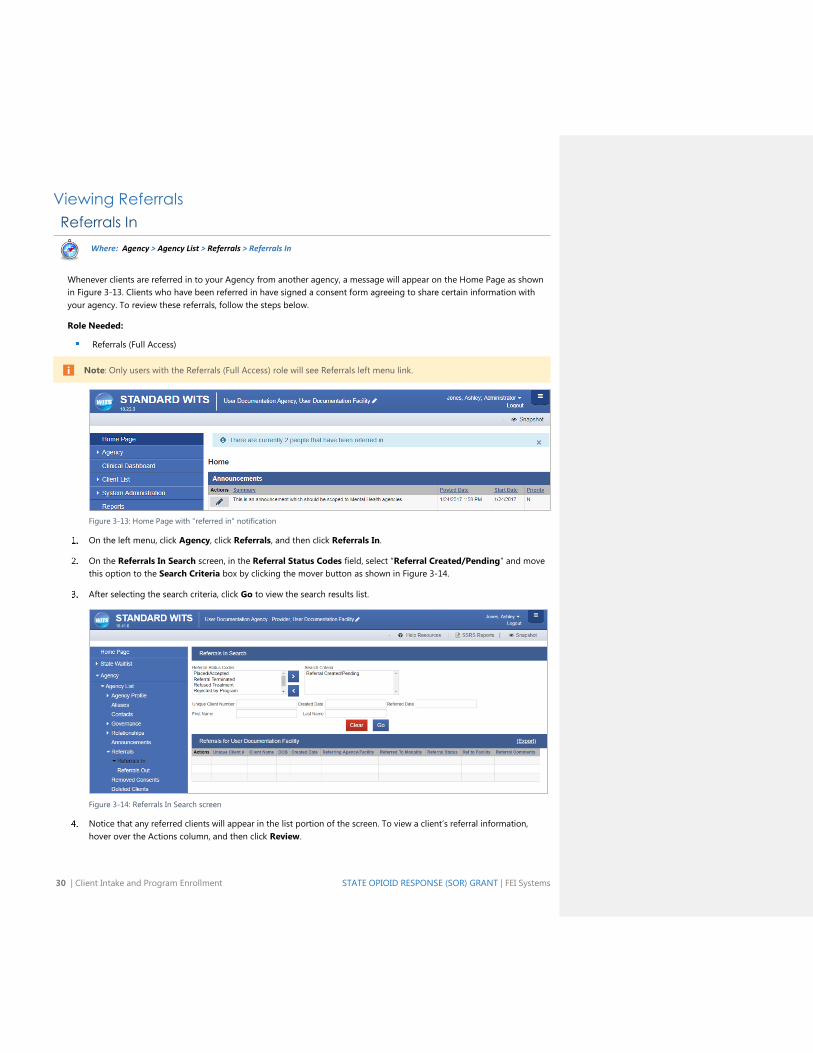
Whenever clients are referred in to your Agency from another agency, a message will appear on the Home Page as shown
in Figure 3-13. Clients who have been referred in have signed a consent form agreeing to share certain information with
your agency. To review these referrals, follow the steps below.
Role Needed:
Referrals (Full Access)
Note: Only users with the Referrals (Full Access) role will see Referrals left menu link.
Figure 3-13: Home Page with "referred in" notification
On the left menu, click Agency, click Referrals, and then click Referrals In.
On the Referrals In Search screen, in the Referral Status Codes field, select “Referral Created/Pending” and move
this option to the Search Criteria box by clicking the mover button as shown in Figure 3-14.
After selecting the search criteria, click Go to view the search results list.
Figure 3-14: Referrals In Search screen
Notice that any referred clients will appear in the list portion of the screen. To view a client’s referral information,
hover over the Actions column, and then click Review.
STATE OPIOID RESPONSE (SOR) GRANT | FEI Systems Viewing Referrals | 31
Figure 3-15: Referrals Search Results, Review link
To accept the client referral, click on the Referral Status field and select “Placed/Accepted” from the drop-down list.
The client must be accepted into your agency before viewing the client’s record, or working on the case.
Figure 3-16: Referral screen, Referral Status field
(Optional) Next, fill in the Appointment Date (Appt Date) and use the drop down box to provide any additional
information about the appointment.
Click Finish to save the record and accept the referral. Note that this action takes you to the Client Profile screen for
the client you just accepted.
(Optional) Additional Referral Status reasons to select:
Referred/Terminated: When the referral has been deleted by the referring agency.
Refused Treatment: Select if the client does not want to be treated.
Rejected by Program: If the client is not eligible or is not acting in compliance.
Wait List: If the client is waiting for a slot to open in the program.
Note: Once the referral is Placed/Accepted, the client record is created within the Agency, and an Intake and
Client Program Enrollment is created within the referred to Facility.
32 | Client Intake and Program Enrollment STATE OPIOID RESPONSE (SOR) GRANT | FEI Systems
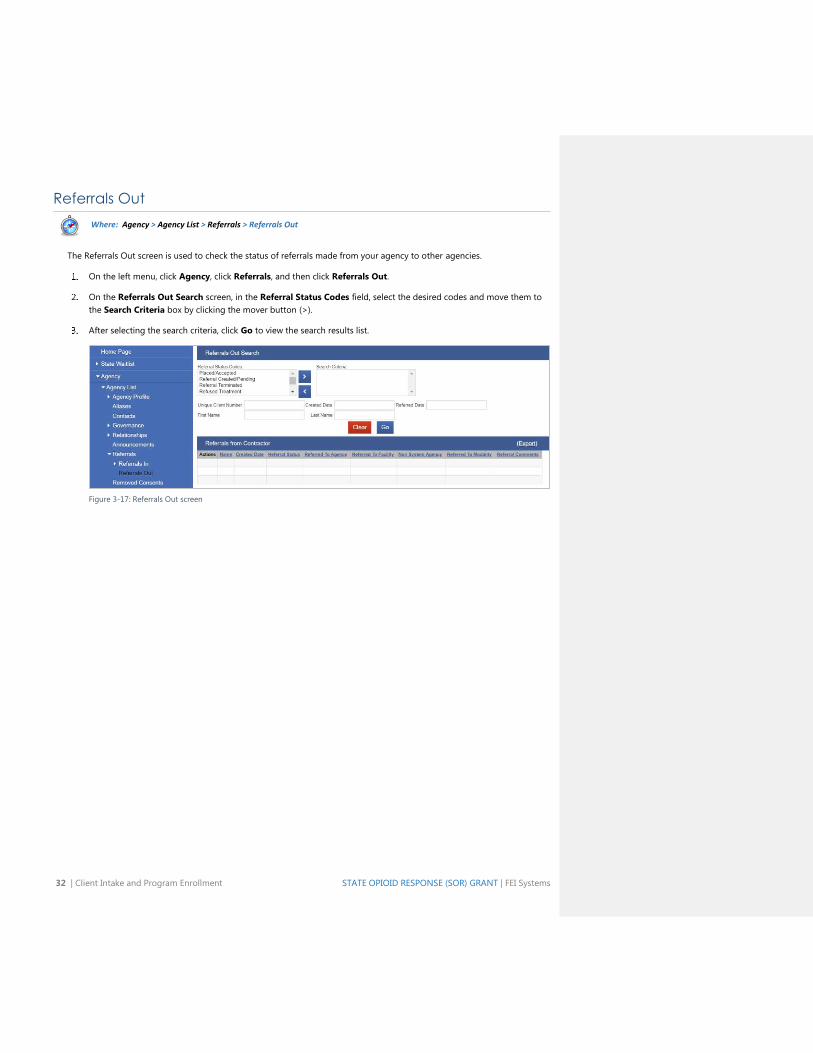
Referrals Out
Where: Agency > Agency List > Referrals > Referrals Out
The Referrals Out screen is used to check the status of referrals made from your agency to other agencies.
On the left menu, click Agency, click Referrals, and then click Referrals Out.
On the Referrals Out Search screen, in the Referral Status Codes field, select the desired codes and move them to
the Search Criteria box by clicking the mover button (>).
After selecting the search criteria, click Go to view the search results list.
Figure 3-17: Referrals Out screen

STATE OPIOID RESPONSE (SOR) GRANT | FEI Systems Removed Consents | 33
Removed Consents
Where: Agency > Agency List > Removed Consents
This screen displays clients with consents that have been removed. This is typically done if a client is no longer in treatment
at your agency. To help easily manage the number of clients with consents from outside agencies on the Client List screen,
users with the Clinical Supervisor role have the ability to “remove” consented clients from the list.
Figure 3-18: Removed Consents screen
34 | Client Intake and Program Enrollment STATE OPIOID RESPONSE (SOR) GRANT | FEI Systems
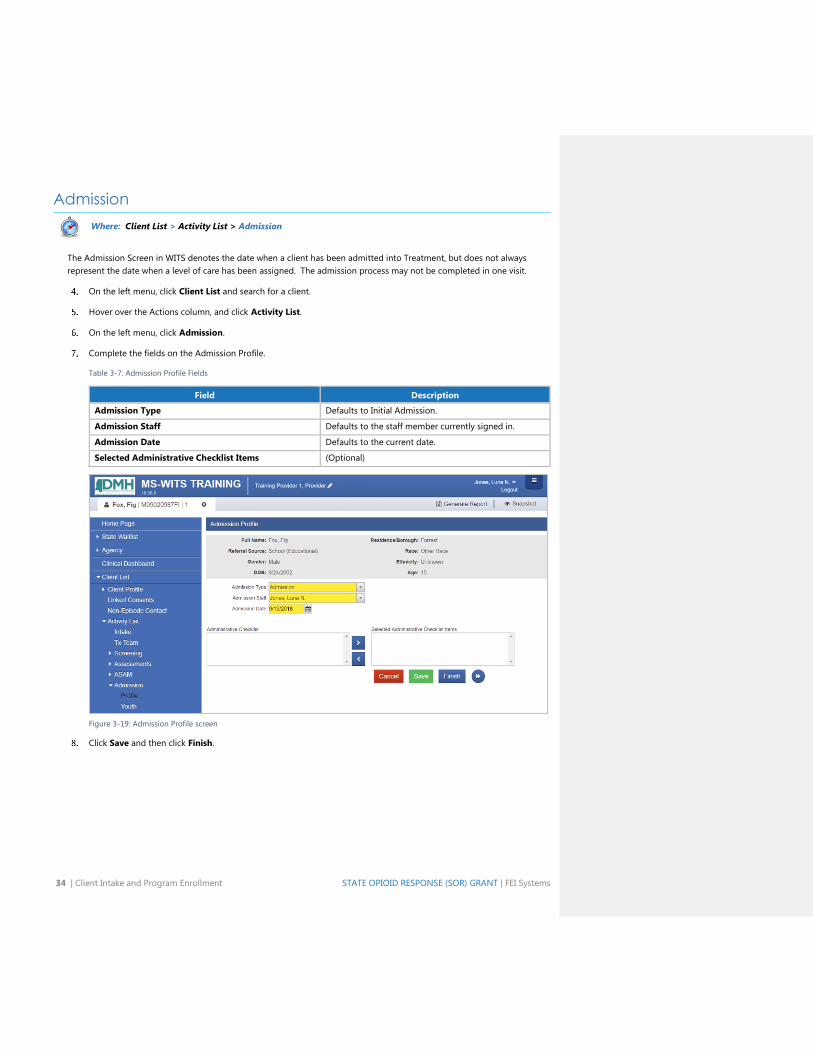
Admission
Where: Client List > Activity List > Admission
The Admission Screen in WITS denotes the date when a client has been admitted into Treatment, but does not always
represent the date when a level of care has been assigned. The admission process may not be completed in one visit.
On the left menu, click Client List and search for a client.
Hover over the Actions column, and click Activity List.
On the left menu, click Admission.
Complete the fields on the Admission Profile.
Table 3-7: Admission Profile Fields
Field Description
Admission Type Defaults to Initial Admission.
Admission Staff Defaults to the staff member currently signed in.
Admission Date Defaults to the current date.
Selected Administrative Checklist Items (Optional)
Figure 3-19: Admission Profile screen
Click Save and then click Finish.
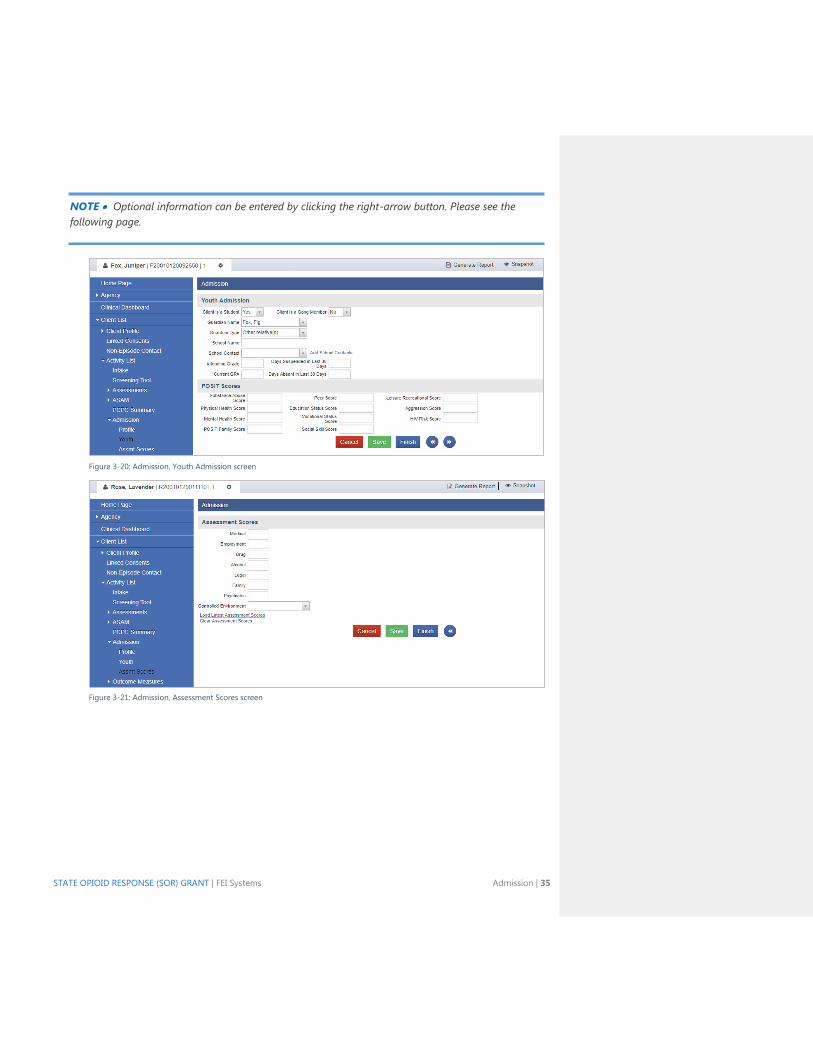
STATE OPIOID RESPONSE (SOR) GRANT | FEI Systems Admission | 35
Figure 3-20: Admission, Youth Admission screen
Figure 3-21: Admission, Assessment Scores screen
NOTE • Optional information can be entered by clicking the right-arrow button. Please see the
following page.
36 | Outcome Measures STATE OPIOID RESPONSE (SOR) GRANT | FEI Systems
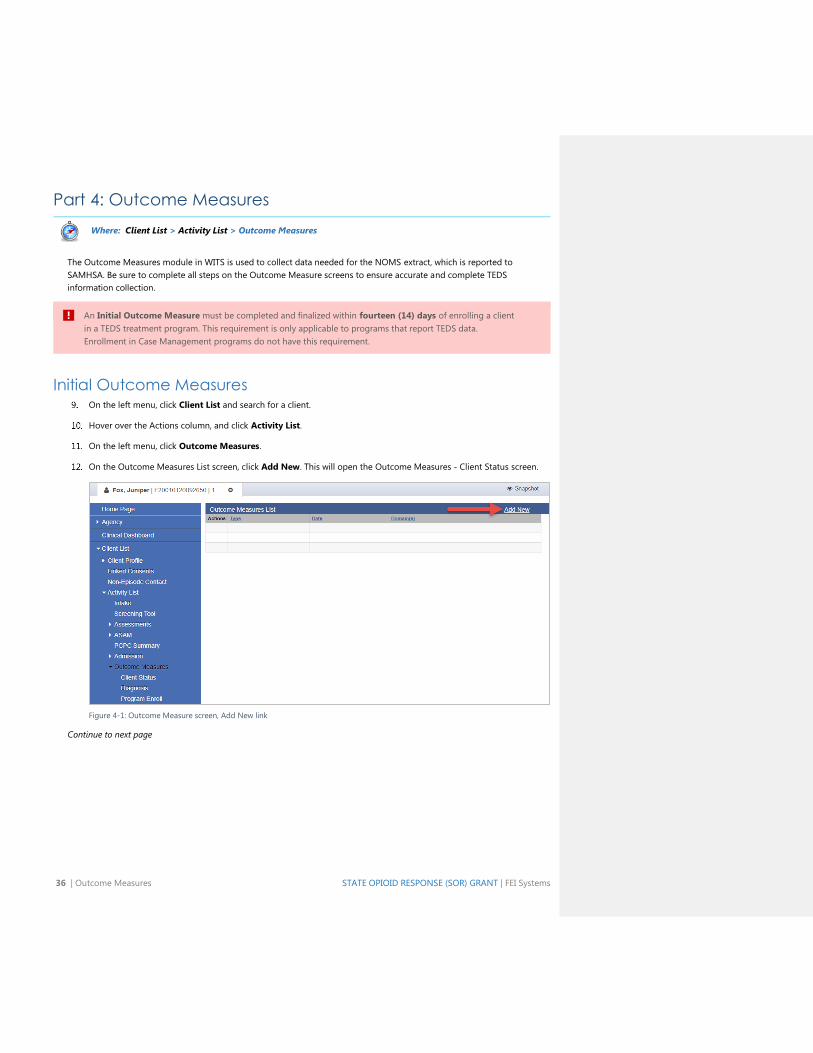
Part 4: Outcome Measures
Where: Client List > Activity List > Outcome Measures
The Outcome Measures module in WITS is used to collect data needed for the NOMS extract, which is reported to
SAMHSA. Be sure to complete all steps on the Outcome Measure screens to ensure accurate and complete TEDS
information collection.
An Initial Outcome Measure must be completed and finalized within fourteen (14) days of enrolling a client
in a TEDS treatment program. This requirement is only applicable to programs that report TEDS data.
Enrollment in Case Management programs do not have this requirement.
Initial Outcome Measures On the left menu, click Client List and search for a client.
Hover over the Actions column, and click Activity List.
On the left menu, click Outcome Measures.
On the Outcome Measures List screen, click Add New. This will open the Outcome Measures - Client Status screen.
Figure 4-1: Outcome Measure screen, Add New link
Continue to next page
STATE OPIOID RESPONSE (SOR) GRANT | FEI Systems Initial Outcome Measures | 37
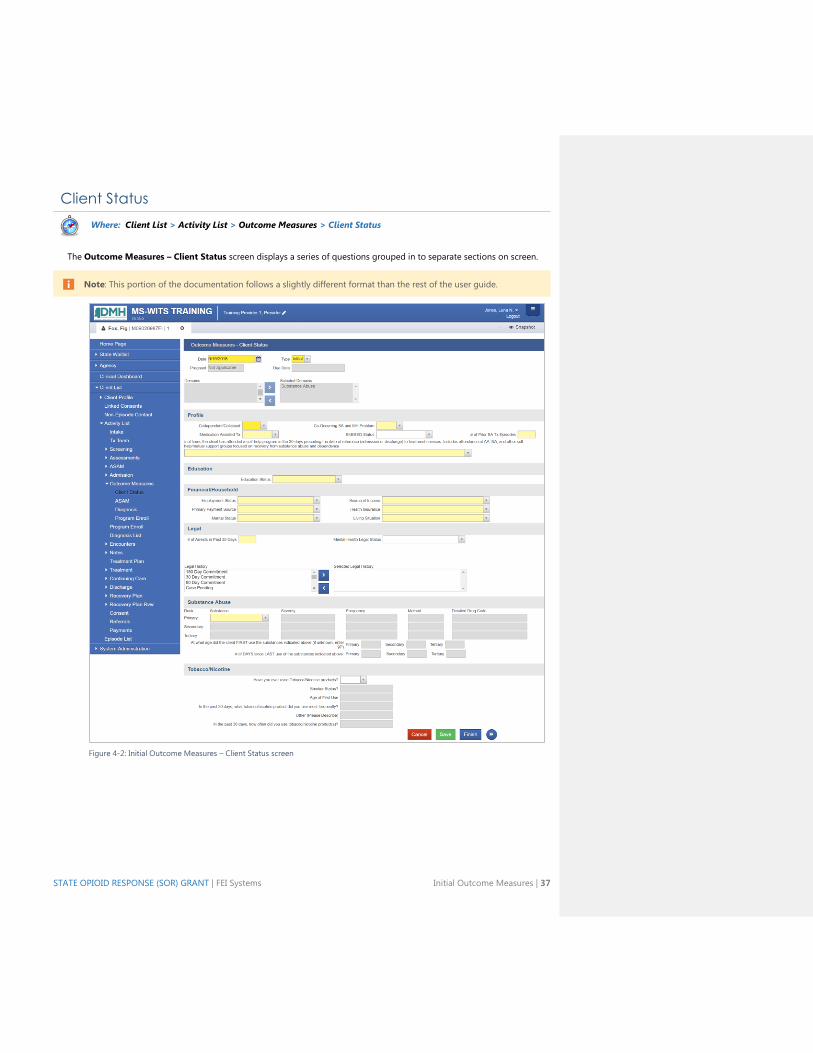
Client Status
Where: Client List > Activity List > Outcome Measures > Client Status
The Outcome Measures – Client Status screen displays a series of questions grouped in to separate sections on screen.
Note: This portion of the documentation follows a slightly different format than the rest of the user guide.
Figure 4-2: Initial Outcome Measures – Client Status screen
38 | Outcome Measures STATE OPIOID RESPONSE (SOR) GRANT | FEI Systems
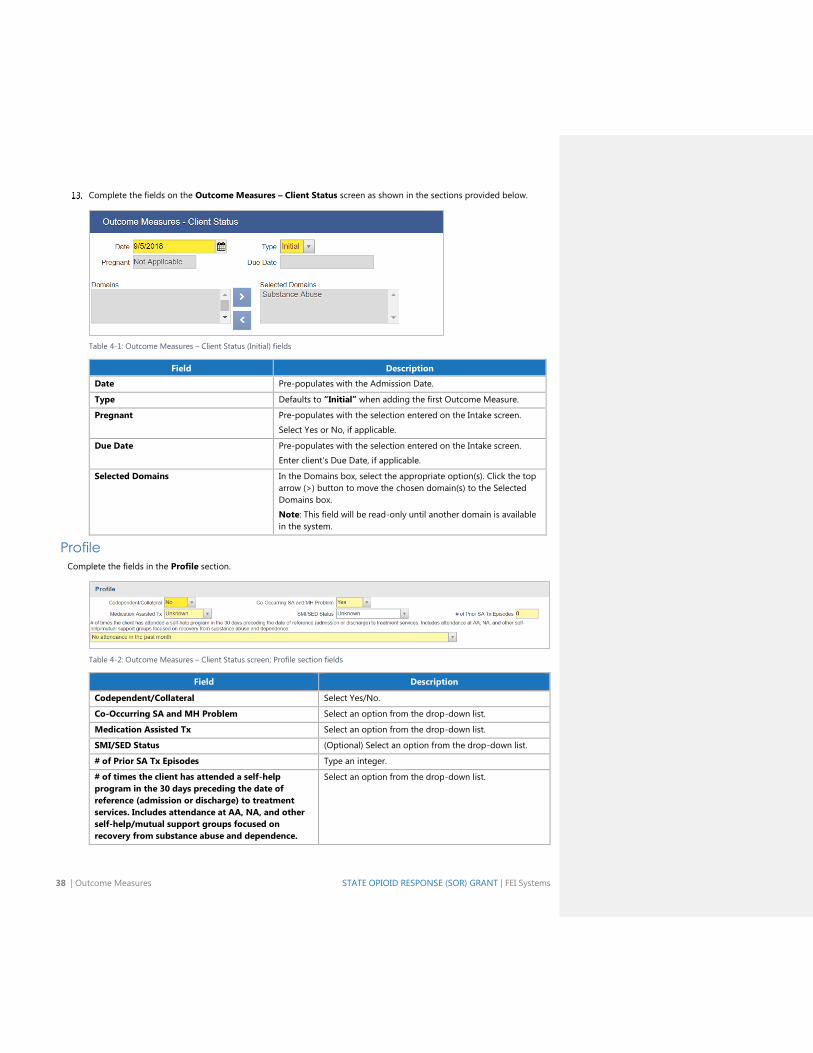
Complete the fields on the Outcome Measures – Client Status screen as shown in the sections provided below.
Table 4-1: Outcome Measures – Client Status (Initial) fields
Field Description
Date Pre-populates with the Admission Date.
Type Defaults to “Initial” when adding the first Outcome Measure.
Pregnant Pre-populates with the selection entered on the Intake screen.
Select Yes or No, if applicable.
Due Date Pre-populates with the selection entered on the Intake screen.
Enter client’s Due Date, if applicable.
Selected Domains In the Domains box, select the appropriate option(s). Click the top
arrow (>) button to move the chosen domain(s) to the Selected
Domains box.
Note: This field will be read-only until another domain is available
in the system.
Profile
Complete the fields in the Profile section.
Table 4-2: Outcome Measures – Client Status screen; Profile section fields
Field Description
Codependent/Collateral Select Yes/No.
Co-Occurring SA and MH Problem Select an option from the drop-down list.
Medication Assisted Tx Select an option from the drop-down list.
SMI/SED Status (Optional) Select an option from the drop-down list.
# of Prior SA Tx Episodes Type an integer.
# of times the client has attended a self-help
program in the 30 days preceding the date of
reference (admission or discharge) to treatment
services. Includes attendance at AA, NA, and other
self-help/mutual support groups focused on
recovery from substance abuse and dependence.
Select an option from the drop-down list.
STATE OPIOID RESPONSE (SOR) GRANT | FEI Systems Initial Outcome Measures | 39
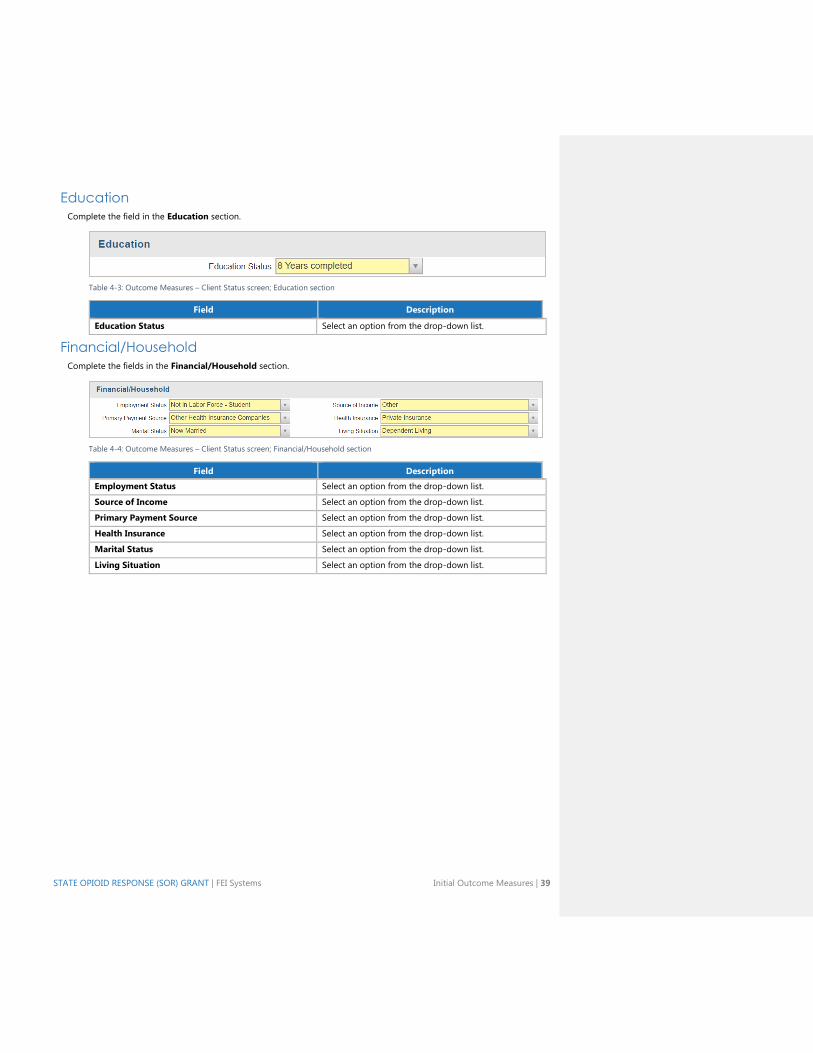
Education
Complete the field in the Education section.
Table 4-3: Outcome Measures – Client Status screen; Education section
Field Description
Education Status Select an option from the drop-down list.
Financial/Household
Complete the fields in the Financial/Household section.
Table 4-4: Outcome Measures – Client Status screen; Financial/Household section
Field Description
Employment Status Select an option from the drop-down list.
Source of Income Select an option from the drop-down list.
Primary Payment Source Select an option from the drop-down list.
Health Insurance Select an option from the drop-down list.
Marital Status Select an option from the drop-down list.
Living Situation Select an option from the drop-down list.
40 | Outcome Measures STATE OPIOID RESPONSE (SOR) GRANT | FEI Systems
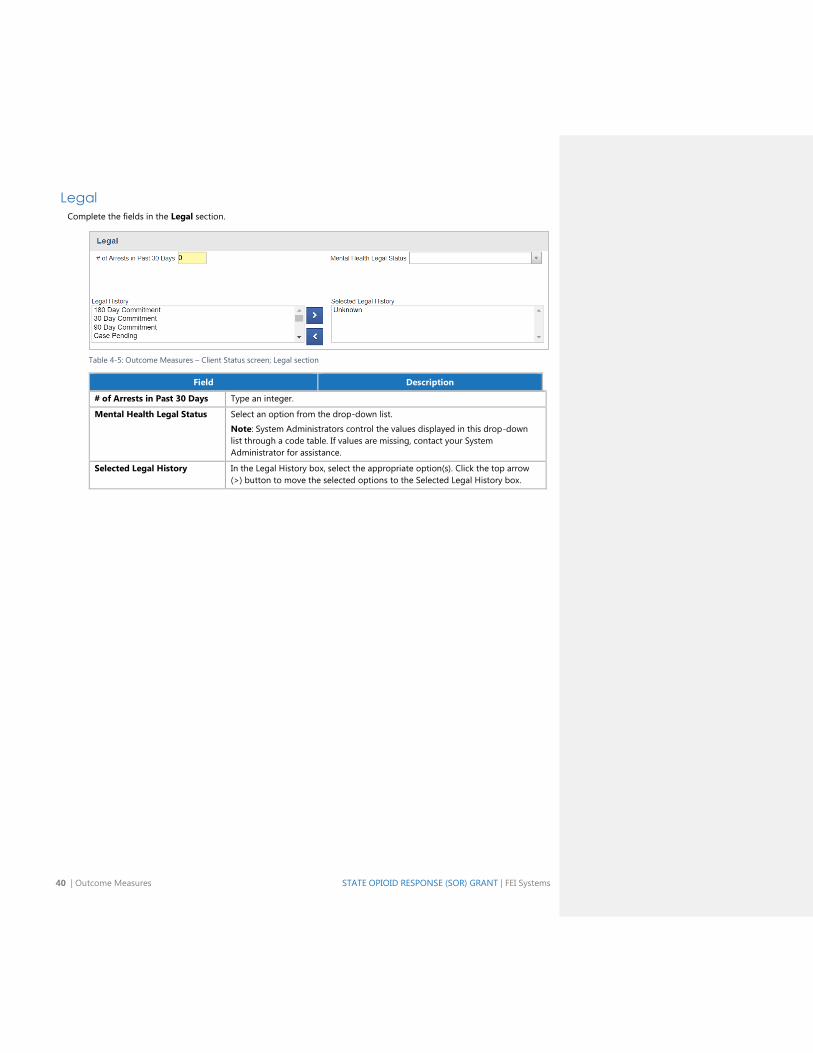
Legal
Complete the fields in the Legal section.
Table 4-5: Outcome Measures – Client Status screen; Legal section
Field Description
# of Arrests in Past 30 Days Type an integer.
Mental Health Legal Status Select an option from the drop-down list.
Note: System Administrators control the values displayed in this drop-down
list through a code table. If values are missing, contact your System
Administrator for assistance.
Selected Legal History In the Legal History box, select the appropriate option(s). Click the top arrow
(>) button to move the selected options to the Selected Legal History box.
STATE OPIOID RESPONSE (SOR) GRANT | FEI Systems Initial Outcome Measures | 41
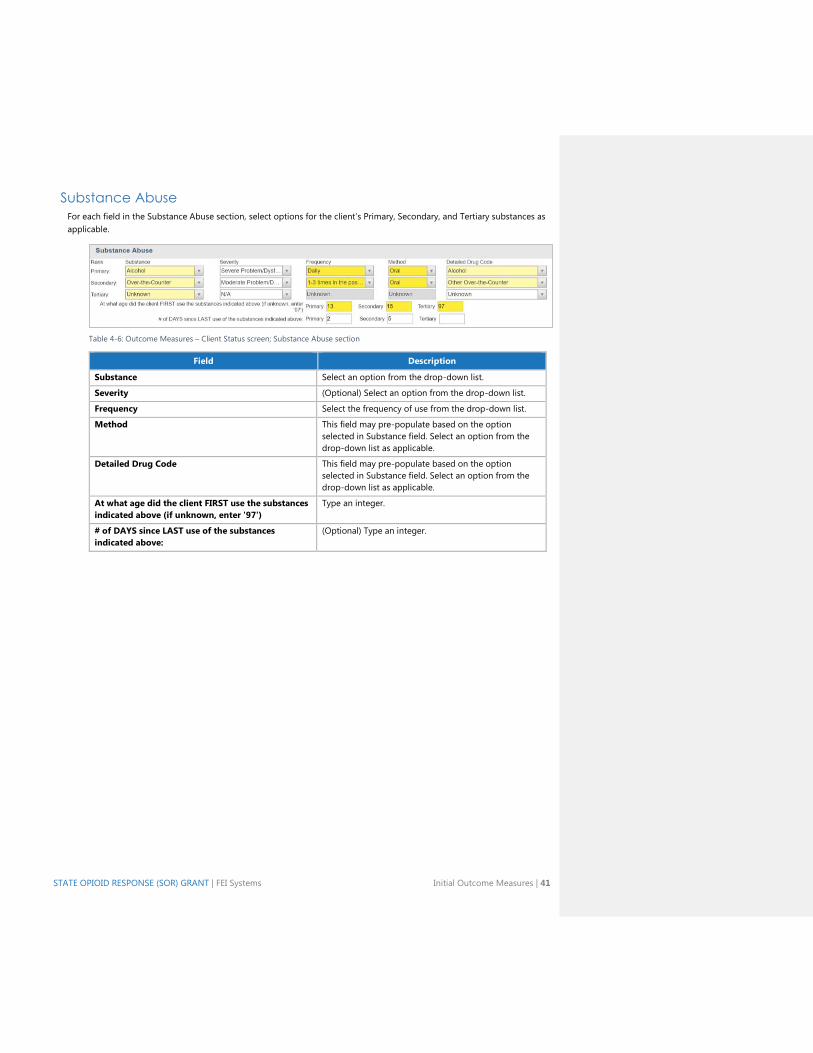
Substance Abuse
For each field in the Substance Abuse section, select options for the client’s Primary, Secondary, and Tertiary substances as
applicable.
Table 4-6: Outcome Measures – Client Status screen; Substance Abuse section
Field Description
Substance Select an option from the drop-down list.
Severity (Optional) Select an option from the drop-down list.
Frequency Select the frequency of use from the drop-down list.
Method This field may pre-populate based on the option
selected in Substance field. Select an option from the
drop-down list as applicable.
Detailed Drug Code This field may pre-populate based on the option
selected in Substance field. Select an option from the
drop-down list as applicable.
At what age did the client FIRST use the substances
indicated above (if unknown, enter '97')
Type an integer.
# of DAYS since LAST use of the substances
indicated above:
(Optional) Type an integer.
42 | Outcome Measures STATE OPIOID RESPONSE (SOR) GRANT | FEI Systems
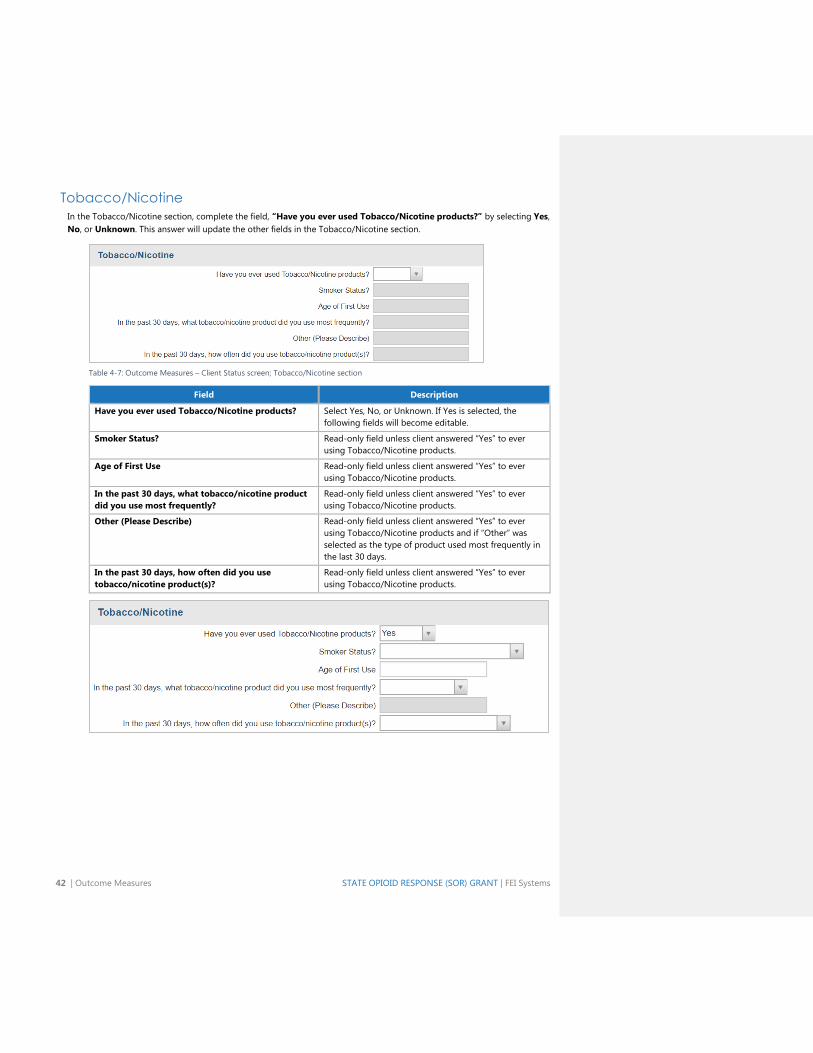
Tobacco/Nicotine
In the Tobacco/Nicotine section, complete the field, “Have you ever used Tobacco/Nicotine products?” by selecting Yes,
No, or Unknown. This answer will update the other fields in the Tobacco/Nicotine section.
Table 4-7: Outcome Measures – Client Status screen; Tobacco/Nicotine section
Field Description
Have you ever used Tobacco/Nicotine products? Select Yes, No, or Unknown. If Yes is selected, the
following fields will become editable.
Smoker Status? Read-only field unless client answered “Yes” to ever
using Tobacco/Nicotine products.
Age of First Use Read-only field unless client answered “Yes” to ever
using Tobacco/Nicotine products.
In the past 30 days, what tobacco/nicotine product
did you use most frequently?
Read-only field unless client answered “Yes” to ever
using Tobacco/Nicotine products.
Other (Please Describe) Read-only field unless client answered “Yes” to ever
using Tobacco/Nicotine products and if “Other” was
selected as the type of product used most frequently in
the last 30 days.
In the past 30 days, how often did you use
tobacco/nicotine product(s)?
Read-only field unless client answered “Yes” to ever
using Tobacco/Nicotine products.
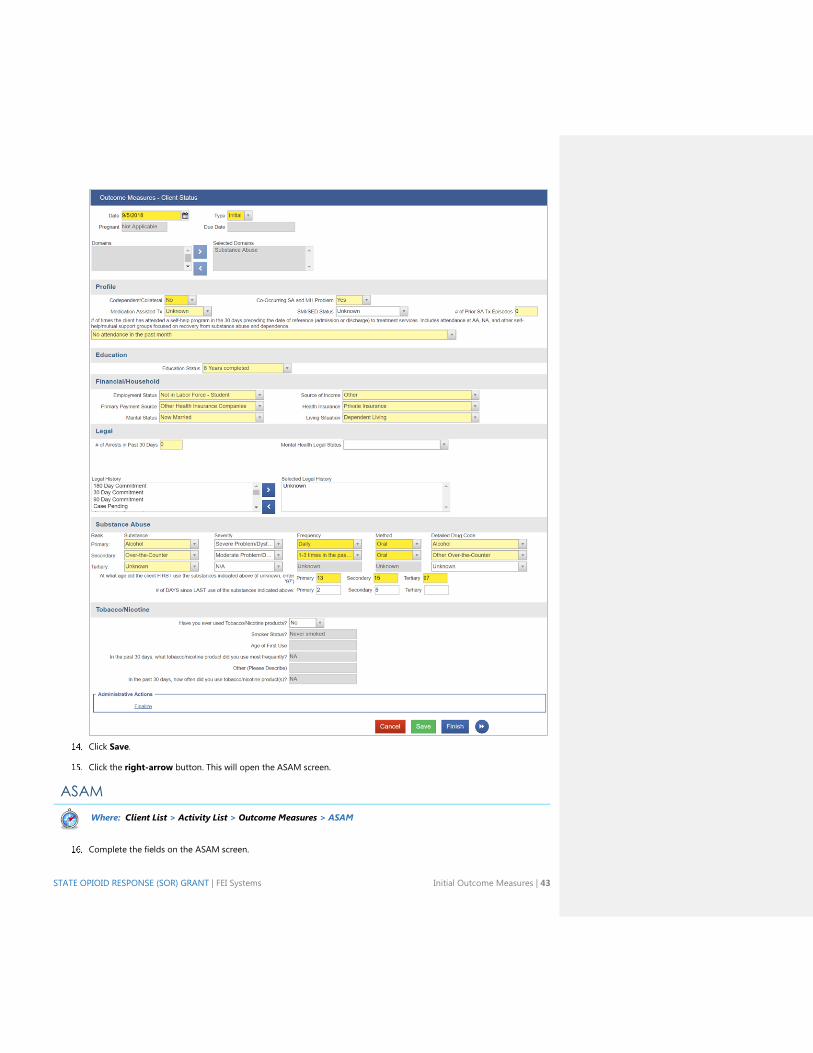
STATE OPIOID RESPONSE (SOR) GRANT | FEI Systems Initial Outcome Measures | 43
Click Save.
Click the right-arrow button. This will open the ASAM screen.
ASAM
Where: Client List > Activity List > Outcome Measures > ASAM
Complete the fields on the ASAM screen.
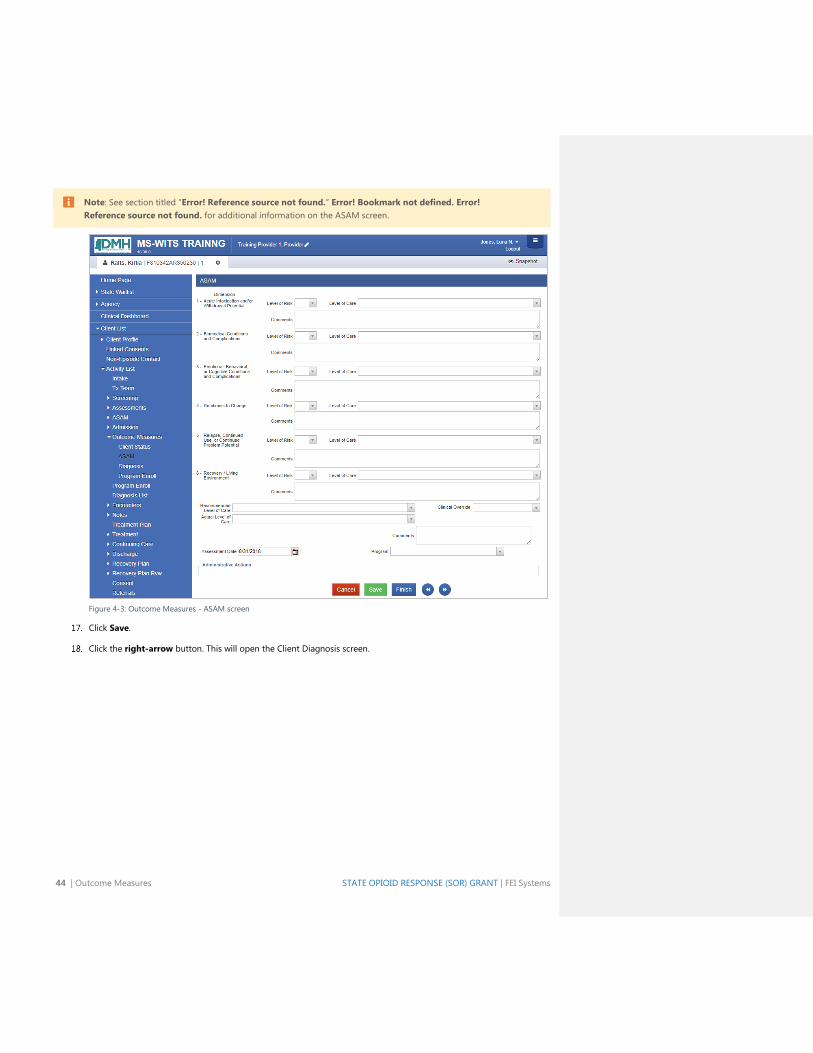
44 | Outcome Measures STATE OPIOID RESPONSE (SOR) GRANT | FEI Systems
Note: See section titled “Error! Reference source not found.” Error! Bookmark not defined. Error!
Reference source not found. for additional information on the ASAM screen.
Figure 4-3: Outcome Measures - ASAM screen
Click Save.
Click the right-arrow button. This will open the Client Diagnosis screen.
STATE OPIOID RESPONSE (SOR) GRANT | FEI Systems Initial Outcome Measures | 45
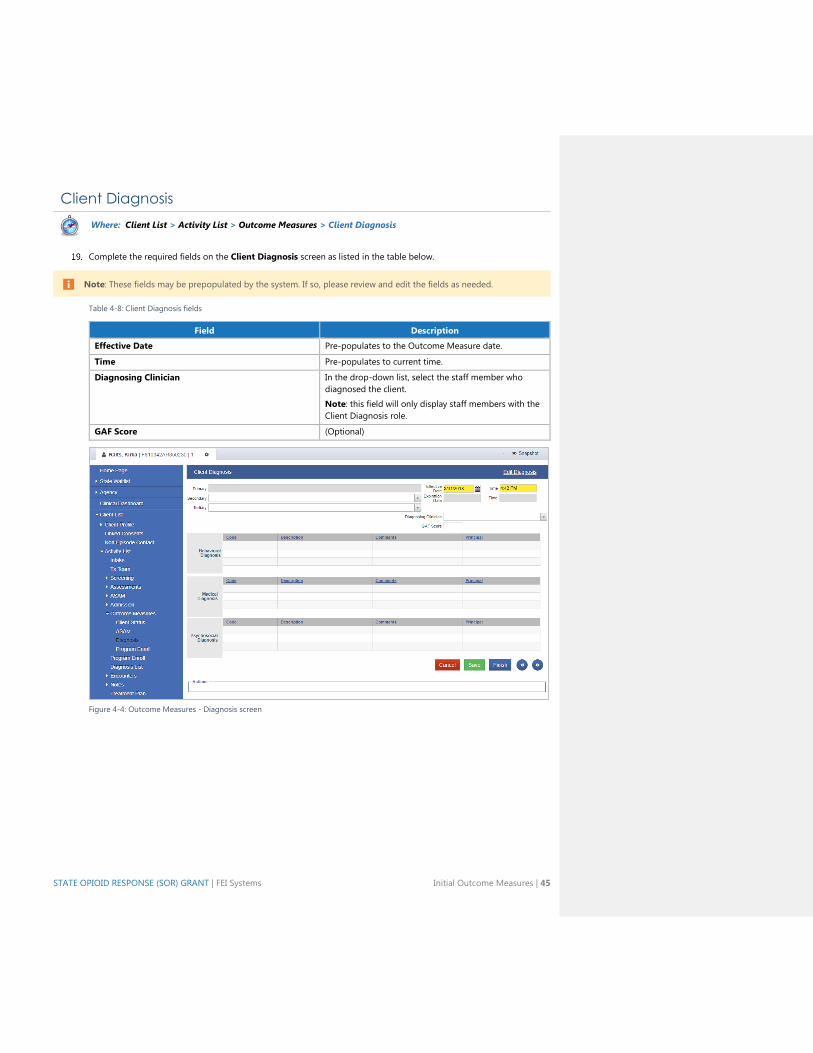
Client Diagnosis
Where: Client List > Activity List > Outcome Measures > Client Diagnosis
Complete the required fields on the Client Diagnosis screen as listed in the table below.
Note: These fields may be prepopulated by the system. If so, please review and edit the fields as needed.
Table 4-8: Client Diagnosis fields
Field Description
Effective Date Pre-populates to the Outcome Measure date.
Time Pre-populates to current time.
Diagnosing Clinician In the drop-down list, select the staff member who
diagnosed the client.
Note: this field will only display staff members with the
Client Diagnosis role.
GAF Score (Optional)
Figure 4-4: Outcome Measures - Diagnosis screen
46 | Outcome Measures STATE OPIOID RESPONSE (SOR) GRANT | FEI Systems
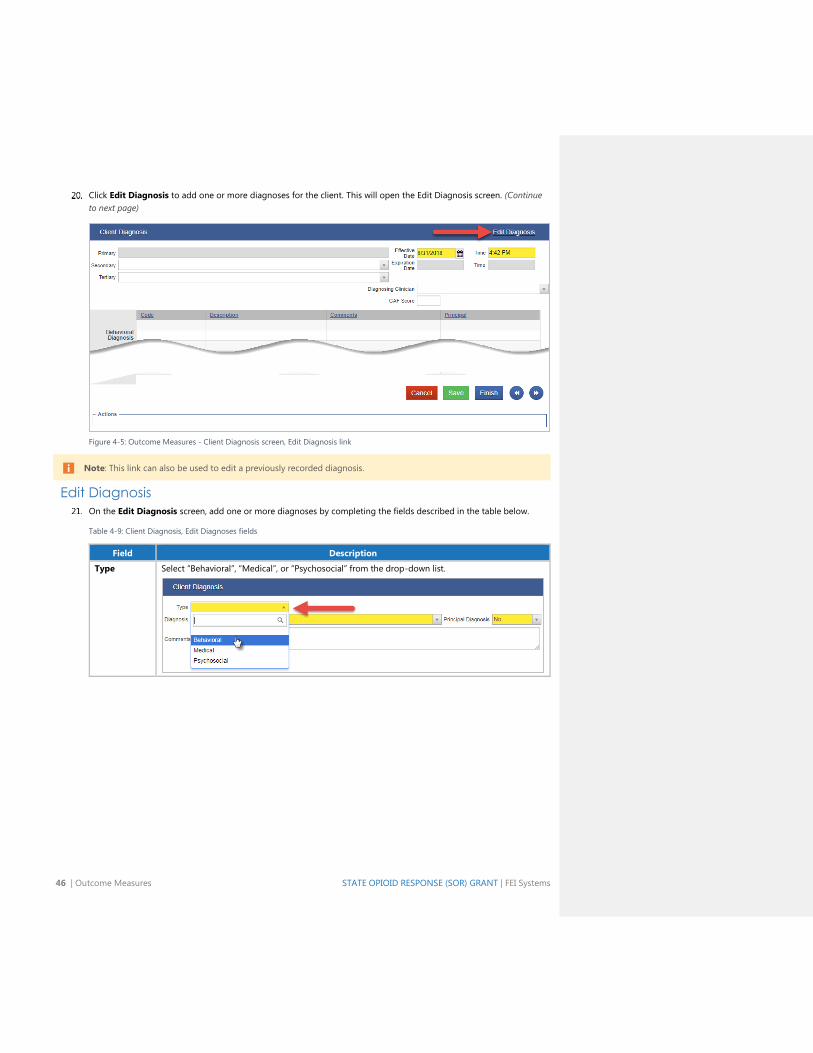
Click Edit Diagnosis to add one or more diagnoses for the client. This will open the Edit Diagnosis screen. (Continue
to next page)
Figure 4-5: Outcome Measures - Client Diagnosis screen, Edit Diagnosis link
Note: This link can also be used to edit a previously recorded diagnosis.
Edit Diagnosis
On the Edit Diagnosis screen, add one or more diagnoses by completing the fields described in the table below.
Table 4-9: Client Diagnosis, Edit Diagnoses fields
Field Description
Type Select “Behavioral”, “Medical”, or “Psychosocial” from the drop-down list.
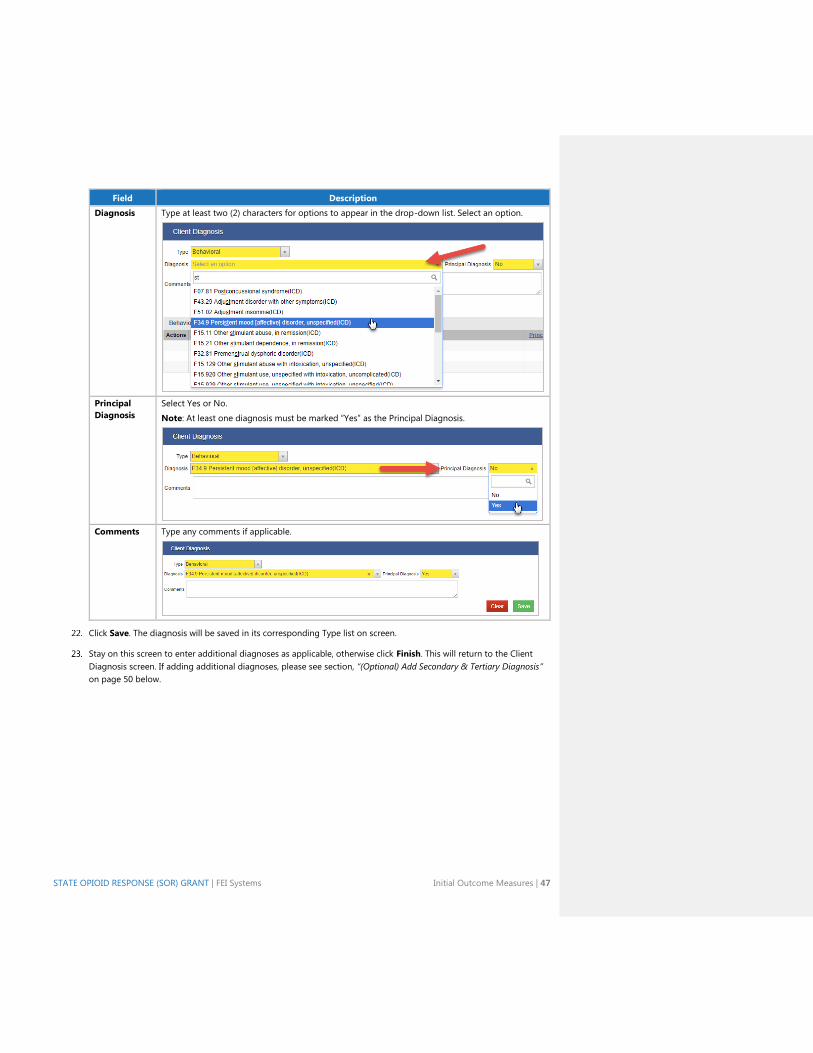
STATE OPIOID RESPONSE (SOR) GRANT | FEI Systems Initial Outcome Measures | 47
Field Description
Diagnosis Type at least two (2) characters for options to appear in the drop-down list. Select an option.
Principal
Diagnosis
Select Yes or No.
Note: At least one diagnosis must be marked “Yes” as the Principal Diagnosis.
Comments Type any comments if applicable.
Click Save. The diagnosis will be saved in its corresponding Type list on screen.
Stay on this screen to enter additional diagnoses as applicable, otherwise click Finish. This will return to the Client
Diagnosis screen. If adding additional diagnoses, please see section, “(Optional) Add Secondary & Tertiary Diagnosis”
on page 50 below.
48 | Outcome Measures STATE OPIOID RESPONSE (SOR) GRANT | FEI Systems
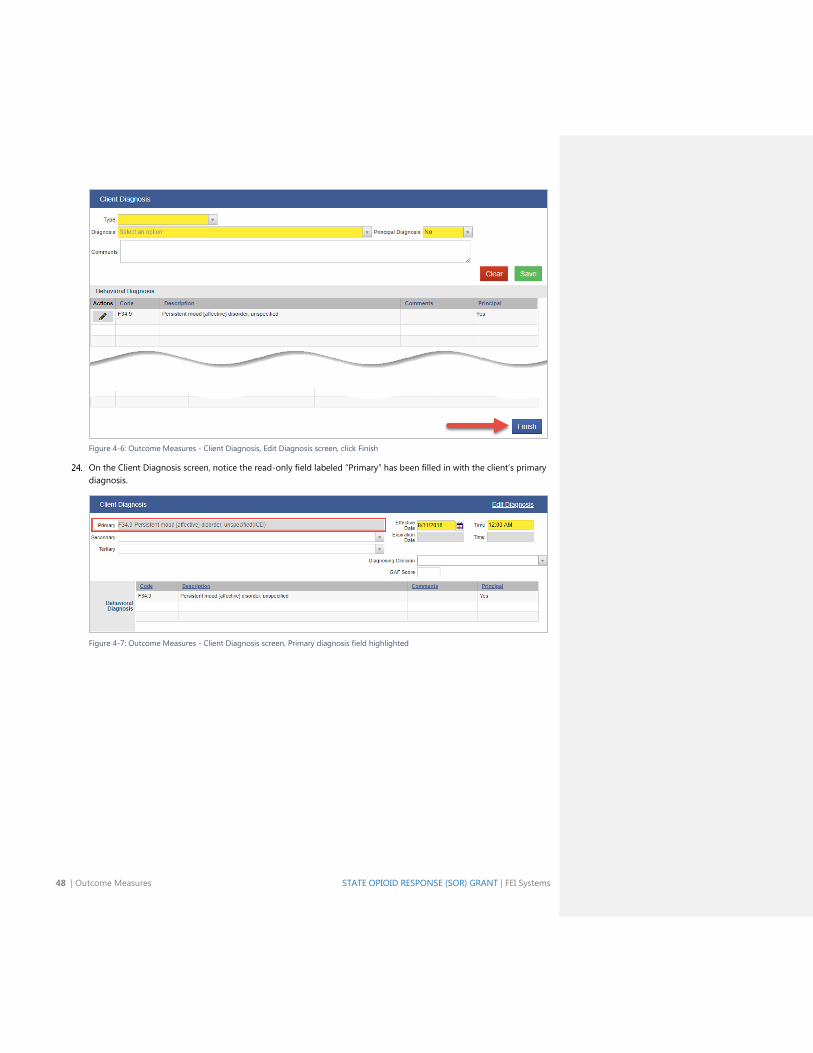
Figure 4-6: Outcome Measures - Client Diagnosis, Edit Diagnosis screen, click Finish
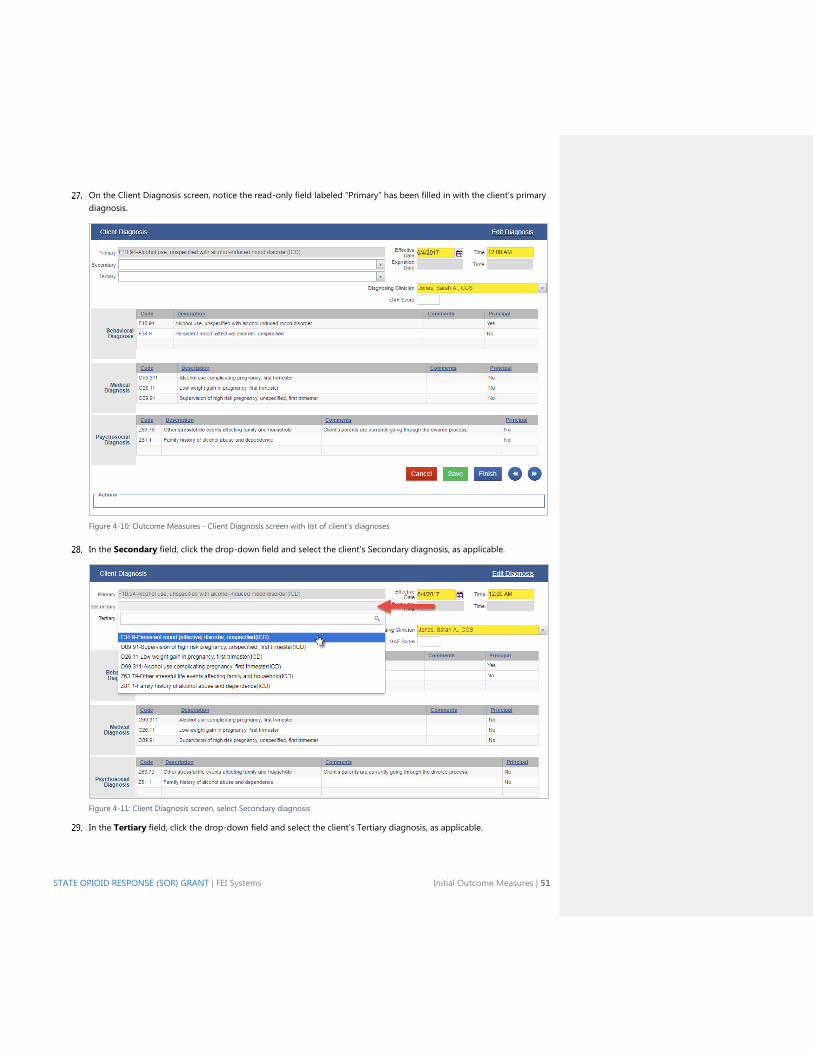
On the Client Diagnosis screen, notice the read-only field labeled “Primary” has been filled in with the client’s primary
diagnosis.
Figure 4-7: Outcome Measures - Client Diagnosis screen, Primary diagnosis field highlighted
STATE OPIOID RESPONSE (SOR) GRANT | FEI Systems Initial Outcome Measures | 49
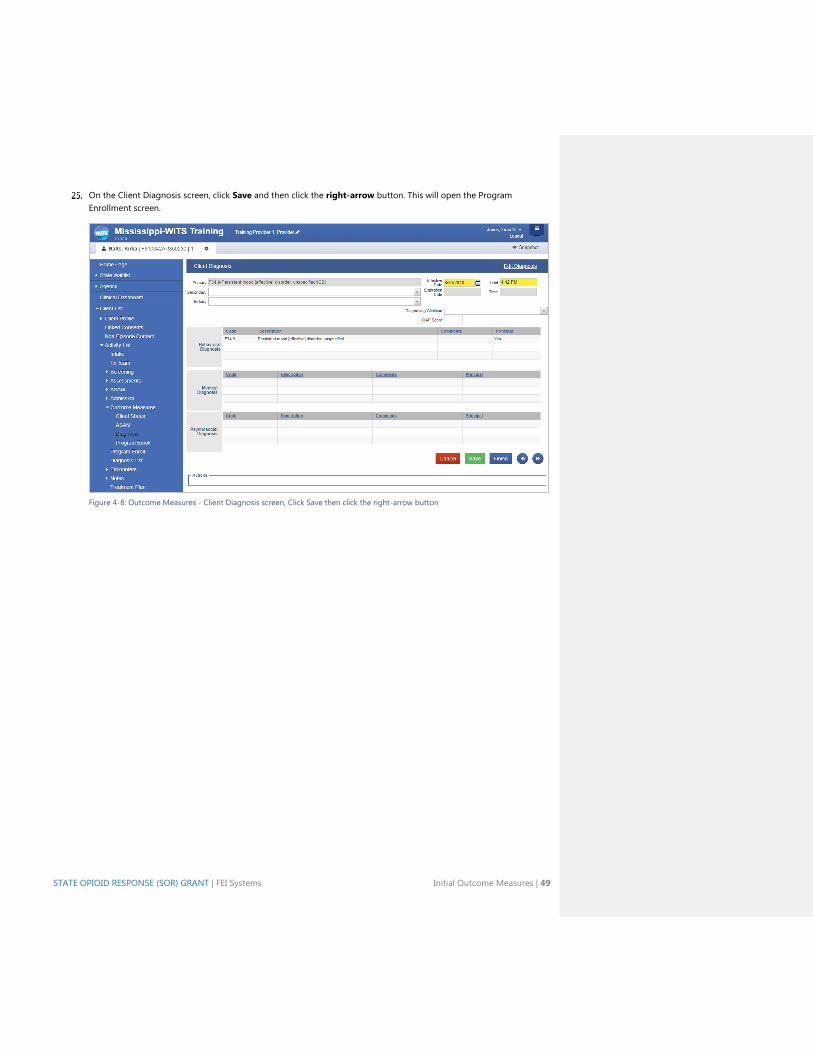
On the Client Diagnosis screen, click Save and then click the right-arrow button. This will open the Program
Enrollment screen.
Figure 4-8: Outcome Measures - Client Diagnosis screen, Click Save then click the right-arrow button
50 | Outcome Measures STATE OPIOID RESPONSE (SOR) GRANT | FEI Systems
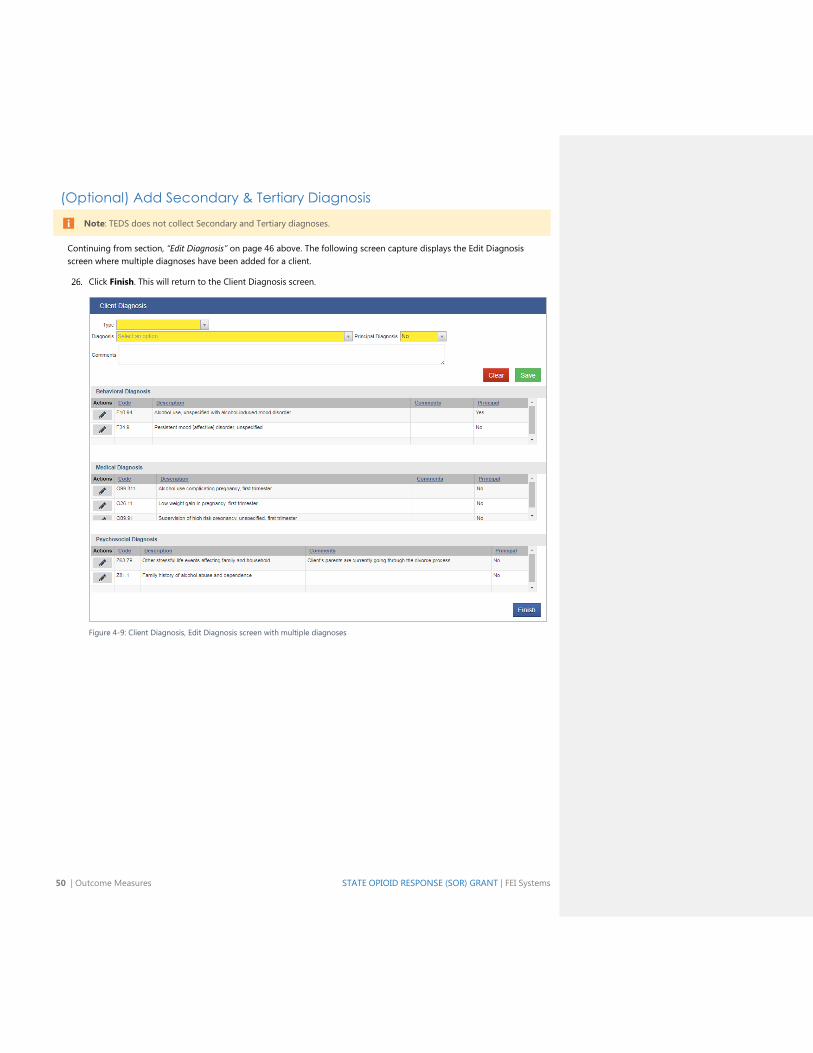
(Optional) Add Secondary & Tertiary Diagnosis
Note: TEDS does not collect Secondary and Tertiary diagnoses.
Continuing from section, “Edit Diagnosis” on page 46 above. The following screen capture displays the Edit Diagnosis
screen where multiple diagnoses have been added for a client.
Click Finish. This will return to the Client Diagnosis screen.
Figure 4-9: Client Diagnosis, Edit Diagnosis screen with multiple diagnoses
STATE OPIOID RESPONSE (SOR) GRANT | FEI Systems Initial Outcome Measures | 51
On the Client Diagnosis screen, notice the read-only field labeled “Primary” has been filled in with the client’s primary
diagnosis.
Figure 4-10: Outcome Measures - Client Diagnosis screen with list of client’s diagnoses
In the Secondary field, click the drop-down field and select the client’s Secondary diagnosis, as applicable.
Figure 4-11: Client Diagnosis screen, select Secondary diagnosis
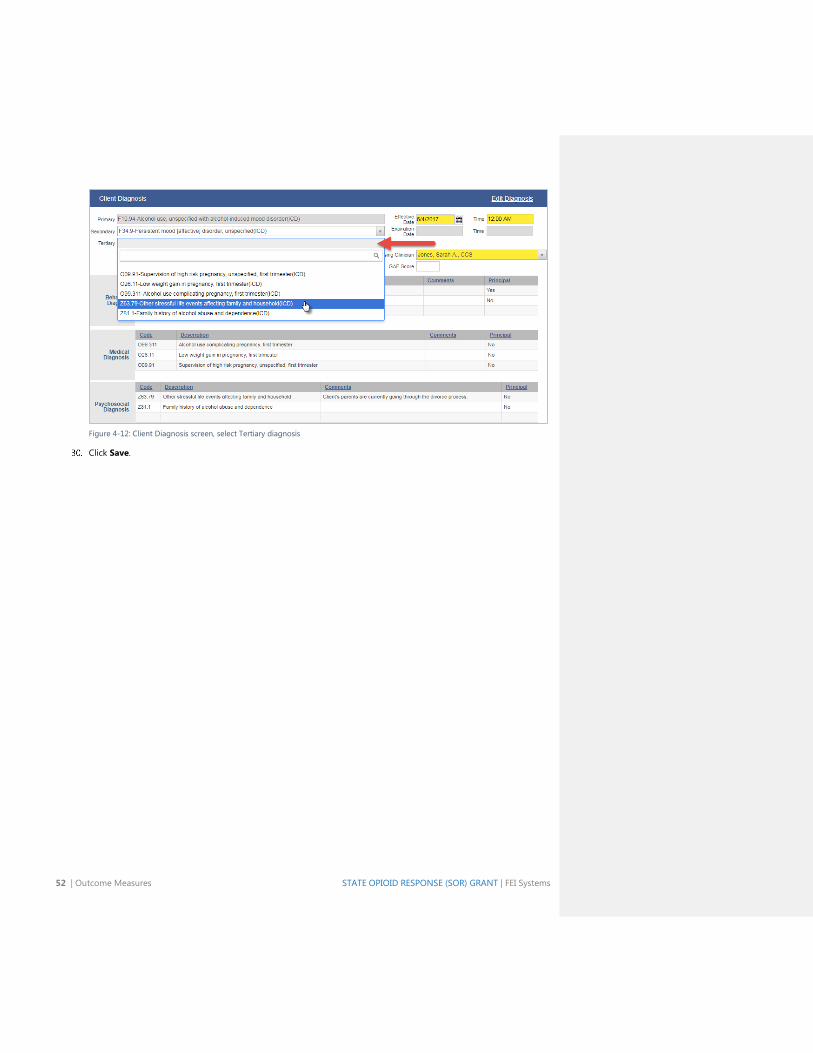
In the Tertiary field, click the drop-down field and select the client’s Tertiary diagnosis, as applicable.
52 | Outcome Measures STATE OPIOID RESPONSE (SOR) GRANT | FEI Systems
Figure 4-12: Client Diagnosis screen, select Tertiary diagnosis
Click Save.

STATE OPIOID RESPONSE (SOR) GRANT | FEI Systems Initial Outcome Measures | 53
Finalize Outcome Measure
Where: Client List > Activity List > Outcome Measures > Client Status
After completing the required information on each screen within the Outcome Measures section, this record can be
finalized. When the Outcome Measures is finalized, the record becomes read-only.
An Initial Outcome Measure must be completed and finalized within fourteen (14) days of enrolling and
disenrolling a client from a TEDS treatment program. This requirement is only applicable to programs that
report TEDS data. Case Management programs do not have this requirement for program
enrollment/disenrollment.
On the Outcome Measures – Client Status screen, in the Administrative Actions box, click Finalize.
On the left menu, click Program Enroll. Continue to the next section.
54 | Outcome Measures STATE OPIOID RESPONSE (SOR) GRANT | FEI Systems
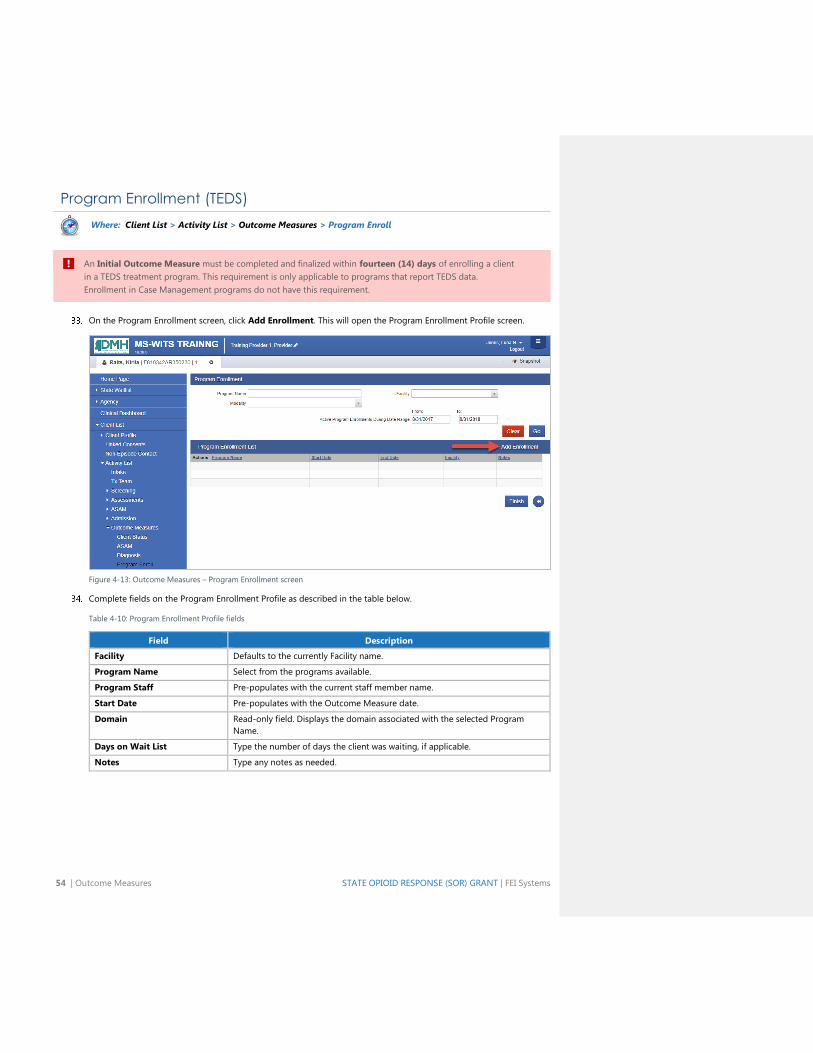
Program Enrollment (TEDS)
Where: Client List > Activity List > Outcome Measures > Program Enroll
An Initial Outcome Measure must be completed and finalized within fourteen (14) days of enrolling a client
in a TEDS treatment program. This requirement is only applicable to programs that report TEDS data.
Enrollment in Case Management programs do not have this requirement.
On the Program Enrollment screen, click Add Enrollment. This will open the Program Enrollment Profile screen.
Figure 4-13: Outcome Measures – Program Enrollment screen
Complete fields on the Program Enrollment Profile as described in the table below.
Table 4-10: Program Enrollment Profile fields
Field Description
Facility Defaults to the currently Facility name.
Program Name Select from the programs available.
Program Staff Pre-populates with the current staff member name.
Start Date Pre-populates with the Outcome Measure date.
Domain Read-only field. Displays the domain associated with the selected Program
Name.
Days on Wait List Type the number of days the client was waiting, if applicable.
Notes Type any notes as needed.
STATE OPIOID RESPONSE (SOR) GRANT | FEI Systems Initial Outcome Measures | 55
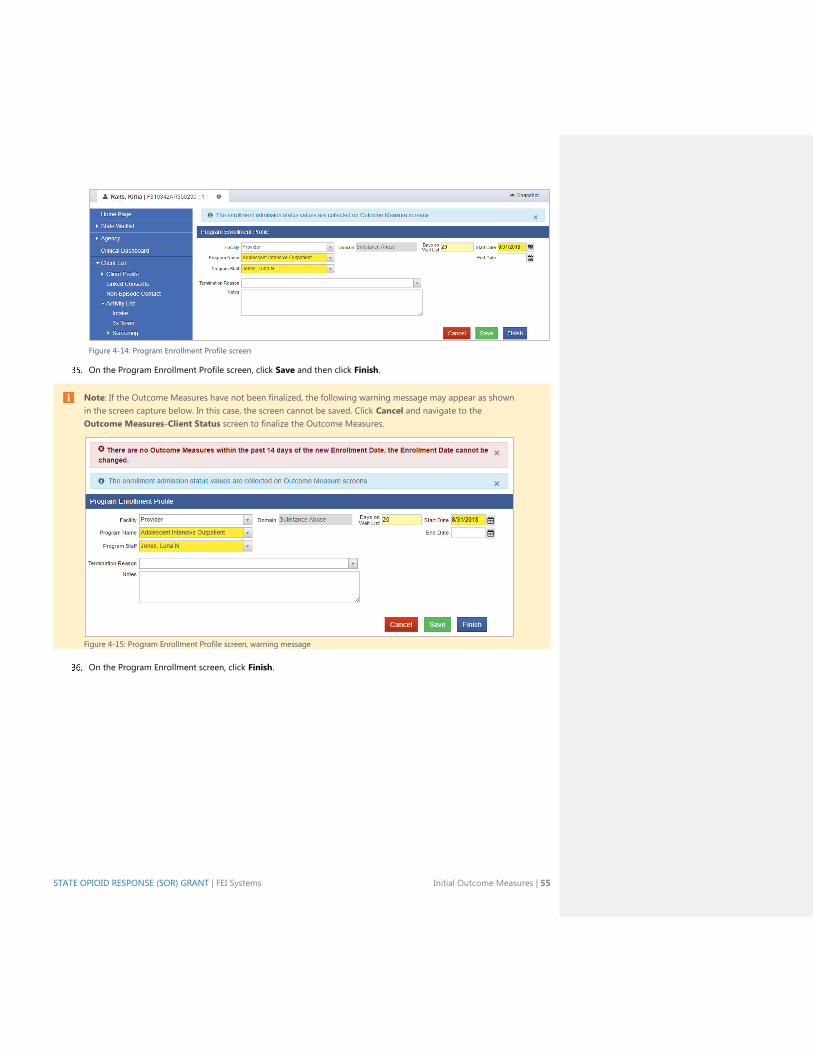
Figure 4-14: Program Enrollment Profile screen
On the Program Enrollment Profile screen, click Save and then click Finish.
Note: If the Outcome Measures have not been finalized, the following warning message may appear as shown
in the screen capture below. In this case, the screen cannot be saved. Click Cancel and navigate to the
Outcome Measures-Client Status screen to finalize the Outcome Measures.
Figure 4-15: Program Enrollment Profile screen, warning message
On the Program Enrollment screen, click Finish.
56 | Outcome Measures STATE OPIOID RESPONSE (SOR) GRANT | FEI Systems
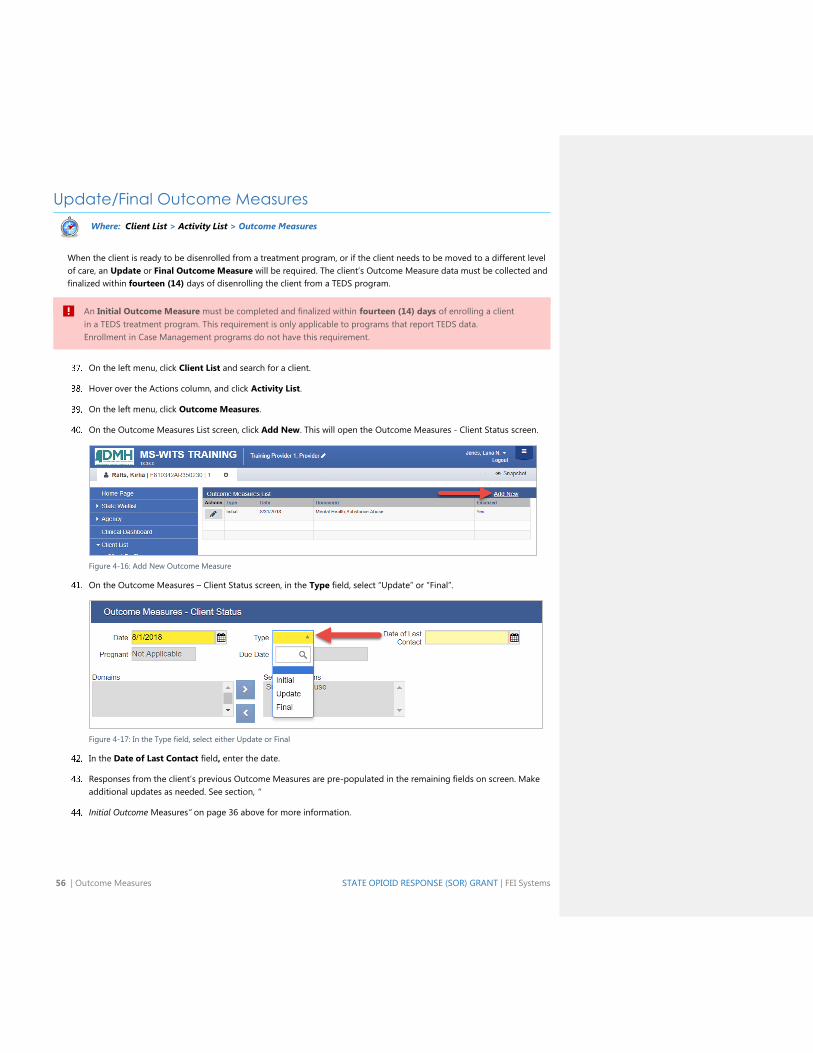
Update/Final Outcome Measures
Where: Client List > Activity List > Outcome Measures
When the client is ready to be disenrolled from a treatment program, or if the client needs to be moved to a different level
of care, an Update or Final Outcome Measure will be required. The client’s Outcome Measure data must be collected and
finalized within fourteen (14) days of disenrolling the client from a TEDS program.
An Initial Outcome Measure must be completed and finalized within fourteen (14) days of enrolling a client
in a TEDS treatment program. This requirement is only applicable to programs that report TEDS data.
Enrollment in Case Management programs do not have this requirement.
On the left menu, click Client List and search for a client.
Hover over the Actions column, and click Activity List.
On the left menu, click Outcome Measures.
On the Outcome Measures List screen, click Add New. This will open the Outcome Measures - Client Status screen.
Figure 4-16: Add New Outcome Measure
On the Outcome Measures – Client Status screen, in the Type field, select “Update” or “Final”.
Figure 4-17: In the Type field, select either Update or Final
In the Date of Last Contact field, enter the date.
Responses from the client’s previous Outcome Measures are pre-populated in the remaining fields on screen. Make
additional updates as needed. See section, “
Initial Outcome Measures” on page 36 above for more information.

STATE OPIOID RESPONSE (SOR) GRANT | FEI Systems Create Encounter Notes | 57
Part 5: Encounters
Create Encounter Notes
Where: Client List > Activity List > Encounters
On the left menu, click Client List and search for a client.
Hover over the Actions column, and click Activity List.
On the left menu, click Encounters. This will display the Encounter Search/List screen.
To view previous encounters, complete the search fields and click Go.
To create a new encounter, click Add Encounter.
Figure 5-2: Encounter screen, Add Encounter
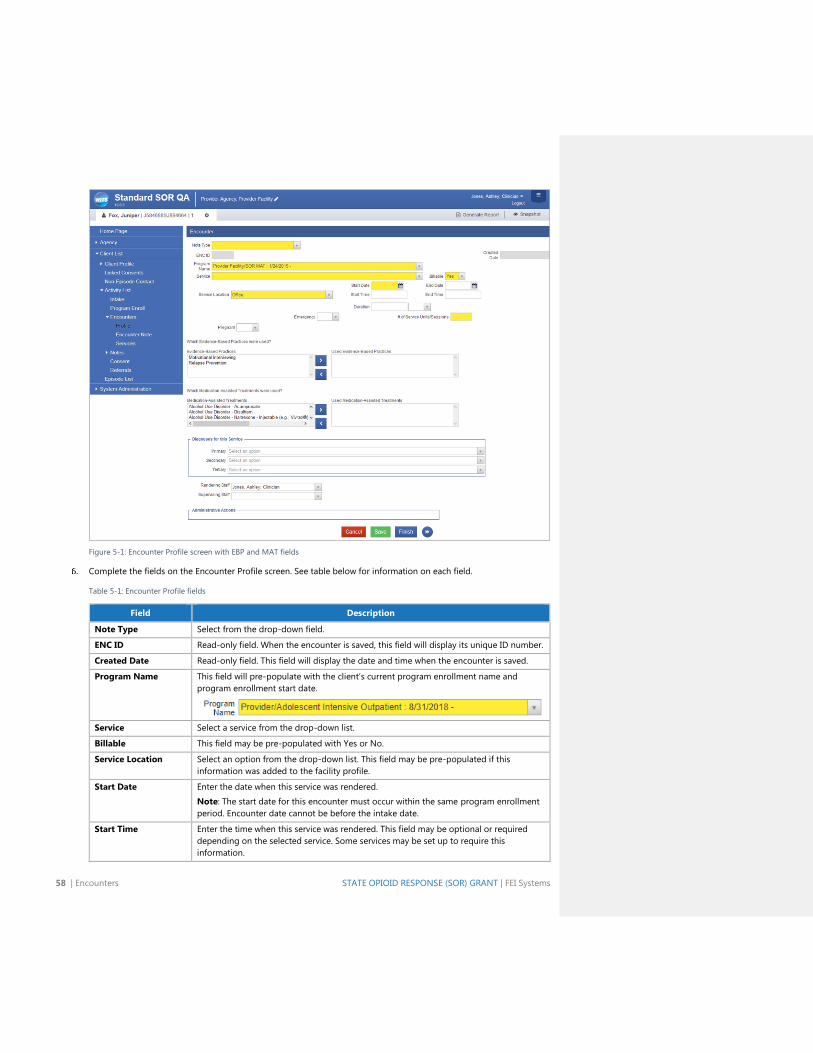
58 | Encounters STATE OPIOID RESPONSE (SOR) GRANT | FEI Systems
Figure 5-1: Encounter Profile screen with EBP and MAT fields
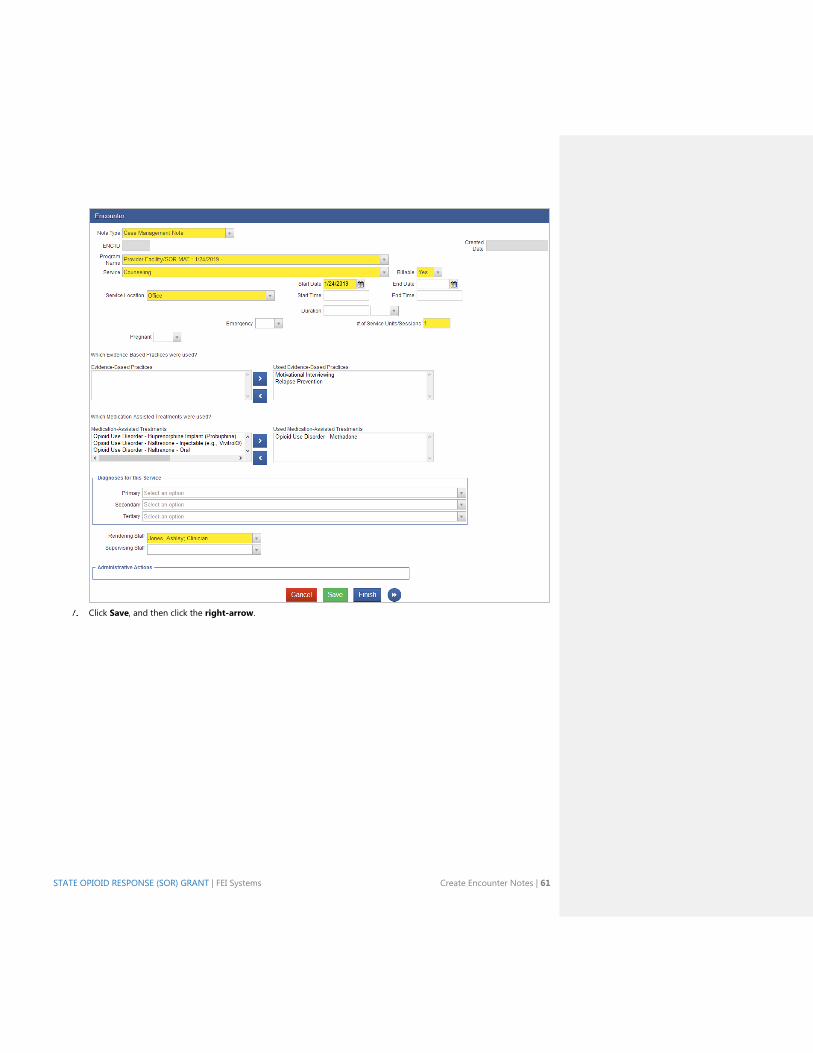
Complete the fields on the Encounter Profile screen. See table below for information on each field.
Table 5-1: Encounter Profile fields
Field Description
Note Type Select from the drop-down field.
ENC ID Read-only field. When the encounter is saved, this field will display its unique ID number.
Created Date Read-only field. This field will display the date and time when the encounter is saved.
Program Name This field will pre-populate with the client’s current program enrollment name and
program enrollment start date.
Service Select a service from the drop-down list.
Billable This field may be pre-populated with Yes or No.
Service Location Select an option from the drop-down list. This field may be pre-populated if this
information was added to the facility profile.
Start Date Enter the date when this service was rendered.
Note: The start date for this encounter must occur within the same program enrollment
period. Encounter date cannot be before the intake date.
Start Time Enter the time when this service was rendered. This field may be optional or required
depending on the selected service. Some services may be set up to require this
information.
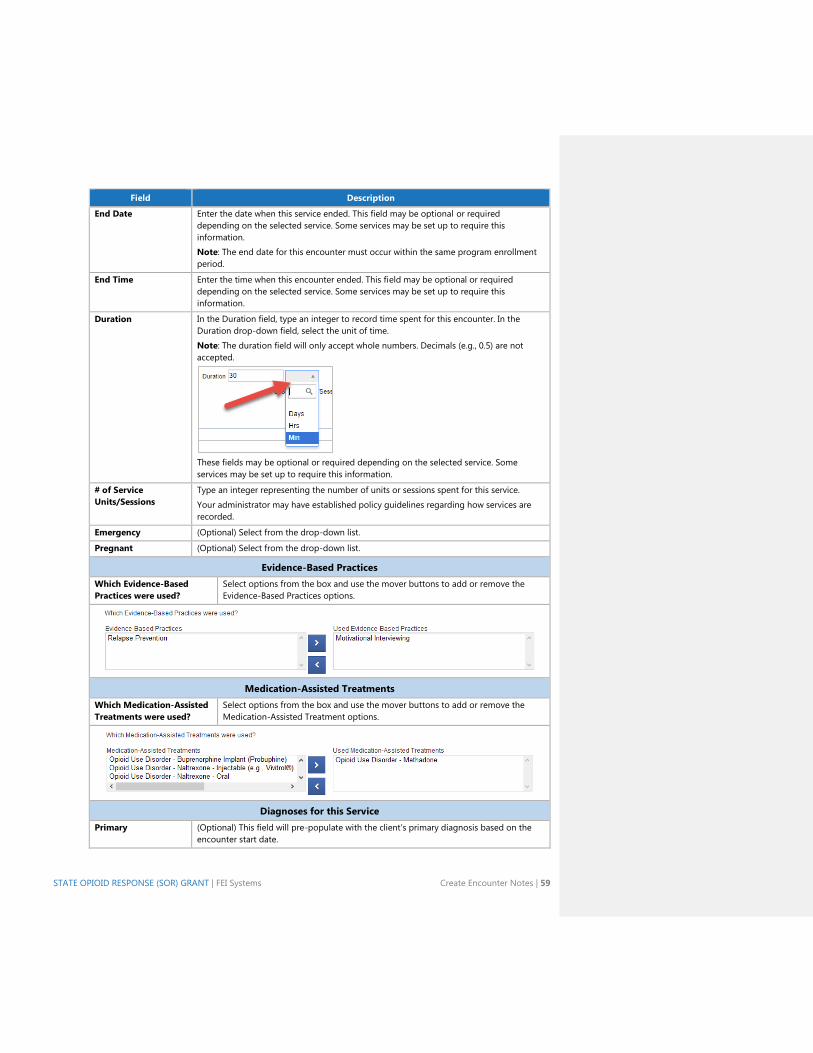
STATE OPIOID RESPONSE (SOR) GRANT | FEI Systems Create Encounter Notes | 59
Field Description
End Date Enter the date when this service ended. This field may be optional or required
depending on the selected service. Some services may be set up to require this
information.
Note: The end date for this encounter must occur within the same program enrollment
period.
End Time Enter the time when this encounter ended. This field may be optional or required
depending on the selected service. Some services may be set up to require this
information.
Duration In the Duration field, type an integer to record time spent for this encounter. In the
Duration drop-down field, select the unit of time.
Note: The duration field will only accept whole numbers. Decimals (e.g., 0.5) are not
accepted.
These fields may be optional or required depending on the selected service. Some
services may be set up to require this information.
# of Service
Units/Sessions
Type an integer representing the number of units or sessions spent for this service.
Your administrator may have established policy guidelines regarding how services are
recorded.
Emergency (Optional) Select from the drop-down list.
Pregnant (Optional) Select from the drop-down list.
Evidence-Based Practices
Which Evidence-Based
Practices were used?
Select options from the box and use the mover buttons to add or remove the
Evidence-Based Practices options.
Medication-Assisted Treatments
Which Medication-Assisted
Treatments were used?
Select options from the box and use the mover buttons to add or remove the
Medication-Assisted Treatment options.
Diagnoses for this Service
Primary (Optional) This field will pre-populate with the client’s primary diagnosis based on the
encounter start date.
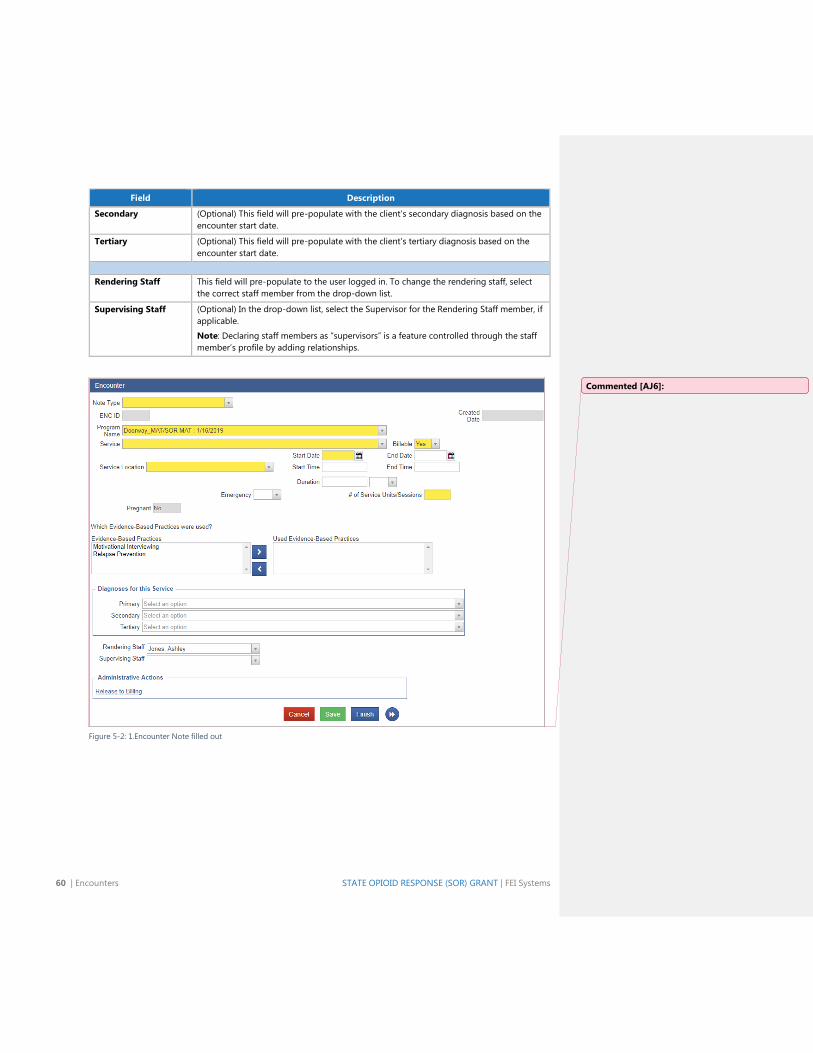
60 | Encounters STATE OPIOID RESPONSE (SOR) GRANT | FEI Systems
Field Description
Secondary (Optional) This field will pre-populate with the client’s secondary diagnosis based on the
encounter start date.
Tertiary (Optional) This field will pre-populate with the client’s tertiary diagnosis based on the
encounter start date.
Rendering Staff This field will pre-populate to the user logged in. To change the rendering staff, select
the correct staff member from the drop-down list.
Supervising Staff (Optional) In the drop-down list, select the Supervisor for the Rendering Staff member, if
applicable.
Note: Declaring staff members as “supervisors” is a feature controlled through the staff
member’s profile by adding relationships.
Figure 5-2: 1.Encounter Note filled out
Commented [AJ6]:
STATE OPIOID RESPONSE (SOR) GRANT | FEI Systems Create Encounter Notes | 61
Click Save, and then click the right-arrow.
62 | Encounters STATE OPIOID RESPONSE (SOR) GRANT | FEI Systems
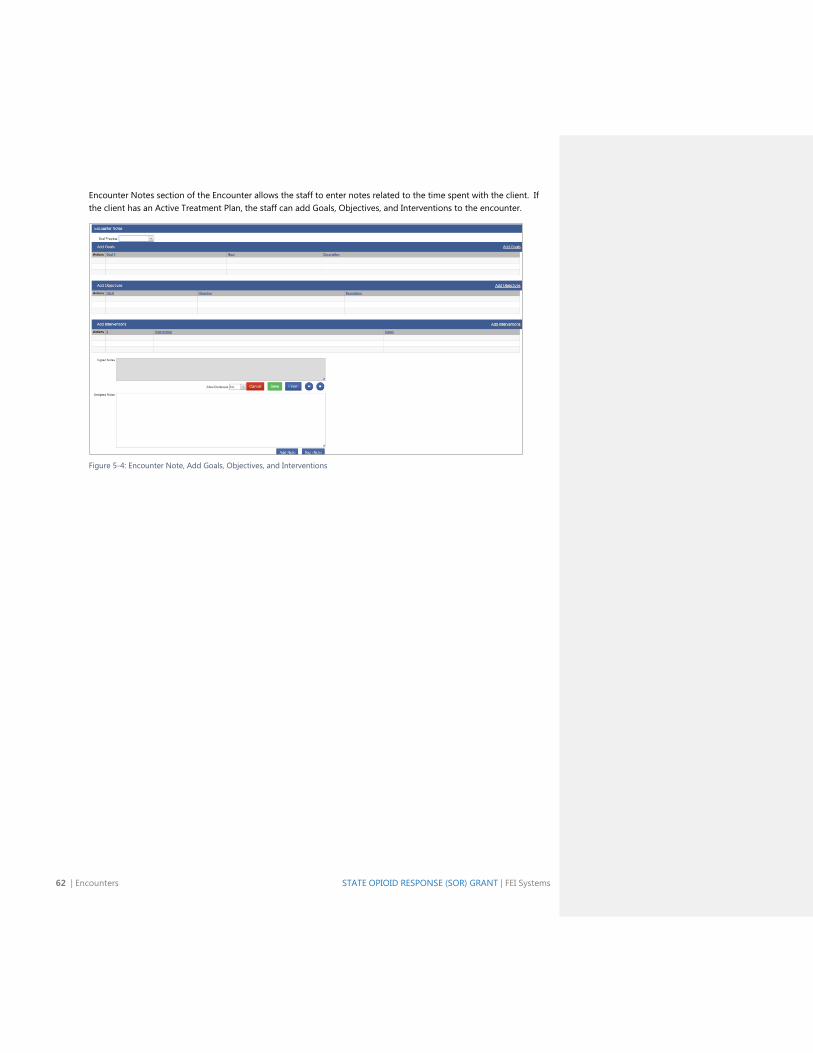
Encounter Notes section of the Encounter allows the staff to enter notes related to the time spent with the client. If
the client has an Active Treatment Plan, the staff can add Goals, Objectives, and Interventions to the encounter.
Figure 5-4: Encounter Note, Add Goals, Objectives, and Interventions
STATE OPIOID RESPONSE (SOR) GRANT | FEI Systems Create Encounter Notes | 63
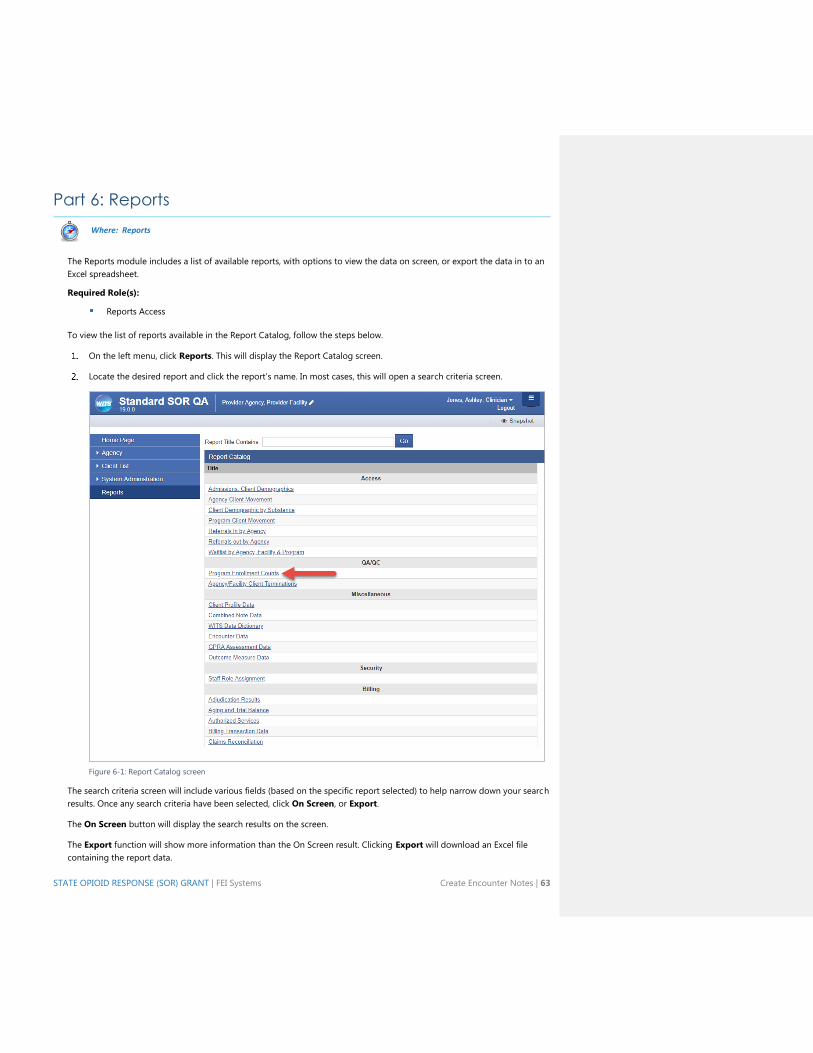
Part 6: Reports
Where: Reports
The Reports module includes a list of available reports, with options to view the data on screen, or export the data in to an
Excel spreadsheet.
Required Role(s):
Reports Access
To view the list of reports available in the Report Catalog, follow the steps below.
On the left menu, click Reports. This will display the Report Catalog screen.
Locate the desired report and click the report’s name. In most cases, this will open a search criteria screen.
Figure 6-1: Report Catalog screen
The search criteria screen will include various fields (based on the specific report selected) to help narrow down your search
results. Once any search criteria have been selected, click On Screen, or Export.
The On Screen button will display the search results on the screen.
The Export function will show more information than the On Screen result. Clicking Export will download an Excel file
containing the report data.
64 | Reports STATE OPIOID RESPONSE (SOR) GRANT | FEI Systems
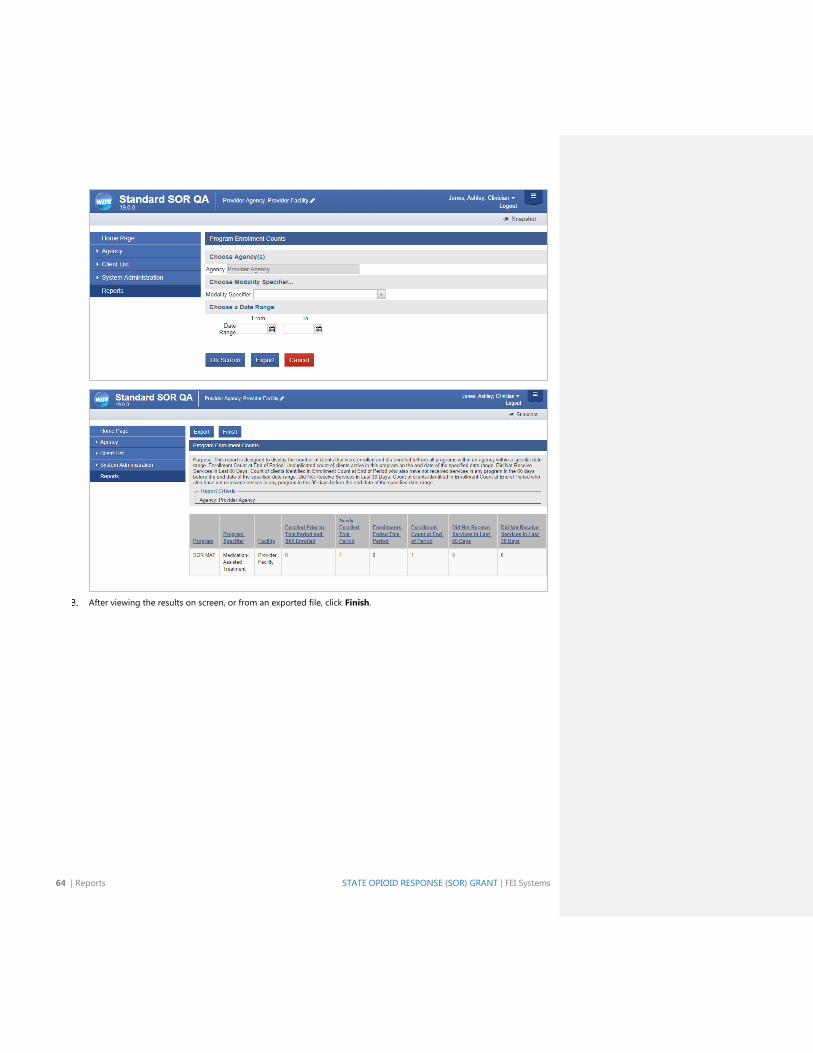
After viewing the results on screen, or from an exported file, click Finish.
STATE OPIOID RESPONSE (SOR) GRANT | FEI Systems Create Encounter Notes | 65
Part 7: Overdose Reversal Kit
Where: Agency > Overdose Reversal Kit
Required Role(s):
Overdose Reversal Kits Management (Full Access)
Overdose Reversal Kits Management (Read Only)
As part of the SOR reporting requirements, grantees have to provide on a quarterly basis the number of naloxone kits
purchased and distributed with the SOR funds. This new module has been created to track three (3) types of events:
Event Types:
Naloxone Purchase
Naloxone Distribution
Naloxone Administration
Note: Please refer to the WITS Basics User guide, Part 1: System Icons for information on the screen
conventions for the Overdose Reversal screens.
66 | Overdose Reversal Kit STATE OPIOID RESPONSE (SOR) GRANT | FEI Systems
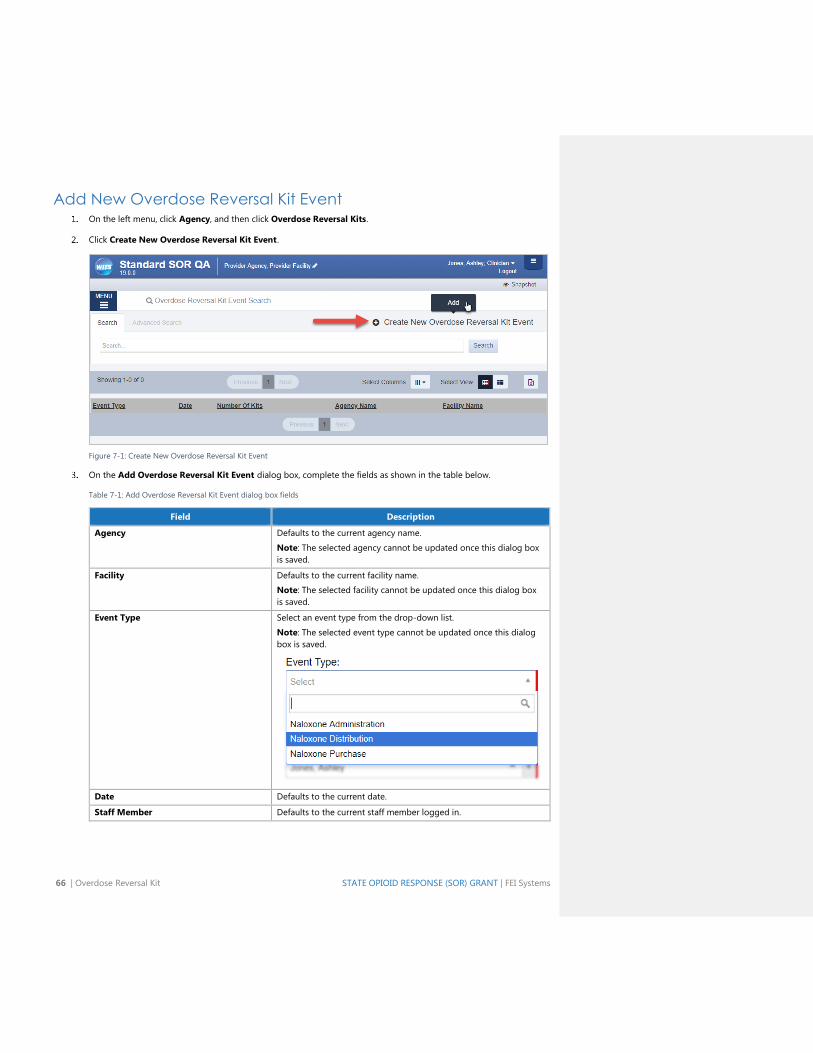
Add New Overdose Reversal Kit Event On the left menu, click Agency, and then click Overdose Reversal Kits.
Click Create New Overdose Reversal Kit Event.
Figure 7-1: Create New Overdose Reversal Kit Event
On the Add Overdose Reversal Kit Event dialog box, complete the fields as shown in the table below.
Table 7-1: Add Overdose Reversal Kit Event dialog box fields
Field Description
Agency Defaults to the current agency name.
Note: The selected agency cannot be updated once this dialog box
is saved.
Facility Defaults to the current facility name.
Note: The selected facility cannot be updated once this dialog box
is saved.
Event Type Select an event type from the drop-down list.
Note: The selected event type cannot be updated once this dialog
box is saved.
Date Defaults to the current date.
Staff Member Defaults to the current staff member logged in.
STATE OPIOID RESPONSE (SOR) GRANT | FEI Systems Add New Overdose Reversal Kit Event | 67
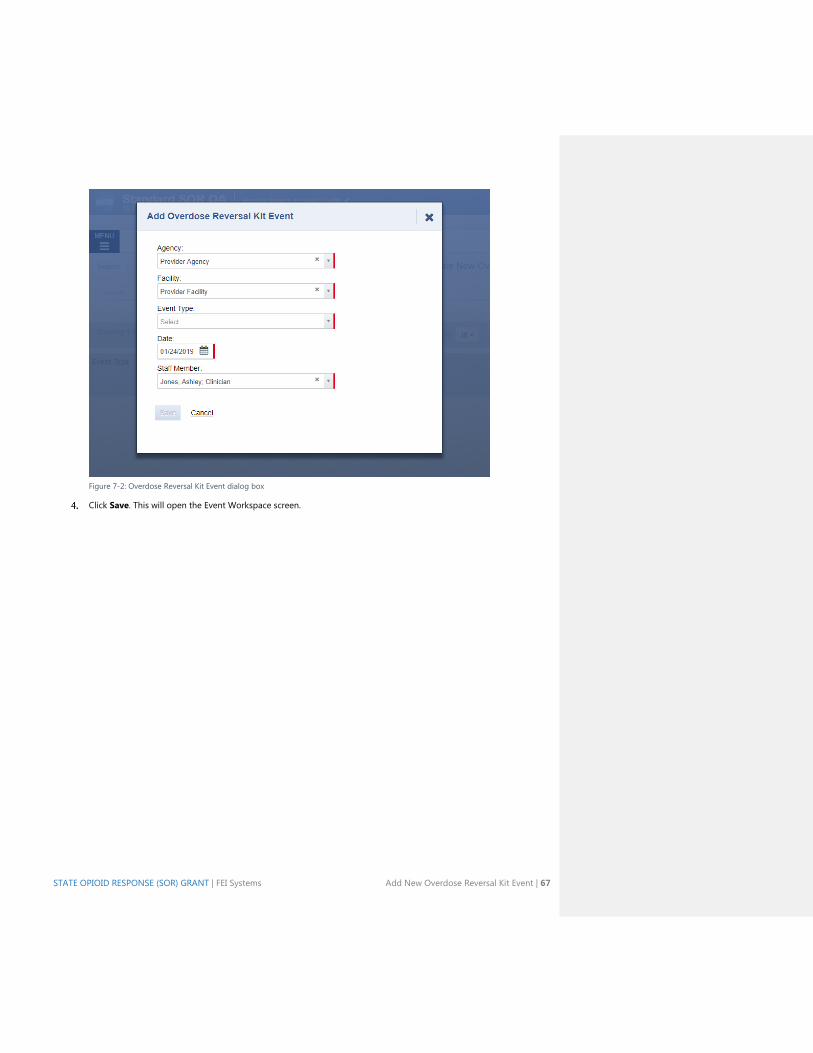
Figure 7-2: Overdose Reversal Kit Event dialog box
Click Save. This will open the Event Workspace screen.
68 | Overdose Reversal Kit STATE OPIOID RESPONSE (SOR) GRANT | FEI Systems
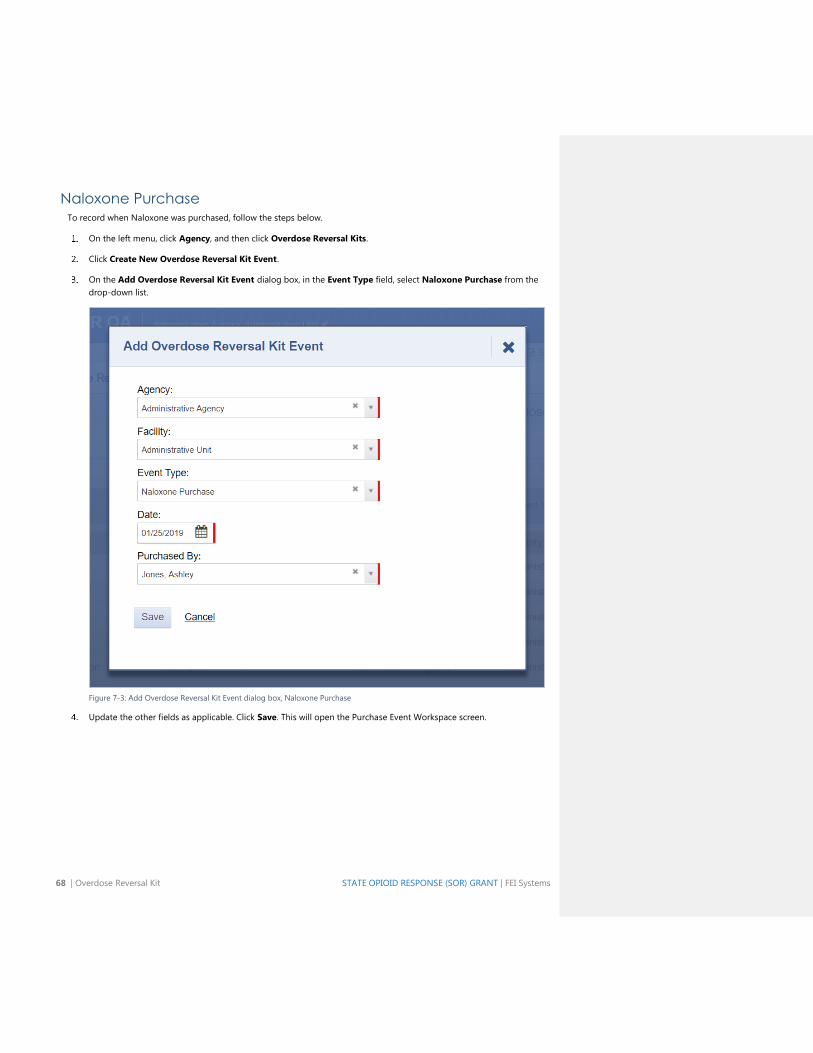
Naloxone Purchase To record when Naloxone was purchased, follow the steps below.
On the left menu, click Agency, and then click Overdose Reversal Kits.
Click Create New Overdose Reversal Kit Event.
On the Add Overdose Reversal Kit Event dialog box, in the Event Type field, select Naloxone Purchase from the
drop-down list.
Figure 7-3: Add Overdose Reversal Kit Event dialog box, Naloxone Purchase
Update the other fields as applicable. Click Save. This will open the Purchase Event Workspace screen.

STATE OPIOID RESPONSE (SOR) GRANT | FEI Systems Add New Overdose Reversal Kit Event | 69
Panel: Event
On the Purchase Event Workspace screen, in the Event panel, click the pencil icon to edit the event information.
Figure 7-4: Purchase Event, edit Event panel
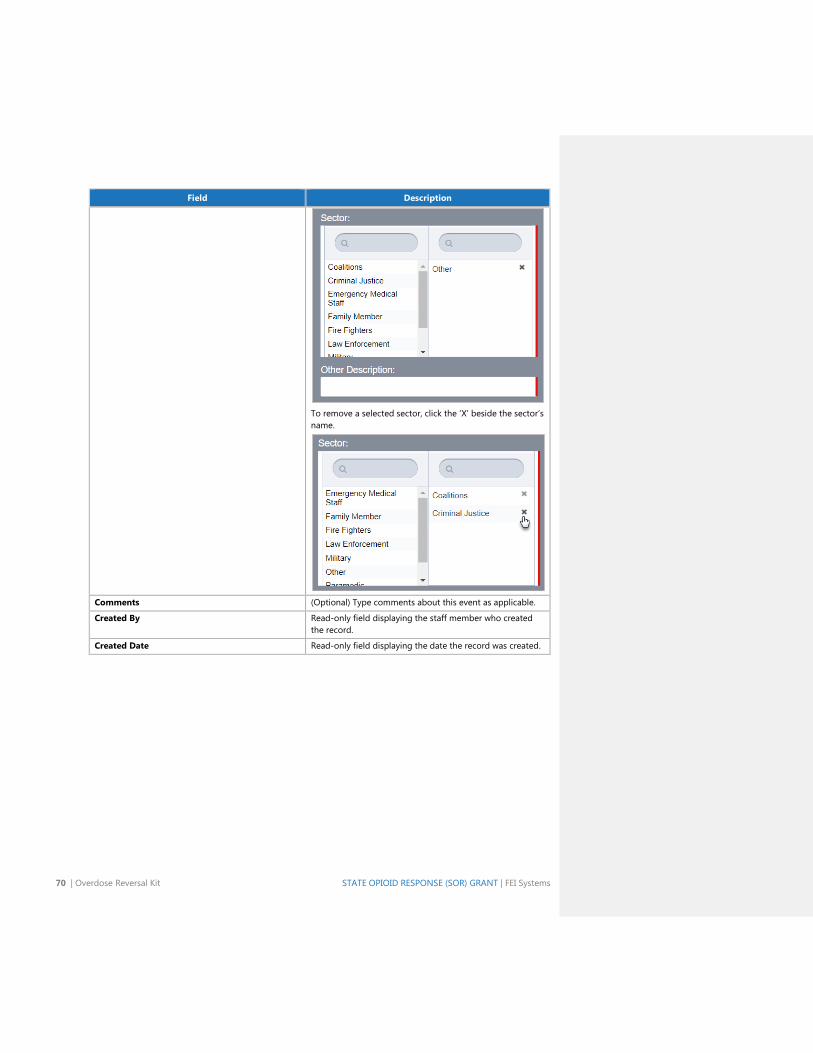
In the Event panel, update the fields as shown in the table below.
Table 7-2: Purchase Event fields
Field Description
Agency Read-only field.
Facility Read-only field.
Event Type Read-only field displaying Naloxone Purchase.
Date Update the date as applicable.
Purchased By Update the name as applicable.
Funding Source (Optional) Select the appropriate value from the drop-
down list. SOR may be the funding source paying for this
event.
Sector Select one or more sectors from the left box by clicking the
name of each sector.
If “Other” is selected, complete the required field, Other
Description.
70 | Overdose Reversal Kit STATE OPIOID RESPONSE (SOR) GRANT | FEI Systems
Field Description
To remove a selected sector, click the ‘X’ beside the sector’s
name.
Comments (Optional) Type comments about this event as applicable.
Created By Read-only field displaying the staff member who created
the record.
Created Date Read-only field displaying the date the record was created.

STATE OPIOID RESPONSE (SOR) GRANT | FEI Systems Add New Overdose Reversal Kit Event | 71
72 | Overdose Reversal Kit STATE OPIOID RESPONSE (SOR) GRANT | FEI Systems
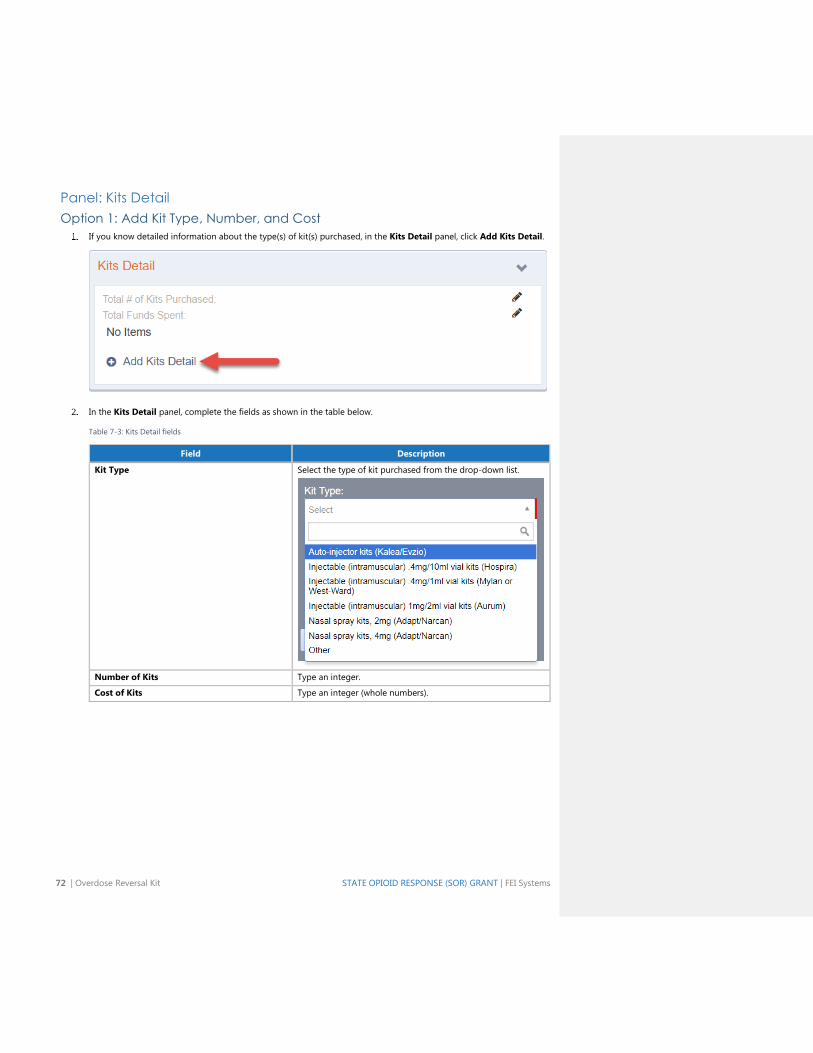
Panel: Kits Detail
Option 1: Add Kit Type, Number, and Cost
If you know detailed information about the type(s) of kit(s) purchased, in the Kits Detail panel, click Add Kits Detail.
In the Kits Detail panel, complete the fields as shown in the table below.
Table 7-3: Kits Detail fields
Field Description
Kit Type Select the type of kit purchased from the drop-down list.
Number of Kits Type an integer.
Cost of Kits Type an integer (whole numbers).
STATE OPIOID RESPONSE (SOR) GRANT | FEI Systems Add New Overdose Reversal Kit Event | 73
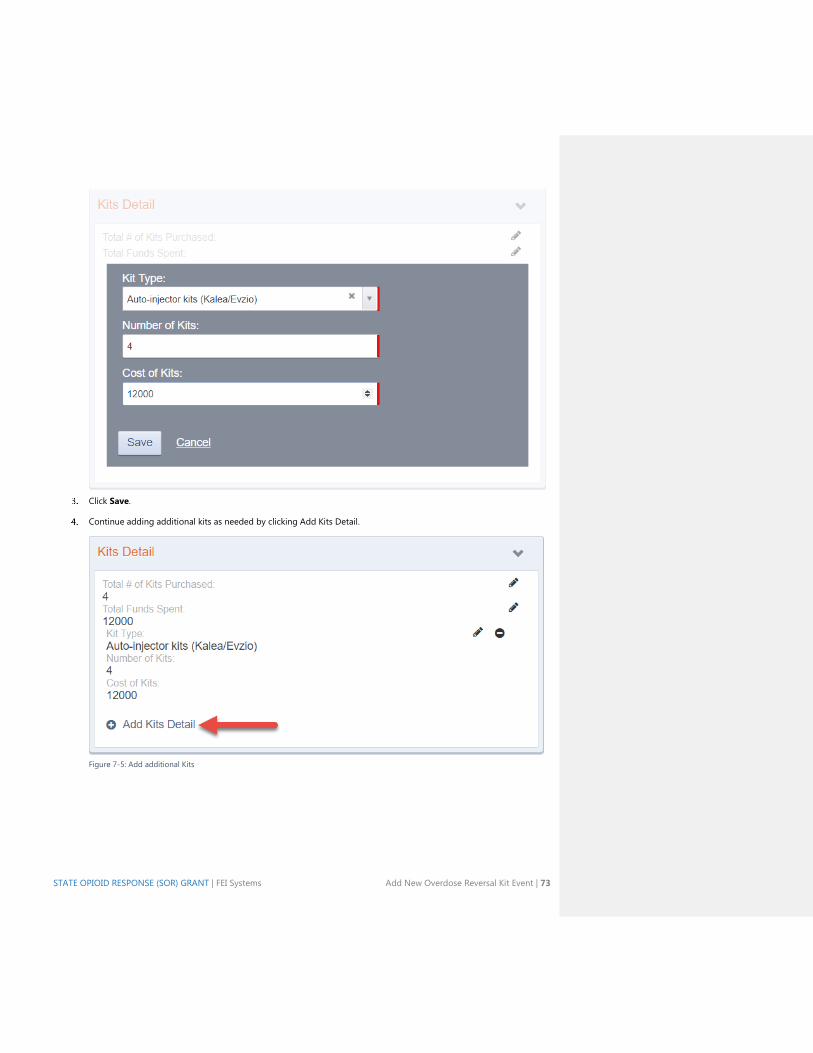
Click Save.
Continue adding additional kits as needed by clicking Add Kits Detail.
Figure 7-5: Add additional Kits
74 | Overdose Reversal Kit STATE OPIOID RESPONSE (SOR) GRANT | FEI Systems
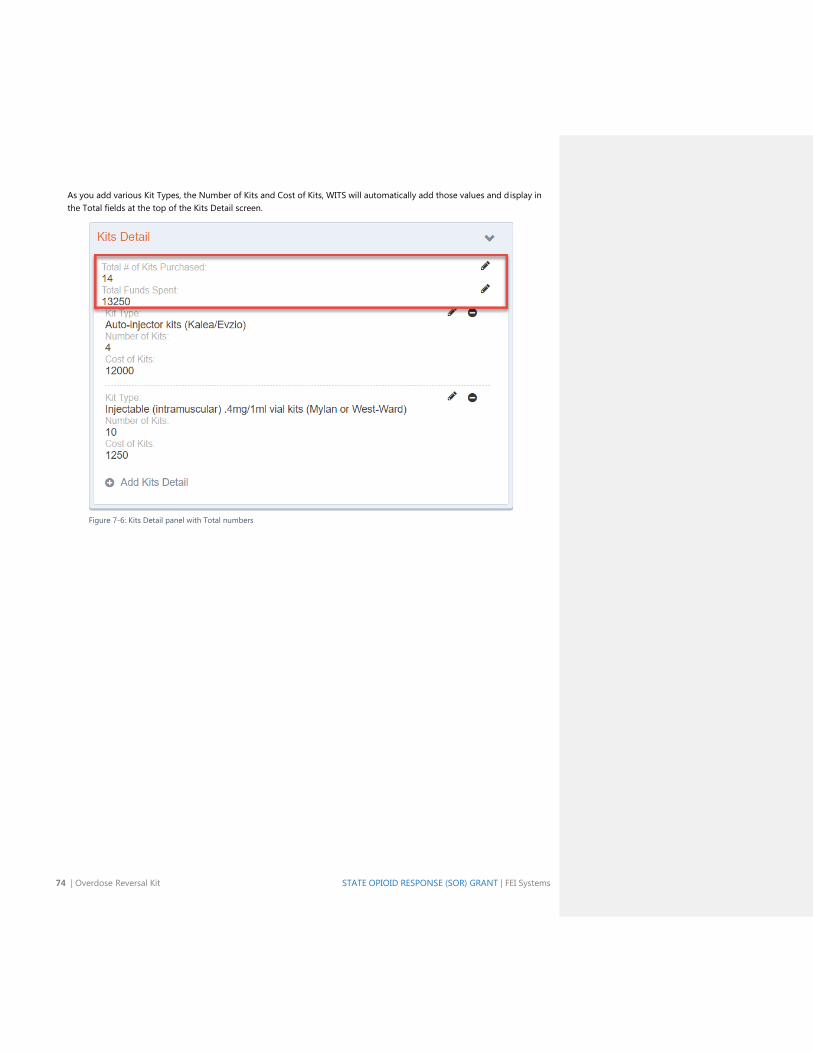
As you add various Kit Types, the Number of Kits and Cost of Kits, WITS will automatically add those values and display in
the Total fields at the top of the Kits Detail screen.
Figure 7-6: Kits Detail panel with Total numbers
STATE OPIOID RESPONSE (SOR) GRANT | FEI Systems Add New Overdose Reversal Kit Event | 75
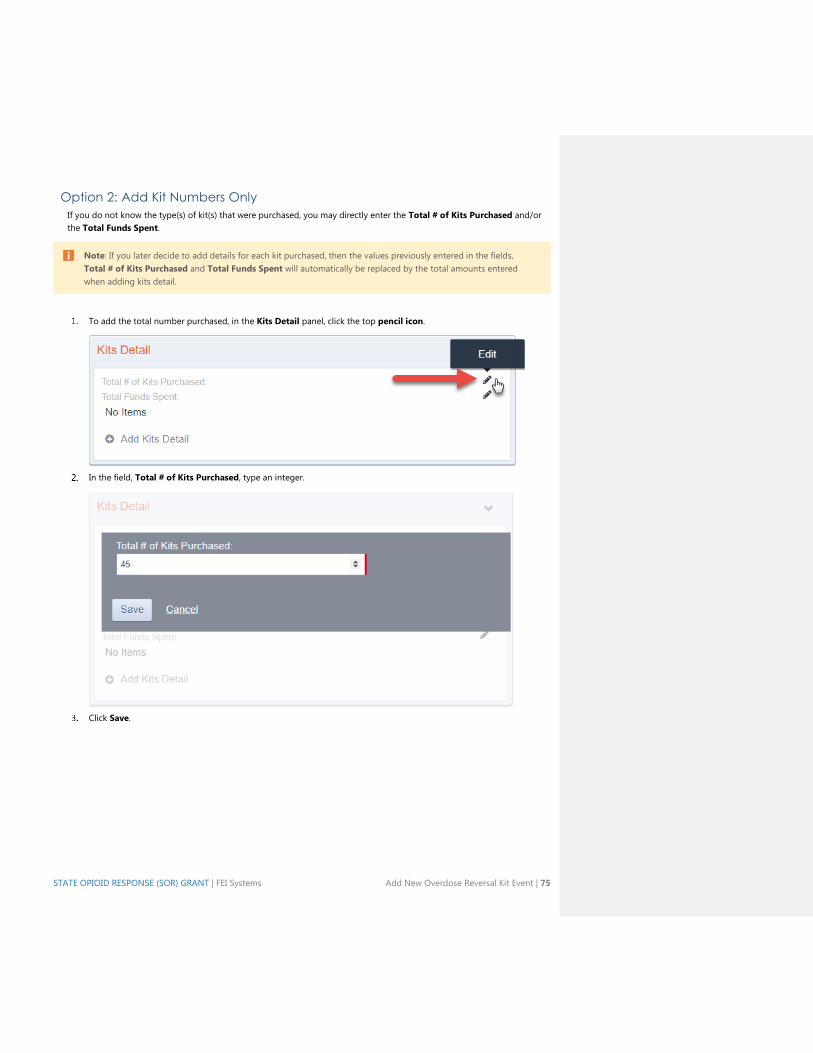
Option 2: Add Kit Numbers Only
If you do not know the type(s) of kit(s) that were purchased, you may directly enter the Total # of Kits Purchased and/or
the Total Funds Spent.
Note: If you later decide to add details for each kit purchased, then the values previously entered in the fields,
Total # of Kits Purchased and Total Funds Spent will automatically be replaced by the total amounts entered
when adding kits detail.
To add the total number purchased, in the Kits Detail panel, click the top pencil icon.
In the field, Total # of Kits Purchased, type an integer.
Click Save.
76 | Overdose Reversal Kit STATE OPIOID RESPONSE (SOR) GRANT | FEI Systems
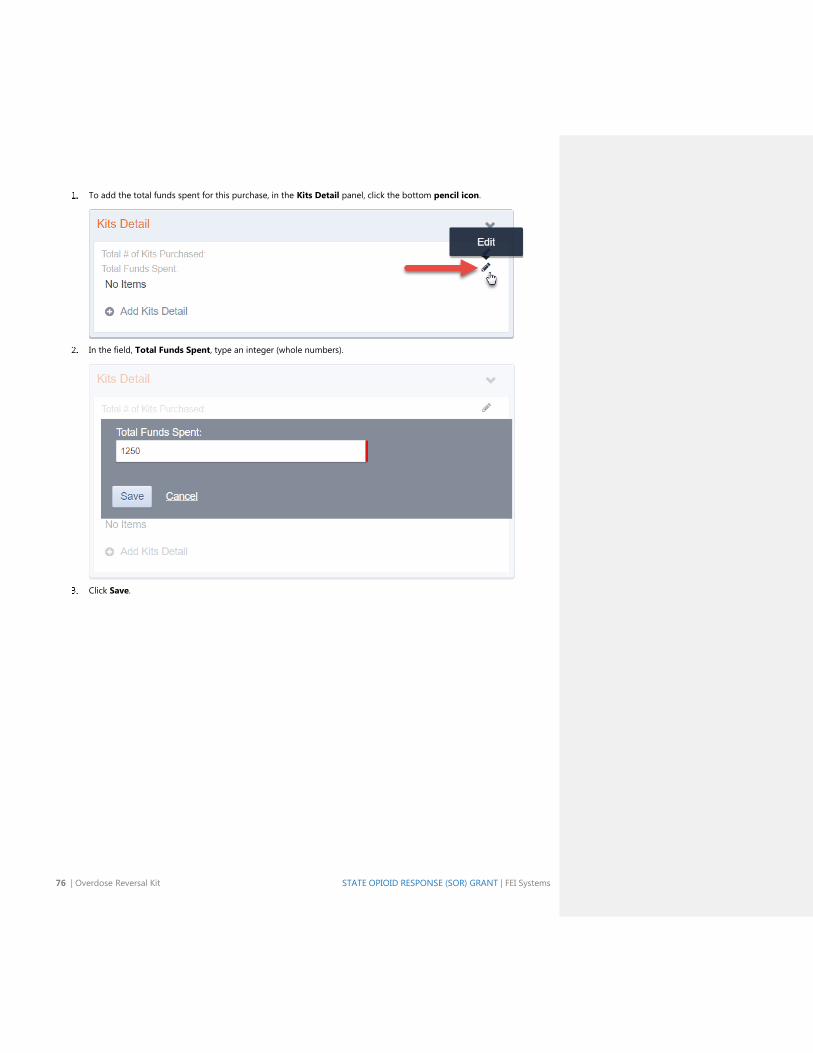
To add the total funds spent for this purchase, in the Kits Detail panel, click the bottom pencil icon.
In the field, Total Funds Spent, type an integer (whole numbers).
Click Save.
STATE OPIOID RESPONSE (SOR) GRANT | FEI Systems Add New Overdose Reversal Kit Event | 77
Additional Steps/Related Information
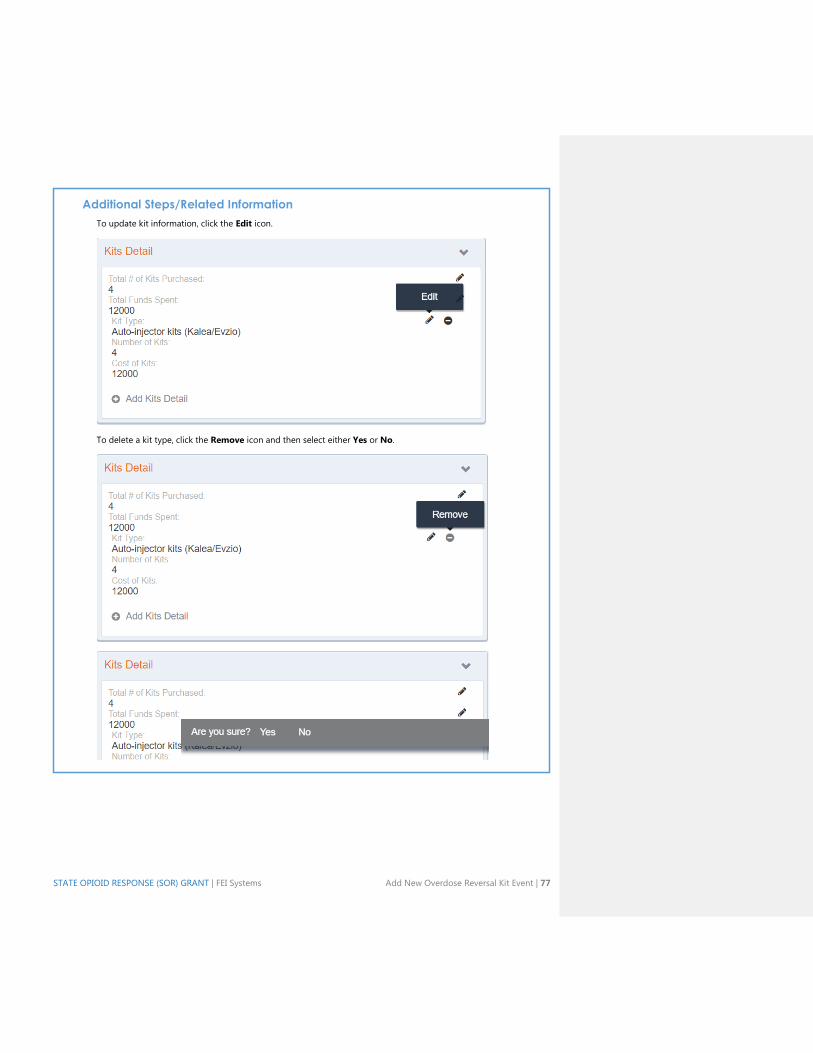
To update kit information, click the Edit icon.
To delete a kit type, click the Remove icon and then select either Yes or No.
78 | Overdose Reversal Kit STATE OPIOID RESPONSE (SOR) GRANT | FEI Systems
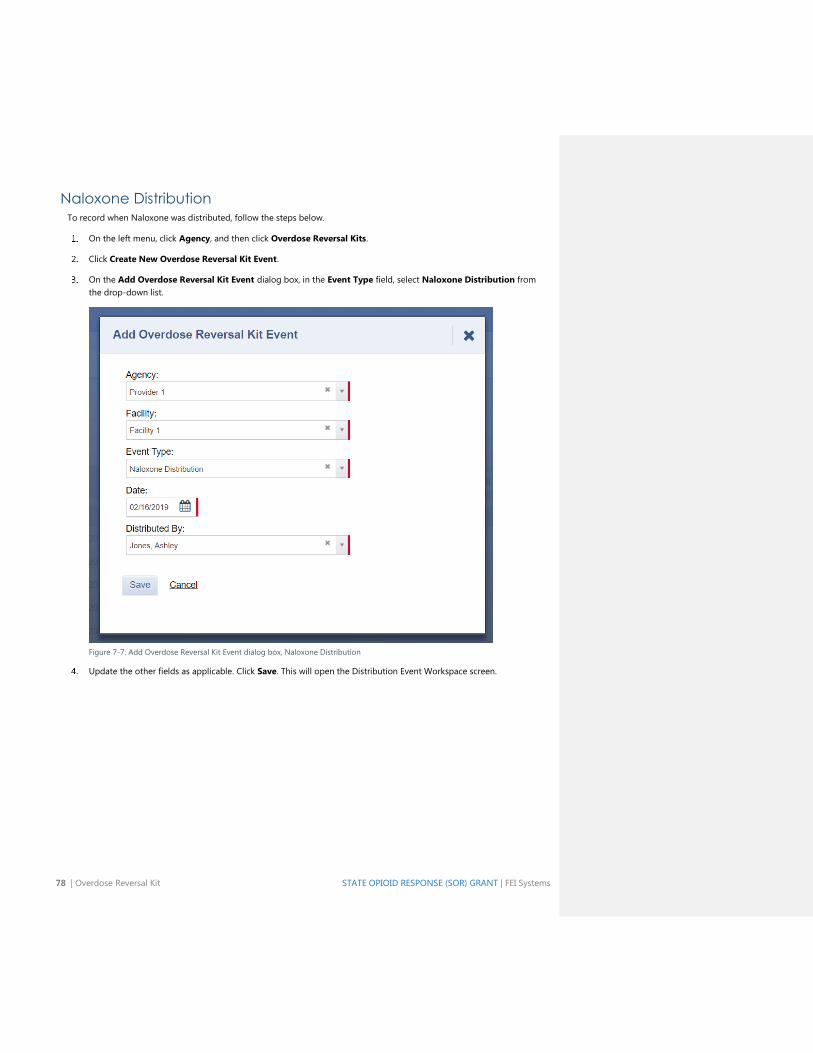
Naloxone Distribution To record when Naloxone was distributed, follow the steps below.
On the left menu, click Agency, and then click Overdose Reversal Kits.
Click Create New Overdose Reversal Kit Event.
On the Add Overdose Reversal Kit Event dialog box, in the Event Type field, select Naloxone Distribution from
the drop-down list.
Figure 7-7: Add Overdose Reversal Kit Event dialog box, Naloxone Distribution
Update the other fields as applicable. Click Save. This will open the Distribution Event Workspace screen.
STATE OPIOID RESPONSE (SOR) GRANT | FEI Systems Add New Overdose Reversal Kit Event | 79
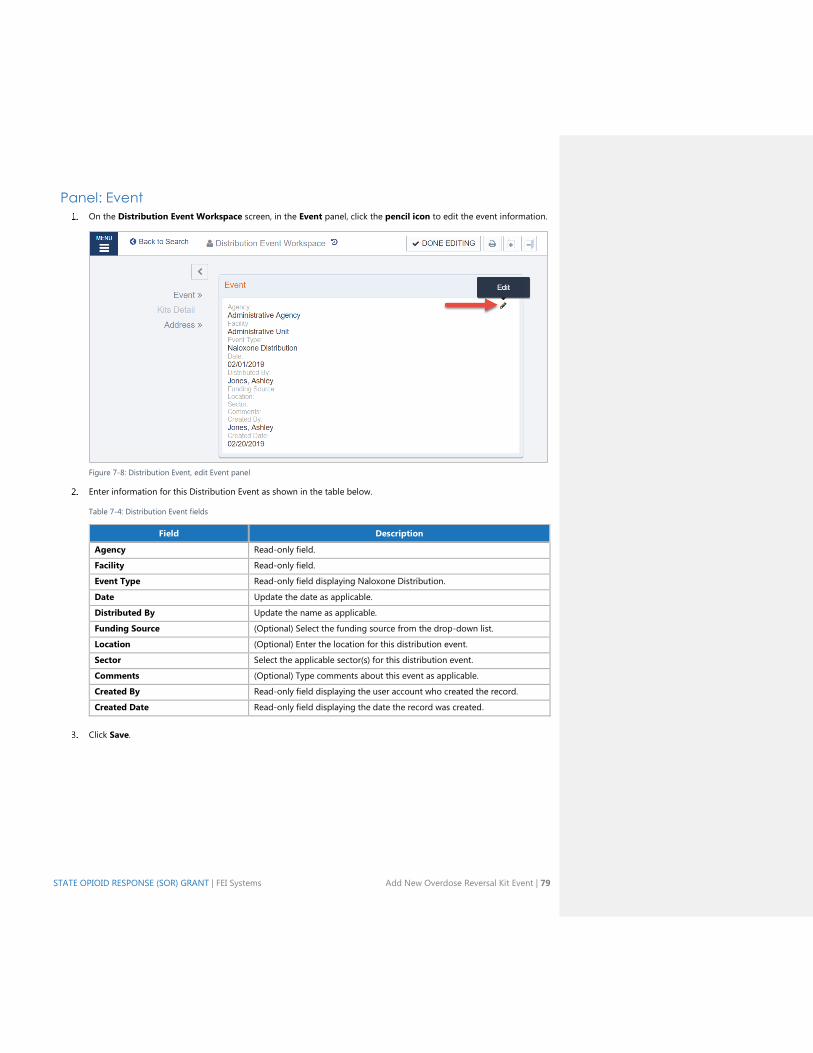
Panel: Event
On the Distribution Event Workspace screen, in the Event panel, click the pencil icon to edit the event information.
Figure 7-8: Distribution Event, edit Event panel
Enter information for this Distribution Event as shown in the table below.
Table 7-4: Distribution Event fields
Field Description
Agency Read-only field.
Facility Read-only field.
Event Type Read-only field displaying Naloxone Distribution.
Date Update the date as applicable.
Distributed By Update the name as applicable.
Funding Source (Optional) Select the funding source from the drop-down list.
Location (Optional) Enter the location for this distribution event.
Sector Select the applicable sector(s) for this distribution event.
Comments (Optional) Type comments about this event as applicable.
Created By Read-only field displaying the user account who created the record.
Created Date Read-only field displaying the date the record was created.
Click Save.
80 | Overdose Reversal Kit STATE OPIOID RESPONSE (SOR) GRANT | FEI Systems
Panel: Kit Detail
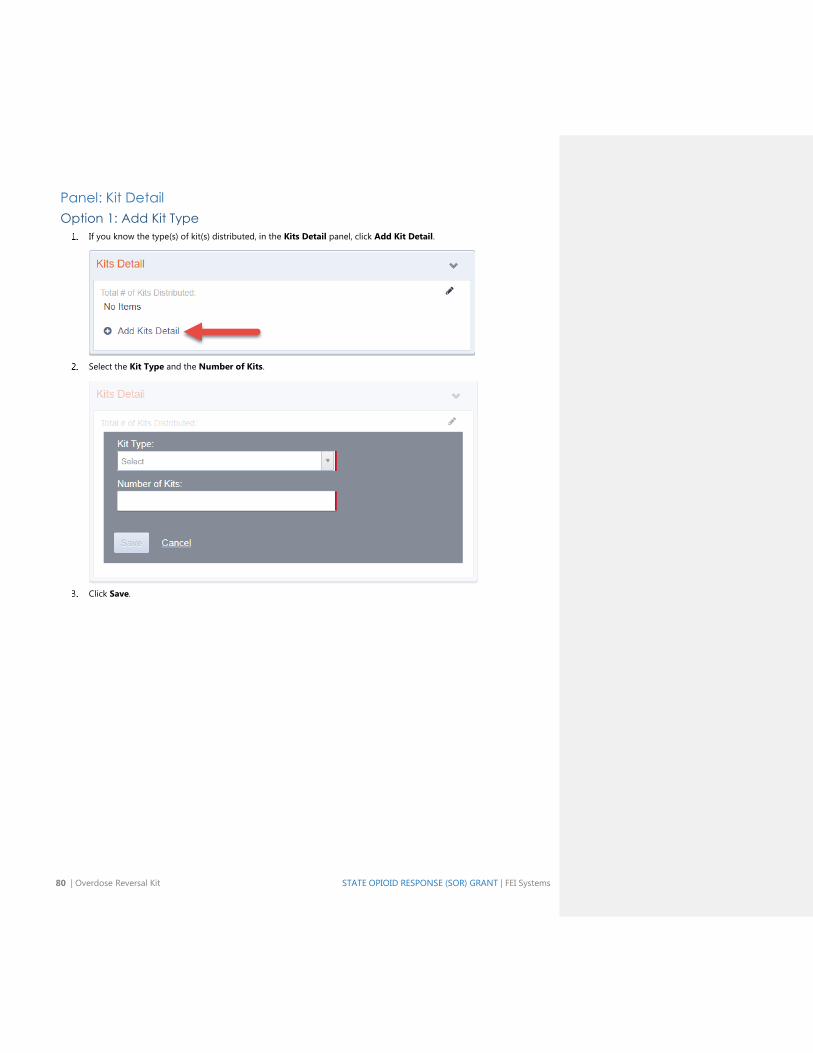
Option 1: Add Kit Type
If you know the type(s) of kit(s) distributed, in the Kits Detail panel, click Add Kit Detail.
Select the Kit Type and the Number of Kits.
Click Save.
STATE OPIOID RESPONSE (SOR) GRANT | FEI Systems Add New Overdose Reversal Kit Event | 81
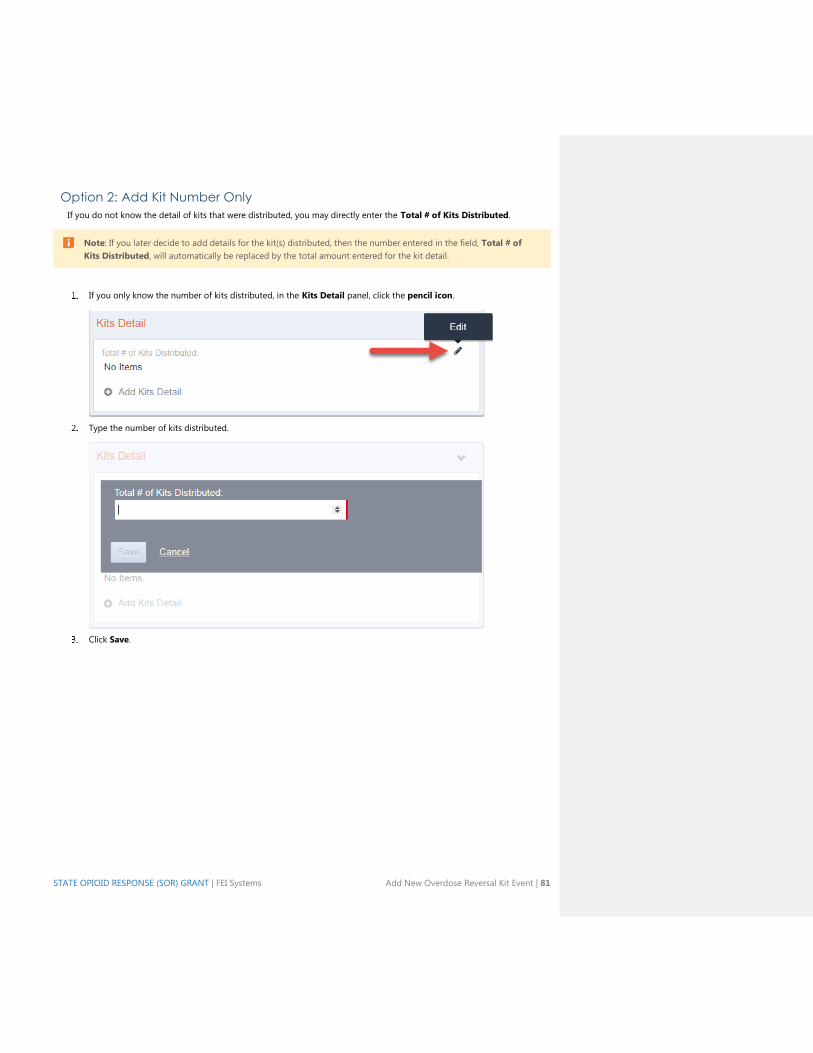
Option 2: Add Kit Number Only
If you do not know the detail of kits that were distributed, you may directly enter the Total # of Kits Distributed.
Note: If you later decide to add details for the kit(s) distributed, then the number entered in the field, Total # of
Kits Distributed, will automatically be replaced by the total amount entered for the kit detail.
If you only know the number of kits distributed, in the Kits Detail panel, click the pencil icon.
Type the number of kits distributed.
Click Save.
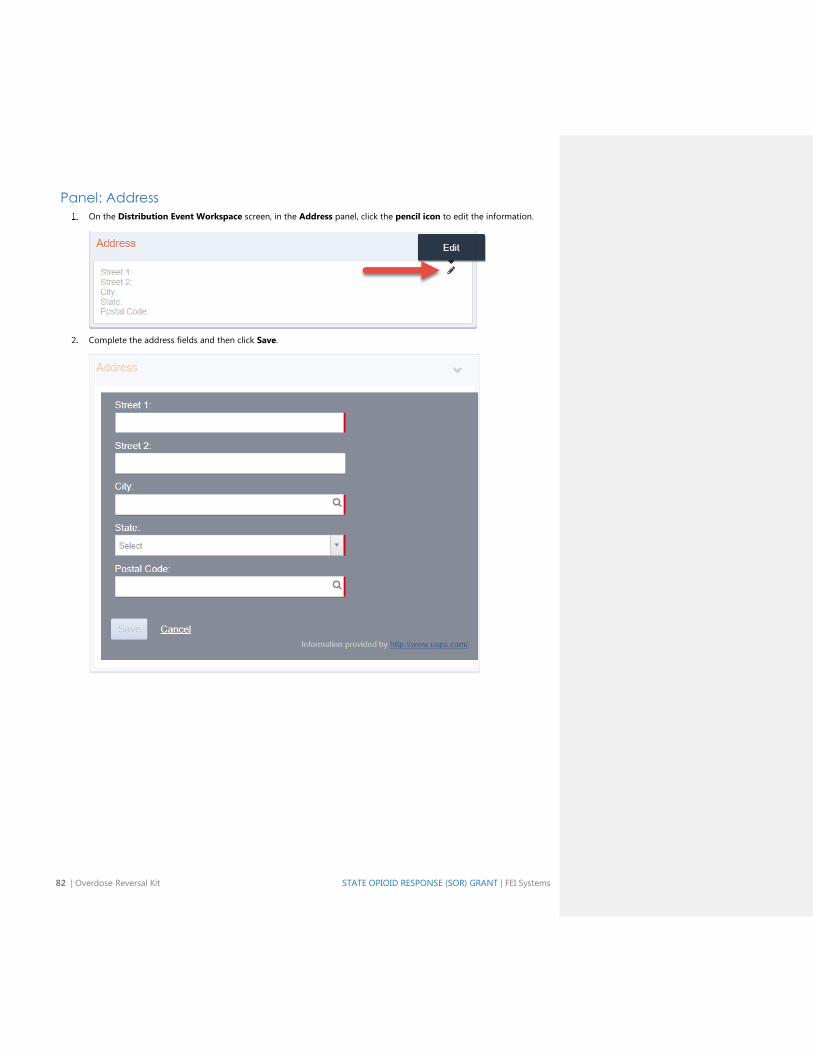
82 | Overdose Reversal Kit STATE OPIOID RESPONSE (SOR) GRANT | FEI Systems
Panel: Address
On the Distribution Event Workspace screen, in the Address panel, click the pencil icon to edit the information.
Complete the address fields and then click Save.
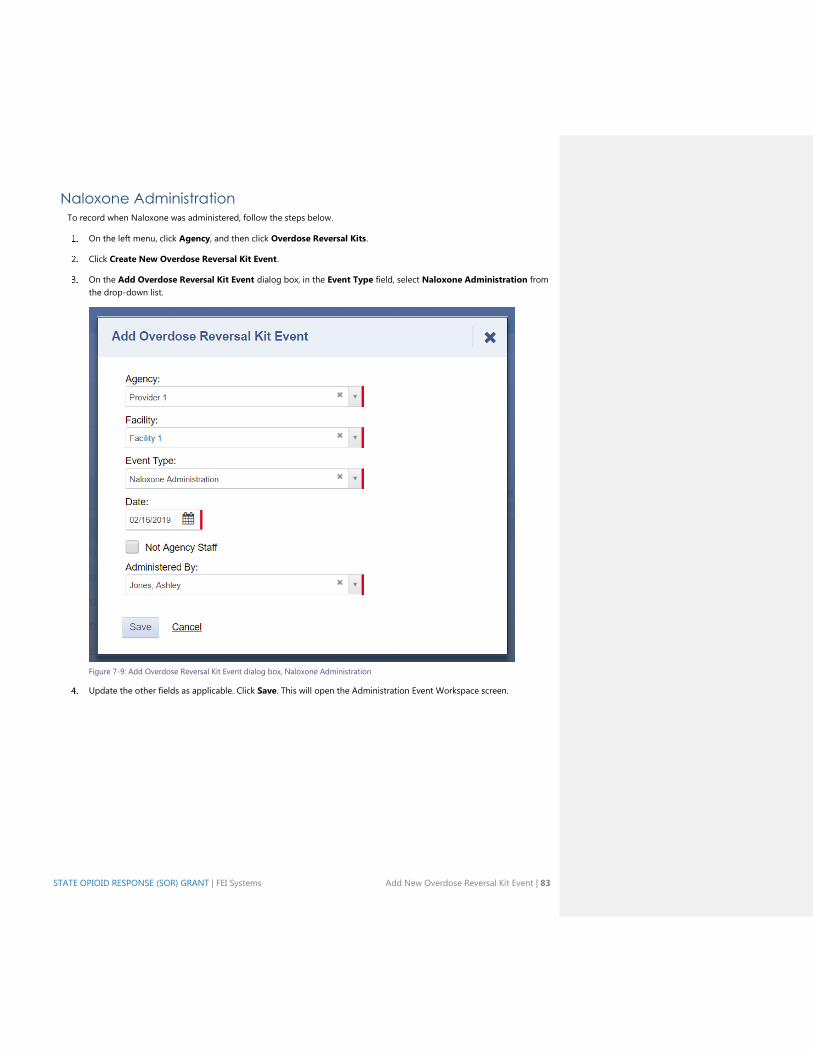
STATE OPIOID RESPONSE (SOR) GRANT | FEI Systems Add New Overdose Reversal Kit Event | 83
Naloxone Administration To record when Naloxone was administered, follow the steps below.
On the left menu, click Agency, and then click Overdose Reversal Kits.
Click Create New Overdose Reversal Kit Event.
On the Add Overdose Reversal Kit Event dialog box, in the Event Type field, select Naloxone Administration from
the drop-down list.
Figure 7-9: Add Overdose Reversal Kit Event dialog box, Naloxone Administration
Update the other fields as applicable. Click Save. This will open the Administration Event Workspace screen.
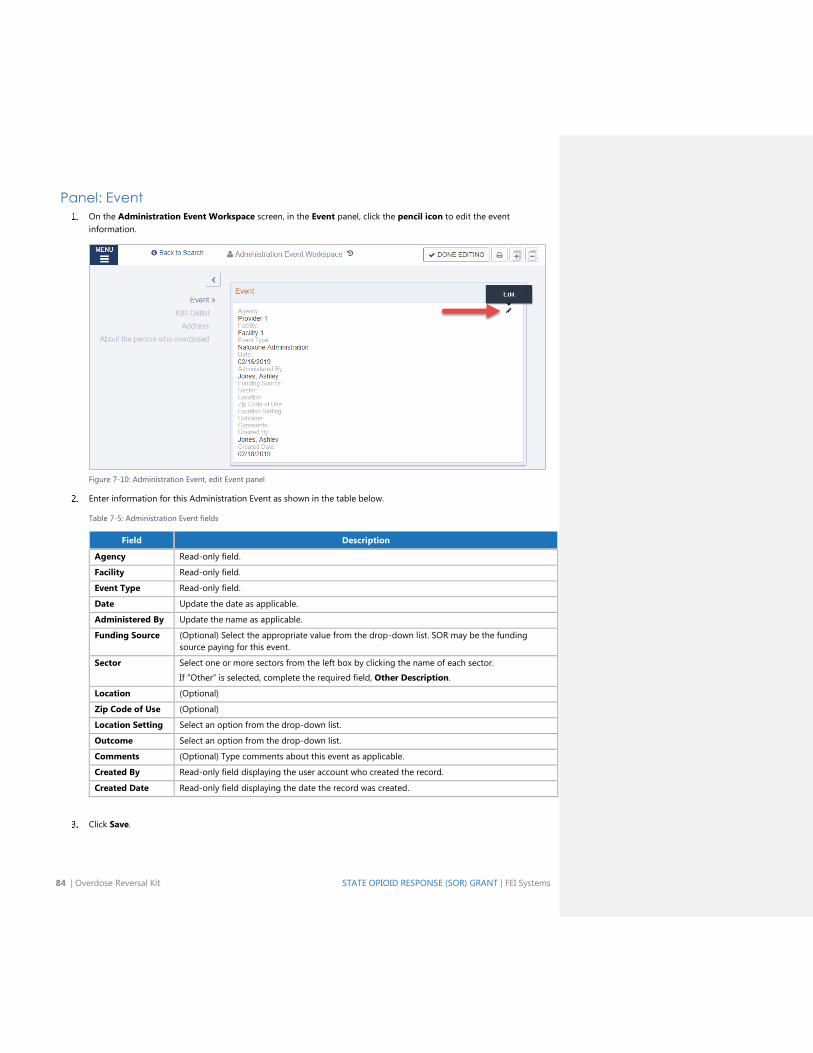
84 | Overdose Reversal Kit STATE OPIOID RESPONSE (SOR) GRANT | FEI Systems
Panel: Event
On the Administration Event Workspace screen, in the Event panel, click the pencil icon to edit the event
information.
Figure 7-10: Administration Event, edit Event panel
Enter information for this Administration Event as shown in the table below.
Table 7-5: Administration Event fields
Field Description
Agency Read-only field.
Facility Read-only field.
Event Type Read-only field.
Date Update the date as applicable.
Administered By Update the name as applicable.
Funding Source (Optional) Select the appropriate value from the drop-down list. SOR may be the funding
source paying for this event.
Sector Select one or more sectors from the left box by clicking the name of each sector.
If “Other” is selected, complete the required field, Other Description.
Location (Optional)
Zip Code of Use (Optional)
Location Setting Select an option from the drop-down list.
Outcome Select an option from the drop-down list.
Comments (Optional) Type comments about this event as applicable.
Created By Read-only field displaying the user account who created the record.
Created Date Read-only field displaying the date the record was created.
Click Save.
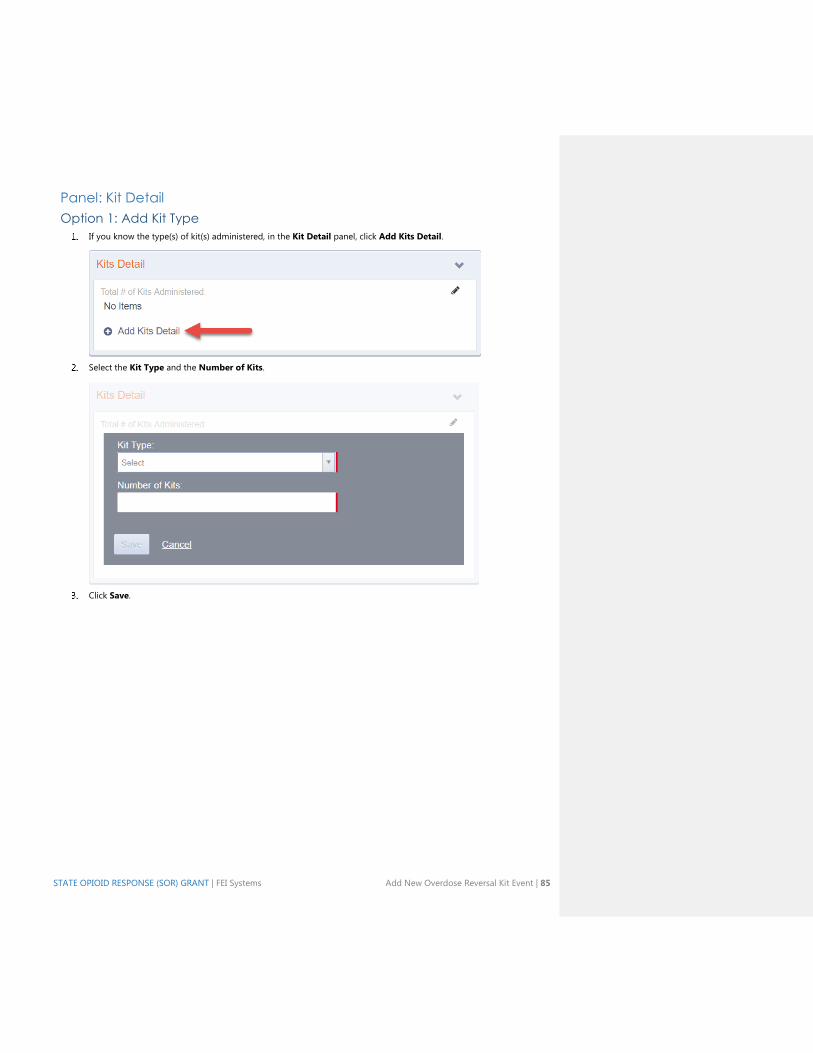
STATE OPIOID RESPONSE (SOR) GRANT | FEI Systems Add New Overdose Reversal Kit Event | 85
Panel: Kit Detail
Option 1: Add Kit Type
If you know the type(s) of kit(s) administered, in the Kit Detail panel, click Add Kits Detail.
Select the Kit Type and the Number of Kits.
Click Save.
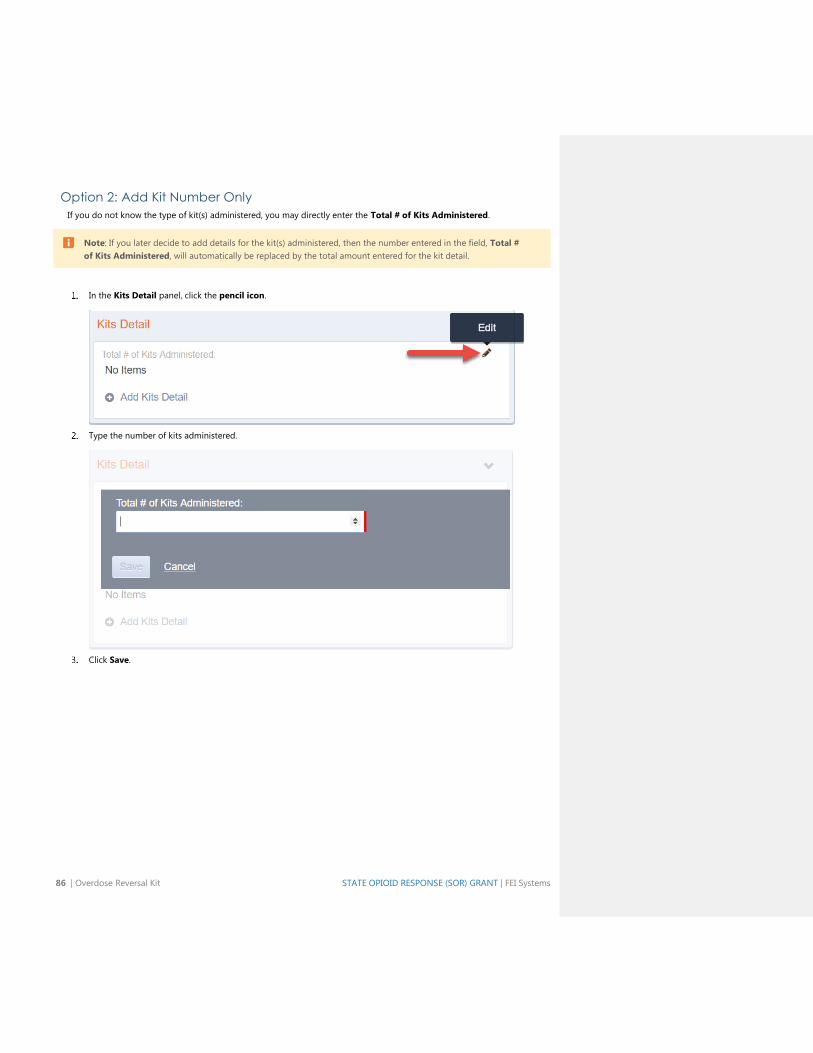
86 | Overdose Reversal Kit STATE OPIOID RESPONSE (SOR) GRANT | FEI Systems
Option 2: Add Kit Number Only
If you do not know the type of kit(s) administered, you may directly enter the Total # of Kits Administered.
Note: If you later decide to add details for the kit(s) administered, then the number entered in the field, Total #
of Kits Administered, will automatically be replaced by the total amount entered for the kit detail.
In the Kits Detail panel, click the pencil icon.
Type the number of kits administered.
Click Save.
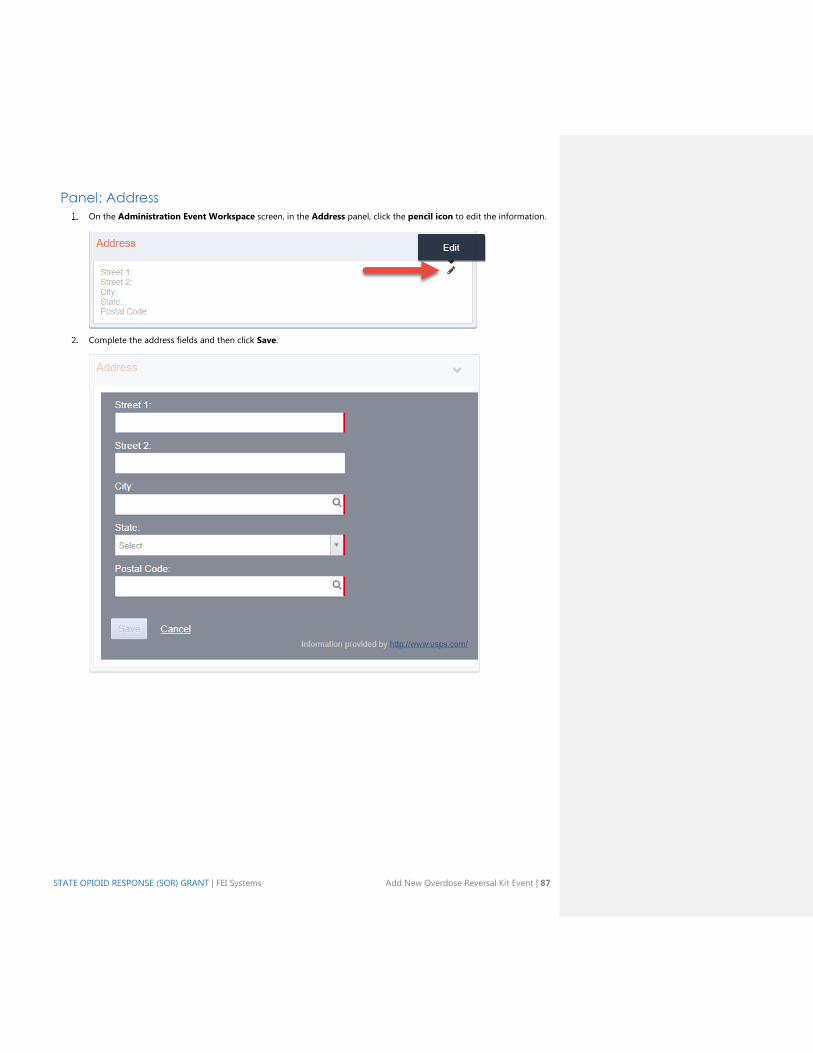
STATE OPIOID RESPONSE (SOR) GRANT | FEI Systems Add New Overdose Reversal Kit Event | 87
Panel: Address
On the Administration Event Workspace screen, in the Address panel, click the pencil icon to edit the information.
Complete the address fields and then click Save.

88 | Overdose Reversal Kit STATE OPIOID RESPONSE (SOR) GRANT | FEI Systems
Panel: About the person who overdosed
On this panel, enter the Gender, Race, and Age of the person who overdosed.
On the Administration Event Workspace screen, in the About the person who overdosed panel, click the pencil
icon to edit the information.
Complete the fields with information about the person who overdosed.
Click Save.
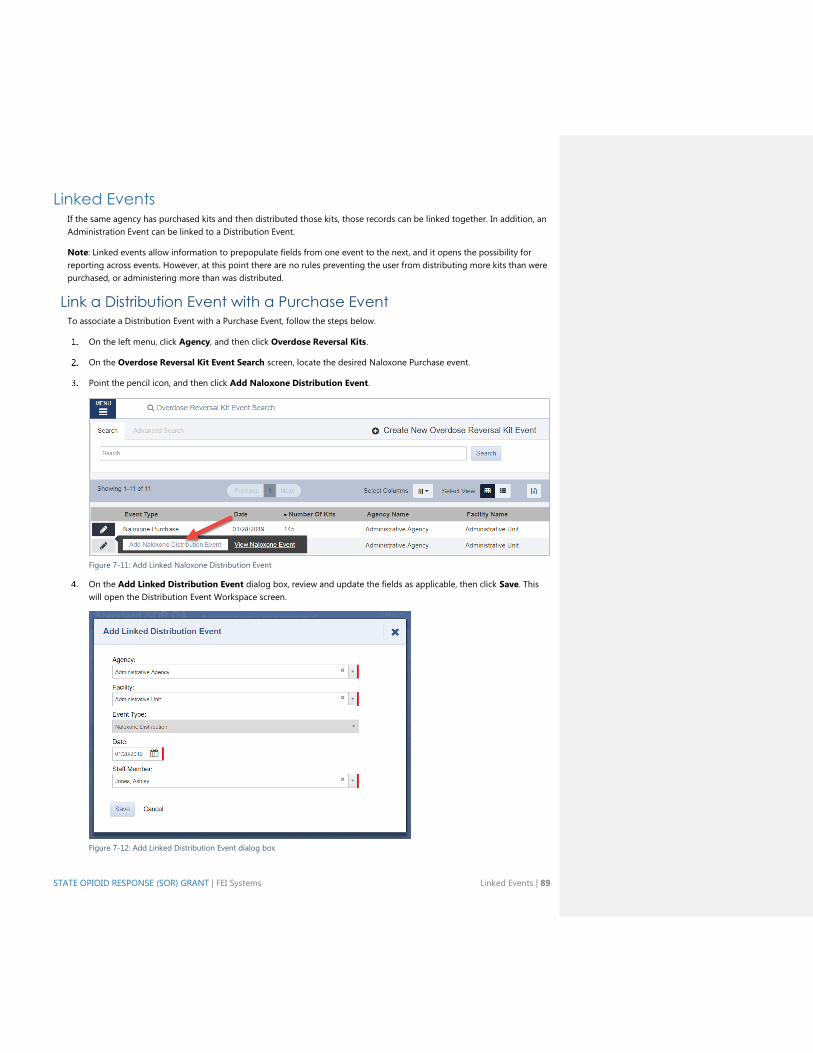
STATE OPIOID RESPONSE (SOR) GRANT | FEI Systems Linked Events | 89
Linked Events If the same agency has purchased kits and then distributed those kits, those records can be linked together. In addition, an
Administration Event can be linked to a Distribution Event.
Note: Linked events allow information to prepopulate fields from one event to the next, and it opens the possibility for
reporting across events. However, at this point there are no rules preventing the user from distributing more kits than were
purchased, or administering more than was distributed.
Link a Distribution Event with a Purchase Event To associate a Distribution Event with a Purchase Event, follow the steps below.
On the left menu, click Agency, and then click Overdose Reversal Kits.
On the Overdose Reversal Kit Event Search screen, locate the desired Naloxone Purchase event.
Point the pencil icon, and then click Add Naloxone Distribution Event.
Figure 7-11: Add Linked Naloxone Distribution Event
On the Add Linked Distribution Event dialog box, review and update the fields as applicable, then click Save. This
will open the Distribution Event Workspace screen.
Figure 7-12: Add Linked Distribution Event dialog box
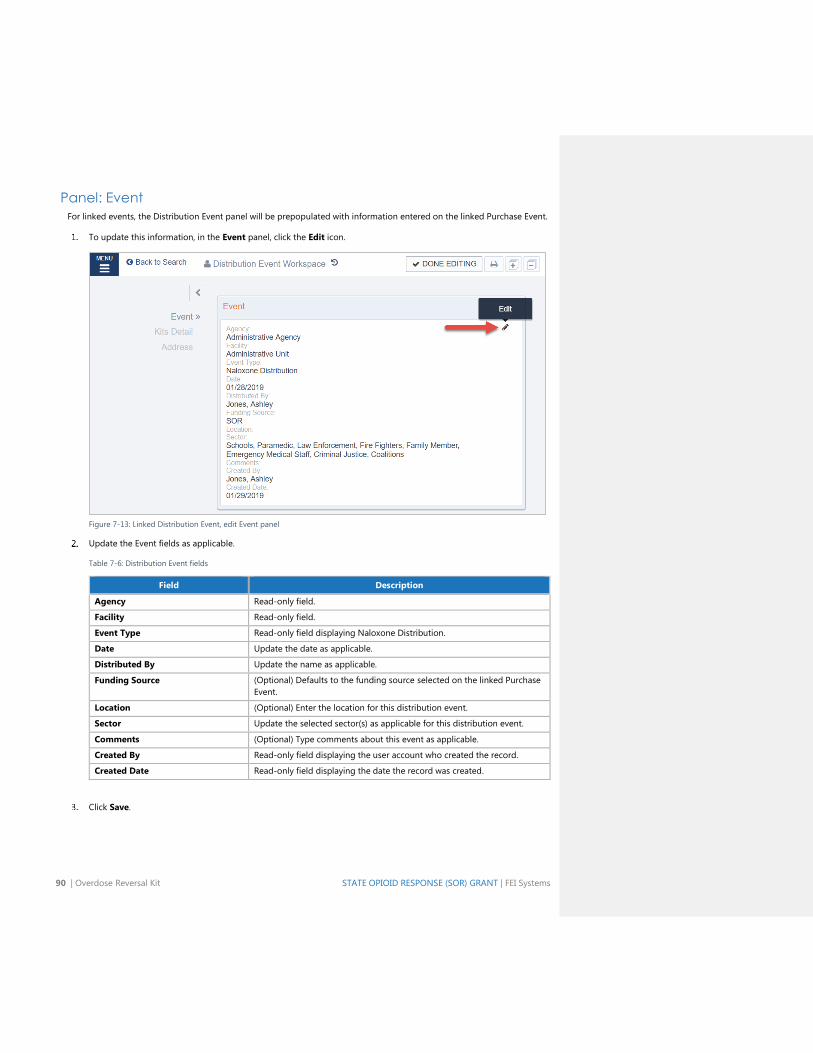
90 | Overdose Reversal Kit STATE OPIOID RESPONSE (SOR) GRANT | FEI Systems
Panel: Event
For linked events, the Distribution Event panel will be prepopulated with information entered on the linked Purchase Event.
To update this information, in the Event panel, click the Edit icon.
Figure 7-13: Linked Distribution Event, edit Event panel
Update the Event fields as applicable.
Table 7-6: Distribution Event fields
Field Description
Agency Read-only field.
Facility Read-only field.
Event Type Read-only field displaying Naloxone Distribution.
Date Update the date as applicable.
Distributed By Update the name as applicable.
Funding Source (Optional) Defaults to the funding source selected on the linked Purchase
Event.
Location (Optional) Enter the location for this distribution event.
Sector Update the selected sector(s) as applicable for this distribution event.
Comments (Optional) Type comments about this event as applicable.
Created By Read-only field displaying the user account who created the record.
Created Date Read-only field displaying the date the record was created.
Click Save.
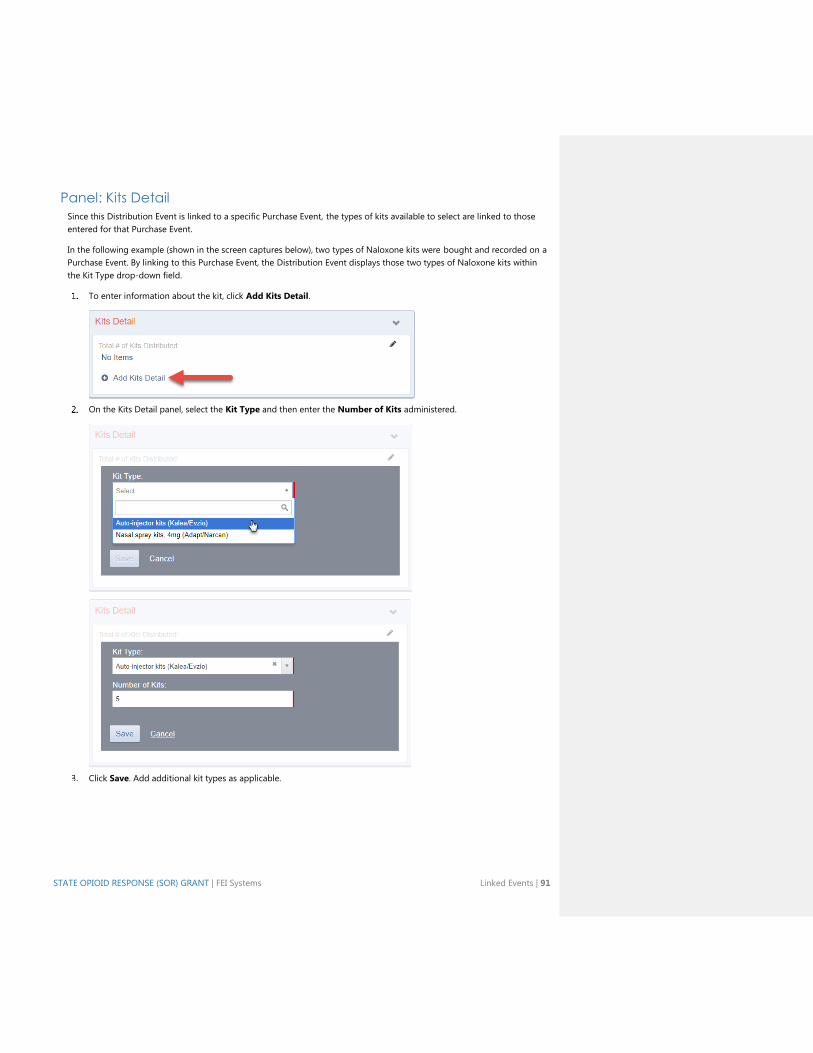
STATE OPIOID RESPONSE (SOR) GRANT | FEI Systems Linked Events | 91
Panel: Kits Detail
Since this Distribution Event is linked to a specific Purchase Event, the types of kits available to select are linked to those
entered for that Purchase Event.
In the following example (shown in the screen captures below), two types of Naloxone kits were bought and recorded on a
Purchase Event. By linking to this Purchase Event, the Distribution Event displays those two types of Naloxone kits within
the Kit Type drop-down field.
To enter information about the kit, click Add Kits Detail.
On the Kits Detail panel, select the Kit Type and then enter the Number of Kits administered.
Click Save. Add additional kit types as applicable.
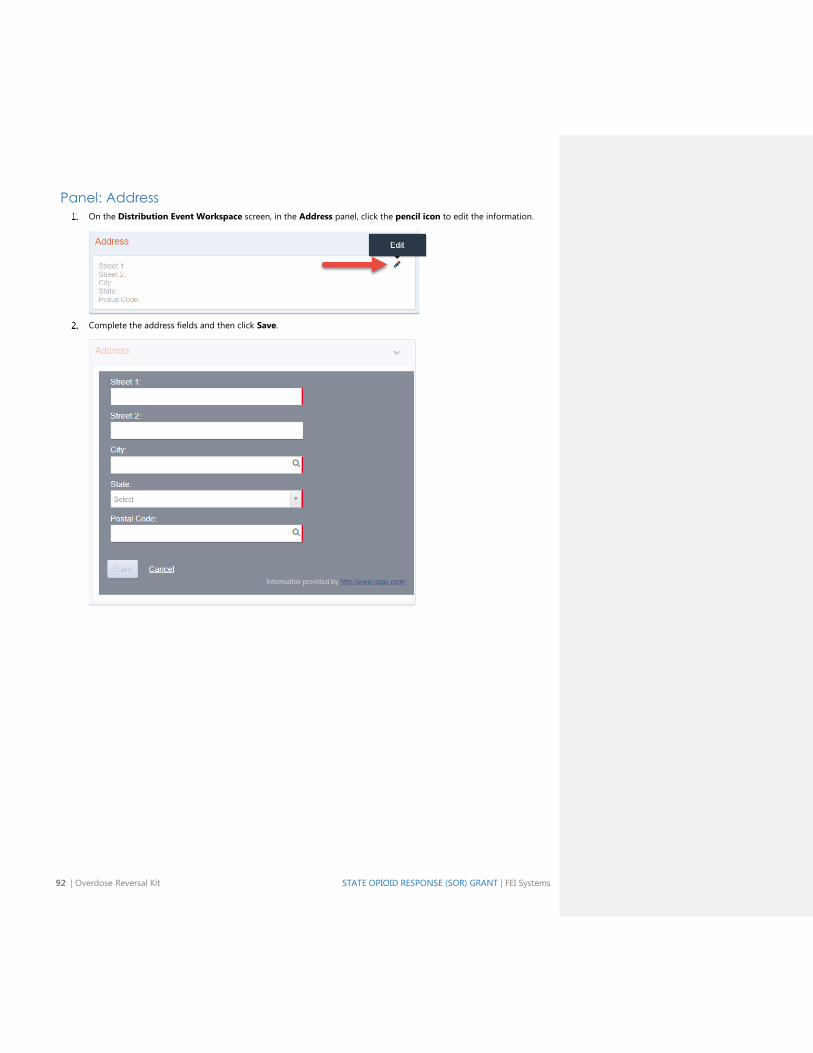
92 | Overdose Reversal Kit STATE OPIOID RESPONSE (SOR) GRANT | FEI Systems
Panel: Address
On the Distribution Event Workspace screen, in the Address panel, click the pencil icon to edit the information.
Complete the address fields and then click Save.

STATE OPIOID RESPONSE (SOR) GRANT | FEI Systems Linked Events | 93
Link a Naloxone Administration Event with a Distribution Event To associate an Administration Event with a Distribution Event, follow the steps below.
On the left menu, click Agency, and then click Overdose Reversal Kits.
On the Overdose Reversal Kit Event Search screen, locate the desired Naloxone Distribution event.
Point the pencil icon, and then click Add Naloxone Administration Event.
Figure 7-14: Add Naloxone Administration event to a Distribution event
On the Add Linked Administration Event dialog box, review and update the fields as applicable, and then click
Save. This will open the Administration Event Workspace screen.
Figure 7-15: Linked Administration Event dialog box
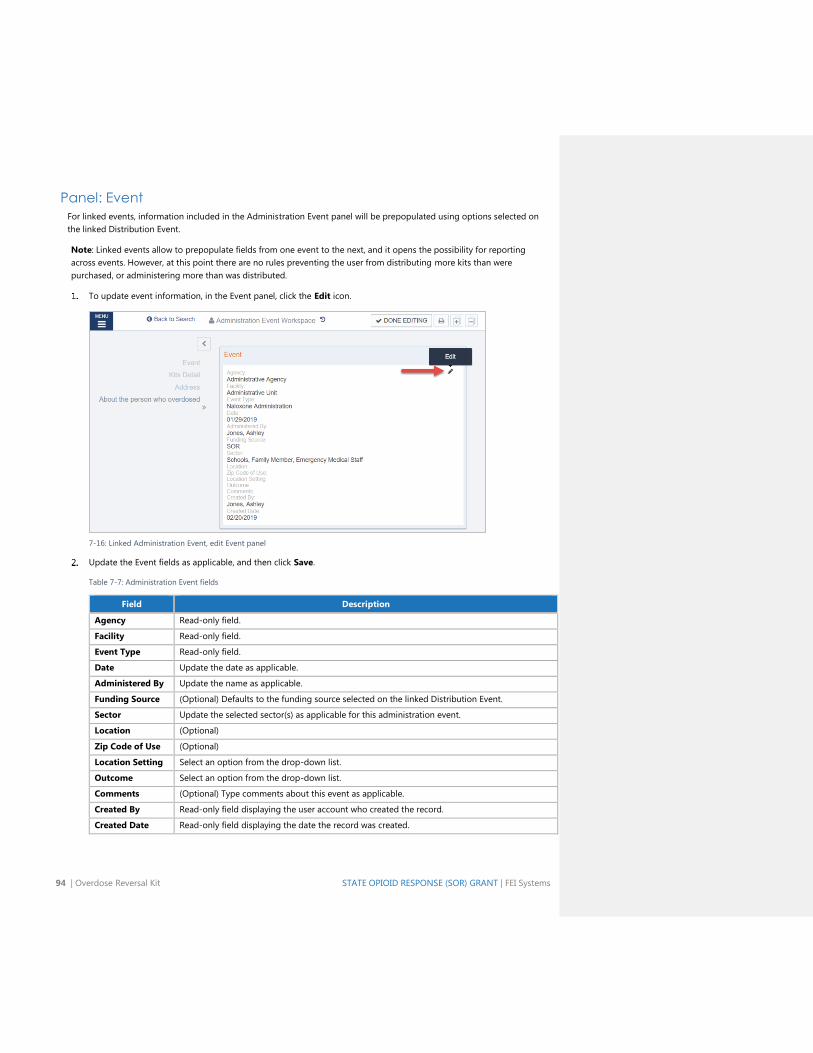
94 | Overdose Reversal Kit STATE OPIOID RESPONSE (SOR) GRANT | FEI Systems
Panel: Event
For linked events, information included in the Administration Event panel will be prepopulated using options selected on
the linked Distribution Event.
Note: Linked events allow to prepopulate fields from one event to the next, and it opens the possibility for reporting
across events. However, at this point there are no rules preventing the user from distributing more kits than were
purchased, or administering more than was distributed.
To update event information, in the Event panel, click the Edit icon.
7-16: Linked Administration Event, edit Event panel
Update the Event fields as applicable, and then click Save.
Table 7-7: Administration Event fields
Field Description
Agency Read-only field.
Facility Read-only field.
Event Type Read-only field.
Date Update the date as applicable.
Administered By Update the name as applicable.
Funding Source (Optional) Defaults to the funding source selected on the linked Distribution Event.
Sector Update the selected sector(s) as applicable for this administration event.
Location (Optional)
Zip Code of Use (Optional)
Location Setting Select an option from the drop-down list.
Outcome Select an option from the drop-down list.
Comments (Optional) Type comments about this event as applicable.
Created By Read-only field displaying the user account who created the record.
Created Date Read-only field displaying the date the record was created.
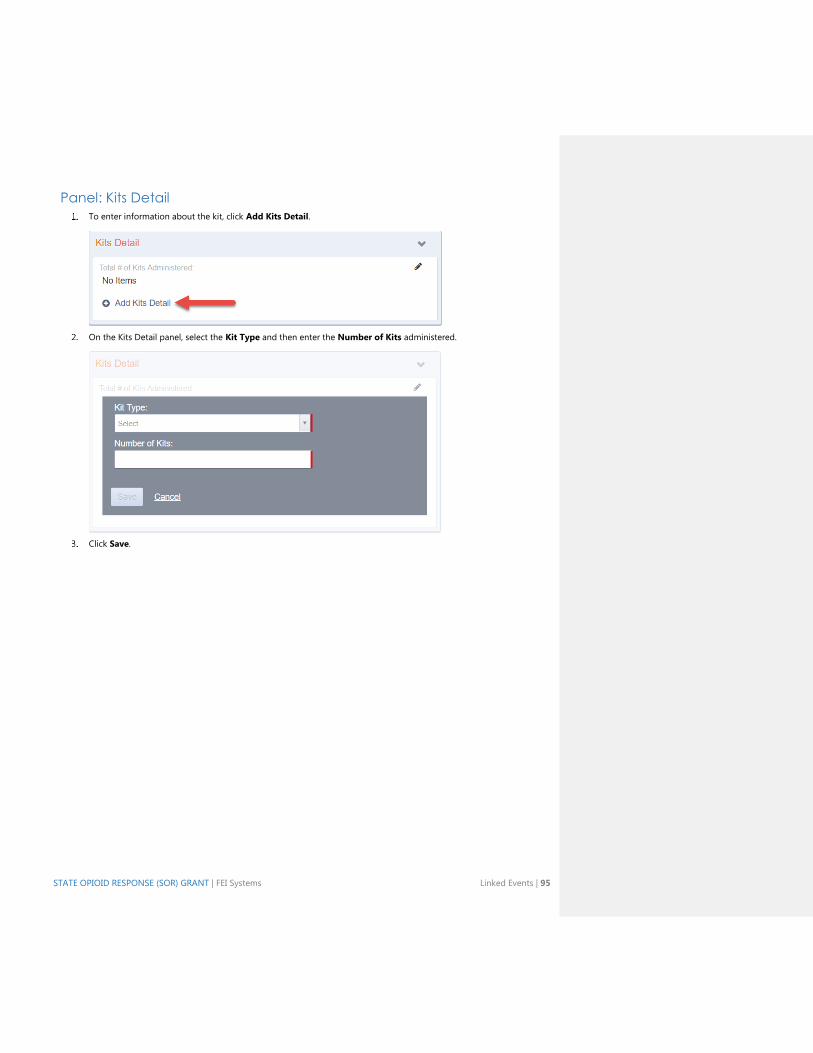
STATE OPIOID RESPONSE (SOR) GRANT | FEI Systems Linked Events | 95
Panel: Kits Detail
To enter information about the kit, click Add Kits Detail.
On the Kits Detail panel, select the Kit Type and then enter the Number of Kits administered.
Click Save.
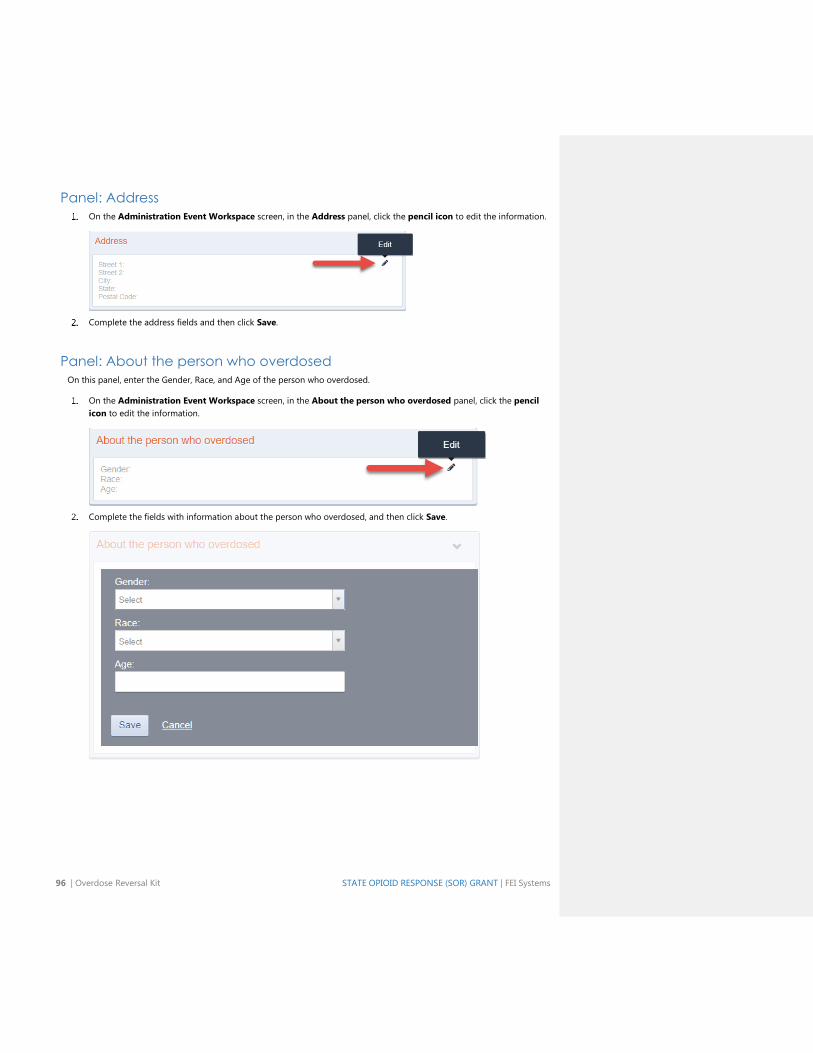
96 | Overdose Reversal Kit STATE OPIOID RESPONSE (SOR) GRANT | FEI Systems
Panel: Address
On the Administration Event Workspace screen, in the Address panel, click the pencil icon to edit the information.
Complete the address fields and then click Save.
Panel: About the person who overdosed
On this panel, enter the Gender, Race, and Age of the person who overdosed.
On the Administration Event Workspace screen, in the About the person who overdosed panel, click the pencil
icon to edit the information.
Complete the fields with information about the person who overdosed, and then click Save.
STATE OPIOID RESPONSE (SOR) GRANT | FEI Systems Review an Overdose Reversal Kit | 97
Review an Overdose Reversal Kit If you need to review and/or edit an event that was previously entered, follow these steps:
On the left menu, click Agency, and then click Overdose Reversal Kits.
On the Overdose Reversal Kit Event Search screen, locate the desired event to review.
Point the pencil icon, and then click View Naloxone Event.
On the Event Workspace, click the Edit button at the top in order to make the workspace editable.
Locate the panel(s) to update and click the associated pencil icon to make updates.