Embed Size (px)
Citation preview

State Health Plan eBilling Client Guide

2 © 2013 Client User Guide
Table of Contents Table of Contents ....................................................................................................................................................... 2
Introduction.................................................................................................................................................................... 3
Logging into eBilling ....................................................................................................................................................... 4
Obtaining your Login Information ............................................................................................................................. 4
Logging in for the First Time ...................................................................................................................................... 4
Changing Your Password ........................................................................................................................................... 5
The eBilling Home Page ................................................................................................................................................ 6
Tabs ........................................................................................................................................................................... 7
Current Invoice Information ...................................................................................................................................... 8
Left Navigation Pane ................................................................................................................................................. 9
Quick Links ................................................................................................................................................................. 9
Viewing Invoices ........................................................................................................................................................... 11
Viewing Invoice Details ........................................................................................................................................... 12
Consolidated and Sub-Group Invoices .................................................................................................................... 12
Paying Invoices ............................................................................................................................................................. 15
Paying Invoices Electronically .................................................................................................................................. 16
Paying Invoices Manually ........................................................................................................................................ 20
Printing Invoices ...................................................................................................................................................... 21
Email Notifications .................................................................................................................................................. 23
Viewing, Creating, and Editing Payment Accounts ...................................................................................................... 24
Creating/Editing Bank Accounts .............................................................................................................................. 24
Reviewing Payment Accounts Audit Data ............................................................................................................... 26
Auto Draft ................................................................................................................................................................ 28
Viewing Payment History ............................................................................................................................................. 30
Searching for Payments ........................................................................................................................................... 30
Creating and Reviewing Reports .................................................................................................................................. 32
Creating and Viewing On-Demand Reports ............................................................................................................ 33
Scheduling Reports .................................................................................................................................................. 36
Invoice Comparison Report ..................................................................................................................................... 38

3 © 2013 Client User Guide
Introduction
eBilling is a tool provided by BCBSNC in partnership with Benefitfocus that allows HBRs to view and pay their bills quickly, accurately, and securely. This guide outlines the functionality offered by eBilling and how to use it.

4 © 2013 Client User Guide
Logging into eBilling
Obtaining your Login Information You will be able to access the eBilling tool by navigating to https://bcbsnc-shp.secureebilling.com . If you use the Communications Portal, you will be able to access eBilling from there.
If you already had a username and password, that information will remain the same. To obtain a Username and initial password for the eBilling application, contact BCBSNC by calling 800-245-7319 or e-mailing [email protected].
Once you click the link from either of the above locations the first time, the State Health Plan eBilling login page displays as seen below..
Logging in for the First Time
When you log in for the first time, you will be prompted to change your password as shown on the next page.
Enter your Username and password and click Log in.

5 © 2013 Client User Guide
Changing Your Password The “Change My Password” window shown below displays the first time you log into eBilling. Complete the following steps to change your password. Note: Your password should be considered personal and confidential.
1. Enter a new password that meets the following criteria:
Password Must Contain: Password Cannot:
8-15 characters (special characters are permitted but not required)
Be the same as your previous password
At least one capital letter Have more than two of the same characters in a row
At least one lower case letter Contain your Username
At least one number
2. Reenter your password in the Confirm New Password field.
3. Click Save.
Note: After you have accessed eBilling once, you will not have to enter in this information again – a single sign on process through the Communications Portal will take you directly to the eBilling home page as shown on the next page of this guide when you click the eBilling link.

6 © 2013 Client User Guide
The eBilling Home Page Once you log into the application, the eBilling Home page displays as shown below. The eBilling Home page is the center of the online billing system and allows access to the various tools available in the application.
The Home page includes these elements, which will be discussed in more detail later in this guide:
1. Tabs 2. Current Invoice Information 3. Left Navigation links 4. Quick links

7 © 2013 Client User Guide
Tabs At the top of the screen, four tabs display. The current tab is highlighted in blue. We will discuss the functions you can perform by accessing these tabs in further detail later in the guide.
• Home: shown on the previous page. • Billing: search and view current invoices, search for a specific invoice, and view payment history.
• Reports: create, view, and schedule reports.

8 © 2013 Client User Guide
• Setup – set up and manage payment accounts.
Current Invoice Information In the center of the eBilling Home page, current invoice information displays as shown below. From this area, you can see the amount due, pay the current amount due, or print the current invoice.
Important Note: Clicking “Print Now” anywhere in the application takes you to the Print Options screen where you can generate your invoice in a variety of formats. Once the invoice is generated, you may choose to save it to your computer and/or print it. Clicking the Print Now button is the way to create a downloadable version of the invoice. This is covered in more detail in the “Printing Invoices” section of this guide.

9 © 2013 Client User Guide
Left Navigation Pane The left side of the eBilling Home page includes the following links:
Payments section:
• Payment History • Pending Payment • Payment Account
Scheduled Report section:
• Scheduled Reports • Create Report
These functions will be discussed in later sections.
Quick Links
Located at the top right of all eBilling screens, the following links display:
• My Account: Change the system password, secret question and answer, and enter or update your e-mail address (shown on page 5 of this guide).
• Enroll: Click the link to go to the Benefitfocus enrollment website.

10 © 2013 Client User Guide
• Help: View help topics and frequently asked questions. Topics available depend on your access level.
• Logout: Click the link to securely log out of the system. The Login screen show on page 4 of this guide displays.

11 © 2013 Client User Guide
Viewing Invoices
Complete the following steps to view your group’s invoices.
The Billing page displays with the View Invoices sub-tab selected as shown below.
• Current: All invoices from the current coverage period that do not have a payment applied to them. • Prior: All invoices from a previous coverage period and do not have a payment applied to them. • Paid: All invoices that have payments applied to them.
From your group’s Home Page, click the Billing Tab.
This field defaults to “Current.” Click the drop down to select “Prior” or “Paid” to view invoices in those categories. Up to 18 months of invoices will be available. See descriptions below.

12 © 2013 Client User Guide
Viewing Invoice Details The Options dropdown allows you to take further action regarding the account or sub-account.
Consolidated and Sub-Group Invoices Consolidated invoices contain multiple sub-group invoices rolled into one overall group invoice. Invoices are consolidated for convenience and to display a summary of all of the invoices for a particular billing period. Consolidated invoices are denoted by a (+) sign by the invoice name.
Click View Invoice to view the Invoice Details screen as shown on the next page. You can also pay or print your invoice from here. We will discuss paying and printing later in this guide.
Click the + sign to display the sub-groups as shown below.
In any table, you can click the icon to sort the data in descending order by that column. Click the icon again to sort in ascending order. Click the column name to undo sorting.

13 © 2013 Client User Guide
The Invoice Details screen displays with the Financial Totals tab selected as shown below.
The Details tab displays all the subscribers covered by the invoice. If your group as more than 2500 subscribers, they will not display here. Instead, you will see the message “The request yielded more than 2500 members so details are not displayed. To export all member records use the Print Invoice button or use the search criteria below to view members online.” See “Printing Invoices” in this guide for more information.
The Invoice Total, Balance Forward, and Total Amount Due display here.

14 © 2013 Client User Guide
The Retroactivity tab displays a list of members who have billing activity applicable to a month other than the current month. For example, a member whose coverage level changed effective April 1st but the change was not reflected in the April invoice because it was not entered into the system until April 15th.

15 © 2013 Client User Guide
Paying Invoices There are multiple ways to access the screens to pay invoices. You can select Pay Invoice from the home screen, Pay Invoice from the drop-down menu on the View Invoices screen (for both consolidated and non-consolidated invoices); or, you can select the Payment button on the Invoice Details screen.
Important Reminders:
• Payments are always due on the first of the month, regardless of when the invoice is generated. • The State Health Plan operates on a pre-pay basis. That means premiums paid on the first of the month (on
May 1st, for example) are for that month (the coverage period May 1st – May 31st). • The key to managing your group’s premium is to maintain current eligibility and to manage any
discrepancies in a timely manner using the tools available; for example, the Retroactivity tab and Invoice Comparison report in the eBilling tool as well as your payroll system.
• The longer a discrepancy goes uncorrected, the more difficult it becomes to identify. • Failure to pay the total amount due by the payment due date will result in delinquency. • Delinquencies are escalated as follows:
o If the invoice is not paid by the end of the first week of the effective month, the delinquency is escalated to the primary HRB contact at the agency.
o If the invoice is not paid by the end of the third week of the effective month, the delinquency is escalated to the Chief Financial Officer of the employing unit.
o If the invoice is not paid by the end of the effective month, the delinquency is escalated to the Chief Financial Officer, Department of Public Instruction, UNC General Administration, and/or the North Carolina Community College’s Division of Business and Finance.

16 © 2013 Client User Guide
Paying Invoices Electronically Complete the following steps to pay your invoice.
The Step 1 Choose payment method window displays.
Depending on your permissions, you will see one of the following:
Select the Make online payment radio button and click Next.
Select one of the Pay Invoice options.

17 © 2013 Client User Guide
Step 2 Choose payment account… or Step 3 – Choose amount & date.
Payment options include:
• Total Amount Due – The total amount of the invoice will be paid from the designated account. This includes any previously unpaid balance forward amounts.
• Balance Forward – The total past due amount will be paid from the designated account. • Updated Total Due – The total updated amount will be paid from the designated account. This displays when
an amount other than the total amount due was applied after the invoice was generated.
At Step 2, choose the payment account for the payment and click Next. Step 3 Choose amount & date displays as shown below.
At Step 3, click Total Amount Due and choose the Date of Payment; then click Next.

18 © 2013 Client User Guide
Step 4 Confirm information displays as shown below.
Review the transaction and acknowledge the payment authorization. When you are ready to finalize the payment, click Submit Payment.
The Confirmation window displays including a tracking number. You can print this page for your records.
At the end of the day on the date of payment you selected, you will receive an email confirming that the payment has been submitted.
19 © 2013 Client User Guide
Important Note: After making a payment, when you return to the home page, you will still see the current invoice information as shown below. This “current invoice” information will continue to display on the home page for 2-3 business days until the payment is fully processed. Do not pay the invoice again! The payment will show as Pending until 5:00 p.m. on the business day the payment was initiated. You can access this information via the Pending Payments link on the left navigation pane of the home page. You can also use the tracking number provided in the confirmation message to search for payments as described on page 29 of this guide.

20 © 2013 Client User Guide
Paying Invoices Manually
1. Click the Print Payment Stub radio button from the Payment Options screen and Click Next.
2. If there are multiple invoices to choose from, select the invoice(s) you want to pay and Click Next. If there is only one invoice, just click Next.
Note: The Total Due for the Current invoice includes any unpaid balance forward amounts.
3. The invoice payment stub displays in a new window. Print the stub and submit it.

21 © 2013 Client User Guide
Printing Invoices There are multiple ways to access the screens to print invoices. You can select Print Invoice from the Home screen, Print Invoice from the drop-down menu on the View Invoices screen (for both consolidated and non-consolidated invoices); or, you can select the Print icon on the Invoice Details page. You can print invoices in PDF format or as comma-separated value (CSV) files (which can be opened in Microsoft Excel, for example). An HTML format is also available to either view in your web browser or to print.
Important Note: Clicking “Print Now” anywhere in the application takes you to the Print Options screen where you can generate your invoice in a variety of formats. Once the invoice is generated, you may choose to save it to your computer and/or print it. Clicking the Print Now button is the way to create a downloadable version of the invoice.
Regardless of where you select to print invoices, the Print Options screen opens. You can print complete invoices or sections from the invoices and specify the invoices to print (if you selected the consolidated view). All invoices with a Current, Prior, and Paid status can be printed and exported.

22 © 2013 Client User Guide
1. After accessing the Print Invoice screen, select the type of format* you want to print and, if there are multiple invoices, select the invoice(s) to print and select the sorting order for each selection. Then click Print to generate the report.
* Note about formats: The following guidelines can assist you in choosing the best output format for your purposes:
• CSV: best for sorting and manipulating data as well as exporting into other applications. • PDF: best for printing • HTML: best for viewing information online when printing is not needed
2. While the invoice is generating, the status displays, “Running” as shown below. Depending on the size and complexity of the report, it may take a few moments to generate the results. Click Refresh to determine if the report is ready to be downloaded.

23 © 2013 Client User Guide
3. Once the report is available, the status changes to Complete. Select Download from the drop-down menu to generate the report in the format you selected.
Email Notifications Email addresses are collected as part of the registration process for HBRs with billing access. It is important to register new users promptly when billing personnel at your agency changes to ensure these email notifications are received.
You will receive email notifications for the following scenarios:
• New Invoice: alerts you when new invoices are available for you to view. • Online Payment: alerts you when an online payment has been made in eBilling. • Returned Payment: alerts you when your payment has been returned from its bank. • Delinquency (Warning): notifies you that your account has reached the first stage of delinquency due to
unpaid premiums.

24 © 2013 Client User Guide
Viewing, Creating, and Editing Payment Accounts Creating/Editing Bank Accounts
1. Select Payment Accounts from the Setup tab to add and edit all accounts used to pay invoices online.
2. To create a new bank account, go to Step 2a. To edit a current account, go to Step 2c.
a. Select Create Payment Account at the top of the Payment Accounts page to display the Account Information tab.
b. Enter all required Bank Account information.
c. Select Edit Account from the drop-down menu for any account you need to update; the Account Information tab displays the current account information.

25 © 2013 Client User Guide
3. Enter/Edit account information (required fields are indicated with *) on the Account Information tab.
If this will be the default account for making payments for your group, check the “Make this my default payment account” checkbox. When you have entered all information, click Save to finish creating the account.

26 © 2013 Client User Guide
Reviewing Payment Accounts Audit Data
The Payment Accounts tab features an Audit History. Both carrier and client users (with security access) will have access to view this information.
When users edit a payment account, they will be able to select the History button to view:
• The Login ID of the last person to make changes • The date and time of the last change made to a payment account
To see the history for any available payment account:
1. Select Payment Accounts from the Setup tab to add and edit all accounts used to pay invoices online.
2. Select Edit Account from the drop-down menu.
3. Select the History button at the top right of the screen.
4. Select View from the drop-down menu for the record.

27 © 2013 Client User Guide
5. Select Back to review other records for this account, or select Close Window to return to the Edit Account Payment screen.

28 © 2013 Client User Guide
Auto Draft There are several ways to set up automatic drafts depending on your permissions:
1. For an existing payment account, go to the Setup tab, then click View/Edit Account as shown below.
2. Set up a new payment account by accessing the Setup tab and clicking Create Payment Account.

29 © 2013 Client User Guide
3. Complete the fields of the Create Payment Account screen.
Notes:
• Auto-draft will be effective the date it is authorized. • Once auto-draft is enabled, your group’s Total Amount Due will be automatically drafted on the first of each
month for the upcoming month. For example, the payment automatically drafted on May 1st covers the billing period May 1-May 31.
• To turn off auto-draft, just repeat the steps to access the auto-draft option, uncheck the box, and click Save. • To view whether an account is set up for auto-draft, refer to Reviewing Payment Accounts Audit Data in this
guide.
Whichever path you take, you will see this checkbox and language. Check the box and click Save to establish auto-draft.

30 © 2013 Client User Guide
Viewing Payment History
Searching for Payments
Perform the following procedure to search for a payment.
1. Select Payment History from the Billing tab to display the Payments search page.
2. Enter search criteria and select Submit.

31 © 2013 Client User Guide
3. Search Results display as shown below.
In any table, you can click the icon to sort the data in descending order by that column. Click the icon again to sort in ascending order. Click the column name to undo sorting.
32 © 2013 Client User Guide
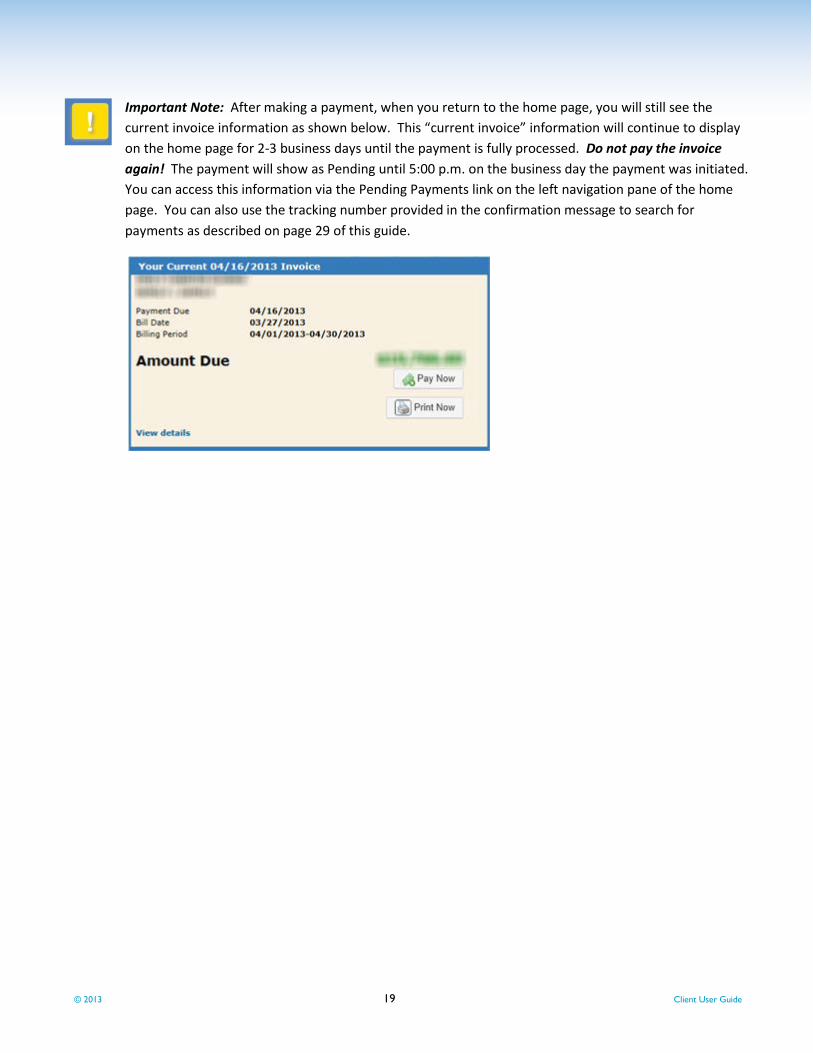
Creating and Reviewing Reports You can generate information for specific invoice reports and payment reports. Once generated, reports can be downloaded (saved to your computer) and/or printed.
The Reports tab contains 3 sub-tabs:
• The Create Reports tab displays all available reports. Each report has search criteria and report format (PDF or CSV, for example). You can create a one-time report or schedule reports to run at specific time intervals.
• The Completed Reports tab lists all the reports that have been generated within the last 7 days. • The Scheduled Reports tab displays any reports that have been set up to run for a specific start and end date. You
can edit the reports or delete them from the scheduled run.

33 © 2013 Client User Guide
Creating and Viewing On-Demand Reports 1. Select Create from the drop-down menu for the report you want to generate from the Reports tab. Reports
are categorized by Invoice or Payment report type.
2. Enter the parameters for the report and click Next to display the Format tab.

34 © 2013 Client User Guide
3. Enter the formatting options, including report output (CSV, HTML, or PDF), and sorting preferences. Do not select the run this report on a regular schedule checkbox since you are submitting this as an on-demand report.
* Note about formats: The following guidelines can assist you in choosing the best output format for your
purposes:
• CSV: best for sorting and manipulating data as well as exporting into other applications. • PDF: best for printing • HTML: best for viewing information online when printing is not needed
4. Click Submit to display the report on the Completed Reports tab. While the report is generating, the status displays as “Running” as shown below. Depending on the size and complexity of the report, it may take a few moments to generate the results. Click Refresh to determine if the report is ready to be downloaded.

35 © 2013 Client User Guide
5. Once the report is available, the status changes to Complete. Select Download from the drop-down menu to generate the report in the format you selected.

36 © 2013 Client User Guide
Scheduling Reports
In addition to creating on-demand reports, you can also schedule them. You can set up a report to be run once a week, for example, and the report will run automatically at the designated time. You can define when the report should be run—daily, weekly, and monthly.
If another scheduled report runs during the time period already set for scheduled reports, eBilling creates another instance of the report, rather than replacing the previously-generated report.
To schedule reports: 1. Select Create from the drop-down menu for the report you want to generate from the Reports tab. Reports
are categorized by Invoice or Payment report type.
The Create a Report window displays with the Filter tab selected.
2. Enter the parameters for the report and select Next to display the Format tab.

37 © 2013 Client User Guide
3. Enter the formatting options, including report output (CSV, HTML, or PDF), and sorting preferences.
Select the Run this Report on a regular schedule checkbox and enter the scheduling parameters for the time frame you want to run the report.
* Note about formats: The following guidelines can assist you in choosing the best output format for your purposes:
• CSV: best for sorting and manipulating data as well as exporting into other applications. • PDF: best for printing • HTML: best for viewing information online when printing is not needed
4. After filling out scheduled criteria and selecting Submit, you receive a message that states “Your report
has been scheduled.”
Notes:
• The report displays under the Scheduled Reports tab with a status of Pending until it runs. It will then have a status of Complete.
• Once you review the report, the status changes to Viewed. Also, the criteria of a scheduled report can be edited.

38 © 2013 Client User Guide
Invoice Comparison Report
The Invoice Comparison Report will assist with the monthly reconciliation process and understanding what has changed from one month’s invoice to the next.
To run the Invoice Comparison Report: 1. Select Create from the Options drop down to the left of the Invoice Comparison Report.
The Create a Report screen displays with the Filter tab selected.
2. Enter the Account Number, Subscriber ID, and Billing Period and click Next.
The Format tab displays.
39 © 2013 Client User Guide
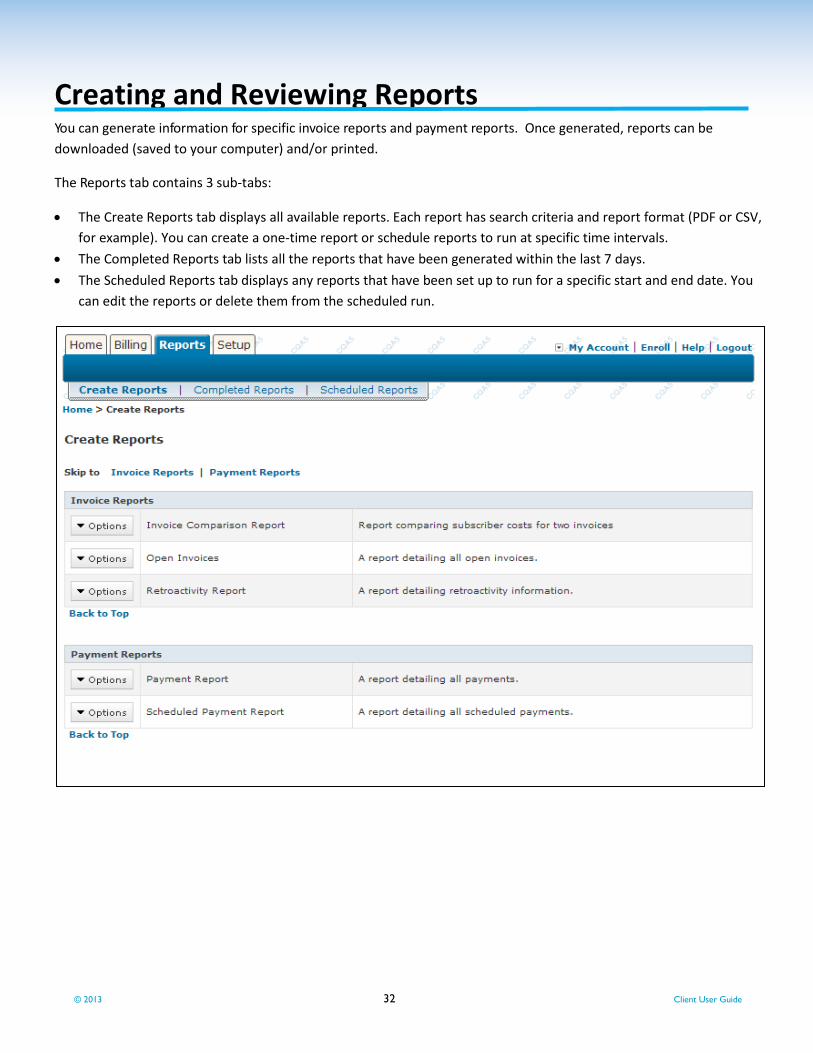
3. Select the Formatting options for the report as described in the previous section. Click Submit.
The Completed Reports screen displays with the report status “Running.”
4. Click Refresh.
When the report is finished generating, the status changes to Complete.

40 © 2013 Client User Guide
5. Click the Options dropdown, then click Download to download the report.
The report is generated in the format you specified.
Reminder: the Subscriber ID is the member’s social security number plus the two-digit BCBSNC suffix.
Use this report to compare each subscriber’s billing totals for the selected month to their totals for the previous month.