Embed Size (px)
Citation preview
Borland® StarTeam® 2009
StarTeam Server Help
Borland Software Corporation8310 N Capital of Texas Hwy, Bldg 2, Ste 100Austin, Texas 78731 USAwww.borland.com
Borland Software Corporation may have patents and/or pending patent applications covering subject matter in thisdocument. Please refer to the product CD or the About dialog box for the list of applicable patents. The furnishing ofthis document does not give you any license to these patents.
Copyright © 1995–2009 Borland Software Corporation and/or its subsidiaries. All Borland brand and product namesare trademarks or registered trademarks of Borland Software Corporation in the United States and other countries. Allother marks are the property of their respective owners.
June 2009PDF
2
StarTeam ServerGetting Started ............................................................................................................................................. 9
Introduction ......................................................................................................................................... 10Installing StarTeam ...................................................................................................................... 11License Overview ........................................................................................................................ 12About Source Control .................................................................................................................. 14StarTeam Product Overview ........................................................................................................ 15Standard StarTeam Architecture Overview ................................................................................. 20StarTeamMPX Components ........................................................................................................ 22
What's New in StarTeam 2009 ........................................................................................................... 25New Features in StarTeam 2009 Server ..................................................................................... 26New Features in the StarTeam 2009 Cross-Platform Client ...................................................... 28New Features in View Compare/Merge ....................................................................................... 31Borland StarTeam 2009 Web Client ............................................................................................ 36New Features in Other StarTeam 2009 Components and Products ........................................... 37
Help on Help ....................................................................................................................................... 39StarTeam Overview ..................................................................................................................... 40Where to Find Documentation for Each Product ......................................................................... 41User Roles and StarTeam Documentation .................................................................................. 44
Guidelines for Deploying StarTeam .................................................................................................... 45Performance and Scalability Factors ........................................................................................... 46Configuration Size ....................................................................................................................... 47Multiple Configurations on the Same Server ............................................................................... 48Medium Configurations ................................................................................................................ 50Large Configurations ................................................................................................................... 52Active/Passive Clustering ............................................................................................................ 54
Server Administration ......................................................................................................................... 56Server Administration Overview .................................................................................................. 57Server Administrator Assumptions .............................................................................................. 59Server Configuration Overview .................................................................................................... 60Server Configuration Guidelines .................................................................................................. 62Audit Logs .................................................................................................................................... 65StarDraw Sample Server Configuration ...................................................................................... 66
Tour of the UI ...................................................................................................................................... 67Server Administration Tool .......................................................................................................... 68Customize VCM Tool ................................................................................................................... 70Online Purge Tool ........................................................................................................................ 73
Concepts .................................................................................................................................................... 76Server Administration ......................................................................................................................... 77
Overview of Security Strategies .................................................................................................. 78Password Use .............................................................................................................................. 83Server Time-Out Options ............................................................................................................. 84Online Purge ................................................................................................................................ 86Granting Access Rights ............................................................................................................... 87
Granting Project-Level Access Rights .................................................................................. 88Granting View-Level Access Rights ..................................................................................... 90Granting Folder-Level Access Rights ................................................................................... 91Granting Item-Level Access Rights ...................................................................................... 93Denying Access Rights ........................................................................................................ 94General Access Rights Rules ............................................................................................... 95Group Privileges and Access Rights .................................................................................... 96StarTeam SDK Connection Control .................................................................................... 97
Data Storage Locations ............................................................................................................... 99Data Storage Overview ...................................................................................................... 100
3
Native-II Vaults and Hives .................................................................................................. 103User and Group Configuration Overview ................................................................................... 106LDAP for Password Verification ................................................................................................ 108Server Configuration Guidelines ................................................................................................ 109Atomic Check-ins ....................................................................................................................... 112Vault Verify for Verifying File Revisions ..................................................................................... 113Tracing Data from Check-out Operations with the Check-out Trace Utility ............................... 116Security Logs ............................................................................................................................. 117Overview of Initialization Files ................................................................................................... 119Using a Test Server ................................................................................................................... 121Backups ..................................................................................................................................... 122
What to Backup .................................................................................................................. 123StarTeam Backups ............................................................................................................. 124Moving Server Configurations Overview ............................................................................ 125Online Backups .................................................................................................................. 127Database Backups ............................................................................................................. 128
Database Backups Overview ...................................................................................... 129SQL Server Database Backups .................................................................................. 130Oracle Database Backups .......................................................................................... 133
Customization ............................................................................................................................ 137Email Support and Customized Email Notifications .................................................................. 138
Procedures ............................................................................................................................................... 141Licensing the Server ......................................................................................................................... 142
Assigning Licenses to Users ..................................................................................................... 143Managing Named User Licenses .............................................................................................. 145Saving License (.slip) Files ........................................................................................................ 147Setting Up License Servers ....................................................................................................... 148Using Evaluation Licenses ........................................................................................................ 149Using Native Licenses ............................................................................................................... 150
Setting Security Options ................................................................................................................... 151Changing Server Time-out Options ........................................................................................... 152Configuring the Number of Logon Attempts .............................................................................. 154Setting an Encryption Level ....................................................................................................... 155
Migrating Servers .............................................................................................................................. 156Migrating Server Configurations to Other Databases ................................................................ 157Moving Server Configurations to a New Server ........................................................................ 160
Managing Users and Groups ............................................................................................................ 162Changing User Passwords ........................................................................................................ 163Configuring Password Constraints ............................................................................................ 164Configuring the Number of Logon Attempts .............................................................................. 165Forcing Password Changes ...................................................................................................... 166Forcing Users to Log Off ........................................................................................................... 167Reactivating Administrative Accounts ....................................................................................... 168Setting Up Groups ..................................................................................................................... 169Setting Up Users ....................................................................................................................... 172
Managing Passwords ....................................................................................................................... 177Changing User Passwords ........................................................................................................ 178Configuring Password Constraints ............................................................................................ 179Forcing Password Changes ...................................................................................................... 180
Managing Access Rights and Group Privileges ................................................................................ 181Configuring Access Rights ........................................................................................................ 182Configuring Group Privileges ..................................................................................................... 187Configuring Privileges ................................................................................................................ 188Configuring Server-level Access Rights .................................................................................... 189
Managing Log and Initialization Files ................................................................................................ 190
4
Displaying and Customizing StarTeam.Log .............................................................................. 191Enabling and Purging the Audit Log .......................................................................................... 193Working with the Security Event Log ......................................................................................... 194Working with the Server Log ..................................................................................................... 196
Backing Up Information .................................................................................................................... 198Backing up Project Data ............................................................................................................ 199Restoring Project Data .............................................................................................................. 200
Tracing Data from Check-out Operations ......................................................................................... 201Enabling Tracing for Server Configurations ............................................................................... 202Generating .CSV Files About Check-out Operations ................................................................ 203
Working with Server Configurations ................................................................................................. 204Creating Server Configurations ................................................................................................. 205Disabling and Enabling Server Configurations .......................................................................... 210Enabling Advanced View Types ................................................................................................ 211Exporting Database Information ................................................................................................ 212Locking and Unlocking Server Configurations ........................................................................... 213Logging On to Server Configurations Using the Server Administration tool .............................. 214Opening the Server Administration Tool .................................................................................... 216Purging Deleted Views from Server Configurations .................................................................. 217Reviewing Database Information ............................................................................................... 219Running Server Configurations as a Windows Service ............................................................. 220Splitting Server Configurations .................................................................................................. 222Starting and Stopping Online Purge .......................................................................................... 225Starting and Stopping Server Configurations ............................................................................ 227Verifying File Revisions with Vault Verify .................................................................................. 230
Customizing Server Configuration Options ....................................................................................... 231Assigning and Removing Event Handlers ................................................................................. 232Changing Server Session Options ............................................................................................ 233Changing Server Time-out Options ........................................................................................... 235Configuring Email Support and Email Notification ..................................................................... 237Configuring Per-project and Per-Component Email Notifications .............................................. 239Creating New Event Handlers ................................................................................................... 241Designating Endpoints ............................................................................................................... 242Diagnosing Server Problems ..................................................................................................... 243Enabling Directory Service Support ........................................................................................... 244Enabling Server Auto-reconnect ................................................................................................ 245Monitoring Server Statistics ....................................................................................................... 246Reviewing or Modifying Existing Event Handlers ...................................................................... 247Setting an Encryption Level ....................................................................................................... 248
Configuring Data Storage Options .................................................................................................... 249Creating New Hives ................................................................................................................... 250Customizing the Archives Path .................................................................................................. 252Verifying File Revisions with Vault Verify .................................................................................. 254Viewing and Customizing Hive Properties ................................................................................. 255
Reference ................................................................................................................................................ 256Administration and Configuration ...................................................................................................... 257
Project Structure ........................................................................................................................ 258Configure Server Dialog Box Options ........................................................................................ 260
Configure Server Dialog Box (General Tab) ...................................................................... 261Configure Server Dialog Box (Audits Tab) ......................................................................... 263Configure Server Dialog Box (Database Tab) .................................................................... 264Configure Server Dialog Box (Protocol Tab) ...................................................................... 265Configure Server Dialog Box (Event Handlers Tab) ........................................................... 266Configure Server Dialog Box (Directory Service Tab) ........................................................ 267Configure Server Dialog Box (Diagnostics Tab) ................................................................. 268
5
Guidelines for Data Files and Transaction Logs ........................................................................ 269Guidelines for Microsoft SQL Server/SQL Server Express Data Files and Transaction Logs ....270Guidelines for Oracle Schema User Data Files .................................................................. 271
Initialization File Reference ....................................................................................................... 272Locating Initialization Files ................................................................................................. 273ConnectionManager.ini ...................................................................................................... 274starteam-server-configs.xml ............................................................................................... 275starteam-client-options.xml ................................................................................................. 278
Server Log File Reference ......................................................................................................... 279Server Log .......................................................................................................................... 280Server Log Error Codes ..................................................................................................... 281Security Event Types ......................................................................................................... 282StarTeam.Log ..................................................................................................................... 283DbConvert.<local>.log ........................................................................................................ 284
Server Configuration Status Icons ............................................................................................. 287Troubleshooting Server Configuration Problems ....................................................................... 288
Access Rights and Privileges ........................................................................................................... 289Group Privileges ........................................................................................................................ 290Server Access Rights ................................................................................................................ 291Project Access Rights ................................................................................................................ 292View Access Rights ................................................................................................................... 293Folder Access Rights ................................................................................................................. 294Child Folder Access Rights ....................................................................................................... 295File Access Rights ..................................................................................................................... 297Generic Item Access Rights ...................................................................................................... 299Promotion State Access Rights ................................................................................................. 300Component Access Rights ........................................................................................................ 301Component-level Filter Access Rights ....................................................................................... 302Individual Filter Access Rights ................................................................................................... 303Component-level Query Access Rights ..................................................................................... 304Individual Query Access Rights ................................................................................................. 305
6

7
StarTeam ServerThis section explains using the StarTeam Server
In This SectionGetting StartedThis section contains basic conceptual topics related to software change management.
ConceptsThis section contains all the conceptual topics.
ProceduresThis section contains all the tasks associated with administering and using StarTeam.
ReferenceThis section contains all reference topics.
8
Getting StartedThank you for choosing StarTeam!
This section contains basic conceptual topics related to software change management.
In This SectionIntroductionThis section provides introductory information about StarTeam.
What's New in StarTeam 2009This section contains 'What's New' information for this release.
Help on HelpThis section describes theStarTeam Help system.
Guidelines for Deploying StarTeamThis section discusses high-level options for hardware deployment with StarTeam.
Server AdministrationThis section contains conceptual topics related to server administration.
Tour of the UIThis section contains conceptual topics describing the StarTeam user interface.
9
IntroductionThis section provides introductory information about StarTeam.
In This SectionInstalling StarTeamLink to the PDF file containing StarTeam installation procedures.
License OverviewThis topic describes licensing options for StarTeam.
About Source ControlThis topic describes source control at a high level.
StarTeam Product OverviewThis topic describes the products that make up StarTeam.
Standard StarTeam Architecture OverviewThis topic provides an overview of the standard StarTeam architecture.
StarTeamMPX ComponentsThis topic describes the components of StarTeamMPX.
10

Installing StarTeamInstallation instructions for installing StarTeam products can be found in Installing StarTeam . To view this document,choose Start Programs Borland StarTeam StarTeam Cross-Platform Client 2009 Documentation Installation, or Start Programs Borland StarTeam StarTeam Server 2009 Documentation
Installation.
11
License OverviewThis topic explains licensing for StarTeam, that is, the license package that you purchase and the different types oflicenses available to determine how many users access StarTeam.
License PackagesStarTeam Server can be run as an Enterprise or Enterprise Advantage server, each of which has a different set offeatures. The features that a client can access on the server is determined by the license package that you purchase.
♦ Enterprise has all basic features including the Task component, the ability to customize properties for anycomponent, and the Web Client
♦ Enterprise Advantage has all the Enterprise features plus the Requirement component, StarTeamMPX, andthe alternate property editors that enable you to create custom forms and design workflow rules to control howall the items in a component move from state to state.
♦ Evaluation licenses are automatically installed and activated when you install the server. These licensesprovide the features that you would get by using an Enterprise Advantage license and expire after a certainnumber of days.
If you change the registered license while a StarTeam project is open on a user’s workstation, the licensing takeseffect for that user by closing and reopening the project window. If you license a StarTeam Server as Enterpriseafter using an evaluation license (which is for the Enterprise Advantage edition) the feature set will change. Forexample, if you created requirements during the evaluation and license the server as anything other than EnterpriseAdvantage, the requirements tab will no longer display in the client.
Named User, Concurrent, and Borland License TypesLicenses also determine how many users can access StarTeam Server. Users can have either named user orconcurrent licenses.
A named user license can be used only by the user who has been assigned that license. For example, if you have5 named user licenses and 25 concurrent licenses, the 5 users who receive the named user licenses are guaranteedaccess to the server. No one else can use their licenses.
A concurrent license can be used by any user who does not have a named user license. For example, users withoutnamed user licenses receive concurrent licenses on a first-come, first-served basis. After all the concurrent licensesare in use, users attempting to log on are notified that there are no more licenses available at this time. They cantry again later. Note that the Cross-Platform Client and the Web Client consume licenses separately.
When you first register the server, you enter one or two serial numbers: one for named user licenses and/or one forconcurrent licenses. When using multiple serial numbers, they must all identify the same StarTeam edition (that is,Enterprise or Enterprise Advantage).
You can add more named user or concurrent licenses. StarTeam Server keeps track of the total number by summingthe licenses supplied in each serial number or slip. This is referred to as stackable licensing.
You can add or import as many users as you choose, but access to the server is granted only to users with nameduser licenses or to users who receive concurrent licenses as they log on. If you have StarTeam named user licenses,you must assign them to specific users in the User Manager dialog (found in the Server Administration Window).Everyone else is assumed to have a StarTeam concurrent license.
If you have Borland licenses, users must be assigned to the correct slip in the User Manager dialog, regardless oftheir named or concurrent user status. An additional status, Unassigned, may be used instead of a slip.
The StarTeam Server Administrator is automatically assigned a named user license that cannot be removed. Thisis a “free” license that is not counted against the number of named user licenses you have available.
12
Using StarTeam LicensingStarTeam Server can be licensed in either of two ways:
♦ StarTeam licensing, also referred to as native licensing, which is internal to the product
♦ Borland licensing available for use with license servers (BLS and FlexLM)
If StarTeam users attempt to access a server configuration that is managed by an unlicensed version of StarTeamServer, the tabs in the upper and lower panes of their StarTeam clients will not display.
Customers buy named Enterprise, concurrent Enterprise, named Enterprise Advantage, or concurrent EnterpriseAdvantage licenses for StarTeam Server. Any client can access any server as long as that server recognizes theuser and has a license for that user. Customers usually choose just one method of licensing: StarTeam nativelicensing, Borland License Server licensing, or FlexLM licensing, but combinations can be supported. Licensing ishandled after the installation, either by setting up a licensing server and putting "slip" files in the StarTeam Server's\licenses folder (a child of the server's installation folder) or by registering StarTeam native licenses using theStarTeam Server Administration tool.
Because StarTeam Server licenses are stackable, you can enter more than one license key so long as all the licensekeys are for the same edition (Enterprise or Enterprise Advantage). Be sure to delete the evaluation license beforeentering the first new license.
When you first register your server, you enter one or two serial numbers: one for named user licenses and/or onefor concurrent licenses. When using multiple serial numbers, they must all identify the same StarTeam edition. Youcan add more named user or concurrent licenses. StarTeam Server keeps track of the total number by summingthe licenses supplied in each serial number or slip. This is referred to as stackable licensing.
Related Concepts
StarTeam Product Overview
Related Procedures
Licensing the Server
13
About Source ControlThis topic describes source control at a high level, including basic information about source control and repositories.
Source Control BasicsEach source control system consists of one or more centralized repositories and a number of clients. A repositoryis a database that contains not only the actual data files, but also the structure of each project you define.
Most source control systems adhere to a concept of a logical project, within which files are stored, usually in one ormore tree directory structures. A source control system project might contain one or many IDE-based projects inaddition to other documents and artifacts. The system also enforces its own user authentication or, very often, takesadvantage of the authentication provided by the underlying operating system. Doing so allows the source controlsystem to maintain an audit trail or snapshot of updates to each file. By storing only the differences, the sourcecontrol system can keep track of all changes with minimal storage requirements. When you want to see a completecopy of your file, the system performs a merge of the differences and presents you with a unified view. At the physicallevel, these differences are kept in separate files until you are ready to permanently merge your updates, at whichtime you can perform a commit action.
This approach allows you and other team members to work in parallel, simultaneously writing code for multipleshared projects, without the danger of an individual team member's code changes overwriting another's. Sourcecontrol systems, in their most basic form, protect you from code conflicts and loss of early sources. Most sourcecontrol systems give you the tools to manage code files with check-in and check-out capabilities, conflictreconciliation, and reporting capabilities. Most systems do not include logic conflict reconciliation or buildmanagement capabilities.
Commonly, source control systems only allow you to compare and merge revisions for text-based files, such assource code files, HTML documents, and XML documents. StarTeam stores binary files, such as images or compiledcode, in the projects you place under control. You cannot, however, compare or merge revisions of binary files. Ifyou need to do more than store and retrieve specific revisions of these types of files, you might consider creating amanual system to keep track of the changes made to such files.
Repository BasicsSource control systems store copies of source files and difference files in some form of database repository. In somesystems, such as CVS or VSS, the repository is a logical structure that consists of a set of flat files and control files.In other systems, such as StarTeam, the repositories are instances of a particular database management system(DBMS) such as MS SQL Server or Oracle.
Repositories are typically stored on a remote server, which allows multiple users to connect, check files in and out,and perform other management tasks simultaneously.
With StarTeam, you create a server configuration to identify a repository for StarTeam projects. Each serverconfiguration acquires its own set of projects as they are created. The Server can run any number of serverconfigurations. Because each server configuration must use a database, you need to make sure that you establishconnectivity not only with the server, but also with the database instance.
Related Concepts
StarTeam Product OverviewServer Configuration Overview
14

StarTeam Product OverviewThis topic describes the products that make up StarTeam. Each product is described in the following sections.
The product descriptions in the sections that follow indicate if it is included in a particular licensing package. StarTeamis available in two licensing packages:
♦ Enterprise: StarTeam Enterprise provides a basic feature set, including the StarTeam Server, StarTeamMPX(Event Transmitter and Message Broker), the Cross-Platform Client, Web Client, LDAP Quick Start Manager,and the SDK. The requirements component is not available with this license; however, it does provide accessto custom fields.
♦ Enterprise Advantage: StarTeam Enterprise Advantage has all the StarTeam Enterprise features plus theRequirement component, StarTeamMPX (Cache Agent and File Transmitter), and StarTeam WorkflowExtensions which include alternate property editors (APEs) that enable you to create custom forms and designworkflow rules to control how all the items in a component move from state to state.StarTeam Datamart isavailable for purchase.
StarTeam Products
The StarTeam family of products includes the StarTeam Server, Cross-Platform Client, Web Client, StarTeamMPX,StarTeam Extensions, tools and utilities to use with the clients and server, such as Borland Search, Borland LDAPQuickStart Manager, File Compare/Merge, and StarTeam Datamart, and a variety of integrations with third-partyproducts, including integrations with Microsoft Visual Studio, Microsoft Project, and the Microsoft SCC Integration.Each product is described in more detail in the following sections.
StarTeam Server and client workstations are connected to maintain the repository, store changes made to files, andgrant users access to project data.
15
StarTeam ServerAvailable for Windows and Linux.
StarTeam Server is a powerful tool that supports distributed development teams and mobile team members. Itsupports data in all languages that can be encoded in UTF-8. You can access the data managed by StarTeam Serverusing a variety of clients, such as the Cross-Platform Client or Web Client. Each client must have a user name andthe correct access rights to access the selected server configuration (an instance of the StarTeam Server).
StarTeam clients use already familiar applications to access the server. For example, you can access the serverfrom Internet Explorer using Web Client. If you use a StarTeam IDE integration, you can access StarTeam Serverfrom IDE applications such as Microsoft Visual Studio and platforms such as Eclipse.
Access to StarTeam Server can be local or remote—via the Internet, intranet, or WAN. Built-in encryption enablesyou to work securely over public networks such as the Internet. Normally, you install StarTeam Server on a computeraccessible to all team members. You then install StarTeam clients on team members’ workstations.
StarTeamMPXAvailable with Enterprise licenses: Event Transmitter andMessage Broker.
Available with Enterprise Advantage licenses: All of StarTeamMPX Enterprise license features plus File Transmitterand Cache Agent.
This product is an addition to the StarTeam Server and must be installed separately. It uses advanced caching andpublish/subscribe communication technology to improve the performance of StarTeam clients and extend thescalability of StarTeam Server. A Linux version of StarTeamMPX is also available.
StarTeam Workflow ExtensionsAvailable with Enterprise Advantage licenses.
StarTeam Workflow Extensions enable you to create custom workflows for StarTeam components, such as changerequests and tasks. You can customize the built-in workflow using alternate property editors (APEs), the WorkflowDesigner, and the Notification Agent.
Alternate Property Editors (APEs) APEs are forms written in Java that replace the standard properties dialogsthat come with each component (files, change requests, and so on) of theapplication.
Workflow Designer StarTeam includes its own built-in workflow. If you intend to use your owncustom workflow, you can use Workflow Designer to develop it.
Workflow Designer outputs item_type.Workflow.xml files that formalize thesteps in a workflow, specifies who will be notified in each step of the workflowor about exceptions and so on. Each *.Workflow.xml file can be used for anentire project or individual views within that project. The StarTeam Extensionsworkflow engine and Notification Agent read from the *.Workflow.xml filesgenerated by Workflow Designer.
Notification Agent Notification Agent monitors server configurations to determine the users thatneed to be notified about pending work and about exceptions that occur in theworkflow process.
Cross-Platform ClientAvailable with both licenses.
First introduced in 2001, the Cross-Platform Client is a pure Java client that provides support of operating systemswhere a compatible JRE or JDK are available. As such, Cross-Platform Client is available for the Windows, Solaris,
16
and Linux operating systems. For the StarTeam release, the Cross-Platform Client has been given many qualityenhancements.
StarTeam Edition for EclipseAvailable with both licenses.
StarTeam Edition for Eclipse allows you to share projects on StarTeam Server and projects in the Eclipse workspace,but it is much more than just a version control plug-in. This integration offers project teams a customizable solutionproviding requirements, task, and change management, defect tracking and threaded discussions tightly integratedwithin the Eclipse platform.
StarTeam Visual Studio IntegrationThe StarTeam Visual Studio Integration provides the StarTeam software configuration management capabilitiestightly integrated with the Visual Studio development environment. Using this integration makes it possible for youto develop applications in the Visual Studio environment while simultaneously using the version control, changerequest, topic, task, and requirement component assets of StarTeam. The integration brings StarTeam main menucommands, context menu commands, and an embedded StarTeam client (providing much of the same look-and-feel as the full-featured Cross-Platform Client) to the Visual Studio development environment.
StarTeam Web ClientThe new StarTeam Web Client is an intuitive web-based interface that many simultaneous users can use to connectto one or more StarTeam Servers to access projects and manage items. This initial release of the Web Client deliversa core feature set designed to meet the needs of users responsible for viewing, creating, and editing StarTeamchange requests, requirements, tasks, and topics. Browsing files and a limited set of file operations are also available.
Note: You must have a StarTeam user license to use the Web Client.
StarTeam SCC IntegrationAvailable with both licenses.
The StarTeam SCC Integration works with any application that uses the Microsoft Source Code Control (SCC)Application Programming Interface (API). This API, originally designed by Microsoft to allow applications to workwith Microsoft Visual SourceSafe, enables you to perform version control operations, such as checking files in andout, using StarTeam as the SCC provider.
StarTeam Synchronizer for Mercury TestDirector for Quality CenterThis product is available with both licenses.
StarTeam Synchronizer for Mercury TestDirector for Quality Center can ensure that the same data appears in QualityCenter and a database used by StarTeam Server. The goal of the synchronization is to provide access to the latestinformation about defects, whether the defects are being processed from Quality Center or from StarTeam. You canuse Quality Center to add defects, and you can use StarTeam to indicate that those defects have been fixed andvice versa. Team members do not need to be aware of where the defect was last processed. The latest data isavailable at all times, as long as the databases are synchronized frequently.
17
StarTeam Version-Control Add-in for Mercury TestDirector for Quality CenterAvailable with both licenses.
TheStarTeam Version-Control Add-in for Mercury TestDirector for Quality Center enables you to place current andprior versions of Quality Center test plans under version control in the StarTeam repository. It supports both theWindows and Linux versions of StarTeam Server.
StarTeam Microsoft Project IntegrationAvailable with both licenses.
The interoperation of the StarTeam Microsoft Project Integration and Microsoft Project make the jobs of both projectplanners and team members easier. Project planners use Microsoft Project to list the tasks that workers mustperform. After exporting the tasks to StarTeam, they can gather information about the work accomplished by eachteam member in StarTeam — rather than communicating individually with each team member.
Borland SearchAvailable with Enterprise Advantage licenses.
Borland Search allows users to perform ad hoc queries across servers and projects. The query results reflect theaccess rights of the user logged on to Borland Search so information is shared across the organization withoutcompromising security.
Borland LDAP QuickStart ManagerAvailable with both licenses.
Borland LDAP QuickStart Manager is a utility that allows you to import user information from a directory service orLDIF file into a CaliberRM or StarTeam Server. The imported user information is stored as user properties on eachrespective server.
StarTeam Layout DesignerAvailable with both licenses for the Cross-Platform Client and Web Client client.
The StarTeam Layout Designer provides the ability to customize forms within the application. Custom forms can beused to show custom properties, hide default properties that are not of interest to your organization, or rearrangethe interface to more closely meet your organization’s requirements.
StarTeam Toolbar UtilityThe StarTeam Toolbar Utility (Toolbar) is a component of the StarTeam and CaliberRM products designed to makeit easier for you to log on to multiple servers and to launch different programs. It automatically caches the user nameand password used to log on to each StarTeam or CaliberRM server, reducing the number of times that you mustenter your logon information. The Toolbar is initially populated with shortcuts for the tools of the StarTeam andCaliberRM products that are installed on your workstation. Because the Toolbar uses the standard Windows programshortcut feature, you can easily add any other program as a tool.
StarTeam DatamartAvailable with Enterprise Advantage licenses. Can be purchased separately with Enterprise licenses.
StarTeam Datamart is a complementary product to the StarTeam Server. StarTeam Datamart uses the StarTeamSDK to communicate with the StarTeam Server to create a reporting database that you can use with popular third
18
party reporting applications such as Crystal Reports and Business Objects (reporting applications are not includedwith StarTeam Datamart). StarTeam Datamart extracts data from a StarTeam Server and places the data into arelational database, where reporting tools can access it. StarTeam Datamart can extract information from everyproject, every view in each project, every folder in each view, and every item in each folder, and labels, links, andhistory for each item. You can restrict extraction of data to a particular project and view or only extract certain tables.
StarTeam Import/Export ManagerAvailable for both licenses.
StarTeam Import/Export Manager is a set of utilities that allow you to copy a project from one StarTeam Server toanother as a one-time necessity.
File Compare/MergeFile Compare/Merge is a graphical compare/merge tool delivered with the Cross-Platform Client. It enables you tocompare a file dynamically with the file in the repository, and manually or automatically merge the content of the twofiles. File differences are highlighted in the File Compare/Merge panes using a configurable color scheme, and actionbuttons display in the highlighted areas to simplify the merging process.
View Compare/MergeView Compare/Merge is a comprehensive tool for comparing and merging views available with the Cross-PlatformClient. There are two versions of View Compare/Merge:
♦ Graphical: Provides interactive comparison and merging with per-item and per-folder interaction, allowing youto carefully control which items are compared and how each difference is resolved.
♦ Command-line: Enables batch/shell-directed sessions.
StarTeam SDKThe StarTeam SDK provides the following features and capabilities:
♦ Open access to the StarTeam repository for custom solution building or third-party product integration
♦ Java API for application portability
♦ COM wrapper to support scripting languages through a COM interface layer
♦ Microsoft .NET Assembly supported by StarTeam COM objects
♦ Support for the StarTeamMPX publish/subscribe technology
Related Concepts
What's New in StarTeam 2009Where to Find Documentation for Each ProductTour of the UI
19
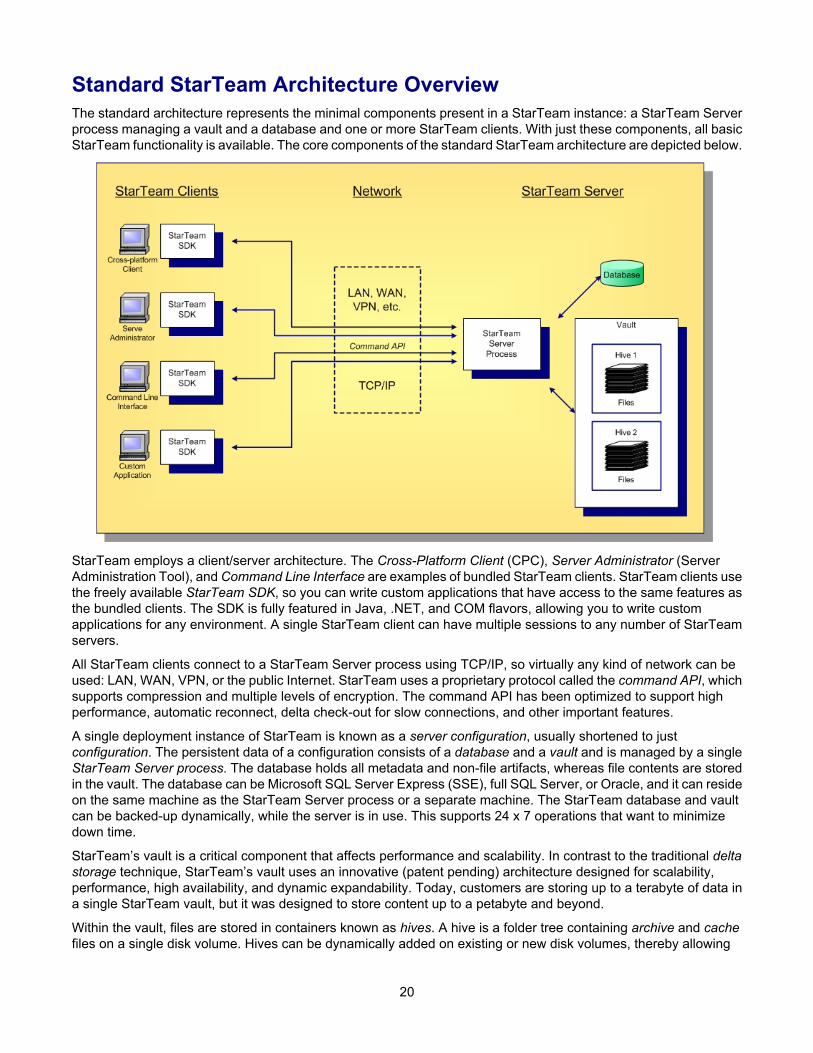
Standard StarTeam Architecture OverviewThe standard architecture represents the minimal components present in a StarTeam instance: a StarTeam Serverprocess managing a vault and a database and one or more StarTeam clients. With just these components, all basicStarTeam functionality is available. The core components of the standard StarTeam architecture are depicted below.
StarTeam employs a client/server architecture. The Cross-Platform Client (CPC), Server Administrator (ServerAdministration Tool), and Command Line Interface are examples of bundled StarTeam clients. StarTeam clients usethe freely available StarTeam SDK, so you can write custom applications that have access to the same features asthe bundled clients. The SDK is fully featured in Java, .NET, and COM flavors, allowing you to write customapplications for any environment. A single StarTeam client can have multiple sessions to any number of StarTeamservers.
All StarTeam clients connect to a StarTeam Server process using TCP/IP, so virtually any kind of network can beused: LAN, WAN, VPN, or the public Internet. StarTeam uses a proprietary protocol called the command API, whichsupports compression and multiple levels of encryption. The command API has been optimized to support highperformance, automatic reconnect, delta check-out for slow connections, and other important features.
A single deployment instance of StarTeam is known as a server configuration, usually shortened to justconfiguration. The persistent data of a configuration consists of a database and a vault and is managed by a singleStarTeam Server process. The database holds all metadata and non-file artifacts, whereas file contents are storedin the vault. The database can be Microsoft SQL Server Express (SSE), full SQL Server, or Oracle, and it can resideon the same machine as the StarTeam Server process or a separate machine. The StarTeam database and vaultcan be backed-up dynamically, while the server is in use. This supports 24 x 7 operations that want to minimizedown time.
StarTeam’s vault is a critical component that affects performance and scalability. In contrast to the traditional deltastorage technique, StarTeam’s vault uses an innovative (patent pending) architecture designed for scalability,performance, high availability, and dynamic expandability. Today, customers are storing up to a terabyte of data ina single StarTeam vault, but it was designed to store content up to a petabyte and beyond.
Within the vault, files are stored in containers known as hives. A hive is a folder tree containing archive and cachefiles on a single disk volume. Hives can be dynamically added on existing or new disk volumes, thereby allowing
20

virtually unlimited capacity. StarTeam stores each file revision in a separate archive file in a manner that minimizesspace usage as well as duplicate content. Amazingly, StarTeam’s vault uses less space than delta-based storage.In certain cases where it is more economical to send file deltas to clients instead of full versions, StarTeam generatesand caches delta files. However, in most cases sending full versions is more economical.
21
StarTeamMPX ComponentsLike all client/server architectures, as the number of clients grows, the server could potentially become a bottleneck.In fact, the scalability of many client/server systems is entirely limited by this bottleneck. Other client/server systemsaddress scalability by deploying multiple instances and replicating information between them to attainsynchronization.
StarTeamMPX (or simply MPX) is a unique solution to client/server scalability. MPX is a publish/subscribe messagingframework that pushes update events that contain metadata and data to clients. It is optional because it is notrequired for basic StarTeam functionality. However, when MPX is activated, it improves StarTeam server scalabilityand improves StarTeam client responsiveness.
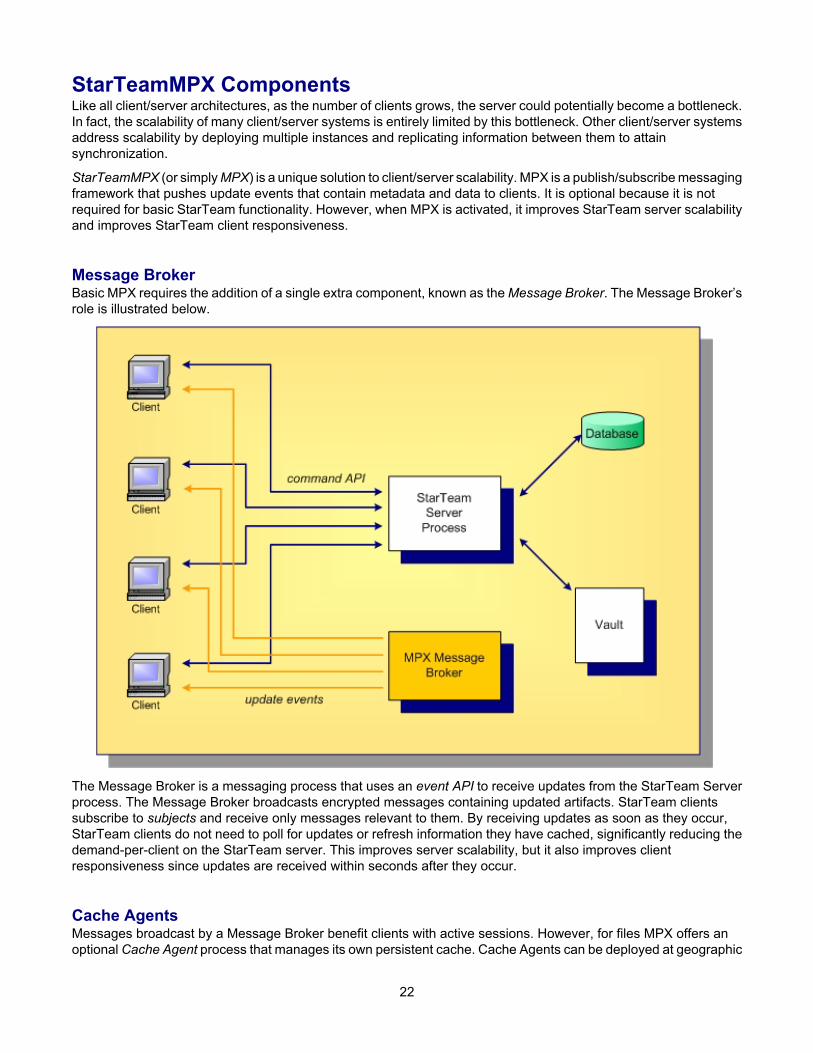
Message BrokerBasic MPX requires the addition of a single extra component, known as the Message Broker. The Message Broker’srole is illustrated below.
The Message Broker is a messaging process that uses an event API to receive updates from the StarTeam Serverprocess. The Message Broker broadcasts encrypted messages containing updated artifacts. StarTeam clientssubscribe to subjects and receive only messages relevant to them. By receiving updates as soon as they occur,StarTeam clients do not need to poll for updates or refresh information they have cached, significantly reducing thedemand-per-client on the StarTeam server. This improves server scalability, but it also improves clientresponsiveness since updates are received within seconds after they occur.
Cache AgentsMessages broadcast by a Message Broker benefit clients with active sessions. However, for files MPX offers anoptional Cache Agent process that manages its own persistent cache. Cache Agents can be deployed at geographic
22
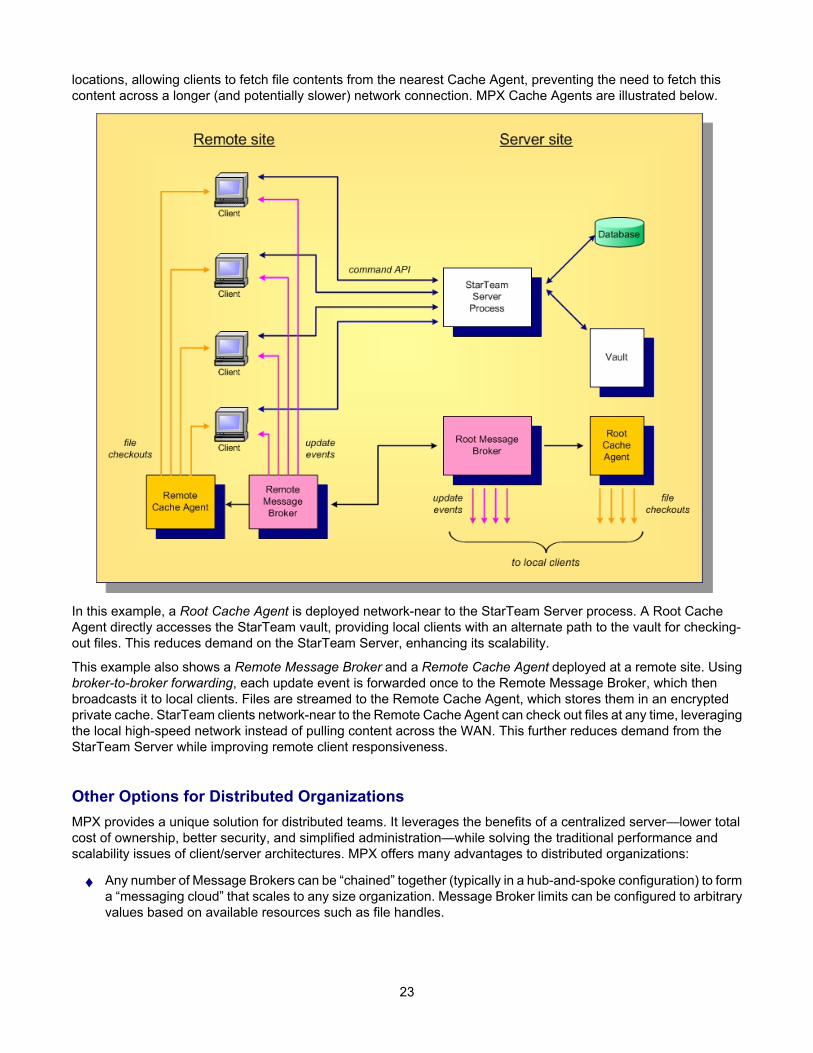
locations, allowing clients to fetch file contents from the nearest Cache Agent, preventing the need to fetch thiscontent across a longer (and potentially slower) network connection. MPX Cache Agents are illustrated below.
In this example, a Root Cache Agent is deployed network-near to the StarTeam Server process. A Root CacheAgent directly accesses the StarTeam vault, providing local clients with an alternate path to the vault for checking-out files. This reduces demand on the StarTeam Server, enhancing its scalability.
This example also shows a Remote Message Broker and a Remote Cache Agent deployed at a remote site. Usingbroker-to-broker forwarding, each update event is forwarded once to the Remote Message Broker, which thenbroadcasts it to local clients. Files are streamed to the Remote Cache Agent, which stores them in an encryptedprivate cache. StarTeam clients network-near to the Remote Cache Agent can check out files at any time, leveragingthe local high-speed network instead of pulling content across the WAN. This further reduces demand from theStarTeam Server while improving remote client responsiveness.
Other Options for Distributed OrganizationsMPX provides a unique solution for distributed teams. It leverages the benefits of a centralized server—lower totalcost of ownership, better security, and simplified administration—while solving the traditional performance andscalability issues of client/server architectures. MPX offers many advantages to distributed organizations:
♦ Any number of Message Brokers can be “chained” together (typically in a hub-and-spoke configuration) to forma “messaging cloud” that scales to any size organization. Message Broker limits can be configured to arbitraryvalues based on available resources such as file handles.
23

♦ Any number of Cache Agents can be distributed globally. Clients can be configured to automatically locate anduse the network-nearest Cache Agent, or they can choose a specific Cache Agent.
♦ Cache Agents use push caching in which content is broadcast and stored by Cache Agents as soon as it iscreated. This makes caches more effective than traditional “pull through” caching, in which every initial requestresults in a “cache miss”.
♦ Cache Agents use advanced synchronization techniques that improve their effectiveness such as pre-charging, tiering, request forwarding, and automatic catch-up.
24
What's New in StarTeam 2009This section provides an overview of the new features found in StarTeam 2009.
In This SectionNew Features in StarTeam 2009 ServerNew features and changes found in StarTeam 2009 Server .
New Features in the StarTeam 2009 Cross-Platform ClientDescribes new features in the StarTeam 2009 Cross-Platform Client.
New Features in View Compare/MergeDescribes changes and new features in View Compare/Merge and the VCMUtility.
Borland StarTeam 2009 Web ClientDescribes the new StarTeam 2009 Web Client.
New Features in Other StarTeam 2009 Components and ProductsNew features in other StarTeam products for this release.
25
New Features in StarTeam 2009 ServerThis release of the StarTeam 2009 Server includes the following new features:
Online PurgeStarTeam 2009 Server introduces Online Purge.
♦ Online Purge allows you to purge data while the Server is running, significantly reducing maintenancedowntime.
♦ The Online Purge process can be started and stopped using a new Online Purge view in the ServerAdministration Tool. You can also write an SDK script to control and automate the Online Purge process, whichenables you to schedule the purge to start and stop at specific times and avoid purging data during peak usagetimes.
♦ The new Online Purge is faster than the previous offline implementation. Offline Purge is still be available inStarTeam 2009, but will be removed in subsequent releases.
♦ The changes to Online Purge are being done in phases over a series of releases. In the StarTeam 2009 phase,newly deleted data will be available to purge only after a Server restart.
♦ Online Purge is an interactive process which can be stopped and restarted anytime when the server is running.Online Purge records its current execution state and provides the ability to restart from the exact point whereit stopped. After a server start, Online Purge has to be restarted manually.
♦ You can start and stop Online Purge on a remote Server as well as a local Server.
StarTeam Connection ControlStarTeam 2009 Server allows administrators to fine tune the set of client applications that can connect to the serverby customizing a new app-control.xml file. This feature prevents unwanted SDK applications from connectingto the Server and draining Server resources.
Note: This is strictly an administrative tool, not a security measure.
app-control.xml Configuration FileThe server looks for a new configuration file named app-control.xml located in the AppControl subdirectory underthe StarTeam repository root directory. When a new configuration is created, StarTeam 2009 Server creates thisfile from a template app-control.xml file located in AppControl directory under the Server installation directory.
The configuration app-control.xml file, if present, contains a set of rules. Each rule asks the server to test theincoming client connections to satisfy one or more of the following conditions:
♦ The StarTeam SDK is greater or equal to a certain version.
♦ The application name, connecting user name, and/or client workstation name must match a specified textpattern.
The Server tests each incoming client connection against all the rules present in the app-control.xml file until amatch is found or until the rule list is depleted. Once a match is found, no more checks are done and the connectionhandshake sequence is resumed. If no match is found, the connection is refused. If the app-control.xml filedoes not exist in the AppControl directory, the Server allows all supported client applications to connect.
26
AllowedAppAllowedApp: This is the main rule element. It must have a Name attribute that specifies the text pattern for theclient application name (such as “client identification string”). The text pattern can have an asterisk character (‘*’)that is used as a wildcard. Besides the Name attribute, this node can optionally specify one or more of the followingattributes:
♦ MinimumSDKVersion: specifies a minimum version of StarTeam SDK with which the client application isbuilt. The format of this field is nn.nn.nn.nn, where nn is a non-negative number. Not all of the “dot” numbershave to be specified, for example MinimumSDKVersion=”10.4” will allow 10.4.x.y and above (10.5,11.0, and so on).
♦ WorkStationID: if set, specifies text pattern to match the client computer name.
♦ Name: if set, specifies text pattern to match the StarTeam user name.
If an optional parameter is not set, the server does not test the corresponding connection attribute.
AppDefaultAppDefault: This is an optional element that can be used to specify default values for one of the parameters listedunder AllowedApp. The syntax of this element is similar to the AllowedApp syntax, except that the Name attributecannot have a default value. Default values can be specified for MinimumSDKVersion, WorkStationID, andUserName.
Other StarTeam 2009 Server FeaturesThis release of the server includes the additional new features:
♦ StarTeam Server for Windows platform is now supported on 64-bit architecture, increasing access to moreavailable memory. This requires Windows Server 2008 64-bit.
♦ StarTeam Server 2009 supports all the other new StarTeam 2009 features as well, such as Change Packagesand trace support for artifact to artifact linking (external links) across different Servers.
♦ StarTeam Server 2009 now creates new projects with only the "File" type pre-selected as a default for newviews. Users can still change the project properties after the project is created, and they can change the itemtypes included for any given new view. However, if the user changes nothing, by default new views will onlyinclude files when they are created. Note: This change does not affect any existing projects. It only affectsnew projects created with new StarTeam Server 2009 Servers or existing servers once they are upgraded toStarTeam Server 2009. Adding other item types to the Project Properties (after the view is created) will NOTpopulate the items that were contained in the parent view (but left out during New View creation). If the userwants to bring the previous items into the new view, they must retrieve them by Rebasing from the parent view.
♦ StarTeam Server 2009 has improved command handling performance achieved by using Asynchronous I/Oto perform network read and write operations on supported Windows 32-bit and 64-bit platforms. This is thesecond phase of Asynchronous I/O support. The first phase was introduced in StarTeam Server 2008 R2release and provided only write operation support.
♦ A new StarTeam Web Server is being introduced to support the new Web Client being released for the firsttime in StarTeam 2009.
♦ Additional changes have been made to increase and improve Server performance.
♦ The Linux Server installation instructions have been moved into the main “StarTeam 2009 InstallationGuide” (ST_Install_en.pdf) at http://techpubs.borland.com/starteam/ .
♦ The StarTeam Server Administration Tool uses the new Eclipse Info Center Help. See “What's New inDocumentation” in “New Features in Other StarTeam 2009 Components and Products.”
27
New Features in the StarTeam 2009 Cross-Platform ClientThis topic describes the new features and changes in this release of the StarTeam 2009Cross-Platform Client.
The following new features in this release are described in more detail in the sections below:
♦ Change Packages
♦ External linking
♦ EOL Improvements
♦ Other Cross-Platform Changes
Change PackagesStarTeam has historically provided many features that support change management (CM), including built-inworkflow, customizable workflow, process links, process tasks, and View Compare/Merge (VCM). Now, StarTeam2009 adds a comprehensive change package feature which allows you to track all changes made in a single commitusing a change package object. As a result of this new feature, VCM now uses change packages instead of VCMprocess tasks as it has in the past. Change packages are a change management feature that improves StarTeamability to manage and track updates. Change packages are an evolution of the View Compare/Merge (VCM) featurefirst introduced in the StarTeam 2006 release.
For more information on the new Change Packages feature see the topic “What's New in View Compare/Merge”.
External LinkingA new external linking feature provides the ability to link between items on different Servers (item to item linkingacross servers). The process for creating external links is basically the same as for creating links between items onthe same Server. However, an external link has a decoration ( ) that clearly shows it is an external link ratherthan a regular link, and there is a new check box on the Link tab that enables you to show or hide external links inthe display.
♦ All the same linking operations are available for external links that are available for standard links, such asCreate Link, Complete Link, and drag and drop operations. To create external links, the projects on bothServers containing the items you want to link need to be opened in the Cross-Platform Client at the same time.
♦ The Link pane also gives you the ability to search for external links in all Servers to which you are logged on.
♦ When you create an external link, the item details for the external link on the Link pane are represented by aURL so you know how to find that item
♦ External link options are the same as standard links, such as being able to view the link properties. However,floating and pinning external links are not available.
♦ External links have direction, so whether you are viewing the external link from the source Item of the link, suchas a CR, or the Item on the external Server, such as the file being linked to from the CR, the source and targetinformation will always remain the same and does not change based on the item you have selected.
♦ You can create external links only to objects that exist on a StarTeam 2009 Server which supports externallinking, and you must use the StarTeam 2009 Cross-Platform Client. Only the Source Item of the external linkmust be on a StarTeam 2009 Server.
♦ You cannot create external links to or between Change Packages.
♦ Some information which is available for standard links is not available for external links because not all of theinformation from the external object is available, such as file status, who has the file locked on the externalServer, what the object's folder path is, and the folder in which the object actually exists.
28
♦ Access Rights dialog boxes now contain External Links container level access rights.
EOL ImprovementsEOL improvements result in better support for fixed EOL conversion files. For example, EOL conversion now workscorrectly for unicode files which previously could be corrupted on check-in.
Files can be checked out in LF format on every platform, regardless of specific options. Also, Update Status worksfor all text files once EOL Format is defined, regardless of what EOL format was used when they were checked-out.
For compatibility with older Clients, if check-out "EOL conversion" is not requested, and EOL Format is Undefined,files are still checked out with the EOL conversion with which they were added to the Server.
StarTeam 2009 provides the following new EOL handling.
♦ The property is still displayed as "EOL Character" in the Cross-Platform Client Item pane.
♦ The EOL Format property is only meaningful for text files during the check-out operation.
♦ The EOL Property values are:
■ Undefined (null in the SDK): Used for files added before StarTeam 2009.■ Client Defined: Causes workstation default or per-checkout EOL conversion option to be used.■ Fixed CR, Fixed LF, and Fixed CRLF: Causes this EOL format to be used always; the work station/check-
out conversion option is ignored.
♦ The EOL Format property can be set in the Cross-Platform Client in the Add/Check-in and File Propertiesdialog boxes.
♦ The Cross-Platform Client EOL conversion for the add/check-in options have been removed.
♦ By default, the SDK will compute the EOL Format under the following conditions:
■ When a new text file is added or a new revision is checked in for a text file whose EOL Format isUndefined, the file's EOL convention matches the platform default, EOL Format is set to ClientDefined. Otherwise, EOL Format is set to the convention found: Fixed LF, Fixed CR, or Fixed CRLF.
■ The user can change EOL Format to any value (other than Undefined) at any time.■ Regardless of their EOL Format setting, text files added or checked in with a StarTeam 2009 Cross-
Platform Client always use a canonical (CRLF) format in the vault.
Note: The default for automatic EOL conversion for check-out operations has been changed to “checked” if theuser does not have that option defined already. Users that upgrade to 2009 should check that option to besure they have it set correctly given the new EOL Format changes.
Other Cross-Platform Client New FeaturesThe following are additional new features added to the Cross-Platform Client:
♦ StarTeam 2009 now has "Me" queries that allows a query to be set up which is evaluated against the currentlylogged in user ("Me"), rather than having to specify a specific username at the time of query creation.
♦ The order of the Folder context menu has been reorganized to be more like the Items Table context menu toimprove menu consistency.
29
♦ The Select View dialog box has a new checkbox which allows the user to choose to open the selected viewin a new View window instead of changing the current view window to the selected view.
♦ In the Folder Tree, folder icons have a new decorator to signify that a folder is using an alternate path for theworking folder rather than the default working path.
♦ When the user creates a new project, the Server previously pre-selected all item types for the project properties.This means that if the user did n0t change anything in the Project Properties dialog box, or in the New ViewWizard, then new views would contain all item types. As a best practice recommendation, we want todiscourage users from including item types other than File for new views. StarTeam Server 2009 will nowcreate new projects with only the File type pre-selected as a default for new views. Users can still change theproject properties after the project is created, and they can change the item types included for any given newview. However, if the user changes nothing, by default new views will only include files when they are created.This change does not affect any existing projects. It only affects new projects created with new StarTeamServer 2009 or existing Servers once they are upgraded to StarTeam Server 2009. Note: Adding other itemtypes to the project properties (after the view is created) will NOT populate the items that were contained inthe parent view (but left out during new view creation). If the user wants to bring the previous items into thenew view, they must retrieve them by using View Compare/Merge to rebase them from the parent view.
♦ The Cross-Platform Client now supports comparing properties of non-file items using the embedded comparepane. For example, you can select two CRs in the Item pane, or two historical revisions of the same CR, andchoose Tools Compare to compare their properties. The embedded compare window will appear at thebottom of the window displaying the properties of each selected CR. This new feature affects the all Item andInformtation tabs in the both the Content Perspective and the Change Perspective.
♦ The File Check In dialog box no longer displays frozen revision labels.
30
New Features in View Compare/MergeThis topic describes the changes and new features in View Compare/Merge and in the VCMUtility.
Change PackagesStarTeam historically provided many features that supported change management (CM), including built-in workflow,customizable workflow, process links, process tasks, and View Compare/Merge (VCM). Now, StarTeam 2009introduces a comprehensive Change Package object which allows you to track all changes made in a single commit.As a result of this new feature, VCM now creates change packages instead of VCM process tasks as it has in thepast.
Change packages improve StarTeam’s ability to manage and track updates. Change packages are an evolution ofthe View Compare/Merge (VCM) feature first introduced in the StarTeam 2006 release. A change package is anobject that contains a set changes applied to a target view. To create a change package, a user first starts a VCMsession, which acts as a staging area where changes are defined, reviewed, and tested.
A VCM session is visible in the target view as a change package after it has been saved or committed.
♦ As a result of using the new change package item, merge points and process tasks are no longer used in VCMsessions to track changes.
♦ Perspectives have been introduced into the StarTeam View window so you can click an icon to switch betweenthe standard Content Perspective, represented by the StarTeam logo icon, and the Change Perspective,represented by a new icon next to the standard icon. These new perspective icons are right-justified in thetoolbar. Using the Change Perspective, a manager, for example, can review all the change package objectsand the details around those change packages, see what changes were committed to a view, and reviewchanges in uncommitted change packages being proposed for committal.
♦ VCM Session menu items have changed. For example, now that the change package is an object, a newChange Package Properties menu item exists for opening the change package to view and/or change itsproperties, such as the working folder for the VCM session. Other menu changes are the Change Package Save menu item that saves a change package object in an uncommitted state onto the target view of the
StarTeam Server. Change Package Export is still supported as the way to save a VCM Session asa .vcmx file to send to others for review, though change packages are now preferred over .vcmx files. Foradditional information on the new Change Package menu, see the “Change Perspective UI” topic in “GettingStarted” under “Tour of the UI”.
♦ Since each change package is a new object in StarTeam that represents a set of changes, StarTeam 2009has added a new Change tab at the bottom of the Client to support viewing updates to a selected item thatoccurred as the result of a change package. A more detailed explanation of all the parts of the ChangePerspective is available in the "Tour of the UI" section of "Getting Started" in the “StarTeam Help”.
♦ Other options are available in the Change Perspective such as toolbar buttons, a standard Filter menu, andChange Layout toolbar button which lets you switch between a left/right layout or a top/bottom layout. In theleft/right layout, icons are used for switching viewers in the Change Perspective between the Detail,History, Label, Change, and Replay panes. In the top/bottom layout, bottom tabs allow you to change theseviews.
♦ A context menu item now lets you copy URLs to the clipboard to saved change packages so others can openthe URL to the target view and review the change package in read-only mode, eliminating the need to senda .vmx file of the whole VCM session.
♦ In the Replay viewer, you can use drag and drop to replay a change package to another view. You can alsore-open the change package in a VCM session using the item's Advanced View Compare/Merge menuoption to initiate a Replay to another view.
♦ You can delete a change package if it is uncommitted. Once it is committed, the delete operation is no longeravailable.
31
♦ You can create exclusive locks on uncommitted change packages. Only one person can make changes to achange package at a time. Consequently, a change package is automatically locked exclusively when it isopened for editing.
♦ A Restart Session menu operation in the Change Perspective allows a user to restart (re-compare) a changepackage in a VCM session.
♦ The VCM Session menu now has two new items: Copy URL to Clipboard and Select in View. When thecurrent VCM Session has been saved as a change package, these operations allow the user to more easilyaccess saved change packages.
♦ A new change package Report menu is available from the Reports dialog box for change packages.
♦ The Change Perspective supports the Compare Properties menu for comparing change package properties.
Other VCM ChangesOther new features in View Compare/Merge, besides the already mentioned Change Packages and External Linking,are the following miscellaneous changes:
♦ The View Compare/Merge Wizard has a new Exclude Properties page which allows you to excludeproperties of any branchable item type. It lets you select specific item type properties for which you do not wantto merge changes when the session is committed.
♦ The View Compare/Merge Wizard has a new button at the bottom right of each wizard page which, whenclicked, opens an information pane that shows you the details of the choices you have made for the VCMsession up to that step in the View Compare/Merge Wizard. To hide this information pane, click the buttonagain and it will disappear. The advantage of this information pane is that you can review in one place all thedetails of the session before you click Finish without having to go back and forth to different pages of thewizard to see what you selected. That way, if you decide you want to make a different choice, you can go backto the specific page of the wizard, make the change, then click Finish at that point.
♦ The Compare, Merge, and Test perspective buttons have been moved to the right side of the toolbar.
Merge PointsMerge points are no longer used in VCM sessions now that the change packages have been implemented. VCMnow uses internal "change" objects that yield improved merge capabilities compared to merge points.
New or Changed Difference TypesThe following changes to difference types and actions have been made:
♦ Fail has been changed to Needs Review. Needs Review is now a legal action in all cases.
♦ Custom merge types: Changing the default action of any difference type to Needs Review means that humanintervention is required before a commit can be made.
♦ Mark Resolved no longer creates a Merge Point. Now it means create a Mark Resolved Change Object. MarkResolved is now a legal action in many cases where it was not previously permitted. This affects about twodozen difference types.
♦ Don't Care difference types have been fixed. We now distinguish between the Modified in target andUnmodified in target cases.
For example, in StarTeam 2008 Release 2,
[2000]: Moved in source, target on different branch
32
ItemPresentInSource: true. ItemPresentInTarget: true. ItemDeletedInSource: false. ItemDeletedInTarget: false. ItemModifiedInSource: false. ItemModifiedInTarget: Don’t Care. ItemMovedInSource: true. ItemMovedInTarget: false. ItemsInDifferentBranches: true Default Action: Ignore. Legal Actions: Ignore; Move; Move and Overwrite
In StarTeam 2009,
[2000]: Moved in source, target on different branch
ItemPresentInSource: true. ItemPresentInTarget: true. ItemDeletedInSource: false. ItemDeletedInTarget: false. ItemModifiedInSource: false. ItemModifiedInTarget: false. ItemMovedInSource: true. ItemMovedInTarget: false. ItemsInDifferentBranches: true Default Action: Ignore. Legal Actions: Ignore; Move; Needs Review; Mark Resolved
Old rows which now have Modified in target=false
[2000]: Moved in source, target on different branch[2500]: Moved and modified in source, target on different branch [2510]: Moved and modified in source, target on different branch, same content.
New rows with Modified in target=true
[2060]: Moved in source, branched and modified in target[2520]: Moved and modified in source, target on different branch, modified in target[2530]: Moved and modified in source, target on different branch, modified in target,same content
Changes to the VCM Table of Action DecisionsThe following changes have been made to the VCM Table of Action Decisions for StarTeam 2009:
[100]: Parent folder failed
ParentFolderFailed: true
Default Action: Needs Review Legal Actions: Ignore; Needs Review
[110]: Parent folder ignored
33
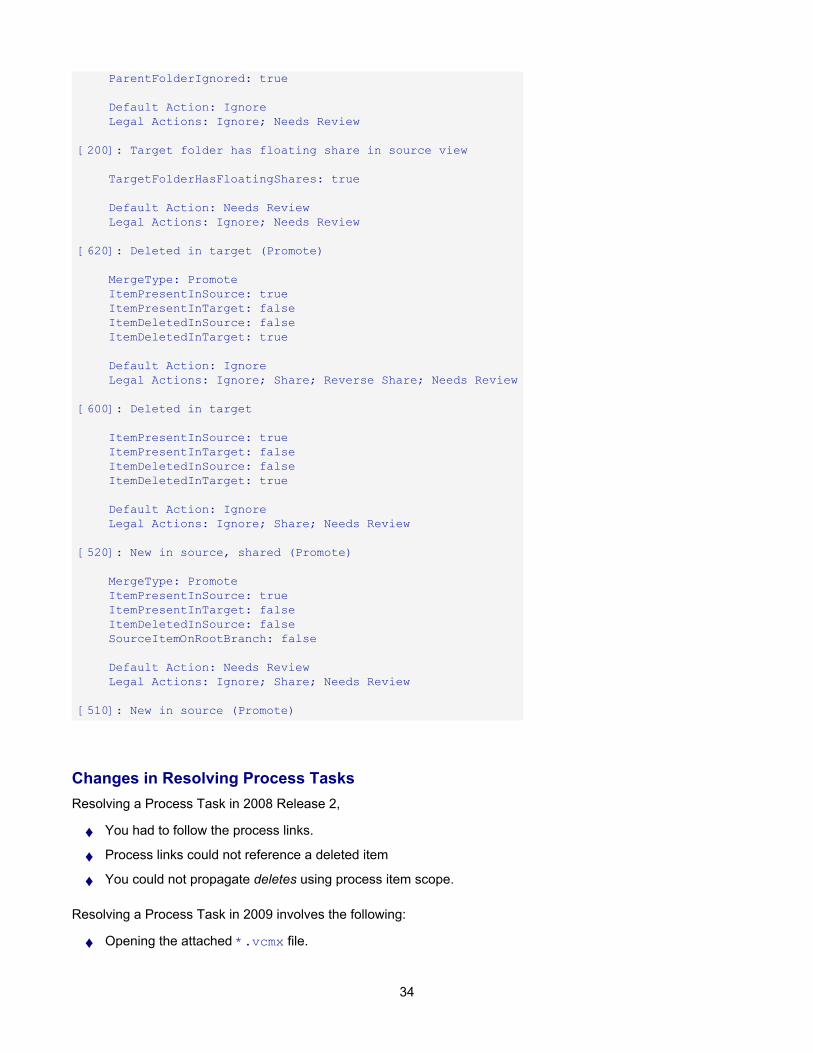
ParentFolderIgnored: true
Default Action: Ignore Legal Actions: Ignore; Needs Review
[200]: Target folder has floating share in source view
TargetFolderHasFloatingShares: true
Default Action: Needs Review Legal Actions: Ignore; Needs Review
[620]: Deleted in target (Promote)
MergeType: Promote ItemPresentInSource: true ItemPresentInTarget: false ItemDeletedInSource: false ItemDeletedInTarget: true
Default Action: Ignore Legal Actions: Ignore; Share; Reverse Share; Needs Review
[600]: Deleted in target
ItemPresentInSource: true ItemPresentInTarget: false ItemDeletedInSource: false ItemDeletedInTarget: true
Default Action: Ignore Legal Actions: Ignore; Share; Needs Review
[520]: New in source, shared (Promote)
MergeType: Promote ItemPresentInSource: true ItemPresentInTarget: false ItemDeletedInSource: false SourceItemOnRootBranch: false
Default Action: Needs Review Legal Actions: Ignore; Share; Needs Review
[510]: New in source (Promote)
Changes in Resolving Process TasksResolving a Process Task in 2008 Release 2,
♦ You had to follow the process links.
♦ Process links could not reference a deleted item
♦ You could not propagate deletes using process item scope.
Resolving a Process Task in 2009 involves the following:
♦ Opening the attached *.vcmx file.
34
♦ Using the ItemDifferences to determine scope
This is the equivalent of using change package/change objects.
VCMUtility Command-line ChangesThe VCMUTILITY is integrated with change package objects. New commands and session options have been madeto support change packages.
The following additions have been made to the VCMUTILITY command to support change packages:
Command Options
♦ {Open <Change Package name>}
♦ {Replay <Change Package name}
Session Options
♦ {Description <description>}
♦ {Name <Change Package name>}
Other Syntax Options
♦ <Change Package name>
♦ <folder path>
♦ <VCM exchange file>
♦ <VCM session file>
These, and all the other VCMUtility commands and options are listed in the Compare/Merge Reference sectionof the Cross-Platform Client Help.
35

Borland StarTeam 2009 Web ClientThe new Borland® StarTeam® Web Client is an intuitive Web-based interface that multiple simultaneous users canuse to connect to one or more StarTeam Servers to access projects and manage items.
This initial release of the Web Client delivers a core feature set designed to meet the needs of users responsible forviewing, creating, and editing StarTeam change requests, requirements, tasks, and topics.
Web Client Capabilities
The StarTeam Web Client supports the following activities:
♦ Using public filters on the StarTeam server to refine the scope of items to browse
♦ Creating a non-file Item
♦ Editing item properties
♦ Locking and unlocking an Item
♦ Displaying item details
♦ Deleting an item
♦ Downloading a file to a local or network drive
♦ Starting a view session with a generated item or folder URL
♦ Viewing an Item's historical revisions
♦ Viewing a revision's properties
♦ Editing a revision's comment
Note: You must possess a StarTeam user license to use the Web Client.
36
New Features in Other StarTeam 2009 Components and ProductsThe following are new features or improvements made in other StarTeam products included with this release.
♦ What's New in Documentation
♦ What's New in StarTeamMPX
♦ What's New in Layout Designer
What's New in DocumentationFor StarTeam 2009, in our basic applications we have changed from the proprietary Borland Help Browser to theEclipse Info Center for our online help presentation. Ultimately the Eclipse Info Center will be used across all Borlandproducts.
The Eclipse Browser will be introduced in this release in the Cross-Platform Client, the Server Administration Tool,and the Layout Designer. The combined help documentation called "Administering and Using StarTeam" in previousreleases has been replaced with smaller pieces of documentation which are relevant to the application being used.So, for example, the Cross-Platform Client will contain the Client Help, and Help on the Command-line tools, includingthe VCMUtility, and the Server Administration Tool will contain only the Server Administration Help, plus the helpfor Command-line tools.
The advantages to you from the Eclipse Info Center is that you can do full-text search, and you can print smallsections or whole sections from the Table of contents.
As always, the Help is also available from the Start menu on Windows. On Linux or Solaris, it will be in /PRODUCT_NAME/Documentation folder.
Note: The Linux Server installation instructions have been moved into the main Installation Guide.
What's New in StarTeamMPXStarTeamMPX 2009 has the following new features:
♦ The Multicast option has been removed from StarteamMPX.
♦ Clients subscribe to a new STEvent3 stream which uses more granular subjects for view-specific events.Messages are compressed and batched by transaction. Each Client receives 70% to 80% reduction in traffic.A StarTeam 2009 Client can get as little as 2% of the messages and 2% of the traffic that a pre-StarTeam2009 Client gets.
♦ Certain "duplicate" cache messages are eliminated, for example, redundant file content messages. Thisreduces traffic to Cache Agents.
♦ The message improvements are transparent to Clients.
♦ When pre-StarTeam 2006 Clients connections are not allowed, which occurs when the Server minimum APIlevel is > 1.25, the STEvent event stream is not broadcast. Similarly, the STEvent2 event stream is notbroadcast when the Server minimum API level is > 1.66, which means that only StarTeam 2009 and laterclients are allowed.
♦ New StarTeam 2009 events are sent to the STEvent3 stream, such as change packages and trace objects(external links).
37

What's New in the Layout DesignerThe following features are new for Layout Designer in StarTeam 2009
♦ The forms provided in the Cross-Platform Client are now available as example Layout Designer forms.
♦ The Layout Designer uses the new Eclipse Info Center Help. See “What's New in Documentation”.
38
Help on HelpThis section describes the Help system for StarTeam. It also explains where to find documentation for each of theStarTeam products.
In This SectionStarTeam OverviewThis topic describes the Help system for StarTeam.
Where to Find Documentation for Each ProductThis topic describes the various methods for accessing the StarTeam product documentation and providesa list of what documentation ships with each of the StarTeam products.
User Roles and StarTeam DocumentationThis topic contains information about various user roles and how the StarTeam documentation ties to thoseroles.
39
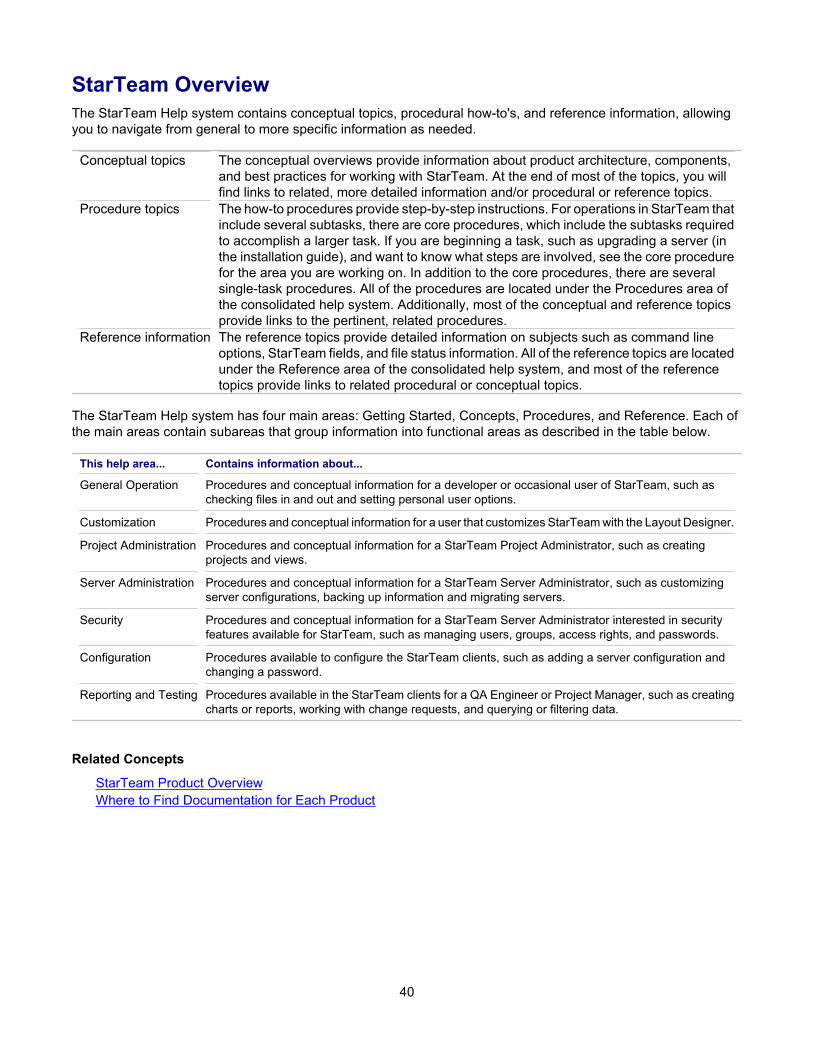
StarTeam OverviewThe StarTeam Help system contains conceptual topics, procedural how-to's, and reference information, allowingyou to navigate from general to more specific information as needed.
Conceptual topics The conceptual overviews provide information about product architecture, components,and best practices for working with StarTeam. At the end of most of the topics, you willfind links to related, more detailed information and/or procedural or reference topics.
Procedure topics The how-to procedures provide step-by-step instructions. For operations in StarTeam thatinclude several subtasks, there are core procedures, which include the subtasks requiredto accomplish a larger task. If you are beginning a task, such as upgrading a server (inthe installation guide), and want to know what steps are involved, see the core procedurefor the area you are working on. In addition to the core procedures, there are severalsingle-task procedures. All of the procedures are located under the Procedures area ofthe consolidated help system. Additionally, most of the conceptual and reference topicsprovide links to the pertinent, related procedures.
Reference information The reference topics provide detailed information on subjects such as command lineoptions, StarTeam fields, and file status information. All of the reference topics are locatedunder the Reference area of the consolidated help system, and most of the referencetopics provide links to related procedural or conceptual topics.
The StarTeam Help system has four main areas: Getting Started, Concepts, Procedures, and Reference. Each ofthe main areas contain subareas that group information into functional areas as described in the table below.
This help area... Contains information about...
General Operation Procedures and conceptual information for a developer or occasional user of StarTeam, such aschecking files in and out and setting personal user options.
Customization Procedures and conceptual information for a user that customizes StarTeam with the Layout Designer.
Project Administration Procedures and conceptual information for a StarTeam Project Administrator, such as creatingprojects and views.
Server Administration Procedures and conceptual information for a StarTeam Server Administrator, such as customizingserver configurations, backing up information and migrating servers.
Security Procedures and conceptual information for a StarTeam Server Administrator interested in securityfeatures available for StarTeam, such as managing users, groups, access rights, and passwords.
Configuration Procedures available to configure the StarTeam clients, such as adding a server configuration andchanging a password.
Reporting and Testing Procedures available in the StarTeam clients for a QA Engineer or Project Manager, such as creatingcharts or reports, working with change requests, and querying or filtering data.
Related Concepts
StarTeam Product OverviewWhere to Find Documentation for Each Product
40
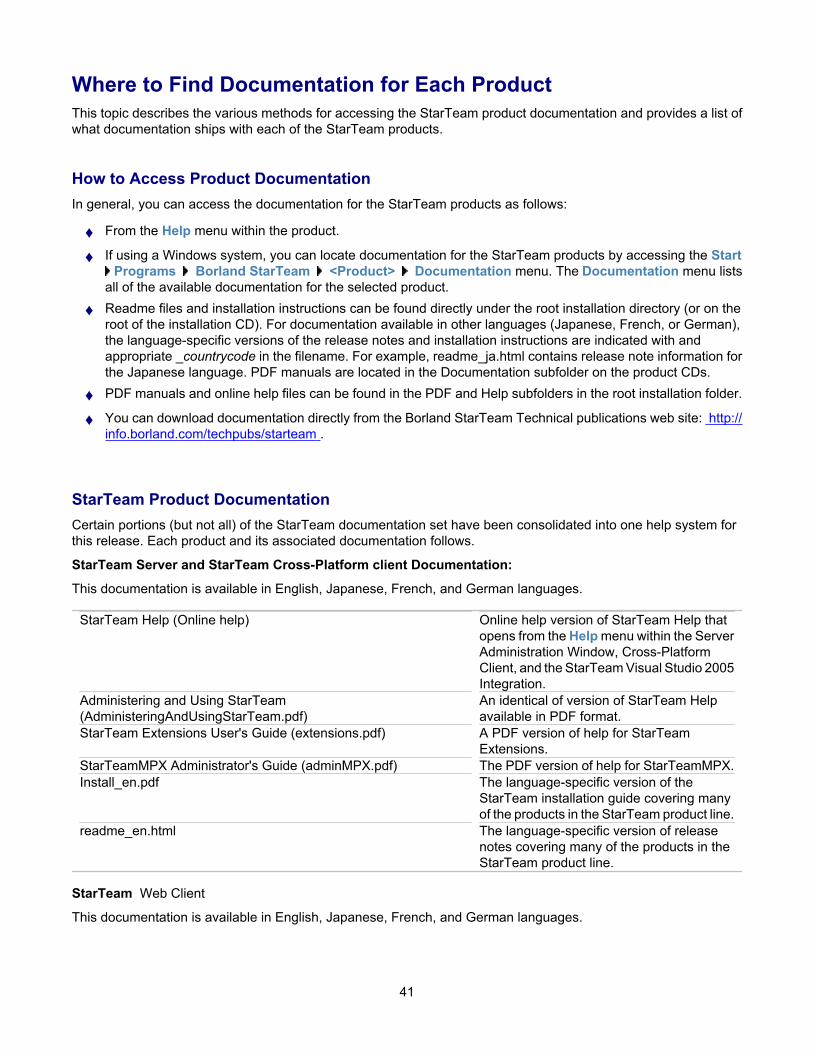
Where to Find Documentation for Each ProductThis topic describes the various methods for accessing the StarTeam product documentation and provides a list ofwhat documentation ships with each of the StarTeam products.
How to Access Product DocumentationIn general, you can access the documentation for the StarTeam products as follows:
♦ From the Help menu within the product.
♦ If using a Windows system, you can locate documentation for the StarTeam products by accessing the Start Programs Borland StarTeam <Product> Documentation menu. The Documentation menu lists
all of the available documentation for the selected product.
♦ Readme files and installation instructions can be found directly under the root installation directory (or on theroot of the installation CD). For documentation available in other languages (Japanese, French, or German),the language-specific versions of the release notes and installation instructions are indicated with andappropriate _countrycode in the filename. For example, readme_ja.html contains release note information forthe Japanese language. PDF manuals are located in the Documentation subfolder on the product CDs.
♦ PDF manuals and online help files can be found in the PDF and Help subfolders in the root installation folder.
♦ You can download documentation directly from the Borland StarTeam Technical publications web site: http://info.borland.com/techpubs/starteam .
StarTeam Product DocumentationCertain portions (but not all) of the StarTeam documentation set have been consolidated into one help system forthis release. Each product and its associated documentation follows.
StarTeam Server and StarTeam Cross-Platform client Documentation:
This documentation is available in English, Japanese, French, and German languages.
StarTeam Help (Online help) Online help version of StarTeam Help thatopens from the Help menu within the ServerAdministration Window, Cross-PlatformClient, and the StarTeam Visual Studio 2005Integration.
Administering and Using StarTeam(AdministeringAndUsingStarTeam.pdf)
An identical of version of StarTeam Helpavailable in PDF format.
StarTeam Extensions User's Guide (extensions.pdf) A PDF version of help for StarTeamExtensions.
StarTeamMPX Administrator's Guide (adminMPX.pdf) The PDF version of help for StarTeamMPX.Install_en.pdf The language-specific version of the
StarTeam installation guide covering manyof the products in the StarTeam product line.
readme_en.html The language-specific version of releasenotes covering many of the products in theStarTeam product line.
StarTeam Web Client
This documentation is available in English, Japanese, French, and German languages.
41
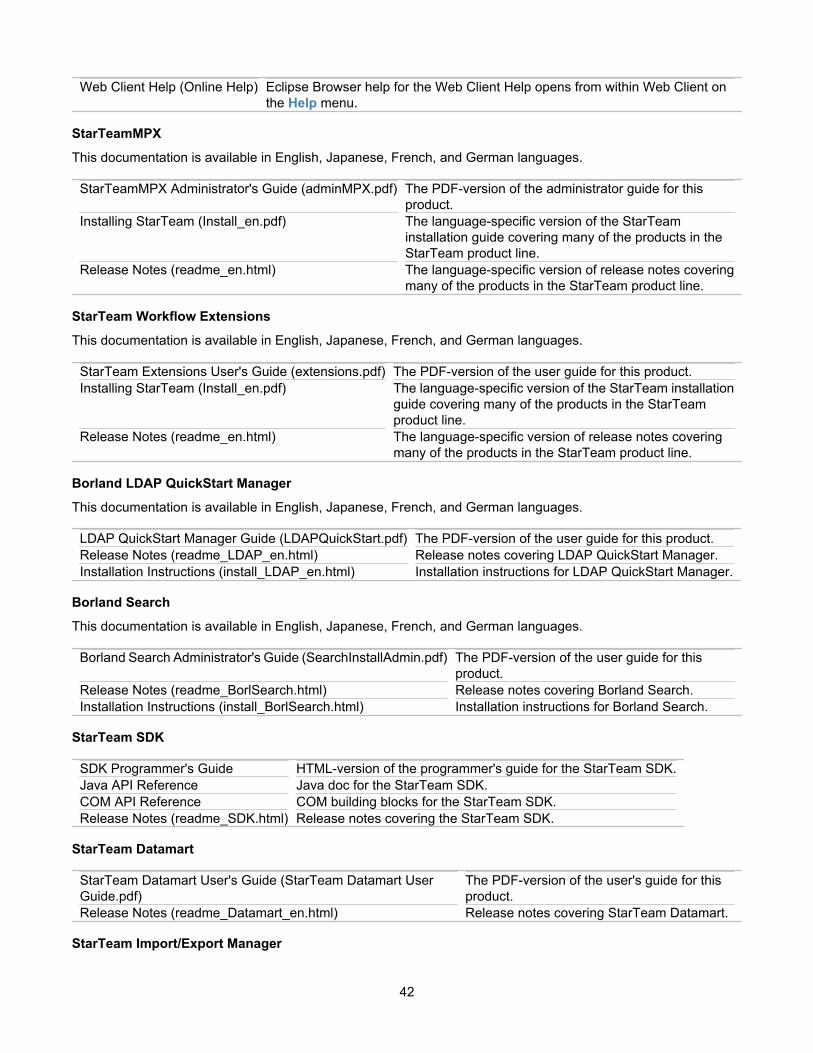
Web Client Help (Online Help) Eclipse Browser help for the Web Client Help opens from within Web Client onthe Help menu.
StarTeamMPX
This documentation is available in English, Japanese, French, and German languages.
StarTeamMPX Administrator's Guide (adminMPX.pdf) The PDF-version of the administrator guide for thisproduct.
Installing StarTeam (Install_en.pdf) The language-specific version of the StarTeaminstallation guide covering many of the products in theStarTeam product line.
Release Notes (readme_en.html) The language-specific version of release notes coveringmany of the products in the StarTeam product line.
StarTeam Workflow Extensions
This documentation is available in English, Japanese, French, and German languages.
StarTeam Extensions User's Guide (extensions.pdf) The PDF-version of the user guide for this product.Installing StarTeam (Install_en.pdf) The language-specific version of the StarTeam installation
guide covering many of the products in the StarTeamproduct line.
Release Notes (readme_en.html) The language-specific version of release notes coveringmany of the products in the StarTeam product line.
Borland LDAP QuickStart Manager
This documentation is available in English, Japanese, French, and German languages.
LDAP QuickStart Manager Guide (LDAPQuickStart.pdf) The PDF-version of the user guide for this product.Release Notes (readme_LDAP_en.html) Release notes covering LDAP QuickStart Manager.Installation Instructions (install_LDAP_en.html) Installation instructions for LDAP QuickStart Manager.
Borland Search
This documentation is available in English, Japanese, French, and German languages.
Borland Search Administrator's Guide (SearchInstallAdmin.pdf) The PDF-version of the user guide for thisproduct.
Release Notes (readme_BorlSearch.html) Release notes covering Borland Search.Installation Instructions (install_BorlSearch.html) Installation instructions for Borland Search.
StarTeam SDK
SDK Programmer's Guide HTML-version of the programmer's guide for the StarTeam SDK.Java API Reference Java doc for the StarTeam SDK.COM API Reference COM building blocks for the StarTeam SDK.Release Notes (readme_SDK.html) Release notes covering the StarTeam SDK.
StarTeam Datamart
StarTeam Datamart User's Guide (StarTeam Datamart UserGuide.pdf)
The PDF-version of the user's guide for thisproduct.
Release Notes (readme_Datamart_en.html) Release notes covering StarTeam Datamart.
StarTeam Import/Export Manager
42
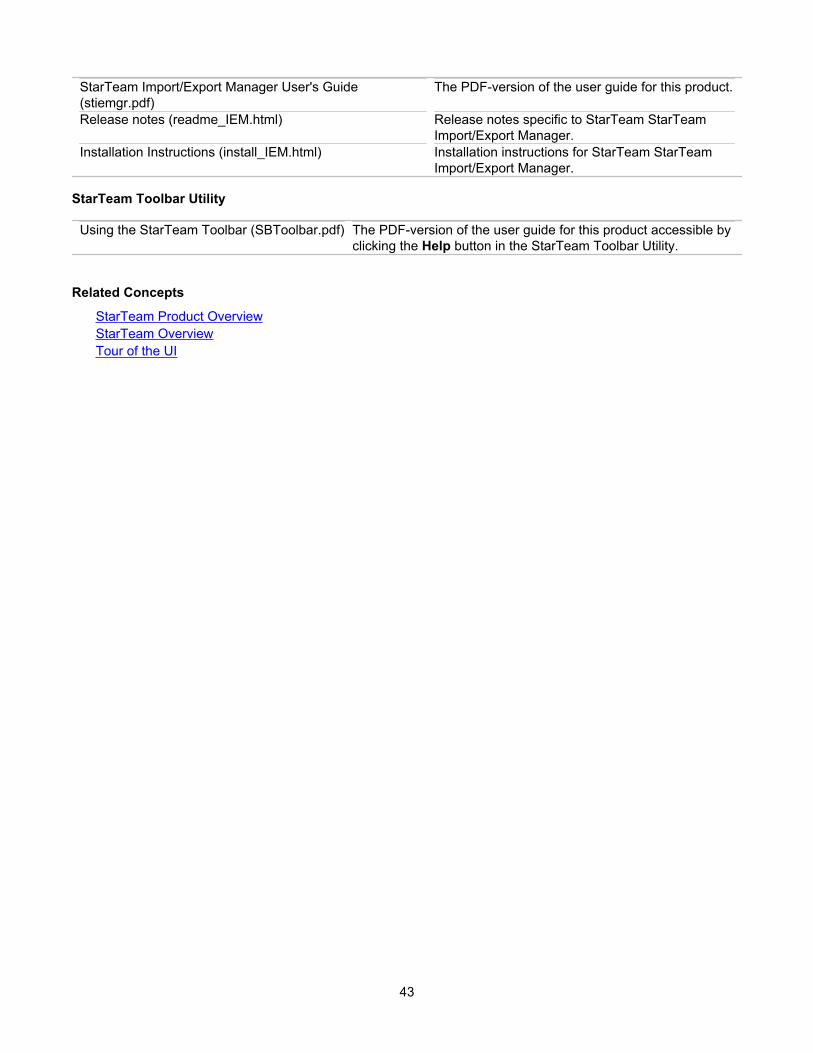
StarTeam Import/Export Manager User's Guide(stiemgr.pdf)
The PDF-version of the user guide for this product.
Release notes (readme_IEM.html) Release notes specific to StarTeam StarTeamImport/Export Manager.
Installation Instructions (install_IEM.html) Installation instructions for StarTeam StarTeamImport/Export Manager.
StarTeam Toolbar Utility
Using the StarTeam Toolbar (SBToolbar.pdf) The PDF-version of the user guide for this product accessible byclicking the Help button in the StarTeam Toolbar Utility.
Related Concepts
StarTeam Product OverviewStarTeam OverviewTour of the UI
43
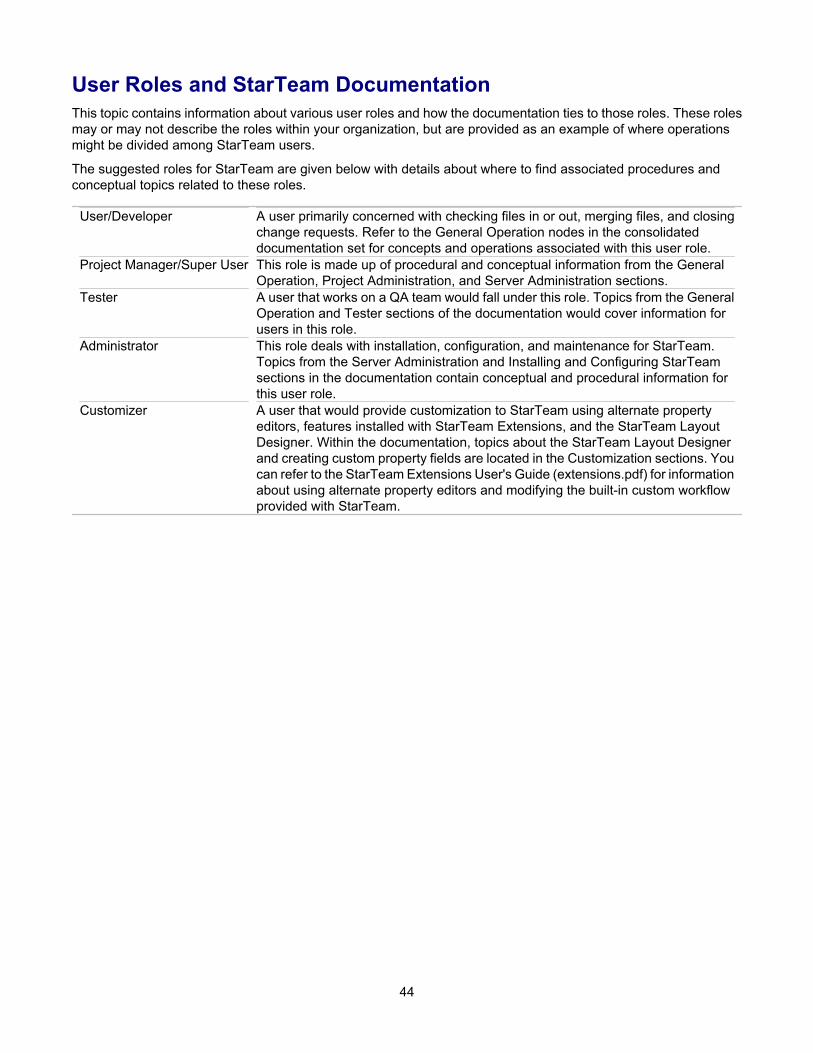
User Roles and StarTeam DocumentationThis topic contains information about various user roles and how the documentation ties to those roles. These rolesmay or may not describe the roles within your organization, but are provided as an example of where operationsmight be divided among StarTeam users.
The suggested roles for StarTeam are given below with details about where to find associated procedures andconceptual topics related to these roles.
User/Developer A user primarily concerned with checking files in or out, merging files, and closingchange requests. Refer to the General Operation nodes in the consolidateddocumentation set for concepts and operations associated with this user role.
Project Manager/Super User This role is made up of procedural and conceptual information from the GeneralOperation, Project Administration, and Server Administration sections.
Tester A user that works on a QA team would fall under this role. Topics from the GeneralOperation and Tester sections of the documentation would cover information forusers in this role.
Administrator This role deals with installation, configuration, and maintenance for StarTeam.Topics from the Server Administration and Installing and Configuring StarTeamsections in the documentation contain conceptual and procedural information forthis user role.
Customizer A user that would provide customization to StarTeam using alternate propertyeditors, features installed with StarTeam Extensions, and the StarTeam LayoutDesigner. Within the documentation, topics about the StarTeam Layout Designerand creating custom property fields are located in the Customization sections. Youcan refer to the StarTeam Extensions User's Guide (extensions.pdf) for informationabout using alternate property editors and modifying the built-in custom workflowprovided with StarTeam.
44
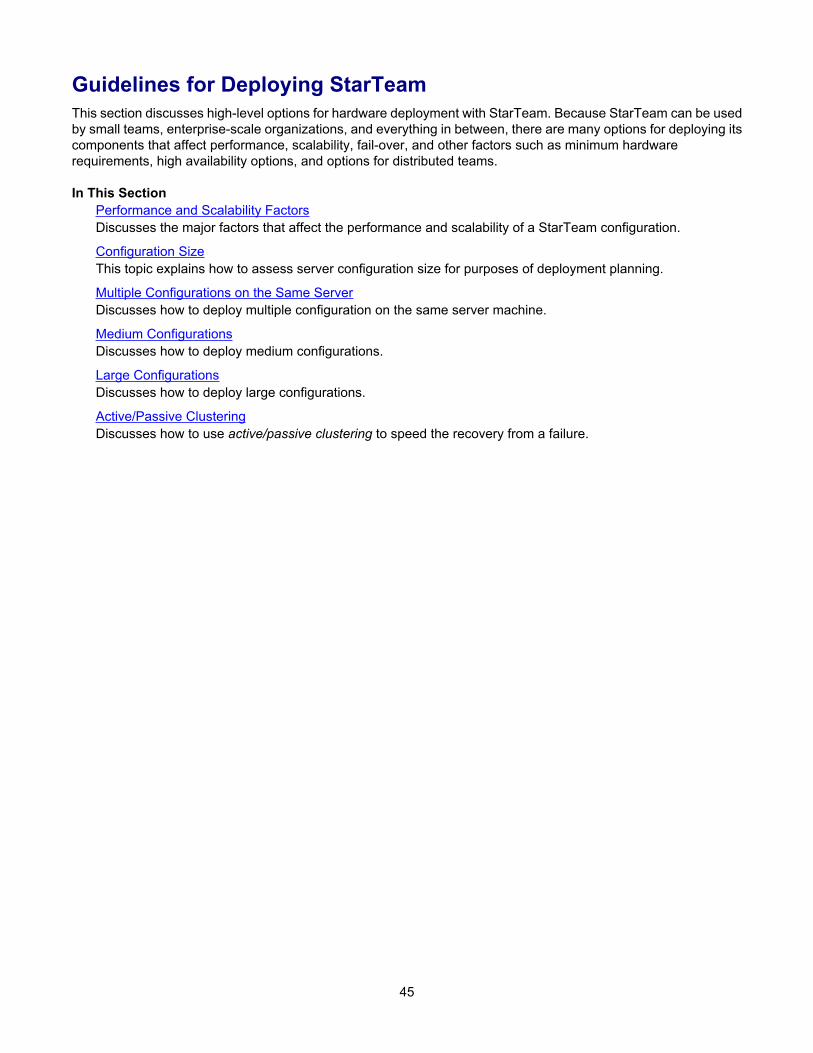
Guidelines for Deploying StarTeamThis section discusses high-level options for hardware deployment with StarTeam. Because StarTeam can be usedby small teams, enterprise-scale organizations, and everything in between, there are many options for deploying itscomponents that affect performance, scalability, fail-over, and other factors such as minimum hardwarerequirements, high availability options, and options for distributed teams.
In This SectionPerformance and Scalability FactorsDiscusses the major factors that affect the performance and scalability of a StarTeam configuration.
Configuration SizeThis topic explains how to assess server configuration size for purposes of deployment planning.
Multiple Configurations on the Same ServerDiscusses how to deploy multiple configuration on the same server machine.
Medium ConfigurationsDiscusses how to deploy medium configurations.
Large ConfigurationsDiscusses how to deploy large configurations.
Active/Passive ClusteringDiscusses how to use active/passive clustering to speed the recovery from a failure.
45
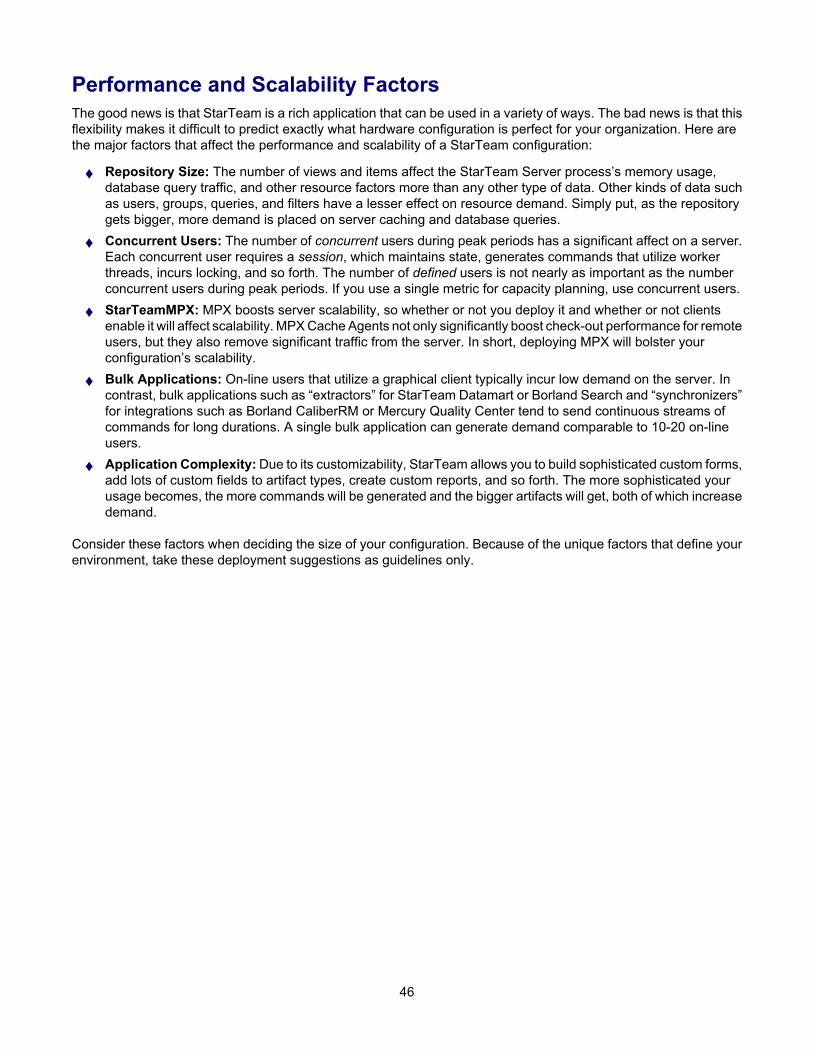
Performance and Scalability FactorsThe good news is that StarTeam is a rich application that can be used in a variety of ways. The bad news is that thisflexibility makes it difficult to predict exactly what hardware configuration is perfect for your organization. Here arethe major factors that affect the performance and scalability of a StarTeam configuration:
♦ Repository Size: The number of views and items affect the StarTeam Server process’s memory usage,database query traffic, and other resource factors more than any other type of data. Other kinds of data suchas users, groups, queries, and filters have a lesser effect on resource demand. Simply put, as the repositorygets bigger, more demand is placed on server caching and database queries.
♦ Concurrent Users: The number of concurrent users during peak periods has a significant affect on a server.Each concurrent user requires a session, which maintains state, generates commands that utilize workerthreads, incurs locking, and so forth. The number of defined users is not nearly as important as the numberconcurrent users during peak periods. If you use a single metric for capacity planning, use concurrent users.
♦ StarTeamMPX: MPX boosts server scalability, so whether or not you deploy it and whether or not clientsenable it will affect scalability. MPX Cache Agents not only significantly boost check-out performance for remoteusers, but they also remove significant traffic from the server. In short, deploying MPX will bolster yourconfiguration’s scalability.
♦ Bulk Applications: On-line users that utilize a graphical client typically incur low demand on the server. Incontrast, bulk applications such as “extractors” for StarTeam Datamart or Borland Search and “synchronizers”for integrations such as Borland CaliberRM or Mercury Quality Center tend to send continuous streams ofcommands for long durations. A single bulk application can generate demand comparable to 10-20 on-lineusers.
♦ Application Complexity: Due to its customizability, StarTeam allows you to build sophisticated custom forms,add lots of custom fields to artifact types, create custom reports, and so forth. The more sophisticated yourusage becomes, the more commands will be generated and the bigger artifacts will get, both of which increasedemand.
Consider these factors when deciding the size of your configuration. Because of the unique factors that define yourenvironment, take these deployment suggestions as guidelines only.
46
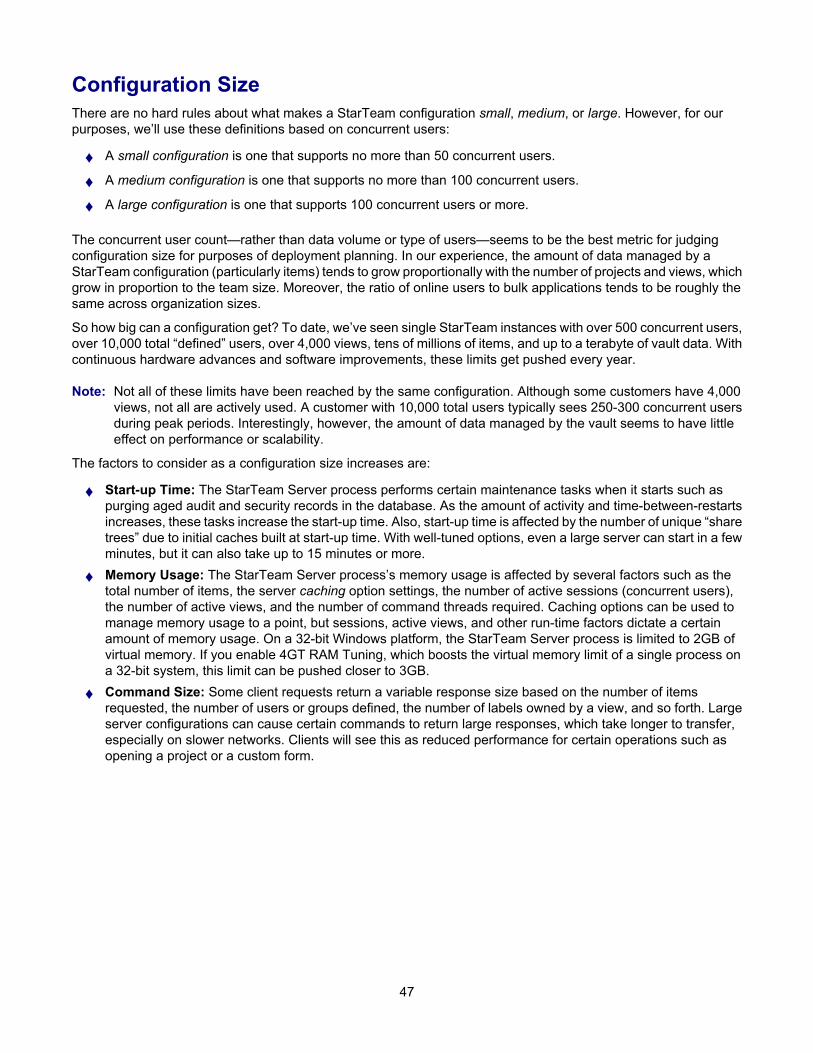
Configuration SizeThere are no hard rules about what makes a StarTeam configuration small, medium, or large. However, for ourpurposes, we’ll use these definitions based on concurrent users:
♦ A small configuration is one that supports no more than 50 concurrent users.
♦ A medium configuration is one that supports no more than 100 concurrent users.
♦ A large configuration is one that supports 100 concurrent users or more.
The concurrent user count—rather than data volume or type of users—seems to be the best metric for judgingconfiguration size for purposes of deployment planning. In our experience, the amount of data managed by aStarTeam configuration (particularly items) tends to grow proportionally with the number of projects and views, whichgrow in proportion to the team size. Moreover, the ratio of online users to bulk applications tends to be roughly thesame across organization sizes.
So how big can a configuration get? To date, we’ve seen single StarTeam instances with over 500 concurrent users,over 10,000 total “defined” users, over 4,000 views, tens of millions of items, and up to a terabyte of vault data. Withcontinuous hardware advances and software improvements, these limits get pushed every year.
Note: Not all of these limits have been reached by the same configuration. Although some customers have 4,000views, not all are actively used. A customer with 10,000 total users typically sees 250-300 concurrent usersduring peak periods. Interestingly, however, the amount of data managed by the vault seems to have littleeffect on performance or scalability.
The factors to consider as a configuration size increases are:
♦ Start-up Time: The StarTeam Server process performs certain maintenance tasks when it starts such aspurging aged audit and security records in the database. As the amount of activity and time-between-restartsincreases, these tasks increase the start-up time. Also, start-up time is affected by the number of unique “sharetrees” due to initial caches built at start-up time. With well-tuned options, even a large server can start in a fewminutes, but it can also take up to 15 minutes or more.
♦ Memory Usage: The StarTeam Server process’s memory usage is affected by several factors such as thetotal number of items, the server caching option settings, the number of active sessions (concurrent users),the number of active views, and the number of command threads required. Caching options can be used tomanage memory usage to a point, but sessions, active views, and other run-time factors dictate a certainamount of memory usage. On a 32-bit Windows platform, the StarTeam Server process is limited to 2GB ofvirtual memory. If you enable 4GT RAM Tuning, which boosts the virtual memory limit of a single process ona 32-bit system, this limit can be pushed closer to 3GB.
♦ Command Size: Some client requests return a variable response size based on the number of itemsrequested, the number of users or groups defined, the number of labels owned by a view, and so forth. Largeserver configurations can cause certain commands to return large responses, which take longer to transfer,especially on slower networks. Clients will see this as reduced performance for certain operations such asopening a project or a custom form.
47
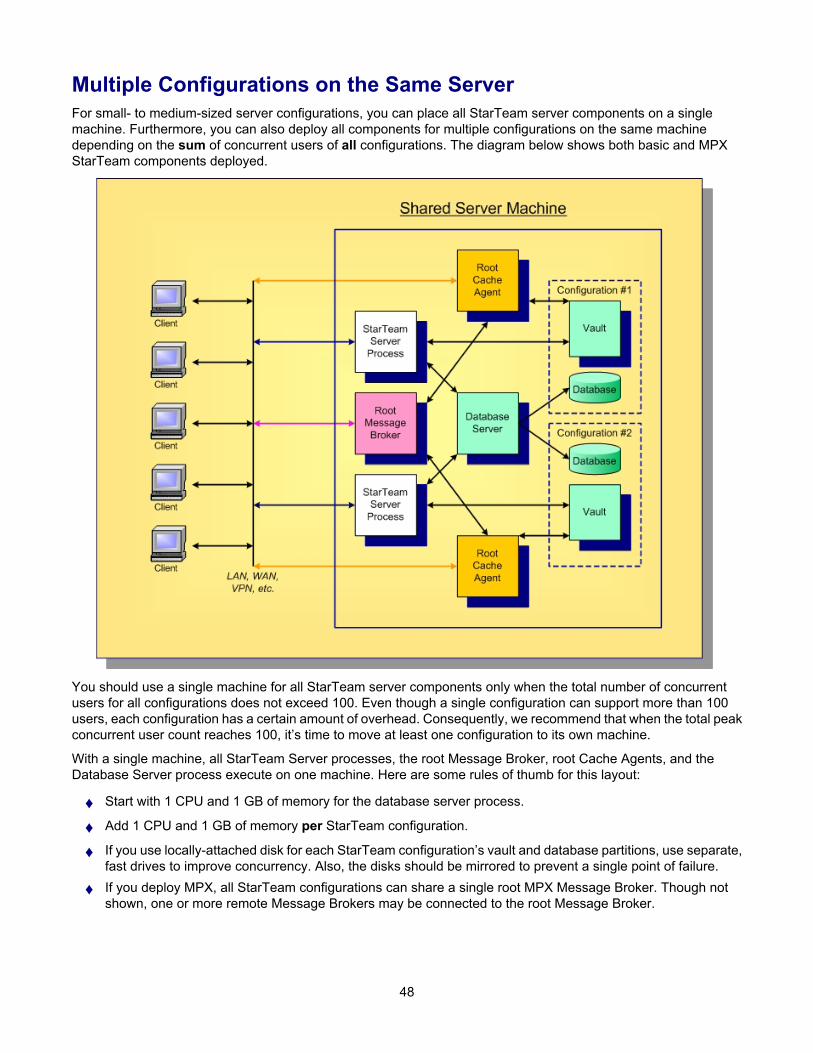
Multiple Configurations on the Same ServerFor small- to medium-sized server configurations, you can place all StarTeam server components on a singlemachine. Furthermore, you can also deploy all components for multiple configurations on the same machinedepending on the sum of concurrent users of all configurations. The diagram below shows both basic and MPXStarTeam components deployed.
You should use a single machine for all StarTeam server components only when the total number of concurrentusers for all configurations does not exceed 100. Even though a single configuration can support more than 100users, each configuration has a certain amount of overhead. Consequently, we recommend that when the total peakconcurrent user count reaches 100, it’s time to move at least one configuration to its own machine.
With a single machine, all StarTeam Server processes, the root Message Broker, root Cache Agents, and theDatabase Server process execute on one machine. Here are some rules of thumb for this layout:
♦ Start with 1 CPU and 1 GB of memory for the database server process.
♦ Add 1 CPU and 1 GB of memory per StarTeam configuration.
♦ If you use locally-attached disk for each StarTeam configuration’s vault and database partitions, use separate,fast drives to improve concurrency. Also, the disks should be mirrored to prevent a single point of failure.
♦ If you deploy MPX, all StarTeam configurations can share a single root MPX Message Broker. Though notshown, one or more remote Message Brokers may be connected to the root Message Broker.
48
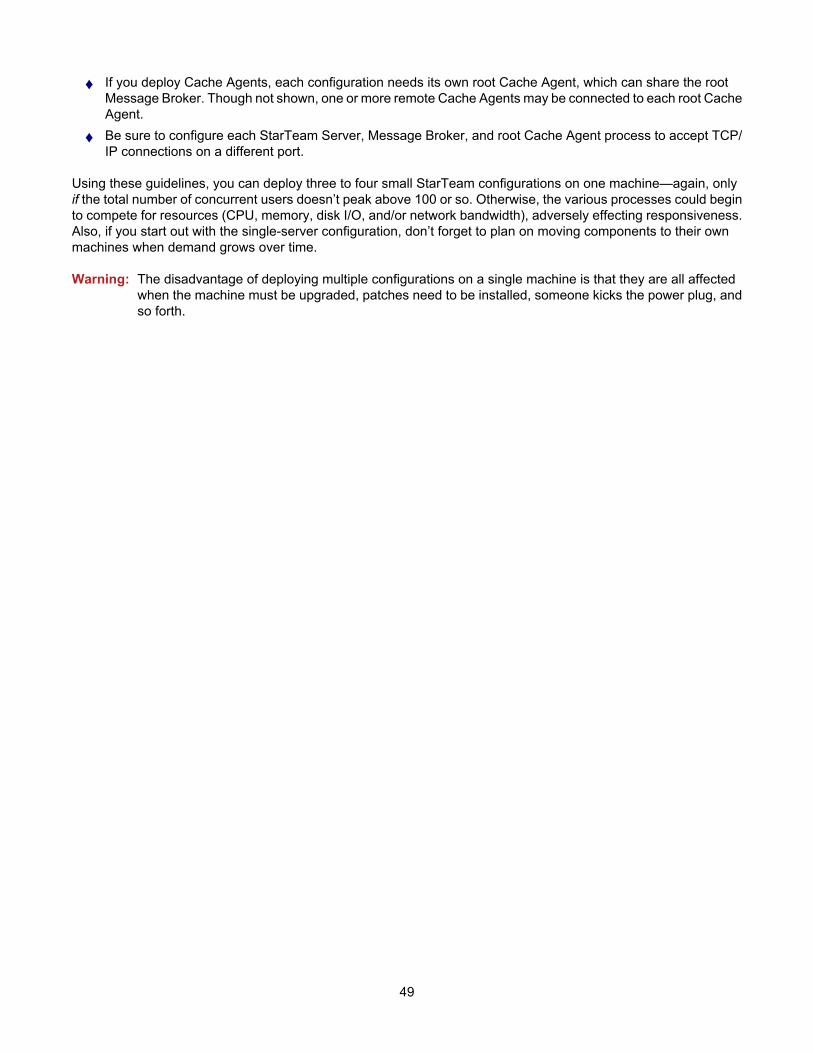
♦ If you deploy Cache Agents, each configuration needs its own root Cache Agent, which can share the rootMessage Broker. Though not shown, one or more remote Cache Agents may be connected to each root CacheAgent.
♦ Be sure to configure each StarTeam Server, Message Broker, and root Cache Agent process to accept TCP/IP connections on a different port.
Using these guidelines, you can deploy three to four small StarTeam configurations on one machine—again, onlyif the total number of concurrent users doesn’t peak above 100 or so. Otherwise, the various processes could beginto compete for resources (CPU, memory, disk I/O, and/or network bandwidth), adversely effecting responsiveness.Also, if you start out with the single-server configuration, don’t forget to plan on moving components to their ownmachines when demand grows over time.
Warning: The disadvantage of deploying multiple configurations on a single machine is that they are all affectedwhen the machine must be upgraded, patches need to be installed, someone kicks the power plug, andso forth.
49
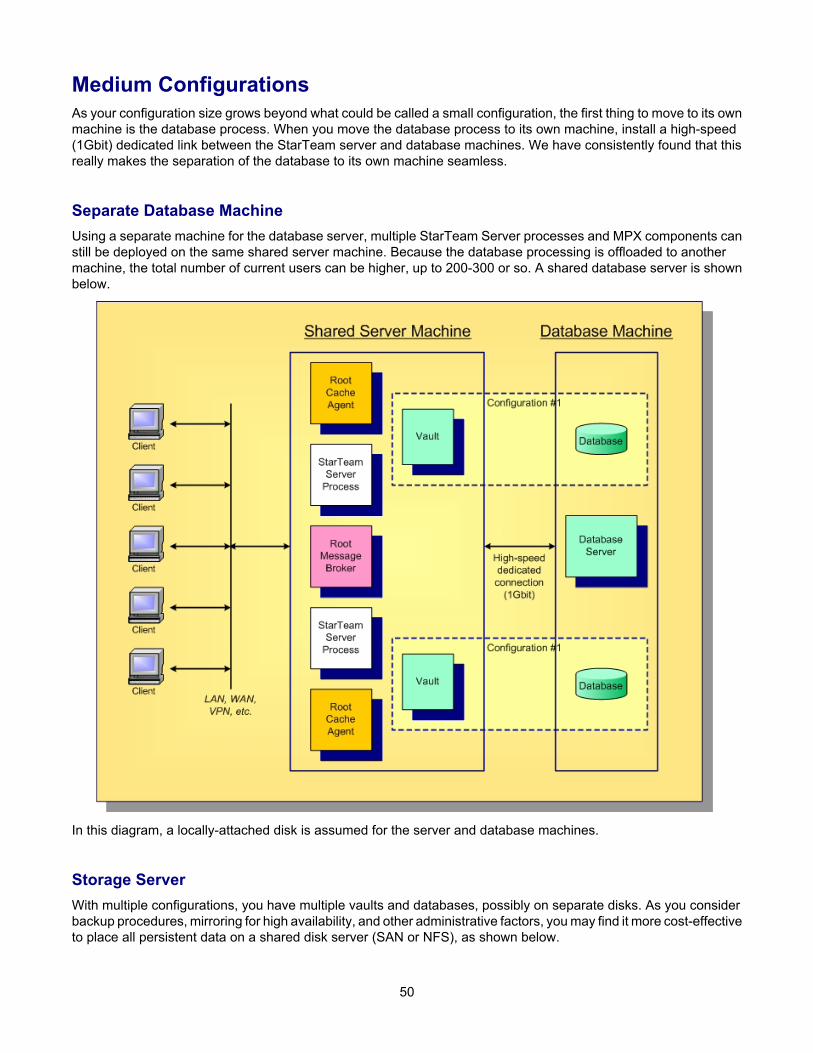
Medium ConfigurationsAs your configuration size grows beyond what could be called a small configuration, the first thing to move to its ownmachine is the database process. When you move the database process to its own machine, install a high-speed(1Gbit) dedicated link between the StarTeam server and database machines. We have consistently found that thisreally makes the separation of the database to its own machine seamless.
Separate Database MachineUsing a separate machine for the database server, multiple StarTeam Server processes and MPX components canstill be deployed on the same shared server machine. Because the database processing is offloaded to anothermachine, the total number of current users can be higher, up to 200-300 or so. A shared database server is shownbelow.
In this diagram, a locally-attached disk is assumed for the server and database machines.
Storage ServerWith multiple configurations, you have multiple vaults and databases, possibly on separate disks. As you considerbackup procedures, mirroring for high availability, and other administrative factors, you may find it more cost-effectiveto place all persistent data on a shared disk server (SAN or NFS), as shown below.
50
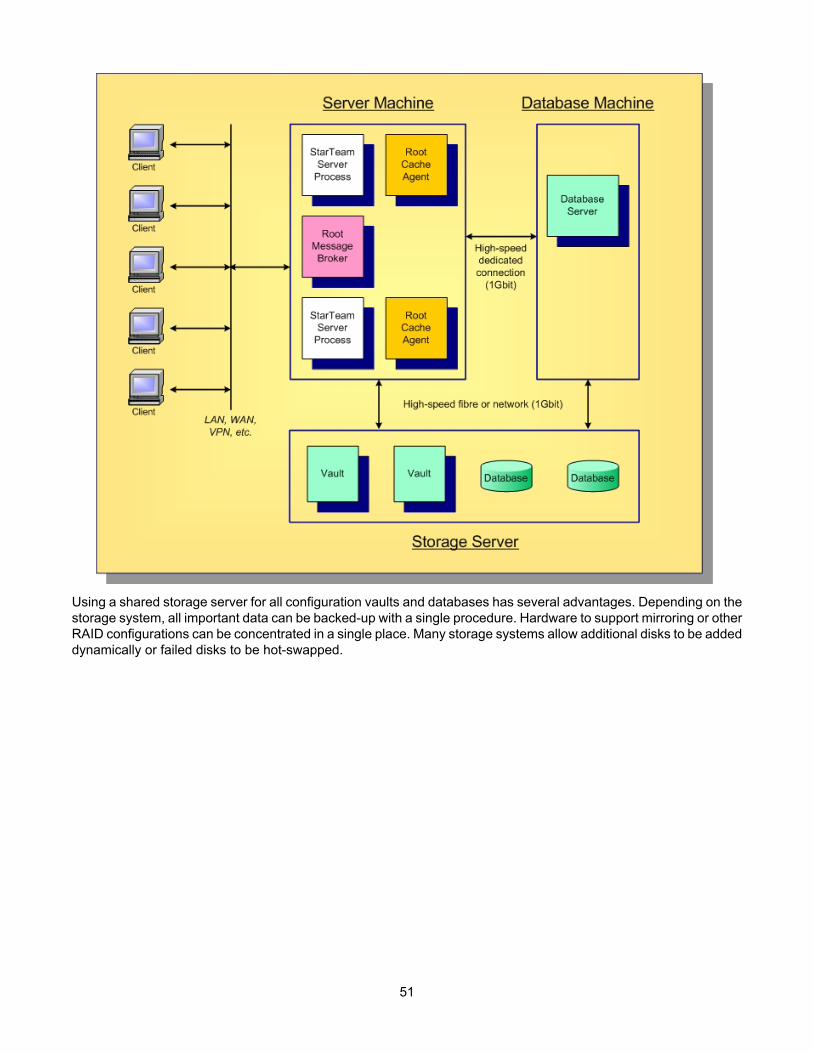
Using a shared storage server for all configuration vaults and databases has several advantages. Depending on thestorage system, all important data can be backed-up with a single procedure. Hardware to support mirroring or otherRAID configurations can be concentrated in a single place. Many storage systems allow additional disks to be addeddynamically or failed disks to be hot-swapped.
51
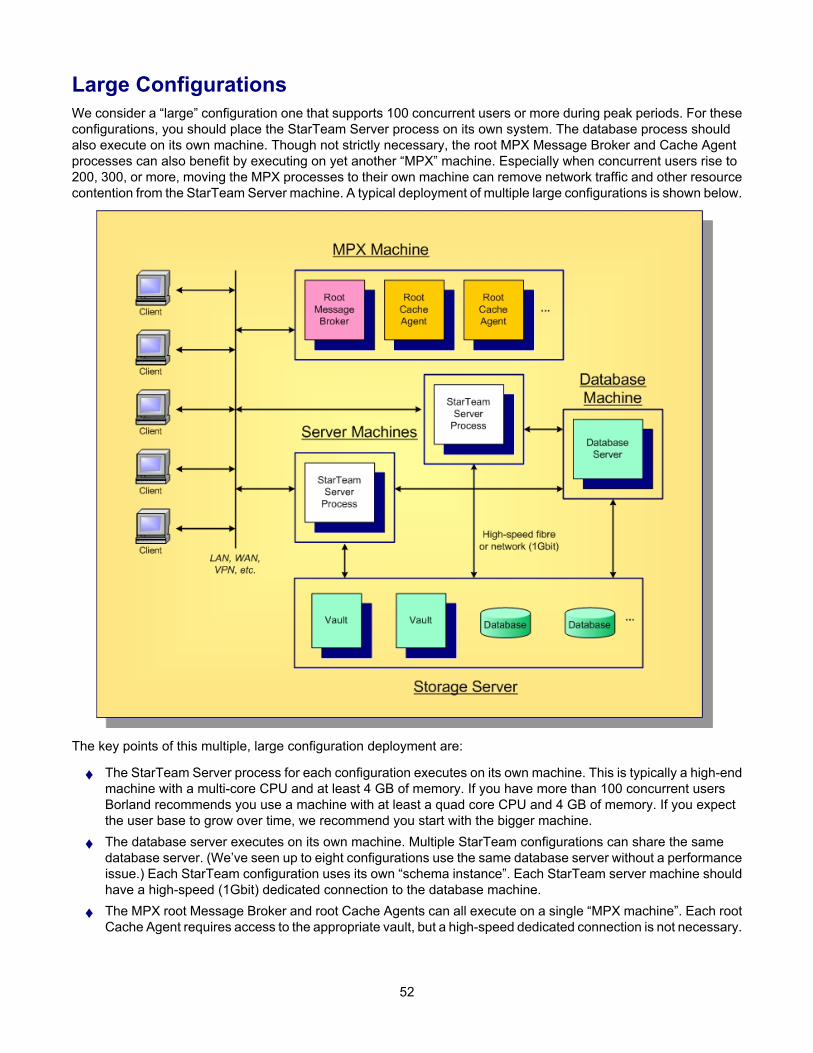
Large ConfigurationsWe consider a “large” configuration one that supports 100 concurrent users or more during peak periods. For theseconfigurations, you should place the StarTeam Server process on its own system. The database process shouldalso execute on its own machine. Though not strictly necessary, the root MPX Message Broker and Cache Agentprocesses can also benefit by executing on yet another “MPX” machine. Especially when concurrent users rise to200, 300, or more, moving the MPX processes to their own machine can remove network traffic and other resourcecontention from the StarTeam Server machine. A typical deployment of multiple large configurations is shown below.
The key points of this multiple, large configuration deployment are:
♦ The StarTeam Server process for each configuration executes on its own machine. This is typically a high-endmachine with a multi-core CPU and at least 4 GB of memory. If you have more than 100 concurrent usersBorland recommends you use a machine with at least a quad core CPU and 4 GB of memory. If you expectthe user base to grow over time, we recommend you start with the bigger machine.
♦ The database server executes on its own machine. Multiple StarTeam configurations can share the samedatabase server. (We’ve seen up to eight configurations use the same database server without a performanceissue.) Each StarTeam configuration uses its own “schema instance”. Each StarTeam server machine shouldhave a high-speed (1Gbit) dedicated connection to the database machine.
♦ The MPX root Message Broker and root Cache Agents can all execute on a single “MPX machine”. Each rootCache Agent requires access to the appropriate vault, but a high-speed dedicated connection is not necessary.
52

File access over the network (e.g., using UNC paths) is sufficient. Note that if you utilize the workflowNotification Agent, you can put it on the MPX machine as well.
♦ A shared storage server such as a SAN server can be used for all StarTeam vaults and database partitions.Depending on the hardware, an interface (e.g., “host” card) may be needed for each StarTeam server machinein order to access the SAN.
53
Active/Passive ClusteringStarTeam works with active/passive clustering, in which a “warm standby” node is maintained for quick failover. Onegeneral rule to remember is that only one StarTeam Server process can be active for a given configuration at onetime. However, StarTeam configuration files can be copied to multiple machines along with all the necessarysoftware. Also, multiple machines under the control of Failure Management Software (FMS) can be connected tothe same database (which may be clustered itself), and they can be connected to the same shared storage serverfor vault access.
Active/passive clustering works like this: the StarTeam Server process on one node in the cluster is started, makingit the active node for that configuration. The IP address of the active node is mapped to a virtual “cluster address”,which is the address to which clients connect. If the active node fails, the FMS takes care of failover: it starts theStarTeam Server process on a passive machine—making it the active node—and remaps the cluster address to thenew active node’s IP address. Running clients receive a disconnect message and have to reconnect, but in mostcases the failover will occur quickly, so clients can immediately reconnect.
When you have multiple StarTeam configurations, you can “pair” machines so that an active node for oneconfiguration is the passive node for a second configuration and vice versa. Hence, both machines are actively used,and only in a failover scenario one machine must support the processing of both configurations. An example ofactive/passive cluster configuration is shown below.
54
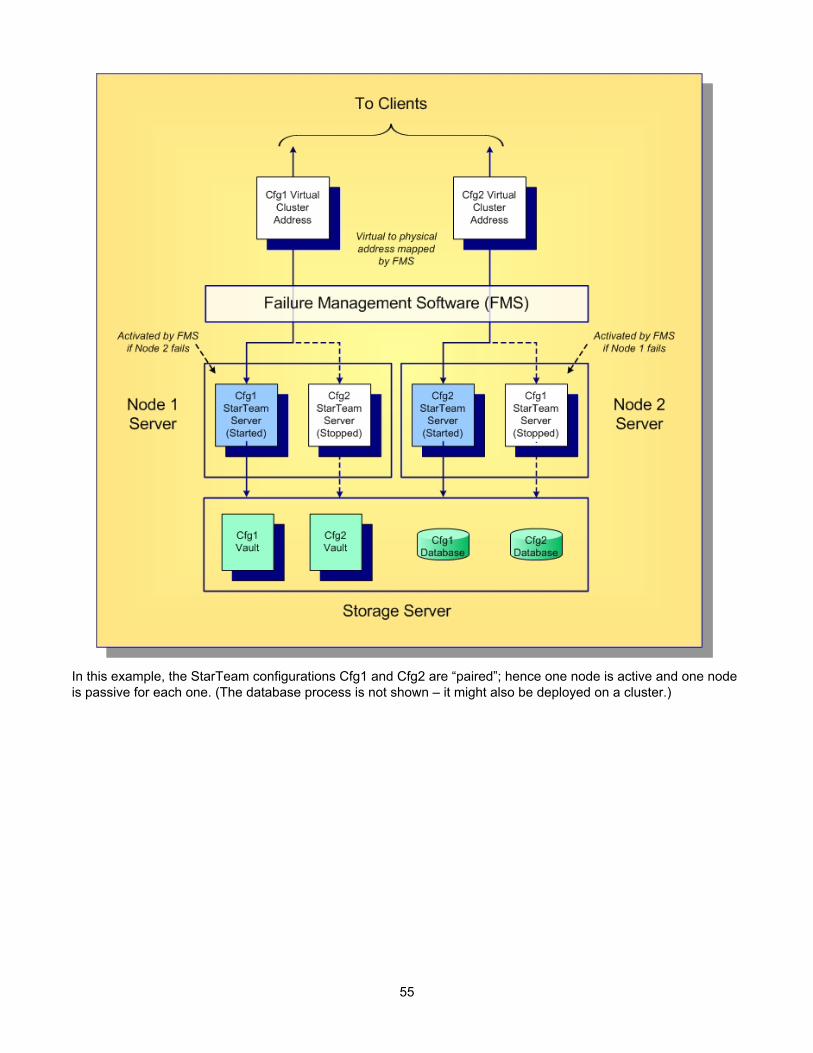
In this example, the StarTeam configurations Cfg1 and Cfg2 are “paired”; hence one node is active and one nodeis passive for each one. (The database process is not shown – it might also be deployed on a cluster.)
55
Server AdministrationThe topics in this section provide getting started information about the StarTeam features and concepts used by aserver administrator.
In This SectionServer Administration OverviewThis provides an overview of concepts related to server administration.
Server Administrator AssumptionsThis topic lists some assumptions made by this help system for a server administrator.
Server Configuration OverviewThis topic provides an overview about server configurations.
Server Configuration GuidelinesDescribes best practices for working with StarTeam Server configurations.
Audit LogsDescribes the auditing feature of the Server.
StarDraw Sample Server ConfigurationThis topic describes the StarDraw sample server configuration that ships and optionally installs withStarTeam Server.
56
Server Administration OverviewThe Server manages data for all its client applications. The server is maintained by a server administrator who isfamiliar with the complexities and details of server operation. Client applications, such as the Cross-Platform Client,connect to the server to access data. As a server administrator who initially installs the Server, you may performsome or all of the following actions:
♦ Install the Server
♦ Configure the Server
♦ Register (license) the Server
♦ Create and start a new server configuration (an instance of the server)
♦ Set up StarTeamMPX for the new server configuration
♦ Add new users and groups to the server configuration
♦ Set up Directory Server and use Borland LDAP QuickStart Manager to add users
♦ Set up a password policy for non-LDAP users
♦ Create projects and views for the server configuration
♦ Set up access rights for projects
♦ Enable server configuration diagnostics
♦ Set up email notification and customize automatic email notification with your own text or HTML-based emailmessage templates
♦ Set up system policy, that is, manage passwords, logon failures, access rights, and security events for theserver configuration
Beginning with StarTeam Server 2009, the server creates new projects with only the "File" type pre-selected as adefault for new views. Users can still change the project properties after the project is created, and they can changethe item types included for any given new view. However, if the user changes nothing, by default new views will onlyinclude files when they are created.
Note: This change does not affect any existing projects. It only affects new projects created with new StarTeamServer 2009 Servers or existing servers once they are upgraded to StarTeam Server 2009. Adding other itemtypes to the Project Properties (after the view is created) will NOT populate the items that were contained inthe parent view (but left out during New View creation). If the user wants to bring the previous items into thenew view, they must retrieve them by Rebasing from the parent view.
A server can manage any number of projects. Each project has one root view and any number of child views. Theroot view and every child view has one application folder as a root folder. An application root folder can have anyhierarchy of child folders. This is called the folder hierarchy. When an administrator creates a project, that project’sroot view and the root view’s root folder are created automatically and given the same name as the project. Forexample, if the project’s name is Great App, the root view’s name is initially Great App, and the root folder’s nameis initially Great App (although the administrator can change these names).
Your first task as an administrator is to install, configure, and register the Server, as explained in the StarTeamInstallation Guide. Next, you must create an instance (known as a server configuration) on the computer on whichthe Server is installed. A server configuration must be running before you and your team members can access theapplication.
57
Related Concepts
Server Configuration OverviewEmail Support and Customized Email Notifications
Related Procedures
Licensing the ServerCreating Server ConfigurationsManaging Users and GroupsEnabling Directory Service SupportManaging PasswordsManaging Access Rights and Group PrivilegesTroubleshooting Server Configuration Problems
58

Server Administrator AssumptionsThis help system assumes that server administrators are familiar with:
♦ Creating and modifying relational databases.
♦ Working with the features of their operating system, such as creating files, running executable files, andmanaging access rights.
♦ Basic software configuration management concepts.
This manual also assumes that server administrators will:
♦ Never modify database contents other than through a client or Server Administration tool. Please be awarethat direct database manipulation is unsupported.
♦ Never modify vault files other than through a client or a Server Administration tool.
Related Concepts
Server Configuration OverviewEmail Support and Customized Email Notifications
Related Procedures
Licensing the ServerCreating Server ConfigurationsManaging Users and GroupsEnabling Directory Service SupportManaging PasswordsManaging Access Rights and Group PrivilegesTroubleshooting Server Configuration Problems
59
Server Configuration OverviewBefore using the Server, you must decide what database to use and where to store the database and file revisions.Then you must create at least one server configuration (an instance of the Server). This topic discusses serverconfigurations and their storage hives.
Server ConfigurationsA server configuration defines:
♦ The set of options, including endpoints (the TCP/IP port) and encryption levels, used for server access.
♦ Location of the database that stores project data, the database DSN, and other related information.
♦ Locations for the repository and repository-related folders.
Any number of projects can be stored in the database associated with a particular server configuration. However,the database must be configured properly to store the amount of data produced by those projects. For moreinformation about specific databases supported by StarTeam, refer to the StarTeam Installation Guide(Install_en.pdf).
You can create a server configuration by using the Server Administration utility. A server configuration defines aspecific database as the repository for its data. To prevent corruption, that database can be associated with onlyone server configuration. However, that database can be used by other applications. The application stores allprojects on the Server, which may contain numerous server configurations.
To access an existing project, you must first add its server configuration to your system. The Server can be accessedfrom the Cross-Platform Client and Web Client. Each client must have a user name and the correct access rights toaccess the selected server configuration. Your company or team may store its data on several server configurationson one or more computers. Any of these configurations can be accessed from a number of clients.
More than one instance of the Server may be running on the same computer. For example, users might run oneserver configuration with the StarDraw sample project and another with a software development project—both onthe same computer. Each server configuration has a different name and a different port or endpoint for each protocol.When a configuration is in use, another session using that configuration cannot be started.
Before creating a server configuration, you need to decide upon a unique name for the configuration. This name iscase insensitive and cannot contain colons (:), back slashes (\), or forward slashes (/), but can contain blanks orapostrophes ( ' ).
The Server places server log files in the location designated as the server configuration's repository path. When youfirst start a new server configuration, the Server creates the Attachments folder, HiveIndex, and other folders in thesame location. These folders are maintained by the Server; do not delete them.
Tip: Once you have created a server configuration, you can change the path to the Attachments folder from theServer Administration utility's Configure Server dialog.
Other server configuration settings control where, when, how, and by whom the data is accessed. Some initialsettings that you provide for the server configuration are properties that are necessary to start it. For example, if theuser name and password that allow the Server to access the database are not accurate, the Server cannot run.Before starting the server, you can change these properties to meet your requirements.
Native-II Vaults/HivesStarTeam 2005 introduced a new vault architecture (Native-II) that provides greater scalability for all serverconfigurations created with StarTeam 2005 or later and for server configurations converted to Native-II vault formatwith StarTeam 2005 or later. Server configurations have one or more hives. A hive is a logical disk container of filesthat includes an Archive area and a Cache area. The Archive area consists of a folder tree in which unique file
60
revisions are stored. The Cache area consists of a folder tree that stores uncompressed file revisions on a temporarybasis. Hives can hold an unlimited number of files, providing increased storage capacity, larger file revisions, morelocations to store archives, and faster, more efficient performance. A single server configuration can have severalhives, each of which has its own archive and cache path.
Note: StarTeam supports only the Native-II vault format for hives.
The initial hive used for storage of the server configuration’s archive files is created along with the serverconfiguration. You must supply an archive path and a cache path to this hive when creating the server configuration.The default paths are repository_path\DefaultHive\Archives and repository_path\DefaultHive\Cache. If desired, the location of these paths can be changed later by using the Hive Manager dialog found in theServer Administration utility.
Native-II vaults store each file revision in its entirety (even though the archive file may be compressed). But therevisions can be spread over many volumes by the use of hives for storage. If one hive fills up, you can add another,without changing any data locations or moving any archive files. When a server configuration has multiple hives, theserver adds files to each hive in turn before reusing the first hive's archive path. For more information about Native-II vaults, see the StarTeam Installation Guide (Install_en.pdf).
When you create a server configuration with StarTeam 2005 or a later release, it automatically has at least one hive(either the default or a custom hive). To increase the amount of available space for a server configuration, you canadd one or more new hives with the Hive Manager. You can create hives while the server configuration is running,because the configuration already has an initial path, if only to a Default Hive in the repository path. The main purposeof the Hive Manager is to create new hives for an existing 2005 or later server configuration, to increase the amountof available space.
Related Concepts
Data Storage Locations
Related Procedures
Creating Server ConfigurationsConfiguring Data Storage OptionsWorking with Server Configurations
61
Server Configuration GuidelinesIn terms of initial planning, one of the most important decisions your organization must make is how many StarTeamconfigurations it will use. While distributing projects across multiple StarTeam Servers will increase administrativecosts, it will also increase project independence and improve performance and availability. By estimating projectgrowth and considering interdependencies ahead of time, you can avoid having to split up a configuration that hasbecome too large. Below are some strategies to consider when developing the server deployment plan for yourorganization.
Advantages of Shared Server ConfigurationsThe advantages of having projects share the same configuration are:
♦ Transactional integrity: Because a configuration uses a single database, all data within the sameconfiguration is transactionally consistent. That is, a configuration represents a data consistency boundary. Ifyou backup and later restore a configuration, all information within the configuration will be restored to thesame point in time.
♦ Linking: Items in the same configuration can be linked, even if they are in different projects. StarTeam doesnot currently support cross-configuration linking.
♦ Sharing and moving: An item can be shared or moved to any folder, view, or project within the sameconfiguration. Moving or sharing items across configuration boundaries is not supported.
♦ Administrative simplicity: Administrative tasks such as adding users and groups, applying security,performing backups, and so forth are done at the configuration level.
♦ Shared customizations: Many StarTeam resources such as filters, queries, custom forms, and workflowscan be defined at the configuration level and shared by all projects. (However, custom forms and workflow canalso be customized per project or per view.)
♦ Shared server components: All data in the same configuration utilize a single server process, database,vault, and root Cache Agent. New projects can be added dynamically without adding any new server-sidecomponents.
Advantages of Separate Server ConfigurationsThe advantages of having projects in separate configurations are:
♦ Performance: Larger configurations take longer to start, use more resources, and tend to return largercommand responses. Conversely, smaller configurations have less data and fewer concurrent users, so theytend to perform better in these regards.
♦ Managing growth: Even if you initially place multiple configurations on a single machine, you can easily movea configuration to its own machine if you need to.
♦ Maintenance schedules: Separate configurations can be independently started and stopped for installingpatches, upgrading hardware, etc. When a configuration is offline, all projects it contains are unavailable.
♦ Custom fields: Custom fields are added at the “type” level, which has configuration-level scope. This meansthat if you add a custom field to a CR, all CRs in that configuration will have a value for that field. Hence, ifdifferent teams or business units have competing interests in custom fields, this argues for placing their projectsin separate configurations.
62

Other Server Configuration ConsiderationsThe next sections describe additional factors to consider when developing the server deployment plan for yourorganization.
Business Unit DivisionsWhen multiple business units require their own StarTeam projects, it often works well to define StarTeam Serversalong organizational boundaries. That is, deploy a separate StarTeam Server for each major business unit ordepartment, allowing each to access its own projects. Dividing along business unit lines isolates separate (andsometimes competing) requirements for security, backup processes, and other administrative issues. Separateservers can also help mitigate ownership or “turf” issues.
Where development lifecycle processes cross server configurations, clients can open multiple projects in a singleStarTeam client. “Deploying” interrelated artifacts from one project to another can also be used to address cross-configuration integration needs.
Leverage StarTeam Support for Distributed TeamsTeam members that require access to the same artifacts should share a single StarTeam server. Dividing a StarTeamserver solely due to geographically dispersed teams is not necessary. StarTeam was designed to work well withdistributed teams. StarTeam emphasizes a centralized configuration approach with MPX publish/subscribemessaging and Cache Agents to support distributed teams.
Avoid Partitions for Internal/External AccessIn many situations, teams both behind and outside the corporate firewall require access to the same StarTeamconfiguration. A common practice in this scenario is to deploy the StarTeam Server process in the DMZ area of thefirewall, placing the database server and storage server behind the firewall. Depending on the capabilities of thefirewall, it may be appropriate to configure a dedicated port to the StarTeam server. Alternatively, you can install twonetwork interface cards (NICs) on the StarTeam server machine: one “outward” facing and one “inward” facing. Inthis scenario, StarTeam allows specific inbound IP addresses (or address ranges) to be configured with differentconnection security requirements.
StarTeam provides SSL-like encryption for the command API, preventing eavesdropping on client/server traffic. AllMPX Message Broker and Cache Agent traffic is also encrypted, making data private across public links. To limitaccess to specific teams, you can use reference views or StarTeam’s security ACLs to limit access to specificprojects, views, folders, and even individual artifacts. Other security features, such as strong password managementand automatic account lockouts, further increase the viability of using the same StarTeam configuration for bothinternal and external users.
Plan for GrowthIn planning how many StarTeam configurations to create, take a long-term view: at least three to five years. If youcan estimate concurrent user usage, this is the best metric for capacity planning. On today’s hardware (a quad-CPUw/4GB memory), StarTeam readily supports up to 300 concurrent users. Some customers have configurations thatpeak at over 400 concurrent users, and one customer has seen peaks of 600 concurrent users. But at theseconcurrency levels, the application types become important (that is, batch applications tend to demand more thanonline clients). Even a 300-concurrent user load may drive down responsiveness unacceptably if a substantialnumber of users are running high-demand applications.
Another way to gauge configuration scalability is with command rates. You can measure the command rates of anexisting configuration by using the server trace functionality. The StarTeam server can be tuned to provide adequateperformance with command rates from 200,000 to 300,000 commands per hour (56 to 83 commands per second).Command rates of 400,000 per hour (111 per second) or more with adequate performance have been observed
63
with good network infrastructure (low latency). Attempts to drive a single configuration higher than this tend toproduce unacceptable response times.
If you cannot project user concurrency rates or command rates, you can use “defined” users, but the server load isless predictable using defined users alone. In geographically-distributed user communities, we typically see adefined-to-concurrent ratio around 10:1. So, we would expect 1,000 named users to yield about 100 concurrent usersessions during peak periods. In less-distributed topologies, where users are concentrated in one or two time zones,we expect the defined-to-concurrent ratio to be closer to 5:1. If you don’t have better data, use these approximationsto estimate your peak concurrent user rate.
After estimating your three-to-five year projection, you should have an idea of how many StarTeam configurationswill be needed to support your user community.
Related Concepts
Server Configuration Overview
Related Procedures
Creating Server ConfigurationsVerifying File Revisions with Vault VerifyPurging Deleted Views from Server Configurations
64
Audit LogsBy default, the Server is automatically configured to generate audit logs. With this option activated, the Server logsaudit events for projects in the server configuration database. For example, the log records when change requestsare created, and when a file is added. The audit log entries can be viewed from a client by selecting the Audit tab inthe upper pane. This operation can be performed only on a server configuration that is running.
A chronological record, the Audit log accumulates data about the actions performed on folders, files, requirements,change requests, tasks, and topics. Each log entry shows the user who carried out the action, the date and time theaction was performed, the class name (type of item), the event (type of action), the view name, and the project name.By using filters or queries, you can locate all the entries for a particular item.
For most items, events may be added, branched, commented, created, deleted, modified, moved from, moved to,and shared. For files, events may also include converted, edited, item overwritten, locked, lock broken, and unlocked.Log entries themselves cannot be moved, shared, modified, or branched. If the Audit tab of the main window displaysno entries, your administrator has probably disabled the Audit log function.
Related Procedures
Enabling and Purging the Audit Log
65

StarDraw Sample Server ConfigurationStarTeam provides a sample server configuration named StarDraw. It contains a Visual C++ sample application andrelated materials. It has sample files, change requests, topics, and tasks. It also includes the StarFlow Extensionproject. You can read the StarTeam Getting Started Guide and use the sample repository to experiment with andlearn more about StarTeam.
Beginning with StarTeam Server 2009, the server creates new projects with only the "File" type pre-selected as adefault for new views. Users can still change the project properties after the project is created, and they can changethe item types included for any given new view. However, if the user changes nothing, by default new views will onlyinclude files when they are created.
Note: This change does not affect any existing projects. It only affects new projects created with new StarTeamServer 2009 Servers or existing servers once they are upgraded to StarTeam Server 2009. Adding other item typesto the Project Properties (after the view is created) will NOT populate the items that were contained in the parentview (but left out during New View creation). If the user wants to bring the previous items into the new view, theymust retrieve them by Rebasing from the parent view.
During the StarTeam Server installation procedure, the sample server configuration is installed as part of the Typicalinstallation and can be installed as part of the Custom installation. The installation procedure:
♦ Copies the stardraw.mdf database into the StarTeam Server 2009\Samples\StarDrawRepository\Database folder.
♦ Copies sample files into the StarTeam Server 2009\Samples\StarDraw Repository\StarDraw\Archives folder and its subfolders.
♦ Creates an ODBC System DSN (Data Source Name) named StarDrawDB110.
♦ Adds the new StarDraw server configuration to the starteam-server-configs.xml file. If a previous StarDrawserver configuration is defined in that file, its settings are updated for the new release’s version of StarDraw.
Note: In the starteam-server-configs.xml file, the predefined value of ServerGuid for the StarDrawRepository is:
be5ee3b0-c719-49c6-a1a1-f493764a03f5
Do not change this value. The StarDraw server configuration will not start if you modify theServerGuid. Use the StarDraw server configuration only for experimentation and training—never for live data.
Related Procedures
Enabling and Purging the Audit Log
66
Tour of the UIThis section contains conceptual topics describing the StarTeam user interface.
In This SectionServer Administration ToolThis topic describes the UI for the Server Administration Tool.
Customize VCM ToolThis topic describes the Customize VCM Tool which allows administrators to customize View Compare/Merge types.
Online Purge ToolThis topic displays the UI of the Online Purge Tool which allows administrators to purge deleted views anddata from a server while it is running.
67
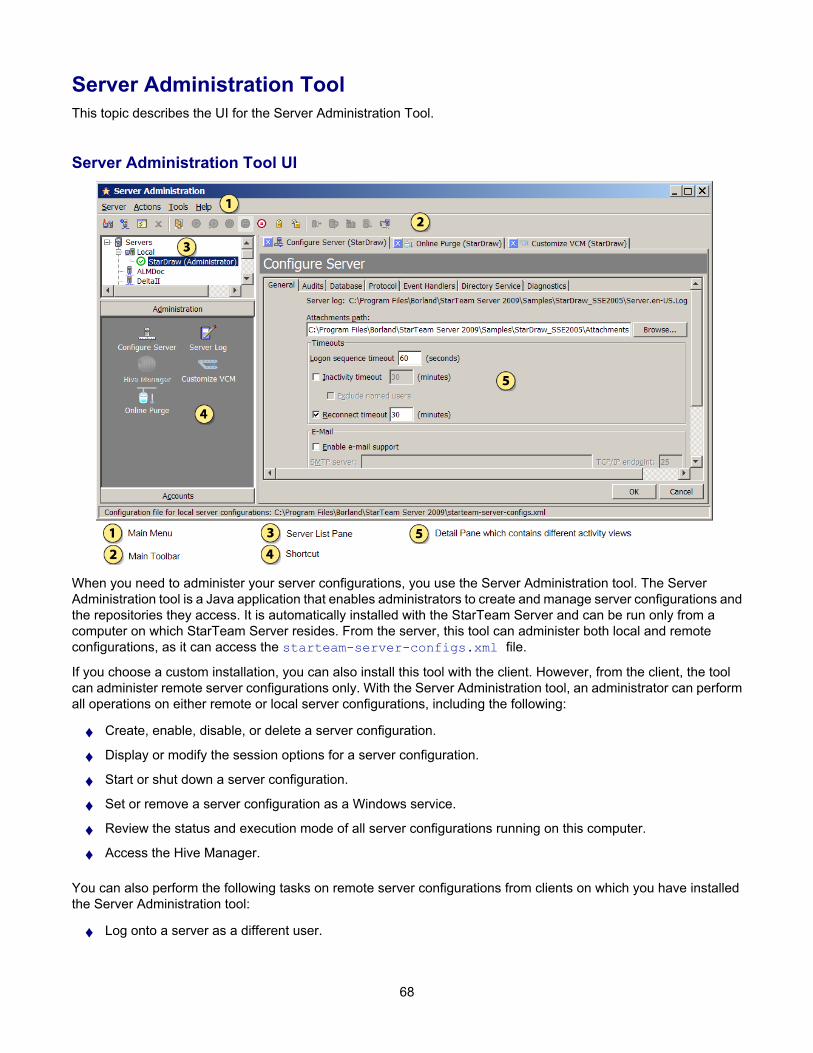
Server Administration ToolThis topic describes the UI for the Server Administration Tool.
Server Administration Tool UI
When you need to administer your server configurations, you use the Server Administration tool. The ServerAdministration tool is a Java application that enables administrators to create and manage server configurations andthe repositories they access. It is automatically installed with the StarTeam Server and can be run only from acomputer on which StarTeam Server resides. From the server, this tool can administer both local and remoteconfigurations, as it can access the starteam-server-configs.xml file.
If you choose a custom installation, you can also install this tool with the client. However, from the client, the toolcan administer remote server configurations only. With the Server Administration tool, an administrator can performall operations on either remote or local server configurations, including the following:
♦ Create, enable, disable, or delete a server configuration.
♦ Display or modify the session options for a server configuration.
♦ Start or shut down a server configuration.
♦ Set or remove a server configuration as a Windows service.
♦ Review the status and execution mode of all server configurations running on this computer.
♦ Access the Hive Manager.
You can also perform the following tasks on remote server configurations from clients on which you have installedthe Server Administration tool:
♦ Log onto a server as a different user.
68
♦ Add and manage user accounts.
♦ Set the security policy for a server configuration.
♦ Assign access rights to users and groups for a server configuration.
♦ Add, modify, or delete connections to a server configuration.
♦ Set or modify the configuration options for a server configuration.
♦ Display the server log file (Server.locale.Log).
♦ Lock or unlock a server configuration.
The rest of this topic describes the numbered components in the above diagram.
Main MenuThe main menu consists of the Server, Actions, Tools, and Help menus. The Tools menu provides a cascadingmenu separating administrative and user account commands.
The Server Administration tool enables or disables menu commands depending on the status of your serverconfiguration. For example, when you are not running a server configuration the Server Administration tool does notenable the Actions Logon As Shutdown Server main menu commands.
ToolbarFrequently used main menu commands corresponding to the Server and Actions menus have correspondingbuttons on the toolbar. Fly-over text displays when you hover your mouse over the toolbar buttons. The ServerAdministration tool enables or disables toolbar buttons depending on the status of your server configuration.
Server PaneThe server pane lists the servers that are present in the starteam-servers.xml file. Choosing Server AddServer and proceeding through the Add Server dialog box updates this file.
Shortcut PaneThe shortcut pane displays quick access buttons corresponding to the cascading menus provided under the Toolsmenu for the administrative and user account commands. The shortcut pane is divided into the Administration andAccounts areas enabling you to access frequently used main menu commands.
Display PaneWhen accessing main menu commands from the Tools cascading menus or from the shortcut pane quick accessbuttons, the Server Administration tool displays the dialog boxes for these commands in the display pane.
Tip: Expand the Server Administration tool window to enlarge the dialog boxes presented in the display pane.
Related Concepts
Where to Find Documentation for Each ProductStarTeam Product Overview
69
Customize VCM ToolThe Customize VCM tool in the Server Administration windowallows an administrator to create new customizedView Compare/Merge types based on the default merge types of Rebase, Promote, Replicate, and Compare Only.The administrator can specify at the server, view, or project level which merge types will be available to the user ofthat particular context. The administrator can also specify what the default merge action will be for each differencetype found in the session.
Using the Customize VCM tool, administrators can simplify the View Compare/Merge process by presetting theVCM operation settings in the View Compare/Merge wizard, eliminating the need for users to view and set all ofthe View Compare/Merge wizard options to start a VCM session. Along with setting the default merge actions, theadministrator can also specify which Included Item Types and VCM Options to display to the user.
Note: Before you can create a custom VCM merge type, you must create a StarFlow Extensions project the server.First create a StarFlow Extensions project, then create the Projects folder under the root folder in the view.Otherwise the save operation will fail in the Customize VCM tool.
Customize VCM UIBelow is the new Customize VCM tab in the Server Administration Tool.
70
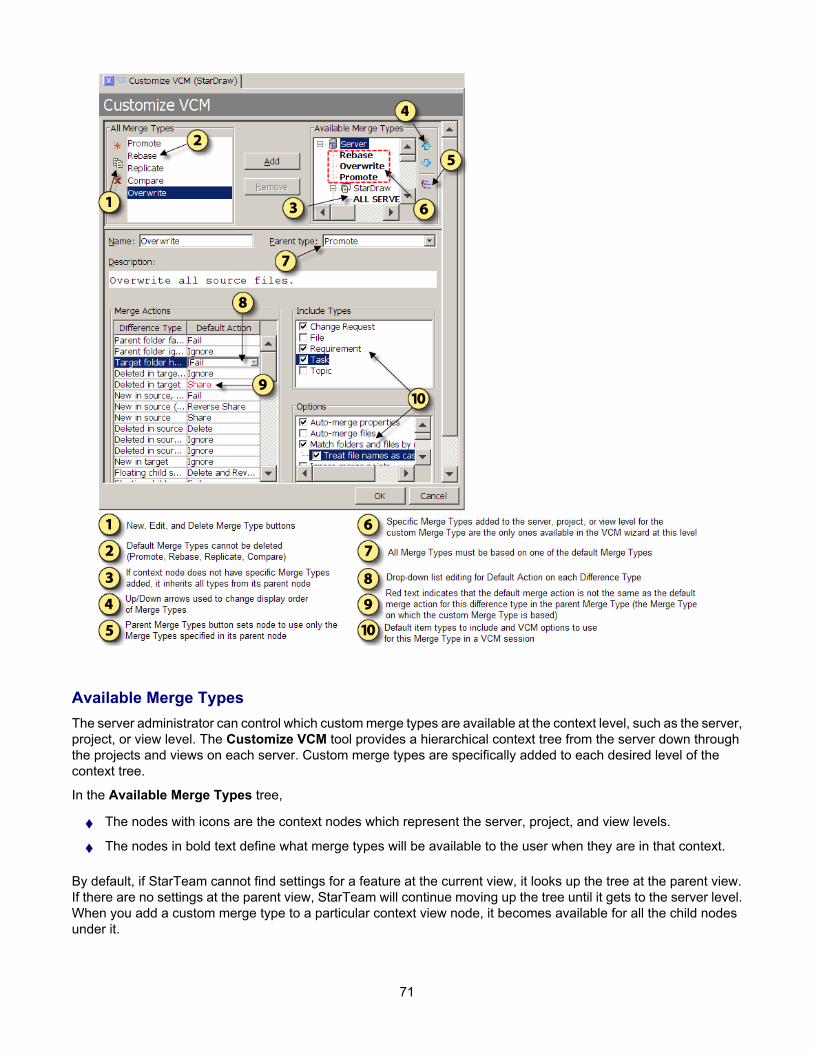
Available Merge TypesThe server administrator can control which custom merge types are available at the context level, such as the server,project, or view level. The Customize VCM tool provides a hierarchical context tree from the server down throughthe projects and views on each server. Custom merge types are specifically added to each desired level of thecontext tree.
In the Available Merge Types tree,
♦ The nodes with icons are the context nodes which represent the server, project, and view levels.
♦ The nodes in bold text define what merge types will be available to the user when they are in that context.
By default, if StarTeam cannot find settings for a feature at the current view, it looks up the tree at the parent view.If there are no settings at the parent view, StarTeam will continue moving up the tree until it gets to the server level.When you add a custom merge type to a particular context view node, it becomes available for all the child nodesunder it.
71
Note: Once you add specific merge types to a level in the Available Merge Types tree, only explicitly added mergetypes will be available in the View Compare/Merge wizard for VCM sessions at that level. You mustspecifically add any default merge types back to the level if you want to still make them available. Use theParent Merge Types button to quickly reset a level to use only its parent merge types.
The order you add merge types to a context level is the order they display in the View Compare/Merge wizard. Youcan change the order using the Up and Down arrows to the right of the Available Merge Types tree.
Default Difference Type ActionsIn the Compare phase of a View Compare/Merge session, VCM uses the default merge actions for the type of mergeselected to resolve any differences. The server administrator can control what default actions VCM will take for eachDifference Type. The Merge Actions section allows the administrator to change which default action to take byselecting a different one from the drop-down lists in the Default Action column.
Note: A merge action that has been changed from the default parent action is displayed with red text.
Include TypesA user can limit the item types to include in a VCM session using the Include Selected Items page of the ViewCompare/Merge wizard. By checking specific item types in the Include Types section of the Customize VCM tool,the server administrator can customize what item types appear in the View Compare/Merge wizard for userselection.
OptionsThe Options section lets the administrator specify which compare/merge options to display as the defaults on theSet Options page of the View Compare/Merge wizard. The options selected on this page of the wizard areperformed when the VCM session begins the compare phase.
72
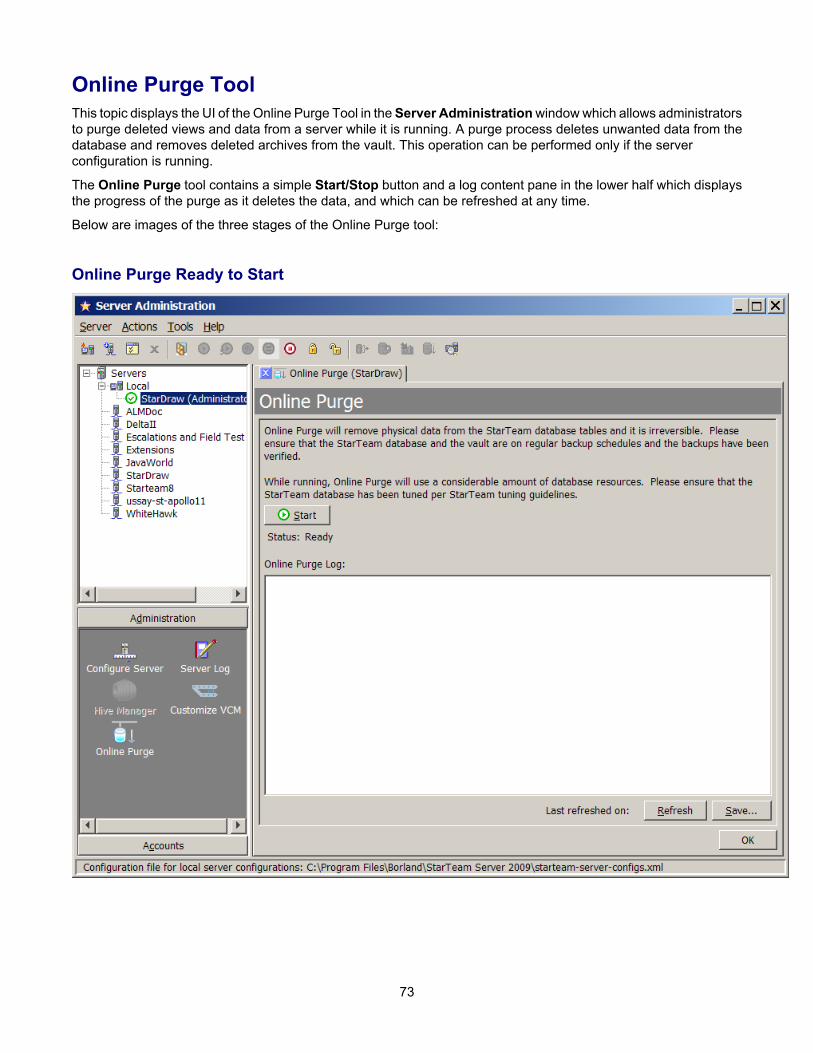
Online Purge ToolThis topic displays the UI of the Online Purge Tool in the Server Administration window which allows administratorsto purge deleted views and data from a server while it is running. A purge process deletes unwanted data from thedatabase and removes deleted archives from the vault. This operation can be performed only if the serverconfiguration is running.
The Online Purge tool contains a simple Start/Stop button and a log content pane in the lower half which displaysthe progress of the purge as it deletes the data, and which can be refreshed at any time.
Below are images of the three stages of the Online Purge tool:
Online Purge Ready to Start
73
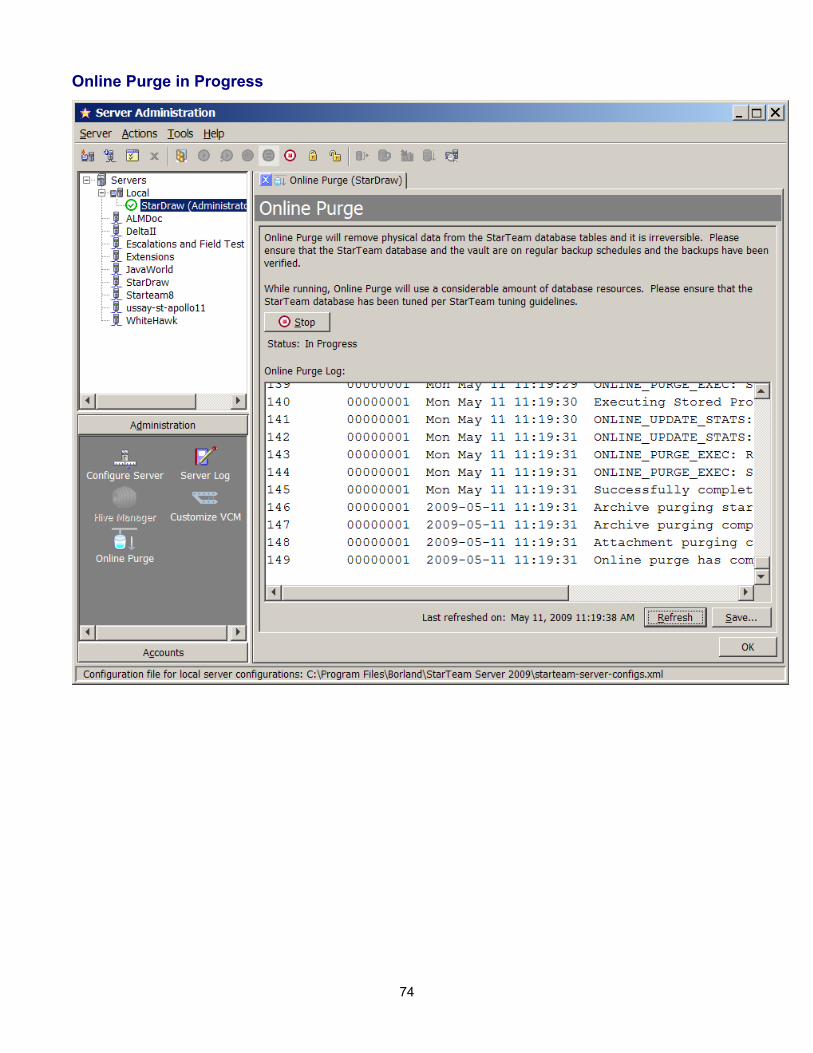
Online Purge in Progress
74
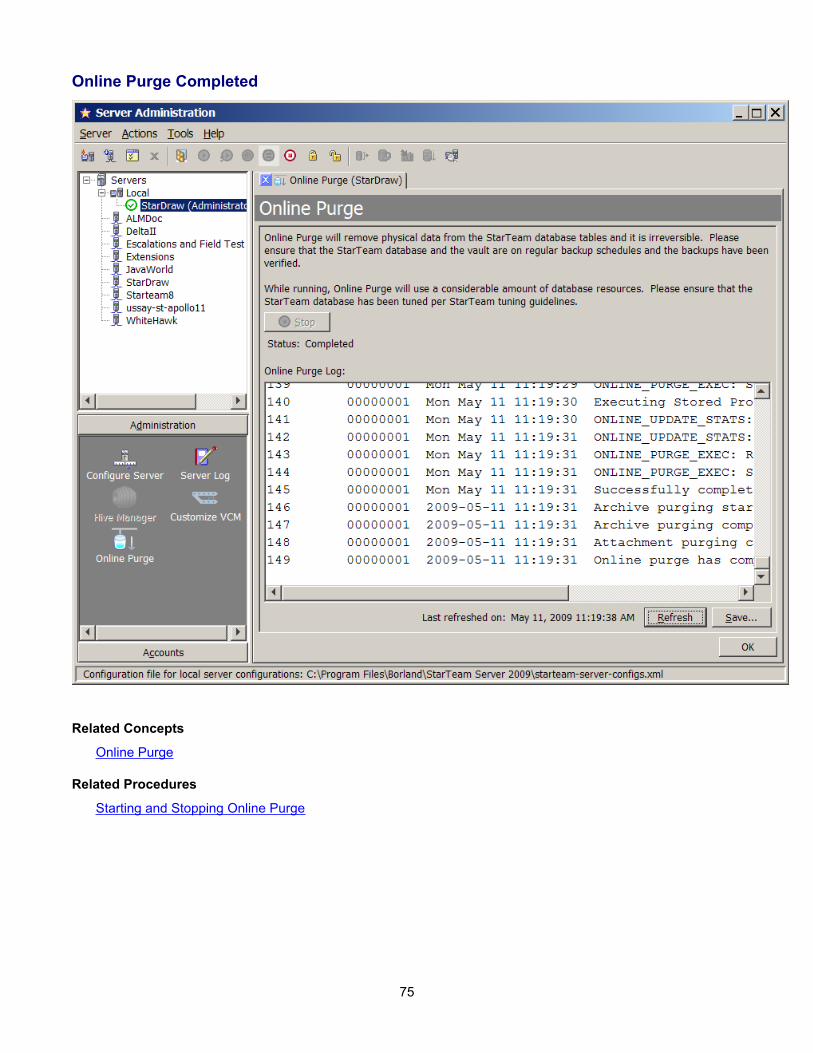
Online Purge Completed
Related Concepts
Online Purge
Related Procedures
Starting and Stopping Online Purge
75
ConceptsThis section contains all the conceptual topics.
In This SectionServer AdministrationThis section contains conceptual topics related to server administration.
76
Server AdministrationThis section contains conceptual topics related to server administration.
In This SectionOverview of Security StrategiesDescribes the types of access rights and the security strategies you can employ.
Password UseDescribes how passwords are created and used to control access to server configurations.
Server Time-Out OptionsDescribes the logon sequence, inactivity, reconnect server, and logon time-out options.
Online PurgeProvides information about purging deleted data while the server is still running.
Granting Access RightsThis section contains conceptual topics on granting access rights.
Data Storage LocationsThis section contains conceptual topics related to where StarTeam stores data.
User and Group Configuration OverviewConceptual information about configuring users and groups in StarTeam Server.
LDAP for Password VerificationDescribes password verification using the Borland LDAP QuickStart Manager directory service.
Server Configuration GuidelinesDescribes best practices for working with StarTeam Server configurations.
Atomic Check-insThis topic describes how atomic check-ins behave in StarTeam.
Vault Verify for Verifying File RevisionsThis topic provides an overview of the Vault Verify utility used for Native-II vaults
Tracing Data from Check-out Operations with the Check-out Trace UtilityThis topic describes the purpose of the check-out Trace Utility.
Security LogsDescribes the three types of security log files that are generated by StarTeam for activity tracking andtroubleshooting.
Overview of Initialization FilesDescribes the purpose of the various initialization files.
Using a Test ServerDescribes the benefits of using a test server.
BackupsThis section contains conceptual topics related to performing backups.
CustomizationThis section contains conceptual topics related to customization.
Email Support and Customized Email NotificationsConceptual information about customized email notifications and email support.
77
Overview of Security StrategiesBy default, all users initially have access to everything in the client. To avoid accidental deletions and other problems,administrators must set access rights as soon as possible.
The following sections cover access rights and provide general security guidelines:
♦ General security guidelines.
♦ Server-level access rights.
♦ Project, view, folder, and item-level access rights.
♦ Component, filter, and query-level access rights.
♦ Access rights for promotion states.
General Security GuidelinesUntil you become familiar with access rights, Borland recommends that you follow the guidelines suggested in thissection.
From the StarTeam ServerOn the server, the User Manager dialog allows you to create users and groups for each server configuration whilethat configuration is running. Use the following guidelines:
♦ Do not change the privileges for the All Users, Administrators, System Managers, and Security Administratorsgroups.
♦ Do not create additional groups under the Administrators group.
♦ Create the groups that you need under All Users or under each other. For example, you may need to createthe following groups: Developers, Testers, and Writers.
♦ Create users and assign them to groups. Make sure that at least two users are administrators, in case oneadministrator becomes locked out.
From the ClientUse the following guidelines:
♦ Although you can deny rights as well as grant them, it is best only to grant them.
♦ If you do deny rights, observe both of the following rules: a) Never allow any node on an Access Rights dialogto have only deny rights records, and b) Always make sure that the deny rights records for any node precedeany records that grant rights for that node.
♦ When you set access rights for a node, remember that any user who does not have access rights for the node(individually or in a group) is denied all rights at this level for this node (unless that user has privileges thatallow access).
♦ Set access rights at the project level first. Set them for every group (except the All Users group) for every node.The nodes are Project, View, Child Folders, File, Change Request, Requirement, Task, and Topic. Dependingon which version of the client your company uses, you may not see all of these nodes. The most importantnodes to set at this level are the Project and View nodes. The Project node is the only location in which youcan set project access rights. The View node controls view-level access to all views. Newly created views startout with only the view access rights set here for all views. Initially, they have no view-level access rights.
78

♦ Set access rights at the view level next. Set rights for every user and/or group that needs access at this levelfor every node. (The nodes are View, Child Folders, File, Change Request, Requirement, Task, and Topic).
♦ Set up access rights at the folder level only if you really need to have access rights for the folders. Rememberthat these settings go with the folder when it is moved or shared and when it becomes part of new views (untilthe folder branches in the new view). Remember that folders branch only when their properties change, andthat their properties tend to change infrequently.
♦ Avoid setting access rights on root folders because those rights can conflict with those set at the project orview levels.
♦ Avoid setting access rights on items. Remember that these settings go with the item when it is moved or sharedand when it becomes part of new views (until the item branches in the new view).
Server-Level Access RightsServer-level access rights allow users to perform server administration operations, such as modifying serverconfigurations and viewing logs. Additional rights at the server level include the rights to create projects, createcustom fields, control component-level access rights, and perform certain operations specific to the NotificationAgent.
The server-level rights you assign to users and groups authorize them to perform specific operations in a particularserver configuration. One of the options determines who can and who cannot create projects when the serverconfiguration is running.
Note: Server-level access rights can be assigned only when a server is running.
By default, the Administrators group is assigned all project and server rights. By default, the All Users group has therights to create projects and review the server configuration and the server log.
Project, View, Folder, and Item-Level Access RightsInitially, any user who can see a project, view, folder, or item can set the access rights for it. However, project-level,view-level, folder-level, and even item-level rights function hierarchically and may be affected by group privileges.
As users log onto a server configuration, they are identified by their user names and as members of the groups towhich they belong. This information is stored as an access token for each user. When users perform operations onobjects (projects, views, folders, and items), the client examines these tokens and the access rights for the objectson which the users are performing the operations.
Determining Object Access Rights and TokensThe StarTeam server checks access rights in layers. The right to access an object begins with the System Policytab which can be reached by choosing Tools Accounts System Policy in the Server Administration Tool.
Similarly, unless privileges are being ignored, the privileges granted to groups also override and take precedenceover the access rights configured elsewhere. Privileges are group properties that are set by using the Privilegestab of the Group Properties dialog.
A user is granted the same privileges as the group to which he or she belongs. If the user belongs to two groupsand one group is granted certain privileges and the other group is denied the same privileges, the user is grantedthe privileges because at least one group to which he or she belongs has those privileges.
After checking privileges, the client checks the access rights granted for specific objects. Settings on the AccessRights dialogs for projects, views, folders, and individual items grant or deny users or groups the ability to performoperations at those levels.
79
Note: If rights are granted to any user or group at a given level in an Access Rights dialog, those users who arenot granted rights at that level are effectively denied the rights. Ultimately, if a user can see an object and nodeny records stop the user from performing an operation, the user can do anything that a grant record allowshim or her to do, whether as an individual user or as a member of a group. The only exception involves issuesof privileges.
To summarize, the client performs the following checks to determine whether a user can perform an operation:
1 If the user belongs to a group that has a satisfactory privilege and privileges are not being ignored, access isgranted. Note that privileges, when not ignored, take precedence over access rights wherever access rights areset. If users belong to a group that has the correct privileges, they can be granted access rights that arespecifically denied to them in the client.
2 If the user or any group to which the user belongs has been granted satisfactory access rights for the object onwhich the operation will performed, access is granted. If the object has access rights set, but none aresatisfactory, the user is denied access.
3 If the object has no access rights set, the client checks the next higher level. For example, if the operation is ona file, change request, topic, task, or child folder, the client checks the access rights for the parent folder. If theoperation is on a root folder, the client checks the access rights for the view. If the operation is on a view, theclient checks the access rights for the project. If the operation is creating a project, the server access rights arechecked.
4 If none of the levels has access rights set, access is granted.
Administrators can override group privileges by setting options from the server configuration System Policy dialog.Use this option with caution, because it changes the steps used by the StarTeam Server to check every user(including administrators) for access to all objects in the repository. If you ignore privileges, only access rightsdetermine who can and cannot perform operations on objects in the repository.
Group Privileges for ObjectsThe privileges assigned to a group may allow members of that group to access objects and perform operations thatthey are otherwise not allowed to do. In other words, group privileges override the access rights settings.
If you choose Tools Accounts User Manager from the Server Administration tool, notice that the serverconfiguration comes with some default groups: All Users, Administrators, System Managers, and SecurityAdministrators. The default user named Administrator belongs to both the Administrators and the SecurityAdministrators groups. By default, the Administrators group has all group privileges. Also by default, the other groupshave none of these privileges.
All members of a group have the same privileges on every project managed by this server configuration. Theprivileges apply to all levels equally: projects, views, folders, and items within folders. If users belong to more thanone group, they have the maximum amount of privileges, regardless of which group provides them with thoseprivileges.
Understanding Object Access Right LevelsAccess rights are defined for individual users or groups at the following levels:
♦ Project level Access rights can be defined for the project itself. You can also define access rights that applyto all its views, child folders and items, unless a object has access rights set specifically for it. There are View,Child Folders, and other nodes at this and other levels.
♦ View level You can define access rights for the view itself. You can also define access rights that apply to allits child folders and items, unless a specific object has access rights set specifically for it.
♦ Folder level You can define access rights for the folder itself. You can also define access rights that apply toall its child folders and items, unless a specific object has access rights set specifically for it.
80
♦ Item level You can define access rights to a specific file, change request, requirement, task, or topic. (It isunusual to set rights at this level.)
Note that project access rights can be set only at the project level, because that is the only level with Project nodein the access rights hierarchy. You can set view access rights at either the project or the view level, because bothof those levels have a View node. You can set folder access right at the project, view, or folder levels, and so on.
Opening Projects and ViewsA project is indistinguishable from its initial view and also from the root folder of that view. In fact, any view of aproject is indistinguishable from its root folder. Therefore, a user will not be able to open a project if you deny thatuser (or all groups to which the user belongs) any of the following:
♦ Ability to see the project.
♦ Ability to see the initial project view.
♦ Ability to see the root folder of the project’s initial view.
A user will not be able to open a particular view of a project if you deny that user (or all the groups to which the userbelongs) any of the following:
♦ Ability to see that view.
♦ Ability to see that view’s root folder.
Component, Filter, and Query-Level Access RightsThe client components (file, change request, requirement, task, and topic) are server-wide objects. For example,the change request component appears in every project view and has the same filters and queries in every view.
Component-level access rights govern the use of filters and queries for each component. They determine the userswho can create public filters and queries in that component, who can use the filters and queries, and so on. A server-level access right named Administer component-level access rights allows users to set these rights.
Individual filters and queries also have access rights. These rights override the general access rights set for filtersand queries.
The right pane contains a tree of access rights subcategories. When expanded, each subcategory displays a set ofaccess rights as its children.
Each filter or query resides in a particular component (such as the Change Request component or the Filecomponent) and can be applied to that component’s type of data only in any project view managed by a specificserver configuration.
Any user can create and use private filters and queries, but public filters and queries have access rights, individuallyand per component. Rights set on a specific filter or query take precedence over access rights set at the componentlevel.
To apply a public filter or query, a user must be able to access the data type for the component in some open projectview. When you apply the filter or query, it affects the type of data that visible in the open project view.
Users can apply any public filters and queries that they can view. In general, users can see any public filters andqueries for which they have access rights.
Access Rights for Promotion StatesEach view has its own set of promotion states. Access to these states is controlled by:
81
♦ The “Define promotion level” right.
♦ Access rights that govern access to individual promotion states.
The Define Promotion Level RightThe Define promotion level right is available from the View node of the Access Rights dialog at the view andproject levels. A user with the Define promotion level right can do anything to the promotion model:
♦ Create and delete states.
♦ Edit their properties.
♦ Promote a label from one state to another. Promotion is a subset of editing properties. Anyone who can editthe properties of a state can also promote that state.
♦ Reorder the states within the view.
Promotion State Access RightsPromotion state access rights govern access to individual promotion states. These Generic object rights andPromotion state specific rights are available from the Promotion State node of the Access Rights dialog at the viewand project levels. They also appear on the access rights for individual promotion states.
The rights for an individual promotion state are checked at the state level; if necessary, the checking continues atthe view level and eventually the project level. If a user is granted a given right at one level, there is no need to checkthe next.
When a right is granted at the view level, it applies to all states in the view, unless access is denied at the state level.
When a right is granted at the project level, it applies to all the states in all the views within the project, unless accessis denied at the state or view levels.
Related Concepts
Granting Access Rights
Related Reference
Access Rights and Privileges
82
Password UsePasswords are required for the server administrator and users to access StarTeam server configurations. When theserver configuration is created, a server administrator account is created by default with both the user name andpassword set to Administrator. This password should be changed immediately. When the server administrator addsa user, a unique user name is created and a password is assigned according to the password properties specifiedfor this server configuration.
The server administrator specifies password properties for each server configuration in the Tools Accounts System Policy dialog on the Passwords tab. Whatever is specified as the system policy for passwords applies toall users accessing this server configuration.
Password properties include the password expiration time limit, the minimum length, and use of strong passwords.
About Strong PasswordsThe server administrator can specify that a strong password is required for users accessing a server configuration.If the system policy for this server configuration requires a strong password, the password must:
♦ Be unique and cannot be recurring.
♦ Be different from the user name.
♦ Contain at least one lowercase and at least one uppercase alphabetical character. (This is the English alphabetas determined by the ASCII value of the character.)
♦ Contain at least one non-alphabetical character.
By default, the strong password option is turned off.
Password Property ChangesIf the system administrator changes the password properties for a server configuration, when the changes take effectdepends on the property.
Changes made to the password length properties take effect immediately, but apply only to new user accounts ornew passwords. For example, if you change the minimum password length from eight characters to ten, all newusers must have a password that is a minimum of ten characters long. However, existing users will still be able touse their eight character passwords.
Changes made to the expiration time limit take effect after the appropriate time interval. For example, if you changethe password expiration time limit to thirty days, user accounts are suspended if their passwords have not beenchanged before the time expires. Users are prompted to change their passwords two weeks before the suspensiontakes place. The only user account not subject to expiration is the Administrator account.
If the strong password option is turned on, it applies only to new users and users who change their passwords. Untilsuch a change is made, their old “weak” passwords continue to work.
Note: The system administrator can force a password change if they want users to immediately conform to apassword property change or if a project security breach has occurred.
Related Procedures
Changing User PasswordsForcing Password ChangesConfiguring Password Constraints
83
Server Time-Out OptionsYou can set these time-out options for the server:
♦ Logon sequence time-out.
♦ Inactivity time-out.
♦ Reconnect time-out.
♦ Number of logon attempts.
Server Logon Sequence Time-OutThe logon sequence time-out setting applies to both a client and the server configuration. This is the amount of timethe client has to make the connection to the Server. If this time expires and a connection was not made, the usermust try to log on again.
You use the Logon sequence timeout option on the Configure Server dialog to set the logon sequence time-outvalue. This operation can be performed only when the server is running.
Server Inactivity Time-OutThe inactivity time-out is a security feature that automatically logs users off when they have been inactive for thelength of time specified by the administrator. If a client has no communication (either automatic or manual) with theserver configuration for that length of time, the server drops the connection. If the user's session has no other serverconnections, the session is deleted from the server. If the user has a concurrent license, that license is automaticallyreturned to the pool of concurrent licenses. The user must then do a full login to reconnect.
You use the Inactivity timeout option on the Configure Server dialog to set the inactivity time-out value. To allownamed users (that is, users with a fixed license) to remain logged on even if they exceed the inactivity time-out limit,administrators can select the Exclude named users option after selecting the Inactivity timeout option and enteringa time-out value.
Even if an inactivity time-out value is set, users will not time out if their system notifications are set for a period oftime that is shorter than the inactivity time-out. For example, suppose a user has notification set to automaticallycheck for new change requests every ten minutes and the inactivity time-out is set for 60 minutes. In this case,because of automatic communication between the client and the server, the user will never time out.
Server Reconnect Time-OutIf a client loses its network connection, users are disconnected from the server. The reconnect time-out optiondetermines the amount of time the client has to reestablish the connection. The client attempts to reconnect only ifthe user is trying to send a command to the server. A reestablished connection contains the full context of the lostconnection.
If the client successfully reestablishes its connection to the server within the window of time set in the Reconnecttime-out, users can simply continue working in the application. They do not have to close their projects, log in again,and reestablish their view settings. However, if the Reconnect time-out has expired, you must either close the client,or log onto the server again.
You use the Reconnect timeout option on the Configure Server dialog to set the reconnect time-out value. Thereconnect time-out can be changed only on a server that is running. It does not work when the server has beenrestarted.
84
Note: When a server must be restarted, the client cannot automatically reconnect to the server.
When setting the Inactivity timeout, set it to a value greater than the Reconnect timeout. Otherwise, if theReconnect timeout and the Inactivity timeout are both enabled and the Inactivity timeout is shorter, the user islogged off before the client can reestablish the connection. That is, if the Reconnect timeout is longer than theInactivity timeout and both are turned on, then the Inactivity timeout acts before the Reconnect timeout timeperiod has expired.
Number of Logon AttemptsYou can increase the security of your projects by entering a logon failure setting and duration. One cause of logonfailure is hackers trying to figure out passwords for users. In such cases, you should consider changing the IP addressof the system to make it more difficult for attackers to locate the server configuration and repeat their efforts. Youmay also want to change the user names of all users in the system.
You choose Tools Accounts System Policy and then use the Logon failures tab to specify how to handlelogon failures and the length of a lockout if one is applied. You can also specify that the server configuration notifymembers of the Security Administrators group by email about logon failures and lockouts. This operation can beperformed only when the server is running.
It is possible for any user, even users with an administrative account, to be locked out of a server configuration whenthe number of retries with the wrong password has been exceeded. The lockout period for the main administrativeaccount (Administrator) is 24 hours. However, you can unlock the administrative account before the 24 hours haveelapsed (see “Reactivating Administrative Accounts” in Related Information.)
Related Procedures
Changing Server Time-out OptionsConfiguring the Number of Logon AttemptsReactivating Administrative AccountsEmail Support and Customized Email Notifications
85
Online PurgeOnline Purge purges provides the ability to delete data while the server is still running. A purge process deletesunwanted data from the database and removes deleted archives from the vault. In the past, this has always requiredthat the server be stopped to run a purge process.
Using Online Purge while the server is running prevents the costly downtime of an Offline Purge, which could beanywhere from a few hours to a few days. Online Purge not only eliminates this costly downtime, but is much fasterthan an Offline Purge.
The Online Purge process can be started and stopped using the Online Purge tab in the Server Administration Tool.You can start and stop Online Purge on a remote Server as well as a local Server.
In Online Purge, newly deleted data will be available to purge only after a Server restart. Online Purge is an interactiveprocess which can be stopped and restarted anytime when the server is running. Online Purge records its currentexecution state and provides the ability to restart from the exact point where it stopped. After a server start, OnlinePurge has to be restarted manually.
Note: Offline Purge is still be available in StarTeam 2009, but will be removed in subsequent releases.
86
Granting Access RightsThere are many considerations that determine when and how you grant access rights.
In This SectionGranting Project-Level Access RightsDescribes the rules for granting project-level access rights.
Granting View-Level Access RightsDescribes the rules for granting view-level access rights.
Granting Folder-Level Access RightsDescribes the rules for granting folder-level access rights.
Granting Item-Level Access RightsDescribes the rules for granting item-level access rights.
Denying Access RightsDescribes the rules for denying access to objects.
General Access Rights RulesDescribes the general rules for granting access rights to objects.
Group Privileges and Access RightsDescribes how group privileges and access rights interact.
StarTeam SDK Connection ControlDescribes how to prevent unwanted SDK applications from connecting to the Server and draining Serverresources.
87
Granting Project-Level Access RightsThis section provides information about setting access rights at the project level. It illustrates this information byusing an example with three user-defined groups: Developers, Testers, and Others. (These groups are in additionto the All Users, Administrators, System Managers, and Security Administrators groups that come with theStarTeam Server.) The example also assumes that the All Users group is larger that the Others group.
The Project NodeAssume that you decide that only members of the Administrators group should control the project and create agrant record. This record prevents anyone who is not a member of the Administrators group from seeing the project,unless privileges apply. As a result, no one else can access and work with the objects in this project.
Note: Although members of the Administrators group require all access rights for the project, you may decide toomit them from the Users and Groups list if they have group privileges. Normally, this is acceptable. However,if the server configuration is set to ignore privileges, you must specifically grant the Administrators groupall project access rights.
Next, you must assign the correct rights to the every other group that needs to access this project. Because keywordexpansion is a project property, the Developers group needs to have the rights to see the project and modify itsproperties. However, they probably do not need to delete the project or change its access rights. The Testers andOthers groups need to see the project and its properties, so you should select only the See Object And ItsProperties check box for these groups.
The View NodeView access rights at the project level apply to all views that now exist or will be created for this project in the future.Members of the Administrators group need all view rights. They may be assigned these rights or receive thembecause of their privileges. The Developers and Testers groups need to see and modify view properties and performoperations on labels. They do not need to create or delete views, manage promotion states, or change view accessrights. The Others group needs to see the view, but requires no other rights.
The Promotion State NodeThe Promotion State node is not important in this example.
The Child Folders NodeFor access rights to child folders at the project level, the Administrators group may need all rights. They may beassigned these rights or receive them because of their privileges. The Developers and Testers groups probably donot need to delete folders, share or move folders, change folder behaviors or configurations, or change folder accessrights. You may want the Others group to only see the folders, their properties, and their histories.
The Item NodesBorland does not recommend creating only one grant or deny record for a given node. The following section illustrateshow project-level item access rights work, using files as an example.
If only the developers need to access files, you can grant only the Developers group all file access rights at theproject level.
With this setting, only members of the Developers group have access rights to any files, regardless of the view,folder, or file. As a result, only developers can see or perform operations on any files. Members of the Testers andOthers groups see only the files that they have in working folders, but the status of these files appears as Not In
88
View. However, by default, one exception exists by using Privileges. If groups other than the Developers have oneor more privileges that allow them to see, modify, define, or perform other actions on a file, members of those groupshave access to the files regardless of the access rights settings. For example, the default settings for theAdministrators group grant all privileges to this group. Therefore, members of this group can perform any fileoperations.
You can stop the server configuration from checking for privileges.
If you give only the Testers and Developers groups access to other types of items (change requests, requirements,tasks, and topics), the same exceptions apply. However, other groups will want to see these types of items, so youwill need to grant these groups some access rights.
Related Concepts
Overview of Security StrategiesGranting Access Rights
Related Procedures
Managing Access Rights and Group Privileges
89

Granting View-Level Access RightsUsually, granting access rights at the project level is not a fine enough level of granularity. For example, one set ofdevelopers may maintain Release 1.0 of the product in one view, while another set of developers writes the sourcecode for Release 2.0 in another view.
To handle this situation, you may want to create new groups, such as 1.0 Developers, 2.0 Developers, 1.0 Testers,and 2.0 Testers. You can give the 1.0 Developers and 1.0 Testers access to files and/or change requests in theRelease 1.0 view and. Then you can give the 2.0 Developers and 2.0 Testers access to files and/or change requestsin the Release 2.0 view.
In this case, you need to set access rights at the view level. However, you must still set project access rights at theproject level because that is the only place where the Project node appears.
View and Child View Access RightsAccess rights in a child view at the view level are independent of the access rights of the parent view at the viewlevel. Therefore, a child view starts out with no access rights at the view level.
A new child view is represented by a different object in the repository from the parent view. It has a different name,description, place in the view hierarchy, etc.
View-level access rights can be set for a new child view. For example, suppose a reference view contains only onebranch of the parent view’s folder hierarchy. The reference view has a root folder named QA Tests. In this situation,you can make the Testers the only group with file access rights in the reference view, even if Developers is theonly group that has file access rights in the parent view.
Access Rights at Different LevelsSometimes a group has different access rights at the view and the project levels for the same type of object in thesame view. In this situation, the access rights at the lowest level are enforced.
When the StarTeam server searches for access rights, it starts from the lowest level and moves to the highest level.When it finds a level at which a group has access rights, it does not search any higher levels for that type of object.
Remember that the project access rights exist only at the project level, so the project level is always searched forthese rights. File access rights, on the other hand, exist at the file, folder, view, and project levels. the server stopsat the first level at which it finds file access rights.
Related Concepts
Overview of Security StrategiesGranting Access Rights
Related Procedures
Managing Access Rights and Group Privileges
90
Granting Folder-Level Access RightsSetting access rights at the folder level is usually done when you want to allow certain groups (but not other groups)to access a particular branch of the folder hierarchy. For example, you may want only the Writers group to be ableto access the branch that has User Manual as its root folder.
Setting access rights at the folder and the item levels has more consequences than setting rights at higher levels.When a child view is derived from a parent view, as all reference and most branching views are, it initially containsobjects that belong to its parent. In branching views, these objects can branch into new objects that exist only in thechild view. Just as a new view has no view-level access rights, folders and items that branch into new objects initiallyhave no access rights at the folder or item level.
This Folder and Child Folder NodesThe folder level has two nodes—This Folder, for the selected folder, and Child Folders, for the other folders in thefolder hierarchy of the branch. This feature allows you to set different access rights for each node.
In the client, the root folder of a view can be indistinguishable from that view. If the view is the root (or initial) viewof a project, the root folder can be indistinguishable from that project.
Using the This Folder node to set access rights for the root folder can therefore affect a user’s access to a view. Ifthe view is the root view, it can also affect the user’s access to the project. Therefore, most administrators avoidsetting folder-level access rights on a root folder, as these rights may interfere with view-level or project-level rights.
For example, suppose the Developers group is not granted the right to see the User Manual folder and that thisfolder is the root of a reference view. Then members of the Developers group cannot open that view, even if view-level access rights allow them to see the view. An error message appears when they try to open the view. Userswho can see a project but not its root view also see an error message.
Access Rights of Child ViewsIf a child view includes child folders that have access rights in the parent view, its access rights depend upon whetherit is a reference view or a branching view.
Access Rights in a Reference ViewThe access rights in a reference view at the folder level are not independent of the access rights at the folder levelin the parent view, as no branching will ever occur. You can see these access rights from either view if you have therights to do so.
If you change access rights in the reference view, you simultaneously change the access rights in the parent view(and vice versa) because the folder in the reference view is the same object as the folder in the parent view.
Access Rights in a Branching ViewIf the child view is a branching view, the access rights in the child view at the folder level are independent of theaccess rights at the folder level in the parent view, but only after the folder in the branching view actually branches.
Initially, any folder you see in the branching view is the same object that exists in the parent view. Therefore, it hasthe same access rights in both views. Initially, you can change access rights in the parent view (and vice versa),because the folder in the branching view is the same object as the folder in the parent view. Once the folder branches,however, a new object for that folder is created in the branching view. This object begins a life cycle of its own andno longer has any access rights at the folder level.
Note: Remember that branching a folder does not branch any of the folder’s contents. Each item is the folder istreated separately.
91
The behavior of folders in a branching view affects the access rights:
♦ If a folder branches on change and you change one of its properties, its revision number changes. When thefolder branches, it becomes a new object in the repository and no longer has any access rights at the folderlevel.
♦ If a folder does not branch on change and you change one of its properties, the revision number changes, butno new object is created. In this case, the folder retains its access rights in both views. Because both viewsstill contain the same object, changes you make to the folder’s access rights in one view also change thatfolder’s access rights in the other view.
Related Concepts
Overview of Security StrategiesGranting Access Rights
Related Procedures
Managing Access Rights and Group Privileges
92
Granting Item-Level Access RightsAlthough access rights can be set on individual items, this is rarely done. For example, if you really need to allowonly one person to know about a particular file, you can give only that person access rights to that file. However, bydefault, the owner of the file and anyone belonging to a group with the correct privileges can still see that file.
To ensure that only that one person can access the file, you would have to stop the StarTeam server from checkingfor privileges. Then the access to every object would be controlled solely by access rights.
Like folders, items in a child view retain the access rights they had in the parent view until they branch into newobjects. Items lose their access rights only when branching.
Moving Folders or ItemsWhen you move a folder or an item, the access rights set for it at the folder or item level go with it. For example, ifyou move the User Manual folder in the StarDraw view to another view, it has the same folder-level access rights inthe new view that it had in the StarDraw view. It also has the same behavior, which either allows it or stops it frombranching on change.
Sharing Folders or ItemsWhen you share a folder or item, the access rights set for it at the folder or item level accompany it, until the folderor item branches.
When you share a folder or item, its behavior may change. When shared, the behavior immediately becomes ableto branch on change, even if the Branch On Change check box was disabled in the original location. Whether theBranch On Change check box is selected or cleared depends on the property setting for the destination view SetItems That Are Shared Into View To Branch On Change.
When the folder or item branches in its new location, a new object is created in the repository, and that new objectinitially has no access rights at the folder or item level.
Related Concepts
Overview of Security StrategiesGranting Access Rights
Related Procedures
Managing Access Rights and Group Privileges
93
Denying Access RightsFor a given node at a given level, grant records are examined until one gives a user or group permission to performan operation or until all the grant records have been examined without finding one that gives permission. Ifmembership in one group does not allow a user to perform an operation but membership in a second group does,the user can perform the operation. However, if a deny record for that node forbids the user from performing anoperation, the user cannot perform that operation. The application disregards any grant records for the same nodethat allowed the user to perform the operation.
Deny Record ConsiderationsDeny records are rarely used. However, they do allow you to create exceptions to the current access rights. Keepthese considerations in mind:
♦ Deny records must precede grant records. The reason is that if the application finds a grant record that allowsa user to perform an operation before it finds a deny record for the user, it stops looking at records for thatnode at that level. Thus, it allows the user to perform the operation.
♦ Creating a grant record with no check boxes selected is not the same as creating a deny record with all thecheck boxes selected, although both stop users and groups from performing the same operations.
♦ Group privileges can override either grant or deny records.
Deny Records for ProjectsBefore deleting a project from StarTeam, you may consider hiding it from the users. Creating one deny record at theproject level for the All Users group (or for another umbrella group of users accessing the project) denies thoseusers the access rights to see the project. It is essentially hidden from view and cannot be accessed for the groupthat has been denied.
Related Concepts
Overview of Security StrategiesGranting Access Rights
Related Procedures
Managing Access Rights and Group Privileges
94
General Access Rights RulesKeep these general rules in mind when granting access rights:
♦ Access rights can be overridden by the fact that a user is the object’s owner. Usually, the owner is the personwho created the object.
♦ Access rights can be overridden by privileges given to a group that includes the user. These privileges are setper group from the Server. By default, the Administrators group has full privileges (rights to do anything andeverything).
♦ Access rights should be set at the highest possible level.
♦ The client checks for access rights from the lowest level (the item level) to the highest level (the project level).
♦ If one grant record is created for a node, a grant record for that node should be created for every group thatrequires access to the project at that level. The Administrators group should have a grant record for eachnode, so that, if privileges are ignored, administrators can still change access rights.
♦ If access rights are set for any user or group for a node, all users or groups without a grant record for that nodewill be denied all access rights at that level for that node.
♦ Every view within a project has the same project-level access rights.
♦ When you derive a child view from an existing view, the new view has no view-level access rights. However,folders and items in the child view that existed in the parent view retain the same folder-level or item-levelaccess rights that they had in the parent view. Changing these access rights in either the parent or the childview also changes them in the other view because you are changing the rights on the same object. If the foldersor items in either the parent view or the child view branch, they can have different access rights, because theyare different objects.
♦ Folders that are moved or shared from one view to another retain any access rights assigned to them at thefolder level in the new view. However, if they branch, they lose their folder-level access rights.
♦ Items that are moved or shared from one view to another retain any access rights assigned to them at the itemlevel to the new view. However, if they branch, they lose their item-level access rights.
♦ Avoid setting item-level access rights.
♦ Avoid creating deny records. But if you deny rights, follow both of these rules: a) never allow any node on anAccess Rights dialog to have only deny rights records, and b) verify that deny rights records for a node precedeany grant rights records for the node.
Related Concepts
Overview of Security StrategiesGranting Access Rights
Related Procedures
Managing Access Rights and Group Privileges
95

Group Privileges and Access RightsWhen users log onto a server configuration, they are identified individually by their user names and as members ofthe groups to which they belong. The application stores this information as an access token for each user. As usersperform operations on application objects (projects, views, folders, and items), the application examines these tokensand the access rights for the objects on which the users are performing the operations. The application checksaccess rights in layers. The right to access an object begins with the System Policy dialog, which can be accessedfrom the Server Administration tool.
Unless group privileges are being ignored, these privileges also override and take precedence over rights configuredelsewhere. Privileges are group properties set on the Privileges tab of the Group Properties dialog in the client. Auser is granted the same privileges as those of the group to which he or she belongs. If the user belongs to twogroups, and one is granted certain privileges while the other is denied the same privileges, the user is granted theprivileges. The Membership tab of the My Account dialog displays the logged-on user's group membershipinformation.
After consideration of group privileges, the application checks the access rights granted for specific objects. Settingson the Access Rights dialogs for projects, views, folders, and individual items grant or deny users or groups theability to perform operations at those levels. It is important to remember that if access rights are granted to any useror group at a given level in an Access Rights dialog, users or groups who are not granted access rights at that levelare effectively denied all rights.
Ultimately, if a user can see an object and is not stopped from performing an operation by a deny record, the usercan do anything that a grant record allows, whether as an individual user or as a member of any group. The onlyexception has to do with privileges.
Related Concepts
Overview of Security StrategiesGranting Access Rights
Related Procedures
Managing Access Rights and Group Privileges
96
StarTeam SDK Connection ControlStarTeam 2009 Server allows administrators to fine tune the set of client applications that can connect to the serverby customizing a new app-control.xml file. This feature prevents unwanted SDK applications from connectingto the Server and draining Server resources.
Note: This is strictly an administrative tool, not a security measure.
app-control.xml Configuration FileThe server looks for a new configuration file named app-control.xml located in the AppControl subdirectory underthe StarTeam repository root directory. When a new configuration is created, StarTeam 2009 Server creates thisfile from a template app-control.xml file located in AppControl directory under the Server installation directory.
The configuration app-control.xml file, if present, contains a set of rules. Each rule asks the server to test theincoming client connections to satisfy one or more of the following conditions:
♦ The StarTeam SDK is greater or equal to a certain version.
♦ The application name, connecting user name, and/or client workstation name must match a specified textpattern.
The Server tests each incoming client connection against all the rules present in the app-control.xml file until amatch is found or until the rule list is depleted. Once a match is found, no more checks are done and the connectionhandshake sequence is resumed. If no match is found, the connection is refused. If the app-control.xml filedoes not exist in the AppControl directory, the Server allows all supported client applications to connect.
app-control.xml Structure and Rule Syntaxapp-control.xml is an XML file. The root XML element must be named StarTeamApplications and have aversion attribute with a value equal to 1.0. For example, <StarTeamApplications version="1.0">The server recognizes the following elements directly under the root node:
AllowedAppAllowedApp: This is the main rule element. It must have a Name attribute that specifies the text pattern for theclient application name (such as “client identification string”). The text pattern can have an asterisk character (‘*’)that is used as a wildcard. Besides the Name attribute, this node can optionally specify one or more of the followingattributes:
♦ MinimumSDKVersion: specifies a minimum version of StarTeam SDK with which the client application isbuilt. The format of this field is nn.nn.nn.nn, where nn is a non-negative number. Not all of the “dot” numbershave to be specified, for example MinimumSDKVersion=”10.4” will allow 10.4.x.y and above (10.5,11.0, and so on).
♦ WorkStationID: if set, specifies text pattern to match the client computer name.
♦ Name: if set, specifies text pattern to match the StarTeam user name.
If an optional parameter is not set, the server does not test the corresponding connection attribute.
AppDefaultAppDefault: This is an optional element that can be used to specify default values for one of the parameters listedunder AllowedApp. The syntax of this element is similar to the AllowedApp syntax, except that the Name attribute
97

cannot have a default value. Default values can be specified for MinimumSDKVersion, WorkStationID, andUserName.
98
Data Storage LocationsThis section contains conceptual topics related to where StarTeam stores data.
In This SectionData Storage OverviewProvides an overview about where StarTeam stores data.
Native-II Vaults and HivesDescribes Native-II vaults and its hives.
99

Data Storage OverviewAs part of creating a new server configuration, StarTeam Server creates a number of folders for storing log files,attachments, archive files, and so on. This topic explains the location and purposes of the files and folders containedin the Native-II vault.
Native-II VaultsAll server configurations in pre-2005 releases of StarTeam Server used what is now referred to as Native-I vaultsfor data storage. All server configurations created using StarTeam Server 2005 or later releases use only Native-IIvaults to store new archive files. Starting with the StarTeam 2006 release, server configurations use only Native-IIvaults for archive file storage.
The Native-II vault improves StarTeam performance and allows much larger files to be stored than in earlierStarTeam releases. For StarTeam, your server configuration will have only Native-II archive files, and this meansthat backups can be done without shutting down the server.
Warning: You should never delete or modify repository files other than through StarTeam Server.
Understanding RepositoriesConsider the following server configuration whose repository path starts with a drive letter (not shown) and endswith the folder name MyConfiguration. As shown in the figure below, the repository contains Attachments,DefaultHive, HiveIndex, Notifications, and Trace subfolders. The DefaultHive folder contains Archives and Cachesubfolders.
The name of the server configuration may also be MyConfiguration. The repository path is a general location forinitial storage of a variety of objects, most of which can be moved to new locations later, independent of one another.
Log Files and FoldersThe repository path folder, such as the MyConfiguration folder in the above example, becomes the home of thefollowing related objects.
The server log files The Server creates a new server log file each time you start the server configuration.
See the “Security Logs” and “Working with the Server Log” links at the bottom of this topicfor more information.
.dmp files The Server creates .dmp files when you use server diagnostics to log errors and unexpectedconditions it encounters. Usually, you have no .dmp files or trace files, discussed below as
100
the contents the Trace subfolder, unless a Borland technical support representative isworking with you on a problem.
See the “Diagnosing Server Problems“ link at the bottom of this topic for more informationabout server diagnostics.
The Trace subfolder The Trace subfolder stores the files that are created when and if you use server diagnosticsto trace server commands.
See the “Diagnosing Server Problems“ link at the bottom of this topic for more informationabout server diagnostics.
These objects do not have to remain in the repository path. You can change the path to all of the above by changingthe Log Path using the Server Administration tool.
See the “Creating Server Configurations” link at the bottom of this topic for more information.
Tip: These folders do not have to be included in a backup.
Attachments FolderThe repository path, such as the MyConfiguration folder in the above example, is also the parent of the Attachmentsfolder.
The Attachments folder contains subfolders that store the files attached to specific types of items. For example, theChange_Attachments subfolder contains files attached to change requests.
You can change the path to the Attachments folder independently by changing the Attachments Path on theGeneral tab of the Configure Server dialog (Tools Administration Configure Server) in the ServerAdministration tool.
Tip: This folder does not have to remain a subfolder of the repository path. These folders must be included in abackup.
Native-II Vault FoldersFor server configurations the repository path is also the initial home of several folders used by the Native-II vault tostore archive files and information about them. The DefaultHive folder contains two subfolders, Archives and Cache.These folders are described below.
HiveIndex The HiveIndex folder stores the hive-index.xml file, which contains the properties foreach hive used by the server configuration.
You can change the path to the HiveIndex folder by changing the repository path in thestarteam-server-configs.xml file. You would make this change only whennecessary, for example, because of a drive failure.
Tip: The HiveIndex folder must be included in a backup.DefaultHive If you accepted all the defaults when you created the server configuration or if you started an
upgraded server configuration without first creating a hive, StarTeam Server automaticallycreates the folder DefaultHive. It is a subfolder of the repository path and is created when youstart the server configuration for the first time.
Whether the initial hive is called DefaultHive or not, you will have at least one hive for eachserver configuration. You may have several hives. Each hive has an archive and cache path.An easy, but not mandatory, naming convention is using DefaultHive. The name of the hivebecomes the name of a folder with two subfolders: Archives and Cache. However, you canplace these paths anywhere. They do not need to be on the same drive or volume.
101
Archives subfolder This folder stores file revisions in archive files, which may be compressed.Cache subfolder This folder stores uncompressed versions of archive files. It has two subfolders Temp and
Deltas. Temp is used for files that are being added to StarTeam and for new file revisionsthat are being checked in. Deltas stores the differences between working files and tip revisionswhen a user asks that transmissions over slow connections be optimized—an option foundin the client on the File tab of the Personal Options dialog.
Related Concepts
Security LogsNative-II Vaults and Hives
Related Procedures
Working with the Server LogDiagnosing Server ProblemsCreating Server ConfigurationsConfiguring Data Storage Options
102
Native-II Vaults and HivesThe Native-II vault improves StarTeam performance (as compared to the old vault structure referred to as Native-I)and allows you to store much larger files than in earlier releases of StarTeam. Additionally, server configurationsusing Native-II archive files enable you to perform backups without shutting down the server. StarTeam serverconfigurations support Native-II vaults only.
The remainder of this topic discusses:
♦ Native-II Vault Performance
♦ Hives
♦ Archive and Cache Structure
♦ Delta Storage
Native-II Vault PerformanceThe sections below explain how StarTeam handles add, check-in, and check-out operations.
Add OperationsTo add a file to the Native-II vault, StarTeam Server stores the revision in a temporary folder, computes the MD5value of its contents, and checks how well it compresses. If the compression is 10% or greater, the Server movesthe compressed version to the archive for the hive and its uncompressed version to the cache for the hive. If therevision does not compress well, the Server moves the uncompressed version to the archive for the hive.
StarTeam converts the MD5 value to a hex string and uses it as the name for the archive file. StarTeam uses the .gzextension when it compresses the file archive. If an archive file already exists with that name, StarTeam does notcreate a new archive file—although the StarTeam properties for that file are set to identify the hive in which therevision is stored, the use of compression, and the name of the archive file.
Check-in OperationsTo check in a file revision to a Native-II vault, StarTeam Server stores the revision in a temporary folder in the nexthive in the hive rotation. Then the server computes the MD5 value of its contents. If an archive file with the correctname already exists in the hive, StarTeam does not create a new archive file, although StarTeam updates the revisionproperties for the file. Otherwise, StarTeam creates a new file archive. Notice that no two files that are identical incontent are ever stored in a given hive.
If the StarTeam file was initially identified as one that compresses well, StarTeam compresses the file revision andplaces it in the hive’s archive with a .gz extension. Its uncompressed version is moved to the hive’s cache. Otherwise,the uncompressed version is moved to the hive’s archive.
Check-out OperationsTo check out a file revision from a Native-II vault, StarTeam Server checks the hive ID of the revision and archivefilename. Then the server retrieves the file revision from the specified hive’s cache or archive. For 2005 and laterclients, it sends the archive file directly. These clients know how to decompress the archive file when necessary.
HivesA hive is a computer location where StarTeam Server stores archive files and a cache. These items are containedin the Archives and Cache folders. For example, if you created a server configuration named MyConfiguration andlocated it on the root of your C:\ drive, by default, StarTeam Server generates a folder under C:
103
\MyConfiguration named DefaultHive containing Archives and Cache subfolders. The DefaultHive folder andits subfolders represent the hive.
StarTeam Server Native-II vaults can have any number of hives, each of which has its own archives and cache. Ifone hive fills up, you can add another without having to change any data locations or move any archive files.Companies with large files or large numbers of files can start off with more than one hive in the first place. They caneven put the archives and cache on different drives or volumes (this is recommended).
Native-II vaults store each file revision in its entirety (even though the archive file may be compressed). This meansthat the Native-II vault eventually takes more space; however, you can spread the revisions over many drives orvolumes by the use of hives for storage. This flexibility in using storage space becomes a greater benefit over timeas hives become full.
When a server configuration has multiple hives, the Server adds files to each hive in turn before reusing the archivepath of the first hive. If you are running a StarTeam client against a StarTeam Server and if a StarTeam serverconfiguration has more than one hive, then the Server does a round-robin as it stores files but it checks first to seethat no hive already has this file before the client attempts to stream the file to the server.
When you create a server configuration, it automatically has at least one hive (either the default or a custom hive).To increase the amount of available space for this server configuration, you can add one or more new hives withthe Hive Manager dialog. When remotely accessing a server configuration, you can create hives while the serverconfiguration is running, because the configuration already has an initial path, if only to a DefaultHive in the repositorypath. For more information about creating hives, refer to the link “Creating New Hives“ at the end of this topic.
You can also use the Hive Manager dialog to change an individual archive path and/or cache path for a hive. Suchchanges should be done only when that hive must be moved. For example, you might move a hive as a result of adrive failure. You would also need to copy the contents of the archive path for that hive to the new location. For moreinformation, refer to the link “Customizing the Archives Path“ at the end of this topic.
Note: Borland recommends that the Archives and Cache volumes from one server configuration should not bemapped to Archives and Cache volumes from any other server configuration. Otherwise, the thresholdsettings on the Archives folders will not be calculated as accurately. This is because the server checks theavailable disk space when starting a server configuration, and it caches the value returned. As files are addedor removed, for cache cleanup, the server adjusts the available space and determines if the threshold hasbeen exceeded. Because of performance concerns, the threshold value is cached instead of checked everytime a file is added or removed. The threshold value is a guideline used by the server to determine when tono longer place files in a particular hive. It is not meant to be an absolute cutoff. Also, if the server believesthat the threshold may have been crossed based on the cached available space, it will do one more checkand query the file system as it does at startup to make sure current available disk space is correct beforepulling the trigger on the hive.
Accordingly, since the threshold value is tracked on a per-server-configuration-basis, in orderfor threshold calculation to be as accurate as possible (thus reducing the number of timesthe file system is checked for available space), Borland recommends that each serverconfiguration point its hives to independent volumes.
Archives and Cache StructureEvery archive path and cache path for a hive has the same structure. This structure is similar to that used byStarTeam clients to store file status records.
StarTeam organizes the files located in the Archives and Cache folders into subfolders. This makes browsing andmanaging the files easier. The name of the subfolders in which StarTeam stores a file revision is based on the initialcharacters in the name of the archive.
For example, suppose the contents of a file revision has an MD5 value of01fc3c4ac5e0e92cc707f30fb73a0726. Assuming the user specified an Archives path of C:\DefaultHive
104
\Archives, the Archives path for this revision would be one of the following, depending on whether or not StarTeamcompresses the archive file:
C:\DefaultHive\Archives\01\f\01fc3c4ac5e0e92cc707f30fb73a0726C:\DefaultHive\Archives\01\f\01fc3c4ac5e0e92cc707f30fb73a0726.gz
Note: You must include the Archives path for each hive (for example C:\DefaultHive\Archives) in a backup.
Delta StorageStarTeam uses deltas to optimize for slow connections. To use this feature, users set the personal option namedOptimize for slow connections found in the client on the File tab of the Personal Options dialog. Then when auser checks out a new revision of a file that is already in his or her working folder, the server recognizes the revisionnumber for the working file and sends only the difference between that revision and the revision that is being checkedout.
StarTeam Server stores each delta for later use in the Deltas folder, a subfolder of the Cache folder found in eachhive. The file containing the delta is given a name that combines the names of the two archive files used to generatethe data. For example, if the file revision for the client on disk has an MD5 value of:
7f46c2bb9602fe972d952f4988ab85cdand the requested revision has an MD5 value of:
7f46c2bb9602fe972d952f4982ab35aathen the server generates a delta between these two revisions and names it:
7f46c2bb9602fe972d952f4988ab85cd.7f46c2bb9602fe972d952f4982ab35aa
Tip: For more information about setting personal options in the client, refer to the link “Customizing PersonalOptions“ at the end of this topic.
Related Concepts
Data Storage Overview
Related Procedures
Creating New HivesConfiguring Data Storage OptionsCustomizing the Archives Path
105
User and Group Configuration OverviewYou can use Borland LDAP QuickStart Manager to import information about people from a directory service or LDIFfile into a StarTeam or CaliberRM Server as user properties. You can also manually add new groups and users toa server configuration. When users log onto the application, they can be validated by a password that has beenentered in or imported to the application or obtained from Microsoft Active Directory Services (the LDAP server).This operation is possible only when the server is on a trusted domain in relation to the LDAP server.
The remainder of this topic discusses the following topics:
♦ Understanding the Default Groups
♦ Group Membership
♦ Directory Service Support
Understanding the Default GroupsNew server configurations come with predefined default groups: All Users, Administrators, System Managers, andSecurity Administrators. These groups come with default privileges but you can assign privileges in accordance withyour company policy.
The users in the Administrators group initially have all available privileges, giving them complete access to the systemunless the system is set up to ignore privileges. The All Users, System Managers, and Security Administrators groupsinitially have no privileges.
All Users All users are members of the All Users group because All Users is the root group in theUser manager and because all members of a child group are members of its parentgroup. Therefore, all users inherit any rights and privileges assigned to this group.
Administrators This group initially contains the Server Administrator user. You may want to add otherswho have administrative privileges.
StarTeam Server comes with a user named “Administrator” who has the password“Administrator”. Because this is common knowledge, you will want to change thatpassword.
System Managers The users in this initially-empty group receive email (at the address specified for themin the User Manager) whenever an error is added to the server log.
Security Administrators The users in this group can receive email about users who attempted to log onunsuccessfully. This group initially contains only the user who has been designated asthe Server Administrator.
Tip: Never have only one user account with administrative privileges. If you are logged on using the only useraccount with administrative privileges and you become locked out, you have no way to unlock your ownaccount.
Group MembershipA user can be a member of more than one group. If users belong to multiple groups, they can perform operationsat the highest level permitted by any of their group privileges. For example, suppose that User A belongs to both theAll Users group and the Administrators group and that the Delete Item privilege is granted to the Administratorsgroup but not to the All Users group. User A can then delete any item in the server configuration projects.
Membership can be explicit or implicit. Membership in a group is explicit if:
106
♦ The group was selected at the time the user was created.
♦ The name of the group was selected from the Group Membership tab in the User Properties dialog of theServer Administration tool.
The group hierarchy determines implicit membership. If a user is a member of a child group, the user is also amember of the parent group, even if the name of the member does not appear in the user list when you select theparent group. For a selected group that has child groups, you must select the Show Users in All DescendantGroups check box to see the complete list of members.
A user who is a member of a parent group and also a member of a child group within that group will have both implicitand explicit membership in the parent group.
Directory Service SupportStarTeam allows password verification with Microsoft Active Directory. Active Directory service is included withMicrosoft Windows Server 2003 and Microsoft Windows 2000 Server operating systems. It allows centralized, securemanagement of an entire network. To validate users against the directory server, the Server must be on a trusteddomain in relation to that server.
On the Directory Service tab of the Configure Server dialog box, you must also select the Enable directoryservice option and enter the location and port number of the directory server. For each individual who will bevalidated against the directory server, you must select the Validate with directory service option on the New UserProperties or User Properties dialog boxes and enter a Distinguished name (used to uniquely identify a directoryservices user).
Even if the settings are correct, the user will not be able to log on if the directory server is unavailable. Althoughdirectory service support is off by default, it can be activated at any time. The server cannot be running at the timeyou enable or disable the support. When the user supplies a StarTeam logon name and a Microsoft Active Directorypassword, StarTeam Server recognizes that the user is set up for directory service password validation and usesthe Distinguished name and password as it contacts Active Directory. If the password is verified, the user is allowedto access the server configuration.
Tip: For more information about enabling directory support, see the links “Enabling Directory Service Support” and“Setting Up Users” at the end of this topic.
Related Concepts
Granting Access Rights
Related Procedures
Managing Users and GroupsSetting Up UsersEnabling Directory Service Support
107
LDAP for Password VerificationStarTeam can use directory services (either Microsoft Active Directory or OpenLDAP) to perform passwordauthorization. As users log on, they enter their StarTeam user name and their directory service password. Beforeallowing the users to access the server, StarTeam then checks a directory service for valid passwords.
Borland LDAP QuickStart Manager is a utility that allows you to import information about people from a directoryservice or LDIF file into a StarTeam server as user properties. LDAP QuickStart Manager makes it easy to maintainthe DNs and other directory service information that you choose to store in StarTeam servers.
To set up directory service authentication in StarTeam, you set options on the Directory Service tab of theConfigure Server dialog. These options enable directory service support and provide information about accessingthe service. In addition, you use the User Manager to set options for the individual users whose passwords are tobe authenticated. Not all users need to use this feature.
The distinguished name (DN), a unique identifier, is used by Borland servers as they communicate with the directoryservice. For example, StarTeam must send each user’s distinguished name (DN) to the directory service in order toverify the user’s password. DNs can be long and not very intuitive. Also, some organization’s change DNsoccasionally, and updating these changes by hand can be very tedious.
When you import users using LDAP QuickStart Manager, you indicate whether new users will have their passwordsauthenticated by the StarTeam server or by a directory service by selecting either the Validate Password ThroughDirectory Service or the Validate Password Through StarTeam Server option button. StarTeam servers requestdirectory service validation of user passwords if the server configuration both allows directory service validation andhas the correct connection settings for the directory service.
Related Concepts
Server Configuration Guidelines
108

Server Configuration GuidelinesIn terms of initial planning, one of the most important decisions your organization must make is how many StarTeamconfigurations it will use. While distributing projects across multiple StarTeam Servers will increase administrativecosts, it will also increase project independence and improve performance and availability. By estimating projectgrowth and considering interdependencies ahead of time, you can avoid having to split up a configuration that hasbecome too large. Below are some strategies to consider when developing the server deployment plan for yourorganization.
Advantages of Shared Server ConfigurationsThe advantages of having projects share the same configuration are:
♦ Transactional integrity: Because a configuration uses a single database, all data within the sameconfiguration is transactionally consistent. That is, a configuration represents a data consistency boundary. Ifyou backup and later restore a configuration, all information within the configuration will be restored to thesame point in time.
♦ Linking: Items in the same configuration can be linked, even if they are in different projects. StarTeam doesnot currently support cross-configuration linking.
♦ Sharing and moving: An item can be shared or moved to any folder, view, or project within the sameconfiguration. Moving or sharing items across configuration boundaries is not supported.
♦ Administrative simplicity: Administrative tasks such as adding users and groups, applying security,performing backups, and so forth are done at the configuration level.
♦ Shared customizations: Many StarTeam resources such as filters, queries, custom forms, and workflowscan be defined at the configuration level and shared by all projects. (However, custom forms and workflow canalso be customized per project or per view.)
♦ Shared server components: All data in the same configuration utilize a single server process, database,vault, and root Cache Agent. New projects can be added dynamically without adding any new server-sidecomponents.
Advantages of Separate Server ConfigurationsThe advantages of having projects in separate configurations are:
♦ Performance: Larger configurations take longer to start, use more resources, and tend to return largercommand responses. Conversely, smaller configurations have less data and fewer concurrent users, so theytend to perform better in these regards.
♦ Managing growth: Even if you initially place multiple configurations on a single machine, you can easily movea configuration to its own machine if you need to.
♦ Maintenance schedules: Separate configurations can be independently started and stopped for installingpatches, upgrading hardware, etc. When a configuration is offline, all projects it contains are unavailable.
♦ Custom fields: Custom fields are added at the “type” level, which has configuration-level scope. This meansthat if you add a custom field to a CR, all CRs in that configuration will have a value for that field. Hence, ifdifferent teams or business units have competing interests in custom fields, this argues for placing their projectsin separate configurations.
109
Other Server Configuration ConsiderationsThe next sections describe additional factors to consider when developing the server deployment plan for yourorganization.
Business Unit DivisionsWhen multiple business units require their own StarTeam projects, it often works well to define StarTeam Serversalong organizational boundaries. That is, deploy a separate StarTeam Server for each major business unit ordepartment, allowing each to access its own projects. Dividing along business unit lines isolates separate (andsometimes competing) requirements for security, backup processes, and other administrative issues. Separateservers can also help mitigate ownership or “turf” issues.
Where development lifecycle processes cross server configurations, clients can open multiple projects in a singleStarTeam client. “Deploying” interrelated artifacts from one project to another can also be used to address cross-configuration integration needs.
Leverage StarTeam Support for Distributed TeamsTeam members that require access to the same artifacts should share a single StarTeam server. Dividing a StarTeamserver solely due to geographically dispersed teams is not necessary. StarTeam was designed to work well withdistributed teams. StarTeam emphasizes a centralized configuration approach with MPX publish/subscribemessaging and Cache Agents to support distributed teams.
Avoid Partitions for Internal/External AccessIn many situations, teams both behind and outside the corporate firewall require access to the same StarTeamconfiguration. A common practice in this scenario is to deploy the StarTeam Server process in the DMZ area of thefirewall, placing the database server and storage server behind the firewall. Depending on the capabilities of thefirewall, it may be appropriate to configure a dedicated port to the StarTeam server. Alternatively, you can install twonetwork interface cards (NICs) on the StarTeam server machine: one “outward” facing and one “inward” facing. Inthis scenario, StarTeam allows specific inbound IP addresses (or address ranges) to be configured with differentconnection security requirements.
StarTeam provides SSL-like encryption for the command API, preventing eavesdropping on client/server traffic. AllMPX Message Broker and Cache Agent traffic is also encrypted, making data private across public links. To limitaccess to specific teams, you can use reference views or StarTeam’s security ACLs to limit access to specificprojects, views, folders, and even individual artifacts. Other security features, such as strong password managementand automatic account lockouts, further increase the viability of using the same StarTeam configuration for bothinternal and external users.
Plan for GrowthIn planning how many StarTeam configurations to create, take a long-term view: at least three to five years. If youcan estimate concurrent user usage, this is the best metric for capacity planning. On today’s hardware (a quad-CPUw/4GB memory), StarTeam readily supports up to 300 concurrent users. Some customers have configurations thatpeak at over 400 concurrent users, and one customer has seen peaks of 600 concurrent users. But at theseconcurrency levels, the application types become important (that is, batch applications tend to demand more thanonline clients). Even a 300-concurrent user load may drive down responsiveness unacceptably if a substantialnumber of users are running high-demand applications.
Another way to gauge configuration scalability is with command rates. You can measure the command rates of anexisting configuration by using the server trace functionality. The StarTeam server can be tuned to provide adequateperformance with command rates from 200,000 to 300,000 commands per hour (56 to 83 commands per second).Command rates of 400,000 per hour (111 per second) or more with adequate performance have been observed
110

with good network infrastructure (low latency). Attempts to drive a single configuration higher than this tend toproduce unacceptable response times.
If you cannot project user concurrency rates or command rates, you can use “defined” users, but the server load isless predictable using defined users alone. In geographically-distributed user communities, we typically see adefined-to-concurrent ratio around 10:1. So, we would expect 1,000 named users to yield about 100 concurrent usersessions during peak periods. In less-distributed topologies, where users are concentrated in one or two time zones,we expect the defined-to-concurrent ratio to be closer to 5:1. If you don’t have better data, use these approximationsto estimate your peak concurrent user rate.
After estimating your three-to-five year projection, you should have an idea of how many StarTeam configurationswill be needed to support your user community.
Related Concepts
Server Configuration Overview
Related Procedures
Creating Server ConfigurationsVerifying File Revisions with Vault VerifyPurging Deleted Views from Server Configurations
111
Atomic Check-insAll check-ins in StarTeam are atomic. Whenever more than one file is checked in as the result of a single transactionall of the files, and their associated process items, are updated in a single action. If for some reason, the check-infails, none of the files are checked in, and the status of the associated process items is not updated.
For example, suppose User A selects to check in all modified files in a StarTeam folder, but one of the selected filesis locked by User B. Because of the locked file, none of the files are checked in (and none of the process items areupdated as fixed) and User A is notified that none of the files were checked in because one of the files was lockedby User B.
112
Vault Verify for Verifying File RevisionsThe Vault Verify utility is a Java application that reports on and optionally attempts to resolve integrity issues with aStarTeam Native-II vault. It requires a StarTeam configuration name and, if the starteam-server-configs.xml file is not in the current folder, the path name of the folder containing this file. Vault Verify opens thecorresponding database via JDBC, but it does not modify the database. Vault Verify also parses the hive-index.xml file to learn the location of vault hives.
This topic contains the following information:
♦ Checks Performed by Vault Verify
♦ Vault Verify Requirements
♦ Tips and Best Practices for Using Vault Verify
Checks Performed by Vault VerifyVault Verify is a command line utility that performs checks for corrupt, missing, or stray files for Native-II vaults.Optionally, Vault Verify can attempt to repair archive files based on what problem it finds with each file. For example,this utility will locate stray files and move them to a specified location. The administrator may then archive them offor delete them (after verifying their results). The checks performed by Vault Verify are described in the followingsections.
Corrupt Files CheckThis check validates all files in archive folders. For each file found in an archive folder, Vault Verify ensures that:
♦ The name of the file is a valid archive filename.
♦ The file is located in the correct folder based on its name.
♦ The file can be opened and read.
♦ The actual MD5 for the file matches its filename.
♦ If it is a compressed (.gz) file, its format is a valid GZIP format.
Note: If the repair option is requested, corrupt files are moved to the default or a configured corrupt files folder.Once moved, the corrupt file is classified as missing if it is referenced in the database.
Missing Files CheckThis check ensures that all archive files defined in the database are present on disk. If the repair option isrequested, Vault Verify will attempt to recover missing files from vault caches or other archive files.
Note: If you specify the useca (use Cache Agent) option, Vault Verify attempts to recover missing files from aremote Cache Agent.
Stray Files CheckThis check ensures that all archive files in the vault are represented by corresponding database records. If therepair option is requested, stray files are moved to the default or a configurable stray files folder.
113
Vault Verify RequirementsVault Verify requires the following:
♦ Vault Verify must have read access to the database used by StarTeam Server.
♦ You must download and install the Oracle JDBC driver for Oracle configurations. Go to http://www.oracle.com/technology/software/index.html , and scroll down to the Drivers section and click JDBC. Click the latest JDBCdriver link. At the time of this writing, it is Oracle Database 11g . Following the download instructions, a pagedisplays a list with .JAR files. Download the .JAR file which corresponds to the JDK version you are using.Note: You must have an Oracle.com user name and password before downloading the JDBC driver. If you donot have an account, you can create one from the Login page. Save the .JAR file in the VaultVerify installationfolder.
♦ Vault Verify must have read access to starteam-server-configs.xml and hive-index.xml.
♦ Vault Verify requires read access to the archive files for each hive and write access to the folders for each hiveif you use the repair option.
Tips and Best Practices for Using Vault VerifyThe following are tips and best practices for working with Vault Verify:
♦ You should run Vault Verify using the tailored batch file, VaultVerify.bat (or the shell script version onLinux) to ensure that the proper version of Java is used. The batch file (or shell script) is located in the VaultVerify installation folder.
♦ You must install the Vault Verify utility on the same system where you are running StarTeam Server. VaultVerify installs in its own Vault Verify folder under the StarTeam Server installation folder. For example, on aWindows system, Vault Verify installs in the C:\Program Files\Borland\StarTeam Server 2009\Vault Verify folder.
♦ Vault Verify must have read access to the database used by StarTeam Server. By default, it uses the sameuserid as the StarTeam Server to access the database. If the password to that userid is not blank, it must beexplicitly passed to Vault Verify. An alternate database userid can also be passed. Note that for Oracleconfigurations on Linux, Vault Verify requires the Oracle JDBC driver, which must be downloaded and installedby the customer.
♦ It is recommended that you run Vault Verify at least once per quarter and as often as once a month. It is alsorecommended that you run Vault Verify on a restored copy of the production database and the vault backupon a test box. Running Vault Verify on a test box not only ensures that the backup/restore procedure is working,but it offloads the I/O that Vault Verify does from the production server.
♦ If you are running Vault Verify against a mid- to large-size database, you should pass the Java -Xmx1024mparameter to avoid running out of memory.
♦ When using the corrupt check (this check opens and reads every archive file), Vault Verify returns resultsat 3 to 30 GB/hour depending on the system hardware and the size of the vault. When also using themissing and stray checks (these checks are much faster and perform file existence tests--they do not openor read files), each check adds another 5-30 minutes to the run time depending on the system hardware andthe size of the vault.
♦ The requested check options are performed in the following order: corrupt, missing, and stray.Consequently, if repair is used along with the corrupt and missing checks, a corrupt file will first be movedto the corrupt files folder and then treated as a missing file.
♦ The specified StarTeam configuration can be in use when Vault Verify is running. However, the stray checkand the repair option will be ignored if the StarTeam configuration is in use.
♦ All reporting, including problem files, displays in the console window (if so desired, you can pipe this informationto a text file). If you request the repair option, the results of any repair attempts are also displayed. The
114
verbose option provides additional progress and diagnostic reporting. Vault Verify uses a stored procedurefor reporting the share paths (project/view/folder path) of each valid archive file that is corrupt or missing. Ifthis procedure is not present, the file name of problem files is reported, but share paths are not.
♦ The Vault Verify utility is contained in a set of jar files. The "main" file is VaultVerify.jar. It requires JRE1.5 or newer. To get help text for Vault Verify, you can enter java -jar VaultVerify.jar -help. Usagetext is also available in this help system. Refer to the Reference link at the bottom of this topic to review theVault Verify command-line options.
♦ StarTeam Server always looks for the starteam-server-config.xml file in its own installation folder todetermine whether the server is running. Be cautious about this fact if you decide to copy this file to a differentlocation and then indicate to Vault Verify its new location with the path option. If you have indicated in thecopied version of starteam-server-config.xml that the server is not running and use the stray andrepair options in Vault Verify, these options are not ignored if StarTeam Server is running.
♦ The server configuration name passed to Vault Verify is case-sensitive, and if it includes spaces, you mustpass the server configuration name to Vault Verify in quotation marks.
♦ By default, Vault Verify uses the same userid as the StarTeam Server to access the database. If the passwordto that userid is not blank, it must be explicitly passed to Vault Verify. An alternate database userid can alsobe passed.
♦ By default, the output from Vault Verify is output to the command window. Borland recommends that you pipethe output to a file so that if needed, you can send the information to Borland Technical Support.
Related Procedures
Verifying File Revisions with Vault Verify
115
Tracing Data from Check-out Operations with the Check-out TraceUtilityThe StarTeam check-out Trace utility generates a *.csv file that provides data about check-out operations for theserver configuration for which tracing is enabled. Before you run the utility, you must enable tracing for the serverconfiguration in the starteam-server-configs.xml file. With tracing enabled, the server generates a tracerecord for each checked out file and saves the information in a trace file (check-out.cotrc). The utility uses thetrace file as input and outputs a *.csv file containing data about the check-out operations. You can import the outputfrom the *.csv file into Datamart or an Excel spreadsheet.
The *.csv file contains the following information for each check-out:
Note: Checkout data will not be included in the generated .cotrc file if a Cache Agent performed the checkout.Data will only be included in the .cotrc file if the check-out operation was performed by the Server.
♦ user ID
♦ user name
♦ time stamp (date/time of check-out)
♦ project ID
♦ project
♦ view
♦ view ID
♦ folder ID
♦ folder path
♦ file ID
♦ filename
♦ file revision number
Note: To optimize performance, StarTeam does not immediately update trace files. StarTeam buffers theinformation for the trace file in memory and writes it to the trace file during idle time processing.
You can find the check-out Trace utility in the StarTeam Server root installation folder(CheckoutTraceDump.exe). For information about using the utility, refer to the links at the bottom of this topic.
Related Procedures
Tracing Data from Check-out Operations
116

Security LogsThe application’s clients and servers generate a number of log files. These logs enable an administrator to evaluatethe performance of the system and potentially troubleshoot problems. Each server configuration has its own serverlog and security log. Each client creates its own log file, which records activity between that client and the serverconfigurations it is connected to.
Users must have the appropriate security access rights in order to view a log file. These access rights can be setusing the Tools Accounts Access Rights menu option in the Server Administration tool. For more informationabout access rights, go to “Access Rights and Privileges” in the Related Information section below.
The sections below describe:
♦ Server log files
♦ Security log files
♦ Client log file (StarTeam.Log)
Server Log FilesThe server log file (Server.locale.Log) records the activity on a server configuration. Each time you start aserver configuration, the Server renames the existing log file and creates a new log file for the current serverconfiguration session. The log file from the previous startup is renamed to include the date and time at which it wasrenamed (Server.locale.date.Log). For example, if you start a server configuration on November 9, 2005 at5:22 P.M., the old Server.locale.Log file is renamed Server.en-US.2005-11- 09-17-22-59.Log and anew Server.locale.Log file is created whose time stamp might be 11/9/2005 17:23:03.
If the locale specified for the operating system on which your server runs is not US English, you will have two serverlog files: one for US English and one for your locale. For example, you might have both Server.en-US.Log andServer.fr-FR.Log. The first log is for support purposes, and the second log is for your use.
You can view the contents of the server log file at any time, even while the server configuration is running bychoosing Tools Administration Server Log. Only the last 64K of the log file appears. To see the entire file,use Notepad, WordPad, or another text editor to display it.
Security Log FilesA security log records all security-related events for a server configuration. For each secured event (such as loggingon or off), the security log records the date and time it occurred, the user performing the operation, the workstationfrom which the operation was performed, the item acted upon, and whether the operation failed.
Depending upon the number of users and the amount of activity on a server configuration, the security log may growrapidly. To keep the log to a reasonable size, you can have the server delete old entries. First, decide how long youwant to have security events available, then configure the server configuration to purge entries that are older thanthis time period. See “Working with the Security Log” topic in Related Information for how to purge security log entries.
If you have access rights to a server configuration, you can view its security log at any time the server is running.The security log is not a typical log file, as its data is stored in the application database. The security log is availableby choosing Tools Accounts Security Log.
117
StarTeam.Log FileThe StarTeam.Log file records the operations performed on your client workstation during a session. It helps youtroubleshoot and document errors or operations between the server and your workstation that failed during serverconfiguration sessions.
The StarTeam.Log file may contain the following types of information:
♦ Commands sent by your workstation to a server configuration when you open and work with a project. If youwork with projects on several different server configurations, you can configure the StarTeam.Log file toinclude the server configuration name with the command information it records.
♦ Commands performed locally on your workstation, such as setting personal options.
♦ Error messages generated while using the application.
♦ Events performed by StarTeamMPX.
Creation of the StarTeam.Log FileEvery time you start your client, the system creates a StarTeam.Log file in the folder location specified in yourpersonal options.
Location of the StarTeam.Log FileOn most systems, the default location for the StarTeam.Log file is C:\Program Files\Borland\StarTeamx.x. If there is a StarTeam.Log file already in this folder, the application renames the existing file to include thedate and time at which it was renamed. For example, if you create a StarTeam.Log file on July 1, 2009 at 10:35A.M., the old StarTeam.Log file is renamed StarTeam-09-Nov-05-10-35-18.Log, and a newStarTeam.Log file is created.
Tip: Tip Because the application creates a new StarTeam.Log file every time you start the client, the log foldercan fill up quickly. To control the number of log files in the folder, you may want to periodically delete old logfiles from the output folder or disable the StarTeam.Log option. To disable the option, clear the Log Errorsand the Log Operations check boxes on the Workspace tab of the Personal Options dialog.
Related Procedures
Working with the Server LogWorking with the Security Event LogDisplaying and Customizing StarTeam.Log
Related Reference
Access Rights and PrivilegesSecurity Event Types
118
Overview of Initialization FilesInitialization files have different locations on different Windows platforms. On NT, C:\interoffice is thepathPrefix. On 2000 and XP, the pathPrefix is C:\Documents and Settings.
The remainder of this topic discusses the various initialization files that StarTeam uses.
ConnectionManager.iniThe ConnectionManager.ini file contains information that the application client must be able to locate in orderto run. It is created at the time that the application is installed.
The following is not useful except as an example. The x’s are replaced by hexadecimal numbers.
[ConnectionManager] WorkstationID=xxxxxxxx-xxxx-xxxx-xxxx-xxxxxxxxxxxx
starteam-server-configs.xmlThe starteam-server-configs.xml file contains session options for one or more server configurations. Serversession options specify the core information that the Server requires to start a server configuration. One starteam-server-configs.xml file exists per computer and is located in the same folder as the Server application. OnWindows platforms, this file is usually located in C:\Program Files\Borland\StarTeam Server.
The session option information for each server configuration begins with the name of the configuration in bracketsand is followed by a set of options and their settings. The Server creates and maintains this file, which is createdwhen the first server configuration is created. The file is updated whenever a server configuration is created, modified,deleted, started, or stopped. Do not edit this file directly.
Borland recommends that you backup the starteam-server-configs.xml file or put it under version control.
Tip: For a description of the information included in this file refer to the link “starteam-server-configs.xml“ at thebottom of this topic.
starteam-client-options.xmlThe starteam-client-options.xml file contains one line for each of the options that can be set from thePersonal Options dialog (accessed by selecting Tools Personal Options from the main menu in the Cross-Platform Client). Most option names in the starteam-client-options.xml file correspond closely to the namesof the options on the dialog. The options that are check boxes in the dialog are set equal to 1 for selected or 0 forcleared. Intervals are set to a number of minutes or seconds depending on the option. Paths are in text. No quotationmarks are used with the text.
For example, the Project Component information provides the paths to alternate working folders for projectsaccessed from your workstation. The entry for this component in the starteam-client-options.xml fileincludes the following parts:
♦ The phrase Project Component.
♦ ViewWorkingFolderOverrides (if the alternate working folder is for an entire view) or WorkingFolderOverrides(if the alternate working folder is for an individual folder).
♦ A hex identification of the project view and folder.
♦ The alternate path for the working folder.
119
starteam-servers.xmlThe starteam-servers.xml file lists the server configurations for which you have created server descriptions,which are used while opening or creating projects. For example, on a Windows XP system, this file is located in theC:\Documents and Settings\<USER>\Application Data\Borland\StarTeam folder.
The initialization files have different locations on different Windows platforms. On NT, C:\winnt\Profiles is thepathPrefix. On 2000 and XP, the pathPrefix is C:\Documents and Settings.
For either UNIX or Windows systems, you can override the default location for the starteam-servers.xml fileby adding
-f NewServerListFileto the Java command in the serveradmin batch/script file. The new filename and location display in the starteam-servers.xml box in the Server Administration tool.
Each time that you update or add a server configuration either in the client or in the Server Administration tool, thisfile is updated.
Related Procedures
Managing Log and Initialization Files
Related Reference
Initialization File Referencestarteam-server-configs.xml
120
Using a Test ServerA simple but often overlooked measure you can take to smooth out administrative operations in your environmentis to deploy a StarTeam server configuration as a test server. Your test server can use lower-cost hardware thanyour production server, but it should be capable of running on a backup copy of your production server. With thiscapability, your test server can provide many useful benefits, including:
♦ You can test new SDK applications, workflow rules, release procedures, and so forth on the test server withoutfear of unwanted side-effects to your production server.
♦ You can use the test server to stage new releases of StarTeam and simulate upgrade and migrate operationsbefore applying them to the production server.
♦ You can use the test server for training new developers and administrators.
♦ You can test backup and recovery procedures for your organization. Once you are sure your emergencyprocedures are functional, you can use the test server as a backup machine in the event of a catastrophicfailure to the production machine.
Note: Beginning with StarTeam Server 2009, the server creates new projects with only the "File" type pre-selectedas a default for new views. Users can still change the project properties after the project is created, and theycan change the item types included for any given new view. However, if the user changes nothing, by defaultnew views will only include files when they are created.
This change does not affect any existing projects. It only affects new projects created withnew StarTeam Server 2009 Servers or existing servers once they are upgraded to StarTeamServer 2009. Adding other item types to the Project Properties (after the view is created) willNOT populate the items that were contained in the parent view (but left out during New Viewcreation). If the user wants to bring the previous items into the new view, they must retrievethem by Rebasing from the parent view.
Related Procedures
Backing Up Information
121
BackupsThis section contains conceptual topics related to performing backups.
In This SectionWhat to BackupDescribes what to information to backup.
StarTeam BackupsDescribes an online backup and recovery procedure.
Moving Server Configurations OverviewProvides an overview of how to move a server configuration.
Online BackupsProvides information about online backups for server configurations.
Database BackupsThis section contains conceptual topics related to performing database backups.
122
What to BackupThis topic describes what StarTeam files you need to backup.
When performing a backup of StarTeam you need to include the following folders and files:
♦ The starteam-server-configs.xml file. This file contains the server configurations. It is located in thefolder in which you installed the Server.
♦ The database files. Each server configuration has one database (or, in the case of Oracle, one schema user).
♦ The Attachments folder and its subfolders. These folders contain the files attached to change requests, tasks,topics, and so on.
♦ The HiveIndex folder.
♦ The Archive folder for each hive. Note that you do not need to backup the Cache folder for each hive.
All of these files should be backed up at the same time, preferably on the same tape.
Tip: For more information about backups, see the “StarTeam Backups” link at the end of this topic.
Related Concepts
Native-II Vaults and HivesStarTeam BackupsData Storage Overview
Related Procedures
Creating New HivesConfiguring Data Storage Options
123
StarTeam BackupsBecause StarTeam uses Native-II vaults, you can perform backups in a completely online manner, requiring noserver locking at all. The StarTeam Native-II vaults allow you to create multiple hives, each of which contains its ownarchive area that must be backed up. You can dynamically add hives to expand the addressability of the vault, soyou must ensure that your backup procedure keeps pace when you add a new hive.
Tip: For more information about Native-II vaults and hives, see the “Data Storage Overview” and “Native-II Vaultsand Hives” links at the end of this topic.
The remainder of this topic describes an online backup procedure and a recovery plan to use with it.
Online BackupsThe online backup procedure that exploits the characteristics of the Native-II vault is summarized below:
1 Back up the database using the online backup procedure for the database.2 When the database backup is complete, online back up the attachment folder and the Archives folders for each
hive. These backups can be performed in parallel, and a full/incremental backup schedule can be used suchas, performing full backups weekly or performing incremental backups daily.
3 Back up the HiveIndex folder for your repository.4 Backup starteam-server-configs.xml.
Note: The server is never locked; therefore, full functionality remains available.
Recovery PlanAs you might guess, the vault (attachments and archive) backup in this scheme will be chronologically “ahead” ofthe information represented in the database backup. That is, the archive and attachment folders may contain newfiles that are not represented by the database captured. But this is okay because the recovery procedure allows forthe time mismatch.
Here is the recovery plan that matches the online backup plan summarized in the last section:
1 Reload the database from the last backup.2 Simultaneously, reload the archive and attachment folders from the last backup. If the full and incremental
backups were used, then you can reload the last full backup, and in parallel, reload all subsequent incrementalbackups.
When all loads are complete, the repository is ready to use. It is okay if archive or attachment folders have “future”files not represented in the database. StarTeam ignores the “future” files and, if those file revisions are eventuallyadded again, StarTeam overwrites the existing files.
Related Concepts
Native-II Vaults and HivesData Storage Overview
Related Procedures
Creating New HivesConfiguring Data Storage Options
124
Moving Server Configurations OverviewYou should backup each of the StarTeam components before attempting to move a server configuration:
♦ Database
♦ Repository
♦ starteam-server-configs.xml file
Tip: For more information about what files to backup, see the link “What to Backup” at the end of this topic.
The remainder of this topic provides an overview for moving server configurations and some common assumptionsthat lead to errors when moving server configurations.
Overview for Moving a Server ConfigurationThe following provides a database-independent overview for moving a server configuration:
1 Shut down the server configuration. Because of Native-II vaults, you do not have to do this, but it is still a goodidea.
2 Create a database backup.3 Verify the location of the files that you need to move. These are the database backup, starteam-server-
configs.xml file, repository including Native-II archives if not located within the repository.4 Copy the files from the source to the target location.5 Copy the entry for the source server configuration into the target starteam-server-configs-xml file. If
this file does not exist on the target machine, then you can copy the entire file and delete any entries from thefile for server configurations that do not exist on the target machine. If this file does exist on the target machine,then take care to copy only the section needed for the server configuration that you are moving to the targetmachine.
6 Correct the repository/log path in starteam-server-configs.xml for the specified server configuration.7 Restore the database from backup.8 Configure an ODBC connection.9 If needed, start the server configuration with the Start with Override option. For more information, see the
“Starting and Stopping Server Configurations” link at the end of this topic.
Incorrect Assumptions about Moving Server ConfigurationsThe following are some incorrect assumptions about moving server configurations that lead to errors, so do not tryany of the following methods:
♦ Just move the database and create a new server configuration pointing to it.
♦ The server configuration consists only of a database and repository. Note that starteam-server-configs.xml file is also required when you move a server configuration.
♦ Just use the Migrate Database toolbar button. Note that this option migrates database types only.
Note: If you need help migrating a server configuration, contact Borland StarTeam Support at http://support.borland.com .
125
Related Concepts
Native-II Vaults and HivesData Storage OverviewStarTeam BackupsWhat to Backup
Related Procedures
Starting and Stopping Server ConfigurationsMoving Server Configurations to a New Server
126

Online BackupsWith the Native-II vault format for archive files, you can back up a server configuration online—without shutting itdown or locking it. You must also set up your database for online backups. For more information about databasebackups, see the link “Database Backups” at the end of this topic.
The vault should not be backed up until after the database backup completes. The two backups should not be donesimultaneously. In this way, you guarantee that everything referenced in the database appears in the vault in theright data location. The fact that the vault may contain files that the database does not know about causes noproblems.
The HiveIndex.xml and the Attachments folder should be included in the vault backup, along with the archive foldersfrom every hive. Backing up the cache folders for the hives is optional. Usually, the database and the vault are ondifferent computers. The vault itself may be spread over several volumes and on different computers. For moreinformation about the data that you need to backup, see the link “What to Backup” at the end of this topic.
In the event that:
♦ The database is lost— the administrator must restore the last full backup of the database and apply the redologs (Oracle) or apply incremental backups (MS SQL Server) to roll forward the database to the vault time.
♦ The vault is lost—it is very important to take a backup of the database in its current state, including thetransaction logs (redo logs), before performing any restoring.
♦ The vault (or both the vault and database are lost)—the server administrator must restore both the databaseand the vault from the last backup. After restoring the online database backup, the database has to be rolledforward to the vault backup time.
Note: If you do not have transaction logs (redo logs) available, this can cause data loss and limit your disasterrecovery capabilities.
Related Concepts
Native-II Vaults and HivesStarTeam BackupsData Storage OverviewWhat to BackupDatabase Backups
Related Procedures
Creating New HivesConfiguring Data Storage Options
127
Database BackupsThis section contains conceptual topics related to performing database backups.
In This SectionDatabase Backups OverviewProvides information about backing up SQL Server and Oracle databases.
SQL Server Database BackupsProvides conceptual information about backing up SQL Sever databases.
Oracle Database BackupsProvides conceptual information about backing up Oracle databases.
128
Database Backups OverviewThis section outlines the backup options available to DBAs and makes recommendations for backing up thedatabases used by the server configurations. Be aware that these are just recommendations. Any finalized disasterrecovery plan must be created by your organization in consultation with its IT infrastructure staff.
Note: An application backup consists of backing up both the database and the application archive files. For moreinformation about the data to backup, see the link “Backups” at the bottom of this topic.
Related Concepts
What to BackupNative-II Vaults and HivesStarTeam BackupsData Storage OverviewOracle Database BackupsSQL Server Database BackupsBackups
Related Procedures
Creating New HivesConfiguring Data Storage Options
129
SQL Server Database BackupsFor server configuration online backups, it is essential to take full database and transaction log backups. Theremainder of this topic explains the types of backups supported by SQL Server and provides recommendationsabout performing SQL Server backups.
SQL Backup Types and Recovery ModelsSQL Server 2005 supports the following types of backups:
Full database backup A full database backup contains the full copy of the database as it was at the timewhen the backup was initiated. Full backups provide a snapshot of the database. Mostof the recovery options require a full backup to be available.
Differential backup A differential database backup records only the data that has changed since the lastfull database backup. Scheduling frequent differential backups is a good idea becausethe backups are smaller and they complete quickly. A differential backup without aprior full backup is useless.
Transaction log backup A transaction log backup includes all the transactions since the last transaction logbackup. Transaction log backups enable recovery up to the last committed transaction.
A file or file group backup A file or file group backup consists of backing up individual data files (or the files in thefile group). The files in a database can be backed up and restored individually.
The entire database can be recreated from a database backup in one step by restoring the database. The restoreprocess overwrites the existing database or creates the database if it does not exist. The restored database willmatch the state of the database at the time the backup completed, minus any uncommitted transactions.Uncommitted transactions are rolled back when the database is recovered.
Based on the resource requirements, the DBA can also choose the recovery model for the database. The recoverymodel balances logging overhead against the criticality of fully recovering the data.
The recovery models supported by SQL Server 2005 are:
Full The data is critical and must be recoverable to the point of failure. All data modifications are logged.All SQL Server 2005 recovery options are available.
Bulk-logged Certain bulk operations, such as bulk copy operations, SELECT INTO, and text processing, can bereplayed if necessary, so these operations are not fully logged. You can recover only to the end thelast database or log backup.
Simple All data modifications made since the last backup are not available. This type of recovery scenariohas the lowest logging overhead, but cannot recover past the end of the last backup.
Recovering to a point-in-time (for example, a time before unwanted data was entered) requires either full or bulk-logged recovery models.
SQL Server Full Database BackupsA full database backup creates a duplicate of the data that is in the database. This is a single operation, usuallyscheduled at regular intervals. Full database backups are self-contained. Full backups provide a snapshot of thedatabase. Most of the recovery options require a full backup to be present.
Borland strongly recommends the use of full backups.
130
SQL Server Differential Database BackupsA differential database backup records only the data that has changed since the last database backup. Frequentdifferential backups are recommended to reduce backup times. Making frequent backups decreases the risk of losingdata.
Differential backups restore the data that they contain to the database. Differential backups cannot be used to recoverthe database to a point in time.
The availability of a differential backup minimizes the time it takes to roll forward transaction log backups whenrestoring a database.
SQL Server Transaction Log BackupsThe transaction log is a serial record of all the transactions that have been performed against the database sincethe transaction log was last backed up. With transaction log backups, you can recover the database to a specificpoint in time or to the point of failure.
When restoring a transaction log backup, SQL Server rolls forward all the changes recorded in the transaction log.When SQL Server reaches the end of the transaction log, it has recreated the exact state of the database at the timeof the backup operation.
If the database is recovered, SQL Server then rolls back all transactions that were incomplete when the backupoperation started.
Transaction log backups generally use fewer resources than database backups. As a result, you can create themmore frequently than database backups. Frequent backups decrease the risk of losing data. For high volume OnlineTransaction Processing (OLTP) environments, it is desirable to create transaction log backups more frequently.Transaction log backups can only be used with Full and bulk-logged recovery models.
The transaction log cannot be backed up during a full database backup or a differential database backup. However,the transaction log can be backed up while a file backup is running.
Never backup a transaction log before a database backup is created because the transaction log contains thechanges made to the database after the last backup was created.
Never truncate the transaction log manually because it breaks the backup chain. If a transaction log has beentruncated, take a full database backup to start a new backup chain.
SQL Server File BackupsA file or file group backup consists of the backing up of individual data files (or the files in the file group). A file-basedrecovery model increases the speed of recovery by allowing you to restore only the damaged files without restoringthe rest of the database. For example, suppose a database is comprised of several files located physically on differentdisks and one disk fails. Only the file on the failed disk needs to be restored and rebuilt using the transaction logbackup.
File backup and restore operations must be used in conjunction with transaction log backups. For this reason, filebackups can only be used with the full recovery and bulk-logged recovery models.
SQL Server Database Backup RecommendationsBorland recommends that you:
♦ Use the full recovery model.
♦ Perform a full database backup once every day. For full database sizes greater than 3 GB, it is okay to performfull backups on alternate days. If you perform full backups on alternate days, Borland strongly recommendsthat you create daily differential backups.
131
♦ Create daily transaction log backups after the completion of the full or differential backup. In addition to this,schedule a transaction log backup every 4 hours. Never truncate a transaction log manually.
♦ In case of a disaster, create a backup of the currently active transaction log. If active transaction log backupis not available (for example, because a media failure for the drive hosting the transaction logs and drive is notbeing mirrored), the database cannot be recovered past the last available transaction log backup. This wouldhamper a point-in-time recovery beyond the last available transaction log backup.
Related Concepts
What to BackupNative-II Vaults and HivesStarTeam BackupsData Storage OverviewOracle Database BackupsBackups
Related Procedures
Creating New HivesConfiguring Data Storage Options
132
Oracle Database BackupsAn online or hot backup is a backup performed while the database is online and available for read/write operations.Except for Oracle exports, you can only perform online backups when running in ARCHIVELOG mode. An offline orcold backup is a backup performed while the database is offline and unavailable to its users.
The remainder of this topic explains the types of backups supported by Oracle and provides recommendations aboutperforming Oracle backups.
Oracle Backup TypesTypically an Oracle DBA uses one or more of the following options to back up an Oracle database.
Export/Import Exports are “logical” database backups that extract logical definitions and data fromthe database to a file.
Export backups are cross-platform and can be easily moved from one operatingsystem to the other.
Cold or Offline Backups These backups require shutting down the database instance and copying all the data,log, and control files.
Hot or Online Backups These backups are taken when the database is available and running in ARCHIVELOGmode. To perform a backup of this type, the tablespaces need to be in backup modeand all the data files associated with the tablespace must be backed up. It is essentialto backup the control files and archived redo log files.
RMAN Backups While the database is offline or online, DBAs can use the RMAN utility to back up thedatabase.
Export/Import Data Pump Export pump and import pump are new for Oracle 10g. Expdp and Impdp are cross-platform and can be easily moved from one operating system to the other.
Oracle Logical Database BackupsOracle exports are “logical” database backups (not physical) as they extract data and logical definitions from thedatabase into a file. Other backup strategies normally back up the physical data files. One of the advantages ofexports is that you can selectively re-import tables. However, you cannot roll forward from a restored export file. Tocompletely restore a database from an export file, you almost need to recreate the entire database. Logical backupstakes a snapshot of the database schema as it was at a particular time.
Oracle Offline/Cold Database BackupsA backup performed when the database is shut down is known as an offline or cold backup. You must copy the datafiles, control file and online redo log files using an OS copy utility. This is a considered a complete backup of thedatabase. Any changes made after this backup are unrecoverable if the database is running in NOARCHIVELOGmode. All transactions are recorded in online redo log files whether the database is archiving or not. When redo logsare archived (ARCHIVELOG mode), Oracle allows you to apply these transactions after restoring files that weredamaged (assuming that an active redo log file was not among the files damaged).
Whenever the schema of the database is changed, such as when you add a new data file, rename a file, or createor drop a tablespace is created, you must shut down the database and copy at least the control file and the newlyadded data file. A complete backup of the database is preferred.
Before performing a cold backup, it is essential to get a list of all the Oracle files that need to be backed up. Runningthe following queries will provide a list of all the files.
select name from sys.v_$datafile;
133

select member from sys.v_$logfile;select name from sys.v_$controlfile;Shut down the database from SQL*Plus or Server Manager. Back up all the files to secondary storage (for example,tapes). Ensure that you back up all data files, all control files, and all log files. When completed, restart your database.
Note: If your database is in ARCHIVELOG mode, you can still use archived log files to roll forward from an offlinebackup. If you cannot take your database down for an offline backup at a convenient time, switch yourdatabase into ARCHIVELOG mode and perform an online backups.
Oracle Online/Hot Database BackupsA backup performed when the database instance is running is known as online or hot backup. Online backups arevery important at customer sites where a database instance must operate 24-hours per day and offline backups arenot feasible. During the duration of an online backup, the database remains available for both reading and updating.For this kind of backup, the database must be in ARCHIVELOG mode. Only data files and current control file needto be backed up. Unlike offline backups, the unit of a online backup is a tablespace, and any or all tablespaces canbe backed up whenever needed. Different data files can be backed up at different times.
To perform an online backup, you switch the tablespace into “backup mode” before copying the files as shown inthe following example.
ALTER TABLESPACE xyz BEGIN BACKUP;! cp xyfFile1 /backupDir/ALTER TABLESPACE xyz END BACKUP;It is better to backup individual tablespaces than to put all tablespaces in backup mode at the same time. Backingthem up separately incurs less overhead. After completing the tablespace backups, it is important to back up thecontrol files as shown in the following example.
ALTER SYSTEM SWITCH LOGFILE; -- Force log switch to update control file headersALTER DATABASE BACKUP CONTROLFILE TO '/<directory name>/control.dbf';The frequency of online backups is inversely proportional to the time taken for recovery in case of a media failure.The older your backup, the more redo log files need to be applied, and the recovery times increases. Backupstrategies should be tested before being used to protect a production database.
Borland strongly recommends that you run online backups at times when the database is least accessed, duringnon-peak hours. Oracle writes complete database blocks instead of the normal deltas to redo log files while in backupmode. This leads to excessive database archiving and even database freezes.
Oracle RMAN Database BackupsRecovery Manager (RMAN) is an Oracle tool that lets the DBA back up and recover Oracle databases. RMAN letsyou perform full backups (with the database online or offline), incremental backups on the block level, and backupsof online redo logs and control files.
The SYSDBA privilege is required to run RMAN on a database. The other benefits of RMAN backups are that youcan:
♦ Keep track of all backup and recovery operations performed against the database.
♦ Manage centralized backup and recovery procedures for the enterprise.
♦ Identify corrupt blocks.
134
♦ Back up only those blocks that actually contain data. This can lead to significant savings in backup spacerequirements.
♦ Have support for incremental backups. Incremental backups back up only those blocks that have changedsince a previous backup. This helps with the disk space usage and reduces the backup times significantly.Oracle 10g has introduced a new feature called “block change training”. This feature provides significantimprovement for incremental backups. Contact your DBA about how to implement this feature.
The following examples of RMAN backup and restore are extremely simplistic and are included on to illustrate basicconcepts. By default, Oracle uses the database control files to store information about backups. Normally, you willprefer to set up an RMAN catalog database to store RMAN metadata. Read the Oracle Backup and Recovery Guidebefore implementing any RMAN backups.
rman target sys/*** nocatalogrun {allocate channel t1 type disk;backup format '/app/oracle/db_backup/%d_t%t_s%s_p%p' (database);release channel t1;}Example RMAN restore:rman target sys/*** nocatalogrun {allocate channel t1 type disk;restore tablespace users;recover tablespace users;release channel t1;}
Oracle Export/Import Data PumpOracle introduced the export/import data pump in the 10g release. The import pump is twenty times faster than theconventional import utility. Export/Import data pump utilities are “logical” database backups (not physical) as theyextract data and logical definitions from the database into a file. Export/Import data pump utilities do not fit into 24/7model because they do not offer roll-forward capabilities. Export data pump provides a snapshot of the databaseschema as it was at a particular time.
Oracle Database Backup RecommendationsBorland strongly recommends the use of RMAN backups if your enterprise wants to run a StarTeam instance in a24/7 environment. RMAN has evolved over the last few years and Oracle Corporation continues to add features thatmake disaster recovery easier, more reliable, and faster.
135
Related Concepts
What to BackupNative-II Vaults and HivesStarTeam BackupsData Storage OverviewSQL Server Database BackupsBackups
Related Procedures
Creating New HivesConfiguring Data Storage Options
136
CustomizationThe topics in this section describe how to customize StarTeam to meet the needs of your organization.
137

Email Support and Customized Email NotificationsTo take advantage of email notifications, you must enable email support and email notification in the General tabof the Configure Server dialog box in the Server Administration window. This topic describes conceptual informationabout email support, email notification, and customized email notifications for StarTeam Server.
Client-calculated fields cannot be used in custom email notifications or with Notification Agent.
Email SupportWhen you enable email for a server configuration, users can email the properties of an item to another user fromwithin the application. The email recipients do not need to be running the application to receive the email.
The application sends automatic email to users when their exclusive locks on items are broken. Users can only breaklocks if they have the correct access rights and privileges to do so.
You can also configure the application to perform automatic email notification when certain other events occur.Depending on the server configuration and system policy options you select:
♦ Members of the System Managers group can receive email whenever an error is added to the server log.
♦ Members of the Security Administrators group can receive email whenever a logon failure occurs.
♦ All users can receive automatic notifications about items for which they are responsible or for which they arerecipients.
Note: If a recipient of an item or notification has an incorrectly formatted email address, an entry is written to theserver log indicating that there was a problem sending email to that address. If an email address is formattedcorrectly but is invalid (as in “[email protected]”), the email is sent to all valid recipients, and the sender getsan “Undeliverable message” from the email system for the invalid address.
Email NotificationIf you enable email notification, a user automatically receives email if:
♦ The Responsibility field value changes in a change request
♦ Any field for a requirement or task for which the user is responsible has changed.
♦ Any field for a topic for which a user is listed as a recipient has changed. (If no recipients are listed for a topic,no one receives notification)
Because email notification is client-independent, your team members do not have to run a client to receive notificationmessages.
Default messages sent to recipients of automatic email notification are localized, based on the locale of the server.For example, if the server’s locale is fr-FR, the message is sent in French because the Server has been localizedin French. When no translation is available for a locale, the message is in English.
Tip: The language used with a specific server configuration can be changed by adding NotificationLocale tothe section of the starteam-server-configs.xml reserved for the configuration. For example, if you addNotificationLocale=ja, the messages are sent in Japanese.
Users may confuse email messages sent by individuals (using the Send to command in the client) with emailnotification messages, because unless you choose to customize the email message templates, they are somewhatsimilar. Therefore, it is a good idea to let users know when you enable automatic email notification and to explainthe differences between the two types of email messages and the two types of notification.
138
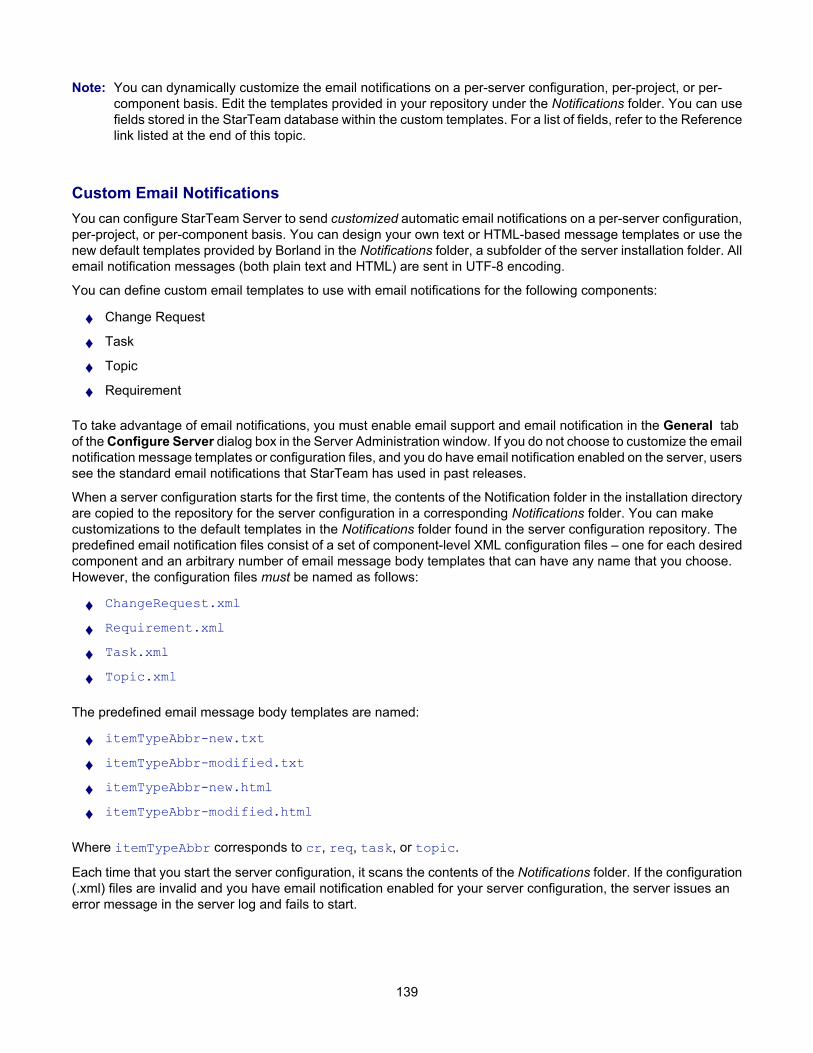
Note: You can dynamically customize the email notifications on a per-server configuration, per-project, or per-component basis. Edit the templates provided in your repository under the Notifications folder. You can usefields stored in the StarTeam database within the custom templates. For a list of fields, refer to the Referencelink listed at the end of this topic.
Custom Email NotificationsYou can configure StarTeam Server to send customized automatic email notifications on a per-server configuration,per-project, or per-component basis. You can design your own text or HTML-based message templates or use thenew default templates provided by Borland in the Notifications folder, a subfolder of the server installation folder. Allemail notification messages (both plain text and HTML) are sent in UTF-8 encoding.
You can define custom email templates to use with email notifications for the following components:
♦ Change Request
♦ Task
♦ Topic
♦ Requirement
To take advantage of email notifications, you must enable email support and email notification in the General tabof the Configure Server dialog box in the Server Administration window. If you do not choose to customize the emailnotification message templates or configuration files, and you do have email notification enabled on the server, userssee the standard email notifications that StarTeam has used in past releases.
When a server configuration starts for the first time, the contents of the Notification folder in the installation directoryare copied to the repository for the server configuration in a corresponding Notifications folder. You can makecustomizations to the default templates in the Notifications folder found in the server configuration repository. Thepredefined email notification files consist of a set of component-level XML configuration files – one for each desiredcomponent and an arbitrary number of email message body templates that can have any name that you choose.However, the configuration files must be named as follows:
♦ ChangeRequest.xml
♦ Requirement.xml
♦ Task.xml
♦ Topic.xml
The predefined email message body templates are named:
♦ itemTypeAbbr-new.txt
♦ itemTypeAbbr-modified.txt
♦ itemTypeAbbr-new.html
♦ itemTypeAbbr-modified.html
Where itemTypeAbbr corresponds to cr, req, task, or topic.
Each time that you start the server configuration, it scans the contents of the Notifications folder. If the configuration(.xml) files are invalid and you have email notification enabled for your server configuration, the server issues anerror message in the server log and fails to start.
139
You can also make dynamic updates to the message templates in the repository Notifications folder without restartingthe server configuration. The server checks for changes in the configuration and message template files every twominutes and immediately applies valid changes found in the files.
If the server finds a corrupted configuration and/or template file while the server configuration is running, a predefinedemail message is sent to the Admin group. Email notification becomes unavailable until you restore a validconfiguration in the Notifications folder. While any of the files in the Notifications folder are in an invalid state, theserver sends users the standard email notifications that StarTeam has used in past releases.
Note: Refer to the link in the Reference section at the end of this topic for descriptions of the configuration andmessage body text template files for a change request.
StarTeam Fields Used in Email Notification Message TemplatesWithin each of the sample templates provided in the Notifications folder in your repository, you will find fields thatyou can use in your own customized templates. StarTeam uses three types of fields:
♦ Fields stored in the database
♦ Client-calculated fields
♦ Server-calculated fields
Note: You cannot use client or server-calculated fields within customized email notification message templates.The templates recognize only fields stored in the database.
Embedded Images in Email Notification Message TemplatesYou cannot embed images in the HTML email message templates. However, you can use a URL to an image on aWeb site that users can access. In this case, the image is considered as external and whether it displays dependson the application settings of the user's email client.
Related Procedures
Configuring Email Support and Email NotificationConfiguring Per-project and Per-Component Email Notifications
140
ProceduresThis section contains all the tasks associated with administering and using StarTeam.
In This SectionLicensing the ServerThis section contains tasks related to licensing.
Setting Security OptionsThis section contains tasks related to setting security options.
Migrating ServersThis section contains tasks related to migrating data from one server to another server.
Managing Users and GroupsThis section contains tasks related to managing users and groups.
Managing PasswordsThis section contains tasks related to managing passwords.
Managing Access Rights and Group PrivilegesThis section contains tasks related to managing access rights and group privileges.
Managing Log and Initialization FilesThis section contains tasks related to managing log and initialization files.
Backing Up InformationThis section contains tasks related to backing up information.
Tracing Data from Check-out OperationsThis section contains tasks related to tracing data from check-out operations using the Check-out Traceutility.
Working with Server ConfigurationsThis section contains tasks related to working with server configurations.
Customizing Server Configuration OptionsThis section contains tasks related to customizing server configuration options.
Configuring Data Storage OptionsThis section contains tasks related to configuring data storage options.
141
Licensing the ServerThese topics describe the procedures you use to set up and manage StarTeam Server - Windows licensing.
In This SectionAssigning Licenses to UsersDescribes how to assign licenses to users.
Managing Named User LicensesDescribes how to assign and remove named user licenses.
Saving License (.slip) FilesDescribes how and where to save the license files that are required when you use a license server to licenseusers.
Setting Up License ServersDescribes how to set up a license server.
Using Evaluation LicensesDescribes how to extend an evaluation license.
Using Native LicensesDescribes how to license the Server using a native license.
142
Assigning Licenses to UsersTo be able to work with StarTeam, users must have a named user license or a concurrent license. By default, usersare assigned to use concurrent licensing. The StarTeam Server Administrator uses the User Manager in the ServerAdministration tool to assign licenses to existing users or to new users.
From the User Manager, you can use the User Properties dialog box or context menu to assign licenses. Generally,use the context menu for bulk actions and the User Properties dialog box for assigning licenses to users one at atime. Licenses can also be assigned using Borland LDAP QuickStart Manager (usually done in bulk but can be doneone-by-one). Which of these you choose depends on what you are doing as illustrated in these scenarios:
♦ If you are adding a new user and filling in all the data about him/her, you can assign a license as part of theprocess. This would most likely be done in the New User Properties dialog box.
♦ If you are upgrading and need to assign a group of existing users to a new license slip for the new release,you can multi-select the appropriate users and assign them to a slip simultaneously. You would do this fromthe context menu.
♦ If you have been evaluating StarTeam and now have purchased native licenses or licenses to be used with alicense server, you can select all the existing users (from the evaluation period) from your production serverconfiguration and assign them to a license type or a license slip. You would do this from the context menu.
♦ If a group of people have been laid off and you no longer want them to use StarTeam, you can select them alland change their license type to Unassigned.
Note: The named and concurrent user licenses are the same as the licenses in earlier StarTeam releases.
To assign licenses to existing users1 Open the Server Administration tool by choosing Start Programs StarTeam StarTeam Server 2009
StarTeam Server.2 Select a server configuration from the list of servers. If you have not yet logged on, you will be asked to do so.
If you are using the client, you can administer remote servers only.3 Do one of the following:
♦ Click the Accounts bar in the lower left pane. Then click the User Manager shortcut.
♦ Choose Tools Accounts User Manager.
These actions display the User Manager.
4 Select one or more users.5 Right-click to display the context menu and choose Properties to display the User Properties dialog box.6 Select the license type from the License drop-down list box:
♦ (optionally) The license number of one or more Borland license server slip files for either a named orconcurrent license.
♦ StarTeam Named. The user has a particular license assigned to them.
♦ StarTeam Concurrent. The user is assigned one of the “floating” licenses when they log on to StarTeam.
♦ Unassigned. Select this “license type” when a user has no license.
7 You may need to edit the properties for the user to change the user name to the network logon name.
143
Note: The status line at the bottom of the User Manager window provides licensing statistics including the numberof named user licenses that are currently available.
To assign a license to a new user1 From the User Manager, select the New User Button.
The New User Properties dialog box opens.
2 On the General tab, select a license type from the License drop-down list box.
♦ StarTeam Named. The user has a particular license assigned to them.
♦ StarTeam Concurrent. The user is assigned one of the “floating” licenses when they log on to StarTeam.
♦ Unassigned. Select this “license type” when a user has no license.
The default is StarTeam Concurrent.
3 Type the rest of the data on the General and other tabs as appropriate. Remember to use the network logonname for the User Name text box on the Logon tab.
4 Click OK to exit the New User Properties dialog box.
Related Concepts
License Overview
Related Procedures
Managing Named User LicensesSetting Up License ServersManaging Users and Groups
144
Managing Named User LicensesUsers can have either named user or concurrent licenses. A named user license (formerly called a fixed license)can be used only by the user who has been assigned that license whereas concurrent license users share thelicenses and can log on as long as there are concurrent licenses available. Users who receive the named userlicenses are guaranteed access to the server.
You can add as many users as you choose, but access to the server is granted only to users with named userlicenses or to users who receive concurrent licenses as they log on. If you have named user licenses, you mustassign them to specific users in the Server Administration tool User Manager. An anchor appears before the nameof users with named user licenses. Before assigning named licenses, you must add the users.
The Server Administrator is automatically assigned a named user license which cannot be removed. This free licenseis not counted against the number of named user licenses you have available. After the server is licensed, named-user licenses can be assigned.
Tip: The User Manager status bar indicates how many named user licenses and how many concurrent licensesare in use.
To assign a named user license1 Open the Server Administration tool by choosing Start Programs StarTeam StarTeam Server 2009
StarTeam Server.2 Select a server configuration from the list of servers. If you have not yet logged on, you will be asked to do so.
If you are using the client, you can administer remote servers only.3 From the Server Administration tool, do one of the following:
♦ Click the Accounts bar in the lower left pane. Then click the User Manager shortcut.
♦ Choose Tools Accounts User Manager.
These actions display the User Manager.
4 Select the user to whom a named user license will be assigned.
Note: If the user is not displayed, you might need to select a particular group, or select the ShowUsers in All Descendant Groups check box.
5 Right-click and choose Assign License Add Named User License from the context menu.
Note: If you have downloaded named or concurrent license files from Borland license server, the context menu thelicense number for each file.
After a named user license is assigned to a user, an anchor appears before the name of the user.
Note: When you change the type of license a user has, the change does not take effect until the user logs on thenext time. To make the license change effective immediately, you need to force-logout the users affected bythe change.
To remove a named user license1 From the User Manager, select one or more users.2 Right-click and choose Assign License Remove Named User License from the context menu.
145
Note: Removing a user named license automatically changes the user to a concurrent use license.
Related Concepts
License Overview
Related Procedures
Assigning Licenses to UsersSetting Up License ServersManaging Users and Groups
146
Saving License (.slip) FilesAfter you receive licensing information from Borland in a License Certificate email (a sales representative shouldput this in motion), you need to install the license server and host the licenses sent by Borland. This involvesaccessing a Borland web site and downloading Borland license files called .slip files as described here.
To save the license (.slip) files1 From the Borland web site using the link in the License Certificate email, download all of the .zip files containing
the .slip files per the instructions provided on the web.2 Copy each concurrent_.slip and/or named_.slp file into your C:\Program Files\Borland
\StarTeam Server 2009\License directory.3 Copy each server_.slip file to C:\Borland\BLS4\conf.
Note: “BLS4” folder name might change depending on the version of Borland License Server thatyou are using. Also, if you are using FLEXlm instead of Borland License Server, theserver_.slip files might need to be installed elsewhere. Check your FLEXlm serverdocumentation.
When StarTeam server starts, it checks for slips and stores information about them in memory. It does not recognizenew slips until the next restart.
Once the slips have been placed in the \License folder and the StarTeam server has been restarted, the UserManager in the Server Administration tool can display information about the slips and an administrator can assignlicenses from those slips to users.
Related Concepts
License Overview
Related Procedures
Assigning Licenses to UsersManaging Named User LicensesSetting Up License Servers
147
Setting Up License ServersYou have a choice between using the Borland License Server (BLS) and the native StarTeam licensing found in thisand earlier releases. If you use the license server, users must use their network logon names as their StarTeamuser names. This section explains the steps the administrator follows to set up a license server.
To set up a license server1 As the StarTeam administrator, you should receive licensing information from Borland via email (a sales
representative should put this in motion).2 Install the license server (the license server documentation explains how to do this).3 Save the license files (this involves accessing a Borland web site and downloading Borland license files called
slips).4 Place the slip files in the /License folder, a subdirectory of the StarTeam Server 2009 installation folder.5 Configure the license server for users (this is covered in the license server documentation).6 Use the StarTeam Server Administration tool to:
♦ Change user names to network logon names.
♦ Assign users to specific licenses by setting the license options.
When StarTeam Server starts, it checks for slips and stores information about them in memory. It does not recognizenew slips until the next restart.
When a user logs in from a StarTeam client, the Server tells the client what features are available to its user basedon the license assigned to that user. If the user is assigned a license from a slip, but that slip is no longer in the /License folder, StarTeam Server displays an error message. If the user license type is Unassigned, the user isnot logged on and StarTeam Server returns an exception.
Note: If you are using a license server, concurrent licenses are released immediately by StarTeam Server, but thelicense server might not find that out for a few minutes. StarTeam Server updates the license server aboutlicense usage at an interval specified in the licensing slip. The license server will know that a license hasbeen released only when the next update for that license occurs.
Related Concepts
License Overview
Related Procedures
Managing Named User LicensesSaving License (.slip) FilesAssigning Licenses to Users
148

Using Evaluation LicensesThe first time you run StarTeam Server - Windows, an evaluation license is created for StarTeam EnterpriseAdvantage, which is the edition of StarTeam with the largest feature set.
Before the 30-day product review period expires, be sure to register the product or extend the evaluation period.Otherwise, when clients access a server configuration managed by a StarTeam Server that has expired, nocomponents (such as the File or Change Request components) are available and in the StarTeam Cross-PlatformClient, the upper and lower panes have no tabs.
To extend the evaluation period for StarTeam Server - Windows1 Obtain an evaluation extender key by contacting Borland at http://www.borland.com/us/company/how-to-
buy.html .2 Open the Server Administration tool by choosing Start Programs StarTeam StarTeam Server 2009
StarTeam Server.3 Choose Help About from the menu bar. The About StarTeam Server dialog box appears.4 Select the License item in the left pane of the dialog box.5 Click Extend Evaluation. The Extend Evaluation dialog box appears.6 Type the evaluation key and click OK.7 Close the About StarTeam Server dialog box.
Related Concepts
License Overview
Related Procedures
Setting Up License Servers
149
Using Native LicensesThe first time you run StarTeam Server, an evaluation license is created for StarTeam Enterprise Advantage, whichis the edition of StarTeam with the largest feature set. Before the 30-day product review period expires, be sure toregister the product or extend the evaluation period.
This topic describes how to license StarTeam Server using the Server Administration tool and at the commandprompt. This type of licensing is native licensing.
To register a native license using the Server Administration tool1 Open the Server Administration tool.2 Choose Help About from the main menu. The About StarTeam Server dialog box opens.3 Select the License node in the left pane of the dialog box.4 If you have yet to enter a license, you must delete the evaluation key by selecting it from the right pane of the
dialog and clicking Delete.5 Click Register. The Server Registration dialog box opens.6 Type the correct numbers in the Serial Number and Access Key text boxes.
Note: Serial numbers are case-sensitive; access keys are not.
7 Click OK.8 Close the About StarTeam Server dialog box.
To register a native license at the command prompt1 Open a command prompt, and navigate to the home installation folder for StarTeam Server. For example, C:
\Program Files\Borland\StarTeam Server xxxx.2 At a command prompt type: starteamserver -serial number -access key
Note: You cannot license StarTeam Server while any of its server configurations are running as a Windows service.
If you change the registered license while a StarTeam project is open on a user’s workstation,the licensing takes effect for that user by closing and reopening the project window.
If you license StarTeam Server as Enterprise after using an evaluation license which is forthe Enterprise Advantage edition, the feature set changes. For example, if you createdrequirements during the evaluation and license the server as anything other than EnterpriseAdvantage, the requirements tab disappears.
Related Concepts
License Overview
Related Procedures
Setting Up License ServersOpening the Server Administration Tool
150
Setting Security OptionsThis section contains tasks related to setting security options.
In This SectionChanging Server Time-out OptionsDescribes how to change time-out options for a server configuration.
Configuring the Number of Logon AttemptsDescribes how to limit the number of user logon attempts.
Setting an Encryption LevelDescribes how to set the encryption level for a server configuration.
151
Changing Server Time-out OptionsThis topic contains the following procedures:
♦ Changing the Logon Sequence Time
♦ Changing the Inactivity Time-out
♦ Changing the Reconnect Time-out
To change the logon sequence time1 Open the Server Administration tool and select the server configuration that you want to modify.
Note: If you are using the client, you will be able to administer remote servers only.
2 Click the Configure Server shortcut in the shortcut pane, or choose Tools Administration ConfigureServer from the main menu.This opens the Configure Server dialog box.
3 Select the General tab.4 Type the number of seconds users have to log on in the Logon sequence timeout text box.
The maximum logon sequence time is five minutes.
5 Click OK to apply your changes.
Note: You can set this option only for a running sever configuration.
To set an inactivity timeout for users1 Open the Server Administration tool and select the server configuration that you want to modify.
Note: If you are using the client, you will be able to administer remote servers only.
2 Click the Configure Server shortcut in the shortcut pane, or choose Tools Administration ConfigureServer from the main menu.This opens the Configure Server dialog box.
3 Select the General tab.4 Check Inactivity timeout.5 Type the number of minutes in the Inactivity timeout text box. 8 Click OK.6 Optionally, if you want to allow named users (that is, users with a fixed license) to remain logged on, even when
they exceed the Inactivity timeout limit, check Exclude named users.7 Click OK to apply your changes.
Note: You can set these options only for a running sever configuration.
To change the reconnect timeout1 Open the Server Administration tool and select the server configuration that you want to modify.
152

Note: If you are using the client, you will be able to administer remote servers only.
2 In the shortcut pane, click the Configure Server shortcut, or choose Tools Administration ConfigureServer from the main menu. The Configure Server dialog opens.
3 Select the General tab.4 Check Reconnect timeout.5 Type the number of minutes in the text box to set the reconnect timeout value. The default time is 30 minutes.6 Click OK to apply your changes.
Related Concepts
Server Time-Out Options
Related Procedures
Opening the Server Administration ToolCustomizing Server Configuration Options
Related Reference
Configure Server Dialog Box Options
153

Configuring the Number of Logon AttemptsYou can increase the security of your projects by entering a logon failure setting and duration. One cause of logonfailure is hackers trying to figure out passwords for users. In such cases, you should consider changing the IP addressof the system to make it more difficult for attackers to locate the server configuration and repeat their efforts. Youmay also want to change the user names of all users in the system.
You can configure the server configuration to notify members of the security administrators group by email aboutlogon failures.
Note: This operation can be performed only when the server is running.
To limit logon attempts1 Open the Server Administration tool. If you are using Server Administration tool installed with the client, you can
administer remote servers only.2 Select a server configuration from the list of servers. If you have not yet logged on, you will be asked to do so.3 Select Tools Accounts System Policy from the main menu. The System Policy dialog box opens.4 Select the Logon Failures tab.5 Select one of the following Logon failures:
♦ Ignore: This selection disables the logon failures option.
♦ Lockout account after ___ failures: Type the number of logon failures you want to allow.
6 Select one of the following Lockout duration options:
♦ Forever: With this option selected, only an administrator can reinstate the user.
♦ Keep locked for ___ minutes: Type the number of minutes for the duration of the lockout. The user willbe able to log on again after the designated timeout period.
7 To notify members of the security administrators group that users attempted to log on unsuccessfully, checkBy e-mail.
8 Click OK to apply the changes and close the dialog box.
Related Concepts
Setting Up UsersEmail Support and Customized Email Notifications
Related Procedures
Setting Up GroupsReactivating Administrative AccountsOpening the Server Administration Tool
154
Setting an Encryption LevelEncryption protects files and other project information from being read by unauthorized parties over unsecurednetwork lines—such as the Internet. For TCP/IP connections, you can set a minimum level of encryption for a serverconfiguration for IP addresses that access that server configuration. You can set different encryption levels for anIP address, ranges of IP addresses, or all IP addresses. This topic explains how to do both.
Clients can set the encryption level on a per-workstation basis. Users must use at least the minimum level ofencryption set for underlying server configuration.
Note: This operation can be performed only when the server configuration is running.
To set an encryption level for transferred data, regardless of the IP address1 Open the Server Administration tool and select the server configuration that you want to modify.
Note: If you are using the client, you will be able to administer remote servers only.
2 Click the Configure Server shortcut in the shortcut pane, or choose Tools Administration ConfigureServer from the main menu.This opens the Configure Server dialog box.
3 Select the Protocol tab.4 Select Default in the TCP/IP encryption levels list box.5 Click Modify.
This opens the Set Encryption Type dialog box.
6 Select the type of encryption you want to use with the server configuration for IP addresses not specified in thislist.
7 Click OK to apply your changes and return to the Protocol tab.8 Click OK.
To set a different encryption level for a specific address or range of addresses1 Click the Protocol tab of the Configure Server dialog box and click Add. This opens the Set Encryption Type
dialog box.2 Type the starting IP address in the Starting IP boxes.3 Type the ending IP address in the Ending IP boxes.4 Select the type of encryption to be used with the server configuration for these addresses.5 Click OK to apply your changes and return to the Protocol tab.6 Click OK.
Related Procedures
Customizing Server Configuration Options
Related Reference
Configure Server Dialog Box Options
155

Migrating ServersThis section contains tasks related to migrating data from one server to another server.
In This SectionMigrating Server Configurations to Other DatabasesDescribes how to migrate a server configuration from one database to another.
Moving Server Configurations to a New ServerDescribes how to migrate a server configuration to another machine.
156
Migrating Server Configurations to Other DatabasesThe Server Administration tool allows you to migrate from any database supported by the Server to any other. Forexample, you can use the migrate feature to migrate an Oracle database to a Microsoft SQL Server database. Themigrate operation adds information about the new server configuration to the starteam-server-configs.xmlfile.
The topic contains the following:
♦ What to do before migrating a database
♦ Migrating a database
♦ What to do after migrating the database
Note: You can perform this operation only if the server configuration is not running.
To prepare for migrating a database1 Create a backup of the database you plan to migrate. Also ensure that you have backups of the files and folders
in the server configuration repository.2 Ensure that the database to be migrated is still in good repair by doing one or both of the following:
♦ Run Vault Verify.
♦ Run any verification tools provided by your database vendor.
3 Do one of the following:
♦ Manually create a database or schema user as the recipient of the migrated data. See the StarTeaminstallation guide, Installing StarTeam (install_en.pdf) for details. Make sure that you note the namesprovided for the DSN name, and the user name and password for the database or schema user. At aminimum, this user must have permission to create tables and stored procedures (if the database supportsstored procedures).
♦ Use the Server Administration tool to automatically create a database or schema user as the recipient ofthe migrated data.
4 Plan the database migration for a time at which it will inconvenience few users. A server configuration cannotbe running while the database is being migrated.Advise team members ahead of time that you plan to make the transition, let them know the time at which it willtake place, and request that they check in their files.
To migrate a database1 Open the Server Administration tool, and select the desired server configuration from the server pane.
Note: The server configuration cannot be running during a database migration.
2 Click the Migrate Database toolbar button, or choose Actions Migrate from the main menu. A messagewarns you that you cannot migrate a server configuration if the server is not registered.
157
Note: If you need to register the server (add license information), see the link “Using NativeLicenses“ at the bottom of this topic.
3 If your server is registered, click Yes. The Create a New Target Configuration for Migration wizard opens.4 In the first page of the wizard, Select Target Configuration for Migration, do the following:
1 Type the name for the new server configuration in the Target Configuration name text box.2 Click Next. The second page of the wizard, Type New Configuration Data, opens.
5 Indicate the type of database in the Database type drop-down list box.6 Do one of the following:
♦ (Default and recommended action) Check Create new StarTeam database and ODBC data source.
♦ Clear the check box if you have already manually created a database or schema user for this migration.
7 Click Next when this information is complete.From this point on, the dialog boxes are the same as those that display when you create a server configuration.
To complete a database migration1 Disable the prior server configuration. This action prevents the server configuration from being started and
accessed accidentally.
1 In the Server Administration tool, select the prior server configuration.2 Click the Disable Server toolbar button or choose Actions Enable Server from the main menu. The
status icon to the left of the server configuration name changes to a disabled icon.
Tip: To see a list of the server configuration status icons, see the link “Server Configuration StatusIcons” at the end of this topic.
Warning: Both the old and the new server configurations access the same vault, cache, andattachments folders. However, they do not access the same database. Continuing touse the prior server configuration will lead to vault verification errors and must beavoided.
2 Empty the Cache folder for the hive before starting the new server configuration. By default, the Cache folderis a child folder of the hive folder, under the repository root folder.
3 After verifying that the new configuration works correctly, delete the:
♦ Prior server configuration;
♦ The database that it used; and
♦ Its System DSN.
4 (Optional) The Z99 table is a temporary table that records the progress of the database migration. If the migrationprocess stops before completing, it uses the Z99 table to determine the point at which it should resume themigration when you restart the process. If your migrate process did not complete properly, you can review thefollowing columns to determine how far the migration process has progressed.
♦ Column 1 contains the source table name.
158
♦ Column 2 contains the ID of the last record copies.
♦ Column 4 contains either a Y or N, indicating whether the table copy is complete.
Related Concepts
BackupsData Storage Locations
Related Procedures
Verifying File Revisions with Vault VerifyBacking Up InformationUsing Native LicensesConfiguring Data Storage Options
Related Reference
Server Configuration Status Icons
159
Moving Server Configurations to a New ServerThe topic contains the following:
♦ What to do before migrating a server configuration
♦ Migrating a server configuration
♦ What to do after migrating a server configuration
To prepare for migrating a server configuration1 Shut down the server configuration.2 Create a database backup.3 Verify the location of the files that you need to move. These file are:
♦ The database backup;
♦ starteam-server-configs.xml; and
♦ The repository including its Native-II archives if they are not located under the repository folder.
To migrate a server configuration1 Copy the files from the source to the target location.2 Open starteam-server-configs-xml in a text editor.3 Copy the entire entry for the source server configuration into the target starteam-server-configs-xml
file.
Note: If starteam-server-configs-xml does not exist on the target machine, then you cancopy the entire file and delete any entries from it for any server configurations that do notexist on the target machine. However, if this file does exist on the target machine, thentake care to copy only the section needed for the server configuration that you are movingto the target machine.
4 Open the starteam-server-configs-xml file.5 Type the correct values in the RepositoryPath and LogPath options for your migrated server configuration
so that it points to the new migrated locations for the specified server configuration.For example, you would update the following values for these options:
♦ <option name="RepositoryPath" value="C:\Program Files\Borland\StarTeam Server2009\Samples\StarDraw Repository\" />
♦ <option name="LogPath" value="C:\Program Files\Borland\StarTeam Server 2009\Samples\StarDraw Repository\" />
To complete a server configuration migration1 Restore the database from backup.
160
2 Configure an ODBC connection for the migrated server configuration.3 Start the migrated server configuration. Depending on whether you have other server configurations running on
the same machine, you may need to start the migrated server configuration on a different port. If you need todo this, do one of the following:
♦ Click the Start with Override toolbar button; or
♦ Choose Actions Start With Override from the main menu.
Related Concepts
BackupsData Storage Locations
Related Procedures
Backing Up InformationMigrating ServersStarting and Stopping Server ConfigurationsConfiguring Data Storage Options
161
Managing Users and GroupsThis section contains tasks related to managing users and groups.
In This SectionChanging User PasswordsDescribes how to change the password for a user.
Configuring Password ConstraintsDescribes how to set password constraints using the Server Administration tool.
Configuring the Number of Logon AttemptsDescribes how to limit the number of user logon attempts.
Forcing Password ChangesDescribes how to force users to change their passwords.
Forcing Users to Log OffDescribes how to force users to log off of a server configuration.
Reactivating Administrative AccountsDescribes how to reactivate an administrative account bypassing the 24-hour lockout period.
Setting Up GroupsDescribes how to set up groups for a server configuration.
Setting Up UsersDescribes how to set up users for a server configuration.
162
Changing User PasswordsIn addition to setting or changing a user’s password, you can specify how long a password is usable, how manycharacters a password must have, and whether strong passwords are required. This operation can be performedonly when the server is running.
To change a password1 Open the Server Administration tool. If you are using Server Administration tool installed with the client, you can
administer remote servers only.2 Select a server configuration from the list of servers. If you have not yet logged on, you will be asked to do so.3 Select Tools Accounts User Manager from the menu. This action displays the User Manager dialog.4 Select the user’s name. If the user you want to work with does not appear in the Users list box, you can display
a list of all users by selecting the Show Users in the All Descendant Groups check box.5 Right-click, and select Properties from the context menu. The User Properties dialog box appears.6 Select the Logon tab.7 Verify that the Validate through StarTeam button has been selected.8 Type a new StarTeam password for the user in the Password text box.9 Type the password again in the Confirm text box and click OK.
Related Procedures
Forcing Password ChangesConfiguring Password ConstraintsOpening the Server Administration Tool
163
Configuring Password ConstraintsChanges made to the password length properties take effect immediately, but apply only to new user accounts ornew passwords. For example, if you change the minimum password length from eight characters to ten, all newusers must have a password that is a minimum of ten characters long. However, existing users will still be able touse their eight character passwords.
Changes made to the expiration time limit take effect after the appropriate time interval. For example, if you changethe password expiration time limit to thirty days, user accounts get suspended if their passwords have not beenchanged before the time expires. Users will be prompted to change their passwords two weeks before the suspensiontakes place. By default, the strong password option is turned off. When this feature is turned on, as users changetheir passwords, they must provide strong passwords. Until such a change is made, their old “weak” passwordscontinue to work.
To set password constraints1 Open the Server Administration tool. If you are using Server Administration tool installed with the client, you can
administer remote servers only.2 Select a server configuration from the list of servers. If you have not yet logged on, you will be asked to do so.3 Select Tools Accounts System Policy from the main menu.4 On the Passwords tab, select a password expiration option:
♦ Passwords never expire
♦ Passwords expire after ___ days. With this option, you must enter the number of days a password willbe valid. StarTeam counts the days from the time the password was created.
5 Select the Require Strong Passwords check box to require passwords to meet all of the following criteria:
♦ New password must be different from the old password.
♦ New password must be different from the user name.
♦ New password must be mixed case, containing at least one lowercase and at least one uppercasealphabetical character. (This is the English alphabet as determined by the ASCII value of the character.)
♦ New password must contain at least one non-alphabetical character.
Selecting this check box also changes the value in the “Minimum password length” text box to 3. You canincrease it if you choose.
6 Optionally, type a number for the minimum password length. The default, zero, allows passwords to be blank.The maximum password length is 32 characters.
7 Click OK.
Related Procedures
Changing User PasswordsForcing Password ChangesOpening the Server Administration Tool
164
Configuring the Number of Logon AttemptsYou can increase the security of your projects by entering a logon failure setting and duration. One cause of logonfailure is hackers trying to figure out passwords for users. In such cases, you should consider changing the IP addressof the system to make it more difficult for attackers to locate the server configuration and repeat their efforts. Youmay also want to change the user names of all users in the system.
You can configure the server configuration to notify members of the security administrators group by email aboutlogon failures.
Note: This operation can be performed only when the server is running.
To limit logon attempts1 Open the Server Administration tool. If you are using Server Administration tool installed with the client, you can
administer remote servers only.2 Select a server configuration from the list of servers. If you have not yet logged on, you will be asked to do so.3 Select Tools Accounts System Policy from the main menu. The System Policy dialog box opens.4 Select the Logon Failures tab.5 Select one of the following Logon failures:
♦ Ignore: This selection disables the logon failures option.
♦ Lockout account after ___ failures: Type the number of logon failures you want to allow.
6 Select one of the following Lockout duration options:
♦ Forever: With this option selected, only an administrator can reinstate the user.
♦ Keep locked for ___ minutes: Type the number of minutes for the duration of the lockout. The user willbe able to log on again after the designated timeout period.
7 To notify members of the security administrators group that users attempted to log on unsuccessfully, checkBy e-mail.
8 Click OK to apply the changes and close the dialog box.
Related Concepts
Setting Up UsersEmail Support and Customized Email Notifications
Related Procedures
Setting Up GroupsReactivating Administrative AccountsOpening the Server Administration Tool
165

Forcing Password ChangesIt may be necessary to force users to change their StarTeam passwords if a project security breach has occurred.This operation can be performed only when the server is running. You can set the password expiration time limit,the minimum length, and require the use of strong passwords. These password properties apply to all user accountson the server configuration.
To force users to change their passwords1 Open the Server Administration tool. If you are using Server Administration tool installed with the client, you can
administer remote servers only.2 Select a server configuration from the list of servers. If you have not yet logged on, you will be asked to do so.3 Click the Accounts bar in the lower left pane. Then click the User Manager shortcut. This will display the User
Manager dialog box.4 Select the user. If the user you want to work with does not appear in the Users list box. To display a list of all
users, select the All Users group from the Groups tree and select the Show Users in All DescendantGroups check box.
5 Right-click the user’s name, and select Force Password Change from the context menu. The AccountStatus column in the Users list box changes to “Password change required.” The user will be asked to changehis or her password at the next log on. If the change is not made, the user is allowed access to the serverconfiguration and the projects it contains, but will be locked out of the server configuration at the next log on.An error message warns the user that this will happen.
Note: The accounts of users who fail to change their passwords can be reactivated byadministrators.
Related Procedures
Changing User PasswordsConfiguring Password ConstraintsOpening the Server Administration Tool
166
Forcing Users to Log OffYou may have to force a user to log off for any number of reasons, including code violations or disaster recovery.When you force a user to log off, the user’s next operation displays the following error message:You are nolonger logged on.Depending on the reason for your action, you may need an additional method, such as e-mail or the telephone, tonotify users to stop accessing the application.
To log on again, the user must exit the application and restart the client. Most integrations between StarTeam andanother application require the user to restart the application being used. However, these users are not usuallynotified that their connections to the server have been terminated. This operation can be performed only when theserver is running.
To force a user to log off1 Open the Server Administration tool. If you are using Server Administration tool installed with the client, you can
administer remote servers only.2 Select a server configuration from the list of servers. If you have not yet logged on, you will be asked to do so.3 Do one of the following:
♦ Click the Accounts bar in the lower left pane. Then click the User Manager shortcut.
♦ Select Tools Accounts User Manager from the menu.
These actions display the User Manager dialog box.
4 Select the user. If the user you want to work with does not appear in the Users list box, you can display a listof all users by doing the following:
1 From the Groups tree, select the All Users group.2 Select the Show Users in All Descendant Groups check box.
5 Right-click the user’s name and select Force Logoff from the context menu. The user is immediately deniedaccess to the server configuration and to all projects residing in this server configuration.
Note: You cannot force your own logoff.
Related Concepts
Setting Up Users
Related Procedures
Setting Up GroupsReactivating Administrative AccountsConfiguring the Number of Logon AttemptsOpening the Server Administration Tool
167

Reactivating Administrative AccountsIt is possible for any user, even users with an administrative account, to be locked out of a server configuration whenthe number of retries with the wrong password has been exceeded. The lockout period for the main administrativeaccount (Administrator) is 24 hours. However, you can unlock the administrative account before the 24 hours haveelapsed by using the following procedure:
To unlock the administrative account1 Shut down the server configuration, and disconnect its network connection to keep remote users off the server
configuration.2 Start the server configuration using the command line in foreground mode from the Server Installation folder.
Example: starteamserver -start StarDraw -fgThe configuration name specification is case-sensitive with the command line. The command prompt must beleft open until the server configuration is shut down.
3 Set the system clock one day ahead.4 Log in as Administrator and log off. This action will reactivate the Administrator account.5 Set the clock back one day to its original time.6 Shut down the server configuration by entering “X” and clicking Type, which is how the server is shutdown in
foreground mode.
Related Procedures
Setting Up GroupsSetting Up UsersForcing Users to Log OffConfiguring the Number of Logon Attempts
168
Setting Up GroupsUsers who can log onto a server configuration can be organized into groups. Creating and using groups simplifiesthe task of managing security on a project, because each group can be assigned a set of privileges that apply to allthe users in that group, rather than setting privileges on a user-by-user basis.
The status bar on the User Manager dialog displays the number of users in the selected group who have access tothe server configuration, the number of users connected to the server configuration, and the number of users loggedon. The number of users connected to the server configuration and the number of logged on users differ whenindividual users log on more than once.
This operation can be performed only when the server is running.
To add a group1 Open the Server Administration tool. If you are using Server Administration tool installed with the client, you can
administer remote servers only.2 Select a server configuration from the list of servers. If you have not yet logged on, you will be asked to do so.3 Do one of the following:
♦ Click the Accounts bar in the lower left pane. Then click the User Manager shortcut.
♦ Select Tools Accounts User Manager from the menu.
These actions display the User Manager dialog box.
4 Select a group from the Groups tree to be the parent of the new group.
Note: We recommend that, initially, you select the All Users group when adding a new group.Subsequent groups can be added to any group listed under the All Users group. Avoidadding new groups to the administrative and management group. If a user is a member ofa child group, it is also implicitly a member of the parent group—even if the member’s namedoes not appear in the list when you select the parent group. You must select the ShowUsers in All Descendant Groups check box to see the complete list of members for aselected group that has child groups.
5 Click New Group. The New Group Properties dialog box appears.6 Type the group name in the Name text box.7 Type a description of the group in the Description text box.8 Select the Privileges tab.
The privileges selected on the Privileges tab can override any Access Rights that have been previously set forany user in the privileged group. However, the privileges are not a substitute for Access Rights. If you have notset up Access Rights, you have no security system.
The privileges set on the Privileges tab apply to all objects in all projects in a server configuration. For example,if you give a group the Delete Item privilege, any user in that group can delete any project, view, folder, childfolder, or item from the server configuration, regardless of what the Access Rights are for deleting these items.
9 Set privileges as appropriate and click OK. The new group appears in the Groups list.
To change the parent of a Group1 Open the Server Administration tool. If you are using Server Administration tool installed with the client, you can
administer remote servers only.
169

2 Select a server configuration from the list of servers. If you have not yet logged on, you will be asked to do so.3 Do one of the following:
♦ Click the Accounts bar in the lower left pane. Then click the User Manager shortcut.
♦ Select Tools Accounts User Manager from the menu.
These actions display the User Manager dialog box.
4 Select the group to be moved from the Groups tree.5 Right-click and select Change Parent Group from the context menu. The Change Parent Group dialog box
appears.6 Select a new parent group, then click OK.7 Click OK.
To determine the members of a group1 Open the Server Administration tool. If you are using Server Administration tool installed with the client, you can
administer remote servers only.2 Select a server configuration from the list of servers. If you have not yet logged on, you will be asked to do so.3 Do one of the following:
♦ Click the Accounts bar in the lower left pane. Then click the User Manager shortcut.
♦ Select Tools Accounts User Manager from the menu.
These actions display the User Manager dialog box.
4 Select the group from the Groups tree. The explicit members of the group appear in the Users list box.5 Select the Show Users in All Descendant Groups check box to also display the implicit members of the group
in the Users list box.
To remove an empty group:1 Open the Server Administration tool. If you are using Server Administration tool installed with the client, you can
administer remote servers only.2 Select a server configuration from the list of servers. If you have not yet logged on, you will be asked to do so.3 Do one of the following:
♦ Click the Accounts bar in the lower left pane. Then click the User Manager shortcut.
♦ Select Tools Accounts User Manager from the menu.
These actions display the User Manager dialog box.
4 Select a group from the Groups tree.5 Right-click to open the context menu, and select Delete.The system displays the following message:
Do you want to delete group groupname?
6 Click Yes.
♦ If the group is empty, it is removed from the Groups list box.
170
♦ If the group contains users, the system displays the following message:
The group you want to delete contains user accounts. Please delete theseuser accounts or move them to another group prior to deleting a group.
When you see this message, click OK. Then either delete the users in this group or move them to another group.
Related Concepts
User and Group Configuration Overview
Related Procedures
Opening the Server Administration Tool
171
Setting Up UsersIf you have the appropriate access rights, you can add users to a server configuration from either the ServerAdministration utility or a client. Initially, you add a user to a specific group, such as Developers or Testers. The userbecomes an explicit member of this group and an implicit member of any of this group’s parent groups, such as theAll Users group. This operation can be performed only when the server is running.
Warning: Creating a user account with the name “StarTeam” has been known to cause problems when using thecommand line stcmd server-mode command to lock or unlock the server configuration. The commandrequests a password even when the user has a blank password or when a password has already beenprovided.
To add a user1 Open the Server Administration tool.
Note: If you are using Server Administration tool installed with the client, you can administerremote servers only.
2 Select a server configuration from the list of servers.If you have not yet logged on, you will be asked to do so.
3 Do one of the following:
♦ Click the Accounts bar in the lower left pane and click the User Manager shortcut.
♦ Select Tools Accounts User Manager from the menu.
These actions display the User Manager dialog box.
4 Select a group from the Groups tree and click New User. The New User Properties dialog appears.5 Type the user’s name in the Full Name text box and optionally type the user’s e-mail address in the E-Mail text
box.6 Optionally, type the user's phone number, voice mail number, pager number, fax phone number, and street
address in the appropriate text boxes.7 Select the Logon tab.
1 Type the name to be used to log onto the application in the User Name text box. If you enter a user namethat already exists, the following message displays after you click OK:A user with a given username already exists.
2 Select the Validate through StarTeam Server button if you want to validate the user against the server.Type a StarTeam password for the user in the Password text box and again in the Confirm text box.Asterisks appear in the text box instead of the password itself. If the password’s minimum length can bezero, you do not have to enter a password. If you are using strong passwords, be sure to follow the rulesfor those passwords.
3 (For Microsoft Active Directory or OpenLDAP) To validate the user against your organization’s directoryserver, select the Validate through directory service button and type the Distinguished Name for theuser. An alphanumeric value of up to 254 characters, this value is used to uniquely identify the directoryservices user. To use directory service validation, the Server must be on a trusted domain in relation to theLDAP server.
8 Optionally, select the Access Policy tab and specify when this user can access the server configuration. Selectone of the following option buttons:
172
♦ Access not restricted (the user can access the server configuration at any time)
♦ Standard five day work week (the user can access the server configuration Monday through Friday from8 A.M. to 5 P.M.)
♦ Custom access hours (to set one or two time periods per day when the user can or cannot access theserver configuration)
♦ Select a day of the week from the Day list box.
♦ Select the No Access on That Day check box to deny access, or clear it to allow access on that day.
♦ Use the From and To boxes to set one or two time periods when access is either allowed or denied.
If the user’s workstation is not in the same time zone as the computer on which the server configuration isrunning, select the Adjust for Workstation Time Zone check box, and type the number of hours fromGreenwich Mean Time (GMT) in the hours from GMT field.
9 Add the new user explicitly to other groups, as appropriate. Remember that a user is implicitly already a memberof the current group’s parent groups, but you must explicitly add a user to groups that are not parents of thecurrent group.
To review a user’s explicit group memberships1 Open the Server Administration tool. If you are using Server Administration tool installed with the client, you can
administer remote servers only.2 Select a server configuration from the list of servers. If you have not yet logged on, you will be asked to do so.3 Do one of the following:
♦ Click the Accounts bar in the lower left pane and click the User Manager shortcut.
♦ Select Tools Accounts User Manager from the menu.
These actions display the User Manager dialog box.
4 Select the user.If the user you want to work with does not appear in the Users list box, you can display a list of all users bydoing the following:
1 Select the All Users group in the Groups tree.2 Select the Show Users in All Descendant Groups check box.
5 Right-click, and select Properties from the context menu. The User Properties dialog box appears.6 Select the Membership tab. The list box displays the groups in which this user has explicit membership.
To change group membership1 Select the user from the User list in the User Manager dialog box.2 Right-click and select Group Membership from the context menu. The Group Membership dialog box
appears.3 Select the groups to which you want to add this user explicitly.4 Click OK.
173
To remove users from groups1 Open the Server Administration tool.
Note: If you are using Server Administration tool installed with the client, you can administerremote servers only.
2 Select a server configuration from the list of servers.If you have not yet logged on, you will be asked to do so.
3 Do one of the following:
♦ Click the Accounts bar in the lower left pane and click the User Manager shortcut.
♦ Select Tools Accounts User Manager from the menu.
These actions display the User Manager dialog box.
4 Select the user.If the user’s name does not appear in the Users list box, you can display a list of all users by doing the following:
1 Select the All Users group in the Groups tree.2 Select the Show Users in All Descendant Groups check box.
5 Right-click the user’s name, and select Group Membership from the menu. The Group Membership dialogbox will open.
6 Deselect the radio button next to the group from which you want to remove the user.7 Click OK.
To check account status for users1 Open the Server Administration tool.
Note: If you are using Server Administration tool installed with the client, you can administerremote servers only.
2 Select a server configuration from the list of servers.If you have not yet logged on, you will be asked to do so.
3 Do one of the following:
♦ Click the Accounts bar in the lower left pane and click the User Manager shortcut.
♦ Select Tools Accounts User Manager from the menu.
These actions display the User Manager dialog box.
4 Select the All Users group in the Groups tree.5 Select the Show Users in All Descendant Groups check box.6 Review the information about the specific user that displays in the Users list box.
Tip: To ensure that the information in the Users list box is current, click Refresh.
174
To remove user accounts1 Open the Server Administration tool.
Note: If you are using Server Administration tool installed with the client, you can administerremote servers only.
2 Select a server configuration from the list of servers.If you have not yet logged on, you will be asked to do so.
3 Do one of the following:
♦ Click the Accounts bar in the lower left pane and click the User Manager shortcut.
♦ Select Tools Accounts User Manager from the menu.
These actions display the User Manager dialog box.
4 Select the user. If the user you want to work with does not appear in the Users list box, you can display a listof all users by doing the following:
1 Select the All Users group in the Groups tree.2 Select the Show Users in All Descendant Groups check box.
5 Right-click the user’s name and select Delete Account from the context menu.The system displays the following message:
Do you want to delete username’s user account?
6 Click Yes.This action permanently removes the user from the server configuration.
To suspend user accounts1 Open the Server Administration tool.
Note: If you are using Server Administration tool installed with the client, you can administerremote servers only.
2 Select a server configuration from the list of servers.If you have not yet logged on, you will be asked to do so.
3 Do one of the following:
♦ Click the Accounts bar in the lower left pane and click the User Manager shortcut.
♦ Select Tools Accounts User Manager from the menu.
These actions display the User Manager dialog box.
4 Select the user.If the user you want to work with does not appear in the Users list box, you can display a list of all users bydoing the following:
1 Select the All Users group in the Groups tree.
175
2 Select the Show Users in All Descendant Groups check box.
5 Right-click the user’s name and select Suspend Account from the context menu. The account status in theUsers list box changes to “Suspended”, and access to the server is denied after the user logs out.
Note: You cannot suspend your own account.
To reactivate user accounts1 Open the Server Administration tool.
Note: If you are using Server Administration tool installed with the client, you can administerremote servers only.
2 Select a server configuration from the list of servers.If you have not yet logged on, you will be asked to do so.
3 Do one of the following:
♦ Click the Accounts bar in the lower left pane and click the User Manager shortcut.
♦ Select Tools Accounts User Manager from the menu.
These actions display the User Manager dialog box.
4 Select the user.If the user you want to work with does not appear in the Users list box, you can display a list of all users bydoing the following:
1 Select the All Users group in the Groups tree.2 Select the Show Users in All Descendant Groups check box.
5 Right-click the user’s name and select Reactivate Account from the context menu. These actions reactivatethe user account.
Related Concepts
User and Group Configuration Overview
Related Procedures
Opening the Server Administration Tool
176
Managing PasswordsThis section contains tasks related to managing passwords.
In This SectionChanging User PasswordsDescribes how to change the password for a user.
Configuring Password ConstraintsDescribes how to set password constraints using the Server Administration tool.
Forcing Password ChangesDescribes how to force users to change their passwords.
177

Changing User PasswordsIn addition to setting or changing a user’s password, you can specify how long a password is usable, how manycharacters a password must have, and whether strong passwords are required. This operation can be performedonly when the server is running.
To change a password1 Open the Server Administration tool. If you are using Server Administration tool installed with the client, you can
administer remote servers only.2 Select a server configuration from the list of servers. If you have not yet logged on, you will be asked to do so.3 Select Tools Accounts User Manager from the menu. This action displays the User Manager dialog.4 Select the user’s name. If the user you want to work with does not appear in the Users list box, you can display
a list of all users by selecting the Show Users in the All Descendant Groups check box.5 Right-click, and select Properties from the context menu. The User Properties dialog box appears.6 Select the Logon tab.7 Verify that the Validate through StarTeam button has been selected.8 Type a new StarTeam password for the user in the Password text box.9 Type the password again in the Confirm text box and click OK.
Related Procedures
Forcing Password ChangesConfiguring Password ConstraintsOpening the Server Administration Tool
178
Configuring Password ConstraintsChanges made to the password length properties take effect immediately, but apply only to new user accounts ornew passwords. For example, if you change the minimum password length from eight characters to ten, all newusers must have a password that is a minimum of ten characters long. However, existing users will still be able touse their eight character passwords.
Changes made to the expiration time limit take effect after the appropriate time interval. For example, if you changethe password expiration time limit to thirty days, user accounts get suspended if their passwords have not beenchanged before the time expires. Users will be prompted to change their passwords two weeks before the suspensiontakes place. By default, the strong password option is turned off. When this feature is turned on, as users changetheir passwords, they must provide strong passwords. Until such a change is made, their old “weak” passwordscontinue to work.
To set password constraints1 Open the Server Administration tool. If you are using Server Administration tool installed with the client, you can
administer remote servers only.2 Select a server configuration from the list of servers. If you have not yet logged on, you will be asked to do so.3 Select Tools Accounts System Policy from the main menu.4 On the Passwords tab, select a password expiration option:
♦ Passwords never expire
♦ Passwords expire after ___ days. With this option, you must enter the number of days a password willbe valid. StarTeam counts the days from the time the password was created.
5 Select the Require Strong Passwords check box to require passwords to meet all of the following criteria:
♦ New password must be different from the old password.
♦ New password must be different from the user name.
♦ New password must be mixed case, containing at least one lowercase and at least one uppercasealphabetical character. (This is the English alphabet as determined by the ASCII value of the character.)
♦ New password must contain at least one non-alphabetical character.
Selecting this check box also changes the value in the “Minimum password length” text box to 3. You canincrease it if you choose.
6 Optionally, type a number for the minimum password length. The default, zero, allows passwords to be blank.The maximum password length is 32 characters.
7 Click OK.
Related Procedures
Changing User PasswordsForcing Password ChangesOpening the Server Administration Tool
179
Forcing Password ChangesIt may be necessary to force users to change their StarTeam passwords if a project security breach has occurred.This operation can be performed only when the server is running. You can set the password expiration time limit,the minimum length, and require the use of strong passwords. These password properties apply to all user accountson the server configuration.
To force users to change their passwords1 Open the Server Administration tool. If you are using Server Administration tool installed with the client, you can
administer remote servers only.2 Select a server configuration from the list of servers. If you have not yet logged on, you will be asked to do so.3 Click the Accounts bar in the lower left pane. Then click the User Manager shortcut. This will display the User
Manager dialog box.4 Select the user. If the user you want to work with does not appear in the Users list box. To display a list of all
users, select the All Users group from the Groups tree and select the Show Users in All DescendantGroups check box.
5 Right-click the user’s name, and select Force Password Change from the context menu. The AccountStatus column in the Users list box changes to “Password change required.” The user will be asked to changehis or her password at the next log on. If the change is not made, the user is allowed access to the serverconfiguration and the projects it contains, but will be locked out of the server configuration at the next log on.An error message warns the user that this will happen.
Note: The accounts of users who fail to change their passwords can be reactivated byadministrators.
Related Procedures
Changing User PasswordsConfiguring Password ConstraintsOpening the Server Administration Tool
180
Managing Access Rights and Group PrivilegesThis section contains tasks related to managing access rights and group privileges.
In This SectionConfiguring Access RightsDescribes how to configure access rights for projects, views, promotion states, filters, queries, andcomponents.
Configuring Group PrivilegesDescribes how to use the User Manager dialog box to configure group privileges for a server configuration.
Configuring PrivilegesDescribes how to enable or disable group privilege access rights for a server configuration.
Configuring Server-level Access RightsDescribes how to configure server-level access rights for a server configuration.
181
Configuring Access RightsThis topic includes the following subtasks:
♦ Configuring access rights (in general)
♦ Configuring exceptions (deny records) for access rights
♦ Configuring project or view level promotion state access rights
♦ Configuring access rights for individual promotion states
♦ Configuring component-level access rights
♦ Configuring individual filter access rights
♦ Configuring individual query access rights
Note: You can modify access rights only on running server configurations. Shared folders or items have the accessrights originally set for them at the folder or item level, until they branch in their new location. Branchingcreates a new object that initially has no access rights at the folder or item levels.
To set access rights (in general)1 Select the object or item in the StarTeam client for which rights will be set:
♦ To set project access rights, the project must be open to any view.
♦ To set view access rights, the view must be open.
♦ To set folder access rights, select the folder from the folder hierarchy in the left pane.
♦ To set component access rights for public filters or queries, (for example, the change request component)bring the component tab into focus in the upper pane.
♦ To set individual file, change request, requirement, topic, or task item access rights, select the item fromthe upper pane.
2 Select Access Rights from the appropriate menu or context menu as follows:
♦ To set project-level access rights, select Project Access Rights from the main menu.
♦ To set view-level access rights, select View Access Rights from the main menu.
♦ To set folder-level access rights, right-click the folder on the Folder tab and choose Advanced AccessRights from the context menu.
♦ To set component-level access rights for public filters and queries, select the component type, (for examplethe Change Request menu) <Component Type> Advanced Component Access Rights fromthe main menu.
♦ To set item-level access rights, select the item from the upper pane, and select <Component Type> Advanced Item Access Rights from the main menu.
3 Click Add in the Access Rights dialog box to select a user or group.This opens the Assign Access Rights To dialog box.
4 Select a user or group. Users are listed by their user names and groups are listed by their paths (excluding theAll Users group).
5 Select Grant, and click OK to return to the Access Rights dialog box.
182
Warning: Never select Deny unless you are creating an exception. Deny records must becreated before grant records.
6 In the Access Rights dialog box, select and/or clear the appropriate check boxes. Selecting or clearing thecheck box for a category, such as Generic object rights for a project, selects or clears all the access rightcheck boxes for that category.The category check box has only two states. When it is cleared, the access right check boxes for that categoryare either all cleared or mixed: some selected and some cleared.
Warning: Clicking Delete removes the selected user or group from the User and Groups list inthe Access Rights dialog box. The selected user or group loses any previously setaccess rights to the Server.
7 Click OK to apply your changes.
Suppose that you have a group called Testers that has complete access to the files in the QA view, a view thatcontains folders full of test files. A newly hired member of the Testers group, New Tester, has not yet been trainedto update the tests, and so on. Although New Tester is a member of the Testers group, you do not want this user toperform certain operations on these files for a couple of weeks. You could remove New Tester from the Testersgroup temporarily, but the application also allows you to give New Tester all the rights of the Testers group with afew exceptions. To list the exceptions, you create a deny record.
To create a deny record to handle access right exceptions1 Click Add in an Access Rights dialog box.
This opens the Assign Access Rights to dialog box.
2 Select the user from the list who is an exception within the group.3 Select Deny, and click OK to return to the Access Rights dialog box.
Warning: Never select Deny to create an exception to a group unless that group is alreadyspecifically granted access for this same node. In this example, the Testers group musthave access for this node.
4 Select and/or clear the appropriate check boxes in the Access Rights dialog.5 Click Move Up to move the deny record to the top of the Users and groups list in the Access Rights dialog
box.
Tip: All deny records must precede all grant records in the Users and groups list. Otherwise,the exception will not occur. For example, if the application finds the grant record for Testersbefore it finds the deny record for New Tester, the rights the user has as a member of theTesters group will apply.
6 Click OK to apply your changes and close the dialog box.
Note: Depending on the privileges of the Testers group, New Tester may be able to perform these operationsanyway.
Also, if a deny record is the only record for a node, anyone not specifically granted accessrights for that node has no access to that type of object at that level. When the application
183
finds a node for the correct type of object that has even one record, it does not check higherlevels for access rights.
Setting promotion state access rights is very similar to setting other access rights. The access rights can be set atthe project or view level as well as for individual promotion states.
To set promotion state access rights at the project or view level1 Select Project Access Rights or View Access Rights from the main menu. The Access Rights dialog
box opens.2 Select the View node.3 Click Add to select a user or group. The Assign Access Rights to dialog box opens.4 Select a user or group. Users are listed by their user names and groups are listed by their paths (excluding the
All Users group).5 Select Grant, and click OK to return to the Access Rights dialog box.6 Select and/or clear the appropriate check boxes in the Access Rights dialog box.7 Click OK to apply your changes.
To set access rights for individual promotion states1 Select View Promotion from the main menu. The Promotion dialog box opens.2 Select a promotion state from the list box.
Note: You can create the promotion state in the Promotion dialog box. However, you must clickApply before you can set access rights. After you click Apply (or close and reopen thedialog), the Access Rights button is enabled.
3 Click Access Rights. The Promotion State Access Rights dialog box opens.4 Click Add to select a user or group. The Assign Access Rights to dialog box opens.5 Select a user or group. Users are listed by their user names and groups are listed by their paths (excluding the
All Users group), and select Grant.6 Click OK to return to the Promotion State Access Rights dialog box.7 Select and/or clear the appropriate check boxes, and click OK to apply your changes and close the Promotion
State Access Rights dialog box.8 Click OK to exit the Promotion dialog box.
If you have the server-level access right to Administer component-level access rights, you can set component-level access rights from any open component.
To set component-level access rights1 Open any project view to which you have access.2 Select the correct tab (file, change request, and so on) for the component.3 Select <Component Type> Advanced Component access rights from the main menu. The
<Component Type> Component Access Rights dialog box opens.4 Select an appropriate node:
♦ To control who can create public filters and queries for the component, use the Component node.
♦ To control who can use public filters for the component, use the Filter node.
184
♦ To control who can use public queries for the component, use the Query node.
5 Add a user or group:
1 Click Add to display the Assign Access Rights to dialog box.2 Select a user or group, and select Grant.3 Click OK to return to the <Component Type> Component Access Rights dialog box.
Warning: Never select Deny in the Assign Access Rights to dialog box unless you are creatingan exception.
6 Select and/or clear the appropriate check boxes in the <Component Type> Component Access Rights dialogbox.
Note: Clicking Delete removes the selected user or group from the User and groups list. Theselected user or group loses any previously set access rights to this component’s filtersand queries.
7 Click OK to apply your changes.
To set access rights for a filter1 Do one of the following:
♦ Right-click a column header on the upper pane, and choose Filters from the context menu.
♦ Choose Filters Filters from the appropriate component (file, change request, requirement, and so on)main menu or component context menu.
The Filters dialog box opens.
2 Select the filter, and click Access Rights. The Filter <Filter Name> Access Rights dialog box opens.3 Click Add. The Assign Access Rights to dialog box opens.4 Select a user or group. Users are listed by their user names and groups are listed by their paths (excluding the
All Users group).5 Select Grant, and click OK to return to theFilter <Filter Name> Access Rights dialog box.
Warning: Never select Deny in the Assign Access Rights to dialog box unless you are creatingan exception.
6 Select and/or clear the appropriate check boxes in the Filter <Filter Name> Access Rights dialog box.
Note: Clicking Delete removes the selected user or group from the User and groups list. Theselected user or group loses any previously set access rights to this filter.
7 Click OK to apply your changes and close the Filter <Filter Name> Access Rights dialog box.8 Click OK to close the Filters dialog box.
To set access rights for a query1 Do one of the following:
185
♦ Right-click a column header on the upper pane, and choose Queries from the context menu.
♦ Choose Filters Queries from the appropriate component (file, change request, requirement, and soon) main menu or component context menu.
The Queries dialog box opens.
2 Select the query, and click Access Rights. The Query <Query Name> Access Rights dialog box opens.3 Click Add. The Assign Access Rights to dialog box opens.4 Select a user or group. Users are listed by their user names and groups are listed by their paths (excluding the
All Users group).5 Select Grant, and click OK to return to theQuery <Query Name> Access Rights dialog box.
Warning: Never select Deny in the Assign Access Rights to dialog box unless you are creatingan exception.
6 Select and/or clear the appropriate check boxes in the Query <Query Name> Access Rights dialog box.
Note: Clicking Delete removes the selected user or group from the User and groups list. Theselected user or group loses any previously set access rights to this query.
7 Click OK to apply your changes and close the Query <Query Name> Access Rights dialog box.8 Click OK to close the Queries dialog box.
Related Concepts
Granting Access RightsDenying Access Rights
Related Procedures
Managing Access Rights and Group Privileges
Related Reference
Access Rights and Privileges
186
Configuring Group PrivilegesThe privileges assigned to a group may allow members of that group to access objects and perform operations thatthey are otherwise not allowed to do. In other words, privileges override the access rights settings.
In the User Manager dialog box, you will notice that the server configuration comes with some default groups (AllUsers, Administrators, System Managers, and Security Administrators). The default user named Administratorbelongs to both the Administrators and the Security Administrators groups. By default, the Administrators group hasall group privileges. Also by default, the other groups have none of these privileges. All members of a group havethe same privileges on every project managed by the this server configuration. The privileges apply to all levelsequally— projects, views, folders, and items within folders. If users belong to more than one group, they have themaximum amount of privileges, regardless of which group provides them with those privileges.
Note: You can modify privileges in the User Manager dialog box only on running server configurations.
To set privileges1 Open the Server Administration tool and select the server configuration that you want to modify.
Note: If you are using the client, you will be able to administer remote servers only.
2 Click the User Manager shortcut in the shortcut pane, or choose Tools Accounts User Manager fromthe main menu. The User Manager dialog box opens.
3 Add or select a group in the User Manager dialog box.4 Add users to the group, if necessary.5 Right-click the name of a group in the Groups tree and choose Properties from the context menu. The Group
Properties opens.6 Select the Privileges tab.7 Check or clear the check boxes to grant privileges to the group or take them away.8 Click OK to apply your changes.
Related Concepts
Group Privileges and Access RightsGranting Access Rights
Related Procedures
Managing Access Rights and Group PrivilegesConfiguring PrivilegesSetting Up UsersSetting Up Groups
Related Reference
Access Rights and PrivilegesGroup Privileges
187
Configuring PrivilegesAs an administrator, you can override group privileges by setting the option for the server configuration in its SystemPolicy dialog box. Use these options with caution, because they change the steps used by the Server to check everyuser (including administrators) for access to all objects in the repository. If you ignore privileges, only access rightsdetermine who can and cannot perform operations on objects in the repository.
Note: You can modify this option only on running server configurations.
To use or ignore group privileges1 Open the Server Administration tool and select the server configuration that you want to modify.
Note: If you are using the client, you will be able to administer remote servers only.
2 Click the System Policy shortcut in the shortcut pane, or choose Tools Accounts System Policy fromthe main menu.This opens the System Policy dialog box.
3 Select the Access Rights tab.4 Check or clear Ignore Group Privileges. When cleared, the server configuration checks for privileges.5 Click OK to apply your changes.
Related Concepts
Denying Access RightsGranting Access Rights
Related Procedures
Managing Access Rights and Group Privileges
Related Reference
Access Rights and Privileges
188
Configuring Server-level Access RightsThe server-level access rights you assign to users and groups authorize them to perform specific operations in aparticular server configuration. One of the options determines who can and who cannot create projects when theserver configuration is running.
Note: You can assign Server access rights only when a server configuration is running.
To set Server access rights1 In the Server Administration tool, select the server configuration that you want to modify. If you are using the
client, you will be able to administer remote servers only.2 In the shortcut pane, click the Access Rights shortcut, or choose Tools Accounts Access Rights from
the main menu. The Access Rights dialog box opens.3 Click New. The Add a User or Group dialog box opens.4 Select the user or group to be assigned access rights.5 Check Grant, and click OK to return to the Access Rights dialog box.
Warning: Never check Deny unless you are creating an exception.
6 In the Access Rights dialog box, select a user or group from the User and Groups list. This enables the variouscheck boxes in the Access Rights dialog box. You can select or clear the appropriate check boxes as needed.If you cannot view the entire Access Rights dialog box, resize the Server Administration tool window.Click Select All and Clear All as necessary to speedily check or clear all of the check boxes in the AccessRights dialog box.
Warning: Clicking Delete under the Users and Groups list removes the selected user or groupfrom the list. As a result, the user or group loses any previously set access rights tothe server.
7 Click OK to apply your changes.
Related Concepts
Denying Access RightsGranting Access Rights
Related Procedures
Managing Access Rights and Group Privileges
Related Reference
Server Access RightsAccess Rights and Privileges
189
Managing Log and Initialization FilesThis section contains tasks related to managing log and initialization files.
In This SectionDisplaying and Customizing StarTeam.LogDescribes how to open and customize the output provided in StarTeam.Log.
Enabling and Purging the Audit LogDescribes how to enable and purge entries from the audit log.
Working with the Security Event LogDescribes how to view and set purging intervals in the security event log.
Working with the Server LogDescribes how to find, view, and copy the contents of the server log file.
190
Displaying and Customizing StarTeam.LogThe StarTeam.Log file records the operations performed on your client workstation during a session. It helps youtroubleshoot and document errors or operations between the server and your workstation that failed during serverconfiguration sessions.
Because the application creates a new StarTeam.Log file every time you start the client, the log folder can fill upquickly. To control the number of log files in the folder, you may want to periodically delete old log files from theoutput folder or disable the StarTeam.Log option. To disable the option, clear the Log Errors and the Log Operationscheck boxes on the Workspace tab of the Personal Options dialog. To display the StarTeam.Log file, select Tools StarTeam Log File from the menu bar. You can also import and view the data from a StarTeam.Log file using any
application that supports tab-delimited fields. For example, if you save the file with a .csv extension, the file can beopened in Microsoft Excel.
The Workspace tab on the Personal Options dialog enables you to specify the location and the type of data recordedin the StarTeam.Log file.
To customize the StarTeam.Log file1 From a client, select Tools Personal Options. The Personal Options dialog box appears.2 On the Workspace tab, enter or browse for the location of the StarTeam.Log file in the Log Output Path text
box. The default is the location in which the application is installed; for example, C:\Documents andSettings\<user-name>\Application Data\Borland\StarTeam. The current log file is always namedStarTeam.log. Log files from earlier sessions of the application include the date and time the file was lastmodified.
Note: StarTeam.log contains data about operations sent from your workstation to one or moreservers, depending on what project views you have open. This data includes the name ofthe project so that you can isolate data for a particular server, when necessary.
3 Select the types of data you want to include in StarTeam.Log.
♦ Log errors — Set by default. Records errors that occur while you are using the client. The errors log liststhe date and time you started your server configuration and any errors or failed operations between theserver and client. The application identifies each failed operation by an internal ID and provides anexplanation. For example, you might see:...Operation 40956 failed: TCP/IP Socket Error10054:...
♦ Log StarTeamMPX events — Selecting this option records information about StarTeamMPX events forthis client. The log identifies the time and date on which a StarTeamMPX event (an automatic refresh orfile status update) took place. The log prefaces a StarTeamMPX event as “Statistics for Events” and usesinternal IDs and brief explanations to identify the server event. The following example describes a statuschange for a file:...Statistics for Events /1b21dd1-e208-51ea-01b2-1dd1e20851ea/Object/File/ Modify You can log StarTeamMPX events only if you check the “EnableStarTeamMPX” checkbox on the StarTeamMPX tab. For StarTeamMPXrelated operations, any changesyou make on the Workspace tab do not apply to projects already open. However, the application will logStarTeamMPX events for any projects you open from this point forward.
♦ Log operations that take at least ___ milliseconds. Select this option to record operations that take longerthan a specific number of milliseconds. (An operation is a command that results from user actions.Operations can be executed on either the Server or the client.) The milliseconds time setting stops the logfrom filling up with operations of little importance. The default is 10 milliseconds. This option recordsinformation on the date, time, and UI Operation number for each command executed by your workstation.You can record either Summary or Detail information.
191
♦ Selecting Summary records the time spent for the total operation, client execution time, and serverexecution time. The application identifies each operation by an internal ID, such as Statistics for Operation40001.
♦ Selecting Detail records a detailed breakdown of all server commands performed for each operation. Thelog identifies the server address, project, and component (File, Change Request, Requirement, Task, orTopic) for each server command. The application identifies each server command by an internal ID, suchas Public Server Command 10.
4 When you are finished, click OK.
Related Procedures
Locating Initialization FilesEnabling and Purging the Audit LogWorking with the Server LogWorking with the Security Event Log
192
Enabling and Purging the Audit LogWhen you select the Enable Audit Generation option, the Server logs audit events for projects in the serverconfiguration database. For example, the log records when change requests are created, and when a file is added.The audit log entries can be viewed from a client by selecting the Audit tab in the upper pane. This operation canbe performed only on a server that is running.
Note: If setting the option to purge logs on server configuration startup, you need to restart your serverconfigurations fairly regularly to avoid startup problems.
To enable the audit log1 Open the Server Administration tool. If you are using Server Administration tool installed with the client, you can
administer remote servers only.2 From the list of servers, select the server configuration that you want to change. If you have not yet logged on,
you will be asked to do so.3 Click the Configure Server shortcut or Tools > Administration > Configure Server. The Configure Server
dialog box appears.4 Select the Audits tab.5 Select the Enable Audit Generation check box.6 Optionally, to automatically delete entries after a specified length of time, select the Purge Audit Entries Older
Than check box. (Clearing this check box keeps the entries indefinitely.) Type a number of days in the Daystext box. The range is from 7 to 1000 days. For example, to delete entries when they become approximatelyone month old, type 30 days in the Day text box. When the server configuration starts, entries that exceed thispurge limit are deleted.
7 Click OK.
Related Procedures
Working with the Server LogWorking with the Security Event LogDisplaying and Customizing StarTeam.LogLocating Initialization FilesOpening the Server Administration Tool
193
Working with the Security Event LogIf you have access rights to a server configuration, you can view its security event log at any time. The security eventlog is not a typical .Log file, as its data is stored in the application database. This operation can be performed onlywhen the server is running.
To view the security event log1 Open the Server Administration tool. If you are using Server Administration tool installed with the client, you can
administer remote servers only.2 Select the appropriate server configuration from the list of servers. If you have not yet logged on, you will be
asked to do so.3 Select Tools Accounts Security Log. These actions display the Security Log contents. This log lists each
secured event (such as logging on or off), the date and time it occurred, the user performing the operation, theworkstation from which the operation was performed, the item acted upon, and whether the operation failed.
4 Use the Security Event Type drop-down list box to view all events of a particular type.5 To reload the security event log and review the most recent entries, click Reload from the Security Event
Log dialog box.6 To print the data selected from the log, click Print Selection from the Security Event Log dialog box.
Depending upon the number of users and the amount of activity on a server configuration, the security event logmay grow rapidly. To keep the log to a reasonable size, you can have the Server delete old entries. First, decidehow long you want to have security events available, then configure the server configuration to purge entries thatare older than this time period. This operation can be performed only when the server is running.
To set the interval for purging the security event log1 Open the Server Administration tool. If you are using Server Administration tool installed with the client, you can
administer remote servers only.2 Select the appropriate server configuration from the list of servers. If you have not yet logged on, you will be
asked to do so.3 Click Tools Accounts System Policy from the menu. The System Policy dialog box appears.4 Select the Security Events tab.5 Select the Purge Security Event Entries Older Than __ Days check box. (Clearing this check box keeps the
entries indefinitely.)6 Type the number of days in the text box. The range is 30 to 1000. The default is 180. The next time the server
configuration starts, entries that exceed the purge limit are deleted.7 Click OK.8 Restart the server configuration for the purge interval to take effect.
194

Related Procedures
Enabling and Purging the Audit LogWorking with the Server LogDisplaying and Customizing StarTeam.LogLocating Initialization FilesOpening the Server Administration Tool
Related Reference
Security Event Types
195
Working with the Server LogYou can view the contents of the server log file at any time, even while the server configuration is running. Only thelast 64K of the log file appears. To see the entire file, use Notepad, WordPad, or another text editor to display it.
To determine the location of a server log file from the Server Administration tool1 Open the Server Administration tool. If you are using Server Administration tool installed with the client, you can
administer remote servers only.2 Select the appropriate server configuration from the list of servers. If you have not yet logged on, you will be
asked to do so.3 Click the Configure Server shortcut or Tools Administration Configure Server. These actions display
the Configure Server dialog box.4 Look at the top of the General tab to find the location of the log file.
To review the contents of a server log file1 Open the Server Administration tool. If you are using Server Administration tool installed with the client, you can
administer remote servers only.2 Select the appropriate server configuration from the list of servers. If you have not yet logged on, you will be
asked to do so.3 Click the Server Log shortcut or Tools Administration Server Log. These actions display the Server Log
contents.The format provides a line number, code, date and time, and message. The code numbers are arbitrarilyassigned and not necessarily in order of severity. They represent the following:
00000001 Message00000002 Warning00000004 Error00000008 Unexpected Condition
4 To display only the errors in the log, select the Errors Only check box.5 To review the most recent entries, click Reload.
On Windows systems, you can copy data from the log window to the Windows clipboard. From the clipboard, youcan paste the data into other applications, such as Microsoft Word or Notepad.
To copy data from the server log1 From the Server Administration tool, click the Accounts bar in the lower left pane and select the Server Log
Shortcut.2 Select the data that you want to copy.3 Press CTRL + C.4 Click OK to exit the dialog.5 Using CTRL + V, paste the information into a text editor or word processing application.6 Click File Print from the menu to print the data.
196
Any users in the System Managers group, a default, will receive email when an error is logged in the server log. Thisgroup is initially empty. To add users to the System Managers group, refer to the link “Setting Up Users” at the bottomof this topic.
Related Procedures
Enabling and Purging the Audit LogWorking with the Security Event LogDisplaying and Customizing StarTeam.LogLocating Initialization FilesOpening the Server Administration ToolSetting Up Users
197
Backing Up InformationThis section contains tasks related to backing up information.
In This SectionBacking up Project DataDescribes the general process of backing up a server configuration.
Restoring Project DataDescribes the general process of restoring a backed up server configuration.
198
Backing up Project DataWhen you create server configurations, the Server creates files and folders that store your configuration and projectinformation. For example, in StarDraw, the sample configuration that ships with the application, the Server placesthe hive (a subfolder of the repository named StarDraw), which contains Archives and Cache subfolders, and theAttachments folder in the Repository. The StarDraw Repository also contains a Database folder that holds SSEdatabase information (that is, the .mdf file). However, in other server configurations, the database files will be in aseparate location.
Although your server configuration repository may differ, the underlying folder structure will be similar. You canchange the location of its folders, if necessary, with the StarTeam Server Configuration dialog or the Hive Managerdialog in the Server Administration tool.
To backup a server configuration:1 Create a backup of the required repository information:
♦ HiveIndex folder
♦ The vault Archives folder
♦ Attachments folder
2 Create a database backup:
♦ For SQL Server databases, full database backups are recommended.
♦ For Oracle databases, RMAN backups are recommended.
3 Create a backup of the starteam-server-configs.xml file.
Note: Be sure to verify your backups periodically. Borland recommends that you restore and test backups of yourproject data on a test system. Doing this helps to ensure that your data is being backed up correctly.
Related Concepts
What to BackupNative-II Vaults and HivesStarTeam BackupsData Storage OverviewOracle Database BackupsSQL Server Database BackupsBackupsStarDraw Sample Server Configuration
Related Procedures
Configuring Data Storage OptionsRestoring Project Data
199
Restoring Project DataBe sure to verify your backups periodically. Borland recommends that you restore and test backups of your projectdata on a test system. Doing this helps to ensure that your data is being backed up correctly.
To restore a server configuration from a backup1 Restore the database.2 Restore the repository information.3 Restore the starteam-server-configs.xml file.4 Start the server configuration.5 Test the server configuration.
You can test the sever configuration by performing all of your regular operations, such as checking-out variouscurrent and historical configurations of your main projects, running your build process, and so on.
Note: If moving the server configuration to a new machine, you will also have to install StarTeam Server, and createan ODBC connection.
Related Concepts
What to BackupNative-II Vaults and HivesStarTeam BackupsData Storage OverviewOracle Database BackupsSQL Server Database BackupsBackupsStarDraw Sample Server ConfigurationMoving Server Configurations Overview
Related Procedures
Configuring Data Storage OptionsBacking up Project Data
200
Tracing Data from Check-out OperationsThe topics in this section describe how to enable the Check-out Trace utility and create *.csv files with this utilityfor a server configuration.
In This SectionEnabling Tracing for Server ConfigurationsThis topic describes how to enable tracing for use with the Check-out Trace utility for server configurations.
Generating .CSV Files About Check-out OperationsThis topic describes how to run the Check-out Trace utility and generate the *.csv file containing data aboutcheck-out operations.
201
Enabling Tracing for Server ConfigurationsWhen you enable tracing for a server configuration, the server saves a trace record for each file that is checked outin a trace file (check-out.cotrc). You then use the trace file as input for the Check-out Trace utility to generatea *.csv file containing information about check-out operations.
To enable tracing for a server configuration1 Open the starteam-server-configs.xml file. You can locate the file under the StarTeam Server root
installation folder.2 Update the following elements with a value of “1” for each server configuration that you wish to enable tracing
on:<option name=”FileAllowCheckoutTrace” value=”1”/><option name=”FileEnableCheckoutTrace” value=”1”/>The first option activates the tracing code. While the second option turns tracing on or off. A value of “1”represents true or on. A value of “0” represents false or off. To enable tracing, both values must be “1”.
3 Save the changes to starteam-server-configs.xml.4 Shut down and restart the server configuration so that it can detect changes from starteam-server-
configs.xml.
When you set both options in starteam-server-configs.xml to “1”, the server configuration createsCheckout.cotrc files in the Trace folder (a subfolder of the repository folder Checkout.cotrc). When the sizeof the current trace file reaches 128 MB, the server saves the current trace file and creates a new trace file. Thename of the older trace file becomes the name plus a time-stamp, similar to the time-stamp naming convention foundin StarTeam server.log files. When you shutdown the server configuration, the server saves the trace file with atime-stamp appended to the filename. When you restart the server configuration, the server creates a new trace file.
Note: To optimize performance, StarTeam does not immediately update trace files. StarTeam buffers theinformation for the trace file in memory and writes it to the trace file during idle time processing.
Related Concepts
Tracing Data from Check-out Operations with the Check-out Trace Utility
Related Procedures
Generating .CSV Files About Check-out Operations
202
Generating .CSV Files About Check-out OperationsBefore you run the utility, you must enable tracing for the server configuration. With tracing enabled, the servergenerates a trace record for each checked out file and saves the information in a trace file (Checkout.cotrc). Theutility uses the trace file as input and outputs a *.csv file containing data about the check-out operations.
The Check-out Trace utility takes one or more check-out trace (*.cotrc) files as input and outputs one *.csv textfile containing check-out trace data as comma-delimited values. The default filename for the .csv file is identical tothe name of the trace file with the extension .csv. For example, when the trace filename is Checkout.cotrc, thenthe csv output filename is Checkout.cotrc.csv.
To run the Check-out Trace utility1 At the command prompt, navigate to the CheckoutTraceDump.exe file in the StarTeam Server root
installation folder.2 The -go option signals the utility to run with default options. You can set many parameters for the utility. For a
list of all of the available options, review the command line operations for the utility at the link referenced at thebottom of this topic.
Note: By default, the server saves the trace files in the Trace folder (a subfolder of the repositoryfolder Checkout.cotrc). You cannot run the utility against the current trace file, but youcan copy the trace file and run the utility against the copy.
Tip: If you want to run the utility from a workstation rather than on the server, you can copyCheckoutTraceDump.exe and OSSup.dll to the alternate location. Be cautious not to move OSSup.dllto the new location because the server configuration also relies on it. Additionally, the utility depends on theMicrosoft .NET Runtime, so it must be available on the alternate workstation.
Related Concepts
Tracing Data from Check-out Operations with the Check-out Trace Utility
Related Procedures
Enabling Tracing for Server Configurations
203
Working with Server ConfigurationsThis section contains tasks related to working with server configurations.
In This SectionCreating Server ConfigurationsDescribes how to create a new server configuration for all database types.
Disabling and Enabling Server ConfigurationsDescribes how to disable and enable a server configuration.
Enabling Advanced View TypesThis topic describes how to enable views of advanced types (Branch All, Float, Branch None, and Non-Derived) for a server configuration.
Exporting Database InformationDescribes how to export database information for a server configuration using the Catalog Export utility.
Locking and Unlocking Server ConfigurationsDescribes how to lock and unlock server configurations using the Server Administration tool.
Logging On to Server Configurations Using the Server Administration toolDescribes how to log on to a server configuration using the Server Administration tool.
Opening the Server Administration ToolDescribes how to open the Server Administration tool.
Purging Deleted Views from Server ConfigurationsDescribes how to purge deleted views from a server configuration when the server is shut down, calledOffline Purge.
Reviewing Database InformationDescribes how to review database information for a server configuration.
Running Server Configurations as a Windows ServiceDescribes how to set up, disable, and troubleshoot a server configuration running as a Windows service.
Splitting Server ConfigurationsDescribes when and how to physically divide a single StarTeam Server configuration into two separate onesthat can be managed and run independently.
Starting and Stopping Online PurgeDescribes how to purge deleted views from a server configuration when the server running, called OnlinePurge.
Starting and Stopping Server ConfigurationsDescribes how to start and stop server configurations.
Verifying File Revisions with Vault VerifyThis topic describes how to run the Vault Verify utility.
204
Creating Server ConfigurationsBefore creating a new server configuration, you need to decide upon a unique name for the configuration. This nameis case insensitive and cannot contain colons (:), back slashes (\), or forward slashes (/), but can contain blanks orapostrophes ( ' ). You must also set up the database to be used with the server configuration. A database can containonly one server configuration; however, other applications can share a database with StarTeam.
This topic contains the following information:
♦ Creating a server configuration using the Server Administration tool
♦ Creating a server configuration from the command line
To create a server configuration1 Open the Server Administration tool.
Note: You must access the Server Administration tool on the computer where the Server isinstalled.
2 Click the New Configuration toolbar button, or choose Server New Configuration from the main menu.The Create a New Configuration wizard opens.
3 To set the General options for the new server configuration, do the following:
1 Type a unique name in the Configuration name text box.2 In the Repository path text box, enter or click Browse for the location in which the Server will create the
server configuration files.3 Select a Database type from the list box. You cannot change the database type once the server
configuration has been created.4 Check or clear Create new StarTeam database and ODBC data source. The wizard selects this option
by default.
4 Select the Default or Custom hive option for the Initial Hive Settings.
Note: If you select the Default, changing the repository path changes the default hive settings.Changing the repository path does not have this effect if you select Custom.
If you select Custom, you can override the default hive settings by modifying any of the following fields:
♦ Name: Unique name for the hive. DefaultHive is the default.
♦ Archive path: Path to the Archives folder for the new hive. The default path is <repository path>\DefaultHive\Archives .
♦ Cache path: Path to the Cache folder for the new hive. The default path is <repository path>\DefaultHive\Cache .
♦ Maximum cache size: Maximum number of megabytes of hard disk space that the Cache can use. Thedefault is 20% of the disk space available when the option is set.
♦ Cache cleanup interval: Seconds between cache cleanup/refresh operations. The default value is 600.The range is 60 (1 minute) to 3153600 (1 year).
♦ Storage limit threshold: Percentage of total disk space allowed for hive. When this percentage has beenreached, StarTeam does not add any more archives to the hive. The default is 95% of total disk space.
205
5 Click Next when the information is complete. The second page of the wizard opens. The information that youmust enter for this page of wizard varies according to the database selected.
Note: The ODBC data source cannot be changed after the server configuration has been created.For Microsoft SQL Server/SQL Server Express databases:
1 If creating a SQL Server Express-based server configuration, the Host name text box defaults to (local)\SSE2005_ST because the SQL Server Express instance on the computer on which StarTeam Server isinstalled was given the name SSE2005_ST. If this is a Microsoft SQL Server database, type or browse forthe names of the computer and the database on your network that should be used.
2 Type the password for the system administrator in the Sys Admin (sa) passwordtext box. If this is a SQLServer Express instance, the initial default system administrator password is StarTeam123 or blank.
3 Click Verify Connection to make sure that you can properly connect to the database.4 To keep the name of the server configuration, the DSN, the database name, and the database login name
the same, all of the ODBC datasource name, New database name, and the New database login nametext boxes default to the name you provided for the server configuration in the first page of the wizard.Change these values if you prefer to have different names.
5 Type and confirm a database password.
For Oracle databases:
1 Type the Oracle net service name in the TNS service name text box.2 Type the database system password in the System password text box.3 Click Verify Connection to make sure that you can properly connect to the database.4 To keep the name of the server configuration, the DSN, and the schema user the same, both the New
ODBC datasource name and the New schema user name text boxes default to the name you providedfor the server configuration in the first page of the wizard. Change these values if you prefer to have differentnames.
5 Type and confirm a password for the schema user name.
6 Click Next. The final page of the wizard, Create Data Files and Transaction Logs opens. Again, the informationthat you can enter for this page of wizard varies according to the database selected.For Microsoft SQL Server/SQL Server Express databases:
1 Review the information in the dialog box.2 If you have fewer than 15 users and expect to store 1GB or less data, the default settings are appropriate
for your use. If you are very familiar with Microsoft SQL Server and SQL Server Express databases, youmay choose to make some changes by first clearing the Use default configuration check box and thenaltering sizes and locations for data files and log files. If you would like some guidelines, see the link“Guidelines for Microsoft SQL Server/SQL Server Express Data Files and Transaction Logs” at the end ofthis topic. To avoid fragmentation, make the data files as large as possible, based on the maximum amountof data expected in the database. Use at least 3 data files and at least 3 transaction log files when creatinga database, because Microsoft SQL Server and SQL Server Express databases use a proportional fillstrategy. This way all the files tend to become full at about the same time.
3 When you are satisfied with your configuration settings, click Finish. A message requests: Please makesure the required disk space (x MB total for both data files and transaction log files) is available on thedatabase host machine.
4 Click OK. After a Please wait message disappears, the Server Administration tool displays, showing yournew server configuration as a child of the Local node.
206
Note: Microsoft limits the size of a SQL Server Express database, by license, to 2048 MB. If yourequire a larger database, you must purchase a license for Microsoft SQL Server.
For Oracle databases:
1 Review the information in the dialog box.2 The tablespace name defaults to the name of your server configuration, but you can change that.3 If you have fewer than 15 users and expect to store 1GB or less of data, the default settings are appropriate
for your use. If you are very familiar with Oracle schema users, you may choose to alter the names, sizes,and locations of the data files. If you would like some guidelines, see the link “Guidelines for Oracle SchemaUser Data Files” at the end of this topic. To avoid fragmentation, make the data files as large as possible,based on the maximum amount of data expected in the database. Use at least three data files when creatinga tablespace because there is a size limit of 2GB per data file, and fewer files can result in slow responsetimes when insert activity is heavy.
4 Click Finish. The Server Administration tool displays, showing your new server configuration as a child ofthe Local node.
7 Select the configuration from the server pane, and click the Start Server toolbar button. The Server theninitializes the database and creates the files and folders for the server configuration.The initialization process may take a few minutes. When the Server finishes this activity, the status icon to theleft of the server configuration name changes from new to running.
In addition to creating the server configuration, StarTeam Server adds information about the new server configurationto your starteam-server-configs.xml file.
After the server configuration has been created, you can modify the default server configuration options, whichenable you to fine-tune server configuration performance.
Note: On a double-byte operating systeim (such as Japanese or Chinese), when a new DSN is createdautomatically using StarTeam Server 2008 with a Microsoft SQL Server 2005 databse, you need to manuallyset the collation squence to Latin1_General_CI_AS.
To create a server configuration from the command line1 Open a command prompt window and navigate to the installation folder for the Server.2 At the command prompt type the following command:
starteamserver -new "ConfigurationName" -r "RepositoryPath" -t DBType -dsn"DataSourceName" -u "DBUserName" -p "DBUserPassword
Option Description/Notes
ConfigurationName A unique server configuration name.
RepositoryPath Specifies the folder and files that the Server creates for this server configuration.
The Server must be able to access this location.
RepositoryPath must not be located in the server installation folder.
If you select a repository path that has been previously used by another serverconfiguration, you will overwrite the repository files for that server configuration. You mustmanually delete or move these files before using the new server configuration.
The starteamserver command puts the log file (Server.locale.Log) at this location. It alsocreates the following objects under the RepositoryPath:
207
■ Server log files: A new server log file is created every time you start the serverconfiguration.
■ Attachments folder: Attachments has child folders that store files attached to specifictypes of items. For example, the Change_Attachments folder stores files attached tochange requests. Never change the names of this folder.
■ HiveIndex folder: This folder stores the hive-index.xml file, which contains the propertiesfor each hive used by the server configuration.
■ DefaultHive folder: If you accepted all the defaults when you created the serverconfiguration, the Server automatically creates the DefaultHive folder as a subfolder inthe RepositoryPath. Whether or not the initial hive is called DefaultHive, you will have atleast one hive for each server configuration. The hive contains two subfolders, generallynamed Archives and Cache. After the server configuration is in use, additional objectswill probably be added under the RepositoryPath.
DBType Specifies the database type used for this server configuration. You can specify thedatabase type only when creating a new server configuration.
Use one of the following values to indicate the database type:
■ 2 = SQL Server Express or Microsoft SQL Server
■ 3 = Oracle
DataSourceName Specifies the database source name (DSN) created for the database. The name mustappear between double quotes (") in the starteamserver command. The DSN mustalready exist.
In releases 5.1 and 5.2, Oracle databases were accessed using the Oracle net servicename that is stored in $ORACLE_HOME/network/admin/tnsnames.ora. This is no longerthe case.
Never create more than one server configuration that uses the same database. The tableinformation for a server configuration will become corrupted if two different serverconfigurations update the same database.
DBUserName Specifies the user name the Server uses to access the database.
DBUserPassword Specifies the password the Server uses to access the database.
3 The Server displays the following message when it finishes executing the starteamserver command:Configuration ConfigurationName created successfully.
The system adds the new server configuration to the starteam-server-configs.xml file.
4 You can start the server configuration by entering the following command:starteamserver -start "ConfigurationName"The first time you start a new server configuration, the Server performs a number of startup tasks, including:
♦ Creating and initializing the database for the server configuration.
♦ Installing the stored procedures for that particular database type.
♦ Creating the repository folders.
This process may take several minutes. When the Server is finished, it displays the following message:
Server ConfigurationName started successfully.
208
Related Concepts
Server Configuration GuidelinesServer Configuration OverviewData Storage Locations
Related Procedures
Opening the Server Administration ToolStarting and Stopping Server ConfigurationsCustomizing Server Configuration Options
Related Reference
Guidelines for Microsoft SQL Server/SQL Server Express Data Files and Transaction LogsGuidelines for Oracle Schema User Data Filesstarteam-server-configs.xmlServer Configuration Status Icons
209
Disabling and Enabling Server ConfigurationsYou can disable or enable a server configuration from the Server Administration tool. Disabling a server configurationenables you to take a server configuration “out of service” and ensure that it is not started by accident. For example,if you migrate a server configuration, you should disable the prior server configuration. After you are sure that thenew server configuration and database are working properly, you can delete the prior server configuration. You canalso reactivate a disabled server configuration.
Note: Only a server configuration that is shut down can be disabled or enabled.
To disable or enable a server configuration1 Open the Server Administration tool from the computer that has the Server installed.2 Select the server configuration that you want to disable or enable, and shut it down by clicking the Shut Down
Server toolbar button, or by choosing Actions Shut Down Server from the main menu.3 Once the server has shut down, click the Disable Server toolbar button, or choose Actions Enable
Server from the main menu. Both the toolbar button and the menu command work as a toggle.
♦ If the server configuration is currently enabled, it becomes disabled.
♦ If the server configuration is currently disabled, it becomes enabled.
Tip: The icon to the left of the server configuration indicates its status.
Related Concepts
Server Configuration GuidelinesServer Configuration Overview
Related Procedures
Working with Server ConfigurationsOpening the Server Administration ToolCustomizing Server Configuration Options
Related Reference
Server Configuration Status Icons
210
Enabling Advanced View TypesBy default, advanced view types are not available for server configurations. However, you can allow users to createviews of advanced types by editing the starteam-server-configs.xml file.
To enable advanced view types1 Open the starteam-server-configs.xml file in an editor. By default this is located in the root installation
folder for StarTeam Server. For example, on a Windows system, you would find this file in the C:\ProgramFiles\Borland\StarTeam Server 2009 folder.
2 For each server configuration that you want to allow advanced view types for, enter the following:
<option name=“DisableAdvancedViews” value=“”/>
If you specify the value as “” , the Show advanced types check box appears in the New View Wizard, andthe Branch All, Float, Branch None, and Non-Derived advanced view types are available in the wizard. If youspecify the value as “1” then the Show advanced types check box does not appear.
Related Procedures
Working with Server Configurations
211
Exporting Database InformationThe Catalog Export utility exports two application tables, Catalog_Tables and Catalog_Fields, into comma-delimited files. This tool is useful for database administrators because Catalog Export translates database tablesand column names into identifiers used by the Server. You can import and view the exported data in any applicationthat supports comma-delimited fields. For example, if you save the file with a .csv extension, it will open in MicrosoftExcel.
If you examine a column of data in the exported field catalog and find that one record has a surprising value (forexample, all other records have a -1 in a column, but this record has a 16-digit number), the record may have beencorrupted. However, Borland does not recommend that you delete any records, especially if you have not backedup the database.
Note: This operation can be performed only if the server configuration is not running.
To run Catalog Export1 Open the Server Administration tool.
Note: You must access the Server Administration tool on the computer where the Server isinstalled.
2 Select the server configuration that you want to modify and shut it down.3 Click the Catalog Export toolbar button or select Actions Catalog Export from the main menu. The Catalog
Export dialog box opens.4 Type. or browse for, the target path and location for the table catalog in the File name for exported table
catalog text box.5 Type, or browse to, the target location and path for the field catalog in the File name for exported field catalog
text box.
Note: Be sure to type the appropriate file extension for the application to which you want to exportthe files. By default, the utility specifies a .csv file.
6 Click OK. The system displays the following message: Catalogs exported successfully.7 Open and view the files in the application in which you exported the files.
Related Procedures
Working with Server Configurations
212
Locking and Unlocking Server ConfigurationsLocking a server configuration enables you to limit access to that configuration while you perform backup proceduresor database maintenance. When a server configuration is locked, only server administration commands areaccepted. For any other command—such as checking out files, the Server sends an exception message stating thatthe server configuration is unavailable.
Note: The server configuration must be running to perform these operations.
To lock a server configuration using the Server Administration tool1 Open the Server Administration tool.
Note: If you are using the Server Administration tool installed with the client, you can administerremote servers only.
2 From the list of servers, select the server configuration that you want to lock.3 Click the Lock Server icon on the toolbar, or choose Actions Lock Server from the main menu. If you are
not already logged on to the server configuration, then you must do so.4 On the resulting dialog, indicate whether you want to:
♦ Lock server. This option allows minimal administrative options, primarily, start, shutdown, lock and unlockoperations. It is usually done for backup operations in environments where server activity is not 24/7.
♦ Lock the server for exclusive use by <user name>. This option, which displays the logon name for theuser, allows a user to lock the server for his or her use only.
5 A dialog box opens indicating that the server configuration is locked. Click OK.
Note: If a locked server configuration is restarted, it will become unlocked.
To unlock a locked server configuration using the Server Administration tool1 Click the Unlock Server icon on the toolbar, or select Actions Unlock Server from the main menu.2 A dialog box opens indicating that the server configuration is unlocked. Click OK.
Related Concepts
Server Configuration GuidelinesServer Configuration Overview
Related Procedures
Working with Server ConfigurationsOpening the Server Administration ToolCustomizing Server Configuration Options
Related Reference
Server Configuration Status Icons
213
Logging On to Server Configurations Using the ServerAdministration toolIf you need to make administrative or account updates to a server configuration, the Server Administration tooldisplays a Log On dialog box.
This topic contains the following information:
♦ Logging on to server configurations.
♦ Logging on as a different user.
To log on to a server configuration in the Server Administration tool1 Open the Server Administration tool. If you are using Server Administration tool installed with the client, you can
administer remote servers only.2 Select the server configuration from the server pane, and choose any of the administrative or account menu
commands, toolbar buttons, or shortcuts. The Log On dialog box opens.3 Type the User name and Password combination.
Tip: Unless it has been changed or deleted by a server administrator, a default username/password, Administrator/Administrator, exists for every server configuration.
4 (Optional for the client-side installed Server Administration tool only) Check the option to Save as defaultcredentials for this server. This saves your server configuration information to the Toolbar Utility.
5 Click OK.
Once logged on, the logged on name of the user displays next to the server configuration name in parentheses. Forexample, in the list of server configurations in the server pane, you might see the following if you were logged on tothe StarDraw server configuration using the default Administrator user name: StarDraw (Administrator).
Sometimes a user has more than one user name. For example, a QA team leader may need to log on as an individualand as the QA team leader. If you are already logged onto a server configuration or are running the applicationToolbar Utility, but wish to log on as a different user, you can do so.
If you are already logged on, the user name you used most recently displays in parentheses after the server namein the New Project Wizard and Open Project Wizard dialogs in the Cross-Platform Client. This information alsodisplays in the Server Administration tool.
On the Toolbar Utility, the user name shown parentheses is the one recognized as your default set of credentials.
Note: The server must be running to perform this operation.
To log on to a server configuration as a different user1 Open the Server Administration tool. If you are using Server Administration tool installed with the client, you can
administer remote servers only.2 Select the server configuration to be accessed.3 Choose Actions Logon As from the main menu. The Log On To dialog box opens.4 Type the alternate user name and password in the appropriate text boxes.
214
5 (Optional for the client-side installed Server Administration tool only) To reset your default credentials for thisserver configuration to the user name and password you just entered, check Save as default credentials forthis server.
6 Click OK.
Related Concepts
Server Configuration GuidelinesServer Configuration Overview
Related Procedures
Working with Server ConfigurationsOpening the Server Administration ToolCustomizing Server Configuration Options
Related Reference
Server Configuration Status Icons
215
Opening the Server Administration ToolBefore you use the Server Administration tool to administer a server configuration, you must have administrativeprivileges for that configuration and the configuration must be running. You can start the Server Administration toolfrom the command prompt or from the Start menu on Windows systems.
The Server Administration utility can be used to manage server configurations running on the computer on which itis installed or multiple computers running the Server. Connection information for server configurations is stored inthe starteam-servers.xml file.
To open the Server Administration tool using the Windows Start Menu1 From the server, select Start Programs Borland StarTeam StarTeam Server xxxx StarTeam
Server.2 If you have installed the Server Administration tool with the Cross-Platform Client, select Start Programs
Borland StarTeam StarTeam Cross-Platform Client xxxx Cross-Platform Client. This is availablewith custom installations only.These actions run the AdminTool.stjava file opening the Server Administration tool. The ServerAdministration tool on the client is similar to that which you run with the Server except that it can be used toadminister remote servers only. Some functions, such as migrating a database, can be performed only from theServer Administration tool which is installed with the Server and only when a server is shut down.
To start the Server Administration tool from the command prompt1 Open a command prompt window.2 Change directories to the Server folder. For example, cd C:\Program Files\Borland\StarTeam Server
xxxx.3 Type the following at the command line:
serveradminThe Server Administration tool opens.
Related Concepts
Server Configuration GuidelinesServer Configuration Overview
Related Procedures
Working with Server ConfigurationsOpening the Server Administration ToolCustomizing Server Configuration Options
Related Reference
Server Configuration Status Icons
216
Purging Deleted Views from Server ConfigurationsThis topic covers how to purge deleted views from a server configuration when the server is shut down. This is calledan Offline Purge. You can use the command line or the Server Administration tool. The Purge toolbar button on theServer Administration tool enables application administrators to remove deleted views from a server configurationdatabase and vault and rebuild the indexes in that database. If the deleted view has items that are active in anotherview, these items are not deleted. For example, if two views share a file and you delete one view, the shared file isnot deleted. Borland recommends that you perform a purge after deleting one or more views from a project. Thepurge operation can take several hours if a large number of records need to be deleted or moved.
You can purge a server configuration from the command line or by using the Server Administration tool. However,it is recommended to use the command line tool to purge. Typically, you place the command in a batch (.bat) fileand schedule the batch file to run at a time when the server configuration will be shut down. Because you cannotrecover a deleted view, it is recommended that you hide the project with access rights for awhile before deleting it.Additionally, when working with large projects and limited down time, it is recommended that you delete one projectand then purge it before deleting the next project.
Note: Be sure to backup the database before using the purge feature. You should also start the server configurationfrom which the view was deleted at least once before using the purge feature. Purge is available for Oracleand Microsoft SQL Server databases. You must have installed the database client application on the samecomputer as the Server for the purge to work properly.
This operation can be performed only if the server configuration is not running.
To purge deleted views using the command line1 Navigate to the installation folder for the Server.
For example, C:\Program Files\Borland\StarTeam Server.
Note: You must run the purge command from the installation folder for the Server.
2 Type: StarTeamPurge <server_configuration_name> at the command prompt.
For example, if you were purging deleted views from the sample StarDraw project, you would enter:StarTeamPurge StarDraw.
To purge deleted views using the Server Administration tool1 Open the Server Administration tool.
Note: You must access the Server Administration tool on the computer where the Server isinstalled.
2 Select the server configuration that you want to modify and shut it down.3 Re-select the server configuration that you want to purge.4 Click the Purge toolbar button on the toolbar at the top, or select Actions Purge from the main menu. When
requested, type your user name and password to log on to the database.
217

Related Concepts
StarDraw Sample Server Configuration
Related Procedures
Working with Server Configurations
218
Reviewing Database InformationThis topic contains the information about how to review database information from the:
♦ <ServerConfigurationName> Properties dialog box
♦ Configure Server dialog box
To review server configuration database information from the<ServerConfigurationName> Properties dialog box1 Open the Server Administration tool. You must be using the Server Administration tool on the same computer
where you have installed StarTeam Server.2 From the list of servers, select the local server configuration that you want to review.3 Click the Configuration Properties toolbar button, or choose Server Configuration Properties from the
main menu. The <ServerConfigurationName> Properties dialog box opens.4 Select the Database Connection Information tab to display the database type, ODBC database name, and
user name.
Tip: If the server configuration is not running, you can edit the ODBC database name, Username, and Password fields and click Verify Connection to check that these settingscorrectly connect to the database.
5 (Only for server configurations using MS SQL Server or SSE databases) Select the Data Files and TransactionLogs tab. You will see the size and location information for data and transaction log files in the database usedby this server configuration.
6 (Only for server configurations using Oracle databases) Select the Tablespace Information tab.7 After you have finished viewing the information, click OK to close the dialog box.
To review server configuration database information from the Configure Server dialog box1 Open the Server Administration tool. If you are using the Server Administration tool installed with the client ,
you will be able to administer remote servers only.2 From the list of servers, select the server configuration that you want to modify. The server must be running. If
you have not yet logged on, you will be asked to do so.3 Click the Configure Server shortcut in the lower left pane, or select Tools Administration Configure
Server from the main menu. The Configure Server dialog box opens.4 Select the Database tab. This tab displays the database type and the DSN name. You cannot modify this
information.
Related Procedures
Opening the Server Administration ToolStarting and Stopping Server ConfigurationsCustomizing Server Configuration Options
Related Reference
Configure Server Dialog Box (Database Tab)
219
Running Server Configurations as a Windows ServiceYou can start a server configuration using the Server Administration tool or from the command prompt using thestarteamserver command. You can also run the server configuration as a Windows service.
This topic contains the following information:
♦ Running server configurations as a Windows service
♦ Disabling the Windows service for a server configuration
♦ How to troubleshoot a Windows service for a server configuration
Note: If a server configuration is newly-created, you must start it once, shut it down, and then set it to runas a Windows service.
To set a server configuration to run as a Windows service1 Open the Server Administration tool, and select the server configuration from the server pane.
Note: You must access the Server Administration tool on the computer where the Server isinstalled.
2 If the server configuration is running, click Shut Down Server on the toolbar, or choose Actions Shut DownServer from the main menu.
Note: A configuration cannot be set to run as a windows service if the server includes a remotehive using a mapped drive.
3 Click Set to Run As Service on the toolbar, or select Actions Set to Run As Service from the main menu.The Log On Service As dialog box opens.
4 Check Local System account to use the local system account, or to use a specific user account, do thefollowing:
1 Clear the Local System account check box.2 Type an account name. The usual format is DomainName\UserName. If the account belongs to a built-in
domain, you can use .\UserName.
5 Click Log On. A dialog box opens indicating that the Window service has been set up.6 Click OK.
The next time you start the server configuration or restart your computer, the server configuration runs as a Windowsservice.
To determine whether a server configuration is running as a Windows service, locate the server name in the leftpanel of the Server Administration tool. Beside the name, an icon indicates whether the server is enabled and/orrunning as a service.
If you want to discontinue running a server configuration as a service, you must first stop the server configuration,and then remove the service using the Server Administration tool.
To stop running a server configuration as a Windows service1 Open the Server Administration tool, and select the server configuration from the server pane.
220
Note: You must access the Server Administration tool on the computer where the Server isinstalled.
2 If the server configuration is running, click Shut Down Server on the toolbar, or choose Actions Shut DownServer from the main menu.
3 Click Set to Run As Service on the toolbar, or select Actions Set to Run As Service from the main menu.The toolbar button and menu command work as a toggle.
The server configuration will no longer run as a service.
If a server configuration that is set as a service fails for any reason or has been shut down, Windows records thatinformation in the Event Viewer Application log.
To troubleshoot a Windows service for a server configuration1 From the computer on which the Server is installed, select Start Settings Control Panel Administrative
Tools Event Viewer from the Windows Start Menu. The Event Viewer opens.2 Click the Application node. The log information displays in the right pane of the Event Viewer.3 Double-click the log entry to view the Event Properties dialog box.
Related Concepts
Server Configuration GuidelinesServer Configuration Overview
Related Procedures
Working with Server ConfigurationsOpening the Server Administration ToolCustomizing Server Configuration OptionsStarting and Stopping Server Configurations
Related Reference
Server Configuration Status Icons
221
Splitting Server ConfigurationsSplitting StarTeam server configurations is not generally recommended. However, it may be appropriate to split aserver configuration if, for example, its size or number of active users has outgrown its hardware or OS platform, orif your company process dictates that data must be moved from production systems to archival storage.
Please contact Borland Technical Support regarding any performance or scalability concerns before making adecision to split your StarTeam server configuration. In many cases, problems can be resolved without splitting theserver configuration.
Before splitting a server configuration, the following implications should be considered.
♦ Irreversibility — Once split server configurations have begun to evolve independently, there is no way tomerge them back together.
♦ Data Traceability — Shares, links, and floating item configurations between the moved and unmoved projectswill be lost.
♦ Administration — Initially, a new server configuration will have the same set of configuration settings, users,and groups as the original configuration. Going forward, you must manage each server configurationindividually, as changes will no longer be propagated between them.
♦ Licensing — Please contact your Borland representative to discuss potential licensing issues that may arisefrom splitting a server configuration. To ensure compliance with the license agreement, you should use licensesmanaged in a license server, preferably FLEXlm, rather than native licenses.
To split a StarTeam Server configuration1 Copy the original server configuration (Server 1) to a separate machine.2 Remove the unwanted StarTeam projects from the original server configuration.3 Remap the SQL Server logins for the new server configuration (Server 2).4 Change the server GUID on the new server configuration ( Server 2).5 Remove the unwanted StarTeam projects from the new server configuration (Server 2).
Note: In this example, we will assume that the original server configuration (Server 1) has three projects namedProject A, Project B, and Project C. The plan is to split the server configuration so that Project A and ProjectB will remain on Server 1, and Project C will reside on the new server configuration (Server 2).
To copy the Server 1 configuration to a separate machine1 Make full database and Vault backups of the Server 1 configuration.2 Restore the database and Vault on a secondary system.
Warning: The database backup must be restored as a different database. Do not reuse the database location, SQLServer database user, or Oracle schema user of the original server configuration.
Once you complete the copy process, you should have two identical copies of your original server configurationrunning on two sets of hardware (server and database).
To remove the unwanted StarTeam projects from the Server 1 configuration1 Make full database and Vault backups of the Server 1 configuration.2 Start the Server 1 configuration.
222
3 Use the Cross-Platform Client to connect to Server 1 and delete Project C.4 Shut down the Server 1 configuration.5 Run Purge on the Server 1 configuration to physically remove the deleted data.6 Use the Vault Verify utility to verify the integrity of the configuration data.7 If necessary, make full database and Vault backups of the Server 1 configuration.8 Restore the database and Vault backups of the Server 1 configuration from step 1 on Server 2.9 If using a different Vault location, configure the files hive-index.xml and starteam-server-
configs.xml to point to the new location.
To remap the SQL Server logins for the Server 2 configuration1 Connect to the database using sa or windows authentication and change the database context to the restored
database.2 Run command sp_change_users_login 'REPORT'. This command will print the orphaned user name.
Note: The following steps assume that the orphaned user is starteam. Use the appropriateorphaned user as reported by the command sp_change_users_login 'REPORT'.
3 Run the following commands in SQL Query Analyzer.
♦ sp_addlogin starteam
♦ EXEC sp_change_users_login 'Update_One', 'starteam', 'starteam'
4 Copy the contents of the script set-owner-to-dbo.sql and run it against the database.
Note: This script can be found in the DBScripts folder under the StarTeam Server installationlocation.
5 As sa user, execute the script by running the command exec change_db_ownership 'starteam'.
Note: Warnings generated from this command are safe to ignore.
6 Go to SQL Enterprise Manager or SQL Server Management Studio for SQL Server 2005 and delete userstarteam from the database. Select Yes to also delete the schema.
Note: This action deletes the database user starteam, not the SQL Server Login starteam.Deleting the schema deletes all the database objects owned by this database user, whichis required in order to delete a database user. This step is essential because, while therecan be many users with dbo privileges, there can be only one database owner. StarTeamServer must be run by the database owner.
7 Run the command sp_changedbowner starteam.8 Log into the database as user starteam (the password is blank by default) and run the SQL statement select
* from s0.9 Ensure that one row is returned.
223
To change the server GUID on the new server configuration ( Server 2)1 In the file starteam-server-configs.xml, update the option ServerGuid with a different GUID value for
the new configuration name. For example: <option name="ServerGuid" value="n"/>, where n is thenew server GUID value.
2 Depending on whether it's a SQL Server or Oracle database, perform one of the following steps to update theServer Settings table with the new server GUID value.
♦ For SQL Server, open a database connection using Microsoft SQL Server Management Studio or StudioExpress, change the database context to the new database, and run the SQL statement update s0 setf3 = n, where n is the new server GUID value.
♦ For Oracle, open a database connection to the new schema using SQL*Worksheet/SQL*Plus and run thefollowing SQL statement, where n is the new server GUID value.
update s0 set f3 = n;commit;
To remove the unwanted StarTeam projects from the new Server configuration (Server 2).1 Configure an ODBC connection for the restored server configuration.2 Start the Server 2 configuration.3 Use the Cross-Platform Client to connect to Server 2 and delete Project A and Project B.4 Shut down the Server 2 configuration.5 Run Purge on the Server 2 configuration to physically remove the deleted data.6 Use the Vault Verify utility to verify the integrity of the configuration data.7 If necessary, make full database and Vault backups of the Server 2 configuration.
Related Concepts
BackupsData Storage Locations
Related Procedures
Backing Up InformationMigrating ServersStarting and Stopping Server ConfigurationsConfiguring Data Storage Options
224
Starting and Stopping Online PurgeThis topic covers how to purge deleted views from a server configuration when the server is running. This is calledan Online Purge. To use Online Purge, you must already have data that has been deleted from one or more views.Online Purge only purges data that has been deleted from a server.
Online Purge is started and stopped from the Server Administration tool. The Online Purge tab in the ServerAdministration tool enables application administrators to remove deleted views from a server configuration databaseand vault and rebuild the indexes in that database. If the deleted view has items that are active in another view,these items are not deleted. For example, if two views share a file and you delete one view, the shared file is notdeleted. It is recommended that you perform a purge after deleting one or more views from a project.
The Online Purge operation takes much less time to complete than an Offline Purge if a large number of recordsneed to be deleted or moved.
Note: Before you start any purge process, be sure to backup the database before using the purge feature sincethe process is irreversible. You should also start the server configuration from which the view was deleted atleast once before using the purge feature. Purge is available for Oracle and Microsoft SQL Server databases.You must have installed the database client application on the same computer as the Server for the purgeto work properly.
This operation can be performed only if the server configuration is running.
To use Online Purge1 Open the Server Administration tool.2 In the Servers list, select the server which contains the data you want to purge.
Note: You must access the Server Administration tool on the computer where the Server isinstalled.
3 Click the Online Purge icon in the Administration section at the bottom left of Server Administration window.This opens the Online Purge tab on the right side of the Server Administration window.
Note: Please note the information at the top of the Online Purge tab.
4 Press the Start button to start the Online Purge.The Start button is only available if the Status is “Ready”. Once the Online Purge starts, the button changes toa Stop button, and the Status changes to “In Progress".
As the Online Purge proceeds, a log of what is being deleted is displayed below the button. You can refreshthe log at any time to see the current status of the purge.
Note: If the Server is stopped for any reason during an Online Purge, you will have to restart theserver, and manually restart the Online Purge. The Purge will start over from the beginning.
5 If you need to pause the Online Purge, press the Stop button.
Note: Stopping the Online Purge pauses the process until you start it again by pressing theStart button. If the server has been running during this time, the Online Purge will continuefrom the place it was stopped.
When the Online Purge is complete, the button returns to a disabled Start button, and the Status is “Completed”.
225

Note: You cannot start another Online Purge on this server until more data is deleted from the server.
Related Concepts
Online PurgeOnline Purge Tool
226
Starting and Stopping Server ConfigurationsYou can start a server configuration using the Server Administration tool or from the command prompt using thestarteamserver command. You can also run the server configuration as a Windows service.
This topic contains the following information:
♦ Starting server configurations using the Server Administration tool and command line
♦ Starting server configurations to override the default configuration options: TCP/IP port and Attachments path
♦ Stopping server configurations using the Server Administration tool and command line
To start a server configuration using the Server Administration tool1 Open the Server Administration tool.
Note: You must access the Server Administration tool on the computer where the Server isinstalled.
2 Select the server configuration from the server pane that you want to start, and do one of the following:
♦ Click Start Server from the toolbar; or
♦ Choose Actions Start Server from the main menu.
Note: Either action starts up the server configuration using its default configuration options. TheServer uses TCP/IP port 49201 as the default starting port for the server configuration.
The server configuration begins is startup operations. The first time you start a new server configuration, the Serverperforms several startup tasks. It creates and initializes the database to be used by the server configuration, installsthe stored procedures for that database type, and creates the repository folders and the hive used by theconfiguration. This process may take several minutes.
Tip: After the server configuration finishes its startup procedure, the status icon to the left of the server configurationname changes to running.
To start the server configuration with a different configuration options1 Open the Server Administration tool, and select the server configuration from the server pane.
Note: You must access the Server Administration tool on the computer where the Server isinstalled. You cannot access this functionality using the Server Administration tool that youcan optionally install with the Cross-Platform Client.
2 Click Start with Override in the toolbar, or choose Actions Start with Override from the main menu.This opens the Start With Override dialog box.
3 Modify the fields as appropriate and click OK.The server configuration information in the starteam-server-configs.xml file is update accordingly. Ifyou are already using the default endpoint (49201) for another server configuration, the first time you start a
227
new configuration you may want to use an override for the endpoint. This action sets the endpoint to the onethat you will want to use in the future.
You can start a server configuration from the command line using the values defined for it in the starteam-server-configs.xml and server configuration database, or you can override these values, as explained below.
Note: You can override certain server configuration values with the -restart option.
To start a server configuration using defined values1 Open a command prompt window, and navigate to the installation folder for the Server.2 Type the following at the command prompt:
starteamserver -start "ConfigurationName"
Note: You can also start a server configuration to override the defined values using: starteamserver -start"ConfigurationName" [options].
Although you do not need to shut down a server configuration to perform a backup, you may need to do so to performother maintenance tasks.
Note: If you have an Enterprise Advantage license and if you are running the Server as a service and the NotificationAgent as a dependent service, you cannot shut down the server configuration unless the Notification Agentservice is shut down first.
To shut down a server configuration using the Server Administration tool1 Open the Server Administration tool and select the server configuration you want to shut down.
Note: If you are using the client, you will be able to administer remote servers only.
2 Do one of the following:
♦ Click Shut Down Server on the toolbar.
♦ Choose Actions Shut Down Server from the main menu.
This opens the Server Administration dialog box which displays a message asking you to confirm that youwant to shut down the server configuration.
3 Click Yes to confirm the shut down.
To shut down a server configuration using the command line1 Open a command prompt window, and navigate to the installation folder for the Server.2 Type the following at the command prompt:
starteamserver -stop "ConfigurationName"
228
Related Concepts
Server Configuration GuidelinesServer Configuration Overview
Related Procedures
Working with Server ConfigurationsOpening the Server Administration ToolCustomizing Server Configuration OptionsRunning Server Configurations as a Windows Service
Related Reference
Server Configuration Status Icons
229

Verifying File Revisions with Vault VerifyThe Vault Verify utility installs by default in the C:\Program Files\Borland\StarTeam Server 2009\VaultVerify folder on a Windows system.
In general, you can run Vault Verify from the command line as follows: Vault Verify [options] "serverconfiguration" .
To run Vault Verify1 Open the Server Administration tool and shut down the server configuration you want to verify.
You can use the specified StarTeam configuration when Vault Verify is running.
Note: The stray check and the repair option are ignored if the server configuration is in use.
2 At the command prompt, navigate to the VaultVerify folder and type the following command:
VaultVerify.bat -check all -cf C:\test -path "C:\Program Files\Borland\StarTeam Server 2009" “My Server Configuration”
On a Windows Server 2008 machine, type the following command instead:
VaultVerify.bat -check all -cf C:\test –dbname <database name> -dbuser <database user> -dbinstance <instance name> -dbhost <host name> “My Server Configuration”
Tip: To view command-line options for the VaultVerify command, navigate to theVaultVerify folder and type VaultVerify.bat - help. Optionally, you can use–?, or –h instead of –help.
Related Concepts
Vault Verify for Verifying File Revisions
230
Customizing Server Configuration OptionsThis section contains tasks related to customizing server configuration options.
In This SectionAssigning and Removing Event HandlersDescribes how to add and remove event handlers to a server configuration.
Changing Server Session OptionsDescribes how to change server session options for a server configuration.
Changing Server Time-out OptionsDescribes how to change time-out options for a server configuration.
Configuring Email Support and Email NotificationThis topic explains how to set up email support and email notifications for StarTeam Server.
Configuring Per-project and Per-Component Email NotificationsExplains how to configure email notifications on a project-specific and component-specific basis.
Creating New Event HandlersDescribes how to create a new event handler for a server configuration.
Designating EndpointsDescribes how to change the default TCP/IP port (endpoint) for a server configuration.
Diagnosing Server ProblemsDescribes how to activate diagnostic tests for a server configuration.
Enabling Directory Service SupportDescribes how to enable directory service support for a server configuration.
Enabling Server Auto-reconnectDescribes how to enable the reconnection time-out for a server configuration.
Monitoring Server StatisticsDescribes how to enable server statistic monitoring for a server configuration.
Reviewing or Modifying Existing Event HandlersDescribes how to review or modify existing event handlers for a server configuration.
Setting an Encryption LevelDescribes how to set the encryption level for a server configuration.
231
Assigning and Removing Event HandlersStarTeamMPX has an event transmitter that must be installed on the same computer as the Server. In addition, theMessage Broker can be installed on the same or another computer, depending on your needs. If you install theMessage Broker, Unicast On-site event displays in the Event Handlers tab of the Configure Server dialog box.
For more information about StarTeamMPX, its XML files, properties, and values, see the StarTeamMPXAdministrator’s Guide. This topic describes how to add and remove event handlers. It does not explain the purposeof the properties, or the range of values that can be assigned to them. The Event Handlers tab provides a simpleinterface for editing the StarTeamMPXTransmitter.XML files.
Note: You can perform this operation only on a running server configuration.
To assign default event handlers for the server and/or clients1 Select the server configuration that you want to modify in the Server Administration tool.
Note: If you are using the client, you will be able to administer remote servers only.
2 Click the Configure Server shortcut in the shortcut pane, or choose Tools Administration ConfigureServer from the main menu.This opens the Configure Server dialog box.
3 Select the Event Handlers tab.4 Select an existing event handler.5 Do one or both of the following:
♦ Click Server Default, to make the selected profile the profile for the server. A server icon displays in frontof the default server profile.
♦ Click Client Default, to make the selected profile the default profile for clients. A green check mark displaysin front of the default client profile. As users create server descriptions on their workstations, the profileselection defaults initially to this profile. Users can change from the default to another existing profile. If aprofile is both the server and client default, you see only the server icon.
6 Click OK to apply your changes.
Note: A file transmitter does not use profiles. It interacts with the event transmitter which uses the Server Defaultprofile.
To remove an event handler1 Click the Event Handlers tab in the Configure Server dialog box.2 Select an existing event handler.3 Click Remove.
Related Concepts
Where to Find Documentation for Each Product
232
Changing Server Session OptionsThe session options for each server configuration are stored in the starteam-server-configs.xml file. Youcan modify a number of these options from the Server Administration tool or the command prompt with thestarteamserver command.
When the server configuration is not running, you can modify the following session options using the ServerAdministration tool. Any changes that you make take effect the next time you start the server configuration. You canalso change certain configuration options by using the Start With Override toolbar button.
♦ Server configuration name
♦ Log file path
♦ Database connection information (DSN name, User name, and Password)
To change the session options for a server configuration1 Open the Server Administration tool and select the server configuration that you want to modify.
Note: You must access the Server Administration tool on the computer where the Server isinstalled.
2 If the server configuration is running, click the Shut Down Server toolbar button, or choose Actions ShutDown Server from the main menu.
3 Click the Configuration Properties toolbar button, or choose Server Configuration Properties from themain menu.The Properties dialog displays for the server configuration.
4 To change the server configuration name, type a new name in the Configuration name text box.5 To change the log file path do the following:
1 Click Change Path.2 Select a new folder for the server log file (Server.locale.Log).3 Click OK.
6 To change the database or schema user used by the server configuration, do the following:
1 Select the Database Connection Information tab.2 Type a new DSN name in the ODBC database name text box.3 Type a new user name and password in the User name and User password text boxes. If the server
configuration uses an Oracle database, these boxes are named Schema user name and Schemapassword.
4 Click Verify Connection to be sure that the DSN name, user name, and password connect to the database.
7 Click OK to close the Properties dialog.8 Restart the server configuration to see the changes take effect.
233

Related Procedures
Starting and Stopping Server ConfigurationsOpening the Server Administration ToolCustomizing Server Configuration Options
234

Changing Server Time-out OptionsThis topic contains the following procedures:
♦ Changing the Logon Sequence Time
♦ Changing the Inactivity Time-out
♦ Changing the Reconnect Time-out
To change the logon sequence time1 Open the Server Administration tool and select the server configuration that you want to modify.
Note: If you are using the client, you will be able to administer remote servers only.
2 Click the Configure Server shortcut in the shortcut pane, or choose Tools Administration ConfigureServer from the main menu.This opens the Configure Server dialog box.
3 Select the General tab.4 Type the number of seconds users have to log on in the Logon sequence timeout text box.
The maximum logon sequence time is five minutes.
5 Click OK to apply your changes.
Note: You can set this option only for a running sever configuration.
To set an inactivity timeout for users1 Open the Server Administration tool and select the server configuration that you want to modify.
Note: If you are using the client, you will be able to administer remote servers only.
2 Click the Configure Server shortcut in the shortcut pane, or choose Tools Administration ConfigureServer from the main menu.This opens the Configure Server dialog box.
3 Select the General tab.4 Check Inactivity timeout.5 Type the number of minutes in the Inactivity timeout text box. 8 Click OK.6 Optionally, if you want to allow named users (that is, users with a fixed license) to remain logged on, even when
they exceed the Inactivity timeout limit, check Exclude named users.7 Click OK to apply your changes.
Note: You can set these options only for a running sever configuration.
To change the reconnect timeout1 Open the Server Administration tool and select the server configuration that you want to modify.
235
Note: If you are using the client, you will be able to administer remote servers only.
2 In the shortcut pane, click the Configure Server shortcut, or choose Tools Administration ConfigureServer from the main menu. The Configure Server dialog opens.
3 Select the General tab.4 Check Reconnect timeout.5 Type the number of minutes in the text box to set the reconnect timeout value. The default time is 30 minutes.6 Click OK to apply your changes.
Related Concepts
Server Time-Out Options
Related Procedures
Opening the Server Administration ToolCustomizing Server Configuration Options
Related Reference
Configure Server Dialog Box Options
236
Configuring Email Support and Email NotificationThis topic describes how to enable email support and email notification messages. When email is enabled for aserver configuration, users can email the properties of an item to another user from within the application. The emailrecipients do not need to be running StarTeam to receive the email. When you enable email notification messages,the application sends email to users if the user is assigned the responsibility for a change request; if any field for arequirement or task for which the user is responsible has changed; or if any field for a topic for which a user is listedas a recipient has changed.
This topic assumes that you have the Server Administration Window open that you have selected and logged ontothe server configuration that you want to change. If you are using the client (available with custom installations only),you can administer remote server configurations only.
The following procedures are covered in this topic:
♦ Enabling email support
♦ Enabling email notifications
To enable email support for a server configuration1 Do one of the following:
♦ Click the Configure Server shortcut under the Administration section in the lower left of the window.
♦ Choose Tools Administration Configure Server from the main menu.
The Configure Server dialog box displays.
2 Select the General tab.3 Check the option to Enable e-mail support.4 Type the host name for your SMTP (Simple Mail Transfer Protocol) server in the SMTP server text box.
You can use an IP address if your site uses only static IP addresses. The application uses SMTP, whichtraditionally operates over TCP using port 25. It is widely used and is the Internet’s standard host-to-host mailtransport protocol.
Note: For Windows environments, the Exchange server is usually the SMTP server.
5 Optionally, type a value in the TCP/IP endpoint text box if your SMTP server uses a port other than the defaultvalue, 25.
6 Click OK.
To enable email notifications for a server configuration1 Enable email support from the General tab in the Configure Server dialog box. Refer to the above procedure
for details.2 Do one of the following:
♦ Click the Configure Server shortcut under the Administration section in the lower left of the window; or
♦ Choose Tools Administration Configure Server from the main menu.
The Configure Server dialog box displays.
237
3 Select the General tab.4 Check the option to Enable e-mail notification.
Related Concepts
Email Support and Customized Email Notifications
Related Procedures
Configuring Per-project and Per-Component Email Notifications
238
Configuring Per-project and Per-Component Email NotificationsThis topic describes how to configure email notifications on a project-specific and component-specific basis usingthe change request component as an example. This topic assumes that you have already enabled email supportand email notification messages. For more information see the link “Configuring Email Support and EmailNotification“ at the end of this topic.
To configure email notifications on a project-specific and component-specific basis1 Navigate to the Notifications folder installed with StarTeam Server. The Notifications folder installs as a subfolder
of your StarTeam Server installation. By default, StarTeam Server is installed in the C:\Program Files\Borland\StarTeam Server 2009 folder.
Tip: Make a copy of the Notifications folder before making any modifications. You can revert tothis copy if you make any undesirable changes.
2 You can edit the component-specific *.xml file for the component (change request, task, topic, requirement)that you want to use for project-specific notifications. Open ChangeRequest.xml and type the following rulesfor a specific project:
<rule-list>
<rule project=”MyProject” event=”new” template=”MyProject-cr-new-txt”/>
<rule project=”MyProject” event=”modified” template=”MyProject-cr-modified-txt”/>
In the above example, “MyProject” corresponds to your specific project name. These entries must go beforethe following default <rule project="*" event="new" template="cr-new-html"/> and <ruleproject="*" event="modified" template="cr-modified-html"/> entries.
3 Enter the template information used for your project under the <template-list> tag. For example,
<template-list> <template-id=”MyProject-cr-new-txt”> <subject>New Change Request #~~ChangeNumber~~</subject> <body content-type>”text/plain” template-file=”.\MyProject-cr-new.txt”/> </template> <template-id=”MyProject-cr-modified-txt”> <subject>Modified Change Request #~~ChangeNumber~~</subject> <body content-type>”text/plain” template-file=”.\MyProject-cr-modified.txt”/> </template>
4 Save the changes and close the template files.5 Copy your new template files and updated ChangeRequest.xml file to the Notifications folder in your
repository.
239

Related Concepts
Email Support and Customized Email Notifications
Related Procedures
Configuring Email Support and Email Notification
240
Creating New Event HandlersThe Event Handlers tab provides a simple interface for editing the StarTeamMPXTransmitter.XML files.
Note: You can perform this operation only on a running server configuration.
To create new event handlers1 Open the Server Administration tool and select the server configuration that you want to modify.
Note: If you are using the client, you will be able to administer remote servers only.
2 Click the Configure Server shortcut in the shortcut pane, or choose Tools Administration ConfigureServer from the main menu.This opens the Configure Server dialog box.
3 Select the Event Handlers tab.4 Select an existing event handler.5 To create a new event handler from scratch:
1 Click Add to open an empty Event Handler Profile Properties dialog box.2 Type a name and description in the appropriate text boxes.3 Click Add to display an empty Event Handler Property dialog box.4 Type the property name and its value in the text boxes.5 Repeat until you have added all the properties you need.
6 To create a new event handler from an existing one:
1 Select an existing event handler that is very similar in its properties to the new handler that you need.2 Click Copy. The Event Handler Profile Properties dialog box opens displaying the properties for the
selected event handler.3 Change the name and description in the appropriate text boxes.4 Select and modify other properties as appropriate.
7 When you are finished, click OK.
Related Concepts
Where to Find Documentation for Each Product
241
Designating EndpointsThe default TCP/IP port (endpoint) is 49201, but you can specify a different port for a server configuration. If youhave more than one server configuration running on the same computer, each server configuration must use a uniqueendpoint. For example, if Server Configuration 1 uses the endpoint 49201, Server Configuration 2 must use adifferent endpoint. If you attempt to run server configurations that have the same endpoint and computer name atthe same time, only the first server configuration you select will start successfully. The remaining server configurationwill appear to start, but in fact is ignored by the Server.
Note: This operation can be performed only on running server configurations. The changes take effect once yourestart the server configuration.
To designate an endpoint1 Open the Server Administration tool and select the server configuration that you want to modify.
Note: If you are using the client, you will be able to administer remote servers only.
2 Click the Configure Server shortcut in the shortcut pane, or choose Tools Administration ConfigureServer from the main menu.This opens the Configure Server dialog box.
3 Select the Protocol tab.4 Type a pot number in the TCP/IP (Sockets) text box to activate a different port.
The range for port numbers is 1023 through 65535.
5 Optionally, click Default if you wish to return to the default endpoint setting (49201).6 Click OK to apply your changes.
Note: You must restart the server configuration for this setting to take effect.
Related Procedures
Customizing Server Configuration Options
Related Reference
Configure Server Dialog Box Options
242
Diagnosing Server ProblemsTo reduce the amount of time spent diagnosing problems, the application provides tracing and debugging tools forthe server. It can create either, or both, trace command files and diagnostic (.dmp) files. By default, both of theseoptions are turned off. If you encounter a problem, you can simply turn them on and create files that you can reviewor discuss with a Borland Technical Support representative.
Note: This operation can be performed only when the server configuration is running.
To turn on the options used for server configuration diagnostics1 Open the Server Administration tool and select the server configuration that you want to modify.
Note: If you are using the client, you will be able to administer remote servers only.
2 Click the Configure Server shortcut in the shortcut pane, or choose Tools Administration ConfigureServer from the main menu.This opens the Configure Server dialog box.
3 Select the Diagnostics tab.4 To create Server.trc files:
♦ Check Trace operations that take at least __ milliseconds .
♦ If you do not want to use the default milliseconds value, type a different number.
By default, this option is not enabled.
5 To create diagnostic .dmp files, check either or both of the following options:
♦ Unexpected conditions (server log entries with code #8)
♦ Errors (server log entries with code #4).
By default, these options are not enabled.
6 Click OK to apply your changes.
Note: Other diagnostic file types should be specified and generated at the direction of Borland technical personnel.
Related Procedures
Customizing Server Configuration Options
Related Reference
Configure Server Dialog Box OptionsTroubleshooting Server Configuration Problems
243
Enabling Directory Service SupportStarTeam allows password verification with Microsoft Active Directory. Active Directory service is included withMicrosoft Windows Server 2003.
To enable directory service support1 Open the Server Administration tool and select the server configuration that you want to modify.
Note: If you are using the client, you will be able to administer remote servers only.
2 Click the Configure Server shortcut in the shortcut pane, or choose Tools Administration ConfigureServer from the main menu.This opens the Configure Server dialog box.
3 Select the Directory Service tab.4 Check Enable directory service. By default this option is not selected.5 Type the Host name and a secure (SSL) or non-secure Port number for the directory server. By default the
Server Administration tool specifies port 636. You must specify both values to enable directory service support.6 You can optionally check the option to Use a secure port. This is the recommended default setting.7 Click OK. The system displays a message instructing you to reboot the server. You must do this to enable
directory service.
Note: Remember that a user cannot be authenticated by the directory server unless the Validate through directoryservice option is selected on the Logon tab of the New User Properties or User Properties dialog boxesand a Distinguished name is entered for that user.
Related Concepts
User and Group Configuration Overview
Related Procedures
Setting Up UsersCustomizing Server Configuration Options
Related Reference
Configure Server Dialog Box Options
244
Enabling Server Auto-reconnectIf a client loses its network connection, users are disconnected from the Server. The reconnect time-out optiondetermines the amount of time the client has to reestablish the connection. The client attempts to reconnect only ifthe user is trying to send a command to the server. A reestablished connection contains the full context of the lostconnection. If the client successfully reestablishes its connection to the server within the window of time set in theReconnect timeout option, users can continue working in the application. They do not have to close their projects,log in again, and reestablish their view settings.
Note: You can change the reconnect time-out for running server configurations. It does not work when the serverhas been restarted.
When a server must be restarted, the client cannot automatically reconnect to the server.Also, if you enabled the Reconnect timeout and the Inactivity timeout options and theInactivity timeout time is shorter, the user may be logged off before the client canreestablish the connection.
To change the reconnect timeout1 Open the Server Administration tool and select the server configuration that you want to modify.
Note: If you are using the client, you will be able to administer remote servers only.
2 Click the Configure Server shortcut in the shortcut pane, or choose Tools Administration ConfigureServer from the main menu.This opens the Configure Server dialog box.
3 Select the General tab.4 Check Reconnect timeout.5 Type the number of minutes in the text box to set the Reconnect timeout value. The default time is 30 minutes.6 Click OK to apply your changes.
Related Procedures
Customizing Server Configuration OptionsChanging Server Time-out Options
Related Reference
Configure Server Dialog Box Options
245
Monitoring Server StatisticsThe StarTeam Server provides an HTML report to monitor server statistics. This report tracks memory usage,currently executed commands, locking statistics, and so on. By default reports are saved in the Diagnostics\ServerStatisticsMonitoring StarTeam Server installation folder.
To enable monitoring of server statistics1 Open the Server Administration tool and select the server configuration that you want to modify.
Note: If you are using the client, you will be able to administer remote servers only.
2 Click the Configure Server shortcut in the shortcut pane, or choose Tools Administration ConfigureServer from the main menu.This opens the Configure Server dialog box.
3 Select the Diagnostics tab.4 Check Enable Statistics Monitoring. Record every __ minutes, and specify the time interval to record the
statistics.By default, this option is not enabled.
5 Click OK to apply your changes.6 Choose Actions Statistics Monitoring from the main menu. An HTML report opens in your Web browser
containing server statistics.
Note: Other diagnostic file types available on the Diagnostics tab should be specified and generated at the directionof Borland technical personnel.
Related Procedures
Customizing Server Configuration Options
Related Reference
Configure Server Dialog Box Options
246
Reviewing or Modifying Existing Event HandlersFor more information about StarTeamMPX, its XML files, properties, and values, see the StarTeamMPXAdministrator’s Guide. This topic describes how to review or modify existing event handlers. It does not explain thepurpose of the properties, or the range of values that can be assigned to them. The Event Handlers tab providesa simple interface for editing the StarTeamMPXTransmitter.XML files.
Note: You can perform this operation only on a running server configuration.
To review or modify an existing event handler1 Open the Server Administration tool and select the server configuration that you want to modify.
Note: If you are using the client, you will be able to administer remote servers only.
2 Click the Configure Server shortcut in the shortcut pane, or choose Tools Administration ConfigureServer from the main menu.This opens the Configure Server dialog box.
3 Select the Event Handlers tab.4 Select an existing event handler.5 Click Modify.
This opens the Event Handler Profile Properties dialog box which allows you to review the property settings,change the settings and add or remove properties.
6 To change a setting:
1 Select a setting from the Profile Properties list box.2 Click Modify. The Event Handler Property dialog box opens.3 Change the value.4 Click OK to apply your changes and close the Event Handler Property dialog box.
7 To add a property:
1 Click Add. An empty Event Handler Property dialog box opens.2 Type a property name and value in the appropriate check boxes, and click OK.
8 To remove a property:
1 Select a setting from the Profile Properties list box.2 Click Remove. Be aware that you cannot delete a profile that is currently used as the default profile.
9 Click OK when you are finished reviewing and/or making modifications.
Related Concepts
Where to Find Documentation for Each Product
247

Setting an Encryption LevelEncryption protects files and other project information from being read by unauthorized parties over unsecurednetwork lines—such as the Internet. For TCP/IP connections, you can set a minimum level of encryption for a serverconfiguration for IP addresses that access that server configuration. You can set different encryption levels for anIP address, ranges of IP addresses, or all IP addresses. This topic explains how to do both.
Clients can set the encryption level on a per-workstation basis. Users must use at least the minimum level ofencryption set for underlying server configuration.
Note: This operation can be performed only when the server configuration is running.
To set an encryption level for transferred data, regardless of the IP address1 Open the Server Administration tool and select the server configuration that you want to modify.
Note: If you are using the client, you will be able to administer remote servers only.
2 Click the Configure Server shortcut in the shortcut pane, or choose Tools Administration ConfigureServer from the main menu.This opens the Configure Server dialog box.
3 Select the Protocol tab.4 Select Default in the TCP/IP encryption levels list box.5 Click Modify.
This opens the Set Encryption Type dialog box.
6 Select the type of encryption you want to use with the server configuration for IP addresses not specified in thislist.
7 Click OK to apply your changes and return to the Protocol tab.8 Click OK.
To set a different encryption level for a specific address or range of addresses1 Click the Protocol tab of the Configure Server dialog box and click Add. This opens the Set Encryption Type
dialog box.2 Type the starting IP address in the Starting IP boxes.3 Type the ending IP address in the Ending IP boxes.4 Select the type of encryption to be used with the server configuration for these addresses.5 Click OK to apply your changes and return to the Protocol tab.6 Click OK.
Related Procedures
Customizing Server Configuration Options
Related Reference
Configure Server Dialog Box Options
248
Configuring Data Storage OptionsThis section contains tasks related to configuring data storage options.
In This SectionCreating New HivesDescribes how to create a new hive.
Customizing the Archives PathDescribes how to modify the path of the Archives folder for a hive.
Verifying File Revisions with Vault VerifyThis topic describes how to run the Vault Verify utility.
Viewing and Customizing Hive PropertiesDescribes how to view and change properties for a hive.
249
Creating New HivesYou can use the Hive Manager dialog for creating new hives to increase the amount of available space, or for viewingand updating the properties of an existing hive.
Note: If accessing a remote server configuration or if a local server configuration has been added as a remoteserver, you can create new hives while that server configuration is running. If accessing a local serverconfiguration locally, you must first shut down the server configuration before creating a new hive.
To use the Hive Manager to create a new hive1 Open the Server Administration tool and select the server configuration from the Server Pane.
If you are not logged on, the Server Administration tool requires you to do so before continuing.
Note: If accessing a local server configuration locally, you must shut down the serverconfiguration before proceeding to the next step.
2 Do one of the following:
♦ Click the Hive Manager shortcut button in the shortcut pane.
♦ Select Tools Administration Hive Manager from the main menu.
The Hive Manager dialog opens.
3 Click New in the Hive Manager dialog box.This opens the New Hive dialog box.
Note: The location of the hive-index.html file, which contains the properties for each hiveused by the server configuration, displays at the top of the dialog.
4 Type information about the new hive in the following fields:
♦ Name: Unique name for the hive. DefaultHive is the default.
♦ Archive path: Path to the Archives folder for the new hive. The default path is <repository path>\DefaultHive\Archives .
♦ Cache path: Path to the Cache folder for the new hive. The default path is <repository path>\DefaultHive\Cache .
♦ Maximum cache size: Maximum number of megabytes of hard disk space that the Cache can use. Thedefault is 20% of the disk space available. In the Server Administration tool, you can calculate the correctdefault maximum size for the cache. However, if you are using the Server Administration tool and it is notrunning on the same computer as the Server, you cannot calculate the maximum size. In this situation,type 100MB, as a default size.
♦ Cache cleanup interval: Seconds between cache cleanup/refresh operations. The default value is 600.The range is 60 (1 minute) to 3153600 (1 year).
♦ Storage limit threshold: Percentage of total disk space allowed for hive. When this percentage has beenreached, StarTeam does not add any more archives to the hive. The default is 95% of total disk space.
Tip: You can use UNC paths for the Archives and Cache paths.
250
5 Select or clear the option to Allow new archives. The default is selected. If no other hives exist for the serverconfiguration, this check box must be selected.
Note: If you are adding a hive because the original hive was low on space, you should also usethe Hive Manager dialog to display the properties of that hive and clear the Allow newarchives check box. This action allows the original hive to remain a check-out location,but keeps it from acquiring any new files. Files that are added go to the new hive.
6 Fill the Root Cache Agent archive path text box if you are using Cache Agent, and the Root Cache Agent isnot on the same computer as the Server. Provide the path to the cache from the point of view of the CacheAgent.For example, suppose you create a new hive whose archive path is C:\ProdServer\Hives\NewHive\Archives, but the Root Cache Agent runs on a computer that has H:\ mapped to C:\ProdServer\Hiveson the StarTeam Server computer. The Root Cache Agent would see the new hive archive path as H:\NewHive\Archives, so in this situation, you would type H:\NewHive\Archives in the Root Cache Agent archivepath text box.
7 Click OK to confirm your choices. This action returns you to the Hive Manager dialog.8 Click OK to return to the main window of the Server Administration tool.
Note: If accessing a local server configuration locally, you can now restart the serverconfiguration.
Related Concepts
Data Storage Overview
Related Procedures
Customizing the Archives PathViewing and Customizing Hive Properties
251
Customizing the Archives PathChanging the Archives path for a hive is generally done because of a serious problem, such as a drive failure. Itmust also be done with caution, or the results can be unexpected.
Note: You must restart the server configuration for the new Archives path to take effect. The Server Administrationtool saves the new path to the hive-index.xml file immediately; however, the changes take effect onlyafter you restart the server configuration.
Note: If accessing a remote server configuration or if a local server configuration has been added as a remoteserver, you can update the Archives path while that server configuration is running. If accessing a local serverconfiguration locally, you must first shut down the server configuration before updating the Archives path.
To change the Archives path for a server configuration that is shut down1 Open the Server Administration tool and shut down the server configuration for which you want to modify the
Archives path.2 Copy the Archives folder to its new location.3 Open the Hive Manager dialog box in the Server Administration tool by doing one of the following:
♦ Click the Hive Manager shortcut button in the shortcut pane,
♦ Select Tools Administration Hive Manager from the main menu.
4 Update the Archive path field pointing to your new Archives path location.5 Click OK to confirm your choices. This action returns you to the Hive Manager dialog.6 Click OK to return to the main window of the Server Administration tool.7 Restart your server configuration.
Note: If you already have more than one hive for your server configuration, and you cannot quickly move theArchives folder to its new location, then you can disable any new archives from being added to the problematicArchives path by clearing the option to Allow new archives in the Hive Properties dialog. With this optioncleared, StarTeam does not add any new archives to the designated Archives folder for the specified hive.
To change the Archives path for a server configuration that is running1 Open the Server Administration tool, and select the running server configuration containing the Archives path
that you wish to update.
Note: This must be a remote server configuration or a local server configuration that has beenadded as a remote server. You cannot access hive properties for local serverconfigurations running locally.
2 Open the Hive Manager dialog box in the Server Administration toolby doing one of the following:
♦ Click the Hive Manager shortcut button in the shortcut pane.
♦ Select Tools Administration Hive Manager from the main menu.
3 Select the applicable hive in the Hive Manager dialog box, and click Properties.This opens the Hive Properties dialog box.
252
4 Clear the Allow new archives check box in the Hive Properties dialog if at least one other hive exists for theserver configuration.The files that are added or checked in will be sent to the other hive.
5 Restart the server configuration.6 At an appropriate time, do the following:
1 Shut down the server configuration.2 Copy the archive files to their new location.3 Change the Archive path field in the Hive Properties dialog to the new location, and check the option to
Allow new archives.4 Restart the server configuration.
Related Concepts
Data Storage Overview
Related Procedures
Creating New HivesViewing and Customizing Hive Properties
253
Verifying File Revisions with Vault VerifyThe Vault Verify utility installs by default in the C:\Program Files\Borland\StarTeam Server 2009\VaultVerify folder on a Windows system.
In general, you can run Vault Verify from the command line as follows: Vault Verify [options] "serverconfiguration" .
To run Vault Verify1 Open the Server Administration tool and shut down the server configuration you want to verify.
You can use the specified StarTeam configuration when Vault Verify is running.
Note: The stray check and the repair option are ignored if the server configuration is in use.
2 At the command prompt, navigate to the VaultVerify folder and type the following command:
VaultVerify.bat -check all -cf C:\test -path "C:\Program Files\Borland\StarTeam Server 2009" “My Server Configuration”
On a Windows Server 2008 machine, type the following command instead:
VaultVerify.bat -check all -cf C:\test –dbname <database name> -dbuser <database user> -dbinstance <instance name> -dbhost <host name> “My Server Configuration”
Tip: To view command-line options for the VaultVerify command, navigate to theVaultVerify folder and type VaultVerify.bat - help. Optionally, you can use–?, or –h instead of –help.
Related Concepts
Vault Verify for Verifying File Revisions
254
Viewing and Customizing Hive PropertiesSometimes you may want to view the properties for a specific hive or change its settings. For example, you maywant to move its Archives or Cache folders to an alternate location. In that situation, you must use the Hive Managerdialog to display the properties for the hive, and then change them.
Note: If accessing a remote server configuration or if a local server configuration has been added as a remoteserver, you can view and update hive properties while that server configuration is running. If accessing alocal server configuration locally, you must first shut down the server configuration before viewing or updatinghive properties.
To view hive properties and change their settings1 Open the Server Administration tool and select the server configuration from the Server Pane.
If you are not logged on, the Server Administration tool requires you to do so before continuing.
Note: If accessing a local server configuration locally, you must shut down the serverconfiguration before proceeding to the next step.
2 Do one of the following:
♦ Click the Hive Manager shortcut button in the shortcut pane.
♦ Select Tools Administration Hive Manager from the main menu.
The Hive Manager dialog opens.
3 Select the applicable hive in the Hive Manager dialog, and click Properties. The Hive Properties dialog opens.4 Review and, if desired, change the information in this dialog.
Tip: With the exception of the Name field, you can edit all of the fields in the Hive Propertiesdialog. For the default and possible settings for these fields, refer to the link “Creating NewHives” at the bottom of this topic.
5 Click OK to confirm your choices when satisfied with your changes.This action returns you to the Hive Manager dialog box.
6 Click OK to return to the main window of the Server Administration tool.
Note: If accessing a local server configuration locally, you can now restart the serverconfiguration.
Related Concepts
Data Storage Overview
Related Procedures
Creating New HivesCustomizing the Archives Path
255
ReferenceThis section contains reference information.
In This SectionAdministration and ConfigurationThis section contains reference topics related to administration and configuration.
Access Rights and PrivilegesThis section contains reference topics related to access rights and privileges.
256
Administration and ConfigurationThis section contains reference topics related to administration and configuration.
In This SectionProject StructureIllustrates a project structure on the server.
Configure Server Dialog Box OptionsThis section contains Configure Server dialog box reference topics.
Guidelines for Data Files and Transaction LogsThis section contains reference topics for the size and number of data files and logs for a server configuration.
Initialization File ReferenceThis section contains reference topics related to initialization files.
Server Log File ReferenceThis section contains reference topics related to server log files.
Server Configuration Status IconsDescribes the status icons for server configurations.
Troubleshooting Server Configuration ProblemsLists the trace and dump files available when running diagnostics on a server configuration.
257
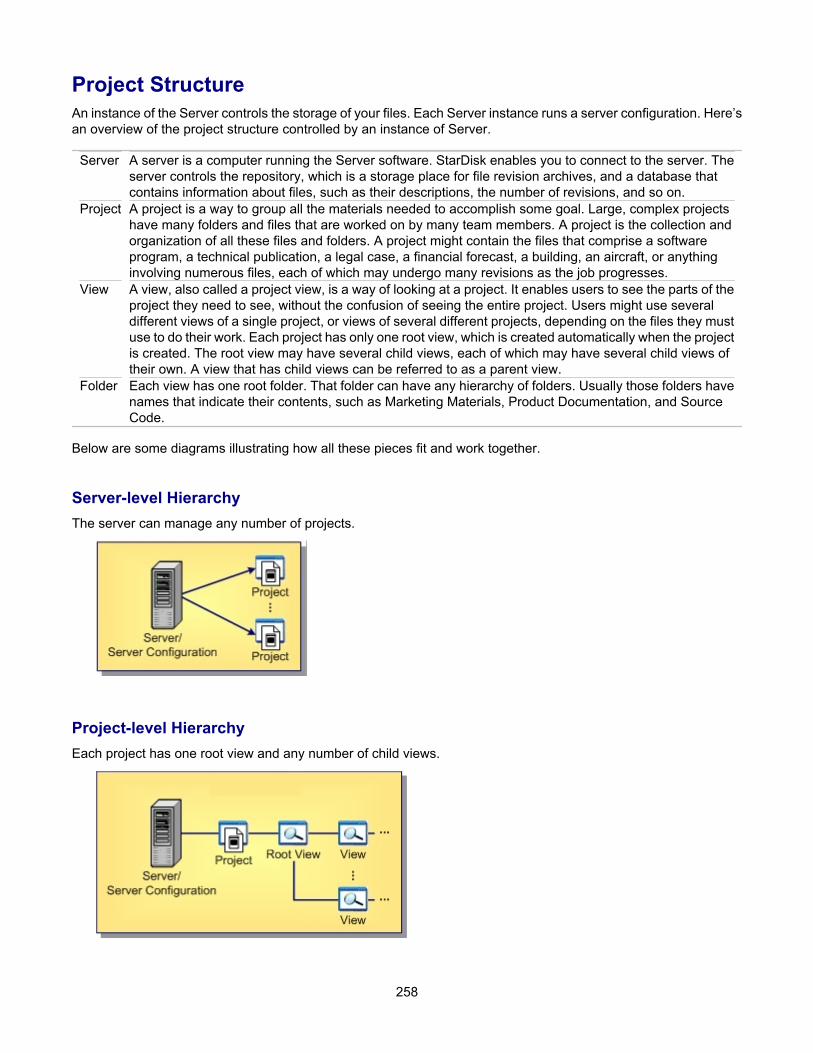
Project StructureAn instance of the Server controls the storage of your files. Each Server instance runs a server configuration. Here’san overview of the project structure controlled by an instance of Server.
Server A server is a computer running the Server software. StarDisk enables you to connect to the server. Theserver controls the repository, which is a storage place for file revision archives, and a database thatcontains information about files, such as their descriptions, the number of revisions, and so on.
Project A project is a way to group all the materials needed to accomplish some goal. Large, complex projectshave many folders and files that are worked on by many team members. A project is the collection andorganization of all these files and folders. A project might contain the files that comprise a softwareprogram, a technical publication, a legal case, a financial forecast, a building, an aircraft, or anythinginvolving numerous files, each of which may undergo many revisions as the job progresses.
View A view, also called a project view, is a way of looking at a project. It enables users to see the parts of theproject they need to see, without the confusion of seeing the entire project. Users might use severaldifferent views of a single project, or views of several different projects, depending on the files they mustuse to do their work. Each project has only one root view, which is created automatically when the projectis created. The root view may have several child views, each of which may have several child views oftheir own. A view that has child views can be referred to as a parent view.
Folder Each view has one root folder. That folder can have any hierarchy of folders. Usually those folders havenames that indicate their contents, such as Marketing Materials, Product Documentation, and SourceCode.
Below are some diagrams illustrating how all these pieces fit and work together.
Server-level HierarchyThe server can manage any number of projects.
Project-level HierarchyEach project has one root view and any number of child views.
258
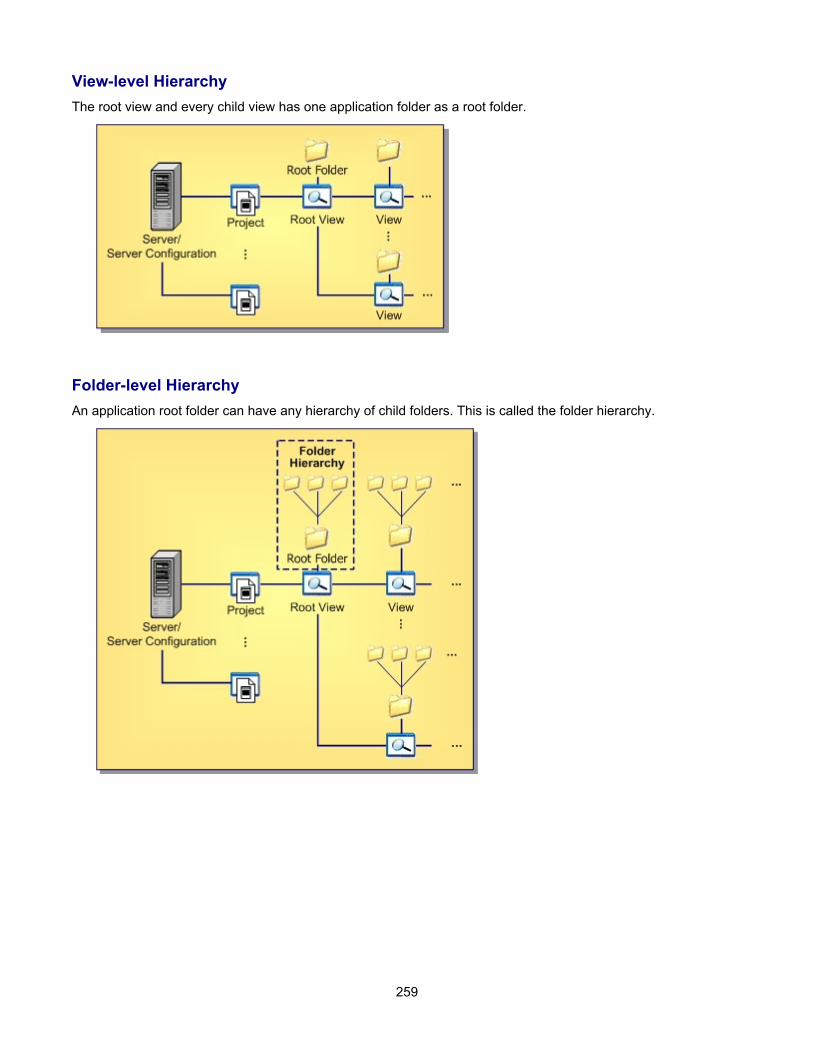
View-level HierarchyThe root view and every child view has one application folder as a root folder.
Folder-level HierarchyAn application root folder can have any hierarchy of child folders. This is called the folder hierarchy.
259
Configure Server Dialog Box OptionsThis section contains Configure Server dialog box reference topics.
In This SectionConfigure Server Dialog Box (General Tab)Describes the options provided in the General tab of the Configure Server dialog box.
Configure Server Dialog Box (Audits Tab)Describes the options provided in the Audits tab of the Configure Server dialog box.
Configure Server Dialog Box (Database Tab)Describes the options provided in the Database tab of the Configure Server dialog box.
Configure Server Dialog Box (Protocol Tab)Describes the options provided in the Protocol tab of the Configure Server dialog box.
Configure Server Dialog Box (Event Handlers Tab)Describes the options provided in the Event Handlers tab of the Configure Server dialog box.
Configure Server Dialog Box (Directory Service Tab)Describes the options provided in the Directory Service tab of the Configure Server dialog box.
Configure Server Dialog Box (Diagnostics Tab)Describes the options provided in the Diagnostics tab of the Configure Server dialog box.
260
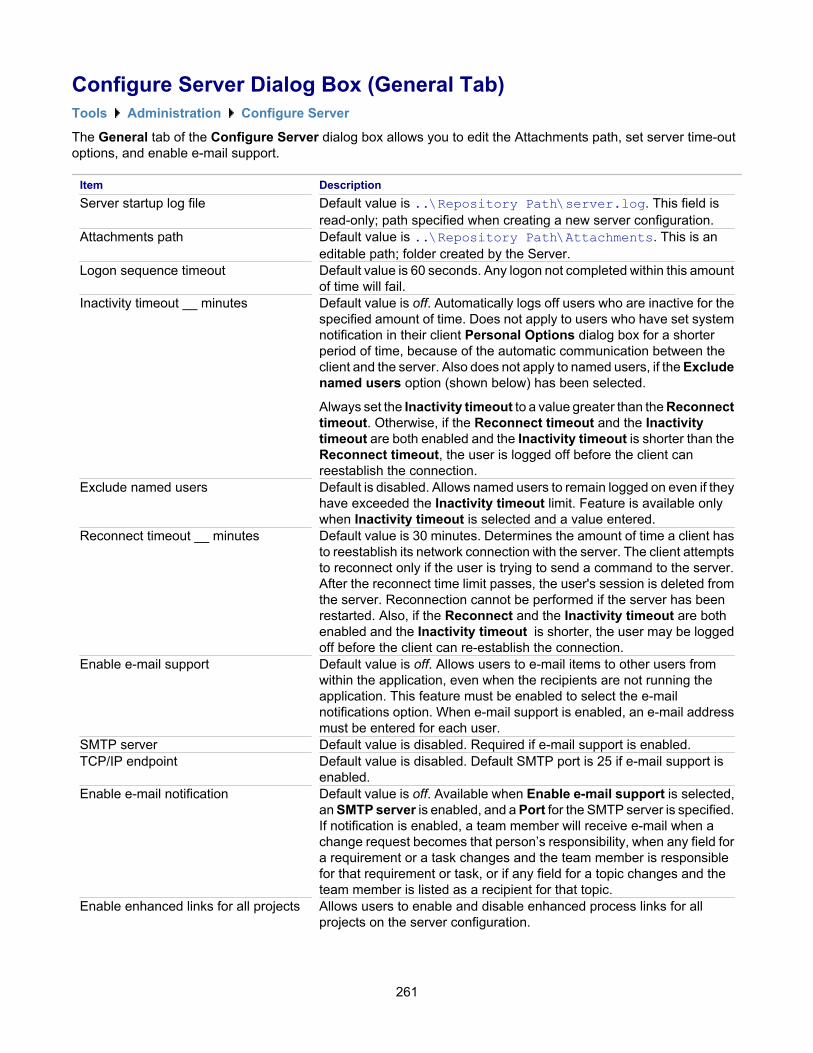
Configure Server Dialog Box (General Tab)Tools Administration Configure Server
The General tab of the Configure Server dialog box allows you to edit the Attachments path, set server time-outoptions, and enable e-mail support.
Item DescriptionServer startup log file Default value is ..\Repository Path\server.log. This field is
read-only; path specified when creating a new server configuration.Attachments path Default value is ..\Repository Path\Attachments. This is an
editable path; folder created by the Server.Logon sequence timeout Default value is 60 seconds. Any logon not completed within this amount
of time will fail.Inactivity timeout __ minutes Default value is off. Automatically logs off users who are inactive for the
specified amount of time. Does not apply to users who have set systemnotification in their client Personal Options dialog box for a shorterperiod of time, because of the automatic communication between theclient and the server. Also does not apply to named users, if the Excludenamed users option (shown below) has been selected.
Always set the Inactivity timeout to a value greater than the Reconnecttimeout. Otherwise, if the Reconnect timeout and the Inactivitytimeout are both enabled and the Inactivity timeout is shorter than theReconnect timeout, the user is logged off before the client canreestablish the connection.
Exclude named users Default is disabled. Allows named users to remain logged on even if theyhave exceeded the Inactivity timeout limit. Feature is available onlywhen Inactivity timeout is selected and a value entered.
Reconnect timeout __ minutes Default value is 30 minutes. Determines the amount of time a client hasto reestablish its network connection with the server. The client attemptsto reconnect only if the user is trying to send a command to the server.After the reconnect time limit passes, the user's session is deleted fromthe server. Reconnection cannot be performed if the server has beenrestarted. Also, if the Reconnect and the Inactivity timeout are bothenabled and the Inactivity timeout is shorter, the user may be loggedoff before the client can re-establish the connection.
Enable e-mail support Default value is off. Allows users to e-mail items to other users fromwithin the application, even when the recipients are not running theapplication. This feature must be enabled to select the e-mailnotifications option. When e-mail support is enabled, an e-mail addressmust be entered for each user.
SMTP server Default value is disabled. Required if e-mail support is enabled.TCP/IP endpoint Default value is disabled. Default SMTP port is 25 if e-mail support is
enabled.Enable e-mail notification Default value is off. Available when Enable e-mail support is selected,
an SMTP server is enabled, and a Port for the SMTP server is specified.If notification is enabled, a team member will receive e-mail when achange request becomes that person’s responsibility, when any field fora requirement or a task changes and the team member is responsiblefor that requirement or task, or if any field for a topic changes and theteam member is listed as a recipient for that topic.
Enable enhanced links for all projects Allows users to enable and disable enhanced process links for allprojects on the server configuration.
261
Enable enhanced links for new projects Allows users to enable and disable enhanced process links for newprojects created on the server configuration.
Note that if you have server configurations created with older versionsof StarTeam Server (prior to StarTeam Server 2008), this option is notavailable.
Related Procedures
Enabling Server Auto-reconnectConfiguring Email Support and Email NotificationCustomizing Server Configuration Options
Related Reference
Configure Server Dialog Box Options
262
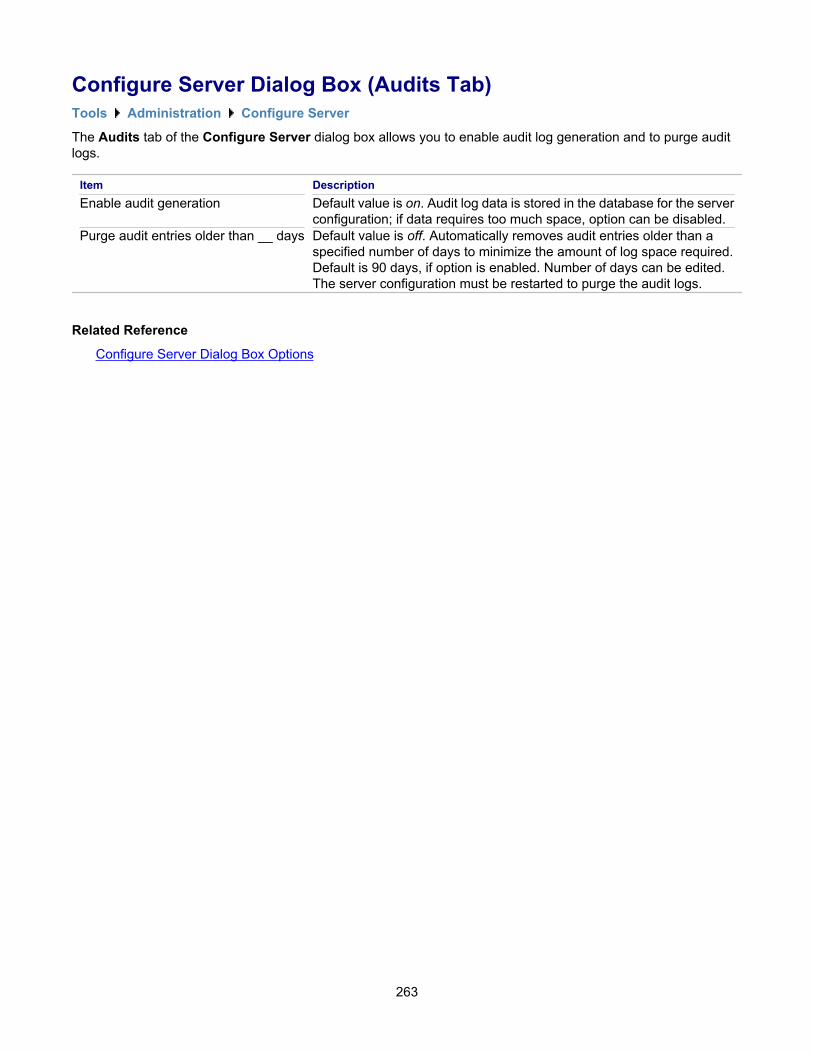
Configure Server Dialog Box (Audits Tab)Tools Administration Configure Server
The Audits tab of the Configure Server dialog box allows you to enable audit log generation and to purge auditlogs.
Item DescriptionEnable audit generation Default value is on. Audit log data is stored in the database for the server
configuration; if data requires too much space, option can be disabled.Purge audit entries older than __ days Default value is off. Automatically removes audit entries older than a
specified number of days to minimize the amount of log space required.Default is 90 days, if option is enabled. Number of days can be edited.The server configuration must be restarted to purge the audit logs.
Related Reference
Configure Server Dialog Box Options
263
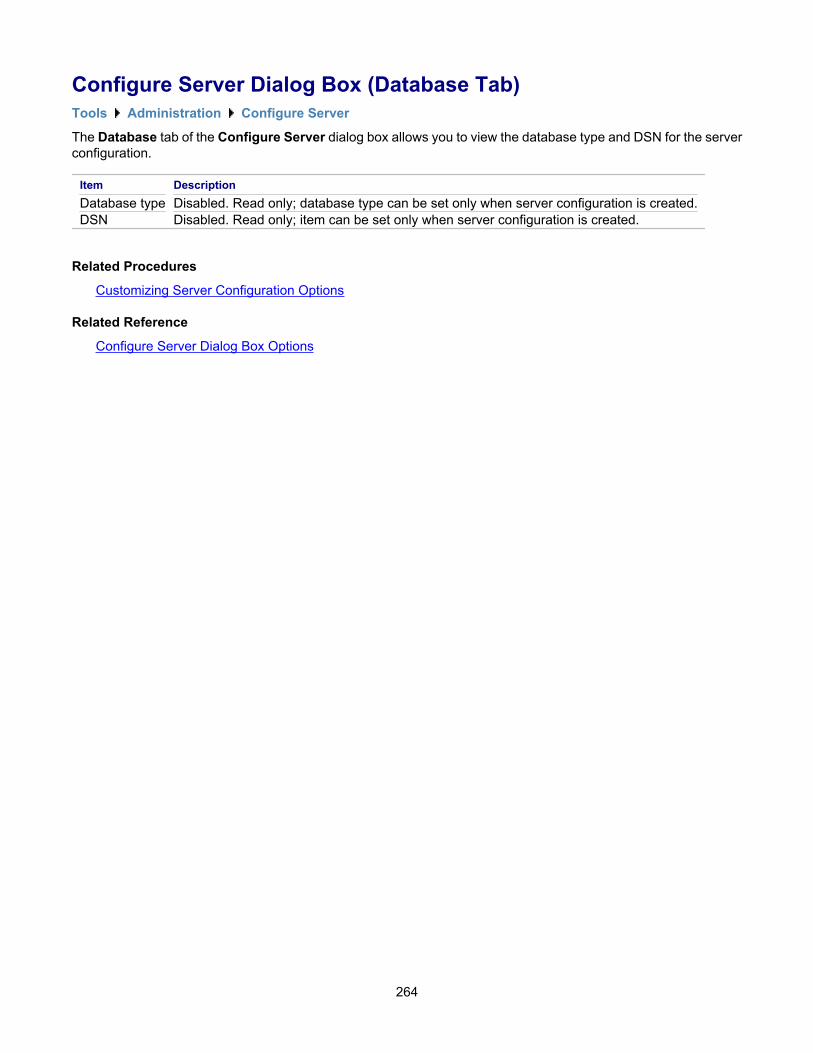
Configure Server Dialog Box (Database Tab)Tools Administration Configure Server
The Database tab of the Configure Server dialog box allows you to view the database type and DSN for the serverconfiguration.
Item DescriptionDatabase type Disabled. Read only; database type can be set only when server configuration is created.DSN Disabled. Read only; item can be set only when server configuration is created.
Related Procedures
Customizing Server Configuration Options
Related Reference
Configure Server Dialog Box Options
264
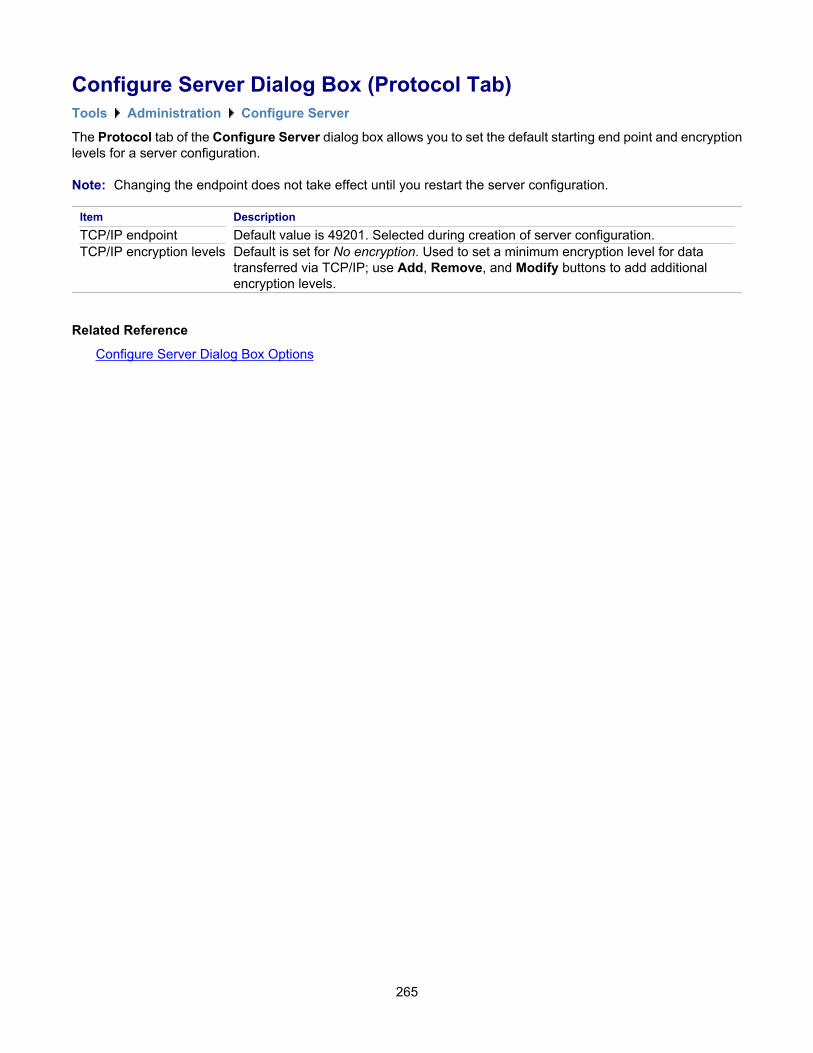
Configure Server Dialog Box (Protocol Tab)Tools Administration Configure Server
The Protocol tab of the Configure Server dialog box allows you to set the default starting end point and encryptionlevels for a server configuration.
Note: Changing the endpoint does not take effect until you restart the server configuration.
Item DescriptionTCP/IP endpoint Default value is 49201. Selected during creation of server configuration.TCP/IP encryption levels Default is set for No encryption. Used to set a minimum encryption level for data
transferred via TCP/IP; use Add, Remove, and Modify buttons to add additionalencryption levels.
Related Reference
Configure Server Dialog Box Options
265
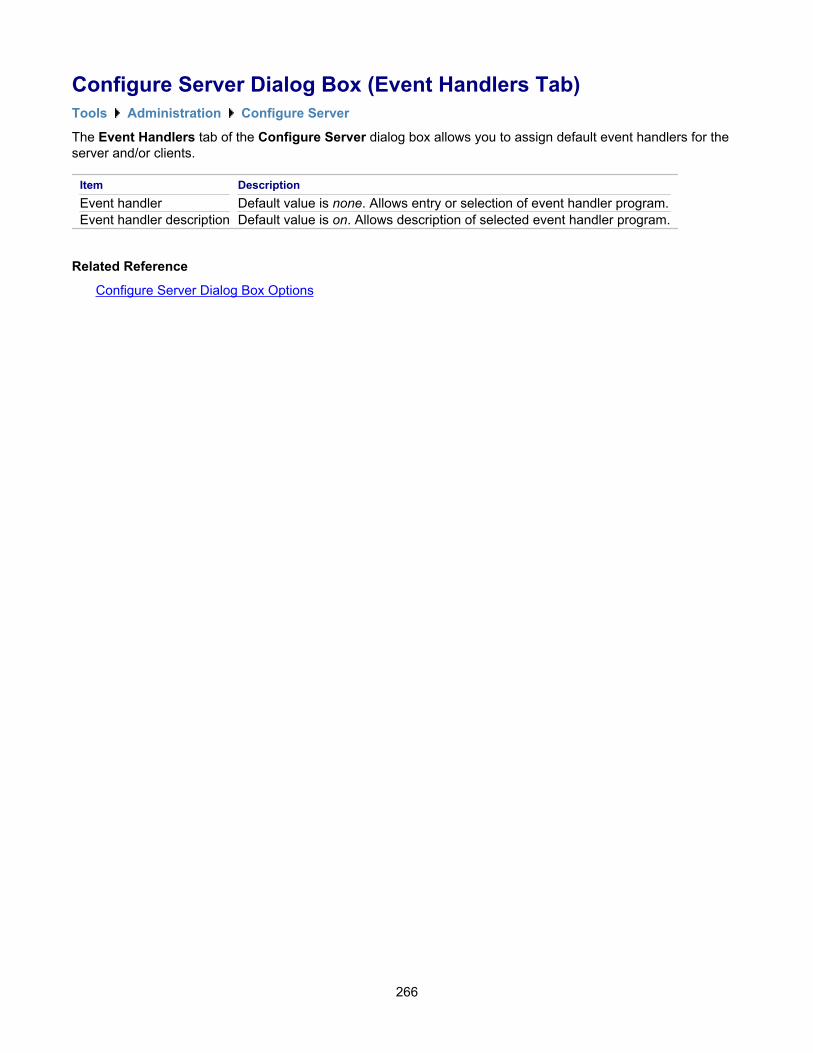
Configure Server Dialog Box (Event Handlers Tab)Tools Administration Configure Server
The Event Handlers tab of the Configure Server dialog box allows you to assign default event handlers for theserver and/or clients.
Item DescriptionEvent handler Default value is none. Allows entry or selection of event handler program.Event handler description Default value is on. Allows description of selected event handler program.
Related Reference
Configure Server Dialog Box Options
266
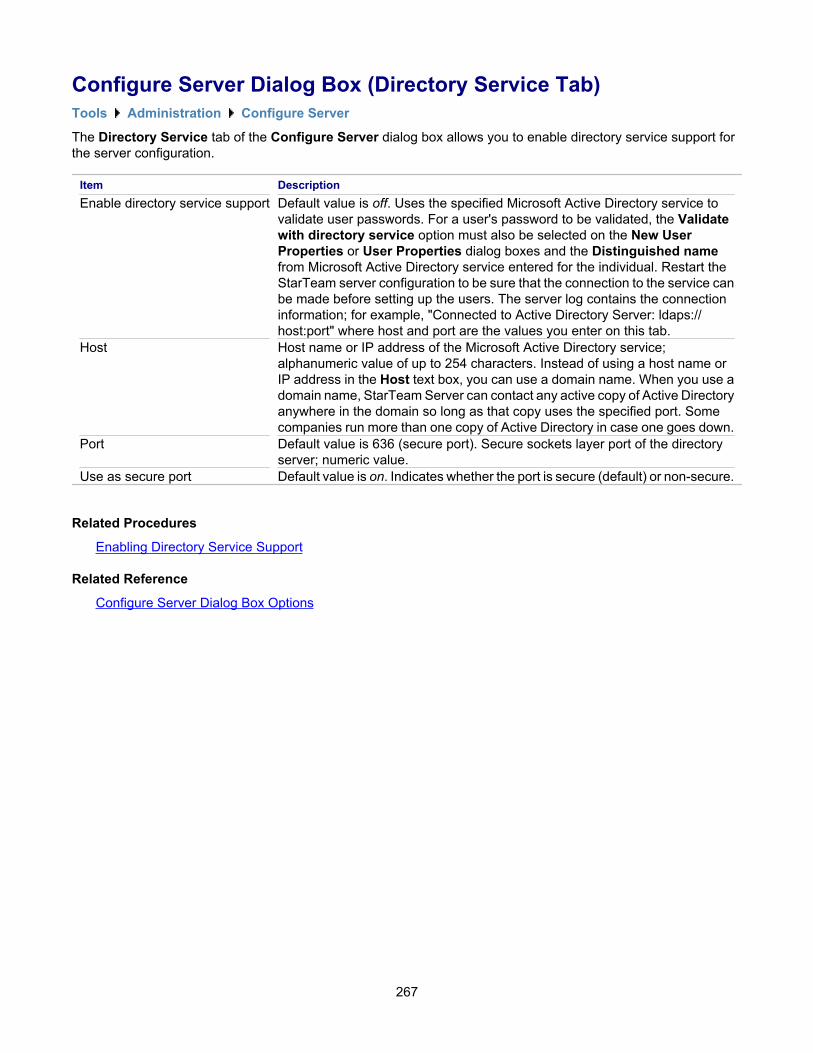
Configure Server Dialog Box (Directory Service Tab)Tools Administration Configure Server
The Directory Service tab of the Configure Server dialog box allows you to enable directory service support forthe server configuration.
Item DescriptionEnable directory service support Default value is off. Uses the specified Microsoft Active Directory service to
validate user passwords. For a user's password to be validated, the Validatewith directory service option must also be selected on the New UserProperties or User Properties dialog boxes and the Distinguished namefrom Microsoft Active Directory service entered for the individual. Restart theStarTeam server configuration to be sure that the connection to the service canbe made before setting up the users. The server log contains the connectioninformation; for example, "Connected to Active Directory Server: ldaps://host:port" where host and port are the values you enter on this tab.
Host Host name or IP address of the Microsoft Active Directory service;alphanumeric value of up to 254 characters. Instead of using a host name orIP address in the Host text box, you can use a domain name. When you use adomain name, StarTeam Server can contact any active copy of Active Directoryanywhere in the domain so long as that copy uses the specified port. Somecompanies run more than one copy of Active Directory in case one goes down.
Port Default value is 636 (secure port). Secure sockets layer port of the directoryserver; numeric value.
Use as secure port Default value is on. Indicates whether the port is secure (default) or non-secure.
Related Procedures
Enabling Directory Service Support
Related Reference
Configure Server Dialog Box Options
267
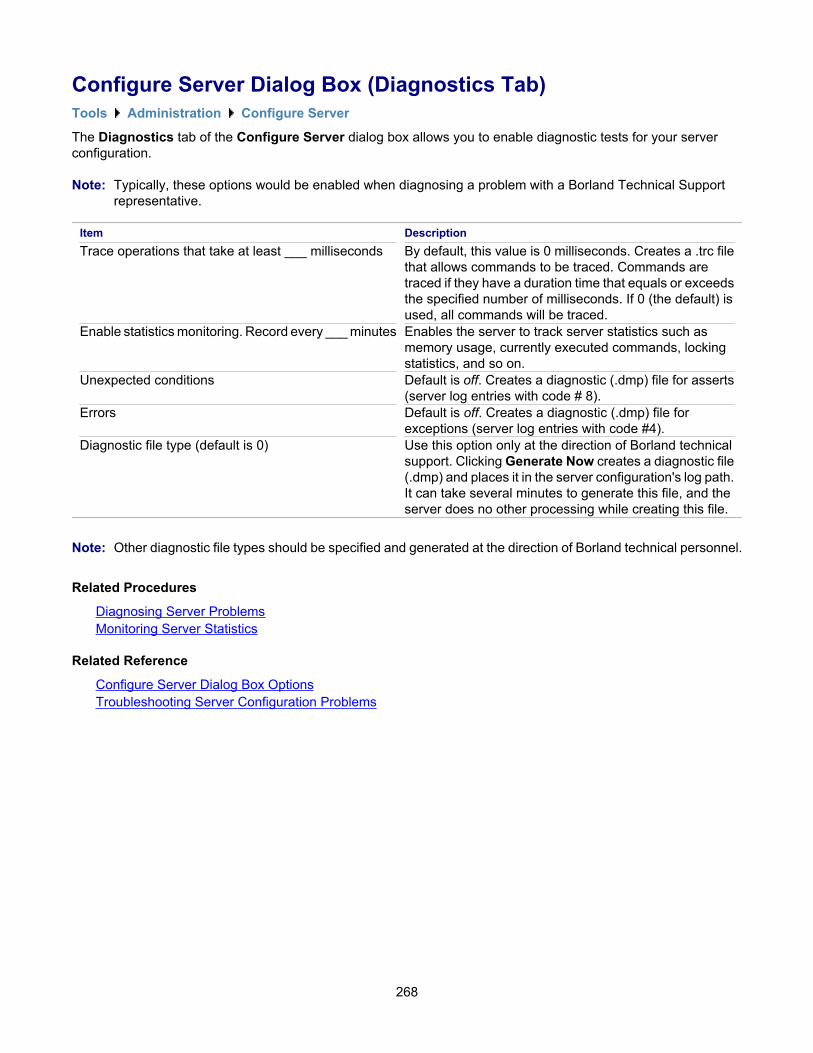
Configure Server Dialog Box (Diagnostics Tab)Tools Administration Configure Server
The Diagnostics tab of the Configure Server dialog box allows you to enable diagnostic tests for your serverconfiguration.
Note: Typically, these options would be enabled when diagnosing a problem with a Borland Technical Supportrepresentative.
Item DescriptionTrace operations that take at least ___ milliseconds By default, this value is 0 milliseconds. Creates a .trc file
that allows commands to be traced. Commands aretraced if they have a duration time that equals or exceedsthe specified number of milliseconds. If 0 (the default) isused, all commands will be traced.
Enable statistics monitoring. Record every ___ minutes Enables the server to track server statistics such asmemory usage, currently executed commands, lockingstatistics, and so on.
Unexpected conditions Default is off. Creates a diagnostic (.dmp) file for asserts(server log entries with code # 8).
Errors Default is off. Creates a diagnostic (.dmp) file forexceptions (server log entries with code #4).
Diagnostic file type (default is 0) Use this option only at the direction of Borland technicalsupport. Clicking Generate Now creates a diagnostic file(.dmp) and places it in the server configuration's log path.It can take several minutes to generate this file, and theserver does no other processing while creating this file.
Note: Other diagnostic file types should be specified and generated at the direction of Borland technical personnel.
Related Procedures
Diagnosing Server ProblemsMonitoring Server Statistics
Related Reference
Configure Server Dialog Box OptionsTroubleshooting Server Configuration Problems
268
Guidelines for Data Files and Transaction LogsThis section contains reference information regarding the size and number of data files and transaction logs neededby a database associated with a server configuration.
In This SectionGuidelines for Microsoft SQL Server/SQL Server Express Data Files and Transaction LogsDescribes data file and transaction log guidelines for Microsoft SQL Server/SQL Server Express databases.
Guidelines for Oracle Schema User Data FilesDescribes data file guidelines for Oracle schema users.
269
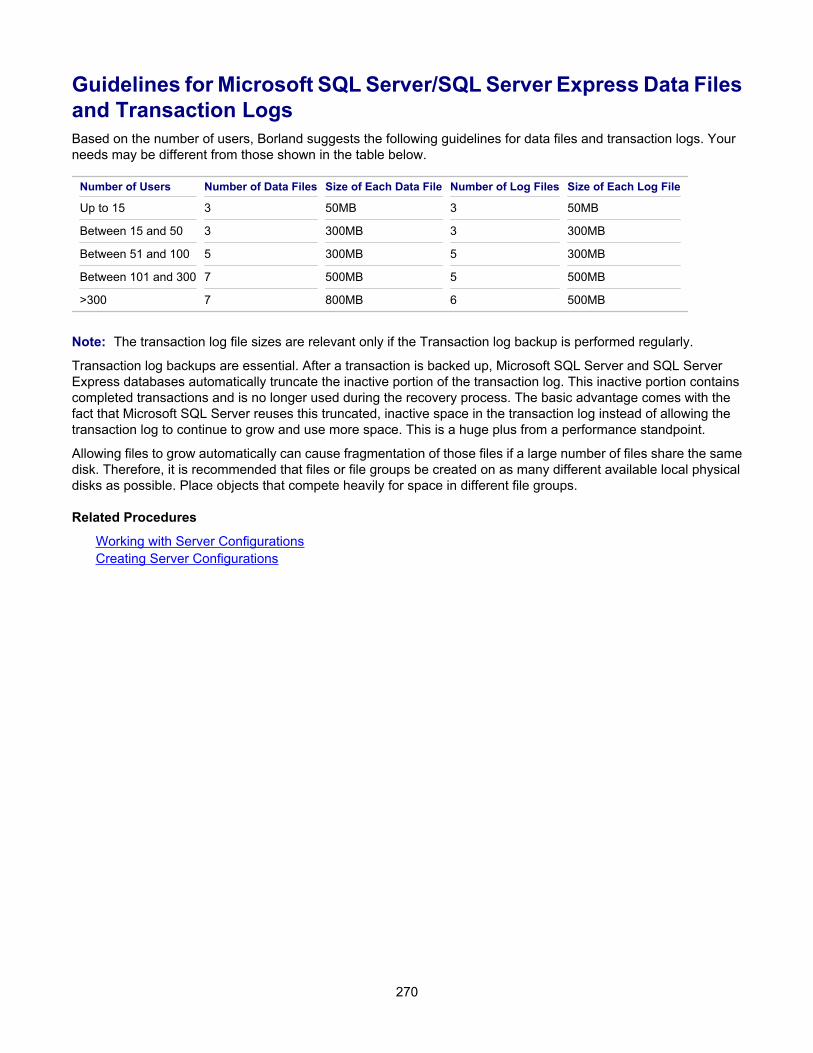
Guidelines for Microsoft SQL Server/SQL Server Express Data Filesand Transaction LogsBased on the number of users, Borland suggests the following guidelines for data files and transaction logs. Yourneeds may be different from those shown in the table below.
Number of Users Number of Data Files Size of Each Data File Number of Log Files Size of Each Log File
Up to 15 3 50MB 3 50MB
Between 15 and 50 3 300MB 3 300MB
Between 51 and 100 5 300MB 5 300MB
Between 101 and 300 7 500MB 5 500MB
>300 7 800MB 6 500MB
Note: The transaction log file sizes are relevant only if the Transaction log backup is performed regularly.
Transaction log backups are essential. After a transaction is backed up, Microsoft SQL Server and SQL ServerExpress databases automatically truncate the inactive portion of the transaction log. This inactive portion containscompleted transactions and is no longer used during the recovery process. The basic advantage comes with thefact that Microsoft SQL Server reuses this truncated, inactive space in the transaction log instead of allowing thetransaction log to continue to grow and use more space. This is a huge plus from a performance standpoint.
Allowing files to grow automatically can cause fragmentation of those files if a large number of files share the samedisk. Therefore, it is recommended that files or file groups be created on as many different available local physicaldisks as possible. Place objects that compete heavily for space in different file groups.
Related Procedures
Working with Server ConfigurationsCreating Server Configurations
270
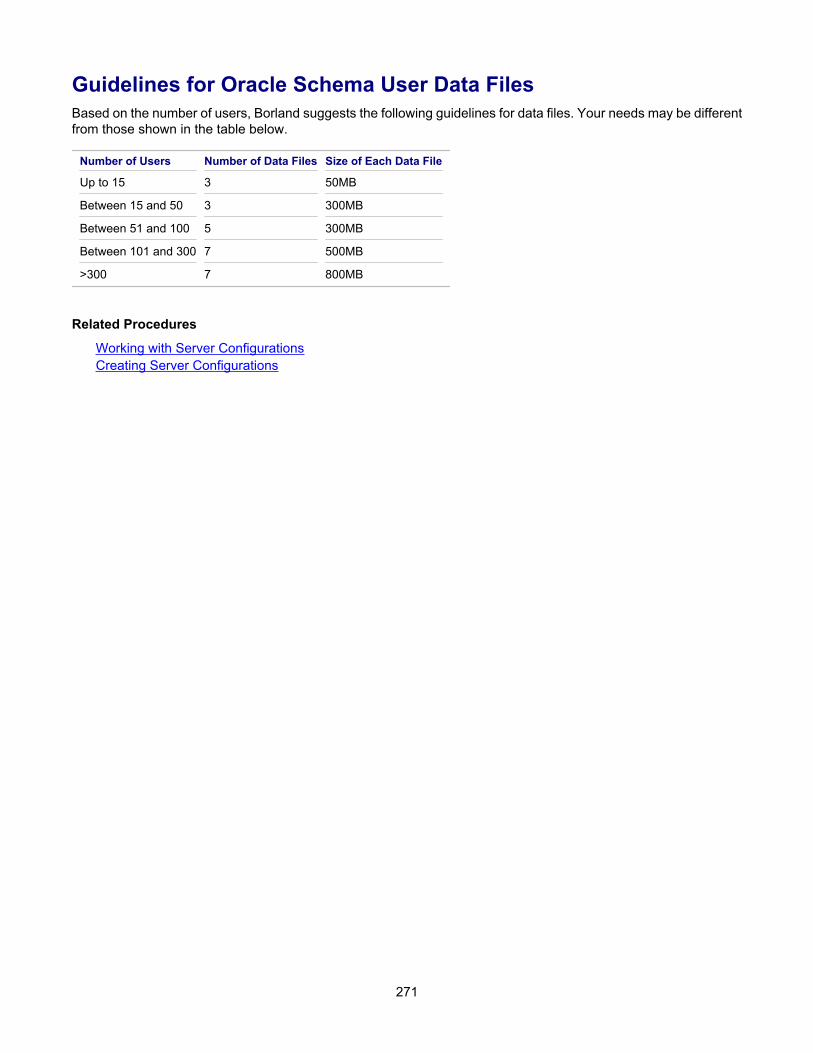
Guidelines for Oracle Schema User Data FilesBased on the number of users, Borland suggests the following guidelines for data files. Your needs may be differentfrom those shown in the table below.
Number of Users Number of Data Files Size of Each Data File
Up to 15 3 50MB
Between 15 and 50 3 300MB
Between 51 and 100 5 300MB
Between 101 and 300 7 500MB
>300 7 800MB
Related Procedures
Working with Server ConfigurationsCreating Server Configurations
271
Initialization File ReferenceThis section contains reference topics related to initialization files.
In This SectionLocating Initialization FilesDescribes where you can locate initialization files.
ConnectionManager.iniDescribes the purpose of the ConnectionManager.ini file.
starteam-server-configs.xmlDescribes the options available in the starteam-server-configs.xml file.
starteam-client-options.xmlDescribes the purpose of the starteam-client-options.xml file.
272
Locating Initialization FilesInitialization files have different locations on different Windows platforms. On NT, C:\ winnt\Profiles is the pathPrefix.On Windows 2000, XP, and 2003, the pathPrefix is C:\ Documents and Settings.
♦ ClientLicenses.st lists is located at \All Users\Application Data\Borland\StarTeam\ ClientLicenses.st. This fileis installed by StarTeam Runtime and the application clients. If the ClientLicenses.st file is missing, you areasked to register the product.
♦ ConnectionManager.ini (used for starting the application) is located at \All Users\ Application Data\Borland\StarTeam\ConnectionManager.ini. This file is installed by StarTeam Runtime and the application clients. Ifthe ConnectionManager.ini file is missing or corrupted, the application asks if you want it recreated.Reinstallation can also recreate the missing ConnectionManager.ini file.
♦ starteam-servers.xml lists the server configurations for which you have created (or will create) serverdescriptions. These descriptions are used while opening or creating projects. This file is located at \user\Application Data\Borland\StarTeam\ ServerList and is installed by StarTeam Runtime and the applicationclients.
♦ The Server’s starteam-server-configs.xml file, which is used for server session information, is located at ServerInstallationFolder\ starteam-server-configs.xml.
♦ starteam-client-options.xml is located at pathPrefix\user\ Application Data\Borland\ StarTeam\starteam-client-options.xml. This file is installed by StarTeam Runtime and the application clients. The starteam-client-options.xml file lists personal option settings and any alternate working folders you have set with the application.You may want to back up this file or put it under version control. If the starteam-client-options.xml file is missing,the application automatically recreates it. However, the recreated file contains only the default settings for thepersonal options and no alternate working folder information. If the starteam-client-options.xml file is corrupted,you can delete it, but you may be able to edit it. You can tell that the starteam-client-options.xml file is missingor corrupted when your personal options are no longer correct, changes you made to personal optionsdisappear when you restart the application, files do not change even though you have checked them out(because they have been copied to the wrong working folders), or the application reports that old files aremissing and does not see new files, because it is looking for them in the wrong place.
Related Reference
Initialization File Reference
273
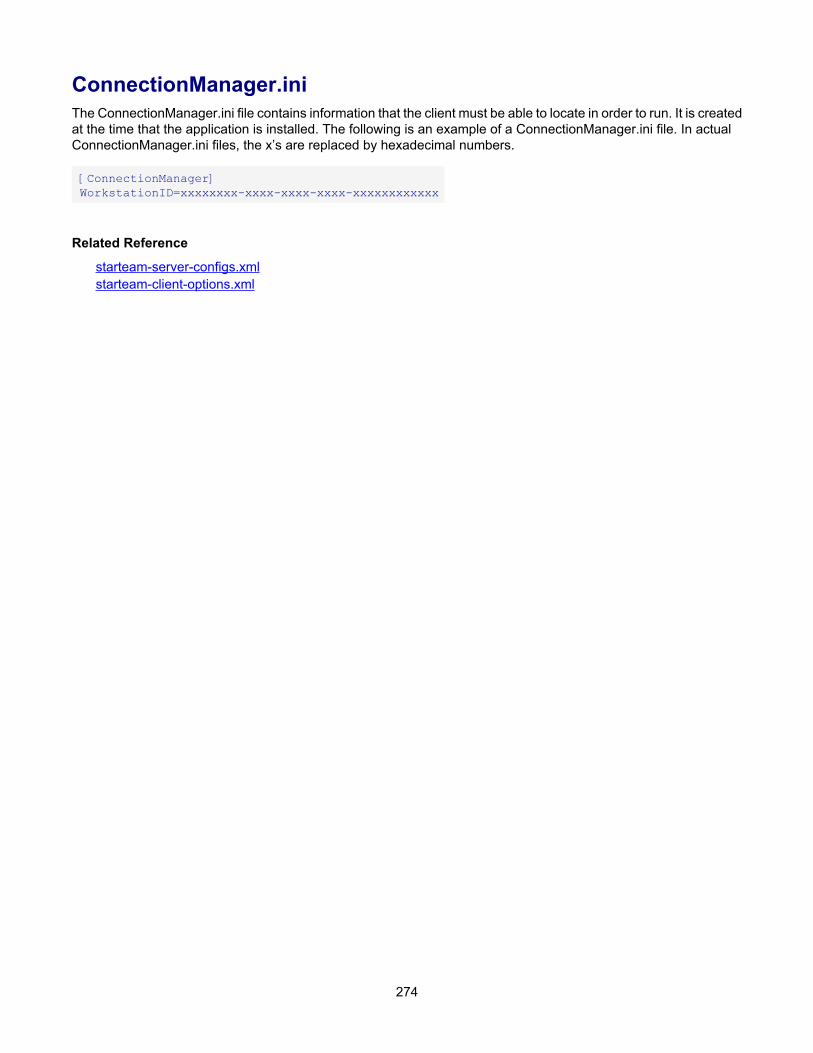
ConnectionManager.iniThe ConnectionManager.ini file contains information that the client must be able to locate in order to run. It is createdat the time that the application is installed. The following is an example of a ConnectionManager.ini file. In actualConnectionManager.ini files, the x’s are replaced by hexadecimal numbers.
[ConnectionManager]WorkstationID=xxxxxxxx-xxxx-xxxx-xxxx-xxxxxxxxxxxx
Related Reference
starteam-server-configs.xmlstarteam-client-options.xml
274
starteam-server-configs.xmlThe starteam-server-configs.xml file contains session options for one or more server configurations. Serversession options specify the core information that the Server requires to start a server configuration. One starteam-server-configs.xml file exists per computer and is located in the same folder as the Server application. On Windowsplatforms, this file is usually located in C:\Program Files\Borland\StarTeam Server.
The session option information for each server configuration begins with the name of the configuration in bracketsand is followed by a set of options and their settings. The Server creates and maintains this file, which is createdwhen the first server configuration is created. The file is updated whenever a server configuration is created, modified,deleted, started, or stopped. Do not edit this file directly. Borland recommends that you backup the starteam-server-configs.xml file or put it under version control.
Information in this file includes:
♦ CipherName: In server configurations created prior to StarTeam Server 5.3. For internal use. Do not edit thisoption.
♦ CipherSource: For internal use. Do not edit this option.
♦ CipherTest: For internal use. Do not edit this option.
♦ ComputerName: ComputerName identifies the computer on which the Server resides. This option is set bythe Server. Do not edit it.
♦ CreatedByBuild: Indicates that a server configuration cannot have any Native-I archive files. Used only inserver configurations created with StarTeam Server 2005 or later releases.
♦ DBCreated: DBCreated indicates whether the database tables used by the application are already created.Do not edit this option.
♦ DBServerName: Because all databases are accessed via ODBC, this is the DSN name for that database. Inreleases 5.1 and 5.2, Oracle databases were accessed using the Oracle net service name that is stored in$ORACLE_HOME/network/ admin/tnsnames.ora. This is not the case for StarTeam Windows Server 5.3or later. This information is set using the -dsn option with the starteamserver command. You can reviewthe DSN using the -view and -edit options from the command line or in the application on the Databasetab of the dialog. Any modifications you make will take effect the next time you start the server configuration.
♦ DBType: Use one of the following numbered values to indicate the type of database. This information is setusing the -t option with starteamserver command. The database type can only be specified when creatinga new server configuration. This information cannot be modified for existing server configurations. 2 = MicrosoftSQL Server or SSE or 3 = Oracle. You can review the database type using the -view option from the commandline or in the application on the Database tab of the dialog.
♦ DBUserName and DBPassword: DBUserName and DBPassword are the name and password by which theapplication accesses the server configuration database. This information is set using the -u (for the username)and -p (for the password) options with the starteamserver command.
♦ DiagCommandTraceCutoffSize: You can add this option to specify a cut-off size for trace files. Forexample, <option name=”DiagCommandTraceCutoffSize” value=”5000000”/> would limit the sizeof the trace file to 5000000 bytes.
♦ Initialized: Initialized indicates whether this server configuration was initialized. This option ismaintained by the Server. Do not edit it.
♦ ItemCacheMemoryLimit: Defines the maximum amount of memory that can be used for caching item data,in MB. The default value is -1, which means no limit is set and the server will use up to the maximum amountof memory available to the server process for caching the data. Example: Adding <optionname="ItemCacheMemoryLimit" value="100"/> to the configuration file will set the cache limit to 100MB.
♦ The following six parameters define the relative preference of each respective component's data in the serverdata cache. The DefaultValues = 0 for ItemCachePriority_Folder. The DefaultValues = 100 for
275
the rest of the components. Each component will occupy no more than it's percent "share", which is calculatedas shown in the following File component example: FileShare% = (100 *ItemCachePriority_File ) / (ItemCachePriority_File + ItemCachePriority_Change +ItemCachePriority_Requirement + ItemCachePriority_Task + ItemCachePriority_Topic+ ItemCachePriority_Folder ). . The DefaultValues = 100 for the rest of the components.
♦ ItemCachePriority_File
♦ ItemCachePriority_Change
♦ ItemCachePriority_Requirement
♦ ItemCachePriority_Task
♦ ItemCachePriority_Topic
♦ ItemCachePriority_Folder
♦ \ListenIP: This option binds a server configuration to a specific TCP/IP (sockets) address. For example, ifthe Server has more than one IP address (more than one NIC card), you can configure the Server to listen toone specific port. When this option is set to 0 (default) the server configuration listens to all IP addresses onthe specified port. The port is specified on the Protocol tab of the Configure Server tool in the ServerAdministration Tool.
♦ LogPath: Specifies the location of the server log file.
♦ MaxCommandThreads: This option specifies the maximum number of command threads that the serverconfiguration can create. The default maximum number of command threads is 16. A setting of 0 for this optioncauses the server configuration to use the default value. MaxCommandThreads can be modified by editingstarteam-server-configs.xml. However, we recommend that you change this option only when directedto do so by a StarTeam representative.
♦ MinCommandThreads: This option specifies the minimum number of command threads that the serverconfiguration will create. When the server configuration starts and while it is running, it will have at least thismany command threads. The default minimum number of threads is 4. A setting of 0 for this option causes theserver configuration to use the default value. MinCommandThreads can be modified by editing thestarteam-server-configs.xml file. However, we recommend that you change this option only whendirected to do so by a StarTeam, representative.
♦ PID: PID is the Process ID for the instance of the server configuration that is currently running. Otherwise, thisoption is set to 0. This option is maintained by the Server. Do not edit it. When this option is missing,starteamserver creates it.
♦ RepositoryPath: RepositoryPath is the complete path to repository folders. This information is set usingthe -r option with starteamserver command. The repository path can only be specified when creating anew server configuration. This information cannot be modified for existing server configurations.
♦ Sample: Indicates StarTeam's sample StarDraw server configuration. For internal use only. Do not edit thisoption.
♦ ServerGuid: ServerGuid is a value supplied by the Server. Do not edit this option.
♦ UseAsyncIO: Microsoft recommends that scalable server applications use Async I/O to improve commandoperation performance. Async I/O is internally enabled by default. Example: Adding <optionname="UseAsyncIO" value="0"/> to the configuration file will disable Async I/O.
♦ UserName: UserName is the domain user name for the user who created the server configuration. This optionis set by the Server. Do not edit it.
♦ ServiceMode: ServiceMode is for use on Windows NT systems only. Use 1 to run the server configurationas an NT Service. Use 0 to run the server configuration as an application.
276

♦ Status: Status indicates whether this server configuration is Ready, Starting, Running, or Stopping. Thisoption is maintained by the server. Do not edit it. When this option is missing, starteamserver creates it.
Related Reference
ConnectionManager.inistarteam-client-options.xml
277
starteam-client-options.xmlThe starteam-client-options.xml file contains one line for each of the options that can be set from the Personal Optionsdialog (accessed by selecting Tools Personal Options from the menu). Most option names in the starteam-client-options.xml file correspond closely to the names of the options on the dialog. The options that are check boxesin the dialog are set equal to 1 for selected or 0 for cleared. Intervals are set to a number of minutes or secondsdepending on the option. Paths are in text. No quotation marks are used with the text.
For example, the Project Component information provides the paths to alternate working folders for projectsaccessed from your workstation. The entry for this component in the starteam-client-options.xml file includes thefollowing parts.
♦ The phrase Project Component.
♦ ViewWorkingFolderOverrides (if the alternate working folder is for an entire view) or WorkingFolderOverrides(if the alternate working folder is for an individual folder).
♦ A hex identification of the project view and folder.
♦ The alternate working folder’s path.
Related Reference
starteam-server-configs.xmlConnectionManager.ini
278
Server Log File ReferenceThis section contains reference topics related to server log files.
In This SectionServer LogDescribes the contents found in the server log file (Server.locale.log).
Server Log Error CodesDescribes the server log error codes.
Security Event TypesDescribes security event types found in the security event log.
StarTeam.LogDescribes the purpose of StarTeam.Log.
DbConvert.<local>.logDescribes the purpose and possible contents of the DbConvert.<local>.log file.
279
Server LogThe server log file (Server.locale.Log) specifies the DBMS version and build number and records the activity on aserver configuration. Each time you start a server configuration, the Server renames the existing log file and createsa new log file for the current server configuration session. The log file from the previous startup is renamed to includethe date and time at which it was renamed (Server.locale.date.Log). For example, if you start a server configurationon November 9, 2005 at 5:22 P.M., the old Server.locale.Log file is renamed Server.en-US.2005-11-09-17-22-59.Log, and a new Server.locale.Log file is created whose time stamp might be 11/9/2005 17:23:03.
If the locale specified for the operating system on which your server runs is not US English, you will have two serverlog files: one for US English and one for your locale. For example, you might have both Server.en-US.Log andServer.fr-FR.Log. The first log is for support purposes, and the second log is for your use.
Formatting of the log gives a line number, code, date and time, and message. The code numbers are not in anyorder of severity.
280
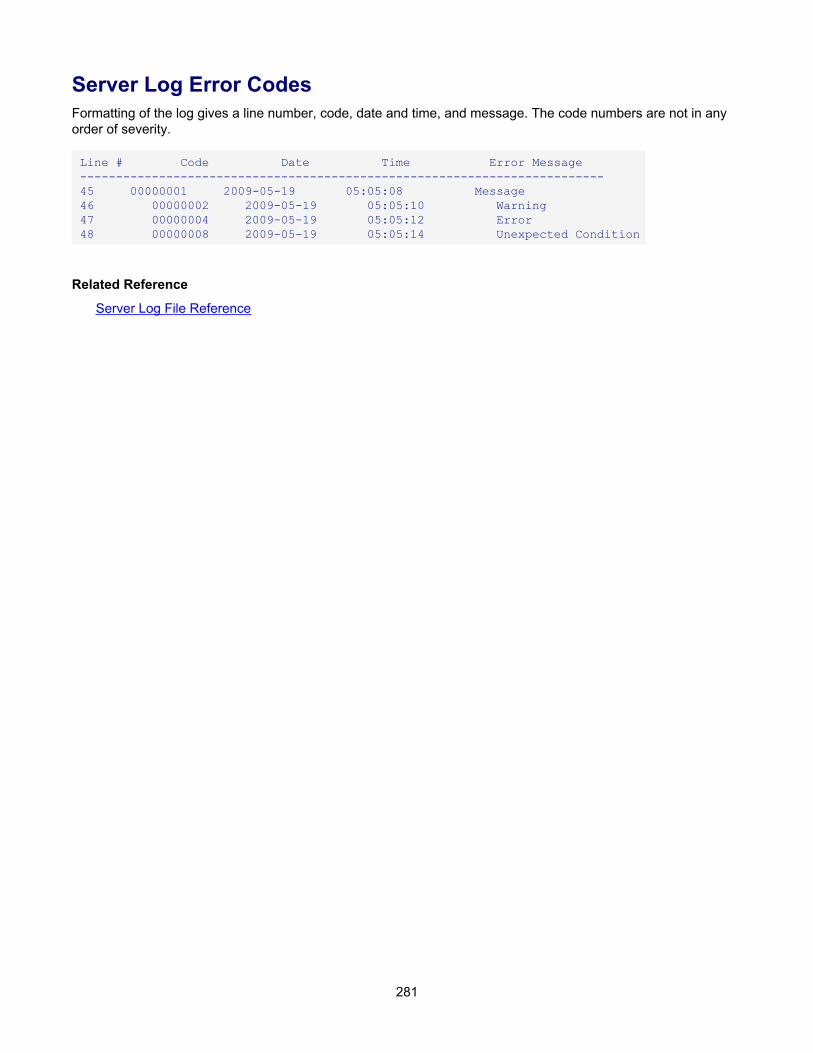
Server Log Error CodesFormatting of the log gives a line number, code, date and time, and message. The code numbers are not in anyorder of severity.
Line # Code Date Time Error Message-------------------------------------------------------------------------45 00000001 2009-05-19 05:05:08 Message46 00000002 2009-05-19 05:05:10 Warning47 00000004 2009-05-19 05:05:12 Error48 00000008 2009-05-19 05:05:14 Unexpected Condition
Related Reference
Server Log File Reference
281
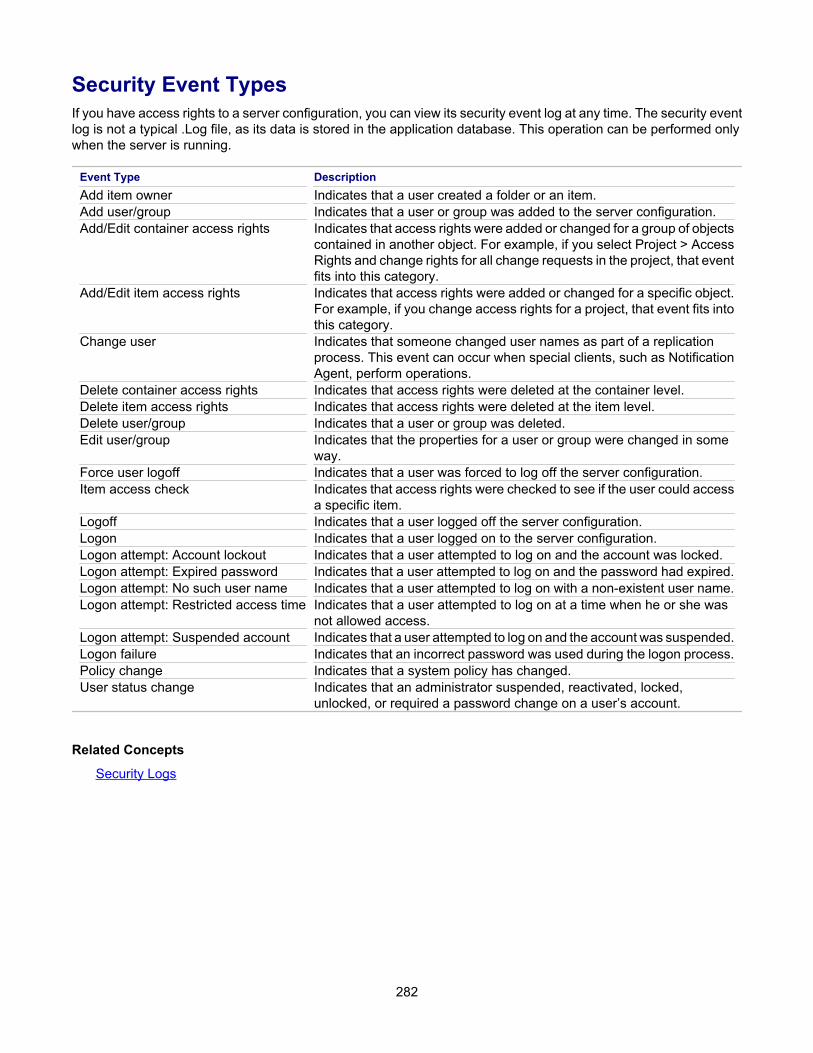
Security Event TypesIf you have access rights to a server configuration, you can view its security event log at any time. The security eventlog is not a typical .Log file, as its data is stored in the application database. This operation can be performed onlywhen the server is running.
Event Type DescriptionAdd item owner Indicates that a user created a folder or an item.Add user/group Indicates that a user or group was added to the server configuration.Add/Edit container access rights Indicates that access rights were added or changed for a group of objects
contained in another object. For example, if you select Project > AccessRights and change rights for all change requests in the project, that eventfits into this category.
Add/Edit item access rights Indicates that access rights were added or changed for a specific object.For example, if you change access rights for a project, that event fits intothis category.
Change user Indicates that someone changed user names as part of a replicationprocess. This event can occur when special clients, such as NotificationAgent, perform operations.
Delete container access rights Indicates that access rights were deleted at the container level.Delete item access rights Indicates that access rights were deleted at the item level.Delete user/group Indicates that a user or group was deleted.Edit user/group Indicates that the properties for a user or group were changed in some
way.Force user logoff Indicates that a user was forced to log off the server configuration.Item access check Indicates that access rights were checked to see if the user could access
a specific item.Logoff Indicates that a user logged off the server configuration.Logon Indicates that a user logged on to the server configuration.Logon attempt: Account lockout Indicates that a user attempted to log on and the account was locked.Logon attempt: Expired password Indicates that a user attempted to log on and the password had expired.Logon attempt: No such user name Indicates that a user attempted to log on with a non-existent user name.Logon attempt: Restricted access time Indicates that a user attempted to log on at a time when he or she was
not allowed access.Logon attempt: Suspended account Indicates that a user attempted to log on and the account was suspended.Logon failure Indicates that an incorrect password was used during the logon process.Policy change Indicates that a system policy has changed.User status change Indicates that an administrator suspended, reactivated, locked,
unlocked, or required a password change on a user’s account.
Related Concepts
Security Logs
282
StarTeam.LogThe StarTeam.Log file records the operations performed on your client workstation during a session. It helps youtroubleshoot and document errors or operations between the server and your workstation that failed during serverconfiguration sessions. The file may contain commands sent by your workstation to a server configuration when youopen and work with a project, commands performed locally on your workstation, error messages generated whileusing the application, or events performed by StarTeamMPX. Every time you start your client, the system creates aStarTeam.Log file in the folder location specified in your personal options. On most systems, the default location forthe StarTeam.Log file is C:\Documents and Settings\<user-name>\Application Data\Borland\StarTeam. If there is aStarTeam.Log file already in this folder, The application renames the existing file to include the date and time atwhich it was renamed. For example, if you create a StarTeam.Log file on November 9, 2005 at 10:35 A.M., the oldStarTeam.Log file is renamed StarTeam-09-Nov-05-10-35-18.Log, and a new StarTeam.Log file is created.
Because the application creates a new StarTeam.Log file every time you start the client, the log folder can fill upquickly. To control the number of log files in the folder, you may want to periodically delete old log files from theoutput folder or disable the StarTeam.Log option. To disable the option, clear the Log Errors and the Log Operationscheck boxes on the Workspace tab of the Personal Options dialog. To display the StarTeam.Log file, select Tools StarTeam Log File from the menu bar. You can also import and view the data from a StarTeam.Log file using any
application that supports tab-delimited fields. For example, if you save the file with a .csv extension, the file can beopened in Microsoft Excel.
The Workspace tab on the Personal Options dialog enables you to specify the location and the type of data recordedin the StarTeam.Log file
Related Reference
Server Log File Reference
283
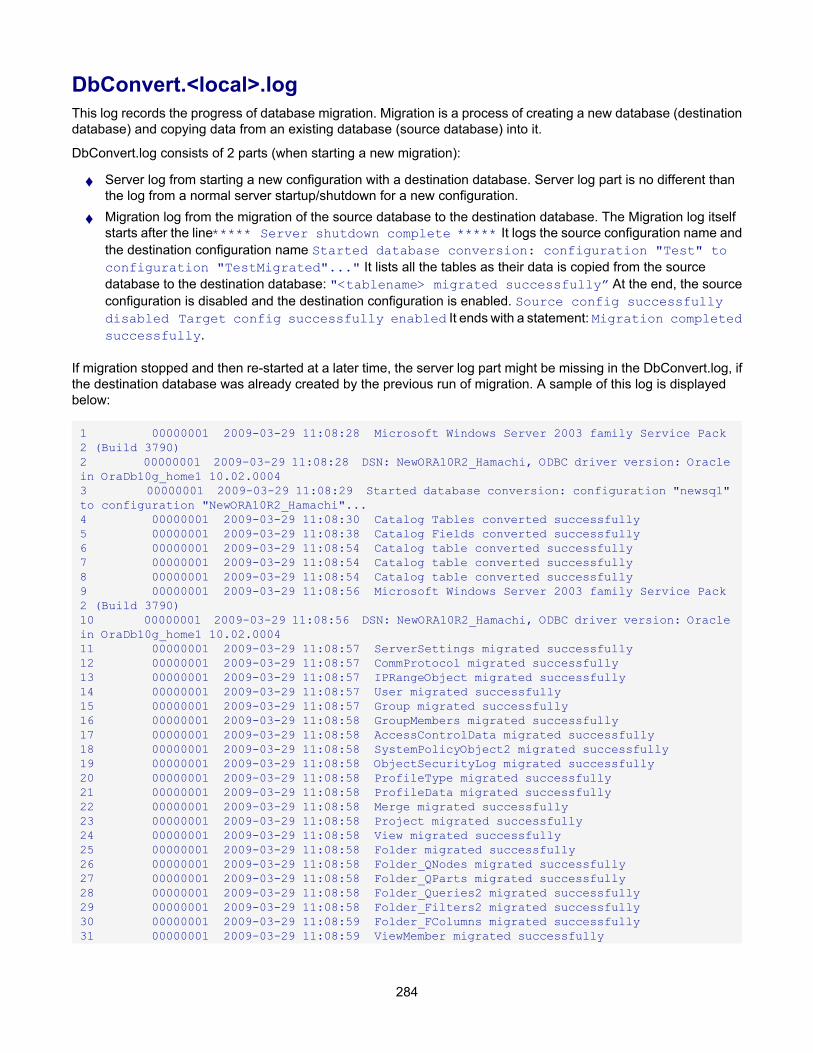
DbConvert.<local>.logThis log records the progress of database migration. Migration is a process of creating a new database (destinationdatabase) and copying data from an existing database (source database) into it.
DbConvert.log consists of 2 parts (when starting a new migration):
♦ Server log from starting a new configuration with a destination database. Server log part is no different thanthe log from a normal server startup/shutdown for a new configuration.
♦ Migration log from the migration of the source database to the destination database. The Migration log itselfstarts after the line***** Server shutdown complete ***** It logs the source configuration name andthe destination configuration name Started database conversion: configuration "Test" toconfiguration "TestMigrated"..." It lists all the tables as their data is copied from the sourcedatabase to the destination database: "<tablename> migrated successfully” At the end, the sourceconfiguration is disabled and the destination configuration is enabled. Source config successfullydisabled Target config successfully enabled It ends with a statement: Migration completedsuccessfully.
If migration stopped and then re-started at a later time, the server log part might be missing in the DbConvert.log, ifthe destination database was already created by the previous run of migration. A sample of this log is displayedbelow:
1 00000001 2009-03-29 11:08:28 Microsoft Windows Server 2003 family Service Pack 2 (Build 3790) 2 00000001 2009-03-29 11:08:28 DSN: NewORA10R2_Hamachi, ODBC driver version: Oracle in OraDb10g_home1 10.02.00043 00000001 2009-03-29 11:08:29 Started database conversion: configuration "newsql" to configuration "NewORA10R2_Hamachi"...4 00000001 2009-03-29 11:08:30 Catalog Tables converted successfully5 00000001 2009-03-29 11:08:38 Catalog Fields converted successfully6 00000001 2009-03-29 11:08:54 Catalog table converted successfully7 00000001 2009-03-29 11:08:54 Catalog table converted successfully8 00000001 2009-03-29 11:08:54 Catalog table converted successfully9 00000001 2009-03-29 11:08:56 Microsoft Windows Server 2003 family Service Pack 2 (Build 3790) 10 00000001 2009-03-29 11:08:56 DSN: NewORA10R2_Hamachi, ODBC driver version: Oracle in OraDb10g_home1 10.02.000411 00000001 2009-03-29 11:08:57 ServerSettings migrated successfully12 00000001 2009-03-29 11:08:57 CommProtocol migrated successfully13 00000001 2009-03-29 11:08:57 IPRangeObject migrated successfully14 00000001 2009-03-29 11:08:57 User migrated successfully15 00000001 2009-03-29 11:08:57 Group migrated successfully16 00000001 2009-03-29 11:08:58 GroupMembers migrated successfully17 00000001 2009-03-29 11:08:58 AccessControlData migrated successfully18 00000001 2009-03-29 11:08:58 SystemPolicyObject2 migrated successfully19 00000001 2009-03-29 11:08:58 ObjectSecurityLog migrated successfully20 00000001 2009-03-29 11:08:58 ProfileType migrated successfully21 00000001 2009-03-29 11:08:58 ProfileData migrated successfully22 00000001 2009-03-29 11:08:58 Merge migrated successfully23 00000001 2009-03-29 11:08:58 Project migrated successfully24 00000001 2009-03-29 11:08:58 View migrated successfully25 00000001 2009-03-29 11:08:58 Folder migrated successfully26 00000001 2009-03-29 11:08:58 Folder_QNodes migrated successfully27 00000001 2009-03-29 11:08:58 Folder_QParts migrated successfully28 00000001 2009-03-29 11:08:58 Folder_Queries2 migrated successfully29 00000001 2009-03-29 11:08:58 Folder_Filters2 migrated successfully30 00000001 2009-03-29 11:08:59 Folder_FColumns migrated successfully31 00000001 2009-03-29 11:08:59 ViewMember migrated successfully
284
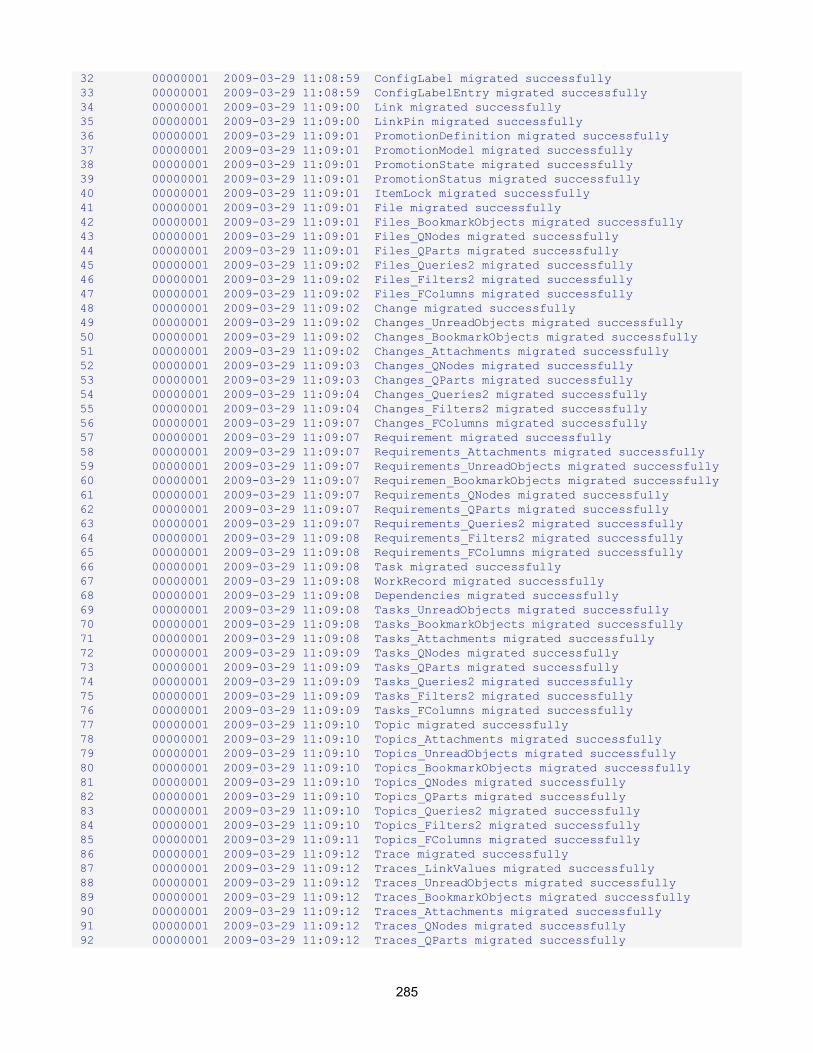
32 00000001 2009-03-29 11:08:59 ConfigLabel migrated successfully33 00000001 2009-03-29 11:08:59 ConfigLabelEntry migrated successfully34 00000001 2009-03-29 11:09:00 Link migrated successfully35 00000001 2009-03-29 11:09:00 LinkPin migrated successfully36 00000001 2009-03-29 11:09:01 PromotionDefinition migrated successfully37 00000001 2009-03-29 11:09:01 PromotionModel migrated successfully38 00000001 2009-03-29 11:09:01 PromotionState migrated successfully39 00000001 2009-03-29 11:09:01 PromotionStatus migrated successfully40 00000001 2009-03-29 11:09:01 ItemLock migrated successfully41 00000001 2009-03-29 11:09:01 File migrated successfully42 00000001 2009-03-29 11:09:01 Files_BookmarkObjects migrated successfully43 00000001 2009-03-29 11:09:01 Files_QNodes migrated successfully44 00000001 2009-03-29 11:09:01 Files_QParts migrated successfully45 00000001 2009-03-29 11:09:02 Files_Queries2 migrated successfully46 00000001 2009-03-29 11:09:02 Files_Filters2 migrated successfully47 00000001 2009-03-29 11:09:02 Files_FColumns migrated successfully48 00000001 2009-03-29 11:09:02 Change migrated successfully49 00000001 2009-03-29 11:09:02 Changes_UnreadObjects migrated successfully50 00000001 2009-03-29 11:09:02 Changes_BookmarkObjects migrated successfully51 00000001 2009-03-29 11:09:02 Changes_Attachments migrated successfully52 00000001 2009-03-29 11:09:03 Changes_QNodes migrated successfully53 00000001 2009-03-29 11:09:03 Changes_QParts migrated successfully54 00000001 2009-03-29 11:09:04 Changes_Queries2 migrated successfully55 00000001 2009-03-29 11:09:04 Changes_Filters2 migrated successfully56 00000001 2009-03-29 11:09:07 Changes_FColumns migrated successfully57 00000001 2009-03-29 11:09:07 Requirement migrated successfully58 00000001 2009-03-29 11:09:07 Requirements_Attachments migrated successfully59 00000001 2009-03-29 11:09:07 Requirements_UnreadObjects migrated successfully60 00000001 2009-03-29 11:09:07 Requiremen_BookmarkObjects migrated successfully61 00000001 2009-03-29 11:09:07 Requirements_QNodes migrated successfully62 00000001 2009-03-29 11:09:07 Requirements_QParts migrated successfully63 00000001 2009-03-29 11:09:07 Requirements_Queries2 migrated successfully64 00000001 2009-03-29 11:09:08 Requirements_Filters2 migrated successfully65 00000001 2009-03-29 11:09:08 Requirements_FColumns migrated successfully66 00000001 2009-03-29 11:09:08 Task migrated successfully67 00000001 2009-03-29 11:09:08 WorkRecord migrated successfully68 00000001 2009-03-29 11:09:08 Dependencies migrated successfully69 00000001 2009-03-29 11:09:08 Tasks_UnreadObjects migrated successfully70 00000001 2009-03-29 11:09:08 Tasks_BookmarkObjects migrated successfully71 00000001 2009-03-29 11:09:08 Tasks_Attachments migrated successfully72 00000001 2009-03-29 11:09:09 Tasks_QNodes migrated successfully73 00000001 2009-03-29 11:09:09 Tasks_QParts migrated successfully74 00000001 2009-03-29 11:09:09 Tasks_Queries2 migrated successfully75 00000001 2009-03-29 11:09:09 Tasks_Filters2 migrated successfully76 00000001 2009-03-29 11:09:09 Tasks_FColumns migrated successfully77 00000001 2009-03-29 11:09:10 Topic migrated successfully78 00000001 2009-03-29 11:09:10 Topics_Attachments migrated successfully79 00000001 2009-03-29 11:09:10 Topics_UnreadObjects migrated successfully80 00000001 2009-03-29 11:09:10 Topics_BookmarkObjects migrated successfully81 00000001 2009-03-29 11:09:10 Topics_QNodes migrated successfully82 00000001 2009-03-29 11:09:10 Topics_QParts migrated successfully83 00000001 2009-03-29 11:09:10 Topics_Queries2 migrated successfully84 00000001 2009-03-29 11:09:10 Topics_Filters2 migrated successfully85 00000001 2009-03-29 11:09:11 Topics_FColumns migrated successfully86 00000001 2009-03-29 11:09:12 Trace migrated successfully87 00000001 2009-03-29 11:09:12 Traces_LinkValues migrated successfully88 00000001 2009-03-29 11:09:12 Traces_UnreadObjects migrated successfully89 00000001 2009-03-29 11:09:12 Traces_BookmarkObjects migrated successfully90 00000001 2009-03-29 11:09:12 Traces_Attachments migrated successfully91 00000001 2009-03-29 11:09:12 Traces_QNodes migrated successfully92 00000001 2009-03-29 11:09:12 Traces_QParts migrated successfully
285
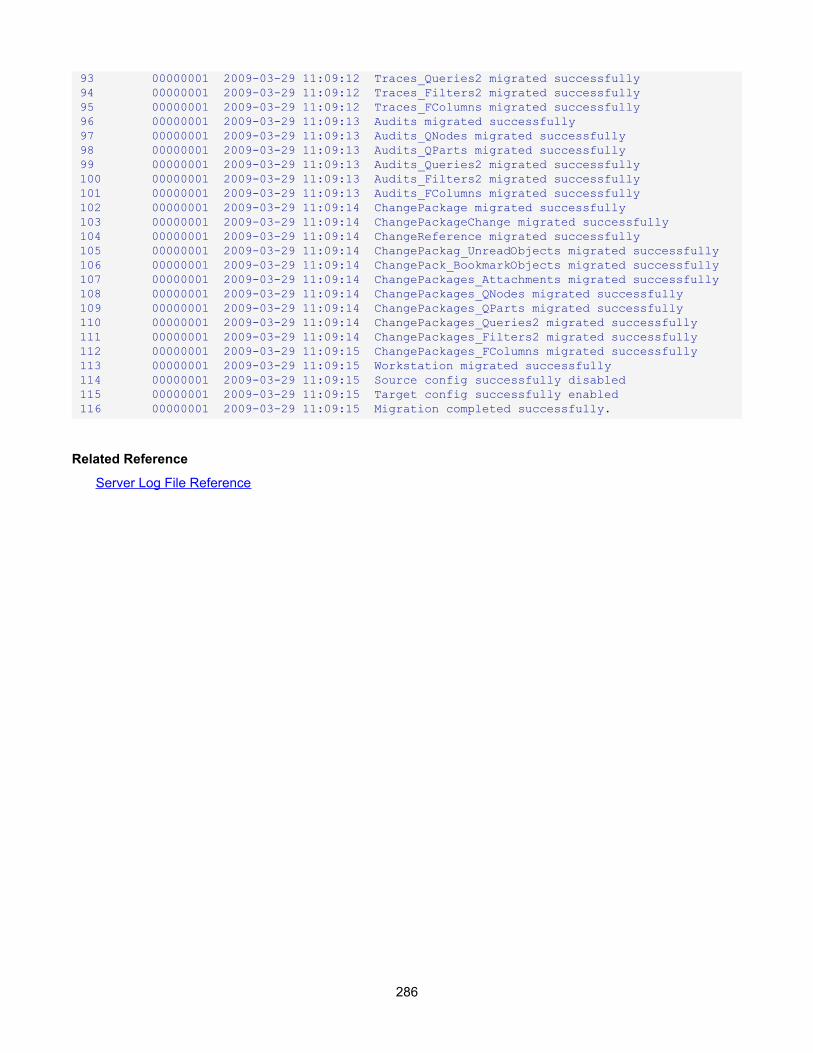
93 00000001 2009-03-29 11:09:12 Traces_Queries2 migrated successfully94 00000001 2009-03-29 11:09:12 Traces_Filters2 migrated successfully95 00000001 2009-03-29 11:09:12 Traces_FColumns migrated successfully96 00000001 2009-03-29 11:09:13 Audits migrated successfully97 00000001 2009-03-29 11:09:13 Audits_QNodes migrated successfully98 00000001 2009-03-29 11:09:13 Audits_QParts migrated successfully99 00000001 2009-03-29 11:09:13 Audits_Queries2 migrated successfully100 00000001 2009-03-29 11:09:13 Audits_Filters2 migrated successfully101 00000001 2009-03-29 11:09:13 Audits_FColumns migrated successfully102 00000001 2009-03-29 11:09:14 ChangePackage migrated successfully103 00000001 2009-03-29 11:09:14 ChangePackageChange migrated successfully104 00000001 2009-03-29 11:09:14 ChangeReference migrated successfully105 00000001 2009-03-29 11:09:14 ChangePackag_UnreadObjects migrated successfully106 00000001 2009-03-29 11:09:14 ChangePack_BookmarkObjects migrated successfully107 00000001 2009-03-29 11:09:14 ChangePackages_Attachments migrated successfully108 00000001 2009-03-29 11:09:14 ChangePackages_QNodes migrated successfully109 00000001 2009-03-29 11:09:14 ChangePackages_QParts migrated successfully110 00000001 2009-03-29 11:09:14 ChangePackages_Queries2 migrated successfully111 00000001 2009-03-29 11:09:14 ChangePackages_Filters2 migrated successfully112 00000001 2009-03-29 11:09:15 ChangePackages_FColumns migrated successfully113 00000001 2009-03-29 11:09:15 Workstation migrated successfully114 00000001 2009-03-29 11:09:15 Source config successfully disabled115 00000001 2009-03-29 11:09:15 Target config successfully enabled116 00000001 2009-03-29 11:09:15 Migration completed successfully.
Related Reference
Server Log File Reference
286
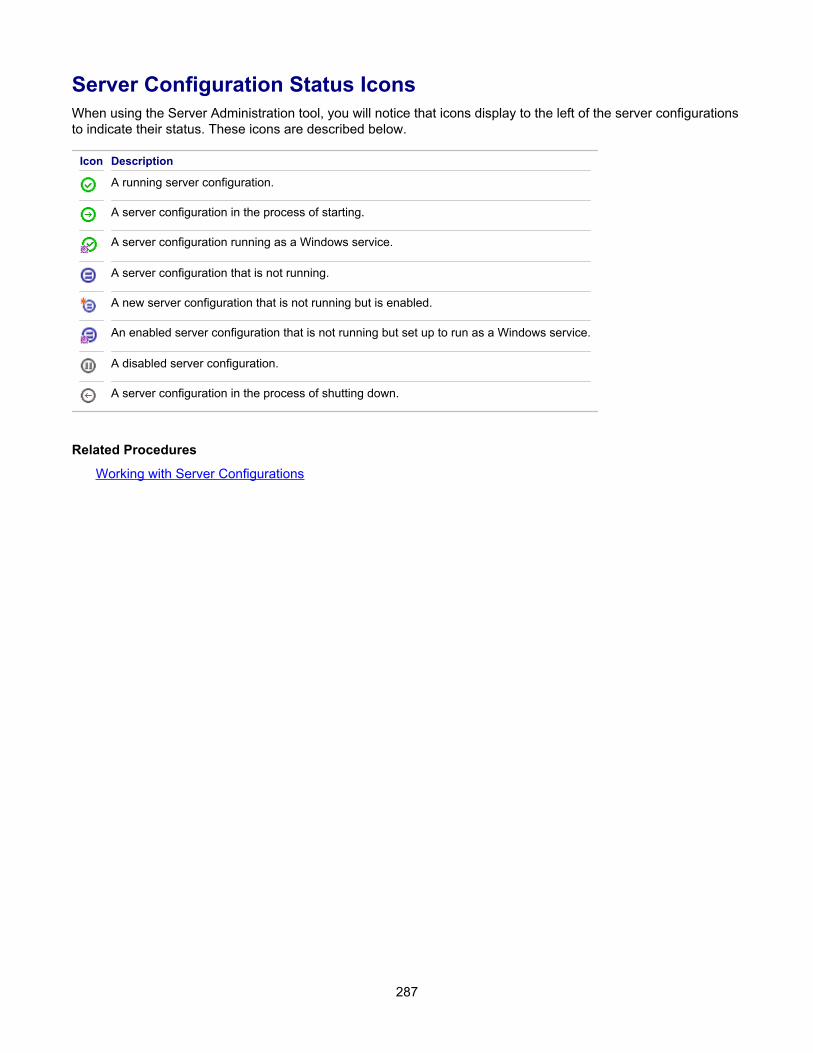
Server Configuration Status IconsWhen using the Server Administration tool, you will notice that icons display to the left of the server configurationsto indicate their status. These icons are described below.
Icon Description
A running server configuration.
A server configuration in the process of starting.
A server configuration running as a Windows service.
A server configuration that is not running.
A new server configuration that is not running but is enabled.
An enabled server configuration that is not running but set up to run as a Windows service.
A disabled server configuration.
A server configuration in the process of shutting down.
Related Procedures
Working with Server Configurations
287
Troubleshooting Server Configuration ProblemsTo reduce the amount of time spent diagnosing problems, the application provides tracing and debugging tools forthe server. It can create either, or both, trace command files and diagnostic (.dmp) files.
Trace Commands The trace option creates a file that records single server commands. Commands to betraced must have a duration time that equals or exceeds the number of specifiedmilliseconds. The default time is 0. If you wish to record only commands of longerduration, you should adjust this setting, to avoid taking up unnecessary space in the tracefile.
No trace file should generate more than 10MB of data per day. Typically, users see onlya small fraction of this amount of data per day.
Trace data is stored in a Server.trc file, which consists of a header followed by anarbitrary number of records. When a trace ends, the server timestamps the existing fileas Server.time.trc. Trace files are located in the repostitoryPath\Log\Trace folder. The next trace file starts when the server configuration is restarted or thetrace option is turned on.
Diagnostic (.dmp) Files The application creates some minidump files automatically, while others are created onlywhen the .dmp options are turned on. Minidump files can be created for either or both:
■ Asserts (unexpected conditions). Server log entries with code number 8.
■ Exceptions (errors, typically access violations). Server log entries with code number4.
Minidump files are created in the same location as the server log file. The general namingconvention for these files is prefix-counter-time.dmp, in which prefix identifies thesource of the dump, counter is an integer that increments with each .dmp file to ensurethat names are unique, and time identifies the local server time at which the dump wascreated.
Related Procedures
Diagnosing Server Problems
Related Reference
Configure Server Dialog Box (Diagnostics Tab)Server Log
288
Access Rights and PrivilegesThis section contains reference topics related to access rights and privileges.
In This SectionGroup PrivilegesDescribes the privileges assigned to a group.
Server Access RightsDescribes server-level access rights.
Project Access RightsDescribes generic access rights for projects.
View Access RightsDescribes access rights for views.
Folder Access RightsDescribes access rights for folders.
Child Folder Access RightsDescribes access rights for child folders.
File Access RightsDescribes file access rights.
Generic Item Access RightsDescribes generic item access rights available from the File nodes in the Project, View, Folder, and FileAccess Rights dialog boxes.
Promotion State Access RightsDescribes access rights for promotion states.
Component Access RightsDescribes access rights for components.
Component-level Filter Access RightsDescribes access rights for component-level filters.
Individual Filter Access RightsDescribes access rights for individual filters.
Component-level Query Access RightsDescribes access rights for component-level queries.
Individual Query Access RightsDescribes access rights for individual queries.
289
Group PrivilegesThe privileges assigned to a group may allow members of that group to access objects and perform operations thatthey are otherwise not allowed to do. In other words, privileges override the access rights settings.
If you select User Manager from the Server Administration dialog, you will notice that the server configuration comeswith some default groups: All Users, Administrators, System Managers, and Security Administrators. The defaultuser named Administrator belongs to both the Administrators and the Security Administrators groups. By default,the Administrators group has all group privileges. Also by default, other groups have none of these privileges.
All members of a group have the same privileges on every project managed by this server configuration. Theprivileges apply to all levels equally: projects, views, folders, and items within folders. If users belong to more thanone group, they have the maximum amount of privileges, regardless of which group provides them with thoseprivileges.
This privilege... Allows a group to...See object and its properties See all projects, views, folders, items, and their
properties. This privilege overrides the similarly namedaccess right found in the Generic Object Rights in theAccess Rights dialogs.
Modify object properties Modify the properties of any projects, views, folders, oritems. This privilege overrides the similarly namedaccess right found in the Generic Object Rights in theAccess Rights dialogs.
Delete object Delete any projects, views, folders, or items. Thisprivilege overrides the similarly named access rightfound in the Generic Object Rights in the Access Rightsdialogs.
Purge object (delete permanently) This privilege is not supported at this time.Change object access right Change access rights for any projects, views, folders,
or items. This privilege overrides the similarly namedaccess right found in the Generic Object Rights in theAccess Rights dialogs.
Create object and place it in a container Create new objects and put them in containers. Whenthis privilege is set, the group can add new views to aproject, new folders to a view, and new folders anditems to a folder. This privilege overrides the similarlynamed access right found in the Generic Object Rightsin the Access Rights dialogs. It does not override theserver-level access right that allows users to createprojects.
Grant all specific class-level rights for all classes ofobjects
Perform any operation not covered by the precedingprivileges. For example, this privilege allows groupmembers to check out files, break locks, perform linkingoperations, and perform labeling operations. Thisprivilege overrides some of the access rights found inthe Generic Object Container Rights and all of theaccess rights in the <item>-specific Rights in theAccess Rights dialog.
Related Reference
Access Rights and Privileges
290
Server Access RightsThe server-level rights you assign to users and groups authorize them to perform specific operations in a particularserver configuration. One of the options determines who can and who cannot create projects when the serverconfiguration is running. Server rights can be assigned only when a server is running.
By default, the Administrators group is assigned all project and Server rights. By default, the All Users group hasthe rights to create projects and review the server configuration and the server log. The Server access rights arebriefly described in the following table.
This access right... Allows a user or group to...View server log Review, but not change, server log information.View statistics and licensing information Review, but not change, statistics information (StarTeam Server 5.4
and earlier). Create license usage files.View server configuration Review, but not change, the server configuration options.Modify server configuration Change the server configuration options.Remotely administer server Lock/unlock the server, restart the server from the client, shut down
the server from the client, access the Start/Stop Conversion and HiveManager vault buttons.
Administer user accounts Add groups and users.View system policy Review, but not change, the password and logon failure options for
the server configuration.Modify system policy Change the password and logon failure options for the server
configuration.Change server security settings Set Server access rights. If you change this setting, be sure that you
remain one of the users who can change access rights.View security log Review, but not change, server log informationStarDisk OperationsCreate new users Add new users to sample project.Replication SupportChange user/operation time Manipulate creation times and user names when using special clients,
such as Notification Agent.Project OperationsCreate projects Create projects when the Server is running the server configuration.CustomizationsAdd/modify database schema Create customized fields as item properties, or modify a field for an
item that can be modified.Component operationsAdminister component-level access rights Designate the users and groups who can create and apply filters and
queries for a specific component in the server configuration.
Related Reference
Access Rights and Privileges
291
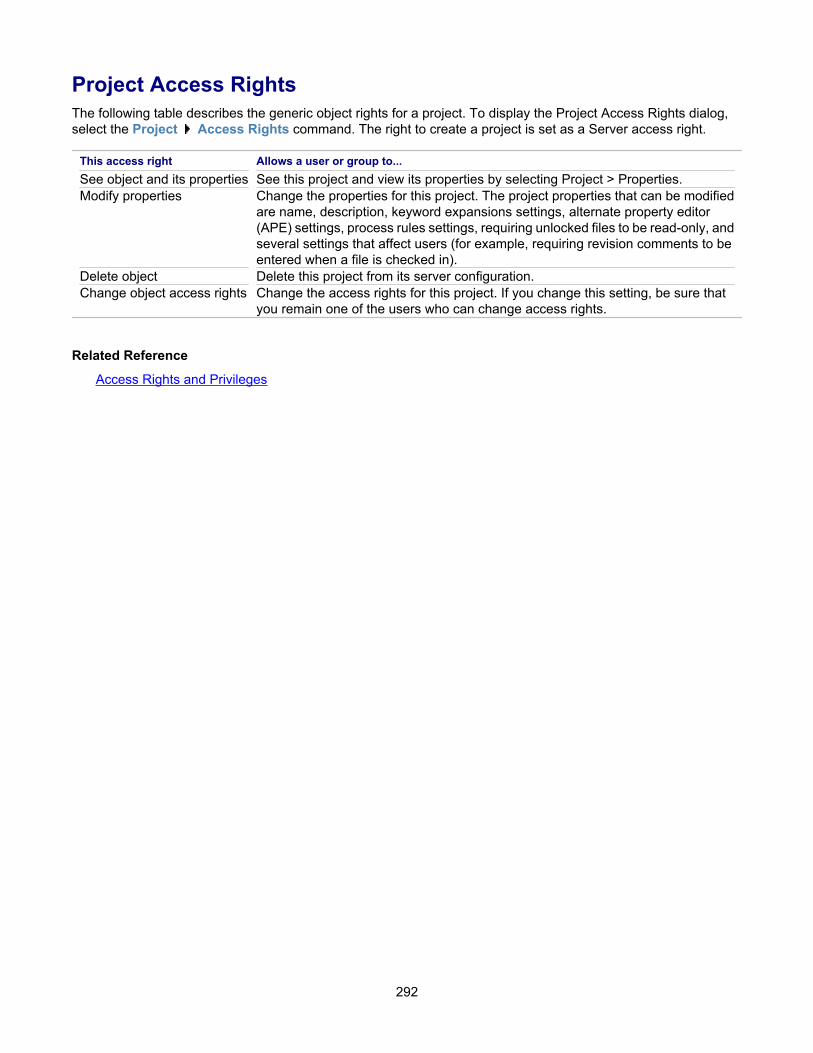
Project Access RightsThe following table describes the generic object rights for a project. To display the Project Access Rights dialog,select the Project Access Rights command. The right to create a project is set as a Server access right.
This access right Allows a user or group to...See object and its properties See this project and view its properties by selecting Project > Properties.Modify properties Change the properties for this project. The project properties that can be modified
are name, description, keyword expansions settings, alternate property editor(APE) settings, process rules settings, requiring unlocked files to be read-only, andseveral settings that affect users (for example, requiring revision comments to beentered when a file is checked in).
Delete object Delete this project from its server configuration.Change object access rights Change the access rights for this project. If you change this setting, be sure that
you remain one of the users who can change access rights.
Related Reference
Access Rights and Privileges
292
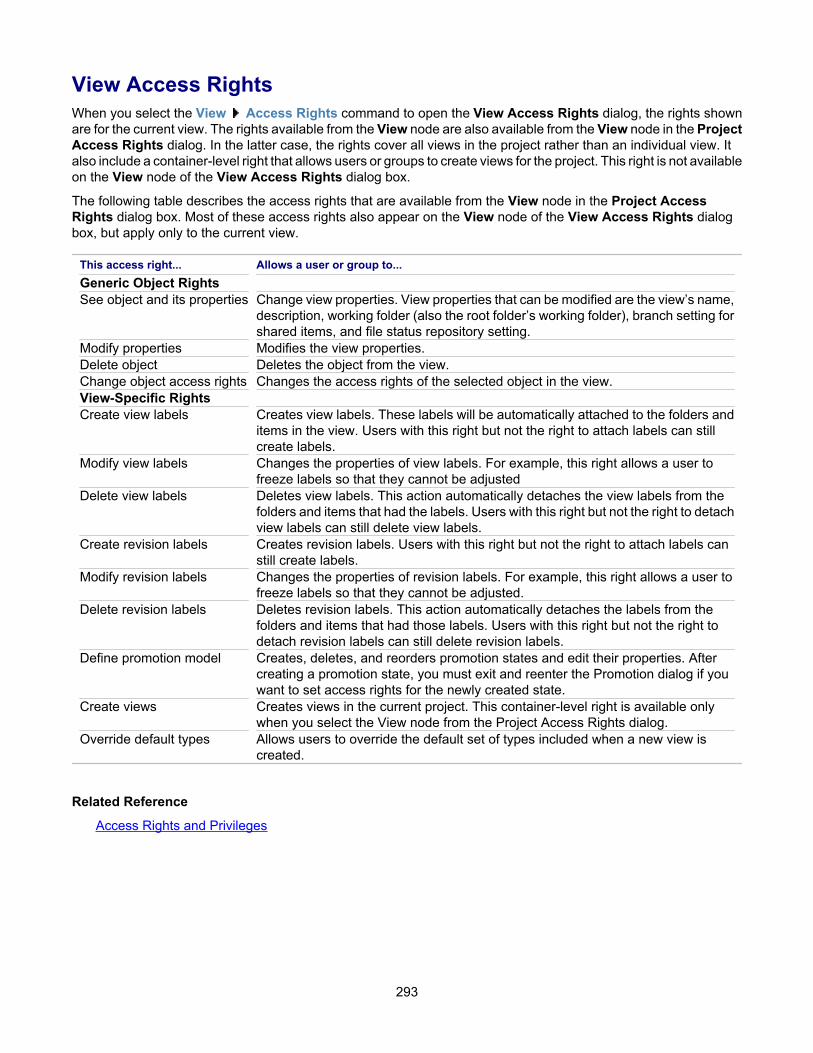
View Access RightsWhen you select the View Access Rights command to open the View Access Rights dialog, the rights shownare for the current view. The rights available from the View node are also available from the View node in the ProjectAccess Rights dialog. In the latter case, the rights cover all views in the project rather than an individual view. Italso include a container-level right that allows users or groups to create views for the project. This right is not availableon the View node of the View Access Rights dialog box.
The following table describes the access rights that are available from the View node in the Project AccessRights dialog box. Most of these access rights also appear on the View node of the View Access Rights dialogbox, but apply only to the current view.
This access right... Allows a user or group to...Generic Object RightsSee object and its properties Change view properties. View properties that can be modified are the view’s name,
description, working folder (also the root folder’s working folder), branch setting forshared items, and file status repository setting.
Modify properties Modifies the view properties.Delete object Deletes the object from the view.Change object access rights Changes the access rights of the selected object in the view.View-Specific RightsCreate view labels Creates view labels. These labels will be automatically attached to the folders and
items in the view. Users with this right but not the right to attach labels can stillcreate labels.
Modify view labels Changes the properties of view labels. For example, this right allows a user tofreeze labels so that they cannot be adjusted
Delete view labels Deletes view labels. This action automatically detaches the view labels from thefolders and items that had the labels. Users with this right but not the right to detachview labels can still delete view labels.
Create revision labels Creates revision labels. Users with this right but not the right to attach labels canstill create labels.
Modify revision labels Changes the properties of revision labels. For example, this right allows a user tofreeze labels so that they cannot be adjusted.
Delete revision labels Deletes revision labels. This action automatically detaches the labels from thefolders and items that had those labels. Users with this right but not the right todetach revision labels can still delete revision labels.
Define promotion model Creates, deletes, and reorders promotion states and edit their properties. Aftercreating a promotion state, you must exit and reenter the Promotion dialog if youwant to set access rights for the newly created state.
Create views Creates views in the current project. This container-level right is available onlywhen you select the View node from the Project Access Rights dialog.
Override default types Allows users to override the default set of types included when a new view iscreated.
Related Reference
Access Rights and Privileges
293
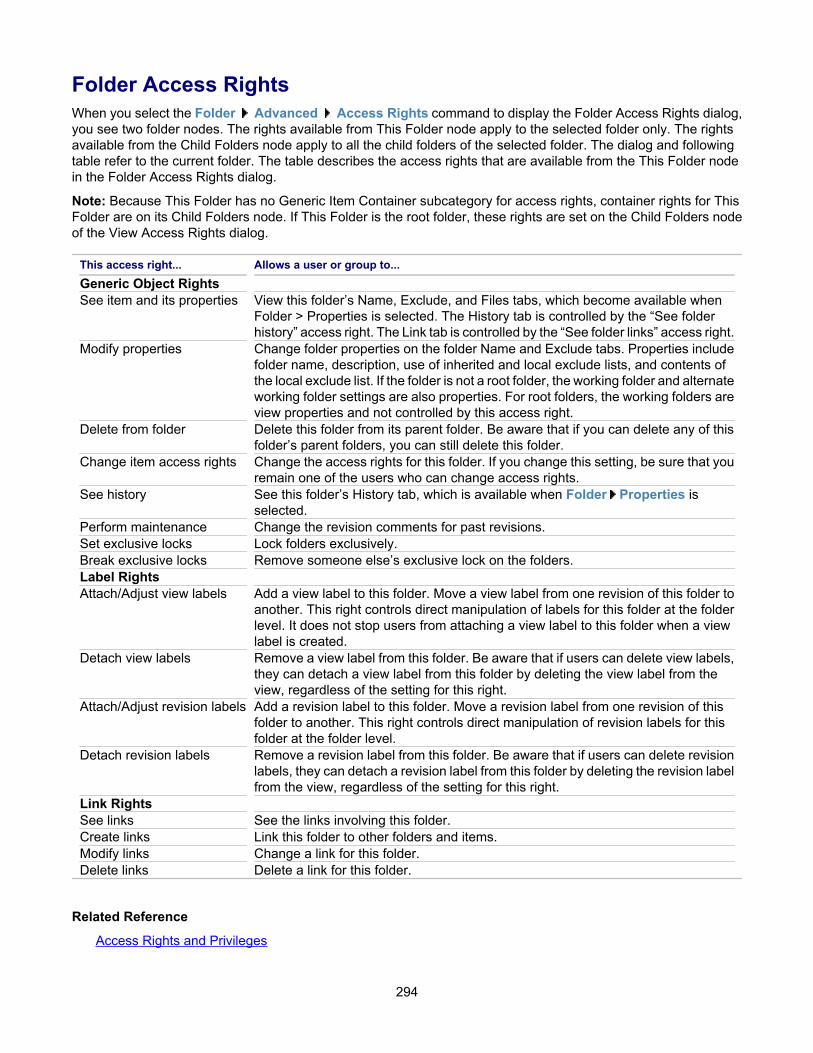
Folder Access RightsWhen you select the Folder Advanced Access Rights command to display the Folder Access Rights dialog,you see two folder nodes. The rights available from This Folder node apply to the selected folder only. The rightsavailable from the Child Folders node apply to all the child folders of the selected folder. The dialog and followingtable refer to the current folder. The table describes the access rights that are available from the This Folder nodein the Folder Access Rights dialog.
Note: Because This Folder has no Generic Item Container subcategory for access rights, container rights for ThisFolder are on its Child Folders node. If This Folder is the root folder, these rights are set on the Child Folders nodeof the View Access Rights dialog.
This access right... Allows a user or group to...Generic Object RightsSee item and its properties View this folder’s Name, Exclude, and Files tabs, which become available when
Folder > Properties is selected. The History tab is controlled by the “See folderhistory” access right. The Link tab is controlled by the “See folder links” access right.
Modify properties Change folder properties on the folder Name and Exclude tabs. Properties includefolder name, description, use of inherited and local exclude lists, and contents ofthe local exclude list. If the folder is not a root folder, the working folder and alternateworking folder settings are also properties. For root folders, the working folders areview properties and not controlled by this access right.
Delete from folder Delete this folder from its parent folder. Be aware that if you can delete any of thisfolder’s parent folders, you can still delete this folder.
Change item access rights Change the access rights for this folder. If you change this setting, be sure that youremain one of the users who can change access rights.
See history See this folder’s History tab, which is available when Folder Properties isselected.
Perform maintenance Change the revision comments for past revisions.Set exclusive locks Lock folders exclusively.Break exclusive locks Remove someone else’s exclusive lock on the folders.Label RightsAttach/Adjust view labels Add a view label to this folder. Move a view label from one revision of this folder to
another. This right controls direct manipulation of labels for this folder at the folderlevel. It does not stop users from attaching a view label to this folder when a viewlabel is created.
Detach view labels Remove a view label from this folder. Be aware that if users can delete view labels,they can detach a view label from this folder by deleting the view label from theview, regardless of the setting for this right.
Attach/Adjust revision labels Add a revision label to this folder. Move a revision label from one revision of thisfolder to another. This right controls direct manipulation of revision labels for thisfolder at the folder level.
Detach revision labels Remove a revision label from this folder. Be aware that if users can delete revisionlabels, they can detach a revision label from this folder by deleting the revision labelfrom the view, regardless of the setting for this right.
Link RightsSee links See the links involving this folder.Create links Link this folder to other folders and items.Modify links Change a link for this folder.Delete links Delete a link for this folder.
Related Reference
Access Rights and Privileges
294
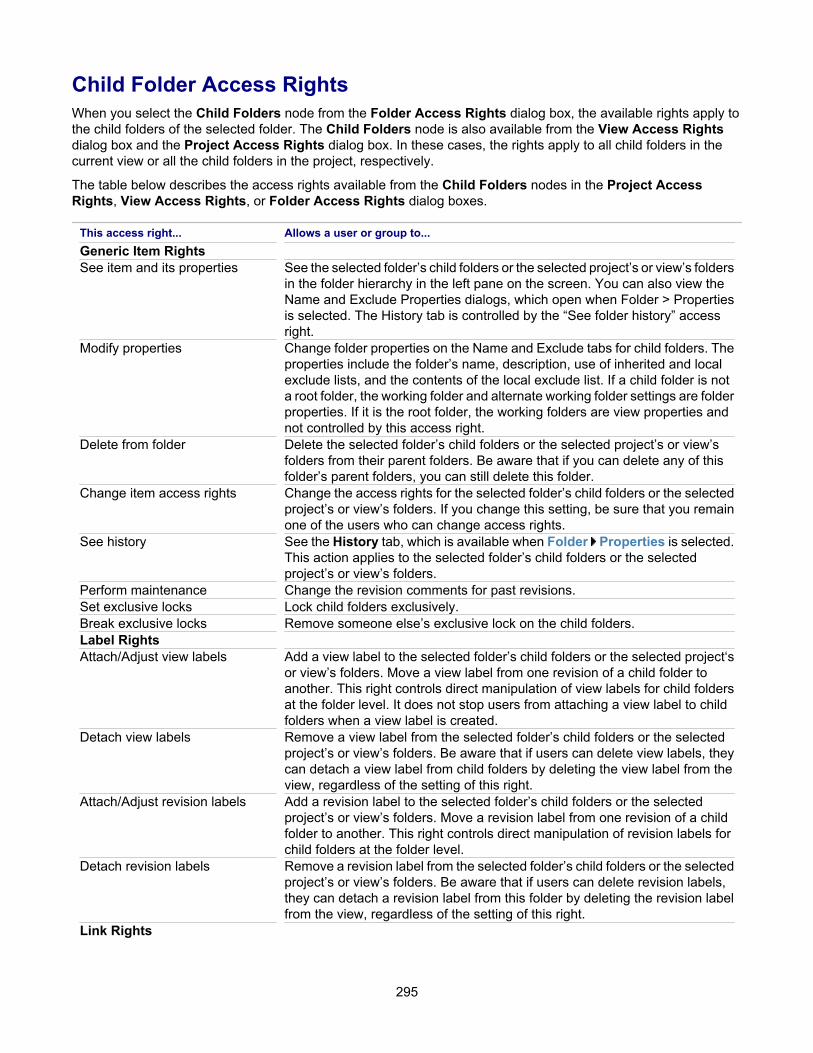
Child Folder Access RightsWhen you select the Child Folders node from the Folder Access Rights dialog box, the available rights apply tothe child folders of the selected folder. The Child Folders node is also available from the View Access Rightsdialog box and the Project Access Rights dialog box. In these cases, the rights apply to all child folders in thecurrent view or all the child folders in the project, respectively.
The table below describes the access rights available from the Child Folders nodes in the Project AccessRights, View Access Rights, or Folder Access Rights dialog boxes.
This access right... Allows a user or group to...Generic Item RightsSee item and its properties See the selected folder’s child folders or the selected project’s or view’s folders
in the folder hierarchy in the left pane on the screen. You can also view theName and Exclude Properties dialogs, which open when Folder > Propertiesis selected. The History tab is controlled by the “See folder history” accessright.
Modify properties Change folder properties on the Name and Exclude tabs for child folders. Theproperties include the folder’s name, description, use of inherited and localexclude lists, and the contents of the local exclude list. If a child folder is nota root folder, the working folder and alternate working folder settings are folderproperties. If it is the root folder, the working folders are view properties andnot controlled by this access right.
Delete from folder Delete the selected folder’s child folders or the selected project’s or view’sfolders from their parent folders. Be aware that if you can delete any of thisfolder’s parent folders, you can still delete this folder.
Change item access rights Change the access rights for the selected folder’s child folders or the selectedproject’s or view’s folders. If you change this setting, be sure that you remainone of the users who can change access rights.
See history See the History tab, which is available when Folder Properties is selected.This action applies to the selected folder’s child folders or the selectedproject’s or view’s folders.
Perform maintenance Change the revision comments for past revisions.Set exclusive locks Lock child folders exclusively.Break exclusive locks Remove someone else’s exclusive lock on the child folders.Label RightsAttach/Adjust view labels Add a view label to the selected folder’s child folders or the selected project‘s
or view’s folders. Move a view label from one revision of a child folder toanother. This right controls direct manipulation of view labels for child foldersat the folder level. It does not stop users from attaching a view label to childfolders when a view label is created.
Detach view labels Remove a view label from the selected folder’s child folders or the selectedproject’s or view’s folders. Be aware that if users can delete view labels, theycan detach a view label from child folders by deleting the view label from theview, regardless of the setting of this right.
Attach/Adjust revision labels Add a revision label to the selected folder’s child folders or the selectedproject’s or view’s folders. Move a revision label from one revision of a childfolder to another. This right controls direct manipulation of revision labels forchild folders at the folder level.
Detach revision labels Remove a revision label from the selected folder’s child folders or the selectedproject’s or view’s folders. Be aware that if users can delete revision labels,they can detach a revision label from this folder by deleting the revision labelfrom the view, regardless of the setting of this right.
Link Rights
295
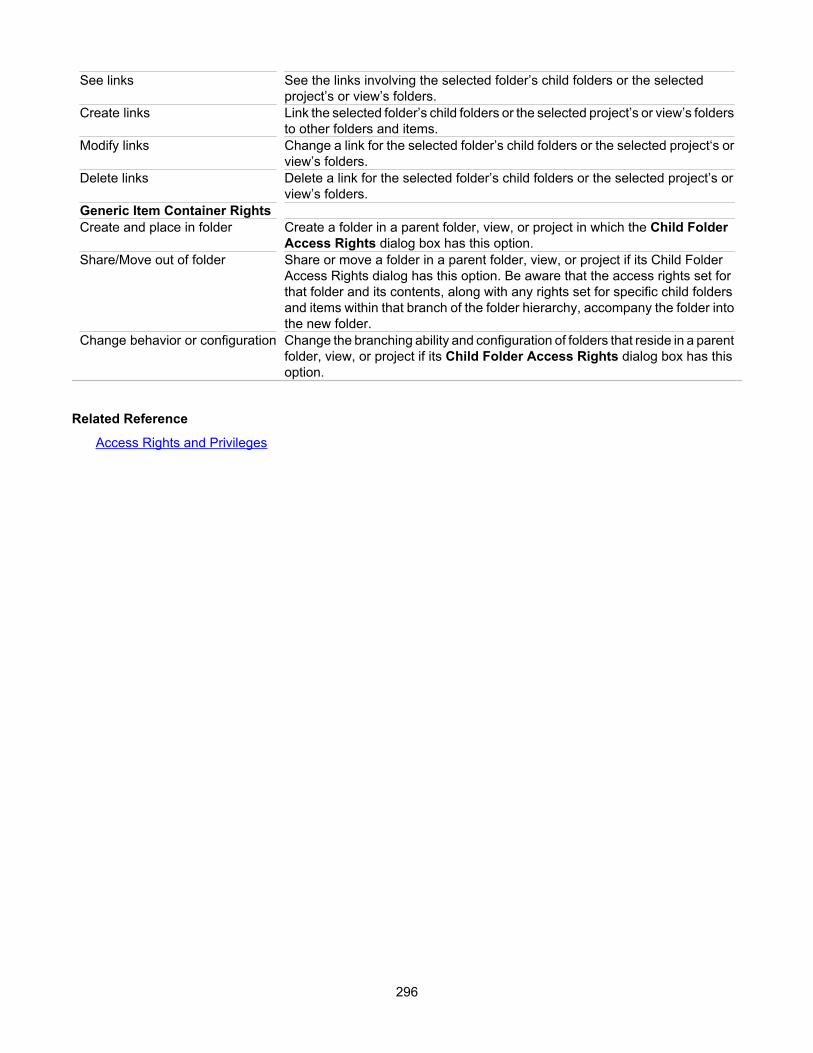
See links See the links involving the selected folder’s child folders or the selectedproject’s or view’s folders.
Create links Link the selected folder’s child folders or the selected project’s or view’s foldersto other folders and items.
Modify links Change a link for the selected folder’s child folders or the selected project‘s orview’s folders.
Delete links Delete a link for the selected folder’s child folders or the selected project’s orview’s folders.
Generic Item Container RightsCreate and place in folder Create a folder in a parent folder, view, or project in which the Child Folder
Access Rights dialog box has this option.Share/Move out of folder Share or move a folder in a parent folder, view, or project if its Child Folder
Access Rights dialog has this option. Be aware that the access rights set forthat folder and its contents, along with any rights set for specific child foldersand items within that branch of the folder hierarchy, accompany the folder intothe new folder.
Change behavior or configuration Change the branching ability and configuration of folders that reside in a parentfolder, view, or project if its Child Folder Access Rights dialog box has thisoption.
Related Reference
Access Rights and Privileges
296
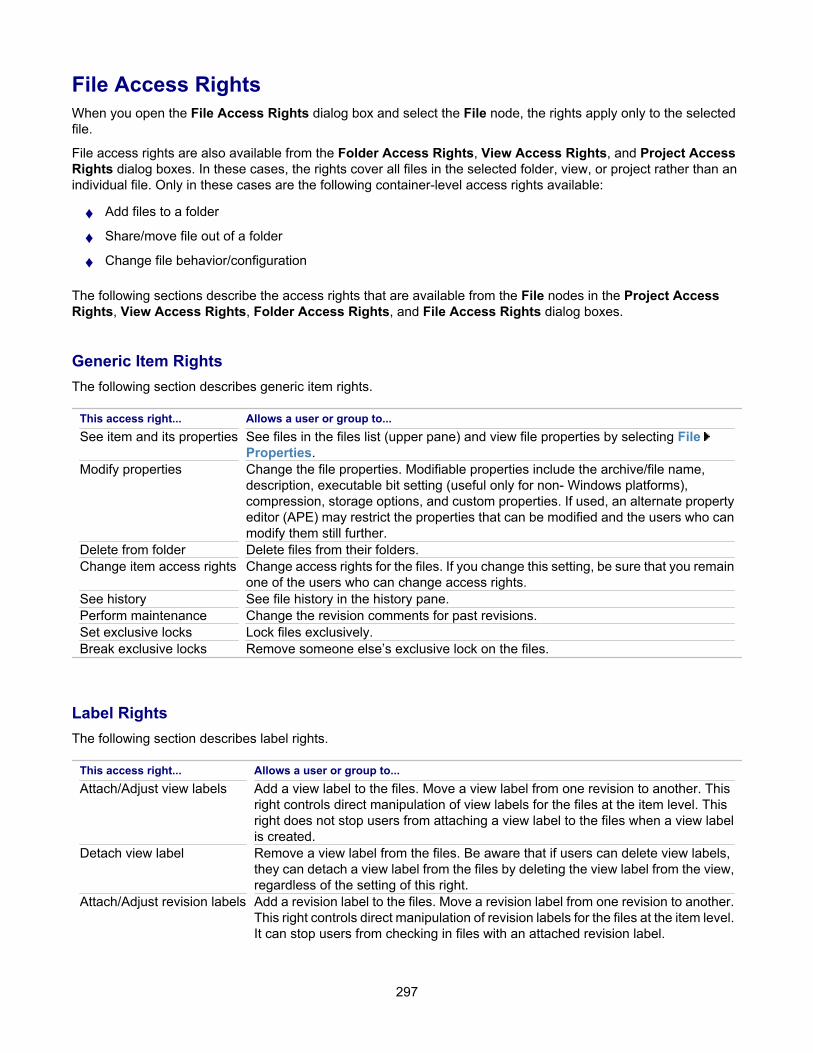
File Access RightsWhen you open the File Access Rights dialog box and select the File node, the rights apply only to the selectedfile.
File access rights are also available from the Folder Access Rights, View Access Rights, and Project AccessRights dialog boxes. In these cases, the rights cover all files in the selected folder, view, or project rather than anindividual file. Only in these cases are the following container-level access rights available:
♦ Add files to a folder
♦ Share/move file out of a folder
♦ Change file behavior/configuration
The following sections describe the access rights that are available from the File nodes in the Project AccessRights, View Access Rights, Folder Access Rights, and File Access Rights dialog boxes.
Generic Item RightsThe following section describes generic item rights.
This access right... Allows a user or group to...See item and its properties See files in the files list (upper pane) and view file properties by selecting File
Properties.Modify properties Change the file properties. Modifiable properties include the archive/file name,
description, executable bit setting (useful only for non- Windows platforms),compression, storage options, and custom properties. If used, an alternate propertyeditor (APE) may restrict the properties that can be modified and the users who canmodify them still further.
Delete from folder Delete files from their folders.Change item access rights Change access rights for the files. If you change this setting, be sure that you remain
one of the users who can change access rights.See history See file history in the history pane.Perform maintenance Change the revision comments for past revisions.Set exclusive locks Lock files exclusively.Break exclusive locks Remove someone else’s exclusive lock on the files.
Label RightsThe following section describes label rights.
This access right... Allows a user or group to...Attach/Adjust view labels Add a view label to the files. Move a view label from one revision to another. This
right controls direct manipulation of view labels for the files at the item level. Thisright does not stop users from attaching a view label to the files when a view labelis created.
Detach view label Remove a view label from the files. Be aware that if users can delete view labels,they can detach a view label from the files by deleting the view label from the view,regardless of the setting of this right.
Attach/Adjust revision labels Add a revision label to the files. Move a revision label from one revision to another.This right controls direct manipulation of revision labels for the files at the item level.It can stop users from checking in files with an attached revision label.
297
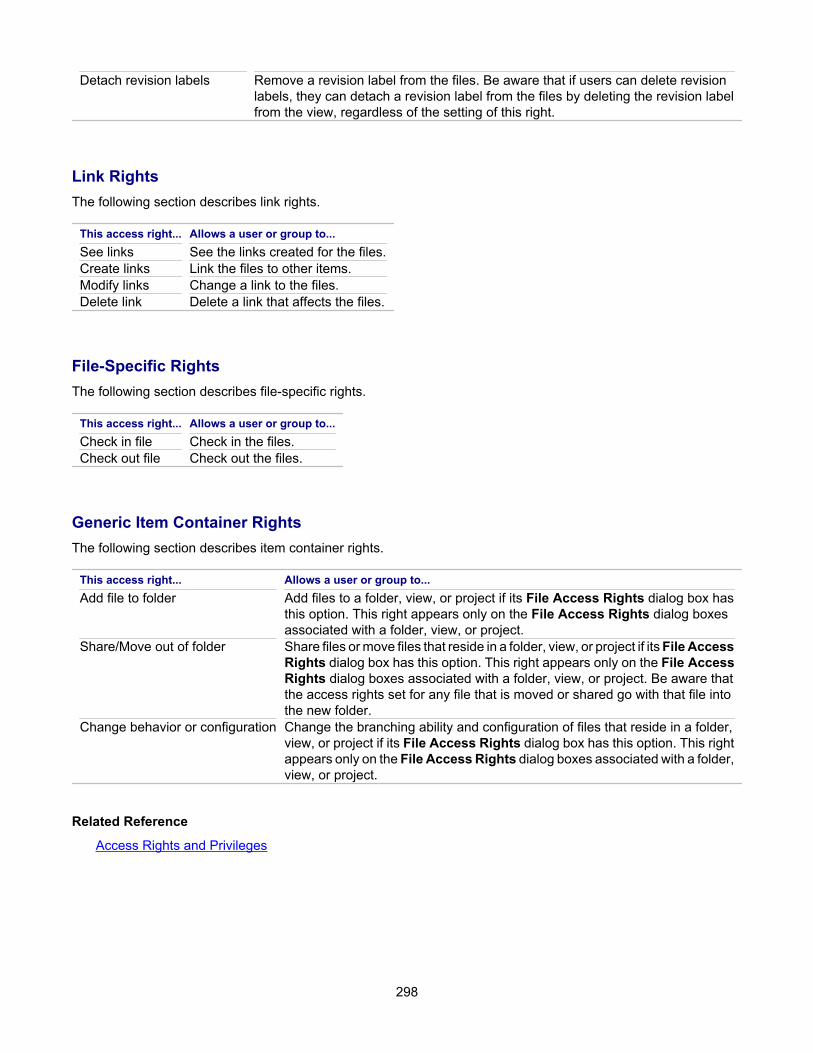
Detach revision labels Remove a revision label from the files. Be aware that if users can delete revisionlabels, they can detach a revision label from the files by deleting the revision labelfrom the view, regardless of the setting of this right.
Link RightsThe following section describes link rights.
This access right... Allows a user or group to...See links See the links created for the files.Create links Link the files to other items.Modify links Change a link to the files.Delete link Delete a link that affects the files.
File-Specific RightsThe following section describes file-specific rights.
This access right... Allows a user or group to...Check in file Check in the files.Check out file Check out the files.
Generic Item Container RightsThe following section describes item container rights.
This access right... Allows a user or group to...Add file to folder Add files to a folder, view, or project if its File Access Rights dialog box has
this option. This right appears only on the File Access Rights dialog boxesassociated with a folder, view, or project.
Share/Move out of folder Share files or move files that reside in a folder, view, or project if its File AccessRights dialog box has this option. This right appears only on the File AccessRights dialog boxes associated with a folder, view, or project. Be aware thatthe access rights set for any file that is moved or shared go with that file intothe new folder.
Change behavior or configuration Change the branching ability and configuration of files that reside in a folder,view, or project if its File Access Rights dialog box has this option. This rightappears only on the File Access Rights dialog boxes associated with a folder,view, or project.
Related Reference
Access Rights and Privileges
298
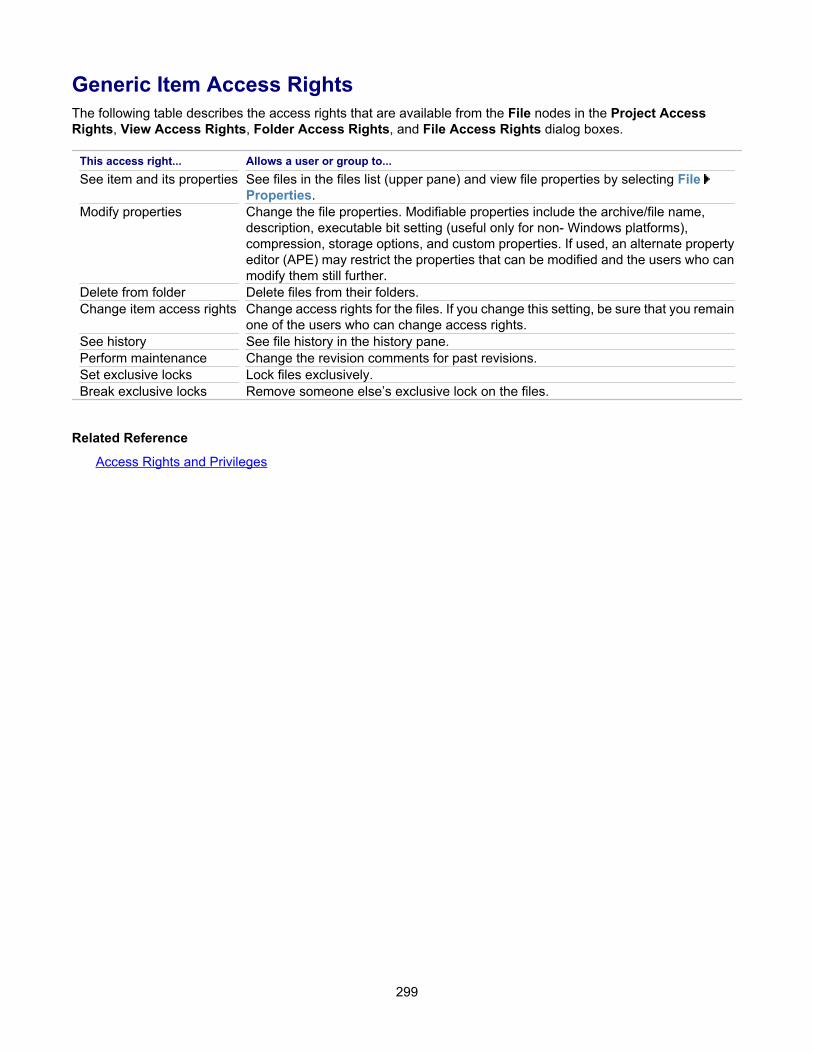
Generic Item Access RightsThe following table describes the access rights that are available from the File nodes in the Project AccessRights, View Access Rights, Folder Access Rights, and File Access Rights dialog boxes.
This access right... Allows a user or group to...See item and its properties See files in the files list (upper pane) and view file properties by selecting File
Properties.Modify properties Change the file properties. Modifiable properties include the archive/file name,
description, executable bit setting (useful only for non- Windows platforms),compression, storage options, and custom properties. If used, an alternate propertyeditor (APE) may restrict the properties that can be modified and the users who canmodify them still further.
Delete from folder Delete files from their folders.Change item access rights Change access rights for the files. If you change this setting, be sure that you remain
one of the users who can change access rights.See history See file history in the history pane.Perform maintenance Change the revision comments for past revisions.Set exclusive locks Lock files exclusively.Break exclusive locks Remove someone else’s exclusive lock on the files.
Related Reference
Access Rights and Privileges
299
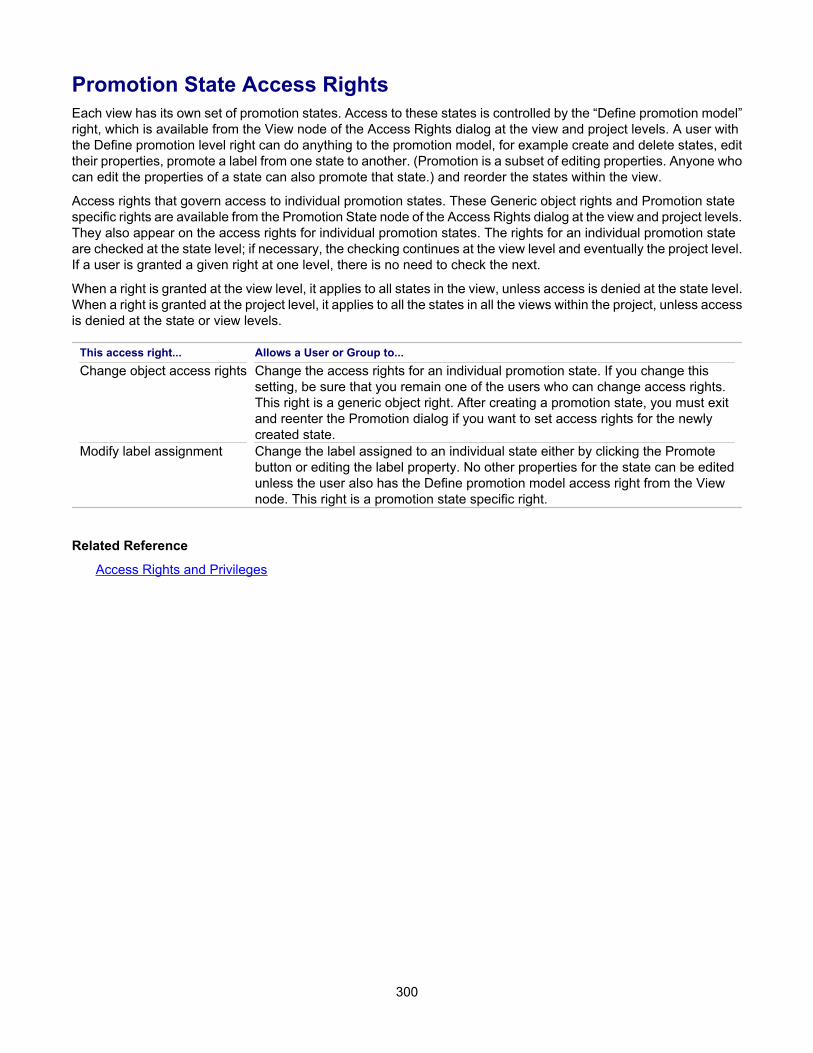
Promotion State Access RightsEach view has its own set of promotion states. Access to these states is controlled by the “Define promotion model”right, which is available from the View node of the Access Rights dialog at the view and project levels. A user withthe Define promotion level right can do anything to the promotion model, for example create and delete states, edittheir properties, promote a label from one state to another. (Promotion is a subset of editing properties. Anyone whocan edit the properties of a state can also promote that state.) and reorder the states within the view.
Access rights that govern access to individual promotion states. These Generic object rights and Promotion statespecific rights are available from the Promotion State node of the Access Rights dialog at the view and project levels.They also appear on the access rights for individual promotion states. The rights for an individual promotion stateare checked at the state level; if necessary, the checking continues at the view level and eventually the project level.If a user is granted a given right at one level, there is no need to check the next.
When a right is granted at the view level, it applies to all states in the view, unless access is denied at the state level.When a right is granted at the project level, it applies to all the states in all the views within the project, unless accessis denied at the state or view levels.
This access right... Allows a User or Group to...Change object access rights Change the access rights for an individual promotion state. If you change this
setting, be sure that you remain one of the users who can change access rights.This right is a generic object right. After creating a promotion state, you must exitand reenter the Promotion dialog if you want to set access rights for the newlycreated state.
Modify label assignment Change the label assigned to an individual state either by clicking the Promotebutton or editing the label property. No other properties for the state can be editedunless the user also has the Define promotion model access right from the Viewnode. This right is a promotion state specific right.
Related Reference
Access Rights and Privileges
300

Component Access RightsIf you have the server-level access right to “Administer component-level access rights,” you can set component-levelaccess rights from any open component.
The following is a description of the Component Access Rights
This access right... Allows a user or group to...Create public filters Create public filter for this component.Create public queries Create public queries for this component.
Related Reference
Access Rights and Privileges
301
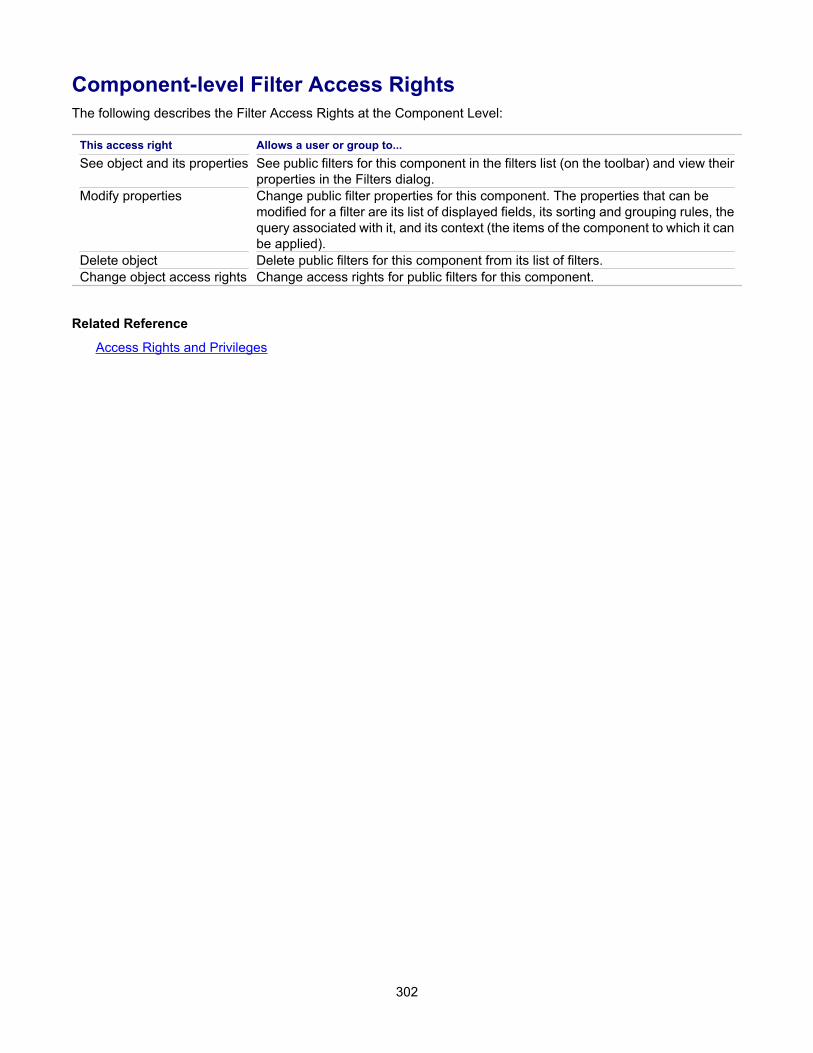
Component-level Filter Access RightsThe following describes the Filter Access Rights at the Component Level:
This access right Allows a user or group to...See object and its properties See public filters for this component in the filters list (on the toolbar) and view their
properties in the Filters dialog.Modify properties Change public filter properties for this component. The properties that can be
modified for a filter are its list of displayed fields, its sorting and grouping rules, thequery associated with it, and its context (the items of the component to which it canbe applied).
Delete object Delete public filters for this component from its list of filters.Change object access rights Change access rights for public filters for this component.
Related Reference
Access Rights and Privileges
302
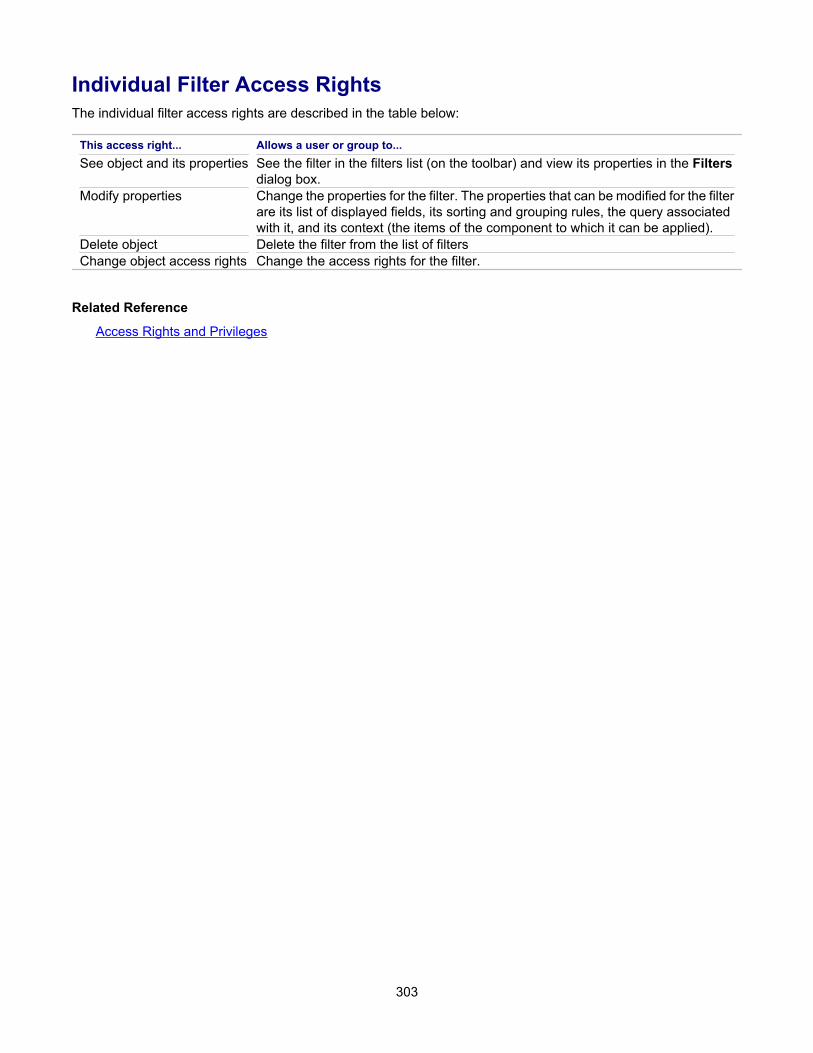
Individual Filter Access RightsThe individual filter access rights are described in the table below:
This access right... Allows a user or group to...See object and its properties See the filter in the filters list (on the toolbar) and view its properties in the Filters
dialog box.Modify properties Change the properties for the filter. The properties that can be modified for the filter
are its list of displayed fields, its sorting and grouping rules, the query associatedwith it, and its context (the items of the component to which it can be applied).
Delete object Delete the filter from the list of filtersChange object access rights Change the access rights for the filter.
Related Reference
Access Rights and Privileges
303
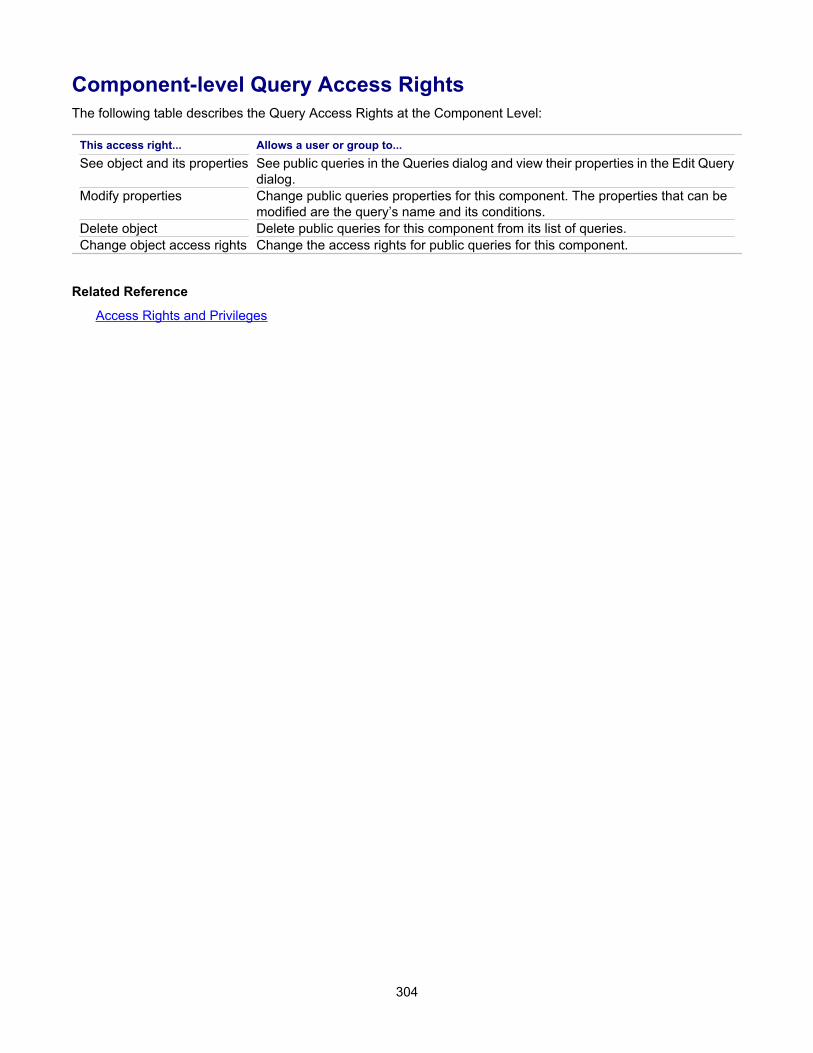
Component-level Query Access RightsThe following table describes the Query Access Rights at the Component Level:
This access right... Allows a user or group to...See object and its properties See public queries in the Queries dialog and view their properties in the Edit Query
dialog.Modify properties Change public queries properties for this component. The properties that can be
modified are the query’s name and its conditions.Delete object Delete public queries for this component from its list of queries.Change object access rights Change the access rights for public queries for this component.
Related Reference
Access Rights and Privileges
304
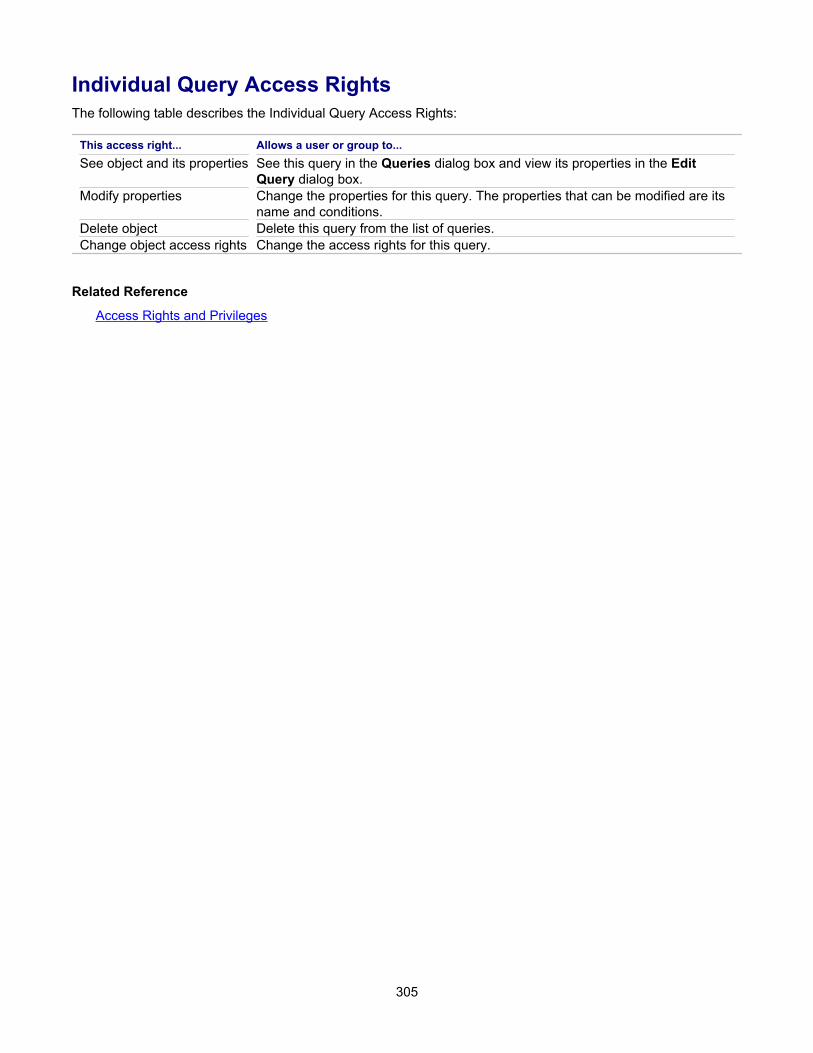
Individual Query Access RightsThe following table describes the Individual Query Access Rights:
This access right... Allows a user or group to...See object and its properties See this query in the Queries dialog box and view its properties in the Edit
Query dialog box.Modify properties Change the properties for this query. The properties that can be modified are its
name and conditions.Delete object Delete this query from the list of queries.Change object access rights Change the access rights for this query.
Related Reference
Access Rights and Privileges
305

Indexaccess rights, 182
group privileges, 188server, 189
access rights and group privileges, 96administrative accounts
reactivate, 168app-control.xml, 26app-control.xml file, 26archives path
customize, 252audit log, 65backups
files, 97 123restore, 200
Catalog Export, 212check-in
atomic, 112check-out Trace Utility
enabling, 202generating files, 203
data filestransaction logs, 270
data storageoverview, 100
databasebackups, 129migrate, 157
deny access rights, 94diagnostics, 243directory service, 244e-mail notifications, 138email notification, 239encryption, 155endpoints, 242event handlers
assign, 232create, 241review, 247
general access rights rules, 95granting folder-level access rights, 91granting item-level access rights, 93granting project-level access rights, 88granting view-level access rights, 90group privileges, 187groups
set up, 169hive
create, 250customize, 255
hives, 103initialization files
overview, 119install
StarTeam, 11LDAP, 108license
native, 150log off, 167logon attempts, 154new features, 28online
backups, 86 127Online Purge
Server, 26Oracle
backups, 133data files, 271
passwordsoverview, 83change, 163 178constraints, 164 179force change, 166 180
projects, 258security
logs, 117security event log, 194security strategy, 78Server Admin tool
Open, 216server administration, 57server administration assumptions, 59Server Administration Tool
UI, 68 70 73server configuration, 60
guidelines, 62 109migrate, 160status, 287
server configurationsmove, 125create, 205database information, 219disable or enable, 210lock and unlock, 213log on, 214start and stop, 227windows service, 220
server log, 196server session
options, 233server statistics
306
statistics, 246server time-out options, 84servers
tracing data, 116backups, 124
sql serverbackups, 130
StarDraw, 66StarTeam.Log, 191test server, 121UI, 22users
set up, 172Vault Verify
concepts, 113Concepts, 113using, 230 254
viewsadvanced, 211
307