Embed Size (px)
Citation preview

www.defectivegeeks.com
Star Wars AT-AT Page 1 of 15
Star Wars AT-AT WalkerBy: Pilbeamwww.defectivegeeks.com
(Action figures not included!)

www.defectivegeeks.com
Star Wars AT-AT Page 2 of 15
Supplies3.0mm crochet hookGrey yarn [suggested Patons UK Merino Wool DK]2 Popsicle sticks4x quarter coins or 4x 2p coinsStuffingYarn needle [for sewing pieces together]A4 or 8”x11” piece of cardboard [to keep shaping of pieces once stuffed]
Terminology and Links(American crochet terminology)Magic loop technique - http://www.planetjune.com/blog/tutorials/magic-ring-right-handed/Slip stitch - http://www.planetjune.com/blog/amigurumi-help/crochet-basics-right-handed/#slstSc – Single CrochetInc – Increase (2 sc in one sc stitch)Dec – Invisible decrease http://www.youtube.com/watch?v=tZ575_ZklWk video orwritten tutorial http://www.planetjune.com/blog/amigurumi-help/invisible-decrease/Row vs. round – A row in crochet is single crochet straight across, chain, and turn. Ina circle, you slip stitch into the first single crochet you made for that row to finish therow, then chain 1, and then do the next row without turning. The slip stitch does notcount towards the stitch count.A round is a spiral, created by continuing on to the next instructions.Back loop only –Do a normal single crochet in the back loop of the V.http://www.stitchdiva.com/custom.aspx?id=128
Feet and legs [make 4]The foot base is done in circular rows. Each time you finish going around the circle,slip stitch into your first stitch and then chain 1 to give you enough height to do thenext row.
The feet are like a tiered wedding cake. You start making the base, then the sides,then the top, and then the next tier.

www.defectivegeeks.com
Star Wars AT-AT Page 3 of 15
The total number of stitches are noted in square brackets [ ] at the end of each lineof instructions.
Magic Ring 6 [6]Inc around [12](1 sc, inc) around, slip stitch, chain 1 [18](1 sc, 1sc, inc) around, slip stitch, chain 1 [24]sc x24 back loop only [24]sc around [24]sc around [24](1 sc, 1sc, 1dec) back loop only [18] (I used standard decrease rather than invisibledecrease here because it was a tight space)Insert coin now. The coin will make the bottom of the foot keep its shape and alsoweight it down.Sc 18 front loop only [18]Sc around [18](1 sc, 1 dec) back loop only [12]1 sc around front loop only [12]The foot is done. The next stitches make up the leg. These are done in the round, soyou don’t have to stop and slip stitch all the time.1 sc around [12] repeat 11 times
The whole foot and leg should measure about 3 inches tall (roughly 7.5 cm)Make 3 more!

www.defectivegeeks.com
Star Wars AT-AT Page 4 of 15
In progress feet and legs
BodyI’m going to give approximate sizes for the pieces of the body. The gauge andblocking will possibly make your pieces a slightly different size to mine. That’s fine,but to deal with it, I recommend starting with the central part of the body and seeinghow big it gets. You can adapt the other pieces to fit better, then.
Body – (D) front sideChain 18Sc 17 (repeat 10 times)Don’t break the yarn, just move on to next body part instruction
Body – (D) sideSc 17 Back loop onlySc 17 (repeat 16 times)Don’t break the yarn, just move on to next body part instruction
Body – (D) back sideSc 17 front loop onlySc 17 (repeat 10 times)Don’t break the yarn, just move on to next body part instruction
Body – (D) sideSc 17 Back loop onlySc 17 (repeat 16 times)

www.defectivegeeks.com
Star Wars AT-AT Page 5 of 15
You have a large box shape with no top or bottom. We’ll make the top now.
Body – (D) topCh 9Sc 8 (repeat 19 times)
Sew the top on to the rectangle.
This is the main body part (D).
Body – (A) [this is the front and back of the body, as seen above]
Body – (A) side [make 4]Chain 12Sc 11 [11]Sc 11 [11]Sc 11 inc [12]Sc 12 [12]Sc 12 inc [13]Sc 13 [13]Sc 13 inc inc [15]Sc 15 [15]Sc 15 inc [16]

www.defectivegeeks.com
Star Wars AT-AT Page 6 of 15
Sc 16 [16]
Body – (A) top [make 2]Chain 5Sc 4 [4]Inc sc 3 inc [6]Sc 6 [6]Inc sc 4 inc [8]Sc 8 [8]Sc 8 [8]
Body – (A) front [make 2]Chain 10Sc 9Dec sc 5 decSc 7Sc 7Sc 7Dec sc 3 decSc 5 (repeat 7 times)
At this point I blocked the Body (A) pieces because they were quite curly.

www.defectivegeeks.com
Star Wars AT-AT Page 7 of 15
You can then sew them together, at this point.
www.defectivegeeks.com
Star Wars AT-AT Page 8 of 15
Sew the front and back onto the main body. It will end up looking like this:

www.defectivegeeks.com
Star Wars AT-AT Page 9 of 15
Now you can make the bottom of the body
Body – BottomChain 12

www.defectivegeeks.com
Star Wars AT-AT Page 10 of 15
Sc 11 (repeat until it is the length of the body. Roughly 13.5 cm (5 inches)
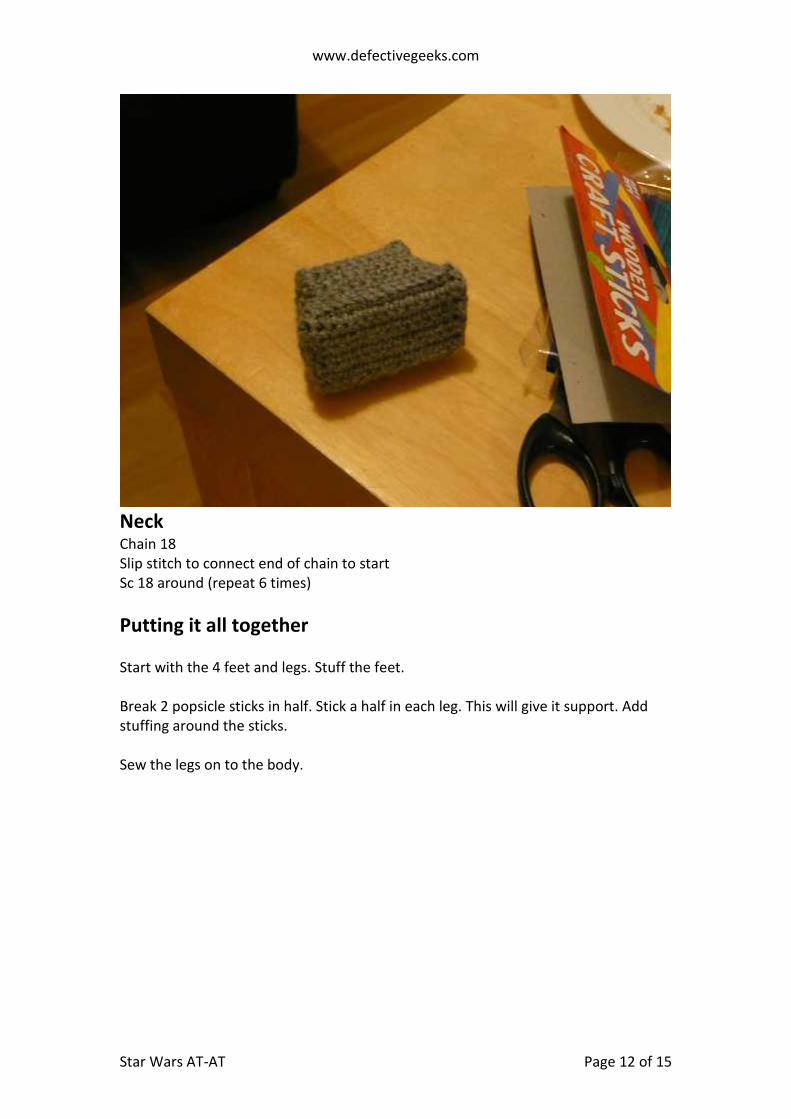
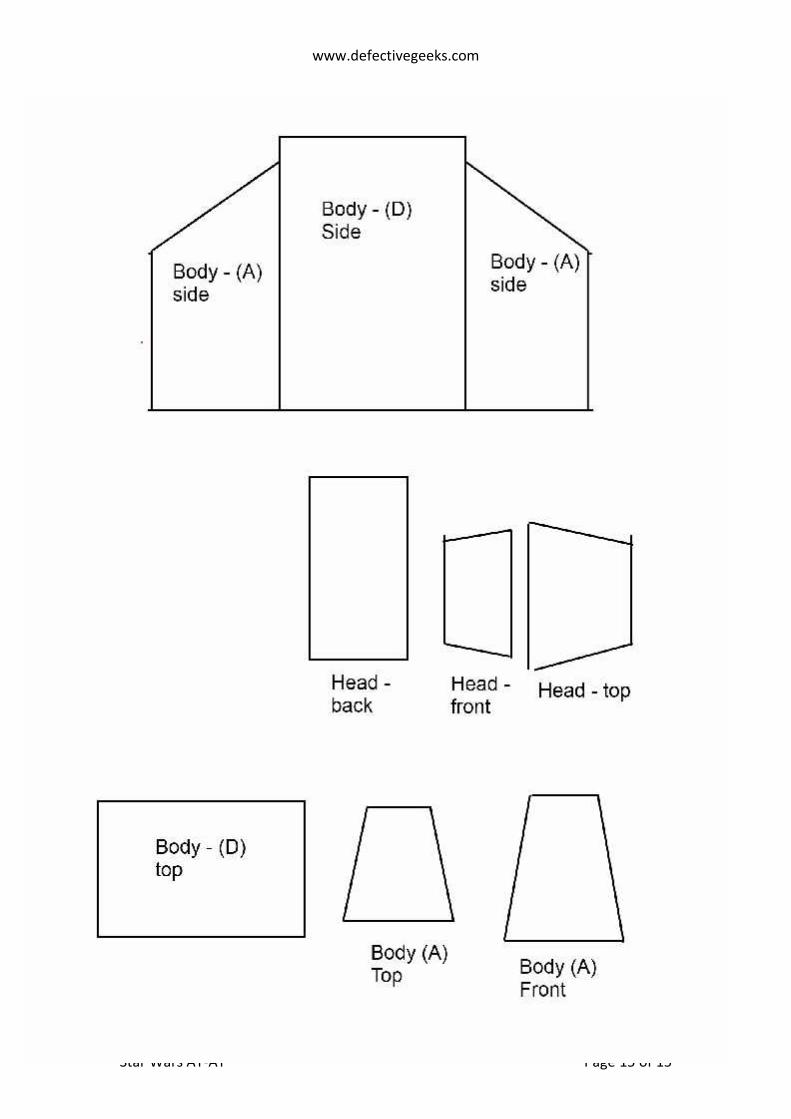
Cut out pieces from the cardboard to stiffen the tops of the body. See the last pageof instructions for a page of pattern cut outs. Obviously, your pieces may not matchthe sizes of mine, so cut to fit yours.
Put the cardboard in place, stuff, and sew the bottom on to the body.
Head
Head – topChain 13Sc 12dec sc 8 dec [10]sc 10sc 10dec sc 6 dec [8]sc 8sc 8Don’t break the yarn, just move on to next body part instruction
Head - frontSc 8 Back loop onlySc 8Inc sc 6 inc [10]Don’t break the yarn, just move on to next body part instruction
Head – bottomSc 10 back loop onlySc 10Sc 10Inc sc 8 inc [12]Inc sc 10 inc [14]Don’t break the yarn, just move on to next body part instruction
Head – backSc 14 back loop onlySc 14 (repeat 8 times)Break the yarn
Head – side (make 2)Chain 6Sc 5Sc 5Sc 5Sc 5Inc sc 3 inc [7]

www.defectivegeeks.com
Star Wars AT-AT Page 11 of 15
Sc 7Sc 7
Cut out a piece from the cardboard to stiffen the top of the head.
Sew head together, stuffing before closing off.
www.defectivegeeks.com
Star Wars AT-AT Page 12 of 15
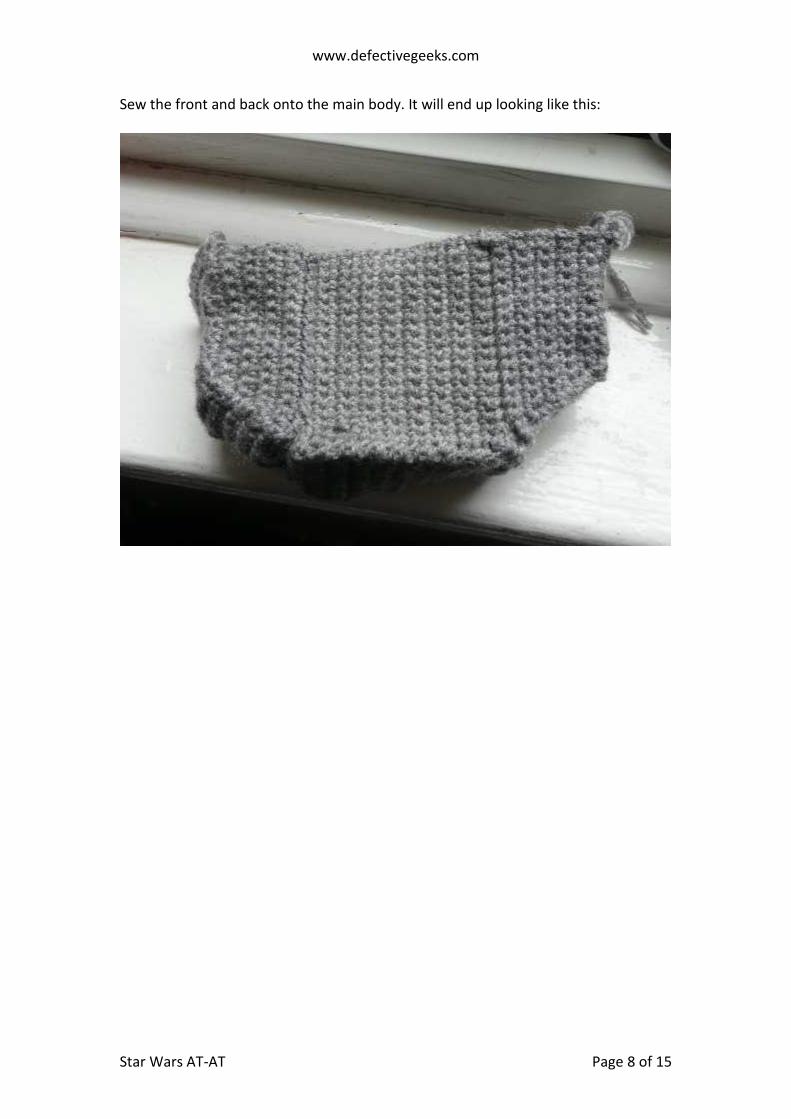
NeckChain 18Slip stitch to connect end of chain to startSc 18 around (repeat 6 times)
Putting it all together
Start with the 4 feet and legs. Stuff the feet.
Break 2 popsicle sticks in half. Stick a half in each leg. This will give it support. Addstuffing around the sticks.
Sew the legs on to the body.

www.defectivegeeks.com
Star Wars AT-AT Page 13 of 15
Sew the neck piece on to the head, stuff the neck. Then sew the other end of theneck to the body. If the head droops too much, you can stick a wooden dowelthrough it.

www.defectivegeeks.com
Star Wars AT-AT Page 14 of 15
Sew in any ends you have, and you’re done!
Next page is a roughly to scale image of how big the body will be and how big to cutout your card board pieces. Again, this is dependent on your gauge, so use only as aguide!
www.defectivegeeks.com
Star Wars AT-AT Page 15 of 15